

Page 1

Operation Guide
CMP0182-01 EN
Page 2

SL-D800 Series Operation Guide
Copyrights and Trademarks
Copyrights and Trademarks
No part of this publication may be reproduced, stored in a retrieval system, or transmitted in any form or by any means, electronic, mechanical,
photocopying, recording, or otherwise, without the prior written permission of Seiko Epson Corporation. The information contained herein is designed
only for use with this Epson printer. Epson is not responsible for any use of this information as applied to other printers.
Neither Seiko Epson Corporation nor its affiliates shall be liable to the purchaser of this product or third parties for damages, losses, costs, or expenses
incurred by the purchaser or third parties as a result of accident, misuse, or abuse of this product or unauthorized modifications, repairs, or alterations to
this product, or (excluding the U.S.) failure to strictly comply with Seiko Epson Corporation’s operating and maintenance instructions.
Seiko Epson Corporation shall not be liable for any damages or problems arising from the use of any options or any consumable products other than those
designated as Original Epson Products or Epson Approved Products by Seiko Epson Corporation.
Seiko Epson Corporation shall not be held liable for any damage resulting from electromagnetic interference that occurs from the use of any interface cables
other than those designated as Epson Approved Products by Seiko Epson Corporation.
, EPSON EXCEED YOUR VISION, EXCEED YOUR VISION and their logos are registered trademarks or trademarks of Seiko Epson
EPSON
®
Corporation.
Microsoft
Apple
General Notice: Other product names used herein are for identification purposes only and may be trademarks of their respective owners. Epson disclaims
any and all rights in those marks.
© 2019 Seiko Epson Corporation. All rights reserved.
and Windows® are registered trademarks of Microsoft Corporation.
®
, Macintosh®, Mac OS®, and OS X® are registered trademarks of Apple Inc.
®
2
Page 3

SL-D800 Series Operation Guide
Contents
Contents
Copyrights and Trademarks
Before Use
Meaning of Symbols........................ 5
Screen Shots In the Guide.................... 5
Printer Parts.............................. 6
Front................................. 6
Rear.................................. 9
Feeding Unit........................... 10
Print head unit......................... 11
Spindle unit........................... 11
Lights................................ 12
Safety Instructions........................ 14
Meaning of Symbols and Marks............. 14
Notes on Installation..................... 15
Notes on Handling...................... 15
Notes on the Power Supply................ 17
Notes on Consumables................... 18
Other Notes........................... 18
Notes on Usage........................... 19
Notes when Handling the Main Unit......... 19
Notes on the Paper...................... 19
Notes on Ink Cartridges.................. 21
Disposing of Used Ink Cartridges and
Maintenance Cartridges.................. 22
Introducing the Software.................... 22
Printing Methods
Basic Printing Methods..................... 23
Attaching and Removing the Print Tray
(Optional).............................. 44
Attaching and Removing the Rigid Print Tray
(Optional).............................. 46
Replacing Ink Cartridges
Checking Ink Levels....................... 48
Checking from the Printer................. 48
Checking from the Computer.............. 49
Replacement Procedure..................... 52
Replacing the Maintenance Cartridge
Checking the Free Space in the Maintenance
Cartridge............................... 56
Checking from the Printer................. 56
Checking from the Computer.............. 57
Replacement Procedure..................... 59
Emptying the Scrap Paper Box
Cleaning the Platen
Maintenance
Maintenance Tool......................... 66
Checking Items List........................ 67
Scrap paper box.......................... 67
Airflow vent............................. 67
Replacing Paper
How to replace........................... 25
Preparing to Replace Paper................ 25
Recording paper level.................... 27
Removing the Spindle Unit................ 29
Removing the Roll Paper.................. 31
Attaching the Roll Paper.................. 32
Attaching the Spindle Unit................ 33
Changing Paper Settings.................. 38
Ejecting Paper
Print tray (optional)....................... 42
Rigid print tray (optional)................... 43
Troubleshooting
When an Error Occurs..................... 68
Warning Buzzer and Light Indicators. . . . . . . . . 68
Error Messages (Windows)................ 71
Error Messages (Mac).................... 71
Errors and Solutions (Windows)............ 72
Errors and Solutions (Mac)................ 77
Cannot Clear the Displayed Error........... 82
Paper Jams.............................. 84
Deleting Print Jobs...................... 85
Paper is Jammed in the Roll Paper Feeder...... 86
Paper is Jammed in the Internal Paper Feeder
.................................... 92
Problems with Print Results.................. 98
Problems when Cutting Paper................ 99
3
Page 4

SL-D800 Series Operation Guide
Contents
When a Problem Cannot be Cleared........... 99
Appendix
Consumables and Optional Items............. 100
Notes on Moving the Printer................ 101
Preparing to Move...................... 102
After Moving......................... 102
Printer Specifications...................... 103
Standards and Approvals................. 104
Necessary space........................ 105
Notes................................. 106
FCC Compliance Statement............... 106
For European customers only. . . . . . . . . . . . . 106
For Turkish customers only............... 107
For Ukraine customers only............... 107
4
Page 5
SL-D800 Series Operation Guide
Before Use
Meaning of Symbols
Before Use
Warning:
Caution:
Important:
c
Note:
Warnings must be followed to avoid serious bodily injury.
Cautions must be followed to avoid damage to this product or bodily injury.
Important must be followed to avoid damage to this product.
Notes contain important information on the operation of this product.
Screen Shots In the Guide
❏ Screen shots used in this manual may differ to the actual screens. Also, the screens may differ depending on the
operating system used and the usage environment.
❏ Unless otherwise noted, screen shots in this manual are from Windows 7 and Mac OS X v10.7.
5
Page 6
SL-D800 Series Operation Guide
Printer Parts
Front
Before Use
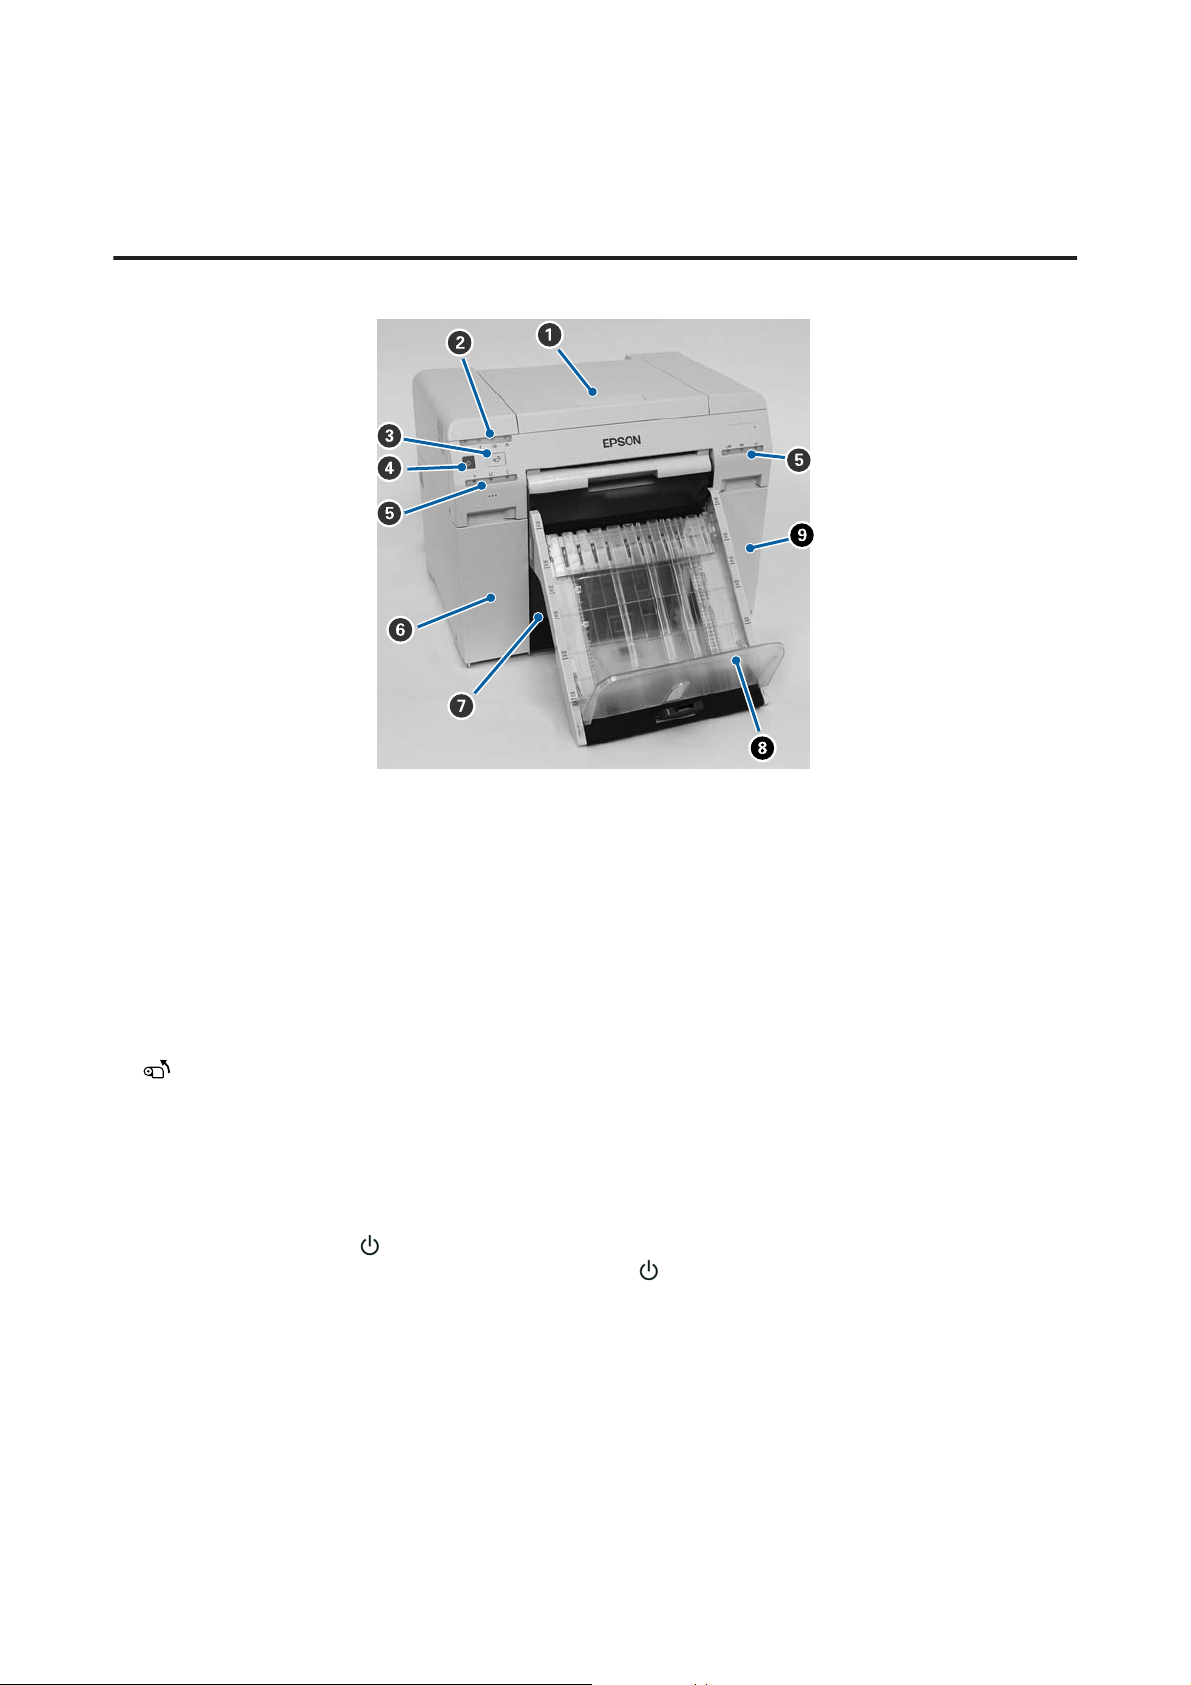
A Top cover
Open when a paper jam occurs or to perform maintenance.
B Status display light
This light indicates when the printer's status is normal or if an error has occurred.
U “Lights” on page 12
C switch
Press to replace the roll paper. The roll paper is wound back to the replacement position.
U “Replacing Paper” on page 25
D Power switch
This is normally ON (the light is lit). If an emergency occurs, or when it is not going to be used for extended
periods of time, press the switch to turn off the printer (the
E Ink light (orange)
U “Lights” on page 12
light turns off).
F Cartridge cover (left)
Open when replacing ink cartridges.
U “Replacing Ink Cartridges” on page 48
6
Page 7

SL-D800 Series Operation Guide
Before Use
G Scrap paper box
Holds waste paper that is cut off during printing. Empty the scrap paper box when you replace the paper. Needs to
be removed when loading or removing paper.
U “Emptying the Scrap Paper Box” on page 61
H Print tray (optional)/Rigid print tray (optional)
Holds the ejected print outs.
U “Attaching and Removing the Print Tray (Optional)” on page 44
U “Attaching and Removing the Rigid Print Tray (Optional)” on page 46
I Cartridge cover (right)
Open when replacing ink cartridges or the maintenance cartridge.
U “Replacing Ink Cartridges” on page 48
U “Replacing the Maintenance Cartridge” on page 56
When the scrap paper box is removed and the cartridge cover is open
J Ink cartridges
Install six color ink cartridges.
K Roll paper feeder
Pull it to the front when removing the spindle unit.
L Maintenance Cartridge
7
Page 8

SL-D800 Series Operation Guide
Container that holds the waste ink fluid.
U “Replacing the Maintenance Cartridge” on page 56
Before Use
8
Page 9
SL-D800 Series Operation Guide
Rear
Before Use
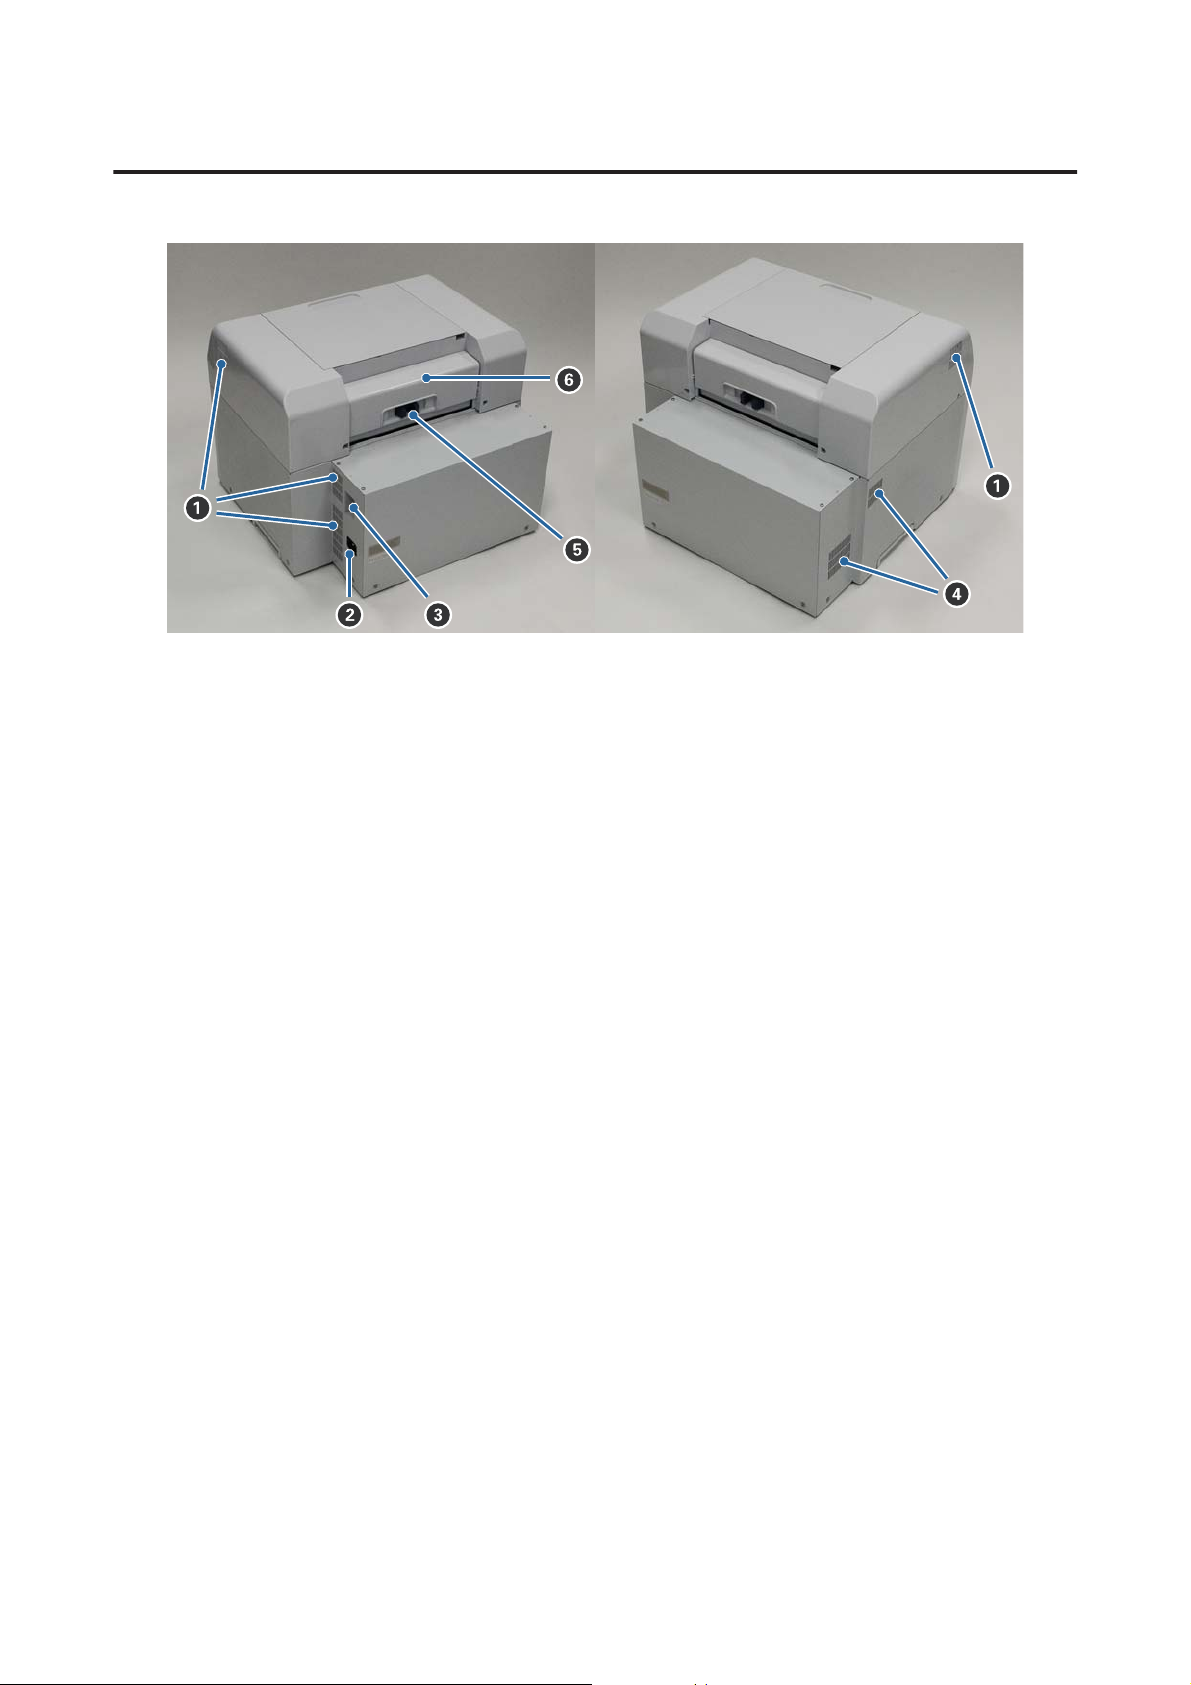
A Exhaust vent
Exhausts air used to cool the printer internally.
B AC inlet
Connects the power cord to the printer.
C USB port
Connect the USB cable here.
D Airflow vent
Takes in air to cool the printer internally.
E Lock lever
Releases the lock for the rear cover.
F Rear cover
Open when a paper jam occurs or to perform maintenance.
9
Page 10
SL-D800 Series Operation Guide
Feeding Unit
Before Use
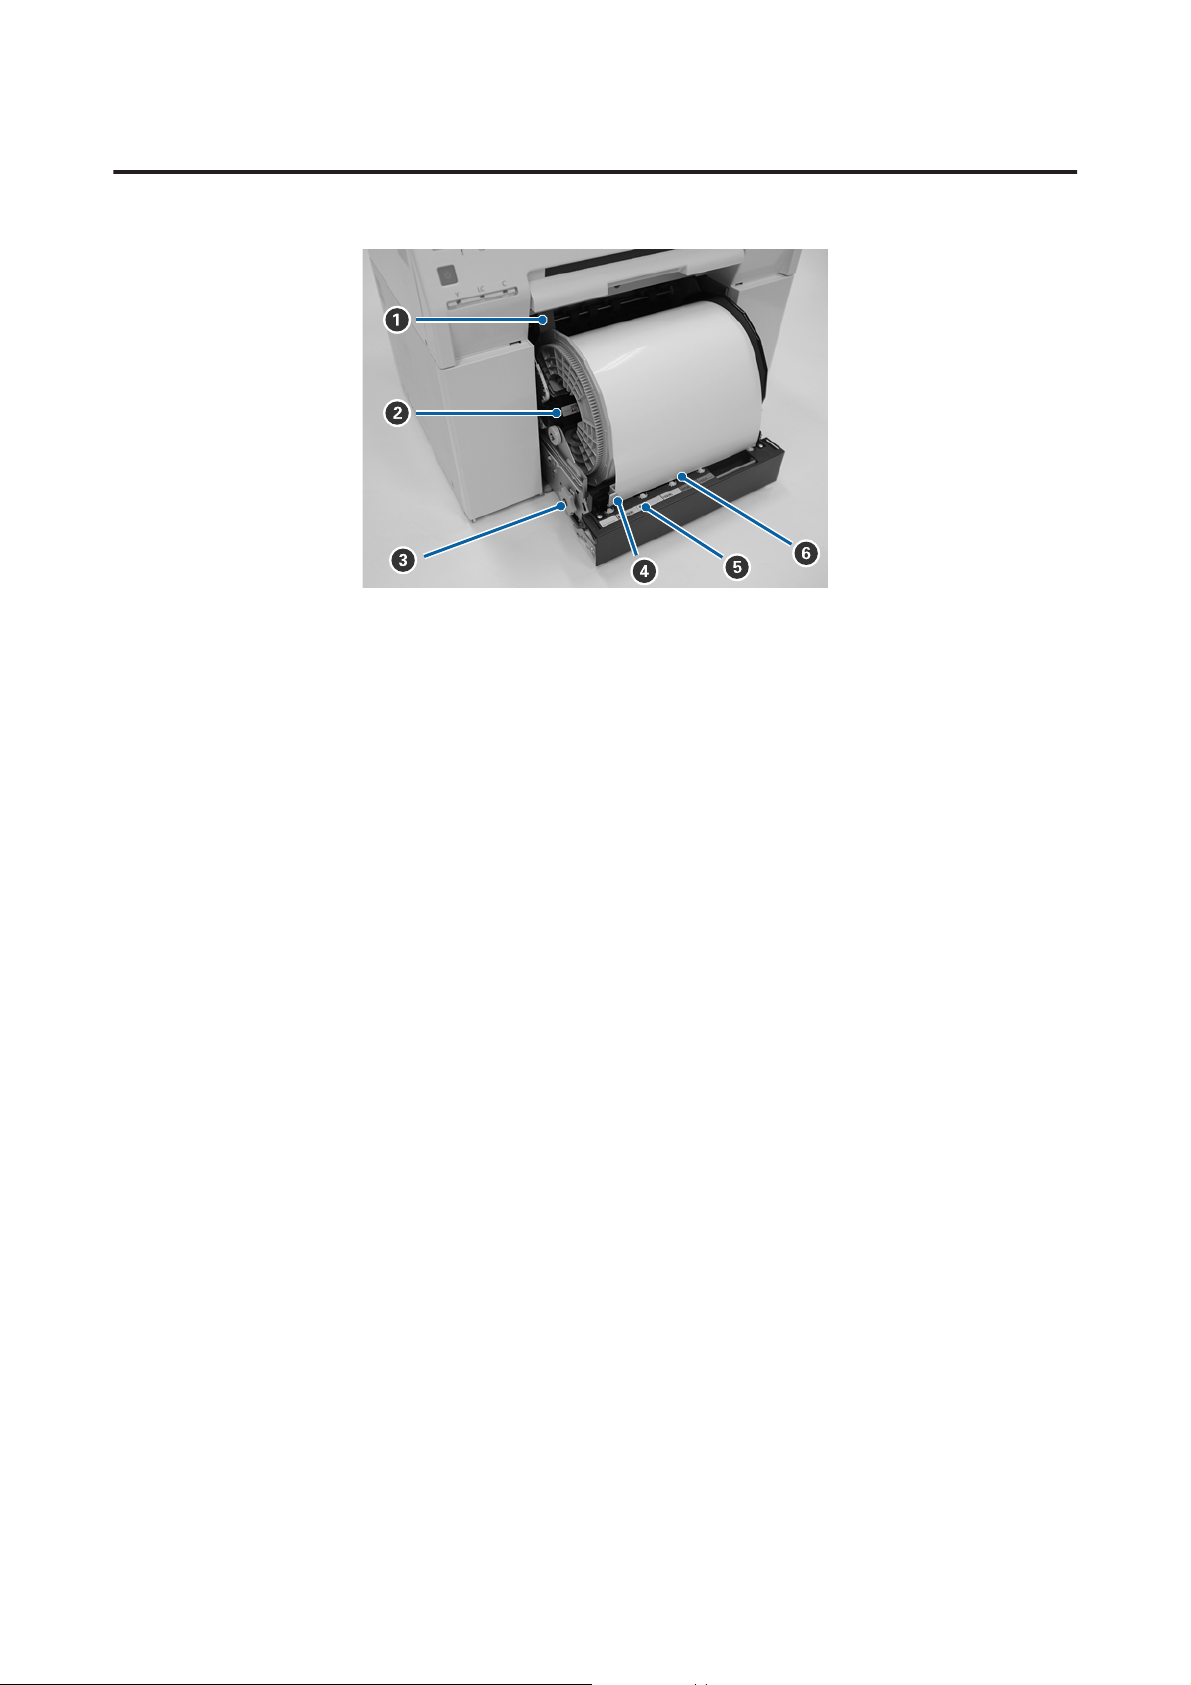
A Inner edge guide
Matches the width of the roll paper.
B Spindle unit
Loads the roll paper.
C Handle
Turn this to rewind roll paper onto the spindle unit.
D Front edge guide
This guide allows you to insert paper into the paper slot. Match the guides to the width of the paper.
E Paper light (blue)
Indicates the paper insertion status for the roll paper feeder.
On: Paper has been inserted into the roll paper feeder correctly.
Off: Paper has not been loaded.
F Paper slot
Insert the leading edge of the roll paper here when loading.
10
Page 11
SL-D800 Series Operation Guide
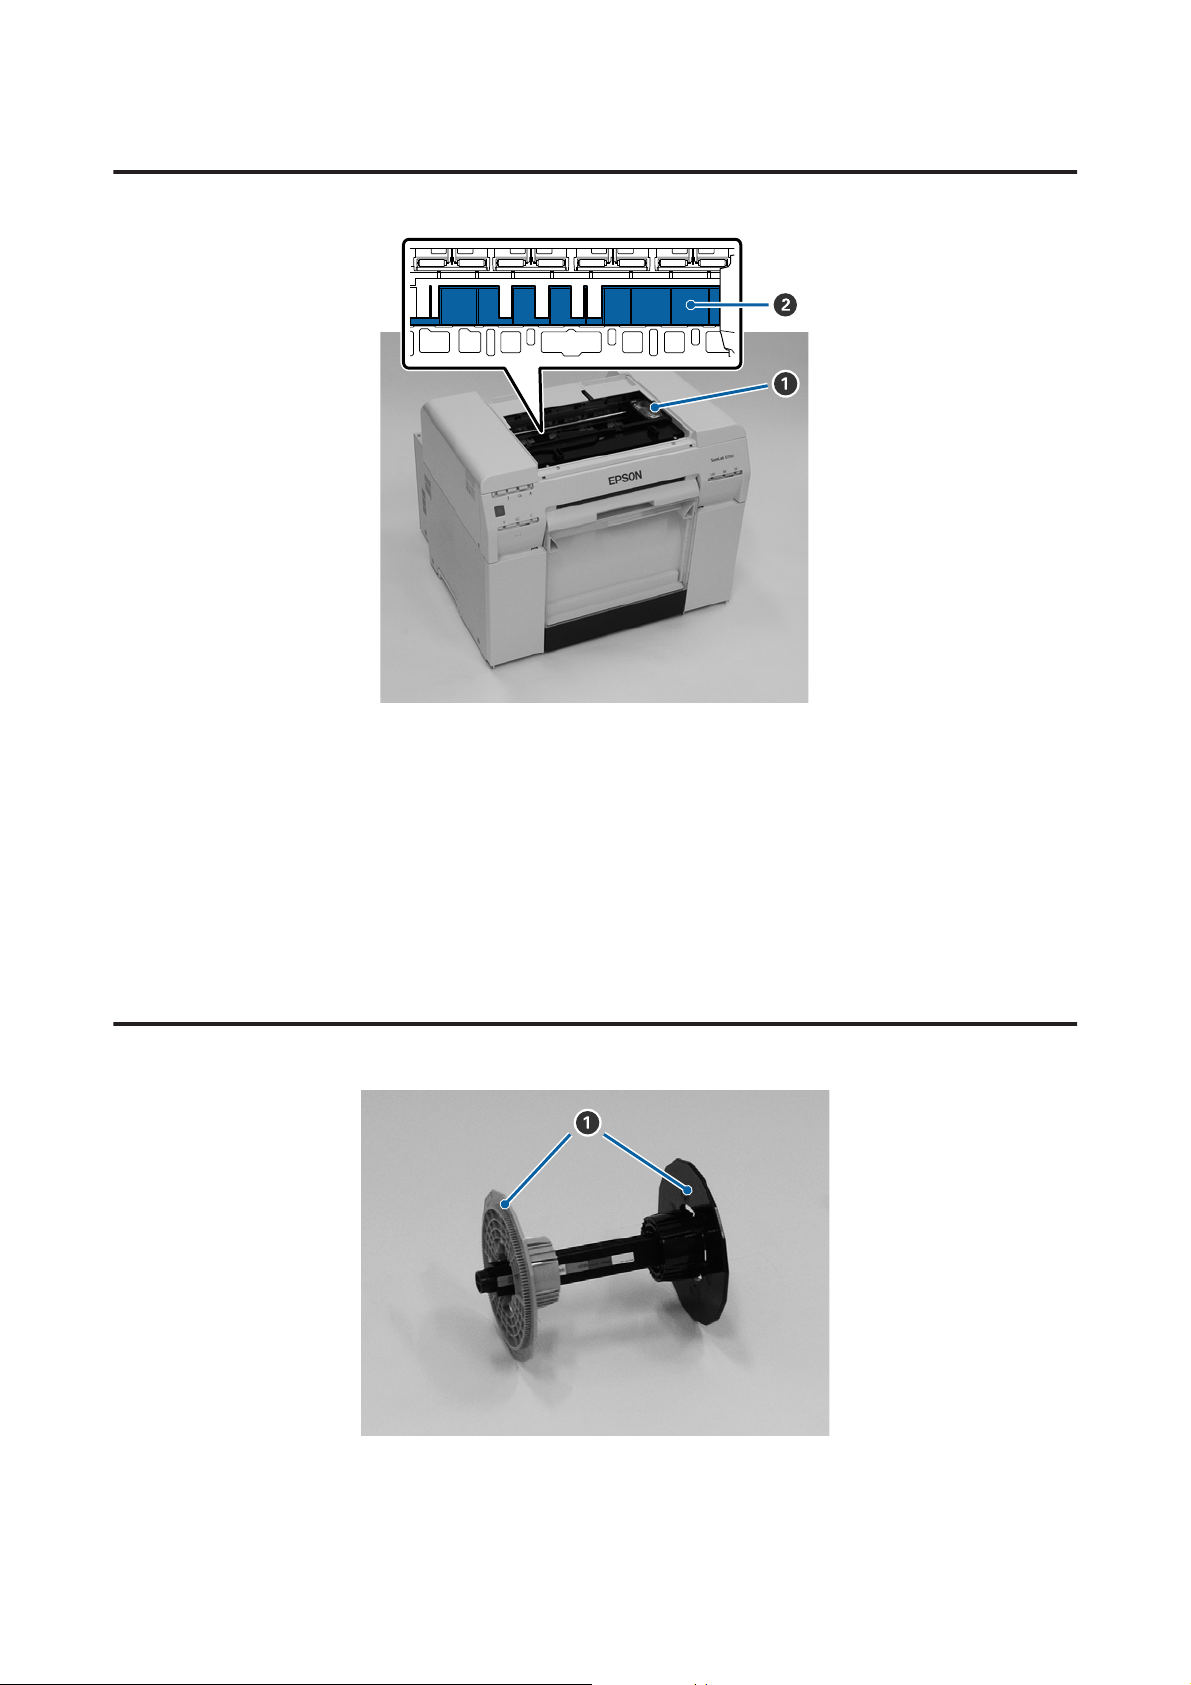
Print head unit
Before Use
A Print head unit
Fires ink while moving left and right to print. Do not move the print head unit manually with too much force.
Otherwise, it may breakdown.
B Platen
Clean the platen if the back of the printed paper is dirty.
U “Cleaning the Platen” on page 63
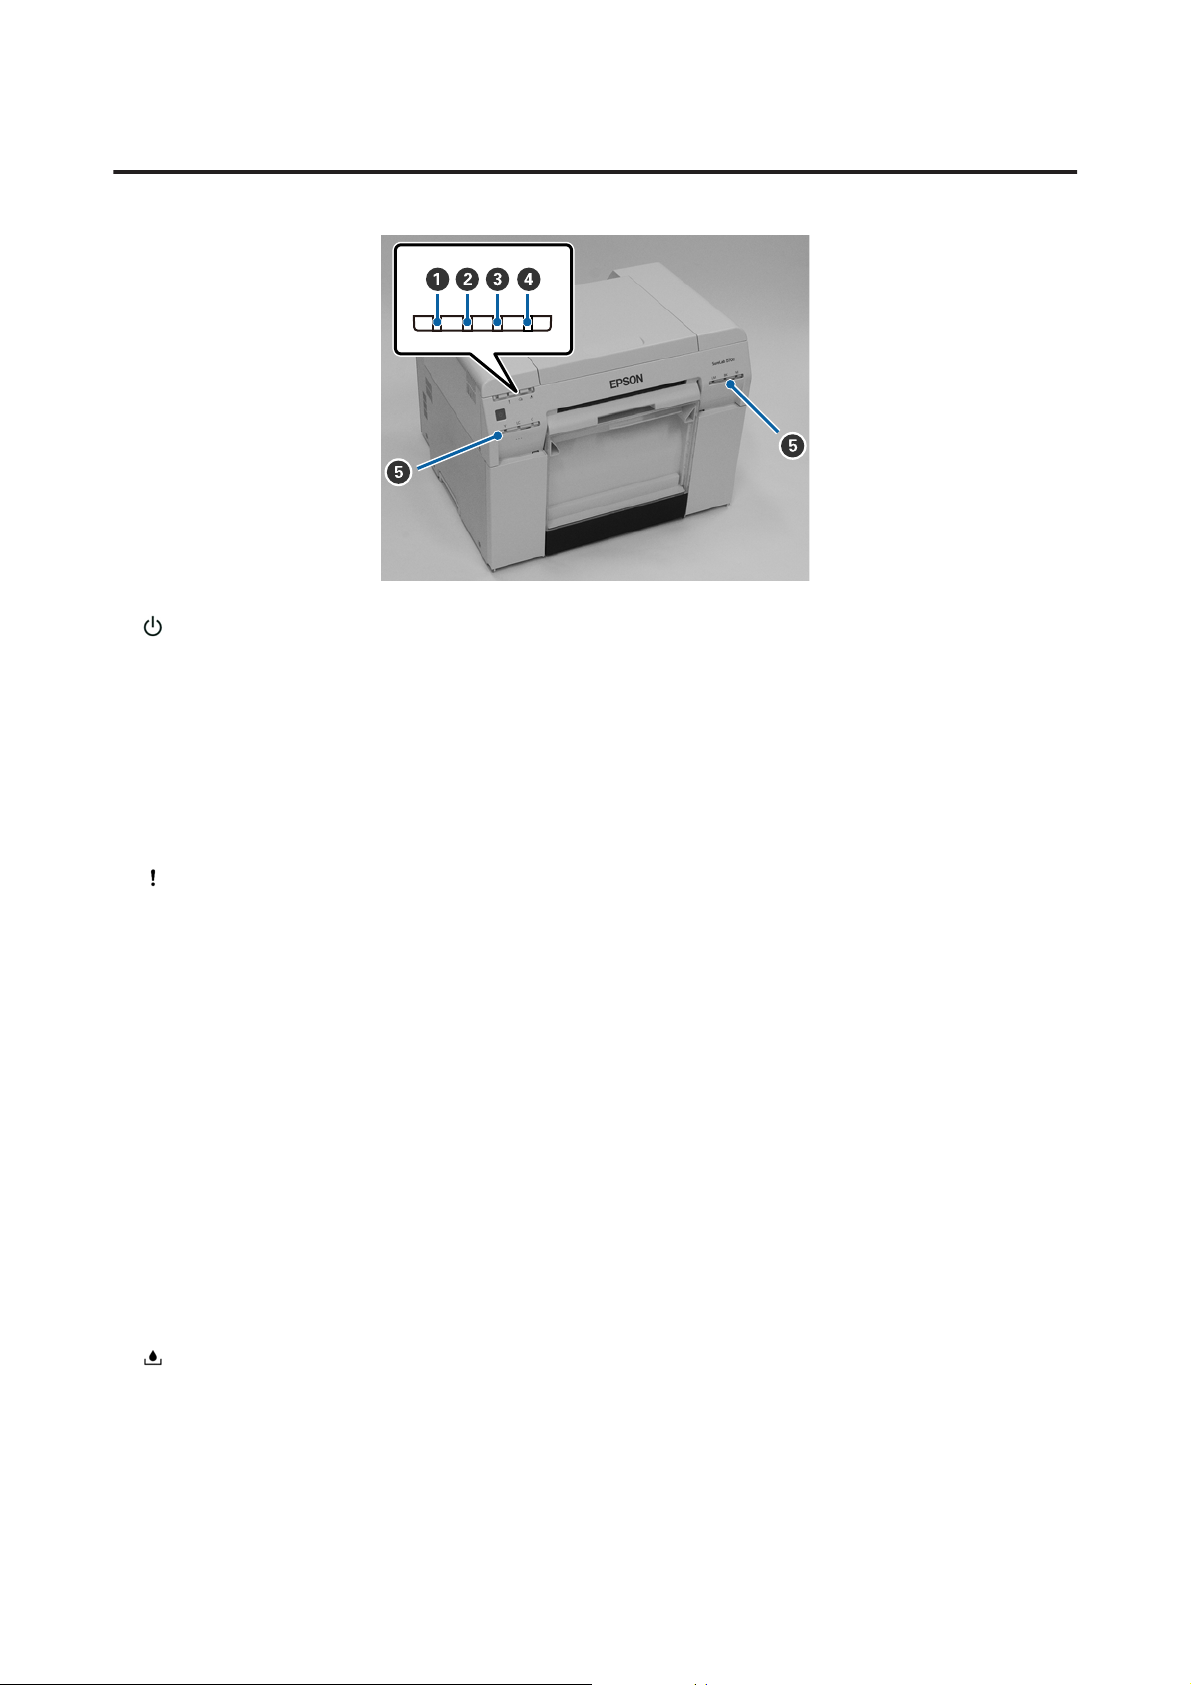
Spindle unit
A Flange
Insert into the ends of the roll paper's roll core on the left and right to secure it.
11
Page 12
SL-D800 Series Operation Guide
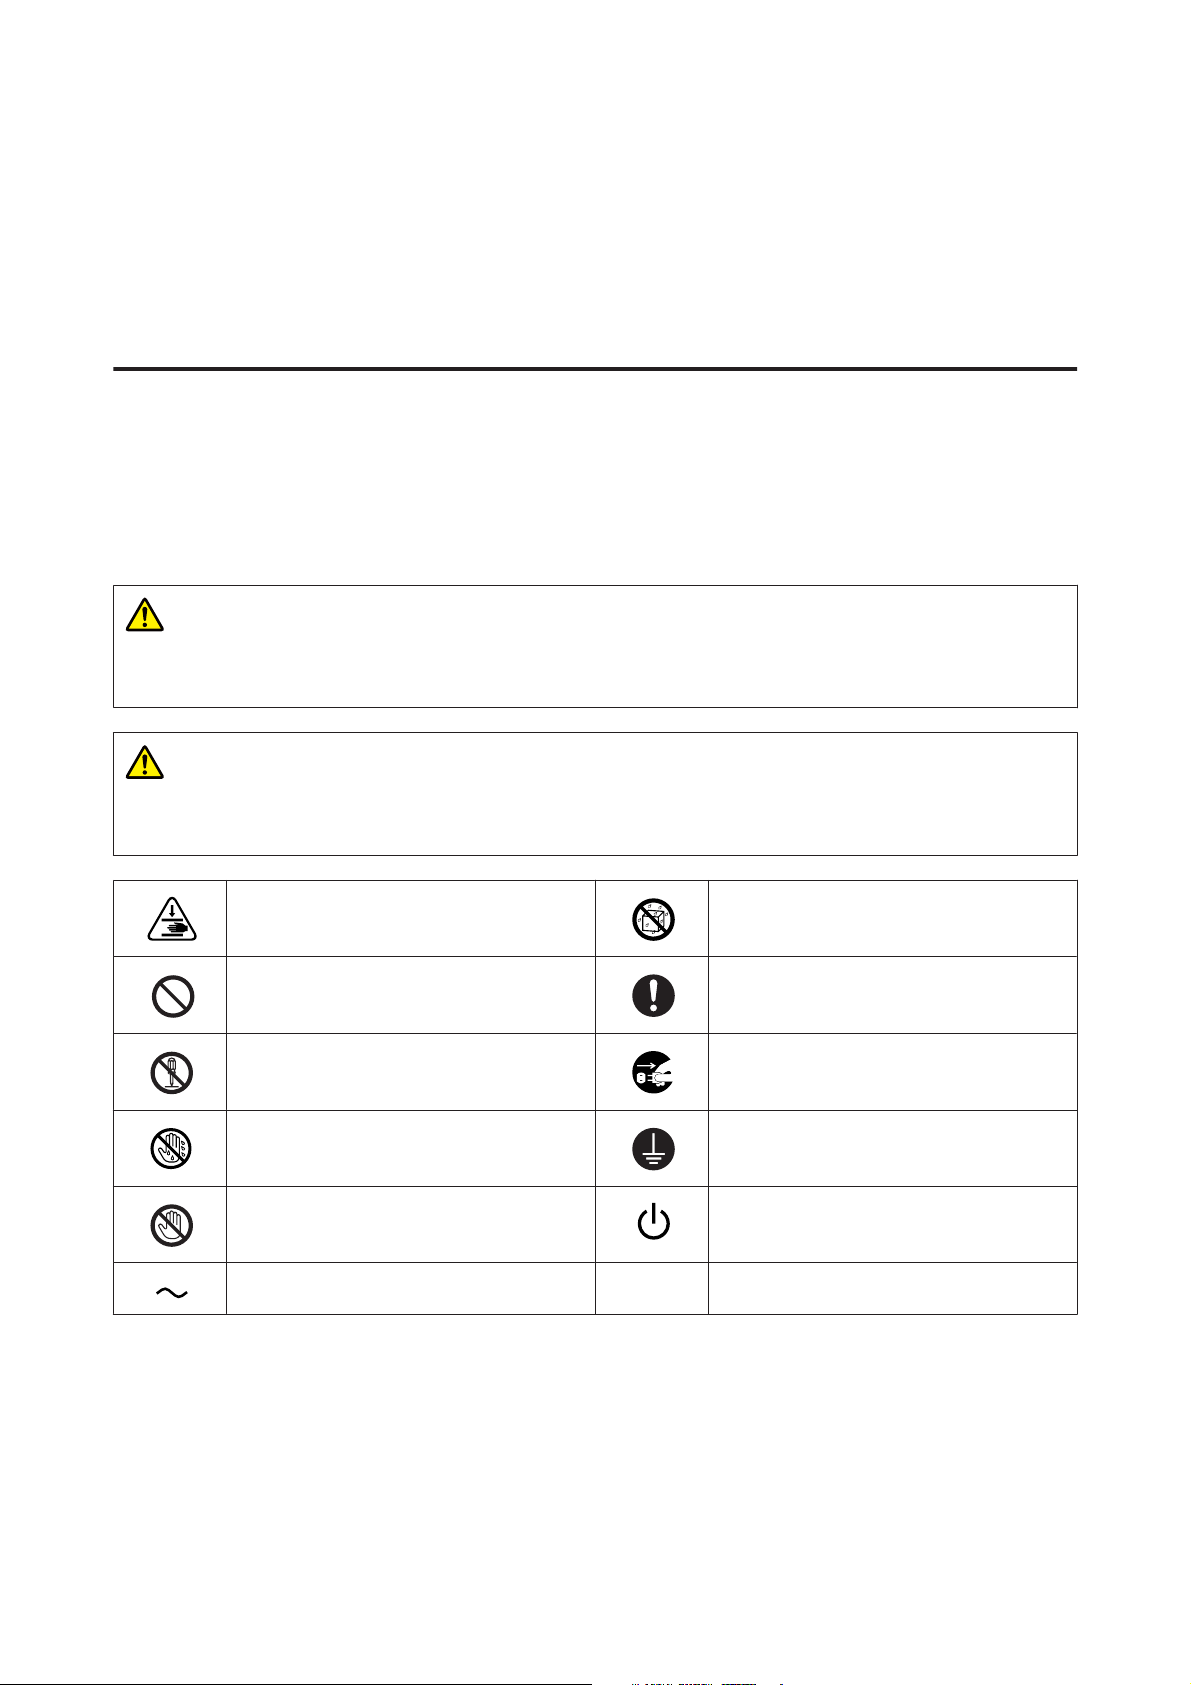
Lights
Before Use
A light (blue)
The printer's operational status is indicated by a lit or flashing light.
On: The printer is ready to print.
Flashing: The printer is printing, initializing, performing maintenance, and so on.
Off: The printer is not on, or printer operations have stopped due to an error.
B light (orange)
The printer's error status is indicated by a lit light.
On: An error has occurred, the printer is performing error recovery operations, or a printer system
error has occurred.
Off: No error.
C M light (orange)
Indicates the status of the roll paper feeder.
On: Paper has not been loaded in the roll paper feeder, or the paper is out.
Flashing: A paper jam has occurred.
Off: No error.
D light (orange)
Indicates the status of the maintenance cartridge.
On: Printing cannot be performed because there is not enough free space in the maintenance
cartridge, or an error has occurred because the maintenance cartridge was not recognized
correctly.
U “Replacing the Maintenance Cartridge” on page 56
12
Page 13

SL-D800 Series Operation Guide
Before Use
Off: No error.
E Ink light (orange)
Indicates the status of the ink cartridges.
On: Printing cannot be performed because the light is on indicating that there is not enough ink in the
ink cartridge, or an error has occurred because the ink cartridge was not recognized correctly.
U “Replacing Ink Cartridges” on page 48
Off: No error.
13
Page 14
SL-D800 Series Operation Guide
Before Use
Safety Instructions
To use this printer safely, be sure to read the manual supplied with the printer before use. Not handling this printer as
described in the supplied manual could cause a breakdown of the printer or an accident. To resolve any unclear points
regarding the printer, keep this manual on hand at all times.
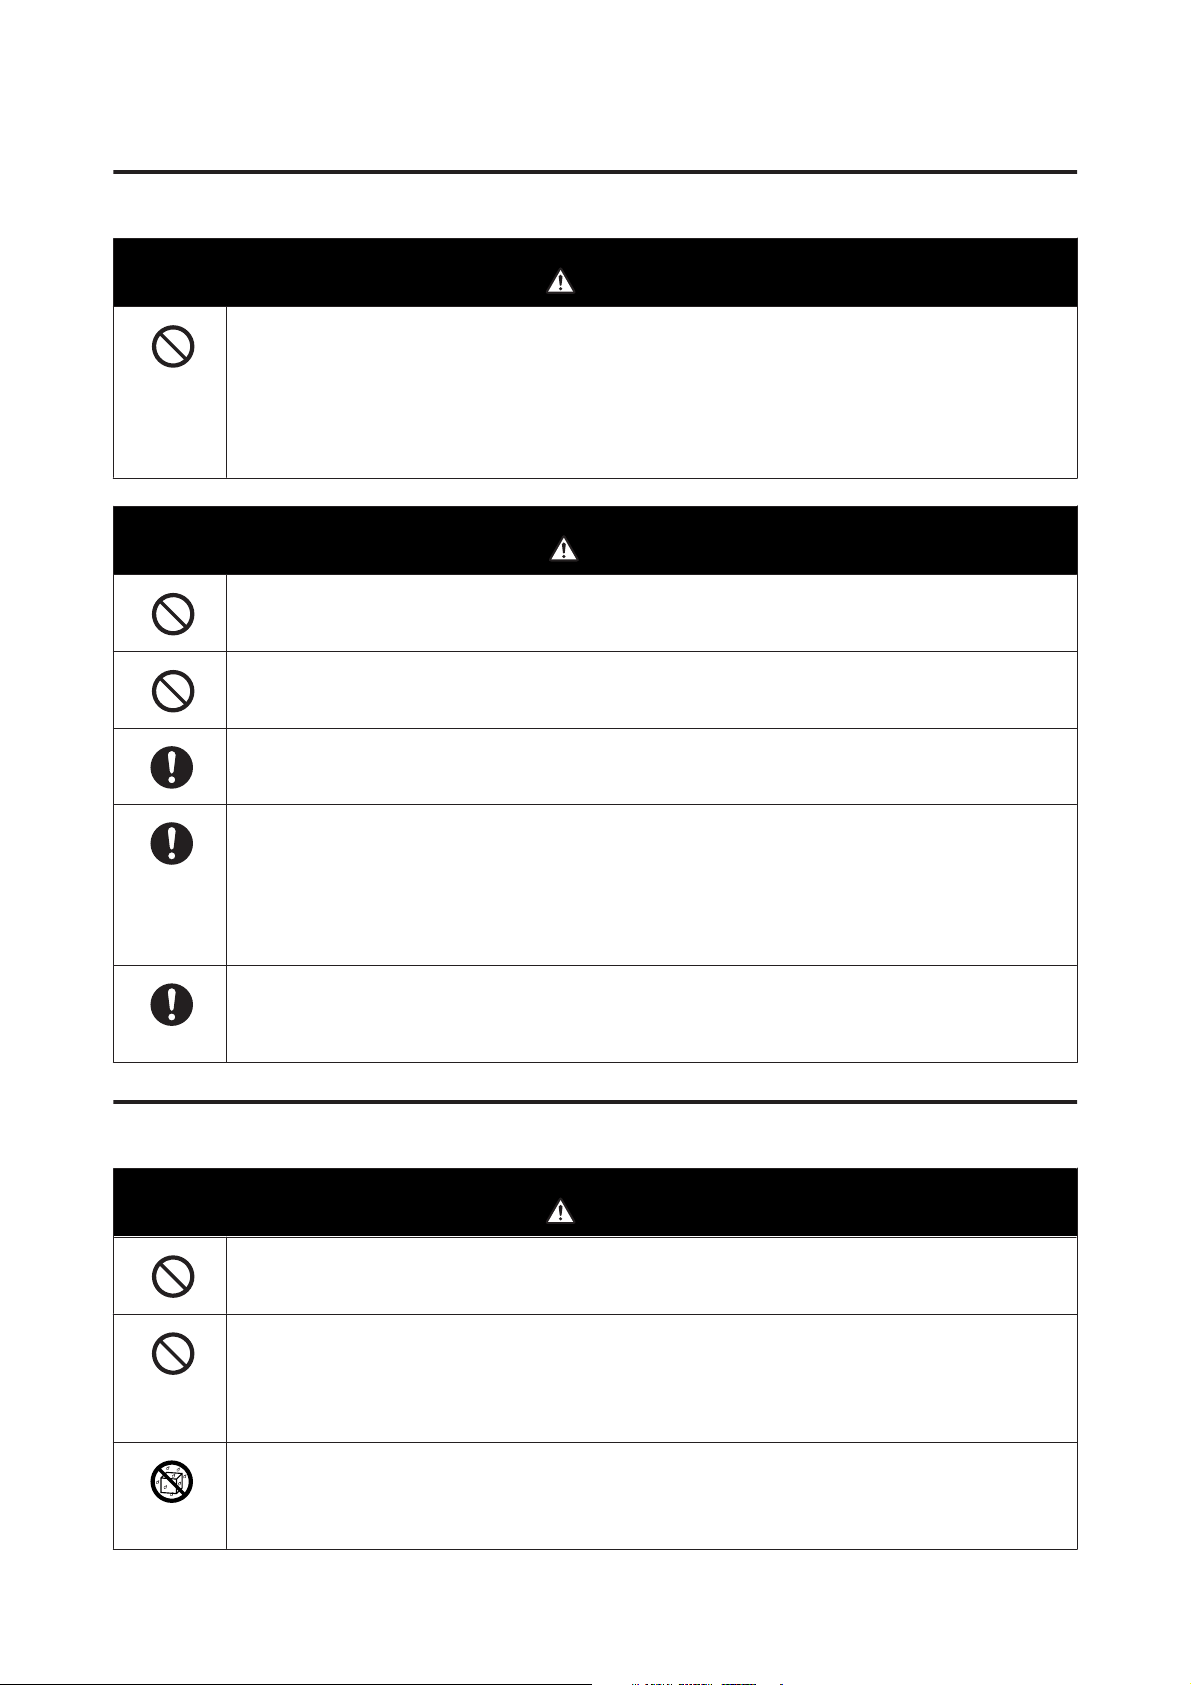
Meaning of Symbols and Marks
The symbols on this Epson product are used in order to ensure safety and proper use of the product and to prevent
danger to customers and other persons, and property damage.
The symbols indicate the meaning below. Be sure that you completely understand the meaning of symbols on this
product before using it.
Warning:
This symbol indicates information that, if ignored, could possibly result in serious injury or even death due to
incorrect handling.
Caution:
This symbol indicates information that, if ignored, could possibly result in bodily injury or damage to property
due to incorrect handling.
Indicates that your hand could get trapped. Indicates that the printer must not get wet.
Indicates prohibited (do not do) actions. Indicates items (instructions/operations) that
must be performed.
Indicates that disassembly is prohibited. Indicates that the power plug must be
unplugged.
Indicates that you must not touch the printer
with wet hands.
Indicates that specific parts must not be
touched.
Indicates that the printer must be earthed.
Stand-by
Alternating Current
14
Page 15
SL-D800 Series Operation Guide
Notes on Installation
Do not block the printer's airflow vents.
If the airflow vents are blocked, the internal temperature rises and could cause a fire.
Do not cover with a cloth or other materials and do not install in an area with poor ventilation.
Also, be sure to secure the installation space indicated in the manual.
U “Necessary space” on page 105
Do not install or store in a location that is unstable or subject to vibrations from other equipment.
If it falls, an injury could occur.
Before Use
Warning
Caution
Do not install it in smoky or dusty locations, humid locations, or locations where it is likely to get wet.
Electric shock or fire could occur.
When lifting this printer, make sure you use the correct posture.
If you do not use the correct posture, an injury could occur.
When lifting the printer, hold it in the areas indicated in the manual.
The printer may fall if you lift it by holding other areas, and your fingers could be caught which may cause an
injury.
See the following for more information on lifting the printer.
U Setup Guide
If you place the printer on a stand with casters (wheels), make sure you secure the casters to prevent them from
moving before starting operations.
If the stand moves unexpectedly during operations, an injury could occur.
Notes on Handling
Warning
Do not use in locations with volatile substances such as alcohol and thinner, or in locations with fires.
Electric shock or fire could occur.
Do not use the printer if you notice smoke, strange odors, or sounds.
Electric shock or fire could occur.
If an abnormality occurs, turn off the printer immediately, unplug it from the electrical outlet, and contact your
local dealer.
Do not use this printer if foreign materials, water, or other liquids have entered the printer.
Electric shock or fire could occur.
Turn off the printer immediately, unplug it from the electrical outlet, and contact your local dealer.
15
Page 16
SL-D800 Series Operation Guide
Except as instructed in the manual, do not disassemble the printer.
Making repairs yourself is extremely dangerous and must not be attempted.
Do not use the printer in locations where inflammable or explosive gas and so on may be present in the
atmosphere. Also, do not use sprays containing inflammable gas inside or around this printer.
A fire could ignite.
Except as instructed in the manual, do not perform any other wiring.
A fire could ignite. Other connected equipment could also be damaged.
Except as instructed in the manual, do not touch any other parts inside this printer.
Electric shock, burns, or injury could occur.
Before Use
Warning
Do not insert or drop any metallic or flammable objects into this printer through the openings.
Electric shock or fire could occur.
Caution
Do not climb on the printer and do not place any heavy objects on the printer.
If it falls or breaks an injury could occur.
When connecting cables or optional accessories, make s ure they are installed in the correct direction and that you
follow the procedures exactly.
A fire or an injury could occur. Connect the cab les or optional accessories correctly by following the instructions in
the manual.
When moving the printer, turn it off, unplug the power cable from the electrical outlet, and make sure that all
cables have been disconnected.
If cables and so on are damaged, electric shock or fire could occur.
Do not put your fingers near the paper roller section when the printer is on or when it is printing.
If your fingers are caught in the paper roller, an injury could occur. Only handle the paper after it has been ejected
completely.
When storing or transporting this printer, do not tilt it, stand it on its side, or hold it upside down.
Ink could leak out.
When opening and closing the covers, do not place your hands near the points where the main unit and the cover
join.
If your fingers or hands are trapped, an injury could occur.
When moving the roll paper feeder in or out, grip the handle.
If you place your hands into any other sections, either side of your hand or fingers could be injured.
16
Page 17
SL-D800 Series Operation Guide
Notes on the Power Supply
Use only the type of the power supply indicated on the label.
Electric shock or fire could occur.
Do not use the power plug if any foreign materials such as dust are stuck to it.
Electric shock or fire could occur.
Make sure the blades of the power plug are fully inserted into the electrical outlet.
Electric shock or fire could occur.
Do not use the power cable if it is damaged.
Electric shock or fire could occur.
Contact your local dealer if the power cable is damaged.
Note the following points to avoid damaging the power cable.
❏ Do not modify the power cable
❏ Do not put heavy objects on the power cable
❏ Do not bend, twist, or pull
Before Use
Warning
❏ Do not place it near heating appliances
Do not plug in or unplug the power cable with wet hands.
Electric shock could occur.
Do not perform daisy-chain wiring for the power cable.
It could overheat and cause a fire.
Take power directly from a residential electrical outlet.
Unplug the power cable periodically and clean between the blades and the base of the blades.
I f t he p ow er ca b le is l ef t p l ug ge d in fo r an ex t en de d p e ri od o f t im e , d us t co ul d ac cu mu l at e a r ou nd t he ed g e o f t h e
plug which could cause a short-circuit and a fire.
When unplugging the power cable from the electrical outlet, grasp the plug itself and not the cable.
The cable could be damaged or the plug could be deformed and an electric shock or fire could occur.
Make sure the printer is earthed to prevent accidental short circuits.
If the printer is used without being earthed, an electric shock or fire could occur. Attach the earth wire for the
power cable to one of the following points.
❏ The earth terminal on the electrical outlet
❏ Copper wire and so on that has been buried at least 65 cm underground.
❏ An earth terminal for which grounding has been performed
When attaching or removing the earth wire, the power plug must be removed from the electrical outlet. Check
the earthing for the electrical outlet being used. If you cannot perform earthing, contact your local dealer.
17
Page 18
SL-D800 Series Operation Guide
Do not connect the earth wire to the following points.
❏ Gas pipes (they could ignite and cause an explosion)
❏ Earth wires for telephone wires or lightning rods (this is dangerous as a lightning strike causes a huge surge in
electricity)
❏ Water pipes or faucets (earthing is not performed if there is any plastic piping in the pipes)
For safety reasons, when the printer is not used for an extended period of time, unplug the power cable from the
electrical outlet.
Before Use
Warning
Caution
Notes on Consumables
If ink gets in the eyes or mouth, or stains the skin, treat the area as follows.
❏ If ink adheres to your skin, immediately wash it off using soapy water.
❏ If ink enters your eyes, rinse immediately with water. Failure to observe this precaution could result in
bloodshot eyes or mild inflammation. If you notice any abnormalities, consult a physician immediately.
❏ If ink enters your mouth, consult a physician immediately.
Do not disassemble ink cartridges and the maintenance cartridge.
If it is disassembled, ink could get in your eyes or adhere to your skin.
Do not shake the ink cartridges too hard.
Ink may leak from the cartridge if you shake it too hard.
Do not rub the edges of the printing paper with your hand.
The edges of the paper are thin and sharp and could cause an injury.
Do not store ink cartridges and the maintenance cartridge within the reach of children.
Caution
Other Notes
❏ Be sure your power cable meets relevant safety standards of the area where you plan to use it.
❏ Connect all equipment to properly grounded power outlets.
❏ Do not put your hand inside this product or touch the printer head during printing.
❏ Do not put your hand inside this product or touch the white flat cable during printing.
18
Page 19

SL-D800 Series Operation Guide
Before Use
Notes on Usage
Notes when Handling the Main Unit
❏ Do not suddenly change the temperature in the room where this printer is installed.
If the temperature changes suddenly, drops of water (condensation) could occur inside the printer which may
have an adverse effect on operations.
❏ Use the printer in an environment with a temperature of 10 to 35˚C, and a humidity of 20 to 80%. When the printer
is placed on a system rack, make sure the environment of the rack is within these ranges.
❏ Do not place any containers containing water, such as vases or cups, on the printer. If water enters the printer, it
may breakdown. Also, do not put any heavy objects on the printer.
❏ The printer is equipped with several airflow vents. The airflow vents allow air to go in and out of the printer. Do not
block these airflow vents by placing any objects near them, or by covering them with film sheets or paper.
❏ Do not use accessories designed for this printer with any other products.
❏ If the printer's covers are opened during printing, a safety device is activated and printing is stopped
automatically. Do not turn off the printer in this condition. This could cause the print head nozzles to dry and
print quality to decline.
❏ Depending on the performance of the computer being used, the printer stops printing temporarily; however, this
is not a malfunction.
❏ If the printer is not used for an extended period of time, make sure you leave the ink cartridges and maintenance
cartridge installed.
❏ Do not leave the printer for more than three days in a state in which the power was turned off due to a power outage
and so on. Paper may curl which could cause a decline in printer performance.
❏ Contact our service support when transporting the printer.
Notes on the Paper
Notes on Handling
Use paper recommended by our company.
Note the following points when handling the paper.
❏ Do not bend the paper or scratch the surface of the printable side.
❏ Do not touch the printable side of the paper. Moisture and oil from hands can have an adverse effect on the print
quality.
❏ Handle the paper by the edges. We recommend wearing cotton gloves.
❏ Do not throw away the paper packaging as you can use it for storing the paper.
❏ Do not wet the paper.
19
Page 20

SL-D800 Series Operation Guide
Before Use
❏ Do not use paper that is wrinkled, scuffed, torn, or dirty.
❏ If the printer is left with paper loaded for some time, the leading edge of the paper may curl and print quality may
decline. We recommend removing paper from the printer when it is not in use.
20
Page 21

SL-D800 Series Operation Guide
Before Use
Notes on storage
Before and after opening the paper, store it in an environment that is not subject to direct sunlight and meets the
following conditions. If paper is not being used after it has been opened, remove it from the spindle unit and wind it up
before storing.
Notes on printing
Make sure that the leading edge of the paper is perpendicular to the long side and cut completely straight.
Storing and displaying print outs
❏ Make sure you do not rub or scratch the printed side.
❏ Avoid locations that are subject to high temperature, humidity, and direct sunlight, and store in a dark place.
❏ Avoid displaying print outs outdoors or in direct sunlight. This may accelerate the fading.
❏ When displaying print outs indoors, we recommend placing them in glass frames and so on. This allows you to
display your print outs for a long time without them fading.
Notes on Ink Cartridges
❏ If you move the ink cartridges from a cold place to a warm place, leave them at room temperature for more than
four hours before use.
❏ We recommend that ink cartridges be stored in a cool location and used before the expiry date printed on the
packaging. Also, the ink cartridges should be used within six months of opening.
❏ Do not touch the ink supply port on the ink cartridge or its surrounding area. Ink may leak from it.
❏ The ink level and other data are stored in the IC chip, allowing ink cartridges to be used after being removed and
replaced.
❏ To avoid getting dirt on the ink supply port, store the removed ink cartridge properly. The ink supply port has a
valve in it so it does not need to be capped.
❏ Removed ink cartridges may have ink around the ink supply port, so be careful not to get any ink on the
surrounding area when removing the cartridges.
❏ Do not touch the green section (IC chip) on the ink cartridge. Doing so may affect normal operation and printing.
❏ Do not drop or knock ink cartridges against hard objects; otherwise, the ink may leak.
❏ Even while nothing is printed, the printer uses ink from all cartridges during head cleaning and other maintenance
operations to keep the print head in good condition.
❏ Although the ink cartridges may contain recycled materials, this does not effect printer function or performance.
❏ Do not leave the printer without ink cartridges installed. The inks inside the printer may dry and you may not be
able to print. When you are not using the printer, make sure there is an ink cartridge installed in each slot.
❏ Install ink cartridges into each slot. You cannot print if any of the slots are empty.
21
Page 22

SL-D800 Series Operation Guide
Before Use
❏ To maintain the quality of the head, the printer stops printing before ink cartridges are completely expended;
therefore, some ink is left in used cartridges.
❏ Do not dismantle or remodel ink cartridges. You may not be able to print properly.
Disposing of Used Ink Cartridges and Maintenance Cartridges
Dispose of consumables and optional parts in accordance with your local laws and statutes, such as by entrusting them
to an industrial waste disposal company.
Introducing the Software
You need to install the printer driver on your computer to use the printer.
Software Name Summary
Printer Driver This software allows you to print using the printing instructions from another
application.
U "Printer Driver Operation Guide"
Maintenance Tool This software allows you to perform adjustment and maintenance operations
such as checking the printer's status, making settings, performing head cleaning
and so on. This is installed with the printer driver.
U "Maintenance Tool Operation Guide"
22
Page 23

SL-D800 Series Operation Guide
Printing Methods
Printing Methods
Basic Printing Methods
Open the printer driver screen on the connected computer, and then make settings such as the Paper Type and Paper
Size.
See the "Printer Driver Operation Guide" for more details on the printer driver.
Load paper into the printer.
A
U “Replacing Paper” on page 25
Display the print screen for the application you are using.
B
Click Print (or Print... and so on) from the File menu.
Operations may differ depending on the application software being used. See the manual supplied with the
application for more details.
Display the printer driver's screen from the application's print screen.
C
In Windows, select this printer, and then click Print Settings (or Detailed Settings or Properties).
On Mac, selec t this printer, and then select Print Settings from the list. You cannot select this from the macOS
Sierra standard software.
23
Page 24
SL-D800 Series Operation Guide
Printing Methods
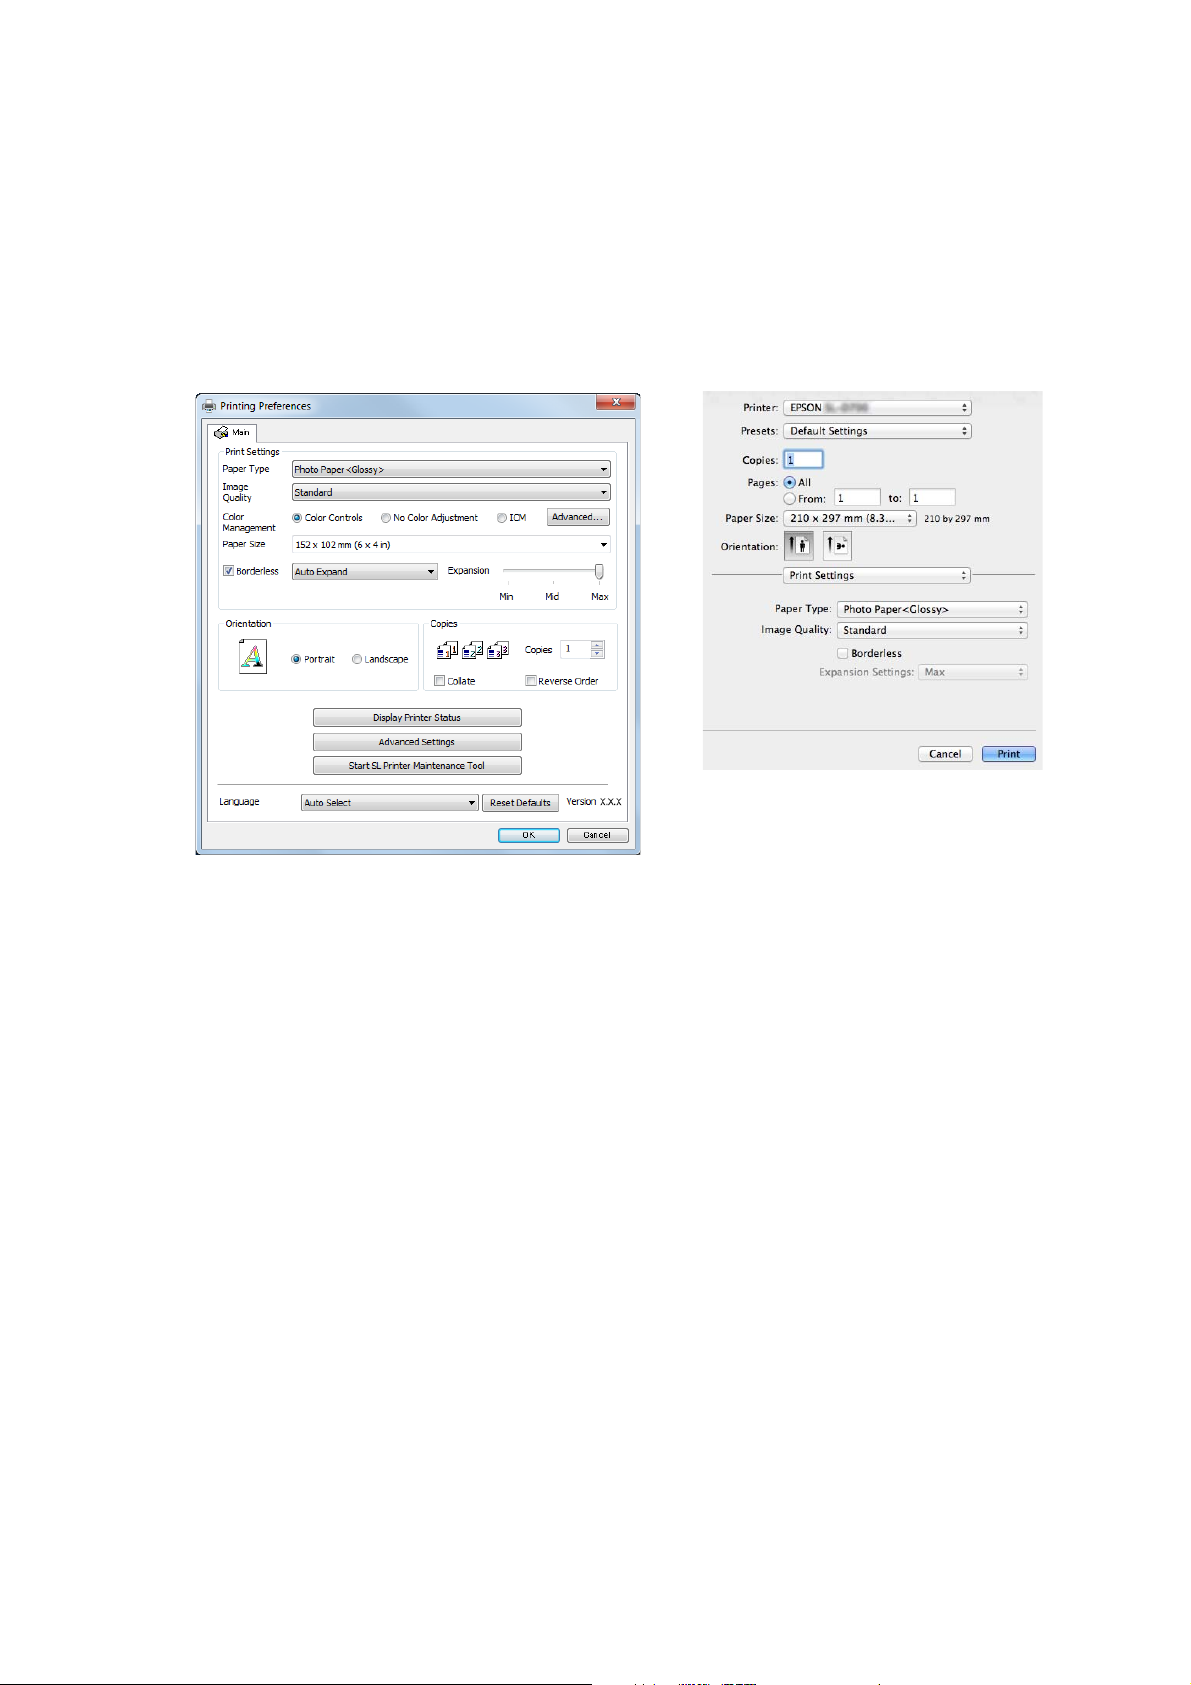
Make the necessary settings.
D
Paper Type: Set the paper being used.
Image Quality (print quality): Normally set Standard. If you want to print using high image quality, set High
Image Quality. If you want to print quickly, set High Speed.
Paper Size: Set the size of the paper used for printing.
Windows: Mac:
See the "Printer Driver Operation Guide" for an explanation of each setting item.
When you have finished making settings, click OK.
E
On the application's print screen, click Print (or Print... and so on) to start printing.
F
24
Page 25
SL-D800 Series Operation Guide
Replacing Paper
Replacing Paper
This section explains how to remove paper from the roll paper feeder, and load new paper.
Important:
c
Make sure the Paper Type setting in the Maintenance Tool matches the paper being loaded. Change the Paper
Type setting straight after replacing paper.
U “Changing Paper Settings” on page 38
Note:
❏ If the leading edge of the paper is ragged, cut it in a straight line with a pair of scissors and so on, and then load.
❏ See the following for supported paper types.
U “Printer Specifications” on page 103
❏ The following conditions are necessary when replacing paper with the same paper width and type.
❏ Before replacing, note the current paper level.
❏ When replacing paper, the paper level after replacement is set with the Maintenance Tool.
If the Paper Level is not set correctly, the level displayed may not be correct.
U “Changing Paper Settings” on page 38
❏ You can load paper with a width of 102 to 210 mm in the roll paper feeder.
How to replace
Preparing to Replace Paper
Prepare the following items.
Item Prepared Explanation
New paper for loading -
Cloth or vinyl rug Spread it out where the spindle unit will be loaded/removed so that the paper does not
become soiled.
Soft cloth Clean the edges of the paper before installing.
Gloves Wear when handling paper so that the paper does not become soiled.
Replace paper in the following order. Follow the steps for each procedure.
❏ “Recording paper level” on page 27
❏ “Removing the Spindle Unit” on page 29
❏ “Removing the Roll Paper” on page 31
25
Page 26

SL-D800 Series Operation Guide
❏ “Attaching the Roll Paper” on page 32
❏ “Attaching the Spindle Unit” on page 33
❏ “Changing Paper Settings” on page 38
Replacing Paper
26
Page 27
SL-D800 Series Operation Guide
Replacing Paper
Recording paper level
If necessary, make a note of the paper level before replacing the paper.
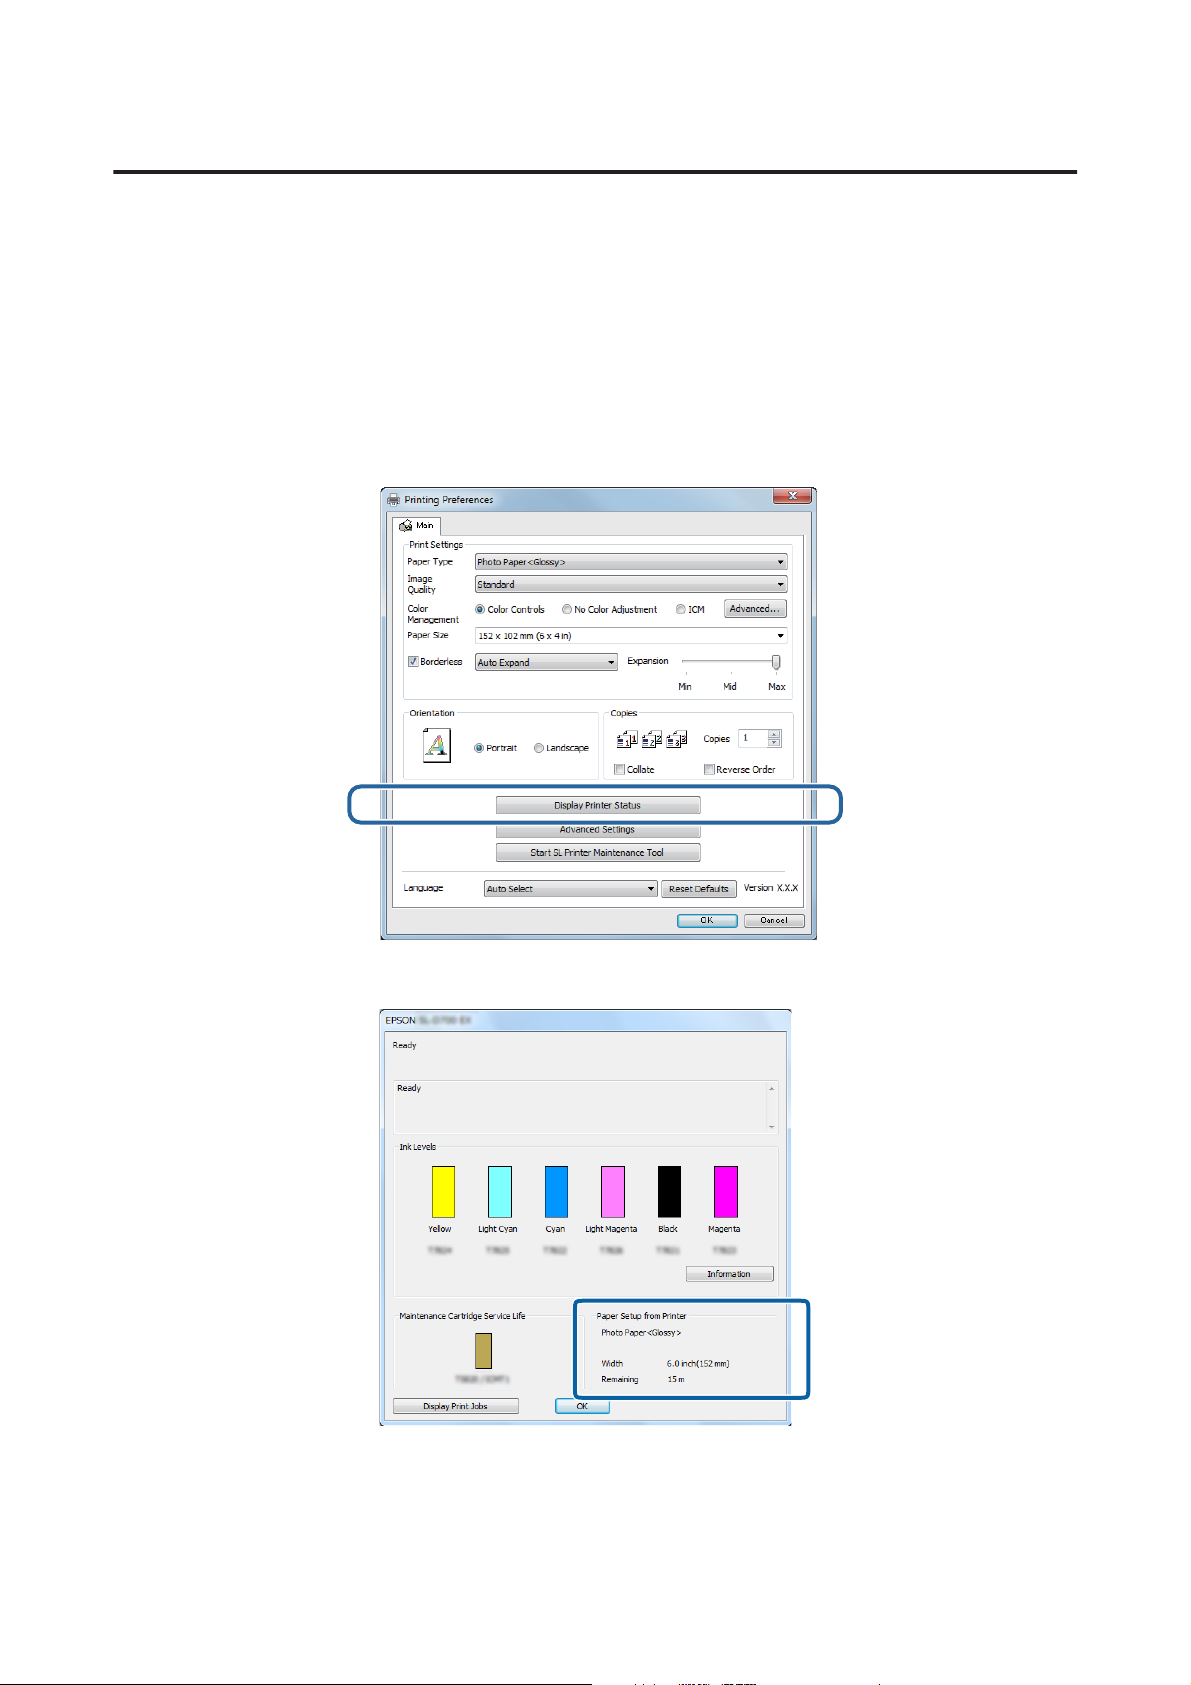
Windows
Display the printer driver's Main screen.
A
U “Basic Printing Methods” on page 23
Click Display Printer Status.
B
Make a note of the Paper Level from Paper Setup from Printer.
C
27
Page 28
SL-D800 Series Operation Guide
Replacing Paper
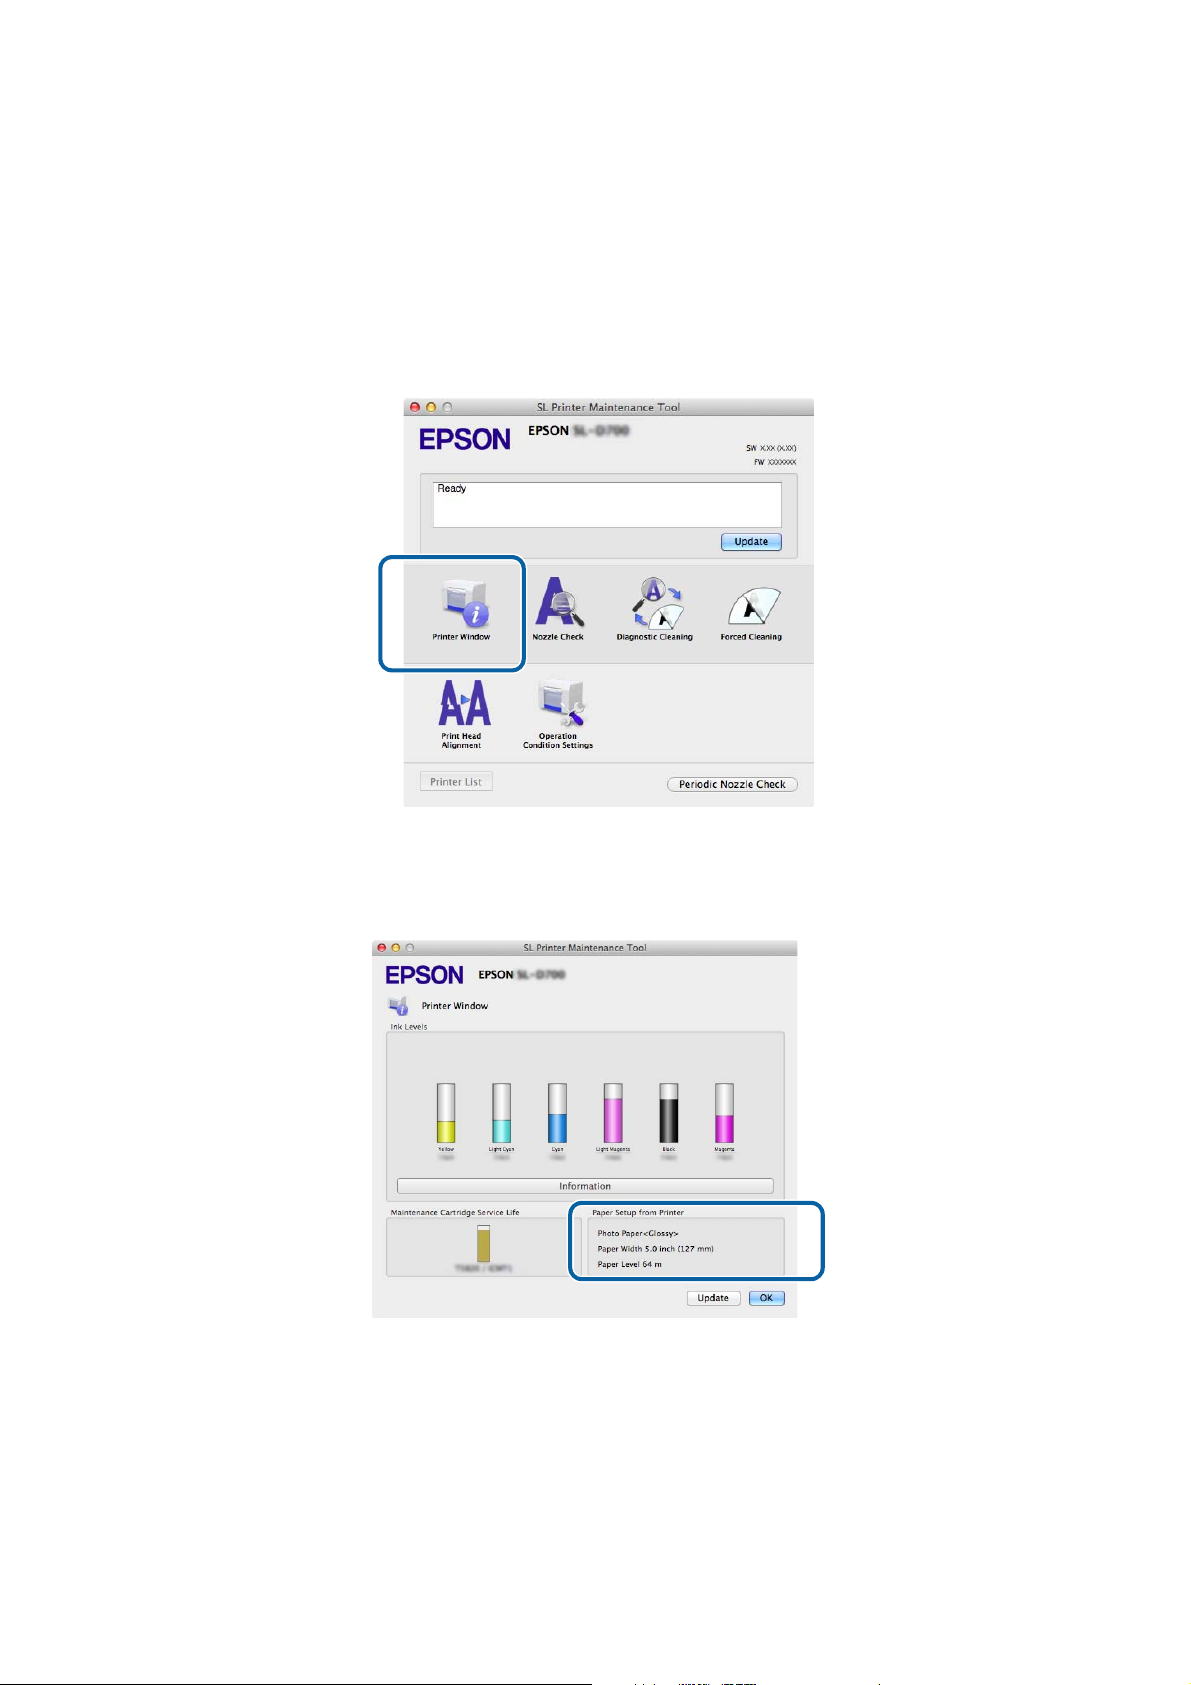
Mac
Start the Maintenance Tool.
A
See the following for information on starting the Maintenance Tool.
U “Error Messages (Mac)” on page 71
Click Printer Window on the main screen.
B
The Printer Window screen is displayed.
Make a note of the Paper Level from Paper Setup from Printer.
C
28
Page 29

SL-D800 Series Operation Guide
Replacing Paper
Removing the Spindle Unit
Important:
c
When the M light is lit and paper is ejected from the eject slot, there is no remaining paper. Pull out the paper from
the eject slot.
Check that the printer's light is on.
A
If the
Press the switch and wait until the M light turns on.
light is flashing, the printer is operating. Wait until all operations have stopped.
Important:
c
Make sure the power is on before replacing paper.
B
Remove the Scrap paper box and empty out the scrap paper.
C
U “Emptying the Scrap Paper Box” on page 61
29
Page 30
SL-D800 Series Operation Guide
Replacing Paper
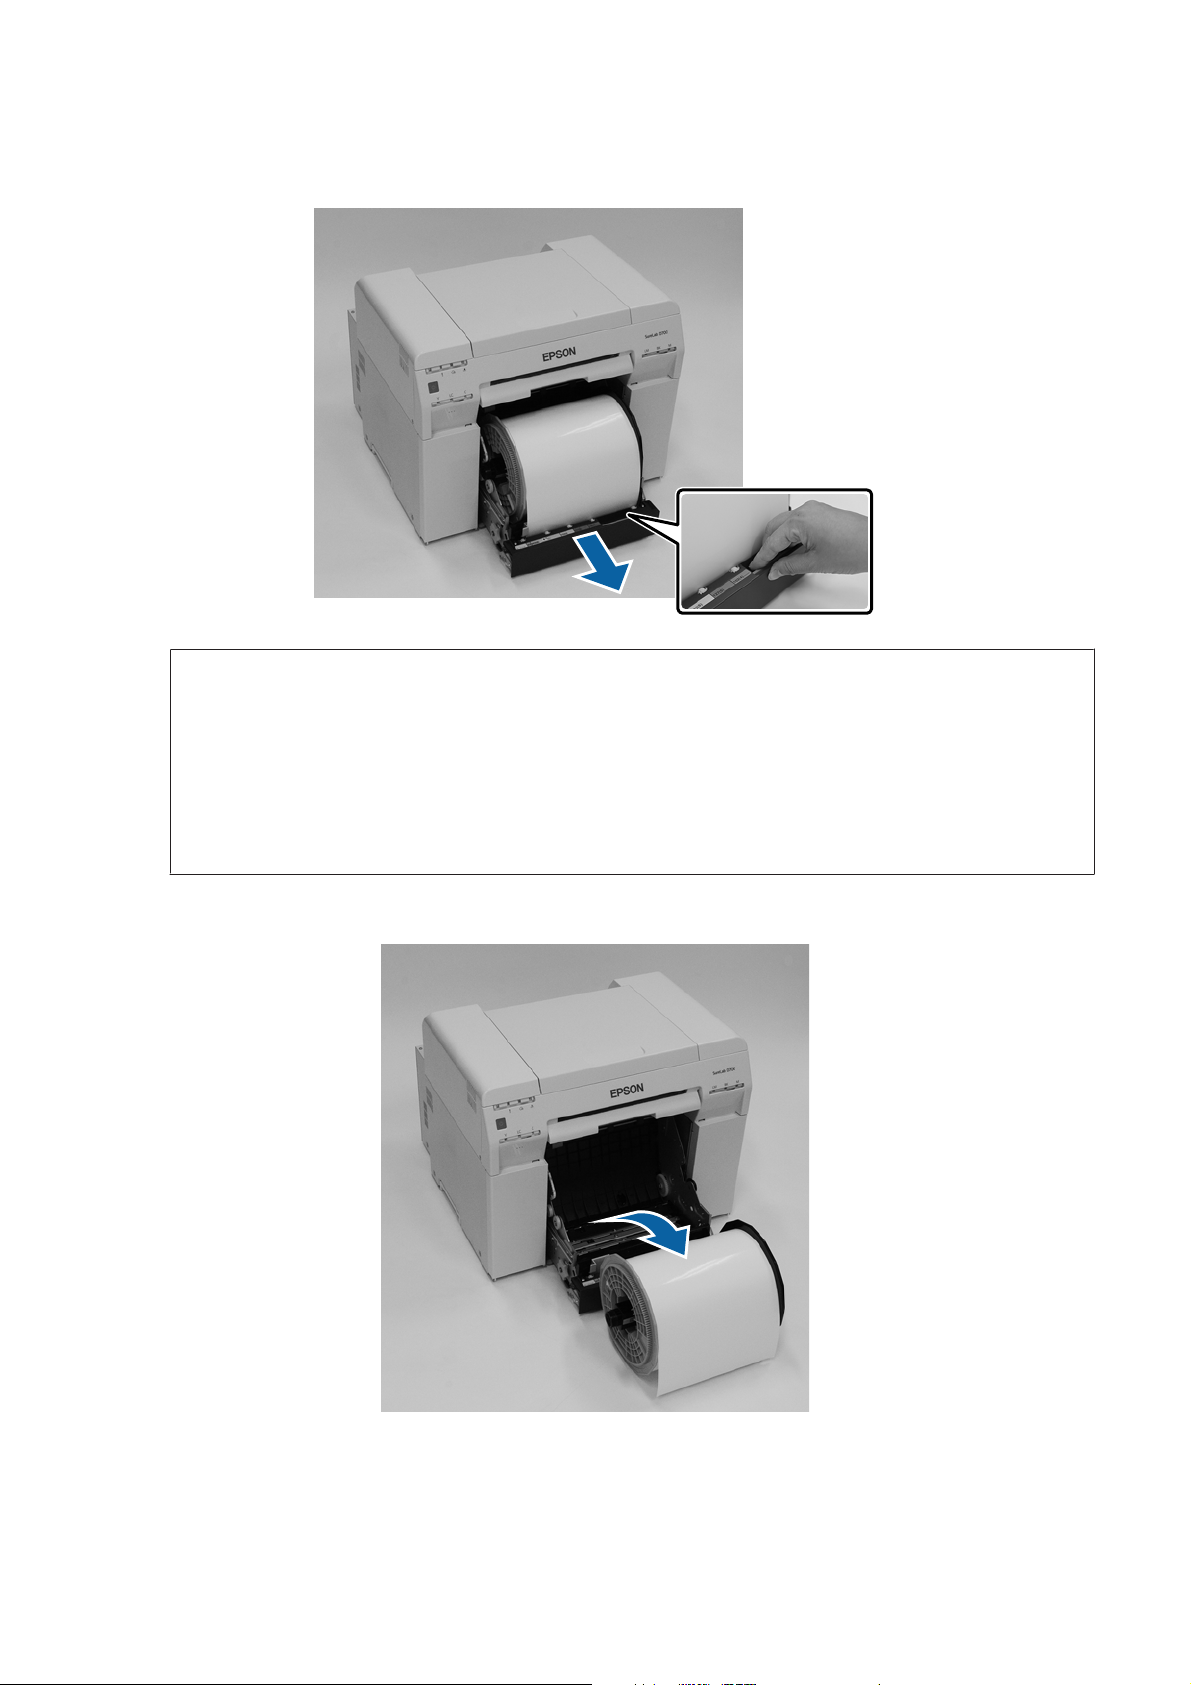
Grip the handle to release the lock, and then pull out the roll paper feeder.
D
Important:
c
If you cannot remove the roll paper feeder for some reason, do not try to pull it out by force. Paper may be
jammed inside. When you can access the top and rear of the printer, remove the paper by following the
procedure in "Paper is Jammed in the Internal Paper Feeder".
U “Paper is Jammed in the Internal Paper Feeder” on page 92
Contact your local dealer if you cannot access the top or rear of the printer.
Remove the spindle unit.
E
30
Page 31

SL-D800 Series Operation Guide
Replacing Paper
Removing the Roll Paper
Stand the spindle unit on a flat surface and remove the upper flange.
A
Remove the paper.
B
Note:
After carefully rewinding the paper, store it in the Paper Case (optional) or wrap it in the original packaging bag and
store it in a box.
31
Page 32

SL-D800 Series Operation Guide
Replacing Paper
Attaching the Roll Paper
Remove the new paper from its packaging, and stand it on a flat surface. Wipe the edge of the paper with a soft
A
cloth several times to remove any dirt such as paper powder.
Stand the paper so that the winding direction of the paper counter-clockwise when viewed from above.
Turn the paper upside down, and then place it on the spindle unit.
B
Place the core over the spindle unit so that the winding direction of the paper is clockwise when viewed from
above.
Wipe the edge of the paper with a soft cloth several times to remove any dirt such as paper powder.
C
32
Page 33

SL-D800 Series Operation Guide
Replacing Paper
Insert the flange into the shaft of the spindle unit so that the core of the roll paper is held securely between the top
D
and bottom flanges.
Attaching the Spindle Unit
Adjust the inner edge guide of the roll paper feeder to the width of the paper.
A
To adjust the position of the inner edge guide, lift it towards you slightly and move it to the left or right. Match
the triangle mark on the inner edge guide to the scale. The scale is in millimeters (inches in parenthesis).
33
Page 34

SL-D800 Series Operation Guide
Replacing Paper
Hold the spindle unit in the orientation shown below, and then place it in front of the roll paper feeder.
B
Remove any tape or protective sheets from the paper.
If the leading edge of the paper is ragged, cut it in a straight line with a pair of scissors and so on.
Load the spindle unit in the roll paper feeder.
C
Check that the shaft of the spindle unit fits into the bearing.
34
Page 35

SL-D800 Series Operation Guide
Match the front edge guide to the width of the paper.
D
Replacing Paper
Insert the leading edge of the paper into the paper feed slot.
E
Insert the paper until the paper light turns on.
35
Page 36

SL-D800 Series Operation Guide
Note:
If the paper light does not turn on, turn the handle on the left of the roll paper feeder in the direction indicated by the
arrow to remove the paper, and then insert it again.
Replacing Paper
Push the roll paper feeder all the way into the printer.
F
Carefully roll the paper into the printer to take up any slack.
G
36
Page 37

SL-D800 Series Operation Guide
Replacing Paper
Important:
c
If printing is performed while the paper is slack, print quality may decline, and paper jams could occur.
Make sure you take the slack out of the paper.
Attach the scrap paper box.
H
Insert the bottom section of the scrap paper box, and then push the top section into place.
Check that the printer's light is off.
Important:
c
If the printer is left with paper loaded for some time, the leading edge of the paper may curl and print quality
may decline. We recommend removing paper from the printer when it is not in use.
This completes this section.
37
Page 38

SL-D800 Series Operation Guide
Replacing Paper
Changing Paper Settings
After replacing paper, set the Paper Type and the Paper Level in the Maintenance Tool.
See the "Maintenance Tool Operation Guide" for more details on the Maintenance Tool.
Update the paper information as necessary. See the "Maintenance Tool Operation Guide" for more details on updating
the information.
Windows
Set the Paper Type and Paper Level in Paper Settings - Current media on the main screen of the maintenance tool,
and then click Set.
The paper width set in Paper Width is displayed.
38
Page 39

SL-D800 Series Operation Guide
Replacing Paper
Mac
Click Operation Condition Settings on the Maintenance Tool's main screen.
A
Select Change the paper type and the paper remaining.
B
When this is selected, you can change the Paper Type and Paper Level.
39
Page 40

SL-D800 Series Operation Guide
Replacing Paper
Set the Paper Type and the Paper Level, and then click Set.
C
The paper width set in Paper Width is displayed.
This completes this section.
40
Page 41

SL-D800 Series Operation Guide
Ejecting Paper
Ejecting Paper
Printed paper is ejected from the front of the printer. By attaching the optional print tray, you can collect multiple print
outs. See the following for more details.
Print Size Capacity
*1
Length
89 to 102 mm 50 to 203 mm 20 copies 20 copies
102 to 203 mm 20 copies 10 copies
203 to 305 mm
*1For prints longer than 305 mm, remove the print tray, and then eject one copy at a time from the front of the printer.
*2One copy if the paper warps after printing 30 mm or more.
Width
Glossy/Luster Matte
5 copies
*2
1 copies
41
Page 42

SL-D800 Series Operation Guide
Ejecting Paper
Important:
c
❏ Do not pull paper that is being ejected.
❏ When paper is being ejected from the front, do not pull it or raise it higher than the eject slot. Otherwise, print
quality may decline.
Note:
When removing the scrap paper box, make sure you remove the print tray first.
Print tray (optional)
After printing, the paper is cut to the specified size and ejected to the print tray.
42
Page 43

SL-D800 Series Operation Guide
Ejecting Paper
Rigid print tray (optional)
After printing, the paper is cut to the specified size and ejected to the rigid print tray.
43
Page 44

SL-D800 Series Operation Guide
Ejecting Paper
Attaching and Removing the Print Tray (Optional)
Attaching
Tilt to insert the hooks, and then lower to hook it in place.
A
44
Page 45

SL-D800 Series Operation Guide
Ejecting Paper
When the length of the print size is 89 to 102 mm, place the hooks into the top holes.
B
When the length of the print size is 102 to 203 mm, place the hooks into the bottom holes.
Removing
Perform operations in reverse order from attaching the parts.
45
Page 46

SL-D800 Series Operation Guide
Ejecting Paper
Attaching and Removing the Rigid Print Tray (Optional)
Attaching
Tilt to insert the hooks, and then lower to hook it in place.
A
46
Page 47

SL-D800 Series Operation Guide
Ejecting Paper
Pinch the handle and move it to match the length of the printer size.
B
Removing
Perform operations in reverse order from attaching the parts.
47
Page 48

SL-D800 Series Operation Guide
Replacing Ink Cartridges
Replacing Ink Cartridges
Caution:
❏ Do not disassemble ink cartridges.
If it is disassembled, ink could get in your eyes or adhere to your skin.
❏ Do not shake the ink cartridges too hard.
Ink may leak from the cartridge if you shake it too hard.
❏ Do not store ink cartridges within the reach of children.
❏ If ink gets in the eyes or mouth, or stains the skin, treat the area as follows.
❏ If ink adheres to your skin, immediately wash it off using soapy water.
❏ If ink enters your eyes, rinse immediately with water. Failure to observe this precaution could result in
bloodshot eyes or mild inflammation. If you notice any abnormalities, consult a physician immediately.
❏ If ink enters your mouth, consult a physician immediately.
Important:
c
❏ See the following points when working with ink cartridges.
U “Notes on Ink Cartridges” on page 21
❏ If you do not have a new ink cartridge for installation, leave the expended ink cartridge in the printer until
the new one is ready. If the printer is left without the ink cartridges, it may malfunction.
❏ When the ink remaining falls below the minimum value, replace it with a new ink cartridge as soon as
possible.
❏ Do not leave the printer without ink cartridges installed. The inks inside the printer may dry and you may
not be able to print. When you are not using the printer, make sure there is an ink cartridge installed in each
slot.
Checking Ink Levels
Checking from the Printer
When the ink remaining falls below the minimum value, the ink light on the front of the printer turns on.
U “Front” on page 6
Ink light
48
Page 49

SL-D800 Series Operation Guide
Replacing Ink Cartridges
Checking from the Computer
Windows
Click Display Printer Status in the printer driver .
A
49
Page 50

SL-D800 Series Operation Guide
Check how much ink remains.
B
Replacing Ink Cartridges
When you have finished checking, click OK.
50
Page 51

SL-D800 Series Operation Guide
Replacing Ink Cartridges
Mac
Start the Maintenance Tool.
A
See the following for information on starting the Maintenance Tool.
U “Error Messages (Mac)” on page 71
Click Printer Window on the main screen.
B
The Printer Window screen is displayed.
Check how much ink remains.
C
When you have finished checking, click OK.
51
Page 52

SL-D800 Series Operation Guide
Replacing Ink Cartridges
Replacement Procedure
Important:
c
❏ Install ink cartridges into each slot. You cannot print if any of the slots are empty.
Check that the printer's light is on.
A
If the
The ink light indicates if it is necessary to replace the ink cartridges.
B
In this example we are replacing the Y (yellow) cartridge. The procedure is the same for the other colors.
light is flashing, the printer is operating. Wait until all operations have stopped.
52
Page 53

SL-D800 Series Operation Guide
Replacing Ink Cartridges
Open the cartridge cover on the side that needs to be replaced.
C
A warning buzzer sounds when you open the cover.
Press the empty Ink cartridge gently so that it pops out a little, and then remove.
D
See the following for more information on disposing of ink cartridges.
U “Disposing of Used Ink Cartridges and Maintenance Cartridges” on page 22
53
Page 54

SL-D800 Series Operation Guide
Important:
c
Removed ink cartridges may have ink around the ink supply port, so be careful not to get any ink on the
surrounding area when removing the cartridges.
Replacing Ink Cartridges
Remove the new ink cartridge from the box.
E
Important:
c
❏ Do not touch the chip (A) on the ink cartridge. Doing so may affect normal operation and printing.
❏ Do not touch the ink supply port (B) on the ink cartridge. Ink could leak out.
(A)
(B)
54
Page 55

SL-D800 Series Operation Guide
Slide the ink cartridge all the way into the printer.
F
Replacing Ink Cartridges
Close the cartridge cover.
G
Check that the printer's light is on.
H
This completes this section.
55
Page 56

SL-D800 Series Operation Guide
Replacing the Maintenance Cartridge
Replacing the Maintenance Cartridge
The maintenance cartridge absorbs ink consumed during head cleaning.
This section explains how to replace used maintenance cartridges.
Important:
c
After removing the maintenance cartridge, do not leave the cartridge cover open, install a new cartridge
immediately.
Checking the Free Space in the Maintenance Cartridge
Checking from the Printer
When it is time to replace the maintenance cartridge, the printer's light turns on.
U “Lights” on page 12
light
56
Page 57

SL-D800 Series Operation Guide
Replacing the Maintenance Cartridge
Checking from the Computer
Windows
Click Display Printer Status in the printer driver.
A
Check the free space in the maintenance cartridge.
B
When you have finished checking, click OK.
57
Page 58

SL-D800 Series Operation Guide
Replacing the Maintenance Cartridge
Mac
Start the Maintenance Tool.
A
See the following for information on starting the Maintenance Tool.
U “Error Messages (Mac)” on page 71
Click Printer Window on the main screen.
B
The Printer Window screen is displayed.
Check the free space in the maintenance cartridge.
C
When you have finished checking, click OK.
58
Page 59

SL-D800 Series Operation Guide
Replacing the Maintenance Cartridge
Replacement Procedure
Check that the printer's light is on.
A
If the
Open the cartridge cover on the right.
B
A warning buzzer sounds when you open the cover.
light is flashing, the printer is operating. Wait until all operations have stopped.
Be careful not to tilt the maintenance cartridge, and remove it carefully.
C
Push up, and then pull it out.
See the following for more information on disposing of maintenance cartridges.
U “Disposing of Used Ink Cartridges and Maintenance Cartridges” on page 22
59
Page 60

SL-D800 Series Operation Guide
Prepare a new maintenance cartridge.
D
Important:
c
Do not touch the chip on the maintenance cartridge. Doing so may affect normal operation and printing.
Insert the new maintenance cartridge.
E
Replacing the Maintenance Cartridge
Close the cartridge cover.
F
Check that the printer's light is on.
G
This completes this section.
60
Page 61

SL-D800 Series Operation Guide
Emptying the Scrap Paper Box
Emptying the Scrap Paper Box
Scraps of paper cut during printing accumulate in the scrap paper box. You need to empty out the paper scraps before
the box is full.
Check visually how much scrap paper has accumulated in the box. Empty the scrap paper box when you replace the
paper.
Check that the printer's light is on.
A
If the
Remove the scrap paper box.
B
Pull the top section forward and then lift out the bottom section.
light is flashing, the printer is operating. Wait until all operations have stopped.
Empty out the scrap paper.
C
Important:
c
After emptying the scrap paper, check that the flap for the scrap paper box is in the correct position as shown
in the following photo.
61
Page 62

SL-D800 Series Operation Guide
Emptying the Scrap Paper Box
Attach the scrap paper box.
D
Insert the bottom section, and then push the top section into place.
Check that the printer's light is on.
E
This completes this section.
62
Page 63

SL-D800 Series Operation Guide
Cleaning the Platen
Cleaning the Platen
Wh en t he back of pr int out s is dirty, p aper powder has accumulated on the platen. Follow the steps below to clean the
platen. Perform cleaning with the power on.
Press the switch and wait until the M light turns on.
A
Open the top cover.
B
c
❏ Do not move the print head unit manually with too much force.
Important:
❏ Do not touch the rollers inside the printer. This could cause print outs to be soiled and so on.
❏ Do not touch the ink tubes inside the printer. Otherwise, it may breakdown.
63
Page 64

SL-D800 Series Operation Guide
Cleaning the Platen
Wipe off any paper powder (this is normally white powder) on the platen (the blue sections in the following
C
figure) with a commercially available cotton swab.
Important:
c
Do not use a dirty swab when cleaning the platen.
Wipe off any paper powder that has accumulated in the borderless absorbent areas (the blue sections in the
D
following figure) with a commercially available cotton swab.
64
Page 65

SL-D800 Series Operation Guide
Cleaning the Platen
If there is no paper powder on the right side of the platen, go to step 7.
E
If there is paper powder on the right side of the platen, press the
The print head unit moves to the left.
switch for three seconds.
Perform steps three and four to wipe off any paper powder.
F
Press the switch for three seconds.
G
The print head unit moves to the right.
Close the top cover.
H
This completes this section.
65
Page 66

SL-D800 Series Operation Guide
Maintenance
Maintenance
Maintenance Tool
By using the Maintenance Tool from your computer you can perform adjustment and maintenance operations such as
checking the printer's status, making settings, performing head cleaning and so on.
Windows
In operator mode, you can only use Current media for Printer maintenance and Paper Settings.
Items of the Main Screen Settings
Printer maintenance
Paper Settings
Printer settings
Printer history
Printer Management
Perform print head maintenance functions such as Diagnostic Cleaning, Forced
Cleaning, and Nozzle Check.
Set the Paper Type and the Paper Level. Make these settings when replacing the paper.
You can also perform printer adjustment functions such as Print Head Alignment, Paper
Feed Adjustment, and Gray Adjustment.
You can execute various printer settings such as the Buzzer, Sleep Mode Threshold,
Periodic Nozzle Check, and Quick Print Mode.
Check the Operation History, and save log files in Collect Logs.
You can execute printer management operations such as Register, Cancel Registration,
and Replace Printer.
Mac
Main Screen Menu Settings
Message Displays the printer's status.
Printer Window Allows you to check the amount of ink remaining, the free space in the maintenance
cartridge, and so on.
Nozzle Check Allows you to print a check pattern and visually check for clogged nozzles.
Diagnostic Cleaning Detects clogged nozzles and automatically performs cleaning.
Forced Cleaning Performs manual cleaning.
Print Head Alignment Corrects the print misalignment.
Operation Condition Settings
Printer List Displays a list of available printers allowing you to select the printer you want to configure.
Periodic Nozzle Check Allows you to set whether or not to automatically perform a nozzle check.
Allows you to make various printer settings such as Time Before Switching to Sleep
Mode, Warning Buzzer, Quick Print Mode, and Paper Settings.
See the "Maintenance Tool Operation Guide" for more details.
66
Page 67

SL-D800 Series Operation Guide
Maintenance
Checking Items List
See the following table for details on inspections and cleaning.
Check Part Contents
Scrap paper box Empty out the scrap paper. When replacing
Airflow vent Clean the airflow vent filter with a
vacuum cleaner.
Checking
Time
paper
Every three
months
Scrap paper box
Remove the scrap paper box and empty out the scrap paper.
U “Emptying the Scrap Paper Box” on page 61
Airflow vent
Clean the airflow vent filter with a vacuum cleaner.
Reference
U “Scrap paper box” on
page 67
U “Airflow vent” on page 67
67
Page 68

SL-D800 Series Operation Guide
Troubleshooting
Troubleshooting
Note:
See the "Printer Driver Operation Guide" for more details on troubleshooting the printer driver.
U "Printer Driver Operation Guide" - "Troubleshooting"
When an Error Occurs
Warning Buzzer and Light Indicators
When the warning buzzer sounds or the lights turn on or flash, check the solutions in the following table and take the
recommended steps.
68
Page 69

SL-D800 Series Operation Guide
Troubleshooting
Light Indicator
M light on
Paper light off
light on The warning
Warning
None
buzzer continues
to sound
intermittently
until you remove
the scrap paper
box.
Buzzer
*
There is no paper loaded in the roll paper feeder.
Load the paper.
U “Replacing Paper” on page 25
Operations have stopped because an error has
occurred, the printer is performing error recovery
operations, or a printer system error has occurred.
❏ Check the code on the computer's screen. See
the following to solve the problem.
U “Errors and Solutions (Mac)” on page 77
❏ Contact your local dealer if a printer system error
has occurred.
Problems and Solutions
light on
The ink cartridge indicated by the ink light is
expended, or an error has occurred.
Replace the ink cartridges.
U “Replacing Ink Cartridges” on page 48
69
Page 70

SL-D800 Series Operation Guide
Troubleshooting
light on
M light on
Paper light off
light on
M light flashing
Light Indicator
Warning
*
Buzzer
The warning
buzzer continues
to sound
intermittently
until you remove
the scrap paper
box.
Problems and Solutions
There is no paper loaded in the roll paper feeder,
or the paper has run out.
Load the paper.
U “Replacing Paper” on page 25
Paper is jammed or the paper has not been fed
correctly.
Clear the paper jam, or feed the paper again.
U “Paper Jams” on page 84
light on
light on
All lights flashing
* You can turn the warning buzzer on and off in the Maintenance Tool.
Continues
sounding until the
power switch is
turned off.
The ink remaining in the cartridge indicated by the
ink light has fallen below the minimum value, or
an error has occurred.
Replace the maintenance cartridge(xxxx).
U “Replacing the Maintenance Cartridge” on
page 56
A fatal error has occurred.
❏ Restart the printer.
❏ Contact your local dealer if the error continues to
occur.
70
Page 71

SL-D800 Series Operation Guide
Troubleshooting
Error Messages (Windows)
Error messages are displayed when an error occurs in the printer while printing.
The code, error details, solutions, and so on are displayed on the screen.
Error Messages (Mac)
When errors occur in the printer while printing, you can check the content of the error and solutions with the
Maintenance Tool. Click Printer Window to display a detailed error message.
See the "Maintenance Tool Operation Guide" for more details on the Maintenance Tool.
Use one of the following methods to start the Maintenance Tool.
Select System Preferences > Print & Scan (or Print & Fax) from the Apple menu.
A
71
Page 72

SL-D800 Series Operation Guide
Troubleshooting
Select the printer and click Options & Supplies > Utility > Open Printer Utility.
B
Errors and Solutions (Windows)
Check the details of the error displayed, and then take the necessary measures.
Code Message What to do
W-2301 to
W-2303
W-2305 to
W-2306
I-2307 Cannot perform [Detect Clogging] correctly.
W-2311 Clogged nozzle(s) detected.
I-2401 Replace the maintenance cartridge soon.
Cannot perform [Detect Clogging] correctly.
Start [Maintenance tool], select [Printer maintenance] and
perform [Diagnostic Cleaning].
Contact service support if the error continues to occur.
Room temperature may not be within the guaranteed operating
range.
Check the room temperature.
Start [Maintenance tool], select [Printer maintenance] and
perform [Diagnostic Cleaning].
Prepare a new maintenance cartridge(xxxx).
You can continue printing until replacement is required.
Perform Diagnostic Cleaning in the
Maintenance Tool.
See the "Maintenance Tool Operation
Guide" for more details on the
Maintenance Tool.
If "Auto nozzle check failed." is
displayed on the Windows screen,
contact service support.
Check the room temperature. Use
within the recommended operating
temperature range.
Perform Diagnostic Cleaning in the
Maintenance Tool.
See the "Maintenance Tool Operation
Guide" for more details on the
Maintenance Tool.
Check the message, and then click
OK.
Prepare a new maintenance cartridge
with the model number displayed in
xxxx.
U “Replacing the Maintenance
Cartridge” on page 56
I-2201 Ink Low
(xxxx)
Prepare a new ink cartridge.
You can continue printing until replacement is required.
Epson recommends the genuine Epson cartridges listed above.
I-2101 to I-2104 It is nearly time to replace parts.
xxxxxx
Contact a technical representative.
You cannot print if parts have reached the end of their service
life.
W-1301 The scrap paper box has come off.
Install the scrap paper box correctly.
Check the message, and then click
OK.
Prepare a new ink cartridge for
replacement.
U “Replacing Ink Cartridges” on
page 48
Contact service support and request
replacement for the part displayed in
xxxxxx.
Attach the scrap paper box. If a
message is displayed, check the
details.
72
Page 73

SL-D800 Series Operation Guide
Troubleshooting
Code Message What to do
W-1302 Cartridge cover (right) open.
When replacing a cartridge, check the location and the cartridg e
type.
Close the cartridge cover.
W-1303 Cartridge cover (left) open.
When replacing a cartridge, check the location and the cartridg e
type.
Close the cartridge cover.
W-1304 Top cover open.
Close the top cover.
W-1305 Rear cover open.
Close the rear cover.
I-1311 Check the scrap paper box.
Empty the box if it is full.
W-1101 A paper jam has occurred.
Remove any paper remaining from the roll paper feeder, and
then reload the paper.
Close the cartridge cover (right). If a
message is displayed, check the
details.
Close the cartridge cover (left). If a
message is displayed, check the
details.
Close the top cover. If a message is
displayed, check the details.
Close the rear cover. If a message is
displayed, check the details.
Check the scrap paper box. Check the
scrap paper box, and empty it if it is full.
U “Emptying the Scrap Paper Box” on
page 61
Remove the paper from the roll paper
feeder, and then reload the paper.
U “Paper Jams” on page 84
W-1102 A paper jam has occurred.
Open the rear cover and the top cover, remove any paper
remaining, and then reload the paper.
W-1103 An error has occurred in the paper feeding unit.
Reload the paper in the same way as when replacing paper.
W-1104 Paper is not loaded correctly.
Check the positions of the edge guides, and then reload the
paper.
W-1105 Paper is out.
Load paper.
W-1106 Paper is out or not loaded correctly.
Load paper.
Remove the paper from the internal
paper feeder, and then reload the
paper.
If the printer is setup so that you
cannot access the rear of the printer to
perform maintenance, contact service
support.
U “Paper Jams” on page 84
Check that there is no paper inside the
printer, and then reload the paper. If a
message is displayed, check the
details.
U “Replacing Paper” on page 25
Check that there is no paper inside the
printer, and then reload the paper.
When loading the paper, match the
inner edge guide and the front edge
guide to the width of the paper. If a
message is displayed, check the
details.
U “Replacing Paper” on page 25
Check that there is no paper inside the
printer, and then reload the paper. If a
message is displayed, check the
details.
U “Replacing Paper” on page 25
73
Page 74

SL-D800 Series Operation Guide
Troubleshooting
Code Message What to do
W-1108 The width of the loaded paper is not supported.
Load supported paper.
W-1109 Cannot recognize the paper type.
Update the paper information.
W-2101 to
W-2104
W-2401 Maintenance cartridge not installed
W-2402 Maintenance cartridge usage exceeded the application limit.
Parts have reached the end of their service life.
xxxxxx
Do you want to continue using the printer or replace parts?
If you continue to use the printer, ink could leak or a malfunction
could occur.
Do you want to continue?
Install the maintenance cartridge(xxxx).
Replace the maintenance cartridge(xxxx).
Load the appropriate paper.
U “Replacing Paper” on page 25
Update the paper information. See the
"Maintenance Tool Operation Guide"
for more details on updating the
information.
Contact service support and request
replacement for the part displayed in
xxxxxx.
Correctly reinstall the maintenance
cartridge for the model number
displayed in xxxx.
U “Replacing the Maintenance
Cartridge” on page 56
Replace the maintenance cartridge
with the model number displayed in
xxxx.
U “Replacing the Maintenance
Cartridge” on page 56
W-2201 Ink cartridge error
(xxxx)
Please install correct cartridge.
Epson recommends the genuine Epson cartridges listed above.
W-2202 Replace Cartridge
(xxxx)
Epson recommends the genuine Epson cartridges listed above.
W-2203 Ink cartridge error
(xxxx)
Remove and reinstall them correctly or replace them.
Epson recommends the genuine Epson cartridges listed above.
Check the ink cartridge with the color
displayed in xxxx, and then replace the
cartridge.
If a message is displayed, check the
details.
U “Replacing Ink Cartridges” on
page 48
Check the ink cartridge with the color
displayed in xxxx, and then replace the
cartridge.
If a message is displayed, check the
details.
U “Replacing Ink Cartridges” on
page 48
Check the ink cartridge with the color
and model number displayed in xxxx,
and then replace the cartridge or
reinstall it correctly.
If a message is displayed, check the
details.
U “Replacing Ink Cartridges” on
page 48
74
Page 75

SL-D800 Series Operation Guide
Troubleshooting
Code Message What to do
W-2204 Ink cartridge error
(xxxx)
Please install correct cartridge.
Epson recommends the genuine Epson cartridges listed above.
W-2205 Insufficient ink left to perform head cleaning or initial charge.
Replace the ink cartridge indicated by the ink light that is turned
on.
The cartridge being used can be installed again for printing.
W-2403 Maintenance cartridge cannot be recognized
Install the maintenance cartridge correctly.
W-2404 Insufficient free space in the maintenance cartridge.
Replace the maintenance cartridge(xxxx), and then perform
head cleaning or initial charge.
The cartridge being used can be reinstalled for printing.
Check the ink cartridge with the color
and model number displayed in xxxx,
and then replace the cartridge.
If a message is displayed, check the
details.
U “Replacing Ink Cartridges” on
page 48
Replace the ink cartridge indicated by
the ink light that is turned on.
If a message is displayed, check the
details.
U “Replacing Ink Cartridges” on
page 48
Replace or correctly reinstall the
maintenance cartridge with the model
number displayed in xxxx.
If a message is displayed, check the
details.
U “Replacing the Maintenance
Cartridge” on page 56
Replace the maintenance cartridge
with the model number displayed in
xxxx.
If a message is displayed, check the
details.
U “Replacing the Maintenance
Cartridge” on page 56
E-5101 The printer is disconnected.
Check that the cable is connected, an d then turn the printer back
on.
Contact service support if the error continues to occur.
Please order the prints again if there are image files that have not
been printed.
Code:xxxx
E-2101 to E-2104 Parts have reached the end of their service life.
xxxxxx
Contact a technical representative.
E-9901, E-9902 A printer system error occurred.
Turn the printer off. Check if there is any paper remaining inside
the printer, and then turn the printer back on.
Contact service support if the error continues to occur.
Please order the prints again if there are image files that have not
been printed.
Code:xxxx
Check that the cables are connected
correctly, and then restart the printer.
If the error persists, contact service
support.
Contact service support and request
replacement for the part displayed in
xxxxxx.
Turn off the printer, and then start it
again.
If the error persists, a malfunction may
have occurred. Contact service
support.
75
Page 76

SL-D800 Series Operation Guide
Troubleshooting
Code Message What to do
W-5201 The paper set in Print Settings and the paper loaded in the
printer differ.
After replacing the paper, click [OK]. If printing is currently being
performed, when printing has stopped, replace the paper, and
then click [OK].
To continue printing using the current settings, click [Print].
W-2206 You have not installed genuine Epson ink cartridges.
Information about ink levels may not be displayed, and use of
non-genuine ink is recorded for possible use in service support.
For optimum quality and reliability Epson recommends using
genuine Epson ink.
Do you want to continue?
Please call Epson user service hot-line 400-810-9977 for genuine
I/C purchase.
E-5201 Failed to acquire printing calibration data.
Check that the cable is connected, an d then turn the printer back
on.
Contact service support if the error continues to occur.
I-5201, W-5202 Amount of data in print jobs sent to printer nearly at maximum
limit.
Stop sending the current print job and send the remaining
pages as another print job.
Load the appropriate paper. After
replacing the paper, set the Paper Type
and the Paper Level in the
Maintenance Tool.
U “Replacing Paper” on page 25
To continue printing with the current
settings, click Print.
This printer is developed for use with
genuine ink cartridges. If you use
non-genuine cartridges, the print
result may be faint, or the ink
remaining may not be detected
normally. We recommend using
genuine Epson products.
Turn off the printer, and then start it
again.
If the error persists, contact service
support.
The print job is too large.
After deleting all of the print jobs, split
up the data, and then try printing
again.
76
Page 77

SL-D800 Series Operation Guide
Troubleshooting
Errors and Solutions (Mac)
Check the details of the error displayed, and then take the necessary measures.
Code Message What to do
W-2301 to
W-2303
W-2305 to
W-2306
I-2307 Cannot perform [Detect Clogging] correctly.
W-2311 Clogged nozzle(s) detected.
I-2401 Replace the maintenance cartridge soon
Cannot perform [Detect Clogging] correctly.
Delete all print jobs remaining in the operating system's print
queue.
Perform [Diagnostic Cleaning].
Contact service support if the error continues to occur.
Room temperature may not be within the guaranteed operating
range.
Check the room temperature.
Delete all print jobs remaining in the operating system's print
queue.
Perform [Diagnostic Cleaning].
Prepare a new maintenance cartridge(xxxx).
You may continue printing until replacement of the
maintenance cartridge is required.
After deleting all of the print jobs,
perform Diagnostic Cleaning in the
Maintenance Tool.
See the "Maintenance Tool Operation
Guide" for more details on the
Maintenance Tool.
If "Auto nozzle check failed." is
displayed on the screen, contact
service support.
Check the room temperature. Use
within the recommended operating
temperature range.
After deleting all of the print jobs,
perform Diagnostic Cleaning in the
Maintenance Tool.
See the "Maintenance Tool Operation
Guide" for more details on the
Maintenance Tool.
Check the message, and then click
OK.
Prepare a new maintenance cartridge
with the model number displayed in
xxxx.
U “Replacing the Maintenance
Cartridge” on page 56
I-2201 Ink Low
(xxxx)
Prepare a new ink cartridge.
You may continue printing until replacement of the ink
cartridge is required.
Epson recommends the genuine Epson cartridges listed above.
I-2101 to I-2104 It is nearly time to replace parts.
xxxxxx
Contact a technical representative.
You cannot print if parts have reached the end of their service
life.
W-1301 The scrap paper box has come off.
Delete all print jobs remaining in the operating system's print
queue.
Install the scrap paper box correctly.
Check the message, and then click
OK.
Prepare a new ink cartridge for the
color and model number displayed in
xxxx, and then get ready to repl ace the
cartridge.
U “Replacing Ink Cartridges” on
page 48
Contact service support and request
replacement for the part displayed in
xxxxxx.
After deleting all of the print jobs,
attach the scrap paper box. If a
message is displayed, check the
details.
77
Page 78

SL-D800 Series Operation Guide
Troubleshooting
Code Message What to do
W-1302 Cartridge cover (right) open.
Delete all print jobs remaining in the operating system's print
queue.
When replacing a cartridge, check the location and the cartridg e
type.
Close the cartridge cover.
W-1303 Cartridge cover (left) open.
Delete all print jobs remaining in the operating system's print
queue.
When replacing a cartridge, check the location and the cartridg e
type.
Close the cartridge cover.
W-1304 Top cover open.
Delete all print jobs remaining in the operating system's print
queue.
Close the top cover.
W-1305 Rear cover open.
Delete all print jobs remaining in the operating system's print
queue.
Close the rear cover.
I-1311 Check the scrap paper box.
Empty the box if it is full.
After deleting all of the print jobs, close
the cartridge cover (right). If a message
is displayed, check the details.
After deleting all of the print jobs, close
the cartridge cover (left). If a message is
displayed, check the details.
After deleting all of the print jobs, close
the top cover. If a message is displayed,
check the details.
After deleting all of the print jobs, close
the rear cover. If a message is
displayed, check the details.
Check the scrap paper box. Check the
scrap paper box, and empty it if it is full.
U “Emptying the Scrap Paper Box” on
page 61
W-1101 A paper jam has occurred.
Delete all print jobs remaining in the operating system's print
queue.
Remove any paper remaining from the roll paper feeder, and
then reload the paper.
W-1102 A paper jam has occurred.
Delete all print jobs remaining in the operating system's print
queue.
Open the rear cover and the top cover, remove any paper
remaining, and then reload the paper.
W-1103 An error has occurred in the paper feeding unit.
Delete all print jobs remaining in the operating system's print
queue.
Reload the paper in the same way as when replacing paper.
After deleting all of the print jobs,
remove the paper from the roll paper
feeder, and then reload the paper.
U “Paper Jams” on page 84
After deleting all of the print jobs,
remove the paper from the internal
paper feeder, and then reload the
paper.
If the printer is setup so that you
cannot access the rear of the printer to
perform maintenance, contact service
support.
U “Paper Jams” on page 84
After deleting all of the print jobs,
check that there is no paper inside the
printer, and then reload the paper. If a
message is displayed, check the
details.
U “Replacing Paper” on page 25
78
Page 79

SL-D800 Series Operation Guide
Troubleshooting
Code Message What to do
W-1104 Paper is not loaded correctly.
Delete all print jobs remaining in the operating system's print
queue.
Check the positions of the edge guides, and then reload the
paper.
W-1105 Paper is out.
Delete all print jobs remaining in the operating system's print
queue.
Load paper.
W-1106 Paper is out or not loaded correctly.
Delete all print jobs remaining in the operating system's print
queue.
Load paper.
W-1108 The width of the loaded paper is not supported.
Delete all print jobs remaining in the operating system's print
queue.
Load supported paper.
After deleting all of the print jobs,
check that there is no paper inside the
printer, and then reload the paper.
When loading the paper, match the
inner edge guide and the front edge
guide to the width of the paper. If a
message is displayed, check the
details.
U “Replacing Paper” on page 25
After deleting all of the print jobs,
check that there is no paper inside the
printer, and then reload the paper. If a
message is displayed, check the
details.
U “Replacing Paper” on page 25
After deleting all of the print jobs, load
the appropriate paper.
U “Replacing Paper” on page 25
W-1109 Cannot recognize the paper type.
Delete all print jobs remaining in the operating system's print
queue.
Update the paper information.
W-2101 to
W-2104
W-2401 Maintenance cartridge not installed
W-2402 Maintenance cartridge usage exceeded the application limit.
Parts have reached the end of their service life.
xxxxxx
Do you want to continue using the printer or replace parts?
Delete all print jobs remaining in the operating system's print
queue.
If you continue to use the printer, ink could leak or a malfunction
could occur.
Do you want to continue?
Delete all print jobs remaining in the operating system's print
queue.
Install the maintenance cartridge.
Delete all print jobs remaining in the operating system's print
queue.
Replace the maintenance cartridge(xxxx).
Update the paper information. See the
"Maintenance Tool Operation Guide"
for more details on updating the
information.
Contact service support and request
replacement for the part displayed in
xxxxxx.
After deleting all of the print jobs,
install the maintenance cartridge
correctly.
U “Replacing the Maintenance
Cartridge” on page 56
After deleting all of the print jobs,
replace the maintenance cartridge
with the model number displayed in
xxxx.
U “Replacing the Maintenance
Cartridge” on page 56
79
Page 80

SL-D800 Series Operation Guide
Troubleshooting
Code Message What to do
W-2201 Ink cartridge error
(xxxx)
Delete all print jobs remaining in the operating system's print
queue.
Please install correct cartridge.
Epson recommends the genuine Epson cartridges listed above.
W-2202 Replace Cartridge
(xxxx)
Delete all print jobs remaining in the operating system's print
queue.
Epson recommends the genuine Epson cartridges listed above.
W-2203 Ink cartridge error
(xxxx)
Delete all print jobs remaining in the operating system's print
queue.
Remove and reinstall them correctly or replace them.
Epson recommends the genuine Epson cartridges listed above.
After deleting all of the print jobs,
check the ink cartridge with the color
displayed in xxxx, and then replace the
cartridge.
If a message is displayed, check the
details.
U “Replacing Ink Cartridges” on
page 48
After deleting all of the print jobs,
check the ink cartridge with the color
and model number displayed in xxxx,
and then replace the cartridge.
If a message is displayed, check the
details.
U “Replacing Ink Cartridges” on
page 48
After deleting all of the print jobs,
check the ink cartridge with the color
and model number displayed in xxxx,
and then replace the cartridge or
reinstall it correctly.
If a message is displayed, check the
details.
U “Replacing Ink Cartridges” on
page 48
W-2204 Ink cartridge error
(xxxx)
Delete all print jobs remaining in the operating system's print
queue.
Please install correct cartridge.
Epson recommends the genuine Epson cartridges listed above.
W-2205 Insufficient ink left to perform head cleaning or initial charge.
Replace the ink cartridge indicated by the ink light that is turned
on.
Delete all print jobs remaining in the operating system's print
queue.
The cartridge being used can be installed again for printing.
W-2403 Maintenance cartridge cannot be recognized
Delete all print jobs remaining in the operating system's print
queue.
Install the maintenance cartridge correctly.
After deleting all of the print jobs,
check the ink cartridge with the color
and model number displayed in xxxx,
and then replace the cartridge.
If a message is displayed, check the
details.
U “Replacing Ink Cartridges” on
page 48
Replace the ink cartridge for which the
ink light is on, and then delete all print
jobs.
If a message is displayed, check the
details.
U “Replacing Ink Cartridges” on
page 48
After deleting all of the print jobs,
replace the maintenance cartridge or
reinstall it correctly.
If a message is displayed, check the
details.
U “Replacing the Maintenance
Cartridge” on page 56
80
Page 81

SL-D800 Series Operation Guide
Troubleshooting
Code Message What to do
W-2404 Insufficient free space in the maintenance cartridge.
Delete all print jobs remaining in the operating system's print
queue.
Replace the maintenance cartridge (xxxx), and then perform
head cleaning or initial charge.
E-5101 The printer is disconnected.
Delete all print jobs remaining in the operating system's print
queue.
Check that the cable is connected, an d then turn the printer back
on.
Contact service support if the error continues to occur.
E-2101 to E-2104 Parts have reached the end of their service life.
xxxxxx
Contact a technical representative.
Delete all print jobs remaining in the operating system's print
queue.
E-9901 (xxxx),
E-9902 (xxxx)
A printer system error occurred.
Delete all print jobs remaining in the operating system's print
queue.
Turn the printer off. Check if there is any paper remaining inside
the printer, and then turn the printer back on.
Contact service support if the error continues to occur.
After deleting all of the print jobs,
replace the maintenance cartridge.
If a message is displayed, check the
details.
U “Replacing the Maintenance
Cartridge” on page 56
After deleting all of the print jobs,
check that the cables are connected
correctly, and then restart the printer.
If the error persists, contact service
support.
After deleting all of the print jobs,
contact service support and request
replacement for the part displayed in
xxxxxx.
After deleting all of the print jobs,
restart the printer.
If the error persists, a malfunction may
have occurred. Contact service
support.
I-5201 Amount of data in print jobs sent to printer nearly at maximum
limit.
Stop sending the current print job and send the remaining
pages as another print job.
W-2206 You have not installed genuine Epson ink cartridges.
xxxx
Information about ink levels may not be displayed, and use of
non-genuine ink is recorded for possible use in service support.
For optimum quality and reliability Epson recommends using
genuine Epson ink.
W-2207 A non-genuine or refilled cartridge has been detected. Ink levels
may not be shown because of unknown ink volume.
W-2208 A non-genuine or refilled cartridge has been detected. Ink levels
may not be shown because of unknown ink volume.
The print job is too large.
After deleting all of the print jobs, split
up the data, and then try printing
again.
This printer is developed for use with
genuine ink cartridges. If you use
non-genuine cartridges, the print
result may be faint, or the ink
remaining may not be detected
normally. We recommend using
genuine Epson products.
81
Page 82

SL-D800 Series Operation Guide
Troubleshooting
Cannot Clear the Displayed Error
If an error is displayed that cannot be cleared, follow the steps below to restart the printer.
Check that the printer's light is on. Turn off the power switch (the light turns off).
A
If you cannot turn off the power using the switch, unplug the power cable.
Reconnect the power cable, and then turn on the power switch (the light turns on).
B
The
light turns on.
82
Page 83

SL-D800 Series Operation Guide
Troubleshooting
Note:
If the error persists even after restarting, contact service support.
This completes this section.
83
Page 84

SL-D800 Series Operation Guide
Troubleshooting
Paper Jams
This section explains how to clear paper jammed in the printer.
When a paper jam occurs, the
U “Lights” on page 12
light
The procedure differs for the roll paper feeder and the internal paper feeder. Check the error message to determine
which procedure to use.
light on the front of the printer turns on, and the light flashes.
❏ W-1101 When the message "A paper jam has occurred. Delete all print jobs remaining in the operating system's
print queue. Remove any paper remaining from the roll paper feeder, and then reload the paper. " is displayed,
check for paper jams in the roll paper feeder.
U “Paper is Jammed in the Roll Paper Feeder” on page 86
❏ W-1102 When the message "A paper jam has occurred. Delete all print jobs remaining in the operating system's
print queue. Open the rear cover and the top cover, remove any paper remaining, and then reload the paper. " is
displayed, check for paper jams in the internal paper feeder.
U “Paper is Jammed in the Internal Paper Feeder” on page 92
Important:
c
❏ Do not leave the printer with a paper jam.
Fire could ignite or smoke could be emitted.
❏ When a printer system error occurs, if the error persists after restarting the printer, check if a paper jam has
occurred.
❏ Do not remove the paper forcibly when clearing paper jams. Otherwise, the printer could be damaged.
84
Page 85

SL-D800 Series Operation Guide
Troubleshooting
Deleting Print Jobs
Before starting operations on Mac, delete all jobs from the print queue.
Mac
Click the printer icon in the Dock.
A
Select the job you want to cancel, and then click [×] (or Delete).
B
85
Page 86

SL-D800 Series Operation Guide
Troubleshooting
Paper is Jammed in the Roll Paper Feeder
Error message W-1101 - When the message "Remove any paper remaining from the roll paper feeder, and then reload
the paper. " is displayed, follow the steps below.
On Mac, delete all jobs from the Print Queue.
A
U “Deleting Print Jobs” on page 85
Remove the scrap paper box.
B
Pull the top section forward and then lift out the bottom section.
Grip the handle to release the lock, and then pull out the roll paper feeder.
C
86
Page 87

SL-D800 Series Operation Guide
Troubleshooting
Important:
c
If you cannot remove the roll paper feeder for some reason, do not try to pull it out by force. Paper may be
jammed inside. When you can access the top and rear of the printer, remove the paper by following the
procedure in the next section "Paper is Jammed in the Internal Paper Feeder".
U “Paper is Jammed in the Internal Paper Feeder” on page 92
Contact your local dealer if you cannot access the top or rear of the printer.
Turn the handle on the left of the roll paper feeder in the direction indicated by the arrow to rewind the paper.
D
Rewind the paper until the leading edge comes out of the paper feed slot.
If the leading edge of the paper is ragged, cut it in a straight line with a pair of scissors and so on.
E
Cut the paper as straight as possible.
87
Page 88

SL-D800 Series Operation Guide
Remove the spindle unit.
F
Troubleshooting
Open the internal rear plate.
G
Place your finger in the hole at the bottom and lift to open.
88
Page 89

SL-D800 Series Operation Guide
Troubleshooting
Check that there is no paper or foreign material at the back of the inside of the printer.
H
If there is a jam, remove the paper slowly.
Open the front plate.
I
Place your finger in the hole at the bottom and lift to open.
Check that there is no paper, foreign material, or scrap paper at the back of the printer.
J
If there is a jam, remove the paper slowly.
89
Page 90

SL-D800 Series Operation Guide
Replace the front plate and the rear plate.
K
Replace the front plate first.
Press down until you hear it click into place.
Troubleshooting
Reload the paper.
L
See the following for more details on loading the paper.
U “Replacing Paper” on page 25
If an error message is still displayed on a Windows computer's screen, click OK to close the screen.
M
90
Page 91

SL-D800 Series Operation Guide
Troubleshooting
Check that the light turns off, and the light turns on.
N
This completes this section.
91
Page 92

SL-D800 Series Operation Guide
Troubleshooting
Paper is Jammed in the Internal Paper Feeder
Error message W-1102 - When the message "Open the rear cover and the top cover, remove any paper remaining, and
then reload the paper." is displayed, follow the steps below.
If you have cleared a paper jam from the roll paper feeder but the error is still not cleared, or you cannot pull out the roll
paper feeder, there may be a jam inside the printer.
Important:
c
Contact your local dealer if you cannot access the top or rear of the printer.
On Mac, delete all jobs from the Print Queue.
A
U “Deleting Print Jobs” on page 85
Remove the scrap paper box.
B
Pull the top section forward and then lift out the bottom section.
Squeeze the lock lever on the back to release the lock, and then open the rear cover.
C
92
Page 93

SL-D800 Series Operation Guide
Open the top cover.
D
Check the point where the jam occurred.
Troubleshooting
If a lot of paper has been ejected from the front of the printer, cut the paper in front of the jam with a pair of
E
scissors and so on.
93
Page 94

SL-D800 Series Operation Guide
Troubleshooting
Slowly pull the remaining paper jammed inside the printer.
F
If you have pulled out the paper, go to step 8.
If the paper is under the print head and cannot be easily removed, go to the next step.
Move the print head unit manually, and remove the paper from the rear.
G
If the paper is on the right, move the print head unit to the left.
If the paper is on the left, move the print head unit to the right.
94
Page 95

SL-D800 Series Operation Guide
Important:
c
❏ If you cannot move the print head unit, do not try to force it to move, contact service support. Otherwise,
the print head unit could be damaged.
❏ When removing the paper, do not touch the ink absorbing areas. Otherwise, the paper stand is soiled
which could also soil the back of the paper.
Troubleshooting
Cut the paper you have pulled out with scissors and so on.
H
Remove the cut section.
Important:
c
After cutting the paper, do not pull the paper inside the printer to the upper section. Remove the paper inside
the printer by following the procedure for removing roll paper.
95
Page 96

SL-D800 Series Operation Guide
Close the top cover.
I
Troubleshooting
Check if there is a paper jam in the roll paper feeder.
J
Perform steps 2 to 11 in "Paper is Jammed in the Roll Paper Feeder".
U “Paper is Jammed in the Roll Paper Feeder” on page 86
Close the rear cover.
K
Reload the paper.
L
See the following for more details on loading the paper.
U “Replacing Paper” on page 25
96
Page 97

SL-D800 Series Operation Guide
Troubleshooting
If an error message is still displayed on a Windows computer's screen, click OK to close the screen.
M
Check that the light turns off, and the light turns on.
N
This completes this section.
97
Page 98

SL-D800 Series Operation Guide
Troubleshooting
Problems with Print Results
Cause What to do
Stripes appear at regular intervals in the
print outs.
Print quality is poor, uneven, too light, or
too dark.
Are the print head unit nozzles clogged?
If the print head unit is clogged, stripes appear at regular intervals, and print
quality declines. Check the nozzle status in the Maintenance Tool, and then try
cleaning.
See the "Maintenance Tool Operation Guide" for more details on the Maintenance
Tool.
Are the print head unit nozzles clogged?
If the nozzles in the print head unit are clogged, specific nozzles do not fire ink and
the print quality declines. Check the nozzle status in the Maintenance Tool, and
then try cleaning.
See the "Maintenance Tool Operation Guide" for more details on the Maintenance
Tool.
Are you using a genuine ink cartridge?
This printer is developed for use with genuine ink cartridges. If you use
non-genuine ink cartridges, the prints may smear, or the color of the printed
image may be changed because the remaining ink level is not correctly detected.
Be sure to use the correct ink cartridge.
Are you using an old ink cartridge?
The print quality declines when an old ink cartridge is used. Replace the old ink
cartridge with a new one. We recommend using all the ink in the ink cartridge
before the expiry date printed on the package (within six months of installation).
U “Replacing Ink Cartridges” on page 48
Do the settings in the Maintenance Tool and the settings in the printer driver
match the paper loaded in the printer?
If the loaded paper type and the set Paper Type differ, print quality may decline.
Check the settings.
U “Changing Paper Settings” on page 38
Have you compared the print result with the image on the display monitor?
Since monitors and printers produce colors differently, printed colors will not
always match on-screen colors perfectly.
98
Page 99

SL-D800 Series Operation Guide
Cause What to do
Troubleshooting
The printed surface is scuffed or soiled.
The back of the printed paper is dirty.
The paper is creased.
Is the paper too thick or too thin?
Check that the paper can be used with this printer.
U “Printer Specifications” on page 103
Is there paper powder on the platen?
Clean the platen.
U “Cleaning the Platen” on page 63
Are you using the printer at normal room temperature?
The printer should be used at normal room temperature (temperature: 15 to 25 ˚C,
humidity: 40 to 60 %). For information about paper such as thin paper from other
manufacturers that requires special handling, see the documentation supplied
with the paper
Problems when Cutting Paper
Cause What to do
The cut is crooked, the cut edge is frayed or
turned up, or the coating is cracked.
The cutter needs to be replaced.
Contact service support to request cutter replacement.
When a Problem Cannot be Cleared
If you cannot resolve a problem after taking the measures described in the "Troubleshooting" section, contact service
support.
99
Page 100

SL-D800 Series Operation Guide
Appendix
Appendix
Consumables and Optional Items
The following consumable products and optional items are available for use with your printer. (As of April, 2019)
Ink cartridges
This printer is developed for use with genuine ink cartridges.
If you use non-genuine cartridges, the print result may be faint, or the ink remaining may not be detected normally.
Model name
SL-D800 Black T43U1
SL-D830 Black T43Y1
SL-D860 Black T43X1
Ink color
Cyan T43U2
Magenta T43U3
Yellow T43U4
Light Cyan T43U5
Light Magenta T43U6
Cyan T43Y2
Magenta T43Y3
Yellow T43Y4
Light Cyan T43Y5
Light Magenta T43Y6
Product number
Cyan T43X2
Magenta T43X3
Yellow T43X4
Light Cyan T43X5
Light Magenta T43X6
100
 Loading...