

Page 1

Printer Driver Operation
Guide
CMP0184-00 EN
Page 2

SL-D800 Series Printer Driver Operation Guide COPY.FM (A4 size) Rev.
Copyrights and Trademarks
Copyrights and Trademarks
Copyrights and Trademarks
No part of this publication may be reproduced, stored in a retrieval system, or transmitted in any form or by any
means, electronic, mechanical, photocopying, recording, or otherwise, without the prior written permission of
Seiko Epson Corporation. The information contained herein is designed only for use with this Epson printer. Epson
is not responsible for any use of this information as applied to other printers.
Neither Seiko Epson Corporation nor its affiliates shall be liable to the purchaser of this product or third parties for
damages, losses, costs, or expenses incurred by the purchaser or third parties as a result of accident, misuse, or abuse
of this product or unauthorized modifications, repairs, or alterations to this product, or (excluding the U.S.) failure
to strictly comply with Seiko Epson Corporation’s operating and maintenance instructions.
Seiko Epson Corporation shall not be liable for any damages or problems arising from the use of any options or any
consumable products other than those designated as Original Epson Products or Epson Approved Products by
Seiko Epson Corporation.
Seiko Epson Corporation shall not be held liable for any damage resulting from electromagnetic interference that
occurs from the use of any interface cables other than those designated as Epson Approved Products by Seiko Epson
Corporation.
®
EPSON
trademarks of Seiko Epson Corporation.
Microsoft
Apple
Adobe
Incorporated.
, EPSON EXCEED YOUR VISION, EXCEED YOUR VISION and their logos are registered trademarks or
®
and Windows® are registered trademarks of Microsoft Corporation.
®
, Macintosh®, Mac OS®, and OS X® are registered trademarks of Apple Inc.
®
, Photoshop®, Elements®, Lightroom®, and Adobe® RGB are registered trademarks of Adobe Systems
General Notice: Other product names used herein are for identification purposes only and may be trademarks of
their respective owners. Epson disclaims any and all rights in those marks.
© 2019 Seiko Epson Corporation. All rights reserved.
2
Page 3

SL-D800 Series Printer Driver Operation Guide COPY.FM (A4 size) Rev.
Copyrights and Trademarks
Meaning of Symbols
Important:
Important must be followed to avoid damage to this product.
c
Note:
Notes contain important information on the operation of this product.
Operating System Versions
In this documentation, the following abbreviations are used.
Windows refers to Windows 10, 8, 7.
O Windows 10 refers to Windows 10 Pro, Windows 10 Pro x64.
O Windows 8.1 refers to Windows 8.1, Windows 8.1 Pro.
O Windows 8 refers to Windows 8, Windows 8 Pro.
O Windows 7 refers to Windows 7 Professional.
Macintosh refers to Mac.
O Mac refers to macOS Mojave/macOS High Sierra/macOS Sierra/OS X El Capitan/OS X Yosemite/OS X
Mavericks/OS X Mountain Lion/Mac OS X v10.7.x/Mac OS X v10.6.8
3
Page 4

TOC.FM (A4 size) Rev.
Contents
Contents
Copyrights and Trademarks
Copyrights and Trademarks. . . . . . . . . . . . . . . . . . . . . . 2
Meaning of Symbols. . . . . . . . . . . . . . . . . . . . . . . . . . . . . 3
Operating System Versions. . . . . . . . . . . . . . . . . . . . . . . 3
Installing the printer driver
System Requirements. . . . . . . . . . . . . . . . . . . . . . . . . . . . 5
Windows. . . . . . . . . . . . . . . . . . . . . . . . . . . . . . . . . . . . 5
Mac . . . . . . . . . . . . . . . . . . . . . . . . . . . . . . . . . . . . . . . . 5
Installing the Printer Driver (Windows) . . . . . . . . . . . 6
Installing the Printer Driver (Mac) . . . . . . . . . . . . . . . 10
Printer Driver Functions
Settings Screen (Windows) . . . . . . . . . . . . . . . . . . . . . . 13
Main Screen . . . . . . . . . . . . . . . . . . . . . . . . . . . . . . . .13
Printer Window screen . . . . . . . . . . . . . . . . . . . . . .15
Driver Settings Screen . . . . . . . . . . . . . . . . . . . . . . . 15
Settings Screen (Mac) . . . . . . . . . . . . . . . . . . . . . . . . . . 17
Page Setup Screen . . . . . . . . . . . . . . . . . . . . . . . . . . .17
Color Matching screen. . . . . . . . . . . . . . . . . . . . . . .18
Print Settings screen . . . . . . . . . . . . . . . . . . . . . . . . 19
Setting Procedure. . . . . . . . . . . . . . . . . . . . . . . . . . . .41
Printing on Non-regular Paper Sizes. . . . . . . . . . . . . .44
Setting Procedure. . . . . . . . . . . . . . . . . . . . . . . . . . . .44
Troubleshooting
When an Error Message Is Displayed . . . . . . . . . . . . .47
You cannot print (because the printer does not work) .
47
The printer sounds like it is printing, but nothing
prints. . . . . . . . . . . . . . . . . . . . . . . . . . . . . . . . . . . . . . . . .48
Problems with Print Quality/Print Results. . . . . . . . .49
Updating Printer Driver (Windows)
Updating the Printer Driver (Mac)
Uninstalling the Printer Driver (Windows)
Uninstalling the Printer Driver (Mac)
Basic Printing Methods (Windows)
Printing from PhotoShop . . . . . . . . . . . . . . . . . . . . . . . 20
Canceling Printing . . . . . . . . . . . . . . . . . . . . . . . . . . . . .24
Basic Printing Methods (Mac)
Printing from PhotoShop . . . . . . . . . . . . . . . . . . . . . . . 25
Canceling Printing . . . . . . . . . . . . . . . . . . . . . . . . . . . . .29
Various Print Functions
Color Management . . . . . . . . . . . . . . . . . . . . . . . . . . . .30
Color Management Settings. . . . . . . . . . . . . . . . . . . 30
Setting colors manually (Windows only). . . . . . . . 31
Color management from the application (no color
management) . . . . . . . . . . . . . . . . . . . . . . . . . . . . . . .34
Color management from the printer driver (ICM)
(Windows) . . . . . . . . . . . . . . . . . . . . . . . . . . . . . . . . .36
Color management by printer driver (ColorSync)
(Mac) . . . . . . . . . . . . . . . . . . . . . . . . . . . . . . . . . . . . . . 38
Borderless Printing. . . . . . . . . . . . . . . . . . . . . . . . . . . . .40
Types of Borderless Printing . . . . . . . . . . . . . . . . . .40
4
Page 5
SL-D800 Series Printer Driver Operation Guide INST.FM (A4 size) Rev.
Installing the printer driver
Installing the printer driver
System Requirements
The following operating systems support the printer driver.
Make sure your computer meets the following requirements.
Windows
Operating system Windows 7 Professional/Ultimate (SP1) 32/64 bit
Windows 8 Pro 32/64 bit
Windows 8.1 Pro 32/64 bit
Windows 10 Pro 32/64 bit
CPU Depends on the application
Memory 4 GB or more
Free space on hard disk 64 GB or more
*1When connecting four printers and printing at a paper size of 89 x 50 mm (3.5 x 2 inches) to 127 x 178 mm (5 x 7 inches).
*2When connecting four printers and printing at a paper size larger than 127 x 178 mm (5 x 7 inch).
*1
(8 GB or more recommended *2)
Mac
Operating system macOS Sierra/OS X El Capitan/OS X Yosemite/OS X Mavericks/OS X Mountain
Lion/Mac OS X v10.7.x/Mac OS X v10.6.8
CPU Depends on the application
Memory 1 GB or more
Free space on hard disk 32 GB or more
Note:
Some apps and functions may not be supported on Mac.
5
Page 6
SL-D800 Series Printer Driver Operation Guide INST.FM (A4 size) Rev.
Installing the printer driver
Installing the Printer Driver (Windows)
The Maintenance Tool is also installed with the printer driver. After installing, you need to update the paper
information in administrator mode in the Maintenance Tool.
Important:
c
O You must log on as a user with administrative privileges.
O If an Administrator password or confirmation is requested, enter the password and then continue with the
operation.
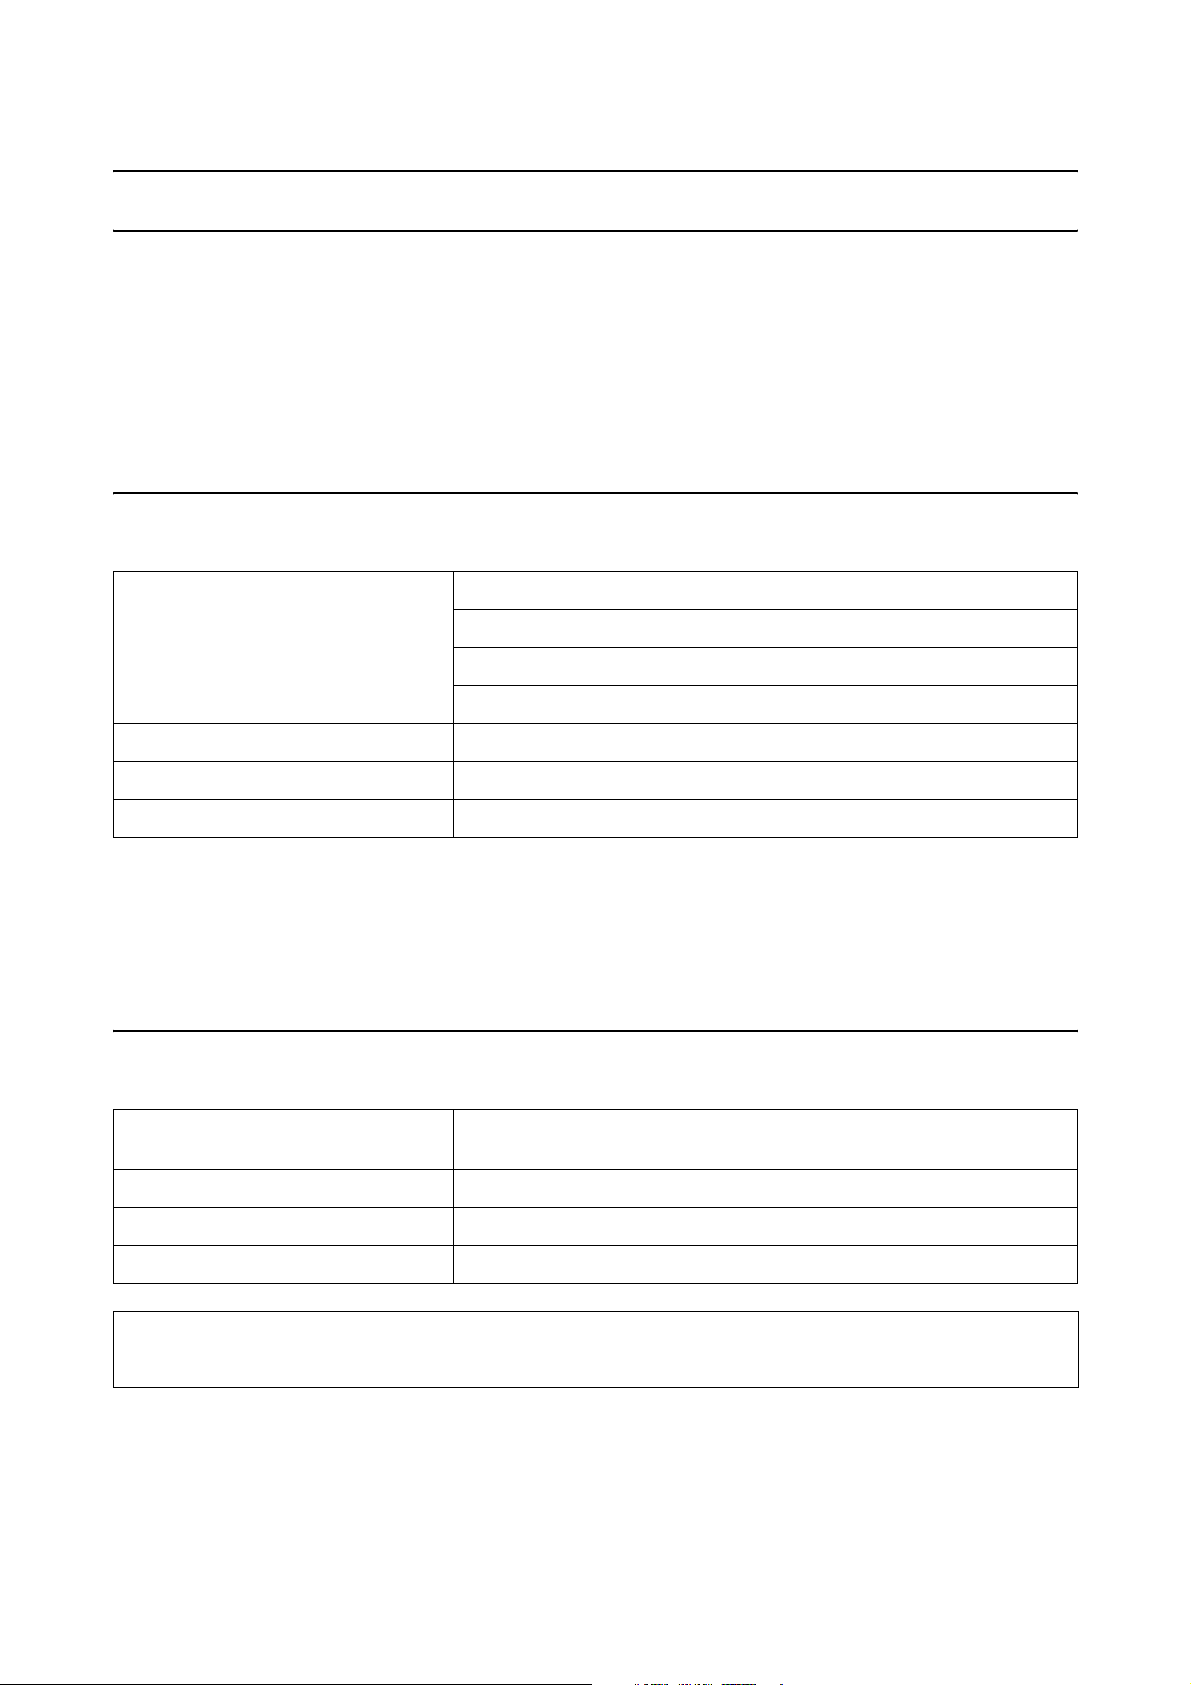
Turn off the printer and then connect the printer to a computer with a USB cable.
A
Insert the software disc, and then double-click Setup.exe in the SystemApplication - Windows folder.
B
Follow the on-screen instructions to install.
C
When the printer driver installation is complete, update the paper information (register information for a
paper type file to the printer).
Start the Maintenance Tool.
D
Click Start - All Programs - EPSON - EPSON SL-D800 Series - SL Printer Maintenance Tool Admin.
6
Page 7
SL-D800 Series Printer Driver Operation Guide INST.FM (A4 size) Rev.
Installing the printer driver
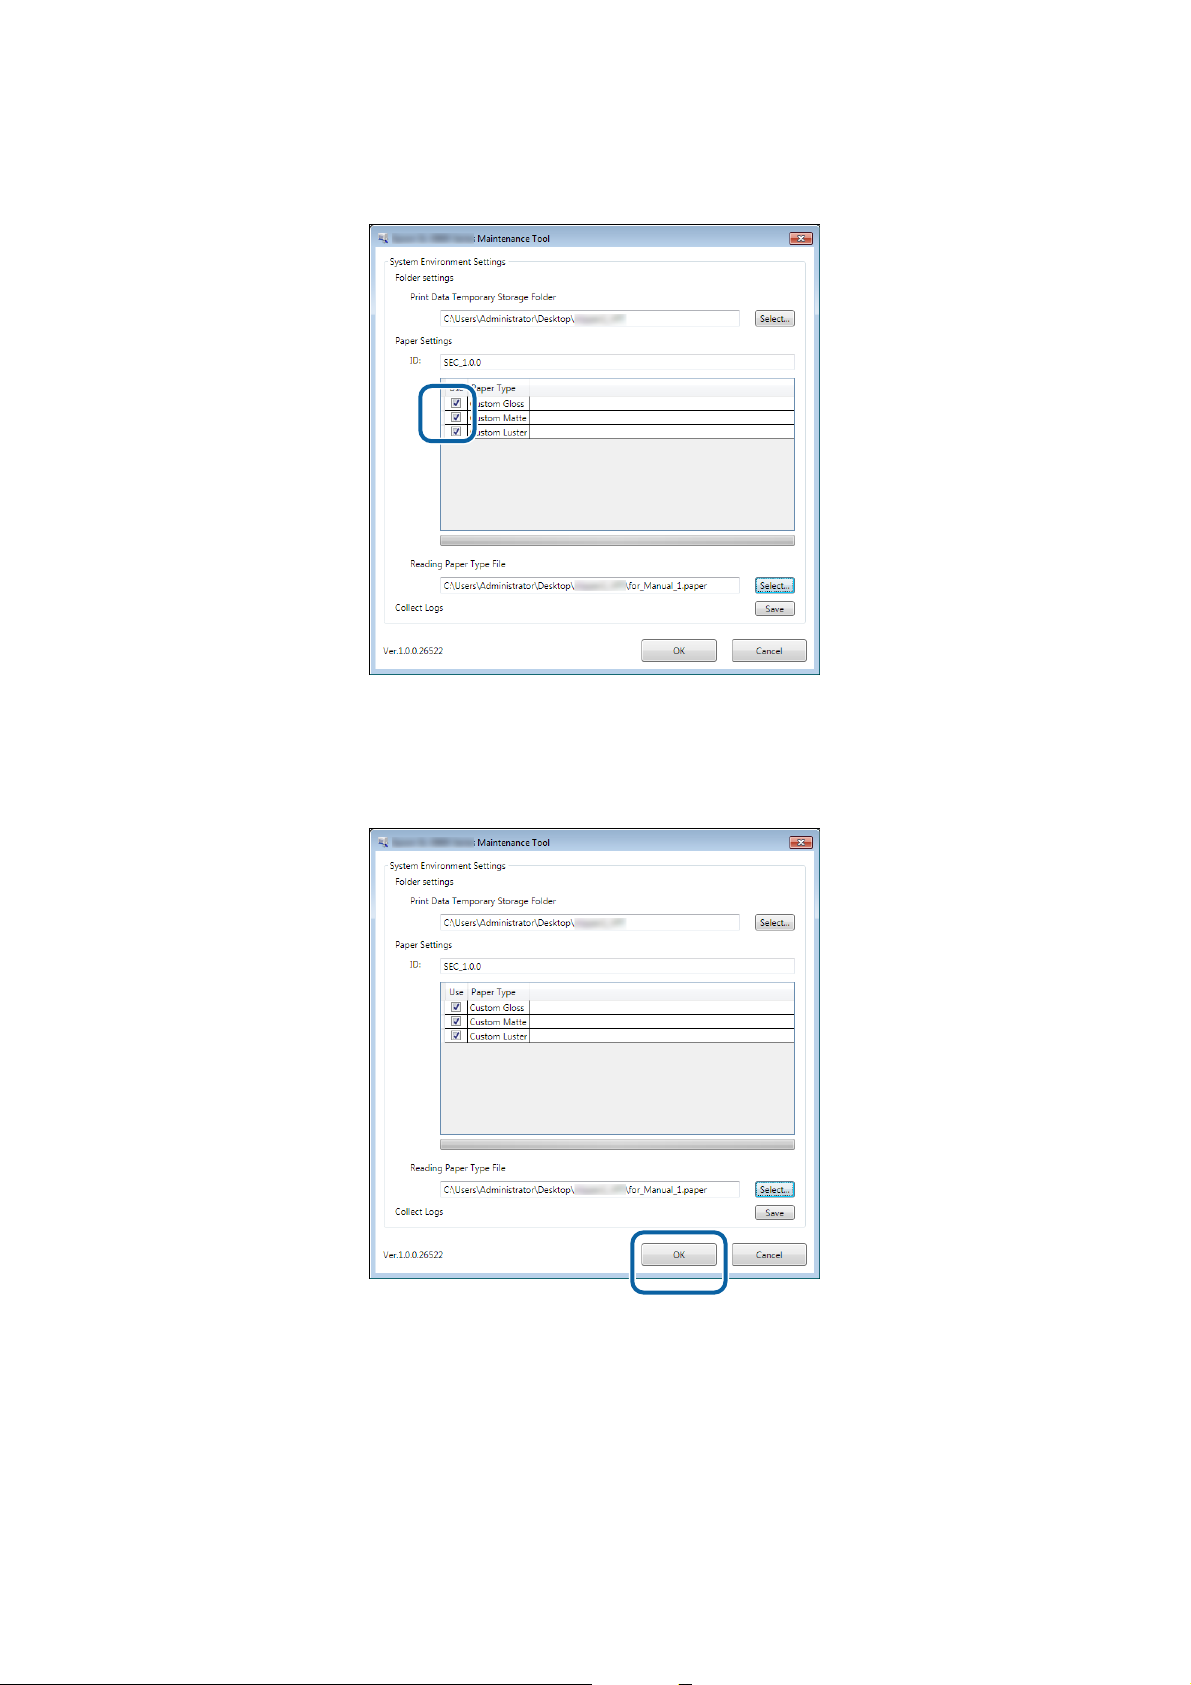
Click System Environment Settings.
E
The System Environment Settings screen is displayed.
Click Select... from Reading Paper Type File.
F
The select file screen is displayed.
7
Page 8
SL-D800 Series Printer Driver Operation Guide INST.FM (A4 size) Rev.
Installing the printer driver
Select a paper type file, and then click Open.
G
The ID for the selected paper type file is displayed.
Important:
c
Make sure you select a paper type file.
Note:
Contact your local dealer for information on acquiring paper type files.
Check that the printer is connected and turned on.
H
When multiple printers are connected, check all of the printers.
Important:
c
Do not print while during updating the paper information.
Select the paper you want to use in Paper Settings - ID.
I
8
Page 9
SL-D800 Series Printer Driver Operation Guide INST.FM (A4 size) Rev.
Installing the printer driver
You can select up to seven paper types.
Click OK.
J
You need to restart the computer. The computer may restart automatically.
9
Page 10

SL-D800 Series Printer Driver Operation Guide INST.FM (A4 size) Rev.
Installing the printer driver
Installing the Printer Driver (Mac)
The Maintenance Tool is also installed with the printer driver.
Important:
c
O You must log on as a user with administrative privileges.
O If an Administrator password or confirmation is requested, enter the password and then continue with the
operation.
O Update the paper information when you install the printer driver.
Turn off the printer and then connect the printer to a computer with a USB cable.
A
Insert the software disc, and then double-click SL Printer Setup.dmg in the SystemApplication - Mac OS X
B
folder.
When the screen is displayed, double-click SL Printer Setup.app.
C
Follow the on-screen instructions to install.
10
Page 11
SL-D800 Series Printer Driver Operation Guide INST.FM (A4 size) Rev.
Installing the printer driver
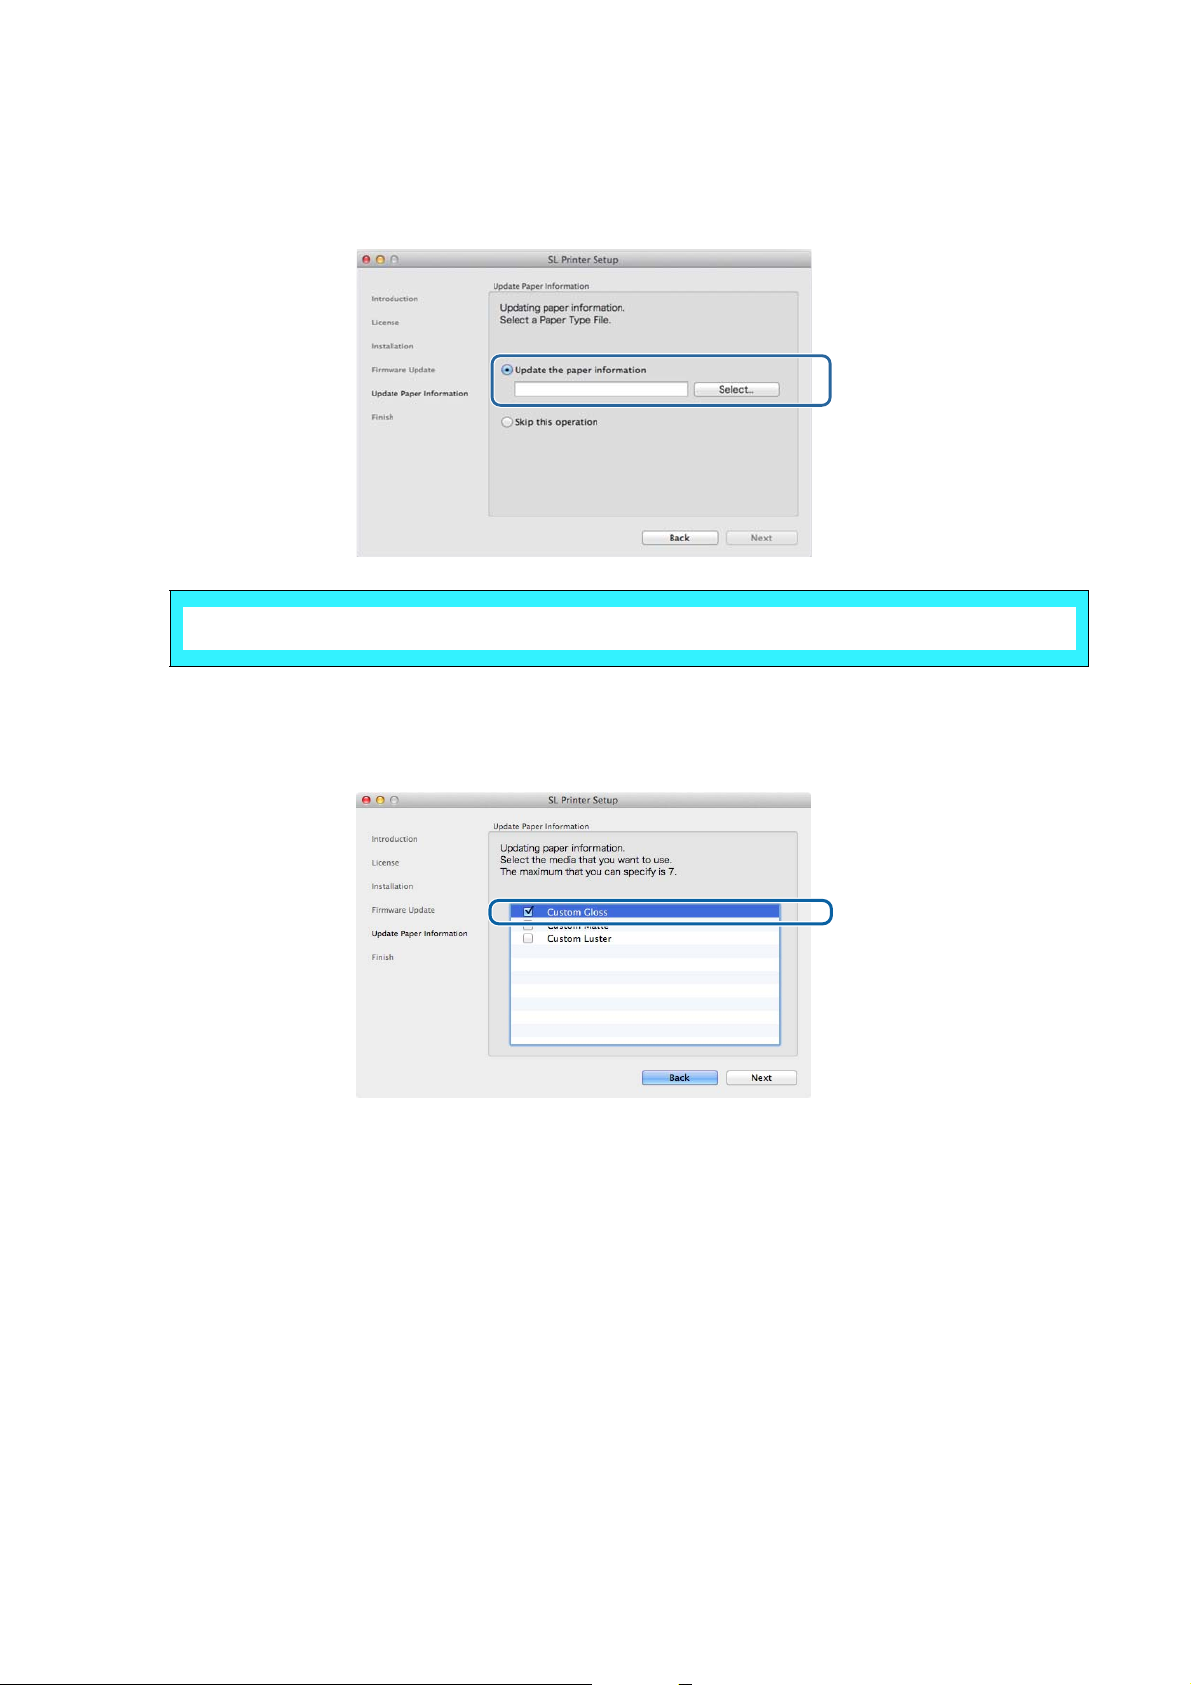
When the following screen is displayed, click Update the paper information - Select..., and then select the
D
paper type file.
Note:
Contact your local dealer for information on acquiring paper type files.
When the following screen is displayed, select the paper you want to use, and then click Next.
E
Follow the on-screen instructions to complete installation.
11
Page 12

SL-D800 Series Printer Driver Operation Guide DRIVR.FM (A4 size) Rev.
Printer Driver Functions
Printer Driver Functions
The printer driver coordinates print instructions from another application to the printer.
The main functions of the printer driver are described below.
O Converts print data received from applications into printable data and sends it to the printer.
O Set print conditions such as the paper type and size on the printer driver's Settings screen.
O Windows only ;
Start the Maintenance Tool in operator mode, and then from your computer you can perform adjustment and
maintenance operations such as checking the printer's status, making paper settings, performing head cleaning
and so on.
U "Maintenance Tool Operation Guide"
12
Page 13
SL-D800 Series Printer Driver Operation Guide DRIVR.FM (A4 size) Rev.
Printer Driver Functions
Settings Screen (Windows)
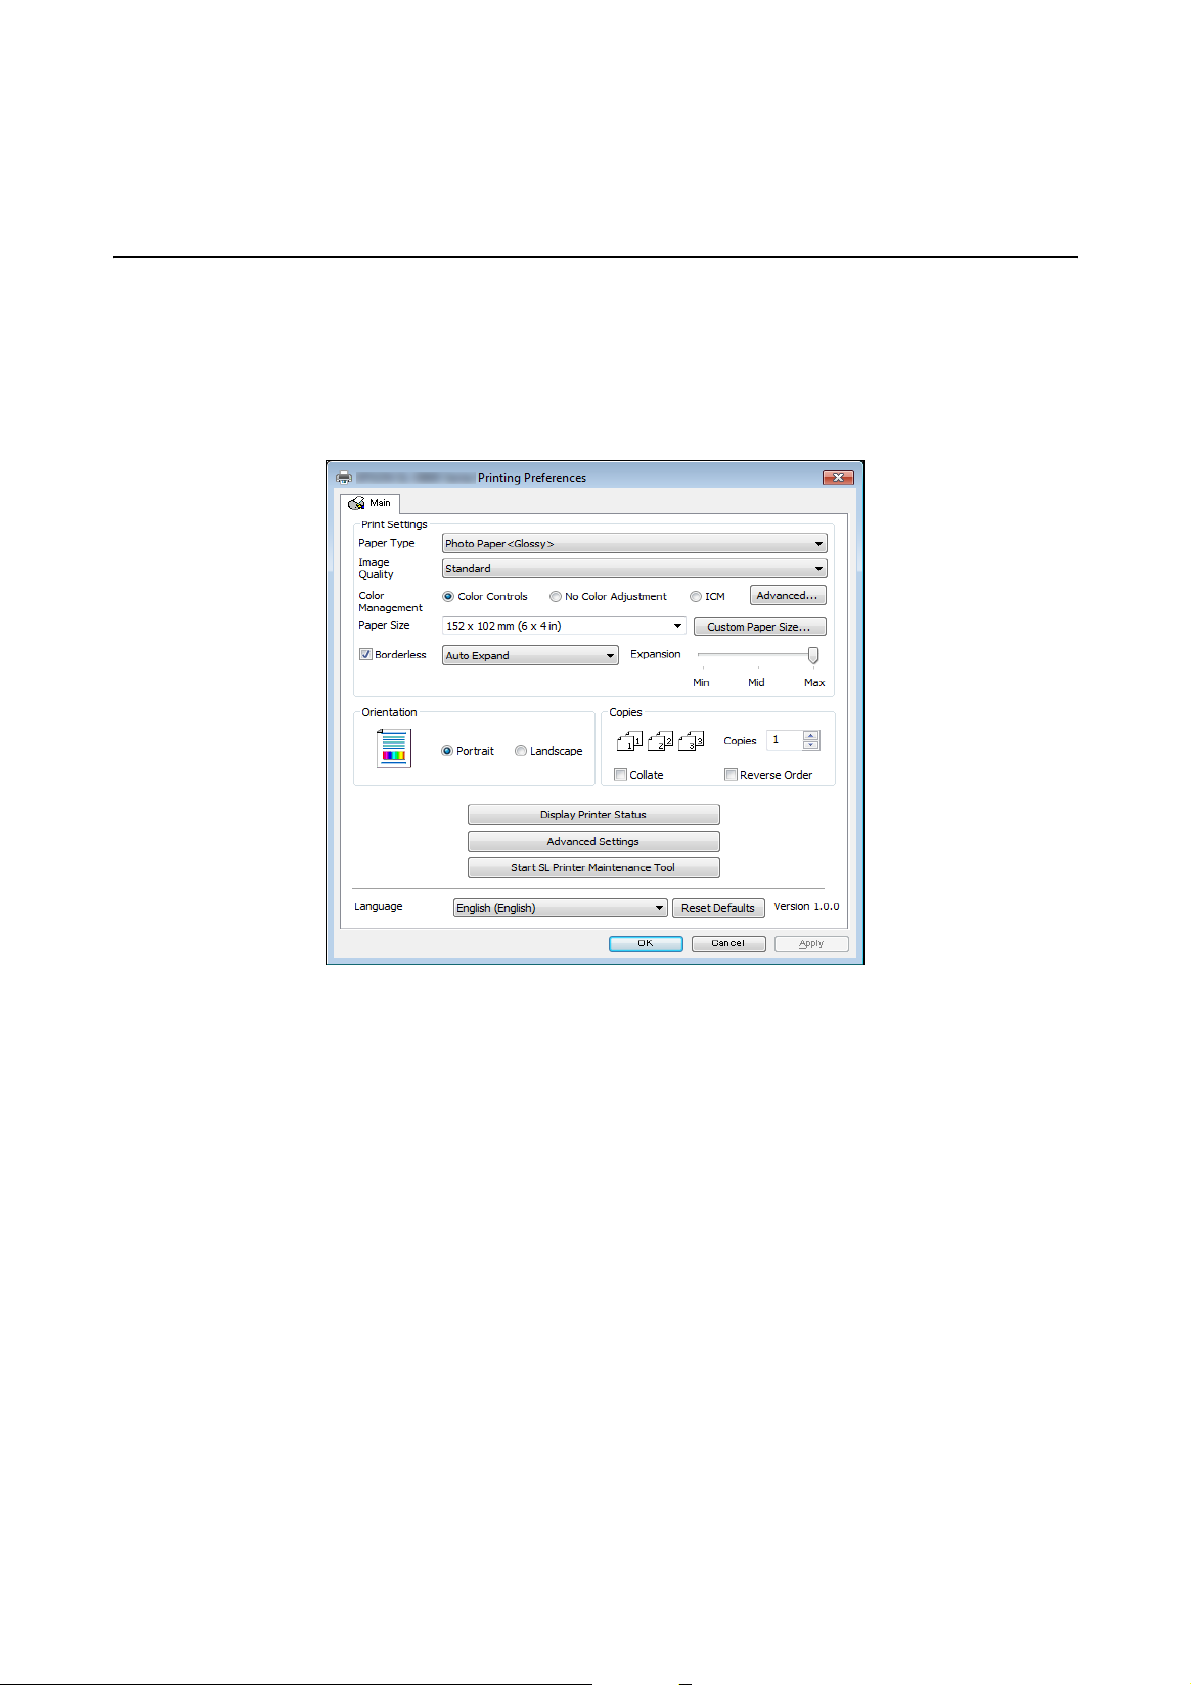
Main Screen
On the Main screen, you can set the necessary items and print quality to print correctly.
For more information on displaying the printer driver's Main screen, see "Basic Printing Methods (Windows)".
U“Basic Printing Methods (Windows)” on page 20
13
Page 14
SL-D800 Series Printer Driver Operation Guide DRIVR.FM (A4 size) Rev.
Printer Driver Functions
Setting Item Explanation
Print Settings Paper Type Select the paper type to match the paper being used.
Image Quality You can select the print quality from High Speed (360 dpi), Standard (720 dpi),
or High Image Quality (1440 dpi).
Normally, select Standard. If you want to print using high image quality, set
High Image Quality. If you want to print quickly, set High Speed. When High
Speed is set, the printing speed is quicker, however the quality may decline a
little.
Color
Management
Paper Size Set the paper size used for printing.
Borderless Select to print without borders (margins).
Expansion When Auto Expand is selected in Borderless, you can set the amount of
Orientation Click Portrait or Landscape to select the print direction. Make sure you match
Copies Copies Set the number of copies.
Collate Select when printing two or more copies of multi-page documents in collated
Reverse Order Prints pages in reverse order.
Select the color management method used when printing.
U“Color Management” on page 30
If the paper size you want is not in the list, click User Defined to register a new
paper size.
U“Printing on Non-regular Paper Sizes” on page 44
Select Auto Expand or Retain Size as the borderless method.
When Auto Expand is selected, set the amount of enlargement.
U“Borderless Printing” on page 40
enlargement with the slider.
this with the direction set in the application.
batches.
Display Printer Status Displays the printer's status. Allows you to check the amount of ink remaining,
the free space in the maintenance cartridge, and the paper settings on the
printer.
U“Settings Screen (Windows)” on page 13
Advanced Settings Driver Settings is displayed.
U“Driver Settings Screen” on page 15
Start SL Printer Maintenance Tool Start the Maintenance Tool in operator mode.
See the "Maintenance Tool Operation Guide" for more details on the
Maintenance Tool.
U "Maintenance Tool Operation Guide"
Language Select the printer driver's display language. Select a language, and then click OK.
The display language changes the next time you open the printer driver.
Auto Select automatically selects the language to match the operating systems
language.
Reset Defaults Returns all settings to their defaults. Paper sizes saved in User Defined are not
deleted.
14
Page 15
SL-D800 Series Printer Driver Operation Guide DRIVR.FM (A4 size) Rev.
Printer Driver Functions
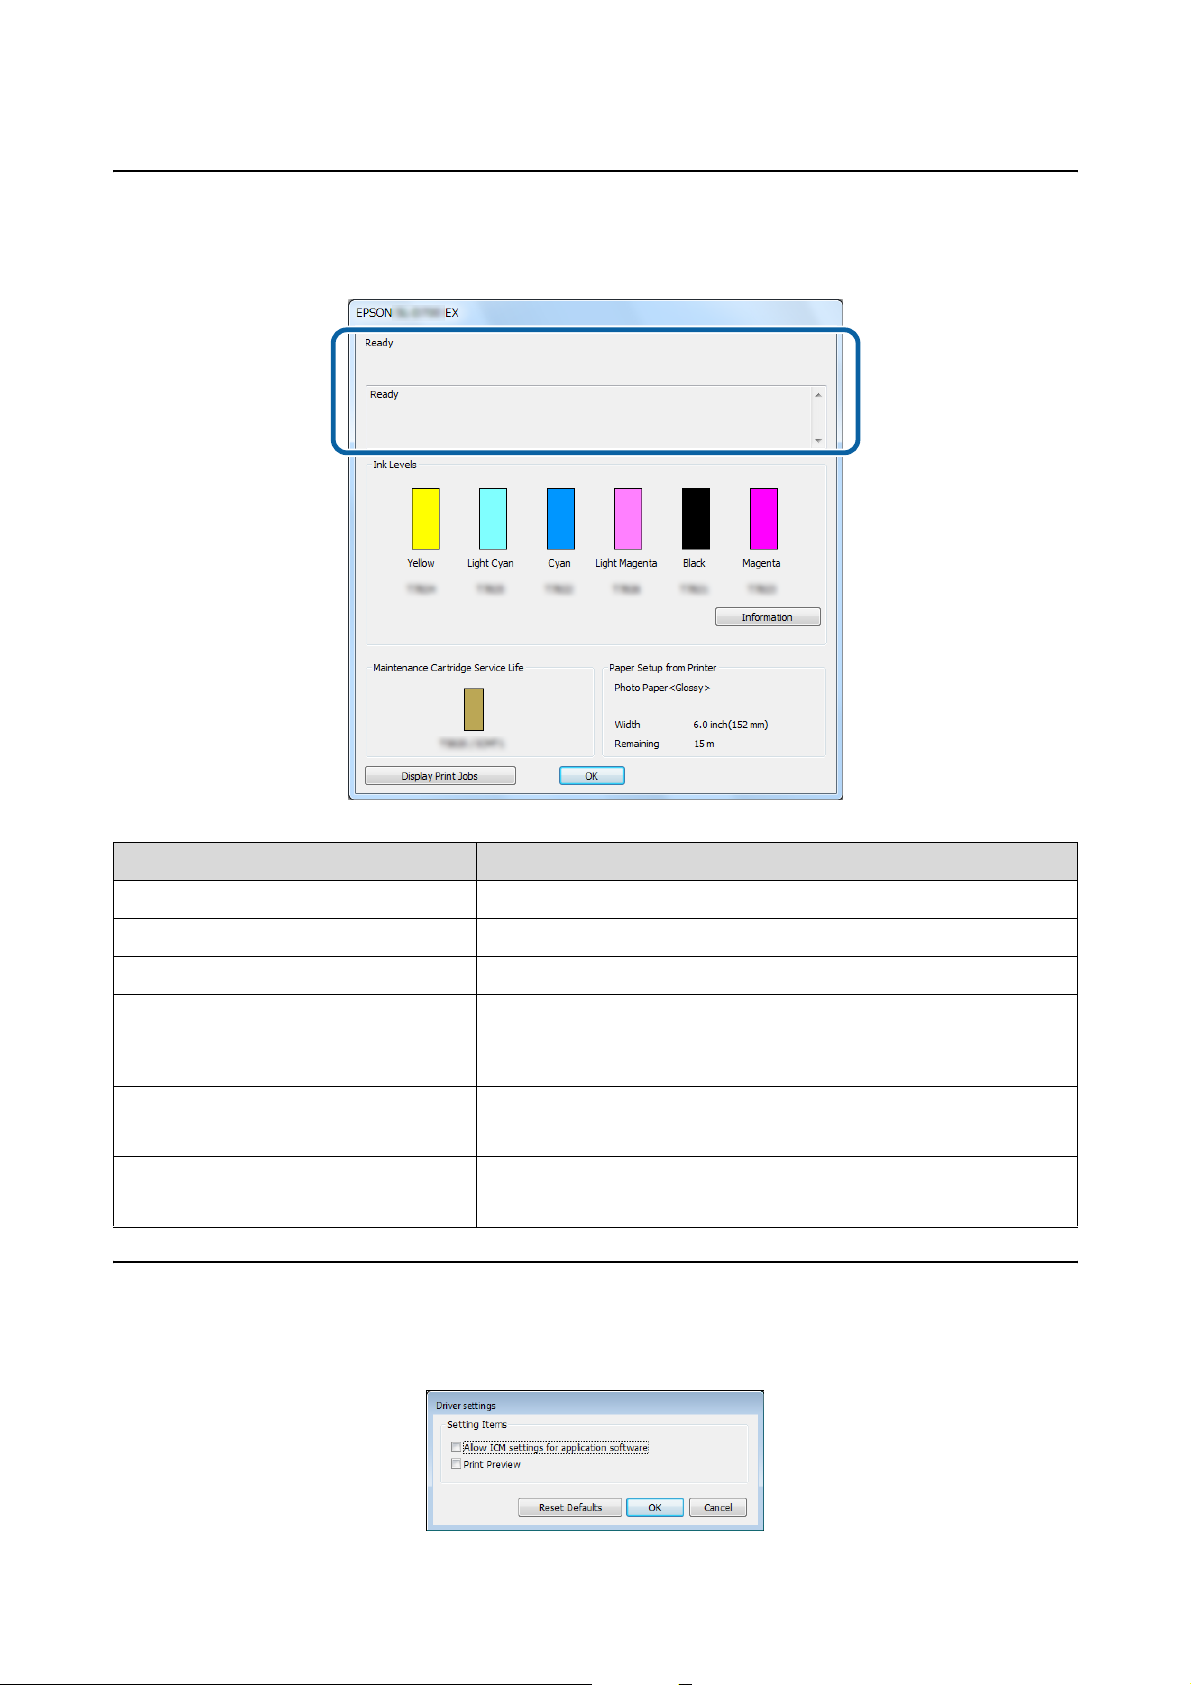
Printer Window screen
On the Main screen, click Display Printer Status to display the Printer Window screen.
Setting Item Explanation
Printer Status Displays the printer's status.
Ink Levels Displays how much ink remains.
Information Displays detailed information for each ink cartridge.
Maintenance Cartridge Service Life Displays the free space in the maintenance cartridge.
The capacity is reset automatically when the maintenance cartridge is
replaced.
Paper Setup from Printer Displays the type, width, and the remaining amount of loaded paper.
Set the Paper Type and the Paper Level in the Maintenance Tool.
Display Print Jobs Displays the print queue list.
You can delete print jobs from here.
Driver Settings Screen
On the Main screen, click Advanced Settings to display the Driver Settings screen.
15
Page 16

SL-D800 Series Printer Driver Operation Guide DRIVR.FM (A4 size) Rev.
Printer Driver Functions
Setting Item Explanation
Allow ICM settings for application software Select this if the application's ICM settings have been enabled and the print
results are not as you expected. This does not normally need to be selected.
Print Preview Select this to view the print image before printing.
Reset Defaults Returns settings to their defaults.
16
Page 17
SL-D800 Series Printer Driver Operation Guide DRIVR.FM (A4 size) Rev.
Printer Driver Functions
Settings Screen (Mac)
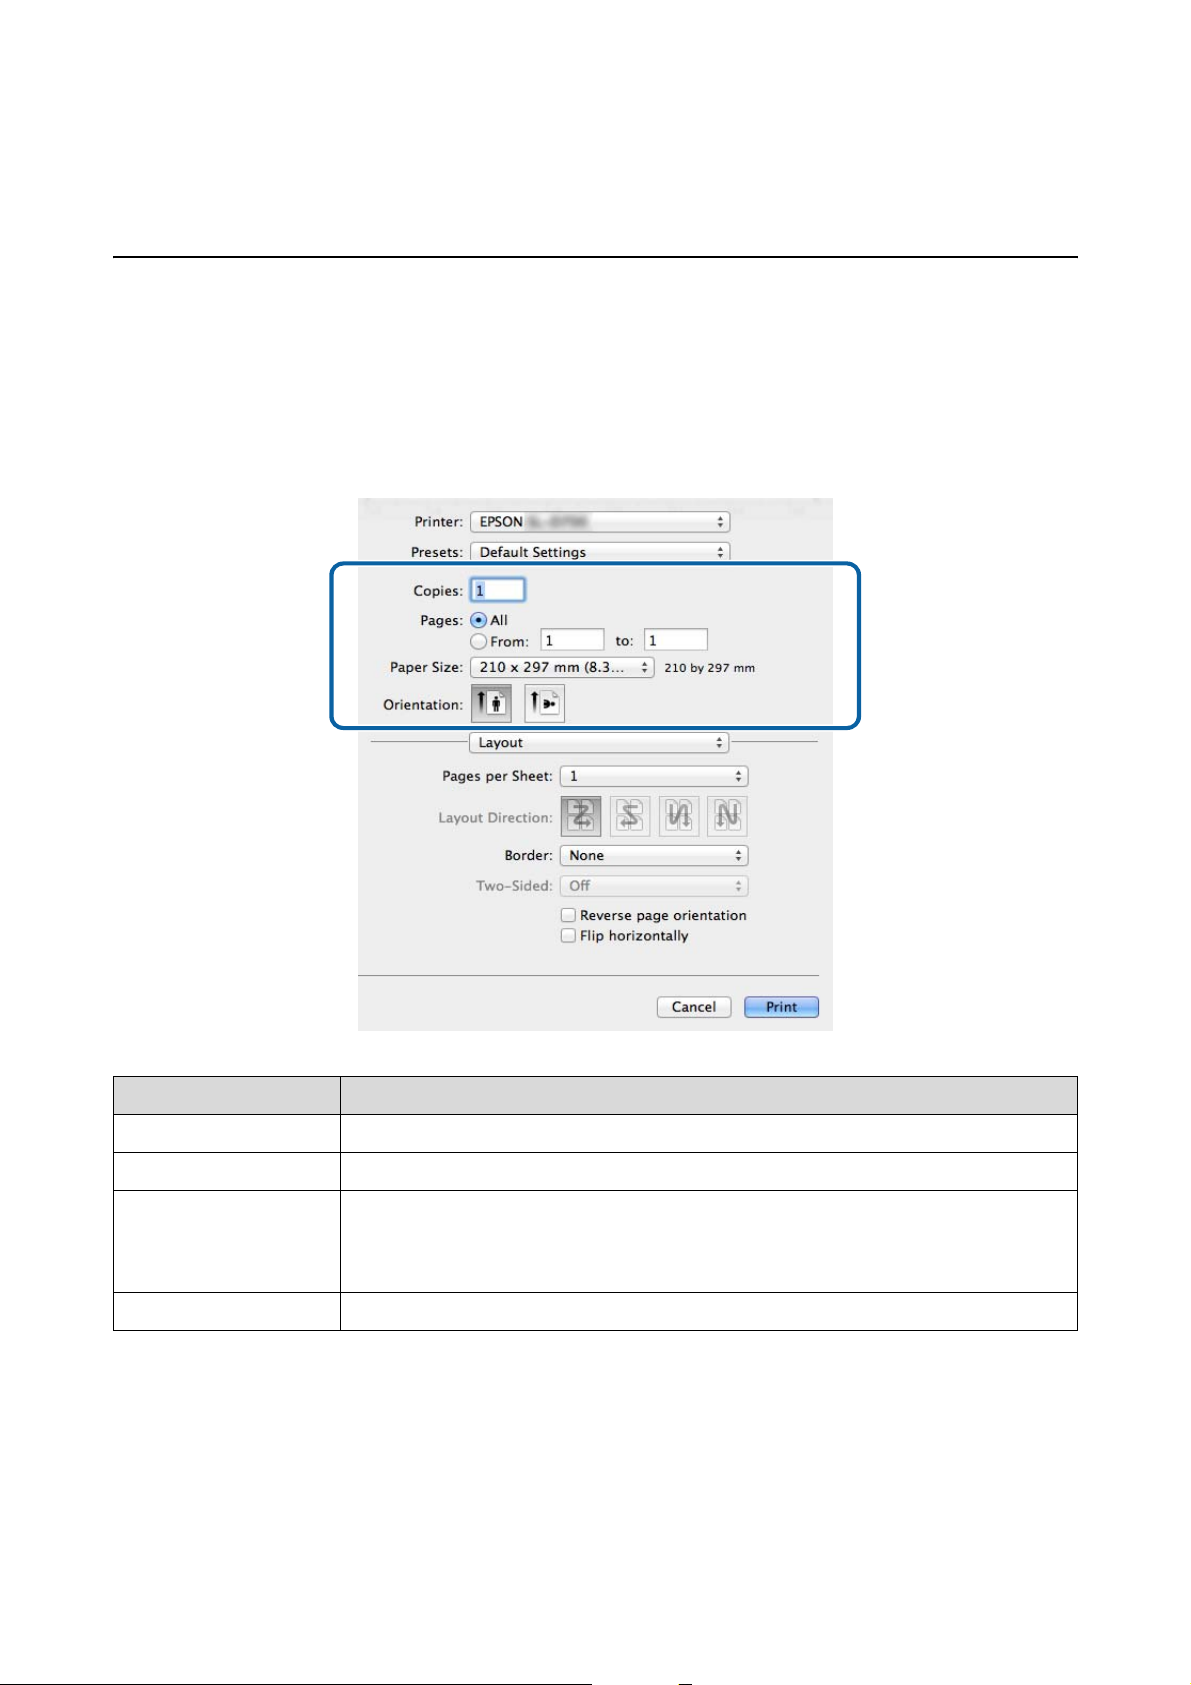
Page Setup Screen
On the Page Setup screen you can set the paper size and direction.
For more information on displaying the printer driver's Page Setup screen, see "Basic Printing Methods (Mac)".
U“Basic Printing Methods (Mac)” on page 25
Setting Item Explanation
Copies Set the number of copies.
Pages Set the print range.
Paper Size Set the paper size used for printing.
Paper sizes not in the list can be registered to User Defined.
U“Printing on Non-regular Paper Sizes” on page 44
Direction Set the paper direction.
17
Page 18

SL-D800 Series Printer Driver Operation Guide DRIVR.FM (A4 size) Rev.
Printer Driver Functions
Color Matching screen
Select Color Matching from the list to set the ColorSync for the color management system installed on your Mac.
Setting Item Explanation
ColorSync / Off (No
Color Adjustment)
Profile Set the printer profile used for color management.
Set whether or not to use ColorSync. You can use ColorSync when printing from applications that
support color management.
18
Page 19

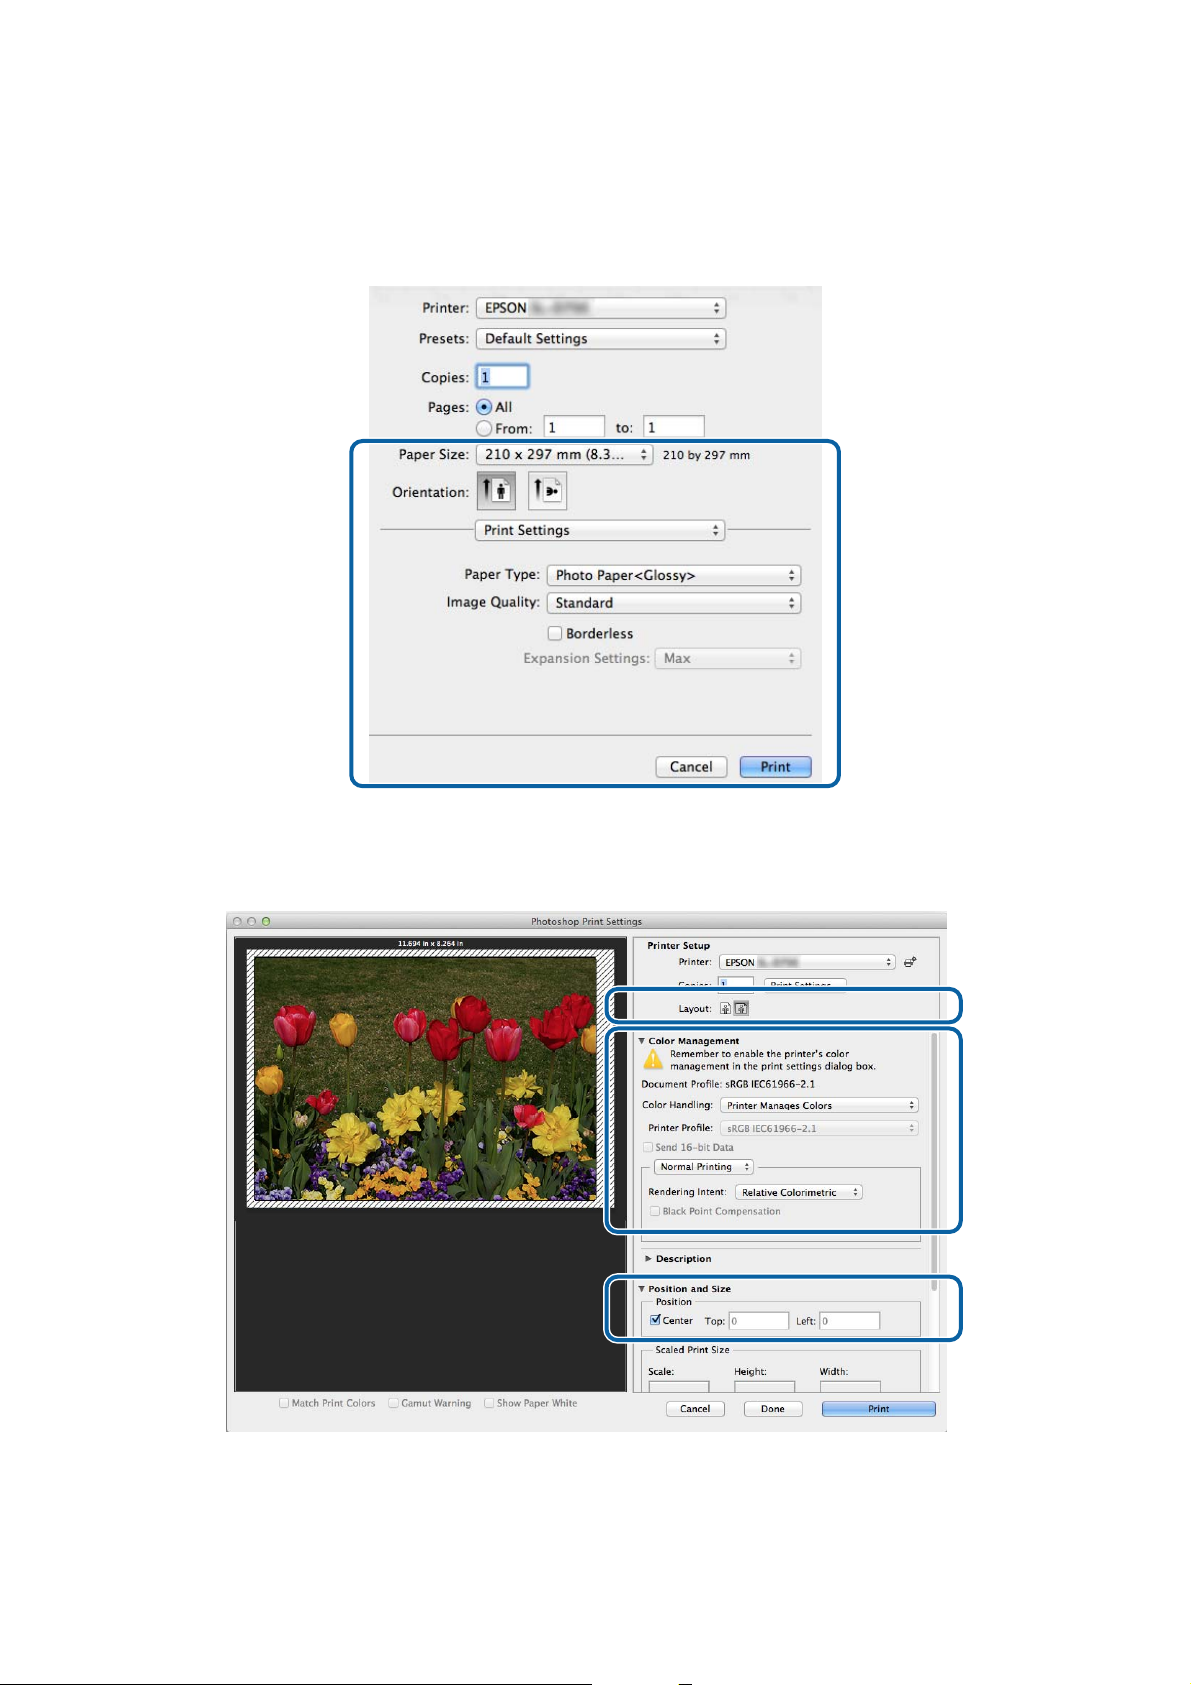
SL-D800 Series Printer Driver Operation Guide DRIVR.FM (A4 size) Rev.
Printer Driver Functions
Print Settings screen
When selecting Print Settings from the list, you can set the paper type and image quality.
Setting Item Explanation
Paper Type Select the paper type to match the paper being used.
Image Quality You can select the print quality from High Speed (360 dpi), Standard (720 dpi), or High Image Quality
(1440 dpi).
Normally, select Standard. If you want to print using high image quality, set High Image Quality. If you
want to print quickly, set High Speed. When High Speed is set, the printing speed is quicker, however
the quality may decline a little.
Borderless Select to print without borders (margins).
U“Borderless Printing” on page 40
Expansion Settings When performing Borderless printing, set the amount of enlargement to Max, Mid, or Min.
19
Page 20

SL-D800 Series Printer Driver Operation Guide BASIC.FM (A4 size) Rev.
Basic Printing Methods (Windows)
Basic Printing Methods (Windows)
Printing from PhotoShop
This section uses Adobe Photoshop CS6 as an example of printing image data on your computer.
Operations may differ depending on the application software being used. See the manual supplied with the
application software for more details.
Start Adobe Photoshop CS6, and open an image.
A
Click Image Size from the Image menu to display the Image Size screen.
B
Set the image size and resolution.
C
Select Constrain Proportions, and match the Width or Height settings to the paper size.
Set the Resolution. In this example, we set 360 pixel/inch.
When you have finished making settings, click OK.
20
Page 21

SL-D800 Series Printer Driver Operation Guide BASIC.FM (A4 size) Rev.
Basic Printing Methods (Windows)
Note:
You can create clear print outs by setting the Resolution so that a multiple of this setting is the printer's Image
Quality resolution.
We recommend setting multiples of 180 pixel/inch because the settings for Image Quality are either High Speed
(360 dpi), Standard (720 dpi), or High Image Quality (1440 dpi).
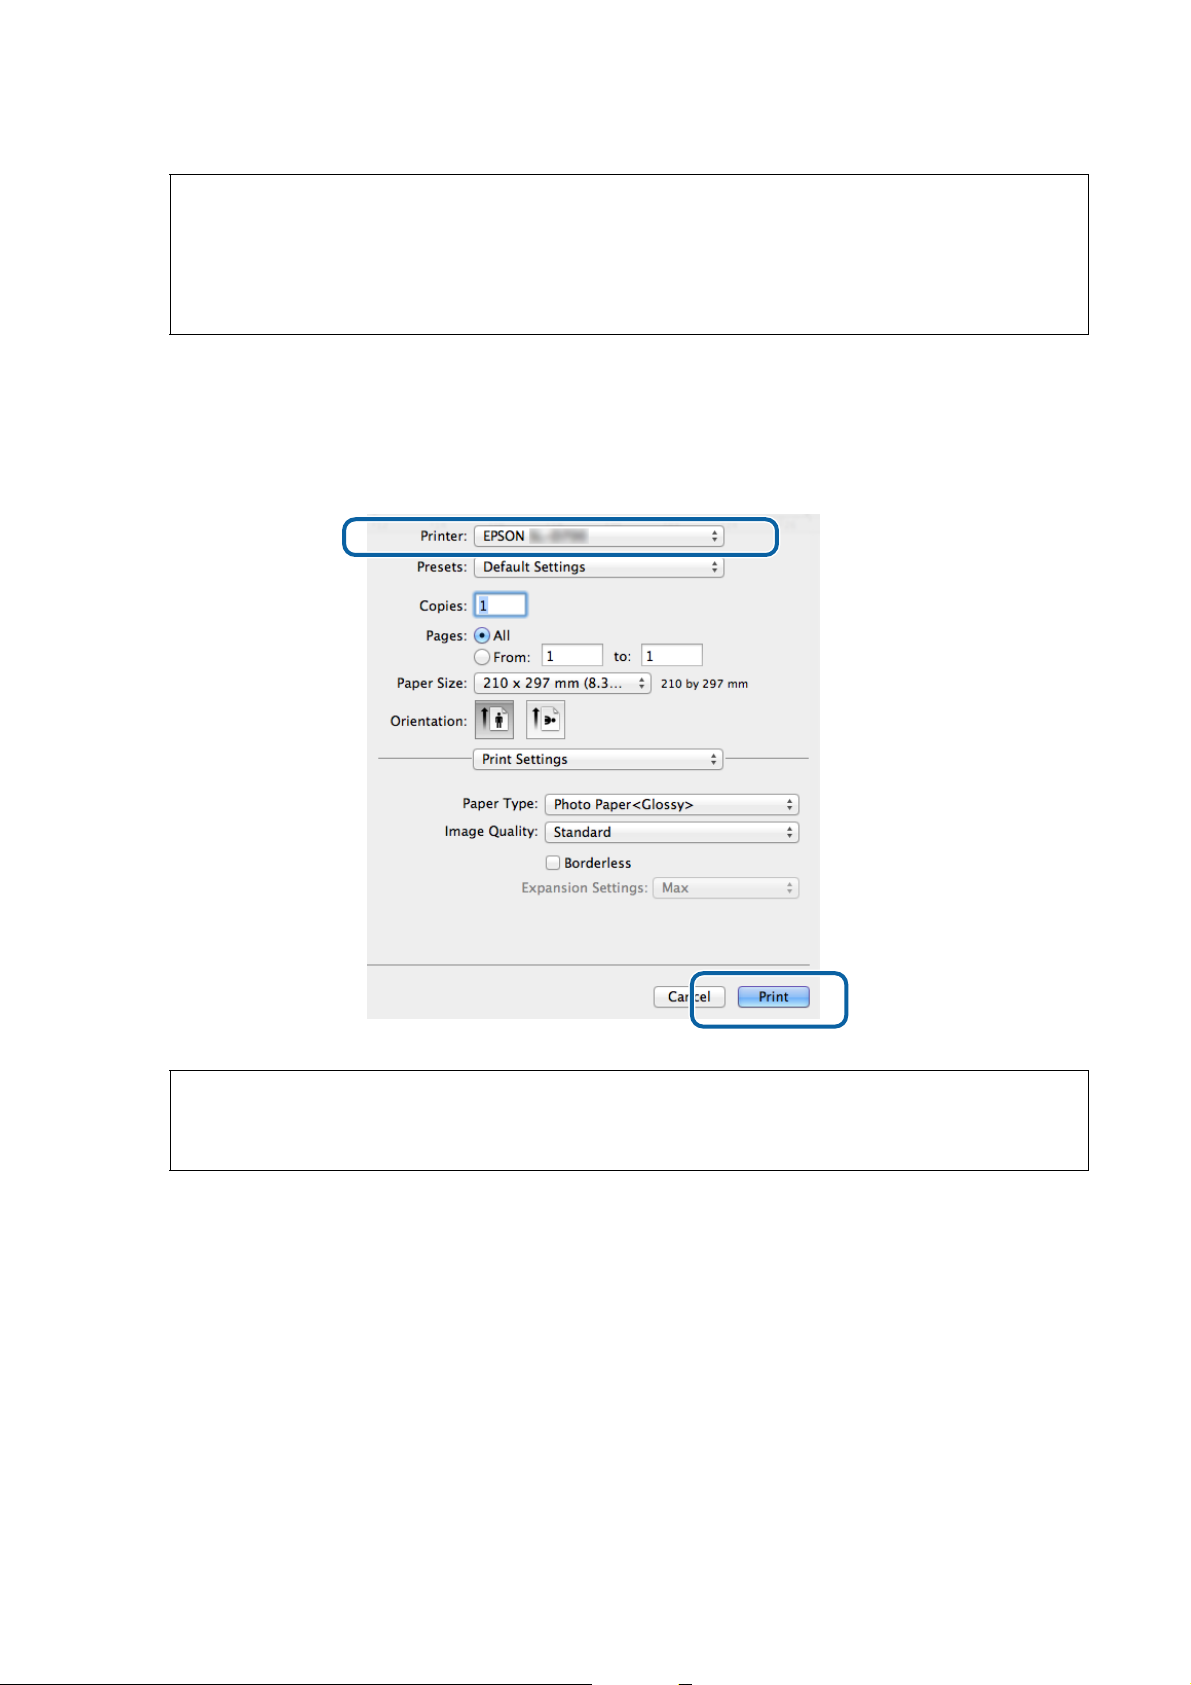
Click Print from the File menu to display the Print Settings screen.
D
Select this printer from Printer on the Main screen, and then click Print Settings.
E
Make the necessary settings.
F
Paper Type: Set the paper being used.
Image Quality: Normally set Standard. If you want to print using high image quality, set High Image
Quality. If you want to print quickly, set High Speed.
21
Page 22

SL-D800 Series Printer Driver Operation Guide BASIC.FM (A4 size) Rev.
Basic Printing Methods (Windows)
Paper Size: Set the size of the paper used for printing. Make sure this is the same as the image size you set in
step 3.
U“Settings Screen (Windows)” on page 13
When you have finished making settings, click OK.
Set each item, such as color management and print position, while checking the image displayed on the Print
G
Settings screen.
22
Page 23

SL-D800 Series Printer Driver Operation Guide BASIC.FM (A4 size) Rev.
Basic Printing Methods (Windows)
Note:
O When the printer driver's Color Management is set to Color Controls (default), select Document in Color
Management, and then select Printer Manages Colors in Color Handling.
U“Color Management” on page 30
O When performing detailed color management using the PhotoShop functions, match the Color Management
conditions to these settings. See the manual supplied with PhotoShop for more details on each function.
U“Color Management” on page 30
Click Print.
H
Note:
If the image size is larger than the print size, the following screen is displayed.
Click Proceed. If you click Cancel, printing is canceled and you are returned to the application's screen.
Select this printer, and then click Print.
I
Print data is sent to the printer.
Note:
This screen may not be displayed depending on the application. After performing step 8, print data is sent to the
printer.
This completes this section.
23
Page 24

SL-D800 Series Printer Driver Operation Guide BASIC.FM (A4 size) Rev.
Basic Printing Methods (Windows)
Canceling Printing
This section explains how to cancel printing.
You can cancel printing from the computer while data is being sent.
Right-click SL-D800 Series Print Manager on the taskbar.
A
Click Display Print Jobs.
B
Select the printer you are using, select the print data you want to cancel, and then click Cancel Selected
C
Document.
Note:
You cannot delete print data that has already been sent to the printer.
This completes this section.
24
Page 25

SL-D800 Series Printer Driver Operation Guide BASIC_M.FM (A4 size) Rev.
Basic Printing Methods (Mac)
Basic Printing Methods (Mac)
Printing from PhotoShop
This section uses Adobe Photoshop CS6 as an example of printing image data on your computer.
Operations may differ depending on the application software being used. See the manual supplied with the
application software for more details.
Start Adobe Photoshop CS6, and open an image.
A
Click Image Size from the Image menu to display the Image Size screen.
B
Set the image size and resolution.
C
Select Constrain Proportions, and match the Width or Height settings to the paper size.
Set the Resolution. In this example, we set 360 pixel/inch.
When you have finished making settings, click OK.
25
Page 26

SL-D800 Series Printer Driver Operation Guide BASIC_M.FM (A4 size) Rev.
Basic Printing Methods (Mac)
Note:
You can create clear print outs by setting the Resolution to a multiple of the printer's Image Quality resolution.
We recommend setting multiples of 180 pixel/inch because the settings for Image Quality are either High Speed
(360 dpi), Standard (720 dpi), or High Image Quality (1440 dpi).
Click Print from the File menu to display the Print Settings screen.
D
Select this printer from Printer on the Main screen, and then click Print Settings.
E
Make the necessary settings.
F
Paper Size: Set the size of the paper used for printing. Make sure this is the same as the image size you set in
step 3.
Paper Type: Set the paper being used.
Image Quality: Normally set Standard. If you want to print using high image quality, set High Image
Quality. If you want to print quickly, set High Speed.
26
Page 27
SL-D800 Series Printer Driver Operation Guide BASIC_M.FM (A4 size) Rev.
Basic Printing Methods (Mac)
U“Settings Screen (Mac)” on page 17
When you have finished making settings, click Print.
Set each item, such as color management and print position, while checking the image displayed on the Print
G
Settings screen.
27
Page 28
SL-D800 Series Printer Driver Operation Guide BASIC_M.FM (A4 size) Rev.
Basic Printing Methods (Mac)
Note:
When performing detailed color management using the PhotoShopPhotoShop functions, match the Color
Management conditions to these settings. See the manual supplied with PhotoShop for more details on each
function.
U“Color Management” on page 30
Click Print.
H
Select this printer, and then click Print.
I
Print data is sent to the printer.
Note:
This screen may not be displayed depending on the application. After performing step 8, print data is sent to the
printer.
This completes this section.
28
Page 29

SL-D800 Series Printer Driver Operation Guide BASIC_M.FM (A4 size) Rev.
Basic Printing Methods (Mac)
Canceling Printing
This section explains how to cancel printing.
You can cancel printing from the computer while data is being sent.
Click the printer icon in the Dock.
A
Select the job you want to cancel, and then click X (or Delete).
B
Note:
You cannot delete print data that has already been sent to the printer.
This completes this section.
29
Page 30

SL-D800 Series Printer Driver Operation Guide PRINT.FM (A4 size) Rev.
Various Print Functions
Various Print Functions
Color Management
Color Management Settings
You can perform color management using the printer driver in the following three ways.
Choose the best method according to the application you are using, the operating system environment, the aim of
the print out and so on.
Setting colors manually (Windows only)
Manually adjust the color space and color tone settings used for printing. This is useful if the application does not
have its own color management function.
U“Setting colors manually (Windows only)” on page 31
Color management from the application (no color management)
This method is for printing from applications that support color management. All color management processes are
carried out by the application's color management system. This method is useful when you want to obtain the same
color management results using a common application among different operating system environments.
U“Color management from the application (no color management)” on page 34
Color management from the printer driver
Performs color management using the operating system's color management system. Windows uses ICM and Mac
uses ColorSync. This is effective in producing similar print results from different applications under the same
operating systems. However, you also need an application that supports color management.
U“Color management from the printer driver (ICM) (Windows)” on page 36
U“Color management by printer driver (ColorSync) (Mac)” on page 38
30
Page 31

SL-D800 Series Printer Driver Operation Guide PRINT.FM (A4 size) Rev.
Various Print Functions
Setting colors manually (Windows only)
You can select the color space used for color management from sRGB or Adobe RGB. You can also adjust the color
tone manually while viewing a preview image.
O sRGB: Normally, select sRGB.
O Adobe RGB: Select when printing data based on the Adobe RGB color space.
When Color Controls is selected, you can fine tune the brightness, contrast, saturation, color balance, and so on.
When using applications featuring a color management function, specify how to adjust colors from these
A
applications.
When using applications without a color management function, start from step 2.
Depending on the type of the application, make the settings following the table below.
Application software Color Management Settings
Adobe Photoshop CS5/CS6/CC Printer Manages Colors
Adobe Photoshop Lightroom 3/4/5
Other applications No Color Adjustment
Example of Adobe Photoshop CS6
Open the Print Settings screen.
Select Standard Printing from Color Management. Select Printer Manages Colors in Color Handling.
31
Page 32

SL-D800 Series Printer Driver Operation Guide PRINT.FM (A4 size) Rev.
Various Print Functions
Click Print Settings to display the printer driver's Settings screen.
B
On the Main screen, select Color Controls in Color Management, and then click Set.
C
Select Mode.
D
sRGB: Manages colors using sRGB. Prints at the optimum color tones. This should normally be selected.
Adobe RGB: Manages colors based on the larger Adobe RGB color space. Select when printing image data
using the Adobe RGB color space information.
Make the necessary settings.
E
32
Page 33

SL-D800 Series Printer Driver Operation Guide PRINT.FM (A4 size) Rev.
Various Print Functions
Color Adjustment
Method:
Brightness: Adjusts the brightness of the image.
Contrast: Adjusts the contrast (difference between light and dark) of the image.
Saturation: Adjusts the saturation (color clarity) of the image. When the saturation is raised, colors become
Color Circle: When the color circle is selected as the Color Adjustment Method, you can click on the color
Slide Bar: When the slide bar is selected as the Color Adjustment Method, you can adjust the colors with
Note:
You can adjust the correction value while checking the sample image on the screen.
Select the color adjustment method.
When the contrast is raised, bright sections become brighter, and dark sections become darker.
When the contrast is lowered, the difference between light and dark sections decreases.
vivid. When the saturation is lowered, the colors become dull until they are close to gray.
circle to adjust the density bar.
You can also adjust the tone by entering horizontal and vertical coordinates.
the slide bar.
Set other items if necessary, and then print.
F
This completes this section.
33
Page 34

SL-D800 Series Printer Driver Operation Guide PRINT.FM (A4 size) Rev.
Various Print Functions
Color management from the application (no color management)
Print using applications with a color management function. Enable the color management settings in the
application and disable the printer driver's color adjustment function.
Make the settings for color adjustment using the application.
A
Example of Adobe Photoshop CS6
Open the Print Settings screen.
Select Standard Printing from Color Management. Select Photoshop Manages Colors in Color Handling,
and then select Printer Profile and Matching Method.
Note:
If you are not using an original printer profile, select a profile for each paper type from the Printer Profile drop-down
menu.
Click Print Settings to display the printer driver's Settings screen.
B
Turn off color management.
C
34
Page 35

SL-D800 Series Printer Driver Operation Guide PRINT.FM (A4 size) Rev.
Various Print Functions
Windows: On the Main screen, select No Color Adjustment from Color Management.
Mac: Select Color Matching from the list, and then select Off (No Color Adjustment).
Set other items if necessary, and then print.
D
This completes this section.
35
Page 36

SL-D800 Series Printer Driver Operation Guide PRINT.FM (A4 size) Rev.
Various Print Functions
Color management from the printer driver (ICM) (Windows)
Performs color management from the printer driver. If the application does not support color management, select
Driver ICM (Basic) or Driver ICM (Advanced). If the application does support color management, select Host ICM.
When performing color management using Host ICM, use image data that contains an embedded input profile.
Make the settings for color adjustment using the application.
A
Depending on the type of the application, make the settings following the table below.
Application software Color Management Settings
Adobe Photoshop CS5/CS6/CC Printer Manages Colors
Adobe Photoshop Lightroom 3/4/5
Other applications No Color Adjustment
Example of Adobe Photoshop CS6
Open the Print Settings screen.
Select Standard Printing from Color Management. Select Printer Manages Colors in Color Handling.
When using applications without a color management function, start from step 2.
Click Print Settings to display the printer driver's Settings screen.
B
36
Page 37

SL-D800 Series Printer Driver Operation Guide PRINT.FM (A4 size) Rev.
Various Print Functions
On the Main screen, select ICM in Color Management, and then click Set.
C
Select ICM Mode.
D
Driver ICM (Basic): Specify the input profile used to process the entire image data.
Driver ICM (Advanced): Specify the input profile for each image such as photos, graphics, and text data.
Host ICM: Specify when printing from applications that support color management.
Make the necessary settings.
E
When Driver ICM (Basic) or Driver ICM (Advanced) is selected, specify an input profile.
When Show all profiles. is selected, specify the Intent and Printer Profile.
Intent Explanation
Saturation Performs conversion, without changing the current saturation.
Perceptual Performs conversion so that a more visually natural image is produced. This feature is used
when a wider gamut of color is used for image data.
Relative
Colorimetric
Absolute
Colorimetric
Performs conversion so that a set of color gamut coordinates and white point (color
temperature) coordinates in original data match their corresponding print coordinates. This
feature is used for many types of color matching.
Performs conversion so that absolute color gamut coordinates are assigned to both the original
and print data. Therefore, color tone adjustment is not performed on any white point (or color
temperature) for the original or print data. This feature is used for special purposes such as logo
color printing.
37
Page 38

SL-D800 Series Printer Driver Operation Guide PRINT.FM (A4 size) Rev.
Various Print Functions
Set other items if necessary, and then print.
F
This completes this section.
Color management by printer driver (ColorSync) (Mac)
Performs color management from the printer driver. The application needs to support ColorSync. When
performing color management using ColorSync, use image data in which an input profile is embedded.
Make the settings for color adjustment using the application.
A
Depending on the type of the application, make the settings following the table below.
Application software Color Management Settings
Adobe Photoshop CS6/CC Printer Manages Colors
Adobe Photoshop Lightroom 4/5
Other applications No Color Adjustment
Example of Adobe Photoshop CS6
Open the Print Settings screen.
Select Standard Printing from Color Management. Select Printer Manages Colors in Color Handling.
Click Print Settings to display the printer driver's Settings screen.
B
38
Page 39

SL-D800 Series Printer Driver Operation Guide PRINT.FM (A4 size) Rev.
Various Print Functions
Select Color Matching from the list, and then click ColorSync. And then select Profile.
C
Set other items if necessary, and then print.
D
This completes this section.
39
Page 40

SL-D800 Series Printer Driver Operation Guide PRINT.FM (A4 size) Rev.
Various Print Functions
Borderless Printing
You can print your data without borders (margins).
Types of Borderless Printing
You can perform borderless printing using the following two methods: Auto Expand or Retain Size. For simple
borderless printing, we recommend Auto Expand. To prevent the printer driver from enlarging your image, we
recommend Retain Size.
Auto Expand
The printer driver enlarges the print data to a size slightly larger than the paper size and prints the enlarged image.
The sections which are beyond the paper edges are not printed; therefore, resulting in borderless printing.
Use settings such as Page Layout in the applications to set the size of the image data as follows.
O Match the paper size and page setting for the print data.
O If the application has margin settings, set the margins to 0 mm.
O Make the image data as large as the paper size.
Retain Size
Create the print data larger than the actual paper size in the applications to produce borderless output. The printer
driver does not enlarge the image data. Use settings such as Page Layout in the applications to set the size of the
image data as follows.
O Set pages so that they are 1.69 mm wider on all sides than the paper size to be printed.
O If the application has margin settings, set the margins to 0 mm.
O Make the image data as large as the paper size.
40
Page 41

SL-D800 Series Printer Driver Operation Guide PRINT.FM (A4 size) Rev.
Various Print Functions
Setting Procedure
Windows
Display the printer driver's Main screen.
A
U“Settings Screen (Windows)” on page 13
On the Main screen, set necessary items such as the Paper Type and the Paper Size.
B
Select Borderless.
C
41
Page 42

SL-D800 Series Printer Driver Operation Guide PRINT.FM (A4 size) Rev.
Various Print Functions
Select Auto Expand or Retain Size as the borderless method.
D
When Auto Expand is selected, set the slider to set the amount of enlargement.
Note:
Moving the slider towards Mid or Min decreases the image enlargement ratio. Therefore, some margins may appear
at the edges of the paper depending on the paper and printing environment.
Set other items if necessary, and then print.
E
This completes this section.
Mac
Display the printer driver's Main screen.
A
U“Settings Screen (Mac)” on page 17
Select the print size and borderless printing method in Paper Size.
B
42
Page 43

SL-D800 Series Printer Driver Operation Guide PRINT.FM (A4 size) Rev.
Various Print Functions
When Auto Expand is selected in Paper Size, select the amount of enlargement.
C
Note:
Moving the slider towards Mid or Min decreases the image enlargement ratio. Therefore, some margins may appear
at the edges of the paper depending on the paper and printing environment.
Set other items if necessary, and then print.
D
This completes this section.
43
Page 44

SL-D800 Series Printer Driver Operation Guide PRINT.FM (A4 size) Rev.
Various Print Functions
Printing on Non-regular Paper Sizes
You can print on paper sizes not included in the printer driver. The printer can be used with paper of the following
sizes.
*
Width
Length 50 to 1,000 mm
* Although you can set 89 to 210 mm in Mac, paper sizes that are not supported by this printer cannot be printed correctly.
Important:
c
Depending on the application, output sizes may be restricted.
89, 102, 127, 152, 203, 210 mm
Setting Procedure
Windows
Display the printer driver's Main screen.
A
U“Basic Printing Methods (Windows)” on page 20
On the Main screen, click Custom Paper Size... .
B
On the User Defined Paper Size screen, enter Paper Size Name, set the paper size, and then click Save.
C
44
Page 45

SL-D800 Series Printer Driver Operation Guide PRINT.FM (A4 size) Rev.
Various Print Functions
Note:
O To change the registered paper size, select the paper size name from the list on the left.
O To delete a registered paper size, select the paper size name from the list on the left, and then click Delete.
O You can register up to 30 paper sizes.
Click OK.
D
The size entered in the paper size list box is registered.
You can then print as normal.
Mac
Display the printer driver's Page Setup screen.
A
U“Settings Screen (Mac)” on page 17
Select Manage Custom Sizes from Paper Size.
B
45
Page 46

SL-D800 Series Printer Driver Operation Guide PRINT.FM (A4 size) Rev.
Various Print Functions
Click +, and then enter a name for the new
C
paper size.
Enter the Width and Height for the Paper Size
D
as well as the margins, and then click OK.
Note:
O To edit a saved custom size, choose its name from the list on the left of the Custom Paper Sizes screen.
O To copy a saved custom size, select the size in the list on the left and click Duplicate.
O To delete a saved custom size, select it from the list on the left, and then click
Set the page size range and the printer margins
according to the printing method.
−
.
O The custom paper size setting differs depending on the operating system version. See your operating system's
documentation for details.
Click OK.
E
You can select the paper size you saved from the
Paper Size pop-up menu.
You can then print as normal.
46
Page 47

SL-D800 Series Printer Driver Operation Guide TRBLE.FM (A4 size) Rev.
Troubleshooting
Troubleshooting
Note:
For problems not related to the printer driver, see the "Operation Guide".
U "Operation Guide" - "Troubleshooting"
When an Error Message Is Displayed
When an error message is displayed, check the solution on the screen and take the required measures.
You cannot print (because the printer does not work)
Cause What to do
The printer driver is not installed correctly.
Is the icon for this printer displayed in the Devices and Printers, Printers and
Faxes folder?
O Yes
The printer driver is installed. See the following item, "The printer is not
connected correctly to the computer".
O No (An icon is displayed under "Unspecified")
Do the following:
(1)Click Start - Control Panel - Hardware and Sound - Device Manager Other devices.
(2)Right-click EPSON SL-D800 series, and then click Update Driver
Software.
(3)Click Search automatically for updated driver software.
(4)After the driver software is updated, click Close.
(5)See "Maintenance Tool Operation Guide" and register the printer.
If the printer driver is still not installed even after the procedure above,
install the printer driver again.
The printer is not communicating with the
computer.
Does the printer port setting match the printer connection port?
Check the printer port.
Click the Port tab on the printer's Properties screen, and check if the printer
name's port is set.
If it is not indicated, the printer driver is not installed correctly.
Delete and reinstall the printer driver.
Is the cable plugged in correctly?
Confirm that the interface cable is securely connected to both the printer
connector and the computer. Also, make sure the cable is not broken nor bent. If
you have a spare cable, try connecting with the spare cable.
47
Page 48

SL-D800 Series Printer Driver Operation Guide TRBLE.FM (A4 size) Rev.
Troubleshooting
Cause What to do
An error has occurred on the printer.
The printer stops printing.
The printer is offline
Check the lights on the printer and the message on the screen.
See the "Operation Guide" for the solution.
Is the status of the print queue Pause?
If you stop printing or the printer stops printing because of an error, the print
queue enters a Pause status. You cannot print in this status.
Double-click the printer icon in the Devices and Printers or Printers and Faxes
folder; if printing is paused, open the Printer menu and clear the Pause check
box.
Has the computer entered sleep mode?
Do not allow the computer to enter sleep mode. When the computer enters
sleep mode, the printer may go offline.
If the printer goes offline, reboot your computer. If the printer is still offline even
after rebooting your computer, turn the printer off and then on again.
The printer sounds like it is printing, but nothing prints
Cause What to do
The print head moves, but nothing prints.
The nozzle check pattern is not printed
correctly.
Confirm the printer operation.
See the "Maintenance Tool Operation Guide" to print a nozzle check pattern, and
then check the printer's operations and status.
Perform head cleaning.
The nozzles may be clogged. See the "Maintenance Tool Operation Guide" to
perform head cleaning, and then try printing the nozzle check pattern again.
48
Page 49

SL-D800 Series Printer Driver Operation Guide TRBLE.FM (A4 size) Rev.
Troubleshooting
Problems with Print Quality/Print Results
Cause What to do
Print quality is poor, uneven, too light, or
too dark.
The color is not exactly the same as
another printer.
The print is not positioned properly on the
paper.
Are the print head nozzles clogged?
If the nozzles are clogged, specific nozzles do not fire ink and the print quality
declines. See the "Maintenance Tool Operation Guide" to perform a nozzle check.
Are the Paper Type settings correct?
Make sure the Paper Type setting on the printer driver's Main screen matches
the paper type you are printing on.
Have you compared the printing result with the image on the display
monitor?
Since monitors and printers produce colors differently, printed colors will not
always match on-screen colors perfectly.
Colors vary depending on the printer type due to each printer's
characteristics.
Because inks, printer drivers, and printer profiles are developed for each printer
model, the colors printed by different printer models are not exactly the same.
Have you specified the print area?
Check the print area in the settings of the application and the printer.
Margins appear in borderless printing.
Are the paper size settings correct?
If the option selected for Paper Size in the printer driver does not match the
paper size (width) loaded in the printer, the print may not be in the correct
position or some of the data may be printed over the edges of the paper.
Check the Paper Size setting on the printer driver's Main screen.
Are the settings for the print data in the application correct?
Make sure that the paper settings in the application are correct as well as in the
printer driver.
U“Borderless Printing” on page 40
49
Page 50

SL-D800 Series Printer Driver Operation Guide UPDATE.FM (A4 size) Rev.
Updating Printer Driver (Windows)
Updating Printer Driver (Windows)
Follow the procedure below to update the printer driver.
Important:
c
O Connect all printers and turn on the power.
O You must log on as a user with administrative privileges.
O If an Administrator password or confirmation is requested, enter the password and then continue with the
operation.
Turn off the printer and then connect the printer to a computer with a USB cable.
A
Insert the software disc, and then double-click Setup.exe in the SystemApplication - Windows folder.
B
When the following screen is displayed, click Yes.
C
Follow the on-screen instructions to install.
D
When the printer driver installation is complete, update the paper information (register information for a
E
paper type file to the printer).
Perform steps 4 to 10 in "Installing the Printer Driver (Windows)".
50
Page 51

SL-D800 Series Printer Driver Operation Guide UPDATE.FM (A4 size) Rev.
Updating Printer Driver (Windows)
U“Installing the Printer Driver (Windows)” on page 6
51
Page 52

SL-D800 Series Printer Driver Operation Guide UPDATE_M.FM (A4 size) Rev.
Updating the Printer Driver (Mac)
Updating the Printer Driver (Mac)
Follow the same procedure as installing the printer driver.
U“Installing the Printer Driver (Mac)” on page 10
52
Page 53

SL-D800 Series Printer Driver Operation Guide UNINST.FM (A4 size) Rev.
Uninstalling the Printer Driver (Windows)
Uninstalling the Printer Driver (Windows)
Note:
O You must log on as a user with administrative privileges.
O In Windows 7/Windows 8, if an Administrator password or confirmation is requested, enter the password and then
continue with the operation.
From the Control Panel, click Uninstall program (or Add or remove programs).
A
Select "EPSON SL-D800 Series Software" as the software you want to uninstall, and then click Uninstall (or
B
Del).
Follow the on-screen instructions to continue.
C
When the delete confirmation message appears, click Yes.
The Maintenance Tool and the printer driver are removed at the same time.
Restart the computer if you are reinstalling the printer driver.
53
Page 54

SL-D800 Series Printer Driver Operation Guide UNINST_M.FM (A4 size) Rev.
Uninstalling the Printer Driver (Mac)
Uninstalling the Printer Driver (Mac)
Use the "Uninstaller" to uninstall the printer driver.
Downloading the Uninstaller
Download the Uninstaller from the Epson website.
http://www.epson.com/
Procedure
Using the Uninstaller Follow the instructions on the Epson website.
54
 Loading...