

Page 1

Epson Stylus® Pro 7900CTP Large Plate Accessory Kit
User’s Guide
Page 2

2
| Introduction
Introduction
The Large Plate Accessory Kit enables the Epson Stylus® Pro 7900CTP Computer to Plate System to print and
cure large aluminum plates. The kit contains a large plate guide for the printer and a tray extension for the
plate curing unit (PCU).
The Large Plate Accessory Kit is recommended for Epson DirectPlate Aluminum plates over 16 inches
(406 mm) wide. See the Epson Stylus Pro 7900CTP Computer to Plate System User’s Guide for information
about the system.
Parts Included in the Kit
•
Large plate guide
•
Tray extension, two extension supports, four screws, four slider screws, and a hexagonal (2.5 mm/0.10
inch) wrench
Page 3

Installing the Large Plate Guide on the Printer |
Installing the Large Plate Guide on the Printer
To ensure proper registration when printing on Epson DirectPlate Aluminum plates, you need to install the
large plate guide on the printer.
1.
Open the roll paper cover on the printer.
2.
Remove the roll paper if installed (see the Epson Stylus Pro 7900/9900 Printer Guide for information).
3.
Remove the small plate guide if installed.
4.
Locate the first and last slots in the back row of slots.
Location of
first slot
3
5.
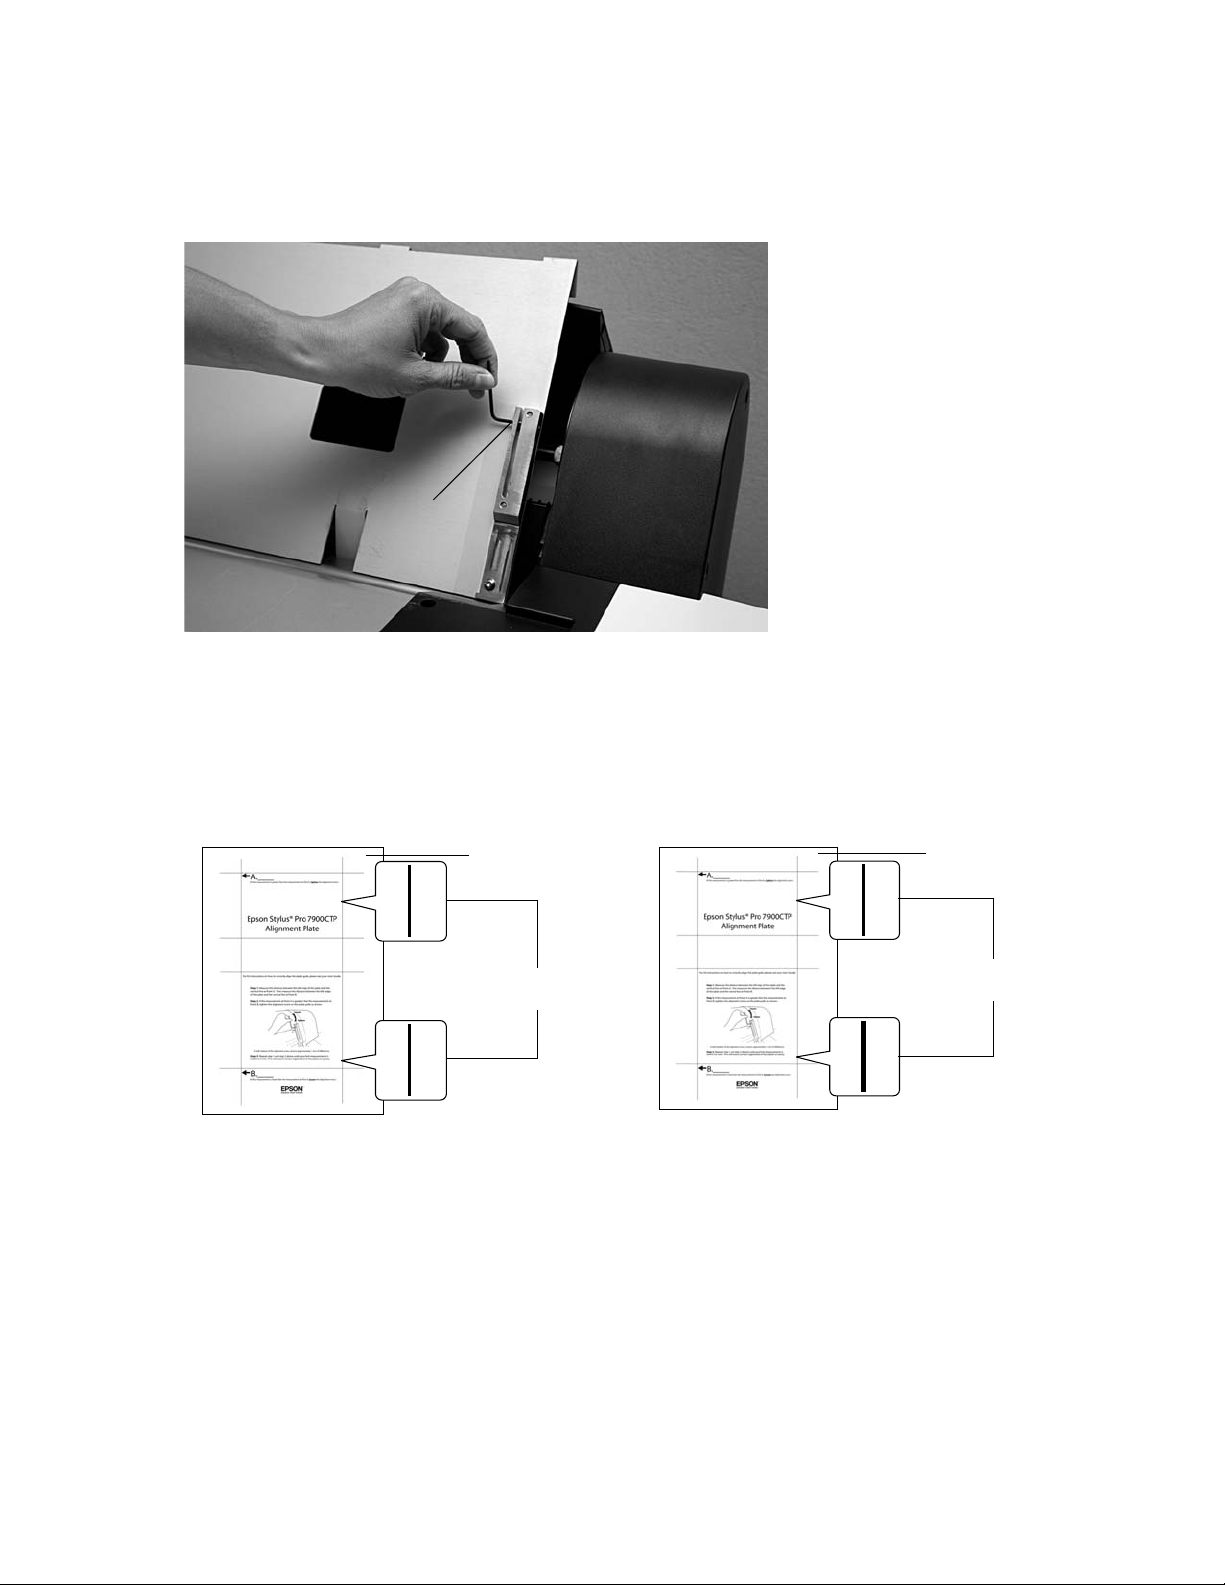
Insert the rear tabs on the bottom of the guide into the first and last slots of the printer.
Once the rear tabs are in position, the front of the paper guide lies on the top of the printer.
Page 4

4
| Aligning the Large Plate Guide
6.
Gently press the top of the guide on both sides to secure it into position.
Aligning the Large Plate Guide
The large plate guide must be correctly aligned to prevent any skew when printing on the plate.
1.
Press the l Paper Source button until the Sheet icon appears on the LCD screen.
2.
Insert a test plate (see “Loading a Plate in the Printer” on page 7) and print the file
“7900CTP_alignment_sheet.pdf” that is included on the CD with the Epson Stylus Pro 7900CTP
system. If you don’t have the CD, you can download it from www.proimaging.epson.com.
If you are using the RIP included with the Epson Stylus Pro 7900CTP system, you can print the file using
the menu options.
Note:
You must use an Epson DirectPlate Aluminum plate for this test because paper won’t be accurate. You should
use the same size plate you will use for final printing.
Page 5

Aligning the Large Plate Guide |
3.
Use a metric ruler to measure the distance from the left edge of the plate to point A on the printed plate.
Then measure the distance from the left edge of the plate to point B. If the distances to points A and B are
equal, go to step 6. If they vary by more than 0.5 mm, the plate guide is not correctly aligned. Continue
with step 4 to adjust the alignment.
5
Note:
For best results, use a ruler delineated in half-millimeter increments and a magnifying lens.
Page 6
6
| Aligning the Large Plate Guide
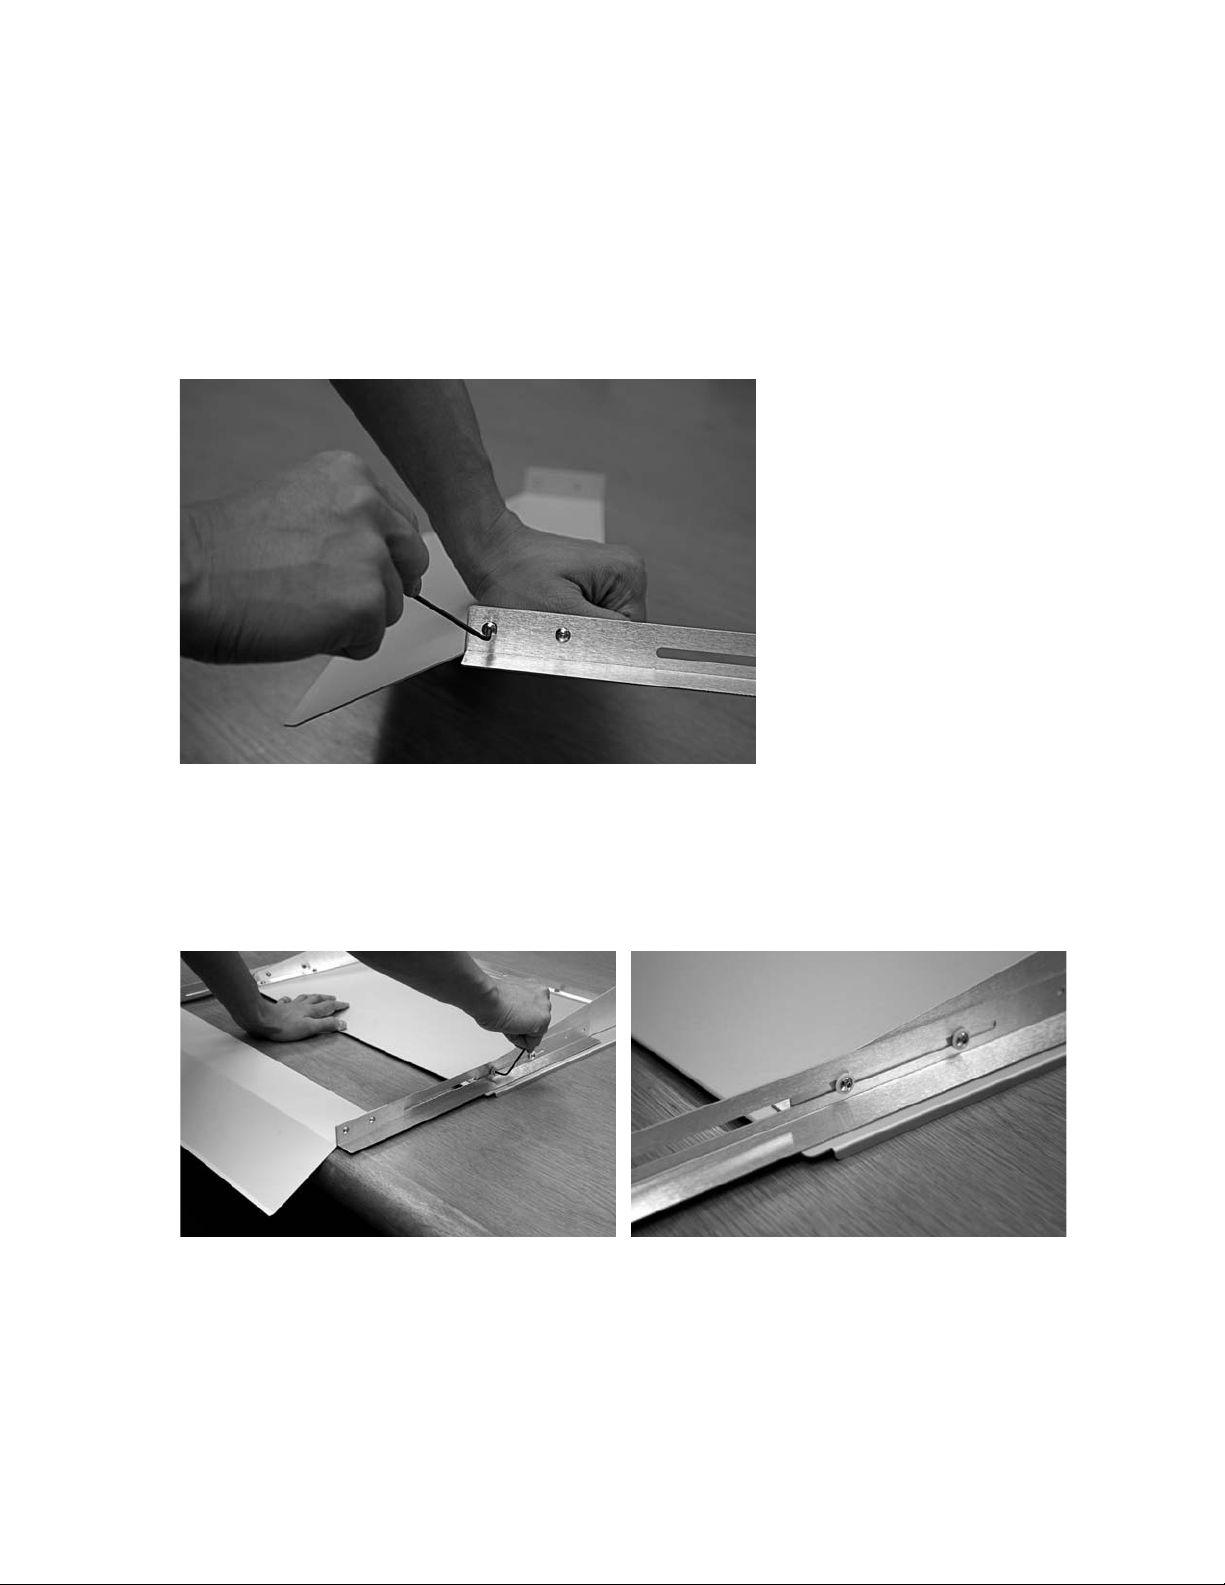
4.
Using the included hexagonal wrench, adjust the alignment of the plate guide. If distance A is greater than
distance B, tighten the alignment screw; if distance B is greater than distance A, loosen the screw. Half a
rotation of the screw moves the guide approximately 1.0 mm (0.04 inch).
Loosen
Tighten
Alignment
screw
5.
Repeat steps 2 and 3 and, if required, step 4 until the measurements are nearly equal, within 0.5 mm.
6.
Once the plate guide is aligned, you need to confirm the alignment. Use a new plate to print the test
pattern, then print the test pattern again on the same plate. The plate is correctly aligned when the line
thickness at the top and bottom of the printed pattern is no greater than 0.5 mm.
Leading edge
Plate
No more than 0.5 mm
difference
Trailing edge
Correct alignment
Leading edge
Plate
More than 0.5 mm
difference
Trailing edge
Incorrect alignment
Page 7

Loading a Plate in the Printer |
Loading a Plate in the Printer
Caution:
Use only Epson DirectPlate Aluminum plates.
Examine each plate carefully before you use it. If the plate is dented or the corners or edges are bent, do not use it.
Even the slightest bent corner can damage the printer.
WARNING:
The plate edges are sharp. Use caution to avoid injury.
7
1.
When working with large size plates, position the media catch bin (fabric bin) as shown to enable the plate
to exit the printer without interference.
Media catch bin
2.
Make sure the printer is turned on and the P power light is not flashing.
3.
Press the l Paper Source button until the Sheet icon appears on the LCD screen.
Page 8

8
| Loading a Plate in the Printer
4.
Press the Paper release (ePlaten) button to disengage the feeder rollers.
Paper release
(ePlaten) button
5.
Set the printer to the highest paper suction setting. This will help load the plate. To do that, press u to
increase the suction.
6.
Lower the plate (with light gray, coated side face up) into the paper slot (short edge first) so at least
1 to 2 inches of the top edge are above the large plate guide. For example, the top edge of a 19-inch long
plate should be no less than 2 to 3 inches above the plate guide.
Slide the plate against the two alignment points along the top and bottom of the large plate guide. Make
sure that the plate touches both top and bottom alignment points.
Top alignment
point
Bottom
alignment point
7.
While gently holding the plate against the guide, press the Paper release (ePlaten) button again to
engage the paper feeder rollers.
PRESS PAUSE
The
message appears on the printer’s LCD screen when the printer detects the plate and
the paper release has closed.
WARNING:
The plate edges are sharp. To avoid injury, remove your hand from the plate after you press the
Pause/reset button.
Page 9

Unloading a Plate from the Printer |
8.
Press the Pause/reset button and let go of the plate. The printer loads and aligns the plate in the
correct position.
If the plate was not in correct position (either too high or too low) in step 6, you get a loading error
message.
9
9.
When you see
NO PAPER SELECTED
Note:
If you will use multiple plates consecutively on the printing press, it is best to load plates into the printer in the same
direction each time. Otherwise, there is a possibility of minor differences in final printing.
PAPER SETTINGS > ARE THESE SETTINGS OK?
.
on the LCD screen, be sure to select
Unloading a Plate from the Printer
After printing is finished, the plate stays in the printer. To prevent damage to the plate, make sure it doesn’t
fall. Hold the plate and do one of the following:
•
If you plan to print more plates, press the Paper release (ePlaten) button. The plate currently in the
printer is released and you can load another plate.
•
If you’re done printing plates, press the d button.
Page 10
10
| Attaching the PCU Tray Extension
Attaching the PCU Tray Extension
The extension attaches to the larger tray supplied with the PCU; the tray should be used as the input tray.
Note:
The extension adds a small incline for the plate to travel into the oven.
1.
Attach the extension supports to both sides of the tray extension. Secure the screws with included
hexagonal wrench, as shown below.
2.
Set the PCU tray upside-down on a table. Attach the extension supports to the tray with the four slider
screws.
Note:
For best results, hang the tray extension over the edge of a table so the tray lies flat while you are attaching the
extension supports.
Page 11

You can now slide the extension in and out to match your plate size.
Where to Get Help |
11
3.
Attach the tray to the PCU by inserting the tab into the slot on the input side of the PCU. Press the tray
down to make sure the tab is completely locked into the PCU.
If you need to adjust the tray, see the Epson Stylus Pro 7900CTP Computer to Plate System User’s Guide.
Note:
You can remove the large plate guide to print paper and then reinsert the large plate guide without having to realign it,
assuming the large plate guide is put back in place correctly.
Where to Get Help
Epson provides technical support and information on the installation, configuration, and operation of
professional imaging products through the Epson Preferred
AM
to 6PM, Pacific Time, Monday through Friday. Days and hours of support are subject to change without
6
notice.
Before you call, make sure you have your Unit ID number, which is included with the Epson Preferred
Limited Warranty Plan information that came with your printer. You’ll also need your printer serial number
and proof of purchase.
Visit Epson’s support website at epson.com/support and select your product for solutions to common
problems. You can download drivers, firmware, and documentation, get FAQs and troubleshooting advice, or
e-mail Epson with your questions.
SM
Limited Warranty Plan. Call (888) 377-6611,
If you experience difficulty with the toll-free line or your Unit ID number, call the Professional Imaging
support line at (562) 276-1305.
Page 12

.
Notices
Copyright Notice
All rights reserved. No part of this publication may be reproduced, stored in a retrieval system, or transmitted in any form or by any
means, electronic, mechanical, photocopying, recording, or otherwise, without the prior written permission of Seiko Epson
Corporation. The information contained herein is designed only for use with these Epson printers. Epson is not responsible for any use
of this information as applied to other printers.
Neither Seiko Epson Corporation nor its affiliates shall be liable to the purchaser of this product or third parties for damages, losses,
costs, or expenses incurred by purchaser or third parties as a result of: accident, misuse, or abuse of this product or unauthorized
modifications, repairs, or alterations to this product, or (excluding the U.S.) failure to strictly comply with Seiko Epson Corporation’s
operating and maintenance instructions.
Seiko Epson Corporation shall not be liable for any damages or problems arising from the use of any options or any consumable
products other than those designated as Original Epson Products or Epson Approved Products by Seiko Epson Corporation.
Trademarks
Epson and Epson Stylus are registered trademarks, and Epson Exceed Your Vision is a registered logomark of Seiko Epson Corporation.
Epson Preferred is a service mark of Epson America, Inc.
General Notice: Other product names used herein are for identification purposes only and may be trademarks of their respective owners.
Epson disclaims any and all rights in those marks.
This information is subject to change without notice.
© 2010 Epson America, Inc. 12/10
CPD-33701
Printed in USA
 Loading...