

Page 1
®
IEEE 1394 I/F Card
English
English .............
EnglishEnglish
Deutsch
Deutsch .............
DeutschDeutsch
Français
Français .............
FrançaisFrançais
Español
Español .............
EspañolEspañol
Italiano
Italiano .............
ItalianoItaliano
Português
Português.............
PortuguêsPortuguês
............. 1111
..........................
............. 13
..........................
............. 25
..........................
............. 37
..........................
............. 49
..........................
............. 61
..........................
13
1313
25
2525
37
3737
49
4949
61
6161
4020112-00
C01
Page 2

All rights reserved. No part of this publication may be reproduced, stored in a retrieval
system, or transmitted in any form or by any means, electronic, mechanical, photocopying,
recording, or otherwise, without the prior written permission of SEIKO EPSON
CORPORATION. No patent liability is assumed with respect to the use of the information
contained herein. Neither is any liability assumed for damages resulting from the use of the
information contained herein.
Neither SEIKO EPSON CORPORATION nor its affiliates shall be liable to the purchaser of
this product or third parties for damages, losses, costs, or expenses incurred by purchaser or
third parties as a result of: accident, misuse, or abuse of this product or unauthorized
modifications, repairs, or alterations to this product.
SEIKO EPSON CORPORATION and its affiliates shall not be liable against any damages or
problems arising from the use of any options or any consumable products other than those
designated as Original EPSON Products or EPSON Approved Products by SEIKO EPSON
CORPORATION.
EPSON is a registered trademark of SEIKO EPSON CORPORATION.
General Notice: Other product names used herein are for identification purposes only and
may be trademarks of their respective companies.
Copyright © 2001 by SEIKO EPSON CORPORATION, Nagano, Japan.
Page 3

Contents
Introduction . . . . . . . . . . . . . . . . . . . . . . . . . . . . . . . . . . . . . . . . . . . . . . . . . .2
Features . . . . . . . . . . . . . . . . . . . . . . . . . . . . . . . . . . . . . . . . . . . . . . . . .2
System Requirements . . . . . . . . . . . . . . . . . . . . . . . . . . . . . . . . . . . . . . . . . .2
Required computer environments . . . . . . . . . . . . . . . . . . . . . . . . . .2
Limitations . . . . . . . . . . . . . . . . . . . . . . . . . . . . . . . . . . . . . . . . . . . . . .3
Connecting to a Computer . . . . . . . . . . . . . . . . . . . . . . . . . . . . . . . . . . . . . .4
When connecting the printer directly to a computer . . . . . . . . . . .4
When connecting the printer to a computer
with other IEEE 1394 devices . . . . . . . . . . . . . . . . . . . . . . . . . . . .5
Installing the Printer Software on Windows . . . . . . . . . . . . . . . . . . . . . . .6
Installing on Windows 2000. . . . . . . . . . . . . . . . . . . . . . . . . . . . . . . .6
Installing on Windows Me . . . . . . . . . . . . . . . . . . . . . . . . . . . . . . . . .7
Ensuring that the IEEE 1394 driver is installed correctly
in Windows Me and 2000 . . . . . . . . . . . . . . . . . . . . . . . . . . . . . . .8
Installing the Printer Software on Macintosh . . . . . . . . . . . . . . . . . . . . . .9
Installing on Macintosh . . . . . . . . . . . . . . . . . . . . . . . . . . . . . . . . . . .9
Using the Chooser to select your printer . . . . . . . . . . . . . . . . . . . . .10
Technical Specifications . . . . . . . . . . . . . . . . . . . . . . . . . . . . . . . . . . . . . . . .10
IEEE 1394 Interface . . . . . . . . . . . . . . . . . . . . . . . . . . . . . . . . . . . . . . .10
1
Page 4

Introduction
This guide explains how to use the Type B IEEE 1394 Interface Card
which has been attached to a printer.
Features
This interface complies with the IEEE 1394 standard, and is equipped
with the following features:
❏
This product can be used on computers equipped with an IEEE 1394
port (OHCI compliant), supported by Windows
Windows Millenium Edition.
❏
It can be connected to Macintosh® FireWire® ports. The required
printer driver is supplied with the printer.
❏
High-speed data transfer is possible with IEEE 1394, which supports
a peak data transfer rate of 400 Mbps.
❏
The cable can be attached or detached without switching off the
power to the computer or printer.
❏
Multiple IEEE 1394 devices can be connected simultaneously in a
daisy-chain configuration. In addition to connecting the printer to
the computer as an IEEE 1394 device via the interface card, you can
also use the same interface card to connect other IEEE 1394 devices.
®
2000 or
System Requirements
Required computer environments
Windows 2000/Windows Me
❏
Computer with Windows 2000/Me preinstalled, with standard
support for IEEE 1394 port (OHCI compliant).
2
Page 5

❏
Computer upgraded from Windows 98 Second Edition preinstalled
OS with standard support for IEEE 1394 port (OHCI compliant) to
Windows 2000/Me (manufacturer must assure IEEE 1394 operation
in Windows 2000/Me).
Macintosh
Hardware: Power Macintosh G3/G4 equipped with the IEEE 1394
(FireWire) port as a standard part, for which operation is
guaranteed by Apple
equipped with an IEEE 1394 (FireWire) PCI card, for
which operation is guaranteed by Apple Computer.
®
Computer, or Power Macintosh G3
Limitations
❏
The IEEE 1394 port uses a standard connector with six contacts. Be
sure to use the appropriate 6-contact cable for interface connection.
❏
Do not connect two computers simultaneously to this interface. For
example, never connect a Windows machine on one end of the cable
and a Macintosh on the other.
Restrictions applying to Windows 2000/Me only
❏
Do not turn other IEEE1394 devices on/off, or connect/disconnect
cables while printing is in progress.
❏
Do not set the Windows to Standby or Hibernate while printing is
in progress.
Restrictions applying to Macintosh only
Do not set the Macintosh to Sleep mode while printing is in progress.
3
Page 6
Connecting to a Computer
The interface card is equipped with two cable connectors. One is used to
connect the card to the computer, and the other is used to connect other
IEEE 1394 devices in a daisy-chain. Use an appropriate 6-contact cable
or an equivalent cable when making the connection. The cable can be
connected without switching off the power supply to the computer or
the printer because it complies with the IEEE 1394 standard.
Note:
❏
The IEEE 1394 Interface Card is attached to optional interface card slot 2
of your printer.
❏
You will not be able to perform the connection procedures explained in this
manual without the cable mentioned above.
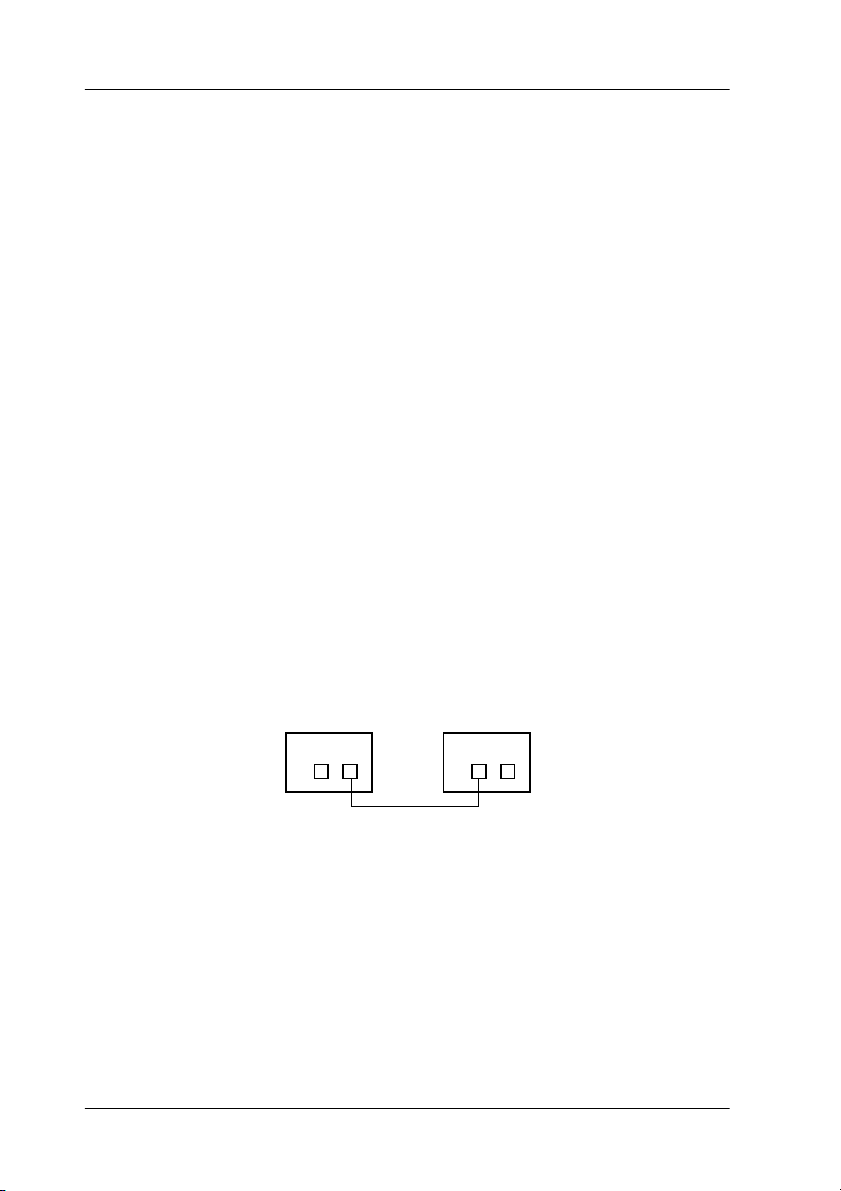
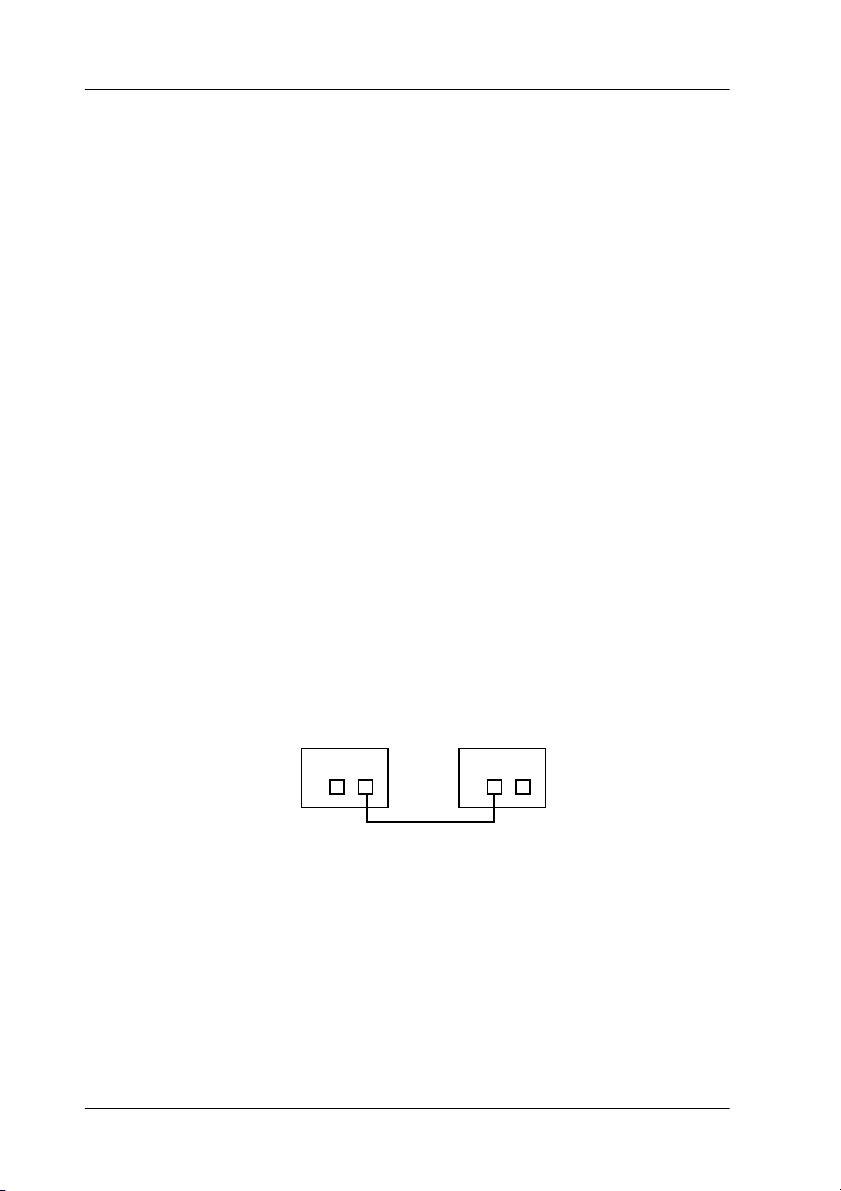
When connecting the printer directly to a computer
1. Connect the cable connector to the computer's IEEE 1394 port
(FireWire port).
2. The other cable can be connected to any of the IEEE 1394 ports on
the interface card attached to the printer (any of the ports may be
used).
Computer Printer
Note:
Do not connect two computers simultaneously to this interface.
4
Page 7
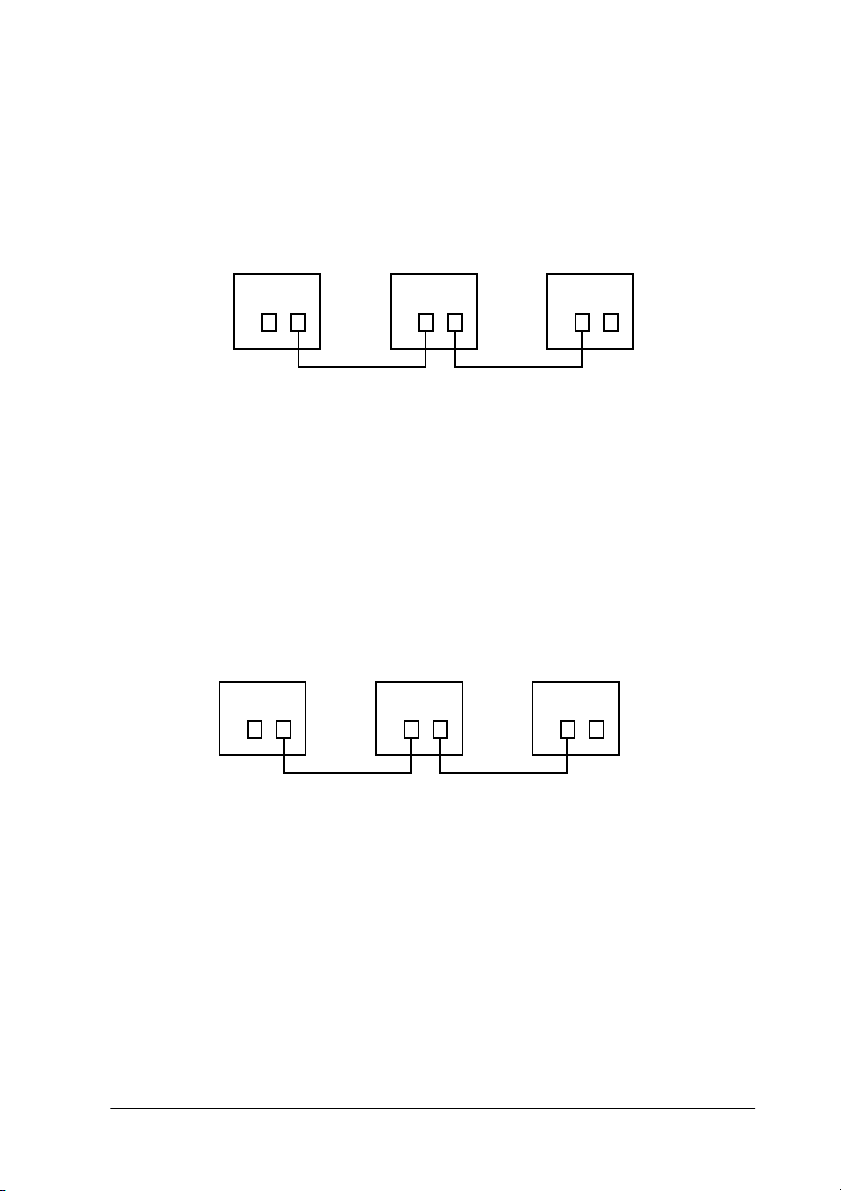
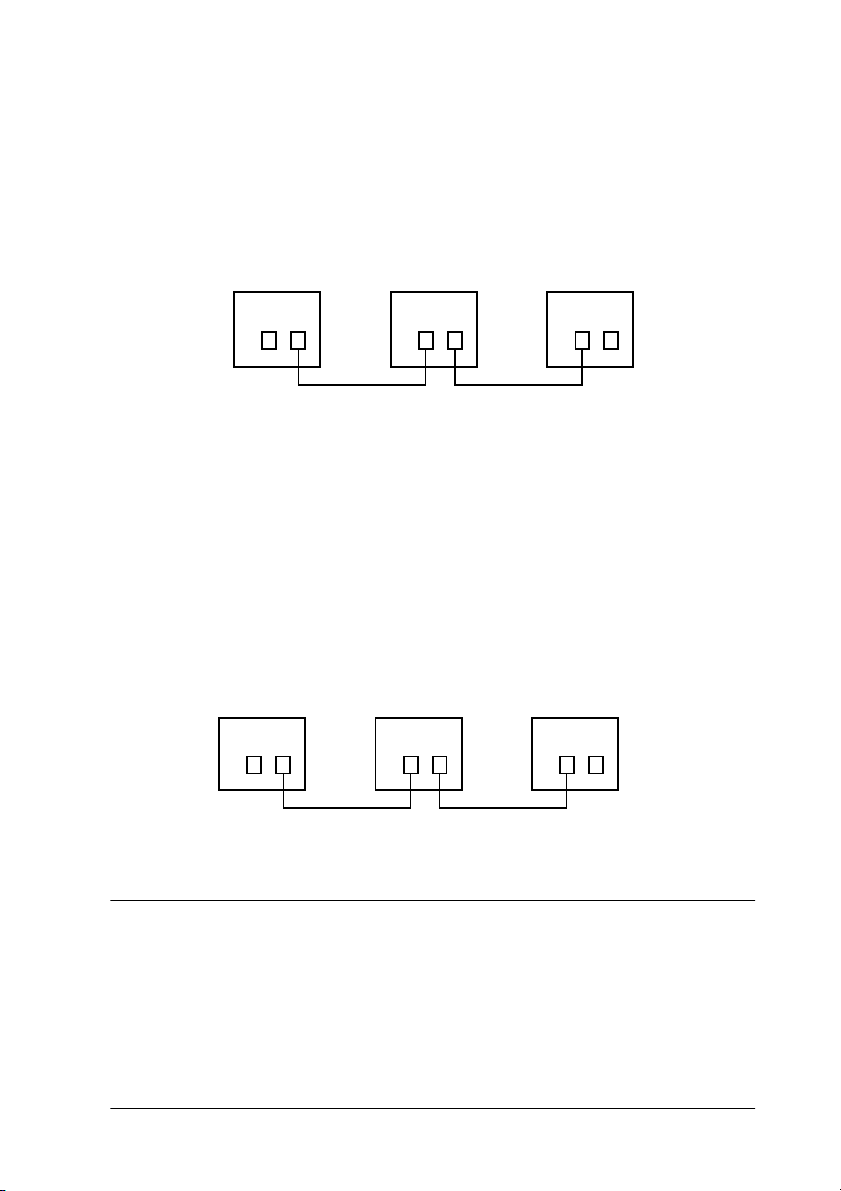
When connecting the printer to a computer with other
IEEE 1394 devices
If IEEE 1394 devices are already connected to the computer, connect the
printer so that it is the last IEEE 1394 device in the chain.
Computer IEEE 1394 device Printer
Note:
When connecting this interface to a 1394 device, always use an appropriate 6contact cable or an equivalent 6-contact standard connector. Normal operation
cannot be assured with a 6-4 converter cable.
Connect the cable to a vacant IEEE 1394 connector if additional
IEEE 1394 devices are to be connected to the printer.
Computer Printer IEEE 1394 device
5
Page 8

Installing the Printer Software on Windows
To install the printer software included on the “Printer Software for
EPSON Stylus PRO 10000/10000CF” CD-ROM shipped with your
printer, follow the sections below.
Installing on Windows 2000
1. Make sure that your printer is off and connected to your computer.
2. Turn on your computer and start Windows. If the New Hardware
Found screen or any other Wizard appears, click
3. Insert the printer software CD-ROM shipped with your printer in
the CD-ROM drive. The Installer dialog box appears.
Cancel
.
If the dialog box does not appear, click
D:\SETUP
another drive, use that drive letter instead.)
4. Choose your printer, then click the right arrow in the Installer dialog
box.
5. Click
in the dialog box that appears to start the printer software
installation.
6. Turn on your printer when the installation program asks you to turn
it on.
7. When Windows 2000 detects the printer,
Wizard
Note:
If an error message is displayed, or the Found New Hardware Wizard is
not displayed, the printer has not been detected normally by Windows 2000.
In this case, check the IEEE 1394 port settings under Windows 2000, your
cable connections, and the printer power.
8. Select
(recommended)
and click OK. (assuming your CD-ROM drive is D. If it is
Install Printer Driver/Utility
will be displayed. Click
Search for a suitable driver for my device.
, and then click
Start
, then the right arrow, and then OK
Found New Hardware
Next
.
Next
.
and
Run
. Then, type
6
Page 9

9. Select
Specify a location
deselect it, and click
. If a different location is already selected,
Next
.
10. Make sure that
click OK. (assuming your CD-ROM drive is D. If it is another drive,
use that drive letter instead.)
11. Check that the dialog box reads
Device
Note:
If the system displays a message that the printer is not connected correctly,
do not click the
Retry
the
12. Wait for the message saying driver installation is complete, and click
Finish
.
13. A message will be displayed saying that the printer driver and the
IEEE 1394 port settings are complete. Click OK.
14. When all settings are complete, the selected printer icon will be
displayed in the Printer folder.
After installation is complete, check if the driver has been installed
correctly. See “Ensuring that the IEEE 1394 driver is installed correctly
in Windows Me and 2000” on page 8 for more information.
D:\10000 (or 10000CF)\WIN2000
EPSON 1394 Printer IEEE 1394 SBP2
and then click
Retry
button.
Next
.
immediately. First click the
is displayed, then
Finish
button, and then
Installing on Windows Me
1. Make sure that your printer is off and connected to your computer.
2. Turn on your computer and start Windows. If any applications are
running them, quit them.
3. Insert the printer software CD-ROM shipped with your printer in
the CD-ROM drive. The Installer dialog box appears.
If the dialog box does not appear, click
D:\SETUP
another drive, use that drive letter instead.)
and click OK. (assuming your CD-ROM drive is D. If it is
Start
and
Run
. Then, type
7
Page 10

4. Choose your printer from the Installer dialog box, then click the r ight
arrow.
5. Click
6. Follow the directions on the screen, and turn on your printer. The
7. A message will be displayed to notify you that installation is
Install Printer Driver/Utility
The installer will copy the required files to your hard disk.
Installer will install the correct driver. Continue with installation as
instructed on the screen.
finished. Click OK and processing is complete.
, then the right arrow, and then OK.
Ensuring that the IEEE 1394 driver is installed correctly in Windows Me and 2000
After the printer software installation is complete, confirm that the IEEE
1394 driver is installed correctly.
1. Click the
sure that the icon for your printer appears in the Printers folder.
2. Click the icon for your printer, then click
menu.
3. Click the Details or Port tab. Make sure that
in the Print on the port list box.
Start
button, point to
Settings
, and click
Properties
EP1394_xxx
Printers
. Make
on the File
is selected
Note:
If the correct port is not displayed, refer to the “Troubleshooting” section
of the Online Guide.
8
Page 11

Installing the Printer Software on Macintosh
Installing on Macintosh
Caution:
c
Follow these steps to install your printer software.
1. Make sure that your Macintosh and printer are connected and that
2. Turn on your computer. If any applications are running them, quit
3. Insert the software CD-ROM shipped with your printer in the CD-
Turn off all virus protection programs before you install your printer
software.
both are turned on.
them.
ROM drive. The EPSON printer software disk opens automatically.
4. Double-click
10000CF
5. If a single
folders containing installer icons for several languages appear,
double-click the folder for your preferred language, then doubleclick the
6. At the initial screen, click
appears.
7. To install the printer software included on your printer software CDROM, make sure the Install Location box displays the correct disk
drive, then click
8. When a message appears informing you that the installation is
complete, click
EPSON STYLUS PRO 10000
, then the Install Printer Driver/Utility folder.
Installer
Installer
icon appears, double-click the icon. If separate
icon inside it.
Install
Restart
Continue.
.
to restart your computer.
The Installer dialog box
EPSON STYLUS PRO
or
9
Page 12

Using the Chooser to select your printer
After you have installed the printer software on your Macintosh, you
need to open the Chooser and select your printer. You must select a
printer port the first time you use it or whenever you want to switch to
another printer port. Your Macintosh will always print using the last
printer selected.
1. Select
2. Click your printer's icon and the FireWire port your printer is
3. Select the appropriate
4. Close the Chooser.
Chooser
connected to.
background printing on or off.
With background printing on, you can use your Macintosh while it
is preparing a document for printing. In order to use the EPSON
Monitor3 utility to manage print jobs, background printing must be
turned on.
from the Apple menu.
Background Printing
radio button to turn
Technical Specifications
IEEE 1394 Interface
Basic specifications
Data transfer method: Half-duplex Data/Strobe differential
serial
Synchronization method: IEEE 1394-1995 compliant
Encoding/decoding: IEEE 1394-1995 compliant
Compatible connectors: IEEE 1394-1995 compatible 6 contact
receptable
10
Page 13
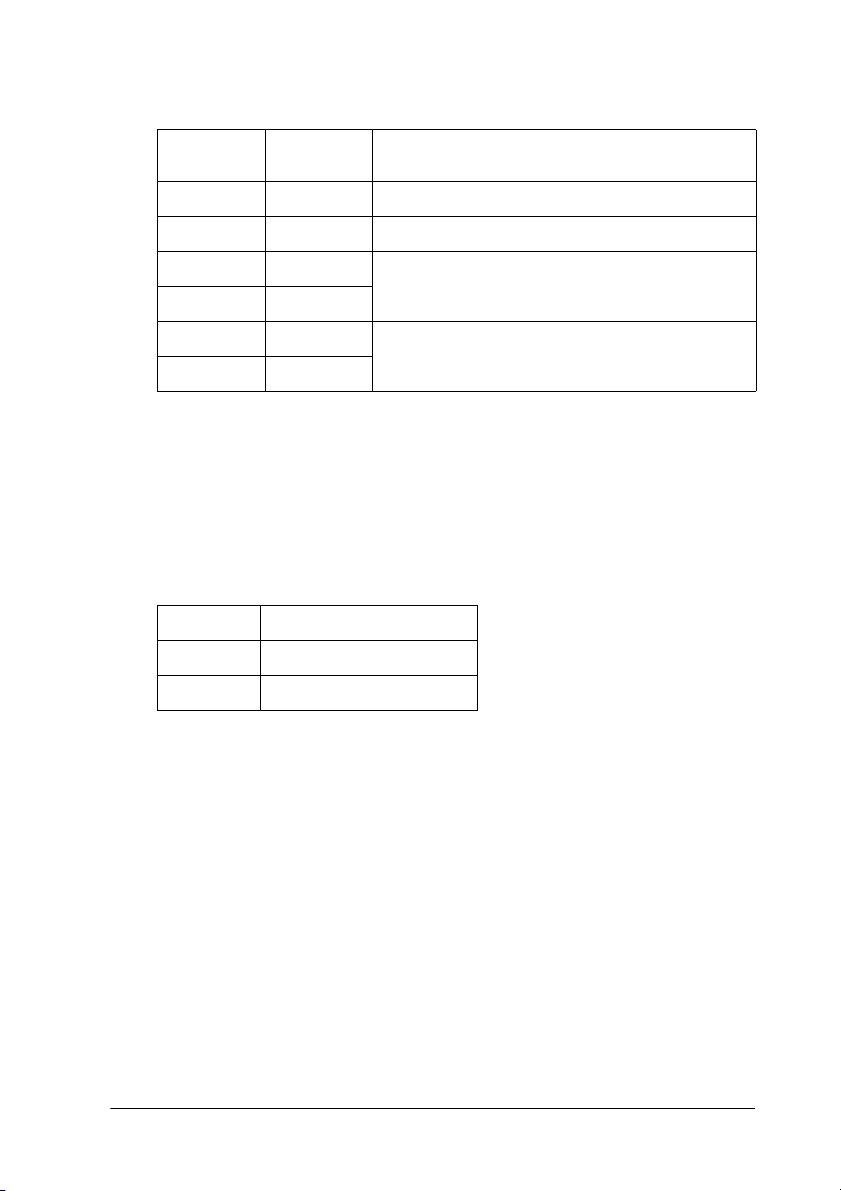
Connector pin signal layout
Pin
number
1 VP Cable power supply
2VGCable ground
3 TPB* Strobe during receipt, data during transmission
4TPB
5 TPA* Data during receipt, strobe during transmission
6TPA
Signal
name
Function
(differential pair)
(differential pair)
Power class
Power class code 100
No power supply from external sources
Fitted with a repeat function with bus power
Jumper
Jumper Default position
JP1 2–3
JP2 2–3
11
Page 14
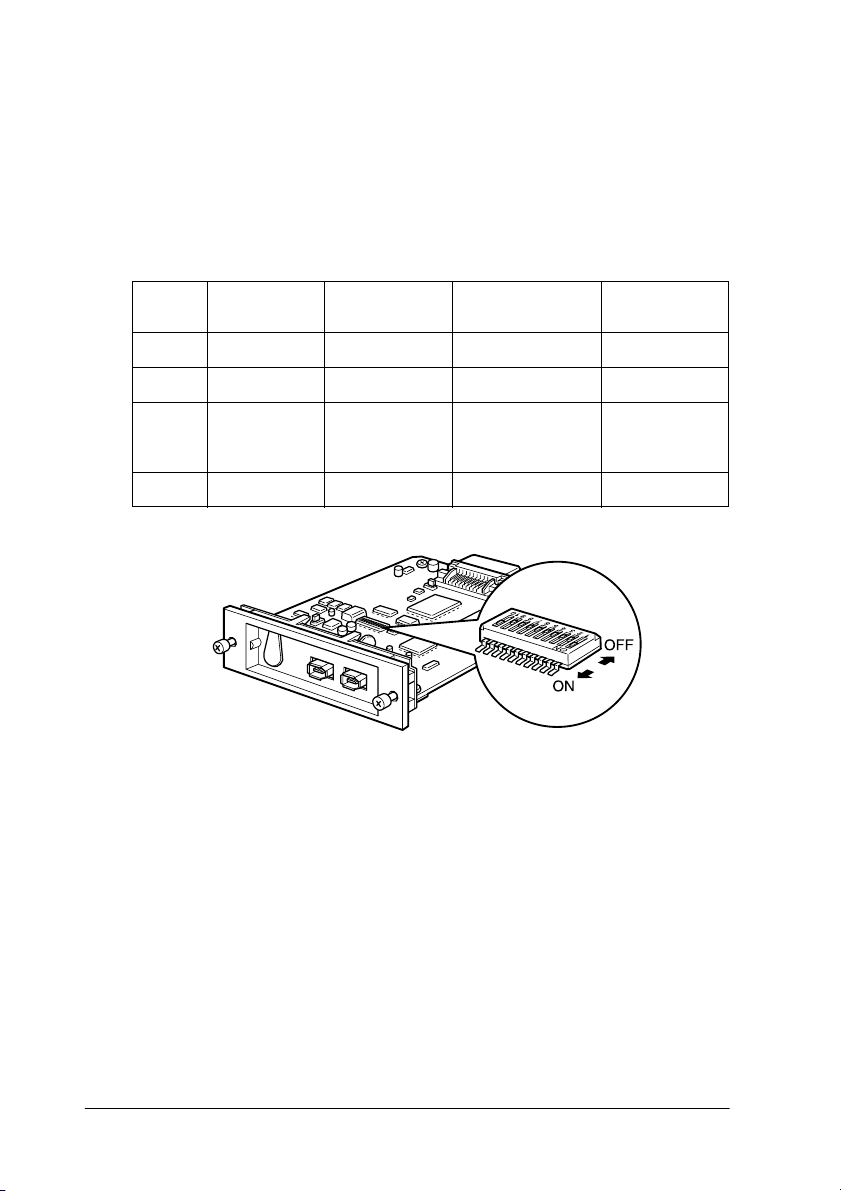
DIP switch
The IEEE 1394 operational mode is set with DIP switch 10. Change the
position of the DIP switch as needed.
Note:
DIP switch 10 should not have to be changed in normal use. It is used for the
Advanced mode under both Windows 2000/Me and Macintosh systems.
SW
No.
1 Reserved — — ON
2–8 Reserved — — OFF
9 Self test Self test
10 Mode Advanced Standard ON
Function ON OFF Factory
mode
Normal
operation
mode
setting
OFF
12
Page 15

Inhalt
Einführung . . . . . . . . . . . . . . . . . . . . . . . . . . . . . . . . . . . . . . . . . . . . . . . . . . .14
Leistungsmerkmale . . . . . . . . . . . . . . . . . . . . . . . . . . . . . . . . . . . . . . .14
Systemvoraussetzungen. . . . . . . . . . . . . . . . . . . . . . . . . . . . . . . . . . . . . . . .14
Erforderliche Systemumgebungen . . . . . . . . . . . . . . . . . . . . . . . . . .14
Einschränkungen . . . . . . . . . . . . . . . . . . . . . . . . . . . . . . . . . . . . . . . . .15
Drucker über die Schnittstellenkarte an
den Computer anschließen . . . . . . . . . . . . . . . . . . . . . . . . . . . . . . . . . . .16
Wenn Sie den Drucker direkt an
den Computer anschließen . . . . . . . . . . . . . . . . . . . . . . . . . . . . . .16
Wenn Sie den Drucker an einen Computer anschließen, an den
bereits andere IEEE 1394-Geräte angeschlossen sind . . . . . . . .17
Druckersoftware unter Windows installieren. . . . . . . . . . . . . . . . . . . . . .17
Installation unter Windows 2000. . . . . . . . . . . . . . . . . . . . . . . . . . . .18
Installation unter Windows Me. . . . . . . . . . . . . . . . . . . . . . . . . . . . .19
Sicherstellen, dass der IEEE 1394-Treiber korrekt
unter Windows Me bzw. 2000 installiert ist . . . . . . . . . . . . . . . .20
Druckersoftware auf einem Macintosh installieren . . . . . . . . . . . . . . . . .21
Installation auf einem Macintosh . . . . . . . . . . . . . . . . . . . . . . . . . . .21
Drucker in der Auswahl auswählen. . . . . . . . . . . . . . . . . . . . . . . . .22
Spezifikationen. . . . . . . . . . . . . . . . . . . . . . . . . . . . . . . . . . . . . . . . . . . . . . . .22
IEEE 1394-Schnittstellenkarte . . . . . . . . . . . . . . . . . . . . . . . . . . . . . .22
13
Page 16

Einführung
Dieses Handbuch liefert Informationen zur Verwendung der IEEE 1394Schnittstellenkarte Typ B bei Anschluss an einen Drucker.
Leistungsmerkmale
Diese Schnittstellenkarte entspricht dem IEEE 1394-Standard und weist
folgende Leistungsmerkmale auf:
❏
Die Schnittstellenkarte kann an jeden Computer, der mit einem von
Windows
kompatibel) ausgerüstet ist, angeschlossen werden.
❏
Die Schnittstellenkarte kann an Macintosh® FireWire®-Ports
angeschlossen werden. Der erforderliche Druckertreiber ist im
Lieferumfang des Druckers enthalten.
❏
IEEE 1394 unterstützt eine Datenübertragungsrate von maximal
400 Mbps, so dass ein schneller Datentransfer ermöglicht wird.
❏
Das Kabel kann bei eingeschaltetem Computer und Drucker
angeschlossen oder herausgezogen werden.
❏
In der "daisy-chain"-Konfiguration können mehrere IEEE 1394Geräte gleichzeitig angeschlossen werden. Sie können über die
Schnittstellenkarte Ihren Drucker als IEEE 1394-Gerät an den
Computer anschließen. Sie können aber auch andere IEEE 1394Geräte über dieselbe Schnittstellenkarte anschließen.
®
2000/Me unterstützten IEEE 1394-Port (OHCI-
Systemvoraussetzungen
Erforderliche Systemumgebungen
Windows 2000/Windows Me
❏
Computer mit vorinstalliertem Windows 2000 oder Windows Me
mit standardmäßiger Unterstützung von IEEE 1394-Ports (OHCIkompatibel).
14
Page 17

❏
Computer mit vorinstalliertem Windows 98 (zweite Ausgabe) mit
standardmäßiger Unterstützung von IEEE 1394-Ports (OHCIkompatibel), der auf Windows 2000 oder Windows Me aufgerüstet
wurde (der Hersteller muss die IEEE 1394-Unterstützung unter
Windows 2000 bzw. Windows Me sicherstellen).
Macintosh
Hardware: Power Macintosh G3/G4, standardmäßig mit dem
IEEE 1394 (FireWire)-Port ausgerüstet, für den Apple
Computer die Garantie übernimmt.
Oder Power Macintosh G3 mit einer IEEE 1394 (FireWire)PCI-Schnittstellenkarte ausgerüstet, für den Apple
Computer die Garantie übernimmt.
Einschränkungen
❏
Der IEEE 1394-Port verfügt über sechs Stifte. Stellen Sie sicher, dass
Sie ein geeignete Schnittstellenkabel mit jeweils sechs Stiften an
jedem Kabelende verwenden.
❏
Schließen Sie niemals zwei Computer gleichzeitig an diese
Schnittstelle an. Verbinden Sie z.B. nie ein Ende des
Schnittstellenkabels mit einem PC und das andere Ende mit einem
Macintosh.
Einschränkungen für Windows 2000 und Windows Me
❏
Schalten Sie während eines Druckvorgangs keine IEEE1394-Geräte
ein oder aus, und schließen Sie weder Kabel an noch ziehen Sie sie
heraus.
❏
Schalten Sie während eines Druckvorgangs den PC nicht in den
Energiesparmodus.
®
Diese Einschränkungen gelten nur für Macintosh
Schalten Sie während eines Druckvorgangs den Macintosh nicht in den
Energiesparmodus.
15
Page 18
Drucker über die Schnittstellenkarte an den Computer anschließen
Die Schnittstellenkarte verfügt über zwei Anschlüsse. Über den einen
Anschluss wird die Schnittstellenkarte an den Computer angeschlossen.
Verwenden Sie zum Anschließen ein geeignetes Kabel mit jeweils sechs
Stiften an jedem Ende. Um das Kabel anzuschließen, brauchen Sie den
Computer oder den Drucker nicht von der Stromversorgung zu trennen,
da es dem IEEE 1394-Standard entspricht.
Hinweis:
❏
Die IEEE-1394-Schnittstellenkarte wird im optionalen
Schnittstellensteckplatz 2 Ihres Druckers installiert.
❏
Ohne das oben aufgeführte Kabel können Sie den in diesem Handbuch
beschriebenen Anschlussvorgang nicht durchführen.
Wenn Sie den Drucker direkt an den Computer anschließen
1. Verbinden Sie einen Anschluss mit dem IEEE 1394 (FireWire)-Port
des Computers.
2. Verbinden Sie den anderen Anschluss mit einem der IEEE 1394Anschlüsse der in dem Drucker installierten Schnittstellenkarte (Sie
können einen beliebigen Anschluss auswählen).
Computer Drucker
Hinweis:
Schließen Sie niemals zwei Computer gleichzeitig an diese Schnittstelle an.
16
Page 19
Wenn Sie den Drucker an einen Computer anschließen, an
den bereits andere IEEE 1394-Geräte angeschlossen sind
Wenn an den Computer bereits andere IEEE 1394-Geräte angeschlossen
sind, schließen Sie den Drucker als letztes Glied in der Kette der
IEEE 1394-Geräte an.
Computer IEEE 1394-
Gerät
Drucker
Hinweis:
Verwenden Sie zum Anschluss der Schnittstelle an ein IEEE 1394-Gerät immer
ein geeignetes Kabel mit jeweils sechs Stiften an jedem Ende. Bei Verwendung
eines 6:4-Adapterkabels treten möglicherweise Betriebsstörungen auf.
Verbinden Sie das Kabel mit einem verfügbaren IEEE 1394-Anschluss,
wenn noch andere IEEE 1394-Geräte an den Drucker angeschlossen
werden sollen.
Computer Drucker IEEE 1394-Gerät
Druckersoftware unter Windows installieren
Gehen Sie folgendermaßen vor, um die Druckersoftware von der mit
Ihrem EPSON Stylus PRO 10000/10000CF mitgelieferten CD-ROM zu
installieren.
17
Page 20

Installation unter Windows 2000
1. Stellen Sie sicher, dass der Drucker ausgeschaltet und an Ihren
Computer angeschlossen ist.
2. Schalten Sie den Computer ein, und starten Sie Windows. Wenn das
Dialogfeld
angezeigt wird, klicken Sie auf
3. Legen Sie die mit Ihrem Drucker mitgelieferte CD-ROM mit der
Druckersoftware in das CD-ROM-Laufwerk ein. Das Dialogfeld zur
Installation wird angezeigt.
Wenn das Dialogfeld nicht angezeigt wird, klicken Sie auf
anschließend auf
Befehl
für die Laufwerkskennung Ihres CD-ROM-Laufwerks und kann
auch anders lauten.)
4. Wählen Sie im Dialogfeld zur Installation Ihren Drucker aus, und
klicken Sie anschließend auf den rechten Pfeil.
5. Klicken Sie auf den Menüpunkt zum Installieren der EPSONDruckersoftware und anschließend auf den rechten Pfeil. Klicken
Sie im angezeigten Dialogfeld auf OK, um die Installation der
Druckersoftware zu starten.
6. Schalten Sie den Drucker ein, wenn Sie dazu aufgefordert werden.
7. Wenn der Drucker unter Windows 2000 erkannt wird, wird das
Dialogfeld
die Schaltfläche
Neue Hardware gefunden
E:\SETUP
Ausführen
ein, und klicken Sie anschließend auf OK. (E steht
Neue Hardware gefunden
Weiter
. Geben Sie in die Befehlszeile den
.
Abbrechen
oder ein anderer Assistent
angezeigt. Klicken Sie auf
.
Start
und
Hinweis:
Wenn eine Fehlermeldung angezeigt wird, oder wenn das Dialogfeld Neue
Hardware
Windows 2000 nicht korrekt erkannt. Überprüfen Sie in diesem Fall die
Einstellungen für den IEEE 1394-Port unter Windows 2000, die
Kabelverbindungen und die Stromversorgung des Druckers.
8. Wählen Sie die Option
suchen (empfohlen)
Weiter
9. Aktivieren Sie das Kontrollkästchen
Wenn bereits ein Pfad angegeben ist, deaktivieren Sie das
Kontrollkästchen, und klicken Sie auf die Schaltfläche
gefunden
.
nicht angezeigt wird, wurde der Drucker unter
Nach dem besten Treiber für das Gerät
aus, und klicken Sie auf die Schaltfläche
18
Geben Sie eine Position an
Weiter
.
.
Page 21

10. Stellen Sie sicher, dass
angezeigt wird, und klicken Sie anschließend auf OK. (E steht für
die Laufwerkskennung Ihres CD-ROM-Laufwerks und kann auch
anders lauten.)
E:\10000 bzw. 10000CF\WIN2000
11. Stellen Sie sicher, dass der Titel des Dialogfelds
IEEE 1394 SBP2 Device
Schaltfläche
Hinweis:
Wenn eine Meldung angezeigt wird, dass der Drucker nicht korrekt
angeschlossen ist, klicken Sie nicht sofort auf die Schaltfläche
Wiederholen
und anschließend auf die Schaltfläche
12. Warten Sie, bis eine Meldung angezeigt wird, dass die
Treiberinstallation abgeschlossen ist, und klicken Sie anschließend
auf die Schaltfläche
13. Es wird eine Meldung angezeigt, dass die Einstellungen für den
Druckertreiber und den IEEE 1394-Port vollständig sind. Klicken Sie
auf die Schaltfläche OK.
14. Wenn alle Einstellungen vollständig sind, wird das ausgewählte
Druckersymbol im Fenster
Wenn die Installation abgeschlossen ist, vergewissern Sie sich, dass der
Treiber korrekt installiert ist. Nähere Informationen dazu erhalten Sie im
Abschnitt ”Sicherstellen, dass der IEEE 1394-Treiber korrekt unter
Windows Me bzw. 2000 installiert ist” auf Seite 20.
Weiter
. Klicken Sie zunächst auf die Schaltfläche
lautet, und klicken Sie anschließend auf die
.
Wiederholen
Fertigstellen
.
Drucker
angezeigt.
EPSON 1394 Printer
Fertigstellen
.
Installation unter Windows Me
1. Stellen Sie sicher, dass der Drucker ausgeschaltet und an Ihren
Computer angeschlossen ist.
2. Schalten Sie den Computer ein, und starten Sie Windows. Schließen
Sie alle geöffneten Anwendungen.
3. Legen Sie die mit Ihrem Drucker mitgelieferte CD-ROM mit der
Druckersoftware in das CD-ROM-Laufwerk ein. Das Dialogfeld zur
Installation wird angezeigt.
19
Page 22

Wenn das Dialogfeld nicht angezeigt wird, klicken Sie auf
anschließend auf
E:\SETUP
Befehl
für die Laufwerkskennung Ihres CD-ROM-Laufwerks und kann
auch anders lauten.)
4. Wählen Sie im Dialogfeld zur Installation Ihren Drucker aus, und
klicken Sie anschließend auf den rechten Pfeil.
5. Klicken Sie nacheinander auf den Menüpunkt zum Installieren der
EPSON-Druckersoftware, auf den rechten Pfeil und auf OK. Das
Installationsprogramm kopiert die erforderlichen Dateien auf Ihre
Festplatte.
6. Folgen Sie den Anweisungen am Bildschirm, und schalten Sie den
Drucker ein. Das Installationsprogramm installiert den korrekten
Treiber. Um die Installation fortzusetzen, folgen Sie den
Anweisungen am Bildschirm.
7. Wenn eine Meldung angezeigt wird, dass die Installation beendet
ist, klicken Sie auf OK , um die Installation abzuschließen.
Ausführen
ein, und klicken Sie anschließend auf OK. (E steht
. Geben Sie in die Befehlszeile den
Start
und
Sicherstellen, dass der IEEE 1394-Treiber korrekt unter Windows Me bzw. 2000 installiert ist
Wenn die Installation der Druckersoftware abgeschlossen ist,
vergewissern Sie sich, dass der IEEE 1394-Treiber korrekt installiert ist.
1. Klicken Sie auf
Drucker
auf
Drucker im Ordner Drucker angezeigt wird.
2. Klicken Sie auf das Symbol für Ihren Drucker und anschließend im
Datei
Menü
3. Klicken Sie auf den Tab
dass im Dropdown-Listenfeld mit den Anschlüssen für die
Druckausgabe
Hinweis:
Wenn der korrekte Anschluss nicht angezeigt wird, schlagen Sie im Kapitel
"Fehlerbehebung" im Online-Benutzerbehandbuch nach.
Start
, zeigen Sie auf
. Vergewissern Sie sich, dass das Symbol für Ihren
Eigenschaften
auf
Details
EP1394_xxx
ausgewählt ist.
Einstellungen
.
Anschluss
oder
, und klicken Sie
. Stellen Sie sicher,
20
Page 23

Druckersoftware auf einem Macintosh installieren
Installation auf einem Macintosh
Achtung
c
Gehen Sie folgendermaßen vor, um die Druckersoftware zu installieren.
1. Stellen Sie sicher, dass Ihr Macintosh und Ihr Drucker angeschlosse n
2. Schalten Sie Ihren Computer ein. Schließen Sie alle geöffneten
3. Legen Sie die mit Ihrem Drucker mitgelieferte CD-ROM mit der
Deaktivieren Sie alle Anti-Viren-Programme, bevor Sie die Installation
der Druckersoftware starten.
und eingeschaltet sind.
Anwendungen.
Druckersoftware in das CD-ROM-Laufwerk ein. Der Inhalt der CDROM mit der Druckersoftware wird automatisch angezeigt.
4. Doppelklicken Sie auf
STYLUS PRO 10000CF
Installation der Druckersoftware.
5. Wenn ein einzelnes Symbol
doppelklicken Sie darauf. Wenn mehrere Ordner mit Symbolen für
verschiedene Sprachen angezeigt werden, doppelklicken Sie auf
den Ordner der gewünschten Sprache und anschließend auf das
darin enthaltene Symbol
6. Klicken Sie auf dem Startbildschirm auf
zur Installation wird angezeigt.
7. Um die Druckersoftware von der mit dem Drucker mitgelieferten
CD-ROM zu installieren, stellen Sie sicher, dass das Laufwerk, auf
dem Sie die Software installieren wollen, im Feld
angezeigt wird. Klicken Sie anschließend in das Feld
8. Wenn eine Meldung angezeigt wird, dass die Installation
abgeschlossen ist, klicken Sie in das Feld
Macintosh neu zu starten.
EPSON STYLUS PRO 10000
und anschließend auf den Ordner zur
Aktualisierer
Aktualisierer
angezeigt wird,
.
Fortfahren.
Neustart
EPSON
bzw.
Das Dialogfeld
Zielvolume
Installieren
, um den
21
.
Page 24

Drucker in der Auswahl auswählen
Wenn Sie die Druckersoftware auf dem Macintosh installiert haben,
müssen Sie Ihren Drucker in der Auswahl auswählen. Sie müssen den
Drucker auswählen, wenn Sie den Drucker zum ersten Mal verwenden
oder wenn Sie zu einem anderen Drucker wechseln möchten. Zum
Drucken wird immer der zuletzt ausgewählte Drucker angesteuert.
1. Öffnen Sie die
2. Klicken Sie auf das Symbol für Ihren Drucker, und wählen Sie
anschließend den FireWire-Anschluss, an den Ihr Drucker
angeschlossen ist, aus.
3. Aktivieren Sie das entsprechende Optionsfeld für den
Hintergrunddruck
auszuschalten.
Ist der Hintergrunddruck eingeschaltet, können Sie auf Ihrem
Macintosh weiterarbeiten, während er im Hintergrund ein
Dokument zum Ausdrucken vorbereitet. Der Hintergrunddruck
muss eingeschaltet sein, um mit dem Utility EPSON Monitor 3
Druckaufträge verwalten zu können.
4. Schließen Sie die
Auswahl
über das Apple-Menü.
, um den Hintergrunddruck ein- bzw.
Auswahl
.
Spezifikationen
IEEE 1394-Schnittstellenkarte
llgemeine Spezifikationen
A
Datenübertragungsmethode: Halbduplex Daten/Strobe symmetrisch
seriell
Synchronisationsmethode: IEEE 1394-1995-kompatibel
Codierung/Decodierung: IEEE 1394-1995-kompatibel
Kompatible Anschlüsse: IEEE 1394-1995- kompatibel 6 Stifte
22
Page 25

Stift-Belegung
StiftNummer
1 VP Kabel-Stromversorgung
2 VG Kabel-Masse
3 TPB* Strobe während des Empfangs, Daten während
4TPB
5 TPA* Daten während des Empfangs, Strobe während
6TPA
SignalName
Funktion
der Übertragung (symmetrisches Paar)
der Übertragung (symmetrisches Paar)
Leistungsklasse
Leistungsklassen-Code 100
Keine externe Stromzufuhr
Mit Repeat-Funktion mit Bus-Leistung ausgerüstet
Jumper
Jumper Standardposition
JP1 2–3
JP2 2–3
23
Page 26

DIP Schalter
Der IEEE 1394-Betriebsmodus wird über den DIP-Schalter 10 eingestellt.
Stellen Sie den DIP-Schalter in die erforderliche Position.
Hinweis:
Normalerweise muss die Position des DIP-Schalters 10 nicht geändert werden.
Er wird unter Windows 2000/ Windows Me und auf Macintosh-Systemen auf
EIN für den erweiterten Modus gestellt.
Schalter
- Nr
1keine
2–8 keine
9 Selbsttest Selbsttest-
10 Modus Erweitert Standard EIN
Funktion EIN AUS Werkseitige
Funktion
Funktion
—— EIN
—— AUS
modus
Nomaler
Betriebs-modus
Einstellung
AUS
24
Page 27

Table des matières
Introduction . . . . . . . . . . . . . . . . . . . . . . . . . . . . . . . . . . . . . . . . . . . . . . . . . .26
Fonctions. . . . . . . . . . . . . . . . . . . . . . . . . . . . . . . . . . . . . . . . . . . . . . . .26
Configuration requise . . . . . . . . . . . . . . . . . . . . . . . . . . . . . . . . . . . . . . . . . .26
Environnements informatiques requis. . . . . . . . . . . . . . . . . . . . . . .26
Limites. . . . . . . . . . . . . . . . . . . . . . . . . . . . . . . . . . . . . . . . . . . . . . . . . .27
Connexion à un ordinateur . . . . . . . . . . . . . . . . . . . . . . . . . . . . . . . . . . . . .28
Connexion directe de l’imprimante et de l’ordinateur. . . . . . . . . .28
Connexion de l’imprimante à un ordinateur avec
d’autres équipements IEEE 1394 . . . . . . . . . . . . . . . . . . . . . . . . .29
Installation du logiciel d'impression sous Windows . . . . . . . . . . . . . . . .29
Installation sous Windows 2000 . . . . . . . . . . . . . . . . . . . . . . . . . . . .30
Installation sous Windows Me . . . . . . . . . . . . . . . . . . . . . . . . . . . . .31
Vérification de l'installation du pilote de la carte IEEE 1394
sous Windows Me et 2000. . . . . . . . . . . . . . . . . . . . . . . . . . . . . . .32
Installation du logiciel d'impression sous Macintosh . . . . . . . . . . . . . . .33
Installation sous Macintosh . . . . . . . . . . . . . . . . . . . . . . . . . . . . . . . .33
Sélection de l'imprimante dans le Sélecteur. . . . . . . . . . . . . . . . . . .34
Caractéristiques techniques . . . . . . . . . . . . . . . . . . . . . . . . . . . . . . . . . . . . .34
Interface IEEE 1394 . . . . . . . . . . . . . . . . . . . . . . . . . . . . . . . . . . . . . . .34
25
Page 28

Introduction
Ce guide décrit la procédure d'utilisation d'une carte d'interface de type
B IEEE 1394 installée dans une imprimante.
Fonctions
Cette interface est conforme à la norme de connexion IEEE 1394 et
présente les caractéristiques suivantes :
❏
Elle peut être utilisée sur des ordinateurs munis de Windows®2000
ou Windows Millenium Edition et équipés d'un port IEEE 1394
(conforme à OHCI).
❏
Elle peut être connectée aux ports Macintosh® FireWire®. Le pilote
d'impression requis est fourni avec l'imprimante.
❏
Avec un débit maximal de 400 Mbps, le bus externe IEEE 1394
permet de transférer des données à grande vitesse.
❏
Le câble peut être raccordé ou débranché sans qu’il soit nécessaire
de mettre l’imprimante ou l’ordinateur hors tension.
❏
Plusieurs équipements IEEE 1394 peuvent être connectés
simultanément en chaîne. De la même manière que vous utilisez
l’imprimante munie de la carte d’interface comme un périphérique
connecté selon IEEE 1394, vous pouvez établir une connexion avec
d’autres équipements IEEE 1394 en utilisant la même carte
d’interface.
Configuration requise
Environnements informatiques requis
Windows 2000/Windows Me
❏
Un ordinat eu r é qu ip é d e W in do ws 2000/Me, et d’un port IEEE 13 94
en standard (conforme à OHCI).
26
Page 29

❏
Un ordinateur dont le système d’exploitation Windows 98 deuxième
édition a été réactualisé vers Windows 2000/Me et équipé d’un port
IEEE 1394 en standard (conforme à OHCI [le fournisseur doit vous
assurer du bon fonctionnement du port IEEE 1394 sous Windows
2000/Me]).
Macintosh
Matériel: Un micro-ordinateur Power Macintosh G3 équipé d’un
port IEEE 1394 (FireWire) en standard, et dont le
fonctionnement est garanti par Apple
micro-ordinateur Power Macintosh G3 doté d’une carte
IEEE 1394 (FireWire) PCI, et dont le fonctionnement est
également garanti par Apple Computer.
®
Computer ; ou un
Limites
❏
Le port IEEE 1394 utilise un connecteur standard avec six broches.
Assurez-vous de bien utiliser un câble approprié à 6 broches pour
raccorder la carte d'interface.
❏
Veillez à ne pas raccorder simultanément deux ordinateurs à la carte
d’interface. Ne raccordez pas, par exemple, un ordinateur équipé de
Windows sur l’une des extrémités du câble, et un Macintosh sur
l’autre.
Restrictions s’appliquant à Windows 2000/Me uniquement
❏
Ne mettez pas d’autres équipements IEEE 1394 sous/hors tension
ou ne connectez/déconnectez pas de câbles pendant l’impression.
❏
Ne mettez pas Windows en mode veille ou veille prolongée pendant
l’impression.
Restrictions s’appliquant à Macintosh uniquement
Ne mettez pas Macintosh en mode veille pendant l’impression.
27
Page 30

Connexion à un ordinateur
La carte d’interface est équipée de deux ports. Le premier port sert à
connecter la carte à l’ordinateur, et le second à connecter en chaîne
d’autres équipements IEEE 1394 à l’ordinateur. Utilisez un câble
approprié à 6 broches ou un câble équivalent pour réaliser cette
connexion. Cette connexion ne nécessite pas de mettre l’ordinateur ou
l’imprimante hors tension, car les périphériques conformes à la norme
IEEE 1394 peuvent être connectés sans mettre l’ordinateur ou
l’imprimante hors tension.
Remarque :
❏
La carte d'interface IEEE 1394 est reliée à l'emplacement 2 pour carte
d'interface optionnelle de votre imprimante.
❏
Vous ne pourrez pas effectuer les procédures de connexion fournies dans ce
manuel si vous n'avez pas le câble mentionné ci-dessus.
Connexion directe de l’imprimante et de l’ordinateur
1. Enfichez le connecteur du câble sur le port IEEE 1394 de l’ordinateur
(port FireWire).
2. L’autre câble peut être raccordé à l’un ou l’autre des ports IEEE 1394
de la carte d’interface installée dans l’imprimante (n’importe quel
port peut être utilisé).
Micro-ordinateur Imprimante
Remarque :
Veillez à ne pas raccorder simultanément deux ordinateurs à la carte d’interface.
28
Page 31

Connexion de l’imprimante à un ordinateur avec d’autres
équipements IEEE 1394
Si des équipements IEEE 1394 sont déjà connectés à l’ordinateur,
raccordez l’imprimante en tant que dernier équipement IEEE 1394 de la
chaîne.
Micro-ordinateur Equipement IEEE 1394 Imprimante
Remarque :
Utilisez toujours un câble approprié à 6 broches ou un connecteur standard à
6 broches, lors du raccordement de la carte d'interface à un équipement
IEEE 1394. L’utilisation d’un câble adaptateur (6 broches/ 4 broches) ne
garantirait pas le bon fonctionnement des opérations.
Si vous êtes amené à ajouter des équipements IEEE 1394
supplémentaires à l’imprimante, branchez le câble à un port IEEE 1394
inutilisé.
Micro-ordinateur Imprimante Equipement IEEE 1394
Installation du logiciel d'impression sous Windows
Pour installer le logiciel d'impression inclus sur le CD-ROM “Pilotes
d'impression EPSON STYLUS PRO 10000/10000CF” fourni avec
l'imprimante, procédez comme suit.
29
Page 32

Installation sous Windows 2000
1. Vérifiez que l'imprimante est hors tension et raccordée à
l'ordinateur.
2. Mettez votre ordinateur sous tension et démarrez Windows. Si
l'écran Nouveau matériel détecté ou tout autre assistant apparaît,
cliquez sur
3. Insérez le CD-ROM livré avec votre imprimante dans le lecteur
correspondant. La boîte de dialogue d'installation s'affiche.
Annuler
.
Si elle n'apparaît pas, cliquez sur
D:\SETUP
tapez
lecteur de CD-ROM soit D. Sinon, utilisez la lettre appropriée.)
4. Sélectionnez votre imprimante, puis cliquez sur la flèche droite dans
la boîte de dialogue d'installation.
5. Cliquez sur
droite. Cliquez ensuite sur OK dans la boîte de dialogue qui apparaît
pour lancer l'installation du logiciel d'impression.
6. Mettez votre imprimante sous tension lorsque le programme
d’installation vous le demande.
7. Lorsque Windows 2000 détecte l’imprimante, l’assistant de
Détection d’un Nouveau Matériel
Remarque :
S’il y a un message d’erreur, ou si l’assistant de Détection d’un Nouveau
Matériel ne s’affiche pas, l’imprimante n’a pas été détectée par
Windows 2000. Vérifiez alors les paramètres du port IEEE 1394 sous
Windows 2000, les raccordements de votre câble, et la mise sous tension de
votre imprimante.
8. Sélectionnez
mon installation (conseillé)
et cliquez sur OK (en supposant que la lettre de votre
Installation du pilote et des utilitaires
Recherche d’un pilote d’impression approprié à
Démarrer
s’affiche. Cliquez sur
, puis cliquez sur
Exécuter
et sur
, puis sur la flèche
Suivant
. Puis
Suivant
.
.
9. Sélectionnez
30
Précisez un emplacement
différent est déjà sélectionné, désactivez-le, et cliquez sur
. Si un emplacement
Suivant
.
Page 33

10. Vérifiez que
cliquez sur OK (en supposant que la lettre de votre lecteur de
CD-ROM soit D. Sinon, utilisez la lettre appropriée.)
D:\10000 (ou 10000CF)\WIN2000
s'affiche, puis
11. Vérifiez que la boîte de dialogue affiche
Périphérique IEEE 1394 SBP2
Remarque :
Si un message s’affiche pour vous prévenir que l’imprimante n’est pas
raccordée correctement, ne cliquez pas sur
Cliquez d’abord sur
12. Attendez le message vous signalant la fin de l’installation du pilote
d’impression, puis cliquez sur
13. Un message vous indiquera alors que le pilote d’impression et les
paramètres du port IEEE 1394 sont définis. Cliquez sur OK.
14. Tous les paramètres étant définis, l’icône de l’imprimante s’affiche
dans le dossier Imprimantes.
Une fois l'installation terminée, vérifiez que le pilote a été installé
correctement. Pour plus d'informations, reportez-vous à la section
“Vérification de l'installation du pilote de la carte IEEE 1394 sous
Windows Me et 2000”, à la page 32.
Terminer
et cliquez sur
, puis sur
Terminé
Imprimante EPSON 1394,
Suivant
Réessayer
Réessayer
.
.
immédiatement.
.
Installation sous Windows Me
1. Vérifiez que l'imprimante est hors tension et raccordée à
l'ordinateur.
2. Mettez votre ordinateur sous tension et démarrez Windows. Si des
applications sont en cours, quittez-les.
3. Insérez le CD-ROM livré avec votre imprimante dans le lecteur
correspondant. La boîte de dialogue d'installation s'affiche.
Si elle n'apparaît pas, cliquez sur
D:\SETUP
tapez
lecteur de CD-ROM soit D. Sinon, utilisez la lettre appropriée.)
et cliquez sur OK (en supposant que la lettre de votre
Démarrer
et sur
Exécuter
. Puis
31
Page 34

4. Sélectionnez votre imprimante dans la boîte de dialogue
d'installation, puis cliquez sur la flèche droite.
5. Cliquez sur
droite et ensuite sur OK. Le programme d'installation copie les
fichiers appropriés sur votre disque dur.
6. Suivez les instructions qui s'affichent à l'écran et mettez
l'imprimante sous tension. Le programme d'installation installe le
pilote approprié. Continuez l'installation en suivant les instructions
qui s'affichent.
7. Un message vous indiquera que l'installation est terminée. Cliquez
sur OK pour terminer la procédure.
Installation du pilote et des utilitaires
, puis sur la flèche
Vérification de l'installation du pilote de la carte IEEE 1394 sous Windows Me et 2000
Une fois l'installation du logiciel d'impression terminée, vérifiez que le
pilote de la carte IEEE 1394 est correctement installé.
1. Cliquez sur
Imprimantes
dans le dossier Imprimantes.
2. Cliquez sur l'icône de votre imprimante, puis choisissez
dans le menu Fichier.
Démarrer
. Vérifiez que l'icône de votre imprimante apparaît
, pointez sur
Paramètres
et cliquez sur
Propriétés
3. Cliquez sur l'onglet Détails ou Ports. Vérifiez que EP1394_xxx est
sélectionné dans la zone de liste Impression sur les ports suivants.
Remarque:
Si le port affiché n'est pas correct, reportez-vous à la section “Dépannage”
du Guide de référence.
32
Page 35

Installation du logiciel d'impression sous Macintosh
Installation sous Macintosh
Attention
c
Pour installer le logiciel d'impression, procédez comme suit.
1. Assurez-vous que le Macintosh et l'imprimante sont connectés et
2. Mettez l'ordinateur sous tension. Si des applications sont en cours,
3. Insérez le CD-ROM livré avec votre imprimante dans le lecteur
Désactivez tous les programmes de protection anti-virus avant
d'installer votre logiciel d'impression.
mis sous tension.
quittez-les.
correspondant. Le contenu du CD-ROM avec le logiciel
d'impression EPSON s'affiche automatiquement.
4. Double-cliquez sur
PRO 10000CF
utilitaires.
5. Si une seule icône
plusieurs dossiers apparaissent avec des icônes d'installation
correspondant à différentes langues, double-cliquez sur le dossier
correspondant à votre langue, puis cliquez sur l'icône
qu'il contient.
6. Lorsque l'écran d'accueil s'affiche, cliquez sur
de dialogue d'installation s'affiche.
7. Pour installer le logiciel d'impression inclus sur le CD-ROM, vérifiez
que la zone de destination affiche le lecteur correspondant, puis
cliquez sur
8. Lorsqu'un message vous informe que l'installation est terminée,
cliquez sur
Installer
Redémarrer
EPSON STYLUS PRO 10000
, puis sur le dossier Installation du pilote et des
Installation
.
apparaît, double-cliquez dessus. Si
pour redémarrer votre ordinateur.
EPSON STYLUS
ou
Installation
Continuer
. La zone
33
Page 36

Sélection de l'imprimante dans le Sélecteur
Une fois le logiciel d'impression installé sur le Macintosh, ouvrez le
Sélecteur pour sélectionner votre imprimante. Cette sélection ne doit être
effectuée qu'à la première utilisation de l'imprimante ou lorsque vous
souhaitez en utiliser une autre. Votre Macintosh utilise toujours la
dernière imprimante sélectionnée.
1. Choisissez
2. Cliquez sur l'icône de votre imprimante, puis sur le port FireWire
auquel elle est connectée.
3. Sélectionnez le cercle d'option
approprié pour activer ou désactiver cette option.
Lorsque l'option Impression en tâche de fond est activée, vous
pouvez continuer à utiliser votre Macintosh pendant qu'il prépare
l'impression d'un document. Elle doit être activée pour que
l'utilitaire EPSON Monitor3 puisse gérer les travaux d'impression.
4. Fermez le Sélecteur.
Sélecteur
dans le menu Pomme.
Impression en tâche de fond
Caractéristiques techniques
Interface IEEE 1394
Spécifications principales
Mode de transfert des
données :
En mode semi-duplex avec signal strobe,
par paire de fils différentielle
Mode de synchronisation : Conforme à IEEE 1394-1995
Codage/décodage : Conforme à IEEE 1394-1995
Connecteurs compatibles : Conforme à IEEE 1394-1995, 6 broches de
réception.
34
Page 37

Disposition des broches des connecteurs et signaux correspondants
Numéro
de
broche
1 VP Alimentation électrique du câble
2VGMise à la masse du câble
3 TPB* Signal strobe durant la réception, données
4TPB
5 TPA* Données durant la réception, signal strobe
6TPA
Nom du
signal
Fonction
durant la transmission (paire de fil s différentielle)
durant la transmission (paire de fil s différentielle)
Classe de gestion de l’alimentation
Classe de gestion de l’alimentation code 100
Aucune alimentation électrique en provenance de sources externes
Doté d’une fonction de répétition avec alimentation gérée par bus
Cavalier
Cavalier Réglage par défaut
JP1 2–3
JP2 2–3
35
Page 38

Minirupteur DIP
Le mode de fonctionnement IEEE 1394 est établi à l’aide du minirupteur
DIP 10. Modifiez la position de ce minirupteur DIP selon vos besoins.
Remarque :
En règle générale, la position du minirupteur DIP 10 ne doit pas être modifiée.
Il est utilisé pour le mode Avancé, à la fois sous Windows 2000/Me et sous
Macintosh.
N°
DIP
1 Réservé — — Activé (ON)
2–8 Réservé — — Désactivé
9Test
10 Mode Plus
Fonction Activé (ON) Désactivé (OFF) Réglages
automatique
Mode de test
automatique
d’options
Mode de
fonctionnement
normal
Norme Activé (ON)
d’usine
(OFF)
Désactivé
(OFF)
36
Page 39

Contenido
Introducción . . . . . . . . . . . . . . . . . . . . . . . . . . . . . . . . . . . . . . . . . . . . . . . . . .38
Características . . . . . . . . . . . . . . . . . . . . . . . . . . . . . . . . . . . . . . . . . . .38
Requisitos del sistema. . . . . . . . . . . . . . . . . . . . . . . . . . . . . . . . . . . . . . . . . .38
Entornos informáticos requeridos. . . . . . . . . . . . . . . . . . . . . . . . . . .38
Limitaciones . . . . . . . . . . . . . . . . . . . . . . . . . . . . . . . . . . . . . . . . . . . . .39
Conectar al ordenador. . . . . . . . . . . . . . . . . . . . . . . . . . . . . . . . . . . . . . . . . .40
Conectar la impresora directamente al ordenador . . . . . . . . . . . . .40
Conectar la impresora al ordenador con
otros dispositivos IEEE 1394. . . . . . . . . . . . . . . . . . . . . . . . . . . . .41
Instalar el software de la impresora en Windows . . . . . . . . . . . . . . . . . .41
Instalar en Windows 2000 . . . . . . . . . . . . . . . . . . . . . . . . . . . . . . . . .42
Instalar en Windows Me. . . . . . . . . . . . . . . . . . . . . . . . . . . . . . . . . . .43
Comprobar que el controlador IEEE 1394 está instalado
correctamente en Windows Me y 2000 . . . . . . . . . . . . . . . . . . . .44
Instalar el software de la impresora en el Macintosh. . . . . . . . . . . . . . . .45
Instalar en el Macintosh . . . . . . . . . . . . . . . . . . . . . . . . . . . . . . . . . . .45
Seleccionar la impresora desde el Selector. . . . . . . . . . . . . . . . . . . .46
Especificaciones técnicas. . . . . . . . . . . . . . . . . . . . . . . . . . . . . . . . . . . . . . . .46
Interface IEEE 1394 . . . . . . . . . . . . . . . . . . . . . . . . . . . . . . . . . . . . . . .46
37
Page 40

Introducción
Este manual explica cómo utilizar la tarjeta de interface Tipo B IEEE 1394
que se incluye con la impresora.
Características
Este interface cumple con el estándar IEEE 1394 y dispone de las
siguientes funciones:
❏
Este producto puede utilizarse en ordenadores con un puerto
IEEE 1394 (compatible con OHCI), soportado por Windows
Windows Millenium Edition.
❏
Se puede conectar a puertos FireWire® del Macintosh®. El
controlador de impresora requerido se incluye con la impresora.
❏
Con la IEEE 1394 puede conseguir una transferencia de datos a alta
velocidad; ésta soporta un máximo de transferencia de datos de 400
Mbps.
❏
El cable puede conectarse y desconectarse sin desactivar el
ordenador ni la impresora.
❏
Los dispositivos IEEE 1394 múltiples pueden conectarse
simultáneamente en una configuración de conexión en cadena.
Además de conectar la impresora al ordenador como un dispositivo
IEEE 1394 a través de la tarjeta de interface, también podrá utilizar
la misma tarjeta de interface para conectar otros dispositivos
IEEE 1394.
®
2000 o
Requisitos del sistema
Entornos informáticos requeridos
Windows 2000/Windows Me
❏
Ordenadores con Windows 2000/Me preinstalado, con soporte
estándar para el puerto IEEE 1394 (compatible con OHCI).
38
Page 41

❏
Ordenador actualizado a partir de Windows 98 Second Edition
preinstalado con soporte estándar para el puerto IEEE 1394
(compatible con OHCI) a Windows 2000/Me (el fabricante debe
garantizar el funcionamiento de IEEE 1394 en Windows 2000/Me).
Macintosh
Hardware: Power Macintosh G3/G4 con el puerto IEEE 1394
(FireWire) como componente estándar, con
funcionamiento garantizado por Apple
Power Macintosh G3 con tarjeta PCI IEEE 1394 (FireWire),
con funcionamiento garantizado por Apple Computer.
Limitaciones
❏
El puerto IEEE 1394 utiliza un conector estándar con seis contactos.
Compruebe que utiliza el cable de 6 contactos adecuado para la
conexión de interface.
❏
No conecte dos ordenadores simultáneamente a este interface. Por
ejemplo, nunca conecte un equipo Windows a un extremo del cable
y un Macintosh en el otro.
Restricciones aplicadas sólo a Windows 2000/Me
®
Computer o
❏
No active/desactive otros dispositivos IEEE1394 ni
conecte/desconecte cables durante la impresión.
❏
No ajuste Windows en Reposo ni en Hibernar durante la impresión.
Restricciones aplicables sólo a Macintosh
No ajuste el Macintosh en el modo de Reposo durante la impresión.
39
Page 42

Conectar al ordenador
La tarjeta de interface dispone de dos conectores. Uno se utiliza para
conectar la tarjeta al ordenador, y el otro para conectar otros dispositivos
IEEE 1394 en una conexión en cadena. Utilice un cable de 6 contactos
adecuado o un cable equivalente al realizar la conexión. El cable puede
conectarse sin desactivar la alimentación del ordenador o de la
impresora, ya que cumple con el estándar IEEE 1394.
Nota:
❏
La tarjeta de interface IEEE 1394 está instalada en la ranura 2 de la tarjeta
de interface opcional de la impresora.
❏
No podrá realizar los procedimientos de conexión descritos en este manual
sin el cable mencionado anteriormente.
Conectar la impresora directamente al ordenador
1. Conecte el conector del cable al puerto IEEE 1394 (puerto FireWire)
del ordenador.
2. El otro cable puede conectarse a cualquiera de los puertos IEEE 1394
de la tarjeta de interface instalada en la impresora (puede utilizar
cualquier puerto).
Ordenador Impresora
Nota:
No conecte dos ordenadores simultáneamente a este interface.
40
Page 43

Conectar la impresora al ordenador con otros dispositivos
IEEE 1394
Si los dispositivos IEEE 1394 ya están conectados al ordenador, conecte
la impresora de modo que sea el último dispositivo IEEE 1394 de la
cadena.
Ordenador Dispositivo IEEE 1394 Impresora
Nota:
Al conectar este interface a un dispositivo 1394, deberá utilizar siempre un cable
de 6 contactos adecuado o un conector estándar de 6 contactos equivalente. No
puede garantizarse un funcionamiento normal con un cable conversor de 6-4.
Conecte el cable a un conector IEEE 1394 libre si va a conectar
dispositivos IEEE 1394 adicionales a la impresora.
Ordenador Impresora Dispositivo IEEE 1394
Instalar el software de la impresora en Windows
Para instalar el software incluido en el CD-ROM que se incluye con la
impresora, siga las instrucciones descritas a continuación.
41
Page 44

Instalar en Windows 2000
1. Compruebe que la impresora esté desactivada y conectada al
ordenador.
2. Active el ordenador e inicie Windows. Si aparece la pantalla Nuevo
hardware encontrado o de cualquier otro Asistente, haga clic en
Cancelar
3. Inserte el CD del software de la impresora (incluido) en la unidad
de CD-ROM. Aparece el cuadro de diálogo del
.
Instalador
.
Si no aparece el cuadro de diálogo, haga clic en
Escriba
unidad de CD-ROM es D. Si es otra unidad, cambie la letra.)
4. Seleccione la impresora y haga clic en la flecha de la derecha del
cuadro de diálogo
5. Haga clic en
en la flecha derecha y en
aparece para iniciar la instalación del software de la impresora.
6. Active la impresora cuando se lo pida el programa de instalación.
7. Cuando Windows 2000 detecta la impresora aparece el
para Nuevo hardware encontrado
Nota:
Si aparece un mensaje de error o no se visualiza el
hardware encontrado
la impresora correctamente. En este caso, compruebe los ajustes del puerto
IEEE 1394 de Windows 2000, las conexiones de cable y la alimentación de
la impresora.
8. Seleccione
dispositivo. (recomendado)
D:\EPSETUP
Instalar utilidades del controlador de la impresora
Buscar un controlador apropiado para mi
y haga clic en
Instalador
Aceptar
, significa que Windows 2000 no ha detectado
Aceptar
.
en el cuadro de diálogo que
. Haga clic en
y haga clic en
Inicio
. (asumiendo que la
Asistente para Nuevo
Siguiente
Ejecutar
y
Asistente
Siguiente
.
.
.
,
9. Seleccione
42
Especificar una ubicación
seleccionada, deselecciónela y haga clic en
. Si ya existe una ubicación
Siguiente
.
Page 45

10. Compruebe que se visualiza
haga clic en
Si es otra unidad, cambie la letra.)
Aceptar
. (asumiendo que la unidad de CD-ROM es D.
D:\10000 (o 10000CF)\WIN2000
y
11. Compruebe que el cuadro de diálogo muestra
SBP2 de la impresora EPSON 1394
Nota:
Si el sistema muestra un mensaje que indica que la impresora no se ha
conectado correctamente, no haga clic inmediatamente en
Primero haga clic en el botón
12. Espere que aparezca un mensaje indicando que la instalación del
controlador se ha completado y haga clic en
13. Se visualizará un mensaje diciendo que se han completado la
instalación del controlador de la impresora y los ajustes del puerto
IEEE 1394. Haga clic en
14. Una vez finalizados los ajustes, el icono de la impresora seleccionada
se visualizará en la carpeta
Una vez completada la instalación, compruebe si ha instalado
correctamente el controlador. Si desea más información, consulte la
sección “Comprobar que el controlador IEEE 1394 está instalado
correctamente en Windows Me y 2000” en la págoma 44.
Finalizar
Aceptar
Impresoras
y haga clic en
y después en el botón
.
Dispositivo IEEE 1394
Siguiente
Reintentar
Finalizar
.
.
Instalar en Windows Me
.
.
Reintentar
.
1. Compruebe que la impresora esté desactivada y conectada al
ordenador.
2. Active el ordenador e inicie Windows. Si hay alguna aplicación
ejecutándose, salga de ella.
3. Inserte el CD del software de la impresora (incluido) en la unidad
de CD-ROM. Aparece el cuadro de diálogo del Instalador.
Si no aparece el cuadro de diálogo, haga clic en
Escriba
unidad de CD-ROM es D. Si es otra unidad, cambie la letra.)
D:\EPSETUP
y haga clic en
Aceptar
Inicio
. (asumiendo que la
Ejecutar
y
43
.
Page 46

4. Seleccione la impresora en el cuadro de diálogo Instalador y haga
clic en la flecha de la derecha.
5. Haga clic en
flecha de la derecha y después en
archivos requeridos en el disco duro.
6. Siga las instrucciones en pantalla para activar la impresora. El
Instalador
instalación tal como se indica en la pantalla.
7. Se visualizará un mensaje para notificar que ha finalizado la
instalación. Haga clic en
Instalar controlador de impresora/utilidad
Aceptar
instalará el controlador correcto. Continúe con la
Aceptar
y se completará el proceso.
. El instalador copiará los
, en la
Comprobar que el controlador IEEE 1394 está instalado correctamente en Windows Me y 2000
Una vez completada la instalación del software de la impresora,
compruebe que el controlador IEEE 1394 se haya instalado
correctamente.
1. Haga clic en el botón
Impresoras
en
la carpeta
2. Haga clic en el icono de la impresora y seleccione
el menú
Impresoras
Archivo
Inicio
, seleccione
. Compruebe que aparece el icono de la impresora en
.
.
Configuración
Propiedades
, y haga clic
en
3. Haga clic en la ficha
EP1394_xxx
puerto
Nota:
Si no se visualiza el puerto correcto, consulte la sección “Solucionar
problemas” del Manual del Usuario.
.
44
Puerto
esté seleccionado en el cuadro de lista
o en
Detalles
. Compruebe que
Imprimir en el
Page 47

Instalar el software de la impresora en el Macintosh
Instalar en el Macintosh
Precaución:
c
Siga los pasos descritos a continuación para instalar el software de la
impresora.
1. Compruebe que el Macintosh y la impresora están conectados
2. Active el ordenador. Si hay alguna aplicación ejecutándose, salga de
3. Inserte el CD del software que se entrega con la impresora en la
Desactive todos los programas de antivirus antes de instalar el software
de la impresora.
mutuamente y que están activados.
ella.
unidad de CD-ROM. El software de la impresora EPSON se abre
automáticamente.
4. Haga doble clic en
PRO 10000CF
de la impresora
5. Si aparece un solo icono del
aparecen diferentes carpetas con iconos del instalador para varios
idiomas, haga doble clic en la carpeta del idioma deseado y en el
icono del
6. Cuando aparezca la pantalla inicial, haga clic en
Aparece el cuadro de diálogo del
7. Para instalar el software de la impresora incluido en el CD-ROM del
software de la impresora, compruebe que en el cuadro
de la instalación
clic en
8. Cuando aparezca un mensaje informando que se ha completado la
instalación, haga clic en
Instalador
Instalar
EPSON STYLUS PRO 10000
, y en la carpeta
.
del interior de la carpeta.
se visualiza la unidad de disquete correcta y haga
.
Instalar utilidades del controlador
Instalador
Reiniciar
, haga doble clic sobre él. Si
Instalador
para reiniciar el ordenador.
o en
Continuar.
.
EPSON STYLUS
Ubicación
45
Page 48

Seleccionar la impresora desde el Selector
Una vez instalado el software de la impresora en el Macintosh, deberá
abrir el
puerto de impresora la primera vez que la utilice, y siempre que desee
cambiar de puerto de impresora. El Macintosh imprimirá siempre
utilizando la última impresora seleccionada.
1. Seleccione Selector desde el menú Apple.
Selector
para seleccionar la impresora. Deberá seleccionar un
2. Haga clic en el icono de la impresora y en el puerto
está conectada.
3. Seleccione el botón de opción de
correspondiente para activar o desactivar la impresión background.
Con la impresión background activada, podrá utilizar el Macintosh
mientras éste prepara un documento para imprimirlo. Active la
impresión background para usar la utilidad EPSON Monitor3 para
gestionar los trabajos de impresión.
4. Cierre el Selector.
Impresión Background
Especificaciones técnicas
Interface IEEE 1394
Especificaciones básicas
Método de transferencia de
datos:
Método de sincronización: Compatible con IEEE 1394-1995
Serie diferencial Datos Semidúplex/Strobe
FireWire
al que
Codificación/ decodificación: Compatible con IEEE 1394-1995
Conectores compatibles: Receptáculo de 6 contactos compatible
con IEEE 1394-1995
46
Page 49

Distribución de señales de las patillas del conector
Número
de
patilla
1 VP Alimentación del cable
2VGCable de masa
3 TPB* Strobe durante la recepción, datos durante la
4TPB
5 TPA* Datos durante la recepción, strobe durante la
6TPA
Nombre
de señal
Función
transmisión (par diferencial)
transmisión (par diferencial)
Clase de alimentación
Código 100 de clase de alimentación
Sin alimentación de fuentes externas
Encajado con una función de repetición con alimentación del bus
Jumper
Jumper Posición por defecto
JP1 2–3
JP2 2–3
47
Page 50

Conmutador DIP
El modo de funcionamiento
DIP 10. Cambie la posición del conmutador
IEEE 1394
está ajustado en el conmutador
DIP
según sea necesario.
Nota:
El conmutador
el modo
Nº SW Función ON OFF Ajuste de
1Reservado— — ON
2–8 Reservado — — OFF
9 Auto test Modo Auto
10 Modo Avanzado Estándar ON
DIP
Avanzado
10 no debería cambiarse en un uso normal. Se utiliza para
en los sistemas Windows 2000/Me y Macintosh.
fábrica
test
Modo de
funcionamiento
Normal
OFF
48
Page 51

Indice generale
Introduzione. . . . . . . . . . . . . . . . . . . . . . . . . . . . . . . . . . . . . . . . . . . . . . . . . .50
Caratteristiche . . . . . . . . . . . . . . . . . . . . . . . . . . . . . . . . . . . . . . . . . . .50
Requisiti di sistema . . . . . . . . . . . . . . . . . . . . . . . . . . . . . . . . . . . . . . . . . . . .50
Requisiti di sistema per il computer. . . . . . . . . . . . . . . . . . . . . . . . .50
Limitazioni . . . . . . . . . . . . . . . . . . . . . . . . . . . . . . . . . . . . . . . . . . . . . .51
Collegamento a un computer. . . . . . . . . . . . . . . . . . . . . . . . . . . . . . . . . . . .52
Collegamento della stampante direttamente a un computer . . . .52
Collegamento della stampante a un computer con
altri dispositivi IEEE 1394 . . . . . . . . . . . . . . . . . . . . . . . . . . . . . . .53
Installazione del software di stampa in Windows . . . . . . . . . . . . . . . . . .53
Installazione in Windows 2000 . . . . . . . . . . . . . . . . . . . . . . . . . . . . .54
Installazione in Windows Me . . . . . . . . . . . . . . . . . . . . . . . . . . . . . .55
Verifica che il driver IEEE 1394 sia installato
correttamente in Windows Me e 2000 . . . . . . . . . . . . . . . . . . . . .56
Installazione del software di stampa su Macintosh . . . . . . . . . . . . . . . . .57
Installazione su Macintosh. . . . . . . . . . . . . . . . . . . . . . . . . . . . . . . . .57
Uso di Scelta risorse per selezionare la stampante. . . . . . . . . . . . .58
Specifiche tecniche. . . . . . . . . . . . . . . . . . . . . . . . . . . . . . . . . . . . . . . . . . . . .58
Interfaccia IEEE 1394. . . . . . . . . . . . . . . . . . . . . . . . . . . . . . . . . . . . . .58
49
Page 52

Introduzione
Questo manuale illustra l’uso della scheda di interfaccia Tipo B
IEEE 1394 collegata alla stampante.
Caratteristiche
Questa interfaccia è conforme allo standard IEEE 1394, ed è dotata delle
seguenti caratteristiche:
❏
Questo prodotto può essere usato su computer dotati di una porta
IEEE 1394 (compatibile OHCI), supportata da Windows
Windows Millenium Edition.
❏
Questo prodotto può essere collegato a porte Macintosh® FireWire®.
Il driver di stampa necessario è fornito con la stampante.
❏
È possibile sfruttare il trasferimento dati ad alta velocità con
l’interfaccia IEEE 1394, che supporta una velocità massima di
trasferimento dati di 400 Mbps.
❏
Il cavo può essere collegato e scollegato senza spegnere il computer
né la stampante.
❏
È possibile collegare simultaneamente più dispositivi IEEE 1394 in
una configurazione a margherita. Oltre a collegare la stampante al
computer come dispositivo IEEE 1394, la stessa scheda di interfaccia
può essere usata anche per collegare altri dispositivi IEEE 1394.
®
2000 o da
Requisiti di sistema
Requisiti di sistema per il computer
Windows 2000/Windows Me
❏
Computer con Windows 2000/Me preinstallato, con supporto
standard per porte IEEE 1394 (compatibile OHCI).
50
Page 53

❏
Computer con Windows 2000/Me aggiornato da Windows 98
Seconda Edizione preinstallato con supporto standard per porte
IEEE 1394 (compatibile OHCI). Il funzionamento IEEE 1394 in
Windows 2000/Me deve essere garantito dal produttore.
Macintosh
Hardware: Power Macintosh G3/G4 equipaggiato con la porta IEEE
1394 (FireWire) come componente standard o Power
Macintosh G3 equipaggiato con una scheda PCI IEEE 1394
(FireWire). Il funzionamento delle porte FireWire deve
essere garantito da Apple
®
Computer.
Limitazioni
❏
La porta IEEE 1394 utilizza un connettore standard a 6 contatti.
Assicuratevi di usare il cavo appropriato a 6 contatti per la
connessione dell’interfaccia.
❏
Non collegate contemporaneamente due computer a questa
interfaccia. Per esempio, non collegate mai un’estremità del cavo a
un computer Windows e l’altra e un Macintosh.
Limitazioni valide solo per Windows 2000/Me
❏
Non accendete/spegnete altri dispositivi IEEE1394, e non
collegate/scollegate cavi mentre è in corso una stampa.
❏
Non abilitare in Windows la modalità Standby o quella Hibernate
mentre la stampa è in corso.
Restrizioni applicate solo per l’ambiente Macintosh
Non abilitare in Macintosh la modalità Sleep mentre la stampa è in corso.
51
Page 54

Collegamento a un computer
La scheda di interfaccia è dotata di due connettori. Il primo è usato per
collegare la scheda al computer e il secondo per collegare altri dispositivi
IEEE 1394 in una configurazione a margherita. Quando effettuate la
connessione, usate un cavo appropriato a 6 contatti o un cavo
equivalente. Il cavo può essere collegato senza spegnere il computer o la
stampante perché è conforme allo standard IEEE 1394.
Nota:
❏
L’interfaccia IEEE 1394 è installata nello Slot per interfacce opzionali n.2
della vostra stampante.
❏
Non siete in grado di effettuare la connessione descritta in questo manuale
se non possedete il cavo sopra descritto.
Collegamento della stampante direttamente a un computer
1. Collegate il connettore del cavo alla porta IEEE 1394 del computer.
2. Il connettore all’altra estremità del cavo può essere collegato a
qualsiasi porta IEEE 1394 sulla scheda di interfaccia montata sulla
stampante (è possibile usare una qualsiasi delle porte).
Computer Stampante
Nota:
Non collegate contemporaneamente due computer a questa interfaccia.
52
Page 55

Collegamento della stampante a un computer con altri dispositivi IEEE 1394
Se al computer sono già collegati altri dispositivi IEEE 1394, collegate la
stampante in modo che sia l’ultimo dispositivo IEEE 1394 della catena.
Computer Dispositivo IEEE 1394 Stampante
Nota:
Quando connettete questa interfaccia a un dispositivo IEEE 1394, usate sempre
un cavo appropriato a 6 contatti o un connettore standard equivalente. Il
normale funzionamento non può essere garantito se fate uso di un riduttore da
6 a 4 pin.
Collegate il cavo a un connettore IEEE 1394 disponibile se alla stampante
vanno collegati altri dispositivi IEEE 1394.
Computer Stampante Dispositivo IEEE 1394
Installazione del software di stampa in Windows
Per installare il software di stampa contenuto nel CD-ROM “Software di
stampa per EPSON Stylus PRO 10000/10000CF” contenuto nell’imballo
della stampante, seguite le istruzioni del paragrafo seguente.
53
Page 56

Installazione in Windows 2000
1. Assicuratevi che la stampante sia spenta e connessa al computer.
2. Accendete il computer e avviate Windows. Se appare la finestra
Nuovo hardware trovato o qualsiasi altra finestra di installazione
guidata, fate clic su
3. Inserite il CD-ROM del software di stampa contenuto nell’imballo
della stampante. Apparirà la finestra di dialogo di installazione.
Annulla
.
Se non appare alcuna finestra di dialogo, fate clic su
Esegui
. Quindi digitate
vostro lettore di CD-ROM è diversa da D, usate la lettera
appropriata.)
4. Scegliete la vostra stampante, quindi fate clic sulla freccia a destra
nella finestra di dialogo.
5. Fate clic su
destra, e infine su OK nella finestra di dialogo che appare; in questo
modo si avvia l’installazione del software di stampa.
6. Quando il programma di installazione ve lo chiede, accendete la
stampante.
7. Quando Windows 2000 rileva la stampante, viene visualizzata la
finestra della procedura
Fate clic su
Nota:
Se viene visualizzato un messaggio di errore o non compare la finestra
Installazione guidata nuovo hardware, significa che la stampante non è
stata rilevata in modo corretto da Windows 2000. In questo caso verificate
le impostazioni della porta IEEE 1394 in Windows 2000, le connessioni del
cavo e assicuratevi che la stampante sia accesa.
Installa Driver di stampa/Utility
Avanti
D:\SETUP
Installazione guidata nuovo hardware
.
e fate clic su OK. (Se la lettera del
, quindi sulla freccia a
Start
e su
.
8. Selezionate
9. Selezionate
54
Cerca un driver adatto alla periferica (scelta
consigliata)
percorso diverso, deselezionatelo e fate clic su
e fate clic su
Specificare un percorso
Avanti
.
. Se è già selezionato un
Avanti
.
Page 57

10. Assicuratevi che sia visualizzato
quindi fate clic su OK. (Se la lettera del vostro lettore di CD-ROM è
diversa da D, usate la lettera appropriata.)
D:\10000 (o 10000CF)\WIN2000,
11. Verificate che nella finestra di dialogo compaia
IEEE 1394 SBP2 Device
Nota:
Se appare un messaggio che avverte che la stampante non è collegata
correttamente, non fate subito clic su
Fine
, quindi sul pulsante
12. Attendete l’apparizione del messaggio che segnala il
completamento dell’installazione e quindi fate clic su
13. Comparirà un messaggio che vi avverte che il driver di stampa e le
impostazioni della porta IEEE 1394 sono state completate. Fate clic
su OK.
14. Quando tutte le impostazioni sono state completate, l’icona della
stampante selezionata apparirà nella cartella Stampanti.
Alla fine dell’installazione, verificate che il driver sia stato installato in
modo corretto. Fate riferimento al paragrafo “Verifica che il driver IEEE
1394 sia installato correttamente in Windows Me e 2000” a pagina 56 per
ulteriori informazioni.
e fate clic su
Riprova
Avanti
Riprova
.
EPSON 1394 Printer
.
. Prima fate clic sul pulsante
Installazione in Windows Me
Fine
.
1. Assicuratevi che la stampante sia spenta e connessa al computer.
2. Accendete il computer e avviate Windows. Uscite da qualsiasi
applicazione che sia eventualmente in esecuzione.
3. Inserite il CD-ROM del software di stampa contenuto nell’imballo
della stampante. Apparirà la finestra di dialogo di installazione.
Se non appare alcuna finestra di dialogo, fate clic su
Esegui
. Quindi digitate
vostro lettore di CD-ROM è diversa da D, usate la lettera
appropriata.)
D:\SETUP
e fate clic su OK. (Se la lettera del
Start
e su
55
Page 58

4. Scegliete la vostra stampante, quindi fate clic sulla freccia a destra
nella finestra di dialogo.
5. Fate clic su
destra, e infine su OK. Il programma di installazione copierà i file
necessari sul disco rigido.
6. Seguite le istruzioni a schermo e accendete la stampante. Il
programma di installazione installerà il driver appropriato.
Proseguite nell’installazione seguendo le istruzioni.
7. Alla fine dell’installazione apparirà un messaggio. Fate clic su OK
per terminare il processo.
Installa Driver di stampa/Utility
, quindi sulla freccia a
Verifica che il driver IEEE 1394 sia installato correttamente in Windows Me e 2000
Dopo l’installazione del software di stampa, verificate che il driver IEEE
1394 sia stato installato correttamente.
1. Fate clic su
Assicuratevi che l’icona della vostra stampante compaia nella
cartella delle stampanti.
2. Fate clic sull’icona della vostra stampante, quindi scegliete
Proprietà
3. Fate clic sull’aletta Dettagli o Porte. Assicuratevi che sia selezionato
EP1394_xxx
“Stampa su”.
Start
, puntate su
dal menu File.
nella casella dell’elenco delle porte dell’opzione
Impostazioni
e fate clic su
Stampanti
.
56
Nota:
Se non è visualizzata la porta corretta, fate riferimento al paragrafo
“Risoluzione dei problemi” della Guida in linea.
Page 59

Installazione del software di stampa su Macintosh
Installazione su Macintosh
Attenzione
c
Seguite questi passi per installare il software di stampa.
1. Assicuratevi che il Macintosh e la stampante siano connessi e spenti.
2. Accendete il Macintosh. Uscite da qualsiasi applicazione che sia
3. Inserite il CD-ROM del software di stampa contenuto nell’imballo
Disattivate qualsiasi programma antivirus prima di installare il
sopftware di stampa.
eventualmente in esecuzione.
della stampante. Il disco del software di stampa EPSON si avvia
automaticamente.
4. Fate doppio clic su
10000CF
5. Se compare una sola icona
compaiano cartelline separate contenenti ciascuna un’icona di
installazione in varie lingue, fate doppio clic sulla cartellina della
vostra lingua, quindi sull’icona
6. Nella schermata iniziale, fate clic su
di dialogo dell’installazione.
7. Per installare il software di stampa contenuto nel CD-ROM,
assicuratevi che la casella Posizione di installazione mostri il drive
corretto, quindi fate clic su
8. Quando un messaggio vi informa che l’installazione è completa, fate
clic su
, quindi sulla cartellina Installa Printer Driver/Utility.
Riavvia
EPSON STYLUS PRO 10000
Installer
Installa
per riavviare il Macintosh.
, fate doppio clic sull’icona. Se
Installer
Continua.
.
EPSON STYLUS PRO
o
al suo interno.
Appare la finestra
57
Page 60

Uso di Scelta risorse per selezionare la stampante
Dopo aver installato il software di stampa sul vostro Macintosh, dovrete
aprire Scelta risorse per scegliere la stampante. Dovrete scegliere la porta
della stampante al primo utilizzo e ogni volta che desiderate passare su
un’altra porta. Il Macintosh stamperà sempre utilizzando l’ultima porta
selezionata.
1. Selezionate
2. Fate clic sull’icona della vostra stampante e sull’icona della porta
FireWire alla quale la stampante è connessa.
3. Selezionate l’appropritao pulsante di
attivare o disattivare la stampa in background.
Con la stampa in background attivata, potete utilizzare il Macintosh
mentre è in processo un documento per la stampa. Per controllare i
lavori di stampa con l’utility EPSON Monitor3, la stampa in
background deve essere attivata.
4. Chiudete Scelta risorse.
Scelta risorse
dal menu Mela.
Stampa in background
Specifiche tecniche
Interfaccia IEEE 1394
Specifiche di base
Trasferimento dei dati: Dati half-duplex/seriale differenziale
strobe
Sincronizzazione: Compatibile IEEE 1394-1995
per
Codifica/decodifica: Compatibile IEEE 1394-1995
Connettori compatibili: Compatibile IEEE
1394-1995 con connessione a 6 contatti
58
Page 61

Descrizione del segnale dei pin del connettore
Numero
del pin
1 VP Alimentazione del cavo
2 VG Messa a terra del cavo
3 TPB* Strobe durante la ricezione, dati durante la
4TPB
5 TPA* Dati durante la ricezione, strobe durante la
6TPA
Nome
del
segnale
Funzione
trasmissione (coppia differenziale)
trasmissione (coppia differenziale)
Classe di alimentazione
Codice della classe di alimentazione 100
Nessuna alimentazione da fonti esterne
Adattata con una funzione di ripetizione con alimentazione a bus
Jumper
Jumper Posizione di default
JP1 2–3
JP2 2–3
59
Page 62

DIP switch
La modalità operativa della IEEE 1394 viene impostata tramite il DIP
switch 10. Modificare la posizione del DIP switch in base alle esigenze.
Nota:
Il DIP switch 10 non dovrebbe essere modificato per un utilizzo normale. Esso
è usato per la modalità avanzata sia in sistemi Windows 2000/Me che in
Macintosh.
N.
SW
1Riservata— — ON
2–8 Riservata — — OFF
9Test
10 Modalità Avanzata Standard ON
Funzione ON OFF Impostazione
automatico
Modalità test
automatico
Funzionamento
normale
di fabbrica
OFF
60
Page 63

Índice
Introdução. . . . . . . . . . . . . . . . . . . . . . . . . . . . . . . . . . . . . . . . . . . . . . . . . . . .62
Características . . . . . . . . . . . . . . . . . . . . . . . . . . . . . . . . . . . . . . . . . . .62
Requisitos de Sistema . . . . . . . . . . . . . . . . . . . . . . . . . . . . . . . . . . . . . . . . . .62
Ambientes de computador necessários . . . . . . . . . . . . . . . . . . . . . .62
Limitações. . . . . . . . . . . . . . . . . . . . . . . . . . . . . . . . . . . . . . . . . . . . . . .63
Ligar a Placa a um Computador . . . . . . . . . . . . . . . . . . . . . . . . . . . . . . . . .64
Quando ligar a impressora directamente a um computador . . . .64
Quando ligar a impressora a um computador com
outros dispositivos IEEE 1394. . . . . . . . . . . . . . . . . . . . . . . . . . . .65
Instalar o Software da Impressora em Windows . . . . . . . . . . . . . . . . . . .65
Instalar no Windows 2000 . . . . . . . . . . . . . . . . . . . . . . . . . . . . . . . . .66
Instalar no Windows Me . . . . . . . . . . . . . . . . . . . . . . . . . . . . . . . . . .67
Verificar se o controlador IEEE 1394 está instalado
correctamente no Windows Me e 2000 . . . . . . . . . . . . . . . . . . . .68
Instalar o Software da Impressora em Macintosh. . . . . . . . . . . . . . . . . . .69
Instalar em Macintosh. . . . . . . . . . . . . . . . . . . . . . . . . . . . . . . . . . . . .69
Utilizar o Selector de Recursos para
seleccionar a impressora . . . . . . . . . . . . . . . . . . . . . . . . . . . . . . . .70
Características Técnicas . . . . . . . . . . . . . . . . . . . . . . . . . . . . . . . . . . . . . . . .70
Interface IEEE 1394 . . . . . . . . . . . . . . . . . . . . . . . . . . . . . . . . . . . . . . .70
61
Page 64

Introdução
Este guia explica como utilizar a Placa de Interface IEEE 1394 Tipo B
fornecida com a impressora.
Características
Este interface está de acordo com a norma IEEE 1394 e possui as
características indicadas em seguida.
❏
Este produto pode ser utilizado em computadores equipados com
uma porta IEEE 1394 (compatível com OHCI), com suporte para
Windows
❏
O interface pode ser ligado a portas Macintosh® FireWire®.
O controlador de impressão adequado é fornecido com a
impressora.
❏
A transferência de dados de alta velocidade é possível com o
interface IEEE 1394, que suporta uma taxa de transferência máxima
de 400 Mbps.
❏
O cabo pode ser ligado ou desligado sem ter de desligar o
computador ou a impressora.
❏
É possível ligar simultaneamente diversos dispositivos IEEE 1394
em circuito (daisy chain). Para além de ligar a impressora ao
computador como um dispositivo IEEE 1394 através da placa de
interface, poderá igualmente utilizar a mesma placa para ligar
outros dispositivos IEEE 1394.
®
2000 ou Windows Millenium Edition.
Requisitos de Sistema
Ambientes de computador necessários
Windows 2000/Windows Me
❏
Computador com o Windows 2000/Me pré-instalado, com suporte
padrão para a porta IEEE 1394 (compatível OHCI).
62
Page 65

❏
Computador com sistema operativo Windows 98 Second Edition
pré-instalado e suporte para porta IEEE 1394 (compatível OHCI)
actualizado para Windows 2000/Me (o fabricante tem de assegurar
o funcionamento da porta IEEE 1394 no Windows 2000/Me).
Macintosh
Hardware: Power Macintosh G 3/G4 equipado com a porta IEEE 1394
(FireWire) de origem, cujo funcionamento é assegurado
pela Apple
equipado com uma placa PCI IEEE 1394 (FireWire), cujo
funcionamento é assegurado pela Apple Computer.
®
Computer, ou Power Macintosh G3
Limitações
❏
A porta IEEE 1394 utiliza um conector padrão com seis contactos.
Certifique-se de que utiliza um cabo de 6 contactos adequado para
ligar a interface.
❏
Não ligue dois computadores em simultâneo a este interface. Por
exemplo, nunca ligue um computador com o Windows a uma
extremidade do cabo e um Macintosh à outra extremidade.
Restrições aplicavéis ao Windows 2000/Me
❏
Não ligue/desligue outros dispositvos IEEE1394, nem
ligue/desligue cabos durante o processo de impressão.
❏
Não coloque o Windows no modo de espera ou de hibernação
durante a impressão.
Restrições aplicáveis apenas a Macintosh
Não coloque o Macintosh no modo de repouso durante a impressão.
63
Page 66

Ligar a Placa a um Computador
A placa de interface está equipada com dois conectores para cabos. Um
deles é utilizado para ligar a placa ao computador e o outro é utilizado
para ligar outros dispositivos IEEE 1394 em circuito ( daisy chain). Quando
efectuar a ligação, utilize um cabo de 6 contactos adequado ou um cabo
equivalente. Dado que o cabo obedece aos requisitos da norma IEEE
1394, não terá de desligar o computador nem a impressora para o ligar.
Nota:
❏
A placa de interface IEEE 1394 está instalada no conector 2 da placa de
interface opcional da sua impressora.
❏
Não conseguirá efectuar os procedimentos de ligação explicados neste
manual sem o cabo acima referido.
Quando ligar a impressora directamente a um computador
1. Ligue o conector do cabo à porta IEEE 1394 do computador (porta
FireWire).
2. O outro cabo pode ser ligado a qualquer uma das portas IEEE 1394
da placa de interface instalada na impressora.
Computador Impressora
Nota:
Não ligue dois computadores em simultâneo a este interface.
64
Page 67

Quando ligar a impressora a um computador com outros dispositivos IEEE 1394
Se já tiver dispositivos IEEE 1394 ligados ao computador, ligue a
impressora de forma a ficar como o último dispositivo do circuito.
Computador Dispositivo IEEE 1394 Impressora
Nota:
Quando ligar esta interface a um dispositivo 1394, utilize sempre um cabo de
6 contactos adequado ou um conector normalizado de 6 contactos equivalente.
O funcionamento normal não é garantido com um cabo conversor de 6-4.
Ligue o cabo a um conector IEEE 1394 livre se precisar de ligar
dispositivos adicionais IEEE 1394 à impressora.
Computador Impressora Dispositivo IEEE 1394
Instalar o Software da Impressora em Windows
Para instalar o
PRO 10000/10000CF e que é fornecido com a impressora, execute os
procedimentos apresentados em seguida.
software
incluído no CD-ROM para a EPSON Stylus
65
Page 68

Instalar no Windows 2000
1. Certifique-se de que a impressora está desligada e ligada ao
computador.
2. Ligue o computador e inicie o Windows. Se aparecer o ecrã Novo
Hardware Encontrado (New Hardware Found) ou qualquer outro
assistente, faça clique em
Cancelar (Cancel)
.
3. Insira o CD-ROM que contém o
leitor. Aparecerá a caixa de diálogo Instalador (Installer).
Se a caixa de diálogo não aparecer, faça clique em
Executar (Run)
em
OK
(se a letra relativa ao leitor de CD-ROM não for a D, substitua-a
pela letra adequada).
4. Seleccione a impressora e faça clique na seta direita da caixa de
diálogo Instalador (Installer).
5. Faça clique em
seguida na seta direita e, por fim, em OK na caixa de diálogo que
aparece para iniciar a instalação do
6. Ligue a impressora quando o programa de instalação lhe pedir para
o fazer.
7. Quando o Windows 2000 detecta a impressora, aparece o
Novo Hardware Encontrado
Nota:
Se aparecer uma mensagem de erro, ou o Assistente Novo Hardware
Encontrado não aparecer, a impressora não foi detectada normalmente pelo
Windows 2000. Neste caso, verifique as definições da porta IEEE 1394 no
Windows 2000, a ligação dos cabos e se a impressora está ligada.
. Em seguida, escreva
Instalar Controlador de Impressão/Utilitários
software
. Faça clique em
da impressora no respectivo
D:\SETUP
software
da impressora.
Iniciar (Start)
e faça clique em
Assistente
Seguinte
.
e
, em
8. Seleccione
9. Seleccione
66
Procurar um controlador adequado para o meu
dispositivo (recomendado)
Especificar uma localização
uma outra localização, desactive-a e faça clique em
e faça clique em
Seguinte
. Se já estiver seleccionada
.
Seguinte
.
Page 69

10. Certifique-se de que aparece
em seguida, faça clique em OK (se a letra relativa ao leitor de CDROM não for a D, substitua-a pela letra correcta).
D:\10000 (ou 10000CF)\WIN2000
e,
11. Verifique se a caixa de diálogo indica
SBP2 Device
Nota:
Se o sistema apresentar uma mensagem a indicar que a impressora não está
ligada correctamente, não faça imediatamente clique na tecla
primeiro lugar, faça clique na tecla
Repetir.
tecla
12. Aguarde que apareça uma mensagem a informar que a instalação
do controlador terminou e faça clique em
13. Aparecerá uma mensagem a indicar que a instalação do controlador
de impressão e as definições da porta IEEE 1394 estão concluídas.
Faça clique em OK.
14. Depois de concluídas todas as definições, o ícone da impressora
seleccionada aparecerá na pasta
Depois de concluir a instalação, verifique se o controlador foi instalado
correctamente. Para obter mais informações, consulte a secção “Verificar
se o controlador IEEE 1394 está instalado correctamente no Windows Me
e 2000” en la página 68.
e faça clique em
EPSON 1394 Printer IEEE 1394
Seguinte
Terminar
Impressora
.
e, em seguida, faça clique na
Terminar
.
.
Instalar no Windows Me
Repetir
. Em
1. Certifique-se de que a impressora está desligada e ligada ao
computador.
2. Ligue o computador e inicie o Windows. Se tiver alguma aplicação
aberta, feche-a.
3. Insira o CD-ROM que contém o
leitor. Aparecerá a caixa de diálogo Instalador (Installer).
software
da impressora no respectivo
67
Page 70

Se a caixa de diálogo não aparecer, faça clique em
Executar (Run)
em
OK
(se a letra relativa ao leitor de CD-ROM não for a D, substitua-a
pela letra correcta).
4. Seleccione a impressora na caixa de diálogo Instalador (Installer) e
faça clique na seta direita.
. Em seguida, escreva
D:\SETUP
Iniciar (Start)
e faça clique em
e
5. Faça clique em
seguida na seta direita e, por fim, em OK. O instalador irá copiar os
ficheiros necessários para o disco.
6. Siga as instruções apresentadas no ecrã e ligue a impressora. O
Instalador (Installer) irá instalar o controlador correcto. Prossiga
com a instalação da forma indicada no ecrã.
7. Aparecerá uma mensagem a indicar que a instalação terminou. Faça
clique em OK para concluir o processo.
Instalar Controlador de Impressão/Utilitários
Verificar se o controlador IEEE 1394 está instalado correctamente no Windows Me e 2000
Depois de concluir a instalação do software, certifique-se de que o
controlador IEEE 1394 foi instalado correctamente.
1. Faça clique na tecla
e, em seguida, faça clique em
de que o ícone da impressora aparece na pasta Impressoras
(Printers).
2. Seleccione o ícone da impressora e, em seguida, faça clique em
Propriedades (Properties)
Iniciar (Start)
Impressoras (Printers)
no menu Ficheiro (File).
, seleccione
Definições (Settings)
. Certifique-se
, em
3. Faça clique no separador Detalhes (Details) ou Porta (Port).
Certifique-se de que
selecção da porta (Print on the port).
Nota:
Se não aparecer a porta correcta, consulte a secção “Resolução de
Problemas” no Guia do Utilizador.
EP1394_xxx
está seleccionado na lista de
68
Page 71

Instalar o Software da Impressora em Macintosh
Instalar em Macintosh
Importante:
c
Para instalar o software da impressora, execute as seguintes operações:
1. Certifique-se de que a impressora está ligada ao Macintosh e que
2. Ligue o computador. Se tiver alguma aplicação aberta, feche-a.
3. Insira o CD-ROM que contém o software da impressora no respectivo
Desactive todos os programas de protecção antivírus antes de instalar o
software
ambos estão ligados à corrente.
leitor. O CD-ROM abre automaticamente.
da impressora.
4. Faça clique duas vezes em
STYLUS PRO 10000CF
Impressão/Utilitários.
5. Se aparecer apenas o ícone
ícone. Se aparecerem várias pastas com o ícone de instalação para
várias línguas, faça clique duas vezes na pasta da língua que preferir
e, em seguida, faça clique duas vezes no ícone
6. No ecrã que aparecer, faça clique em
de diálogo Instalador.
7. Para instalar o software fornecido com a impressora, certifique-se de
que a caixa de localização de instalação (Install Location) apresenta
a unidade correcta e, em seguida, faça clique em
8. Quando aparecer uma mensagem a indicar que a instalação está
concluída, faça clique em
computador.
EPSON STYLUS PRO 10000
e na pasta Instalar Controlador de
Instalador
Reiniciar (Restart)
, faça clique duas vezes no
Instalador
Continuar.
Aparecerá a caixa
Instalar (Install)
para reiniciar o
ou em
.
EPSON
.
69
Page 72

Utilizar o Selector de Recursos para seleccionar a impressora
Depois de ter instalado o controlador de impressão no Macintosh, terá
de abrir o Selector de Recursos (Chooser) e seleccionar a impressora. Terá
de seleccionar uma porta para a impressora quando a utilizar pela
primeira vez ou sempre que quiser trocar de porta. O Macintosh
imprimirá sempre através da última impressora seleccionada.
1. No menu da maçã, seleccione
2. Faça clique no ícone da impressora e na porta FireWire à qual a
impressora está ligada.
3. Seleccione o botão de rádio adequado referente à opção
em Segundo Plano
Se a impressão em segundo plano estiver activada, poderá utilizar
o Macintosh enquanto ele estiver a preparar um documento para ser
impresso. Se quiser usar o utilitário EPSON Monitor3 para gerir as
tarefas de impressão, a impressão em segundo plano tem de estar
activada.
4. Feche o Selector de Recursos (Chooser).
para a activar ou desactivar.
Selector de Recursos (Chooser)
Características Técnicas
Interface IEEE 1394
Caracteríscas básicas
Transferência de dados: Dados Half-Duplex/Série diferencial
Strobe
Sincronização: Compatível IEEE 1394-1995
.
Impressão
Codificação/descodificação: Compatível IEEE 1394-1995
Conectores compatíveis: IEEE 1394-1995 com 6 contactos
70
Page 73

Esquema dos sinais dos pinos do conector
Número
do pino
1 VP Energia fornecida por cabo
2 VG Cabo de terra
3 TPB* Strobe durante a recepção, dados durante a
4TPB
5 TPA* Dados durante a recepção, Strobe durante a
6TPA
Nome
do sinal
Função
transmissão (par diferencial)
transmissão (par diferencial)
Energia
Código de classe 100
Sem fornecimento de energia de fontes externas
Equipado com uma função de repetição com energia de barramento
Cavilha
Cavilha Posição predefinida
JP1 2–3
JP2 2–3
71
Page 74

Interruptor DIP
O modo de funcionamento IEEE 1394 é definido com o interruptor DIP
10. Altere a posição do interruptor DIP consoante necessitar.
Nota:
Não deverá ter de mudar o interruptor DIP 10 durante o funcionamento normal.
Este interruptor é utilizado para o modo avançado nos sistemas Windows
2000/Me e Macintosh.
N.o
Int.
1Reservada— — ON
2–8 Reservada — — OFF
9 Auto-teste Modo de
10 Modo Avançado Normal ON
Função ON OFF Predefinição
auto-teste
Modo de
funcionamento
normal
OFF
72
Page 75

EPSON OVERSEAS MARKETING LOCATIONS
Epson America, Inc.
3840 Kilroy Airport Way
Long Beach, CA 90806
Phone: (562) 981-3840
Fax: (562) 290-5220
EPSON DEUTSCHLAND GmbH
Zülpicher Straße 6,
40549 Düsseldorf Germany
Phone: (0211) 56030
Fax: (0211) 5047787
EPSON AUSTRALIA PTY. LTD.
70 GIBBES STREET,
CHATSWOOD 2067 NSW.
Phone: 2-9903-9000
Fax: 2-9903-9177
EPSON HONG KONG LTD.
Rooms 4706-10, 47/F,
China Resources Bldg.,
26 Harbour Road, Wanchai, Hong Kong
Phone: 2585-4300
Fax: 2827-7083
EPSON ITALIA S.p.A.
V.le F.lli Casiraghi 427
20099 Sesto S.Giovanni
MI, Italy
Phone: +3902262331
Fax: +39022440750
EPSON UK LTD.
Campus 100, Maylands Avenue,
Hemel Hempstead, Herts,
HP2 7TJ, U.K.
Phone: (+44) 01442 261144
Fax: (+44) 01442 227227
EPSON FRANCE S.A.
68 bis, rue Marjolin
92300, Levallois-Perret, France
Phone: 33.1.41.86.26.56
Telex: 610657
EPSON SINGAPORE PTE. LTD.
No. 1 Temasek Avenue #36-00
Millenia Tower, Singapore 039192
Phone: (065) 33 77 911
Fax: (065) 33 41 185
EPSON TAIWAN TECHNOLOGY &
TRADING LTD.
10F, No. 287 Nanking E. Road, Sec. 3,
Taipei, Taiwan, R.O.C.
Phone: (02) 717-7360
Fax: (02) 712-9164
EPSON IBERICA S.A.
Av. de Roma, 18-26
08290 Cerdanyola del Valles
Barcelona, Spain
Phone: 582. 15.00
Fax: 582. 15.55
SEIKO EPSON CORPORATION
(Hirooka Office)
80 Harashinden, Hirooka
Shiojiri-shi, Nagano-ken
399-0785 Japan
EPSON PORTUGAL, S.A.
R. do Progresso, 471, 1° Perafita
4460 Matosinhos, Portugal
Phone: (02) 996 14 02
Fax: (02) 996 14 11
2001 January
Page 76

Printed in Japan
xx.xx-xx
 Loading...