

Page 1
®
EPSON
Priority Fax
TM
n Owner’s Manual
2000
Page 2

®
EPSON
Priority Fax
n
Owner’s Manual
2000
™
Page 3

FCC COMPLIANCE STATEMENT FOR AMERICAN USERS
This equipment generates and uses radio frequency energy and if not installed and used properly, that is, in strict
accordance with the manufacturer’s instructions, may cause interference to radio and television reception. It has been type
tested and found to comply with the limits for a Class B computing device in accordance with the specifications in Subpart
J of Part 1.5 of FCC Rules, which are designed to provide reasonable protection against such interference in a residential
installation. However, there is no guarantee that interference will not occur in a particular installation. If this equipment
does cause interference to radio and television reception, which can be determined by turning the equipment off and on,
you are encouraged to try to correct the interference by one or more of the following measures:
.
Reorient the receiving antenna
.
Relocate the equipment with respect to the receiver
.
Move the equipment away from the receiver
.
Plug the equipment into a different outlet so that the equipment and receiver are on different branch circuits.
If necessary, consult your dealer or an experienced radio/television technician for additional suggestions. You may find the
following booklet prepared by the Federal Communications Commission helpful:
‘Television Interference Handbook.”
This booklet is available from the U.S. Government Printing Office, Washington, DC 20402. Stock No. 004-000-00450-7.
IMPORTANT NOTICE: DISCLAIMER OF WARRANTY
Epson America makes no representations or warranties, either express or implied, by or with respect to anything in this
manual, and shall not be liable for any implied warranties of merchantability and fitness for a particular purpose or for any
indirect, special, or consequential damages. Some states do not allow the exclusion of incidental or consequential damages,
so this exclusion may not apply to you.
COPYRIGHT NOTICE
All rights reserved. No part of this publication may be reproduced, stored in a retrieval system, or transmitted, in any form
or by any means, electronic, mechanical, photocopying, recording, or otherwise, without the prior written permission of
Epson America, Inc. No patent liability is assumed with respect to the use of information contained herein. While every
precaution has been taken in the preparation of this publication, Epson America assumes no responsibility for errors or
omissions. Nor is any liability assumed for damages resulting from the use of the information contained herein. Further,
this publication and the features described herein are subject to change without notice.
TRADEMARKS
Epson is a registered trademark of Seiko Epson Corporation.
Copyright © 1989 by Epson America, Inc.
Torrance, California
ii
4000039-01
Page 4

IMPORTANT SAFETY INSTRUCTIONS
1.
Read all of these instructions and save them for later reference.
2.
Follow all warnings and instructions marked on the product.
3.
Unplug this product from the wall outlet before cleaning. Do not use liquid cleaners or aerosol cleaners. Use a damp
cloth for cleaning.
Do not use this product near water.
4.
5.
Do not place this product on an unstable cart, stand, or table. The product may fall, causing serious damage to the
product.
6.
Slots and openings in the cabinet and the back or bottom are provided for ventilation; to ensure reliable operation of
the product and to protect it from overheating, these openings must not be blocked or covered. The openings should
never be blocked by placing the product on a bed, sofa, rug, or other similar surface. This product should never be
placed near or over a radiator or heat register. This product should not be placed in a built in installation unless proper
ventilation is provided.
7.
This product should be operated from the type of power source indicated on the marking label. If you are not sure of
the type of power available, consult your dealer or local power company.
8.
This product is equipped with a 3-wire grounding-type plug, a plug having a third (grounding) pin. This plug will
only fit into a grounding type power outlet. This is a safety feature. If you are unable to insert the plug into the outlet,
contact your electrician to replace your obsolete outlet. Do not defeat the purpose of the grounding type plug.
9.
Do not locate this product where the cord will be walked on.
10.
If an extension cord is used with this product, make sure that the total of the ampere ratings on the products plugged
into the extension cord do not exceed the extension cord ampere rating. Also, make sure that the total of all products
plugged into the wall outlet does not exceed 15 amperes.
11.
Never push objects of any kind into this product through cabinet slots, as they may touch dangerous voltage points or
short out parts that could result in a risk of fire or electric shock. Never spill liquid of any kind on the product.
12.
Except as specifically explained in the User’s Manual, do not attempt to service this product yourself. Opening or
removing those covers that are marked ‘Do Not Remove” may expose you to dangerous voltage points or other risks.
Refer all servicing in those compartments to service personnel.
13.
Unplug this product from the wall outlet and refer servicing to qualified service personnel under the following
conditions:
When the power cord or plug is damaged or frayed.
A.
If liquid has been spilled into the product.
B.
If the product has been exposed to rain or water.
C.
If the product does not operate normally when the operating instructions are followed. Adjust only those controls
D.
that are covered by the operating instructions, since improper adjustment of other controls may result in damage
and will often require extensive work by a qualified technician to restore the product to normal operation.
If the product has been dropped or the cabinet has been damaged.
E.
If the product exhibits a distinct change in performance, indicating a need for service.
F.
iii
Page 5

TELEPHONE INFORMATION
This equipment complies with Part 68 of the FCC Rules. On the rear panel of this equipment is a label that contains, among
other information, the FCC Registration number and Ringer Equivalence Number (REN) for this equipment. You must,
upon request, provide this information to your telephone company.
Ask your telephone company or installer to install the lack suitable for your device if such is not available.
The REN is useful to determine the quantity of devices you may connect to your telephone line and still have those devices
ring when your telephone number is called. In most, but not all, areas, the sum of the RENs of all devices connected to one
line should not exceed five (5.0). To be certain of the number of devices you may connect to your line, as determined by the
REN, you should contact your local telephone company to determine the maximum REN for your calling area.
If your telephone equipment causes harm to the telephone network, the telephone company may discontinue your service
temporarily. If possible, they will notify you in advance. But if advance notice isn’t practical, you will be notified as soon as
possible. You will be informed of your right to file a complaint with the FCC.
Your telephone company may make changes in its facilities, equipment, operations, or procedures that could affect the
proper functioning of your equipment. If they do, you will be notified in advance to give you an opportunity to maintain
uninterrupted telephone service.
If you experience trouble with this telephone equipment, please contact the manufacturer’s authorized service agency for
information on obtaining service or repair. The telephone company may ask that you disconnect this equipment from the
network until the problem has been corrected or unit you are sure that the equipment is not malfunctioning.
WARNING
For protection against the risk of electrical shock, always disconnect all cables from the wall outlet before servicing,
modifying, or installing the equipment.
This equipment may not be used on coin service provided by the telephone company nor connected to party lines.
Hearing Aid Compatibility
The telephone with this equipment is hearing aid compatible.
When Programming Emergency Numbers and/or Making Test Calls to Emergency Numbers:
1.
Remain on the line and briefly explain to the dispatcher the reason for the call before hanging up.
2.
Call only in the off-peak hours, such as early morning or late evenings.
iv
Page 6

Contents
Introduction
Features
About This Manual.
Where to Get Help .........................................
1 Setting Up the PriorityFax
..................................................
........................................
Conventions Used in This Manual
........................
1
2
2
3
2 Using the PriorityFax
Unpacking the Fax Machine
Choosing a Place for the Fax Machine
Assembling the Fax Machine.
Connecting the Handset
Connecting the Fax Machine to the Telephone Line
Installing the Output Tray and Paper Rest
Attaching the Quick Reference Sticker
Plugging in the Fax Machine. .............................
Inserting the Recording Paper Roll
Reloading paper
Running a Copy Test.
The Control Panels .......................................
The Top Control Panel
The Back Control Panel
Sending a Document. .....................................
Document Sending Cautions
Sending Photocopies
Sending Documents More Than Five Pages Long.
Manual Sending ......................................
Document Sending Enhancements
Fax Number Redialing ................................
Receiving Documents ....................................
Automatic Reception .................................
Manual Reception. ...................................
Basic Customizing Procedures
Setting the Date and Time
Registering Your Number and Name
One-touch and Speed Dial Faxing
Removing Numbers and Names
The Add Paper Message
Activity Reports.
.....................................
....................................
........................................
...............................
.......................
..............................
...............................
........
................
..................
........................
.................................
................................
...........................
..................................
.........
.....................
............................
.............................
...................
......................
..........................
.................................
l-1
1-2
l-2
l-3
l-3
l-5
l-10
l-10
l-10
l-13
l-13
2-l
2-l
2-4
2-5
2-6
2-7
2-7
2-8
2-l0
2-l1
2-l2
2-l2
2-l2
2-l3
2-13
2-14
2-l6
2-24
2-25
2-25
V
Page 7

PriorityFax 2000 Manual
3
Using the PriorityFax as a Telephone
The Control Panels .......................................
The Top Control Panel.
The Back Control Panel
Adjusting the Handset Volume and Ringer Switches
Standard Dialing .........................................
Manual Redialing ........................................
One-touch Telephone Dialing
Registering One-touch Telephone Numbers
Using One-touch Telephone Dialing
4
Using the PriorityFax Advanced Features
Sending a Fax Back Message
Fax Back Message With a Document.
Fax Back Message Only
Setting the Resolution. ....................................
One Document Only ..................................
All Documents. .......................................
Setting the Contrast. ......................................
One Document Only ..................................
All Documents. .......................................
Turning the Beeper Off. ...................................
Sending a Lead Sheet .....................................
Setting the Transmission Verification
Changing Automatic Redial Settings.
Printing Lists ...........................................
Activity Report Timing ..................................
Using Delayed Send .....................................
Using Password Security .................................
Setting the Password .................................
Activating the Password
Using Polling ...........................................
Setting Called-side Polling
Setting Calling-side Polling.
Setting Delayed Polling
................................
................................
..........
..............................
..............
.....................
...............................
....................
................................
......................
......................
..............................
............................
...........................
...............................
3-1
3-1
3-4
3-4
3-5
3-6
3-6
3-7
3-9
4-1
4-2
4-2
4-3
4-4
4-4
4-5
4-6
4-6
4-7
4-8
4-10
4-l1
4-13
4-14
4-14
4-l6
4-l6
4-18
4-19
4-20
4-21
4-24
vi
Page 8

5 Troubleshooting
Contents
Problems and Solutions
Sending..............................................5-1
Documentjam.....................................5-1
Document doesn’t enter the feeder properly. ..........
Documents cannot be fed into the fax machine ........
Password security documents cannot be sent ..........
You hear ringing but the other fax machine does not
answer
The receiving party image quality is poor
Documents you sent are received blank.
One-touch or speed dial faxing does not work .........
Receiving..
Manual reception doesn’t work.
Recording paper is jammed
Received copies are blank.
The telephone rings continuously
Received documents are excessively curled
Polling reception doesn’t work
Received document image quality is poor.
Copying
Nothing comes out of the paper slot.
No image appears on the paper.
Print quality of the copy is poor
Telephone............................................5-6
One-touch and speed dialing don’t work
Call reservation does not work
The telephone does not ring.
When you press SPKR you hear nothing
LCD Error Messages.
........................................
...........................................
...................................
........................................
.............
..............
.....................
.........................
..........................
....................
...........
......................
............
.................
.....................
.....................
.............
......................
........................
..............
..................................
5-l
5-l
5-2
5-2
5-2
5-3
5-3
5-3
..5-4
5-4
5-4
5-4
5-4
5-4
5-5
5-5
..5-5
5-5
5-6
5-6
5-6
5-7
5-7
5-7
5-7
6 Maintenance
Cleaning the Interior of the Fax Machine
Cleaning the Exterior of the Fax Machine
....................
....................
6-l
6-2
vii
Page 9

PriorityFax 2000 Manual
7 Technical Specifications
Glossary
Index
Viii
Page 10

Introduction
The Epson PriorityFax™ 2000 is an advanced desktop facsimile
machine and telephone that combines high speed and quality with
a wide range of features.
Features
In addition to its compact design and ease of operation, this fax
machine offers the following:
Ll
High-speed transmission
cl
An automatic document feeder holding up to five pages at a
time
Li
A multi-featured telephone including one-touch and speed
dialing, last number redial, and hold
Lb
An LCD/clock display to keep you informed of the machine’s
operation
cl
An automatic paper cutter
Q
Activity reports that document faxes sent and faxes received
ci
A convenience copier capability
0
Delayed send, which allows you to send documents when
telephone rates are lower
Ll
Programmable password security
ci
Three levels of resolution
photos -
0
Transmission verification to confirm that your document
to provide superior document transmission quality
- including a 16-shade gray scale for
reached its destination.
Introduction-l
Page 11
PriorityFax 2000 Manual
About This Manual
Conventions Used in This Manual
This manual provides step-by-step instructions for setting up and
operating the fax machine.
Chapter 1 contains information on unpacking, setting up,
connecting, and testing the fax machine.
Chapter 2 provides basic information on using the fax machine,
including using one-touch and speed dialing.
Chapter 3 explains using the fax machine as a telephone.
Chapter 4 tells how to use all the advanced features of the fax
machine.
If the fax machine does not operate properly or the print quality is
not what you expect, see Chapter 5 for a list of possible problems
and recommended solutions.
Other chapters include information on general maintenance and
technical specifications. There is also a glossary of terms and an
index.
Note
Notes contain important information and useful tips on
the operation of your fax machine.
Introduction-2
WARNING
Warnings must be followed carefully to avoid damage to
your fax machine and to ensure that it operates correctly.
Page 12
Introduction
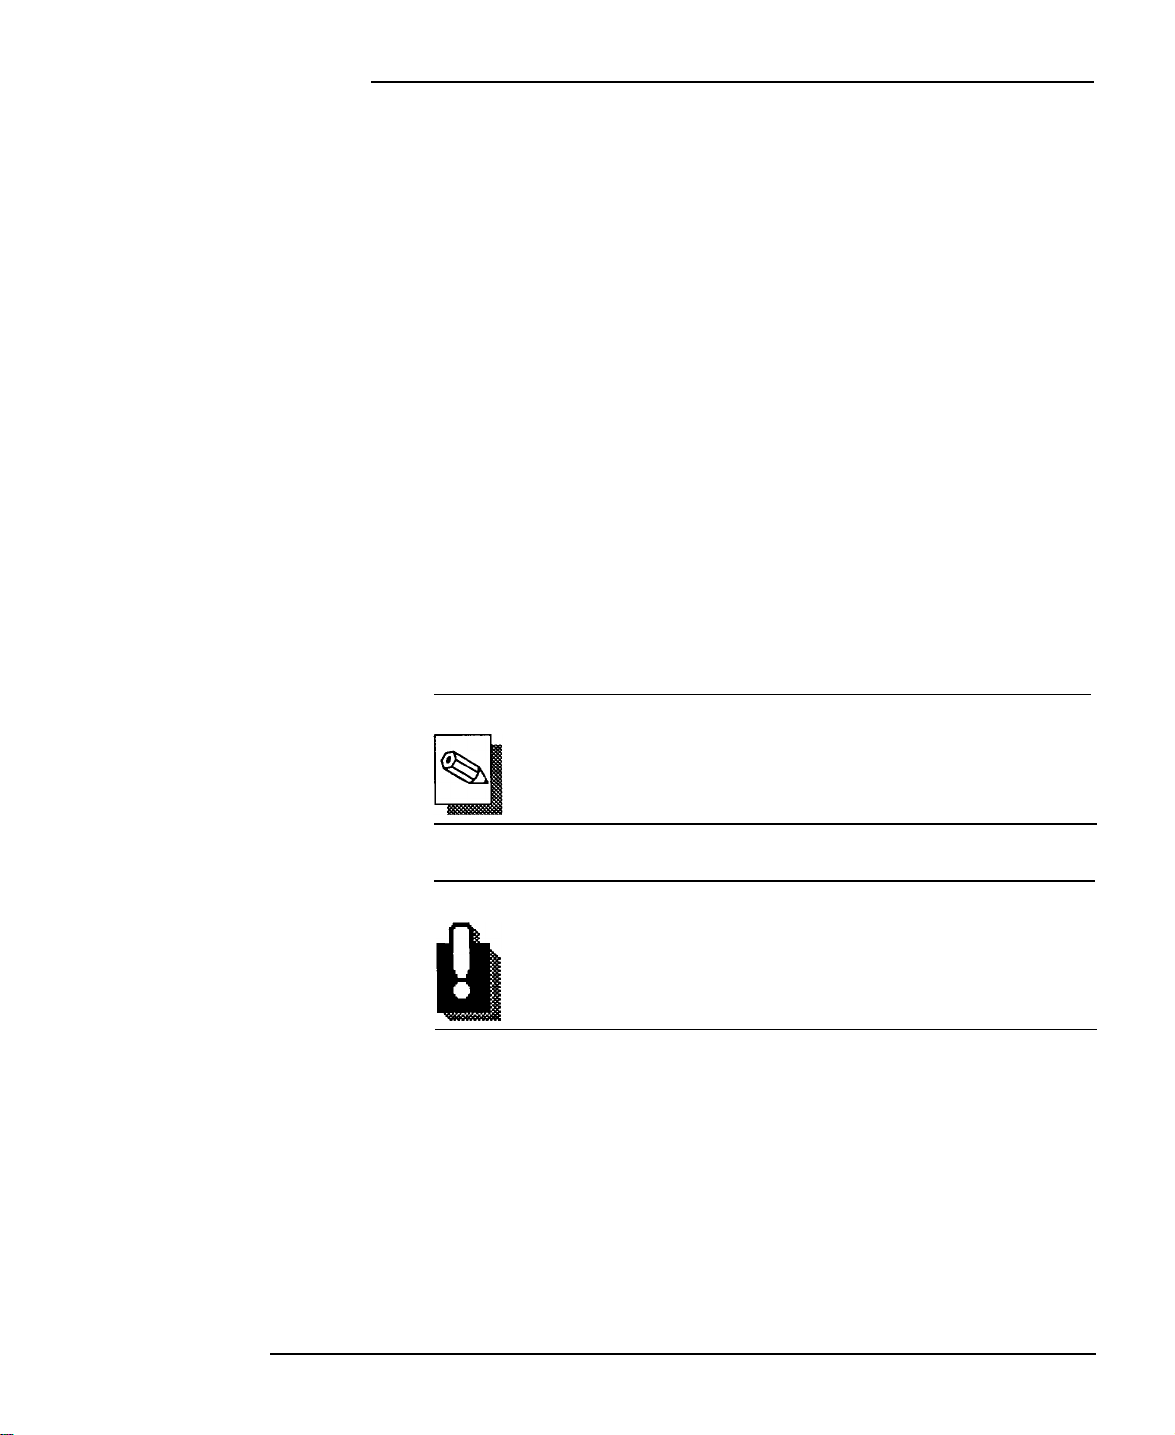
The words twice or 3 times under a button indicates that you push
the button two or three times.
This tells you to make sure that no document is in the fax machine.
This tells you to insert a document in the feeder.
Where to Get
Help
Customer service for Epson products is provided by a network of
authorized Epson Customer Care Centers throughout the United
States.
Call the Epson Consumer Information Center at l-800-922-8911 for
the following:
D
Customer Care Center referrals
tI
Technical support referrals
0
Information on Epson User Groups.
To locate or purchase accessories or supplies, contact your nearest
Epson dealer or call l-800-873-7766.
Introduction-3
Page 13
1
Setting Up the PriorityFax
This chapter takes you through the steps of unpacking,
assembling, and testing the fax machine.
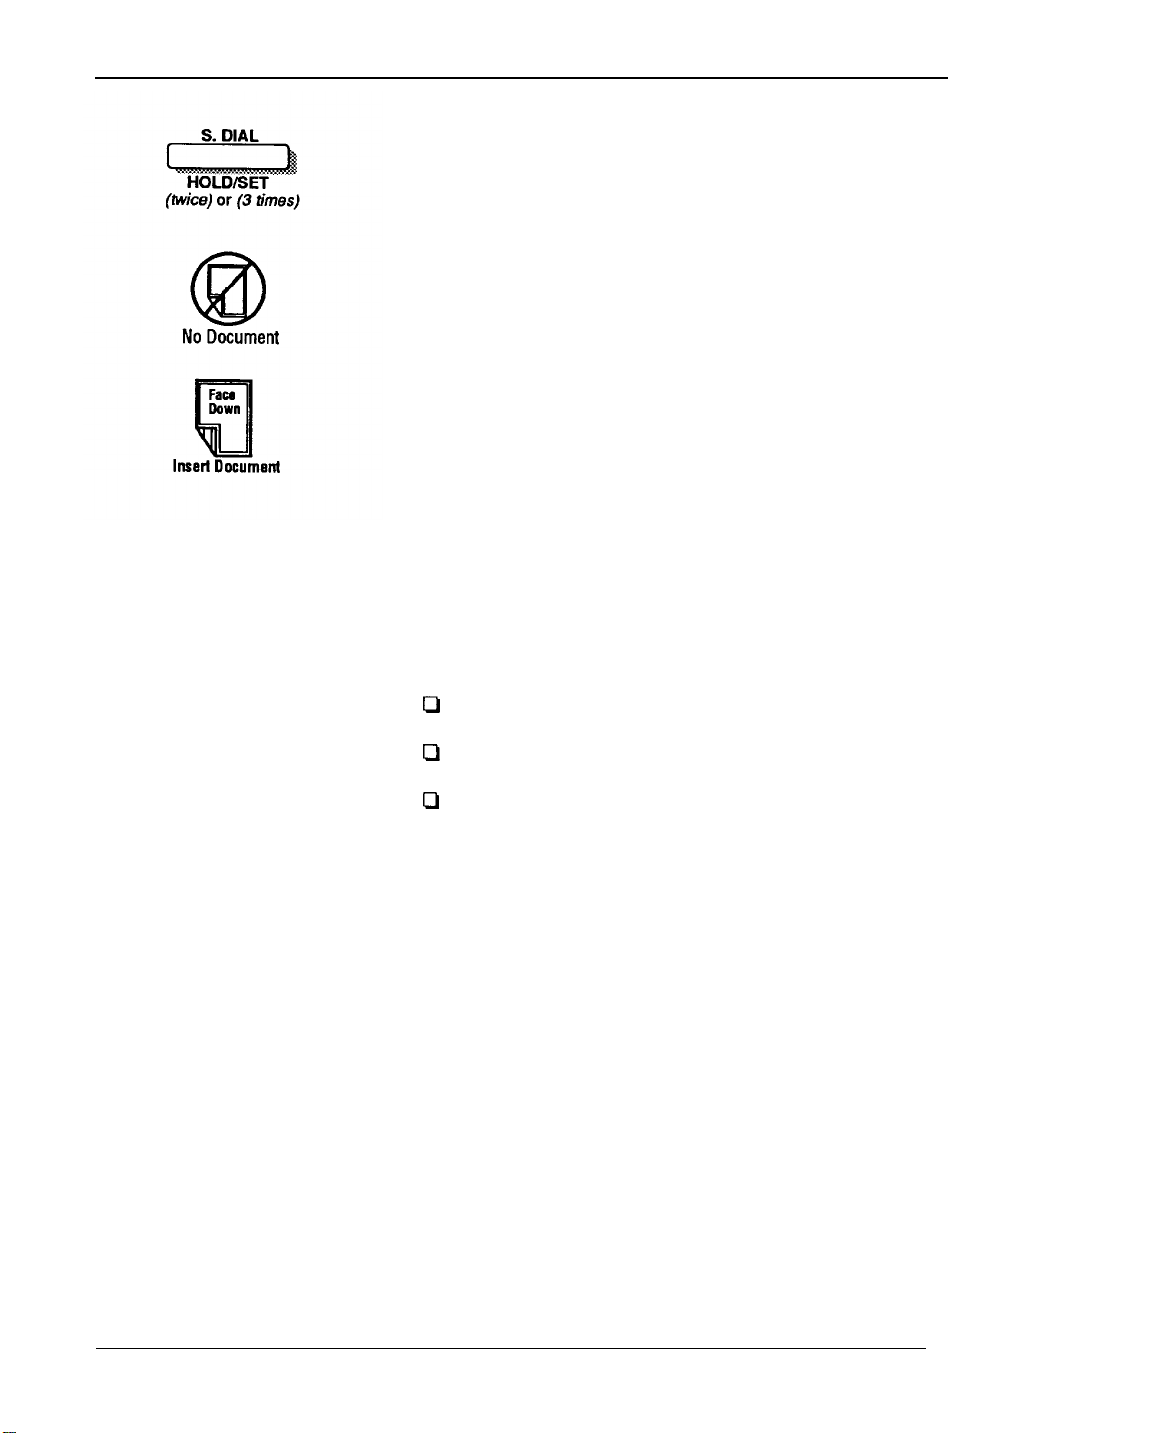
Unpacking
Machine
the Fax
As you unpack the fax machine, check that you have all
shown below and none have been damaged during transportation.
the items
After removing the contents, store the packaging materials in case
you ever need to transport your fax machine.
1-1
Page 14
PriorityFax 2000 Manual
WARNING
Lift the fax machine by its body, never by the telephone
handset or cradle.
Choosing a Place for
the Fax Machine
When you select a location for your fax machine, keep the
following in mind:
0
Place the fax machine on a flat, stable surface
Cl
Select a vibration-free area
Cl
Locate the unit near a telephone wall jack and a standard
grounded outlet.
WARNING
Q
Avoid locations that are subject to direct sunlight,
excessive heat, moisture, or dust.
Avoid using electrical outlets controlled by wall
switches or automatic timers. Disruption of power can
wipe out information in the unit’s memory.
Avoid using outlets on the same circuit with large
motors or other appliances that might disturb the
power supply.
Keep the unit away from potential sources of
interference, such as loudspeakers or the base units of
cordless telephones.
Assembling the Fax
Machine
1-2
To assemble the fax machine, you need only do the following:
Cl
Connect the handset
Cl
Plug in the line cord
Cl
Install the output tray and paper rest
0
Attach the Quick Reference sticker.
Page 15
Setting Up the PriorityFax
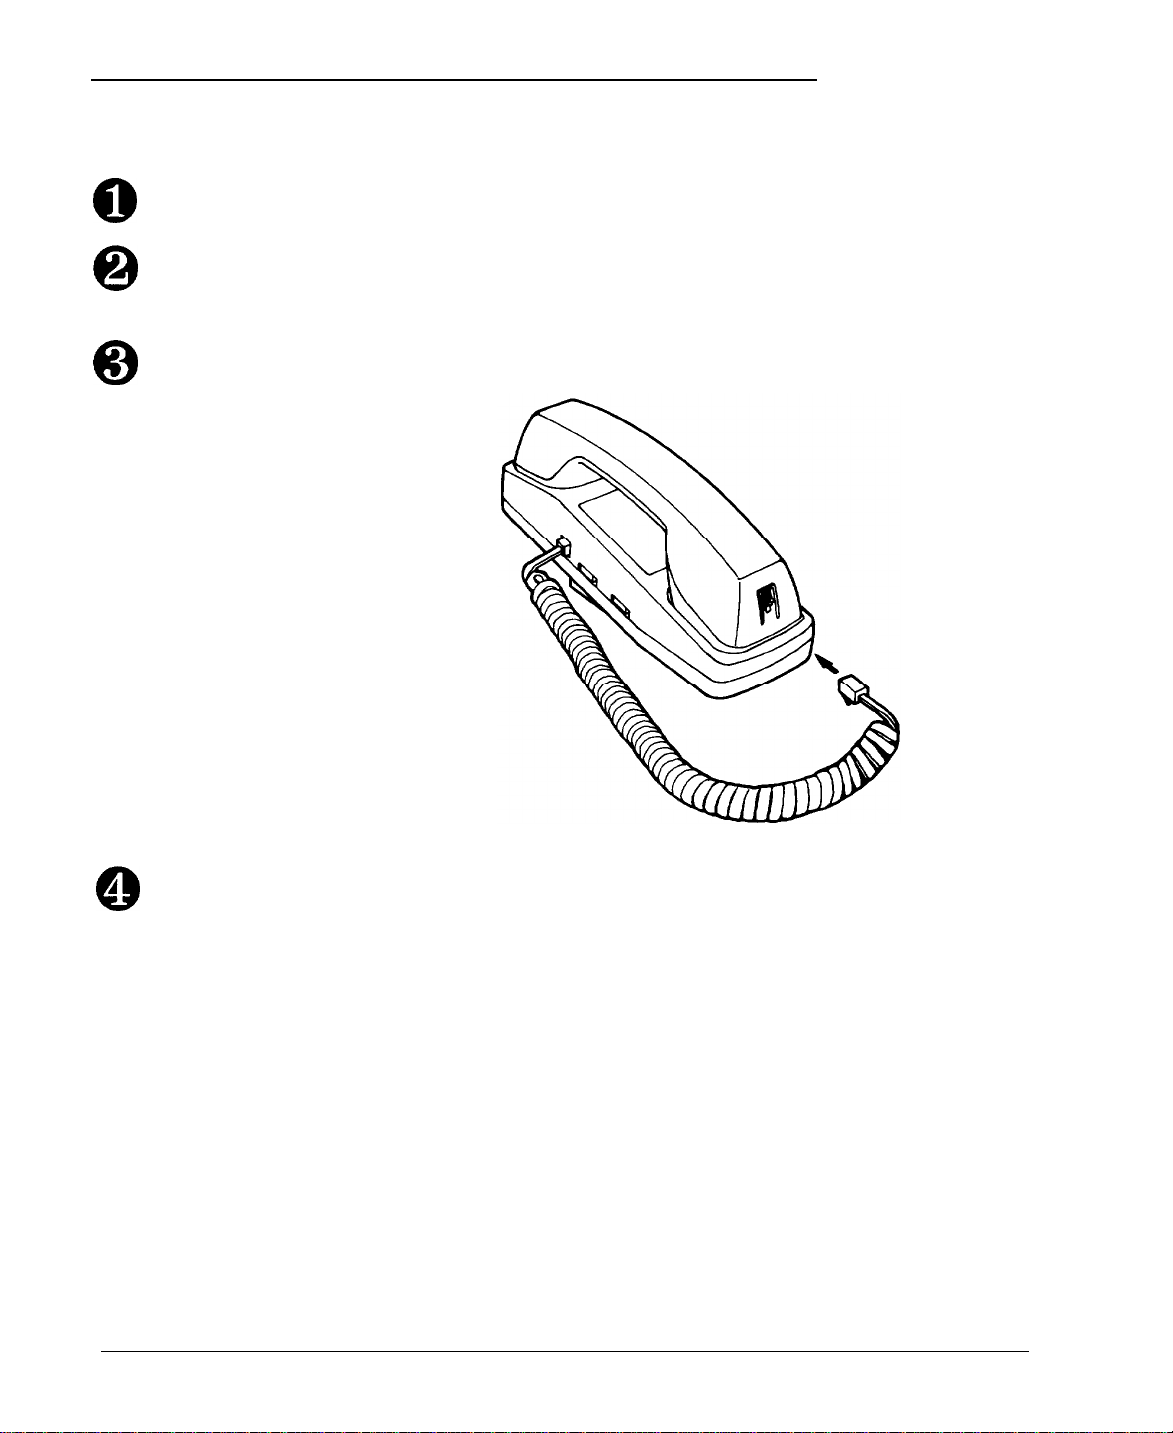
Connecting the Handset
0
0
0
To connect the handset to the telephone cradle, follow these steps:
Remove the protective plastic cover from the curled handset cord.
Locate the insert opening on the left side of the telephone cradle
and plug in one end of the handset cord.
Plug the other end of the cord into the handset, as shown below.
0
Connecting the Fax
Machine to the
Telephone Line
Installing a single-line
telephone connection
Push firmly to be sure both ends of the cord are locked in place.
There are two types of connections for installing your fax machine:
single-line and multi-line.
A single-line connection is the preferred solution for installing the
fax machine. To hook up to a single-line connection, perform the
following steps.
1-3
Page 16
PriorityFax 2000 Manual
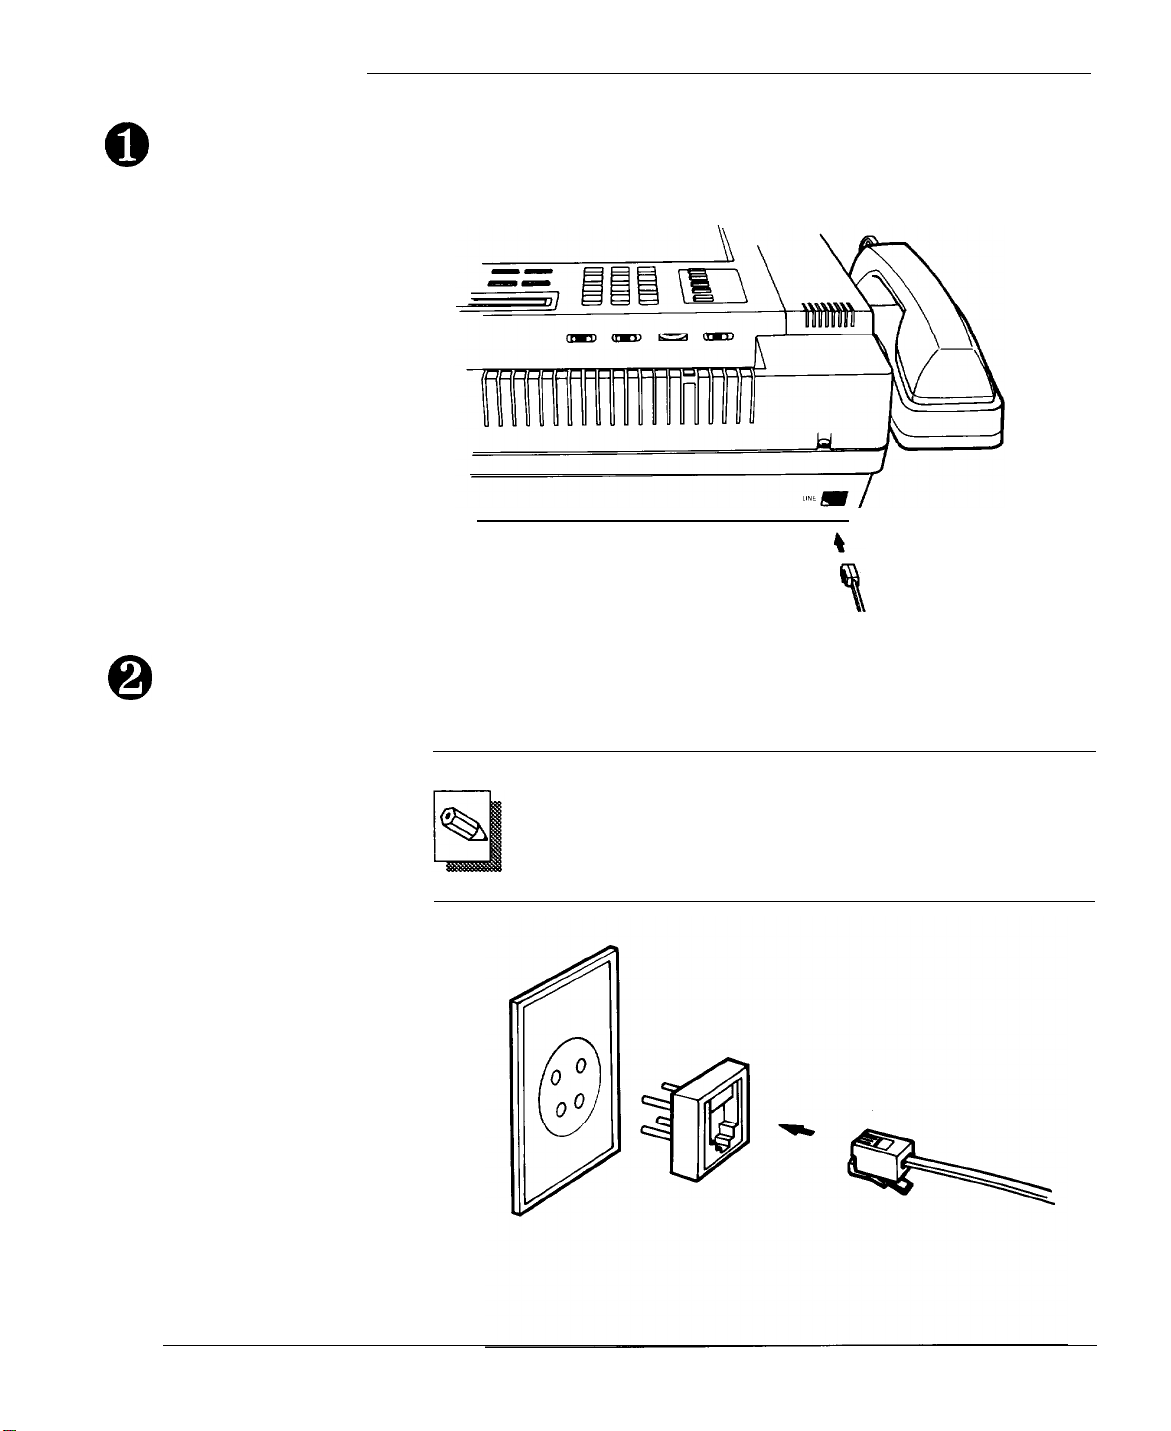
0
Plug one end of the telephone line cord (the flat cord) into the back
of the fax machine, as shown below.
Plug the other end into your modular telephone wall jack (USOC
0
RJllC). Make sure both ends of the cord click securely into place.
Note
If you have the older 4-prong telephone wall jack, you
must use a modular 4-prong adapter WSOC RJA1X). Plug
the adapter into the wall jack and then plug the telephone
cord into the adapter, as shown in the illustration below.
1-4
Page 17
Setting Up the PriorityFax
Installing a multi-line
telephone connection
Most offices have a central phone system. Although in many
cases it is relatively easy to connect the fax machine to this
system, we suggest that you contact the company that
installed your organization’s telephone system and ask them
to connect the fax machine for you.
It is preferable to have a separate line to the fax machine.
This way, you can leave the unit in Automatic Answer mode
24 hours a day and derive full benefit from the fax machine’s
unattended operations capabilities.
If the fax machine is connected to a multi-line system, ask
your installer to connect the fax machine to the last line on
the system. This prevents the fax machine from being
activated each time a telephone call comes into your office.
WARNING
If you install the PriorityFax and a separate
telephone on the same telephone line, do not pick
up the telephone handset when you are receiving a
fax. This can cause the received document to
contain distorted characters.
Installing the Output
Tray and Paper Rest
There are two types of paper holders for the PriorityFax: the
output tray for holding documents sent to or copied by you,
and the paper rest for holding documents you have just sent
to others.
1-5
Page 18

PriorityFax 2000 Manual
Installing the output tray
Horizontal
Base only
Shown below are the three ways you can install the output tray,
depending upon your workspace. The vertical and base only
installations use the least desk space, but the horizontal installation
minimizes curling of incoming documents.
Vertical
To install the output tray base (and the output tray if desired),
follow these steps:
Place the output tray base on the table in front of you. Then insert
0
the wire output tray paper guide into the holes on either side of
the output tray base as shown below.
Place the fax machine at the edge of the table and locate the two
0
notches on the front underside of the fax machine.
1-6
Page 19
Setting Up the PriorityFax
Holding the output tray base level, press the tabs extending from
the output tray base into the notches on the front of the fax
machine, as shown in the following illustration.
If you have chosen the base only installation, skip the next
two steps.
Place the output tray in front of you and insert each of the
two wire paper holders into the holes at the edge of the
output tray, as shown below.
1-7
Page 20

PriorityFax 2000 Manual
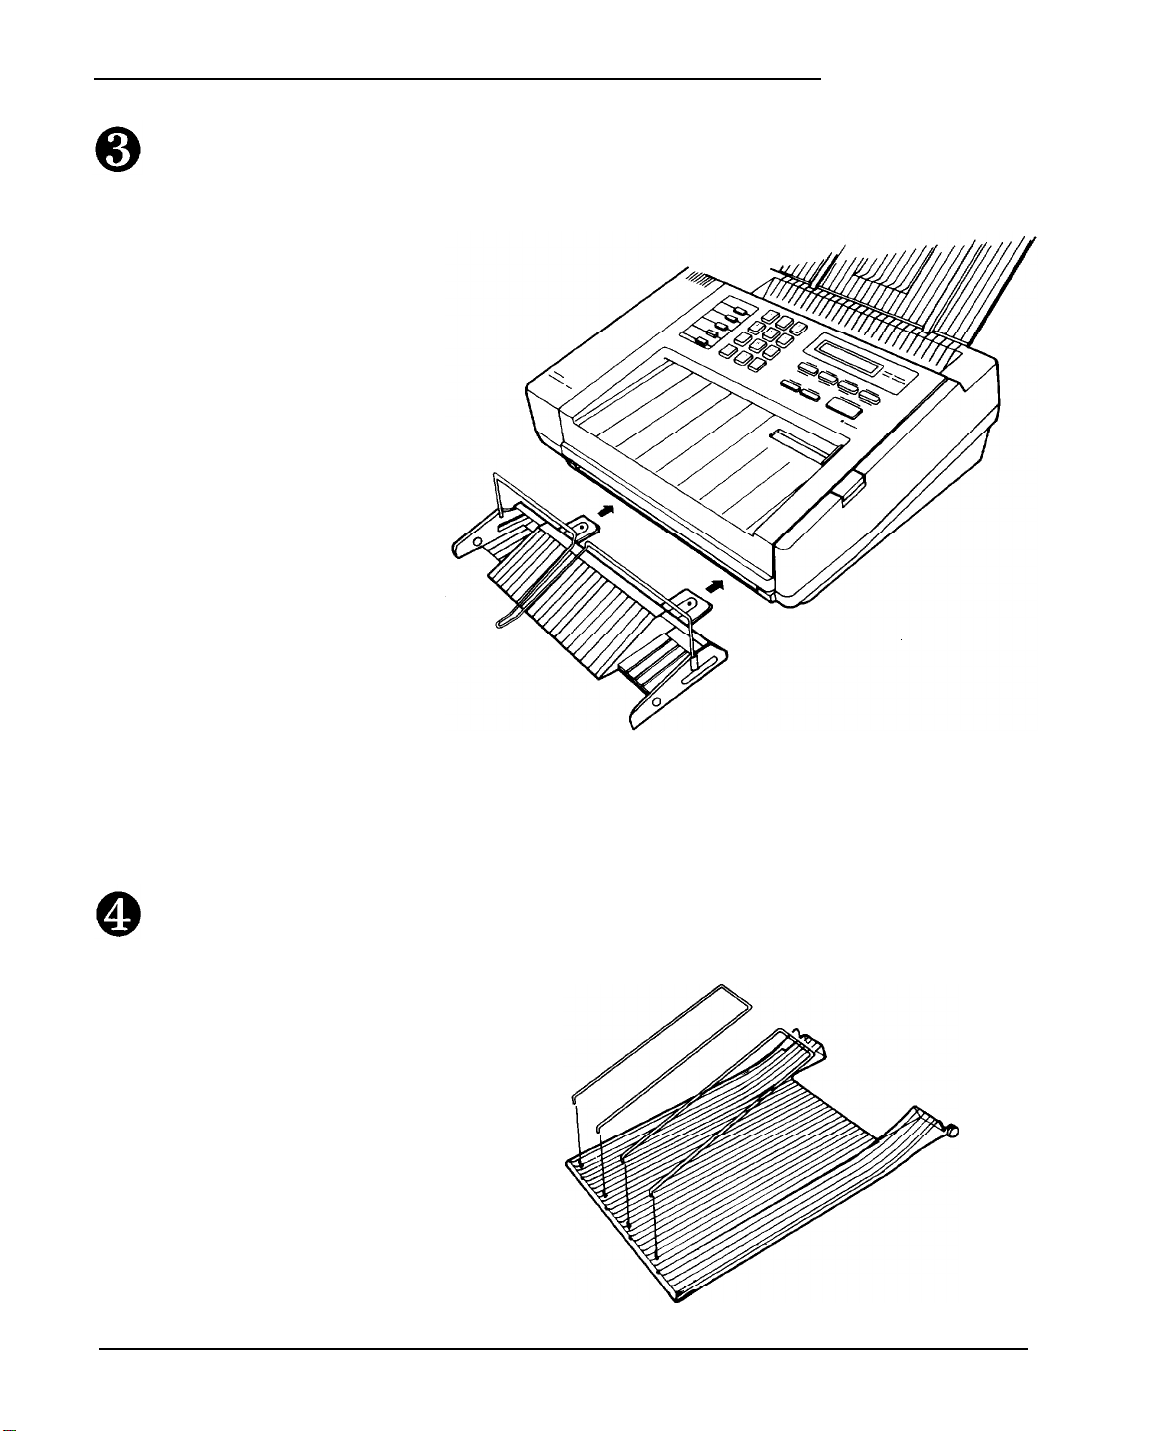
For the horizontal installation, attach the output tray to the output
tray base using the rear slots. For the vertical installation, attach
the tray to the base using the front holes. See the illustration below.
To attach the output tray in a horizontal position, insert the pegs
on both sides of the output tray into the rear slots on the output
tray base. Then push the output tray as far back as it will go.
To attach the tray in a vertical position, insert the pegs on the
output tray into the front holes on the output tray base. Then allow
the tray to hang over the edge of the fax machine operating surface
to catch your incoming or copied documents.
1-8
Page 21
Setting Up the PriorityFax
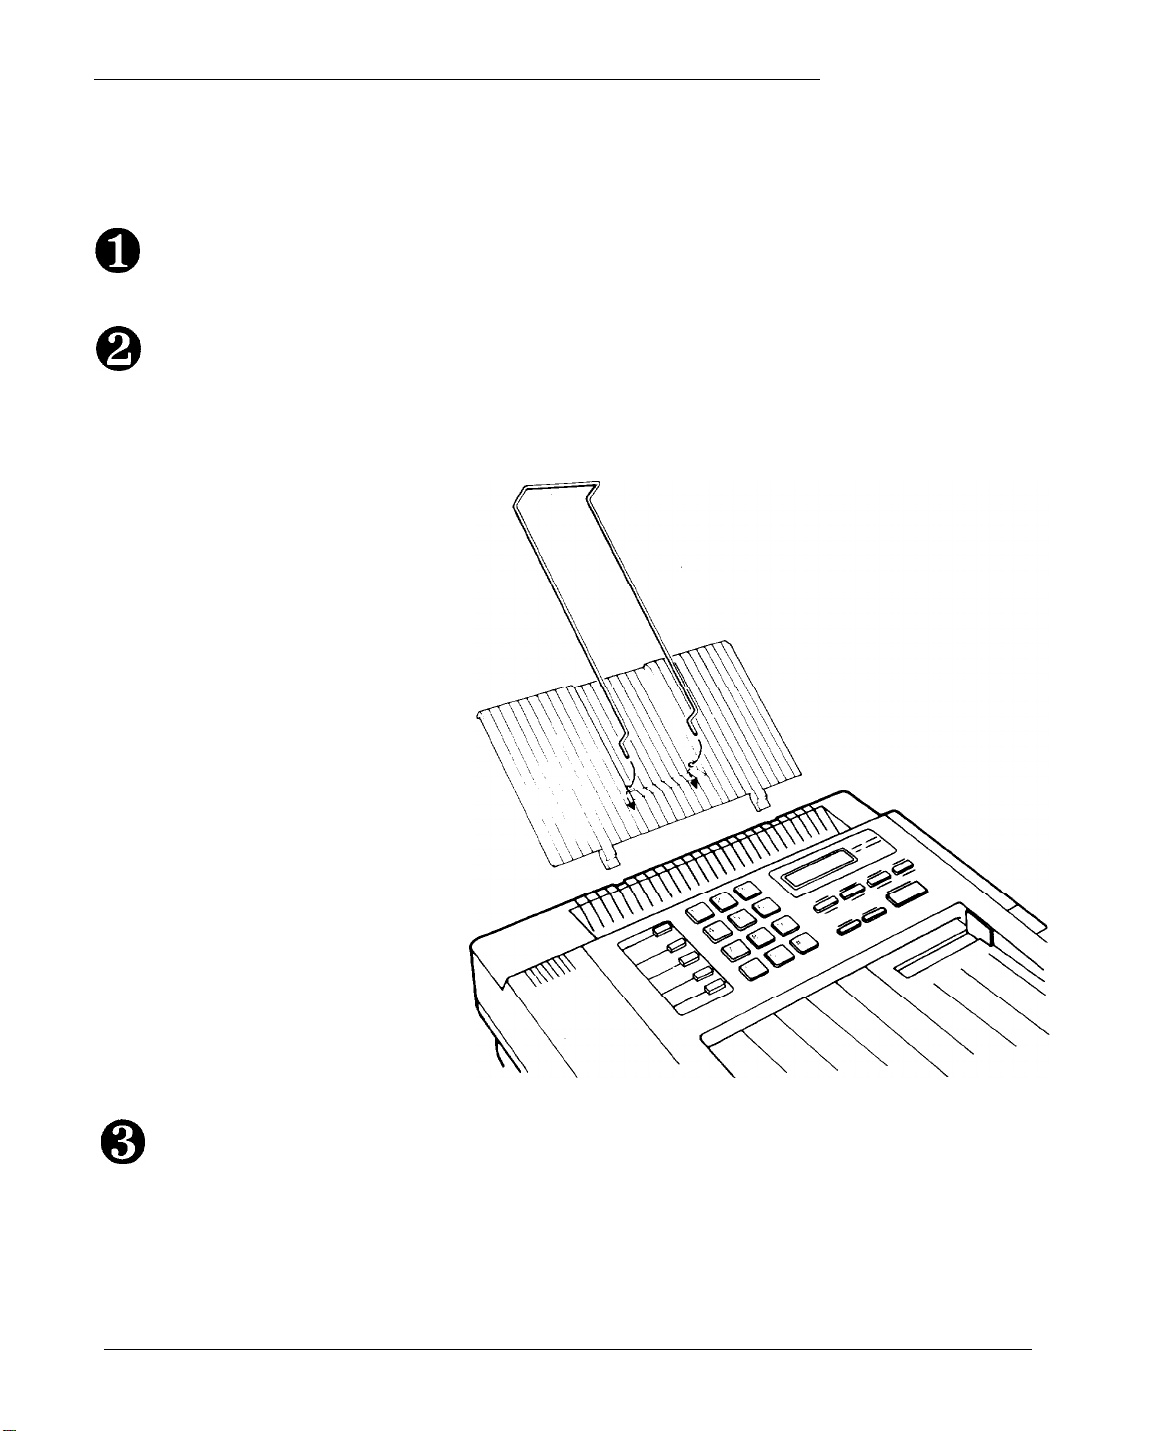
Installing the paper
rest
0
0
The smaller of the paper holders, the paper rest, is used to hold
documents that you have just faxed to others. To install the paper
rest, follow these steps:
Locate the grooves at the back of the fax machine, right below the
back control panel.
Holding the paper rest at about a 45o angle to the fax machine,
press the tabs extending from one end of the rest into the grooves,
as shown in the following illustration. If you wish, you can also
install the paper rest wire as shown below. Do not use the paper
rest wire for legal size documents.
Make sure that the tray fits evenly and securely.
0
1-9
Page 22
PriorityFax 2000 Manual
Attaching the Quick
Reference Sticker
0
0
Plugging in the Fax Machine
Attach the Quick Reference sticker as follows:
Remove the backing from the adhesive side of the sticker.
Place the sticker in the blank space on the far left of the top control
panel.
The fax machine can be plugged into any standard power outlet.
Make sure that the outlet is grounded and that it is not on the same
line as large appliances or office machines that tend to draw a lot
of power in a very short period of time, such as refrigerators and
copiers. The fax machine power requirements can be found in
Technical Specifications, Chapter 7.
Plug the power cord into a properly grounded electrical outlet.
You do not need to turn the fax machine on or off. The LCD (liquid
crystal display) is on the top control panel to the right of the
keypad. When you plug in the fax machine, the following display
appears on the LCD:
Inserting the
Recording Paper
Roll
l-10
This display prompts you to insert the recording paper roll into
the fax machine.
Follow these steps to insert the recording paper roll.
WARNING
The recording paper is heat-sensitive. Avoid exposure to
high temperature, high humidity, direct sunlight, alcohol,
or blueprints to avoid discoloration.
Page 23
Setting Up the PriorityFax
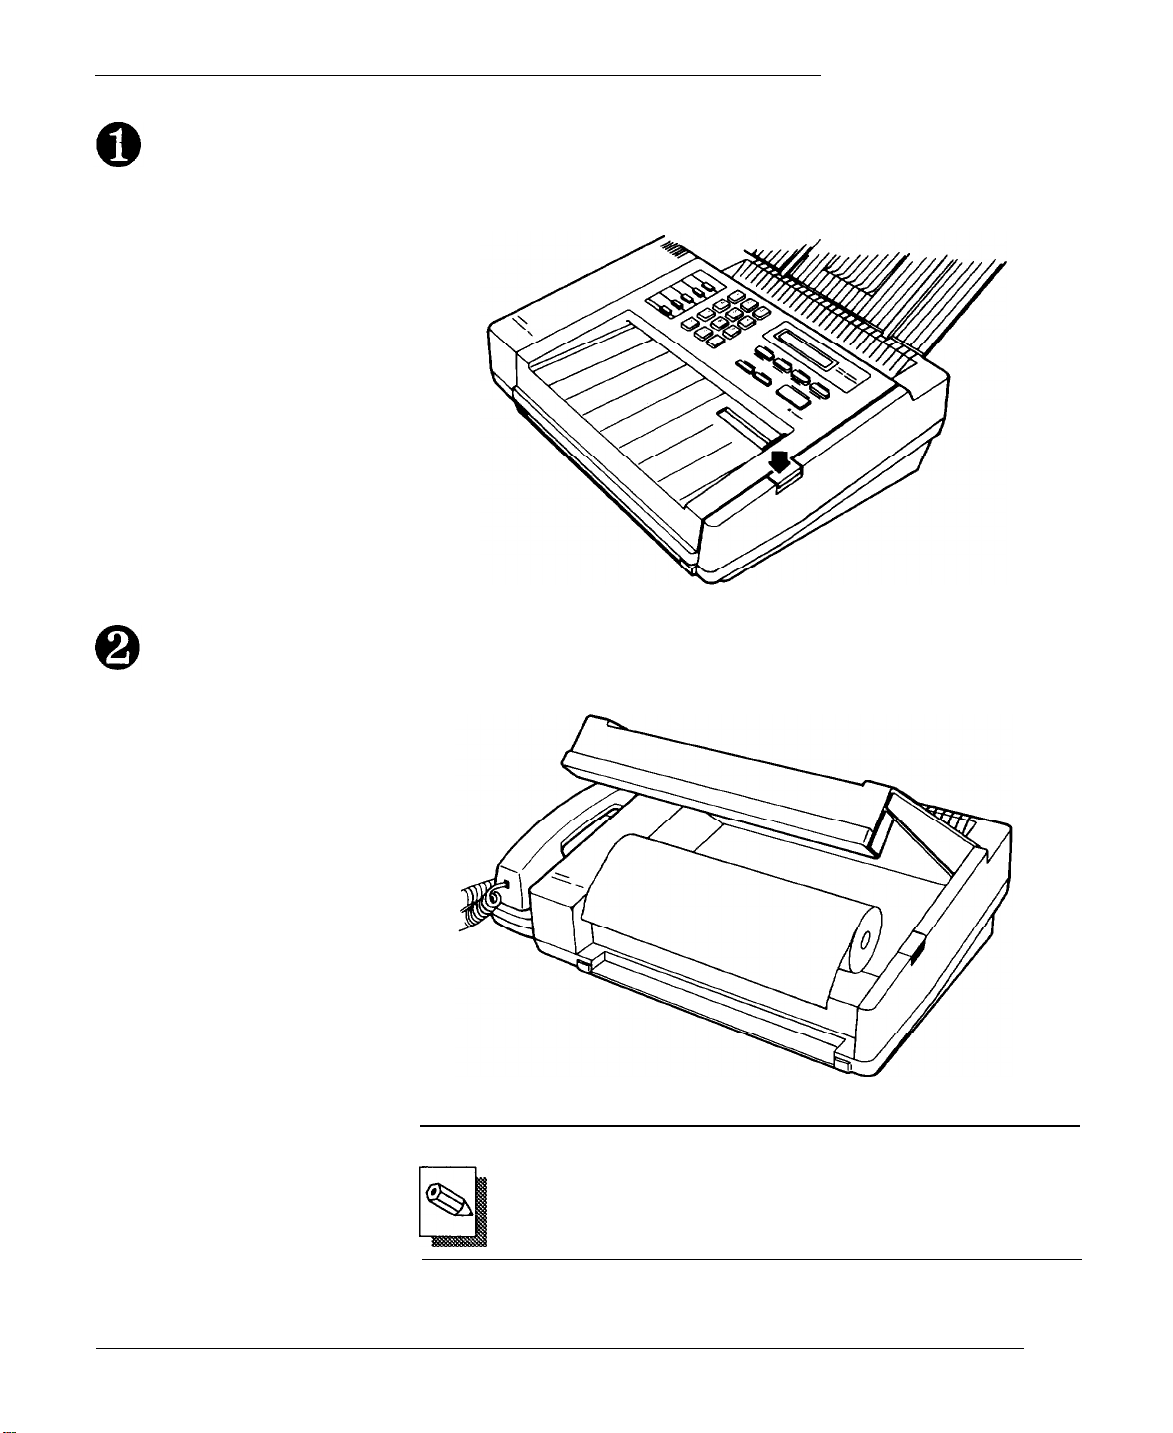
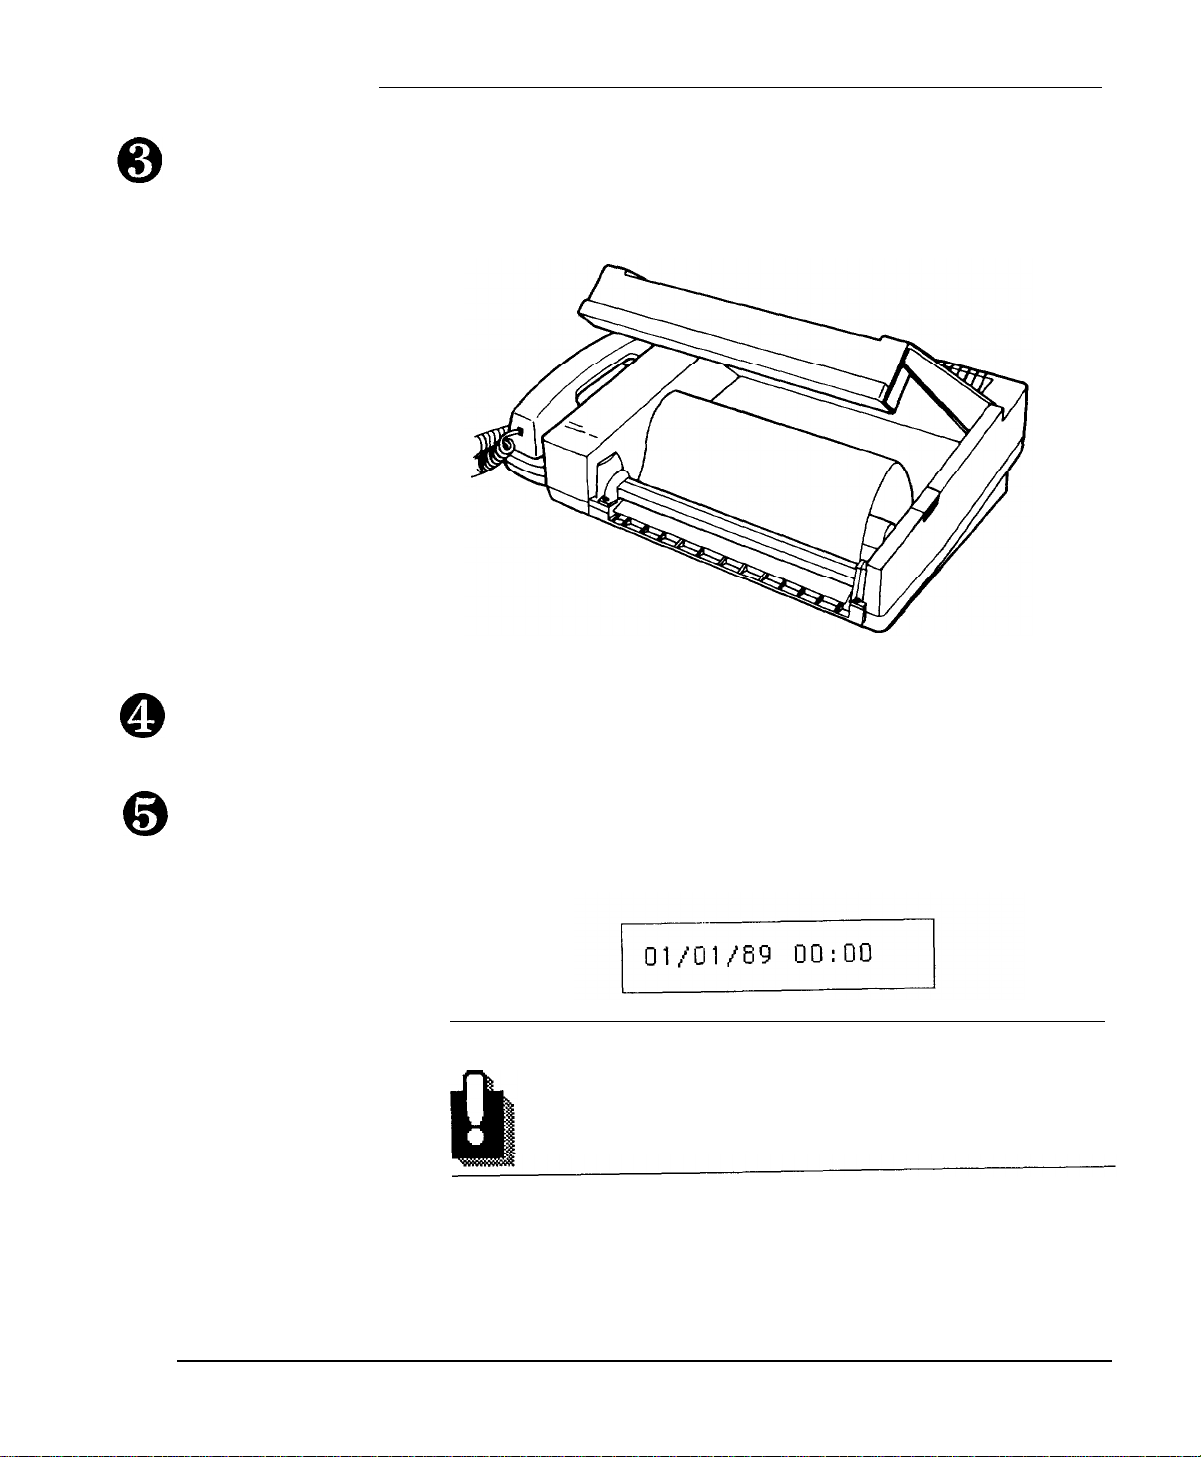
Press the paper cover button, which is located at the right edge of
the top of the machine. This opens the cover. Then remove the slip
of protective paper from underneath the cover.
Unwrap the paper roll. Hold the roll so that the free end of the
paper points toward you from the top of the roll, as shown.
Note
Be sure not to insert the paper roll upside down. If the
paper roll is inserted upside down, the fax machine cannot
produce an image.
l-11
Page 24
PriorityFax 2000 Manual
Place the paper into the machine. Then pull the paper from
the top of the roll and carefully insert the end of the paper
under the paper cutter guide, as shown below. (Paper
loading instructions are also printed inside the fax machine.)
0
0
If you’ve inserted the paper correctly, it comes out through
the front of the machine. Pull approximately four inches
(10 cm) of paper out the front of the machine.
Push the cover shut until you hear a click. The automatic cutter
trims the excess paper and the date/time display appears as
shown below.
Your fax machine is ready for use.
WARNING
Always use the proper type of recording paper in
this fax machine. Epson PriorityFax paper is
recommended.
l-12
Page 25
Setting Up the Priority Fax
Reloading Paper
Running a Copy
Test
Q
B
Insert Document
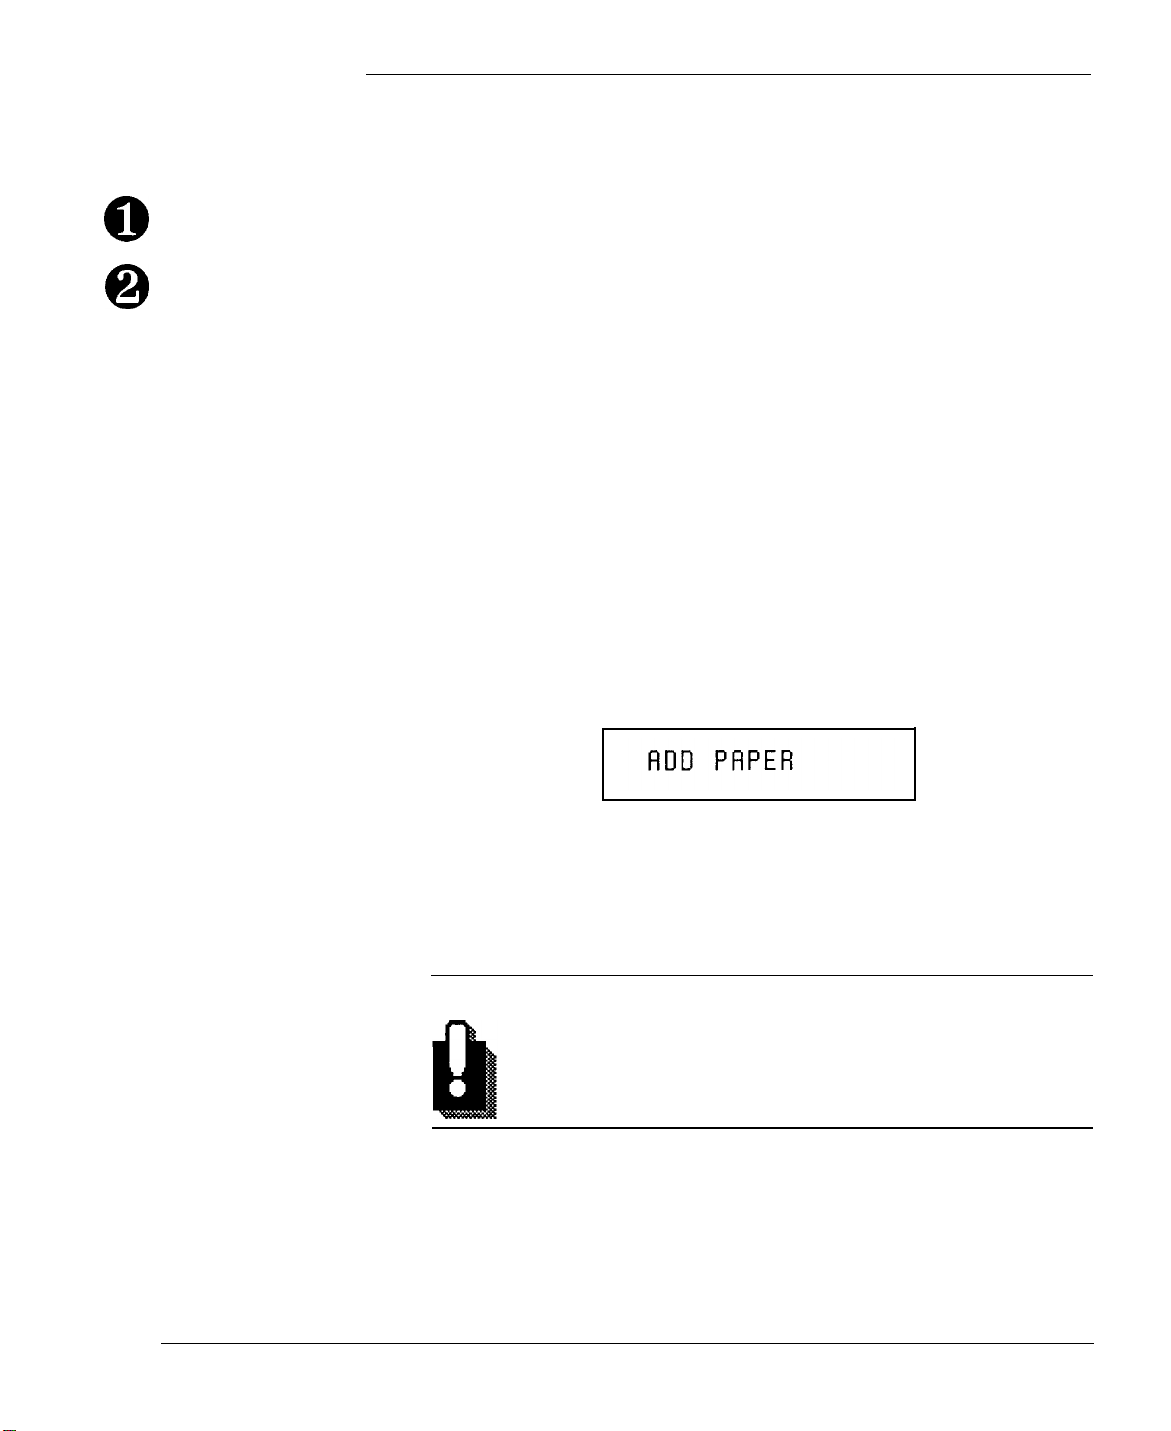
The LCD lets you know when to replace the paper roll. When
approximately 4 inches (10 cm) of paper is left, the ADD PAPER
message appears on the LCD. When you see this message, remove
the old roll and follow the instructions above to insert the new roll.
A quick test of your PriorityFax is the convenience copy function.
You can copy any document that is no more than 8.5 inches wide.
Just follow the instructions below.
Note
The fax machine cannot read anything at the very edge of
a document. Make sure to leave a margin of at least 0.15
inches (3.8mm) on the top, bottom, and sides of any
document you copy or send.
Use copies duplicated by this machine as temporary copies only. If
it is necessary to store a copy for a long time, use a copy machine
to reproduce the original document.
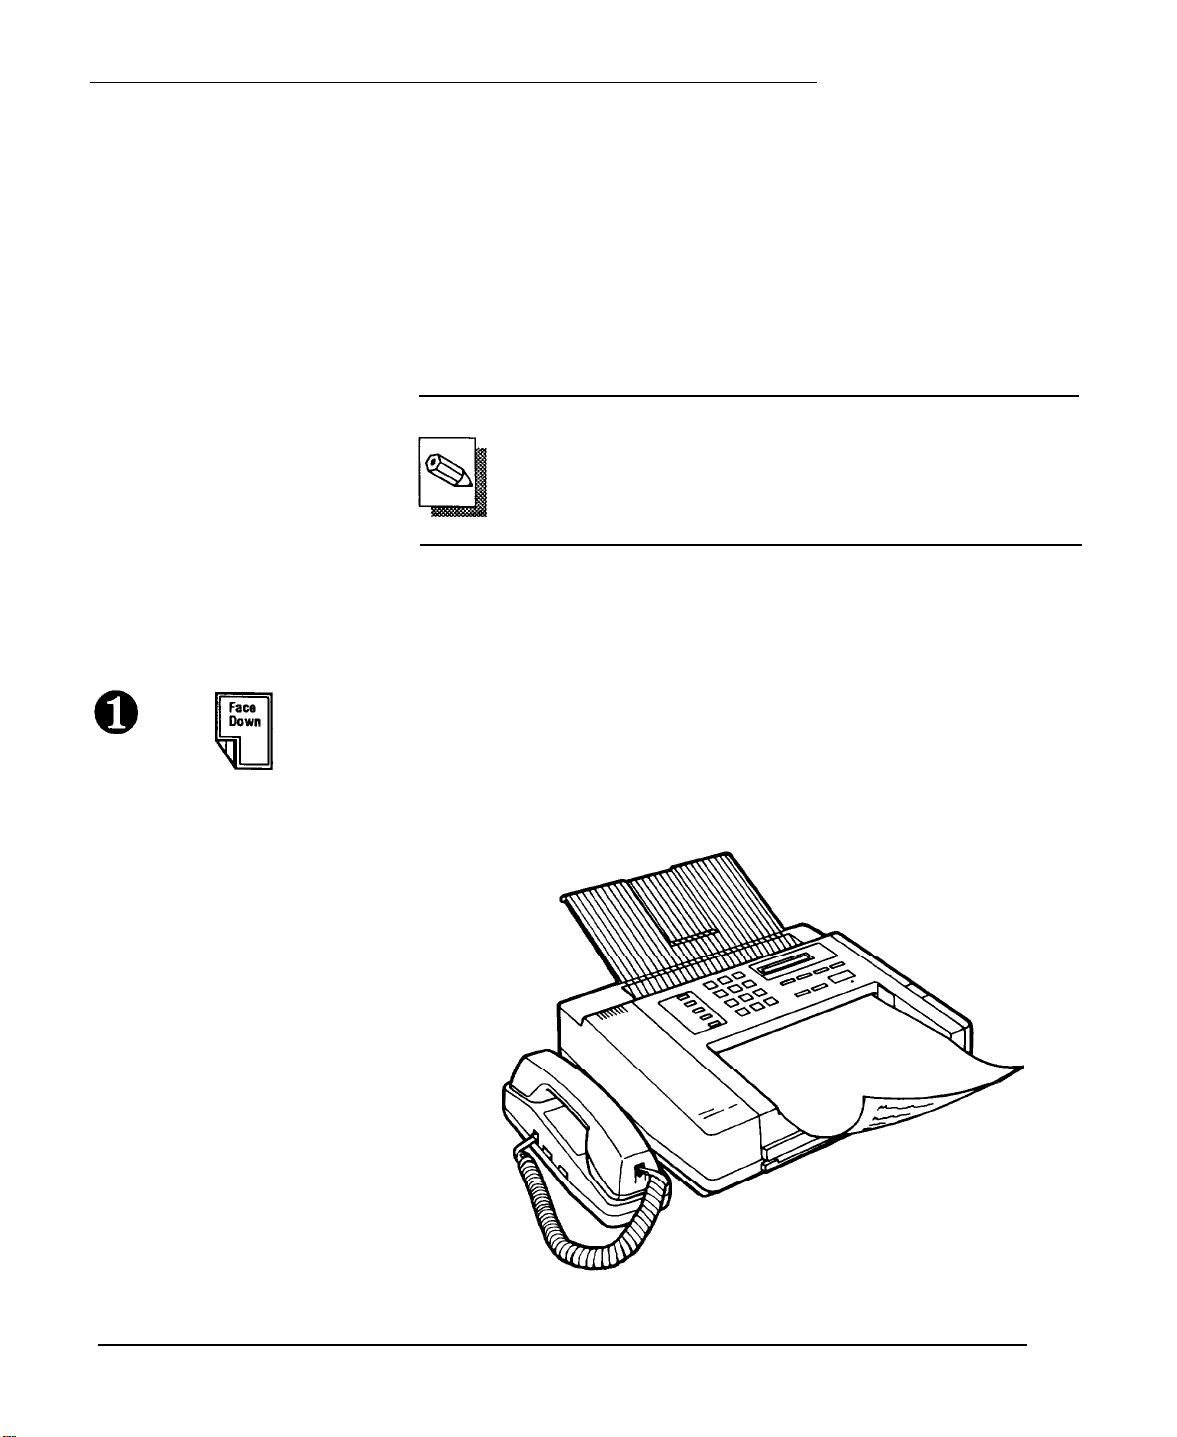
Turn the document face down with the top of the document toward
the feeder. Insert the document into the feeder as shown in the
illustration below. If the document is less than 8.5 inches wide,
adjust the document guide on the right to match the width of the
paper. The paper is drawn slightly into the fax machine.
1-13
Page 26
PriorityFax 2000 Manual
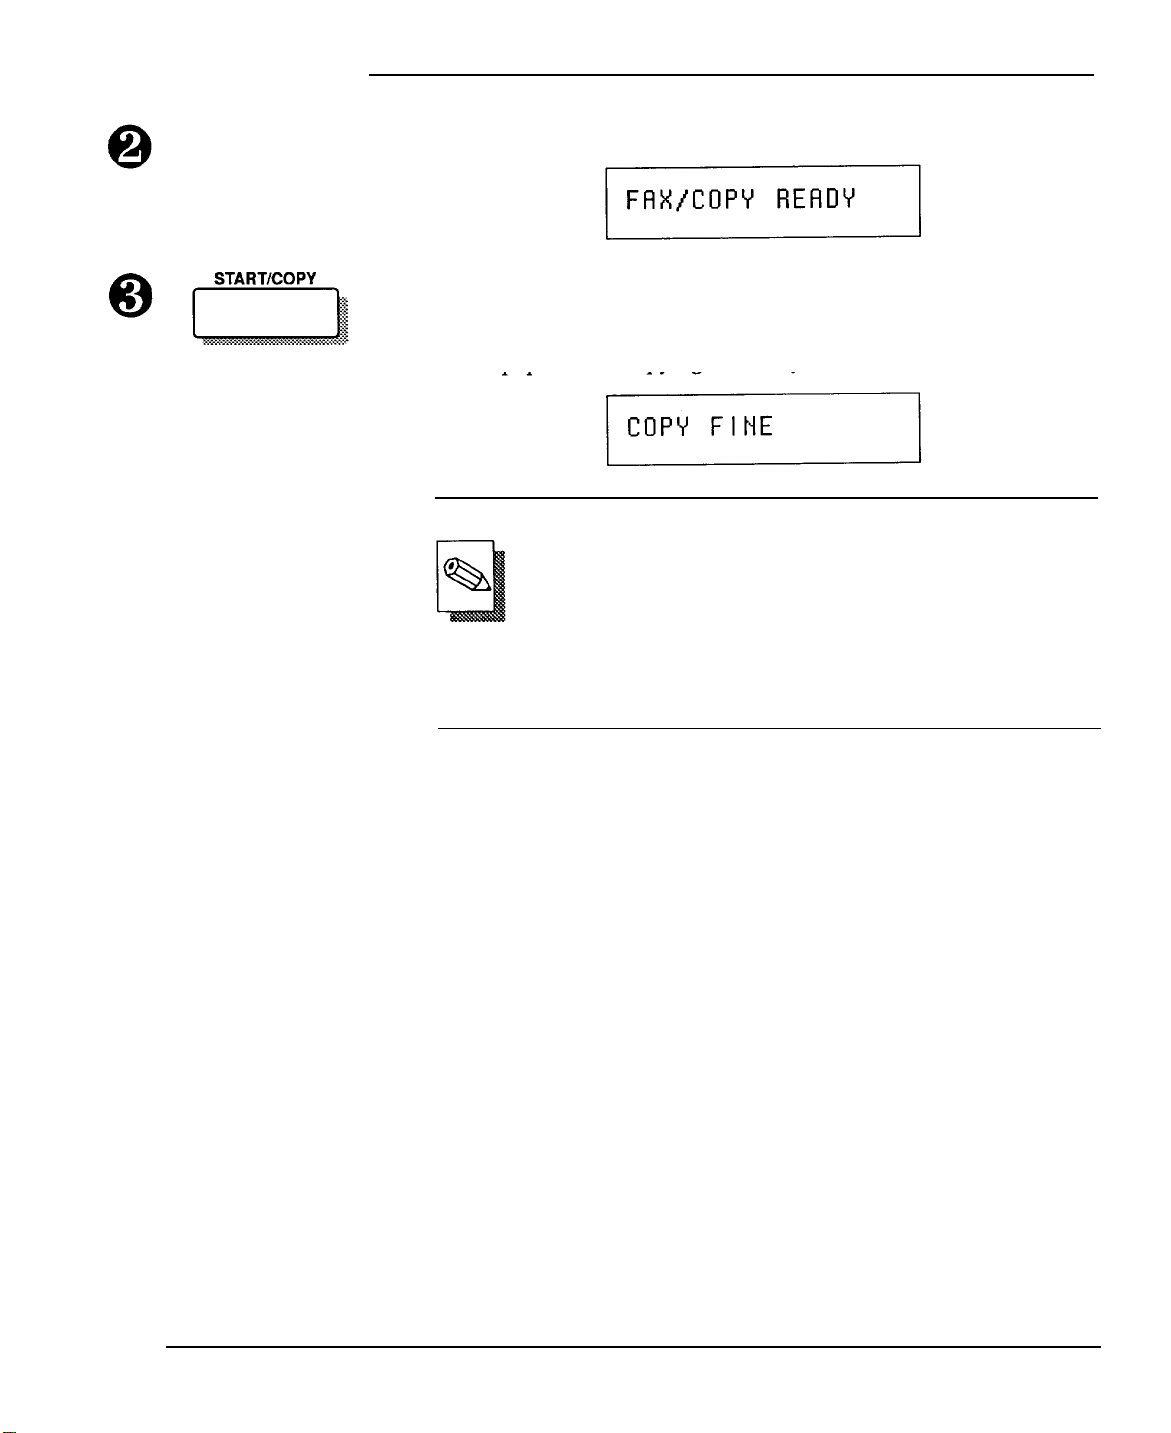
The ready display appears:
Press START. The fax machine draws the original document
through the machine, the following display appears, and the copy
begins to emerge from the slot at the front of the unit. Do not pull
on the paper while copying. You may ruin the copied image.
Note
You can select the quality of the documents produced by
the PriorityFax by changing the resolution mode to suit
the type of documents you copy or send. When you use
the copy function, two modes are available; photo (for
photographs), and fine (for all other documents). Fine is
the factory setting. See Chapter 4 for instructions on
changing the resolution mode.
l-14
Once copying is complete, the automatic cutter cuts the page off
and the unit beeps. Now the copy can be removed from the output
tray. The date and time display appears on the LCD.
Page 27
2 Using the PriorityFax
This chapter covers the control panels, sending and receiving
documents, and the basic special features, such as one-touch and
speed dial faxing, and setting the date and time.
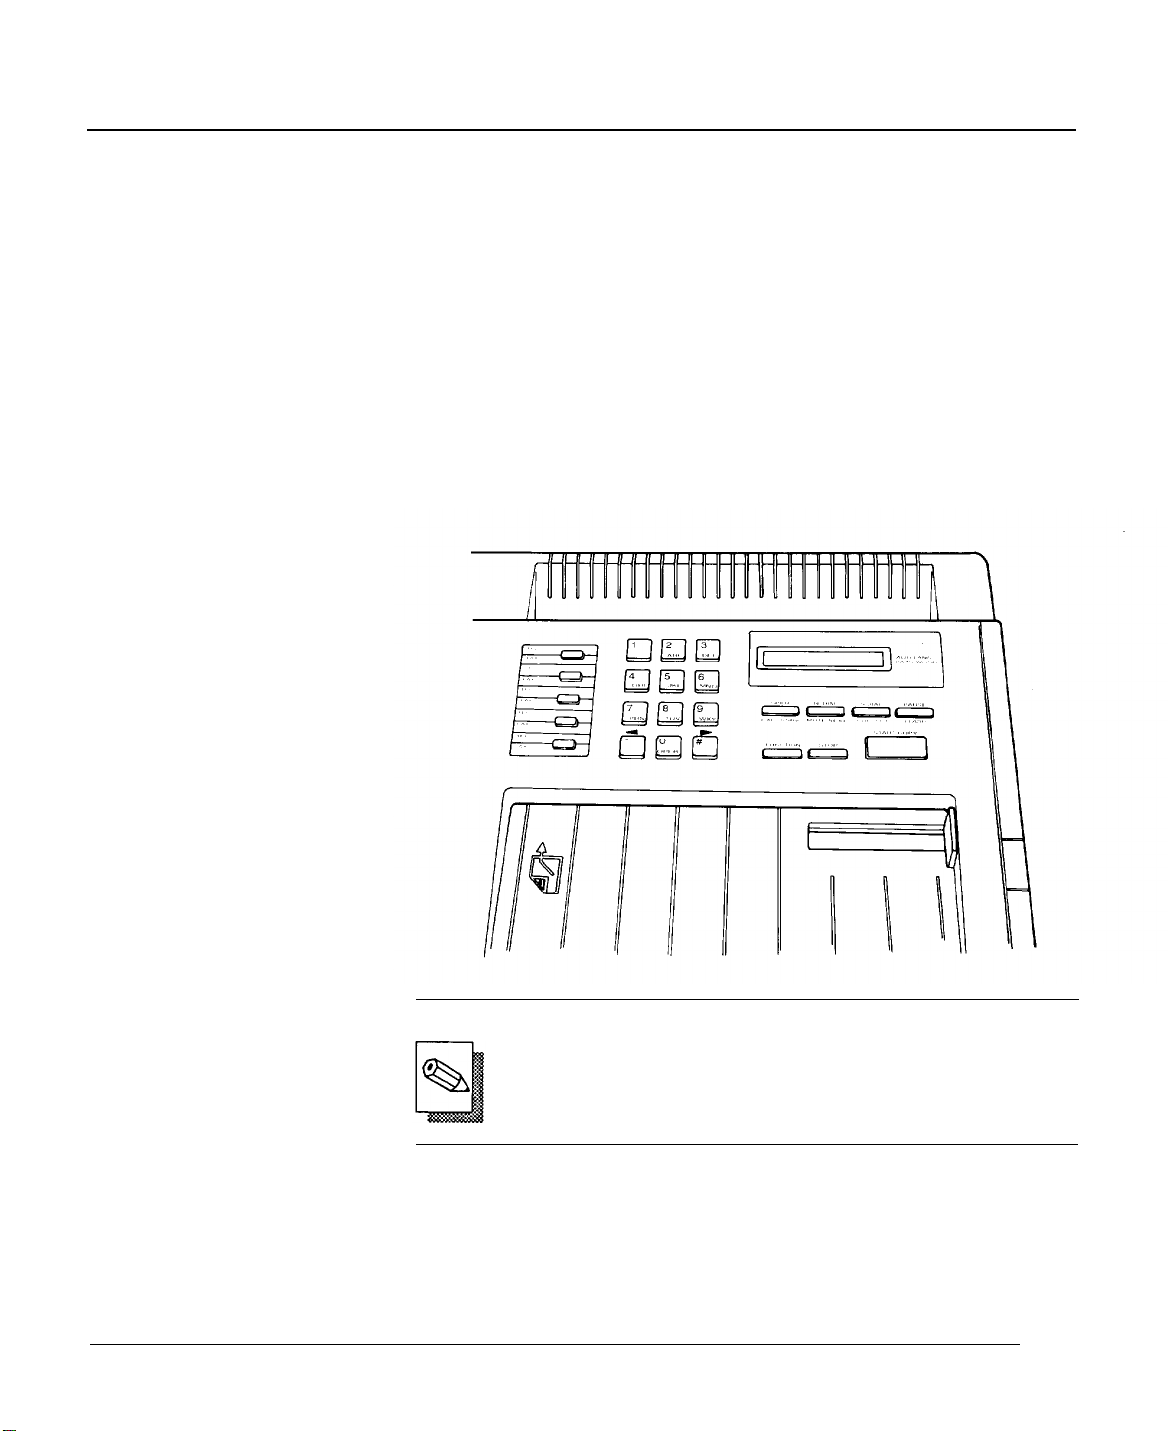
The Control Panels
The Top Control Panel
The buttons and switches on the top and back control panels let
you control many of the fax machine’s settings.
The top control panel has a Liquid Crystal Display (LCD) and
many buttons. The Liquid Crystal Display assists you in making
settings and in other operations of the machine.
Note
Most of the buttons have more than one function, as you
can see from their labels. This chapter explains only the fax
uses of the buttons. Chapter 3 explains their telephone
uses.
2-1
Page 28
PriorityFax 2000 Manual
Buttons
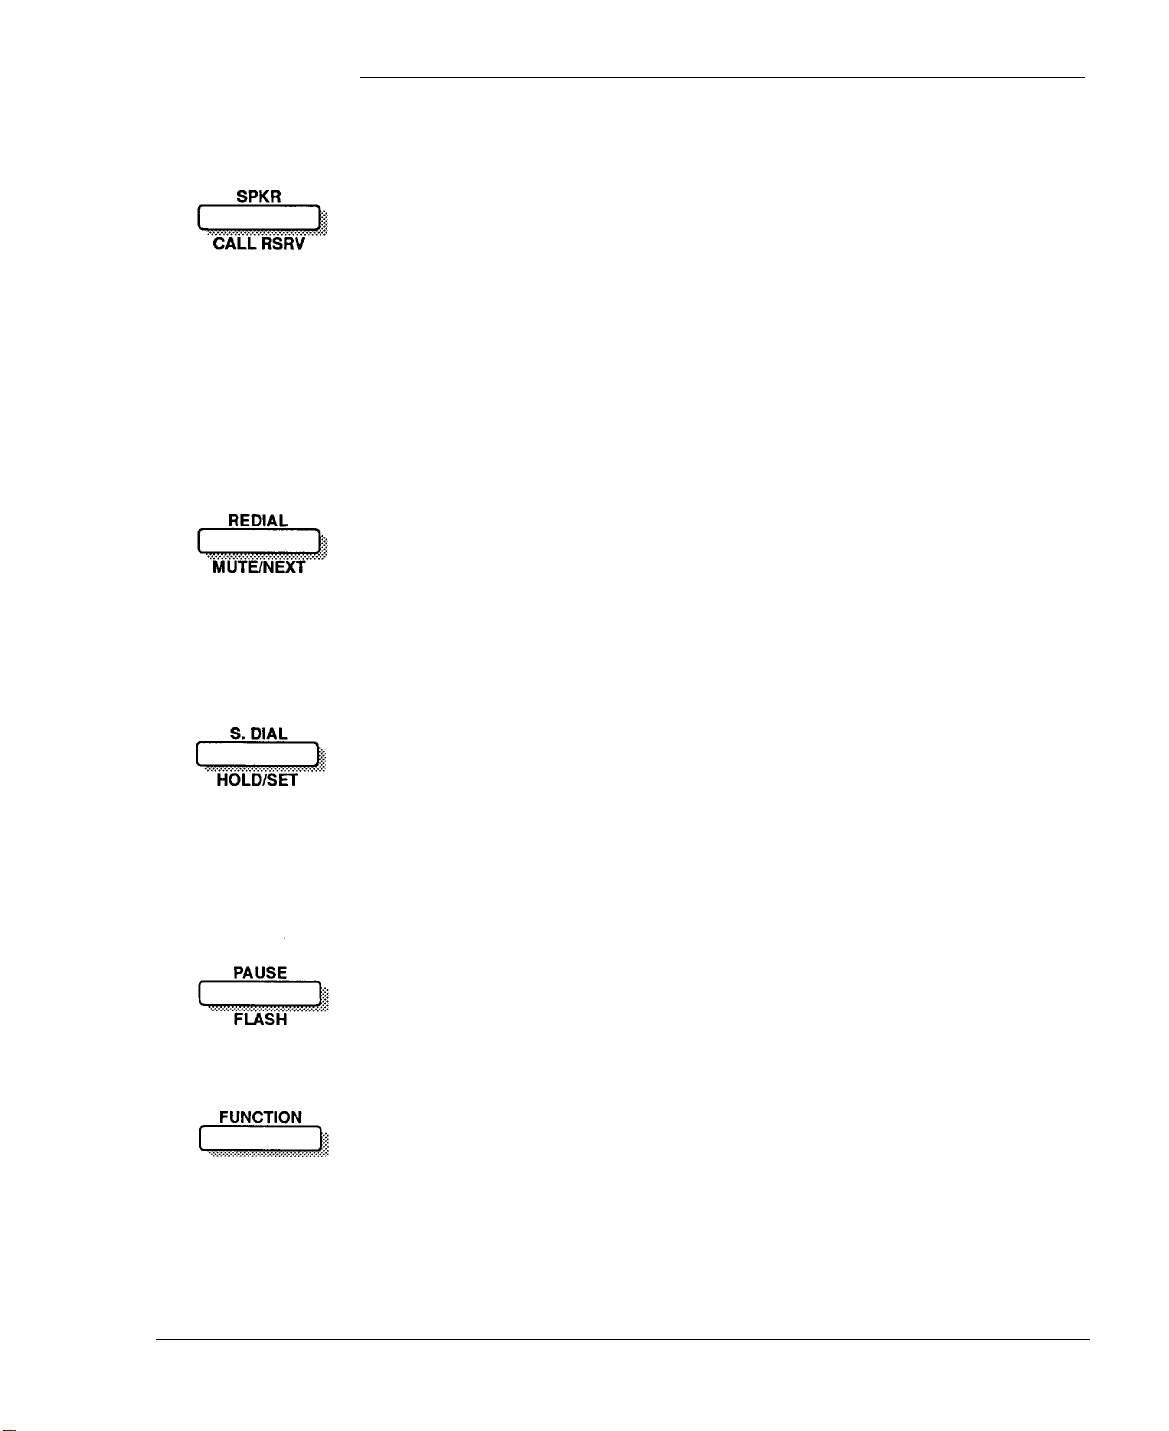
SPKR (Speaker). Pressing this button allows you to dial without
lifting the handset.
CALL RSRV (Call Reservation). Pressing this button during fax
transmission allows you to talk to the receiving party after the
document is sent. (Both fax machines must have the call
reservation feature.) After the fax machine has finished sending
the document, both your telephone and the telephone you called
ring, and you can talk to the other party. If the called party does
not answer within three rings, the fax machine automatically sends
a Fax Back Message. See Chapter 4.
REDIAL. Pressing this button dials the most recent number called
by manual sending.
MUTE. This button is used in telephone operations. See Chapter 3.
NEXT. This button is used in the customizing process. See
Chapters 2, 3, and 4.
S. DIAL (Speed Dial). You can dial a complete pre-registered fax or
telephone number by pressing this button and two numbers on the
keypad.
HOLD. This button is used in telephone operations. See Chapter 3.
SET. This button is used in the customizing process. See Chapters
2, 3, and 4.
PAUSE. This button is used in the customizing process. See
Chapters 2 and 3.
FLASH. This button is used in telephone operations. See Chapter 3.
FUNCTION. This button is used in the customizing process. See
Chapters 2, 3, and 4.
2-2
Page 29
Using the PriorityFax
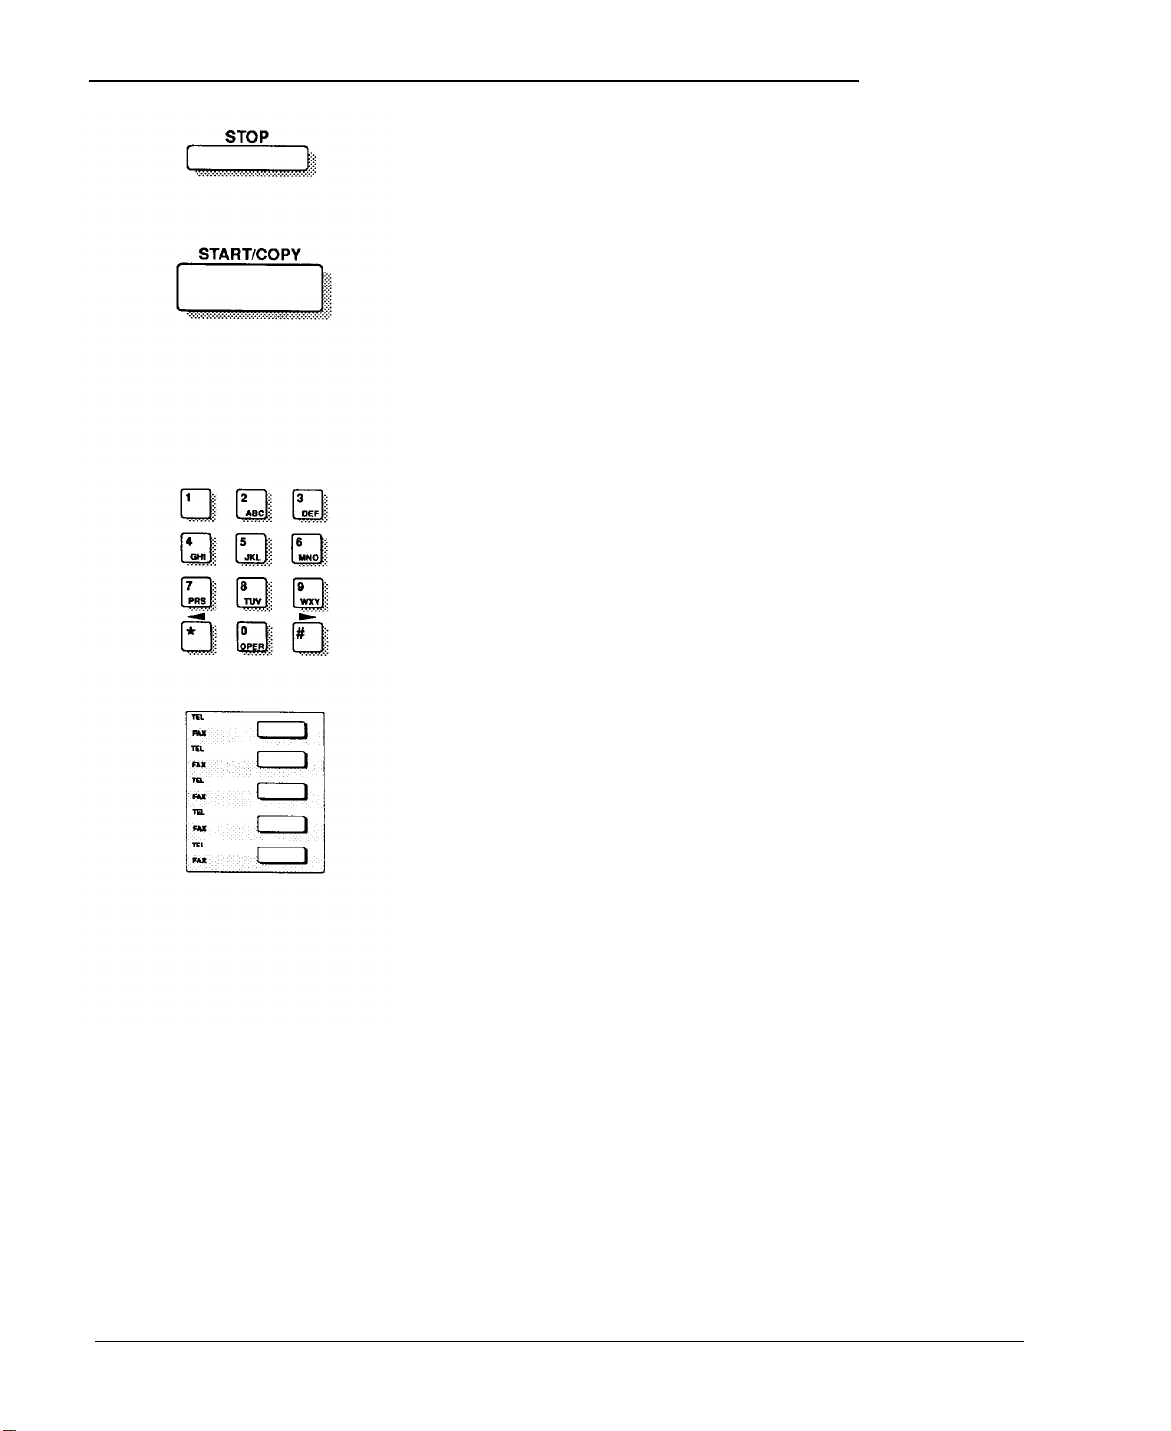
STOP. Pressing this button halts operation during document
transmission or copying, cancels setting operations, and returns
the display to date/time after an error.
START. After dialing, press this button to begin sending the
document. If Automatic Answering is off, pressing this button
starts document receiving. This button is also used for polling. See
Chapter 4.
COPY. Pressing this button starts copying (as with a photocopy
machine) if you insert a document and do not dial a number. See
Chapter 1.
KEYPAD. Use these buttons for dialing, speed dialing,
and for
some customizing functions. See Chapters 2, 3, and 4.
ONE-TOUCH. Each button allows you to dial a complete
pre-registered fax or telephone number. See Chapters 2 and 3.
2-3
Page 30
PriorityFax 2000 Manual
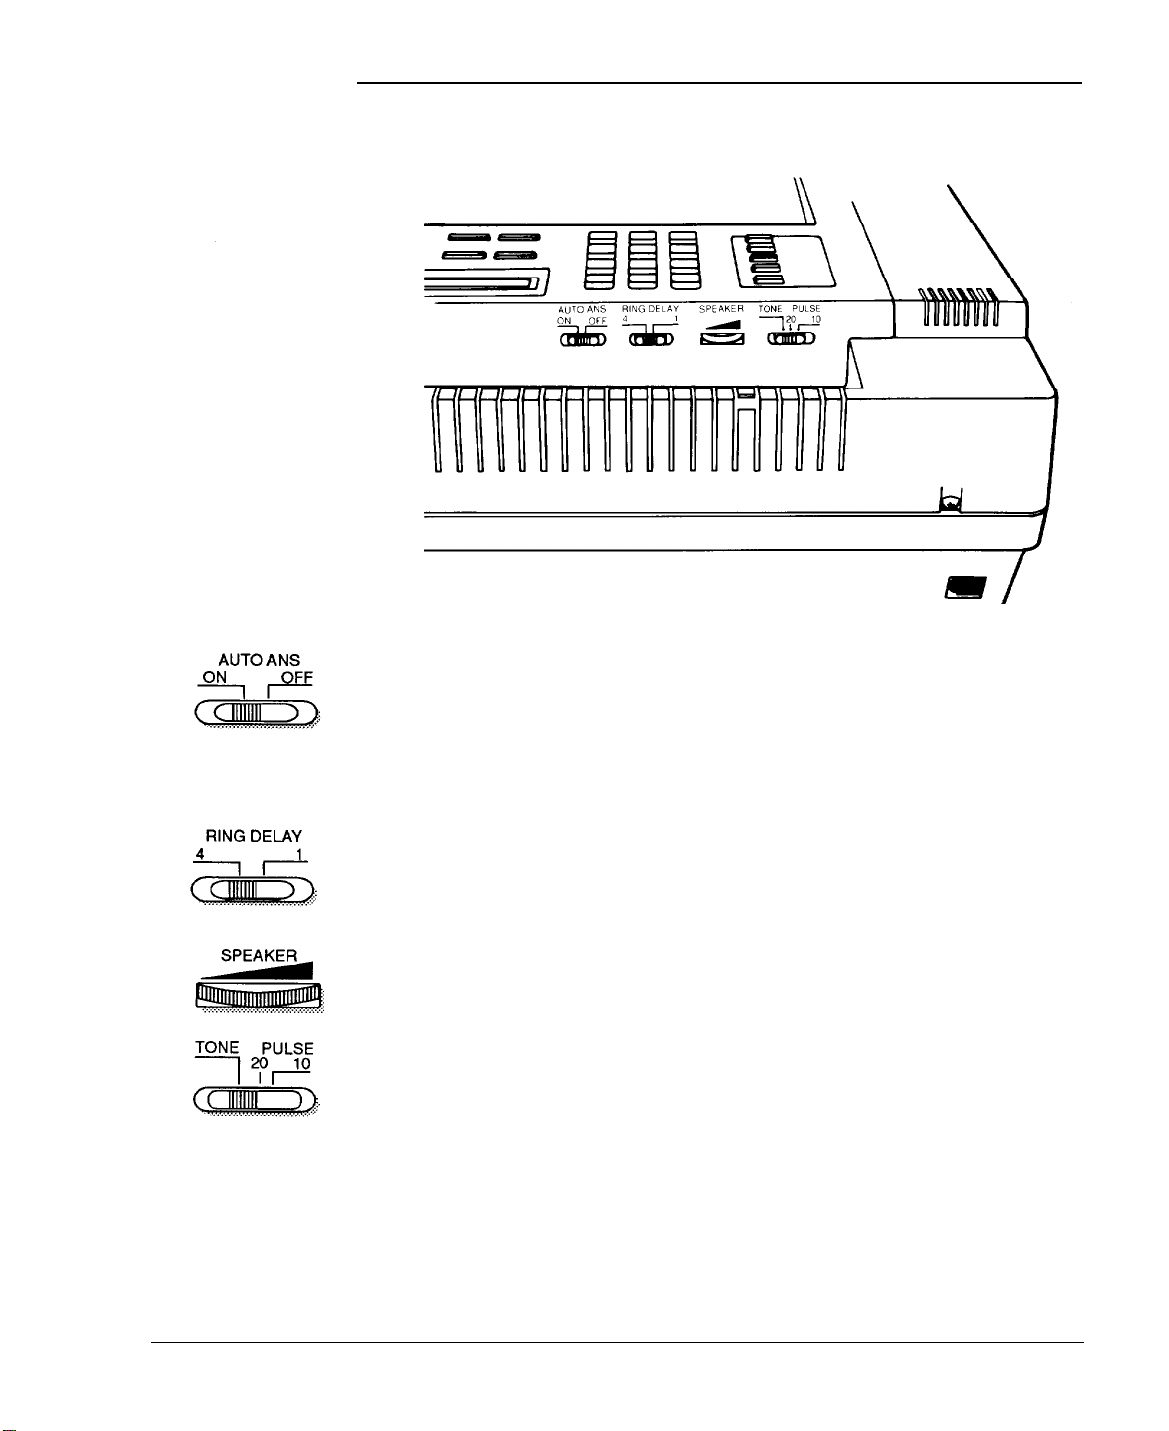
The Back Control Panel
The back control panel contains only four controls.
AUTO ANS (Automatic Answering). When this is turned on, fax
reception begins after the telephone rings the number of times set
by the RING DELAY switch. Also when this is on, a hyphen
appears opposite the AUTO ANS label in the last space of the LCD.
When off, fax reception begins if the telephone handset is not
picked up within ten rings.
2-4
RING DELAY. This switch is effective only when Automatic
Answering is on. It selects how many times (one or four) the
telephone rings before automatic fax reception begins.
SPEAKER. Use this control to adjust the volume of the internal
speaker.
TONE PULSE. Use this switch to match the type of telephone line
you have: tone for touch tone and 10 or 20 (usually 10) for rotary.
Leave it set on tone if you are not sure about the type of phone you
have. If necessary, check with your telephone company to find the
proper setting.
Page 31

Using the PriorityFax
Sending a Document
0
lnsert Document
Sending a document is a simple process. Instructions later in this
chapter tell you how to make it even more simple by using onetouch and speed dial faxing.
There are two ways to send a document: automatic sending and
manual sending. Because you will probably use automatic sending
most of the time, all the instructions in this manual are for
automatic sending. In case you do need to use manual sending, the
instructions for it are on page 2-8.
Included with the PriorityFax is a test document for you to send to
Epson. It is ideal for your first exercise in sending a document.
First complete the information on the PriorityFax Test Sheet. Then
perform the following steps.
Insert the Test Sheet face down with the top of the sheet facing the
fax machine as shown below.
The display changes from date/ time to the following:
0
FAX / COPY/ READ
2-5
Page 32

PriorityFax 2000 Manual
0
Dial the number of the receiving fax machine. (Include the area
code if the receiving fax number is outside of your dialing area.)
The number appears on the LCD display as you dial it.
START/COPY
Document Sending
Cautions
When you press START, the fax machine pulls the document
through the slot as it sends it; then it beeps once when
transmission is complete. (If the Transmit Verification feature is
turned on, the fax machine prints a report a few moments later.)
If a fax does not successfully reach its destination, the PriorityFax
displays COMM ERROR on the LCD, beeps several times, and
prints a communication error report.
Note
When you send a document to another PriorityFax
machine using automatic sending, the document is
transmitted in Quick Mode.
Whenever you send any documents, keep these cautions in mind.
Never put more than five pages in the feeder at a time.
Do not send documents on any of the following types of paper:
Thick paper (over 0.005 inches or 0.12 mm thick)
0
2-6
Very thin paper such as tissue, tracing, or carbon paper
0
Wet, wrinkled, tom, curled, or slippery-surfaced paper
0
Paper with tape or staples.
0
If you need to send documents on any of these types of paper,
copy them first with a photocopy machine, and then send the
copies with the fax machine.
When you send a document, remember that the fax machine
cannot read anything closer than 0.15 inches (3.8 mm) to any of the
four edges of the document.
Page 33

Using the PriorityFax
Pages of a multi-page document must be between 0.0024 and
0.0035 inches (0.06 and 0.09 mm) thick. If they are not, transmit
them one by one or use a copier to copy them and send the copies
instead.
If a document stops partway through the feeder, press STOP and
then remove it.
Sending Photocopies
Sending Documents More Than Five Pages Long
The following hints will help you avoid trouble when you send
photocopied documents.
Make sure the document is photocopied on the correct side of
Cl
the photocopy paper. (Most photocopy paper packages have
an arrow indicating which side goes up.)
If a photocopied page does not go into the feeder and the
0
message PAPER JAM appears on the LCD, remove the page
and re-insert it, pushing a little harder.
If the PriorityFax does not accept a freshly photocopied
Ll
document, wait a few minutes and try sending it again.
If a multiple-page photocopied document does not feed
0
through the feeder correctly, send the document one page at a
time.
You can send documents longer than five pages if you make sure
that the feeder never has more than five pages in it at one time.
The easiest way to send more than five pages is to follow the steps
below:
Insert the first five pages of your document face down. Since the
fax machine sends the bottom page first, the pages are sent in the
correct order.
Dial the fax number.
37
Page 34

PriorityFax 2000 Manual
Press START.
As the pages are fed into the fax machine, notice when there is
only one page left. Then place the next four pages face down on
top of the page that is still in the feeder and push them gently in as
far as they will go.
Continue performing step 3 as often as necessary until the entire
document has been sent.
If the last page in one group has been drawn completely through
the fax machine, you can still put additional pages in the machine
without redialing if you do so before the beep sounds.
Note
If you have selected the FAX BACK MESSAGE or LEAD
SHEET option (described in Chapter 4), you need to insert
additional pages into the feeder before the fax machine
starts feeding the last page in the group.
Manual Sending
2-8
To use manual sending, follow the steps below:
Insert the document face down in the fax machine, as shown
below.
Page 35

Using the PriorityFax
The ready display appears.
Press SPKR or lift the handset. You hear the dial tone.
Dial the number of the receiving fax machine. (Include the area
code if the receiving fax machine is outside of your dialing area.)
When you hear the fax tone, press START promptly. Then hang
up if you are using the handset. Unless you press START
immediately, the line is disconnected and you hear the busy
tone.
Note
If the receiving fax machine is not using Auto Answer, a
voice may answer. If this happens, ask the other party to
start fax reception by pressing START and hanging up.
(Since PriorityFax is not a speaker phone, you must use
the handset to talk to the other party.) Press START and
then hang up when you hear the fax tone.
The fax machine pulls the document through the slot as it sends it;
then it beeps once when transmission is complete. (If the
Transmission Verification feature is turned on, the fax machine
prints a report a few moments later.)
If a fax does not successfully reach its destination, the PriorityFax
displays COMM ERROR, beeps several times, and prints a
communication error report.
2-9
Page 36

PriorityFax 2000 Manual
Document Sending
Enhancements
For special document sending needs you can choose one or more
of
the following enhancements:
0
Resolution. You can change this from standard to fine (for
newsprint and detailed drawings) or photo (for photographs).
Contrast. You can change this from normal to light or dark for
sending documents that are unusually dark or light.
Lead sheet. With this feature you can send a lead sheet after
your document. The lead sheet contains your fax number and
your name along with the fax number and name of the party
receiving the fax. You can also include the number of pages
you are sending.
Ll
Transmission verification. Using this feature, you receive a
printout confirming that your fax reached its destination after
you send it.
cl
Fax back message. With this option, the fax machine sends a
special message asking the receiving party to send you a fax.
cl
Delayed send. Using this option, you can set a time at which
you want your document to be sent, allowing you to send
documents when you are out of the office and when telephone
rates are lower.
2-10
cl
Polling. This feature provides several ways for two or more fax
machines to request documents from each other.
Note
See Chapter 4 for instructions on how to use these options.
Page 37

Using the PriorityFax
Fax Number Redialing
Automatic Redialing
Manual Redialing
If the fax number you dial is busy, you need not reenter the
number you dialed. There are two types of redialing—automatic
and manual.
If you use automatic sending, the fax machine automatically enters
the Automatic Redial mode when the number is busy. In the
Automatic Redial mode, the fax machine redials the number you
just tried every five minutes until it reaches the other fax machine
or until it has tried the number six times. If there is no answer, the
machine hangs up after 15 rings and waits for the next scheduled
try. When the other number answers, your document is sent
automatically.
Note
You can change the number of minutes before your
machine automatically redials and the number of times
the number is tried by changing the automatic redial
settings. See Chapter 4 for instructions.
When you are using manual sending and you receive a busy
signal, you can dial the same number again using REDIAL. When
you receive the busy signal, follow these steps:
0
0
0
0
Press SPKR or hang up the handset.
When you want to redial the same number, press SPKR or lift the
handset.
When you hear the dial tone, press REDIAL. The fax machine
automatically redials the number. (The redial feature redials the
last number dialed. If you tried a different number between the
busy signal and the redial attempt, REDIAL calls the second
number.)
When you hear the fax tone, press START promptly. The fax
machine begins sending your document.
2-11
Page 38

PriorityFax 2000 Manual
Receiving Documents
Automatic Reception
The PriorityFax can receive documents either automatically or
manually; you make the choice with the AUTO ANS switch on the
back control panel. If Automatic Answering is on, fax reception is
automatic; if it is off, fax reception is manual.
Automatic reception is recommended unless you have only one
line for both faxing and telephoning.
If Automatic Answering is on, you need not answer your
telephone when it rings. On the fourth ring the fax machine begins
fax reception. If you wish, you can use the RING DELAY switch on
the back control panel to begin fax reception on the first ring.
The document you are receiving begins appearing from the paper
slot at the front of the fax machine. The automatic cutter cuts off
each page as it is received, and the machine beeps once when
transmission is complete.
Do not touch the received document until it is completely out of
the front paper slot. Pulling on a document that is still coming out
of the fax machine can decrease the quality of the printing.
Manual Reception
If Automatic Answering is off, lift the handset and speak to the
other party when the phone rings.
If the other party is telephoning you and not trying to send a fax,
simply use the PriorityFax as an ordinary telephone.
If the other party is calling in order to send you a fax, press START
and hang up. The document you are receiving begins appearing
from the paper slot at the front of the fax machine; the automatic
cutter cuts off each page as it is received; and the machine beeps
once when transmission is complete.
Do not touch the received document until it is completely out of
the front paper slot. Pulling on a document that is still coming out
of the fax machine can decrease the quality of the printing.
Don’t worry about missing a fax if you leave the AUTO ANS
switch off and are away and unable to answer your telephone.
After ten rings with no answer, the fax machine begins automatic
reception anyway.
2-12
Page 39

Using the PriorityFax
Basic Customizing
Procedures
Setting the Date and
Time
Now that you have been introduced to the basics of sending and
receiving documents on your PriorityFax, you can begin
customizing your fax machine. This section has the basic
customizing features, and Chapter 4 has the more advanced
options.
To set the correct date and time for the display, perform the
following steps:
Make sure no document is in the machine.
Press FUNCTION. You see the following display:
Press 6 to choose date and time setting. You see the following
display:
Use the keypad to enter the correct numbers in the display. Ignore
the slashes and the colon. They appear automatically. If you make
a mistake, use the * cursor key to move the cursor to the incorrect
digit, and enter the correct one.
When the date and time are correct, press SET twice. Now the
new date and time are registered and appear on the display.
2-13
Page 40

PriorityFax 2000 Manual
Registering Your Number
and Name
After you use the following procedure to register your number
and name, they are automatically printed (along with the page
number) at the top of each page of each document you send. This
makes it easy for the recipients of your faxes to identify and keep
straight all the pages you send.
To register your fax number and name, perform the following
steps:
Make sure no document is in the machine.
Press FUNCTION. You see the function display.
Press 1 to choose the register mode.
Press 1 again. You see the following display:
2-14
Enter your fax number using the keypad. You can enter up to 22
digits, but the display can show only the last 13 to 16 digits. Be
sure to include your area code so that it can appear on the top of
each page you send.
Note
If you make a mistake when you are entering this number,
use the * cursor key to move the cursor to the incorrect
digit. Then retype the rest of the number. If you need to
erase an entire number, see Removing Numbers and
Names later in this chapter.
Page 41

Using the PriorityFax
When your fax number is entered, press NEXT so you can enter a
name, such as your own name or your company’s name. You see
the following on the display:
Enter your name using the method explained below.
Entering letters instead of
numbers
Character Code Table
When the display asks you for a name, you cannot enter letters
directly. You must use a special method to convert numbers into
letters, as shown on the chart below.
For example, the name Epson is 37, 48, 51, 47, 46.
2-15
Page 42

PriorityFax 2000 Manual
As you enter your name, you see each character appear on the
display. If you want to enter a space, enter 00.
Note
If you make a mistake when you are entering your
name use the * cursor key to move the cursor to the
incorrect letter and re-enter it. If you need to erase an
entire name, see Removing Numbers and Names later
in this chapter.
Press SET three times.
You use this same method for registering names for one-touch and
speed dial numbers, which are explained in the next section.
One-touch and Speed Dial Faxing
One-touch faxing
Registering one-touch
numbers
You can dial the fax numbers you use most often by pressing only
one key (for up to five fax numbers) or only three keys (for up to
30 more numbers). Once you register them as described below, the
numbers are in the memory of the PriorityFax for easy access.
Anytime you want, you can print out all the one-touch or speed
dial numbers you have registered. Printing these lists is described
later in this chapter.
You can register up to five fax numbers for dialing frequently-
called numbers by pressing just one of the five buttons to the left of
the keypad. You can also assign sets of fax numbers to groups so
that you can use an advanced feature discussed in Chapter 4.
Groups can be chosen now or at a later time. First you must
register the fax numbers.
To register one-touch fax numbers, follow the steps below.
Make sure no document is in the machine.
2-16
Press FUNCTION. You see the function display.
Page 43

Using the PriorityFax
Press 1 to enter the register mode.
Press 3 to choose the one-touch fax number mode.
Press the top one-touch button. (If you are adding a number to a
list you have already begun, press the next available one-touch
button.)
You see the following display:
Enter the first fax number using the keypad. You can enter up to
22 digits, but the display can show only the last 16. Include the
area code if the fax number is outside of your dialing area.
Note
If you make a mistake when you are entering this number
use the l cursor key to move the cursor to the incorrect
digit. Then retype the rest of the number. If you need to
erase an entire number, see Removing Numbers and
Names later in this chapter.
To register a number, including an outside line access code or an
international dialing code, enter the number or code, press
PAUSE, and then enter the fax number. For example, if your
telephone system requires you to dial 9 before dialing a number,
you would enter the following: 9 PAUSE 5551212. The pause
appears as a P in the display. The following appears on the LCD:
FX1:9P5551212.
2-17
Page 44

PriorityFax 2000 Manual
Press NEXT. The following display appears:
Enter the name of the person or company associated with the fax
number, using the instructions on entering letters on page 2-15.
When the name is correct, press NEXT. You see the following
display:
You can assign any one-touch or speed dial number to one of five
groups, numbered 1 through 5. You need the group number only
when you use one of the polling features described in Chapter 4. If
you do want to assign this number to a group, enter the group
number and press NEXT.
2-18
If you do not want to assign this number to a group, press NEXT to
return to the fax number display.
Now your display shows FXl: and the first 12 digits of the number
you just registered. Write the name corresponding to the one-touch
number beside the appropriate button to the left of the keypad.
Then press the next one-touch button. Repeat steps 5 through 9 for
up to four more one-touch numbers.
When you are through registering one-touch numbers, press SET
three times to return to the date/time display.
Page 45

Using the PriorityFax
Printing a one-touch fax
number list
To check your work or for reference, you can print a list of the one-
touch numbers you have registered by performing the following
steps:
Make sure no document is in the machine.
Press FUNCTION. You see the function display.
Press 2.
Press the # cursor key until you see the following display:
Press START. The list begins printing.
Using one-touch faxing
Insert Document
When the list is finished printing, you see the function display.
Press SET once to return to the date/time display.
After you have registered the one-touch numbers, you can send a
fax to any of those numbers in just three steps:
Insert the document in the feeder. The ready display appears:
2-19
Page 46

PriorityFax 2000 Manual
Press the one-touch button for the number you want to use. If you
have not registered a number for the button you pressed, the
message NOT REGISTERED appears.
Press START. The fax machine starts feeding the first page and
dialing begins.
Speed dial faxing
Registering speed dial
numbers
You can access up to 30 numbers for dialing frequently-called fax
numbers by pressing S. DIAL and two number keys. First you
must register the speed dial numbers.
Note
Speed dial may be used for telephone numbers as well as
fax numbers.
To register the speed dial numbers, follow the steps below:
Make sure no document is in the machine.
Press FUNCTION. You see the function display.
2-20
Press 1 to enter the register mode.
Page 47

Using the PriorityFax
Press 4 to choose the speed dial number mode. You see the
following display:
If you are adding a speed dial number to a list you have already
begun, enter the next available speed dial number now. You can
enter up to 30 speed dial numbers, numbered 01 through 30. The
underline is the curson The two digits before the colon are the
speed dial number. Use the # cursor key to move the cursor to the
right of the colon.
Enter the first number using the keypad. You can enter up to 22
digits, but the display can show only the last 16. Include the area
code if the speed dial number is outside your dialing area.
Note
If you make a mistake when you are entering this number
use the l cursor key to move the cursor to the incorrect
digit. Then retype the rest of the number. If you need to
erase an entire name, see Removing Numbers and Names
later in this chapter.
To register a number, including an outside line access code or an
international dialing code, enter the number or code, press
PAUSE, and then enter the number. The pause appears as a P in
the display. For example, if your telephone system requires you to
dial 9 before dialing a number, you would enter the following: 9
PAUSE 5551212. The following appears on the LCD:
#01:9P5551212
Press NEXT. The following display appears.
Enter the name of the person or company associated with the
number, using the instructions for entering letters on page 2-15.
2-21
Page 48

When the name is correct, press NEXT. You see the following
display:
You can assign any one-touch or speed dial number to one of
five groups, numbered 1 through 5. You need the group
number only when you use sequential polling which is
described in Chapter 4. If you do not want to assign this
number to a group, press NEXT to return to the fax number
display. If you want to assign this number to a group, enter
the group number and press NEXT.
Now your display shows #0l and the first 12 digits of the
number you just registered. To register another number
make sure the cursor is under the first digit after the # sign,
enter 02 and repeat the process until you have registered all
the speed dial numbers you need, up to a total of 30. When
you are through registering numbers, press SET three times
to return to the date/time display.
Printing a speed dial
number list
2-22
Be sure to write the names corresponding to the speed dial
numbers on the label under the handset.
To check your work or for reference, you can print a list of
the speed dial numbers you have registered by performing
the following steps:
Make sure no document is in the machine.
Press FUNCTION. You see the function display.
Press 2.
Page 49

Using the PriorityFax
Press the # cursor key until you see the following display:
Press START. The list begins printing.
When the list is finished printing, you see the function display.
Press SET to return to the date/time display.
Using speed dial faxing
After you have registered the speed dial numbers, you can send a
fax to any of those numbers in just four steps:
Insert the document face down in the feeder. The ready display
appears.
Press S. DIAL.
Press the two numbers on the keypad corresponding to the speed
dial number you want to use. If you have not registered a number
for the button you pressed, the message NOT REGISTERED
appears.
Press START. The fax machine starts feeding the first page and
dialing begins.
2-23
Page 50

PriorityFax 2000 Manual
Removing Numbers
and Names
Removing Numbers
If you wish to remove an entire fax number, telephone number, or
name, use the instructions in this section.
Note
If you remove a fax number, this procedure also removes
the name registered with it.
To remove a number follow these steps:
If not already shown, bring up the number on the display. Follow
the instructions for registering numbers in the section above.
Make sure the cursor is under the first number of the item you
wish to remove. Use the * cursor key to move to the left and the #
cursor key to move to the right.
Press PAUSE three times to remove the number.
Removing Names
You may now enter a new number. Remember to enter a new
name also, if you want. If you would rather return to the date/
time display without entering a new number, press SET three
times.
To remove a name, follow these steps:
If not already shown, bring up the name on the display. Follow the
instructions for registering a name above.
Make sure the cursor is under the first letter of the name you wish
to remove. Use the * cursor key to move to the left and the # cursor
key to move to the right.
Press 0 twice to remove the name.
You may now enter a new name.
2-24
Page 51

Using the PriorityFax
If you would rather return to the date/time display without
entering a new name, press SET three times.
The Add Paper
Message
Activity Reports
The LCD lets you know when to replace the paper roll. When
approximately 4 inches (10 cm) of paper is left, the ADD PAPER
message appears. When you see this message, remove the old roll
and follow the instructions in Chapter 1 to insert the new roll.
Every 12 hours your PriorityFax automatically prints an activity
report. This report includes the following:
Date and time the document was sent
Destination fax number or name
Mode of transmission (G3 for regular mode; QUICK for quick
mode)
Resolution mode (standard, fine, or photo)
Transmission code (TX for document sent; RX for document
received)
Number of pages
Result (OK for successful transmission; NG for unsuccessful
transmission).
If you have been sending and receiving a large number of faxes,
the message PLS PRINT REPORT may appear on the LCD. If this
happens, perform the following steps to print the activity report:
Make sure no document is in the machine.
Press FUNCTION.
2-25
Page 52

PriorityFax 2000 Manual
Press 2 to select the print mode. You see the following display:
Press START. The report is printed out.
When the list is finished printing, you see the function display.
Press SET once to return to the date/time display.
If the PLS PRINT REPORT message appears frequently, you can
have the activity report automatically printed more often by
changing the activity report interval, as explained on page 4-14.
2-26
Page 53

3
Using the PriorityFax as a Telephone
The PriorityFax offers sophisticated, yet easy-to-use telephone
capabilities. You can use this fax machine for voice conversation
even when it is set to automatic fax reception mode.
This chapter covers operating the control panels, standard dialing,
redialing, and one-touch telephone dialing.
The Control Panels
The Top Control Panel
This section describes the PriorityFax telephone controls on the top
and back panels.
All numbers are dialed from the numeric keypad on the top
control panel of the fax machine. This pad is identical to the
standard touch-tone telephone dial.
3-1
Page 54

PriorityFax 2000 Manual
The four buttons to the right of the keypad and just below the
LCD (Liquid Crystal Display) have several applications; some are
used for fax operations, some for telephone functions and some
can be used for both. Each button has a label printed above and
below as shown.
Before you dial, available functions are SPKR (Speaker), REDIAL,
and
S.DIAL
(Speed Dial).
After you dial, available buttons are CALL RSRV (Call
Reservation),
MUTE, HOLD,
and
FLASH.
After you press the yellow FUNCTION button (found below the
SPKR/CALL RSRV
and
PAUSE.
button), available functions are
NEXT, SET
Buttons
Buttons are discussed below only as they relate to telephone
operations. For information on button use for fax operations, see
Chapter 2.
KEYPAD. The keypad is used to dial telephone numbers, speed
dial numbers, and for registering one-touch numbers.
SPKR (Speaker). Pressing this button allows you to dial a
telephone number without lifting the handset. When you press
this button, you can hear the dial tone.
Note
The PriorityFax is not a speaker phone. You cannot speak
to someone on the other end of a call without lifting the
handset.
3-2
REDIAL. Pressing this button dials the most recent number called.
Page 55

Using the PriorityFax as a Telephone
MUTE. Pressing this button when you are in the middle of a
telephone call silences your conversation momentarily. Press
MUTE again to reenter the conversation. Hanging up the handset
when MUTE is on breaks the telephone connection.
S.DIAL. You can speed dial a registered telephone number by
pressing this button and an assigned 2-digit number on the
keypad. See Chapter 2 for more information on speed dialing.
HOLD. Pressing this button stops the transmission of sound to and
from the other party. The connection is not broken even if the
handset is returned to the telephone cradle while HOLD is on.
Resume transmission by pressing the HOLD button again or by
removing the handset from the cradle (if so positioned).
PAUSE. Use this button in registering or removing one-touch and
speed dial telephone numbers. Both dial methods are described in
this chapter.
FLASH. You can use this button for special telephone company
features you may have installed, such as call waiting.
Note
Call waiting is discouraged for use with this fax machine
because it may interfere with fax transmission and
reception.
FUNCTION. Use this button in registering one-touch and speed
dial telephone numbers.
ONE-TOUCH. Each button on the one-touch keypad allows you to
dial a complete registered telephone or fax number.
3-3
Page 56

PriorityFax 2000 Manual
The Back Control Panel
The back control panel has only two controls that have telephone
uses.
SPEAKER (volume). Moving this dial on the back control panel of
the fax machine allows you to adjust the speaker sound from low
to high (left to right). This dial controls the speaker volume of the
fax machine, not the handset (listening) volume.
Adjusting the
Handset Volume and
Ringer Switches
3-4
TONE PULSE. Set this switch to match your telephone line. If you
are not sure about the type of line you have, set it on tone. If
necessary, check with your telephone company to find the proper
setting.
The handset of the fax machine is used like the handset of any
other telephone.
To adjust the listening volume of the handset, perform the
following steps:
Locate the HANDSET switch on the left side of the telephone
cradle.
Page 57

Using the PriorityFax as a Tel&phone
Move the switch left to H for higher volume and right to N for
lower (normal) volume.
To adjust the ringer switch:
Locate the RINGER switch on the left side of the telephone cradle
to the right of the HANDSET switch.
Move the switch left to H for high, center to L for low, or right to
OFF for no ringing.
Standard Dialing
There are two ways to start dialing a telephone call: lifting the
handset or pressing the SPKR button.
To use the handset, simply lift the handset off the cradle, wait for a
dial tone, and dial the number.
To use the SPKR button, follow these steps:
Press SPKR.
Leaving the handset in its cradle, wait for the dial tone, and then
dial the number.
(Include the area code if the number is outside of
your dialing area.)
Note
Remember that you can adjust the speaker volume by
moving the SPEAKER dial on the back control panel of
the fax machine.
When you hear the number start ringing, lift the handset. The
PriorityFax is not a speaker phone. You cannot speak to someone
on the other end without using the handset.
3-5
Page 58

PriorityFax 2000 Manual
Manual Redialing
When you receive a busy signal, you can redial the same number
using REDIAL. When you receive the busy signal, follow these
steps:
Press SPKR or hang up the handset.
When you want to redial the same number, press SPKR or lift the
handset.
When you hear the dial tone, press REDIAL. (This feature dials the
last number dialed. If you tried a different number between the
busy signal and this redial attempt, REDIAL calls the second
number.) If you pressed the SPKR button, be sure to lift the
handset when ringing begins.
Note
The manual redialing feature may also be used to send a
fax. See Chapter 2.
3-6
The PriorityFax allows you to access up to five telephone numbers
for dialing frequently-called numbers by pushing just one of the
five buttons to the left of the keypad. First you must register these
one-touch numbers.
Note
Any time you want, you can print all the one-touch
numbers you registered. See the instructions later in this
section.
Page 59

Using the PriorityFax as a Telephone
Registering One-touch
Telephone Numbers
To register the one-touch telephone numbers, follow the steps
below.
Make sure no document is in the machine.
Press FUNCTION. You see the function display:
Press 1 to choose the register mode.
Press 2 to choose the one-touch telephone number mode.
Press the top one-touch button. (If you are adding a number to a
list you have already begun, press the next available one-touch
button.)
You see the following display:
3-7
Page 60

PriorityFax 2000 Manual
Enter the first telephone number using the keypad. (Include the
area code if the one-touch number is outside of your dialing area.)
Note
You can enter up to 22 digits, but the display can show
only 16. If you make a mistake when you are entering this
number use the * cursor key to move the cursor to the
incorrect digit. Then retype the rest of the number.
To register a number to dial out on a central telephone system or
an international access code, enter the number or code, press
PAUSE, and then enter the telephone number. The pause appears
as a P in the display. For example, if your telephone system
requires you to dial 9 before dialing a number, you would enter
the following: 9 PAUSE 5551212. The following appears on the
LCD: TL1:9P5551212
In the space to the left of the top one-touch button, write the name
associated with the telephone number you just entered. Press
NEXT. Now your display shows TL2:. Repeat the steps above to
register up to four more one-touch numbers.
3-8
When you are through registering one-touch numbers, press SET
three times to return to the date/time display.
To check your work or for reference, you can print a list of the one-
touch numbers you registered by performing the following steps:
Make sure no document is in the machine.
Press FUNCTION. You see the function display.
Press 2.
Page 61

Using the PriorityFax as a Telephone
Press the # cursor key until you see the following display:
Press START. The list begins printing.
When the list is finished printing, you see the function display.
Press SET once to return to the date/time display.
Using One-touch Telephone Dialing
After you have registered the one-touch numbers, you can call any
of those telephone numbers in just two steps:
Press SPKR or lift the handset and wait for a dial tone.
Press the number (from 1 through 5) that you want to call. If you
pressed SPKR, lift the handset when the telephone begins ringing.
If you have not registered a number for the button you pressed,
the message NOT REGISTERED appears.
3-9
Page 62

4 Using the PriorityFax Advanced Features
Your PriorityFax has expanded capabilities for enhanced
document transmission and security. The following list allows
you to easily select those features appropriate to your faxing
needs.
Sending a Fax Back
Message
Feature
FaxBackMessage
Resolution
Contrast
Beeper
LeadSheet
.......................................
.........................................
..........................................
.......................................
Transmission Verification.
Automatic Redial Settings
Printing Lists and Activity Reports
Changing the Activity Report Interval.
DelayedSend
Password Security
Polling
..........................................
................................
...........................
...........................
.....................
..................
....................................
.................................
Page No.
4-1
4-3
4-5
4-7
4-8
4-10
4-11
4-13
4-14
4-14
4-16
4-19
Your fax machine allows you to send a message like the one below.
Use this option to send a fax back message after a document or by
itself without sending a document.
4-1
Page 63

PriorityFax 2000 Manual
Fax Back Message With
a Document
lnsert Document
To send the fax back message after a document, follow these steps:
Insert the document face down in the feeder. The ready display
appears:
Press FUNCTION. You see the function display.
I
Press 0. You see the following display:
Press the # cursor key to turn Fax Back on.
Fax Back Message Only
No Document
4-2
Press SET twice to return to the ready display.
Send the document.
To send a fax back message without sending a document, follow
these steps:
Make sure no document is in the machine.
Page 64

Using the PriorityFax Advanced Features
Press FUNCTION. You see the function display:
Press 0 to enter the fax back message mode.
Press SET. You see the following display:
Dial the fax number and press START.
Setting the Resolution
You can adjust the quality of the documents produced by the
PriorityFax by changing the resolution mode to suit the type of
documents you copy or send. There are three resolution modes:
standard (std), fine, and photo. Standard is for typewritten or
typeset text and line drawings; fine is for newsprint and detailed
drawings; and photo is for photographs. Standard is the factory
setting.
NoteNote
The fine and photo modes give more detail, but they areThe fine and photo modes give more detail, but they are
slower than the standard mode; therefore, use the photoslower than the standard mode; therefore, use the photo
mode only for photographs and the fine mode only whenmode only for photographs and the fine mode only when
necessary.
necessary.
The copy function (described in Chapter 1) uses only two
resolution modes: fine and photo.
4-3
Page 65

PriorityFax 2000 Manual
One Document Only
To change the resolution for only one document, follow these
steps:
Insert the document face down in the feeder. The ready display
appears:
Press FUNCTION. You see the function display.
Press
1. You see the following display:
Press the * or # cursor key to select from the standard, fine, or
photo options.
All Documents
Press SET twice to return to the ready display.
Send the document.
To change the resolution for all your documents, follow these
steps:
Make sure no document is in the machine.
Press FUNCTION. You see the function display.
4-4
Page 66

Using the PriorityFax Advanced Features
Press 7 to select user-definable switches. You see this display:
Press 1. The following display appears:
Press the l or # cursor key to select from the standard, fine, or
photo options.
Press SET three times to register your selection and return to the
date/ time display.
Remember that this procedure changes the resolution for all
documents. Follow the instructions on page 4-4 to change the
resolution for only one document.
Setting the Contrast
Your fax machine has three contrast settings: normal, light, and
dark. You can change the contrast for an individual document if it
is unusually dark or light. You can also permanently set the
contrast to a dark or light setting if your ongoing contrast needs
require it. If the document is light, choose light; if the document is
dark, choose dark.
Note
Use this procedure only with fine resolution. In standard
resolution, the PriorityFax automatically adjusts the
contrast, and in photo resolution the contrast cannot be
adjusted.
4-5
Page 67

PriorityFax 2000 Manual
One Document Only
To select light or dark for a single document, follow these steps:
First follow steps 1 through 4 on page 4-4 to set the resolution to
fine.
Press SET to return to the function display.
Press 2. You see the following display:
Press the l cursor key to choose dark or the # cursor key to choose
light.
Press SET twice to return to the ready display.
All Documents
Send the document.
To permanently set the contrast to light or dark, follow these steps:
First, follow steps 1 through 6 on pages 4-4 to 4-5 to permanently
Press 2 to select contrast. You see the following display:
4-6
Page 68

Using the PriorityFax Advanced Features
Press the l or # cursor key to choose one of the three options:
normal, light, or dark. For light documents, choose light, and for
dark documents, choose dark.
Press SET three times to register your selection and return to the
date/time display.
Remember that this procedure changes the contrast for all
documents. Follow the instructions on page 4-6 to change the
contrast for only one document.
Turning the Beeper
Off
If you do not want the beeper to sound, use the following steps to
turn the beeper off.
Make sure no document is in the machine.
Press FUNCTION. You see the function display.
Press 7 to select the user-definable switches.
Press 3 to select beeper.
Press the # cursor key to choose the off option.
4-7
Page 69

PriorityFax 2000 Manual
HOLD/SET
(3 times)
Press SET three times to register your selection and return to the
date and time display.
Sending a Lead Sheet
When you send a lead sheet, a message like the one below is sent
after your document. As you can see, it includes the number and
name of both the sender and the recipient. If you choose the
number of pages option, as described in the following procedure,
the lead sheet also includes the total number of pages.
The lead sheet is sent after the document so that it is the first (or
top) document in the output tray of the receiver’s fax machine.
If you dial the fax number manually instead of using one-touch or
speed dial (explained in Chapter 21, the name of the recipient does
not appear.
4-8
To choose this option, perform the following steps:
Insert the document face down in the feeder. The ready display
appears.
Press FUNCTION. You see the function display.
Press 8. You see the following display:
Page 70

Using the PriorityFax Advanced Features
Press the # cursor key to turn Lead Sheet on.
Press SET once to return to the function display.
Press 6. You see the following display:
Press either cursor key. The following display appears:
Use the keypad to enter the total number of pages in the document
you are sending. If the number is less than 10, enter a 0 before it.
For example, enter 03 for a three-page document.
Press SET twice to return to the ready display.
Send the document. (It takes a little bit longer to send a document
with a lead sheet.)
Remember that you can turn on the Lead Sheet for only one
document.
4-9
Page 71

PriorityFax 2000 Manual
Setting the
Transmission
Verification
Transmission verification is a printed report that confirms that
your fax reached its destination. The transmission verification
message includes the date and time of transmission, the
destination fax number or name, the mode of transmission (G3 for
regular mode or QUICK for quick mode), standard, fine, or photo
resolution mode, the number of pages, and the result (OK for
successful transmission).
This feature must be selected before you send the document for
which you want a verification. An example is shown below.
Note
If your document does not successfully reach its
destination, the PriorityFax prints a communication error
report, even if transmission verification is turned off.
4-10
If you want to receive a transmission verification message
whenever you successfully send a fax, follow these steps:
Make sure no document is in the machine.
Press FUNCTION.
Page 72

Using the PriorityFax Advanced Features
Press 7 to select the user-definable switches.
Press 5 to select transmission verification.
Press the # cursor key to turn the option on.
Press SET three times to register your selection and return to
the date/time display.
Now every time you send a document, a transmission
verification message prints out automatically from your fax
machine if the document successfully reaches its destination.
Changing Automatic
Redial Settings
If you use automatic sending and the fax number you dial is
busy, the fax machine enters the automatic redial mode.
This feature leaves you free to continue with other work
without neglecting to send out that important document.
The factory setting for Automatic Redial causes the
PriorityFax to redial the number you tried every five
minutes until it reaches the other fax machine or until it
redials six times. If you want to change the number of tries
or the number of minutes between tries, follow these steps:
Make sure no document is in the machine.
Press FUNCTION. You see the function display.
4-11
Page 73

PriorityFax 2000 Manual
Press 1 to enter the register mode.
Press 7 to enter the automatic redial mode.
Enter the number of times you would like the automatic redial
feature to call the fax number in the event of a busy signal. Use a
zero before a single-digit entry, such as 03 for three tries. The
maximum is 15, and 00 turns off the feature.
Press NEXT. The following display appears:
Enter the number of minutes you would like the automatic redial
feature to wait between redial tries of the fax number in the event
of a busy signal. Use a zero before a single-digit entry, such as 03
for three minutes. The maximum is 99 and the minimum is 01. You
cannot set an interval of 00 minutes.
Press SET three times to return to the date/time display.
4-12
Page 74

Using the PriorityFax Advanced Features
Printing Lists
To see what settings you have made, what numbers you have
registered, or what faxes you have sent and received, you can use
the Print function of the PriorityFax to print lists. This feature has
the following options:
Function
ACTIVITY Faxes sent and received
FAX # One-touch fax numbers registered
TEL # One-touch telephone numbers registered
SPEED # Speed dial numbers registered
USER SW User switch settings
ALL LISTS
Settings Printed
The FAX, TEL, and SPEED number lists
To print one of these lists, perform the following steps:
Make sure no document is in the machine.
Press FUNCTION. You see the function display.
Press 2. You see the following display:
Use the l or # cursor key to select one of the options listed above.
When you see the option you want, press START. The fax machine
begins printing the list or lists.
After printing is over, the LCD returns to the function display.
Press SET to return to the date/time display.
4-13
Page 75

PriorityFax 2000 Manual
Activity Report Timing
Ordinarily, the PriorityFax automatically prints an activity report
every 12 hours. (See page 2-25.) If you send and receive a great
number of faxes, you may want to change this interval. To change
the time between automatic activity reports, follow these steps:
Make sure no document is in the machine.
Press FUNCTION. You see the function display.
Press 8. You see the following display:
Use the keypad to enter the new time. Remember that the time in
this function is the time between report printings, not the time of
day the reports are printed. If you choose an interval time of less
than ten, enter two digits (for example, 03 for a three-hour
interval). The minimum interval is 01 (for a one-hour interval) and
the maximum is 24 (for a 24-hour interval).
Using Delayed Send
4-14
Press SET twice to return to the date/time display.
The Delayed Send feature allows you to send documents at times
when you know you will be out of the office and when telephone
rates are lower. To use Delayed Send, follow these steps:
Insert a document face down into the feeder. The ready display
appears.
Page 76

Using the PriorityFax Advanced Features
Press FUNCTION. You see the function display.
Press 3 for Delayed Send.
Use the # cursor key to turn the function on. The following display
appears:
Press SET. You see the following display.
Use the keypad to select the day and time to send. For the first 0
(day), enter a number from 0 to 7, where 0 is today, 1 is tomorrow,
4 is four days from now, etc. For 00:00, enter the hour and minutes
using a 24hour clock; for example, 01:20 is 1:20 a.m. and 14:03 is
2:03 p.m. If you enter 0 for today, be sure that you enter a time
later than the current time. If you enter the current time or an
earlier time, the PriorityFax sends your document immediately.
The document to be sent remains physically in the feeder of your
machine until the delay time is reached. You can receive
documents, but you cannot send them until the delay time has
been reached and the document in the feeder has been sent.
Press SET twice.
4-15
Page 77

PriorityFax 2000 Manual
Dial the fax number and press START. You see the following
Your document is sent automatically when the day and time for
sending is reached.
To cancel delay waiting, press FUNCTION; then press 3. Press * to
select DELAY
Now you can remove the document.
SEND : OFF; then press SET twice, and press STOP.
Using Password Security
Setting the Password
Using a password can help insure confidentiality of fax machine
communication and prevent an influx of fax “junk mail.”
WARNING
Do not use passwords casually. Only people who have
Epson PriorityFax machines, who know your password,
and who know how to use passwords can send and
receive documents to and from your fax machine.
When the password is activated, a hyphen appears in the LCD
next to the label PASSWORD. This hyphen is a reminder to you
that your fax machine is in a restricted mode.
To enter your password, follow these steps:
Make sure no document is in the machine.
Press FUNCTION. You see the function display.
4-16
Page 78

Using the PriorityFax Advanced Features
Press 1 to enter the register mode.
Press 6.
Enter a four-digit password code using the keypad.
HOLD/SET
(3 times)
Press SET three times to register your selection and return to the
date/time display.
Even though you have entered a password, the password feature
is not activated until you follow the steps to activate the password.
4-17
Page 79

PriorityFax 2000 Manual
Activating the Password
0
WARNING
cl
After you activate the password, all the documents
you send have this password. Therefore, only people
who have Epson PriorityFax machines with the
password feature, who know the password, and who
know how to use the password can receive
documents from your fax machine.
Ll
Also, after you activate the password, your fax
machine cannot receive any faxes that do not have this
password.
cl
Be sure to turn off the password feature when you are
through with it.
Be sure you have entered a password following the steps above.
To activate your password, follow this procedure:
Make sure no document is in the machine.
0
0
A
0
Press FUNCTION. You see the function display.
Press 7 to select user-definable switches.
Press 6 to select password.
Press the # cursor key to turn on the password. To turn off the
password, press the # cursor key again.
4-18
Page 80

Using the PriorityFax Advanced Features
Press SET three times to register your selection and to return
to the date/time display.
Note
When you send a document in password mode, the
fax machine beeps if it is unable to transmit the
document. This could be caused by any of the
following conditions:
The receiver’s fax machine does not have a
Cl
password
The passwords of the two fax machines do
Cl
not match
You called a wrong number
Ll
The password feature of the receiver’s fax
CI
machine is not activated.
Using Polling
Polling is a feature by which fax machines request
documents from each other. Polling can be controlled for
both incoming requests (others request documents from you,
so you are the called side), and outgoing requests (you
request documents from others, so you are the calling side).
Your fax machine has four calling-side polling types:
LI
OFF
Cl
STANDARD Requests documents from a single
The polling feature is not set
destination
Cl
SEQUENTIAL Requests documents from several
destinations as registered in one-touch
and speed dialing by group
0
TURNAROUND After sending a document, the fax
machine automatically receives a
document from the other party.
4-19
Page 81

PriorityFax 2000 Manual
There are two called-side polling types:
Cl
OFF The polling feature is not set
Cl
STANDARD Your fax machine is ready to be polled.
After your document is polled successfully, your fax machine
prints a polling report including the time, date, destination, mode,
number of pages, and result (OK) of the polling transmission.
Setting Called-side
If you expect to be polled, you must follow these steps:
Insert a document face down into the feeder. The ready display
appears.
Press
FUNCTION. You
see the function display.
Press 4 to enter polling.
Use the # cursor key to select standard.
4-20
Press SET twice. The following display appears:
Page 82

Using the PriorityFax Advanced Features
Once the document has been polled by the calling side, the display
returns to the date/time. Then the fax machine prints a polling
report.
To cancel called-side polling, return to steps 2 and 3 above. Select
P O L L I
NG
:
O F F
, press
SET
twice, and press
STOP.
Now
you
can
remove the document.
Setting Calling-side Polling
Setting standard polling
If you want to request documents from other fax machines, you
must first be sure that the other parties expect to be polled and
have set their fax machines accordingly. You may then select the
type of calling-side polling best suited to your faxing needs.
To poll a single fax machine (that is, to receive a document by
calling another fax machine) follow these steps:
Make sure no document is in the machine.
Press FUNCTION. You see the function display.
Press 4 to enter polling.
Use the # cursor key to select the standard option. The following
display appears:
4-21
Page 83

PriorityFax 2000 Manual
Press SET. You see this display:
Dial the fax number and press START.
Once the polled document is received, the display returns to the
date and time. You do not receive a polling report; only the calledside receives a report, if the feature is available.
Setting sequential polling
When you want to request documents from several fax machines,
use sequential polling. Sequential polling requires that you have
already set up one-touch and/or speed dial numbers and assigned
them to groups as described in Chapter 2. Make sure that all of the
parties expect to be polled and have set their fax machines
accordingly. When you are finished polling, you receive a
sequential polling report. To set sequential polling, follow these
steps:
Make sure no document is in the machine.
Press FUNCTION. You see the function display.
Press 4 to enter polling.
4-22
Use the # cursor key to select the sequential option. The following
display appears:
Page 84

Using the PriorityFax Advanced Features
Press SET. You see the following display:
Press the l cursor key followed by the group number (from 1 to 5)
that you wish to poll and then press START.
Once the polled documents are received, the display returns to the
date and time. You receive a sequential polling report.
Setting turnaround polling
If you want to send a document and then receive a document in
return, make sure that the other party expects to be polled; then
follow these steps:
Insert a document face down into the feeder. The ready display
appears.
Press FUNCTION. You see the function display.
Press 4 to enter polling.
Use the # cursor key to select the turnaround option. The
following display appears:
Press SET twice. You see this display:
4-23
Page 85

PriorityFax 2000 Manual
Dial the fax number and press START.
Once your fax machine sends your document and receives the
polled document from the other party, the display returns to the
date/time. You do not receive a polling report; only the calledside party receives a polling report.
Setting Delayed
Setting delayed standard
polling
Polling
To take advantage of two powerful fax machine features delayed send and polling-your machine offers Delayed Polling.
This feature enables your machine to request faxes from other
machines when you are away from the office and/or when
telephone rates are lower.
There are four delayed polling types: off, standard, sequential,
and turnaround; all of which are described in Using Polling earlier
in this chapter.
Note
Before using any type of polling, make sure that the other
party expects to be polled.
To request a document from a single destination at a time when
you are away from your fax machine, do the following:
Make sure no document is in the machine.
4-24
Press FUNCTION. You see the function display.
Press 3 to enter the delayed polling mode.
Page 86

Using the PriorityFax Advanced Features
Use the # cursor key to select the standard option. The following
display appears:
Press SET. You see the following display:
Use the keypad to select the day and time to send. For the first 0
(day), enter a number from 0 to 7, where 0 is today, 1 is tomorrow,
4 is four days from now, etc. For 00:00, enter the hour and minutes
using a 24hour clock; for example, 01:20 is 1:20 a.m. and 14:07 is
2:07 p.m. If you enter 0 for today, be sure that you enter a time
later than the current time. If you enter the current time or an
earlier time, the PriorityFax sends your document immediately.
Press SET. You see the following display:
Dial the fax number and press START. You see the following
display:
Once the document is received, the display returns to the
date/ time.
To cancel delayed standard polling, press FUNCTION; then
press 3. Press
* to select POLLING: OFF; then press SET twice.
The display returns to date/time.
4-25
Page 87

PriorityFax 2000 Manual
Setting delayed
sequential polling
When you want to request documents from several fax machines
when you are away from the office, use this feature. Delayed
sequential polling requires that you already have set up one-touch
and/or speed dial numbers and assigned them to groups as
described in Chapter 2. Make sure that all of the parties in the
group expect to be polled and have set their fax machines
accordingly. When you are finished polling, you receive a
sequential polling report.
Make sure no document is in the machine.
Press FUNCTION. You see the function display.
Press 3 to enter the delayed polling mode.
Use the # cursor key to select the sequential option. The following
display appears:
Press SET. You see this display.
Use the keypad to select the day and time to send. For the first 0
(day), enter a number from 0 to 7, where 0 is today, 1 is tomorrow,
4 is four days from now, etc. For 00:00 enter the hour and minutes
using a 24hour clock; for example, 01:20 is 1:20 a.m. and 14:03 is
2:03 p.m. If you enter 0 for today, be sure that you enter a time
later than the current time. If you enter the current time or an
earlier time, the PriorityFax sends your document immediately.
4-26
Page 88

Using the PriorityFax Advanced Features
Press SET. You see the following display:
Press the l cursor key followed by the group number (from 1 to 5)
that you wish to poll and then press START. You see the following
display:
Once the documents are received, the display returns to the
date/time and you receive a sequential polling report.
To cancel delayed sequential polling, press FUNCITON; then
press 3. Press # to select POLLING: OFF; then press SET twice.
The display returns to date/time.
Setting delayed
turnaround polling
When you want to send a document and then receive a document
automatically in return at a time when you are away from the
office and/or when telephone rates are lower, follow the
instructions below. Make sure the other party expects to be polled.
When polling is complete, the called side receives a polling report.
Insert a document face down in the feeder. The ready display
appears.
Press FUNCTION. You see the function display.
Press 3 to enter the delayed polling mode.
4-27
Page 89

PriorityFax 2000 Manual
Use the # cursor key to select the turnaround option. The
following display appears:
Press SET. You see this display:
Use the keypad to select the day and time to send. For the first 0
(day), enter a number from 0 to 7, where 0 is today, 1 is tomorrow,
4 is four days from now, etc. For 00:00, enter the hour and minutes
using a 24hour clock; for example, 01:20 is 1:20 a.m. and 14:09 is
2:09 p.m. If you enter 0 for today, be sure that you enter a time
later than the current time. If you enter the current time or an
earlier time, the PriorityFax sends your document immediately.
Press SET twice. The following display appears:
Dial the fax number (or use the one-touch or speed-dial buttons)
and press START. You see the following display:
Once your fax machine sends your document and receives the
polled document from the other party, the display returns to the
date/ time.
To cancel delayed turnaround polling, press FUNCITON; then
press 3. Press # to select DELAY SEND: OFF; then press SET
twice.
Press STOP to eject the document.
The display returns to date/time.
4-28
Page 90

5 Troubleshooting
This chapter discusses problems you may encounter and their
likely solutions.
Problems and Solutions
Sending
This section includes five categories: sending, receiving, copying,
telephoning, and LCD error messages.
Document jam.
Q
Push down on the cover release button to open up the fax
machine. Remove the jammed document from below. Push the
cover back in place until you hear a click. Make a copy of the
jammed document, and send the copy.
Document doesn’t enter the feeder properly.
The cover may not be closed securely. Push down on the cover
until you hear a click.
The document’s left edge is not aligned with the document
guide. Open the paper cover to remove the document and
then push it closed until you hear a click. Align the document
with the document guide.
The documents may be too thick or too thin. (From 0.055 mm
to 0.12 mm is the recommended range of document thickness.)
Use a copier other than the fax machine to reproduce the
original document. Then send the copy.
The documents may be wrinkled, wet, curled, or tom. Use a
copier other than the fax machine to reproduce the document.
Then send the copy.
Photocopies may be curled from the heat of the photocopy
machine, or two or more pages may be stuck together by static
electricity. Gently fan the documents or smooth out each page
before sending.
You may be inserting more than five pages at a time. Feed the
first five pages and then insert more pages before the beep. See
Chapter 2 for more information.
Page 91

PriorityFax 2000 Manual
Sending
(continued)
Cl
The documents may be too small. Use a copier other than the
fax machine to reproduce the original document. Then send
the copy.
0
Multi-page documents on some types of paper, such as
bond paper, may need to be fed one page at a time.
Documents cannot be fed in to the fax machine.
tl
You may be trying to feed the documents from the back of the
fax machine. Make sure you insert documents from the front
side where the Face Down icon appears.
Password security documents cannot be sent.
Cl
The receiving fax machine does not have a password feature.
Cl
The password feature of the receiving fax machine may not be
activated.
0
The passwords of the sending fax machine and receiving fax
machine do not match.
Cl
You may have dialed the wrong fax number.
In all cases, call the receiving party to verify the problem.
You hear ringing but the other party’s fax machine does not answer.
Ll
Be sure you entered a fax number and not a telephone number.
0
Be sure you entered the correct fax number. Enter it again.
CI
The other fax machine may be out of paper.
Cl
The AUTO ANS feature of the other fax machine may be
turned off. Allow the telephone to ring at least 10 times to start
transmission.
5-2
Page 92

Troubleshooting
Sending
(continued)
The receiving party image quality is poor.
If the receiving party reports poor image quality, use the copying
capability of the fax machine to copy the document. If the image
quality of the copy is good, the problem is probably with the
receiving party’s machine.
If the image quality of the copy is poor, make another copy, but
change the resolution setting as described in Chapter 4. For
detailed drawings or photos, use the fine or photo modes. Then
clean the inside of the fax machine as described in Chapter 6 and
make another copy.
If this process does not improve the image quality, take the
fax machine to an authorized Epson Customer Care Center.
To find the location of the nearest Customer Care Center, call
l-800-922-8911.
Documents you sent are received blank.
Ll
Be sure you sent the document through the fax machine face
down. Resend the document, being careful to place the
document in the feeder face down.
One-touch or speed dial faxing does not work.
Cl
You may have used a one-touch or speed dial number that is a
telephone number, not a fax number. Check to be sure the
number you are dialing is a fax number, and try again.
Cl
You may have pushed a one-touch or speed dial number that is
not registered properly. Check Chapter 2 for proper
registration procedures.
Ll
Delayed Sending is set. Turn off Delayed Sending before using
one-touch or speed dial faxing. See Chapter 4.
5-3
Page 93

PriorityFax 2000 Manual
Receiving
Manual reception doesn‘t work.
0
A document is in the feeder. Press STOP to remove the
document, and try manual reception again.
Recording paper is jammed.
Cl
Push down on the recording paper cover button to open up
the fax machine. Pull out the jammed recording paper. Use
scissors to make a clean edge on the end of the paper roll.
Reinsert the paper according to the instructions in Chapter 1.
Received copies are blank.
Ll
The recording paper roll may be in upside down. Reload the
paper according to the instructions in Chapter 1.
Cl
Documents may have been sent to you incorrectly. Check with
the sending party.
The telephone rings continuously.
Cl
Be sure that the recording paper roll is inserted. If not, load in a
roll of thermal recording paper as described in Chapter 1.
Lt
When the AUTO ANS switch on the back control panel is
turned off, the telephone rings ten times before reception
begins. Turn on the AUTO ANS switch.
Cl
The paper cover may not be closed securely. Push the cover
shut until you hear a click.
Received documents are excessively curled
Cl
This may happen when you are almost out of paper. You may
want to replace the recording paper roll.
5-4
Page 94

Troubleshooting
Receiving
(continued)
Polling reception doesn’t work.
D
There is no paper in the machine. See Chapter 1 to properly
insert a new paper roll.
cl
Documents are sitting in the feeder. Remove the documents.
Q
Make sure your fax machine is set for calling side polling. See
Chapter 4.
0
Make sure polled parties have set their fax machines for calledside polling. See Chapter 4.
Received document image quality is poor.
The scanning area may be dirty. See Chapter 6 for cleaning
LI
instructions.
You may be using the wrong type of paper. Use Epson
tl
PriorityFax recording paper for best results.
The sending party’s resolution and/or contrast may need
Cl
adjustment. Check with the sending party.
Copying
If none of these methods improves the image quality, take the
fax machine to an authorized Epson Customer Care Center.
To find the location of the nearest Customer Care Center, call
l-800-922-8911.
Nothing comes out of the paper slot.
The paper roll may not be inserted properly. See Chapter 1.
Ll
The recording paper may be jammed. Push down on the paper
LI
cover button to open the fax machine. Pull out the jammed
recording paper. Use scissors to make a clean edge on the end
of the paper roll. Reinsert the paper according to the
instructions in Chapter 1.
5-5
Page 95

PriorityFax 2000 Manual
Copying
(continued)
No image appears on the paper.
Cl
The paper roll may be inserted upside down. See Chapter 1.
Cl
Be sure that you inserted the document in the feeder face
down. Try copying again.
Print quality of the copy is poor.
Cl
You may be using the wrong type of paper. Use Epson
PriorityFax recording paper for best results.
After checking the type of paper you are using, change the
resolution setting as described in Chapter 4. For detailed drawings
or photos, use the fine or photo modes. Then make another copy.
After that, clean the inside of the fax machine as described in
Chapter 6 and make another copy.
If neither of these methods improves the image quality, take the
fax machine to an authorized Epson Customer Care Center.
To find the location of the nearest Customer Care Center, call
l-800-922-8911.
Telephone
5-6
One-touch and speed dialing don’t work.
Ll
Check to be sure the power cord is plugged in.
Ll
The one-touch and speed dialing numbers are not registered
properly. See Chapter 3.
Call reservation does not work.
Cl
The receiver may not have a call reservation feature. Check
with the receiving party.
Cl
The receiving party left the fax machine area.
Cl
The call reservation feature is set improperly. See Chapter 2.
Page 96

Troubleshooting
Telephone
(continued)
LCD Error Messages
The telephone does not ring.
Ci
The ringer switch is off. Turn the ringer switch to H for high
or L for low.
When you press SPKR you hear nothing.
Q
Check to be sure the power cord is plugged in.
0
Check the speaker volume dial on the back control panel. If it is
set to the minimum, turn the volume higher.
You may receive the following error messages on the LCD display.
You are out of recording paper. Load a new roll according to
the instructions in Chapter 1.
The recording paper may not be inserted properly. See
Chapter 1.
Documents may not have been fed correctly Resend the
documents (up to five pages at a time).
You may be using an incorrect procedure for sending a
document. See Chapter 2 and try sending the document again.
If you are receiving a document, the sending party may be
having a problem during transmission. Call the sender.
You may be attempting to transmit to a non-fax number. Check
to make sure the number you are calling is a fax number, then
try sending the document again.
If you are sending a document and the transmission is not
successful, this message is displayed. Press STOP and try
sending the document again.
Page 97

PriorityFax 2000 Manual
LCD Error Messages
(continued)
Ll
The document was removed from the fax machine during the
REDIAL function. Insert the document and begin the sending
procedure again.
0
If the paper jam occurs when you are using the copy option or
when you are sending a document, open the paper cover and
remove the jammed paper from under the paper cover. Make a
new copy of the document and copy or resend it.
Cl
If the paper jam occurs when you are receiving a document,
open the paper cover and remove the jammed paper. Use
scissors to make a clean edge on the end of the paper roll.
Reload the roll of paper as described in Chapter 1.
5-8
Cl
You tried to use a one-touch or speed dial number that is not
registered. See Chapters 2 and 3 for information on registering
these numbers.
Q
The cover is open. Close the cover.
Page 98

LCD Error Messages
(continued)
Troubleshooting
Cl
These messages indicate a problem with your fax machine.
Press STOP and try the operation a second time. If the error
occurs again, write down the error message and the conditions
during which it occurred and take the fax machine to an
authorized Epson Customer Care Center. To find the location
of the nearest Customer Care Center, call l-800-922-8911.
5-9
Page 99

6 Maintenance
To maintain optimum printing quality, clean your PriorityFax after
every three or four rolls of recording paper you use.
Cleaning the Interior of the Fax Machine
0
0
To clean the interior of the fax machine, follow these steps:
WARNING
Unplug the machine before cleaning it to avoid electric
shock.
When you unplug the machine, most of the items in memory are
not affected. If you print an activity report (page 2-25) just before
you unplug the machine, the only items you lose are the date and
time setting, and the activity report interval (if you have changed
it).
Unplug the machine.
Press down on the recording paper cover button to open up the fax
machine.
Remove the recording paper roll.
Use a soft cloth or a cotton swab soaked in isopropyl alcohol to
gently clean the surfaces and rollers inside the machine. Be
particularly careful to clean the clear plastic cover of the scanner
(indicated by the two arrows in the illustration) and the white
document pressure bar above it.
6-1
Page 100

PriorityFax 2000 Manual
WARNING
Do not use organic solvents, such as benzene or thinner.
0
0
Cleaning the Exterior of the Fax Machine
6-2
Use a dry cloth to gently wipe off any excess alcohol from the
newly cleaned interior.
Replace the recording paper roll as described in Chapter 1.
To clean the exterior of the fax machine, use a dry cloth to gently
wipe off any dirt from the surface.
WARNING
Do not use water, alcohol, thinner, or any other organic
solvent on the exterior of the machine.
 Loading...