

Page 1

Introduction
About Your Network Interface
The EpsonNet 802.11g Wireless Ext. Print Server is a wireless
network interface that connects to the USB port of an Epson device
(such as printer or all-in-one). With this network interface, you
can create a wireless connection between the Epson device and a
local area network using the IEEE 802.11b/g communication
standard.
A radio signal is transmitted over the wireless network when you
send a job to the device. Then the device prints or scans the file
when the network interface receives the radio signal directly from
a computer or from an access point.
This network interface is Wi-Fi certified for interoperability with
other 802.11-compliant products.
Because the network interface supports multiple protocols and
automatically detects protocols on your network, you can print
from Microsoft
®
OS/2 applications.
IBM
®
Windows®, Apple® Macintosh®, UNIX®, and
Use EpsonNet EasyInstall to easily configure the network
interface for use on a TCP/IP network. If you are using an
all-in-one, EpsonNet EasyInstall installs the drivers on your
computer. You can use the device on the TCP/IP network at once.
For protocols such as TCP/IP, NetWare, NetBEUI, AppleTalk
IPP, and SNMP, you can use EpsonNet Config, the configuration
utility provided with your product, to quickly and easily
configure the network interface to use these protocols.
®
,
1
Page 2

Note:
The EpsonNet Config utility configures the network interface to work
only with protocols that exist on your network. This does not imply that
you can use all of the above-mentioned protocols on your network or
operating system. The protocols that the network interface can use may
vary depending on the operating system and the network configuration.
About This Guide
This Reference Guide contains information about using the
network interface on a network. It includes how to set up the
network interface, install the configuration software, and modify
network settings of your device and computer.
For information about your device, see the manual shipped with
the device.
Note:
❏ To read the online guide, you must have Microsoft Internet Explorer
4.0 (or later) or Netscape Navigator 4.0 (or later) installed on your
computer.
❏ This guide is written for network administrators, and many of the
steps included here require detailed network knowledge and
administrator rights.
❏ The term “network administrator” refers to the person responsible
for maintaining the network. “Administrator” is synonymous with
“Supervisor” in this guide.
❏ The term “network interface” refers to the EpsonNet 802.11g
Wireless Ext. Print Server in this guide.
❏ The term “device” refers to the printer or all-in-one that is supported
by the network interface.
2
Page 3

❏ Some screen shots in this guide may list a device name other than
your device. This difference does not alter the instructions.
Instructions on Using the Network Interface
Notes on powering on and off
❏ Do not turn off the device and the network interface when
changing the settings. This may damage the device and the
network interface.
❏ Do not turn off the device and the network interface while
printing is in progress. This may cause operational trouble to
the computer sending the print data and suspend the printing
process.
❏ Do not turn off the network interface during a firmware
update. Otherwise, the update cannot be completed correctly
and the network interface may not turn on (may not work)
after the update.
Notes on USB connection
❏ Only supported devices can connect to a USB downstream
connector of the network interface. Do not use a USB hub.
❏ Only IBM compatible computer or Macintosh equipped with
USB can connect to a USB upstream connector of the network
interface.
Notes on security
❏ WEP Key
Set a WEP Key or WPA-PSK to prevent wireless interception
by unauthorized persons. The wireless transmission speed is
reduced when WEP or WPA-PSK is enabled because time is
required for encryption and decryption.
3
Page 4

❏ Security lock
Insert a commercially available theft-prevention cable
through the security lock, which is located on the back panel
of the network interface, to secure the device to a table or
pillar. This network interface is compatible with the
Microsaver Security System manufactured by Kensington.
Notes on radio waves
❏ Radio wave interference may occur when there are devices
that use radio waves within the 2.4 GHz ISM band near the
network interface. Therefore, separate the network interface
from these devices as much as possible to prevent radio wave
interference.
❏ When using the network interface in the Ad Hoc mode, radio
wave interference may occur if the channel of the network
interface and the other devices are close to each other.
Therefore, separate a few channels from the channel used near
the network interface.
❏ Shorten the distance of the network interface and devices that
communicate with the network interface.
Where to locate the network interface
❏ The location of the network interface must be considered to
improve the wireless communication. The rotary stand can
provide a good position. The condition of radio wave can be
checked using EpsonNet Config, lights of the network
interface, and the status sheet.
Package Contents
Your network interface package includes the following items.
4
Page 5

❏ Wireless network interface (The Web-based EpsonNet Config
is pre-installed.)
❏ AC adapter and power cord
Caution:
Only use the AC adapter shipped with this package to supply
c
power to the network interface.
❏ USB cable
❏ Software CD-ROM containing:
-- EpsonNet Config (for Windows)
-- EpsonNet Config (for Macintosh)
-- EpsonNet Print
-- EpsonNet Internet Print
-- EpsonNet WebManager
-- EpsonNet SetupManager
-- Reference Guide
-- Drivers and utilities for the following Epson devices:
EPSON STYLUS PHOTO RX500
EPSON STYLUS PHOTO RX600
EPSON STYLUS CX4600
EPSON STYLUS CX6400
EPSON STYLUS CX6600
❏ Setup sheet
❏ AC Adapter sheet
Note:
You need to supply items such as a computer with an 802.11b/g WLAN
compliant network interface card installed, an Epson device with a USB
port, a USB cable, and an access point (required for infrastructure mode
only).
5
Page 6

Operating Environment
Supported operating systems
The network interface supports the following operating systems.
Supported operating systems Windows XP
Windows Me
Windows 98 Second Edition
Windows Server 2003
Windows 2000
Mac OS X 10.2 or later
Mac OS 9.1 or later
Printing environments
The network interface receives print jobs in the following
environments.
Operating systems Version Protocol
Windows XP
(Home,
Professional)
Windows Me - TCP/IP (using EpsonNet Print)
Windows 98
Second Edition
- TCP/IP (using LPR, Standard
TCP/IP Port, or EpsonNet Print)
IPP
IPP
NetBEUI
- TCP/IP (using EpsonNet Print)
IPP (using EpsonNet Internet
Print)
NetBEUI
6
Page 7

Operating systems Version Protocol
Windows Server
2003
Windows 2000
(Professional,
Server)
Macintosh Mac OS X 10.2.4
or later
Mac OS X 10.2 or
later
Mac 9.1 or later AppleTalk
NetWare 3.x Bindery mode
4.x/IntranetWare NDS mode
5.x/6.0 NDS Queue-based print
OS/2 (OS/2 Warp
Connect, OS/2
Warp Server)
UNIX Sun OS 4.1.4 or
V3
V4
later: SPARC
- TCP/IP (using LPR, Standard
TCP/IP Port, or EpsonNet Print)
IPP
AppleTalk
TCP/IP
Rendezvous
AppleTalk
TCP/IP
Bindery emulation mode
system
NDPS
TCP/IP (lprportd)
NetBEUI
lpr, ftp
SunSoft Solaris 2.4
or later: SPARC
and x86
SCO UNIX 4.2 or
later
SCO UnixWare
2.01 or later
HP/UX 9.05 or
later
IBM AIX 3.2.5 or
later and 4.1.3 or
later
7
Page 8

Note:
❏ The multi-user environment of Mac OS 9 is not supported.
❏ If you use the device in a dial-up router environment, you must set
an IP address for the device. Make sure the IP address is suitable for
the segment; incorrect IP address may generate unexpected dial-up.
❏ See the manual shipped with your device for information on the
supported operating system of the device.
Scanning environments
The network interface supports EPSON Scan via TCP/IP and
allows network scanning when it is connected to the all-in-one.
The supported operating systems are Windows XP/Me/98/2000
and Mac OS X/9.
Network Storage environments
The network interface supports sharing memory via SMB when
it is connected to the all-in-one. The supported operating systems
are Windows XP/2000.
Supported Epson Devices
The network interface can be installed for the following Epson
devices (as of May, 2004).
❏ Ink Jet Printer:
Stylus C64/C84
Stylus Photo 1280/2200
Stylus Photo R200/R300/R800
8
Page 9

❏ All-in-one:
Stylus Photo RX500/RX600
Stylus CX3600/CX4600/CX6400/CX6600
❏ Laser Printer:
EPL-6200
EPL-N2500/N3000/N7000
AL-C1900/C4000/C4100
❏ Impact Dot Matrix Printer:
FX-880+/890/1180+/2190
DLQ-3500
PLQ-20
LQ-590/630/2090
Features of the Network Interface
❏ Meets the IEEE 802.11b/g (2.4 GHz) communication
standard.
❏ Prints or scans via wireless network.
❏ Supports the network storage function.
❏ Supports both the Infrastructure mode and the Ad Hoc mode.
❏ Supports the roaming function.
❏ Supports 64-bit/128-bit WEP Key and WPA-PSK(TKIP).
❏ Communicates with up to 11 or 13 channels.
❏ Communicates with any Wi-Fi certified products.
❏ Uses communication speeds at 11/5.5/2/1 Mbps for 802.11b,
54/48/36/24/18/12/9/6 Mbps for 802.11g, or automatically
changes the speed according to the radio waves.
9
Page 10

❏ Supports multiple protocols, such as TCP/IP, NetWare,
NetBEUI, AppleTalk, and IPP.
❏ Supports DHCP.
❏ Supports Automatic Private IP Addressing (APIPA) that
assigns an IP address automatically to the network interface
even if there is no DHCP server on your network.
❏ Supports the Dynamic DNS function.
❏ Supports Rendezvous on Mac OS X 2.4 or higher.
❏ Supports SNMP and MIB.
❏ Supports NTP (Network Time Protocol).
10
Page 11
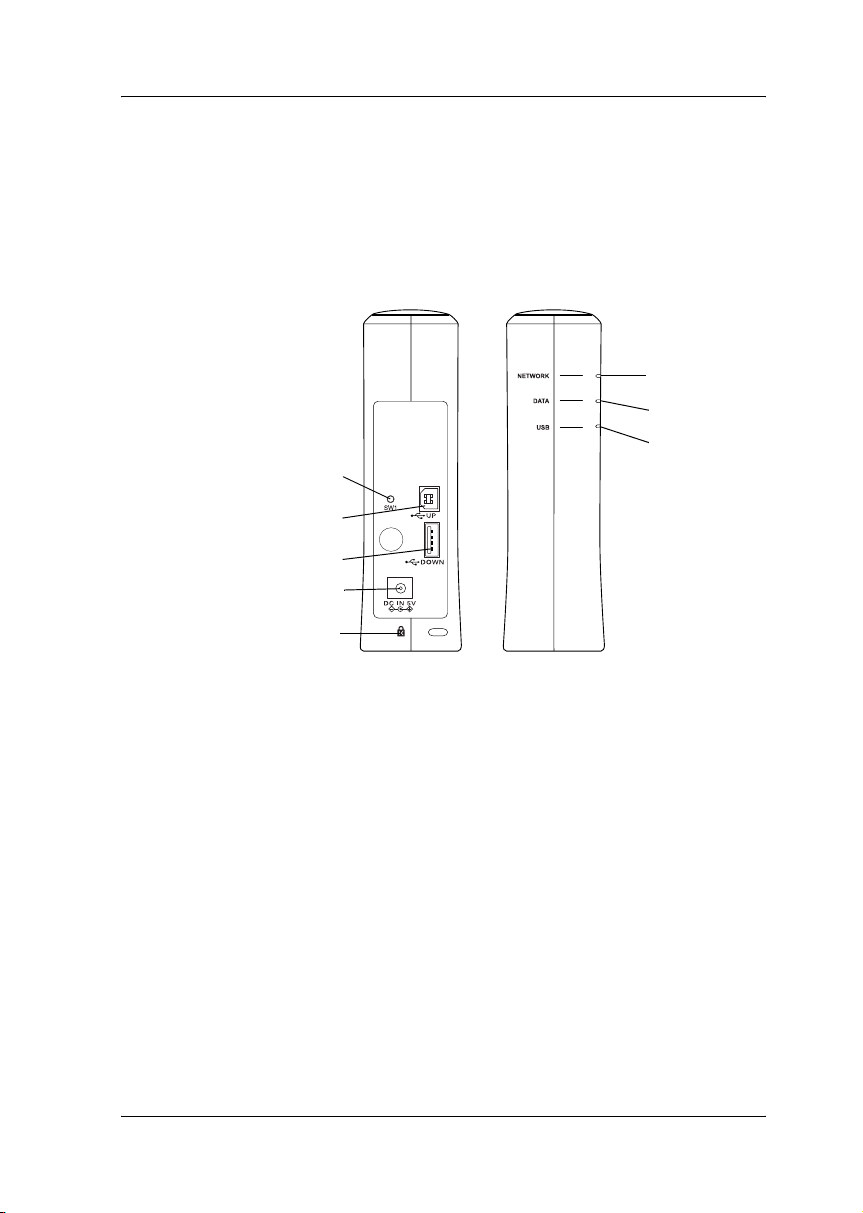
Network Interface Operation
The status lights and status sheet can provide you with important
information about the operation and configuration of the network
interface.
Status sheet button
USB upstream connector
USB downstream connector
DC-IN connector
Security lock
1. NETWORK light
2. DATA light
3. USB light
4. Status sheet button
5. USB upstream connector
6. USB downstream connector
7. DC-IN connector
8. Security lock
Back panel
Front panel
NETWORK light
DATA light
USB light
11
Page 12

Status lights
The network interface has three lights (NETWORK, DATA, and
USB), which indicates the current operating status of the network
interface when you first turn on the device, during normal
operation, and when errors occur. The NETWORK and USB lights
have three colors (red, green, and yellow). The DATA light is
green.
The status lights indicate the network interface status, as follows:
NETWORK DATA USB Network interface status
Off Off Green
flashing
Off Off Red flashing Error status
Off Off Red and
green lights
flashing
alternately
Off Off Red on Printer communication is
Off Off Green
Red NETWORK light and green USB light flashing
simultaneously
Red on Off Off Network
Yellow on Flashing
when
receiving
data
flashing
when
receiving
data
Off High speed link
Initializing
Firmware update mode
disabled.
Printer communication is
enabled.
Wireless LAN and the IP
address are not set.
communication is
disabled.
12
Green on Flashing
when
receiving
data
Off Low speed link
Page 13

Status sheet button
The first time you use the network interface after installing or
reinstalling it, plug the power cord of the network interface into
a wall outlet while holding down the status sheet button for about
twenty seconds to initialize the network interface. The length of
time necessary to hold down the status sheet button varies
depending on the device model.
Before you start configuring the network interface, be sure to
press and hold down the status sheet button on the network
interface to print a status sheet. A status sheet provides important
information about the network interface, such as MAC address,
SSID, device settings, and device’s current status. Press the status
sheet button once to print a simple status sheet, or twice to print
a full status sheet. You cannot print a status sheet when the device
has already started printing, or when it is offline or not ready to
print.
Note:
If the device does not print a status sheet, make sure the device is online
and no print jobs are being processed, then wait a minute. If it still does
not print a status sheet, turn the device off, wait until the DATA light
goes out while the red USB light is on, and then turn it back on again.
The status sheet can be printed one minute after the device finishes
warming up.
Caution:
After turning off the device, wait until the DATA light goes out
c
before turning it back on; otherwise the network interface may not
work correctly.
USB upstream connector
This connector is used to connect a USB cable to a computer, so
that the default network interface settings can be modified by
using the configuration utility.
13
Page 14

USB downstream connector
This connector is used to connect a USB cable to the device to
enable communication with the device.
DC-IN connector
This is an external power supply connector for the AC adapter
shipped with the network interface. Plug or unplug the power
cord of the network interface from a wall outlet to turn the
network interface on or off.
Security lock
You can pass a commercially available theft-prevention cable
through the security lock hole to secure the network interface to
a table or pillar. This network interface is compatible with the
Microsaver Security System manufactured by Kensington.
Rotary stand
The rotary stand is located at the bottom of the network interface.
Rotate the rotary stand counterclockwise by 90 degrees to provide
an auxiliary stand for stability. The stand can be screwed to a
location or on the wall for hanging.
The IEEE 802.11g Communication Standard
The network interface supports the IEEE 802.11b/g
communication standard. It is compatible with other IEEE
802.11b/g compliant products.
14
Page 15
An IEEE 802.11b/g WLAN (wireless local area network) operates
within the 2.4 GHz ISM band. It divides the 2.4 GHz into 11 or 13
channels using Direct-Sequence Spread Spectrum (DSSS), and
uses Carrier Sense Multiple Access with Collision Avoidance
(CSMA/CA) to avoid packet collision. Both CSMA/CA with
ACK and CSMA/CA with RTS/CTS are supported.
Wi-Fi certification
This wireless network interface is
Wi-Fi certified by the Wi-Fi Alliance
(WFA). The WFA certification ensures
full product interoperability with
other Wi-Fi certified products. For
more information on other Wi-Fi
certified products, go to
http://www.wi-fi.org.
Wireless Environment
Operating modes
You can configure the network interface for the Infrastructure
mode or the Ad Hoc mode.
15
Page 16
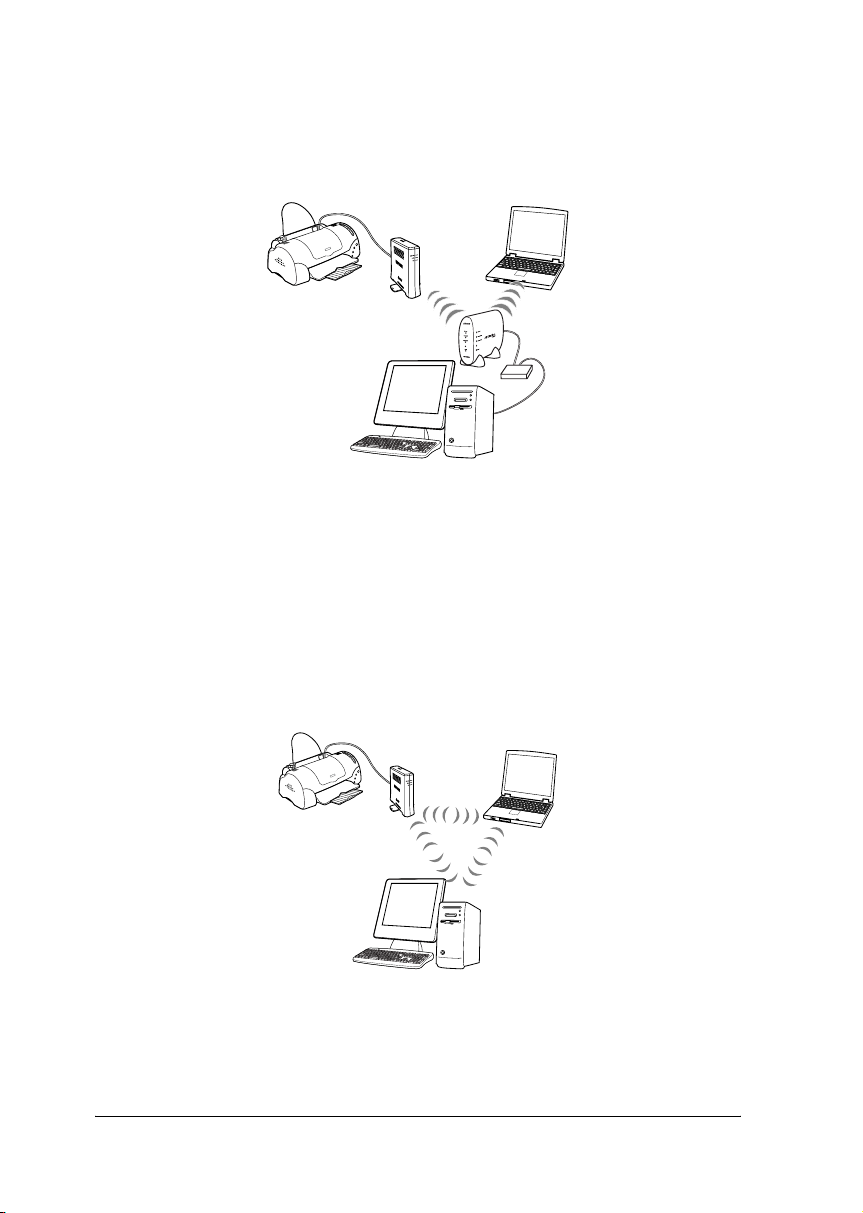
In the Infrastructure mode, both wireless and wired computers
can communicate through an access point to send data to the
network interface.
HUB
Note:
Some access points or routers support only the TCP/IP protocol. If you
use this product with a protocol other than TCP/IP, make sure the
protocols are supported by the access point or router.
In the Ad Hoc mode, a network interface and computers
wirelessly communicate directly with each other, without using
an access point.
16
Page 17

Security
WEP (Wired Equivalent Privacy) is a security protocol for
wireless network. Data is encrypted using the WEP Key
providing the security of your wireless network. You must set the
same WEP Key to the network interface and the access point.
The network interface supports a 64-bit or 128-bit encryption key,
and you can use either hexadecimal or ASCII characters.
WPA-PSK(TKIP) is a Wi-Fi security with a strong encryption
algorithm as well as user authentication. It provides a high
security that user data remains protected and that only authorized
users may access the network.
Note:
The wireless transmission speed is reduced when WEP or
WPA-PSK(TKIP) is enabled because time is required for encryption and
decryption.
SSID is a unique identifier to specify a wireless LAN. All devices
and access points connected to a specific wireless LAN must use
the same SSID to communicate with devices on the wireless LAN.
Radio signal range
The data transfer rate of the network interface depends on the
environment where the network interface is located.
Note:
The wireless transmission speed decreases as the distance between the
network interface and the computer or the access point increases.
17
Page 18

About the Software
❏ EpsonNet Config for Windows is a Windows-based
configuration utility for administrators that allows you to
configure the network interface for various protocols such as
TCP/IP, NetWare, MS Network, AppleTalk, IPP, and SNMP.
See “About EpsonNet Config”.
❏ EpsonNet Config for Macintosh is a Macintosh-based
configuration utility for administrators that allows you to
configure the network interface for TCP/IP, AppleTalk, and
IPP. See “About EpsonNet Config”.
❏ EpsonNet Config with Web Browser is a Web-based
configuration utility that allows you to configure the network
interface for TCP/IP, NetWare, MS Network, AppleTalk, IPP,
and SNMP. See “About EpsonNet Config”.
❏ EpsonNet Print is a utility that enables TCP/IP printing for
Windows. (Windows XP/Server 2003/2000/NT 4.0 also
support OS standard LPR printing.) See “About EpsonNet
Print”.
❏ EpsonNet Internet Print is a utility that supports printing
across the Internet using Internet Printing Protocol for
Windows 98/95/NT 4.0. See “About EpsonNet Internet
Print”.
❏ EpsonNet WebManager is a Web-based utility that helps
network administrators to easily manage network devices.
See “About EpsonNet WebManager”.
❏ EpsonNet SetupManager is a utility that provides a simple
printer installation and configuration tool for network
administrators, and an easy network printer installation
process for clients. See “About EpsonNet SetupManager”.
18
Page 19

Terms and Concepts
2.4 GHz range -- the frequency spectrum assigned by the
organization such as FCC or IC to WLAN systems
Access point -- a device that acts as a communication hub linking
a wireless LAN to a wired LAN
Ad Hoc mode -- a wireless network mode. It allows devices to
communicate directly without being wired to a network.
Configuration -- a prepared set of conditions for proper operation
of a device. Configuring the network interface is to prepare it to
work with protocols available on a network.
DHCP -- a dynamic host configuration protocol. It is a protocol
that assigns dynamic IP addresses to devices on a network.
EtherTalk --the communication protocol of AppleTalk governing
Ethernet transmissions
ftp -- a TCP/IP application protocol for file transfer
IEEE 802.11g -- an IEEE standard for the 2.4 GHz range of WLANs
Infrastructure mode -- a wireless network mode. It allows both
wireless and wired computers to send print jobs to the device
through an access point.
lpd -- a TCP/IP remote printing protocol application
Print queue -- a location where a print job is stored as a file, until
the network interface sends the job to the assigned device
Protocol -- a rule that controls how data or information is
exchanged through a network. Computers and software cannot
communicate with each other using different protocols.
19
Page 20

Remote printer -- a shared device connected elsewhere on the
network, but under the control of a NetWare print server
Roaming -- the ability to move the wireless station from one access
point to another without losing the connection or interrupting the
service
SSID (or ESSID) -- Service Set Identifier (or Extended Service Set
Identifier), a unique identifier to specify a WLAN
TCP/IP -- Transmission Control Protocol/Internet Protocol, a
layer of protocols that provides communications between nodes
on a network
WEP -- Wired Equivalent Privacy, a security protocol for WLANs
defined in the IEEE 802.11b/g standard. WEP provides security
by encrypting data over radio waves.
WEP key -- a shared key algorithm for encrypting data
WLAN -- Wireless Local Area Network
WPA-PSK(TKIP) -- a Wi-Fi security with a strong encryption
algorithm as well as user authentication
20
Page 21

How To
Overview
This section describes the general procedure on how to set up the
network interface for use on a network.
1. Check the network interface operation.
Check the functions and operations of the network interface,
such as status lights, status sheet button, USB connector,
DC-IN connector, and security lock. See “Network Interface
Operation” for details.
2. Select a printing method.
Select a printing method appropriate for your network
environment and operating system. If you are not sure, see
“Printing from Windows” or “Printing from Macintosh” for
details.
3. Install the necessary components on your computer.
Make sure the necessary components (such as TCP/IP,
NetBEUI, etc.) are installed on the computer, and network
settings (such as IP address, subnet mask, etc.) of the
computer is set. See “About Installing Components on Your
Computer” for details.
4. Insert the Software CD-ROM in the CD-ROM drive to
configure the network interface.
If you are using one of the following Epson devices, see “For
Windows” or “For Macintosh” for details.
21
Page 22

- EPSON STYLUS PHOTO RX500
- EPSON STYLUS PHOTO RX600
- EPSON STYLUS CX4600
- EPSON STYLUS CX6400
- EPSON STYLUS CX6600
If your device is not listed above, see “For Windows” or “For
Macintosh” for details.
5. If necessary, install the printer driver.
Install the printer driver from the CD-ROM that comes with
the device. See “About Installing the Printer Driver” for
details.
6. If necessary, configure the network settings of the network
interface using EpsonNet Config.
Configure the network interface for TCP/IP, AppleTalk, MS
Network, etc. using EpsonNet Config. For Windows users,
see “About EpsonNet Config”. For Macintosh users, see
“About EpsonNet Config”.
22
Page 23

Selecting a Printing Method
Printing from Windows
Check if there is a Windows XP/Server 2003/2000 print server on
your network, and then use the suggestions below.
Note:
Only the recommended printing methods are introduced here. See
“Features of the Printing Methods” for information on additional
methods.
If no Windows XP/Server 2003/2000 print server exists
Use a printing method appropriate to your operating system:
❏ For Windows Me/98
We recommend TCP/IP printing via EpsonNet Print. See
“About EpsonNet Print”.
❏ For Windows XP/Server 2003/2000
We recommend TCP/IP printing via LPR. See “Windows
XP”, “Windows Server 2003”, or “Windows 2000”.
If a Windows XP/Server 2003/2000 print server exists
On the server, set the printer to connect with LPR and turn it into
a shared printer. Your clients can then print to this shared printer.
23
Page 24

Printing from Macintosh
Mac OS X 10.2.4 or later
❏ Rendezvous
❏ EPSON TCP/IP
❏ EPSON AppleTalk
Mac OS X 10.2 or later
❏ EPSON TCP/IP
❏ EPSON AppleTalk
Mac OS 9
❏ AppleTalk
Features of the Printing Methods
This section describes features of the printing methods available
for you to choose.
LPR (TCP/IP) printing
Advantages
❏ No computer as a network interface is required.
❏ No special utility for Windows XP/Server 2003/2000 is
required.
24
Page 25

❏ You can see the printer status using EPSON Status Monitor 2
or 3.
❏ For Windows XP/Server 2003/2000, you can create a print
log using the event viewer.
❏ You can print via a router.
Disadvantages
❏ You need to set up TCP/IP.
❏ For Windows Me/98, EpsonNet Print must be installed on all
computers to use for printing.
Internet printing
Advantages
❏ No proxy server (computer) is required.
❏ You can print to the printer over the Internet.
Disadvantages
❏ EPSON Status Monitor 2 or 3 cannot be used.
❏ TCP/IP and DNS settings are required.
❏ For Windows Me/98, EpsonNet Internet Print must be
installed on all computers used for printing.
❏ For Windows XP/Server 2003/2000, you cannot share the
Internet printer.
25
Page 26

Microsoft Network Shared printing
Advantages
❏ Easy to set up (IP address is not required if NetBEUI protocol
is installed).
❏ No computer as a network interface is required.
❏ No special print utility is required.
Disadvantages
❏ EPSON Status Monitor 2 or 3 cannot be used.
❏ You cannot print via a router.
❏ It takes a longer time to start printing because more time is
required to search for a network device.
26
Page 27

Installing Components on Your Computer
About Installing Components on Your Computer
Before configuring the network interface and printing from the
computer, you need to install the necessary components (such as
TCP/IP, NetBEUI, etc.) and assign an IP address and subnet mask
for your computer, depending on the printing method you want
to use. See the section appropriate for your operating system.
Note:
You need to install the TCP/IP protocol on your computer to use EPSON
Scan.
“Windows XP”
“Windows Me/98”
“Windows Server 2003”
“Windows 2000”
“Macintosh”
Windows XP
For Windows XP, use the following procedure to install the
necessary components.
Note:
❏ The Windows XP CD-ROM may be required during the
installation.
27
Page 28
❏ When using TCP/IP or IPP for printing, you need to set the IP
address, the subnet mask, and the default gateway of the computer.
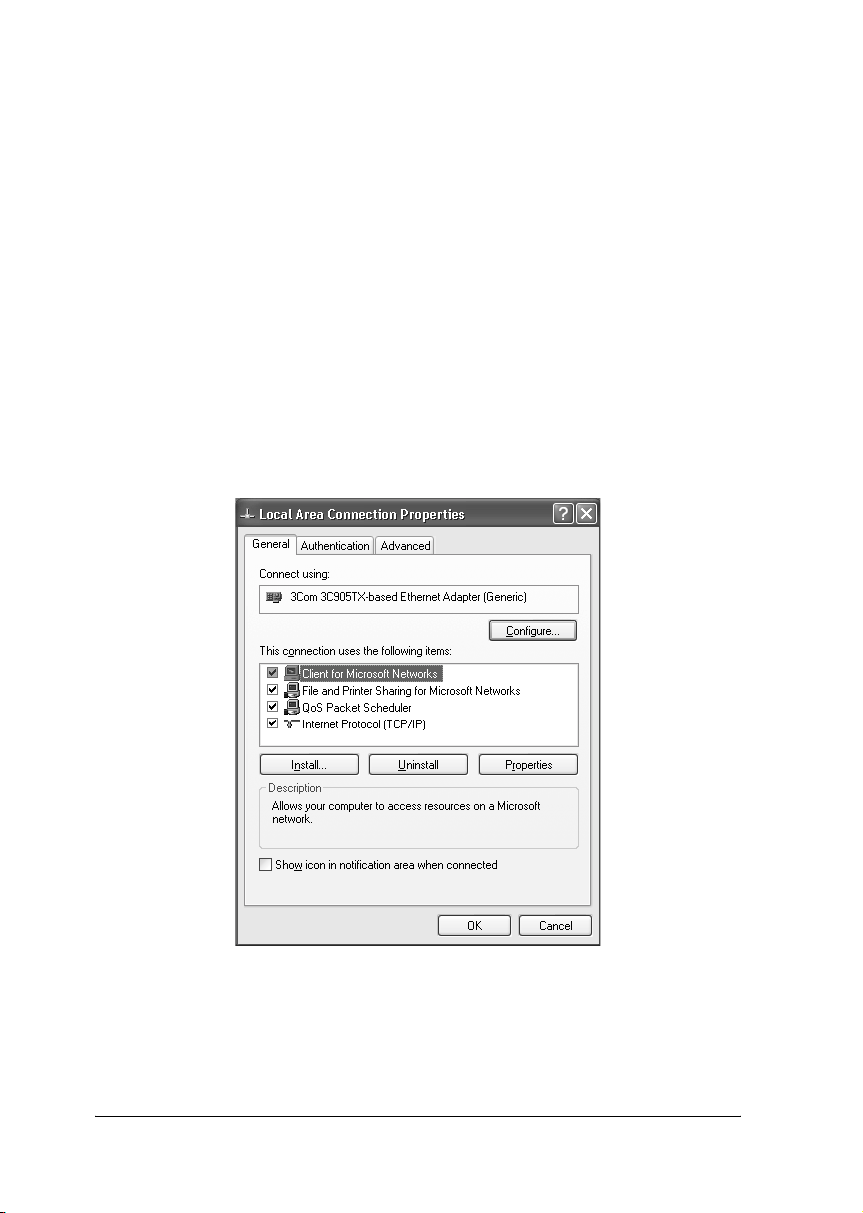
1. Click Start, highlight Control Panel, and then click Network
and Internet Connections. Select Network Connections.
2. Under LAN or High-Speed Internet, click the Local Area
Connection icon.
3. Under Network Tasks, click Change settings of this
connection.
4. Check if the following necessary components are in the list. If
they are already installed, see “How to Set Up the Network
Interface”.
28
Page 29

The following table lists the components required for
configuring the network interface with EpsonNet Config.
EpsonNet Config’s setting screens Necessary components
TCP/IP, AppleTalk, IPP, SNMP (IP trap) Internet Protocol (TCP/IP)
MS Network Internet Protocol (TCP/IP)
NetWare, SNMP (IPX trap) Latest Novell Client
downloaded from the Novell
Web site
The following table lists the components required for network
printing.
Printing method Necessary components
LPR or Internet printing Internet Protocol (TCP/IP)
Microsoft Network Shared
printing
Printing via NetWare server Latest Novell Client downloaded
Internet Protocol (TCP/IP)
Client for Microsoft Networks
from the Novell Web site
5. If the necessary components are not in the list, click Install to
install them, as described below.
For LPR or Internet printing:
Internet Protocol (TCP/IP) is installed by default. You cannot
add or delete it.
For Microsoft Network Shared printing:
Select Client and then click Add. Select Client for Microsoft
Networks and then click OK.
For printing via NetWare server:
Download the latest Novell Client from the Novell Web site
and install it on the computer. Also, be sure to install IPX. See
the Novell Web site for detailed information.
29
Page 30

6. For LPR, Internet, Microsoft Network Shared printing:
Double-click Internet Protocol (TCP/IP) on the Local Area
Connection Properties dialog box to open the Internet
Protocols (TCP/IP) Properties dialog box. Set the IP address,
the subnet mask, etc. and then click OK.
7. Restart the computer.
The necessary components are now installed.
Windows Me/98
For Windows Me/98, use the following procedure to install the
necessary components.
Note:
❏ The Windows Me/98 CD-ROM may be required during the
installation.
❏ When using TCP/IP or IPP for printing, you need to set the IP
address, the subnet mask, and the default gateway of the computer.
1. Click Start, point to Settings, and then select Control Panel.
30
Page 31

2. Double-click the Network icon. Check if the following
necessary components are in the list of installed network
components on the Configuration menu. If they are already
installed, see “How to Set Up the Network Interface”.
The following table lists the components required for
configuring the network interface with EpsonNet Config.
EpsonNet Config’s setting screens Necessary components
TCP/IP, AppleTalk, IPP, SNMP (IP trap) TCP/IP
MS Network NetBEUI or TCP/IP
NetWare, SNMP (IPX trap) Latest Novell Client
downloaded from the Novell
Web site
31
Page 32

Note:
Do not use Novell Client for Windows 95/98 version 3.00 and
Novell Client for Windows NT version 4.50 when using the
following modes: NetWare 3.x/4.x Bindery Print Server mode,
NetWare 3.x Remote Printer mode, NetWare 4.x Bindery Remote
Printer mode, and NetWare 4.x/5.x NDS Remote Printer mode.
The following table lists the components required for network
printing.
Printing method Necessary components
LPR or Internet printing TCP/IP
Microsoft Network Shared
printing
Printing via NetWare server Latest Novell Client downloaded
TCP/IP or NetBEUI
Client for Microsoft Networks
from the Novell Web site
3. If the necessary components are not in the list, click Add to
install them, as described below.
For LPR or Internet printing:
Select Protocol and then click Add. Select Microsoft from the
Manufacturers list and TCP/IP from the Network Protocols
list. Then click OK.
For Microsoft Network Shared printing:
To use TCP/IP, see the description described earlier to install
TCP/IP.
To use NetBEUI, select Protocol and then click Add. Select
Microsoft from the Manufacturers list and NetBEUI from the
Network Protocols list. Then click OK.
Select Client and then click Add. Select Microsoft from the
Manufacturers list and Client for Microsoft Networks from
the Network Clients list. Then click OK.
32
Page 33

For printing via NetWare server:
Download the latest Novell Client from the Novell Web site
and install it on the computer. Also, be sure to install IPX. See
the Novell Web site for detailed information.
4. For LPR, Internet, Microsoft Network Shared printing:
Double-click TCP/IP on the Configuration menu to open the
TCP/IP Properties dialog box. Set the IP address, the subnet
mask, etc. and then click OK.
5. Restart the computer.
The necessary components are now installed.
Windows Server 2003
For Windows Server 2003, use the following procedure to install
the necessary components.
Note:
❏ The Windows Server 2003 CD-ROM may be required during the
installation.
❏ When using TCP/IP or IPP for printing, you need to set the IP
address, the subnet mask, and the default gateway of the computer.
1. Click Start, point to Control Panel, and then select Network
Connections. Click Local Area Connections.
2. Click the Properties button.
33
Page 34

3. Check if the following necessary components are in the list. If
they are already installed, see “How to Set Up the Network
Interface”.
34
The following table lists the components required for
configuring the network interface with EpsonNet Config.
EpsonNet Config’s setting screens Necessary components
TCP/IP, AppleTalk, IPP, SNMP (IP trap) Internet Protocol (TCP/IP)
MS Network Internet Protocol (TCP/IP)
NetWare, SNMP (IPX trap) Latest Novell Client
downloaded from the Novell
Web site
The following table lists the components required for network
printing.
Printing method Necessary components
Page 35

LPR or Internet printing Internet Protocol (TCP/IP)
Microsoft Network Shared
printing
Printing via NetWare server Latest Novell Client downloaded
Internet Protocol (TCP/IP)
Client for Microsoft Networks
from the Novell Web site
4. If the necessary components are not in the list, click Install to
install them, as described below.
For LPR or Internet printing:
Internet Protocol (TCP/IP) is installed by default. You cannot
add or delete it.
For Microsoft Network Shared printing:
Select Client and then click Add. Select Client for Microsoft
Networks and then click OK.
For printing via NetWare server:
Download the latest Novell Client from the Novell Web site
and install it on the computer. Also, be sure to install IPX. See
the Novell Web site for detailed information.
5. For LPR, Internet, or Microsoft Network Shared printing:
Double-click Internet Protocol (TCP/IP) in the Local Area
Connection Properties dialog box to open the Internet
Protocols (TCP/IP) Properties dialog box. Set the IP address,
the subnet mask, etc. and then click OK.
6. Restart the computer.
The necessary components are now installed.
Windows 2000
For Windows 2000, use the following procedure to install the
necessary components.
35
Page 36

Note:
❏ The Windows 2000 CD-ROM may be required during the
installation.
❏ When using TCP/IP or IPP for printing, you need to set the IP
address, the subnet mask, and the default gateway of the computer.
1. Click Start, point to Settings, and then select Network and
Dial-up Connections. The Network and Dial-up
Connections screen appears.
2. Right-click the desired network connection and then select
Properties.
3. Check if the following necessary components are in the list. If
they are already installed, see “How to Set Up the Network
Interface”.
36
Page 37

The following table lists the components required for
configuring the network interface with EpsonNet Config.
EpsonNet Config’s setting screens Necessary components
TCP/IP, AppleTalk, IPP, SNMP (IP trap) Internet Protocol (TCP/IP)
MS Network NetBEUI or Internet Protocol
(TCP/IP)
NetWare, SNMP (IPX trap) Latest Novell Client
downloaded from the Novell
Web site
Note:
Do not use Novell Client for Windows 95/98 version 3.00 and
Novell Client for Windows NT version 4.50 when using the
following modes: NetWare 3.x/4.x Bindery Print Server mode,
NetWare 3.x Remote Printer mode, NetWare 4.x Bindery Remote
Printer mode, and NetWare 4.x/5.x NDS Remote Printer mode.
The following table lists the components required for network
printing.
Printing method Necessary components
LPR or Internet printing Internet Protocol (TCP/IP)
Microsoft Network Shared
printing
Printing via NetWare server Latest Novell Client downloaded
Internet Protocol (TCP/IP) or NetBEUI
Client for Microsoft Networks
from the Novell Web site
4. If the necessary components are not in the list, click Install to
install them, as described below.
For LPR or Internet printing:
Select Protocol and then click Add. In the Select Network
Protocol dialog box, select Internet Protocol (TCP/IP) and
then click OK.
37
Page 38

For Microsoft Network Shared printing:
To use Internet Protocol, see the description described earlier
to install Internet Protocol (TCP/IP).
To use NetBEUI, select Protocol and then click Add. Select
NetBEUI Protocol and then click OK.
Select Client and then click Add. Select Client for Microsoft
Networks and then click OK.
For printing via NetWare server:
Download the latest Novell Client from the Novell Web site
and install it on the computer. Also, be sure to install IPX. See
the Novell Web site for detailed information.
5. For LPR, Internet, Microsoft Network Shared printing:
Double-click Internet Protocol (TCP/IP) on the
Configuration menu to open the TCP/IP Properties dialog
box. Set the IP address, the subnet mask, etc. and then click
OK.
6. Restart the computer.
The necessary components are now installed.
Macintosh
To assign an IP address, subnet mask, etc. to your Macintosh,
follow the steps below.
Note:
To print using the AppleTalk protocol and configure the network
interface with EpsonNet Config for Macintosh, select AirMac or
Built-in Ethernet on the AppleTalk Control Panel or the AppleTalk
tab. Then configure the network interface with EpsonNet Config for
Macintosh.
38
Page 39

Mac OS X
1. From the Apple menu, select System Preferences.
2. Click the Network icon.
3. Select AirMac, and then click the Configure button.
4. Click the TCP/IP tab.
5. Assign an IP address and other settings if necessary.
6. Click the Apply Now button to save any changes.
Mac OS 9
1. From the Apple menu, select Control Panel, and then TCP/IP.
2. Set Connect via to AirMac.
3. Assign an IP address and other settings if necessary.
4. Close the dialog box to save any changes.
39
Page 40

40
Page 41

How to Set Up the Network Interface
For Windows
Connecting the network interface
Note:
If EpsonNet WinAssist is installed on your computer, uninstall it before
following the steps below.
1. Insert the Software CD-ROM in the CD-ROM drive.
If the Installer dialog box does not appear automatically,
double-click EPSETUP.EXE on the CD-ROM.
2. From the Welcome screen, click Next.
41
Page 42

3. Read the license agreement, and then click Agree.
4. Select Connect the Wireless Print Server.
5. Connect the square connector to the USB port on the device,
and then connect the other end to the USB downstream
connector on the network interface. Finally, turn on the
device.
42
Page 43

Note:
Be sure to use the USB cable that comes with the network interface.
6. Connect the square connector on the USB cable to the USB
upstream connector on the network interface, and then
connect the other end to the USB port on the computer.
43
Page 44
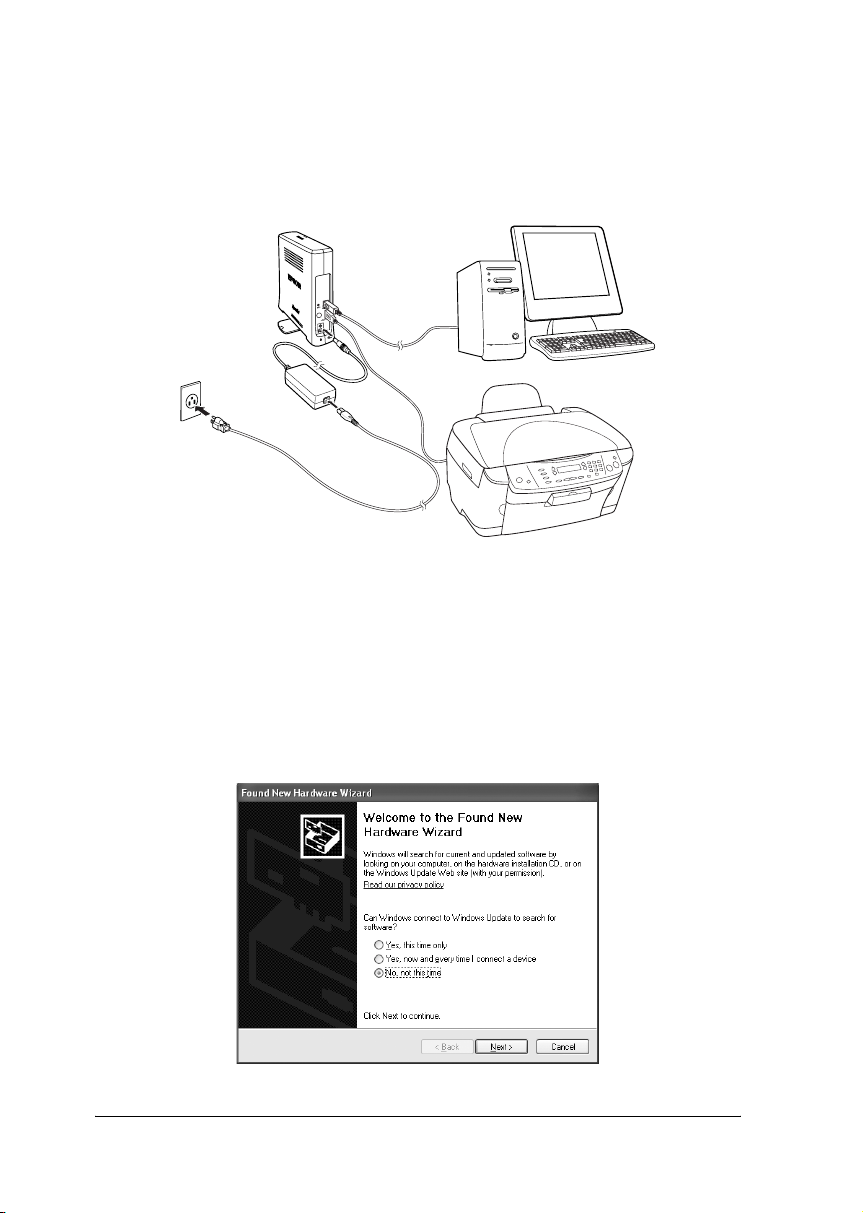
7. Connect the power cord to the AC adapter, and then plug the
AC adapter into the network interface's DC-IN connector.
Finally, plug the power cord into a properly grounded wall
outlet.
8. The “Found New Hardware Wizard” appears to prompt you
to install the USB driver. Select the Install from a list or
specific location radio button and then click Next.
44
Note for Windows XP Service Pack 2 Users:
If the following screen appears, select the No, not this time radio
button, and then click Next.
Page 45

Note:
These screens may be different depending on the operating system.
9. Select the Search for the best driver in these locations radio
button and select the Search removable media check box,
and then click Next.
45
Page 46

10. When the operation is completed, click Finish.
11. Click Back to go back to the main menu.
46
Page 47

12. Select Install Network Utility.
13. Click the Install button located next to EpsonNet Config.
Follow the on-screen instructions to complete the installation.
14. Click the Install button located next to EpsonNet Print. Follow
the on-screen instructions to complete the installation.
47
Page 48

15. Click Exit.
16. Configure the network interface using EpsonNet Config. See
“Configuring the network interface” for details.
Configuring the network interface
Note:
It is a good idea to write down the SSID and WEP Key or WPA Personal
password before taking the steps below.
Note for Windows XP Service Pack 2 users:
If the following screen appears after starting EpsonNet Config, click the
Unblock button; otherwise the device is not listed on the screen of
EpsonNet Config.
48
Page 49

1. Click Start, point to All Programs (for Windows XP/Server
2003 users) or Programs (for Windows Me/98/2000 users),
and then select EpsonNet. Click EpsonNet Config to start it.
2. Select the device and then click the Configuration button.
3. Select Basic under Network. Make the following settings.
Items Explanations
Communication Mode Select a wireless LAN mode: Infrastructure
or Ad Hoc.
Operation Mode For 802.11g only:
Select the operation mode from the list.
SSID Enter or select the SSID (or ESSID) of the
access point or wireless LAN (up to 32
characters).
Channel When the mode is Ad Hoc, select the
channel used on the network interface. If
the mode is Infrastructure, this item is
dimmed.
Transmission Rate Select the transmission speed from the list.
49
Page 50

4. Click Security Level under Network. Make the following
settings.
Items Explanations
Security Level Select the security level from the list.
Note:
If you are using EpsonNet 802.11g Wireless
Ext. Print Server in the Ad Hoc mode, you
cannot use WPA-Personal (TKIP) for the
security level.
WEP Authentication
Method
WEP Settings (appears for WEP-64bit or WEP-128bit security level)
Input using hex Select this check box to set the WEP Key in
WEP Key (1 to 4) When you select 64 bit(40 bit) for the length,
Active WEP Key Select one WEP Key as an active key before
WPA Settings (appears for WPA-Personal security level)
Password Enter the password for WPA-Personal
Select an authentication algorithm: Open
System, Shared Key, or Automatic.
(This item is dimmed when WPA-Personal
(TKIP) is selected for the security level.)
hexadecimal.
you can set up to 4 WEP Keys. When you
select 128 bit(104bit), you can set only one
WEP Key.
For 64bit and ASCII, enter 5 characters.
For 64bit and Hex, enter 10 digit values.
For 128bit and ASCII, enter 13 characters.
For 128bit and Hex, enter 26 digit values.
Note:
The WEP Key disappears after the network
interface is configured. Therefore, do not
forget the WEP Key you have set.
enabling use of encryption.
authentication (8 to 63 characters).
Password (again) Enter the password again.
5. Click Basic under TCP/IP.
50
Page 51

6. Select a method for specifying the IP address. If you select
Automatic, DHCP becomes available and assigns an IP
address automatically. If you want to set the IP address
manually, select Manual and enter the IP address, subnet
mask, and default gateway.
7. Click the Send button to send the settings to the network
interface.
8. Pull out the USB cable from your computer and the network
interface.
9. Install the printer driver.
See the section appropriate for your operating system.
❏ “For Windows XP/Server 2003/2000/NT 4.0 Users”
❏ “For Windows Me/98/95 Users”
For more detailed information on EpsonNet Config, see the
EpsonNet Config Reference Guide.
51
Page 52

Note for Windows users
If you are using an ink jet printer or all-in-one (excluding EPSON
STYLUS PHOTO RX500/600/1280/2200), follow the steps below
after installing the printer driver. You can use EPSON Status
Monitor 3 via the wireless network.
1. Insert the Software CD-ROM in the CD-ROM drive.
If the Installer dialog box appears automatically, click the Exit
button.
2. Double-click the CD-ROM drive.
3. In the ENGLISH folder, open the APPS folder, and then open
the AddNet folder.
4. Double-click SETUP.EXE. Follow the on-screen instructions.
Using the network storage
If the device connected to the wireless network interface has
memory card slots, you can display or read data on the memory
card via a wireless network.
52
Page 53

Note:
❏ You can use this function on Windows XP/2000 only.
❏ You can only display or read data on the memory card.
❏ When you access the Network Storage and delete data on the
memory card, the data disappears. However, the data is not actually
deleted so the data appears again when you select Refresh from the
View menu.
Accessing the network storage
1. Run EpsonNet Config. Select Basic under MS Network, and
then check the host name.
2. From the Start menu, select Run.
53
Page 54

3. Enter the host name you checked in step 1, and then click OK.
\\the host name of the MS Network\
4. Right-click the MEMORYCARD icon, and then select Map
Network Drive.
5. Specify the drive letter for the connection. We recommend
that you select the Reconnect at logon check box. You can
access Network Storage whenever you start the computer.
6. Click Finish.
54
Page 55

7. The network drive you mapped appears in My Computer.
To display or read the file, double-click the network drive
icon.
Disconnecting the network storage
To disconnect the network drive of the network storage,
right-click the network drive icon, and then select Disconnect.
Changing the network storage information
You can change the host name or the storage name you specified
in the Run dialog box by using EpsonNet Config. For more
detailed information, see EpsonNet Config Reference Guide or
“About EpsonNet Config”.
For Macintosh
Connecting the network interface
Use EpsonNet Config to configure the network interface for use
on the TCP/IP network and set up the printer on your computer.
Note:
This section explains the instructions using Mac OS X. The instructions
are almost the same for Mac OS 9.
1. Insert the Software CD-ROM in the CD-ROM drive.
55
Page 56

2. Double-click the EPSON CD-ROM icon.
3. Double-click the appropriate OS icon in the EPSON folder.
4. From the Welcome screen, click Next.
56
Page 57

5. Read the license agreement, and then click Agree.
6. Select Install Network Utility.
57
Page 58

7. Click the Install button located next to EpsonNet Config to
install EpsonNet Config. Follow the on-screen instructions to
complete the installation.
8. Restart your computer.
9. Connect the square connector to the USB port on the device,
and then connect the other end to the USB downstream
connector on the network interface. Finally, turn on the
device.
58
Page 59

Note:
Be sure to use the USB cable that comes with the network interface.
10. Connect the square connector on the USB cable to the USB
upstream connector on the network interface, and then
connect the other end to the USB port on the computer.
59
Page 60

11. Connect the power cord to the AC adapter, and then plug the
AC adapter into the network interface's DC-IN connector.
Finally, plug the power cord into a properly grounded wall
outlet.
12. Configure the network interface using EpsonNet Config. See
“Configuring the network interface” for details.
Configuring the network interface
Note:
It is a good idea to write down the SSID and WEP Key or WPA Personal
password before taking the steps below.
60
Page 61

1. Double-click the Macintosh HD icon. In the Applications
folder, double-click the EpsonNet folder, and then
double-click the EpsonNet Config folder. Finally,
double-click the EpsonNet Config icon.
2. Select the device and then click the Configuration button.
3. Select Basic under Network. Make the following settings.
Items Explanations
Communication Mode Select a wireless LAN mode: Infrastructure
or Ad Hoc.
Operation Mode For 802.11g only:
Select the operation mode from the list.
SSID Enter or select the SSID (or ESSID) of the
access point or wireless LAN (up to 32
characters).
Channel When the mode is Ad Hoc, select the
channel used on the network interface. If
the mode is Infrastructure, this item is
dimmed.
Transmission Rate Select the transmission speed from the list.
61
Page 62

4. Click Security Level under Network. Make the following
settings.
Items Explanations
Security Level Select the security level from the list.
Note:
If you are using EpsonNet 802.11g Wireless
Ext. Print Server in the Ad Hoc mode, you
cannot use WPA-Personal (TKIP) for the
security level.
WEP Authentication
Method
WEP Settings (appears for WEP-64bit or WEP-128bit security level)
Input using hex Select this check box to set the WEP Key in
WEP Key (1 to 4) When you select 64 bit(40 bit) for the length,
Active WEP Key Select one WEP Key as an active key before
WPA Settings (appears for WPA-Personal security level)
Password Enter the password for WPA-Personal
Select an authentication algorithm: Open
System, Shared Key, or Automatic.
(This item is dimmed when WPA-Personal
(TKIP) is selected for the security level.)
hexadecimal.
you can set up to 4 WEP Keys. When you
select 128 bit(104bit), you can set only one
WEP Key.
For 64bit and ASCII, enter 5 characters.
For 64bit and Hex, enter 10 digit values.
For 128bit and ASCII, enter 13 characters.
For 128bit and Hex, enter 26 digit values.
Note:
The WEP Key disappears after the network
interface is configured. Therefore, do not
forget the WEP Key you have set.
enabling use of encryption.
authentication (8 to 63 characters).
62
Password (again) Enter the password again.
Page 63

5. For Mac OS X:
Click Basic under TCP/IP. Select a method for specifying the
IP address. If you select Automatic, DHCP becomes
available and assigns an IP address automatically. If you want
to set the IP address manually, select Manual and enter the
IP address, subnet mask, and default gateway.
For Mac OS 9:
Click Basic under AppleTalk. Make sure the Use AppleTalk
check box is selected, and then make the necessary settings.
6. Click the Send button to send the settings to the network
interface.
7. Pull out the USB cable from your computer and the network
interface.
8. Set up the device. See “Setting up the device” for details.
63
Page 64

Setting up the device
The printer driver must be installed on the computer before you
can set up the device. See the device’s manual for information on
installing the printer driver.
Mac OS X
1. Open the Applications folder.
2. Open the Utilities folder.
3. Open Print Center (for Mac OS X 10.2 or below) or Printer
Setup Utility (for Mac OS X 10.3), and then click Add.
4. Select Rendezvous from the drop-down list.
5. Select the printer model from the list.
6. Click Add.
Mac OS 9
1. Open Chooser from the Apple menu.
2. Click the printer icon.
3. Select the zone containing the printer.
4. Select the printer name from the list.
5. Make sure AppleTalk is active.
6. Close Chooser.
Now you can use the device on the wireless network.
64
Page 65

For EPSON STYLUS PHOTO RX500/600 and
EPSON STYLUS CX4600/6400/6600 Users
For Windows
Configuring the network interface
Configure the network interface for use on the TCP/IP network,
and install the drivers and the utility for the all-in-one on your
computer.
Make sure the all-in-one is set up and the software for the
all-in-one is installed on your computer before taking the steps
below. See the manual shipped with the all-in-one for detailed
instructions.
Note:
❏ If EpsonNet WinAssist is installed on your computer, uninstall it
before following the steps below.
❏ It is a good idea to write down the SSID and WEP Key or WPA
Personal password before taking the steps below.
❏ Windows Server 2003 does not support this function.
1. Insert the Software CD-ROM in the CD-ROM drive.
If the Installer dialog box does not appear automatically,
double-click EPSETUP.EXE on the CD-ROM.
65
Page 66

2. From the Welcome screen, click Next.
3. Read the license agreement, and then click Agree.
66
Page 67

4. Select Connect the Wireless Print Server.
5. Connect the network interface and the all-in-one with a USB
cable. Finally, turn on the all-in-one.
Note:
Be sure to use the USB cable that comes with the network interface.
If the all-in-one has a built-in USB cable, use it to connect to the
network interface.
67
Page 68

6. Connect the square connector on the USB cable to the USB
upstream connector on the network interface, and then
connect the other end to the USB port on the computer.
7. Connect the power cord to the AC adapter, and then plug the
AC adapter into the network interface's DC-IN connector.
Finally, plug the power cord into a properly grounded wall
outlet.
68
Page 69

8. The “Found New Hardware Wizard” appears to prompt you
to install the USB driver. Select the Install from a list or
specific location radio button and then click Next.
Note for Windows XP Service Pack 2 Users:
If the following screen appears, select the No, not this time radio
button, and then click Next.
Note:
These screens may be different depending on the operating system.
69
Page 70

9. Select the Search for the best driver in these locations radio
button and select the Search removable media check box,
and then click Next.
10. When the operation is completed, click Finish.
70
Page 71

11. Click Next.
12. Select the device model name.
71
Page 72

13. Click Install.
Note for Windows XP Service Pack 2 users:
If the following screen appears, click the Unblock button; otherwise
the device is not listed on the screen of EpsonNet EasyInstall.
14. EpsonNet EasyInstall starts. Select the device and then click
Next.
72
Page 73

Note:
If “Printer” appears for the model name, this indicates the all-in-one
is not connected to the network interface. Connect the all-in-one and
the network interface with a USB cable, and then turn on the
all-in-one; otherwise, you cannot install the driver as described in
the following steps.
73
Page 74
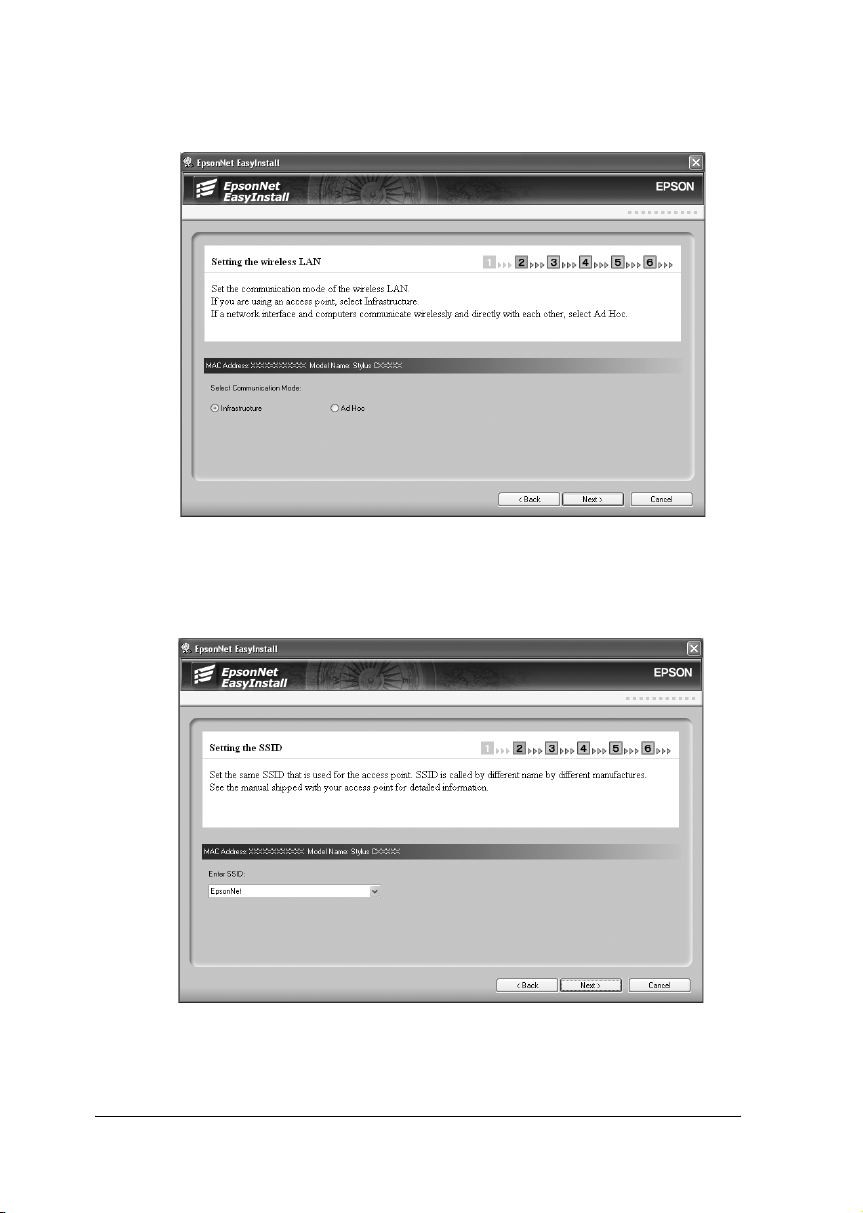
15. Select Infrastructure or Ad Hoc, and then click Next.
16. Enter or select the SSID of the access point or wireless LAN
(up to 32 characters), and then click Next.
74
Page 75
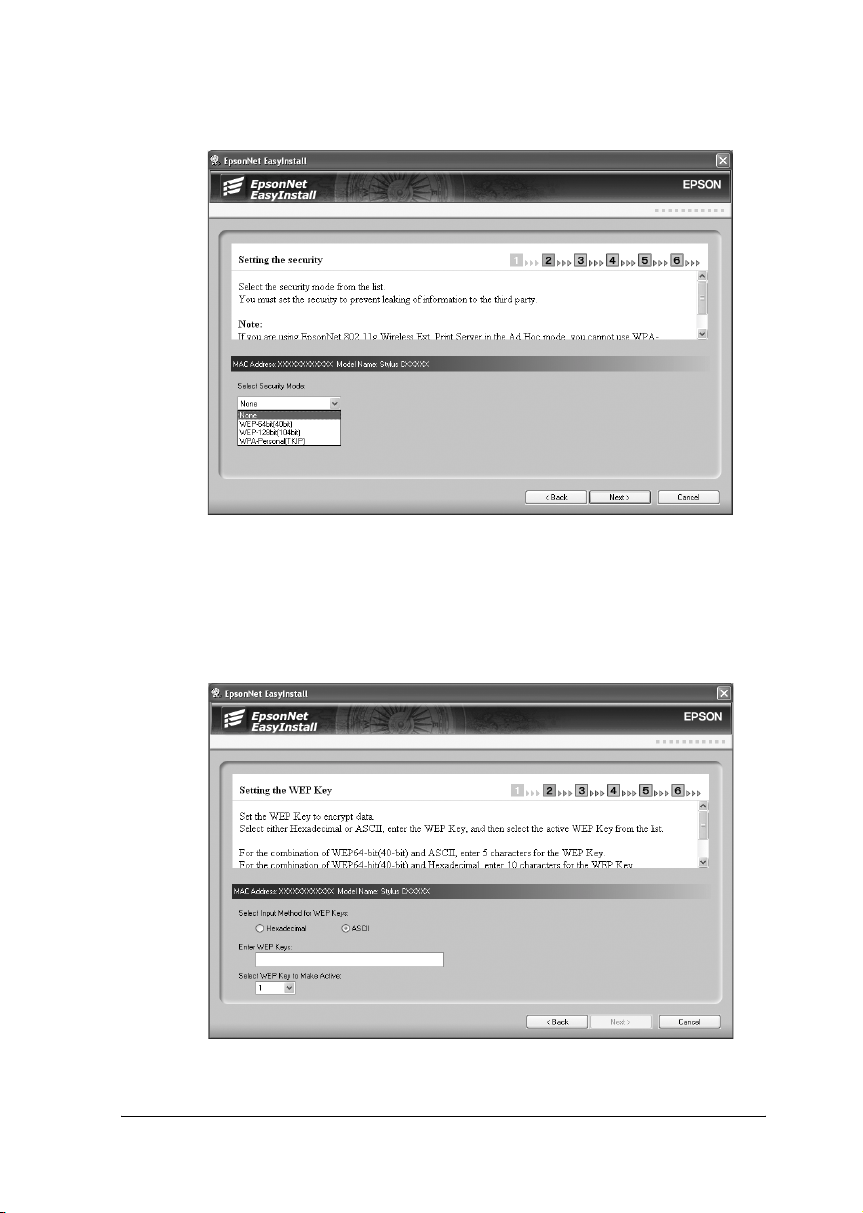
17. Select the security mode, and then click Next.
18. Enter the WEP Key or the WPA-Personal password, if
necessary. Click Next.
For WEP security:
75
Page 76

For WPA security:
19. Select a method for specifying the IP address. If you select
Automatic, DHCP becomes available and assigns an IP
address automatically. If you want to set the IP address
manually, select Manual and enter the IP address, subnet
mask, and default gateway. Click Next.
76
Page 77
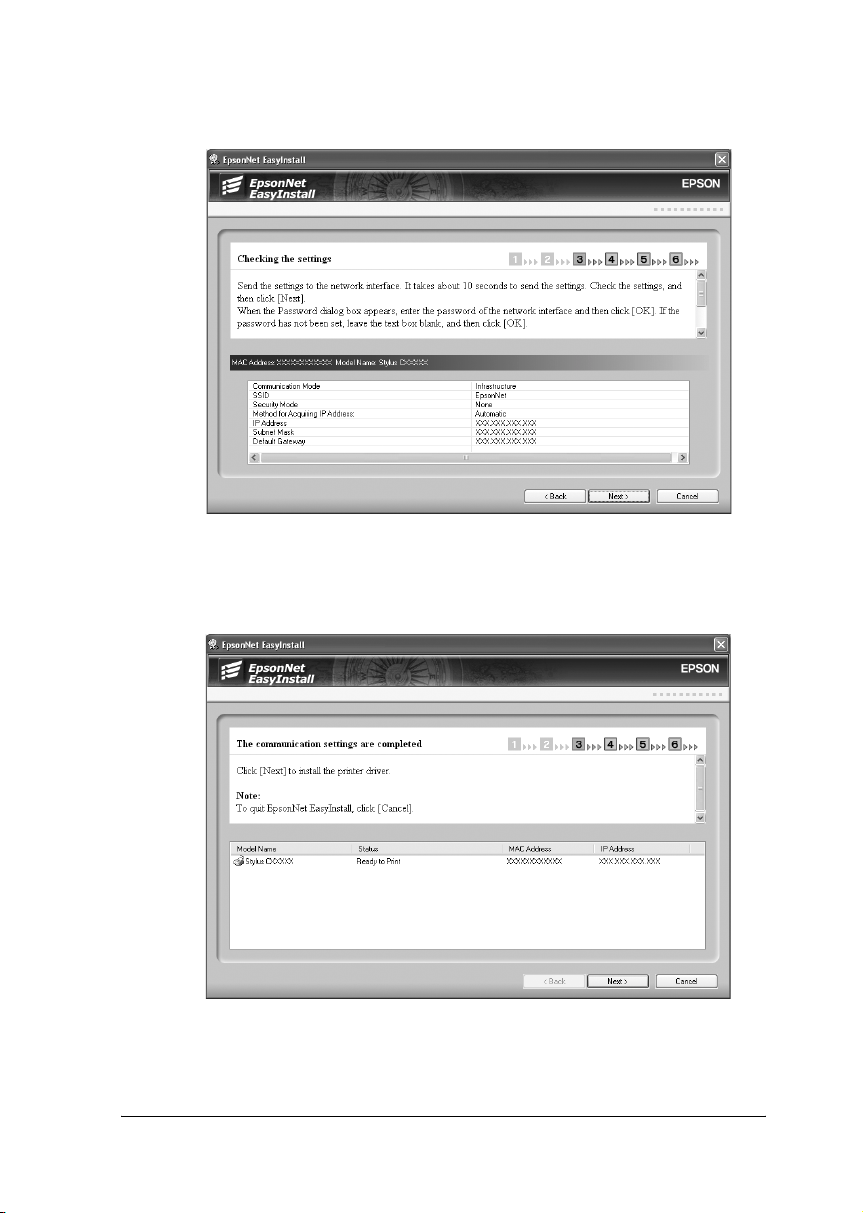
20. Check the settings you have made, and then click Next.
21. Select the device where you have just set the IP address, and
then click Next to install the drivers and the utility.
77
Page 78

22. Enter the printer name. If you want to set the printer as the
default printer, select the Set as default printer check box.
Click Next.
Note for Windows XP Service Pack 2 users:
If the following screen appears, click the Unblock button.
78
Page 79
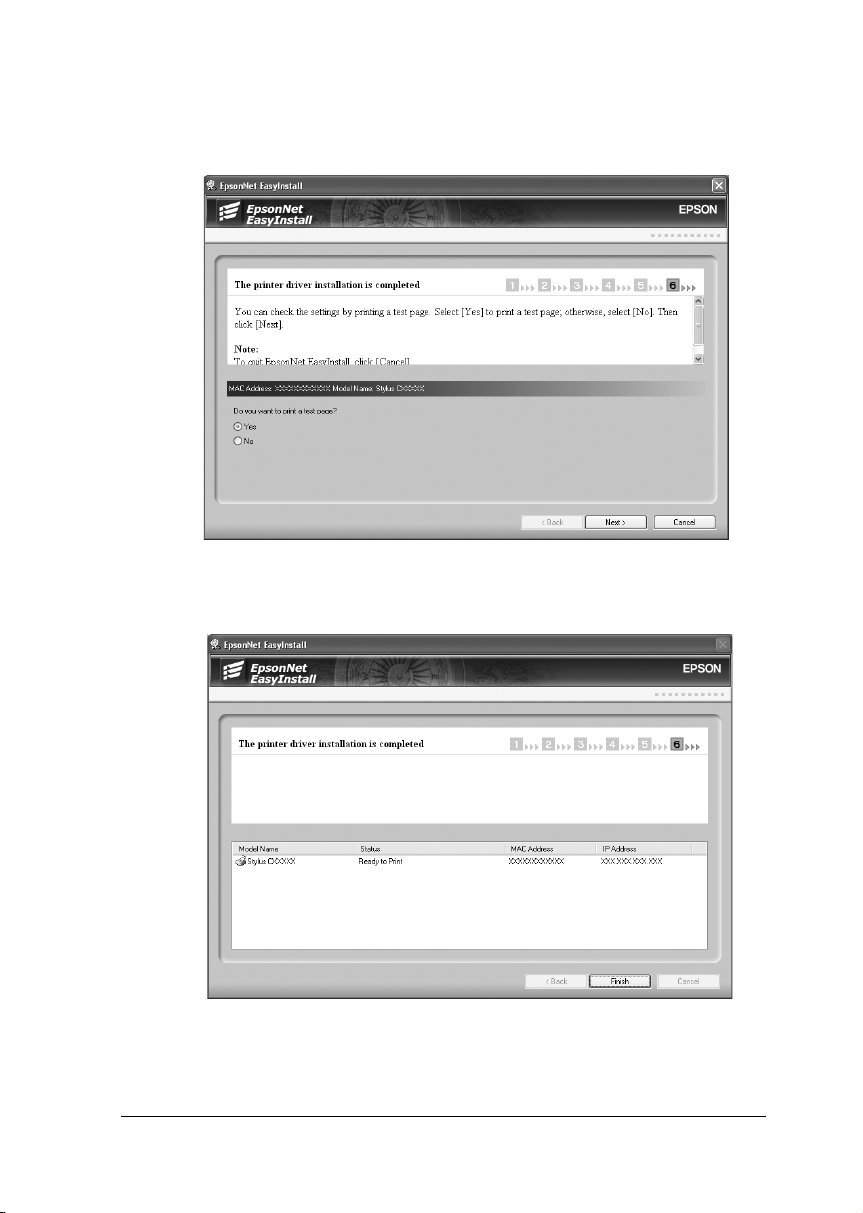
23. Select Yes to print a test page; otherwise, select No. Click
Next.
24. Click Finish to complete the installation.
79
Page 80

25. Pull out the USB cable from your computer and the network
interface.
Now you can use the device on the wireless network.
Scanning via a wireless network
You can scan images via a wireless network. For details on the
scanning function, see the documentation shipped with your
device or the online help for EPSON Scan.
Note:
Windows Server 2003 does not support this function.
80
Page 81

Starting EPSON Scan
Click Start, point to All Programs (for Windows XP users) or
Programs (for Windows Me/98/2000 users) and EPSON Scan,
and then select EPSON Scan. The EPSON Scan screen appears.
Note:
❏ If EPSON Scan does not start, see “Making settings for
EPSON Scan” for details.
❏ You cannot start Smart Panel on the computer by pushing the
button on the LCD panel of the all-in-one via a wireless network.
Getting information through the online help
EPSON Scan has an online help that provides you with
instructions on scanning and making driver settings.
81
Page 82

Click Help in any of the dialog boxes in EPSON Scan.
82
Page 83

Making settings for EPSON Scan
1. Click Start, point to All Programs (for Windows XP users) or
Programs (for Windows Me/98/2000 users) and EPSON
Scan, and then select EPSON Scan Settings. The EPSON
Scan Settings dialog box appears.
2. Select the model name of your device from the Select Scanner
drop-down list.
83
Page 84

3. Select the Network radio button.
4. Click the Test button. Make sure the device in the Scanner
Status text box is available for use on the network.
84
Page 85

Note:
If the network connection fails, see EPSON Scan Troubleshooting
Assistant.
5. Click OK.
Using the network storage
You can display or read data on the memory card via a wireless
network.
Note:
❏ You can use this function on Windows XP/2000 only.
85
Page 86

❏ You can only display or read data on the memory card.
❏ When you access the Network Storage and delete data on the
memory card, the data disappears. However, the data is not actually
deleted so the data appears again when you select Refresh from the
View menu.
Accessing the network storage
The network drive you mapped appears in My Computer. To
display or read the file, double-click the network drive icon.
Note:
When the network drive does not appear in My Computer, connect it
manually. See “Using the network storage” for more details.
Disconnecting the network storage
To disconnect the network drive of the network storage,
right-click the network drive icon, and then select Disconnect.
Changing the network storage information
You can change the host name or the storage name you specified
in the Run dialog box by using EpsonNet Config. For more
detailed information, see EpsonNet Config Reference Guide or
“About EpsonNet Config”.
For Macintosh
Configuring the network interface
Configure the network interface for use on the TCP/IP network,
and install the drivers for the all-in-one and the utility on your
computer.
86
Page 87

Make sure the all-in-one is set up and the software for the
all-in-one is installed on your computer before taking the steps
below. See the manual shipped with the all-in-one for detailed
instructions.
Note:
❏ This section explains the instructions using Mac OS X. The
instructions are almost the same for Mac OS 9.
❏ It is a good idea to write down the SSID and WEP Key or WPA
Personal password before taking the steps below.
1. Insert the Software CD-ROM in the CD-ROM drive.
2. Double-click the EPSON CD-ROM icon.
3. Double-click the appropriate OS icon in the EPSON folder.
87
Page 88

4. From the Welcome screen, click Next.
5. Read the license agreement, and then click Agree.
88
Page 89

6. Select Connect the Wireless Print Server.
7. Follow the on-screen instructions to install the USB driver.
8. Connect the network interface and the all-in-one with a USB
cable. Finally, turn on the all-in-one.
Note:
Be sure to use the USB cable that comes with the network interface.
If the all-in-one has a built-in USB cable, use it to connect to the
network interface.
89
Page 90

9. Connect the square connector on the USB cable to the USB
upstream connector on the network interface, and then
connect the other end to the USB port on the computer.
10. Connect the power cord to the AC adapter, and then plug the
AC adapter into the network interface's DC-IN connector.
Finally, plug the power cord into a properly grounded wall
outlet.
90
Page 91

11. Click Next.
12. Select the device model name.
91
Page 92

13. Click Install.
14. EpsonNet EasyInstall starts. Select the device and then click
Next.
92
Page 93

15. Select Infrastructure or Ad Hoc, and then click Next.
16. Enter or select the SSID of the access point or wireless LAN
(up to 32 characters), and then click Next.
93
Page 94

17. Select the security mode, and then click Next.
18. Enter the WEP Key or the WPA-Personal password, if
necessary. Click Next.
For WEP security:
94
Page 95

For WPA security:
19. Select a method for specifying the IP address. If you select
Auto, DHCP becomes available and assigns an IP address
automatically. If you want to set the IP address manually,
select Manual and enter the IP address, subnet mask, and
default gateway. Click Next.
95
Page 96

20. Check the settings you have made, and then click Next.
21. Click Finish to exit EpsonNet EasyInstall.
96
Page 97

22. EPSON Scan Installer starts. Select Custom Install from the
pull-down menu.
23. Select the model of the all-in-one from the list, and then click
Install.
24. Follow the on-screen instructions to install the printer driver
and utilities.
97
Page 98

25. Restart your computer.
26. Pull out the USB cable from your computer and the network
interface.
27. Setup the device. See “Setting up the device” for details.
Setting up the device
Mac OS X
1. Open the Applications folder.
2. Open the Utilities folder.
3. Open Print Center (for Mac OS X 10.2 or below) or Printer
Setup Utility (for Mac OS X 10.3), and then click Add.
4. Select Rendezvous from the drop-down list.
98
Page 99

5. Select the device model from the list.
6. Click Add.
Mac OS 9
1. Double-click the Macintosh HD icon. In the Applications
folder, double-click the EpsonNet folder, and then
double-click the EpsonNet Config folder. Finally,
double-click the EpsonNet Config icon.
2. Select the device and then click the Configuration button.
3. Click Basic under AppleTalk. Make sure the Use AppleTalk
check box is selected, and then make the necessary settings.
4. Click the Send button to send the settings to the network
interface.
5. Open Chooser from the Apple menu.
6. Click the printer icon.
7. Select the zone containing the printer.
8. Select the printer name from the list.
9. Make sure AppleTalk is active.
10. Close Chooser.
Now you can use the device on the wireless network.
Scanning via a wireless network
You can scan images via a wireless network. For details on the
scanning function, see the documentation shipped with your
device or the online help for EPSON Scan.
99
Page 100

Making settings for EPSON Scan
1. Mac OS X
Double-click the Macintosh HD icon. In the Applications
folder, double-click the Utilities folder. Then double-click the
EPSON Scan Settings icon.
Mac OS 9
Click the Apple menu, point to Control Panels, and then
select EPSON Scan Settings.
2. Select the model of your device from the Select Scanner
drop-down list.
100
 Loading...