

Page 1
PowerLite® Pro G5300
Quick Reference
This Quick Reference card gives brief instructions on connecting your
PowerLite® projector and using common features. For details, install
and view the User’s Guide from the projector’s CD-ROM.
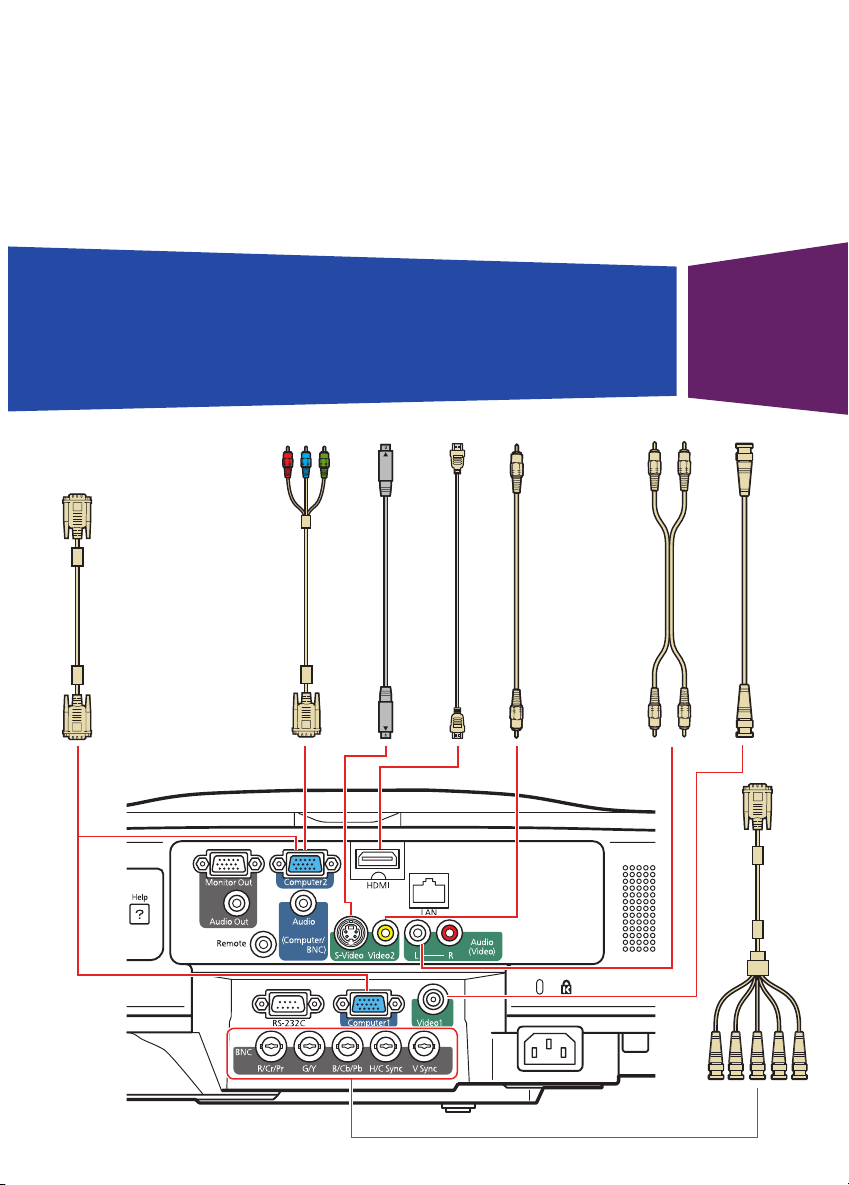
VGA cable
S-video cable
Component to VGA cable
HDMI cable
Composite video cable
Audio cable
Coax video cable
Component to VGA cable
Page 2
Installing the Manuals
1. Insert the projector CD in your
computer’s CD or DVD drive.
(Double-click the Epson installer
icon, if necessary.)
2. Select your language, then click
User’s Guide, EMP Monitor
Guide (Windows®) or User’s Guide
(Macintosh®) to install the manuals.
(If you are using Windows and you
don’t have Adobe® Reader®, click
Adobe Reader to install it also.)
Then click Exit.
3. To view the manuals, double-click
the PL Pro G5300 User’s Guide or
EMP Monitor Operation Guide (for
Windows users only) icon on your
computer’s desktop.
Turning the Projector On
1. Turn on your computer or image
source.
2. Remove the lens cover.
3. Press the power button. After
the power light stays green, the
projector is ready.
Note: If the Direct Power On function is
enabled, you can turn the projector on
without pressing the power button;
just plug it in or flip the switch controlling
the outlet to which the projector is
connected. To turn on this feature, see
the User’s Guide.
4. If you don’t see your image, see
“Switching Between Image Sources”
or “Troubleshooting.”
Switching Between Image Sources
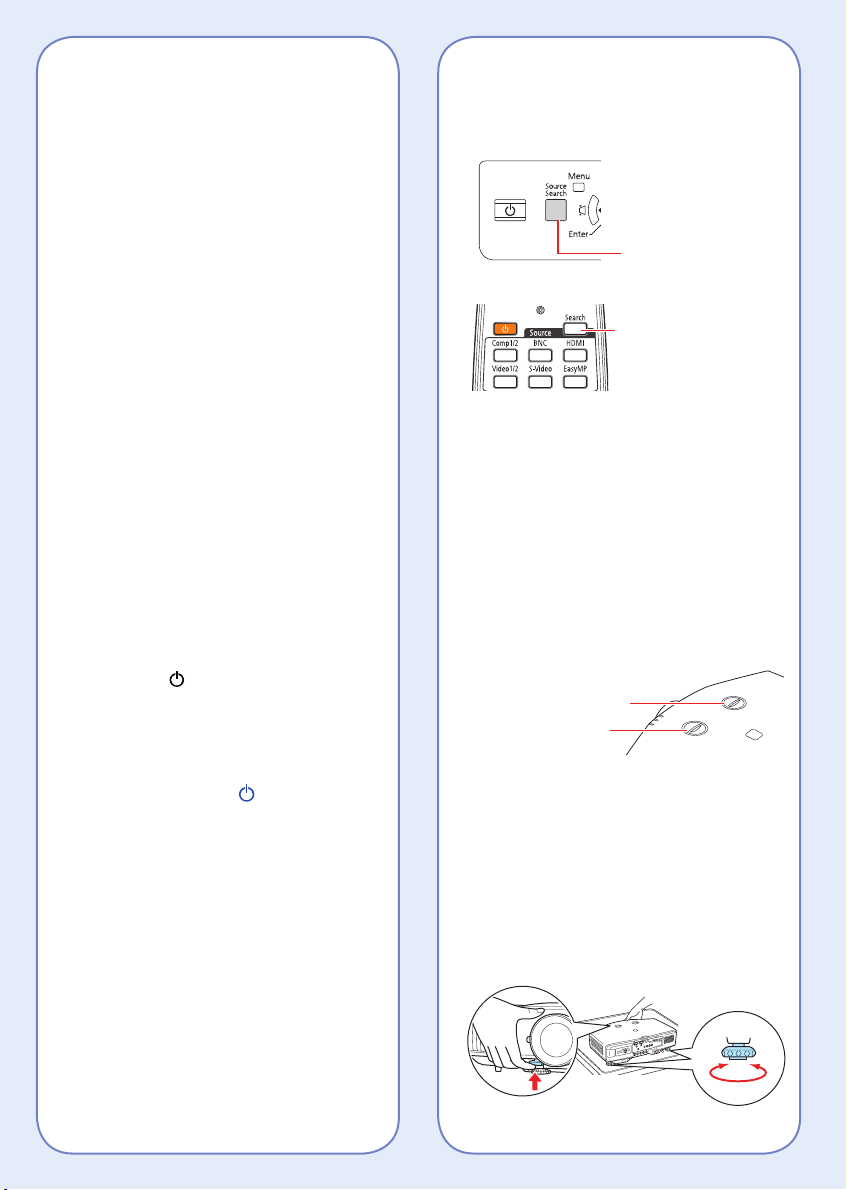
Press the Source
Search button on the
projector
Press the Search button
or one of the Source
buttons on the remote
control
Note: The BNC, EasyMP®, and HDMI
buttons are not applicable to this projector.
Adjusting Image Position
If the projector is mounted to the
ceiling, use the vertical lens shift dial
to move your image up or down or use
the horizontal lens shift dial to move
your image left or right. You can also
use the ceiling mount to adjust the
position.
Horizontal lens shift dial
Vertical lens shift dial
If the projector is on a table, place
it so it faces the screen as squarely
as possible. To raise the image, use
the vertical lens shift dial as shown
above. Or press the blue foot release
lever and lift the front of the projector
to extend the front adjustable foot.
Release the lever to lock the foot in
position.
Page 3
You can fine-tune the height or level the
image by turning any of the projector’s
adjustable feet. Use the horizontal lens
shift dial to move your image left or
right, as shown above.
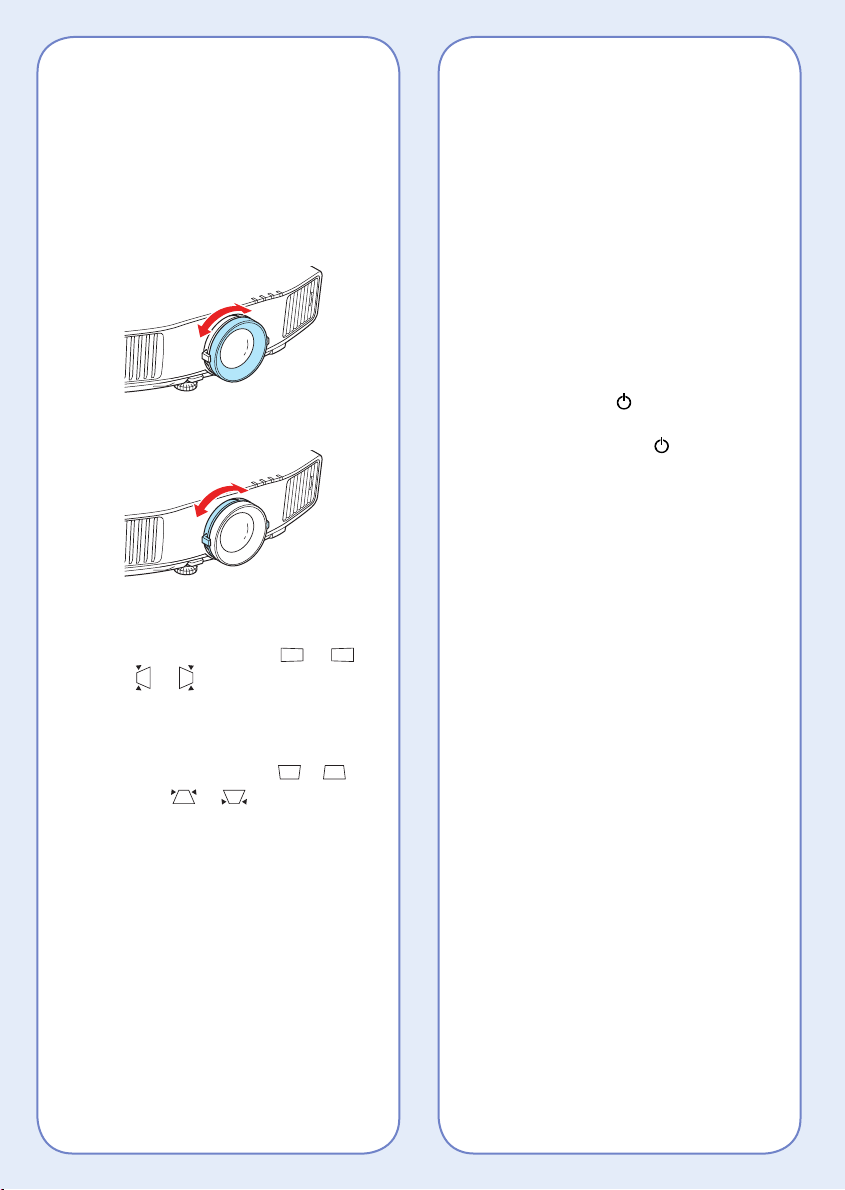
Focusing and Zooming
Turn the focus ring to sharpen the
image.
Turn the zoom ring to reduce/enlarge
the image.
Changing the Aspect Ratio
Press the Aspect button on the remote
control to change the aspect ratio.
For images input through the
Computer1, Computer2, or BNC ports,
select Normal to automatically resize
the image.
Turning the Projector Off
1. First turn off your computer or
image source.
2. Then press the power button
to turn it off. At the confirmation
message, press the power
button again.
Note: If the Direct Power On function
is enabled, you can unplug the projector
or flip the switch controlling the outlet
to which the projector is connected
instead.
Correcting Image Shape
• If your image looks like or ,
press or button on the projector
to correct it. You can also use the
remote control to correct the image
shape (see the User’s Guide).
• If your image looks like or ,
press the or button to
correct it. You can also use the
remote control to correct the image
shape (see the User’s Guide).
• If your image is uneven on all sides,
you can use Quick Corner® to adjust
the shape. See the User’s Guide.
With Epson’s Instant Off® technology,
you don’t have to wait for the projector
to cool down; just turn it off or unplug
it when you’re done.
Page 4
Troubleshooting
If you see a blank screen or the
message No signal
• Make sure the power light on
the projector is green and not
flashing, and the lens cover is
removed.
• Make sure the cables are
connected correctly. (See the
User’s Guide.)
• You may need to change the
image source. See “Switching
Between Image Sources.” (Also
make sure the source device is
turned on.)
Where To Get Help
Internet Support
Visit Epson’s suupport website at
www.latin.epson.com and select
your product for solutions to common
problems. You can download utilities
and doucmentation, get FAQs and
troubleshooting advice, or e-mail
Epson with your questions.
Speak to a Support Representative
You may speak to a support service
representative by dialing one of
the following numbers. (Toll or long
distance charges may apply.)
Country Telephone Number
If the projector and the notebook
don’t display the same image
Windows:
Hold down the Fn key and press
the function key on your notebook
(such as or CRT/LCD) until you
see the display on both monitors.
If that does not work, open the
Windows Control Panel, click Display
or Change Display Settings. In
Windows Vista®, right-click on the
desktop and select Personalize,
then select Display Settings. Make
sure the external monitor port is set
as your primary display. See your
computer’s documentation or online
help for details.
Macintosh:
From the Apple® menu, select System
Preferences, Display or Displays,
VGA Display or Color LCD, and
Arrange or Arrangement. Then select
Mirror Displays.
Argentina (54 11) 5167-0300
Brazil (55 11) 3956-6868
Chile (56 2) 230-9500
Colombia (57 1) 523-5000
Costa Rica (50 6) 2210-9555
800-377-6627
Mexico
Mexico City (52 55) 1323-2052
Other cities 01-800-087-1080
Peru (511) 418-0210
Venezuela (58 212) 240-1111
If your country does not appear on the
list, contact the Epson sales office of
the nearest country.
Purchase supplies and accessories
You can purchase screens and other
accessories from an Epson authorized
reseller. To find the nearest reseller,
call your nearest Epson sales office as
described above.
Page 5
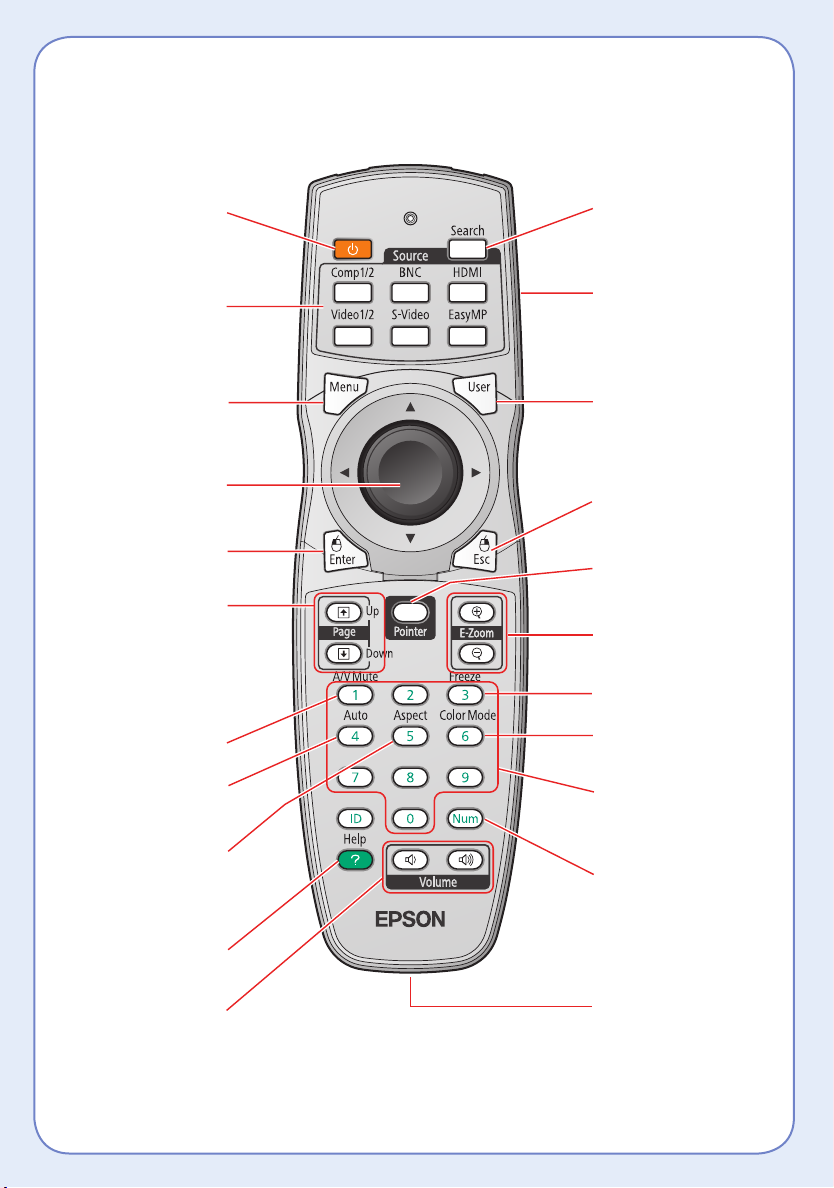
Remote Control Map
Turn the projector
on and off
Select a source
(Note: theBNC, EasyMP,
and HDMI buttons are
not applicable to this
projector)
Open projector menus
Navigate through menu
settings; move pointer
Select menu settings
Change slides in
PowerPoint® (optional
wireless mouse
eceiver required) or
scenario files
Temporarily turn off
display and audio
Automatically adjust
computer image
Change the
aspect ratio
Switch image sources
Remote control ID
switch
Open menus assigned
by user
Cancel current
operation or return to
previous menu
Activate screen pointer
Zoom in and out
Freeze the image;
sound continues
Select from 9 color
modes
Use numeric keys to
enter passwords, IP
settings, etc.
Enter passwords
Display on-screen help
Control volume
Connect optional
remote cable
Page 6

Replacement Parts
Product Product Number
Replacement lamp V13H010L46
Air filter V13H134A17
You can purchase replacement parts from an
Epson authorized reseller. See “Where To Get
Help” inside this card for more information.
Epson, EasyMP, Instant Off, and Quick Corner are registered trademarks and Epson Exceed Your Vision is a logomark of Seiko Epson
Corporation. PowerLite is a registered trademark of Epson America, Inc.
General Notice: Other product names used herein are for identification purposes only and may be trademarks of their respective owners.
Epson disclaims any and all rights in those marks.
This information is subject to change without notice.
© 2009 Epson America, Inc. 12/09
Printed in XXXXXX
CPD-27846
 Loading...