

Page 1
PowerLite
®
Home Cinema 5025UB
User's Guide
Page 2

Page 3

Contents
PowerLite Home Cinema 5025UB User's Guide ....................................................................................... 7
Introduction to Your Projector ................................................................................................................... 8
Setting Up the Projector ........................................................................................................................... 21
Projector Features................................................................................................................................ 8
Product Box Contents...................................................................................................................... 9
Additional Components ................................................................................................................ 10
Optional Equipment and Replacement Parts................................................................................. 10
Warranty and Registration Information.......................................................................................... 11
Notations Used in the Documentation................................................................................................ 11
Where to Go for Additional Information .............................................................................................. 12
Projector Part Locations..................................................................................................................... 12
Projector Parts - Front/Top............................................................................................................ 13
Projector Parts - Rear.................................................................................................................... 14
Projector Parts - Base.................................................................................................................... 15
Projector Parts - Control Panel...................................................................................................... 16
Projector Parts - Remote Control................................................................................................... 18
Projector Placement........................................................................................................................... 21
Projector Setup and Installation Options ....................................................................................... 21
Projection Distance........................................................................................................................ 23
Projector Connections........................................................................................................................ 25
Connecting to Video Sources........................................................................................................ 26
Connecting to an HDMI Video Source ...................................................................................... 26
Attaching and Removing the Cable Clips.................................................................................. 27
Connecting to a Component Video Source............................................................................... 27
Connecting to a Composite Video Source ................................................................................ 28
Connecting to Computer Sources.................................................................................................. 29
Connecting to a Computer for VGA Video................................................................................. 29
Connecting to a Computer for HDMI Video............................................................................... 29
Connecting to External Speakers.................................................................................................. 30
Installing Batteries in the Remote Control .......................................................................................... 31
3
Page 4

Using Basic Projector Features ............................................................................................................... 33
Turning On the Projector.................................................................................................................... 33
Turning Off the Projector.................................................................................................................... 35
Viewing 3D Images ............................................................................................................................ 36
Pairing the 3D Glasses with the Projector...................................................................................... 37
Charging the 3D Glasses............................................................................................................... 38
3D Viewing Range......................................................................................................................... 39
Selecting the Language for the Projector Menus................................................................................ 40
Adjusting the Image Height ................................................................................................................ 41
Adjusting the Image Position Using Lens Shift .............................................................................. 42
Image Shape...................................................................................................................................... 44
Correcting Image Shape with the Keystone Buttons...................................................................... 44
Resizing the Image with the Zoom Ring............................................................................................. 45
Focusing the Image Using the Focus Ring......................................................................................... 46
Adjusting the Color Convergence (Panel Alignment) ......................................................................... 47
Remote Control Operation ................................................................................................................. 49
Selecting an Image Source ................................................................................................................ 50
Projection Modes ............................................................................................................................... 52
Changing the Projection Mode Using the Menus........................................................................... 52
Image Aspect Ratio............................................................................................................................ 53
Changing the Image Aspect Ratio................................................................................................. 53
Available Image Aspect Ratios...................................................................................................... 54
Color Mode......................................................................................................................................... 54
Changing the Color Mode.............................................................................................................. 55
Available Color Modes................................................................................................................... 55
Turning On Auto Iris....................................................................................................................... 56
Using Picture in Picture...................................................................................................................... 57
Available Picture in Picture Options............................................................................................... 58
Adjusting Projector Features................................................................................................................... 59
Shutting Off the Picture Temporarily .................................................................................................. 59
Projector Security Features................................................................................................................ 59
Locking the Projector's Buttons ..................................................................................................... 59
Unlocking the Projector's Buttons............................................................................................. 60
4
Page 5

Installing a Security Cable............................................................................................................. 61
Saving Settings to Memory and Using Saved Settings ...................................................................... 61
Adjusting the Menu Settings.................................................................................................................... 63
Using the Projector's Menus............................................................................................................... 63
Image Quality Settings - Image Menu ................................................................................................ 64
Input Signal Settings - Signal Menu.................................................................................................... 67
Projector Feature Settings - Settings Menu........................................................................................ 71
Projector Setup Settings - Extended Menu......................................................................................... 74
Projector Memory Options - Memory Menu........................................................................................ 78
Projector Information Display - Info Menu .......................................................................................... 79
Projector Reset Options - Reset Menu............................................................................................... 80
Maintaining and Transporting the Projector........................................................................................... 82
Projector Maintenance....................................................................................................................... 82
Cleaning the Lens.......................................................................................................................... 82
Cleaning the 3D Glasses............................................................................................................... 83
Cleaning the Projector Case.......................................................................................................... 84
Air Filter and Vent Maintenance .................................................................................................... 84
Cleaning the Air Filter................................................................................................................ 85
Replacing the Air Filter.............................................................................................................. 87
Projector Lamp Maintenance......................................................................................................... 89
Replacing the Lamp.................................................................................................................. 89
Resetting the Lamp Timer......................................................................................................... 94
Replacing the Remote Control Batteries ....................................................................................... 95
Transporting the Projector.................................................................................................................. 97
Solving Problems...................................................................................................................................... 98
Projection Problem Tips..................................................................................................................... 98
Projector Light Status......................................................................................................................... 99
Solving Image Problems .................................................................................................................. 102
Solutions When No Image Appears............................................................................................. 102
Solutions When "No Signal" Message Appears........................................................................... 103
Displaying From a PC Laptop................................................................................................. 103
Displaying From a Mac Laptop ............................................................................................... 104
Solutions When "Not Supported" Message Appears................................................................... 104
5
Page 6

Solutions When Only a Partial Image Appears............................................................................ 104
Solutions When the Image is Not Rectangular ............................................................................ 105
Solutions When the Image Contains Noise or Static ................................................................... 105
Solutions When the Image is Fuzzy or Blurry.............................................................................. 106
Solutions When the Image Brightness or Colors are Incorrect .................................................... 106
Solutions When a 3D Image Does Not Display Correctly ............................................................ 107
Solving Projector or Remote Control Operation Problems ............................................................... 108
Solutions to Projector Power or Shut-Off Problems..................................................................... 108
Solutions to Problems with the Remote Control........................................................................... 109
Where to Get Help............................................................................................................................ 110
Technical Specifications ........................................................................................................................ 112
General Projector Specifications...................................................................................................... 112
Projector Lamp Specifications.......................................................................................................... 113
Remote Control Specifications......................................................................................................... 114
Projector Dimension Specifications.................................................................................................. 114
Projector Electrical Specifications.................................................................................................... 114
Projector Environmental Specifications............................................................................................ 115
Projector Safety and Approvals Specifications................................................................................. 115
Supported Video Display Formats.................................................................................................... 115
Notices ..................................................................................................................................................... 118
Recycling.......................................................................................................................................... 118
Important Safety Information............................................................................................................ 118
Important Safety Instructions............................................................................................................ 119
3D Safety Instructions ................................................................................................................. 122
Restriction of Use........................................................................................................................ 123
FCC Compliance Statement............................................................................................................. 123
Trademarks...................................................................................................................................... 124
Open Source Software License........................................................................................................ 125
Copyright Notice............................................................................................................................... 170
A Note Concerning Responsible Use of Copyrighted Materials................................................... 170
Copyright Attribution.................................................................................................................... 170
6
Page 7

PowerLite Home Cinema 5025UB User's Guide
Welcome to the PowerLite Home Cinema 5025UB User's Guide.
7
Page 8

Introduction to Your Projector
Refer to these sections to learn more about your projector and this manual.
Projector Features
Notations Used in the Documentation
Where to Go for Additional Information
Projector Part Locations
Projector Features
The PowerLite Home Cinema 5025UB projector includes these special features:
Bright, high-resolution projection system
• Up to 2200 lumens of color brightness (color light output) and 2200 lumens of white brightness (white
light output)
Note: Color brightness (color light output) and white brightness (white light output) will vary depending
on usage conditions. Color light output measured in accordance with IDMS 15.4; white light output
measured in accordance with ISO 21118.
• 1080p native resolution
• Images up to 300 inches (7.62 m) for projection on any wall or screen
• Fujinon lens for uniformity
Full 3D projection
• Active 3D projection with RF active shutter glasses
• Supports side-by-side, top-and-bottom, and frame packing 3D formats
Flexible connectivity
• Two HDMI ports for video device or computer connections
Easy-to-use setup and operation features
• Vertical and horizontal lens shift dials, and vertical keystone correction buttons for flexible projector
placement
• 2.1× optical zoom ratio for improved zooming capability
Product Box Contents
8
Page 9
Additional Components
Optional Equipment and Replacement Parts
Warranty and Registration Information
Parent topic: Introduction to Your Projector
Product Box Contents
Save all the packaging in case you need to ship the projector. Always use the original packaging (or
equivalent) when shipping.
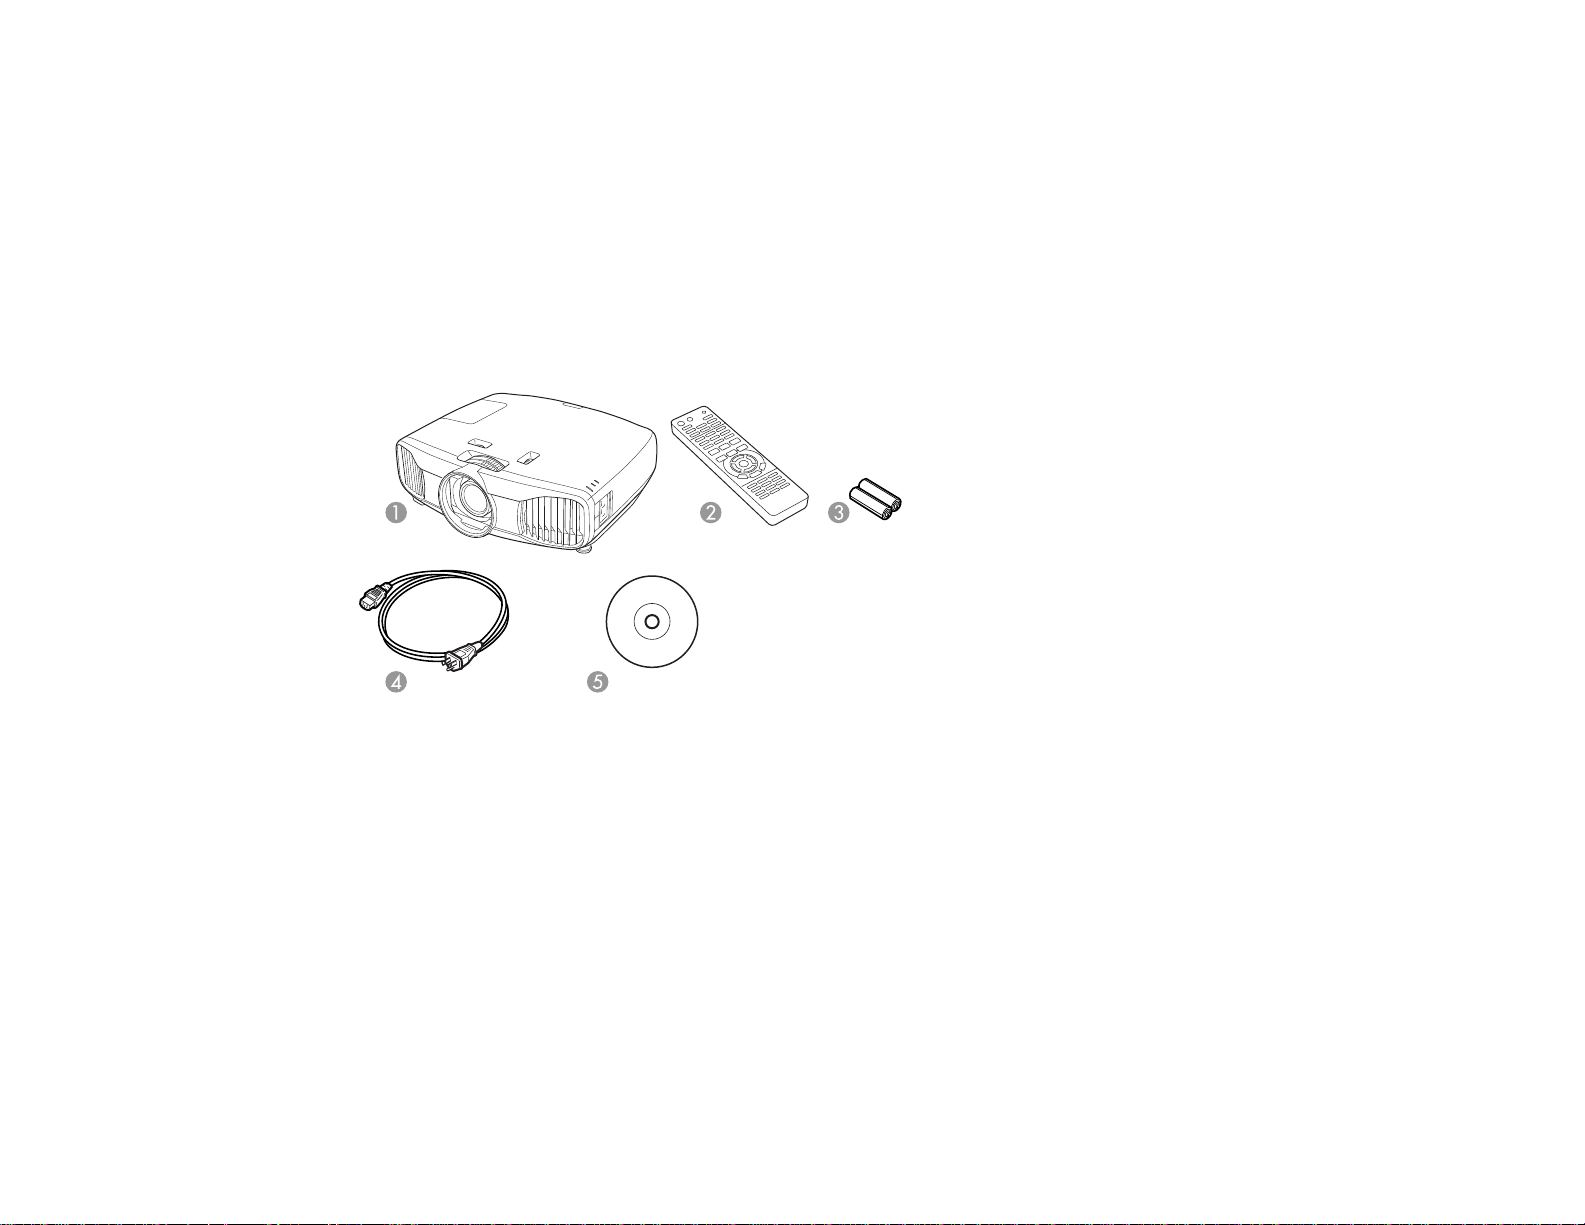
Make sure your projector box included all of these parts:
1 Projector
2 Remote control
3 Remote control batteries (two AA alkaline)
4 Power cord
5 Projector documentation CD
Parent topic: Projector Features
9
Page 10
Additional Components
Depending on how you plan to use the projector, you may need to obtain the following additional
components:
• To receive a component video signal, you need a compatible component cable. You can purchase
one from Epson or an authorized Epson reseller.
• To receive an HDMI signal, you need a compatible HDMI cable. You can purchase one from Epson or
an authorized Epson reseller.
Note: To connect a Mac that includes only a Mini DisplayPort, Thunderbolt port, or Mini-DVI port for
video output, you need to obtain an adapter that allows you to connect to the projector's HDMI port.
Contact Apple for compatible adapter options.
• To receive and view a 3D signal, you need a compatible HDMI cable and active shutter 3D glasses.
You can purchase them from Epson or an authorized Epson reseller. If your video source is a 3D Bluray disc, you also need a Blu-ray player that supports 3D playback. See your local computer or
electronics dealer for purchase information.
Parent topic: Projector Features
Related references
Optional Equipment and Replacement Parts
Optional Equipment and Replacement Parts
You can purchase screens, other optional accessories, and replacement parts from an Epson authorized
reseller. To find the nearest reseller, call 800-GO-EPSON (800-463-7766). Or you can purchase online
at epsonstore.com (U.S. sales) or epson.ca (Canadian sales).
Epson offers the following optional accessories and replacement parts for your projector:
Option or part Part number
Genuine Epson replacement lamp (ELPLP69) V13H010L69
Replacement air filter V13H134A39
RF 3D glasses (ELPGS03) V12H548006
Projector ceiling mount CHF1000
Belkin PureAV HDMI audio video cable, 6 ft AV22300-06
Belkin PureAV HDMI audio video cable, 12 ft AV22300-12
10
Page 11
Option or part Part number
Belkin PureAV HDMI audio video cable, 3 ft AV22300-03
Belkin Pro Series VGA/SVGA cable, 6 ft F3H982-06
Belkin Pro Series VGA/SVGA cable, 10 ft F3H982-10
Belkin Pro Series VGA/SVGA cable, 25 ft F3H982-25
Kensington security lock ELPSL01
Remote control 1598522
In addition to the accessories listed above, 1-year and 2-year extended service plans are available.
Parent topic: Projector Features
Warranty and Registration Information
Your projector comes with a basic warranty that lets you project with confidence. For details, see the
warranty brochure that came with your projector.
In addition, Epson offers free Extra Care Home Service. In the unlikely event of an equipment failure,
you won’t have to wait for your unit to be repaired. Instead, Epson will ship you a replacement unit
anywhere in the United States, Canada, or Puerto Rico. See the Extra Care Home Service brochure for
details.
Register your product online using the projector CD or at this site: epson.com/webreg
Registering also lets you receive special updates on new accessories, products, and services.
Parent topic: Projector Features
Notations Used in the Documentation
Follow the guidelines in these notations as you read your documentation:
• Warnings must be followed carefully to avoid bodily injury.
• Cautions must be observed to avoid damage to your equipment.
• Notes contain important information about your projector.
• Tips contain additional projection information.
Parent topic: Introduction to Your Projector
11
Page 12

Where to Go for Additional Information
Need quick help on using your projector? Here's where to look for help:
• epson.com/support (U.S) or epson.ca/support (Canada)
View FAQs (frequently asked questions) and e-mail your questions to Epson technical support 24
hours a day.
• If you still need help after checking this manual and the sources listed above, you can use the Epson
PrivateLine Support service to get help fast. For details, see "Where to Get Help".
Parent topic: Introduction to Your Projector
Related references
Where to Get Help
Projector Part Locations
Check the projector part illustrations to learn about the parts on your projector.
Projector Parts - Front/Top
Projector Parts - Rear
Projector Parts - Base
Projector Parts - Control Panel
Projector Parts - Remote Control
Parent topic: Introduction to Your Projector
12
Page 13
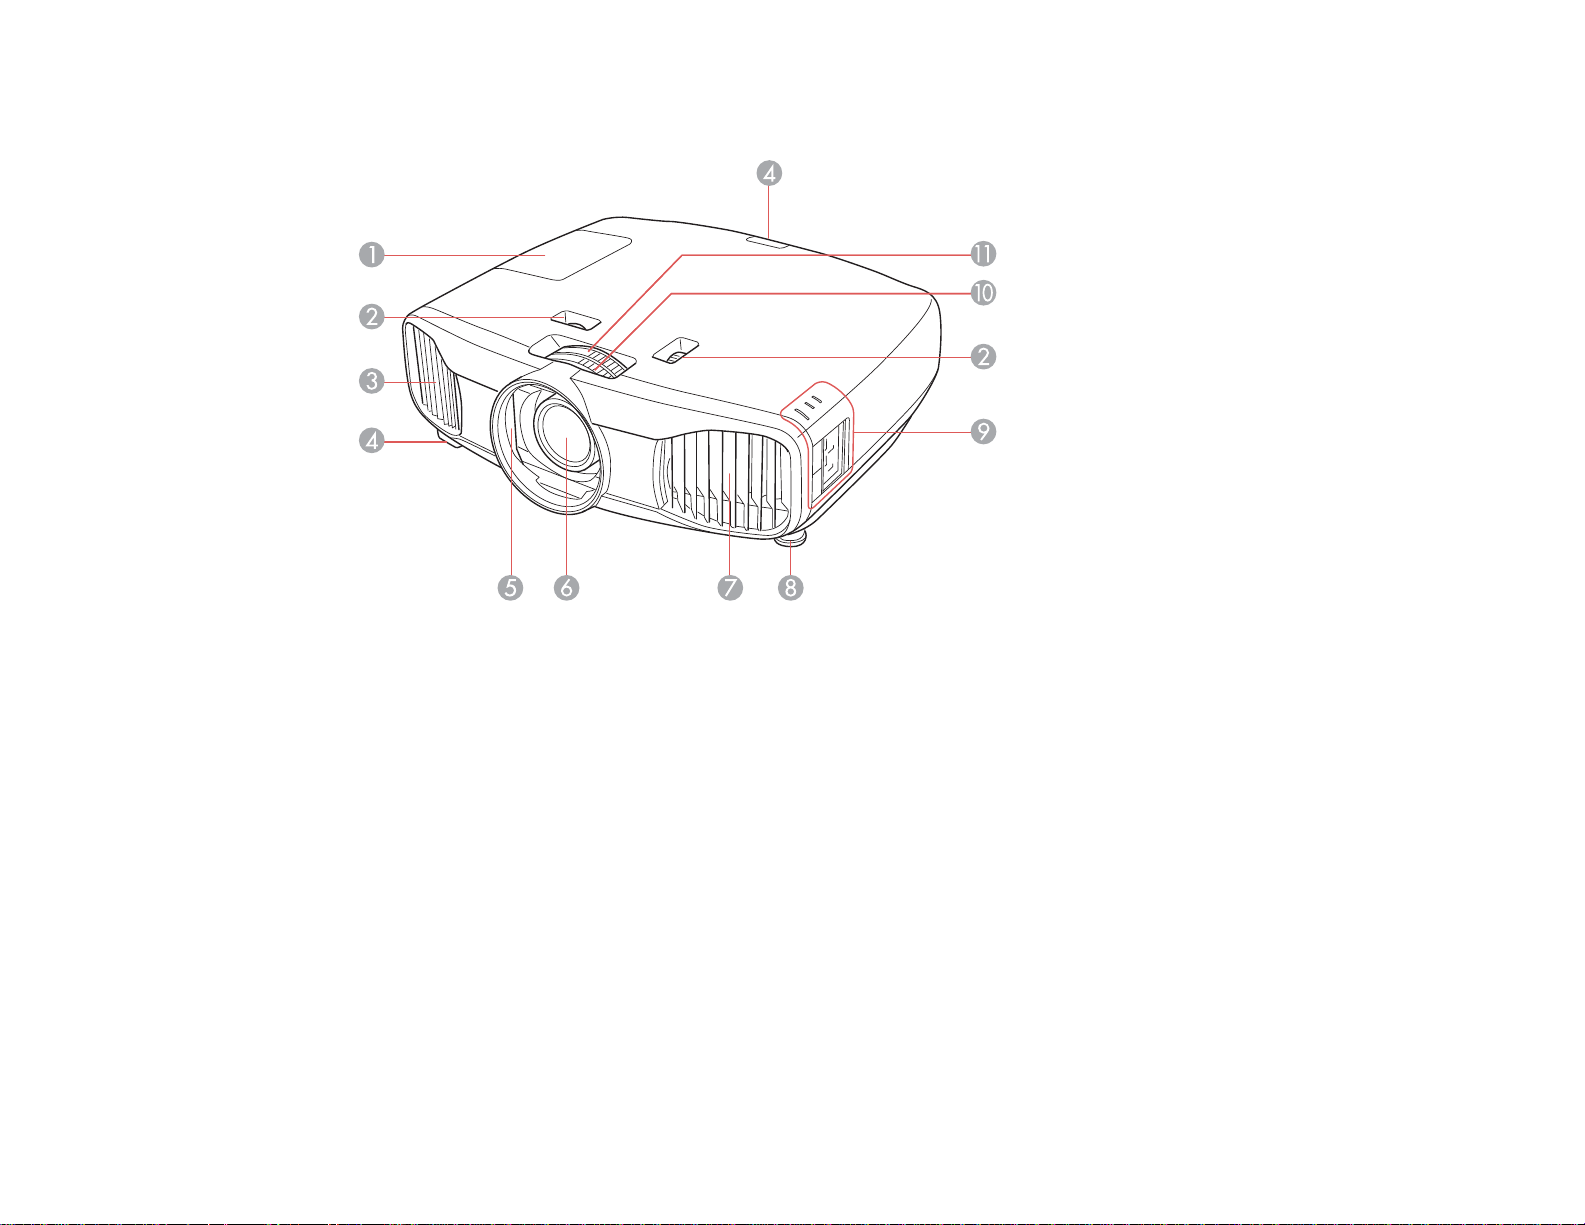
Projector Parts - Front/Top
1 Lamp cover
2 Horizontal and vertical lens shift dials
3 Exhaust vent
4 Remote receiver
5 Lens shutter
6 Lens
7 Air intake/air filter cover
8 Front adjustable foot
9 Control panel and lights
10 Focus ring
11 Zoom ring
Parent topic: Projector Part Locations
13
Page 14
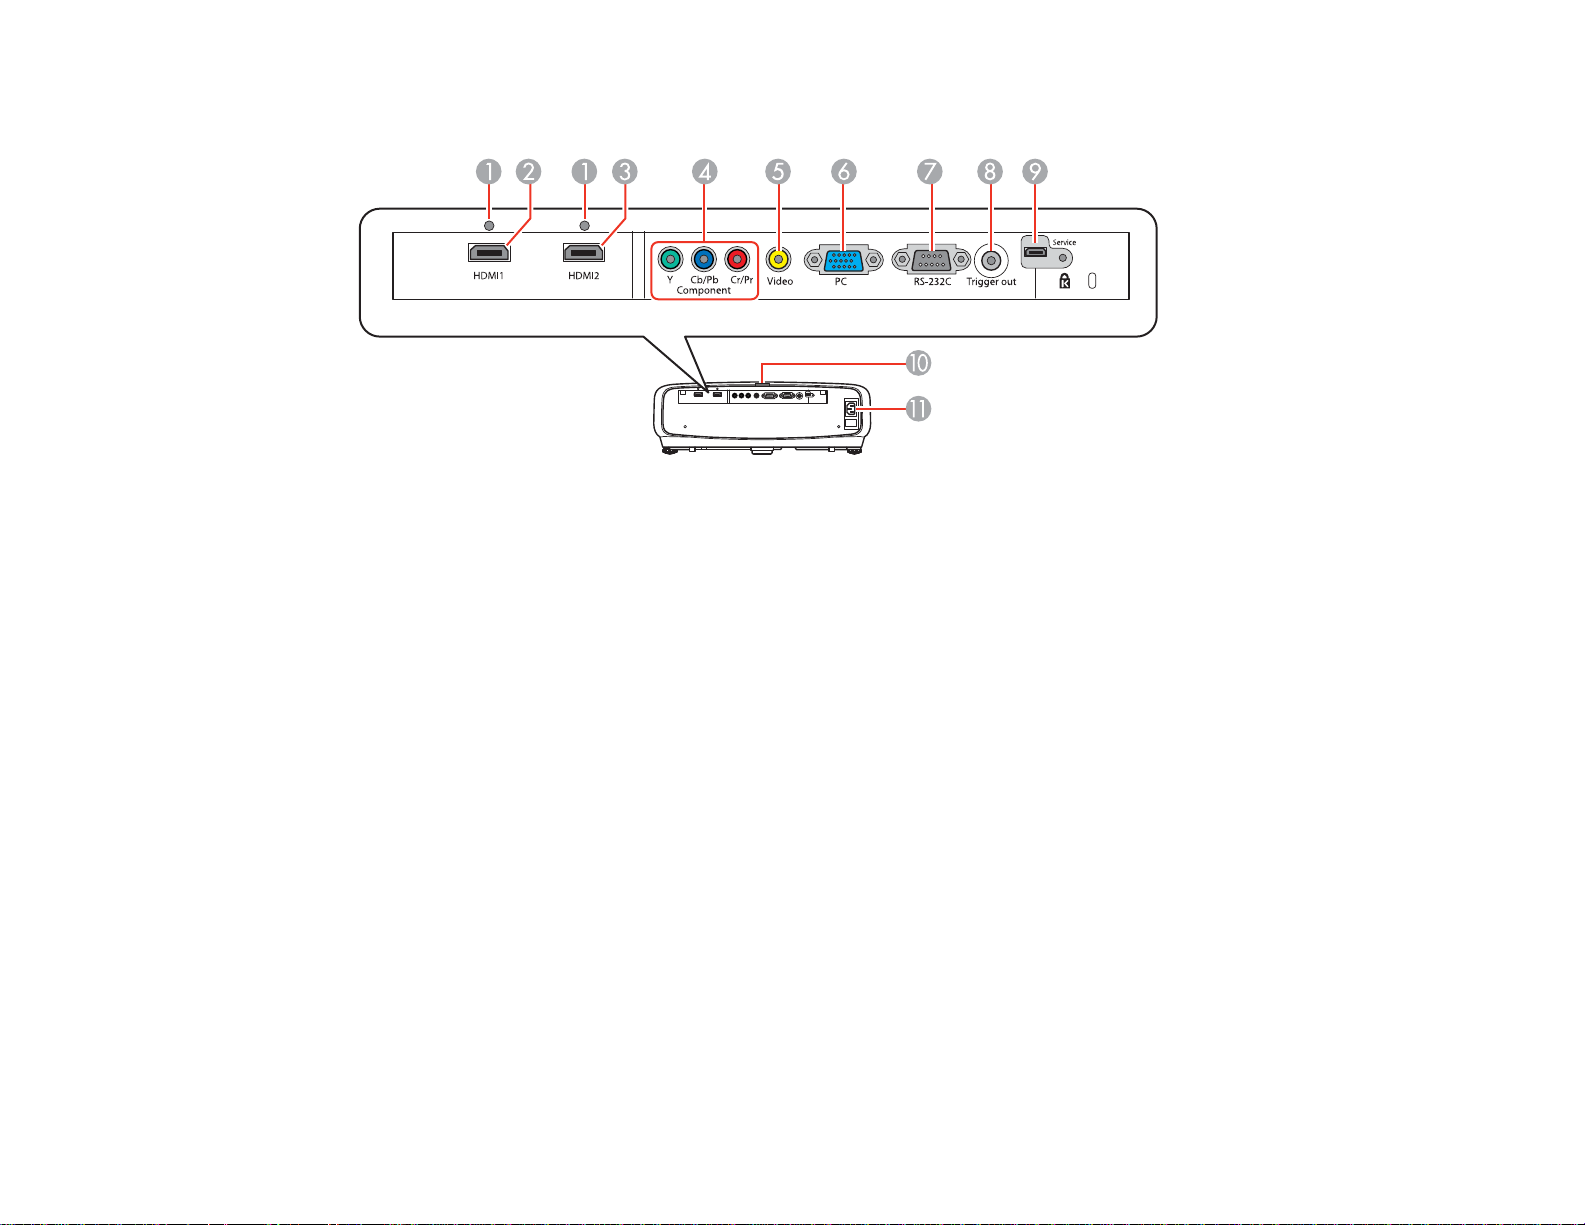
Projector Parts - Rear
1 Cable clip holes
2 HDMI1 port
3 HDMI2 port
4 Component ports
5 Video port
6 PC port (VGA)
7 RS-232C port
8 Trigger out port
9 Service port
10 Remote receiver
11 AC input port
Parent topic: Projector Part Locations
Related tasks
Installing a Security Cable
Attaching and Removing the Cable Clips
14
Page 15
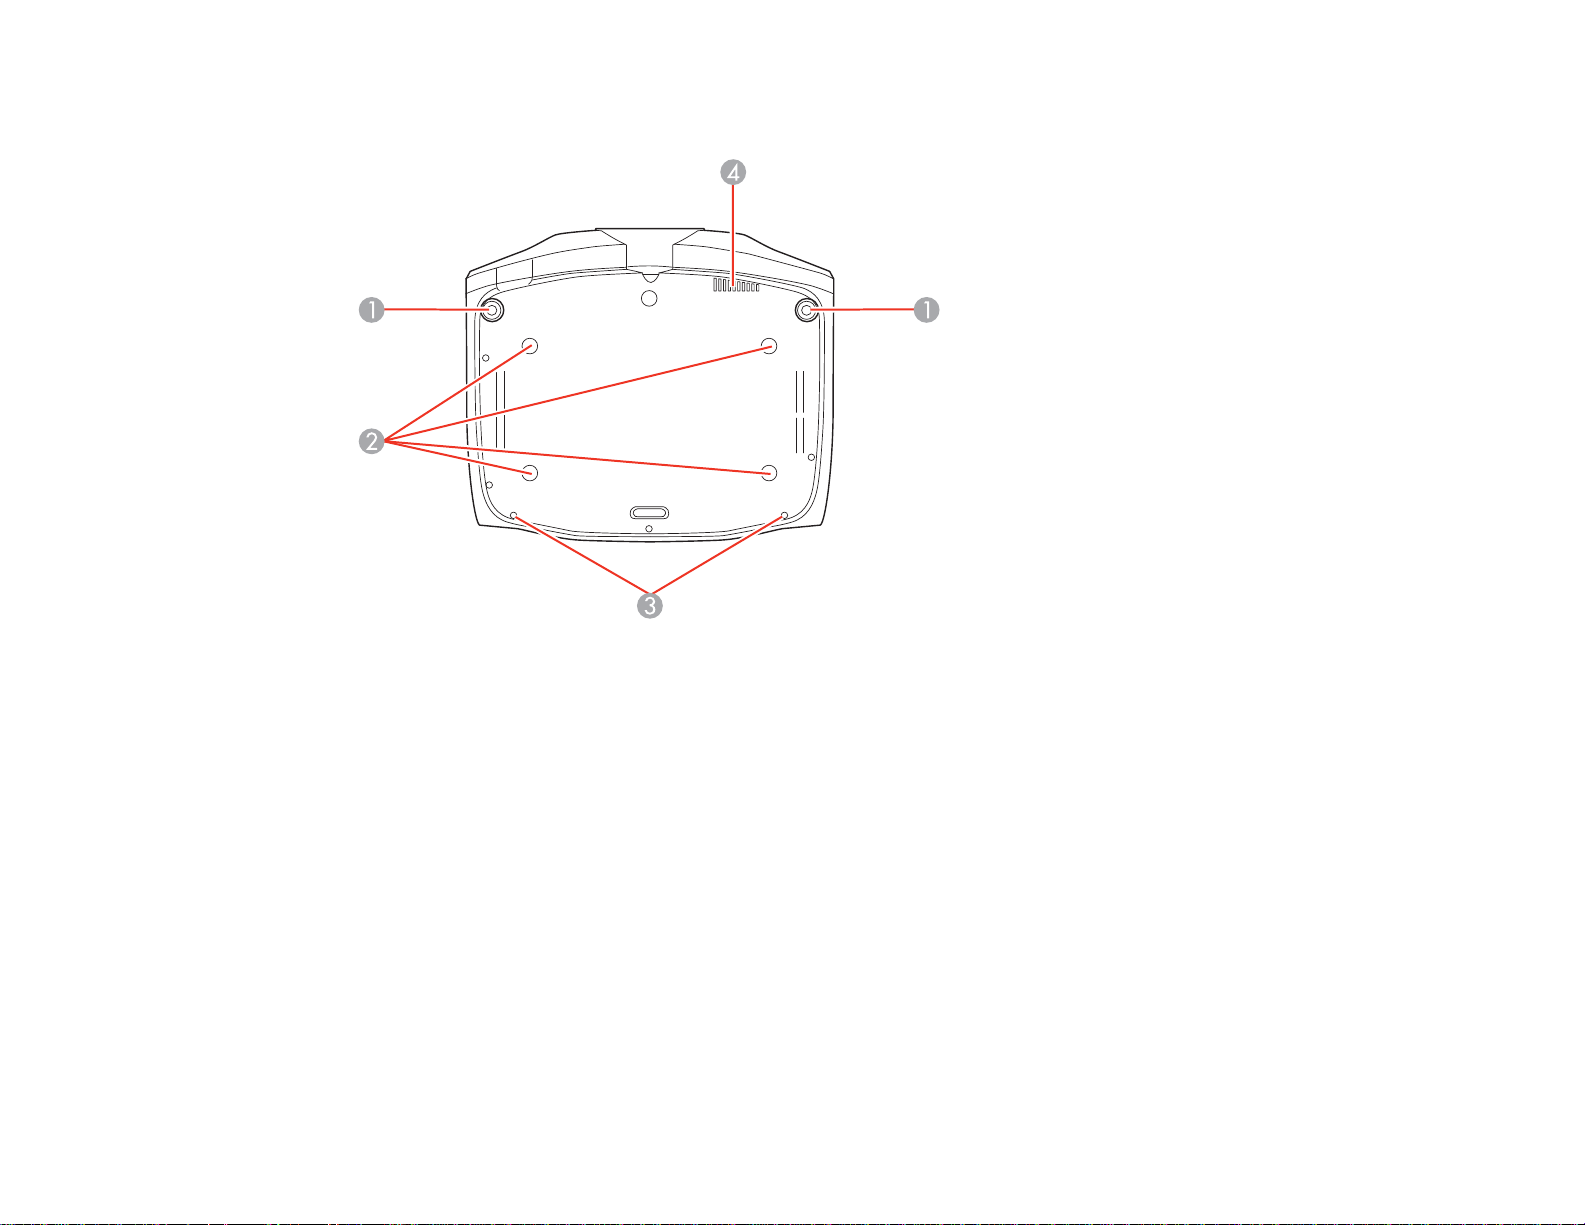
Projector Parts - Base
1 Front adjustable feet
2 Mounting bracket holes
3 Cable cover attachment point
4 Air exhaust vent
Parent topic: Projector Part Locations
15
Page 16

Projector Parts - Control Panel
1 Status light
2 Lamp light
3 Temp light
4 Menu button (accesses projector menu system)
5 Control panel cover
16
Page 17

6 Vertical keystone adjustment buttons (adjust screen shape) and arrow buttons
7 Arrow buttons
8 Esc button (cancels/exits functions)
9 Enter button (selects options)
10 Source button (cycles through the list of sources)
11 Power button/light
Parent topic: Projector Part Locations
Related references
Projector Light Status
17
Page 18
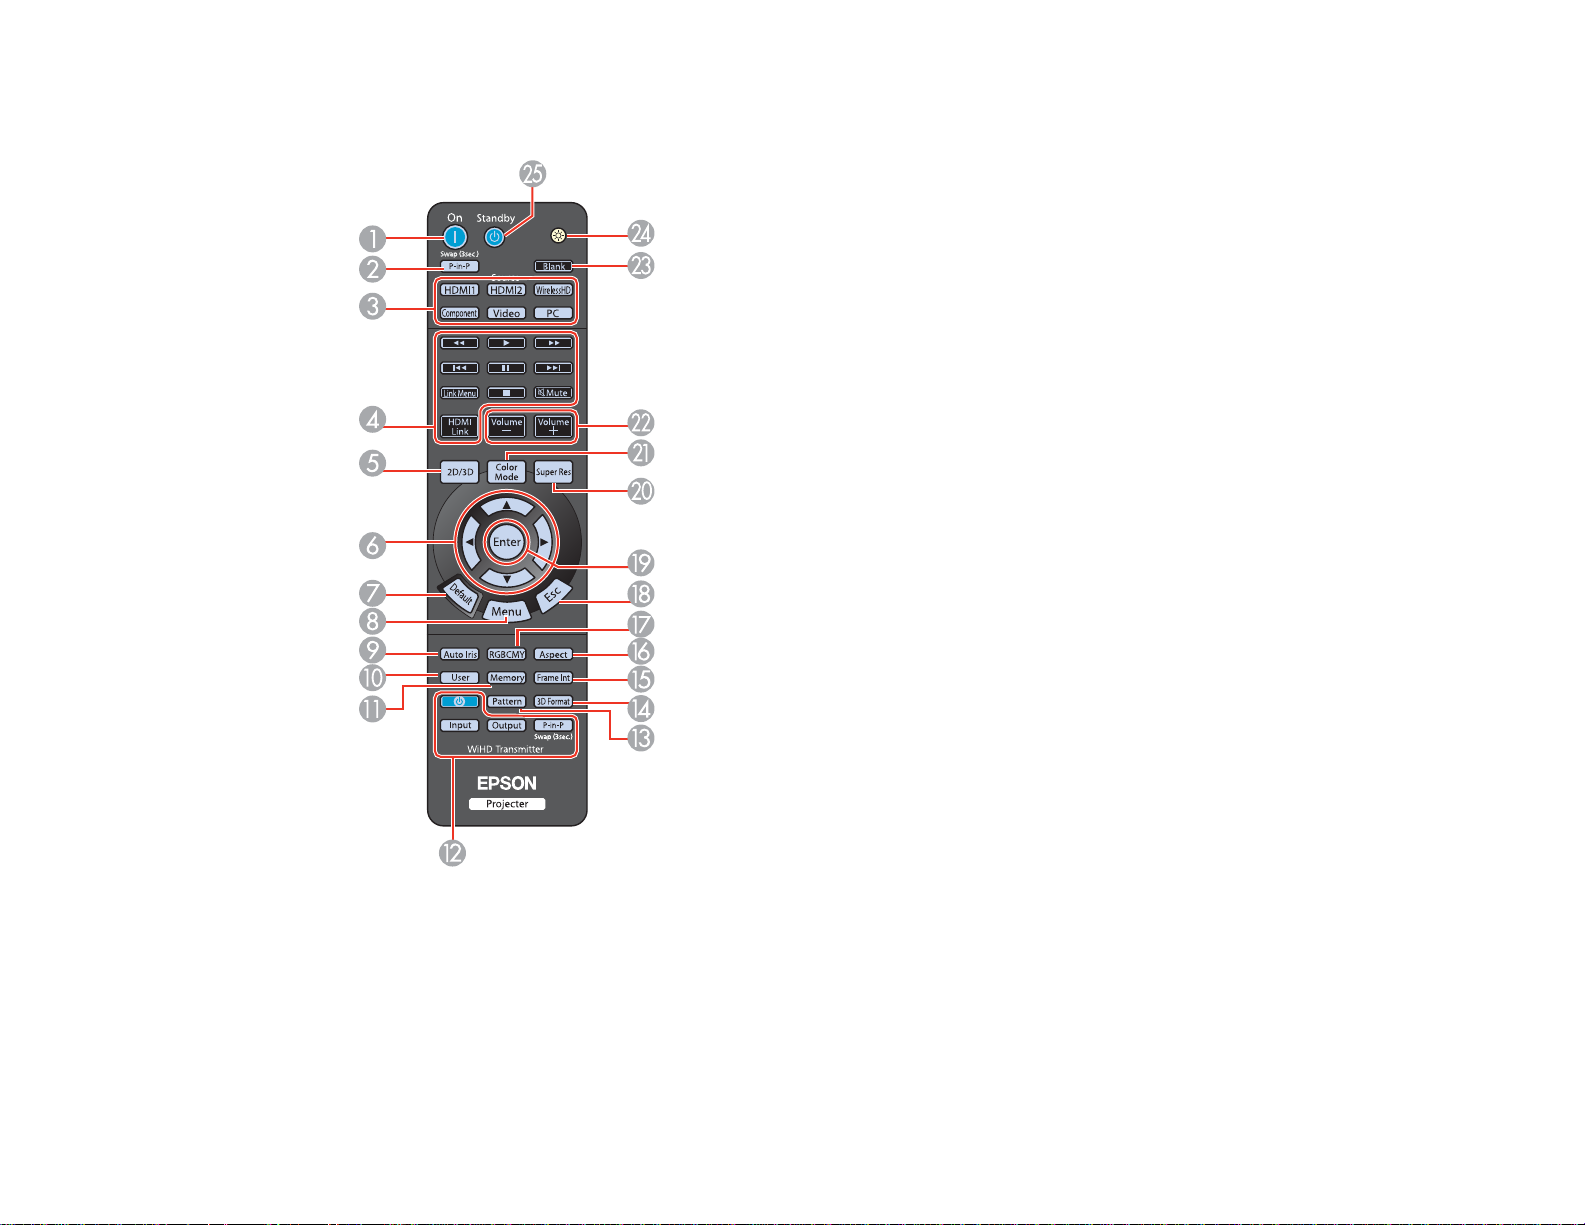
Projector Parts - Remote Control
1 On button (turns on projector)
2 P-in-P button (controls the Picture-in-Picture mode for HDMI inputs)
3 Source buttons (select specific video input sources)
18
Page 19

4 HDMI Link button (displays the settings menu for HDMI Link)
Link Menu button (displays the main menu of the connected device)
Control buttons (control playback and other features of connected devices that support the HDMI
CEC standard)
5 2D/3D button (cycles between 2D and 3D modes)
6 Arrow buttons (move though on-screen options)
7 Default button (returns selected setting to default value)
8 Menu button (accesses projector menu system)
9 Auto Iris button (optimizes the image based on brightness of content)
10 User button (customizable for different functions)
11 Memory button (accesses the Memory menu)
12 WirelessHD transmitter control buttons (buttons are not functional)
13 Pattern button (displays a test pattern)
14 3D Format button (changes the 3D format)
15 Frame Int button (adjusts the Frame Interpolation setting)
16 Aspect button (selects the image aspect ratio)
17 RGBCMY button (adjusts hue, saturation, and brightness for each RGBCMY color)
18 Esc button (cancels/exits functions)
19 Enter button (selects options)
20 Super Res button (reduces blurring around the edges of images when viewing 3D content)
21 Color Mode button (selects display modes)
22 Volume up/down buttons (adjust volume for devices connected via HDMI Link)
23 Blank button (turns off video projection)
24 Illumination button (lights the remote control)
25 Standby button (turns off the projector)
Parent topic: Projector Part Locations
Related references
Remote Control Operation
19
Page 20

Projector Memory Options - Memory Menu
20
Page 21

Setting Up the Projector
Follow the instructions in these sections to set up your projector for use.
Projector Placement
Projector Connections
Installing Batteries in the Remote Control
Projector Placement
You can place the projector on almost any flat surface to project an image.
You can also install the projector in a ceiling mount if you want to use it in a fixed location.
Keep these considerations in mind as you select a projector location:
• Place the projector on a sturdy, level surface or install it using a compatible mount.
• Leave plenty of space around and under the projector for ventilation, and do not place it on top of or
next to anything that could block the vents.
• Position the projector within reach of a grounded electrical outlet or extension cord.
Projector Setup and Installation Options
Projection Distance
Parent topic: Setting Up the Projector
Related tasks
Changing the Projection Mode Using the Menus
Projector Setup and Installation Options
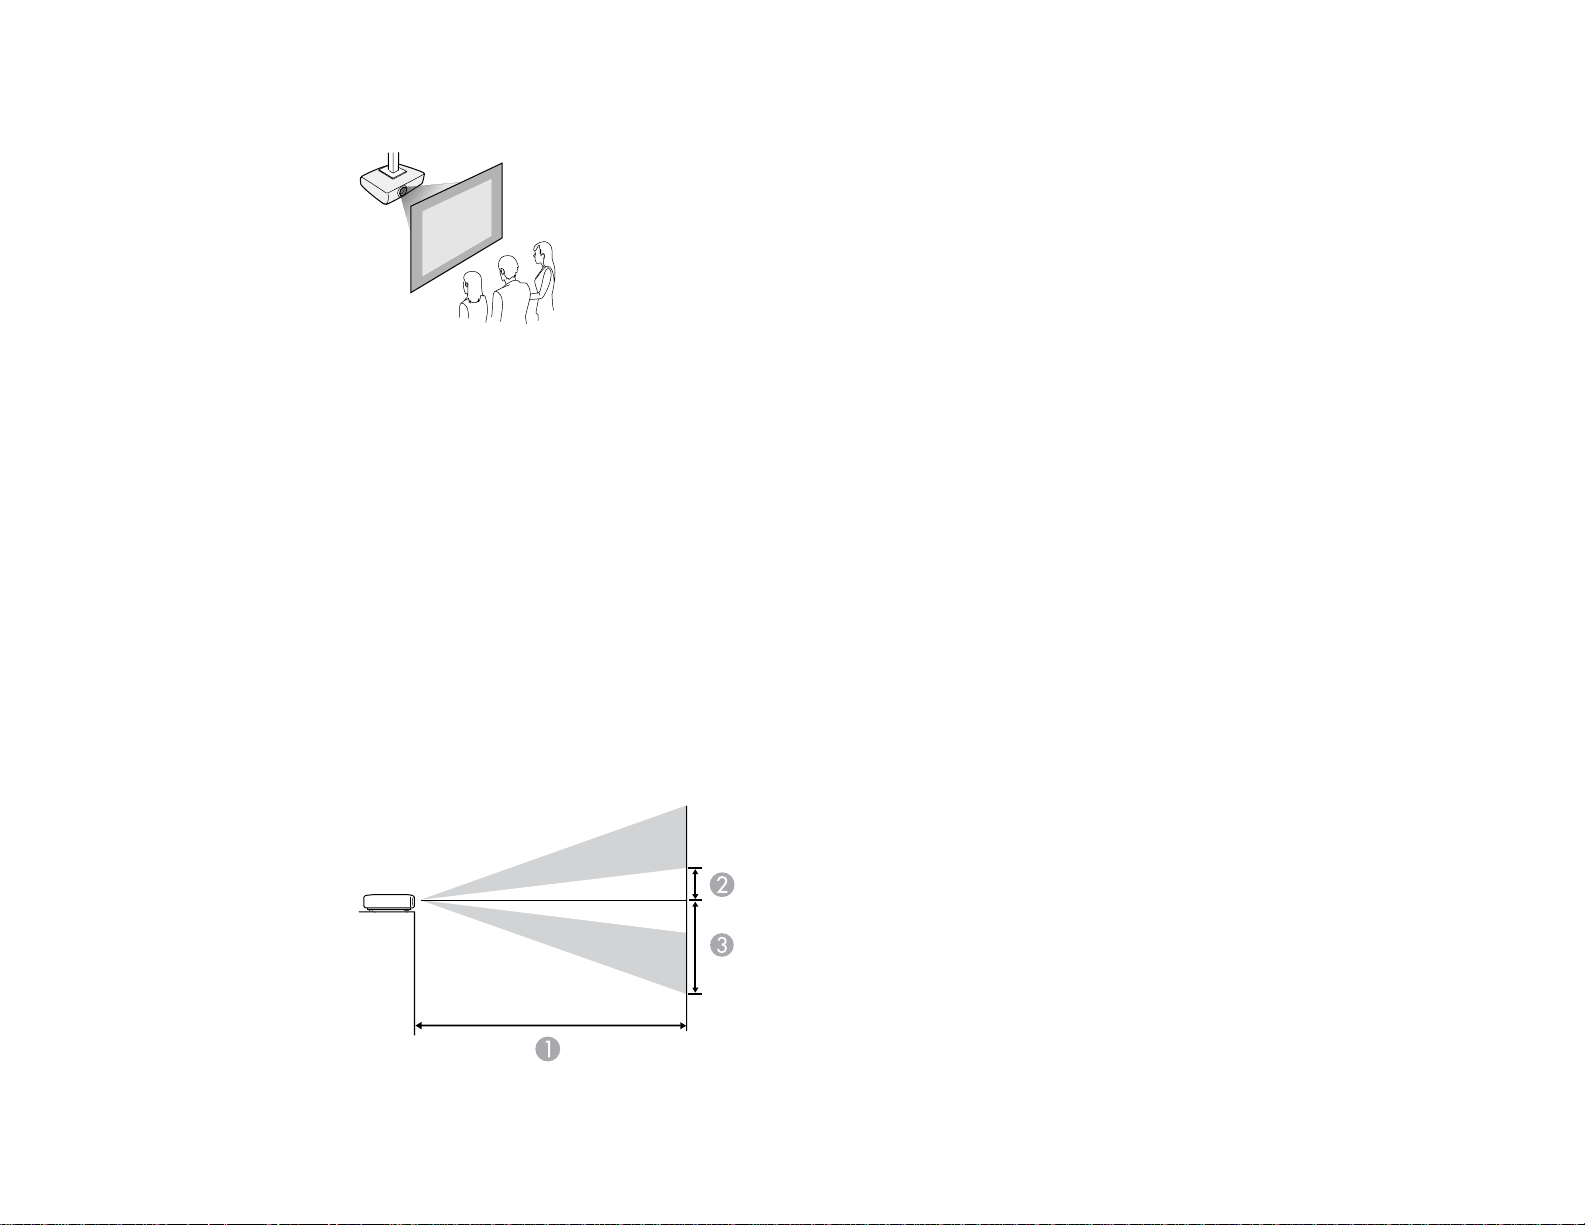
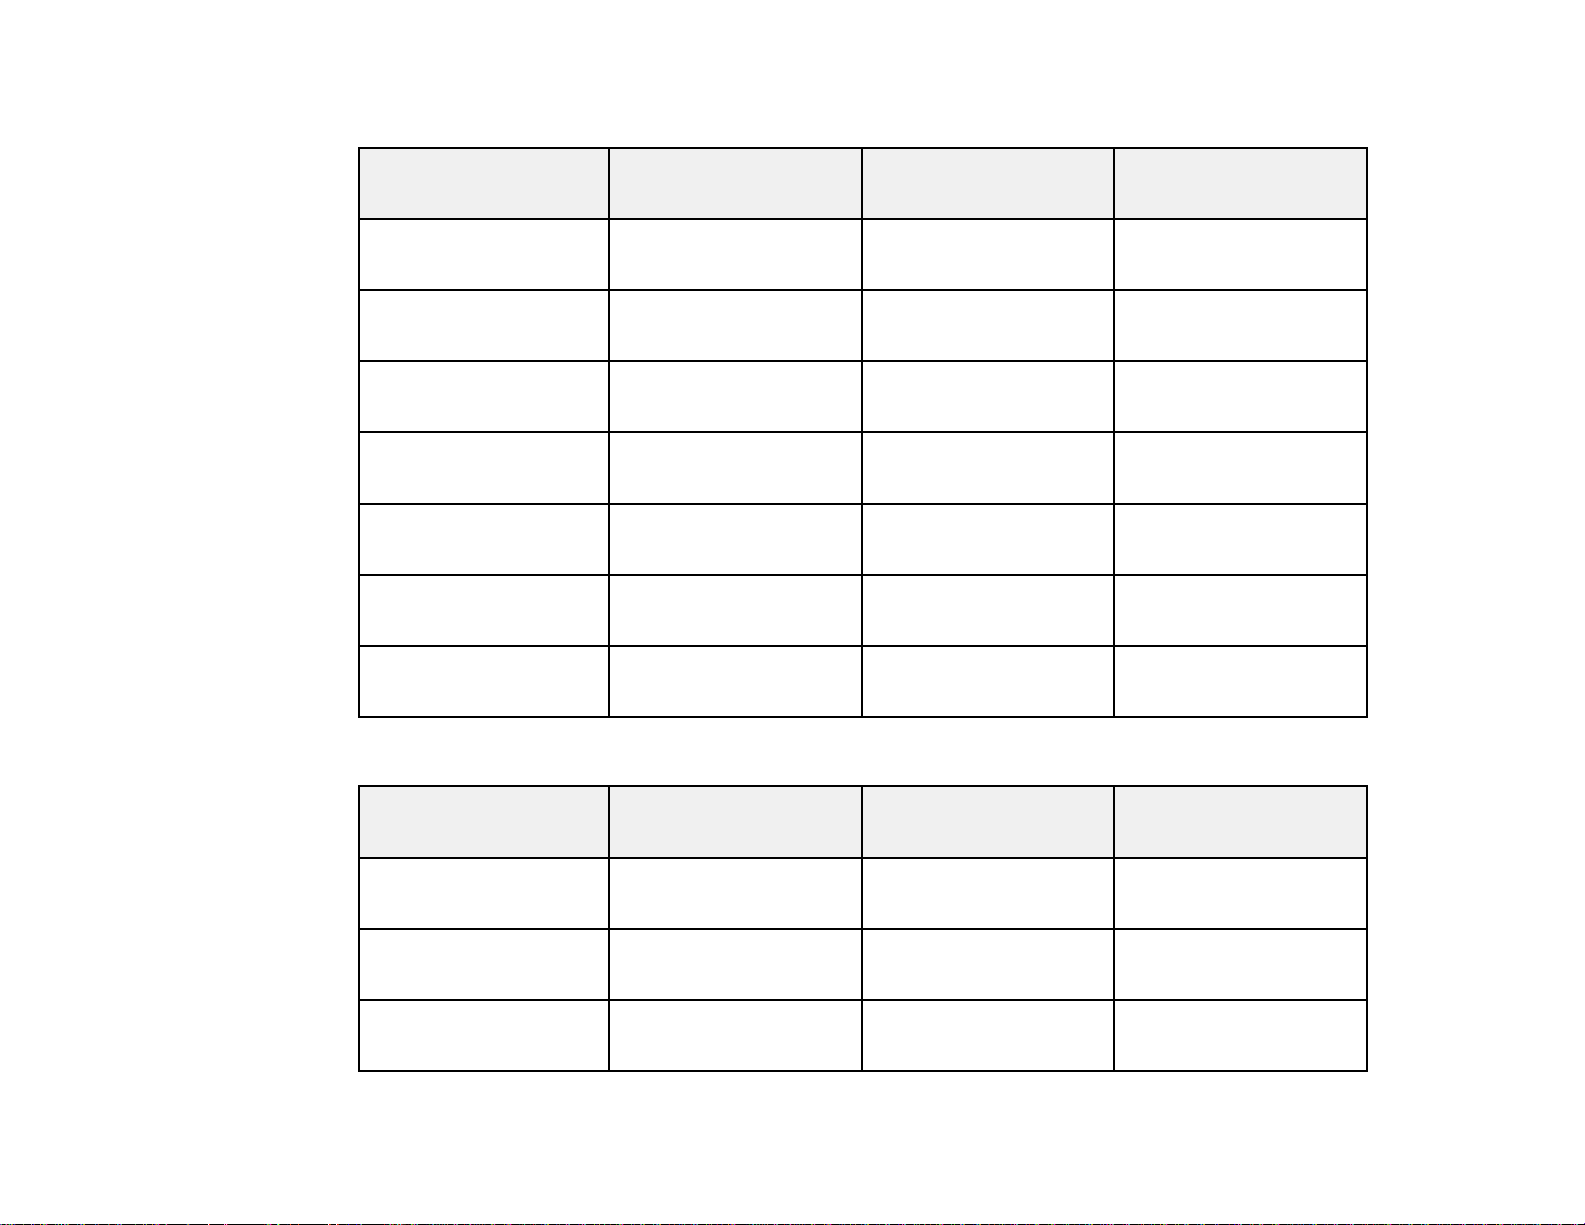
You can set up or install your projector in the following ways:
21
Page 22
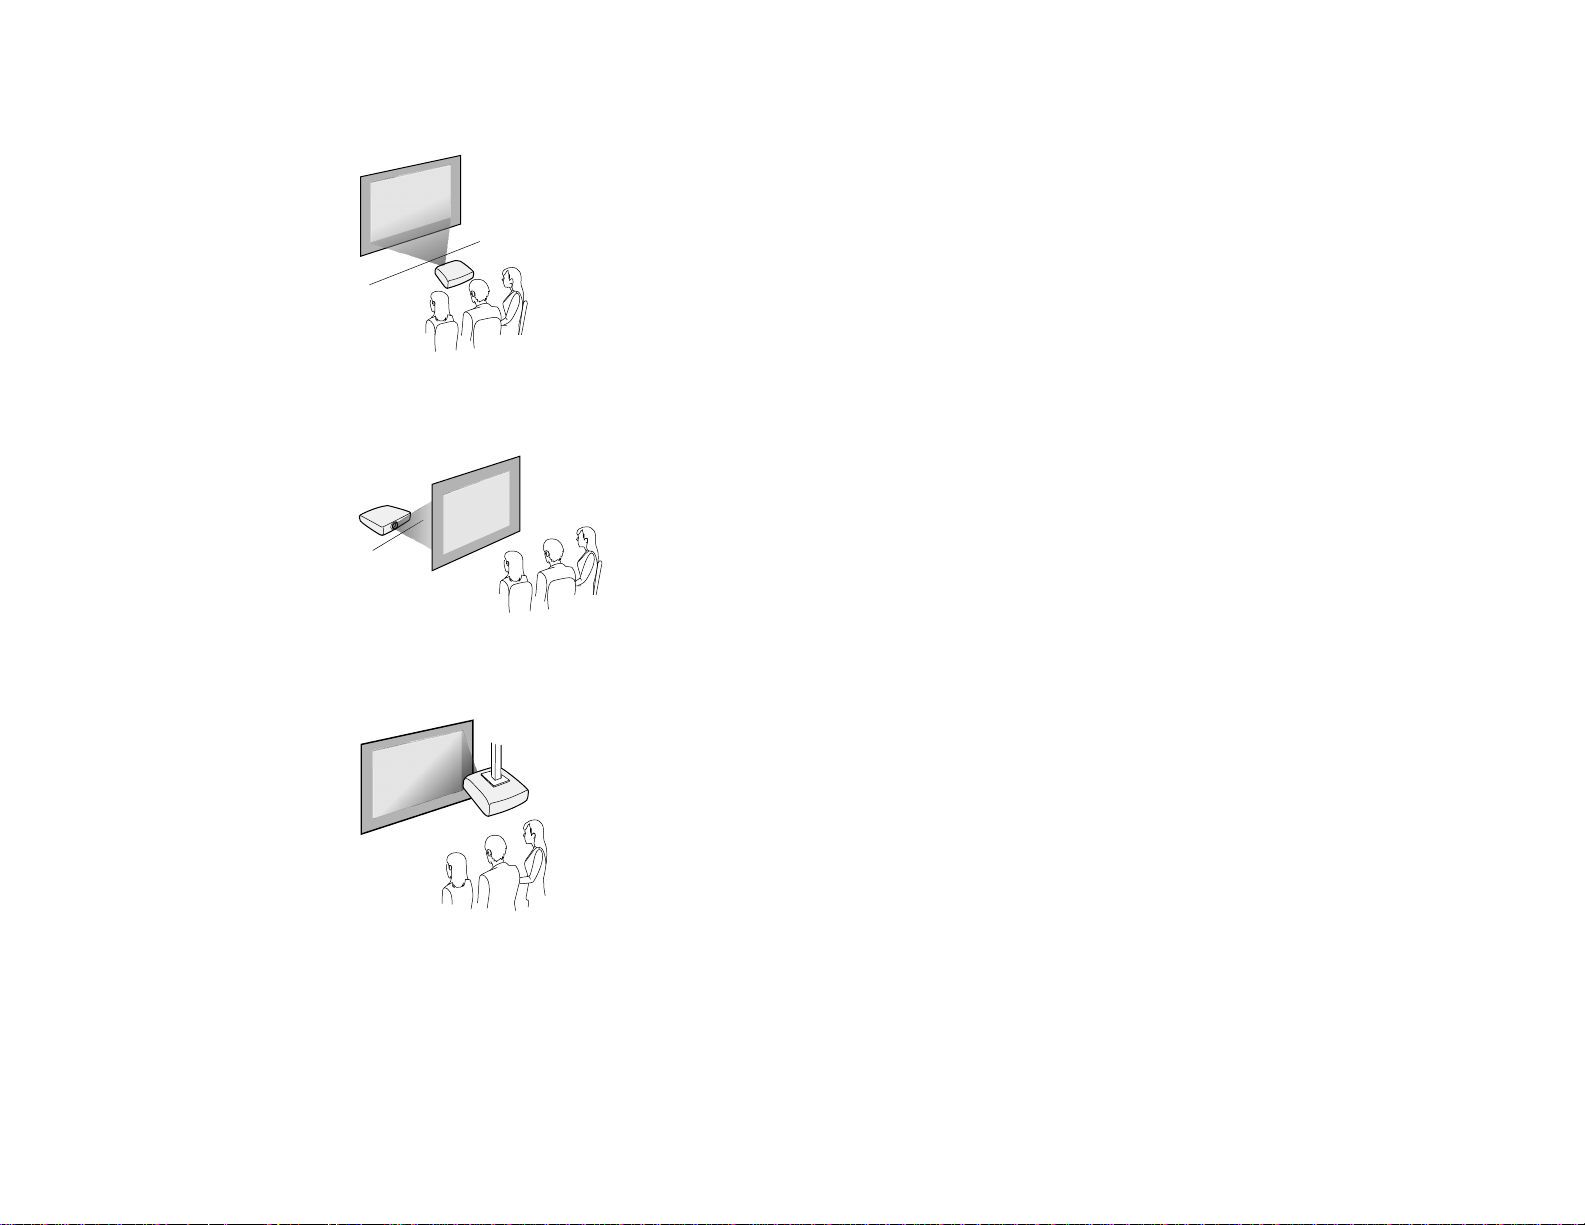
Front
Rear
Front Ceiling
22
Page 23
Rear Ceiling
Wherever you set up the projector, make sure to position it squarely in front of the center of the screen,
not at an angle, if possible.
If you project from the ceiling or from the rear, be sure to select the correct Projection option in the
projector's menu system.
Parent topic: Projector Placement
Related references
Projector Feature Settings - Settings Menu
Projection Distance
The distance at which you place the projector from the screen determines the approximate size of the
image. The image size increases the farther the projector is from the screen, but can vary depending on
the zoom factor, aspect ratio, and other settings.
Use the tables here to determine approximately how far to place the projector from the screen based on
the size of the projected image. (Conversion figures may have been rounded up or down.)
23
Page 24
4:3 Aspect Ratio Image or Screen
Screen or image size Projection distance (1) Offset from lens center Offset from lens center
Wide to Tele
(2) (3)
40 inches (101.6 cm) 57 to 121.7 inches 11 inches (28 cm) 35.0 inches (89 cm)
(144 to 309 cm)
60 inches (152.4 cm) 85.8 to 183.5 inches 16.5 inches (42 cm) 52.4 inches (133 cm)
(218 to 466 cm)
80 inches (203.2 cm) 115 to 245.3 inches 22 inches (56 cm) 70.1 inches (178 cm)
(292 to 623 cm)
100 inches (254 cm) 144.1to306.7inches 27.6 inches (70 cm) 87.4 inches (222 cm)
(366 to 779 cm)
120 inches (304.8 cm) 173.2 to 368.5 inches 33.1 inches (84 cm) 105.1 inches (267 cm)
(440 to 936 cm)
150 inches (381 cm) 216.9to461.0inches 41.3 inches (105 cm) 131.1 inches (333 cm)
(551 to 1171 cm)
180 inches (457.2 cm) 289.8 to 615 inches 54.7 inches (139 cm) 174.8 inches (444 cm)
(736 to 1562 cm)
16:9 Aspect Ratio Image or Screen
Screen or image size Projection distance (1) Offset from lens center Offset from lens center
Wide to Tele
(2) (3)
40 inches (101.6 cm) 46.1 to 94.2 inches 9.1 inches (23 cm) 28.7inches(73cm)
(117 to 252 cm)
60 inches (152.4 cm) 69.7 to 149.6 inches 13.4 inches (34 cm) 42.9 inches (109 cm)
(177 to 380 cm)
80 inches (203.2 cm) 93.7 to 200 inches 18.1 inches (46 cm) 57.1 inches (145 cm)
(238 to 508 cm)
24
Page 25
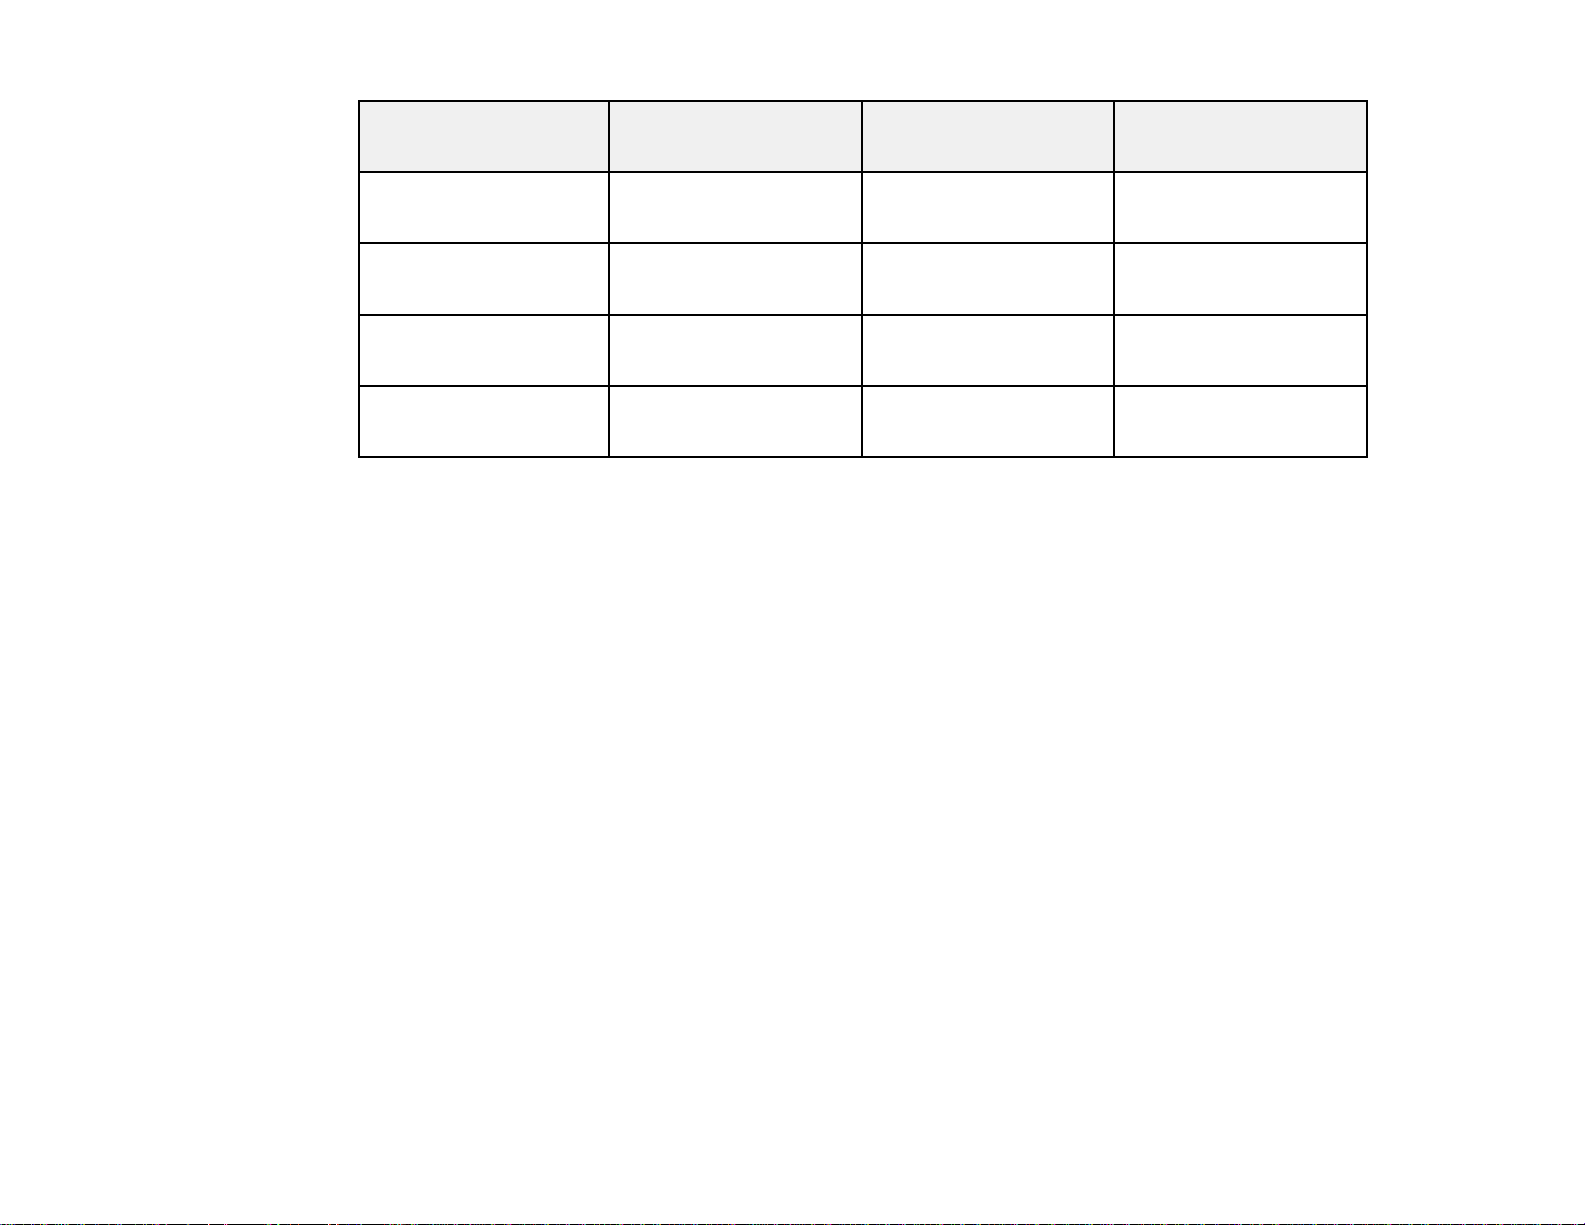
Screen or image size Projection distance (1) Offset from lens center Offset from lens center
100 inches (254 cm) 117.3to250.4inches 22.4 inches (57 cm) 71.3 inches (181 cm)
120 inches (304.8 cm) 141.3 to 300.8 inches 26.8 inches (68 cm) 85.8 inches (218 cm)
150 inches (381 cm) 177.2to376.4inches 33.5 inches (85 cm) 107.1 inches (272 cm)
180 inches (457.2 cm) 212.6 to 452 inches 40.6 inches (103 cm) 128.7 inches (327 cm)
Parent topic: Projector Placement
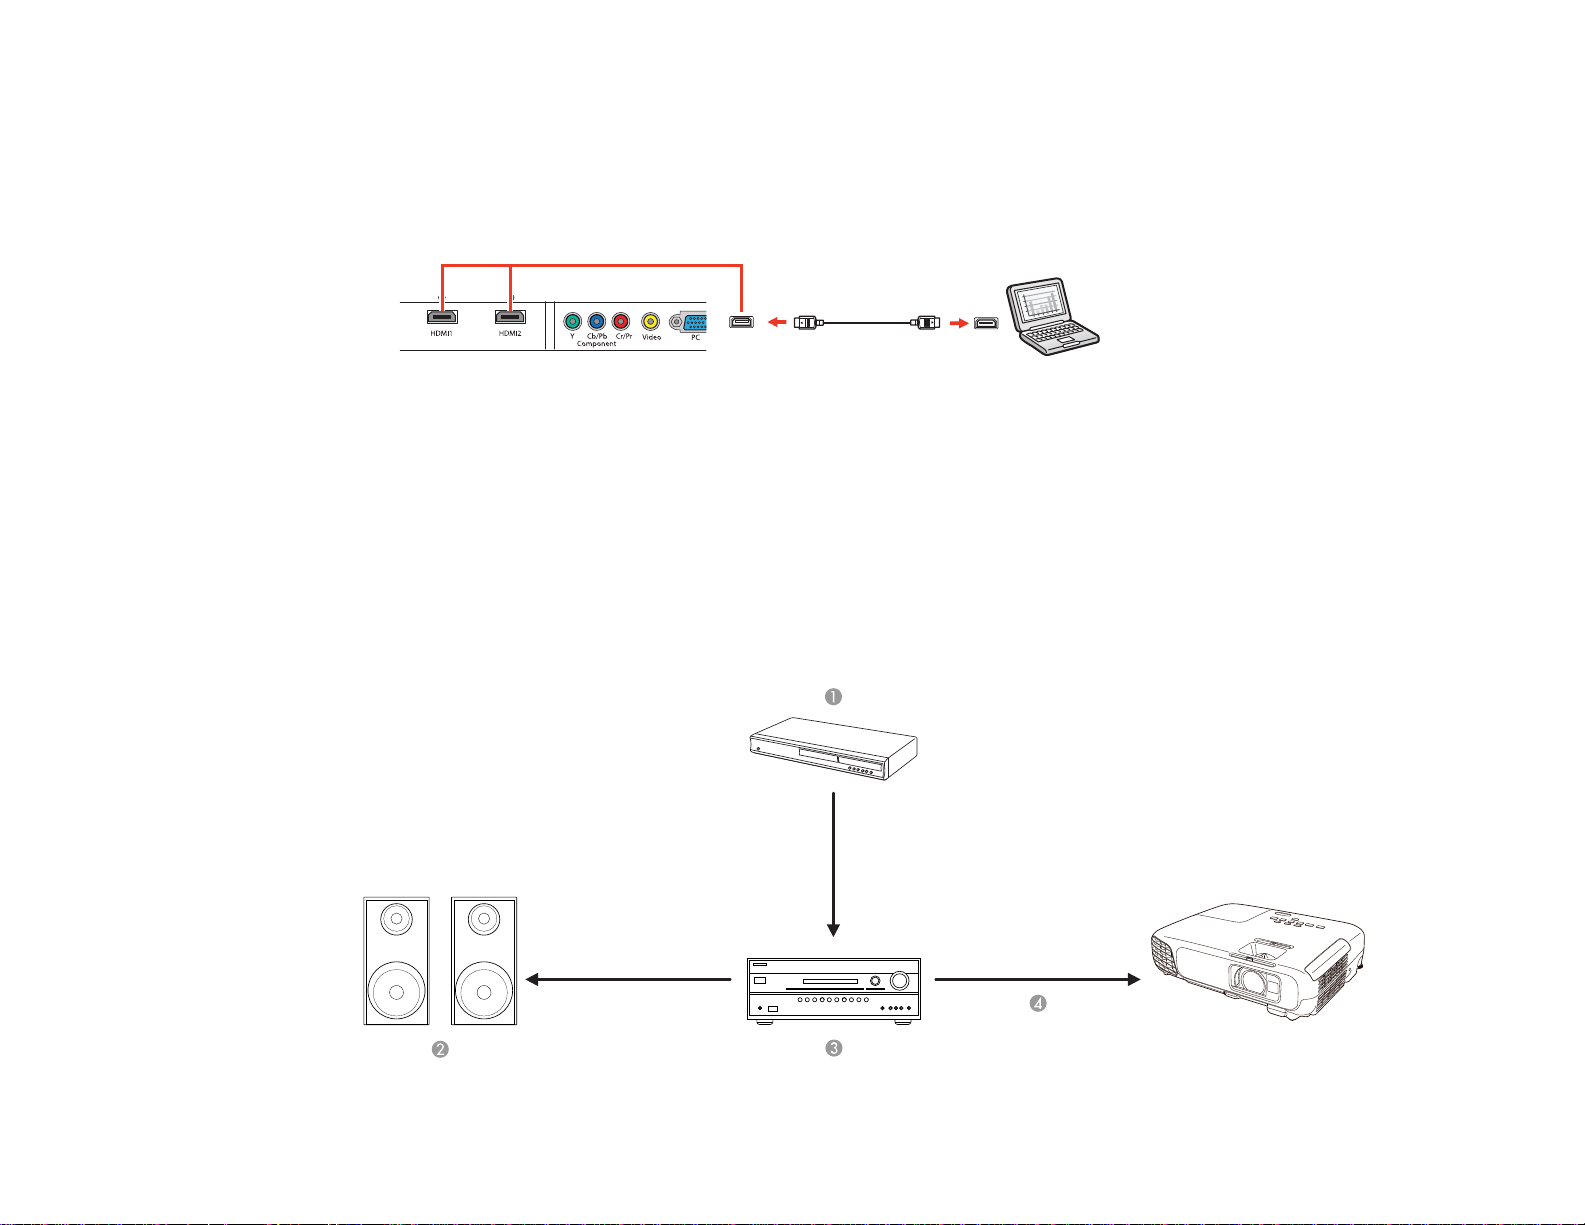
Projector Connections
You can connect the projector to a variety of computer, video, and audio sources to display
presentations, movies, or other images, with or without sound.
• For video projection, connect devices such as DVD players, gaming consoles, streaming devices,
digital cameras, smartphones, and tablets with compatible video output ports.
Wide to Tele
(298 to 636 cm)
(359 to 764 cm)
(450 to 956 cm)
(540 to 1148 cm)
(2) (3)
Note: To connect a smartphone or tablet, you may need to obtain an adapter that allows you to
connect to the projector. This allows you to mirror your smartphone or tablet screens, watch movies,
and more. Contact your device manufacturer for compatible adapter options.
• Connect any type of computer (Windows or Mac) that has a standard video output (15-pin VGA
monitor) port, or HDMI port.
Caution: If you will use the projector at altitudes above 4921 feet (1500 m), turn on High Altitude Mode
to ensure the projector's internal temperature is regulated properly.
Connecting to Video Sources
Connecting to Computer Sources
Connecting to External Speakers
Parent topic: Setting Up the Projector
25
Page 26
Related references
Projector Setup Settings - Extended Menu
Connecting to Video Sources
Follow the instructions in these sections to connect video devices to the projector.
Connecting to an HDMI Video Source
Attaching and Removing the Cable Clips
Connecting to a Component Video Source
Connecting to a Composite Video Source
Parent topic: Projector Connections
Connecting to an HDMI Video Source
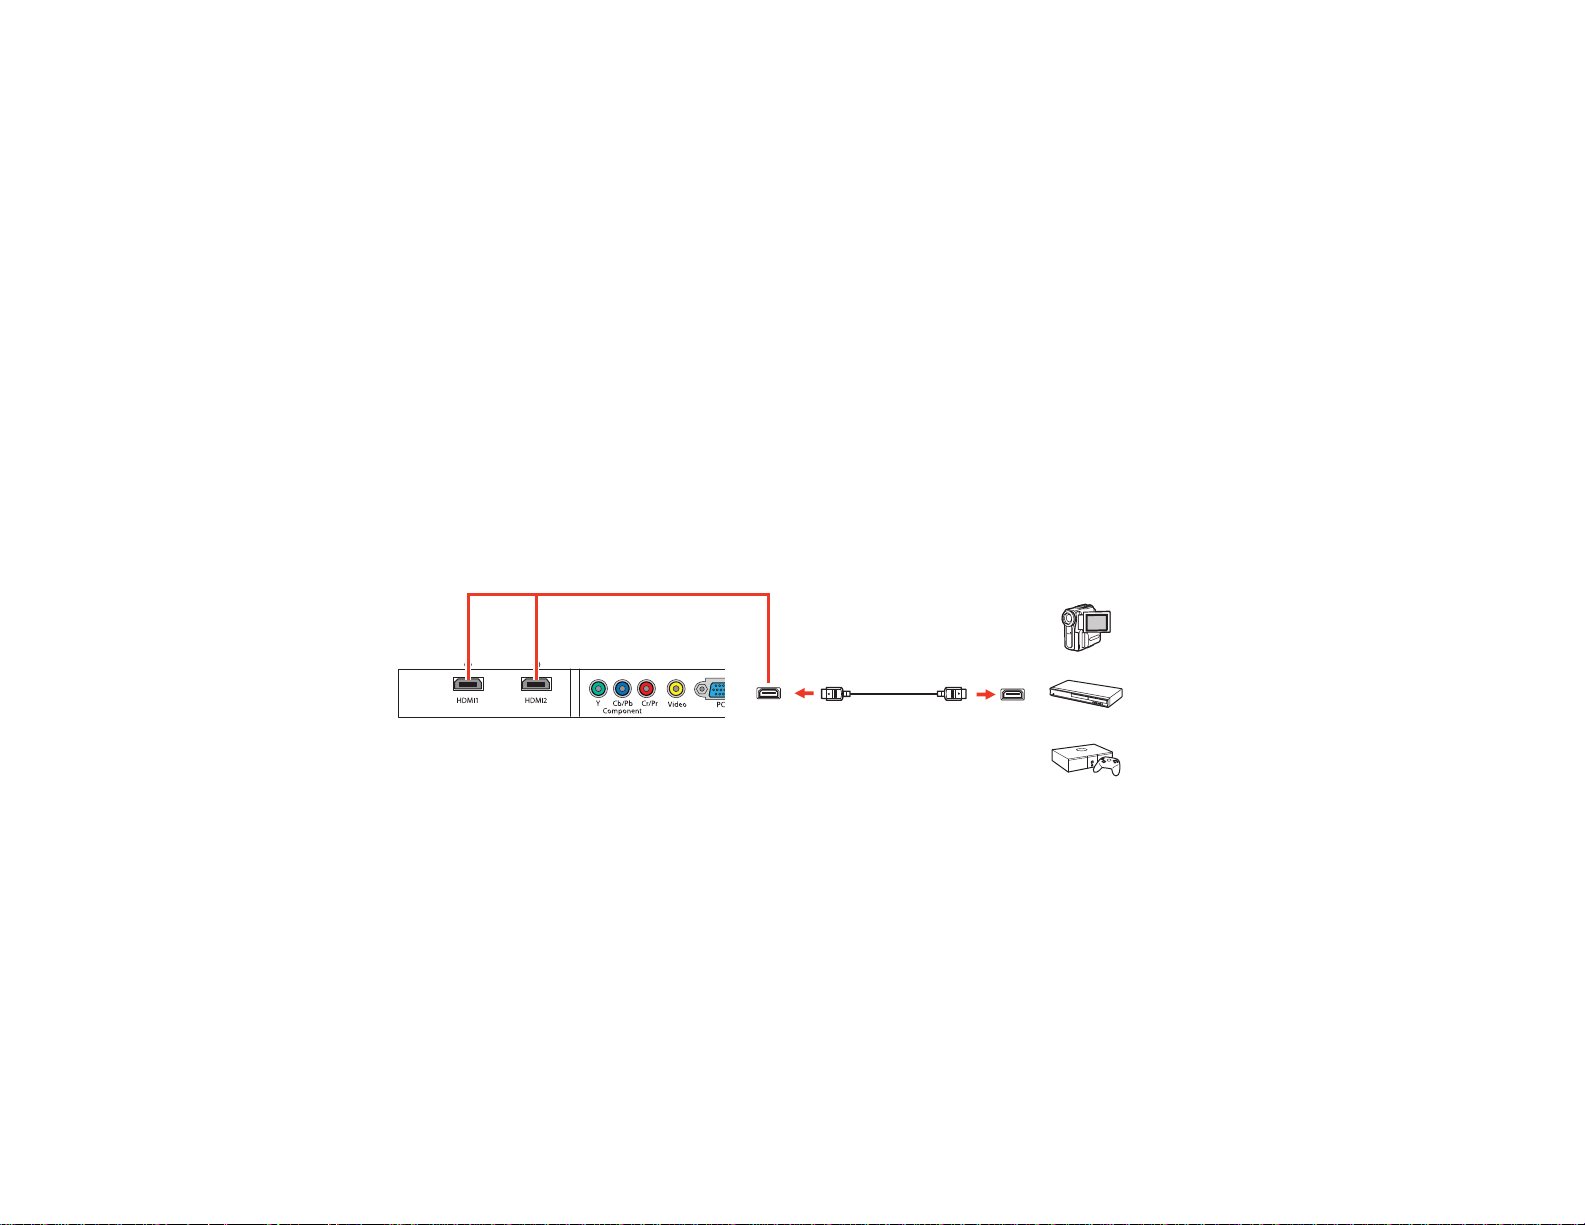
If your video source has an HDMI port, you can connect it to the projector using an optional HDMI cable.
The HDMI connection provides the best image quality.
1. Connect the HDMI cable to your video source's HDMI output port.
2. Connect the other end to one of the projector's HDMI ports.
Note: If you connected a game console, it may take a few seconds for your image to appear when you
switch to the game console's input source. To reduce the potential lag in response time to game
commands, set your game console's output format to a progressive signal of 480p, 720p, or higher. See
your game console documentation for instructions.
You can also select the Fast Image Processing setting to reduce lag time.
Note: When an audio/video source that meets the HDMI CEC standard is connected to the projector's
HDMI port, you can use the projector's remote control to control certain features of the linked device by
pressing the HDMI Link button on the remote control and setting HDMI Link to On.
26
Page 27
Parent topic: Connecting to Video Sources
Related references
Input Signal Settings - Signal Menu
Related tasks
Attaching and Removing the Cable Clips
Attaching and Removing the Cable Clips
You can install the cable clips that came with your projector to provide additional support to the HDMI
cables.
1. Plug in the HDMI cables.
2. Insert each guide into the cable clip holes near the HDMI port.
3. Attach the cable clips to the HDMI cables. Be sure to leave the clamps unlocked.
4. Slide each cable clip onto the guides and lock the clamps onto the connectors.
To remove the cable clips, open the clamps and disconnect the cables. Then pinch the sides of each
guide and carefully pull them out of the cable clip holes.
Parent topic: Connecting to Video Sources
Connecting to a Component Video Source
If your video source has component video ports, you can connect it to the projector using an optional
component video cable. Depending on your component ports, you may need to use an adapter cable
along with a component video cable.
1. Connect the component connectors to your video source's color-coded component video output
ports, usually labeled Y, Pb, Pr or Y, Cb, Cr. If you are using an adapter, connect these connectors
to your component video cable.
27
Page 28
2. Connect the other end to the projector's color-coded Component video input ports.
If your image colors appear incorrect, you may need to change the Input Signal setting in the projector's
Extended menu.
Note: If you connected a game console, it may take a few seconds for your image to appear when you
switch to the game console's input source. To reduce the potential lag in response time to game
commands, set your game console's output format to a progressive signal of 480p, 720p, or higher. See
your game console documentation for instructions.
You can also select the Fast Image Processing setting to reduce lag time.
Parent topic: Connecting to Video Sources
Related references
Input Signal Settings - Signal Menu
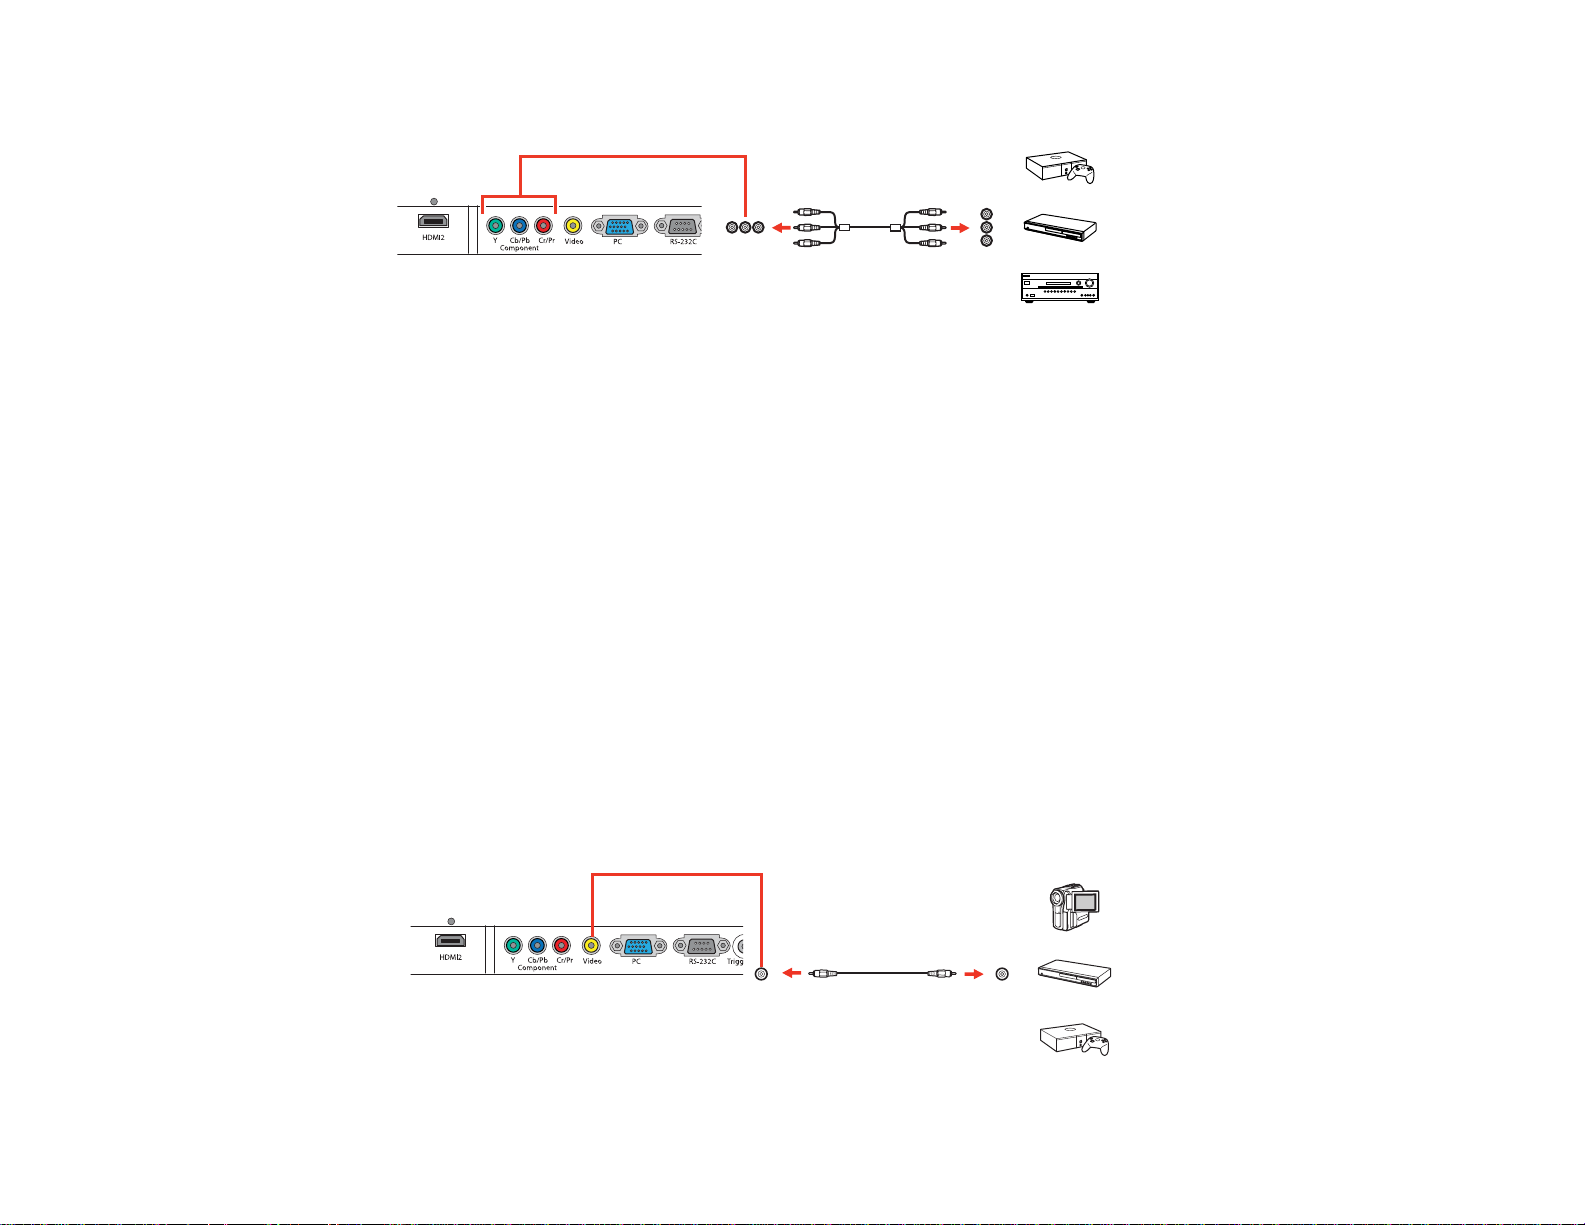
Connecting to a Composite Video Source
If your video source has a composite video port, you can connect it to the projector using an optional
RCA-style video or A/V cable.
1. Connect the cable with the yellow connector to your video source's yellow video output port.
2. Connect the other end to the projector's Video port.
28
Page 29
Note: If you connected a game console, it may take a few seconds for your image to appear when you
switch to the game console's input source. To reduce the potential lag in response time to game
commands, set your game console's output format to a progressive signal of 480p, 720p, or higher. See
your game console documentation for instructions.
Parent topic: Connecting to Video Sources
Connecting to Computer Sources
Follow the instructions in these sections to connect a computer to the projector.
Connecting to a Computer for VGA Video
Connecting to a Computer for HDMI Video
Parent topic: Projector Connections
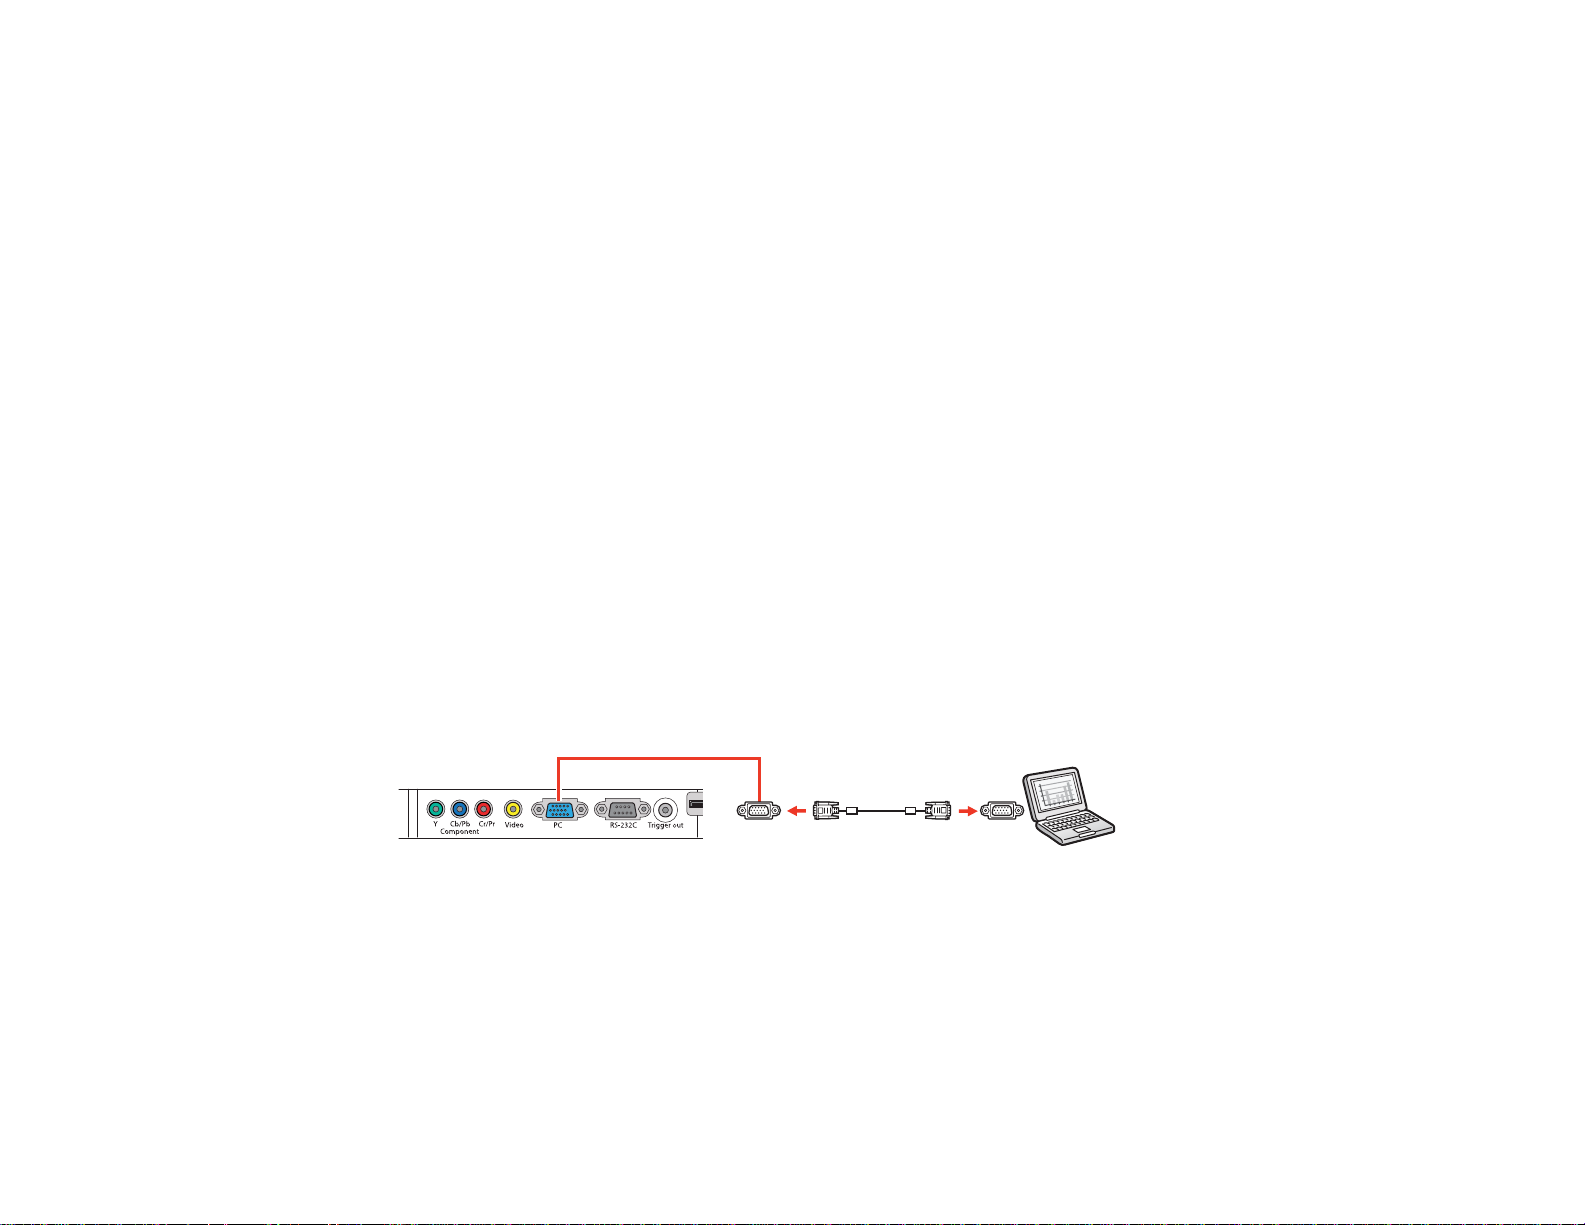
Connecting to a Computer for VGA Video
You can connect the projector to your computer using a VGA computer cable.
Note: To connect a Mac that includes only a Mini DisplayPort, Thunderbolt port, or Mini-DVI port for
video output, you need to obtain an adapter that allows you to connect to the projector's VGA video port.
Contact Apple for compatible adapter options.
1. If necessary, disconnect your computer's monitor cable.
2. Connect the VGA computer cable to your computer's monitor port.
3. Connect the other end to a PC port on the projector.
4. Tighten the screws on the VGA connector.
Parent topic: Connecting to Computer Sources
Connecting to a Computer for HDMI Video
If your computer has an HDMI port, you can connect it to the projector using an optional HDMI cable.
29
Page 30
Note: To connect a Mac that includes only a Mini DisplayPort, Thunderbolt port, or Mini-DVI port for
video output, you need to obtain an adapter that allows you to connect to the projector's HDMI port.
1. Connect the HDMI cable to your computer's HDMI output port.
2. Connect the other end to one of the projector's HDMI ports.
Parent topic: Connecting to Computer Sources
Related tasks
Attaching and Removing the Cable Clips
Connecting to External Speakers
To add sound, you can connect your video source and speakers to an audio video receiver, then
connect the receiver to the projector using one of the receiver's compatible video outputs (an HDMI
connection provides the best image quality, if available). You can also connect speakers to any video
source that has its own speaker connections.
30
Page 31

1 Video source
2 Surround sound speakers
3 Receiver
4 Video cable
Parent topic: Projector Connections
Installing Batteries in the Remote Control
The remote control uses the two AA batteries that came with the projector.
Caution: Use only the type of batteries specified in this manual. Do not install batteries of different types,
or mix new and old batteries.
1. Remove the battery cover.
31
Page 32

2. Insert the batteries with the + and – ends facing as shown.
3. Replace the battery cover and press it down until it clicks into place.
Warning: Dispose of used batteries according to local regulations. Do not expose batteries to heat
or flame. Keep batteries out of the reach of children; they are choking hazards and are very
dangerous if swallowed.
Parent topic: Setting Up the Projector
Related references
Remote Control Specifications
32
Page 33

Using Basic Projector Features
Follow the instructions in these sections to use your projector's basic features.
Turning On the Projector
Turning Off the Projector
Viewing 3D Images
Selecting the Language for the Projector Menus
Adjusting the Image Height
Image Shape
Resizing the Image with the Zoom Ring
Focusing the Image Using the Focus Ring
Adjusting the Color Convergence (Panel Alignment)
Remote Control Operation
Selecting an Image Source
Projection Modes
Image Aspect Ratio
Color Mode
Using Picture in Picture
Turning On the Projector
Turn on the computer or video equipment you want to use before you turn on the projector so it can
display the image source.
33
Page 34

1. Connect the power cord to the projector's power inlet.
2. Plug the power cord into an electrical outlet.
Note: With Direct Power On turned on, the projector turns on as soon as you plug it in.
3. Press the power button on the projector or the On button on the remote control to turn on the
projector.
The shutter opens and the Status light flashes blue as the projector warms up. Once the projector is
warmed up, the Status light stops flashing and turns blue.
Warning: Never look into the projector lens when the lamp is on. This can damage your eyes and is
especially dangerous for children.
If you do not see a projected image right away, try the following:
• Turn on the connected computer or video device.
• Insert a DVD or other video media and press the play button, if necessary.
• Press the Source button on the projector to detect the video source, or press a source button on the
remote control.
Parent topic: Using Basic Projector Features
Related references
Projector Setup Settings - Extended Menu
34
Page 35
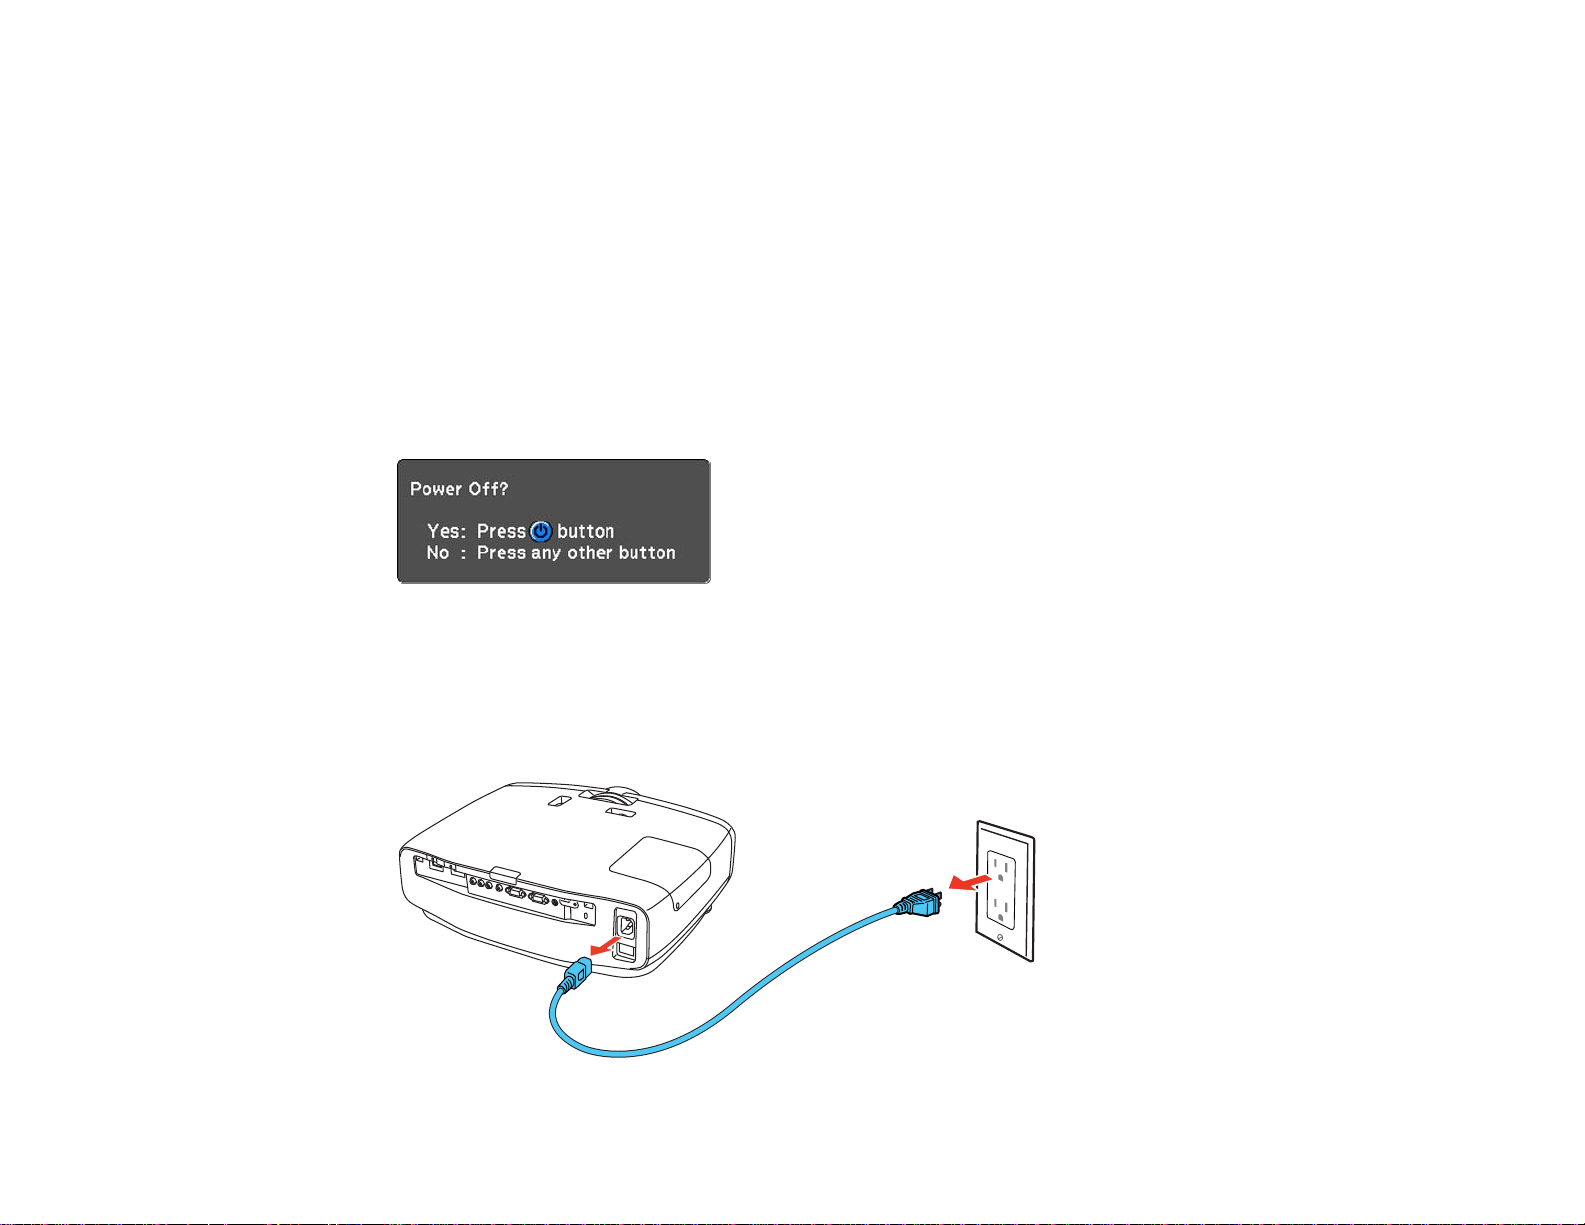
Turning Off the Projector
Before turning off the projector, shut down any computer connected to it so you can see the computer
display during shutdown.
Note: Turn off this product when not in use to prolong the life of the projector. Lamp life will vary
depending upon mode selected, environmental conditions, and usage. Brightness decreases over time.
Note: When using the Blank feature, the projector lamp is still on. To turn off the lamp, turn off the
projector.
1. Press the power button on the projector or the Standby button on the remote control.
The projector displays a shutdown confirmation screen.
2. Press the power button on the projector or the Standby button on the remote control again. (To
leave it on, press any other button.)
The shutter closes, the lamp turns off, and the Status light turns off.
3. To transport or store the projector, make sure the Status light is off, then unplug the power cord.
35
Page 36

Caution: To avoid damaging the projector or lamp, never unplug the power cord when the Status
light is on or flashing.
Parent topic: Using Basic Projector Features
Related tasks
Shutting Off the Picture Temporarily
Transporting the Projector
Viewing 3D Images
You can view 3D images using your projector. Viewing 3D images requires a 3D-compatible video
device and a pair of Epson RF 3D glasses (not included with your projector). You can also convert 2D
images to 3D using the 2D-to-3D Conversion setting in your projector's Signal > 3D Setup menu.
You can purchase Epson RF 3D glasses from an Epson authorized reseller. To find the nearest reseller,
call 800-GO-EPSON (800-463-7766). Or you can purchase online at epsonstore.com (U.S. sales) or
epson.ca (Canadian sales).
1. Connect a 3D-compatible video device to the projector using a compatible HDMI cable.
2. Turn on the video device, then turn on the projector.
3. Begin playback from the video device.
Note: Make sure you set the video device to play content in 3D mode.
4. Press the 2D/3D button on the remote control to activate 3D mode, if necessary.
36
Page 37

5. Slide the power switch on the 3D glasses to the On position.
6. Put on the 3D glasses. If you do not see a 3D image, pair the glasses with the projector.
Note: If you change the video source or you are not within range of your projector, the glasses enter
standby mode and the status light flashes green. Slide the power switch on the glasses to the Off
position and then back to the On position to resume 3D viewing.
Pairing the 3D Glasses with the Projector
Charging the 3D Glasses
3D Viewing Range
Parent topic: Using Basic Projector Features
Related tasks
Connecting to an HDMI Video Source
Connecting to a Computer for HDMI Video
Pairing the 3D Glasses with the Projector
Pair the glasses with the projector to establish communication between them for 3D viewing.
1. Turn on the projector.
2. Set the image source to HDMI.
3. Project a 3D image.
37
Page 38

4. Slide the power switch on the 3D glasses to the On position.
5. Move the glasses within 10 feet (3 m) of the projector, then hold down the Pairing button on the
glasses for at least three seconds.
The status light on the glasses flashes green and red. If pairing is successful, the light turns green
for 10 seconds and then turns off.
Parent topic: Viewing 3D Images
Charging the 3D Glasses
Charge the glasses when the status light on the glasses flashes red to indicate a low battery.
38
Page 39

1. Connect the smaller end of the charging cable to the port on the bridge of the glasses.
Note: Make sure you connect the cable in the correct orientation or you may damage the glasses or
cable.
2. Do one of the following:
• Plug the other end of the charging cable into a powered USB port on a computer or other device.
• Plug the other end of the charging cable into a USB-to-AC adapter with the following
specifications:
Input: 100-240V, ~0.15A, 50-60Hz
Output: 5V=1A
The glasses are fully charged when the status light on the glasses stays green.
Parent topic: Viewing 3D Images
3D Viewing Range
When you view 3D images, make sure you are positioned within the viewing range shown here.
39
Page 40

1 32 ft (10 m)
Parent topic: Viewing 3D Images
Selecting the Language for the Projector Menus
If you want to view the projector's menus and messages in another language, you can change the
Language setting.
1. Turn on the projector.
2. Press the Menu button.
40
Page 41

3. Select the Extended menu and press Enter.
4. Select the Language setting and press Enter.
5. Select the language you want to use and press Enter.
6. Press Menu or Esc to exit the menus.
Parent topic: Using Basic Projector Features
Adjusting the Image Height
If you are projecting from a table or other flat surface, and the image is too high or low, you can adjust
the image height using the projector's adjustable feet.
1. Turn on the projector and display an image.
2. If the image is tilted, rotate the front feet to adjust their height.
3. Use the vertical and horizontal lens shift dials on the projector to adjust the position of the projected
image as necessary.
41
Page 42

If the projected image is unevenly rectangular, you need to adjust the image shape.
Adjusting the Image Position Using Lens Shift
Parent topic: Using Basic Projector Features
Related concepts
Image Shape
Adjusting the Image Position Using Lens Shift
If you cannot install the projector directly in front of the screen, you can adjust the position of the
projected image using the lens shift feature.
Note: Wait 30 minutes after turning on the projector before setting the focus, zoom, and lens shift for
maximum accuracy.
1. Turn on the projector and display an image.
42
Page 43

2. Turn the vertical and horizontal lens shift dials on the projector to adjust the position of the projected
image as necessary.
Note: You cannot move the image to both the horizontal and vertical maximum values.
1 Horizontal width × 47%
2 Vertical height × 96%
Follow these guidelines when using lens shift to adjust your images:
• When adjusting the image height, position the image lower than where you want it to be and then
move it up using the vertical lens shift dial. This will help prevent the image from moving down after
adjustment.
• Keep the vertical and horizontal lens shift dials in their center positions for the clearest picture.
43
Page 44

Parent topic: Adjusting the Image Height
Image Shape
You can project an evenly rectangular image by placing the projector directly in front of the center of the
screen and keeping it level. If you place the projector at an angle to the screen, or tilted up or down, or off
to the side, you may need to correct the image shape for the best display quality.
Correcting Image Shape with the Keystone Buttons
Parent topic: Using Basic Projector Features
Correcting Image Shape with the Keystone Buttons
You can use the projector's keystone correction buttons to correct the shape of an image that is
unevenly rectangular on the sides.
Note: To provide the best possible image quality, adjust the projector's position to correct the image
shape. If this isn't possible, use the keystone correction buttons on the projector to correct the image
shape.
1. Turn on the projector and display an image.
Note: You can display a pattern to aid in adjusting the projected image using the Settings menu.
Note: You can also display the pattern by pressing the Pattern button on the remote control.
2. Press one of these keystone buttons on the control panel to display the Keystone adjustment
screen.
44
Page 45

3. Press a keystone button on the projector's control panel to adjust the image shape.
After correction, your image is slightly smaller.
Note: If the projector is installed out of reach, you can also correct the image shape with the remote
control using the Keystone settings in the projector menus.
Parent topic: Image Shape
Related references
Projector Feature Settings - Settings Menu
Resizing the Image with the Zoom Ring
1. Turn on the projector and display an image. Wait 30 minutes after turning on the projector before
setting the focus, zoom, and lens shift for maximum accuracy.
Note: You can display a pattern to aid in adjusting the projected image using the Pattern button on
the remote control.
45
Page 46

2. To enlarge or reduce the image size, rotate the projector's zoom ring.
Parent topic: Using Basic Projector Features
Focusing the Image Using the Focus Ring
1. Turn on the projector and display an image. Wait 30 minutes after turning on the projector before
setting the focus, zoom, and lens shift for maximum accuracy.
Note: You can display a pattern to aid in adjusting the projected image using the Pattern button on
the remote control.
2. To sharpen the image focus, rotate the projector’s focus ring.
46
Page 47

Parent topic: Using Basic Projector Features
Adjusting the Color Convergence (Panel Alignment)
You can use the Panel Alignment feature to manually adjust the color convergence (the alignment of the
red, green and blue colors) in the projected image.
Note: Allow your projector to warm up for at least 10 to 15 minutes and make sure the image is in focus
before you use the Panel Alignment feature. The projected image should be a minimum of 60 inches
(152 cm) diagonally and the projection surface should not be colored or textured, otherwise the
adjustment grids will be difficult to align.
1. Turn on the projector.
2. Press the Menu button.
3. Select the Extended menu and press Enter.
4. Select the Panel Alignment setting and press Enter.
5. Select the Panel Alignment setting and press Enter.
6. Select On and press Enter.
7. Select the Select Color setting and choose one of the following:
• R to adjust the red color convergence.
47
Page 48

• B to adjust the blue color convergence.
Note: You can only adjust the red or blue color convergence. Green is the standard color panel and
cannot be adjusted.
8. Select the Pattern Color setting and press Enter.
9. Select the pattern you want to use and press Enter.
10. Select Start Adjustments and press Enter.
You see this screen:
11. Use the arrow buttons on the remote control to adjust the color alignment in the corner of the screen
highlighted by the orange box.
12. Press the Enter button to move to the next corner of the screen.
13. When you are finished adjusting each corner of the screen, press Enter.
48
Page 49

You see this screen:
14. Do one of the following:
• If your projector's panel alignment is now correct, select Exit and press Enter to return to the
Panel Alignment menu.
• If your projector needs additional panel alignment, select Select intersection and adjust and
press Enter. Use the arrow keys on the remote control to highlight the corner of any box on the
screen that is misaligned and press Enter to adjust the color convergence. Repeat this step as
necessary.
Parent topic: Using Basic Projector Features
Remote Control Operation
The remote control lets you control the projector from almost anywhere in the room. You can point it at
the screen, or the front or back of the projector.
49
Page 50

Make sure that you aim the remote control at the projector's receivers within the distance and angles
listed here.
1 32 feet (10 m)
2 ± 30°
3 60°
4 10°
Note: Avoid using the remote control in conditions with bright fluorescent lights or in direct sunlight, or
the projector may not respond to commands. If you will not use the remote control for a long time,
remove the batteries.
Parent topic: Using Basic Projector Features
Selecting an Image Source
If you connected multiple image sources to the projector, such as a computer and DVD player, you may
want to switch from one image source to the other.
50
Page 51

1. Make sure the connected image source you want to use is turned on.
2. For video image sources, insert a DVD or other video media and press its play button, if necessary.
3. Do one of the following:
• Press the Source button on the projector until you see the image from the source you want.
• Press the button for the source you want on the remote control. If there is more than one port for
that source, press the button again to cycle through the sources.
1 HDMIportsources
2 WirelessHDsources(buttonisnotfunctional)
3 PC port(VGA)source
4 Compositevideosource
5 Componentsource
Parent topic: Using Basic Projector Features
51
Page 52

Projection Modes
Depending on how you positioned the projector, you may need to change the projection mode so your
images project correctly.
• Front (default setting) lets you project from a table in front of the screen.
• Front/Ceiling flips the image over top-to-bottom to project upside-down from a ceiling or wall mount.
• Rear flips the image horizontally to project from behind a translucent screen.
• Rear/Ceiling flips the image over top-to-bottom and horizontally to project from the ceiling and behind
a translucent screen.
Changing the Projection Mode Using the Menus
Parent topic: Using Basic Projector Features
Changing the Projection Mode Using the Menus
You can change the projection mode to flip the image over top-to-bottom and/or left-to-right using the
projector menus.
1. Turn on the projector and display an image.
2. Press the Menu button.
3. Select the Settings menu and press Enter.
4. Select the Projection setting and press Enter.
5. Select a projection mode and press Enter.
52
Page 53

6. Press Menu or Esc to exit the menus.
Parent topic: Projection Modes
Related concepts
Projector Placement
Image Aspect Ratio
The projector can display images in different width-to-height ratios called aspect ratios. Normally the
input signal from your video source determines the image's aspect ratio. However, for certain images
you can change the aspect ratio to fit your screen by pressing a button on the remote control.
If you always want to use a particular aspect ratio for a certain video input source, you can select it using
the projector's menus.
Changing the Image Aspect Ratio
Available Image Aspect Ratios
Parent topic: Using Basic Projector Features
Changing the Image Aspect Ratio
You can change the aspect ratio of the displayed image to resize it.
Note: For HDMI sources, the input signal determines the image's aspect ratio.
1. Turn on the projector and switch to the image source you want to use.
2. Press the Aspect button on the remote control.
A list of the available aspect ratios appears.
3. To cycle through the available aspect ratios for your input signal, press the up or down arrow button.
4. Press Enter to select the aspect ratio.
Parent topic: Image Aspect Ratio
53
Page 54

Available Image Aspect Ratios
You can select the following image aspect ratios, depending on the input signal from your image source.
Note: When the projector is in 3D mode, the aspect ratio is automatically set to Normal.
Note: Black bands and cropped images may project in certain aspect ratios, depending on the aspect
ratio and resolution of your input signal.
Aspect ratio setting Description
Auto Automatically sets the aspect ratio according to the input signal.
Normal Displays images using the full projection area and maintains the
Zoom Displays images using the full width of the projection area and
Full Displays images using the full width of the projection area, but does
Note: The Auto aspect ratio setting is available only for HDMI and component image sources.
Parent topic: Image Aspect Ratio
aspect ratio of the image.
maintains the aspect ratio of the image.
not maintain the aspect ratio.
Related references
Input Signal Settings - Signal Menu
Color Mode
The projector offers different Color Modes to provide optimum brightness, contrast, and color for a
variety of viewing environments and image types. You can select a mode designed to match your image
and environment, or experiment with the available modes.
If you always want to use a particular color mode for a certain video input source, you can select it using
the projector menus.
Changing the Color Mode
Available Color Modes
Turning On Auto Iris
Parent topic: Using Basic Projector Features
54
Page 55

Related references
Image Quality Settings - Image Menu
Changing the Color Mode
You can change the projector's Color Mode using the remote control to optimize the image for your
viewing environment.
1. Turn on the projector and switch to the image source you want to use.
2. If you are projecting from a DVD player or other video source, insert a disc or other video media and
press the play button, if necessary.
3. Press the Color Mode button on the remote control to change the Color Mode.
A list of available Color Modes appears.
4. To cycle through all the available Color Modes for your input signal, press the up or down arrow
button.
5. Press Enter to select a Color Mode.
Parent topic: Color Mode
Available Color Modes
You can set the projector to use these Color Modes, depending on the input source you are using:
2D Images
Color Mode Description
Dynamic Best for projecting in a bright room
Natural or THX Best for projecting in a dark room
BrightCinema Best for projecting in a room with closed curtains
Cinema Best for movies projected in a dark room
55
Page 56

Color Mode Description
B&W Cinema Best for black and white movies projected in a dark room
3D Images
Color Mode Description
3D Dynamic Best for projecting in a bright room
3D Cinema Best for movies projected in a dark room
3D THX Best for projecting in a dark room
Parent topic: Color Mode
Turning On Auto Iris
In certain color modes, you can turn on the Auto Iris setting to automatically optimize the image based on
the brightness of the content you project.
1. Turn on the projector and switch to the image source you want to use.
2. Press the Menu button.
Note: You can also press the Auto Iris button on the remote control to access the Auto Iris setting
directly.
3. Select the Image menu and press Enter.
56
Page 57

4. Select the Auto Iris setting and choose one of the following:
• High Speed to adjust brightness as soon as the scene changes.
• Normal for standard brightness adjustment.
Note: You can set Auto Iris for each Color Mode that supports the feature.
5. Press Menu or Esc to exit the menus.
Parent topic: Color Mode
Using Picture in Picture
You can use Picture in Picture mode to view two image sources simultaneously.
Note: You can display only HDMI video sources when Picture in Picture mode is active.
1. Turn on the projector and switch to the HDMI image source you want to use.
2. Press the P-in-P button on the remote control.
The second HDMI video source appears as a sub-screen in the corner of the image.
Note: While Picture in Picture mode is active, press the Menu button on the remote control to adjust
the size and position of the sub-screen.
3. To swap the main screen and sub-screen video sources, press and hold the P-in-P button for at
least three seconds.
4. Press the P-in-P button again to close the sub-screen and resume normal projection.
Available Picture in Picture Options
Parent topic: Using Basic Projector Features
57
Page 58

Available Picture in Picture Options
You can adjust the following options by pressing the Menu button on the remote control while Picture in
Picture mode is active:
Setting Description
Subscreen Size Adjusts the size of the sub-screen
Subscreen Position Adjusts the location where the sub-screen is displayed
Swap Main/Sub Switches the video source displayed on the main screen with the
Exit Picture in Picture Closes the sub-screen and resumes normal projection
Parent topic: Using Picture in Picture
source displayed on the sub-screen
58
Page 59

Adjusting Projector Features
Follow the instructions in these sections to use your projector's feature adjustments.
Shutting Off the Picture Temporarily
Projector Security Features
Saving Settings to Memory and Using Saved Settings
Shutting Off the Picture Temporarily
You can temporarily turn off the projected picture if you want to redirect your audience's attention during
a presentation. Any video action continues to run, however, so you cannot resume projection at the point
that you stopped it.
1. Press the Blank button on the remote control to temporarily stop projection.
2. To turn the picture back on, press the Blank button again.
Parent topic: Adjusting Projector Features
Projector Security Features
You can secure your projector to deter theft or prevent unintended use by setting up the following
security features:
• Button lock security to block operation of the projector using the buttons on the control panel.
• Security cabling to physically cable the projector in place.
Locking the Projector's Buttons
Installing a Security Cable
Parent topic: Adjusting Projector Features
Locking the Projector's Buttons
You can lock the buttons on the projector's control panel to prevent anyone from using the projector.
59
Page 60

1. Press the Menu button.
2. Select the Settings menu and press Enter.
3. Select the Lock Setting setting and press Enter.
4. Select one of these lock types and press Enter:
• To lock the projector's power button, select Child Lock. To turn the projector on, you must press
the power button for longer than three seconds.
• To lock all buttons except the power button, select Control Panel Lock.
You see a confirmation prompt.
5. Select Yes and press Enter.
6. Restart the projector for the lock settings to take effect.
Unlocking the Projector's Buttons
Parent topic: Projector Security Features
Related references
Projector Feature Settings - Settings Menu
Unlocking the Projector's Buttons
If the projector's buttons have been locked, hold the Enter button on the projector's control panel for
seven seconds to unlock them.
Parent topic: Locking the Projector's Buttons
60
Page 61

Installing a Security Cable
You can use the security slot on the back of the projector to attach a Kensington Microsaver Security
system, available from Epson.
Parent topic: Projector Security Features
Saving Settings to Memory and Using Saved Settings
You can save customized settings for each of your video inputs and then select the saved settings
whenever you want to use them.
1. Turn on the projector and display an image.
2. Press the Menu button.
Note: You can also press the Memory button on the remote control to access the Memory menu
directly.
3. Select the Memory menu and press Enter.
You see this screen:
4. Select one of the following options:
• Load Memory: Overwrites your current settings with saved settings
• Save Memory: Saves your current settings to memory (10 memories with different names are
available)
61
Page 62

Note: A memory name that has already been used is indicated by a green mark. Saving over a
previously saved memory overwrites the settings with your current settings.
• Erase Memory: Erases the selected memory settings
• Rename Memory: Renames a saved memory
5. Press Esc to exit.
Parent topic: Adjusting Projector Features
62
Page 63

Adjusting the Menu Settings
Follow the instructions in these sections to access the projector menu system and change projector
settings.
Using the Projector's Menus
Image Quality Settings - Image Menu
Input Signal Settings - Signal Menu
Projector Feature Settings - Settings Menu
Projector Setup Settings - Extended Menu
Projector Memory Options - Memory Menu
Projector Information Display - Info Menu
Projector Reset Options - Reset Menu
Using the Projector's Menus
You can use the projector's menus to adjust the settings that control how your projector works. The
projector displays the menus on the screen.
1. Press the Menu button on the control panel or remote control.
63
Page 64

You see the menu screen displaying the Image menu settings.
2. Press the up or down arrow button to move through the menus listed on the left. The settings for
each menu are displayed on the right.
Note: The available settings depend on the current input source.
3. To change settings in the displayed menu, press Enter.
4. Press the up or down arrow button to move through the settings.
5. Change the settings using the buttons listed on the bottom of the menu screens.
6. To return all the menu settings to their default values, select Reset.
7. When you finish changing settings on a menu, press Esc.
8. Press Menu or Esc to exit the menus.
Parent topic: Adjusting the Menu Settings
Image Quality Settings - Image Menu
Settings on the Image menu let you adjust the quality of your image for the input source you are currently
using.
64
Page 65
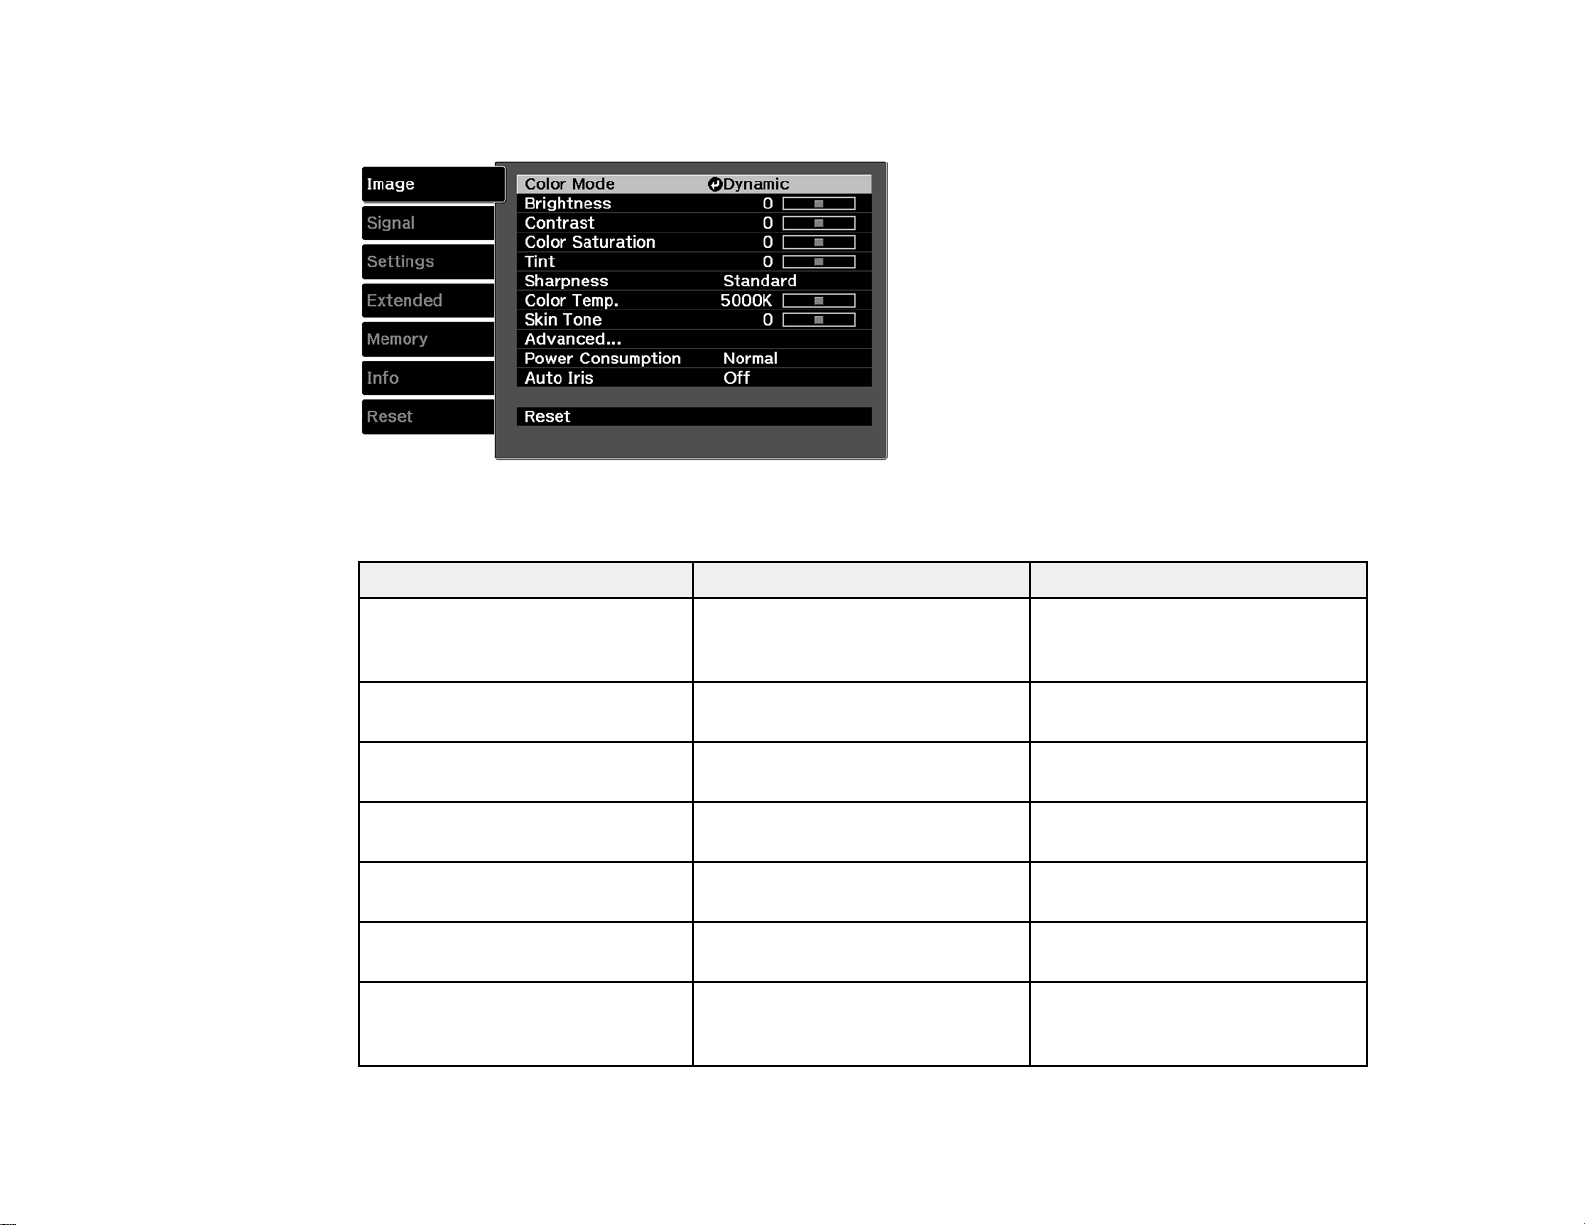
Note: The available settings depend on the currently selected input source.
To change settings for an input source, make sure the source is connected and select that source.
Setting Options Description
Color Mode See the list of available Color Adjusts the vividness of image
Modes colors for various image types
and environments
Brightness Varying levels available Lightens or darkens the overall
image
Contrast Varying levels available Adjusts the difference between
light and dark areas of the image
Color Saturation Varying levels available Adjusts the intensity of the image
colors
Tint Varying levels available Adjusts the balance of green to
magenta tones in the image
Sharpness Varyinglevels available Adjusts the sharpness or
softness of image details
Color Temp. (color temperature) Varying levels available Sets the overall color tone; higher
values tint the image blue and
lower values tint the image red
65
Page 66

Setting Options Description
Skin Tone Varyinglevelsavailable Makesfineadjustmentstothe
color tone; higher values tint the
image blue and lower values tint
the image red
Advanced Gamma Selects various detailed color
RGB
RGBCMY
EPSON Super White
settings
Gamma: adjusts the gamma
levels of the image
RGB: adjusts the offset and gain
for each color
RGBCMY: adjusts the hue,
saturation, and brightness for
each color
EPSON Super White: reduces
over-exposure of whites in your
image; can be set only when
Color Mode is set to Natural,
Cinema, THX, 3D THX, B&W
Cinema, or 3D Cinema.
Power Consumption Normal Selectsthebrightnessmodeof
ECO
the projector lamp
Normal: sets maximum lamp
brightness
ECO: reduces lamp brightness
and fan noise, and saves power
and lamp life
Auto Iris Off Adjusts the projected luminance
Normal
High Speed
based on the image brightness
when certain Color Modes are
selected
Note: The Brightness setting does not affect lamp brightness. To change the lamp brightness mode,
use the Power Consumption setting.
66
Page 67

Parent topic: Adjusting the Menu Settings
Related concepts
Color Mode
Input Signal Settings - Signal Menu
Normally the projector detects and optimizes the input signal settings automatically. If you need to
customize the settings, you can use the Signal menu.
Note: The available settings depend on the currently selected input source.
To change settings for an input source, make sure the source is connected and select that source.
67
Page 68

Setting Options Description
3D Setup 3D Display Selects various 3D options
2D-to-3D Conversion 3D Display: enables 3D mode
3D Format 2D-to-3D Conversion: converts
3D Depth
Diagonal Screen Size
3D Brightness
Inverse 3D Glasses
3D Viewing Notice
2D images to 3D
3D Format: selects the 3D
format
3D Depth: sets the depth for the
3D image
Diagonal Screen Size: selects
the actual size of the screen to
maximize the 3D effect
3D Brightness: adjusts the
brightness of the 3D image
Inverse 3D Glasses: reverses
the images projected for the left
and right eyes (enable only if 3D
images do not display correctly)
3D Viewing Notice: enables the
viewing notice displayed when
using 3D mode
Aspect See the list of available aspect Sets the aspect ratio (width-to-
ratios height ratio) for the selected input
source
Tracking Varyinglevelsavailable Adjustssignaltoeliminate
vertical stripes in computer
images from the PC input port
Sync. Varying levels available Adjusts signal to eliminate
fuzziness or flickering in
computer images from the PC
input port
Position Up, down, left, right Adjusts the image location on the
screen
68
Page 69

Setting Options Description
Deinterlacing Off Sets whether to convert
Video
Film/Auto
interlaced-to-progressive signals
for certain video image types
Off: for fast-moving video images
Video: for most video images
Film/Auto: for movies, computer
graphics, and animation
Motion Detection 1 to 5 Selects how the image is
converted to a progressive signal
(Adjust this setting if you
experience problems with still
image quality or flickering video.
Select a lower setting for still
images or a higher setting for
fast-moving video content.)
Frame Interpolation Off Smooths fast moving video by
Low
Normal
comparing consecutive frames
and inserting an intermediate
frame between them
High
Super-resolution 0 to 5 Sharpens blurred images
Auto Setup On Automatically optimizes
Off
69
computer image quality
Page 70

Setting Options Description
Advanced Noise Reduction NoiseReduction: reduces
Setup Level
Overscan
HDMI Video Range
Image Processing
flickering in analog images in
three levels
Setup Level: adjusts the level at
which dark areas of the image
are rendered black; leave this
setting at 0% for most video
equipment; check your video
equipment specifications to verify
the correct setting
Overscan: changes the
projected image ratio to make the
edges visible by a selectable
percentage or automatically
HDMI Video Range: sets the
video range to match the setting
of the device connected to the
HDMI input port
Image Processing: adjusts how
images are processed; select
Fast to display images quicker;
select Fine to display images in
higher quality
Note:
• The Deinterlacing setting is available only for 480i, 576i or 1080i signals from Component or HDMI
video sources.
• You can set the HDMI Video Range setting only when the Epson Super White setting is set to Off.
• The Reset setting does not reset the Diagonal Screen Size, 3D Viewing Notice, Aspect, and Image
Processing settings.
• When you view 3D images, the Frame Interpolation and Super-resolution settings are only
available for 1080p 24 fps signals from HDMI video sources.
• The Aspect setting is not available for HD video signals.
70
Page 71

Parent topic: Adjusting the Menu Settings
Related concepts
Image Aspect Ratio
Related tasks
Viewing 3D Images
Projector Feature Settings - Settings Menu
Options on the Settings menu let you customize various projector features.
Setting Options Description
Keystone Varying levels available Adjusts image shape to
rectangular (vertically)
71
Page 72

Setting Options Description
HDMI Link Device Connections Adjusts the HDMI Link options
HDMI Link
Power On Link
Power Off Link
that allow the projector remote to
control HDMI-connected devices
that support the CEC standard
Device Connections: lists the
devices connected to the HDMI1
and HDMI2 ports
HDMI Link: enables or disables
the HDMI Link function
Power On Link: controls what
happens when you turn on the
projector or a linked device
• PJ -> Device or Bidirectional:
turns on the linked device
when the projector is turned on
• Device -> PJ or Bidirectional:
turns on the projector when the
linked device is turned on
Power Off Link: controls
whether linked devices are
turned off when the projector is
turned off
Lock Setting Child Lock Controls projector button locking
Control Panel Lock
to secure the projector
Child Lock: locks the power
button
Control Panel Lock: locks all
buttons except the power button
Projection Front Selects the way the projector
Front/Ceiling
faces the screen so the image is
oriented correctly
Rear
Rear/Ceiling
72
Page 73

Setting Options Description
User Button 2D-to-3D Conversion Assigns a menu option to the
3D Depth
User button on the remote
control for one-touch access
3D Brightness
Inverse 3D Glasses
Power Consumption
Info
Picture in Picture See the list of available Picture in Adjuststhesizeandlocationof
Picture options the sub-screen, swaps sources
and exits Picture in Picture mode
Parent topic: Adjusting the Menu Settings
Related concepts
Projector Security Features
Projector Placement
Related references
Available Picture in Picture Options
Related tasks
Correcting Image Shape with the Keystone Buttons
Connecting to an HDMI Video Source
Changing the Projection Mode Using the Menus
73
Page 74

Projector Setup Settings - Extended Menu
Settings on the Extended menu let you customize various projector setup features that control its
operation.
74
Page 75

Setting Options Description
Operation Direct Power On Selects various operation
Sleep Mode
Illumination
Trigger Out
High Altitude Mode
options
Direct Power On: lets you turn
on the projector without pressing
the power button
Sleep Mode: automatically
places the projector in standby
mode after an interval of
inactivity
Illumination: turns off the lights
on the projector
Trigger Out: outputs a DC 12V
signal from the 3.5 mm mini-jack
Trigger Out port whenever the
projector is turned on
High Altitude Mode: regulates
the projector’s operating
temperature at altitudes above
4921 feet (1500 m)
75
Page 76

Setting Options Description
Display Menu Position Selects various display options
Menu Color Menu Position: adjusts the
Messages
Display Background
Startup Screen
Standby Confirmation
location where the menu is
displayed
Menu Color: selects the color of
the menu
Messages: controls whether
messages are displayed on the
screen
Display Background: selects
the screen color or logo to
display when no signal is
received
Startup Screen: controls
whether the Epson logo appears
when the projector starts up
Standby Confirmation: displays
a confirmation message after
pressing the Standby button on
the remote control
Input Signal VideoSignal Selects the input signals for
Component
certain ports
Video Signal: Specifies the
signal type from input sources
connected to the Video port or
select Auto to detect the signal
automatically
Component: Specifies the
signal type from input sources
connected to the Component
port or select Auto to detect the
signal automatically
76
Page 77

Setting Options Description
Panel Alignment Panel Alignment Corrects color misalignment in
Select Color
Pattern Color
Start Adjustments
the projected image
Panel Alignment: enables
adjustments for color
convergence (the alignment of
the red and blue colors in the
projected image)
Select Color: specifies the color
convergence to correct
Pattern Color: specifies the
color pattern used during panel
alignment
Start Adjustments: starts the
Panel Alignment feature
Language Various languages available Selects the language for
projector menu and message
displays (not changed by Reset
option)
Note: The Reset setting does not reset the High Altitude Mode or Language settings.
Parent topic: Adjusting the Menu Settings
Related tasks
Adjusting the Color Convergence (Panel Alignment)
77
Page 78

Projector Memory Options - Memory Menu
Your projector comes with 10 memory locations where you can save customized settings to obtain the
best picture quality for each of your video inputs.
Setting Description
Load Memory Displays the list of customized settings entries that you have
created; select an entry and press Enter on the remote control to
load it
Save Memory Saves the current projector settings to the projector's memory
Erase Memory Displaysthelistofcustomizedsettingsentriesthatyouhave
created; select an entry and press Enter on the remote control to
erase it
Rename Memory Displays the list of customized settings entries that you have
created; select an entry and press Enter on the remote control to
rename it
Parent topic: Adjusting the Menu Settings
Related tasks
Saving Settings to Memory and Using Saved Settings
78
Page 79

Projector Information Display - Info Menu
You can display information about the projector and input sources by viewing the Info menu. However,
you cannot change any settings in the menu.
Note: The information displayed depends on the currently selected input source.
Note: The lamp usage timer does not register any hours until you have used the lamp for at least 10
hours. Available settings depend on the current input source.
Information item Description
Lamp Hours Displays the number of hours (H) the lamp has been used in each
Power Consumption mode
Source Displays the name of the port to which the current input source is
connected
Input Signal Displays the input signal type setting of the current input source
Resolution Displays the resolution of the current input source
Scan Mode Displays the scan mode (progressive or interlaced)
Refresh Rate Displaystherefreshrateofthecurrentinputsource
3D Format Displays the 3D format of the current input source
Sync Info Displaysinformationthatmaybeneededbyaservicetechnician
79
Page 80

Information item Description
Deep Color Displays Deep Color information
Status Displays information about projector problems that may be needed
by a service technician
Serial Number Displays the projector's serial number
Version Displays the firmware version of the projector
Parent topic: Adjusting the Menu Settings
Related references
Optional Equipment and Replacement Parts
Related tasks
Replacing the Lamp
Resetting the Lamp Timer
Projector Reset Options - Reset Menu
You can reset most of the projector settings to their default values using the Reset All option on the
Reset menu.
You can reset the projector's lamp usage timer to zero when you replace the lamp using the Reset
Lamp Hours option and you can also reset all memory entries using the Reset Memory option.
80
Page 81

You cannot reset the following settings using the Reset All option:
• PC Signal
• Language
• Lamp Hours
• Memory settings
Parent topic: Adjusting the Menu Settings
81
Page 82

Maintaining and Transporting the Projector
Follow the instructions in these sections to maintain your projector and transport it from place to place.
Projector Maintenance
Transporting the Projector
Projector Maintenance
Your projector needs little maintenance to keep working at its best.
You may need to clean the lens periodically, and clean the air filter and air vents to prevent the projector
from overheating due to blocked ventilation.
The only parts you should replace are the lamp, air filter, and remote control batteries. If any other part
needs replacing, contact Epson or an authorized Epson servicer.
Warning: Before cleaning any part of the projector, turn it off and unplug the power cord. Never open
any cover on the projector, except as specifically explained in this manual. Dangerous electrical voltages
in the projector can injure you severely.
Warning: Do not try to service this product yourself, except as specifically explained in this manual.
Refer all other servicing to qualified servicers.
Cleaning the Lens
Cleaning the 3D Glasses
Cleaning the Projector Case
Air Filter and Vent Maintenance
Projector Lamp Maintenance
Replacing the Remote Control Batteries
Parent topic: Maintaining and Transporting the Projector
Related references
Where to Get Help
Cleaning the Lens
Clean the projector's lens periodically, or whenever you notice dust or smudges on the surface.
82
Page 83

• To remove dust or smudges, gently move the shutter to the side and wipe the lens with lens-cleaning
paper.
• To remove stubborn smudges, moisten a soft, lint-free cloth with lens cleaner and gently wipe the
lens. Do not spray any liquid directly on the lens.
Warning: Do not use a lens cleaner that contains flammable gas. The high heat generated by the
projector lamp may cause a fire.
Caution: Do not use glass cleaner or any harsh materials to clean the lens and do not subject the lens
to any impacts; you may damage it. Do not use canned air, or the gases may leave a residue. Avoid
touching the lens with your bare hands to prevent fingerprints on or damage to the lens surface.
Parent topic: Projector Maintenance
Cleaning the 3D Glasses
To remove dust, dirt, smudges, or fingerprints from the glasses, use a lint-free cloth.
83
Page 84

Note: Unplug any charging cables from the glasses before cleaning them.
Caution: Do not use paper towels or any other abrasive materials to clean the glasses.
Parent topic: Projector Maintenance
Cleaning the Projector Case
Before cleaning the projector case, turn off the projector and unplug the power cord.
• To remove dust or dirt, use a soft, dry, lint-free cloth.
• To remove stubborn dirt, use a soft cloth moistened with water and mild soap. Do not spray liquid
directly on the projector.
Caution: Do not use wax, alcohol, benzine, paint thinner, or other chemicals to clean the projector
case. These can damage the case. Do not use canned air, or the gases may leave a residue.
Parent topic: Projector Maintenance
Air Filter and Vent Maintenance
Regular filter maintenance is important to maintaining your projector. Your Epson projector is designed
with an easily accessible, user-replaceable filter to protect your projector and make regular maintenance
simple. Filter maintenance intervals will depend on the environment.
If regular maintenance is not performed, your Epson projector will notify you when the temperature
inside the projector has reached a high level. Do not wait until this warning appears to maintain your
projector filter as prolonged exposure to high temperatures may reduce the life of your projector or lamp.
84
Page 85

Damage due to the failure to properly maintain the projector or its filter may not be covered by the
projector or lamp Limited Warranties.
Cleaning the Air Filter
Replacing the Air Filter
Parent topic: Projector Maintenance
Related references
Projector Light Status
Cleaning the Air Filter
You need to clean the projector's air filter in the following situations:
• The filter or vents get dusty.
• You see a message telling you to clean it.
1. Turn off the projector and unplug the power cord.
2. Press in on the inner edge of the air filter cover to release the latch, then pull to remove.
85
Page 86

3. Pull the air filter out of the projector.
4. Tap each side of the air filter 4 to 5 times to shake off any excess dust.
Caution: Do not use excessive force when tapping the air filter, or it may crack and become
unusable. Do not rinse the air filter in water, or use any detergent or solvent to clean it. Do not use
canned air; the gases may leave a residue, or push dust and debris into the projector's optics or
other sensitive areas.
86
Page 87

5. Vacuum the front of the air filter (the side with the tabs) to remove any remaining dust.
Note: If dust is difficult to remove or the air filter is damaged, replace the air filter.
6. Place the air filter back in the projector as shown.
7. Attach the air filter cover and press gently until it clicks into place.
Parent topic: Air Filter and Vent Maintenance
Related tasks
Replacing the Air Filter
Replacing the Air Filter
You need to replace the air filter in the following situations:
• After cleaning the air filter, you see a message telling you to clean or replace it
• The air filter is torn or damaged
87
Page 88

• If the filter is a dark gray color
You can replace the air filter while the projector is mounted to the ceiling or placed on a table.
1. Turn off the projector and unplug the power cord.
2. Press in on the inner edge of the air filter cover to release the latch, then pull to remove.
3. Pull the air filter out of the projector.
Note: Air filters contain polypropylene. Dispose of used air filters according to local regulations.
88
Page 89

4. Place the new air filter in the projector as shown.
5. Attach the air filter cover and press gently until it clicks into place.
Parent topic: Air Filter and Vent Maintenance
Projector Lamp Maintenance
The projector keeps track of the number of hours the lamp is used and displays this information in the
projector's menu system.
Replace the lamp as soon as possible when the following occurs:
• The projected image gets darker or starts to deteriorate
• A message appears when you turn on the projector telling you to replace the lamp
• The projector's lamp light is flashing orange and its power light is flashing blue
Replacing the Lamp
Resetting the Lamp Timer
Parent topic: Projector Maintenance
Related references
Optional Equipment and Replacement Parts
Projector Information Display - Info Menu
Projector Lamp Specifications
Replacing the Lamp
Before you replace the lamp, let the projector cool down for at least one hour so the lamp will not be hot.
Warning: Let the lamp fully cool before replacing it to avoid injury.
89
Page 90
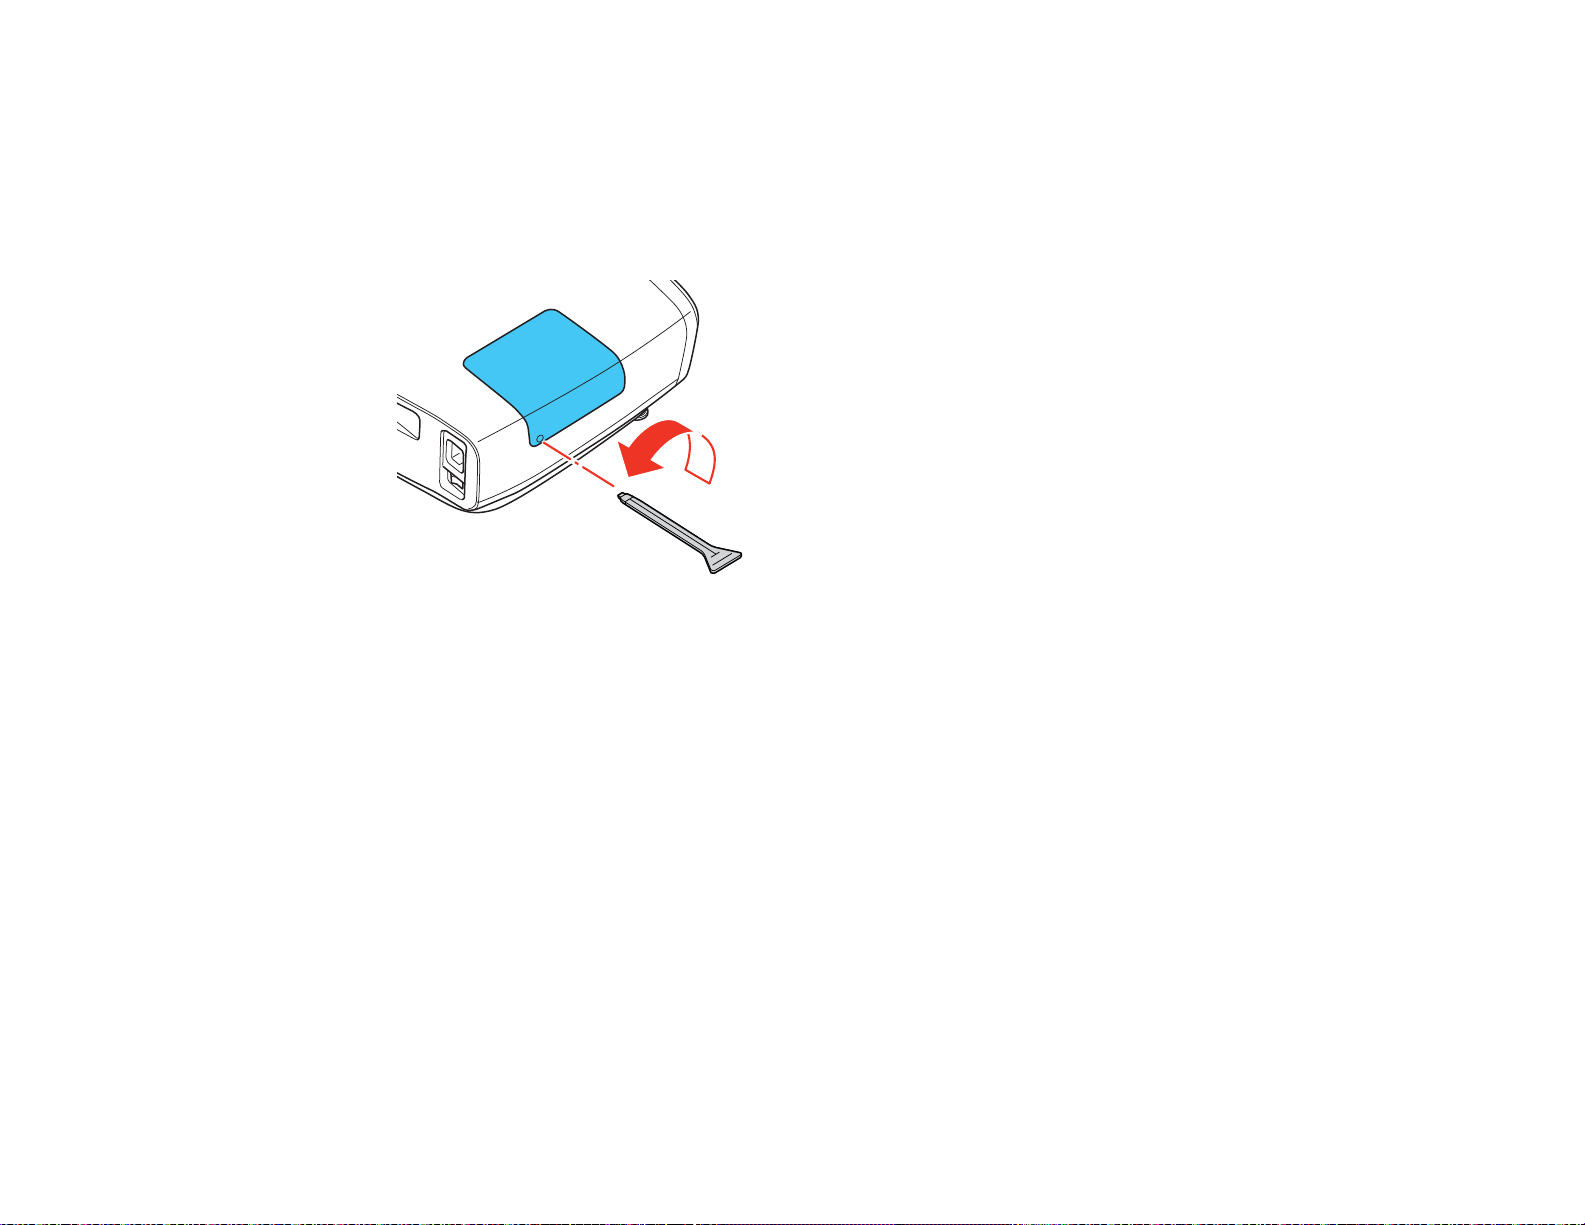
You can replace the lamp while the projector is mounted to the ceiling, if necessary.
1. Turn off the projector and unplug the power cord.
2. Allow the projector lamp to cool down for at least one hour.
3. Use the screwdriver included with the replacement lamp to loosen the screw securing the lamp
cover.
Warning: If the lamp is broken, glass fragments may be loose inside the lamp chamber. Be careful
removing any broken glass to avoid injury. If the projector is installed on the ceiling, stand to the side
of the lamp cover and not underneath it; pieces of glass could fall into your eyes or mouth when you
open the lamp cover.
90
Page 91

4. Slide the lamp cover out and lift it off.
5. Loosen the screws securing the lamp to the projector. The screws do not come all the way out.
91
Page 92
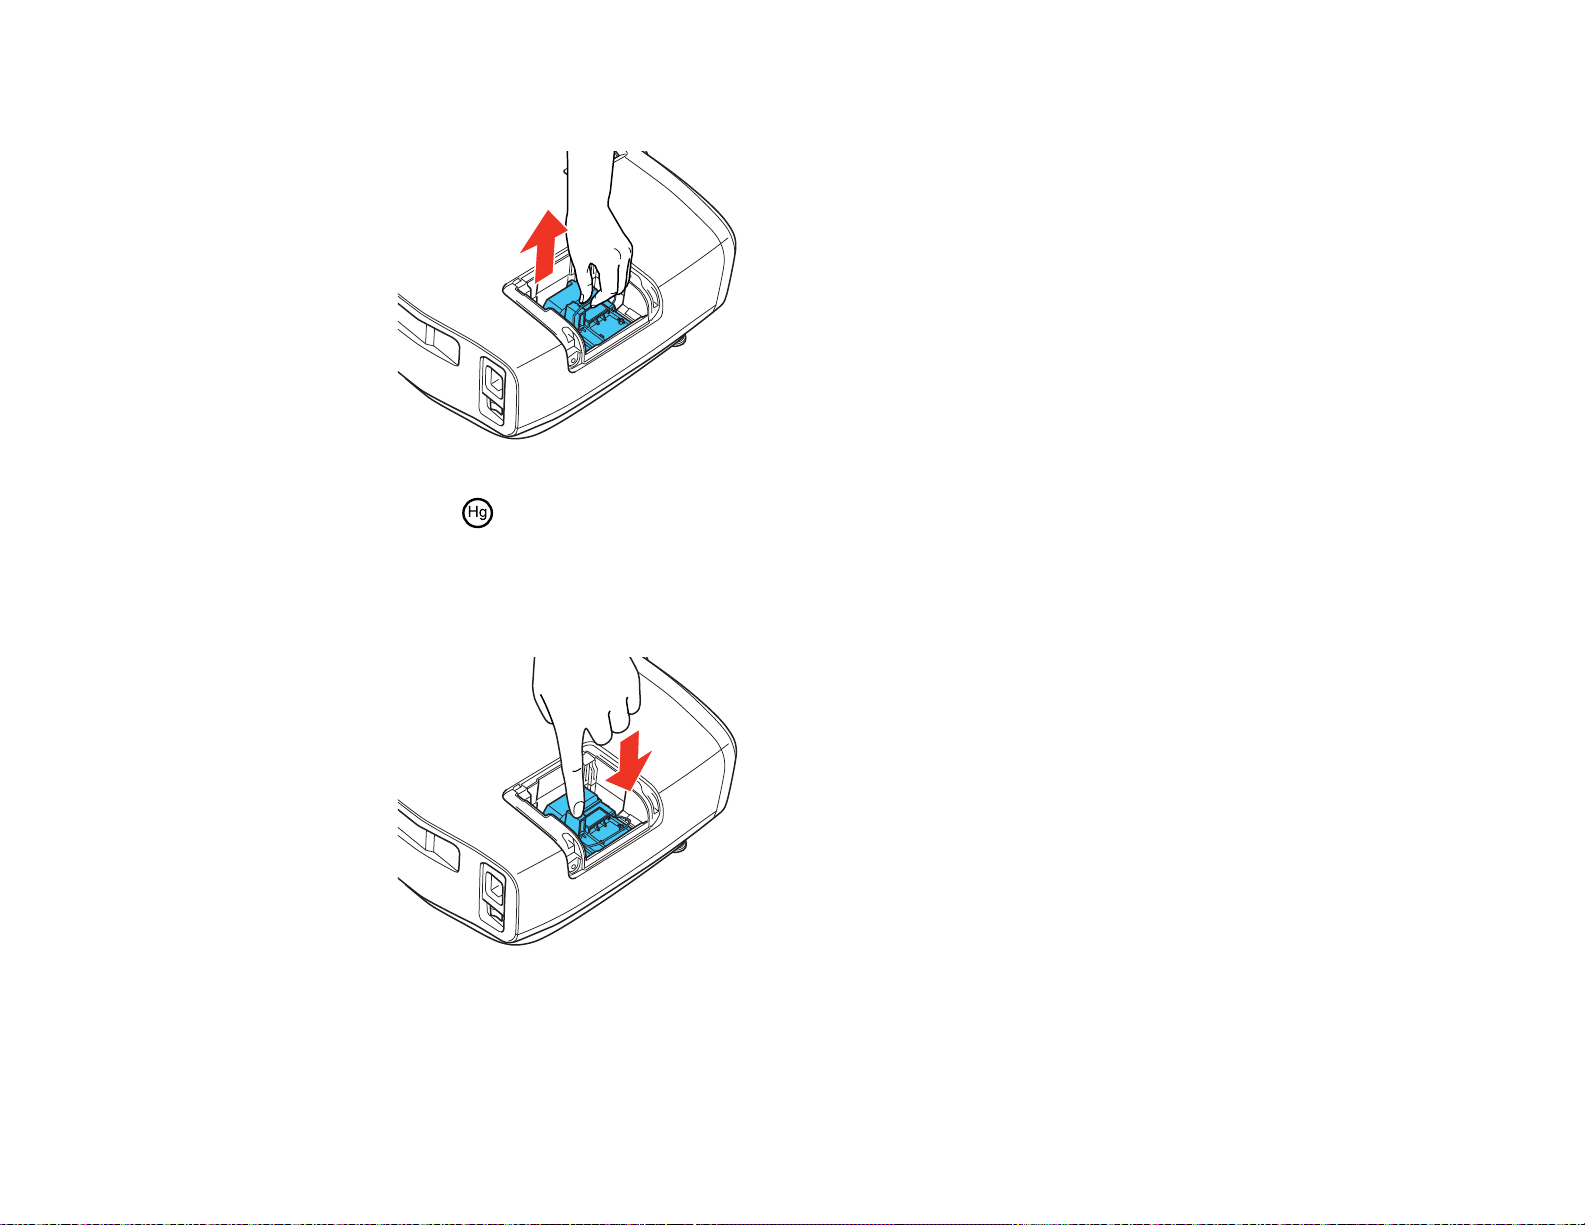
6. Lift up the lamp handle and gently pull the lamp out of the projector.
Note: The lamp(s) in this product contain mercury. Please consult your state and local
regulations regarding disposal or recycling. Do not put in the trash.
7. Gently insert the new lamp into the projector. If it does not fit easily, make sure it is facing the right
way. Press the handle down until it locks into place.
Caution: Do not touch any glass on the lamp assembly to avoid premature lamp failure.
92
Page 93

8. Push in the lamp firmly and tighten the screws to secure it.
Caution: Do not over-tighten the screws.
9. Replace the lamp cover and tighten the screw to secure it.
Note: Be sure the lamp cover is securely installed or the lamp will not come on.
Reset the lamp timer to zero to keep track of the new lamp’s usage.
Parent topic: Projector Lamp Maintenance
93
Page 94

Related tasks
Resetting the Lamp Timer
Resetting the Lamp Timer
You must reset the lamp timer after replacing the projector's lamp to clear the lamp replacement
message and to keep track of lamp usage correctly.
Note: Do not reset the lamp timer if you have not replaced the lamp to avoid inaccurate lamp usage
information.
1. Turn on the projector.
2. Press the Menu button.
3. Select the Reset menu and press Enter.
4. Select Reset Lamp Hours and press Enter.
You see a prompt asking if you want to reset the lamp hours.
5. Select Yes and press Enter.
6. Press Menu or Esc to exit the menus.
Parent topic: Projector Lamp Maintenance
94
Page 95

Replacing the Remote Control Batteries
The remote control uses two AA manganese or alkaline batteries. Replace the batteries as soon as they
run out.
Caution: Use only the type of batteries specified in this manual. Do not install batteries of different types,
or mix new and old batteries.
1. Remove the battery cover as shown.
2. Remove the old batteries.
Warning: If the battery fluid has leaked, wipe it away with a soft cloth and avoid getting the fluid on
your hands. If it gets on your hands, wash them immediately to avoid injury.
95
Page 96

3. Insert the batteries with the + and – ends facing as shown.
4. Replace the battery cover and press it down until it clicks into place.
Warning: Dispose of used batteries according to local regulations. Do not expose batteries to heat
or flame. Keep batteries out of the reach of children; they are choking hazards and are very
dangerous if swallowed.
Parent topic: Projector Maintenance
Related references
Remote Control Specifications
96
Page 97

Transporting the Projector
The projector contains precision parts, some of which are glass. Follow these guidelines to transport,
ship, or store the projector safely:
• Remove any equipment connected to the projector.
• Center the lens position using the vertical and horizontal lens shift dials.
• When transporting the projector a long distance or as checked luggage, pack it in a firm box with
cushioning around it and mark the box "Fragile."
• When shipping the projector for repairs, place it in its original packing materials, if possible, or use
equivalent materials with cushioning around the projector. Mark the box "Fragile."
Note: Epson shall not be liable for any damages incurred during transportation.
Parent topic: Maintaining and Transporting the Projector
97
Page 98

Solving Problems
Check the solutions in these sections if you have any problems using the projector.
Projection Problem Tips
Projector Light Status
Solving Image Problems
Solving Projector or Remote Control Operation Problems
Where to Get Help
Projection Problem Tips
If the projector is not working properly, try turning it off and unplugging it. Then plug it back in and turn it
on.
If this does not solve the problem, check the following:
• The lights on the projector may indicate what the problem is.
• The solutions in this manual can help you solve many problems.
If none of these solutions help, you can contact Epson for technical support.
Parent topic: Solving Problems
Related references
Where to Get Help
Projector Light Status
98
Page 99

Projector Light Status
The lights on the projector indicate the projector status and let you know when a problem occurs. Check
the status and color of the lights and look for a solution in the table here.
1 Status light
2 Lamp light
3 Temp light
4 Power light
Power light Status light Lamplight Temp light Status and solution
Blue Blue Off Off Normal operation
99
Page 100

Power light Status light Lamplight Temp light Status and solution
Blue Flashing blue Off Off Warming up; wait for an image to
appear
Off Off Off Off Standby or sleep mode
Blue Flashing blue Off Off Shutting down; when the Status light
stops flashing, you can unplug the
projector
Flashing blue Varies Off Flashing Projector is too hot
orange
• Make sure that the vents and air
filter are not clogged with dust or
obstructed by nearby objects
• Clean or replace the air filter
• Make sure the environmental
temperature is not too hot
Off Flashing blue Off Orange Projector has overheated and turned
off; leave it turned off to cool down for
about five minutes, then do the
following:
• Make sure that the vents and air
filter are not clogged with dust or
obstructed by nearby objects
100
• Clean or replace the air filter
• If operating the projector at high
altitude, turn on High Altitude
Mode
• If the problem persists, unplug the
projector and contact Epson for
help
 Loading...