

Page 1
Page 2

User’s Guide
A
B
Page 3

IMPORTANT NOTICE
DISCLAIMER OF WARRANTY
Epson America makes no representations or warranties, either express or
implied, by or with respect to anything in this manual, and shall not be liable for
any implied warranties of merchantability and fitness for a particular purpose or
for any indirect, special, or consequential damages. Some states do not allow the
exclusion of incidental or consequential damages, so this exclusion may not
apply to you.
COPYRIGHT NOTICE
All rights reserved. No part of this publication may be reproduced, stored in a
retrieval system, or transmitted, in any form or by any means, electronic,
mechanical, photocopying, recording, or otherwise, without the prior written
permission of Epson America, Inc. No patent liability is assumed with respect to
the use of information contained herein. Nor is any liability assumed for
damages resulting from the use of the information contained herein. Further,
this publication and features described herein are subject to change without
notice.
TRADEMARKS
EPSON and EPSON Stylus are registered trademarks of SEIKO EPSON
CORPORATION.
PhotoPC is a registered trademark and EPSON FaxAdvice, EPSON Photo!3,
HyPict, PhotoEnhance, and Image Authentication System are trademarks of
Epson America, Inc.
EPSON SoundAdvice is a service mark of Epson America, Inc.
Image Expert and Camio are trademarks of Sierra Imaging, Inc. in the United
States and other countries and are used under license.
Lexar Media is a trademark of Lexar Media.
General notice: Other product names used herein are for identification purposes
only and may be trademarks of their respective owners. EPSON disclaims any
and all rights in those marks.
A NOTE CONCERNING RESPONSIBLE USE OF
COPYRIGHTED MATERIALS
Digital cameras and scanners, like photocopiers and conventional cameras, can
be misused by improper copying of copyrighted material. While some countries’
laws permit limited copying in certain circumstances, those circumstances may
not be as broad as some people assume. EPSON encourages each user to be
responsible and respectful of the copyright laws when using digital cameras and
scanners.
Copyright © 1999 by Epson America, Inc. CPD 8478
Torrance, California, USA 7/99
ii
Page 4

Contents
Introduction
PhotoPC 800 Features Intro-2
Optional Accessories Intro-4
Minimum System Requirements Intro-4
Windows Systems Intro-4
Macintosh Systems Intro-5
Where To Get Help Intro-6
Software Support Intro-7
Software Licensing Intro-7
Registration Intro-7
Safety Instructions Intro-8
1 Getting Started
Unpacking Your PhotoPC 800 1-1
Identifying Camera Parts 1-2
Using Rechargeable NiMH Batteries 1-4
Charging Batteries 1-4
Installing Batteries 1-6
Battery Options 1-8
Attaching the Wrist Strap 1-9
Installing Your Memory Card 1-10
Setting the Date and Time 1-11
Formatting Your Memory Card 1-12
Removing Your Memory Card 1-13
Installing Your PhotoPC 800 Software 1-14
Installing for Windows 98, Windows 95,
or Windows NT 4.0 1-14
Installing on a Macintosh 1-16
2 Taking Pictures
Using the Camera Dial 2-1
Reading the Status Display Panel 2-2
Checking the Battery 2-2
Checking the Picture Counter 2-3
Taking Pictures With the Viewfinder 2-4
Taking Pictures With the LCD Screen 2-6
A
B
iii
Page 5

3 Using the Camera Buttons to Change
Settings
Setting Image Quality 3-1
Standard 3-2
Fine 3-2
Super Fine 3-2
HyPict 3-2
Using the Flash 3-3
Auto 3-3
Forced Flash 3-3
Flash Off 3-3
Slow Synchronized Flash 3-3
Taking Pictures With the Timer 3-4
Making Advanced Adjustments 3-5
Adjusting the Sensitivity Setting 3-5
Adjusting the White Balance Setting 3-6
Adjusting the Exposure Setting 3-7
4 Using the LCD Menus to Change Settings
Choosing the User Mode 4-2
Taking Color or Black and White Pictures 4-4
Taking Quick Shots 4-4
Taking Digital Zoom Pictures 4-5
Taking Close-Ups With Macro Mode 4-7
Taking Digital Panoramic Pictures 4-8
Continuous Shooting 4-10
Continuous Shooting Using the Timer 4-11
Interval Shooting 4-12
Adding Voice Recordings to Pictures 4-13
Using Programmed Subject Settings 4-15
Adjusting the Sensitivity Setting 4-17
Adjusting the White Balance Setting 4-18
Photographing With Fixed White Balance 4-19
Photographing With User Defined White
Balance 4-21
Adjusting Exposure 4-22
Making Predefined Exposure Adjustments 4-23
Making Advanced Exposure Adjustments 4-24
Adjusting the Focus 4-24
Changing the Metering Method 4-25
Setting Camera Options 4-26
Setting the Automatic Power Off Feature 4-26
Setting the LCD Brightness 4-28
Setting the Alert Beep 4-28
Setting the Time and Date 4-29
Setting the Language 4-30
iv
Page 6

5 Playing Back Photos
Playing Back Pictures One by One 5-2
Playing Back Multiple Pictures 5-3
Deleting Pictures 5-4
Deleting the Currently Displayed Picture 5-4
Deleting All Pictures 5-5
Deleting Selected Pictures 5-5
Locking Pictures 5-6
Unlocking Pictures 5-8
Adding Audio Recordings 5-8
Deleting Audio Recordings 5-10
Magnifying a Picture 5-11
Viewing Picture Information 5-12
Playing Your Pictures as a Slide Show 5-13
Excluding Pictures From a Slide Show 5-14
Rotating Pictures in a Slide Show 5-15
Playing Back Pictures on TV 5-17
6 Getting Photos Into Your Computer
Connecting the Camera 6-1
Connecting to a Windows PC 6-2
Connecting to a Macintosh 6-4
Transferring Photos and Sound Files 6-5
What To Do if You See an Error Message 6-9
Getting Images Into TWAIN-Compliant
Applications 6-10
Getting Images That You Can Import 6-12
What To Do If the Camera Is Not
Responding 6-14
7 Getting Your Photos Into Documents
Importing Images Into Documents 7-2
Getting Images With Copy and Paste 7-3
Using Drag and Drop From an Album
(Windows Only) 7-4
Getting Images With the Camio Viewer
(Windows) 7-6
Dragging and Dropping a Picture Into
a Document 7-7
Transferring Images Before Placing Them 7-8
8 Working With Photos and Albums
Using Image Expert Albums 8-2
Organizing Pictures in Albums 8-2
Renaming a Picture 8-3
Viewing Picture Information 8-3
A
B
v
Page 7

Printing an Image or Album 8-4
Choosing the Layout Style 8-5
Adding Text 8-6
Choosing Album Images 8-7
Adjusting the Printed Area 8-7
Adding Sound to an Image 8-8
Playing Back Sounds 8-9
Editing Sounds 8-10
Deleting Sounds 8-10
Displaying Albums as Slide Shows 8-11
Using an Album as a Screen Saver 8-12
Setting an Image as Wallpaper 8-12
Copying to Diskette or Zip Disk 8-13
Viewing the Pictures on Diskette or
Zip Disk 8-14
Sending Pictures and Sound by E-mail 8-14
9 Editing Images
Viewing and Selecting Images 9-2
Applying Quick Fix 9-3
Correcting an Image 9-3
Cropping an Image 9-5
Resizing an Image 9-5
Rotating an Image 9-6
Flipping an Image 9-7
Applying Special Effects 9-8
Changing the Number of Colors 9-9
10 Operating the Camera From Your Computer
Taking Pictures From Your Computer With
Image Expert 10-1
Using the Self Timer 10-3
Taking Pictures With EPSON Photo!3 10-4
Adjusting Camera Settings From Your Computer 10-5
Changing Settings With Image Expert 10-5
Changing Settings With EPSON Photo!3 10-7
11 Using Your Camera for Presentations
Uploading Images to the Camera 11-1
Uploading Images From Your Windows PC 11-2
Uploading Images From Your Macintosh 11-5
Converting Presentations 11-7
Capturing Windows Screens 11-8
Capturing Macintosh Screens 11-9
Projecting Your Presentation 11-11
12 Printing Directly From the Camera
Connecting the Camera to the Printer 12-2
Starting Direct Print 12-3
vi
Page 8

Printing 12-4
Printing Single and Multiple Images 12-4
Producing Your Printout 12-8
Printing a Card 12-10
Printing Album Images 12-11
Printing Stickers 12-13
Printing an Index of Your Images 12-15
Removing the Direct Print Program 12-16
Reinstalling the Direct Print Program 12-17
Reading Error and Status Messages 12-17
13 Maintenance and Troubleshooting
Caring for the Camera and Battery Charger 13-1
Cleaning the Camera and Battery Charger 13-1
Storing the Camera 13-2
Solving Camera Problems 13-2
Solving Picture Problems 13-8
B Specifications
Camera B-1
Physical Dimensions B-1
Power B-1
Technical B-2
Environmental B-3
Safety B-3
Photographic B-3
Memory Card Picture Capacity B-4
NiMH Battery Charger B-5
Physical Dimensions B-5
Technical B-5
Optional AC Adapter B-5
Physical Dimensions B-5
Technical B-5
CompactFlash Card B-5
Physical Dimensions B-5
A Optional Accessories
Using the Universal AC Adapter A-2
Using an Optional Tripod A-4
Using a PCMCIA Adapter A-4
Installing the PCMCIA Adapter A-4
Transferring Photos With the Adapter A-5
About the IOMEGA Clik! Drive A-6
Index
A
B
vii
Page 9

Introduction
our new EPSON
two megapixel, USB and serial digital camera small
Y
enough to fit in your pocket, purse, or briefcase. It includes
three different user modes with three levels of control: fully
automatic point-and-shoot for the beginner photographer,
and increasing levels of control for intermediate and expert
photographers.
The PhotoPC 800 comes with a built-in microphone that
lets you add voice messages to your photos, and an LCD
screen so you can view your pictures before and after you
capture them. You can display your images on a TV or
multimedia projector, or transfer them to your computer.
You can even upload pictures, text, and graphics into your
camera, and play them back for presentations.
PhotoPC
800 is a high resolution,
Introduction
A
B
1
Page 10

The PhotoPC 800 captures images at 1600
× 1200 pixel
resolution in 24-bit color, using a 2.14 megapixel CCD
sensor. With EPSON’s HyPict™
technology, the images can be interpolated to 1984
image enhancement
× 1488
pixels right inside the camera.
Your PhotoPC 800 comes complete with cables, batteries,
battery charger, soft camera case, handstrap, and 8MB
CompactFlash
™
memory card. It also comes with a
CD-ROM with software and utilities for downloading,
editing, organizing, and printing your pictures.
PhotoPC 800 Features
PhotoPC 800 is a complete system for capturing digital
images, and includes the following features:
◗ 2.14 million pixel CCD sensor
◗ Resolutions of 1600
1984
× 1488 pixels (interpolated) using EPSON’s
HyPict image enhancement technology
× 1200 pixels, and up to
◗ 24-bit color or grayscale image capture
◗ High-speed image processing (one second per image in
quick shot mode)
◗ 8MB EPSON CompactFlash card that holds
approximately 24 fine-resolution or 120 standard-
resolution images
◗ Built-in microphone that lets you record a voice message
of up to 10 seconds for each picture
◗ 1.8-inch, active matrix TFT color LCD screen that
supports instant preview, playback, delete, and power
save mode
◗ Capability to print directly to several EPSON ink jet
printers—without using a computer
◗ Video output for playing your pictures back on a TV,
VCR, or projector
◗ Macro, 2× digital zoom, panorama, quick shot mode, and
interval and continuous shooting
Introduction
2
Page 11

◗ Adjustments for white balance, exposure, sensitivity,
aperture, shutter, and focus
◗ Built-in flash with a slow synchronized mode for night
photography
◗ Four rechargeable NiMH AA batteries and a fast charger
◗ Automatic shut-off to save batteries
◗ Automatic date and time recording for each picture
◗ Serial and USB cables for transferring photos to your
Windows
◗ Fully USB-compatible
Your camera comes with the PhotoPC 800 software suite,
which includes the following applications for both PC and
Macintosh users:
◗ Sierra Imaging Image Expert
organizing, editing, and printing your pictures
◗ The EPSON Photo!3
for transferring your pictures
or Macintosh computer
™
software for transferring,
™
application and TWAIN driver
◗ EPSON Photo File Uploader for converting
presentation slides into image files and uploading them
to your camera
◗ EPSON Photo Program Uploader for installing the
Direct Print program on your camera (Direct Print lets
you print directly from the camera to a number of
EPSON ink jet printers)
A
B
Introduction
3
Page 12

Optional Accessories
EPSON offers these accessories for the PhotoPC 800:
◗ Universal AC adapter (B867062) for use with any
standard (100 to 240 V) electrical outlet
◗ Additional or replacement NiMH rechargeable batteries
(B818061)
◗ Additional or replacement universal NiMH Power Pak,
which includes batteries and charger (B818172)
◗ EPSON Image Authentication System
(PPC8–IAS)
You can also obtain additional CompactFlash memory cards
and PCMCIA adapters from leading suppliers, such as Lexar
™
Media
and SanDisk.
™
(IAS) software
Minimum System Requirements
To transfer images to your computer and edit them, make
sure your system meets these minimum requirements:
Windows Systems
◗ IBM
◗ Microsoft
◗ Serial port with standard RS-232C interface (19200 bps
◗ At least 32MB RAM
◗ Double-speed CD-ROM drive
◗ At least 40MB free hard disk space
◗ VGA or SVGA monitor with at least 256-color display
◗ Mouse or other pointing device
-compatible PC with 486 or higher processor
Windows 98, Windows 95, or
Windows NT
4.0 (Service Pack 3 or later
recommended)
or higher), or USB support for Windows 98 computer
with built-in USB port.
Introduction
4
◗ 16-bit sound card and speakers (for voice annotation
feature only)
Page 13

Macintosh Systems
◗ One of the following systems:
™
Macintosh PowerPC
7.5 or later
Power Macintosh
8.51 or later
™
iMac
computer with System Software Version 8.1 with
iMac Update 1.0
◗ At least 32MB RAM
◗ At least 30MB free hard disk space
◗ CD-ROM drive
◗ VGA monitor with minimum resolution of 640 × 480
◗ Macintosh modem/printer serial port (19200 bps, or
higher) or built-in USB port on an iMac or new
Power Mac G3
◗ 16-bit sound card and speakers (for voice annotation
feature only)
with System Software Version
®
G3 with System Software Version
NOTE
If your iMac is running OS 8.1, you must download and install the
iMac Update 1.0 from Apple at http://swupdates.info.apple.com
before you install the PhotoPC 800 software. Contact Apple
Computer if you have problems installing this update or if you
have any questions. If your iMac is running OS 8.5, you do not
need to download and install the iMac Update 1.0. Your operating
system already includes full support for the PhotoPC 800
software. (To find out which operating system your iMac is
running, select About This Computer in the Apple menu.)
A
B
Introduction
5
Page 14

Where To Get Help
Automated telephone services
EPSON provides technical assistance through electronic
support services and automated telephone services
24 hours a day.
The following tables list the contact information:
Electronic support services
Service Access
World Wide Web From the Internet, you can reach EPSON’s Home
EPSON Internet FTP Site If you have Internet FTP capability, use your Web
EPSON Forum on
CompuServe
®
Page at http://www.epson.com.
browser (or other software for FTP downloading)
to log onto ftp.epson.com with the user name
anonymous and your e-mail address as the
password.
Members of CompuServe can type GO EPSON at
the menu prompt to reach the Epson America
Forum. For a free introductory CompuServe
membership, call (800 ) 848-8199 and ask for
representative #529.
Automated telephone services
Service Access
EPSON SoundAdvice For pre-recorded answers to commonly asked
SM
questions about EPSON products 24 hours a day,
seven days a week, call (800) 922-8911.
Service Access
EPSON FaxAdvice
EPSON Referral Service For the location of your nearest Authorized
To speak to a technical support representative, dial
(310) 974-1983
to 6PM, Pacific Time, Monday through Friday.
6
AM
™
(U.S.), or
Access EPSON’s technic al information li brary by
calling (800) 922-8911. You mu st provide a return
fax number to use this service.
EPSON Reseller call (800) 922-8911.
(905) 709-3839
(Canada),
Toll or long distance charges may apply.
Before you call, please have the following information ready:
Product name
◗
Product serial number
◗
Computer configuration
◗
Description of the problem
◗
Introduction
6
Page 15

You can purchase manuals and accessories from EPSON
Accessories at (800) 873-7766 (U.S. sales only). In Canada,
please call (800) 873-7766 for dealer referral. Or visit our
website at www.epsonsupplies.com (U.S. sales only).
Software Support
If you are having problems with a software application
included with the camera, you can call one of the following
numbers for technical support:
◗ (800) 501-8902 for Sierra Imaging Image Expert
software questions. Available weekdays 9 AM to 5 PM,
Pacific Time. Or e-mail support@sierraimaging.com.
Worldwide support number is (831) 461-4710.
◗ (310) 974-1983 for the EPSON Photo!3 application
and TWAIN driver, the EPSON Photo File Uploader,
the EPSON Photo!3 Program Uploader, and the Direct
Print software.
Software Licensing
You can install EPSON Photo!3, the EPSON Photo File
Uploader, and the EPSON Photo!3 Program Uploader on
multiple computer systems. If you want to install Image
Expert on multiple computer systems, please contact Sierra
Imaging at (800) 501-8902 regarding the licensing fee.
Registration
Please take a minute to fill out the registration card for the
PhotoPC 800 digital camera and mail it back to us. This
enables you to receive special information on accessories,
new products, and software upgrades. You’ll get immediate
attention if you have a problem with your PhotoPC 800.
A
Introduction
B
7
Page 16

Safety Instructions
Read all of these instructions before using your camera and
battery charger. Also follow all warnings and instructions
marked on the camera, battery charger, and batteries.
◗ To reduce the risk of electric shock, do not remove the
camera’s cover or open any of the compartments except
as instructed in this
◗ To prevent fire or electric shock, do not insert objects
through any openings in the camera or battery charger.
Do not expose the camera or battery charger to rain or
moisture.
User’s Guide
.
◗ If the battery charger shows unusual signs such as noise,
odor, or smoke, unplug it immediately.
◗ To avoid damage to the optics of the camera, do not
expose the lens to direct sunlight for extended periods of
time.
◗ Do not use the charger near water. Never insert or
remove the charger’s power plug with wet hands.
◗ Keep the charger away from heat sources. Do not use
outside the temperature range of 32 to 95
(0 to 35
◗ Do not use the charger within reach of children.
°
C).
F
°
◗ To prevent fire or explosion, do not use the camera or
battery charger where inflammable or volatile gas is
stored.
◗ If the camera shows unusual signs such as noise, odor, or
smoke, turn it off immediately. Remove the batteries
and/or disconnect the AC adapter, and unplug the AC
adapter from the electrical outlet.
Introduction
8
◗ Do not insert batteries backwards.
◗ Use only the types of power sources listed on the charger
label and in this
the charger directly from a standard domestic electrical
outlet.
◗ Do not charge the batteries using an electrical outlet on
an airplane.
User’s Guide
. Always supply power to
Page 17

◗ Do not use the camera outdoors during adverse weather
conditions.
◗ Do not store the camera near sources of bright light,
direct sunlight, high humidity, heat, excessive dirt or
dust, or where it will be exposed to strong vibrations or
magnetic fields.
◗ To prevent possible eye injury, do not take flash pictures
of faces at close range.
◗ Avoid sudden temperature changes, which can cause
moisture to condense on the camera. Keep the camera in
a case or bag if you need to move it from a cold
environment to a warm one. Allow time for the camera
and its optional accessories to adjust to temperature
changes before using them.
◗ Do not use a frayed or damaged power cord with the
AC adapter.
◗ Remove batteries and/or unplug the camera and the AC
adapter and refer servicing to qualified service personnel
under the following conditions: if the power cord or
plug is damaged; if liquid has entered the camera; if the
camera has been dropped or its exterior has been
damaged; if the camera or its optional accessories do not
operate normally or exhibit a distinct change in
performance.
◗ Adjust only those controls that are covered by the
operating instructions.
◗ Do not attempt to service the camera or battery charger
yourself. Refer all servicing to qualified service
personnel.
◗ If the liquid crystal solution contained in the display
panel or in the LCD screen leaks out and gets on your
hands, wash them thoroughly with soap and water. If it
gets in your eyes, flush them immediately with water.
A
Introduction
B
9
Page 18

Introduction
10
Page 19
14.
1
1
efore you can start using your PhotoPC 800, you
need to charge the batteries. You should also be familiar
B
with all the camera components.
This chapter describes the following:
◗
Unpacking your PhotoPC 800
◗
Identifying camera parts
◗
Using rechargeable NiMH batteries
◗
Attaching the wrist strap
◗
Using the CompactFlash memory card
◗
Setting the date and time
◗
Installing your PhotoPC 800 software
Getting Started
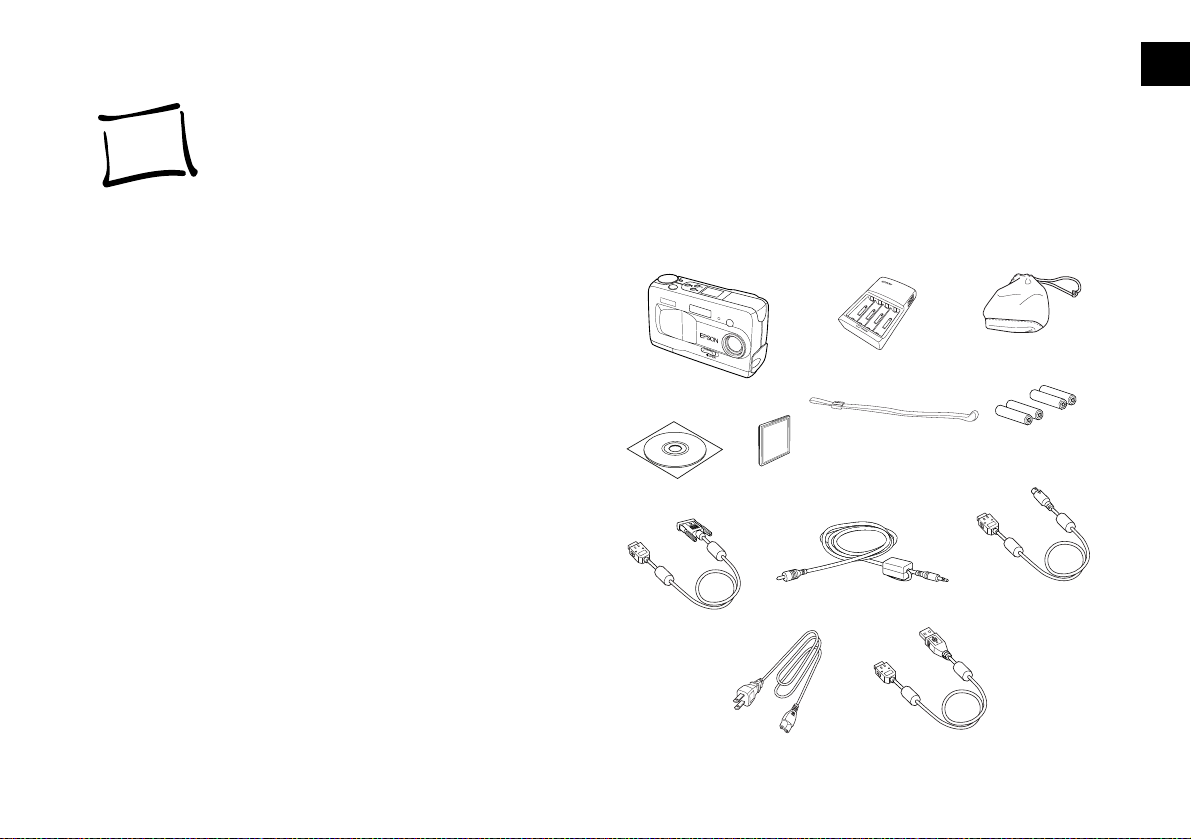
Unpacking Your PhotoPC 800
Make sure you have all the parts shown below.
battery charger
camera
wrist strap
software
PC serial cable
AC power cord
Compac tFlash
card (8MB)
video cable
Mac/Direct Print
serial cable
camera bag
rechargeable
batteries
A
USB cable
B
Getting Started
1-1
Page 20
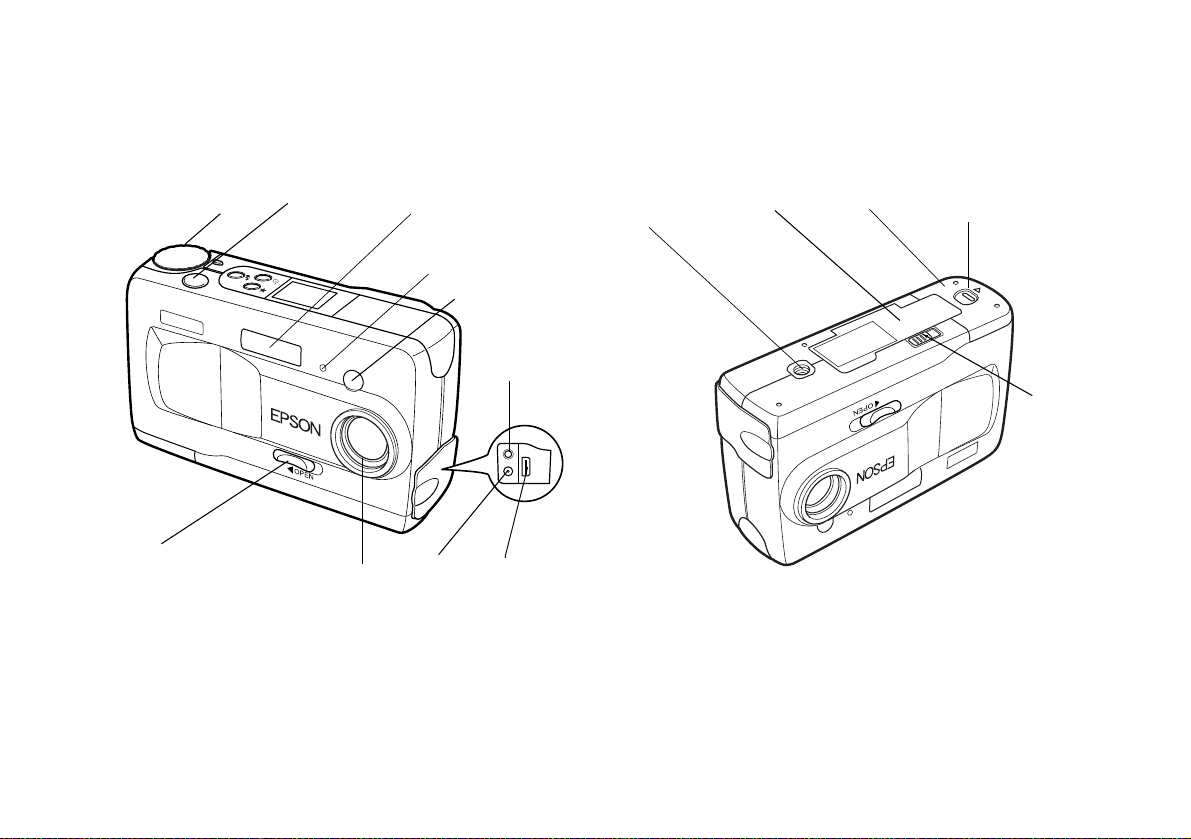
Identifying Camera Parts
camera dial
lens cover switch
shutter button
front view
lens
flash
timer light
viewfinder
AC adapter
connector
video out
connector
interface
connector
tripod
socket
memory
card cov er
battery
cover
bottom view
battery
cover lock
memory
card cov er
lock
Getting Started
1-2
Page 21
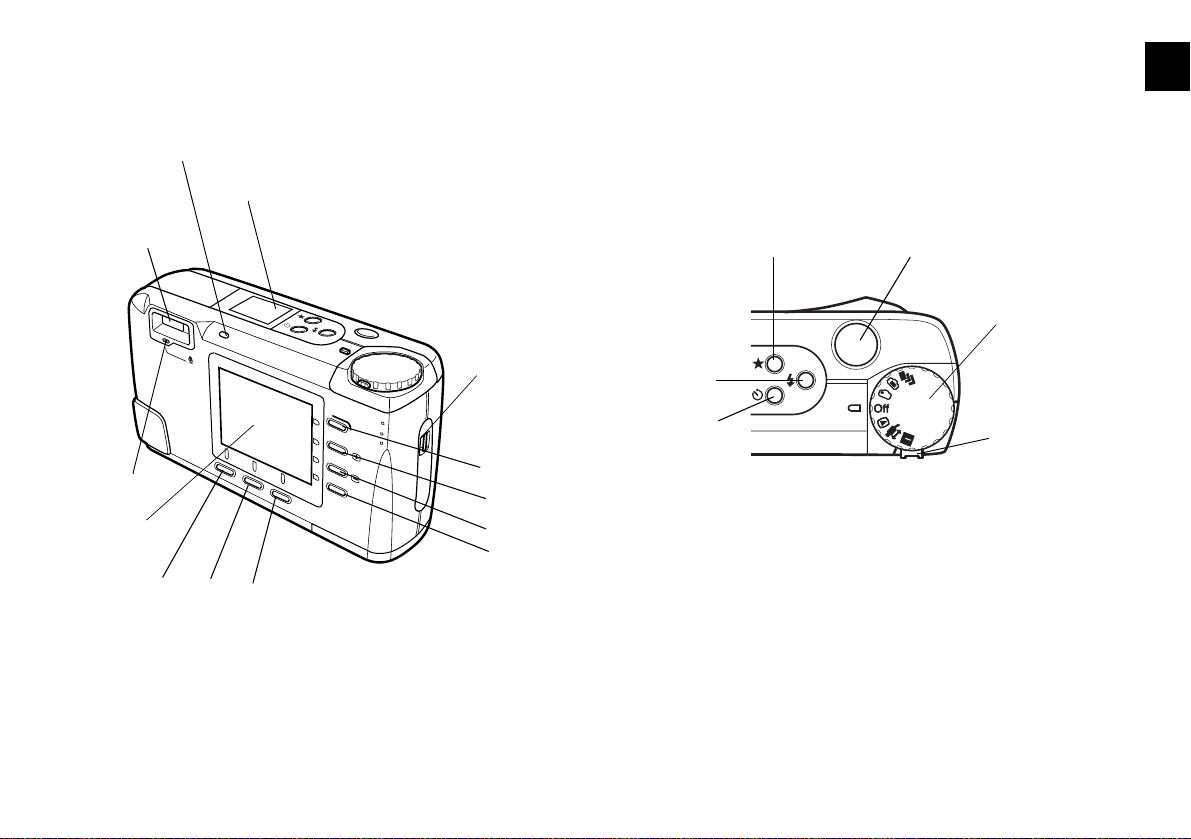
camera status light
1
viewfinder
and photo
capture light
microphone
LCD
screen
MENU
button
status display panel
ISO
W.B.
button
button
back view
hand strap
holder
top button
(unlabeled)
+ button
− button
bottom
button
(unlabeled)
image quality button
flash button
self timer button
shutter button
camera dial
dial lo ck
top view
A
B
Getting Started
1-3
Page 22
Using Rechargeable NiMH Batteries
Your PhotoPC 800 comes with a charger and four
rechargeable NiMH batteries that can be recharged hundreds
of times. While you use two batteries in your camera, you
can keep a replacement set of batteries charged and ready to
take along.
WARNING
Shock hazard. Make sure you use the charger only with EPSON
rechargeable NiMH batteries (model EU-24). To avoid the danger
of leakage or explosion, do not place any other batteries in the
charger. Read all safety and handling instructions in the
Introduction of this guide before using the charger.
NOTE
New batteries need to be fully charged three times before you
use them. This process takes approximately five or six hours—
but you only need to do it once. When you need to recharge your
batteries in the future, it takes approximately two and a half hours
for a full charge.
Charging Batteries
It’s important to fully charge your batteries, so they will last
as long as possible before they need recharging.
Getting Started
1-4
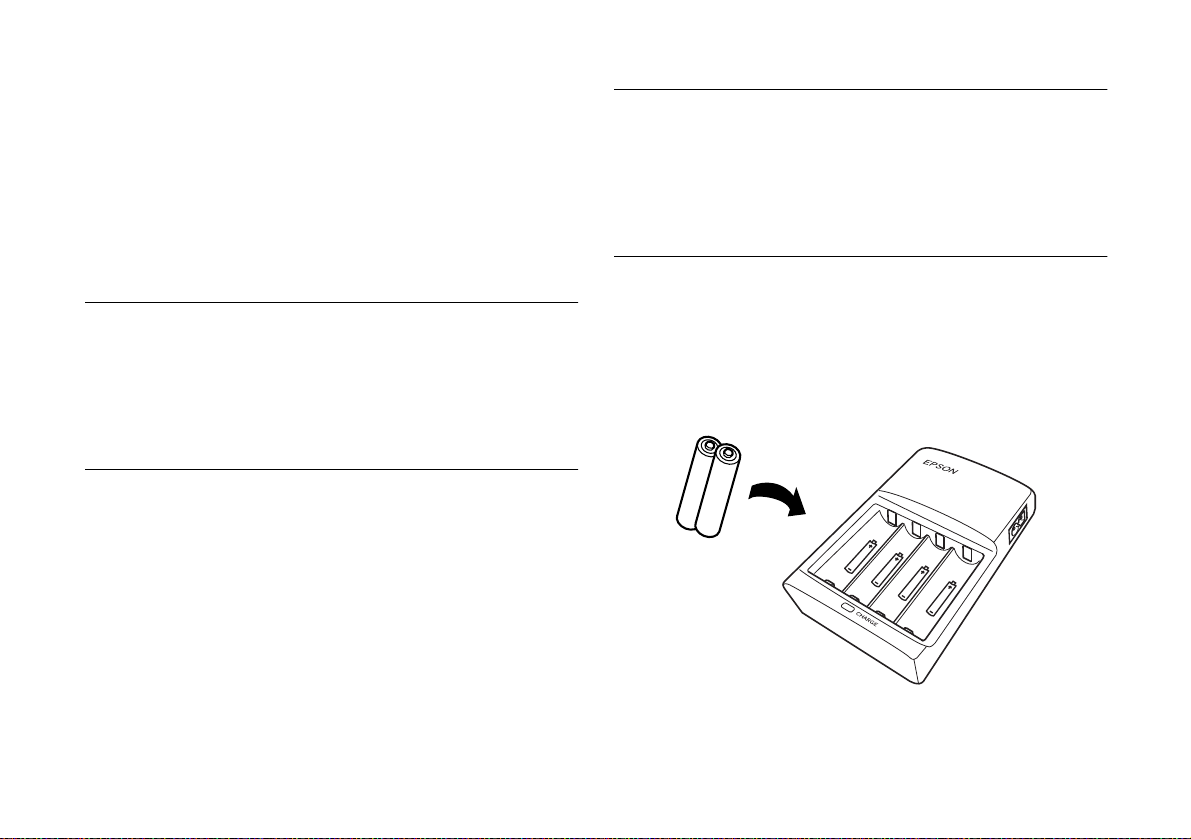
Follow these steps to charge your batteries for the first time:
Insert two or four batteries, positioning the + and – ends
1
as shown.
Page 23
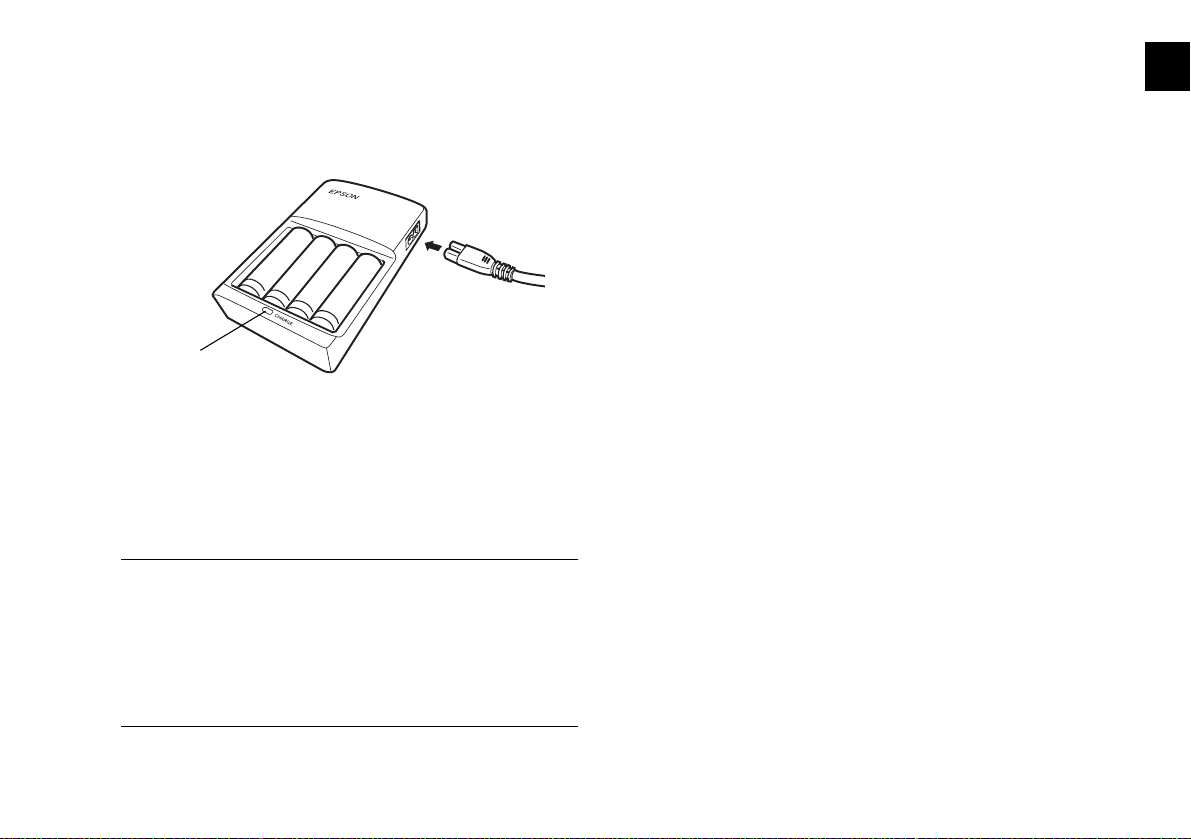
2
Connect the battery charger to the battery charger power
cord, as shown below.
charger light
3
Plug the charger into an electrical outlet. The charger
light turns red, indicating that the charger is working.
When the batteries are charged, after about two and a
half hours, the light goes off.
4
Now charge your batteries again by unplugging the
battery power cord and then plugging it in again.
5
Charge the batteries a third time. After the charger light
goes off, unplug the charger. To avoid overcharging,
don’t leave the charger plugged in for long periods of
time after the light goes off.
6
Wait one hour until the batteries cool before removing
them from the charger.
7
Before storing the charger, disconnect the power cord
and remove the batteries.
(For subsequent charges of your NiMH rechargeable
batteries, follow steps 1 through 3, then unplug the charger
and follow steps 6 and 7 above.)
1
NOTE
The charger light flashes to indicate changes in battery
temperature and voltage. If the light continues to flash for
more than half an hour, the batteries may be damaged or
worn out, and should be replaced. Unplug the charger if the
batteries are not fully charged after four hours.
Be sure to charge the batteries completely to make them last
as long as possible. They can be recharged hundreds of times,
so do not dispose of them until they are worn out.
Getting Started
1-5
A
B
Page 24
NOTE
To keep the charger terminals clean, unplug the charger and wipe
the terminals with a dry cloth. Make sure you charge the batteries
before you use them. If you find that your batteries run out faster
after you recharge them a few times, make sure you discharge
them completely before recharging. If this doesn’t help, replace
the batteries.
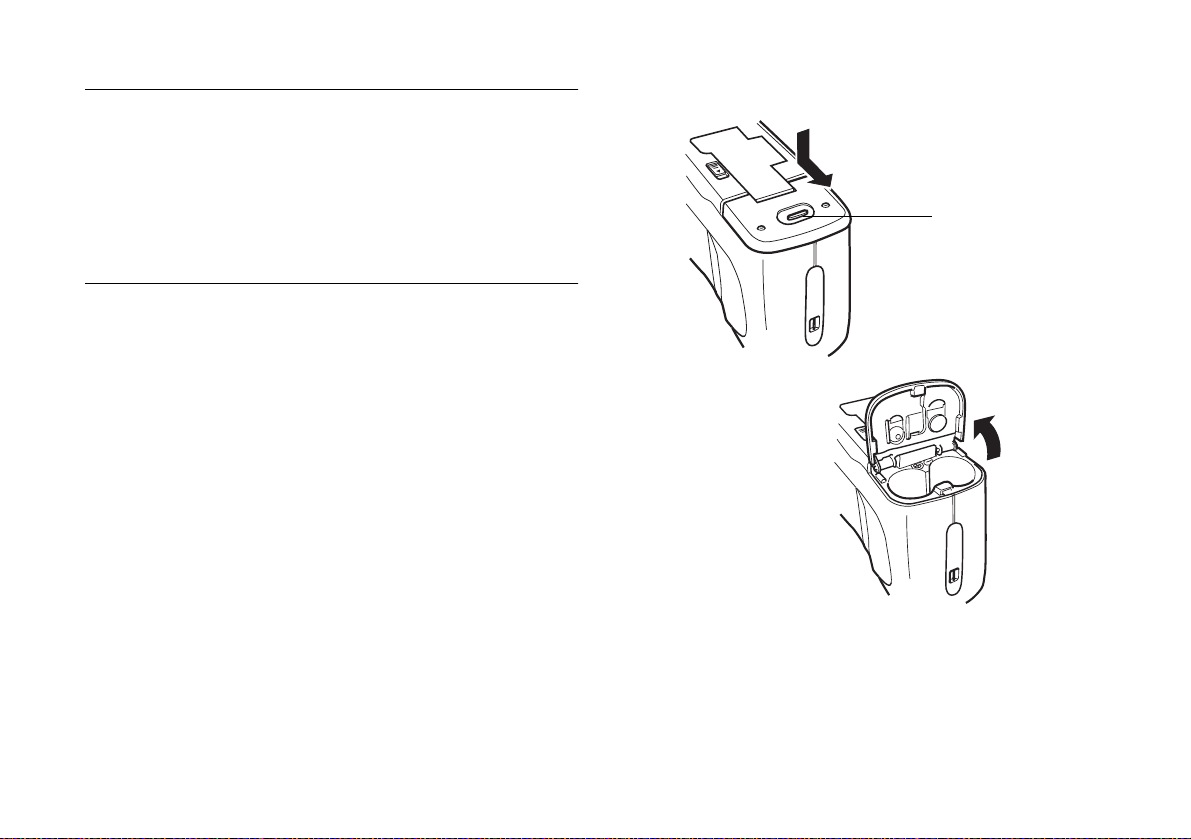
Installing Batteries
Before you install the batteries, make sure the camera is
turned off.
Turn the camera upside down.
1
Hold the battery cover lock down and slide the cover
2
out to open it.
battery cover lock
Getting Started
1-6
Page 25
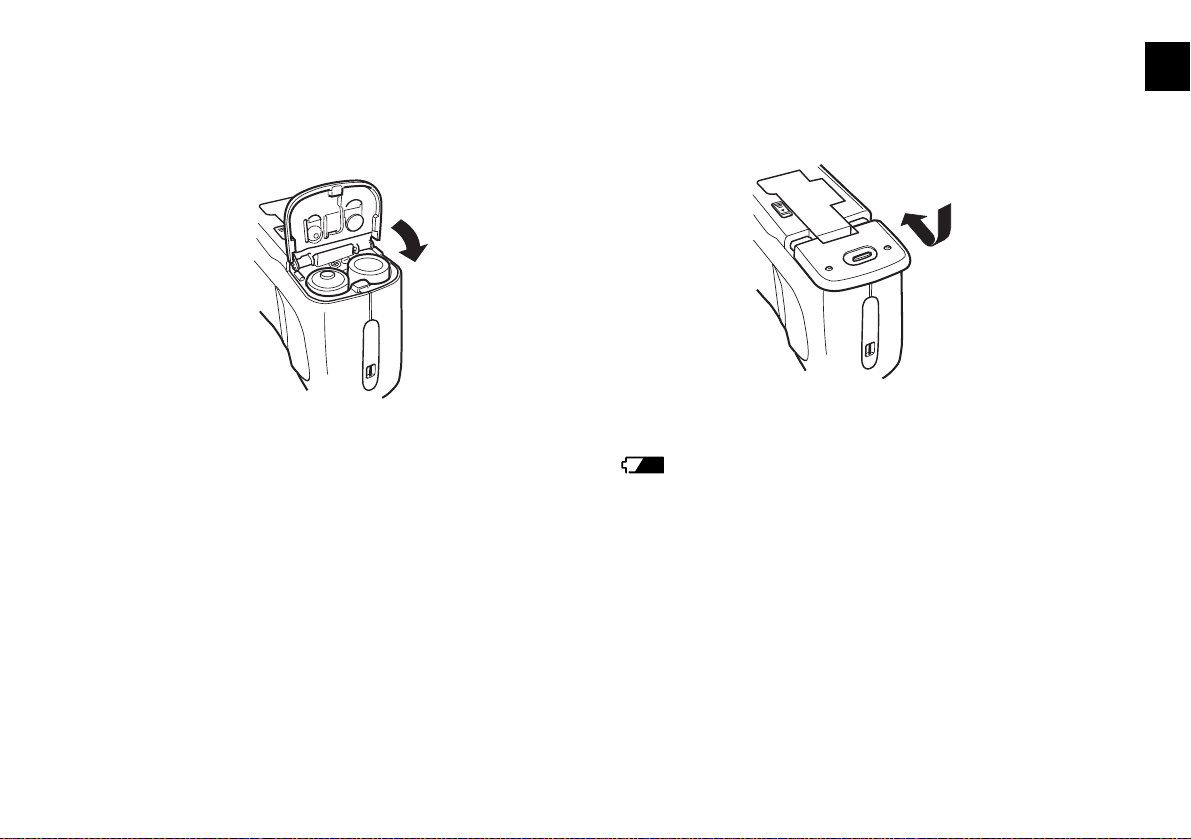
3
Insert two batteries into the compartment, positioning
the + and − ends as shown below.
4
Lower the battery cover and slide it in, as shown below.
When the battery power is almost out, a low battery icon
appears on the camera’s display panel. Be sure to
replace both batteries at the same time.
1
A
Getting Started
B
1-7
Page 26

Battery Options
If you forget to charge your rechargeable NiMH batteries or
if they need to be replaced, the PhotoPC 800 camera can also
accept the following:
◗ Rechargeable AA NiCad batteries
◗ Single-use AA lithium batteries (longer life, Energizer
recommended)
WARNING
To avoid the danger of fire or explosion, do not mix different
types of batteries. Do not allow the battery contacts to touch
metal objects such as coins or keys, which could short out the
battery’s circuits. Read all safety and handling instructions before
using batteries.
◗ Do not use manganese batteries.
◗ Do not mix different types of batteries; this can cause
fire or explosion.
◗ Replace both batteries at the same time. Do not mix old
and new batteries.
◗ Batteries that have not been used for a long time do not
charge well. However, with regular use, the batteries will
return to normal.
◗ Batteries discharge at least 2% per day, whether they are
used or not.
◗ If the batteries are charged in a hot environment, or if
they are charged repeatedly without being discharged,
they will wear out more quickly.
Note the following when handling batteries:
◗ Use only the EPSON battery charger (Model EU-38) to
charge the batteries that came with your camera.
◗ Use the batteries that came with your camera only in
EPSON digital cameras.
Getting Started
1-8
◗ Do not drop, puncture, disassemble, or mutilate
batteries. Do not get them wet or expose them to fire.
◗ When the camera is not used for long periods of time,
remove the batteries and store them at a low temperature
in a dry location. Store away from the reach of children.
Page 27
◗ To avoid fire or electric shock, do not use batteries that
are leaking or damaged in any way.
◗ If battery acid gets in your eyes or on your skin,
immediately rinse the area with water and seek medical
treatment. If a battery is swallowed, seek medical
treatment immediately.
◗ Dispose of used batteries according to the
manufacturer’s instructions and in compliance with all
applicable laws. Contact your local government agency
for information about battery recycling and disposal.
◗ Battery life varies depending on the battery type, the
manufacturer, and other factors.
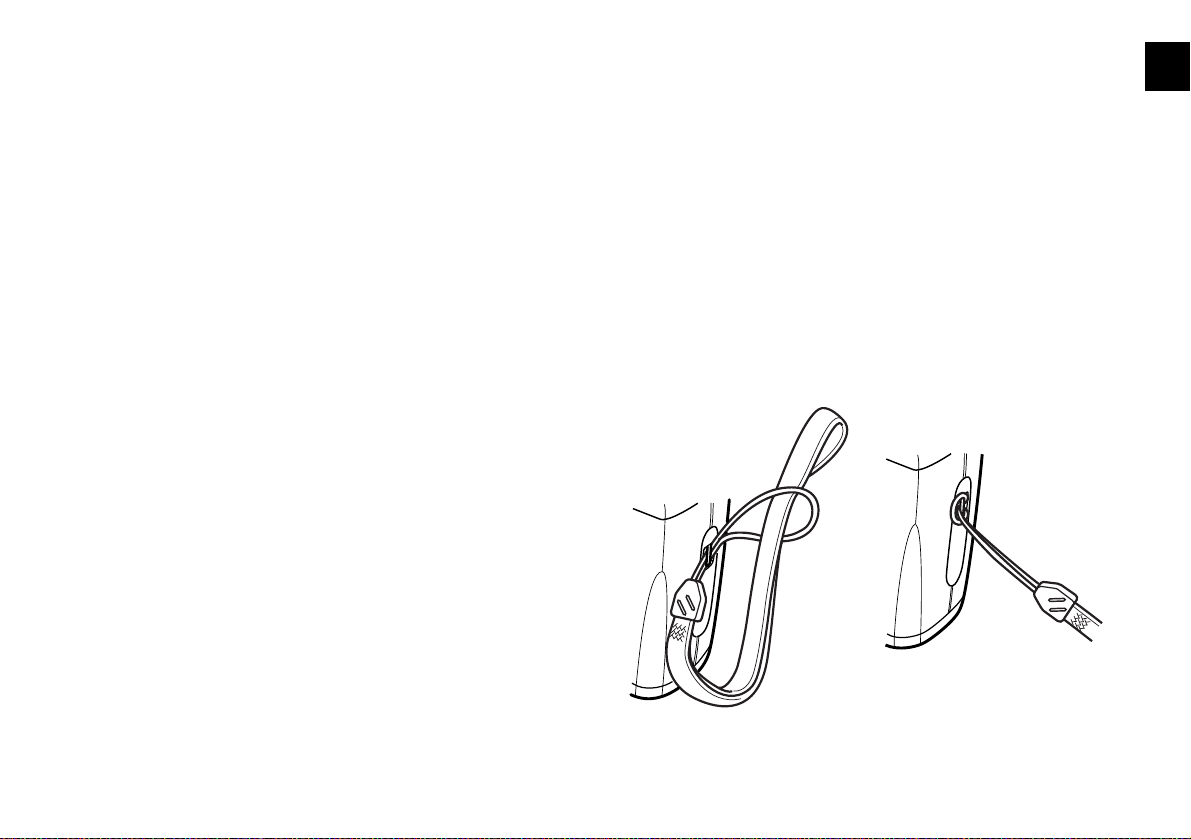
Attaching the Wrist Strap
To attach the wrist strap, follow these steps:
Push the loop on the end of the strap through the small
1
opening in the holder on the side of the camera. (You
may need to use a small pointed object, such as the tip of
an untwisted paper clip, to push it through.)
Pull the strap through the loop and tighten, as shown
2
below.
1
A
Getting Started
B
1-9
Page 28
Installing Your Memory Card
Your camera comes with an 8MB CompactFlash memory
card that you need to install before you take any photos.
Since there is no internal camera memory for storage, this
card will store your photographs until you transfer them to
your computer.
You can purchase additional memory cards (4MB to 96MB)
from leading suppliers like Lexar Media and SanDisk. See
page A-2 for more information.
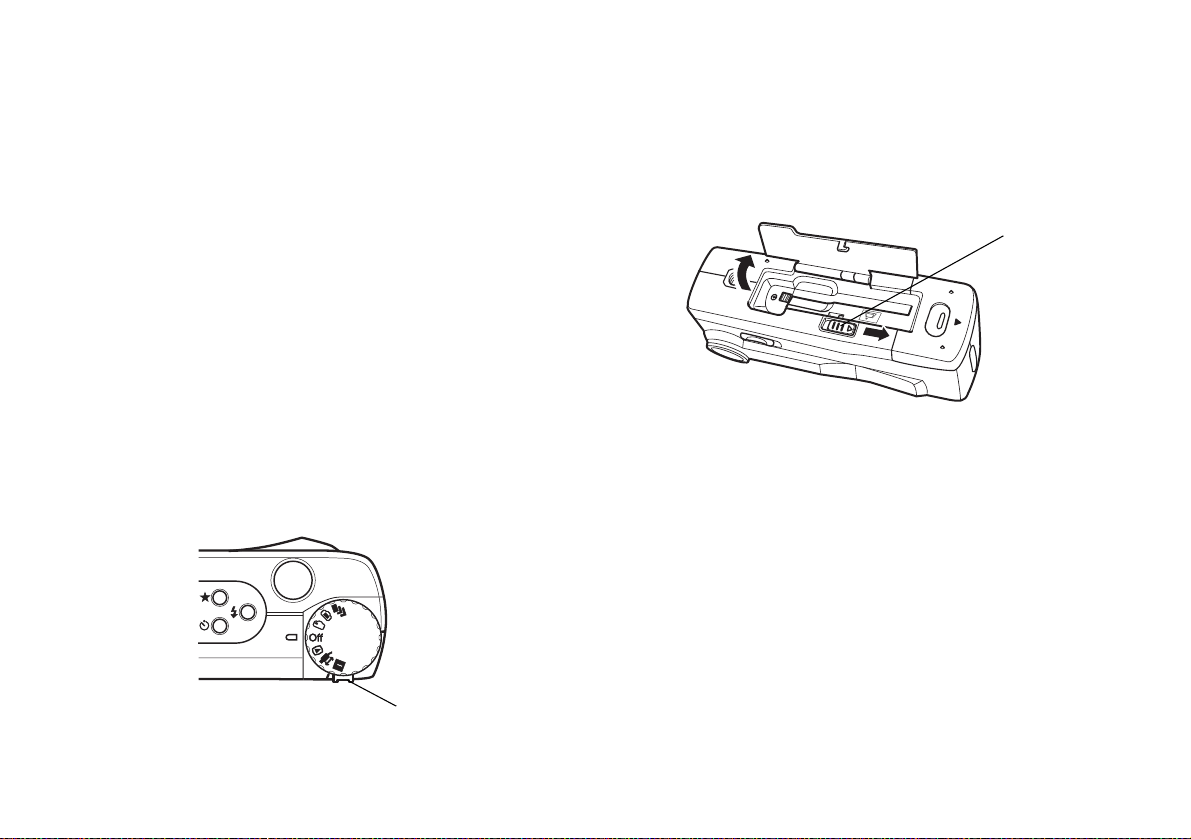
Make sure the camera dial is turned to Off and the lens
1
cover is closed. (To change the dial setting, press the
white dial lock in and turn the dial.)
Turn the camera upside down and open the memory
2
card cover by sliding the memory card cover lock in the
direction of the arrow, as shown below.
memory card
cover l ock
Getting Started
1-10
dial lock
Page 29
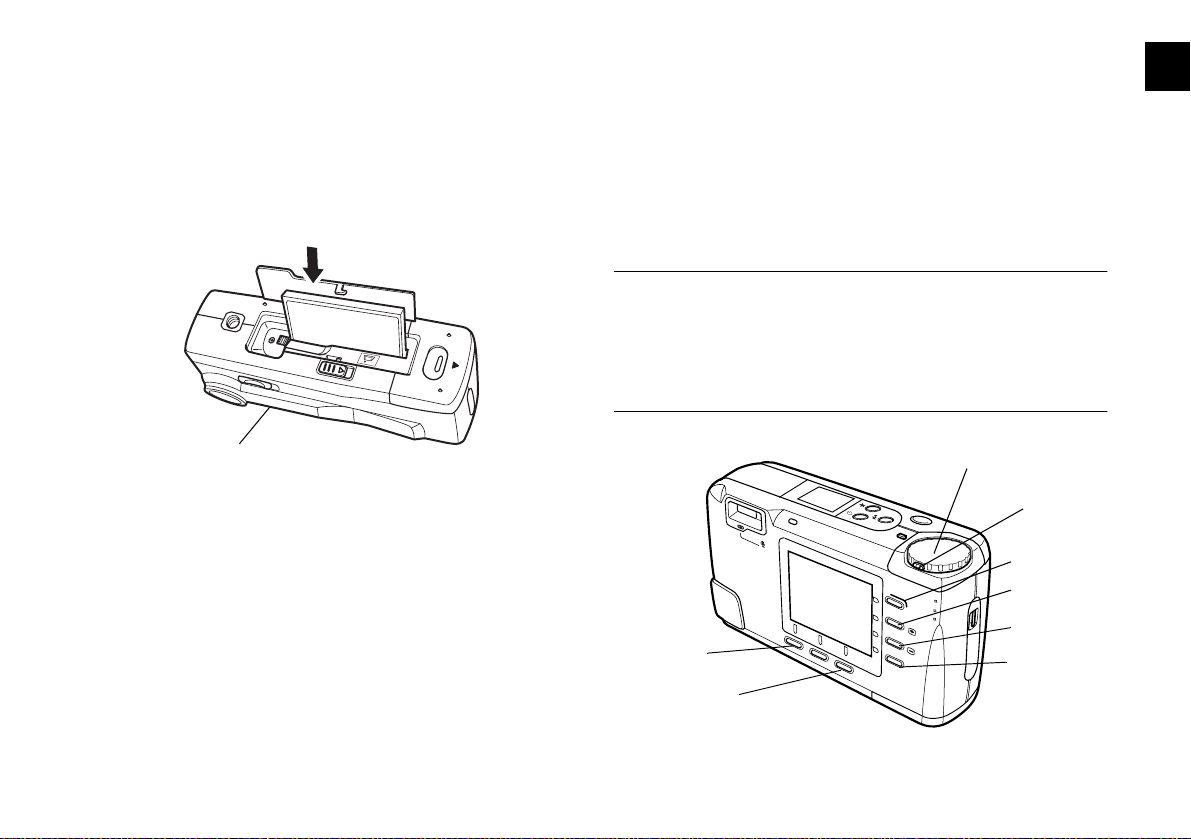
3
Insert the card all the way into the memory card slot.
Make sure the front of the card is facing the front of the
camera, and the arrow on the card’s label is pointing
down.
1
Setting the Date and Time
Before you use the camera, you need to set its clock. Then
the camera will automatically record the date and time for
each picture you take. You may need to set the clock again if
you don’t use it for extended periods of time.
NOTE
You can also set the camera’s clock through your computer. See
page 6-1 for instructions on connecting the camera to your
computer, and page 10-5 for instructions on setting the date and
time.
front of camera
4
Close the memory card cover.
Next, you need to set the camera’s date and time in
preparation for formatting the memory card.
MENU button
W.B. button
camera dial
camera dial lock
top button
+ button
− button
bottom button
Getting Started
A
B
1-11
Page 30
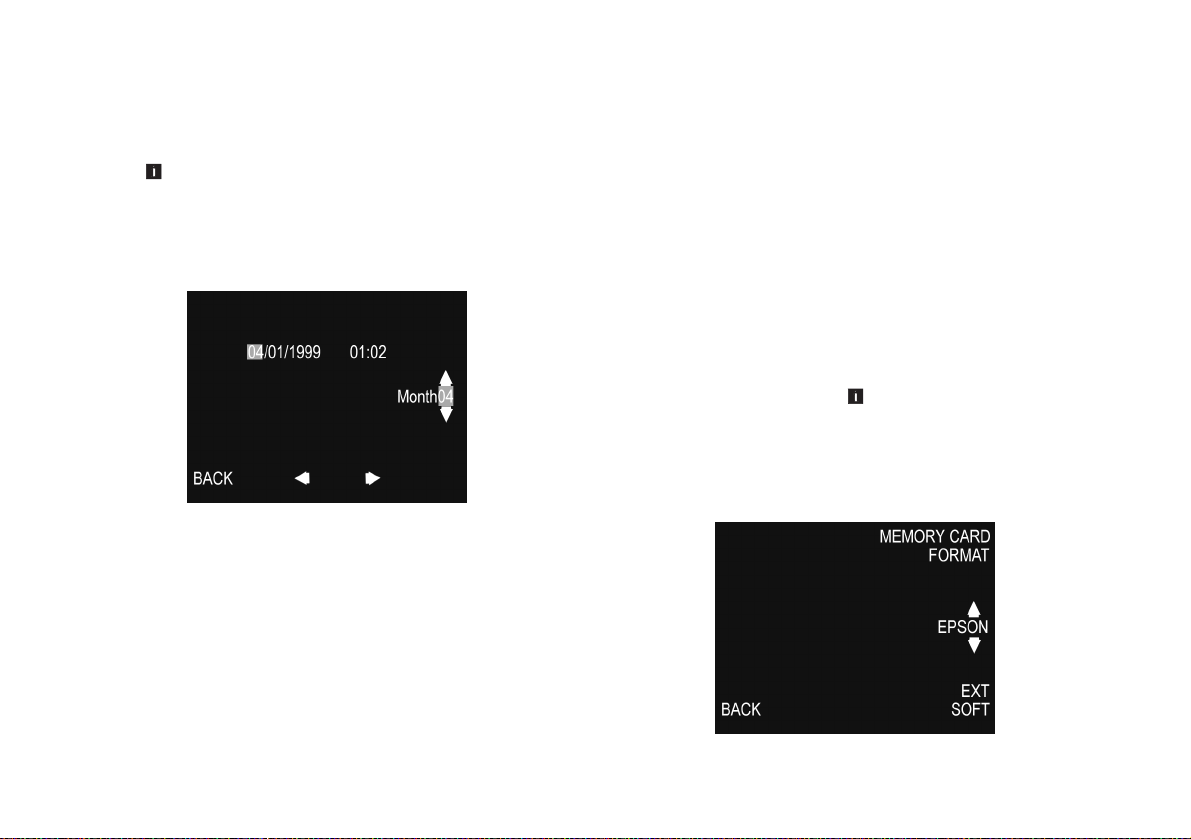
Follow these steps to set the date and time:
1
Push the camera dial lock in and turn the camera dial
.
to
5
When you’re finished, press the MENU button (under
BACK). You see the SETUP menu.
6
Turn the camera dial Off.
2
You see the clock setting screen with the month
highlighted in red.
3
Press the + or − button (next to the up and down
arrows) to increase or decrease the number, until the
month is correct.
4
Press the W.B. button (below the right arrow) to move
through the day and year, and make adjustments as
described in the previous step.
Getting Started
1-12
Now you’re ready to format the memory card.
Formatting Your Memory Card
You should format your card before you use it. Follow these
steps:
1
Turn the camera dial to . Then press the W.B. button
Memory SETUP). The Memory Card Format
(below
menu appears if a memory card is installed in the
camera.
Page 31

2
Press the top button (next to MEMORY CARD
FORMAT
warning you that all data on the card will be deleted if
you format it.
3
Press the button next to Yes to format the card, or the
button next to
) to format the card. You see a message
No to cancel.
Removing Your Memory Card
Turn your camera dial to Off before you remove the card.
CAUTION
Never remove the card while the camera is on. Data in the card
may be lost or damaged.
1
Open the memory card cover.
2
Press the eject button next to the memory card and
remove the card by hand. Then close the cover.
eject button
1
A
Getting Started
B
1-13
Page 32

Installing Your PhotoPC 800
Software
PhotoPC 800 comes with everything you need to transfer
your pictures from the camera to your computer, organize,
enhance, and share your images, and insert them into
documents. You can also upload pictures and presentations
to your camera. The PhotoPC 800 CD-ROM has these
applications for your Windows or Macintosh computer:
◗ Sierra Imaging Image Expert
Installing for Windows 98, Windows 95, or
Windows NT 4.0
Follow these steps:
Insert the CD-ROM in your drive. The Setup program
1
starts automatically.
If it doesn’t start automatically, double-click
Computer
On the first screen, select the language you want to use.
2
. Then double-click your CD-ROM icon.
My
◗ EPSON Photo!3 TWAIN and standalone application,
and EPSON Photo!3 Program Uploader
◗ EPSON Photo File Uploader
Follow the steps in the appropriate section below to install
the software on your computer.
Getting Started
1-14
When you see the following screen, click the Install
3
Image Expert
button.
Page 33

4
Follow the instructions on the screen to install Image
Expert. When installation is complete, you return to the
Setup screen.
5
Click the button labeled Install EPSON Photo!3 and
Program Uploader
screen.
6
When you return to the Setup screen, click the Install
EPSON Photo File Uploader
instructions on the screen.
7
When installation is complete, click Exit.
and follow the instructions on the
button. Follow the
NOTE
You may need your Windows 98 system disk to perform this
installation.
Follow these steps to install the driver for your camera:
1
Insert your PhotoPC 800 CD-ROM in your CD-ROM
drive, if necessary.
2
At the first screen, click Next.
3
Select Search for the best driver for your device,
then click
Next.
1
Your camera software is now installed.
Installing Your Windows 98 USB Driver
If you’re installing on a Windows 98 system with a USB
port, complete the steps above to install your software. The
first time you connect the camera to your computer with
your USB cable, you’ll see the Add New Hardware Wizard.
Click Cancel. (See page 6-2 if you need help connecting the
camera.)
4
Select Specify a location and browse to your
CD-ROM drive.
5
Select the Win98E folder if you’re installing the English
driver (or the
driver, or the
driver). Click
Win98S folder to install the Spanish
Win98F folder to install the French
OK.
Getting Started
A
B
1-15
Page 34

6
On the following screen, click Next. The wizard locates
your camera’s driver.
6
Open the folder for your language, then open the
EPSON Photo!3 Ver. 1 folder.
7
Click Next on the installation screen to install the
driver. When installation is complete, click
Finish.
Your camera software is now installed.
Installing on a Macintosh
Follow these steps:
1
Insert the CD-ROM in your drive.
2
If necessary, double-click the CD-ROM icon to open it.
3
Open the folder for the language you want to use.
4
Double-click the Install Image Expert icon. Click
Continue and follow the instructions on the screen.
5
When you’re done installing Image Expert, click
Restart to restart your computer.
7
Double-click the Photo!3 Installer – Part 1 icon.
Click
Continue and follow the instructions on the
screen. When installation is complete, click
Restart to
restart your computer.
8
Open the folder for your language. Then copy the
EPSON Photo File Uploader folder to the EPSON
Photo!3 Ver. 1
NOTE
To create the preferences for the EPSON Photo File
Uploader, start, then close the
on your hard drive. You need these preferences to run Photo
File Uploader.
folder on your hard drive.
EPSON Photo!3
Your camera software is now installed.
program
Getting Started
1-16
Page 35

2
k
2
Taking Pictures
aking pictures with the PhotoPC 800 is similar to
using a traditional “point and shoot” auto focus
T
camera. This chapter gives you all the basic information you
need to start taking pictures, including the following:
◗ Using the camera dial
◗ Reading the status display panel
◗ Taking pictures with the viewfinder
◗ Taking pictures with the LCD screen
Using the Camera Dial
The camera dial has an
Off position and six other
settings: three for taking
pictures, and three for
performing other functions,
such as setting up your
photos or playing them
back on the LCD screen.
When
Off is selected, press the white dial lock in to turn the
dial. (You don’t need to press the dial lock in when another
setting is selected.)
Taking Pictures
dial loc
2-1
A
B
Page 36

Camera dial settings include the following:
Reading the Status Display Panel
Use this setting for continuous and interval
shooting. See pages 4-10 through 4-13 for details.
Use this setting to take photos with the LCD screen.
See Chapter 4 for information about how to change
settings in the View menus.
Use this setting to take photos with the optical
viewfinder. See page 2-4 for details.
Use this setting to play back, delete, and add voice
recording to your photos. See Chapter 5 for details.
Use this setting to print directly from your camera to
an EPSON ink jet printer. See Chapter 12.
Use this setting to set up or view information about
your camera on the Setup screen. See Chapter 4 for
information.
When your camera dial is turned to , , or , the status
display panel shows the camera’s current settings and how
many additional pictures you can take.
.
image quality
sensitivity
white
balance
low
battery
icon
exposure
pictures
remaining
flash
timer
monochrome
indicator
Checking the Battery
When your battery power is almost out, the low
battery icon appears on the display panel. The icon
flashes when your battery power is completely out.
Taking Pictures
2-2
Page 37

You need to recharge or replace the batteries or use the
optional universal AC adapter when you see the low battery
icon. Although you may be able to use the camera with low
batteries, it needs full battery power to operate reliably.
Several factors can affect battery life, including the
surrounding temperature and the type of batteries you use.
Low temperatures—especially below 50 °F (10 °C)—drain
batteries faster. See page 1-4 for battery use instructions.
Checking the Picture Counter
The large number in the lower right of the status display
panel shows how many additional pictures you can take.
Before you can take any more pictures, you need to delete
some of the images on the memory card. (See page 5-4 for
instructions.)
If you want to save your photos before you delete them,
connect the camera to your computer and transfer the
pictures as described in Chapter 6.
Instead of the number of pictures remaining, you may see
one of the following in the lower right corner of the status
display panel:
In quick shot mode, the number of photos
taken is displayed in brackets.
2
This number is affected by the image quality setting. Also,
if you have any voice recordings stored on your memory
card, the number on the display panel may be greater than
the actual number of remaining pictures.
When the memory card is full, the number on the display
panel reads
flashes red, and you can no longer use the shutter button.
0, the status light on the back of the camera
In Program or Manual mode, the exposure
value appears on the left and the shutter
speed appears on the right when you hold the
shutter button down halfway. See page 4-2
for more information about user modes.
Taking Pictures
A
B
2-3
Page 38

When you turn the camera’s dial to
is displayed. No other information appears
in the status display panel.
When you make a voice recording,
rEc
appears in this space.
When you take photos using the interval
shooting feature,
Int appears in the display
panel.
, SEt
Taking Pictures With the Viewfinder
You can capture an image as you would with any
point-and-shoot auto-focus camera: look through the optical
viewfinder and press the two-step shutter.
viewfinder
photo capture light
camera status light
NOTE
One advantage of the optical viewfinder is that it uses less
battery power than taking pictures with the LCD screen.
However, you can’t use the optical viewfinder when you make
voice recordings or use the panorama or digital zoom features.
camera dial
Taking Pictures
2-4
Page 39

Follow these steps:
viewfinder
camera status light
shutter button
1
Make sure you are at least 20 inches (50 cm) away from
your subject. (If you want to get closer, use macro mode
as described on page 4-7.)
2
Slide the lens cover switch to open the lens cover. Then
turn the camera dial to and wait until the status light
turns green.
3
Look straight through the viewfinder and center your
subject within the cross-hairs.
NOTE
The frame in the viewfinder indicates the area captured
when taking pictures at close range.
photo capture
status light
4
Use the camera’s controls to make any changes you want
to image quality, the flash, or other basic settings. (See
Chapter 3 for information about changing settings when
taking pictures with the viewfinder.)
5
Hold the shutter button halfway down to lock the auto
focus.
2
A
B
Taking Pictures
2-5
Page 40

While holding down the shutter button, you can
reframe your picture and move your subject off-center if
you want. The photo capture status light stops flashing
when the lens locks in focus.
6
Press the shutter button the rest of the way down to take
the picture.
After you take a picture, the photo capture status light
flashes. This indicates that the image was captured and the
camera is processing it. When the light stops flashing, the
image is saved.
CAUTION
If you set the camera down while the light is still flashing, make
sure you handle it carefully. The camera may lose your image if
you set it down too hard.
7
Hold the camera still until it beeps, then release the
shutter button.
NOTE
You may notice a brief delay between the time you press the
shutter button and when the camera beeps. To avoid blurring
your images, make sure you hold the camera still until it beeps.
Taking Pictures
2-6
Saved images remain on the memory card even when you
turn the camera off or remove the memory card or the
batteries.
Taking Pictures With the LCD Screen
The LCD screen lets you see a live preview of what the
camera’s lens sees at any moment. Although you can use this
setting anytime, you always choose it when you want to use
the panorama or digital zoom features, or when you want to
make voice recordings to go with your photos.
Page 41

NOTE
Before you begin to take pictures, you can use the LCD menus to
turn recording on and make many other adjustments to your
camera. See Chapter 4 for details.
Follow these steps:
The following screen illustrates what you see if your
camera is set to Full Auto user mode, the default user
mode. The settings may look different if you’re using
Program or Manual user mode. See Chapter 4 for details
about user mode.
2
1
Make sure you are at least 20 inches (50 cm) away from
your subject. (If you want to get closer, use macro mode
as described on page 4-7.)
2
Slide the lens cover switch to open the lens cover. Then
turn the camera dial to
to see the View menu. Wait
until the camera status light turns green.
You see a preview of your picture on the LCD screen,
with the image quality setting in the upper left corner of
the screen and the digital zoom setting in the upper
right.
image
quality
digital zoom
Normal
Macro
Panorama
Taking Pictures
A
B
2-7
Page 42

NOTE
If you’re using batteries, the camera shuts off automatically
after a designated period of inactivity. (The default is 10
seconds. See page 4-26 for instructions on setting the
power off interval.) If the image on your LCD screen
disappears, press the shutter button to “wake” the camera.
3
Using the preview image to guide you, make any final
changes to the settings on the View menu. See
Chapter 4 for details.
NOTE
You can also use the camera’s buttons to change the image
quality, flash, or timer. See Chapter 3.
4
Center your subject on the screen, then press the shutter
button halfway down to lock the auto focus.
The camera status light stops flashing and you see a
green circle
on the screen when the lens locks in
focus. While you hold the shutter button down, you can
reframe your picture if you want.
camera status light
microphone
5
Press the shutter button the rest of the way down to take
the picture.
press to
delete
Taking Pictures
2-8
Page 43

6
Hold the camera still until it beeps. Then release the
shutter button. (You may notice a brief delay between
the time you press the shutter button and when the
camera beeps. To avoid blurring your images, make sure
you hold the camera still until it beeps.)
After a few seconds, you see a confirmation screen.
NOTE
Delete
You can press the button next to
the picture. You can also delete pictures in playback mode.
(See Chapter 5 for details.)
if you don’t want
When the camera status light stops flashing, you’re ready
to take another picture. Or, if you’ve turned recording
on, you see a countdown of the recording time on the
screen. During this time, you can record a message into
the built-in microphone on the back of the camera. (See
page 4-13 for more information on recording a
message.)
NOTE
◗
The LCD screen uses up battery power quickly. If it’s idle for
more than the designated power off interval, the camera
turns off automatically. To turn it back on, press the shutter
Off
button, or turn the camera dial to
See page 4-26 for instructions on changing the power off
interval.
◗
Even if you don’t speak into the microphone, your camera
records ambient noise when recording is turned on, and your
images take up more space on the memory card. To fit more
images on your memory card, make sure you turn recording
off when you no longer want to use it.
and then back to .
2
A
Taking Pictures
B
2-9
Page 44

Taking Pictures
2-10
Page 45

3
Using the Camera Buttons to Change
Settings
ou use the camera’s buttons to set the flash, enable
the timer, and set image quality. You can also make
Y
quick adjustments to other basic settings, which gives you
greater control of your images when you’re taking pictures
with the viewfinder. This chapter explains the following:
◗ Setting image quality
◗ Using the flash
◗ Taking pictures with the timer
◗ Adjusting the sensitivity setting
◗ Adjusting the white balance setting
◗ Adjusting the exposure setting
Setting Image Quality
The PhotoPC 800 has four image quality (resolution)
settings. Press the image quality button on top of the camera
to cycle from one setting to the other.
NOTE
The camera dial must be turned to , , or .
image quality
button
3
A
B
Using the Camera Buttons to Change Settings
3-1
Page 46

The image quality icons appear on the status display panel as
described below.
Standard
Produces color or black and white images at 640 × 480
pixels. The CompactFlash card holds approximately
118 standard image quality pictures without audio
recordings, but the image size is smaller and includes less
detail when enlarged. This setting is good for pictures that
are viewed on screen or on the Web.
Fine
Produces color or black and white images at
1600 × 1200 pixels, with moderate compression. Your
pictures include ample detail, and the CompactFlash card
holds approximately 25 pictures without audio recordings.
Super Fine
Produces color or black and white images at
1600 × 1200 pixels with low compression. Your pictures
include greater detail, and the CompactFlash card holds
approximately 12 pictures. With less compression, super fine
images are better for enlarging.
HyPict
Produces color or black and white images at
1984 × 1488 pixels (interpolated) with moderate
compression. Your pictures include excellent detail, and the
CompactFlash card holds approximately 10 HyPict pictures.
These images are best for enlarging for 8 × 10-inch prints.
Using the Camera Buttons to Change Settings
3-2
Page 47

Using the Flash
The camera’s built-in flash is effective within a range of 1.6
to 11.2 feet (0.5 to 3.4 m), or 6 inches to 1.6 feet (15 to
50 cm) when using the macro feature. Press the flash button
to cycle through the four flash settings.
Flash Off
The flash is disabled, even when adequate lighting is
not available. Use this setting for special effects,
where flash photography is prohibited, or for macro mode
close-ups.
3
NOTE
The camera dial must be turned to , , or .
An icon for each setting appears on the status display panel,
as shown below:
Auto
The flash goes off automatically whenever it’s needed
for adequate lighting (factory setting).
Forced Flash
The flash goes off with every picture you take. Use this
setting to compensate for backlighting; for example,
when you are facing a light source.
Slow Synchronized Flash
To light up the background as well as your subject,
use the slow synchronized flash mode when taking
pictures at night. This option causes the aperture to stay
open longer, allowing more light to enter the camera.
NOTE
Slow synchronized flash is available only in the Program or
Manual user modes. See page 4-2 for information about changing
the user mode.
After you take a flash picture, the icon blinks until the flash is
fully recharged. Your flash setting remains in effect even after
you turn off the camera.
Using the Camera Buttons to Change Settings
3-3
A
B
Page 48

TIPS
◗
When you’re using the flash off setting, hold the camera
steady or use a tripod to avoid capturing blurry images.
◗
When you’re taking pictures outdoors, make sure the sun is
at your back. In very bright light (at the beach or in snow, for
example), your pictures may come out too light. You can
adjust the exposure manually to darken an image before you
capture it. See page 4-22 for instructions. Alternatively, you
can use Image Expert or other image editing software to
correct over-exposure problems after you take the picture.
See Chapter 9 for details about editing photos.
Taking Pictures With the Timer
Setting the timer creates a 10-second delay between
the time you press the shutter button and the actual
image capture. This allows you to take a picture of yourself.
You can also combine continuous shooting with the timer
for delayed automatic capture of ten images in ten seconds.
This allows you to photograph yourself in motion. (See page
4-11 for more information.)
Follow these steps to take a single picture with the timer:
Secure the camera on a flat surface or on a tripod. (See
1
page A-4 for information on attaching the camera to a
tripod.)
Open the lens cover.
2
Turn the camera’s dial to . Then wait until the photo
3
capture status light turns green.
Press the timer button
4
on the top of the camera. The
timer icon appears in the status display panel.
timer button
Using the Camera Buttons to Change Settings
3-4
Page 49

5
Press the shutter button. The timer icon and the red
timer light on the front of the camera flash slowly for
eight seconds. Then they flash rapidly for two seconds
before the shutter is released.
The camera beeps when the image is captured. The
status light on the back of the camera flashes green as the
PhotoPC 800 processes the image(s).
NOTE
To cancel a picture after you’ve pressed the shutter button,
press the shutter button again, or press the
button.
NOTE
◗
You can also use the LCD screens to adjust sensitivity, white
balance, and exposure. See Chapter 4 for details.
◗
The camera dial must be turned to , , or to change
settings using the camera buttons.
Adjusting the Sensitivity Setting
The camera’s high sensitivity settings let you take pictures in
low light or indoors without the flash. With these settings,
you can set the sensitivity from the camera’s standard ISO
equivalent of 100 to an ISO equivalent of 200 or 400.
3
Making Advanced Adjustments
You can also use the camera’s buttons to adjust the
sensitivity, white balance, and exposure settings. However,
you must be in Program or Manual mode to make these
adjustments. See page 4-2 for instructions on changing the
user mode.
You can also use the high and super high sensitivity settings
when taking pictures of fast-moving subjects, or when
shooting distant subjects with a flash. Since image quality is
lower when you use higher sensitivity settings, the standard
setting is recommended for most photos.
Using the Camera Buttons to Change Settings
3-5
A
B
Page 50

Press the
ISO button on the back of the camera to cycle
through the three sensitivity settings.
ISO button
The arrow icons in the upper left corner of the status display
panel indicate the sensitivity setting:
The standard setting is equivalent to ISO 100. This
is the recommended setting for most photos.
The high sensitivity setting is equivalent to ISO
200.
Adjusting the White Balance Setting
Normally the PhotoPC 800 adjusts the white balance of your
pictures automatically. This means that both outdoor and
indoor pictures have accurate colors, without a “bluish” or
“yellowish” appearance.
However, you can have the camera use a fixed white balance
for a warmer appearance under fluorescent lighting or for
special effects, such as a red-tinted sunset. You can also
customize the white balance setting.
Press the
through the three white balance settings.
W.B. button on the back of the camera to cycle
The super high sensitivity setting is equivalent to
ISO 400.
Using the Camera Buttons to Change Settings
3-6
W.B. button
Page 51

The setting, which appears in the status display panel next to
W.B. mark, remains in effect while you take pictures.
the
white
balance
setting
The PhotoPC 800 includes the following white balance
settings:
Adjusting the Exposure Setting
Your camera normally adjusts exposure automatically.
However, if you want to lighten or darken a photo before
you take it, you can adjust the exposure manually.
Press the + or − button on the back of the camera to increase
or decrease the exposure setting. (The range for this setting is
−2.0 to +2.0.)
3
AUTO Adjusts the white balance of your photos
automatically. This is the recommended setting
for most pictures.
FIX Locks the white balance setting at 5200 °K.
(This setting is similar to normal daylight.)
CUST Lets you define a custom white balance setting.
See page 4-21 for more information about
photographing with a user-defined white
balance.
+ and − buttons
Using the Camera Buttons to Change Settings
A
B
3-7
Page 52

The setting appears in the status display panel next to
the +/− mark and remains in effect while you take pictures.
exposure setting
Using the Camera Buttons to Change Settings
3-8
Page 53

.
4
Using the LCD Menus to Change
Settings
he LCD menus let you preview your pictures while
you make your camera settings. This chapter explains
T
the following:
◗
FOR SALE
FOR SALE
• 1995 Mitsubishi Montero
• Good condition
• Low Mileage
999-555-5555
Jim Jackson’s Auto Sales
Choosing the user mode
◗
Taking color or black and white pictures
◗
Taking quick shots
◗
Taking digital zoom pictures
◗
Taking close-ups with macro mode
◗
Taking digital panoramic pictures
◗
Using continuous and interval shooting
◗
Adding voice recordings to pictures
◗
Using programmed subject settings
◗
Adjusting the sensitivity setting
4
A
B
Using the LCD Menus to Change Settings
4-1
Page 54

◗ Adjusting the white balance setting
◗ Adjusting exposure
◗ Adjusting the focus manually
◗ Changing the metering method
◗ Setting camera options (automatic power off, LCD
brightness, alert beep, language, and time and date)
top button
+
–
bottom button
MENU
ISO
W.B.
NOTE
If you’re using batteries, the camera shuts off automatically after
a designated period of inactivity. If the image on your LCD screen
disappears and your camera dial is set to , press any button on
the back of the camera to “wake” the camera. If your dial is set
to or , press the shutter button to wake the camera.
Choosing the User Mode
The PhotoPC 800 has three user modes to fit the needs of
beginner, intermediate, and expert photographers. Each
mode gives you a different amount of control over the
camera settings, whether you’re using the LCD screen or the
viewfinder to take pictures. To use the more advanced
features, such as white balance and exposure adjustment, you
must be in Program or Manual mode.
Using the LCD Menus to Change Settings
4-2
Page 55

Full Auto The camera chooses settings for you. This mode,
which is the default, is recommended for the
beginning photographer. You can simply point
and shoot, or you can still adjust some basic
settings if you want (for example, image quality,
digital zoom, and macro or panoramic mode).
Program This setting is recommended for the
intermediate photographer who wants a
moderate amount of control over the camera’s
functions. Programmed subject settings
(Normal, Sports, Portrait, and Landscape) tailor
your camera settings to the type of picture you’re
taking. You can also use the LCD menus to
make your own adjustments to sensitivity, white
balance, and exposure.
Manual This setting is for experienced photographers
who want complete control over the camera’s
wide array of settings and features. In addition to
changing sensitivity and white balance, you can
adjust the shutter speed and aperture, choose a
spot or divided brightness metering system, and
focus the camera to three feet, eight feet, or
infinity.
Follow these steps to choose the camera mode:
1
Push the camera dial lock in and turn the dial to .
You see the SETUP menu.
2
Press the + button to cycle through the three modes.
4
user mode
A
B
Using the LCD Menus to Change Settings
4-3
Page 56

Taking Color or Black and White
Taking Quick Shots
Pictures
You also use the SETUP menu to switch between color and
black and white pictures.
NOTE
There is no difference between the file sizes of color and black
and white pictures when you take pictures with the LCD screen.
Follow these steps:
Turn the camera dial to . You see the SETUP menu.
1
color/
monochrome
setting
After taking a picture, the PhotoPC 800 normally takes a few
seconds to process and save the image in the installed
memory card. In quick shot mode, the camera stores up to
10 images internally in temporary storage while you keep
taking pictures. It saves the images to the CompactFlash card
after you’re done.
Follow these steps to use quick shot mode:
Turn the camera dial to . You see the SETUP menu.
1
(
Normal Shot appears in the bottom right corner of
the screen.)
Press the − button to change the setting.
2
Using the LCD Menus to Change Settings
4-4
Page 57

2
Press the bottom button (next to Normal Shot) to
Quick Shot.
select
3
Slide the lens cover switch to open the lens cover.
4
Turn the camera dial to
camera status light turns green. The image quality icon
on the status display panel flashes, indicating that
quick shot mode is enabled.
5
Press and hold the shutter button to begin taking
pictures. When you’re finished, release the button.
The bracketed number on the status display panel
indicates the number of pictures temporarily saved to
the camera.
or and wait until the
NOTE
◗
You can’t use quick shot mode when battery power or
CompactFlash card memory is low.
◗
HyPict image quality is disabled in quick shot mode.
◗
When using quick shot mode, you can only make an audio
recording for the last image.
Taking Digital Zoom Pictures
Digital zoom pictures are magnified two times (2×). This
format is like a digital version of telephoto. The automatic
cropping effect makes file sizes smaller, allowing you to store
more pictures in the digital zoom format.
4
A
Using the LCD Menus to Change Settings
B
4-5
Page 58

This setting is available for all user modes (Full Auto,
Program, and Manual).
1
Open the lens cover and turn the camera dial to .
You see the View menu. The current digital zoom
setting appears in the upper right corner.
digital zoom
setting
2
Press the top button (next to the ×1).
The words
DIGITAL ZOOM
appear on your LCD
briefly. A yellow frame appears around the previewed
image, and the digital zoom setting changes to ×2.
3
Press the shutter button halfway to lock the auto focus.
When the lens locks in focus, the camera status light
stops flashing and you see a green circle
on the
screen. If you want, you can reframe your picture while
you hold the button down.
4
Press the button all the way down to capture the image.
The zoom format remains active until you change it or turn
off the camera.
NOTE
This View menu illustrates what you see if your user mode is
Full Auto
set to
user mode is set to
Using the LCD Menus to Change Settings
4-6
. Your View menu will look different if the
Program
or
Manual
.
NOTE
Since the digital zoom mode crops the image and magnifies it, it’s
best to print the image in a smaller format.
Page 59

Taking Close-Ups With Macro Mode
You can use the camera’s macro mode to take pictures as
close as 6 inches (15 cm). This setting is available for all user
modes (Full Auto, Program, and Manual).
Follow these steps:
Open the lens cover and turn the camera dial to . You
1
see the View menu.
2
Press the bottom button (next to the current frame
setting).
For a few seconds, the word
LCD screen, and a green frame appears around the
previewed image. Also, the macro mode icon
in the lower right corner of the screen.
3
Press the shutter button halfway to lock the auto focus.
When the lens locks in focus, the camera status light
stops flashing and you see a green circle
screen. If you want, you can reframe your picture while
you hold the button down.
4
Press the button all the way down to capture the image.
MACRO
appears on the
on the
appears
4
frame setting
NOTE
This View menu illustrates what you see if your user mode is
Full Auto
set to
user mode is set to
. Your View menu will look different if the
Program
or
Manual
.
Macro mode remains active until you change it or turn off
the camera.
Using the LCD Menus to Change Settings
A
B
4-7
Page 60

NOTE
When you take macro close-ups, you should use a tripod (as
described in Appendix A) and disable the flash. Otherwise, your
pictures may appear blurry and washed out.
Taking Digital Panoramic Pictures
Images in the panoramic format are long and narrow,
although they are not captured at a wider angle than normal
images. Strips at the top and bottom of the image area are
cropped out. Smaller file sizes mean you can store more
pictures in the panorama format.
You can take panoramic pictures using any user mode (Full
Auto, Program, or Manual). Follow these steps:
Open the lens cover and turn the camera dial to .
1
You see the View menu. The current frame setting
appears in the lower right corner.
NOTE
You can’t select standard image quality when taking
panoramic pictures. For more information about image quality,
see page 3-1.
Using the LCD Menus to Change Settings
4-8
frame setting
NOTE
This View menu illustrates what you see if your user mode is
Full Auto
set to
user mode is set to
. Your View menu will look different if the
Program
or
Manual
.
Page 61

2
digital panorama
Press the bottom button (next to the current setting) to
cycle through the frame settings (
Macro, and Panorama).
Normal Frame,
The following examples show the same subject captured in
normal, digital zoom, and digital panorama formats:
For a few seconds, the word
the LCD screen, and a black frame appears around the
previewed image. Also, the panorama mode icon
appears in the lower right corner of the screen.
3
Press the shutter button halfway to lock the auto focus.
When the lens locks in focus, the camera status light
stops flashing and you see a green circle
screen. If you want, you can reframe your picture while
you hold the button down.
4
Press the button all the way down to capture the image.
The Panorama format remains active until you change it or
turn off the camera.
PANORAMA appears on
on the
normal
4
digital zoom
A
B
Using the LCD Menus to Change Settings
4-9
Page 62

Continuous Shooting
In this mode, you can take two standard or fine
resolution pictures each second, with up to ten pictures in
sequence (or one super fine resolution picture per second,
with up to eight pictures in sequence). You can capture a
complex motion, such as a golf swing, in a series of steps to
create animation sequences for the Internet, screen savers, or
presentations. Continuous shooting is available for all user
modes.
NOTE
You can’t use the flash for continuous shooting, so make sure
you have adequate lighting for your pictures. In addition, you can’t
select the HyPict image quality setting.
Make sure you are at least 20 inches (50 cm) away from
1
your subject.
Open the lens cover, then turn the camera dial to .
2
Wait until the camera status light turns green.
You see a preview of your picture on the LCD screen,
with a red frame around it.
CONTINUOUS appears on
the screen.
Center your subject in the red frame.
3
Press and hold the shutter button all the way down. The
4
camera beeps as it captures each picture.
When the camera has captured the first sequence of
5
pictures, it stops beeping and the camera status light
flashes. Release the shutter button.
NOTE
If you continue to hold down the shutter button after the first
sequence of pictures, the camera will take a second sequence.
The camera will continue to take pictures until the memory card
is full.
Using the LCD Menus to Change Settings
4-10
Page 63

Continuous Shooting Using the Timer
You can also combine continuous shooting with the timer
for delayed automatic capture of a series of images. This
allows you to photograph yourself in motion.
NOTE
You can capture 10 standard or fine resolution images or 8 super
fine resolution images in eight seconds.
Secure the camera on a flat surface or on a tripod. (See
1
page A-4 for information on attaching the camera to a
tripod.)
Open the lens cover, then turn the camera dial to .
2
Wait until the camera status light turns green.
You see a preview of your picture on the LCD screen,
with a red frame around it.
the screen.
3
Center your subject in the red frame.
4
Press the timer button.
CONTINUOUS appears on
timer button
The timer icon
indicate that the timer is enabled.
5
Press the shutter button.
You have 10 seconds to get ready for “action” in front of
the camera.
The timer icon and the red timer light on the front of
the camera flash slowly for eight seconds. Then they
flash rapidly for two seconds before the shutter is
released.
Using the LCD Menus to Change Settings
appears on the status display panel to
4
A
B
4-11
Page 64

The camera beeps each time it captures an image, and
the timer light on the front of the camera flashes as the
images are processed.
Interval Shooting
You can use this time lapse feature to capture scenes that
change over time, such as a sunset or a busy street corner.
Your camera lets you set a time interval from 10 seconds to
24 hours. Interval shooting is available for all user modes.
NOTE
When you’re adding audio recordings or taking pictures with
HyPict image quality, the shortest time interval available is 20
seconds.
Follow these steps to use the time lapse feature:
Secure the camera on a flat surface or on a tripod. (See
1
page A-4 for information on attaching the camera to a
tripod.)
Open the lens cover, then turn the camera dial to .
2
Wait until the camera status light turns green.
You see a preview of your picture on the LCD screen,
with a red frame around it.
CONTINUOUS appears on
the screen.
Hold down the MENU button (under PRESS or
3
HOLD
) until you see the following screen:
time lapse
interval setting
The current setting for the time lapse interval (hours,
minutes, and seconds) appears in the center of the
screen, with seconds highlighted.
Using the LCD Menus to Change Settings
4-12
Page 65

4
Press the + or − button (next to the up and down
arrows) to change the highlighted setting, then press the
ISO button (under the left arrow) to move to the next
setting and repeat the process. Continue until you’ve set
the correct interval.
NOTE
You can also choose the maximum interval (24 hours) by
pressing the top button (next to
minimum interval (10 seconds) by pressing the bottom
button (next to
5
Press the shutter button to take the first picture.
The camera turns off automatically after you take the
first picture, then turns on again after the selected
interval to take the next photo.
6
To stop taking pictures, turn the camera’s dial to
Min Interval
Max Interval
).
), or the
Off
Adding Voice Recordings to Pictures
Your camera has a built-in microphone that lets you add a
voice recording of up to 10 seconds to each photo. You can
make a recording immediately after shooting a photo, or add
it later. (For information about adding a recording later, see
page 5-8.) You can make voice recordings in any user mode.
NOTE
You can’t record a message when taking a picture with the
optical viewfinder or when taking a picture in Quick Shot mode.
microphone
.
4
A
Using the LCD Menus to Change Settings
B
4-13
Page 66

Follow these steps to add a recording right after taking a
picture:
4
Open the lens cover and turn the camera dial to
Center the subject on the LCD screen.
.
1
Turn the camera dial to to display the SETUP menu.
2
Press the MENU button (under Camera SETUP). You
see the Camera SETUP menu. The current audio setting
appears at the bottom of the screen under Rec.
current audio setting
3
Press the ISO button (under Rec) to choose a different
setting. You can record a 3, 5, or 10-second message, or
turn recording off.
5
Press the shutter button halfway down to lock the auto
focus.
6
When the camera status light stops flashing and you see
a green circle
the rest of the way down.
7
Hold the camera still until it beeps. Then release the
shutter button.
After a moment, you see a confirmation message. Then
you see the message
countdown of the recording time.
8
Speak clearly into the microphone. You see another
confirmation message indicating that the recording was
successful.
on the screen, press the shutter button
Sound recording... and a
Using the LCD Menus to Change Settings
4-14
Page 67

NOTE
Even if you don’t speak into the microphone, your camera records
ambient noise when recording is turned on, and your images take
up more space on the memory card. To fit more images on your
memory card, make sure you turn recording off when you no
longer want to use it.
Using Programmed Subject Settings
The Program user mode provides four programmed settings
that let you choose the type of shot you’re taking. The
camera automatically assigns the optimum exposure,
metering method, and sensitivity for your subject.
Normal Appropriate for most photographs. Uses
◗
the following settings: auto exposure,
matrix metering.
Sports Recommended for action photographs.
◗
Uses the following settings: high shutter
speed, automatic sensitivity, matrix
metering.
Portrait Recommended for portraits. Uses the
◗
following settings: spot metering,
aperture fixed at f/2.4.
Landscape Recommended for landscapes or scenery.
◗
Uses the following settings: matrix
metering, aperture set to f/8.0. (The
aperture automatically changes to f/2.4
when the subject is dim.)
Follow these steps to use programmed subject settings:
1
Set the camera to Program user mode. (See page 4-2 for
instructions.)
4
A
B
Using the LCD Menus to Change Settings
4-15
Page 68

2
Open the lens cover and turn the camera dial to . You
see the View menu.
3
Hold down the MENU button (under PRESS or
) until you see the following screen:
HOLD
4
Press the ISO button to cycle through the four subject
settings.
5
When you’ve made your setting, press the MENU
button (under
BACK) to save it.
Your subject setting appears in the upper left corner of
the View menu.
subject
setting
6
Take your picture. (See page 2-6 for instructions.)
subject setting
Using the LCD Menus to Change Settings
4-16
Page 69

Adjusting the Sensitivity Setting
If you’ve set the user mode to Program or Manual, you can
use the LCD screens to adjust the sensitivity setting. (You
can also use the camera’s ISO button to adjust this setting.
See page 3-5.)
With the PhotoPC 800’s high sensitivity settings, you can
take pictures of fast-moving subjects, or indoor pictures
without a flash. You can set the sensitivity from the camera’s
standard ISO equivalent of 100 to an ISO equivalent of 200
or 400.
NOTE
Since image quality is lower when you use high sensitivity
settings, the standard setting is recommended for most pictures.
The arrow icons above the ISO button indicate the
sensitivity setting:
The standard setting is equivalent to ISO 100. This
is the recommended setting for most pictures.
The high sensitivity setting is equivalent to
ISO 200.
The super high sensitivity setting is equivalent to
ISO 400.
Follow these steps to adjust sensitivity:
1
Make sure the camera is set to Program or Manual user
mode. (See page 4-2 for instructions.)
2
Open the lens cover and turn the camera dial to . You
see the View menu.
sensit ivity sett ing
4
A
B
Using the LCD Menus to Change Settings
4-17
Page 70

NOTE
This View menu illustrates what you see if your user mode is
Program
set to
the user mode is set to
3
Do one of the following:
. Your View menu will look slightly different if
Manual
.
If user mode is set to Program, the current sensitivity
setting appears above the
button. (See the previous
ISO
illustration.) Press the ISO button to change the
sensitivity setting.
If user mode is set to Manual, hold down the
button (under
PRESS or HOLD
following screen. Press the
sensitivity setting, then press the
) until you see the
button to change the
ISO
MENU
button to save
MENU
your setting.
sensitivity setting
Adjusting the White Balance Setting
Although the PhotoPC 800 adjusts white balance for you
automatically to ensure color accuracy, you may sometimes
want to change this setting for special effects (for example, to
retain the red tints in a sunset).
Using the LCD Menus to Change Settings
4-18
Page 71

The PhotoPC 800 includes the following white balance
settings:
AUTO Adjusts the white balance of your pictures
automatically. This is the recommended setting
for most pictures.
FIX Locks the white balance setting at 5200 °K.
CUST Lets you customize the white balance setting.
See page 4-21 for details.
You must be in Program or Manual mode to adjust the white
balance setting. See page 4-2 for information about changing
the user mode.
NOTE
If you’re using the viewfinder, you can also press the
to change the white balance. See page 3-6 for details.
W.B.
button
Photographing With Fixed White Balance
The fixed white balance setting gives your pictures a warmer
appearance under fluorescent lighting. It’s also a good choice
for retaining the reds in a sunset.
Follow these steps to lock the white balance setting at
5200 °K:
Make sure the camera is set to Program or Manual user
1
mode. (See page 4-2 for instructions.)
Open the lens cover and turn the camera dial to . You
2
see the View menu.
4
A
Using the LCD Menus to Change Settings
B
4-19
Page 72

3
Do one of the following:
If user mode is set to Program, the current white balance
setting appears above the
button to select
FIX.
W.B. button. Press the W.B.
white balance setting
If user mode is set to Manual, hold down the
button (under
following screen. Press the
then press the
PRESS or HOLD) until you see the
W.B. button to select FIX,
MENU button (under Back) to save your
setting.
white balance setting
MENU
Using the LCD Menus to Change Settings
4-20
Page 73

Photographing With User Defined White Balance
Follow these steps to customize the white balance setting:
Press the bottom button (next to the entry New W/B).
4
You see the following screen:
Turn the camera dial to
1
If necessary, change to Program or Manual user mode.
Press the MENU button (under Camera SETUP) to
2
go to the Camera SETUP menu.
Open the lens cover.
3
to display the SETUP menu.
Press the bottom button (next to Yes) to save a new
5
white balance setting.
You see a message instructing you to press the shutter
button to set a new white balance.
Focus the camera on a piece of white paper, or some
6
other object to set white balance by, and press the
shutter button to save the setting.
Open the lens cover and turn the camera dial to . You
7
see the View menu.
Using the LCD Menus to Change Settings
4
A
B
4-21
Page 74

8
Do one of the following:
Adjusting Exposure
If user mode is set to Program, the current white balance
setting appears above the
button to select
CUSTOM.
If user mode is set to Manual, hold down the
button (under
PRESS or HOLD) until you see the
following screen. Press the
CUSTOM, then press the MENU button (under Back)
W.B. button. Press the W.B.
MENU
W.B. button to select
to save your setting.
white balance setting
Your camera normally adjusts exposure automatically.
However, you may want to increase the exposure setting if
you want to lighten your picture or if you’re taking pictures
of an object against a bright background, such as sand or
snow on a sunny day. Similarly, you may want to decrease it
if you want to darken the picture, or if you’re taking pictures
against a dark background.
With the PhotoPC 800, you can select predefined exposure
settings, or you can fine-tune the exposure manually by
setting the shutter speed and aperture setting.
NOTE
If you’re using the viewfinder, you can also use the camera’s
controls to make predefined exposure adjustments. See page 3-7
for instructions.
Using the LCD Menus to Change Settings
4-22
Page 75

Making Predefined Exposure Adjustments
Follow these steps to make predefined exposure adjustments:
Make sure that the camera is set to Program or Manual
1
user mode. (See page 4-2 for details.)
Open the lens cover and turn the camera dial to .
2
Do one of the following:
3
In Manual mode, press the
Exposure) to select AUTO, then press the + button to
ISO button (under
increase the exposure setting, or the − button to decrease
it. You can choose from 21 settings in increments of 0.2,
from −2.0 to +2.0 EV.
4
In Program mode, press the + button (next to the up
arrow) to increase the exposure setting, or the − button
(next to the down arrow) to decrease it. You can make
nine different settings in increments of 0.5, from
−2.0 to +2.0 EV (Exposure Value).
exposure
setting
adjust
predefined
exposure
settings
set exposure mode to AUTO
NOTE
Exposure Value is a combination of shutter speed and aperture
setting.
Using the LCD Menus to Change Settings
4-23
A
B
Page 76

Making Advanced Exposure Adjustments
Experienced photographers can set the exposure manually by
adjusting the shutter speed and aperture.
Press the + button (next to the up arrow) to increase
4
shutter speed, or the − button (next to the down arrow)
to decrease it.
Follow these steps to set the shutter speed and aperture:
Make sure that the camera is set to Manual user mode.
1
(See page 4-2 for details.)
Open the lens cover and turn the camera dial to .
2
Press the ISO button (under Exposure) to change the
3
exposure mode to
Using the LCD Menus to Change Settings
4-24
MANUAL.
set shutter
speed
set exposure mode to MANUAL
NOTE
When the flash is set to automatic or forced flash, you can
select shutter speeds from 1/30 to 1/750. When the flash is
turned off, you can select shutter speeds from 1/2 to 1/750.
See page 3-3 for instructions on setting the flash.
Press the W.B. button to change the aperture setting.
5
(You can choose either
F2.4 or F8.)
Adjusting the Focus
The PhotoPC 800 lets you adjust the distance of the focal
point. Follow these steps:
Make sure that the camera is set to Manual user mode.
1
(See page 4-2 for details.)
Open the lens cover and turn the camera dial to .
2
Page 77

3
If you want to use the macro feature or take panoramas,
press the button next to
or
Panorama appears in the center of the screen.
4
Hold down the MENU button (under PRESS or
HOLD
) until the following screen appears:
Normal Frame until Macro
If the camera is set to
you can choose from the following settings:
AF The camera determines the focus automatically.
Focal point is about three feet.
Focal point is about 10 feet.
Focal point is infinity (∞).
Normal Frame or Panorama,
4
5
Press the + or − button (next to the up and down
arrows) to select a manual focus setting.
focus setting
If you’re using the macro feature, you can choose a
setting from 1 to 10, where 1 is the closest possible
focus.
Changing the Metering Method
If you’re using Manual mode, your camera lets you choose
between matrix metering and spot metering.
With matrix metering, the camera automatically measures
the available light and determines the correct exposure. If
you’re an advanced photographer, you can use spot metering
to choose a point that the camera samples to determine
exposure.
Using the LCD Menus to Change Settings
4-25
A
B
Page 78

Follow these steps to change the metering system:
Setting Camera Options
1
Make sure that the camera is set to Manual user mode.
(See page 4-2 for details.)
2
Open the lens cover and turn the camera dial to .
3
Hold down the MENU button (under PRESS or
HOLD
) until you see the following screen. The current
metering setting is in the lower right corner.
4
Press the bottom button (beside Metering) to change
the setting.
5
Press the MENU button (under BACK) to save your
setting.
metering
setting
You can change the settings of several camera options,
including the automatic power off feature, the LCD screen’s
brightness, and when and whether the camera beeps. You
can also reset the camera’s clock and language.
NOTE
You can also set the camera’s clock and automatic power off
feature from your computer. See Chapter 10 for details.
Setting the Automatic Power Off Feature
The automatic power off feature saves battery power by
automatically turning your camera off when it’s idle for a
designated period of time. You can set the camera to turn off
after 10 seconds, 30 seconds, one minute, or three minutes.
Using the LCD Menus to Change Settings
4-26
Page 79

Follow these steps to change the power off interval:
1
Push the camera dial lock in and turn the dial to . You
see the SETUP menu.
2
Press the MENU button (below Camera SETUP) to
go to the Camera SETUP menu. The current power off
setting appears in the upper right corner of the screen.
power off
setting
3
Press the top button (next to the current setting) to
select a new setting.
NOTE
Automatic power off is only in effect when you’re using batteries
to power the camera.
4
A
Using the LCD Menus to Change Settings
B
4-27
Page 80

Setting the LCD Brightness
To adjust the brightness of the LCD screen, follow these
steps:
Turn the camera dial to to display the SETUP menu.
1
Then press the
SETUP
MENU button (under Camera
). You see the Camera SETUP menu.
Setting the Alert Beep
Normally, the camera’s alert beep lets you know when an
image has been captured. However, you can turn the alert
beep off, or set the camera to beep whenever you press any of
its buttons.
To set the alert beep, follow these steps:
Press the + or − button (next to the up and down
2
arrows) to adjust the screen brightness.
Using the LCD Menus to Change Settings
4-28
Turn the camera dial to
1
Then press the
SETUP
). You see the Camera SETUP menu.
to display the SETUP menu.
MENU button (below Camera
Page 81

2
Press the W.B. button (under Beep) to cycle through
these choices:
Shutter The camera beeps when an image is
◗
captured.
◗
Never Turns the beep off.
Always The camera beeps whenever you press
◗
a button.
Setting the Time and Date
The camera remembers the time and date settings you made
when you formatted your memory card, unless it goes
without battery power for more than a couple of hours. If
you need to reset the time and date for any reason, follow
these steps:
1
Turn the camera dial to
You see the camera date and time setting in the upper
right corner of the screen.
2
Press the top button (next to the setting) to display the
following screen. The month is highlighted in red.
to display the SETUP menu.
camera date
and time
setting
4
A
Using the LCD Menus to Change Settings
B
4-29
Page 82

3
Press the + or − button (next to the up and down
arrows) to adjust the setting, then press the
(under the right arrow) to highlight the day.
4
Repeat step 3 for each item you want to change. (To
return to a previous setting, press the
5
When you’re done, press the MENU button (under
BACK) to save the setting and return to the SETUP
menu.
ISO button.)
W.B. button
2
Press the ISO button (under the
language setting screen.
icon) to go to the
Setting the Language
You can choose from two languages for information
displayed on the LCD screen.
Follow these steps to change the language setting:
1
Turn the camera dial to
Using the LCD Menus to Change Settings
4-30
to display the SETUP menu.
3
If necessary, press the W.B. button (under the right
arrow) to highlight
4
Press the MENU button (under BACK) to save the
setting and return to the SETUP menu.
ENG.
Page 83

.
5
Playing Back Photos
he LCD screen lets you play back your pictures one-
by-one or in groups of four or nine. You can magnify
T
or delete selected pictures and customize playback features.
You can also view your pictures on a television as easily as on
the camera’s screen. This chapter explains the following:
◗
Playing back pictures one-by-one or several pictures
at a time
◗
Deleting pictures
◗
Locking pictures
◗
Adding and deleting audio recordings
◗
Magnifying pictures
◗
Viewing detailed information about a picture
◗
Playing pictures as a slide show
5
A
B
◗
Playing back pictures on TV
Playing Back Photos
5-1
Page 84

Playing Back Pictures One by One
top button
+
–
bottom button
When you set the camera dial to , you see the last picture
you took on the LCD screen:
MENU
ISO
W.B.
NOTE
After a designated period of inactivity, the camera
automatically shuts off to conserve battery power. If the
image on your LCD screen disappears, press any button on
the back of the camera to “wake” the camera.
Playing Back Photos
5-2
picture number
display multiple images
Press the + button (next to the right arrow) to display the
earliest picture taken. You can continue pressing the +
button to view your pictures in order. Press the − button
(next to the left arrow) to move backward through your
pictures.
Page 85

Playing Back Multiple Pictures
You can play back your pictures in Multi mode to view small
“thumbnail” versions of either four or nine pictures at once.
Follow these steps to play back multiple pictures:
Turn the camera dial to . You see the last picture you
1
took on the LCD screen.
Press the ISO button (below Multi).
2
If you want to display nine pictures at once, press the
3
ISO button (under 1x9) again.
Press the + and − buttons to move the white selection
4
frame through the images on screen, or hold one of these
buttons down to move through the images quickly.
When the frame passes the first or last image of the
current group, the previous or next three images are
displayed in the group.
5
Small thumbnail images of the last four pictures you
took appear on the screen, with the currently selected
image framed in white.
press the + or −
button to move
through images
To switch back to displaying one picture at a time, press
5
ISO button again.
the
Playing Back Photos
A
B
5-3
Page 86

Deleting Pictures
The LCD screen provides two different methods for deleting
images after you play them back:
◗ You can delete the currently displayed picture
NOTE
To make choosing images easier, you can display four or
ISO
nine images at a time by pressing the
twice.
button once or
◗ You can select multiple pictures for deletion, or “lock”
(protect) them from deletion
You can also delete images through your software when the
camera is connected to your computer. For instructions, see
Chapter 6.
Deleting the Currently Displayed Picture
Make sure the camera dial is set to , then follow these
steps:
Press the + or − button (next to the right and left arrows)
1
to display the image you want to delete.
Playing Back Photos
5-4
2
Press the
button (under
W.B.
Delete
). A confirmation
message appears.
Press the top button (next to
3
or the bottom button (next to
NOTE
If you try to delete a locked image , you see a warning
message. Press any button to clear the message. See pages 5-6
for instructions on locking and unlocking images in the camera.
) to delete the image,
Yes
) to cancel.
No
Page 87

Deleting All Pictures
To delete all the images from your memory card, make sure
the camera dial is set to
Press the bottom button (next to Select Image). Then
1
press the top button (next to
images in your card.
Press the ISO button (under Delete) to delete the
2
images. A confirmation message appears.
Press the top button (next to Yes) to delete the images,
3
or the bottom button (next to
NOTE
If any images are locked, you see a message asking if you want
to delete them. Press the button next to
unlocked images, or next to
See page 5-8 for instructions on unlocking images.
, then follow these steps:
Select All) to select all the
No) to cancel.
No
to delete only the
Yes
to delete the locked images too.
Deleting Selected Pictures
Make sure the camera dial is set to , then follow these steps:
Press the
1
pictures on the screen, or twice to display nine. A white
frame appears around one of the pictures.
Press the button next to
2
following on your screen:
button (under
ISO
) once to display four
Multi
Select Image
. You see the
5
A
Playing Back Photos
B
5-5
Page 88

3
Press the + or − button (next to the right and left arrows)
to move the frame to an image you want to erase. Then
press the bottom button (next to Select). A red frame
appears around the image and the word
to
Release.
NOTE
If you change your mind, press the button next to
deselect the image.
4
Repeat step 3 to select any additional images.
5
After you’ve finished selecting images, press the ISO
button (under
Delete) to delete them.
Select changes
A confirmation message appears. Press the top button
(next to
bottom button (next to
Yes) to delete the selected images, or the
No) to cancel.
Release
Locking Pictures
The lock feature allows you to keep your images from being
accidentally deleted. You can lock selected images or all the
images in the camera. Make sure the camera dial is set to ,
then follow these steps to lock pictures:
1
Press the ISO button (under Multi) once to display four
to
pictures on the screen, or twice to display nine. A white
frame appears around one of the pictures.
2
Press the bottom button (next to Select Image). You
see the following on your screen:
Playing Back Photos
5-6
Page 89

3
Do one of the following:
◗ If you want to lock all images, press the top button
(next to
press the same button to deselect all images.)
◗ If you want to lock just one or some of the images,
press the + or − button to move the frame to an
image you want to lock. Then press the bottom
button (next to
press the button next to
image.) Repeat this step for each image you want to
lock.
Select All). (If you change your mind,
Select). (If you change your mind,
Release to deselect the
4
Press the W.B. button (under the padlock icon). You see
the following on your screen:
5
Press the button next to Lock.
5
A red frame appears around each image selected.
A padlock icon appears in the upper left corner of each
locked image.
6
Press the MENU button (under BACK) to save your
settings.
Playing Back Photos
A
B
5-7
Page 90

Unlocking Pictures
After you have locked some of your pictures, you can unlock
selected pictures or all the pictures in the camera.
Make sure the camera dial is set to
Repeat steps 1 through 3 of “Locking Pictures” to select
1
the images you want to unlock.
Press the W.B. button (under the padlock icon). You see
2
the following:
, then follow these steps:
Press the bottom button (next to Release).
3
The selected images are unlocked. If an image is
successfully unlocked, the padlock icon disappears from
the upper left corner of its frame.
Press the MENU button (under BACK) to save your
4
settings.
Adding Audio Recordings
You can add audio recordings to images stored on your
memory card.
NOTE
You can’t add audio recordings to images taken in quick shot
mode.
Playing Back Photos
5-8
Page 91

Follow these steps to add a recording to an existing image:
1
Turn the camera dial to
2
Press the + or − button (next to the right and left arrows)
to move to the photo to which you want to add a
recording. (If you’re displaying multiple images, you’ll
see a white frame around the currently selected photo.)
to go to playback mode.
3
Hold down the MENU button (under HOLD to
NEXT
) until the screen changes, then press the top
button (next to
4
Press the button next to the desired recording time. A
countdown of the recording time appears on the screen.
NOTE
If there’s already a message on the selected photo, a
confirmation message appears after you choose the
recording time. To erase the old recording and make a new
one, press the top button (next to
button (next to No) to cancel.
RECORD). You see the following:
Yes
). Or press the bottom
5
A
Playing Back Photos
B
5-9
Page 92

5
Speak clearly into the microphone on the back of the
camera.
A microphone icon appears in the upper left corner of
the image to indicate that a recording has been added.
Deleting Audio Recordings
You can also delete audio recordings that you’ve added to the
pictures on your memory card.
Make sure your camera dial is set to
steps:
1
Press the ISO button (under Multi) once to display four
pictures on the screen, or twice to display nine. A white
frame appears around one of the pictures.
2
Use the + or − button (next to the right and left arrows)
to move to an image whose attached recording you want
to erase. (You’ll see a microphone icon in the upper left
corner if the image has a recording attached.)
, then follow these
3
Hold down the MENU button (under HOLD to
NEXT
) until you see the following:
4
Press the button next to RECORD. You see the
following on your screen:
Playing Back Photos
5-10
Page 93

5
Press the ISO button (under Sound Delete) to delete
the recording for this picture. A message appears asking
you to confirm the deletion.
The sections of your image that can be viewed are
demonstrated in the figure below:
NOTE
If you see a message that the selected image is locked,
press the button next to
6
Press the button next to
cancel.
7
Press the
to the playback menu.
MENU
Unlock
to unlock it.
to confirm, or No to
Yes
button (under
) twice to return
BACK
Magnifying a Picture
You can zoom in to magnify a portion of your image on the
LCD screen and view it in greater detail. Then you can use
the camera’s buttons to scroll the image and display another
section (up to nine sections for regular images and three
sections for panoramic images).
The center
section is
magnified first
Make sure the camera dial is set to
1
To magnify the currently displayed image, press the top
button (next to the magnifying glass icon).
A magnified view of the center section of the picture
appears. An icon in the top left corner of the screen
indicates which section of the image is currently
displayed.
2
To view different sections of the magnified image, press
the + and − buttons (next to the up and down arrows) to
move up or down, or the
to the left and right arrows) to move left or right.
, and follow these steps:
and
ISO
W.B.
Playing Back Photos
buttons (next
5
A
B
5-11
Page 94

NOTE
When you magnify a panoramic picture, it’s divided into
three parts. You can only scroll left and right.
3
To exit the magnification screen, press the MENU
button (next to
BACK).
Viewing Picture Information
You can use the LCD screen to view detailed information
about individual images, including date and time taken,
shutter speed, exposure settings, aperture and white balance
settings, and metering method. To display image
information, follow these steps:
1
Turn the camera dial to , then hold down the MENU
button (under
HOLD to NEXT).
You see the following screen:
2
Press the W.B. button (below INFO) to display
information for the currently selected image.
Playing Back Photos
5-12
3
Press the MENU button (under BACK) to exit the
picture information screen.
Page 95

Playing Your Pictures as a Slide Show
You can use the LCD screen to play back your pictures in a
continuous “slide show.” You can even control the slide
show’s speed and pauses.
Follow these steps:
Turn the camera dial to . Then hold down the MENU
1
button under
screen appears:
HOLD to NEXT) until the following
Press the bottom button (next to SLIDE SHOW). You
2
see the following screen:
Press the + button to select the slide show speed. (You
3
can have the image change automatically every 3, 5, or
10 seconds, or you can choose to change the images
manually.)
NOTE
You can also rotate the images, or exclude certain images
from your slide show. See the following sections for
instructions.
slide
show
speed
5
A
Playing Back Photos
B
5-13
Page 96

4
Press the bottom button (next to Start) to begin the
slide show.
2
Press the bottom button (next to SLIDE SHOW). You
see the following screen:
To pause the slide show, press the
press the
slide show is paused, you can view the last image by
pressing the
To stop the slide show, press the bottom button (next to
Quit).
MENU button again to restart it. While the
ISO button (under BACK).
MENU button; then
Excluding Pictures From a Slide Show
All pictures saved in your camera’s memory card are
automatically included in the slide show. To exclude any
pictures from the slide show, follow these steps:
1
Turn the camera dial to . Then hold down the MENU
button (next to
screen.
HOLD to NEXT) until you see the next
3
Press the − button (next to SlideSelect). The following
screen appears:
Playing Back Photos
5-14
Page 97

4
Press the + or − button (next to the right and left arrows)
to select the picture you want to exclude from the slide
show. (If you want, press the ISO button to display
multiple pictures.)
5
Do one of the following:
◗ Press the bottom button (next to
exclude the selected picture.
Exclude) to
Rotating Pictures in a Slide Show
You can display pictures in your slide show rotated 90
degrees to the right or left. To rotate a picture, follow these
steps:
1
Turn the camera’s dial switch to
playback menu, then hold down the
(under
HOLD to NEXT
) until you see the next screen.
to display the
MENU
button
5
◗ Press the top button (next to
all pictures.
NOTE
If you change your mind, move the white frame to the
picture you want to include again and press the bottom
button (next to
Select All
6
When you’re finished, press the
return to the playback menu.
Select
). Or press the top button (next to
) to include all pictures.
Excld All) to exclude
MENU
button twice to
Playing Back Photos
A
B
5-15
Page 98

2
Press the bottom button (next to SLIDE SHOW). You
see the following:
3
Press the − button (next to SlideSelect) to display the
following:
4
Press the + or − button (next to the right and left arrows)
to frame the image you want to rotate. Then press the
bottom button (next to Select) to select the image.
NOTE
To make it easier to view your picture, press the
to display multiple images, then use the + or − button to
select an image.
5
To rotate the image 90 degrees to the right, press the
W.B. button (under Rotate) once. An orientation icon
appears in the upper left corner of the screen
ISO
indicating that the picture will be rotated to the right
when displayed in the slide show.
To rotate the image 90 degrees to the left, press the
W.B. button twice. A left orientation icon
the upper left corner of the screen.
6
Repeat steps 4 and 5 to rotate more pictures. When
you’re finished, press the
MENU button (under BACK)
to save your changes.
button
appears in
Playing Back Photos
5-16
Page 99

Playing Back Pictures on TV
You can display your pictures on a regular television
or VCR by using the video cable that came with your
PhotoPC 800.
TIP
You can videotape your pictures to share them without using a
computer. After you connect the camera to your VCR, press the
Record button on the VCR and use the camera’s slide show
feature, as described on page 5-13.
Follow these steps to play back your pictures on TV:
Make sure the camera and TV (and VCR) are turned off.
1
Open the camera’s connector cover and connect the
2
black end of the video cable to the
shown.
Video Out port, as
5
A
Playing Back Photos
B
5-17
Page 100

3
Connect the yellow end of the cable to the VIDEO IN
port on the television or VCR.
4
Turn on the TV (and VCR) and switch to the correct
video mode.
5
Playing Back Photos
5-18
 Loading...