

Page 1
Page 2

Where to Find Information
This User’s Guide
Provides you with detailed inform at io n on using your EPS ON PhotoPC 700, the Dir e ct Print program, and optional
products; from setting up to troubleshooting.
EPSON Photo!2/EPSON Photo File Uploader User’s Guide
Provides you wi th inform at io n on EPSON Photo!2 so ftw are and uploading uti lit ies including EPS ON Photo File Uploader.
Online Help
Provides you wi th deta iled information and in st ruc t ion s fo r th e software that controls your Pho toPC 700. Online help is
installed automatically when yo u install the digital camer a sof twa re. See EPSON Photo!2 User’s Guide for information on
accessing onli ne help.
Color Guide (may not be available in some countries)
Explains th e basic s of co lor im aging and shows you ho w to get im p ressive results from your Pho toPC 700 and other
EPSON products. See this User’s Guide for information o n acc essing the Color Guide.
Page 3
®
COLOR DIGITAL CAMERA
User’s Guide
Page 4

IMPORTANT NOTICE
All rights reserved. No part of this publication may be reproduced,
stored in a retrieval system, or transmitted in any form or by any
means, electronic, mechanical, photocopying, recording, or otherwise,
with o ut the prior writ ten permission of S EIKO EPSON
CORPORATION. No patent liability is assumed with respect to the use
of the information contained herein. Neither is any liability assumed for
damages resulting from the use of the information contained herein.
Neither SEIKO EPSON CORPORATION nor its affiliates shall be
liable to the purchaser of this product or third parties for damages,
losses, costs, or expenses incurred by the purchaser or third parties as
a result of: accident, misuse, or abuse of this product or unauthorized
modifications, repairs, or alterations to this product, or (excluding the
U.S.) failure to strictly comply with SEIKO EPSON
CORPORATION’s operating and maintenance instructions.
SEIKO E P SON CORPOR ATION shall not be liable against any
damages or problems arising from the use of any options or any
consumable products other than those designated as Original EPSON
Products or EPSON Approved Products by SEIKO EPSON
CORPORATION.
EPSON is a registered trademark of SEIKO EPSON CORPORATION.
PhotoPC is a trademark of SEIKO EPSON CORPORATION.
Macintosh is a regi ster ed trademark of Apple Computer, I nc .
Microsoft and Windows are registered trademarks of Microsoft
Corporation.
CompactFlash is a trademark of SanDisk Corporation.
General Notice: Other product names used herein are for identification
purposes only and may be trademarks of their respective owners. EPSON
disclaims any and all rights in those marks.
Copyri ght©1 9 98 by SEIKO EPSON CORPORATION, Nagano, Japan .
Declaration of Conformity
According to ISO/IEC Guide 22 and EN 45014
Manufacturer: SEIKO EPSON CORPORATION
Address: 3-5, Owa 3-chome, Suwa-shi, Nagano-ken 392 Japan
Representative: EPSON EUROPE B.V.
Address: Prof. J. H. Bavincklaan 5 1183 AT Amstelveen
The Netherlands
Declares that the Product:
Product Name: Digital Still Camera
Model: G690A
Conforms to the following Directive(s) and Norm(s):
Directive 89/336/EEC:
EN 55022 Class B
EN 50082- 1
IEC 801-2
IEC 801-3
IEC 801-4
EN 61000- 3-2 (Using AC Adapter Mo del EU-20)
EN 61000- 3-3 (Using AC Adapter Mo del EU-20)
June, 1998
Y. Ishii
President of EPSON EUROPE B. V .
A NOTE CONCERNING RESPONSIBLE USE OF
COPYRIGHT ED MATERIALS
Like photocopiers, digital cameras can be misused by improper
photographing of copyrighted material. Unless you have the advice
of a knowledgeable attorney, be responsible and respectful by not
photographing published material without the permission of the
copyright holder.
ii
Page 5

Contents
Introduction
PhotoPC 700 Features . . . . . . . . . . . . . . . . . . . . 0-1
Options . . . . . . . . . . . . . . . . . . . . . . . . . . . . 0-2
For United Kingdom users - use of options . . . . . 0-2
Safety Instructions . . . . . . . . . . . . . . . . . . . . . . 0-3
Warnings, Ca ut io ns, and N otes . . . . . . . . . . . . . . 0-4
Chapte r 1
Unpacking Your PhotoPC 700 . . . . . . . . . . . . . . . 1-1
Getting to Know the Camera . . . . . . . . . . . . . . . . 1-2
Installing Batteries . . . . . . . . . . . . . . . . . . . . . . 1-4
Handling batteries . . . . . . . . . . . . . . . . . . . 1-5
Attaching the Hand Strap . . . . . . . . . . . . . . . . . 1-7
Setting the Language . . . . . . . . . . . . . . . . . . . . 1-7
Setting the Date and Time . . . . . . . . . . . . . . . . . 1-8
Using the Camera With Your Computer . . . . . . . . . 1-9
Viewing the Color Guide . . . . . . . . . . . . . . . . . . 1-9
Getting Started
Chapte r 2
Turning the Camera On and Off . . . . . . . . . . . . . . 2-1
Auto Shut-off . . . . . . . . . . . . . . . . . . . . . . . . . 2-2
The Display Panel . . . . . . . . . . . . . . . . . . . . . . 2-3
Checking Battery Power . . . . . . . . . . . . . . . . . . . 2-3
Activating the Shutter . . . . . . . . . . . . . . . . . . . . 2-4
Using the viewfinder . . . . . . . . . . . . . . . . . . 2-4
Using the LCD monitor . . . . . . . . . . . . . . . . . 2-5
Picture-taking Range . . . . . . . . . . . . . . . . . . . . . 2-6
Adjusting Set tings . . . . . . . . . . . . . . . . . . . . . . 2-6
Image quality . . . . . . . . . . . . . . . . . . . . . . . 2-8
Flash . . . . . . . . . . . . . . . . . . . . . . . . . . . 2-9
Self timer . . . . . . . . . . . . . . . . . . . . . . . . . 2-9
Macro mode . . . . . . . . . . . . . . . . . . . . . . . 2-10
Using the Function Button . . . . . . . . . . . . . . . . . 2-11
Adjusting the exposure . . . . . . . . . . . . . . . . . 2-11
Erasing your photos . . . . . . . . . . . . . . . . . . . 2-13
Checking the Picture Counter . . . . . . . . . . . . . . . 2-13
Playing Back Your Photos . . . . . . . . . . . . . . . . . . 2-14
Displaying photos on the LCD screen . . . . . . . . . 2-14
Displaying photos on a television . . . . . . . . . . . 2-15
Taking Pictures with PhotoPC 700
iii
Page 6

Chapte r 3
Working with LCD Monitor Menus . . . . . . . . . . . . 3-1
Using the Panorama/Zoom Menu . . . . . . . . . . . . . 3-4
Using the Conditions Menu . . . . . . . . . . . . . . . . . 3-4
Setting the continuous shooting mode . . . . . . . . 3-4
Adjusting the white balance . . . . . . . . . . . . . . 3-5
Adjusting the exposure . . . . . . . . . . . . . . . . . 3-5
Adjusting the sensitivity . . . . . . . . . . . . . . . . 3-6
Using the Information Menu . . . . . . . . . . . . . . . . 3-6
Using the Settings Menu . . . . . . . . . . . . . . . . . . 3-7
Setting the clock . . . . . . . . . . . . . . . . . . . . . 3-7
Setting the alert beep . . . . . . . . . . . . . . . . . . 3-7
Setting LCD brightness . . . . . . . . . . . . . . . . . 3-8
Setting the energy saving mode . . . . . . . . . . . . 3-8
Using the Information Menu . . . . . . . . . . . . . . . . 3-8
Using the Playback Menu . . . . . . . . . . . . . . . . . . 3-9
Using the Magnification Menu . . . . . . . . . . . . . . . 3-9
Using the Photo Control Menu . . . . . . . . . . . . . . . 3-10
Erasing photos . . . . . . . . . . . . . . . . . . . . . . 3-10
Locking photos . . . . . . . . . . . . . . . . . . . . . . 3-11
Getting memory information . . . . . . . . . . . . . . 3-13
Copying photos . . . . . . . . . . . . . . . . . . . . . 3-13
Formatting memory cards . . . . . . . . . . . . . . . 3-14
Using the Slide Show Menu . . . . . . . . . . . . . . . . 3-14
Using the Software Menu . . . . . . . . . . . . . . . . . . 3-15
Using the Language Menu . . . . . . . . . . . . . . . . . 3-16
Using the LCD Monitor Menus
Chapte r 4
Features . . . . . . . . . . . . . . . . . . . . . . . . . . . 4-1
Preparing to Use the Direct Print Program . . . . . . . 4-2
Connecting Your Camera to the Printer . . . . . . . . . 4-2
Available Paper Type . . . . . . . . . . . . . . . . . . . 4-3
Using the Direct Print Program . . . . . . . . . . . . . . 4-4
Accessing the Direct Print program . . . . . . . . . 4-4
Printing your images . . . . . . . . . . . . . . . . . . 4-4
LCD Screen and Display Panel Messages . . . . . . . . 4-15
Printed Image Dimensions . . . . . . . . . . . . . . . . 4-16
Chapte r 5
Using CompactFlash Memory Cards . . . . . . . . . . . 5-1
Installing a CompactFlash Card . . . . . . . . . . . 5-2
Removing a CompactFlash Card . . . . . . . . . . . 5-3
Using the PCMCIA Adapter . . . . . . . . . . . . . . . . 5-3
Using the AC Adapter . . . . . . . . . . . . . . . . . . . 5-4
Using the Ni-MH Battery Charger . . . . . . . . . . . . 5-6
Important Safety Instructions . . . . . . . . . . . . . 5-6
Operating instructions . . . . . . . . . . . . . . . . . 5-7
Using the Direct Print Program
Camera Options
iv
Page 7

Chapte r 6
Maintenance . . . . . . . . . . . . . . . . . . . . . . . . . 6-1
Cleaning the camera . . . . . . . . . . . . . . . . . . 6-1
Storing the camera . . . . . . . . . . . . . . . . . . . 6-1
Problems and Solutions . . . . . . . . . . . . . . . . . . . 6-2
Camera problems . . . . . . . . . . . . . . . . . . . . 6-2
Picture Problems . . . . . . . . . . . . . . . . . . . . 6-4
Appendix A
Camera . . . . . . . . . . . . . . . . . . . . . . . . . . . . A-1
Physical dimensions . . . . . . . . . . . . . . . . . . A-1
Product type . . . . . . . . . . . . . . . . . . . . . . . A-1
Recorded image . . . . . . . . . . . . . . . . . . . . . A-1
Optical . . . . . . . . . . . . . . . . . . . . . . . . . . A-2
Functional . . . . . . . . . . . . . . . . . . . . . . . . A-2
Interface . . . . . . . . . . . . . . . . . . . . . . . . . A-3
Power . . . . . . . . . . . . . . . . . . . . . . . . . . . A-3
Optional CompactFlash Card . . . . . . . . . . . . . . . A-4
Optional PCMCIA Adapter . . . . . . . . . . . . . . . . A-4
Optional AC Adapter . . . . . . . . . . . . . . . . . . . . A-4
Optional Battery Charger and Batteries . . . . . . . . . . A-5
Maintenance and Troubleshooting
Specifications
Appendix B
For United Kingdom and the Republic of Ireland Users B-1
World Wide Web . . . . . . . . . . . . . . . . . . . . B-1
Faxon EPSON . . . . . . . . . . . . . . . . . . . . . . B-2
Bulletin Board Serv ic e for lat est drivers and utilities B- 2
Customer and Warranty Support . . . . . . . . . . . B-2
Pre Sales Enquiry Desk . . . . . . . . . . . . . . . . . B-2
For Australian Users . . . . . . . . . . . . . . . . . . . . . B-3
EPSON FAXBACK . . . . . . . . . . . . . . . . . . . . B-3
EPSON Bulletin Board System . . . . . . . . . . . . . B-3
Internet URL http://www.epson.com.au . . . . . . B-3
Your dealer . . . . . . . . . . . . . . . . . . . . . . . . B-3
EPSON Helpdesk . . . . . . . . . . . . . . . . . . . . B-3
For Singapore Users . . . . . . . . . . . . . . . . . . . . . B-4
For Hong Kong Users . . . . . . . . . . . . . . . . . . . . B-4
Internet home page . . . . . . . . . . . . . . . . . . . B-4
Electronic bulletin board system . . . . . . . . . . . . B-4
Technical Support Hotline . . . . . . . . . . . . . . . B-4
For Philippi nes U sers . . . . . . . . . . . . . . . . . . . . B-4
Glossary
Index
Contacting Customer Support
v
Page 8

vi
Page 9
Introduction
Your new EPSON® PhotoPC 700 is a re v ol ut ionary,
easy-to-use digit al c am era that enables you to take
full-color pictures and use t hem right away with your
computer. The Photo PC 700 com es w ith ev erything you
need, including EPSON Pho to! 2 so ftw are t hat let s yo u
transfer your pictures to your computer’s hard disk. You
can then edit, enhance, and organize your pictures or
simply place t hem into y our doc uments. To use EPSON
Photo!2, see you r digital camera softw are manual.
Create professional letters, documents, and presentations
with real life im ages right on your des kt op. S hare
pictures with bu siness colleagues or frie nds over the
Internet. A dd color and visua l appeal to your
newsletters, fl yers, and brochures . Anything you can
display on your screen or print will look better with
images from yo ur PhotoPC 700.
PhotoPC 700 Features
PhotoPC 700 is a c omplete system for cap turing digital
images, and includes the following features:
o
1.3 Mega pix e l CCD
o
24-bit color image capture
o
High resolu ti on (1280 × 960 pixels)
o
4MB internal m e m o ry t hat ho ld s ap proximately
6 super fine quality color or mo noc hro m e im ages,
12 to 13 fine qualit y co lor or monochrom e im ages, or
40 to 43 standard quality color imag es (the number
differs for NTSC and PAL mo dels; see page A-2 for
details)
o
Three color and t w o monochrome image quality
settings
o
Built-in color LCD m o nit or for previewing and
playing ba ck p ict ures
o
Optical real image viewfinder
o
Macro, digital ×2 zoom, and pano ram a photo formats
o
Continuous shooting of up to 10 pictures in sequence
Introductio n
1
Page 10
o
Automatic or fixed white balance
o
Automatic or manual exposure setting
o
Automatic date and time recording for each picture
o
Video cable for displaying your pictu res on a
television monitor
o
Built-in flash w it h au tom at ic , forc ed f lash, and flash
off settings
o
Self timer
o
Automatic shut-off to save batteries
o
Serial cab les f or transferring pho t os to yo ur computer
o
EPSON Pho t o!2 software that lets you t ransfer your
pictur es to your computer
o
EPSON Pho t o Fil e U plo ader software that allo ws
you to convert images stored in your computer to
EPSON Ph oto f ile f ormat and upload them to you r
camera
o
EPSON Program Uploader software that lets you
upload op t i onal progr a m s to t h e ca me ra f r om your
comput e r
o
Use your pictures with Windows
applications
®
and Mac intos h
Options
The following PhotoPC 700 optio ns are available from
EPSON:
o
CompactFlash Cards (4MB: B 808311,
15MB: B8 08301)
o
PCMCIA adapter (B867041)
o
AC Adapter (B86703]) for use with a standa rd
electr i c al outlet
o
Power Pack (B81812]) which includes the N i- MH
Battery Charger and Ni-MH Rec hargeable Batteri es
o
Ni-MH Rec hargeable Batteri es (B81811])
Note:
The asterisk is a substitute for the last digit of the product
number, which varies by country.
For United Kingdom users - use of options
EPSON (UK) LTD shall not be liable against any
damages or problems arising from the use of any options
®
or consumable products other tha n th ose d esignated as
Original EPSON Products or EPSON Approved Products
by EPSON (UK) LTD.
2
Introduction
Page 11

Safety Instruc tions
Read all these inst ru ctions and save them for la te r
reference. Follow all warnings and instructions marked
on the camera and options.
o
To reduce the risk of elec tric shoc k, do not rem ove
the cover of the camera or options and do not open
any compartments except as instructed in this User’s
Guide.
o
Do not insert objects into any openings.
o
To prevent fire or electric shock, do not expose the
camera or options to rain or moisture.
o
To prevent fire or explosion, do not use the camera
where inflamm able or volatile gas is stored.
o
Do not use outdoors during a thunderstorm.
o
If the camera or op ti on sh ow s unusual signs such as
noise, odor, or smoke, stop usage and turn off
immediately. Remove the batteries and/or
disconnect the AC adapter from the camera, and
unplug the AC adapter from the electrical outlet.
o
Do not use harsh or abrasive cleaners. Wipe off dust
with a clean, dr y clot h.
o
To avoid damage to the optics of the camera, do not
expose the lens to direct sunlight for extended
periods of tim e .
o
Do not store the camer a or options near sources of
bright light, direct sunlight, high humidity, heat,
excessive dirt or dust, or where they will be expo sed
to strong vibrations or magnetic fi elds.
o
Always keep you r ca m era in its case when you’ re no t
using it.
o
To prevent possible injury, do not take flash pictures
close to the subject’s eyes.
o
Avoid sudden temp erature changes, wh ich can c ause
moisture to form on the camera and options. Keep
the camera and o ptio ns in a case or bag if you need
to move them fr om a cold environment to a w arm
one. Allow time for the camera and options to adjust
to temperature changes before using them.
o
Use only the type of power source indicated in this
User’s Guide.
o
Do not use d am aged or frayed po wer cords.
Introductio n
3
Page 12
o
Remove the batteries and/or unplug the camera and
refer servi cing to qualified serv ice personnel in the
following cir cu m st anc es:
The power cord or plug is damag ed; liqu id
has entered the camera or options; the cam era
or options hav e b een dro pped or the case
damaged; the cam era or options do not operate
normally or exhibit a distinct change in
performa nce.
Never adjust controls that are no t mentioned in
the operating in st ruc t ion s.
o
If you plan to us e th e cam era and options in
Germany, obs erv e t he f oll owing:
To provide adequate short-circuit protection and
over-current protection for the products, the
building in st alla ti on must be protected by a 16
Amp circuit breaker.
Bei Anschlu ß des Produkts an die
Stromversor gung muß sicherges te llt we rden,
daß die Gebädeinstallation mit einem 16
A-Überstr oms c halter abgesic hert ist.
o
If you plan to dispose of the batteries in The
Netherlands, do not dispose of them with ordinary
refuse. Instead, dispose them as small chem ic al waste
in accordance with local laws , an d the fo llo wing
Dutch Government Gazett e 45, KC A Marking:
Bij dit produkt zijn batterijen gel e ve rd.
Wanneer deze le eg zijn, moet u ze niet
weggooien maar inleveren als KC A.
o
If the liquid crystal solu t ion conta ined in the display
panel or in the screen on the LCD monitor leaks out
and gets on your han ds, wa sh t hem t hor ou ghly with
soap and water. If it gets into your eyes, flush them
immediately with water.
Warnings, Cautions, and Notes
Warnings must be followed carefully to avoid bodily
w
c
injury.
Cautions must be observed to avoid damage to your
equipment.
4
Notes contain important info rm a tion and useful tips on the
operati on of your camera and option s .
Introduction
Page 13
Chapter 1
Getting Started
1
This chapter prepares you to use your PhotoPC 700. It
covers the follo wi ng:
Unpacking your PhotoPC 700
Getting to know the camera
Installing the batt eries
Attaching the hand strap
Setting the language
Setting the date and time
Using the camera with your computer
Viewing the Color Guide
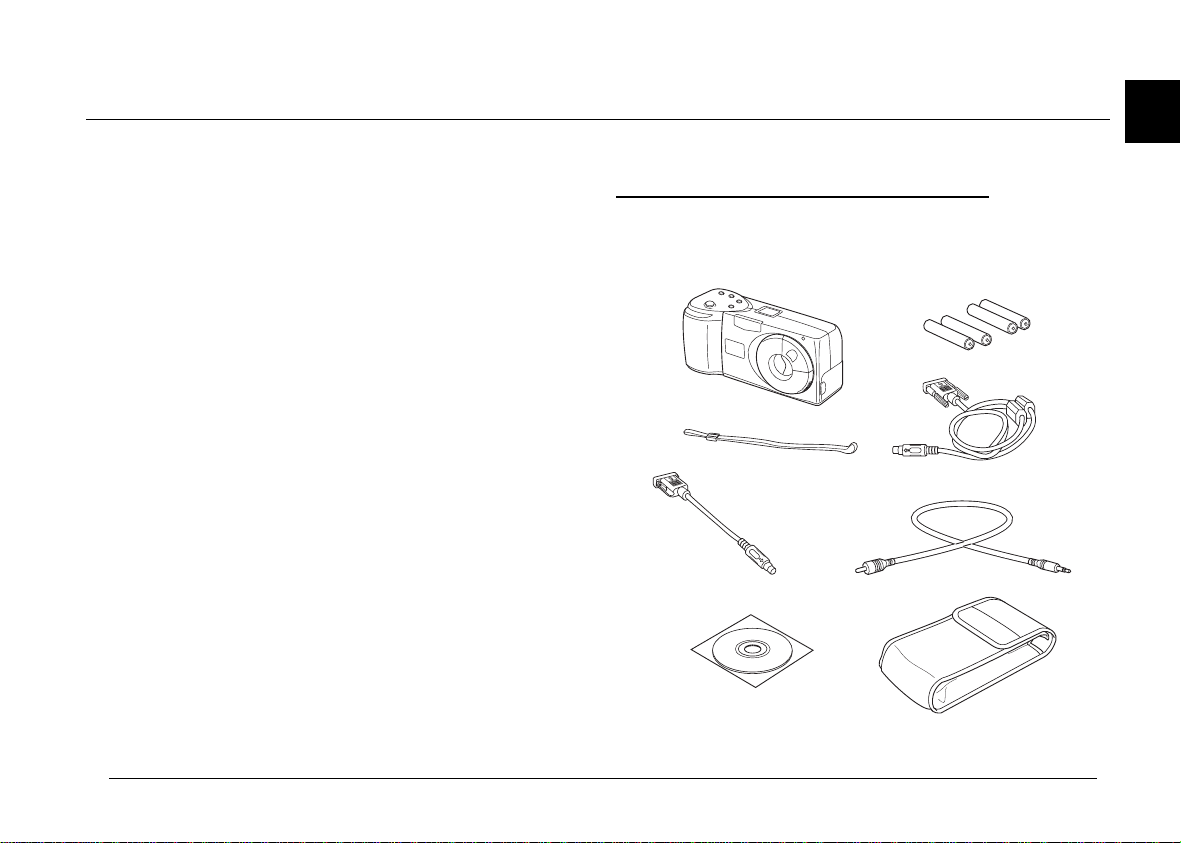
Unpacking Your PhotoPC 7 00
Make sure you ha v e all t he p art s sho w n below.
camera
hand strap
Macintosh
adapter cable
CD-ROM and/or floppy disks
(media type and quantity
varies depending on country)
camera case
batteries (4)
serial cable
video cable
Getting Star te d
1-1
Page 14
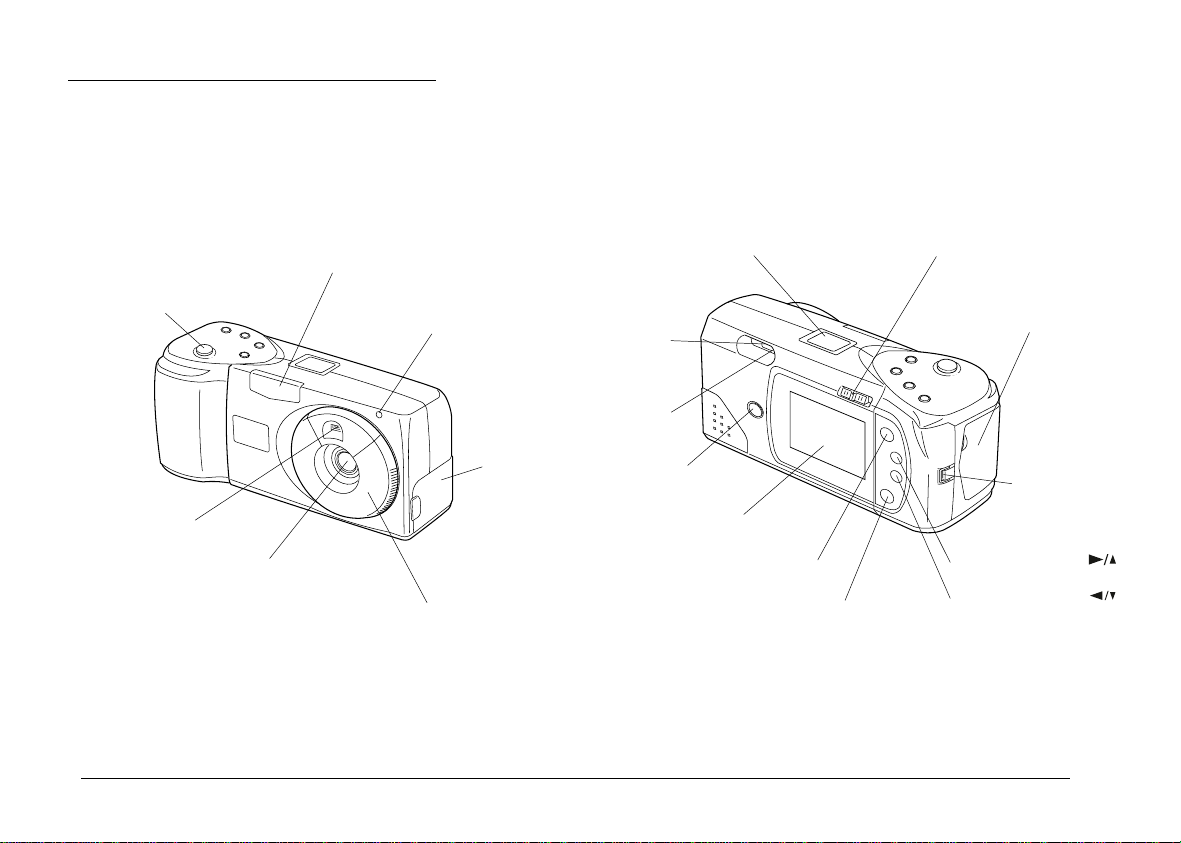
Getting to Know the Camera
After you unp ack your PhotoPC 70 0, tak e a few m inutes
to learn about its fe atures, as shown below .
Back view
Front view
shutter button
1-2
viewfinder
lens
Getting Started
flash
timer light
connector
lens cover and power switch
cover
viewfinder
status light
function button
LCD monitor
display panel
SELECT button
BACK butt on
monitor mode switch
memory card cover
hand strap
holder
navigation button
navigation button
Page 15
1
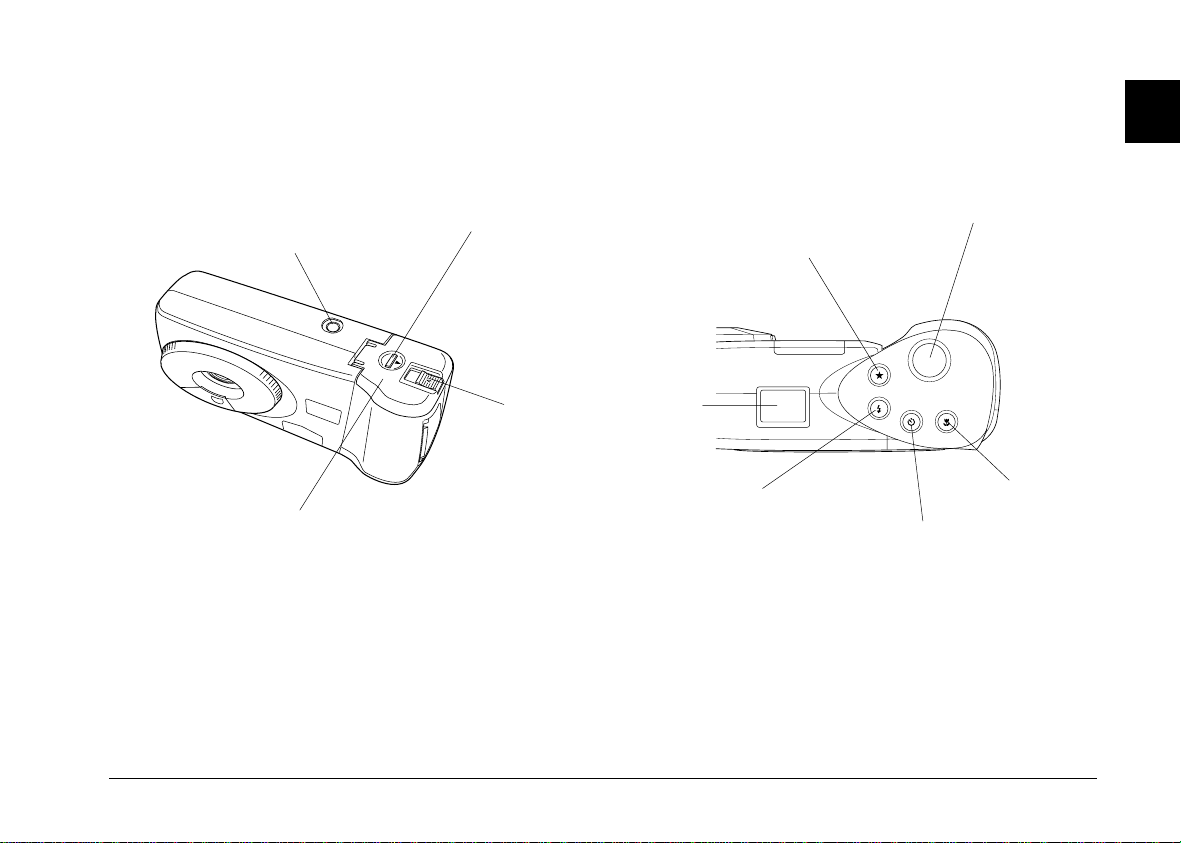
Bottom view
tripod socket
battery cover
battery cover lock
memory card
eject lever
Top v iew
display panel
image quality setting
flash setting
shutter button
macro mode
setting
self timer setting
Getting Star te d
1-3
Page 16
Installing Batteries
Depending o n th e co unt ry of purchase, your PhotoPC
700 comes w it h fo ur A A (LR6) alkaline batteries or
Ni-MH rechargeable batteries ( cha rge before use). Make
sure the camera is off, and f oll ow th ese st ep s t o ins ert the
batteries.
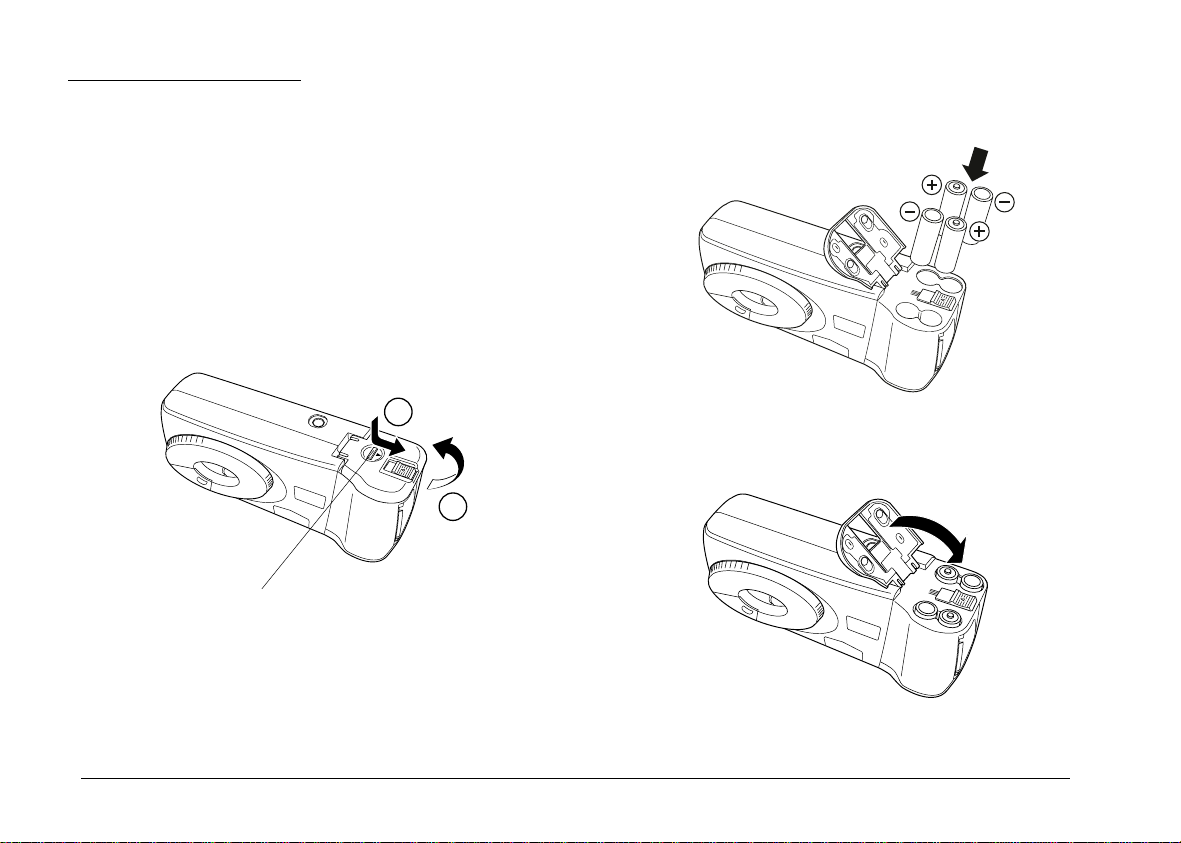
1. Turn the cam era upside down with the lens facing
you. Push the battery co v er lock down and slide it
to the right, then open the cover.
1
2
battery cover lock
2. Insert all four ba tteries into the compar tment,
positioning the + and - ends as shown below .
3. Close the battery cover and make sure the lock snaps
into place as s h own bel ow.
1-4
Getting Started
Page 17
Handling batteries
When your Pho toPC 700 batteries wear out, you can
replace them with any of the following:
o
To avoi d the danger of fire or explo si on, do not
mix different types of batteries.
o
Keep the batteries from making contact with metal
objects suc h as coins or keys, which could s hort
out the batteri es’ circuits.
o
Do not drop, puncture, disassemble, mutilate, or
short circui t batter ies. Do not put the batte ries
near or into fire or water.
o
Do not insert batteries into wall outlets or other
powe r sources such as a ca r cigarette ligh ter socket.
o
Do not solder lead wires or terminals directly to a
battery.
1
Single-use A A (LR6) alkaline batteries
Single-use AA (FR6) lithium batteries
Rec hargeabl e A A Ni -Cd bat teries
Rechargeable AA Ni-MH ba tteries
Warning:
o
w
If battery acid gets into your eyes or on your skin,
immediately rinse the affected area well with water
and seek medical trea tment. If the batte ry is
swallowed, seek medical treatment immediately.
o
To avoid fire or electric shock, do not use batteries
that are leaking or damaged in any way.
Note the following when handlin g bat te ries:
o
Do not use manganese batteries.
o
Replace all four batt eries at the same time.
o
When the camera is not used for long pe rio d s of ti m e,
remove the bat teri es and store the m at a low
temperature in a dry location.
Getting Star te d
1-5
Page 18
o
Dispose of used batteries according to the
manufactu rer ’s inst ructions and in com pli ance with
all applicable laws. Contac t your local government
agency for infor m at ion abou t batte ry rec y c ling and
disposal.
o
If you plan to dispose of the batteries in The
Netherlands, do not dispose of them with ordinary
refuse. Instead, dispose them as small chem ic al waste
in accordance with local laws , an d the fo llo wing
Governme nt Gazette 45, KCA Marking:
Bij dit produkt zijn batterijen gel e ve rd.
Wanneer deze le eg zijn, moet u ze niet
weggooien maar inleveren als KC A.
o
If you use rec hargeable Ni-Cd or Ni -M H batte ries,
replace them with fou r fu lly- charged batteries. If you
find that your batteries run out faster after you
recharge them a number of times, make sure you
discharg e th em completely befor e recharging.
o
Battery life varie s dep ending on the battery type and
the manufacturer.
o
Always use batteries from the same package as a set.
Do not mix old and new batteries.
o
Use a damp cloth f or c leaning.
If you have E PSON Ni-MH Rec h argeable batterie s, s ee
the following:
Warning:
o
w
Use only the EPSON Ni-MH Battery Charger,
Model EU -23, EU-27, or EU -28 to charge the
EPSON Ni-MH Batteries Model EU-24.
o
The batteries should only be used in EPSON
Digital Cameras as specified in this manual.
o
Never use EPSON Ni-MH batteries in
combination with any other type of batteries.
o
To guard agai nst short-circ ui ting, do not remove
the outside sleeve s.
Instructions for storage
Warning:
o
w
Do not store batteries with meta l obje cts, which
coul d short out th e batter ies’ circ u its. Also, avoi d
stori n g batteries in extremely hot o r h umid
locations.
o
Store ba t teries ou t of reach of children.
o
Do not keep batteries loose in your pockets, to avoid
short-circuiting.
1-6
Getting Started
Page 19

Attaching the Hand Strap
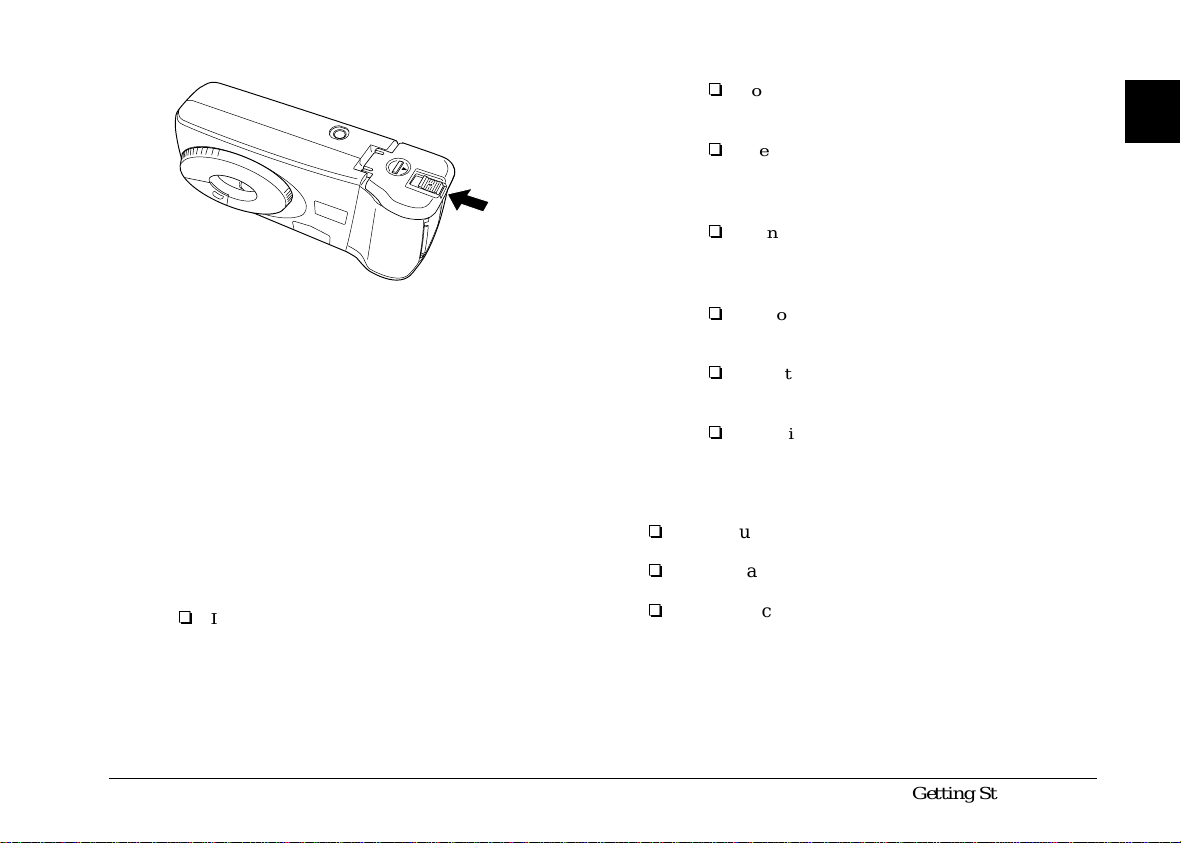
To attach the hand strap , loop the st rap arou nd the
holder on the side of th e camera as shown below.
1. Slide the monitor mode switch on the back of the
camera to
For PAL model cam eras, a message stating you need
to set the language appears on the LCD screen. Press
the
seconds. The language setting screen appears.
Playback
SELECT, BACK
.
, or navigation buttons, or wait 5
monitor mode switch
SELECT button
navigation
buttons
BACK button
1
Setting the Language
For PAL model cameras, you need to set the language for
messages displayed on the LCD monitor the first time
you use it. Depending on the coun tr y of pur chase, you
can choose English, Japanese, Frenc h, Germ an, Italian,
Portugue se, or S panish.
Follow these step s to set the language:
2. Press the
is highligh te d.
3. Press the
return to the View or Playback mode.
If you want to change the language setting, see page 3-16
for instruct ion s.
button until th e language you want
SELECT
button to save you r selection and
BACK
Getting Star te d
1-7
Page 20

Setting the Date and Time
When you install the ba tter ies f or the first time, you need
to set the date (year, month, and day) and time (hour and
minutes).
After installing the batteries, follow these steps to set the
clock on the LCD monitor, and to have the date and time
of each pict ure automatica lly recorded.
3. Press the button to increase the number, or the
button to decrease the number, until the year is
correct.
4. Press the
and the month setting is highlighted.
5. Adjust the mon th, da y, hou r, and minutes settings as
described above until the dat e and t im e are correctly
adjusted and saved.
button. The year setting is save d
SELECT
Note:
If you connect Phot oPC 70 0 to your com put er and access
EPSON Photo!2 when the camera’s clock is not set, the
camera’s date and time will be set to that of the computer’s
automatically. For instructions on connecting the camera to
the computer and accessing EPSON Photo!2, see your digital
came ra software manual.
1. Slide the monitor mode switch on the back of the
camera to
you need to reset the clock appears on the screen.
2. Press the
setting screen appears with the settin g for th e year
highlighted in red.
Note:
If you do not want to set the clock, press the
to return to the View or Playback mode.
1-8
Getting Started
or
View
SELECT
Playback
button to set the clock. The clock
. A message statin g th at
BACK
button
Note:
If you want to reset any previous item, simply press the
butto n u n til the i tem you want to reset turns red.
BACK
When you finis h m aking the minutes setting, press the
button. The LCD screen returns to the View
SELECT
or Playba ck m o d e.
You’re now ready to take pictures with your PhotoPC
700. Turn to Chap te r 2 for sim ple, step-by-step
instruction s.
Page 21

Using the Camera With Your Computer
After you have t aken pictures, you can c onn ect the
camera to you r computer and transfer the images . You
can then use them in yo ur letters, presentations, or just
about anything you crea te on yo ur computer. See you r
digital camera software manual fo r m or e det ails,
includin g th e follo wing:
o
Installing EP SO N Photo!2 and Photo File Uploader
Viewing the Color Guide
1
Using an HTML browser in your computer, you ar e able
to view the Color Gu ide. This provides tips f or ha ndling
color imaging data, using several color imaging
produ c ts, and other general informa t ion about color
imaging.
You need one of t h e f ol lowing browse r s t o view the
Color Guide, or an equivalent:
o
Connecting PhotoPC 700 to your computer
o
Transferring pi ct ures to your computer
o
Erasing pic t ures from the camera
o
Using pictures in your documents
o
Uploading EPS ON ph oto images to the camera
o
Uploading programs to the camera
o
Netscape N av igator 3.0 or later
o
Microsoft Internet Expl orer 3.0 or later
If a browser is not inst alled in your com pu te r, you need
to obtain one and install it, or you can install the brow ser
that comes w ith your Color Guide CD-ROM. For fu rther
details, double-click the Readme.txt (for Windows) or
Read Me First ico n (for Mac int os h), and follow the
instruction s.
To view the Color Guide, double-click on the following
icon:
For Windows: color.htm
For Macintosh: Color Guide
Then follow the in structions on the screen.
Getting Star te d
1-9
Page 22

1-10
Getting Started
Page 23
Chapter 2
Taking Pictures with PhotoPC 700
Using PhotoPC 700 to take pictur es is similar to usin g a
traditional “point and shoot” ca m era. T his chapter tells
you everything you need to know about t he follo wing:
Turning the camera on and off
Auto shut-off
The display panel
Checking battery power
Activating the shutter
2
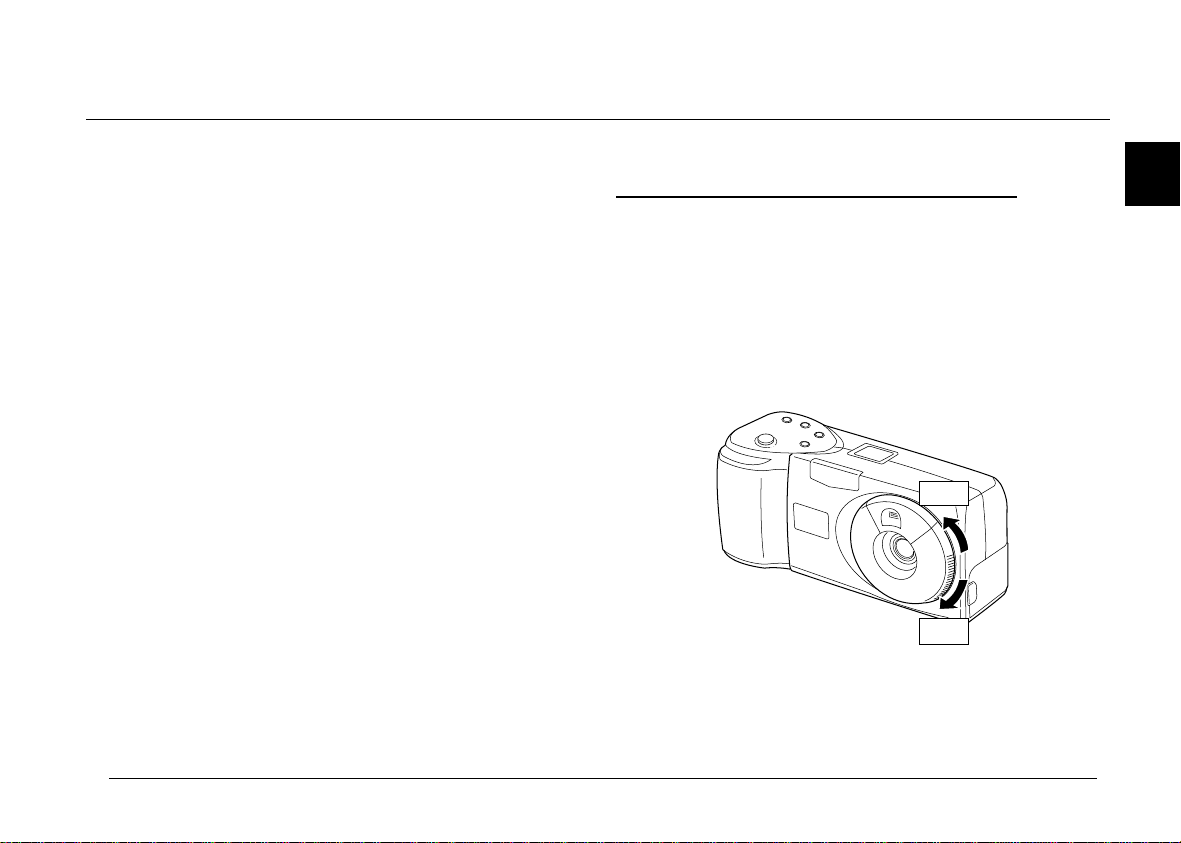
Turning the Camera On and Off
To turn the camera on, simply rotate the lens cover
counterclockwise. The lens cover opens and the display
panel on the top of the camera lights up. The status light
on the back of the camera flashes red for a few seco nds,
then turns green. The camera is now ready to take
pictures.
Picture-taking range
Adjusting settin gs
Using the function button
Checking the picture counte r
Play ing back your photos
On
Off
Rotate th e len s cov e r clockwi se to turn off the cam era.
The lens cover closes and the display pane l turns off.
Taking Pictures with PhotoPC 700
2-1
Page 24

Auto Shut-off
To save battery powe r , the camera turns itse lf off
automaticall y after 60 seconds if no button s are p ressed
(when the lens cover is o pen and the LCD monitor is off).
The camera also shuts off after 60 seconds when you take
pictures using the view fin der w ith the LC D monito r off.
To turn the camera back on, press th e shu tter button, or
close the lens cove r then op en it again.
When your camera is connected to the optional AC
adapter, the au t o shu t-o ff feature is disabled.
Note:
When the camera is connected to your computer, it shuts itself
off after 5 minutes of inactivity. It comes back on automatically
when you us e an y of th e software cam era contro ls i n you r
EPSON Photo!2 software.
LCD monitor power saving features
Because the L CD monitor consu m e s additional powe r,
the LCD moni tor turns off automatically in th e fo llo wi ng
cases:
o
When you turn off the camera with the LCD monitor
in View mode
o
When the camera is not used for 30 seco nds w it h
the LC D monit or in Vi ew mode
o
When the camera is connec t ed to a compu ter w ith
the LC D monit or in Vi ew mode
o
When the camera is co nnec t ed to a televi sio n
In the following ca ses, yo u ca n turn t he LCD monitor
back on by simply pressing the shutt er button, or sliding
the monitor mode switch to
or
View
o
o
o
o
Note:
When your camera is connected to the optional AC adapter, the
LCD monitor auto shut-off feature is disabled.
Playback.
Right after you take a picture, when your camera is
default set to SAVE in energy saving m ode
After 30 secon ds of im age processing, when your
camera is set to NORM in energy saving mode
Note:
In Playback mode, you can se t the energ y saving m ode to
SAVE or NORM . F or instru c tions on setting the energ y
saving m ode , see page 3-8.
When the camera is not used for 5 minutes with the
LCD monit or in Playback mode
When the camera is not turned on within 15 seconds
of switching the LCD monitor to View mode
, then sliding it back to
OFF
2-2
Taking Pictures with Photo P C 700
Page 25
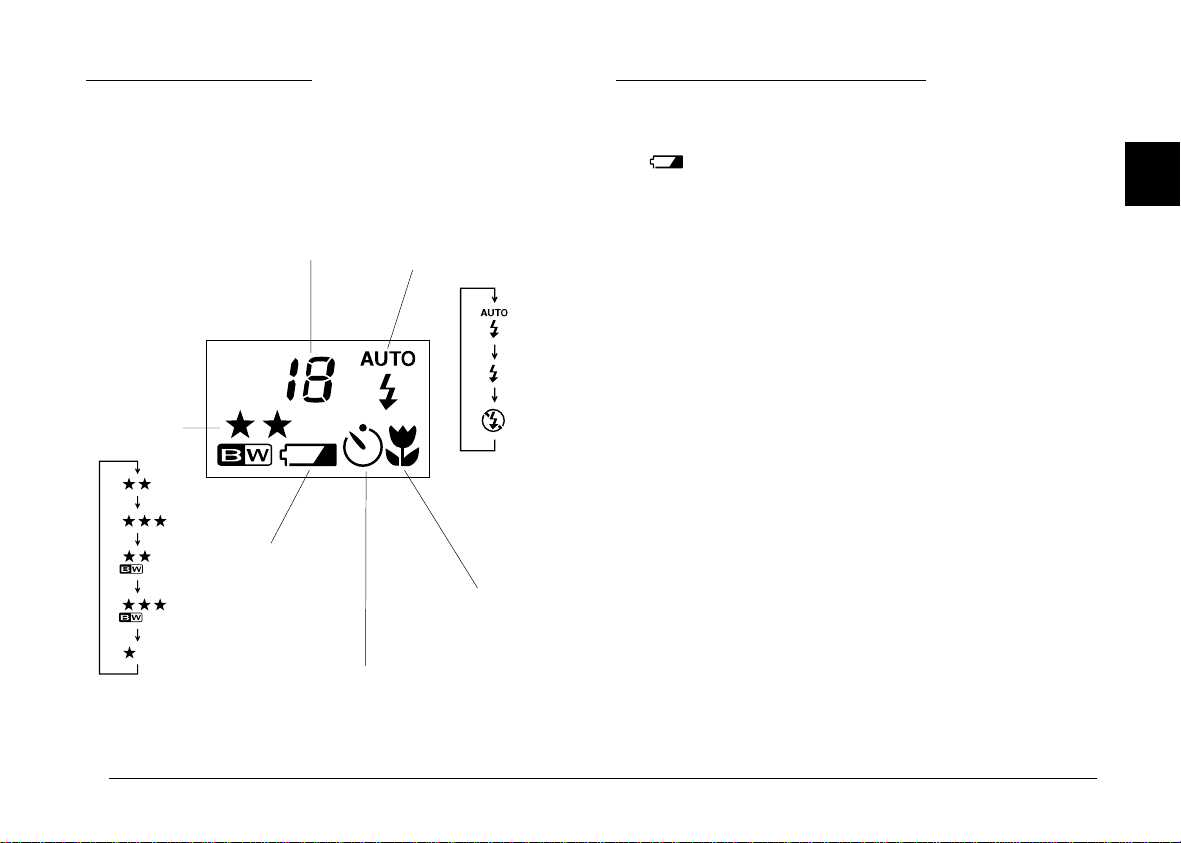
The Display Panel
Checking Battery Pow er
The display panel keeps track of how many pi ctures you
can take and gives you info rmat io n on camera settings
and the battery level.
number of pictures remaining
(see page 2-13)
flash (see page 2-9)
image quality
(see page 2-8)
low battery icon
(see page 2-3)
macro mode
(see page 2-10)
self timer (see page 2-9)
When the battery power is almost out, a lo w ba ttery icon
appears on the d isp lay panel. When this ico n is
flashing, you cannot take pictures until you change the
batteries. Wh en batt ery power runs out wit h th e LCD
monitor in the Playbac k or Vi ew mode, the lo w ba ttery
icon appears on the L C D screen for five second s, the n th e
monitor and the camera turn off automatically.
You should use the low battery ic on only as a rough
guide to the power remaining. Even after the low battery
icon appears, you can turn off the LCD monitor and take
several more pictures using the vi ew fin der.
Note that seve ral factors can affect batte ry lif e, inc luding
the surrounding temperature and the type of batteries
you use. Low tem peratures (espe cia lly below 10°C) will
drain your batteries more rapidly. See 1-4 for info rm ation
about changing batteries.
2
Taking Pictures with PhotoPC 700
2-3
Page 26
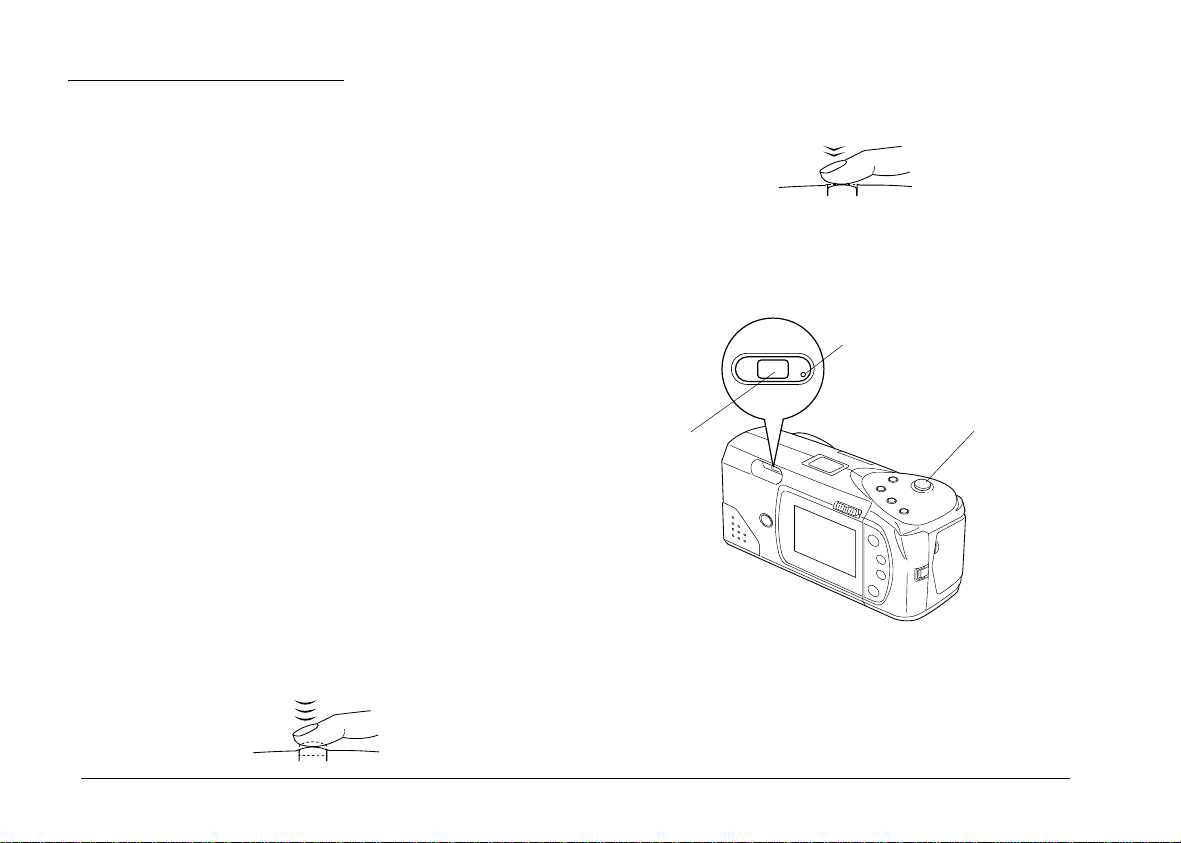
Activating the Shutter
Follow the ste ps below to take photos usi ng the
viewfinder or t he LCD mo nitor.
You can also take photos from your computer using
EPSON Photo!2. To use this feature, see your digital
camera software manual.
Using the viewfinder
1. Turn the cam e ra o n and w ait until the status light
beside the view fi nder turns green.
4. Press the shutter button the rest of the way down to
take the photo.
5. Hold the cam era st ill until the status light starts
flashing red and the camera beeps. T hen release the
shutter button.
status light
2. Look straight through th e view fi nder and center your
subject in the cross-hairs.
Note:
The frame in the viewfi n der indic a t es the area captured
when t aking pict ures at close range.
3. Hold the shutter button halfway down to lock the
auto focus. The statu s light beside the view fin der
changes from green to orange. If you w ish, you can
now move your subject off-center without altering
the focus.
2-4
Taking Pictures with Photo P C 700
viewfinder
shutter button
Page 27
The flashing red light indicates that the image is captured
and the came ra is processing it. Whe n th e light stops
flashing and turns green, the image is saved. Save d
images rem ain in the memory for ye ars, even when the
camera is turned off and the batteries are removed. You
can take another pho to wh en t he stat us light turns green.
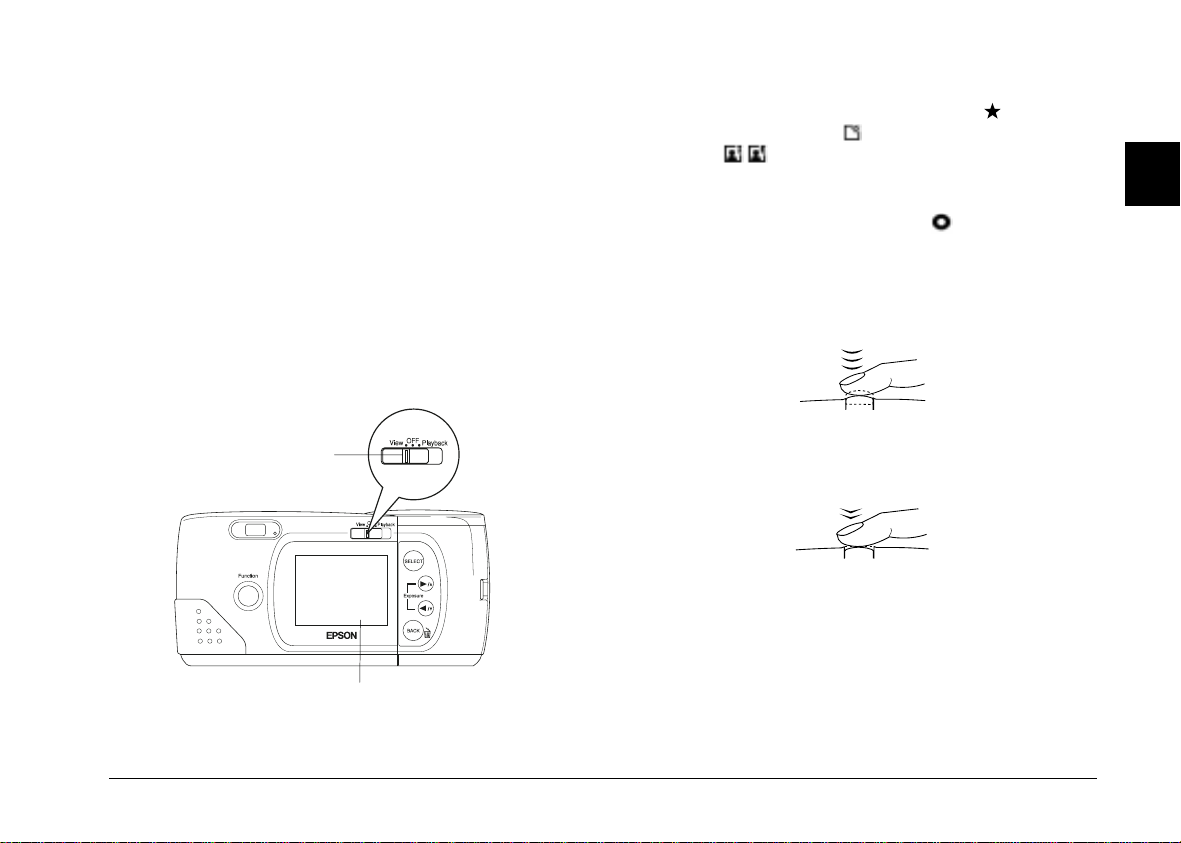
Using the LCD monitor
1. Turn the cam era o n and slide the monitor mod e
switch on the back of the camera to
see a live previ ew on the LC D scre en. Cen te r your
subject on the screen.
View
. You will
Note:
Icons indi cati ng the image qualit y se tt in g , the numb er
of photos you can ta ke , and the nu mber of phot os
taken appear at the bo tt om of the LCD sc reen.
2
2. Hold the shutter button halfway down to lock the
auto focus. A small green circle appears on the
upper right corner of the LCD scr een, and the status
light beside the viewfinder changes from green to
orange. If you wis h, you can no w mo v e yo ur subject
off-center without altering the focus.
monitor mode switch
LCD screen
3. Press the shutter button the rest of the way down to
take the photo.
4. Hold the cam era st ill until the status light starts
flashing red and the camera beeps. T hen release the
shutter button.
When you press the shutter button, the LCD monitor
freezes and disp lays the picture until the camera finishes
processing it, then the mon itor re turns to live preview.
Taking Pictures with PhotoPC 700
2-5
Page 28

Note:
When battery power is low and the flash is used to take a
picture, the r et urn to live preview m ay b e de l ayed while the
camera recharges the flash. The LCD screen will be blank
during this pe ri od.
You can erase th e pho t o you hav e just taken. Press the
function button and
while your cam era is still processing the ph oto.
button at the same time,
BACK
Picture-taking Range
The camer a sho uld be at least 50 cm awa y fro m the
subject when com po sing a shot through the view fi nder.
Close-up p hoto s can be taken from as ne ar as 10 cm to
the subject usi ng the m acro mode. See page 2-10 for
instruction s.
When you use the fl ash in macro mode, you may find
your pictures come out too light, since the flash is close to
the subject. In this c ase, try set ting the flash to Flash off.
Note:
When you are taking pictures outdoors, make sure the sun is
behind you. In very bright light (for exampl e, at the beach or i n
snow) your pictures may c om e out too light. However, you can
adjust the exposure manually to make your photos brighter or
darker. For instructions, see page 2-11. You can also correct
these problems from your computer using image-editing
software.
Adjusting Settings
The buttons on the top of the camera allow you to control
the following PhotoPC 700 featur es:
Note:
To make sure yo ur subjec t is framed accura tely, use of the LC D
moni tor rath er than the viewfin der is rec ommended when
taking photos in macro mode.
You can take flash p ict u res w it hin a range of 20 cm to
2.4 m. See page 2-9 for more inform at ion on using the
built-in flash.
2-6
Taking Pictures with Photo P C 700
Image qual it y (see page 2-8)
Flash (see pag e 2-9 )
Self timer (see p age 2- 9)
Macro mode (see p age 2- 10)
Page 29
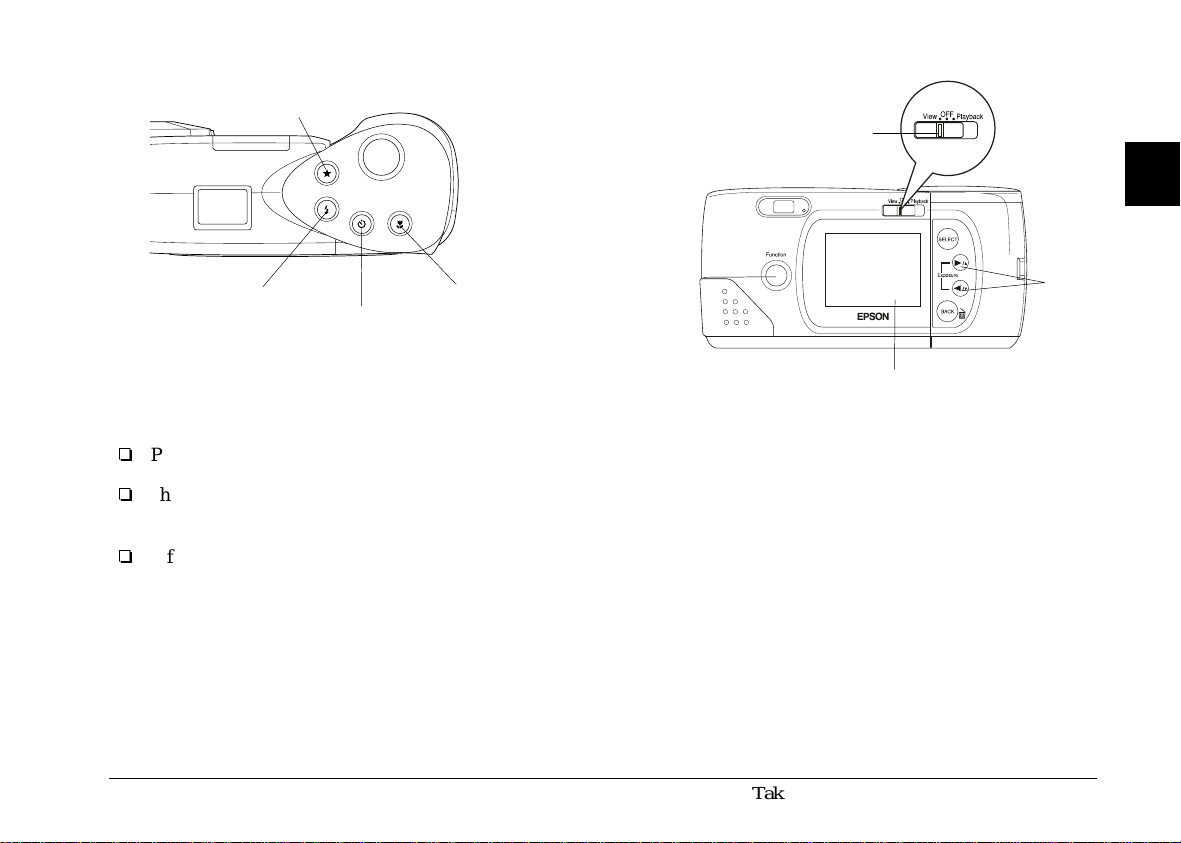
image quality
monitor mode switch
2
flash
self timer
macro
When the LCD monitor on the back of your camera is
switched to Vie w, yo u ca n select modes and mak e m enu
settings as foll ows:
o
Panorama an d Zoo m
o
Shooting Cond it ion s; such as continuous, white
balance, expo su re, and sensitivity
o
Information d isplay
For instructi ons , se e page 3-2.
function button
Note:
LCD monitor
Some camera settin gs return to their default setting s w h en you
remo ve or chang e t h e batteries, or wh en y ou turn o ff the
camera.
Taking Pictures with PhotoPC 700
navigation
buttons
2-7
Page 30
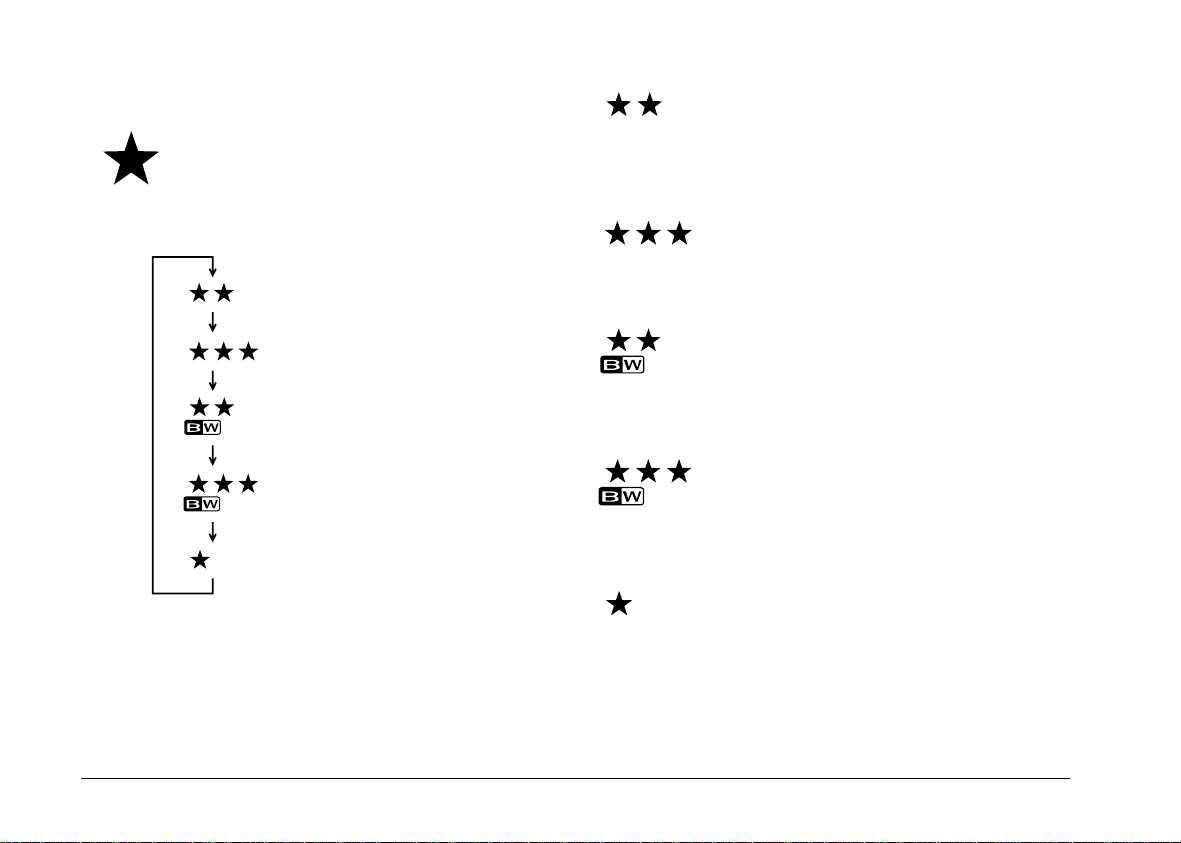
Image quality
The PhotoPC 700 has three color and two
monochrom e im age quality settings . P ress
the
image quality contro l
from one setting to another. The settings appear on the
display panel as show n below.
Fine (default setting)
Super fine
Monochrome fine
Monochrome super fine
Standard
Note:
When the power is turned off, the image quality condition
inside the camera does not change.
butt on to c ycle
Fine
Images are cap tu red in color at 1280 × 960
pixels. Your pict ures inc lude mode rate det ail,
and the camera holds approximately 12 to 13
pictures.
Super fine
Images are cap tu red in color at 1280 × 960
pixels. Your pictures in clude gr eate r detail,
and the camera holds approximat ely 6 pictures.
Monochrome fine
Images are captured in black and white at
1280 × 960 pixels. You r pictures include
moderate detai l, and t he camera holds
approximately 12 to 13 pictures.
Monochrome super fine
Images are captured in black and white at
1280 × 960 pixels. You r pictures inclu de
greater detail , and the cam era holds
approximat ely 6 p i ctures.
Standard
Images are captured at 640 × 480 pixels.
The camera hold s approximate ly 40 to 43
pictures, and the im ages are less deta iled.
2-8
Taking Pictures with Photo P C 700
Page 31

Note:
If you select one of the monochrome image quality settings
when the LCD monitor is in View mode, the image turns from
color to bl ack and wh it e, a blue frame appear s around the
image, and MONOCHROME appears briefly on the screen.
You can switch freely between these settings and mix
pictures of varying quality in the cam era. The camera’ s
image capac ity w ill v ary accordingly.
Flash
The PhotoPC 700’ s built-in flash is effe ctiv e
within a range of 20 cm to 2.4 m . P ress the
button to cycle through the three flash
control
settings. The settings appear on the displa y pan el as
shown below.
flash
Auto matic
The flash fires automatical ly w henever more
lighting is needed.
Forced flash
The flash fires with eve ry picture you take. Use
this setting to compensate for backlig hting; for
example, when you are f aci ng t he sun.
Flash off
The flash is disabled, ev en when adequate
lighting is not availa ble. U se t his setting for
special effects , or wh en fl ash photography is
prohibited.
Note:
After taking a flash photo, the flash icon blinks until the flash is
fully recharged.
2
Automatic (default setting)
Forced flash
Flash off
Self timer
Setting the self timer creates a 10-second delay
between the tim e you pre ss t he shutter button
and the actu al im age capture. Thi s allo w s you
to take a picture of yourself. The timer icon appears on
the display panel when you use the timer. Follow these
steps to take a picture w ith th e tim er:
Taking Pictures with PhotoPC 700
2-9
Page 32

1. Secure the camera on a flat surf ac e or a tripod.
2. Turn on the camera and wait until th e stat us light
turns green.
3. Press the timer button. The timer icon appears on the
display panel.
4. Press the shutter button. The timer icon and the red
timer light on the front of the camera flash slowly for
eight secon ds, th en rap idly for two seconds be fore
the shutter releases.
The camera beeps w hen the im a ge is captured. The
status light on the bac k of the cam era flashes red as
the PhotoPC 700 p roc esses the image. When the
status light stops flashing and turns green, you can
take another picture. You need to press the timer
button again ea ch tim e yo u w ant to take a picture
using the self ti m er.
You can use this mode along with the continuous
shooting mode so that the camera continues to take up to
10 pictures in seq u ence. For instructions, see page 3-4.
Macro mode
Use the macro mode to take close-up pictures
within a range of 10 c m to 50 cm . Follow these
steps to take a picture in t he m ac ro mo de:
1. Press the ma cro button. The ma cro mode icon appears
on the display pan el. When you are using the LCD
monitor, a green frame appears around the
previewed image and
LCD screen.
2. Press the shutter button.
Note:
o
To make sure your subject is framed accurately, use of the
LCD monitor rather than the viewfinder is recommended
when taking photos in macro mode.
o
When you use the flash in macro mode, you may find your
pictu res come out to o light, since th e flash i s c lose to th e
subject. In this case, try setting the flash to Flash off.
To turn off macro mode, simply press the macro button
again.
MACRO
appears briefl y on the
2-10
Taking Pictures with PhotoPC 700
Page 33

Using the Function Button
Using the func ti on bu tton and other control butto ns, you
can adjust expo sure and erase pho tos in the camera
easily.
Adjusting the exposure
Exposure re fer s to th e am ou nt of light th e ca m e ra
captures when a photo is taken.
The camera adjusts the ex po su re of your ph otos
automatically. However, you can manually adjust the
exposure to change the darkness or bright ness of your
photos for certain conditions.
Adjust the exposure to + when:
o
you are taking pho tos at th e beach or in the snow on
sunny days, o r taking photos of an object with a
white background.
Adjust the exposure to - when:
o
you want to make you r pho tos da rker.
o
the photo you have taken is too bright, and you want
to increase the darkness.
o
you are taking pictures of a black object which may
tend to look grayish in the photos.
o
you are taking pictures of an object with a black
background.
To adjust th e exposure of your ph otos manually, follow
these steps:
2
o
you want to make you r pho t os li ght er.
o
the photo you have taken is too dark, and you want
to increase the brightness.
o
you are taking pic tures of a white object which m ay
tend to look grayish in the photos.
o
you are taking pictures of an object with a bright
background, such as windows facing the sun.
1. Set the exposure adjustment to MANUAL using the
View mode. Fo r instructions, see page 3-5.
Taking Pictures with Photo P C 700
2-11
Page 34

2. Press the fun ctio n but t on . Yo u w ill see the display
panel has changed from showing the nu m ber of
pictures rem aining, to showing exposu re adjustment
information. Y ou can al so see adjustment
information on the top of the LCD monitor. While
pressing the function button, press the and
buttons to change the number. Keep pressing the
or buttons to cycle from one setting to
another, as fo llows:
adjust -2
adjust -1
no adjustment
(default sett ing)
adjust +1
adjust +2
Note:
If you take your finger off the function button, the
information on the disp la y pa nel c hanges to show the
number of pic tures remaining. To se e the expo su re setti n g
again, simply press the function button again.
3. When you are fin ished making the setting, ju st take
your fingers off the buttons.
Note:
o
Experien ce and knowledge of photography is n eces sa ry to
correct ly adjust exposure. Make sur e y our expo sure
adjustment se tting is correct when taking imp or ta nt
photos.
o
When the conditions for photog raphy ar e n ot very go od,
we recommend you take several photos of the same object
using different exposures.
o
The e xp osure ad justment value changes back to A UTO
when the front rotary sw itch is turned of f , or the cam era
shuts d ow n d ue to powerfail .
2-12
Taking Pictures with PhotoPC 700
Page 35

Erasing your photos
You can eras e th e pho t os in your camera on e at a time
easily usin g the fu nct io n button, as follows:
In View Mo de
1. When you take a picture and want to erase it
immedia tely af te r it has been taken, press the
function button and
You can erase im ages being processe d one at a time.
2. When the confirm a ti on me ssage appears, p ress
to erase the photo.
SELECT
In Playback Mode
1. Slide the monitor mode switch to
2. Press the function button and
simultaneo usl y to erase the images displayed on the
LCD screen one at a tim e.
3. When the confirm a ti on me ssage appears, p ress
to erase the photo.
SELECT
You can e rase selected phot os or all the photos at once,
using the Pho to Co nt ro l m enu. For instructions , se e
page 3-10.
button simultaneously.
BACK
Playback
BACK
.
button
monitor mode switch
function button
Checking the Picture Counter
The large num ber in the center of the cam era’s display
panel shows how many pictures yo u ca n take.
number of pictures remaining
2
select button
back button
Taking Pictures with Photo P C 700
2-13
Page 36

The nu m ber of p ictures remaining depe nds on the imag e
quality setting you hav e chosen. If you change this
setting, the number of pictures remaining will also
change.
When the camera’s memory is full, you will see the
number on the dis pla y pan el reads 0. The status light on
the back of the cam e ra turns red, and you are u nable to
press the shutter button. You need to erase some or all of
the images in you r cam era before you can take any m ore
pictures. See page 2-13 or 3-10 f or in st ructions on erasin g
photos using th e LC D monit o r. If you w ant t o save your
photos before you erase them, connect the camera to
your computer and transfer the photos as described in
the digital cam era software manual.
You can use the LCD monitor to find out how many
photos you have taken. See page 3-6 or 3-8 for
instruction s.
Playing Back Your Photos
When the LCD m onitor is in Playback m ode, you can
view photos on your camera’s LCD screen or on a
regular telev ision set.
You can also view your photos on the com pu ter using
EPSON Photo!2. To use this feature, see your digital
camera software manual.
If you install an o pt io n al CompactFlash C ard , t he
number of pictures you can store in the memo ry card
appears in brackets on the camer a’ s display panel as
shown below. For in st ruc t ion s on u sing optional mem ory
cards, see page 5-1.
number of pictures remaining in the CompactFlash Card
brackets
2-14
Taking Pictures with PhotoPC 700
Displaying photos on the LCD screen
To playback your photos on the LC D screen, follow the
steps below.
1. Slide the monitor mode switch to
photo you took appears on the LCD screen along
with the date and time that the photo was taken.
Icons indic ating the im age quality setting , frame
number , and the number of photos take n
appear at the bo ttom of the sc reen.
Playback
. The last
Page 37

monitor mode switch
LCD screen
2. Press the or button to display the previous or
next photos.
Note:
You can also disp la y up t o ni ne co nsec utive “thumbnail”
images at a time using the Multi-photo Playback mode, or
automatically playback your photos in sequence using the Slide
Show featur e. Se e page 3-9 or 3-14 for instructions.
Displaying photos on a television
You can display the pictures in your camera on a regular
television ju st as you can on the LCD screen simp ly by
using the vi d eo cable that came with yo ur PhotoPC 700.
Note:
Color television telecasting specifications are different
depending o n the count ry. If you have an NTSC c am e ra mo del,
your television must meet NTSC color television telecasting
specifications. If you have a PAL camera model, your television
must meet PAL specifications.
Follow these st ep s to co nnect PhotoPC 700 to your
television:
1. Make sure the cam era and television are tur ned o ff.
2. Open the connector cover on the side of the camera.
connector cover
2
Taking Pictures with Photo P C 700
2-15
Page 38

3. Connect the video cable to the
camera as sho w n belo w.
4. Connect the other end of the vide o cable to the vid eo
inp ut port on the televi sion.
Video Out
port on the
5. Turn on the tel e vi sion and switch it to vid eo mode.
6. Slide the monitor mode switch to
The last pict ure you took appe ars o n th e te lev ision screen.
Note:
If you use the optional A C ad apter, you can see the pictu res on
both the televi sion an d th e LCD screen.
Playback
.
2-16
Taking Pictures with PhotoPC 700
Page 39

Chapter 3
R
Using the LCD Monitor Menus
When the LCD moni tor is in View or Playback mo des,
you can acces s th e LCD monitor menus, where you can
erase selec te d pho t os an d m ake a v ar iet y of cam era and
option settings. Thi s cha pte r ex p lains how, including:
Working with LCD m on it or me nus
Setting Panorama or Zoom
Setting shooting conditions
Displaying ph oto in fo rm ation
Making camera settings
Play ing back your photos
Magnifying your photos
Contr olling photos
Setting up the camera’s software
Setting the language
Working with LCD Monitor Menu s
The LCD mon i tor f eat ures three menus in View mode
and eight men us in Playback mode , that all ow you to
delete sele cted photos from the cam e ra, and make a
variety of came ra and option settings. You c an op en all
the menus described in this chapter from the monitor’s
View or Playback mode. By pressing the SELECT, BACK,
and navigation buttons as described in this chapter, you
can access and make settings on each menu.
monitor mode
switch
3
SELECT button
navigation
buttons
BACK button
Using the LCD Monitor Menus
3-1
Page 40

Follow these step s to acc ess the LCD monitor menus:
Following are the three LCD monitor menus in View mode:
1. Slide the monitor mode switch to
then press the
button. Menu ico ns ap pear at
SELECT
View
or
Playback
the top of the LCD screen with the currently selected
menu framed in orange.
2. Press the and buttons to view the settings for
other menus. The orange frame indicates the selected
menu.
3. Press the
button to choose yo ur setting.
SELECT
Depending on the menu, you may have t o p ress the
SELECT butto n sev eral times.
4. To exit the LCD monitor me nu s, pre ss the
BACK
button until the menu icons and settings disappear.
Depending on the menu, you may have t o p ress the
BACK butt on se v eral times to return to th e Playback
mode.
Read the followi ng m enu descriptions and in st ruc t ion s
on changing the set tings for each menu.
,
Panorama/Zoom
This menu allows you to
choose from the
followi ng shooting
modes:
Panorama
Zoom
Information
This menu allows you to
choose whether or not
to have photo
information displayed
on the LCD screen.
See page 3-4.
See page 3-6.
Conditions
→
←
This menu allows you to
change th e following
shooting conditions:
Continuous shooting
White balance
Exposure
Sensitivity
See page 3-4.
→
←
3-2
Using the LCD Monitor Menus
Page 41

Following are the eight LCD monitor me nus in Playback m ode:
R
Settings
See page 3-7.
This menu allows you to
change the following
settings:
clock
alert beep
LCD brightness
energy savi ng
Photo control
See page 3-10.
This menu allows you to
do the following:
erase photos
lock photos
get memory information
copy photos
format memory cards
Information
→
←
This menu allows you to
choose whether or not
to have photo
information displayed
on the LCD screen.
Slide Show
→
←
This menu allows you to
play back all the
photos in your camera
one-by-one
automatically.
See page 3-8.
See page 3-14.
Playback
→
←
This menu allows you to
choose to dis play a
single ph oto or nine
photos at a time by
switching between
Normal and Multi.
Software
→
←
This menu allows you to
install, use, and delete
optional programs
availab l e for use with
your camera.
See page 3-9.
See page 3-15.
Magnification
→
←
This menu allows you to
magnify the picture for
detail ed viewing.
Language
→
←
Dependin g on the
country, you can
choose the following
languages for
displaying information
on the LCD screen:
English, Japanese,
French, German,
Italian, Portuguese,
or Spanish
See page 3-9.
See page 3-16.
→
←
3
Using the LCD Monitor Menus
3-3
Page 42

Using the Panorama/Z oom Menu
Using the Conditions Menu
The Panorama/Zoom menu allows you to take
pictures in zoo m or p ano ram a m o d e. A cc ess
the LCD monitor menus in
select the Pano ram a/Zoom menu as described on page
3-2, then press the
menu.
Panorama
This mode allows you to take wide-angle panoramas.
Use the
camera to select fine or super fine image quality (1280
480 pixels). See page 2-8 for more information on image
quality settings.
Zoom
This mode allo ws you to enlarge the image by as much
as two times . In zoo m mode, images ar e captured at
standard quality (640 × 480 pixels).
Standard
If you do not want any special photo format, choose
standard.
Note:
When you are taking picture s i n panorama or zoom mode, yo u
cannot set the c a m era to continuo u s shooting mode .
image quality control
button to choose from the
SELECT
button on top of the
View
mode and
×
The Conditions menu allows you to take
photos by con ti n uo us shooting, fix white
balance, set exp osu re t o c hange manually, an d
set sensitivity to high.
Follow the instructions below for th e sho oting condition
feature you want to use.
Setting the continuous shooting mode
This mode allows you to take almost two photos
a second, with up to ten photos in sequence. The
shooting mode is useful when you want to brea k
down a comple x mo ti on in to a series of easy-to-see steps.
It is also useful to take several pictures, and then choose
from those the ones you lik e best.
1. Access the LCD monitor menus in
select the Conditions menu as described on pag e 3-2 ,
then press the
appear on the screen, w ith the co ntinu ou s sho oting
icon highlighted in orange.
2. Press the
The current selection is highlighted.
SELECT
button. Icons for eac h set ting
SELECT
button again to choose ON or OFF.
View
mode and
3-4
Using the LCD Monitor Menus
Page 43

3. Press the
R
to the Conditions menu. You will see CONTINUOUS
appears briefly on the screen.
4. To take picture s in cont inuous shooting mode , ke ep
pressing the shut t er button until your ca mera stops
taking pictures.
Note:
When the camera is set in panorama or zoom mode, you cannot
take pictures in , or se t the continuous shootin g m ode .
button to save your setting and return
BACK
When taking pictures at dusk, for example, adjust white
balance to FIX to incr ease reddish color tones in you r
images. Wh en taking pictures under white light,
however, keep white balance set to A U TO t o avo id w h ite
appearing greenish in your images.
1. Access the LCD monitor menus in
select the Conditions menu as described on pag e 3-2 ,
then press the
appear on the screen, w ith the up per m ost ic on
highlighted in orange.
button. Icons for eac h set ting
SELECT
View
mode and
3
You can set the self ti m er alo ng w it h the co nt inuous
shooting mod e to create a 10-second de lay between the
time you press the shutter button and the actual image
captures. For inst ructions, see page 2-9.
Adjusting the white balance
The camera’s white balance is default set to
AUTO, which means white ba lanc e is adjusted
for your photos aut omatically. A t ce rt ain times
you may want to ad just the white balance sett ing, so that
the colors in you r im ages appear more li ke t hose seen by
the eye.
2. Press the button to select the white balance icon
; then press the
FIX. Your selection is highlig ht ed.
3. Press the
to the Conditions menu.
button to save your setting and return
BACK
button to choose AUTO or
SELECT
Adjusting the exposure
The camera’s exposure is default set to AUTO,
which mean s ex posure is adjusted for your
photos automatically. When you set the exposure
to MANUAL, you can change the exposure to take
lighter or darker photos. To change the exposure setting
between AUTO and MANUAL, follow these steps, then
see page 2-11 to adjust the ex po sure manually usin g th e
function button.
Using the LCD Monitor Menus
3-5
Page 44

1. Access the LCD monitor menus in
select the Conditions menu as described on pag e 3-2 ,
then press the
appear on the screen, w ith the up per m ost ic on
highlighted in orange.
button. Icons for eac h set ting
SELECT
View
mode and
1. Access the LCD monitor menus in
select the Conditions menu as described on pag e 3-2 ,
then press the
appear on the screen, w ith the up per m ost ic on
highlighted in orange.
button. Icons for eac h set ting
SELECT
View
mode and
2. Press the button to select the exposure icon ;
then press the
MANUAL. Your selection is highlighted.
3. Press the
to the Conditions me nu . Then see the steps on page
2-11 to adjust the exposure manually between +2 and
-2.
BACK
button to choose AUTO or
SELECT
button to save your setting and return
Adjusting the sensitivity
The camera’s sensitivity is default set to STD ,
which mean s th e camera’s sensitivit y is
standardized automatically. When taking photos
while moving fast however, or in the dark without a
flash, you can set t he sensitivity to HIGH so tha t the
camera can adjust to the less than f av or able conditions. It
is recommended sensitivity is set back to STD at all other
times, as im age quality is higher wh en set to STD .
3-6
Using the LCD Monitor Menus
2. Press the button to select the sensitivity icon ;
then press the
HIGH. Your selection is highlight ed.
3. Press the
to the Conditions menu.
BACK
button to choose STD or
SELECT
button to save your setting and return
Using the Information Menu
The Informati on menu allows you to ch oose
whether or not to hav e photo informatio n
displayed on the LC D screen. If you choose
ON, you can get inf or m at ion on the dat e and time that
the photo was taken, the image quality setting, frame
number, and the num ber of photos taken.
Access the LCD monitor menus in
mode and select the Information me nu as described on
page 3-2. The curre nt set ting is highlighted. To chang e
the setting, press the
button to save your setting.
BACK
button. Then press the
SELECT
View
or
Playback
Page 45

Using the Settings Menu
R
The Settings menu allows you to change
settings for the c am era’s internal clock, the
alert beep, the LCD brightness level, and the
energy saving mode.
Follow the instru ct io ns below for the changing sett ings .
Setting the clock
Follow these steps to adjust the date (year,
month, day) and the time (hour and minu tes) .
1. Access the LCD monitor menus in
and select the Settings menu as described on page
3-2, then press the
setting appear on the screen, with the clock icon
highlighted in orange.
2. Press the
mode.
3. Press the
adjust is selected. The selected item turns red.
SELECT
SELECT
SELECT
button again to enter the clock setting
but ton un til th e item you w ant to
button. Icons for each
Playback
mode
5. Press the
and want to change an other clock setting.
6. Repeat steps 3 th rou gh 5 u nt il t he date and time are
correctly adjust ed and saved. Press the
button or
menu.
button after you change one setting,
SELECT
button to return to the Settings
BACK
SELECT
Setting the alert beep
To turn the came ra’ s alert beep on or off, follow
the se step s:
1. Access the LCD monitor menus in
and select the Settings menu as described on page
3-2, then press the
setting appear on the screen, with the uppermost
icon highlighted in orange.
2. Press the button to select the beep setting icon ;
then press the
The current selection is highlighted.
3. Press the
to the Settings menu.
SELECT
button to save your setting and return
BACK
button. Icons for each
SELECT
button to select ON or OFF.
Playback
3
mode
4. Press the button to increase the number, or the
button to decrease the number, until the item
you want to adjust is correct.
Using the LCD Monitor Menus
3-7
Page 46

Setting LCD brightness
Setting the energy saving mode
To adjust the brightne ss of th e LCD sc reen,
follow these steps:
1. Access the LCD monitor menus in
and select the Settings menu as described on page
3-2, then press the
setting appear on the screen, with the uppermost
icon highlighted in orange.
2. Press the button until the brightness icon is
highlighted in orange, t hen p ress the
again. The mark on the brightness settin g slide bar
turns orang e.
3. Slide the mark on the bar by pressin g th e and
buttons to adjust the scr een br ight ness. The
lightness inc reases towards right, an d dec reases
towards le ft.
4. Press the
and return to the Settings menu.
SELECT
or
button. Icons for each
SELECT
button to save your setting
BACK
Playback
SELECT
mode
button
To set the energy saving mode to SA V E or
NORM, follow these steps:
1. Access the LCD monitor menus in
select the Settings menu as described on page 3-2,
then press the
appear on the screen, w ith the up per m ost ic on
highlighted in orange.
2. Press the button to select the energy saving icon ;
then press the
NORM. The c urr ent selection is highlighted.
3. Press the
to the Settings menu.
BACK
button. Icons for eac h set ting
SELECT
button to select SAVE or
SELECT
button to save your setting and return
Playback
Using the Information Menu
The Informati on menu allows you to ch oose
whether or not to hav e photo informatio n
displayed on the LC D screen. If you choose
ON, you can get inf or m at ion on the dat e and time that
the photo was taken, the image quality setting, frame
number, and the num ber of photos taken.
mode and
3-8
Using the LCD Monitor Menus
Page 47

Access the LCD monitor menus in
R
mode and select the Information me nu as described on
page 3-2. The curre nt set ting is highlighted. To chang e
the setting, press the
button to save your setting.
BACK
button. Then press the
SELECT
View
or
Playback
Using the Playback Menu
Press the and buttons to move the white selection
frame forwar d and back through the im ages on screen.
When the frame reaches the first or la st pho to of the
current group, the previous or next group of up to nine
images is disp layed.
3
Using the Magnification Menu
The Playback m enu allows you to sw itch
between Normal and Multi-pho to Playback
modes.
Access the LCD monitor menus in
select the Playback menu as d escribed on page 3-2. The
current setting is highlighted. Press the
make your setting , an d press
and exit this menu.
If you choose Normal, one selected picture is displayed.
If you switch to Multi, nine small “thum bnail” images of
the last photos you took appear on the screen, with the
currently se lected image framed in white.
Playback
SELECT
to save your set ti ng
BACK
mode and
button to
The Magnif ication menu all ows yo u t o
magnify the pi ctur e you hav e t aken. Access the
LCD monitor menus in
select the Magni fic atio n m e nu as described on page 3-2,
then press the
magnified by two, and the image is divide d int o ni ne
parts.
At first you will see an enlarged v iew of the center of the
image. Scroll to the left and right, top and bo tto m , using
the and buttons. An icon in the top corner of the
screen indicates which of the nine sections of the ima ge
you are viewing .
When you mag nif y th e pan ora m a pic t ure, your image is
divided into three parts, and you can sc roll to only the
left and right.
To exit the Magnification menu and return to the
Playback mode, pr ess t he
button. You can see a selected area
SELECT
BACK
Playback
button.
Using the LCD Monitor Menus
mode and
3-9
Page 48

Using the Photo C ontrol Menu
The Photo Control menu allows you t o er ase,
lock, or unl oc k im ages in your came ra, and to
get informatio n on the camera’s internal and
CompactFlash Card’s mem o ry. T his menu also allow s
you to forma t mem ory cards and co py images between
the camera and t he card.
Select Pho to
1. With the Photo Cont ro l m e nu se lec t ed, pre ss t he
button. The Ph ot o C ontrol features app ear
SELECT
on the screen, with the Erase option highlighted in
orange.
2. Press the
press the or button to choose Select Photo.
button to enter the Erase mode, then
SELECT
Access the LCD monitor menus in
select the Photo Con tr ol menu as described on page 3-2,
then follow the instructions below for the Photo Control
feature you want to use.
Playback
mode and
Erasing photos
There are two w ays to erase photos fr om your camera:
Select Photo or Erase All . Use Select Photo to erase one or
several photos at a time; use Er ase A ll to erase all phot os
from the camera’s memory. Follow the steps below for
the method you want to use.
Note:
Be sure to unlock the photos before erasing them. See “Locking
photos” on page 3-11 for instructions.
3-10
Using the LCD Monitor Menus
3. Press the
button to move fo rward or back thro ugh the
im a g es in the ca mera u ntil the p h oto you wa n t to
erase appears on the screen.
4. Press the
appears asking if you are sure you wa nt to e rase that
image. Press the
BACK
photos at the same time, use the or button to
display them, then p ress the
them.
Note:
o
o
SELECT
to cancel your job. If you want to erase other
To cancel the selection of a photo, simpl y press the
SELECT
If you t ry to select a locked p hoto, the camera be eps and
you cannot select that photo until you unlock it,
as described on page 3-11.
button, then press the or
SELECT
button. A confirmation message
button to erase, or pr ess
SELECT
SELECT
button again.
button to select
Page 49

5. When you have selected all the photos you want to
R
erase, press the
asking you to confi rm you r sel e ctio ns.
6. Press the
to the Photo Control menu; press
the Photo Control menu without erasing the photos.
SELECT
button. A message appears
BACK
button to erase the images and return
BACK
Erase All
1. With the Photo Cont ro l m e nu se lec t ed, pre ss t he
button. The Ph ot o C ontrol features app ear on
SELECT
the screen, with the Erase option highlighted in
orange.
2. Press the
press the or button to choose Erase All.
3. Press the
you to confirm you want to erase all photos. Press the
button to erase the photos and return to the
SELECT
Photo Control me nu; pr ess the BA CK button to
cancel your job an d ret ur n to the Pho t o Co ntrol menu.
Note:
If the re are lo c k ed photos in you r c amera, t h e camera beeps
and a message appears on the screen before the erase photos
confirma ti on message. Pr ess the
only the unlo cked ima g es from t h e c amera, or p ress the
button to cancel.
BACK
button to enter the Erase mode, then
SELECT
button. A message appears aski ng
SELECT
SELECT
to return to
button to erase
Locking photos
The lock feature keeps you r phot os from being
accidentally erased. You can lock and unlo ck selected
photo s from the Se lect Ph ot o m ode, or lock all t he photos
in the camera from the Loc k A ll m o de. To unlock all
photos, use the Unlock A ll m enu. Follow the steps below
for each procedure:
Select Pho to
1. With the Photo Cont ro l m e nu se lec t ed, pre ss t he
button. The Ph ot o C ontrol features app ear
SELECT
on the screen, with the Erase option highlighted in
orange.
2. Press the button to select the Lock option, then
press the
Then press the or button to choose Select
Photo.
3. Press the
button to move fo rw ard or back through the images
in the camera until th e p hoto you w a nt to l o ck or
unlock appears on the screen.
button to enter the Lock mode.
SELECT
button, then press the or
SELECT
3
Using the LCD Monitor Menus
3-11
Page 50

4. Press the
bottom of the screen when the photo is lo cke d, and
disappe ars w hen the photo is unlocked. If you want
to lock or unlock other photos at the same time, use
the or button to display them, then press the
button.
SELECT
button. A lock icon appears at the
SELECT
3. Press the
you to confirm you want to lock all the photos in the
camera. Press th e
and return to the Photo Control menu; press the
button to return to the Photo Control menu
BACK
without locking the photos.
button. A message appears aski ng
SELECT
button to lock the photos
SELECT
5. When you have selected all the photos you want to
lock or unlock, press the
appears asking you to confirm your selections.
6. Press the
and return to the Photo Control menu; press the
button to return to the Photo Control menu
BACK
without locki ng or unlo ck ing t he p hoto s.
button to lock or unlock the images
SELECT
button. A mes sage
BACK
Lock All
1. With the Photo Cont ro l m e nu se lec t ed, pre ss t he
button. The Ph ot o C ontrol features app ear
SELECT
on the screen, with the Erase option highlighted in
orange.
2. Press the button to select the Lock option, then
press the
Then press the or button to choose Lock All.
3-12
Using the LCD Monitor Menus
button to enter the Lock mode.
SELECT
Unlock All
1. With the Photo Cont ro l m e nu se lec t ed, pre ss t he
button. The Ph ot o C ontrol features app ear
SELECT
on the screen, with the Erase option highlighted in
orange.
2. Press the button until Lock is highligh te d in orange.
Press the
mode, then press the or button to choose
Unlock All.
3. Press the
you to confirm that you want to unlock all the photos
in the camera. Pre ss the
photos an d ret u rn to the Photo Con t rol menu; pres s
the
BACK
menu without unlocking the photos.
button to enter the Lock Photos
SELECT
button. A message appears aski ng
SELECT
button to unlock the
SELECT
button to return to the Photo Control
Page 51

Getting memory information
R
The memory in form at io n m ode allows you to get
informatio n on bo t h you r camera’s inte rnal memory and
optional Com p act Flash memory c ards.
With the Photo Cont ro l m enu selected, press the
button. Then press the button until Memory Info is
highlighted. Press the
internal and ex te rnal memory appe ars, includi ng the
number of photos you can take , the number of photos
stored in internal memory and external memory ,
and the total num ber o f photos that can be stored at the
current image quality setting .
button. Information on
SELECT
Copying photos
When an optional CompactFlash memory card is
installed in yo ur camera, you can use the copy mode to
copy photos be tween the camera’s int ernal memory an d
the memory card. Fo llo w thes e steps:
1. Make sure the mem ory card is install e d in t he c am era.
2. With the Photo Cont ro l m e nu se lec t ed, pre ss t he
button. Then press the button until Copy
SELECT
is highligh te d in orange.
SELECT
3. Press the
press the or button to select Camera→Card or
Card→Camera as the c op y de stination.
4. Press the
button to move fo rward or back thro ugh the
im a g es in the ca mera u ntil the p h oto you wa n t to
copy appea rs on the screen.
5. Press the
around the photo . If yo u w ant to co py several photos
at the same time, use the or button to display
them and press the
Note:
o
If you select mo re photo s than the card or cam era can
hold, the error message “Insufficient Memory” appears.
o
If no external memor y c ard is in stalled, the error
message “No Card” appea rs .
6. When you have selected all the photos you want to
copy, press the
asking you to confi rm you r sel e ctio ns.
7. Press the
to the Photo Cont rol menu; press the
cancel and ret urn to the Photo Control m enu.
button to enter the Copy mode, then
SELECT
button, then press the or
SELECT
button. An ora nge f ram e appears
SELECT
butt on each ti me.
SELECT
button. A mess age appears
BACK
button to copy the images and return
SELECT
BACK
butt on to
3
Using the LCD Monitor Menus
3-13
Page 52

Formatting memory cards
To format optional CompactFlash Cards, follow these
steps:
Note:
If no memory card is installed in the camera, the error
message “No Ca rd” appea rs.
Caution:
When you format a memory card, all the data on the
c
card is lost, including any locked images.
Note:
EPSON CompactFlash Cards are already formatted when you
buy them. You need to format a card only if you want to erase
all the data on the card or if a message on the LCD screen
instructs you to do so.
1. Make sure the mem ory card is install e d in t he c am era.
2. With the Photo Co nt ro l m enu selected, press t he
button. Then press the button until
SELECT
Format Card is highlighted.
3. Press the
that all data on the card will be erased and asking
you to confirm the procedure. Press the
button again to format the card and return to the
Photo Control menu; press the
return to the Photo Control menu without formatting
the card.
button. A me ssage appears stat ing
SELECT
BACK
SELECT
butt on to
Using the Slide Show Menu
The Slide Show menu allows you to
automatica lly p lay back all the photos in your
camera one by on e.
Access the LCD monitor menus in
select the Slide Show menu as described on page 3- 2,
then press the
playing back t he photos in your cam e ra o ne at a ti m e at
regular intervals.
To move forw ard or back through the pho tos m anually,
press the or button. To pause the slide show on a
particul ar photo, press the
icon and current picture count appear at the bottom of
the screen.
Note:
A message saying No Photos in Memory appears when there
are no reco rd ed images in th e c amera.
To stop the slide sh ow and return to Playback mode,
press th e
BACK
button. The LCD monitor beg ins
SELECT
SELECT
button.
Playback
button. The pause
mode and
3-14
Using the LCD Monitor Menus
Page 53

Using the Software Menu
R
The Software menu allows you to install, use,
or delete sof tware program s av ailable for use
with your cam e ra .
Access the LCD monitor menus in
select the Softwar e m enu as described on page 3-2, then
press th e
already installed in your camera appear on the me nu,
along with an Add/Delete com m and, w h ic h you can use
to install prog ram s f rom a m em ory card or dele te
progra m s from your camera.
Note:
For information on the availability of CompactFlash Cards
which contain s oftware, contact your deal e r.
SELECT
button. The name s of any pr ogr am s
Playback
mode and
Note:
You can also upload software programs to your camera from
your computer. See your digita l camer a softwa re manual for
instructions.
1. If there are any pho tos in the camera’s internal
memory , tran sfer the ones you want to you r
computer or to a CompactFla sh Card, then erase all
the photos from the camera.
Caution:
c
2. Insert the memory card into your camera as desc ribed
on page 5-2.
If any images are left in the camera’s memory
when yo u u pl oad an opti onal progra m , the
camera may not work properly.
3
To use an install ed so ftw are program, press t he
button then press the or button to select the
optional prog ram you want to use . Press the
button again to open th e p rog ram . To use the Direct Print
program, see Chapter 4.
To copy a program from a CompactFlash memory card
to your camera, or to delete an optional program from
your camera, use the Add/Delete command following
these steps:
SELECT
SELECT
With the Software men u sel ected, press the
button then press the or button to select
Add/Delete.
3. Press the
to select Add or Delete.
4. Press the
message app ears asking you to confirm you want to
install the program.
button, then use the or button
SELECT
button. If you selected Add, a
SELECT
Using the LCD Monitor Menus
SELECT
3-15
Page 54

If you selected Delete, a list of the programs installed
in your cam e ra ap pears. Use the or button to
choose the program you want to delete, then press
the
confirm you want to delete the program.
button. A me ssage appears aski ng you to
SELECT
5. Press the
program an d return to the Software menu; press the
button to return to the Software menu without
BACK
installing or deleting the program.
button to install or delete the
SELECT
Using the Language Menu
The Language menu allows you to select the
language used to display camera information
on the LCD screen. D epending on the country
of purchase, you can choose English , Japa nese, French,
German, I talian, Portugue se, or S panish.
Access the LCD monitor menus in
select the Language menu as de scribed on page 3-2. Th e
current setting is highlighted. To select a different
language, press t he
you want is highlighted. Press
Playback mode.
3-16
Using the LCD Monitor Menus
SELECT
Playback
button until the language
to return to the
BACK
mode and
Page 55

Chapter 4
Proof Sign-off:
R
Using the Direct Print Program
Features
Preparing the Di rect Print program
Connecting your camera to the printer
Available paper types
Using the Direc t Print program
LCD screen and di splay panel message s
Printed image dimen sio ns
Features
The Direct P rint program is software t hat allows you to
print images directly from y ou r Pho t oP C 700 with simple
procedure. This softwar e inc ludes the following features:
o
Color, mono chrome, blue, and sepia pri nt ing
o
Full-size, 5 × 7 size, C ard, A lbum, Stick er, and Index
(contact sheet) printing modes
o
Fast and Fine printing m o des
4
Using the Direct Print Program
4-1
Page 56

Preparing to Use the Direct Print
Program
Connecting Your Camera to the
Printer
You need the following item s to use the Direct Print
Program.
Digital ca m e ra: EPSON PhotoPC 700
Printer: EPSON STYLU S PHOTO, E PSON
STYLUS PHOTO 700, EPSON STYLUS
PHOTO E X, EPSON STYL U S COLOR
600, EPS ON STY LUS COLO R 800,
EPSON ST Y LUS COLOR 850
Printer cable: Apple System Serial-8 cable
(8-pin mini-circular conn ector)
Note:
Use of th e optional A C ad apter (B867 03]) is also
recommended, to avoid batteries running out while printing.
The Direct P rint program is already installed in EP SON
PhotoPC 700. If you uninstalled th e pro g ram and want to
use it again, you can reinstall the program (the Direct
Print kit is packed with your cam era). For instruct ion s on
installation, see your digital camera software man ual.
Follow these step s to co nnect the camera to the
appropriat e EPSON print er.
1. Make sure both th e cam era and the printe r are t ur n ed
off.
2. Connect one end of the interfac e ca ble to the se rial
connector on the back of the printer.
Note:
The interface cable must be purchased separately (see
previous section) . Do not use the PC connection cable or
Macintosh adapter cable that came with the camera.
4-2
Using the Direct Print Program
Page 57

3. Open the connector cover on the side of the camera.
R
mark
4. Depending o n the ty pe o f ser ial cable you have, line up
either the arrow or the flat surface of the cable
connector w ith th e m ark on the camera’s serial port,
then insert the connector.
Caution:
Be su re to position the c a b le corre ctly bef ore
c
pushing it into the connector. Otherwise, the
cable’s pi ns m ay be damaged.
flat surface
or
arrow
Available Paper Type
You can use any of th e pape r types listed below whe n
printing with the Direct Print program.
Photo Quality Ink Jet Paper:
Use this pap er for standard pho to q ual it y printing.
EPSON Photo Quality Ink J et Paper (A4) S041061
EPSON Photo Quality Ink J et Card (A6) S041054
EPSON Pho t o Qu ality Ink Jet Paper (L et te r) S041062
Using the Direct Print Program
4
S041026
S041029
4-3
Page 58

Photo Quality Glossy Paper:
Use this paper for photo quality glossy pr ints .
EPSON Pho t o Qu ality Glossy Pape r (A4) S041126
EPSON Photo Paper (A4) S041140
EPSON Pho t o Qu ality Glossy Pape r (Letter) S041124
EPSON Photo Paper (Lette r) S041141
EPSON Photo Paper (4 × 6 in.) S041134
Accessing the Direct Print program
1. Slide the monitor mode switch on your camera to
Playback.
2. Press the SELECT button on the back of the camera.
Menu icons appear at the top of th e LCD screen with
the currently selected menu highlighted in orange.
Photo Quality Glossy Film:
Use glossy film to get high gloss photo quality print s.
EPSON Pho t o Qu ality Glossy Film (A 4) S041071
EPSON Pho t o Qu ality Glossy Film (A 6) S041107
EPSON Pho t o Qu ality Glossy Film (Letter) S041072
EPSON Pho t o Stickers (A6) S041144
Note:
o
The availability of special media varies by country.
o
Ink jet printers are particularly sensitive to the condition
of your paper . Keep unused paper in it s o ri gi nal packaging
and store it in a cool, dark place.
Using the Direct Print Program
Follow the inst ructions in this se ction to access the
software and print ou t ima ges.
4-4
Using the Direct Print Program
3. Press the or button until the Software menu
is highligh te d, then press the SELECT button.
4. After select ing Direct Print, press the SELECT button to
display the Dir e ct Pr int m ode s.
To print, see the instructions in the next sect ion for the
print mode you wa nt to use.
Printing your images
The Direct Print program features the following print
modes.
Note:
When printing, you can choose to use eithe r the Fa st or Fine
mode. If you select Fast, printing is faster; if you select Fine,
printing is finer quality.
Page 59

o
R
Full Size
The Full Size print mode allows you to print a single
image f ul l-size on to a s he et of paper . You can print
several copies of individual images.
Item Choices
Photo All or Select
Paper Size: A4, Letter, A6, Photo paper
Copies 1 to 99
Time On or Off (P hoto pa per excluded)
Color Color, Monochrome, Blue, Sepia
Mode Fast or Fine
Type: Glossy paper , Glossy film,
Inkjet paper
o
5 × 7 size
The 5 × 7 size print mode allows you to print a
5 × 7 in. (176 × 132 mm) picture .
Item Choices
Photo All or Select
Paper Size: A4, Letter
Copies 1 to 99
Time On or Off
Color Color, Monochrome, Blue, Sepia
Mode Fast or Fine
Type: Glossy paper , Glossy film, Inkjet
paper
4
Photo paper
Photo paper
panorama
A6
A6
Panorama
A4/Letter A4/Letter
Panorama
See page 4-9 for instructions on print ing with this
mode.
A4/Letter
A4/Letter
Panorama
See page 4-8 for instructions on print ing with this
mode.
Using the Direct Print Program
4-5
Page 60

o
Card
The Card print mode allows you to print one image
on an A6-sized card.
Item Choices
Photo All or Select
Paper Size: A6
Position Top, Center, Bottom, Full size
Copies 1 to 99
Time On or Off
Color Color, Monochrome, Blue, Sepia
Mode Fast or Fine
Type: Glossy paper , Glossy film, Inkjet
paper
o
Album
The Album print mode allows you to print up to
three images on A4 or Letter size paper, or up to two
images on A 6 size paper.
Item Choices
Photo All or Select
Paper Size: A4, Letter, A6
Position Right, Center, Left, Covered Binding
Time On or Off
Color Color, Monochrome, Blue, Sepia
Mode Fast or Fine
Type: Glossy paper , Glossy film, Inkjet
paper
(A4 or Letter only)
A6
Top
A6
Center
A6
Bottom
See page 4-10 for instructions on printing with this
mode.
4-6
Using the Direct Print Program
A6
Full-size
A4/Letter
Left
A4/Letter
Center
A4/Letter
Right
A6
See page 4-11 for instructions on printing with this
mode.
Page 61

o
R
Sticker
The Sticker p rint m od e allows you to print onto
EPSON Photo Stickers. T his m o d e prints 16 small
copies of the selecte d im age onto each Photo Sticker
sheet.
Item Choices
Photo All or Select
Paper Size: Sticker
Color Color, Monochrome, Blue, Sepia
Adjust Right or Left in 0.2 mm increments
Mode Fast or Fine
Type: Glossy film
(maximum of 2.0 mm)
Photo sticker
See page 4-12 for instructions on printing with this
mode.
o
Index (contact shee t)
The Index print mode allows you to print A4, Letter,
or A6 size contact sheets consisting of small
“thumbnail” images of all the phot os in y our cam era.
Item Choices
Photo All or Select
Paper Size: A4, Letter, A6
Time On or Off (if you ch oose On, the
Color Color, Monochrome, Blue, Sepia
Mode Fast or Fine
A4/Letter
Type: Glossy paper , Glossy film, Inkjet
paper
photo number will also be shown
with the time and date.)
A6
4
See page 4-13 for instructions on printing with this
mode.
Using the Direct Print Program
4-7
Page 62

To print, acces s th e D irec t Print program as described on
page 4-4, then follo w the inst ru ct io ns below for the print
mode you want to use.
Note:
If you select to pri nt o n Pho to pape r, you cannot select
Time ON.
Full-Size print mode
Follow these step s to pri nt using the Full Size print mode:
1. Access th e D irect Print program as d escribed on pa ge
4-4. Press the but ton to h ighl ight Layout, then
press the SEL ECT button. With Full size selected,
press the SEL ECT button again.
2. Sel e ct Photo and pre s s t he SELECT button. Choose All
if you want to print all the images, then press the
SELECT button once mo re.
If you want to print an indi v idual image, choose Select.
Thumbnail im ages of the first nine pho tos in yo ur
camera app ear with the currently selected image
framed in blue. Press the or button to frame
the image you want to print, then press SELECT. You
can select se ve ral im ages at the same time.
3. To change the paper size and ty pe, nu m ber of copies
(1-99), color, printing mode, and whether to print the
time and date the photo was taken, press the or
button to select the option you want to change,
then press the SELECT butt on . The settings for that
option appea r on the screen.
4. Press the or button to select a setting, then
press the SEL ECT button.
5. Connect the camera to the printer as described on page
4-2, then turn on the printer and load the size and
type of paper you selected. For p aper loading
instructio ns, see yo ur printer
6. When you are ready to start printing, pr ess t he
button to select Print.
7. Press the SELECT button. The camera starts send ing
the image data to the printer.
While the camera is sending data and p rinting, the
LCD screen goes blank and star icon s m ove ac ross
the display panel on the top of the camera.
Note:
To cancel printing, hold down the camera’s
for about thre e seconds. A message stating printing is
canc el ed appear s on the LCD screen for three seconds,
before returning to the Direct Print menu. The printer
stops printing and ejects the paper.
User’s Guide
.
BACK
button
4-8
Using the Direct Print Program
Page 63

8. When printing is fi nished, the LCD scree n ret ur ns t o
R
the Direct Print menu, and the display panel returns
to normal.
When you finis h printing, close the Direct Print program
by pressing the BACK button. Then slide the monitor
mode switch to OFF and turn off the printer.
5 × 7 size print mode
Follow these step s to pri nt using the 5 × 7 size print
mode:
1. Access th e D irect Print program as d escribed on pa ge
4-4. Press the button to highlight Layou t, then
press the SEL ECT button. With 5 × 7 Siz e selected,
press the SEL ECT button again.
3. To change paper size and ty pe, number of copi es
(1-99), color, printing mode, and whether to print the
date and time that the photo was taken, press the
or button to select the option you want to
change, then pr ess t he SELECT button. The settings
for that option appear on the screen.
4. Press the or button to select a setting, then
press the SEL ECT button.
5. Connect the camera to the printer as described on
page 4-2, then turn on the printer and load the size
and type of p aper you selected. For paper loadi ng
instructio ns, see yo ur printer
6. When you are ready to start printing, pr ess t he
button to select Print.
User’s Guide
.
4
2. Sel e ct Photo and pre s s t he SELECT button. Choose All
if you want to print all the images, then press the
SELECT button once m o re.
If you want to print an indi v idual image, choose Select.
Thumbnail im ages of the first nine pho tos in yo ur
camera app ear with the currently selected image
framed in blue. Press the or button to frame
the image you want to print, then press SELECT. You
can select se ve ral im ages at the same time.
7. Press the SELECT button. The camera starts send ing the
image data to the printer.
While the camera is sending data and p rinting, the
LCD screen goes blank and star icon s m ove ac ross
the display panel on the top of the camera.
Using the Direct Print Program
4-9
Page 64

Note:
To cancel printing, hold down the camera’s
for about thre e seconds. A message stating printing is
canc el ed appear s on the LCD screen for three seconds,
before returning to the Direct Print menu. The printer
stops printing and ejects the paper.
BACK
button
If you want to print an indi v idual image, choose Select.
Thumbnail im ages of the first nine pho tos in yo ur
camera app ear with the currently selected image
framed in blue. Press the or button to frame
the image you want to print, then press SELECT. You
can select se ve ral im ages at the same time.
8. When printing is fi nished, the LCD scree n ret ur ns t o
the Direct Print menu, and the display panel returns
to normal.
When you finis h printing, close the Direct Print program
by pressing the BACK button. Then slide the monitor
mode switch to OFF and turn off the printer.
Card print mode
1. Access th e D irect Print program as d escribed on pa ge
4-4. Press the button to highli ght Layout, then
press the SEL ECT button. With Card selected, press
the SELECT button again.
2. Sel e ct Photo and pre s s t he SELECT button. Choose All
if you want to print all the images, then press the
SELECT button once m o re.
4-10
Using the Direct Print Program
3. To change the paper type, position (top, center, bottom,
or ful l -size), n umber of copie s (1-99), color, p ri n t i ng
mode, and whether to print the date and time the
photo was taken, pr ess the or button to
select the option you want to change, then press the
SELECT button. The settings for that option appear on
the screen.
4. Press the or button to select a setting, then
press the SEL ECT button.
5. Connect the camera to the printer as described on page
4-2, then turn on the printer and load the size and
type of paper you selected. For p aper loading
instructio ns, see yo ur printer
6. When you are ready to start printing, pr ess t he
button to select Print.
User’s Guide.
Page 65

7. Press the SELECT button. The camera starts send ing
R
the image data to the printer.
While the camera is sending data and p rinting, the
LCD screen goes blank and star icon s m ove ac ross
the display panel on the top of the camera.
Note:
To cancel printing, hold down the camera’s
for about thre e seconds. A message stating printing is
canc el ed appear s on the LCD screen for three seconds,
before returning to the Direct Print menu. The printer
stops printing and ejects the paper.
8. When printing is fi nished, the LCD scree n ret ur ns t o
the Direct Print menu, and the display panel returns
to normal.
When you finis h printing, close the Direct Print program
by pressing the BACK button. Then slide the monitor
mode switch to OFF and turn off the printer.
Album print mode
Follow these step s to print using the Album prin t mo de:
1. Access th e D irect Print program as d escribed on pa ge
4-4. Press the but ton to h ighl ight Layout, then
press the SEL ECT button. With Al bum selected, press
the SELECT button again.
BACK
button
2. Sel e ct Photo and pre s s t he SELECT button. Choose All
if you want to print all the images, then press the
SELECT button once m o re.
If you want to print selected images, choose Select.
Thumbnail im ages of the first nine pho tos in yo ur
camera app ear with the currently selected image
framed in blue. Press the o r button to frame
the image you want to print, then press the SELECT
button. Continue to press the or button to
select the image you want to print, then press the
SELECT button again.
Note:
You can print up to thre e im ag es on an A4 or Letter size
sheet, or up to two images on an A6 size sheet.
3. To change pa per size and type, co lor, printing mod e,
and whether to print the date and time the photo was
taken, press or button to select the option
you want to change, then press the SELECT button.
The setting for that option appears on the screen.
To select the printi ng po sitio n, select Position and
press the SEL ECT button. Then choose the position of
right, center, left, or covered binding. If you choose
covered bi nding, the images are pr int ed on the right
side on right pages , an d lef t side on left pa ges.
4
Using the Direct Print Program
4-11
Page 66

4. Press the or button to select a setting, t hen
press the SEL ECT button.
5. Connect the camera to the printer as described on
page 4-2, then turn on the printer and load the size
and type of paper you selected. When a message
telling you how m any sheets to load appears at the
bottom of the Albu m print options screen, be sure to
load at least that many sheets. For paper loading
instructio ns, see yo ur printer
6. When you are ready to start printing, pr ess t he
button to select Print.
User’s Guide
.
8. When printing is fi nished, the LCD scree n again
displays thum bnail images of the phot os in you r
camera selected for Album print mode, and the
display panel returns to normal.
To print a new group of pho t os, follo w these instructions
from step 2. To finish printing, clo se the Direct Print
program by pressing the BACK button. Then slide the
monitor mode switch to OFF and turn off the printer.
Sticker print mode
Follow these step s to pri nt using the Sticker print mod e :
7. Press the SELECT button. The camera starts send ing
the image data to the printer.
While the camera is sending data and p rinting, the
LCD screen goes blank and star icon s m ove ac ross
the display panel on the top of the camera.
Note:
To cancel printing, hold down the camera’s
for about thre e seconds. A message stating printing is
canc el ed appear s on the LCD screen for three seconds,
before returning to the Direct Print menu. The printer
stops printing and ejects the paper.
4-12
Using the Direct Print Program
BACK
button
1. Access th e D irect Print program as d escribed on pa ge
4-4. Press the button to highlight Lay ou t, then
press the SEL ECT button. With Sticker selected, press
the SELECT button again.
2. Sel e ct Photo and pre s s t he SELECT button. Choose All
if you want to print all the images, then press the
SELECT button once mo re.
If you want to print an indi v idual image, choose Select.
Thumbnail im ages of the first nine pho tos in yo ur
camera app ear with the currently selected image
framed in blue. Press the or button to frame
the image you want to print, then press SELECT. You
can select se ve ral im ages at the same time.
Page 67

3. To change co lo r and printing mode , p ress or
R
button to select the option you want to change, then
press the SEL ECT button. The settin g for th at optio n
appears on the sc reen.
When the photo is not printed in the correct position,
select Adjust and press the SELECT button. Then
follow the instructions on the LC D screen to move
the print le ft or ri ght a m ax im um o f 2. 0 m m in 0. 2
mm increments, so that printing occurs in the correct
position.
4. Press the or button to select a setting, t hen
press the SEL ECT button.
5. Connect the camera to the printer as described on
page 4-2, then turn on the printer and load EPSON
Photo Stickers. See the loading inst ructions that came
with the Photo Stickers.
6. When you are ready to start printing, pr ess t he
button to select Print.
7. Press the SELECT button. The camera starts send ing the
image data to the printer.
While the camera is sending data and p rinting, the
LCD screen goes blank and star icon s m ove ac ross
the display panel on the top of the camera.
Note:
To cancel printing, hold down the camera’s
for about thre e seconds. A message stating printing is
canc el ed appear s on the LCD screen for three seconds,
before returning to the Direct Print menu. The printer
stops printing and ejects the paper.
8. When printing is fi nished, the LCD scree n ret ur ns t o
the Direct Print menu, and the display panel returns
to normal.
When you finis h printing, close the Direct Print program
by pressing the BACK button. Then slide the monitor
mode switch to OFF and turn off the printer.
BACK
Index print mode
Follow these step s to pri nt using the Index print mode:
1. Access th e D irect Print program as d escribed on pa ge
4-4. Press the button to highlight Layout , then
press the SEL ECT button. With Index selected, pres s
the SELECT button again.
2. Sel e ct Photo and pre s s t he SELECT button. Choose All
if you want to print all the images, then press the
SELECT button once m o re.
button
4
Using the Direct Print Program
4-13
Page 68

If you want to print an indi v idual image, choose Select.
Thumbnail im ages of the first nine pho tos in yo ur
camera app ear with the currently selected image
framed in blue. Press the or button to frame
the image you want to print, then press SELECT. You
can select se ve ral im ages at the same time.
Note:
To cancel printing, hold down the camera’s
for about thre e seconds. A message stating printing is
canc el ed appear s on the LCD screen for three seconds,
before returning to the Direct Print menu. The printer
stops printing and ejects the paper.
BACK
button
3. To change pa per type and size, co lo r, printing mode,
and whether to print the date and time the photo was
taken, p r ess the or button to select the option
you want to change, then press the SELECT button.
The settings for that option appear on the screen.
4. Press the or button to select a setting, then
press the SEL ECT button.
5. Connect the camera to the printer as described on
page 4-2, then turn on the printer and load the size
and type of p aper you selected. For paper loadi ng
instructio ns, see yo ur printer
6. When you are ready to start printing, pr ess t he
button to select Print.
7. Press the SELECT button. The camera starts send ing the
image data to the printer.
While the camera is sending data and p rinting, the
LCD screen goes blank and star icon s m ove ac ross
the display panel on the top of the camera.
4-14
Using the Direct Print Program
User’s Guide
.
8. When printing is fi nished, the LCD scree n ret ur ns t o
the Direct Print menu, and the display panel returns
to normal.
When you finis h printing, close the Direct Print program
by pressing the BACK button. Then slide the monitor
mode switch to OFF and turn off the printer.
Page 69

LCD Screen and Displa y Pane l
R
Messages
When printing with the Direct Print program, a variety
of status me ssages may appear on the camera’s LCD
screen and di spl ay pa nel. Fo r det ail ed ex planations of
these messages, see the following tables .
LCD screen messages
Message Explanation
Check Printer
Model.
Print: SELECT
Cancel: BACK
Battery is low.
Use AC
adapter.
Check Printer
Connection or
Printer Error.
Printing
Canceled
The camera is not connected to an
appropri ate printer . Connect the
camera to a printer described in page
4-2, then press the SELECT button to
begin printing. (If you want to cancel
printing, press the BACK button.)
Battery power is almost out. Connect
the camera to the optional AC adapter.
Printing stopped because of a pri nter
error. Clear the error, then start printing
again fro m the beginning. (For
information about how to clear printer
errors, refer to your printer User’s Guide.)
This message appears when you hold
down the BACK button for more than 3
seconds while printing. The printer stops
printing a nd eje cts the paper. The main
menu will be displayed automatically
after 3 seconds.
No photos in
memory
Print setting is
returned to
default.
Display panel messages
Message Explanation
E51: Another
interface is active
E54: Paper jam Printing stopped because paper i s
E55: No ink Printing stopped because the
This message appears when there are
no photos in the memory. Press SELECT
to return to the main menu.
This message appears when an err or
occurs while the Direct Print prog ram is
working. The setting you have made is
returned to the default value. Press the
SELECT button to go back to the main
menu, and make your print setting
again.
The printer is receiving a prin t job
through another interface. When
the print job ends, the printer begins
printing from the Direct Print
Program automatically.
jammed in the printer. To remove
the paper from the printer, see your
printer’s User’s Guide.
printer ran out of ink. Replace ink
cartridges as needed and start
printing again from the beginning.
(For info rmation about h ow to
replace ink cartridges, refer to your
printer Us er’s Guide.)
4
Using the Direct Print Program
4-15
Page 70

E56: No paper Load paper into the printer, and
then press the prin ter’s load/eject
button (
press the camera’s BACK button to
cancel printing.)
) to begin printing. (Or
E
Printed Image Dimensions
Full-size mode
Layout setting Paper Size
setting
Framed Photo A6 108 × 81 mm
Photo Print Photo Paper 157 × 106 mm
Panorama A4/Letter 228 × 86 mm
A6/Photo Paper 108 × 40 mm
Full size A4/Letter 228 × 172 mm
5 × 7 size mode
A4/Letter 176 × 132 mm
Card mode
A6 85.5 × 64 mm
A6 (Panora m a) 85.5 × 32 mm
Image
Dimensions
Album mode
A4/Letter: 108 × 81 mm
A6: 72 × 54 mm
Sticker mode
Photo Stickers: 28 × 21 mm
Index mode
A4/Letter/A6: 36 × 27 mm
4-16
Using the Direct Print Program
Page 71

Chapter 5
Camera Options
A variety of optio ns are available that exp and the
flexibility of you r PhotoPC 700. Optio nal CompactFlash
Cards allo w you t o increase the cam era’s storage
capacity, and if used with the optional PCMCIA adapter,
you can access images store d on CompactFlash Cards
directly from you r co m pu t er. B att ery p ow er c an be saved
with the use of the optio nal AC adapter, particularly
when preview ing and transferring pictu res t o your
computer. The optional N i- MH Battery Charger and
rechargeable batteries enable you to recharge batteries
quickly, and allow the batteries t o las t longer in your
camera. Als o, you d o not hav e t o bu y new batt eries every
time your batteries run out. This chapter describes the
following:
Using CompactFlash Cards
Using the PCMCIA adapter
Using the AC adapter
Usi ng the Ni -MH Batter y Char ger
Using CompactFlash Memory Cards
PhotoPC 700 co m e s w it h 4MB of internal m e m or y ,
which holds u p to ap pro x im ately 6 super fine qualit y
pictures ( 1280 × 960 pixels), app rox im ately 12 to 13 fine
quality pictures (1280 × 960 pix els) , or ap proximately
40 to 43 standard quality pictur es (6 40 × 480 pixels). You
can add to the camera’s storage capacit y by installing an
optional 4M B (B808311) or 15MB (B808301)
CompactFlash Card. The sto rage capacity of the c am era’s
internal memory and of each CompactFlash Card is
shown in the following table.
Internal
Memory
(PAL)
Standard 43 40 60 227
Fine 13 12 19 72
Super fine 66 9 36
Note:
EPSON recommends use of EPSON CompactFlash Cards
only. Other memory cards may be incompatible with the
EPSON PhotoPC 700.
Internal
Memory
(NTSC)
4MB
CompactFlash
Card
15MB
CompactFlash
Card
5
Camera Options
5-1
Page 72

If your computer is equipped with a Type II PCMCIA
memory card slot, you can acce ss im ages stored on
memory card s directly from yo ur computer by using the
optional P CM CIA adapter (B8 67041). See page 5-3 for
more inform ation on this option.
Installing a CompactFlash Card
Follow these st ep s to inst all a memory card in t he ca m era:
1. Before you open t he m em ory card cover , mak e sure
the camera and the monitor mode switch are turned
off.
2. Open the memory card cover, and insert the card all
the way into t he m em ory card slot, as sh own below.
3. After you have in st alled the memory card, clo se the
memory card cover.
When a memo ry card is installed , pho t os yo u take are
stored in the card’s memory rather than the camera’s
internal memory. The number of pictures you can store
in the memory card appears in brackets on the camera’s
display panel.
brackets
When a memory card is installed , you m ay notice a delay
between the tim e you press the shutter button and w hen
the camera beeps. To avoid blurrin g , be sur e to hol d th e
camera still until the camera beeps. The photo processing
time also incre ases by a few seconds when u sing the
memory card .
Caution:
Never remove the card while the camera is accessing it.
c
Data in the card may be lost or damaged.
5-2
arrow mark
Camera Options
Page 73

Removing a CompactFlash Card
Follow these step s to rem o v e a m em or y card from the
camera:
1. Before you open t he m em ory card cover , mak e sure
the camera and the monitor mode switch are turned
off.
2. Open the memory card cover, and slide the lever on
the bottom of the camera to eject the memory card.
3. Remove it by hand, then close the me m o ry card cover.
Caution:
o
c
Never remove the card while the camera is
accessing it. Data in the card may be lost or
damaged.
o
Avoid using or storing the card in direct sunlight,
or in places that are extre m el y hot, humid, or
dusty.
Using the PCMCIA Adapter
The optional PCMCIA adapter allows yo u t o ac cess
images stored o n Co m pactFlash Cards directly from
your computer. To use this adapter, your computer must
be equipped with a Type I I PC MCIA memo ry c ard slot.
Macintosh users m ust enable the PC Exchange e xten sio n
software to acc ess f iles on CompactFla sh Ca rds. See your
Macintosh user’s manual for more information.
Follow these steps to use the optional adapter:
5
Camera Options
5-3
Page 74

1. Insert the memo ry card into the optiona l adapter all
the way, as shown below.
2. Insert the ad apte r into your comput er’ s T yp e II
PCMCIA slot.
3. Now you can access the photos in the memory card
from your computer. You can find the images in the
Photo_1
selected file to open the thu m bnail.
folder. Double-click on the name of your
Note:
It is easy to use EPSON Photo!2 to access the photo
images in the memory card, since you can see the
thumbnail on the screen. To use EPSON Photo!2, see your
digital camera software manual.
Using the AC Adapter
The AC adap t e r (B 86703]) allows you to connec t you r
PhotoPC 700 t o a standard electrical outlet. This is
especially us efu l w hen you are transferring p ictu res and
operating the c ame ra fro m you r co m pu te r. Th e adapter
powers the camera, but does not charge the batteries. In
some locatio ns th e A C adapter comes with a sep arat e A C
power cable.
Note:
o
The asteris k in th e pr oduct number (B86703]) is a
substitute for the last digit, which varies by countr y .
o
You should also read th e AC ada pter User’s Gui de before
you use thi s product.
5-4
Camera Options
Page 75

Warning:
w
To avoid losing any images or settings, make sure the
camera is fin ished processin g and is turned off before
you connect or disc onnect the AC adapter . The n follo w
these steps:
1. If your AC adapter has a separ at e A C po wer cable,
Use only t h e A C adapter desi gn ed for Phot oP C 700.
Use of any other adapter could cause fire, electrical
shock, or inju ry . Do not us e the AC po wer cabl e and
the adapter for any purpose other than powering your
PhotoPC 700 . If the AC pl ug doesn’t fit your outl e t,
have a proper outlet installed by a qualified electrician.
To avoid radiation danger, do not expose or remove the
ferrite core.
push th e cable connector firml y int o th e AC inlet.
2. Open the connector cover on the side of the camera.
connector cover
3. Plug the adapter cable into the DC port on the camera.
5
4. Plug the AC adapter into an electric al ou t let.
Camera Options
5-5
Page 76

Caution:
Place the camera and the AC adapter near an electrical
c
outlet where the plug can be easil y u n plugged.
Note for French- spe aki ng users:
Place z l ’apparei l photographique et ses options près
d’une prise de coura nt où la prise peut être dé b ra nc hée
facilement.
Avoid electrical outlets controlled by wall switches or
automatic timers. Also, avoid outlets on the same
circuit as large motors or other appliances that can
cause fluctuations in line voltage.
Using the Ni-MH Battery Charger
Important Safety Instructions
Warning:
o
w
Read a ll relevan t safety and oper ating in structions
before using this product.
o
You sho uld also read the AC adapter User’s Guide
before you use this product.
For the battery charger
o
Beware of shock hazard.
o
Use only with E PSON Ni-MH R e chargeable
Batteries , M odel EU-24 (1400 mA h) . Ne ver attempt to
charge other ty pes of ba tter ies in this charger as they
may explode, leak, overheat, or cause personal injury.
o
Always cha rge f ou r batt eries at one time.
o
Do not charge prim ary (non-rechargeable) batteries.
o
Use the type of power source indicated on the label.
Always supply power directly from a standard
domestic electrical outlet.
o
Be sure your AC power cable meets relevant safety
standards of the area whe re yo u pl an to use th is
product.
o
Do not use this product near water or handle it with
wet hands.
o
Unplug the charger if the batteries are not fully
charged aft er fo ur hours.
o
Unplug the cha rger im m ediately if it shows unusu al
signs such as sm o ke, odo r, or no ise.
5-6
Camera Options
o
Do not attempt to service this product yourself. Refer
all servici ng t o qua lif ied service personnel.
Page 77

o
Keep away from heat sources. Do not use the charger
outside the temperature range of 0°C to 35°C (2°F to
95°F).
o
Do not insert bat te ries into the charge r backward as
they may expl ode, leak, overhe at , or cause personal
injury.
o
Do not insert obje cts t hro ugh any openings as the y
may touch dan gerous voltage poi nts or short out
parts that could result in fire or electric shock.
o
Never disassemble or modify this product.
o
Indoor, dry location use only.
o
Do not expose to rain or moisture.
o
Unplug this product from the wall outlet before
cleaning.
o
Use a damp cloth for cleaning; do not use liquid or
aerosol cleaners.
o
Keep the charger term inals clean by wiping them
with a dry cloth. B e sure to disconnect the batter y
charger from the power outlet befor e cleaning.
Operating instructions
For battery handling
o
Always cha rge batteries that have ne ver been used or
haven’t been used for a long time. Charge new
batteries two or three times before use.
o
Use batteries regularly so they continue to charge
well. Batteries which have not been used for a long
time will return to normal with regular use.
o
Discharge ba tter ies completely before recharging
them. If the batt eries are not fully discharged bef ore
rechargi ng, you r ca m era’ s o perating time may
decrease temporarily.
o
Be sure to replace batteries when camera operating
time becomes short. Rechargeable batteries wear out
with repeated use. As their charging capacity
decrease s, you r cam era’s operating tim e becomes
shorter.
o
See page 1-4 for instructions on handling, installing,
and removing the batteries.
5
o
Keep the charger out of reach of chi ldren.
Camera Options
5-7
Page 78

For battery charging
1. If your battery charger has a cover, open t he c ove r .
2. Install the batteries into the compartments, positioning
the + and - ends as shown.
Warning:
Be sure you install four batteries to fill all
w
compartments.
5-8
Camera Options
3. If your batter y charger has a cover, close the cove r
firmly. (The ba tter y charger cover also act s as a
power switch, so be sure to close the cover
completely.)
Page 79

4. Extend the retractable plug located on the back of the
charger, or connect the battery charger to the power
cord as show n belo w .
5. Plug the charger into an electric al o utlet . The light(s)
turn red indicating that the charger is working. (If
your charger has 2 lights, wait until both SIDE A and
SIDE B lights turn red.)
When the batteries are fully charged after about two
and half to three hours, the lights go off. To charge
your batteries again, open and then close the charge r
again, or unp lug the AC power co rd t hen plug it in
again.
Note:
o
If your batt er y c harger has a cov er , do not open it
while char gi ng.
o
The charger lights flash to indicate ch anges in battery
temperature and voltage. If the charger lights continue
to flash more than half an hour, the batteries may be
damaged or wo rn out. Replace them w i th fo ur ne w
Ni-MH batteri es .
6. After the lights go off, unplug t he charger. To avoi d
overcharging, don’t leave the charger pl ugg ed in f or
long periods of time after the light s go off .
7. Just after charging, the batteries are very hot
(approximat ely 65°C). Wait one hour until the
batteries cool bef or e rem o v ing t hem f rom the charger.
8. Before storing t he c harger, close the re tr actable plug or
disconnect the AC cable.
5
Camera Options
5-9
Page 80

5-10
Camera Options
Page 81

Chapter 6
Maintenance and Troubleshooting
Your PhotoPC 700 is easy to take care of, and an y
problems you m ay have should be eas y to solve.
See the following section for guidanc e on clea ning and
storing the camera. For solut io n s to common camera
problems, see the section beginning on page 6-2.
Maintenance
o
To clean the lens, first blo w off any lo os e d us t or dirt .
Then breathe on the lens and wipe o ff all m oi s ture
with a soft, lint-fre e clo th or lens cleaning tissue.
o
To avoid scratc hing the lens, be care fu l not to pr ess
too hard.
o
If necessary, clean the battery contacts w ith a dry
cloth.
Your PhotoPC 700 camera re quires only basic c are.
Before you do any m aintenance procedu res o n the
camera, be sure to read the Safety Instructions in the
Introduction. Then follow these guidelines:
Cleaning the camera
o
Use a clean, dry cloth to keep the camera free of dust.
o
Do not use harsh or abrasive cleaners.
Storing the camera
o
Make sure the cam era’s power is off and keep your
camera in its ca se w h en yo u are not using it.
o
When the camera is not used for long period of time,
remove the bat teri es and store the m at a low
temperature in a dry lo catio n. This prevents camera
damage from battery leaks or corrosion.
Do not store the came r a in t he following locations :
o
Where it will be ex posed t o di rec t sunlight; for
example, on a car dashboard
Maintenance and Troubleshooting
6
6-1
Page 82

o
Near sources of bright light or high humidity
o
Near heat sourc e s o r in a cl osed car
o
In areas of excessive dirt or dust
o
Where it will be ex po sed t o stro ng vibrations or
magnetic fields
Problems and Solutions
Before you ca ll for help, check this list of pro blem s and
possible solutions.
Camera problems
The camera has no power.
Make sure the le ns co ver is open all the way. The
power comes on automatically when the lens cover
is opened fully.
The camera may have shut off automatically. To turn
the power back on, press the shutter button, or close
and reopen the lens cover.
Check the batteries and make sur e they are installed
correctly. Re pla ce the batteries if necessary, following
the instructions on page 1-4.
If you are using the AC adapter, m ake sure it is
plugged int o a w ork ing o utlet .
You cannot take a picture with the camera.
The flash may be recharging. Wait un ti l th e stat us light
beside the viewfinder turns green, and try again.
The camera may be connected to your computer.
When it is connected, you cannot use any of the
controls on t he camera itself. See your digital ca m era
software manual for instructions on taking pictures
from your com puter.
The camera’s memory may be full. Check the picture
counter on th e disp lay panel. Erase some pictures
using the LCD monitor , or transfer the pictures to
your computer and then erase them.
Note:
o
To use t he L C D monitor to eras e p i ctures, see
page 2-13. To use your computer to tra ns fe r and erase
pictures, see the digital camera software manual.
o
Installing an optional CompactFlash Card allows you
to take more pictures without deleting any images in
the camera. See pa ge 5-1 for details.
6-2
Maintenance and Troubleshooting
Page 83

Taking a picture takes too long.
You may be pressing the shutter button all the way
down at once. Hold the shutter button halfway down
to lock the auto focus, then press the shutter button
the rest of the way down to take the photo. For more
information, see page 2-4.
Check the batteries and make sur e they are installed
correctly. Re pla ce the batteries if necessary, fo llo wi ng
the instructions on page 1-4.
The camera may have shut off automatically. To turn
the power back on, press the shutter button, or close
and open the lens cove r.
Note:
When you try to take a picture by clicking the shutter
once, the camera tries to p rocess fo c u s, exposure etc., all at
the same time. This is why it seems it is taking too long to
take a picture.
The flash does not work.
Make sure the flash is set to Automatic or Forc ed
Flash. See page 2-9 for more info rm at io n on setting
the flash.
Check the batteries and make sur e they are installed
correctly. Re pla ce the batteries if necessary, fo llo wi ng
the instructions on page 1-4.
Nothing appears on the LCD screen in View mode.
Make sure the pow er is on. Power com es on
automatically when the lens cover is ope ned f ully.
Nothing appears on the LCD screen in Playback m ode.
Check the batteries and make sur e they are installed
correctly. Re pla ce the batteries if necessary, fo llo wi ng
the instructions on page 1-4.
The camera may have shut off automatically. To turn
the power back on, press the shutter button, or close
and reopen the lens cover.
The image on the LCD monitor screen is too dark, or
is not visible at all.
Adjust the bright ness of the LCD screen if nece ssary,
following th e instructions on page 3-8 .
You cannot select the mode you want on the LCD
monitor.
Some modes c anno t be selected because of othe r
selection s; for exa m ple, panorama an d continuous
shooting modes cannot be set at the same time .
Check this User’s Guide for possible selection s.
Maintenance and Troubleshooting
6-3
6
Page 84

Nothing appears on the TV monitor when the
camera is connected to your television.
Check the video cable is c onn ected correctly, as
described on page 2-15.
Make sure the LCD m oni tor is sw itched to the
Playbac k m ode.
Che ck th e tele vis i o n is switc h ed to the v i deo m o de.
Make sure the cam e ra ’s bat te ries have enough power
and are installed correct ly. R eplace the batterie s if
necessar y, follow ing the instructions o n page 1-4.
Your camera may not be compatible with local
televisi on broadcasting standards. Cameras
purchased in count ries using the NTSC standard can
only be use d wi th NTS C te levisions, and cam eras
purchased in count ries conforming to the PAL
standard can only be used with PAL televi sio ns.
Note:
Also check your television user’s manual for possible
solutions.
You cannot take a picture with the camera when an
optional CompactFlash Card is installed.
Check your cam era’ s LCD monitor for mess ages. If
you get a message indicating that you need to format
or eject the card, follow the instructi ons .
Your card’s memory may be full. Check the picture
counter on the disp lay panel. If the card is ful l,
change to anot her card, erase som e pictures using
the LCD monitor, or transfer the pictures to your
computer and then erase them .
Even after you take a picture, the number of pictures
remaining showing on the picture counter stays the
same.
The number on the p ictu re co unter shows how many
more pictures yo u can take. The number ma y not
change, dep ending on the image quality o r
complexity of the photo.
Picture Problems
If you are not satisf ied with the pictures yo u get from
PhotoPC 700, you m ay need to adjust some of the cam era
settings, or else yo u m ay need to brush up on your
photography tec hniques. Read the sugg est io ns listed
below and giv e t hem a try.
6-4
Maintenance and Troubleshooting
Page 85

Your pictures display poor image quality on the
screen or when you print them out.
PhotoPC 700 captures imag es in 24-bit color (16 milli on
colors). You r pic tures will not display m ax im um
image quality if you r m on itor o r you r com puter’s
video controller do es no t supp or t this color de pth.
You may need to u pgr ade yo ur system to achieve the
best possible im age quality.
If your pictures look better on the screen than when
you print them out, you may need to upgrade your
printer. An EPSON color ink je t print er, for example,
will provide exc ellent image quality .
Your picture is blurry or out of focus.
Make sure your s ubj ect is within the camer a’ s range.
You should be at least 50 cm away to take a picture
without the flash, and 20 cm to 2.4 m away to take a
picture with the flash. You can take a picture as close
as 10 cm with or without the flash in macro mode.
Make sure the subject is not moving.
Be careful to hol d the cam era steady while the ima ge
is being cap t ured.
Make sure your flash is not set to Flash off.
Your picture is too dark (underexposed).
You may need to us e th e fla sh. Set the fl ash t o
Automatic or Forced Flash, following t he instructions
on page 2-9.
If you are usin g th e fla sh, m ake su re yo ur subject is
within the range of 20 cm to 2.4 m.
You can adjust th e ex po sure manually to ma ke yo ur
photos bright er. For instructions, see page 2-11.
Use an image-editing prog ram to adjust the pictur e’ s
brightness an d co nt rast.
If you are using th e macro mode to take close-up
photos, be sure to pr ovide adequate lighting f or your
subject, sinc e t he camera’s apertu re is au t omat ic ally
set to the smallest setting in this mode.
6
Your picture is too light (overexposed).
If you are usin g th e forced flash setting, it may be
too bright. Try setting the flash to Automatic. See
page 2-9.
You can adjust th e ex po sure manually to ma ke yo ur
photos darker. Fo r inst ru ct io ns, see page 2-11.
Maintenance and Troubleshooting
6-5
Page 86

When you use the fl ash in macro mode, you may find
your pictures come out too light, since the flash is
close to the subjec t. In th is ca se, try set ting t he f lash
to Flash off.
If you are facing a bright light source , you m ay need
to take your picture from a different angle.
Use an image-editing prog ram to adjust the pictur e’ s
brightness an d co nt rast.
The color in your picture does not look right.
When you take pic tures under certain artificial lighting
conditions, the colors may be slightly distorted. You can
use image-edit ing software to adjust colo r.
Whe n you want to get m ore realistic colored im ages,
for example, reddish images at dusk, set the white
balance mode t o FIX ED . F or in structions, see
page 3-5.
Part of your picture is missing.
Make sure you ar e not blo cking the lens with your
finger, hand str ap, clothing, or other object.
A horizontal or vertical red line appears on your
picture.
Red lines are ca used by glare. Avoid photographing very
shiny surfaces that reflect light int o your lens.
The wrong date and/or time is displayed on your
camera.
If you remove t he bat teries and leave the c am era for a
certain tim e period, you will need to reset the clock.
See page 3-7 to use the LCD monitor to set the clock.
You can also set the clock from your comput er. For
instructio ns, see yo ur digital camera soft wa re m anu al.
6-6
Maintenance and Troubleshooting
Your pictures do not look as good as they used to.
Your camera’s lens may be dirty or dusty. Try
cleaning it following the instructions on page 6-1.
The area captured in the photo is different from
what you saw in the viewfinder.
Take care to look straight through the vie wf inder.
When taking photos in macro mode, we recommend
you use the LCD m onitor rather than the viewf inder
to frame your subject.
Keep in mind that the area visible through the
viewfinder is slightly smaller than the area captured
in the actu al photo.
Page 87

Appendix A
Specifications
Camera
Physical dimensions
Width 144.2 mm
Height 69.8 mm
Depth 49.3 mm
Weight 280 g (without batteries and hand
strap)
Temperature
Humidity
(non-condensing)
Operating: 5 to 35°C
Non-operating: -20 to 60°C
Operating: 30% to 90%
Non-operating: 10% to 90%
Product type
Type Digital still AF c ame r a with LCD
monitor
CCD 1/2.7 inch color area CCD
(1,300,000 pixels)
LCD monitor 2-inch color LCD monitor
Internal memory 4MB (recorded image data, program
(110 ,000 pixe l s)
memory)
Recorded i m age
Data type JPEG (16 millio n colors, 24 bit)
Image size
1280 × 960 pixels,
1280 × 480 pixels (panorama),
640 × 480 pixels
A
Spe cificat ions
A-1
Page 88

Image quality modes
Alternative formats
Supe r fine im age quality (1280 × 960
pixels, 12 80 × 480 pixels)
Fine image quality (1280 × 960 pixels,
1280 × 480 pixels)
Standar d ima ge qu al i ty (640 × 480
pixels)
Monochrome, macro, digital ×2
zoom, panorama, continuous shooting
Optical
Lens f = 5.5 mm F2.8 (equivalent to a 36
Range 0.5 m to infin i ty
Focus Automatic focus
Sensitivity Equivalent to ISO 60/120
Aperture f2.8, f5.6, f11
mm lens on a 35 mm camera)
0.1 m to 0.5 m (macro mode)
Shutter Electric iris wi th mechanical shutter
1/4 second to 1/500 seco nd (flash off
mode), 1/30 se cond to 1/500 sec ond
(auto flash and forced flash modes)
Exposure control Program auto exposure
Manual adjustment (-2 to +2)
White balance TTL automatic whit e balance
Viewfinder Real-image optical (view range over
80%)
Self timer 10 seconds
Flash Automatic luminance control flash
Flash modes Autom atic, for ced flash, flash o ff
Flash range 0.2 to 2.4 m
Functional
Average storage capacity
NTSC model PAL model
Standard 43 40
Fine 13 12
Super fine 6 6
Fine/ panorama 26 24
Super fine/ panorama 13 12
Zoom/ continuous shooting 43 40
A-2
Specifications
Page 89

Note:
o
Figures shown here represent storage capacity when optional
programs are not installed in the camera’s internal memory. If
you remove the Direct Print program from the camera, the
storage capacity will increase and you can take more pictures.
o
The number of pictu res you can take dep end s on the
complexity of each photo, even if the image quality is the same
for all the photos.
Photo processing time (approximate)
Interface
Serial in te r f ac e 8-pin mini- DI N, RS-2 32 C -co mp at ib l e
special interface for PC, Macintosh,
and EPSON printers
Communication speed: 19.2 Kbps or
higher (max 230.4 Kbps)
Video out NTSC (NTSC model)
PAL (PAL model)
Time (seconds)
Standard 2
Fine 4
Super fine 6
LCD monitor photo displaying time (approximate)
Time (seconds)
Standard 3
Fine 6
Super fine 7
Power
Sources 4 AA batteries (single-use alkaline
(LR6), single-use Ni-Cd, single-use
lithium (F R6 ), r echa rgeable Ni-Cd, or
rechargeable Ni-MH
Optional AC Adapter (B86703
Battery life*
LCD monito r of f LCD mon itor on
Alkaline
batteries
Ni-MH
batteries
* Battery life varies depending on the type an d the
manufacturer.
Approximately
800 pictures
Approximately
1000 pictures
View mode
Approximately 80 pictures
Playback mode
Approximate ly 90 minu tes
View mode
App roxim ately 260 pictures
Playback mode
Approximately 120 minutes
Spe cificat ions
]
)
A
A-3
Page 90

Optional CompactFlash Card
Optional PCMCIA Adapter
4MB CompactFlash Card (B808311)
Storage capacity 4M B
Physical Dimensions:
Width 42.8 mm
Height 36.8 mm
Depth 3.3 mm
15MB CompactFlash Card (B808301)
Storage capacity 15MB
Physical Dimensions:
Width 42.8 mm
Height 36.8 mm
Depth 3.3 mm
Interface PCMCIA PC Card ATA
Card slot type Type II
Physical Dimensions:
Width 54.0 mm
Height 85.6 mm
Depth 5.0 mm
Optional AC Adapter
Model EU-18
Output DC 7V/2.0A
Input AC 11 0, 50/60 Hz
Physical Dimensions:
Width 50 mm
Height 30 mm (47 mm including plug)
Depth 95 mm
A-4
Specifications
Page 91

Model EU-19
Output DC 7V/2.0A
Input AC 12 0V, 50/60 H z
Physical Dimensions:
Width 50 mm
Height 30 mm (47 mm including plug)
Depth 95 mm
Model EU-20
Output DC 7V/2.0A
Input AC 127/220/230/240V, 50/60 Hz
Physical Dimensions:
Width 60 mm
Height 34 mm
Depth 95 mm
Optional Battery Charger and Batteries
Battery Charger
Model EU-23
Input AC 12 0V, 60Hz
Output
Compatible
batteries
Charging time Approx. 160 minutes
Power consumption Approx. 8W
Charging
temper ature 0 to 35°C
Dimensions
Weight Approx. 110g
Model EU-27
Input AC 11 0V, 60Hz
Output
Compatible
batteries
Charging time Approx. 160 minutes
DC 1.2V 650mA × 4
EPSON Ni-MH Batteries
(model EU-24/1400 mAh)
76 × 112 × 22mm
DC 1.2V 650mA × 4
EPSON Ni-MH Batteries
(model EU-24/1400 mAh)
A
Spe cificat ions
A-5
Page 92

Power consumption Approx. 8W
Charging
temper ature 0 to 35°C
Dimensions
Weight Approx. 110g
Model EU-28
Input AC 220/230/240V, 50/60Hz
Output
Compatible
batteries
Charging time Approx. 180 minutes
Power consumption Approx. 8W
Charging
temper ature 0 to 35°C
Dimensions
Weight Approx. 120g
76 × 112 × 22mm
DC 1.2V 490mA × 4
EPSON Ni-MH Batteries
(model EU-24/1400 mAh)
76 × 115 × 28.5mm (without AC inlet)
Battery
Model EU-24
Type name Cylindical sealed Nickel-Metal
Hydride rechargeable battery
Size AA (I EC LR6 Battery compatibl e)
Ratings DC 1.2V/1400 mAh
Temperature Charging: 0 to 35 °C
Discharging: 0 to 50 °C
Storage: -20 to 30 °C
Humidity 45 to 85% RH
Weight Approx. 25g
A-6
Specifications
Page 93

Appendix B
Contacting Customer Support
If your camera is not operating properly and you cannot
solve the problem us ing the troubleshooting information in
this guide, contact customer support services for assistance.
We will be able to he lp you much more quickly if you give
us the following inf or m ation:
Serial number of your camera:
(The serial number label is on the back of the camera.)
Camera model:
Brand and model of your computer:
Camera software version:
(Click the About button in your camera software.)
Windows version (for example, 95 or 3.1) you are using:
Software appli ca tions you normally use with your camera
and their version numbers:
For United Kingdom and the Republic
of Ireland Users
If you purchased your printer in the UK or the Republic of
Ireland, EPSON (UK) LTD provides a range of customer
services and technical support:
o
World Wide Web
o
Faxon EPSON Faxback
o
Bulletin Board Service
o
Customer and Warranty Support
o
Pre Sales Enquiry Desk
See the following sections for details.
World Wide Web
If you can connect to the Internet and have a Web browser,
you can access our Web site at http://www.epson.co.uk.
Here you will find inf or m ation on the latest EPSON
products, software drivers, on-line user guides, and answers
to frequently asked questions.
B
Contacting Customer Support
B-1
Page 94

Faxon EPSON
Contact Faxon EPSON faxback service for support
information inc luding troubleshoo ting tips, switch settings ,
and driver information.
When you first connect to the Bulletin Board Service, you
will be asked for your name, company name, phone
number, and a password (which you can invent yourself).
Customer and Warranty Suppor t
To use Fa xon EPSON, call 01442 227332 in the U K or 0044
1442 22 7332 from the Republic of Ireland using a touch-tone
phone. You will be asked to follow a simple routine to
register your document request. Once you have entered
your telephone and fax n um bers, Faxon EPSON will fax a
copy of the document catalogue to your fax machine.
When you have found the documents that you need in the
catalogue, call Faxon EPSON again and enter the document
ID numbers. The documents will be faxed to you
automatically.
Bulletin Board Service for latest drivers and
utilities
You can call the EPSON Bulletin Board Service on 0144 2
227479 i n the UK o r 0044 1442 227479 from the Re public of
Ireland. No membership is required. Make sure that your
communications software is set to 8 data bits, 1 stop bit, no
parity bit, ANSI terminal mode em u l ation, and a modem
speed of up to 28.8 Kbps. Downloading protocols supported
include Xmodem, Ymodem, and Zmodem. See the
documentati o n that cam e with your communications
software and modem for more information.
B-2
Contacting Customer Support
Our Customer and Warranty Support teams can be
contacted by calling 0870 163 7766 in the UK or 0044 0870
163 7766 from the Republic of Ireland. They can provide the
following se rvices:
o
Technical information on instal ling, configuring , a nd
operating your EPSON products
o
Arra ng ing for faulty EPSON pr od u cts to be repai r ed
within the warran ty period
A full list of EPSON Customer and Warranty Support
services is available on the technical suppor t s ection of our
world wide web pages at
http://www.epson.co.uk/support/ and on Faxon EPSON
faxback service in document number 5085.
Pre Sales Enquiry Desk
The Enquiry Desk team can be con tacted by callin g 0800
220546 i n the UK o r 1 800 4091 32 from t he Republic of
Ireland, by faxing 01442 227271 i n the UK o r 0044 1442
227271 from the Republic of Ireland, and via Email at
info@epson.co.uk. They can provide the following
information:
Page 95

o
Pre Sales information and literature on new EPSON
products (also available via our world wide web site at
http://www.epson.co .u k)
o
Where to purchase genuine EPSON consumables,
accessories, and options
Internet URL http://www.epson.com.au
Access the Epson Australia World Wide Web pages. Worth
taking your modem here for the occasional surf! You can get
the same information as offered on the EPSON FAXBACK
and the EPSON Bulletin Board plu s more.
For Australian Users
EPSON Australia wishes to provide you with a high level of
Customer Service. As well as this Use r’s Guide , we provide
the following so urces for obtaining inform ation:
EPSON FAXBACK
EPSON FAXBACK will fax you th e la test specifications and
pricing for most EPSON products offered in Aust rali a . There
is also technical inf ormation includin g details of the latest
software and drivers available. Phone (02) 9903 9075 and the
system will guide you through a number of choices before
faxing the information to your fax machine.
EPSON Bulletin Board System
This is where you can download the latest software and
drivers. Visit the BBS to check out the latest versions. If you
have a modem, phone (02) 9417 5090.
Your dealer
Don’t forget that your dealer can often help identify and
resolve problems. The dealer should always be the first call
for advice on problems. They can often solve problems
quickly and easily as we ll as give you advice on the ne xt
step to take.
EPSON Helpdesk
EPSON Helpdesk is p ro vided as a final backup to m ak e sure
our clients have access to advice. Operators on the Helpdesk
can aid y ou in diagnosing hardware a nd software problems.
They can also advise you on the latest EPSON products and
where the nearest dealer or service agent is located. Many
types of queries are answered here.
The Helpdesk numbers are:
Phon e: (02) 9903 9040
Fax: (02) 9903 9189
Contacting Customer Support
B
B-3
Page 96

We encourage you to have all the relevant information on
hand when you ring. The more information you prepare, the
faster we can help solve the problem. This information
includes the User’s Guide for your EPSON product, type of
computer, operating system, application programs, and any
other information you feel is required.
o
Latest v ersions of EPSON camera software
Users can access our World Wide Web home page at:
http://www.epson.com.hk.
Electronic bulletin board system
For Singapore Users
Contact the telephone and fax numbers below:
Phone: (065) 337-7911
Fax: (065) 334-1185
For Hong Kong Users
To obtain technical support as well as other after-sales
services, users are welcome to contact EPSON Hong Kong
Limited.
Internet home page
EPSON H o ng Kong has established a lo cal home page in
both Chinese and English on the Internet to provide users
with the following informat ion:
o
Product informa tion
o
Answers to Frequently Asked Questions (FAQs)
B-4
Contacting Customer Support
An electronic bulletin board system (BBS) is also available to
obtain camera information and the latest versions of camera
software. You can log on to the following number for the
BBS service:
BBS: (852) 2827-4244
Technical Support Hotline
You can also contact our technical staff at the following
teleph one and fax numbers:
Phone: (852) 2585-4399
Fax: (852) 2827-4383
For Philippines Users
To obtain technical support as well as other after sales
services, users are welcome to contact the EPSON
Philippines Repre s enta tive Office at the telephon e and fax
numbers below:
Phone: (632) 813-6552
Fax: (632) 813-6545
BBS: (632) 814-0595
Page 97

Glossary
applicatio n
A software program that helps you ca rry out a particular task ,
such as word processing, image editing, or financial planning.
bit
Short for binary digit. The smallest unit of data in computer
processing. A bit can represent two values: on and off, or 1 and 0.
bps (bits per second)
A measure of data transmission speed.
browser (HTML browser)
An application which allows the u sers to view HTML documen ts.
default
A value or setting that takes effect when the equipment is turned
on, reset, or initialized. Also known as a factory setting.
exposure
The amount of light the camera captures when a photo is taken.
HTML
Hyper Text Markup La ng uag e. A language used to write
documents on the World Wide Web.
Image
Data representing a tw o-dimensional scene. A digital image is
composed of pixels arranged in a rectangular array with a certain
heigh t and widt h. Each pix els may consist of o ne or more bits of
information, representing the brightness of the image at that
point.
ink jet printer
A printer that transfers ink onto paper by spraying the ink
through a number of small nozzles.
interface
A piece of hardware, a method, or a standard used for
connection between the computer and the camera.
macro
An enlargement or a close-up of an image.
NTSC
National Television Standards Committee. A video encoding
standard largely used in North America and Japan.
PAL
Phase Al ternati o n Line. A video encoding st andard largely used
in Europe and Australia.
Glossary
1
Page 98

pixel
Short for picture element. Each image is composed of a number
of pixels. Pixels are also coun ted in units of dots.
port
An interface channel through whic h data is transmitted between
devices.
resolution
Indication of h ow finely an image is resolve d into pixels.
thumbnails
Small representations of images.
TWAIN
A type of interface protocol that makes input peripherals, such as
scanners or digital cameras, easier to access directly from
application programs.
white balance
The balance between the whiteness and color in your image.
When the white balance is fixed to the environment where the
picture is taken, the colors in your images appear more like those
seen by the eye.
zoom
To show a smaller area of an image at a higher magnification
(“zoom in”) or a larger area at a lower magnification (“zoom
out”).
2
Glossary
Page 99

Index
5 × 7 size print mode, 4-5, 4-9–10, 4-16
A
AC ada pter, 2, 5-4–6
specification s, A-4–5
Activating the shutter, 2-4–6
Adjusting camera settings
flash, 1-3, 2-9
image quality, 1-3, 2-8–9
macro, 1-3, 2-10
self timer, 1-3, 2-9–10
Album print mode, 4-6, 4-11–12, 4-16
Alert beep, 3-7
Attaching the hand strap, 1-7
Auto shut-off, 2-2
B
BACK butt o n, 1-2
Batter i e s
handling, 1-5–6
installing, 1-4–5
checking, 2-3
life, A-3
Batte ry charg er , 2, 5-6–9
specification s, A-5–6
Beep, 3-7
Brightness
LCD monitor, 3- 8
picture, 6-5–6
Buttons, 1-2−3
C
Cables
serial, 1-1
video, 1-1, 2-15–16
Camera
button s, 1-2–3
cleani ng, 6-1
getting to know , 1-2–3
parts of, 1-1
problems, 6-2–4
storag e capacity, 2-8, 5-1, A-2
storing, 6-1–2
turning on and off, 2-1
Card print mode, 4-6, 4-10–11, 4-16
Checking
battery, 2-3
picture counter, 2-13–14
Clock, setting, 3-7
Color Guide, 1-9
Index
1
Page 100

CompactFlash Cards, 2
formatting, 3-14
installing and removing, 5-2–3
installing programs from, 3-15–16
specification s, A-4
storage capacity, 5-1
Computer, using the camera with, 1-9
Conditions menu, 3-2, 3-4–6
Continuous shooting mode, 3-4–5
Copying phot os , 3-13
Customer support, Appendix B
F
Fine image quality setting, 2-8
Flash settings, 2-9
Formatting memory cards, 3-14
Full si ze print m ode, 4-5, 4-8–9, 4-16
Functio n but ton, 1-2, 2-11– 13
G
Getting memory information, 3-13
Getting photo information, 3-6, 3-8–9
D
Date and time, setting, 1-8
Direct Print,
available paper typ e, 4-3 –4
connec ting the camera to the printer, 4-2–3
LCD screen and display panel messages, 4-15–16
prepar ing, 4-2
printed image dim e ns ions, 4-16
using, 4-4–14
Display panel, 1-2, 2-3
messages, 4-15–16
Disp l aying photos on a televis i on, 2-15–16
E
Energy saving mode, 3-8
Erasing photos
using the function button, 2-13
using the Photo Control menu, 3-10–11
Exposure, 2-11–12, 3-5–6
2
Index
I
Image quality settings, 2-8–9
Index print mode, 4-7, 4-13–14, 4-16
Information menu, 3-2, 3-3, 3-6, 3-8–9
Installing
batteries, 1-4– 5
CompactFlash Cards, 5-2
optional program s in the camera, 3-15–16
Interface, A-3
L
Language menu, 3-3, 3-1 6
Language, setting, 1-7, 3-16
LCD monitor
brightness, 3-8
menus, 3-2–3
photo displaying time, A-3
playin g ba ck photo s , 2- 14 –1 6
problems, 6-3
using to take photos, 2-5–6
 Loading...