

Page 1
User’s Guide
Update
Remove any protective plastic film you may find in these areas before using your
camera:
protective film
EPSON
EPSON
protective film
protective film
When playing back pictures on a television or recording them on videotape, ignore
the steps beginning on page 3-11 of your manual. Instead, do the following:
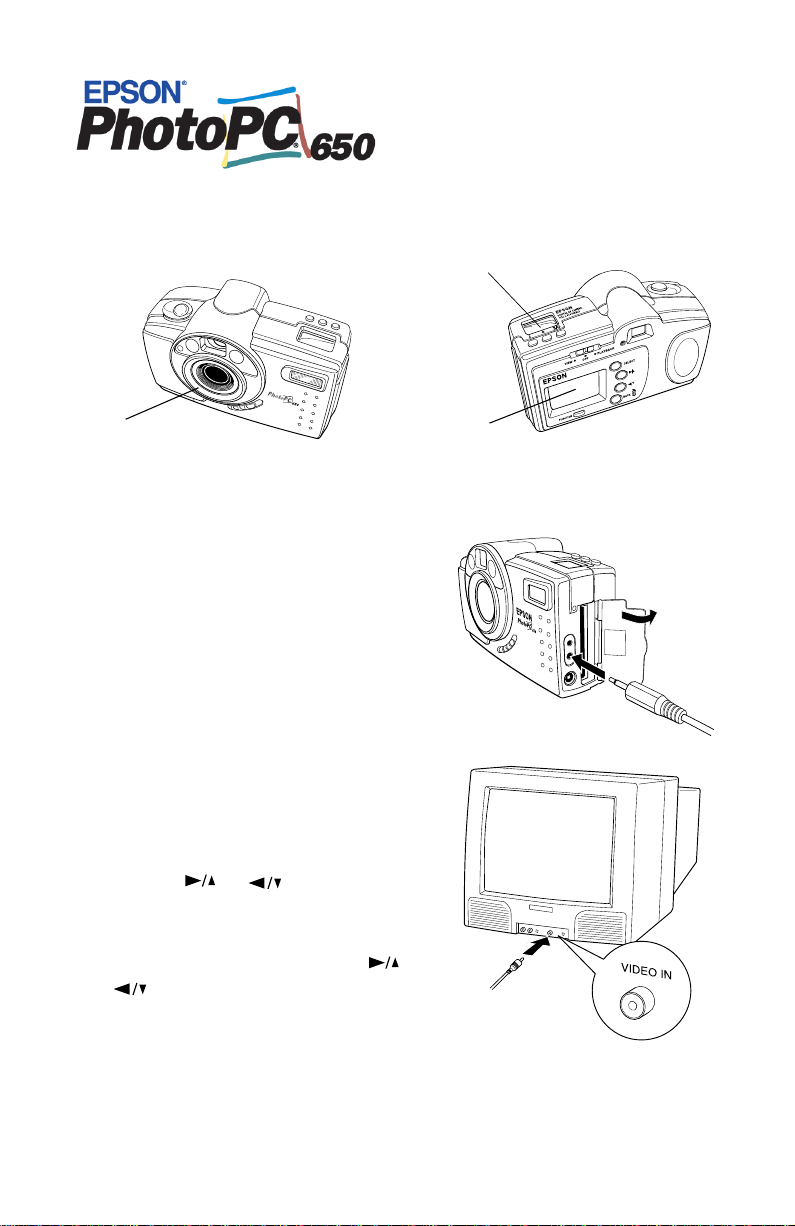
1 Make sure the camera and TV (and VCR)
are turned off.
2 Open the camera’s card and port cover
and connect the black end of the video
cable to the
Video Out port.
3 Connect the yellow end of the cable to the
VIDEO IN port on the television or VCR.
4 Turn on the TV (and VCR) and switch to
the correct video mode.
5 Turn on the camera and set the LCD
monitor switch to
recent picture appears on the TV screen.
PLAYBACK. The most
6 Press the or button to move
through your pictures.
7 To display or record your pictures as a
slide show, hold down either the or
button until you hear two beeps;
then release the button. The camera now
scrolls through the pictures.
EPSON is a registered trademark of SEIKO EPSON CORPORATION. PhotoPC is a trademark of
Epson America, Inc.
Copyright © 1999 by Epson America, Inc. CPD 9386
Long Beach, California, USA 9/99
Page 2

Notice to Windows® Users
If you are using the EPSON PhotoPC® 650 TWAIN
software to delete individual photos within the camera, do
not attempt to delete locked images. Attempting to do so
may inadvertently delete other photos. We apologize for
any inconvenience this may cause.
It is recommended that you first transfer all of your
images to your computer before you delete photos, to
safeguard against accidentally deleting the wrong photo.
A new CD-ROM will be available that solves this
problem. Please contact end user technical support at
(562) 276-4303 in order to receive an updated disk.
EPSON is a registered trademark of SEIKO EPSON CORPORATION.
PhotoPC is a registered trademark of Epson America, Inc.
Copyright © 1999 by Epson America, Inc. CPD 9349
Torrance, California, USA 8/99
Page 3

A
B
Page 4

IMPORTANT NOTICE
DISCLAIMER OF WARRANTY
Epson America makes no representations or warranties, either express or
implied, by or with respect to anything in this manual, and shall not be liable for
any implied warranties of merchantability and fitness for a particular purpose or
for any indirect, special, or consequential damages. Some states do not allow the
exclusion of incidental or consequential damages, so this exclusion may not
apply to you.
COPYRIGHT NOTICE
All rights reserved. No part of this publication may be reproduced, stored in a
retrieval system, or transmitted, in any form or by any means, electronic,
mechanical, photocopying, recording, or otherwise, without the prior written
permission of Epson America, Inc. No patent liability is assumed with respect to
the use of information contained herein. Nor is any liability assumed for
damages resulting from the use of the information contained herein. Further,
this publication and features described herein are subject to change without
notice.
TRADEMARKS
EPSON and EPSON Stylus are registered trademarks of SEIKO EPSON
CORPORATION.
PhotoPC is a registered trademark and EPSON FaxAdvice is a trademark of
Epson America, Inc.
EPSON SoundAdvice is a service mark of Epson America, Inc.
PictureWorks and HotShots are trademarks of PictureWorks Technology, Inc.
Lexar Media is a trademark of Lexar Media.
General notice: Other product names used herein are for identification purposes
only and may be trademarks of their respective owners. EPSON disclaims any
and all rights in those marks.
Copyright © 1999 by Epson America, Inc. CPD 8855
Torrance, California, USA 7/99
A NOTE CONCERNING RESPONSIBLE USE OF
COPYRIGHTED MATERIALS
Digital cameras and scanners, like photocopiers and conventional cameras, can
be misused by improper copying of copyrighted material. While some countries’
laws permit limited copying in certain circumstances, those circumstances may
not be as broad as some people assume. EPSON encourages each user to be
responsible and respectful of the copyright laws when using digital cameras and
scanners.
ii
Page 5

Contents
Introduction
EPSON PhotoPC 650 Features 2
Optional Accessories 3
Minimum System Requirements 3
Windows Systems 3
Macintosh Systems 3
Registration 4
Safety Instructions 4
1 Getting Started
Unpacking Your PhotoPC 650 1-2
Installing the CompactFlash Card 1-2
Installing Batteries 1-3
Using Batteries Safely and Efficiently 1-4
Attaching the Hand Strap 1-5
Removing the Protective Plastic 1-5
Setting the Date and Time 1-5
Formatting the USB CompactFlash Card 1-7
Installing Your PhotoPC 650 Software 1-8
Installing on a Windows PC 1-8
Installing on a Macintosh 1-8
Identifying Camera Parts 1-9
2 Taking Pictures
Getting Ready to Take Pictures 2-1
Turning the Camera On and Off 2-2
Saving Battery Power with Auto Shut-off 2-2
Using the Status Display Panel 2-2
Checking the Battery 2-3
Picture-Taking Guidelines 2-3
Taking Pictures with the Viewfinder 2-4
Taking Pictures with the LCD Monitor 2-6
Checking the Picture Counter 2-8
Setting Image Quality 2-8
Using Macro Mode to Take Close-ups 2-10
Using the Flash 2-11
Taking Pictures with the Timer 2-12
A
B
iii
Page 6

3 Playing Back Pictures
Using Playback Mode Menus 3-2
Playing Back Pictures One-by-One 3-3
Playing Back Multiple Pictures 3-4
Playing Your Pictures as a Slide Show 3-5
Turning Off Picture Information 3-5
Erasing Pictures 3-6
Erasing the Currently Displayed Picture 3-6
Selecting Pictures to Erase 3-6
Locking Photos 3-8
Unlocking Photos 3-9
Playing Back Pictures on TV or Video 3-11
Setting the Video Standard 3-11
Playing Back Pictures 3-11
Changing Camera Settings 3-12
Setting the Date and Time 3-12
Setting the Alert Beep 3-13
Selecting Quick Review Mode 3-14
Setting the LCD Monitor Brightness 3-14
Setting the Language 3-15
4 Getting Photos Into Your Computer
Transferring Photos with the JumpShot
USB Cable 4-1
Inserting the USB CompactFlash Card
in the JumpShot USB Cable 4-2
Connecting the Jumpshot USB Cable 4-3
Installing the Windows 98 USB CompactFlash
Card and USB Cable Drivers 4-4
Transferring Pictures with Windows 98 4-5
Transferring Pictures with a Macintosh 4-7
Erasing Pictures 4-9
Transferring Pictures with the Serial Cable 4-9
Connecting the Camera to a Windows PC 4-9
Connecting the Camera to a Macintosh 4-10
Transferring Pictures Using HotShots 4-11
Getting Images Into Other TWAIN or Plug-
In Applications 4-17
Making an EPSON PhotoPC 650
Plug-In Driver Alias (Macintosh) 4-18
Opening EPSON PhotoPC 650 TWAIN
or Plug-In 4-18
Changing the Picture Transfer Speed 4-19
Selecting Pictures to Transfer 4-20
Transferring Pictures From the Camera to
Your Computer 4-20
What To Do If the Camera Doesn’t Respond 4-23
iv
Page 7

5 Getting Your Photos Into Documents
Importing Images Into Documents 5-2
Getting Images with Copy and Paste 5-3
Using Drag and Drop From a Collection 5-3
6 Working with Photos and Collections
Opening Pictures and Collections 6-2
Opening an Individual Picture 6-2
Opening a Collection 6-2
Saving Pictures 6-3
Using Collections 6-3
Adding or Deleting Pictures in Collections 6-3
Organizing Pictures in Collections 6-4
Saving a Picture with a New Name 6-5
Adding Collection Information 6-5
Adding Picture Information 6-6
Viewing Picture Information 6-7
Searching for Pictures in a Collection 6-7
Printing a Picture or Collection 6-8
Printing an Individual Picture 6-8
Sizing and Printing Multiple Copies of an
Individual Picture 6-9
Printing a Picture with Smart Print 6-11
Printing a Collection 6-12
Using Creative Templates 6-13
Creating a Photo Page 6-13
Modifying a Photo Page 6-15
Saving a Photo Page 6-17
Printing a Photo Page 6-18
Displaying Collection Slide Shows 6-18
7 Editing Images
Making Basic Adjustments 7-2
Flipping 7-2
Rotating 7-3
Resizing 7-4
Adjusting Resolution (Windows Only) 7-5
Optimizing Pictures with Quick Fix 7-6
Optimizing Pictures with SmartPix 7-6
Enhancing Pictures with Fix By Example 7-8
Applying Special Effects 7-10
Using Enhancement Tools 7-12
Zooming 7-13
Selecting an Enhancement Area 7-13
Selecting Colors 7-15
Cropping an Image 7-16
Using Paint and Drawing Tools 7-17
Using Correction Tools 7-22
Adding Text 7-24
A
B
v
Page 8

8 Using CompactFlash Card Options
Removing a CompactFlash Card 8-2
Formatting an ATA-Compatible
CompactFlash Card 8-3
Transferring Pictures with a PCMCIA Adapter 8-3
9 Maintenance and Troubleshooting
Caring for the Camera 9-1
Cleaning the Camera 9-1
Storing the Camera 9-2
Solving Camera Problems 9-2
Solving Picture Problems 9-7
Where To Get Help 9-9
Software, CompactFlash Card, and
JumpShot USB Cable Support 9-10
A Using Optional Camera Accessories
Using the Optional AC Adapter A-2
Using an Optional Tripod A-3
Using Optional Lenses A-3
Using Wide-angle Lenses A-4
Using Telephoto Lenses A-5
Using Close-up Lenses A-6
B Specifications
Camera B-1
Physical Dimensions B-1
Safety Specifications B-1
Power Sources B-1
Environmental B-1
Technical B-2
Photographic B-3
Lexar Media JumpShot USB Cable B-4
Optional AC Adapter B-4
Physical Dimensions B-4
Technical B-4
Index
vi
Page 9

Introduction
RESAMP3.WMF REMOVED
our new EPSON
high resolution digital camera with a built-in LCD
Y
monitor. You can preview your pictures before and after you
capture them, so you can store only the pictures you want
before transferring them to your computer. You can even
display your pictures on a TV or videotape them.
The PhotoPC 650 captures images at 1152
resolution in 24-bit color, using a 1.09-megapixel CCD
sensor. You can store approximately 88 pictures with the
standard 8MB USB CompactFlash
pictures via your computer’s USB port (Windows
™
iMac,
or Power Macintosh® G3 only) or serial port
(Windows 95, 98, or PowerPC
built-in 37 mm threads let you connect optional video
camcorder lenses to capture close-up, wide-angle, and
telephoto shots.
PhotoPC 650 is an easy-to-use,
× 864 pixel
™
card and download
®
98,
™
Macintosh). The camera’s
A
B
Introduction
1
Page 10

Your PhotoPC 650 comes complete with cables, batteries,
USB CompactFlash card, and software for transferring,
editing, organizing, and printing your pictures.
EPSON PhotoPC 650 Features
The EPSON PhotoPC 650 is a complete system for
capturing digital images, and includes the following features:
◗ Resolutions up to 1152
images up to 5 × 7 inches
◗ 8MB USB CompactFlash card that holds 30 superfine-
resolution, 47 fine-resolution, 88 standard-resolution, or
4 uncompressed JPEG images (on average)
◗ 24-bit color image capture
◗ 1.8-inch, active matrix TFT color LCD monitor for
previewing and playing back pictures
◗ Power-saving Quick Review feature for previewing and
deleting pictures before the camera stores them
◗ Video output for playing your pictures back on a TV or
for videotaping them
× 864 pixels, ideal for printing
◗ Built-in flash with red-eye reduction mode
◗ Automatic shut-off to save battery power
™
◗ Lexar Media
JumpShot™ USB cable for transferring
photos to your USB-compatible Windows 98 PC, iMac,
or Power Macintosh G3 directly from the USB
CompactFlash card
◗ Serial cable for transferring photos from your camera
to your Windows PC or PowerPC
™
Macintosh
◗ Video cable for displaying photos on a TV or
videotaping them
Your camera comes with the following software:
™
◗ PictureWorks
HotShots™ software for transferring,
organizing, editing, and printing your pictures
◗ The EPSON PhotoPC 650 TWAIN driver (Windows)
or Plug-In (Macintosh) for transferring your pictures
◗ Macro mode for close-ups
◗ Built-in threads for optional 37 mm lenses and filters
Introduction
2
Page 11

Optional Accessories
Minimum System Requirements
EPSON offers these optional accessories for the
PhotoPC 650:
◗ AC adapter for use with any electrical outlet (B867038)
◗ NiMH Power Pak with four rechargeable batteries; with
a universal charger (B818172) or 110V charger
(B818051)
You can also use optional CompactFlash cards and PCMCIA
CompactFlash card adapters available from leading suppliers,
such as Lexar Media or SanDisk.
enabled CompactFlash cards from Lexar Media work with
the JumpShot USB cable.
You can also attach optional 37 mm video camcorder lenses
and filters, and connect a tripod to your camera.
See Appendix A for details on using all the optional
accessories.
However, only USB-
Make sure your system meets these minimum requirements.
Windows Systems
◗ IBM
◗ Serial transfer: Microsoft
◗ At least 16MB RAM (32MB recommended)
◗ At least 50MB free hard disk space
◗ Double-speed CD-ROM drive
◗ VGA or SVGA monitor displaying thousands of colors
◗ Mouse or other pointing device
-compatible PC with 486/66 or higher processor
(Pentium
or Windows NT
USB transfer: Windows 98 and an available USB port
recommended)
4.0 and an available serial port;
Windows 95, Windows 98,
Macintosh Systems
◗ Macintosh with PowerPC or higher processor, iMac, or
Power Macintosh G3 (see NOTE on next page)
◗ Serial transfer: System 7.6 or higher and an available
serial port; USB transfer: System 8.1 with iMac Update
1.0, or System 8.5 or higher and an available USB port
A
B
Introduction
3
Page 12

NOTE
If your iMac is running OS 8.1, you must install iMac
Update 1.0 from Apple at http://swupdates.info.apple.com
before you install the Lexar Media JumpShot USB drivers.
Contact Apple Computer if you have questions while
installing this update.
If your iMac is running OS 8.5, you do not need to install
iMac Update 1.0. Your operating system already includes full
support for the Lexar Media JumpShot USB drivers. To find
out which operating system your iMac is running, select
About This Computer from the Apple menu.
◗ At least 16MB RAM (32MB recommended)
◗ At least 50MB free hard disk space
◗ Double-speed CD-ROM drive
◗ VGA monitor displaying thousands of colors
◗ Mouse or other pointing device
Registration
Please take a minute to fill out the registration card for the
PhotoPC 650 digital camera and mail it back to us. This
enables you to receive special information on accessories,
new products, and software upgrades. You’ll get immediate
attention if you have a problem with your PhotoPC 650.
Safety Instructions
Read these instructions and all warnings and instructions
marked on your camera and batteries before using them.
◗ To reduce the risk of electric shock, don’t remove the
camera’s cover or open any of the compartments except
as instructed in this
◗ To prevent fire or electric shock, don’t insert objects
through any openings in the camera. Don’t expose the
camera to rain or moisture.
◗ To prevent fire or explosion, don’t use the camera where
inflammable or volatile gas is stored.
◗ If the camera shows unusual signs such as noise, odor, or
smoke, turn it off immediately. Remove the batteries
and/or disconnect the AC adapter, and unplug the AC
adapter from the electrical outlet.
◗ To avoid damage to the camera optics, don’t expose the
lens to direct sunlight for extended periods of time.
◗ Don’t use the camera outdoors during adverse weather
conditions.
◗ Don’t store the camera near sources of bright light,
direct sunlight, high humidity, heat, excessive dirt or
dust, or where it will be exposed to strong vibrations or
magnetic fields.
User’s Guide
.
Introduction
4
Page 13

◗ To prevent possible eye injury, don’t take flash pictures
of faces at close range.
◗ Avoid sudden temperature changes, which can cause
moisture to condense on the camera. Keep the camera in
a case or bag if you need to move it from a cold
environment to a warm one. Allow time for the camera
and its optional accessories to adjust to temperature
changes before using them.
◗ Don’t use a frayed or damaged power cord with the
AC adapter.
◗ To ensure the best performance, make sure the AC
adapter is fully plugged into the camera whenever you
connect it.
◗ Remove batteries and/or unplug the camera and the AC
adapter and refer servicing to qualified service personnel
under the following conditions: if the power cord or
plug is damaged; if liquid has entered the camera; if the
camera has been dropped or its exterior has been
damaged; if the camera or its accessories do not operate
normally or exhibit a distinct change in performance.
◗ Adjust only those controls that are covered by the
operating instructions.
◗ Don’t attempt to service the camera yourself. Refer all
servicing to qualified service personnel.
◗ If the liquid crystal solution contained in the status
display panel or in the LCD monitor leaks out and gets
on your hands, wash them thoroughly with soap and
water. If it gets in your eyes, flush them immediately
with water.
A
Introduction
B
5
Page 14

Introduction
6
Page 15

.
1
JumpShot
USB cable
software
Getting Started
PhotoPC 650 camera
batteries
hand strap
video cable
USB Com pactFlash card
in envelope
Mac
adapter
cable
serial cable
his chapter helps you get ready to use your new
PhotoPC 650. It covers the following:
T
◗
Unpacking your PhotoPC 650
◗
Installing the USB CompactFlash card
◗
Installing and using batteries
◗
Attaching the hand strap
◗
Removing the protective plastic
◗
Setting the date and time
◗
Formatting the USB CompactFlash card
◗
Installing your PhotoPC 650 software
◗
Identifying camera parts
A
B
Getting Started
1-1
Page 16

Unpacking Your PhotoPC 650
Make sure you have all the parts shown on the previous page.
You won’t need the Macintosh adapter cable with a PC, or
the JumpShot USB cable, if you don’t have a Windows 98,
iMac, or Power Macintosh G3 system with compatible USB
support. However, you must install the USB CompactFlash
card to provide memory for your camera. It’s in the
envelope labelled “ATTENTION!”.
Installing the CompactFlash Card
Follow these steps to install the USB CompactFlash card:
1
Before you start, make sure the camera is turned off. The
lens cover switch should be in the off position.
2
Remove the USB CompactFlash card from the envelope
labelled “ATTENTION!”.
3
Open the camera’s card and port cover and insert the
card all the way into the slot, as shown below. Make sure
the card’s label faces the front of the camera.
CARD
Getting Started
1-2
EPSON
EPSON
lens cover switch
down: Off
4
Close the card and port cover.
Page 17
Installing Batteries
Before you install the four AA alkaline batteries that came
with your camera, make sure the camera is turned off (the
lens cover switch is in the off position, as shown to the left).
Then follow these steps:
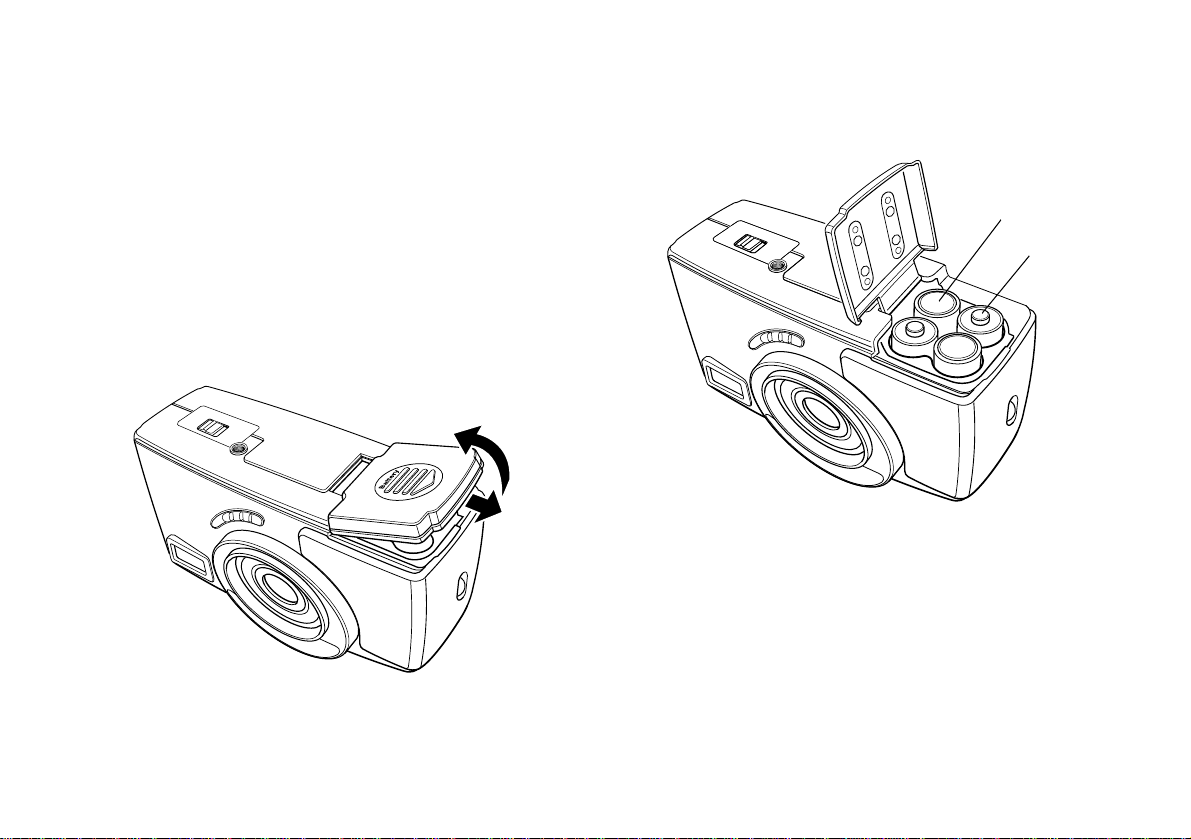
1
Turn the camera upside down with the front of the
camera facing you.
2
Push the battery cover down and to the right. Then raise
the cover.
3
Insert all four batteries into the compartment,
positioning the + and – ends as shown:
4
Close the battery cover by sliding it to the left while
pressing it down until it snaps into place.
– end
+ end
See the next page for important information about using
your batteries safely and efficiently.
Getting Started
A
B
1-3
Page 18

Using Batteries Safely and Efficiently
When your batteries need to be replaced, the PhotoPC 650
camera can accept four AA batteries of the following types:
◗ Rechargeable NiMH batteries (recommended)
◗ Rechargeable NiCad batteries
TIP
To save battery power, use the camera’s View mode sparingly.
You can still view pictures before saving them with the Quick
Review feature; see Chapter 2 for details.
Note the following as you use batteries:
◗ Single-use alkaline batteries
◗ Single-use lithium batteries (longer life)
WARNING
To avoid the danger of fire or explosion, do not mix different
types of batteries. Do not allow the battery contacts to touch
metal objects such as coins or keys, which could short out the
battery’s circuits. Read all safety and handling instructions before
using batteries.
EPSON offers an optional NiMH Power Pak that includes a
charger and rechargeable batteries for convenient battery
replacement whenever you need them. When you’re
transferring pictures to your computer with the serial cable,
you’ll use more battery power, so it’s best to power your
camera with the optional AC adapter. See page A-2 for
details on EPSON’s optional power accessories.
Getting Started
1-4
◗ Don’t use manganese batteries.
◗ Replace all four batteries at the same time. Don’t mix
old and new batteries.
◗ Don’t drop, puncture, disassemble, or mutilate batteries.
Don’t get them wet or expose them to fire.
◗ When the camera isn’t used for long periods of time,
remove the batteries and store them at a low temperature
in a dry location. Store away from the reach of children.
◗ To avoid fire or electric shock, don’t use batteries that
are leaking or damaged in any way.
◗ If battery acid gets in your eyes or on your skin,
immediately rinse the area with water and seek medical
treatment. If a battery is swallowed, seek medical
treatment immediately.
Page 19

◗ Dispose of used batteries according to the
manufacturer’s instructions and in compliance with all
applicable laws. Contact your local government agency
for information about battery recycling and disposal.
◗ Battery life varies depending on the battery type, the
manufacturer, and other factors.
◗ Avoid using your camera in low temperatures, especially
below 50 °F (10 °C); this drains your batteries faster.
Attaching the Hand Strap
To attach the hand strap, slide the loop through the holder
on the camera, then pull the strap through the loop.
.
Removing the Protective Plastic
You may need to peel off protective plastic sheets from your
camera’s back panel, the status display panel at the top of the
camera, and the viewfinder area on the front of the camera.
Setting the Date and Time
Before you use the camera, you need to set its clock. Then
the camera will automatically record the date and time for
each picture you take. You’ll need to set the clock again
whenever you install new batteries.
Follow these steps to set the camera’s clock:
1
Slide the lens cover switch up to the ON position to
open the lens cover and turn on the camera.
EPSON
EPSON
A
lens cover switch
up: ON
Getting Started
B
1-5
Page 20
NOTE
If you hear rapid beeps and see an error on the status display
panel on the top of the camera when you first turn it on, you
may not have installed the USB CompactFlash card or may
have installed it incorrectly. Follow the steps on page 1-2 to
install the card and try again. If you still get an error, see
Chapter 9 for troubleshooting information.
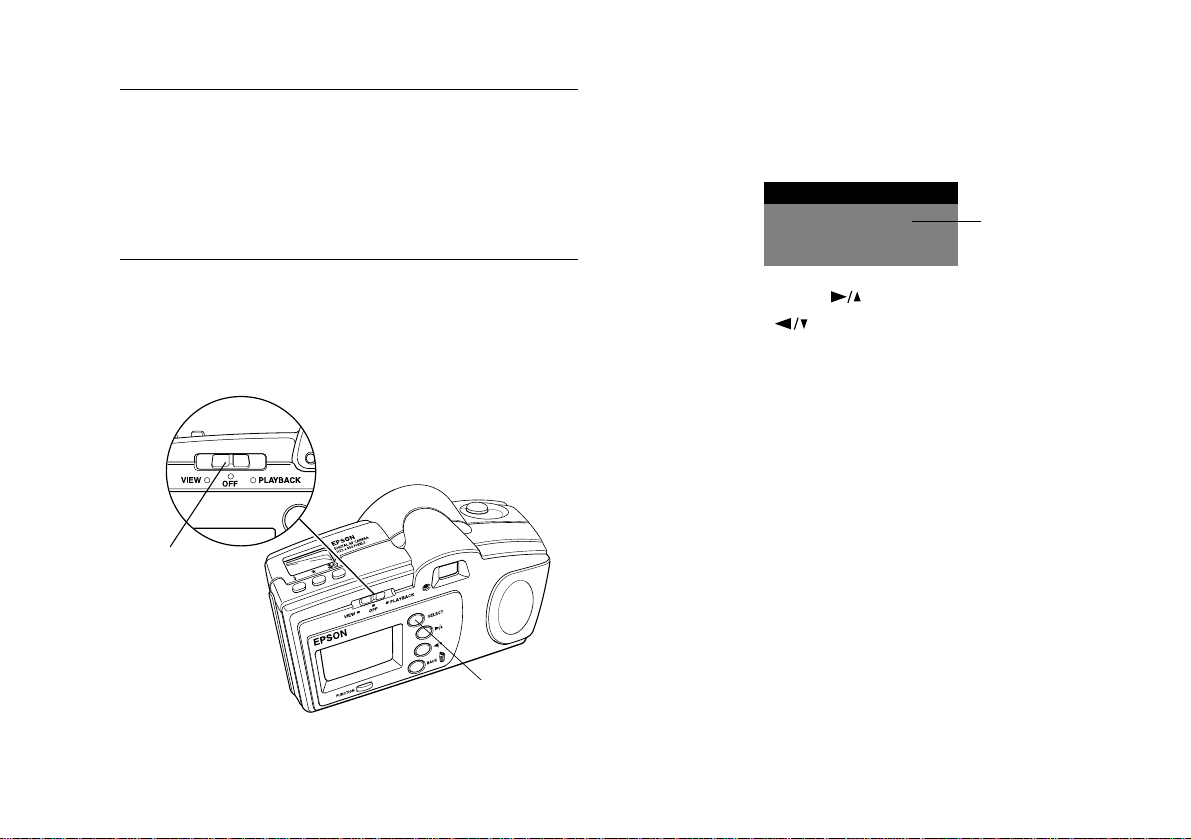
3 Press the SELECT button. You see the clock setting
display in the LCD monitor, with the month setting
highlighted in white:
Clock Setting
05/15/99
02:37
mm/dd/yy
2 On the back of the camera, slide the monitor switch to
PLAYBACK. You see a message asking you to set the
clock.
monitor
switch
SELECT
button
Getting Started
1-6
4 If necessary, press the button to increase the
number or the button to decrease the number,
until the month is correct.
5 Press the SELECT button. The month setting is saved
and the day setting is highlighted.
6 Adjust the day, year, hour, and minute settings as
described above until the date and time are correctly
adjusted and saved.
After you finish setting the clock and press the
SELECT
button, your monitor returns to playback mode.
7 Slide the monitor switch to the OFF position.
Page 21

Formatting the USB CompactFlash Card
Before you use your camera for the first time, you need to
format your USB CompactFlash card so it can store your
pictures. After that, you only need to format the card if a
message appears on the LCD monitor instructing you to do
so or if you want to quickly erase all the pictures it contains.
Make sure you installed the USB CompactFlash card in the
camera (as described on page 1-2), and set the camera’s date
and time (as described on page 1-5), then follow these steps:
1
On the back of the camera, set the monitor switch to
PLAYBACK (as shown to the left).
2
Press the SELECT button to display the LCD monitor
menus.
3
Press the or button until you see the Photo
Control menu. Then press the
display the menu options, as shown below:
Photo Control
Erase
Lock
Reformat
SELECT button to
4
Press the or button until Reformat is
highlighted, then press the
message appears.
5
Press the SELECT button again to format the card and
return to the Photo Control menu.
6
Press BACK until you return to normal playback mode.
NOTE
Your USB CompactFlash card works with any ATA-compatible
digital camera, such as EPSON’s PhotoPC 600, 700, or 750Z
cameras.
If you have problems formatting or using your CompactFlash
card, contact Lexar Media, as described on page 9-10.
SELECT button. A warning
A
B
Getting Started
1-7
Page 22

Installing Your PhotoPC 650 Software
Your PhotoPC 650 comes with everything you need to
transfer your pictures from the camera to your computer,
and organize, enhance, and print your images. The
CD-ROM has these applications for your PC or Macintosh:
◗ PictureWorks HotShots
◗ EPSON PhotoPC 650 TWAIN driver (Windows) or
Plug-In driver (Macintosh)
It also contains the driver software for the JumpShot USB
cable and USB CompactFlash card, which you need to install
only if you’re using a compatible USB system. If you’re using
a Macintosh, you’ll install the USB drivers along with your
other camera software. Installation of the Windows 98 USB
drivers is covered in Chapter 4.
Installing on a Windows PC
Close all open applications, then follow these steps:
1
Insert the EPSON CD-ROM in your drive.
2
Double-click My Computer. Then double-click your
PhotoPC 650 CD-ROM icon.
3
Double-click the Setup.exe icon. The installer opens.
4
Follow the instructions on the screen to install HotShots
and EPSON PhotoPC 650 TWAIN. Be sure to select
Full Install on the Setup Options screen.
Installing on a Macintosh
Close all open applications, then follow these steps:
1
Insert the EPSON CD-ROM in your drive.
2
Double-click the PhotoPC 650 CD-ROM icon on your
desktop to open the CD-ROM window, if necessary.
3
Double-click the HotShots Installer icon to install
HotShots and the EPSON PhotoPC 650 Plug-In driver.
Click
Continue and follow the on-screen instructions.
4
If you’re using an iMac or a Power Macintosh G3, you
also need to install the drivers for the JumpShot USB
cable and USB CompactFlash card.
Double-click the
open it, then double-click the
JumpShot Installer
instructions to view the license agreement and Read Me
file, and install the drivers. At the end of installation,
click
Restart to restart your system.
Lexar Media JumpShot folder to
Lexar Media
icon. Follow the on-screen
Getting Started
1-8
Page 23

Identifying Camera Parts
shutter button
timer light
37 mm threads
for optional
lenses
viewfinder
flash
EPSON
lens lens cover
(on/off)
front view
EPSON
card an d
port cover
tripod threads
battery cover CompactFlash
card eject switch
bottom view
A
B
Getting Started
1-9
Page 24

status display
panel
LCD monitor
switch
status light
viewfinder
status display
panel
EPSON
shutter
button
Getting Started
1-10
FUNCTION
button
back view
LCD monitor
flash
button
image
quality
button
macro/timer
button
top view
Page 25

.
2
Taking Pictures
FOR SALE
FOR SALE
• 1995 Mitsubishi Montero
• Good condition
• Low Mileage
999-555-5555
Jim Jackson’s Auto Sales
aking pictures with PhotoPC 650 is similar to using
a traditional “point and shoot” auto-focus camera.
T
This chapter tells you everything you need to know about
getting great shots, including the following information:
◗
Getting ready to take pictures
◗
Taking pictures with the viewfinder or LCD monitor
◗
Checking the picture counter
◗
Setting image quality
◗
Using macro mode to take close-ups
◗
Using the flash and timer
Getting Ready to Take Pictures
Before you can take pictures with PhotoPC 650, you need
to turn on the camera and check t he stat us of yo ur batteri es
on the status display panel.
A
B
Taking Pictures
2-1
Page 26
Turning the Camera On and Off
Saving Battery Power with Auto Shut-off
To turn on the camera, slide the lens cover switch to the ON
position, as shown in the illustration below. The lens cover
opens and the status display panel on the top of the camera
lights up. The status light on the back of the camera flashes
for a few seconds (if the LCD monitor switch is set to
PLAYBACK, set it to VIEW or OFF to take pictures). When
it turns green and stays on, you can take pictures.
To turn off the camera, slide down the lens cover switch to
the off position. The lens cover closes, and the status display
panel and status light turn off.
.
status display
panel
EPSON
EPSON
lens cover switch
up:
ON
lens cover switch
down:
OFF
When the LCD monitor is turned off and you wait more
than 60 seconds before or after taking a picture, the camera
shuts off automatically to save battery power.
When the LCD monitor is on, the camera shuts off if you
wait more than 30 seconds before or after taking a picture.
To “wake” the camera after auto shut-off, press the
or
BACK button on the back of the camera, or use the lens
SELECT
cover switch to turn the camera off and on again.
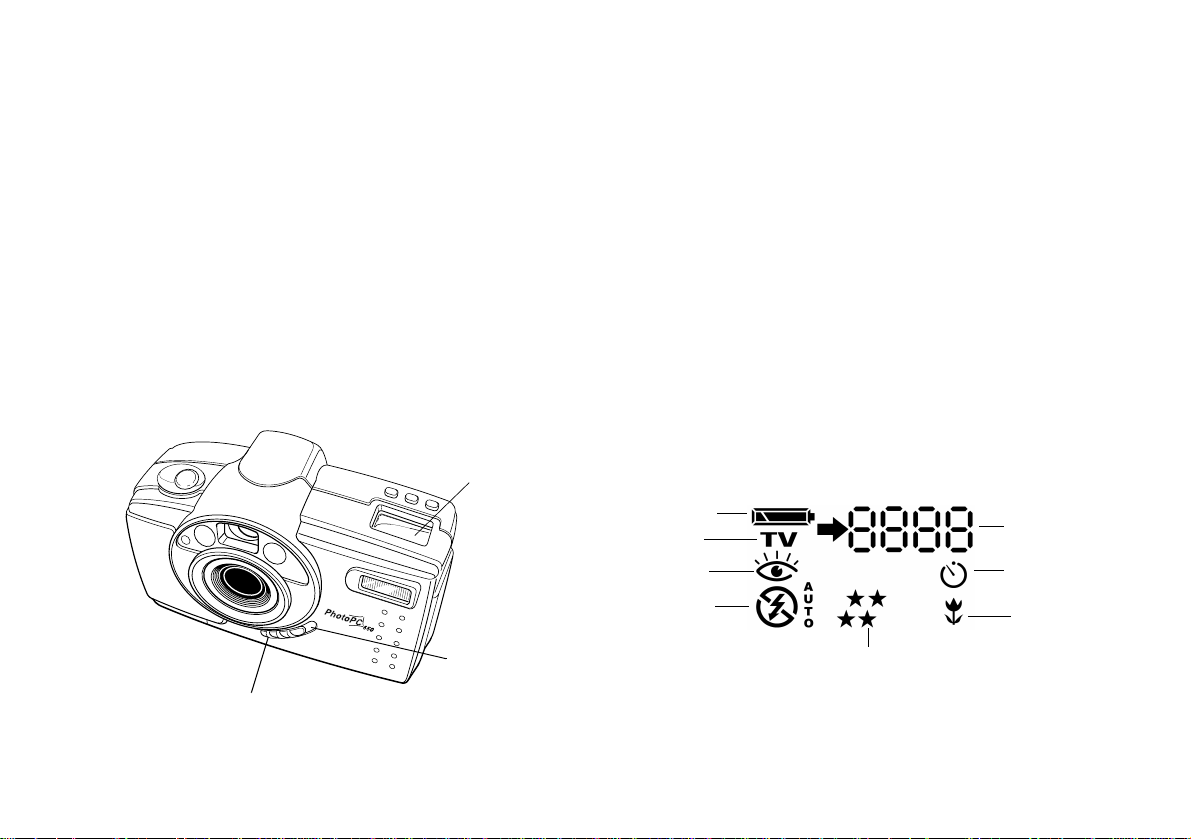
Using the Status Display Panel
The status display panel shows the current camera settings
and the status of your battery power:
.
battery power
video mode
red eye
reduction flash
flash mode
image quality
pictures
remaining
timer
macro
mode
Taking Pictures
2-2
Page 27

Checking the Battery
Picture-Taking Guidelines
When your battery power is running low, the low
battery icon appears on the status display panel. The icon
flashes when your battery power is completely out.
You need to replace the batteries or use the AC adapter when
you see the low battery icon. Although you may be able to
use the camera with low batteries, it may operate differently.
The camera needs full battery power to operate reliably.
NOTE
The low battery icon estimates remaining battery power.
You may have some power left even when the low battery icon
appears, depending on the type of batteries you’re using. When
you see the icon, try turning the camera off (as described on the
previous page) and letting the batteries “rest” for a minute or
two. Then turn the camera back on and try to take more pictures.
Many factors can affect battery life, including the
surrounding temperature. See page 1-3 for battery handling
and power-saving details.
To take the best pictures, follow these guidelines:
◗ Make sure your subject and the camera aren’t moving,
or your picture will be blurred.
◗ When you auto-focus your picture (by pressing the
shutter button halfway down), position the most
important subject in the center. This sets the camera’s
focus point based on the distance from the camera to the
center subject. Objects in the foreground or background
of the focus point won’t be focused as sharply. Once
you’ve auto-focused, you can move the camera so the
most important subject is slightly off center, if you want.
◗ Remember that room lighting affects the color casts that
appear in your picture. Certain lighting—such as by
fluorescent, incandescent, and halogen lamps—can add
a green or yellow cast. You can touch up pictures taken
in these lighting conditions using HotShots; see
Chapter 7 for instructions.
◗ In certain low light conditions—such as evening,
outdoor scenery shots where the subject is over 9 feet
away—you may get the best results by disabling the
camera’s flash, using the timer feature, and either
holding the camera steady or placing it on a tripod, as
described in this chapter.
A
B
Taking Pictures
2-3
Page 28

Taking Pictures with the Viewfinder
You can capture an image with the PhotoPC 650 as you
would with any point-and-shoot auto-focus camera: look
through the viewfinder and snap the two-step shutter.
However, you can also use the LCD monitor to preview your
picture as you take it; see page 2-6 for instructions.
Follow these steps to take a picture with the viewfinder:
1
Make sure you are at least 12 inches (0.3 m) away from
your subject. (If you want to get closer, use macro mode
as described on page 2-10.)
2
Turn the camera on and wait until the status light turns
green and stays on.
shutter
button
status
light
viewfinder
3
Look straight through the viewfinder and center your
subject within it.
NOTE
For best results, use the LCD monitor to take macro mode
pictures; see page 2-10 for instructions. If you use the
viewfinder for macro or close-up pictures, you’ll need to
allow space around the image to compensate for any
parallax shift (the difference between what you see in the
viewfinder and the captured image).
4
Hold the shutter button halfway down to lock the auto
focus. You hear a click and the status light changes from
green to orange. While holding the shutter button
down, you can reframe your picture and move your
subject off-center if you want.
5
Press the shutter button the rest of the way down to take
the picture.
6
Hold the camera still until it beeps and the status light
starts flashing red. The flashing red light indicates that
the camera has captured the image and is processing it.
Taking Pictures
2-4
Page 29

CAUTION
If you set the camera down while the light is still flashing,
make sure you handle it carefully. The camera may lose your
image if you set it down too hard.
7 Then move the camera away from your eye and check
the Quick Review image on the LCD monitor. (If you
don’t see the image, Quick Review mode may be turned
off; see page 3-14 to turn it on.)
The Quick Review image lets you see how your picture
will turn out and lets you delete the picture, if necessary,
before your camera saves it. (You can still delete the
picture after it’s saved.)
Quick Review gauge
The Quick Review image remains on the monitor for
around 5 seconds. A gauge on the image shows you the
time you have left to delete the picture before it’s saved.
To delete the picture, hold down the
button and press the
BACK button.
FUNCTION
If you didn’t delete the image before the Quick Review gauge
disappeared, the image is saved when the status light stops
flashing and turns green. You can take another picture at this
point. Saved images remain in memory for at least a year,
even when the camera is off and the batteries are removed.
NOTE
Remember that the camera shuts off automatically 60 seconds
after you take a picture with the LCD monitor turned off. To
“wake up” the camera, press the SELECT or BACK button on
the back of the camera or use the lens cover switch to turn the
camera off and on again.
A
Taking Pictures
B
2-5
Page 30

Taking Pictures with the LCD Monitor
The LCD monitor lets you see a live preview of what the
camera’s lens sees at any moment. Note the following when
taking pictures with the LCD monitor:
Follow these steps to take a picture with the LCD monitor:
1
Turn on the camera and slide the monitor switch left to
VIEW position. You see a preview of your picture on
the
the LCD monitor.
◗ The image area displayed on the LCD monitor is
slightly smaller than the image that will be captured.
◗ In direct sunlight, you may need to shade the LCD
monitor with your hand to see it better, or you can
adjust the LCD brightness setting to make viewing
easier (see page 3-14 for instructions).
◗ In a low lighting environment, the image on the LCD
monitor may appear speckled or “noisy” due to
insufficient light reaching the camera’s sensor. This
won’t affect the quality of your picture unless you turn
the flash off. (See page 2-11 for instructions on using the
flash.)
◗ The preview image may appear to flicker under strong
fluorescent lighting. When your subject is very bright (a
sunlit white wall, for example), you may see a band of
washed-out color in the image on the monitor. This will
not affect the actual image captured by the camera.
Taking Pictures
2-6
monitor switch
2
Center your subject on the monitor and hold the shutter
button halfway down to lock the auto focus.
You hear a click and the status light changes from green
to orange. While holding the shutter button down, you
can reframe your picture and move your subject offcenter if you want.
Page 31

3 Press the shutter button the rest of the way down to take
the picture.
4 Hold the camera still until it beeps and the status light
starts flashing red. The flashing red light indicates that
the camera has captured the image and is processing it.
CAUTION
If you set the camera down while the light is still flashing,
make sure you handle it carefully. The camera may lose your
image if you set it down too hard.
5 The Quick Review image appears on the LCD monitor.
(If you don’t see the image, Quick Review mode may be
turned off; see page 3-14 to turn it on.)
The Quick Review image lets you see how your picture
will turn out and lets you delete the picture, if necessary,
before your camera saves it. (You can still delete the
picture after it’s saved.)
The Quick Review image remains on the monitor for
around 5 seconds. A gauge on the image shows you the
time you have left to delete the picture before it’s saved.
To delete the picture, hold down the
button and press the
BACK button.
FUNCTION
If you didn’t delete the image before the Quick Review gauge
disappeared, the image is saved when the status light stops
flashing and turns green. You can take another picture at this
point. Saved images remain in memory for at least a year,
even when the camera is turned off and the batteries are
removed.
NOTE
The LCD monitor uses up battery power quickly. If it is idle for
more than 30 seconds, the camera shuts off automatically. To
“wake up” the camera, press the SELECT or BACK button on
the back of the camera or use the lens cover switch to turn the
camera off and on again.
A
Quick Review gauge
Taking Pictures
B
2-7
Page 32

Checking the Picture Counter
Setting Image Quality
The number in the upper right corner of the status display
panel shows how many pictures you can take, depending on
your current image quality and format settings. If you change
these settings, the number may also change.
pictures remaining
When the camera’s memory is full, the number of pictures
remaining is 0. The status light on the back of the camera
turns red, and you hear a rapid beeping when you press the
shutter button.
To free up some of the camera’s memory, you can play back
your pictures on the LCD monitor and erase the ones you
don’t want to save; see page 3-2 for instructions. If you want
to save your pictures before you erase them, you need to
transfer the images to your computer, as described in
Chapter 4.
The PhotoPC 650 has four image quality (resolution)
settings. Press the image quality button on top of the
camera to cycle from one setting to the other.
EPSON
image quality button
The PhotoPC 650 image quality settings vary by the number
of pixels and level of compression used to store the picture.
Pixels (picture elements) are the tiny “dots” of color or tone
that make up the image. Your eye blends the pixels together
so they appear as continuous tones; the more pixels in an
image, the sharper the image appears.
Taking Pictures
2-8
Page 33

Compression is a technique used to make the image data fit
in a smaller memory area and transfer at a quicker rate. The
JPEG compression used by your camera eliminates some
image data (“lossy” compression) to achieve these results.
The
Uncompressed image quality setting doesn’t
eliminate image data (“lossless” compression), but the images
are much larger and slower to transfer.
Standard
Produces color images at 640 × 480 pixels. The
CompactFlash card holds approximately
88 pictures, but the image size is smaller and includes less
detail when enlarged. You should use this setting when
taking lower resolution pictures for distribution on the
World Wide Web.
You can select from these image quality settings:
Fine
Produces color images at 1152 × 864 pixels, with
moderate compression. Your pictures include ample
detail, and the CompactFlash card holds approximately
47 pictures.
Superfine
Produces color images at 1152 × 864 pixels with
low compression. Your pictures include greater
detail, and the CompactFlash card holds approximately
30 pictures. With less compression, superfine images are
better for enlarging.
Uncompressed
Produces color images at 1152 × 864 pixels with
lossless compression. The CompactFlash card holds
approximately 4 pictures in this mode. It’s best to
use this mode only for specialty applications that require
uncompressed pictures.
Fine image quality is sufficient for most purposes. Use
superfine if you need maximum detail (in enlargements, for
example), but remember that the image files are larger than
fine quality image files and take longer for the camera to
process.
NOTE
You can switch freely between the settings and mix pictures of
varying quality in the camera. The camera’s picture capacity will
vary accordingly. Depending on the content of your pictures, your
camera may hold more or fewer pictures than listed here.
Taking Pictures
2-9
A
B
Page 34

Using Macro Mode to Take Close-ups
You can use the camera’s macro mode to take pictures as
close as 6 inches (15 cm). Follow these steps:
4
Hold the camera still until it beeps and the status light
starts flashing red. The flashing red light indicates that
the camera has captured the image and is processing it.
1
Turn the camera on and slide the monitor switch to the
VIEW position. You see a live preview on the LCD
monitor.
2
Press the / macro button on top of the camera
once. The macro icon appears on the status display
panel.
EPSON
macro button
3
Press the shutter button halfway down to focus, then
press it all the way down to capture the image.
CAUTION
If you set the camera down while the light is still flashing,
make sure you handle it carefully. The camera may lose your
image if you set it down too hard.
5
The Quick Review image appears on the LCD monitor.
(If you don’t see the image, Quick Review mode may be
turned off; see page 3-14 to turn it on.) This lets you see
how your picture will turn out and lets you delete the
picture, if necessary, before your camera saves it. (You
can still delete the picture after it’s saved.)
Quick Review gauge
The Quick Review image remains on the monitor for
around 5 seconds. A gauge on the image shows you the
time you have left to delete the picture before it’s saved.
Taking Pictures
2-10
Page 35

To delete the picture, hold down the FUNCTION
button and press the
If you didn’t delete the image before the Quick Review
gauge disappeared, the image is saved when the status
light stops flashing and turns green. (You can still delete
the picture after it’s saved, if necessary.)
To turn off macro mode, press the
three times or turn off the camera. The camera returns to
normal photo mode automatically.
BACK button.
/ macro button
An icon for each setting appears on the status display panel:
Auto
The flash goes off automatically whenever it’s needed
for adequate lighting (factory setting). Use only when
you’re 3.2 to 9.8 feet (1 to 3 m) from your subject.
Forced Flash
The flash goes off with every picture you take. Use
this setting to compensate for backlighting; for
example, when you are facing a light source.
NOTE
To take macro close-ups in low light conditions, use a tripod and
the timer (see page 2-12), and disable the flash (as described in
the next section). Otherwise, your pictures may appear blurry and
washed-out.
Using the Flash
The camera’s built-in flash is effective within a range of 3.2
to 9.8 feet (1 to 3 m). Press the flash button to cycle
through the four flash settings.
Flash Off
The flash is disabled. Use this setting for special
effects, where flash photography is prohibited, or for
macro mode close-ups.
Red-Eye Reduction Flash
The flash blinks on and off rapidly, then flashes
normally to prevent light from shining directly off
your subject’s pupils. Use this setting for flash
pictures of people or animals.
Your flash setting remains in effect even after you turn off the
camera.
Taking Pictures
2-11
A
B
Page 36

Taking Pictures with the Timer
Setting the timer creates a 10-second delay between the time
you press the shutter button and the actual image capture.
This allows you to take a picture of yourself.
Follow these steps to take a picture with the timer:
1
Place the camera on a flat surface or install it on a tripod.
(See page A-3 for tripod instructions.)
5
The Quick Review image appears on the LCD monitor
on the back of the camera to let you see how your
picture will turn out and let you delete the picture, if
necessary, before your camera saves it. (If you don’t see
the image, Quick Review mode may be turned off; see
page 3-14 to turn it on.)
2
Turn on the camera and wait until the status light turns
green.
3
Press the / timer button twice. The timer icon
appears on the status display panel. If you’re taking a
timed, macro mode picture, press the
button three times. The timer and macro icon
appear on the status display panel.
4
Press the shutter button. The red timer light on the
front of the camera comes on and the timer icon on
the status display panel begins flashing. About 2 seconds
before the camera takes the picture, the red timer light
flashes.
The camera beeps when the image is captured and the
status light flashes red.
Taking Pictures
2-12
/ timer
Quick Review gauge
The Quick Review image remains on the monitor for
around 5 seconds. A gauge on the image shows you the
time you have left to delete the picture before it’s saved.
To delete the picture, hold down the
button and press the
If you didn’t delete the image before the Quick Review
gauge disappeared, the image is saved when the status
light stops flashing and turns green.
6
Once you’ve taken a timed picture, the camera turns off
the timer automatically. To take another picture with
the timer, repeat steps 3 through 5.
BACK button.
FUNCTION
Page 37

.
3
Playing Back Pictures
he LCD monitor lets you play back your pictures
one-by-one or in groups of nine at a time. You can
T
erase selected pictures and customize camera settings
through the LCD monitor menus. You can even view your
pictures on a television just as easily as on the camera’s
monitor. This chapter explains the following:
◗
Using playback mode menus
◗
Playing back pictures one by one
◗
Playing back multiple pictures
◗
Playing pictures as a slide show
◗
Turning off picture information
◗
Erasing and locking pictures
◗
Playing back pictures on a TV
◗
Changing the camera settings
◗
Setting the language of the playback mode menus
A
B
Playing Back Pictures
3-1
Page 38

Using Playback Mode Menus
Follow these steps to use the playback mode menus:
1
Turn on the camera, as described on page 2-2.
2
Slide the monitor switch to PLAYBACK. After a
moment, the last photo you took appears on the LCD
monitor.
monitor
switch
3
To access the menus, press the SELECT button.
Blue menu icons appear at the top of the monitor with
the currently selected menu highlighted in green.
menu icons
Settings
05/15/99
05:15
: On
: On
4
Press the and buttons to view the settings for
other menus.
You can choose from the following menus:
Settings (set the date, time, beep, and
Quick Review mode, and LCD
brightness). See page 3-12 for more
information.
Information (turn off the display of
information on played-back pictures). See
page 3-5 for instructions.
Playing Back Pictures
3-2
Page 39

Playback Mode (play back images one at a
time or in groups of 9). See page 3-4 for
instructions.
Photo Control (erase or lock your pictures, or
reformat CompactFlash cards). See page 3-6
and Chapter 8 for instructions.
Video (NTSC or PAL video output to
standard TV). See page 3-11 for instructions.
Slide Show (play back pictures
automatically). See page 3-5 for instructions.
Language (select language for LCD display
and menus). See page 3-15 for instructions.
5 To exit the menus, press the BACK button until the
menu icons and settings disappear. (Depending on the
menu, you may have to press this button several times to
return to playback mode.)
6 When you’re finished with playback mode, slide the
monitor switch
OFF.
Playing Back Pictures One-by-One
When you set the monitor switch to PLAYBACK, you see
the last picture you took on the LCD monitor, along with
the image quality and picture number information:
13/20
image
quality
Press the button to display the previous picture. You
can continue pressing the button to view your pictures in
order. Press to move forward through your pictures.
number of current picture/number of photos taken
A
Playing Back Pictures
B
3-3
Page 40

Playing Back Multiple Pictures
You can play back your pictures in Multi mode to
view small “thumbnail” versions of nine pictures at
once. Make sure the monitor switch is set to
PLAYBACK, and follow these steps:
1
Press the SELECT button to display the monitor
menus.
2
Press the or button until you see the Playback
Mode menu.
Playback Mode
Normal
Multi
3
Press the SELECT button again to choose the Multi
setting (the checkmark moves to that setting), then press
the
BACK button to exit the menus.
Thumbnail images of the last photos you took (up to 9
of them) appear on the LCD monitor, with the
currently selected image framed in white, as shown on
the right.
4
Press the and buttons to move the white
selection frame through the images on the LCD
monitor. When the frame reaches the first or last photo
of the current group, the previous or next group of up to
nine images is displayed.
5
To switch back to displaying one picture at a time,
follow steps 1 through 3 again, but choose the
setting on the Playback Mode menu.
6
Press the BACK button to return to normal playback
mode.
Normal
Playing Back Pictures
3-4
Page 41

Playing Your Pictures as a Slide
Turning Off Picture Information
Show
You can use the LCD monitor to automatically
display each of your pictures, one at a time. Make
sure the monitor switch is set to
follow these steps:
1
Press the SELECT button to display the LCD monitor
menus.
2
Press the or button until you see the Slide
option.
Show
3
Press the SELECT button again. The LCD monitor
begins playing back your pictures one by one.
◗ To move forward or back through the photos
manually, press the or button.
◗ To pause the slide show at a particular photo, press
the
SELECT button. The pause icon appears
next to the picture count on the monitor. Press
SELECT again to resume the slide show.
4
To stop the slide show, press the BACK button. Press
BACK again to return to playback mode.
PLAYBACK, and
The LCD monitor displays the image quality setting
of each picture along with picture number
information. You can turn off the information
display if you want.
Make sure the monitor switch is set to
follow these steps:
1
Press the SELECT button to display the LCD monitor
menus.
2
Press the or button until you see the
Information menu.
Information
On
Off
3
Press the SELECT button to turn information Off. You
can press it again to turn information back on.
4
To save your setting and return to playback mode, press
the
BACK button.
PLAYBACK, and
A
B
Playing Back Pictures
3-5
Page 42

Erasing Pictures
You see the following message on the LCD monitor:
The LCD monitor provides different methods for deleting
images stored in your camera as you play them back:
◗ You can delete the currently displayed picture
◗ You can select pictures for deletion or delete all the
pictures
◗ You can “lock” pictures to prevent their deletion
You can erase photos right after you take them, before they
are stored in your camera, using Quick Review. See
Chapter 2 for instructions.
You can also erase stored photos through your software when
you’re transferring them to your computer. For instructions,
see Chapter 4.
Erasing the Currently Displayed Picture
Make sure the monitor switch is set to PLAYBACK and the
image you want to erase is displayed. Then follow these steps:
1
Hold down the FUNCTION button and press the
BACK button.
Confirmation
Erase this
photo?
Yes : SELECT
No : BACK
2
Press the SELECT button to erase the picture. The
monitor returns to playback mode.
NOTE
If you try to erase a locked photo , you see a warning message.
Press any button to clear the message. See page 3-8 for
instructions on locking and unlocking images in the camera.
Selecting Pictures to Erase
You select pictures to erase using the Photo Control
menu. You can either select individual pictures, or
choose to erase all the pictures in the camera. To
select pictures to lock (protect from erasing), or lock
all pictures, see page 3-8.
Playing Back Pictures
3-6
Page 43

Before you start, set the playback mode to Multi. This makes
it easier to select images; see page 3-4 for instructions.
4 Press the or button to choose Select Photo
or
Erase All.
Make sure the monitor switch is set to
follow these steps to erase pictures:
PLAYBACK, and
1 Press the SELECT button to display the LCD monitor
menus.
2 Press the or button until you see the Photo
Control menu, then press the
display the menu options:
Photo Control
Erase
Lock
Reformat
SELECT button to
3 Press the SELECT button to enter Erase mode. The
Erase Photos menu is displayed:
Erase Photos
Select Photo
Erase All
◗ If you chose
A message appears asking you to confirm that you
want to erase all the photos. Press the
button to erase the photos; or press the
button to return to the Erase Photos menu without
erasing the photos.
◗ If you chose
Erase All, press the SELECT button.
SELECT
BACK
Select Photo, continue with step 5.
5 Press the SELECT button, then press the or
button to move the white selection box to the photo you
want to erase.
6 Press the SELECT button. The selection box on the
image turns yellow. If you want to erase other photos at
the same time, use the or button to frame
them, then press the
NOTE
To cancel the selection of a photo, press the SELECT button
again.
SELECT button to select them.
A
B
Playing Back Pictures
3-7
Page 44

7 When you have selected all t he photos you want to erase,
press the
you’re sure you want to erase.
BACK button. A message appears asking if
2 Press the or button until you see the Photo
Control menu, then press the
display the menu options:
SELECT button to
8 Press the SELECT button to erase the images and return
to the Erase Photos menu. To keep the images, press the
BACK button, then repeat steps 4 through 7 to reselect
the photos.
NOTE
If there are locked photos in your camera, you hear a beep
when you press the SELECT button to indicate that only the
unlocked images were erased.
9 Press BACK until you return to playback mode.
Locking Photos
The lock feature allows you to keep your photos from being
accidentally erased. You can lock selected photos or all the
photos in the camera.
Make sure the monitor switch is set to
follow these steps to lock pictures:
1 Press the SELECT button to display the LCD monitor
menus.
PLAYBACK, then
Photo Control
Erase
Lock
Reformat
3 Press the button until Lock is highlighted, then
press the
Lock Photos menu is displayed:
SELECT button to enter Lock mode. The
Lock Photos
Select Photo
Lock All
Unlock All
4 Press the or button to choose Select Photo
or
Lock All.
◗ If you chose
A message appears asking you to confirm that you
want to lock all the photos. Press the
button to lock the photos. Then press the
button until you return to normal playback mode.
Lock All, press the SELECT button.
SELECT
BACK
Playing Back Pictures
3-8
Page 45

◗ If you chose Select Photo, continue with step 5.
9 Press BACK until you return to playback mode.
5 Press the SELECT button, then press the or
button to move through the images in the camera until
the photo you want to lock appears on the monitor.
6 Press the SELECT button. A lock icon appears in the
lower left corner. If you want to lock other photos, use
the or button to display them, then press the
SELECT button to select them.
NOTE
To cancel the selection of a photo, press the SELECT button
again.
7 When you have selected all the photos you want to lock,
press the
BACK button. The following message appears:
Confirmation
Lock/unlock
Photos?
Yes : SELECT
No : BACK
8 Press the SELECT button to lock the images.
Unlocking Photos
After you have locked your pictures, you can unlock selected
photos or all the photos in the camera.
Make sure the monitor switch is set to
follow these steps to unlock pictures:
1 Press the SELECT button to display the LCD monitor
menus.
2 Press the or button until you see the Photo
Control menu, then press the
display the menu options:
Photo Control
Erase
Lock
Reformat
3 Press the button until Lock is highlighted, then
press the
SELECT button to enter Lock mode.
PLAYBACK, then
SELECT button to
A
B
Playing Back Pictures
3-9
Page 46

The Lock Photos menu is displayed:
Lock Photos
Select Photo
Lock All
Unlock All
4 Press the or button to choose Select Photo
or
Unlock All.
◗ If you chose
Unlock All, press the SELECT
button. A message appears asking you to confirm
that you want to unlock all the photos. Press the
SELECT button to unlock the photos. Then press
BACK button until you return to normal
the
playback mode.
◗ If you chose
Select Photo, continue with step 5.
5 Press the SELECT button, then press the or
button to move through the images in the camera until
the photo you want to unlock appears on the monitor.
6 Press the SELECT button. The lock icon disappears
from the monitor. If you want to unlock other photos at
the same time, use the or button to display
them, then press the
NOTE
To cancel the selection of a photo, press the SELECT button
again.
SELECT button to select them.
7 When you have selected all the photos you want to
unlock, press the
appears:
BACK button. The following message
Confirmation
Lock/unlock
Photos?
Yes : SELECT
No : BACK
8 Press the SELECT button to unlock the images.
9 Press BACK until you return to playback mode.
Playing Back Pictures
3-10
Page 47

Playing Back Pictures on TV or Video
Playing Back Pictures
You can display your pictures on a regular television
or videotape them with a VCR by using the video
cable that came with your PhotoPC 650. First, select the
correct video standard:
PAL (for Europe, South America, and other areas).
NTSC (for the US and Canada) or
Setting the Video Standard
Set the monitor switch to PLAYBACK and follow these
steps to select a video standard:
1
Press the SELECT button to display the LCD monitor
menus.
2
Press the or button until you see the Video
menu:
Video
NTSC (US/CAN)
PAL (Europe)
3
Press the SELECT button to select the video standard
you want to use.
4
Press the BACK button to return to playback mode.
Using the optional AC adapter is highly recommended when
you play back your pictures on a TV. See pages A-1 and A-2
for instructions and ordering information.
TIP
You can videotape your pictures to share them without using a
computer. First set the camera’s LCD monitor to Slide Show, as
described on page 3-5. Then connect the camera to the Video In
port on your VCR and press the Record button.
Follow these steps to play back your pictures on TV:
1
Make sure the camera and TV (and VCR) are turned off.
2
Open the camera’s card and port cover and connect the
black end of the video cable to the
Video Out port.
A
B
Playing Back Pictures
3-11
Page 48

3 Connect the yellow end of the cable to the VIDEO IN
port on the television or VCR.
4 Turn on the TV (and VCR) and switch to the correct
video mode.
5 Turn on the camera and slide the monitor switch to
PLAYBACK.
6 Press the SELECT button on the back of the camera.
The last picture you took appears on the TV screen.
Press the or button to move forward or
backward through your pictures.
7 When you’re finished viewing pictures, press the BACK
button, slide the LCD monitor switch to
the camera, and disconnect the video cable.
OFF, turn off
Changing Camera Settings
The Settings menu lets you change these camera
settings:
◗ Current date and time
◗ Alert beep (on or off)
◗ Quick Review mode setting (on [default] or off)
◗ Brightness of the LCD on the back of the camera
Setting the Date and Time
If you ever want to change the camera’s clock settings, set the
monitor switch to
1 Press the SELECT button to display the LCD monitor
menus.
2 Press the or button until you see the Settings
menu. The current date and time are displayed.
PLAYBACK, then follow these steps:
Settings
05/15/99
05:15
: On
: On
Playing Back Pictures
3-12
Page 49

3 Press the SELECT button once to open the settings
menu, then press
highlighted in white.
SELECT again to change the month,
4 Press the button to increase the number, or the
button to decrease the number, until the month is
correct.
5 Press the SELECT button. The month setting is saved
and the day setting is highlighted.
6 Adjust the day, year, hour, and minute settings as
described above until the date and time are correctly
adjusted and saved.
7 If you need to change the alert beep, Quick
Review mode, or LCD brightness settings, see the next
three sections for instructions.
If you’re finished changing settings, press the
button until you return to playback mode.
BACK
Setting the Alert Beep
The camera’s alert beep lets you know when an image has
been captured. Set the monitor switch to
follow these steps to turn the beep on or off:
1 Press the SELECT button to display the menus.
2 Press the or button until you see the Settings
menu. The current beep setting is displayed.
Settings
05/15/99
05:15
: On
: On
3 Press the SELECT button once to open the settings
menu, then press the button to select the beep
setting icon.
PLAYBACK, then
NOTE
You need to reset the time and date whenever you replace the
camera’s batteries. In this case, you change the settings through
the Clock Setting menu. See page 1-5 for instructions.
4 Press the SELECT button to select On or Off. The
current selection is highlighted. When you turn the
setting on, you hear the camera beep.
5 If you’re finished changing settings, press the BACK
button until you return to playback mode.
Playing Back Pictures
A
B
3-13
Page 50

Selecting Quick Review Mode
Quick Review mode lets you review the picture you just took
on the LCD monitor and delete it, if necessary, before your
camera stores it in memory. You can turn off Quick Review
mode to save additional battery power or if you’d rather not
use it.
Press the SELECT button to select On or Off. The
4
current selection is highlighted.
If you’re finished changing settings, press the BACK
5
button until you return to playback mode.
Setting the LCD Monitor Brightness
Set the monitor switch to
PLAYBACK, then follow these
steps to turn Quick Review mode on or off:
Press the SELECT button to display the LCD monitor
1
menus.
Press the or button until you see the Settings
2
menu. The current Quick Review mode setting is
displayed.
Settings
05/15/99
05:15
: On
: On
Press the SELECT button once to open the settings
3
menu, then press button twice to select the
Quick Review mode icon.
Playing Back Pictures
3-14
You may want to adjust the LCD monitor brightness when
you’re taking pictures in bright light to make it easier to see.
Set the monitor switch to
PLAYBACK, then follow these
steps to adjust the LCD brightness:
Press the SELECT button to display the LCD monitor
1
menus.
Press the or button until you see the Settings
2
menu.
Settings
05/15/99
05:15
: On
: On
Page 51

3 Press the SELECT button once to open the settings
menu, then press the button three times to select
the LCD brightness icon.
4 Press the SELECT button to highlight the LCD
brightness slider.
5 Press the or buttons to adjust the monitor
brightness.
6 If you’re finished changing settings, press the BACK
button until you return to playback mode.
Setting the Language
Set the monitor switch to
steps to select a language:
PLAYBACK and follow these
1 Press the SELECT button to display the LCD monitor
menus.
2 Press the or button until you see the Language
menu:
Language
English
Español
Portuguese
You can choose from these six languages for
information displayed on the camera’s LCD
monitor:
◗ English
◗ Español (Spanish)
◗ Portuguese
◗ Français (French)
◗ Deutsch (German)
◗ Italiano (Italian)
3 Press the SELECT button to open the Language menu.
4 Press the or button until the language you
want to use is highlighted. (The
and
Italiano settings will scroll onto the monitor as you
move down.)
Français, Deutsch,
5 Press the SELECT button to choose the highlighted
language. The LCD display changes automatically to
that language.
6 Press the BACK button to return to playback mode.
Playing Back Pictures
3-15
A
B
Page 52

Playing Back Pictures
3-16
Page 53

.
4
hen you’re finished taking pictures, you can
W
them in the projects you create. This chapter describes the
following:
◗ Transferring pictures with the JumpShot USB cable
◗ Transferring pictures with the serial cable and HotShots
◗ Getting images into other TWAIN compliant or
◗ What to do if the camera doesn’t respond
The fastest way to transfer your pictures from your camera to
your computer is using the JumpShot USB cable. If you have
a Windows 98 system with a USB port or an iMac or Power
Macintosh G3, you can remove the USB CompactFlash card
from your camera, insert it in the JumpShot USB cable, and
transfer pictures directly from the card. See the next section
for instructions.
transfer them to your computer, where you can use
Plug-In compatible applications
Getting Photos Into Your Computer
If you don’t have compatible USB support on your system,
you can transfer your pictures by connecting the serial cable
and using HotShots. See page 4-9 for instructions.
Transferring Photos with the JumpShot USB Cable
The fastest way to transfer your pictures from your camera to
your computer is using the JumpShot USB cable. To transfer
your pictures using the USB cable, you need the following:
◗ A computer with USB support (Windows 98, iMac, or
Power Macintosh G3 only; see page 3 in the
Introduction for details)
◗ The JumpShot USB cable that came with your camera
◗ The Jumpshot USB cable and CompactFlash card
drivers installed on your computer
A
B
Getting Photos Into Your Computer
4-1
Page 54

On an iMac or Power Macintosh G3, you installed the USB
drivers when you installed the rest of your camera software (if
not, see page 1-8). With Windows, you’ll install the drivers
when your system detects the connected JumpShot USB
cable and USB CompactFlash card, as described on page 4-4.
To use the JumpShot USB cable to transfer your pictures,
follow the steps in these sections:
◗ Inserting the card in the cable
◗ Connecting the cable to your computer
The JumpShot USB cable won’t recognize any other
type of CompactFlash card
◗ Never insert any other object into the slot on the USB
cable; you’ll damage the cable components.
◗ Never use a USB extension cable with the USB cable.
Before you can insert the USB CompactFlash card in the
cable, you need to remove it from the camera. Make sure the
camera and the LCD monitor are turned off. Then follow
these steps:
◗ Installing the USB drivers (Windows 98 only)
◗ Transferring pictures
◗ Erasing pictures
Inserting the USB CompactFlash Card
in the JumpShot USB Cable
Follow these CompactFlash card and USB cable precautions:
◗ Insert only a Lexar Media USB
CompactFlash card in the
JumpShot USB cable. You can
identify the USB card by the USB
logo on the label.
Getting Photos Into Your Computer
4-2
USB logo
Open the card and port cover on the side of the camera.
1
Then slide the
camera to eject the card, as shown below.
Eject Card switch on the bottom of the
Page 55

2 Remove the card by hand, then close the card and port
cover.
3 Insert the card into the slot in the cable connector with
the label facing toward the side of the connector
stamped “USB.” Make sure the pin holes on the card
face into the connector slot. Push the card all the way
into the slot.
Connecting the Jumpshot USB Cable
You can connect the USB cable to your computer’s USB
port or USB hub while your computer is turned on or off.
1 Locate an available USB port or USB hub port on your
computer system. See your computer documentation for
instructions.
NOTE
If your system can’t recognize the USB CompactFlash card
when it’s connected to a USB port on the keyboard or
monitor of an iMac or Power Macintosh G3, or a hub port on
any system, connect the USB cable directly to a USB port on
your computer instead.
2 Position the JumpShot USB
cable connector so the side
shown here faces in the
correct direction for your port. Then connect it to your
computer’s USB port or USB hub port.
If you have a Windows 98 computer, see the next section for
instructions on installing the USB CompactFlash card and
USB cable drivers. If you have a Macintosh, see page 4-7 for
instructions on transferring your pictures.
Getting Photos Into Your Computer
4-3
A
B
Page 56

Installing the Windows 98 USB
CompactFlash Card and USB Cable Drivers
The first time you connect the USB CompactFlash card and
JumpShot USB cable to your system, you need to install
their Windows 98 USB drivers using the plug-and-play
function. Follow these steps:
Make sure the USB CompactFlash card is inserted into
1
the JumpShot USB cable, and that the cable is
connected to your computer.
Turn on your computer (if it isn’t already turned on).
2
During plug-and-play installation, the light on the cable
turns on. (If it doesn’t turn on, see page 9-4 for
troubleshooting steps.)
You see the Add New Hardware Wizard that tells you
3
Windows 98 has detected new hardware on your system.
Click
Next.
You see the screen below. Click Search for the best
4
driver for your device
. Then click Next.
click this option
Getting Photos Into Your Computer
4-4
Page 57

5 You see the screen below. Click CD-ROM drive. Then
click
Next.
To check if your driver installation was successful, do the
following:
1 Click Start, point to Settings, and click Control
.
Panel
click CD-ROM
drive
6 You see a message that a driver was located for the USB
cable, called
then click
LexarMedia JumpShot. Click Next,
Finish on the next screen.
7 You see the Add New Hardware Wizard screen again.
Repeat steps 2 through 4.
8 You see a message that a driver was located for the USB
CompactFlash card, called
Mass Storage Device
at the next screen.
LexarMedia USB CF
. Click Next, then click Finish
2 Double-click the System icon.
3 Click the Device Manager tab.
4 Click the + next to Universal serial bus controller
in the device list. You should see
JumpShot
listed as a USB device.
LexarMedia
Transferring Pictures with Windows 98
Follow these steps to transfer your pictures via the JumpShot
USB cable with Windows 98:
1 Right-click Start, then select Explorer from the pop-
up list. (Or click
Windows Explorer.)
2 You see the Exploring window. Locate the USB
CompactFlash card drive.
Start, point to Programs, and click
Getting Photos Into Your Computer
4-5
A
B
Page 58

The card is identified as the next available drive letter on
your system and described as a
Removable Disk. For
example, if your hard disk is drive C and your
CD-ROM is drive D, the USB CompactFlash card is
assigned as drive E.
Click the
+ next to the drive letter to open its contents.
3 You see the Photo650 folder on the card. Click the
Photo650 folder icon. You see a list of your pictures:
your
pictures
4 Now locate the folder on your computer’s hard disk you
want to copy the pictures to. For example, if your hard
disk is drive C and you have a folder called
locate that folder in the Exploring window.
Pictures,
5 Adjust the window as necessary until you can see both
the
Photo650 folder on the card and the folder you
want to copy the pictures to on your hard disk.
6 To copy all the pictures in the camera at once, click the
Photo650 folder, hold down the mouse button, and
drag it to the picture folder on your hard disk. Release
the mouse button.
To copy individual pictures, click the
to open it. Then click the picture in the folder. To copy
multiple pictures, press either the
you click the pictures you want. Then hold down the
mouse button, drag the pictures to the picture folder on
your hard disk, and release the mouse button.
As it accesses data on the card, the light on the USB cable
flashes. (If your computer enters a power-saving sleep mode,
the cable light turns off.)
Properly Ejecting the Card
When you’ve finished transferring pictures, close the
Photo650 folder and exit any open applications. In
Windows Explorer, right-click the card drive letter (such
as E:) and click
Eject. Then pull the CompactFlash card out
of the USB cable slot and install it back in your camera.
Photo650 folder
Shift or Ctrl key as
Getting Photos Into Your Computer
4-6
Page 59

CAUTION
Never remove the USB CompactFlash card or unplug the USB
cable when the Photo650 folder is open or any applications are
running on your system. Close the Photo650 folder and exit all
your applications first.
Always select Eject in Windows Explorer (as described above) or
wait at least 10 seconds after the last card activity before
removing the card.
On some computers, you may have to unplug the JumpShot USB
cable before removing the USB CompactFlash card from the
cable slot.
You can disconnect the Jumpshot USB cable from your
computer, if you want, or leave it connected. However, once
you remove the USB CompactFlash card, the computer no
longer recognizes it as a drive.
TIP
If you’re using the JumpShot USB cable to transfer pictures, it’s a
good idea to check Lexar Media’s web site periodically for
possible updates to your USB CompactFlash card and JumpShot
USB cable drivers. Access www.lexarmedia.com for details.
Transferring Pictures with a Macintosh
Follow these steps to transfer your pictures via the JumpShot
USB cable with an iMac or Power Macintosh G3:
Make sure the USB CompactFlash card is inserted into
1
the JumpShot USB cable, and that the cable is
connected to your Macintosh.
Turn on your Macintosh (if it isn’t already turned on).
2
You see a diskette icon for the USB CompactFlash card
3
on your desktop. Double-click the icon to open the card
folder, then double-click the
your picture icons.
Photo650 folder to see
card icon
your
pictures
A
B
Getting Photos Into Your Computer
4-7
Page 60

4 Now locate the folder on your hard disk you want to
copy the pictures to. For example, if you have a folder
called
Pictures, open that folder on your hard disk.
5 Adjust the folders as necessary until you can see both the
Photo650 folder on the card and the folder you want to
copy the pictures to on your hard disk.
6 To copy all the pictures in the camera at once, click the
Photo650 folder, hold down the mouse button, and
drag it to the picture folder on your hard disk. Release
the mouse button.
To copy individual pictures, click the
to open it. Then click the picture in the folder. To copy
multiple pictures, click and drag a box around the
pictures you want. Then drag the box to the picture
folder on your hard disk, and release the mouse button.
As it accesses data on the card, the USB cable light flashes. (If
your Macintosh enters sleep mode, the light turns off.)
Photo650 folder
Properly Ejecting the Card
When you’ve finished transferring pictures, close the
Photo650 and card folders and exit any open applications.
Then drag the card icon into the
Trash folder. (Always drag
the card icon into the trash before removing the card—don’t
use the
Eject command from the Special menu.) Pull the
CompactFlash card out of the USB cable slot and install it
back in your camera. See page 1-2 for instructions.
CAUTION
Never remove the USB CompactFlash card or unplug the USB
cable when the Photo650 folder is open or any applications are
running on your system. Close the Photo650 folder, exit all your
applications, and drag the card icon into the Trash folder first.
You can disconnect the Jumpshot USB cable from your
Macintosh, if you want, or leave it connected. However,
once you remove the USB CompactFlash card, the
Macintosh no longer recognizes it as a drive.
TIP
If you’re using the JumpShot USB cable to transfer pictures, it’s a
good idea to check Lexar Media’s web site periodically for
possible updates to your USB CompactFlash card and JumpShot
USB cable drivers. Access www.lexarmedia.com for details.
Getting Photos Into Your Computer
4-8
Page 61

Erasing Pictures
It’s best to erase the pictures from the USB CompactFlash
card after you re-install it in your camera using the camera’s
Reformat mode (see page 1-7 for instructions). However,
you can also erase pictures from the card while it’s connected
to your computer by the JumpShot USB cable.
To erase pictures from the card, select the pictures inside the
Photo650 folder and press the Delete key. Then confirm
the deletion at the prompt.
Transferring Pictures with the Serial Cable
Follow the steps in these sections to transfer your pictures
directly from the camera using the serial cable and HotShots:
◗ Connecting the camera to a Windows PC or Macintosh
NOTE
When the camera is connected to your system, you can’t use any
of the camera controls.
To save battery power, you can leave the camera turned off as
you transfer the pictures or connect the optional AC adapter, as
described in Appendix A.
Connecting the Camera to a Windows PC
Make sure you have the serial cable that came with your
camera. Before you start, turn off the camera, LCD monitor,
and your computer.
Locate a serial port on the back of your computer. You
1
may have two serial ports labeled COM1 and COM2, or
they may be labeled with icons. For the best results, use
COM1 (port 1) to connect your camera.
◗ Transferring pictures using HotShots
NOTE
If you have a 25-pin serial port, you can use a 9- to 25-pin
adapter, available at most computer stores.
Getting Photos Into Your Computer
A
B
4-9
Page 62

2 Line up the serial connector on the cable with one of the
serial ports on your computer, and insert the connector.
Then tighten the screws.
3 Open the card and port cover on the side of the camera.
Then insert the other end of the cable into the camera’s
serial port.
NOTE
If you have problems connecting to your COM port, check your
computer’s COM port settings and try again. If you have a highspeed serial board, you may be able to transfer pictures at
230.4Kb per second. See page 4-23 for instructions on changing
your Port speed setting with EPSON PhotoPC 650 TWAIN.
Connecting the Camera to a Macintosh
Make sure you have the long serial cable and short
Macintosh adapter that came with your camera. Before you
start, turn off the camera, LCD monitor, and Macintosh.
NOTE
On a PowerPC Macintosh, you may be able to transfer your
pictures at 230.4Kb per second. See page 4-23 for instructions on
selecting your Port setting with the EPSON PhotoPC 650 Plug-In.
1 Connect the small Macintosh adapter cable to either the
modem port or printer port on the back of your
Macintosh.
4 Turn on your computer system.
Getting Photos Into Your Computer
4-10
Page 63

Line up the arrow on the cable connector with the port
icon on your Macintosh. Then insert the connector.
.
Macintosh
adapter
3 Open the card and port cover on the side of the camera
and insert the connector on the long serial cable into the
camera’s serial port.
4 Turn on your Macintosh system.
NOTE
If you share a serial port with another device, make sure
AppleTalk™ is turned off. Your Macintosh may not recognize
the camera if AppleTalk is on. Also, if you have problems
connecting to the printer port, use the modem port instead.
2 Connect the long serial cable to the short Macintosh
adapter cable, then tighten the screws.
Transferring Pictures Using HotShots
To transfer your pictures via the serial cable using HotShots
and the EPSON PhotoPC 650 TWAIN (Windows) or PlugIn driver (Macintosh), follow the steps in these sections:
◗ Opening the EPSON PhotoPC 650 TWAIN or Plug-In
driver
◗ Saving pictures to a folder, or
◗ Transferring pictures into HotShots
Getting Photos Into Your Computer
4-11
A
B
Page 64

Opening the EPSON PhotoPC 650 TWAIN or
Plug-In Driver
1
Connect the camera to your computer using the serial
cable; see page 4-9 for instructions.
2
Start HotShots.
4
Click the arrow in the Select Camera menu. Then click
EPSON PhotoPC 650 TWAIN (Windows) or
EPSON PhotoPC 650 (Macintosh).
5
Click the Get Pictures Now button. You see the Get
Pictures window:
In Windows, double-click the
Windows desktop. (Or click
HotShots icon on your
Start, point to Programs,
PhotoPC 650, and then click HotShots 1.5.)
On a Macintosh, open the
open the
HotShots folder and double-click the
PhotoPC650 folder, then
HotShots icon.
3
You see the main HotShots
window with the remote
control on the right side.
Click the
Get button on
the remote control, then
click
Get from Camera.
Getting Photos Into Your Computer
4-12
Get
button
Get from
Camera
Select
Camera
menu
6
Click the Open Them button.
NOTE
If you select Add to New Collection or Add to Existing
Collection, you may see a dialog box allowing you to change the
transfer file format. It’s best to keep your files in the JPEG format
because of their small size and quick transfer speed. This only
affects files you transfer into HotShots (see page 4-16); it doesn’t
affect files you save to your hard disk (see page 4-15).
On a Macintosh, if no existing collection is open and you select
Add to Existing Collection, HotShots prompts you right away to
select a collection file.
Page 65

You see the EPSON PhotoPC 650 TWAIN or Plug-In
window (the Windows screen is shown below). The
pictures in your camera appear in the window.
Camera Content
tab
Setup tab current transfer speed
Changing the Picture Transfer Speed
If the current transfer speed displayed on the Camera
Content tab is
57600 or lower, you can change it to speed
up the transfer. Follow these steps:
1
Click the Setup tab. You see the Setup screen:
pictures in
your ca mera
(If you don’t see the pictures in your camera when you
open the window, click
Open Camera. If that doesn’t
work or you see an error message, see page 4-23.)
If the current transfer speed displayed on the Camera
Content tab is
57600 or lower, see the next section to
select a faster transfer speed.
When you’re ready to select the pictures you want to
transfer, see page 4-14.
2
Click the arrow in the Speed setting list to open it.
Then select
115200 (for Windows) or 230400 (for
Macintosh). If your system won’t support these faster
speeds, select the next lower speed.
3
Click the Camera Content tab to select the pictures
you want to transfer, as described in the next section.
Getting Photos Into Your Computer
Speed
setting
A
B
4-13
Page 66

NOTE
The Speed setting you selected is not displayed on the Camera
Content tab unless you click the Open Camera button; however,
your pictures will still transfer at the new rate.
Selecting Pictures to Transfer
There are three ways to select pictures to transfer:
◗ Click an individual picture
◗ Hold down the
Shift or Ctrl key (Windows) or the
J
key (Macintosh) and click multiple pictures
◗ Click the Select All button to select all of them.
Your selected pictures are outlined in red.
selected
pictures
NOTE
To permanently erase a picture from your camera, select it and
click Erase, then confirm the erasure.
Once you’ve selected pictures, you’re ready to transfer them
to your camera. See the next section.
Transferring Pictures From the Camera to Your
Computer
There are two ways to transfer your pictures from your
camera to your computer:
Save to Folder and Transfer.
Transfer button
Save to Folder
button
Getting Photos Into Your Computer
4-14
Page 67

◗ The fastest method is Save to Folder. This lets you
transfer your pictures and save them directly to a
selected folder on your hard disk, saving battery power
and time. See the next section for instructions.
◗ You can also use
Transfer to import your pictures into
HotShots, but they are stored in your computer’s RAM
(memory), not saved directly to your hard disk. See
page 4-16 for instructions.
NOTE
If your camera shuts off automatically while you’re transferring
pictures (to save battery power), click the Open Camera button
on the TWAIN or Plug-In window to “wake it up.”
Saving Pictures to a Folder
To save your pictures to a folder on your hard disk, click
1
the
Save to Folder button. You see one of these dialog
boxes:
Windows
Macintosh
Select the folder you want to save your pictures to, or
2
click the
Create New Folder (Windows) or New
Create New Folder
button
Save as type list
New folder button
File naming field
folder button (Macintosh) to create a new folder.
A
B
Getting Photos Into Your Computer
4-15
Page 68

NOTE
To select a different default folder for the program to use
each time you open it, click the Setup tab on the window
and click Browse under Default Photo Folder.
3 If you want to save your pictures in a format other than
JPEG, select it from the Save as type list (Windows
only). On a Macintosh, you can also type in a different
file name for the image files in the file naming field.
4 When you’re ready to transfer your pictures, click Save.
Transferring Pictures into HotShots
1 To transfer your pictures into HotShots, click the
Transfer button.
◗ If you selected
HotShots automatically transfers the pictures into
your computer’s memory, opens them in individual
windows, and numbers the windows sequentially.
CAUTION
The pictures are not yet saved to your computer’s hard disk.
Open Them in step 6 on page 4-12,
As the files are transferred, they are either automatically
given a generic name (Windows) or given the name you
selected (Macintosh), and then numbered sequentially.
To cancel a transfer in progress, click
Cancel
(Windows) or press the J and . keys (Macintosh).
5 Close the EPSON PhotoPC 650 TWAIN or Plug-In
windows and return to HotShots.
You’ll need to open your pictures from disk to use them
in your image editing application. To open them in
HotShots, see Chapter 6 for instructions. To import
them with another application, see Chapter 5.
Getting Photos Into Your Computer
4-16
◗ If you selected Add to New Collection, HotShots
transfers your pictures into a new collection window
and saves them to the HotShots collection folder.
◗ If you selected
Add to Existing Collection,
HotShots transfers them into an open collection or
prompts you to open the collection you want to
transfer them to. Then HotShots saves the pictures
in the same folder as the collection.
Page 69

NOTE
If you see a memory error message while transferring
pictures, close the EPSON PhotoPC 650 TWAIN or Plug-In
window and use the Save to Folder method to transfer your
pictures instead. See page 4-15 for instructions. (You may
also need to close and then reopen HotShots to free-up your
computer’s memory.)
To cancel a transfer in progress, click Cancel
(Windows) or press the J and . keys (Macintosh).
2 After your pictures are transferred, close the EPSON
PhotoPC 650 TWAIN or Plug-In window and return to
HotShots. You see the picture(s) in the HotShots
window. To work with your pictures and collections in
HotShots, see Chapter 6.
TIP
If you don’t want to select a transfer method each time you open
TWAIN or the plug-in with HotShots, open the Edit menu and
select Preferences, Acquire, Bring Pictures Into, and choose a
specific transfer method. You can also select other transfer
preferences this way. See HotShots’ help utility for details.
Getting Images Into Other TWAIN or
Plug-In Applications
If you use Adobe Photoshop or other TWAIN-compliant
or Plug-In compatible applications, you can transfer your
pictures directly into your program from the camera.
Make sure you’ve already connected the camera to your
computer using the serial cable, as described on page 4-9
(Windows) or page 4-10 (Macintosh).
Before you can use the EPSON PhotoPC 650 Plug-In with
other applications on a Macintosh, you must copy the
Plug-In driver into the application’s Plug-In folder.
Follow the steps in these sections:
◗ Copying the EPSON PhotoPC 650 Plug-In driver
(Macintosh)
◗ Opening EPSON PhotoPC 650 TWAIN or Plug-In
◗ Saving pictures to a folder, or transferring pictures into
your TWAIN-compliant or Plug-In compatible
application
A
Getting Photos Into Your Computer
B
4-17
Page 70

Making an EPSON PhotoPC 650 Plug-In
Opening EPSON PhotoPC 650 TWAIN or
Driver Alias (Macintosh)
Open the PictureWorks folder on your hard di sk, then
1
open the
Now open the Plug-ins folder and click the EPSON
2
PhotoPC 650 Plug-In
Open the File menu and select Make Alias. An
3
EPSON PhotoPC 650 Plug-In alias icon is created.
Click and drag the Plug-In alias to your Macintosh
4
desktop.
Locate your application’s Plug-In folder. Then click and
5
drag the Plug-In alias from your desktop to the folder.
HotShots folder within it.
icon.
Plug-In
Connect the camera to your computer using the serial
1
cable; see page 4-9 for instructions.
Start your application.
2
Windows: From the File menu, choose Import, then
3
Select TWAIN_32 Source (or Acquire, then
TWAIN Select Source). Go to step 4.
Macintosh: From the File menu, select
select EPSON PhotoPC 650 Plug-in. Go to step 6.
Choose EPSON PhotoPC 650 TWAIN as the
4
TWAIN source, then click
From the File menu, choose Import, then TWAIN_32
5
(or Acquire, then TWAIN Acquire).
Select.
Import, then
Getting Photos Into Your Computer
4-18
Page 71

6 You see the EPSON PhotoPC 650 TWAIN or Plug-In
window (the Windows screen is shown below). The
pictures in your camera appear in the window.
Camera Content
tab
pictures in
your ca mera
(If you don’t see the pictures in your camera when you
open the window, click
work or you see an error message, see page 4-23.)
If the current transfer speed displayed on the Camera
Content tab is
57600 or lower, see the next section to
select a faster transfer speed.
When you’re ready to select the pictures you want to
transfer, see page 4-20.
Setup tab current transfer speed
Open Camera. If that doesn’t
Changing the Picture Transfer Speed
If the current transfer speed displayed on the Camera
Content tab is
up the transfer. Follow these steps:
1 Click the Setup tab. You see the Setup screen:
2 Click the arrow in the Speed setting list to open it.
Then select
Macintosh).
3 Click the Camera Content tab to select the pictures
you want to transfer, as described in the next section.
57600 or lower, you can change it to speed
Speed
setting
115200 (for Windows) or 230400 (for
A
B
Getting Photos Into Your Computer
4-19
Page 72

NOTE
The Speed setting you selected is not displayed on the Camera
Content tab unless you click the Open Camera button; however,
your pictures will still transfer at the new rate.
Selecting Pictures to Transfer
NOTE
To permanently erase a picture from your camera, select it and
click Erase, then confirm the erasure.
Once you’ve selected pictures, you’re ready to transfer them
to your camera. See the next section.
There are three ways to select pictures to transfer:
◗ Click an individual picture
◗ Hold down the
Shift or Ctrl key (Windows) or the
key (Macintosh) and click multiple pictures
◗ Click the
Select All button to select all of them.
Your selected pictures are outlined in red.
Getting Photos Into Your Computer
4-20
selected
pictures
J
Transferring Pictures From the Camera to Yo u r C o m p u t e r
There are two ways to transfer your pictures from your
camera to your computer:
Save to Folder and Transfer.
Transfer button
Save to Folder
button
Page 73

◗ The fastest method is Save to Folder. This lets you
transfer your pictures and save them directly to a
selected folder on your hard disk, saving battery power
and time. See the next section for instructions.
◗ You can also use
Transfer to import your pictures into
your application, but they are stored in your computer’s
RAM (memory), not saved directly to your hard disk.
See page 4-22 for instructions.
NOTE
If your camera shuts off automatically while you’re transferring
pictures (to save battery power), click the Open Camera button
on the TWAIN or Plug-In window to “wake it up.”
Saving Pictures to a Folder
1
To save your pictures to a folder on your hard disk, click
the
Save to Folder button. You see one of these dialog
boxes:
Windows
Macintosh
Create New Folder
button
Save as type list
New folder button
File naming field
2
Select the folder you want to save your pictures to, or
click the
Create New Folder (Windows) or New
folder button (Macintosh) to create a new folder.
Getting Photos Into Your Computer
A
B
4-21
Page 74

NOTE
To select a different default folder for the program to use
each time you open it, click the Setup tab on the window
and click Browse under Default Photo Folder.
3 If you want to save your pictures in a format other than
JPEG, select it from the Save as type list (Windows
only). On a Macintosh, you can also type in a different
file name for the image files in the file naming field.
Transferring Pictures Into Your Application
1 To transfer pictures into your application, click the
Transfer button. The pictures are automatically
transferred into your computer’s memory, opened in
individual windows in your application, and numbered
sequentially.
CAUTION
The pictures are not yet saved to your computer’s hard disk.
4 When you’re ready to transfer your pictures, click Save.
As the files are transferred, they are either automatically
given a generic name (Windows) or given the name you
selected (Macintosh), and then numbered sequentially.
To cancel a transfer in progress, click
Cancel
(Windows) or press the J and . keys (Macintosh).
5 Close the EPSON PhotoPC 650 TWAIN or Plug-In
window and return to your application.
You’ll need to open your pictures from disk to use them
in your image editing application. To open them in
HotShots, see Chapter 6 for instructions. To import
them with another application, see Chapter 5.
Getting Photos Into Your Computer
4-22
To cancel a transfer in progress, click Cancel
(Windows) or press the J and . keys (Macintosh).
NOTE
If you see a memory error message while transferring
pictures, close the EPSON PhotoPC 650 TWAIN or Plug-In
window and use the Save to Folder method to transfer your
pictures instead. See page 4-21 for instructions. (You may
also need to close and then reopen your application to freeup your computer’s memory.)
2 After your pictures are transferred, close the EPSON
PhotoPC 650 TWAIN or Plug-In window and return to
your application. You see the picture(s) in the
application window.
Page 75

3 To save your pictures in your application, click a picture
window and select your application’s Save command.
(Check your application’s help utility for detailed
instructions.)
2 Click the Setup tab on the window and make sure the
Port option is set to either
Auto (Macintosh). For best results, try setting the Speed
to
115200 (Windows) or 230400 (Macintosh).
Auto Detect (Windows) or
What To Do If the Camera Doesn’t Respond
If you don’t see your camera’s pictures in the EPSON
PhotoPC 650 TWAIN or Plug-In window and you see an
error message like this one, follow the steps in this section.
1 Click the Open Camera button on the Camera
Content tab. If you still don’t see your pictures and the
error message appears again, continue with step 2.
Port s etting
Speed
setting
3 Click the Camera Content tab, then click Open
Camera
the error message appears again, continue with step 4.
again. If you still don’t see your pictures and
4 Check the cable and make sure the connections are
secure, and the pins inside the connector are not bent.
Getting Photos Into Your Computer
A
B
4-23
Page 76

5 Make sure your batteries have enough power, or your
AC adapter is connected. If your camera automatically
shuts off (to save battery power), “wake” it by turning it
off and on again.
6 Click Open Camera again. If you still don’t see your
pictures and the error message appears again, continue
with step 7.
7 Close the EPSON PhotoPC 650 TWAIN or Plug-In
window and try transferring your pictures again.
If you still don’t see your pictures and the error message
appears again, see Chapter 9 for more troubleshooting
tips.
Getting Photos Into Your Computer
4-24
Page 77

.
p
5
Getting Your Photos Into Documents
Gardening Monthly
Cactus Fever
Large, round or cylindrical cacti with deep
accordianlike ribbing and prominent spines
comprise this group of Mexican and Southwestern
U.S. natives. They vary i n size and shape, but all
are easy to grow and can reach 10 ft. tall and wide.
Spring and summer flowers bloom in pink or
yellow in a circle at t he plant’s crown. Don’t plant
where children ar e present.
Recipe of the Month
Grilled Cactus Pads
* 1 pound cactus leaves * Olive Oil
This is an interesting treat for a cookout. Scrub cactus leaves
well with a vegetable scrubber to remove any spines that may
be on them. With the end of a potato peeler cut around the
spiney nodules and remove them. Make sure that all are
removed. Grill the leaves over charcoal or wood fire for 1 0
to 12 minutes on each side. Thicker leaves may take slightly
longer to grill. Brush leaves with oil occasionally while
grilling. Serve hot.
- Focus on Echinocatus
This print sample was created using actual 1024x768 pixel images taken with the EPSON PhotoPC 600 XGA color digital camera. It was
rinted with the EPSON Stylus Color 600 printer at 1440 dpi on EPSON Photo Quality Glossy Paper.
Sunflowers
Sunflowers are big-leafed, sturdy plants that need
full sun and moist soils. Seeds attract birds.
Perennial species grow rapidly, forming sizable
clumps that can become invasive. Pla nt in large
gardens or parks. Start by division or seed. All
bloom in late summer a nd fall.
November 1998
New Next Month
Orchid Mania
Landscaping Page 2
Bulbs Page 3
Book Reviews Page 4
Seeds Page 5
Supplies Page 6
hotoPC 650 provides several methods for getting
your pictures into newsletters, flyers, and other
P
projects. You can import an image into your application,
or copy and paste it. You can even drag and drop a picture
from a HotShots collection directly into a document
(Windows only). This chapter describes the following:
◗
Importing imag es into documents
◗
Getting images with copy and paste
◗
Using drag and drop from a HotShots collection
(Windows only)
NOTE
Although most of the instructions and illustrations in this chapter apply
to Windows, you can fol low the same steps on a Macint osh (if
applicable).
A
B
Getting Your Photos Into Documents
5-1
Page 78

Importing Images Into Documents
Once your pictures are transferred and saved on your hard
drive, you can import them into your applications. If your
application can’t import JPEG files, you can use the Save As
feature of HotShots to convert them to another format; see
HotShots online help for instructions.
NOTE
Your picture may display poor image quality after you import it.
However, in most cases it will print correctly.
Follow these steps to import a picture into your document:
1
Start your word processor or other application.
2
Open the document in which you want to use the
picture.
3
Select the point where you want to place your picture.
4
Select Picture from the Insert menu, then select From
File
. (In some applications you may need to select
different commands, such as
usually in the File menu.) A file selection dialog box
appears.
Import Picture, which are
5
Locate and select the image you want to insert. In some
applications you can see a preview of your picture.
6
Click OK (or Insert, Import, or whatever command
your application uses) to insert your picture. The picture
appears in your document.
Getting Your Photos Into Documents
5-2
Page 79

NOTE
In some applications, you can add a frame around the picture if
you want to move it around on the page or resize it. In other
applications, you create a frame first, and then place the picture in
it. For instructions, see your application’s online help or
documentation.
Getting Images with Copy and Paste
You can use this method to place a picture in just about any
type of document or project. Follow these steps:
3
Now select Copy from the Edit menu.
4
Start your word processor or other application.
5
Open the document in which you want to use the
picture.
6
Select the point where you want to place the picture.
7
Choose Paste (or Paste Special) from the Edit menu.
A copy of the picture appears in your document.
Using Drag and Drop From a
1
Open your picture in HotShots; see page 6-2 for
instructions.
2
From the Edit menu,
click
Select All. A
dotted border appears
around your picture.
dotted
border
Collection
Once you have organized your pictures into HotShots
collections, you can easily drag and drop them into
documents or other projects (Windows only). For more
information on using HotShots collections, see Chapter 6.
NOTE
Dragging and dropping an image into a document works only with
OLE-2.0-compliant applications, such as Microsoft Word,
PowerPoint,
on how well your application supports OLE 2.0, your images may
not look as good when you drag and drop them as when you
import them.
WordPerfect, or Lotus SmartSuite. Depending
Getting Your Photos Into Documents
5-3
A
B
Page 80

Follow these steps:
1 Start HotShots as described on page 4-11.
2 Click Get on the remote
control to open the Get
menu, if necessary. Then
select
Get from Disk.
Get button
Get from
Disk
3 Click the Open a
Collection
see the Open dialog box.
button. You
Open a
Collection
6 Open the document in which you want to use the
picture. Arrange the window for HotShots so it is next
to the window for your application.
4 Locate the collection you
want and double-click the
collection name to open it.
5 Start your word processor
or other application.
Getting Your Photos Into Documents
5-4
click the picture . . .
hold down the mouse
button . . .
and drag it to your
document
7 Click the image you want to copy from the HotShots
collection.
8 While holding down the mouse button, drag the image
to the location where you want it in your document.
9 Release the mouse button. The picture appears in your
project or document in the other application.
Page 81

6
Working with Photos and Collections
Action Travel, Inc.
Action Travel, Inc.
Action Travel, Inc. Action Travel, Inc.
Escape On An Affordable
Great Summer Weekend Specials
1357 World Drive, Torrance, CA 90509
Outdoor Adventure!
ou can use HotShots collections to organize your
Y
pictures, add identifying information to them, and
even display them in slide shows. You can also print your
pictures or collections and put them in dozens of
predefined layouts, incl udi ng pa ges that combine diffe rent
pictures of various sizes. This chapter covers the
following:
◗ Opening pictures and collections
◗ Saving modified pictures
◗ Organizing pictures in collections
National Pa r k
Excursion
$250 All-Inclusive Package for Either Outing!
Please Call Our Helpful Representatives for Mor e Information
310-555-5555
Sailing
Expedition
◗ Printing pictures and collections
◗ Using Photo Page layouts
◗ Displaying collections as slide shows
Working with Photos and Collections
A
B
6-1
Page 82

Opening Pictures and Collections
You can open individual pictures in HotShots, or open a
collection and then open the picture from there. For
instructions on starting HotShots, see page 4-11.
TIP
The first time you use HotShots, you should calibrate your
monitor so your pictures look their best on screen. Click the Get
button, then select Open a Picture. Select the calibrat.bmp
(Windows) or calibrat.pct (Macintosh) file in the HotShots folder
and click Open. (Windows path: Program Files/PictureWorks/
HotShots; Macintosh: PictureWorks, HotShots folder.) You see a
grayscale strip numbered 0 through 10. Adjust your monitor’s
brightness and contrast until you can clearly see the 0 and 10;
then close the picture.
Opening an Individual Picture
Follow these steps to open a picture that’s not in a collection:
1
Click the Get button on the remote control.
2
Select Get from Disk and click the Open a Picture
button. (You can also select
File menu.)
Open Picture from the
3
You see the Open dialog box.
Open the folder where you
saved the picture, highlight the
picture file, and click
Open.
Your picture opens in a
window.
Opening a Collection
Follow these steps to open a collection, and then open a
picture from it:
1
Click the Get button on the remote control.
2
Select Get from Disk and click the Open a
Collection
Collection
3
You see the Open dialog box. Open the folder where
you saved your collection, highlight the collection, and
click
button. (You can also select Open
from the file menu.)
Open.
Working with Photos and Collections
6-2
Page 83

4 Your collection
opens in a
window.
5 To open a picture in the collection, double-click it. The
picture opens in its own window, as shown to the left.
(To add pictures to a collection, see “Adding or Deleting
Pictures in Collections” to the right.)
Using Collections
HotShots collections provide a convenient way to access and
view your pictures. Here are some of the things you can do
with collections:
◗ Add or delete pictures in collections
◗ Move or copy pictures from one collection to another
◗ Rename pictures and collections
◗ Add information to your pictures—such as a subject or
description—to make finding specific pictures easier
Saving Pictures
When you save changes you make to your pictures, it’s best
to save your picture with a new name so you always have
your original; see page 6-5.
However, you can save your picture with the same name, if
you like. Just select
NOTE
If you try to close a picture that you have made changes to,
HotShots asks if you want to save your changes or not. If you
choose Yes, your picture is saved with the same name
automatically. If you choose No, your changes aren’t saved.
Save Picture from the File menu.
Adding or Deleting Pictures in Collections
There are two ways to add a picture to your collection: using
drag-and-drop and using the Add button.
To drag and drop a picture into a collection, open the
picture and collection as described on page 6-2. Then click
the gray grab bar on the picture, drag it to the collection
window, and release the mouse button.
Working with Photos and Collections
6-3
A
B
Page 84

The picture appears in the collection window.
click the gray grab bar . . .
hold down the mouse
button . . .
then drag the picture to
the collection window
To add an unopened picture, click the Add button on
the taskbar in the collection window. You see the Add to
Collection dialog box. Select the picture you want to add and
click
Add (Windows) or Open (Macintosh). The picture
appears in the collection window.
To delete a picture from a collection, click it; a green line
appears around the picture. To select multiple pictures for
deletion, hold down the
Ctrl (Windows only) or Shift key as
you click the pictures. Then click the Delete button. You
see a confirmation message; click
Yes.
Organizing Pictures in Collections
You can easily drag and drop images between HotShots
collections to organize them in any way you want.
Follow these steps to copy pictures from one collection to
another:
Follow the steps on page 6-2 to open the collection
1
where the pictures are located. Then open the collection
you want to copy the images to.
Click the picture or pictures you want to move or copy;
2
a green line appears around your selection. Hold down
the
Ctrl (Windows only) or Shift key to select multiple
pictures.
selected
pictures
Working with Photos and Collections
6-4
Page 85

3 Then click inside one of the selected images and hold
down the mouse button. Drag the image(s) to the other
collection window and release the mouse button. The
images are copied to the collection.
copied
pictures
3 Select a location to store your renamed file. Then type in
the new name and click
Options dialog box.
Save. You see the JPEG
4 Click OK. The new name appears above the picture (in a
window) or below the picture (in a collection).
Adding Collection Information
To quickly add a text and/or recorded description to your
entire collection, follow these steps:
1 Open your collection as described on page 6-2.
2 Click the Collection Info button. Type a
description in the field on the Collection Image
Properties dialog box.
Saving a Picture with a New Name
You can easily rename a picture in the HotShots window or
in a collection. Follow these steps:
1 Open the picture as described on page 6-2. In a
collection, double-click the picture; it opens in its own
window.
2 Select Save As from the File menu. You see the Save As
dialog box.
3 To record voice information for your collection, click
Record. You see this dialog box:
Working with Photos and Collections
A
B
6-5
Page 86

NOTE
Your computer must be set up to record sound before you
can use the Record function. See your computer
documentation for details.
4 Click the Record button to record your message,
then click the Stop button when you’re finished. To
play back your message, click the Play button. With
a Macintosh, you can also pause the message playback
with the Pause button.
3 To quickly add a keyword to multiple pictures, click the
Add to Keywords button. Type a keyword in the
field on the Add Keyword dialog box and click
To add multiple information items to one picture, click
the File Info button on the collection taskbar. You
see the Collection Image Properties dialog box.
picture file
location
OK.
5 When your message is how you want it, click Save. You
see the Collection Image Properties dialog box.
6 Click OK to save your collection information.
Adding Picture Information
You can add information to pictures in your collections to
make it easy to find them by criteria such as subject,
keywords, or description. Follow these steps:
1 Open your collection as described on page 6-2.
2 Select the picture or pictures you want to add
information to.
Working with Photos and Collections
6-6
Subject field
Keyword field
Desc ription field
Enter a subject, keywords, and/or description to help
identify your picture in the dialog box fields. Then
click
OK.
The information is saved with the picture so you can
view it or search for it, as described in the next sections.
Page 87

Viewing Picture Information
To view basic information about a picture outside of a
collection—such as resolution, file size, file type, or folder
location—click on the picture and select
Get Info from the
Image menu.
To view basic information plus any descriptive information
that you added to a picture in a collection, follow these steps:
Open your collection as described on page 6-2.
1
Click the picture you want to view information on.
2
To view the picture alongside its descriptive
3
information, click the Card View button to change
the collection view. Use the scroll bar to check
information on other pictures in your collection.
To view the descriptive information and change it at the
same time, if necessary, click the File Info button
on the collection taskbar. You see the Collection Image
Properties dialog box, shown to the left.
Searching for Pictures in a Collection
To find a picture or set of pictures in a collection, you can
search for them by a variety of identification criteria.
Follow these steps to search in a collection:
Open your collection as described on page 6-2.
1
Click the Find button on the taskbar. You see the
2
Find in Collection dialog box.
Select the search criteria you want to use in the Find
3
Where fields, as described in the following table.
Search criterion Modifier Description
Name (file name) contains Enter the whole name, part of the
Kind (file type) is Select a file type from the list or
Date modified is, is not, is
Size (file size) is less than
Subject contains Enter the whole subject, part of the
Keywords contains Enter one o r more of the keywords
Description contains Enter the whole description, part of
before, or is
after
is greater than
name, or even one letter of the name
choose all image files; choose from:
.BMP, .EPS, .FPX, .GIF, .JPG, .PCX,
.PCD, .PSD, .PCT, or .TIF
Enter a date in
Enter a file size in kilobytes (KB)
subject, or even on e letter of the
subject you added
you added
the description, or even one letter of
the description you added
mm/dd/yy
format
A
B
Working with Photos and Collections
6-7
Page 88

4 Click Find. If the first picture matching the search
criteria is found, the picture is highlighted. If no picture
is found, you see a message.
5 To find another picture matching the search criteria,
click
Find Next.
Printing a Picture or Collection
HotShots offers many choices for printing an individual
picture or collection. You can:
◗ Print an individual picture at full size (one per page)
◗ Print multiple copies of the picture on one sheet of
paper
◗ Size your picture to a standard photo size, such as wallet
size or 5 × 7, printing either one or multiple copies on a
sheet of paper
◗ Use HotShot’s Smart Print feature to print a test strip
with varying image quality settings and adjust your
picture before you print
◗ Print an entire collection of pictures and include
descriptive information about them, if you like
Printing an Individual Picture
To print an individual picture at the size of your paper,
first open the picture you want to print; see page 6-2 for
instructions.
Printing with Windows
1 Select Printer Setup from the File menu. Make sure
your printer is selected and click the
2 Select the print settings for your printer, making sure to
select the correct paper size setting. (See your printer
manual for instructions.)
3 Select Print from the File menu. You see the Print
dialog box. Click
Printing on a Macintosh
OK to print your picture.
1 Select Page Setup from the File menu. Select some of
the print settings for your printer, making sure to select
the correct paper size setting. (See your printer manual
for instructions.)
2 Select Print from the File menu. You see the Print
dialog box. Select the rest of your print settings, then
click
Print to print your picture.
Properties button.
Working with Photos and Collections
6-8
Page 89

Sizing and Printing Multiple Copies of an
Individual Picture
Follow these steps to print an individual picture at a different
size and/or in multiple copies on a single page:
Open the picture you want to print; see page 6-2 for
1
instructions.
Select the size at which you want to print your picture,
3
as described in the following table.
Size setting Description
Wallet Size 2 × 3 inches (5.08 × 7.62 cm)
3 X 5 7.62 × 12.70 cm
4 X 6 10.16 × 15.24 cm
Click Share on the remote control to open the Share
2
menu. Then select
Share button
Print Pictures
option
Print Pictures from the menu.
5 X 7 12.70 × 17.78 cm
Fit to page Prints as large as possible on the paper size you select
Select the number of copies of your picture you want
4
in your print settings.
printed on one page:
◗
1 per page prints a single copy of your picture. If
the picture’s proportions are different than the size
you selected in step 3, it is sized to fit on the paper
size you select in step 5 with its initial proportions.
◗
Fill Page prints multiple copies of the picture at
the size you select in step 5, filling the printable area
on the paper size you select in step 6.
Working with Photos and Collections
A
B
6-9
Page 90

5 Do one of the following:
◗ Windows: Select
the Share menu on the remote control. (You can
also select
Make sure your printer is selected and click the
Properties button.
Select the print settings for your printer, making
sure to select the correct paper size setting. (See your
printer manual for instructions.) When you return
to the Printer Setup dialog box, click
Print It Now from the bottom of the Share
Select
menu. You see the Print dialog box. The number of
picture copies that will print on the page is shown in
the Print dialog box.
Printer Setup at the bottom of
Printer Setup from the File menu.)
OK.
Print It Now from the bottom of the Share
Select
menu. You see the Print dialog box. Select the rest
of your print settings. The number of picture copies
that will print on the page is shown in the Print
dialog box.
NOTE
The print options you select from the Share menu on the
remote control affect your print job only if you select Print It
Now from the remote control. They do not affect print jobs
printed from the Print option in the File menu, which
produces only pictures that are fit to the page size.
6 Click OK (Windows) or Print (Macintosh) to print
your picture(s).
◗ Macintosh: Select
Page Setup at the bottom of
the Share menu on the remote control. (You can
also select
Page Setup from the File menu.)
Select some of the print settings for your printer,
making sure to select the correct paper size setting.
(See your printer manual for instructions.)
Working with Photos and Collections
6-10
Page 91

Printing a Picture with Smart Print
You see the Smart Print dialog box:
The HotShots Smart Print feature lets you quickly adjust the
sharpness and brightness of your picture before you print it.
The Smart Print setting you select is then applied to any
other pictures you print until you change the setting.
You use Smart Print by printing a test strip of an area of your
picture using nine different sharpness and brightness
settings. Then you select the example you want to use to set
the image quality and print your adjusted picture.
Follow these steps to print with Smart Print:
Open the picture you want to print; see page 6-2 for
1
instructions.
Click Share on the remote control to open the Share
2
menu. Then select
Select Smart Print from the bottom of the Share menu
3
on the remote control. (You can also select
from the File menu.)
Print Pictures from the menu.
Smart Print
Smart Print setting examplesimage area marker
Nine Smart Print setting examples using different
sharpness and brightness levels are shown in the middle
of the dialog box, with the currently selected setting
outlined and described beneath.
The image area used in the examples is in the middle of
your picture by default, but you can select a new area.
A
B
Working with Photos and Collections
6-11
Page 92

4 To select new area, click the image area marker and drag
it to a new location; then release the mouse button. The
new image area appears in the nine Smart Print setting
examples.
5 You can print a page containing all the examples so you
can select the one you want to use. Click
Strip
. You see the Print dialog box. Click OK to print.
Print Test
6 Examine the printed test strip to determine which
example looks the best. Click that example in the Smart
Print dialog box; the new example is outlined.
7 Click OK when you’re finished.
8 Now follow the steps in either “Printing an Individual
Picture” on page 6-8 or “Sizing and Printing Multiple
Copies of an Individual Picture” on page 6-9 to print
your picture using the new Smart Print setting.
The Smart Print setting you choose applies to any
subsequent pictures you print. To change the setting, repeat
the steps in this section.
NOTE
The results you get with Smart Print depend on your current
printer driver settings; see your printer manual for details.
Printing a Collection
Follow these steps to print an entire collection of pictures
using the currently selected collection view:
1 Open the collection you want to print; see page 6-2 for
instructions.
2 Select the format in which you want your collection
printed by choosing a view in the collection window:
view selection buttonsprint icon
◗ Click Large Icon View for a slide-size format
with file names beneath each picture.
◗ Click Small Icon View for a small thumbnail of
each picture.
Working with Photos and Collections
6-12
Page 93

◗ Click Line View for a smaller thumbnail format
with file names and other picture information to the
right of each picture.
Then click the Print button. You see the Print
dialog box. Select the rest of your print settings,
then click
Print to print your collection.
◗ Click Card View for a large view of each picture
printed on one page with its file name and other
picture information to the right. After printing the
first picture, click in the scroll bar on the right of
the collection window to print the next picture.
3 Do one of the following:
◗ Windows: Click the Print button. You see the
Print dialog box. Make sure your printer is selected
and click the
Select the print settings for your printer, making
sure to select the correct paper size setting. (See your
printer manual for instructions.) When you return
to the Print dialog box, click
collection.
◗ Macintosh: Select
menu. Select some of the print settings for your
printer, making sure to select the correct paper size
setting. (See your printer manual for instructions.)
Properties button.
OK to print your
Page Setup from the File
Using Creative Templates
HotShots supplies a variety of templates you can use to
display your photos in creative frames, called Photo Pages.
Once you drag and drop one or more pictures into a Photo
Page, you can modify them and add text to the page, if you
like. Then you can save and print the Photo Page.
Creating a Photo Page
Follow these steps to create a HotShots Photo Page:
1 Open a picture, or a collection containing the picture
that you want; see page 6-2 for instructions.
2 Click Share on the remote control to open the Share
menu.
A
B
Working with Photos and Collections
6-13
Page 94

Then select
Photo Page
Make
from
the menu.
3 Select a category of
Photo Page
templates you’d like
to use, such as
Sports, Labels, or
Holiday. The
available Photo
Pages for the
category appear in
the list below the category.
Share button
Make Photo
Page option
template
categories
Photo Page list
4 To view the Photo Page choices, click the up or down
arrow in the list. When you find the Photo Page you
want, click it. A Photo Page window opens:
import or drag
pictures into
these areas
5 Arrange the Photo Page window and your picture or
collection window so you can see them both.
Working with Photos and Collections
6-14
Page 95

6 To import a picture into your Photo Page, you can drag
and drop a picture or select a picture file from disk.
◗ To import an image
that is not in a
collection, place the
mouse cursor in the
gray grab bar
between the image
and the title bar; the
cursor changes to a
hand. Click and drag
the picture to a
Photo Page location;
then release the mouse button.
◗ To import an image from a collection, click the
picture in the collection window and drag it to a
Photo Page location; then release the mouse button.
◗ To import an image from disk, double-click a
picture import area in the Photo Page template and
select the file from the Open dialog box.
gray
grab
bar
7 To import another photo in a different area of your
template, repeat step 6. (To delete a picture you
imported, select
Undo from the Edit menu.)
8 Now follow the steps in the next few sections to modify
your Photo Page, then save it and print it, if you like.
Modifying a Photo Page
Once you’ve created a Photo Page, you can modify it by
moving the picture, increasing or decreasing the picture size,
and adding text.
Follow these steps to modify a Photo Page:
1 Create a Photo Page as described on page 6-13.
2 To modify the picture in the Photo Page, click in the
picture area you want to modify.
A
Your imported picture appears in the Photo Page.
Working with Photos and Collections
B
6-15
Page 96

Four control boxes appear in the corners:
control
boxes
3 Use the tools in the Photo Page window taskbar to
adjust the size and position of the picture:
◗ Click the Enlarge tool, then click in the picture
area to enlarge its size 10% with each mouse click.
◗ Click the Reduce tool, then click in the picture
area to reduce its size 10% with each mouse click.
◗ Click the Pan tool, then click and drag the
picture to reposition it.
4 To add text to the Photo Page, click the Text tool.
Then click and drag the mouse over the area where you
want to place a text box and type your text in the box.
text box
5 Now click on the text box border; the border becomes
striped with control boxes in each corner.
◗ To resize or reposition your text box, click and drag
the striped border.
◗ To edit the text, click inside the text box where you
want the cursor positioned and add or delete text.
Working with Photos and Collections
6-16
Page 97

6 To format all the text in the box, click any of the text
options you want to use in the taskbar:
left, center, and
right align
text color
Follow these steps to save a Photo Page:
1 Select Save As from the File menu. You see the Save As
dialog box.
2 Select the location where you want to store your Photo
Page, then select the file type in the
Save as type list.
bold, italic,
and underline
point size
font
7 If you need to delete a text box, select it and press the
Delete key on your keyboard (Windows) or select
Clear from the Edit menu (Macintosh).
8 Once your Photo Page looks how you want it to, you
can save it or print it, as described on page 6-18.
Saving a Photo Page
You can save a Photo Page in one of a variety of file formats,
such as .JPG, .BMP, or .TIF. However, you may want to
save it in the default Photo Page format (.SSD) so you can
edit the Photo Page later, if you need to.
NOTE
If you select a file type other than the Photo Page format
(.SSD), the picture, text, and template will be “fused” to
create a single image. You won’t be able to modify it as a
Photo Page in the future.
3 Type a name for your Photo Page file and click Save.
To open a saved Photo Page, select
file menu, locate the Photo Page (.SSD) file, and click
Open.
Working with Photos and Collections
Open Picture from the
6-17
A
B
Page 98

Printing a Photo Page
Displaying Collection Slide Shows
Follow the steps below to print your completed Photo Page.
Printing with Windows
Select Printer Setup from the File menu. Make sure
1
your printer is selected and click the
Select the print settings for your printer, making sure to
2
select the correct paper size setting. (See your printer
manual for instructions.)
Select Print from the File menu. You see the Print
3
dialog box. Click
Printing on a Macintosh
Select Page Setup from the File menu. Select some of
1
the print settings for your printer, making sure to select
the correct paper size setting. (See your printer manual
for instructions.)
Select Print from the File menu. You see the Print
2
dialog box. Select the rest of your print settings, then
click
Print to print your picture.
OK to print your picture.
Properties button.
You can display each photo in your collection on your full
monitor screen, one at a time, just like a slide show. Before
playing it, you can select from a variety of transition effects
to use between the pictures.
Follow these steps to display a collection slide show:
Open the collection you want to display as a slide show;
1
see page 6-2 for instructions.
Click the Slide Show button in the collection
2
taskbar. You see a slide option dialog box:
Working with Photos and Collections
6-18
Page 99

3 Select the type of transition you’d like to use for the first
picture and between pictures, as described in this table:
Transition Type Description
Random Transitions
(Windows)
Random (Macintosh)
Wipe Down Replaces pictures by rolling down over them, like
Wipe Up Replaces pictures by rolling up over them, like a
Wipe Left Replaces pictures by rolling left across them
Wipe Right Replaces pictures by rolling right across them
Randomly uses all of the other transition types
between pictures
a window shade being pulled down
window shade being raised
4 Select how you want to display the slide show:
◗
Wait for Mouse Click displays the next slide only
if you click the mouse button
◗
Pause lets you select a delay time between slide
transitions from 5 to 30 seconds
◗
Loop Continuously displays all the slides, then
starts over again automatically
5 Click OK to start the slide show. To stop a slide show in
progress, press the
Esc key on your keyboard.
Horizontal Blinds Replaces pictures in horizontal strips, like window
Vertical Blinds Replaces pictures in vertical strips, like window
Box In Replaces pictures from the outside edges inward,
Box Out Replaces pictures from the center outward, like
Random Blocks Replaces pictures in a pattern of randomly placed
blinds
blinds
like an imploding box
an exploding box
blocks
Working with Photos and Collections
A
B
6-19
Page 100

Working with Photos and Collections
6-20
 Loading...