

Page 1

User’s Guide
ENGLISH
Page 2

Page 3

IMPORTANT NOTICE
All rights reserved. No part of this publication may be reproduced,
stored in a retrieval s ystem, or transmitted in any form or by any means,
electronic, mechanical, photocopying, recording, or otherwise, without
the prior written permission of SEIKO EPSON CORPORATION. No
patent liability is assumed with respect to the use of the information
contained herein. Neither is any liability assumed for damages
resulting from the use of the information contained herein.
Neither SEIKO E PSON CORPORATION nor its af filiates shall be liable
to the purchaser of this product or third parties for damages, losses,
costs, or expenses incurred by the purchaser or third parties as a result
of: accident, misuse, or abuse of this product or unauthorized
modifications, repairs, or alterations to this product, or (excluding the
U.S.) failure to strictly comply with SEIKO EPSON CORPORATION's
operating and maintenance instructions.
SEIKO EPSON CORPORATION shall not be liable against any
damages or problems arising from the use of any options or any
consumable products other than those designated as Original EPSON
Products or EPSON Approved Products by SEIKO EPSON
CORPORATION.
EPSON is a registered trademark of SEIKO EPSON CORPORATION.
PhotoPC is a trademark of SEIKO EPSON CORPORATION.
Macintosh is a registered trademark of Apple Computer, Inc.
Microsoft and Windows are registered trademarks of Microsoft
Corporation.
CompactFlash is a trademark of SanDisk Corporation and has been
licensed to CFA (CompactFlash Association).
General Notice:
purposes only and may be trademarks of their respective owners.
EPSON disclaims any and all rights in those marks.
Copyright©1999 by SEIKO EPSON CORPORATION, Nagano, Japan.
Other product names used herein are for identification
A NOTE CONCERNING RESPONSIBLE USE OF
COPYRIGHTED MATERIALS
Like photocopiers, digital cameras can be misused by improper
photographing of copyrighted material. Unless you have the advice of
a knowledgeable attorney, be responsible and respectful by obtaining
the permission of the copyright holder before photographing
published material.
ii
Page 4

Contents
Introduction
EPSON PhotoPC 650 Features . . . . . . . . . . . . . . . . . . . . 1
System Requirements . . . . . . . . . . . . . . . . . . . . . . . . . . . 1
Safety Instructions. . . . . . . . . . . . . . . . . . . . . . . . . . . . . . 1
Warnings, Cautions, and Notes . . . . . . . . . . . . . . . . . . . 3
Chapter 1 Getting Started
Unpacking Your PhotoPC 650 . . . . . . . . . . . . . . . . . . . . 1-1
Installing the CompactFlash Card . . . . . . . . . . . . . . . . . 1-1
Installing Batteries . . . . . . . . . . . . . . . . . . . . . . . . . . . . . . 1-2
Setting the Date and Time. . . . . . . . . . . . . . . . . . . . . . . . 1-4
Attaching the Strap . . . . . . . . . . . . . . . . . . . . . . . . . . . . . 1-5
Removing the Protective Plastic. . . . . . . . . . . . . . . . . . . 1-5
Chapter 2 Taking Pictures
Taking Pictures with the Viewfinder . . . . . . . . . . . . . . 2-1
Taking Pictures with the LCD Monitor. . . . . . . . . . . . . 2-2
Using the Macro Feature to Take Close-ups . . . . . . . . 2-3
Taking Pictures with the Timer . . . . . . . . . . . . . . . . . . . 2-3
Saving Battery Power with Auto Shut-Off . . . . . . . . . . 2-4
Checking the Status of the Camera . . . . . . . . . . . . . . . . 2-4
Chapter 3 Playing Back and Managing Your Pictures
Playing Back Pictures on the LCD Monitor. . . . . . . . . . 3-1
Playing Back Pictures on TV or Video . . . . . . . . . . . . . . 3-1
Erasing the Currently Displayed Picture. . . . . . . . . . . .3-2
Accessing the Playback Menus . . . . . . . . . . . . . . . . . . . . 3-3
Changing the Camera Settings . . . . . . . . . . . . . . . . . . . .3-4
Locking and Erasing Photos . . . . . . . . . . . . . . . . . . . . . . 3-6
Chapter 4 Getting Photos Into Your Computer
Installing Your PhotoPC 650 Software. . . . . . . . . . . . . . 4-1
Transferring Pictures with the Serial Cable
and HotShots. . . . . . . . . . . . . . . . . . . . . . . . . . . . . . . . . 4-2
Chapter 5 Using Camera Options
Using Optional CompactFlash Cards . . . . . . . . . . . . . . 5-1
Using the Optional AC Adapter . . . . . . . . . . . . . . . . . . . 5-3
Appendix
iii
Page 5

Introduction
EPSON PhotoPC 650 Features
The EPSON® PhotoPC 650 TM i s a co m p l e t e sy s t e m f o r c a p t u r in g
digital images, and includes the following features:
❏
Resolutions up to 1152 × 864 pixels, ideal for printing
images up to 5 × 7 inches
❏
24-bit color image capture
❏
1.8-inch, active matrix TFT color LCD monitor for
previewing and playing back pictures
❏
Video output for playing your pictures back on a TV or for
videotaping them
❏
Built-in lens and filter threads (37 mm)
❏
Built-in flash with red-eye reduction mode
System Requirements
For PCs
❏
486/66 or higher processor (Pentium
❏
Microsoft Windows 95, Windows 98, or
Windows NT
❏
At least 16 MB RAM (32 MB recommended)
❏
At least 50 MB free hard disk space
4.0 and an available serial port
recommended)
❏
Double-speed CD-ROM drive
❏
VGA or SVGA monitor displaying thousands of colors
❏
Mouse or other pointing device
For Macintosh computers
❏
Macintosh with PowerPC or higher processor
❏
System 7.6 or higher, and an available serial port
❏
At least 16 MB RAM (32 MB recommended)
❏
At least 50 MB free hard disk space
❏
Double-speed CD-ROM drive
❏
VGA monitor displaying thousands of colors
❏
Mouse or other pointing device
Note:
To use your Photo PC 650 with an iMac or Power Macintosh G3, you
need to install a PC card reader or USB/Serial port adapter in your
Macintosh. See your dealer for details.
Safety Instructions
Read all these instructions and save them for later reference.
Follow all warnings and instructions marked on the camera and
options.
1
Introduction
Page 6

When using the camera
❏
T o r e du c e t h e r i sk o f el e ct r ic s ho c k, d o n o t r e mo v e t h e co v er
of the camera or options and do not open any
compartments except as instructed in this
❏
Do not insert objects into any openings.
❏
To prevent fire or electric shock, do not expose the camera
or options to rain or moisture, and do not cover the camera
with a blanket.
❏
To prevent fire or explosion, do not use the camera where
flammable or volatile gas is stored.
❏
Do not use outdoors during a thunderstorm.
❏
If the camera or option shows unusual signs such as noise,
odor, or smoke, stop usage and turn off immediately.
Remove the batteries and/or disconnect the AC adapter
from the camera, and unplug the AC adapter from the
electrical outlet.
❏
To prevent possible injury, do not take flash pictures close
to the subject's eyes.
❏
Remove the batteries and/or plug from the camera and
refer servicing to qualified service personnel in the
following circumstances:
Th e powe r cord or plu g is da maged ; liqu id has enter ed the
camera or options; the camera or options have been
dropped, or the case damaged; the camera or options do
not operate normally or exhibit a distinct change in
performance.
❏
Never adjust controls that are not mentioned in the
operating instructions.
User's Guide
❏
If the liquid crystal solution contained in the display panel
or in the screen on the LCD monitor leaks out and gets on
your hands, wash them thoroughly with soap and water.
.
If it gets into your eyes, flush them immediately with water.
When using the strap
❏
Do not swing the camera about. This can damage the
camera or other objects, or injure others.
❏
Do not pull or tighten the strap too firmly while wearing it
around your hand; this can cause serious injury.
❏
Keep the strap away from children.
When using the batteries
❏
Read all relevant safety and operating instructions before
using the batteries.
❏
Only use the batteries in EPSON Digital Cameras as
specified in this manual.
❏
If battery acid gets into your eyes or on your skin,
immediately rinse the affected area thoroughly with water
and seek medical treatment. If a battery is swallowed, seek
medical treatment immediately.
❏
Always use batteries from the same package as a set. Do
not mix old and new batteries, or charged and discharged
batteries.
❏
Do not use manganese batteries.
❏
Keep the batteries from making contact with metal objects
such as coins or keys, which could short circuit the
batteries.
❏
Do not drop, puncture, disassemble, mutilate, or short
circuit batteries. Do not put the batteries near or into fire or
water.
Introduction
2
Page 7

❏
Do not insert batteries into wall outlets or other power
sources such as a car cigarette lighter socket.
❏
Do not solder lead wires or terminals directly to a battery.
❏
To avoid fire or electric shock, do not use batteries that are
leaking or damaged in any way.
❏
To prevent fire or explosion, do not use the charger where
flammable or volatile gas is stored.
For United Kingdom users
Use of options
EPSON (UK) LTD shall not be liable against any damages or
problems arising from the use of any options or consumable
products other than those designated as Original EPSON
Products or EPSON Approved Products by EPSON (UK) LTD.
Safety information
Warning:
w
This appliance must be earthed. Refer to the rating
plate for voltage and check that the appliance voltage
corresponds to the supply voltage.
Important:
The wires in the mains lead fitted to this appliance are
colored in accordance with the following code:
Green and yellow — Earth
Blue — Neutral
Brown — Live
Warnings, Cautions, and Notes
Warnings
w
c
Notes
operation of your camera and options.
bodily injury.
Cautions
your equipment.
contain important information and useful tips on the
must be followed carefully to avoid
must be observed to avoid damage to
3
Introduction
Page 8
Chapter 1
EPS
O
N
EPSON
Getting Started
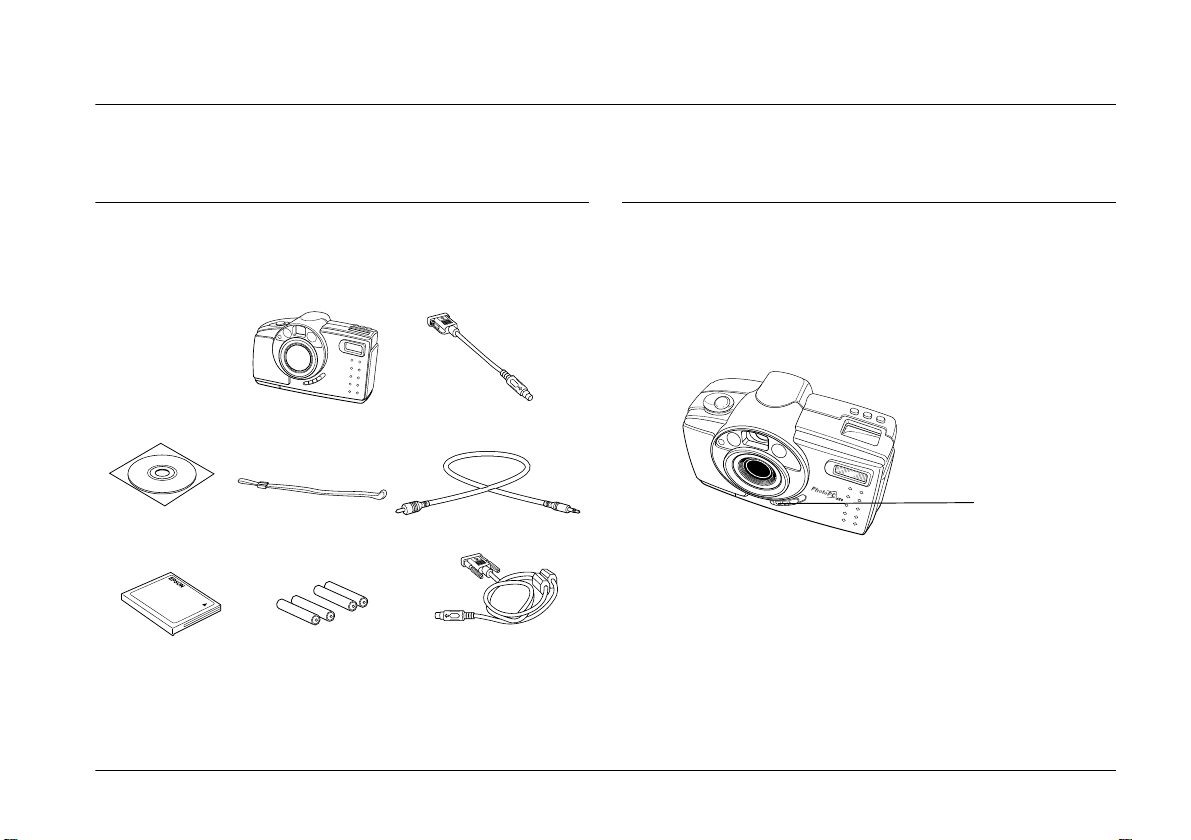
Unpacking Your PhotoPC 650
Make sure you have all the parts shown below.
Mac adapter cable
software (Media
type and quantity
varies by location.)
CompactFlash
Card (8 MB)
PhotoPC 650 camera
habd strap
four AA alkaline
batteries
video cable
serial cable
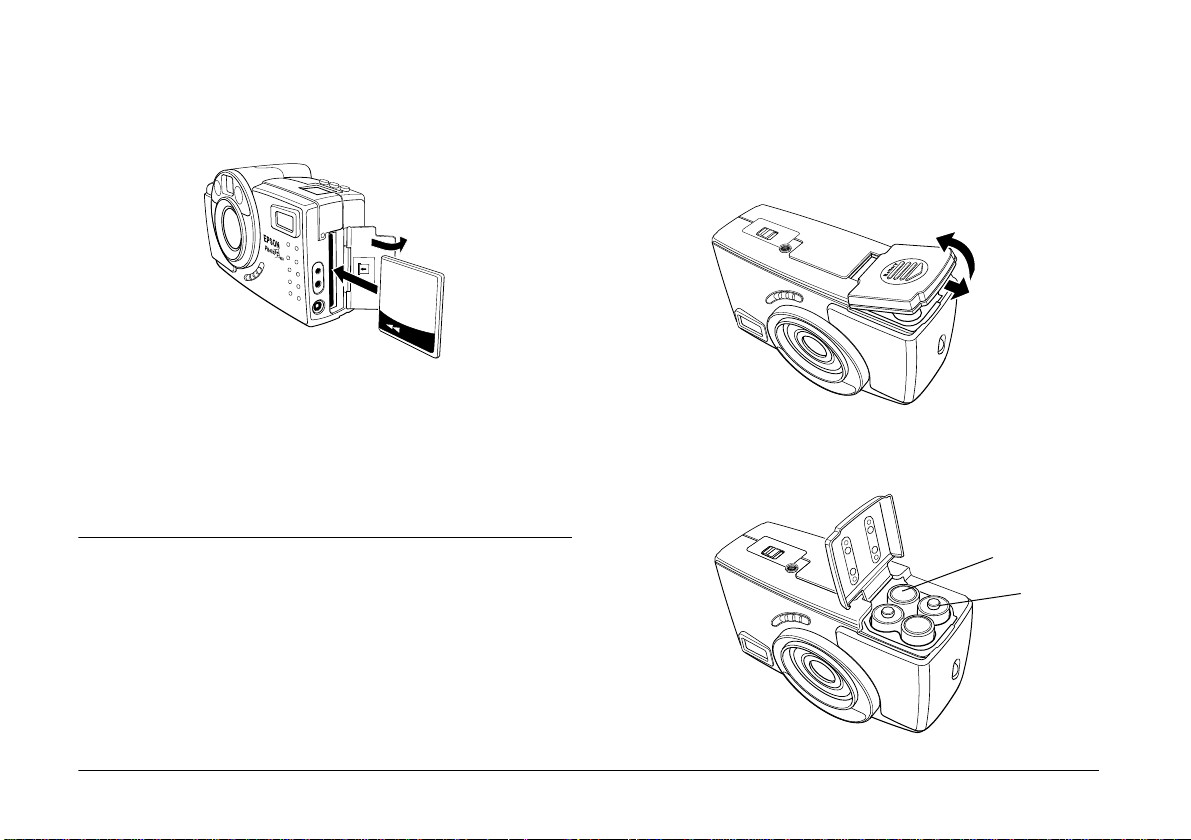
Installing the CompactFlash Card
Before you can take pictures with your camera, you
must install a CompactFlash Card. Follow these steps.
1. Make sure the camera is turned off.
Slide lens cover
switch down to
turn off camera.
Getting Started
1-1
Page 9
2. Open the camera’s card and port cover, and insert
the card all the way into the slot, as shown. Make
sure the card’s label faces the front of the camera.
CARD
3. Close the card and port cover.
2. Orient the camera upside down with the front of
the camera facing you.
3. To open the battery cover, push it down and to
the right. Then raise the cover.
Note:
For instructions on removing CompactFlash Cards, see
“Removing a CompactFlash Card” on page 5-1.
Installing Batteries
Before installing the batteries, be sure to read the
safety instructions on page 2. Then follow these steps.
1. Make sure the camera is turned off. The camera is
off when the lens cover switch is down.
1-2
Getting Started
4. Insert all four batteries into the compartment,
positioning the + and – ends as shown.
– end
+ end
Page 10
5. Lower the battery cover, then slide it to the left
while pressing it down until it snaps into place.
See the next section for important information about
using your batteries safely and efficiently.
Using batteries safely and efficiently
When your PhotoPC 650 batteries wear out,
them with one of the following types of AA batterie
❏
Rechargeable NiMH (recommended) or NiCad batteries
❏
Single-use alkaline batteries
❏
Single-use lithium batteries (longer life)
Warning:
To avoid the danger of fire or explosion, do not mix different
w
types of batteries. Do not allow the battery contacts to touch
metal objects such as coins or keys, which could short out the
battery’s circuits. Read all safety and handling instructions
before using batteries.
Note the following when using batteries:
❏
Replace all four batteries at the same time. Do not mix old
and new batteries.
❏
When the camera is not used for long periods of time,
remove the batteries and store them at a low temperature
in a dry location. Store away from the reach of children.
replace
s.
❏
Battery life varies depending on the battery type, the
manufacturer, and other factors.
❏
Avoid using your camera in low temperatures, especially
below 10 °C (50 °F); this drains your batteries faster.
Disposing of the batteries
Before disposing of batteries, make sure you discharge them
completely.
Warning:
Be sure to securely cover the + end of each battery with
❏
w
For the Netherlands users:
Do not dispose of the batteries with ordinary refuse. Instead,
d is p os e of t he m as s m al l ch e mi c al w as t e i n ac c or d a nc e wi t h l o ca l
laws, and the following Dutch Government Gazette 45, KCA
Marking:
For German users:
Do not dispose of batteries with ordinary refuse. Instead,
dispose of them in a recycle box in accordance with local laws.
tape to prevent combustion or explosion when disposing.
Dispose of used batteries according to the manufacturer’s
❏
instructions and in compliance with all applicable laws.
Contact your local government agency for information
about battery recycling and disposal.
Bij dit produkt zijn batterijen geleverd.
Wanneer deze leeg zijn, moet u ze niet
weggooien maar inleveren als KCA.
Getting Started
1-3
Page 11
Setting the Date and Time
You need to set the camera’s clock before using the
camera for the first time, and each time after installing
new batteries.
Note:
To adjust the date and time while using camera, see
“Changing the Camera Settings” on page 3-4.
Make sure you have installed the CompactFlash Card
in the camera, then follow these steps to set the
camera’s clock.
1. Slide the lens cover switch up to the
to open the lens cover and turn on the camera.
ON
position
2. On the back of the camera, slide the monitor
switch to
PLAYBACK
. A message asking you to
set the clock appears on the LCD monitor.
LCD monitor
switch
SELECT
button
3. Press the
SELECT
button. The Clock Setting menu
appears with the month setting highlighted in
white.
1-4
Getting Started
EPSON
EPSON
lens cover
switch
Clock Setting
05/15/99
02:37
4. If necessary, press the button to increase the
number or the button to decrease the
number, until the month is correct.
5. Press the
SELECT
button. The month setting is
saved and the day setting is highlighted.
Page 12
6. Adjust the day, year, hour, and minute settings as
described above until the date and time are
correctly adjusted.
7. Press the
SELECT
button to exit the Clock Setting
menu.
8. Slide down the lens cover switch to turn the
camera off.
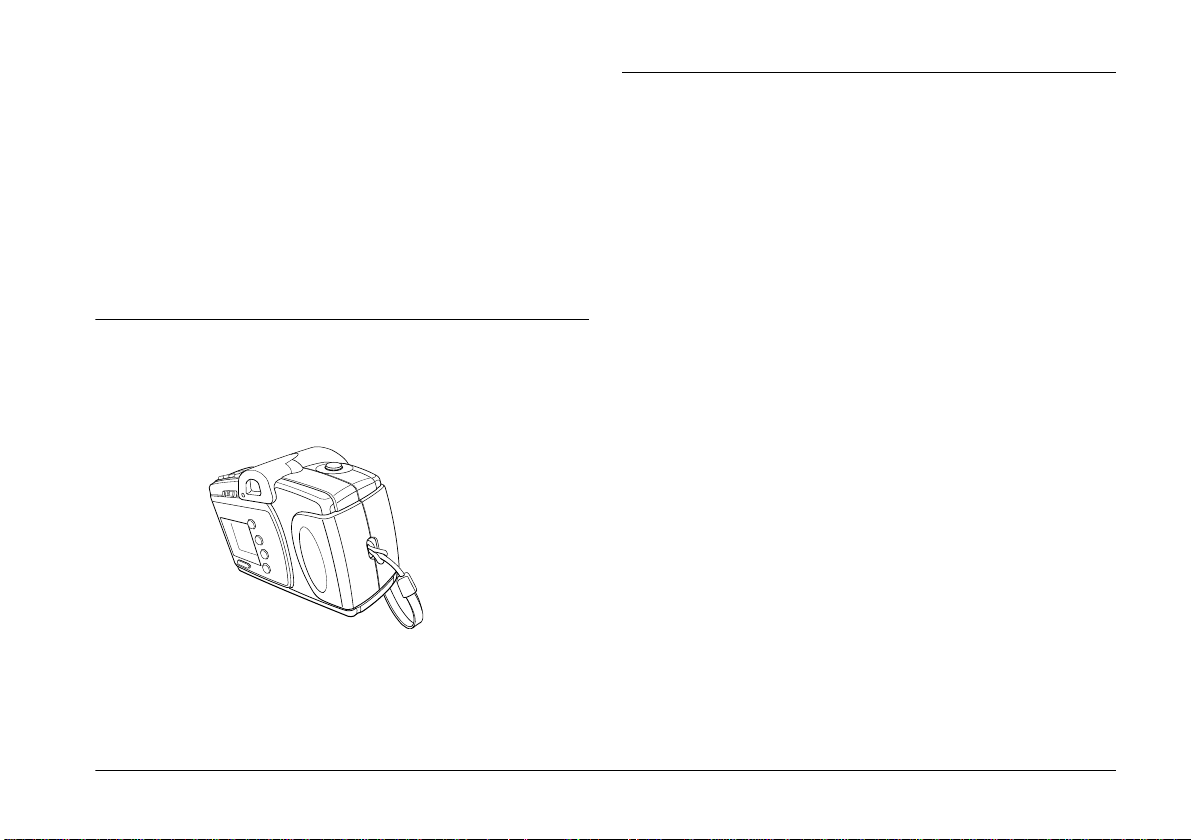
Attaching the Strap
Slide the loop through the holder on the camera, then
pull the strap through the loop.
.
Removing the Protective Plastic
Peel off the protective plastic sheets from the camera’s
back panel, and from the viewfinder area on the front
of the camera.
Getting Started
1-5
Page 13

Chapter 2
Taking Pictures
Taking Pictures with the Viewfinder
Follow these steps to take a picture with the
viewfinder.
1. Make sure you are at least 0.3 meters (12 inches)
away from your subject. (If you want to get closer,
use the macro feature as described on page 2-3.)
2. Turn the camera on and wait until the status light
beside the viewfinder turns green and stays on.
shutter
button
status
light
viewfinder
3. Look straight through the viewfinder and center
your subject.
4. Press and hold the shutter button halfway down
to lock the auto focus. The status light beside the
viewfinder changes from green to orange. If you
wish, you can now move your subject off-center
without altering the focus.
5. Press the shutter button the rest of the way down
to take the picture.
6. Hold the camera still until it beeps and the status
light starts flashing red. This indicates that the
camera has captured and is processing the image.
Caution:
c
If you set the camera down while the light is still
flashing, make sure you handle it carefully. The
camera may lose your image if you set it down too
hard.
2-1
Taking Pictures
Page 14

7. The quick review image appears on the camera’s
LCD monitor to let you see how your picture
turned out, and to let you delete the picture, if
necessary, before your camera saves it. This image
remains on the monitor for about five seconds,
and a gauge appears on the image indicating the
time you have left to delete the picture. To delete
the picture, hold down the
press the
BACK
button.
FUNCTION
quick review gauge
button and
1. Turn on the camera and slide the LCD monitor
switch left to the
VIEW
position. A preview of
your picture appears on the LCD monitor.
LCD monitor switch
If you did not delete the image, the image is saved
when the status light stops flashing and turns
green. You can take another picture at this point.
Taking Pictures with the LCD Monitor
Follow these steps to take a picture with the LCD
monitor.
2. Center your subject on the monitor.
3. Follow the instructions from step 4 of “Taking
Pictures with the Viewfinder” on page 2-1.
Taking Pictures
2-2
Page 15

Using the Macro Feature to Take Close-ups
Taking Pictures with the Timer
You can use the camera’s macro function to take
pictures from as close as 15 centimeters (6 inches) to
your subject. Follow these steps.
1. Turn the camera on and slide the monitor switch
VIEW
to the
the LCD monitor.
2. Press the
the camera until the macro icon appears on the
display panel at the top of the camera. To use the
macro feature and the timer together, press the
macro/timer button until the macro and
timer icons appear together on the display panel.
3. Center your subject on the monitor.
4. Follow the instructions from step 4 of “Taking
Pictures with the Viewfinder” on page 2-1.
Note:
To take macro close-ups in low light conditions, use a tripod
and the timer (see the next section), and disable the flash (as
described on page 2-5). Otherwise, your pictures may
appear blurry and washed-out.
position. A live preview appears on
macro/timer button on the top of
/
Setting the timer creates a ten-second delay between
the time you press the shutter button and the actual
image capture. This allows you to take a picture of
yourself.
Follow these steps to take a picture with the timer.
1. Place the camera on a flat surface or on a tripod.
The tripod threads are located on the bottom of
your camera.
/
2. Turn on the camera and wait until the status light
turns green.
3. Press the
timer icon appears on the display panel at the top
of the camera. To use the timer and the macro
feature together, press the
button until the timer and macro icons
appear together on the display panel.
4. Press the shutter button. The red timer light on the
front of the camera comes on, and the timer
icon on the display panel begins flashing. About
two seconds before the camera takes the picture,
the red timer light begins flashing.
macro/timer button until the
/
macro/timer
/
2-3
Taking Pictures
Page 16

The camera beeps when the image is captur ed and
the status light flashes red.
Checking the Status of the Camera
5. The quick review image appears on the LCD
monitor.
For more information on the quick review image,
see page 2-2.
Saving Battery Power with Auto Shut-Off
To save battery power, the camera automatically turns
off after a certain period of time. When the LCD
monitor is on, the camera turns off when idle for 30
seconds; when the monitor is off, the camera turns off
when idle for 60 seconds.
To turn the camera back on, press the
BACK
button, or use the lens cover switch to turn the
SELECT
camera off and back on again.
or
The display panel shows the current camera settings
and the status of your battery power.
.
battery power
video mode
red-eye
reduction flash
flash setting
image quality setting
❏
Battery power
When your battery power is running low, the
low battery icon appears. This icon flashes
when your battery power is completely out.
❏
Picture counter
The number in the upper right corner of the
display panel shows how many pictures you can
take.
Making the image quality setting
Press the image quality button on top of the camera
to cycle from one setting to the other. You can select
from these image quality settings.
pictures
remaining
timer icon
macro
icon
Taking Pictures
2-4
Page 17

Note:
Depending on the content of your pictures, your camera
may hold more or fewer pictures then listed here.
Standard
×
Produces color images at 640
CompactFlash Card holds approximately
88 pictures, but the image size is smaller and
includes less detail when enlarged.
Fine
Produces color images at 1152 × 864 pixels,
with moderate compression.
The CompactFlash Card holds
approximately 47 pictures. Fine image
quality is sufficient for most purposes.
Super fine
Produces color images at 1152 × 864 pixels
with low compression. The CompactFlash
Card holds approximately 30 pictures.
Uncompressed
Produces color images at 1152 × 864
pixels with lossless compression. The
CompactFlash Card holds approximately
four pictures in this mode.
480 pixels. The
Making the flash settings
The camera’s built-in flash is effective within a range
of one to three meters (3.2 to 9.8 feet). Press the flash
button to cycle through the four flash settings. Your
flash setting remains in effect even after you turn off
the camera.
An icon for each setting appears on the display panel.
Automatic
The flash goes off automatically whenever it is
needed for adequate lighting. Use only when
you are one to three meters (3.2 to 9.8 feet) from
your subject.
Forced flash
The flash goes off with every picture you take.
Flash off
The flash is disabled.
Red-eye reduction
The flash blinks on and off rapidly, then
flashes normally to prevent light from
reflecting directly off your subject’s pupils.
2-5
Taking Pictures
Page 18

Chapter 3
n
Playing Back and Managing Your Pictures
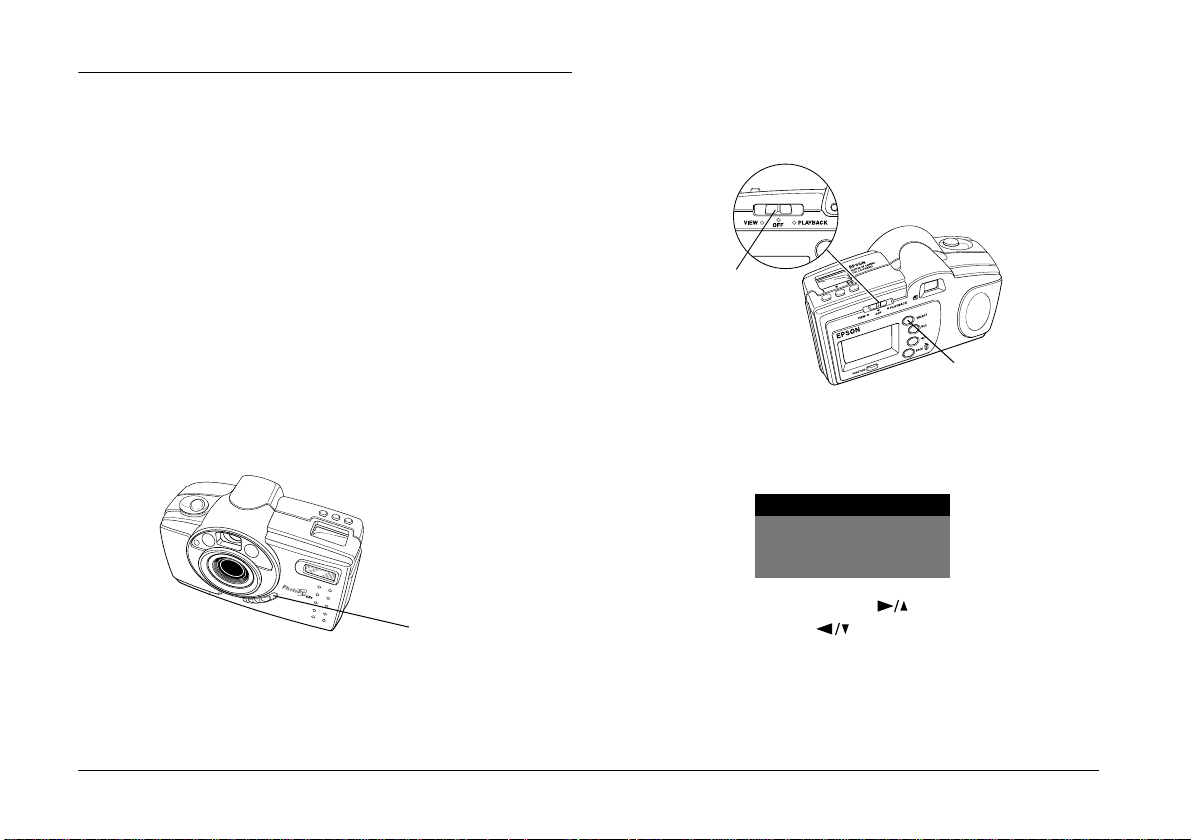
Playing Back Pictures on the LCD Monitor
When you set the monitor switch to
last picture you took appears on the LCD monitor,
along with the image quality setting and picture
number information.
image
quality
Press the or button to move backward or
forward through your pictures.
number of current picture/number of photos take
PLAYBACK
13/20
, the
Playing Back Pictures on TV or Video
Use the video cable that came with your PhotoPC 650.
Setting the video standard
Set the monitor switch to
steps to select a video standard.
1. Press the
menus.
2. Press the or button until the Video menu
appears.
3. Press the
standard you want to use. (Select
Canada, or
SELECT
SELECT
PAL
Playing Back and Managing Your Pictures
PLAYBACK
button to display the Playback
Video
NTSC (US/CAN)
PAL (Europe)
button to select the video
for Europe/S. America/etc.)
and follow these
NTSC
for U.S./
3-1
Page 19

4. Press the
BACK
button to exit the menus.
4. Turn on the TV (and VCR), and switch to the
correct video mode.
Viewing the pictures
Using the optional AC adapter is highly
recommended when you play back your pictures on
a TV. See Chapter 5, “Using Camera Options.”
Follow these steps to play back your pictures on TV.
1. Make sure the camera and TV (and VCR) are
turned off.
2. Open the camera’s card and port cover and
connect the black end of the video cable to the
Video Out
3. Connect the yellow end of the cable to the
IN
port on the television or VCR.
port.
VIDEO
5. Turn on the camera and slide the monitor switch
PLAYBACK
to
6. Press the
camera. The last picture you took appears on the
TV screen. Press the or button to move
forward or backward through your pictures.
7. When you are finished viewing pictures, press the
BACK
button, slide the LCD monitor switch to
OFF
. Then tur n off the camera, and disconnect the
video cable.
.
SELECT
button on the back of the
Erasing the Currently Displayed Picture
Make sure the LCD monitor switch is set to
PLAYBACK
displayed. Then follow these steps.
1. Hold down the
BACK
and the image you want to erase is
FUNCTION
button.
button and press the
3-2
Playing Back and Managing Your Pictures
Page 20

The following message appears on the LCD
monitor.
2. Slide the LCD monitor switch to
PLAYBACK
last photo you took appears on the LCD monitor.
. The
Confirmation
Erase this
photo?
Yes: SELECT
No: BACK
Note:
You cannot erase any pictures that are locked. To
unlock pictures, see “Locking and Erasing Photos” on
page 3-6.
2. Press the
SELECT
button to erase the picture and
exit the menus.
Accessing the Playback Menus
Follow these steps to access the playback menus.
1. Turn on the camera by sliding the lens cover
switch up to the ON position.
LCD monitor
switch
3. To access the menus, press the
SELECT
Menu icons appear at the top of the monitor with
the currently selected menu icon highlighted. The
corresponding menu appears below the icons, as
shown.
button.
Playing Back and Managing Your Pictures
3-3
Page 21

menu icons
Settings
05/15/99
05:15
: On
: On
4. Press the and buttons to view the
settings for other menus. You can choose from the
following menus.
Settings
Quick Review, and LCD brightness). See
page 3-4 for more information.
(set the date, time, beep, and
Photo Control
pictures, or reformat CompactFlash
Cards). See page 3-6 for instructions.
Video
(NTSC or PAL video output to
standard TV). See page 3-1 for
instructions.:
Slide Show
automatically). Press
start the slide show. Press
Language
LCD display and menus.)
5. Press the
options.
6. To exit the menus, press the
the menu icons and settings disappear.
SELECT
(erase or lock your
(play back pictures
SELECT
(select from six languages for
button to select the menu
BACK
button to
BACK
to stop it.
button until
3-4
Information
information on played-back pictures).
Playback Mode
at a time or in groups of 9).
(turn off/on the display of
(play back images one
Playing Back and Managing Your Pictures
Changing the Camera Settings
The Settings menu includes the following
settings, and lets you:
Adjust the date and time
Page 22

Turn the alert beep on and off
(When on, camera beeps when an image is
captured.)
Turn the quick review on and off
(When on, you can review/delete the picture you
just took.)
Adjust the LCD monitor brightness.
To change the settings above, follow the steps below.
1. Display the Settings menu as described in
“Accessing the Playback Menus” on page 3-3. The
current settings are displayed.
Settings
05/15/99
05:15
: On
: On
2. Press the
or button to select the icon of the setting you
want to change.
SELECT
button once, then press the
❏
To set the date and time:
SELECT
Press
setting. Press
the number, then press the
again to save your changes and highlight the
next setting. Continue changing the settings
this way until all the date and time settings
are correct and saved.
❏
To turn the alert beep on or off:
Press or to highlight the alert
beep icon, then press the
select On or
❏
To turn the quick review function on or off:
Press or to highlight the quick
review icon, then press the
select On or
❏
To change the LCD monitor brightness:
Press or to highlight the
brightness icon, then press the
to highlight the LCD brightness slider. Press
the or buttons adjust the monitor
brightness.
3. When you are finished changing the settings,
press the
BACK
to highlight the month
the or button to adjust
SELECT
SELECT
Off
.
SELECT
Off
.
button until you exit the menus.
button
button to
button to
SELECT
button
Playing Back and Managing Your Pictures
3-5
Page 23

Locking and Erasing Photos
The Photo Control menu lets you erase or lock
photos to protect from the deletion and unlock
them, or reformat CompactFlash Card.
To erase or lock/unlock pictures using the Photo
Control menu, follow these steps:
Note:
To reformat CompactFlash Card, see “Using Optional
CompactFlash Cards” on page 5-1.
2. Press the
highlighted. If you want to erase photos, press the
SELECT
press the button once (
then press the
One of these menus appears.
SELECT
button again. If you want to lock photos,
Erase Photos Lock Photos
Select Photo Select Photo
Erase All Lock All
button once.
SELECT
button.
Unlock All
Erase
Lock
is highlighted),
is
1. Display the Photo Control menu as described in
“Accessing the Playback Menus” on page 3-3.
Photo Control
Erase
Lock
Reformat
3-6
Playing Back and Managing Your Pictures
3. Press the or button to choose
Photo
Select Photo, Lock All
Photos menu
❏
❏
4. Press the or button to move the white
selection frame to the photo you want to erase or
lock.
Erase All
or
If you chose
press the
message appears. Follow the instructions on
the LCD monitor.
If you chose
button. The thumbnail images of your photos
are displayed. Go to the next step.
from Erase Photos menu, or
Unlock All
or
.
Erase All
SELECT
Select Photo
Lock All
,
button. A confirmation
, press the
Select
from Lock
Unlock All
or
SELECT
Page 24

5. Press the
around the image turns yellow. If you want to
erase or lock other photos at the same time, use
the or button to frame them, then press
the
Note:
To cancel the selection of a photo, press the
button again.The selection box turns white.
6. When you have selected all the photos you want
to erase or lock, press the
confirmation message appears.
7. Follow the instructions on the LCD monitor.
Note:
When you lock photos, a lock icon appears in the
selected photos. When you unlock photos, the lock
icon disappears from the photos.
8. When you are finished, press the
until you exit the menus.
SELECT
SELECT
button. The selection frame
button to select them.
BACK
SELECT
button. A
BACK
button
Playing Back and Managing Your Pictures
3-7
Page 25

Chapter 4
Getting Photos Into Your Computer
Installing Your PhotoPC 650 Software
The included CD-ROM contains these applications for
your Windows PC or Macintosh computer.
❏
PictureWorks HotShots
❏
EPSON PhotoPC 650 TWAIN driver (Windows)
or Plug-In (Macintosh)
On a Windows PC
Follow these steps:
1. Close all open applications, then insert the
PhotoPC 650 software CD-ROM shipped with
your camera in the CD-ROM drive.
2. Double-click
PhotoPC 650
the
3. Double-click the
opens.
My Computer
icon.
Setup.exe
. Then double-click
icon. The installer
4. Follow the instructions on the screen to install
HotShots and EPSON PhotoPC 650 TWAIN. Be
sure to select
Options screen.
Full Install - Typical
On a Macintosh
Follow these steps:
1. Insert the PhotoPC 650 software CD-ROM
shipped with your camera in the CD-ROM drive.
2. Double-click the
desktop to open the CD-ROM window.
3. Double-click the
HotShots and the EPSON PhotoPC 650 Plug-In
driver. Click
instructions.
PhotoPC 650
HotShots Installer
Continue
and follow the on-screen
icon on your
on the Setup
icon to install
4-1
Getting Photos Into Your Computer
Page 26

Transferring Pictures with the Serial Cable and HotShots
Follow the steps in these sections to transfer your
pictures directly from the camera using the serial cable
and HotShots.
Connecting the Camera to a Windows PC
Make sure you have the serial cable that came with
your camera. Before you start, turn off the camera,
LCD monitor, and your computer.
1. Locate a serial port on the back of your computer.
You may have two serial ports labeled COM1 and
COM2, or they may be labeled with icons. For best
results, use COM1 (port 1) to connect your
camera.
Note:
If you have a 25-pin serial port, you can use a 9- to 25pin adapter, available at most computer stores.
2. Line up the serial connector on the cable with one
of the serial ports on your computer, and insert
the connector. Then tighten the screws.
3. Open the card and port cover on the side of the
camera. Then insert the other end of the cable into
the camera’s serial port.
4. Turn on your computer system.
Getting Photos Into Your Computer
4-2
Page 27

Note:
If you have problems connecting to your COM port, check
your computer’s COM port settings and try again. If you
have a high-speed serial board, you may be able to transfer
pictures at 230.4 Kbps. See page 4-5 for instructions on
using EPSON PhotoPC 650 TWAIN to change your Port
speed setting.
Connecting the Camera to a Macintosh
Make sure you have the long serial cable and short
Macintosh adapter that came with your camera.
Before you start, turn off the camera, LCD monitor,
and Macintosh.
1. Connect the small Macintosh adapter cable to
either the modem port or printer port on
the back of your Macintosh.
Line up the arrow on the cable connector with the
port icon on your Macintosh. Then insert the
connector.
.
Note:
If you share a serial port with another device, make sure
AppleTalk™ is turned off. Your Macintosh may not
recognize the camera if AppleTalk is on. Also, if you
have problems connecting to the printer port, use the
modem port instead.
2. Connect the long serial cable to the short
Macintosh adapter cable, then tighten the screws.
Macintosh
adapter
4-3
Getting Photos Into Your Computer
Page 28

3. Open the card and port cover on the side of the
camera and insert the connector on the long serial
cable into the camera’s serial port.
4. Turn on your Macintosh system.
Opening the EPSON PhotoPC 650 TWAIN or
Plug-In driver
To transfer the pictures via the serial cable, you must
first
open the EPSON
(Windows) or Plug-In driver (Macintosh) from
within HotShots.
1. Connect the camera to your computer using the
serial cable; see page 4-2 for instructions.
PhotoPC 650 TWAIN
In Windows, click
PhotoPC 650
Start
, and then click
On a Macintosh, open the
then open the
HotShots
the
HotShots
icon.
3. The main HotShots
window with the
remote control
appears. Click the
Get
button on the
remote control, then
Get from
click
Camera
.
4. Click the arrow in the
Select Ca mera menu.
Then click
EPSON
PhotoPC 650
TWAIN
or
(Windows)
EPSON PhotoPC 650
, point to
Programs
,
HotShots 1.5
PhotoPC650
folder,
folder and double-click
Get
button
Get from
Camera
Select
Camera
menu
(Macintosh).
.
2. Start HotShots.
Getting Photos Into Your Computer
4-4
Page 29

5. Click the
Pictures
in your
camera
Camera
Content tab
Setup tab
Current transfer speed
Transfer
button
Save to
Folder
button
Get Pictures Now
Pictures window appears.
button. The Get
The EPSON PhotoPC 650 TWAIN or Plug-In dialog
box appears (the Windows version is shown below).
The pictures in your camera appear in the dialog box.
6. Click the
Note:
❏
❏
4-5
Open Them
If you select
Add to New Collection
Existing Collection
button.
Add to
or
, you may see a dialog box
allowing you to change the transfer file format. It is
best to keep your files in the JPEG format because of
their small size and quick transfer speed. This only
affects files you transfer into HotShots (see page 4-8);
it does not affect files you save to your hard disk (see
page 4-7).
On a Macintosh, if no existing collection is open and
you select
, HotShots
Add to Existing Collection
then prompts you to select a collection file.
Getting Photos Into Your Computer
(If you do not see the pictures in your camera when
you open the dialog box, click
Open Camera
If the current transfer speed displayed on the
Content
speed from the
tab is
57600
or lower, select a faster transfer
Setup
menu.
.)
Camera
When you are ready to select the pictures you want to
transfer, see the next section.
Page 30

Selecting pictures to transfer
There are three ways to select pictures to transfer.
❏
Clicking an individual picture
❏
Holding down the
J
key (Macintosh), and clicking multiple
the
pictures
❏
Clicking the
pictures
Your selected pictures are outlined in red.
Note:
To permanently erase a picture from your camera, select it
and click
Once you have selected pictures, you are ready to
transfer them to your camera. See the next section.
Erase
, then confirm the erasure.
Shift
Select All
Ctrl
or
key (Windows), or
button to select all the
Transferring pictures from the camera to your computer
❏
The fastest method is using the
Camera Content
on the
transfer your pictures and save them directly to a
selected folder on your hard disk, saving battery
power and time. See the next section for
instructions.
❏
You can also use the
Camera Content
into HotShots. This stores the pictures in your
computer’s RAM (memory), not on your hard
disk. See page 4-8 for instructions.
Note:
If your camera shuts off automatically while you are
transferring pictures (to save battery power), click the
Open Camera
box to turn it back on.
button on the TWAIN or Plug-In dialog
Transfer
tab to import your pictures
Save to Folder
tab. This lets you
button on the
You can use the
button to transfer your pictures from your camera to
your computer.
Save to Folder
button or the
Transfer
Getting Photos Into Your Computer
4-6
Page 31

Saving pictures to a folder
Wind
1. To save your pictures to a folder on your hard
disk, click the
button. One of
Save to Folder
these dialog boxes appears:
ows
Macintosh
Create new
folder button
Save as type list
New folder
button
File naming field
Note:
To select a different default folder for the program to
use each time you open it, click the
dialog box and click
Folder
.
Browse under Default Photo
Setup
tab on the
3. If you want to save your pictures in a format other
than JPEG, select it from the
Save as type
list
(Windows only). On a Macintosh, you can also
type in a different file name for the image files in
the file naming field.
4. When you are ready to transfer your pictures,
Save
click
.
As the files are transferred, they are either
automatically given a generic name (Windows),
or given the name you selected (Macintosh), and
then numbered sequentially.
To cancel a transfer in progress, click
Cancel
(Windows) or press the J and period (.) keys
(Macintosh).
2. Select the folder you want to save your pictures
to, or click the create new folder (Windows) or
new folder button (Macintosh) to create a new
folder.
4-7
Getting Photos Into Your Computer
5. Close the EPSON PhotoPC 650 TWAIN or PlugIn dialog box and return to HotShots.
Page 32

You need to open your pictures from disk to use
them in your image editing application. To open
them in HotShots, see your HotShots
documentation. To import them with another
application, see that application’s documentation.
Transferring pictures into HotShots
1. To transfer your pictures into HotShots, click the
Transfer
❏
Note:
The pictures are not yet saved to your computer’s hard
disk.
❏
button.
If you selected
page 4-5, HotShots automatically transfers
the pictures into your computer’s memory,
opens them in individual windows, and
numbers the windows sequentially.
If you selected
HotShots transfers your pictures into a new
collection window and saves them to the
HotShots collection folder.
Open Them
in step 6 on
Add to New Collection
❏
If you selected
HotShots transfers them into an open
collection or prompts you to open the
collection you want to transfer them to. Then
HotShots saves the pictures in the same
folder as the collection.
Note:
If a memory error message appears while transferring
pictures, close the EPSON PhotoPC 650 TWAIN or
Plug-In dialog box and use the Save to Folder method
to transfer your pictures instead. See page 4-7 for
instructions. (You may also need to close and then
reopen HotShots to free-up your computer’s memory.)
To cancel a transfer in progress, click
(Windows), or press the J and period (.) keys
(Macintosh).
2. After your pictures are transferred, close the
,
EPSON PhotoPC 650 TWAIN or Plug-In dialog
box and return to HotShots. The picture(s)
appear(s) in the HotShots window. To work with
your pictures and collections in HotShots, see
your HotShots documentation.
Add to Existing Collection
Cancel
,
Getting Photos Into Your Computer
4-8
Page 33

.
Chapter 5
Using Camera Options
Using Optional CompactFlash Cards
Removing a CompactFlash Card
Caution:
c
❏
Never remove the card while the camera is
accessing it. Data in the card may be lost or
damaged.
❏
Avoid using or storing the card in direct
sunlight or in dusty, hot, or humid places.
Note:
For instructions on installing CompactFlash Cards,
see page 1-1.
1. Make sure the lens cover switch is down and the
camera is off.
2. Open the card and port cover on the side of the
camera. Then slide the
bottom of the camera to the left to eject the card.
Eject Card switch
3. Remove the card, then close the card and port
cover.
Eject Card
switch on the
Formatting a CompacfFlash Card
You only need to format a card if a message appears
on the LCD monitor instructing you to do so. With the
card installed in the camera, follow these steps.
5-1
Using Camera Options
Page 34

1. Turn on the camera, slide the LCD monitor switch
PLAYBACK
to
Press the or button until the Photo
Control menu appears:
Erase
Lock
Reformat
2. Press the
, then press the
Photo Control
SELECT
button.
SELECT
Erase
is highlighted.
button.
Transferring pictures with a PCMCIA adapter
You can easily transfer pictures stored on a
CompactFlash Card directly to your computer by
using a PCMCIA adapter. To use this adapter, your
computer must be equipped with a Type II PCMCIA
card slot.
If you are using a Macintosh, see your Macintosh
documentation for more information.
Follow these steps to transfer pictures with a PCMCIA
adapter.
3. Press the button twice to highlight
Reformat
confirmation message appears.
4. To format the card, press the
again. The Photo Control menu appears.
5. Press
Note:
If you have problems formatting or using a CompactFlash
Card, contact the manufacturer for technical support.
, then press the
BACK
until you exit the menus.
SELECT
SELECT
button. A
button
1. Remove the CompactFlash Card from your
camera, as described on page 5-1.
2. Insert the card all the way into the adapter.
3. Insert the adapter into your computer’s Type II
PCMCIA slot.
Using Camera Options
5-2
Page 35

4. Once the adapter and card are installed in your
computer’s PCMCIA slot, you can transfer photos
by simply copying them to your hard drive. To do
so, locate the card’s
photos are stored, and drag-and-drop the image
files to your hard disk. See your computer
documentation for more details.
Note:
Be careful not to delete the Photo650 folder on the card. If
you do, you will need to reformat the card when you reinstall it in the camera.
Photo650
folder where your
Using the Optional AC Adapter
Using the optional PhotoPC 650 AC adapter (B867✽✽1)
is highly recommended for saving battery power
when you transfer your pictures via the serial cable.
Warning:
w
❏
Use only the adapter designed for the
PhotoPC 650. Using any other adapter may
cause fire, electrical shock, or injury.
❏
Do not alter the plug on the power cable, and do
not use the adapter for any other purpose than
powering your PhotoPC 650.
Follow these steps to connect the AC adapter.
1. To avoid losing any images or settings, make sure
the camera is finished processing. Then turn off
the camera.
2. Open the connector cover on the side of the
camera and plug the adapter cable into the
DC port.
3. Plug the AC adapter into an electrical outlet.
5-3
❏
To ensure the best performance, make sure the
AC adapter is fully plugged into the camera.
Using Camera Options
Page 36

Appendix
Contacting Customer Support
If your camera is not operating properly and you cannot solve
your problem using this guide, contact customer support
services for assistance.
We will be able to help you more quickly if you are able to give
the exact information indicated below.
Serial number of your camera
(The serial number label is on the bottom of the camera.)
Brand and model of your computer
Camera software version
About
(Click
version number.)
Version of Windows
(for example, 95, 3.1, or NT 4.0)
Software application(s) you normally use with your
camera and their version number(s)
on the Help menu in your application for its
For United Kingdom and the Republic of Ireland users
If you purchased your product in the UK or the Republic of
Ireland, EPSON (UK) LTD provides a range of customer services
and technical support.
Support Via the World Wide Web
❏
For information on the latest EPSON products, software
drivers, on-line user guides and answers to frequently
asked questions:
http://www.epson.co.uk
❏
To email EPSON Technical Support:
http://www.epson.co.uk/support/email/
❏
For a full list of EPSON Customer and Warranty Support
services:
http://www.epson.co.uk/support/
Support Via Telephone
Our Customer and W arranty Support teams can be conta cted by
calling 0870 163 7766 in the UK or 0044 0870 163 7766 from the
Republic of Ireland. They can provide the following services:
Contacting Customer Support
A-1
Page 37

❏
Technical information on installing, configuring and
operating your EPSON products
❏
Arranging for faulty EPSON products to be repaired within
the warranty period
Before you call, please have the following information ready:
Product Model:
Serial number of your product:
(The serial number label is on the back of the product)
Brand and model of your computer:
Driver software version:
(Click the About button in your driver)
Operating System (for example, Windows 3.1/ 95/98, NT
3.5/4.0, Mac OS):
❏
Where to purchase genuine EPSON consumables,
accessories, and options
CE Marking
This product conforms to the following Directive(s) and
Norm(s):
Conforms to the following Directive(s) and Norm(s):
EMC Directive 89/336/EEC:
EN 55022 Class B
EN 50082-1
IEC 801-2
IEC 801-3
IEC 801-4
Software applications(s) you normally use with your
product and their version numbers(s):
Pre Sales Enquiry Desk
Our Enquiry Desk team can be contacted by calling 0800 220546
in the UK or 1 800 409132 from the Republic of Ireland, by faxing
01442 227271 in the UK or 0044 1442 227271 from the Republic
of Ireland, and via Email at
provide the following information:
❏
Pre sales information and literature on new EPSON
products (also available via our world wide web site at
http://www.epson.co.uk
A-2
CE Marking
info@epson.co.uk.
)
They can
Environmental
Temperature Operating: 41 to 95 °F (5 to 35 °C)
Humidity
(noncondensing)
Storage: –4 to 140 °F (–20 to 60 °C)
Operating: 30 to 80%
Storage: 10 to 80%
Page 38

Printed in R.O.C.
 Loading...