

Epson PhotoPC 600 Color User Manual

ABA

EPSON AMERICA, INC.
LIMITED WARRANTY
What is Covered: Epson America, Inc. (“Epson”) warrants to the first end-user
customer of the EPSON PhotoPC 600 Digital Camera enclosed with this limited
warranty statement, if purchased and used in the United States or Canada, conforms
to the manufacturer’s specifications and will be free from defects in workmanship and
materials for a period of one year from the date of original purchase. Epson further
warrants to the first end-user customer that the Nickel Metal Hydride Battery
Charger and four Nickel Metal Hydride Batteries enclosed with this limited warranty
statement will be free from defects in workmanship and materials for a period of
ninety days from the date of original purchase. EPSON warrants that the EPSON
product is manufactured from new components and parts or like-new components
and parts which perform like new and meet the EPSON standard of quality.
What Epson Will Do To Correct Problems: Should your EPSON product prove
defective during the warranty period, please call the EPSON Connection at
800-922-8911 for warranty repair instructions and return authorization, if required.
Epson will, at its option, repair or replace on an exchange basis the defective unit,
without charge for parts or labor. If the product requires repair or replacement,
package it in its original container or an equivalent, along with proof of the date of
original purchase. When warranty service involves the exchange of the product or of
a part, the item replaced becomes EPSON property. The exchanged product or part
may be new or previously repaired to the EPSON standard of quality. Exchange or
replacement products or parts assume the remaining warranty period of the product
covered by this limited warranty.
What This Warranty Does Not Cover: This warranty covers only normal consumer
use in the United States and Canada. This warranty does not cover damage to the
EPSON product caused by parts or supplies not manufactured, distributed or
certified by EPSON. This warranty does not cover third party parts, components or
peripheral devices added to the EPSON product after its shipment from EPSON.
EPSON is not responsible for warranty service should the EPSON label or logo or the
rating label or serial number be removed or should the product fail to be properly
maintained or fail to function properly as a result of misuse, abuse, improper
installation, neglect, improper shipping, damage caused by disasters such as fire,
flood, and lightning, improper electrical current, software problems, interaction with
non-EPSON products, or service other than by an EPSON Authorized Servicer.
Packaging and shipping costs incurred in presenting your EPSON product for
warranty service are your responsibility. Shipping costs from the EPSON repair
facility will be EPSON’s responsibility. If a claimed defect cannot be identified or
reproduced in service, you will be held responsible for costs incurred.
THE WARRANTY AND REMEDY PROVIDED ABOVE ARE EXCLUSIVE
AND IN LIEU OF ALL OTHER EXPRESS OR IMPLIED WARRANTIES
INCLUDING, BUT NOT LIMITED TO, THE IMPLIED WARRANTIES OF
MERCHANTABILITY OR FITNESS FOR A PARTICULAR PURPOSE. SOME
LAWS DO NOT ALLOW THE EXCLUSION OF IMPLIED WARRANTIES. IF
THESE LAWS APPLY, THEN ALL EXPRESS AND IMPLIED WARRANTIES
ARE LIMITED TO THE WARRANTY PERIOD IDENTIFIED ABOVE.
UNLESS STATED HEREIN, ANY STATEMENTS OR REPRESENTATIONS
MADE BY ANY OTHER PERSON OR FIRM ARE VOID. EXCEPT AS
PROVIDED IN THIS WRITTEN WARRANTY, NEITHER EPSON AMERICA,
INC. NOR ITS AFFILIATES SHALL BE LIABLE FOR ANY LOSS,
INCONVENIENCE, OR DAMAGE, INCLUDING DIRECT, SPECIAL,
INCIDENTAL OR CONSEQUENTIAL DAMAGES, RESULTING FROM THE
USE OR INABILITY TO USE THE EPSON PRODUCT, WHETHER
RESULTING FROM BREACH OF WARRANTY OR ANY OTHER LEGAL
THEORY.
In Canada, warranties include both warranties and conditions.
Some jurisdictions do not allow limitations on how long an implied warranty lasts
and some jurisdictions do not allow the exclusion or limitation of incidental or
consequential damages, so the above limitations and exclusions may not apply to you.
This warranty gives you specific legal rights, and you may also have other rights which
vary from jurisdiction to jurisdiction.
To locate the EPSON Authorized Reseller nearest you call:
(800) 922-8911
or write to:
Epson America, Inc. • P. O. Box 2842 • Torrance, CA 90509-2842 • MS:CS1
B

IMPORTANT NOTICE
DISCLAIMER OF WARRANTY
Epson America makes no representations or warranties, either express or
implied, by or with respect to anything in this manual, and shall not be liable for
any implied warranties of merchantability and fitness for a particular purpose or
for any indirect, special, or consequential damages. Some states do not allow the
exclusion of incidental or consequential damages, so this exclusion may not
apply to you.
COPYRIGHT NOTICE
All rights reserved. No part of this publication may be reproduced, stored in a
retrieval system, or transmitted, in any form or by any means, electronic,
mechanical, photocopying, recording, or otherwise, without the prior written
permission of Epson America, Inc. No patent liability is assumed with respect to
the use of information contained herein. Nor is any liability assumed for
damages resulting from the use of the information contained herein. Further,
this publication and features described herein are subject to change without
notice.
TRADEMARKS
EPSON and EPSON Stylus are registered trademarks of SEIKO EPSON
CORPORATION.
PhotoPC, EPSON SoundAdvice, and EPSON FaxAdvice are trademarks of
Epson America, Inc.
Image Expert and Camio are trademarks of Sierra Imaging, Inc. in the United
States and other countries and are used under license.
General notice: Other product names used herein are for identification purposes
only and may be trademarks of their respective owners. EPSON disclaims any
and all rights in those marks.
A NOTE CONCERNING RESPONSIBLE USE OF
COPYRIGHTED MATERIALS
Digital cameras and scanners, like photocopiers and conventional cameras, can
be misused by improper copying of copyrighted material. While some countries’
laws permit limited copying in certain circumstances, those circumstances may
not be as broad as some people assume. EPSON encourages each user to be
responsible and respectful of the copyright laws when using digital cameras and
scanners.
C o p y r i g h t © 1 9 9 7 b y E p s o n A m e r i c a , I n c . C P D 5 2 8 1
Torrance, California, USA 4007823
8/97
ii

Contents
Introduction
PhotoPC 600 Features 2
Optional Accessories 3
Minimum System Requirements 3
Windows Systems 3
Macintosh Systems 4
Where To Get Help 4
Software Support 5
Registration 5
Safety Instructions 6
1 Getting Started
Unpacking Your PhotoPC 600 1-1
Identifying Camera Parts 1-2
Using Rechargeable NiMH Batteries 1-4
Charging Batteries 1-4
Installing Batteries 1-6
Handling Batteries 1-8
Attaching the Hand Strap 1-9
Installing Your PhotoPC 600 Software 1-10
Installing for Windows 95 or
WindowsNT4.0 1-10
Installing for Windows 3.1x or
WindowsNT3.51 1-11
Installing on a Macintosh 1-11
Making Software Installation Diskettes 1-11
Setting the Language 1-12
Setting the Date and Time 1-13
2 Taking Pictures
Getting Ready to Take Pictures 2-2
Turning the Camera On and Off 2-2
Saving Power With Auto Shut-off 2-2
Using the Display Panel 2-3
Checking the Battery 2-3
Taking Pictures With the Viewfinder 2-3
Taking Pictures With the LCD Screen 2-5
A
B
iii

Using Macro Mode to Take Close-ups 2-6
Using the Flash 2-6
Taking Pictures With the Timer 2-7
Setting Image Quality and Color Mode 2-8
Fine 2-8
Super Fine 2-8
Monochrome Fine 2-8
Monochrome Super Fine 2-8
Standard 2-8
Taking Special Format Pictures 2-10
Digital Zoom 2-10
Panorama 2-11
Multi-frame 2-12
Checking the Picture Counter 2-12
3 Playing Back Photos
Using the Playback Mode 3-2
Playing Back Pictures One by One 3-3
Playing Back Multiple Pictures 3-4
Playing Your Pictures as a Slide Show 3-5
Turning Off Picture Information 3-5
Erasing Images 3-6
Erasing the Currently Displayed Picture 3-6
Selecting Pictures to Erase 3-7
Locking Photos 3-9
Unlocking Photos 3-10
Playing Back Pictures on TV 3-12
4 Getting Photos Into Your Computer
Connecting the Camera 4-1
Connecting to a Windows PC 4-2
Connecting to a Macintosh 4-3
Transferring Photos With Image Expert 4-4
What To Do if You See an Error Message 4-7
Getting Images Into TWAIN Applications 4-9
Getting Images That You Can Import 4-10
What To Do If the Camera Is Not
Responding 4-12
5 Getting Your Photos Into Documents
Importing Images Into Documents 5-2
Getting Images With Copy and Paste 5-3
Using Drag and Drop From an Album
(Windows only) 5-4
Getting Images With the Camio Viewer
(Windows95) 5-5
To Drag and Drop a Picture Into a Document 5-7
To Transfer Images Before Placing Them 5-8
iv

6 Working With Photos and Albums
Using Albums 6-2
Organizing Pictures in Albums 6-2
Viewing Picture Information 6-3
Printing an Image 6-4
Printing an Album 6-5
Additional Options for Windows 6-6
Displaying Albums as Slide Shows 6-7
Copying to Diskette 6-8
Using an Album as a Screen Saver 6-9
Setting an Image as Wallpaper 6-10
Sending Pictures by E-mail 6-11
7 Editing Images
Viewing and Selecting 7-2
Applying Quick Fix 7-2
Correcting 7-3
Cropping 7-4
Resizing and Changing Resolution 7-5
Rotating 7-6
Flipping 7-7
Applying Special Effects 7-7
Changing the Number of Colors 7-8
8 Using Custom and Advanced Features
Taking Pictures From Your Computer 8-1
Using the Self Timer 8-3
Setting the Shutter Speed 8-4
Taking Pictures with EPSON Photo!2 8-4
Adjusting Camera Settings From Your Computer 8-5
Changing Settings With Image Expert 8-5
Changing Settings With EPSON Photo!2 8-7
Customizing Settings With the LCD Screen 8-8
Setting the Camera Clock 8-9
Setting the Alert Beep 8-10
Setting the LCD Brightness 8-10
Setting the Multi-frame Shooting Time 8-11
Uploading Programs into the Camera 8-11
9 Using Your Camera for Presentations
Uploading Images to the Camera 9-1
Uploading Existing Images From Your
WindowsPC 9-2
Uploading Images From Your Macintosh 9-4
Converting Presentations 9-6
Capturing Windows Screens 9-6
Capturing Macintosh Screens 9-8
Projecting Your Presentation 9-9
A
B
v

10 Using CompactFlash Memory Cards
Installing a Memory Card 10-2
Removing a Memory Card 10-3
Getting Images From a Card to Your Computer 10-3
Using a PCMCIA Adapter 10-4
Transferring Photos 10-4
Formatting a Memory Card 10-4
Getting Memory Information 10-6
Copying to and From a Memory Card 10-7
11 Maintenance and Troubleshooting
Caring for the Camera and Battery Charger 11-1
Cleaning the Camera and Battery Charger 11-1
Storing the Camera 11-2
Solving Camera Problems 11-2
Solving Picture Problems 11-7
A Optional Accessories
Using the AC Adapter A-2
Using a Tripod A-3
B Specifications
Camera B-1
Physical Dimensions B-1
Safety Specifications B-1
Power B-1
Technical B-2
Environmental B-2
Photographic B-3
NiMH Battery Charger B-4
Physical Dimensions B-4
Technical B-4
Optional AC Adapter B-4
Physical Dimensions B-4
Technical B-4
Index
vi
Introduction
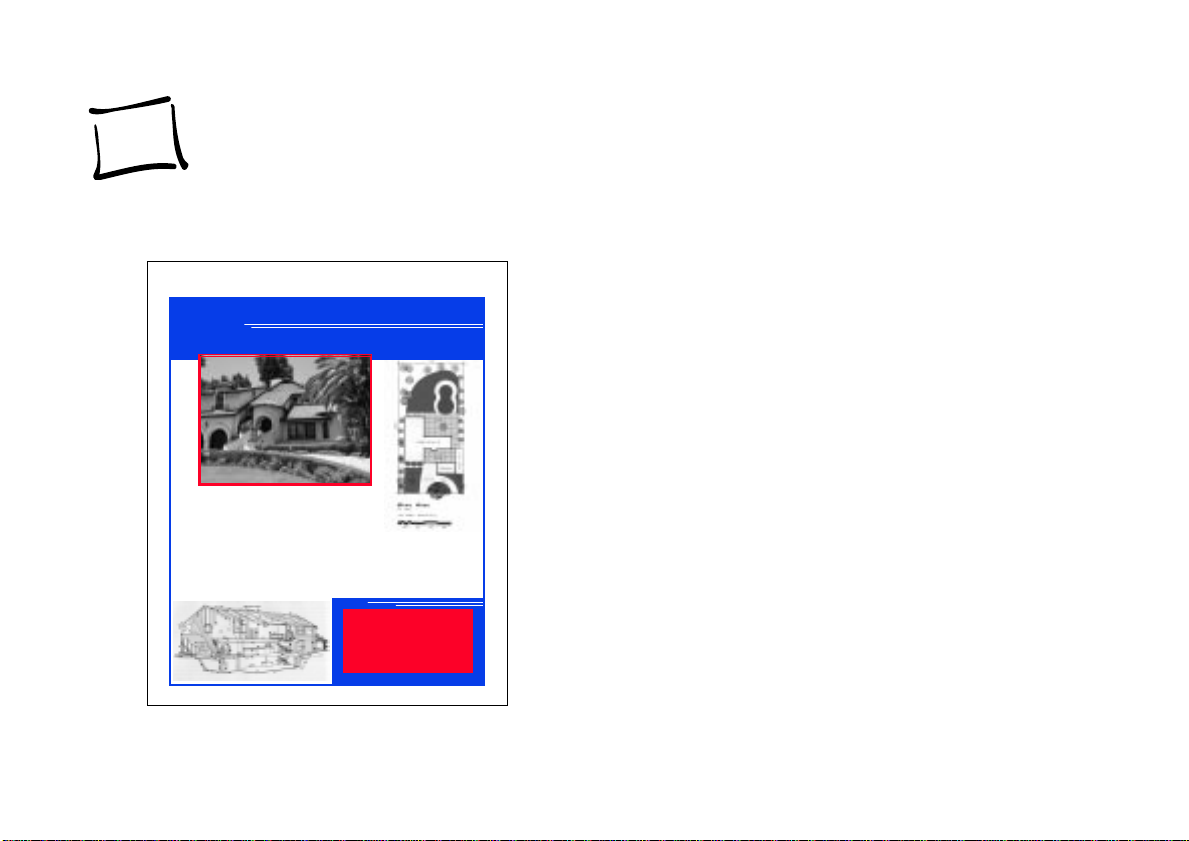
CONTINENTAL REALTY
3521 Ojai Way
Sun Park, WE 9999
(999) 888-888
our new EPSON PhotoPC™ 600 is an advanced,
Y
easy-to-use digital camera with a built-in LCD screen.
You can view your pictures before and after you capture
them, or display them on a TV or multimedia projector and
transfer them to your computer. You can even upload
pictures, text, and graphics into your camera, and play them
back for presentations.
NEW LISTING...
ω 4 Bedroom/3 Bathroom
ω
Dinning Room
ω Pool
ω 2 Car Garage
ω
Original Owner
ω Excellent location
−
Near schools and park
ω
Competitive price
Contact Monica for an
Appointment
999-888-8888
PhotoPC 600 captures images in 24-bit color at XGA
×
resolution (1024
768 pixels). Macro, zoom, panorama, and
multi-frame modes give you the flexibility you need for
professional results. You can expand the camera’s capacity
™
with optional CompactFlash
memory cards. Your
PhotoPC 600 comes complete with cables, batteries, battery
charger, software, and utilities for downloading, editing,
organizing, and printing your pictures.
Introduction
A
B
1

PhotoPC 600 Features
PhotoPC 600 is a complete system for capturing digital
images, and includes the following features:
×
◗ Resolutions up to 1024
◗ 4MB internal flash memory that holds at least 16 high-
resolution or 50 standard-resolution images
◗ 24-bit color or 8-bit grayscale image capture
◗ Two-inch, active matrix TFT color LCD screen for
previewing and playing back pictures
◗ Video output for playing your pictures back on a TV,
VCR, or projector
◗ Macro, digital zoom, panorama, and multi-frame picture
formats
◗ Built-in flash
◗ Automatic shut-off to save batteries
◗ Automatic date and time recording for each picture
768 pixels
◗ Cables for transferring photos to your Windows
Macintosh
and displaying on a TV or multimedia
PC or
projector
Your camera comes with the PhotoPC 600 software suite,
which includes the following applications:
◗ Sierra
Image Expert™ software for transferring,
organizing, editing, and printing your pictures
◗ The EPSON Photo!2 application and TWAIN driver
for transferring and converting your pictures
◗ EPSON Photo File Uploader for converting
presentation slides into image files and uploading them
into your camera
◗ EPSON Photo!2 Program Uploader for adding new
firmware that will let you print directly from the camera
2
Introduction

Optional Accessories
EPSON offers these accessories for the PhotoPC 600:
◗ AC adapter for use with any electrical outlet
Minimum System Requirements
To transfer images to your computer and edit them, make
sure your system meets these minimum requirements:
◗ EPSON Stylus Photo Direct Print kit that allows you to
print directly from the camera to the EPSON Stylus
Photo printer (Check EPSON’s website for availability.)
◗ Replacement NiMH rechargeable batteries
◗ Replacement NiMH Power Pak including batteries and
charger
You can also use CompactFlash memory cards and PCMCIA
adapters available from leading suppliers, such as Simple
Technology
or SanDisk.
Windows Systems
◗ IBM-compatible PC with 486 or higher processor
◗ Microsoft
Windows for Workgroups 3.11 or later, or
Windows NT
◗ Serial port with standard RS-232C interface
◗ At least 16MB RAM
◗ Double-speed CD-ROM drive
◗ Hard disk drive with at least 30MB free space
◗ VGA or SVGA monitor with at least 256-color display
◗ Mouse or other pointing device
Windows 95, Windows 3.1 or later,
3.5 or later
Introduction
A
B
3

Macintosh Systems
™
◗ Macintosh 68040 or higher or PowerPC
◗ System Software Version 7.1 or later (System 7.5 or later
is required to access optional CompactFlash card
memory directly from the Macintosh.)
processor
Electronic support services (continued)
Service Access
EPSON Internet FTP Site If you have Internet FTP capability, use your Web
browser (or other software for FTP downloading)
to log onto
anonymous
password.
ftp.epson.com
and your e-mail address as the
with the user name
◗ 16MB RAM
◗ At least 30MB free hard disk space
◗ Double-speed CD-ROM drive
◗ VGA monitor with at least 256 colors
◗ Standard Macintosh modem/printer serial port
Where To Get Help
EPSON
services:
Electronic support services
Service Access
World Wide Web From the Internet, you can reach EPSON’s Home
4
provides customer support through the following
Page at
http://www.epson.com
Introduction
.
EPSON Download Service You can call the EPSON Download Service at
EPSON Forum on
CompuServe
®
(800) 442-2007
software to 8 data bits, 1 stop bit, no parity.
Modem speed can be up to 28.8 Kbps.
Members of CompuServe can type
the menu prompt to reach the Epson America
Forum. For a free introductory CompuServe
membership, call (800) 848-8199 and ask for
representative #529.
. Set your communications
GO EPSON
Automated telephone services
Service Access
EPSON SoundAdvice
EPSON FaxAdvice
EPSON Referral Service For the location of your nearest Authorized
™
Pre-recorded answers to commonly asked
questions about EPSON products 24 hours a day,
seven days a week, call
™
Access EPSON’s technical information library by
calling
(800) 442-2110
fax number to use this service.
EPSON Reseller call
(800) 442-2110
. You must provide a return
(800) 442-2110
.
.
at

EPSON
the installation, configuration, and operation of
products. Dial (800) 922-8911, (310) 782-2600 (U.S.), or
(905) 709-9475 (Canada), 6 A.M. to 6 P.M., Pacific Time,
Monday through Friday.
Before you call, please have the following information ready:
also provides technical support and information on
EPSON
Software Support
If you’ve tried the on-screen help and you still have
questions, call one of the following numbers for technical
support:
◗ (800) 501-8902 for Image Expert (For Windows 95
users, make sure you check the Quick Tour first)
◗ Product name
◗ Product serial number
◗ Computer configuration
◗ Description of the problem
You can purchase manuals, accessories, and parts from
EPSON
Canada, please call (800) 873-7766 for dealer referral.
Accessories at (800) 873-7766 (U.S. sales only). In
◗ (800) 922-8911 for EPSON Photo!2
Registration
Please take a minute to fill out the registration card for the
PhotoPC 600 digital camera and mail it back to us. This
enables you to receive special information on accessories,
new products, and software upgrades. You’ll get immediate
attention if you have a problem with your PhotoPC 600.
Introduction
A
B
5

Safety Instructions
Read all of these instructions before using your camera and
battery charger. Also follow all warnings and instructions
marked on the camera, battery charger, and batteries.
◗ To reduce the risk of electric shock, do not remove the
camera’s cover or open any of the compartments except
as instructed in this User’s Guide.
◗ To prevent fire or electric shock, do not insert objects
through any openings in the camera or battery charger.
Do not expose the camera or battery charger to rain or
moisture.
◗ To prevent fire or explosion, do not use the camera or
battery charger where inflammable or volatile gas is
stored.
◗ If the battery charger shows unusual signs such as noise,
odor, or smoke, unplug it immediately.
◗ To avoid damage to the optics of the camera, do not
expose the lens to direct sunlight for extended periods of
time.
◗ Do not use the charger near water. Never insert or
remove the charger’s power plug with wet hands.
◗ Keep the charger away from heat sources. Do not use
outside the temperature range of 35 to 95
◗ Do not use the charger within reach of children.
◗ Use only the types of power sources listed on the charger
label and in this User’s Guide. Always supply power to
the charger directly from a standard domestic electrical
outlet.
°
F (0 to 35°C)
◗ If the camera shows unusual signs such as noise, odor, or
smoke, turn it off immediately. Remove the batteries
and/or disconnect the AC adapter, and unplug the AC
adapter from the electrical outlet.
6
Introduction
◗ Do not use the camera outdoors during adverse weather
conditions.

◗ Do not store the camera near sources of bright light,
direct sunlight, high humidity, heat, excessive dirt or
dust, or where it will be exposed to strong vibrations or
magnetic fields.
◗ To prevent possible eye injury, do not take flash pictures
of faces at close range.
◗ Avoid sudden temperature changes, which can cause
moisture to condense on the camera. Keep the camera in
a case or bag if you need to move it from a cold
environment to a warm one. Allow time for the camera
and its optional accessories to adjust to temperature
changes before using them.
◗ Do not use a frayed or damaged power cord with the
AC adapter.
◗ If you use an extension cord with the optional AC
adapter, make sure the total ampere rating of the devices
plugged into the extension cord does not exceed the
cord’s ampere rating. Also, make sure the total ampere
rating of all devices plugged into the wall outlet does not
exceed the wall outlet’s ampere rating.
◗ Remove batteries and/or unplug the camera and the AC
adapter and refer servicing to qualified service personnel
under the following conditions: if the power cord or
plug is damaged; if liquid has entered the camera; if the
camera has been dropped or its exterior has been
damaged; if the camera or its optional accessories do not
operate normally or exhibit a distinct change in
performance.
◗ Adjust only those controls that are covered by the
operating instructions.
◗ Do not attempt to service the camera or battery charger
yourself. Refer all servicing to qualified service
personnel.
◗ If the liquid crystal solution contained in the display
panel or in the LCD screen leaks out and gets on your
hands, wash them thoroughly with soap and water. If it
gets in your eyes, flush them immediately with water.
A
B
Introduction
7
.
1
1
camera
Mac
adapter
cable
software
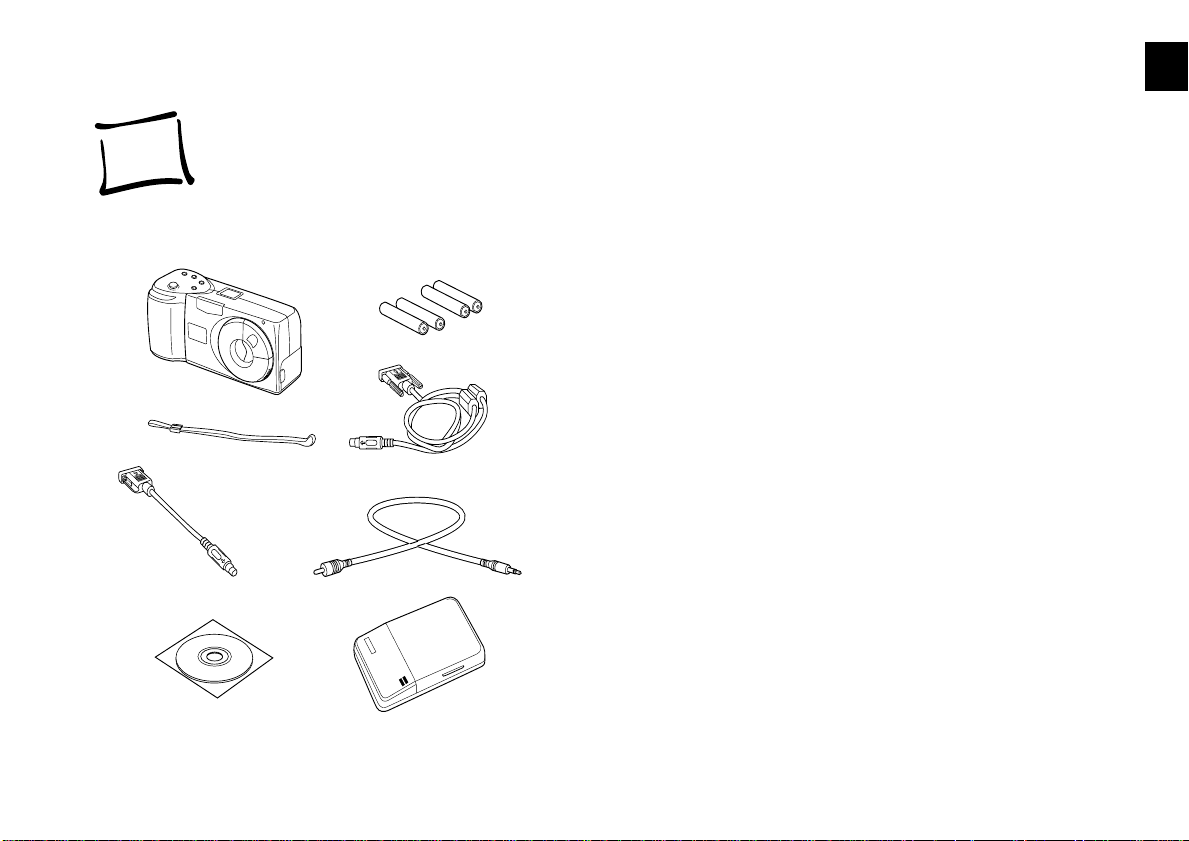
Getting Started
batteries
hand strap
PhotoPC 600 cable
video cable
battery charger
his chapter helps you get ready to use your new
PhotoPC 600. It covers the following:
T
◗
Unpacking your PhotoPC 600
◗
Identifying camera parts
◗
Using batteries
◗
Attaching the hand strap
◗
Installing your PhotoPC 600 software
◗
Setting the language
◗
Setting the date and time
Unpacking Your PhotoPC 600
Make sure you have all the parts shown to the left. If you’re
using a PC, you won’t need the Macintosh adapter cable.
A
B
Getting Started
1-1
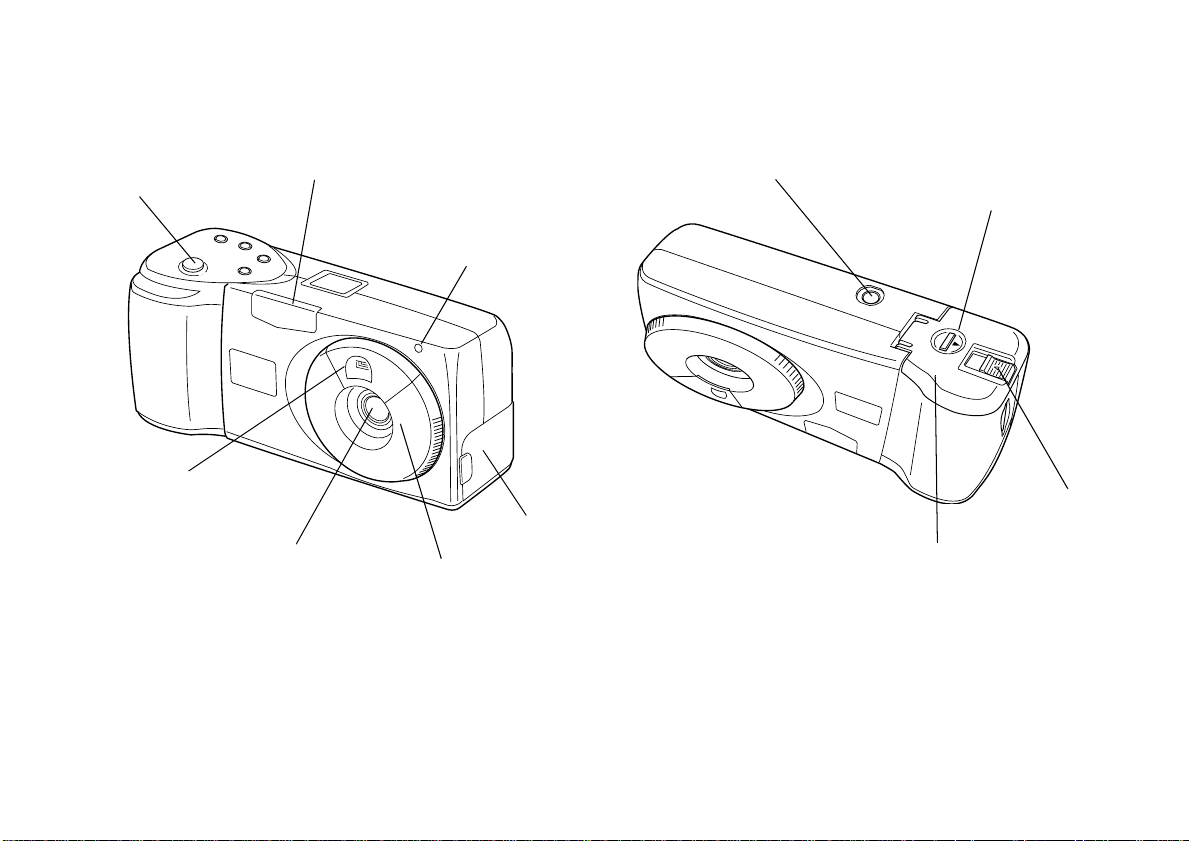
Identifying Camera Parts
shutter button
viewfinder
flash
lens
front view
timer light
lens cover
(on/off)
connector
cover
tripod socket
battery cover
bottom view
battery
cover lock
memory
card eject
lever
1-2
Getting Started
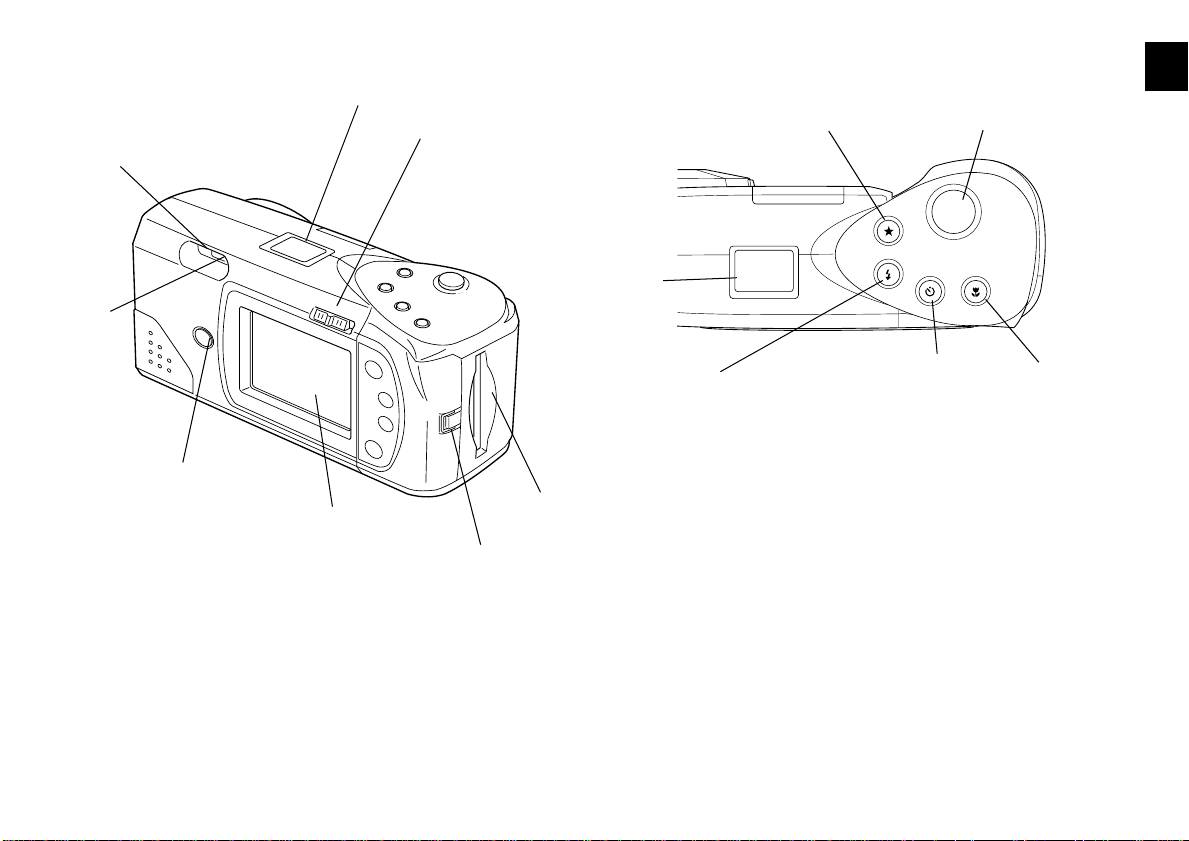
viewfinder
status
light
picture
format
button
LCD screen
back view
display panel
screen switch
hand strap
holder
memory
card slot
display
panel
flash
button
image quality button
top view
timer
button
shutter
button
macro
button
1
A
Getting Started
B
1-3

Using Rechargeable NiMH Batteries
Note the following when charging batteries:
To help lower the cost of ownership, your PhotoPC 600
comes with four rechargeable NiMH batteries and a charger.
Before you install the batteries in your camera, you may need
to charge them two or three times so they are fully charged.
The instructions in the following sections tell you how to
charge, install, and handle batteries.
Charging Batteries
WARNING
Shock hazard. Make sure you use the charger only with EPSON
rechargeable NiMH batteries (model EU-24). To avoid the danger
of leakage or explosion, do not place any other batteries in the
charger. Read all safety and handling instructions before using
the charger.
◗
Do not insert batteries backwards.
◗
Do not open the cover while batteries are charging.
◗
Do not use near water or handle with wet hands. For
indoor use only.
◗
Do not use within reach of children.
1-4
Getting Started
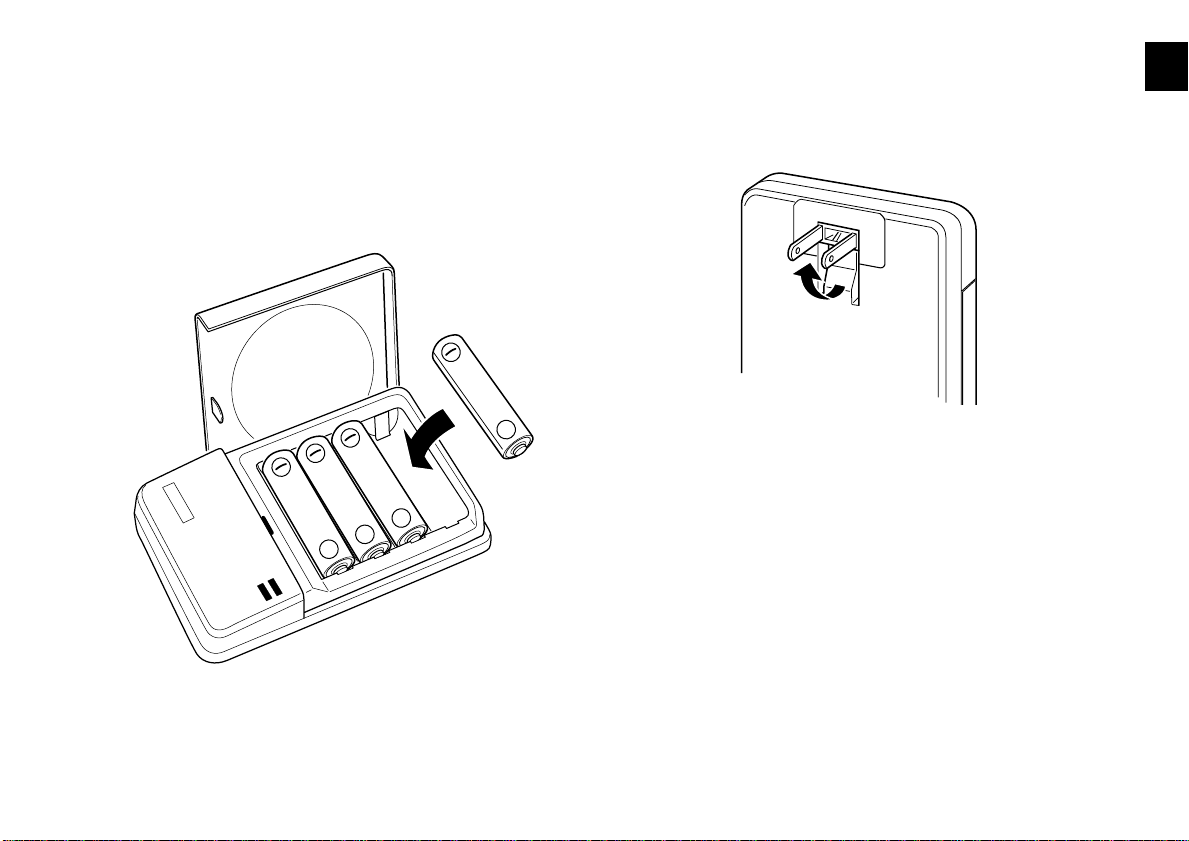
Follow these steps to charge your batteries:
1
Lift up the cover of the charger and insert all four
batteries, positioning the + and – ends as shown. Then
close the cover firmly.
2
1
Turn the charger over and flip the two prongs out of
their compartment.
+
3
Plug the charger into an electrical outlet.
+
+
+
Both lights turn red, indicating that the charger is
working. When the batteries are fully charged, after
about two and a half hours, the lights go off. To charge
your batteries again, open and then close the charger
again.
A
B
Getting Started
1-5

NOTE
The charger lights flash to indicate changes in battery
temperature and voltage. If the charger lights continue to
flash for more than half an hour, the batteries may be
damaged or worn out, and should be replaced. Unplug the
charger if the batteries are not fully charged after two and a
half hours.
NOTE
Keep the charger terminals clean by wiping them with a dry cloth.
Make sure you charge all four batteries before you use them. If
you find that your batteries run out faster after you recharge them
a few times, make sure you discharge them completely before
recharging. If this doesn’t help, replace the batteries.
4
When both lights are off, unplug the charger. To avoid
overcharging, don’t leave the charger plugged in for long
periods of time after the lights go off.
5
Wait one hour until the batteries cool before removing
them from the charger.
6
Before storing the charger, press down on the prongs to
lock the plug into place.
1-6
Getting Started
Installing Batteries
Before you install the batteries, make sure the camera is
turned off (the lens cover is closed). Then follow these steps:
1
Turn the camera upside down with the LCD screen
facing you.
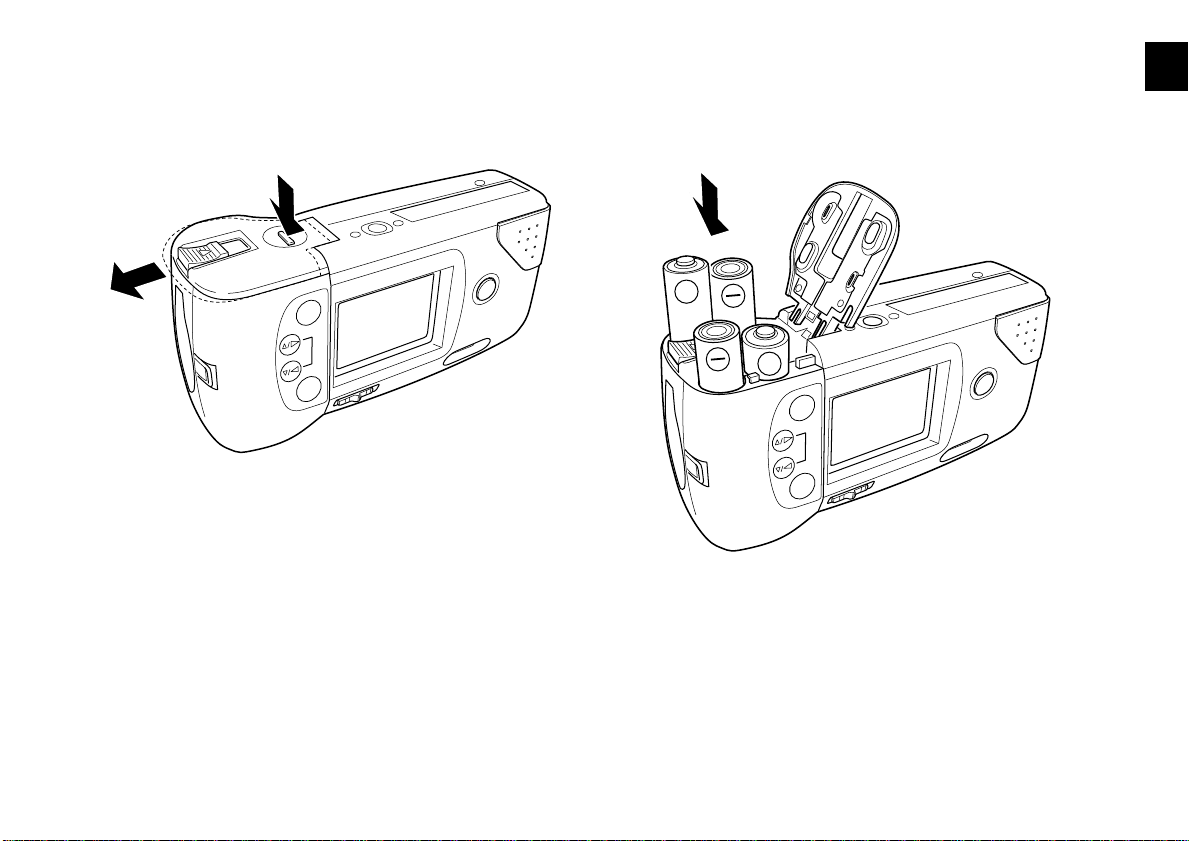
2
Push the battery cover lock down. While holding the
lock, slide the battery cover to the left to open it.
3
Insert all four batteries into the compartment,
positioning the + and - ends as shown below:
+
+
4
Close the battery cover and slide it to the right until it
snaps into place.
1
A
Getting Started
B
1-7

Handling Batteries
If you need to replace your rechargeable NiMH batteries, the
camera can also accept the following:
◗
Rechargeable AA NiCad batteries
◗
Single-use AA alkaline batteries (Energizer
recommended)
◗
Single-use AA lithium batteries (longer life)
WARNING
To avoid the danger of fire or explosion, do not mix different
types of batteries. Do not allow the battery contacts to touch
metal objects such as coins or keys, which could short out the
battery’s circuits. Read all safety and handling instructions before
using batteries.
Note the following when handling batteries:
◗
Use only the EPSON battery charger (Model EU-23) to
charge the batteries that came with your camera.
brand
◗
Use the batteries that came with your camera only in
EPSON digital cameras.
◗
Do not use manganese batteries.
◗
Replace all four batteries at the same time.
◗
Batteries that have not been used for a long time do not
charge well. However, with regular use, the batteries will
return to normal.
◗
Batteries discharge 2% per day, whether they are used or
not.
◗
If the batteries are not fully discharged before you charge
them, your camera’s operating time may decrease
temporarily.
◗
If the batteries are charged in a hot environment, or if
they are charged repeatedly without being discharged,
they will wear out more quickly.
◗
Do not drop, puncture, disassemble, or mutilate
batteries. Do not get them wet or expose them to fire.
Pour usage avec le chargeur de piles modele EU-23.
1-8
Getting Started
◗
When the camera is not used for long periods of time,
remove the batteries and store them at a low temperature
in a dry location. Store away from the reach of children.
◗
To avoid fire or electric shock, do not use batteries that
are leaking or damaged in any way.
◗
If battery acid gets in your eyes or on your skin,
immediately rinse the area with water and seek medical
treatment. If a battery is swallowed, seek medical
treatment immediately.
◗
Dispose of used batteries according to the
manufacturer’s instructions and in compliance with all
applicable laws. Contact your local government agency
for information about battery recycling and disposal.
◗
Battery life varies depending on the battery type and the
manufacturer.
1
Attaching the Hand Strap
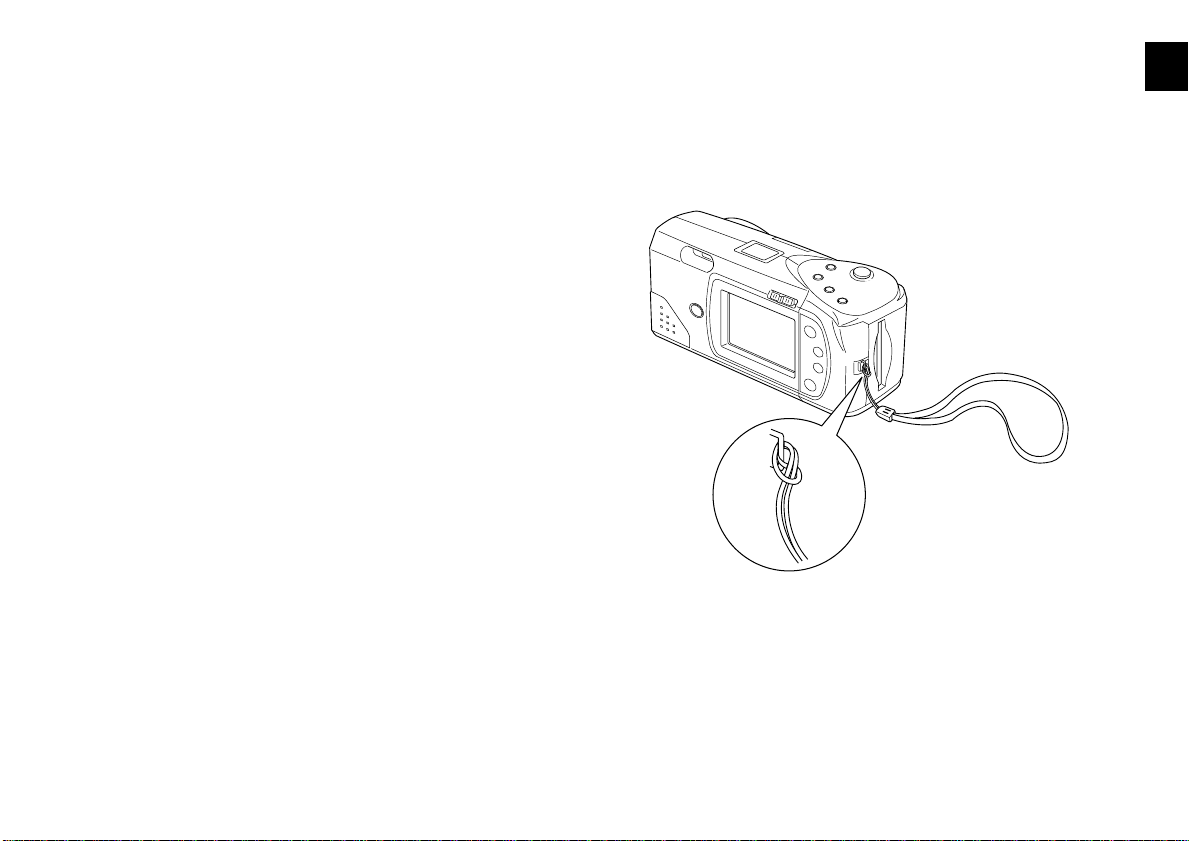
To attach the hand strap, loop the strap around the holder
on the side of the camera as shown below.
.
A
Getting Started
B
1-9

Installing Your PhotoPC 600 Software
PhotoPC 600 comes with everything you need to transfer
your pictures from the camera to your computer, organize,
enhance, and share your images, and insert them into
documents. You can also upload pictures and presentations
into your camera. The included CD-ROM has these
applications for your Windows PC or Macintosh:
◗
Sierra Image Expert
◗
EPSON Photo!2 TWAIN and standalone application
◗
EPSON Photo File Uploader
◗
EPSON Photo!2 Program Uploader
All programs will be installed in the PhotoPC 600 folder.
Installing for Windows 95 or Windows NT 4.0
Follow these steps:
1
Insert the CD-ROM in your drive. The install program
starts automatically.
If it doesn’t start automatically, double-click
My Computer
icon.
2
Follow the instructions on the screen.
NOTE
After you install your software for Windows 95, you can run the
Image Expert Quick Tour to learn more about your camera. See
page 4-5 for instructions.
. Then double-click your CD-ROM
1-10
Getting Started

Installing for Windows 3.1x or Windows NT 3.51
Follow these steps:
1
Insert the CD-ROM in your drive.
2
In the Program Manager, select
menu.
3
4
D:\SETUP
Type
drive D, substitute the correct letter.
Click OK and follow the instructions on the screen.
. If your CD-ROM drive is not
Run
from the File
Installing on a Macintosh
Follow these steps:
Making Software Installation Diskettes
You can create Image Expert installation diskettes from the
CD-ROM, following the instructions below. If you need the
EPSON Photo!2 software and utilities on diskette, you can
download the files from the EPSON website at
www.epson.com
Making Windows Diskettes
Before you start, make sure you have 6 blank, formatted
diskettes for Windows 3.1 or 9 for Windows 95 and
Windows NT. Then follow these steps:
1
Use the Windows Explorer (or File Manager) to access
your CD-ROM drive. (You may have to exit the Setup
program first.)
.
1
1
Insert the CD-ROM in your drive.
2
Double-click the CD-ROM icon.
3
Double-click the
Continue
Install Image Expert
and follow the instructions on the screen.
icon. Click
2
Double-click
3
Depending on which version of Windows you’re using,
Windows 95/Windows NT
select
Then select your diskette drive and click
instructions on the screen to create the installation
diskettes.
Mkfloppy
.
Windows 3.1
or
OK
. Follow the
Getting Started
1-11
A
.
B
Making Macintosh Diskettes
Before you start, make sure you have 8 blank, formatted
diskettes. You can use either the Disk Copy 6.2 utility (you
can download it from the Apple
website if you don’t have
it), or the DropImage program on the PhotoPC 600
CD-ROM.
4
Drag the Disk 1 icon onto the Image Expert 1 icon. If
you are asked to confirm the copy, click
5
When the copy finishes, drag both icons to the trash.
Yes
Your Macintosh ejects the diskette.
6
Repeat steps 2 to 5 for each disk image file.
.
To use Disk Copy 6.2, double-click the file named
Make Floppies
and follow the instructions on the screen.
The Image Expert disk image files are located in the Disk
Images folder on the CD-ROM.
Follow these steps to make diskettes using the DropImage
program:
1
Open the Disk Images folder on your CD-ROM.
2
Drag the file
icon for
3
Insert a blank, formatted diskette in your drive and
Disk1.image
Disk 1
appears on your desktop.
onto DropImage 1.0. An
change its name to Image Expert 1.
1-12
Getting Started
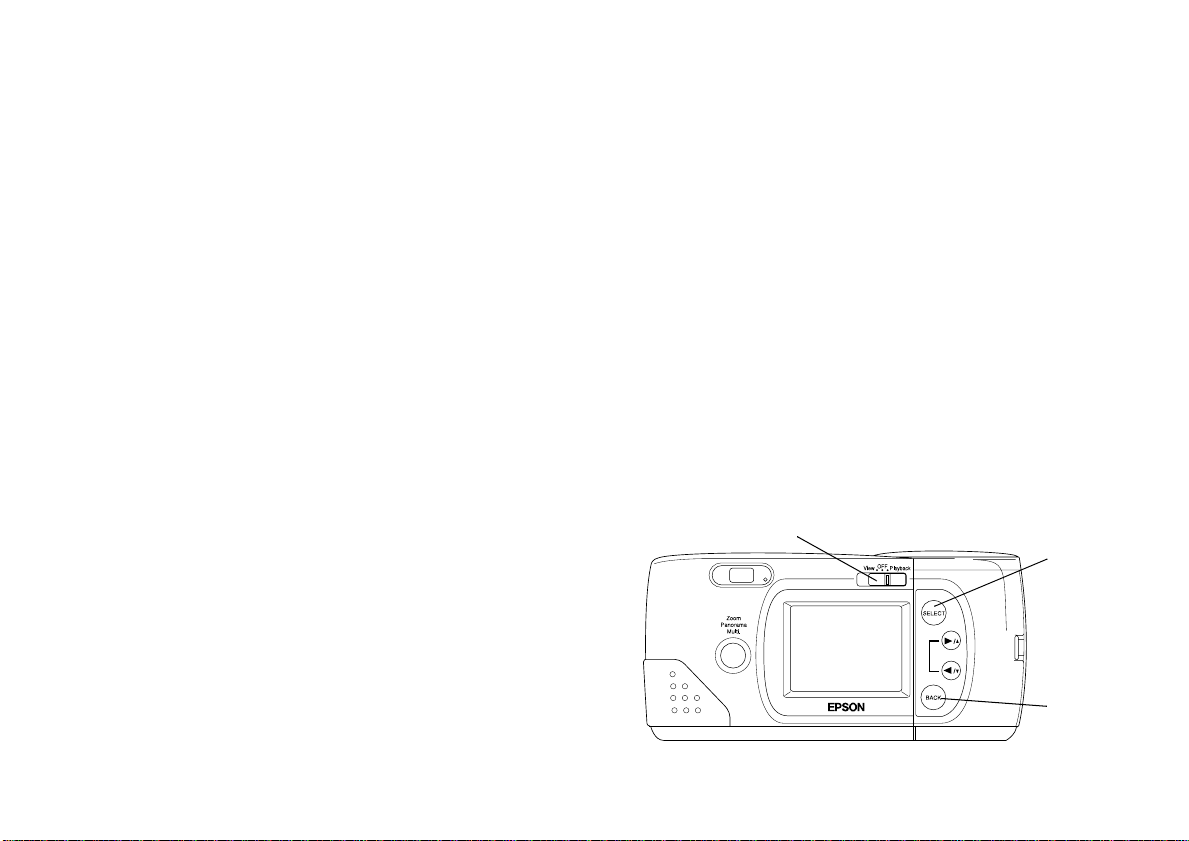
Setting the Language
Before you use the camera, you need to set the language for
information displayed on the LCD screen.
Follow these steps to select English:
1
Slide the screen switch to
screen switch
Playback
.
SELECT
button
BACK
button
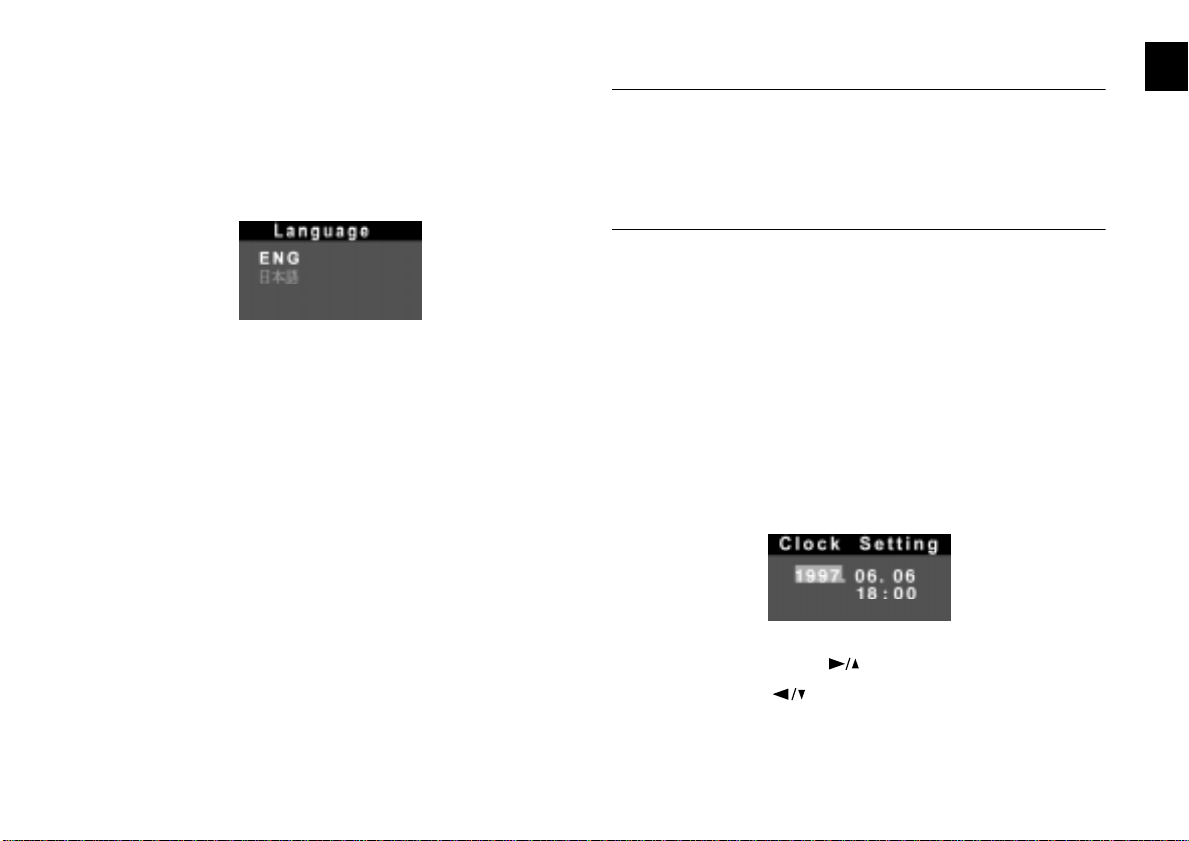
You see a message asking you to select your language.
2
Press the
menu:
SELECT
button. You see the Language Setting
1
NOTE
You can also set the camera’s clock through your computer. See
Chapter 4 for instructions on connecting the camera to your
computer, and page 8-6 for instructions on setting the date and
time.
Follow these steps to set the camera’s clock:
3
Press the
4
Press the
5
Slide the screen switch
SELECT
BACK
button until English is highlighted.
button to save your selection.
OFF
.
Setting the Date and Time
Before you use the camera, you need to set its clock. Then
the camera will automatically record the date and time for
each picture you take. You’ll need to set the clock again
whenever you install new or recharged batteries.
button.
Playback
. You see a message
Getting Started
1
Slide the screen switch to
asking you to set the clock.
2
Press the
You see the clock setting screen, with the year setting
highlighted in red:
3
If necessary, press the button to increase the
number or the button to decrease the number,
until the year is correct.
SELECT
A
B
1-13

4
Press the
the month setting is highlighted.
5
Adjust the month, day, hour, and minute settings as
described above until the date and time are correctly
adjusted and saved.
SELECT
button. The year setting is saved and
After you finish setting the clock and press the
button, your screen returns to playback mode.
6
Slide the screen switch
1-14
Getting Started
OFF
.
SELECT

.
2
2
Taking Pictures
FOR SALE
FOR SALE
• 1995 Mitsubishi Montero
• Good condition
• Low Mileage
999-555-5555
Jim Jackson’s Auto Sales
aking pictures with PhotoPC 600 is similar to
using a traditional “point and shoot” camera. This
T
chapter tells you everything you need to know, including the
following information:
◗
Getting ready to take pictures
◗
Taking pictures with the viewfinder
◗
Taking pictures with the LCD screen
◗
Using macro mode to take close-ups
◗
Using the flash
◗
Taking pictures with the timer
◗
Setting image quality and color mode
◗
Taking special format pictures
◗
Checking the picture counter
A
B
Taking Pictures
2-1
Getting Ready to Take Pictures
Before you can take pictures with PhotoPC 600, you need to
turn on the camera and check the display panel. It’s
important to be aware of the camera’s power-saving features
and the status of your batteries.
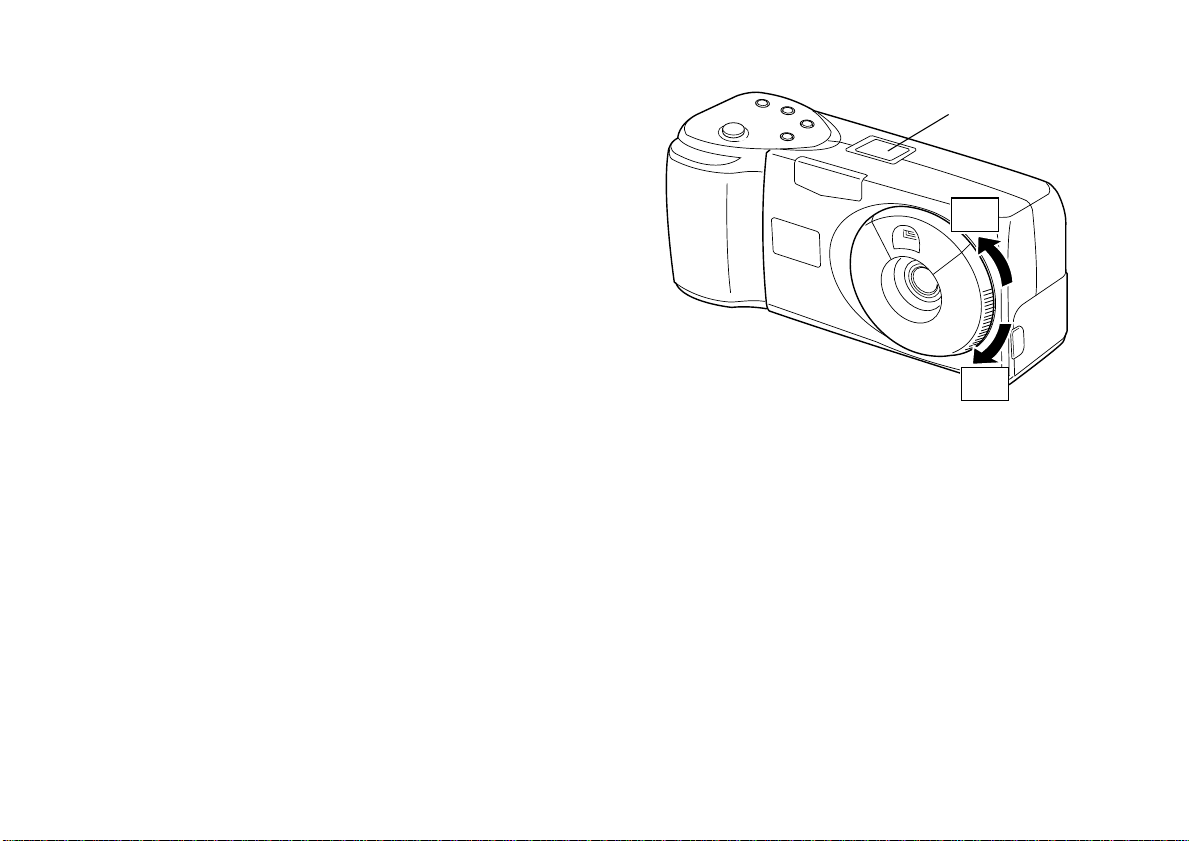
Turning the Camera On and Off
To turn the camera on, rotate the lens cover
counterclockwise. The lens cover opens and the display panel
on the top of the camera lights up, as shown in the
illustration on the right. The status light on the back of the
camera flashes for a few seconds. When it turns green, the
camera is ready to take pictures.
To turn off the camera, rotate the lens cover clockwise. The
lens cover closes and the display panel turns off.
.
display panel
On
Off
Saving Power With Auto Shut-off
If you wait more than 60 seconds before taking a picture, the
camera turns off automatically to save battery power. To
turn the camera back on, close the lens cover and then open
it again.
If you want, you can change the 60-second time period for
auto shut-off. For more information, see pages 8-6 and 8-8.
2-2
Taking Pictures
 Loading...