

Page 1
EPSON Perfection 2450 PHOTO
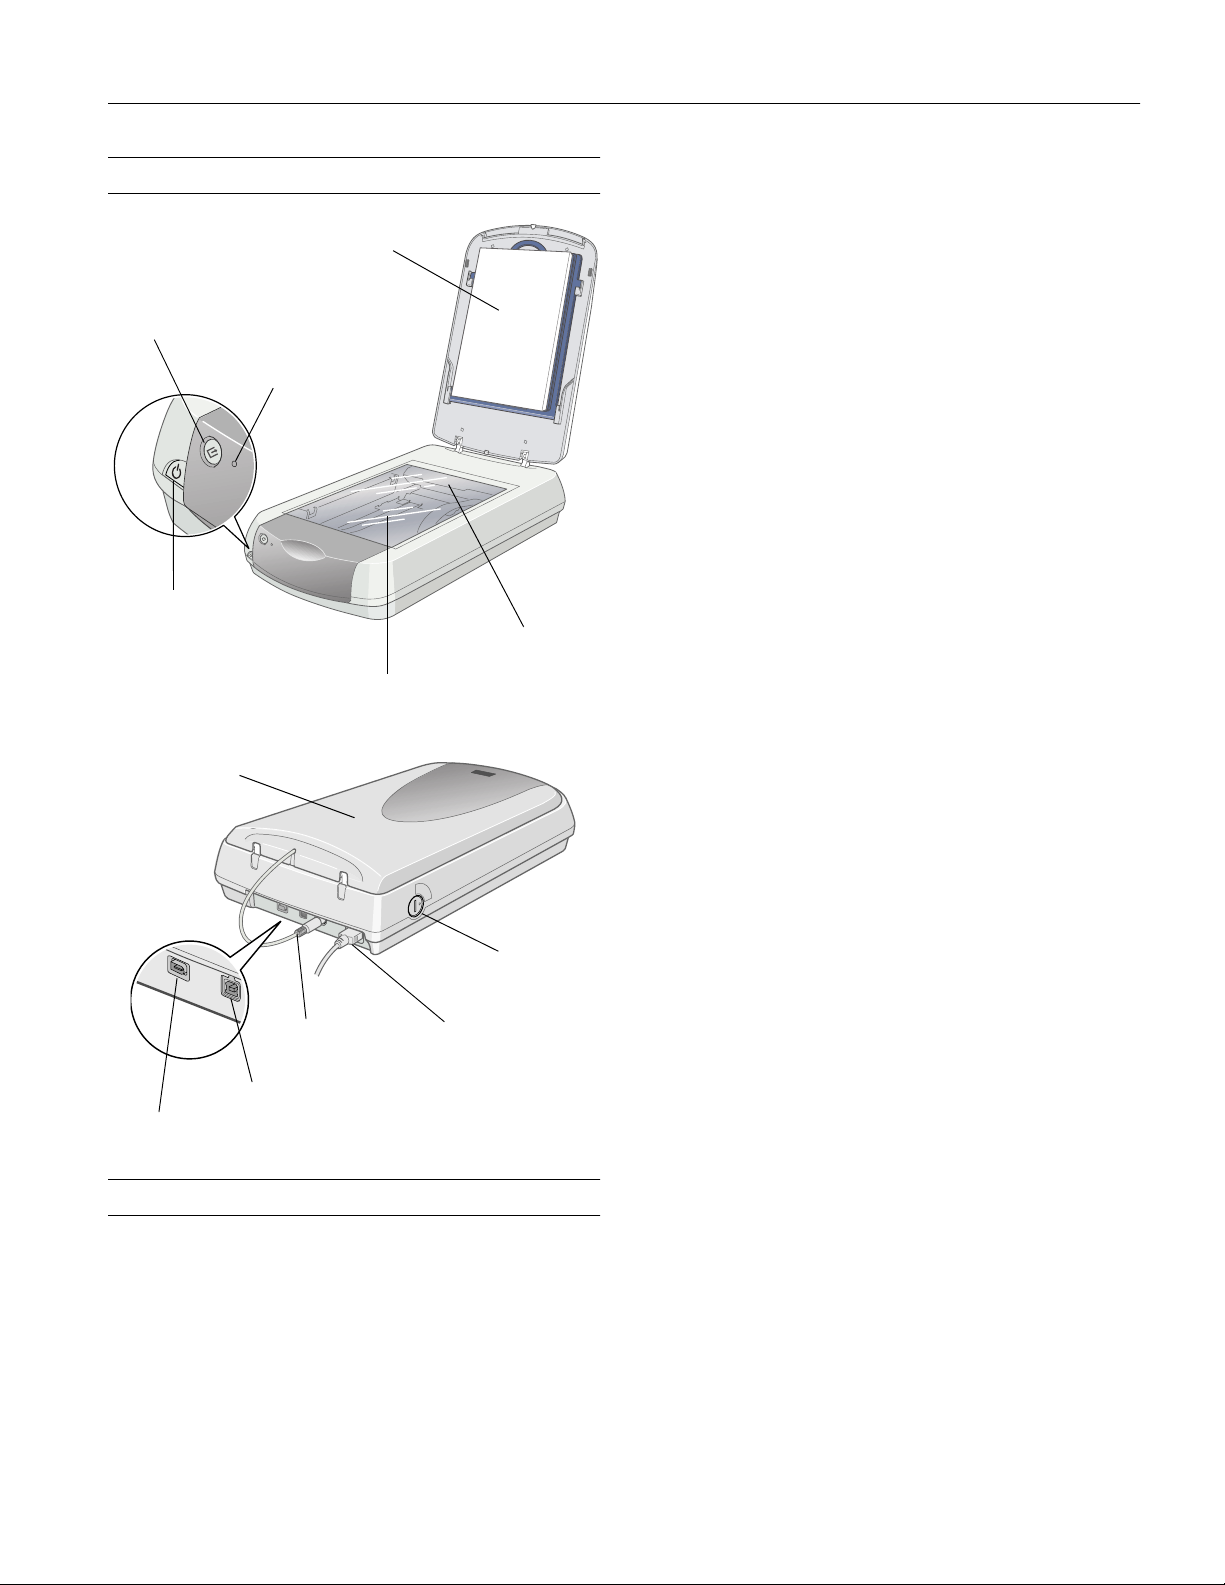
Scanner Parts
Start button
indicator
power button
transparency unit
(TPU) under lid
USB port
IEEE 1394 port
document
cover
light
document
transparency unit
(TPU) connector
table
carriage and lamp
(in the home
position)
transportation lock
(in unlocked position)
power cord
Maximum US letter or A4 size
document size (8.5 × 11.7 inches [216 × 297 mm])
Optical resolution 2400 dpi
Maximum 2400 dpi (main scan) × 4800 dpi hardware
(sub scan)
resolution*
* The maximum hardware resolution of 2400 × 4800 dpi is achieved
using EPSON’s Micro Step Drive
™
technology.
Maximum 12,800 dpi
interpolated
resolution
Output resolution 50 to 12,800 dpi
(50 to 6400 dpi in 1 dpi increments,
12,800 dpi performed with zoom function)
Speed (2400 dpi, Color: 11.0 msec/line
draft mode) Grayscale: 3.8 msec/line
Command level ESC/I (B8), FS
Zoom 50 to 200% in 1% increments
Pixel depth 16 bits per pixel
Brightness 7 levels
Line art settings Fixed threshold
TET (Text Enhancement Technology),
enable/disable selectable
Digital halftoning AAS (Auto Area Segmentation), enable/
disable selectable
3 error diffusion modes (A, B, and C) and
4 dither patterns (A, B, C, and D) for
bi-level and quad-level data
(2 downloadable dither patterns)
Gamma correction 2 types for CRT display
3 types for printer output
1 type for user-defined
Color correction 1 type for CRT display
3 types for printer output
1 type for user-defined (only user-defined
color correction is available in EPSON
TWAIN)
Scanner Specifications
Basic Specifications
Scanner type Flatbed, color
Photoelectric Color CCD line sensor
device
Effective pixels 20,400 × 28,080 pixels at 2400 dpi,
100% scaling
Interface
USB (Type B receptacle connector)
IEEE 1394 (FireWire
)
Light source White cold cathode fluorescent lamp
Reliability 30,000 cycles of carriage movements
(MCBF)
Dimensions Width: 12.0 inches (30.4 cm)
Depth: 18.7 inches (47.6 cm)
Height: 4.8 inches (12.2 cm)
Weight Approx. 12.8 lb (5.8 kg)
9/01 EPSON Perfection 2450 PHOTO - 1
Page 2
EPSON Perfection 2450 PHOTO
Electrical
Input voltage 100-120 VAC
range
Rated input 0.45 A
current
Power Approx. 23 W operating
consumption approx. 7 W in power saving mode
Note: Scanners sold outside the US market may operate at a different
voltage. Check the label on the back of the scanner for voltage
information.
Environmental
Temperature Operation: 41 to 95 °F (5 to 35 °C)
Storage: –13 to 140 °F (–25 to 60 °C)
Humidity Operation: 10% to 80%
(without Storage: 10% to 85%
condensation)
Operating Ordinary office or home conditions; avoid
conditions extreme dust, direct sunlight, and strong
light sources.
Safety Approvals
Safety UL 1950
CSA C22.2 No. 950
EMC FCC part 15 subpart B class B
CSA C108.8 class B
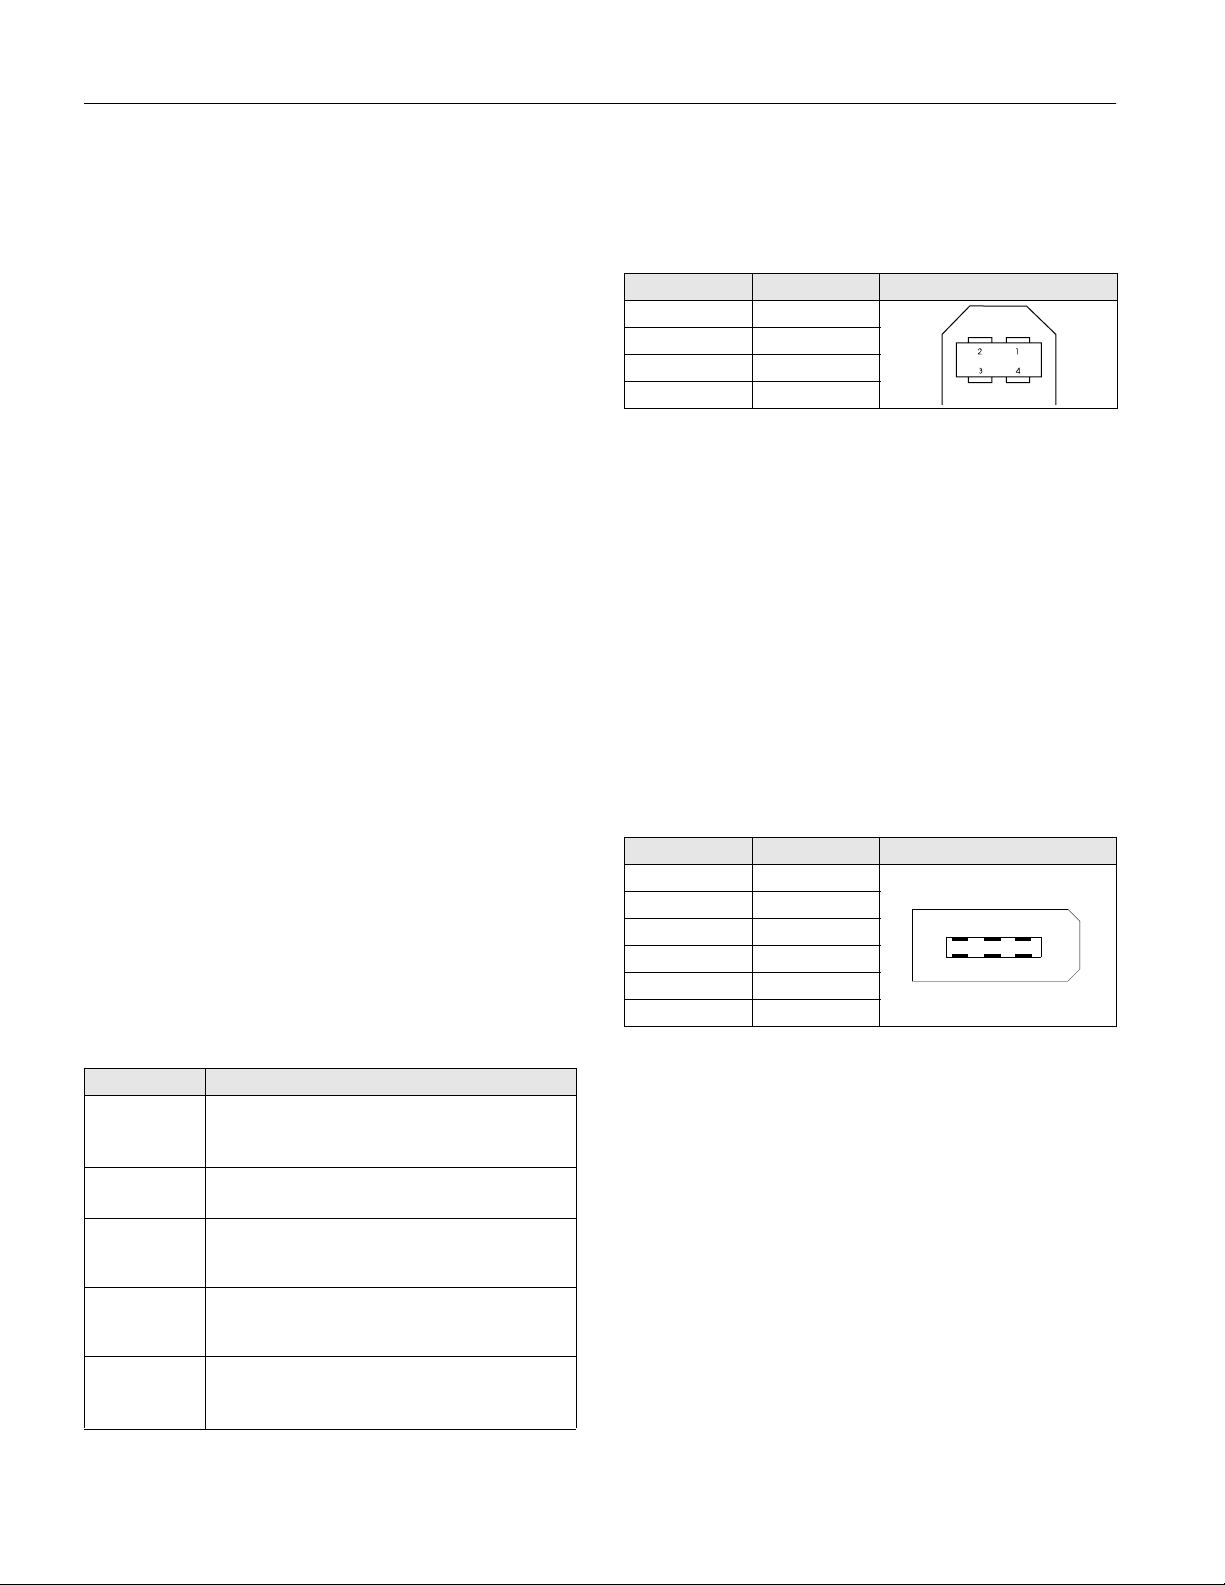
USB Interface
Interface type Universal Serial Bus Specification
Revision 2.0
Connector type One receptacle (Type B)
Configuration
Element Description
Characteristics Self-powered
Remote wake up feature: Not supported
Maximum power consumption from VBUS: 2mA (5V)
Interface No alternate setting
Class: Vendor specific
Endpoint 1 Bulk IN transfer
Maximum data transfer size: 64 bytes (Full Speed)
Endpoint 2 Bulk OUT transfer
Maximum data transfer size: 64 bytes (Full Speed)
String
Descriptor
Language ID: US English
1: Manufacturer: “EPSON”
2: Product: “EPSON Scanner”
512 bytes (High Speed)
512 bytes (High Speed)
Electrical Full Speed mode (12 Mbit/s) and High
standard Speed mode (480 Mbit/s), Universal
Serial Bus Specification Revision 2.0
Connector pin arrangement
Pin number Signal Connector
1VCC
2 –DATA
3+DATA
4GND
FireWire Interface
Interface type IEEE 1394a-2000 compatible
Data transfer Half-duplex data / strobe differential
serial
Synchronization Clock synchronization with DS-Link
Encoding/ DS-Link
Decoding
Logic level: 3.3. V
Power class Power class code 100
No power supply from external sources
Fitted with a repeat function with bus
power
Connector pin arrangement
Pin number Signal Connector
1VCC
2GND
3TPB–
4 TPB+
5TPA–
6 TPA+
2
1
64
3
5
Transparency Unit
The transparency unit is built into the scanner lid.
Electrical Supply voltage: DC 24 V ±10% V
Rated current: 0.5 A
Document Positive or negative film in the following
specifications sizes:
35 mm strips
35 mm slides
120/220 (6 × 9-cm) film
4 × 5-inch film
Readable area 4 × 9 inches (102 × 230 mm)
2 - EPSON Perfection 2450 PHOTO 9/01
Page 3

EPSON Perfection 2450 PHOTO
Scanning Transparencies and Film
Before scanning transparent documents, you need to remove
the scanner’s reflective document mat; this exposes the scanner’s
transparency unit (light source), which is built into the lid.
If you’re scanning slides or film strips, you’ll also need to use
one of the film holders.
Using the Transparency Unit
To use the transparency unit, remove the reflective document
mat by grasping the top of the mat and sliding it up gently, as
shown.
remove mat
by sliding it up
transparency unit
Using Film Holders
Film has two sides, a shiny base side and a dull emulsion side.
The base side of the film has the film maker’s name and film ID
numbers printed on it. Always place the shiny base side down.
To scan 35-mm film strips, 4 × 5-inch film, or 120/220 (6 × 9cm) film, place the film in the correct holder, as shown:
120/220 (6 × 9-cm)
film
35-mm strips
4 × 5-inch film
Make sure the cable for the tranparency unit is plugged into the
round connector. If not, turn off the scanner, then connect the
cable as shown.
Place the holder with the film onto the scanner. Make sure the
white triangle on the holder points to the upper-right corner of
the scanner.
9/01 EPSON Perfection 2450 PHOTO - 3
Page 4

EPSON Perfection 2450 PHOTO
If you’re scanning 35-mm slides, set the holder on the
scanner first, then place the slides in the holder.
Using EPSON Smart Panel
Follow these steps to use EPSON Smart Panel to scan
documents or photos:
1. Place the original document(s) face down on the document
table.
2. Do one of the following to open the Smart Panel:
❏ Press the
❏ Click the Smart Panel icon on the desktop.
❏ On a Macintosh,
and select
] Start button on your scanner.
®
you can also open the Apple® menu
EPSON SMART PANEL
The
Start button is set to open EPSON Smart Panel by
]
default. However, you can assign the
automatically open any of the Smart Panel applications.
.
Start button to
]
Keep the following in mind when using Smart Panel:
❏ If you select Copy or Photo Print, make sure your printer is
turned on and the correct paper type and size is loaded in
your printer.
❏ Scan to E-mail requires a MAPI-compliant e-mail program.
(AOL is not MAPI compliant; however, you can select
Scan to File
, then use your email software to attach the file
to your message.)
For instructions on using each of the Smart Panel applications,
see the online help for EPSON Smart Panel.
3. Click the icon for your desired scanning application. The
window for that option appears and lets you adjust settings
for your scan. Follow the on-screen steps for each option.
4 - EPSON Perfection 2450 PHOTO 9/01
Page 5

EPSON Perfection 2450 PHOTO
Selecting TWAIN Settings
If you need to manually adjust
the settings in EPSON
TWAIN, follow the guidelines
shown at right. The illustration
shows the preferred order in
which settings should be
adjusted. Detailed descriptions
are given in the electronic
Reference Guide.
1 Select basic settings:
Document Source
Image Type
Destination
Resolution
3 Automatically set the
scan area for your image
using Auto Locate
The most important
thing to remember
when scanning is to
select the correct
image type and
resolution for your
scan.
2 Preview your image
Indicator Light
The indicator light (next to the
status of the scanner, as described below.
Light Color Status
On Green The scanner is ready to scan images.
Flashing Green The scanner is initializing (warming up) or is
Flashing Red Check the following, then turn your
Off — The scanner is unplugged or turned off.
] Start button) indicates the
busy scanning.
scanner off and back on to reset it:
❏ Make sure the transportation lock is
turned to the unlocked position. See
the Start Here sheet for details.
❏ Make sure the scanner is properly
connected to your computer.
❏ If you are scanning transparencies,
make sure you’ve removed the
reflective document mat.
If this does not eliminate the error, the
fluorescent lamp may need to be replaced
or the scanner may have another problem.
Consult your dealer or EPSON.
4 Size or scale
the image
5 Customize your
exposure and use
color management
6 Scan the image into
your application
7 Close EPSON TWAIN
Related Documentation
CPD-12888 EPSON Perfection 2450 PHOTO Start
Here poster
CPD-12887 EPSON Perfection 2450 PHOTO Scanner
Basics
CPD-12889 EPSON Perfection 2450 PHOTO scanner
software CD-ROM
— Reference Guide (HTML)
— EPSON Smart Panel User’s Manual
(HTML)
TM-PERF2450 EPSON Perfection 2450 PHOTO Service
Manual
PL-PERF2450 EPSON Perfection 2450 PHOTO Parts
List
9/01 EPSON Perfection 2450 PHOTO - 5
 Loading...