

Page 1

EPSON® Perfection™ 636
Reference Guide
Page 2

Copyright Notice
All rights reserved. No part of this publication may be reproduced, stored in a retrieval system, or transmitted
in any form or by any means, electronic, mechanical, photocopying, recording, or otherwise, without the prior
written permission of SEIKO EPSON CORPORATION. The information contained herein is designed only for
use with this EPSO N scanner. EPSON is not responsible for any use of this information as applied to other
scanners.
Neither SEIKO EPSON CORPORATION nor its affiliates shall be liable to the purchaser of this product or
third parties for damages, losses, costs, or expenses incurred by purchaser or third parties as a result of:
accident, misuse, or abuse of this product or unauthorized modifications, repairs, or alterations to this product,
or (excluding the U.S.) failure to strictly comply with SEIKO EPSON CORPORATION’s operating and
maintenance instructions.
SEIKO EPSON CORPORATI ON shall not be liable for any damages or problems arising from the use of any
options or any consumable products other than those designated as Original EPSON Product s or EPSON
Approved Products by SEIKO EPSON CORPORATION.
A Note Concerning Responsible Use Of Copyrighted Materials
Digital cameras and scanners, like photocopiers and conventional scanners, can be misused by improper
copying of copyrighted material. While some countries’ laws permit limited copying of copyrighted material in
certain circumstances, those circumstances may not be as broad as some people assume. Epson
encourages each user to be responsible and respectful of the copyright laws when using digital cameras and
scanners.
Page 2
Page 3

Trademarks
EPSON is a registered trademark of SEIKO EPSON CORPORATION. EPSON SoundAdvice is a service
mark, and Perfection, Micro Step and EPSON FaxAdvice are trademarks of Epson America, Inc.
General Notice: Other product names used herein are for identification purposes only and may be trademarks
of their respective owners. EPSON disclaims any and all rights in those marks.
Copyright © 1998 by Epson America, Inc. P636R998-00
9/98
Page 3
Page 4

Contents
Introduction
About Your Documentation 7
Using Links 8
Cautions, Notes, and Tips 8
Under st an din g SC S I Connections
Setting the SCSI ID Number 12
Changing the SCSI ID Number in Windows 98 14
Upgrading from Windows 95 to Windows 98
Installing the Optional Equipment
Transparency Unit 18
Unpacking the Transparency Unit 19
Installing the Transparency Unit 19
Loading Transpar encies 21
Selecting Settings 29
Scanning Reflective Documents or Photographs 29
Removing the Transparency Unit 30
15
17
7
9
Page 4
Page 5

Auto Document Feeder 31
Unpacking the Auto Document Feeder 31
Installing the Auto Document Feeder 32
Loading Paper into the Auto Document Feeder 35
Loading Documents Manually 37
Selecting Settings 37
Clearing Jammed Paper from the
Auto Document Feeder 38
Removing the Document Cover 40
Reattaching the Document Cover 40
Maintaining the Scanner
Cleaning the Scanner 41
Replacing the Fluorescent Lamp 42
Cleaning the Paper Path Guide 42
Removing the Paper Path Guide 43
Cleaning the Paper Path Guide 45
Attaching the Paper Path Guide 46
Transporting the Scanner 47
41
Page 5
Page 6

Troubleshooting
Problems and Solutions 48
Scanner Light 49
Operating Problems 50
Image Quality Problems 52
Where to Get Help 60
48
Specifications
Scanner Specifications 62
Transparency Unit Specifications 68
Auto Document Feeder Specifications 70
Glossary
Index
62
73
77
Page 6
Page 7

Introduction
About Your Documen t ation
This manual include s inf ormation on the follow ing:
Understanding SCSI Connections
and termi nat ors are.
pgrading from Wind ows95 to Wi ndow s 9 8 explains how to uninstall and
U
re-instal l th e s c anner software.
Installing t he Optiona l Equipmen t
for the optional transparency unit and auto document feeder.
Maintaining the Scanner
for shippin g.
Troubles hooting
Specificat ions
equipment.
The Glossary
The Index
See your
scanner , sc anning tips, and basic tro ubleshoo tin g advice. F or help with
the scanner software, see the
LaserSof t® for EPSON Perfection 636 User’ s G uide
Scanner Basics
provides so lut ions to problems you may encounter.
give the specifications for the sc anner and opt ional
defines terms you may not be famil iar w it h.
gives you a quick way to jump to indexed information.
explains how to clean the scanner and prepare it
book for instructions for setting up your
explains what daisy chains, SCSI IDs,
gives insta llat ion and use ins t ruc t ions
EPSON TWAIN User’s Guide
.
or the
Introduction Page 7
Page 8

Using Links
Green, underlined text indicates that the text is a link (cross-reference) to
other parts of this guide. Click on the text with the mouse pointer to view
the refere nc ed informat ion.
Cautions, Notes, and Tips
Please fo llow t hese guide lines as you read your doc umentat ion:
Cautions must be observ ed to avoid damage to yo ur
equipment.
Notes cont ain important inform at ion about your scann er.
Tips contain addit ional hints f or better scanning.
Introduction Page 8
Page 9
Understanding SCSI
Connections
Read the followi ng sections t o determi ne how to set up you r SCSI devices
and whet her you need any optional S C SI c ables.
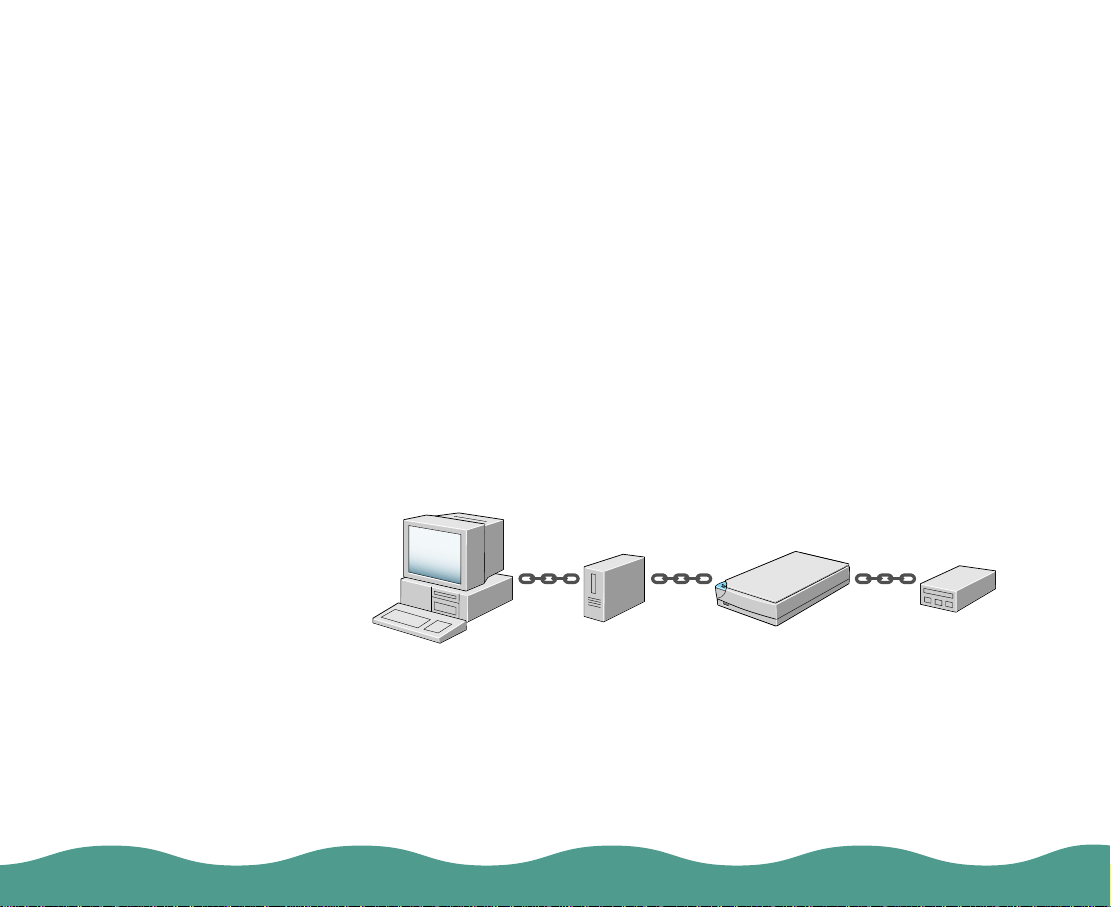
SCSI chain
The SCSI inte rf ac e allows you to con nect up to seven de v ic es (su c h as a
scanner, hard disk, CD-ROM, and so on) to the computer. This
arrange m ent is often ca lled a “daisy c hain.” On ly th e f irs t SC SI device in
the chain is connected to the computer; each of the other devices is
connected to another SCSI dev ic e.
Understanding SCSI Connectio ns Page 9
Page 10
SCSI cables
If you are us ing a SCSI ca ble other than the one pro v ided, the le ngth of
the cable must not e xceed 9.8 feet (3 meters) to maintain complianc e with
SCSI-2.
If you are connecting multiple SCSI devices to your computer, you
may need to purchase SCSI cables before setting up your SCSI
chain. Be su re t he SCSI cab le c onnectors are suitable f or your
hardware, depend ing on the mak er of your SC SI device an d SC SI
interface board.
To connect the scanner to another SCSI device, the length of cable must
not exceed 19.7 feet (6 meters); otherwise the system may not work
properly.
SCSI ID
Each device has a SCSI ID number:
the SCSI adapter in the compute r is
usually nu m ber 7, and ea c h of th e
other dev ic es m us t have a differ ent
number between 0 and 6. The
EPSON Perfection 636 default SC SI
ID number is 2.
2
3
1
4
0
5
9
6
8
7
Understanding SCSI Connectio ns Page 10
Page 11
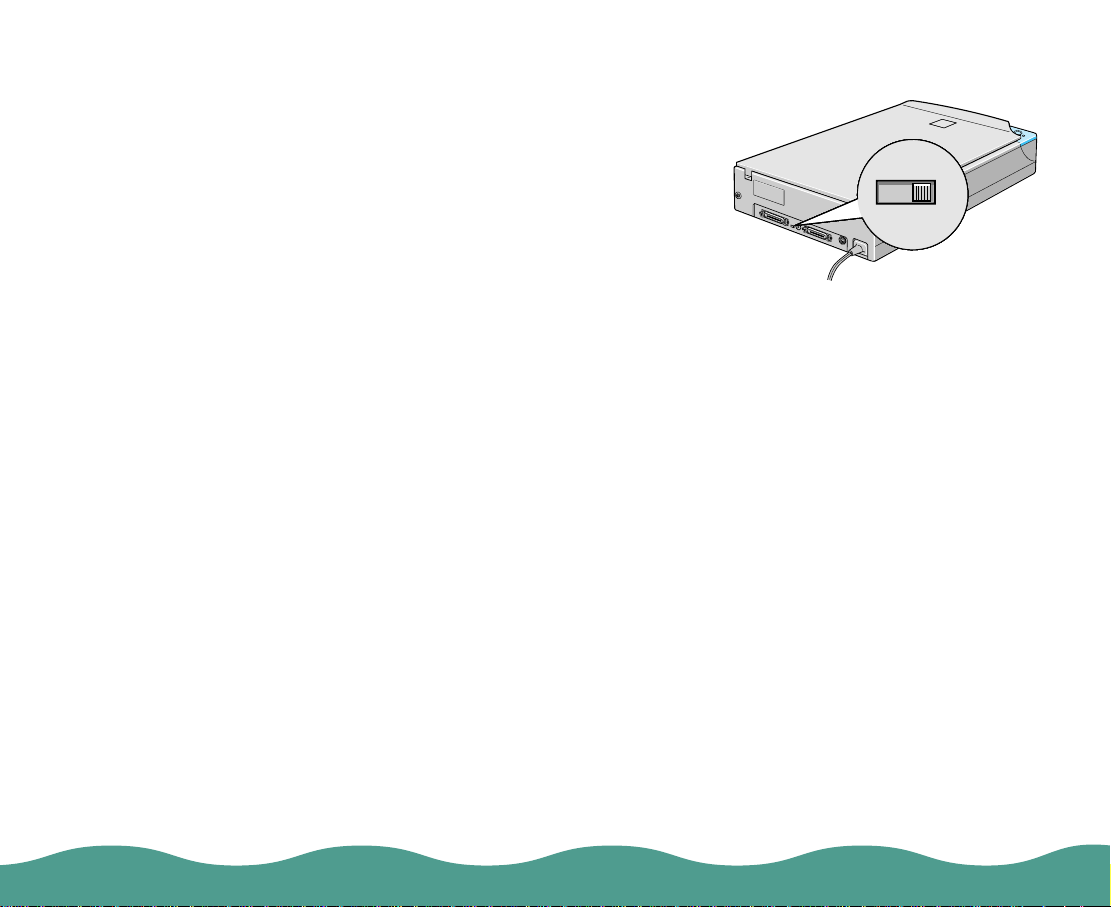
SCSI termination
The first device and the last device in
the chain (not inc luding the adapter)
must have a terminator. No other device
can have a te rm inator, or if a terminator
does exist, it must be turned off or
removed . Th e EPSON Pe rf ec t ion 636
terminator is located at th e rear of the
scanner . The default position of the
termination switch is ON . D o not use an
external te rm inator with the EPSON
Perfection 636.
ON
SW
Understanding SCSI Connectio ns Page 11
Page 12

Make sure the
scann er is tu rned off
before c hanging th e
SCSI ID number.
Setting the SCSI ID Number
The scanner’s default SCSI ID n um ber is 2. If you add the scan ner to a
system in w hic h one of your SCSI dev ic es already ha s S C SI ID 2, you
can chan ge t he ID numb er t o an unused num ber using th e rot ary switch
at the rear o f the scanner. See the table on the next page for a guid e t o
SCSI ID nu m bers. Then fo llow t hese steps t o c hange the ID number:
1 Turn the sc anner off.
Do not set the SCSI
ID to an ID number
that is already
assigned to another
device ot herwise the
computer, scanner,
and other devices will
not operate prope rly .
If you are us ing
Window s 98, see
Changing the SCSI ID
Numb er in
Window s 98 for more
inform at ion.
2 Change the SCSI ID number.
3 Turn the scan ner back on.
4 Restart your computer.
2
3
1
4
0
5
9
6
8
7
SCSI ID 2
Understanding SCSI Connectio ns Page 12
Page 13

Changing the SCSI ID N umber
ID Availability
®
0 Not available for Mac intosh
Not recom m ended fo r W indows
; used for hard disk
®
; usually us ed f or hard disk
1 Not recom m ended; u s ually used fo r hard disk
2 Factory setting of the scanner; can be changed
3 Available for Windows.
Not available if your M acintosh has a built-in CD -R OM
4 Available
5 Available
6 Available
7 Not available for Mac intosh; always used fo r th e M ac intosh itself
May not be availabl e fo r W indows; u su ally used for th e SC SI
board
8, 9 Not available ; scanner will n ot wo rk if se lec t ed.
Understanding SCSI Connectio ns Page 13
Page 14
Changing the SCSI ID Number in Windows 98
If you are using your scanner with Windows 98 and you want to change
the scanner’s SCSI ID number, fo llow t he steps be low .
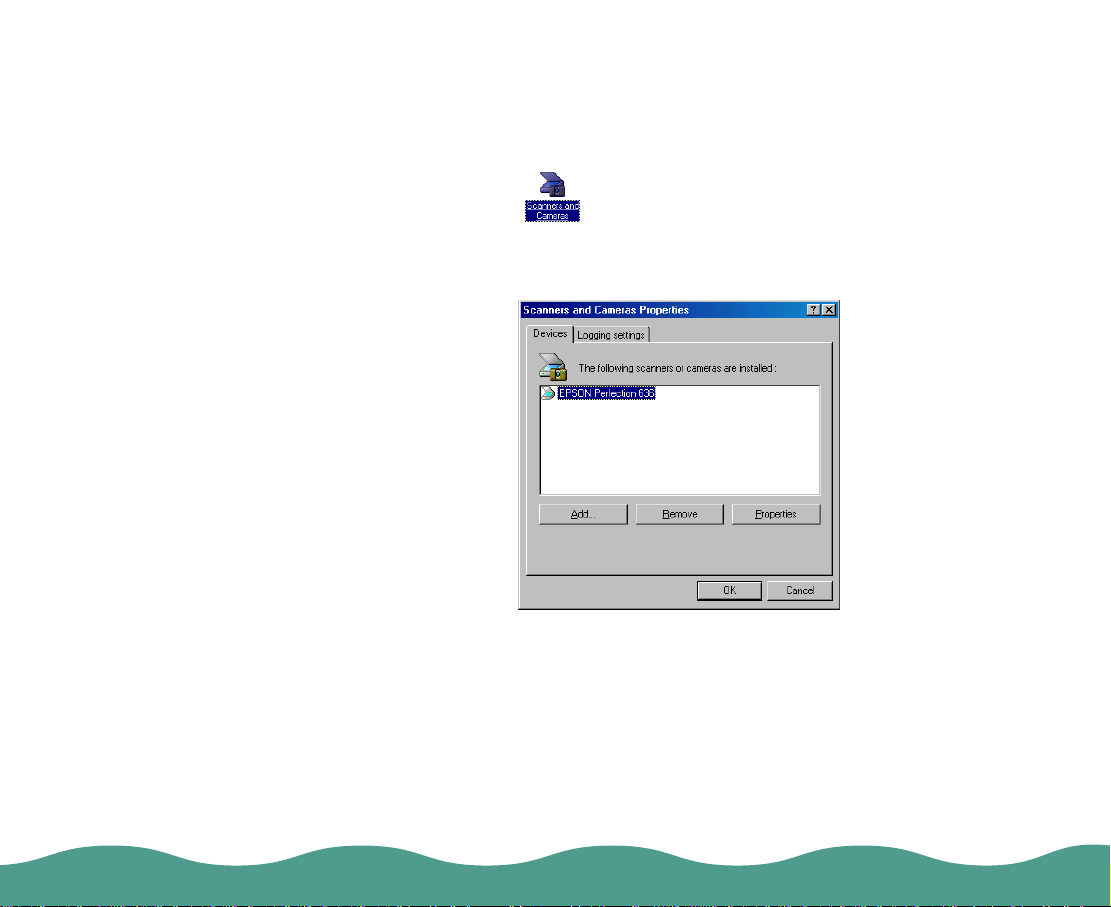
1 Double-c lic k th e Scanners and Cameras icon in the C ontrol
Panel.
2 Select your scanner in the installed devices list, then click Remove.
3 Click OK and close th e dialog box .
4 Shut dow n W indows 98 and turn off your PC and scanner.
5 Change the SCSI ID number of the scanner.
6 Turn on your s c anner, and th en t urn on your P C .
7 Follow the instructions on the screen.
Understanding SCSI Connectio ns Page 14
Page 15
Upgrading from
Windows 95 to Windows 98
If you installed th e scanne r softwa r e on a comput er wi th Windo ws 95 and
then upgraded to Windows 98, yo u m ust uninstall and re- ins t all the
scanner so ftw are. Follow th es e steps:
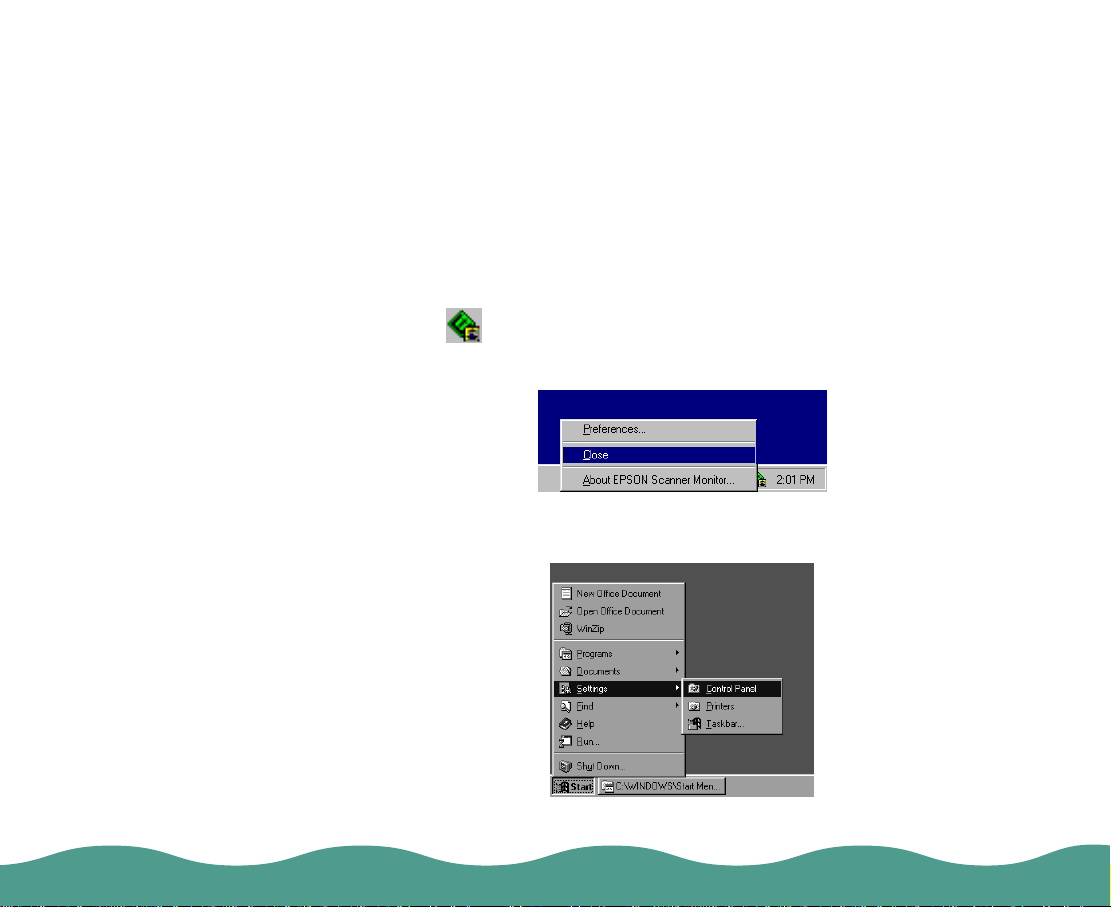
1 Click the EPSON Sc anner Mo nit or icon in the t as k bar and select
Close to close EPSON Scanner Mon it or.
2 Click Start, Settings, and then select Control Panel.
Upgrading from Windows 95 to Windows 98 Page 15
Page 16
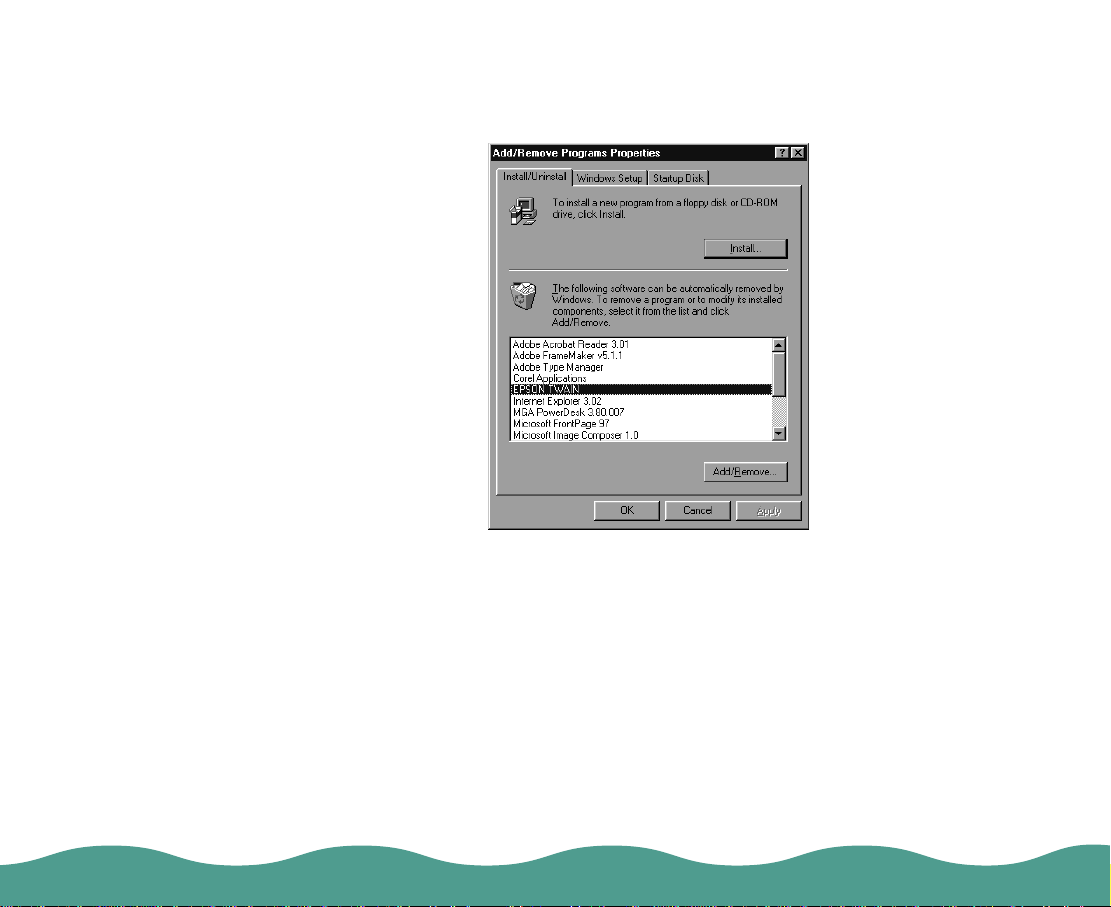
3 Double-click Add/Remove Programs. Select EPSON TWAIN and
click Add/Remove. Then follow the in structions o n th e s c reen.
4 To re-install the EPSON scanner software:
a Insert yo ur sca nner CD- ROM in your CD-ROM dri ve . Th e CD-ROM
automatically opens to the Main Menu. If it doesn’t, click Start,
select Run, and type D:\epson, where D is your CD-ROM drive
letter.
b Se lect Re-install Scanner Software.
c At the next screen, click Re-install.
Upgrading from Windows 95 to Windows 98 Page 16
Page 17

Installing the Optional
Equipment
This chapt er includes informati on on installing and using the two o pt ions
for the EPSON Perfection 636:
◗ Transparency Unit
◗ Auto Document Feeder
You can purchase th es e options fro m EPSON Acc essorie s at
(800) 873-7766 (U . S. sa les only). In Canada, please call (800) 873-7766
for dealer referral. Or visit our web site at www.epsonsupplies.com (U.S.
sales only).
To use the optional equipment, you must first remove the document
cover, as described in Removing the Document Cover
Installing the Optional Equipment Page 17
(B813132)
(B81314 2)
.
Page 18

Transparency Unit
The transparency unit (B8131 32) lets you sc an negative or positi v e fi lm
strips and s lides on your s c anner. The t ransparen c y unit is co m pact so it
can be attached or removed easily when you alternate between scanning
transpar ent materia ls and normal re f lec t iv e (paper) doc uments. See the
following se c t ions for information on:
◗ Unpacking the Transparency Unit
◗ Installi ng t he Transparency Un it
◗ Loading Transparencies
◗ Scanning Reflec t iv e D ocument s or Photograp hs
◗ Removing the Transparency Unit
◗ Selecting Settings
Installing the Optional Equipment Page 18
Page 19
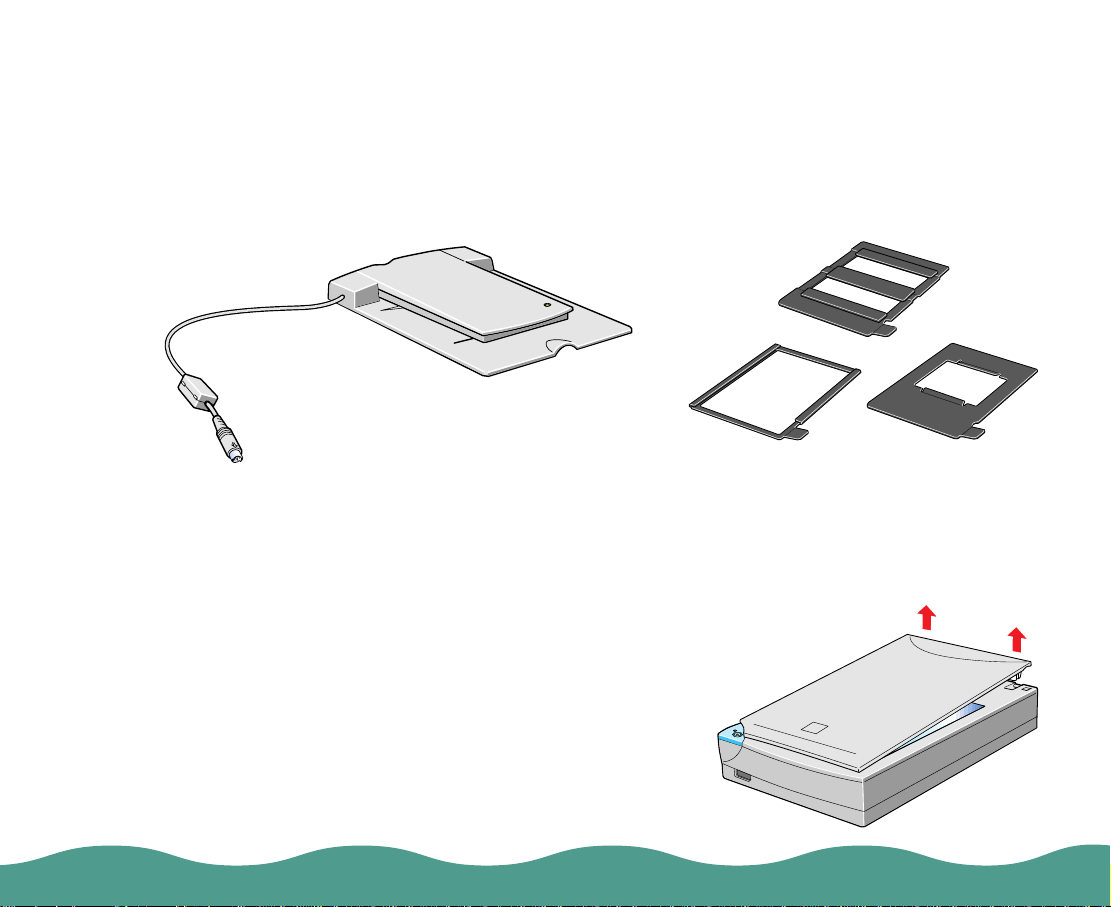
Unpa cking the Transparen cy Un it
Make sure t hat all the foll ow ing items ar e included in th e t ransparency
unit box. If any items are m issing or damaged, c ontact you r EPSON
dealer imm ediately. Keep all the pa c k ing materials s o y ou can use th em
for storage when you are not scan ning transparencies .
transparency unit
film holders
Installing the Transparency Unit
Follow the s t eps below to ins t all t he transparency unit on t he scann er.
1 Make sure t he scanner is t urned
off.
2 Remove the document cover from
the scanner by lifting th e back
straight up.
Installing the Optional Equipment Page 19
Page 20
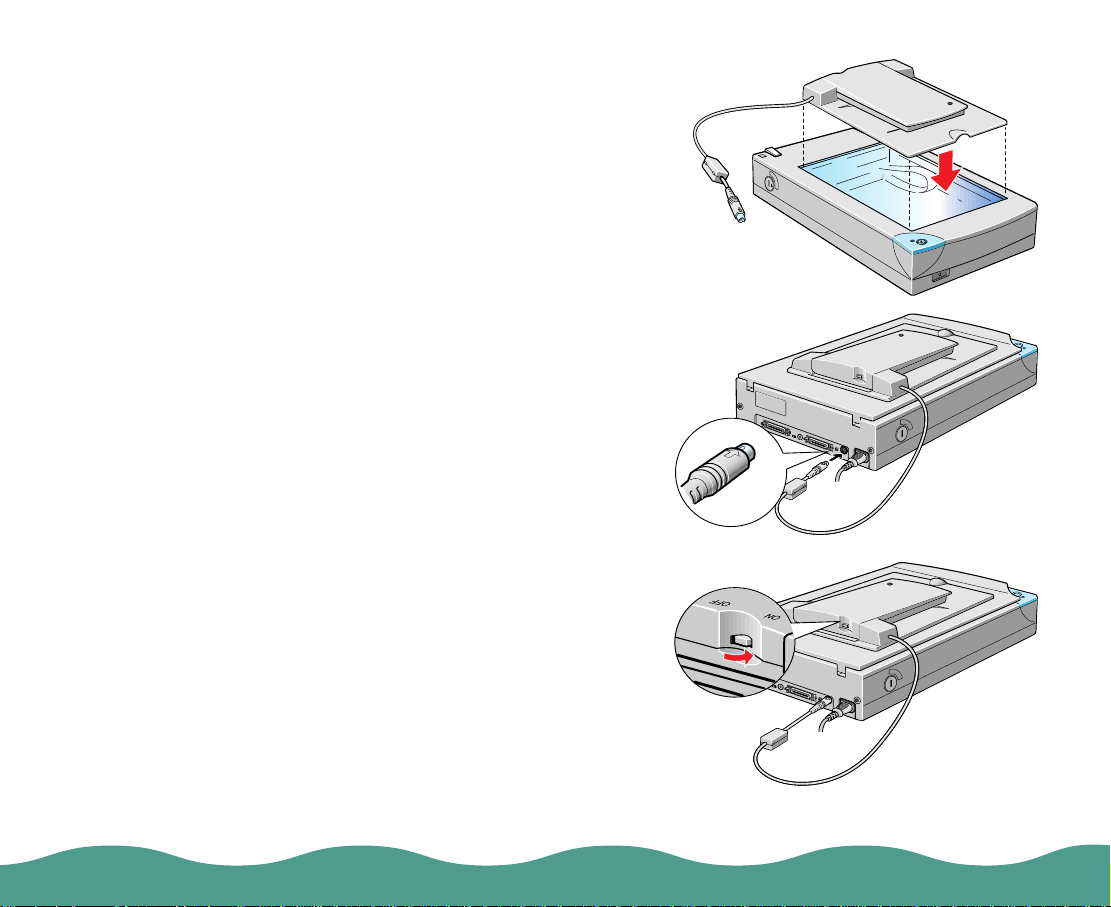
3 Make sure the document table
glass is clean and dust free.
4 Place the transparency unit on
the document table glass so that
the hinges fa c e t he rear of the
scanner and it fits on the
docume nt ta ble glass:
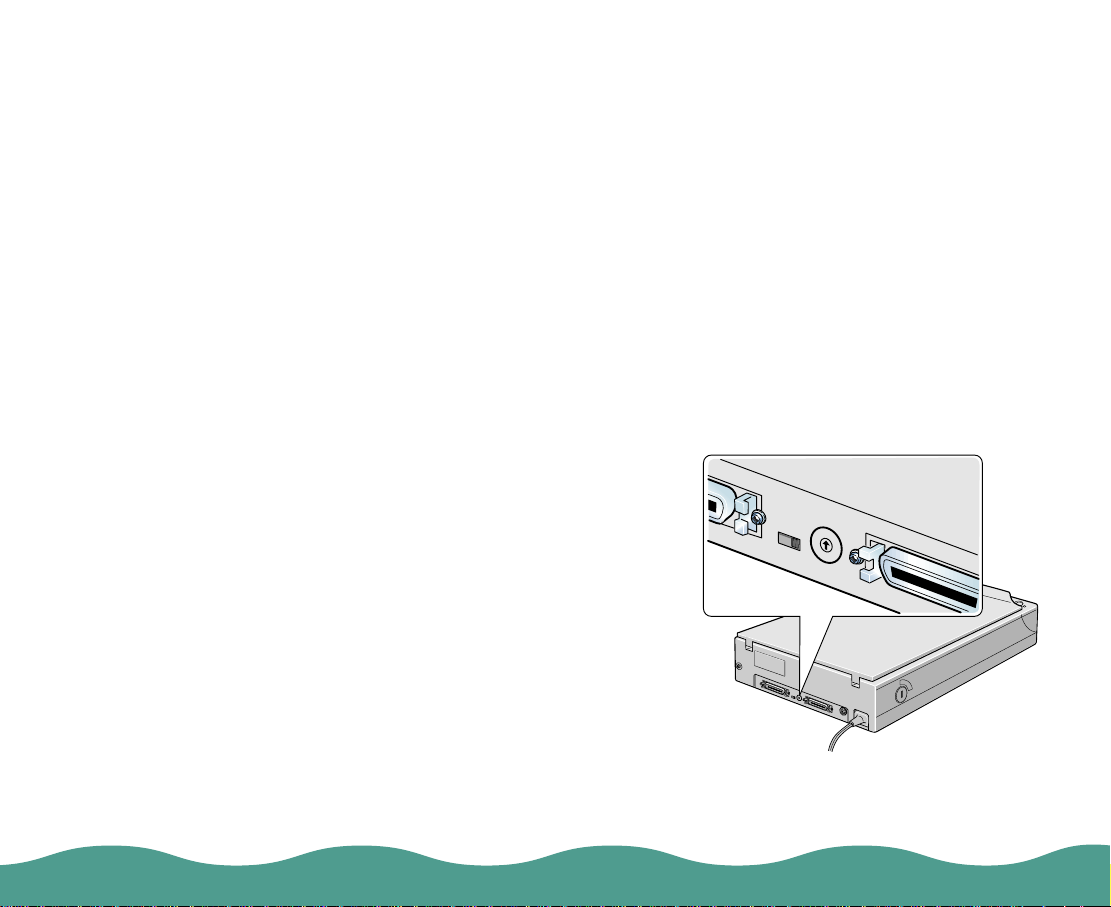
5 Connect the transparency unit
connector (arrow faces up) to
the scanner’s option interface :
6 Turn on the s ca nner.
7 Turn on the tr ans parency unit:
8 See the next section for
information on loading
transpar encies.
Installing the Optional Equipment Page 20
Page 21
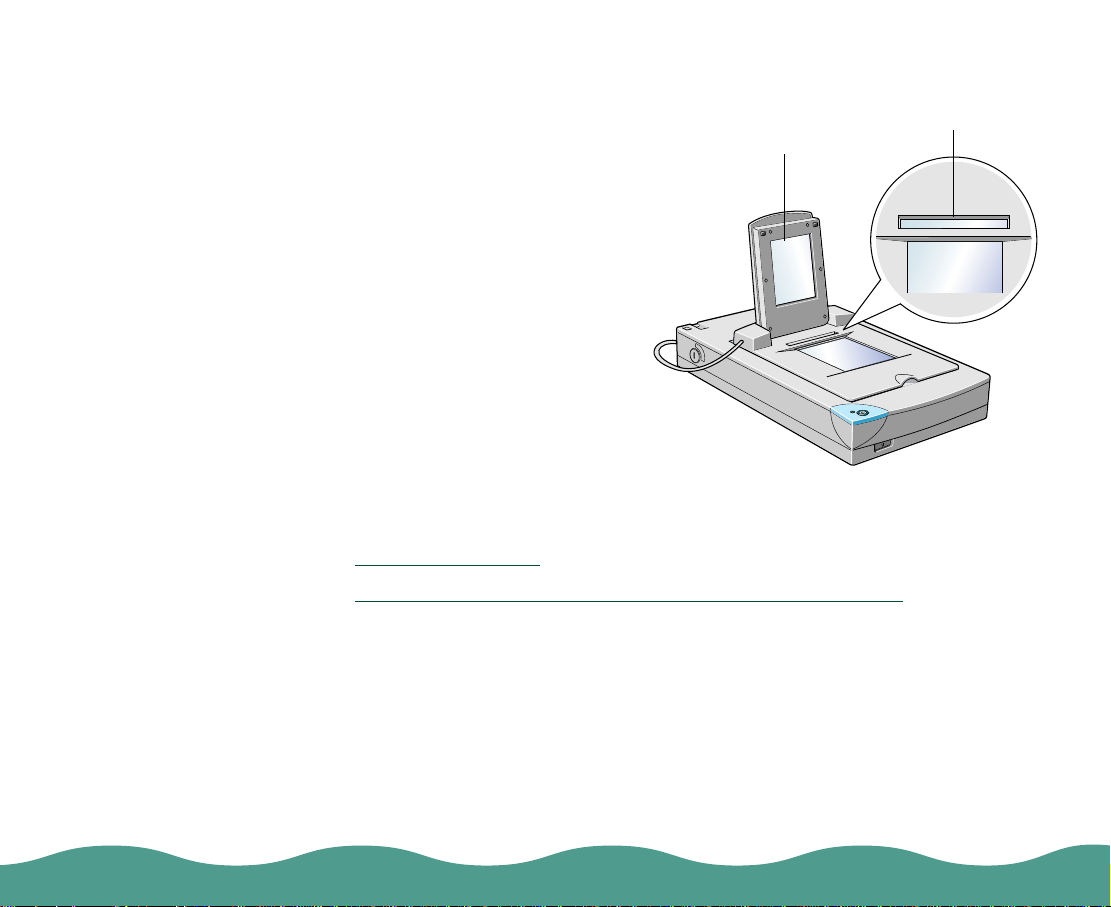
Loading Transparencies
Before scanning transparenci es,
wipe the lid of the transparency
unit, the scanner’s do c um ent
table glass, and the narrow
window n ear the hinge s . Be
sure to keep the window
uncover ed when load ing your
transpar encies. If your
transparency obstructs the
window, the colors in your scans
will be affec t ed.
You can load transparencies in
the film holders or you can place
them dire ctly on the docum ent
table, as des c ribed in the
following se c t ions:
◗ Using Fi lm H olders
◗ Load ing Slides an d F ilm D irectly on the Docume nt T able
lid
window
Installing the Optional Equipment Page 21
Page 22

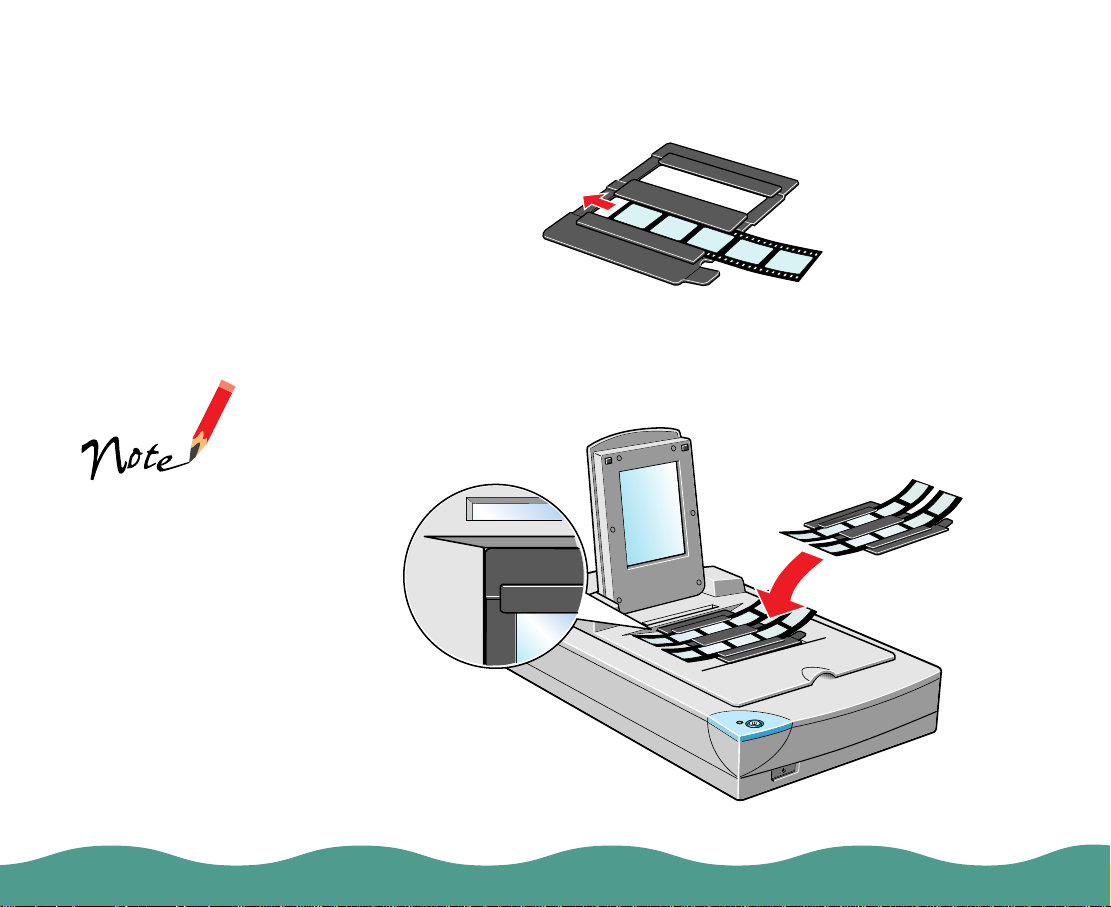
Using Film Holders
Three film holders are included with this unit . To pla c e film in the holders,
see the instructions below.
Hold the fi lm by th e
edges or use gloves .
Touch ing the film
surface with bare
hands can leave
fingerprints or oth er
marks on the film.
The bas e s ide of the
film is the si de on
which the film maker’s
name and film ID
numbers are printed.
◗ Placing th e F il
◗ Load ing 35 mm Ne gat iv e or Positiv e F ilm
◗ Loading Brownie Size Film
◗ Load ing 4 x 5 inch Film
To remove a film holder from the document table, lift it out by its tab.
m
Placing the Film
Film has two sides, a ba s e s ide that is shiny and a dull sid e w it h t he
emulsion . Fi lm sh ould always be loaded in t he film holders or placed on
the document table with the base side down.
Installing the Optional Equipment Page 22
Page 23
The bas e s ide of the
film is the si de on
which the film maker’s
name and film ID
numbers are printed.
Loading 35 mm Negative or Positive Film
Insert a strip of film in the 35 mm film holder, base s ide facing down.
v
Then plac e t he film holder on the document tab le. Be sure to al ign the
upper left co rner of the film holder with t he upper lef t corner of th e
transpar ency unit.
Installing the Optional Equipment Page 23
Page 24
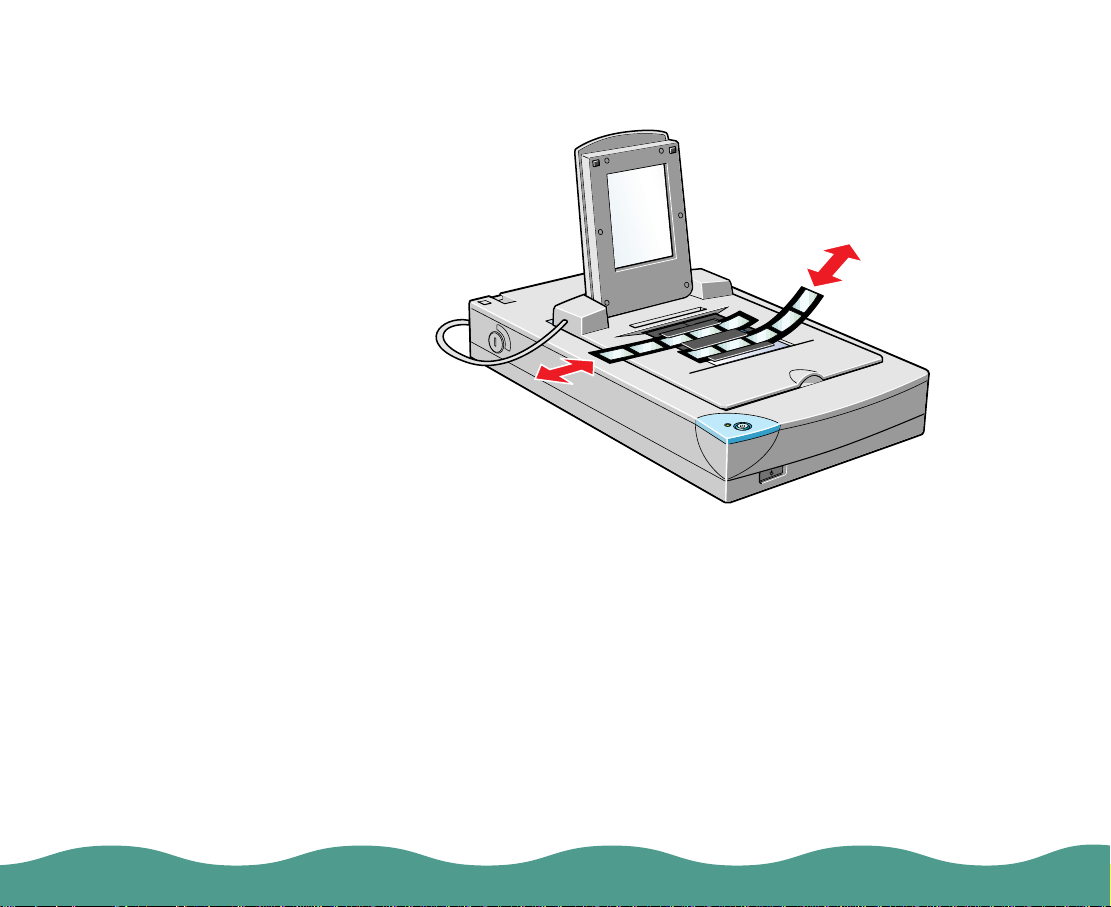
You can adjust the po si ti on of 35 mm film by s liding the stri ps in t he film
holder so t he f rames you wa nt to scan are pos it ioned in the window.
Installing the Optional Equipment Page 24
Page 25

Brownie size film is
2.4 × 3.5 inches
(6 cm × 9 cm).
Loading Brownie Size Film
Insert film in the Brownie size film holder, base side facing down.
Then plac e t he film holder on the document tab le. Be sure to al ign the
upper left co rner of the film holder with t he upper lef t corner of th e
transpar ency unit.
Installing the Optional Equipment Page 25
Page 26

Loading 4 x 5 inch Film
Insert film in the 4 × 5 inch film holder, base sid e fa c ing down.
Then plac e t he film holder on the document tab le. Be sure to al ign the
upper left co rner of the film holder with t he upper lef t corner of th e
transpar ency unit.
Installing the Optional Equipment Page 26
Page 27

Hold the fi lm by th e
edges or use gloves .
Touch ing the film
surface with bare
hands can leave
fingerprints or oth er
marks on the film.
If the film size is
4" × 5", it may be
easier to use the film
holder . If yo u place
the film directly the
document table, it
may be difficult to
pick up.
Loading Slides and Film Dir ec tly on the Doc um e nt Ta ble
You can scan slides and film strips in t he 4 × 5-inch (1 01. 6 × 127 mm)
scannin g area of the tra ns parency unit. You can us e f ilm holders (a s
describe d in the previous sections ) or place them direc tly on the
docume nt ta ble.
Follow the s t eps below to scan film or slid es .
1 Open the t op of the transparency unit while holding the ba s e down.
Installing the Optional Equipment Page 27
Page 28

2 Load the slide or film with
the base side down on the
scanner ’s doc ument tab le
in the wind ow of th e
transpar ency unit as s hown:
3 Close the t ransparen c y u nit .
Leave the narrow window
window
uncover ed, otherwi se th e
colors in your scans will be
affected.
Make sure t he unit is
completely closed,
otherwise an option error
results and you will not be
able to scan the docum ent
or get corre c tl y co lored
images.
Installing the Optional Equipment Page 28
Page 29

Selecting Settings
If you are using EPSON TWAIN, select TPU - Neg. Film or TPU - Pos.
Film in the Document Source settings, depending on the type of film
(35 mm fi lm strips or slides ) y ou are scanning. W hen previ ew ing image s
of negatives scanned using a film holder, the color may appear odd as the
frame of th e f ilm holder is per ce iv ed as white, c ausing your s c ans to
appear darker. To see the correct color, click and drag the mouse over an
area, then click the zoom preview button. For d e tail s o n scanner so ftwa re
settings , see the elect ronic
If you are using LaserSoft, select Neg. Transparency or 35 mm for
negative film or 35 mm film strips or Pos. Transparency for 35 mm slides
and posit iv e f ilm in t he Original s et t ing. When previewing images, you
may need to adjust the marquee (fra m e border). For details on s c anner
software settings, see the electronic
User’s Guide
.
EPSO N TWAIN User’s Guide
LaserSoft for EPSON Perfection 636
.
Scanning Reflective Documents or Photographs
When you ret urn to scann ing normal ref lec t iv e docum ents (such as
memos or photogra phs), you can t urn off the transparency unit, th en
place documents between it and the document table. Remember to
change the Document Source setting to Fla tbed in EPSON TWAIN or the
Original setting to Refl ective in La s erSoft. Be a w are that the en t ire
document table will be scanned so you will scan not only your document,
but also the undersid e of t he t ranspare nc y unit. To prevent scanning the
underside of the tran s parency unit , yo u c an place a whit e piece of paper
between yo ur document and the tra ns parency unit.
Installing the Optional Equipment Page 29
Page 30

When scanning thin doc uments, y ou may see a n im pressio n of th e
underside of the tran s parency unit in y our scans. If s o, remove the
transpar ency unit an d re-install th e document co v er as described in the
next section.
If you don’t plan to scan transparencies for a while, you can remove the
transpar ency unit an d re-install th e document co v er as described in the
next section.
Removing the Tran sp ar enc y Un it
Follow these steps to remove the transparency unit:
1 Turn off the tr ans parency unit and the s c anner.
2 Remove any film holders or film from the document table.
3 Unplug the t ransparen c y u nit c onnector fro m th e s c anner’s op ti on
interface.
4 Store the transparency unit and film holders in their original packaging.
5 Reattach the document cover as described in Reatta c hing the
Document Cover.
Installing the Optional Equipment Page 30
Page 31

When using the auto
document feeder, you
must select EPSON
TWAIN 3 as your
TWAIN source and
Auto Document
Feeder (ADF) as yo ur
Document Source in
TWAIN. See your
electronic
TWAIN User’s Guide
for more in fo rm ation.
EPSON
Auto Document Feeder
The auto d oc ument fee der (B813142) allows y ou to automa t ic ally load
single-si ded, multip le-page document s int o y our scan ner. The document
feeder is p art ic ularly usef ul f or OCR (opti ca l c haracter r ec ognition)
scannin g or f or creating an image da ta base. See t he f ollowing s ec t ions
for information on:
◗ Unpacking the Auto Document Feeder
◗ Installi ng t he Auto Doc um ent Feeder
◗ Load ing Paper int o th e Auto Docu m ent Feeder
◗ Loading Documents Manually
Unpacking the Auto Document Feeder
When you unpack your au to document fe eder, make su re you have all t he
parts show n below. Keep all th e packing ma t erials so you ca n us e them
for storage when you are using the auto document feeder. If any items are
missing or damaged, contact your EPSON dealer.
paper supportauto document feeder
Installing the Optional Equipment Page 31
Page 32

Installing the Auto Document Feeder
Follow the steps below to insta ll th e aut o document fee der (ADF) on yo ur
scanner .
1 Make sure your scanner is turned off.
2 Remove your scanner’s document cover by lifting the back straight up.
3 Make sure the document table is clean and dust free.
4 Remove the protective materials from the ADF.
Installing the Optional Equipment Page 32
Page 33

5 Insert the hinges on the ADF into the o ut er square holes at the back of
the scanner and close the ADF.
Installing the Optional Equipment Page 33
Page 34

6 Attach the AD F ’s connector to the s c anner’s option interf ac e.
7 Attach the paper support to the ADF, as shown.
8 Turn on the s ca nner.
9 See the fol low ing sectio n f or instructions on loadi ng paper in the AD F .
Installing the Optional Equipment Page 34
Page 35

Loading Paper into the Auto Document Feeder
Your auto document fe eder can automaticall y lo ad up to 20 sh eet s of th e
following paper sizes (based on a pa per weight of 17 lbs and a s ta c k
thickness of 0.16 inch [4.0 mm] or less):
Do not feed
photographic sheet s
or valuable original
artwork into the auto
documen t fee der as a
misfeed may result in
accidental wrinkling or
damage.
If you are scanning
high-quality color or
halftone documents,
place the do c um ents
directly on the
docum ent tabl e.
Checks: 3.3 × 5 inches ( 83 × 1 27 mm)
B5: 7.17 × 10.1 inches (182 × 257 mm)
A4: 8.27 × 11.6 9 inc hes (210 × 297 mm)
Letter: 8.5 × 1 1 inc hes (215.9 × 279.4 mm)
Legal: 8.5 × 14 inches (215.9 × 355.6 mm)
Check the fo llowing before feedin g a document int o t he feeder:
◗ Ink on the document is dry.
◗ The document has no holes, is no t ripped or wrin kl ed, and has no
articles at ta c hed to it.
◗ The document has no staples or other objects attached that might
damage the feeder mechanism.
◗ The document has no folds closer than 0.2 inch (5 mm) from its edge.
◗ The document is no t a m ult i-part form o r bound.
◗ The doc ument has no rear carbo n c oating.
◗ The document has no cut-out areas.
Installing the Optional Equipment Page 35
Page 36

Make sure no
documents or dust are
on the document table
glass when using the
auto doc ument
feeder. Dust on the
document table glass
near the car riage
home position may
result in ve rt ic al lines
on the scanned
images.
Follow the s t eps below to load paper int o t he auto document feeder
(ADF):
1 Slide the righ t edge guide all t he way to the right.
2 Insert the paper stack int o the ADF unti l it me ets resista nce. Make su re
that the side you want to scan is facing up, with the top edge facing
into the feeder; the first page you want to scan should be on top. Then
move the right edge g uide so it is flush w it h t he right edge of yo ur
paper.
Documents are out put int o the lower t ray af t er s c anning is finis hed.
Installing the Optional Equipment Page 36
Page 37

Loading Documents Manually
You can load documents manu ally even wh en the auto doc ument fee der
(ADF) is ins t alled.
Opening the auto
document feeder or its
cover while it is
operating results in an
option error and paper
feeding stops.
When s ca nning thin
documents, you may
see an im pression of
the underside of th e
auto document feeder
in your scans. If so,
remove the auto
document feeder and
re-inst all the
document cover as
descri bed in
Reattaching the
Document Cover.
Lift the AD F a nd place the document on t he document table . Then lower
the ADF and scan the document.
Always cl os e t he ADF and it s co v er before sca nning. If you are scann ing
thick material or docu m ents more than 1.6 i nc hes (2 cm) t hick, leave the
ADF in the upright posit ion. Be sure t o c ov er any expos ed area s o f the
docume nt ta ble glass.
Be sure to select Flatbed in the Document Source settings in EPSON
TWAIN.
Selecting Settings
When you are using the auto document feeder, you must use the EPSON
TWAIN dr iv er. F or informat ion on select ing driver se t ti ngs , s ee the
EPSON TWAIN User’s Guide
.
Installing the Optional Equipment Page 37
Page 38

Clearing Jammed Paper from the Auto Document Feeder
To clear jammed pap er in the optional auto do cu m ent feed er, fo llow the
steps below :
1 Turn off the scanner.
2 Push down t he release le v er t o s lightly raise th e f eeder mec hanism
and relea s e th e paper.
release
lever
Installing the Optional Equipment Page 38
Page 39

3 Then slowl y p ull t he jammed paper out o f the feeder mec hanism. (Be
careful not to pul l too hard; th e paper may tear, making it more difficu lt
to remove. )
4 If paper is still jammed ins ide the mec hanism, op en the cover to
remove it.
ADF cover
5 After removing j ammed pa per, mak e sur e that the cover is clos ed, a nd
push the feeder mechanism down until it clicks into place.
Installing the Optional Equipment Page 39
Page 40

Removing the Document Cover
If you’re scanning something that doesn’t fit under the document cover,
you can remove it. To do this, simply lift the back of the document cover
straight up.
When scanning with the cover removed, make sure you cover any
exposed areas of the do c um ent table glass to prevent inter fe rence from
external light.
Reattaching the Document Cover
When reattaching the document cover, be sure to hold the cover in a
vertical position as you push its attachments into place.
Installing the Optional Equipment Page 40
Page 41

Maintaining the Scanner
Be careful not to
scratch or damage the
document table glass,
and don ’t us e a hard or
abrasive brush to clean
it. A damaged glas s
surface can decrease
scanning quality.
Never use alcohol,
thinner, or corrosive
solvent to clean the
scanner. These
chemicals can
damage the scan ner
components and the
case.
Don’t spray lubricants
inside the scanner. Be
careful not to spill liquid
in the scanner. This
could permanen tl y
damage the scan ner.
Cleaning the Scanner
To keep your scanner operatin g at it s b es t , you should cle an it
periodically. Befor e c leaning, un plug the power cord.
Use a soft cloth to clean the outer case with mild detergent dissolved in
water.
If the document table glass gets dirty, clean it with a soft, dry cloth. If the
glass is stained with grease or other hard-to-remove material, use a small
amount of glass cleaner on a soft cloth to remove it. Wipe off any
remaining liquid with a dry cloth.
Be sure there’s no dust on your document table. Dust can cause white
spots to ap pear in your sc anned ima ge.
Maintaining the Scanner Page 41
Page 42

Never open the
scanner case. If you
think re pairs or
adjustments are
necessary, consult
your dealer.
Replacing the Fluorescent Lamp
The luminosity of the fluorescent lamp declines over time. If the lamp
breaks or becomes too dim to operate normally, the scanner stops
working and the operate light rapidly flashes red. If this happens, the lamp
assembly m us t be replaced . Fo r details, cont act your de aler.
Cleaning the Pa per Path Guide
If you notice the quality of y our scans ha ve declined, or y ou simply w ant
to keep the quality of your scans at t heir best, clean the auto docume nt
feeder paper path gu ide.
Follow the instructions below to rem ove, clea n, and reatta c h th e paper
path guide.
Maintaining the Scanner Page 42
Page 43

Removing the Paper Path Guide
1 Turn off the scanner.
2 Disconnect the cable for the auto document feede r (ADF), and remove
the ADF.
Maintaining the Scanner Page 43
Page 44

3 Gently pull out the paper support.
4 Place the ADF on the document table upside down, with the front of
the ADF towards you.
5 Gently pull the two white hooks up, and then push them back down out
of the recta ngular holes .
Maintaining the Scanner Page 44
Page 45

6 Pull the pap er path guide upward s a nd out to remo v e it.
To clean the paper pat h guide, see C leaning th e Paper Path Guide
reattach t he paper pat h guide, see At t ac hing the Pa per Path Gu ide
Be careful not to
scratch or damage the
paper p at h guide.
To avoi d damaging
the auto doc ument
feeder, be careful not
to touch the rollers or
metal p art s .
Maintaining the Scanner Page 45
Cleaning the Paper Path Guide
Use a soft dry cloth to gently wipe the transparent plastic sheet of the
paper path guide.
. To
.
Page 46

Attaching the Paper Path Guide
1 Insert the tra ns parent pla s tic s heet of the paper path guide into the
paper path of the auto document feeder.
2 Insert the hoo k s in t o th e rectangular holes in the bottom of the aut o
document feeder. Make sure the hooks click into place.
Maintaining the Scanner Page 46
Page 47

Transporting the Scanner
If you are tra ns porting the s c anner a sign if ic ant distance or storing it fo r
an extend ed period, follow the steps below to se c ure the car riage.
If the car riage does
not automatically
return to the home
positio n, rais e the
front of the scanner
and hold it up until the
carriage comes to rest
in the home position.
Then turn the
transp ort ation lock to
the locked position.
If you are us ing the
transp arency unit and
it is switched on, the
carriage will not move
to the home position.
Remove the
transparency unit fi rst,
then perform steps 2
and 3.
1 Remove any optional
equipment and repl ac e t he
docume nt co v er.
2 Turn on the scanner and
wait until th e c arriage
moves to the home position
(towards t he back of the
scanner ). Th en turn off the
scanner .
3 Use a coin or
screwdriver to turn
the transportation
lock to the lo c k ed
position to secure
the carria ge.
home position
locked
unlocked
Maintaining the Scanner Page 47
Page 48

Troubleshooting
This chapter gives you the basics for diagnosing and solving scanner
problems. For additional troubleshooting tips, see the “Problems? Need
Help?” ch apter of your
chapters of your electronic
for EPSON Perfectio n 636 User’ s Guide
First see P roblems and Solution s. I f n one of the sug gested solu ti ons
solve your problem, c ontact your EPSON de aler or see Where
Help.
Problems and Solutio ns
This section divides scanner problems into two categories:
◗ Operat ing Problem s
◗ Imag e Quality Problems
See the tab le in Scanne r Light first. If this does not help you solve your
problem, go t o t he category fo r t he type of pro blem you hav e, th en look
for the prob lem descrip t ion.
Scanner Basics
EPSO N TWAIN User’s Guide
book and t he “Troubl es hooting”
.
and
LaserSof t
to Get
Troubleshooting Page 48
Page 49

Scanner Lig ht
The operat e light indicates the sta t us of th e s c anner. If an er ror occurs,
the scanner stops ope rating and the operate light s hows the typ e of error.
Light status Scanner status Solution
F (slowly
flashin g green)
N (green) Ready to scan images —
O
F
(rapidly flashing
red)
F
(rapidly flashing
orange)
N
= on (green), O = off, F = flashing
Initializing or busy scanning —
The scanner is turned off —
The inter fa c e s et up is wrong, or
the scanner is not properly
connected to the computer.
The transportation lock has not
been rele as ed, the fluo res c ent
lamp needs to be replaced, or the
scanner is broken.
The cover of the optio nal auto
docume nt fe eder is open , or th e
release lev er is presse d and
paper feeding unit is slightly open.
No paper is loaded, or p aper has
jammed in the auto document
feeder.
Check th e interface connection. Then tur n
the scanner off and back on to reset it.
Make sure that the transportation lock is in
the unlocked position; then turn the scanner
off and then back on. If the scanner still does
not operate properly, or if this error occurs
repeatedly, consult your dealer.
Make sure that the cover of the optional auto
docume nt f eeder is clos ed and/or pu sh th e
paper feeding mechanism down until it cli cks
into plac e.
Load pa per in the auto document fe eder, or
turn the scanner off and remove the jammed
paper from the auto document feeder.
Troubleshooting Page 49
Page 50

Operating Problems
Problems y ou may have w hile using the s c anner often involve the
operation of your software and computer. Operation problems usually
occur because of:
◗ Incorrect setup of the interface card (see
◗ Incorrect setup of your computer or software (see
◗ Incorrect operation o f your software (see your electronic
TWAIN User’s Guide
Guide
).
◗ Inappropriate se lec t ion of the scanner softw are settin gs (s ee your
electronic
EPSO N TWAIN User’s Guide
Perfection 636 User’s Guide
Also see the doc umentat ion that came wi th yo ur c om puter and pri nt er for
possible solutions.
The operate light does not come on.
Problem Solution
The scanner is not
turned on.
The power cord is not
plugged in.
Press the
Make sure t he power cord is correc tl y p lugged into the power out let .
Also, make sure the power outlet is working.
P operate but t on to turn on th e s c anner.
Scanner Basics
).
Scanner Basics
EPSON
and
LaserSoft for EPSON Perfection 636 User’s
and
LaserSof t fo r EPSON
).
).
Troubleshooting Page 50
Page 51

The scanner does not start scanning.
Problem Solution
The scanner is not
turned on.
The interface board is
not correctly installed.
Press the
Make sure that you have selected the correct interface port and settings
with your software. Also make sure the interface board in your computer
is properly ins t alled.
Make sure that the terminator and SCSI ID are correctly set up.
If you have ot her expansion boards in y our comput er, m ake sure th at
they are not interfering with the interrupt setting of the interface board for
your scanner. (See yo ur c om puter documentat ion.)
P operate but t on to turn on th e s c anner.
The scanner software does not work properly.
Problem Solution
The scanner software
was not ins ta lled
correctly or has been
corrupted.
You have not selected
a TWAIN source.
Be sure yo u have correc t ly ins t alled your sof t w are or re-install your
software.
For your TWAIN source, select Perfection 636 (32-bit) if you are using
LaserSoft or EPSON TWAIN3 if you are us ing EPSON T W AI N .
Troubleshooting Page 51
Page 52

Problem Solution
Your system does not
meet the minimum
system requirements.
You are try ing to scan
an imag e at too hi g h a
resolution.
Make sure that your computer system meets the minimum system
requirements, such as the operating system version, specified for your
software.
Confirm that the compute r has eno ugh memory fo r your sof tware . If your
computer has many device drivers, or if you are running other software at
the same time, or using RAM-resident programs, the computer may not
have enough memory available. (See your softwa re and computer
docume nt at ion.)
Image Qualit y Pr ob le m s
The entire image is distorted or blurred.
Problem Solution
Your document is no t
flat again st t he
document table.
The scanner is not on
a flat surface.
Make sure t hat the docu m ent is place d fl at against the d oc ument table.
You may have accidentally moved the document during scanning. Check
the position of the doc um ent and do not m ov e it while the scanner is
operating.
Make sure that the scanner is not tilted or placed on an unstable surface.
Troubleshooting Page 52
Page 53

Part of the image is distorted or blurred.
Problem Solution
Your document is no t
flat.
Make sure your document is in good condition. Part of the document may
be wrinkle d, w arped, or no t in co nt ac t w it h t he document t able. Be sure
the document is unifo rm ly f lat .
Edges of the document are not scanned.
Problem Solution
Your document is too
large.
The document table has non- readable areas around the edges. If part of
your document extends beyond the maximum limits marked on the
docume nt tabl e edge guides, you may hav e to rep os it ion your docume nt
so that the im age you want to scan is within th e readable area.
Color is patchy or distorted at the edges of the image.
Problem Solution
Your document is no t
flat.
Your document is too
large.
If the document is very thick or warped at the edges, the edges of the
image may be discolored. Cover the edges of the document with opaque
paper to block outside light.
If part of the document extends beyond the document table, that edge
may not be in contact with the document table. Change the position of
the document.
Troubleshooting Page 53
Page 54

The image is faint or out of focus.
Problem Solution
Your document is no t
flat.
Your software settings
are not correct for your
document type.
Check tha t th e document is p lac ed flush against the do c um ent table.
See your electronic
EPSON Perfection 636 User’s Guide
settings.
The image is too dark.
Problem Solution
Your software settings
are not correct for your
document type.
Adjust the brightness w it h y our applica t ion software. Also c hec k t he
brightnes s and contras t va lues of your di s play screen .
Straight lines in the image are jagged.
Problem Solution
The document is not
aligned wit h t he
scanner lamp.
The document may have been placed at an angle on the document table.
Align it so that the horiz ontal and vert ic al lines are carefully aligned with
the scales on the top and s ide of the doc um ent table.
EPSON TWAIN User’s Guide
for information on sof t w are
and
LaserSof t fo r
Troubleshooting Page 54
Page 55

The image does not look the same as the original.
Problem Solution
Your software settings
are not correct for your
document type.
The colors displayed
on your mo nit or don’t
match the original or
printed colors.
You selec te d an
incompatible image
type for your scanned
image.
Try differe nt c om bination s o f image settin gs us ing your sc anner
software.
Try increas ing your monitor’s col or palette to 1 6 bit or 24 bit.
Because your monitor and printer use different technologies to represent
colors, yo ur printed colors cannot ex actly match the colors yo u s ee on
your mon ito r s c reen.
Your softw are may not hav e sufficient c olor matchi ng and color
management features, or these components of yo ur soft ware may not be
correctly installed. (See your software, monitor, and computer manuals
for information on color matchin g and calibr at ion.)
If you are im porting an image file into y our applica t ion software, m ak e
sure the file f ormat is one yo ur s oftware can read. Also check th at th e
image sett ings in your application are appropriate for th e t y pe of image
you want to scan. (See your software manual.)
A line of dots is always missing in the scanned image.
Problem Solution
Your printer is running
out of ink or to ner.
If this happ ens in your printed image only, you r printer is low on ink or
toner. Replace your ink or toner c art ridge. If this does not solve the
problem, yo ur printer may be malfunc t ioning. (See y our printer m anual.)
The scanner is
malfunct ioning.
Troubleshooting Page 55
If this happ ens on both y our screen and printou t, th e s c anner’s s ensor
may be malf unctioning. Consul t your dealer.
Page 56

A line of dots always appears in the scanned image.
Problem Solution
Your scan ner needs
cleaning.
If this happ ens on both y our screen and printou t, t he docum ent t able
glass may be dusty or scratched. Clean the document table glass as
describe d in Cleaning th e Scanner
If you are us ing the auto document fe eder, the paper path gui de of the
auto document feeder may be dusty. Clean the paper path guide as
describe d in Cleaning th e Paper Pat h Guide
the guide m ay be scratched and mu st be replace d.
.
Textured patterns of dots appear on areas of an image.
Problem Solution
You are using
halftonin g.
This is normal and caused by moiré patterns
minimizes the problem if Best & de-screening is selected as the Quality &
de-scree ning settin g in t he Image Type dialog box.
Colors in the image look odd.
Problem Solution
Your software settings
are not correct for your
document type.
You are no t u si ng the
transpar ency unit
correctly.
See your electronic
EPSON Perfection 636 User’s Guide
settings.
When you are using the transparency unit, make sure the rectangular
window near the hinges on the base is uncovered, or make sure the top
of the trans parency unit is c los ed when sc anning.
EPSON TWAIN User’s Guide
for information on sof t w are
. If the prob lem s t ill ex ists,
Your scanner automatically
.
and
LaserSof t fo r
Troubleshooting Page 56
Page 57

Colors on your monitor are different from those in the original image.
Problem Solution
The colors displayed
on your mo nit or don’t
match the original or
printed colors.
Try increas ing your monitor’s col or palette to 1 6 bit or 24 bit.
Because your monitor and printer use different technologies to represent
colors, yo ur printed colors cannot ex actly match the colors yo u s ee on
your mon ito r s c reen.
Check the image settings in your scanner software, especially data
format (bit s /p ix el/color), g am m a correcti on, and color c orrection . Tr y a
different c om bination of th es e s et t ings.
Your softw are may not hav e sufficient c olor matchi ng and color
management features, or these components of yo ur soft ware may not be
correctly installed. (See your software, monitor, and computer manuals
for information on color matchin g and calibr at ion.)
Printed colors are different from those in the original image.
Problem Solution
The colors displayed
on your mo nit or don’t
match the original or
printed colors.
Try increas ing your monitor’s col or palette to 1 6 bit or 24 bit.
Because your monitor and printer use different technologies to represent
colors, yo ur printed colors cannot ex actly match the colors yo u s ee on
your mon ito r s c reen.
Your softw are may not hav e sufficient c olor matchi ng and color
management features, or these components of yo ur soft ware may not be
correctly installed. (See your software, monitor, and computer manuals
for information on color matchin g and calibr at ion.)
Troubleshooting Page 57
Page 58

The printed image is larger or smaller than the original size.
Problem Solution
You have changed the
resolutio n or scaled
your imag e.
The image size settings in your software determine the size of the printed
image. Do not use the size of the image on your monitor to judge the
printed size.
Your image cannot be printed or the printout is garbled.
Problem Solution
Your image file size is
too large.
Your printer is not set
up correctly.
Your softw are is not
installed correctly.
Confirm that the compute r has eno ugh memory fo r your sof tware . If your
computer has many device drivers, or if you are running other software at
the same time, or using RAM-resident programs, the computer may not
have enough memory available. (See your softwa re and computer
docume nt at ion.)
Check tha t th e printer is properly connected to the c ompute r and is
correctly se t up. (See your pri nt er manual.)
Check that your software is properly installed and set up for your printer.
(See your software manual.)
Troubleshooting Page 58
Page 59

Color of negative film preview images looks odd.
Problem Solution
You are no t u si ng the
software settings.
Check tha t s ettings are c orrect. See your electronic
EPSON Perfection 636 User’s Guide
details.
Make sure t he narrow window at th e t op of the transparency unit is not
covered.
Remember that the dark area around the film, such as the frame of the
film holder, is perceived as white—altering the exposure of the scanning
area and causing your scans to appear dark er. See the co rrect color b y
adjustin g th e m arquee or frame border and then adjust ing the expo s ure.
See your electronic
EPSON TWAIN User’s Guide
LaserSoft for EPSON Perfection 636 User’s Guide
for details.
or
EPSON TWAIN User’s Guide
LaserSoft for
for
or
Troubleshooting Page 59
Page 60

Where to Get Help
EPSON provides technical assistance through electronic support services
and autom ated telephone servic es 24 hour s a day . T he f ollowing t ables
list the contact information:
Electron ic su pport servi ce s
Service Access
World Wi de W eb From the Internet , you can reach EPSON ’s Ho m e
Page at http://www.epson.com.
EPSON Internet
FTP Site
EPSON
Downlo ad
Service
EPSON Forum
on Comp uServe
Troubleshooting Page 60
If you hav e I nt ernet FTP ca pability, use your Web
brows er (or other sof tware for FTP download ing) to
log onto ftp.epson.com with the user name
anonymous and your e-mail add res s as t he
password.
You can c all the EPSO N D ow nload Serv ic e at
(800) 442-2007. Set your communicat ions softwa re
to 8 data bits, 1 stop bit, no parity. Modem speed
can be up to 28.8 Kbps .
Members of CompuServe can type GO EPSON at
®
the men u prompt to re ac h the Epson America
Forum. For a free introductory CompuServe
memb ers hip, call (800) 848-8199 and ask f or
repre s entati v e #529.
Page 61

Automa te d t elephone s erv ic es
Service Access
If you need help
using another
manuf ac t urer’s
software with an
EPSON product, see
the doc um entat ion for
that software for
techni ca l s upport
inform at ion.
EPSON
SoundA dv ic e
SM
For pre-rec orded ans w ers t o c om monly as ke d
question s about EPSO N products 24 hours a day,
seven days a week, call (800) 922-8911.
EPSON
FaxAdvice
TM
Access E PSON’s technical information library by
calling (800) 922- 8911. You mus t provide a return
fax number to use this s erv ic e.
EPSON R eferral
Service
For the location of your nearest Authorized
EPSON R es eller or Cust om er Care Center, call
(800) 9 22-8911.
To speak to a technical support representative, dial (310) 974-1970 (U.S.)
AM
or (905) 709-3839 (Canada), 6
to 8PM, Pacific Time, Monday through
Friday. To ll or long distance charges may app ly .
Before yo u c all, please have the follo w ing informat ion ready:
◗ Produ c t nam e (EPSON Perfection 636)
◗ Product serial number (located on the back of scanner)
◗ Computer configuration
◗ Description of th e problem
You can purchase genuine Eps on supplie s and access ories from
EPSON Ac c essories at (8 00) 873-7766 (U.S. sales only) . In C anada,
please ca ll (800) 873-7766 for de aler referral . O r vi s it o ur w eb site at
www.epsonsupplies.com (U.S. sales only).
Troubleshooting Page 61
Page 62

This chapt er contains sp ec if ic ations for the scanner and options:
Specificat ions are
subject to change
without notice.
◗ Scanner Specific ations
◗ Transparency Unit Specifications
◗ Auto D oc ument Fee der Specific at ions
Scanner Specifications
Basic Specifications
Scanner t y pe Flatbed, color
Specification s
Photoelec t ric
device
Effective pixels 5100 × 702 0 pix els at 600 dpi, 100% scalin g
Maximum
document size
Optical re s olution 600 dpi
Specifications Page 62
Color CCD line sensor
A4 or US letter size (8.5 inches × 11.7 inches [216 mm × 297 mm])
Up to legal size if using the optional auto document feeder
(The reading area can be specified from software.)
Page 63

Maximum
hardware
resolution*
600 dpi (main scan)
2400 (sub s c an)
* The maximum hardware resolution of 600 × 2400 dpi is achieved using
EPSON’s Micro Step
™
drive technology.
Maximum
9600 dpi
interpolat ed
resolutio n
Speed (6 00 dpi,
draft mode)
Color: 8.1 m s ec / line
Monoch rom e (bi-leve l): 2. 7 m s ec / line
Output resolution 50 to 9600 dpi
(50 to 4800 dpi in 1 dpi increments, 4800 dpi reading at 200% produces
9600 dpi re ading with 16, 368 pixel lim it in main scan, 7200 dpi, and
9600 dpi; 7200 dpi and 9600 dpi performe d w it h z oom function)
Color sep aration By the color f ilt er of CCD
Command level ESC / I- B7
Reading sequence Monochrome: One-pass scanning
Color page sequen ce : Th ree-pass scanning (R , G, B)
Color byte sequence: One-pass scanning (R, G, B)
Color line s equence: One-pass s c anning (R, G, B)
Zoom 50% to 200% in 1% inc rem ents
Pixel dept h 8 bits per pixe l (12 bits per pix el input, 8 bits per pixel output)
Brightnes s 7 levels
Line art sett ings Fixed thres hold
TET (Tex t E nhancement Techno logy, enable/disable s electab le)
Specifications Page 63
Page 64

Digital ha lftoning AAS (Auto Area Se gm entation, enable/disable select able)
3 halftoning modes (A, B, and C) and 4 dither patterns (A, B, C, and D) for
bi-level and quad-level data
Gamma correction 2 types for CRT display
3 types for printer
1 type for us er-defined
Color correction 1 type for CRT display
3 types for printer output (av ailable in c olor byte seq uence mo de and
color line s equence mode)
1 type for us er-defined
Interface Two SCSI (50-pin half pit ch c onnectors )
Light sou rc e White cold c athode fluorescent lam p
Reliability 3 0, 000 cycles of carriage moveme nt s (m ain unit MC BF )
Dimensions Width: 11. 3 inches (287 mm)
Depth: 16.7 inches (425 mm)
Height: 3. 4 inches (88 m m )
Weight Approx. 9.9 lb (4.5 kg)
Specifications Page 64
Page 65

Electrical
Specification 100−120 V mo d el 220−240 V model
Input voltage range AC 90 to 132 V AC 198 to 264 V
Rated frequency 50 to 60 Hz
Input frequency 49.5 to 60.5 Hz
Rated current 0 .5 A 0.3 A
Power c onsumpti on Approx. 20W
Check the label on the back of the scanner for voltage information.
Environmental
Tempera t ure Operation: 41 °F to 95 °F (5 °C to 35 °C)
50 °F to 89 °F (1 0 °C t o 32 °C) when using the auto
docume nt fe eder
Storage: –13 °F to 14 0 °F (–25 °C to 60 °C )
Humidity (w it hout
condensation)
Operating
conditio ns
Operation: 10% to 80%
20% to 80%, when us ing the auto doc ument fee der
Storage: 10% to 85%
Ordinary office or home conditions; avoid extreme dust, operation under
direct sunlight, and s tr ong light sourc es.
Safety Approvals
120V model Safety standards UL 1950 with D3
CSA C22.2 No. 950
EMI FCC part 15 subpart B class B
CSA C108.8 class B
Specifications Page 65
Page 66

230V model Safety standards EN 60950
EMC EN 55022 (C I SPR Pub 2 2) c lass B
AS/NZS 3548 class B
CE marking
230 V model Low Voltage Directive 73/23/EECEN 60950
EMC Directive 89/336/EECEN 55022 Class B
EN 61000-3-2
EN 61000-3-3
EN 50082-1
IEC 801-2
IEC 801-3
IEC 801-4
SCSI Interface
Interface type ANSI X3T9.2/375R Revision 10L (SCSI 2)
Functions BUS FREE phase
ARBITRATION phase
SELECTION/RESELECTION phase
COMMAND phase
(the Logic al U nit Numbe r is fixed to 0 and the comma nd link function
is not supported)
DATA phase
Data in phase
Data out phase
STATUS phase
Specifications Page 66
Page 67

MESSAGE phase
MESSAGE IN phase
MESSAGE OUT phase
ATTENTION condition
RESET condition
Logic leve l TTL compat ible
Electrical standard ANSI X3T9.2/375R Revision 10L (SCSI 2)
ID Setting Selectable from 0 to 7
Termina to r Internal terminator s electable (enable/d is able)
Connec to r type Two 50-pin ha lf pit c h c onnectors (m ic ro DB 50 connectors)
Connec to r pin
arrange m ent
Initialization
Methods
Specifications Page 67
The scanner can be initialized (returned to a fixed set of conditions) in the
following w ay s :
Hardw are
initializ at ion
Software
initializ at ion
* The sca nner is turned on.
* The scanner receives a SCSI Reset signal from the
SCSI interface.
* Softw are sends th e ESC @ (initi aliz e the scan ner)
command.
* The scanner receives a SCSI Bus Device Message.
Page 68

Transparency Unit Specifications
Basic Specifications
Dimensions Width: 8.8 inc hes (222.4 m m )
Depth: 12.0 inches (305.4 mm)
Height: 1. 4 inches (36. 9 m m )
Weight 1.5 lb (0.7 kg)
Maximum readable
area
Electrical Supply voltage: DC 24V 10%V
Reliabili t y 10,000 ho urs
Humidity (w it hout
condensation)
Operating
conditio ns
Document
specifications
Safety approvals
3.6 inche s × 4.6 inches (93 × 118 mm, size of 4 × 5 film hold er opening)
Rated current: 0.5A
Operation: 10% to 80%
Storage: 10% to 85%
Ordinary office or home conditions; avoid extreme dust, operation under
direct sunlight, and s tr ong light sourc es.
Transpa rencies up to 4 × 5 film (nega ti ve fi lm , pos it iv e/ reversal fi lm )
35 mm strip film
35 mm slides
Brownie s iz e s t rip f ilm
UL 1950
CSA C22.2 No. 950
EN 60950
IEC 950
Specifications Page 68
Page 69

EMC
FCC Part 15 subpart B class B
CSA C108.8 class B
AS/NZS3548 Class B
CE Marking
Low voltage directiv e 73/23/EEC EN60950
EMC Directive 89/336/EEC EN55022 Class B
EN50082-1
IEC 801-2 / 801-3/801 -4
Resistance to
electrical noise
(static electricity)
Specifications Page 69
panel: 10k V
metal: 7kV / 150pF, 150 ohm
Page 70

Auto Document Feeder Specifications
Basic Specifications
Dimensions Width: 12. 6 inches (319 mm)
Depth: 17.8 (451 mm)
Height: 5. 4 inches (137 mm)
Weight 4.9 lbs (2.2 k g)
Feeder type Sheet thr ough, face u p loading, fac e down eject ing, roller fr ic t ion
Loading position Left side of document against left side of feeder, opposite scanner’s
original po int
Scanning speed 3 pages per minute (A4, line art, 30 0 dpi, draft m ode)
Connector 8-pin DIN male
Environmental
temperatures
Humidity (w it hout
condensation)
Operating
conditio ns
Reliability Load/eject: MCBF 20,000 sheets
Electrical Input volt age: DC 24V ± 10%
Specifications Page 70
Operation: 50 °F to 90 °F (10 °C to 32 °C )
Storage: –4 °F to 140 °F (–20 °C to 60 °C )
Operation: 20% to 80%
Storage: 10% to 85%
Ordinary office or home conditions; avoid extreme dust, operation under
direct sunlight, and s tr ong light sourc es.
Hinge: MCBF 12,000 cycles
DC 5V±5%
Input current: 24V: 0.8 A
5V: 0.2 A
Page 71

Safety approvals
UL 1950
CSA C22.2 No. 950
EN60950 (VDE)
IEC950 (ROSTEST, PSB)
EMC FCC Part 15 Subpart B Class B
CSA C108.8 Class B
AS/NZS3548 Class B
CISPR Pub 22 Class B
CNS13438 Class B
CE Marking Low voltag e directive 73 / 23/ EEC EN60950
EMC Directive 89/336/EEC EN55022 Class B
EN50082-1
IEC 801-2 / 801-3/801 -4
Resistance to
electrical noise
Casing: 10kV
Metal: 7kV / 150pF, 150 ohm
(static electricity)
Document
Specifications
Feeder capacity Total stack: 20 sheets of maximum weight 55 gm paper, thickness less
than 4 mm
Size Width: 3.3 to 8. 5 inc hes (85 to 216 mm)
Length: 5 to 14 inches (127 to 356 mm )
Thickness 0.0028 to 0.0063 inch (0.07 to 0.16 mm)
Ream weight 50 to 105 kg
Weight 58 to 122 g/m
Specifications Page 71
2
Page 72

Paper qu alit y High-quality bond paper, chec k paper, rec ycled paper
Applied color Color an d m onochrome
Document type Documents printed with impact printers, laser printers, or facsimile
machines
Don’t use t he following paper types : tr ansparencies, coat ed paper,
labels, carbon paper, or paper wit h staples, holes, rip s, c urls, or folds.
Specifications Page 72
Page 73

Glossary
additive primary
colors
bit Short for bin ary digit. The sma lles t unit of data in com put er process ing. A
bit/pixel The unit that in dic ates the nu m ber of bits allo c at ed for a pixel. Th e larger
brightness A scanner fu nc t ion to lighten or darken the out put image data.
carriage A component of the sca nner that con t ains the optical sensor and light
color correction A method of adjusting the c olor image da t a fo r a particular t y pe of device
color separation A process of converting full-color images into a limited number of primary
The color s o f re d, green and blue (RGB)—w hich give the perception of
white when fully added. These are the colors of the color system used
with monitors and scanners.
bit can represent two values: on and off, or 1 and 0.
the bit value, the more det ail a pixel can represen t.
source for scanning.
so that the reproduction results are as close as pos s ible to the original
colors.
colors. Additive prim ary colors (re d, green, and blue) are us ed by the
scanner , a nd t he subtrac ti ve primary colo rs (c y an, magent a, and yellow )
plus black are used for printing pr es s se paration.
Glossary Page 73
Page 74

default A set of values us ed when no ot her selectio ns have been ma de. These
are sometimes called factory defaults if the original values have not been
changed since the scanner has left the factory.
dithering A process in which software or an output device simulates continuous
tones with groups of dots.
document The item , su c h as a s heet of paper or a book, th at is placed on the
docume nt ta ble for the scanner to rea d.
dpi Dots per inch. A unit of measurement for resolution. The higher the value,
the higher t he resolution.
grayscale I m ages repres ented wit h v arious shades of gray in addition to blac k and
white.
halftoning A method of us ing dot patte rns t o represen t an im age.
home position The positio n at th e rear (nearest the cove r hinge posi tio n) of the sca nner
where the carriage rests before a scanning operation.
interface A piece of hardware, a m et hod, or a stan dard used for c onnection
between or among com puter devic es .
line sequence A type of color s c anning tha t separates primary co lors line by line. T he
carriage m ak es only one pass.
monochrome Black and white ima ges, or imag es represented only by th e intensity of
luminosi ty.
Glossary Page 74
Page 75

OCR Optical Cha racter Recognition. T he technology that allo w s co m puters to
“read” text from physical objec ts. OCR requires a graphical representat ion
of text to inte rpret, which usually co m es f rom a scanned im age.
page sequence The type of co lor scanning in which th e entire image is scanne d once for
each sep arate color.
pixel Short for picture element. Each image is composed of a number of pixels.
Pixels are als o c ounted in u nit s of dot s .
port An interfa c e c hannel thro ugh which dat a is transmit t ed betwee n devices.
resolution Indication of how finely an image is resolved into pixels. Measured in dots
per inch (dpi), pixels p er inch (ppi), or s amples per inch (spi ).
scan An operation performed by the sensor and the carriage of a scanner. The
image is di vi ded into pixels by s c anning.
scanning area The physical size of the image that can be scanned by the scanner.
SCSI Small Computer System Interface. A method used to connect your
computer to periphe rals such as s c anners, hard disk drives, and
CD-ROM drives.
SCSI chai n A SCSI bus arrangemen t th at allows several devices to be c onnected
simultaneously in a line to a single c omputer. Somet im es c alled a daisy
chain.
SCSI ID The numbers that all devices in a SCSI connection use to identify each
other. If the s ame ID number is used by t w o devices in the same S C SI
chain, the devices cannot oper at e properly.
Glossary Page 75
Page 76

subtractive primary
colors
terminator A device that st ops electro nic s ignals, and prevents them from
The color s cy an, magent a, and yellow (C M Y)—whic h produce blac k
when mixed in certain amounts . In printing, black is often added to giv e
more defi nit ion as mixin g of ac t ual inks cann ot produce pu re black.
proceeding or retur ning to other devices. Th is is nec essary to stop a
signal from continuously bounc ing between devic es .
Glossary Page 76
Page 77

Index
Numerics
35 mm film, loading, 23 to 24
4 × 5 inch fi lm , loading, 26
A
Accessories, 17, 61
Attaching document cover, 40
Auto docu m ent feeder
installing , 32
loading p aper, 35 to 37
specifications, 70 to 73
unpacki ng, 31
to 34
B
Base side , 22
Brownie s iz e f ilm , loading, 25
C
Cable length, 10
Cleaning
paper p at h guide, 45
scanne r, 41
Correc ti ng c olor, 29, 53, 56 to 57, 59
D
Daisy chain, 9 to 10
Document cover, 40
Documentation, how to use, 7 to 8
Dust and image quality, 36, 41
E
EPSON
Accessories, 17
help, 60 to 61
, 61
Index Page 77
Page 78

F
Film holde r
35 mm film, 23
4 × 5 inch fi lm , 26
Brownie s iz e f ilm , 25
correcting color when using, 29
removin g, 22
Fluorescent lamp, 42
to 24
H
Help, 60 to 61
I
Image quality problems, 52 to 59
Initialization, 67
L
Light, scanner, 49
Loading
documents manually, 37
paper, aut o document f eeder, 35 to 37
Loading sli des and film
on document table, 27
using film holders, 22 to 26
Lock, transportation, 47
to 28
M
Maintenance, 41 to 47
Moving the scanner, 47
O
Operating problems, 50 to 52
Options
auto document feeder, 31
purchasing, 17
transparency unit, 18 to 30
P
Paper jams, 38 to 39
Paper p at h guide
attaching, 46
cleaning, 45
removing, 43 to 45
Paper support, 34, 44
R
Reflective documents, 29to 30
Removing document cover, 40
Replacing fluorescent lamp, 42
to 39
Index Page 78
Page 79

S
Safety approvals, 65 to 66, 68 to 69, 71
Scanner
light, 49
maintaining, 41 to 47
operating problems, 50 to 52
specifications, 62 to 67
SCSI
connection, 9
ID number, 10 to 14
interface s pecifications, 66 to 67
SCSI-2, 10
Service, 60 to 61
Slides, loa ding, 27 to 28
Software, uninstalling, 15 to 16
Specificat ions
auto docu m ent feeder, 70
scanner , 62 to 67
transpar ency unit, 68 to 69
Support, 60 to 61
to 14
to 73
T
Technical support, 60 to 61
Transparency unit
installing, 19
removing, 30
specifications, 68 to 69
unpacking, 19
using, 21 to 30
to 20
Transp ort ing the sca nner, 47
Troubleshooting, 48 to 59
U
Uninstalling software, 15 to 16
Upgrading to Windows 98, 15 to 16
W
World W ide Web, 60
Index Page 79
 Loading...