

Page 1
Color Image Scanner
User's Guide
4010809
S01-00
Page 2

Where to Find Information
This User's Guide
This guide leads you through the scanner setup, tells you how to
use the scanner, and how to make basic scans.
It also leads you through the EPSON scanner software
installation, tells you how to use the Start Button function, and
how to make basic software settings. Finally, it offers
troubleshooting tips, customer support information and
calibrating information.
Information on EPSON Scanner Software for Windows
Online help provides you with detailed information on EPSON
TWAIN. Access online help from the EPSON Scanner folder, or
click the Help button in the EPSON TWAIN dialog box.
Information on PageManager and other Software
See the PageManager for EPSON, and other software
documentation.
Page 3

®
Color Image Scanner
All rights reserved. No part of this publication may be reproduced, stored in a retrieval
system, or transmitted in any form or by any means, electronic, mechanical, photocopying,
recording, or otherwise, without the prior written permission of SEIKO EPSON
CORPORATION. No patent liability is assumed with respect to the use of the information
contained herein. Neither is any liability assumed for damages resulting from the use of the
information contained herein.
Neither SEIKO EPSON CORPORATION nor its affiliates shall be liable to the purchaser of
this product or third parties for damages, losses, costs, or expenses incurred by purchaser or
third parties as a result of: accident, misuse, or abuse of this product or unauthorized
modifications, repairs, or alterations to this product.
SEIKO EPSON CORPORATION and its affiliates shall not be liable against any damages or
problems arising from the use of any options or any consumable products other than those
designated as Original EPSON Products or EPSON Approved Products by SEIKO EPSON
CORPORATION.
EPSON is a registered trademark of SEIKO EPSON CORPORATION.
IBM and PS/2 are registered trademarks of International Business Machines Corporation.
Macintosh is a registered trademark of Apple Computer, Inc.
Microsoft and Windows are registered trademarks of Microsoft Corporation in the United
States of America and other countries.
Presto! is a trademark of NewSoft Technology Corporation.
General Notice:
trademarks of their respective companies.
Copyright © 1999 by SEIKO EPSON CORPORATION, Nagano, Japan.
Other product names used herein are for identification purposes only and may be
User’s Guide
i
Page 4

Declaration of Conformity
Manufacturer: SEIKO EPSON CORPORATION
Address: 3-5, Owa 3-chome, Suwa-shi,
Nagano-ken 392-8502 Japan
Representative: EPSON EUROPE B.V.
Address: Prof. J. H. Bavincklaan 5 1183
AT Amstelveen
The Netherlands
Declares that the Product:
Product Name: Image Scanner
Model: G750A
Conforms to the following Directive(s) and Norm(s):
Directive 89/336/EEC:
EN 55022 Class B
EN 61000-3-2
EN 61000-3-3
EN 50082-1
IEC 801-2
IEC 801-3
IEC 801-4
Directive 73/23/EEC:
July, 1999
H. Horiuchi
President of EPSON EUROPE B.V.
ii
EN 60950
Page 5

Contents
Safety Instructions
Important Safety Instructions . . . . . . . . . . . . . . . . . . . . . . . . . . . . . 1
Warnings, Cautions, and Notes. . . . . . . . . . . . . . . . . . . . . . . . . . . . 2
ENERGY STAR Compliance . . . . . . . . . . . . . . . . . . . . . . . . . . . . . . 3
For United Kingdom Users . . . . . . . . . . . . . . . . . . . . . . . . . . . . . . . 3
Safety information . . . . . . . . . . . . . . . . . . . . . . . . . . . . . . . . . .3
Chapter 1 Getting to Know Your Scanner
Features. . . . . . . . . . . . . . . . . . . . . . . . . . . . . . . . . . . . . . . . . . . . . . . . 1-2
Unpacking the Scanner. . . . . . . . . . . . . . . . . . . . . . . . . . . . . . . . . . .1-3
Scanner Parts . . . . . . . . . . . . . . . . . . . . . . . . . . . . . . . . . . . . . . . . . . . 1-4
Button . . . . . . . . . . . . . . . . . . . . . . . . . . . . . . . . . . . . . . . . . . . . . . . . . 1-5
Chapter 2 Setting Up the Scanner
Choosing a Place for the Scanner . . . . . . . . . . . . . . . . . . . . . . . . . . 2-2
Releasing the Transportation Lock . . . . . . . . . . . . . . . . . . . . . . . . .2-4
Plugging in the Scanner . . . . . . . . . . . . . . . . . . . . . . . . . . . . . . . . . . 2-5
Initialization . . . . . . . . . . . . . . . . . . . . . . . . . . . . . . . . . . . . . . . . . . . .2-6
Connecting the Scanner to Your Computer. . . . . . . . . . . . . . . . . .2-7
Understanding USB connections . . . . . . . . . . . . . . . . . . . . . . 2-7
Connecting the scanner . . . . . . . . . . . . . . . . . . . . . . . . . . . . . . 2-9
Installing the Scanner Software . . . . . . . . . . . . . . . . . . . . . . . . . . . .2-10
Chapter 3 Installing the Software
System Requirements . . . . . . . . . . . . . . . . . . . . . . . . . . . . . . . . . . . . 3-2
For PCs . . . . . . . . . . . . . . . . . . . . . . . . . . . . . . . . . . . . . . . . . . . . 3-2
For Macintosh computers . . . . . . . . . . . . . . . . . . . . . . . . . . . . 3-2
iii
Page 6

Installing the Scanner Software for Windows . . . . . . . . . . . . . . . 3-3
Installing the Scanner Software for Macintosh . . . . . . . . . . . . . . 3-8
Calibrating Your Screen . . . . . . . . . . . . . . . . . . . . . . . . . . . . . . . . . 3-10
Viewing the Color Guide . . . . . . . . . . . . . . . . . . . . . . . . . . . . . . . . 3-13
Chapter 4 Using Your Scanner
Scanning Procedure . . . . . . . . . . . . . . . . . . . . . . . . . . . . . . . . . . . . . 4-2
Placing a Document on the Scanner . . . . . . . . . . . . . . . . . . . . . . . 4-2
Removing the Cover for Thick or Large Documents . . . . . . . . . 4-6
Starting EPSON TWAIN . . . . . . . . . . . . . . . . . . . . . . . . . . . . . . . . . 4-7
Scanning an Image . . . . . . . . . . . . . . . . . . . . . . . . . . . . . . . . . . . . . . 4-8
Making EPSON TWAIN settings on the Photo menu . . . . 4-10
Making EPSON TWAIN settings on the OCR/Line Art
menu . . . . . . . . . . . . . . . . . . . . . . . . . . . . . . . . . . . . . . . . . . . 4-16
Saving the Scanned Image . . . . . . . . . . . . . . . . . . . . . . . . . . . . . . . 4-18
Scanning by Pressing the Start Button . . . . . . . . . . . . . . . . . . . . . 4-19
Chapter 5 Using the Start Button
The Start Button Feature . . . . . . . . . . . . . . . . . . . . . . . . . . . . . . . . . 5-2
PageManager for EPSON . . . . . . . . . . . . . . . . . . . . . . . . . . . . . . . . 5-2
Target applications in the Scan Buttons bar . . . . . . . . . . . . 5-2
Assigning an application to the Start button. . . . . . . . . . . . 5-3
Adding Applications to the Scan Buttons Bar. . . . . . . . . . . 5-5
Registering new applications. . . . . . . . . . . . . . . . . . . . . . . . . 5-6
Setting Up EPSON Scanner Monitor for Macintosh . . . . . . . . . . 5-8
Setting Up the Start Button Feature for Windows 98 . . . . . . . . . 5-10
Chapter 6 Maintenance and Troubleshooting
Maintenance . . . . . . . . . . . . . . . . . . . . . . . . . . . . . . . . . . . . . . . . . . . 6-2
Cleaning the scanner. . . . . . . . . . . . . . . . . . . . . . . . . . . . . . . . 6-2
Replacing the fluorescent lamp . . . . . . . . . . . . . . . . . . . . . . . 6-3
Transporting the Scanner . . . . . . . . . . . . . . . . . . . . . . . . . . . . . . . . 6-3
Problems and Solutions . . . . . . . . . . . . . . . . . . . . . . . . . . . . . . . . . . 6-4
iv
Page 7

Error indicator. . . . . . . . . . . . . . . . . . . . . . . . . . . . . . . . . . . . . .6-5
Operating problems . . . . . . . . . . . . . . . . . . . . . . . . . . . . . . . . . 6-5
Quality problems . . . . . . . . . . . . . . . . . . . . . . . . . . . . . . . . . . . 6-8
Software setup problems. . . . . . . . . . . . . . . . . . . . . . . . . . . . .6-14
Software operation problems . . . . . . . . . . . . . . . . . . . . . . . . . 6-14
Scanning problems . . . . . . . . . . . . . . . . . . . . . . . . . . . . . . . . . .6-16
Sizing Up Your System. . . . . . . . . . . . . . . . . . . . . . . . . . . . . . . . . . . 6-18
RAM and hard disk size . . . . . . . . . . . . . . . . . . . . . . . . . . . . .6-18
Accelerator boards . . . . . . . . . . . . . . . . . . . . . . . . . . . . . . . . . .6-19
Video cards . . . . . . . . . . . . . . . . . . . . . . . . . . . . . . . . . . . . . . . . 6-19
Monitors. . . . . . . . . . . . . . . . . . . . . . . . . . . . . . . . . . . . . . . . . . .6-19
File compression software. . . . . . . . . . . . . . . . . . . . . . . . . . . . 6-19
Appendix A Technical Specifications
Scanning . . . . . . . . . . . . . . . . . . . . . . . . . . . . . . . . . . . . . . . . . . . . . . .A-2
Electrical . . . . . . . . . . . . . . . . . . . . . . . . . . . . . . . . . . . . . . . . . . . . . . .A-3
Environmental . . . . . . . . . . . . . . . . . . . . . . . . . . . . . . . . . . . . . . . . . . A-4
Safety Approvals . . . . . . . . . . . . . . . . . . . . . . . . . . . . . . . . . . . . . . . . A-5
CE marking. . . . . . . . . . . . . . . . . . . . . . . . . . . . . . . . . . . . . . . . . . . . .A-5
USB Interface . . . . . . . . . . . . . . . . . . . . . . . . . . . . . . . . . . . . . . . . . . . A-6
Initialization Methods. . . . . . . . . . . . . . . . . . . . . . . . . . . . . . . . . . . . A-7
Appendix B Contacting Customer Support
For United Kingdom and the Republic of Ireland Users. . . . . . . B-3
For Australian Users . . . . . . . . . . . . . . . . . . . . . . . . . . . . . . . . . . . . . B-5
For Singapore Users . . . . . . . . . . . . . . . . . . . . . . . . . . . . . . . . . . . . . B-6
For Hong Kong Users . . . . . . . . . . . . . . . . . . . . . . . . . . . . . . . . . . . . B-7
For Philippines Users . . . . . . . . . . . . . . . . . . . . . . . . . . . . . . . . . . . . B-8
Glossary
Index
v
Page 8

vi
Page 9

Safety Instructions
Important Safety Instructions
Read all these instructions and save them for later reference.
Follow all warnings and instructions marked on the scanner.
Unplug the scanner before cleaning. Clean with a damp cloth
❏
only. Do not spill liquid on the scanner.
Do not place the scanner on an unstable surface, or near a
❏
radiator or heat source.
Use only the type of power source indicated on the scanner's
❏
label.
Connect all equipment to properly grounded power outlets.
❏
Avoid using outlets on the same circuit as photocopiers or air
control systems that regularly switch on and off.
Do not let the power cord become damaged or frayed.
❏
If you use an extension cord with the scanner, make sure the
❏
total ampere rating of the devices plugged into the extension
cord does not exceed the cord's ampere rating. Also, make
sure the total ampere rating of all devices plugged into the
wall outlet does not exceed the wall outlet's ampere rating.
Except as specifically explained in this
❏
attempt to service the scanner yourself.
Unplug the scanner and refer servicing to qualified service
❏
personnel under the following conditions:
User's Guide
Safety Instructions
, do not
1
Page 10

If the power cord or plug is damaged; if liquid has entered the
scanner; if the scanner has been dropped or the case damaged;
if the scanner does not operate normally or exhibits a distinct
change in performance. (Do not adjust controls that are not
covered by the operating instructions.)
If you plan to use the scanner in Germany, observe the
❏
following:
To provide adequate short-circuit protection and overcurrent protection for this scanner, the building installation
must be protected by a 16 Amp circuit breaker.
Note for German-speaking users:
Bei Anschluß des Scanners an die Stromversorgung muß
sichergestellt werden, daß die Gebäudeinstallation mit einem 16 AÜberstromschalter abgesichert ist.
If you will not use the scanner for an extended time, be sure
❏
to unplug it.
Warnings, Cautions, and Notes
w
c
Notes
your scanner.
2
Safety Instructions
Warnings
Cautions
contain important information and useful tips on the operation of
must be followed carefully to avoid bodily injury.
must be observed to avoid damage to your equipment.
Page 11

NERGY STAR Compliance
E
As an ENERGY STAR Partner, EPSON has determined that this
E
product meets the
industry to promote the introduction of energy-efficient personal
computers, monitors, printers, fax machines, copiers, and
scanners, in an effort to reduce air pollution caused by power
generation.
NERGY STAR guidelines for energy
efficiency.
E
The International
Equipment Program is a voluntary partnership
with the computer and office equipment
NERGY STAR Office
For United Kingdom Users
Safety information
Warning:
w
As the colours of the wires in the mains lead of this appliance may
not correspond with the coloured markings identifying the
terminals in your plug, proceed as follows:
for voltage and check that the appliance voltage corresponds to the
supply voltage.
Important:
coloured in accordance with the following code:
Green and yellow — Earth
Blue — Neutral
Brown — Live
This appliance must be earthed. Refer to the rating plate
The wires in the mains lead fitted to this appliance are
Safety Instructions
3
Page 12

The green and yellow wire must be connected to the terminal in
the plug which is marked with the letter E or with the earth
symbol (
G
).
The blue wire must be connected to the terminal in the plug
marked with the letter N.
The brown wire must be connected to the terminal in the plug
marked with the letter L.
If damage occurs to the plug, replace the cord set or consult a
qualified electrician.
Replace fuses only with a fuse of the correct size and rating.
4
Safety Instructions
Page 13

Chapter 1
Getting to Know Your Scanner
Features. . . . . . . . . . . . . . . . . . . . . . . . . . . . . . . . . . . . . . . . . . . . . . . . . 1-2
Unpacking the Scanner. . . . . . . . . . . . . . . . . . . . . . . . . . . . . . . . . . . . 1-3
Scanner Parts . . . . . . . . . . . . . . . . . . . . . . . . . . . . . . . . . . . . . . . . . . . . 1-4
Button . . . . . . . . . . . . . . . . . . . . . . . . . . . . . . . . . . . . . . . . . . . . . . . . . . 1-5
1
Getting to Know Your Scanner
1-1
Page 14

Features
The EPSON Perfection 610 scanner offers the following features:
Maximum optical resolution of 600 dots per inch (dpi) for
❏
main scanning, and 2400 dpi with micro step for sub scanning
(36-bit input, 24-bit output).
Start Button control for shortcut scanning operation.
❏
Light body with A4/Letter size scanning area.
❏
Full color or grayscale scanning. Capture your images with
❏
over 16 million colors; or up to 256 shades of gray and black
and white.
EPSON TWAIN lets you take full advantage of your scanner's
❏
advanced features.
EPSON TWAIN's Unsharp Mask option automatically
❏
sharpens the image to provide crisp detail.
EPSON TWAIN's De-screening option automatically
❏
removes unwanted moiré patterns from scanned images for
higher quality output.
1-2
Getting to Know Your Scanner
Page 15
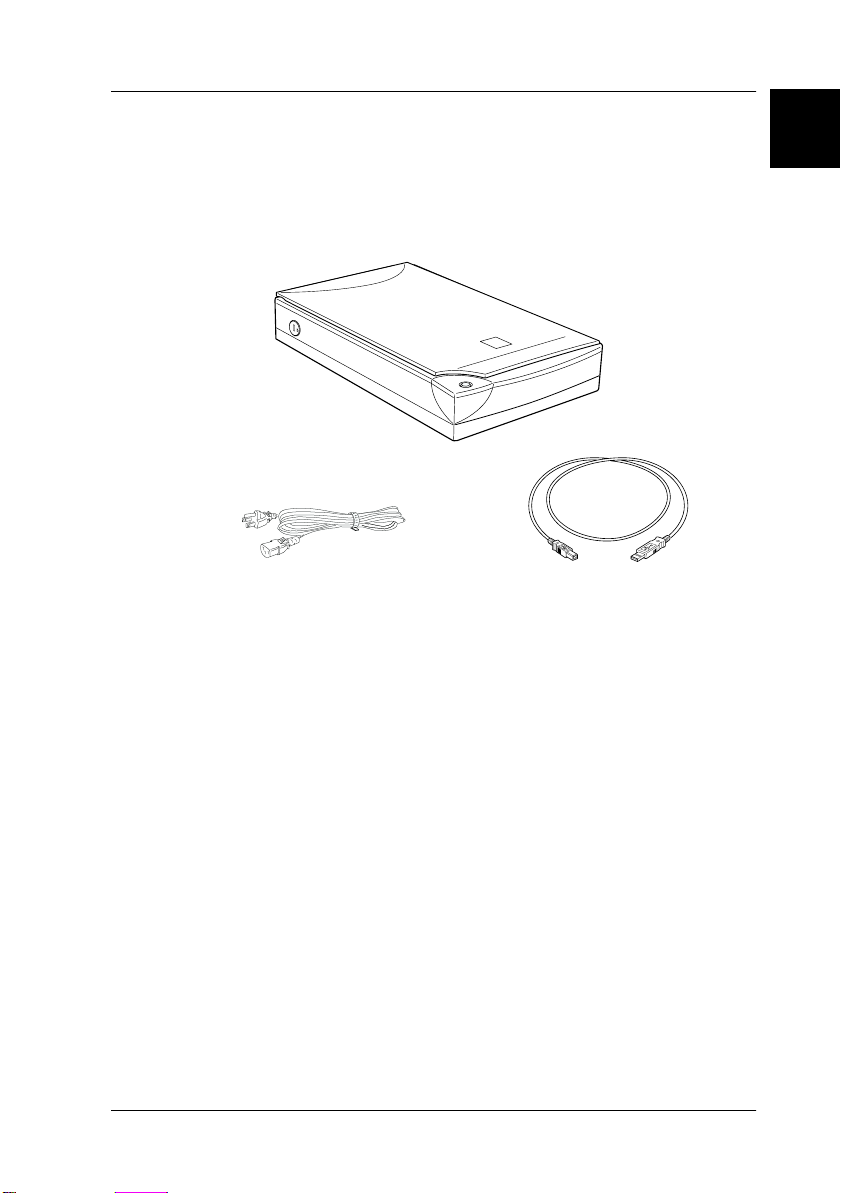
Unpacking the Scanner
Your Perfection 610 comes shipped with CD-ROMs which
include the driver software that runs your scanner, and some
additional items.
scanner
1
power cord
Depending on the country of purchase, the power cord may come
attached to the scanner. The shape of the AC plug also varies, so
make sure the plug included is the correct shape for the electrical
outlet in your country.
Getting to Know Your Scanner
USB interface cable
1-3
Page 16

Scanner Parts
transportation lock
document cover
carriage
(in the home position)
document table
start button
1-4
USB interface connector
Getting to Know Your Scanner
AC inlet
Page 17
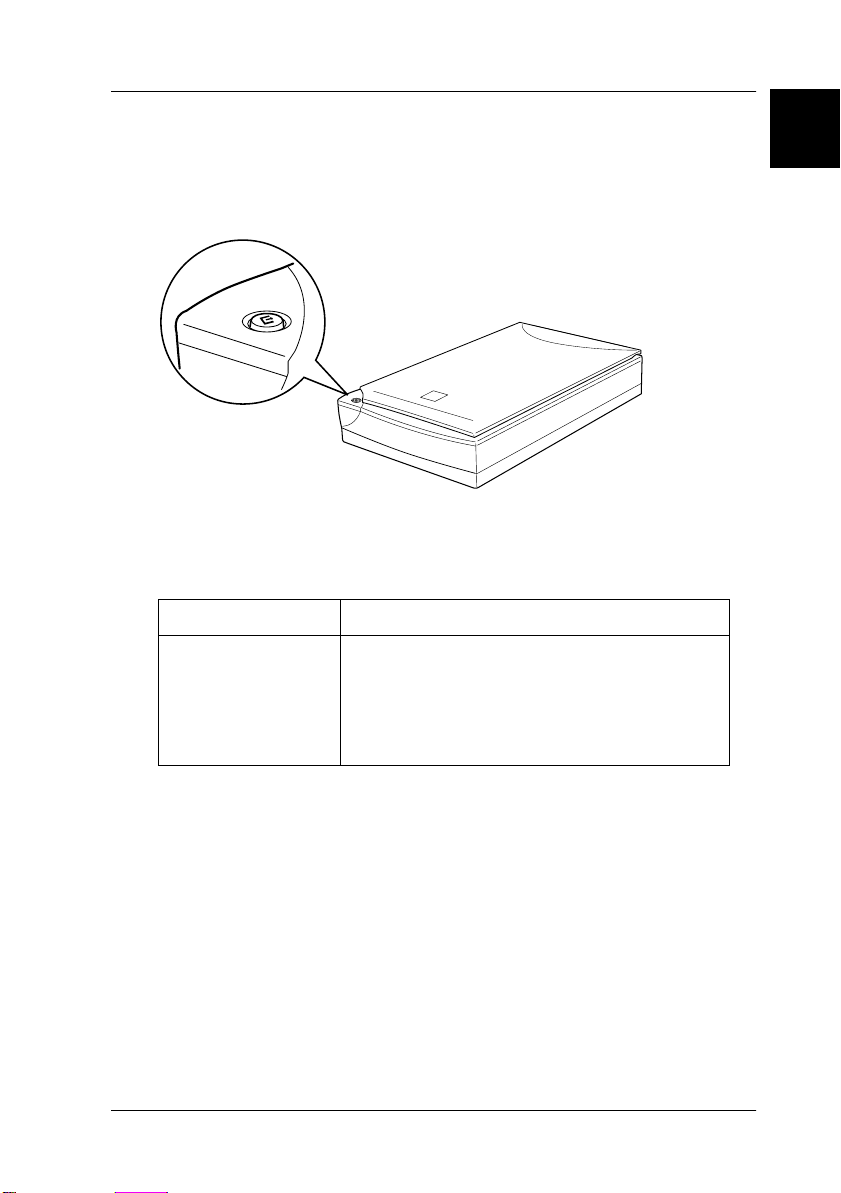
Button
The scanner has one button, the Start button.
Button
Button Function
]
Start The hardw are switch to exec ute scanning and
transfer the scanned image to assigned
application software. To use this feature, you
need to setup software. See Chapter 5 for
more details.
1
Getting to Know Your Scanner
1-5
Page 18

1-6
Getting to Know Your Scanner
Page 19

Chapter 2
Setting Up the Scanner
Choosing a Place for the Scanner . . . . . . . . . . . . . . . . . . . . . . . . . . . 2-2
Releasing the Transportation Lock . . . . . . . . . . . . . . . . . . . . . . . . . .2-4
Plugging in the Scanner . . . . . . . . . . . . . . . . . . . . . . . . . . . . . . . . . . . 2-5
Initialization . . . . . . . . . . . . . . . . . . . . . . . . . . . . . . . . . . . . . . . . . . . . . 2-6
Connecting the Scanner to Your Computer. . . . . . . . . . . . . . . . . . . 2-7
Understanding USB connections . . . . . . . . . . . . . . . . . . . . . . . 2-7
Connecting the scanner . . . . . . . . . . . . . . . . . . . . . . . . . . . . . . . 2-9
Installing the Scanner Software . . . . . . . . . . . . . . . . . . . . . . . . . . . . . 2-10
2
Setting Up the Scanner
2-1
Page 20

Choosing a Place for the Scanner
Follow the guidelines below when selecting a location for your
scanner:
Place the scanner on a flat, stable surface. The scanner will not
❏
operate properly if it is on an angle.
Place the scanner close enough to the computer for the
❏
interface cable to reach it easily.
Place the scanner near a wall outlet where the power cord can
❏
be easily unplugged.
Note for French-speaking users:
Placez le scanner près d’une prise de courant où la fiche peut-être
débranchée facilement.
Allow space behind the scanner for the cables, and space
❏
above the scanner so that you can fully raise the document
cover.
2-2
Setting Up the Scanner
Page 21

480 mm
2
88 mm*
425 mm
287 mm
* When document cover is closed.
Keep the scanner away from high temperatures, humidity
❏
100 mm or more
and excessive dirt or dust. Also avoid using or storing the
scanner in places subject to rapid changes of temperature and
humidity.
Keep the scanner away from direct sunlight and strong light
❏
sources.
Avoid places subject to shocks and vibrations.
❏
Setting Up the Scanner
2-3
Page 22
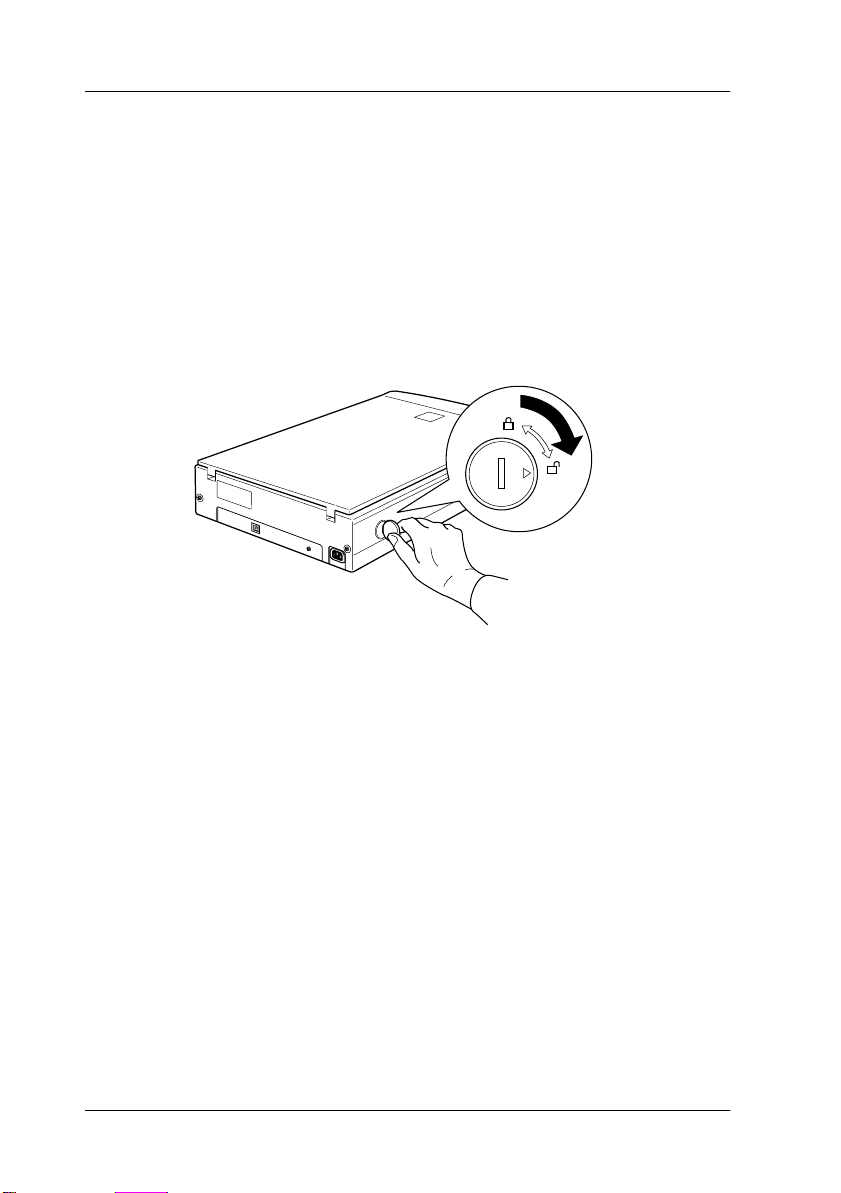
Releasing the Transportation Lock
Before connecting the scann er to a power source, you m ust release
the transportation lock.
1. Place the scanner on a flat, stable surface with the back facing
you.
2. Turn the transportation lock on the right side to the unlocked
position using a coin or similar object, as shown below.
Note:
❏
When you cannot turn the transportation lock because of excessive
resistance, plug the scanner in, then, after the fluorescent lamp on
the carriage starts flashing, unplug the scanner, and try again. See
the next section to plug in the scanner.
❏
2-4
Return the transportation lock to the locked position when
transporting the scanner.
Setting Up the Scanner
Page 23
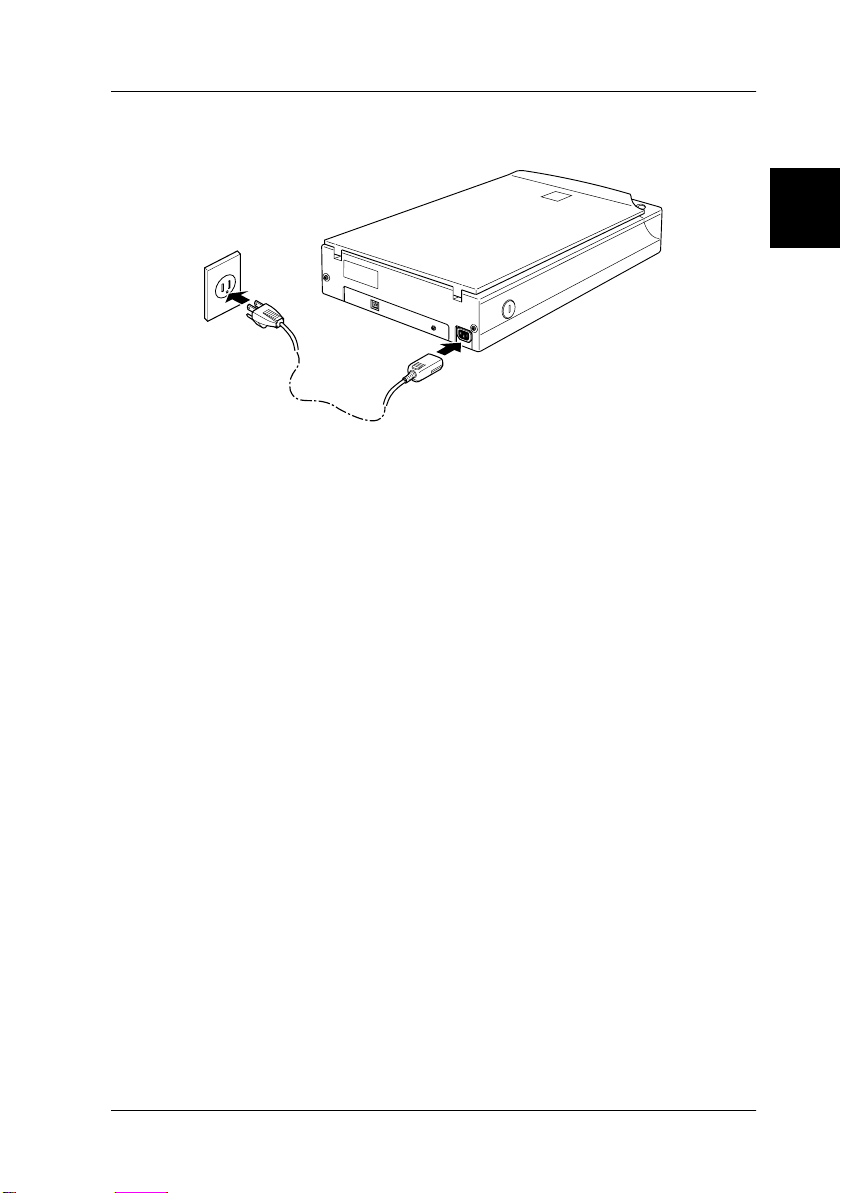
Plugging in the Scanner
If the power cord is not attached to the scanner, connect it to the
AC inlet on the back of the scanner, and plug the other end into
a properly grounded electrical outlet.
Caution:
c
It is not possible to change the scanner's voltage. If the label on
the back of the scanner does not show the correct voltage for your
country, contact your dealer. Do not plug in the power cord.
2
Setting Up the Scanner
2-5
Page 24
Initialization
Before connecting the scanner to your computer, follow the steps
below to make sure that the scanner is operating properly.
1. If the scanner is plugged in, unplug the scanner and wait 10
seconds.
2. Open the document cover so you can see the operation of the
scanner during initialization (startup).
3. Plug in the scanner.
4. Make sure the fluorescent lamp on the carriage turns on, and
the carriage moves slightly.
5. The fluorescent lamp stays on, meaning the scanner has
completed initialization.
6. Unplug the scanner.
If the scanner does not work as described, make sure the power
cord is firmly plugged in and that you have released the
transportation lock, then try again.
2-6
Setting Up the Scanner
Page 25

Note:
❏
The scanner will turn off the fluorescent lamp if it does not receive
any commands from the computer within 10 minutes.
❏
Be sure to unplug the scanner once you have finished using it.
Caution:
c
Whenever you unplug the scanner, wait at least 10 seconds before
plugging it back in. Rapidly plugging and unplugging the
scanner can damage the scanner.
Connecting the Scanner to Your Computer
Your PC must be preinstalled with Windows 98, and have a
working USB port. For Macintosh, you will need a Power
Macintosh G3 or iMac running system 8.5 or later, or system 8.1
with iMac Update 1.0. See Chapter 3 ”System Requirements” for
details.
Note:
If you connect your scanner through more than one hub, your system
may not work properly. In this case, try connecting the scanner directly
to the computer’s USB port. Also, your system may not work properly
if you use a USB cable other than that supplied by EPSON.
2
Understanding USB connections
USB Cables
USB cables enable you to connect or remove peripherals to and
from your computer easily, without having to shut down and
restart the system each time a peripheral is plugged in or
unplugged.
Note:
Do not connect or disconnect USB cables when the scanner is in use.
Setting Up the Scanner
2-7
Page 26
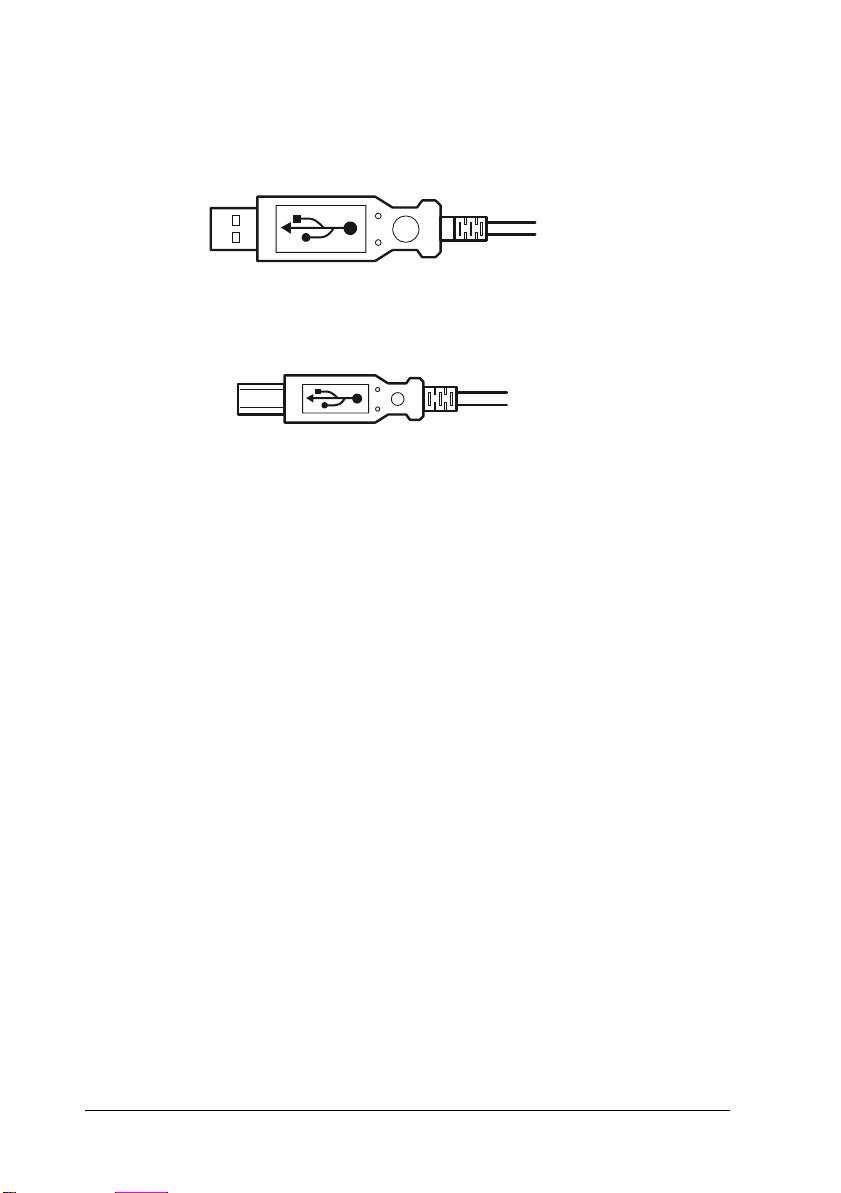
USB cables have two different connectors at each end.
Type A connects to your computer.
Type B connects to your scanner.
USB hub
You can also use a USB hub, allowing you to increase the number
of USB ports and therefore connect several peripherals.
2-8
Setting Up the Scanner
Page 27
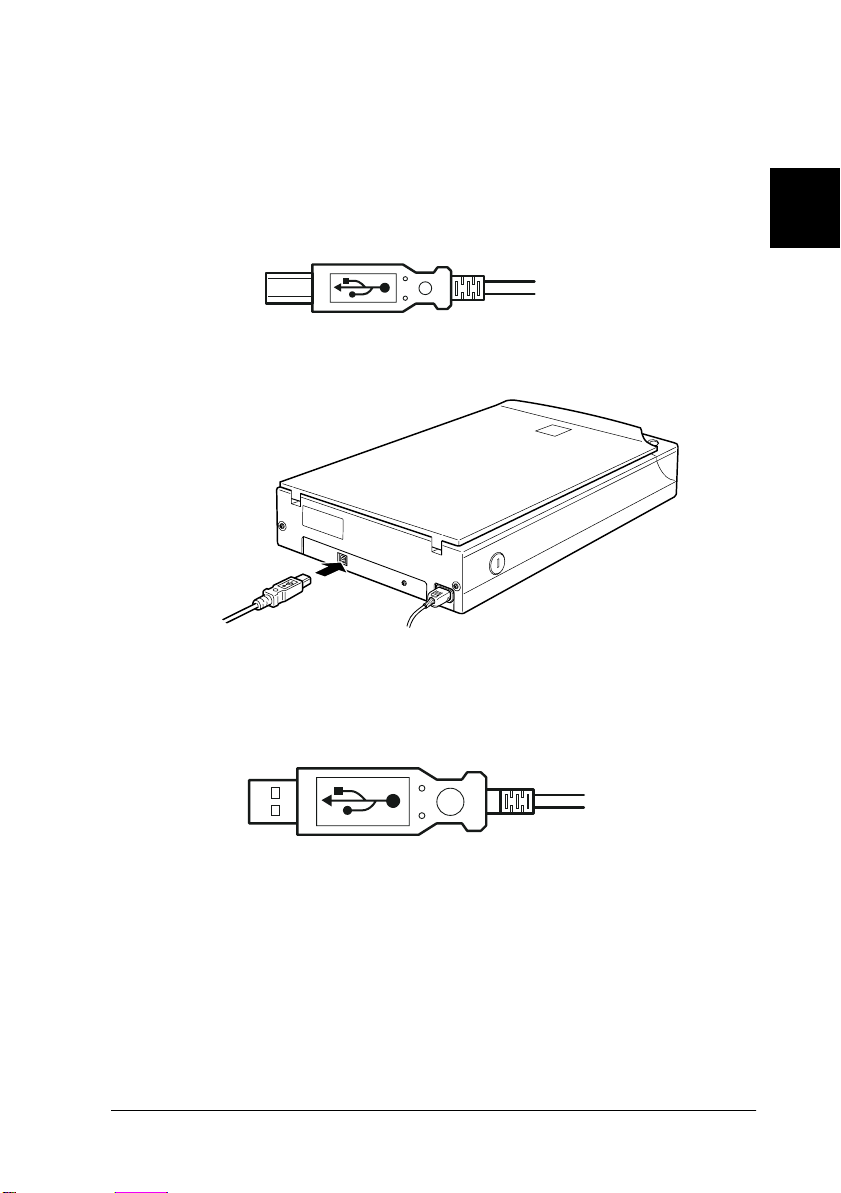
Connecting the scanner
To connect the scanner to your computer or USB hub:
1. Connect one end of the cable (Type B) to the USB port on the
back of the scanner.
2
2. Connect the other end of the cable (Type A) to the USB port
on your computer, or USB hub.
Note:
❏
USB cables enable you to connect the scanner whether your
computer is on or off. If you connect the scanner while your
computer is on, the “ Add New Hardware Wizard” dialog box
(Windows) or a message telling you that the scanner driver needs
to be installed (Macintosh) will appear. When this happens, follow
the instructions in Chapter 3, then install the software.
Setting Up the Scanner
2-9
Page 28

❏
Connect the USB cable to your computer, then install or start the
scanner software. Do not connect or disconnect the USB cable while
the scanner software is open.
Installing the Scanner Software
After setting up the scanner as described above, you need to
install the scanner software before you use the scanner to scan
documents. For details on setting up the scanning software, see
the next chapter.
2-10
Setting Up the Scanner
Page 29

Chapter 3
Installing the Software
System Requirements . . . . . . . . . . . . . . . . . . . . . . . . . . . . . . . . . . . . . 3-2
For PCs . . . . . . . . . . . . . . . . . . . . . . . . . . . . . . . . . . . . . . . . . . . . . 3-2
For Macintosh computers . . . . . . . . . . . . . . . . . . . . . . . . . . . . . 3-2
Installing the Scanner Software for Windows. . . . . . . . . . . . . . . . . 3-3
Installing the Scanner Software for Macintosh . . . . . . . . . . . . . . . . 3-8
Calibrating Your Screen . . . . . . . . . . . . . . . . . . . . . . . . . . . . . . . . . . . 3-10
Viewing the Color Guide . . . . . . . . . . . . . . . . . . . . . . . . . . . . . . . . . . 3-13
3
Installing the Software
3-1
Page 30

System Requirements
Before installing the scanner software, make sure that your
system meets the following requirements.
For PCs
System: Microsoft
®
Windows
®
98 preinstalled
Interface: The computer’s USB port (TYPE A
receptacle)
Display: VGA or higher resolution monitor 640 × 480
screen resolution (800 × 600 or higher
recommended), and 256 color (65,000 color
or higher recommended)
Note:
Color and tone reproduction are subject to the
display capability of your computer system,
including the video card, display monitor, and
software. See the product documentation for
details.
For Macintosh computers
®
System: Apple
iMac
8.1 with iMac Update 1.0
Power Macintosh® G3 computer or
™
running s ystem 8.5 or la ter, or system
3-2
Interface: Macintosh USB
Note:
You cannot use a serial interface.
Installing the Software
Page 31

Display: Color Monitor, 640 × 480 screen resolution
(or higher recommended), and 256 color
(32,000 color or higher recommended)
Note:
Color and tone reproduction are subject to the
display capability of your computer system,
including the video card, display monitor, and
software. See the product documentation for
details.
Installing the Scanner Software for Windows
After connecting the scanner to your computer, install the scanner
software from the CD-ROM.
1. Make sure that the scanner is plugged in and on.
2. Turn on the computer, and start Windows.
3. When the dialog box below appears, insert the scanner
software CD in the CD-ROM drive, then click
Next
3
.
Installing the Software
3-3
Page 32

4. Select the
then click
Search for the best driver for your device
Next.
option,
5. Make sure the
Specify a location
check box is selected, then
browse and select or type in the CD-ROM drive letter, Epson
folder, the folder of your preferred language, and
folder as the location, as shown below, and click
Win98
Next.
3-4
Installing the Software
Page 33

6. Follow the instructions on the screen. Depending on your
system, you may be asked to insert the Windows 98 CD-ROM.
Make sure that the correct CD-ROM drive letter and the
Win98 folder are specified in the Copy files from: box as
shown below.
3
7. The EPSON Screen Calibration utility automatically starts.
Follow the instructions on the screen. For details, see page
3-10.
Note:
If the EPSON Screen Calibration utility doesn’t start automatically
after installing the scanner software, see page 3-10 to calibrate your
screen.
Installing the Software
3-5
Page 34

8. When the following dialog box is displayed, click
Finish
.
This completes the EPSON TWAIN installation, next you will
install utility and application software from the CD-ROM.
1. Double-click the
My Computer
icon.
2. Double-click the CD-ROM drive icon. A dialog box asking for
your preferred language appears on your screen. If no dialog
box appears, double-click the
3. Select your preferred language and click
4. You will see the following dialog box. Click
3-6
Installing the Software
Cdsetup.exe
OK
icon.
.
Add Software
.
Page 35

5. You will see a list of software in the list box. Click to select the
names of the software you want to install in your PC. Make
sure Presto! PageManager for EPSON is selected to be
installed. Descriptions of the software can be found in the
software documentation, or on the CD-ROMs that come with
your scanner.
6. Click
Note:
❏
❏
OK
. Then follow the instructions on the screen.
The setup program installs the selected software.
If folders for the applications on the CD-ROM contain README
files, double-click and read them as they contain up-to-date
information regarding the software.
You will find the
the Control Panel after EPSON TWAIN is installed.
Scanners and Cameras
icon shown below in
3
Installing the Software
3-7
Page 36

Installing the Scanner Software for Macintosh
After connecting the scanner to your Macintosh computer, install
the EPSON scanner software; EPSON TWAIN, EPSON Scanner
Monitor, PageManager for EPSON and other application
software from the CD-ROM. Follow the steps below.
Note for iMac users:
❏
If you are using Mac OS 8.1, you need to install iMac Update before
installing the scanner software. This is available online from the
Apple Web site, where complete information on the software is
provided.
1. Make sure your scanner is plugged in and on. Then turn on
the computer.
When the message telling you that the scanner driver needs
to be installed appears, click OK.
2. Insert the CD in the CD-ROM drive.
3. Double-click the EPSON TWAIN folder.
The EPSON TWAIN folder contains multiple-language
versions of the software. Double-click the folder of your
preferred language.
4. Double-click the
3-8
Installing the Software
EPSON TWAIN L Installer
icon.
Page 37

5. The installer software shows a dialog box. Click
dialog box that appears, and follow the instructions on the
screen.
When you have finished the entire installation, the EPSON
Screen Calibration utility automatically starts. Go to page 3-10
for instructions. After restarting your Macintosh continue
from step 6 below to install other software.
6. Double-click the folder that contains the software you want
to install.
Install
in the
3
The Software folder contains multiple-language versions of
the software. Double-click the folder of your preferred
language.
7. Double-click the installer icon to start the installation
program. Then follow the instructions on the screen.
Installing the Software
3-9
Page 38

Calibrating Your Screen
When you install EPSON TWAIN, the EPSON Screen Calibration
utility is automatically installed.
EPSON Screen Calibration calibrates your monitor to ensure the
tone and contrast on your screen closely match the original image.
Be sure to calibrate your screen before starting to use your
scanner, and anytime you switch to a different monitor.
For information regarding color and output device calibration,
see the
Color Guide
For Windows 98 users
.
1. Double-click the
Control Panel. The Scanners and Cameras Properties dialog
box appears. Click the
3-10
Installing the Software
Scanners and Cameras icon
Properties
button.
in the
Page 39

2. Click the
icon. The
Utility
tab, then click the
Screen Calibration
Screen Calibration Utility
dialog box appears.
r
3. Look at the screen from a distance and move the slider right
or left until the two tones closely match.
r
Note:
The gray stripes will not perfectly blend together; however, try to make
the different tones match as closely as possible.
3
4. Click OK to finish calibrating your scanner and monitor.
Installing the Software
3-11
Page 40

For Macintosh users
1.
Double-click the
Scanner folder to view the
EPSON Screen Calibration
Screen Calibration
i c on in th e E PS O N
dialog box.
r
2. Look at the screen from a distance and move the slider right
or left until the two tones closely match.
Note:
The gray stripes will not perfectly blend together; however, try to make
the different tones match as closely as possible.
3. Click OK to finish calibrating your scanner and monitor.
3-12
Installing the Software
Page 41

Viewing the Color Guide
You can view the Color Guide using an HTML browser on your
computer. The Color Guide contains tips for handling color
imaging data, using several color imaging products, and other
general information about color imaging.
You will need one of the following browsers, or an equivalent, to
view the Color Guide:
Netscape Navigator 3.0 or later
❏
Microsoft Internet Explorer 3.0 or later
❏
If a browser is not installed on your computer, you will need to
obtain one and install it, or you can install the browser that comes
with your Color Guide CD-ROM. For further details, double-click
Readme.txt
To view the Color Guide, double-click on
the instructions on the screen.
, and follow the instructions.
color.htm
, and follow
3
Installing the Software
3-13
Page 42

3-14
Installing the Software
Page 43

Chapter 4
Using Your Scanner
Scanning Procedure. . . . . . . . . . . . . . . . . . . . . . . . . . . . . . . . . . . . . . . 4-2
Placing a Document on the Scanner . . . . . . . . . . . . . . . . . . . . . . . . . 4-2
Removing the Cover for Thick or Large Documents . . . . . . . . . . . 4-6
Starting EPSON TWAIN . . . . . . . . . . . . . . . . . . . . . . . . . . . . . . . . . . 4-7
Scanning an Image . . . . . . . . . . . . . . . . . . . . . . . . . . . . . . . . . . . . . . . 4-8
Making EPSON TWAIN settings on the Photo menu . . . . . 4-10
Making EPSON TWAIN settings on the OCR/Line Art
menu. . . . . . . . . . . . . . . . . . . . . . . . . . . . . . . . . . . . . . . . . . . . . . . 4-16
Saving the Scanned Image . . . . . . . . . . . . . . . . . . . . . . . . . . . . . . . . . 4-18
Scanning by Pressing the Start Button . . . . . . . . . . . . . . . . . . . . . . . 4-19
4
Using Your Scanner
4-1
Page 44

Scanning Procedure
This chapter shows you how the scanner operates. The basic
procedure for scanning is as follows:
1. Plug in the scanner.
2. Place the document you want to scan on the document table.
(This is described in detail below.)
3. Run the scanner software and scan. (See page 4-7 for details
on scanning.)
Placing a Document on the Scanner
Before scanning a document, remember to respect the rights of
copyright owners. Do not scan published text or images without
first checking the copyright status.
1. Plug in the scanner
on.
4-2
Using Your Scanner
. The fluorescent lamp in the carriage turns
Page 45

2. Turn on the computer and make sure that the scanner's
fluorescent lamp
Note:
❏
If the fluorescent lamp is flashing, it means there is some kind
of error. See Chapter 6 “Maintenance and Troubleshooting” if
the fluorescent lamp is flashing.
❏
The scanner will turn off the fluorescent lamp if it does not
receive any commands from the computer within 10 minutes.
This is normal and the lamp will turn back on when you scan.
The lamp will also turn off if you unplug the USB cable. To turn
the lamp back on, plug the USB cable in again.
3. Open the document cover.
is on, and not flashing.
4
Using Your Scanner
4-3
Page 46

4. Place the document on the document table, with the side to
be scanned facing down. Make sure that the document is
carefully aligned.
corner of the document
Note:
An area approximately 3mm in from both the horizontal and vertical
guides will not be scanned.
4-4
3mm (approx.)
3mm (approx.)
Using Your Scanner
Page 47

5. Close the document cover gently so that the document does
not move.
Note:
❏
Make sure the document is flat against the glass surface,
otherwise the image will appear fuzzy and out of focus. Also be
sure to close the document cover to prevent interference from
external light.
4
❏
Always keep the document table clean. See “ Cleaning the
Scanner” in Chapter 6.
❏
Do not leave photographs on the document table for an extended
period of time as they may stick to the glass.
❏
Do not place heavy objects on top of the scanner.
6. Start EPSON TWAIN and scan. For details see pages 4-7 to 4-8.
Using Your Scanner
4-5
Page 48

Removing the Cover for Thick or Large Documents
For thick materials or documents that are larger than the
document table, remove the document cover.
Note:
When scanning with the cover removed, do not leave any area of the
document table exposed to prevent interference from external light.
When you are finished scanning, reattach the document cover by
pushing straight down on the back until it clicks into place.
4-6
Using Your Scanner
Page 49

Caution:
c
Make sure both of the cover's notches are directly above the clips
on the scanner before pushing it down into place; otherwise
damage may occur.
Starting EPSON TWAIN
There are two ways to scan; with an application that supports
TWAIN, or with the
software.
If you ..
use an application that supports EPSON TWAIN to scan,
❏
open your application (see “Starting EPSON TWAIN through
your application software” below).
want to scan an image directly to your application without
❏
opening EPSON TWAIN or the TWAIN-compliant
application every time, setup the ] Start button and the
application to work with (see Chapter 5 “Using the Start
Button”). Then simply press the ] Start button.
Start button and preassigned application
]
4
Note:
Even if your application supports TWAIN, some features of EPSON
TWAIN may not be available depending on the application software.
Starting EPSON TWAIN through your application software
Application programs that support the scanning interface
standard TWAIN, allow you to scan images while an application
is running. To verify whether your application is compatible with
TWAIN, see your application documentation.
How you should open EPSON TWAIN and scan varies
depending on the application. Read the following to find out how
to access EPSON TWAIN.
Using Your Scanner
4-7
Page 50

1. Start your application, for example, Presto! PageManager for
EPSON.
2. Select
Select Source
EPSON TWAIN L
.
Note:
You usually need to perform this step only the first time you use the
scanner with your application.
3. Choose
Acquire
fro m the File menu to ope n EPSON TWA IN.
To scan, see the next section.
Scanning an Image
EPSON TWAIN window
from the File menu, and then select
When you open EPSON TWAIN, the EPSON TWAIN window
will appear. Click on either the
Photo
tab or
OCR/Line Art
depending on which type of scanning you wish to do.
4-8
Using Your Scanner
tab,
Page 51

Note for Macintosh users:
Most illustrations shown in this chapter are for Windows, so they may
vary from the actual dialog boxes that appear on your screen. You can
use the dialog boxes following for both Macintosh and Windows
reference however, as almost all the settings and functions are the same.
Note:
❏
Online help also provides you with information on settings. Click
Help
to access Help.
❏
You cannot scan an image that exceeds available memory or disk
space. If you attempt to scan an image that is too large, an alert
appears on the screen.
❏
Before you begin scanning, you should calibrate your screen. For
details, see Chapter 3, “ Calibrating Your Screen.”
❏
After an image is scanned, be sure to save it.
4
Then click
document table will appear in the window on the right side of the
EPSON TWAIN window.
Note:
You cannot preview an image that exceeds available memory or disk
space.
You can now make settings in the
You can see the effects of the following settings in the preview
image.
Color Management
❏
Unsharp Mask
❏
Threshold
❏
Preview
. A preview image of the entire scanner
Photo
OCR/Line Art
or
Using Your Scanner
menus.
4-9
Page 52

To make settings for color or black and white photos, see “ Making
EPSON TWAIN settings on the Photo menu” on page 4-10. To
make settings for OCR or line art see “ Making EPSON TWAIN
settings on the OCR/Line Art menu” on page 4-16.
Making EPSON TWAIN settings on the Photo menu
This section describes all the settings you can make on the
menu.
Image Type
Use the
Image Type
list to select the type of image to be scanned.
Photo
Color Photo:
24-bit Color scanning
Black & White Photo:
8-bit Gray scanning
4-10
Using Your Scanner
Page 53

Resolution
Use the
to scan. You can choose from 75, 150, 300, 600, 1200 and 2400 dpi.
Recommended resolutions for scanning images are as follows:
A resolution value greater than 600 dpi is useful if you want to
enlarge the image.
Resolution
Displaying on a monitor 75 dpi
Printing 150 or 300 dpi
list to select the resolution at which you wish
File Size
File Size
The
the scanned image will be. Changes you make in your settings or
the size of the marquee will be reflected here.
indicator only displays what the rough file size of
Color Management
Color Management
matching.
Speed:
Speed
quickest scans.
uses auto optimization functions and provides the
provides two settings for controlling color
4
Effect
Quality:
Quality
sRGB (for Windows) or ColorSync (for Macintosh) color
management to provide the best quality scans. If your
monitor and printer support these color management
systems, select this to obtain a quality scan.
Effect
is only available for
provides two options to manipulate the scanned image.
Color Photo
Using Your Scanner
and uses ICM/
4-11
Page 54

Unsharp Mask:
Unsharp Mask
and displays the effect in the preview image.
De-screening:
De-screening
images scanned from printed matter.
A moiré is a cross-hatch pattern that appears on scanned
images when scanning printed material. It is a result of
interference that occurs due to the difference between the
pitches of the scanning and the halftone screens.
Note:
De-screening is performed by the software and may take more time to
provide the final image.
If Resolution is set at 1200 or 2400 dpi,
available. EPSON recommends you select 150 dpi to achieve the best
results.
automatically sharpens the scanned image
automatically removes moiré patterns from
De-screening
will not be
4-12
Using Your Scanner
Page 55

Configuration
Click the
following dialog box. You can make settings that affect the
previewing.
Configuration
button on the
Windows
Macintosh
Photo
menu to view the
4
Save Preview Image and Settings:
Select this check box to automatically save the preview image
and all the image settings when you exit EPSON TWAIN (quit
scanning). The next time you restart EPSON TWAIN, the last
preview image and settings will reappear.
Using Your Scanner
4-13
Page 56

Automatic Preview:
Previewing automatically starts when you launch EPSON
TWAIN (if this check box is selected).
Help
Clicking
Help
will start the EPSON TWAIN help system.
Close
Clicking
Note:
Be sure to save your scanned image before closing the application. See
page 4-18 for details.
Close
will close the EPSON TWAIN software.
Preview
Photo
Preview
menu (Preview window).
will scan the entire document table and display
Clicking
a preview image with the settings you have made to the right of
the
Note:
Although the image in the Preview window changes as you make
settings, the settings do not affect the actual image until you scan, or
rescan, the image.
Scan
Once you have made all your settings, you must scan the image
for all your settings to take effect. You can scan the entire
document table or only a section of the preview image.
Scanning the entire document table:
To scan the entire document table, simply click
4-14
Using Your Scanner
Scan
.
Page 57

Scanning a portion of the preview image:
Perform the following steps to scan a portion of the preview
image.
1. Click and drag your mouse in the Preview window and select
the portion of the image you want to scan. A marquee will
appear showing what portion will be scanned.
2. Click
Note:
❏
❏
Scan
.
When the mouse pointer is placed within the marquee (the frame of
the selected image area), the mouse pointer changes to a hand icon.
You can drag the marquee anywhere in the Preview window.
When the mouse pointer is placed on the edge of the marquee, it
changes to an arrow allowing you to resize the marquee.
4
❏
To remove or delete a marquee, double-click on the Preview window.
Using Your Scanner
4-15
Page 58

Making EPSON TWAIN settings on the OCR/Line Art menu
This section describes all the settings you can make on the
Line Art
Note:
For details on the
buttons, see the previous section.
menu.
Configuration, Help, Preview, Scan
and
OCR/
Close
Resolution
Use the
to scan. You can choose either 300 or 600 dpi.
Recommended resolutions for scanning text or black-and-white
line art are as follows:
4-16
Resolution
OCR 300 dpi
FAX 300 dpi
Printing 300 or 600 dpi
Using Your Scanner
list to select the resolution at which you wish
Page 59

If you have a character recognition problem with OCR scanning,
using 600 dpi may improve your OCR results. However, note that
scanning at higher resolution takes longer.
File Size
File Size
The
the scanned image will be. Changes you make in your settings or
the marquee size will be reflected here.
indicator only displays what the rough file size of
Threshold
Threshold
You can adjust the
using the slide bar.
is used to control the lightness of the scanned image.
Threshold
Threshold list
Threshold
The
are suitable for scanning these materials with increasing
levels of darkness:
Newspaper
❏
Magazine
❏
list provides the following four options which
value using the
Threshold
4
list or by
Printout
❏
Book
❏
Slide bar
The slide bar lets you adjust the lightness value seven steps
from lighter to darker. If you use the slide bar, “ User Defined”
will appear in the
remain in effect until you uncheck the “ Save Preview Image
and Settings” in the Configuration dialog box.
Threshold
list. Your threshold settings will
Using Your Scanner
4-17
Page 60

Saving the Scanned Image
To save a scanned image in your application, choose
❏
Save As
documentation.
To save a scanned image in PageManager for EPSON, follow
❏
the steps below.
Note:
Parenthesized words in the following steps apply to Macintosh users.
1. Choose
dialog boxes appears on the screen.
from the File menu. For details, see your application
Save As
from the File menu. One of the following
Save
or
4-18
Using Your Scanner
Page 61

2. Select the folder where the image will be saved.
3. Type a filename for your image in the File name (Save as) field.
4. Select the file format you want to save the image in from the
Save as type (Save File as Type) field.
5. Click
Save
.
Scanning by Pressing the Start Button
You can open EPSON TWAIN, start scanning, and have the
scanned image sent to a certain application, simply by pressing
Start button on your scanner. To use this feature, you need
the
]
to install PageManager for EPSON, or other Start button
compatible software. The following occurs:
Windows 98 detects when the
❏
sends information to the Start button compatible application,
such as PageManager for EPSON. Macintosh use EPSON
Scanner Monitor, which performs the same function.
The Start button compatible application will automatically
❏
open EPSON TWAIN, scan the image and process it in the
way the application is designed.
Note:
❏
You need to setup the Start button compatible software before using
this feature. See Chapter 5 and the documentation that comes with
the application.
Start button is pressed and
]
4
❏
The scanned image will be handled by the software to its maximum
capability. For example, using PageManager for EPSON, you can
send the scanned image to a printer to print, or convert your scanned
OCR image to text format and paste it in a wordprocessing
]
application— all by simply pressing the
Start button.
Using Your Scanner
4-19
Page 62

4-20
Using Your Scanner
Page 63

Chapter 5
Using the Start Button
The Start Button Feature. . . . . . . . . . . . . . . . . . . . . . . . . . . . . . . . . . . 5-2
PageManager for EPSON. . . . . . . . . . . . . . . . . . . . . . . . . . . . . . . . . .5-2
Target applications in the Scan Buttons bar . . . . . . . . . . . . . . 5-2
Assigning an application to the Start button . . . . . . . . . . . . . 5-3
Adding Applications to the Scan Buttons Bar . . . . . . . . . . . . 5-5
Registering new applications . . . . . . . . . . . . . . . . . . . . . . . . . . 5-6
Setting Up EPSON Scanner Monitor for Macintosh. . . . . . . . . . . . 5-8
Setting Up the Start Button Feature for Windows 98. . . . . . . . . . . 5-10
5
Using the Start Button
5-1
Page 64

The Start Button Feature
The Start Button feature allows you to scan and send data to a
target application with a single push of your scanner’s
button. The following sections will help you set up your
PageManager for EPSON, and EPSON Scanner Monitor software
for Macintosh or Windows 98 system, so you can begin to use the
Start Button feature.
Note for Windows 98 users:
The Start Button feature is supported by Windows 98 and EPSON
Scanner Monitor software will not be installed onto Windows 98.
See page 5-10 for details on setting up the Start Button feature for
Windows 98.
PageManager for EPSON
PageManager allows you to scan and send data directly to an
assigned application with a single push of your scanner’s
button. You can also scan to any target application by simply
clicking on the application icon in PageManager’s Scan Buttons
bar. This section will help you set up PageManager so you can
begin to scan using the
information on PageManager settings, see your PageManager
documentation.
Start button. For more detailed
]
]
Start
]
Start
Note:
For information on PageManager installation, see Chapter 3.
Target applications in the Scan Buttons bar
When PageManager is started, the Scan Buttons bar will appear
on your screen. The icons in this bar represent target applications
or peripheral devices that can be accessed by your scanner. This
means that you can scan and send data directly to these
applications or devices by clicking on their icons.
5-2
Using the Start Button
Page 65

PageManager for EPSON also allows you to assign any one of the
applications or devices on the Scan Buttons bar to the ] Start
button. This means that an image can be scanned and sent straight
to your selected application with one simple push of the
button.
Start button icon
Note:
The application button showing the Start button icon represents the
application that is assigned to the Start button.
Assigning an application to the Start button
]
Start
5
To assign an application on the Scan Buttons bar to the
button, follow the steps below.
1. Select
Scan Buttons Setting
from the File menu.
Using the Start Button
]
Start
5-3
Page 66

2. Click the
Setting
The icons in Select target application correspond to the icons
in the Scan Buttons bar and represent the possible target
devices and applications.
Start Button Settings
dialog box. The following dialog box appears.
tab in the
Scan Buttons
3. Select an application from the Select target application box
and click OK.
The selected application is now assigned to the scanner’s
Start button.
Execute Scan Button automatically check box
When this check box is selected, the assigned application will be
automatically opened and the scanned image sent to the
application when you press the ] Start button. When this check
box is clear, no application is assigned to the ] Start button and
only the Scan Buttons bar will appear when the ] Start button is
pressed. Then you can select an application from the Scan Buttons
bar.
5-4
Using the Start Button
]
Page 67

Adding Applications to the Scan Buttons Bar
You can add applications appearing in the Application bar at the
bottom of the PageManager window to the Scan Buttons bar.
Follow the steps below.
1. Select
2. Specify the name of the setting in the Name box.
Scan Buttons Setting
the following dialog box.
from the File menu. You will see
5
3. Click the arrow next to the Scan to box and select the
application you want to add to the Scan Buttons bar.
4. Select the appropriate scanning settings (Document Type,
Scan Mode, etc.) for the application from this dialog box and
Add
click
The button of the selected application appears on the Scan
Buttons bar.
. Then click OK.
Using the Start Button
5-5
Page 68

To remove an application assigned to the Scan Buttons bar, select
the application in the box on the left of the dialog box and click
Remove
. Then click OK.
Suppress TWAIN User Interface check box
When this check box is selected, the EPSON TWAIN dialog box
does not appear when you scan, and the scanner works according
to the settings in PageManager. When this check box is clear, the
EPSON TWAIN dialog box appears when you scan, and the
scanner works according to the settings in EPSON TWAIN.
Registering new applications
To add an application to Scan Buttons bar, you need to register
the application. The registered applications will appear in the
Scan to: box in the Scan Buttons Setting dialog box.
1. Select
5-6
Application Setting
Register New Application
The Register Application Wizard dialog box appears.
Using the Start Button
from File menu and then select
.
Page 69

2. Specify the application’s name, location and icon and click
Next>
.
5
3. Specify the format of the image and click
Using the Start Button
Finish
.
5-7
Page 70

Setting Up EPSON Scanner Monitor for Macintosh
EPSON Scanner Monitor is software that recognizes when the
Start button is pressed and sends information to assigned
application software supporting the Start Button feature and
EPSON Scanner Monitor, such as PageManager for EPSON.
Once EPSON TWAIN is installed on Macintosh, EPSON Scanner
Monitor is active and identifies PageManager for EPSON as the
application that allows you to use the Start Button feature. If you
need to turn off Scanner Monitor, or select another application
that supports the Start Button feature, access Scanner Monitor as
described below.
Note:
Application software other than PageManager for EPSON which
supports both EPSON Scanner Monitor and the Start button feature
may be limited.
Epson Scanner Monitor Setup
Select
from the Apple menu.
]
❏
5-8
Turning off Scanner Monitor
Using the Start Button
Page 71

If you want to turn off Scanner Monitor, clear the
Monitoring
scanner’s Start Button feature.
To activate Scanner Monitor again, select the
Monitoring
Assigning an application to Scanner Monitor
❏
Browse
Click
the Start Button feature and EPSON Scanner Monitor, such as
PageManager for EPSON.
check box. However, this will disable the
check box.
. Select a folder and an application that supports
Enable
Enable
5
Using the Start Button
5-9
Page 72

Setting Up the Start Button Feature for Windows 98
Without having EPSON Scanner Monitor installed, Windows 98
allows you to use the ] Start button on your scanner without
having to open an application that supports the Start Button
feature. When you press the ] Start button, you can have a
scanned image automatically sent to your application, such as
PageManager for EPSON, as long as it is installed.
Once EPSON TWAIN is installed on Windows 98, the
and Cameras
scanner is listed in the
dialog box as shown below.
icon appears on the control panel, and your
Scanners and Cameras Properties
Assigning an application to the Start button
After you install applications that support “ Scanner events” , such
as PageManager for EPSON, you need to select one of those
applications for the scanner event.
Scanners
If you want to use your scanner’s ] Start button with
PageManager for EPSON as the supporting application, follow
the steps on the next page.
5-10
Using the Start Button
Page 73

1. Select your scanner from the installed scanners and cameras
list in the
Click
Scanners and Cameras Properties
Properties,
and then click the
Events
dialog box.
tab.
5
2. You can see the
Make sure the check box of the application you want to assign
to the ] Start button is selected and all other application check
boxes are clear in the
Note:
❏
If more than one application is selected, a dialog box appears
prompting you to select an application when the Start button
is pressed.
❏
Some applications do not support linkage to scanners and
digital cameras. Linkage is available only with the applications
that appear in the
3. Close the dialog box by clicking OK.
Start Button
Send to this application
Send to this application
is listed as the scanner event.
Using the Start Button
list.
list.
5-11
Page 74

Disabling the Start button
If you need to disable the Start Button feature, select the
device event
Properties
will detect if the ] Start button is pressed and launch the
application you selected in the
check box in the
dialog box. When this check box is clear, Windows 98
EPSON Perfection 610
Send to this application
Disable
list.
5-12
Using the Start Button
Page 75

Chapter 6
Maintenance and Troubleshooting
Maintenance . . . . . . . . . . . . . . . . . . . . . . . . . . . . . . . . . . . . . . . . . . . . . 6-2
Cleaning the scanner . . . . . . . . . . . . . . . . . . . . . . . . . . . . . . . . . 6-2
Replacing the fluorescent lamp . . . . . . . . . . . . . . . . . . . . . . . . 6-3
Transporting the Scanner . . . . . . . . . . . . . . . . . . . . . . . . . . . . . . . . . . 6-3
Problems and Solutions . . . . . . . . . . . . . . . . . . . . . . . . . . . . . . . . . . . 6-4
Error indicator. . . . . . . . . . . . . . . . . . . . . . . . . . . . . . . . . . . . . . . 6-5
Operating problems . . . . . . . . . . . . . . . . . . . . . . . . . . . . . . . . . . 6-5
Quality problems . . . . . . . . . . . . . . . . . . . . . . . . . . . . . . . . . . . . 6-8
Software setup problems. . . . . . . . . . . . . . . . . . . . . . . . . . . . . . 6-14
Software operation problems . . . . . . . . . . . . . . . . . . . . . . . . . . 6-14
Scanning problems . . . . . . . . . . . . . . . . . . . . . . . . . . . . . . . . . . . 6-16
Sizing Up Your System. . . . . . . . . . . . . . . . . . . . . . . . . . . . . . . . . . . . 6-18
RAM and hard disk size . . . . . . . . . . . . . . . . . . . . . . . . . . . . . . 6-18
Accelerator boards . . . . . . . . . . . . . . . . . . . . . . . . . . . . . . . . . . . 6-19
Video cards . . . . . . . . . . . . . . . . . . . . . . . . . . . . . . . . . . . . . . . . . 6-19
Monitors. . . . . . . . . . . . . . . . . . . . . . . . . . . . . . . . . . . . . . . . . . . . 6-19
File compression software. . . . . . . . . . . . . . . . . . . . . . . . . . . . . 6-19
6
Maintenance and Troubleshooting
6-1
Page 76

Maintenance
Cleaning the scanner
To keep your scanner operating at its best, you should clean it
periodically, as described below.
1. Unplug the power cord.
2. Clean the outer case with mild detergent and water.
3. If the glass of the document table gets dirty, clean it with a
so ft dry clot h. If the g lass is staine d with grease or some o ther
hard-to-remove material, use a small amount of glass cleaner
and a soft cloth to remove it. Wipe off all remaining liquid.
Be sure that there is no dust on the glass of the document table.
Dust can cause white spots in your scanned image.
Caution:
w
❏ Be careful not to scratch or damage the glass of the document
table, and do not use a hard or abrasive brush to clean it. A
damaged glass surface can decrease the scanning quality.
6-2
❏ Never use alcohol, thinner, or corrosive solvent to clean the
scanner. These chemicals can damage the scanner
components as well as the case.
❏ Be careful not to spill liquid into the scanner mechanism or
electronic components. This could permanently damage the
mechanism and circuitry.
❏ Do not spray lubricants inside the scanner.
❏ Never open the scanner case.
Maintenance and Troubleshooting
Page 77

Replacing the fluorescent lamp
The luminosity of the fluorescent lamp declines over time. If the
lamp breaks or becomes too dim to operate normally, the scanner
stops working and the fluorescent lamp will not come on
this happens, the lamp assembly must be replaced. For details,
contact your dealer.
Caution:
c
Never open the case of the scanner. If you think repairs or
adjustments are necessary, consult your dealer.
Transporting the Scanner
If you are transporting the scanner a significant distance or storing
it for an extended period, follow the steps below to secure the
carriage.
1. Plug in the scanner and wait until the carriage moves to the
home position (position nearest the cover hinges). When the
carriage lamp remains on, unplug the scanner.
. When
6
2. Turn the transportation lock to the locked position to secure
the carriage.
Maintenance and Troubleshooting
6-3
Page 78

Problems and Solutions
This section divides scanner problems into six categories:
Error indicator . . . . . . . . . . . . . . . . . . . . . . . page 6-5
Operating problems . . . . . . . . . . . . . . . . . . page 6-5
Quality problems. . . . . . . . . . . . . . . . . . . . . page 6-8
Software setup problems . . . . . . . . . . . . . . page 6-14
Software operation problems . . . . . . . . . . page 6-14
Scanning problems . . . . . . . . . . . . . . . . . . . page 6-16
See the table in “Error indicator” first. If this does not help you
solve your problem, go to the category for the type of problem
you have, then look for the problem description.
The online Color Guide also provides versatile tips and other
information helpful for problem-solving.
6-4
Maintenance and Troubleshooting
Page 79

Error indicator
If an error occurs, the scanner stops operating and the carriage
lamp
shows the type of error.
Pattern of
light
F
(Rapidly
flashing )
O
= on, O = off,
N
Problem and solution
Cause 1: The interface setup is wrong, or the
What to do 1: Check the interface connection. Then
Cause 2: The transportation lock is not released or
What to do 2: Make sure that th e transportation lock is in
Cause: The lamp is worn out.
What to do: Consult your dealer.
= flashing
F
scanner is not properly connected to the
computer.
turn the scanner off and back on to
initialize the scanner again.
the scanner is broken.
the unlocked position; then turn the
scanner off and then back on. If the
scanner still does not operate properly, or
if this error occurs repeatedly, consult your
dealer.
Note:
The scanner will turn off the fluorescent lamp if it does not receive any
commands from the computer within 10 minutes.
6
Operating problems
Problems you may have while using the scanner often involve the
operation of your software and computer. Operation problems
usually occur because of:
Incorrect setup of the interface (see Chapter 3).
❏
Maintenance and Troubleshooting
6-5
Page 80

Incorrect setup of your computer or software (see Chapter 3
❏
in this guide or the software documentation).
Incorrect operation of your software (see Chapters 4 and 5).
❏
Also see the documentation that came with your computer and
printer for possible solutions.
The fluorescent lamp does not come on.
Cause What to do
The scanner is not
connected correctly.
Normal power saving
function
Make sure the power cord is
connected to the scanner and plugged
into a power outlet.
If the scanner does not receive any
commands after 10 minutes, it turns
off the lamp. The lamp will turn back
on when you scan.
The scanner does not scan.
Cause What to do
The scanner is not ready
to scan.
More than one USB hub
is in use, or the cable is
unsuitable.
Wait until the fluorescent lamp stays
on (ready for scanning).
Try connecting the scanner directly
to the computer’s USB port, or
EPSON USB cable .
use an
6-6
Maintenance and Troubleshooting
Page 81

The scanner software does not work properly.
Cause What to do
Software is not installed
properly.
Make sure your software is installed
correctly.
For Windows 98 users:
Check if your scanner is listed more
than once in the Scanners and
Cameras Properties dialog box. To
view the dialog box, double-click the
Scanners and Cameras icon in Control
Panel. Remove your scanner every
place it appears in the dialog box, then
reinstall EPSON TWAIN following
the instructions in the Chapter 3.
Note:
When reinstalling the scanner software, if
a dialog box does not appear and a message
box and followed by a dialog box
requesting the EPSON Scanners Driver
Disk appears instead, insert the Scanner
Software CD in the CD-ROM drive.
Make sure to specify the correct drive
letter, the EPSON folder, the folder of
your preferred language, and the Win98
folder as the location.
6
Computer system
doesn’t meet the
requirements.
Not enough memory is
available.
Make sure your computer meets the
memory and other system
requirements specified for the
software you are using.
Make sure the computer has enough
memory for your software. If the
computer does not have enough
memory available, see your software
and computer documentation for
details.
Maintenance and Troubleshooting
6-7
Page 82

Quality problems
The entire image is distorted or blurred.
Cause What to do
Document is not placed
correctly.
Document was moved. Make sure you do not accidentally
Scanner orientation is
unsuitable.
Make sure the document is flat against
the document table.
move the document during scanning.
Make sure the scanner is on a flat,
stable surface.
Part of the image is distorted or blurred.
Cause What to do
The document condition
is poor or the document
was placed incorrectly.
Make sure the document is uniformly
flat against the document table. A
document that is wrinkled or warped
may not scan well.
c
Caution:
Do not place heavy objects on the
document table.
Edges of the document are not scanned.
Cause What to do
The document size
exceeds the readable
scanning area.
6-8
Maintenance and Troubleshooting
Position the document so the area you
want to scan is at least 3mm from the
edge guide limits of the document
table.
Page 83

Colors are patchy or distorted at the edges of the image.
Cause What to do
The document is too
thick or warped, or there
is too much outside light.
The document is not
placed correctly.
A document that is very thick or
warped at the edges can cause
discoloration. Cover the edges of the
document with paper to bl ock outside
light.
M ak e s u r e the do c u me nt i s f la t ag ai n s t
the document table.
The image is faint or out of focus.
Cause What to do
The document is not
placed correctly.
M ak e s u r e the do c u me nt i s f la t ag ai n s t
the document table.
The image is too dark.
Cause What to do
Threshold is unsuitable. Check your software’s threshold.
Check the brightness and contrast
settings of your computer display.
See Chapter 4.
6
Maintenance and Troubleshooting
6-9
Page 84

Straight lines in the image come out jagged.
Cause What to do
Document is not placed
correctly.
Make sure the document orientation
is perfectly straight on the document
table. Align vertical and horizontal
lines with the scales at the top and side
of the document table.
The image does not look the same as the original.
Cause What to do
Image settings are
incorrect.
Color matching software
is not sufficient, or not
installed properly.
File format or image
settings are unsuitable.
Try different image setting
combinations on your scanner
software.
Your software may not have sufficient
color matching and color
management features, or these
components may not be installed
correctly. See the documentation that
comes with your software and
computer.
If you are importing an image file,
make sure the file format is one your
software can read. Also, make sure the
image settings of your software are
appropriate for the type of image you
want to scan.
6-10
Maintenance and Troubleshooting
Page 85

A line of dots is always missing from the scanned image.
Cause What to do
The print head has
malfunctioned.
The scanner sensor has
malfunctioned.
Print head malfunction is indicated
when a line is missing on printouts
only. See your printer manual.
Scanner sensor malfunction is
indicated when a line is missing on
both screen images and printouts.
Contact your dealer.
A line of dots always appears in the scanned image.
Document table is dusty
or scratched.
If this happens on both your screen
and printout, the document table may
be dusty or scratched. Clean the
document table. If the problem still
exists the table may be scratched and
require replacement.
When scanning printed matter, textured patterns of dots
appear inside particular areas of the image.
Cause What to do
6
Normal scanning. This condition is normal. The scanner
automatically mimimizes the problem
De-screening
if
Photo
menu on the EPSON TWAIN
window.
Maintenance and Troubleshooting
is checked on the
6-11
Page 86

Colors on your monitor are different from those in the
original image.
Cause What to do
Software image settings
need adjustment.
Color matching and color
management capabilities
of your system are
insufficient.
Normal scanning. Exact color matching is very difficult.
Check the image settings of your
scanner software. Try different
combinations of these settings.
Check the color matching and color
management capabilities of your
computer, display adapter, and
software. Some computers can change
the color palette to adjust the colors on
your screen. See your software and
hardware manuals for details.
Check your software and monitor
documentation for information on
color matching and calibration. Also
see your
Color Guide
.
Printed colors are different from those in the original
image.
Cause What to do
Normal scanning. Exact color matching is very difficult.
Check your software or contact your
printer company for information on
color matching and calibration.
6-12
Maintenance and Troubleshooting
Page 87

The printed image is larger or smaller than the original.
Cause What to do
Printed size was judged
using the monitor image.
The image settings of your software
determine the size of the printed
image. Do not use the size of the
monitor image to judge the printed
size.
Scanned images cannot be printed or come out garbled
when printed.
Cause What to do
Printer is not connected
or set up properly, or
maintenance is
necessary.
Software is not installed
properly.
Make sure your printer is properly
connected to the computer, correctly
set up, and maintained. See your
printer manual for details.
Check that your software is properly
installed and set up for your printer.
See your software manual.
6
Maintenance and Troubleshooting
6-13
Page 88

Software setup problems
You cannot install EPSON TWAIN.
Cause What to do
System configuration does
not meet the requirements.
Check if your computer and operating
system meets the system
requirements on page 3-2.
Make sure your computer has enough
memory to run the application.
Software operation problems
You cannot start EPSON TWAIN.
Cause What to do
Scanner is switched off. Plug in the scanner and then turn on
the computer.
Interface cable is unsuitable. Make sure the interface cable meets
the requirements of your interface
board. See the m anual that comes with
the interface board.
Connection is not made
properly.
Unplug the scanner and turn off
computer and check the connection
between the scanner and the
computer.
Incorrect selection of
TWAIN Data Source in
application.
6-14
Maintenance and Troubleshooting
Make sure that EPSON TWAIN L is
selected properly in your application
software. See “ Starting EPSON
TWAIN through your application
software” on page 4-7.
Page 89

Software is not installed
properly and EPSON
TWAIN L does not appear in
the TWAIN Data Source list.
Make sure your software is installed
correctly.
For Windows 98 users:
Check if your scanner name appears
under Imaging Device hardware type
without a ? or ! mark in the Device
Manager menu. To view this menu,
right-click the My Computer icon on
the Desktop. If your scanner appears
with a ? or ! mark, or appears as an
Unknown devices hardware type,
Remove
click
connected and turned on to remove it
from the Device Manager menu. Then
reinstall EPSON TWAIN following
the instructions in the Chapter 3.
while your scanner is
Note:
If the EPSON Scanners Driver Disk is
requested when reinstalling the scanner
software, insert the Scanner Software CD
in the CD-ROM drive and make sure to
specify the correct drive letter, the
EPSON folder, the folder of your preferred
language, and the Win98 folder as the
location.
6
Maintenance and Troubleshooting
6-15
Page 90

Scanning problems
Image is dark, with little or no detail.
Cause What to do
Screen is not calibrated. Calibrate the screen as described in
“ Calibrating Your Screen” on page
3-10.
You cannot scan an image or you only get a few dots for the
scanned image.
Cause What to do
No document on the
document table.
Threshold setting needs
changing.
Make sure you have placed a
document on the document table of
the scanner.
When the
in the EPSON TWAIN window, change
the
Art
4-17.
OCR/Line Art
Threshold
menu. See “ Threshold” on page
setting on the
tab is selected
OCR/Line
Moiré (cross hatch) patterns appear in the scanned image
during scanning of printed material
Cause What to do
Effect setting is unsuitable. Select the
the
Transparent sheet was not
used.
Place a transparent sheet between the
document and document table to
defocus the image.
De-screening
Photo
menu.
setting on
6-16
Maintenance and Troubleshooting
Page 91

Document is not positioned
correctly.
Move or angle the document slightly.
Unsharp Mask setting is
selected.
De-select
focus setting.
Unsharp Mask
for a softer
Colors differs from the original or look strange.
Cause What to do
Screen is not calibrated. Calibrate the screen. See Chapter 3.
Image Type and Color
Management settings are
incorrect.
Normal scanning. Printed colors will not exactly match
Make sure the
4-10) and
settings (page 4-11) are correct.
the colors on your monitor, since
printers and monitors use different
color systems: monitors use RGB (red,
green, and blue), while printers
typically use CMYK (cyan, magenta,
yellow, and black).
Image Type
Color Management
(page
Poor character recognition during OCR scanning.
6
Cause What to do
Resolution setting is
unsuitable.
Threshold setting is
unsuitable.
Select a different
OCR/Line Art
on the
Try adjusting the
OCR/Line Art
on the
Maintenance and Troubleshooting
Resolution
menu.
Threshold
menu.
setting
setting
6-17
Page 92

Scanning does not start by pressing the Start button.
Cause What to do
Scanner Monitor software is
not installed properly. (For
Macintosh)
Scanner Event is not selected
properly. (For Windows 98)
Make sure the Scanner Monitor
software is running and check the
Scanner Monitor’s Launch
Application path is set correctly.
Click the
Properties dialog box and make sure
the
is clear. And make sure the Start
button is selected as the
events
recognizable application in the
to this application
Events
Disable device events
, and at least one scanner event
tab in your scanner’s
check box
Scanner
box is selected.
Sizing Up Your System
Your scanner is sufficient for most scanning needs, but if you are
not satisfied with the quality of the images on your monitor or
with the speed of image processing, read this section. While it
does not contain specific recommendations, it describes various
possibilities for improving your scanning system. For further
information, seek advice from your dealer or an experienced
scanner user.
Send
RAM and hard disk size
Scanned images use much more memory than text files, so
you may need more RAM (Random Access Memory) in your
computer and a larger hard disk than you have used previously.
6-18
Maintenance and Troubleshooting
Page 93

Accelerator boards
In addition to memory, processing speed is important because
large files take longer to process than small ones. Therefore, you
may want to add an accelerator board to your computer.
Video cards
A video card that is sufficient for text may not be good enough
for displaying graphic images, especially in color. If all your
scanned images look coarse on your monitor, you may want to
upgrade your video card. You will need 24-bit color, also called
true color or millions of colors, to make the highest quality image
reproductions.
Monitors
The resolution of your monitor affects the quality of the image
you see. Consider a high resolution monitor if you do precise color
work, but also be sure you have a high quality video card.
File compression software
6
Many different programs are available to make image files
smaller for storage or transmission. For example, some
compression software can store a 3MB image file on a 1.44MB
floppy disk, and compress images and restore them with no loss
of data or quality; others compress images more, but the restored
file is not exactly the same as the original. The difference between
the original and restored files is, however, almost unnoticeable.
Maintenance and Troubleshooting
6-19
Page 94

6-20
Maintenance and Troubleshooting
Page 95

Appendix A
Technical Specifications
Scanning . . . . . . . . . . . . . . . . . . . . . . . . . . . . . . . . . . . . . . . . . . . . . . . . A-2
Electrical . . . . . . . . . . . . . . . . . . . . . . . . . . . . . . . . . . . . . . . . . . . . . . . . A-3
Environmental . . . . . . . . . . . . . . . . . . . . . . . . . . . . . . . . . . . . . . . . . . . A-4
Safety Approvals . . . . . . . . . . . . . . . . . . . . . . . . . . . . . . . . . . . . . . . . . A-5
CE marking. . . . . . . . . . . . . . . . . . . . . . . . . . . . . . . . . . . . . . . . . . . . . . A-5
USB Interface . . . . . . . . . . . . . . . . . . . . . . . . . . . . . . . . . . . . . . . . . . . . A-6
Initialization Methods. . . . . . . . . . . . . . . . . . . . . . . . . . . . . . . . . . . . . A-7
A
Technical Specifications
A-1
Page 96

Scanning
Scanner type: Flatbed, color
Photoelectric device: Color CCD line sensor
Effective pixels: 5100 × 7020 pixels at 600 dpi, 100%
Document size: 216 mm × 297 mm (8.5 inches × 11.7
inches A4 or US letter size.
The reading area can be specified from
your software.)
Scanning resolution: 600 dpi (main scan)
2400 dpi with Micro Step (sub scan)
Output resolution: 75, 150, 300, 600, 1200 and 2400 dpi
Color separation: RGB color filters on CCD
Reading sequence:
Monochrome One-pass scanning
Color byte sequence One-pass scanning (R, G, B)
Color line sequence One-pass scanning (R, G, B)
Image data: 12 bits per pixel per color internal
8 bits per pixel per color external
Line Art settings: Fixed threshold
Gamma correction: 1 type for user-defined
Interface: USB (Type B Receptacle Connector)
Light source: White cold cathode fluorescent lamp
Reliability: 10,000 cycles of carriage movements
(main unit MCBF)
A-2
Technical Specifications
Page 97

Dimensions: Width: 287 mm (11.3 inches)
Depth: 425 mm (16.7 inches)
Height:88 mm (3.4 inches)
Weight: Approx. 4.5 kg (9.9 lb)
Electrical
100−120 V model 220−240 V model
Input voltage range AC 90 to 132 V AC 198 to 264 V
Rated frequency 50 to 60 Hz
Rated current 0.5 A 0.3 A
Power consumption Approx. 20W
Note:
Check the label on the back of the scanner for voltage information.
A
Technical Specifications
A-3
Page 98

Environmental
Temperature:
Operation 5° C to 35° C (41° F to 95° F)
Storage –25° C to 60° C (–13° F to 140° F)
Humidity:
Operation 10% to 80%, without condensation
Storage 10% to 85%, without condensation
Operating conditions: Ordinary office or home conditions.
Extreme dust should be avoided.
Operation under direct sunlight or
near a strong light source should be
avoided.
Note:
Specifications are subject to change without notice.
A-4
Technical Specifications
Page 99

Safety Approvals
120V model:
Safety standards UL 1950 with D3
EMC FCC part 15 Subpart B Class B
230V model:
Safety standards EN 60950
EMC EN 55022 (CISPR Pub 22) Class B
CE marking
230 V model:
Low Voltage Directive 73/23/EEC EN 60950
EMC Directive 89/336/EEC EN 55022 Class B
CSA C22.2 No. 950
CSA C108.8 Class B
AS/NZS 3548 Class B
A
EN 61000-3-2
EN 61000-3-3
EN 50082-1
IEC 801-2
IEC 801-3
IEC 801-4
Technical Specifications
A-5
Page 100

USB Interface
Interface type: Universal Serial Bus Specification Revision 1.0
Configuration:
Element
Device
Configuration
Interface
Endpoint 1
Endpoint 2
String
Descriptor
Description
Full Speed mode (12Mbit/s)
Class : Vendor-specific
Vendor ID : 0x04B8 (Seiko Epson Corp.)
Product ID : 0x0103
Characteristics : Self-powered
Re mo te wak e u p fe at ur e: No t s upp o rt ed
Maximum power consumption from VBUS : 2mA (5V)
No alternate setting
Number of endpoints used by this interface
(excluding endpoint 0) : 2
Class : Vendor specific
Bulk IN transfer
Maximum data transfer size : 64 byte
Bulk OUT transfer
Maximum data transfer size: 64 byte
Language ID : US English
1 : iManufacturer: “EPSON”
2 : iProduct: “Perfection610”
Electrical standard: Full Speed mode(12Mbit/s) of Universal
Serial Bus Serial Bus Specification Revision
1.0.
Connector type: One receptacle (Type B)
A-6
Technical Specifications
 Loading...