

Page 1
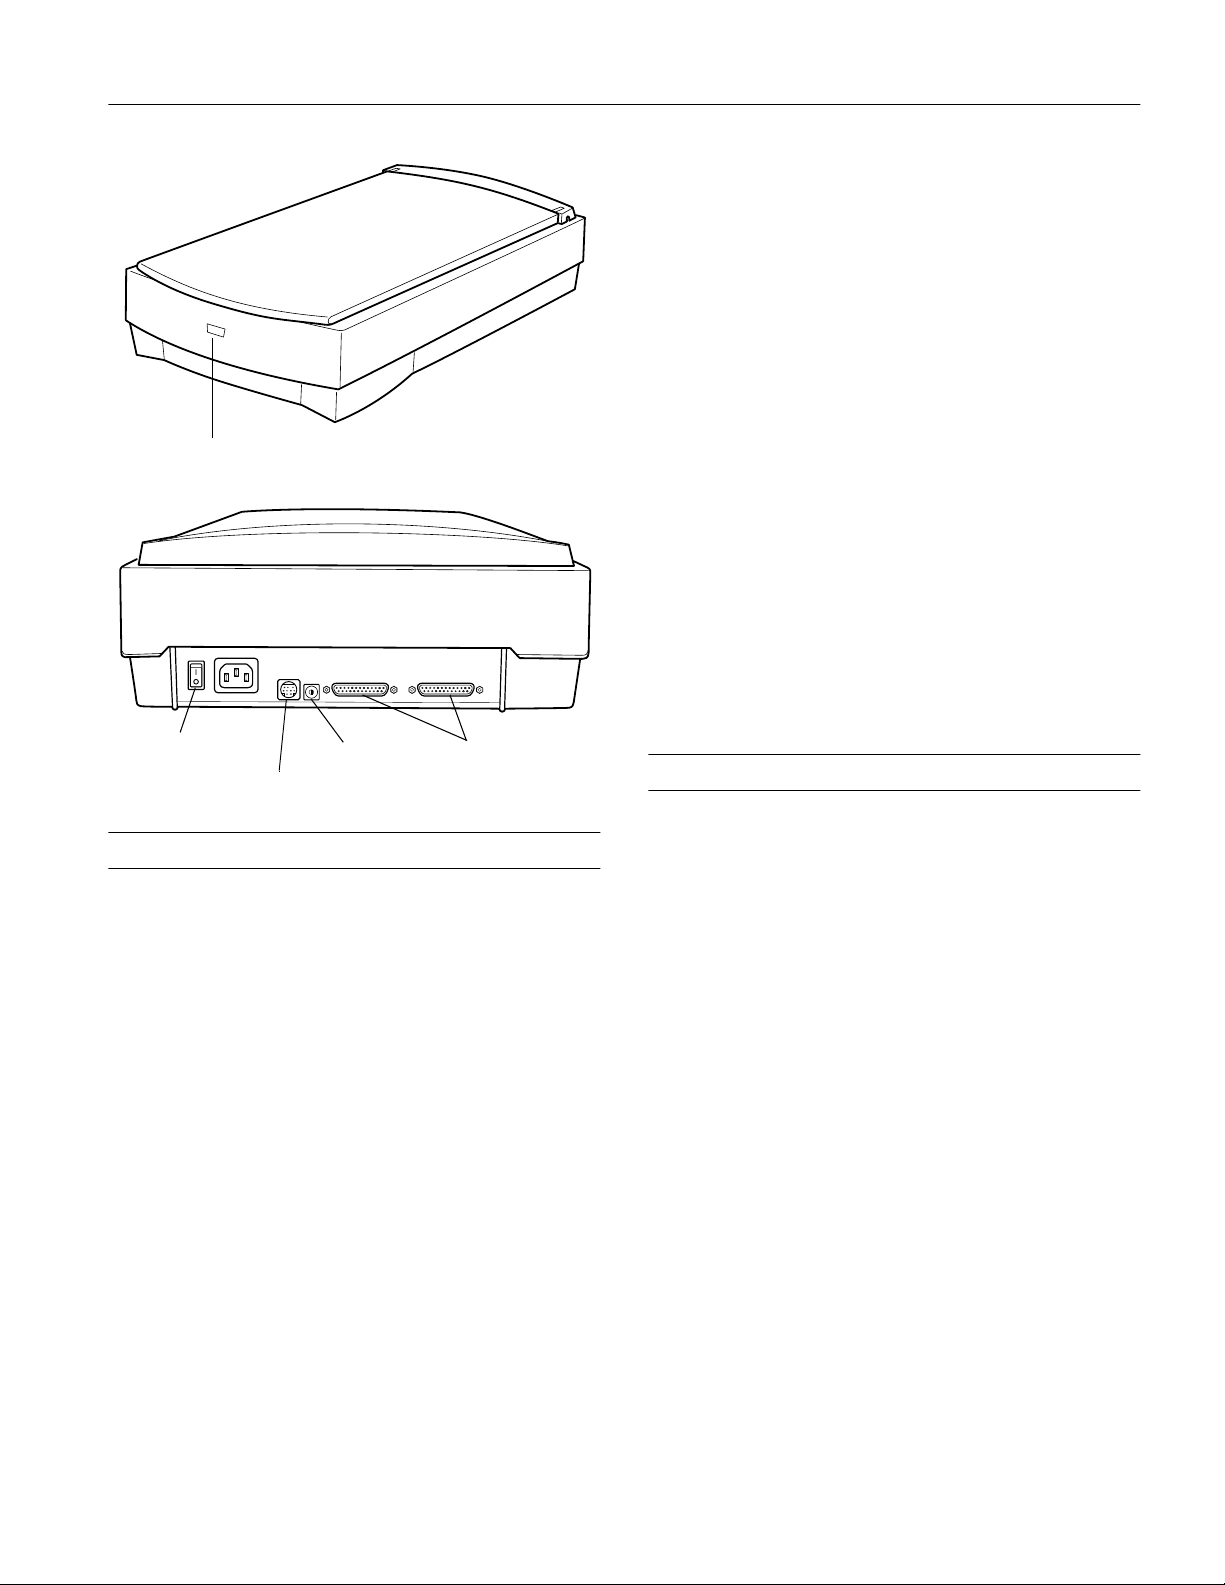
ready light
EPSON AMERICA, INC.
p
TITLE
front.EPS
EPSON Perfection 600
Interface: SCSI II
Data input: 30 bits internal
24 bits external
Light source: Cold cathode fluor es cen t lam p
Reli a b ility: Main u n it and tr ansparen cy unit MTBF:
10,000 scan hours
Lamp: Warm up time: 30 seconds at 77° F
Auto switch off: 30 minutes
Dimensions: Width: 12.8 inches ( 322 mm)
Depth: 21.7 inche s (5 50 mm)
Height: 5.1 inches (129 mm)
Weight: About 11.4 lb (5.2 kg)
Brightness: * –100 to 100
Contrast:* –100 to 100
5
6
4
7
3
8
2
9
1
0
power switch
SCSI ID switch
EPSON AMERICA, INC.
Documentation Department
20770 Madrona Avenue, Torrance, CA 90503
(310) 782-0770
OPTION connector
TITLE
DATE
DRAWN BY
MNT20.EPS
7/31/97
B. Levert
SCSI connectors
Scanner Specifications
Scanner type: Flatbed, color/monoch rom e
Photoelectric
device:
Maximum
docume n t si ze:
Optical scanning
resolution:
Output
resolution:
Scanning speed: Color: 10 ms/line
Color separation: Trilinear color CCD element
Color CCD (C har g ed C oup l ed De v ice )
line sensor
8.5 inches × 14 inches (216mm ×
356 mm) up to US legal size
600 dpi (main scan); 1200dpi (subscan)
25 dpi to 2400 dpi interpolated
(Win 95, Win NT, and Macint os h)
1 dpi to 4800 dpi interpolated
(Win 3.1 only)
Grayscale: 5 ms/ line
Line Art: 5 ms/line
*Processed by driver software
Electrical Specifications
Power supply Main unit: internal universal power
supply (switching type)
Transparency unit: universal AC adapter
power supply
Rated voltage AC 100 V
AC 240 V
Input voltage
range:
Rated current: Main unit: 0.5 A at AC connector
Rated frequency : 50 to 60 Hz
Rated frequency
range:
Power
consumption:
AC 90 to 132 V (at 100 V)
AC 198 to 264 V (at 240 V)
Transparency unit: 0.33 A at AC
connector
48 to 52 Hz (at 100 V)
58 to 62 Hz (at 240 V)
Operation: maximum 12 W (main unit);
maximum 8.8 W (transparency unit)
Standby: maximum 7.5 W (main unit);
maximum 6.4 W (transparency unit)
9/97 EPSON Perfection 600
- 1
Page 2

EPSON Perfection 600
Environmental Conditions
Temperature: Operation: 41° F to 95° F
(5° C to 35° C)
Storage: –13° F to 140° F
(–25° C to 60° C)
Humidity: Operation: 10% to 80%, without
condensation
Storage: 10% to 85%, without
condensation
Operating
conditions:
Ordinary office or home conditions.
Avoid extremely dusty co nditions, direct
sunlight, and strong light conditions
Note:
Specifications are subj ect to cha nge without notice.
Interface Spec ifications
Interface type: ANSI X3T9.2/375D revision 10L
standard
Function: BUS FREE phase
ARBITRATION phase
SELEC TION/RESELECTION phase
COMMAND phase
DATA phase
Data in phase
Data out phase
STATUS phase
MESSAGE phase
MESSAGE IN phase
MESSAGE OUT phase
SCSI connector pin assignments:
Signal I/O Pin no. Description
REQ O 1 Request
MSG O 2 Message
I/O O 3 Input/Output
RST I 4 Reset
ACK I 5 Acknowledge
BSY I/O 6 Busy
GND — 7 Ground
DB0 I/O 8 D ata Bus 0
GND — 9 Ground
DB3 I/O 10 Data Bus 3
DB5 I/O 11 Data Bus 5
DB6 I/O 12 Data Bus 6
DB7 I/O 13 Data Bus 7
GND — 14 Ground
C/D O 15 Command/Data
GND — 16 Ground
ATN I 17 Attention
GND — 18 Ground
SEL I/O 19 Select
DBP I/O 20 Data Bus P
DB1 I/O 21 Data Bus 1
DB2 I/O 22 Data Bus 2
DB4 I/O 23 Data Bus 4
GND — 24 Ground
TERMPWR — 25 Te rminator Power
Changing the Defa ult Settings
You can change d efaul t sc annin g set tings bef ore o r af ter you
prescan the image. (This is also true for all advanced scanning
tools and procedures.)
Electrical
As per ANSI X3T9.2/375D revision 10L
standard:
SCSI ID setting : Selectabl e from 0 to 7 with the ro ta ry
switch (Do not sele ct 8 o r 9.) Defau lt
setting is 5.
Connector type: Two 25-pin D-SUB connectors
Terminator type: E xternal 25-pin D-SUB passive
terminator
2 - EPSON Perfection 600
Note:
You can restore the def ault scan settings at any time by clicking the
Reset button.
You can also change the foll owin g sett ings :
Document Source
To get the best results from your EPSON scanner, you must
specify the type of media you’re scanning.
From the EPSON Perfection 600 main window, select one of
the following document source options:
❏ Reflective—The image is captured when light reflects off
the original on the scanner flatbed. Most originals require
reflective scanning. In the Windows 3.1 scanner driver, this
option is called Flatbed/Reflective.
9/97
Page 3

EPSON Perfection 600
❏ Transp a rency— The image is captu red when light shin es
through the original instead of reflecting off it. This option
is called Transparentive in the Windows 3.1 scanner driver.
(An optional transparency unit must be installed.)
Document Output
From the EPSON Perfection 600 main window, select the
output option that best matches your source.
Scan Type (Windows 95/NT and Macintosh)
If you’ve installed the scanner driver for Windows 95,
Windows NT, or Macintosh, choose one of the following
options under Scan Type to save your scanned image:
❏ 30 bit Color—Saves the scanned original as a color image.
❏ 10 bit Grayscale—Saves the scanned original as a blac k a nd
white image with shades of gray.
❏ 1 bit Line Art ( OCR)—Saves th e scann ed orig inal a s a black
and white line art image, with no gray tones. Use this
option when you’re scanning line art or text.
Image Type (Windows 3.1)
If you’re running Windows 3.1, select one of the following
options under Image Type to save your scanned image:
❏ Color Photo—Saves the scanned orig inal as a 24-bit color
image.
❏ 256 Colors—Saves the scanned original as an 8-bit color
image. Use this option when you’re scanning color images
with fewer tones than color photographs, such as drawings.
❏ Black & White Photo—Saves the scanned origina l as an
8-bit grayscale image (256 shades).
❏ Black & White Halftone—Saves the scanned origi nal as a
1-bit halftone image.
❏ Line Art—Saves the scanned original as a black and white
image. Choose this option if you’re scanning a black and
white illustration.
❏ OCR—Use this option when you’re scanning text to be
used with an Optical Character Recognition (OCR)
program.
❏ Copy/FAX—Use this option t o scan an ima ge that has be en
faxed or photocopied.
Resolu tio n
The following table shows the best scanning resolutions for
most output devices:
Output device Recommended resolution
Inkjet pri nter 240 dpi
Monochrome laser printer 150 dpi
Computer screen 72 dpi
Four-color printing press with 150 lpi 250 dpi
Four-color printing press with 175 lpi 300 dpi
B&W printing press with 85 lpi 150 dpi
B&W prin ti ng press wit h 100 lpi 170 dpi
B&W prin ti ng press wit h 133 lpi 225 dpi
Line art log o 600 dpi
OCR 300 dpi
Problems and Solutions
The ready light doesn’t come on...
Check the scanner power cord.
Make sure the power cord is securely plugged into the scanner
and the power ou tle t, and that th e scanne r is turn e d on. Al so,
check that the power outlet is working. If you’re using the
optional transparency unit, make sure the power adapter is
installed correctly.
If the scanner test fails (PC only)...
Check the cable connecting th e scanne r to the c omputer .
Make sure the scanner is correctly connected to the computer.
Also, make sure the scanner’s ready light is on.
Check the terminator and SCSI ID.
Make sure you’v e attached the termin ato r and set the corre ct
SCSI ID.
Check your SCSI board installation.
Make sure that th e SC SI inte rf ace bo ard is ins tall ed co rrectl y.
Check that your system recognizes your scanner and S CSI
interface board.
Check System D evice Manager in the Window s 95 Co nt rol
Panel, or the Ada ptec S CSI Inter roga to r if you ’r e run ning
Windows 3.1. For Windows NT, check the SCSI Adapter
dialog in the Control Panel. If your system isn’t recognizing
either the SCSI board or the scanner, go to the next section.
Check for conflicts in the inte rrupt s etting for your SC SI
board, I/O address, or other settings .
See your comput er m anual for d e taile d in formation about
selecting settings.
9/97 EPSON Perfection 600
- 3
Page 4

EPSON Perfection 600
If your system doesn’t recognize the scanner or the SCSI board (PC only)...
Check the plug-and-play opt ion.
If you’re runnin g Wind o ws 95 , pl ug-an d- play sh ould be
active.
If you’re running Windows NT, plug-and-play should be
disabled. (You can disable ISA plug-and-play from the
Advanced Conf igu rati on O pt ion s men u in SC SIS elect.)
If you’re runnin g Wind o ws 3.1, ru n S CS I Select to di sabl e
plug-and-play.
Did you install another SCSI device, such as a ZIP drive, after
you installed your SCSI board? (Windows 95 only)
If so, your device installation may have overwritten the SCSI
driver (sparrow.mpd) with an older version of the driver.
Copy sparrow.mpd from the Sparrow directory on your
EPSON CD- RO M to th e \w ind ows \sy ste m\io s ubs ys
subdirectory on your hard drive.
Run the Add New Hardware wizard.
(Windows 95 and N T on ly)
Follow the instructions on the screen. (It’s best to accept the
default settings.) When you’re done, restart your computer.
Run SCSISelect.
Your scanner comes with the 1505 SCSISelect diskette, which
contains SCSISelect, a special SCSI troublesh oot ing and
configuration utility for W indows 3. 1, Wi ndow s 95, and
Windows NT. Insert this diskette in your diskette drive and
restart your computer, then follow the instructions on your
screen.
If SCSISelect hangs or you get an error message, you have a
hardware problem. Make sure your SCSI board is installed
correctly. If the S CSI car d is fo und , b ut n ot the s can ne r, you
need to install a SCSI terminator. Also, check the SCSI cable
connection and make sure the scanner is turned on. After
checking your hardware, run SCSISele c t again.
If you continue to have problems, your SCSI board may be
defec tive.
Check the cable connecting th e scanne r to the c omputer .
Make sure the scanner is correctly connected to the computer.
Also, make sure the scanner’s ready light is on.
Check the terminator and SCSI ID.
Make sure you’v e attached the termin ato r and set the corre ct
SCSI ID.
If the s c anner s oftwa re doesn’t wo rk properly...
Check your system requirements.
Check that the system requirements, such as the operating
system version, are correct for your software.
Check your computer’s memory.
See if the computer has enough memory for your software. If
you’re running other software at the same time, using RAM
resident programs, or have many device drivers, the computer
may not have enough memory. (See your software and
computer manuals.)
Check your software installation.
Make sure that your software is correctly installed or set up. If
all else fails, uninstall your software, then reinstall it.
If the file size is too big...
Adjust your scan settings.
Try setting a lower resolution, or scan only part of the image.
If your sca nne d i ma ge is bl ur re d or distor te d.. .
Check the position and cond ition of your do cume nt.
Make sure the document is placed flat against the scanner’s
document table (the glass area). If only part of the image is
blurred, part of your document may be wrinkled or warped.
If your scanned image is faint or has gaps...
Check the brightness.
Decrease the scanner driver’s brightness setting.
If the scanner doesn’t scan your image.
Check your image source setting.
Make sure you selected the Perfection 600 as your source.
Run the scanner test (PC on ly).
Run the scanner test to make sure the scanner is
communicating with your computer. If the test fails, check the
items above. (The scanner test is not available for the
Macintosh.)
4 - EPSON Perfection 600
Check the condition of y our original.
If the document is damaged, dirty, or wrinkled, these
imperfections will show up in your scan.
If your image scans at an angle...
Check the position of your source document.
It may be placed at an angle on the document table. Align it so
the horizontal and vertical edges are carefully aligned with the
scales on the top and side of the document table.
9/97
Page 5

Options
Transparency Unit (B813121)
The transparency uni t allows you to scan slides, negatives, and
transparencies up to 8.5 × 14 inches. The transparency unit
replaces the scann er cove r but s till allow s sc ann ing o f
individual items.
Scanner Bundled Kits
The scanner is available in a bundled kit that includes software
for operating the scanne r in a PC o r Ma cinto sh enviro nment.
The kit includes the following:
Perfection 600 scanner
EPSON Installer CD Pak
Adaptec SCSI bo ard (AVA–1505 AE)
SCSI c a ble
SCSI terminato r
1505SELECT (conf igu ratio n u tility for th e AVA–1505 AE)
Adobe
®
PhotoD e l uxe
™
Visioneer® PaperPort™ LE with Xerox® Textbridge
Adobe PageMill™ (not available for Windows 3.1)
®
EarthLink
Netscape
Adobe Acrobat
Network TotalAccess™ with
®
Navigator™ (not available for Windows NT)
™
Reader
™
EPSON Perfection 600
Inform at io n Reference List
Related Documentation
CPD 5595 EPSON Perfection 60 0 We lcom e
Placemat
CPD 5594 EPSON Perfection 60 0 Qu ick Start
Guide
TM-PERF600 EPSON Perfection 600 Service Manual
PL-PERF600 EPSON Per fectio n 60 0 Part s List
Engineering Change Notices
None
Product Support Bulletins
None
Technical Support Bulletins
None
9/97 EPSON Perfection 600
- 5
 Loading...