

Page 1

COLOR SCANNER
QUICK START
Guide
CPD 5594
Page 2

FCC COMPLIANCE STATEMENT
FOR UNITED STATES USERS
This equipment has been tested and found to comply with the limits for a Class B digital device,
pursuant to Part 15 of the FCC Rules. These limits are designed to provide reasonable protection
against harmful interference in a residential installation. This equipment generates, uses, and can
radiate radio frequency energy and, if not installed and used in accordance with the instructions, may
cause harmful interference to radio or television reception. However, there is no guarantee that
interference will not occur in a particular installation. If this equipment does cause interference to
radio and television reception, which can be determined by turning the equipment off and on, the
user is encouraged to try to correct the interference by one or more of the following measures.
◗ Reorient or relocate the receiving antenna.
◗ Increase the separation between the equipment and receiver.
◗ Connect the equipment into an outlet on a circuit different from that to which the receiver is
connected.
◗ Consult the dealer or an experienced radio/TV technician for help.
WARNING
The connection of a non-shielded equipment interface cable to this equipment will invalidate the
FCC Certification of this device and may cause interference levels which exceed the limits established
by the FCC for this equipment. It is the responsibility of the user to obtain and use a shielded
equipment interface cable with this device. If this equipment has more than one interface connector,
do not leave cables connected to unused interfaces. Changes or modifications not expressly approved
by the manufacturer could void the user’s authority to operate the equipment.
For Canadian Users
This Class B digital apparatus meets all requirements of the Canadian Interference-Causing
Equipment Regulations.
Cet appareil numérique de la classe B respecte toutes les exigences du Règlement sur le materiel
brouilleur du Canada.
A NOTE CONCERNING RESPONSIBLE USE OF COPYRIGHTED MATERIALS
Like photocopiers, scanners can be misused by improper copying of copyrighted material. Although
Section 107 of the U.S. Copyright Act of 1976 (Title 17, United States Code), the “fair use” doctrine,
permits limited copying in certain circumstances, those circumstances may not be as broad as some
people assume. Unless you have the advice of a knowledgeable attorney, be responsible and respectful
by not scanning published material without the permission of the copyright holder.
EPSON is a registered trademark of SEIKO EPSON CORPORATION. EPSON Perfection, EPSON SoundAdvice and EPSON FaxAdvice are trademarks of
Epson America, Inc.
General Notice: Other product names used herein are for identification purposes only and may be trademarks of their respective owners.
EPSON disclaims any and all rights in those marks.
Copyright © 1997 by Epson America, Inc. 10/97
Printed on recycled paper with at least 10% post-consumer content.
Page 3

CONTENTS
A Complete Scanning Solution 1
Important Safety Instructions 3
Where To Get Help 4
SETTING UP YOUR SCANNER 7
Unpack Your Scanner 7
Choose a Good Place for Your Scanner 8
Install the SCSI Interface Board (PC Only) 8
Unlock the Scanner 9
Set the SCSI ID Number 10
Connect the Scanner to Your Computer 10
Install the SCSI Software (PC Only) 11
Install the EPSON Scanner Driver and Software Applications 13
Power-On Sequence 17
Test the Connection 17
Install the Optional Transparency Unit 18
SCANNER BASICS 21
Perform Your First Scan 22
Power Scanning—New Tools That Give You Great Results 26
If You’re Scanning Something That Doesn’t Fit Under the Document Cover 28
Online User’s Guide 28
Using the Copy Utility 30
Transporting the Scanner 31
Maintenance 31
i
Page 4

PUTTING IT ALL TOGETHER 33
You Want To Edit a Printed Document and Distribute It Electronically 34
You Want To Put Scanned Images on Your Company’s Web Site 36
You Want To Create a Gallery of “Antique” Photographs 37
PROBLEMS? NEED HELP? 39
The Ready Light Doesn’t Come On… 40
If You Can’t Open the Scanner Driver… 40
If Your System Doesn’t Recognize the Scanner or the SCSI Board (PC Only)… 41
If the Scanner Doesn’t Scan Your Image… 41
If the Scanner Software Doesn’t Work Properly… 42
If the File Size Is Too Big… 42
If Your Scanned Image Is Blurred or Distorted… 42
If Your Scanned Image Is Faint or Has Gaps… 43
If the Edges of the Document Are Not Scanned… 43
If Your Image Scans at an Angle… 43
SPECIFICATIONS 45
Scanner Specifications 46
Electrical Specifications 47
Environmental Conditions 48
SCSI Specifications 49
Index 51
ii
Page 5

A COMPLETE SCANNING SOLUTION
The EPSON® Perfection™ 600 scanner comes with a combination of leadingedge applications that let you use your scanner in exciting new ways. (Not all the
software listed is available for every system.)
EPSON Perfection 600 Driver by LaserSoft
®
This exclusive professional-quality scanner driver
has never been offered on a scanner in this class.
Its powerful but flexible features let you obtain
expert results quickly and easily. (An exclusive
EPSON driver is available for Windows 3.1,
which doesn’t support the LaserSoft driver.)
Visioneer® PaperPort
™
PaperPort is the leading document management
software on the market today. It lets you organize,
file, edit, copy, fax, and e-mail your paper-based
information from one easy-to-use screen.
PaperPort has been modified to include
Xerox® Imaging Systems TextBridge LE™, the
premier OCR (Optical Character Recognition)
software.
Adobe® PhotoDeluxe
™
Lets you edit your photos with professional
results. You can improve image quality, add
special effects, eliminate red eye, combine
elements from several photos, add titles and
captions, restore old photos, and add many other
creative enhancements to your photographs.
1
Page 6

Adobe PageMill
™
Provides easy-to-use features that enable even the
novice user to build professional-looking Web
pages. You can use your scanned image as a logo,
an image map, or an illustration or background
pattern for a Web page. (PageMill is not available
to Windows® 3.1 users.)
EarthLink® Network TotalAccess
™
Combines an EarthLink Network access account
with Netscape® Navigator™ and other great
Internet tools to give you total access to the World
Wide Web. When you subscribe to EarthLink
Network, the setup fee is waived and you get 30
days free Internet access. (TotalAccess is not
available to Windows NT users.)
®
Adobe Acrobat® Reader
Allows you to share and read documents across
platforms with the original formatting intact. You
must install Acrobat Reader to read the online
guides.
2
Page 7

IMPORTANT SAFETY INSTRUCTIONS
Read all of these instructions and save them for later reference. Follow all
warnings and instructions marked on the scanner.
◗ Unplug the scanner before cleaning. Clean with a damp cloth only. Do
not spill liquid on the scanner.
◗ Do not place the scanner on an unstable surface or near a radiator or heat
source.
◗ Do not block or cover the openings in the scanner’s cabinet. Do not
insert objects through the slots.
◗ Use only the type of power source indicated on the scanner’s label.
◗ Connect all equipment to properly grounded power outlets. Avoid using
outlets on the same circuit as photocopiers or air control systems that
regularly switch on and off.
◗ Do not let the power cord become damaged or frayed.
◗ If you use an extension cord with the scanner, make sure the total ampere
rating of the devices plugged into the extension cord does not exceed the
cord’s ampere rating. Also, make sure the total ampere rating of all devices
plugged into the wall outlet does not exceed the wall outlet’s ampere
rating.
◗ Do not attempt to service the scanner yourself.
Unplug the scanner and refer servicing to qualified service personnel
under the following conditions:
If the power cord or plug is damaged; if liquid has entered the scanner; if
the scanner has been dropped or the cabinet damaged; if the scanner does
not operate normally or exhibits a distinct change in performance.
3
Page 8

WHERE TO GET HELP
EPSON provides customer support through the following services:
ELECTRONIC SUPPORT SERVICES
Service Access
World Wide Web From the Internet, you can reach EPSON’s
Home Page at http://www.epson.com.
EPSON Internet FTP Site If you have Internet FTP capability, use your
Web browser (or other software for FTP
downloading) to log onto ftp.epson.com with the
user name anonymous and your e-mail address as
the password.
EPSON Download Service You can call the EPSON Download Service at
(800) 442-2007. Set your communications
software to 8 data bits, 1 stop bit, no parity.
Modem speed can be up to 28.8 Kbps.
EPSON Forum on CompuServe
®
Members of CompuServe can type GO EPSON
at the menu prompt to reach the Epson America
Forum. For a free introductory CompuServe
membership, call (800) 848-8199 and ask for
representative #529.
4
Page 9

AUTOMATED TELEPHONE SERVICES
Service Access
EPSON SoundAdvice
EPSON FaxAdvice
EPSON Referral Service For the location of your nearest Authorized
™
™
For pre-recorded answers to commonly asked
questions about EPSON products 24 hours a day,
seven days a week, call (800)␣ 442-2110.
Access EPSON’s technical information library by
calling (800)␣ 442-2110. You must provide a return
fax number to use this service.
EPSON Reseller or Customer Care Center, call
(800) 442-2110.
TELEPHONE SUPPORT
EPSON also provides technical support and information on the installation,
configuration, and operation of EPSON products. Dial (800) 922-8911,
(310) 782-2600 (U.S.), or (905)␣ 709-9475 (Canada), 6 A.M. to 6 P.M., Pacific
Time, Monday through Friday.
Before you call, please have the following information ready:
◗ Product name
◗ Product serial number
◗ Computer configuration
◗ Description of the problem
You can purchase ink cartridges, paper, manuals, accessories, and parts from
EPSON Accessories at (800) 873-7766 (U.S. sales only). In Canada, please call
(800) 873-7766 for dealer referral.
5
Page 10
6
Page 11

SETTING UP YOUR SCANNER
UNPACK YOUR SCANNER
Remove the scanner from the box, then remove
the packing material from your scanner. Save the
packaging in case you need it later.
7
Page 12

CHOOSE A GOOD PLACE FOR YOUR SCANNER
Here are some points to consider:
◗ Place the scanner on a flat, stable surface. If the scanner is tilted, it can’t
operate properly.
◗ Make sure to place the scanner where you can easily unplug the power
cord, and where the SCSI cable can reach your computer.
◗ Be sure there’s enough room behind the scanner for the cables, and above
the scanner so you can fully raise the document cover, if necessary.
◗ Keep the scanner away from direct sunlight and strong light sources.
◗ Avoid places subject to shocks and vibrations, or high temperatures and
humidity.
INSTALL THE SCSI INTERFACE BOARD (PC ONLY)
You must install your SCSI board and SCSI software before installing the
scanner driver and software applications.
If you have a Macintosh or if you already have a SCSI board installed in
your PC, skip this section.
Note:
For additional information, see the Installation Guide that came with your
SCSI board.
1. Turn off the computer and any peripheral devices. Unplug any power
cords; then disconnect all cables from the back panel of your computer.
2. Remove the cover from your computer.
Caution:
Ground yourself before you touch any of the computer’s internal components
by touching an unpainted metal surface inside the computer case.
8
Page 13
3. Insert the interface board into an empty 16-bit ISA
expansion slot; then secure it with the retaining screw.
4. Replace the computer cover and reconnect all
cables.
5. If you’re installing the optional transparency
unit, go to “Install the Optional
Transparency Unit” on page 18.
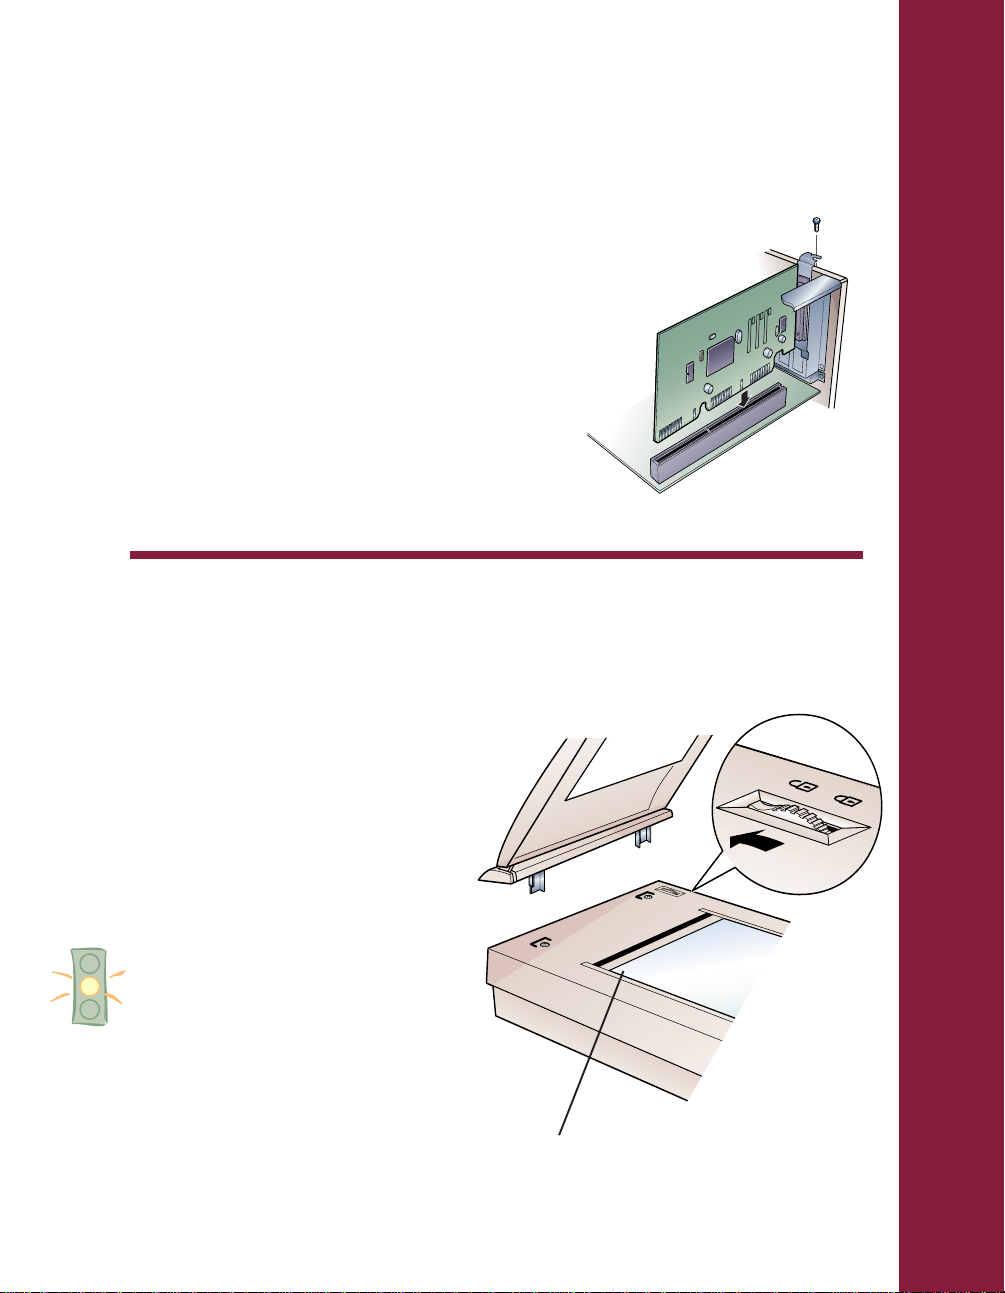
UNLOCK THE SCANNER
1. Remove the document cover and turn the carriage lock to the
unlock position (away from the document table).
2. Reinstall the document cover as
described on page 28. (If you
purchased the optional
transparency unit, install it now.
Follow the instructions in
“Install the Optional
Transparency Unit” on
page 18.)
Caution:
Always lock the scanner carriage
before transporting it; otherwise, the
scanner may be damaged. Be sure
the scanner lamp is in the home
position; to ensure this, always turn
off the scanner before locking the carriage.
home position
9
Page 14
SET THE SCSI ID NUMBER
The scanner is preset at the factory to SCSI ID 5. If you
need to change this number, use the tip of a small
screwdriver to turn the rotary switch on
the back panel. Be sure to choose
a unique number that doesn’t
conflict with the ID number of
other SCSI devices (including the
SCSI interface board).
5
6
4
7
3
8
2
Note:
Don’t use SCSI ID 8 or 9 for your
scanner. These are for factory use
only.
9
1
0
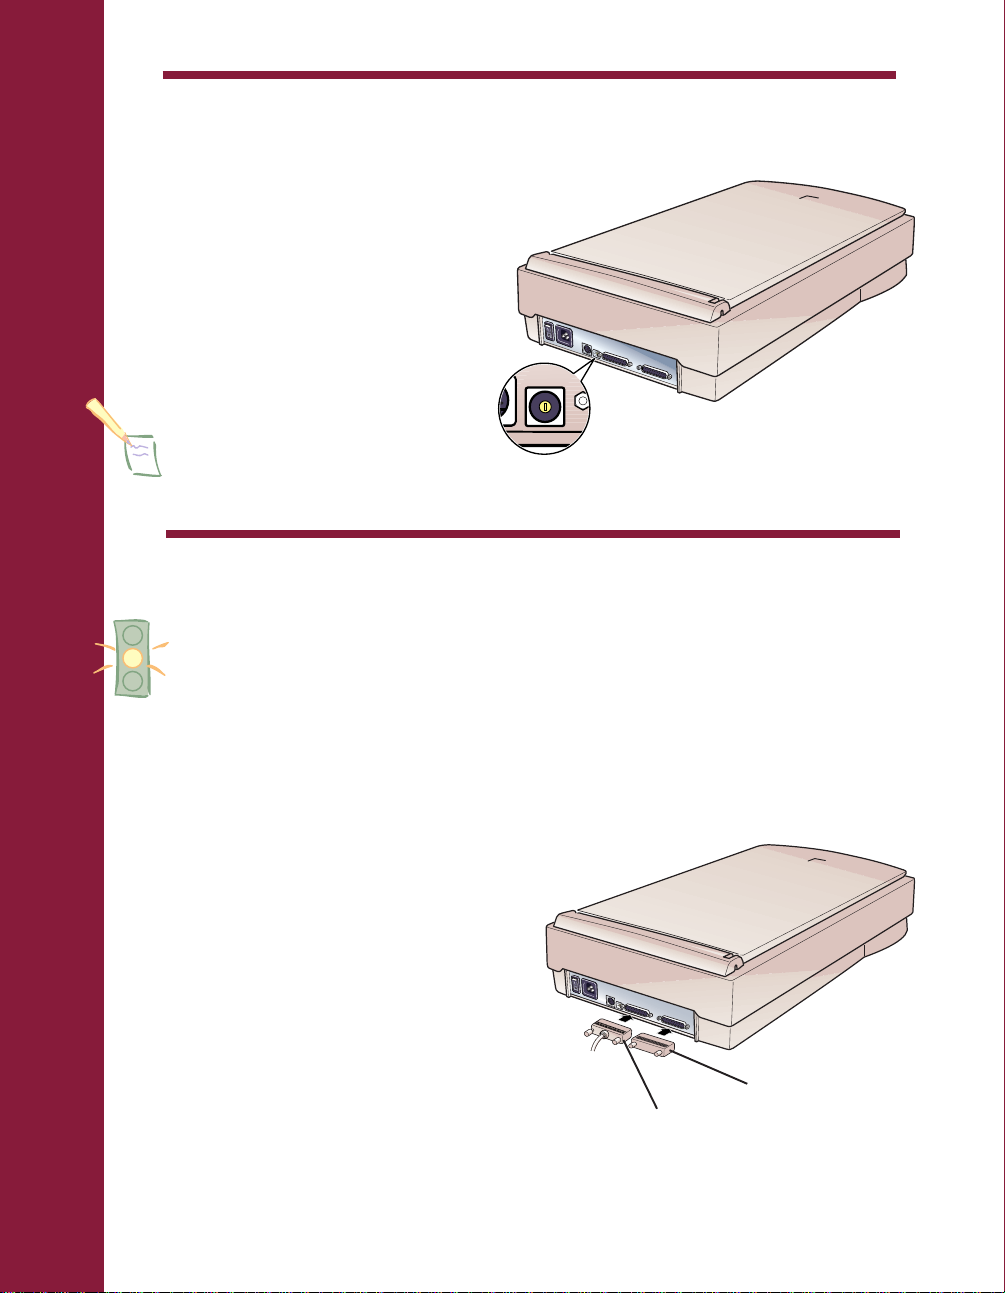
CONNECT THE SCANNER TO YOUR COMPUTER
Caution:
Make sure both the scanner and computer are turned off.
1. Locate the connector cable that came with your scanner.
Connect one end to either SCSI connector on the back of
the scanner and tighten the screws to secure it. Then connect
the other end to the SCSI port on your computer or other
SCSI device in the chain.
10
2. Locate the SCSI terminator. If the scanner is
the only SCSI device you connect to
your computer or if it’s the last
device in the SCSI chain, you
must insert the SCSI terminator
into the empty SCSI connector
on the back panel of the scanner.
(This step is not required if
you’ve connected your scanner
in the middle of a SCSI chain.)
SCSI connector
3. Connect the power cable to the scanner.
4. Plug in the power cables for your computer, scanner, and
other external SCSI devices.
SCSI terminator
Page 15

INSTALL THE SCSI SOFTWARE (PC ONLY)
The EPSON Perfection 600 CD-ROM for Windows 95 and Windows NT
includes the Windows 95 and Windows NT drivers for your SCSI board.
The EPSON Perfection 600 CD-ROM for Windows 3.1 includes Adaptec
EZ-SCSI™ Lite, which installs your Windows 3.1 SCSI driver. You need to
install the SCSI software for your system before you can use your scanner.
Note:
Your scanner also comes with a bootable diskette that contains SCSISelect, a
SCSI configuration utility for Windows 3.1, Windows 95, and Windows NT. You
only need to use this utility if you have problems with your SCSI board. See
page 41 if necessary.
If you’re running Windows 95...
1. Turn on your scanner first; then turn on your computer. A screen
appears saying that your system has detected new hardware and asking
you to install the driver (sparrow.mpd). If Windows doesn’t ask for the
driver, you’ve already installed it with another SCSI device. Skip to
step 5.
2. Insert the EPSON Perfection 600 CD-ROM for Windows 95 and
Windows NT in your CD-ROM drive. (If the EPSON Perfection 600
installation program launches, click Exit.)
3. Click Browse and change to your CD-ROM drive. The SCSI driver
installs automatically.
4. When installation is complete, turn off your computer. (Select Shut
from the Start menu, then select the option that shuts down the
Down
computer.) After a few seconds, turn it on again.
Windows 95 tells you that an unknown device has been found. This
indicates your scanner has been detected. Windows may ask you if you
want to install a driver. Select “Do not install a driver” and click OK.
If you have a newer version of Windows 95, you will be guided through
a device driver setup wizard. Click Next on the first screen, and then
click Finish.
5. Install the rest of the EPSON Perfection 600 software as described on
page 13.
11
Page 16

If you’re running Windows 3.1…
EZ-SCSI Lite installs your Windows 3.1 SCSI driver.
1. Turn on your scanner first; then turn on your computer.
2. Insert the EPSON Perfection 600 CD-ROM for Windows 3.1 in your
CD-ROM drive.
3. From Program Manager, open the File menu and choose Run. The Run dialog
box appears.
4. Type D:\ezscsi\setup (if another letter is assigned to your CD-ROM drive,
enter that letter instead of D:) and click OK. After a few moments, the Adaptec
Setup Wizard appears.
5. Follow the instructions on the screen. (The default settings are generally best.)
6. When installation is complete, exit Windows and turn off your computer.
After a few seconds, turn it on again. Setup creates a program group called
Adaptec SCSI.
7. Run the SCSI Interrogator in the Adaptec SCSI program group to make
sure your system recognizes the SCSI board.
8. Install the rest of the EPSON Perfection 600 software as described on page 13.
12
If you’re running Windows NT 4.0…
1. Turn on your scanner first, then turn on your computer. Insert your
EPSON Perfection 600 CD-ROM for Windows 95 and Windows NT in your
CD-ROM drive.
2. Go to the Windows Control Panel and double-click SCSI Adapters.
3. Click Add on the Drivers tab. A screen appears listing SCSI driver manufacturers.
4. Select Adaptec in the Manufacturers listbox, then double-click AHA-152X/AHA-
1510 SCSI Host Adapter
in the Drivers listbox.
5. Click OK. A screen appears prompting you for the driver path.
6. Enter the drive letter assigned to your CD-ROM drive (for example, D:). Then
use the Browse function to enter the rest of the path (\sparrow\sparrow.sys).
Click OK.
7. Turn off your computer. After a few seconds, turn it on again.
8. Install the rest of the EPSON Perfection 600 software, as described on page 13.
Page 17

INSTALL THE EPSON SCANNER DRIVER AND SOFTWARE APPLICATIONS
The Windows 95 and Windows NT 4.0 software are combined on one
CD-ROM. Windows 3.1 and Macintosh software are on separate CD-ROMs.
The application software bundled with your scanner varies depending on the
operating system. You can view the manuals that come with your software by
clicking the View Manuals button at the bottom of the installer screen.
Note:
Adobe Acrobat Reader must be installed before you can view a manual. Acrobat
Reader is bundled with your scanner software.
Before you begin, make sure your SCSI board and SCSI driver are installed, and
your scanner is attached to the computer and turned on. Also, check the CD
label to make sure you have the correct CD-ROM for your operating system.
If you’re running Windows 95 or Windows NT 4.0…
Follow these steps to install the software:
1. Start Windows and then insert the EPSON Perfection 600 CD-ROM for
Windows 95 and Windows NT into your drive. The installer screen
appears.
Windows 95
Note:
If the screen doesn’t appear, click Start and Run. At the prompt, type D:\setup. (if your
CD-ROM drive uses a different drive letter, use it instead); then click OK.
Windows NT
13
Page 18

2. If you’re using Windows 95, make sure the applications you want to
install are highlighted. Click to deselect a program if you don’t want to
install it (the red box turns gray).
Click the Install button to install the selected software.
If you’re using Windows NT, click the button for the software you want
to install. After each installation, your system returns to the installer
screen.
You must install the EPSON Perfection 600 scanner driver before you use
your scanner.
Note:
◗ You can skip the installation of a selected program at any time by clicking the
Skip button at the bottom of the installer window.
◗ If you’re running Windows 95, the EPSON Copy and Scanner Test utilities are
automatically loaded onto your hard drive. To run these utilities, click Start
and point to Programs. Choose Perfection 600_32, then click either
EPSON Copy Utility or Scanner Test.
◗ The Windows NT version of Perfection 600 does not include the Copy and
Scanner Test utilities.
14
After installing your software, you will be prompted to restart your system.
Page 19

If you’re running Windows 3.1…
Follow these steps to install your scanner driver and application software.
Make sure you’ve already installed EZ-SCSI Lite, as described on page 12.
1. Start Windows and then insert the EPSON Perfection 600 CD-ROM for
Windows 3.1 in your CD-ROM drive.
2. From the File menu, select Run. Then type D:\setup (if your CD-ROM
drive uses a different drive letter, use it instead) and click OK. The scanner
driver launches, and you see the installer screen.
3. Click Install to install your scanner driver, then follow the instructions on
the screen.
If you’re performing a complete installation, finish installing your scanner
driver before you install any applications. Once the driver installs, you’ll be
prompted to restart Windows.
4. After Windows restarts, start the installation program again (repeat step 2).
5. From the installer screen, click the titles of the applications you want to
install, then click Install. The selected programs install, one after another.
Note:
◗ You can skip the installation of a selected program at any time by clicking the
Skip button at the bottom of the installer window.
◗ The EPSON Copy and Scanner Test utilities are automatically loaded onto your
hard drive. To run these utilities, open the Perfection 600 program group and
double-click the Copy Utility or Scanner Test icon.
◗ You will need to enter a serial number when you install Adobe PhotoDeluxe; this
number is printed on the CD envelope that came with your scanner.
After installing your software, you will be prompted to restart your system.
15
Page 20

If you’re using a Macintosh…
Follow these steps to install your scanner driver and software applications:
1. Insert the EPSON Perfection 600 CD-ROM for Macintosh® into your
CD-ROM drive. Then double-click the EPSON Perfection 600 Installer
icon. The installer screen appears.
2. Make sure the applications you want to install are highlighted. Click to
deselect a program if you don’t want to install it (the red box turns gray).
3. Click the Install button and follow the instructions on the screen. The
scanner driver software is copied to the EPSON Perfection 600 folder on
your hard drive. (You can skip the installation of a selected program at any
time by clicking the Skip button at the bottom of the installer window.)
4. When installation is complete, restart your computer.
5. If you need to install Acrobat Reader, restart the EPSON Perfection 600
installation program. Click View Manuals to go to the View Manuals screen,
then click Install Acrobat Reader.
After installing your software, you will need to copy the Perfection600 scanner
driver plug-in folder to the appropriate plug-ins folder for your host application.
(To copy, hold down the Option key while dragging the driver plug-in.) See the
documentation for your application for details.
16
Note:
◗ The Copy utility is copied to the EPSON Copy Utility folder on your hard drive.
◗ You will need to enter a serial number when you install Adobe PhotoDeluxe; this
number is printed on the CD envelope that came with your scanner.
◗ The first time you launch Visioneer PaperPort, you will need to enter the serial
number; this number is printed on the CD envelope that came with your scanner.
◗ Visioneer PaperPort does not require that you copy the Perfection600 scanner
driver plug-in to its plug-ins folder.
Page 21

POWER-ON SEQUENCE
Always turn your scanner on before you turn on your computer.
Otherwise, your scanner driver may not recognize your EPSON
scanner.
Note:
The ready light on the front of the scanner
blinks as the scanner head initializes.
If your driver fails to
recognize the scanner,
you won’t see the
EPSON Perfection 600
driver when you try to
select a scanning data source from
your host application. In addition, an error message may appear. If
this happens, turn off your scanner and then turn it back on. Then
restart the computer.
ready light
power
switch
TEST THE CONNECTION
Now you’re ready to test the connection between your scanner and
computer.
Follow these steps:
1. Start the Scanner Test.
For Windows 95, click Start and point to Programs,
Perfection 600_32, then click Scanner Test.
For Windows 3.1, open Program Manager, then double-click the
Scanner Test icon in the EPSON Perfection 600 program group.
Note:
The Windows NT and Macintosh versions of EPSON Perfection 600 do
not have a Scanner Test utility.
17
Page 22

2. Click the Test button. The Test Scan dialog box appears.
Note:
The default scan method is Reflective. If you have an optional
transparency unit attached to the scanner, you can test its
operation.
3. Click the Scan button.
When the test is complete, you’ll either see a message saying the
scan was successful, or you’ll see an error message. If you see an
error message, go to “Problems? Need Help?” on page 39.
INSTALL THE OPTIONAL TRANSPARENCY UNIT
Caution:
Before you begin, make sure the scanner is turned off and the
scanner’s power cord is disconnected.
1. If you haven’t already removed the document cover from the
scanner, do so now.
Follow the instructions
on page 9.
unlocked
slider
18
2. Make sure the optical
assembly on the
transparency unit is
unlocked. (Push down to
move the slider to the
unlock symbol.) The
optical assembly should be
in the home position.
home position
locked
Page 23

3. Insert the hinge brackets on the transparency
unit into the slots at the back of the scanner.
4. Insert the end of the cable attached to the
transparency unit into the OPTION
connector on the back of the scanner.
5. Locate the power adapter that came with the
transparency unit. Carefully insert the power
adapter plug into the back of the transparency
unit.
6. Connect the power cord to the power
adapter, and then plug the other end of
the power cord into a wall outlet.
OPTION connector
If you haven’t connected the scanner to your
computer, continue with “Connect the
Scanner to Your Computer” on page 10.
power adapter
plug
power adapter
19
Page 24

20
Page 25

SCANNER BASICS
This section shows you how to get started with your
EPSON Perfection 600—how to perform your first
scan, and how to use Acrobat Reader to read your
online manuals when you need more information.
You’ll also find basic maintenance procedures.
Before you can scan an image, you must install the
EPSON Perfection 600 driver. See “Install the
EPSON Scanner Driver and Software Applications”
on page 13 for instructions.
Note:
The illustrations in this section show screens and
controls for the EPSON Perfection 600 scanner driver by
LaserSoft. If you’re running Windows 3.1, your screens
and controls will differ slightly. See your online
Perfection 600 Driver User’s Guide
for details.
EPSON
21
Page 26

PERFORM YOUR FIRST SCAN
Now you’re ready to scan. First, choose an image. When selecting an
image or text to scan, respect the rights of the copyright holders.
Note:
For more detailed scanning instructions, see your online
Perfection 600 Driver User’s Guide
.
Placing Your Original Document
1. Raise the scanner cover and place the document face
down on the document table. If you’re scanning a
transparency, the optional transparency unit should be
installed.
2. Position the document so the horizontal and vertical
edges are carefully aligned with the scales
on the top and left-hand side of the
document table.
3. Close the document cover
slowly. Be careful not to move
the document.
EPSON
22
Beginning Your Scan
Scans are always performed from within a host
application (the application into which you plan to import the
scanned image or document). You have to start this application
before you can access your scanner software.
If you’re running Windows, your scanner software is compatible with
most TWAIN-compliant programs. If you’re using a Macintosh,
your software is compatible with applications that support plug-in
modules.
Page 27

1. Start the host application (for
example, Visioneer PaperPort).
2. Select your scanner software.
(Unless you change your source, you
only need to do this step once.)
For example, from PaperPort choose
Select Source from the File menu.
Highlight Perfection 600 (32 Bit)
from the Select Source list and click
Select.
If you’re running Windows 3.1,
select EPSON Perfection 600 as
your source.
If you have a Macintosh, choose Select Source from PaperPort’s File menu.
Make sure the Perfection600 icon is highlighted, then click OK. Only use
this icon with PaperPort.
Note:
If you’re running any application but PaperPort on your Macintosh, choose Acquire
from the host application’s File menu, then select Perfection600 from the cascading
menu. If you don’t see Perfection600 in the
menu, make sure you copied the
Perfection600 plug-in module from the
EPSON Perfection 600 folder to the plug-ins
folder for your application. (You don’t need
to copy this module to PaperPort’s Plug-ins
folder.) The scanner software automatically
opens, so you can skip step 3.
3. Open the scanner software.
For example, choose Acquire from
PaperPort’s File menu, or click the
Scan button on the PaperPort
toolbar.
The EPSON Perfection 600 main
window appears.
23
Page 28

Completing Your Scan
1. Make the appropriate selections for your scan.
Here are some recommended settings for different types of scans.
IMAGE TYPE RESOLUTION RECOMMENDED
TOOLS
Color Photo 240 dpi Sharpen
Magazine\Printed Image 240 dpi Descreen
OCR 300 dpi
Line Art 600 dpi
Blurry Image 240 dpi Sharpen
If you’re scanning a
transparency, be sure to
select Transparency in
the Original drop-down
list box. (In the
Windows 3.1 driver,
this option is called
Transparentive.) You
must install the optional
transparency unit first.
24
2. Click the Prescan
button to preview your
scan.
You see a preview of
your scan in the
Prescan area to the right.
Page 29

3. Make any changes you want to adjust the image, then click the
Scan button. See your online driver manual for more information.
The ready light on the front of the scanner blinks for several
seconds while it’s scanning. In a few moments, the scanned image
is imported into your host application’s window. (You may have to
close the Perfection 600 main window to get it out of the way.)
If the ready light continues to blink, it may indicate an error
condition. See “Problems? Need Help?” on page 39 for more
information.
Note:
◗ Don’t leave photographs on the document table for long periods of
time; they may stick to the glass.
◗ Don’t leave transparencies on the document table for long periods;
the warmth of the scanner may cause them to deteriorate.
25
Page 30

POWER SCANNING—NEW TOOLS THAT GIVE YOU GREAT RESULTS
Your EPSON Perfection 600 has some extra tools that aren’t available to any
other scanner in its price range. (Some of these tools, like batch scanning and
image rotation, aren’t available on the Windows 3.1 driver.)
Flip horizontally
Flip vertically
Rotate 90°
26
For example, a powerful
batch scanning function
lets you scan multiple
images at the same time
with a single click of the
mouse. You can scan
different types of images,
use different settings for
each scan, import your
scans directly into your
host application, or save
your scans automatically
to your hard disk.
Note:
Batch Mode scanning is not
available with Adobe
PhotoDeluxe; however, you
can still scan multiple images
using the Batch Mode Tiff
option.
AutoExposure
AutoExposure, a
sophisticated image
adjustment tool,
automatically adjusts your
image for the best contrast
possible while removing
any color cast (distinctive
overall color) that the
image might have.
Toggle between pixel zoom
and orientation view
You can rotate images in
90° increments before you
scan, eliminating the need
to rotate an image later in
your graphics application.
You can also flip the image
horizontally or vertically.
(Use the toggle tool to see
your image in the
orientation view window.)
tools that give
great
Page 31

Zoom tool
Powerful descreening and
sharpening filters give you
the kind of results you’d
expect from a much more
expensive scanner.
Note:
These functions are not
available if you choose Line
Art as the scan type.
Gradation curves
Your scanner’s zoom tool also beats the
competition. Instead of simply enlarging the
pixels on an existing preview image, it creates a
new preview that captures more detail.
Special slider controls
in the Gradation
Curves dialog box let
you make exact
adjustments to your
image’s tone curves
(highlight, shadow,
and midtone) quickly
and easily.
results
27
Page 32

IF YOU’RE SCANNING SOMETHING THAT DOESN’T FIT UNDER THE DOCUMENT COVER
You can remove the document cover. To do this,
simply lift the back of the document cover
straight up.
When scanning with the cover
removed, make sure you cover any
exposed areas of the document table
to prevent interference from external
light.
Reattach the document cover as
shown. Be sure to hold the cover in
a vertical position as you push its
attachments into place.
ONLINE USER’S GUIDE
You always have easy access to your
online EPSON Perfection 600
Driver User’s Guide—just go to the
installer screen on your EPSON
Perfection 600 CD-ROM and click
the View Manuals button. You
access the online guides for
Visioneer PaperPort, Adobe
PhotoDeluxe, and Adobe PageMill
the same way.
28
Note:
◗ You must install Adobe Acrobat Reader before you can read the online
manuals. You can install it from the View Manuals screen in your scanner
driver installation program.
◗ Windows 3.1 does not support Adobe PageMill. Also, Visioneer PaperPort for
Windows 3.1 does not provide an online manual.
Page 33

Using Adobe Acrobat Reader
Here are some quick guidelines for using Acrobat Reader. If you need
more information, see your Acrobat Reader online guide.
When you open an online guide, you’ll see this toolbar at the top of
your screen.
Previous Page
First Page
Select Text
Zoom In
Move
Show Thumbnails and Page
Show Bookmarks and Page
Show Page Only
With Acrobat Reader, you
have several ways to
navigate through text.
You can click on hot topics,
which are usually
underlined or displayed in
a different color. To find
out if a topic is hot, move
your cursor over it. If the
cursor turns into a pointing
hand, the topic is hot—you
can jump to it by clicking
once.
Next Page
Last Page
Go Back
Go Forward
Actual Size
Fit Page
Fit Width
Find
29
Page 34

You can also use the bookmark section on the
left side of the screen to move quickly to the
topic of your choice. You have to click the
Show Bookmarks icon on the toolbar to see
the bookmark section.
Not every manual has a bookmark section.
Some manuals only have a table of contents,
although you can also use this to navigate the
manual if the topics are hot.
Finally, you can use the arrow buttons in the
toolbar or the vertical scroll bar on the right
side of the document to move through a
manual. (The box to the left of the scroll bar
displays the current page number.)
USING THE COPY UTILITY
Show Bookmarks
The EPSON Copy utility turns your scanner and printer into a photocopier. Follow
these steps to use the utility:
1. Start the Copy utility. (See page 14 or 15 for details.)
keypad
2. Place your original on the document
table of your scanner.
3. Choose the type of original image you
want to scan. For example, click B/W if
you are copying a black and white text
document.
4. Use the online keypad to select the
number of copies. You can use other
controls to resize the image, adjust the
brightness, or select the image quality.
copy button
5. Click the Printer Setup button to make sure your printer is set up properly.
6. Click the copy button.
Note:
◗ The Windows NT version of EPSON Perfection 600 does not have a Copy utility.
30
◗ The Copy utility does not support the optional transparency unit.
Page 35

TRANSPORTING THE SCANNER
When you transport the scanner a long
distance or store it for an extended period,
follow the steps below to secure the
carriage.
1. Turn on the scanner and wait until
the carriage moves to the home
position. Then turn off the scanner.
2. Remove the document cover.
3. Turn the carriage lock to the locked
position (toward the document table).
home position
MAINTENANCE
To keep your scanner operating at its best, you should clean it periodically.
Before cleaning, unplug the power cord.
Use a soft cloth to clean the outer case with mild detergent dissolved in water.
If the glass of the document table gets dirty, clean it with a soft, dry cloth. If the
glass is stained with grease or other hard-to-remove material, use a small amount
of glass cleaner on a soft cloth to remove it. Wipe off any remaining liquid with
a dry cloth.
Be sure there’s no dust on your document table. Dust can cause white spots to
appear in your scanned image.
Caution:
◗ Never use a harsh or abrasive brush or cleaning product to clean the document
table. A damaged glass surface can decrease the scanning quality.
◗ Never use alcohol, thinner, or corrosive solvent to clean the scanner. These
chemicals can damage the scanner components as well as the case.
◗ Be careful not to spill liquid into the scanner mechanism or electronic
components. This could permanently damage them.
◗ Don’t spray lubricants inside the scanner.
◗ Never open the scanner case. If you think repairs or adjustments are necessary,
consult your dealer or contact EPSON.
31
Page 36

32
Page 37

PUTTING IT ALL TOGETHER
Your EPSON Perfection 600 software lets you do
great things with your scanner. This section gives
you some ideas.
For complete information about how to use a host
application, see that application’s online help or
user’s guide.
33
Page 38

YOU WANT TO EDIT A PRINTED DOCUMENT AND DISTRIBUTE IT ELECTRONICALLY
You have a page of text from a printed report that you want to
distribute to several colleagues, but first you’d like to make a few
changes to it. With your EPSON Perfection 600 scanner, you can
create an OCR (Optical Character Recognition) image of the page
that you can edit, then e-mail or fax electronically.
1. Start PaperPort.
If you’re running Windows 95 or Windows NT, click
Start and point to Programs. Then point to PaperPort
and click the PaperPort icon.
If you’re running Windows 3.1, open the PaperPort program
window and double-click the PaperPort icon.
If you have a Macintosh, open the PaperPort folder and
double-click the PaperPort icon.
2. Raise the document cover and place the document face down
on the document table. Close the document cover.
3. If you haven’t already selected your scanner, choose Select Source
from the File menu. Then select Perfection 600 (32 Bit)
and click Select.
34
Note:
If you’re running Windows 3.1, select EPSON Perfection 600. If you have a
Macintosh, choose Select Source from the File menu. Make sure the
Perfection600 icon is highlighted, then click OK.
4. Click the Scan button, or choose Acquire from the File menu to
open the scanner driver.
The EPSON Perfection 600 main window appears.
5. Choose 1 bit Line Art (OCR) as your Scan Type, and set the
resolution to 300 dpi.
Note:
◗ If you’re running Windows 3.1, select OCR as your Image Type.
◗ Your OCR option doesn’t support scanning resolutions greater
than 600 dpi.
Page 39

6. Click the Prescan button to show a
preview of your scan in the Prescan area.
Adjust the frame to select a portion of
the document to scan, or enlarge the
frame to fit the entire page.
Note:
With Windows 3.1, click the Preview
button.
frame
7. Click the Scan button. After scanning
the image, close the EPSON Perfection
600 main window.
Note:
If you have a Macintosh, the driver window
closes automatically.
The scanned image appears on PaperPort’s desktop. Although it looks
like text, you can’t edit it because it is still an image.
If you don’t want to edit the page, you can fax or e-mail it at this point.
Just drag the scanned image onto the icon for your fax or e-mail
application on PaperPort’s link bar. If you’re sending it now, skip steps
8 through 10. Otherwise, continue with step 8.
8. Drag the scanned image onto your word processing icon on PaperPort’s
link bar.
This step converts the image to text. You’ll briefly see the TextBridge
dialog box while conversion is underway.
When conversion is complete, your word processing application opens,
and the document is displayed.
9. Edit the document, then select Save As from the File menu to name
and save it to your hard disk.
10. Open your fax or e-mail application. Follow your application’s
instructions to send the document.
35
Page 40

YOU WANT TO PUT SCANNED IMAGES ON YOUR COMPANY’S WEB SITE
You’d like to enhance your company’s Web site with some photographs
of your product line. Now you can get those great photographs in your
marketing brochures onto your Web site for everyone to see.
1. Set up a directory structure for your Web site on your hard disk. See
PageMill’s online manual for information. (PageMill is not available
for Windows 3.1 users.)
2. Open a TWAIN-compliant application, such as PaperPort or
PhotoDeluxe. (PageMill won’t work, since it’s not TWAIN-compliant.)
3. Follow the instructions under “Perform Your First Scan” on page 22 to
scan the first photograph.
If you have several photographs or multiple images on a single page, you can
scan them all at once using your scanner’s batch scanning feature. Place the
originals on the scanner’s document table. Select Batch Mode in your scanner
software, prescan your image, then highlight each image to be scanned with the
selection tool. You can select different scanner settings for each image, if
necessary. Click Scan Batch to automatically scan your images. This feature
works only with programs that allow you to open multiple windows, such as
PaperPort. (Batch scanning is not available with the Windows 3.1 scanner
driver.)
36
4. Choose Export or Save As from your application’s File menu to export
your image as a BMP or PICT file to a folder on your hard disk. (You
may want to put all your image files in a single folder within your Web
site’s local root folder.) See PageMill’s online manual for information
on image file formats and how they affect links to your Web page.
5. When you’re ready to create your first Web page, follow the
instructions in PageMill’s online manual to add your scanned images
to the page.
6. Continue to create new pages until you’ve completed your Web site.
When you’re ready, add links to your pages, then upload your pages to
the Web server.
You can even use your scanned images as hot spots to link the pages on your
Web site.
Page 41

YOU WANT TO CREATE A GALLERY OF “ANTIQUE” PHOTOGRAPHS
You can use Adobe PhotoDeluxe to turn photographs you snapped yesterday
into instant antiques.
1. Start PhotoDeluxe.
2. Place your photograph face-down on the scanner’s document table.
3. Select your scanner software.
From PhotoDeluxe 2.0, click Get Photo and choose the Get Photo tab.
Click the bottom half of the Scanners button and select Perfection 600
(32 Bit)
From PhotoDeluxe 1.1, choose Acquire from the File menu, then choose
Select TWAIN Source. Highlight EPSON Perfection 600 and click
Select.
Note:
◗ If you have a Macintosh, choose Acquire from the File menu, then choose
4. Open the scanner software. (If you have a Macintosh, skip this step.)
From PhotoDeluxe 2.0, click the top half of
the Scanners button from the Get Photo tab.
as your input source.
Perfection600.
From PhotoDeluxe 1.1, choose Acquire from
the File menu, then choose TWAIN.
You see the EPSON Perfection 600 main
window.
5. Follow the instructions under “Completing
Your Scan” on page 24 to scan the
photograph.
When you’ve finished scanning, your photo is
automatically loaded into PhotoDeluxe.
6. Follow the instructions in your PhotoDeluxe
online user’s guide for adding old-fashioned
special effects to your photographs.
37
Page 42

38
Page 43

PROBLEMS? NEED HELP?
If you’re having problems, this section answers
some of the most common questions.
39
Page 44

IF YOU CAN’T OPEN THE SCANNER DRIVER…
Check the cable connecting the scanner to the
computer.
Make sure the scanner is correctly connected to the
computer. Also, make sure the scanner’s ready light
is on. The scanner must be turned on before you
start your computer. If necessary, turn on your
scanner and restart your computer.
Check your SCSI board installation (PC only).
Make sure that the SCSI interface board is installed
correctly in your computer. See page 8 for details.
40
THE READY LIGHT
DOESN
Check the scanner power
cord.
Make sure the power cord
is securely plugged into
the scanner and the power
outlet, and that the
scanner is turned on.
Also, check that the
power outlet is working.
If you’re using the
optional transparency
unit, make sure the power
adapter is installed
correctly.
’T COME ON…
Check that your system recognizes your scanner and
SCSI board (PC only).
Check System Device Manager in the Windows
Control Panel, or the Adaptec SCSI Interrogator if
you’re running Windows 3.1. For Windows NT 4.0,
check the SCSI Adapters dialog in the Windows
Control Panel. If your system isn’t recognizing either
the SCSI board or the scanner, go to page 41.
Check for conflicts in your SCSI ID setting, I/O
address, the interrupt setting for your SCSI board,
and other settings.
For information about the SCSI ID setting, see
page 10. For information about choosing other
settings, see your computer manual.
Page 45

IF YOUR SYSTEM DOESN’T RECOGNIZE THE SCANNER OR
SCSI BOARD (PC ONLY)…
THE
Check the plug-and-play option
If you’re running Windows 95, plug-and-play should be active.
If you’re running Windows NT, plug-and-play should be disabled.
(You can disable ISA plug-and-play from the Advanced
Configuration Options menu in SCSISelect.)
If you’re running Windows 3.1, run SCSISelect to disable
plug-and-play.
Have you installed another SCSI device, such as a ZIP drive,
after installing the scanner? (Windows 95 only)
If so, your device installation may have overwritten the
SCSI driver (sparrow.mpd) with an older version of the driver.
Copy sparrow.mpd from the Sparrow directory on your
EPSON CD-ROM to the \windows\system\iosubsys
subdirectory on your hard drive.
Run the Add New Hardware wizard (Windows 95)
Follow the instructions on the screen. (It’s best to accept the
default settings.) When you’re done, restart your computer.
Run SCSISelect
Your scanner comes with the 1505SELECT diskette, which
contains SCSISelect, a special SCSI configuration utility for
Windows 3.1, Windows 95, and Windows NT. Insert this diskette
in your diskette drive and restart your computer, then follow the
instructions on your screen.
If SCSISelect hangs or you get an error message, you have a
hardware problem. Make sure your SCSI board is installed
correctly. If the SCSI board is found, but not the scanner, you
need to install a SCSI terminator. Also, check the SCSI cable
connection and make sure the scanner is turned on. After
checking your hardware, run SCSISelect again.
If you continue to have problems, your SCSI board may be
defective.
IF THE SCANNER
DOESN
YOUR
Check your image
source setting.
Make sure you
selected the
Perfection 600 as
your source. See
page 23 for details.
Make sure that the
SCSI terminator is
set up correctly.
See page 10 for
details.
Run the scanner
test (Windows 95
and 3.1 only).
Run the scanner
test to make sure
the scanner is
communicating
with your
computer. (See
“Test the
Connection” on
page 17.) If the test
fails, check the
items under “If You
Can’t Open the
Scanner Driver...”
’T SCAN
IMAGE…
41
Page 46

IF THE SCANNER
SOFTWARE
WORK
Check your system
requirements.
Check that the system
requirements, such as the
operating system version,
are correct for your
software.
Check your computer’s
memory.
See if the computer has
enough memory for your
software. If you’re running
other software at the same
time, using RAM resident
programs, or have many
device drivers, the computer
may not have enough
memory. (See your software
and computer manuals.)
DOESN’T
PROPERLY…
IF THE FILE SIZE IS
BIG…
TOO
Adjust your scan settings.
Try setting a lower
resolution (dpi), or scan
only part of the image.
IF YOUR SCANNED
IMAGE
DISTORTED
Check the position and
condition of your
document.
Make sure the document
is placed flat against the
scanner’s document table
(the glass area). If only
part of the image is
blurred, part of your
document may be
wrinkled or warped.
IS BLURRED OR
…
42
Check your software
installation.
Make sure that your
software is correctly installed
or set up. If all else fails,
uninstall your software, then
reinstall it.
problems
with
Page 47

IF YOUR SCANNED
IMAGE
HAS
Check the brightness.
IS FAINT OR
GAPS…
Decrease the software or
driver’s brightness setting.
Check the condition of
your original.
If the document is
damaged, dirty, or
wrinkled, these
imperfections will show
up in your scan.
IF THE EDGES OF THE
DOCUMENT
SCANNED
Check the position of your
source document.
Adjust your document’s
position so that the image
is within the glass area.
scanning?
ARE NOT
…
IF YOUR IMAGE SCANS
AN ANGLE…
AT
Check the position of
your source document.
It may be placed at an
angle on the document
table. Align it so the
horizontal and vertical
edges are carefully
aligned with the scales
on the top and side of
the document table.
43
Page 48

44
Page 49

SPECIFICATIONS
45
Page 50

SCANNER SPECIFICATIONS
Scanner type: Flatbed, color/monochrome
Photoelectric device: Color CCD line sensor
Maximum document size: 8.5 inches by 14 inches (216 mm by 356 mm)
US legal size
Optical scanning resolution: 600 dpi (main scan); 1200 dpi (subscan)
Output resolution: 25 to 2400 dpi interpolated (Win 95/NT/Mac)
1 to 4800 dpi interpolated (Win 3.1 only)
Color separation: Trilinear color CCD element
Interface: SCSI II
Light source: Cold cathode fluorescent lamp
Data input/output: Color:
30 bits internal
24 bits external
Grayscale:
10 bits internal
8 bits external
46
Brightness:* -100 to 100
Contrast:* -100 to 100
Color correction: N/A
Lamp: Warm up time: 30 seconds at 77° F
Auto switch off: 30 minutes
Dimensions: Width: 12.7 inches (322 mm)
Depth: 21.7 inches (550 mm)
Height: 5.1 inches (129 mm)
Weight: About 11.5 lb (5.2 kg)
* Processed by driver software
Page 51

ELECTRICAL SPECIFICATIONS
Power supply: Main unit:
internal universal power supply
(switching type)
Transparency unit:
universal AC adapter power supply
Rated voltage: AC 100 V
AC 240 V
Input voltage range: AC 90 to 132 V (at 100 V)
AC 198 to 264 V (at 240 V)
Rated current: Main unit: 0.5 A at AC connector
Transparency unit: 0.33 A at AC connector
Rated frequency: 50 to 60 Hz
Rated frequency range: 48 to 52 Hz (at 100 V)
58 to 62 Hz (at 240 V)
Power consumption: Operation:
maximum 17.5 W (main unit)
maximum 13 W (transparency unit)
Standby:
maximum 11.5 W (main unit)
maximum 9.5 W (transparency unit)
Insulation resistance: 10 MΩ between AC power
line and chassis at 500 VDC
47
Page 52

ENVIRONMENTAL CONDITIONS
Temperature: Operation:
41° F to 95° F
(5° C to 35° C)
Storage:
-13° F to 140° F
(-25° C to 60° C)
Humidity: Operation:
10% to 80%,
without condensation
Storage:
10% to 85%,
without condensation
Operating conditions: Ordinary office or home conditions.
Avoid extremely dusty conditions, direct
sunlight, and strong light sources.
48
Page 53

SCSI SPECIFICATIONS
Interface type: ANSI X3T9.2/375D revision 10L standard
Functions: The following functions are included:
BUS FREE phase
ARBITRATION phase
SELECTION/RESELECTION phase
COMMAND phase
DATA phase
Data in phase
Data out phase
STATUS phase
MESSAGE phase
MESSAGE IN phase
MESSAGE OUT phase
Electrical standard: As per ANSI X3T9.2/375D revision 10L
SCSI ID setting: Selectable from 0 to 7 with the rotary switch.
(Do not select 8 or 9.)
Default setting is 5.
Connector type: Two 25-pin D-SUB connectors
Terminator type: External 25-pin D-SUB passive terminator
49
Page 54

SCSI connector pin
assignments:
Signal I/O Pin No. Description
REQ O 1 Request
MSG O 2 Message
I/O O 3 Input/Output
RST I 4 Reset
ACK I 5 Acknowledge
BSY I/O 6 Busy
GND — 7 Ground
DB0 I/O 8 Data Bus 0
GND — 9 Ground
DB3 I/O 10 Data Bus 3
DB5 I/O 11 Data Bus 5
DB6 I/O 12 Data Bus 6
50
DB7 I/O 13 Data Bus 7
GND — 14 Ground
C/D O 15 Command/Data
GND — 16 Ground
ATN I 17 Attention
GND — 18 Ground
SEL I/O 19 Select
DBP I/O 20 Data Bus P
DB1 I/O 21 Data Bus 1
DB2 I/O 22 Data Bus 2
DB4 I/O 23 Data Bus 4
GND — 24 Ground
TERMPWR — 25 Terminator Power
Page 55

INDEX
A Adobe Acrobat Reader, see Acrobat Reader
Adobe PageMill, see PageMill
Adobe PhotoDeluxe, see PhotoDeluxe
Acrobat Reader
description, 2
using, 29 to 30
AutoExposure button, 26
B Batch scanning, 26, 36
C Connecting the scanner to the computer, 10
Copy utility
starting, 14, 15, 16
using, 30
Cover, removing, 9
D Data input, 46
Dimensions, 46
E EarthLink Network TotalAccess, description, 2
Electrical specifications, 47
Electronic support services, 4
Environmental conditions, 48
G Guides, reading online, 28 to 30
H Help, 4 to 5
I Installing
scanner driver and software
applications, 13 to 16
SCSI board, 8 to 9
SCSI software, 11 to 12
SCSI terminator, 10
transparency unit, 18 to 19
Internet support services, 4
M Macintosh, installing software, 16
Maintenance, 31
Moving the scanner, 31
O OCR
recommended resolution, 24
creating an OCR image, 34 to 35
Parts, purchasing, 5
PhotoDeluxe
description, 1
using with the Perfection 600, 37
Power supply, 47
Power-on sequence, 17
Problems, 40 to 43
R Removing the document cover, 28
Resolution
recommended, 24
output resolution, 46
S Safety, 3
Scanner test
problems, 41
starting, 14, 15
Scanning
performing a scan, 22 to 25
problems, 40 to 43
recommended settings, 24
rotating images, 26
SCSI
connector pin assignments, 50
installing the board, 8 to 9
installing the SCSI software, 11 to 12
installing the terminator, 10
problems, 40 to 41
SCSISelect, 11
setting the SCSI ID, 10
specifications, 49
Support services, 4 to 5
T Temperature, 48
Terminator, installing, 10
TotalAccess, description, 2
Transparency unit
installing, 18 to 19
scanning a transparency, 24
removing the document cover, 9
Transporting the scanner, 31
Troubleshooting, 40 to 43
U Unlocking the scanner, 9
P PageMill
description, 2
using scanned images on Web pages, 36
PaperPort
description, 1
scanning and editing text, 34 to 35
W Web, putting images on, 36
Z Zoom tool, 27
55
51
Page 56

 Loading...