

Page 1
Start Here
Type: MT500G II
Model: M-S751
© 2014 Seiko Epson Corporation
All rights reserved.
Printed in Japan, 12/14
Read these instructions before using your product.
This information is subject to change without notice.
Introduction
This product analyzes golf swings based on extensive measurements and scientic
analysis. The analysis results, which can be easily checked on your mobile device,
are useful in helping you improve your game.
The following mobile devices are supported:
• iPhone 5, iPhone 5s, iPhone 5c, iPhone 6, iPhone 6 Plus, iPod touch (5th
generation) with iOS 7 or later
• Mobile device running Android™ 4.0 or later with Bluetooth SPP
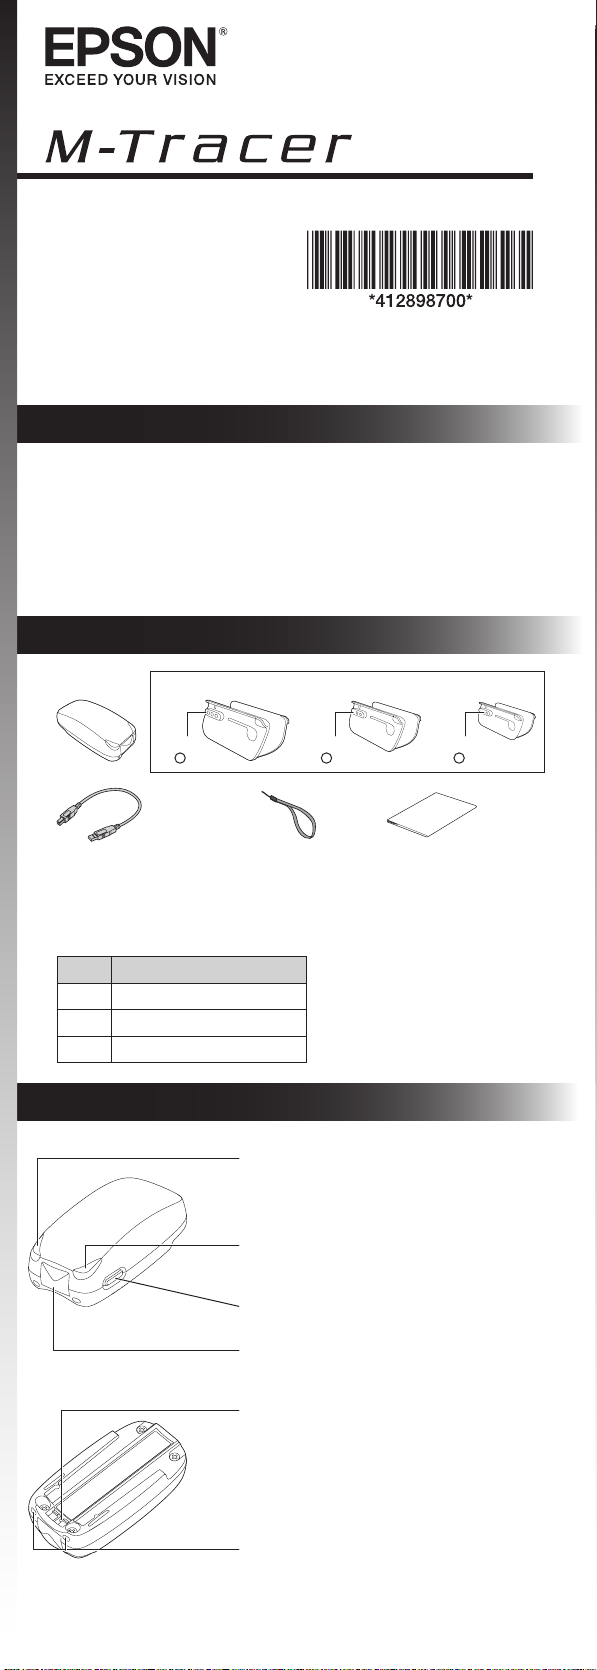
What’s in the Box
M-Tracer
L size
(3 marks)
Micro USB
charging cable
The supplied micro USB cable is designed specically for this product. Only use it
to charge this product.
The strap comes attached to the M-Tracer.
Attachment Sizes:
Size Grip circumference
L 2.44~2.71 in. (62~69 mm)
M 2.28~2.40 in. (58~61 mm)
S 2.12~2.24 in. (54~57 mm)
Attachment
M size
(2 marks)
Strap Warranty
S size
(1 mark)
1. Part Names and Functions
Top View
Bottom View
Status LED (blue and red)
The lamp ashes to indicate the status of the product.
For more details, see the in-app help.
Charging LED (orange)
On: Charging
O: Charging complete
Power button
Turns the power on/o
Micro USB charging port and cover
Open the cover to charge the device.
Reset button
Strap hole
Page 2

Meaning of Status LEDs
Status Display
Turning on The blue LED turns on for one second and ashes
Communicating The blue LED ashes twice every two seconds.
Turning o The blue LED turns on and then turns o.
No battery power The red LED ashes once every 5 seconds.
Pairing mode The blue and red LED ash alternately.
Error The red LED ashes once a second.
Hardware error The red LED turns on for ve seconds and then
Please refer to the in-app help for additional information about the LED display.
once every two seconds.
When turning on, the blue LED is on for one second,
then the red LED ashes once.
turns o for half a second repeatedly.
2. Charging the Battery
Before using your product for the rst time, make sure the battery is fully charged. To charge
the product, insert the USB plug into a power source.
You can use:
• Optional USB AC adapter (part number: E12E204001)
• Computer (using a USB port)
Turn o the product before charging.
Micro charging USB cable
(AC adapter not included)
The orange LED turns on when the product is charging and off when charging is
complete.
NOTE
• Stop charging the product even when charging is not nished after 3 hours.
• The battery may not charge correctly if you are using a charger other than the specied
AC adapter.
• Charging may not nish if your computer is in Sleep or Stand-by mode.
• Connect the micro USB charging cable directly to your computer, not to a USB hub.
3.
Connecting to a Mobile Device
To use this product, you need to pair it to a mobile device using a Bluetooth
connection.
1 Place the product within 3 feet (1 m) of the mobile device.
2 With the product turned off, hold down the power button for at least five
seconds to turn on the product and enter pairing mode.
When the product is in pairing mode, the status LED ashes blue and red
alternately.
3 Turn on Bluetooth on your mobile device.
Example: [Settings] - [Bluetooth] - [ON]
4 On your mobile device, tap “MT + last 5 digits of the serial number” in the list
of detected Bluetooth devices.
(Example: MT12345)
When pairing is complete:
iOS, the status LED ashes blue twice every two seconds.
Android, the status LED continues ashing blue and red alternately.
device displays “MT + last 5 digits of serial number” as a detected device.
NOTE
The serial number is printed on the sticker on the back of the product.
If you plan to use the product with different mobile devices, you’ll need to pair again.
Your mobile
Page 3
4. Installing the Application
To use this product, you rst need to install Epson M-Tracer For Golf app on your
mobile device.
1 Download the app from the App Store for iOS or Google Play for Android.
2 Tap .
The Epson M-Tracer For Golf app starts.
3 Follow the on-screen instructions to register an account.
NOTE
Epson Sensing ID allows you to use multiple services and functions provided by Epson
with one ID and password.
The user is responsible for any communication charges incurred when exchanging data using
your mobile device. For information on charges and other items, contact your carrier.
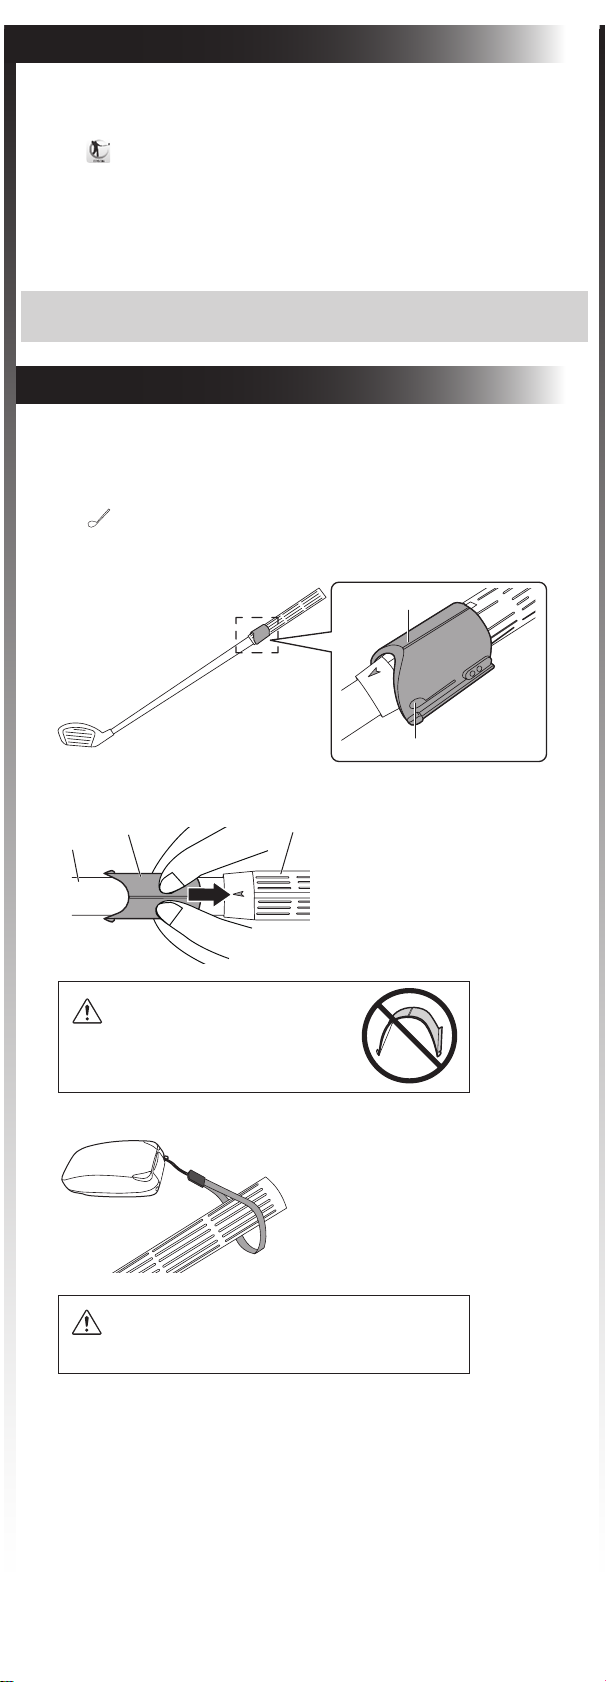
5. Mounting the Product
1 Place the attachment around the grip.
First try the medium size attachment. For a thinner grip like on Ladies or
Junior clubs, try the small size attachment. For a thicker grip, try the large size
attachment.
The on the attachment should be pointing the same direction as the golf
club. If the attachment is upside-down, the attachment will become loose and
y off the club.
Center
Golf club mark
Make sure the center of the attachment is aligned with the center of the golf
club.
Shaft
Attachment
Caution
Grip
Slide the attachment from the shaft
onto the grip of the golf club.
If the attachment is too tight, widen it
with your nger.
Do not widen the attachment too much,
otherwise the attachment will break. If the
attachment is loose, do not use the product.
2 Put the strap around the club shaft.
Caution
Always put the strap around the club shaft.
Page 4

3 Slide the product onto the attachment until it comes in contact with the
stoppers at the end.
Stopper
NOTE
• Do not push too hard when the attachment is tight on the grip of the golf club.
Try a thinner grip area or a larger attachment.
• If the attachment is too loose, try a thicker grip area or a smaller attachment.
4 Make sure the product is firmly attached to the grip.
Caution
The product should not move
when attached to the grip.
• Make sure the product is attached to the underside of the club.
• If the product is scratched while mounting, it should not aect its functioning.
Doesn’t move
back and forth
Doesn’t move
around
6. Using the Product
1 Hold down the power button on the product for at least two seconds to turn it
on.
The blue status LED ashes once every two seconds.
2 Connect the product to your mobile device using Bluetooth.
3 Tap on your mobile device.
While your mobile device and product are communicating, the blue LED
ashes.
4 Tap Measure to start.
The red status LED turns on.
If you need to choose the type of club or shot, tap Stop, then tap Setup.
To start measuring again, tap Start.
5 Address the ball.
When the product detects that you are standing still (this takes a few seconds),
the blue status LED turns on.
Target line
90°
Shaft
90°
Club face
6 Swing the club.
After detecting the impact of the swing, the blue LED ashes and the data is
transmitted to your mobile device. The product will not measure your swing if
the impact is not detected.
Repeat steps 5 and 6 to record multiple swings.
7 When you are finished swinging, tap Stop.
8 Go to the Analysis page:
Tap Analysis on iOS.
Tap Back on Android.
9 Push the power button on the product for 2 seconds to turn it off.
The product automatically turns off when your mobile device screen is left on
any screen other than the Measurement screen for over 10 minutes.
Page 5

10 Pinch the attachment, then slide the product off of the attachment.
11 Slide the attachment off of the grip.
Attachment
Shaft
• The swing measurement steps and the LED display may vary depending on the Epson
M-Tracer For Golf version.
Refer to the Help section of Epson M-Tracer For Golf for the latest information.
• When the red LED ashes once per second, follow the on-screen instructions in the app to
troubleshoot the issue.
• When the red LED is on for 5 seconds, then o for half a second, turn your product o then on.
• When the product operation is unstable, push the reset button.
To clean your product, wipe it with a soft, dry cloth. Do not use chemicals or
detergent.
Grip
7. Viewing the In-app Help
For details on using the app, see the in-app Help section:
1 Tap Menu at the top left of the Analysis screen.
2 Tap Help.
8. Specications
Communication method Bluetooth 2.1+EDR Class 2
Communication distance Approximately 30 feet (10 m) with no obstructions*
Operation time Approximately 4 hours*
Built-in battery Lithium polymer rechargeable battery
Charging method USB bus power (+5 V DC)
Charging time Approximately 2 hours*
Operating temperature range 32 to 104 °F (0 to 40 °C)*
Storage temperature range -4 to 113 °F (-20 to 45 °C)
External dimensions 2 in. D x 1 in. W x 0.6 in. H (50 mm D x 27 mm W x 16 mm H)
Weight Approximately 0.5 oz (15 g)
*1 The communication distance varies depending on the surrounding environment and the
performance of the Bluetooth device.
*2 The operation time conditions are in compliance with our measurement conditions.
*3 The charging time will increase or decrease in accordance with the usage conditions of the
charging battery. Charging may take about 3 hours from the fully discharged state.
*4 50 to 95 °F (10 to 35 °C) during charging (charge the battery at room temperature as much
as possible).
2
3
4
1
Certication Information
Contains Transmitter Module FCC ID: SQK-MBH7BTZXXC2
CAN ICES-3 (B) / NMB-3 (B)
Contains Transmitter Module IC: 337L-MBH7BTZXXC2
FCC /IC Notices
This transmitter must not be co-located or operated in conjunction with any other
antenna or transmitter.
CAUTION
Changes or modications not expressly approved by the party responsible for
compliance could void the user’s authority to operate the equipment.
This device complies with Part 15 of FCC Rules and Industry Canada
license-exempt RSS standard(s). Operation is subject to the following two
conditions: (1) this device may not cause interference, and (2) this device must
accept any interference, including interference that may cause undesired operation
of this device.
Page 6

This equipment complies with FCC/IC radiation exposure limits set forth for an
uncontrolled environment and meets the FCC radio frequency (RF) Exposure
Guidelines and RSS-102 of the IC radio frequency (RF) Exposure rules. This
equipment has very low levels of RF energy that are deemed to comply without
testing of specic absorption ratio (SAR).
Note: This equipment has been tested and found to comply with the limits for a
Class B digital device, pursuant to part 15 of the FCC Rules. These limits are
designed to provide reasonable protection against harmful interference in a
residential installation. This equipment generates, uses and can radiate radio
frequency energy and, if not installed and used in accordance with the instructions,
may cause harmful interference to radio communications. However, there is
no guarantee that interference will not occur in a particular installation. If this
equipment does cause harmful interference to radio or television reception, which
can be determined by turning the equipment off and on, the user is encouraged to
try to correct the interference by one or more of the following measures:
—Reorient or relocate the receiving antenna.
—Increase the separation between the equipment and receiver.
— Connect the equipment into an outlet on a circuit different from that to which the
receiver is connected.
—Consult the dealer or an experienced radio/TV technician for help.
Epson America, Inc.
3840 Kilroy Airport Way Long Beach, CA 90806 U.S.A
Tel: 562-290-5254
9. Where to Get Help
Internet support
Visit epson.com/support/mtracergolf (U.S.) or epson.ca/support/mtracergolf
(Canada) for solutions to common problems. You can get tips, usage information, FAQs,
or e-mail Epson.
Telephone support services
Call (562) 276-4394 (U.S.) or (905) 709-3839 (Canada).
Support hours are 6 am to 8 pm, Pacic Time, Monday through Friday, and 7 am
to 4 pm, Pacic Time, Saturday. Days and hours of support are subject to change
without notice. Toll or long distance charges may apply.
Using the Product Safely
Read this document to use this product safely. Failure to handle the product as
instructed may result in a malfunction or accident.
• Keep this guide to answer any questions you have about this product during use.
• This product is designed specically for use in North America. If this product
is to be taken and used outside of North America, check the relevant laws and
regulations of the corresponding country/region.
Meaning of Symbols
The following symbols are used to warn of operations and handling that may be
dangerous. Understand these symbols before reading this guide.
Warning
Caution
Safety Instructions
Be sure to always drape the strap around the grip to secure the product in place. Check that
the product is properly installed in the attachment before use. Replace the strap with a new
one if it becomes frayed.
The cords included with this product contain chemicals, including lead, known to the State
of California to cause birth defects or other reproductive harm. Wash hands after handling.
(This notice is provided in accordance with Proposition 65 in Cal. Health & Safety Code §
25249.5 and following.)
Do not leave this product within the reach of small children. It is a choking hazard and is
extremely dangerous if licked or placed in a mouth.
Turn the power o in public facilities and on public transport. This product communicates
with your smartphone wirelessly. The radio waves may interfere with devices around you,
causing a malfunction, accident, or injury.
Do not charge this product in a location that may become hot such as near a re or heating
appliance, in a location subject to direct sunlight, or inside a car. Doing so may cause a re,
burns, or the battery to deteriorate.
Do not disassemble and repair the product yourself. Doing so may cause an electric shock
or accident.
If uid leaks from the battery, do not touch it with your bare hands. If uid comes into
contact with your body, immediately rinse it o with tap water and then contact a doctor.
This symbol indicates information that, if ignored, could possibly result
in death or serious injury due to incorrect handling.
This symbol indicates information that, if ignored, could possibly result
in personal injury or physical damage due to incorrect handling.
Warning
Page 7

Caution
Make sure the attachment is installed in the correct direction. If not installed correctly, the
product may y o the golf club.
Take care not to pinch your fingers when mounting the product to the attachment
Be sure to remove this product and attachment from the golf club before storing or
carrying the golf club, otherwise, this product may be damaged when the golf clubs are
stored or carried.
Check that the micro USB port cover is closed securely before use, otherwise, the product
may be damaged due to water exposure or foreign materials.
When the product is placed in a bag, make sure that it does not end up below a heavy
object. The case may crack or the battery may rupture, causing an injury.
Exercise according to your physical capabilities. Stop your activity and consult your doctor
if you feel unwell.
Take care not to hit any people or objects when swinging the golf club.
Do not use the product for anything other than its intended use.
Do not throw the product or subject it to strong impacts. This could result in damage,
malfunction, or cause an injury.
Do not wet the product or insert foreign objects inside the product. This product is not
waterproof, so there is the risk of malfunction or electric shock.
Do not leave the product in a hot or humid location or in direct sunlight. It generates heat
or causes thermal expansion of the rechargeable battery inside the product.
Do not attach this product to anything other than a golf club.
Do not mount the attachment to a golf club that has a damaged grip as this could interfere
with the attachment.
Do not retrieve the product if it comes o the club and goes outside of the hitting box at
the driving range.
Do not widen the attachment when the product is attached to a golf club.
Before using this product, check that it is secured to the golf club. If it is insucienty
secured, the product may come o, causing injury or malfuncion.
Other Precautions
About the built-in battery
• The battery is a consumable item that deteriorates even under normal use.
• Battery performance will decline if this product is stored for a long period of time
without being used.
• The battery life will be shorter in areas with low ambient temperatures.
• The battery is not replaceable.
The product uses a rechargeable lithium polymer battery.
Lithium polymer rechargeable battery is recyclable product.
When your dispose of the product, do not remove the battery
from the product and refer to your local regulations.
For California customers only:
The lithium batteries in this product contain
Perchlorate Material - special handling may apply,
See www.dtsc.ca.gov/hazardouswaste/perchlorate.
Page 8

EPSON is a registered trademark, EPSON Exceed Your Vision is a registered
logomark, and M-Tracer is a trademark of Seiko Epson Corporation.
iPhone is a trademark of Apple Inc., registered in the U.S. and other countries.
Android and Google Play are trademarks of Google Inc.
Bluetooth and the Bluetooth logo are trademarks of Bluetooth SiG, Inc. in the United
States. The ® mark is omitted in this guide.
General Notice: Other product names used herein are for identication purposes only
and may be trademarks of their respective owners. Epson disclaims any and all rights
in those marks.
CPD-42547
 Loading...