

Page 1

®
EPSON
LX-80™ PRINTER
User’s Manual
Page 2

FCC COMPLIANCE STATEMENT
FOR AMERICAN USERS
This equipment generates and uses radio frequency energy and if not
installed and used properly, that is,
in strict accordance with the
manufacturer’s instructions, may cause interference to radio and television
reception. It has been type tested and found to comply with the limits for a
of Part 15 of FCC rules, which are designed to provide reasonable
protection against such interference in a residential installation. However,
installation. If this equipment does cause interference to radio or television
reception, which can be determined by turning the equipment off and on,
the following measures:
- Reorient the receiving antenna
Relocate the computer with respect to the receiver
are on different branch circuits.
If necessary, the user consult the dealer or an experienced radio/television
booklet prepared by the Federal Communications Commission helpful:
“How to Identify and Resolve Radio-TV Interference Problems.”
Washington DC 20402. Stock No. 004-000-00345-4.
WARNING
invalidate the FCC certification of this device and may cause interference
which exceeds the limits established by the FCC for this equipment. If this
equipment has more than one interface connector, do not leave cables
connected to unused interfaces.
Apple is a registered trademark of Apple Computer, Inc.
Applesoft is a trademark of Apple Computer, Inc.
Centronics is a registered trademark of Data Computer Corporation.
LX-80 is a trademark of Epson America, Inc.
IBM-PC is a registered trademark of International Business Machines
Corporation.
Microsoft is a trademark of Microsoft Corporation.
QX-10 is a trademark of Epson America, Inc.
TRS-80 is a registered trademark of Radio Shack, a division of Tandy
Corporation.
80 Micro is published by Wayne Green Publishers.
NOTICE:
l All rights reserved. Reproduction of any part of this manual in any form
whatsoever without EPSON’s express written permission is forbidden.
l The contents of this manual are subject to change without notice.
* All efforts have been made to ensure the accuracy of the contents of this manual.
However, should any errors be detected, EPSON would greatly appreciate being
informed of them.
*
The above notwithstanding, EPSON can assume no responsibility for any errors
in this manual or their consequences.
@ Copyright 1984 by EPSON CORPORATION
Nagano. Japan
P8492004
Page 3

Contents
List of Figures
. . . . . . . . . . . . . .
List of Tables . . . . . . . . . . . . . . . . . . . . .
Introduction . . . . . .
LX-80 Features
. . . .
About This Manual
Setting Up Your LX-80 Printer
1
Printer Parts
Printer Location
.........................
.......................
Paper Feed Knob Installation
Ribbon Installation
Ribbon Replacement
Paper Loading
Control Panel
Test Pattern
.......................
.........................
...........................
. . .
...................
...................
. .
.........
...........
Connecting the LX-80 to Your Computer .
First Printing Exercise
SelecType
2
.........................
Choosing Print Modes
Turning SelecType Mode On
Using SelecType
.....................
First SelecType Exercises
.................
...............
.........
.............
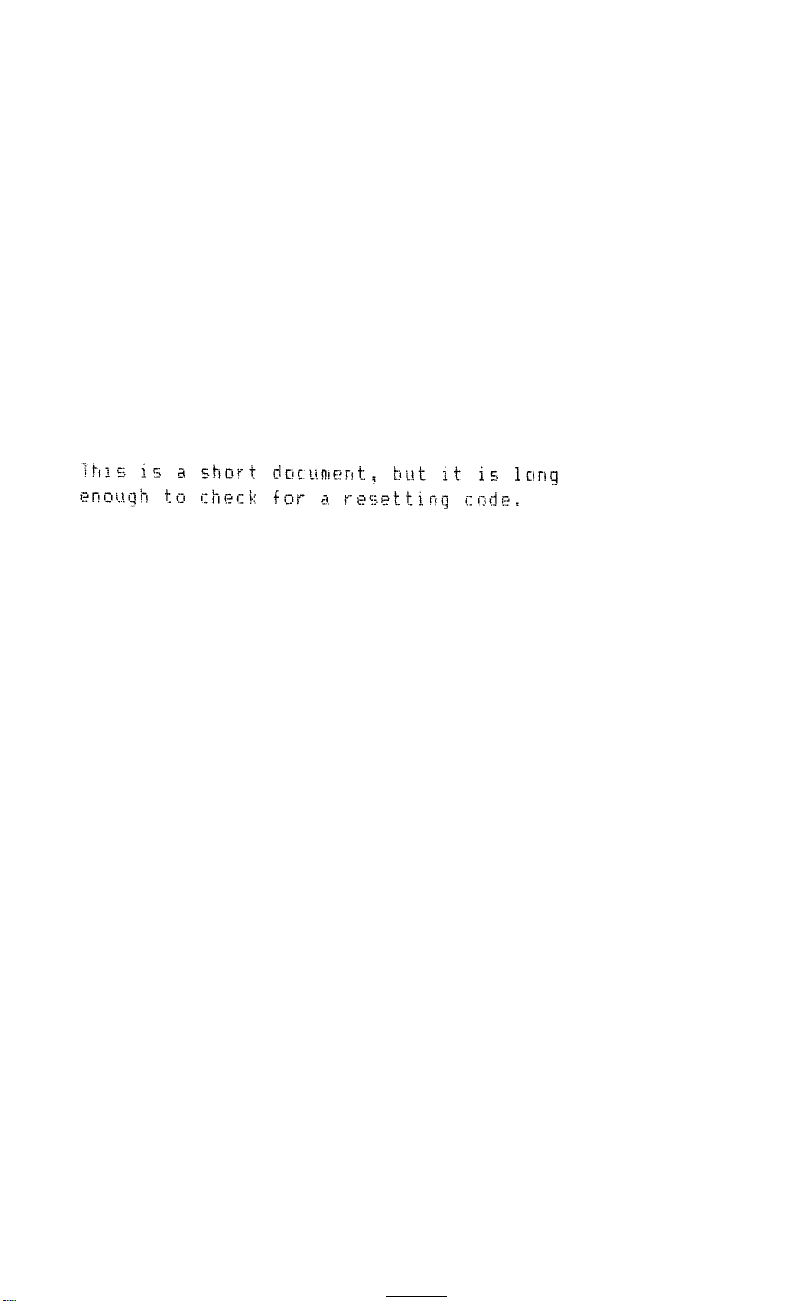
Testing Your Software for the Reset Code
Mode Combinations
SelecType Cautions and Tips
.................
.........
. . .
. . .
. . .
. . .
. . .
. . .
. . .
. . .
. . .
. . .
. . .
. . .
. . . .
. . .
. . . .
. . .
vii
Vlll
. . .
1
1
2
3
3
4
4
5
8
9
10
12
13
14
15
15
16
17
18
19
20
22
3
Elements of Dot Matrix Printing
The Print Head . . . . . . . .
Bidirectional Printing . . .
Changing Pitches . . . . . . . .
NLQ Mode . . . . . . . . . .
4
Printer Control Codes .
ASCII Codes . . . . . .
ESCape Code . . . .
Printer Codes . . . . .
Embedded codes . . .
Inserted codes . . . .
Programming Languages .
. . . .
....
. . . .
. .
.
. .
. . .
. . .
. .
.
.
. .
. .
. .
. . .
. .
. . . .
. .
23
23
24
24
26
29
29
30
31
32
32
33
. . .
III
Page 4
LX-80 Features
5
Demonstration Programs
Pica Printing
Changing Pitches
Cancelling Codes
Resetting the Printer
Pitch Comparison
Near Letter Quality Mode
........
..........
......
......
....
......
. . .
. . .
.
. .
. .
. .
. . . .
. . . .
. . . .
. .
. . .
. .
......
......
......
......
. . . .
. . . .
. . . .
. . . .
. .
. .
. .
. .
35
35
36
37
37
38
38
39
Print Enhancements and Special Characters
6
Bold Modes..
Emphasized mode
Master program
Double-strike
Expanded Mode
Mode Combinations
Italic Mode
Underline Mode
Master Select
Superscript and Subscript
Special Characters
International Characters
Graphics Character Set
Page Formatting
7
Margins
Justification with NLQ . .
Skip Over Perforation
Line Spacing
Paper-Out Sensor
User-Defined Characters
8
Defining Your Own Characters
Designing Process
First definition program
Running the program
Second definition program
Running the program
Defining NLQ Characters
NLQ grid
First NLQ definition program
..............................
........................
..........................
............................
............................
........................
................................
............................
..............................
....................
..........................
....................
......................
. . . . .
. . . . . . . . .
. . . . . . . . . .
. . . . .
. .
. . . .
. . . .
. .
.
. .
. . .
...............
.........
.....................
.............
.................
...........
.................
.............
.........................
.........
Second NLQ definition program
. .
. . . .
. . . .
. .
. .
. . . .
.......
. . .
. . .
. . .
. .
. . . . .
. . . . .
. .
. .
. .
. .
. .
.
.
. .
. . .
. . .
. . .
. . . .
. . . .
41
41
41
42
43
44
44
45
46
47
49
49
49
52
55
55
56
57
57
59
61
61
62
63
64
65
66
67
67
70
71
iv
Page 5

Introduction to Dot Graphics
9
Dot Patterns
Print Head
Graphics Mode
..............................
................................
............................
..............
Pin Labels ................................
First Graphics Program
Multiple-Line Exercise
Density Varieties
Reassigning Code
Column Reservation Numbers
WIDTH Statements
Design Your Own Graphics
Graphics Programming Tips
......................
......................
..........................
..........................
................
........................
..................
..................
Semicolons and command placement
String variables
Graphics and low ASCII codes
...........................
..............
Appendixes
........
73
74
75
75
76
78
78
80
81
81
82
83
86
86
88
89
A
ASCII Codes and Character Fonts
Special Graphics Characters . . . . . . . . . . .
Draft International Characters . . . . . . .
B
Control Codes in Numeric Order . . . . .
Control Key Chart . . . . . . . . . . . . . . .
C
Control Codes by Function
Near Letter Quality Mode
Character Width (Pitch)
Character Weight
Print Enhancement
. . . . . . . . . . .
. . . . . . . . . .
. . .
. . .
. . . . .
Mode and Charcter-Set Selection .
Special Printer Features . . . . . . .
Line Spacing . . . . . . . . . . . . .
Forms Control
. . . . . . . . . . . . . .
Page Format . . . . . . . . . . . . . .
User-defined Characters
. . . . .
Dot Graphics . . . . . . . . . . . . . .
D
The DIP Switches . . . . . . . . . . . . . . . . . . . . . .
E
Using the Optional Tractor Unit
Printer Location . . . . . . . . . . . . .
Tractor Unit Installation
Loading Continuous Paper
. . . . . .
. . . . . .
. .
. . . .
. . . . . . .
. . .
. . . .
. . . .
. . . .
. . .
. . .
. . . .
. . . .
. . .
. . .
. . . . .
. . . . .
. . . . .
. . . . .
. . .
. . .
. .
. . .
. . .
. . .
. .
. . .
A-1
A-3
A-5
B-1
B-12
C-1
C-1
C-1
C-1
C-2
C-2
C-2
C-2
C-3
C-3
C-3
C-3
D-1
E-1
E-1
E-2
E-4
Page 6
Troubleshooting and Advanced Features
F
Problem/Solution Summary
Setting print styles
Tabbing
Graphics
................................
................................
Paper-out sensor
........................
........................
..................
SelecType Solutions
.
Method l..
Method 2..
Method3
Method 4
......
..............................
................................
................................
..I......::::::::::::::
Cancelling Functions with SelecType
Other software
Beeper Error Warnings
Data Dump Mode
Coding Solutions
POKEing codes
Special printer drivers
..........................
......................
..........................
..........................
..........................
....................
Solutions for Seven-Bit Systems
Solutions for Specific Systems
Applesoft BASIC solutions
Apple II solutions
TRS-80T”
IBM-PCTM
solutions
solution
QX-10™ solutions
........................
......................
: : : : : : : : : : : : : : : : : : : : : :
................
................
......
..........
..............
F-1
F-1
F-1
F-1
F-1
F-3
F-3
F-3
F-3
F-4
F-4
F-4
F-6
F-6
F-6
F-8
F-9
F-10
F-10
F-11
F-11
F-12
F-13
F-13
F-14
Printer Maintenance
G
......................
Always
NowandThen..::::::::::::::::::::
Rarely
Technical Specifications
H
Printing
Paper
Printer
Dimensions and Weight
Environment
....................................
....................
..................................
Character size
Characters per line
............................
........................
....................................
....................................
....................
..............................
Interface ..................................
I
The Parallel Interface
Data Transfer Sequence
Interface timing
Signal relationships
......................
......................
..........................
......................
vi
........
........
G-1
G-1
G-1
G-1
H-1
H-1
H-1
H-2
H-2
H-2
H-2
H-3
H-3
I-1
I-3
I-3
I-3
Page 7

List of Figures
1-1
1-2
1-3
1-4
1-5
1-6
1-7
1-8
1-9
1-10
2-1
3-1
3-2
3-3
6-1
6-2
6-3
6-4
6-5
6-6
7-1
Printer parts
. . . . . . . . . . .
Paper feed knob installation . . .
Ribbon cassette
Print head assembly
. . . . . . . . . . .
. . . . . . .
Ribbon cassette installation . .
. .
. . .
..
. .
. .
Ribbon placement . . . . . . . . .
LX-80 ready for paper loading .
Control panel . . . . . . . . . . .
Test patterns
Cable connection
SelecType setting and functions
A capital T
. . . . . . . . . . .
. . . . . . . .
. . . . . . . .
. . . . . . . . . . . .
The three pitches of the LX-80 . .
LX-80 dot matrix characters . . .
Emphasized and single-strike
Double-strike and single-strike
. . . . .
. . .
Expanded and standard characters
Italic and pica . . . . . . . . . . . . .
The underline mode
Special graphics characters
Standard line spacing
. . . . . . . . . . . . .
. . . . . .
......................
.
. .
. .
. . .
. . .
. . . .
. . .
. . .
. . . .
. . . . .
. .
. .
. . .
. . .
...
. . .
......
......
. .
3
5
5
6
7
8
9
10
12
14
17
23
25
26
41
43
44
46
47
52
58
8-1
8-2
8-3
8-4
8-5
8-6
8-7
9-1
9-2
9-3
9-4
9-5
9-6
9-7
D-1
Grid for designing draft characters
Correct and incorrect designs
Design for sigma
..................
Using the bottom eight rows
Grid for NLQ characters
Data numbers for one column
Arrow design and data numbers
........
........
............
........
......
Pin labels . . . . . . . . . . . . .
Calculating numbers for pin patterns
Designing in different densities
. .
Arrow design . . . . . . . . . . .
First line of arrow figure
. . . . .
Result of incorrect program . . . . .
Pin patterns of incorrect program
DIP switch location
. . . . . . . . . . . . . . . . .
....
. . .
. . . .
. . .
. . . .
. . .
. . .
. . .
. . . .
. . .
. . .
.
. .
. .
.
. .
.
62
63
64
65
68
69
70
77
77
83
84
84
86
87
D-1
vii
Page 8

E-1
E-2
E-3
E-4
E-5
E-6
E-7
E-8
Continuous paper with printer stand
Continuous paper without stand
Tractor placement
...................
Paper separator and paper guide
Tractor release levers
.................
Pin feed holder adjustment
Open
Top of
in feed cover
page position
.................
.................
.......
.......
...........
...
. .
. . . .
. . .
. . . .
. . . .
. . . .
. . . .
E-1
E-2
E-2
E-3
E-4
E-5
E-5
E-6
I-1
2-1
2-2
5-1
6-1
6-2
6-3
9-1
D-1
D-2
I-1
I-2
Parallel interface timing
...............
List of Tables
SelecType modes
Mode combinations
Summary of LX-80 pitches
International characters in NLQ mode
International characters in draft mode
International characters in draft italic
Graphics modes
DIP switch functions
International DIP switch settings
Pins and signals
Signal interrelations
........................
......................
................
..........................
......................
............
..........................
......................
. . . . .
......
........
........
I-3
16
21
40
50
51
51
80
D-2
D-2
I-1, I-2
I-4
Vlll
. . .
Page 9

Introduction
The Epson LX-80 printer combines low price with the high quality
and advanced features formerly available only on more expensive
printers.
LX-80 Features
In addition to the high performance and reliability you’ve come to
expect from an Epson printers, the LX-80 offers:
l Draft mode for quick printing of ordinary work
l Near Letter Quality mode for top quality printing
l A variety of print styles, including Roman and italic, six widths,
and two kinds of bold printing
l User-definable characters so you can create and print your own
symbols or characters
l High-resolution graphics for charts, diagrams, and illustrations
l Eleven international character sets
l Easy paper loading
l Ribbon cassette for quick and clean ribbon changing
Page 10
About This Manual
We’re not going to waste your time with unnecessary information,
but we won’t neglect anything you need to know about the LX-80
and its many features.
You can read as much or as little of this manual as you wish. If you
have used printers before and have a specific program that you want
to use with the LX-80, a quick reading of the first chapter may be all
you need. If, on the other hand, you are new to computers and
printers, you will find this manual easy to follow and the LX-80 easy
to use. No matter what your background, if you want to learn about
and experiment with all the advanced features of the LX-80, the
information you need is here.
For a preview of what your LX-80 can do, look at the following
samples of a few of its typestyles.
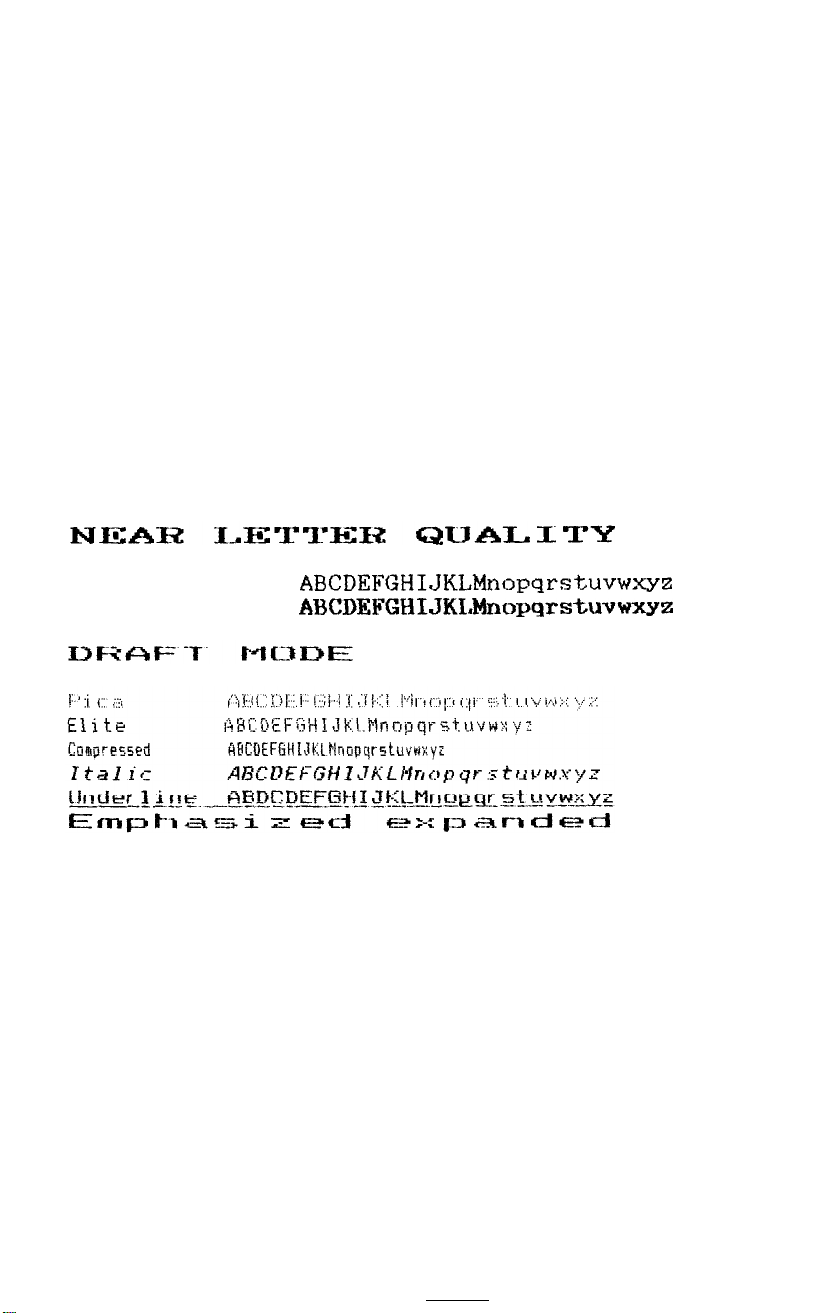
NLQ. standard
ABCDEFGHIJKLMnopqrstuvwxyz
WLQ emphasized ABCDEFGHIJKLMnopqrstuvwxyz
2
Page 11
Chapter 1
Setting Up Your LX-80 Printer
Setting up your LX-80 printer is a simple matter of attaching two
parts, putting in the ribbon and paper, and connecting the printer to
your computer.
This chapter will have you printing a test pattern within fifteen to
twenty minutes and doing more complicated work not long after.
Printer Parts
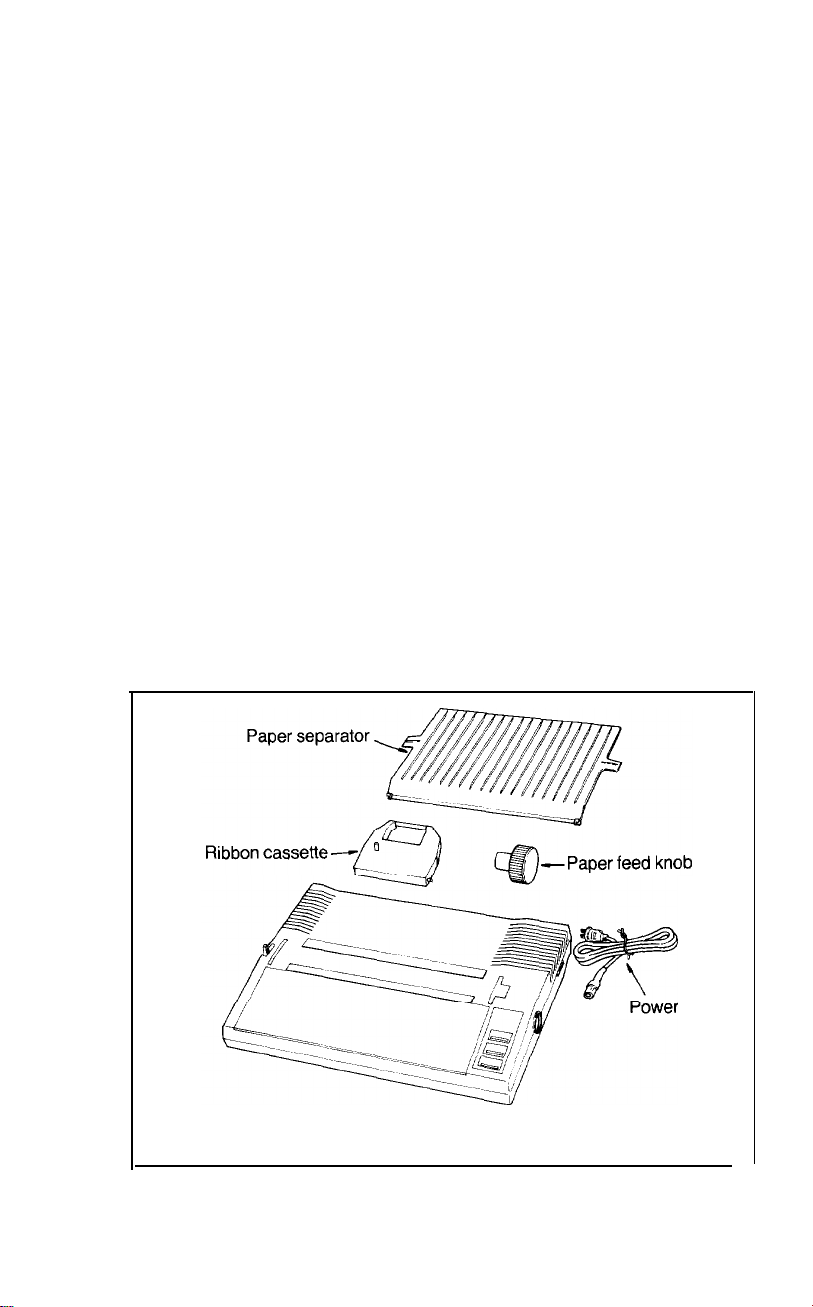
First, see that you have all the parts you need. In addition to this
manual, the printer box should contain the items shown in Figure l-1.
* In the United States, the printer is delivered with the power
cord attached.
Figure 1-1. Printer parts
cord*
3
Page 12

In addition to the items in the box, you need a cable and possibly
an interface board. The cable connects the printer to your computer,
and the interface board is necessary only for those computers that
can’t use the LX-80’s Centronics® parallel interface. Your computer
manual or your dealer will tell you which cable you need and whether
or not you need a special interface.
Printer Location
Now that you have unpacked your printer, you should choose a
suitable location for it. The main requirement, of course, is that the
printer be close enough to your computer for the cable to reach. Also
remember the following:
l Use a grounded outlet, and do not use an adapter plug.
l Avoid using electrical outlets that are controlled by wall switches.
Accidentally turning off a switch can wipe out valuable information in your computer’s memory and disrupt your printing.
l Avoid using an outlet on the same circuit breaker with any large
electrical machines or appliances. These can cause disruptive power fluctuations.
l Keep your printer and computer away from base units for cordless
telephones.
l Protect the printer from direct sunlight, excessive heat, moisture,
and dust. Make sure that it is not close to a heater or other heat
source.
Paper Feed Knob Installation
Now that you have chosen where to set up your LX-80, the first
and simplest piece to install is the paper feed knob, which you use to
manually advance the paper-just as you do on a typewriter. To
install the knob, merely push it onto the shaft found in the hole on the
right side of the printer. (See Figure l-2.) The shaft has one flat side
that must be matched with the flat side of the hole in the knob.
4
Page 13
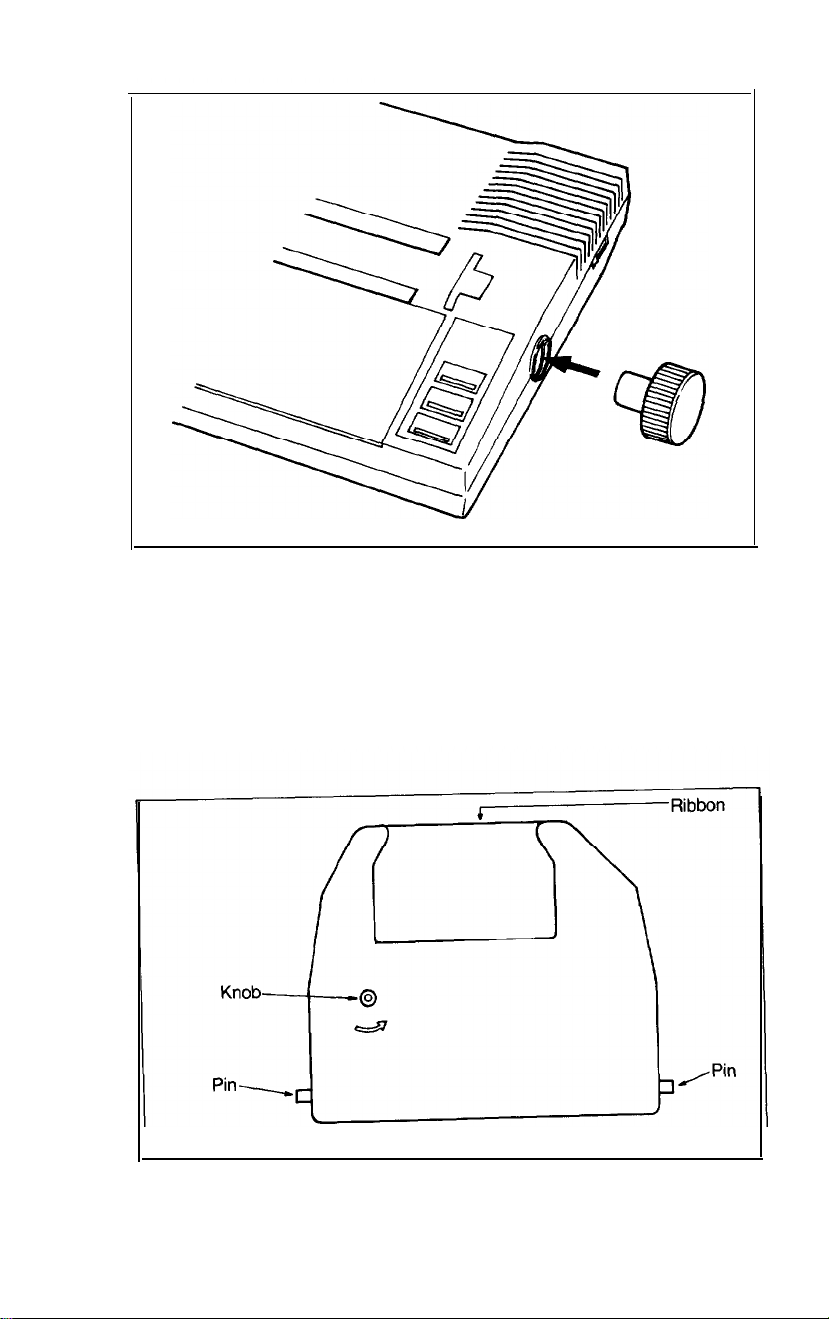
Figure 1-2. Paper feed knob installation
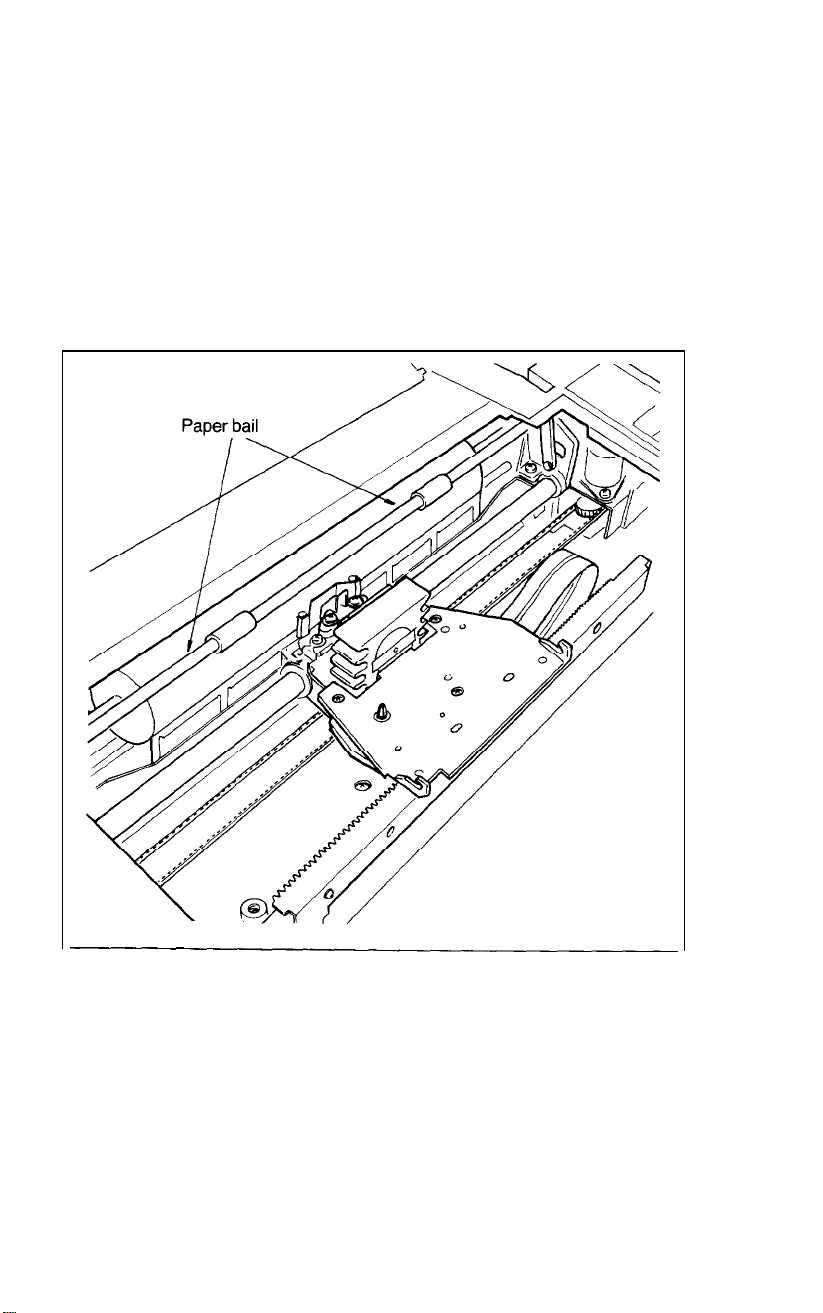
Ribbon Installation
The LX-80 printer uses a continuous-loop, inked fabric ribbon,
which is enclosed in a cassette that makes ribbon installation and
replacement a clean and easy job. The parts of this cassette are labelled
in Figure 1-3.
Figure 1-3. Ribbon
cassette
5
Page 14
To install the ribbon, first open the lid at the front of the LX-80 so
that you can see the print head assembly shown in Figure 1-4. Move
the assembly by hand to the center of the printer so that the other
parts of the printer will not get in your way. Also be sure that the
paper bail is against the black roller so it too will not be in your way.
Note: Moving the print head by hand when the printer is turned on
can harm the printer. Always be sure that the printer is turned
off before you move the print head.
Figure l-4. Print bead assembly
Page 15
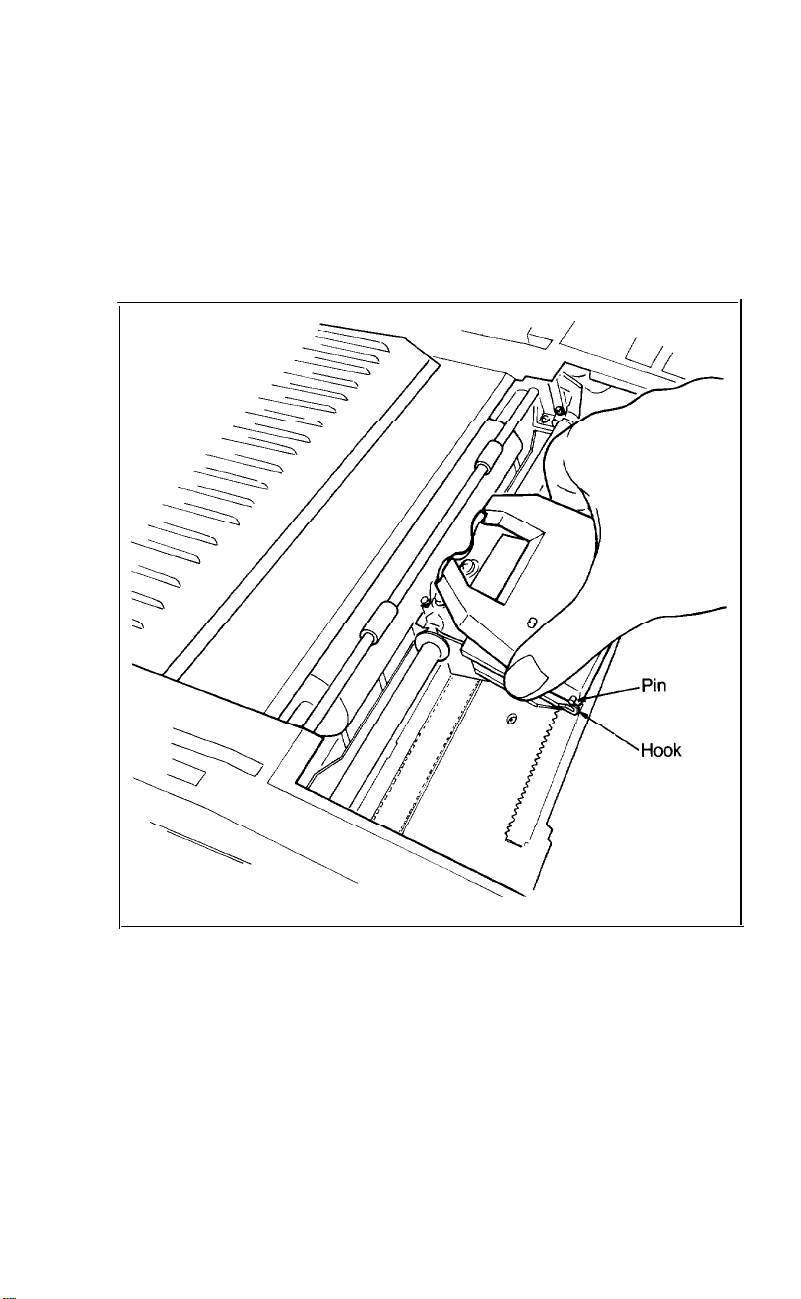
Then hold the ribbon cassette so that the small knob is on top and
the exposed section of ribbon is away from you. Insert the cassette in
its holder by first sliding the pins at the back of the ribbon cassette
under the small hooks on the holder. (See Figure l-5.) Then lower the
front of the cassette so that the exposed section of ribbon can fit
between the print head nose and the silver ribbon guide. Push down
until the cassette fits firmly in place.
Figure 1-5. Ribbon cassette installation
7
Page 16
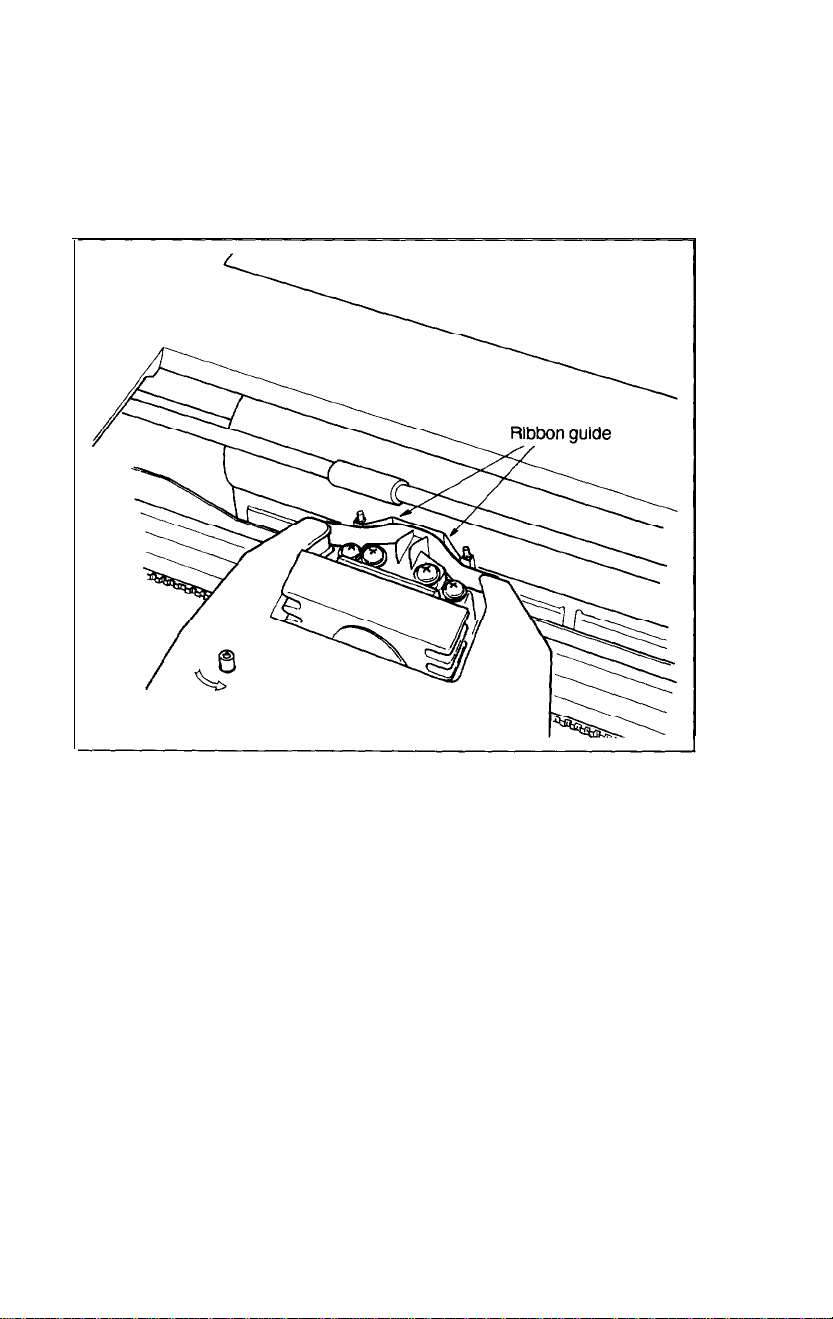
Now turn the knob on the cassette in the direction of the arrow to
tighten the ribbon. As you turn the knob, see that the ribbon slips
down into its proper place between the print head nose and the silver
ribbon guide (Figure l-6). If it doesn’t, guide it with a pen or a pencil.
Figure l-6. Ribbon placement
Ribbon Replacement
When your printing begins to become light and you need to replace the ribbon, lift the front of the cassette to remove it and then
follow the above instructions with a new cassette. If you have been
using your printer just before you change cassettes, be aware that the
print head becomes hot during use. Be careful not to touch it. Also
remember never to move the print head by hand when the printer is
turned on.
8
Page 17
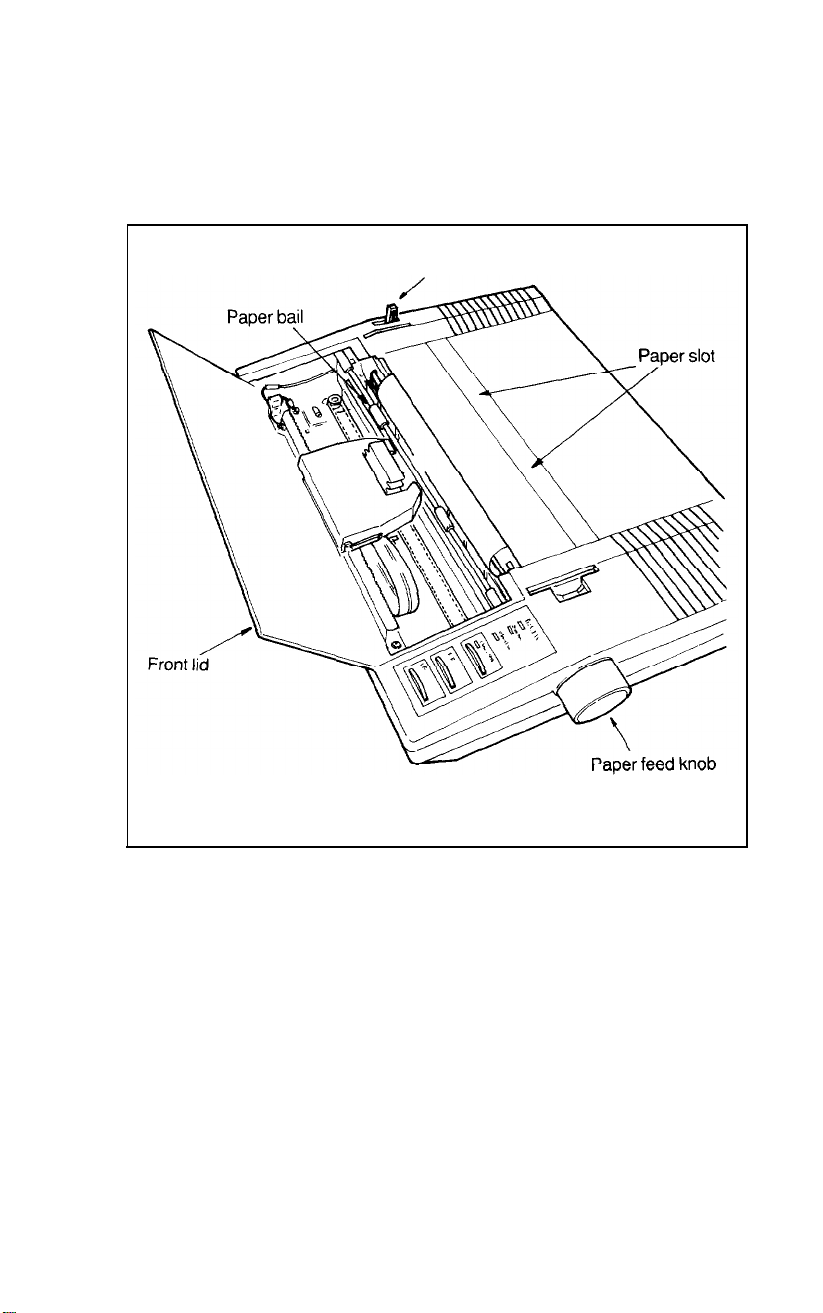
Paper Loading
Now put a sheet of paper in your LX-80 so you can test it. Figure
1-7 shows the names of the parts that you need to know.
Friction lever
Figure 1-7. LX-80 ready for paper loading
9
Page 18
See that the printer is turned off, open the front lid, and push the
friction lever back and the paper bail forward. Then move the print
head by hand to the center of the printer and feed the paper into the
paper slot in the top of the printer,
When the paper will not go any farther, turn the paper feed knob
to advance it as you would with a typewriter. Turn the knob until the
top of the paper is at least
the paper bail against the paper. If the paper becomes crooked, pull
the friction-release lever forward, straighten the paper, and push the
friction lever back.
If you have the optional tractor unit for continuous pin-feed paper,
see Appendix E for instructions on its use.
3/+inch
above the ribbon guide. Then push
Control Panel
Now that your paper is loaded, it is time to plug in the printer and
see what the buttons on the control panel do. First, see that the power
switch on the right side of the printer is off; then plug in the power
cord. Now turn on the power switch and look at the control panel on
the right side of the top of your LX-80.
10
Figure 1-8. Control panel
Page 19

There are several buttons and indicator lights on the control panel.
Their primary functions are described below:
l The POWER light glows green when the power is on.
l The READY light glows green when the printer is ready to accept
data. This light flickers somewhat during printing.
l The PAPER OUT light glows red to indicate that the printer is
out of paper or the paper is loaded incorrectly.
l The ON LINE light glows green when the printer can receive
data.
l The ON LINE button switches the printer between on-line and
off-line status. When the printer is on-line, the ON LINE light
glows and the printer is ready to accept data.
The following two buttons work only when the printer is off-line.
If the ON LINE light is on, press the ON LINE button to put the
printer off-line before you use these buttons.
l The FF (Form Feed) button advances the paper to the top of the
next page.
l The LF (Line Feed) button advances the paper one line at a time.
The control panel buttons can also be used to turn on several
printing functions using a feature called SelecType, which is described
in Chapter 2. In addition, you’ll find another use for the LF and FF
buttons in the next section.
11
Page 20
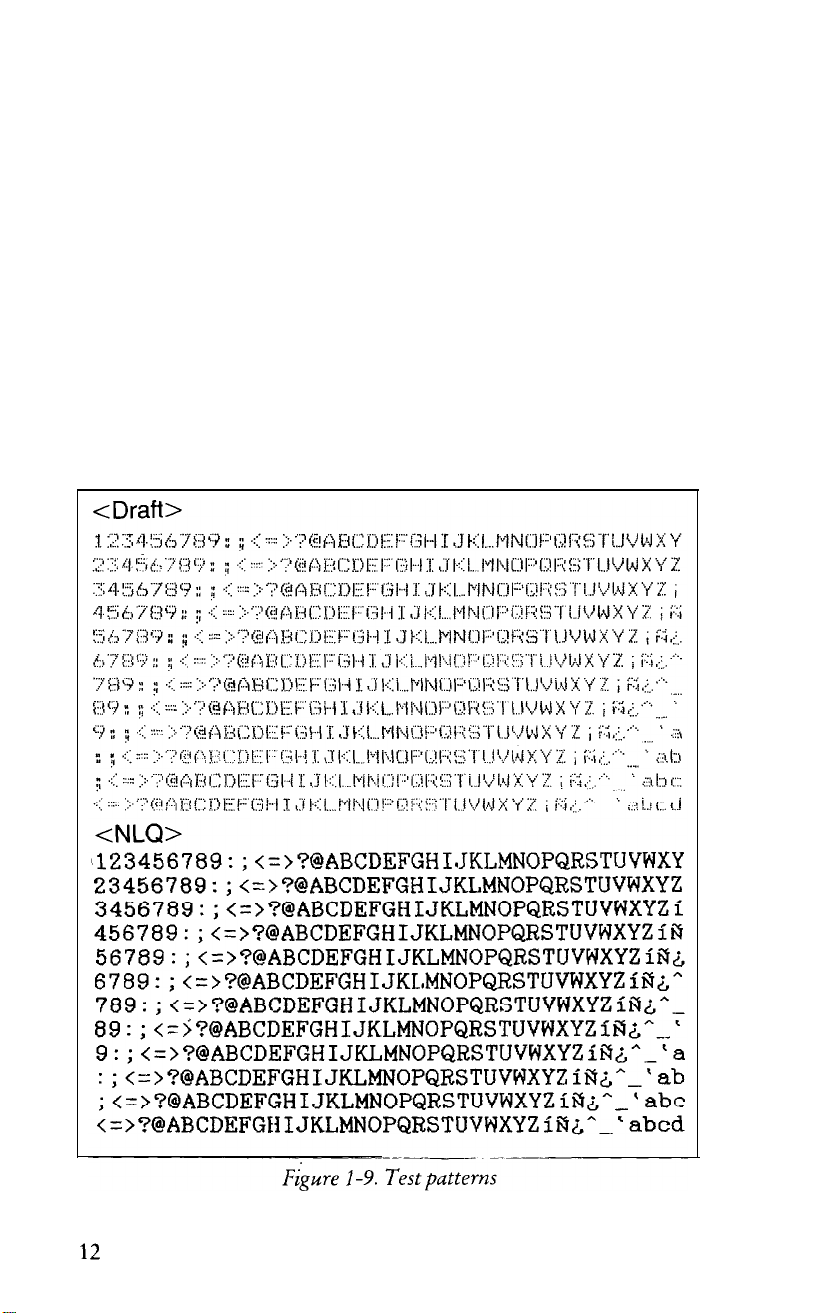
Test Pattern
Now you’ll see your LX-80 print something even though it’s not
connected to a computer yet. Make sure that your printer has paper in
it and that the power switch is off. Now, hold down the LF button
on the control panel while you turn the printer on with the power
switch. The LX-80 will begin printing all the letters, numbers, and
other characters that are stored in its ROM (Read Only Memory) for
the draft mode. When the printing starts, you can release the LF
button; the printing will continue until you turn the printer off or
until the print head gets near the end of the page. To see the same test
in the NLQ (Near Letter Quality) mode, turn the printer on while
holding down the FF button. Partial results of both tests are shown in
Figure 1-9.
Page 21

Connecting the LX-80 to Your Computer
Now that the test pattern has shown that your printer is working
well, it’s time to hook it up to your computer. It is best to have both
the printer and the computer turned off when you do this.
Remember that each computer system has its own way of communicating with a printer. If your computer expects to communicate
through a Centronics parallel interface, all you need is a cable. If your
computer requires any other kind of interface, you will also need an
interface board.
If you don’t know what a Centronics parallel interface is, your
computer manual or your dealer will tell you what you need. Then,
once you have plugged your printer cable into your printer and
computer, you will probably never think about interfaces again. (If
you do want the technical specifications, however, you can find them
in Appendix I.)
The first three steps in connecting your printer and computer are
shown in Figure 1-10. Plug one end of your printer cable into the
cable connector of your LX-80 printer. The plug is shaped so that
there is only one way it will fit the connector. Now secure the plug to
the printer with the wire clips on each side of the connector. These
clips insure that your cable will not be loosened or unplugged
accidentally. If your cable has a grounding wire, fasten it to the
grounding screw below the connector.
13
Page 22
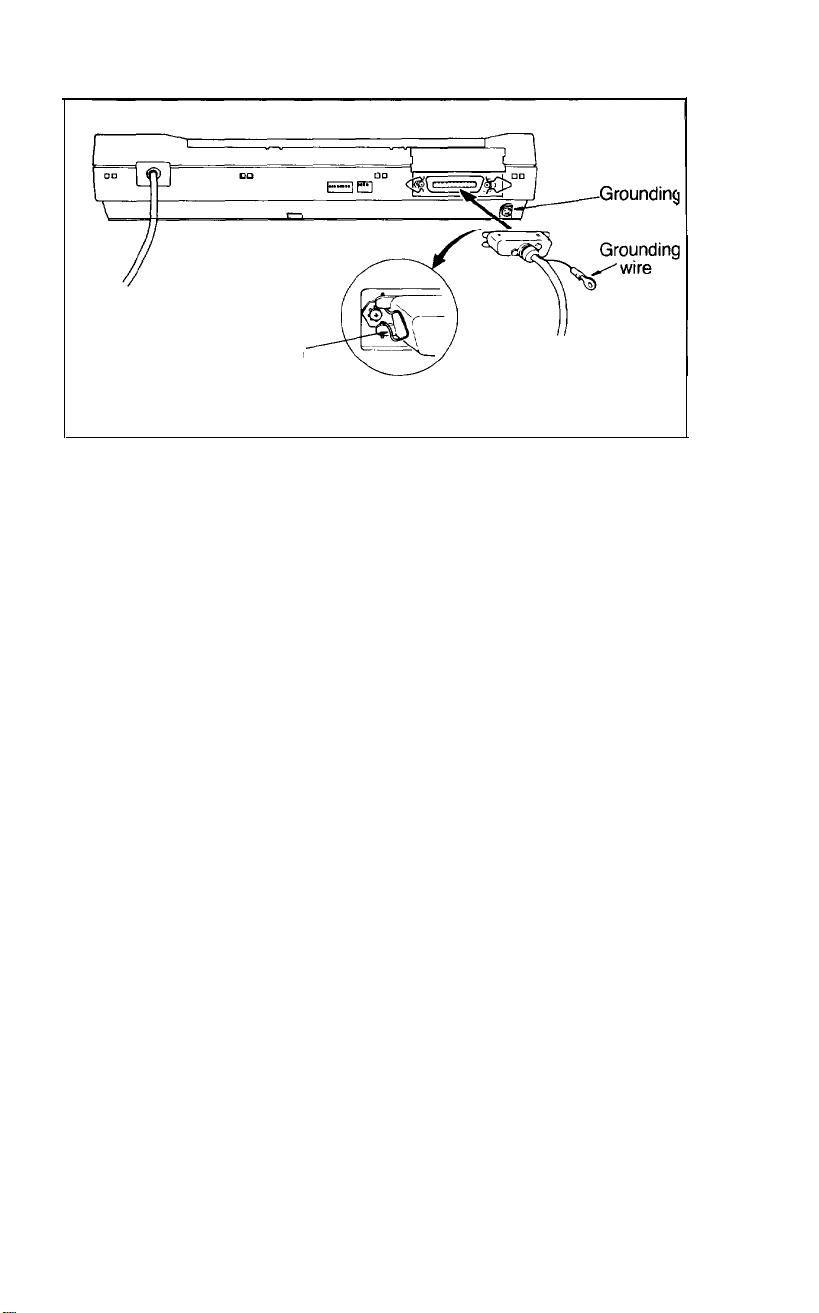
Groundin{
screw
Wire clip
Figure 1-10. Cable connection
Next connect the other end of the printer cable to your computer.
On most computers you can easily find the correct connector for the
printer cable, but if you are not sure, consult your computer manual
or your dealer.
First Printing Exercise
Now it is time to see something more interesting than the test
pattern from your LX-80 printer. Your next step depends upon what
kind of printing you plan to do. If you have a word processing or
other commercial software program, just load the program in your
computer, follow its printing instructions, and watch your LX-80
print. If you plan to use your LX-80 for printing program listings,
load a program and use your computer system’s listing command
(LLIST for Microsoft™ BASIC, for example).
Note: If all the lines of your first printing exercise are printed on top
of each other, don’t worry. There is nothing wrong with your
printer. All you have to do is change the setting of a small
switch in the back of your printer. See the section on automatic line feeds in Appendix D.
14
Page 23
Chapter 2
SelecType
At the end of the introduction you saw samples of the typestyles
available on your LX-80. In this chapter you’ll learn how Epson’s
SelecType feature puts the most-used print modes at your fingertips.
With a few taps on the panel buttons of the LX-80, you can change
your printing from
$:ll~~,
i!+, 1”) (I:/ cl r’ (::I
to the more detailed
Near Letter Quality (NLQ) mode
or any of several other possibilities.
<ii> j, r) (::I 11, Et! ....’ !:I;. ‘t;, r j, 1.:: (<;$
. . .
Choosing Print Modes
The LX-80 printer’s many print modes give you a great choice of
width, weight, and style of characters. You can activate these modes
in several different ways, depending on your needs and the capabilities of your software. The most common ways include placing printing codes in your document, using a programming language such as
BASIC, and giving print commands as part of the printing instructions for your software.
1::) j, <:I fi
Often the SelecType feature is the easiest way to choose print
modes on the LX-80. This feature changes the function of the three
buttons on top of your printer-ON LINE, FF, and LF. After turning on the SelecType mode, you can use the buttons to choose one or
more of six separate functions. The functions include five typestyles
and a reset code.
15
Page 24
Table 2-1 shows the typestyles you can print with SelecType,
and-as you will learn later in this chapter-you can combine some
of them.
Table 2-1. SelecType modes
1
NLQ
2
Emphasized
3
Double-strike
4
Compressed
Elite
5
ABCDEFGHIJKL,MNopqrst,uvwxyz
ABCDEFGH I JKL.MNop qrstUswx yz
0 Ix:: 1:) 1.: F” G I.-I :I ;I
kECDEFSHIJKLnN@pqrstuvwxyz
ABC~EFGHIJKt.MNopqrstL~~~~I~~~~
K
l... PI Iv (::I /z:, Cl I’” !iii t, L.1 v w 2: y
z
SelecType lets you use the Epson typestyles in Table 2-1 and
combinations of those styles even if your word processing or business
program does not support all of them. SelecType also lets you make
print style choices when you print rather than when you edit. If you
would like a memo or letter to be in the NLQ mode, a few taps on
the panel buttons tell your printer what you want, and you don’t have
to re-edit the document to put in print codes.
SelecType is also handy for selecting narrow pitches to put more
characters on a line. If you find that your spreadsheet would be too
wide for a single page in pica, with SelecType you can choose compressed to fit over 130 characters on a line or compressed elite for
over 150 characters. In addition, you undoubtedly will have your
own uses for this feature.
Using SelecType is a simple four-step process:
1) Enter SelecType mode.
2) Select a print function.
3) Set the function.
4) Exit SelecType mode.
Turning SelecType Mode On
To turn on SelecType make sure that the printer is turned on (with
the POWER, READY,
the top two buttons on the panel (ON LINE and FF) at the same
time, as illustrated in Figure 2-1. The LX-80 will beep to signal that it
is in SelecType mode. The READY light also turns off, and the ON
LINE light begins flashing. Now that your printer is in SelecType
16
and ON LINE lights all on), and then press
Page 25
mode, all the panel buttons have new functions (also shown in Figure
2-1).
Exit
Figure 2-1. SelecType setting and functions
In SelecType mode, the ON LINE button selects printing func-
tions, the FF button sets the functions, and the LF button turns
SelecType off, returning the panel buttons to their former operation.
Using SelecType
Once you have turned on SelecType, you select the print functions
you want according to Table 2-1. The mode number is the number of
times you press the ON LINE button to select each function.
After you press the ON LINE button the required number of
times, press the FF button to set your selection. Then press the LF
button to turn off SelecType and return all the panel buttons to their
standard operations.
17
Page 26
First SelecType Exercises
For practice in using SelecType, try setting emphasized mode. First
turn the printer off and back on with the switch on the right side of
the printer. Then press the ON LINE and FF buttons at the same
time. The LX-80 beeps to tell you that it is in SelecType mode, the
READY light turns off, and the ON LINE light begins blinking.
Then press the ON LINE button two times to select emphasized.
(The printer beeps each time you press the ON LINE button in
SelecType mode.) After that, press the FF button once to set the
function.
You have now set emphasized mode. Next, press the LF button
once, and your panel buttons return to their normal operation, but
your printer is in emphasized mode. Since this is only an exercise,
turn the LX-80 off and back on again to cancel all settings and prepare
for the next exercise.
You will probably use SelecType with commercial software as well
as with BASIC or another programming language, but for now try a
simple exercise using BASIC. You don’t need to know anything
about programming for this exercise. It is merely for practice. If your
computer system does not include BASIC or if you would rather not
use it, skip to the next section.
Type the short BASIC program listed below:
10 LPRINT
20
LF’RINT
3d3
LPRINT
Next, print a listing of the program using LLIST or your computer
system’s print listing command. Your LX-SO prints your program in
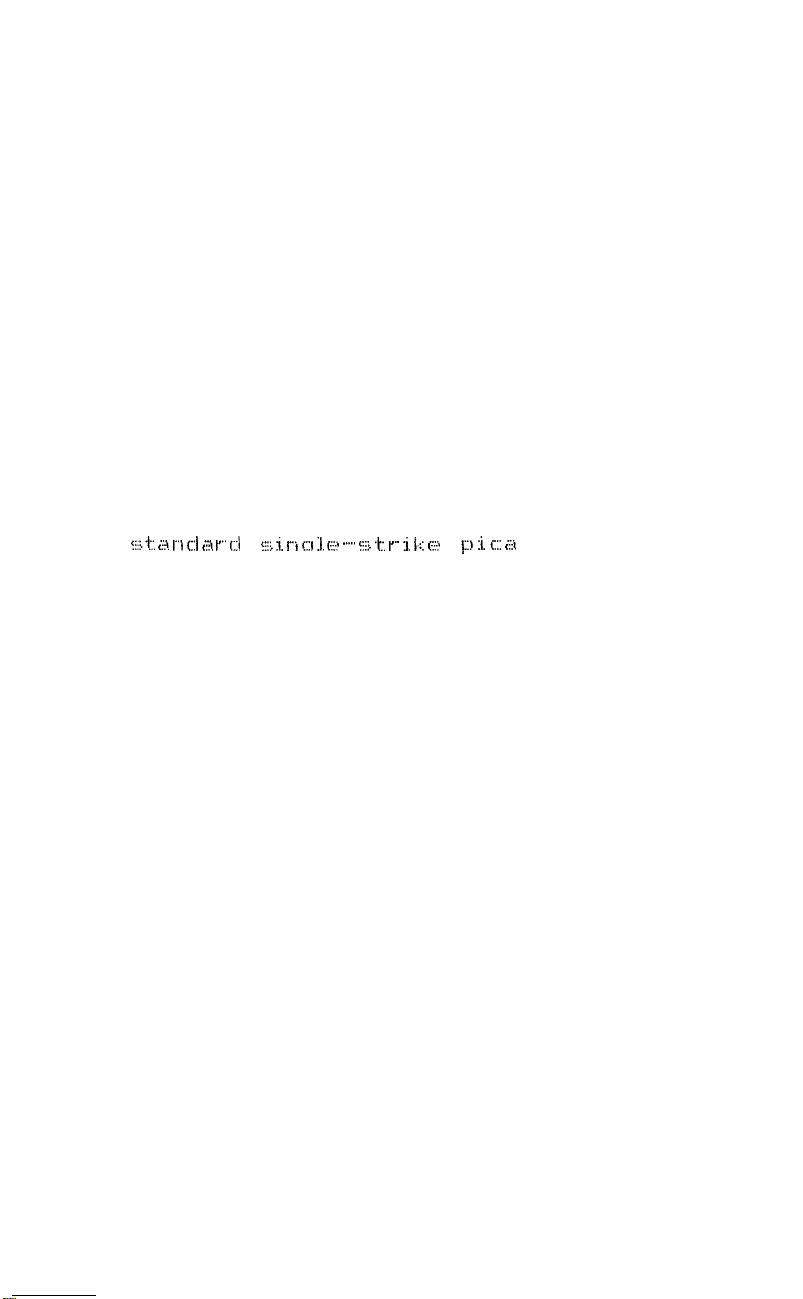
ordinary single-strike pica,
program.
11. $j/,
;:.:I 1.2 ‘,I I;?, ‘!’
I,
p
,i i;;‘l
::y,;;q \ I’.‘,:( ‘(,I;..,\ yti
Now that you have a sample program to list, follow these simple
steps to print your listing in compressed mode:
1) See that both the ON LINE light and the READY light are on.
2) Press the ON LINE and FF buttons at the same time. You hear a
beep to signal that SelecType is on.
18
I’,: 1,: /i ..,, “i
"This is a sample program."
“Notice
"and darkness of the print. "
” ‘i’j-, j, .,:. ;,
” f.,ji 1i.t. :j i: i;?
ill ,,,“, ij.J -
the size I’ ;
as illustrated below in our sample
;::,
j. x;;;. .,
I. .I <:? p
i.;. ;:;I, (g ,:;I 1. i’””f> r <::I <:;I te ;?a, if’! .:
.k, 1
,
(:;+!; j j, 1:
.-I .._ ._. ._
k:,
, , “”
‘y.:. :::‘.
f., .:”
(.;+
,k, p, (2p
I;
12. yi. j-, .k. ” ”
Page 27

3) As you can see in Table 2-1, the code for compressed is four.
Therefore, press the ON LINE button four times. (Remember
that you hear a beep each time you press the ON LINE button
when you are in SelecType mode).
4) Now that you have selected compressed, push the FF button once
to set that mode.
5) Push the LF button once to return the panel buttons to their
standard functions.
Now you have set the LX-80 to print in compressed mode. Merely
push the ON LINE button to put your printer back on-line and list
your program once more. It should print in compressed mode just as
in our example below:
Turn your printer off to cancel the compressed setting, and if you
wish, try this exercise with other modes.
Testing Your Software for the Reset Code
A few commercial software programs clear all previous modes by
resetting the LX-SO before printing each document. Of course, this
resetting wipes out whatever you have done with SelecType. But
don’t worry if your software resets the printer; you can still use
SelecType. In Appendix F we tell you ways around the problem.
Since only a few programs reset the LX-80 before printing, you
probably won’t have this problem. The following test tells you for
sure. First, use your word processing or business program in the
normal way to create a short file or document of the type you usually
print.
After you have created a file or document, print it in the usual way.
Save this first copy for comparison with the next versions you print.
Your test can be as simple as our example below, a two-line document created with a word processor and printed with its standard
print command.
Now set your LX-80 for elite printing using the following steps.
19
Page 28
1) See that both the ON LINE and READY lights are on.
2) Press the ON LINE and FF buttons at the same time.
3) Press the ON LINE button five times (the code for elite). You
should hear a beep each time you press the button.
4) Press the FF button to set elite.
5) Press the LF button to leave SelecType and return the panel but-
tons to their standard functions.
Now press the ON LINE button and print your file again, using
exactly the same command that you used before. If your document
comes out in elite as in our example below, you can forget about
resetting codes and continue to use SelecType as described above.
If your example is once again printed in pica, turn your printer off
and back on. Then try the steps above one more time to be sure that
you made no mistakes. If your printout is still in pica after the second
test, turn to Appendix F for an explanation of how to solve the
problem.
Now that you know the basics of using SelecType, all you need to
learn is how to combine modes and how to avoid unexpected results
with SelecType.
Mode Combinations
In addition to the five typestyles available with SelecType, there are
also many combinations of those five that you can use. Table 2-2
shows which modes can be combined. An X in a box indicates that
the two modes can be combined.
20
Page 29
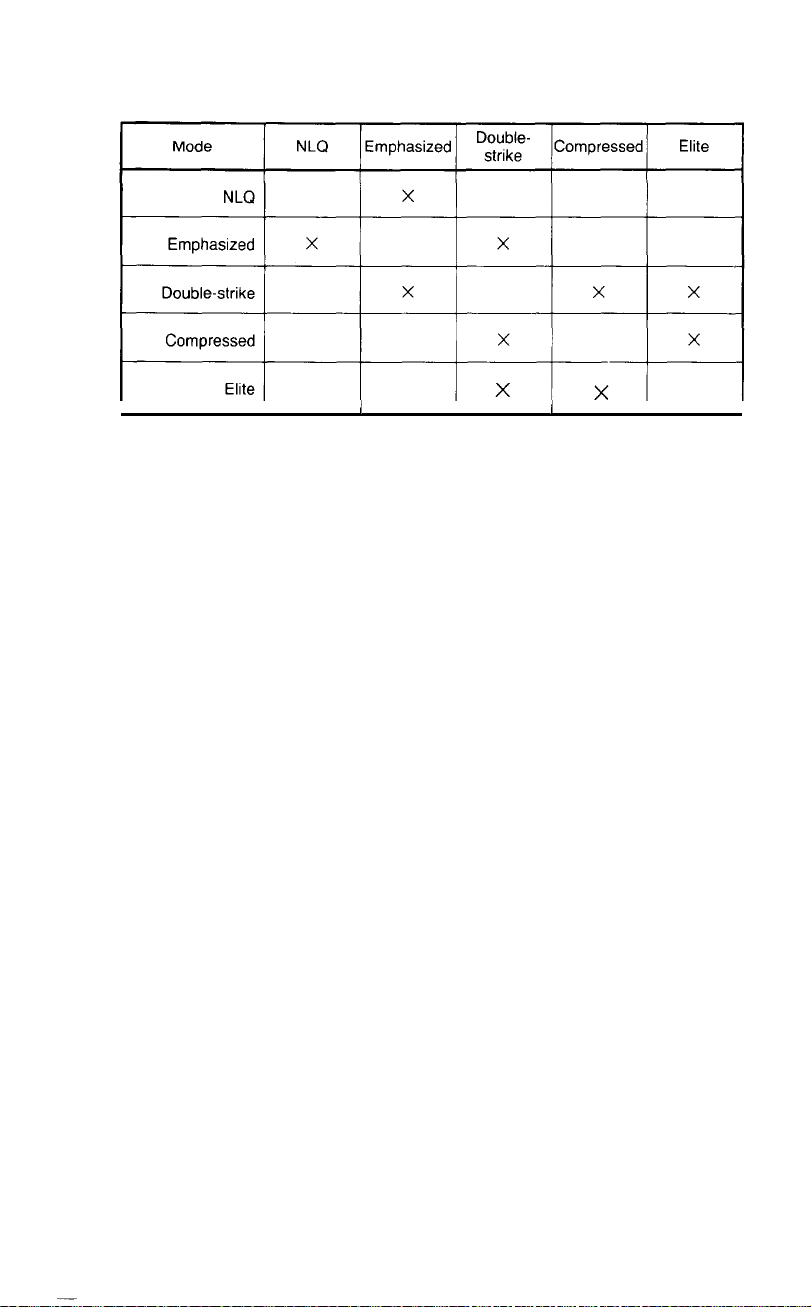
Table
2-2.
Mode combinations
I
I
/
I
I
I
To combine modes you simply select and set more than one mode
before you press the LF button to leave SelecType. After beginning
the procedure in the normal way and pressing the ON LINE button
to select a function and the FF button to set it, you do not press the
LF button. Instead, you press the ON LINE button the required
number of times to select another mode and set that mode with the
FF button. When you have selected and set all the modes you want,
press the LF button to leave SelecType.
Don’t worry about harming your printer if you try to combine
two modes that the LX-80 can’t mix. Your settings cannot damage
the printer because it is prepared for the possibility of receiving codes
for conflicting modes. If it receives codes for two modes that it can’t
combine, it uses only one of the codes.
The essential element in combining modes is keeping a correct
count of the number of times you press the ON LINE button. You
do not start counting again after you press the FF button the first
time. Instead, you continue the count. Therefore, pressing the ON
LINE button three times, then the FF button, then the ON LINE
button two more times and the FF button again gives you a combination of double-strike and elite. The first pressings of the ON LINE
button select double-strike and the next two give a total of five, which
is the number for elite. The number of times you press ON LINE is
cumulative.
J
For another example, follow these steps to combine NLQ with
emphasized for a crisp, bold effect:
1) See that the ON LINE and READY lights are on. Then press the
ON LINE and FF buttons at the same time.
21
Page 30

2) Press the ON LINE button once and then the FF button once.
Since one is the code for NLQ, you have now set the LX-80 for
that mode.
3) Press the ON LINE button one more time and then the FF
button once. This makes a total of two times, and thus sets the
LX-80 for emphasized also.
4) Press the LF button to return the panel buttons to their stan-
dard functions.
Now press the ON LINE button and print your document. If
your printing appears in
emphasized Near Letter Quality
as you see here, you have successfully combined the two modes.
If you get any other results, turn your printer off and back on (to
reset it) and then try the steps again.
SelecType Cautions and Tips
Once you have learned the simple technique for controlling print
styles with the panel buttons, you can use it whenever you wish. You
should be aware of two minor restrictions, however.
l SelecType is designed to control the printing of an entire file or
document, not an individual line or word. To print a single word
in an enhanced mode, use one of the other print control methods
listed at the beginning of this chapter.
l If there are print codes in the document or file you are printing,
those codes override your SelecType settings. This seldom happens, since most people use SelecType on files that don’t have
print codes, but remember that if your LX-80 follows the SelecType
instructions for only part of a document, you may have print
codes in the document that are conflicting with the SelecType
modes.
Remember that any mode you turn on with SelecType stays in
effect until the printer is turned off or receives a cancelling or reset
code. Turning off the printer is the simplest method to cancel the
modes you have set, but if you want to learn how to cancel them by
using SelecType, turn to the section called Cancelling Functions with
SelecType in Appendix F.
22
Page 31

Chapter 3
Elements of Dot Matrix Printing
This chapter is for those of you who want to know something
about how your printer works. It’s a simple, non-technical explanation of the basics of dot matrix printing that will help you understand
some of the later chapters.
The Print Head
The LX-80 uses a print head with nine pins or wires mounted
vertically. Each time a pin is fired, it strikes the inked ribbon and
presses it against the paper to produce a dot. This dot is about 1/72nd
of an inch in diameter. The size varies slightly depending upon the age
of the ribbon and the type of paper used. As the head moves horizontally across the page, these pins are fired time after time in different
patterns to produce letters, numbers, symbols, or graphics.
For example, to print a pica capital T, the head fires the top pin,
moves 1/60th of an inch, fires the top pin again, moves 1/60th of an
inch, fires the top seven pins, moves 1/60th of an inch, fires the top
pin, moves another 1/60th of an inch, and fires the top pin once more
to finish the letter. All this happens in only 1/100th of a second.
Figure 3-1. A capital T
23
Page 32

Bidirectional Printing
In nearly all of our discussions in this manual, we describe the
action of the LX-80 print head as moving from left to right, as a
typewriter does. During its normal operation while printing in the
draft mode, however, the LX-80 prints bidirectionally. That is, the
print head goes from left to right only on every other line. On the
other lines it reverses everything and prints right to left.
By reversing both the dot patterns and the printing direction, the
LX-80 produces a line that is correct and looks no different from a
line printed from left to right. It does this to save time. Otherwise, the
time the print head takes to go from the right margin back to the left
would be wasted.
The intelligence of the printer takes care of all the calculations
necessary for this bidirectional printing, so you don’t have to be
concerned about it. You simply do your part of the work as if the
printer will be printing from left to right on each line and let the
LX-80 do all the necessary calculations so that you can enjoy the
increased speed.
Changing Pitches
In addition to pica, in which there are 10 characters per inch, the
LX-80 can also print in other widths, or pitches. It does so by reduc-
ing the distance between pin firings. In the elite mode it prints 12
characters per inch and in the compressed mode it prints slightly
more than 17 characters per inch. The pattern of the dots is not
changed, but the horizontal space between them is reduced.
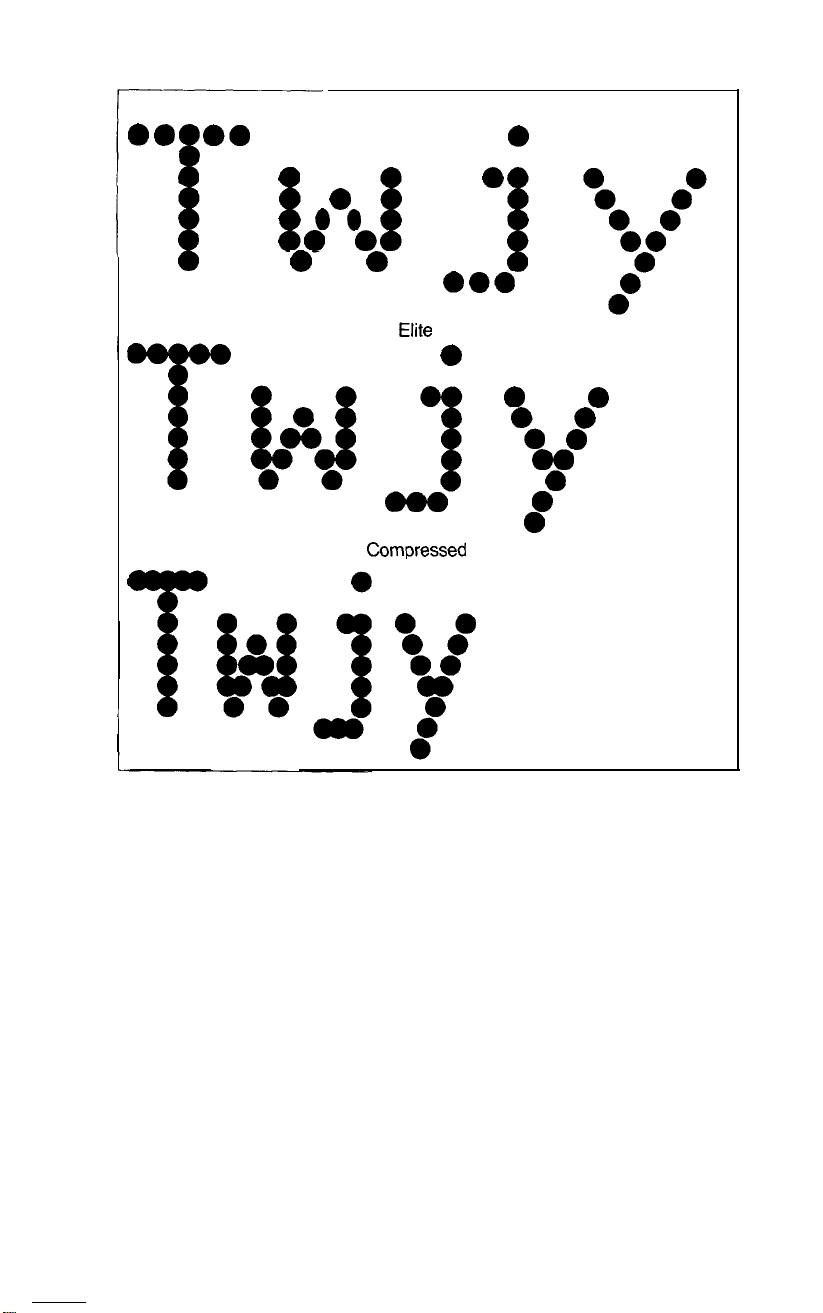
In Figure 3-2 are enlargements of four sample letters in each of the
three pitches. These letters are chosen to show how the LX-80 prints
letters that are uppercase and lowercase, wide and narrow, and with
and without descenders (the bottom part of the y).
24
Page 33
Pica
a.
00
0
l a
I
I----
f
0 0
0
I
0
..a
Elite
l
a
0
f
0
f
0
8
T
Compressed
I
v
0
0
1
Figure 3-2. The three pitches of the LX-80
The dot pattern of each character is carefully designed so that in
pica mode no dot overlaps another. The reason is that in normal
high-speed printing of pica the pins cannot fire and retract and fire
again quickly enough to print one dot overlapping another.
25
Page 34

In Figure 3-3 there is a grid of lines behind the pica characters so
that you can more easily see how they are designed. As you look at
these characters you can see three rules that govern their design: the
column on the right side is always left blank so that there will be
spaces between the characters on a line; no character uses both the top
and the bottom row; and a dot can be placed on a vertical line only
when the columns next to that line are not used.
Figure 3-3. LX-80 dot matrix characters
NLQ Mode
The preceeding examples are in the LX-80’s draft mode, but the
LX-80 also has the high-quality NLQ (Near Letter Quality) mode
that you have seen in previous chapters.
The NLQ letters are more fully formed than the draft letters because they are made up of many more dots. Two differences between
draft and NLQ printing enable the LX-80 to print such a large num-
ber of dots for each character. In the NLQ mode, the head moves
more slowly, so that dots can overlap horizontally, and each character
is printed with two passes of the print head.
To further insure the quality of NLQ characters, both passes of the
print head are in the same direction so the alignment of the dots is
exact.
Because the NLQ mode uses two passes for each line and prints
only in one direction, your printing does take longer in this mode.
With the two modes, draft and NLQ, the LX-80 lets you choose
high speed or high quality each time you print. You can print your
ordinary work or preliminary drafts quickly in the draft mode and
use the NLQ mode for final copies or special purposes.
26
Page 35

SelecType makes it especially easy to change from draft to NLQ,
but you can also select and cancel the NLQ mode with a software
command or with a special switch in the back of your printer. You
can find the software command in Chapter 5 and the operation of the
switch (called a DIP switch) in Appendix D.
27
Page 36

Chapter 4
Printer Control Codes
The LX-80 printer is easy to use, especially with commercial soft-
ware that has print control features. This chapter explains some of the
how a computer communicates with your printer. This information
should also help you understand the terms used in your software or
If you are an advanced user or a programmer, you may want to
turn to Appendix B, which has a full summary of all the LX-80
ASCII Codes
When you write a document with a word processing program, you
press keys with letters on them. When you send the document to a
printer, it prints the letters on paper. The computer and the printer,
however, do not use or understand letters of the alphabet. They
function by manipulating numbers. Therefore, when you press the A
key, for example, the computer sends a number to its memory. When
the computer tells the printer to print that letter, it sends the number
to the printer, which must then convert the number to a pattern of
pins that will fire to print the dots that make up that letter.
The numbers that computers and printers use are in binary form,
which means that they use only the digits 0 and 1. In this manual,
however, we use decimal numbers in our explanations because most
users are more familiar with these numbers and because most programming languages and applications programs can use decimal numbers. The computer system or the program takes care of changing the
decimal numbers to binary form for you.
29
Page 37

Computer and printer interaction would be terribly confusing if
different kinds of computers and printers used different numbers for
the same letter of the alphabet. Therefore, most manufacturers of
computers, printers, and software use the American Standard Code
for Information Interchange, usually referred to as ASCII (pronounced ASK-Key). The ASCII standard covers the decimal num-
127 and includes codes for printable characters
(letters, punctuation, numerals, and mathematical symbols) and a few
control codes, such as the codes for sounding the beeper and performing a carriage return.
Although other codes are not standardized in the computer industry, the ASCII system means that at least the alphabet is standardized.
A programmer or engineer knows, for example, that 72 is the decimal
code for a capital H and 115 is the code for a lowercase s no matter
what system he or she is using.
ESCape Code
Although the original ASCII standard was designed to use the
decimal numbers 0 through 127, computer and printer manufacturers
soon extended this range (to 0 through 255) in order to make room
for more features. On the LX-80, for example, the codes from 160
through 254 are used for italic characters. Because even this extended
range is not enough for all the features used on modern printers, the
range is further extended with a special code called the Escape code.
This code is often printed with the first three letters capitalized
(Escape) or abbreviated as ESC or <ESC>.
With the ESCape code, for which decimal 27 is used, printers and
computers are not restricted to only 256 instructions. The ESCape
code is a signal that the next code will be a printer control code
instead of text to print. For example, if the printer receives the number 69, it prints a capital E because 69 is the ASCII code for that letter.
If, however, the printer receives a 27 just before the 69, it turns on
emphasized mode, because ESCape “E” is the code for emphasized.
You can see how important the ESCape code is by looking at
Appendix B. There you will see that nearly every code the LX-80
uses is an ESCape code.
30
Page 38

Printer Codes
TO take advantage of the many print features of the LX-80, you
can use a software program that sends the correct codes or you can
use another method to send codes. It’s not possible to be as precise
and specific as we would like in the rest of this chapter because the
LX-80 works with so many different applications programs and com-
puter systems. If we gave precise instructions on how to use your
LX-80 with every one of them, this manual would fill at least four
volumes and would have to be updated every month.
We will, therefore, give you the general principles of how software
communicates with your printer, plus several ways the codes of the
LX-80 are used by applications programs such as word processing
and business programs. With this information and possibly some help
from your dealer or the manual for your applications program, you
can take advantage of all the features of the LX-80 that you want to
use. Incidentally, there is no standard terminology for software
codes; thus, the terms in your software manual may be different from
the ones we use here.
In general there are three ways you send printer codes with com-
mercial software:
l Using SelecType, the feature described in Chapter 2.
l Instructing the program during an installation or setup procedure
so that you can then use codes that are typed in along with your
text or numbers; we call these embedded codes.
l Inserting LX-SO printer codes in your text along with a special
code that tells the printer that the inserted codes are not text or
data.
There are three common formats for sending printer codes. Your
applications software or its manual should tell you which one to use.
l Decimal numbers-for example, 27 is the decimal number for the
ESCape code, and 13 is the decimal number for a carriage return.
l Hexadecimal numbers, in which the ESCape code is 1B and a
carriage return is 0D. You don’t have to understand hexadecimal
numbers to use them. If your software calls for hex numbers, just
consult Appendix B or the Quick Reference Card for the
appropriate number.
31
Page 39

l The ESCape and control keys on your computer’s keyboard. With
this system you send the ESCape code by pressing the ESCape
key and a carriage return by pressing the control key and the M at
the same time. (See Appendix B or the Quick Reference Card for
the control key codes.)
Embedded codes
A program that uses embedded codes usually has its own set
of codes that you type into your document or file. When the program receives one of these codes, it sends the proper code to the
LX-80. For example, one popular word processing program has
you turn italic mode on and off by pressing the control key and P
and then pressing the Q. So if you want to italicize a word, you type
Control-PQ before it and after it. When the program reaches the first
Control-PQ, it sends the code to turn italic mode on and when it
reaches the second, it sends the code to cancel
~~.III<
Please note that
these are not the same as the control key codes mentioned above.
Once you tell such a program that you are using an Epson printer,
it will know which codes to send. (Often you don’t even need to
specify which Epson printer you are using.) You usually tell the
program what printer you are using through an installation or set-up
procedure. The instructions should be in your software manual. In
addition, your software or computer dealer may be able to help you.
Many programs that use embedded codes also have a few commands that the user can define. If you are new to using printers, don’t
worry about these yet. Just use the standard features. Later, when
you are more familiar with your software and with your LX-SO, you
may want to investigate the user-defined commands and customize
your program.
Inserted codes
To take advantage of some of the advanced features of the LX-80,
some programs require inserted codes. Those codes allow you to send
commands to the printer in the middle of text or data. In most of
these programs one code signals that the next numbers are printer
instructions, not text or data. In one such program, for example, you
type Control-V (pressing V while holding down the control key) to
signal the beginning of printer instructions. Then you enter your
print codes and type Control-V again to signal the end of the printer
instructions.
32
Page 40

If your word processing program allows inserted codes, it will
probably do standard printing without such codes. It is only for
special features that you will need to use inserted codes. For example,
if you want to have headings in wide bold printing (called expanded
emphasized), you would probably have to use inserted codes. For the
program we mentioned above you would type Control-V, then the
code for expanded emphasized, Control-V again, and then the text of
the heading. The codes for expanded emphasized are in Chapter 6 and
Appendix B.
Again, if this sounds terribly complicated, don’t worry. Use your
LX-80 with the standard features of your word processing program
until you become more familiar with both of them. Then you can
decide whether or not you need or want to learn to use inserted
codes.
Programming Languages
If neither of the methods described above seems appropriate for
your application, you can write a program in BASIC or any other
programming language to send control codes to your printer. In the
chapter on page formatting you will find examples of such programs.
Just remember that with this method your printer control code stays
in effect for the whole document you print. This method is good for
setting margins, for example, but does not work for italicizing a word.
Now you have some background on how printers work and how
software can communicate with them. Turn to the next chapters to
learn about the specific features of your LX-80 printer.
33
Page 41

Chapter 5
LX-80 Features
Beginning with this chapter we describe many of the printing fea-
Demonstration Programs
Along with our discussion and examples of the LX-80 features, we
include demonstrations in the BASIC programming language so that
you can see these features in action. Although we know that you will
probably not do much of your printing using BASIC, we chose it for
our demonstrations because most computer systems include some
form of BASIC, so our examples are ones that almost every one of
you can try.
You don’t need to know anything about BASIC to type in and run
these programs. Just check your BASIC manual to see how to load
BASIC in your computer and how to run a program. As you run the
programs (or even as you read the explanations and look at the
printed examples), you learn how the LX-80 responds to the messages your computer sends it by printing letters, numbers, symbols,
and graphics in various print modes.
Even if you never use BASIC again, you will know the capabilities
of your printer, capabilities that can often solve your printing problems. For example, if you need a special symbol, such as the Greek
character
user-defined characters and create such a character.
Z:,
you will know that you can turn to the chapter on
35
Page 42

If you don’t want to do the exercises in BASIC, you don’t have to.
Many users are quite happy with their printers without ever learning
load paper. Therefore, you shouldn’t be intimidated by the information in this manual. In most cases the software that you use for word
cating with the printer for you.
In fact, because of Epson’s long-standing popularity, many prog-
need to do is specify in an installation program that you are using an
Epson printer. Then the program sends the correct codes for the
explained in the manual for your software program.
We have designed these chapters so that you can concentrate on
using the features of the LX-80 instead of on programming, but a few
instructions arc necessary. Because the examples in this manual are in
Microsoft BASIC (MBASIC), the most widely used BASIC in personal computers, most users can enter and run the programs exactly
as they appear in these pages.
If your computer system uses any other kind of BASIC, you may
have to make a few changes. Probably the only item you will need to
change is the instruction LPRINT, which is the MBASIC command
to send something to the printer. Some forms of BASIC use PR#l at
the beginning of a program to route information to the printer and
PR#0 at the end to restore the flow of information to the screen. If
you have such a system, just put PR#1 at the beginning of your
program and then use PRINT instead of LPRINT in the programs. If
you have any other system, consult its manual to see if any modifications to our programs arc necessary.
In Chapter 3 you saw the enlargements of the three LX-80 pitches.
Now you’ll learn how to produce them.
Pica Printing
The first exercise is a simple three-line program to print a sample
line of characters in pica, the standard pitch. Just type in this program
exactly as you see it:
40
FOR
50 LPRINT
60 NEXT
36
X=65 TO 105
(ZHR$(X)
X:
LPRINT
;
Page 43

Changing Pitches
Now you can try other pitches. As we explained in Chapter 3, the
20 LPRINT CEIR$( 27 > “M” ;
This line uses the command for elite, ESCape “M”, to turn on that
mode. Your printout should look like the one below.
i’; B i: g E i- C; H 1 J
x L M bi a ,Q Q 17 5 T [ !
!j’ W yi, ‘Y Z i \ j .” _ ’ ij. 1) c: rj
e f g h
i
The next addition to the program cancels elite with ESCape “P”
and turns on compressed with ASCII 15:
30 LPRINT CHR$(27) “P”CHR$(15);
Now run the program to see the line printed in compressed mode.
Cancelling Codes
As you saw in the third version of the print pitch program, you
must cancel a code when you do not want it any more. With very few
exceptions, the LX-80 modes stay on until they are cancelled. It is
important to remember this because an LX-80 mode can stay on even
if you change from BASIC to another type of software. For example,
if you print a memo with a word processing program after you run
the program above, the printer will still be in compressed mode;
therefore, the memo will be in compressed print. To cancel compressed, use ASCII 18.
37
Page 44

To avoid having one program interfere with the printing modes of
another, you can cancel a mode one of two ways:
l With a specific cancelling code, such as the ESCape "P" that we
used above to cancel elite. Each mode has a cancelling code, which
you can find in the discussion of the code and in Appendix B. Pica
is an exception to this rule. To cancel pica, turn on elite.
l By resetting the printer, a method explained in the next section.
Resetting the Printer
Resetting your LX-80 cancels all modes that are turned on. You
can reset the printer with one of two methods:
l Sending the reset code (Escape
l Turning the printer off and back on.
“a”)
Either one of these methods returns the printer to what are called
its defaults, which are the standard settings that are in effect every
time you turn the printer on. The two effects of resetting the printer
that you should be concerned with are: it returns the printing to
single-strike pica, thus cancelling any other pitches or enhancements
you may have turned on, and the current position of the print head
becomes the top of page setting.
Some of our demonstration programs end with a reset code so that
the commands from one program will not interfere with the commands in the next one. After you run a program with a reset code in
it, remember to change the top of page setting before you begin
printing full pages.
Pitch Comparison
Now that you have used three short programs to produce samples
of the three main pitches, you can choose the pitch that you prefer or
the one that best fits a particular printing job. Most people use either
pica or elite for printing text and compressed for spreadsheets or
other applications in which it is important to get the maximum number of characters on a line.
38
Page 45

In fact, if you need even more than the 132 characters per line that
compressed gives you, you can combine elite and compressed for a
mode we call compressed elite. It is not really another pitch, because
the size of the characters is the same as in the compressed mode; only
the space between the characters is reduced. You can see this mode,
which allows 160 characters to fit on a line, if you replace line 30 in
your last program with this line:
30 LPRINT CHR$(15);
With this addition, the program turns on compressed but doesn’t
turn off elite, giving you the printout below:
~~DEF~~]Jr~#M~~i~~~~‘i~~‘~,
If your printout is different, you may need a WIDTH statement
such as the one below:
I.“- &&f$l
5 WIDTH LPRINT 255
The format for your system will probably be different. Consult
your BASIC manual.
Near Letter Quality Mode
The examples so far in this chapter are in the draft mode, and you
have already learned how to turn on the NLQ mode with SelecType,
but you can also see the NLQ mode with the following program:
10 LPRINT CHRrG(27)
20
FOR
X=65 TO 105
30 LPRINT
40
NEXTX:
Note that you use a lowercase x, not a capital X, in line 10. Because
of the high resolution of the NLQ mode, it prints only in pica, not in
elite or compressed.
CHR$(X);
LPRINT
“x”CHR$(l);
39
Page 46

All the modes demonstrated in this chapter are compared in Table
5-1.
Table
5-1.
Summary of
LX-80
pitches
On
“x”
Codes
1
ESC
ESC
ESC
Off
“x”
“P”
“P”
Print sample CPI
t 1 inch +
Near
L,et;ter
,3 ‘; (:‘;i’>, !Y.yti ‘I !\,‘!“[
Elite pri.rrt
r.oepr essej
~iqtt-ess~ ei 1 te f3-if-$
0’ !.
nt
Quality
10.00
10.00
12.00 ESC “M”
17.16 15 18
20.00 ESC
ESC
“M” 15
Remember that you don’t have to use BASIC to change modes;
you can use any method that sends the printer the proper codes.
0
18
40
Page 47

Chapter 6
Print Enhancements and Special Characters
Now that you have seen how you can change the pitch of your
LX-80 printing, we can show you many more ways to vary and
enhance your printing. So that you won’t have to type in dozens of
programs to try all the features, we give you just one master program
that can demonstrate any feature.
Bold Modes
Besides the pitches (pica, elite, and compressed) that we covered in
Chapter 5, the LX-80 offers many other typestyles, including two for
bold printing-emphasized and double-strike.
Emphasized mode
In the emphasized mode the LX-80 prints each dot twice, with the
second dot slightly to the right of the first. In order to do this, the
print head must slow down so that it has time to fire, retract, and fire
the pins quickly enough to produce the overlapping dots. As you can
see in Figure 6-1, this method produces better-looking, more fully-
formed characters that are darker than single-strike ones.
Figure 6-1. Emphasized
and
single-strike
41
Page 48

Emphasized works only in draft pica and NLQ modes. In elite and
compressed the dots are already so close together that even with the
reduced print speed, the LX-80 cannot fire, retract, and again fire the
pins quickly enough to print overlapping dots.
You do sacrifice some print speed and ribbon life with emphasized,
because the print head slows down and prints twice as many dots, but
the increase in print quality is well worth it. Indeed, you may want to
use emphasized instead of the NLQ mode for some purposes because
emphasized printing is faster than NLQ printing.
Now that you have seen our example of emphasized printing, we
will give you a master program that allows you to test almost any of
the ESCape codes, including the ESCape code to turn on emphasized: ESCape “E”.
Master program
First, type in the program below. If you have some programming
experience, you can see that the program asks you what codes
you want to test and then prints a sample of what the codes do. Be
sure to type in the blank spaces in lines 70 and 80. If you are using
Applesoft™ BASIC, see Appendix F.
20 PRINT
"Which ESCape code do you II
30 INPIJT "want to test";A$
40 PRINT "What kind of printing (
50 INPUT "does it produce";B$
60 LPRINT CHR$(27)A$
70 LPRINT "This sample uses ESCape ";A$
80 LPRINT "to produce ";B$;" printing."
90 LPRINT CHR$(27)"@"
Now run the program. When the first question appears on the
screen, type a capital E and then press the RETURN key. Type
“emphasized” and press the RETURN key in answer to the second
question. The program is easy to use. Just remember to press the
RETURN key after the answer to each question and to use a capital
letter in the answer to the first question unless we tell you to use a
lowercase letter for a specific code.
42
Page 49

You should get the following printout when you run this program
and type “E” and “emphasized” in answer to the questions.
This sample
t.o
proi-fuce
USPS ESCape E
emphasized
pr-inting.
The code to turn off emphasized is ESCape “F”.
Double-strike
The other bold mode on the LX-80 is double-strike. For this mode
the printer prints each line, then moves the paper up slightly and
prints the line again. Each dot is printed twice, with the second one
slightly below the first as
you can see in Figure 6-2.
tiiiiil
Figure 6-2. Double-strike and single-strike
Unlike emphasized, double-strike combines with any draft pitch
(but not with NLQ)because
it does not overlap dots horizontally.
Since each line in this mode is printed twice, the speed of your
printing is slowed. The code for double-strike is ESCape “G”. Try it
in the the master program if you wish. The code to turn off doublestrike is ESCape “H”.
43
Page 50

Expanded Mode
Perhaps the most dramatic mode on the LX-80 is expanded. It
produces extra-wide characters that are good for titles and headings.
For this mode, the dot pattern of each character is expanded and a
duplicate set of dots is printed one dot to the right. You can see the
difference between pica and expanded pica in Figure 6-3.
Figure 6-3. Expanded and standard characters
You can try expanded yourself by using the code “W1” in the
master program. Notice that expanded uses an ESCape code format
that is slightly different from the previous ones. You must use the
numeral one as well as a capital W to turn on expanded. For this
mode the letter and the numeral one together turn on the mode and
the letter and the numeral zero together turn it off. Thus ESCape
“W1” turns on expanded and ESCape “W0” turns it off.
Those of you who are programmers may be interested in another
form of expanded. In this alternate form, called one-line expanded,
the printing is the same as that in Figure 6-3, but it is turned on by
ASCII 14 and is turned off by a line feed, ASCII 20, or ESCape
“MO”.
Mode Combinations
If you have read Chapter 2, by now you’re probably wondering
how to combine modes using control codes as you did with the
SelecType feature. For example, can a title be made especially vivid by
combining expanded and emphasized? The answer is that you can
combine nearly all of the print modes on the LX-80. Indeed, your
44
Page 51

LX-80 printer can print such complicated combinations as doublestrike emphasized expanded underlined italic subscript, although
we’re not sure that you would ever want to use such a combination.
The point is, however, that the LX-80 has the ability to produce
almost any combination you can think of; it’s up to you to decide
which ones you want to use.
To see a few combinations, remove line 90 from the master program. (In MBASIC simply type 90 and press RETURN to delete the
line.) Now run the program once and enter “E” and “emphasized” in
response to the questions on the screen. This will give you the same
results as the first time you ran the program, but it will leave the
printer in emphasized mode so that you can add another mode. Then
run the program again (without turning off the printer). The second
time enter “W1” and “emphasized expanded.”
Your printout should be in the typestyle below, showing that the
two modes combine with no trouble. You can experiment with other
combinations if you wish or you can wait for the section later in this
chapter that explains a special ESCape code, Master Select, which
allows you to combine as many as seven features with one ESCape
code.
When you are through trying combinations, be sure to replace line
90 in the master program so that you can again try one feature at a
time.
Italic Mode
You may occasionally want to print italic words for emphasis,
titles, or other uses. The LX-80 has italic mode to enable you to use
italic characters for any purpose. Although characters produced by
the previous modes in this manual are modifications of the standard
pica characters, the LX-80 uses completely different characters for the
italic mode. In the printer’s Read Only Memory (ROM) is a complete
set of draft italic characters. You can see the difference between standard and italic draft characters in Figure 6-4.
45
Page 52

The code to turn italic mode on is ESCape “4”. Try it in the master
program if you wish. When you use this code in the master program,
enter “4” in answer to the first question just as if it were a letter of the
alphabet instead of a number. ESCape “5” turns off italic mode.
Those of you who use this code in an applications program should
remember that any character in quotation marks in our discussions of
ESCape codes is an alphanumeric character, not a numerical value.
Underline Mode
The LX-80 also has a mode that will underline characters and
spaces. You turn it on with ESCape “-1” and off with ESCape “-0”.
Note that the underline code is like the expanded code in that it uses a
character, in this case the hyphen or minus sign, combined with
numeral one to turn it on and a character combined with the numeral
zero to turn it off. As you can see in Figure 6-5, this mode prints a dot
in the bottom row of each column, thus producing a continuous
underline.
46
Page 53

Figure
As shown in Figure 6-5, the underline mode is continuous, but
some word processing and other applications programs produce an
underline that leaves spaces between characters as demonstrated in the
printout below.
If your software prints this type of underline, it is using the
LX-80’s underline character (ASCII 95), not the underline mode.
Because the underline character is only five dots wide, it does not fill
the spaces between characters. If you prefer a continuous underline,
you may be able to use the underline mode through one of the
methods we discussed in Chapter 4.
6-J.
The underline mode
Master Select
The LX-80 has a special ESCape code called Master Select that
allows you to choose any possible combination of eight different
modes: pica, elite, compressed, emphasized, double-strike, expanded,
italic, and underline. The format of the Master Select code is ESCape
“!” followed by a number that is calculated by adding together the
values of the modes listed below:
underline
italic
expanded
double-strike
emphasized
compressed
elite
pica
128
64
32
16
8
4
1
0
47
Page 54

For any combination, just add up the values of each of the modes
you want and use the total as the number after ESCape “!“. For
example, to calculate the code for expanded italic underlined pica, add
the following numbers together:
underline
italic
expanded
pica
To print this combination, therefore, you use ESCape “!” followed
by the number 224. In BASIC the command is CHR$(27)“!”
CHR$(224).
To try this number or any other, enter and run this short program,
which will ask you for a Master Select number and then give you a
sample of printing using that code. Again, if you are using Applesoft
BASIC, see Appendix F.
10 INPUT
20 LPRINT
30 LPRINT “This
40 LPRINT “Master
50 LPRINT
In this program, you can use any number you calculate with the
formula above, but remember that emphasized can’t combine with
compressed or elite. If you try to combine emphasized with either of
the two narrow pitches, you won’t harm your printer; it will simply
use a priority list in its memory to determine which mode to use. This
priority list causes a combination of emphasized and elite to produce
elite only, a combination of emphasized and compressed to produce
emphasized only, and a combination of all three to produce compressed elite.
"Master Se1
CHR$(
27) ” ! “CHR$(M)
CHR$(
27) “@”
sample
Select
128
64
32
-4
224
ect number” ;
of
printing
number”;M
M
u.ses ”
Master Select is a powerful code that gives you an easy way to
produce multiple combinations with a single command. To see
double-strike emphasized italic printing, for example, you need only
one ESCape code instead of three.
48
Page 55

Indeed, Master Select is such a powerful feature that it may occasionally be more powerful than you want it to be. Because it controls
eight different modes, a Master Select code will cancel any of those
eight that are not selected. For example, suppose that you have a page
in elite and want part of it printing in italic. If you use ESCape “!” 64
to turn on italic, your LX-80 will begin printing in italic pica instead
of italic elite because the 64 code does not include elite. Use 65 for
italic elite.
Superscript and Subscript
Your LX-80 can also print superscripts and subscripts, which you
can use for mathematical formulas, footnotes, and other items that
require numbers or letters above or below the usual print line.
ESCape “S0” turns on superscript and ESCape “S1” turns on subscript. ESCape “T” turns off either one. You can enter either ESCape
“SO” or ESCape “S1” in the master program, but that will print the
whole sentence in superscript or subscript. Some more realistic examples are below:
E-ttl[‘”
H&i
-This
-Farrt i
5
+cILLnd if? t f-rree? sO?it-lT:BEi.
7
As you can see, you can use superscript or subscript for an individual character. Just find out how to send printer codes in your
applications program; then send the proper codes to the printer.
Special Characters
The LX-80 has two groups of special characters that can add distinction to your printing. The international set gives you characters
used in many different languages, and the special graphics set contains
symbols, objects, and line characters that you can combine for artistic
effects or business uses.
International Characters
As you know, you need a few extra characters for languages other
than English. The LX-80 has provided for printing in many languages
by having 96 international characters in its ROM (Read Only Mem-
ory). This total includes characters in three sets: draft, draft italic, and
NLQ (Near Letter Quality).
49
Page 56

In order to print any of these characters, first select one of the
following character sets and then use the individual characters within
that set.
Italy
USA
0
1
France
2
Germany
United Kingdom
3
4
Denmark I
5
Sweden
6
7
8
9
10
ain
SP
Japan
Norway
Denmark II
You select the character set in one of two ways: with an ESCape code
or with a switch in the back of your printer. The ESCape code in
BASIC has the following format:
LPRINT CHR$(27) “R”CHR$(n)
in which n stands for the appropriate number from the list above. In
other words, the BASIC command to select the French character set
is
LPRINT CHR$(27) “R”CHR$(1)
The other method of selecting an international character set is with
the small switches, called DIP switches, in the back of the printer. If
you plan to use one of the international sets quite a bit, see Appendix
D for instructions for using the DIP switches.
Once you have selected a character set, whether you do it with the
ESCape code or the DIP switches, you will be able to print several
new characters. The character sets are shown in Tables 6-1, 6-2, and
6-3.
Table 6-1. International characters in NLQ mode
96 123 124 125 126
94
’
’
--
ii ) -
USA
FRANCE
GERMANY
UK
DENMARK
SWEDEN
ITALY #
SPAIN
JAPAN #
NORWAY
DENMARK II #
1
35
36
$~Aou^*~iju~
#
#
n
h
# n d
ttilBAUBz0A~
64
91 92 93
ti#UAti8~b&~
\lfAAtiBb&3i
A * -
Y f *
rFBAiiB:::ij
50
Page 57

Table
Table
6-2.
International characters in draft mode
6-3.
International characters in draft italic
The number at the top of each column in the tables is the ASCII
code that prints the characters in that column.
Once you have selected an international character set with the DIP
switches or the ESCape “R” code, you can use the tables to see which
characters on your standard USA keyboard will produce the international characters you want. Simply type the character from the top
row of one of the figures in order to print the corresponding character
in the row of the set you have chosen. For example, if you have reset
the DIP switches for the UK character set and you press the # key,
the f: symbol will be generated. Even though you will see the #
symbol on the screen, the 2 symbol will be printed on the paper. For
another example, if you have selected the Swedish character set and
you press the @ key, the I? symbol will be generated.
If your keyboard does not have one of the keys that you need, you
will have to send the proper ASCII number to the printer in another
way, such as a programming language or inserted or embedded codes.
51
Page 58

Graphics Character Set
The LX-80 printer’s Read Only Memory (ROM) also contains the
32 graphics characters that you see in Figure 6-6.
Figure 6-6. Special graphics characters
Undoubtedly you can think of uses for many of the shapes and
symbols available in this set, and you can combine the line graphics
characters (the ones on the first row) to form various sizes and shapes
of boxes and other figures that use straight lines.
To print these graphics characters you must use either a programming language or a computer with a graphics shift or other special key
that allows you to send graphics codes.
Sending the codes for these characters to the printer is a two-step
process just as it is for the international characters. In BASIC, first
you send CHR$(27)“m”CHR$(4) to turn on the graphics character
set, then you send the code numbers given in Figure 6-6. After you
have used the ESCape code to turn on the graphics character set, the
LX-80 prints the codes from 128 through 159 as graphics characters.
You can change pitch and weight with the graphics characters just
as you can with the other characters in the ROM of the LX-80. The
characters in Figure 6-6 are printed in expanded elite. The printout
below shows the characters in pica:
52
Page 59

The next printout shows the characters in emphasized expanded
pica:
The design of all the special graphics characters is shown in en-
largements in Appendix A.
Because normal line spacing leaves space between the lines of
graphics characters just as it does between lines of text, you must
change the line spacing when you combine line graphics characters to
form boxes or other figures. For most programs ESCape “1” gives
you the best line spacing for combinations of graphics characters.
Further details on line spacing are in Chapter 7.
Although you can use any print mode with the graphics characters,
we suggest that you not use elite or compressed. These modes cause
small gaps in horizontal lines that are formed by a combination of line
graphics characters.
53
Page 60

Chapter 7
Page Formatting
Although the LX-80 printer has many sophisticated commands to
set margins, line spacing, and horizontal and vertical tabs, we won’t
take up your time with extensive discussions of these because most of
these functions are taken care of by applications programs. This chapter merely describes a few commands that the average user might
need. If you want more information, you can find all the commands
in Appendixes B and C.
Margins
The LX-80 allows you to set the left and right margins with simple
ESCape sequences. The left margin command is ESCape “1” followed
by the number of the column you choose for the left margin. The
right margin command is ESCape “Q” followed by the column number of the right margin you want. For the left margin command, be
sure to use a lowercase letter 1, not the numeral one.
If your word processing program does not allow you to change the
margins, you can send margin commands to your LX-80 with BASIC
or another programming language before you print your documents.
For example, if you prefer wider margins than your word processing
program gives you, run the following BASIC program before printing. This program gives you a left margin of 10 and a right margin of
60, but you can use any numbers you prefer for the margin com-
mands.
10
L,PRINT CHR$(
20 LPRINT CHR$( 27 ) “Q”CHR$( 60 1 ;
27) “l”CHR$( 10) ;
Such a program will also allow you to choose the margins you
prefer for program listings. Just remember that once you run a program that sets margins, those margins are in effect until you change
them with new margin commands or turn off or reset the printer.
55
Page 61

You should be aware that a few applications programs reset the
printer before each document or file they print. These programs will,
of course, cancel your new margin settings. See Chapter 2 to find out
how to test for a reset code in your program.
The maximum right margins on the LX-80 printer are 80 in pica,
96 in elite, 137 in compressed, and 160 in compressed elite. For
further information on this command see Appendix B.
Justification with NLQ
The NLQ (Near Letter Quality) mode offers a justification command that will give you four choices in the formatting of your text.
The command is ESCape “a” followed by one of these numbers:
Left justification
0
1
Centering
2
Right justification
Full justification
3
Left justification is the standard format, in which the left margin is
even and the right margin is not. This is the way most typewritten
pages look.
The centering command centers a line of text between the margins.
This is handy for headings, titles, and captions.
Right justification is the opposite of left justification. The right
margin is even and the left is not.
Full justification puts extra spaces between words where necessary
so that both the left and right margins are even. This is the wav most
magazines, newspapers, and books (including this one) are printed.
With this command, you may need a WIDTH statement. Since different systems use different WIDTH statements, see your computer or
programming language manual for the proper format. Remember also
to use carriage returns only at the end of paragraphs when you are
using auto justification.
When you use any of the justification commands, be sure that you
send the NLQ command first.
The justification command is designed to be used withs BASIC or
another programming languages, not with word processing prog-
rams.
56
Page 62

Skip Over Perforation
If you are using continuous pin-feed paper for printing program
listings or other material not controlled by an applications program,
you may find that the LX-80 prints right over the perforations between pages. The LX-80 has an ESCape code to prevent this: the
ESCape “N” command. You send ESCape “N” followed by the
number of lines you want the LX-80 to skip at the bottom of a page.
For example, in BASIC the following line will make the LX-80 skip
six lines after each 60 lines:
10
LJPRINT
Since a standard page is 66 lines, this will give you one inch of
blank space at the bottom of each page. If you prefer to have half of
the blank space at the top of the page and half at the bottom, simply
set the top of page approximately three lines (1/2 inch) below the
perforation. (See Appendix E if you need to refresh your memory on
setting the top of page.)
CHR$( 27) “N”CHR$( 6) ;
Line Spacing
Ordinarily you don’t have to worry about how the printer moves
the paper so that it doesn’t print lines of text on top of each other; the
LX-80 takes care of this without any special instructions. If, however,
you want to understand how line spacing works or you need to
change the line spacing for a special application such as graphics,
you’ll want to read this brief explanation of line spacing on the
LX-80.
The movement of the paper between lines is called a line feed and
the distance the paper moves is called a line space. In ordinary printing the line spacing is 1/6-inch, which produces six lines of print per
inch. Figure 7-1 will help you visualize this spacing. As you can see in
the figure, the standard (default) spacing is the same as 12 rows of
dots. Since the LX-80 characters use nine rows of dots, the 12-dot line
spacing leaves three blank rows between the lines of text.
57
Page 63

116 inch
1/6 inch
3 blank
rows
1
3 blank
rows
1
1
Figure 7-l. Standard line spacing
The default line spacing illustrated in Figure 7-1 is the only one
you need for almost all printing of text, but in some cases you may
want to increase or decrease the space between lines. The LX-80 has
several commands to do this. ESCape “0” decreases the line spacing
to 9-dot (9/72-inch), ESCape “1” decreases it to 7-dot, and ESCape
“2” returns it to 12-dot.
In addition, there are commands to specify the line spacing in
72nds of an inch and 216ths of an inch. If you need to make such fine
adjustments in the line spacing, see Appendix B for the proper commands. In the chapter on dot graphics you will see how useful
ESCape “1” can be.
58
Page 64

Paper-Out Sensor
Under the platen (the black roller) of your LX-80 printer is a small
switch that senses whether or not paper is in the printer. When the
end of the paper passes this switch, it sends a signal that sounds the
beeper and stops your printing. This saves wear on your print head,
ribbon, and platen, but because of the distance between the switch
and the print head, it stops the printing about 2 inches from the end of
the page. Therefore, if you use single-sheet paper in your LX-80, you
can’t print on the last 2 inches of each page without an adjustment.
For most computer systems, you merely send the printer an
ESCape “8” to deactivate the paper-out sensor or change one of the
DIP switches described in Appendix D. Then you can print to the
end of the page with single-sheet paper. Some systems, however,
ignore the ESCape code and the DIP switch setting. If ESCape “8” or
the DIP switch setting does not solve this problem for you, see
Appendix F for other solutions.
59
Page 65

Chapter 8
User-Defined Characters
The LX-80 has 416 different characters stored in its ROM (Read
Only Memory). Although this number includes draft, italic, international, special graphics, and Near Letter Quality characters, sometimes you would like to have a few more. For those occasions when
you need a special character or a few letters in a different typeface, the
LX-80 allows you to create your own characters and print them just
as if they were ordinary letters.
Defining Your Own Characters
The printout below displays a few such characters to give you an
idea of what can be done, but remember that these characters are truly
user-defined-you create what you need or want.
c
It may seem that designing a character and telling the LX-80 how
to print it would be extremely complicated, but we have reduced the
task to a simple three-step process: planning your character, running
one program that tests your work and calculates the required DATA
numbers, and running another program to put the character in your
printer’s RAM (Random Access Memory) for use whenever you
need it.
Because the high-resolution NLQ (Near Letter Quality) mode
uses many more dots per character than the draft mode, defining
NLQ characters is somewhat more complex than defining draft characters. You will find the programs for defining NLQ characters at the
end of this chapter.
c-2
v’
it-
43
61
Page 66

After you have created your own characters with our programs,
certain keys that you seldom use will generate the user-defined char-
acters. For example, you will be able to type = to print t .
Your user-defined characters can be utilitarian or imaginative, anything from a scientific symbol to script letters for your initials. Just
follow the simple steps below.
The only restriction on your creativity is that the characters you
define must follow the same rules that govern the rest of the characters printed by the LX-80. They must fit into an 11x9 matrix, no dot
can overlap another, and either the top or the bottom row must be
empty. Look at the enlargements of sample letters in Chapter 3 to see
how the standard LX-80 characters are designed.
Designing Process
Suppose that you need the Greek letter sigma (2) for your work.
Although the LX-80 has a number of special symbols, the sigma is
not one of them. You can, however, create and print such a symbol
with ease. First, use a grid like the one in Figure 8-l to plan where to
place the dots.
123456789
Figure
8-l.
Grid
for
designing
draft characters
Because the last two columns are reserved for the space between
characters, we have not included them in the grid. And since most
characters do not use the bottom two rows, we have used a heavy line
to indicate the usual lower limit for an LX-80 character.
62
Page 67

When you place your dots on this grid, remember that dots cannot
go on horizontal lines, but they can go on vertical lines so long as they
do not overlap any other dots. As you design your characters, draw
the dots as large as you see them in the example on the left in Figure
8-2. If you draw them smaller, you may have overlapping dots with-
realizing it.
out
.overlapping dots
dot on horizontal
I
Figure 8-2. Correct and incorrect designs
line
If you do accidentally call for overlapping dots, don’t worry. The
program will still work, but only one of the dots will be printed.
First definition program
Once you. have drawn your dots on the grid, type in the following
BASIC program and run it. If you are using Applesoft BASIC, see
Appendix F.
100 DIM F(9)
110 FOR I=1 TO 9
120 PRINT "WHICH ROWS HAVE DOTS IN COLUMN";1
130 INPUT R: IF R=0 THEN 150
140 F(I)=F(I)+2-(R-1)
150 IF R=0 THEN NEXT I ELSE GOT0 130
160 LPRINT CHR$(27)":"CHR$(O)CHR$(O)CHR$(O);
170 LPRINT CHR$(27)"%"CHR$(l)CHR$(0);
180 LPRINT CHR$(27)"&"CHR$(O)"<<";
190 LPRINT CHR$(128);
200 FOR X=1 TO 9
210 LPRINT CHR$(F(X));: NEXT X
220 LPRINT CHR$(B)CHR$(O);
230 LPRINT "YOUR CHARACTER
IN
PICA: < < <"
240 LPRINT "IN EXPANDED EMPHASIZED PICA: ";
250 LPRINT CHR$(27)"!*< < <"
260 LPRINT CHR$(27)"!"CHR$(B)"YOUR DATA NUMBERS:"
270 FOR K=l TO 9: LPRINT F(K);: NEXT K
300 END
63
Page 68

So that you can see how the program works, we’ll present the steps
used to create the Greek letter sigma. First is the grid we used to
design the character.
123456789
Figure 8-3. Design
for
sigma
Running the program
For each of the nine columns, the program will ask for the numbers of the rows in which you want dots to appear. Enter the row
numbers one at a time, pressing the RETURN key after each one.
When you have entered all the numbers for a column or when you
want no dots in a column, press RETURN without a number. Remember that the vertical lines in the grid are the even-numbered
columns.
In our example, the program first asks what rows have dots in
column 1. Respond with 8, RETURN, and 2, RETURN to indicate
that you want dots in rows 8 and 2. Then press RETURN alone to
indicate that no more dots go in column 1. For column 2 (the vertical
line) enter 7, and 3, with a RETURN after each of them. Then enter
RETURN to finish with column 2 and go on to column 3.
For column 3 enter 8, 6, 4, and 2. (From now on we assume that
you know to press RETURN after each number and one extra time
to end the entries for each column.) For column 4 enter 5; for column
5 enter 8 and 2; in column 6 there are no dots, so press RETURN
only; for column 7 enter 8 and 2; for column 8 RETURN only; for
column 9 enter 8, 7, 3, and 2.
64
Page 69

Now wait a moment for your computer to calculate the dot patterns and your LX-80 to print the new character in two different
typestyles. Your printout also gives you nine numbers, which you
will use in the next program. You should get the printout you see
below:
When you get to this point with a character of your own, you see
how it looks and whether or not you like it. If you want to make any
changes, move the dots as needed and re-run the program.
If you want to put dots in the bottom row, change the number in
line 190 from 128 to 0. Then the usable rows will be as shown in
Figure 8-4 below.
8
7
6
5
4
3
2
1
123456789
Figure 8-4. Using the bottom eight rows
Second definition program
Once the character looks the way you want it to, enter, modify,
and run the next program. The program as listed creates the sigma
character, but you can use it for any characters you create if you make
one or two changes that we explain after the program listing.
65
Page 70

90 FOR P=58 TO 63: LPRINT CHR$(P);: NEXT P
100 K=l: IF K>3 THEN A=58 ELSE A=60
110 LPRINT CHR$(27)":"CHR$(0)CHR$(B)CHR$(PI);
120 LPRINT CHR$(27)"%"CHR$(l)CHR$(O);
130 LPRINT CHR$(27)"&"CHR$(O)CHR$OCHR$(A-1tK);
140 FOR Z=l TO K
150 LPRINT CHR$(128);
160 FOR X=1 TO 9
170 READ R
180 LPRINT CHR$(R);: NEXT X
190 LPRINT CHR$(O)CHR$(O);
200 NEXT Z
210 DATA 130,68,170,16,130,0,130,0,198
290 FOR P=58 TO 63: LPRINT CHR$(P);: NEXT P
300 SYSTEM
To use this program for your own character or characters, change
the DATA numbers in line 210 by substituting the numbers generated by the first program when you created your own character. If
you have created more than one character, put the DATA numbers
for each character on a separate line as you see in the example below:
210 DATA 112,8,0,138,116,138,0,8,112
220 DATA 58,68,2,128,0,128,2,68,58
Check your work by making sure that there are nine numbers in
each line and that the numbers are separated by commas.
To define more than one character, use the total number of characters you are defining instead of the 1 in line 100. (You can define as
many as six characters at a time. Just run the first program several
times and enter all the DATA numbers in this program.)
Running the program
When you run this second program, it prints six characters, then
re-defines some or all of them and prints them again, as in the example below.
66
Page 71

The two lines when printed by your own program provide you
with a key to the characters your LX-80 will now print. When you
press the key for one of the characters in the top row, the printer will
print the corresponding character in the bottom row. In the example
above, if you type = your LX-80 will print t (although your screen
will continue to show the character
Because the program puts these new definitions in your printer’s
Random Access Memory (RAM), it will print the new characters (the
ones in the bottom row) unless it is turned off or receives the reset
code.
If you have designed a few characters and want to use them with
your word processing program, for example, just run the second
definition program before you start using your word processing
program. Then use the two-line printout as your guide to tell you
which keys to press for your new characters.
=).
Defining NLQ Characters
Since NLQ characters use many more dots than draft characters,
defining NLQ characters is more complex than designing draft ones.
If you use the grid and the programs in this section, however, you
will be able to design your own NLQ characters.
NLQ grid
Because the NLQ characters can use as many as 18 dots vertically
and 12 dots horizontally, you plan your designs on a different grid
than the one you used for draft characters.
67
Page 72

128
64
32
16
2
1
8
4
64 I
I
3
2
1
Figure 8-5. Grid
I
4
I 1
7 8
6
5
for
NLQ characters
I
J
10
1112
9
On this grid you can use any numbered line or space. As you can
see, that includes the bottom line and the line on the right side. You
should remember to leave one or two columns blank for space be-
tween characters, however.
Each NLQ character definition requires 36 data numbers. Therefore, each vertical column must be divided into three sections for the
calculation of data numbers. The process is not difficult once you get
some practice using it.
Figure 8-6 shows a single column to make clear how the data
numbers are calculated. Notice that in designing NLQ characters we
suggest using circles instead of dots to make it easier to keep track of
overlapping dots.
68
Page 73

/
128
64
First
data
number
Second
data
number
Third
data
number
(
\
<
\
-
1
32
16
8
4
2
128
64
32
16
8
4
2
1
128
64
Figure 8-6. Data numbers for one column
128’
64
32
84
4
1
>
=229
=64
To calculate the data numbers for this column, you see which dots
are used in the top group (the top eight positions) and add their values
together. Then you go down to the middle group (the next 8 positions) and add the values of any dots that are used there. Finally, you
look at the bottom group (2 dot positions) and add together the
values used there.
If no dots are used in a group, the data number for that group is
zero. All zeros must be entered in the DATA statements for the
NLQ definition programs.
Now we’ll show you how to use the NLQ character definition
with a simple arrow design. Figure 8-7 shows the design drawn on a
grid and the data numbers printed at the top or bottom of each
column.
69
Page 74

128
64
32
16
128
64
32
16
255
8
32
0
0
0 0
8
4
2
1
32
255 0 0
192
iJ
0
8
0
0
0
4
16
a
0 0
0
64 64
0 0 0
0 0 0
16
4
0
0
Figure 8-7. Arrow design and data numbers
If you look at each column individually, you can see how the data
numbers were calculated.
First NLQ definition program
Now type in and run the following program. It has the data num-
bers for the arrow design. For a character of your own, change the
data numbers in lines 130-150.
70
Page 75

la LPRINT CHR$(27)
"x"CHR$(l)
20 LPRINT CHR$(27)":"CHR$(I)CHR$(O)CHR$(0);
30 LPRINT CHR$(27)"%"CHR$(l)CHR$(O);
40 LPRINT CHR$(27)"&"CHR$(O)"<(";
50 LPRINT CHR$(O)CHR$(lZ)CHR$(0);
60 FOR X=1 TO 36
70 READ C: LPRINT CHR$(C);
80 NEXT X
90 LPRINT "YOUR CHARACTER IN PICA: < < <"
100 LrjRINT "IN EXPANDED EMPHASIZED PICA: ";
110 LPRINT CHR$(27)"!*< < <"
120 LPRINT CHR$(27)"!"CHR$(0)
130 DATA 4,0,0,8,0,0,16,0,0,32,0,0
140 DATA 64,0,0,255,255,192,64,0,0,32,0,0
150 DATA 16,0,0,8,0,0,4,0,0,0,0,0
When you run this program for your own character, you find out
whether or not it looks right to you. If it doesn’t, move the dots as
needed, recalculate and change the data numbers, and run the program again.
Second NLQ definition program
When you are satisfied with the character you have created, enter
and run the next program. Use your data numbers instead of the ones
in lines 130-150. If you want to define more than one character,
change line 10 so that J equals the total number of characters you are
defining (the maximum is six) and enter the extra data numbers (36
for each character).
10 J=l: IF J>3 THEN A=58 ELSE A=60
20 LPRINT CHR$(27)"x"CHR$(l)
30 FOR X=58 TO 63: LPRINT CHR$(X)" ";: NEXT X
40 LPRINT
50 LPRINT CHR$(27)":"CHR$(I)CHR$(O)CHR$(0);
60 LPRINT CHR$(27)"%"CHR$(l)CHR$(0);
70 LPRINT CHR$(27)"&"CHR$(O)CHR$(A)CHR$(A-l+J);
80 FOR Y=l TO J
90 LPRINT CHR$(O)CHR$(12)CHR$(0);
100 FOR X=1 TO 36
110 READ C: LPRINT CHR$(C);
120 NEXT X: NEXT Y
130 FOR X=58 TO 63: LPRINT CHR$(X)" ";: NEXT X
140 DATA 4,0,0,8,0,0,16,0,0,32,0,0
150 DATA 64,0,0,255,255,192,64,0,0,32,0,0
160 DATA 16,0,0,8,0,0,4,0,0,0,0,0
71
Page 76

When you run this program it prints six characters, then redefines
one or more of them and prints them again. As with the draft characters, you use this two-line printout as a guide to the new characters
your LX-80 will print. You can use them with an applications program or a program you write yourself.
72
Page 77

Chapter 9
Introduction to Dot Graphics
The Epson dot graphics mode allows your LX-80 printer to produce pictures, graphs, charts, or almost any other illustrative or creative material you can devise.
numerals, and symbols stored in the LX-80’s ROM (Read Only
Memory), the graphics mode prints dots column by column and line
by line. You plan where you want the dots to appear and then use a
program to tell the LX-80 where to put them.
Because many software programs take advantage of Epson dot
graphics, you may be able to print graphics like the ones on this page
and the next by simply giving your software a few instructions. The
chart on the next page, for example, was created and printed in about
10 minutes.
Instead of using the standard letters,
73
Page 78

----
I
~I;IENCE
MHWZIMS
FIl;TION
---
--------
-------
EE';;T - s;ELLEF;;
Some commercial software programs perform what is called a
screen dump, in which whatever is on the computer screen is sent to,
and printed by, the printer. This function is sometimes accomplished
by a “print screen”
command. If you have a program for screen
dumps or any other software that produces graphics, all you need to
know about Epson dot graphics is how to use the software. If, on the
other hand, you wish to do your own programming or merely wish
to understand how the LX-80 prints graphics, read on.
Dot Patterns
The LX-80 forms graphic images approximately the same way that
pictures in newspapers and magazines are printed. If you look closely
at a newspaper photograph, you can see that it is made up of many
small dots. The LX-80 also forms its images with patterns of dots. In
fact, the resolution of Epson graphics is higher than that of standard
newspaper photographs because the LX-80 graphics mode allows as
many as 240 dot positions per inch horizontally and 72 vertically. The
images you print on the LX-80 can, therefore, be as finely detailed as
the one on the first page of this chapter.
If you plan carefully where you want the dots to appear and then
use or create a program that gives the proper instructions to the
printer, your LX-80 will print nearly any pattern or figure you can
imagine.
74
Page 79

Print Head
The graphics mode on the LX-80 is quite different from the text
modes, Instead of sending codes for letters and printing functions,
you send codes for dot patterns, one number for each column in a
line. Since none of the predefined characters or symbols in the printer’s memory is used, your program controls where each dot is
printed.
For each column on a print line, the print head prints the pattern of
dots you have specified. In the standard graphics mode it uses only
the top eight pins on the print head because the computer uses eight
data lines to communicate with the printer. Therefore, each of the top
eight pins of the print head corresponds to one of the data lines.
To print figures taller than eight dots, the print head makes more
than one pass. It prints one line, then advances the paper and prints
another, just as it does with text. To keep the print head from leaving
gaps between the graphics lines as it does between the text lines, the
line spacing must be adjusted to eliminate the space between lines.
When the line spacing is properly adjusted, the LX-80 prints finely
detailed graphics images that give no indication that they are made up
of separate lines, each no more than 1/8 of an inch wide.
To insure the proper alignment of dots in figures that use more
than one pass of the print head, the LX-80 abandons the bidirectional
printing it uses for draft text. Instead it prints graphics from left to
right only.
Each pass of the print head contains one piece of the total pattern,
which can be as tall or short and as wide or narrow as you desire. You
don’t have to fill the whole page or even an entire line with your
graphics figures. In fact, you can use as little or as much space as you
like for a figure and put it anywhere on the page.
Graphics Mode
The graphics mode command is quite different from the other
commands covered so far in this manual. For most of the other
LX-80 modes, such as italic and emphasized, one ESCape code turns
the mode on and another turns it off. For graphics, the command is
more complicated because the code that turns on a graphics mode also
specifies how many columns it will use.
75
Page 80

The LX-80 has several different graphics densities, but we’ll keep
things simple by using only one in the first exercises. The code for
entering single-density graphics mode is ESCape “K” nl n2. In Microsoft BASIC the command is given in this format:
LPRINT
ESCape “K” specifies single-density graphics, and the next two num-
bers (n, and n2) specify the number of columns reserved for graphics.
The graphics command requires more than one number to specify
how many columns to reserve because as many as 1920 columns are
possible in graphics printing. Since the LX-80 uses eight digit binary
numbers, it can’t accept decimal numbers larger than 255. Therefore,
the graphics mode command uses two numbers for reserving columns.
The number of columns reserved is the first number plus 256 times
the second number. Since the command is set up for two numbers,
you must supply two even if you only need one. When you need less
than 256 columns, just make nt the number of columns you are
reserving and make n2 a zero.
CHR$(Z?)“K’*CHR$(Nl)CHR$(NZ);
Pin Labels
Once you put the printer into graphics mode and reserve the
number of columns you want, your next step is to tell the print head
which pins to fire in each column. There are 256 possible combinations of eight pins, and you send only one number for each column.
The numbering system that allows you to use a single number to
specify which of the 256 possible patterns you want is shown in
Figure 9-1.
76
Page 81

128
0
64
0
32
0
16
0
8
0
4
0
2
0
1
0
not used
Figure 9-1. Pin labels
To fire any one pin, you send its number. To fire more than one
pin at the same time, add up the numbers of the pins and send the
sum to the printer. With these labels for the pins, you fire the top pin
by sending 128. To fire the bottom graphics pin, you send 1. If you
want to fire only the top and bottom pins, you simply add 128 and 1,
then send 129.
By adding the appropriate label numbers together, you can fire any
combination of pins you want. Figure 9-2 shows you three examples
of how to calculate the number that will fire a particular pattern of
pins.
0
128
64
32
16
not used
\
‘28
64
01
64
s
128
0
0
16
a
8
0
4
0
2
a
1
a
2
id
0
Figure 9-2. Calculating numbers for pin patterns
8
2
7r
not used
128
64
32
16
8
4
2
1
0
0
0
0
0
l
0
0
0
4
1
5
J
77
Page 82

With this numbering system any combination of the eight pins
adds up to a unique decimal number between 0 and 255. Although
you use a decimal number, it is, of course, converted to a binary
number before it goes to the printer.
Now that you know the principles of Epson graphics, we’ll give
you two simple exercises, more densities, and then something more
complex as a basis for writing your own programs.
First Graphics Program
For your first graphics exercise we could give you a program that
prints a single column of dots, but it is difficult to see the pattern of a
single column of dots, so your first graphics program prints the same
pattern 40 times.
The first line is the code for 40 columns of single-density graphics.
As usual, our example is in Microsoft BASIC, but you can adapt it to
the programming language you prefer.
10 LPRINT CHR$(27)“K”CHR$(40)CHR$(O);
The second line is the data that is printed as pin patterns. Be sure
that you type in the semicolons in both lines:
20
FOR X=1 TO
That’s it. Run the program to see the result below. Although it is
not as interesting as the examples at the beginning of this chapter, it
does allow you to see exactly how the mode works.
40: LPRINT CHR$(74);:
NEXT X
Multiple-Line Exercise
Now that you’ve entered and run a simple graphics program, we’ll
go on to an exercise that shows you how the LX-80 combines several
lines of graphics for a figure taller than eight dots.
Start with a line for 100 columns of single-density graphics and
lines to print two pin patterns. Notice that since there are two pin
patterns in the loop, it is only executed 50 times.
78
Page 83
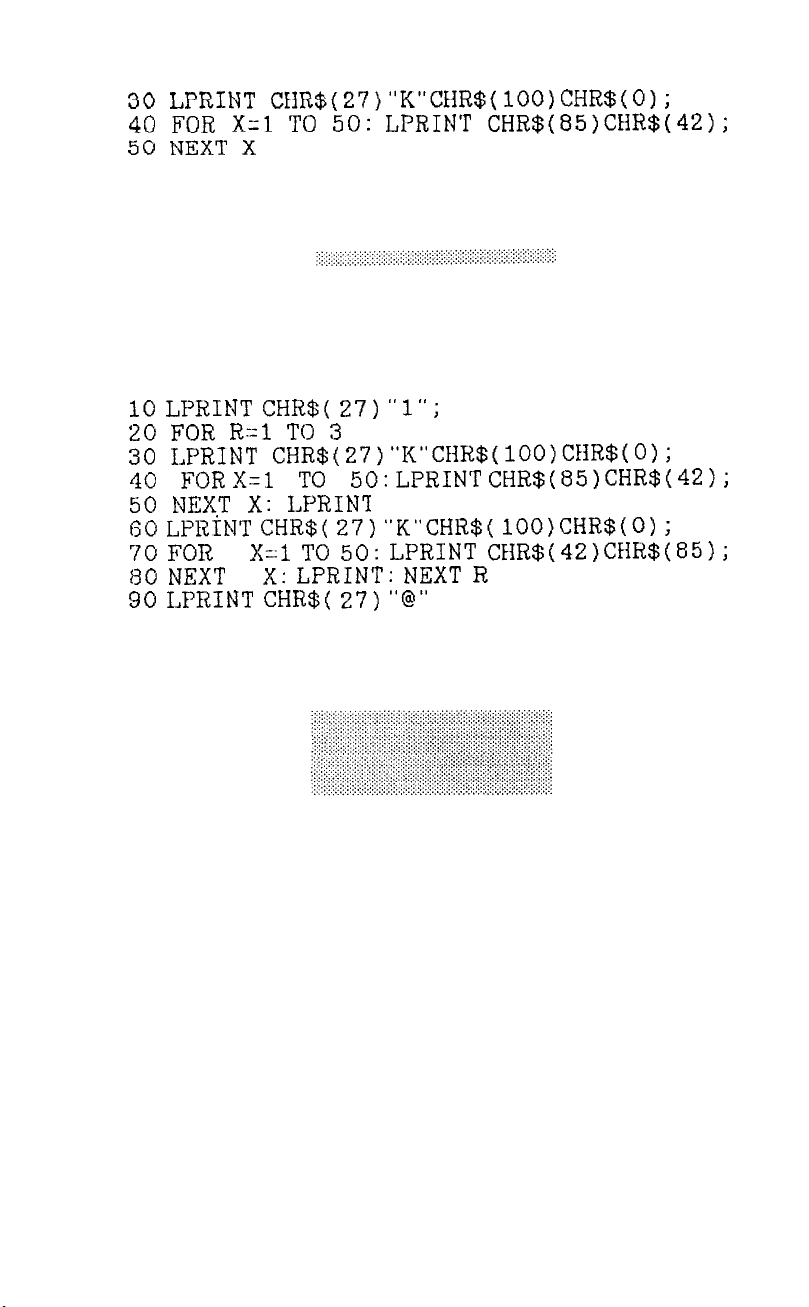
30 LPRINT CHR$(27>"K"CHR$(lOO)CHR$(O);
40
FOR
50
NEXT X
If you run the program now, you’ll see how one line of the pattern
looks:
To see a how more than one line combines to form a figure, enter
and run the following program, which uses two of the lines you have
already typed and adds several more.
X-l TO 50: LPRINT CHR$(85)CHR$(42);
10 LPRINT
20
FOR
30 LPRINT CHR$(27>“~~“CWR$(lOo)CMR$~O);
40
FOR
50 NEXT
60 LPRIMT
70
FOR
80 NEXT
90 LPRINT
Now run the program to see the six print lines combine into a
pattern :
The short and simple program that produced the pattern demonstrates many elements of graphics programming. Therefore, we’ll explain each line. Line 10 changes the line spacing to 7-dot, which is the
height of the dot patterns used in the program. Therefore, there is no
space between the print lines.
CHR$(
R-l TO 3
X=1
X:
TO 50:
LPRIN?
CHR$(
X-l
TO
X:
LPRINT: NEXT R
CHR$(
27) “1”;
LPRINT CHR$(85)CHR$(42);
27) “K”CHR$( lOO)CHR$(O) ;
50: LPRINT CEJR$(42)CHR$(85);
27) “@‘”
79
Page 84

Line 20 begins a loop to produce multiple print lines. Lines 30 and
40 were covered above, but an LPRINT is added to line 50 to produce a line feed after line 40. Lines 60 and 70 are like lines 30 and 40
except that line 70 uses a reversal of the patterns in line 40. As the loop
is executed, the program prints lines 40 and 70 alternately so that the
patterns of the print lines will fit together well.
Notice that the graphics command can be in effect for only one
print line. The command is in lines 30 and 60 so that it is issued each
time a new print line is begun. You cannot print more than one line of
graphics without having the graphics command issued more than
once.
Line 90 is the reset code to return the printer to its defaults.
Density Varieties
Although all the examples so far in this chapter have been in the
single-density graphics mode, the LX-80 offers five other eight-pin
density modes and two nine-pin ones. Nine-pin graphics is not necessary for most uses, but you can find its command (Escape “ * “) in
Appendix B. All the eight-pin densities and their commands are described in Table 9-1.
Mode
80
Table 9-l. Graphics modes
Density
0
1
2
3
4
5
Single ESC “K”
/go;bSepeed
High-Speed
Double
Quadruple ESC “Z”
Epson none
ox-1 OTM
One-to-one
(plotter)
6
90 dots/inch none
Alternate
code
ESC “L”
ESC “Y”
none
Description
60 dots/inch:
480 dots/8” line
120 dots/inch
960 dots/8 line
120 dot positions/inch
Faster than Mode 1; does not print
consecutive dots in a row.
240 dot positions/inch; 1920 dot
positionsW
consecutive dots in a row.
80 dots/inch;
640
Matches the screen density of the
QX-10, which makes it easy to do
screen dumps.
I72 dots/inch:
1576
dotsB” line
Produces the
zontallv as verticallv.
circles look round.
90 dots/inch;
720
line. Does not print
dots/W
line
same density
dots/W
line
hori-
which makes
Page 85

You are familiar with the command format that uses the ESCape
code and a letter, but LX-80 graphics commands can also be in the
following format:
LPRINT CHR$(27)"*"CHR$(M)CHR$(Nl)CHR$(NZ);
with m being the mode number found in the left column of Table 9-l.
As usual, nl and n2 reserve the number of columns for graphics. The
seven modes include six densities, with two speeds for doubledensity.
Reassigning Code
The LX-80 has a graphics command that changes one graphics
mode to another. You can use it with many commercial graphics
software programs to change the density and shape of your printouts.
The code is ESCape
graphics codes (K, L, Y, or Z) and n is the number of the new code
(O-6).
For example, if you send the following code before you run a
graphics program, it will change every instance of mode “Y” (highspeed double-density) to mode 5 (one-to-one).
LPRINT CHR$(27)"@?Y"CHR$(S);
As usual, this example is in MBASIC, but you can send the code in
any programming language.
“?s” n, where s is one of the four alternate
Even if you don’t know which code your graphics program uses, a
little experimentation should tell you whether the reassigning code
can improve your graphics printouts.
Column Reservation Numbers
Now that we’ve introduced you to the rest of the S-pin graphics
densities and the reassigning code, we’ll explain in more detail the part
of the graphics command that reserves the number of columns for
graphics (the numbers n, and n2 in our examples).
If you need fewer than 255 columns of graphics, n, is the number
of columns you want and n2 is zero. As you can see in Table 9-1,
however, a single line will hold as many as 1920 columns in quadruple-density. Specifying more than 255 is where the second number
slot
(n2)
fits in. The first number that you send (n,) indicates a num-
ber of columns, but the second does not represent a number of
columns; it is multiplied by 256 and added to
nl.
The command for
81
Page 86

the maximum number of dots you can reserve on the LX-SO, then, is:
CHR$(27)"Z"CHR$(128)CHR$(7);
or, in the other format:
which is 128 dots plus 7 times 256 dots, for a total of 1920 dots in one
row.
Once you have chosen the number of columns you want to use,
you can have your program do the calculations for you with the
following format:
CHR$(27)"L"CHR$(N
N is the total number of columns you want to specify. The MOD
(modulus) function calculates the value for
function calculates the value for
than BASIC, consult your manual for the proper form for these
functions.
This format can be used with any graphics density and with any
value of N up to the maximum number of columns per line for that
density.
MOD
256)CHR$(INT(N/2~6));
nl,
and the INT (integer)
n2.
For programming languages other
WIDTH Statements
Many computer systems automatically insert the control codes for
a carriage return and a line feed after every 80 characters. This insertion is usually no problem with text, but it can spoil your graphics. In
the graphics mode they may insert the control codes after 120 columns, which could be in the middle of a line.
You can usually prevent these unwanted control codes with a
WIDTH statement such as the one below:
WIDTH LPRINT 255
The format for your system may be different. Consult your computer
or computer language manual to find the correct format for your
system. Then put a WIDTH statement in one of the first lines of all
your graphics programs. It is easier to put a WIDTH statement in all
but the simplest of your programs than to examine each one to see
whether or not such a statement is necessary.
82
Page 87

Design Your Own Graphics
In this section we take you through the development of a graphics
program. The example is not especially complicated, but it does include the same steps you would use for a more complex figure so that
you have the basis for designing graphics on your LX-80.
You will plan your figure with dots on graph paper, but before
beginning to place the dots, you should decide which graphics density
you want. Figure 9-3 shows the differences between the three most-
used graphics modes so that you can choose the one you want.
Figure 9-3. Designing in different densities
In this figure you can see the main rules for graphics design in the
three densities. In single density no dots can be placed on vertical
lines. In high-speed double density dots can be placed on vertical
lines, but no dots can overlap. In low-speed double density dots can
be placed on vertical lines and they can overlap.
Now look at our figure designed for high-speed double density. It
should point you in the right direction for your own designs.
83
Page 88

Figure 9-4. Arrow design
After plotting all the dots as in Figure 9-4, you calculate the numbers for each pin pattern by dividing the design grid into separate
print lines. For the arrow design the grid was divided into three lines,
each seven dots high. Then each column was examined and the sums
of the pin values determined. This process for the first line is shown in
Figure 9-5. The pin values are on the left side and the sums are at the
bottom of each column.
Those of you who have read the previous chapter will see that
designing graphics is much like designing user-defined characters.
r
810888888421000000000234100
4100000000000000000082000
84
Figure 9-5. First line of arrow figure
Page 89

The numbers for the second and third lines were calculated in the
same manner. Once the numbers for the pin patterns are calculated,
they go in DATA statements, separated by commas.
First we’ll give you the whole program and its printout; then we’ll
explain two techniques we have not used before:
90 WIDTH LPRINT 255
100 LPRINT CHR$(27)"1"
590
FOR K=l TO 3
600 LPRINT CHR$(27)"Y"CHR$(50)CHR$(0);
610 READ
N: IF N=128
THEN 650
620 IF N>=0 THEN LPRINT CHR$(N);: GOT0 610
630 READ P,R: FOR J=l TO -N
632 LPRINT CHR$(P)CHR$(R);: NEXT J
640
GOT0 610
650 LPRINT: NEXT K: LPRINT CHR$(27)"@": END
800 DATA 8,4,10,1,-6,8,0,4,0,2,0,1,-9,0,0,0
805 DATA 23,8,4,2,1,-2,0,0,0,128
810 DATA 0,0,0,0,64,32,17,10,4,0,-6,0,0,-10
815 DATA 64,0,0,0,0,64,32,17,10,4,128
820 DATA 2,4,10,16,34,64,-5,2,0,4,0,8,0,16
825
DATA 0,-9,32,0,61,2,4,8,16,32,64,0,0,0,128
In this program we used the number 128 in the DATA statements
to signal the end of a print line. This is the reason for the IF-THEN
statement in line 610 that skips to line 650 and causes a line feed.
The other special technique used in this program is found in lines
620 and 630. Since some of the data numbers are repeated many
times, we save typing by using negative DATA numbers for repetitions. Line 620 tests for a negative number, and if it finds one, reads
the next two numbers and prints their pin patterns the number of
times indicated by the negative number.
For example, when the minus 6 in line 800 is read, the program
then reads the next two numbers (8 and 0) and sends them to the
printer six times. This feature is not a necessary part of the program,
but it does allow you to type fewer data numbers.
Otherwise the program is a straightforward graphics program that
uses 7-dot line spacing and reads numbers from DATA statements
and sends them to the printer. If you want to see the figure in other
densities, change the “Y” in line 600 to “L” or “Z”.
85
Page 90
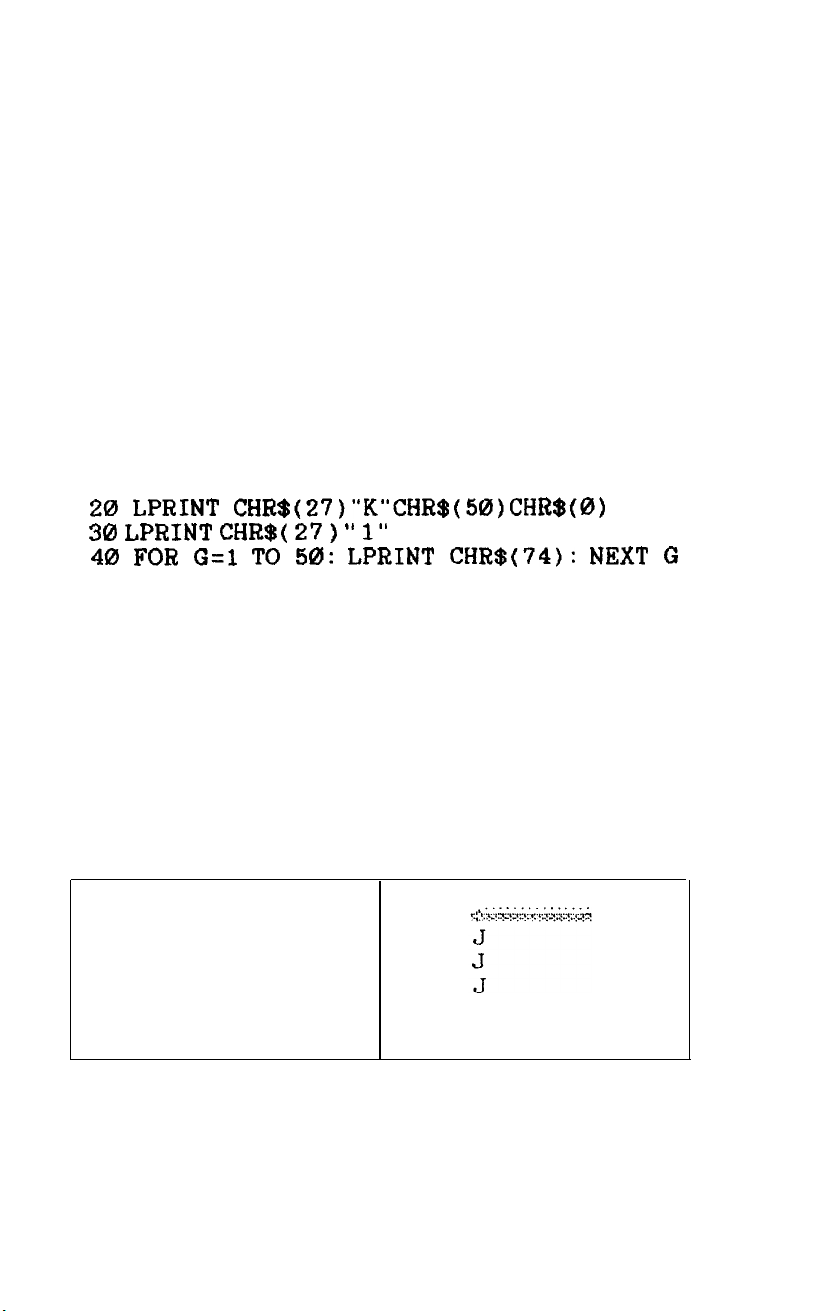
Graphics Programming Tips
Now that we’ve shown you how to design your own graphics,
we’ll review and emphasize a few elements of graphics programming.
As usual, we use MBASIC in the examples, but the principles apply
to any programming language.
Semicolons and command placement
After the graphics command is issued, every number sent to the
LX-80 is interpreted as a pin pattern and printed on paper. Therefore,
you must be careful where you put graphics commands in your
program.
For example, suppose you want a 50-column graphics line with the
line spacing set to 7-dot. You might enter the following program:
20
LPRINT
30
LPRINT
40 FOR G=l TO 50:
This program has all the necessary elements. Line 20 has the command for single-density graphics and specifies 50 columns. (Remember that you must use two numbers to reserve columns even if you
only need the first one.) Line 30 has the correct command for 7-dot
line spacing, and line 40 calls for the printing of a pin pattern 50 times.
(If you wish, refer back to Figure 9-2 to see a representation of the pin
pattern that 74 produces.)
CHR$(27)“K”CHR$(50)CHR$(0)
CHR$( 27 ) ” 1"
LPRINT
CHR$(74): NEXT G
Although this program has all the necessary elements, it will not
give you the single pin pattern that you want, as you can see in the
partial printout in Figure 9-6.
Expected pattern
Figure 9-6. Result of incorrect program
Actual result
86
Page 91

What went wrong? To help you understand the graphics command
and avoid some of the more common errors made with it, we’ll
examine this program in detail.
First look at line 20. ESCape “K” calls for single-density graphics,
and the two CHR$ numbers specify 50 columns of dots. Once that
command is given, every number sent to the printer is interpreted as a
pin pattern and printed on the paper. Since there is no semicolon at
the end of the line, the numbers 13 and 10--the codes for carriage
return and line feed-are sent to the printer after CHR$(0). Because
the graphics command has been issued, these codes are printed as pin
patterns.
Line 30 would normally be the command for 7-dot line spacing,
but since the graphics mode is still in effect, the command is interpreted by the printer as two pin patterns: 27 and 49 (the ASCII codes
for ESCape and “1”). Since there is no semicolon at the end of this
line, the numbers 13 and 10 are sent again, and again they are printed
as pin patterns.
In line 40 nothing is sent to the printer until after the LPRINT.
Then the desired pin pattern-74-is finally sent, but since no semi-
colon is after it, 13 and 10 are sent next each time the loop is executed.
Figure 9-7 is an enlarged representation of the first 13 columns of
the printout. In this figure you can see exactly how the printer reacted
to the first part of the incorrect program.
128
84
32
18
8
4
2
1
13
1
27
(
13
1
74
1
10
10
49
10 13
Figure 9-7. Pin patterns of incorrect program
74
)
13
1
74
10
87
Page 92

You may also wonder why the program prints not only the different pin patterns but also the character “J” a number of times. The
reason lies in the number of columns you reserved with the graphics
command. After the LX-80 receives all the numbers reserved by a
graphics command-50 in this case-it leaves the graphics mode and
resumes interpreting numbers as printable characters or print commands.
Since the incorrect program has sent many extra numbers, mainly
10s and 13s, the 50 columns reserved are filled before the loop in line
40 has been executed 50 times. Therefore, during the last passes of the
loop the LX-80 interprets CHR$(74) as the ASCII code for “J” and
prints that character each of the last 35 passes of the loop.
If you want to make the program work correctly, put the line-
spacing command in line 10, delete line 30, and add two semicolons:
one at the end of line 20 and one between CHR$(74) and the colon in
line 40.
We have explained this incorrect program in detail so that you will
remember two important tips about using the graphics command:
l Use semicolons to prevent the LX-80 from printing carriage re-
turn and line feed codes as pin patterns.
l Do not put any other commands between the graphics command
and its data.
Our example should help you understand the graphics mode better
and may help you find the problem when one of your own programs
gives you unexpected results.
String variables
In a long and complicated graphics program, typing in the graphics
command or repetitive data numbers over and over can become time-
consuming. You can avoid much of the repetitive typing by storing
commands and data in string variables.
Look at the program below. It is the same as the multiple-line
exercise earlier in the chapter except for the string variables.
88
Page 93

10
G$zCHR$(27>+"K"+CHR$(l00)+CHR(0)
2c3
A$=CHR$( 85 >
30
B$~~CHR$(42)tCMR$(85)
40
I,PRINT CHR$(27)"1";
50
FOR Rr-1 TO 3
60
LPRINT G$;
+(;EW$( 42
>
70 FOR X=1 TO 50: L,PRINT A$;: NEXT X
80
LPRINT
90
InPRINT G$;
100 FOR X=1 TO 50: LPRINT B$;: NEXT X
110 LPRINT: NEXT R
120 LPRINT CE<R$(27) "@"
Notice that the first line stores the whole graphics command in a
single string variable. In order to do this you must put plus signs
between the elements of the command. Once you have done this at
the beginning of the program, each time you enter LPRINT G$; you
have issued the graphics command. Lines 20 and 30 do the same thing
with the data used in this program. As you can see, the use of string
variables saves some typing even in this short program. In a long
program it can save you much more time and effort.
Graphics and low ASCII codes
Sending a few of the codes between 0 and 31 with BASIC or
another programming language can cause problems on some computer systems. The problem is that most computer systems handle some
of these codes in a special way instead of delivering them to the
printer.
For example, one computer system handles form feeds by itself. It
counts lines to keep track of the top of page. If a program sends the
ASCII code for form feed (12) to the printer, the computer system
intercepts it and sends instead the code for line feed (10) several times.
If you are in a graphics mode with this system and send a 12 to fire
pins 3 and 4, the computer system will intercept that 12 and send
several 10s instead. You can see how this would ruin your graphics.
You would get pins 2 and 4 (whose sum is 10) several times instead of
pins 3 and 4 only once.
If your computer system screens out or changes any codes sent to
it, you can often design around these problems by using other numbers with similar patterns, and you can see Appendix F for a method
to determine which codes may cause problems and for some ideas on
overcoming those problems.
89
Page 94

Appendix A
ASCII Codes and Character Fonts
This appendix provides information about the way ASCII codes
are used on the LX-80 printer and about the character fonts associated with those codes. The first section summarizes the codes. The
second section displays the decimal and hexadecimal numbers, a
printout, and an enlarged dot matrix for each of the special graphics
characters and the draft international characters. Other dot matrixes
are in Chapter 3. The enlarged dot matrix characters are shown in
elite to save space.
Sending printer codes is discussed in Chapter 4, and the method of
printing the special graphics and international characters is discussed
in Chapter 6.
A-l
Page 95

Dee Hex
cl
00 none
1
01
2
02
3
03
4
04
5
05 none
6
06
7
07 EEL
a
08
9
::
10
11
OB VT
12
CC
13 OD
14
OE
15
OF
16
10
17
11
la
12
19 13
20
14
21 15
22
16
23
17
24
ia
25
19 EM
26
1A
1B
zl 1c
29
1D
30
1E
1F
i: 20
33
21
34
22
35 23
36
24
37 25
38
26
39
27
40 28
41
29
42 2A
43
28
44
2c
45
20
46
2E
47 2F
48
30
49
31
50
32
51
33
52
34
53 35
54 36
55
56
57
58 3A
59
60
61
62
63
CHR
none
none
none
none
none
BS
HT
LF
FF
CR
SO
Sl
none
none
DC2
none
DC4
none
none
none
CAN
none
ESC
none
none
none
none
37 7
38
39
38
3C :
3D
3E
3F
Dee
Hex
co
Cl
c2
c3
c5
C6
c7
ca
CQ
CA
CB
CC
CD
CE
DO
Dl
D2
D4
D5
D6
07
DQ
DA
DB
DC
DE
DF
EO
E2
E3
E4
E5
E6
E7
Ea
EQ
EA
EB
EC
ED
EE
EF
FO
F2
F3
F4
F5
F6
F7
Fa
F9
FA
FB
FC
FD
FE
FF
CHR
Dee
Hex
cm
64 40
65 41
66 42
67 43
68 44
69 45
70 46
71 47
72 48
73 49
74 4A
75 4B
76 4C
77 4D
78 4E
79 4F
a0 50
i: z:
a3 53
a4 54
a5 55
86 56
a7 57
88 58
a9 59
90 5A
91
58
92
5c
93 5D
94 5E
’
III
3
%
&
(
)
t
+
1
.
.’
0
1
2
3
4
5
6
B
9
:
=
‘)
-
iii: 20’
97 61
98 62
99 63
100 64
101 65
102 66
103 67
104 68
105 69
106 6A
107 6B
108 6C
109 6D
110 6E
111 6F
112 70
113 71
114 72
115 73
116 74
117 75
118 76
119 77
120 78
121 79
122 7A
123 78
124 7C
125 7D
126 7E
127 7F
B
A
H
C
D
E
F
G
H
I
J
k.
L
II
N
0
P
Q
R
S
T
u
V
w
x
Y
2
C
\
1
;:
c
d
e
f
:
1
J
If
1
Ill
n
0
P
9
t0
t
CI
”
w
:<
Y
2
-.
DEL
:
1
Dee Hex CHR
128
a0
129
at
130 a2
131
a3
132 a4
133 a5
134
86
135
a7
136
aa
137
a9
138
aA
139
8B
140
ac
141
8D
142 aE
143 8F
144
90
145
91
146
92
147
93
148
94
149
95
150
96
151
97
152
98
153
99
154
9A
155
QB
156
QC
157
QD
158
QE
159 9F
160
A0
161
Al
162 A2
163 A3
164
A4
165
A5
166
A6
167 A7
168
A8
169
A9
170
AA
171
AB
172 AC
173
AD
174 AE
175 AF
176
BO
177
Bl
178
82
179
83
iao 84
iai
85
la2 B6
la3
87
la4
Ba
la5 BQ
la6 BA
la7
BB
la8
BC
la9 BD
190
BE
191
BF
192
193
194
195
196 C4
197
198
199
200
201
202
203
204
205
206
207 CF
208
209
210
211 D3
212
213
214
215
216 Da
217
218
219
220
221 DD
222
223
224
225 El
226
227
228
229
230
231
232
233
234
235
236
237
238
239
240
241 Fl
242
243
244
245
246
247
248
249
250
251
252
253
254
255
A-2
Page 96

Special Graphics Characters
Dec
129
130
131
132
133
Hex
81
82
83
84
85
Character
L..
Y
4
t-
138
139
140
141
Hex
89
8A
8B
8C
8D
Character
.1
.,.
.:.:.:
:.:.I
m
134
135
136
86
87
88
I
I-’
142
143
8E
8F
I
+
tiiiiil
“I
144
90
L.1
A-3
Page 97

Dec Hex Character
Dec Hex Character
145 91
148 94
!k
+
154 9B
155
9C
156 9C
157 9D
158 9E
A
-.L.
::,:.
.-:-
150 96
152 98
A-4
-is
u
159 9F
+
Page 98

Draft International Characters
Roman characters
aracters
Italic ch
,I
1
i
A-5
Page 99

Appendix B
Control Codes in Numeric Order
You can use any of the methods explained in Chapter 4 to send
these control codes to your LX-80. If you use MBASIC, you send a
control code using LPRINT CHR$(27) followed by CHR$(n),
where n is a number from the decimal (Dee) column below. For a few
codes, those with a dash in the ESC column, you omit the ESCape
code. For the codes above decimal 27, you can use either the character
in the symbol column (in quotation marks) or CHR$(n). For example, the command for turning on emphasized can be entered as:
LPRINT CHR$(27)CHR$(69)orL,PRINT
See Chapter 4 and your system documentation for other methods
of sending codes to the printer.
Some applications programs can use control key codes for decimal
codes O-26. See the control key chart at the end of this appendix or
the Quick Reference Card for a complete list of control key values.
Abbreviations:
ESC Dec Hex Symbol
0
7
8
9
cpi = characters per inch
cps = characters per second
Function
00
07
08 BS
09
NUL
BEL
HT
Terminates horizontal and vertical
tab setting ESCape sequences.
Sounds beeper.
Backspace. Empties the printer buffer, then moves the print head left 1
space in the current pitch.
Horizontal tab. Empties the printer
buffer, then moves the print head to
the next tab stop.
CHR$(27)“E”
B-l
Page 100

ESC Dec
10
11
12
13
14
15
17
18
19
20
24
Hex
OA
0B
0C
OD
OE
OF
11
12
13
14
18
Symbol
LF
VT
FF
CR
SO
SI
DC1
DC2
DC3
DC4
CAN
Function
Line feed. Empties the printer buffer,
performs a line feed at the current
line spacing, and resets the buffer
character count to 0.
Vertical tab. Empties the printer buffer, then advances the paper to the
next vertical tab stop.
Form feed. Empties the printer buffer, then advances the paper to the
next top of form.
Carriage return. Prints the contents
of the buffer and resets the buffer
character count to 0.
Shift out. Turns expanded mode ON
for the length of the line. Can be cancelled by ASCII 20 or ESC “W0”.
Works with pica, elite, or compressed mode.
Shift in. Empties buffer and turns
compressed (17.16 cpi) ON. Cannot
mix with emphasized or pica.
Can also use DIP switch l-l.
When DIP switch 2-2 is OFF, places
printer in the active state.
Device control 2. Turns compressed
mode OFF.
Device control 3. When DIP switch
2-2 is OFF, places printer in the inactive state until a DC1 code is received.
Device control 4. Turns the expanded mode set by ASCII 14 OFF.
Cancels all text but not control codes
in the print buffer.
ESC 25
B-2
19
EM
Sets the optional cut-sheet feeder.
Format:
ESC 25 n
where n toggles the cut-sheet feeder:
n=0 turns it OFF and n=4 turns it
ON. You cannot use “EM” in place
of 25. Can also use DIP switch l-3.
 Loading...