

Page 1

®
24-pin Dot Matrix Printer
All rights reserved. No part of this publication may be reproduced, stored in a retrieval
system, or transmitted in any form or by any means, electronic, mechanical, photocopying,
recording, or otherwise, without the prior written permission of Seiko Epson Corporation.
The information contained herein is designed only for use with this Epson printer. Epson is
not responsible for any use of this information as applied to other printers.
Neither Seiko Epson Corporation nor its affiliates shall be liable to the purchaser of this
product or third parties for damages, losses, costs, or expenses incurred by the purchaser or
third parties as a result of: accident, misuse, or abuse of this product or unauthorized
modifications, repairs, or alterations to this product, or (excluding the U.S.) failure to strictly
comply with Seiko Epson Corporation’s operating and maintenance instructions.
Seiko Epson Corporation shall not be liable for any damages or problems arising from the
use of any options or any consumable product s other than those designated as Original Epson
Products or Epson Approved Products by Seiko Epson Corporation.
EPSON and EPSON ESC/P are registered trademarks of Seiko Epson Corporation.
Microsoft, Windows, and Windows NT are registered trademarks of Microsoft Corporation.
IBM is a registered trademark of International Business Machines Corporation.
General Notice: Other product names used herein are for identification purposes only and may be
trademarks of their respective owners. Epson disclaims any and all rights in those marks.
Copyright © 2003 by Seiko Epson Corporation, Nagano, Japan.
Reference Guide
Page 2

Page 3

Contents
Chapter 1 Safety Instructions
Warnings, Cautions, and Notes . . . . . . . . . . . . . . . . . . . . . . . . . . . . . . 1
Hot Parts Caution Symbol . . . . . . . . . . . . . . . . . . . . . . . . . . . . . . . . . . 1
Important Safety Instructions . . . . . . . . . . . . . . . . . . . . . . . . . . . . . . . . 1
Chapter 2 Paper Handling
Selecting a Paper Source . . . . . . . . . . . . . . . . . . . . . . . . . . . . . . . . . . . . 7
Printing on continuous paper . . . . . . . . . . . . . . . . . . . . . . . . . . . 7
Printing on single sheets . . . . . . . . . . . . . . . . . . . . . . . . . . . . . . 10
Setting the Paper Release Lever . . . . . . . . . . . . . . . . . . . . . . . . . . . . . 11
Adjusting the Paper-Thickness Lever . . . . . . . . . . . . . . . . . . . . . . . . 12
Loading Continuous Paper. . . . . . . . . . . . . . . . . . . . . . . . . . . . . . . . . 14
Positioning the continuous paper supply . . . . . . . . . . . . . . . . 14
Loading continuous paper with the tractor. . . . . . . . . . . . . . . 14
Using the Tear-off Function . . . . . . . . . . . . . . . . . . . . . . . . . . . . 45
Loading Single Sheets . . . . . . . . . . . . . . . . . . . . . . . . . . . . . . . . . . . . . 48
Available paper types. . . . . . . . . . . . . . . . . . . . . . . . . . . . . . . . . 49
Using the paper guide . . . . . . . . . . . . . . . . . . . . . . . . . . . . . . . . 49
Loading paper in the paper guide . . . . . . . . . . . . . . . . . . . . . . 50
Using the front sheet guide and front paper guide . . . . . . . . 52
Loading Special Paper . . . . . . . . . . . . . . . . . . . . . . . . . . . . . . . . . . . . . 53
Multipart forms . . . . . . . . . . . . . . . . . . . . . . . . . . . . . . . . . . . . . . 53
Labels . . . . . . . . . . . . . . . . . . . . . . . . . . . . . . . . . . . . . . . . . . . . . . 54
Envelopes . . . . . . . . . . . . . . . . . . . . . . . . . . . . . . . . . . . . . . . . . . . 56
Cards. . . . . . . . . . . . . . . . . . . . . . . . . . . . . . . . . . . . . . . . . . . . . . . 58
Switching Between Printing on Continuous Paper and
Single Sheets. . . . . . . . . . . . . . . . . . . . . . . . . . . . . . . . . . . . . . . . . . . 59
Switching to printing on single sheets . . . . . . . . . . . . . . . . . . . 59
Switching to printing on continuous paper. . . . . . . . . . . . . . . 60
Using the Micro Adjust Function. . . . . . . . . . . . . . . . . . . . . . . . . . . . 61
Adjusting the tear-off position . . . . . . . . . . . . . . . . . . . . . . . . . 61
iii
Page 4

Adjusting the top-of-form position . . . . . . . . . . . . . . . . . . . . . .64
Chapter 3 Printer Software
About Your Printer Software. . . . . . . . . . . . . . . . . . . . . . . . . . . . . . . .67
Using the Printer Driver with Windows Me, 98, and 95 . . . . . . . . .67
Accessing the printer driver from Windows applications . . .68
Accessing the printer driver from the Start menu. . . . . . . . . .70
Changing the printer driver settings. . . . . . . . . . . . . . . . . . . . .71
Using the Printer Driver with Windows XP, 2000, and
Windows NT 4.0 . . . . . . . . . . . . . . . . . . . . . . . . . . . . . . . . . . . . . . . .72
Accessing the printer driver from Windows applications . . .73
Accessing the printer driver from the Start menu. . . . . . . . . .75
Changing the printer driver settings. . . . . . . . . . . . . . . . . . . . .77
Printer Driver Settings Overview . . . . . . . . . . . . . . . . . . . . . . . . . . . .78
Using EPSON Status Monitor 3 . . . . . . . . . . . . . . . . . . . . . . . . . . . . .81
Setting up EPSON Status Monitor 3 . . . . . . . . . . . . . . . . . . . . .82
Accessing EPSON Status Monitor 3 . . . . . . . . . . . . . . . . . . . . .83
Setting Up Your Printer on a Network . . . . . . . . . . . . . . . . . . . . . . .84
Sharing the printer . . . . . . . . . . . . . . . . . . . . . . . . . . . . . . . . . . . .84
Setting up your printer as a shared printer . . . . . . . . . . . . . . .85
Using an additional driver . . . . . . . . . . . . . . . . . . . . . . . . . . . . .87
Setting for the clients . . . . . . . . . . . . . . . . . . . . . . . . . . . . . . . . . .94
Installing the printer driver from the CD-ROM . . . . . . . . . .102
Canceling Printing . . . . . . . . . . . . . . . . . . . . . . . . . . . . . . . . . . . . . . .104
Uninstalling the Printer Software . . . . . . . . . . . . . . . . . . . . . . . . . . .105
Uninstalling the printer driver and
EPSON Status Monitor 3 . . . . . . . . . . . . . . . . . . . . . . . . . . .105
Chapter 4 Control Panel
Buttons and Lights . . . . . . . . . . . . . . . . . . . . . . . . . . . . . . . . . . . . . . .111
Selecting a Font and Pitch . . . . . . . . . . . . . . . . . . . . . . . . . . . . . . . . .115
About Your Printer’s Default Settings . . . . . . . . . . . . . . . . . . . . . . .117
Understanding default settings . . . . . . . . . . . . . . . . . . . . . . . .118
Changing default settings. . . . . . . . . . . . . . . . . . . . . . . . . . . . .124
Lock-Out Mode . . . . . . . . . . . . . . . . . . . . . . . . . . . . . . . . . . . . . . . . . .126
iv
Page 5

Turning on or off the lock-out mode . . . . . . . . . . . . . . . . . . . 126
Changing the lock-out mode setting . . . . . . . . . . . . . . . . . . . 127
Chapter 5 Problem Solver
Diagnosing the Problem . . . . . . . . . . . . . . . . . . . . . . . . . . . . . . . . . . 131
Using the error indicators . . . . . . . . . . . . . . . . . . . . . . . . . . . . 132
EPSON Status Monitor 3 . . . . . . . . . . . . . . . . . . . . . . . . . . . . . 133
Printing a Self Test . . . . . . . . . . . . . . . . . . . . . . . . . . . . . . . . . . 134
Printing Hex Dump . . . . . . . . . . . . . . . . . . . . . . . . . . . . . . . . . 135
Problems and Solutions. . . . . . . . . . . . . . . . . . . . . . . . . . . . . . . . . . . 137
Power supply problems . . . . . . . . . . . . . . . . . . . . . . . . . . . . . . 138
Paper loading or feeding problems . . . . . . . . . . . . . . . . . . . . 139
Printing position problems . . . . . . . . . . . . . . . . . . . . . . . . . . . 142
Printing or printout quality problems . . . . . . . . . . . . . . . . . . 144
Network problems . . . . . . . . . . . . . . . . . . . . . . . . . . . . . . . . . . 149
Correcting USB Problems . . . . . . . . . . . . . . . . . . . . . . . . . . . . . . . . . 150
Clearing Paper Jams. . . . . . . . . . . . . . . . . . . . . . . . . . . . . . . . . . . . . . 154
Aligning Vertical Lines in Your Printout . . . . . . . . . . . . . . . . . . . . 154
Canceling Printing . . . . . . . . . . . . . . . . . . . . . . . . . . . . . . . . . . . . . . . 156
Contacting Customer Support . . . . . . . . . . . . . . . . . . . . . . . . . . . . . 157
For users in North America . . . . . . . . . . . . . . . . . . . . . . . . . . . 158
For users in Australia . . . . . . . . . . . . . . . . . . . . . . . . . . . . . . . . 159
For users in Singapore . . . . . . . . . . . . . . . . . . . . . . . . . . . . . . . 160
For users in Thailand . . . . . . . . . . . . . . . . . . . . . . . . . . . . . . . . 161
For users in Indonesia. . . . . . . . . . . . . . . . . . . . . . . . . . . . . . . . 161
For users in Hong Kong . . . . . . . . . . . . . . . . . . . . . . . . . . . . . . 163
For users in Malaysia . . . . . . . . . . . . . . . . . . . . . . . . . . . . . . . . 163
For users in India. . . . . . . . . . . . . . . . . . . . . . . . . . . . . . . . . . . . 164
For users in the Philippines . . . . . . . . . . . . . . . . . . . . . . . . . . . 166
Chapter 6 Options and Consumables
Ribbon Cartridge . . . . . . . . . . . . . . . . . . . . . . . . . . . . . . . . . . . . . . . . 167
Genuine Epson ribbon cartridge . . . . . . . . . . . . . . . . . . . . . . . 167
Replacing the ribbon cartridge . . . . . . . . . . . . . . . . . . . . . . . . 167
Cut-Sheet Feeder . . . . . . . . . . . . . . . . . . . . . . . . . . . . . . . . . . . . . . . . 175
v
Page 6

Installing the cut-sheet feeder . . . . . . . . . . . . . . . . . . . . . . . . .176
Loading paper in the single-bin cut-sheet feeder . . . . . . . . .178
Loading paper in the high-capacity cut-sheet feeder . . . . . .183
Assembling the double-bin cut-sheet feeder . . . . . . . . . . . . .188
Selecting the paper path (bin 1 or bin 2) . . . . . . . . . . . . . . . . .190
Front Sheet Guide and Front Paper Guide . . . . . . . . . . . . . . . . . . .191
Installing the front sheet guide or front paper guide . . . . . .192
Loading paper in the front sheet guide or
front paper guide. . . . . . . . . . . . . . . . . . . . . . . . . . . . . . . . . .195
Roll Paper Holder . . . . . . . . . . . . . . . . . . . . . . . . . . . . . . . . . . . . . . . .198
Assembling the roll paper holder . . . . . . . . . . . . . . . . . . . . . .198
Installing the roll paper holder . . . . . . . . . . . . . . . . . . . . . . . .199
Loading roll paper . . . . . . . . . . . . . . . . . . . . . . . . . . . . . . . . . . .201
Removing roll paper . . . . . . . . . . . . . . . . . . . . . . . . . . . . . . . . .204
Additional Tractor Unit . . . . . . . . . . . . . . . . . . . . . . . . . . . . . . . . . . .204
Interface Card . . . . . . . . . . . . . . . . . . . . . . . . . . . . . . . . . . . . . . . . . . .205
Installing an interface card . . . . . . . . . . . . . . . . . . . . . . . . . . . .206
Print Server . . . . . . . . . . . . . . . . . . . . . . . . . . . . . . . . . . . . . . . . . . . . .207
Appendix A Product Information
Printer Parts . . . . . . . . . . . . . . . . . . . . . . . . . . . . . . . . . . . . . . . . . . . . .209
Printer Specifications . . . . . . . . . . . . . . . . . . . . . . . . . . . . . . . . . . . . .211
Mechanical . . . . . . . . . . . . . . . . . . . . . . . . . . . . . . . . . . . . . . . . .211
Electronic. . . . . . . . . . . . . . . . . . . . . . . . . . . . . . . . . . . . . . . . . . .214
Electrical . . . . . . . . . . . . . . . . . . . . . . . . . . . . . . . . . . . . . . . . . . .217
Environmental . . . . . . . . . . . . . . . . . . . . . . . . . . . . . . . . . . . . . .218
Paper . . . . . . . . . . . . . . . . . . . . . . . . . . . . . . . . . . . . . . . . . . . . . .218
Printable area . . . . . . . . . . . . . . . . . . . . . . . . . . . . . . . . . . . . . . .224
Command Lists . . . . . . . . . . . . . . . . . . . . . . . . . . . . . . . . . . . . . . . . . .226
EPSON ESC/P control codes . . . . . . . . . . . . . . . . . . . . . . . . . .226
IBM PPDS emulation control codes. . . . . . . . . . . . . . . . . . . . .228
Standards and Approvals . . . . . . . . . . . . . . . . . . . . . . . . . . . . . . . . .229
Cleaning the Printer . . . . . . . . . . . . . . . . . . . . . . . . . . . . . . . . . . . . . .230
Transporting the Printer. . . . . . . . . . . . . . . . . . . . . . . . . . . . . . . . . . .231
vi
Page 7

Glossary
Index
vii
Page 8

viii
Page 9

Chapter 1
Safety Instructions
Warnings, Cautions, and Notes
Warnings
must be followed carefully to avoid bodily injury.
w
Cautions
must be observed to avoid damage to your equipment.
c
Notes
contain important information and useful tips on the operation of your
printer.
Hot Parts Caution Symbol
This symbol is placed on the print head and other
K
parts to indicate that they may be hot. Never touch
those parts just after the printer has been used. Let
them cool for a few minutes before touching them.
1
1
1
1
1
1
1
1
1
Important Safety Instructions
Read all of these safety instructions before using the printer. In
addition, follow all warnings and instructions marked on the
printer itself.
Safety Instructions 1
1
1
1
Page 10

When setting up the printer
❏ Do not place the printer on an unstable surface or near a
radiator or heat source.
❏ Place the printer on a flat surface. The printer will not operate
properly if it is tilted or placed at an angle.
❏ Do not place this product on a soft, unstable surface like a bed
or a sofa, or a small, enclosed area, as this restricts ventilation.
❏ Do not block or cover the slots and openings in the printer’s
cabinet, and do not insert objects through the slots.
❏ Use only the type of power source indicated on the printer’s
label. If you are not sure of the power supply specifications in
your area, contact your local power company or consult your
dealer.
❏ Connect all equipment to properly grounded electrical
outlets. Avoid using outlets on the same circuit as
photocopiers or air control systems that regularly switch on
and off.
❏ Do not use a damaged or frayed power cord.
❏ The power cord should be placed to avoid abrasions, cuts,
fraying, crimping, kinking, and other damage.
❏ If you use an extension cord with the printer, make sure the
total ampere rating of all devices plugged into the extension
cord does not exceed the cord’s ampere rating. Also, make
sure the total ampere of all devices plugged into the electrical
outlet does not exceed the electrical outlet’s ampere rating.
❏ Use only the power cord that comes with this product. Use of
another cord may result in fire or electric shock.
2 Safety Instructions
Page 11

❏ This product’s power cord is for use with this product only.
Use with other equipment may result in fire or electric shock.
When maintaining the printer
1
❏ Unplug the printer before cleaning it, and always clean it with
a piece of damp cloth only.
❏ Do not spill liquid onto the printer.
❏ Except as specifically explained in this guide, do not attempt
to service the printer yourself.
❏ Unplug the printer and refer servicing to qualified service
personnel under the following conditions:
i. If the power cord or plug is damaged.
ii. If liquid has entered the printer.
iii. If the printer has been dropped or the cabinet damaged.
iv. If the printer does not operate normally or exhibits a
distinct change in performance.
❏ Adjust only those controls that are covered by the operating
instructions.
❏ If you plan to use the printer in Germany, observe the
following:
To provide adequate short-circuit protection and
over-current protection for this printer, the building
installation must be protected by a 10- or 16-amp circuit
breaker.
1
1
1
1
1
1
1
1
1
1
Safety Instructions 3
1
Page 12

When Handling the paper
❏ Never use the knob to adjust, move, or eject paper; this may
damage the printer or cause it to lose the top-of-form position
❏ Use the knob on the left side of the printer to clear paper jams
only when the printer is off. Otherwise, you may damage the
printer or change the top-of-form or tear-off position.
❏ Never press the Load/Eject or Tear Off/Bin button when you
are using the pull tractor; the paper could come off the pull
tractor and jam the printer.
❏ Do not pull up the paper by hand to fit it on the pull tractor;
this may damage the printer. Press the LF/FF button to move
the paper.
❏ Do not load multipart forms, carbon paper, or labels in the
paper guide.
❏ It is best to load continuous paper with labels on the pull
tractor. Loading labels on the rear or the front push tractor is
not recommended.
❏ Never feed labels backward using the Load/Eject or Tear
Off/Bin button. When fed backward, labels can easily peel off
the backing sheet and cause a paper jam.
❏ Because labels are sensitive to temperature and humidity, use
them only under normal operating conditions described
below:
Temperature 15 to 25°C (59 to 77°F)
Humidity 30 to 60% RH
❏ Do not leave labels loaded in the printer between jobs; they
may curl around the platen and jam when you resume
printing.
4 Safety Instructions
Page 13

❏ Do not load continuous paper with labels from the rear paper
slot. Because the paper path from the rear slot is curved, labels
may come off their backing sheets inside the printer and cause
a paper jam.
1
❏ Do not load paper that is curled or has been folded.
When operating the printer
❏ Adjust only those controls that are covered in the user
documentation. Improper adjustment of other controls may
result in damage requiring extensive repair by a qualified
technician.
❏ Whenever you turn off the printer, wait at least five seconds
before turning it back on; otherwise, you may damage the
printer.
❏ Do not turn off the printer while it is printing the self test.
Always press the Pause button to stop printing and the
Load/Eject button to eject the printed page before you turn
off the printer.
❏ Do not turn off the printer while it is printing the hex dump.
Always press the Pause button to stop printing and the
Load/Eject button to eject the printed page before you turn
off the printer.
❏ Do not reconnect the power cord to an electrical outlet that
has the wrong voltage for your printer.
❏ Never replace the print head yourself; you may damage the
printer. Also, other parts of the printer must be checked when
the print head is replaced.
1
1
1
1
1
1
1
1
1
1
❏ You need to move the print head by hand to replace the ribbon
cartridge. If you have just used the printer, the print head may
be hot; let it cool for a few minutes before touching it.
Safety Instructions 5
1
Page 14

Note for German-speaking users:
Bei Anschluss des Druckers an die Stromversorgung muss
sichergestellt werden, dass die Gebaudeinstallation mit einer 10 Aoder 16 A-Sicherung abgesichert ist.
ENERGY STAR
The International ENERGY STAR® Office Equipment Program
is an international program that promotes energy saving through
the penetration of energy efficient computers and other office
equipment. The program backs the development and
dissemination of products with functions that effectively reduce
energy consumption. It is an open system in which business
proprietors can participate voluntarily. The targeted products are
office equipment such as computers, monitors, printers,
facsimiles, copiers, scanners, and multifunction devices. Their
standards and logos are uniform among participating nations.
®
Compliance
ENERGY STAR
As an
has determined that this product meets
the
ENERGY STAR
energy efficiency.
®
Partner, Epson
®
guidelines for
6 Safety Instructions
Page 15

Chapter 2
Paper Handling
Selecting a Paper Source
Your printer provides a variety of paper sources for printing on
single sheets and continuous paper. Paper can be fed into the
printer from the top, front, bottom, or rear. Select the paper source
that best suits your current printing needs.
Printing on continuous paper
You can choose from three tractor positions (front push, rear push,
and pull) and three paper entry slots (front, rear, and bottom) for
continuous paper printing. This section helps you determine
which paper paths and tractor positions are best for your
continuous paper printing needs. See “Loading continuous paper
with the tractor” on page 14 for tractor installation and paper
loading instructions.
2
2
2
2
2
2
2
2
Using the push tractor positions
If you often need to tear off sheets of continuous paper (for
example, if you are printing purchase orders or sales slips), it is
best to use the tractor in the front or rear push position. This allows
you to use the printer’s tear-off edge to easily tear off sheets of
continuous paper at the perforation. Also, when continuous
paper is loaded on a push tractor, you can print on single sheets
of paper from the paper guide without removing the continuous
paper from the tractor.
Paper Handling 7
2
2
2
2
Page 16
There are two push tractor positions: front and rear. The tractor
is installed in the rear push position when the printer is shipped.
See the table below for details about the push positions and the
corresponding paper paths.
Tractor
position
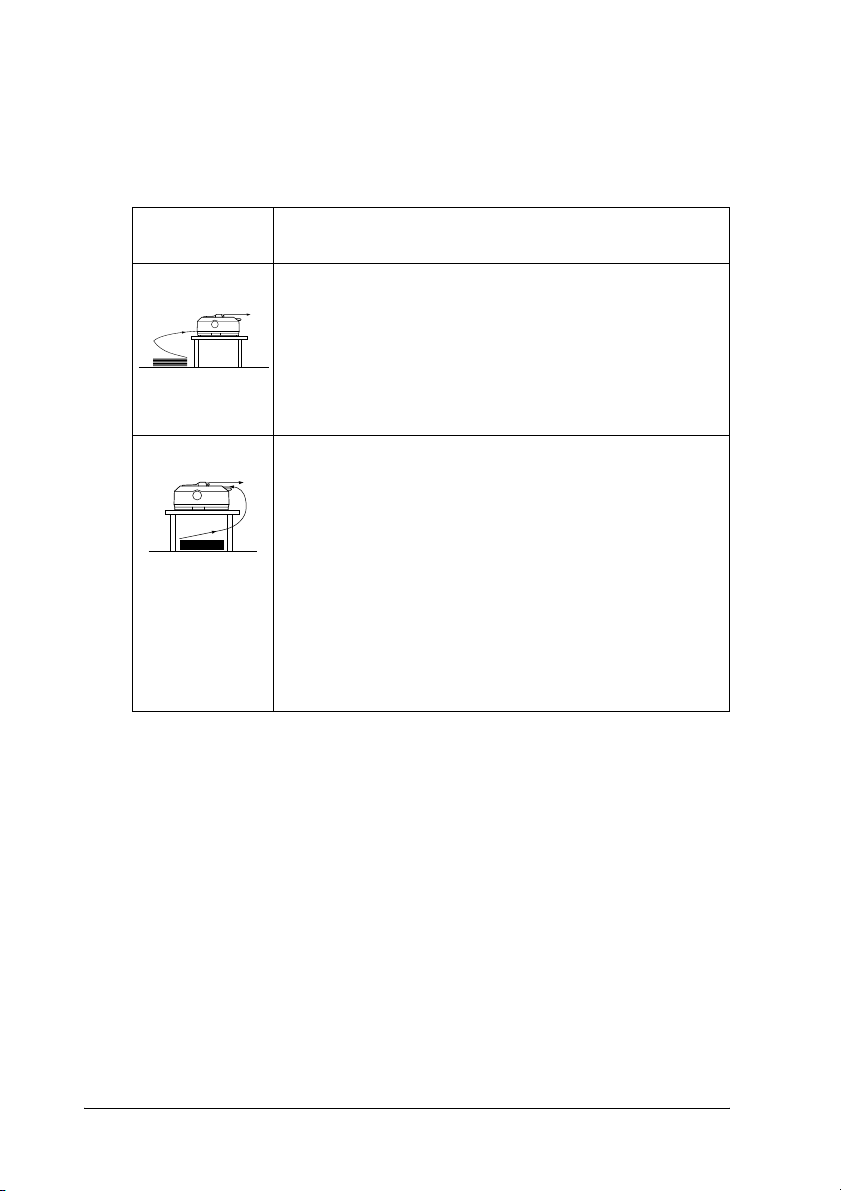
front push
rear push
Description
Load paper from the front slot.
If you print on thick paper such as multipart forms, use
the front paper slot because this paper path is almost
straight. This reduces the chances of paper jams.
Load paper from the rear slot.
Caution:
Do not load continuous paper with labels from
c
the rear slot. Labels require a straight paper path;
otherwise the labels may come off their backing
sheets inside the printer and cause a paper jam.
Note:
The rear slot is also not recommended when your
multipart forms have 5 parts (1 original plus 4 copies),
because paper might jam.
Using the pull tractor position
If you often print on thick or heavy continuous paper, such as
multipart forms or continuous paper with labels, use the tractor
in the pull position. The pull tractor provides you with the best
paper jam prevention, and allows you to load continuous paper
from the front, rear, or bottom of the printer. However, you cannot
use the tear-off feature when the tractor is in the pull position.
8 Paper Handling
Page 17
Note:
To use the tractor in the pull position, you can remove the tractor from
the rear push position and reinstall it in the pull position, or you can
purchase the optional pull tractor unit (C80020✽ for the LQ-590,
C80021✽ for the LQ-2090) and install it in the pull position.
If you use a push tractor with the optional tractor in the pull
position, you can create a push/pull tractor combination. This
improves the performance of continuous paper, and is
recommended for printing on continuous pre-printed forms. See
“Using two tractors in a push/pull combination” on page 42 for
more information.
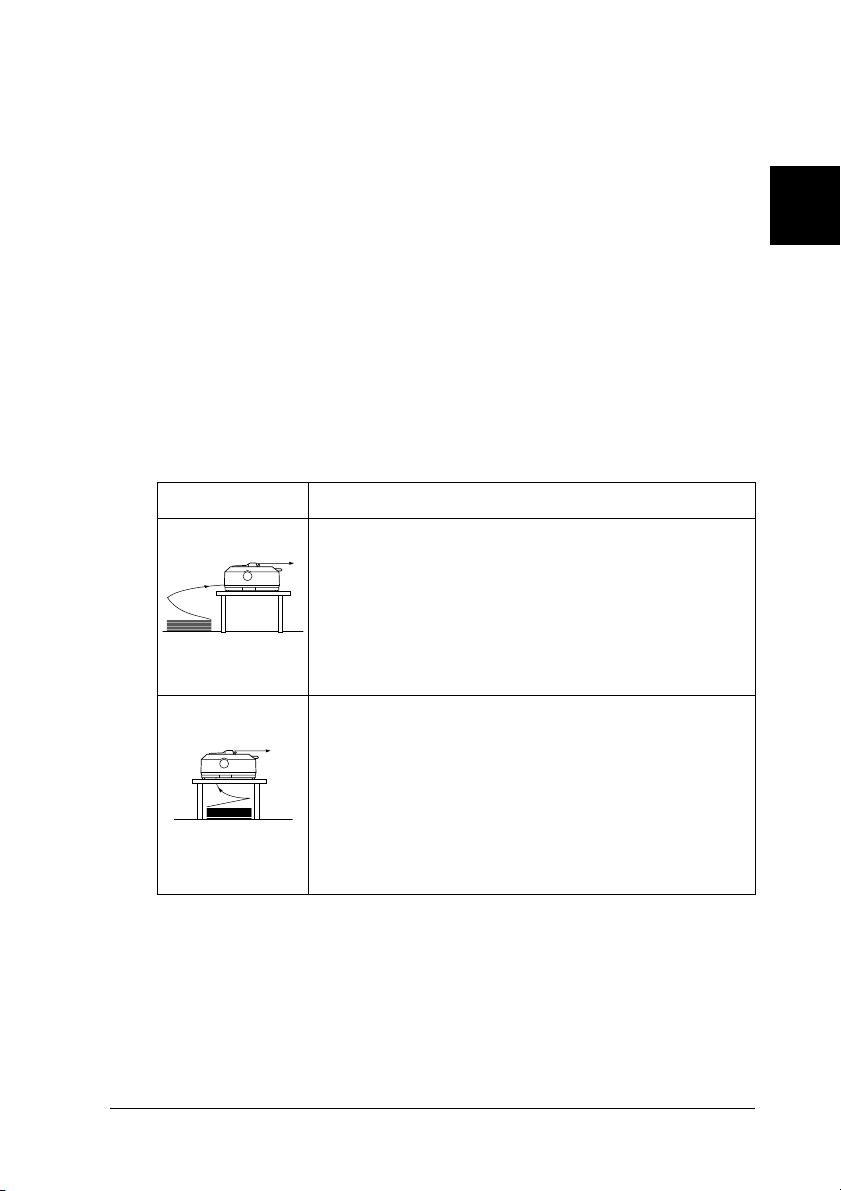
You can use the front, bottom, or rear paper slot with the pull
tractor.
Paper slot Description
2
2
2
2
2
front
bottom
If you print on thick paper such as multipart forms or
continuous paper with labels, use the front paper slot
because this paper path is nearly straight. This reduces
the chances of paper jams.
The bottom paper slot has the straightest paper path,
so it is the best slot to use when printing on thick paper,
such as multipart forms or continuous paper with labels.
Note:
When loading paper from the bottom slot, be sure to
use a printer stand with an opening large enough for
the paper to feed through it without obstruction.
2
2
2
2
2
2
2
Paper Handling 9
Page 18

Paper slot Description
If the front or bottom paper slot is unavailable, you can
also load ordinary continuous paper from the rear slot.
Please note that loading paper from the rear slot results
in a curved paper path, which may affect loading
performance, so use the front or bottom slot whenever
possible.
rear
Caution:
Do not load continuous paper with labels from
c
the rear slot. The labels may come off the
backing sheets inside the printer and cause a
paper jam.
Printing on single sheets
As shown below, you can load ordinary single sheets (not
single-sheet multipart forms) and envelopes one at a time from
the rear paper entry slot of the printer, using the paper guide that
comes with the printer.
To load single-sheet multipart forms, you need to use the front
paper entry slot. The front sheet guide and front paper guide are
available for easy operation.
10 Paper Handling
Page 19
Note:
❏ For LQ-590 users, the front sheet guide comes with your printer.
For LQ-2090 users, it is available as an optional equipment
(C81401
✽
).
2
❏ For LQ-2090 users, the front paper guide comes with your printer.
For LQ-590 users, it is available as an optional equipment
✽
(C81402
You can also load a stack of single-sheet paper using the optional
cut-sheet feeder. See “Loading Single Sheets” on page 48 for more
information. See “Cut-Sheet Feeder” on page 175 for information
on the optional cut-sheet feeder.
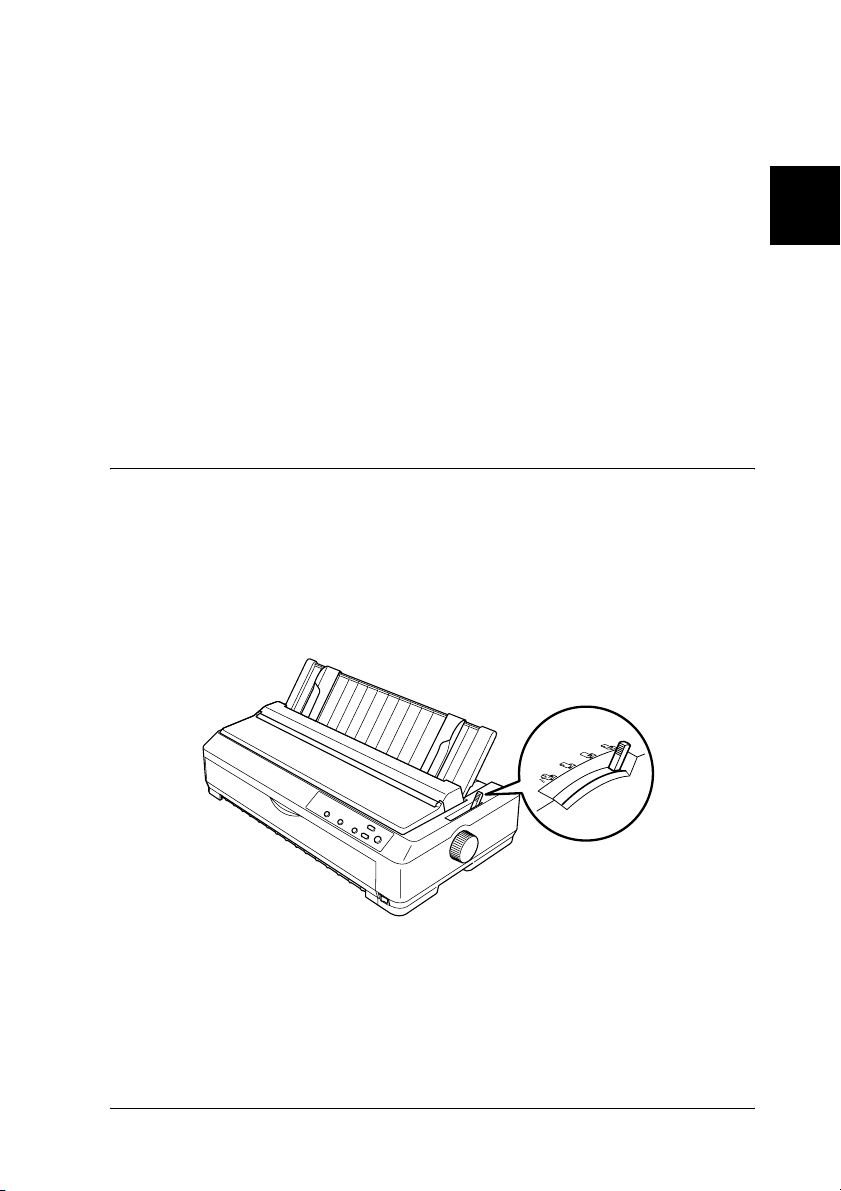
Setting the Paper Release Lever
When you load continuous paper in the printer, you need to set
the paper release lever to indicate the paper source you want to
use, as described in the table below.
).
2
2
2
2
2
2
2
2
Paper Handling 11
2
2
2
Page 20
The table below describes each paper release lever position.
Paper
release
lever
position
Description
Single-sheet position
For loading single-sheet paper from the top or front slot.
See “Loading Single Sheets” on page 48 for instructions.
Rear push tractor position
For loading continuous paper using the tractor installed in
the rear push position. Also set the lever to this position
when using the rear push and pull tractors in combination.
Front push tractor position
For loading continuous paper using the tractor installed in
the front push position. Also set the lever to this position
when using th e front push and pull trac tors in combination.
Pull tractor position
For loading continuous paper from the tractor installed on
top of the printer in the pull position. When the tractor is in
the pull position, you can load paper in the front, rear, or
bottom slot.
Adjusting the Paper-Thickness Lever
Before you start printing, you may need to change the
paper-thickness setting depending on the type of paper you are
using. Follow these steps:
12 Paper Handling
Page 21
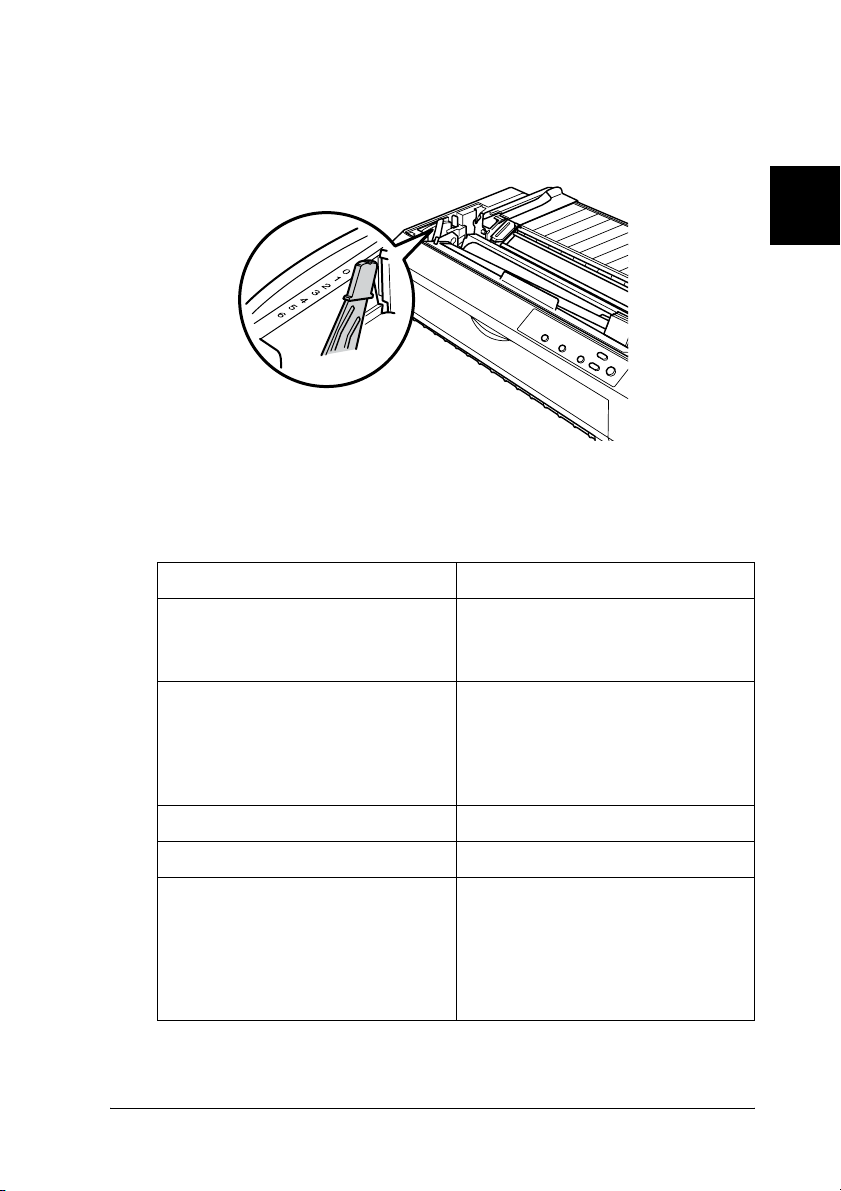
1. Turn the printer off and open the printer cover. The
paper-thickness lever is located on the left side of the printer.
2. Use the table below to select the appropriate paper thickness.
The numbers next to the lever indicate the thickness setting.
Paper type* Lever position
2
2
2
2
2
2
Ordinary paper:
Single sheets
Continuous paper
Carbonless multipart forms with:
2 parts (original + 1 copy)
3 parts (original + 2 copies)
4 parts (original + 3 copies)
5 parts (original + 4 copies)
Continuous paper with labels 2
Cards 2
Envelopes:
AIRMAIL No.6
AIRMAIL No.10
PLANE
BOND 20lb
BOND 24lb
* See “Paper” on page 218 for more information.
0
0
1
2
3
5
3
3
4
4
6
2
2
2
2
2
2
Paper Handling 13
Page 22
Note:
When the temperature is 5°C (41°F) or lower, or 35°C (95°F) or higher,
set the paper-thickness lever one position higher to improve print quality.
Loading Continuous Paper
Follow the instructions in this section to load continuous paper in
the printer.
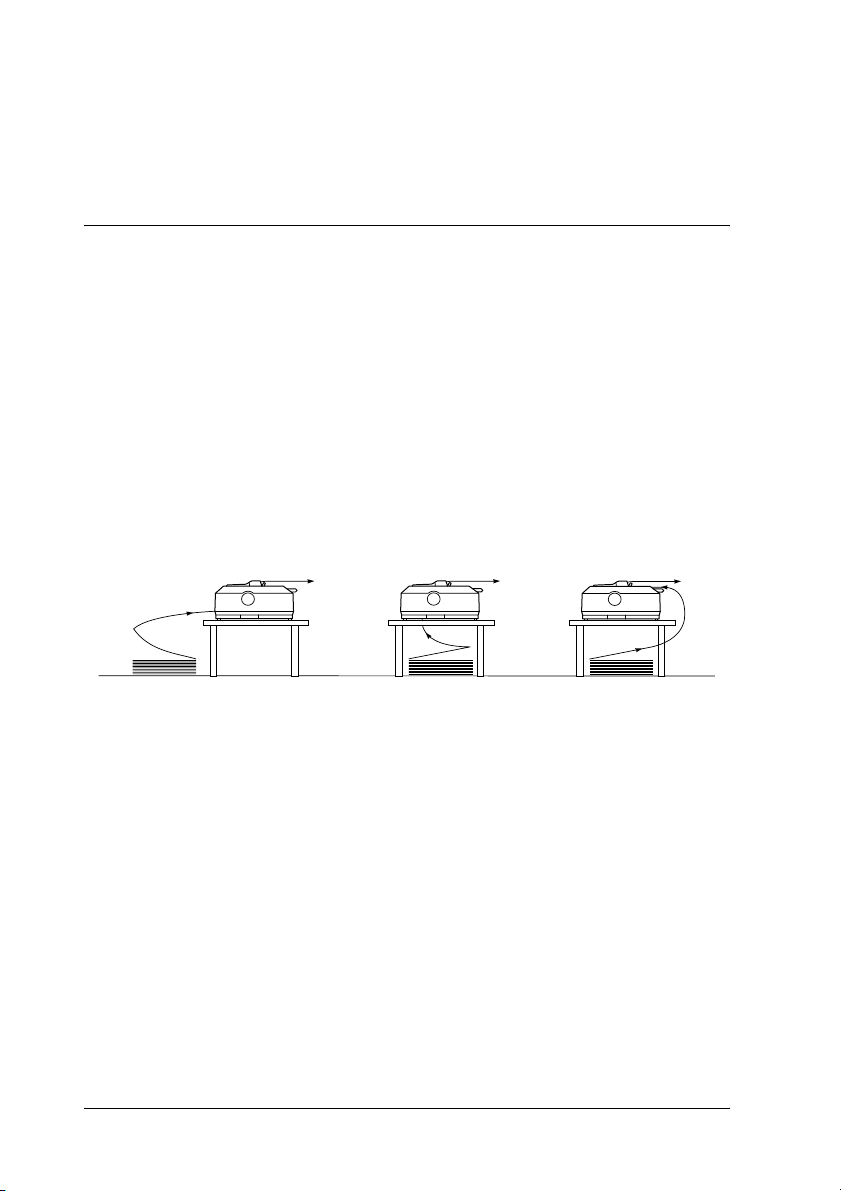
Positioning the continuous paper supply
Before using continuous paper, make sure you line up your paper
supply with the tractor feeder as shown below, so that the paper
feeds smoothly into the printer.
Loading continuous paper with the tractor
The paper loading procedure depends on where you position the
tractor which feeds paper to the printer. Follow the instructions
below for your tractor position.
This section provides instructions on “Using the tractor in the
front push position” on page 15, “Using the tractor in the rear
push position” on page 23, “Using the tractor in the pull position”
on page 30, and “Using two tractors in a push/pull combination”
on page 42.
14 Paper Handling
Page 23

Using the tractor in the front push position
This section provides instructions on “Installing the tractor in the
front push position” on page 15, “Loading paper with the front
push tractor” on page 17, and “Removing the tractor from the
front push position” on page 22.
Installing the tractor in the front push position
Before installing the tractor in the front push position, remove it
from its current position. If the tractor is in t he rear p ush posit ion,
remove the paper guide and then press the tractor’s lock tabs
while lifting it out. If the tractor is in the pull position, remove it
following the instructions in “Removing the tractor from the pull
position” on page 40.
Note:
The tractor is installed in the rear push position when the printer is
shipped.
1. Make sure the printer is turned off. If necessary, install the
paper guide on your printer as described in “Assembling the
Printer” in the Setup Sheet.
2
2
2
2
2
2
2
2
Paper Handling 15
2
2
2
2
Page 24
2. If the front sheet guide is installed, remove it by grasping the
fins on both sides and pulling the guide slightly up and away
from the printer. If the front paper guide is installed, open the
front cover and remove it.
Note:
❏ For LQ-590 users, the front sheet guide comes with your printer.
For LQ-2090 users, it is available as an optional equipment
(C81401
✽
).
❏ For LQ-2090 users, the front paper guide comes with your printer.
For LQ-590 users, it is available as an optional equipment
✽
(C81402
).
16 Paper Handling
Page 25
3. Insert the tractor into the printer’s mounting slots and press
down both ends of the tractor to make sure that it is firmly
seated.
See “Loading paper with the front push tractor” on page 17 for
instructions on loading continuous paper with the front push
tractor.
Loading paper with the front push tractor
When using the push tractor, it is a good idea to set the Auto
tear-off function in the Default Setting mode to On. See “About
Your Printer’s Default Settings” on page 117 for more
information.
2
2
2
2
2
2
2
2
2
Follow these steps to load paper using the front push tractor:
1. Make sure the printer is turned off.
Paper Handling 17
2
2
2
Page 26

2. Open the front cover. Make sure the tractor is installed in the
front push position.
3. Set the paper release lever to the front push tractor position.
Also set the paper-thickness lever (located under the printer
cover) to the proper position for your paper’s thickness. See
“Adjusting the Paper-Thickness Lever” on page 12 for
instructions.
18 Paper Handling
Page 27
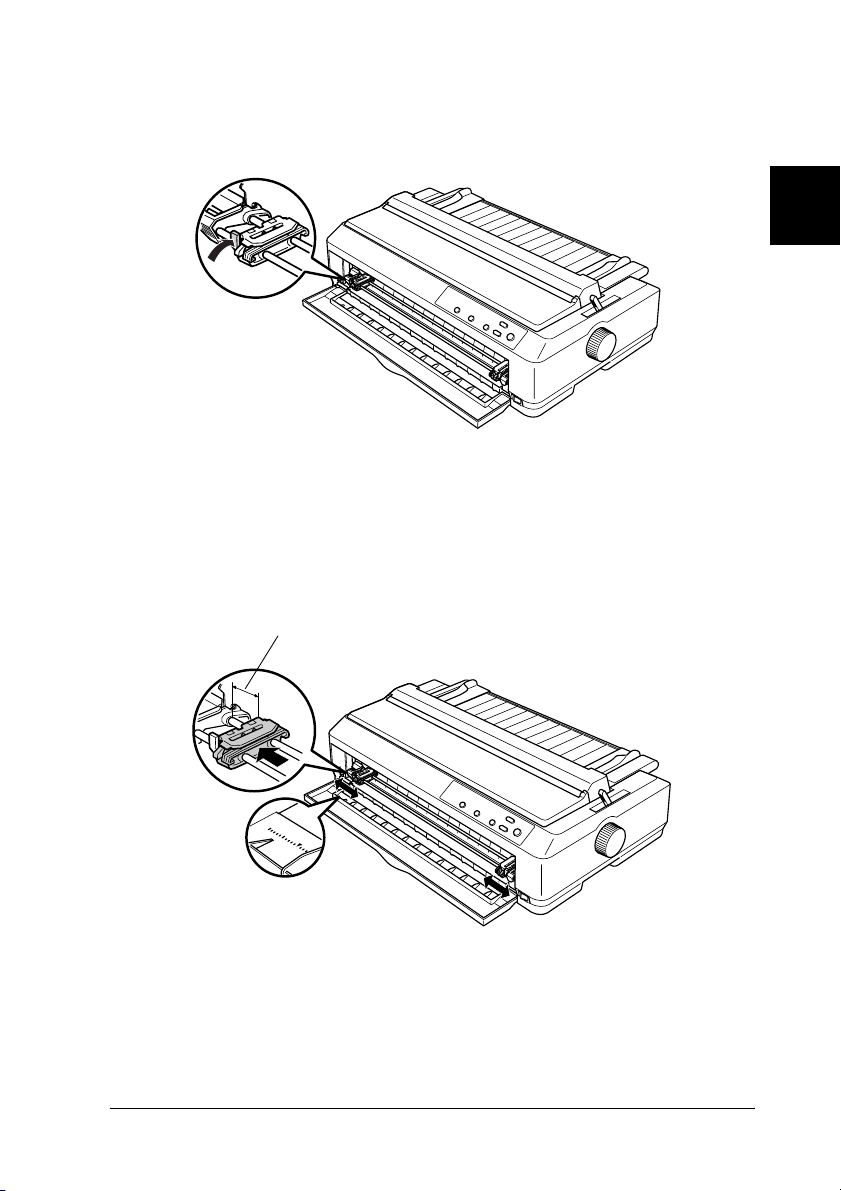
4. Release the left and right sprockets by pushing the blue
sprocket lock levers backward.
5. Slide the left sprocket approximately 12 mm (0.5 inch) from
the far left position and pull the blue lever forward to lock it
in place. Then slide the right sprocket to match the width of
your paper, but do not lock it.
2
2
2
2
2
2
approx. 12 mm (0.5 inch)
10
5
0
2
2
2
2
2
2
Paper Handling 19
Page 28
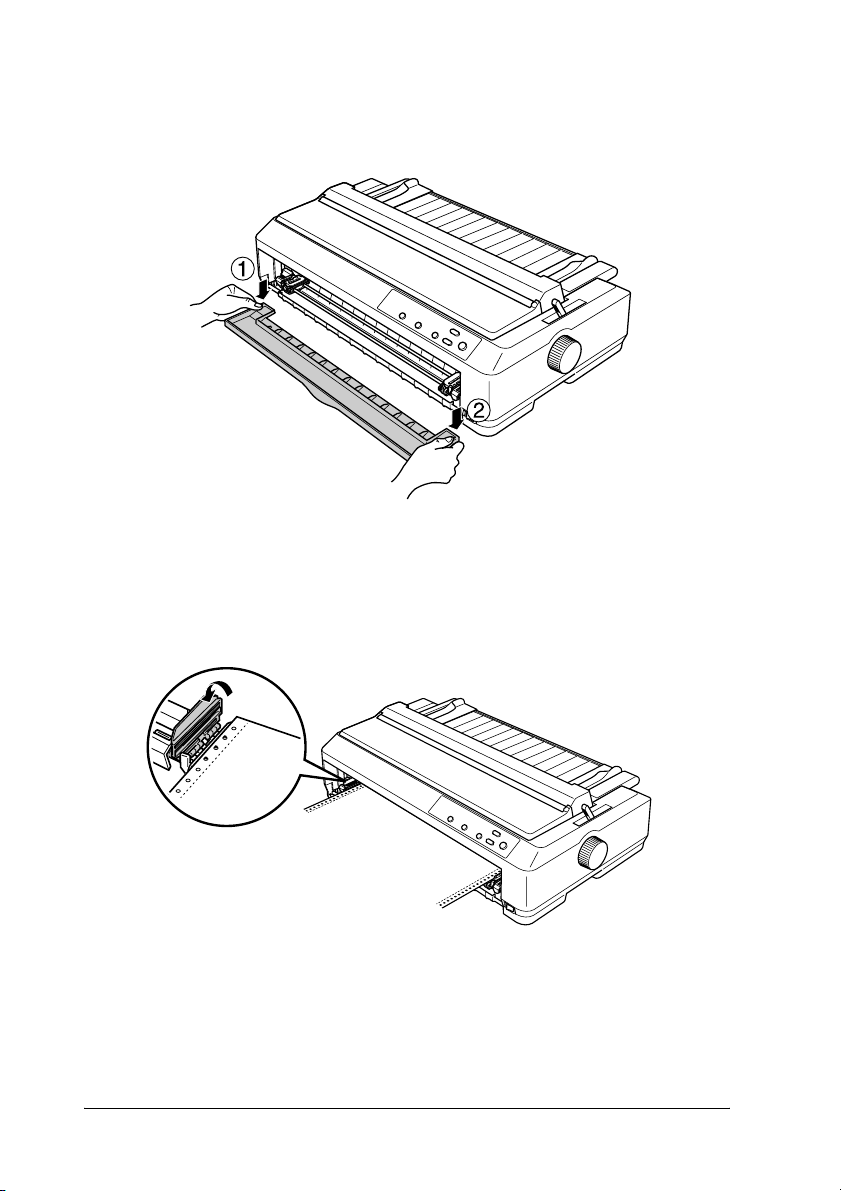
6. Remove the front cover by pushing it straight down, as shown
below.
7. Make sure your paper has a clean, straight edge. Then open
both sprocket covers and fit the first four holes of the paper,
with printable side up, over the tractor pins.
8. Close the sprocket covers.
20 Paper Handling
Page 29
9. Slide the right sprocket to remove any slack in the paper; then
lock it in place by pushing the sprocket lock down.
10. Attach the front cover with the continuous paper positioned
as shown below.
2
2
2
2
2
2
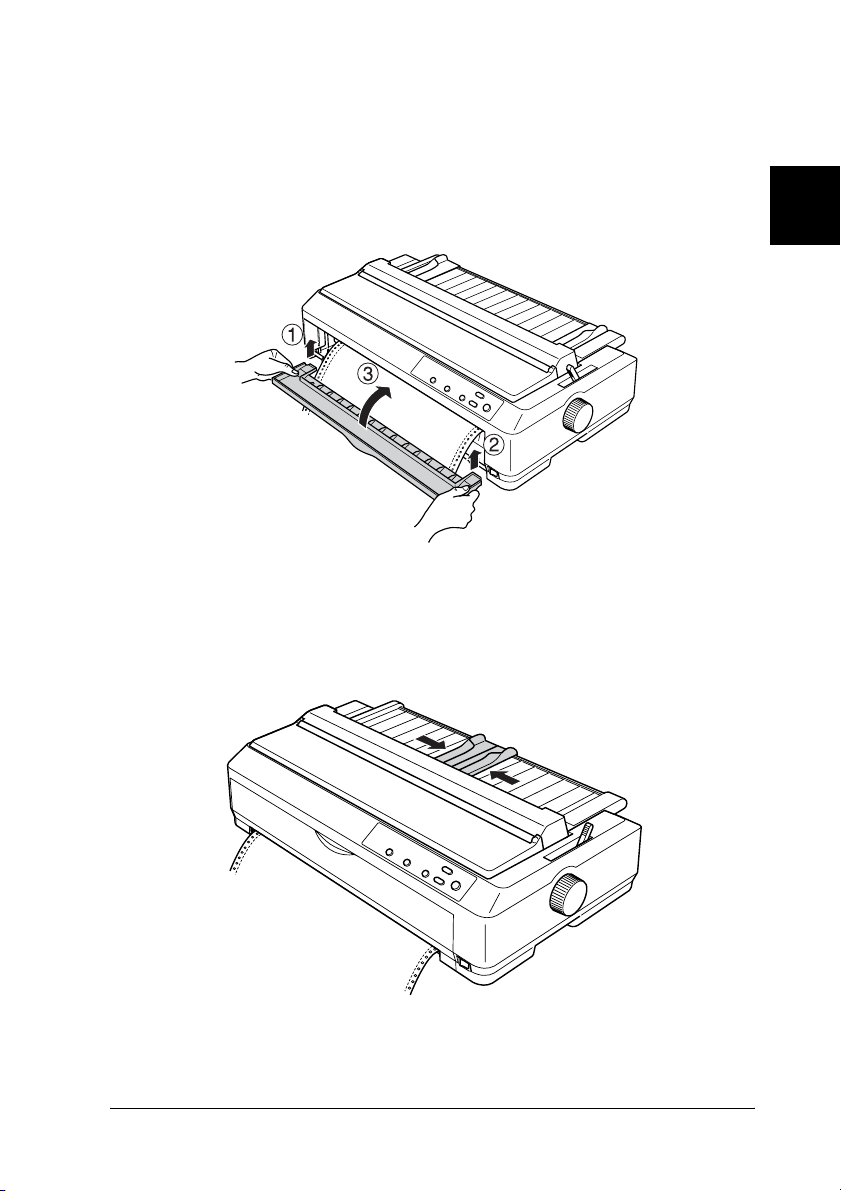
11. Make sure the paper guide is lying flat on the printer and slide
the edge guides to the middle of the paper guide.
Paper Handling 21
2
2
2
2
2
2
Page 30

Note:
For your safety, Epson recommends operating the printer with the
printer cover closed. The printer will function with the printer cover
open or removed, but for maximum safety keep the cover closed.
12. Turn on the printer. When the printer receives data, it
automatically loads the paper and starts printing.
13. After you finish printing, follow the steps in “Removing
continuous paper” on page 45 to remove your printed
document.
If the first line on your page appears too high or low, you can
change its position by using the Micro Adjust function as
described in “Adjusting the top-of-form position” on page 64.
Caution:
Never use the knob to adjust the top-of-form position; this may
c
damage the printer or cause it to lose the top-of-form position.
Removing the tractor from the front push position
Follow these steps to remove the tractor from the front push
position:
1. Make sure the printer is turned off.
2. Remove any paper from the tractor as described in
“Removing continuous paper” on page 45.
22 Paper Handling
Page 31

3. Press the tractor’s lock tabs, tilt the tractor up, and lift it out
of the printer.
4. Close the front cover.
2
2
2
2
2
2
2
Using the tractor in the rear push position
The tractor is installed in the rear push position when the printer
is shipped. If your tractor is in the rear push position, skip to
“Loading paper with the rear push tractor” on page 25 for
instructions on loading paper.
Paper Handling 23
2
2
2
2
2
Page 32

This section provides instructions on “Installing the tractor in the
rear push position” on page 24, “Loading paper with the rear
push tractor” on page 25, and “Removing the tractor from the rear
push position” on page 29.
Note:
Thick paper, such as continuous paper with labels or multipart forms
with five parts, requires a relatively straight paper path to avoid paper
jams. When printing on thick continuous paper, use the tractor in the
front push position or the pull position.
Installing the tractor in the rear push position
Before installing the tractor in the rear push position, remove it
from its current position. If the tractor is in the front push position,
remove it by pressing the tractor’s lock tabs while lifting it out. If
the tractor is in the pull position, remove it as described in
“Removing the tractor from the pull position” on page 40.
1. Make sure the printer is turned off. Then open the paper guide
cover by pulling its back edge forward.
2. Lift the paper guide up and off the printer.
24 Paper Handling
Page 33

3. Lower the tractor into the printer’s mounting slots and press
down both ends of the tractor to make sure that it is firmly
seated.
2
2
2
2
2
See “Loading paper with the rear push tractor” on page 25 for
instructions on loading continuous paper using the rear push
tractor.
Loading paper with the rear push tractor
Follow these steps to load paper using the rear push tractor:
1. Make sure the printer is turned off and the tractor is installed
in the rear push position. Also make sure the paper guide is
removed.
2
2
2
2
2
2
2
Paper Handling 25
Page 34

2. Set the paper release lever to the rear push tractor position.
3. Release the left and right sprockets by pulling the blue
sprocket lock levers forward.
26 Paper Handling
Page 35

4. Slide the left sprocket approximately 12 mm (0.5 inch) from
the far left position and push the blue lever back to lock it in
place. Then slide the right sprocket to match the width of your
paper, but do not lock it.
approx. 12 mm (0.5 inch)
2
2
2
2
2
2
The triangle mark on top of the printer indicates the point furthest
to the left where printing can begin.
Paper Handling 27
2
2
2
2
2
2
Page 36

5. Make sure your paper has a clean, straight edge. Then open
both sprocket covers and fit the first four holes of the paper,
with the printable side down, over the tractor pins.
6. Close the sprocket covers.
7. Slide the right sprocket to remove any slack in the paper; then
lock it in place by pushing the blue sprocket lock down.
8. Attach the paper guide and lay it flat on the printer and slide
the edge guides to the middle of the paper guide.
Note:
For your safety, Epson recommends operating the printer with the
printer cover closed. The printer will function with the printer cover
open or removed, but for maximum safety keep the cover closed.
9. Turn on the printer. When the printer receives data, it
automatically loads the paper and starts printing.
10. After you finish printing, follow the steps in “Removing
continuous paper” on page 45 to remove your printed
document.
28 Paper Handling
Page 37

If the first line on your page appears too high or low, you can
change its position using the Micro Adjust function as described
in “Adjusting the top-of-form position” on page 64.
Caution:
Never use the knob to adjust the top-of-form position; this may
c
damage the printer or cause it to lose the top-of-form position.
2
2
Removing the tractor from the rear push position
Follow these steps to remove the tractor from the rear push
position:
1. Make sure the printer is turned off.
2. Remove any paper from the tractor as described in
“Removing continuous paper” on page 45.
3. Press the tractor’s lock tabs, tilt the tractor up, and lift it out
of the printer.
2
2
2
2
2
2
2
2
Paper Handling 29
2
2
Page 38

Using the tractor in the pull position
Using the tractor in the pull position is ideal for printing on thick
and heavy continuous paper, such as multipart forms or
continuous paper with labels. However, you cannot use the
tear-off function with the pull tractor.
Because thick paper requires a straight paper path to avoid paper
jams, you should load paper in the front or bottom slot when
using the pull tractor. To further reduce the chances of paper jams
and improve the performance of continuous paper, you can use
two tractors in combination. See “Using two tractors in a
push/pull combination” on page 42 for more information.
To install the tractor in the pull position, you need to remove the
paper tension unit and install the tractor in its place. See
“Installing the tractor in the pull position” on page 30 for
information on the installation procedure.
This section provides instructions on “Installing the tractor in the
pull position” on page 30, “Loading paper with the pull tractor”
on page 33, and “Removing the tractor from the pull position” on
page 40.
Installing the tractor in the pull position
Before installing the tractor in the pull position, remove it from
its current position. If the tractor is in the front push position,
remove it by pressing the tractor’s lock tabs while lifting it out. If
the tractor is in the rear push position, remove the paper guide
and then press the tractor’s lock tabs while lifting it out.
Note:
The tractor is installed in the rear push position when the printer is
shipped.
30 Paper Handling
Page 39

1. Make sure the printer is turned off. Then open the paper guide
cover by pulling its back edge forward.
2
2
2
2
2. Lift the printer cover and pull it straight up and off the printer.
2
2
2
2
2
2
2
2
Paper Handling 31
Page 40

3. Press the tabs on each side of the paper tension unit upward
and lift the unit up and off the printer. Store the paper tension
unit in a safe place.
Note:
If you plan to load paper from the rear, you need to insert the paper
into the paper path before installing the paper guide and tractor. See
“Loading paper with the pull tractor” on page 33 for instructions.
4. Attach the paper guide if necessary, slide the edge guides to
the middle of the paper guide, and lay it flat on the printer.
32 Paper Handling
Page 41

Note:
If you plan to load paper from the rear, you need to insert the paper
into the paper path before installing the paper guide and tractor.
5. Lower the tractor into the printer’s mounting slots and press
down both ends of the tractor to make sure it is firmly seated.
2
2
2
2
2
2
2
Loading paper with the pull tractor
Follow these steps to load paper using the pull tractor:
Paper Handling 33
2
2
2
2
2
Page 42

1. Make sure the printer is turned off, and the printer cover is
removed. Also make sure the tractor is installed in the pull
position and the paper guide is lying flat on the printer.
2. Set the paper release lever to the pull tractor position.
34 Paper Handling
Page 43

3. Release the sprockets by pulling the sprocket lock levers
forward.
4. Slide the left sprocket approximately 12 mm (0.5 inch) from
the far left position and push the lever back to lock it in place.
Then slide the right sprocket to match the width of your
paper, but do not lock it.
2
2
2
2
2
2
2
approx. 12 mm (0.5 inch)
5. Make sure your paper has a clean, straight edge. Then open
the sprocket covers.
Paper Handling 35
2
2
2
2
2
Page 44

Note:
Make sure the printer is off before you insert the paper in the paper
slot. If you insert the paper while it is on, a paper jam may occur.
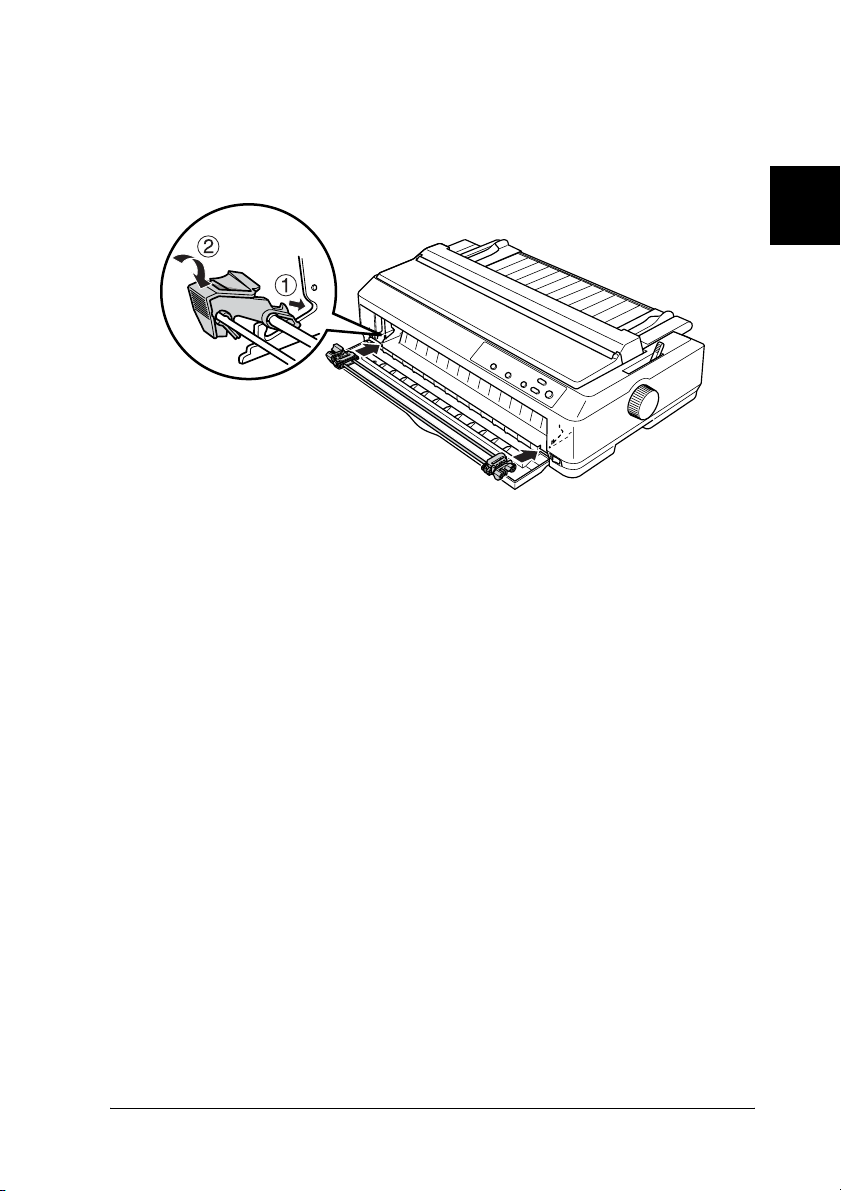
6. Insert the paper into the front or bottom paper slot as shown
in the illustration below until it emerges between the platen
and the ribbon guide. Then pull up the paper until the
perforation between the first and second pages is even with
the top of the printer’s ribbon.
Front slot
Before you load paper in the front slot, remove the front cover.
Then load paper with the printable side facing up.
36 Paper Handling
Page 45

Bottom slot
Load paper in the bottom slot with the printable side facing
up.
7. Fit four holes of the paper over the tractor pins on both
sprockets. Then close the sprocket covers.
2
2
2
2
2
2
2
2
8. Slide the right sprocket to remove any slack in the paper, then
lock it in place.
Paper Handling 37
2
2
2
2
Page 46

9. Slide the edge guides on the paper guide to the center.
10. If you load paper in the front slot, reattach the front cover as
shown below. If you load paper in the bottom slot, go to the
next step.
11. Turn on the printer.
12. Remove any slack in the paper by pressing the LF/FF button.
Caution:
Always remove any slack from the paper; otherwise print
c
quality may deteriorate.
38 Paper Handling
Page 47

13. If necessary, follow the steps in “Adjusting the top-of-form
position” on page 64 to adjust the current position of the
paper.
Caution:
Never use the knob to adjust the top-of-form position; this
c
may damage the printer or cause it to lose the top-of-form
position.
14. Attach the printer cover by inserting the front tabs into the
slots on the printer, then lowering the cover into place. Then
close the paper guide cover.
Note:
For your safety, Epson recommends operating the printer with the
printer cover closed. The printer will function with the printer cover
open or removed, but for maximum safety keep the cover closed.
2
2
2
2
2
15. Send a print job to the printer. The printer starts printing from
the top-of-form position. After you finish printing, open the
paper guide cover, then tear off the printed document at the
perforation nearest the paper exit slot.
Removing paper from the pull tractor
Follow these steps to remove continuous paper from the pull
tractor:
2
2
2
2
2
2
2
Paper Handling 39
Page 48

1. After you finish printing, tear off the paper supply at the
perforation nearest the paper entry slot.
2. To feed paper forward and eject it, hold down the LF/FF
button.
Caution:
Never press the Load/Eject or Tear Off/Bin button when
c
you are using the pull tractor; the paper could come off the
pull tractor and jam the printer.
Removing the tractor from the pull position
Follow these steps to remove the tractor from the pull position:
1. Remove any paper loaded on the pull tractor as described in
“Removing paper from the pull tractor” on page 39.
2. Make sure the printer is turned off. Then open the paper guide
cover by pulling its back edge toward you.
3. Lift the printer cover by its back edge and then pull it straight
up and off the printer.
40 Paper Handling
Page 49

4. Press the tractor’s lock tabs, tilt the tractor toward you, and
lift it off the printer.
2
2
2
2
2
5. Store the tractor in a safe place, or install it in the front or rear
push position as described in “Using the tractor in the front
push position” on page 15 or “Using the tractor in the rear
push position” on page 23.
6. Reinstall the paper tension unit by lower it onto the printer’s
mounting pegs. Then press down on both ends of the unit
until it clicks into place.
2
2
2
2
2
2
2
Paper Handling 41
Page 50

7. Replace the printer cover.
Using two tractors in a push/pull combination
Using two tractors at the same time is recommended for printing
on continuous pre-printed forms, multipart forms, and labels, and
for printing high quality graphics. To reduce paper jams and
improve continuous paper feeding, you can install the optional
additional tractor (C80020✽ for the LQ-590, C80021✽ for the
LQ-2090) and then use two tractors at the same time.
Follow these steps to use two tractors at the same time:
1. Install one tractor in the front or rear push position as
described in “Installing the tractor in the front push position”
on page 15 or “Installing the tractor in the rear push position”
on page 24.
2. Load continuous paper using the front or rear push tractor as
described in “Loading paper with the front push tractor” on
page 17 or “Loading paper with the rear push tractor” on page
25.
3. Set the paper release lever to the front or rear push position,
depending on the position of your push tractor.
4. Turn on the printer. Press the Load/Eject button to advance
the paper to the top-of-form position. Then press the LF/FF
button until the perforation between the first and second
pages is even with the top of the printer’s ribbon.
Caution:
Never use the knob to move the paper; this may damage the
c
printer or cause it to lose the top-of-form position.
5. Install the other tractor in the pull position as described in
“Installing the tractor in the pull position” on page 30.
42 Paper Handling
Page 51

6. Fit the holes of the paper over the pins on both sprockets of
the pull tractor.
Caution:
Do not pull up the paper by hand to fit it on the pull tractor;
c
this may damage the printer. Press the LF/FF button to move
the paper.
2
2
7. Set the paper release lever to the pull tractor position. Then
use the Micro Adjust function (described in “Using the Micro
Adjust Function” on page 61) to remove any slack in the paper
between the push and pull tractors.
8. Move the paper release lever back to the position you set in
step 3.
9. When the printer receives data, it will start printing at the
current position without advancing the paper. If necessary,
follow the steps in “Adjusting the top-of-form position” on
page 64 to adjust the current position of the paper.
10. Attach the printer cover. Make sure the paper guide is
installed and lying flat on the printer.
Note:
For your safety, Epson recommends operating the printer with the
printer cover closed. The printer will function with the printer cover
open or removed, but for maximum safety keep the cover closed.
11. Send a print job to the printer. The printer starts printing from
the current position without advancing the paper. After you
finish printing, tear off the printed document at the
perforation nearest the paper exit slot.
2
2
2
2
2
2
2
2
Paper Handling 43
2
2
Page 52

The table below summarizes the various methods of feeding
continuous paper with two tractors and shows which paper
release lever setting to use for each method.
Tractor positions Paper release
Pull + front push Front push tractor
Pull + rear push Rear push tractor
Front push
+ rear push
lever position
Front push tractor
Rear push tractor
Paper path
44 Paper Handling
Page 53

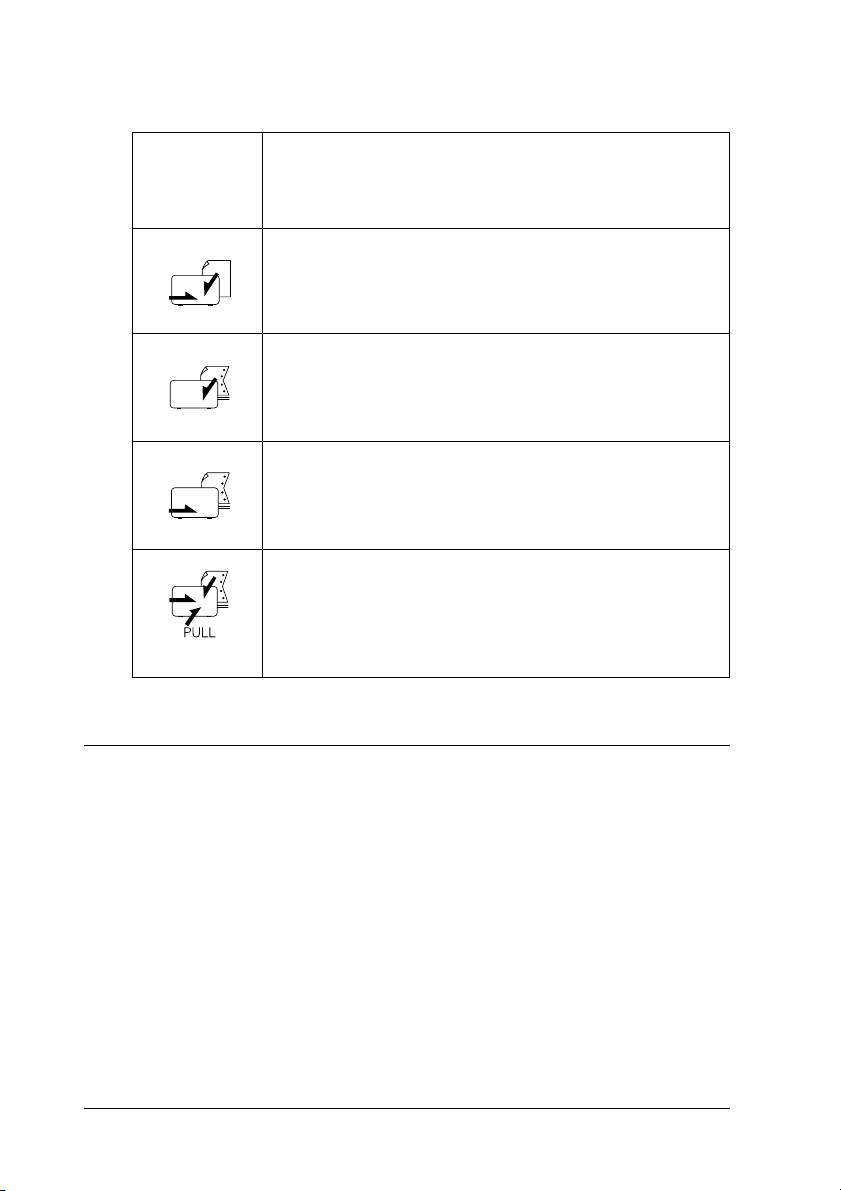
Using the Tear-off Function
If the push tractor is installed, you can use the tear-off function to
advance your continuous paper to the printer’s tear-off edge
when you finish printing. You can then easily tear off the printed
document. When you resume printing, the printer automatically
feeds the paper back to the top-of-form position so that you can
save the paper normally lost between documents.
Removing continuous paper
You can remove continuous paper using the tear-off function in
two ways: manually by pressing the printer’s Tear Off/Bin button
or automatically by turning on auto tear-off mode. The Tear
Off/Bin light flashes when the paper is in the tear-off position.
If the perforation between pages is not aligned with the tear-off
edge, you can adjust the position of the perforation using the
Micro Adjust function. See “Adjusting the tear-off position” on
page 61 for more information.
Caution:
❏ Never use the tear-off function with the pull tractor; the paper
c
may come off the pull tractor and jam the printer. After you
finish printing, tear off the printed document at the
perforation nearest the paper exit slot.
2
2
2
2
2
2
2
2
❏ Never use the tear-off function to feed continuous paper with
labels backward; they may come off their backing sheet and
jam the printer.
Using the Tear Off/Bin button
Follow these steps to remove continuous paper using the Tear
Off/Bin button:
1. After the printer finishes printing your document, check that
the Tear Off/Bin light is not flashing.
Paper Handling 45
2
2
2
2
Page 54

Note:
If the Tear Off/Bin light is flashing, the paper is in the tear-off
position. If you press the Tear Off/Bin button again, the printer
feeds your paper to the next top-of-form position.
2. Press the Tear Off/Bin button. The printer advances the paper
to the tear-off edge.
paper perforation
tear-off edge of the paper tension unit
Caution:
Never use the knob to adjust the tear-off position; this may
c
damage the printer or cause it to lose the top-of-form position.
Note:
If your paper’s perforation is not properly aligned with the tear-off
edge, you can adjust the tear-off position using the Micro Adjust
function as described in “Adjusting the tear-off position” on page
61.
3. Tear off the printed document using the tear-off edge of the
paper tension unit.
46 Paper Handling
Page 55

4. To feed the continuous paper backward out of the printer and
into the standby position, press the Load/Eject button.
To remove the remaining paper from the printer, press the
Load/Eject button to feed the paper backward to the standby
position. Then open the sprocket covers of the tractor and remove
the paper.
2
2
Caution:
Always tear off your printed document before you press the
c
Load/Eject button. Reverse feeding several pages at a time may
cause a paper jam.
Advancing paper to the tear-off position automatically
To automatically advance your printed documents to the tear-off
position, turn on the auto tear-off mode and select the appropriate
page length for continuous paper in the Default Setting mode. See
“Changing default settings” on page 124 for instructions on how
to change the default settings.
When auto tear-off is on, the printer automatically advances the
paper to the tear-off position whenever it receives a full page of
data or a form feed command followed by no more data.
2
2
2
2
2
2
2
2
Paper Handling 47
2
2
Page 56

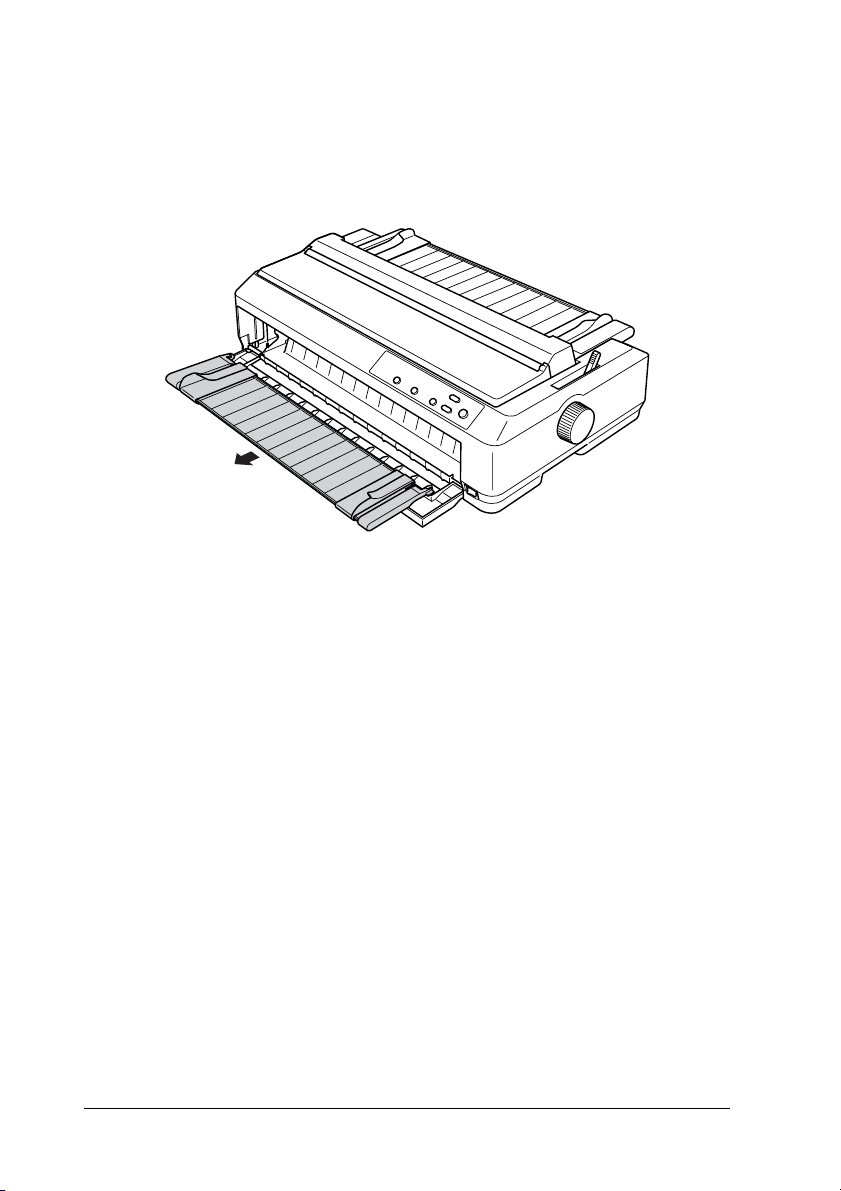
Loading Single Sheets
As shown below, you can load ordinary single sheets and
envelopes one at a time from the top of the printer, using the paper
guide.
You can also load single-sheet paper using an optional cut-sheet
feeder, front sheet guide, or front paper guide. See “Cut-Sheet
Feeder” on page 175 or “Front Sheet Guide and Front Paper
Guide” on page 191 for more information.
Note:
❏ For LQ-590 users, the front sheet guide comes with your printer.
For LQ-2090 users, it is available as an optional equipment
(C81401
❏ For LQ-2090 users, the front paper guide comes with your printer.
For LQ-590 users, it is available as an optional equipment
(C81402
✽
).
✽
).
48 Paper Handling
Page 57

Available paper types
The table below shows the types of paper you can load and the
paper slots you can use with each paper type. See “Adjusting the
Paper-Thickness Lever” on page 12 for instructions on how to
adjust the paper-thickness lever.
Paper type Available paper slot(s)
Ordinary paper front and rear
Multipart forms (carbonless)
2 parts (original and one copy)
3 parts (original and two copies)
4 parts (original and three copies)
5 parts (original and four copies)
Envelopes rear
Note:
❏ When the temperature is 5°C (41°F) or lower, or 35°C (95°F) or
higher, set the paper-thickness lever one position higher to improve
print quality.
❏ Do not load paper that is curled or has been folded.
front
2
2
2
2
2
2
2
2
Using the paper guide
Using the paper guide that comes with your printer, you can load
one single sheet or envelope at a time from the top of the printer.
Your single-sheet paper can be up to 257 mm (10.1 inches) wide
on the LQ-590 and 420 mm (16.5 inches) wide on the LQ-2090.
(See “Printer Specifications” on page 211 for detailed paper
specifications.)
Caution:
Do not load multipart forms, carbon paper, or labels in the paper
c
guide.
Paper Handling 49
2
2
2
2
Page 58

Loading paper in the paper guide
Follow these steps to load paper in the paper guide:
1. Make sure the paper guide is in the upright position. Then set
the paper-thickness lever (located under the printer cover) to
0 if you are using ordinary single-sheet paper. (If you are
using envelopes, see “Envelopes” on page 56 for instructions
on setting the paper-thickness lever.) Also move the paper
release lever to the single-sheet position.
2. Turn on the printer, if necessary.
50 Paper Handling
Page 59

3. Slide the left edge guide until it locks in place next to the
triangle mark on the paper guide. Then, adjust the right edge
guide to match the width of your paper.
2
2
2
2
2
2
4. Insert a sheet of paper with the printable side down between
the edge guides until it meets resistance. The printer feeds the
paper automatically and is ready to print.
Paper Handling 51
2
2
2
2
2
2
Page 60

Note:
For your safety, Epson recommends operating the printer with the
printer cover closed. The printer will function with the printer cover
open or removed, but for maximum safety keep the cover closed.
If the first printed line on your page appears too high or low,
you can use the Micro Adjust function to adjust the
top-of-form position. See “Adjusting the top-of-form
position” on page 64 for more information.
Using the front sheet guide and front paper guide
Using the front sheet guide or front paper guide, you can load
single sheets and carbonless single-sheet multipart forms up to 5
parts (one original and four copies). Paper used with the front
guides must be 148-257 mm (5.8 to 10.1 inches) wide and can only
be loaded one sheet at a time. See “Installing the front sheet guide
or front paper guide” on page 192 or “Loading paper in the front
sheet guide or front paper guide” on page 195 for instructions.
Note:
❏ For LQ-590 users, the front sheet guide comes with your printer.
For LQ-2090 users, it is available as an optional equipment
(C81401
✽
).
❏ For LQ-2090 users, the front paper guide comes with your printer.
For LQ-590 users, it is available as an optional equipment
✽
(C81402
).
52 Paper Handling
Page 61

Loading Special Paper
2
Multipart forms
You can use carbonless multipart forms of up to five parts (four
copies on top of the original). Make sure you set the
paper-thickness lever to the proper position based on the number
of layers in your form. See “Adjusting the Paper-Thickness Lever”
on page 12 for instructions.
Continuous multipart forms
Except for setting the paper-thickness lever, you load continuous
multipart forms the same way as ordinary continuous paper. See
“Loading Continuous Paper” on page 14 for detailed instructions.
Note:
❏ Be sure your multipart forms do not exceed 0.39 mm (0.015 inch)
in thickness.
❏ Do not load paper that is curled or has been folded.
❏ Thick paper, such as multipart forms with five parts, requires a
straight paper path to avoid paper jams. Load thick paper in the front
or bottom slots.
2
2
2
2
2
2
2
2
Single-sheet multipart forms
When loading single-sheet multipart forms, you need to use the
front paper entry slot with the front sheet guide and front paper
guide installed on your printer, because thick paper, such as
multipart forms with five parts, requires a straight paper path to
avoid paper jams.
To load single-sheet multipart forms, follow the instructions in
“Loading paper in the front sheet guide or front paper guide” on
page 195.
Paper Handling 53
2
2
2
Page 62

Note:
❏ For LQ-590 users, the front sheet guide comes with your printer.
For LQ-2090 users, it is available as an optional equipment
(C81401
❏ For LQ-2090 users, the front paper guide comes with your printer.
For LQ-590 users, it is available as an optional equipment
(C81402
❏ Be sure your multipart forms do not exceed 0.39 mm (0.015 inch)
in thickness.
❏ Do not load paper that is curled or has been folded.
✽
).
✽
).
Labels
When printing on labels, use only the type of labels that are
mounted on continuous backing sheets with sprocket holes for
use with a tractor feeder. Do not try to print on single sheets with
labels because the printer may not feed labels on a shiny backing
sheet properly.
Thick paper, such as continuous paper with labels, requires a
straight or almost straight paper path. Load labels only in the front
(push tractor or pull tractor) or bottom (pull tractor) paper slot;
however, for best results, use the tractor in the pull position, and
load paper in the front or bottom paper slot.
The loading procedure for continuous paper with labels is the
same as that for ordinary continuous paper, except that you must
set the paper-thickness lever to 2 before printing. See “Loading
paper with the pull tractor” on page 33 for more information.
54 Paper Handling
Page 63

Caution:
❏ It is best to load continuous paper with labels on the pull
c
tractor. Loading labels on the rear or the front push tractor
is not recommended.
2
❏ Never feed labels backward using the Load/Eject or Tear
Off/Bin button. When fed backward, labels can easily peel off
the backing sheet and cause a paper jam.
❏ Because labels are sensitive to temperature and humidity, use
them only under normal operating conditions described
below:
Temperature: 15 to 25°C (59 to 77°F)
Humidity: 30 to 60% RH
❏ Do not leave labels loaded in the printer between jobs; they
may curl around the platen and jam when you resume
printing.
❏ Do not load continuous paper with labels from the rear paper
slot. Because the paper path from the rear slot is curved, labels
may come off their backing sheets inside the printer and cause
a paper jam.
❏ Do not load paper that is curled or has been folded.
Removing continuous paper with labels
2
2
2
2
2
2
2
2
To avoid peeling labels off the backing sheet and jamming the
printer, follow these steps to remove continuous paper with labels
from the printer:
Paper Handling 55
2
2
2
Page 64

1. Tear off the fresh supply of continuous labels at the
perforation nearest the paper entry slot.
perforation nearest
the paper entry slot
2. Hold down the LF/FF button to eject the remaining labels from
the printer.
Caution:
Never feed labels backward using the Load/Eject or Tear
c
Off/Bin button. When fed backward, labels can easily come off
the backing sheet and cause a paper jam.
Envelopes
You can feed envelopes one at a time using the paper guide, or
you can load multiple envelopes using the optional high-capacity
cut-sheet feeder (bin 1 of the double-bin cut-sheet feeder).
Before loading envelopes, set the paper-thickness lever to a
position 3, 4, or 6 depending on the thickness of the envelopes.
Envelopes can be loaded only in the rear paper slot.
56 Paper Handling
Page 65

To load single envelopes, follow the instructions in “Loading
paper in the paper guide” on page 50. To load multiple envelopes,
see “Loading paper in the high-capacity cut-sheet feeder” on page
183. Load envelopes with the printable side down and push them
completely into the feed slot.
Note:
❏ Be sure to place the envelope printable side down and insert the top
edge of the envelope into the printer first.
2
2
2
2
2
2
2
2
❏ The print head must not print past the left or right edge of the
envelope or other thick paper. Make sure your application program
prints entirely within the printable area of your envelope. See
“Printable area” on page 224 for more information on the printable
area of envelopes.
❏ If you are using No. 6 envelopes, make sure the left edge guide is
aligned with the arrow on the paper guide.
Paper Handling 57
2
2
2
2
Page 66

Cards
You can feed cards one at a time using the paper guide, or you
can load multiple cards using the optional high-capacity cut-sheet
feeder (bin 1 of the double-bin cut-sheet feeder).
Before loading cards, set the paper-thickness lever to position 2
and set the paper release lever to the single-sheet position.
The cards can be loaded only in the front or rear paper slot.
To load single card, follow the instructions in “Loading paper in
the paper guide” on page 50. To load multiple cards, see “Loading
paper in the high-capacity cut-sheet feeder” on page 183.
Note:
❏ When you are loading postcards long edge first, always load them
in the top slot.
❏ Before printing, turn on the card mode by pressing the Tear Off/Bin
button several times until the left Tear Off/Bin light is on.
58 Paper Handling
Page 67

❏ Use postcards under the following temperature and humidity
conditions:
Temperature: 15 to 25°C (59 to 77°F)
Humidity: 30 to 60% RH
❏ When loading A6 size cards, always load them long edge first.
Switching Between Printing on Continuous Paper and Single Sheets
2
2
2
2
You can easily switch back and forth between printing on
continuous paper with a push tractor and printing on single
sheets without having to remove or reload the continuous paper.
Switching to printing on single sheets
Follow the steps below to switch from printing on continuous
paper from a push tractor to printing on single sheets.
Note:
❏ If continuous labels are loaded in the printer, remove them before
switching to single-sheet printing. See “Removing continuous
paper with labels” on page 55 for more information.
❏ If the tractor is in the pull position, remove any continuous paper
from it before switching to single-sheet printing. See “Removing
paper from the pull tractor” on page 39 for more information.
1. If any printed pages remain in the printer, press the Tear
Off/Bin button to advance the paper to the tear-off position.
Then tear off the printed pages.
2
2
2
2
2
2
2
2
Paper Handling 59
Page 68

Caution:
Make sure you tear off your printed document before you
c
press the Load/Eject button in the next step. Reverse
feeding several pages at a time may cause a paper jam.
2. Press the Load/Eject button to feed the continuous paper
backward to the standby position. The paper is still attached
to the push tractor but is no longer in the paper path.
3. Move the paper guide to the upright position.
4. Set the paper release lever to the single-sheet position.
5. Load single sheets as described in “Loading Single Sheets” on
page 48.
Switching to printing on continuous paper
Follow these steps to switch from printing on single sheets to
printing on continuous paper with a push tractor:
60 Paper Handling
Page 69

Note:
To switch from printing with the front sheet guide to printing with the
front push tractor, you need to remove the front sheet guide.
1. If a single sheet remains in the printer, press the Load/Eject
button to eject it.
Caution:
Never use the knob to eject paper; this may damage the printer
c
or cause it to lose the top-of-form position.
2
2
2
2. Make sure that the tractor is installed in the front or rear push
position and that continuous paper is loaded on it as
described in “Loading continuous paper with the tractor” on
page 14.
3. Set the paper release lever to the front or rear push position,
depending on the tractor position you are using.
Your printer loads the continuous paper automatically when you
begin printing.
Using the Micro Adjust Function
The Micro Adjust function allows you to move the paper forward
or backward in 0.141 mm (1/180-inch) increments so that you can
make precise adjustments to the top-of-form and tear-off
positions.
Adjusting the tear-off position
If your paper’s perforation is not aligned with the tear-off edge,
you can use the Micro Adjust function to move the perforation to
the tear-off position.
2
2
2
2
2
2
2
2
2
Paper Handling 61
Page 70

Follow these steps to adjust the tear-off position:
Caution:
Never use the knob to adjust the tear-off position; this may damage
c
the printer or cause it to lose the tear-off position.
Note:
Your tear-off position setting remains in effect until you change it, even
if you turn off the printer.
1. Make sure the Tear Off/Bin light is flashing (the paper is at
the current tear-off position). You may need to press the Tear
Off/Bin button to advance the paper to the tear-off position.
2. Hold down the Pause button for about three seconds. The
Pause light begins flashing and the printer enters the Micro
Adjust mode.
62 Paper Handling
Page 71

3. Open the paper guide cover, then press the LF/FF button to
feed paper backward, or press the Load/Eject button to feed
paper forward, until the paper perforation is aligned with the
tear-off edge of the paper tension unit.
paper perforation
tear-off edge of the paper tension unit
2
2
2
2
2
2
Note:
The printer has a minimum and a maximum tear-off position. If you
try to adjust the tear-off position beyond these limits, the printer
beeps and stops moving the paper.
4. Tear off the printed pages.
5. Press the Pause button to turn off Micro Adjust mode.
When you resume printing, the printer automatically feeds the
paper back to the top-of-form position and begins printing.
Paper Handling 63
2
2
2
2
2
2
Page 72

Adjusting the top-of-form position
The top-of-form position is the position on the page where the
printer starts printing. If your printing appears too high or low
on the page, you can use the Micro Adjust function to adjust the
top-of-form position.
Follow these steps to adjust the top-of-form position:
Caution:
Never use the knob to adjust the top-of-form position; this may
c
damage the printer or cause it to lose the top-of-form position.
Note:
❏ Your top-of-form position setting remains in effect until you change
it, even if you turn off the printer.
❏ The top margin setting made in some application software overrides
the top-of-form position setting you make with the Micro Adjust
function. If necessary, adjust the top-of-form position in your
software.
1. Make sure the printer is turned on.
2. Load paper. (If the tractor is in a push position, press the
Load/Eject button to advance continuous paper to the
current top-of-form position.) If necessary, lift up the printer
cover so you can see the paper position.
3. Hold down the Pause button for about three seconds. The
Pause light starts flashing and the printer enters the Micro
Adjust mode.
64 Paper Handling
Page 73

4. Press the LF/FF button to move the top-of-form position up on
the page, or press the Load/Eject button to move the
top-of-form position down on the page.
Note:
❏ The printer has a minimum and a maximum top-of-form
position. If you try to adjust it beyond these limits, the printer
beeps and stops moving the paper.
2
2
2
2
2
2
2
❏ When the paper reaches the default top-of-form position, the
printer also beeps and stops moving the paper briefly. You can
use the default setting as a reference point when adjusting the
top-of-form position.
5. After you set the top-of-form position, press the Pause button
to exit the Micro Adjust mode.
Note:
For your safety, Epson recommends operating the printer with the
printer cover closed. The printer will function with the printer cover
open or removed, but for maximum safety keep the cover closed.
Paper Handling 65
2
2
2
2
2
Page 74

66 Paper Handling
Page 75

Chapter 3
Printer Software
About Your Printer Software
The Epson software that comes with your printer includes the
printer driver software and EPSON Status Monitor 3.
The printer driver is software that allows your computer to
control the printer. You need to install the printer driver so your
Windows software applications can take full advantage of the
printer’s capabilities.
EPSON Status Monitor 3 program allows you to monitor the
status of your prin ter, alert s you whe n errors oc cur, and p rovides
you with troubleshooting tips. Status Monitor 3 is automatically
installed when you install the printer driver.
Note:
Before proceeding, make sure you have installed the printer driver on
your computer as described in the Setup Sheet.
3
3
3
3
3
3
3
3
Using the Printer Driver with Windows Me, 98, and 95
You can access the printer driver from your Windows
applications or from the Start menu.
Printer Software 67
3
3
3
3
Page 76

❏ When you access the printer driver from a Windows
application, any settings you make apply only to the
application you are using. See “Accessing the printer driver
from Windows applications” on page 68 for more
information.
❏ When you access the printer driver from the Start menu, the
printer driver settings you make apply to all your
applications. See “Accessing the printer driver from the Start
menu” on page 70 for more information.
See “Changing the printer driver settings” on page 71 to check
and change printer driver settings.
Note:
❏ The examples in the following section are from the LQ-2090. If you
have the LQ-590, substitute LQ-590 for the model name in the
examples. The instructions are the same for both models.
❏ While many Windows applications override the settings made with
the printer driver, some do not, so you must verify that the printer
driver settings match your requirements.
Accessing the printer driver from Windows applications
Follow these steps to access the printer driver from a Windows
application:
68 Printer Software
Page 77

1. Select Print Setup or Print from the File menu of your
application software. In the Print or Print Setup dialog box
displayed, make sure that your printer is selected in the Name
drop-down list.
3
3
3
3
3
3
3
Printer Software 69
3
3
3
3
3
Page 78

2. Click Printer, Setup, Properties, or Options. (You may need
to click a combination of these buttons.) The Properties
window appears, and you see the Paper, Graphics, and
Device Options menu. These menus contain the printer driver
settings.
3. To view a menu, click the corresponding tab at the top of the
window. See “Changing the printer driver settings” on page
71 for information on how to change the settings.
Accessing the printer driver from the Start menu
Follow these steps to access the printer driver from the Start
menu:
1. Click the Start button, and then go to Settings.
2. Click Printers.
70 Printer Software
Page 79

3. Right-click your printer icon, and click Properties. The screen
displays the Properties window, which contains the Paper,
Graphics, Device Options, and Utility menus. These menus
display the printer driver settings.
3
4. To view a menu, click the corresponding tab at the top of the
window. See “Changing the printer driver settings” on page
71 for information on how to change the settings.
Changing the printer driver settings
Your printer driver has four menus: Paper, Graphics, Device
Options, and Utility. For an overview of the available settings, see
“Printer Driver Settings Overview” on page 78. You can also view
online help by right-clicking items in the driver and selecting
What’s this?
3
3
3
3
3
3
3
3
Printer Software 71
3
3
3
Page 80

When you finish making printer driver settings, click OK to apply
the settings, or click Restore Defaults to return the settings to
their default values.
Once you have checked your printer driver settings and made
any necessary changes, you are ready to print.
Using the Printer Driver with Windows XP, 2000, and Windows NT 4.0
You can access the printer driver from your Windows
applications or from the Start menu.
❏ When you access the printer driver from a Windows
application, any settings you make apply only to the
application you are using. See “Accessing the printer driver
from Windows applications” on page 73 for more
information.
❏ When you access the printer driver from the Start menu, the
printer driver settings you make apply to all your
applications. See “Accessing the printer driver from the Start
menu” on page 75 for more information.
To check and change printer driver settings, see “Changing the
printer driver settings” on page 77.
Note:
❏ The examples in the following section are from the LQ-2090. If you
have the LQ-590, substitute LQ-590 for the model name in the
examples. The instructions are the same for both models.
❏ While many Windows applications override the settings made with
the printer driver, some do not, so you must verify that the printer
driver settings match your requirements.
72 Printer Software
Page 81

Accessing the printer driver from Windows applications
Follow these steps to access the printer driver from a Windows
application:
Note:
The examples in the following section are from the Windows 2000
operating system. They may vary in appearance from what actually
appears on your screen; however, the instructions are the same.
1. Select Print Setup or Print from the File menu of your
application software. In the Print or Print Setup dialog box
displayed, make sure that your printer is selected in the Name
drop-down list.
3
3
3
3
3
3
3
3
Printer Software 73
3
3
3
3
Page 82

2. Click Printer, Setup, Properties, or Options. (You may need
to click a combination of these buttons.) The Document
Properties window appears, and you see the Layout and
Paper/Quality menus. These menus contain the printer
driver settings.
74 Printer Software
Page 83

3. To view a menu, click the corresponding tab at the top of the
window. See “Changing the printer driver settings” on page
77 to change the settings.
Accessing the printer driver from the Start menu
Follow these steps to access the printer driver from the Start
menu:
Note:
The screen shots used in this procedure are from the Windows 2000
operating system. They may vary in appearance from what actually
appears on your screen; however, the instructions are the same.
3
3
3
3
3
3
3
3
3
3
1. Click the Start button, and then point to Settings.
2. Click Printers.
Printer Software 75
3
3
Page 84

3. Right-click your printer icon, and click Printing Preferences
(in Windows XP or 2000) or Document Defaults (in
Windows NT 4.0). The screen displays the Default Document
Properties window, which contains the Layout and
Paper/Quality menus. These menus display the printer
driver settings.
76 Printer Software
Page 85

When you click Properties in the menu displayed by
right-clicking the printer icon, the printer software window
appears, which includes menus used to make the printer
driver settings.
3
3
3
3
3
3
3
4. To view a menu, click the corresponding tab at the top of the
window. See “Printer Driver Settings Overview” on page 78
for information on how to change the settings.
Changing the printer driver settings
Your printer driver has two menus from which you can change
the printer driver settings; Layout and Paper/Quality. You can
also change settings on the Utility menu in the printer software.
For an overview of the available settings, see “Printer Driver
Settings Overview” on page 78. You can also view online help by
right-clicking items in the driver and selecting What’s this?
Printer Software 77
3
3
3
3
3
Page 86

When you finish making your printer driver settings, click OK to
apply the settings, or click Cancel to cancel your changes.
Once you have checked your printer driver settings and changed
them if necessary, you are ready to print.
Printer Driver Settings Overview
The following tables show the Windows printer driver settings.
Note that not every setting is available in all versions of Windows.
78 Printer Software
Page 87

Printer settings
Settings Explanations
Paper size Select the size of the paper you want to use. If you
Orientation Select Portrait or Landscape.
Paper source Select the paper source you want to use.
Resolution/
Graphics
Resolution
Dithering You can leave this option set to Fine, which is the
Intensity/
Intensity Control
Print quality Select a print quality option from the Print quality list.
do not see your paper size, use the scroll bar to scroll
through the list.
Select the printing resolution you want. The higher the
resolution you select, the more detailed your printout
will be; however, increasing the resolution slows
printing.
default setting, or select another dithering pattern
depending on the kind of printout you want.
Move the slider to make your printout lighter or
darker.
If you turn on Hi-speed, you will enter bidirectional
printing mode and printing speed will increase.
Turning Hi-speed off will return the printer to
unidirectional printing mode. Printing speed will
decrease, but printing precision will improve. Printing
with the default settings uses the settings stored in the
printer.
3
3
3
3
3
3
3
3
EPSON Status
Monitor 3
Monitoring
Preferences
Paper/Output Check the Paper Size, Orientation, and Paper So urce
You can access EPSON Status Monitor 3 when you
click this button. To monitor the printer, make sure the
Monitor the printing status check box is selected.
Click this button to open the Monitoring Preferences
dialog box where you can make settings for EPSON
Status Monitor 3.
settings you made on the Page Setup menu and
change them if necessary. Select the setting and
then choose an option from the Change Setting list
box.
Printer Software 79
3
3
3
3
Page 88

Settings Explanations
Halftone Click this button to set the brightness and contrast,
Halftoning Select the type of halftoning to use when printing
Printer Fonts
Support
input the RGB gamma, or make other settings. The
Halftone Color Adjustment dialog box appears. For
details, click the Help button in this dialog box.
graphics. To let the printer determine the best
halftone quality, use Auto Select.
Select a character table group to use. You can select
one of three character table groups, Standard,
Expanded, and None (Bit Image printing).
When Standard or Expanded is selected, the printer
uses the device fonts. Expanded includes more fonts
than Standard.
When None is selected, the printer uses bit map
images instead of the device fonts.
For details on the fonts which are included in each
table, see “Electronic” on page 214.
80 Printer Software
Page 89

Monitoring settings
Settings Explanations
EPSON Status
Monitor 3
Monitoring
Preferences
You can access EPSON Status Monitor 3 when you
click this button. To monitor the printer, make sure the
Monitor the printing status check box is selected.
Click this button to open the Monitoring Preferences
dialog box where you can make settings for EPSON
Status Monitor 3. See “Setting up EPSON Status
Monitor 3” on page 82 for more information.
Using EPSON Status Monitor 3
EPSON Status Monitor 3 that comes with your printer is available
for Windows XP, Me, 98, 95, 2000, and Windows NT 4.0. It allows
you to monitor your printer’s status, alerts you when printer
errors occur, and provides troubleshooting instructions when
needed.
EPSON Status Monitor 3 is available only when:
❏ The printer is connected directly to the host computer via the
parallel port [LPT1].
3
3
3
3
3
3
3
3
❏ Your system is configured to support bidirectional
communication.
EPSON Status Monitor 3 is installed when you install the printer
driver as described in the Setup Sheet.
Note:
If you install the driver using the “Point and Print” method, EPSON
Status Monitor 3 may not function properly. If you want to use EPSON
Status Monitor 3, reinstall the driver as described in the Setup Sheet.
Printer Software 81
3
3
3
3
Page 90

Before using EPSON Status Monitor 3, be sure to read the
README file on the printer software CD-ROM. This file contains
the latest information on the utility.
Setting up EPSON Status Monitor 3
Follow these steps to set up EPSON Status Monitor 3:
1. Open the Utility menu as described in “Using the Printer
Driver with Windows Me, 98, and 95” on page 67 or “Using
the Printer Driver with Windows XP, 2000, and Windows NT
4.0” on page 72.
2. Click the Monitoring Preferences button. The Monitoring
Preferences dialog box appears.
82 Printer Software
Page 91

3. The following settings are available:
Select Notification Displays the error item check box ON/OFF
status.
Turn on this check box to display the selected
error notification.
Select Shortcut
Icon
Receive error
notification for
shared printers
Allow monitoring
of shared printer
Note:
Click the Default button to revert all items to the default settings.
The selected icon is displayed in the sy stem tray
on the taskbar on the computer screen. The
setting’s example is shown on the right window.
By clicking the shortcut icon, you can access
the Monitoring Preferences dialog box easily.
Error notification for a shared printer can be
received when this check box is selected.
When this check box is selected, a shared
printer can be monitored by other PCs.
Accessing EPSON Status Monitor 3
Do one of the following to access EPSON Status Monitor 3;
3
3
3
3
3
3
3
3
❏ Double-click the printer-shaped shortcut icon on the taskbar.
To add a shortcut icon to the taskbar, go to the Utility menu
and follow the instructions.
❏ Open the Utility menu, then click the EPSON Status Monitor
3 icon. To find out how to open the Utility menu, See “Using
the Printer Driver with Windows Me, 98, and 95” on page 67
or “Using the Printer Driver with Windows XP, 2000, and
Windows NT 4.0” on page 72.
Printer Software 83
3
3
3
3
Page 92

When you access EPSON Status Monitor 3 as described above,
the following printer status window appears.
You can view printer status information in this window.
Setting Up Your Printer on a Network
Sharing the printer
This section describes how to share the printer on a standard
Windows network.
The computers on a network can share a printer that is directly
connected to one of them. The computer that is directly connected
to the printer is the printer server, and the other computers are
the clients which need permission to share the printer with the
printer server. The clients share the printer via the printer server.
According to the versions of Windows OS and your access rights
on the network, perform the appropriate settings of the printer
server and clients.
Setting the printer server
❏ For Windows Me, 98, or 95, see “Setting up your printer as a
shared printer” on page 85.
84 Printer Software
Page 93

❏ For Windows XP, 2000, or Windows NT 4.0, see “Using an
additional driver” on page 87.
Setting the clients
3
❏ For Windows Me, 98, or 95, see “With Windows Me, 98, or
95” on page 95.
❏ For Windows XP or 2000, see “With Windows XP or 2000” on
page 96.
❏ For Windows NT 4.0, see “With Windows NT 4.0” on page
100.
Note:
❏ When sharing the printer, be sure to set EPSON Status Monitor 3
so that the shared printer can be monitored on the printer server.
See “Setting up EPSON Status Monitor 3” on page 82.
❏ When you are Windows shared printer user in a Windows Me, 98,
or 95 environment, on the server, double-click the Network icon in
Control panel and make sure that the “File and printer sharing for
Microsoft Networks” component is installed. Then, on the server
and clients, make sure that the “IPX/SPX-compatible Protocol” or
the “TCP/IP Protocol” is installed.
❏ The printer server and clients should be set on the same network
system, and they should be under the same network management
beforehand.
3
3
3
3
3
3
3
3
❏ The on-screen displays on the following pages may differ depending
on the version of Windows OS.
Setting up your printer as a shared printer
When the printer server’s OS is Windows Me, 98, or 95, follow
these steps to set the printer server.
1. Click Start, point to Settings, and click Control Panel.
Printer Software 85
3
3
3
Page 94

2. Double-click the Network icon.
3. Click File and Print Sharing on the Configuration menu.
4. Select the I want to be able to allow others to print to my
printer(s). check box, then click OK.
5. Click OK to accept the settings.
Note:
❏ When “Insert the Disk” appears, insert the Windows Me, 98,
or 95 CD-ROM in the computer. Click OK and then follow the
on-screen instructions.
❏ When the prompt to restart the computer appears, restart the
computer and continue with the settings. See “For users
restarting the computer” on page 86.
For users restarting the computer
1. Double-click the Printers icon on the control panel.
2. Right-click your printer icon, and click Sharing in the menu
that appears.
3. Select Shared As, type the name in the Share Name box, and
click OK. Type a Comment and Password if needed.
86 Printer Software
Page 95

Note:
❏ Do not use spaces or hyphens for the share name, or an error
may occur.
❏ When sharing the printer, be sure to set EPSON Status
Monitor 3 so that the shared printer can be monitored on the
printer server. See “Setting up EPSON Status Monitor 3” on
page 82.
You need to set the client computers so that they can use the
printer on a network. See the following pages for details.
❏ “With Windows Me, 98, or 95” on page 95
3
3
3
3
❏ “With Windows XP or 2000” on page 96
❏ “With Windows NT 4.0” on page 100
Using an additional driver
When the printer server’s OS is Windows XP, 2000, or Windows
NT 4.0, you can install the additional drivers in the server. The
additional drivers are for client computers that have different OS
from the server.
Follow these steps to set a Windows XP, 2000, or Windows NT
4.0 as a printer server, and install the additional drivers.
Note:
❏ You must access Windows XP, 2000, or Windows NT 4.0 as the
Administrators of the local machine.
❏ If the Printer server’s OS is Windows NT 4.0, the Additional driver
can be used only on Service Pack 4 or later.
3
3
3
3
3
3
3
3
Printer Software 87
Page 96

1. For a Windows 2000 or Windows NT 4.0 printer server, click
Start, point to Settings, and click Printers.
For a Windows XP printer server, click Start, point to Printers
and Faxes. For Windows XP Home edition users, point to
Control panel first, then click Printers and Faxes.
2. Right-click your printer icon, and click Sharing in the menu
that appears.
For Windows XP, if the following menu appears, click either
Network Setup Wizard or If you understand the security
risks but want to share printers without running the wizard,
click here.
In either case, follow the on-screen instructions.
For a Windows 2000 or Windows NT 4.0 printer server, select
Shared (for Windows 2000) or Shared as (for Windows NT
4.0), then type the name in the Share Name box.
88 Printer Software
Page 97

For a Windows XP printer server, select Share this printer,
then type the name in the Share name box.
Note:
Do not use spaces or hyphens for the share name, or an error may
occur.
3. Select the additional drivers.
3
3
3
3
3
Note:
If the computers of the server and clients use the same OS, you do
not have to install the additional drivers. Just click OK after step3.
3
3
3
3
3
3
3
Printer Software 89
Page 98

On a Windows NT 4.0 printer server
Select Windows being used for clients. For example, select
Windows 95 to install the additional driver for the Windows
Me, 98, or 95 clients. Then click OK.
1
2
Note:
❏ You do not have to select Windows NT 4.0x86, because that
driver has been already installed.
❏ Do not select additional drivers other than Windows 95. The
other additional drivers are not available.
90 Printer Software
Page 99

On the Windows XP or 2000 printer server
Click Additional Drivers.
3
3
3
3
3
3
3
3
Printer Software 91
3
3
3
3
Page 100

Select Windows being used for clients then click OK.
For Windows Me, 98, or 95
clients
For Windows NT 4.0 clients Select Intel Windows NT
For Windows XP or 2000
clients
Select Intel Windows 95 or
98 (and Me)
4.0 or 2000
Intel Windows XP (or
2000) may been already
selected.
Note:
❏ You do not have to install the additional driver for Intel
Windows 2000 (or XP) only, because that driver is preinstalled.
❏ Do not select additional drivers other than Intel drivers. The
other additional drivers are not available.
4. When a prompt appears, insert the CD-ROM that comes with
your printer in your CD-ROM drive, then click OK.
92 Printer Software
 Loading...