

Page 1
Page 2

Scanner Parts
document cover
carriage (in the home pos i tion)
document table
OPERATE button
RESET button
01
lights
tra nsportation screw
SCSI ID rotary switch
storage hole
0
1
*
2
7
3
6
4
SCSI SCSI
5
SCSI interface connectors
ON
SW
AC inlet
terminator switch
!e2scsi
Page 3

®
GT-5500
Color Image Scanner
All rights reserved. No part of this publication may be reproduced, stored in a retrieval
system, or transmitted in any form or by any means, electronic, mechanical, photocopying,
recording, or otherwise, without the prior written permission of SEIKO EPSON
CORPORATION. No patent liability is assumed with respect to the use of the information
contained herein. Neither is any liability assumed for damages resulting from the use of
the information contained herein.
Neither SEIKO EPSON CORPORATION nor its affiliates shall be liable to the purchaser of
this product or third parties for damages, losses, costs, or expenses incurred by purchaser
or third parties as a result of: accident, misuse, or abuse of this product or unauthorized
modifications, repairs, or alterations to this product.
SEIKO EPSON CO RPORAT ION an d its aff iliates shall not be liable against an y damage s
or problems arising from the use of any options or any consumable products other than
those designated as Original EPSON Products or EPSON Approved Products by SEIKO
EPSON CORPORATION.
EPSON is a registered tra dema r k of SEIKO EPSON C OR POR AT I O N.
IBM and PS/2 are registered trademarks of International Business Machines Corporation.
Macintosh is a registered tradem ark of Apple Computer, In c.
General Notic e: Other product names used herein are for identification purposes only and may be
trademarks of their respective companies.
Copyrigh t © 1997 by SEIKO EPSO N CORPORAT ION, Nagano, Japan.
User’s Guide
Page 4

Declaration of Conformity
Manufact u rer: SEIKO EPSON CORPORATION
Address : 3-5, Owa 3-c h ome, Suwa-shi,
Nagano-ken 392 Jap an
Repre sentat i ve : EPSON EUROPE B.V.
Address: Prof. J. H. Bavinck laan 5 1183
AT Amstelveen
The Netherlands
Declares that the Prod u c t:
Product Name: Image Scanner
Type Name: GT-5500
Model: G670B
Conforms to the following Directive( s) and Nor m(s ):
Directive 89/33 6/ EE C :
EN 55022 Class B
EN 61000-3-2
EN 61000-3-3
EN 50082-1
IEC 801-2
IEC 801-3
IEC 801-4
Directive 73/23 /EE C:
EN 60950
August, 1997
Y. Ishii
President of EPSON EUROPE B.V.
ii
Page 5

Contents
Introduction
Features . . . . . . . . . . . . . . . . . . . . . . . . . . . . . . . . 1-1
Options . . . . . . . . . . . . . . . . . . . . . . . . . . . . . . . . 1-1
Warnings, Cautions, and Notes . . . . . . . . . . . . . . . . . . 1-2
Important Safety Instructions . . . . . . . . . . . . . . . . . . . 1-2
For United Kingdom Users . . . . . . . . . . . . . . . . . . . . 1-4
Safety information . . . . . . . . . . . . . . . . . . . . . . . . 1-4
Chapter 1
Choosing a Place for the Scanner . . . . . . . . . . . . . . . . . 1-2
Removing the Transportation Screw . . . . . . . . . . . . . . . 1-3
Plugging In the Scanner . . . . . . . . . . . . . . . . . . . . . . 1-4
Initialization . . . . . . . . . . . . . . . . . . . . . . . . . . . . . 1-5
Connecting the Scanner to Your Computer . . . . . . . . . . . 1-6
Understanding SCSI connections . . . . . . . . . . . . . . . 1-6
Setting the SCSI ID number . . . . . . . . . . . . . . . . . . 1-7
Setting the terminator switch . . . . . . . . . . . . . . . . . 1-8
Connecting the scanner . . . . . . . . . . . . . . . . . . . . 1-10
Power-on sequence . . . . . . . . . . . . . . . . . . . . . . . 1-11
Power-off sequence . . . . . . . . . . . . . . . . . . . . . . . 1-12
Setting Up the Scanner
iii
Page 6

Chapter 2
Using Your Scanner
Lights and Buttons . . . . . . . . . . . . . . . . . . . . . . . . . . 2-2
Placing a Document on the Scanner . . . . . . . . . . . . . . . . 2-4
Removing the Cover for Thick or Large Documents . . . . . . . 2-6
Sizing Up Your System . . . . . . . . . . . . . . . . . . . . . . . 2-7
RAM and hard disk size . . . . . . . . . . . . . . . . . . . . . 2-7
Accelerator boards . . . . . . . . . . . . . . . . . . . . . . . . 2-8
Video cards . . . . . . . . . . . . . . . . . . . . . . . . . . . . 2-8
Monitors . . . . . . . . . . . . . . . . . . . . . . . . . . . . . . 2-8
File compression software . . . . . . . . . . . . . . . . . . . . 2-8
Chapter 3
Maintenance and Troubleshooting
Maintenance . . . . . . . . . . . . . . . . . . . . . . . . . . . . . . 3-2
Cleaning the scanner . . . . . . . . . . . . . . . . . . . . . . . 3-2
Replacing the fluorescent lamps . . . . . . . . . . . . . . . . 3-3
Transporting the Scanner . . . . . . . . . . . . . . . . . . . . . . 3-3
Problems and Solutions . . . . . . . . . . . . . . . . . . . . . . . 3-4
Error indicators . . . . . . . . . . . . . . . . . . . . . . . . . . 3-4
Operating problems . . . . . . . . . . . . . . . . . . . . . . . 3-5
Quality problems . . . . . . . . . . . . . . . . . . . . . . . . . 3-7
Appendix A
Technical Specifications
Scanning . . . . . . . . . . . . . . . . . . . . . . . . . . . . . . . . A-2
Electrical . . . . . . . . . . . . . . . . . . . . . . . . . . . . . . . . A-3
Environmental . . . . . . . . . . . . . . . . . . . . . . . . . . . . A-4
Safety Approvals . . . . . . . . . . . . . . . . . . . . . . . . . . . A-4
SCSI Interface . . . . . . . . . . . . . . . . . . . . . . . . . . . . . A-5
Initialization Methods . . . . . . . . . . . . . . . . . . . . . . . . A-6
iv
Page 7

Appendix B
Contacting Customer Support
For United Kingdom and the Republic of Ireland Users . . . . B-2
For Australian Users . . . . . . . . . . . . . . . . . . . . . . . . B-4
For Singapore Users . . . . . . . . . . . . . . . . . . . . . . . . . B-5
For Hong Kong Users . . . . . . . . . . . . . . . . . . . . . . . . B-5
For Philippines Users . . . . . . . . . . . . . . . . . . . . . . . . B-6
Glossary
Index
v
Page 8

vi
Page 9

Introduction
Features
The EPSON GT-5500 scanner offers the following features:
Maximum optical resolution of 400 dots per inch (dpi), 30-bit
❑
(for input, 24-bit for output), single/triple pass graphics scanner.
Small and light body with A4 or letter size scanning area.
❑
Twice the scan speed of the EPSON GT-5000.
❑
Full color or grayscale (varying shades of gray, from black
❑
to white) scanning. You can scan full color (16 million
colors), 256 colors, or grayscale up to 256 grays.
The EPSON Scan! II scanner utility and EPSON TWAIN let
❑
you take full advantage of your scanner’s advanced features.
Auto Area Segmentation (AAS) allows you to separate text
❑
from photographs on a page so that grayscale images are
clearer and text recognition is more accurate.
Text Enhancement Technology (TET) enhances text
❑
recognition accuracy when using your scanner for optical
character recognition (OCR) scanning.
A special feature for higher quality output with EPSON
❑
TWAIN’s “Best & de-screening” option automatically
removes unwanted moiré patterns from scanned images.
Options
The following cables are available to expand the versatility of
your scanner. For detailed information on the use of these
cables, see the guides that come with them.
Introducti o n
1
Page 10

SCSI System Cable (25-pin to 50-pin) (B860081)
This cable provides a connection between a SCSI device and an
®
Apple
SCSI Peripheral Cable (50-pin to 50-pin) (B860091)
This cable provides a connection between two SCSI devices in a
daisy chain.
Macintosh® comp u te r.
Warnings, Cautions, and Notes
Warnings must be followed carefully to avoid bodily injury.
w
Cautions must be observed to avoid damage to your
c
equipment.
Notes contain important information and useful tips on the operation
of your scanner.
Important Safety Instructions
Read all of these instructions and save them for later reference.
Follow all warnings and instructions marked on the scanner.
Unplug the scanner before cleaning. Clean with a damp
❑
cloth only. Do not spill liquid on the scanner.
Do not place the scanner on an unstable surface or near a
❑
radiator or heat source.
Do not block or cover the openings in the scanner’s cabinet.
❑
Do not insert objects through the slots.
Use only the type of power source indicated on the
❑
scanner’s label.
Introduction
2
Page 11

Connect all equipment to properly grounded power
❑
outlets. Avoid using outlets on the same circuit as
photocopiers or air control systems that regularly switch on
and off.
Do not let the power cord become damaged or frayed.
❑
If you use an extension cord with the scanner, make sure the
❑
tota l a mpe r e ra ti n g of th e d ev ic e s plug ged in to t he ex ten si o n
cord does not exceed the cord’s ampere rating. Also, make
sure the total ampere rating of all devices plugged into the
wall outlet does not exceed the wall outlet’s ampere rating.
Except as specifically explained in this user’s guide, do not
❑
attempt to service the scanner yourself.
Unplug the scanner and refer servicing to qualified service
❑
personnel under the following conditions:
If the power cord or plug is damaged; if liquid has entered
the scanner; if the scanner has been dropped or the cabinet
damaged; if the scanner does not operate normally or
exhibits a distinct change in performance. Adjust only those
controls that are covered by the operating instructions.
If you plan to use the scanner in Germany, observe the
❑
following:
To provide adequate short-circuit protection and
over-current protection for this scanner, the building
installation must be protected by a 16 Amp circuit breaker.
Note for German-speaking users:
Bei Anschluß des Scanners an die Stromversorgung muß
sichergestellt werden, daß die Gebäudeinstallation mit einem 16
A-Überstromschalter abgesichert ist.
Introducti o n
3
Page 12

For United Kingdom Users
Safety information
Warning: This appliance must be earthed. Refer to the rating
w
As the colours of the wires in the mains lead of this appliance
may not correspond with the coloured markings identifying
the terminals in your plug, proceed as follows:
plate for voltage and check that the appliance voltage
corresponds to the supply voltage.
Important: The wires in the mains lead fitted to this appliance
are coloured in accordance with the following code:
Green and yellow — Earth
Blue — Neutral
Brown — Live
The green and yellow wire must be connected to the terminal
in the plug which is marked with the letter E or with the earth
symbol (
The blue wire must be connected to the terminal in the plug
marked with the letter N.
The brown wire must be connected to the terminal in the plug
marked with the letter L.
If damage occurs to the plug, replace the cord set or consult a
qualified electrician.
Replace fuses only with a fuse of the correct size and rating.
G
).
4
Introduction
Page 13

Chapter 1
Setting Up the Scanner
Choosing a Place for the Scanner . . . . . . . . . . . . . . . . . 1-2
Removing the Transportation Screw . . . . . . . . . . . . . . . 1-3
Plugging In the Scanner . . . . . . . . . . . . . . . . . . . . . . 1-4
Initialization . . . . . . . . . . . . . . . . . . . . . . . . . . . . . 1-5
Connecting the Scanner to Your Computer . . . . . . . . . . . 1-6
Understanding SCSI connections . . . . . . . . . . . . . . . 1-6
Setting the SCSI ID number . . . . . . . . . . . . . . . . . . 1-7
Setting the terminator switch . . . . . . . . . . . . . . . . . 1-8
Connecting the scanner . . . . . . . . . . . . . . . . . . . . 1-10
Power-on sequence . . . . . . . . . . . . . . . . . . . . . . . 1-11
Power-off sequence . . . . . . . . . . . . . . . . . . . . . . . 1-12
1
Setting Up the Scanner
1-1
Page 14
Choosing a Place for the Scanner
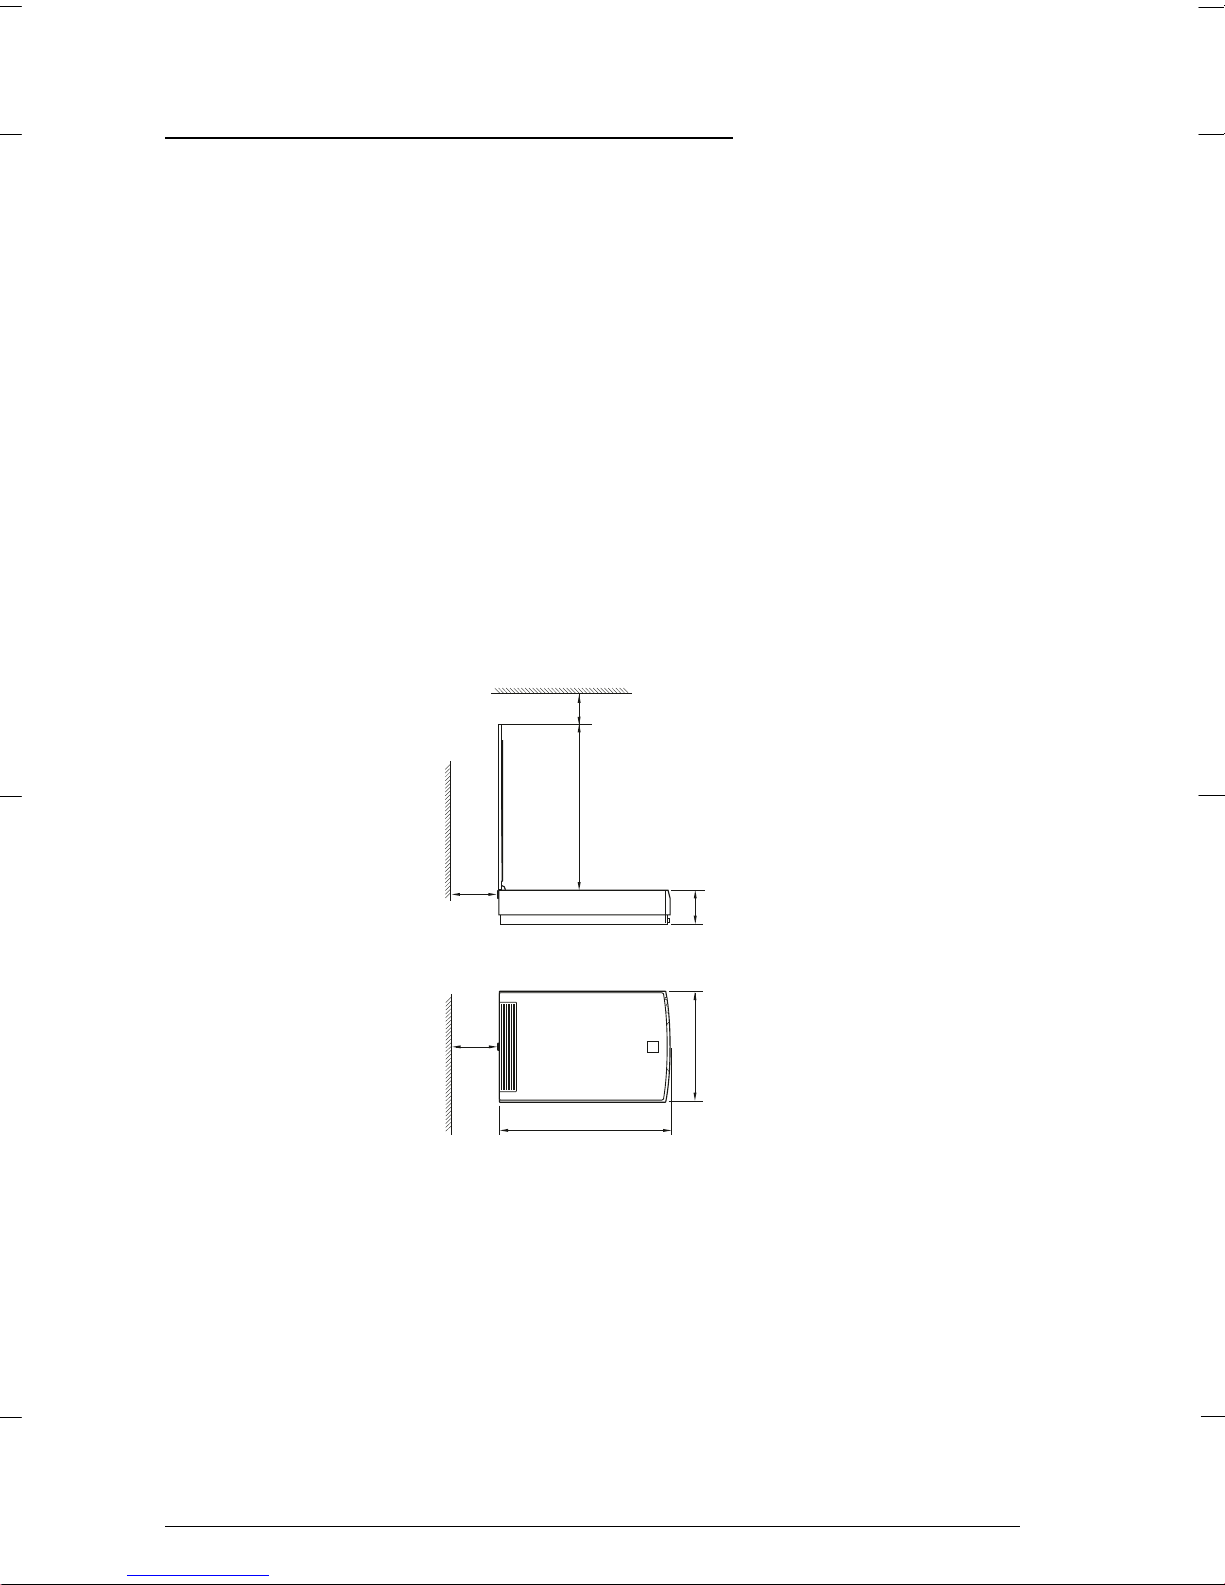
Follow the guidelines listed below when selecting a location for
your scanner:
Place the scanner on a flat, stable surface. The scanner will
❑
not operate properly if it is tilted or at an angle.
Place the scanner close enough to the computer for the
❑
interface cable to reach it easily.
Allow some space behind the scanner for the cables, and
❑
make sure to place the scanner where you can easily
unplug the power cord. Also allow sufficient space above
the scanner so that you can fully raise the document cover.
150 mm or more
443 mm
87 mm
150 mm or more
297 mm
443 mm
Keep the scanner away from high temperature and
❑
humidity. Also avoid using or storing the scanner in places
subject to rapid changes of temperature and humidity.
Keep the scanner away from direct sunlight and strong
❑
light sources.
18.eps
Avoid places subject to shocks and vibrations.
❑
1-2
Setting Up the Scanner
Page 15
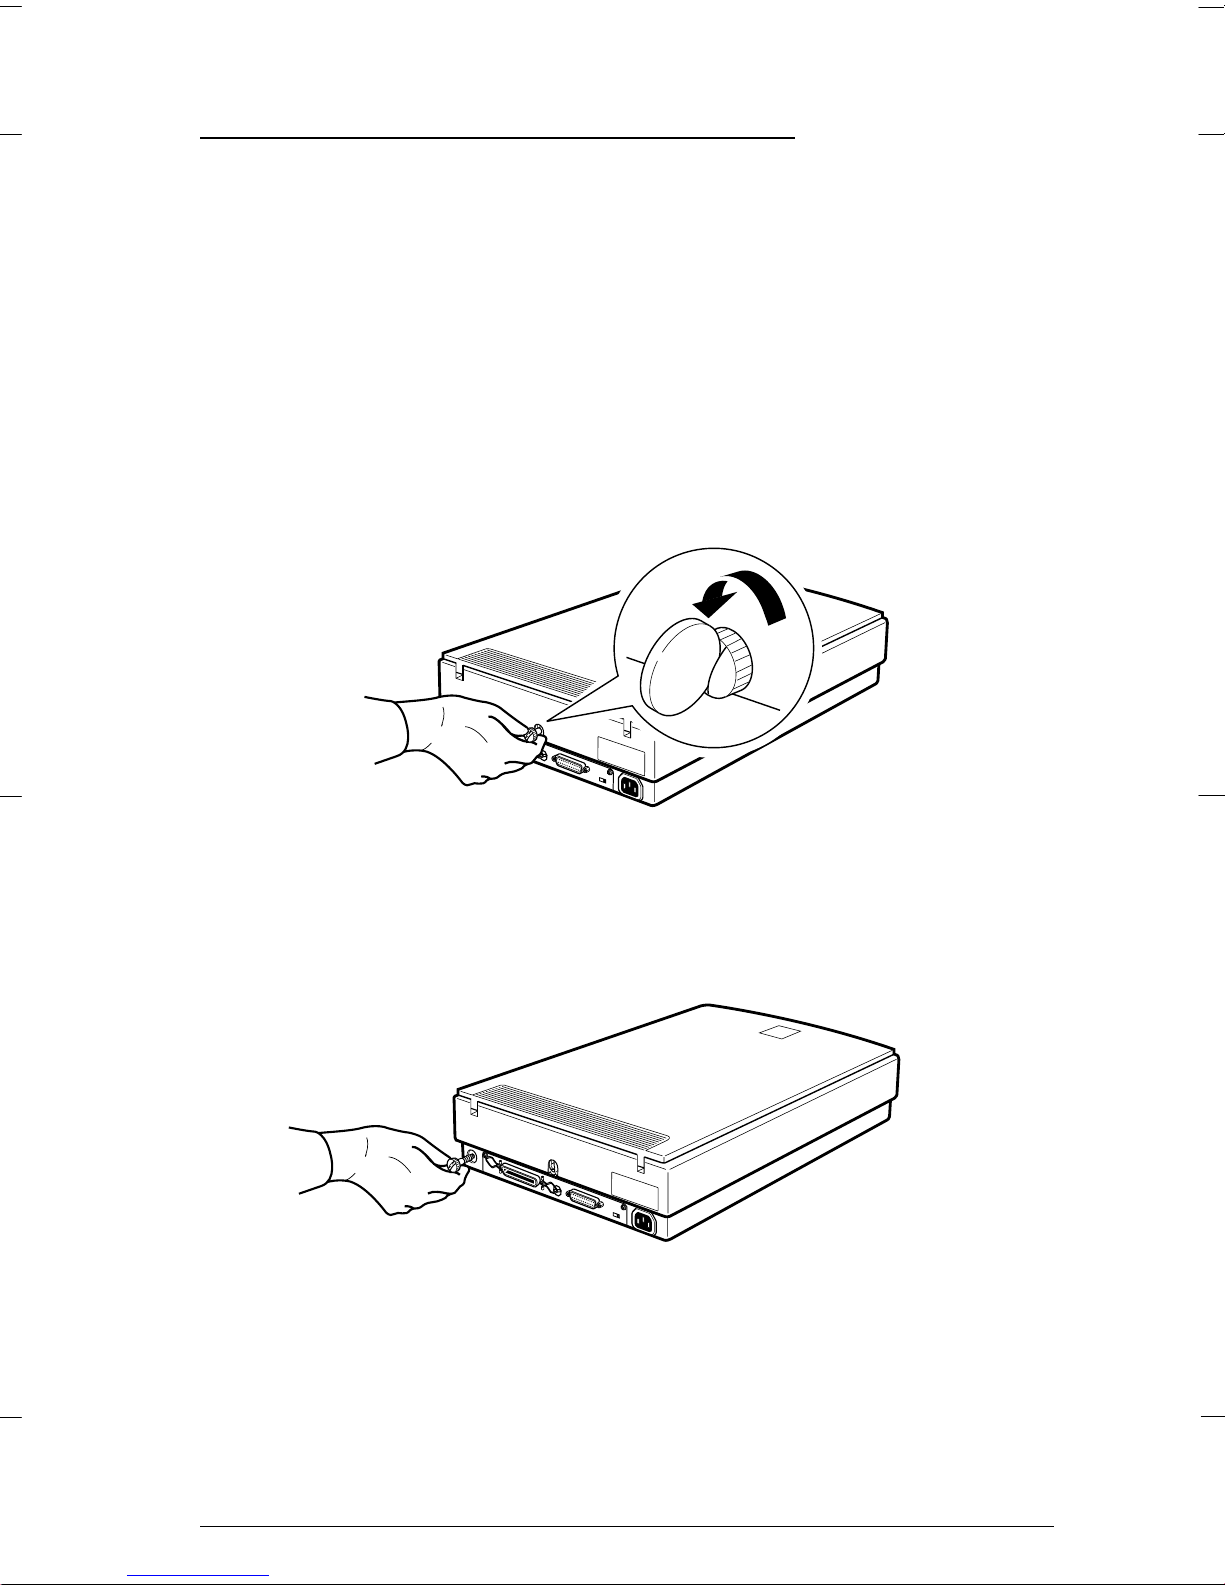
Removing the Transportation Screw
Before connecting the scanner to a power source, you must
remove the transportation screw.
1. Place the scanner on a flat, stable surface with its rear panel
facing you.
2. Remove the screw located in the middle of the rear panel by
turning it counter-clockwise, as shown below. If necessary,
turn the screw with a coin or screwdriver to loosen it.
SCSI
0
*
1
2
7
6
3
4
5
SCSI
ON
SW
02
3. Push the screw into the storage hole marked STOCK. It does
not screw in. Make sure you push it all the way into the
hole.
SCSI
0
*
1
2
7
6
3
4
5
SCSI
ON
SW
Note:
Do not discard the transportation screw. It must be replaced when
storing or transporting the scanner.
03
Setting Up the Scanner
1-3
Page 16
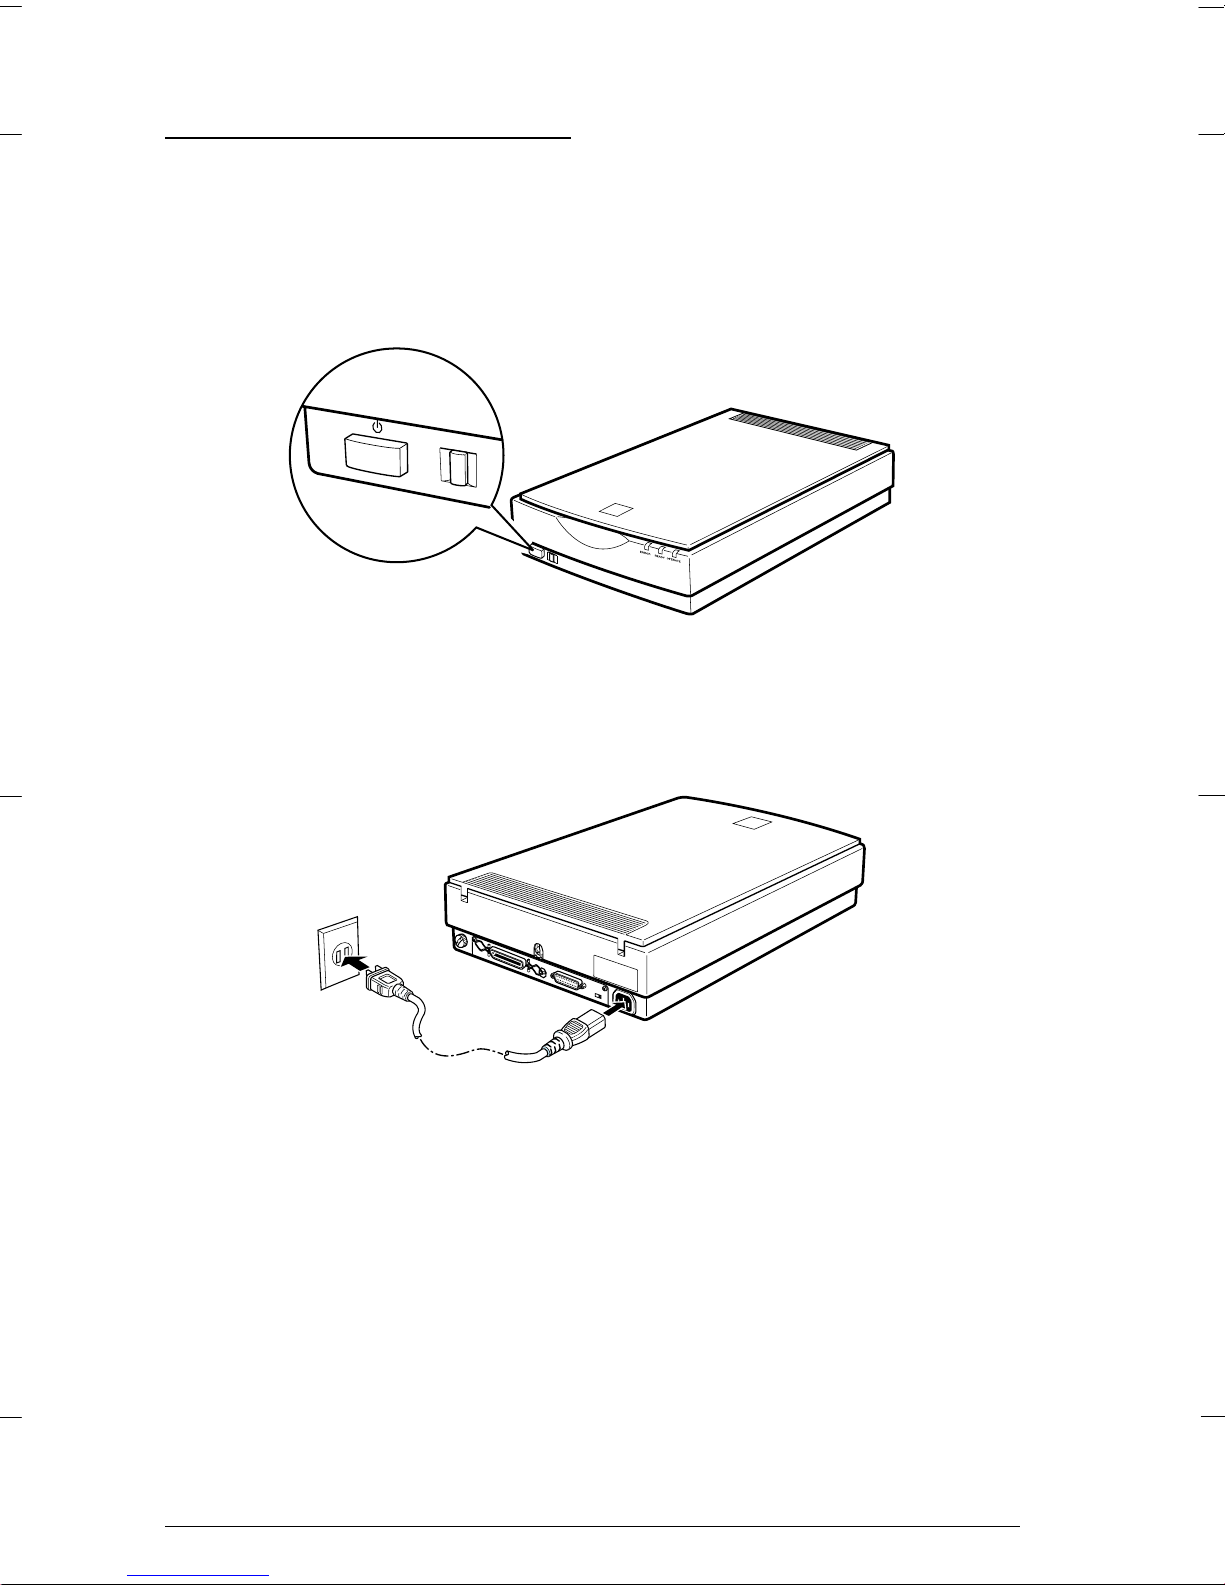
Plugging In the Scanner
1. Make sure that the scanner is turned off. It is off when the
OPERATE
panel.
button protrudes from the surface of the front
OPERATE
RESET
2. Connect the power cable to the power inlet on the rear of the
scanner and plug the other end into a properly grounded
outlet.
SCSI
0
*
1
2
7
6
3
4
5
SCSI
ON
SW
08
04
Caution:
c
It is not possible to change the scanner’s voltage. If the
label on the back of the scanner does not show the correct
voltage for your country, contact your dealer.
1-4
Setting Up the Scanner
Page 17

Initialization
Before connecting the scanner to your computer, follow the
steps below to make sure that the scanner is operating properly.
1. Open the document cover so you can see the operation of
the scanner during initialization (startup).
2. Turn on the scanner by pressing the
OPERATE
3. Make sure the fluorescent lamps on the carriage flash, and
the carriage moves slightly.
4. The
5. Turn off the scanner.
If the scanner does not work as described, make sure that the
power cord is firmly plugged in and that you have removed
the transportation screw, then try again.
c
READY
completed its initialization.
Caution:
Whenever you turn off the scanner, wait at least 10 seconds
before turning it back on. Rapidly turning it on and off can
damage the scanner.
light comes on.
light comes on. This means the scanner has
OPERATE
button. The
Setting Up the Scanner
1-5
Page 18

Connecting the Scanner to Your Computer
For PC users:
If your PC does not have a SCSI board installed, you need to
install one according to the directions that come with the SCSI
board. If your PC already has a SCSI board, connect the scanner
as described in the next section.
Note:
If you use Windows 95 or NT, install the SCSI driver included in
Windows 95 or NT (see your system documentation for instructions)
or the driver described in the SCSI board installation documentation.
If you use Windows 3.1, install the driver packed with the SCSI
board, as described in the SCSI board installation documentation.
For Macintosh users:
All Macintosh computers have SCSI ports; you do not need to
install a SCSI board in a Macintosh. Follow the directions below
to connect your scanner and computer.
Understanding SCSI connections
Read the following sections to help determine how to set up
your SCSI device(s) and if you need any optional SCSI cables.
Daisy Chain
The SCSI interface allows you to connect up to seven devices
(such as scanner, hard disk, CD-ROM, and so on) to the
computer, in what is called a “daisy chain” arrangement. Only
the first SCSI device in a daisy chain is connected to the
computer; each of the other devices is connected to another
SCSI device.
16
1-6
Setting Up the Scanner
Page 19
SCSI Cables
Before purchasing a SCSI cable or setting up your SCSI daisy
chain, be sure your SCSI cable(s) has the right combination of
50-pin and 25-pin connectors. The combination you need varies
depending on the maker of your SCSI device and SCSI
interface board.
SCSI ID
and
terminator
Each device has a SCSI ID number: the computer is usually
number 7, and each of the other devices must have a different
number between 0 and 6. Also, the first device and the last
device in the chain (not including the computer) must have
a terminator. No other device can have a terminator or if a
terminator does exist, it must be turned off.
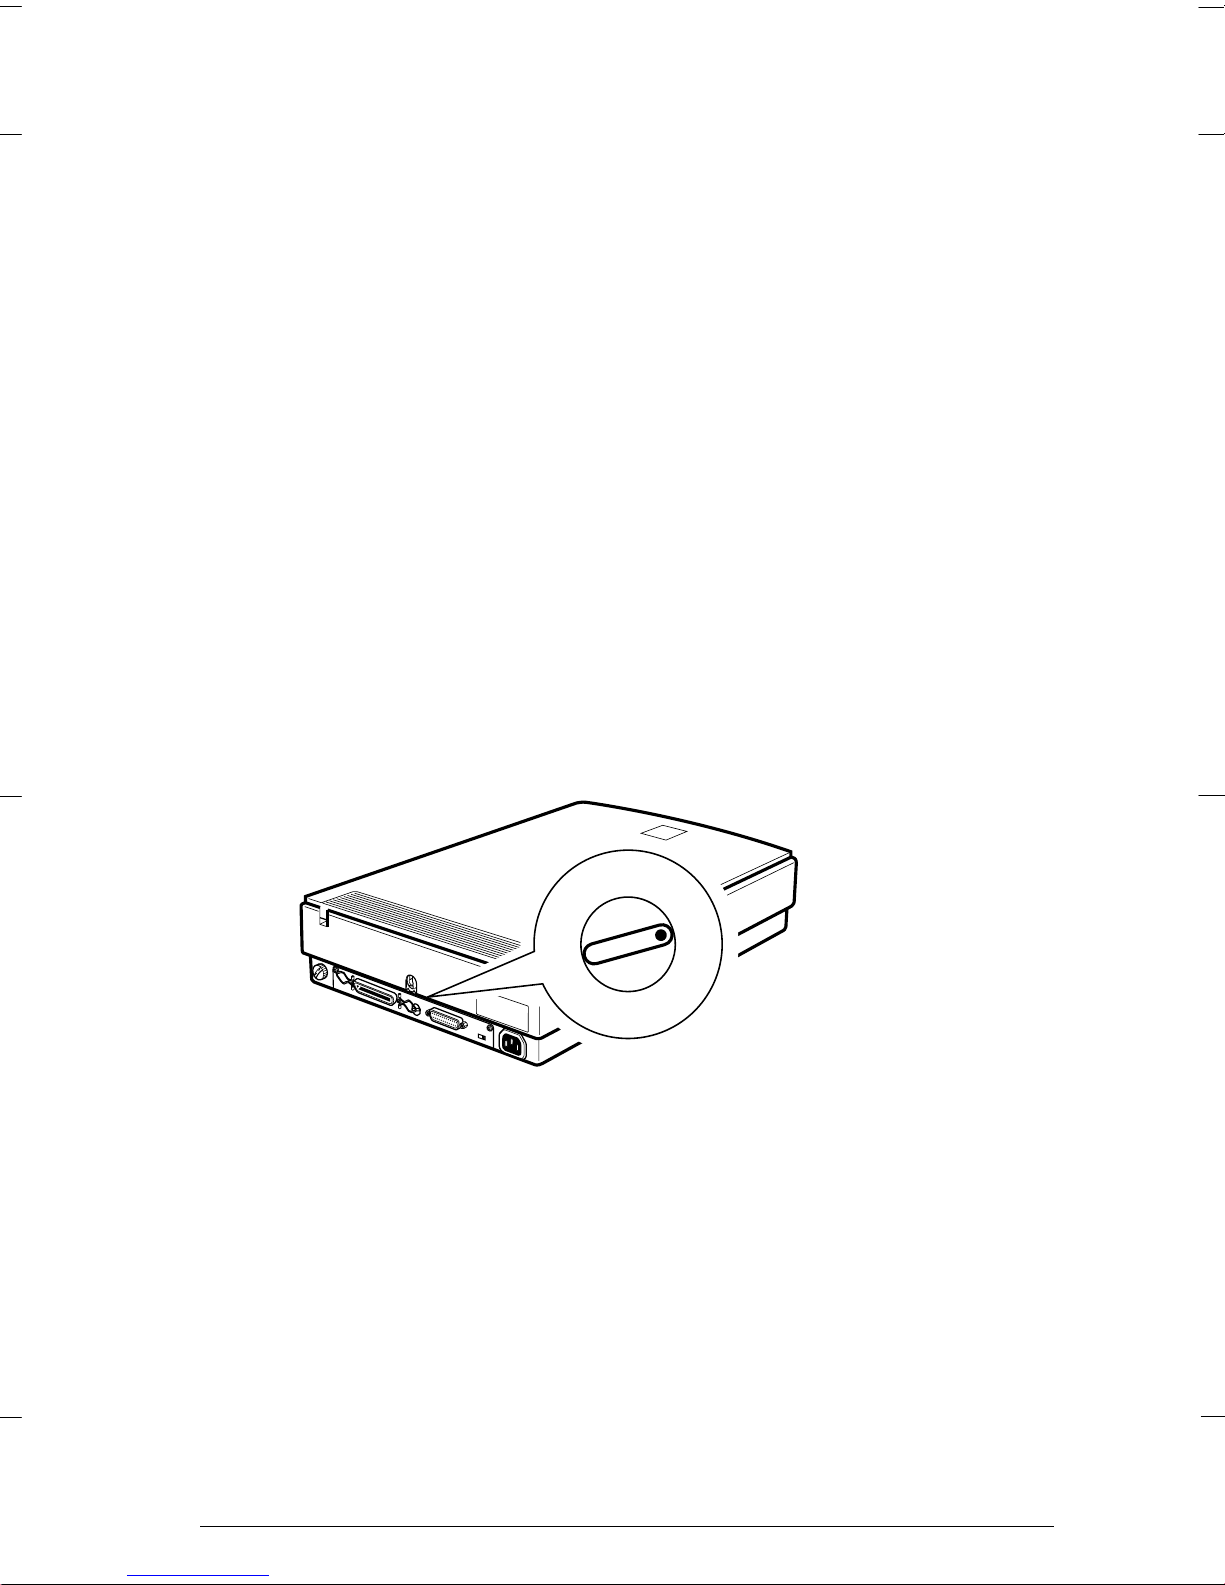
Setting the SCSI ID number
The scanner’s default SCSI ID number is 2.
*
7
SCSI
0
*
1
2
7
6
3
4
5
SCSI
ON
SW
6
0
5
4
1
3
2
05
The SCSI ID rotary switch
is located at the rear of
the scanner.
If you add the scanner to a system in which one of your SCSI
devices already has a SCSI ID of 2, change the ID number of the
scanner to an unused number. See the table on the next page as
a guide.
Setting Up the Scanner
1-7
Page 20

ID Availability Description
0 Not available for Macintosh Used for hard disk
Not recommended for
Windows
1 Not recommended Usually
2 Factory setting of the scanner
3 Not available if your Macintosh
4
5
6
7 Not available for Macintosh Always used for the Macintosh
May not be available for
Windows
Not available Never selected
*
1
Otherwise the scanner does not work properly.
Usually used for hard disk
used for hard disk
has a built-in CD-ROM
itself
Usually used for the SC SI boar d
1
Caution:
c
Do not set the SCSI ID to an ID number that is already
assigned to another device. Otherwise the computer,
scanner, and other devices will not function properly.
Setting the terminator switch
The scanner has a built-in terminator, which allows SCSI
devices to communicate properly with each other. You may
need to change the terminator switch setting according to
your computer system.
1-8
Setting Up the Scanner
Page 21

Note:
Do not use an external terminator.
ON
06
The terminator switch is loc ated
SCSI
0
*
1
2
7
6
3
4
5
SCSI
ON
SW
SW
only the scanner is connected
terminator on
the sc anner i s the last device in the daisy chain
at the rear of the scanner.
16-1
16-2
the scanner is in the middle of the daisy chain
(other SCSI device)
terminator on
terminator off (other SCSI device)
Setting Up the Scanner
16-3
1-9
Page 22

Connecting the scanner
Connect the scanner to your computer or to another SCSI
device as follows:
Note:
The combination of 50-pin and 25-pin connectors you need varies
depending on the maker of your SCSI device and SCSI interface board.
1. Make sure the scanner, computer, and all other SCSI devices
are turned off and unplugged from the power source.
Caution:
c
2. Connect one end of the cable to the scanner SCSI connector;
then squeeze the wire clips together until they lock in place
on both sides.
Do not connect the scanner to the computer or other devices
while they are turned on; otherwise damage may occur.
PARALLEL
SW
12
ON
Thi s is an ex ample using the
scanner’s 50-pin interface.
Note:
❑
To connect the scanner to a SCSI device other than the computer,
the length of cable in the daisy chain must be 6 meters or less;
otherwise the system may not work properly.
❑
To connect the scanner to a PC using SCSI-2, the length of the
cable must be 3 meters or less.
07
1-10
Setting Up the Scanner
Page 23

3. Connect the other end of the cable to the SCSI port of your
computer or another SCSI device.
Note:
The SCSI port of the Macintosh is the larger port with the SCSI
icon over it.
4. Connect the power cables of your computer, scanner, and
other external SCSI devices.
Note:
Before turning on your system, be sure to read “Power-on sequence”
below.
Power-on sequence
Keep the following in mind every time you turn on your
computer and SCSI devices (such as the scanner).
Be sure to turn on SCSI devices first, then your computer. If
❑
you attempt to use a SCSI device which has been turned on
after the computer, it may not work properly, or the
computer may not work properly.
Setting Up the Scanner
1-11
Page 24

For Windows 95 users:
a
❑
The fi r s t ti m e you tu r n o n th e co m pu t e r af ter turning on
the scanner, either of the following dialog boxes may
appear.
If you see either of these, follow the installation instructions
in Chapter 1 of your scanner software manual, and then see
“Power-off sequence” below.
device2, osr2
Power-off sequence
Keep the following in mind every time you turn off your
computer and SCSI devices.
When you are finished using your system, turn off your
❑
computer first, then the scanner and other SCSI devices.
While using your computer, do not turn off the SCSI device
❑
whose terminator is active (on).
Do no t tu r n th e sc a n n e r of f an d b a c k o n w h ile us i ng y ou r
❑
computer, otherwise the scanner may not scan properly.
Now that the connection is completed, you need to install the
scanner software. See Chapter 1 of your scanner software
manual.
1-12
Setting Up the Scanner
Page 25

Chapter 2
Using Your Scanner
Lights and Buttons . . . . . . . . . . . . . . . . . . . . . . . . . . 2-2
Placing a Document on the Scanner . . . . . . . . . . . . . . . . 2-4
Removing the Cover for Thick or Large Documents . . . . . . 2-6
Sizing Up Your System . . . . . . . . . . . . . . . . . . . . . . . 2-7
RAM and hard disk size . . . . . . . . . . . . . . . . . . . . 2-7
Accelerator boards . . . . . . . . . . . . . . . . . . . . . . . . 2-8
Video cards . . . . . . . . . . . . . . . . . . . . . . . . . . . . 2-8
Monitors . . . . . . . . . . . . . . . . . . . . . . . . . . . . . 2-8
File compression software . . . . . . . . . . . . . . . . . . . 2-8
2
Using Your Scanner
2-1
Page 26

This chapter shows you how the scanner operates. The basic
procedure for scanning is as follows.
1. Turn on the scanner. (Keep in mind the ’Power-on sequence’
on page 1-11.)
2. Place the document or material you want to scan on the
document table. (This is described in detail on page 2-4.)
3. Run the scanner software and enjoy scanning. (See your
sca nne r sof tware man u al for de ta il s on sc an ni ng .)
Lights and Buttons
The scanner has three indicator lights and two buttons.
OPERATE
buttons
RESET
10
lights
2-2
Using Your Scanner
Page 27

Lights
Indicator Printer Status
ERROR
(red)
READY
(green)
OPERATE
(green)
o
= on, f = flashing
Buttons
o
o
/
o
/
o
f
f
An error occurred.
This light, along with the
READY light, indicates the
type of error as shown on
page 3-4.
Ready to scan images .
Along with the ERROR l ight,
indicates the type of error.
See page 3-4 for
troub leshooting infor mat ion.
The scanner is turned on.
Button Function
OPERATE Turns the scanner on and off.
RESET Resets the scanner after an error. Do
not press this button while scanning,
or you may cause an error.
Using Your Scanner
2-3
Page 28

Placi ng a Document on the Scann er
Before scanning a document:
Remember to respect the rights of copyright owners. Do not scan
published text or images without first checking the copyright status.
1. Turn on the scanner, if necessary, by pressing the
button. The
OPERATE
OPERATE
RESET
light comes on.
OPERATE
2. Turn on the computer and make sure that the scanner’s
READY
light is on.
3. Open the document cover.
08
2-4
Using Your Scanner
09
Caution:
Do not open the document cover
forcefully, or you may damage the
cover’s hinge.
Page 29

4. Place the document on the document table, with the side to
be scanned facing down. Make sure that the document is
carefully aligned.
corner of the document
11
5. Close the document cover gently so that the document does
not move.
12
Using Your Scanner
2-5
Page 30

Note:
❑
Make sure the document is flat against the glass surface;
otherwise the scanner cannot pr operly focus and scan your
image. Also, make sure to close the document cover. This
prevents interference from external light.
❑
Always keep the document table clean. See “Cleaning the
Scanner” in Chapter 3.
❑
Do not leave photographs on the document table for an
extended period of time; they may stick to the glass.
❑
Do not place heavy objects on top of the scanner.
6. Start your scanner software, and follow scanning
instructions in your scanner software manual.
Removing the C over for Thick or Large Documents
For thick materials or documents that are larger than the
document table, remove the document cover.
Hold th e back of the document
cover and lift straight up.
Note:
When scanning with the cover removed, make sure you cover any
exposed areas of the document table to prevent interference from
external light.
13
2-6
Using Your Scanner
Page 31

When you are finished scanning, reattach the document cover
by pushing straight down on the back of it until it clicks into
place.
Caution:
14
c
Make sure that both of the cover’s notches are directly above
the clips on the scanner before pushing the cover down into
place; otherwise you may damage the cover.
Sizing Up Your System
Your scanner is sufficient for most scanning needs, but if you
are not satisified with the quality of the images on your
monitor or with the speed of image processing, read this
section. While it does not contain specific recommendations, it
describes various possibilities for improving your scanning
system. For further information, see your dealer or an
experienced scanner user.
RAM and hard disk size
Scanned images use much more memory than text files, so
you may need more RAM (Random Access Memory) in your
computer and a larger hard disk than you have used
previously.
Using Your Scanner
2-7
Page 32

Accelerator boards
In addition to memory, processing speed is important because
large files take longer to process than small ones. Therefore,
you may want to add an accelerator board to your computer.
Video cards
A video card that is sufficient for text may not be good enough
for displaying graphic images, especially in color. If all your
scanned images look coarse on your monitor, you may want to
upgrade your video card. You will need 24-bit color, also called
true color or millions of colors, to make the highest quality
image reproductions.
Monitors
The resolution of your monitor affects the quality of the image
you see. Consider a high resolution monitor if you do precise
color work, but also be sure you have a high quality video card.
File compression software
Many different programs are available to make image files
smaller for storage or transmission. For example, some
compression software can store a 3MB image file on a 1.44MB
floppy disk, and compress images and restore them with no
loss of data or quality; others compress images more, but the
restored file is not exactly the same as the original. The
difference between the original and restored files is, however,
almost unnoticeable.
2-8
Using Your Scanner
Page 33

Chapter 3
Maintenance and Troubleshooting
Maintenance . . . . . . . . . . . . . . . . . . . . . . . . . . . . . 3-2
Cleaning the scanner . . . . . . . . . . . . . . . . . . . . . . 3-2
Replacing the fluorescent lamps . . . . . . . . . . . . . . . . 3-3
Transporting the Scanner . . . . . . . . . . . . . . . . . . . . . 3-3
Problems and Solutions . . . . . . . . . . . . . . . . . . . . . . 3-4
Error indicators . . . . . . . . . . . . . . . . . . . . . . . . . 3-4
Operating problems . . . . . . . . . . . . . . . . . . . . . . . 3-5
Quality problems . . . . . . . . . . . . . . . . . . . . . . . . 3-7
3
Maintenance and Troubleshooting
3-1
Page 34

Maintenance
Cleaning the scanner
To keep your scanner operating at its best, you should clean it
periodically, as described below.
1. Unplug the power cable.
2. Clean the outer case with mild detergent diluted in water.
3. If the glass of the document table gets dirty, clean it with a
soft dry cloth. If the glass is stained with grease or some
other hard-to-remove material, use a small amount of glass
cleaner on a soft cloth to remove it. Wipe off any remaining
liquid with a dry cloth.
Be sure that there is no dust on the glass of the document table.
Dust can cause white spots in your scanned image.
c
Caution:
Be careful not to scratch or damage the glass of the
❑
document table, and do not use a hard or abrasive brush to
clean it. A damaged glass surface can decrease the
scanning quality.
Never use alcohol, thinner, or corrosive solvent to clean
❑
the scanner. These chemicals can damage the scanner
components as well as the case.
Be careful not to spill liquid into the scanner mechanism
❑
or electronic components. This could permanently damage
the mechanism and circuitry.
Do not spray lubricants inside the scanner.
❑
Never open the scanner case.
❑
3-2
Maintenance and Troubleshooting
Page 35

Replacing the fluorescent lamps
The luminosity of the fluorescent lamps declines over time. If
the lamps break or become too dim to operate normally, the
scanner stops working and both the READY and ERROR lights
flash. When this happens, the lamp assembly must be replaced.
For details, contact your dealer.
Caution:
c
Never open the case of the scanner. If you think repairs or
adjustments are necessary, consult your dealer.
Transporting the Scanner
If you transport the scanner a long distance or store it for an
extended period, follow the steps below to secure the carriage.
1. Turn on the scanner and wait until the carriage moves to the
home position (position nearest the cover hinge). Then turn
off the scanner.
2. Remove the transportation screw from the storage hole
marked STOCK and screw it into the center hole.
SCSI
0
*
1
2
7
6
3
4
5
SCSI
ON
SW
Note:
If the scanner is broken, the carriage may not automatically return to
the home position. If it does not, raise the front of the scanner and
hold it up until the carriage comes to rest in the home position. Then
perform step 2 above.
15
Maintenance and Troubleshooting
3-3
Page 36

Problems and Solutions
This section divides scanner problems into three categories:
Error indicators ................page 3-4
Operating problems ........page 3-5
Quality problems .............page 3-7
See the table in “Error indicators” first, and if the information
there does not help you solve the problem, go to the category
for the type of problem you have and look for the description
that most closely matches the problem.
Error indicators
If an error occurs, the scanner stops operating and the
and
ERROR
Pattern of
lights
ERRORoREADY
ERRORfREADY
ERRORfREADY
lights show the type of error.
Problem and solution
Cause: The scanner has received incorrect
commands from your scanning software.
What to do: Check your software settings and try scanning
o
n
f
Cause: The interface setup is wrong, or the scanner is
What to do: Check the interface connection. Then push
Cause: The tr ansportation screw has not been removed.
What to do: Check that the transportation screw has been
again. The scanner returns to normal when it
receives correct commands. Resetting the
scanner has no effect.
not properly connected to the computer.
the RESET button or turn the scanner off and
back on to reset it.
Or, one or more fluorescent lamps need to be
replaced.
Or, the scanner is broken.
removed; then push the RESET button. If the
scanne r still does not operate properly, try
turning the scanner off and then back on. If
the sca nner st ill does not operate properly, or
if this error occurs repeatedly, consult your
dealer.
READY
o
= on, n = off,f = flashing
3-4
Maintenance and Troubleshooting
Page 37

Operating problems
The problems you may have while using the scanner often
involve the operation of your software and computer.
Operation problems usually occur because of:
Incorrect setup of the interface (see Chapter 1).
❑
Inappropriate selection of the scanner functions (see your
❑
software manual).
Incorrect setup of your computer or software (see Chapter
❑
1 in this guide or the software manual).
Incorrect operation of your software (see your software
❑
manual).
Also see the documentation that came with your computer and
printer for possible solutions.
OPERATE
The
Press the
light does not come on.
OPERATE
button to turn on the scanner.
Make sure the power cable is correctly plugged into the
scanner and the power outlet.
READY
The
light does not come on.
Make sure the scanner is correctly connected to the computer
and that the computer is turned on.
The scanner does not start scanning.
Make sure that the
READY
light is on.
Maintenance and Troubleshooting
3-5
Page 38

Make sure that you have selected the correct interface port and
settings with your software. Also make sure the interface board
in your computer is properly installed.
Make sure that the terminator and SCSI ID are correctly set up.
See page 1-7.
If you have other expansion boards in your computer, make
sure that they are not interfering with the interrupt setting of
the interface board for your scanner. (See your computer
manual.)
The scanner software does not work properly.
Be sure you have correctly installed your software.
Make sure that your computer system meets the requirements,
such as the operating system version, specified for your
software.
Confirm that the computer has enough memory for your
software. If your computer has many device drivers, or if you
are running other software at the same time, or are using
RAM-resident programs, the computer may not have enough
memory left. (See your software and computer manuals.)
3-6
Maintenance and Troubleshooting
Page 39

Quality problems
The entire image is distorted or blurred.
Make sure that the document is placed flat against the
document table.
You may have accidentally moved the document during
scanning. Check the position of the document and do not move
it while the scanner is operating.
See that the scanner is not tilted or placed on an unstable
surface.
Part of the image is distorted or blurred.
Part of the document may be wrinkled, warped, or not in
contact with the document table. Be sure the document is
uniformly flat.
Caution:
c
Edges of the document are not scanned.
The document table has non-readable areas around the edges.
If part of your document extends beyond the maximum limits
marked on the document table edge guides, you may have to
reposition your document so that the image you want to scan
is within the readable area.
Color is patchy or distorted at the edges of the image.
If the document is very thick or warped at the edges, the
edges of the image may be discolored. Cover the edges of the
document with opaque paper to block outside light.
Do not place heavy objects on the document table.
Maintenance and Troubleshooting
3-7
Page 40

If part of the document extends beyond the document table,
that edge may not be in contact with the document table.
Change the position of the document.
The image is faint or out of focus.
Check that the document is placed flush against the document
table.
Check the Gamma setting in your software.
Check the Exposure setting in your software.
The image is too dark.
Adjust the brightness with your software. Also check the
brightness and contrast values of your display screen.
Straight lines in the image are jagged.
The document may be placed at an angle on the document
table. Align it so that the horizontal and vertical lines are
carefully aligned with the scales on the top and side of the
document table.
The image does not look the same as the original.
Try different combinations of image settings using your
scanner software.
Your software may not have sufficient color matching and
color management features, or these components of your
software may not be correctly installed. (See your software and
computer manuals.)
3-8
Maintenance and Troubleshooting
Page 41

If you are importing an image file into your application
software, make sure the file format is one your software can
read. Also check that the image settings in your application
are appropriate for the type of image you want to scan. (See
your software manual.)
A line of dots is always missing in the scanned image.
If this happens in your printed image only, your printer or its
print head is probably malfunctioning. (See your printer
manual.)
If this happens on both your screen and printout, the scanner’s
sensor may be malfunctioning. Consult your dealer.
When halftoning is used, textured patterns of dots appear on
particular areas of an image.
This is normal. See the explanation of moiré patterns in the
Color Guide
.
Colors on your monitor are different from those in the original
image.
Check the image settings in your scanner software, especially
data format (bits/pixel/color), gamma correction, and color
correction. Try a different combination of these settings.
Check the color matching and color management capabilities
of your computer, display adapter, and software. Some
computers can change the color palette to adjust the colors on
your screen. (See your software and computer manuals.)
Exact matching of colors is very difficult. The reason for
this is explained in your
Color Guide
. Check your software and
monitor manuals for information on color matching and
calibration.
Maintenance and Troubleshooting
3-9
Page 42

Printed colors are different from those in the original image.
Exact reproduction of colors is very difficult. The reason for
this is explained in your
Color Guide
. See your software manual
or your printing company for guidance on color matching.
The printed image is larger or smaller than the original size.
The image size settings in your software determine the size of
the printed image. Do not use the size of the image on your
monitor to judge the printed size.
Your image cannot be printed or the printout is garbled.
Check that the printer is properly connected with the computer
and is correctly set up. (See your printer manual.)
Check that your software is properly installed and set up for
your printer. (See your software manual.)
3-10
Maintenance and Troubleshooting
Page 43

Appendix A
Technical Specifications
Scanning . . . . . . . . . . . . . . . . . . . . . . . . . . . . . . . A-2
Electrical . . . . . . . . . . . . . . . . . . . . . . . . . . . . . . . A-3
Environmental . . . . . . . . . . . . . . . . . . . . . . . . . . . . A-4
Safety Approvals . . . . . . . . . . . . . . . . . . . . . . . . . . A-4
SCSI Interface . . . . . . . . . . . . . . . . . . . . . . . . . . . . A-5
Initialization Methods . . . . . . . . . . . . . . . . . . . . . . . A-6
Technical Specifications
A
A-1
Page 44

Scanning
Scanner t yp e : Flatbed, color
Photoelectric device: Color CCD line sensor
Effective p ix els:
Docum ent size:
Scanning resolutio n: 400 dpi (main , sub)
Output resolution: 50 d pi to 16 00 dp i in 1 dpi steps
Color separation: RGB color filters on CCD
Reading sequence:
Monochrome One-pass sca nning
Color page sequ enc e Three-pass sca nning (R, G, B)
Color byte se quence One-pass sca nning (R, G, B)
Color lin e sequ ence One-pass sca nning (R, G, B)
Zoom: 50% to 200% in 1% increments
3400 × 4680 pixels at 400 d p i, 100%
216 mm × 297 mm (8.5 inches × 11.7 inches)
A4 or US letter size
(The reading area can be spec ifi ed fr om
your software.)
Image da ta : 10 bits per pix el per color sav e d as 8 bits pe r
pixel per color ma ximum
Brightne ss: 7 levels
Line Art settings: Fixed threshold
Text Enhance m ent Technology
(enable/disable sele ctab le)
Halftoning process: AAS (Auto Area Segmentation)
Enable/disable selectable
3 halftoning modes (A, B, and C) and
4 dither patterns (A, B, C, and D) for
bi-lev el and quad-level data
(2 downloadable dither patterns)
Gamm a co rrection: 2 types for CR T display
3 types for printer
1 type for user-defined
A-2
Technical Specifications
Page 45

Color correction: 1 type for CRT display
Interface: SCSI
Light source: Xe-gas cold cathode fluorescent lamp
Reliability: 100,000 cycles of carriage movements
Dimensions: Width: 297 mm (11.9 inches)
Weight: Approx. 5 kg ( 11. 1 lb)
Electrical
3 types fo r printer output (available in color
byte sequence mode and color line
sequence mod e)
1 type for user-defined
(main unit MCBF)
Depth: 443 mm (17.7 inches)
Height : 87 mm (3.5 in ches)
This product is also designed for IT power systems with Phase to Phase
voltage 220-240V.
100−120 V model 220−24 0 V mo d el
Input voltage range AC 90 to 132 V AC 198 to 264 V
Rated frequency 50 to 60 Hz
Input frequency 49.5 to 60.5 Hz
Rated current 0.5 A 0.3 A
Power consum ption Approx. 20W
Note:
Check the label on the back of the scanner for the voltage of your scanner.
Technical Specifications
A-3
Page 46

Environmental
Temperature:
Operation 5° C to 35° C (41° F to 95° F)
Storage –25° C to 60° C (–13 ° F to 140° F)
Humidity:
Operation 10% to 80%, without condensation
Storage 10% to 85%, without condensation
Operating c onditions: Ordin ary o ffice or home conditio ns.
Note:
Specifications are subject to change without notice.
Extreme dust shoul d be avoided.
Operation under direct sun light
or near a strong light so urce shoul d be
avoided.
Safety Approvals
Safety stan dards: EN 60950 (VDE)
EMC: EN55022 (CISPR Pu b 22) class B
EN 60950 N o rd ic D ev iat io n (N EMKO)
EN 61000- 3-2
EN 61000- 3-3
EN 50082- 1,
IEC 801 -2
IEC 802 -3
IEC 802 -4
A-4
Technical Specifications
Page 47

SCSI Interface
Interfa ce t ype: ANSI X 3T 9. 2/375R Rev ision 10L (SCSI)
Functions: BUS FREE phase
Logic level: TTL compatible
ARBITRATION phase
SELECTION/RESELECTION phase
COMMAND phase
(Logical Unit Number is fixed to 0 an d
command li nk function is not suppo rted. )
DATA phase
Data in phase
Data out phase
STATUS phase
MESS A GE phase
MESSAGE IN phase
MESSAGE OUT phase
ATTENTION condition
RESET condition
Electrical standard: ANSI X 3T9. 2/375R Revi sion 10L (S CSI)
ID Setting: Se lec ta ble f rom 0 t o 7
Terminat or: In te rnal terminator selectable
(enable/disable)
Connector type: 25/50-pin connectors
Connector pin arrangement:
50 pin
25
50
1
26
25 pin
13
1
17a.eps
25
14
Technical Specifications
A-5
Page 48

Initialization Methods
The scan ner can be initiali zed ( ret urned to a fixed set of co ndit io ns) in t he
following ways:
Hardware initialization * When the scanner is tu rned on.
* When the scanner receives a SCSI Reset
signal from the SCSI interface.
* When you push the RE SET button.
Software initialization
When software sends the ESC @ (initialize
*
the scanner) command.
When the scanner receives a SCSI Bus
*
Device Message.
A-6
Technical Specifications
Page 49

Appendix B
Contacting Customer Support
For United Kingdom and the Republic of Ireland Users . . . . B-2
For Australian Users . . . . . . . . . . . . . . . . . . . . . . . . B-4
For Singapore Users . . . . . . . . . . . . . . . . . . . . . . . . B-5
For Hong Kong Users . . . . . . . . . . . . . . . . . . . . . . . . B-5
For Philippines Users . . . . . . . . . . . . . . . . . . . . . . . . B-6
B
Contacting Customer Support
B-1
Page 50

If your scanner is not operati ng pr op erly and you cannot so lv e you r
problem with the troubleshooting information in this guide and online
help, contact customer support services for assistance.
We will be able to help you much m or e quic kly if you are able to give the
exact inform at io n ind icated below.
Serial number of your scanner:
(The serial number label is on the back of the scanner.)
Brand and model of your computer:
Scan n er software v ersio n:
(Click the Abo u t bu t ton on the Help menu in your application for the
version num ber. )
Version of Windows (95, 3.1, NT 4.0, an d so on):
Version of software applications you normally use with your
scanner:
For United Kin gdom and the Republic of Ireland
Users
If you purc hased your scanner in the UK or the Repu blic of Ireland, Epson
(UK) Limit ed p rovides a range of cust o m er serv ic es and t echnical su pp ort.
Note:
For customers in the Republic of Ireland, please use the correct dialing codes
when dialing the UK telephone numbers listed in the following sections. For
examp le the Enquiry De sk fa x num b er, 01442 227271, shoul d b e di al e d as 0044
1442 227271 f rom the Republic of Ire l and.
Enqui ry Desk
The enquiry de sk team can be contacted by calling 080 0 220546 in the UK
or 1 800 409132 from the Repub lic of Ir eland, by faxing 01442 227271, and
via the Internet at info@epson.co.uk. They can provide the following
information:
Information and lite rature on new EPS ON products ( also av ailable
❑
from Faxon Epson)
Where to purc hase genuine EPSO N co nsumables, accessories and
❑
options
B-2
Contacting Customer Support
Page 51

Customer Support
Our Customer Support team can pr ovide the fo llo w ing services:
Technic al inf or m ation on installin g, con fig uring, and opera ting yo ur
❑
EPSON products
Arranging for faulty EPSON products to be repaired within the
❑
warranty period
For informa ti on on co nt acting our Cust omer Su pp ort team, please see the
Service and Su pport Inform at ion bookle t that came with yo ur EPSON
product.
If this booklet is not av ailable, details can be fou nd on F axon Ep so n
faxback serv ice, EPtec Bull etin B o ard Service or on EPSON’s W orld Wide
Web site. See below for de tails.
Faxon Epson
Contact Faxo n Ep son faxback servic e fo r:
Literature and specificatio ns on the latest EPSO N pro ducts
❑
Support infor m at ion including trou bleshooting tips, switch settings
❑
and driver informatio n
To use Faxon Epso n, call 01442 227332 using a tou ch-tone phone. You will
be asked to follo w a si m ple ro utine to register your document requ est ,
and once you have entered you r telephone and fax numbers, Fax o n Epson
will fax a copy of th e doc um ent catalogue to your f ax ma chine.
When you have found the documents t hat you need in the catalogue, call
Faxon Epson ag ain and enter the docume nt ID numbers. The docu m ent s
will be faxed to you automatically.
EPtec - Bulletin Boa rd Service
Call the Eps on Bulletin Board Service on 014 42 227479 for the latest
drivers and uti lities. N o mem bership is required. Make sure that your
communications software is set to 8 data bits, 1 stop bit, no parity bit,
ANSI terminal mode emulation and a modem speed of up to 28.8 Kbps.
Download ing p roto co ls su pp orted include Xmod em , Ymodem and
Zmodem. See the documentation that came with your com m uni cations
software and mo de m for m ore information.
When you first connect to the Bulletin Board Ser vice, you wi ll be ask ed fo r
your name, c omp any name, phone number and a passwor d (whic h you
can invent yourself).
Contacting Customer Support
B-3
Page 52

World Wide Web
If you can co nnec t to the In ter net and hav e a Web Browser, you can access
EPSON ’s World Wi de Web site at http:// w ww.epson.com. Here you will
find inform at io n on the lat est EP SON products , softw are drivers, and
answers to frequent ly asked questions.
For Australian Users
EPSON Aust ralia wishes to provi de you with a high level of Cu stom er
Service. As well as this User’s Guide, we provide the followin g sou rc es for
obtaining inf or m at ion :
EPSON FAXBACK
EPSON FA XB A CK will fax you the la tes t specifications and pricing for
most EPSO N prod u ct s offer ed in A ustralia. There is also technical
information including det ails of the latest software and drivers available.
Phone (02) 9903 9075 and the syst em wi ll gu id e yo u t hro ugh a number of
choices befor e faxing the informatio n to you r fax machine.
EPSON Bulletin Boar d Syst em
This is where you ca n download the latest software an d drivers. Visit the
BBS to check ou t the lates t versions. If you have a m odem, phone (02)
9417 5090.
Internet URL http://www.epson.com.au
Access the EPSON Australia World Wide Web pages. Worth taking your
modem here fo r the oc casional su rf! You can get the same in form at io n as
offered on the EPSON FAXBACK and the EPSON Bull etin Board pl us
more.
Your Dealer
Don’t forget that yo ur dealer can often help id ent ify and reso lve
problems. T he dealer should alwa ys be t he first call for adv ice o n
problems. They can often solve probl e m s quic kly and easily as w ell as
give you ad vice on the next st ep to take.
B-4
Contacting Customer Support
Page 53

EPSON He l pd esk
EPSON Helpdesk is provided as a final backup to make sure our clients
have access to adv ice. Operators on the Helpdesk can aid you in
diagnosing hardware and so ftw are pr obl em s. They can also adv ise you
on the latest EPSON produc ts and w here the nearest dealer or service
agent is located. Many types of queries are ans wer ed here.
The Helpdesk nu m bers ar e:
Phone: (02) 9903 9040
Fax: (02) 9903 9189
We encourag e you to have all the relev ant information on han d wh en you
ring. The more infor m ation you prep are, the faster we can help solv e the
problem. This inf orma ti on in clud es the User’ s Guide for your EPSON
product, ty pe of co m pu ter , operating system, application programs, and
any other infor m ation you feel is required.
For Singapore Users
Contact the telephone and fax num bers below:
Phone: (065) 337-7911
Fax: (065) 334-1185
For Hong Kong Users
To obtain technic al support as well as other after-sales servic es, users are
welcome to contact EPSON Hong Kong Li mited.
Internet home page
EPSON Hon g Kong has established a lo ca l home page in both Chi nese
and English on the Internet to provide users with the followin g
information:
Product inf ormation
❑
Answers to Frequen tl y A sked Q uestio ns ( FA Qs )
❑
Latest versions of EPSON scanner drivers
❑
Users can ac cess our World Wide Web home page at:
http://www.epson.com.hk.
Contacting Customer Support
B-5
Page 54

Electronic bulletin board system
An electronic bu llet in board system (B BS) is also av ailable to obtain
scanner information and the latest versions of scanner drivers. You can
log on to the following number for the BBS service:
BBS: (852) 2827-4244
Technical Support Hotline
You can also contact ou r t echnical staff at the following telep ho ne and f ax
numbers :
Phone: (852) 2585-4399
Fax: (852) 2827-4383
For Philippines Users
To obtain technical support as well as other after sales services, users are
welcome to contact the EPSON P hili pp ines Rep resentative Of fice at the
telephone and fax numbers below:
Phone: (632) 813-6552
Fax: (632) 813-6545
BBS: (632) 814-0595
B-6
Contacting Customer Support
Page 55

Glossary
additive primary colors
Primary colors which produce white when mixed in a certain proportion. These are
red, green, and blue --- the colors of the scanner lamps and color monitor displays.
bi-level data
Image data that is composed of 1 bit per pixel. A pixel is represented by a single bit
of digital data that can express only 1 (light) or 0 (dark).
bit
Short for binary digit. The smallest unit of data in computer processing. A bit can
represent two values: on and off, or 1 and 0.
bit / pixel
The unit that indic ates th e number of bits allocated for a pixel. The lar ger th e bi t
value, the more detail of a pixel will be reproduced.
brightness
A scanner function to lighten or darken the output image data.
byte
A unit of information consisting of eight bits. A byte can represent a control code or
character.
carriage
A component of the scanner that contains the optical sensor and light source for
scanning.
color correction
A method of adjusting the color image data for a particular type of device so that
the reproduction results are as close as possible to the original colors.
color separation
A process to convert full-color images into a limited number of primary colors. The
additive primary colors (red, green, and blue) are used by the scanner, and the
subtractive primary colors (cyan, magenta, and yellow) plus black are used for
printing press separation.
daisy chain
A SCSI bus arrangement that allows several devices to be connected simultaneously
in a line to a single computer. See SCSI.
default
A set of values used when no oth e r se lections have been made. T hese are
sometimes called factory defaults if the original values have not been changed since
the scanner has left the factory.
dithering
A process in which software or an output device simulates continuous tones with
groups of dots.
Glossary
1
Page 56

document
The physical item, such as a sheet of paper or a book, that you place on the
document table for the scanner to read.
dpi
Short for dots per inch. A unit of measurement for resolution. The higher the value,
the higher the resolution.
dropout color
A color the scanner does not recognize and ignores. You can select and deselect
dropout colors in the scanner software.
ESC/I
Abbreviation for EPSON Standard Code for Image scanners. A system of
commands that allows you to control image scanners from your software.
ESC/P
Abbreviation for EPSON Standard Code for Printers. A system of commands that
allows you to control printers from your software.
grayscale
Images represented with various shades of gray in addition to black and white.
halftoning
A method of reproducing images with patterns of dots to improve the quality of the
output.
home position
The positio n a t th e rear ( nea r es t the cover hinge posi tion) of the scanner where i ts
carriage rests before a scanning operation.
imageset ter
A device that uses co m puter f iles to produce high- r es o lution text and gra phi cs
output on film or paper. These are usually found in service bureaus and printing
companies.
impact dot printer
A printer that transfers ink onto the paper by striking an ink ribbon with a number
of small pins.
ink jet printer
A printer that transfers ink onto the paper by spraying it through a number of small
nozzles.
interface
A piece of hardware, a method, or a standard used for connection between or
among computer devices.
line sequence
A type of color scanning that separates primary colors line by line. The carriage
makes only one pass.
monochrome
Black and white images , or images represented only by the intensity of luminosity.
2
Glossary
Page 57

page sequence
The type of color scanning in which the entire image is scanned once for each
separation color.
pixel
Short for picture element. Each image is composed of a number of pixels. Pixels are
also counted in units of dots.
plain bi-level
Bi-level image data without the ha lfto n ing process.
port
An interface channel thr o u gh which data is tr ansmitted between devices.
primary colors
Basic colo r s . See additive primary colors and subtractive prima ry col ors.
resolution
Indication of how finely an image is resolved into pixels. Measured in dots per inch
(dpi), pixels per inch (ppi), or samples per inch (spi).
scan
An operation performed by the sensor and th e carr iage. The image is divided into
pixels by scanning.
scanning are a
The physical size of the image that can be scanned by the scanner.
SCSI
Small Computer System Interface. This is one method used to connect your
computer to peripherals such as scanners, hard disk drives, CD-ROM drives, and so
on.
SCSI ID
The numbers tha t all devices in a SCSI co n nection (see daisy ch ain) use to identif y
each other. If the same ID number is used by two devices in the same daisy chain,
the devices cannot operate properly.
subtractive primary colors
Primary colors that produce black when mixed in certain proportion. These are
cyan, magenta, and yellow. In printing, black is often added to give more definition
because mixing of actual inks cannot produce pure black.
terminator
A device that stops electronic signals, and prevents them f r o m proceeding or
returning to other devices. This is necessary to stop one signal from continuously
bouncing between devices, which would stop all electronic traffic between those
devices.
Glossary
3
Page 58

threshold
A reference point that is used to determine whether data will be processed as “on”
or “off”. If the value of the data is larg er than the reference point , the d ata is
considered “on ”, and if the value is less than the reference poin t, the data is
consi dered “o ff”. In th e case of col o r image data, “on” means that a certain co lor
will ap p e ar in a pixel or dot, and “off” me ans that color will not appear t here.
tone correction
A method of adjusting the tone curve so that the reproduction results on different
types of output devices have gradations similar to the original image.
tone curve
The graph that shows the contrast ratio between the input (original image) and
output (image data) in image processing.
4
Glossary
Page 59

Index
A
AAS, 1
Accelerato r board, 2-8
Auto Area Segme n ta tion
(AAS), 1
B
Best & de-screening, 1
Board
accelerator, 2-8
SCSI, 1-6
Button, 2-2
OPERAT E, 1-4–5, 2-2–3
RESET, 2- 2
D
Daisy cha in , 1-6, 1-9
Document
cover, 2- 3, 2-6–7
table, 2-5
placing, 2-4, 2-6
E
Electrical spe cifica tions, A-3
Environmental specifications,
A-4
ERROR ligh t, 2-2, 3-4
F
C
Cable
power, 1-4
SCSI, 2, 1-7, 1-10
Carriage, 1-5
Cleaning, 3-2
Chain, daisy, 1-6, 1-9
Choosing a p lace, 1-2
Compression, 2-8
Connecting
cable, 1-10
power cable, 1-4
SCSI device, 1-10
to computer, 1-6
Factory set, SCSI ID, 1-7
File compression, 2-8
Fluorescent lamp, 1-5, 3-3
H
Hard disk, 2-7
Index
IN-1
Page 60

I
O
Important s afet y in st ruc tions, 2
Indicator ligh ts, 2-2, 3-4
Initialization, 1-5
method, A- 6
Installation
scanner softwar e, 1-12
screws, 3-3
softwar e , 1-12
Interface ca ble, 1-2–3, 1-5–7
connecting, 1-10
SCSI cable, 2, 1-7
specifications, SCSI, A -5
L
Lamps, fluo rescent , 1-5, 3-3
Lights, 2-2, 3-4
ERROR, 2- 2, 3-4
OPERATE , 1-5, 2-2–3
READY, 1-5, 2-2–4
OCR, 1
OPERATE
button, 1-4–5, 2-2–3
light, 1-5, 2- 2–3
Optical Character Recognition
(OCR), 1
Options, 1–2
P
Peripheral c able, SCSI, 1–2
Placing
document , 2- 3
scanner, 1-2
Plugging in, 1-4
Port (SCSI), 1-6, 1-11
Power cable, 1-4
Power -on sequen ce, SCSI, 1-11
Power-off sequence, 1-12
Problems and solutions, 3-4
M
Macintosh SCSI port, 2, 1-6–7,
1-11, see also SCS I
Maintenance, 3-2–3
Moiré, 1, see also Color Guide
Monitor, 2-8
IN-2
Index
R
RAM, 2-7
READY ligh t, 1-5, 2-2–4
Removing
document cover, 2-6
transportation screw, 1-3
Replacing fluorescen t lamps, 3-3
RESET button, 2-2
Rotary sw itc h, SCSI ID , 1-7–8
Page 61

S
T
Safety approvals, A-4
Safety inf or mat ion for UK, 4
Safety instru c tio n s, 2–3
Scanne r sp ec ific atio n s, A- 2–6
Scanning,
normal documents, 2-4–6
thick or large documen t , 2-6
specificatio n s, A- 2–3
Screw
removing , 1-3
shipping, 3-3
SCSI
board, 1-6
cable, 2, 1-7
connec t ion s, 1-6, 1-10
device , 1- 10
terminat or , 1- 7–9
SCSI ID
number, 1-7–8
rotary switch, 1-7–8
port, 1-6, 1-11
power-on sequence, 1-11
power-off sequenc e, 1-12
SCSI interf ac e, 1-6–8, 14
specificatio ns, A- 4
Space for th e sc an n er, 1-2
Specifications
electrical, A-3
environmental, A-4
safety app r oval, A-4
scanning, A-2–3
SCSI interf ac e, A-5
Storage hole, 1-3
Switch
rotary, 1-7
terminat or , 1- 8–9
Tabl e , docu men t, 2-5
Terminat or , 1- 7–9
switch, 1-8–9
TET, 1
Text Enhancement Technology
(TET), 1
Thick document, 2-6
Transp or tation sc re w, 1-3, 3-3
Tran sporting , 3- 3
Troubleshooting, 3-4
V
Video c ar d , 2-8
Index
IN-3
Page 62

IN-4
Index
Page 63

EPSON OVERSEAS MARKETING LOCATIONS
EPSON AMERICA, INC.
20770 Madrona Ave.
P.O. Box 2842
Torrance, CA 90509-2842
Phone: (800) 922-8911
Fax: (310) 782-5220
EPSON DEUTSCHLAND GmbH
Zülpicher Straße 6,
40549 Düsseldorf Germany
Phone: (0211) 56030
Telex: 8584786
EPSON AUSTRALIA PTY. LTD.
70 GIBBES STREET, CHATSWOOD 2067 NSW.
Phone: 2-9903-9000
Fax: 2-9903-9177
EPSON HONG KONG LTD.
Rooms 4706-10, 47/F,
China Resources Bldg.,
26 Harbour Road, Wanchai, Hong Kong
Phone: 2585-4300
Fax: 2827-7083
EPSON UK LTD.
Campus 100, Maylands Avenue,
Hemel Hempstead, Herts,
HP2 7TJ, U.K.
Phone: (+44) 01442 61144
Fax: (+44) 01442 227227
EPSON FRANCE S.A.
68 bis, rue Marjolin
92300, Levallois-Perret, France
Phone: 33.1.40.87.37.37
Telex: 610657
EPSON SINGAPORE PTE. LTD.
No. 1 Temasek Avenue #36-00
Millenia Tower, Singapore 039192
Phone: (065) 33 77 911
Fax: (065) 33 41 185
EPSON TAIWAN TECHNOLOGY &
TRADING LTD.
10F, No. 287 Nanking E. Road, Sec. 3,
Taipei, Taiwan, R.O.C.
Phone: (02) 717-7360
Fax: (02) 712-9164
EPSON ITALIA S.p.A.
V.le F.lli Casiraghi 427
20099 Sesto S.Giovanni
MI, Italy
Phone: 2-262331
Fax: 2-2440750
SEIKO EPSON CORPORATION
(Hirooka Office)
80 Harashinden, Hirooka
Shiojiri-shi, Nagano-ken
399-07 Japan
EPSON IBERICA S.A.
Av. de Roma, 18-26
08290 Cerdanyola del Valles
Barcelona, Spain
Phone: 582. 15.00
Fax: 582. 15.55
EPSON PORTUGAL, S.A.
R. do Progresso, 471, 1º Perafita
4460 Matosinhos, Portugal
Phone: (02) 996 14 02
Fax: (02) 996 14 11
1996 October
Page 64

 Loading...