

Page 1
Page 2
Page 3

All rights reserved. No part of this publication may be reproduced, stored in a retrieval system,
or transmitted in any form or by any means, electronic, mechanical, photocopying, recording,
or otherwise, without the prior written permission of Seiko Epson Corporation. No patent
liability is assumed with respect to the use of the information contained herein. Neither is any
liability assumed for damages resulting from the use of the information contained herein.
Neither Seiko Epson Corporation nor its affiliates shah be liable to the purchaser of this
product or third parties for damages, losses, costs, or expenses incurred by purchaser or third
parties as a result of: accident, misuse, or abuse of this product or unauthorized modifications,
repairs, or alterations to this product, or (excluding the U.S.) failure to strictly comply with
Seiko Epson Corporation’s operating and maintenance instructions.
Seiko Epson Corporation shall not be liable against any damages or problems arising from the
use of any options or any consumable products other than those designated as Original EPSON
Products or EPSON Approved Products by Seiko Epson Corporation.
EPSON is a registered trademark of Seiko Epson Corporation.
EPSON Connection is a service mark of Epson America, Inc.
General Notice: Other product names used herein are for identification purposes only and may
be trademarks of their respective owners. EPSON disclaims any and all rights in those marks.
ii
Copyright © 1995 by Epson America, Inc.
Torrance, California, USA
4003816-01
3/24/95
Page 4
Introduction
vii
Getting the Most Out of Your Projector
Optional Accessories
About This Manual
Safety Instructions
Where to Get Help
CompuServe online support
1 Installation
Unpacking the Projector
Additional components
Setting Up the Projector
Connecting to a Computer
Connecting to a PC desktop computer
Connecting to a PC laptop computer
Contents
viii
X
Xi
Xii
xiv
xv
1
2
3
4
6
7
8
111
Page 5

Connecting to a desktop Macintosh
Connecting to a PowerBook
Connecting to a Video Source
Connecting to an Audio Source
Connecting to an External Speaker or PA System
Setting Up Serial Communication
Connecting the serial cable
Installing the software
Connecting the Remote Control with the Lead Wire
9
10
11
13
14
15
15
16
17
2 Using the Projector
Turning the Equipment On and Off
Focusing
and
Positioning the Screen Image
Controlling the Projector
Adjusting the settings from ELP Link
Monitoring the Projector
Using Rear Projection
3 Using the Menus
Accessing the Menus
Changing menu settings
Accessing ELP Link menus
Restoring the default settings
Menu Settings
Computer menu
iv
Contents
19
20
21
23
26
27
28
29
30
31
32
33
33
34
Page 6

Video menu
Display menu
Audio menu
Options menu
Custom menu
36
37
39
40
41
4
Remote Control of the Computer
ELP Remote Programmer Templates
Starting the ELP Remote Programmer
Assigning a Macro to a Programmable Button
Using record mode
Using manual mode
Activating a Template
ELP Remote Programmer Menus
5 Maintenance
Cleaning the Lens
Cleaning the Projector Case
Cleaning the Air Filter
Cleaning the Trackball
Replacing the Lamp
Replacing the Fuse
43
44
45
48
49
51
51
52
53
54
54
54
56
58
61
Contents
V
Page 7

6 Troubleshooting
63
Problems with the Projector
Problems with the Image or Sound
Problems with the Remote Control
A Technical Specifications
General
optical
Projector Lamp
Mechanical
Electrical
Environmental
Supported Monitor Displays
Pin Assignments
Glossary
Index
64
67
70
73
73
74
74
74
75
75
76
77
79
83
vi
Contents
Page 8
Introduction
he
compact, lightweight EPSON” ELP-3000 Projector allows you to project
T
computer images and video onto a large screen for full-color presentations. The
projector can connect simultaneously to two image sources; one can be your PC
or Apple” Macintosh’ computer and the other can be a video source, such as a
VCR, camcorder, digital camera, or laser disk player. Audio can be supplied with
one or both image sources.
Images are displayed in up to 16 million colors at a resolution of 640 x 480
pixels. The projector’s 250-lumen bulb produces bright images that can be easily
seen in rooms light enough to take notes. You can play audio on the projector’s
internal speakers or route it to an external speaker for amplification. You control
the projector through a hand-held remote control, which allows you to switch
between image sources and make adjustments to the projected image.
The projector supports any computer capable of VGA output, including IBM
compatible PCs and laptops and Apple Macintosh computers, including the
PowerBook™ and Power Macintosh.” The video source can be NTSC, PAL,
and SECAM in composite video or S-Video format.
®
-
vii
Page 9

Getting the Most Out of Your Projector
The projector comes with a full set of features that allow you to control the
settings for the image display, video, and audio. To get the most out of your
projector, read this section for a quick summary of the important features.
Remote control
The buttons on the remote control allow you to directly change the volume,
control the brightness, or switch from one image source to the other. Additional
adjustments can be made by using the buttons on the remote control to access
the projector’s menu system.
The menus, which you can superimpose on the projector image or display on
your computer screen, allow you to do the following:
l
Control the brightness, contrast, sharpness, color, and position of the image.
l
Adjust the volume, balance, treble, and bass settings.
l
Adjust the display by rotating or inverting it.
viii
Additional settings are described in Chapter 3.
You can also use the remote control to control your computer if you install the
Serial Communication Kit.
Introduction
Page 10

Serial Communication Kit
The Serial Communication Kit allows your computer and projector to communicate over an RS-232C connection. The kit includes an RS-232C serial cable and
two software utilities: ELP Link and ELP Remote Programmer.
ELP Link allows you to make adjustments to the projector from your computer.
l
The same controls that are available on your remote control, including the
ability to access the projector menus, are available from the main ELP Link
screen.
The ELP Remote Programmer allows you to use the remote control to control
l
your computer. The trackball moves the mouse on your computer monitor, and
five buttons on the remote control can be programmed to drag or click
windows and icons or perform the same functions as keys on your keyboard.
For information on using ELP Link, see Chapters 2 and 3. For information on the
ELP Remote Programmer, see Chapter 4.
Standby mode
Standby mode conserves electricity by automatically turning off the lamp if the
projector has not been used for a specified period of time (the default is
10
minutes). In standby mode, the projector remains on but the lamp is turned
off. This conserves electricity, cools the projector, and extends the life of the lamp.
Use the Standby button on the remote control to turn standby mode on or off.
Getting the Most Out of Your Projector
ix
Page 11

Rear projection
If you have a translucent screen, you can set up the projector for rear projection,
in which the projector sits behind the screen. To use the remote control with rear
projection, you need to purchase the optional lead wire and connect the remote
control directly to your computer.
Optional Accessories
To enhance your use of the projector, EPSON provides the following accessories:
l
Polarized screens designed specifically for use with the projector. They allow
you to project images in a bright, illuminated room, making it unnecessary to
dim lights to view the projected image. The polarized screen comes in two
sizes: 40” and 60” diagonal.
l
Carrying cases especially designed for the projector and its cables. Both a soft
and hard case are available.
l
Remote control lead wire, which allows you to directly connect the remote
control to the projector. This option enables you to use the remote control
when an object is blocking the path between the remote control and projector,
such as during rear projection when the screen is between the remote control
and the projector.
You can purchase these accessories from your ELP-3000 dealer or by calling
EPSON Accessories at (800) 873-7766.
X
Introduction
Page 12

About This Manual
Chapter 1, “Installation,” gives step-by-step instructions on setting up the
projector and connecting it to your computer, video source, and optional other
equipment. Read the installation procedures that apply to your environment.
Chapter 2, “Using the Projector,” tells you how to turn on the projector; control
simple projector settings using the remote control, the operation panel, and the
ELP Link software; and set up the projector for rear projection.
Chapter 3, “Using the Menus,” describes how to use the menus to adjust the color
and image settings, change the display of the projected image, and modify audio
settings such as bass or treble.
Chapter
Remote Programmer so you can use the remote control to control your computer. It also describes how you can assign keyboard macros to the programmable buttons on the remote control.
Chapter 5, “Maintenance,” describes how to maintain the projector in good
working order.
Chapter
lights and gives helpful information for avoiding errors, optimizing image quality,
and solving problems.
Appendix A provides technical specifications.
4,
“Remote Control of the Computer,” explains how to use the ELP
6,
“Troubleshooting,” tells you how to interpret the projector’s status
About This Manual
xi
Page 13

Safety Instructions
Follow these safety instructions when setting up and using the projector:
1.
Do not place the projector on an unstable cart, stand, or table.
2.
Do not use the projector near water or sources of heat.
3.
Use attachments only as recommended.
4.
Use the type of power source indicated on the projector. If you are not sure
of the type of power available, consult your dealer or local power company,
Insert the projector’s three-wire grounding-type plug into a properly
5.
grounded outlet. If you have a two-prong outlet, contact an electrician to
replace it.
6.
Do not overload wall outlets, extension cords, or integral convenience
receptacles. This can cause fire or electric shock.
7.
Do not place the projector where the cord can be walked on.
8.
Unplug the projector from the wall outlet before cleaning. Use a damp cloth
for cleaning. Do not use liquid or aerosol cleaners.
xii
9.
Do not block the slots and openings in the projector case. They provide
ventilation and prevent the projector from overheating. Do not put the
projector on a sofa, rug, or other soft surface or in a built-in installation
unless proper ventilation is provided.
Introduction
Page 14

10. Never push objects of any kind through cabinet slots. Never spill liquid of any
kind in the projector.
11. Except as specifically explained in this Owner’s Manual, do not attempt to
service this product yourself. Opening or removing covers may expose you to
dangerous voltages and other hazards. Refer all servicing to qualified service
personnel.
12. Unplug the projector during lightning storms or when it will not be used for
extended periods.
13. Unplug the projector from the wall outlet and refer servicing to qualified
service personnel under the following conditions:
A.
When the power cord or plug is damaged or frayed.
B.
If liquid has been spilled into it or it has been exposed to rain or water.
C.
If it does not operate normally when the operating instructions are
followed or if it exhibits a distinct change in performance, indicating a
need for service.
D.
If it has been dropped or the cabinet has been damaged.
Safety Instructions
Xiii
Page 15

Where to Get Help
Epson America provides local customer support and service through a nationwide
network of authorized EPSON dealers and Service Centers.
EPSON also provides the following support services through the EPSON
Connection.
l
l
SM
In the U.S., call (800)
922-8911; in Canada, call (800) GO-EPSON.
Assistance in locating your nearest Authorized EPSON Reseller or Service Center
Technical assistance with the installation, configuration, and operation of
EPSON products
l
EPSON Technical information library fax service
l
Product literature with technical specifications on EPSON’s current and new
products
l
Customer Relations.
You can purchase supplies, parts, documentation, and accessories by calling
EPSON Accessories at (800) 873-7766 (U.S. sales only). In Canada, call
(800) CO-EPSON for sales locations.
When you call for technical assistance, be ready to identify your system and its
configuration.
If you need help with any software application program you are using, see the
documentation that came with that program for technical support.
xiv
Introduction
Page 16

CompuServe® online support
The fastest way to access helpful tips, specifications, drivers, application notes,
and bulletins is through the Epson America Forum on CompuServe,
If you are already a CompuServe member, simply type GO EPSON at the menu
prompt to reach the Epson America Forum.
If you are not currently a member of CompuServe, you are eligible for a free
introductory membership as an owner of an EPSON product. This membership
entitles you to:
An introductory $15 credit on CompuServe
l
Your own user ID and password
l
A complimentary subscription to
l
Compuserver Magazine,
CompuServe’s
monthly publication.
To take advantage of this offer, call (800) 848-8199 in the United States and
Canadaand ask for representative #529. In other countries, call (614) 529-1611
or your local CompuServe access number.
Where to Get Help
xv
Page 17

Remote control information
The ELP-3000 allows you operate it by remote control bia infrared(IR) receivers
located at the front and back of projector. The projector may not respond to
remote control commands under the following conditions :
l The ambient room light is too bright
l Certain types of fluorescent lighting are used
l A strong light sourse shines into either IR receiver
l
Other equipment that emits infrared energy, such as a radiant room heater,
is in the room.
These conditions commonly cause problems for most infrared-controlled
equipment.
Try the following solutions :
l The remote control unit’s batteries may be low on power, replace the batteries.
l Dim the ambient lighting and/or Dim off any fluorescent lights.
l Close any window coverings and/or move the projector out of direct sunlight.
l Turn off other equipment that emits infrared energy.
If the remote control still does not work properly, cover the unused IR receiver
on the projector with light-blocking material, such as masking tape.
Remember, you can always control your computer-based presentation directly
from the computer, even in an environment containing one of the conditions
listed above.
xvi
README File Information
The diskettes that came with your projector include README files that contain
additional important information about the projector. Be sure to read these
files.
introduction
Page 18
Installation
his chapter describes how to unpack, set up, and connect your projector to
T
other equipment. You must connect the projector to your computer or to a video
source such as a VCR, camcorder, digital camera, or laser disk player. Connecting
to other equipment is optional. For example, you may want to connect the projector to both your computer and video source, or set up the projector for one or
more of the following:
l
Provide audio for one or both image sources. The audio source can be the
computer, video source, or another device such as a stereo.
l
Connect to an external speaker or PA system to amplify the audio.
l
Install the
between your computer and the projector so you can use the remote control to
control your computer and use your computer to control the projector settings.
l
Directly connect the remote control and the projector using the optional lead
wire. You need to do this to use the remote control for rear projection.
RS-232C Serial
Communication Kit. This kit enables communication
1
Page 19

Unpacking the Projector
After you unpack the projector, make sure you have all these components:
l Projector
l Remote control
l 2 AA batteries
l Power cord
l Y-shaped VGA cable
l
2 Macintosh adapters (labeled VGA and MONITOR)
l Lens cover
l Video/audio cable
l
RS-232C serial communication kit, which consists of an RS-232C serial cable,
an RS-232C adapter for the Macintosh, and two diskettes (one for the
Macintosh, and one for the PC)
l Sparefuse.
Depending on your configuration, you may not need all of these components.
Save all packaging materials in case you need to ship the projector in the future. It
should always be transported in its original packaging or the equivalent.
2
1 l Installation
Page 20

Additional components
Depending on how you plan to use the projector, you may need to obtain
additional components:
l
To receive audio from both the computer and video source, you need a second
video/audio cable. See your computer dealer to obtain one.
l
To receive an S-Video signal, you need au S-Video cable. One is usually
provided with your video device.
l
For a Macintosh PowerBook, you need a video-out cable. One is provided for
ah new PowerBooks that have video-out capability. If your PowerBook does
not include one, see your Macintosh dealer.
l
To connect the projector to external speakers, you need an RCA-to-3.5mm
audio cable. You can obtain one from your computer dealer.
l
If your PC has a 25-pin RS-232C port, you need a 25-pin to 9-pin converter.
You can obtain one from your computer dealer.
Unpacking the Projector
3
Page 21

Setting Up the Projector
1.
Place the projector on a sturdy, level surface within five feet of the computer
or video source.
Caution: Do not bold the projector by the lens when you move it. This
wiU damage the lens.
2.
Place the projector the proper distance from the screen.
The distance between the projector and the screen determines the actual
image size. Use the following general guidelines to determine the proper
distance.
Image size
Maximum Zoom Minimum Zoom
300 inches (25
204 inches
96 inches 69 inches
60 inches 42 inches
30 inches 21 inches
3.
Turn the projector so the lens is at a right angle to the screen. If the projector
(diagonal)
feet)
214
inches (30 feet)
146 inches
Distance from screen
(approximate)
40 feet
27 feet
13 feet
6 feet
4 feet
is not at a right angle, the screen image will be crooked.
4
1
l Installation
Page 22
4.
Connect one
end of the power cord to the projector’s power connector.
Connect the other end to a grounded electrical outlet.
If the projector comes on, turn it off using the power switch at the back of
the projector.
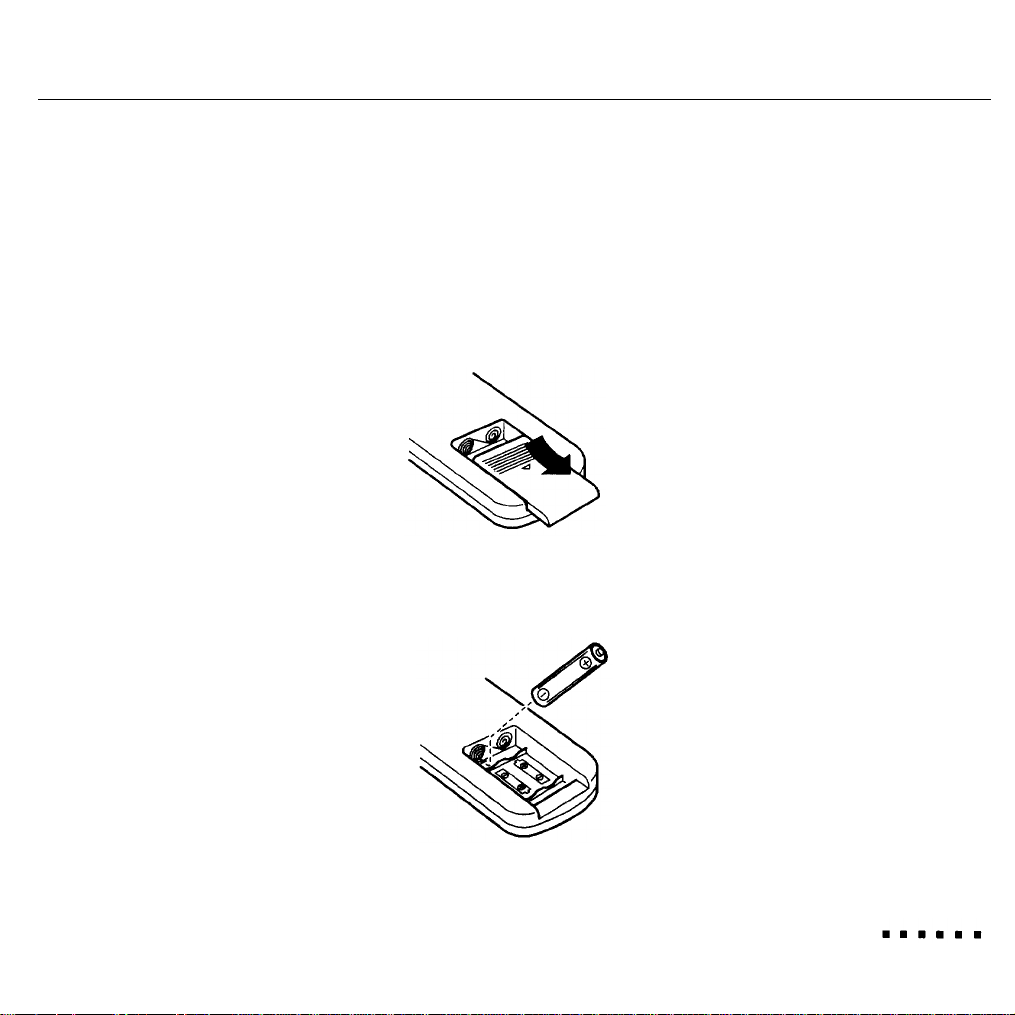
5.
To insert the batteries in the remote control, slide off the battery compartment cover as shown here.
6.
Insert the two AA batteries included with the projector. Make sure the
polarity of the batteries is correct.
7.
Replace the battery compartment cover.
Setting Up the Projector
5
Page 23

When replacing batteries, take the following precautions:
l
Do not mix old and new batteries.
l
Replace batteries as soon as they run out. If the batteries leak, wipe away the
fluid with a soft cloth. If battery fluid gets on your hands, wash immediately.
l
Remove batteries if you will not be using the projector for long periods.
l
Because batteries are hazardous waste, always dispose of them with nonburnable trash. Whenever possible, recycle used batteries.
Connecting to a Computer
You can connect the projector to any computer capable of VGA output, including:
l
IBM desktop PC or compatible
l IBM laptop or compatible
l
Apple Macintosh desktop computer, including Macintosh Quadra
®
Macintosh
Centris,® and Power Macintosh
l
Any Apple PowerBook with video-out capability. This includes all 160, 165,
180, and 500 series PowerBooks.
See the following section that applies to your computer.
6
1 l installation
Page 24
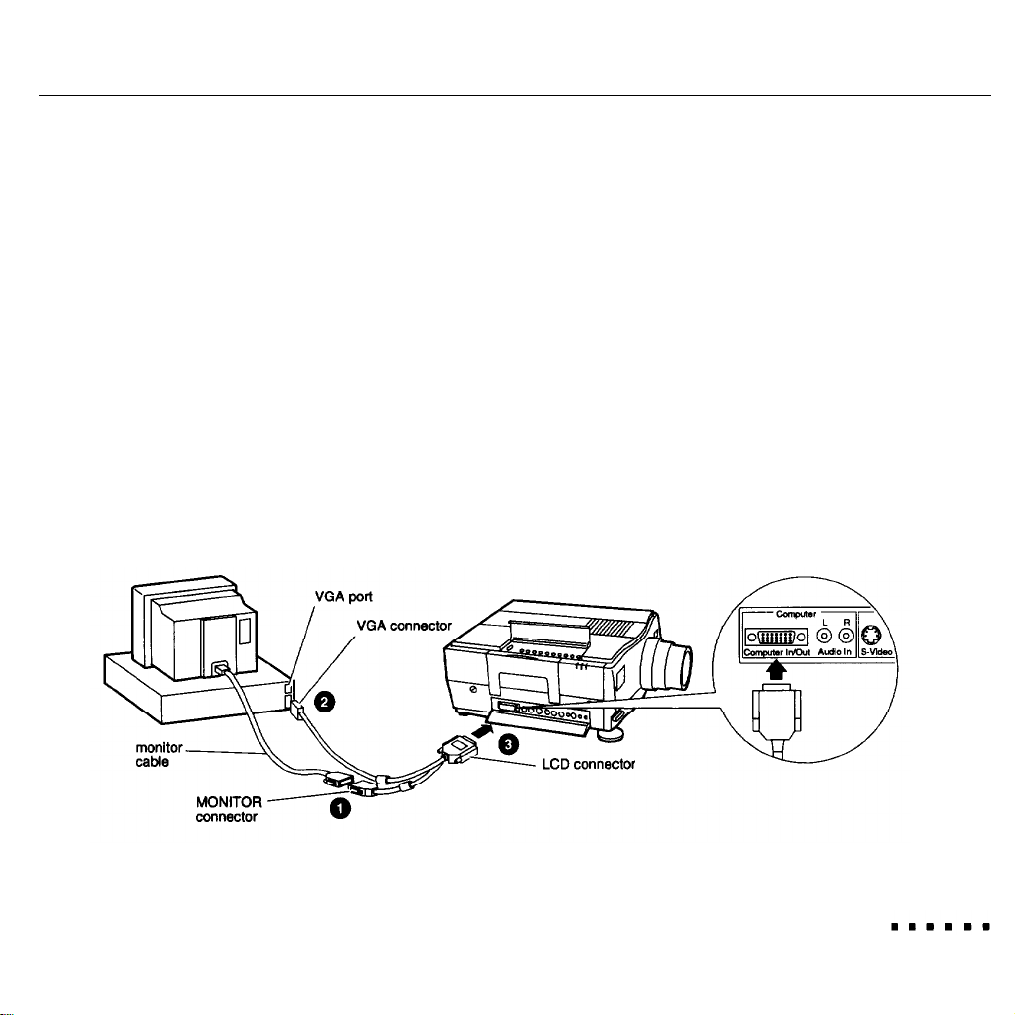
Connecting to a PC desktop computer
Before beginning, turn off the projector and computer if they are on. To access
the connectors on the projector, push open the coyer located on the right side
of the projector, under the handle.
1.
Disconnect the computer’s monitor cable from the VGA port on the back of
your computer and connect it to the MONITOR connector of the Y-cable.
2. Connect the Y-cable’s VGA connector to the computer’s VGA port.
3.
Connect the Y-cable’s LCD connector to the projector’s Computer IN/OUT
port.
4.
Tighten the screws for all connectors to make sure they are fastened securely.
Connecting to a Computer
7
Page 25
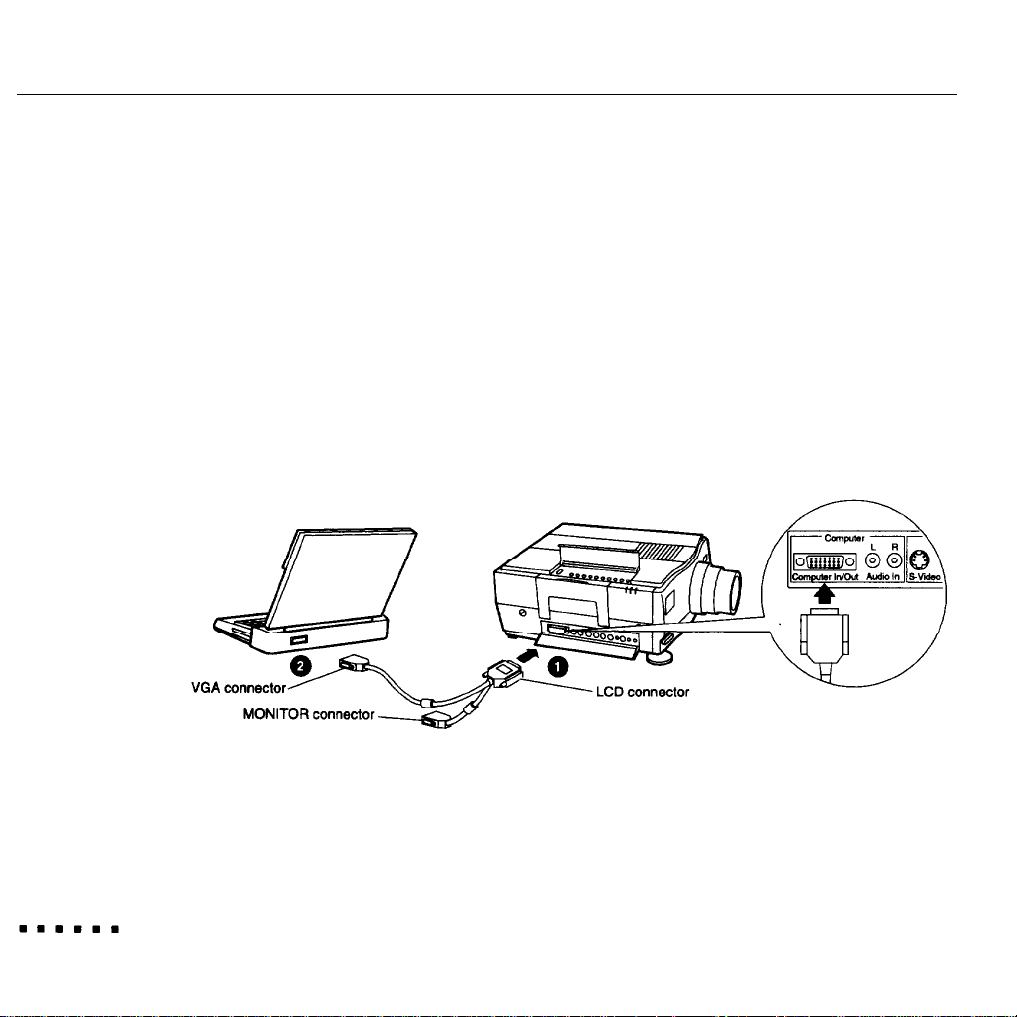
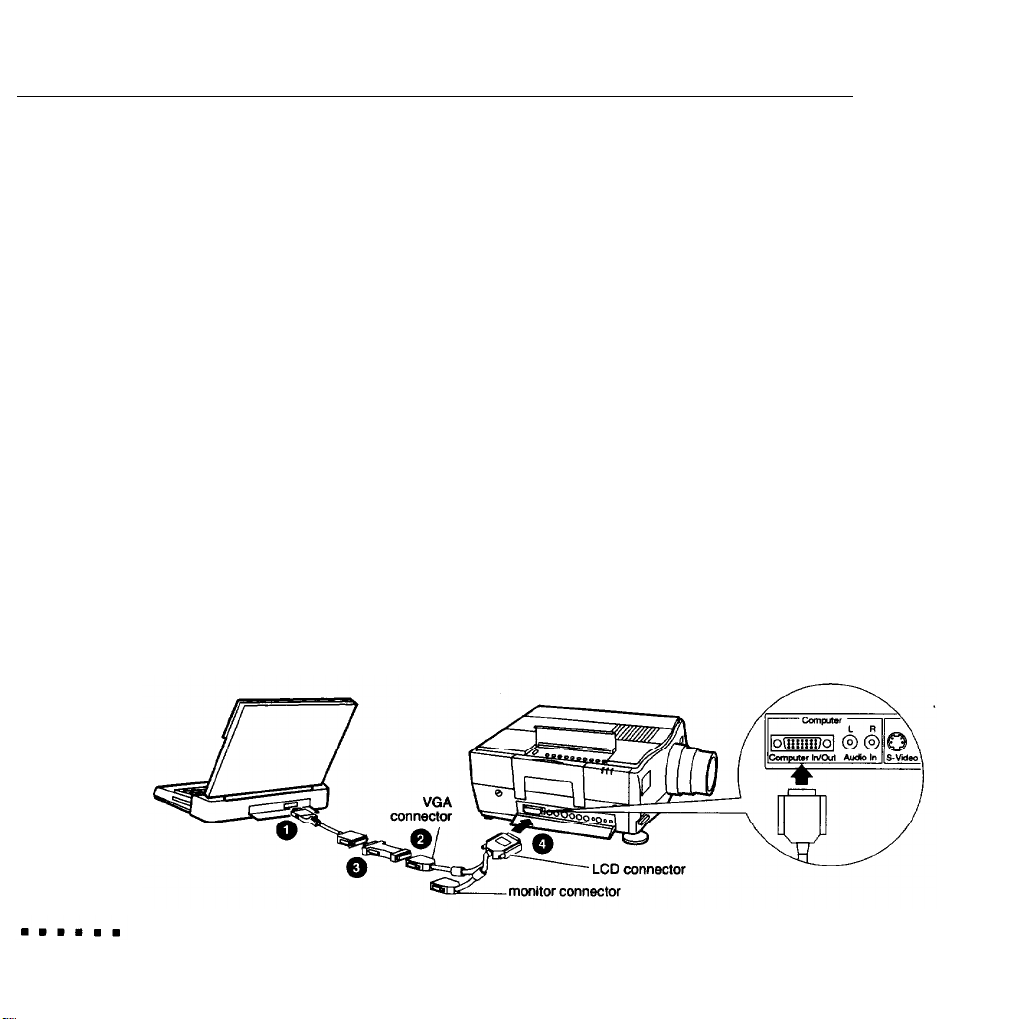
Connecting to a PC laptop computer
Before beginning, turn off the projector and computer if they are on. To access
the connectors on the projector, push open the cover located on the right side of
the projector, under the handle.
1.
Connect the LCD connector on the Y-cable to the projector’s Computer
IN/OUT port.
2.
Connect the VGA connector on the Y-cable to the laptop’s monitor port.
3.
Tighten the screws for all connectors to make sure they are fastened securely.
When the external graphics port is activated, some laptop computers
automatically turn off their internal display See your computer manual for
information on using the internal display,
8
1 l Installation
Page 26
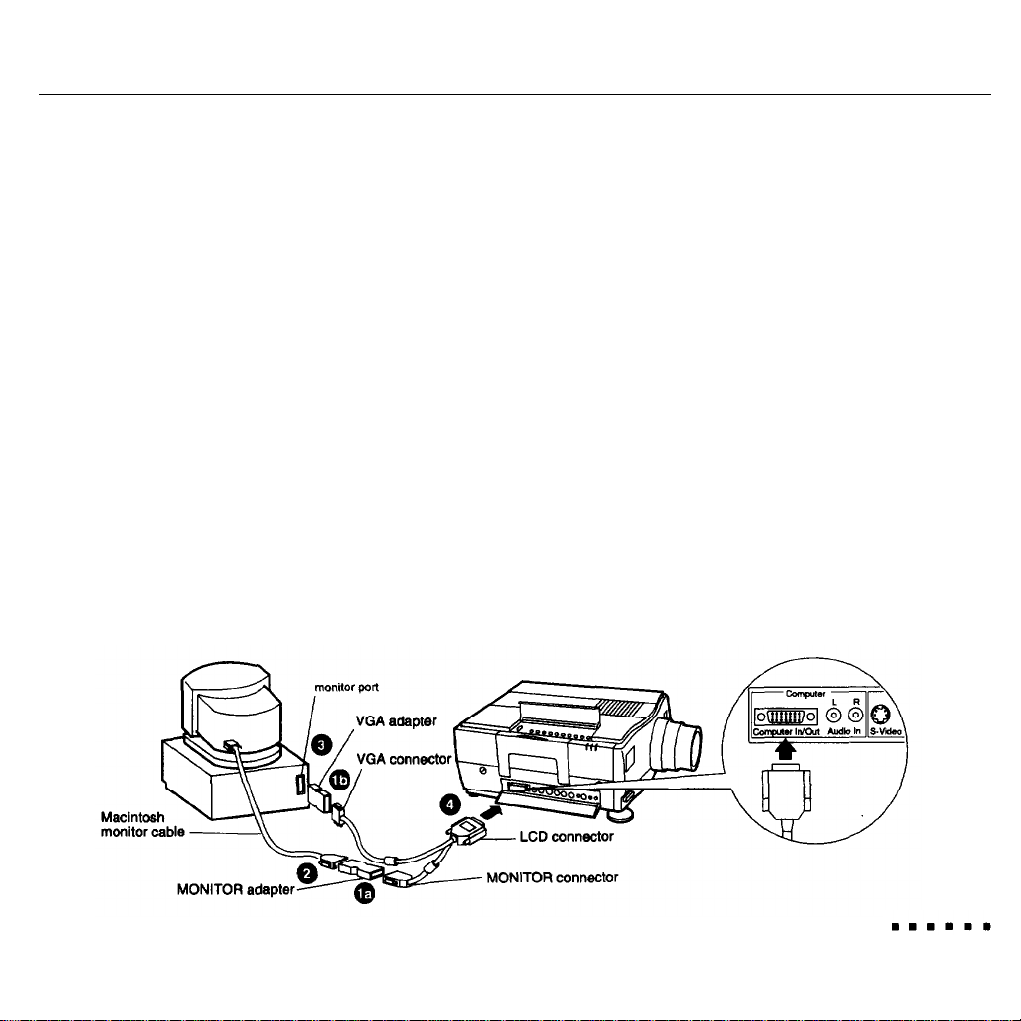
Connecting to a desktop Macintosh
Before beginning, turn off the projector and Macintosh if they are on. To access the
connectors on the projector, push open the cover located on the right side of the
projector, under the handle.
1.
Attach the Macintosh adapters provided with the projector to the appropriate
connectors
connector (la), and connect the VGA adapter to the VGA connector (1b).
2.
Disconnect the monitor cable from the monitor port on the back of the
Macintosh and
3.
Connect the VGA adapter (attached to the Y-cable) to the Macintosh’s monitor
port.
4.
Connect the Y-cable’s LCD connector to the projector’s Computer IN/OUT port.
5.
Tighten the screws for all connectors to make sure they are fastened securely.
on the Y-cable. Connect the MONITOR adapter to the MONITOR
connect
it to the MONITOR Macintosh adapter.
Connecting to a Computer
9
Page 27
Connecting to a PowerBook
Your PowerBook must have a video-out capability, See page 6 for more information.
Before beginning, turn off the projector and computer if they are on. To access the
connectors on the projector, push open the cover located on the right side of the
projector, under the handle.
1.
Attach the video-out cable supplied with your PowerBook to the video-out
connector on the back of the PowerBook.
2.
Attach the Macintosh VGA adapter to the VGA connector of the Y-cable.
3.
Connect the VGA Macintosh adapter to the video-out cable.
4.
Connect the Y-cable’s LCD connector to the projector’s Computer IN/OUT port.
5.
Tighten the screws for all connectors to make sure they are fastened securely.
6.
In the PowerBook’s Display Control Panel, select Mirroring.
10
1 l Installation
Page 28

Connecting to a Video Source
The projector can receive composite video or S-Video. You have composite video
if your video source has a one-pm RCA video jack. You have S-Video if your video
source has a four-pin video jack.
Note: The projector is not compatible with a cable TV-style F connector
You can connect to both an S-Video and a composite video source at the same
time. However, the projector automatically selects the S-Video source. To display
composite video, you need to disconnect the S-Video source.
The projector supports NTSC, PAL, and SECAM video formats. By default, it
automatically detects and identifies the video format. However, you can specify
that a single broadcast format be detected. (See “Video menu” in Chapter 3.)
Note that the projector will then be able to detect only one type of video signal.
The type of cable you use to connect the video source to the projector depends
on whether you have composite video or S-Video. For composite video, use the
video/audio cable supplied with the projector. For S-Video, use the S-Video cable
supplied with your video device or obtain one from your computer dealer.
To connect a video source to the projector:
1.
Turn off the projector and video source if they are on.
2.
Locate the video-out jack on the video source. It may be labeled Video Out,
To Monitor, or something similar.
Connecting to a Video Source
11
Page 29
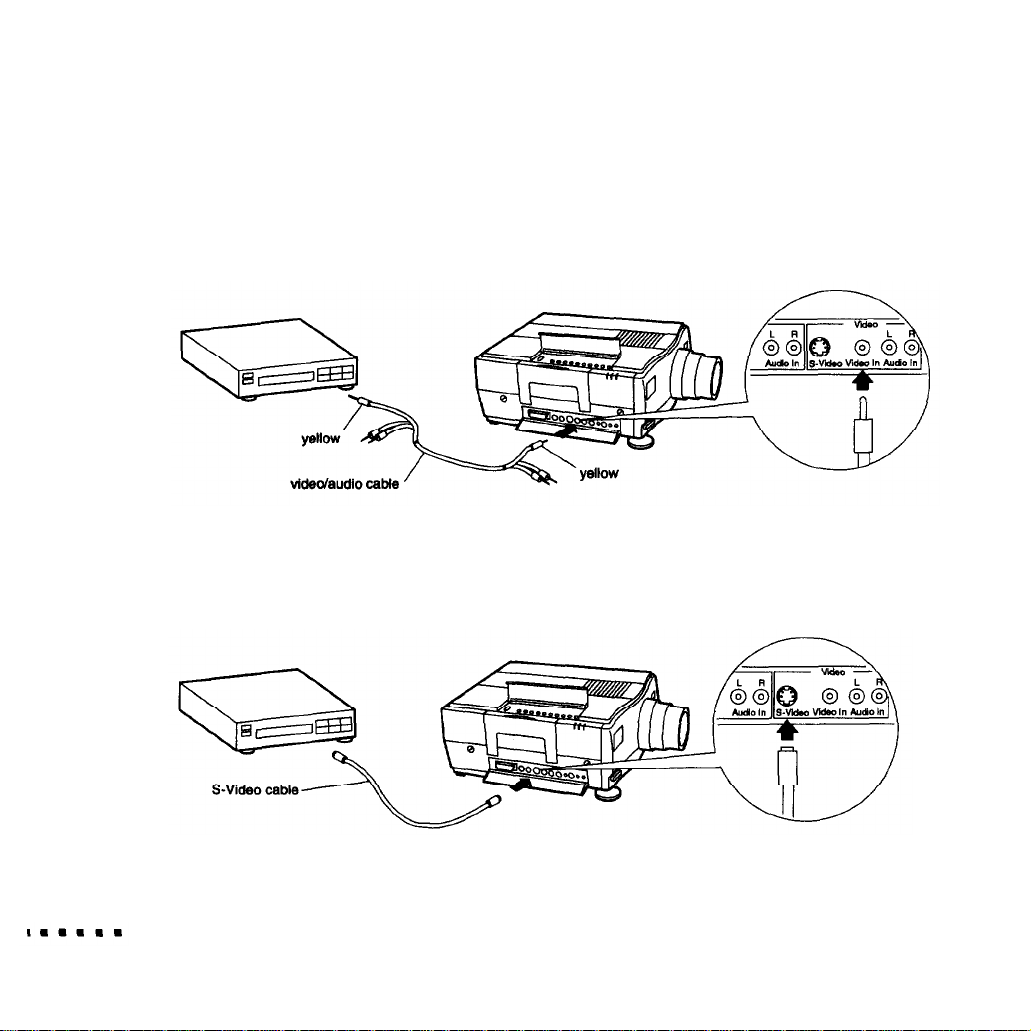
For composite video, connect the yellow RCA plug on one end of the video/audio
cable to the projector’s Video In jack. Connect the other yellow RCA plug to the
video-out jack of the video source. (The red and white plugs carry audio. For
information about audio, see page 13.)
For S-Video, insert one end of the S-Video cable into the projector’s S-Video jack.
Insert the other end to the video-out jack of your video source.
12
1 l Installation
Page 30
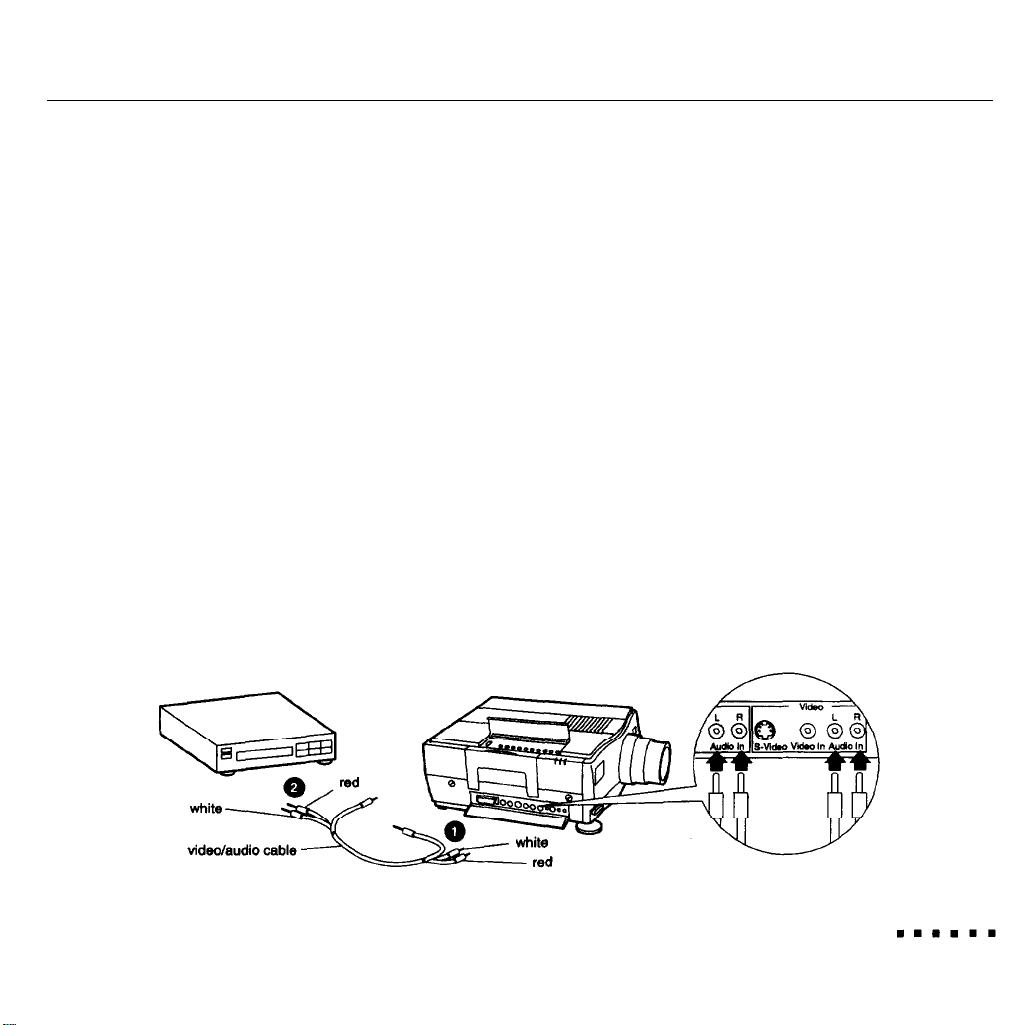
Connecting to an Audio Source
The projector has two inputs for audio: one for your computer and one for your
video source. Each input has two audio jacks: the L jack controls the left speaker
and the R jack controls the right speaker. If you’re connecting to an audio
source that has only a single plug, connect it to the L Audio In jack.
To receive audio from the computer or video source, use the video/audio cable
supplied with the projector. To receive audio from both the computer and video
source, you need to obtain an additional cable from your computer dealer.
Connect one end of the audio cable to the appropriate (computer or video
1.
source) Audio In jacks on the projector. Insert the white plug in the L Audio
In jack and the red plug in the R Audio In jack. (You don’t use the yellow
plug unless you’re supplying composite video.)
Connect the other end of the cable to the audio source. Insert the white plug
2.
in the L Audio Out jack, and the red plug in the R Audio Out jack.
Connecting to an Audio Source
13
Page 31
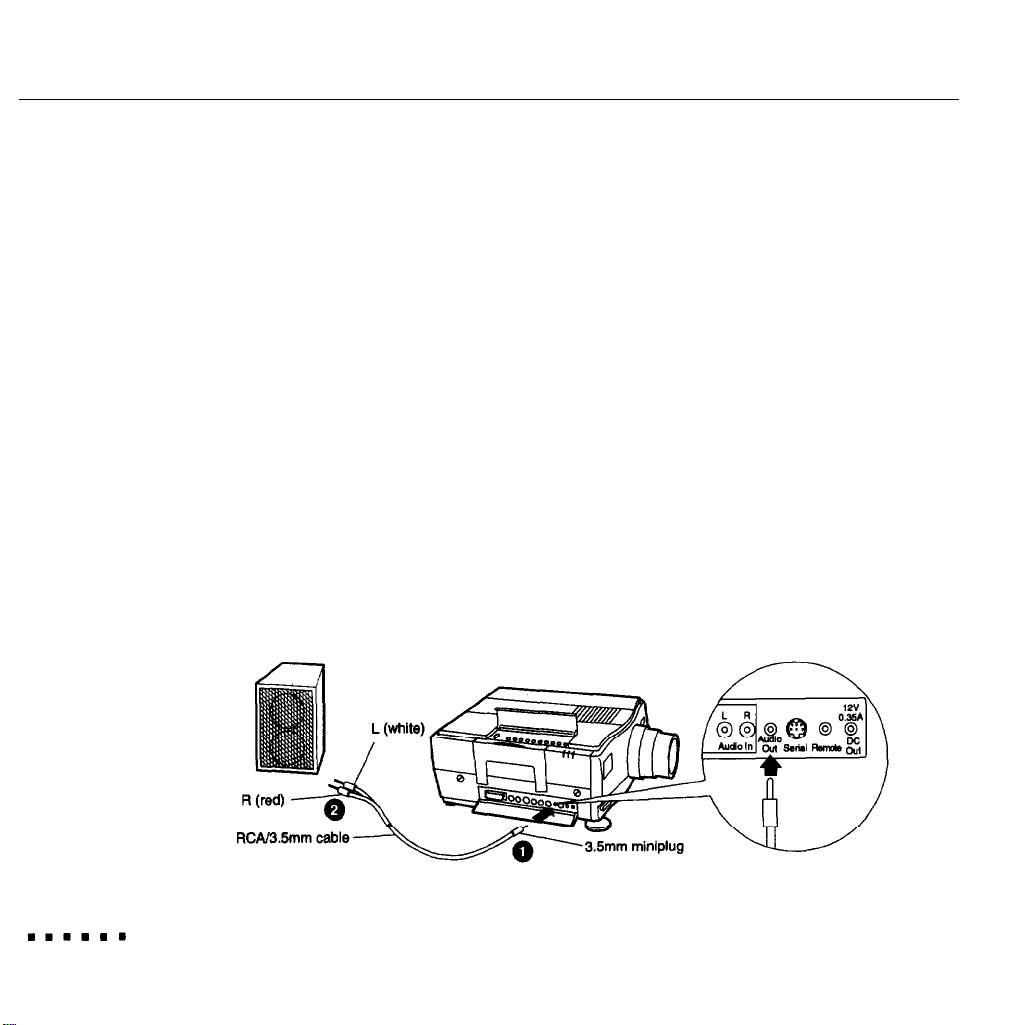
Connecting to an External Speaker or PA System
For most small-or medium-sized rooms, the projector’s internal speakers are
sufficient. If you need extra amplification for a large room, you can connect the
projector to an external amplified speaker or PA system.
To connect the projector to an external sound system, you need to obtain an RCAto-3.5mm Stereo audio cable. You can get one from your computer dealer.
Before beginning, turn off the projector and the speaker or PA system,
1.
Connect the cable’s
jack.
2.
Connect the RCA plug to the external amplified speaker or PA system. Insert
the cable’s red plug into the R side, and the white plug into the L side.
3.5mm
stereo miniplug into the projector’s Audio Out
14
You should now adjust the Fade menu setting. See page
1 l Installation
39.
Page 32

Setting Up Serial Communication
The RS-232C Serial Communication Kit allows your computer and projector
to communicate so you can access the projector menus from your computer
and use the remote control to control your computer. The kit consists of a
cable, a Macintosh adapter, and two software utilities: ELP Link and ELP
Remote Programmer.
Instructions for installing the cable and software are given in the next two
sections. For information on using ELP Link, see Chapters 2 and 3. For
information on the ELP Remote Programmer, see Chapter 4.
By default, the Serial setting in the Options menu is on to enable communication
when the Serial Communication Kit is installed. If, after installing the kit, you
cannot enable communication, make sure the Serial setting has not been turned
off. See Chapter 3 for more information about the menus.
Connecting the serial cable
To connect the serial RS-232C cable to your computer and projector:
1.
Connect one end of the serial RS-232C cable to the projector’s RS-232C
connector.
2.
If you have a Macintosh, attach the RS-232C adapter to the modem port on
the Macintosh.
Setting Up Serial Communication
15
Page 33

The modem port is identifled by the following icon:
3.
Connect the other end of the RS-232C cable to the PC’s RS-232C serial
connector or to the RS-232C adapter on your Macintosh.
The serial connector on your PC is a nine-pin male connector. It may be
labeled Serial, RS-232C, COM1, or something similar. If you have a 25-pin
serial connector, you need to obtain a 25-pin to 9-pin converter.
Installing the software
Two diskettes are provided with the kit: one for the Macintosh and one for the PC.
Use only the diskette appropriate for your platform. Each contains ELP Link and
the ELP Remote Programmer,
Before installing the software, exit any open programs. Insert the appropriate
diskette in a diskette drive. Then do the following:
16
l
Windows.™ Co to the Program Manager and choose Run from the File
menu. In the Command Line text box, type A: SETUP or B : SETUP as
appropriate. Choose OK. Then follow the onscreen instructions.
l
Macintosh Double-click on the ELP Installer icon and follow the onscreen
instructions.
1 l Installation
Page 34
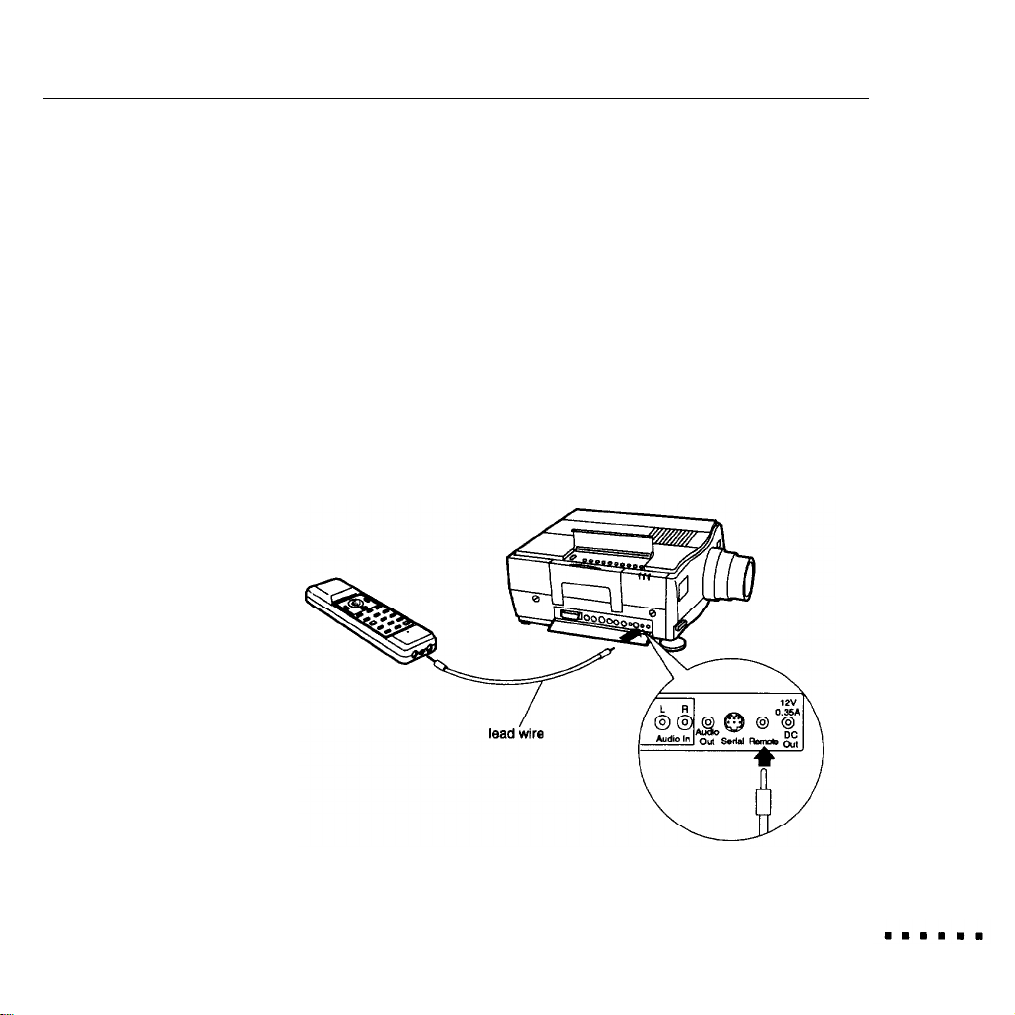
Connecting the Remote Control with the Lead Wire
If you set up the projector for rear projection and want to use the remote control
to control the projector, you need to connect the remote control directly to the
projector with the optional lead wire. You might also need to directly connect
the remote control if anything is blocking the path between the remote control
and the projector.
To directly connect the remote control, connect one end of the lead wire to the
projector’s Remote jack. Connect the other end to the output terminal at the front
end of the remote control. Make sure both ends are plugged in securely.
Connecting the Remote Control with the Lead Wire
17
Page 35
Using the Projector
his chapter provides the following information about using your projector:
T
l
Turning the equipment on and off
l
Focusing and positioning the image
l
Controlling the projector with the remote control, operation panel, and ELP
Link software
l
Monitoring the status of the projector
l Using rear projection.
19
Page 36

Turning the Equipment On and Off
Always turn on the projector and its attached equipment in the following order:
1. Monitor
2. Video source
3.
Audio source (if different than computer or video source)
4. Projector
5.
External amplified speaker or PA system
6. Computer.
The projector’s power switch is at the back When you turn on the projector, the
green power indicator comes on and the lamp begins to warm up. Remove the
lens cap. After a few seconds, an image appears on screen.
20
Warning:
Never look into the lens when the lamp is on. This can damage
your eyes. It is especially important that children not look into the lens.
If the lamp does not come on when you turn on the projector, the projector may
be in standby mode. To turn off standby mode, press the Standby button on the
remote control.
To turn off the projector and other equipment, reverse the order shown above.
After you turn off the projector, the fan may remain on a few minutes to dissipate
heat from the lamp. Always wait 10 to 60 seconds before turning the projector
back on. If you turn on the projector immediately after turning it off, the lamp
might be too hot and the projector will not turn on.
2 l Using the Projector
Page 37
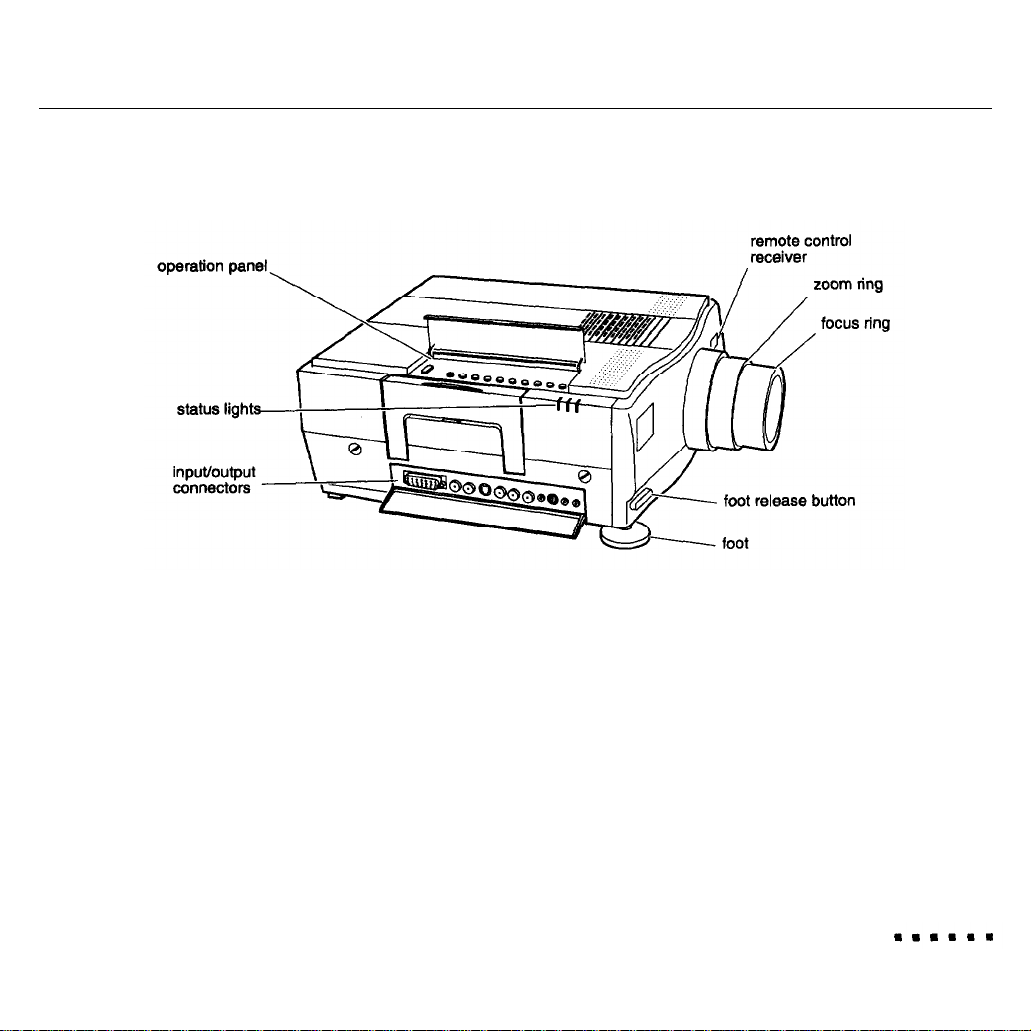
The following illustration identifies the different parts of the projector:
Focusing and Positioning the Screen Image
When an image appears on screen, check that it is in focus and correctly
positioned on the screen. To focus the image, rotate the focus ring, which is the
outside ring on the lens. To adjust the size of the image, rotate the zoom ring,
which is the inside ring. Rotate the zoom ring clockwise to make the screen
image larger or counterclockwise to make it smaller.
Focusing and Positioning the Screen Image
21
Page 38
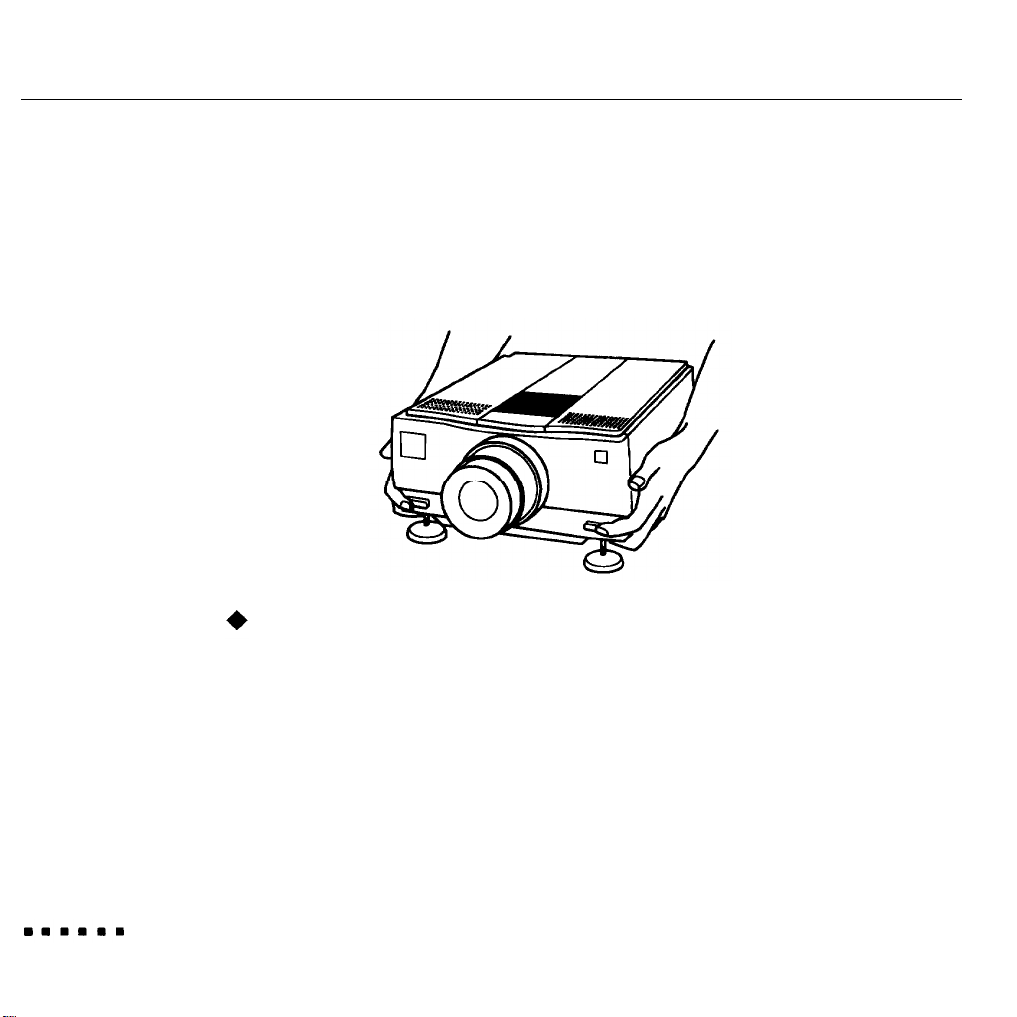
If you need to raise or lower the image on the screen, extend or retract the two
feet at the bottom of the projector as follows:
1.
Stand behind the projector and support the front of it while you press the
purple release buttons located above the feet. This unlocks the feet so they
can move up and down freely. Do not let the projector drop.
22
Caution:
2.
While pressing the release buttons, raise or lower the projector until the
Do not bold the projector by its lens. This can damage the has.
screen image is correctly positioned.
Release the buttons to lock the feet in their new position.
3.
4.
To line-tune the height of the projector, turn the feet clockwise to raise the
height or counterclockwise to lower it.
2 l Using the Projector
Page 39

Controlling the Projector
Normally you control the projector using the remote control. The buttons on the
remote control allow you to do the following:
l
Switch between the computer and video images
l
Adjust the brightness, volume, and synchronization
l
Turn standby mode on or off
l
Access the menus to adjust the image, audio, video, or display settings
(described in Chapter 3)
l
Control your computer (described in Chapter 4).
The functions of the remote control buttons are summarized on page 25.
To use the remote control, always point it toward one of the two remote control
receivers. One is located at the front of the projector; the other is located on the
back. You can use the remote control up to 33 feet
In addition to the remote control, you can control the projector by:
(10
meters) from the projector.
l
Pressing the buttons on the projector’s operation panel, located on top of the
projector. These buttons duplicate the buttons on the remote control.
l
Running the ELP Link software on your computer. This program contains
the same controls available on the remote control, including the menus.
See page 26 for more information.
Controlling the Projector
23
Page 40
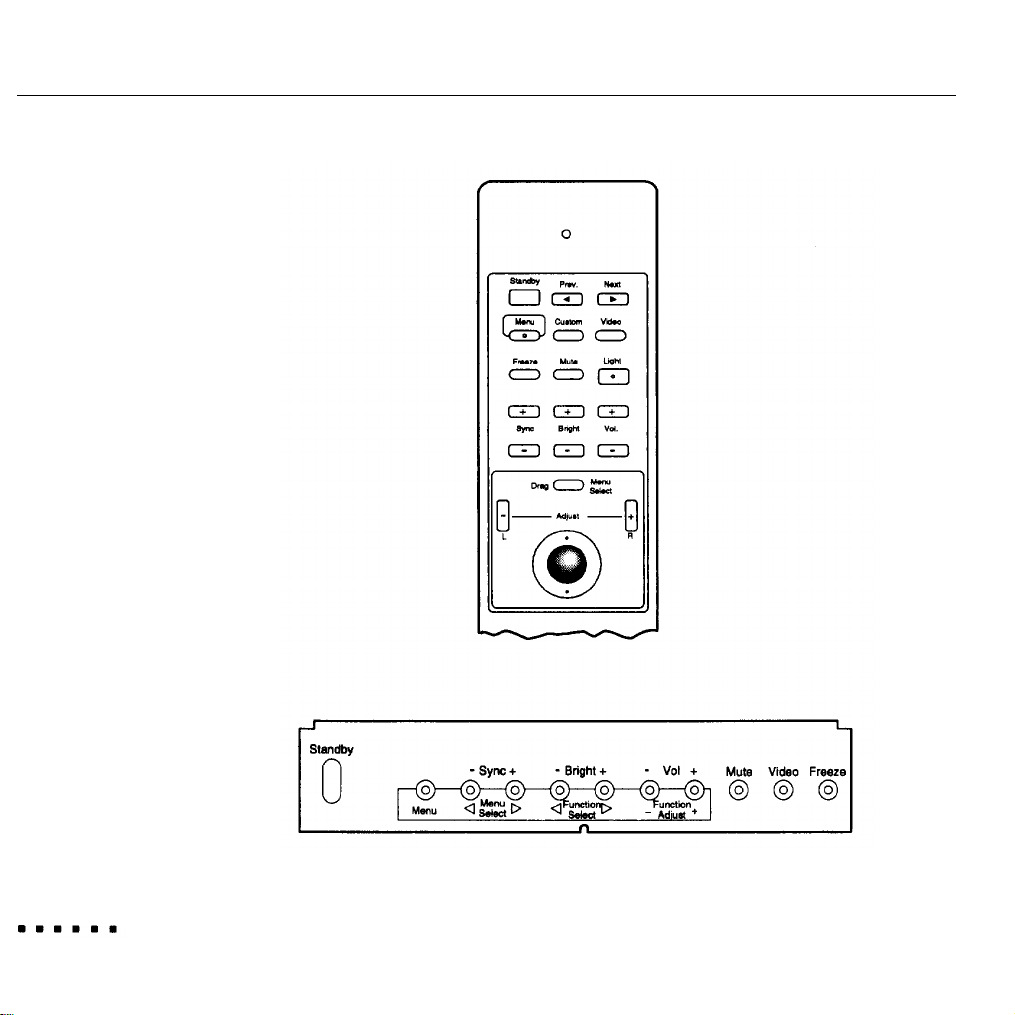
24
2. Using the Projector
Page 41

Button/component
Function
Standby
Prev, Next*
Menu
Custom
Video
Freeze
Mute
Light
Sync (+ and -)
Bright (+ and -)
Volume (+ and -)
Drag/Menu Select*
Trackball
Adjust buttons (+ and -)* Adjust the settings when using the projector menus. When no
l
Programmable to control the computer. See Chapter 4 for more information.
Turns standby mode on or off.
Control the computer (see Chapter 4).
Displays or hides the menus.
Selects one of four functions: pattern (default), serial, blank, or
prompt. See Chapter 3 to assign the function.
Switches between the computer image and video source.
Freezes or unfreezes the image.
Turns off the sound.
Illuminates buttons for 10 seconds or until you press a button
or use the trackball. Pressing again keeps the buttons on for
another 10 seconds.
Synchronize the RGB signals coming from the computer to
eliminate flickering.
Adjust the image brightness.
Adjust the volume level.
Selects a menu when the menu bar is displayed or controls
the computer (see Chapter 4).
Moves the cursor when using the projector menus, or moves
the mouse on your computer screen.
menu is displayed, these buttons control the computer.
If you do not use the remote control for
cannot be reactivated using the trackball.
15
minutes, it enters sleep mode and
Press
so you can use the trackball.
Controlling the Projector
any button to turn off sleep mode
25
Page 42
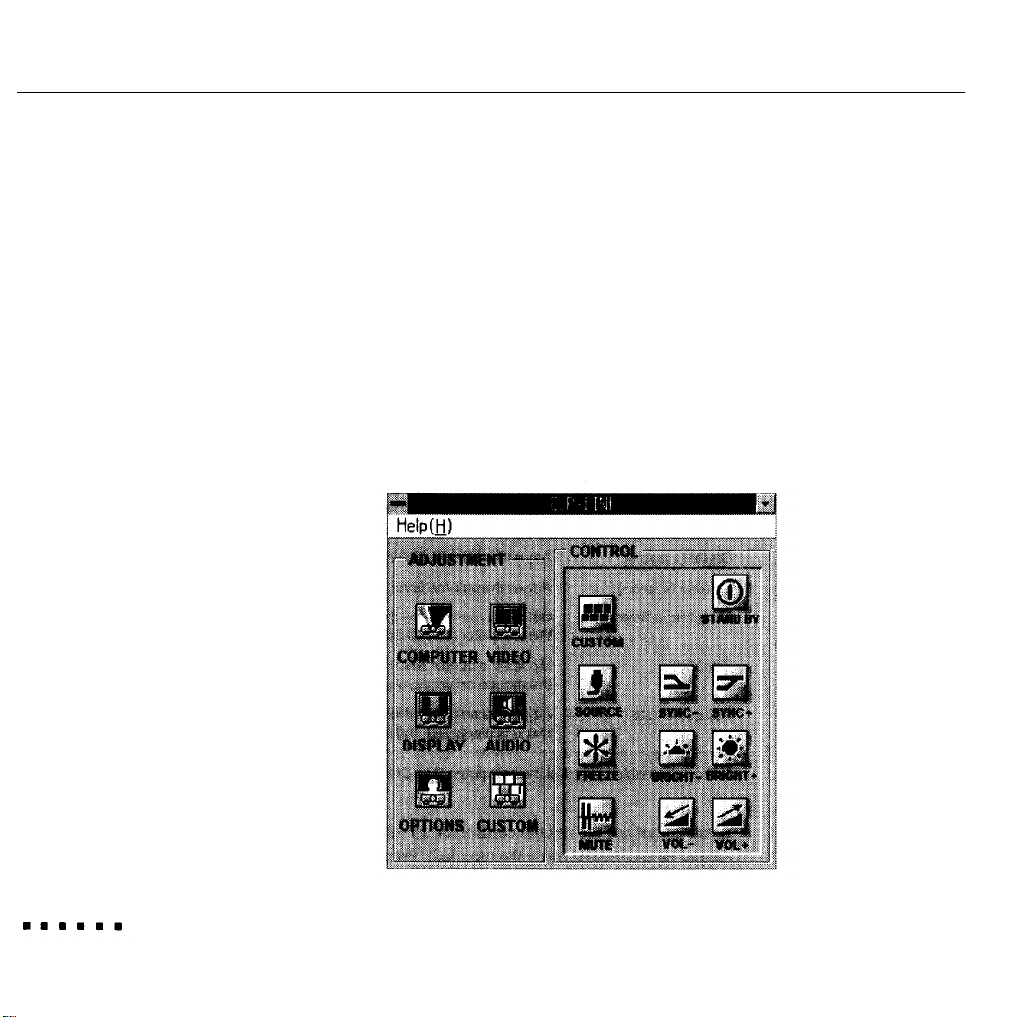
Adjusting the settings from ELP Link
If you set up the projector for serial communication as described in Chapter
1,
you can use the ELP Link program to control the projector from your computer.
To start ELP Link, do one of the following:
l
Windows. Open the ELP Utilities program group by double-clicking on its
icon. Then double-click the ELP Link icon.
l
Macintosh. Open the ELP Utilities folder by double-clicking on its icon.
Double-click the
ELP
Link folder icon and then double-click the ELP Link icon.
You see a screen similar to the following:
26
2 l Using the Projector
Page 43

The buttons on the right side of the screen allow you to control the projector
settings as you do with the remote control. See the table on page 25 for a
description of these buttons. The buttons on the left allow you to access the
menus. For more information about the menus, see Chapter 3.
Monitoring the Projector
The three lights at the top of the projector monitor its operating status:
Under normal circumstances the power and lamp lights are green and the
temperature light is off. (During standby mode, the lamp light is off and the
power light is orange.) Any time the status or operation of the projector changes
or whenever a problem occurs, the lights gash or turn orange. See Chapter 6 for
specific information about the meaning of the status lights,
Monitoring the Projector
27
Page 44
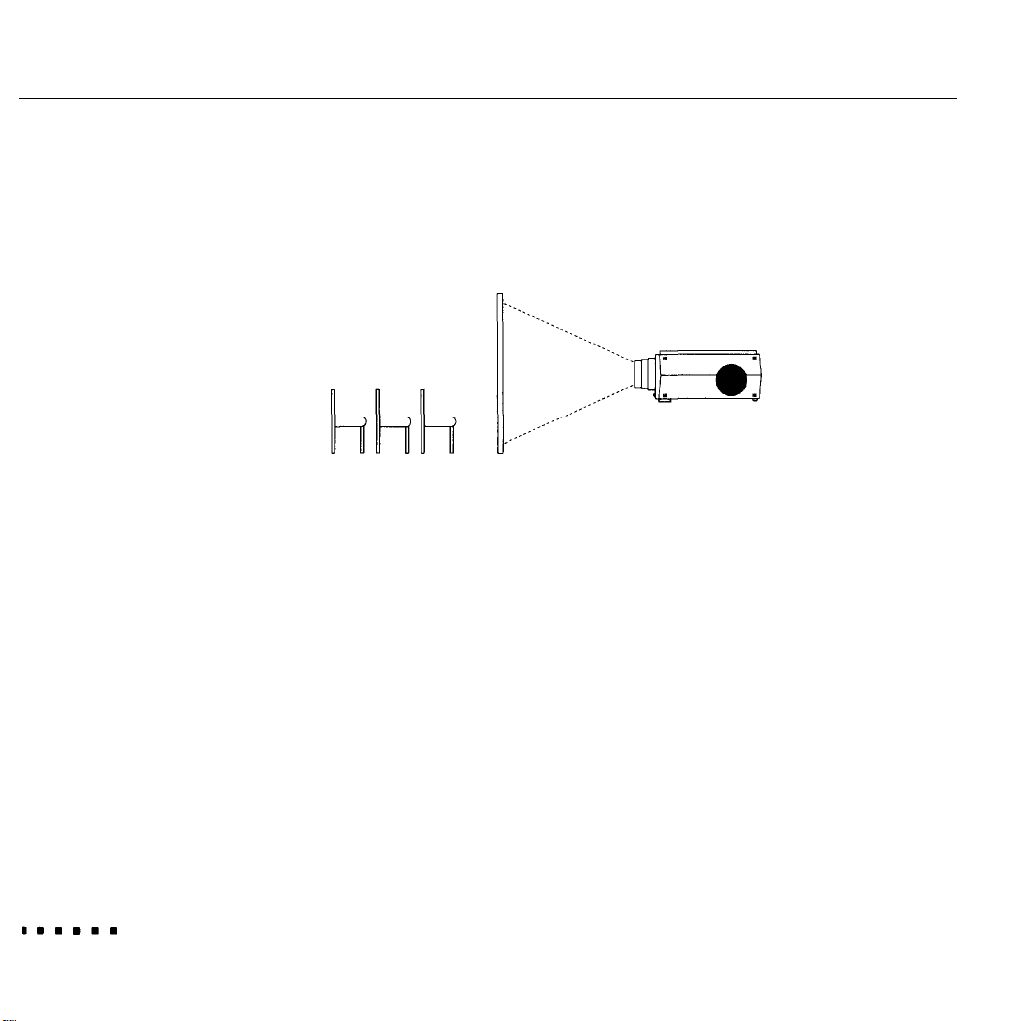
Using Rear Projection
The projector can be set up for front or rear projection. In rear projection, the
projector is on the opposite side of the screen from the audience, as shown here:
For rear projection, you must turn on the Rear setting in the Display menu. This
setting flips the image from left to right for correct viewing. See Chapter 3 for
information about the menus.
Because the screen is between the remote control and the projector for rear
projection, you need the optional lead wire to use the remote control. See
Chapter 1 for more information. If you don’t have the lead wire, use the buttons
on the operation panel to make changes to the menus.
28
2 l Using the Projector
Page 45
Using the Menus
he projector menus allow you to do the following:
T
l
Control the brightness, contrast, sharpness, and color of the image.
l
Adjust the vertical or horizontal position of the display, change the placement
of the menus, and configure the display for rear projection or an upside down
ceiling mount.
l
Adjust audio settings such as volume, balance, bass, and treble.
l
Adjust the display by rotating or inverting it and modifying the color.
l
Change the language used in the menus and specify how long the projector is
idle before it enters standby mode.
l
Assign a function to the remote control’s Custom button.
29
Page 46
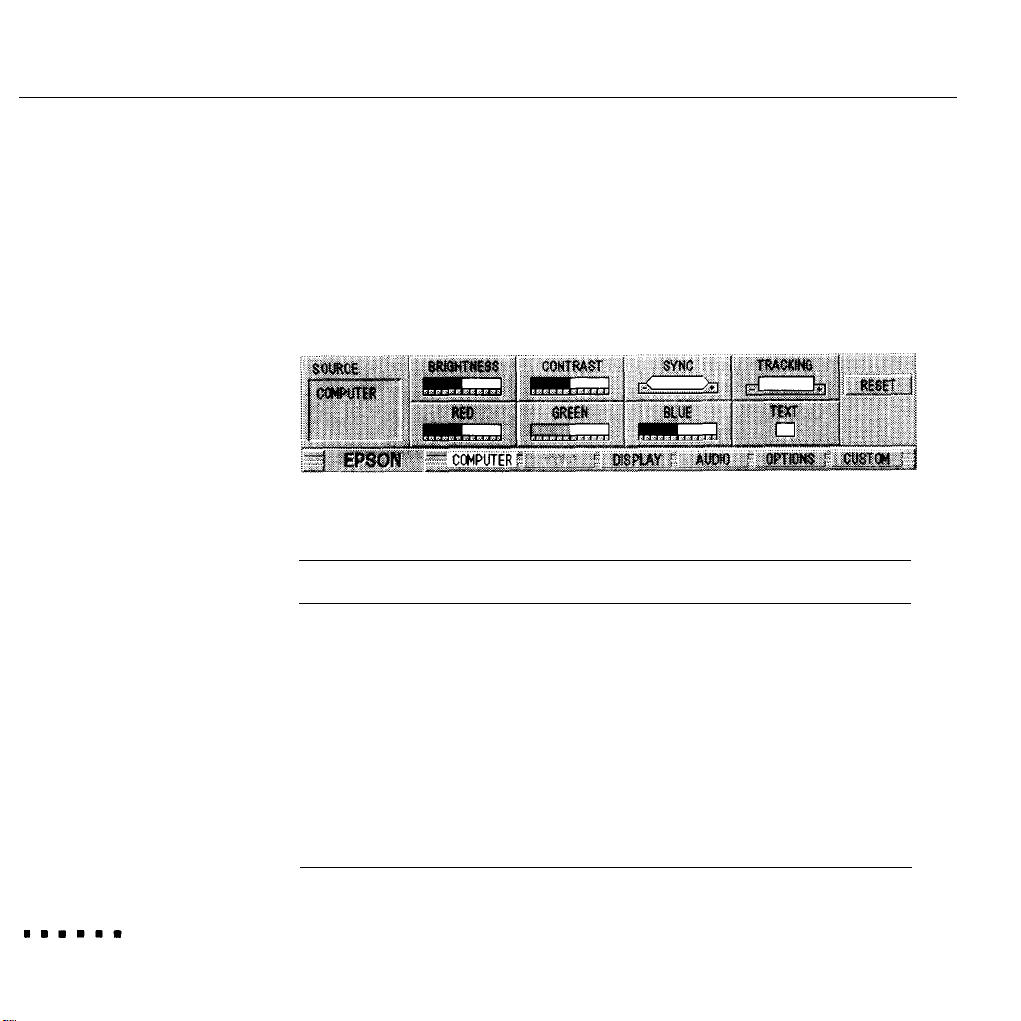
Accessing the Menus
You can display menus on the projector screen or on your computer. To display
menus on top of the projector screen, press the Menu button on the remote
control or the operation panel. This opens the currently selected menu. Other
menus are available from the menu bar at the bottom of the menu.
The following table shows the settings for each of the menus:
30
Menu
Computer
Video
Display
Audio
Options
Custom
3 l Using the Menus
Settings
Brightness, Contrast, Sync, Tracking, Red, Green, Blue, Tint
(PC only), Mac LC (Macintosh only)
Brightness, Contrast, Sharpness, Color, Mode, Text
Horizontal, Vertical, Menu, Blank To, Rear Proj, Upside Down,
Invert
Volume, Balance, Audio Source, Bass, Treble, Loudness, Fade
Prompt, Backgnd, Serial, Power Save, Dly On, Language
Pattern, Serial, Blank To, Prompt
Page 47

To select a different menu, press the Menu Select button on the remote control
or operation panel. To select a setting in the menu, use the trackball (remote
control) or the Function Select buttons (operation panel).
To close the menus, again press the Menu button.
Changing menu settings
Menu settings are sliders with increasing and decreasing values or checkboxes
you turn on or off. A checkbox is on when it is shown with a checkmark.
To change a slider setting or turn a checkbox on or off, do one of the following:
l
If you’re using the remote control, use the trackball to select a menu setting.
Then press the Adjust buttons (+ and -) to increase or decrease a slider
setting or turn a checkbox on or off.
l
If you’re using the operation panel, use the Function Select buttons to select a
setting and use the Function Adjust buttons to change a slider setting or turn a
checkbox on or off.
Any adjustments you make using the menus remain in effect until you change
them. Turning off the projector does not reset the settings.
Accessing the Menus
31
Page 48
Note: If you do
mode and cannot be reactivated using the trackball. Press any button to turn
off sleep mode so you can use the trackball.
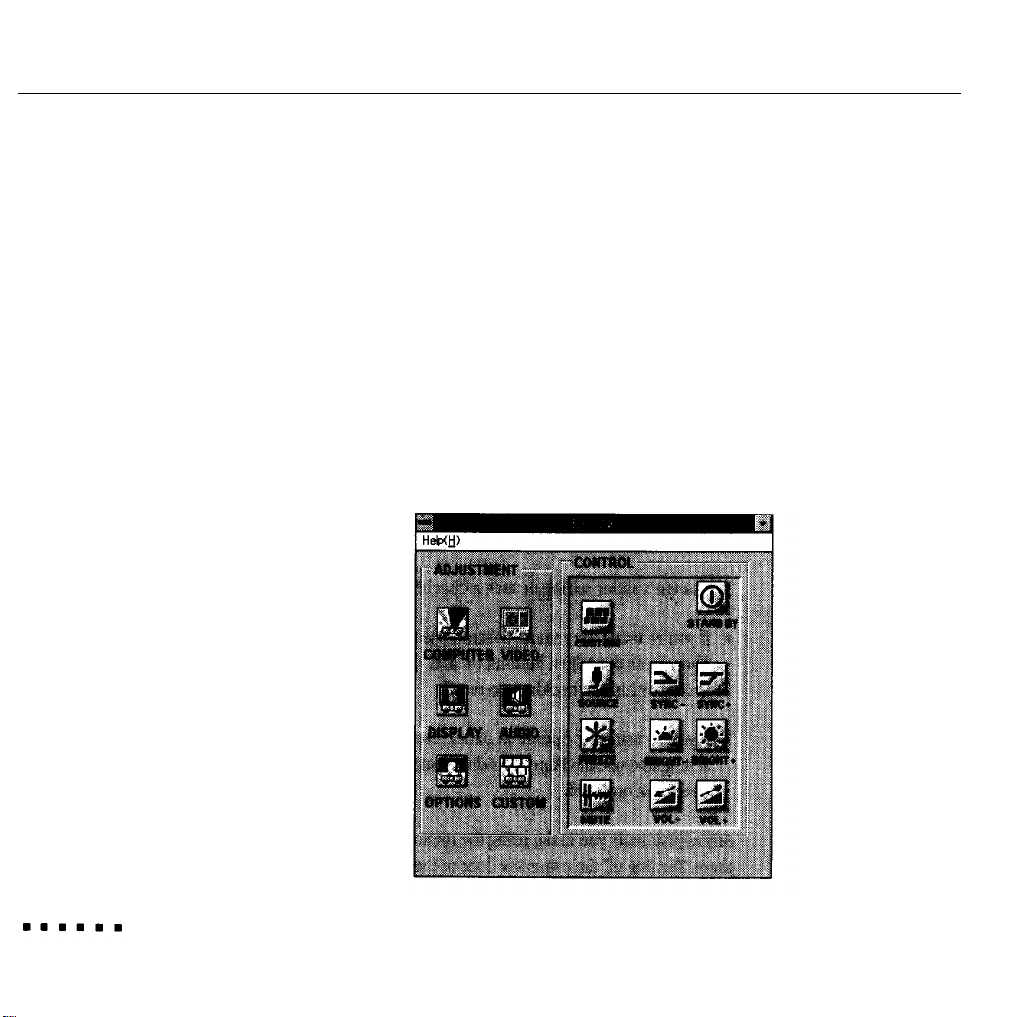
Accessing ELP Link menus
You can also access menus from your computer. To do so, start the ELP Link
program as described in Chapter 2. You see a screen similar to the one shown
below. The menu buttons are on the left. To open a menu, simply double-click on
the appropriate icon. Although the menus look different from those displayed on
the projector screen, the menu settings are the same.
not use the remote control for
15
minutes, it enters sleep
32
3 l Using the Menus
Page 49

Restoring the default settings
You can reset all settings in the current menu back to the factory defaults by
pressing the Reset button, which appears in each projector and ELP Link menu
except the Options menu.
To restore all default settings in all menus, choose the Reset All button in the
Options menu.
Menu Settings
The following sections describe the settings on each menu. Note that the
Computer and Video menus both contain Brightness and Contrast settings. This
allows you to change the brightness and contrast of one image source without
affecting the other.
Note: You cannot display the Video menu when the computer is
selected as
the image source Likewise, you cannot dispIay the Computer menu when
the video source is selected.
The menus displayed on the projector screen are shown on the following pages.
The ELP Link screens look different, but the settings on the menus are the same.
Menu Settings
33
Page 50
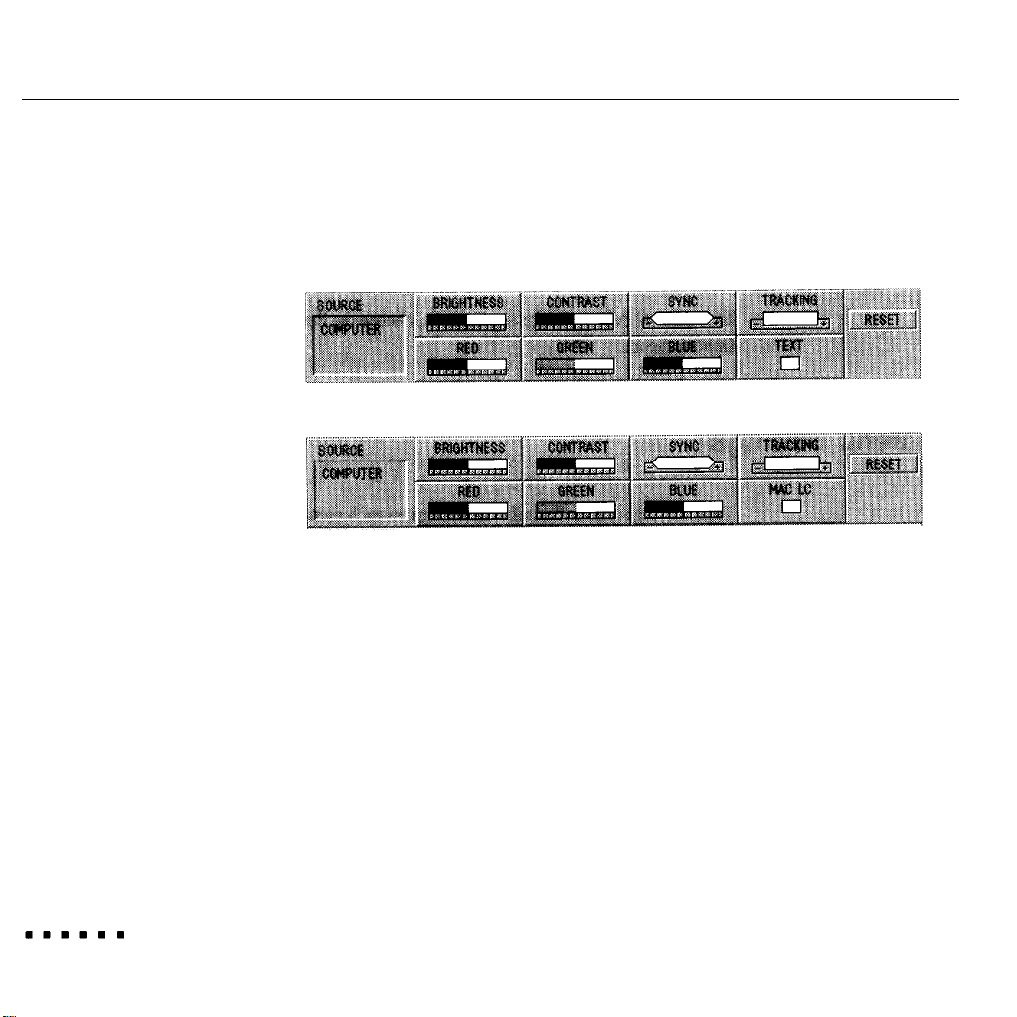
Computer menu
You see the first Computer menu if you have a PC, or the second menu if you have
a Macintosh.
34
Brightness
Contrast
synchronize
3 l Using the Menus
Lightens or darkens the overall image. Increase brightness to lighten an image; decrease it to darken an image.
Adjusts the degree of difference between light and dark
areas. Increase the contrast if you want light areas to be
very light and dark areas to be very dark. Decrease
contrast to minimize the difference between the lightest
and darkest parts of the image.
Synchronizes the graphics signals coming from the
computer. Adjust this setting if the image is fuzzy or
streaked or contains artifacts.
Page 51

Use the Synchronize setting only if the image cannot be
corrected by adjusting Brightness and Contrast.
Tracking
Red
Green
Blue
Text
(PC only)
Mac LC
(Mac only)
Matches the projector’s internal clock to the various
computer graphics signals. If vertical lines appear within
an image, adjust Tracking to spread the distance between
the lines until they disappear
Adjusts the strength of the red level.
Adjusts the strength of the green level.
Adjusts the strength of the blue level.
Compresses the projected image to fit into the projector’s
640-pixel image area. Normally you need to compress
an image only if your DOS software program has a text
screen wider than the projector’s area.
Configures the projector for the Macintosh LC model.
Turn on this setting if you have a Macintosh LC.
Menu Settings 35
Page 52
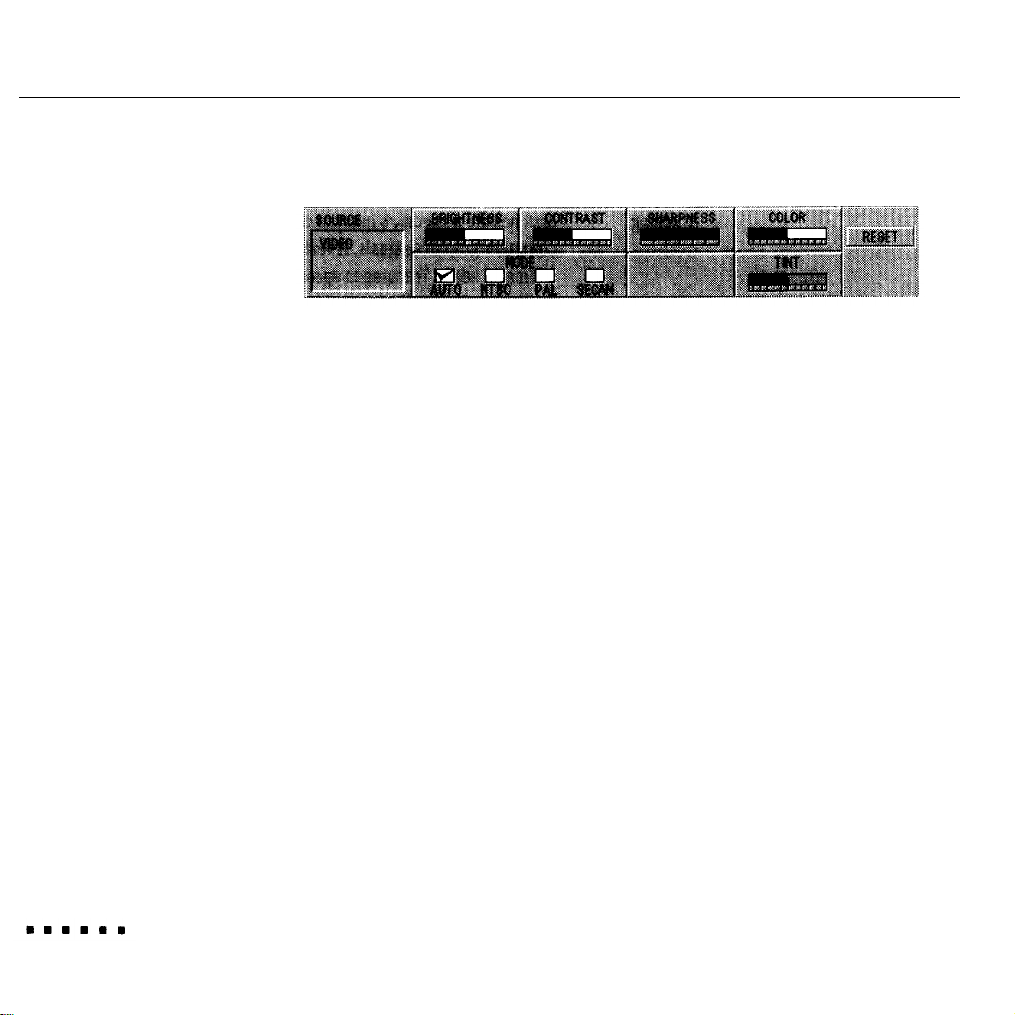
Video menu
Brightness
Contrast
Sharpness
Color
Mode
Lightens or darkens the overall image. Increase bright-
ness to lighten an image; decrease it to darken an image.
Adjusts the degree of difference between light and dark
areas. Increase the contrast if you want light areas to be
very light and dark areas to be very dark Decrease
contrast to minimize the difference between the lightest
and darkest parts of the image.
Emphasizes or de-emphasizes edges within an image.
Increase sharpness for more edge definition and a
sharper image. Decrease sharpness for softer edges.
Adjusts the color density. Increase color when you want
darker and more opaque colors. Decrease color for
lighter and less opaque colors.
Specifies the type of video signal the projector can
receive. Mode can be Auto (default), NTSC, PAL, or
SECAM.
36
3 l Using the Menus
Page 53
When Auto is selected, the projector automatically
identifies the incoming video signal. If you select NTSC,
PAL, or SECAM, the projector accepts only the selected
video signal. Normally you should not change the default
setting.
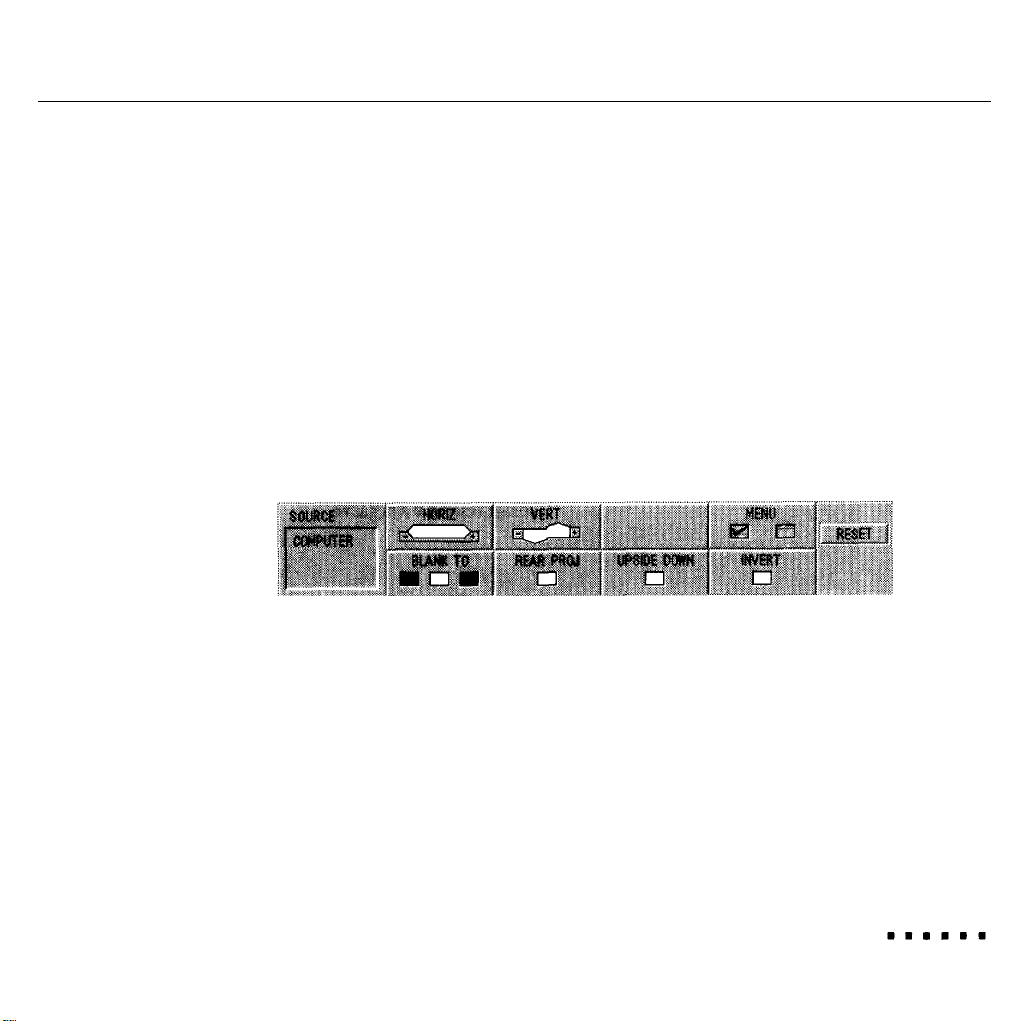
Display menu
Tint
Horizontal
Vertical
Menu
Adjusts the red/green color balance. Increase tint to make
the image more green; decrease to make it more red.
Moves the image left or right. To move the image to the
right, increase the setting; to move it to the left, decrease
the setting.
Moves the image up or down, To move the image up,
increase the setting; to move it down, decrease the setting.
Switches the position of the menu between the top and
bottom of the projector screen.
Menu Settings
37
Page 54

Blank To
Selects the color shown on the screen when you use the
Blank setting to clear the screen. Choose Black, White, or
Blue. For a description of Blank, see page 41.
Rear Proj
Upside Down
Invert
Flips the right and left of the projected image so the
projector can be used for rear projection. For front
projection, Rear Proj should be off.
Flips the horizontal axis of the image so the projector can
be turned upside down from a ceiling mount.
Substitutes each color with its complementary opposite.
For example, when you use Invert, red areas of an image
turn green. For black and white images, Invert makes the
image resemble a negative.
38
3 l Using the Menus
Page 55
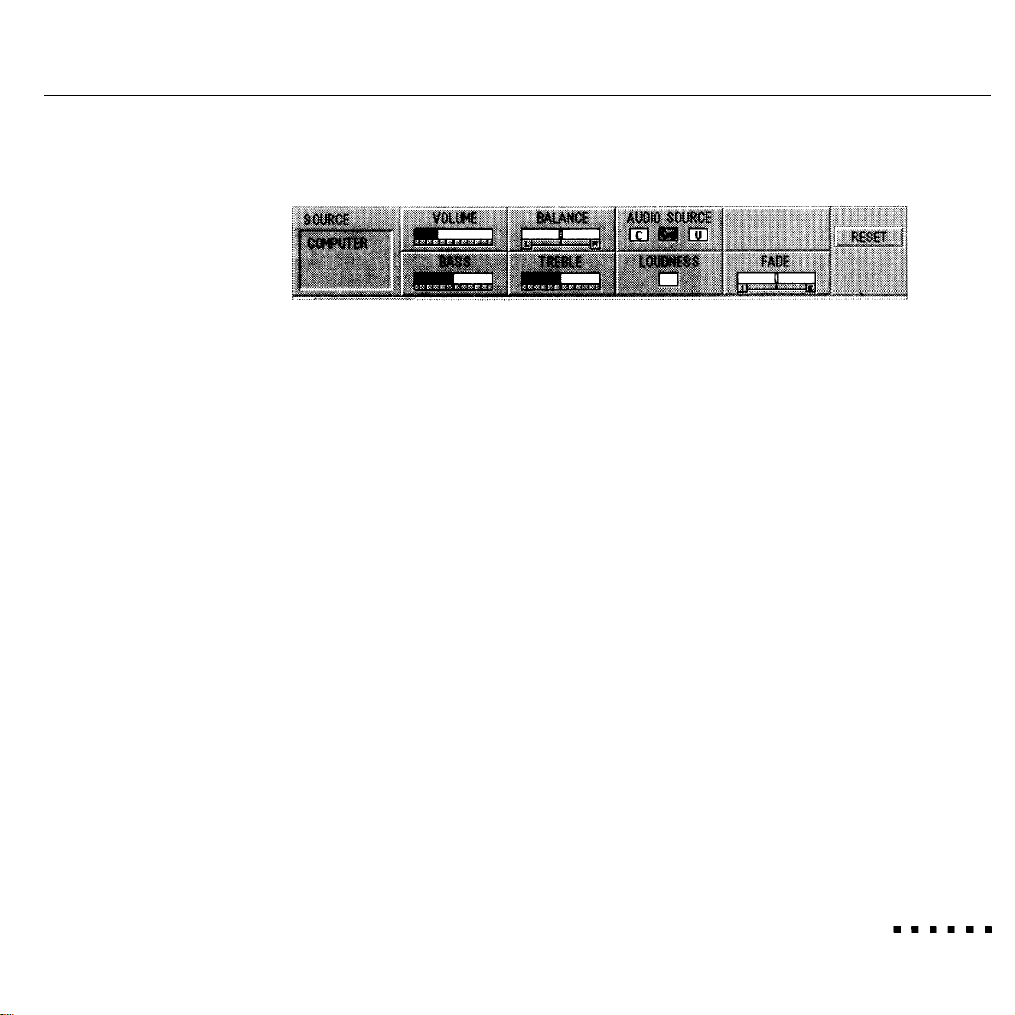
Audio menu
Volume
Balance
Audio Source
Bass
Treble
Loudness
Fade
Increases or decreases the volume.
Distributes sound between the left and right speakers.
Increase the setting for more sound on the left and less on
the right. Decrease it for more sound on the right.
Specifies whether audio is supplied only from the
computer (C), only from the video source (V), or from
the currently selected source (CV, the default), If you
select C or V, pressing the Video button does not switch
the audio.
Increases or decreases low tones.
Increases or decreases high tones.
Turns bass boost on or off.
Adjusts the audio levels between the projector’s built-in
speakers and an external amplified speaker. If you
connect to an external speaker, move the slider to the
right to increase volume to the external speaker.
Menu Settings 39
Page 56
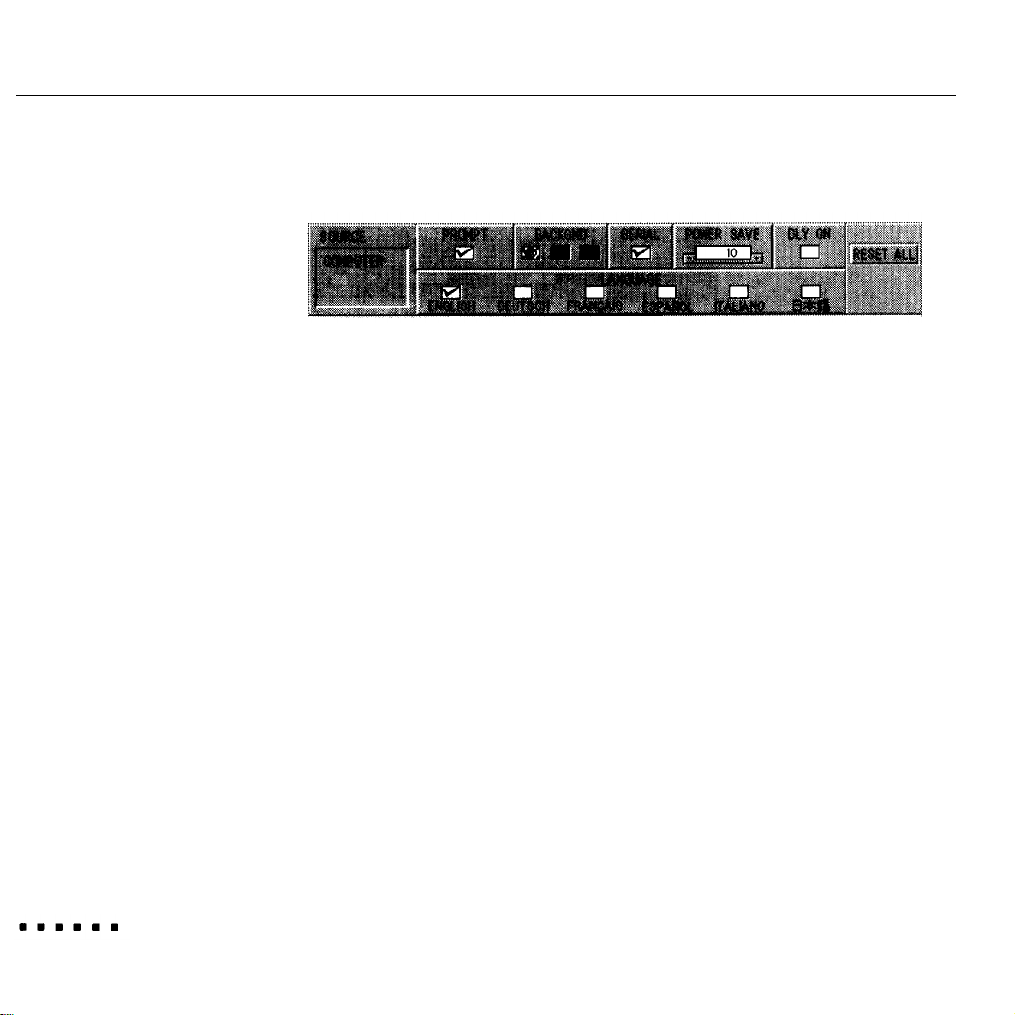
Options menu
Prompt
Backgrnd
serial
Power Save
Delay On
Temporarily displays a prompt on the projector screen to
identify which source (computer or video) is providing
the image. This prompt appears only when you switch the
image source.
Specifies what is shown onscreen when an image signal
is not available. The options are Test Pattern (default),
Black, or Blue.
Enables communication between your computer and the
projector. See Chapter 4 for more information.
Specifies in minutes how long the projector waits for an
image signal before entering standby mode. If an image
signal is not received within the specified time, the
projector automatically enters standby mode.
Power Save can be 5 to 60 minutes. The default is 10.
Automatically places the projector in standby mode when
it is turned on. By default Delay On is off.
40
3 l Using the Menus
Page 57
Custom menu
Language
Specifies the language used in the menus. The choices are
English (default), Deutsch, Francais, Espanol, Italiano,
and Japanese.
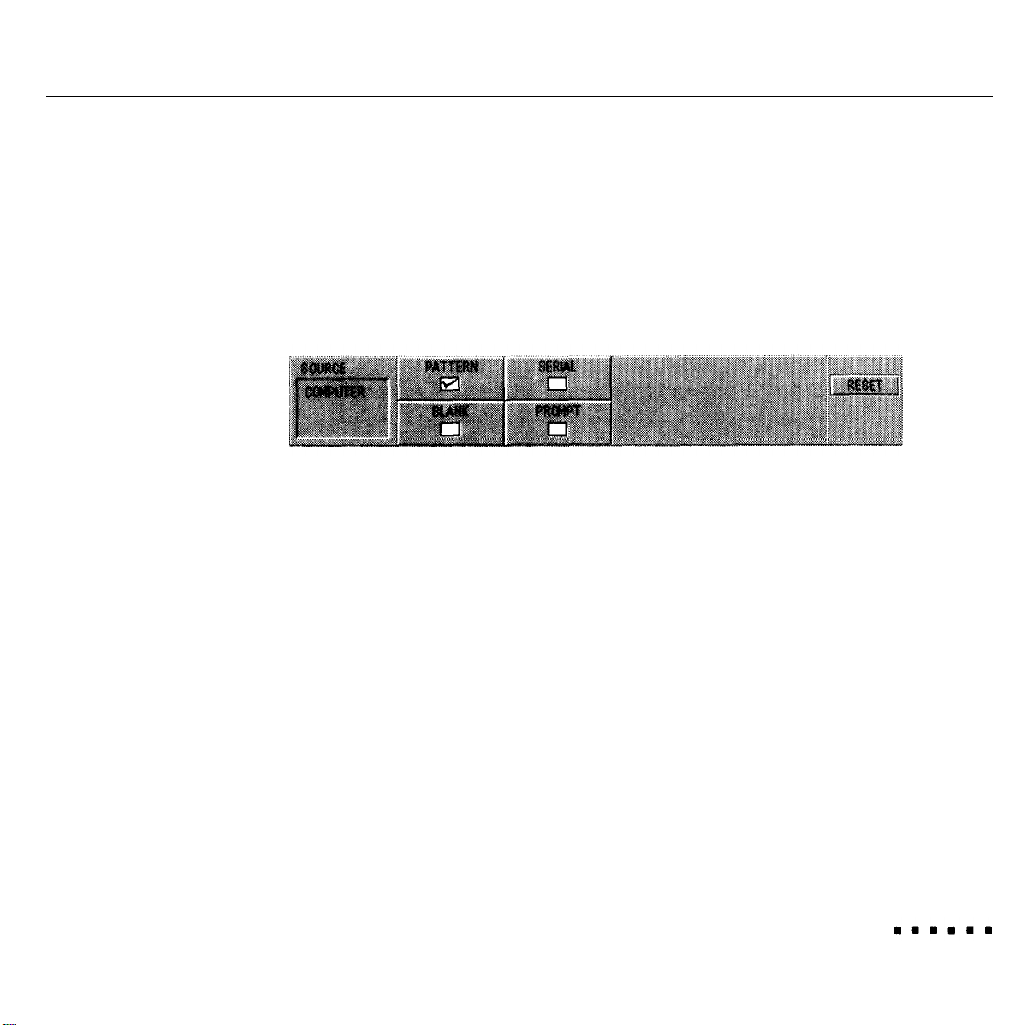
The Custom menu allows you to use the Custom button to immediately access one
of the following four functions:
l
Pattern (default), Displays a test pattern on the screen.
l
Serial. Enables communication between the projector and your computer if
you have installed the Serial Communication Kit.
l
Blank. Turns off the image display and blanks the screen to black, white,
or blue. The color of the screen is determined by the Blank To setting
(see page 38).
l
Prompt. Temporarily displays a prompt on the projector screen to identify
which source (computer or video) is providing the image. This prompt
appears only when you switch the image source.
Menu Settings
41
Page 58
Remote Control of the
Computer
his chapter describes the ELP Remote Programmer. When this utility is
T
running on your computer, you can use the remote control to control your
software program. The trackball moves the mouse on your computer, and the
five programmable buttons can be used to drag or click windows or icons.
If you wish, you can also assign a keyboard macro to a programmable button.
A macro is a sequence of up to 32 keystrokes and mouse commands. If you
assign a macro to a button, pressing the button has the same effect as typing the
keys on the keyboard or using the mouse. For example, if you have Windows and
assign Alt + Tab to one of the buttons, you can cycle through your open programs
with the press of a button. If you have a Macintosh, you could assign Apple + 0
and open a new document by pressing a button.
In order to use the ELP Remote Programmer, you must first install the Serial
Communication Kit as described in Chapter 1.
43
Page 59
ELP Remote Programmer Templates
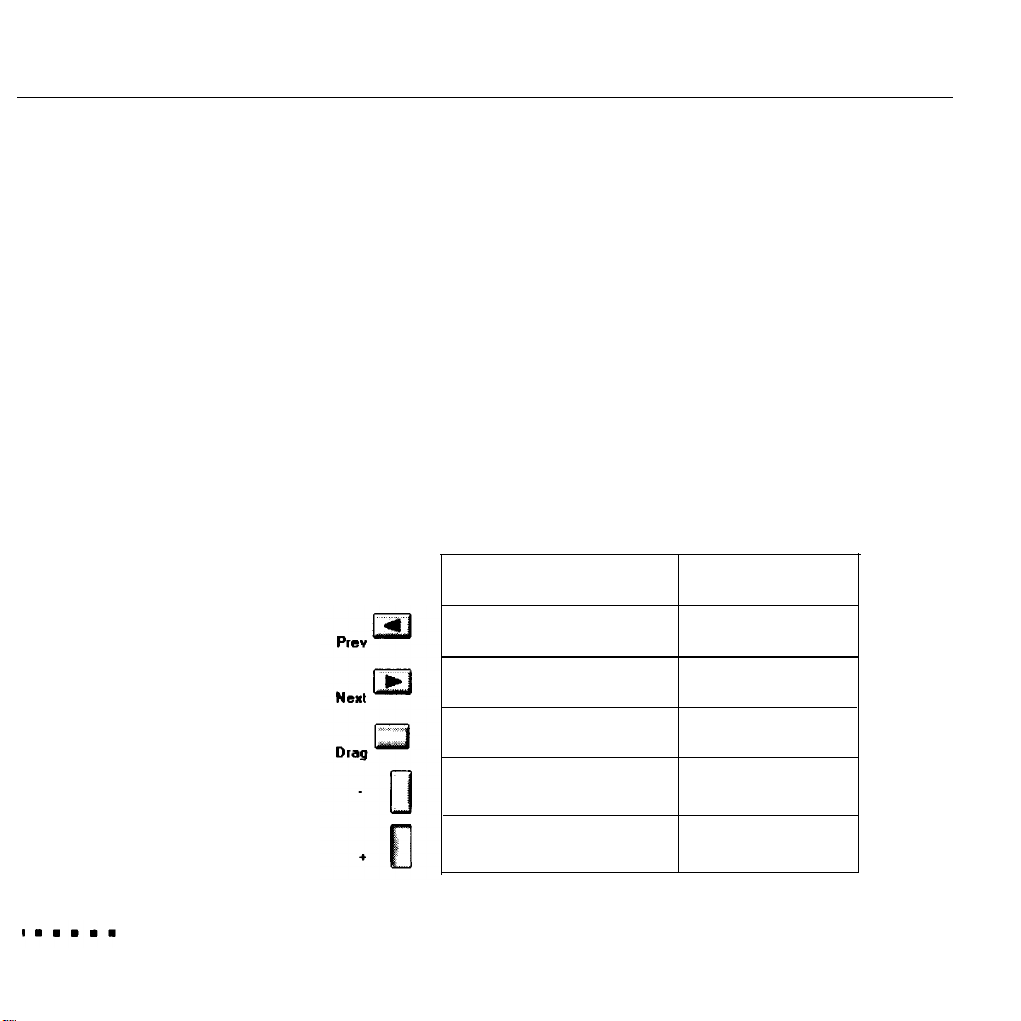
Five buttons on the remote control can control the computer if you are running
the ELP Remote Programmer. The five programmable buttons are the Prev, Next,
Drag, and Adjust (+ and -) buttons.
The keys and mouse commands assigned to each button are stored in a file
called a template. The ELP Remote Programmer comes with a series of templates. Each is customized for several popular software programs.
Only one template can be active at a time. The following table shows the button
assignments for the default template. This template is active the first time you
start the ELP Remote Programmer. You can modify the default template or any
of the custom templates for your own purposes.
44
Windows
Left mouse click [MLBC]
Right mouse click [MRBC]
Left mouse drag [MLBDG]
Left mouse click [MLBC]
Right mouse click [MRBC]
4 l Remote Control of the Computer
Macintosh
Left arrow
Right arrow
Mouse drag
Mouse click
Mouse click
Page 60

Starting the ELP Remote Programmer
The ELP Remote Programmer can run under Windows or on the Macintosh. This
section provides general information that applies to both platforms. For specific
information on how to use the ELP Remote Programmer on your platform, see
the online help, which is available by selecting Help in the menu bar.
Do the following to start the ELP Remote Programmer:
l
Windows: Open the ELP Utility program group by double-clicking on it.
Then double-click the ELP Remote Programmer icon.
l
Macintosh: Open the ELP Utilities folder by double-clicking on its icon.
Double-click the ELP Remote Programmer folder and then double-click the
ELP Remote Programmer icon.
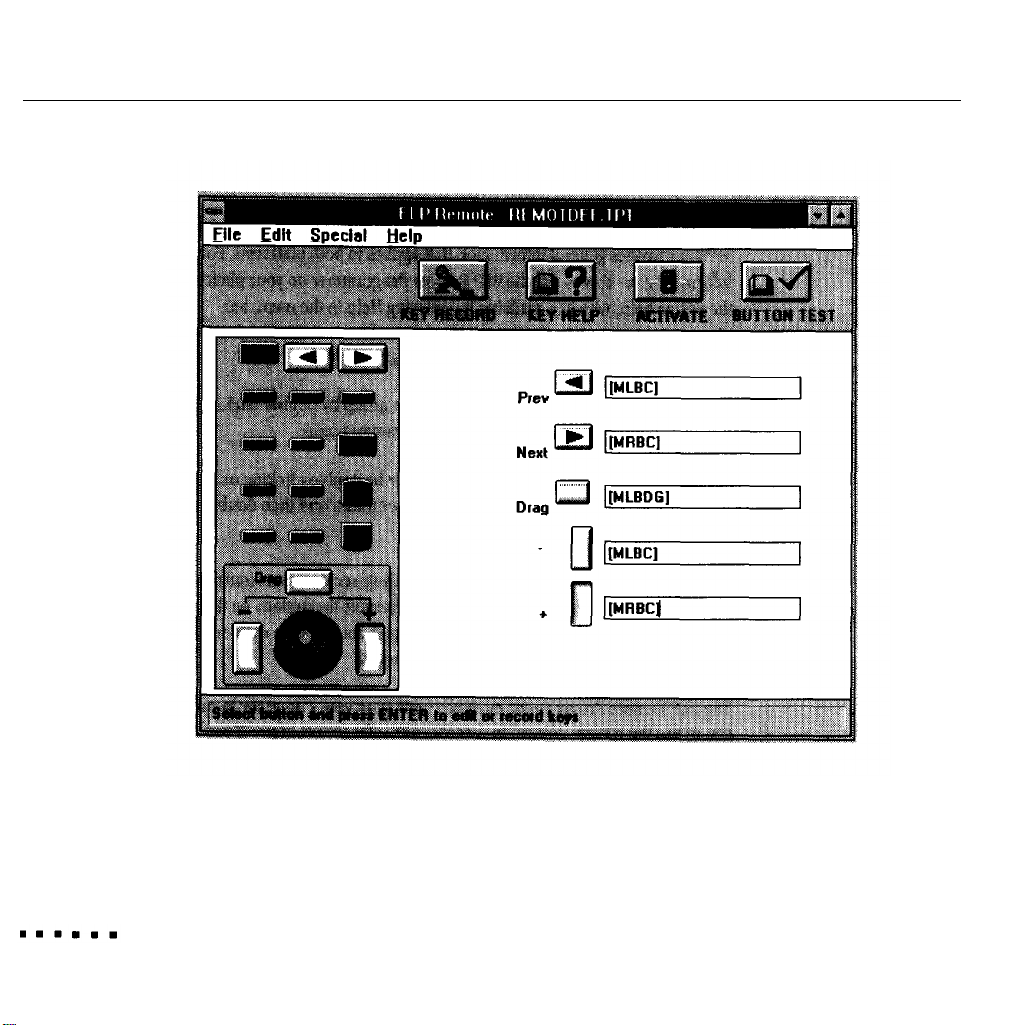
When you start the ELP Remote Programmer, you see a screen similar to the
one on the next page. This screen, which represents the buttons on the remote
control, allows you to change the button assignment and then activate the
template so you can use it with the remote control.
The ELP Remote Programmer must be running on your computer in order for
you to use the remote control to control your software program. If you do not
need to program any buttons, you can minimize the ELP Remote Programmer
screen so it appears as an icon at the bottom of the screen.
Note: Although both ELF Remote Programmer and ELP Link can be running
on your computer at the same the, only one can be active. If both are
running, ELP Link has priority.
Starting the ELP Remote Programmer
45
Page 61
46
4 l Remote Control of the Computer
Page 62

The following table describes the elements in the ELP Remote Programmer
screen. The remote control buttons that can be programmed are shown at the
right of the screen.
Element Function
Menu bar
Key Record button
Key Help button
Activate button
Button Test button
Contains ELP Remote Programmer commands. See “ELP
Remote Programmer Menus” on page 52 for information.
Turns record mode on and off.
Windows: Brings up a list of the codes that represent non-
character keys and mouse commands.
Macintosh: Identifies the special symbols used to represent
non-character keys (e.g.,Alt, Shift, Control) and mouse
commands.
Makes the current template active so it can be used with the
remote control.
Brings up a text box that displays the assigned keystrokes
when you press a remote control button.
Starting the ELP Remote Programmer
47
Page 63

Assigning a Macro to a Programmable Button
To assign a macro, start the ELP Remote Programmer. Move the cursor to the text
box of the button you want to edit. You can then assign keystrokes and mouse
commands.
To assign a mouse command, open the Special menu at the top of the screen
and select the appropriate mouse command. This inserts a special code (PC)
or symbol (Macintosh) in the text box to represent the mouse command.
To assign keyboard keys, you can use record mode or manual mode.
l
In record mode, you simply type one or more keyboard keys. The keys are
shown in the text box next to the button, with special codes (PC) or symbols
(Macintosh) representing non-character keys (e.g., Ctrl, Alt,
On the Macintosh, some non-character keys cannot be typed in, including
Command, Shift, and Control. You need to choose these keys from Mouse/
Special Buttons in the Special menu at the top of the screen.
l
If you have a PC, use manual mode to include Scroll Lock in a macro or
to enter key combinations, such as Ctrl + Alt + S. See page 51 for more
information about manual mode. You do not normally need to use manual
mode on the Macintosh because key combinations are created using the
options in Mouse/Special Buttons of the Special menu.
F1).
46
4 l Remote Control of the Computer
Page 64

Using record mode
In record mode, you simply type keystrokes and the ELP Remote Programmer
displays the keys in the text box next to the button. For non-character keys, the
ELP Remote Programmer enters codes (PC) or special symbols (Macintosh) that
represent the keys. For a list of codes or symbols, choose the Key Help button.
To use record mode to assign a button:
1.
Open the ELP Remote Programmer.
2.
Turn on record mode. Choose the Key Record button at the top of the screen.
If you have a PC, you can also press Scroll Lock
3.
Move the cursor to the text box of the button you want to program. Use the
mouse or press Enter to move the cursor.
4.
Type the keys you want to assign to the button or assign a mouse command.
Simply type the keys into the text box. On the Macintosh, you cannot type
some non-character keys (e.g., Shift, Command, and Control) in the text box.
Instead, you need to select these keys from the Mouse/Special Buttons list in
the Special menu.
To enter mouse commands, open the Special menu and select Mouse
Buttons (PC) or Mouse/Special Buttons (Macintosh).
Assigning a Macro to a Programmable Button
49
Page 65

On the Macintosh, you can assign key combinations, such as
while in record mode. To do so, use the Link symbol under Mouse/Special
Buttons between each key you want to combine. For example, to program
Command + 0, choose Command in Mouse/Special Buttons, then choose
Link in Mouse/Special Buttons, then type 0 in the text box. (It is not neces-
sary to be in record mode to choose keys from Mouse/Special Buttons.)
On the PC, use manual mode to create key combinations. See the next
section.
5.
Repeat steps 3 through 4 for each button you want to program.
6.
Turn off record mode. Choose the Key Record button or, if you have a PC,
press the Scroll Lock key
7.
Activate the template by pressing the Activate button. This makes the new
button assignment active with the remote control.
To be able to use the remote control and the new macros, be sure you have
connected the RS-232C cable as described in Chapter
8.
Save the template. Choose Save or Save As in the File menu.
Command + 0,
1.
50
Note: In Windows, the ELP Remote Programmer assumes use of the COM1
serial port. To use COM2 port, choose COM2 in the Special menu
4 l Remote Control of the Computer
Page 66

Using manual mode
Use manual mode if you have a PC and want to create macros that include the
Scroll Lock key or key combinations such as Ctrl + Alt + Delete.
To manually enter alphanumeric characters (1-9 and A, B, C . . .), simply type the
key. For non-character keys, enter the code for the key. To display the codes,
press the Key Help button. Each control code is enclosed in square brackets. For
example, the code for the Control key is [C] or [Ctrl].
When entering a control key combination, put brackets around the entire
combination as well as around each control key. Do not put individual brackets
around alphanumeric keys. The following gives examples of how to program key
combinations on the PC:
To program Ah + X, enter [ [A]X].
To program Ah + X followed by the escape key, enter [ [A] X] [ESC].
To program Control + Alt + Delete, enter [ [C] [A] [DEL]].
Activating a Template
Once you assign a new macro to a button, you need to activate the template to be
able to use the new button assignment with the remote control. You do not need
to save a template before you activate it. To activate the template, choose the
Activate button.
Activating a Template
51
Page 67

ELP Remote Programmer Menus
The menu bar at the top of the screen contains these four menus:
File
Allows you to create a new template or open an existing one,
save the current template or create a new one, or exit the
program.
Edit Makes it easy to edit text in the text box of the currently
selected button. The items on this menu allow you to cut,
copy, and paste text and clear the contents of the currently
selected button.
The items on this menu allow you to do the following:
l
Activate and test the buttons of the current template
l
Insert codes for mouse commands
l
Insert codes for special keys (Macintosh only)
l
Adjust the mouse speed to your preference
l
Configure the remote control for the COM1 or COM2
port (PC only).
Help
Displays topics to help you use the program.
52
4 l Remote Control of the Computer
Page 68
Maintenance
he projector needs little maintenance. You should keep the lens clean because
T
any dirt or stains will appear on the screen. You also need to periodically clean
the air filter, which is located at the bottom of the projector. Keeping the air filter
clean is important because a clogged air filter prevents proper ventilation, which
is necessary to cool the projector and prevent it from overheating.
You should also clean the trackball on the remote control whenever you notice
that the trackball is not rotating smoothly due to dirt and dust that have collected
on the trackball.
The only parts you should replace are the lamp, air filter, and fuse. If any other
part needs replacing, contact your ELP-3000 dealer or a qualified service person,
Whenever you clean any part of the projector, always turn off the projector and
unplug it first.
53
Page 69

Cleaning the Lens
Clean the lens whenever you notice dirt or dust on the surface. tightly wipe the
lens surface with a soft, dry, lint-free cloth.
To
remove dirt or stains on the lens, moisten a soft cloth with an alcohol-based
cleaner and gently wipe the lens surface.
Cleaning the Projector Case
To clean the projector case, first unplug the power cord. To remove dirt or dust,
wipe the casing with a soft, dry, lint-free cloth. To remove stubborn dirt or stains,
moisten a soft cloth with water and a neutral detergent. Then wipe the casing.
Do not use alcohol, benzine, thinner, or other chemical detergents. These can
cause the casing to warp.
Cleaning the Air Filter
54
The air filter, which is located at the bottom of the projector, should be cleaned
after every
clogged with dust and prevent the projector from being ventilated properly This
can cause overheating and damage the projector.
5 l Maintenance
100
hours of use. If it is not cleaned periodically, it can become
Page 70
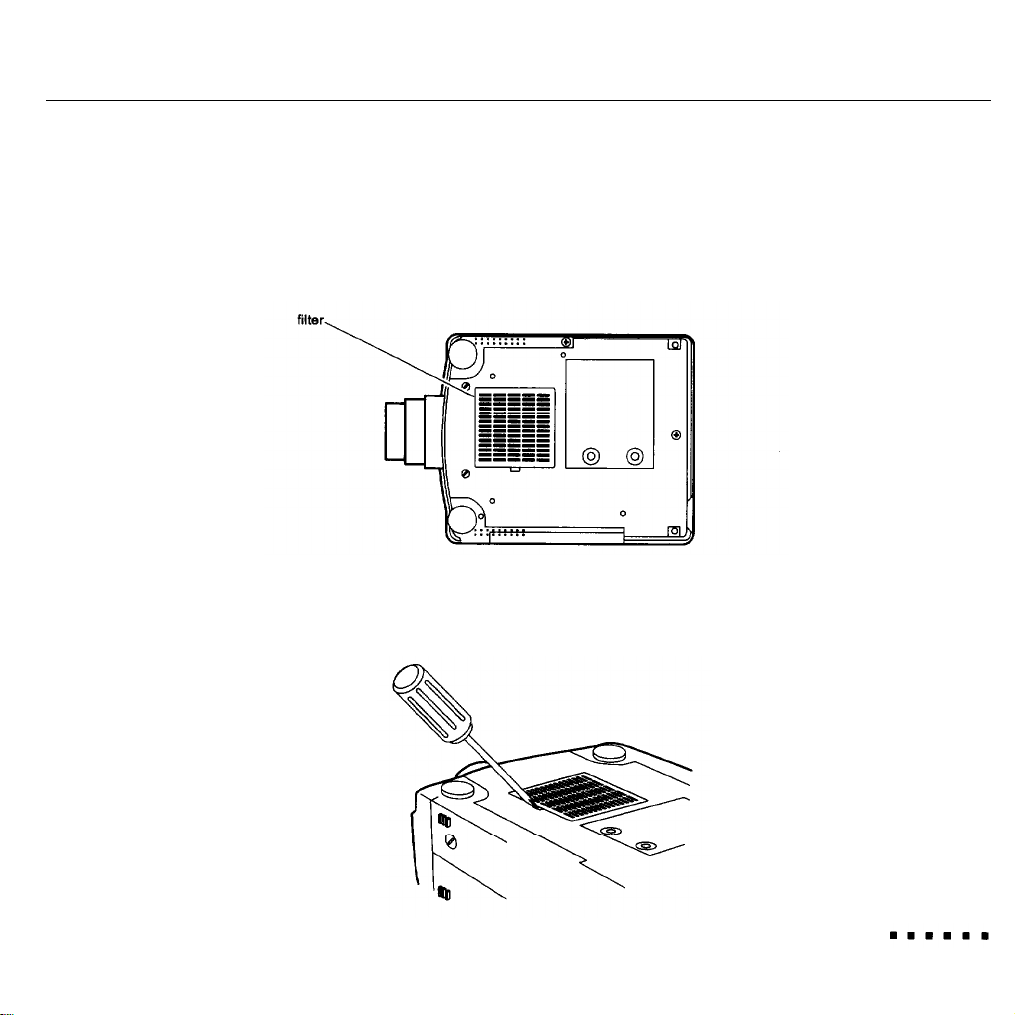
To clean the air filter:
1.
Turn off the projector and unplug the power cable from the wall outlet.
2.
Turn the projector over so you can easily access the filter.
3. Use a flat-head screwdriver to lift and remove the filter cover.
Cleaning the Air Filter
55
Page 71

4.
The filter is attached to the other side of the filter cover To clean the filter it is
recommended that you use a small vacuum cleaner designed for computers
and other office equipment. If you don’t have one, use a dry, lint-free cloth.
If the dirt is difficult to remove or if the filter is tom, replace it. Contact your
ELP dealer or call EPSON Accessories at (800) 873-7766 to obtain a new one.
Be sure to request part number 1023658.
5.
Replace the filter,
6.
Reconnect the power cord to the wall outlet.
Cleaning the Trackball
You should clean the trackball periodically and whenever you notice that it is not
moving smoothly
1.
Turn off both the projector and the computer.
2.
Turn the frame that surrounds the trackball counterclockwise until it unlocks.
You may need to use a sharp object, such a pencil, to help turn the frame.
56
5 l Maintenance
Page 72
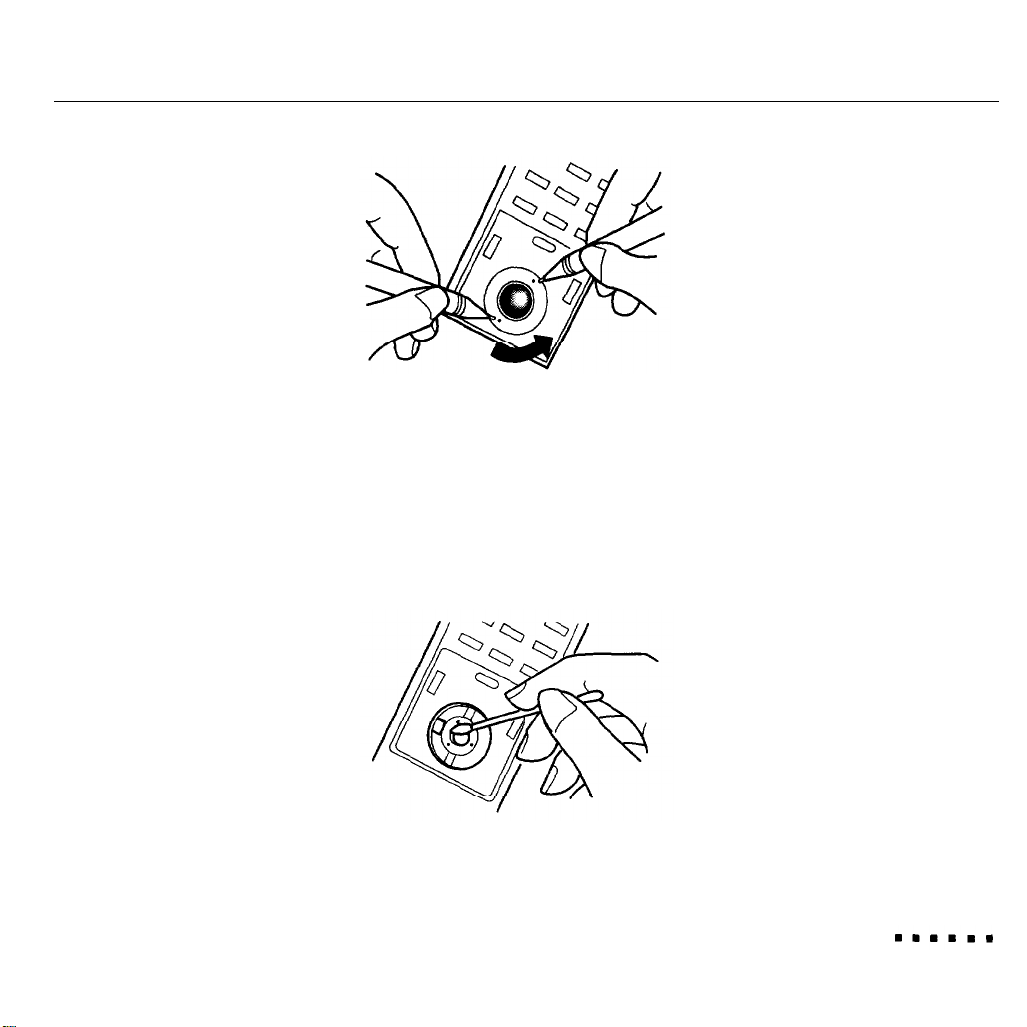
3.
Lift out the trackball from its holder and wipe it completely with a soft, dry
cloth to remove dirt and grit. To remove stubborn dirt and stains, moisten the
cloth with a neutral detergent. Do not use an alcohol-based cleaner.
4.
Use a cotton swab to gently clean the trackball holder. Pressing too hard can
cause the holder to move out of position.
5.
Place the trackball back into its holder and rotate its frame clockwise until it
locks in place.
Cleaning the Trackball
57
Page 73
Replacing the Lamp
If the lamp light does not come on or turns red, or if you notice that the screen
image is dark, you might need to replace the lamp. Use only replacement lamp
type MSCRl50E3H, part number 1023661.
Warning:
Allow the lamp to and before replacing it. During use it becomes
hot enough to burn you.
1.
Turn off the projector and disconnect the power cable from the wall outlet.
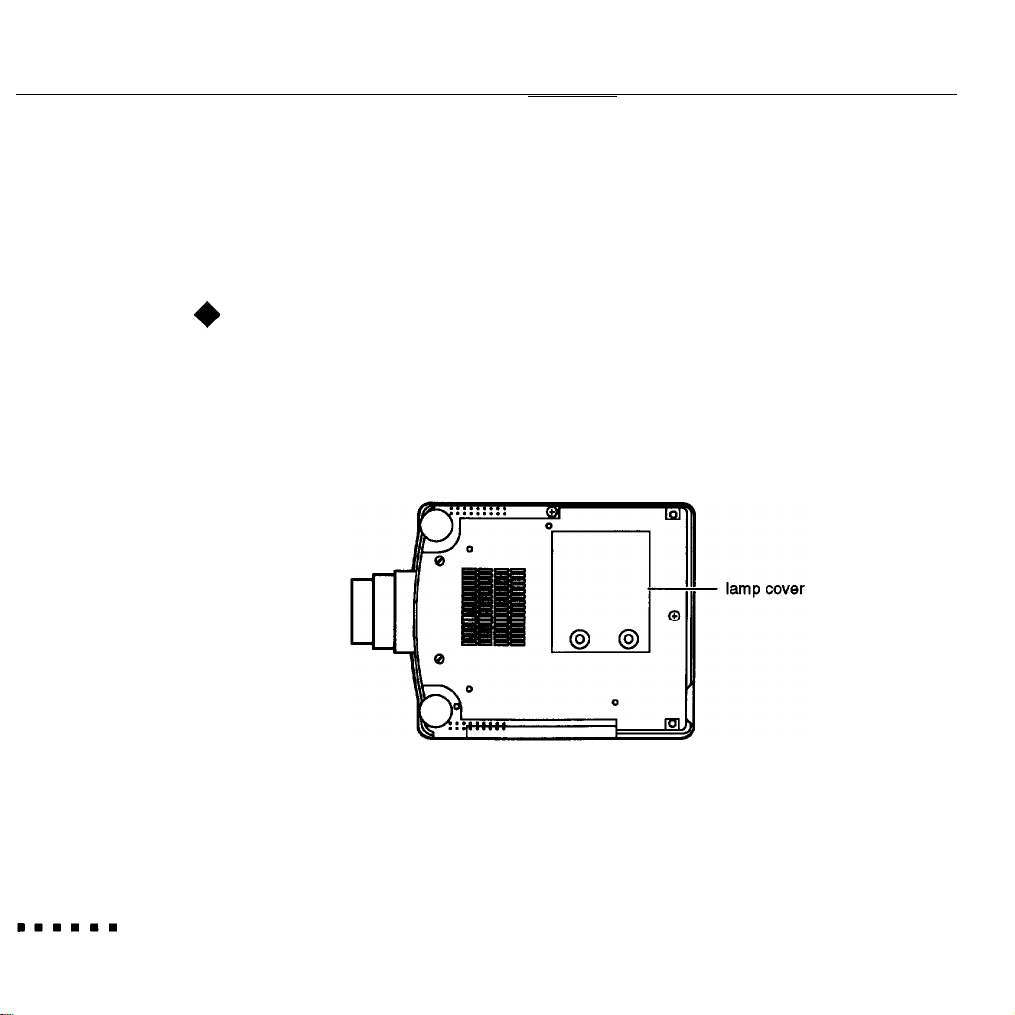
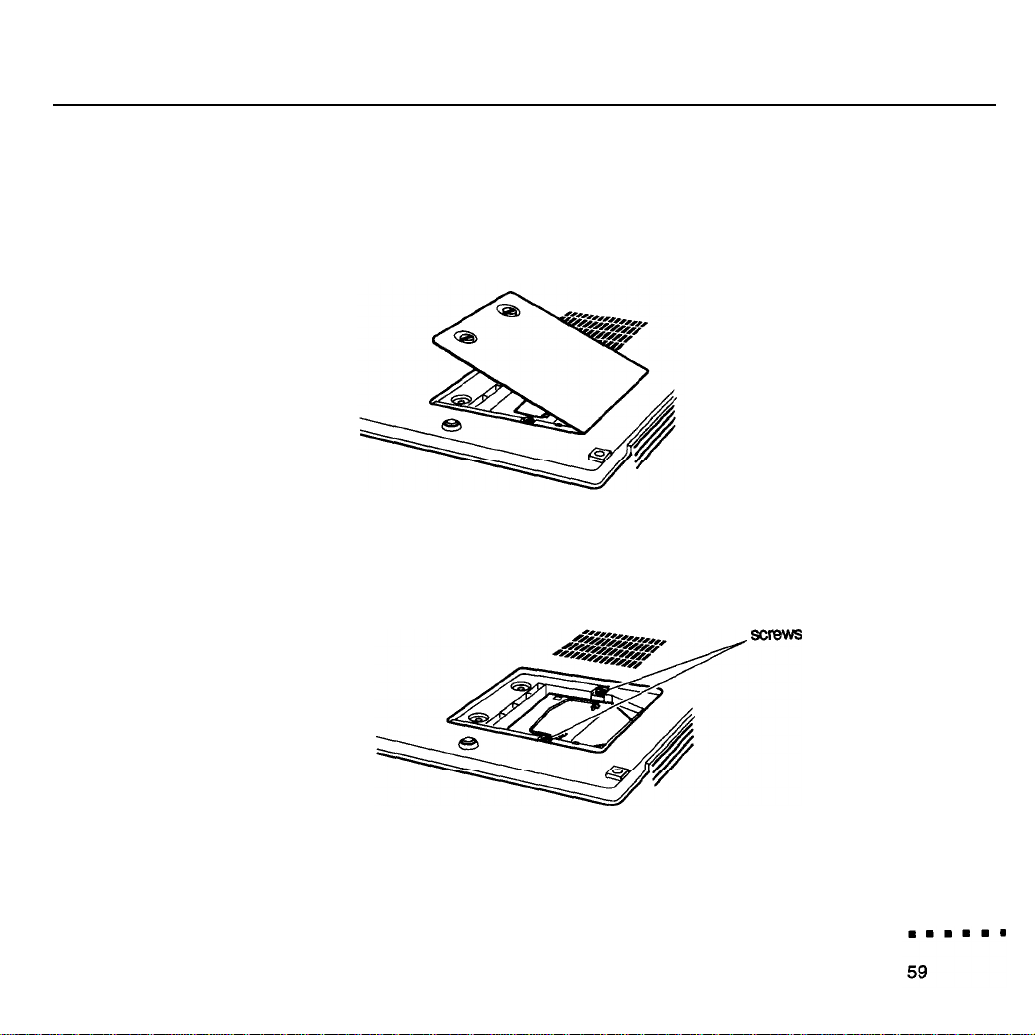
2.
Turn the projector over so you can access the lamp cover.
58
5 l Maintenance
Page 74
3.
Use a screwdriver, coin, or similar object to unloosen the two retaining
screws on the lamp cover. You cannot remove these screws.
4.
When the screws are loose, lift off the lamp cover.
5.
Use a screwdriver, coin, or similar object to unloosen the two screws holding
the lamp in position. You cannot remove these screws.
Replacing the Lamp
Page 75
6.
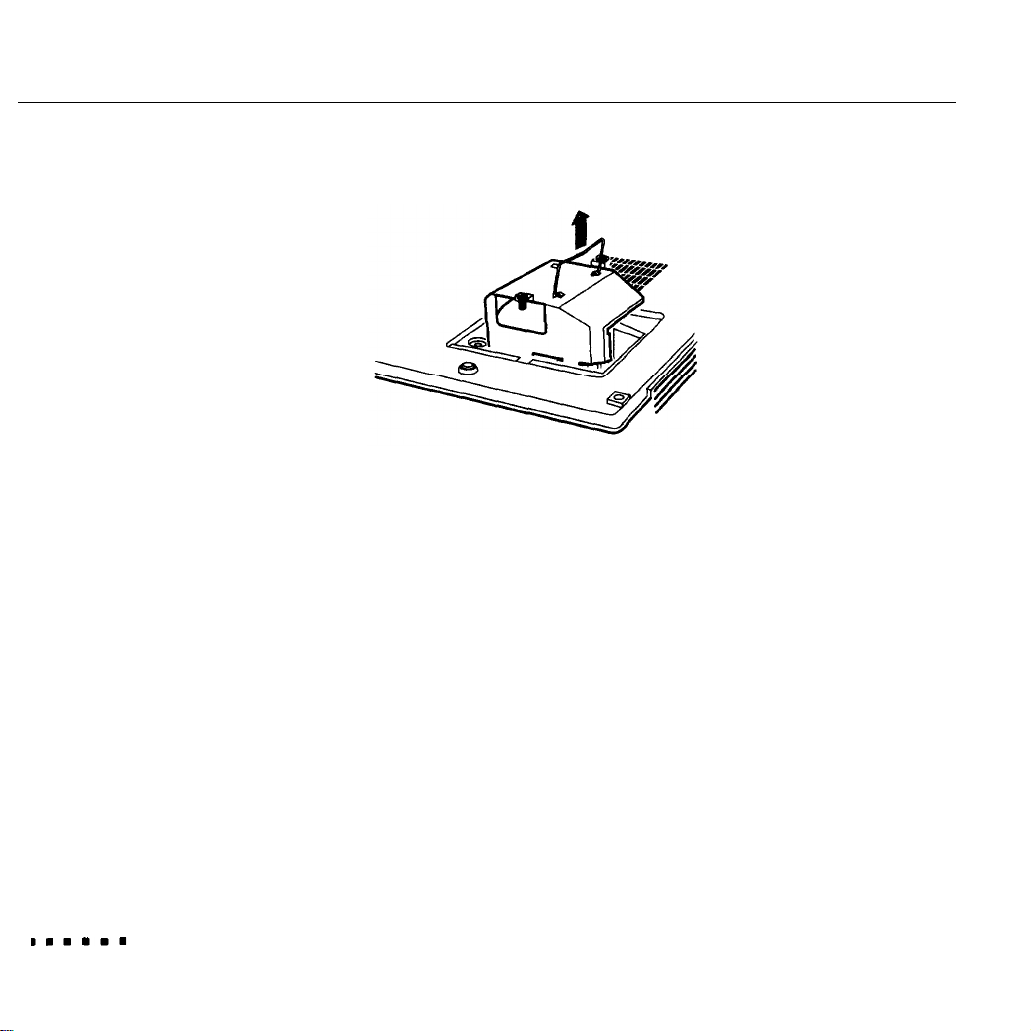
Lift up the handle and pull out the lamp.
7.
Gently insert the new lamp by lowering it into position.
8.
Tighten the screws you loosened in step 5.
9.
Replace the lamp cover and tighten the cover screws.
Make
sure the lamp cover is securely fastened. The projector turns itself off
if the lamp cover is open.
60
5 l Maintenance
Page 76

Replacing the Fuse
When you need to replace the fuse, use only a 250 V, 6.3 AT fuse appropriate for
your voltage.
Turn off the projector and disconnect the power cord from both the back of
1.
the projector and the wall outlet.
Turn the projector so its back panel is facing you. The fuse holder is located
2.
below the power switch.
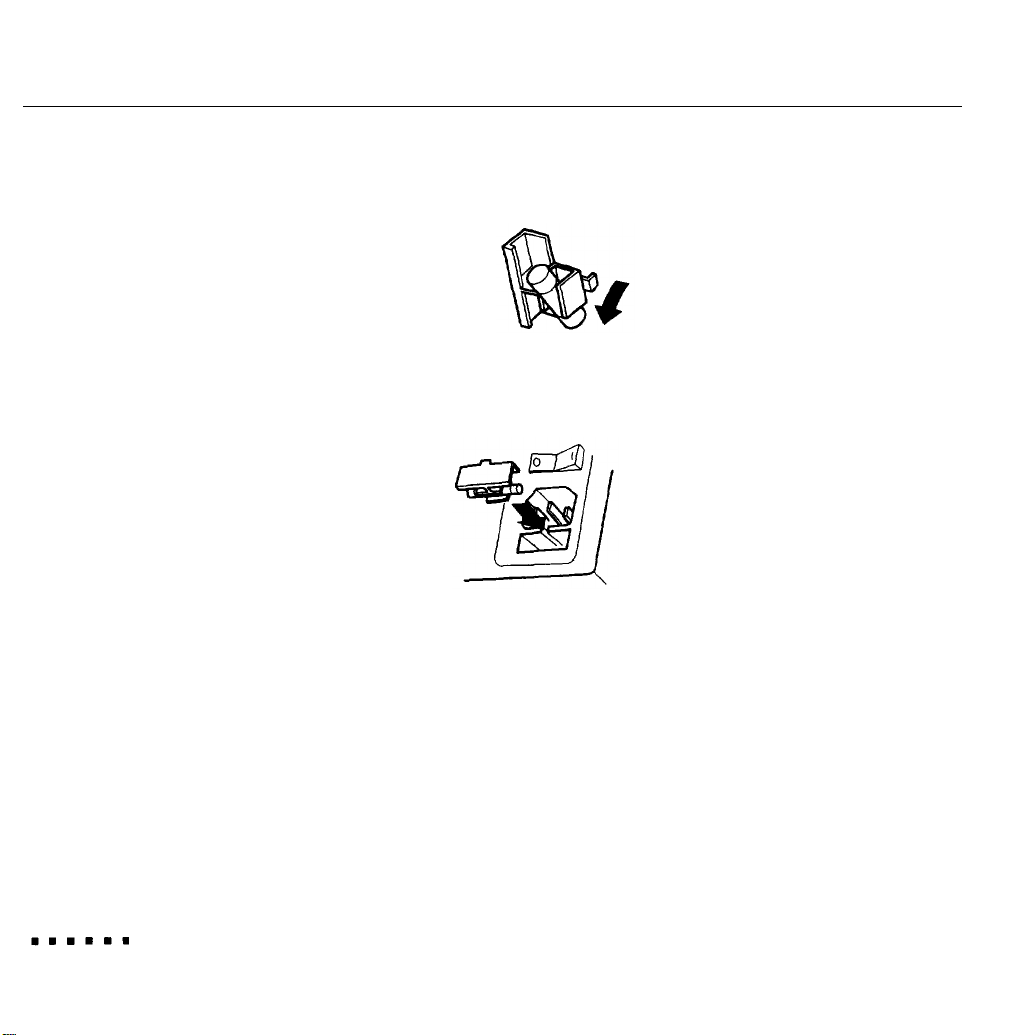
Remove the fuse holder by inserting a screwdriver or similar object into the
3.
groove. Then pry out the holder.
Follow
these steps:
Replacing the Fuse
n n n n n n
61
Page 77
4.
To
remove the fuse from the holder, pull out one end so it is at an angle
Then pull out the fuse.
5.
Insert the new fuse and push the fuse holder back into position.
6.
Reconnect the power cord.
62
5 l Maintenance
Page 78
Troubleshooting
his chapter describes what problems are indicated by the status lights and
T
provides information on what to do if you are having problems with the projector.
It is divided into the following sections:
.
General problems with the projector. See this section if the projector is not
working and to find out what the status lights are indicating.
l
Problems with the screen image. See this section if you cannot project an
image or if the screen image is not good.
l
Problems with the remote control. See this section if the projector or
computer does not respond correctly when you use the remote control.
If you have a problem, check the appropriate section and follow all suggestions
that apply to your problem. If none of the suggested solutions solves the problem,
call your ELP-3000 dealer or call the EPSON Connection. In the U.S., call
(800) 922-8911.
In Canada, call (800) GO-EPSON.
63
Page 79
Problems with the Projector
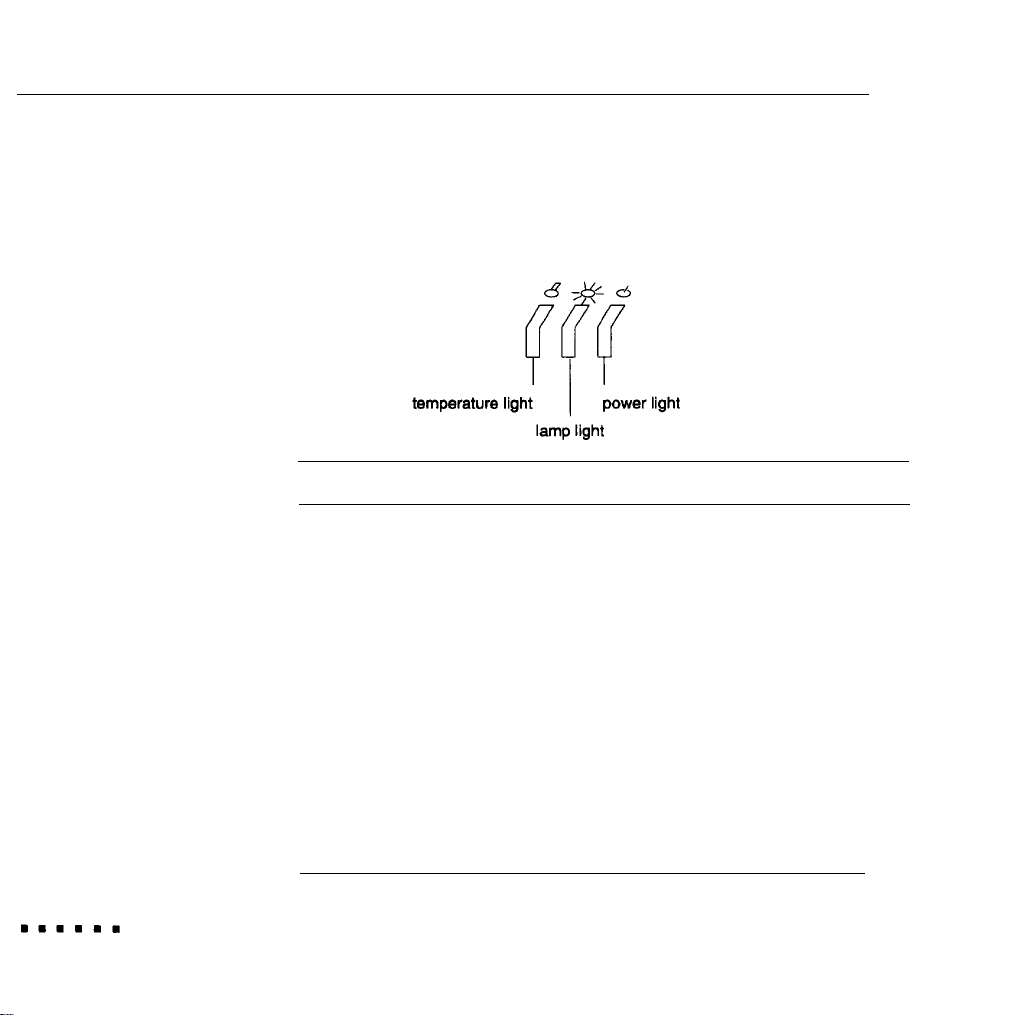
If you are having problems with the projector, first check the status lights at the
top of the projector. These lights monitor the operation of the projector.
64
status light
Temperature
Lamp
Power
6 l Troubleshooting
Color
Flashing orange
Orange
Flashing green
Green
Flashing orange
Flashing red
Orange
Green
Flashing green
Flashing red
Status
The projector is hot.
The projector is too hot. The lamp turns off.
The lamp is warming up.
The lamp is on.
The lamp is cooling down.
The lamp is not working.
The projector is in standby mode.
The projector and lamp are on.
The projector is receiving a signal from the
remote control.
There is a problem with the projector.
Page 80

For specific problems, see the following:
I
The power status light does not come on.
Check the power switch and make sure the power cable is securely connected at
both the power outlet and the projector.
The projector has become too hot and has turned off automatically Wait for the
projector to cool before turning it back on.
The fuse may have blown. Replace the fuse as described in Chapter 5.
I
The lamp does not come on.
The projector is in standby mode. Press the Standby button on the remote control
or the operation panel.
The lamp is burned out and needs to be replaced.
I
The temperature status light is flashing orange.
The lamp is too hot. Turn off the lamp and let it cool. When you turn the lamp
back on, check the temperature light again. Make sure nothing is blocking the
ventilation vents.
Problems with the Projector
65
Page 81

I
The temperature status light is orange.
The projector is overheating and turns the lamp off automatically. Let the
projector cool for a few minutes; then turn it back on. Make sure nothing is
blocking the ventilation vents.
The air filter may be clogged. Clean it as described in Chapter 5 and then let the
projector cool for a while.
If the projector continues to overheat after you clean the air filter, the problem
may be caused by damage to the cooling fan or internal circuits. Contact a
qualified service person.
The lamp status light is flashing red and the lamp does not come on.
Turn off the projector and turn it back on again. Check the lamp fight again.
If the lamp still does not come on, it may have burned out or become damaged.
Replace it as described in Chapter 5.
66
6 l Troubleshooting
Page 82

Problems with the Image or Sound
I An image does not appear on the screen.
Check that the power light is on and the lens cover is off. Also make sure the
Y-cable is installed correctly to both the image source and projector as described
in Chapter 1.
The projector may be in standby mode. Press the Standby button on the remote
control or operation panel to turn on the lamp.
The correct image source may not be selected. Press the Video button on the
remote control or operation panel to choose the other image source.
The brightness level may not be set correctly, Use the Brightness button to adjust
the brightness level.
I
Only part of the computer image is displayed.
Your monitor is set up for a resolution higher than 640 x 480, and the projector
is compressing the image. You need to choose a different monitor display setting.
In Windows, use Windows Setup in the Main program group. For a Macintosh,
choose Control Panels under the Apple menu and then Monitors; in the Monitors
screen, choose Options and make sure Macintosh Hi-Res Display or another
640 x
480 display is selected. For supported display settings, see Appendix A.
You may also need to modify existing presentation files if you created for them for
a different resolution. See your software manual for specific information,
Problems with the Image or Sound
67
Page 83

I
Only the test pattern is displayed.
The input source has not been selected correctly. Press the Video button on the
remote control or operation panel to select the other image source.
The projector is not detecting the signal from the source. Check that the cable is
securely attached to both the source and projector If it is, the problem may be
with your presentation software.
The proper order was not followed when the projector and peripheral devices
were turned on. Turn off the projector and all devices in the reverse order shown
on page 20. Then turn everything back on in the proper order.
I
The image or parts of the image are blurred or not in focus.
Turn the focus ring on the projector to see if this improves the image. Check also
that the projector is within the recommended distance
according
to the size of
the screen (see page 4). For the sharpest images, the projector must be perpendicular to the screen and the projection surface must be flat.
Adjust the Brightness and Contrast settings on the Computer or Video menu. If
you’re viewing a computer image, also try adjusting the Sync setting on the
Computer menu.
66
There may be dirt or stains on the lens. Clean the lens as described in Chapter 5.
6 l Troubleshooting
Page 84

I The colors of the image are not right.
The color balance may be incorrect. If you’re displaying a computer image,
adjust the Red, Green, and Blue settings in the Computer menu. If you’re
displaying video, adjust the Color and Tint settings. Check also that Invert in the
Display menu is not selected.
The video cable from your computer may not be properly attached. Check to see
that it is properly and securely attached to the connectors on both the projector
and image source.
I
Text is not displayed correctly.
The software program you are using displays text at 720
Pixel, but the projector
displays text at 640 Pixel. Use the Text setting in the Computer menu to compress
the text to 640 Pixel.
I
There is no sound.
Check first that the volume setting is not turned all the way down and that the
audio/video cable is securely attached to both the projector and the audio
source. Press the Mute button on the remote control to make sure the mute
function is not on.
The wrong source is selected. Use the Video button on the remote control to
change the source. Also, check that the Audio Source setting in the Audio menu
is not set for a specific source.
The Fade setting might not be appropriate. Adjust this setting in the Audio menu.
Problems with the Image or Sound
69
Page 85

Problems with the Remote Control
I
You
programmed the buttons on the remote control to control the
computer, but pressing one or more buttons has no effect.
First make sure the RS-23X serial cable is properly and securely connected as
described in Chapter
and the ELP Remote Programmer is running on your computer.
The remote control is more than 33 feet from the projector or is more than
30 degrees to the side of the projector. Move closer to the projector and hold the
remote control more directly in front of it.
There is an obstacle in the path between the remote control and the receiver at
the front or back of the projector. Remove anything blocking the path. If you’re
using rear projection and the screen is between the remote control and the
projector, you need to connect the remote control directly to the projector using
the optional lead wire.
Both the ELP Remote Programmer and ELP Link utilities are running. When both
are running, ELP Link has priority, You need to close ELP Link in order to use the
ELP Remote Programmer.
1.
Check that the Serial setting on the Options menu is on
70
The ELP Remote Programmer might be set up for a different serial port than the
one you’re using. Bring up the ELP Remote Programmer and open the Special
menu to check which serial COM port is selected.
6. Troubleshooting
Page 86

The batteries in the remote control are not inserted properly or are no longer
good. Reinsert them or replace them if necessary.
A strong light source, such as direct sunlight or a compact fluorescent tube, is
causing interference. Move the projector away from the strong fight source.
I
Using the trackball has no effect.
The remote control is in sleep mode. Press any button to exit sleep mode so you
can use the trackball.
I
Double-clicking a programmable button has no effect.
You are double-clicking too fast and the projector is not able to distinguish both
clicks. Double-click more slowly.
I
When using the ELP Remote Programmer on your PC, the mouse speed
is too slow or too East.
The ELP Remote Programmer mouse speed and the Windows Control Panel
mouse speed may be interfering with one another. First try adjusting the mouse
speed in the ELP Remote Programmer’s Special menu. If this does not solve the
problem, adjust the mouse speed in your computer’s Control Panel.
Problems with the Remote Control
71
Page 87
Technical Specifications
General
Type of display
Size of liquid
crystal panels
Resolution
Image size
Projection distance
Remote control range
Maximum volume
Thin Film Transistor (TFT)
1.32 inches (33.6 mm)
640 (horizontal) x 480 (vertical) pixels
21 to 300 inches (.5 to 7 meters)
4 to 40 feet (1.2 to 12.3 meters)
33 feet (10 meters)
1W X 1W stereo
73
Page 88

Optical
Aspect ratio
Brightness
Zoom ratio
Projector Lamp
Model number
Type
Power
Mechanical
Height
Width
Depth
Weight
4 x 3 (horizontal x vertical)
250 lumens maximum
1:1.4
MSCRl50E3H
Metal halide
150w
5.9 inches (14.9 cm)
11.2 inches (28.5 cm)
16.3 inches (41.3 cm)
17 lb (7.7 kg)
74
A l Technical Specifications
Page 89

Electrical
Environmental
Voltage
Rated frequency
Fuse type
Power
consumption
l00-120U4C and 220-240VAC
50/60 Hz
25OV, 6.3AT, 5 x 20mm
22OW (in standby mode, 5OW)
l00 - 120 VAC 3.5 Amps, 50/60 Hz
220 - 240 VAC 2.1 Amps, 50/60 Hz
Temperature Operation: 41 to 104°F (5 to 40° C)
Storage:
Humidity Operation:
14 to 140° F (-20 to 60° C)
20 to 80% RH,
non-condensing
Storage: 10 to 90% RH,
non-condensing
Electrical
75
Page 90

Supported Monitor Displays
The projector displays images at a resolution of 640 x 480 pixels. To display a
higher resolution image, the projector compresses it to 640 x 480.
The following table lists the display formats supported by the projector:
Computer type
IBM PC compatible VGA, VESA, NEC,
Apple Macintosh
l
Compressed to 640 x 460.
Formats
JEGA,
CGA
Standard 8- and
24-bit color monitor
Resolutions
640 x 460
640x200
640x400
640x360
720x360*
720x400
800X600*
640 x 460
640x400
76
A l Technical Specifications
Page 91

Pin Assignments
The following tables describe the pin assignments for the three connectors of the
Y-cable: LCD connector, VGA connector, and Monitor connector. The pin assignments for the VGA and Monitor connectors are identical.
LCD connector pin assignments
The LCD connector is a 26-pin D-style connector. Its pin assignments are as
follows:
Input pin Signal
1
2
8
6
7
9
16
17
18
20
21
22
23
24
25
26
Vertical sync
Horizontal sync
Blue analog
Intensity digital
Green digital
Red analog
Blue digital
Red digital
Green analog input with composite sync
GND
GND
GND
Digital/analog video cable ID
GND
VGA/no video cable ID pin
Monochrome digital (Hercules)
Pin Assignments
Output pin
10
11
14
12
13
15
3
4
5
19
77
Page 92

Monitor and VGA connector pin assignments
The Monitor connector is a female video RGB, 15-pin micro-D style connector, and
the VGA connector is a male video RGB, 15-pin micro-D style connector. The pin
assignments for both connectors are as follows:
Input pin
1
2
3
4
5
6 Red GND
7
8
9
10
11
12
13
14
15
Signal
Red analog input
Green analog input with composite sync
Blue analog input
GND
GND
Green GND
Blue GND
NC
Sync GND
GND
NC
Horizontal sync/composite sync input
Vertical sync input
NC
78
A l Technical Specifications
Page 93
Glossary
Brightness. The
Composite video. A type
synchronization information so it can be carried in one signal.
Contrast. A measure of the tonal differences between the highlights and
shadows of an image. In a high-contrast image, light areas are very bright and
dark areas are very dark, with relatively few levels of gray between white and
black Contrast is made lower by adding grays.
ELP Remote Programmer. Utility
control your computer. It also allows you to assign a keyboard macro to the
remote controls five programmable buttons.
Macro. As used in the ELP Remote Programmer, a series of 32 keystrokes and
mouse commands that can be assigned to a programmable button on the remote
control. Pressing the button has the same effect as typing the keys contained in
the macro.
balance of light and dark shades in an image.
of video signal that encodes picture, luminance, and
that
allows
you to use the remote control to
79
Page 94

NTSC. A 525-line video broadcast format developed by the National Television
Standards Committee, NTSC is widely used in North America, Mexico, and Japan.
PAL (Phase Alternation by Line).
A 625-line video broadcast format used in
Western Europe, India, China, Australia, New Zealand, and parts of Africa.
Record mode.
A Remote Control Programmer mode in which the codes for
non-character keys are entered automatically when the key is pressed.
Resolution.
A measure of the amount of detail contained in an image. Resolution can be measured in dots per inch or in pixels. Image sharpness and clarity
improve as resolution increases.
RGB.
A type of color scheme that defines color as percentages of red, green, and
blue.
RS-232C. A standard type of serial communication.
S-Video.
A type of video signal used in S-VHS videotape formats. It transmits
luminance and color separately
Saturation.
A measure of how much white is mixed with a hue. For example,
a pale pink and bright red are the same hue but differ in the level of saturation,
with red being very saturated and pink being pure (not saturated).
SECAM (System Electronique pour Couleur Avec Memoire).
A 625-line
TV system used in France, Eastern Europe, Russia, and parts of Africa.
80
Glossary
Page 95

Serial. The type of communication interface that transmits data over a single
wire.
Sleep mode.
A battery-saving feature in which the remote control becomes idle
when it is not used for 15 minutes.
Standby mode.
A power-saving feature in which the projector remains on but
the lamp is turned off. By default, standby mode is automatically turned on when
the projector is not used for 10 minutes.
VGA.
Video Graphics Array, A high-resolution display adapter that provides a
variety of video modes.
Glossary
81
 Loading...