

Page 1
EB-PU2113W/EB-PU2213B EB-
PU2116W/EB-PU2216B EB-
PU2120W/EB-PU2220B User's Guide
Page 2

Page 3

Contents
EB-PU2113W/EB-PU2213B/EB-PU2116W/EB-PU2216B/EB-PU2120W/EB-PU2220B User's Guide ... 11
Introduction to Your Projector ................................................................................................................. 12
Projector Features.............................................................................................................................. 12
Product Box Contents.................................................................................................................... 13
Additional Components ................................................................................................................ 14
Additional Projector Software and Manuals................................................................................... 15
Optional Equipment and Replacement Parts................................................................................. 18
Optional Equipment and Replacement Parts (Latin America)........................................................ 18
Warranty and Registration Information (U.S. and Canada) ........................................................... 19
Warranty and Registration Information (Latin America)................................................................. 19
Notations Used in the Documentation ................................................................................................ 20
Where to Go for Additional Information .............................................................................................. 20
Projector Part Locations ..................................................................................................................... 20
Projector Parts - Front/Top ............................................................................................................ 21
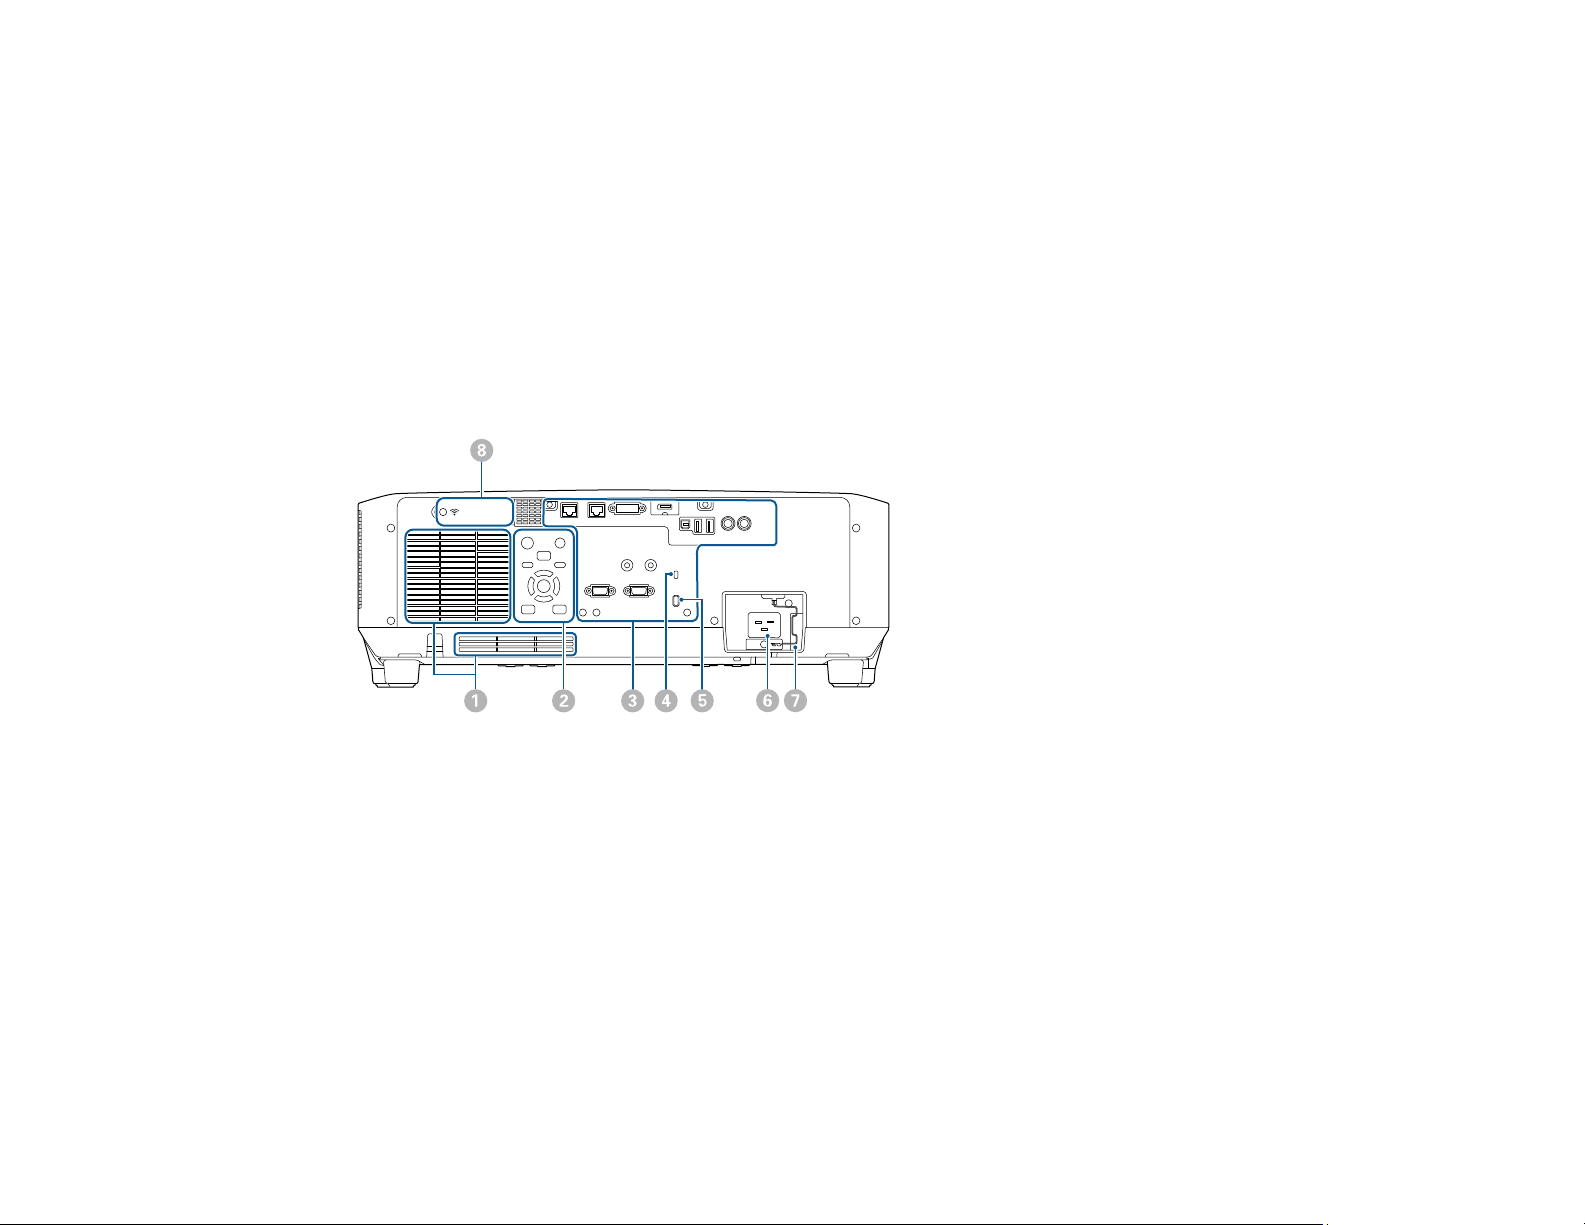
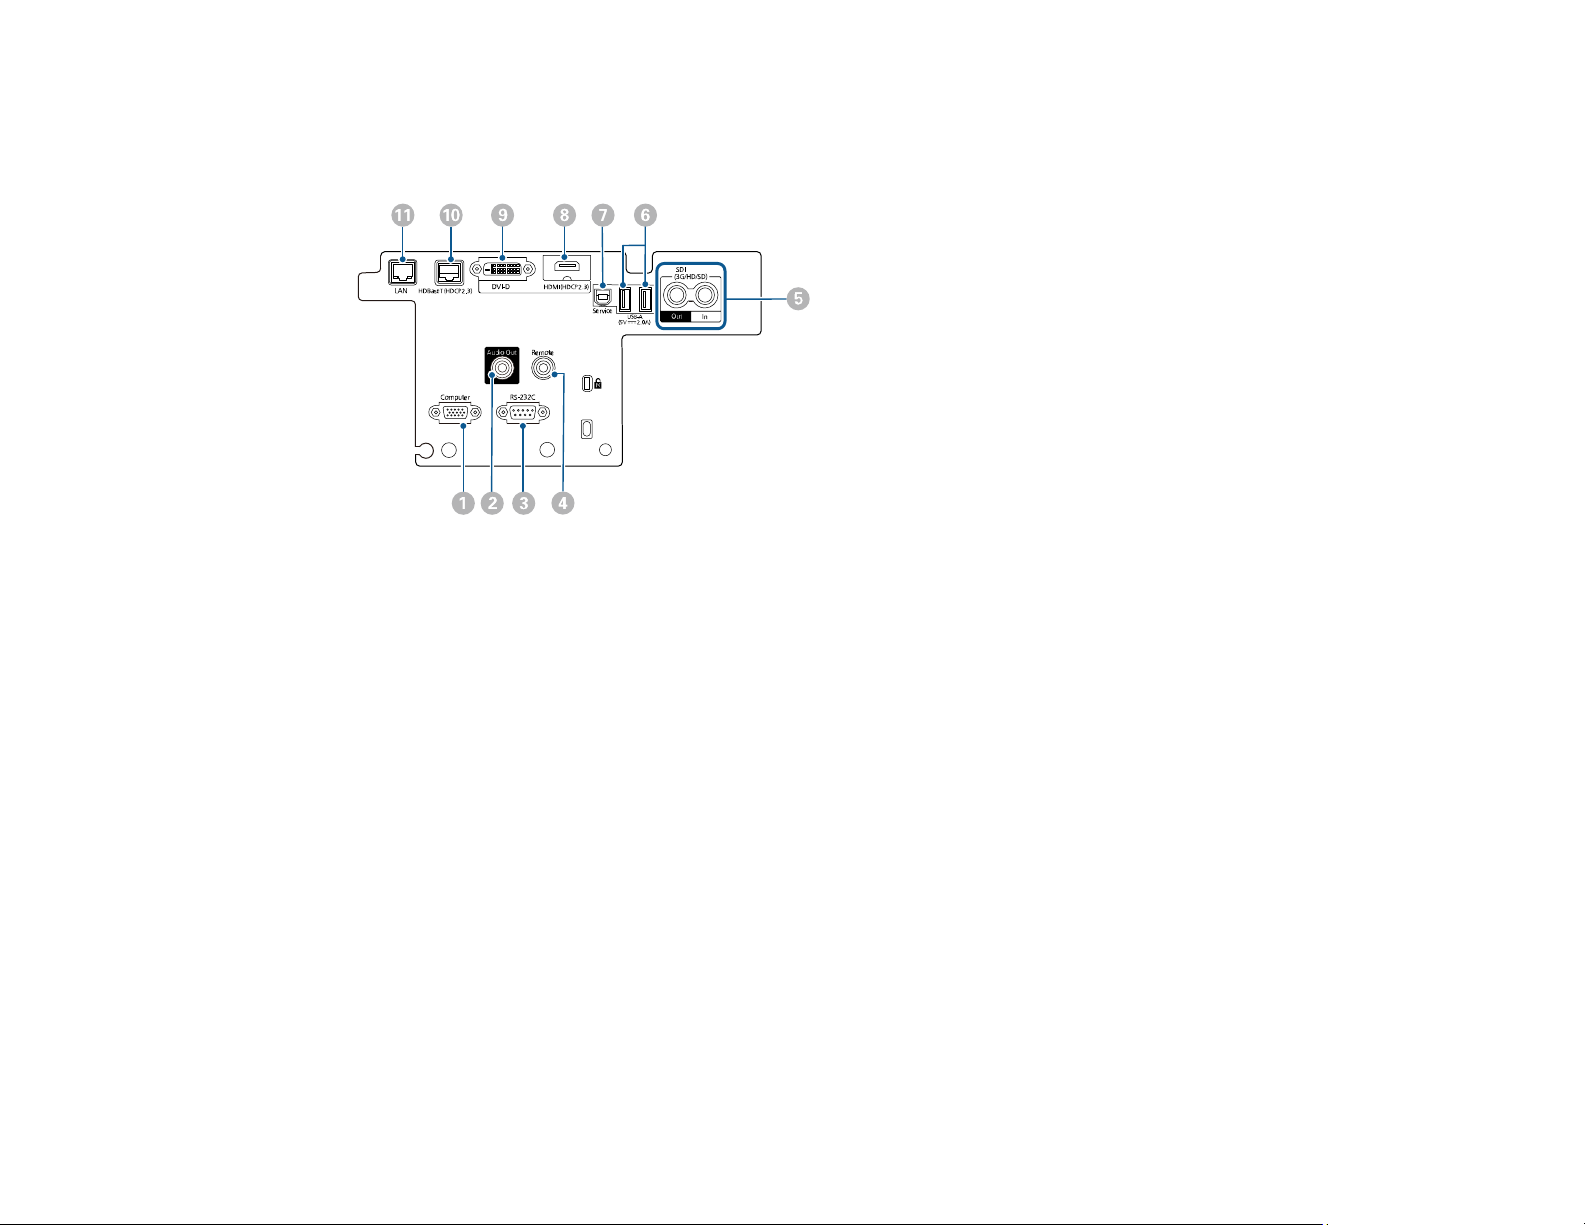
Projector Parts - Rear.................................................................................................................... 22
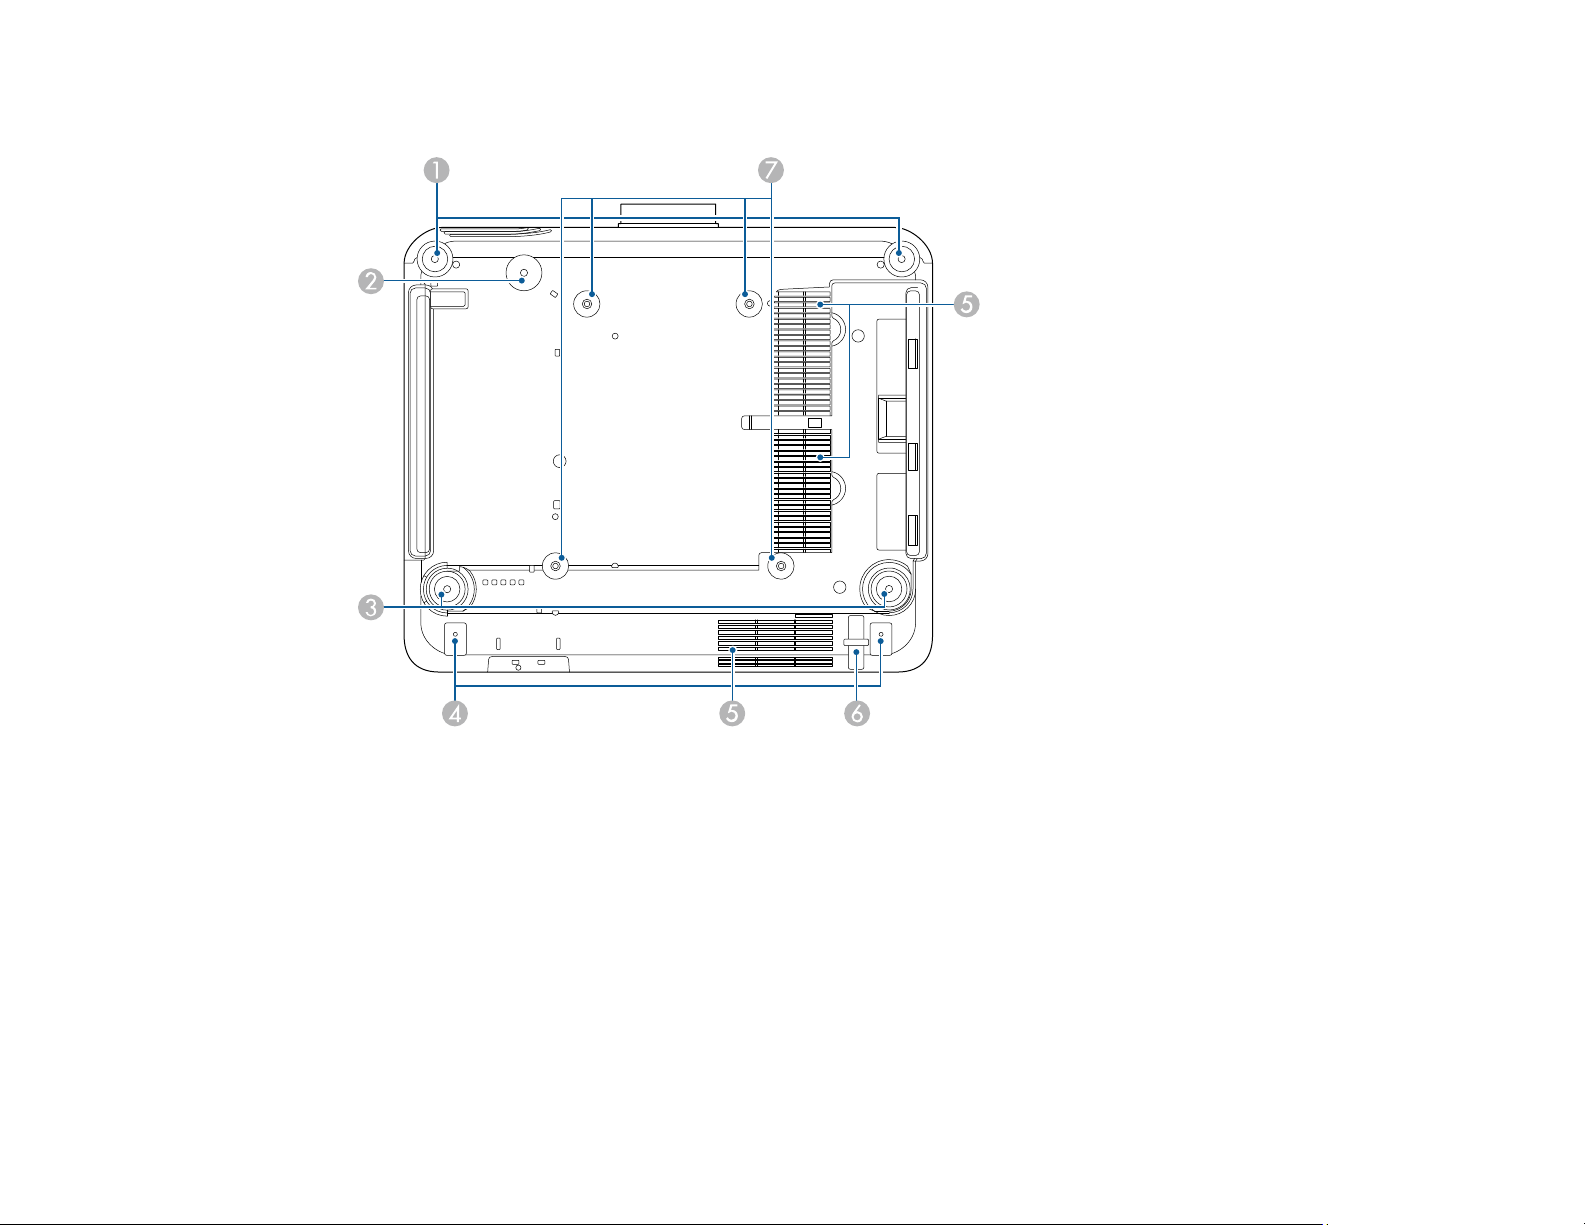
Projector Parts - Interface Ports .................................................................................................... 23
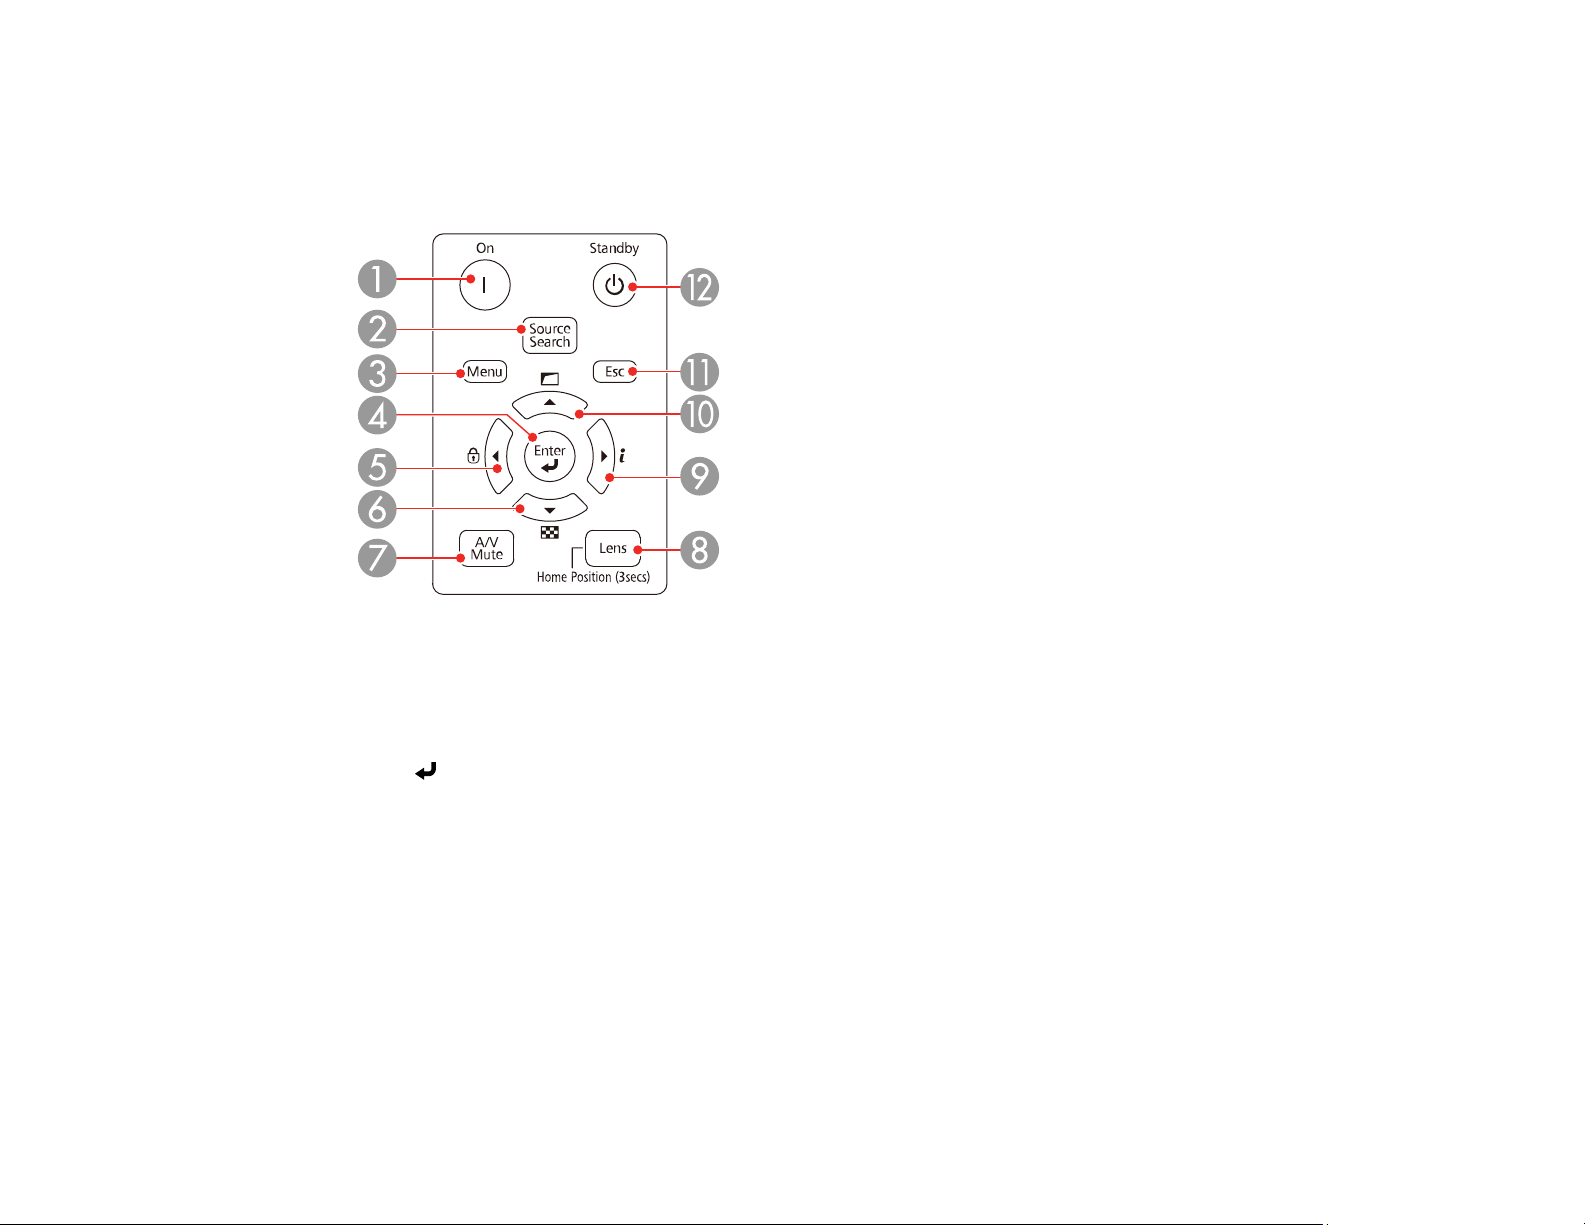
Projector Parts - Base.................................................................................................................... 24
Projector Parts - Control Panel ...................................................................................................... 25
Projector Parts - Remote Control................................................................................................... 27
Setting Up the Projector ........................................................................................................................... 30
Projector Placement........................................................................................................................... 30
Projector Setup and Installation Options ....................................................................................... 30
Projection Distance........................................................................................................................ 34
Projector Connections........................................................................................................................ 34
Connecting to Video Sources ........................................................................................................ 34
Connecting to an HDMI Video Source ...................................................................................... 35
Connecting to an SDI Video Source.......................................................................................... 35
Connecting to a Component Video Source ............................................................................... 36
Connecting to Computer Sources.................................................................................................. 37
Connecting to a Computer for VGA Video................................................................................. 37
3
Page 4

Connecting to a Computer for HDMI Video and Audio.............................................................. 37
Connecting to a Computer for DVI-D Video .............................................................................. 38
Connecting to an HDBaseT Transmitter ....................................................................................... 39
Connecting to External Speakers .................................................................................................. 40
Attaching and Removing a Lens......................................................................................................... 41
Attaching a Lens ........................................................................................................................... 41
Removing a Lens .......................................................................................................................... 47
Attaching and Removing the Cable Cover.......................................................................................... 50
Installing the Safety Wire.................................................................................................................... 51
Installing Batteries in the Remote Control .......................................................................................... 52
Using the Projector on a Network ............................................................................................................ 54
Wired Network Projection................................................................................................................... 54
Connecting to a Wired Network ..................................................................................................... 54
Selecting Wired Network Settings ................................................................................................. 55
Wireless Network Projection .............................................................................................................. 58
Installing the Wireless LAN Module ............................................................................................... 59
Using a QR Code to Connect a Mobile Device .............................................................................. 61
Using Quick Wireless Connection (Windows)................................................................................ 63
Selecting Wireless Network Settings Manually.............................................................................. 64
Wireless LAN Menu Settings .................................................................................................... 67
Selecting Wireless Network Settings in Windows.......................................................................... 69
Selecting Wireless Network Settings on Mac ................................................................................ 70
Setting Up Wireless Network Security ........................................................................................... 70
Setting Up Projector Network E-Mail Alerts........................................................................................ 72
Network Projector E-mail Alert Messages ..................................................................................... 74
Selecting Other Network Settings....................................................................................................... 74
Controlling a Networked Projector Using a Web Browser .................................................................. 75
Web Control Options ..................................................................................................................... 77
Viewing an Image Capture of the Displayed Image from a Remote Location ............................... 86
Controlling a Networked Projector in Content Playback Mode ........................................................... 89
Web Control Options in Content Playback Mode........................................................................... 92
Using Crestron Connected................................................................................................................. 96
Setting Up Crestron Connected..................................................................................................... 97
4
Page 5

Controlling a Networked Projector Using Crestron Connected...................................................... 98
Registering a Digital Certificate on the Projector ................................................................................ 99
Importing a Web Server Certificate Using the Projector Menus..................................................... 99
Registering Digital Certificates from a USB Device ..................................................................... 100
Registering Digital Certificates from a Web Browser ................................................................... 102
Digital Certificate Types............................................................................................................... 104
Using Basic Projector Features ............................................................................................................. 106
Turning On the Projector .................................................................................................................. 106
Using the Home Screen............................................................................................................... 109
Turning Off the Projector .................................................................................................................. 110
Selecting the Language for the Projector Menus.............................................................................. 112
Setting the Date and Time................................................................................................................ 112
Date and Time Settings ............................................................................................................... 113
Resizing the Image with the Zoom Button ........................................................................................ 114
Focusing the Image Using the Focus Buttons .................................................................................. 115
Focusing the Image When Using an Optional Short Throw Lens ................................................ 116
Setting the Lens Type ...................................................................................................................... 117
Setting the Screen Type................................................................................................................... 118
Adjusting the Image Position Using Lens Shift ................................................................................. 119
Adjusting the Image Position Using Screen Position........................................................................ 120
Displaying a Test Pattern ................................................................................................................. 121
Adjusting the Image Height .............................................................................................................. 122
Image Shape.................................................................................................................................... 123
Correcting Image Shape with H/V-Keystone ............................................................................... 124
Correcting Image Shape with Quick Corner ................................................................................ 127
Correcting Image Shape with Curved Surface ............................................................................ 129
Correcting Image Shape with Corner Wall................................................................................... 133
Correcting Image Shape with Point Correction............................................................................ 139
Selecting an Image Source .............................................................................................................. 142
Remote Control Operation ............................................................................................................... 144
Projection Modes ............................................................................................................................. 145
Changing the Projection Mode Using the Remote Control .......................................................... 145
Changing the Projection Mode Using the Menus......................................................................... 146
5
Page 6

Image Aspect Ratio .......................................................................................................................... 147
Changing the Image Aspect Ratio ............................................................................................... 147
Available Image Aspect Ratios.................................................................................................... 148
Color Mode....................................................................................................................................... 149
Changing the Color Mode............................................................................................................ 150
Available Color Modes................................................................................................................. 150
Adjusting the Brightness................................................................................................................... 151
Constant Brightness Usage Hours .............................................................................................. 153
Adjusting Luminance Controls.......................................................................................................... 155
Controlling the Volume with the Volume Buttons.............................................................................. 157
Projecting in Content Playback Mode............................................................................................... 158
Projecting a Playlist in Content Playback Mode........................................................................... 158
Adding Effects to the Projected Image......................................................................................... 160
Adjusting Projector Features ................................................................................................................. 162
Shutting Off the Picture and Sound Temporarily (A/V Mute) ............................................................ 162
Shutting Off the Picture and Sound Temporarily (Shutter) ............................................................... 163
Stopping Video Action Temporarily .................................................................................................. 164
Zooming Into and Out of Images ...................................................................................................... 164
Projector Security Features.............................................................................................................. 165
Password Security Types ............................................................................................................ 166
Setting a Password ................................................................................................................. 166
Selecting Password Security Types........................................................................................ 168
Entering a Password to Use the Projector............................................................................... 169
Saving a User's Logo Image to Display................................................................................... 170
Locking the Projector's Lens Settings and Buttons...................................................................... 172
Unlocking the Projector's Buttons ........................................................................................... 173
Locking the Remote Control Buttons .......................................................................................... 173
Installing a Security Cable ........................................................................................................... 174
Projecting Two Images Simultaneously............................................................................................ 176
Using Advanced Image Adjustment Features .................................................................................. 178
Using Frame Interpolation .......................................................................................................... 179
Using 4K Enhancement............................................................................................................... 180
Creating Image Presets............................................................................................................... 182
6
Page 7

Using MPEG Noise Reduction..................................................................................................... 183
Adjusting Scaled Resolution Images (Super-resolution) ............................................................. 184
Adjusting Detail Enhancement .................................................................................................... 185
Adjusting the Color Convergence (Panel Alignment)................................................................... 186
Adjusting the Color Tone (Color Uniformity) ................................................................................ 188
Running Light Source Calibration ................................................................................................ 190
Using Multiple Projectors ................................................................................................................. 192
Multiple Projector Adjustment Overview ...................................................................................... 192
Projector Identification System for Multiple Projector Control ...................................................... 195
Setting the Projector ID........................................................................................................... 195
Setting the Remote Control ID ................................................................................................ 196
Tiling Images into One Image...................................................................................................... 197
Configuring Tiling Automatically.............................................................................................. 198
Configuring Tiling Manually..................................................................................................... 200
Blending the Image Edges .......................................................................................................... 202
Adjusting the Black Level ............................................................................................................ 204
Matching Tint and Brightness (Screen Matching) ....................................................................... 208
Screen Matching Conditions ................................................................................................... 209
Matching the Screens Manually ............................................................................................. 210
Scaling an Image......................................................................................................................... 211
Simple Stacking for One Bright Image......................................................................................... 212
Simple Stacking Conditions .................................................................................................... 212
Setting Up Simple Stacking..................................................................................................... 213
Saving Settings to Memory and Using Saved Settings .................................................................... 214
Saving a Scheduled Event ............................................................................................................... 216
Viewing Scheduled Events .......................................................................................................... 218
Editing a Scheduled Event........................................................................................................... 218
Copying Menu Settings Between Projectors .................................................................................... 219
Saving Settings to a USB Flash Drive.......................................................................................... 220
Transferring Settings from a USB Flash Drive............................................................................. 221
Saving Settings to a Computer .................................................................................................... 222
Transferring Settings from a Computer ....................................................................................... 223
7
Page 8

Adjusting the Menu Settings .................................................................................................................. 225
Using the Projector's Menus............................................................................................................. 225
Image Quality Settings - Image Menu .............................................................................................. 227
Input Signal Settings - Signal Menu.................................................................................................. 231
Projector Feature Settings - Settings Menu...................................................................................... 234
Projector Setup Settings - Extended Menu....................................................................................... 241
Projector Network Settings - Network Menu..................................................................................... 250
Projector Information Display - Info Menu ........................................................................................ 252
Event ID Code List....................................................................................................................... 254
Projector Reset Options - Reset Menu............................................................................................. 256
Maintaining and Transporting the Projector ......................................................................................... 259
Projector Maintenance ..................................................................................................................... 259
Cleaning the Lens........................................................................................................................ 259
Cleaning the Projector Case........................................................................................................ 260
Cleaning the Air Vents................................................................................................................. 260
Replacing the Remote Control Batteries ..................................................................................... 261
Transporting the Projector................................................................................................................ 263
Solving Problems .................................................................................................................................... 265
Projection Problem Tips ................................................................................................................... 265
Projector Light Status ....................................................................................................................... 266
Viewing the Status Display............................................................................................................... 270
Projector Status Display Messages ............................................................................................. 272
Using the Projector Help Displays .................................................................................................... 278
Solving Image or Sound Problems ................................................................................................... 278
Solutions When No Image Appears............................................................................................. 279
Solutions When "No Signal" Message Appears........................................................................... 280
Displaying From a PC Laptop ................................................................................................. 280
Displaying From a Mac Laptop ............................................................................................... 281
Solutions When "Not Supported" Message Appears ................................................................... 281
Solutions When Only a Partial Image Appears............................................................................ 281
Solutions When the Image is Not Rectangular ............................................................................ 282
Solutions When the Image Contains Noise or Static ................................................................... 283
Solutions When the Image is Fuzzy or Blurry .............................................................................. 284
8
Page 9

Solutions When the Image Brightness or Colors are Incorrect .................................................... 285
Solutions When an Afterimage Remains On the Projected Image............................................... 285
Solutions When Automatic Adjustments are not Applied Correctly.............................................. 286
Solutions to Simple Stacking Problems ....................................................................................... 287
Solutions to Sound Problems ...................................................................................................... 288
Solving Projector or Remote Control Operation Problems ............................................................... 289
Solutions to Projector Power or Shut-Off Problems..................................................................... 289
Solutions to Remote Control Problems........................................................................................ 290
Solutions to Password Problems ................................................................................................. 291
Solutions When a Battery Message Appears ................................................................................... 291
Solving Network Problems ............................................................................................................... 292
Solutions When Wireless Authentication Fails ............................................................................ 292
Solutions When You Cannot Access the Projector Through the Web ......................................... 292
Solutions When the Image Contains Static During Network Projection ....................................... 293
Solutions When Network Alert E-Mails are Not Received............................................................ 293
Solutions to Problems Using Content Playback ............................................................................... 294
Where to Get Help (U.S. and Canada) ............................................................................................. 295
Where to Get Help (Latin America)................................................................................................... 296
Technical Specifications ........................................................................................................................ 298
General Projector Specifications ...................................................................................................... 298
Projector Light Source Specifications............................................................................................... 300
Remote Control Specifications ......................................................................................................... 301
Projector Dimension Specifications.................................................................................................. 301
Projector Electrical Specifications .................................................................................................... 302
Projector Environmental Specifications............................................................................................ 304
Projector Safety and Approvals Specifications................................................................................. 305
Supported Monitor Display Resolutions ........................................................................................... 305
Notices ..................................................................................................................................................... 312
Recycling (U.S. and Canada)........................................................................................................... 312
Important Safety Information ............................................................................................................ 312
Important Safety Instructions............................................................................................................ 313
Laser Safety Information (EB-PU2113W/EB-PU2213B/EB-PU2116W/EB-PU2216B)................ 316
Laser Safety Information (EB-PU2120W/EB-PU2220B) ............................................................. 317
9
Page 10

Laser Safety Labels (EB-PU2113W/EB-PU2213B/EB-PU2116W/EB-PU2216B) ....................... 318
Laser Safety Labels (EB-PU2120W/EB-PU2220B)..................................................................... 319
Hazard Distance (HD) ................................................................................................................. 323
Restriction of Use ........................................................................................................................ 325
List of Safety Symbols (corresponding to IEC60950-1 A2)............................................................... 325
FCC Compliance Statement............................................................................................................. 329
Manufacturer and Importer Address................................................................................................. 331
Binding Arbitration and Class Waiver ............................................................................................... 331
Trademarks...................................................................................................................................... 334
Copyright Notice............................................................................................................................... 335
A Note Concerning Responsible Use of Copyrighted Materials................................................... 335
Copyright Attribution.................................................................................................................... 335
10
Page 11

EB-PU2113W/EB-PU2213B/EB-PU2116W/EB-PU2216B/EBPU2120W/EB-PU2220B User's Guide
Welcome to the EB-PU2113W/EB-PU2213B/EB-PU2116W/EB-PU2216B/EB-PU2120W/EB-PU2220B
User's Guide.
For a printable PDF copy of this guide, click here.
Note: Availability of products in this guide varies by country.
11
Page 12

Introduction to Your Projector
Refer to these sections to learn more about your projector and this manual.
Projector Features
Notations Used in the Documentation
Where to Go for Additional Information
Projector Part Locations
Projector Features
Your projector includes these special features:
Bright, high-resolution projection system
• Between 13000 and 20000 lumens of brightness (white light output and color light output), depending
on your projector model
Note: Color brightness (color light output) and white brightness (white light output) will vary depending
on usage conditions. Color light output measured in accordance with IDMS 15.4; white light output
measured in accordance with ISO 21118.
• Native resolution of 1920 × 1200 pixels (WUXGA)
• 4K enhancement doubles full HD resolution and provides beautiful, high-definition images
• 3-chip 3LCD technology provides brighter colors and uncompromising image quality
• Mechanical shutter available on the EB-PU2213B/EB-PU2216B/EB-PU2220B
• HDR support for dynamic images
• Scene adaptive gamma correction for clear and natural images
• Overlay effects can add color filters or shapes to your projected images
Flexible connectivity
• Wired and wireless (optional) network support for projection, monitoring, and control via remote
network computer
• Variety of connection methods for a computer or video device including HDMI, DVI-D, and HDBaseT
• SDI connectivity available on the EB-PU2213B/EB-PU2216B/EB-PU2220B
• Port for connecting external speakers
12
Page 13

• Optional camera accessory for shooting remote images and accessing advanced tools to speed up
and simplify setup
Easy-to-use setup and operation features
• Interchangeable bayonet lens options available
• Built-in NFC chip provides reduced installation time for multiple projectors using the Epson Projector
Config Tool app for iOS and Android
• Stacking assist function allows you to create bright images by overlapping the images of multiple
projectors using the camera accessory
• Side-by-side projection from two separate input sources
• Projection onto curved or corner surfaces
• Built-in Edge Blending tool can create one large seamless display when projecting from multiple
projectors
• Epson's Instant Off and Direct Power On features for quick setup and shut down
• Support for Crestron Connected network monitoring systems
• Network message broadcast system to project timely messages to all networked projectors (Windows
only)
• Sealed light source and optical engine removes need for air filter cleaning
Product Box Contents
Additional Components
Additional Projector Software and Manuals
Optional Equipment and Replacement Parts
Optional Equipment and Replacement Parts (Latin America)
Warranty and Registration Information (U.S. and Canada)
Warranty and Registration Information (Latin America)
Parent topic: Introduction to Your Projector
Product Box Contents
Save all the packaging in case you need to ship the projector. Always use the original packaging (or
equivalent) when shipping.
13
Page 14
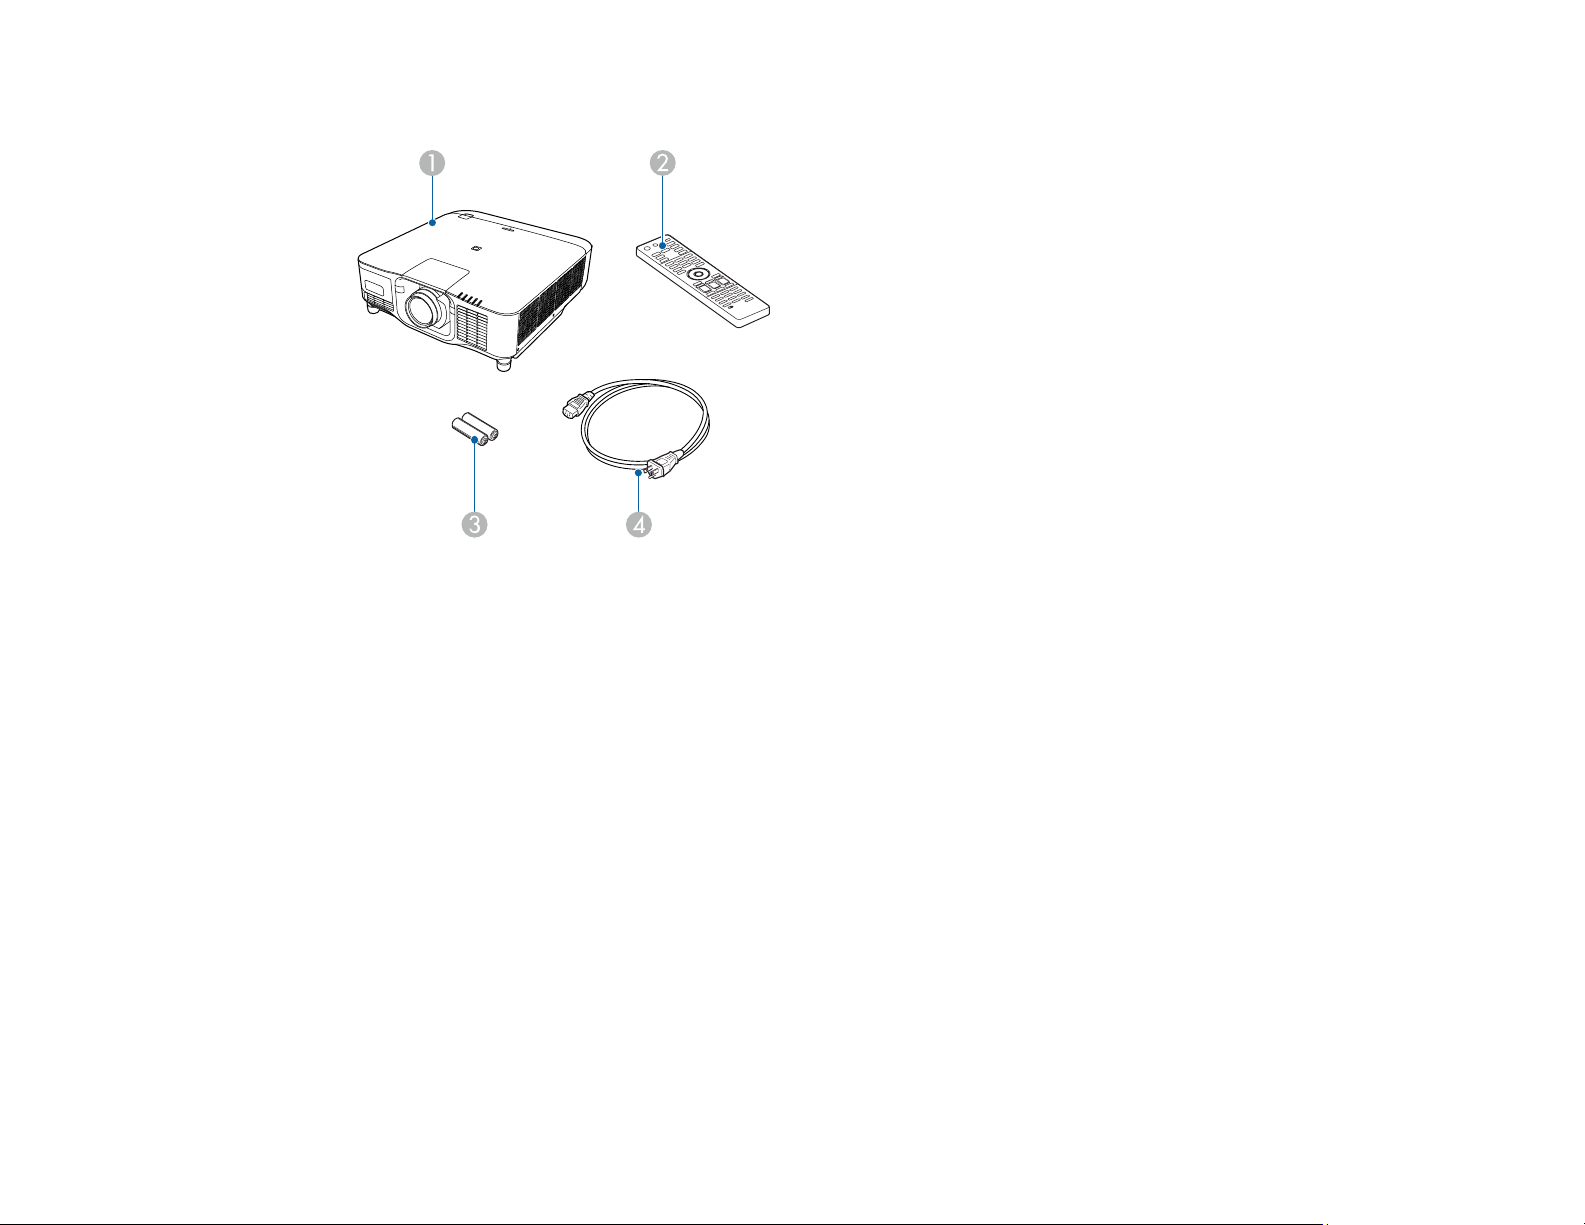
Make sure your projector box included all of these parts:
1 Projector (with cable cover)
Note: Projector does not include a lens.
2 Remote control
3 Remote control batteries (two AA alkaline)
4 Power cord
Parent topic: Projector Features
Additional Components
Depending on how you plan to use the projector, you may need to obtain additional components.
Note: To connect a Mac that does not include a compatible video output port, you need to obtain an
adapter that allows you to connect to an input port on the projector. Contact Apple for compatible
adapter options. To connect a smartphone or tablet, you may need to obtain an adapter that allows you
to connect to the projector. This allows you to mirror your smartphone or tablet screens, watch movies,
and more. Contact your device manufacturer for compatible adapter options.
14
Page 15
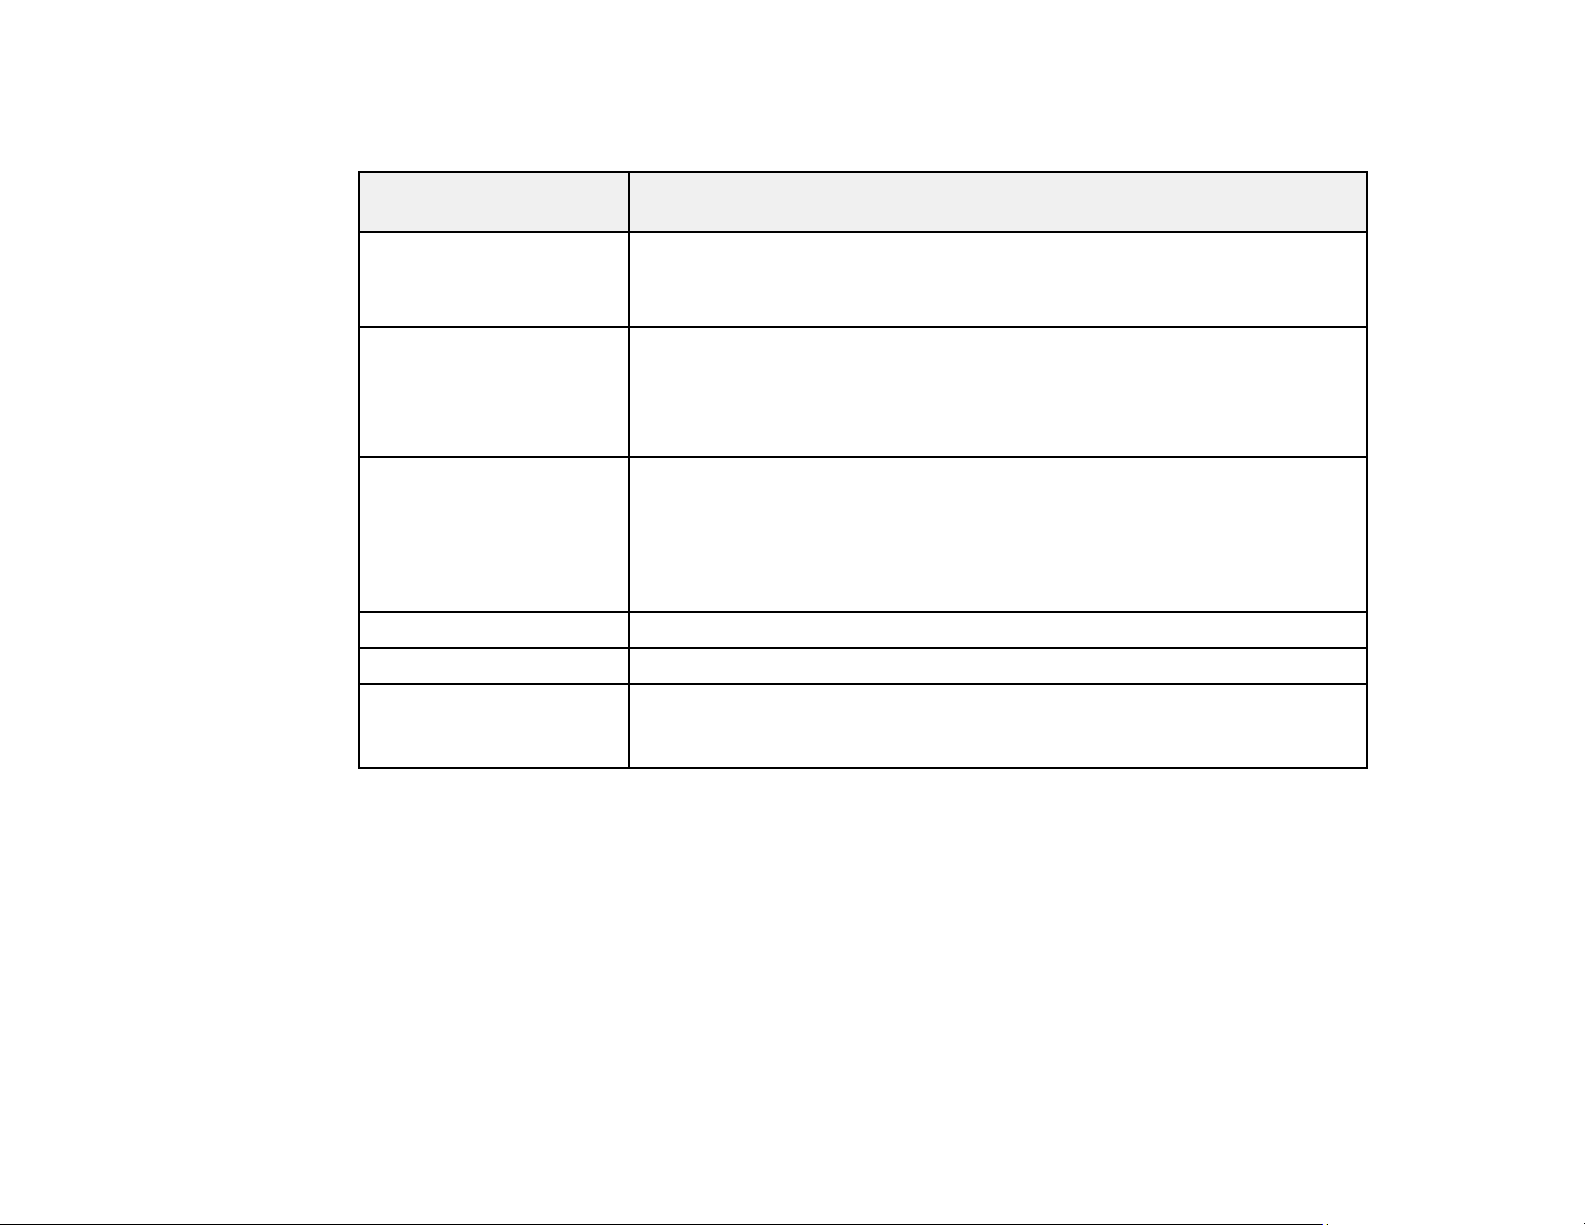
Unless listed as available from Epson in this table, see your local computer or electronics dealer for
purchase information.
Signal or connection
type
Component video Component-to-BNC or D-sub, 15-pin, component-to-VGA video cable or
HDMI HDMI cable
VGA VGA computer cable
DVI-D Compatible DVI-D 24-pin single-link cable
HDBaseT Compatible 100Base-TX LAN cable
SDI (EB-PU2213B/ EBPU2216B/EB-PU2220B
only)
Additional component necessary
adapter
Available for purchase from Epson or an authorized Epson reseller.
Available for purchase from Epson or an authorized Epson reseller.
You also need a splitter that supports HDMI signals (commercially
available).
Available for purchase from Epson or an authorized Epson reseller.
If you want to connect the projector using a splitter, you also need a splitter
that supports VGA signals (commercially available) and a second VGA
computer cable.
Compatible BNC video cable
Parent topic: Projector Features
Related concepts
Projector Connections
Additional Projector Software and Manuals
After connecting and setting up the projector, install the projector software as necessary. You may need
to install it from a software CD, if included, or download the software and manuals as necessary.
You can install the projector software programs listed here and view their manuals for instructions on
using them.
15
Page 16

Note: If you still need help after checking this manual and the sources listed here, you can use the
Epson PrivateLine Support service to get help fast. For details, see "Where to Get Help."
Projector software Manual Description
Epson Projector
Management (Windows
only)
Epson iProjection
(Windows/Mac)
Epson Projector
Management Operation
Guide
Epson iProjection
Operation Guide
(Windows/Mac)
Epson iProjection app Instructions are included
with the app
Epson Projector
Professional Tool
(Windows/Mac)
Epson Projector
Professional Tool
Operation Guide
Lets you monitor and control your projector
through the network.
You can download the latest software and
documentation from the Epson web site. Go to
epson.com/support (U.S.), epson.ca/support
(Canada), or latin.epson.com/support
(Caribbean) and select your projector.
Lets you project the computer screens of
users over a network.
You can download the latest software and
documentation from the Epson web site. Go to
epson.com/support (U.S.), epson.ca/support
(Canada), or latin.epson.com/support
(Caribbean) and select your projector.
Visit epson.com/support (U.S.),
epson.ca/support (Canada), or
latin.epson.com/support (Caribbean) for more
information. (Software available only in
English.)
Lets you manage multiple Epson projectors
simultaneously
You can download the latest software and
documentation from the Epson web site. Go to
epson.com/support (U.S.), epson.ca/support
(Canada), or latin.epson.com/support
(Caribbean) and select your projector.
(Software and documentation available only in
English.)
16
Page 17

Projector software Manual Description
— Open Source Software
License
Epson Projector Content
Manager
Epson Creative Projection
(iOS only)
Epson Projector Content
Manager Operation Guide
Instructions are included
with the app (instructions
included with the app
available only in English)
You can download this document from the
Epson web site. Go to epson.com/support
(U.S.), epson.ca/support (Canada), or
latin.epson.com/support (Caribbean) and
select your projector. (Document available
only in English.)
Lets you add images and movies to playlists,
and save them on a USB device; insert the
USB device into the projector to project your
playlist content without using a cable
connection.
You can download the latest software and
documentation from the Epson web site. Go to
epson.com/support (U.S.), epson.ca/support
(Canada), or latin.epson.com/support
(Caribbean) and select your projector.
Lets you create custom content using built-in
templates and stamps, and wirelessly transfer
it to the projector if it is connected to a network
that includes a wireless access point.
You can download the latest software and
documentation from the Apple App Store.
Epson Projector
Configuration Tool
Instructions are included
with the app (instructions
included with the app
available only in English)
Lets you use the NFC feature of your projector
to speed up installation (kitting), read and write
projector settings, manage installed projectors,
and more.
You can download the latest software and
documentation from the Apple App Store or
Google Play Store.
Note: Epson iProjection is not recommended for use with streaming video.
Parent topic: Projector Features
17
Page 18

Optional Equipment and Replacement Parts
You can purchase screens, other optional accessories, and replacement parts from an Epson authorized
reseller. To find the nearest reseller, call 800-GO-EPSON (800-463-7766) in the U.S. or 800-807-7766 in
Canada. Or you can purchase online at epsonstore.com (U.S. sales) or epsonstore.ca (Canadian sales).
Epson offers the following optional accessories and replacement parts for your projector:
Option or part Part number
Remote control cable set (ELPKC28) V12H005C28
Ultra short-throw lens (ELPLX02S) V12H004X0B
White ultra short-throw lens (ELPLX02WS) V12H004Y0B
Short-throw #1 zoom lens (ELPLU03S) V12H004UA3
Short-throw #2 zoom lens (ELPLU04) V12H004U04
Wide-throw #2 zoom lens (ELPLW06) V12H004W06
Wide-throw #3 zoom lens (ELPLW08) V12H004W08
Middle-throw #2 zoom lens (ELPLM15) V12H004M0F
Middle-throw #3 zoom lens (ELPLM10) V12H004M0A
Middle-throw #4 zoom lens (ELPLM11) V12H004M0B
Long throw zoom lens (ELPLL08) V12H004L08
Rigging Frame ELPMB59
Wireless LAN Module (ELPAP11) V12H005A02
Projector Ceiling Mount (ELPMB67) V12HA54010
Suspension Adapter (ELPFP15) V12HA55010
PixAlign Camera (ELPEC01) V12HA46010
Parent topic: Projector Features
Optional Equipment and Replacement Parts (Latin America)
You can purchase optional accessories and replacement parts from an Epson authorized reseller. To
find the nearest reseller, go to latin.epson.com. Or you can contact your nearest sales office as
described in "Where to Get Help".
18
Page 19

Note: Availability of accessories varies by country.
Epson offers the following optional accessories and replacement parts for your projector:
Option or part Part number
Remote control cable set (ELPKC28) V12H005C28
Ultra short-throw lens (ELPLX02S) V12H004X0B
Short-throw #1 zoom lens (ELPLU03S) V12H004UA3
Short-throw #2 zoom lens (ELPLU04) V12H004U04
Wide-throw #2 zoom lens (ELPLW06) V12H004W06
Wide-throw #3 zoom lens (ELPLW08) V12H004W08
Middle-throw #2 zoom lens (ELPLM15) V12H004M0F
Middle-throw #3 zoom lens (ELPLM10) V12H004M0A
Middle-throw #4 zoom lens (ELPLM11) V12H004M0B
Long throw zoom lens (ELPLL08) V12H004L08
Wireless LAN Module (ELPAP11) V12H005A02
PixAlign Camera (ELPEC01) V12HA46010
Parent topic: Projector Features
Warranty and Registration Information (U.S. and Canada)
Your projector comes with a basic warranty that lets you project with confidence. For details, see the
warranty brochure that came with your projector.
Register your product online at this site: epson.com/webreg
Registering also lets you receive special updates on new accessories, products, and services.
Parent topic: Projector Features
Warranty and Registration Information (Latin America)
Your projector comes with a basic warranty that lets you project with confidence. For details, see the
warranty that came with your projector.
Register your product online at latin.epson.com/support, search for your product, and select Register.
19
Page 20

Registering also lets you receive special updates on new accessories, products, and services.
Parent topic: Projector Features
Notations Used in the Documentation
Follow the guidelines in these notations as you read your documentation:
• Warnings must be followed carefully to avoid bodily injury.
• Cautions must be observed to avoid damage to your equipment.
• Notes contain important information about your projector.
• Tips contain additional projection information.
Parent topic: Introduction to Your Projector
Where to Go for Additional Information
Need quick help on using your projector? Here's where to look for help:
• Built-in help system
Press the Home button on the remote control, select Help, and press Enter to get quick solutions to
common problems.
• epson.com/support (U.S.), epson.ca/support (Canada), or latin.epson.com/support (Caribbean)
View FAQs (frequently asked questions) and e-mail your questions to Epson technical support 24
hours a day.
• If you still need help after checking this manual and any other sources listed here, you can use the
Epson PrivateLine Support service to get help fast (U.S. and Canada only). For details, see "Where to
Get Help."
Parent topic: Introduction to Your Projector
Related references
Where to Get Help (U.S. and Canada)
Where to Get Help (Latin America)
Related tasks
Using the Projector Help Displays
Projector Part Locations
Check the projector part illustrations to learn about the parts on your projector.
20
Page 21
Projector Parts - Front/Top
Projector Parts - Rear
Projector Parts - Interface Ports
Projector Parts - Base
Projector Parts - Control Panel
Projector Parts - Remote Control
Parent topic: Introduction to Your Projector
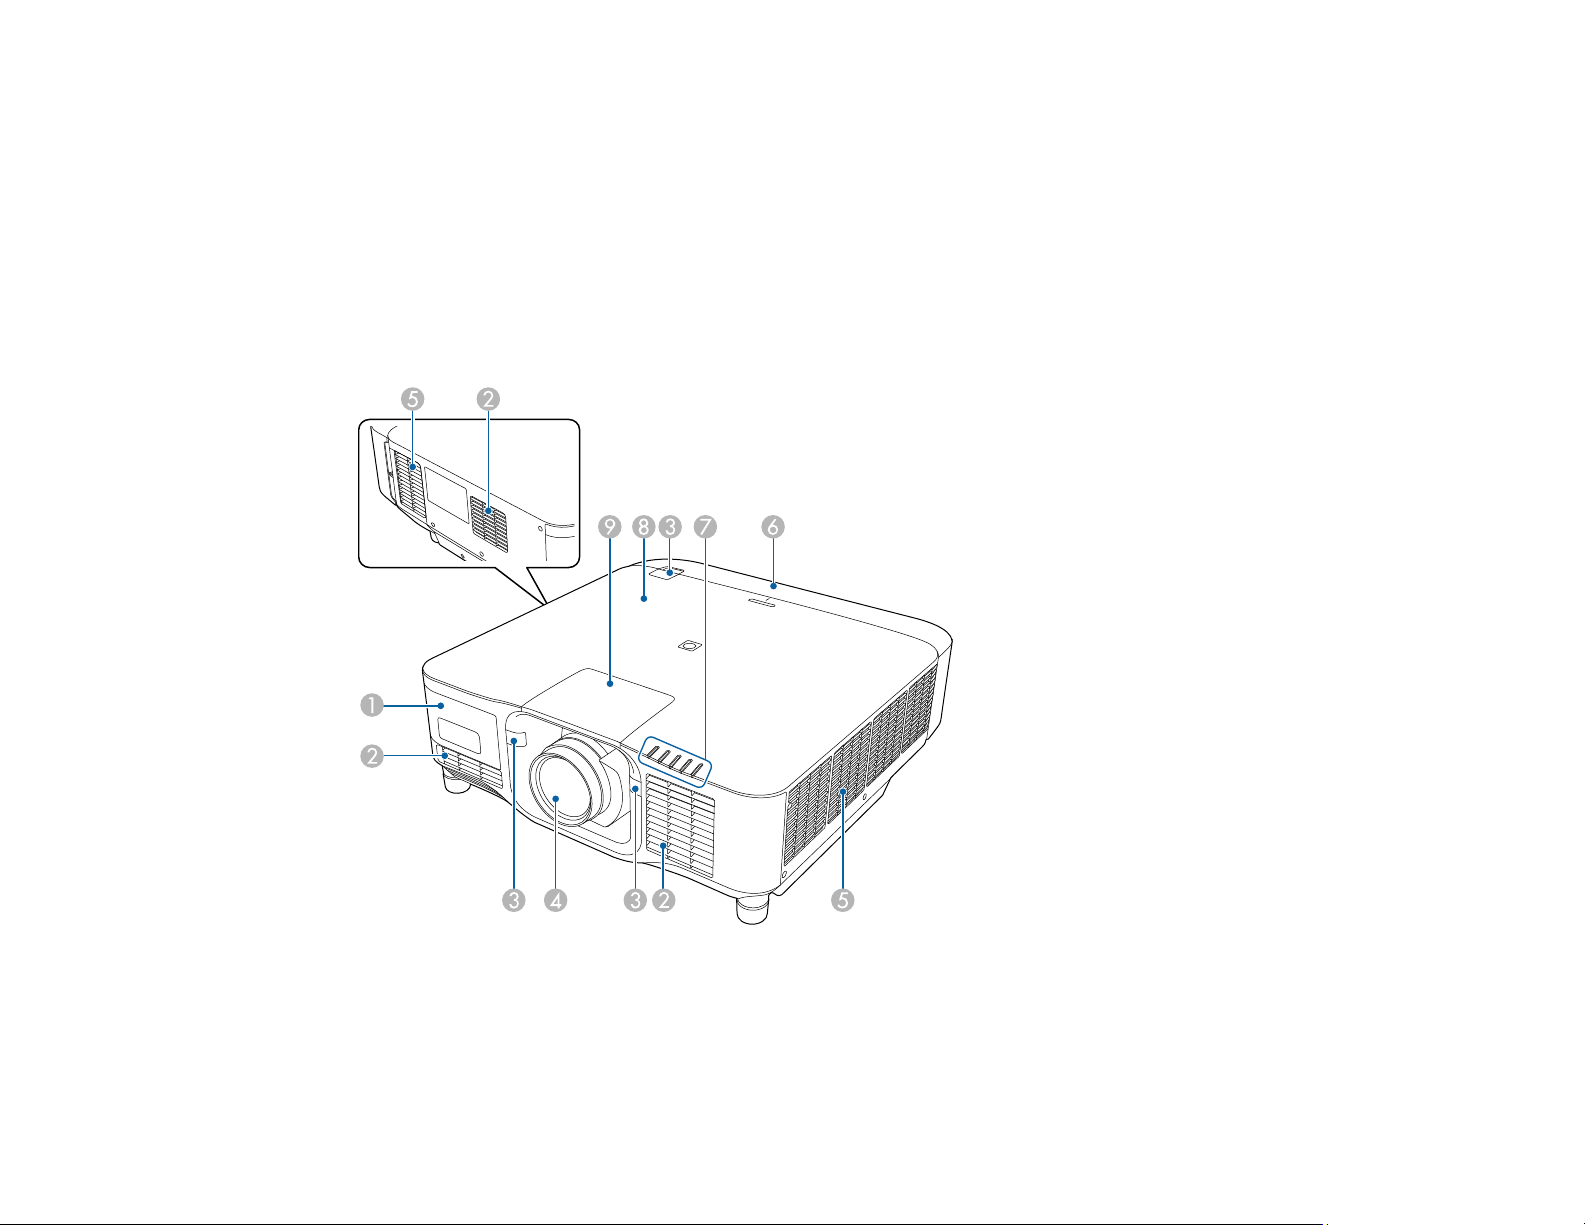
Projector Parts - Front/Top
1 External camera cover
2 Air intake vent
3 Remote receivers
21
Page 22
4 Projection lens
5 Air exhaust vent
6 Cable cover
7 Status lights
8 NFC tag
9 Lens replacement cover
Parent topic: Projector Part Locations
Projector Parts - Rear
1 Air intake vents
2 Control panel
3 Interface ports
4 Kensington security slot
5 Cable tie attachment point
6 Power inlet
7 Power cord holder
8 Wireless LAN module cover
22
Page 23
Parent topic: Projector Part Locations
Projector Parts - Interface Ports
1 Computer port
2 Audio Out port
3 RS-232C port
4 Remote port
5 SDI Out/In ports (EB-PU2213B/EB-PU2216B/EB-PU2220B)
6 USB-A port
7 Service port
8 HDMI port
9 DVI-D port
10 HDBaseT port
11 LAN port
Parent topic: Projector Part Locations
23
Page 24
Projector Parts - Base
1 Front feet
2 Screw hole for safety wire
3 Rear feet
4 Screw holes for cable cover
5 Air intake vent
6 Security cable attachment point
7 Ceiling mount (ELPMB67) fixing points
Parent topic: Projector Part Locations
24
Page 25
Related tasks
Installing the Safety Wire
Projector Parts - Control Panel
1 On button (turns on the projector)
2 Source Search button (searches for connected sources)
3 Menu button (accesses projector menu system)
4 Enter button (selects options)
5 Left arrow button and displays the Control Panel Lock screen
6 Down arrow button and displays a test pattern
7 A/V Mute button (turns the video and audio on or off)
8 Lens button (displays the lens shift, zoom, focus, and distortion adjustment screens; hold for 3
seconds to return the lens to the home position)
9 Right arrow button and displays the Info menu
10 Up arrow button and displays screen adjustment options
11 Esc button (cancels/exits functions)
25
Page 26

12 Standby button (turns off the projector)
Parent topic: Projector Part Locations
26
Page 27
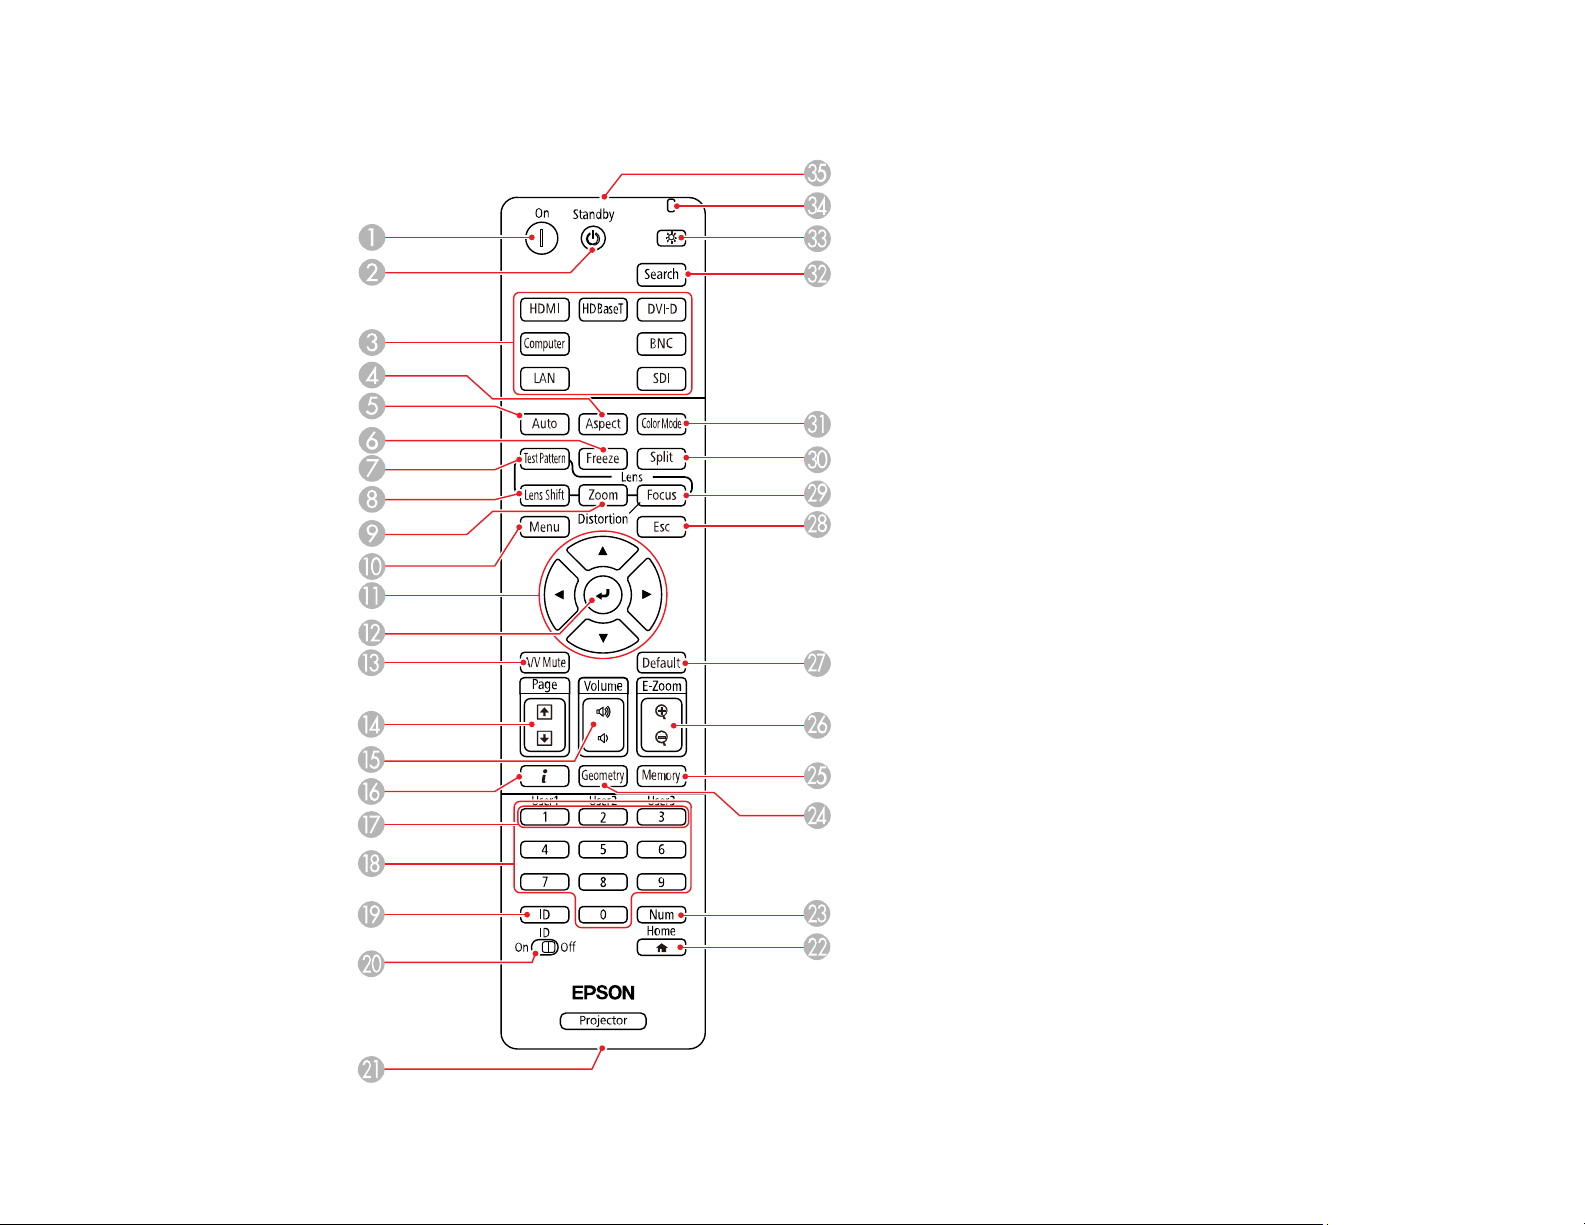
Projector Parts - Remote Control
27
Page 28

1 On button (turns on the projector)
2 Standby button (turns off the projector)
3 Source buttons (select an image source) (BNC button not available)
4 Aspect button (selects the image aspect ratio)
5 Auto button (automatically adjusts computer images)
6 Freeze button (stops video action)
7 Test Pattern button (displays a test pattern)
8 Lens Shift button (adjusts the image position)
9 Zoom button (changes the image size)
10 Menu button (accesses projector menu system)
11 Arrow buttons (move through on-screen options and move pointer)
12 Enter button (selects options)
13 A/V Mute button (turns the video and audio on or off)
14 Page up and down buttons (scroll through image files when projecting from a computer over a
network connection)
15 Volume up and down buttons (adjust volume)
16 i button (displays the Info menu)
17 User1, User2, and User3 buttons (open menu assigned by user)
18 Numeric buttons (enter numbers)
19 ID button (display the projector ID and the remote ID)
20 ID switch (enables ID settings for the remote control)
21 Remote port (connects to an optional remote control cable)
22 Home button (displays the Home screen)
23 Num button (hold down and use numeric keys to enter numbers)
24 Geometry button (corrects image distortion)
25 Memory button (saves and applies presets)
26 E-Zoom +/– buttons (zoom into and out of the image)
27 Default button (resets settings to their default values in the projector menu system)
28
Page 29

28 Esc button (cancels/exits functions)
29 Focus button (adjusts the image focus)
30 Split button (splits the screen between two inputs)
31 Color Mode button (selects display modes)
32 Search button (searches for connected sources)
33 Light button (lights up the remote control buttons temporarily)
34 Indicator light (lights up when the remote control is in use)
35 Remote control signal emitter (emits remote control signals)
Parent topic: Projector Part Locations
29
Page 30

Setting Up the Projector
Follow the instructions in these sections to set up your projector for use.
Projector Placement
Projector Connections
Attaching and Removing a Lens
Attaching and Removing the Cable Cover
Installing the Safety Wire
Installing Batteries in the Remote Control
Projector Placement
You can place the projector on almost any flat surface to project an image.
You can also install the projector in a ceiling mount if you want to use it in a fixed location.
There is no vertical or horizontal limit to how the projector can be installed.
Warning: The EB-PU2120W and EB-PU2220B are class A products. In a domestic environment this
product may cause radio interference in which case the user may be required to take adequate
measures.
Keep these considerations in mind as you select a projector location:
• Place the projector on a sturdy, level surface or install it using a compatible mount.
• Leave plenty of space around and under the projector for ventilation, and do not place it on top of or
next to anything that could block the vents.
• Position the projector within reach of a grounded electrical outlet or extension cord.
Projector Setup and Installation Options
Projection Distance
Parent topic: Setting Up the Projector
Projector Setup and Installation Options
You can set up or install your projector in the following ways:
30
Page 31
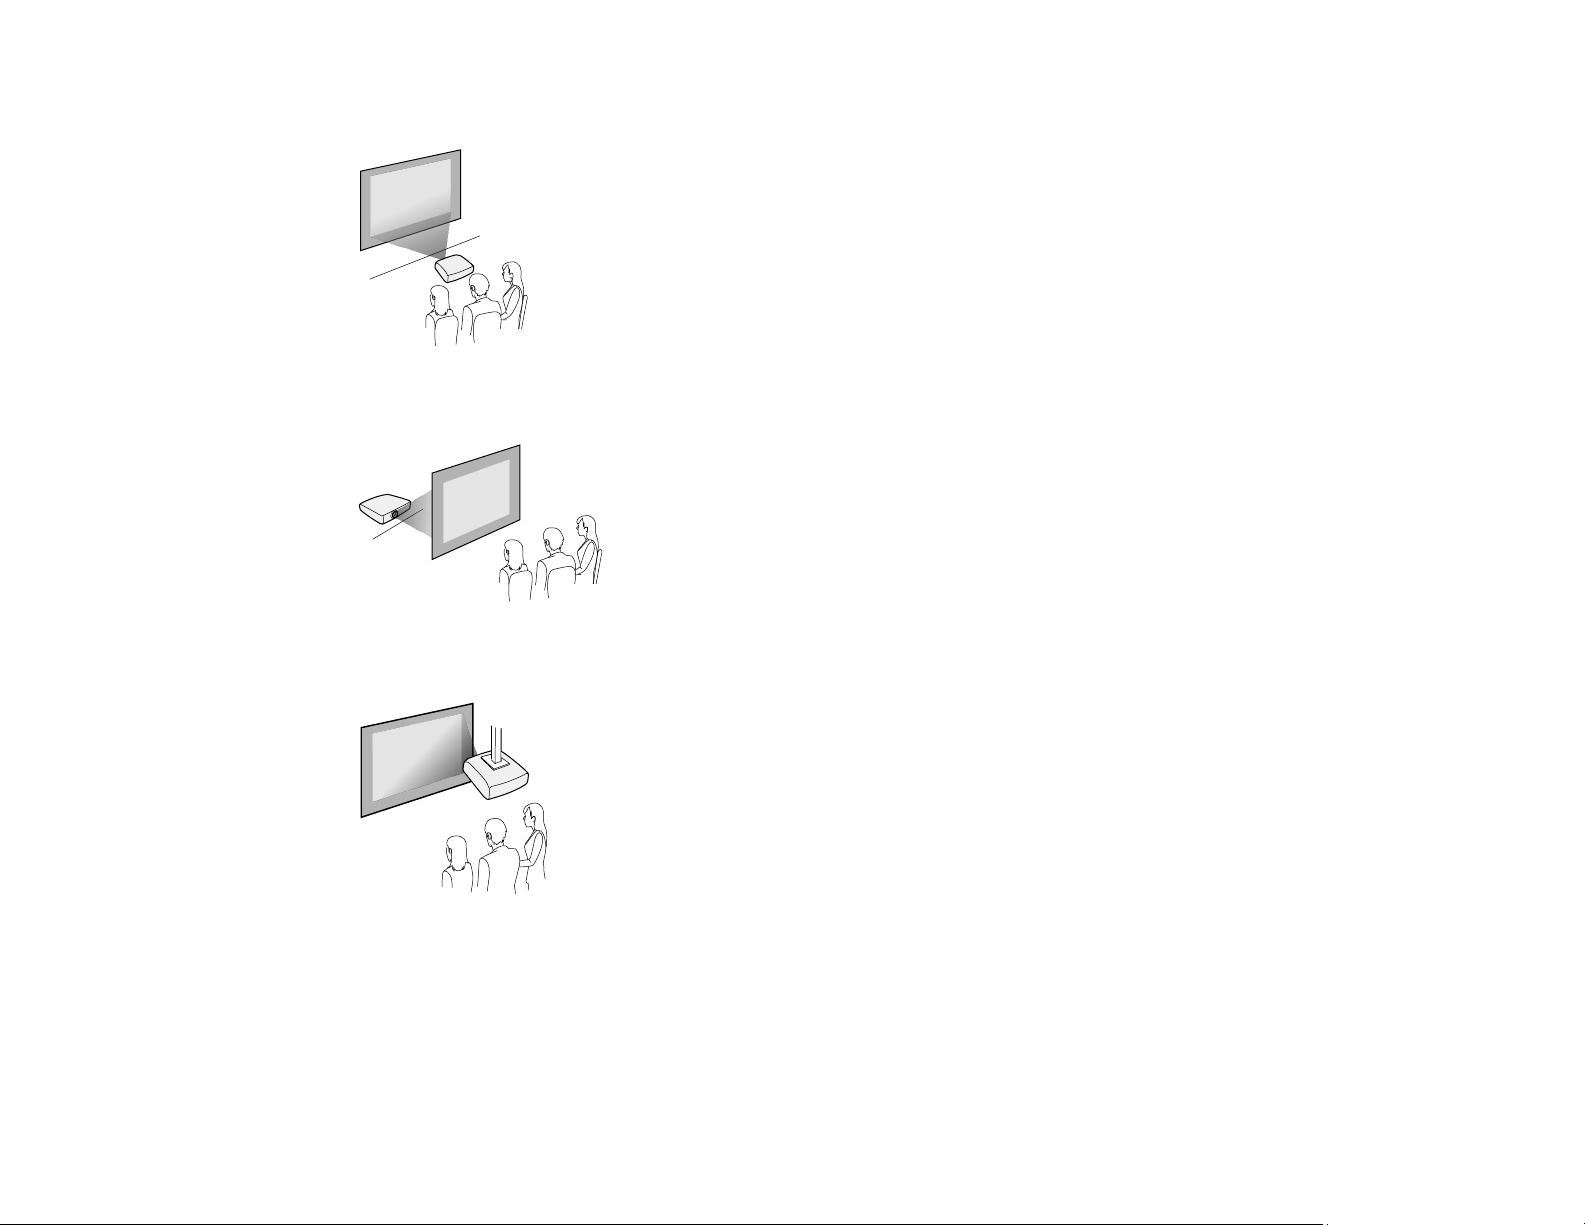
Front
Rear
Front ceiling
31
Page 32
Rear ceiling
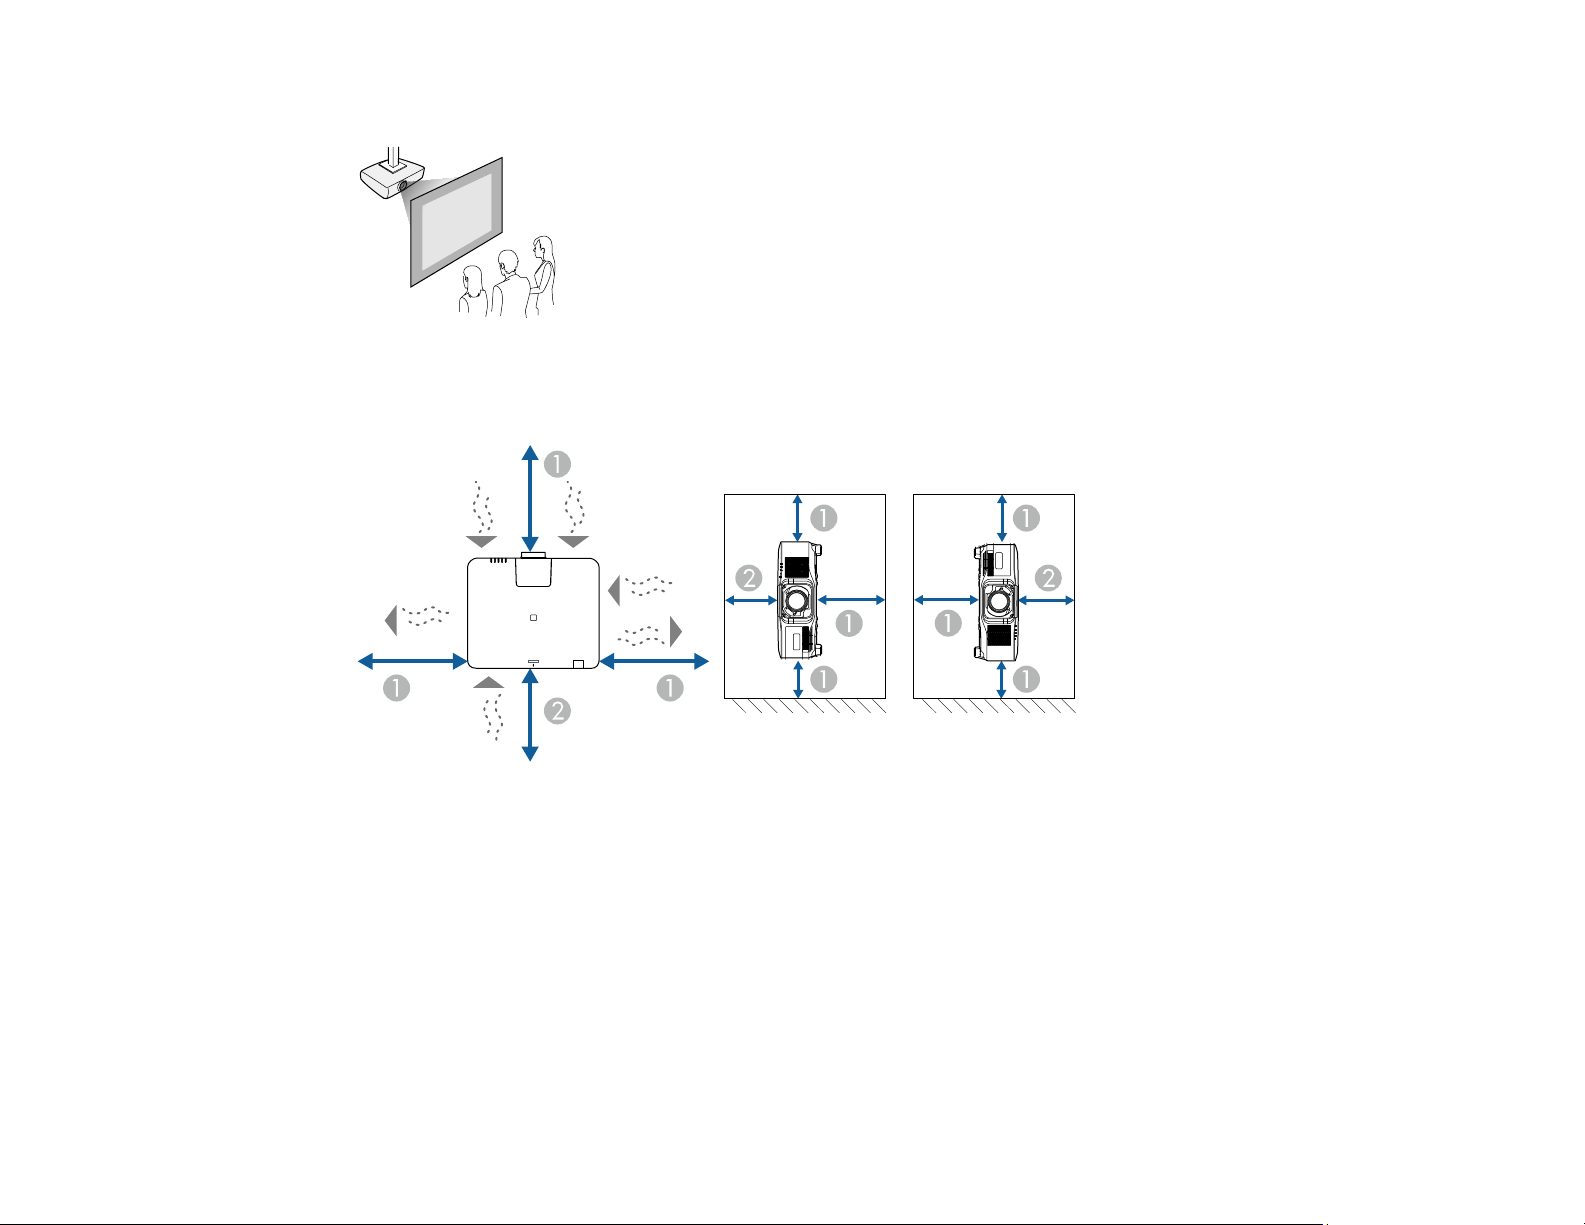
Caution: Be sure to leave the following amount of space around the projector to avoid blocking the air
exhaust and intake vents.
1 7.9 inches (30 cm)
2 11.8 inches (20 cm)
32
Page 33
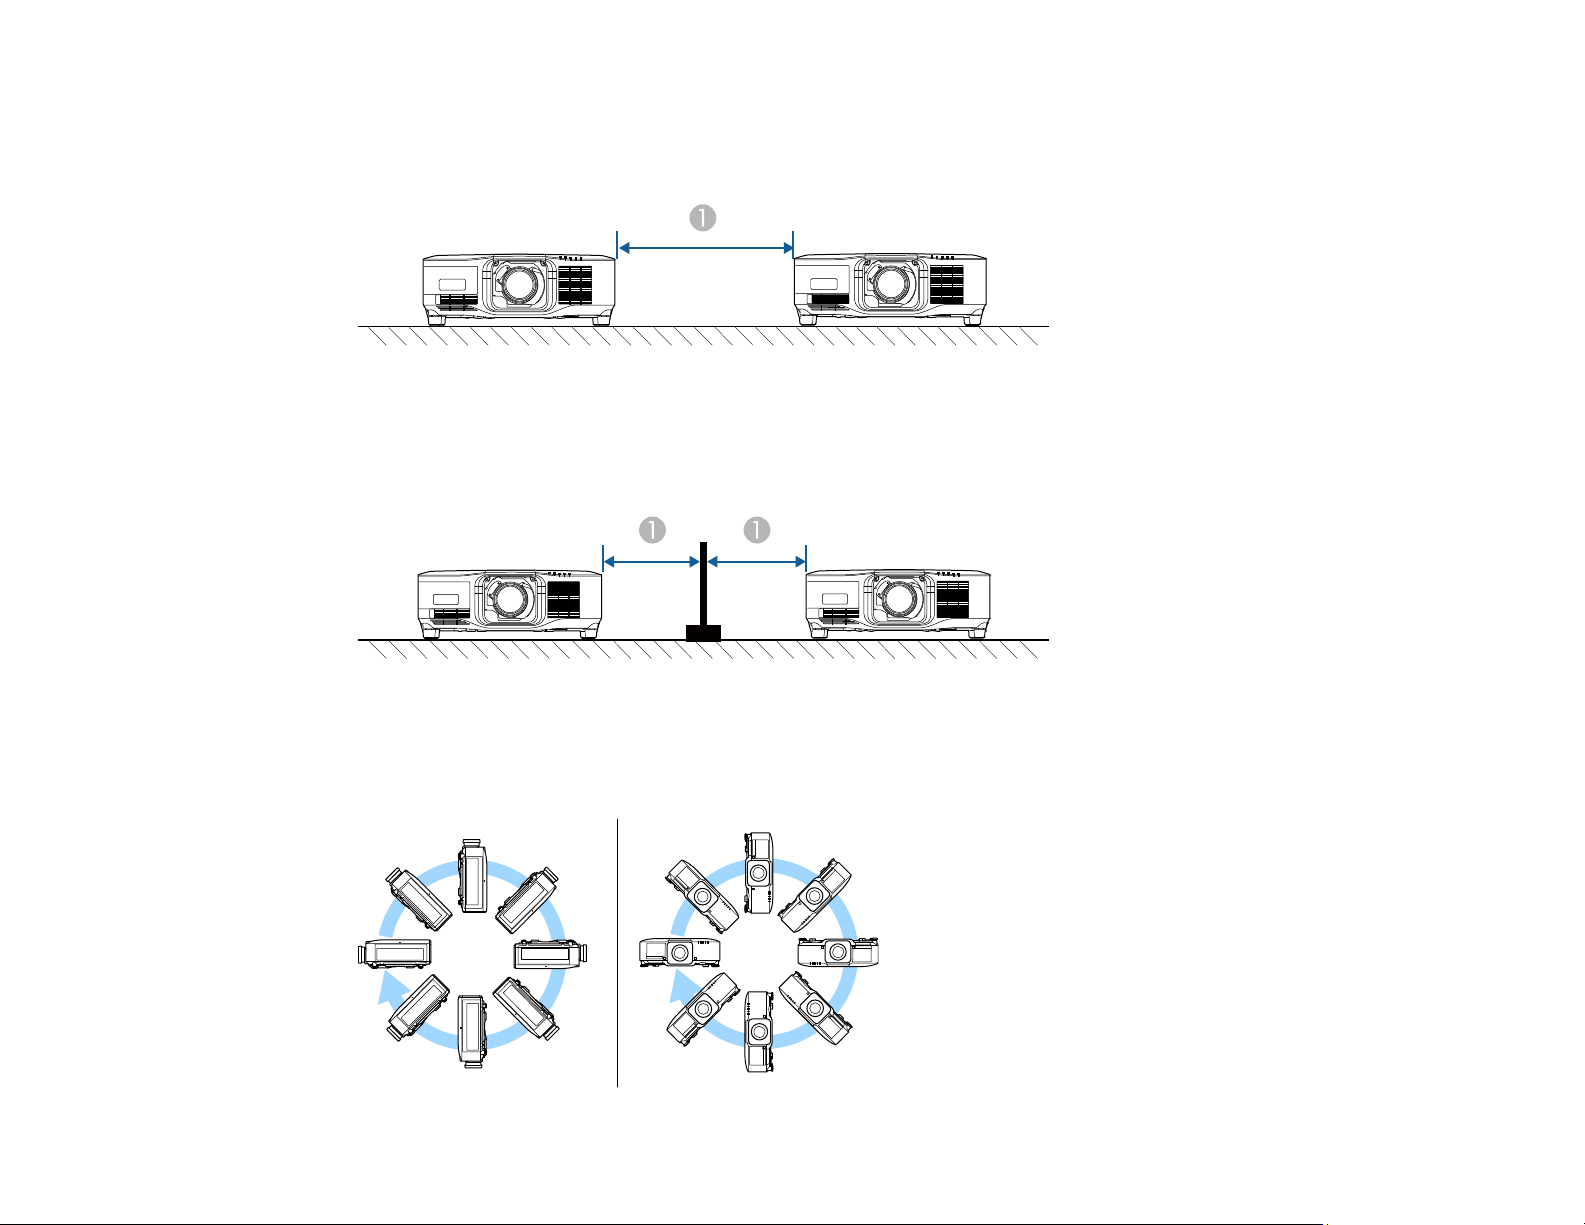
If you are installing multiple projectors next to each other, be sure to leave at least 28 inches (70 cm) of
space between the projectors. Also, make sure heated air from an exhaust vent does not go into the air
intake vent of another projector.
1 28 inches (70 cm)
With a partition:
1 11.8 inches (30 cm)
You can mount the projector to the ceiling at any horizontal or vertical angle.
33
Page 34

If you project from the ceiling or from the rear, select the correct Projection setting and, if necessary,
adjust the OSD Rotation setting.
You can switch the Projection setting between Front and Front/Ceiling or Rear and Rear/Ceiling by
holding the A/V Mute button on the remote control for approximately 5 seconds.
Parent topic: Projector Placement
Related references
Projector Setup Settings - Extended Menu
Projection Distance
The distance at which you place the projector from the screen determines the approximate size of the
image. The image size increases the farther the projector is from the screen, but can vary depending on
the zoom factor, aspect ratio, and other settings.
Use the Projection Distance Calculator here (U.S.), here (Canada), or here (Caribbean) to determine
approximately how far to place the projector from the screen based on the size of the projected image.
Parent topic: Projector Placement
Projector Connections
See these sections to connect the projector to a variety of projection sources.
Caution: If you will use the projector at altitudes above 4921 feet (1500 m), turn on High Altitude Mode
to ensure the projector's internal temperature is regulated properly.
Connecting to Video Sources
Connecting to Computer Sources
Connecting to an HDBaseT Transmitter
Connecting to External Speakers
Parent topic: Setting Up the Projector
Related references
Projector Setup Settings - Extended Menu
Connecting to Video Sources
Follow the instructions in these sections to connect video devices to the projector.
Connecting to an HDMI Video Source
34
Page 35
Connecting to an SDI Video Source
Connecting to a Component Video Source
Parent topic: Projector Connections
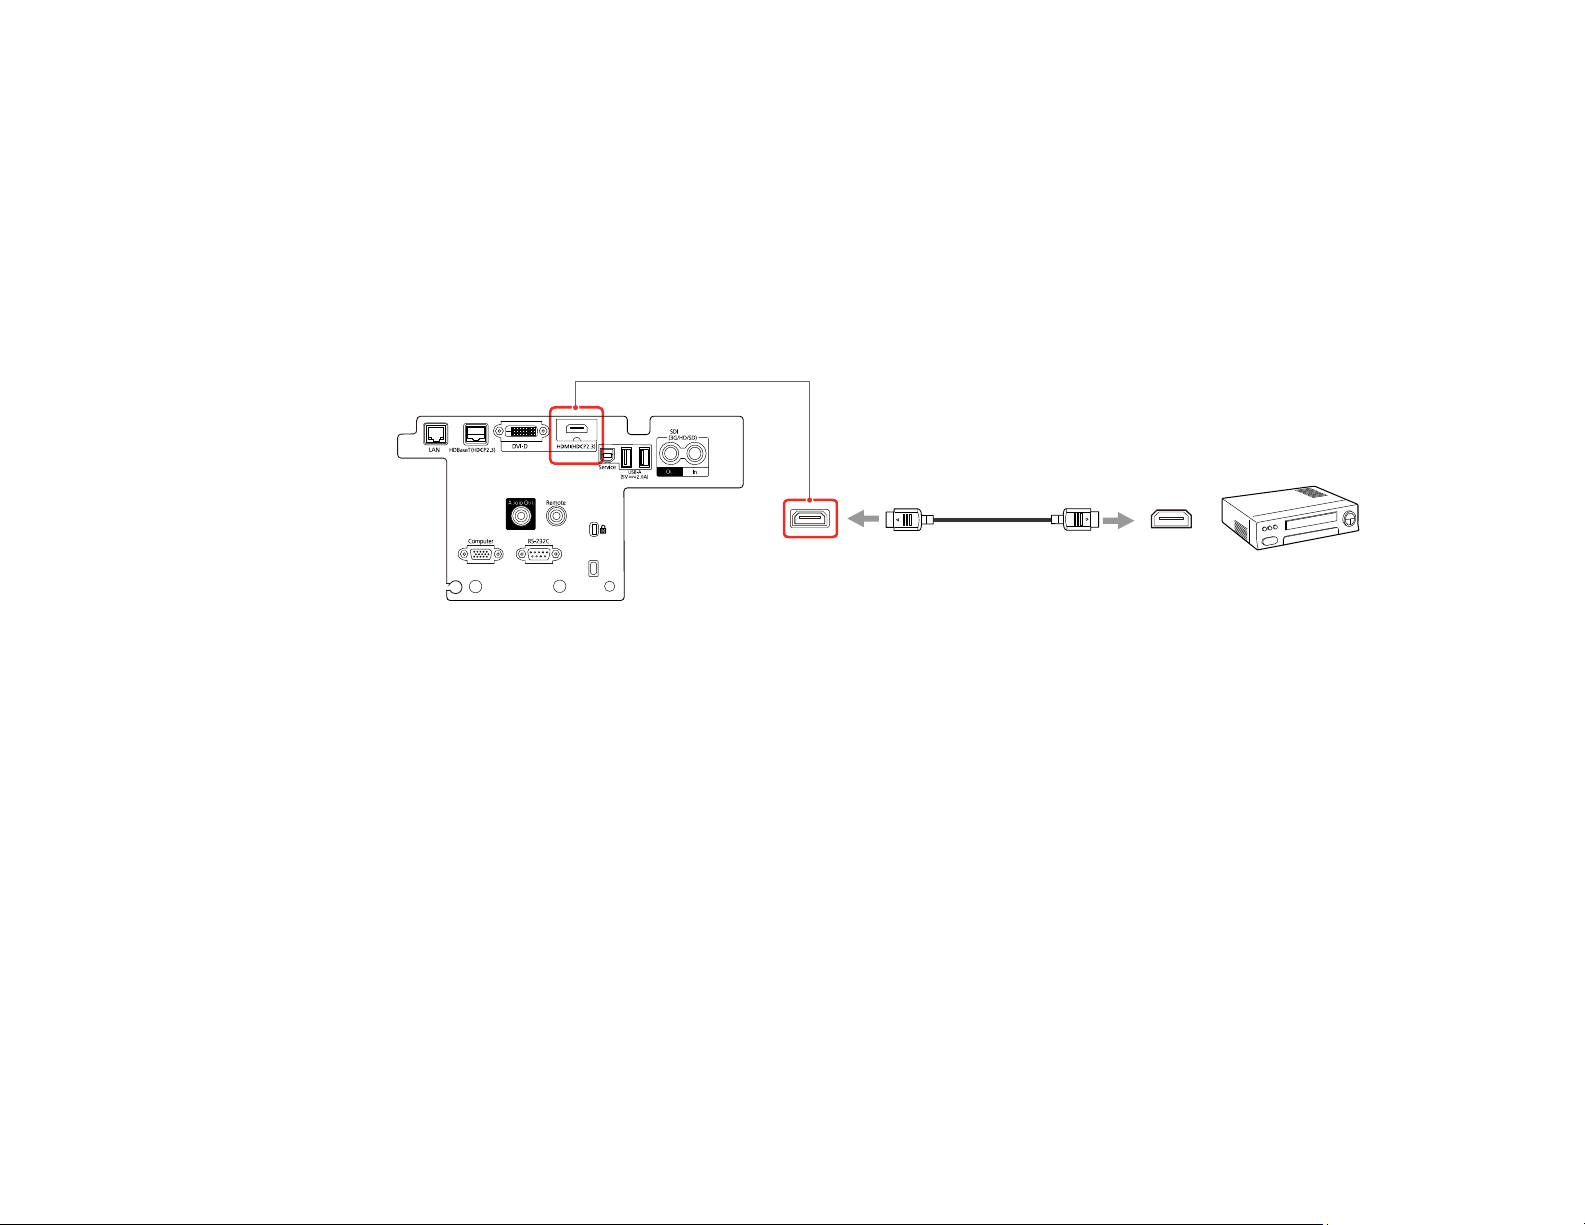
Connecting to an HDMI Video Source
If your video source has an HDMI port, you can connect it to the projector using an optional HDMI cable.
The HDMI connection provides the best image quality.
1. Connect the HDMI cable to your video source's HDMI output port.
2. Connect the other end to the projector's HDMI port.
Note: Your projector does not have an internal speaker. The projector converts the digital audio signal
sent from your computer into a stereo analog signal when you are connecting to external speakers.
Note: When an audio/video source that meets the HDMI CEC standard is connected to the projector's
HDMI port, you can use the projector's remote control to control certain features of the linked device by
turning on the HDMI Link setting in the Settings menu.
Parent topic: Connecting to Video Sources
Connecting to an SDI Video Source
If your video source has an SDI port, you can connect it to the projector using an optional BNC video
cable (EB-PU2213B/EB-PU2216B/EB-PU2220B).
1. Connect the BNC video cable to your video source's SDI output port.
35
Page 36
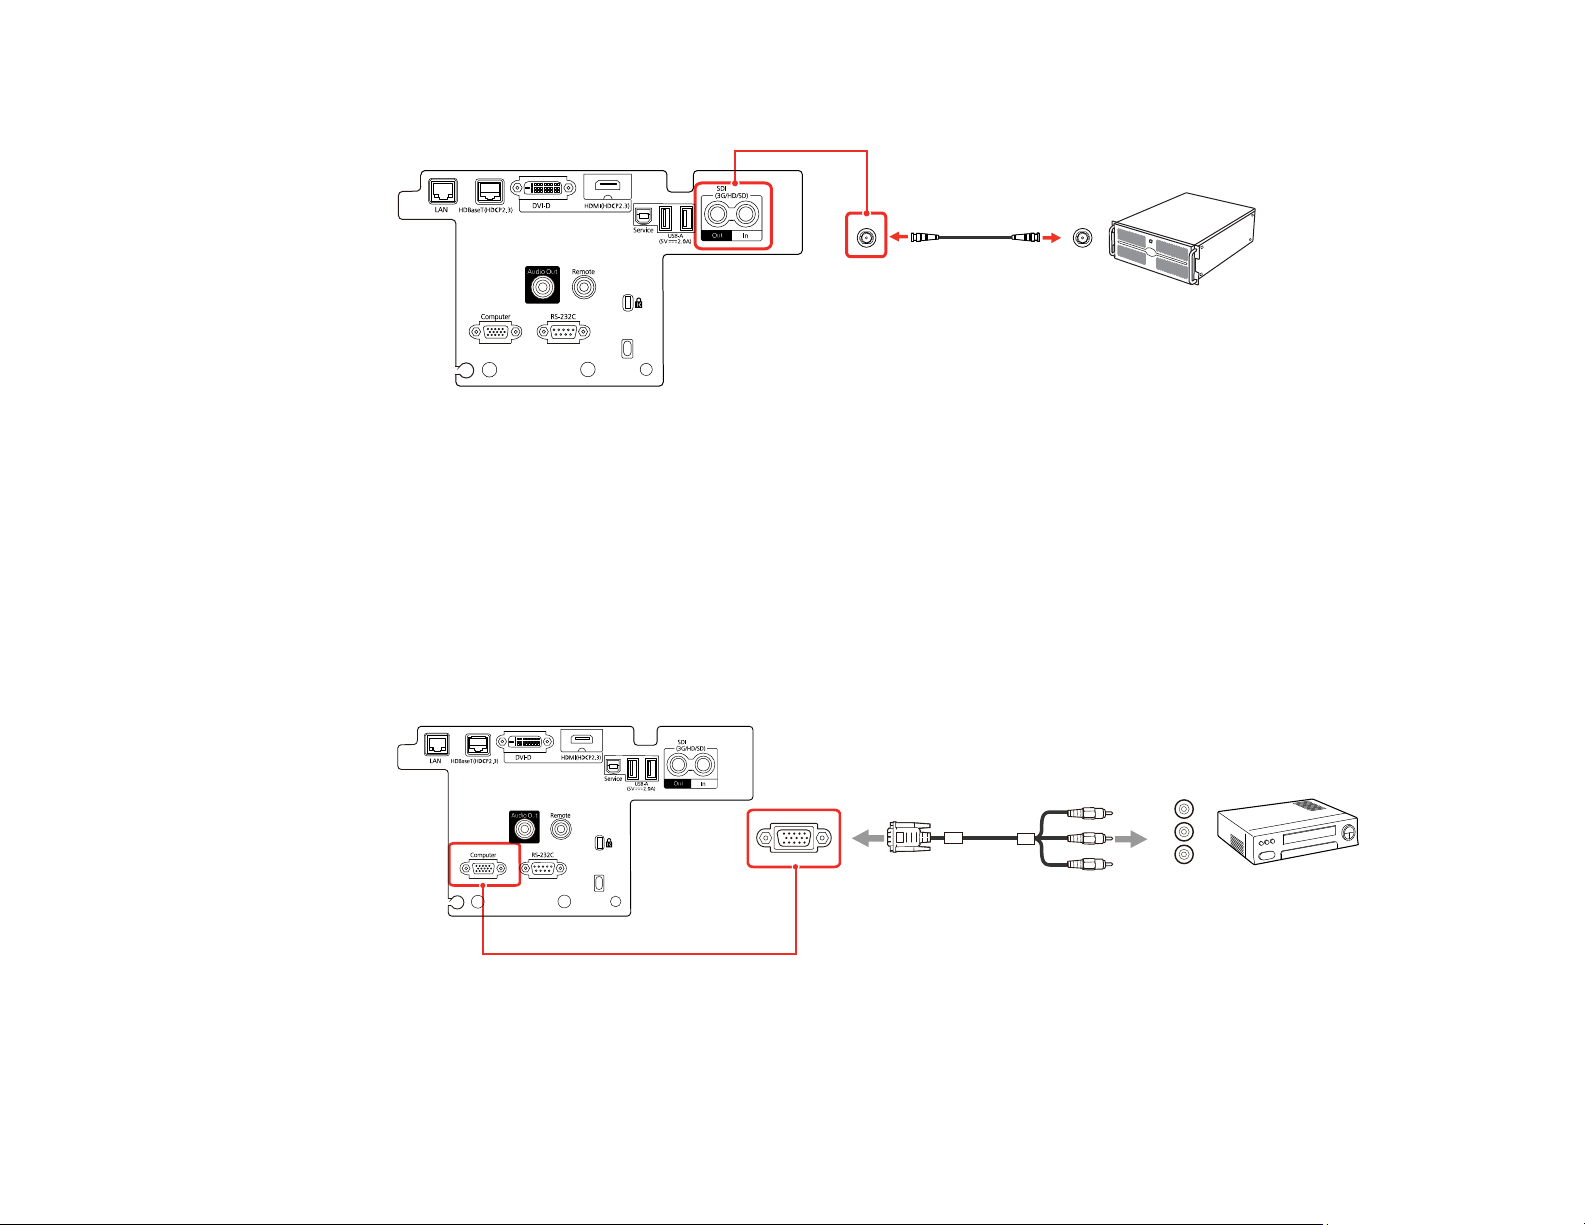
2. Connect the other end to the projector's SDI port.
Parent topic: Connecting to Video Sources
Connecting to a Component Video Source
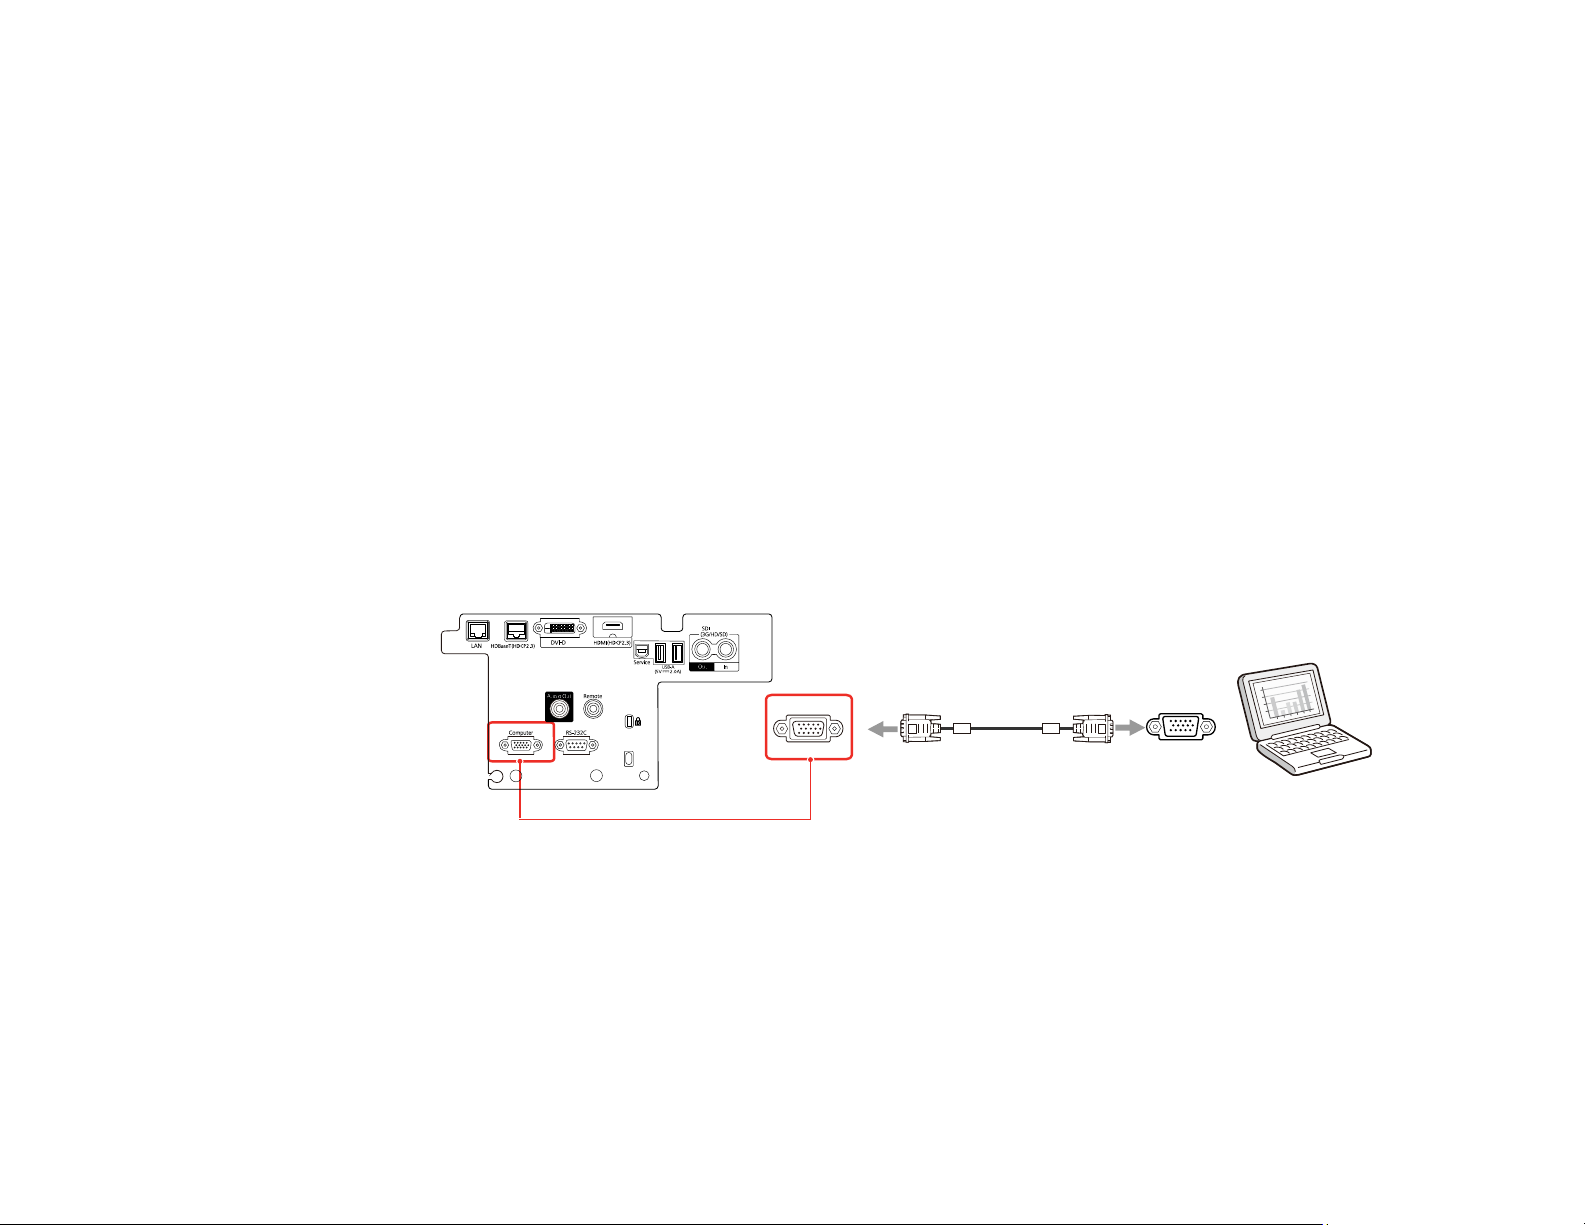
If your video source has component video ports, you can connect it to the projector using an optional
component-to-VGA video cable. Depending on your component ports, you may need to use an adapter
cable along with a component video cable.
1. Connect the component connectors to your video source's color-coded component video output
ports, usually labeled Y, Pb, Pr or Y, Cb, Cr. If you are using an adapter, connect these connectors
to your component video cable.
2. Connect the VGA connector to the Computer port on the projector.
3. Tighten the screws on the VGA connector.
Parent topic: Connecting to Video Sources
36
Page 37
Connecting to Computer Sources
Follow the instructions in these sections to connect a computer to the projector.
Connecting to a Computer for VGA Video
Connecting to a Computer for HDMI Video and Audio
Connecting to a Computer for DVI-D Video
Parent topic: Projector Connections
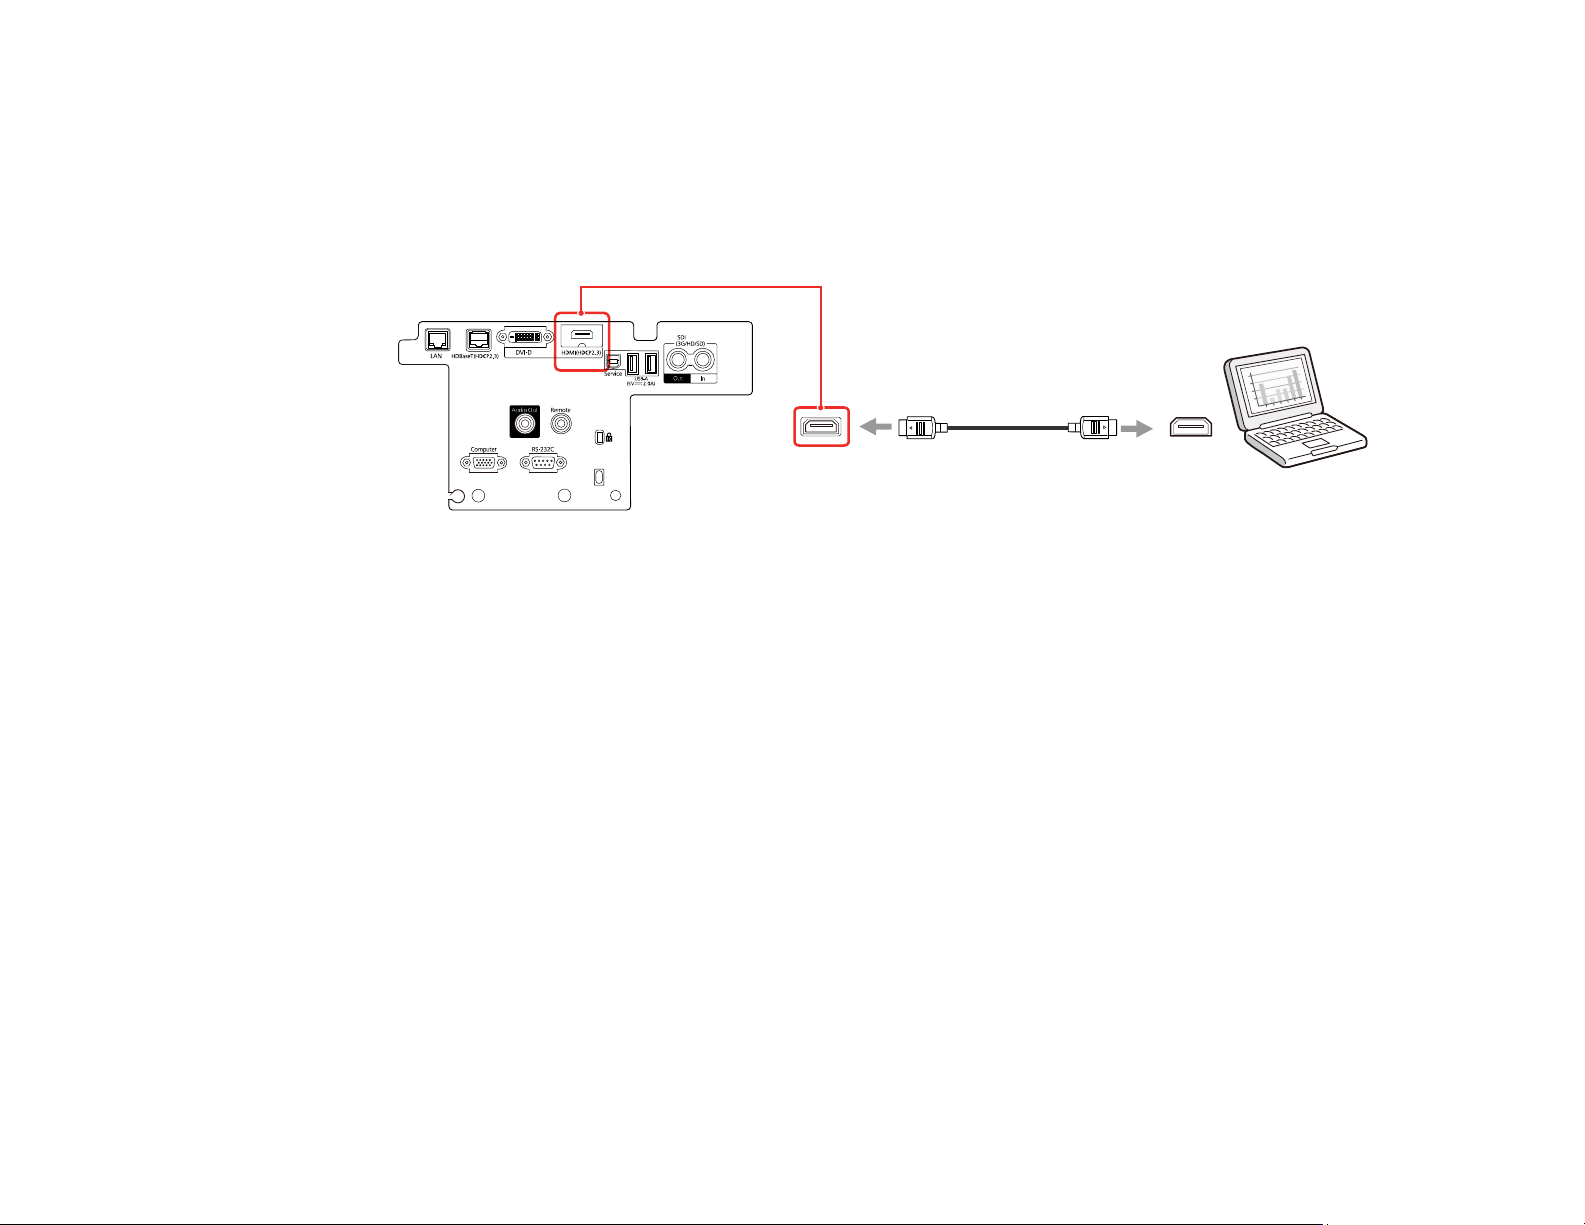
Connecting to a Computer for VGA Video
You can connect the projector to your computer using a VGA computer cable.
Note: To connect a Mac that includes only a Mini DisplayPort, Thunderbolt port, or Mini-DVI port for
video output, you need to obtain an adapter that allows you to connect to the projector's VGA video port.
Contact Apple for compatible adapter options.
1. If necessary, disconnect your computer's monitor cable.
2. Connect the VGA computer cable to your computer's monitor port.
3. Connect the other end to the Computer port on the projector.
4. Tighten the screws on the VGA connector.
Parent topic: Connecting to Computer Sources
Connecting to a Computer for HDMI Video and Audio
If your computer has an HDMI port, you can connect it to the projector using an optional HDMI cable.
37
Page 38
Note: To connect a Mac that includes only a Mini DisplayPort, Thunderbolt port, or Mini-DVI port for
video output, you need to obtain an adapter that allows you to connect to the projector's HDMI port.
Contact Apple for compatible adapter options.
1. Connect the HDMI cable to your computer's HDMI output port.
2. Connect the other end to the projector's HDMI port.
Note: The projector converts the digital audio signal sent from your computer into a mono analog signal
for the internal speaker or a stereo analog signal if you are connecting to external speakers. (Make sure
the HDMI audio playback device on your computer's audio settings is set to EPSON PJ.)
Note: Your projector does not have an internal speaker. The projector converts the digital audio signal
sent from your computer into a stereo analog signal when you are connecting to external speakers.
Parent topic: Connecting to Computer Sources
Connecting to a Computer for DVI-D Video
If your computer has a DVI-D connector, you can connect it to the projector using an optional DVI-D
cable.
1. Connect the DVI-D cable to your computer's DVI-D connector.
38
Page 39
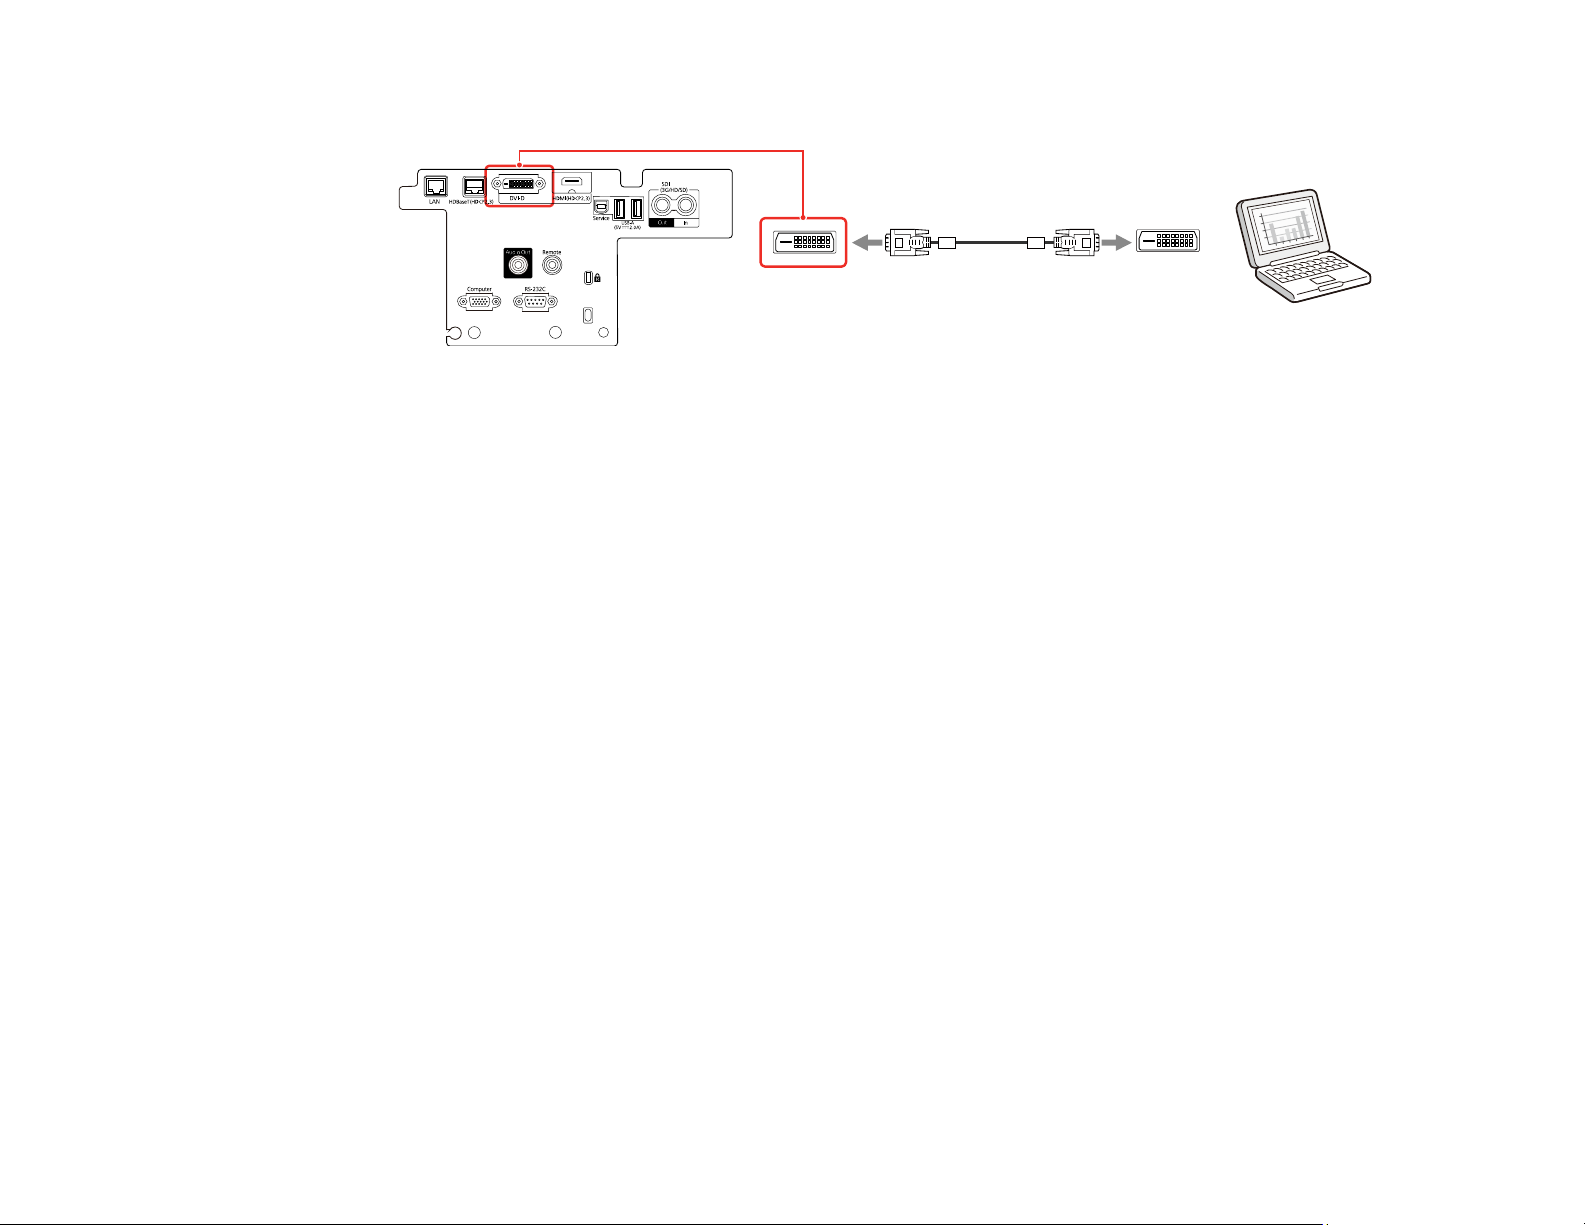
2. Connect the other end to the projector's DVI-D connector.
Parent topic: Connecting to Computer Sources
Connecting to an HDBaseT Transmitter
To send an HDMI or RS-232C signal over a long distance, you can connect the projector to an optional
HDBaseT transmitter using a 100Base-TX network cable. This is useful when you want to send a signal
to or control the projector from a remote location, such as in a hall or event site, since you can use a
network cable up to 328 feet (100 m) in length. To ensure proper data transmission, use a Category STP
cable or better.
Note: Set the A/V Output setting to Always On in the Signal I/O menu to control the projector when it is
not projecting any images.
1. Turn off the projector and HDBaseT transmitter.
Note: Make sure the projector and HDBaseT transmitter are turned off when connecting or
disconnecting a network cable between the two devices.
2. Connect one end of the network cable to the HDBaseT port on the transmitter.
39
Page 40
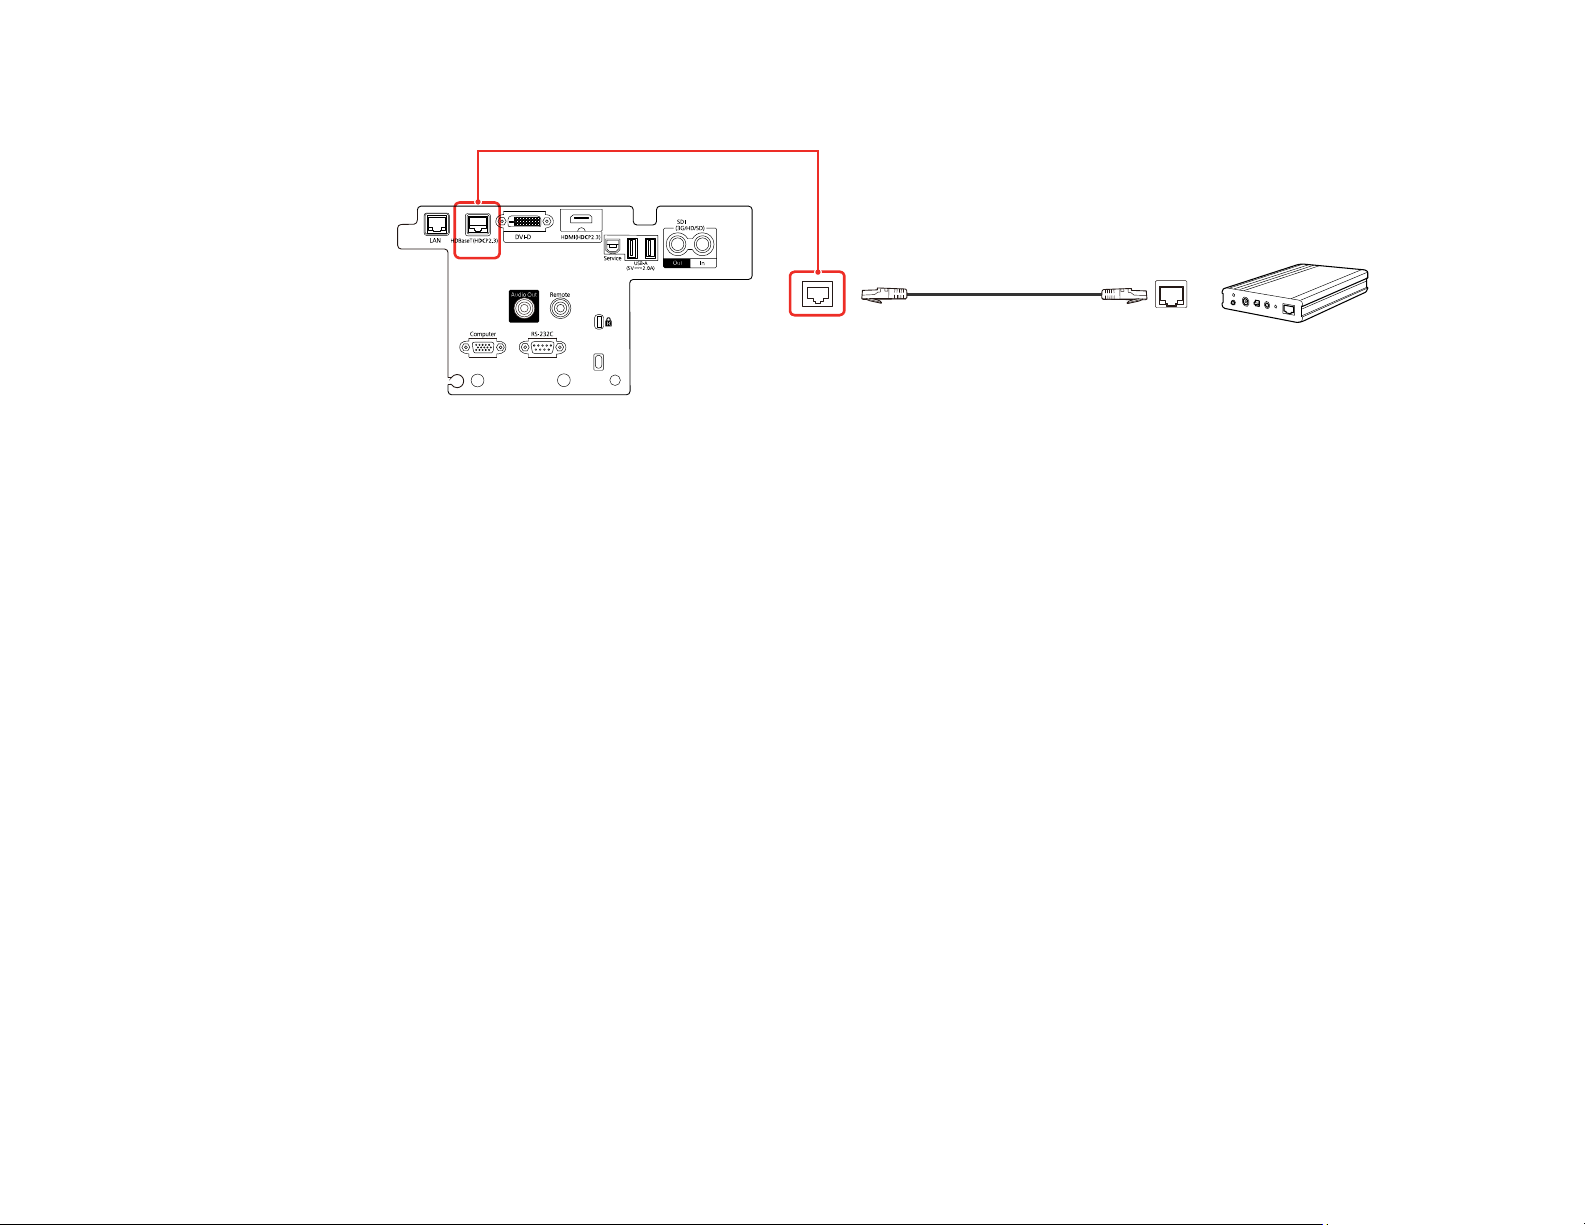
3. Connect the other end to the projector's HDBaseT port.
Note: See the documentation that came with the HDBaseT transmitter for instructions on connecting
it to your video device or computer.
4. Turn on the projector and HDBaseT transmitter.
Note: To enable communication from the Ethernet and serial ports on the transmitter, select On as the
Control Communications setting in the projector's Extended menu. Turning on this setting disables the
projector's LAN, RS-232C, and Remote ports. If you connected an Extron XTP transmitter or switcher to
the projector's HDBaseT port, select On as the Extron XTP setting in the projector's Extended menu.
Parent topic: Projector Connections
Related references
Projector Setup Settings - Extended Menu
Connecting to External Speakers
You can connect the projector to external self-powered speakers and control the volume using the
projector's remote control.
You can also connect the projector to an amplifier with speakers.
If you want to output audio from the external speakers when the projector is turned off, you need to
select Always On as the A/V Output setting in the projector's Extended menu.
1. Make sure your computer or video source is connected to the projector with both audio and video
cables as necessary.
40
Page 41
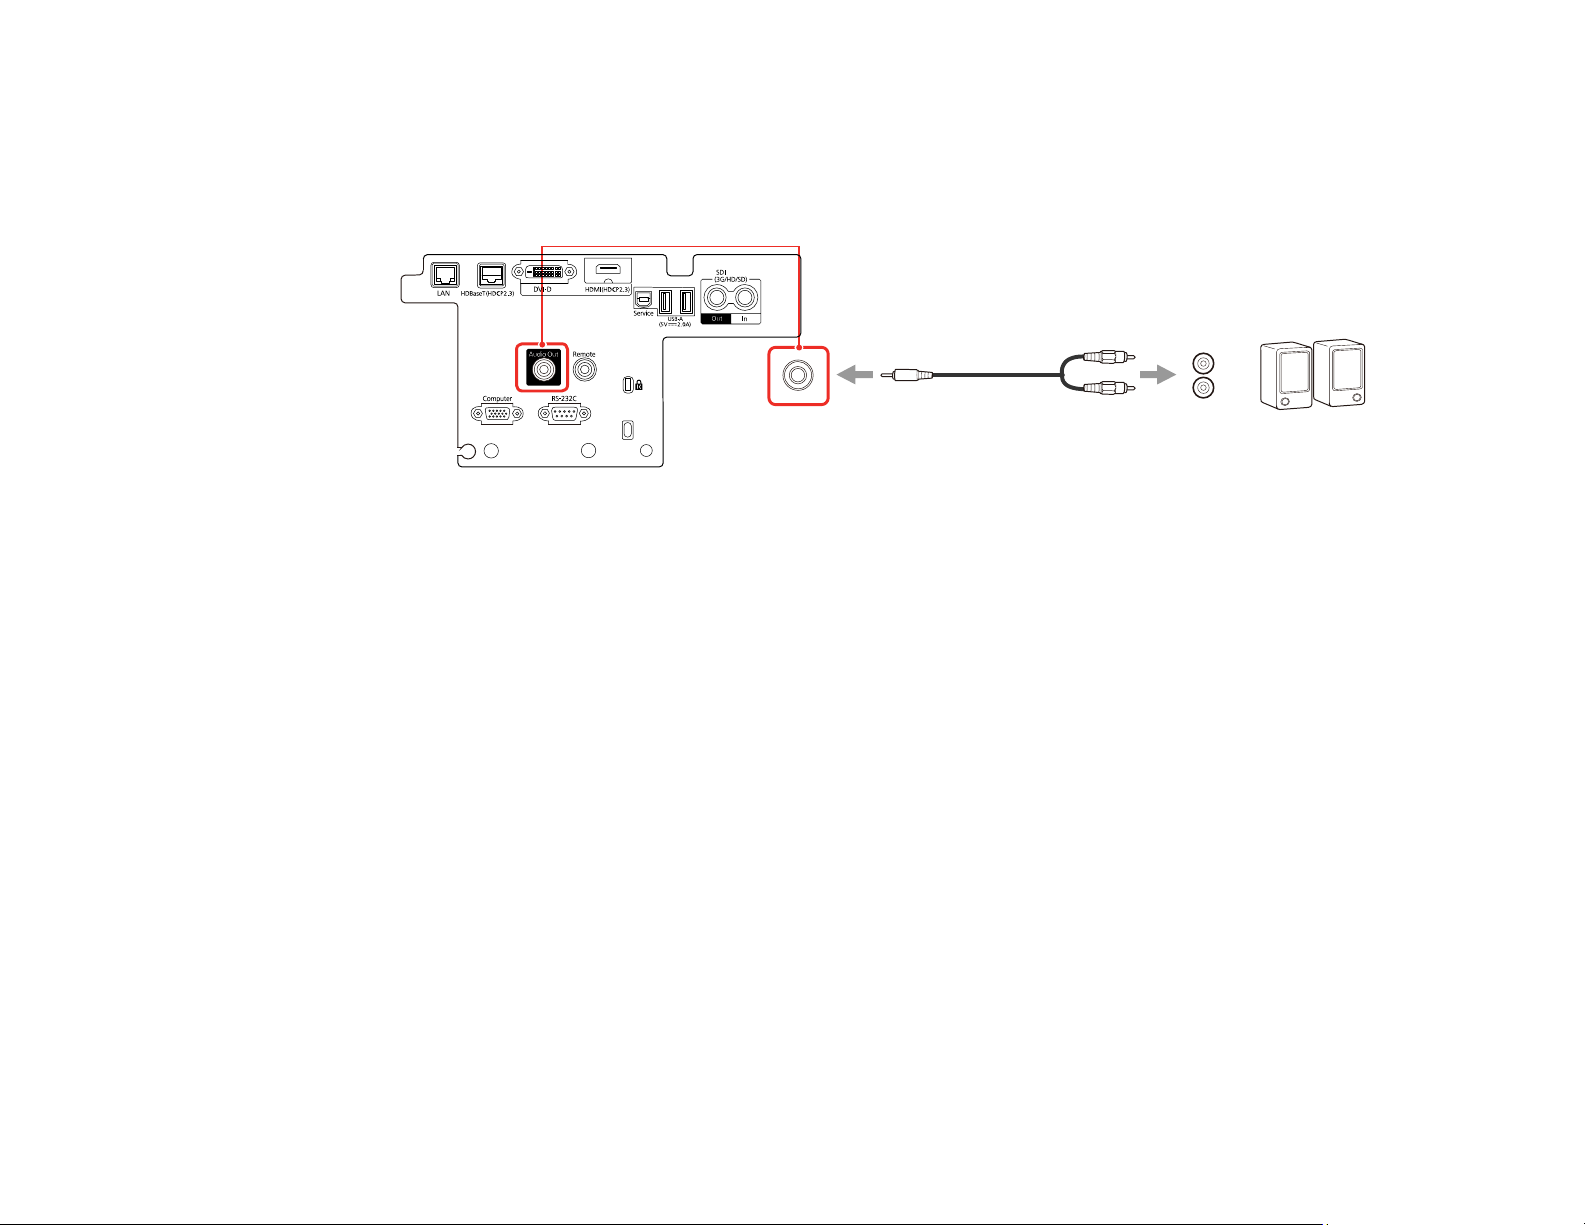
2. Locate the appropriate cable to connect your external speakers, such as a stereo mini-jack-to-pin-
jack cable, or another type of cable or adapter.
3. Connect one end of the cable to your external speakers as necessary.
4. Connect the stereo mini-jack end of the cable to your projector's Audio Out port.
Parent topic: Projector Connections
Related references
Projector Setup Settings - Extended Menu
Attaching and Removing a Lens
Follow the instructions in these sections to attach or remove a compatible lens.
Warning: Make sure you turn off the projector and unplug the power cord before attaching or removing a
lens. Otherwise, you may receive an electric shock.
Attaching a Lens
Removing a Lens
Parent topic: Setting Up the Projector
Attaching a Lens
You can attach a compatible lens to the projector.
Caution: Unplug the power cord from the projector before attaching the lens. Avoid touching the lens
with your bare hands to prevent fingerprints on or damage to the lens surface.
41
Page 42
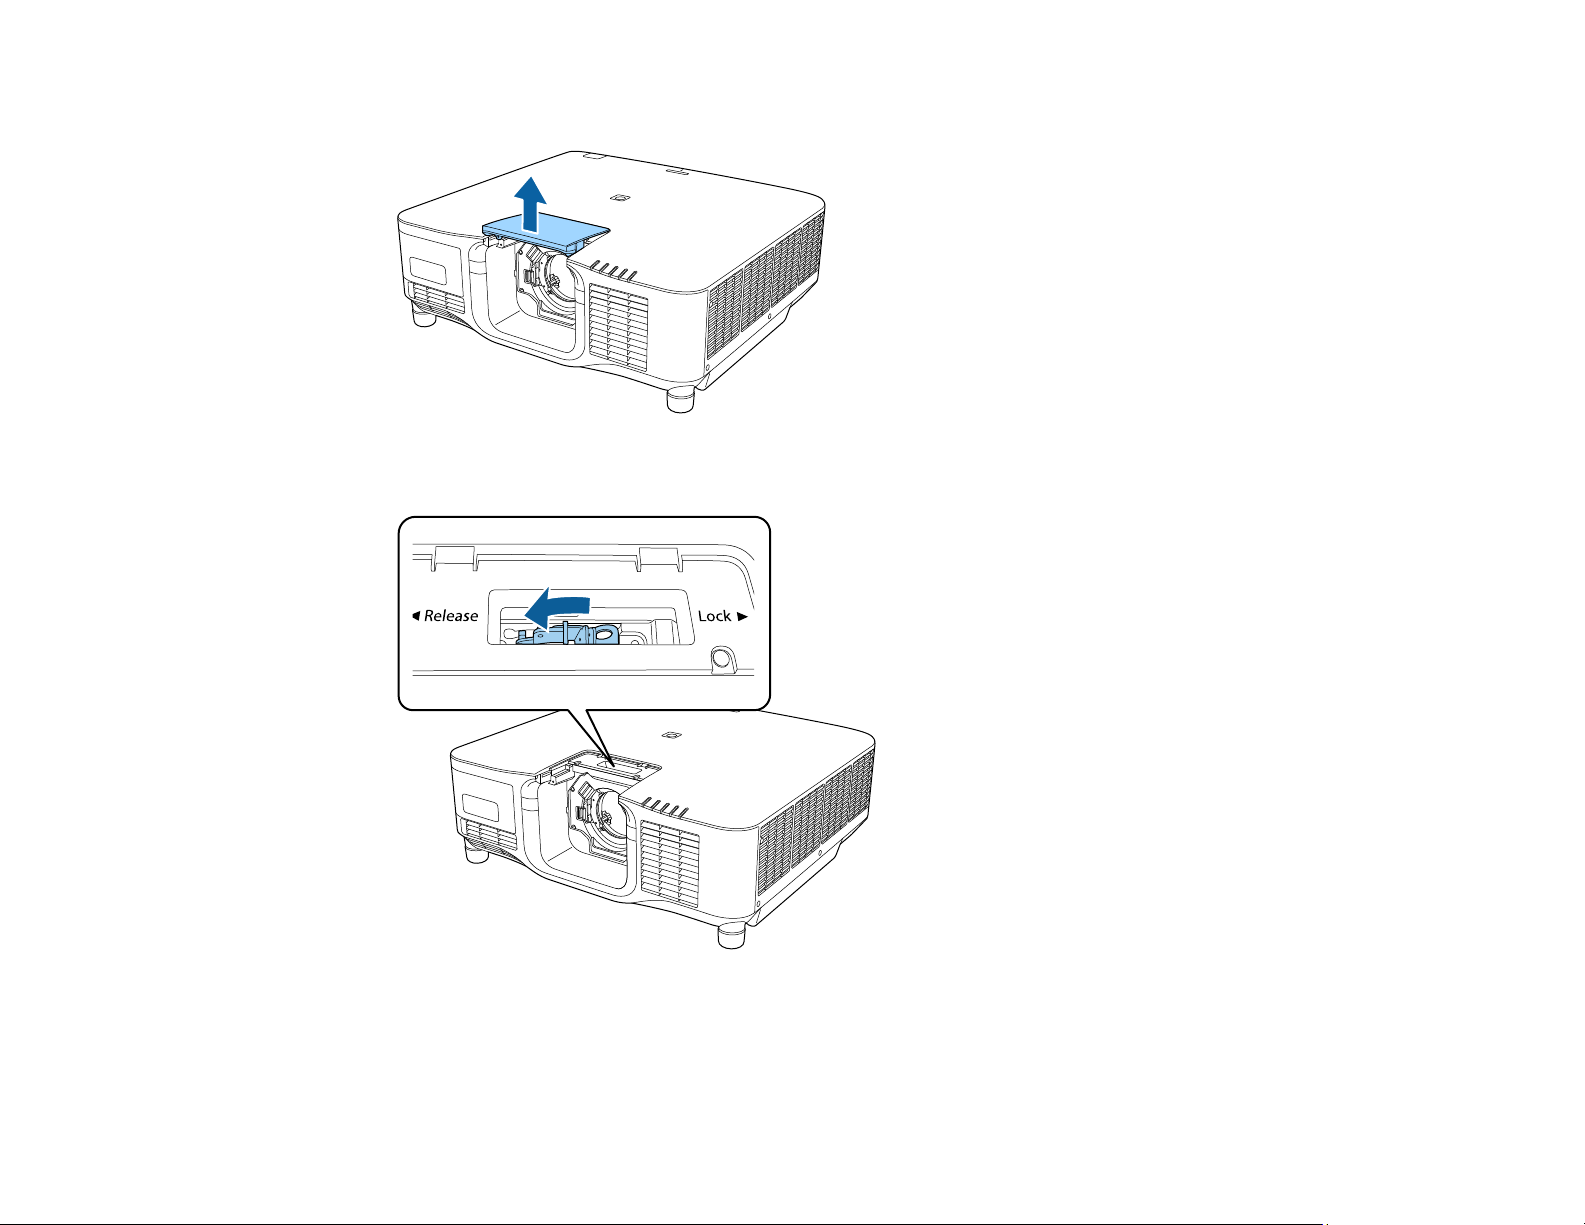
1. Pull the lens replacement cover off of the projector.
2. Pinch the lock lever and move it to the Release position. Remove the black lock lever stopper.
42
Page 43
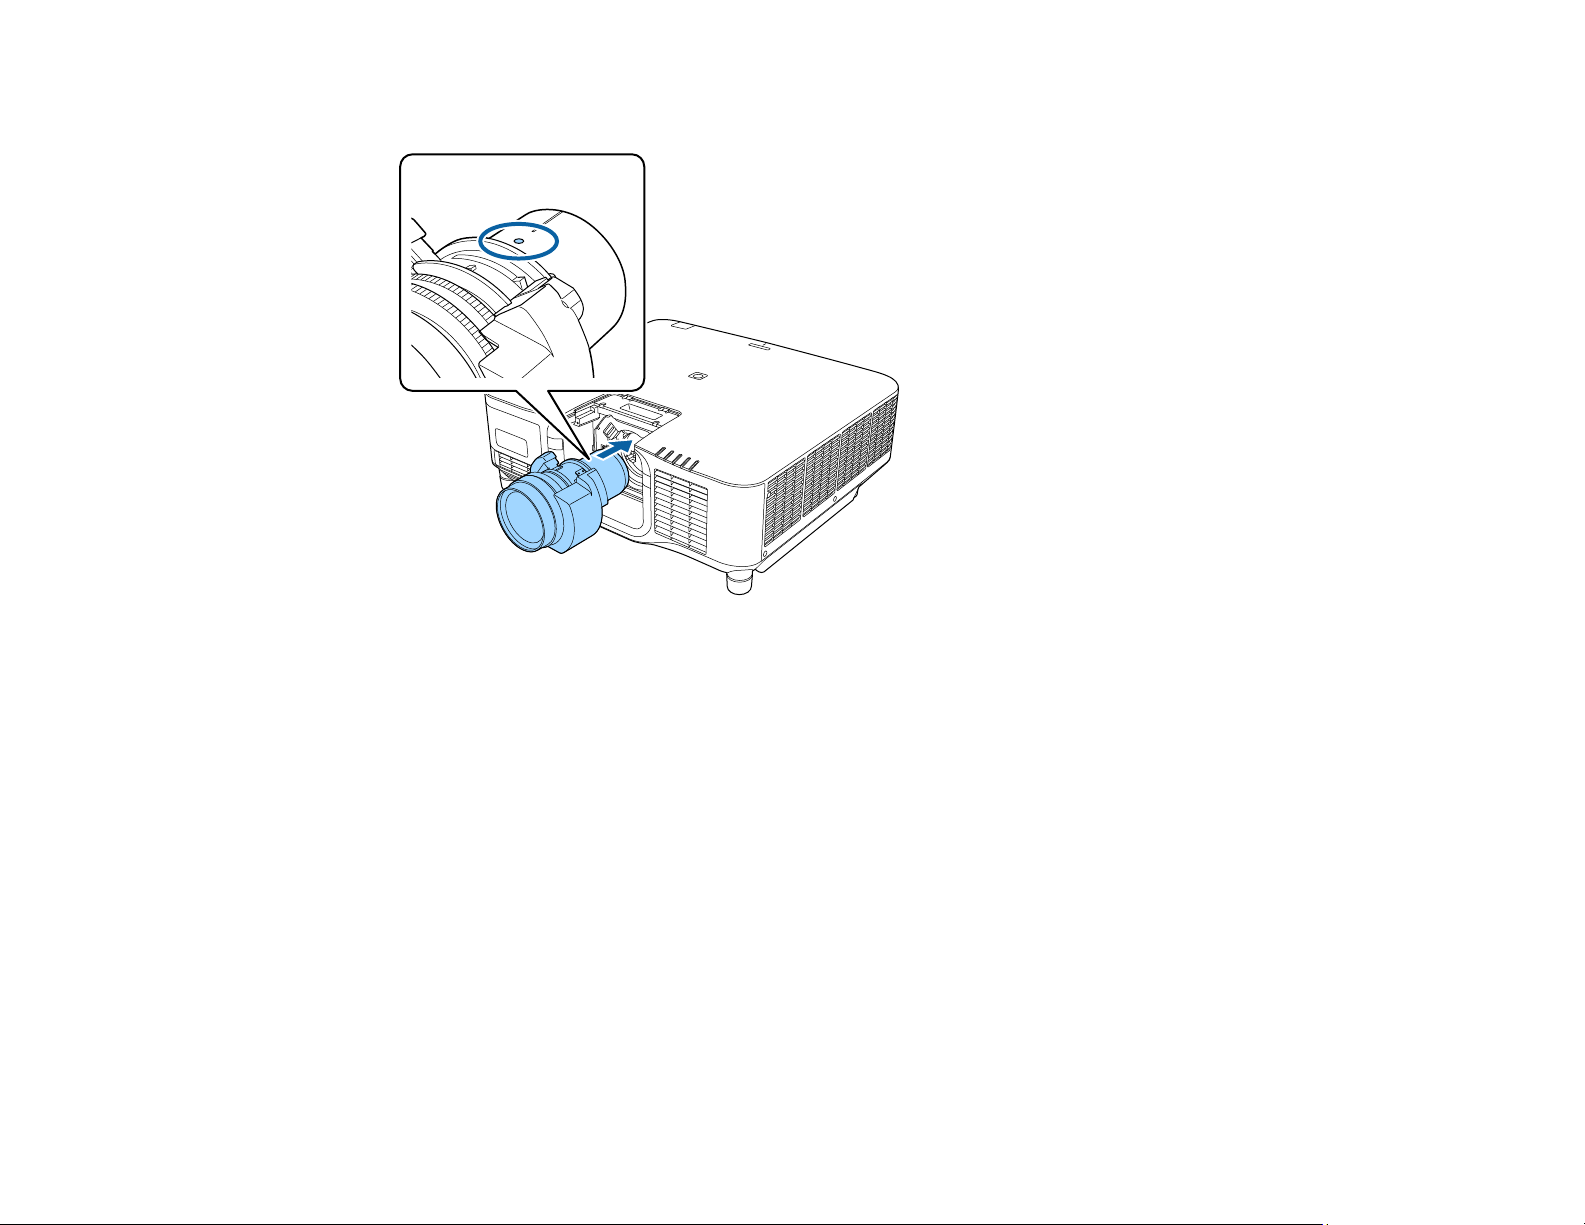
3. Insert the lens straight into the projector's lens socket with the white dot facing up.
Caution: Make sure you do not get your fingers caught between the lens and projector.
43
Page 44
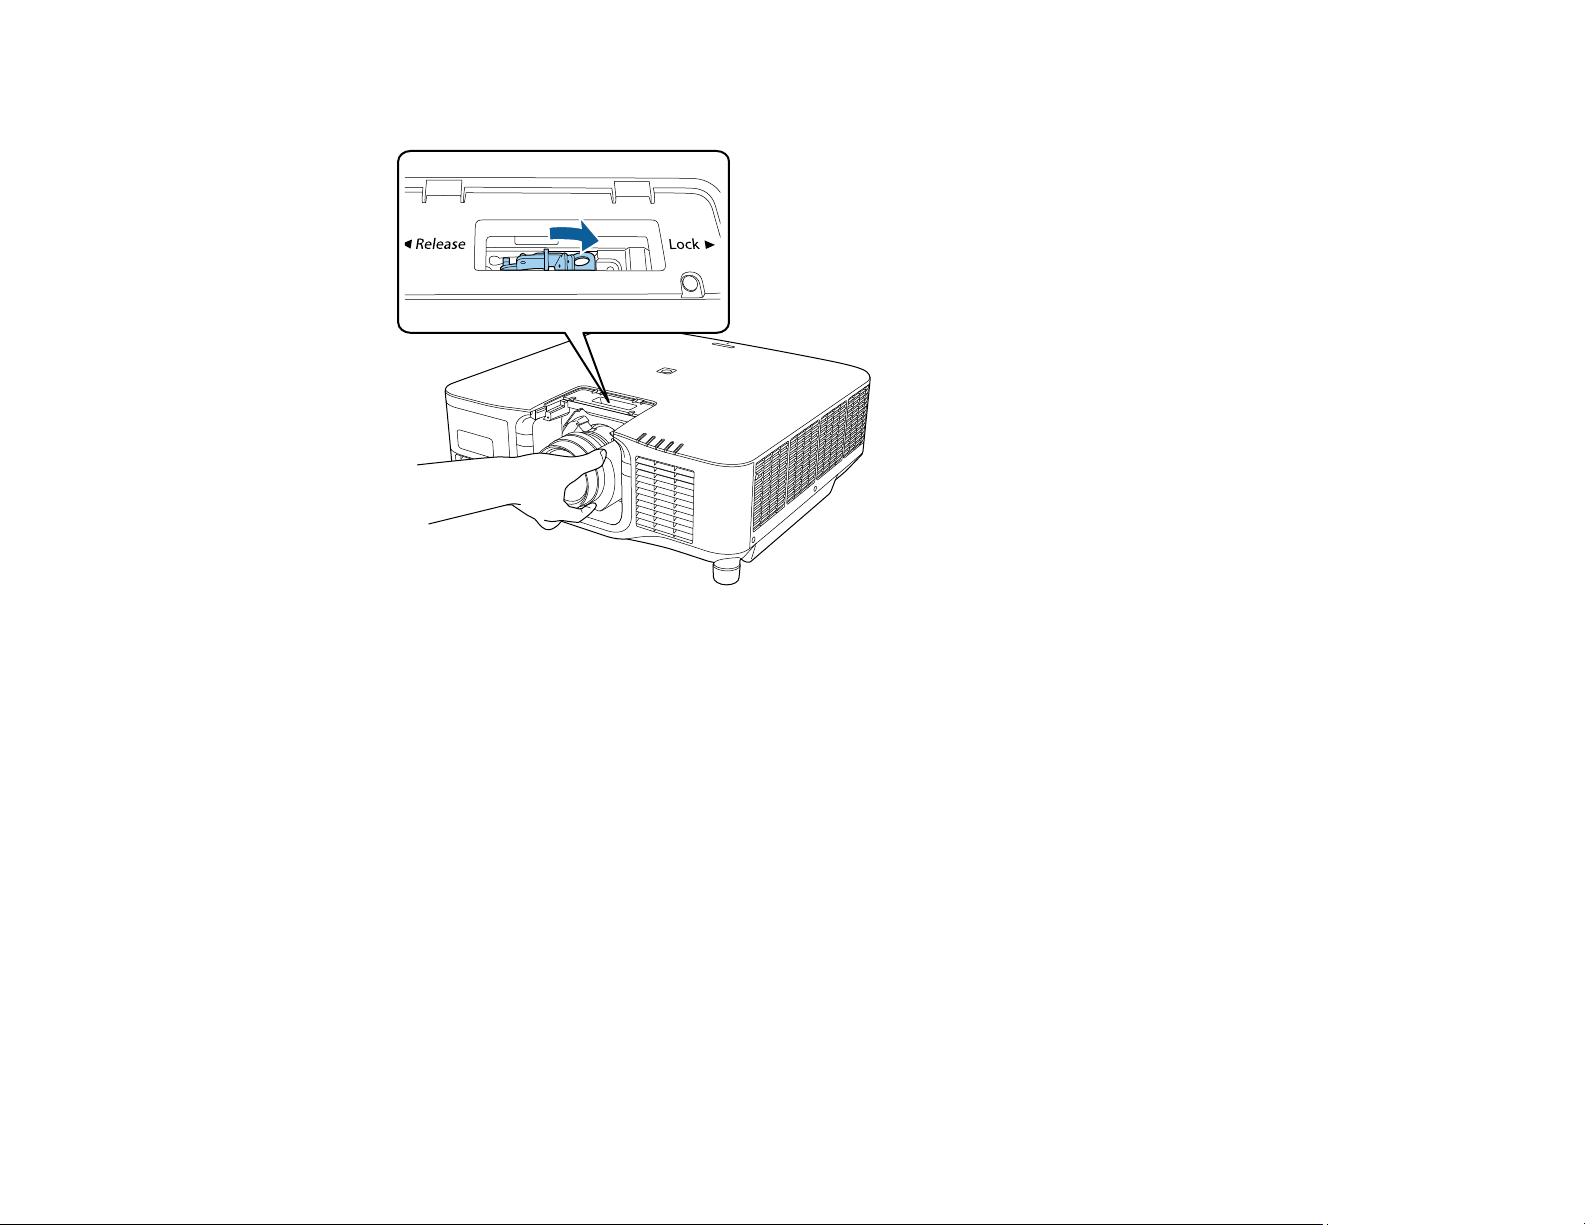
4. Hold the lens firmly after it is fully inserted, then pinch the lock lever and move it to the Lock position.
Note: Make sure the lens is securely attached.
44
Page 45
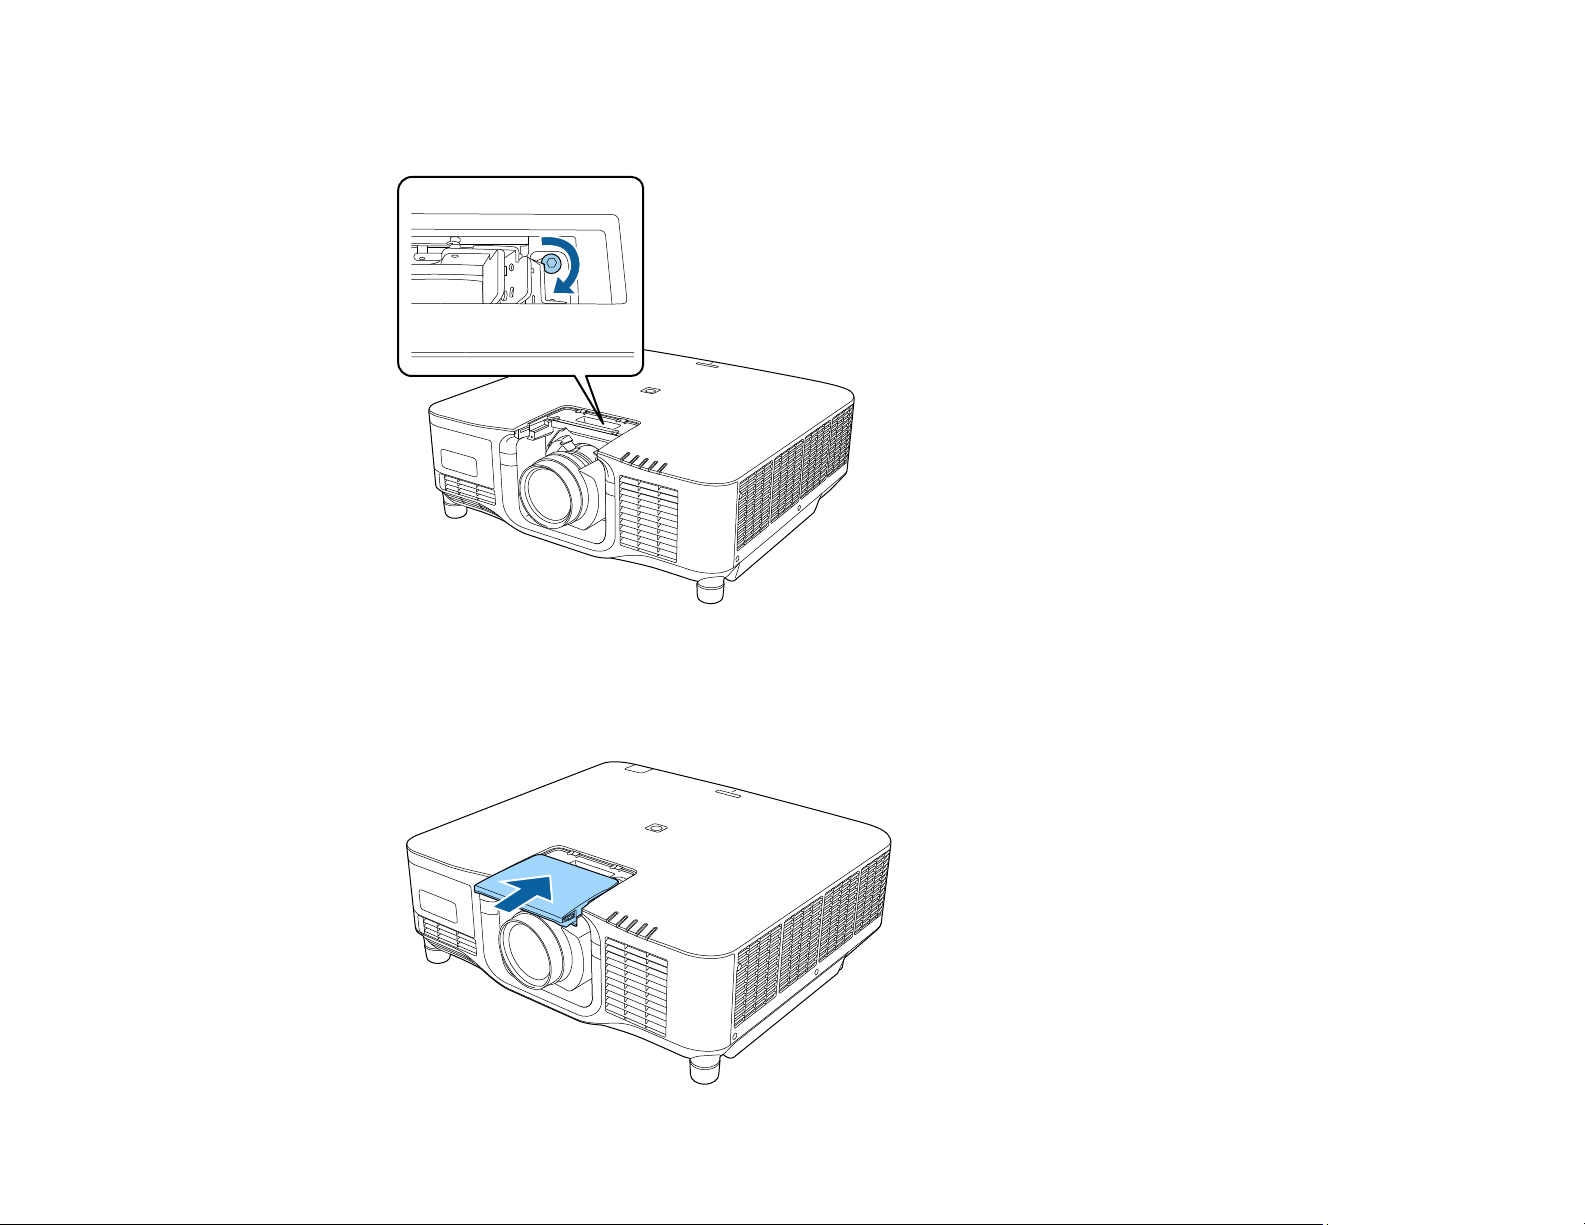
5. If you want to secure the lens more firmly, tighten the screw next to the lock lever with a 2.5 mm
hexagonal wrench.
Note: The ELPLX02S and ELPLX02WS lenses are secured even without using the screw lock.
6. Replace the lens replacement cover.
45
Page 46
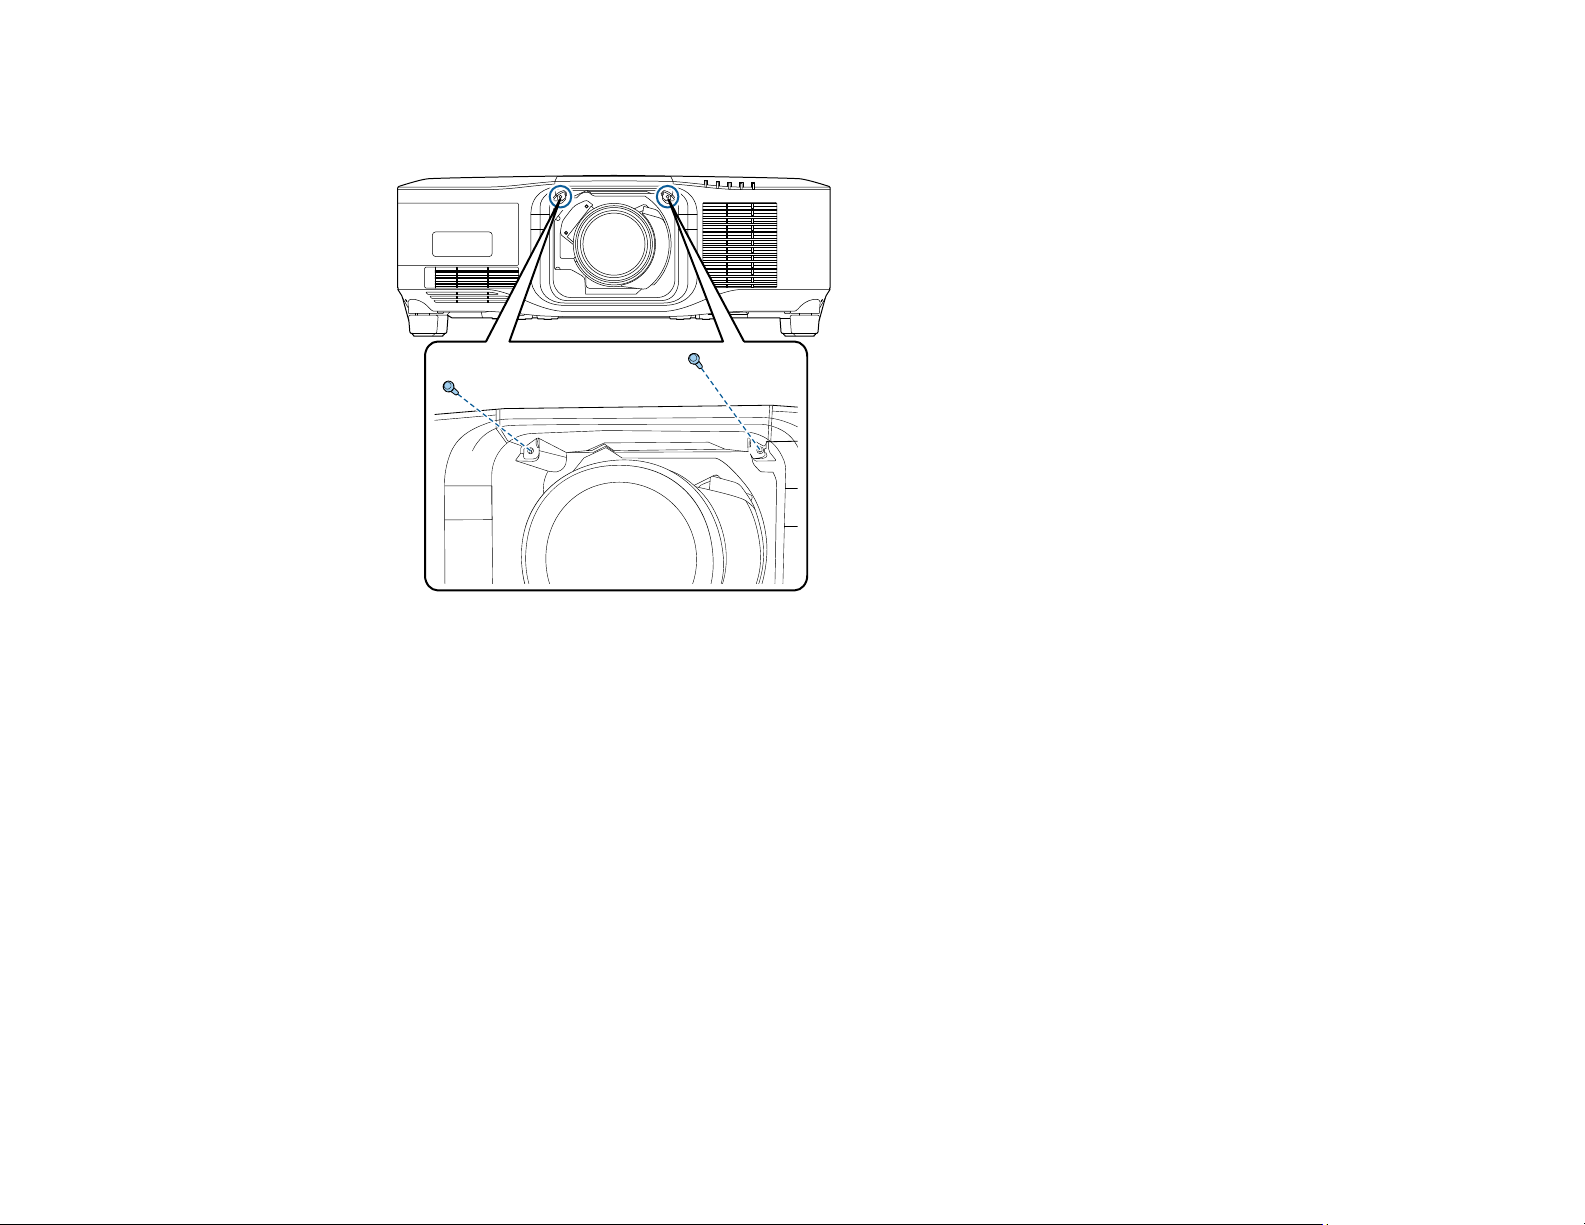
Note: If you are projecting downwards, we recommend securing the lens replacement cover with M3
x 12 mm screws (not included).
7. Turn on the projector to perform lens calibration. When you see a message prompting you to begin
lens calibration, select Yes.
Note: If no message appears after attaching the lens, perform lens calibration by holding down the
Default button on the remote control for approximately 3 seconds, or you can go to Extended >
Operation > Lens Calibration in the projector menu.
Note: Lens calibration helps the projector to correctly acquire the lens position and adjustment
range, and can take up to 100 seconds to complete. When calibration is finished, the lens returns to
the same position it was in before calibration. The ELPLX02S and ELPLX02WS lenses return to the
standard position.
Parent topic: Attaching and Removing a Lens
Related references
Optional Equipment and Replacement Parts
Optional Equipment and Replacement Parts (Latin America)
46
Page 47
Related tasks
Setting the Lens Type
Removing a Lens
You can remove a lens to replace it with a different lens. The projector uses a laser as the light source.
As a safety measure, the light source turns off when the lens is removed. Attach the lens, and then press
the On button to turn it back on.
Warning: Wait at least 30 minutes to remove or replace the lens after turning off the projector. Touching
the lens unit before it cools down may cause burns.
1. Press and hold the Lens Shift (remote control) or Lens (control panel) button for approximately 3
seconds to move the lens to the center position.
2. Turn off the projector and unplug the power cord.
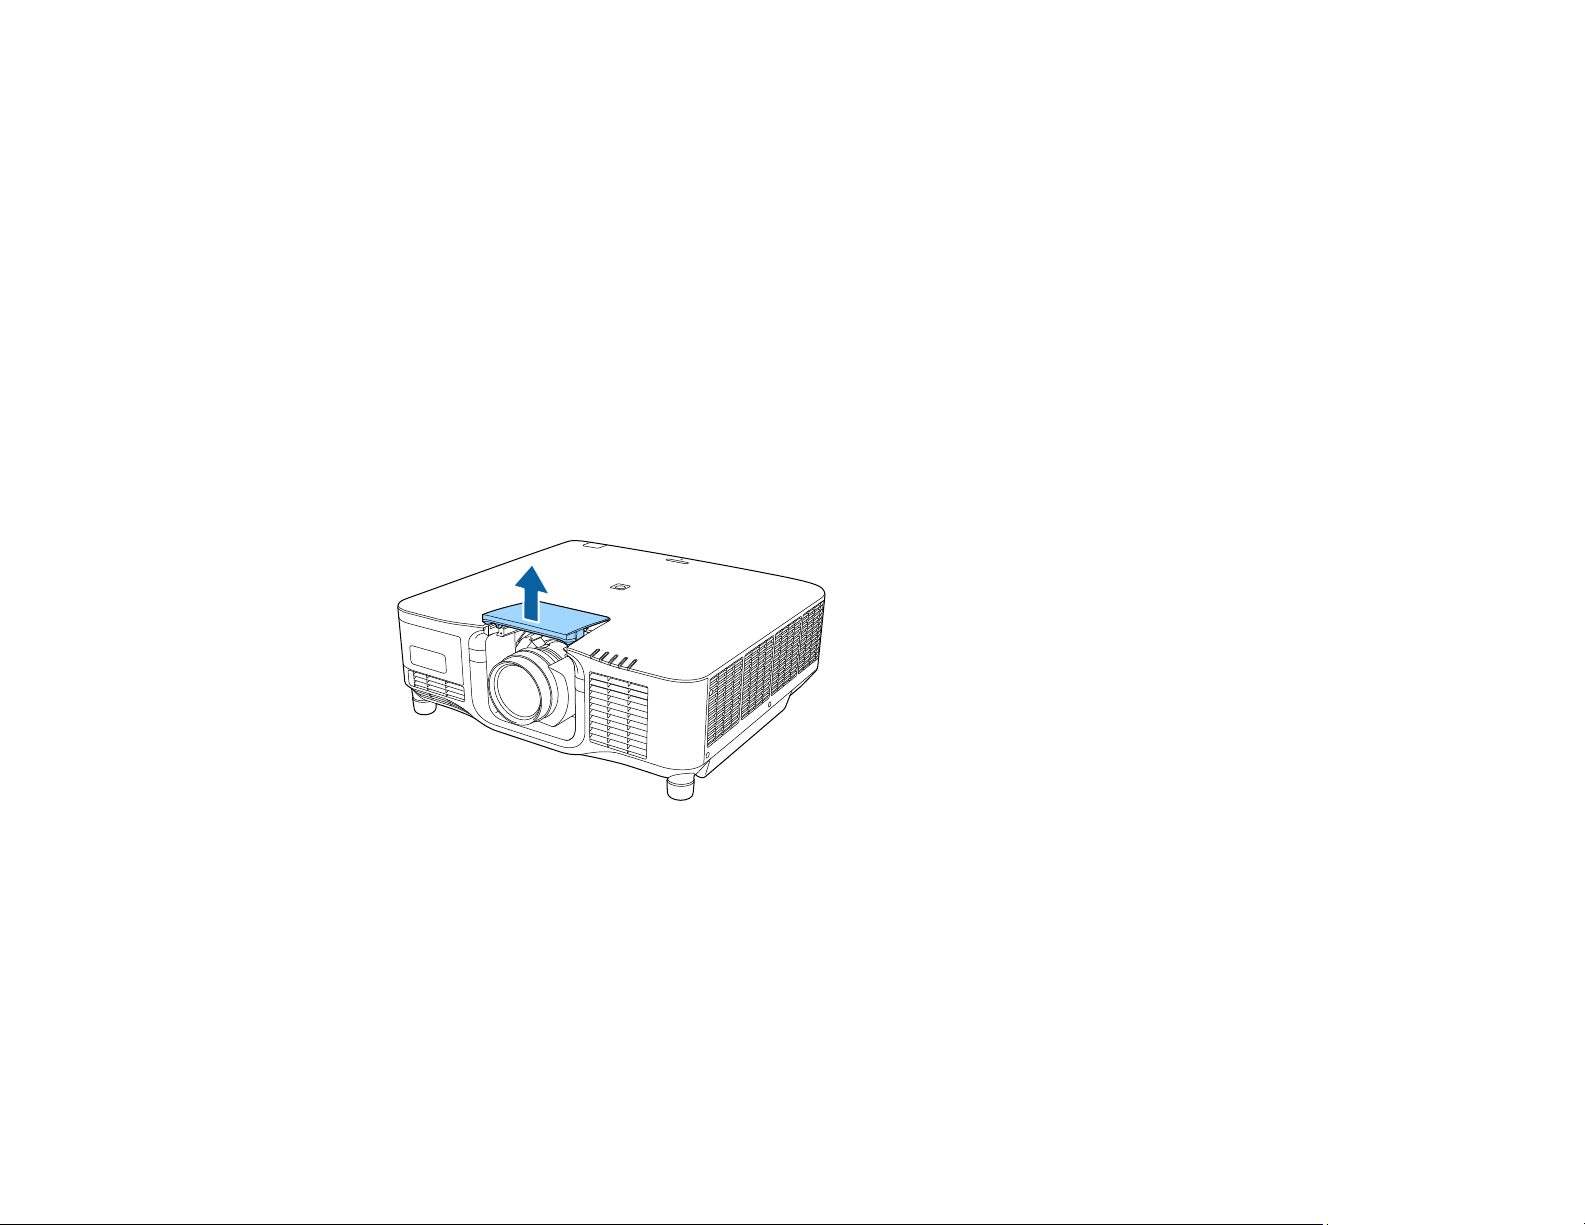
3. Pull the lens replacement cover off of the projector.
47
Page 48
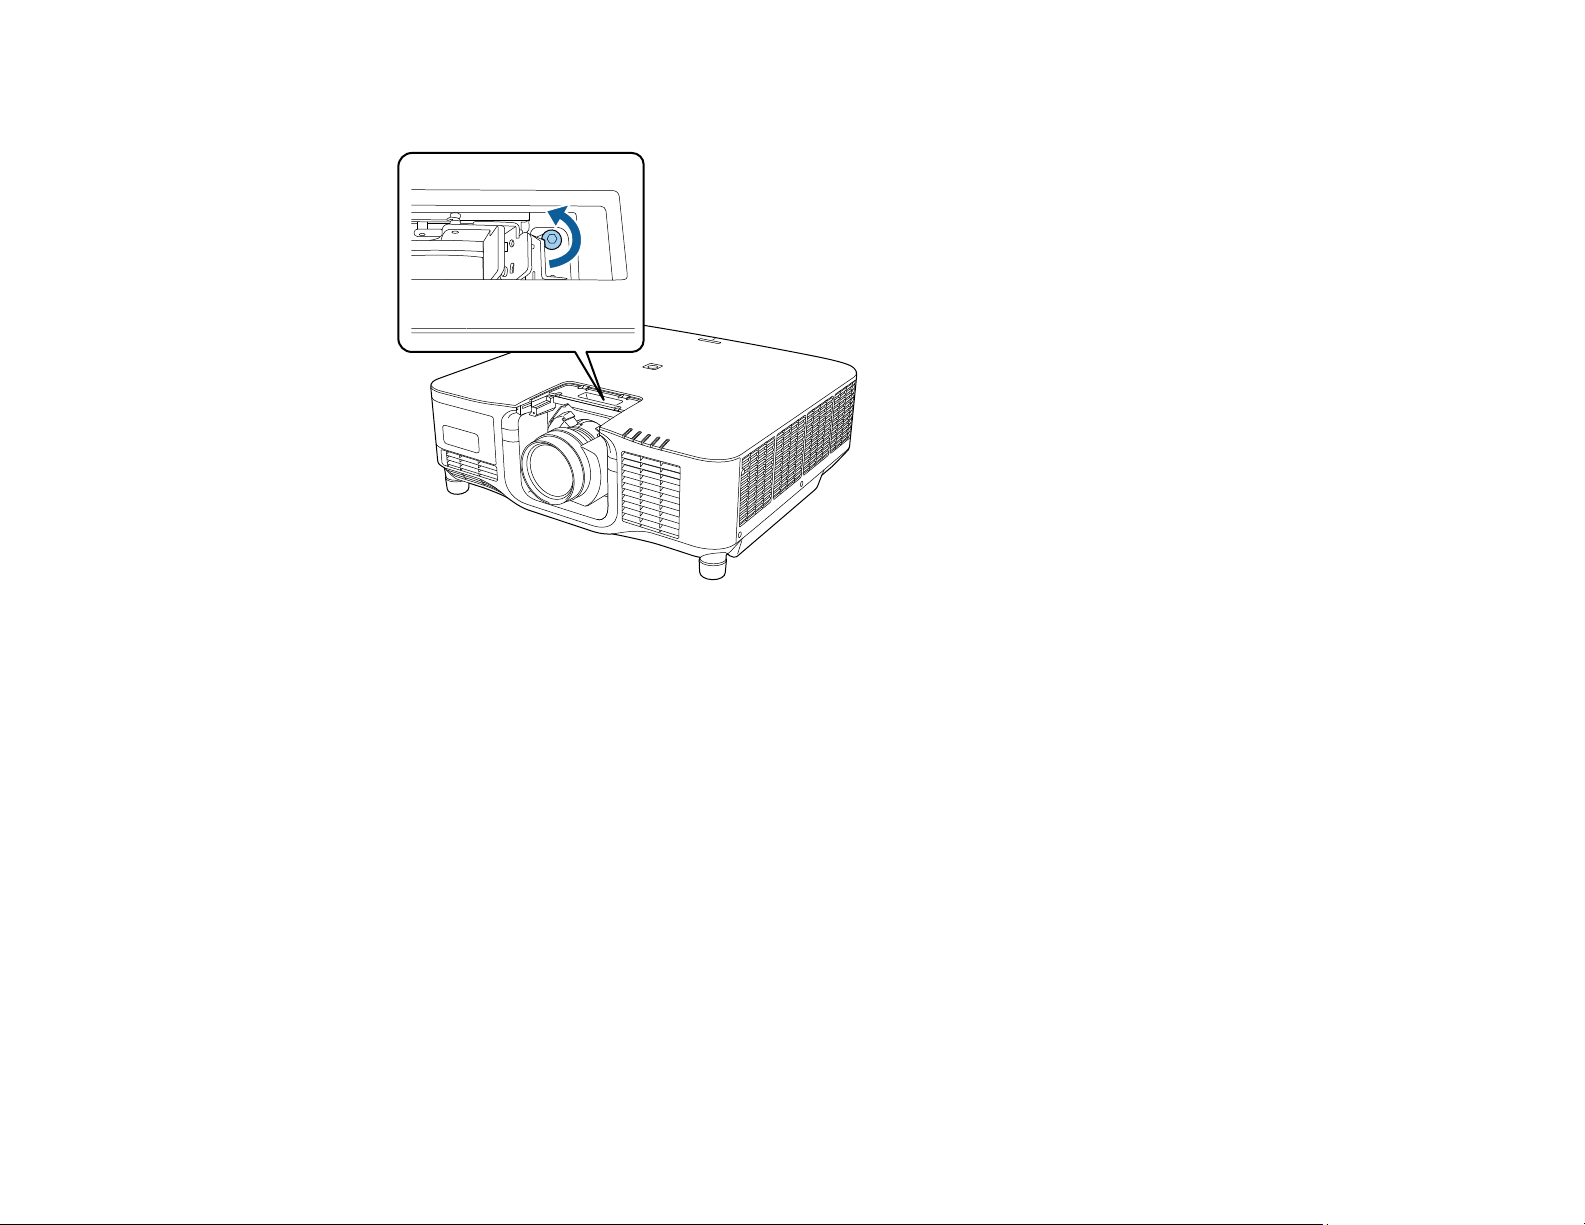
4. If necessary, loosen the screw next to the lock lever.
48
Page 49
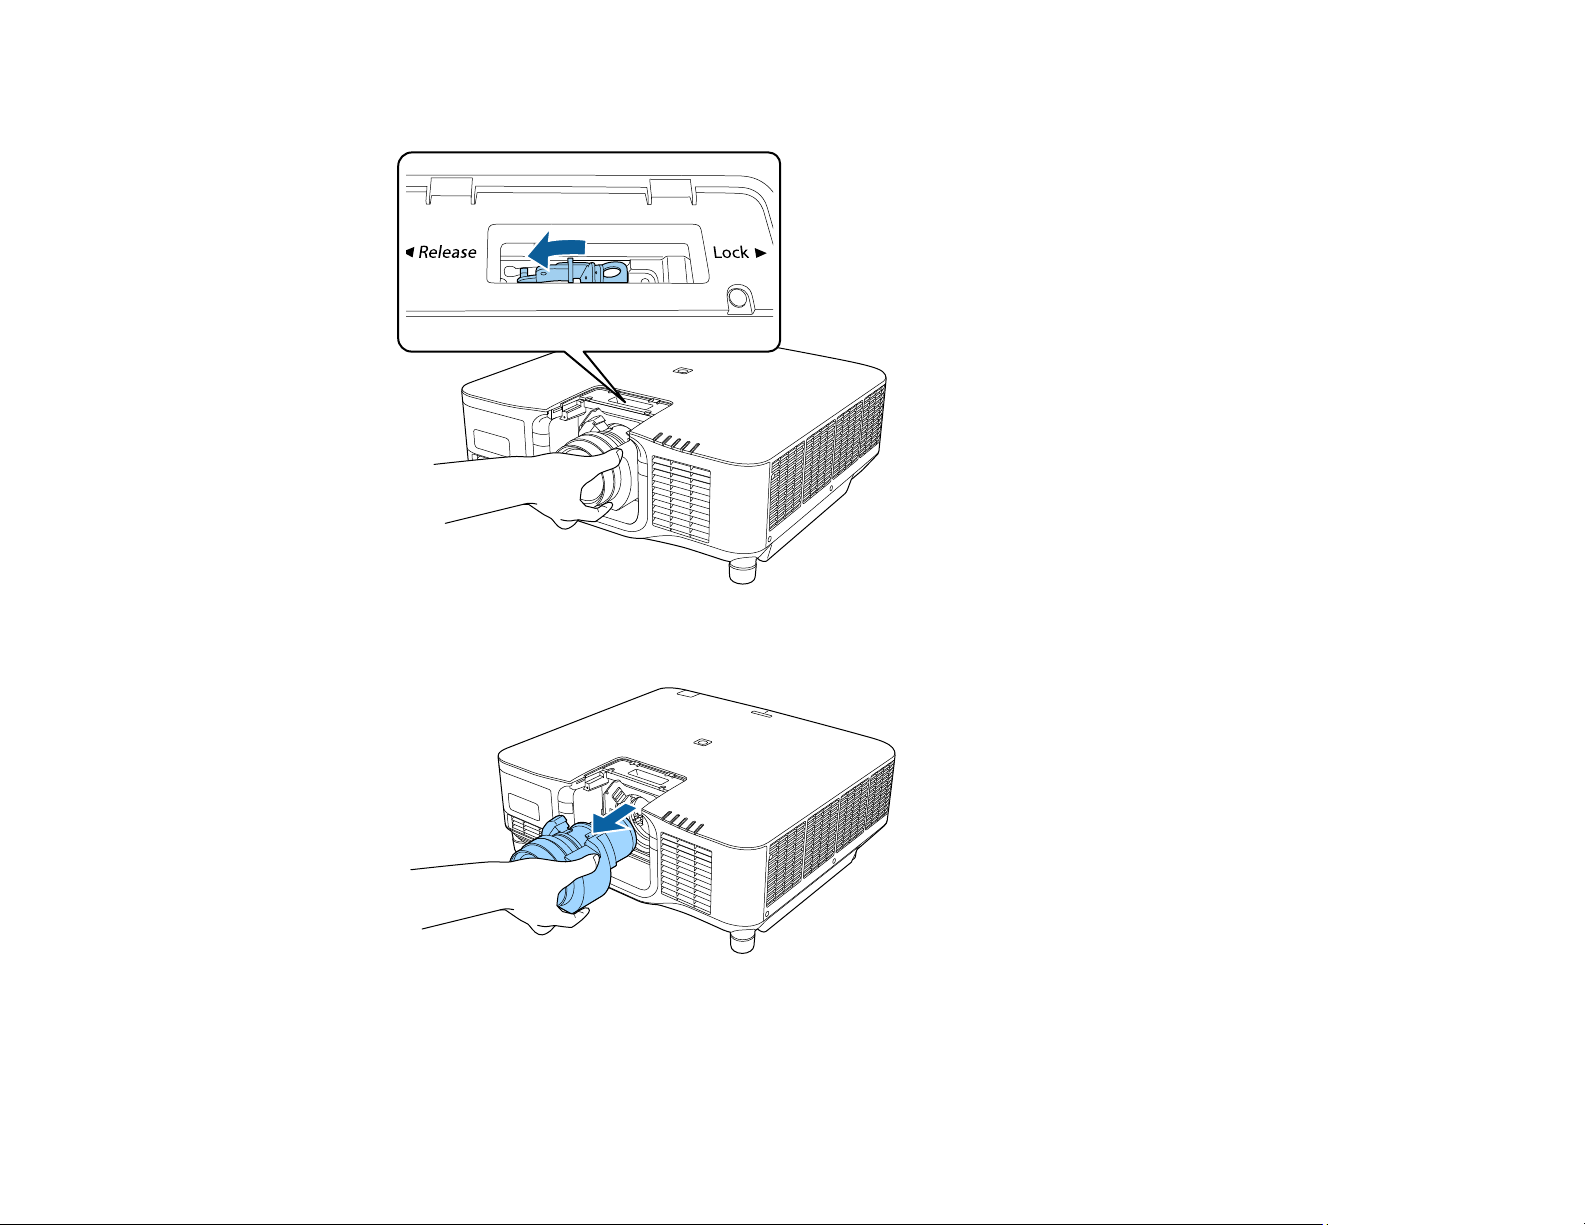
5. Hold the lens firmly as you pinch the lock lever and move it to the Release position.
6. Gently pull the lens straight out of the projector.
Parent topic: Attaching and Removing a Lens
49
Page 50
Attaching and Removing the Cable Cover
You can attach the cable cover that came with your projector to hide the attached cables from view while
the projector is suspended from the ceiling.
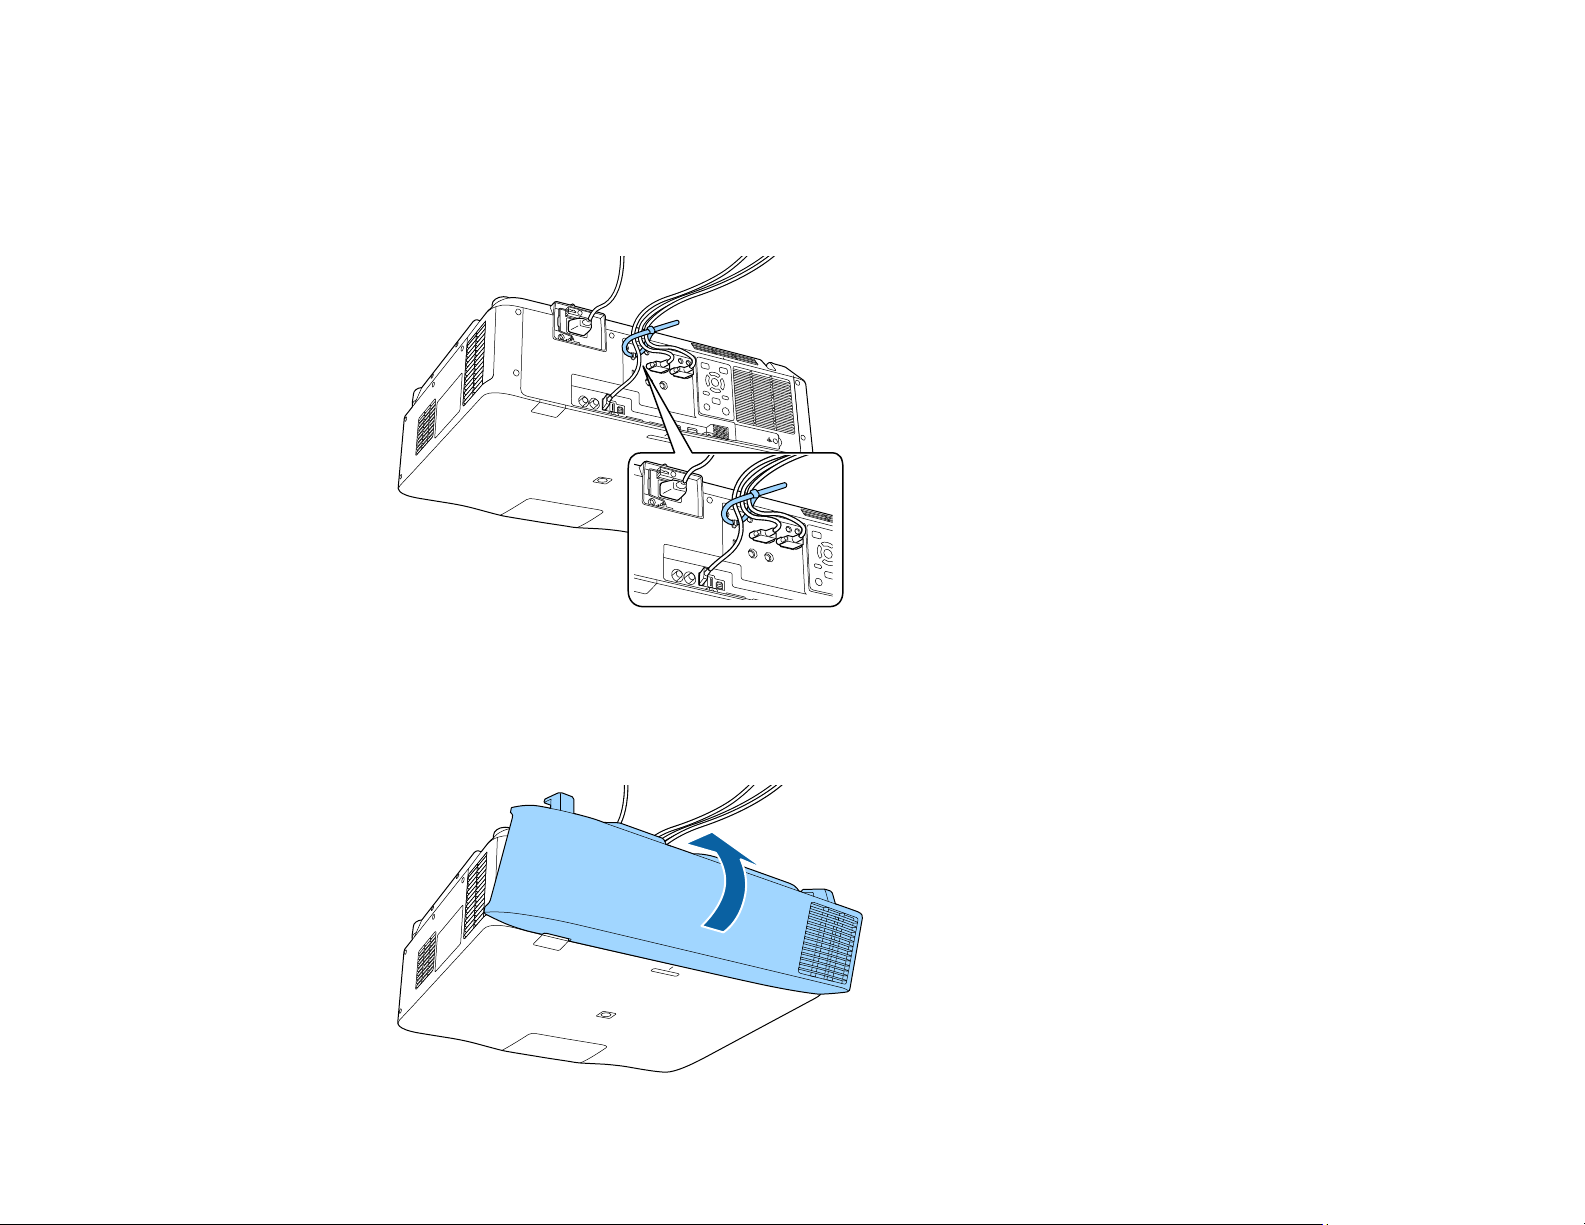
1. Bundle the cables together using a band or other fastener (not provided).
Caution: Do not bundle the power cord to the other cables. Otherwise, a fire may occur.
2. Place the cable cover on the projector as shown, guiding the cables through the notch on the base of
the cable cover.
50
Page 51
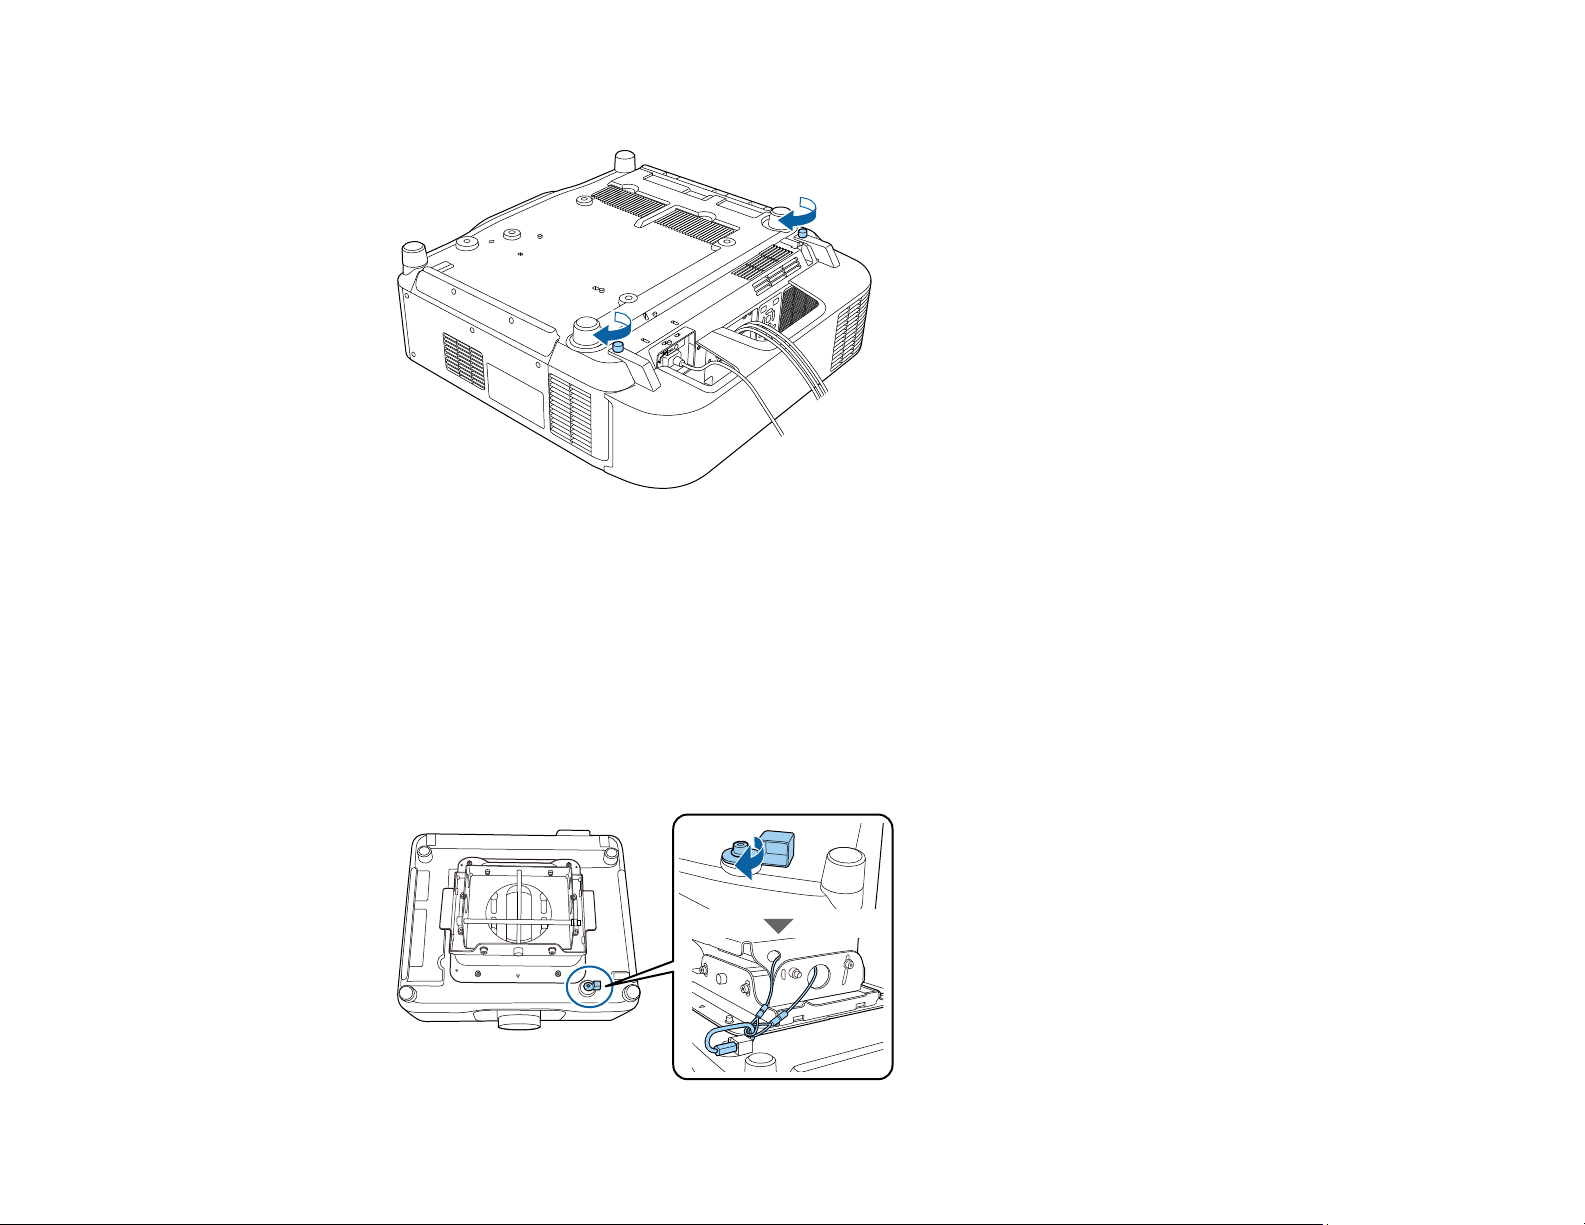
3. Tighten both cable cover screws.
To remove the cover, loosen both screws and pull the cover off of the projector.
Parent topic: Setting Up the Projector
Installing the Safety Wire
When you use the optional ceiling mount, you can install the safety wire (not included) to prevent the
projector from falling from the mount.
1. Secure the ring of the safety wire using the M6 × 15 mm bolt included with the safety wire set.
2. Loop the safety wire through the ceiling mount to secure it.
51
Page 52
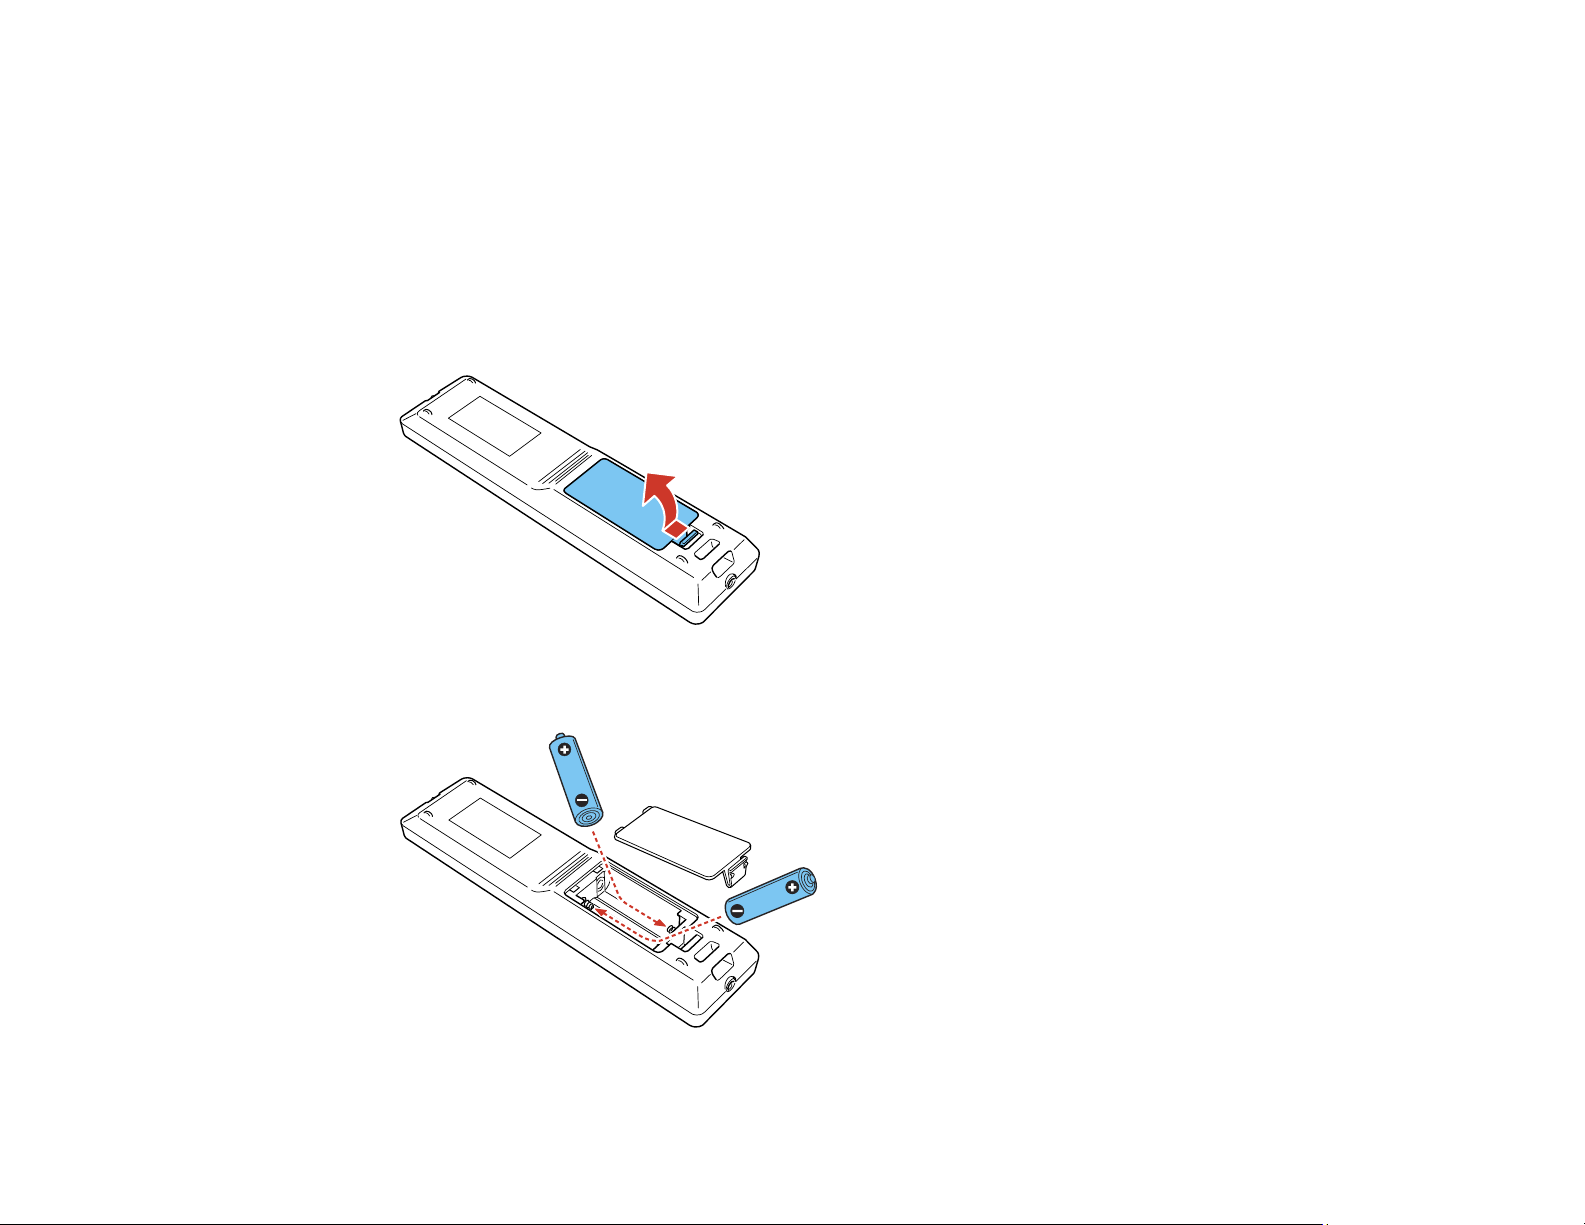
Parent topic: Setting Up the Projector
Installing Batteries in the Remote Control
The remote control uses the two AA batteries that came with the projector.
Caution: Use only the type of batteries specified in this manual. Do not install batteries of different types,
or mix new and old batteries.
1. Remove the battery cover.
2. Insert the batteries with the + and – ends facing as shown.
52
Page 53
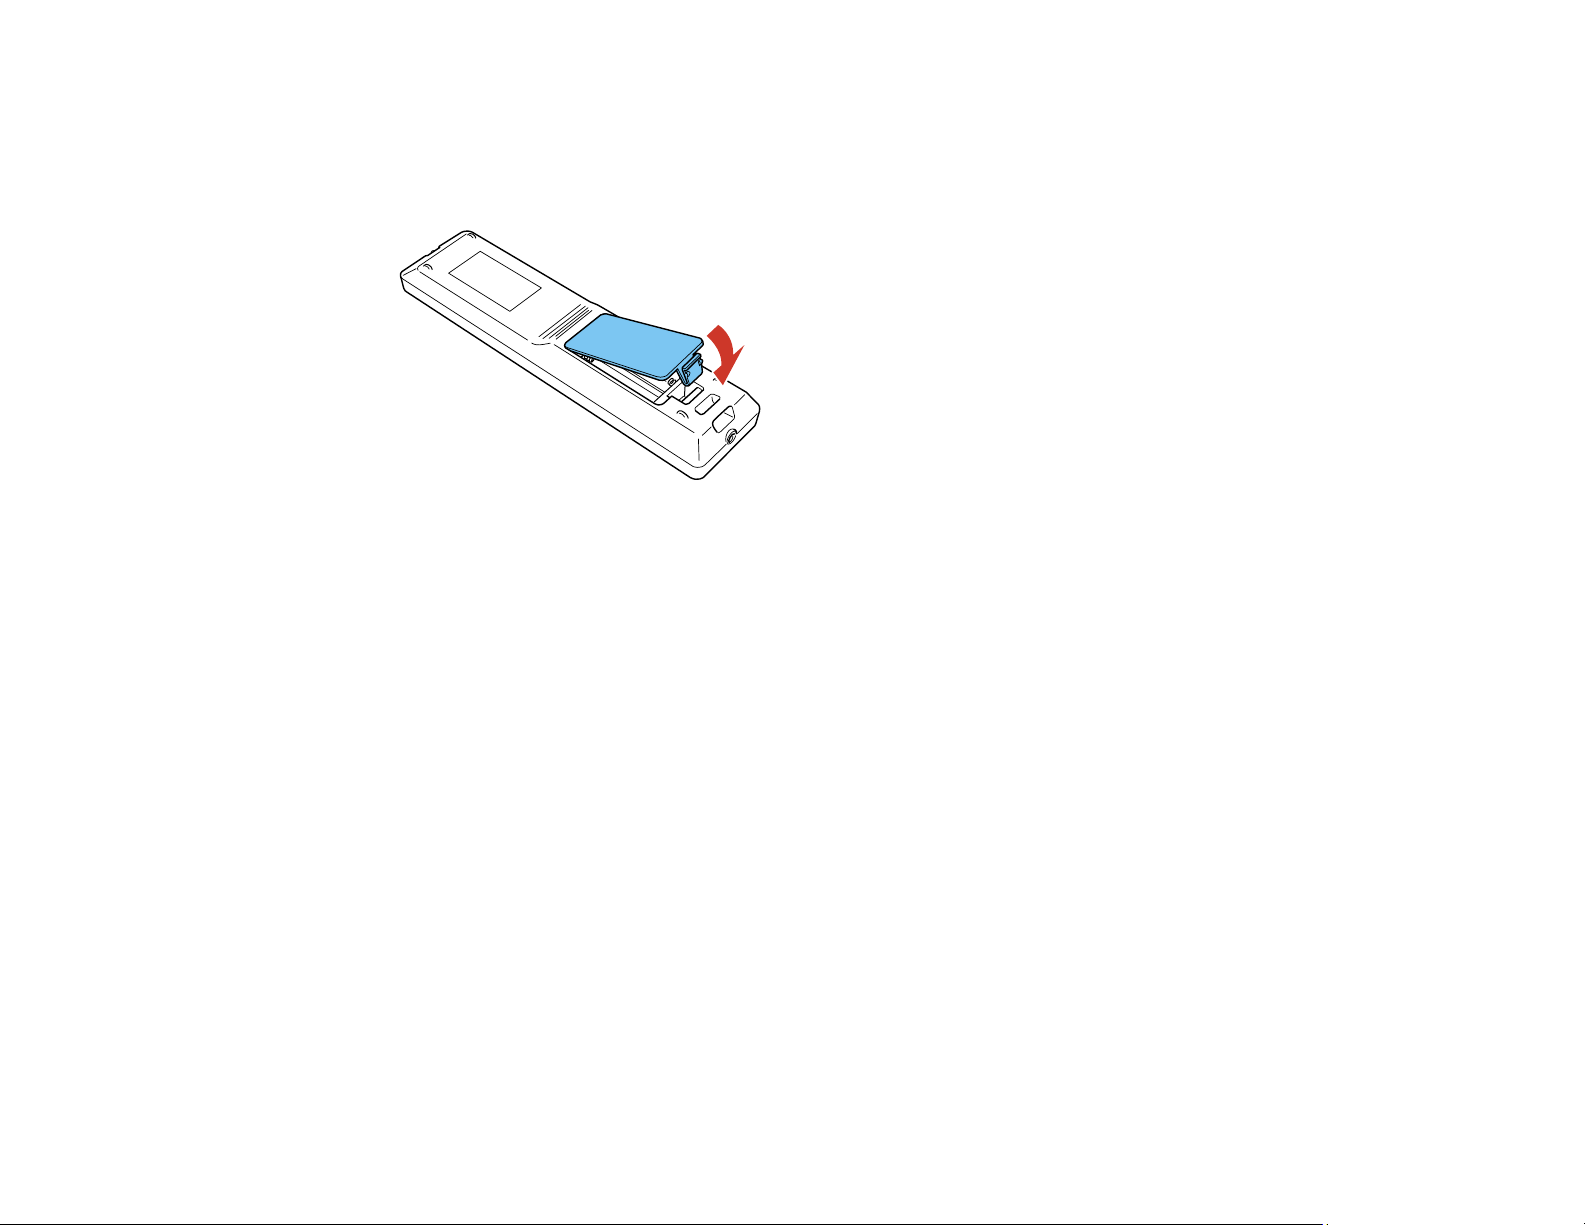
Warning: Make sure the batteries are inserted in the correct positions. If the batteries are not
inserted correctly, they could explode or leak, causing a fire, injury, or damage to the product.
3. Replace the battery cover and press it down until it clicks into place.
Warning: Dispose of used batteries according to local regulations. Do not expose batteries to heat
or flame. Keep batteries out of the reach of children; they are choking hazards and are very
dangerous if swallowed.
Parent topic: Setting Up the Projector
53
Page 54

Using the Projector on a Network
Follow the instructions in these sections to set up your projector for use on a network.
Note: Epson iProjection is not recommended for use with streaming video.
Wired Network Projection
Wireless Network Projection
Setting Up Projector Network E-Mail Alerts
Selecting Other Network Settings
Controlling a Networked Projector Using a Web Browser
Controlling a Networked Projector in Content Playback Mode
Using Crestron Connected
Registering a Digital Certificate on the Projector
Wired Network Projection
You can project through a wired network. To do this, you connect the projector to your network with an
Ethernet cable, and then set up your projector and computer for network projection.
After connecting and setting up the projector, install the projector software. You may need to install it
from a software CD, if included, or download the software and manuals as necessary.
Note: If your projector is connected via a LAN (Ethernet) cable to a network that includes a wireless
access point, you can connect to the projector wirelessly through the access point using the Epson
network software.
Connecting to a Wired Network
Selecting Wired Network Settings
Parent topic: Using the Projector on a Network
Related references
Additional Projector Software and Manuals
Connecting to a Wired Network
To connect the projector to a wired local area network (LAN), use a 100Base-TX or 10Base-T network
cable. To ensure proper data transmission, use a Category 5 shielded cable or higher.
54
Page 55
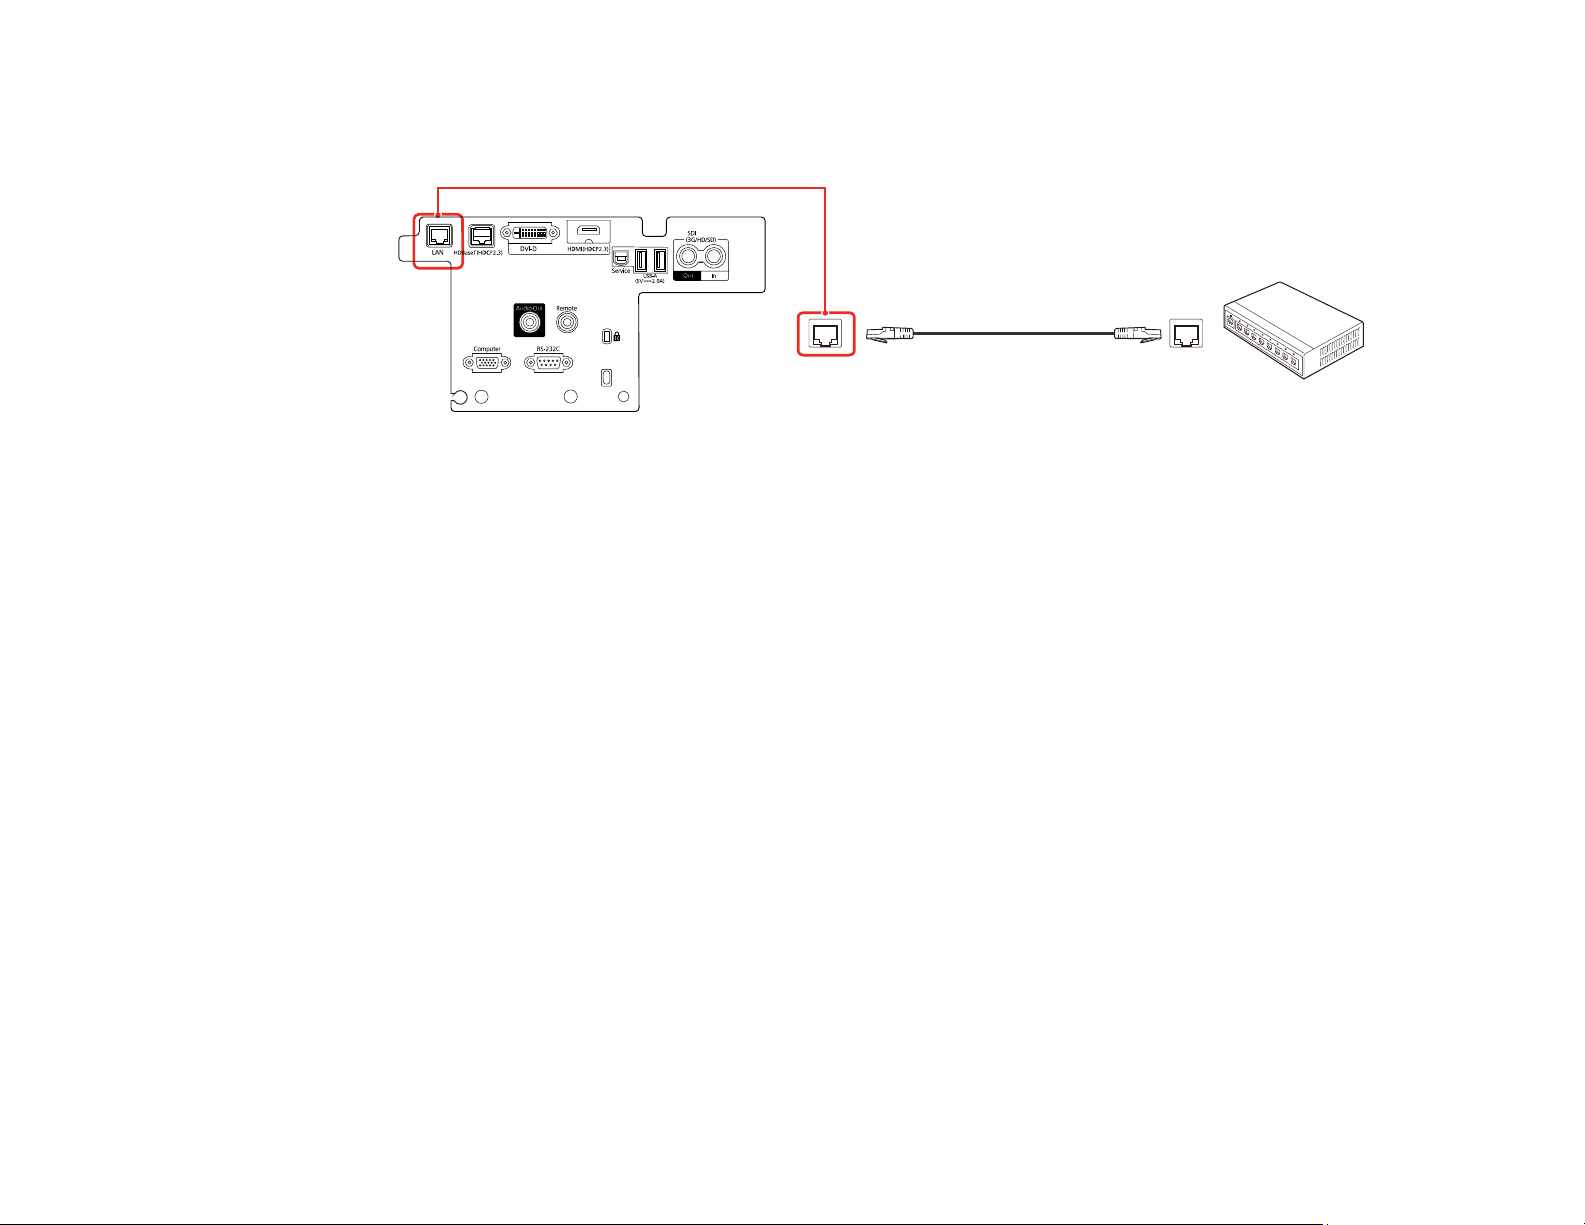
1. Connect one end of the network cable to your network hub, switch, or router.
2. Connect the other end of the cable to the projector's LAN port.
Parent topic: Wired Network Projection
Selecting Wired Network Settings
Before you can project from computers, tablets, or smartphones over your network, you must select the
network settings for the projector using its menu system.
Note: Make sure you already connected the projector to your wired network using the LAN port.
1. Turn on the projector.
2. Press the Menu button.
55
Page 56
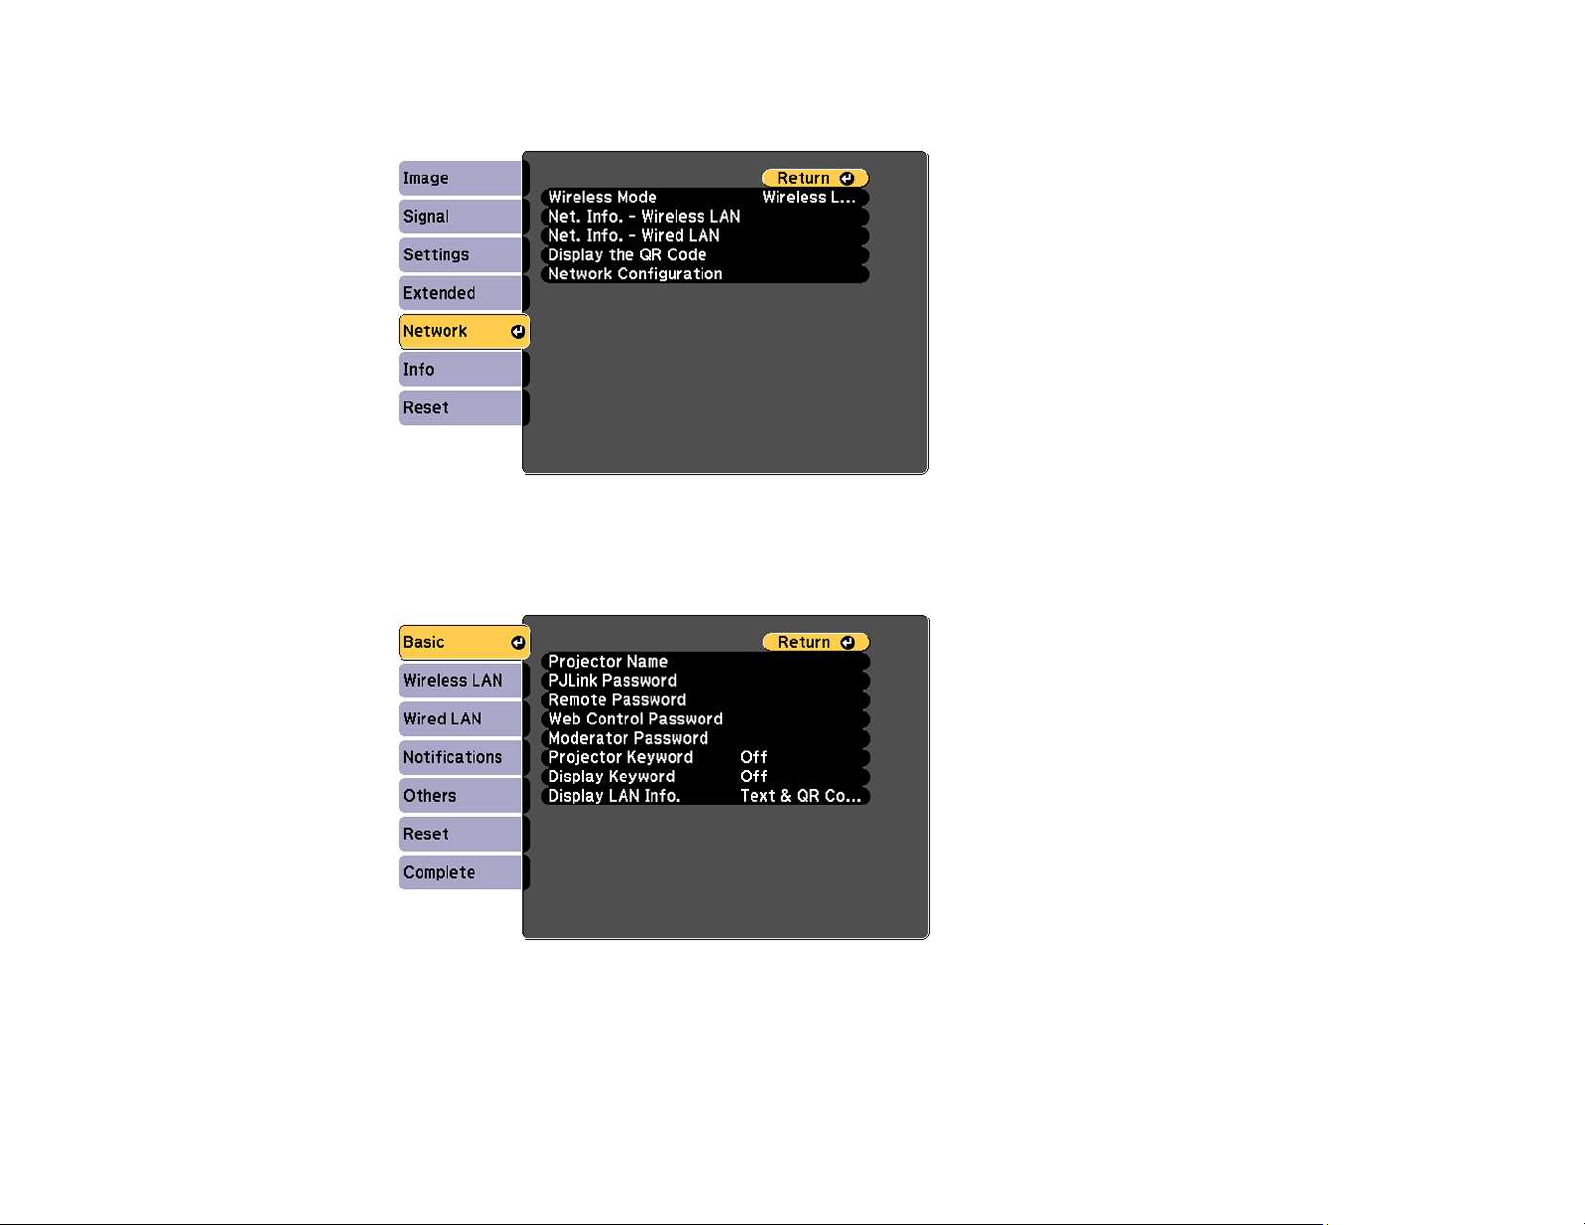
3. Select the Network menu and press Enter.
4. Select Network Configuration and press Enter.
5. Select the Basic menu and press Enter.
6. Select the following basic options as necessary:
• Projector Name lets you enter a name up to 16 alphanumeric characters long to identify the
projector over the network.
56
Page 57

• PJLink Password lets you enter a password up to 32 alphanumeric characters long for using the
PJLink protocol for projector control.
• Remote Password lets you enter a password up to 32 alphanumeric characters long for
accessing the Remote screen in Epson Web Control. (Default user name is EPSONREMOTE;
default password is the projector's serial number.)
• Web Control Password lets you enter a password up to 32 alphanumeric characters long for
accessing Epson Web Control. (Default user name is EPSONWEB; default password is the
projector's serial number.)
• Moderator Password lets you enter a password up to 4 numbers long for accessing the projector
as a moderator with the Epson iProjection (Windows/Mac) software or the Epson iProjection app.
• Projector Keyword lets you turn on a security password to prevent access to the projector by
anyone not in the room with it. The projector displays a random keyword that you must enter from
a computer using the Epson iProjection (Windows/Mac) software or an iOS or Android device, or
on a Chromebook, using the Epson iProjection app.
• Display Keyword lets you display a keyword on the projected image when accessing the
projector from a computer using the Epson iProjection (Windows/Mac) software or an iOS or
Android device, or on a Chromebook, using the Epson iProjection app.
• Display LAN Info lets you select how the projector displays network information. You can select
an option to display a QR code that lets you quickly connect your iOS or Android devices using the
Epson iProjection app.
Note: Use the displayed keyboard to enter the name, passwords, and keyword. Press the arrow
buttons on the remote control to highlight characters and press Enter to select them.
57
Page 58
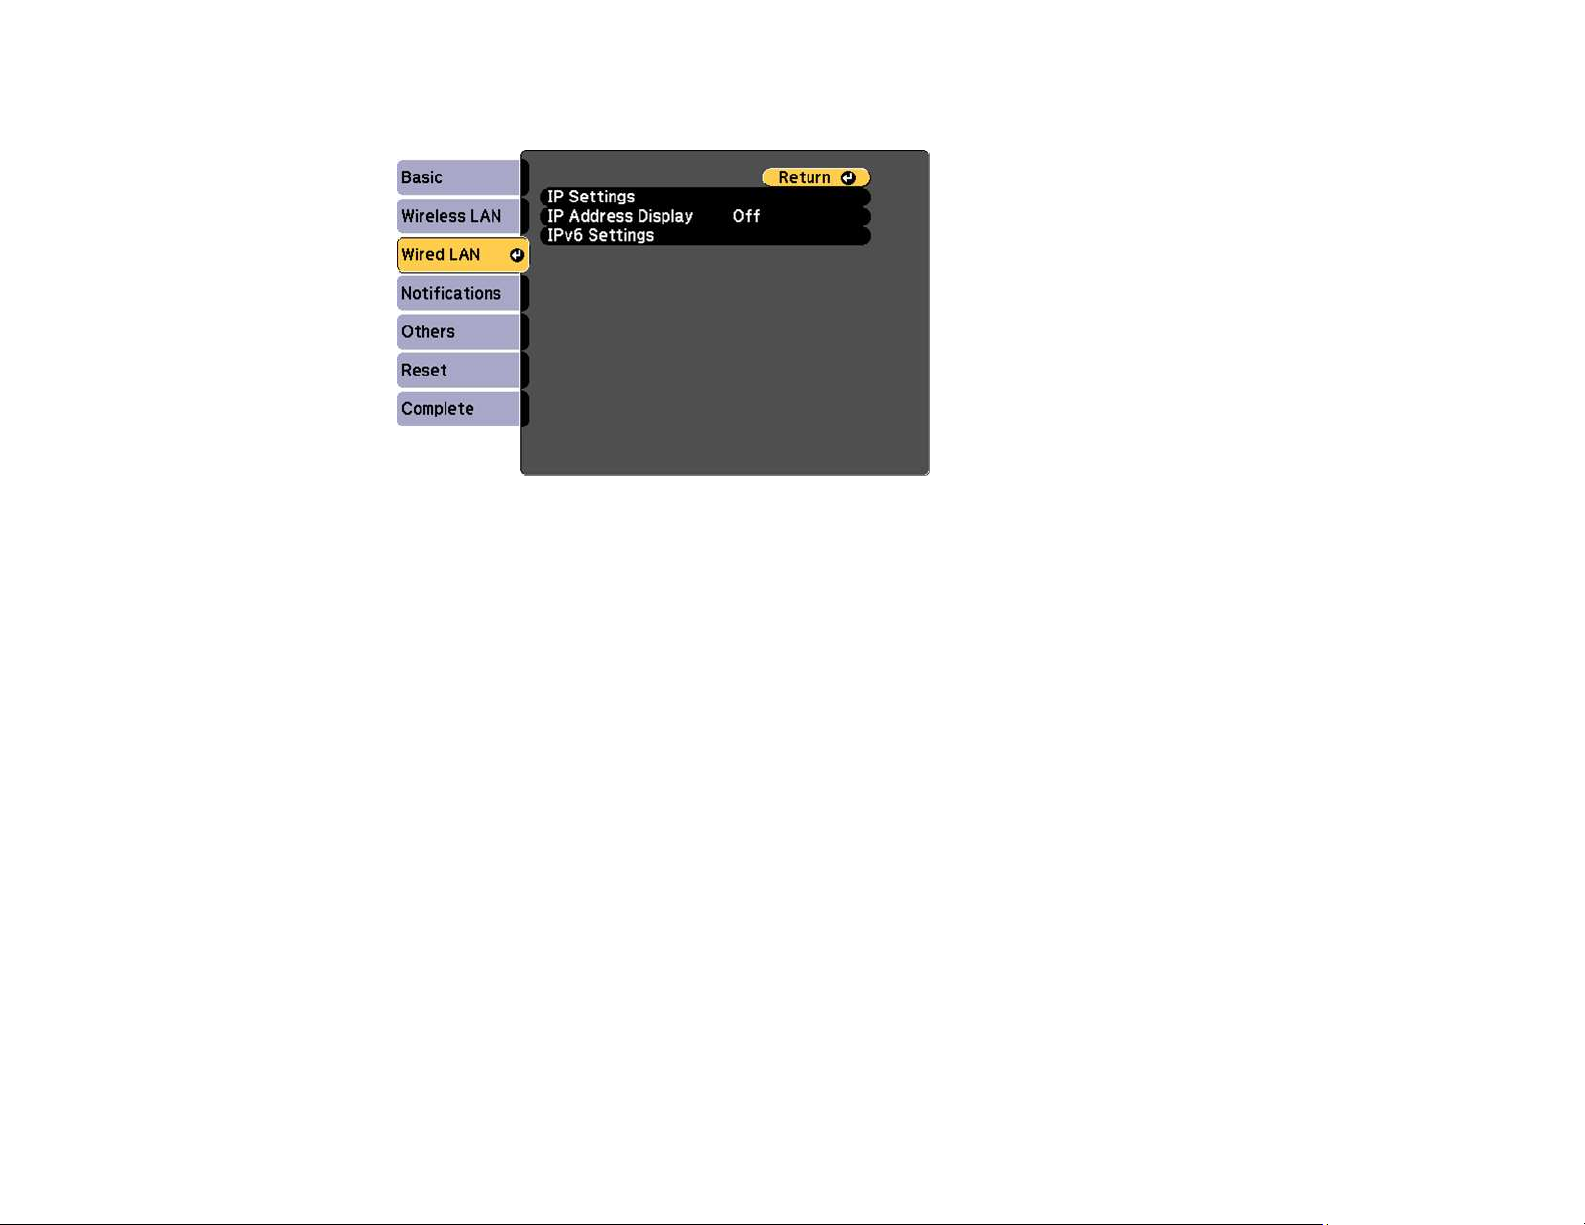
7. Select the Wired LAN menu and press Enter.
8. Select your IP Settings as necessary:
• If your network assigns addresses automatically, turn on the DHCP setting.
• If you must set addresses manually, turn off DHCP and enter the projector's IP Address, Subnet
Mask, and Gateway Address as needed.
Note: To highlight the numbers you want from the displayed keyboard, press the arrow buttons on
the remote control. To select a highlighted number, press Enter.
9. To prevent display of the IP address on the standby screen, turn off IP Address Display.
10. To connect the projector to the network using IPv6, select On as the IPv6 Settings option. Then
select the Auto Configuration and Use Temporary Address settings as necessary.
11. When you finish selecting settings, select Complete and follow the on-screen instructions to save
your settings and exit the menus.
Parent topic: Wired Network Projection
Wireless Network Projection
You can project over a wireless network. To do this, you must set up your projector and computer for
wireless projection.
58
Page 59

Note: The Epson 802.11b/g/n wireless LAN module is not included with your projector and is optional.
There are two ways to connect to your projector wirelessly:
• Creating a Quick Wireless Connection USB Key (Windows only) using the Epson iProjection software
• Configuring the connection manually using the projector's Network menus
After connecting and setting up the projector, install the projector software. You may need to install it
from a software CD, if included, or download the software and manuals as necessary.
You can use Epson iProjection to project static images and presentations over a wireless network.
Note: Epson iProjection is not recommended for use with streaming video.
Installing the Wireless LAN Module
Using a QR Code to Connect a Mobile Device
Using Quick Wireless Connection (Windows)
Selecting Wireless Network Settings Manually
Selecting Wireless Network Settings in Windows
Selecting Wireless Network Settings on Mac
Setting Up Wireless Network Security
Parent topic: Using the Projector on a Network
Related references
Additional Projector Software and Manuals
Optional Equipment and Replacement Parts
Optional Equipment and Replacement Parts (Latin America)
Installing the Wireless LAN Module
To use the projector over a wireless network, install the optional Epson 802.11b/g/n wireless LAN
module. Do not install any other type of wireless LAN module.
Caution: Never remove the module while its indicator light is green or flashing, or while you are
projecting wirelessly. You may damage the module or lose data.
59
Page 60
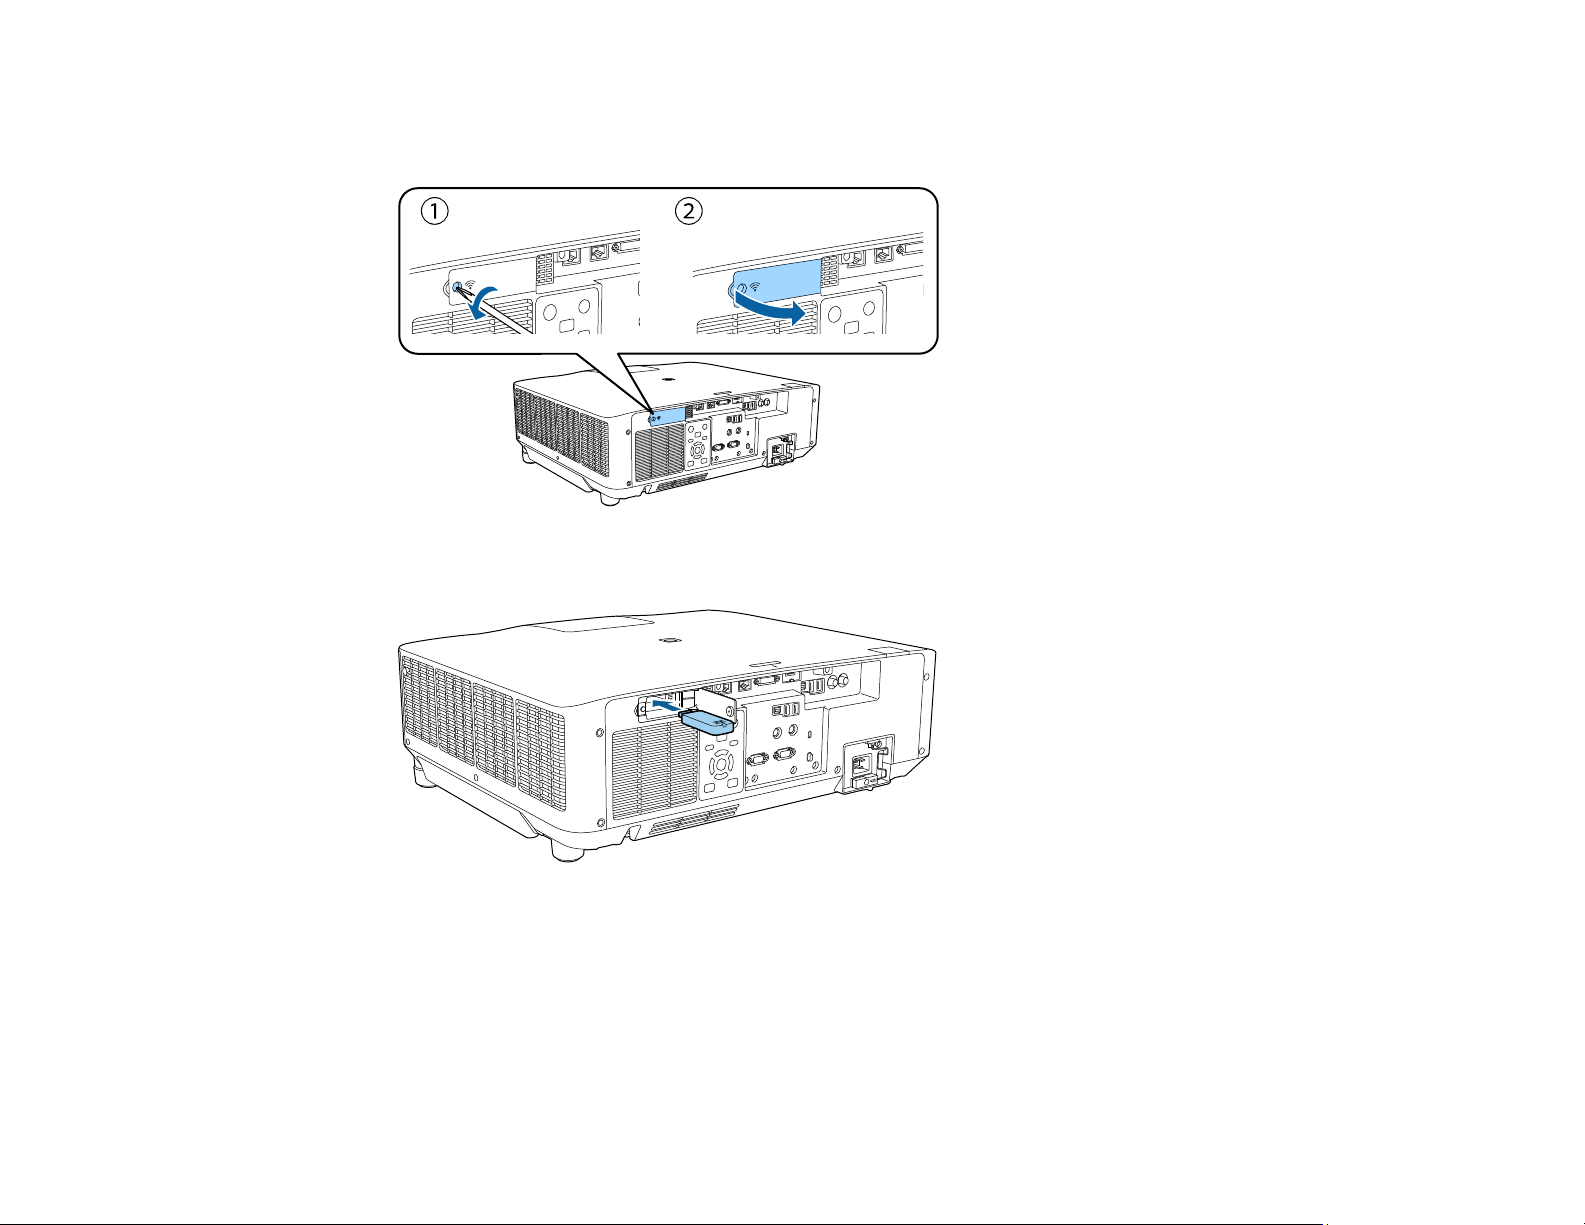
1. Remove the screw securing the wireless LAN module port cover.
2. Remove the wireless LAN module port cover.
3. Insert the wireless LAN module into the port.
60
Page 61
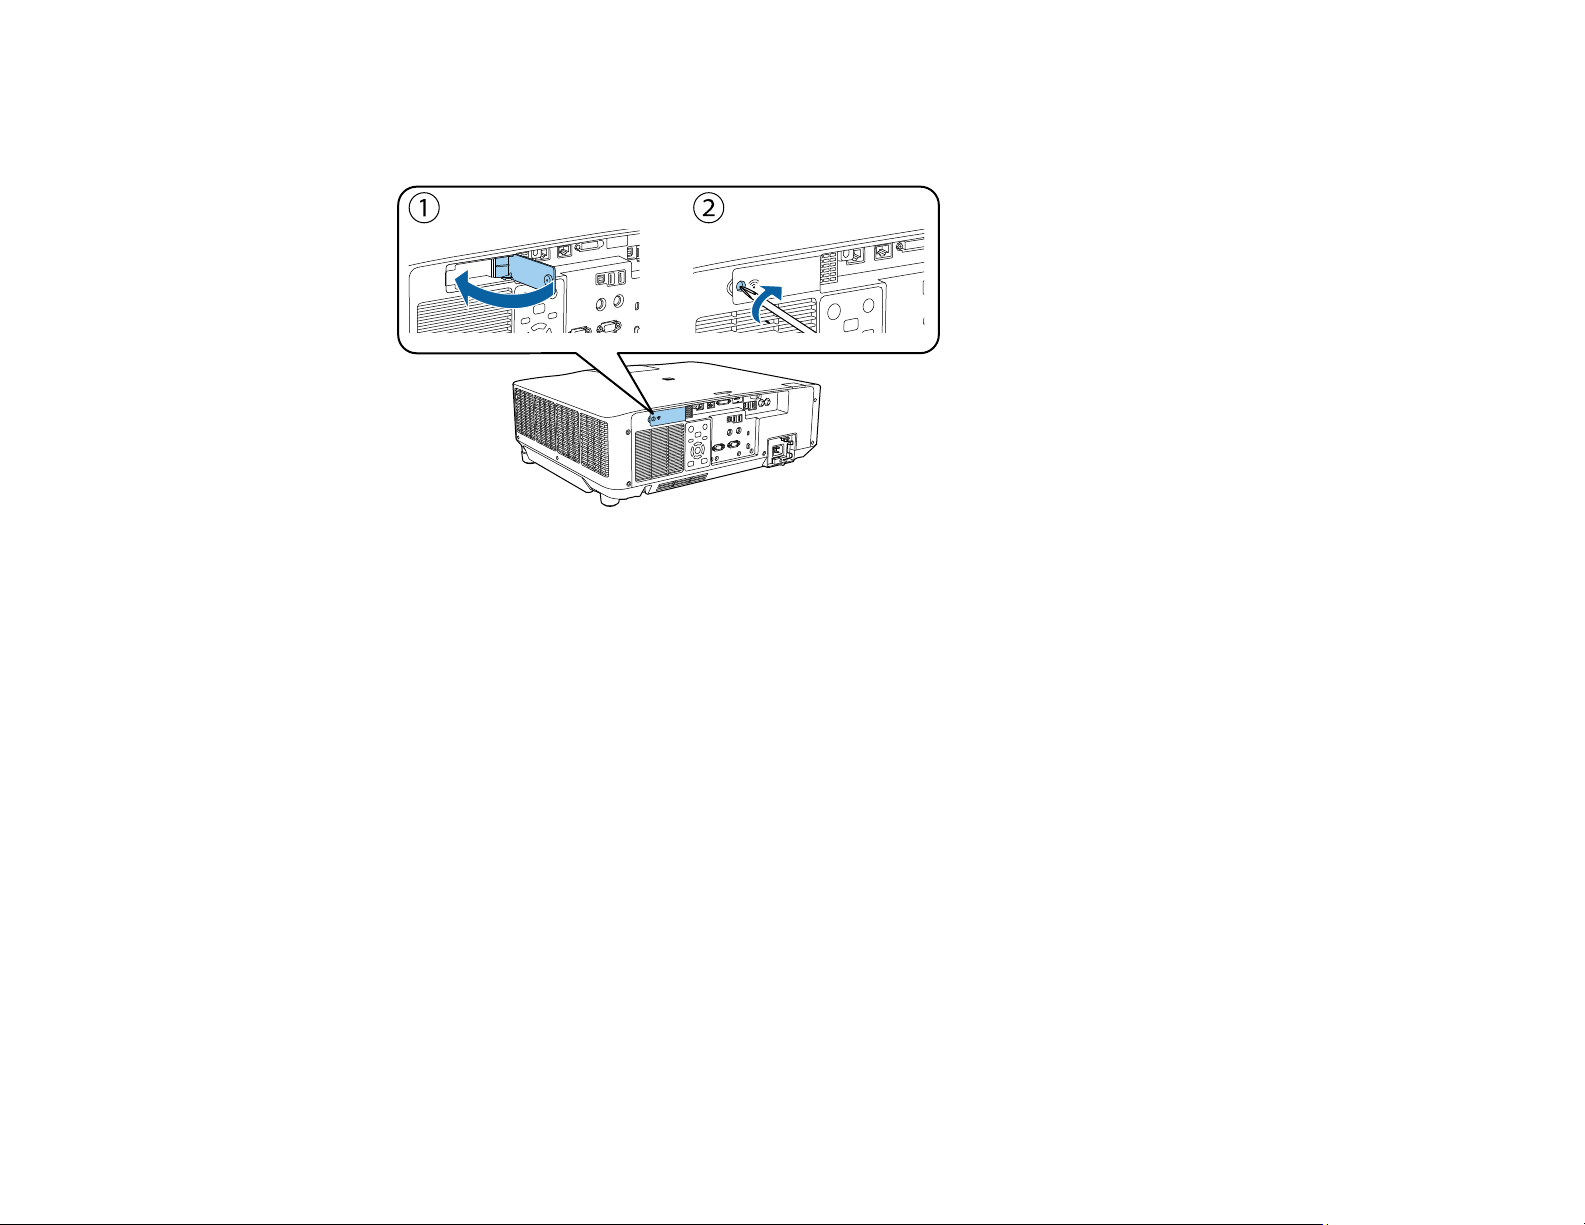
4. Replace the wireless LAN module port cover.
5. Secure the wireless LAN module port cover using the screw you removed.
Parent topic: Wireless Network Projection
Related references
Optional Equipment and Replacement Parts
Optional Equipment and Replacement Parts (Latin America)
Using a QR Code to Connect a Mobile Device
After you select the wireless network settings for your projector, you can display a QR code on the
screen and use it to connect a mobile device using the Epson iProjection app.
Note: Make sure you have installed the latest version of Epson iProjection on your device. Visit
epson.com/iprojection (U.S.), epson.ca/iprojection (Canada), or latin.epson.com/iprojection (Caribbean)
for more information.
1. Press the Menu button.
61
Page 62
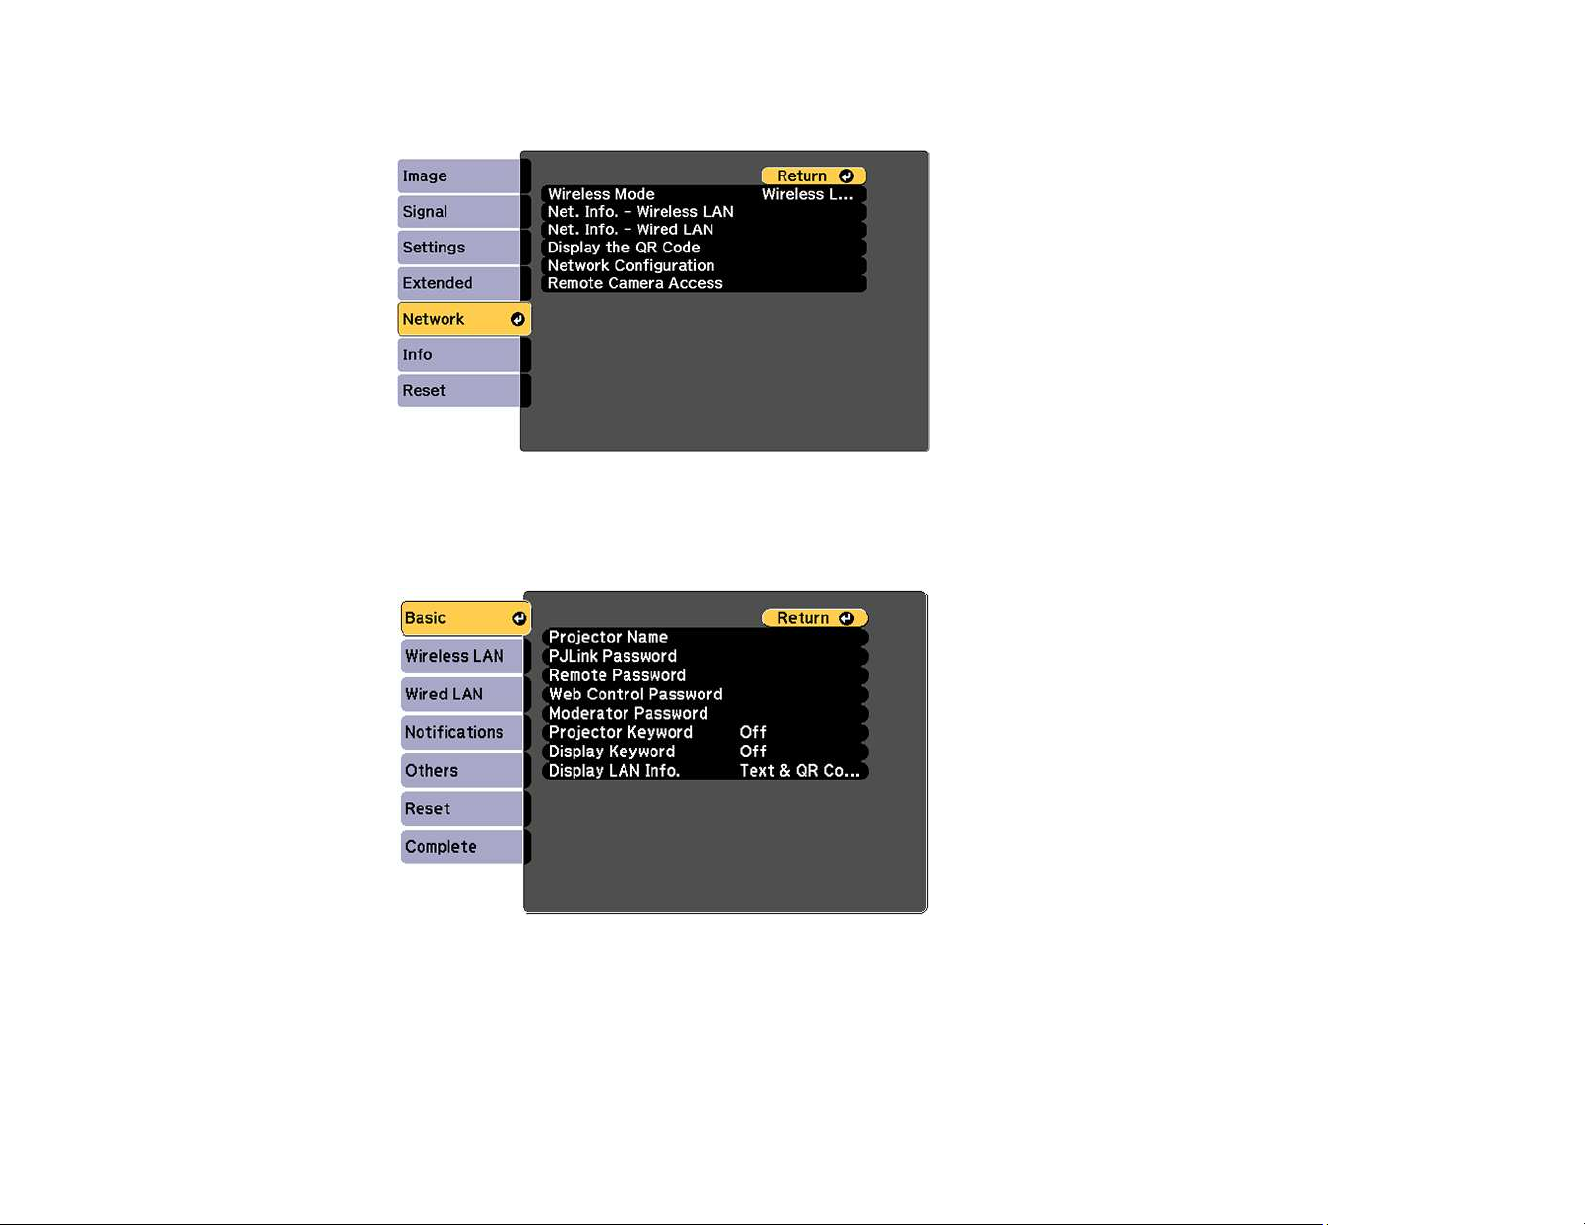
2. Select the Network menu and press Enter.
3. Select Network Configuration and press Enter.
4. Select the Basic menu and press Enter.
5. Set the Display LAN Info setting to Text & QR Code.
6. Select Complete and follow the on-screen instructions to save your settings and exit the menus.
62
Page 63

7. Do one of the following:
• Press the LAN button on the remote control.
• Select Display the QR Code in the projector's Network menu.
Your projector displays the QR code on the projection surface.
Note: If you do not see the QR code after pressing the LAN button, press Enter to display it.
8. Start Epson iProjection on your mobile device.
9. Use the QR code reader feature to read the QR code and connect your device to the projector. Visit
epson.com/iprojection (U.S.), epson.ca/iprojection (Canada), or latin.epson.com/iprojection
(Caribbean) for instructions.
Parent topic: Wireless Network Projection
Using Quick Wireless Connection (Windows)
You can create a Quick Wireless Connection USB Key to quickly connect the projector to a Windows
computer wirelessly. Then you can project your presentation and remove the key when you are done.
Note: A USB flash drive is not included with your projector.
1. Create a Quick Wireless Connection USB Key with a USB flash drive and the Epson iProjection
(Windows/Mac) software.
Note: See the online Epson iProjection Operation Guide (Windows/Mac) for instructions.
2. Turn on the projector.
3. Press the LAN button on the remote control.
You see the LAN standby screen.
4. Verify that an SSID and IP address are displayed.
5. Remove the wireless LAN module from the projector.
6. Insert the USB key into the same port used for the wireless LAN module.
You see a projected message that the network information update is complete.
7. Remove the USB key.
8. Reinsert the wireless LAN module into the projector.
63
Page 64

9. Insert the USB key into a USB port on your computer.
Note: In Windows Vista, if you see the AutoPlay window, select Run MPPLaunch.exe, then select
Allow on the next screen.
10. Follow the on-screen instructions to install the Epson iProjection (Windows/Mac) software.
Note: If you see a Windows Firewall message, click Yes to disable the firewall. You need
administrator authority to install the software. If it is not installed automatically, double-click
MPPLaunch.exe in the USB key.
After a few minutes, your computer image is displayed by the projector. If it does not appear, press
the LAN or Source Search button on your remote control or restart your computer.
11. Run your presentation as necessary.
12. When you finish projecting wirelessly, select the Safely Remove Hardware option in the Windows
taskbar, then remove the USB key from your computer.
Note: You can share the USB key with other computers without disconnecting your computer. You
may need to restart your computer to reactivate your wireless LAN connection.
Parent topic: Wireless Network Projection
Selecting Wireless Network Settings Manually
Before you can project from your wireless network, you must select the network settings for the projector
using its menu system.
1. Turn on the projector.
2. Press the Menu button.
64
Page 65
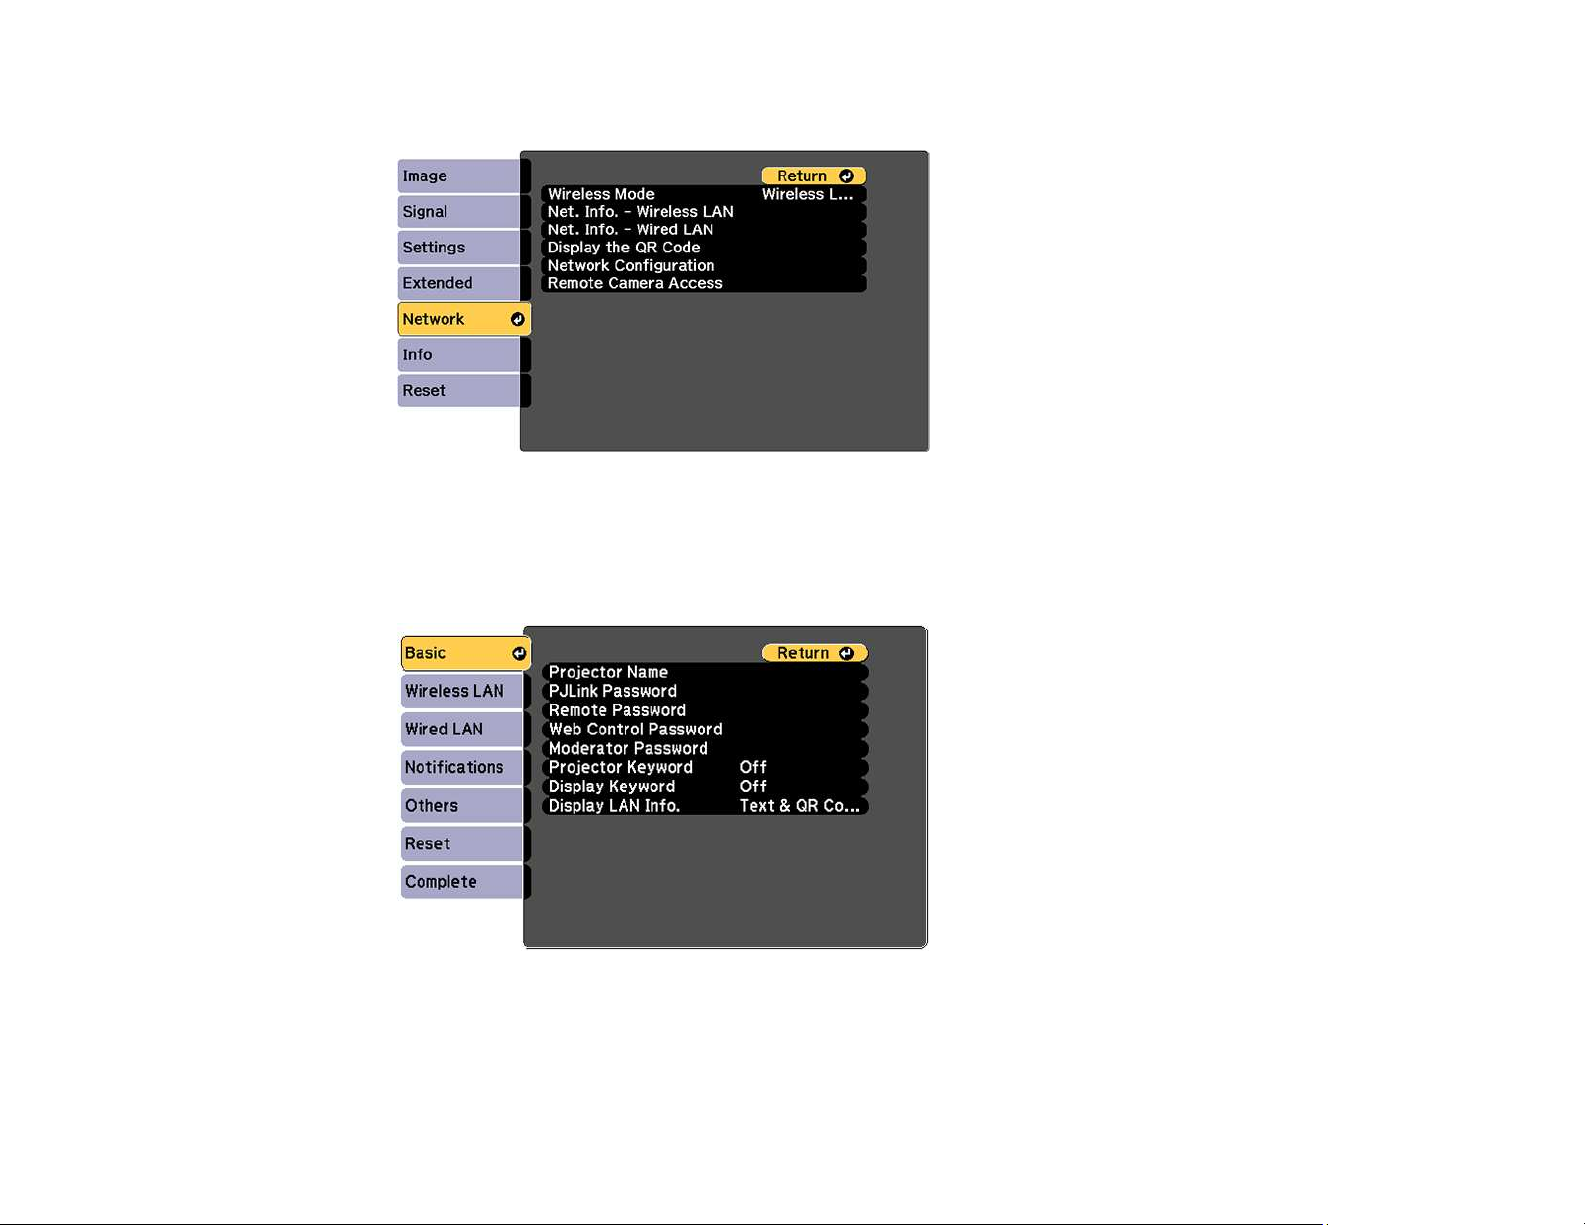
3. Select the Network menu and press Enter.
4. Set the Wireless Mode setting to Wireless LAN On and press Enter.
5. Select Network Configuration and press Enter.
6. Select the Basic menu and press Enter.
7. Select the following basic options as necessary:
• Projector Name lets you enter a name up to 16 alphanumeric characters long to identify the
projector over the network.
65
Page 66

• PJLink Password lets you enter a password up to 32 alphanumeric characters long for using the
PJLink protocol for projector control.
• Remote Password lets you enter a password up to 32 alphanumeric characters long for
accessing the projector using Basic Control. (Default user name is EPSONREMOTE; default
password is the projector's serial number.)
• Web Control Password lets you enter a password up to 8 alphanumeric characters long for
accessing the projector over the web.
• Moderator Password lets you enter a password up to 4 numbers long for accessing the projector
as a moderator with the Epson iProjection (Windows/Mac) software or the Epson iProjection app.
• Projector Keyword lets you turn on a security password to prevent access to the projector by
anyone not in the room with it. The projector displays a random keyword that you must enter from
a computer using the Epson iProjection (Windows/Mac) software or an iOS or Android device, or
on a Chromebook, using the Epson iProjection app.
• Display Keyword lets you display a keyword on the projected image when accessing the
projector from a computer using the Epson iProjection (Windows/Mac) software or an iOS or
Android device, or on a Chromebook, using the Epson iProjection app.
• Display LAN Info lets you select how the projector displays network information. You can select
an option to display a QR code that lets you quickly connect your iOS or Android devices with the
Epson iProjection app.
Note: Use the displayed keyboard to enter the name, passwords and keyword. Press the arrow
buttons on the remote control to highlight characters and press Enter to select them.
66
Page 67
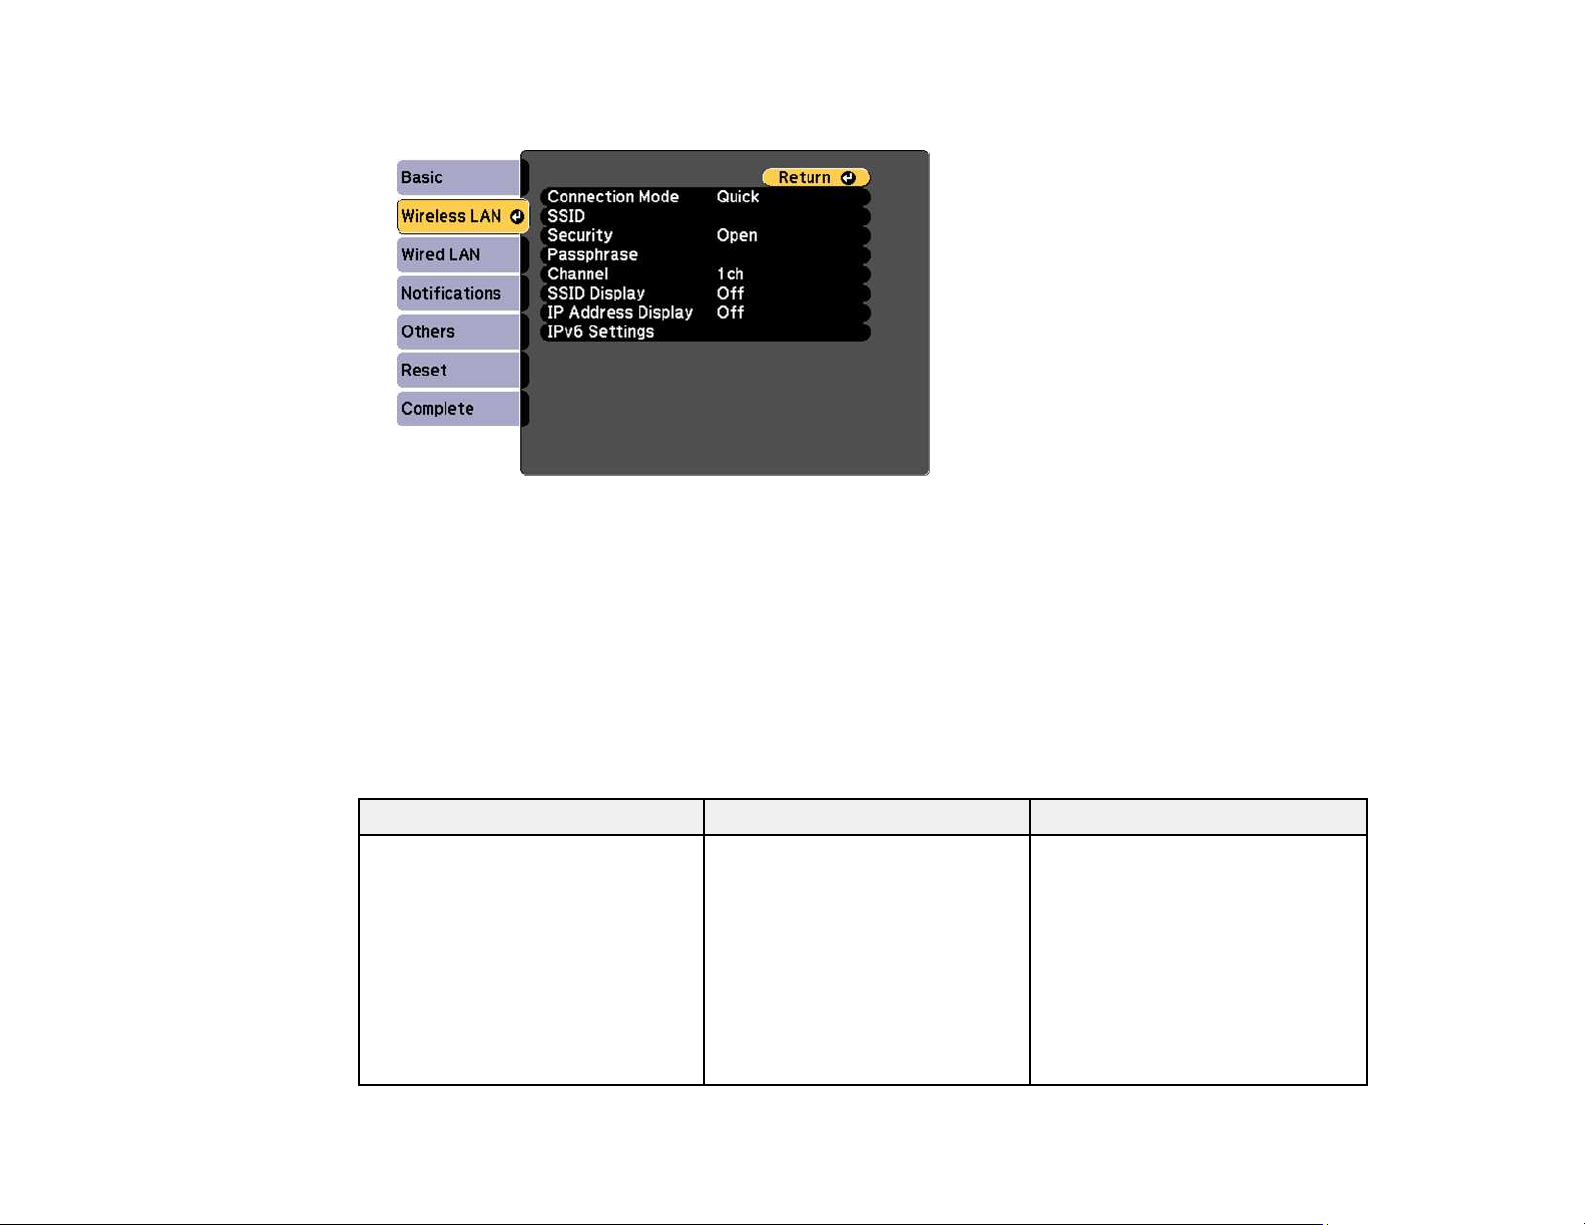
8. Select the Wireless LAN menu and press Enter.
9. Select the settings on the Wireless LAN menu as necessary for your network.
10. When you finish selecting settings, select Complete and follow the on-screen instructions to save
your settings and exit the menus.
After you complete the wireless settings for your projector, you need to select the wireless network on
your computer, Chromebook, or iOS or Android device.
Wireless LAN Menu Settings
Parent topic: Wireless Network Projection
Wireless LAN Menu Settings
Setting Options Description
Connection Mode Quick
Advanced
67
Selects the type of wireless
connection:
Quick: lets you connect to
multiple smartphones, tablets, or
computers directly
Advanced: lets you connect to
multiple smartphones, tablets, or
computers via a wireless network
access point
Page 68

Setting Options Description
Search Access Point To Search View Search for available wireless
network access points in
Advanced connection mode
SSID Up 32 alphanumeric characters Sets the SSID (network name) of
the wireless LAN system the
projector is connecting to
Security Open
WPA2-PSK
WPA3-PSK
WPA2/WPA3-PSK
WPA3-EAP
WPA2/WPA3-EAP
Passphrase Between 8 to 63 alphanumeric
characters
EAP Method EAP Type
User name
Password
Client Certificate
Verify Server Cert.
CA certificate
RADIUS Serv.Name
Channel 1ch
6ch
11ch
Selects the type of wireless
security used in the wireless
network (some options are only
available when the Connection
Mode setting is set to
Advanced)
Enter a paraphrase for the
wireless network
Sets the EAP settings for WPA2EAP and WPA/WPA2-EAP
security
In Quick connection mode,
selects the frequency band
(channel) used by the wireless
LAN
68
Page 69

Setting Options Description
IP Settings DHCP
IP Address
Subnet Mask
Gateway Address
DNS Server 1
DNS Server 2
SSID Display On
Off
IP Address Display On
Off
IPv6 Settings IPv6
Auto Configuration
Use Temporary Address
Parent topic: Selecting Wireless Network Settings Manually
Turns on DHCP if your network
assigns addresses automatically;
set to Off to manually enter the
network's IP Address, Subnet
Mask, and Gateway Address
(some options are only available
when the Connection Mode
setting is set to Advanced)
Selects whether to display the
SSID on the network standby
screen
Selects whether to display the IP
address on the network standby
screen
Selects the IPv6 settings when
you connect the projector to the
network using IPv6
The Epson Web Control and
PJLink functions support IPv6.
Selecting Wireless Network Settings in Windows
Before connecting to the projector, select the correct wireless network on your computer.
1. To access your wireless utility software, access the Desktop and double-click the network icon on
the Windows taskbar.
2. Do one of the following:
• If your projector is set up on an existing network (Advanced mode), select the network name
(SSID).
• If your projector is configured for Quick mode, select the projector's SSID.
3. Click Connect.
Parent topic: Wireless Network Projection
69
Page 70

Selecting Wireless Network Settings on Mac
Before connecting to the projector, select the correct wireless network on your Mac.
1. Click the AirPort icon on the menu bar at the top of the screen.
2. Make sure AirPort is turned on, then do one of the following:
• If your projector is set up on an existing network (Advanced mode), select the network name
(SSID).
• If your projector is configured for Quick mode, select the projector's SSID.
Parent topic: Wireless Network Projection
Setting Up Wireless Network Security
You can set up security for your projector to use on a wireless network. Set up one of the following
security options to match the settings used on your network:
• WPA2-PSK (Quick connection mode)
• WPA3-PSK (Advanced connection mode)
• WPA3-EAP (Advanced connection mode)
• WPA2/WPA3-PSK (Advanced connection mode)
• WPA2/WPA3-EAP (Advanced connection mode)
Note: Contact your network administrator for guidance on entering the correct information.
1. If you want to set up WPA3-EAP or WPA2/WPA3-EAP security, make sure your digital certificate file
is compatible with projector registration and placed directly on the USB storage device.
2. Press the Menu button.
70
Page 71
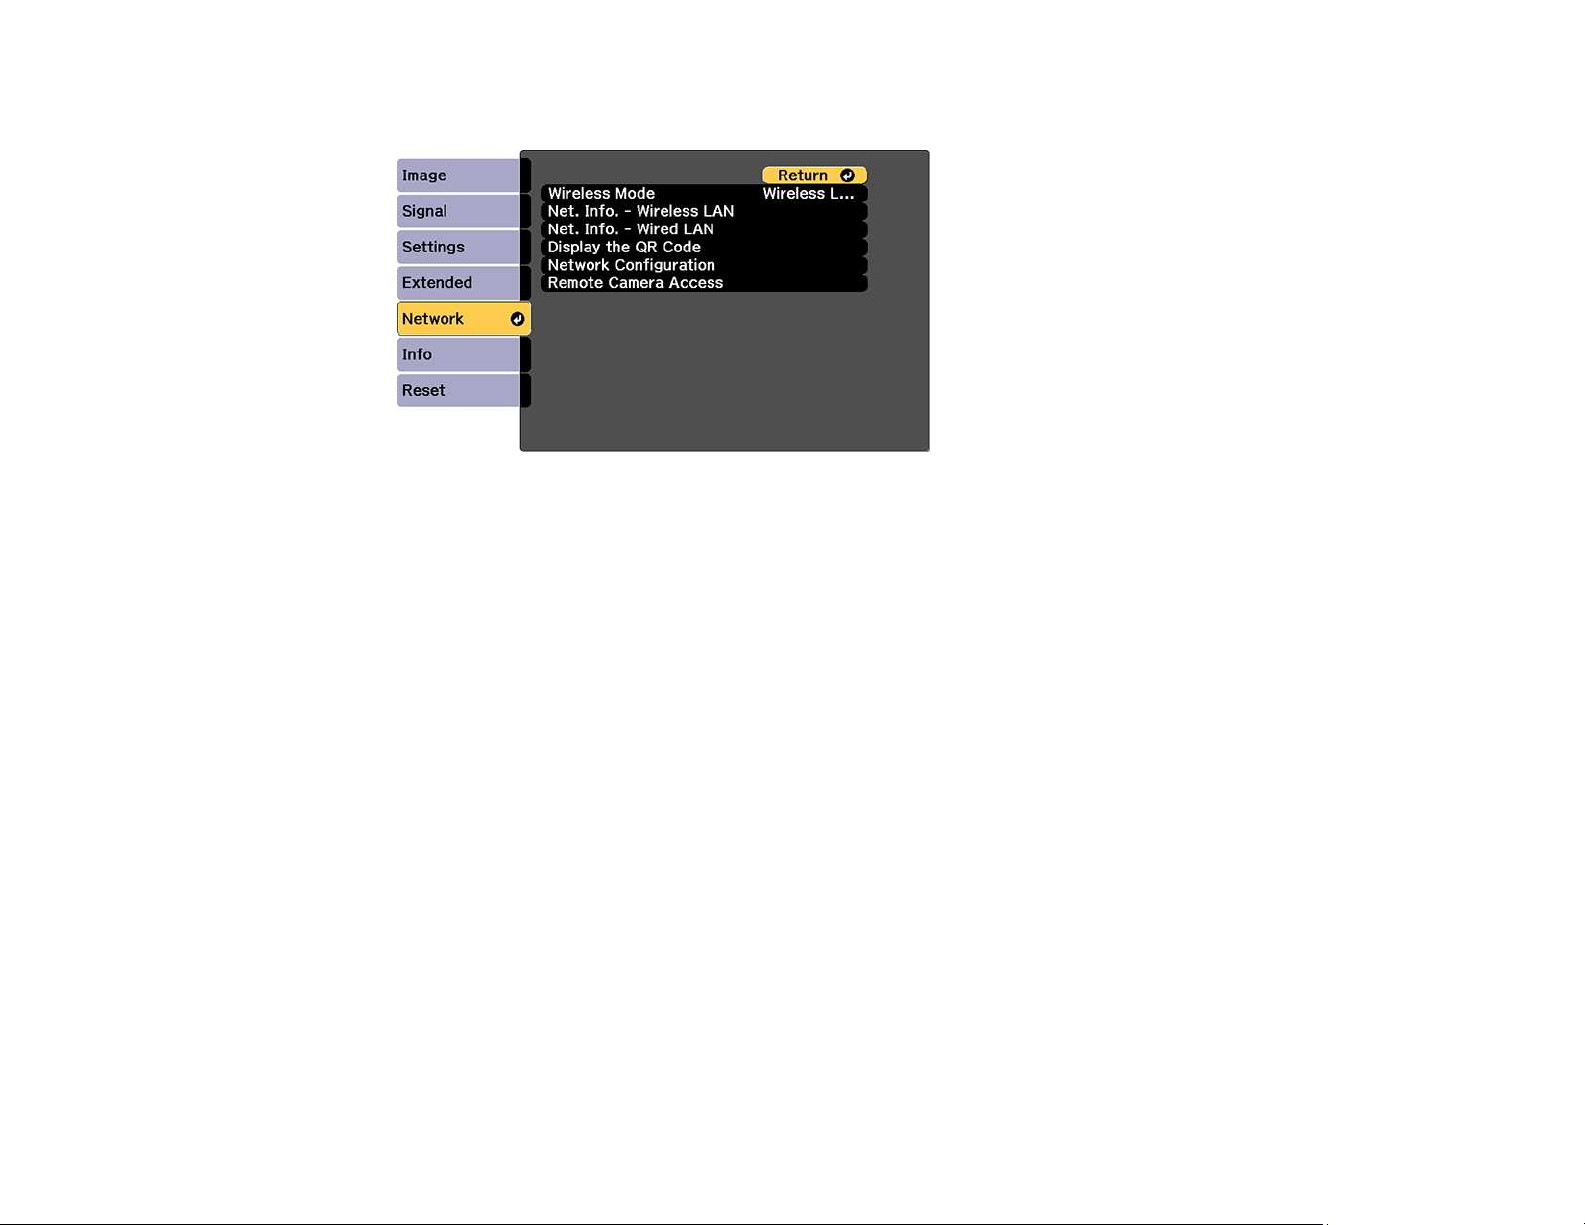
3. Select the Network menu and press Enter.
4. Select Network Configuration and press Enter.
5. Select the Wireless LAN menu and press Enter.
6. Set the Security setting to match your network settings.
7. Do one of the following depending on the network security setting you selected:
• WPA2-PSK, WPA3-PSK, or WPA2/WPA3-PSK: Select Complete and follow the on-screen
instructions to save your settings and exit the menus. Skip the remaining steps.
• WPA3-EAP or WPA2/WPA3-EAP: Select EAP Method and press Enter.
8. Select your authentication protocol as the EAP Type setting.
9. To import your certification, select the certificate type (either Client Certificate or CA certificate)
and press Enter.
Note: You can also register a digital certificate from your web browser. Make sure to register just
once or the certificate may not install correctly.
10. Select Register and press Enter.
11. Follow the on-screen instructions to connect a USB storage device to the projector's USB-A port.
12. Press Enter to display the certificate list.
13. Select the certificate to import from the displayed list.
You see a message to enter the certificate password.
71
Page 72

14. Enter a password and press Enter.
You see a completion message after the certificate is imported.
15. Set the following EAP settings as necessary:
• User name lets you enter a user name up to 64 alphanumeric characters long. To enter more than
32 characters, use your web browser.
• Password lets you enter a password up to 64 alphanumeric characters long when using the
PEAP, EAP-FAST, or LEAP protocols. To enter more than 32 characters, use your web browser.
• Verify Server Cert. lets you select whether or not to verify the server certificate when a CA
certificate has been set.
• RADIUS Serv.Name lets you enter the server name to be verified.
16. When you finish selecting settings, select Complete and follow the on-screen instructions to save
your settings and exit the menus.
Parent topic: Wireless Network Projection
Setting Up Projector Network E-Mail Alerts
You can set up the projector to send you an e-mail alert over the network if there is a problem with the
projector.
1. Press the Menu button.
2. Select the Network menu and press Enter.
3. Select Network Configuration and press Enter.
72
Page 73
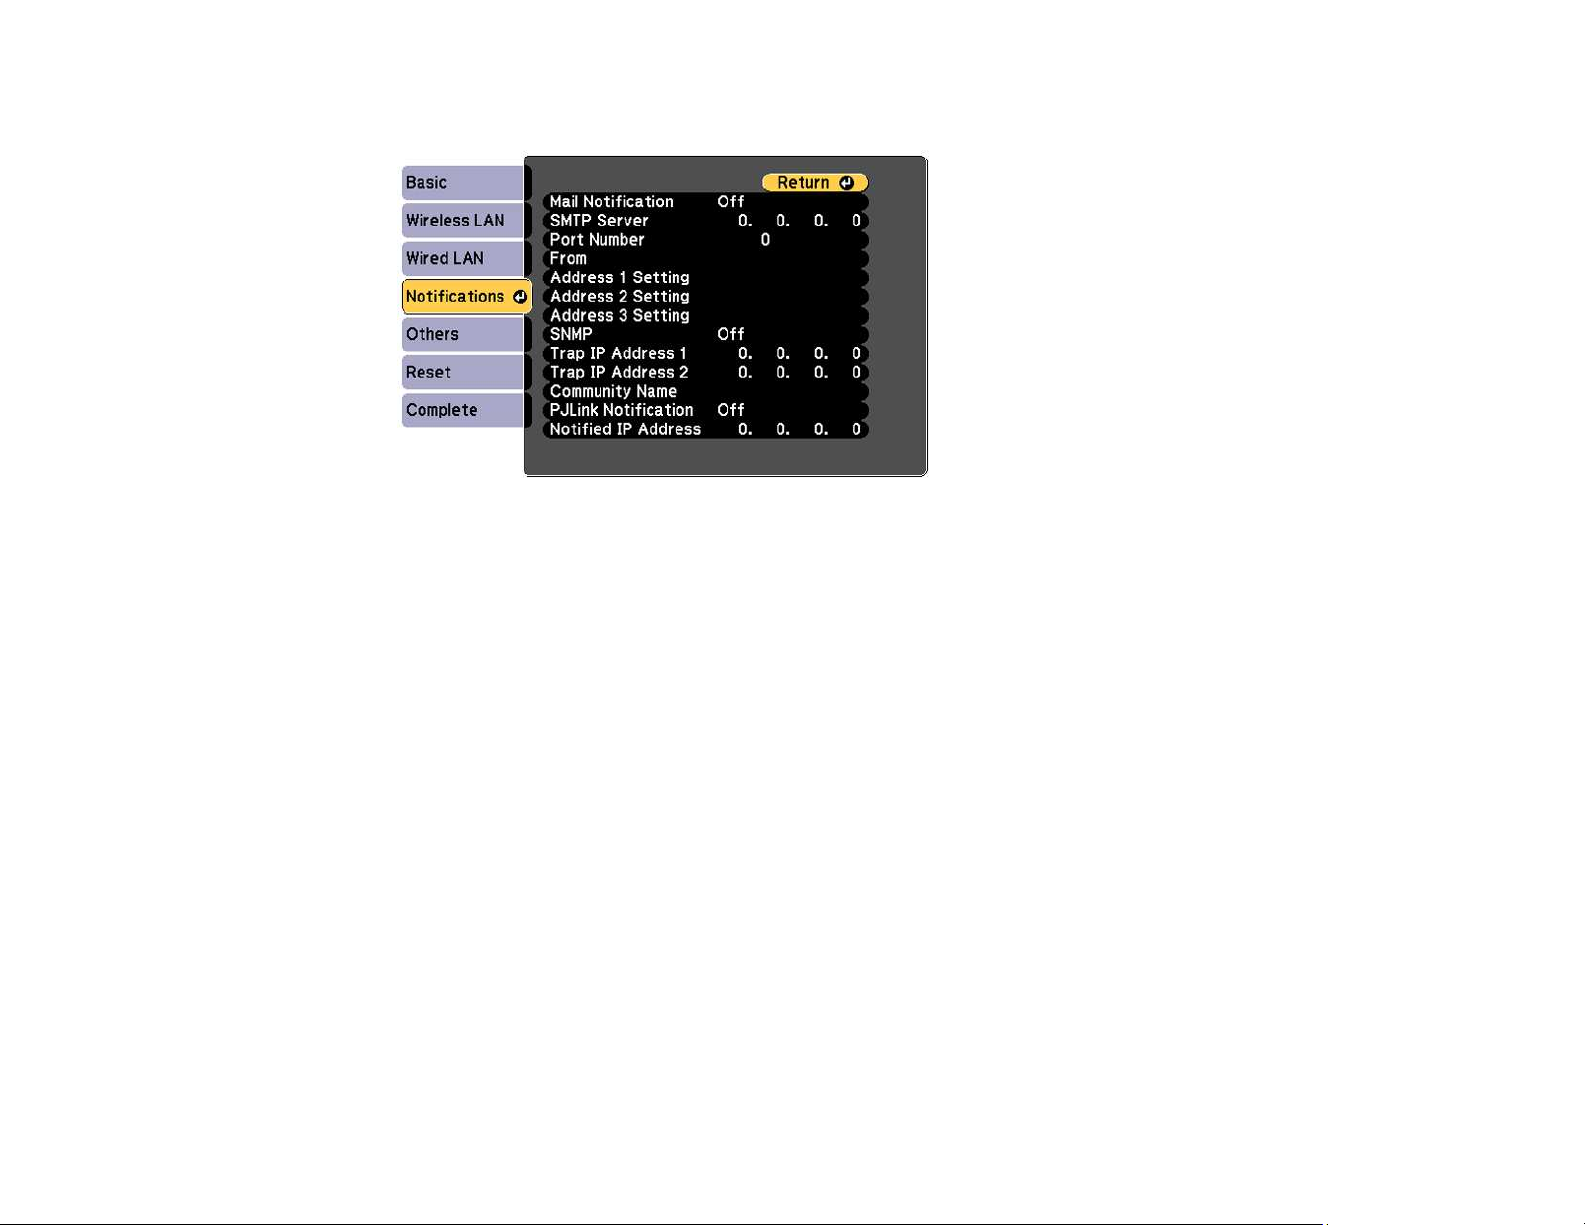
4. Select the Notifications menu and press Enter.
5. Turn on Mail Notification.
6. Enter the IP address for the SMTP Server setting.
Note: Do not use these addresses: 127.x.x.x or 224.0.0.0 through 255.255.255.255 (where x is a
number from 0 to 255).
7. Select a number for the SMTP server Port Number setting, from 1 to 65535 (default is 25).
8. Enter the sender's email address as the From setting.
9. Choose an Address Setting field, enter the e-mail address, and select or deselect the alerts you
want to receive there. Your e-mail address can be up to 32 alphanumeric characters long. Repeat
for up to three addresses.
10. If you are using the PJLink protocol for projector control, turn on the PJLink Notification setting and
enter the IP address where you want to receive PJLink notifications as the Notified IP Address
setting.
11. When you finish selecting settings, select Complete and follow the on-screen instructions to save
your settings and exit the menus.
Note: If a critical problem causes a projector to shut down, you may not receive an e-mail alert.
Network Projector E-mail Alert Messages
73
Page 74
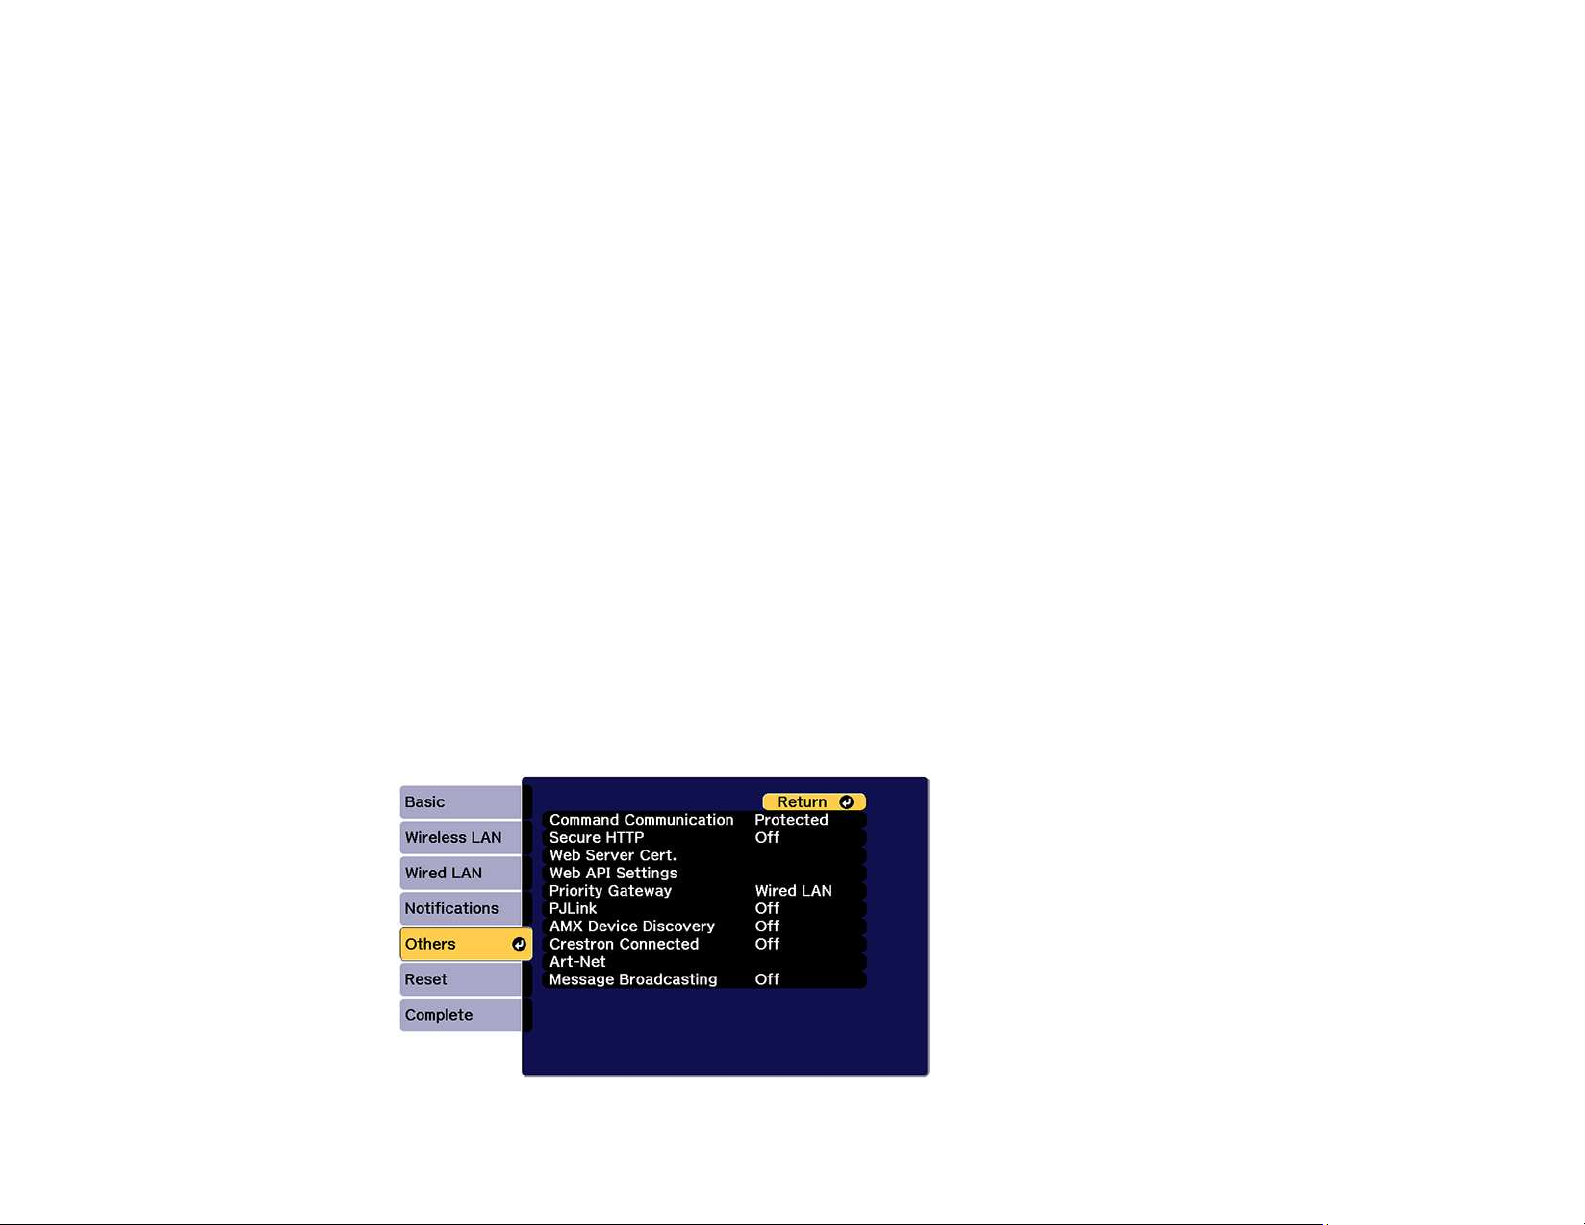
Parent topic: Using the Projector on a Network
Network Projector E-mail Alert Messages
When a problem occurs with a networked projector, and you selected to receive e-mail alerts, you
receive an e-mail containing the following information:
• The email address entered as the From setting
• Epson Projector on the subject line
• The name of the projector experiencing a problem
• The IP address of the affected projector
• Detailed information about the problem
Note: If a critical problem causes a projector to shut down, you may not receive an e-mail alert.
Parent topic: Setting Up Projector Network E-Mail Alerts
Selecting Other Network Settings
You can select optional network settings on the Others menu.
1. Press the Menu button.
2. Select the Network menu and press Enter.
3. Select Network Configuration and press Enter.
4. Select the Others menu and press Enter.
74
Page 75

5. If you want to select the authentication method for command communication, select Command
Communication. Select Protected to perform Digest Authentication using the Web Control
Password setting. Select Compatible to perform plain text authentication using the Monitor
Password.
6. If you want to use the Secure HTTP protocol to encrypt communication when using Web Control,
turn on the Secure HTTP setting and import the web server certificate using the Web Server Cert.
setting.
7. If you want to operate the projector using Web API, turn on the Web API setting. The username for
API authentication is EPSONWEB; use the password that is set for the Web Control Password.
8. Select the Priority Gateway setting for your network.
9. If you want to monitor the projector using PJLink, turn on the PJLink setting.
10. If your network environment uses an AMX controller, turn on the AMX Device Discovery setting to
allow the projector to be detected.
11. If your network environment uses a Crestron Connected controller, turn on the Crestron Connected
setting to allow the projector to be detected.
Note: Enabling Crestron Connected disables the Message Broadcasting feature in the Epson
Projector Management software (Windows only).
12. If you want to control the projector using Art-Net (an Ethernet communication protocol based on
TCP/IP), turn on the Art-Net setting.
13. If you want this projector to receive broadcast messages over the network, turn on the Message
Broadcasting setting. Administrators can broadcast messages over the network using the Epson
Projector Management software (Windows only).
14. When you finish selecting settings, select Complete and follow the on-screen instructions to save
your settings and exit the menus.
Parent topic: Using the Projector on a Network
Controlling a Networked Projector Using a Web Browser
Once you have connected your projector to your network, you can select projector settings and control
projection using a compatible web browser. This lets you access the projector remotely.
Note: The web setup and control features support Microsoft Internet Explorer 11.0 or later (Windows),
Microsoft Edge (Windows), Safari (Mac), and Chrome (Android) on networks that do not use a proxy
75
Page 76
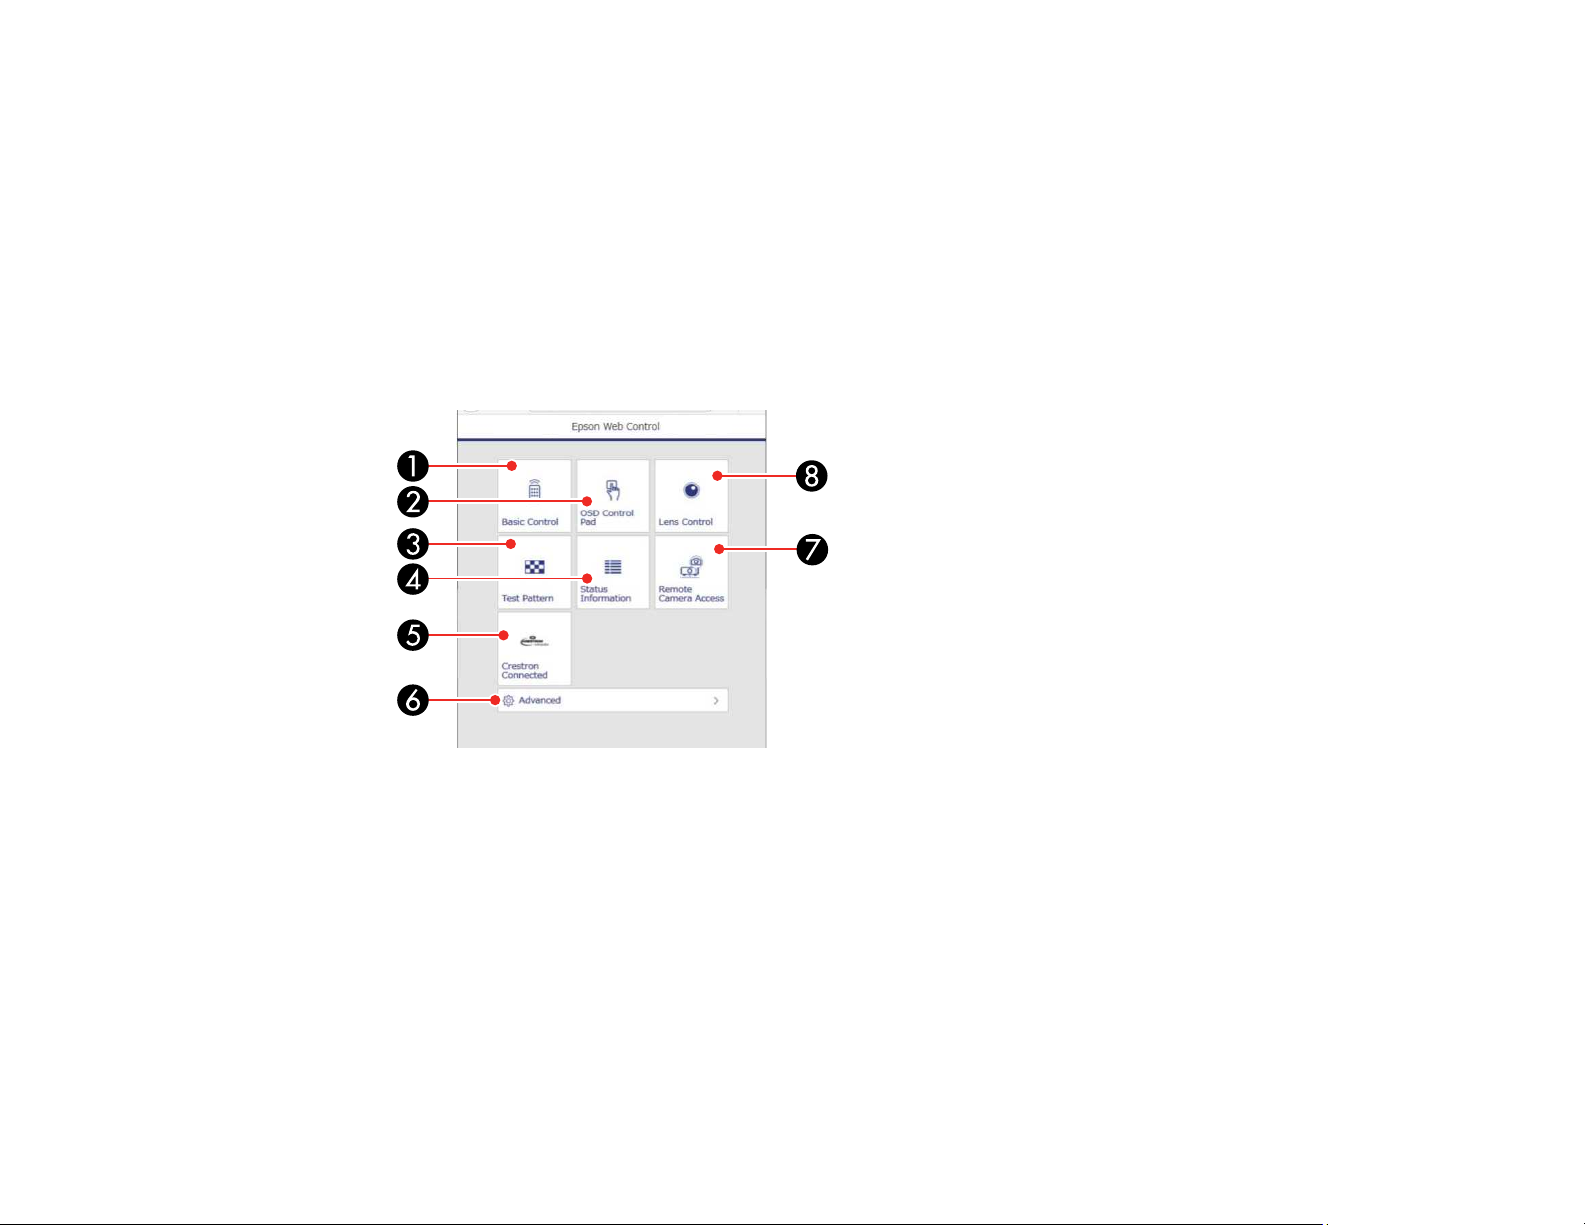
server for connection. You cannot select all of the projector menu settings or control all projector
functions using a web browser.
Note: If you set Standby Mode to Communication On, you can use a web browser to select settings
and control projection even if the projector is in standby mode.
1. Make sure the projector is turned on.
2. Start your web browser on a computer or device connected to the network.
3. Type the projector's IP address into the browser's address box and press the computer's Enter key.
You see the Epson Web Control screen.
1 Select Basic Control to control the projector remotely.
2 Select OSD Control Pad to change the projector's menu settings.
3 Select Test Pattern to display a test pattern.
4 Select Status Information to view the projector's status.
5 Select Crestron Connected to open the menu.
6 Select Advanced to open the advanced menu screen.
7 Select Remote Camera Access to display the image taken by the optional external camera.
8 Select Lens Control to adjust the lens (focus, zoom, and lens shift).
76
Page 77
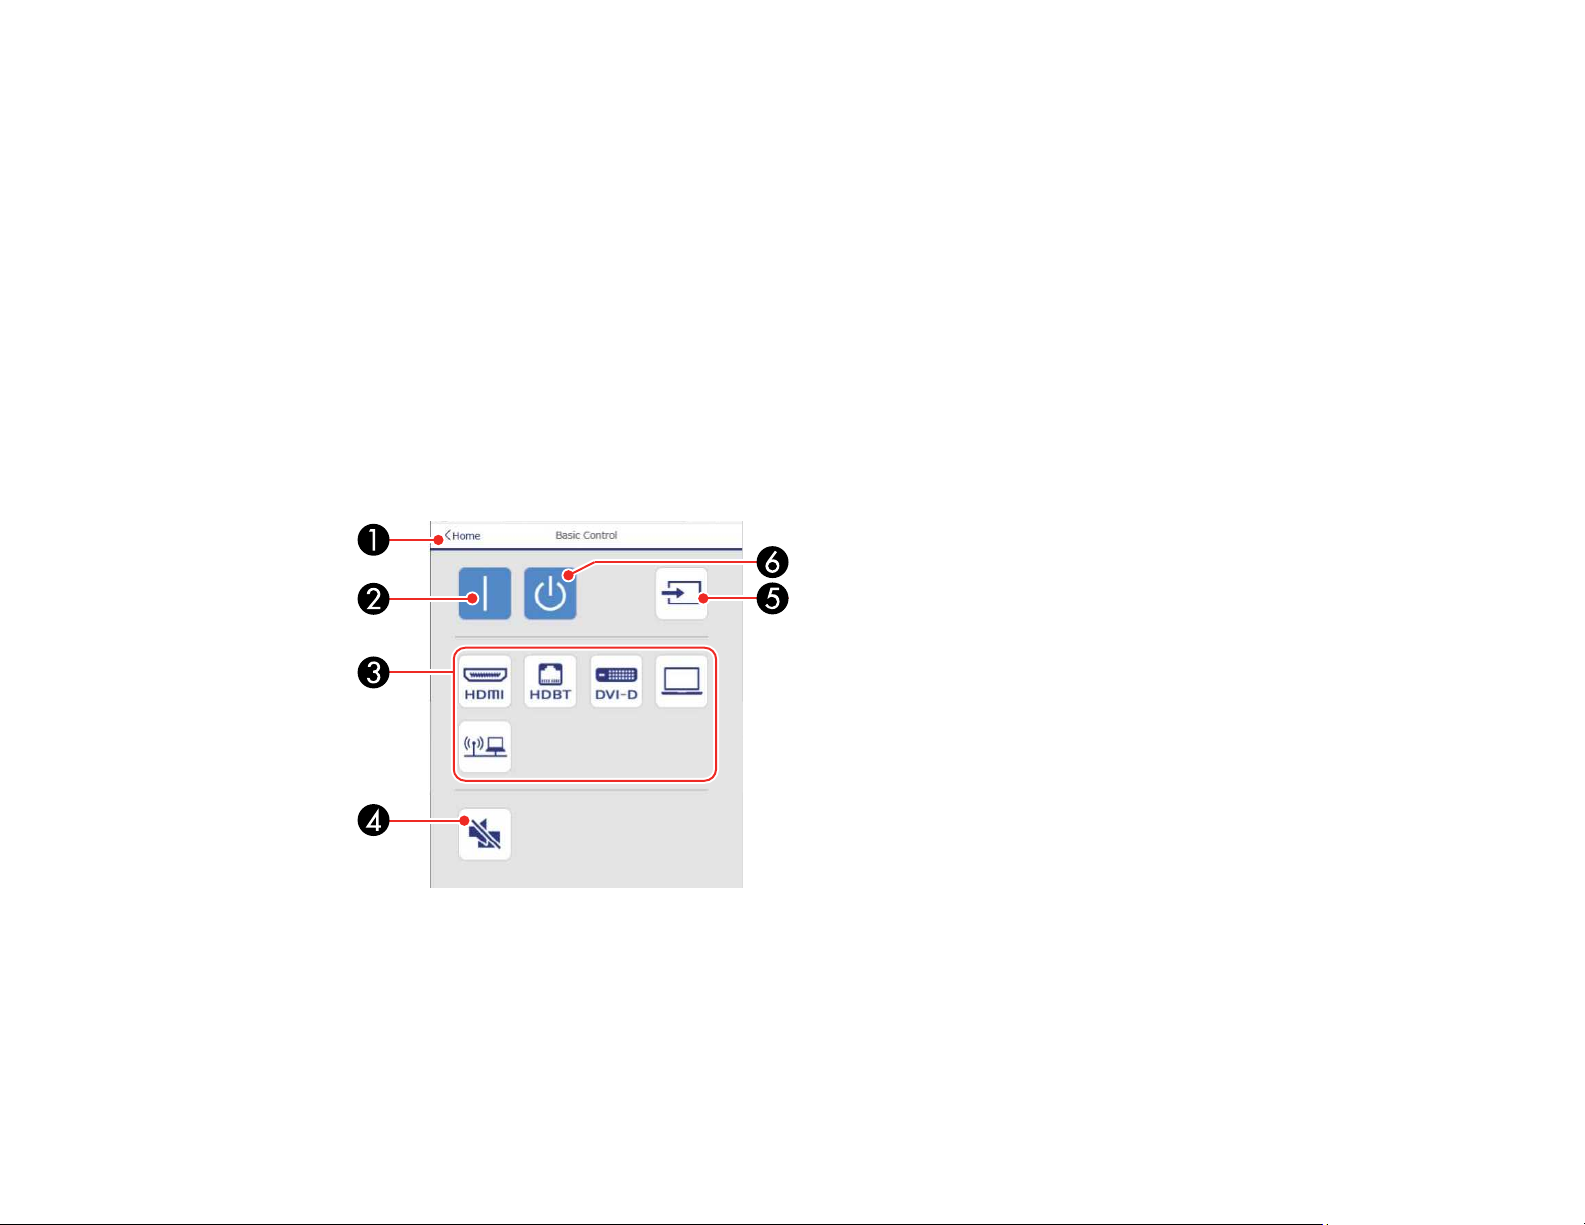
4. Select the option corresponding to the projector function you want to control.
Web Control Options
Viewing an Image Capture of the Displayed Image from a Remote Location
Parent topic: Using the Projector on a Network
Related references
Projector Setup Settings - Extended Menu
Web Control Options
Basic Control
Note: If the Remote Password is set to On, you need to enter your user name and password. (The
default username is EPSONREMOTE and the default password is the projector's serial number. Enter
the serial number with uppercase letters.).
1 Returns to the Home screen
2 Turns on the projector
3 Input source selection controls
4 Turns the image on or off temporarily
77
Page 78
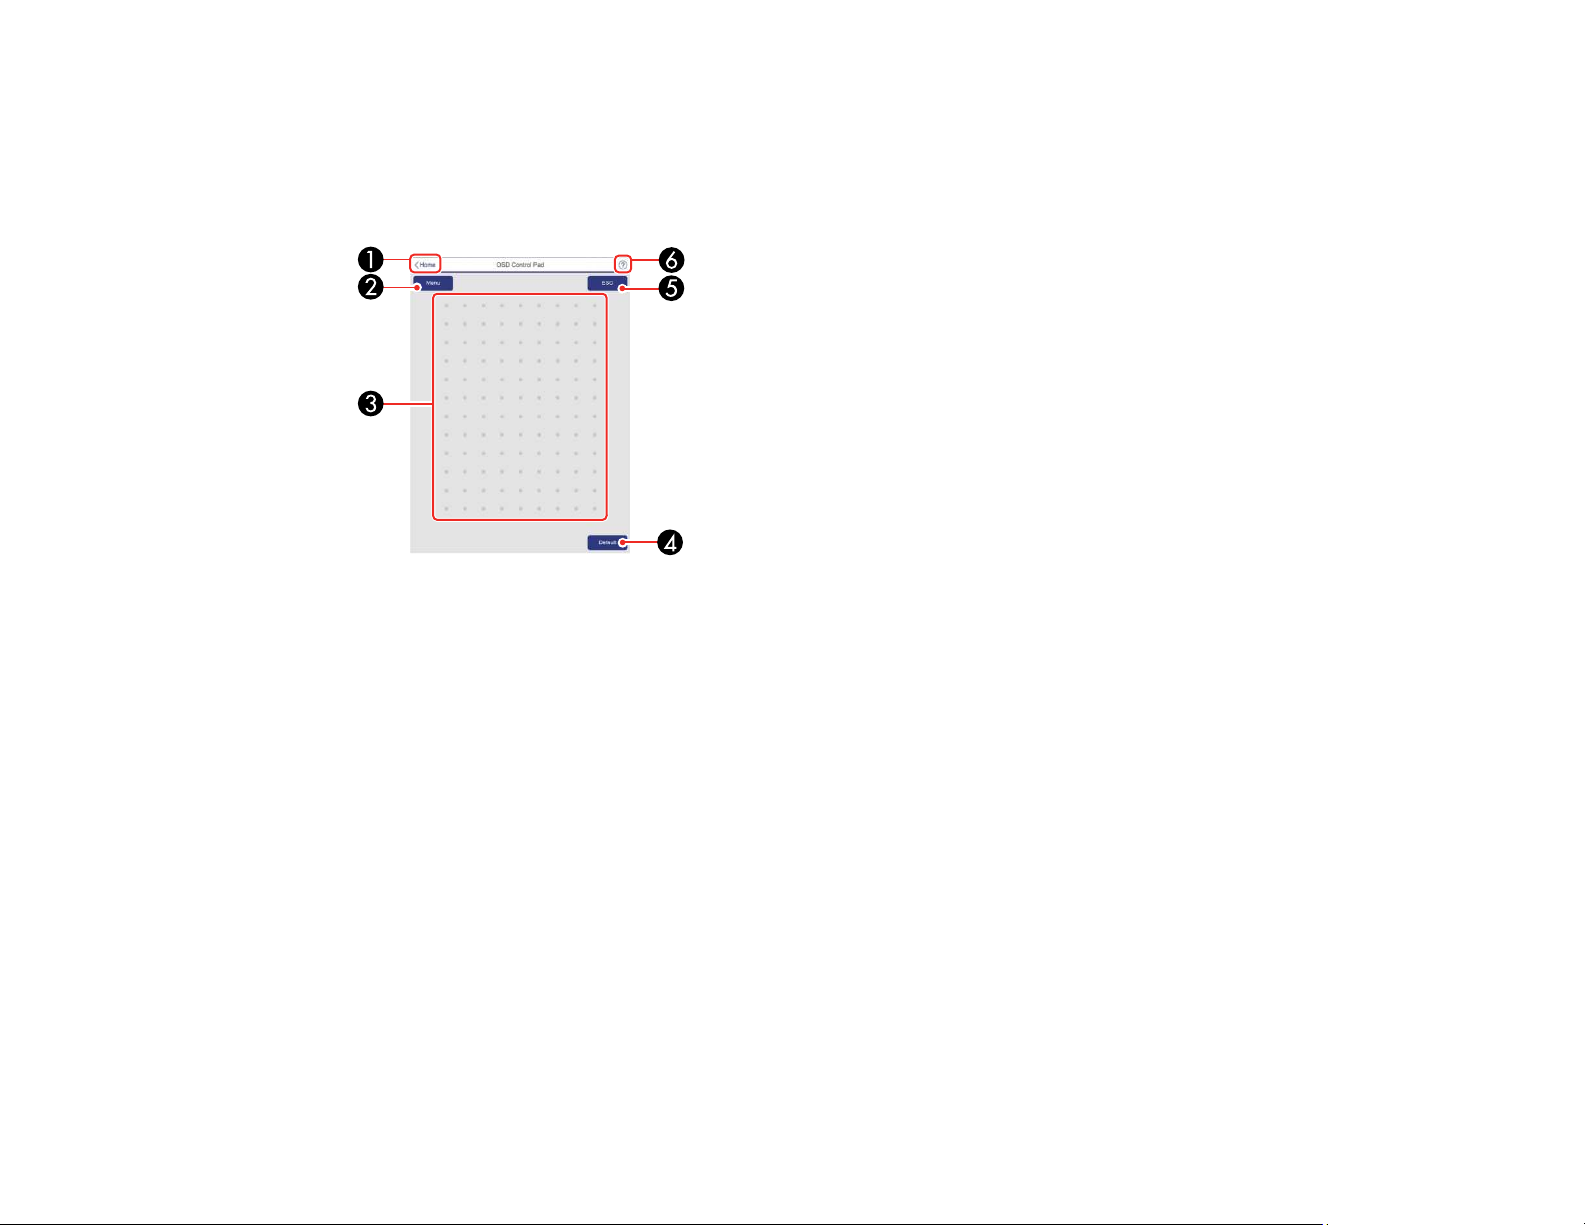
5 Searches for sources
6 Turns off the projector
OSD Control Pad
1 Returns to the Epson Web Control screen
2 Displays the projector's setting menus
3 Use your finger or mouse to navigate the menus
4 Returns projector to default settings
5 Returns to the previous menu
6 Displays help topics
Note: You cannot change some settings using Epson Web Control.
78
Page 79
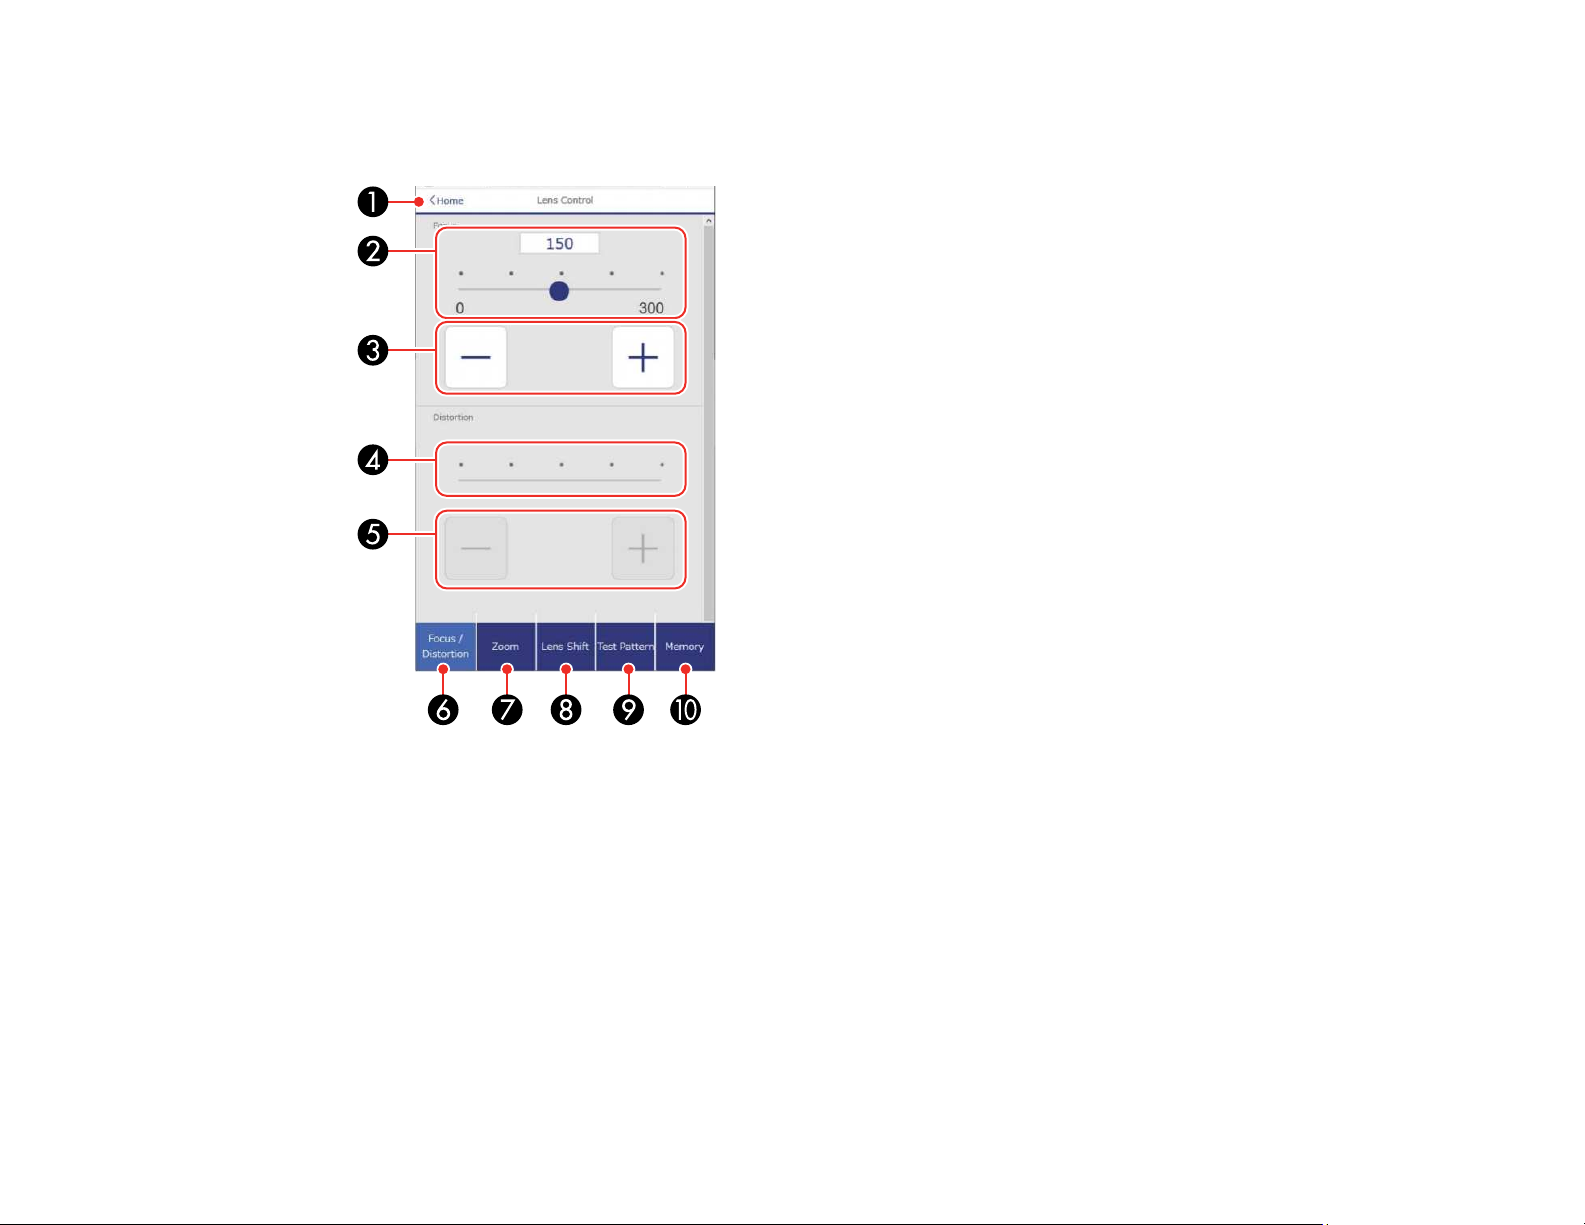
Lens Control
Focus/Distortion screen
1 Returns to the Home screen
2 Focus adjustment slider
3 Focus adjustment buttons
4 Distortion adjustment slider
5 Distortion adjustment buttons
6 Displays the Focus/Distortion screen
7 Displays the Zoom screen
8 Displays the Lens Shift screen
79
Page 80
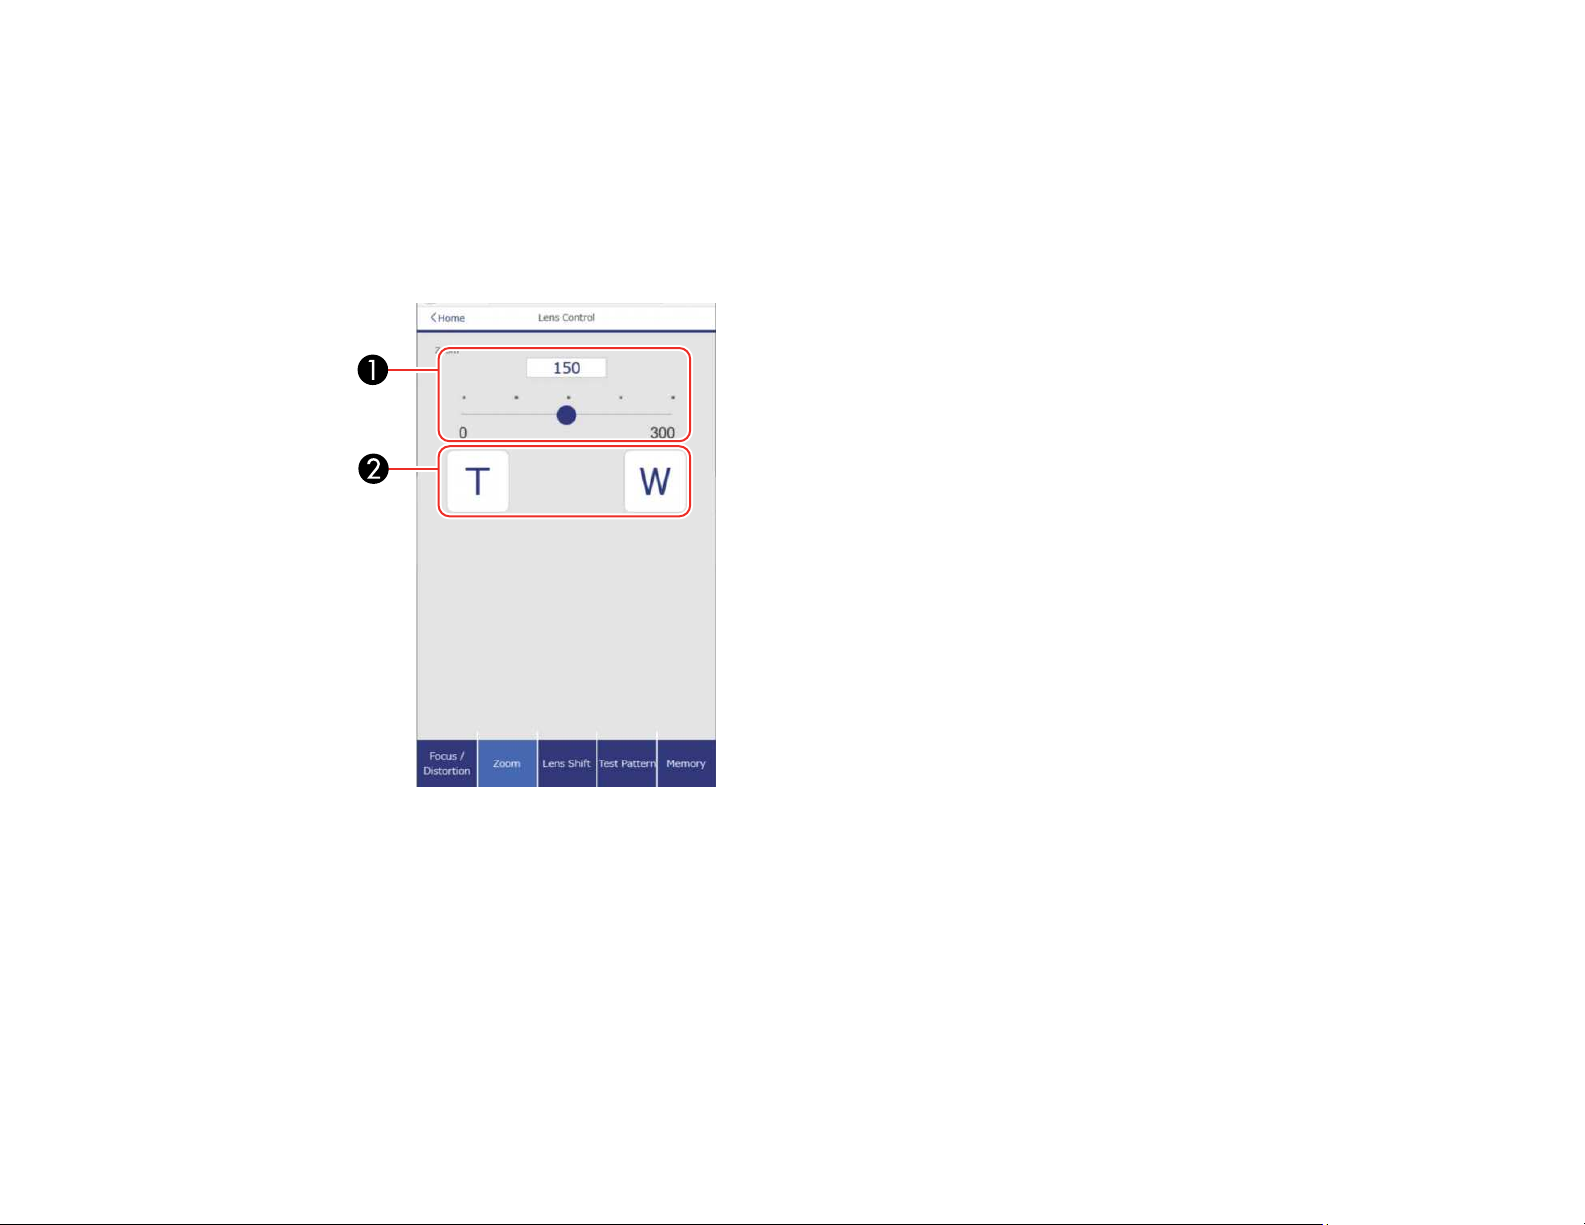
9 Displays the Test Pattern screen
10 Displays the Memory screen
Zoom screen
Note: Depending on the installed lens, the Zoom feature may not be available.
1 Zoom adjustment slider
2 Zoom adjustment buttons
80
Page 81
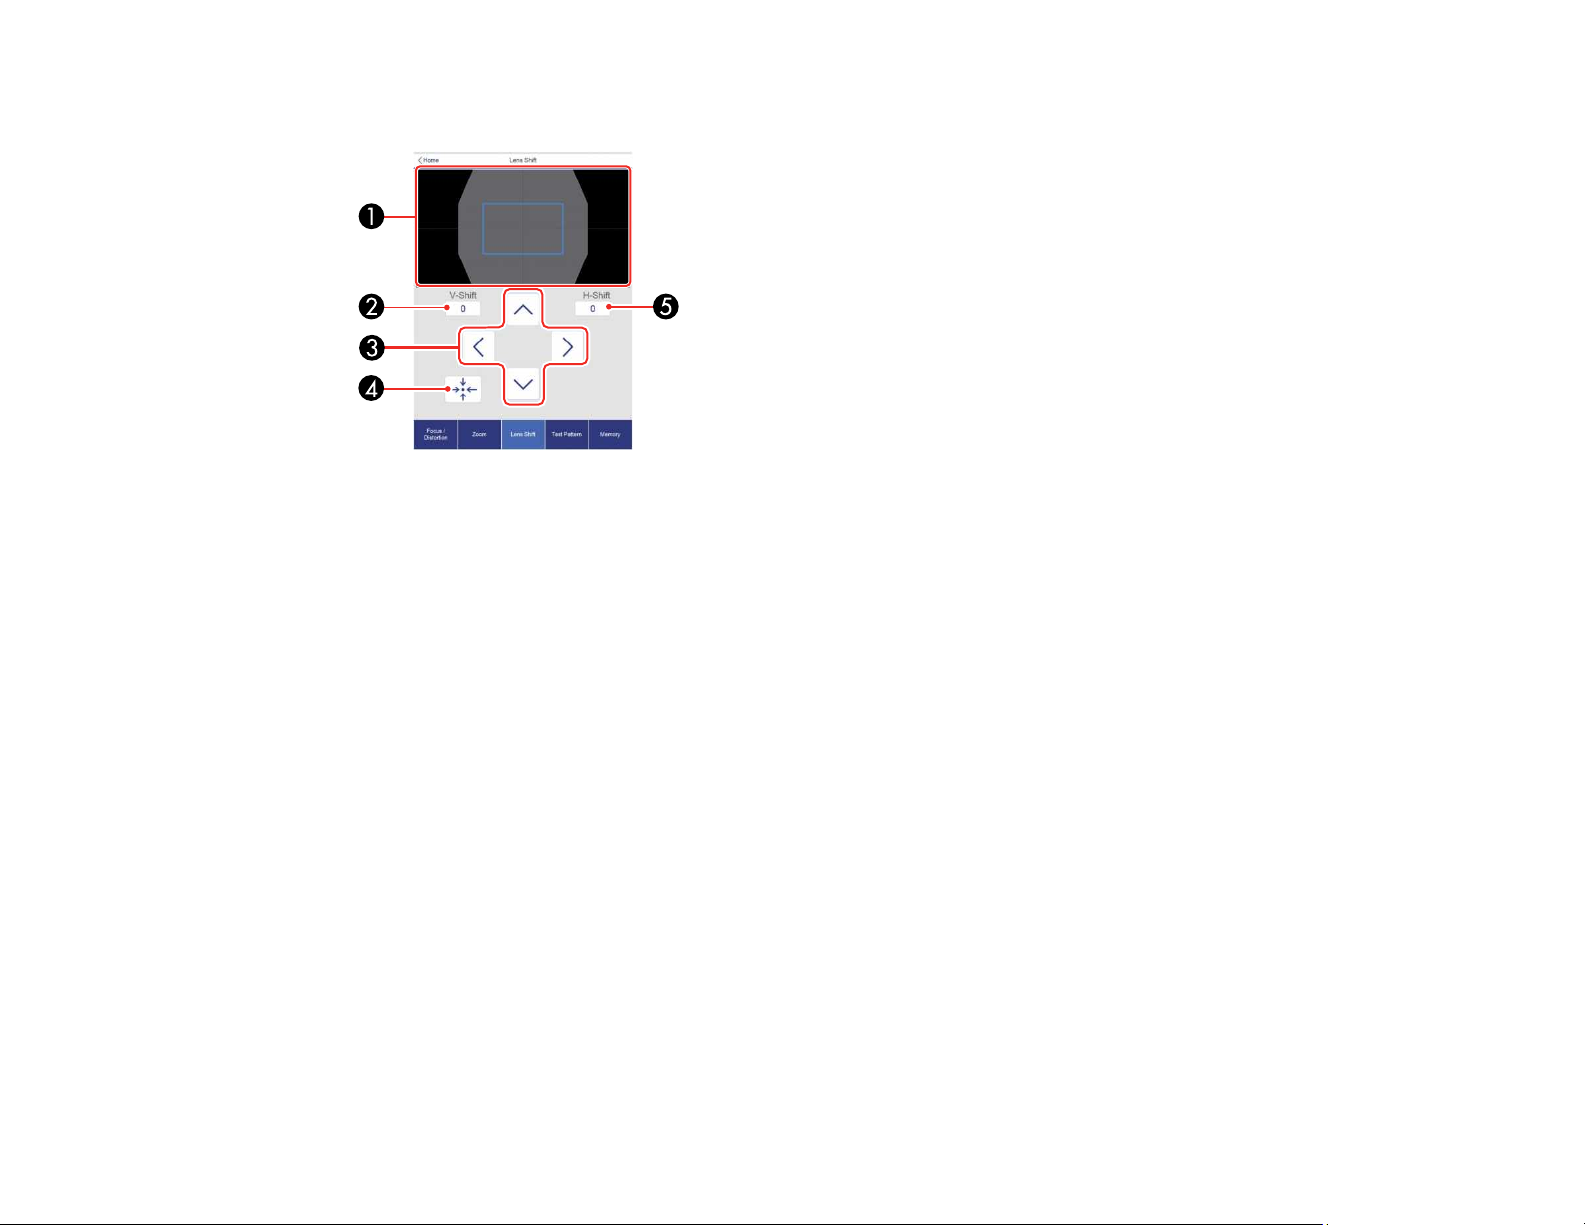
Lens Shift screen
1 The blue square displays the current image position and the red square displays the new image
position
2 Displays the vertical image position; select to change the value
3 Moves the image position up, down, left, or right
4 Moves the lens to the home position
5 Displays the horizontal image position; select to change the value
81
Page 82
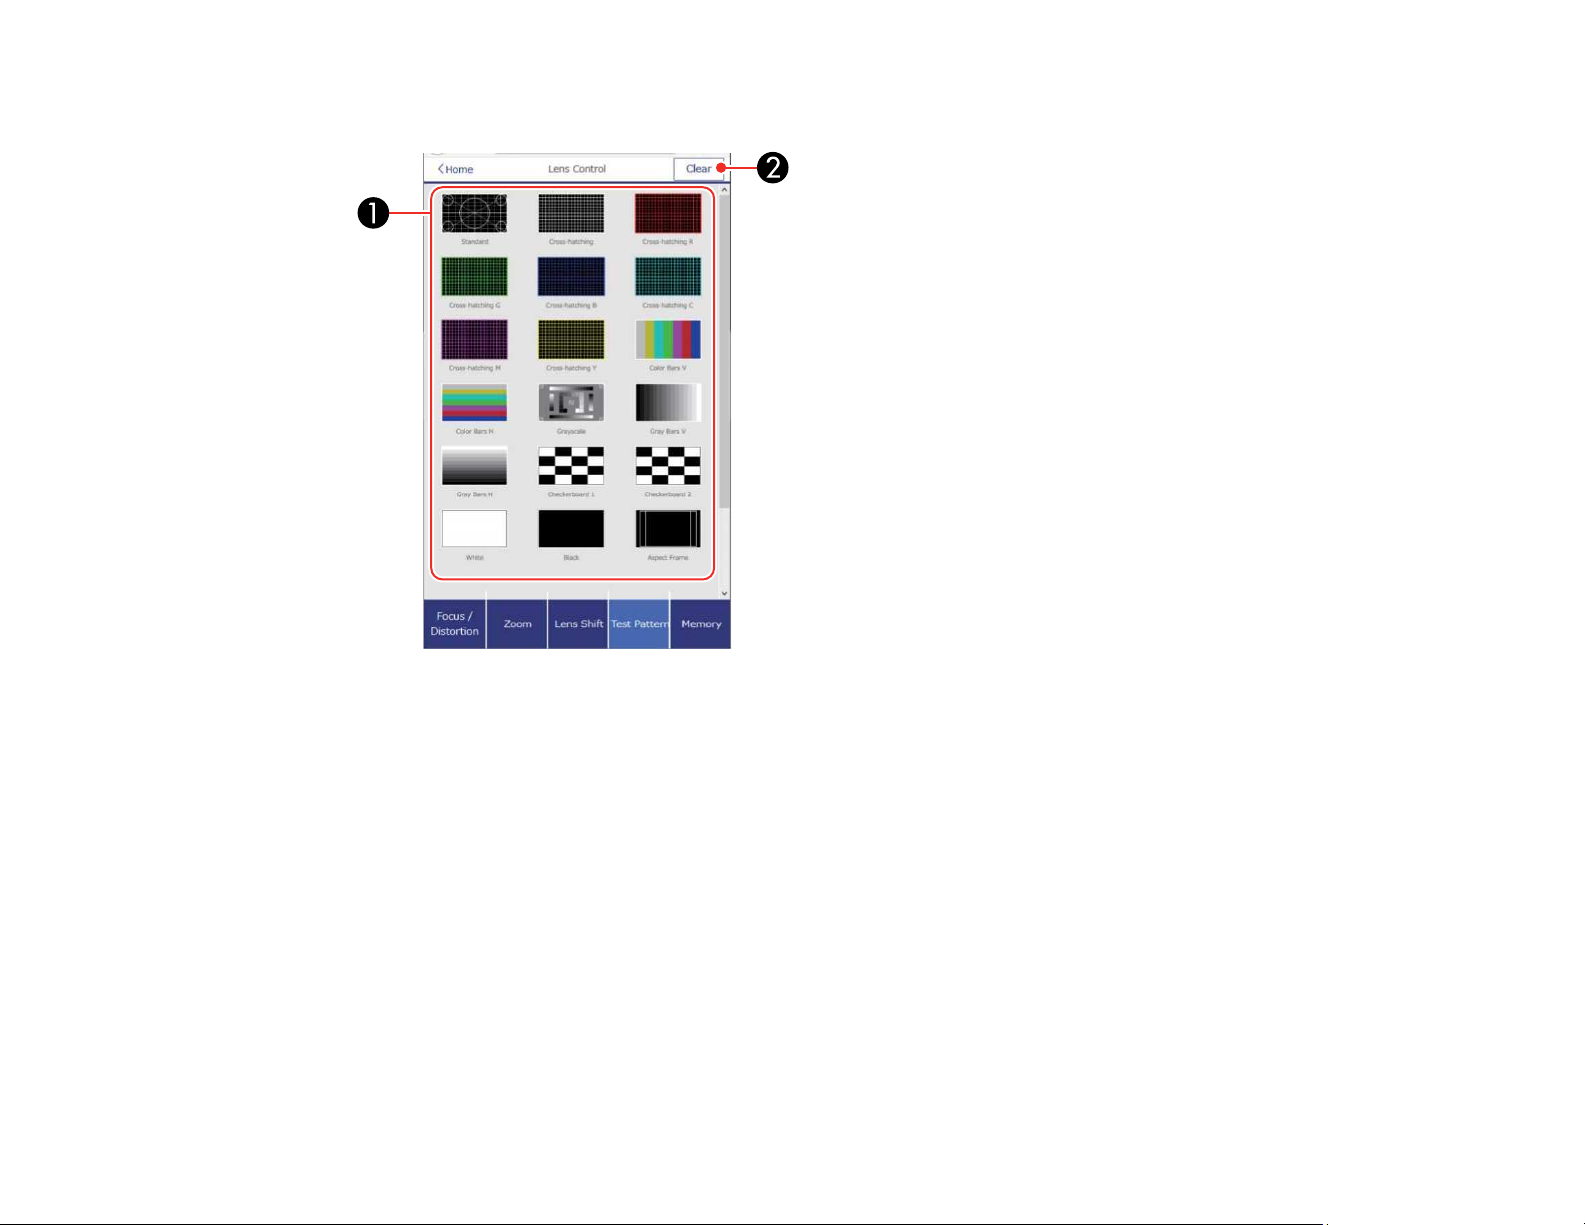
Test Pattern screen
1 Displays available test patterns; select to project a test pattern
2 Turns off test pattern display
82
Page 83
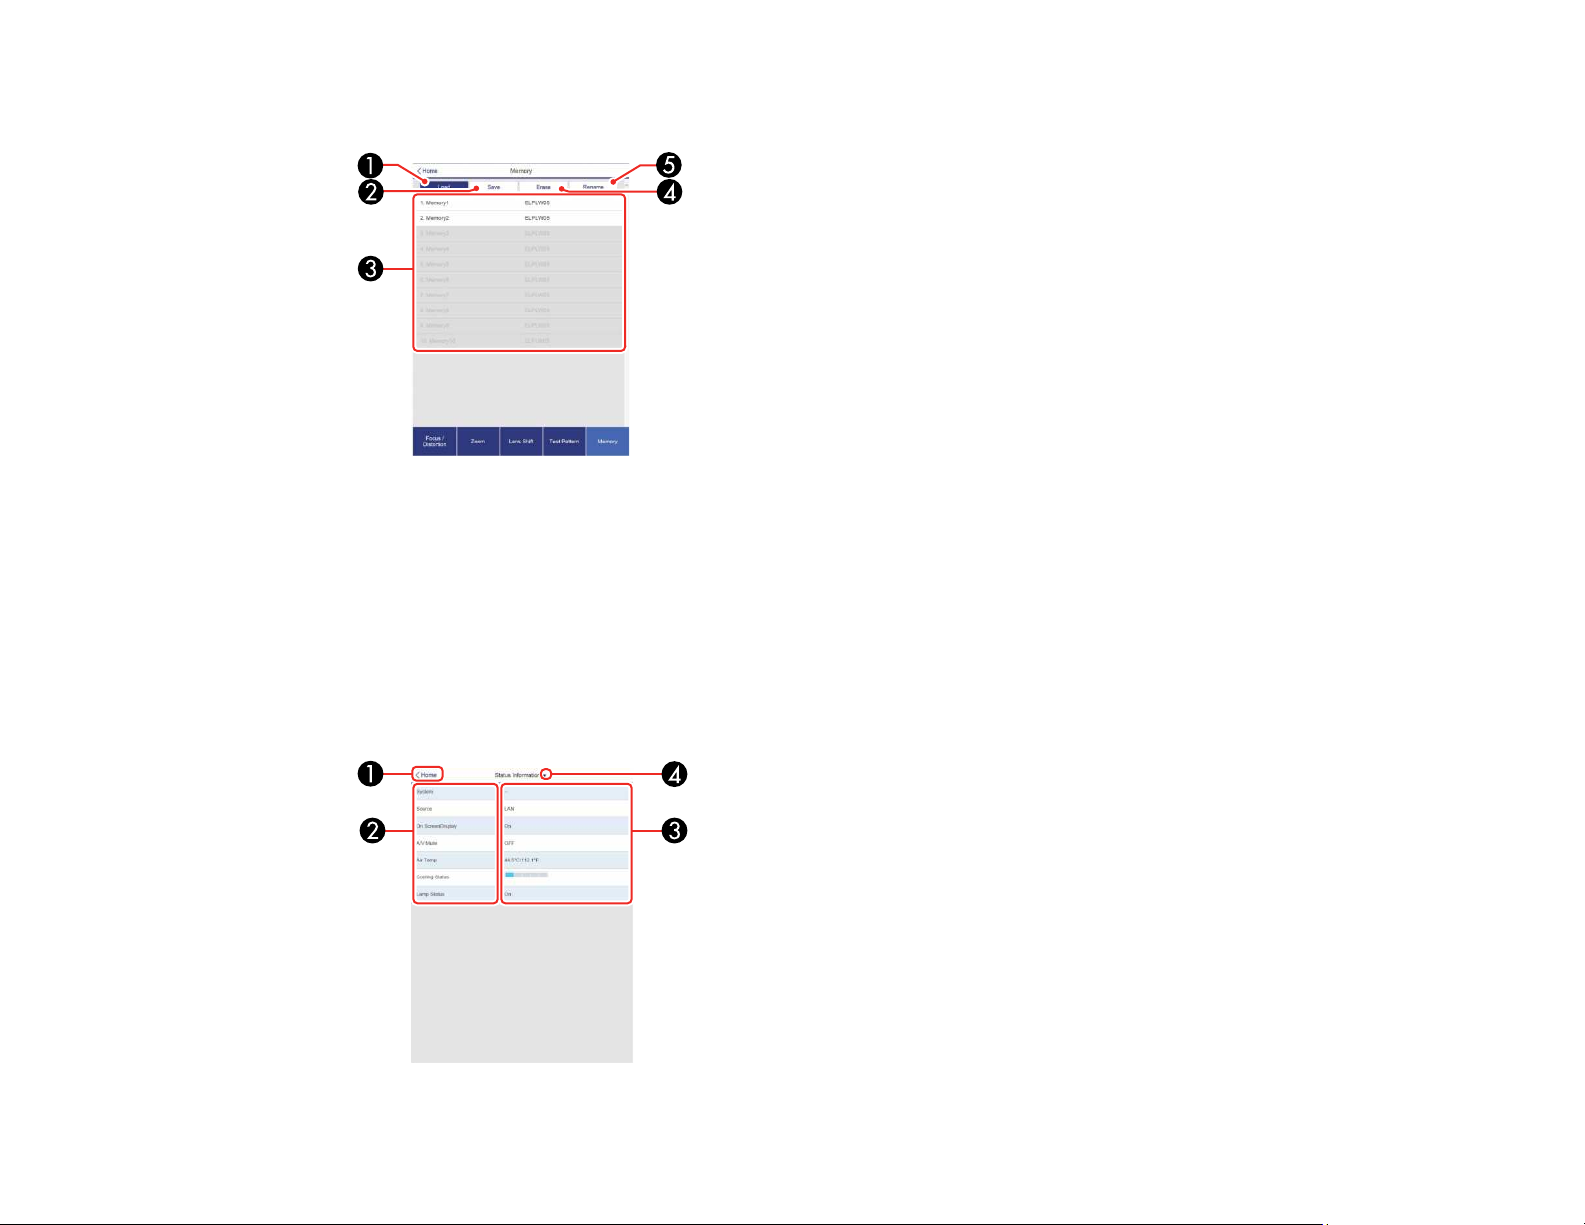
Memory screen
1 Overwrites your current settings with saved settings
2 Saves your current settings to memory
3 Displays a list of saved memories
4 Erases a saved memory
5 Renames a saved memory
Status Information screen
83
Page 84
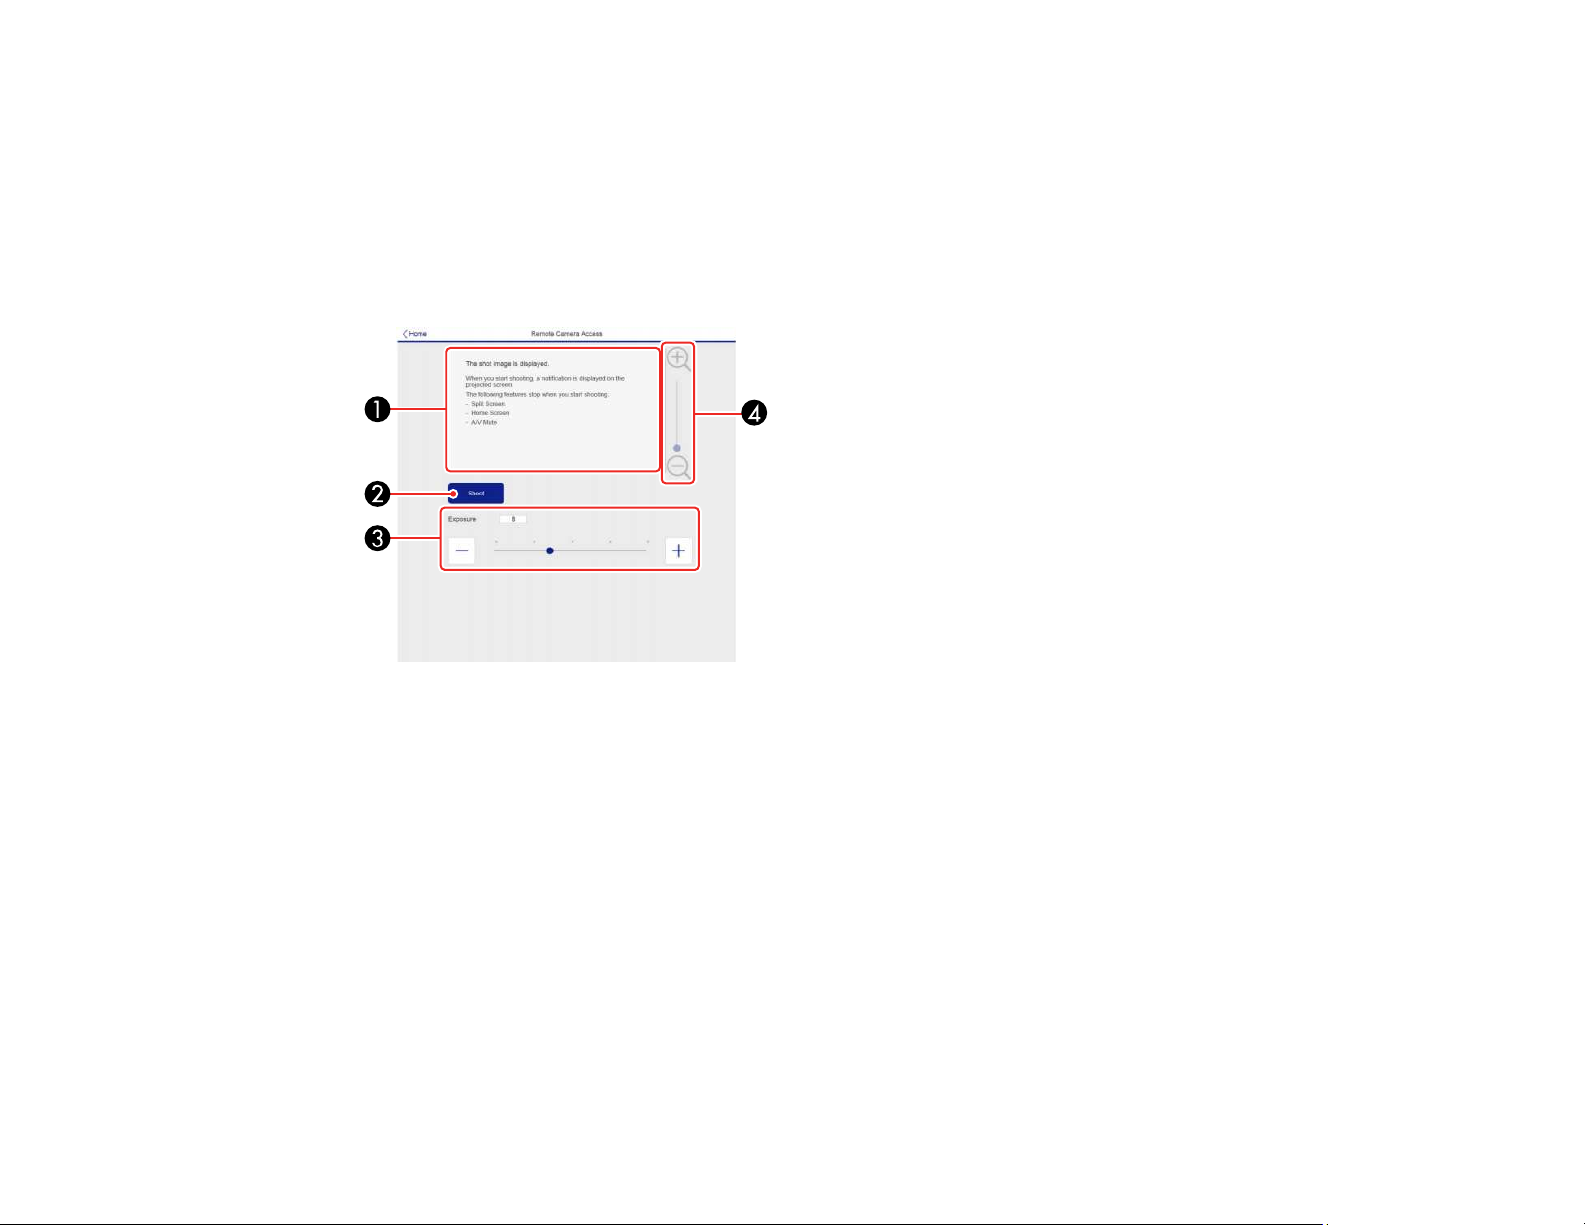
1 Returns to the Home screen
2 Displays a list of monitored settings
3 Displays the setting status
4 Select to view different status information
Remote Camera Access screen
1 Displays the image you captured using the Shoot button
2 Takes a picture of the projected image using the camera on the front of the projector
3 Adjusts the image exposure
4 Zooms in or out on the image you captured
Advanced
If the default Web Control Password is set, a screen prompting you to change the password appears
before you can view the Advanced screen. It is strongly recommended that you change the password
regularly to prevent unauthorized access to your projector.
Note: Not all settings can be changed through Web Control. The following settings can only be set using
Web Control:
• Monitor Password (up to 16 alphanumeric characters)
84
Page 85
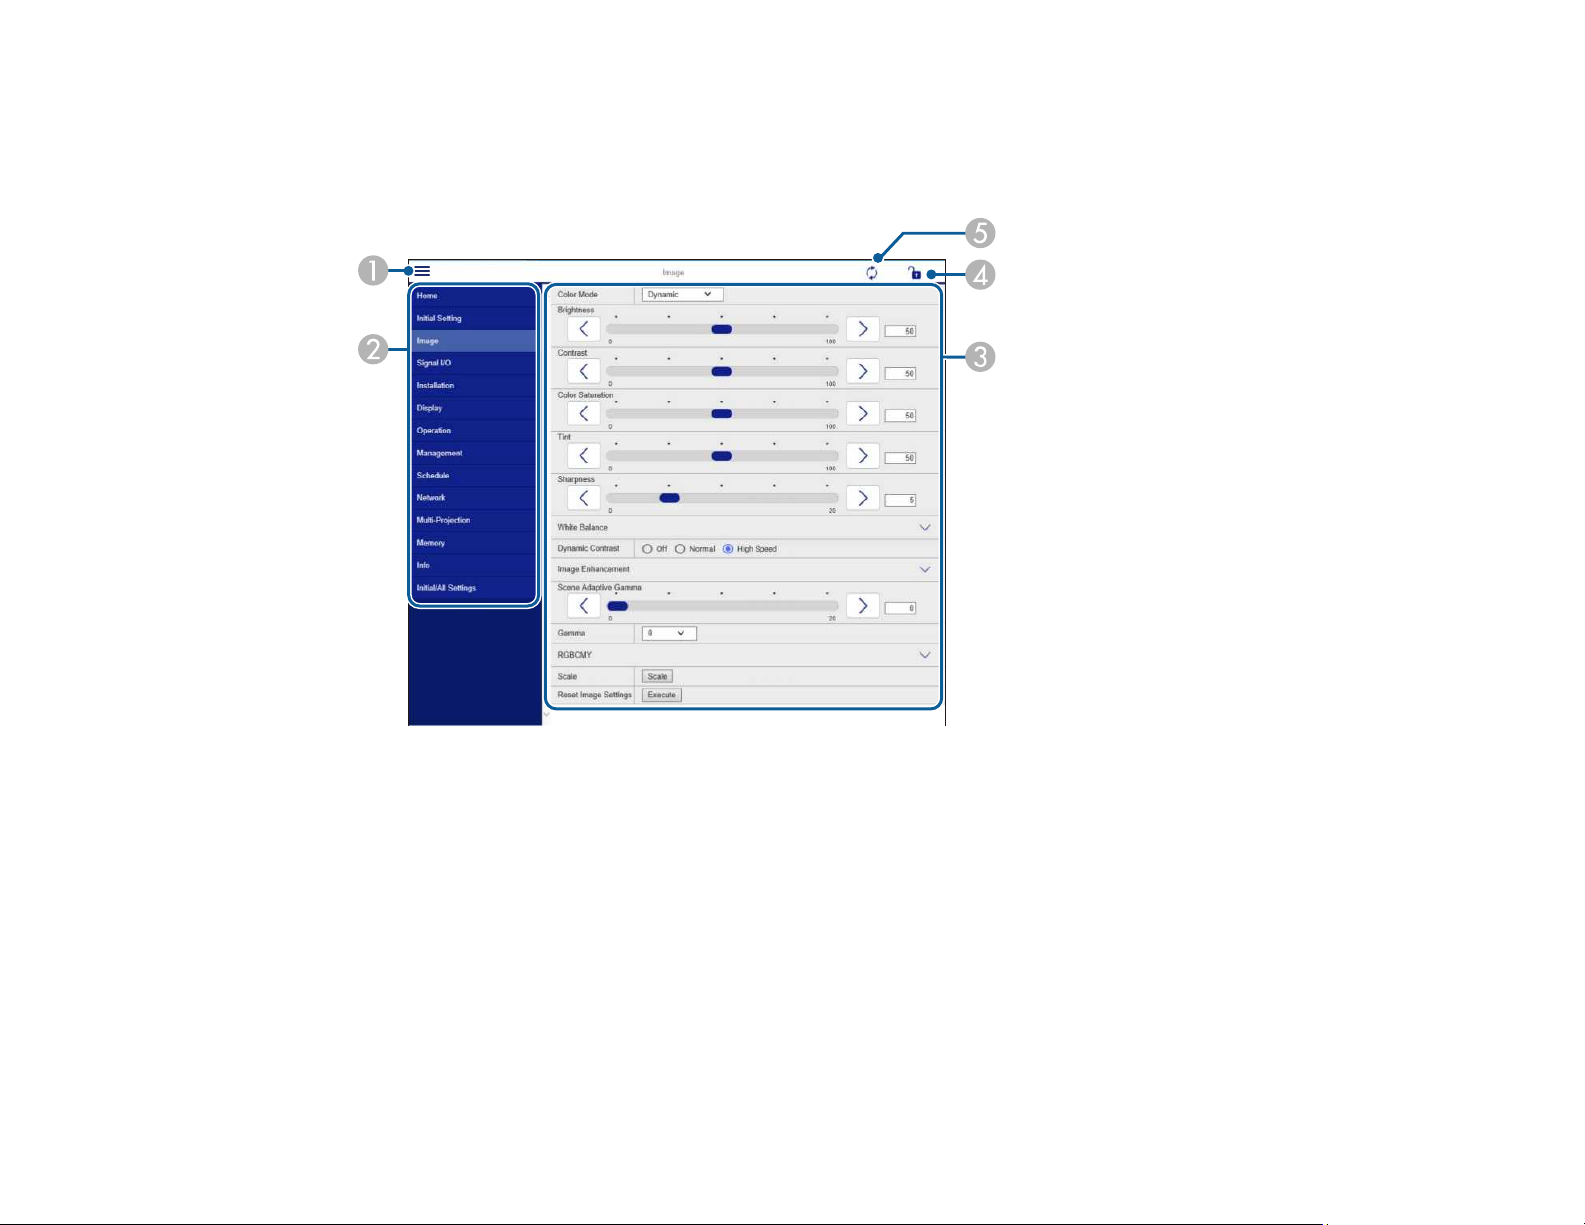
• IPv6 Settings (manual)
• HTTP port (used for Web Control; cannot use 80 [default], 843, 3620, 3621, 3625, 3629, 4352, 4649,
5357, 10000, 10001, or 41794)
1 Opens the menus
2 Displays the selected menu name
3 Contains the selected projector settings
4 Locks or unlocks the projector settings
5 Updates the projector settings
Parent topic: Controlling a Networked Projector Using a Web Browser
85
Page 86
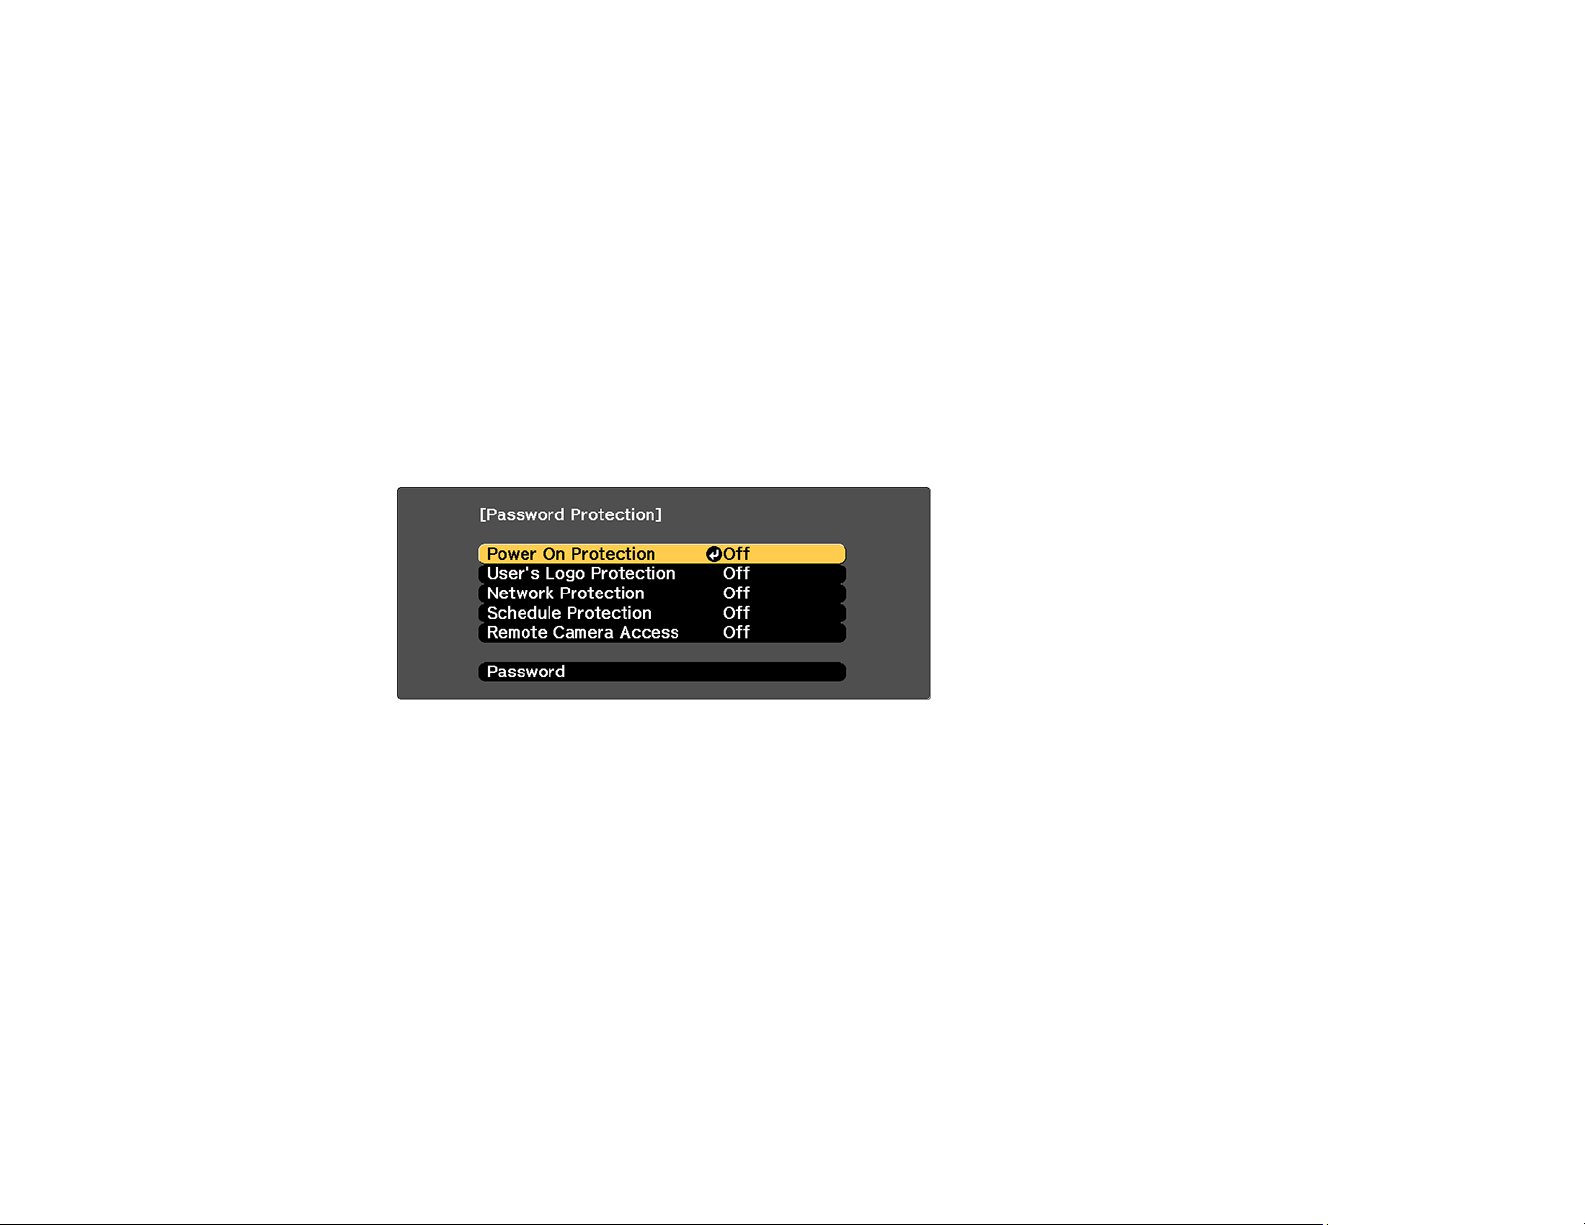
Viewing an Image Capture of the Displayed Image from a Remote Location
You can take an image capture of the projected image and view it from a remote location using the
projector's optional camera.
Note the following when using this feature:
• This feature is not supported with the ELPLL08 lens.
• This feature is not supported when performing the following functions: Tiling, Tiling Assist, stacking
assist tool, Screen Matching, Color Calibration, Lens Calibration, Message Broadcasting in the Epson
Projector Management software.
• Using this feature cancels the following functions: Split Screen, Shutter, on-screen display (when the
message is hidden).
1. Hold down the Freeze button on the remote control for about five seconds or until you see this
menu.
2. Make sure the Remote Camera Access setting is set to Off, then exit the menu.
3. Press the Menu button.
86
Page 87
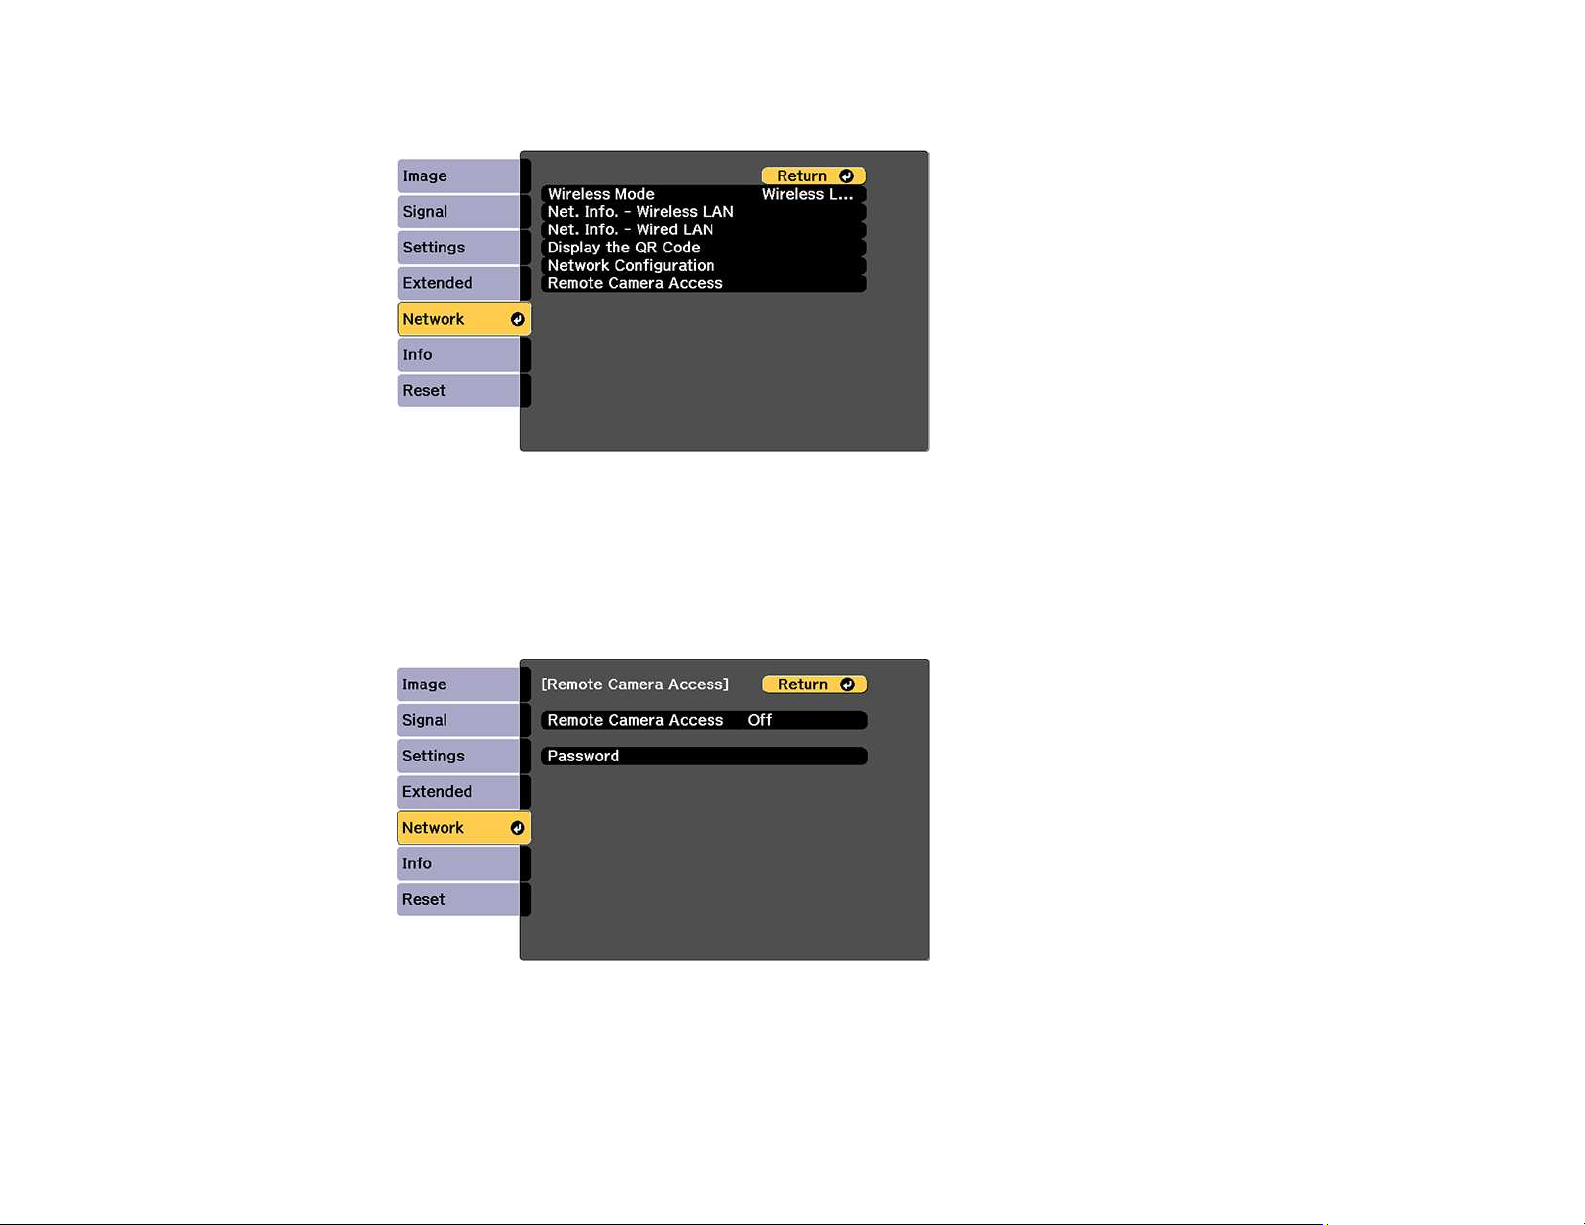
4. Select the Network menu and press Enter.
5. Select Network Configuration and select the Others menu.
6. Make sure the Secure HTTP setting is enabled and return to the Network menu.
7. Select Remote Camera Access and press Enter.
You see a screen like this:
8. Select the Password setting and enter a password up to 32 alphanumeric characters long.
Note: Do not use these characters in the password: * (asterisk), : (colon), or a space character.
87
Page 88

9. Select On as the Remote Camera Access setting.
10. Open a web browser on a computer or mobile device connected to the projector over a network
connection.
11. Enter the projector's IP address in your browser's address box to connect to Epson Web Control.
You see a screen like this:
Note: You can view the projector's IP address by selecting Net. Info. - Wireless LAN or Net. Info. Wired LAN on the Network menu.
12. Select Remote Camera Access.
Note: You may need to log in to access some of the options on the Epson Web Control screen. If
you see a login window, enter your user name and password. (The default user name is
EPSONWEB and the default password is the projector's serial number. Enter the serial number with
uppercase letters.)
88
Page 89
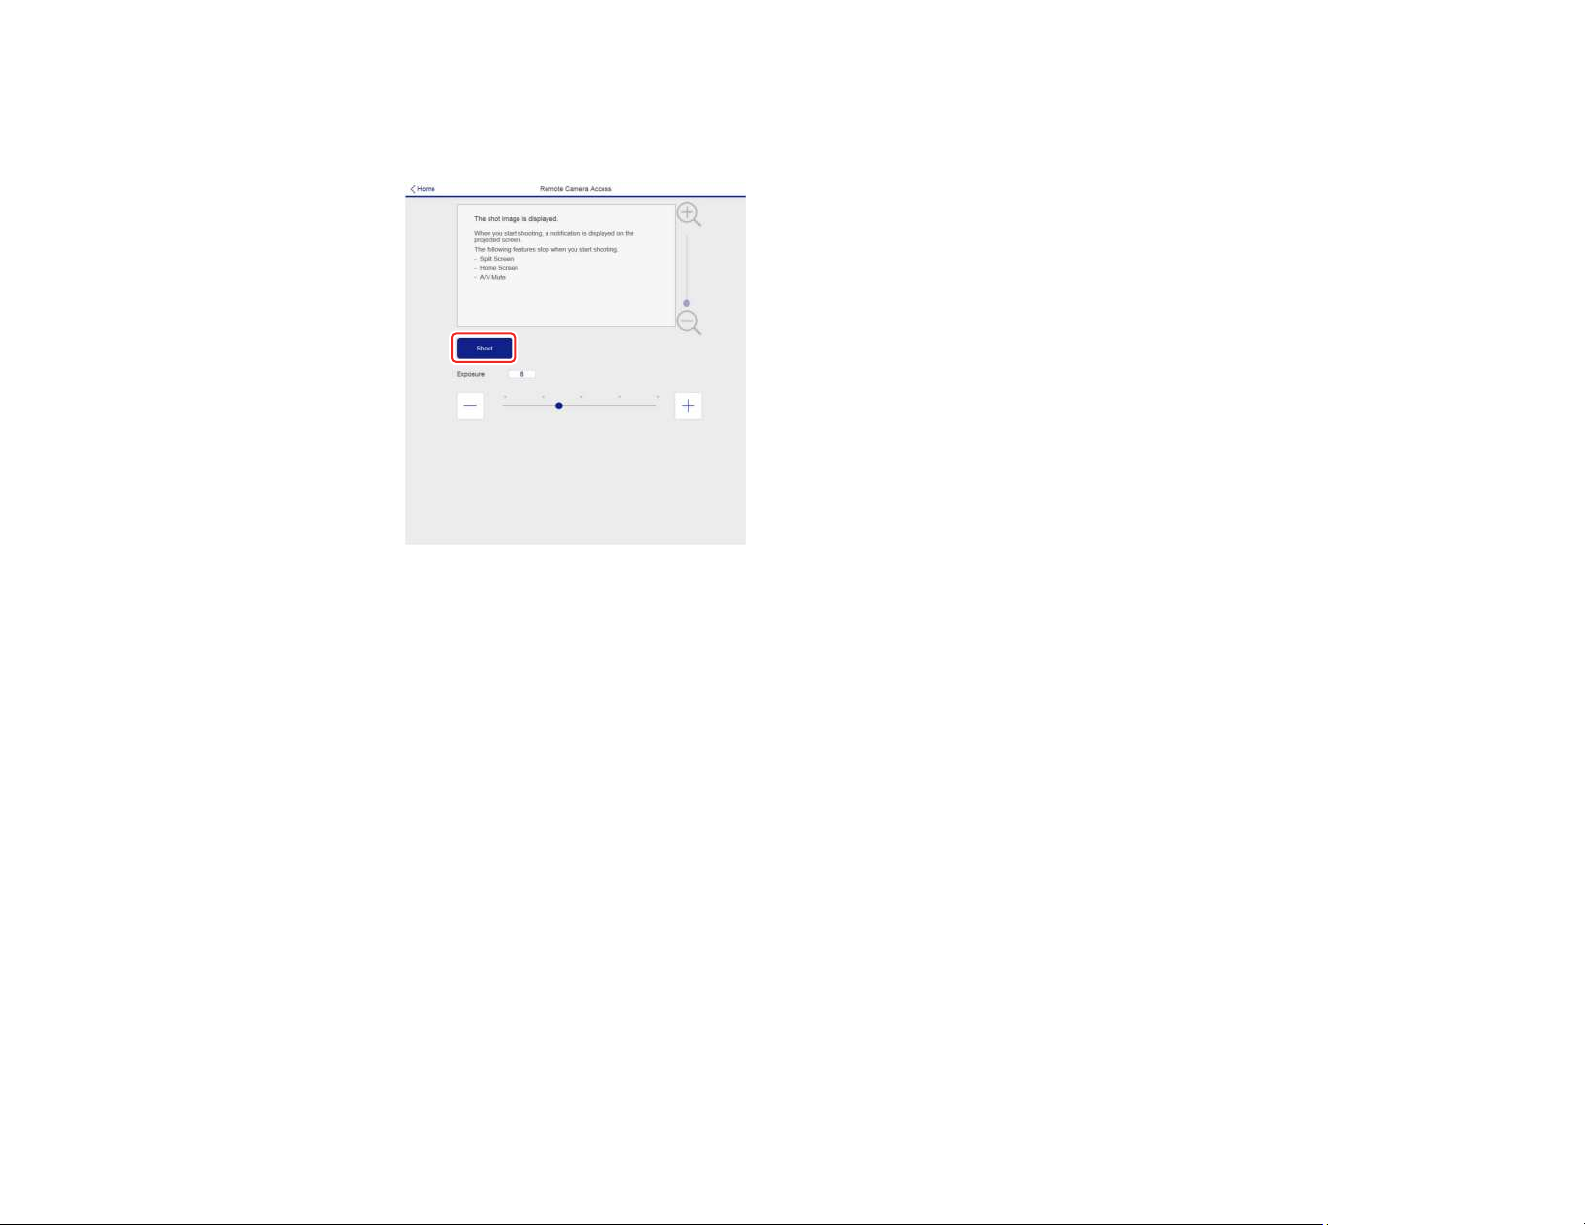
13. Click Shoot to take a capture of the projected image. (You cannot capture warning or caution
messages.)
Note: If you see a password screen, enter the password you selected for remote camera access.
You cannot perform any projector operations during shooting other than turning off the projector.
Parent topic: Controlling a Networked Projector Using a Web Browser
Controlling a Networked Projector in Content Playback Mode
When Content Playback mode is turned on in the Settings menu, you can select projector settings,
control projection, and edit playlists using a web browser.
Note: You can also control the projector using a web browser through the Epson iProjection app.
Note: Do not remove any USB device connected to the projector or unplug the power cord when the
Playlists or USB Memory Device screen is displayed; data saved on the USB device may be damaged.
1. Make sure the projector is operating in Content Playback mode.
2. Make sure the projector is turned on and your computer or device is connected to the same network
as the projector.
3. Start your web browser on the computer or device.
89
Page 90
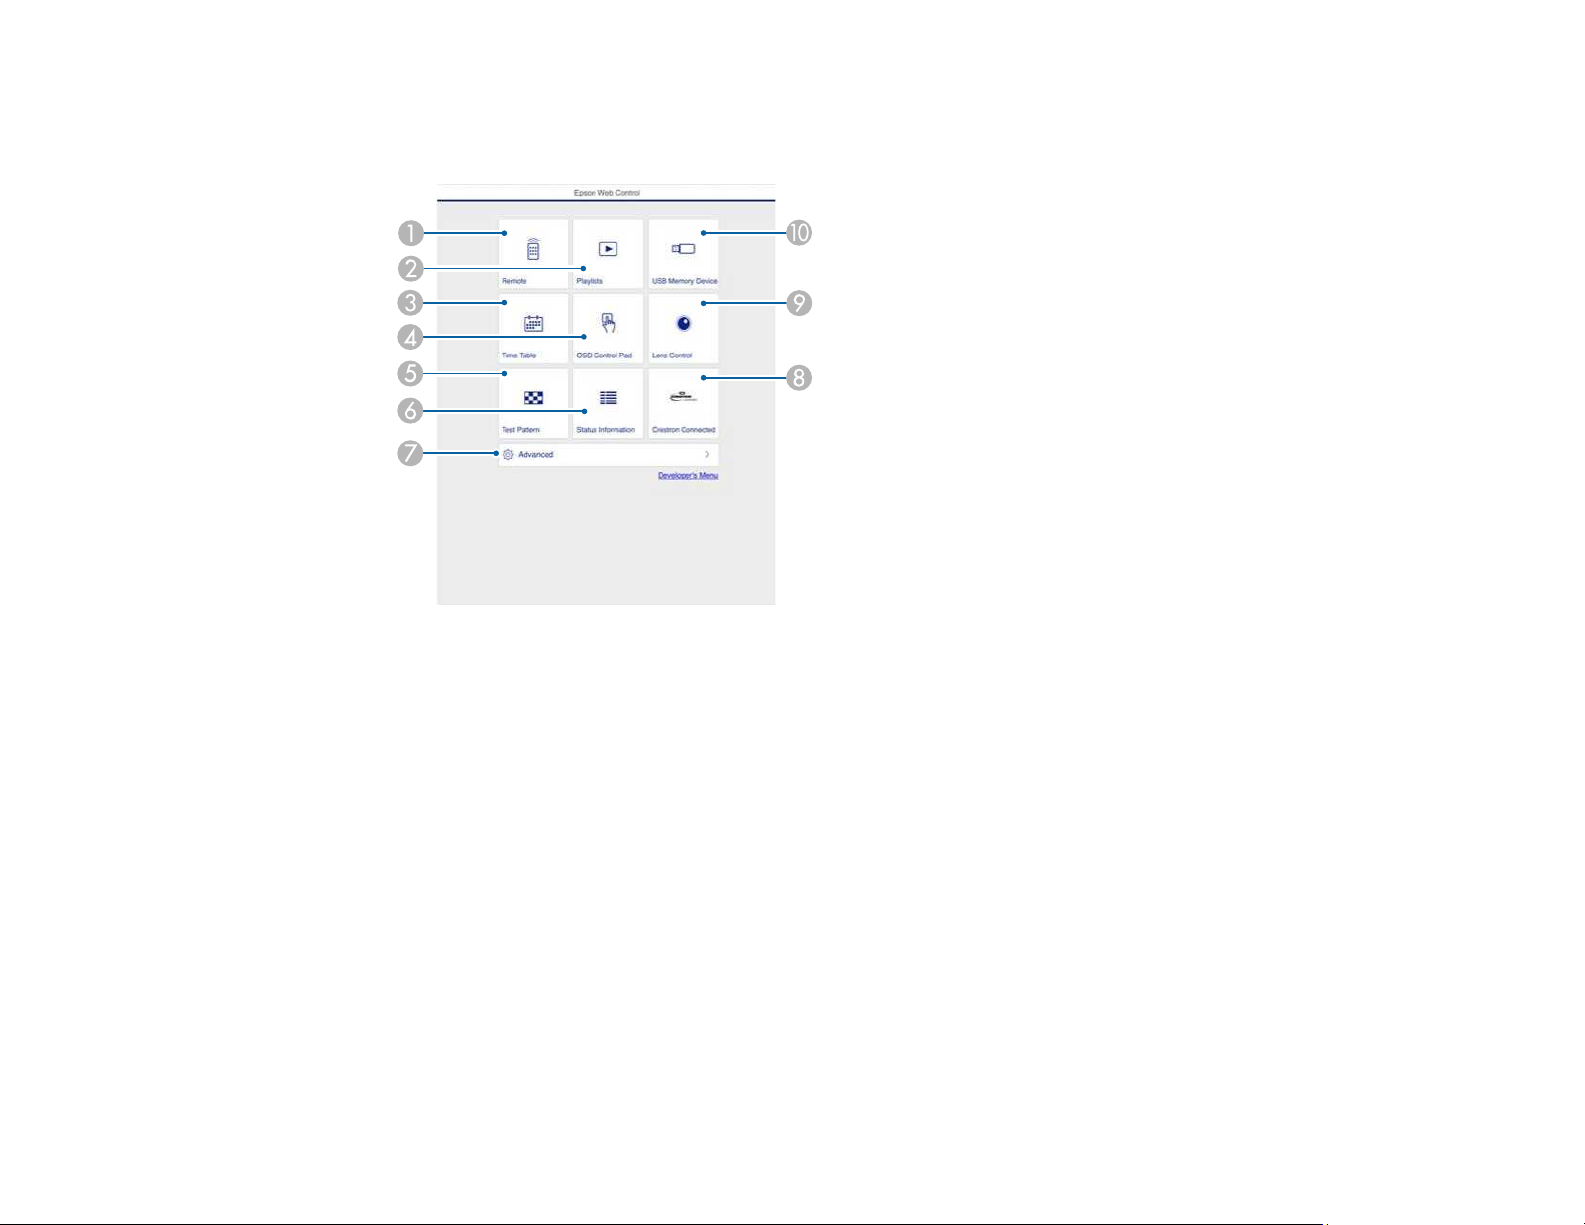
4. Type the projector's IP address into the browser's address box and press the computer's Enter key.
You see the Epson Web Control screen.
1 Controls the projector remotely
2 Edits playlists for Content Playback mode
3 Opens the Time Table screen
4 Operates the projector's menus with your finger or a mouse
5 Displays a test pattern
6 Displays the projector's status
7 Opens detailed projector settings
8 Opens the Crestron Connected window (available when Crestron Connected is turned on)
9 Operates the projector's lens
10 Registers or deletes playlist data on the USB device
90
Page 91

5. Select the option corresponding to the projector function you want to control.
Note: You may need to log in to access some of the options on the Web Control screen. If you see a
login window, enter your user name and password. (The default user name is EPSONWEB and the
default password is the projector's serial number. Enter the serial number with uppercase letters.)
Web Control Options in Content Playback Mode
Parent topic: Using the Projector on a Network
Related topics
Projecting in Content Playback Mode
91
Page 92
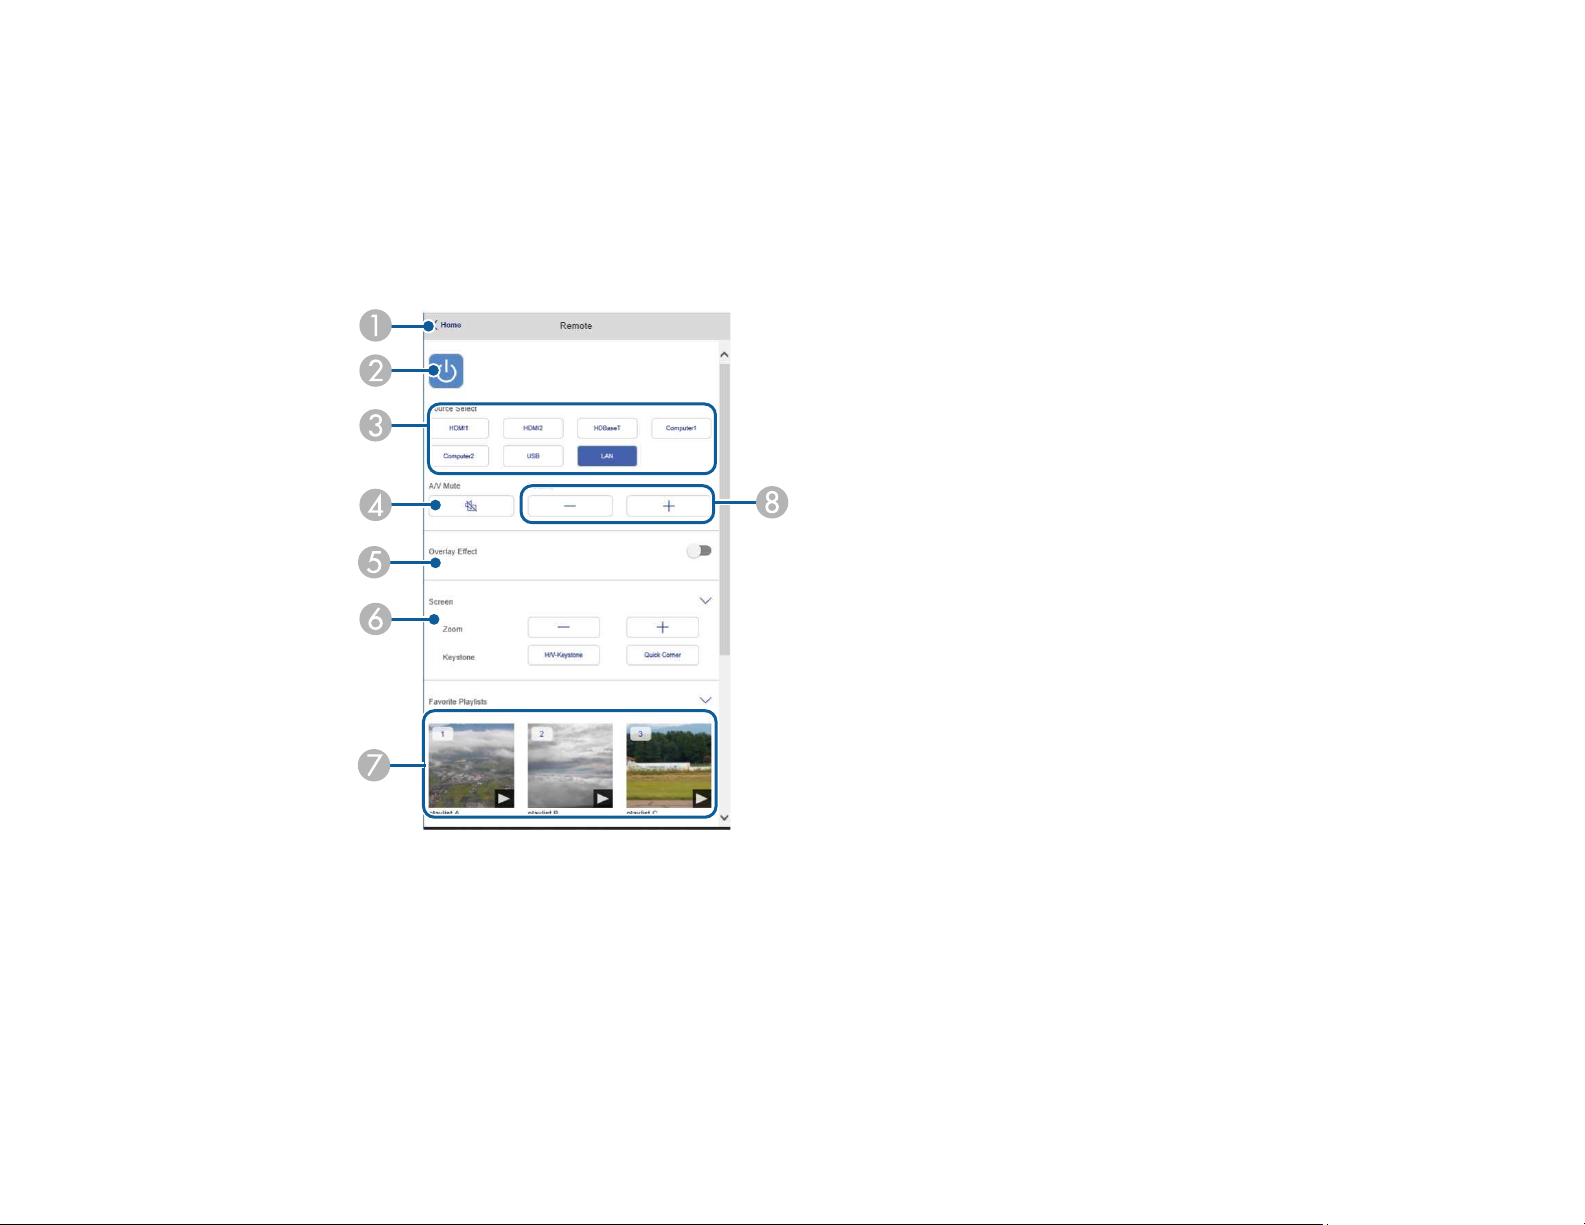
Web Control Options in Content Playback Mode
Remote
Note: If the Remote Password is set to On, you need to enter your user name and password. (The
default username is EPSONREMOTE and the default password is the projector's serial number. Enter
the serial number with uppercase letters.)
1 Returns to the Epson Web Control screen
2 Turns the projector on or off
3 Selects the input source
4 A/V Mute button control
5 Turns Overlay Effect on or off
92
Page 93
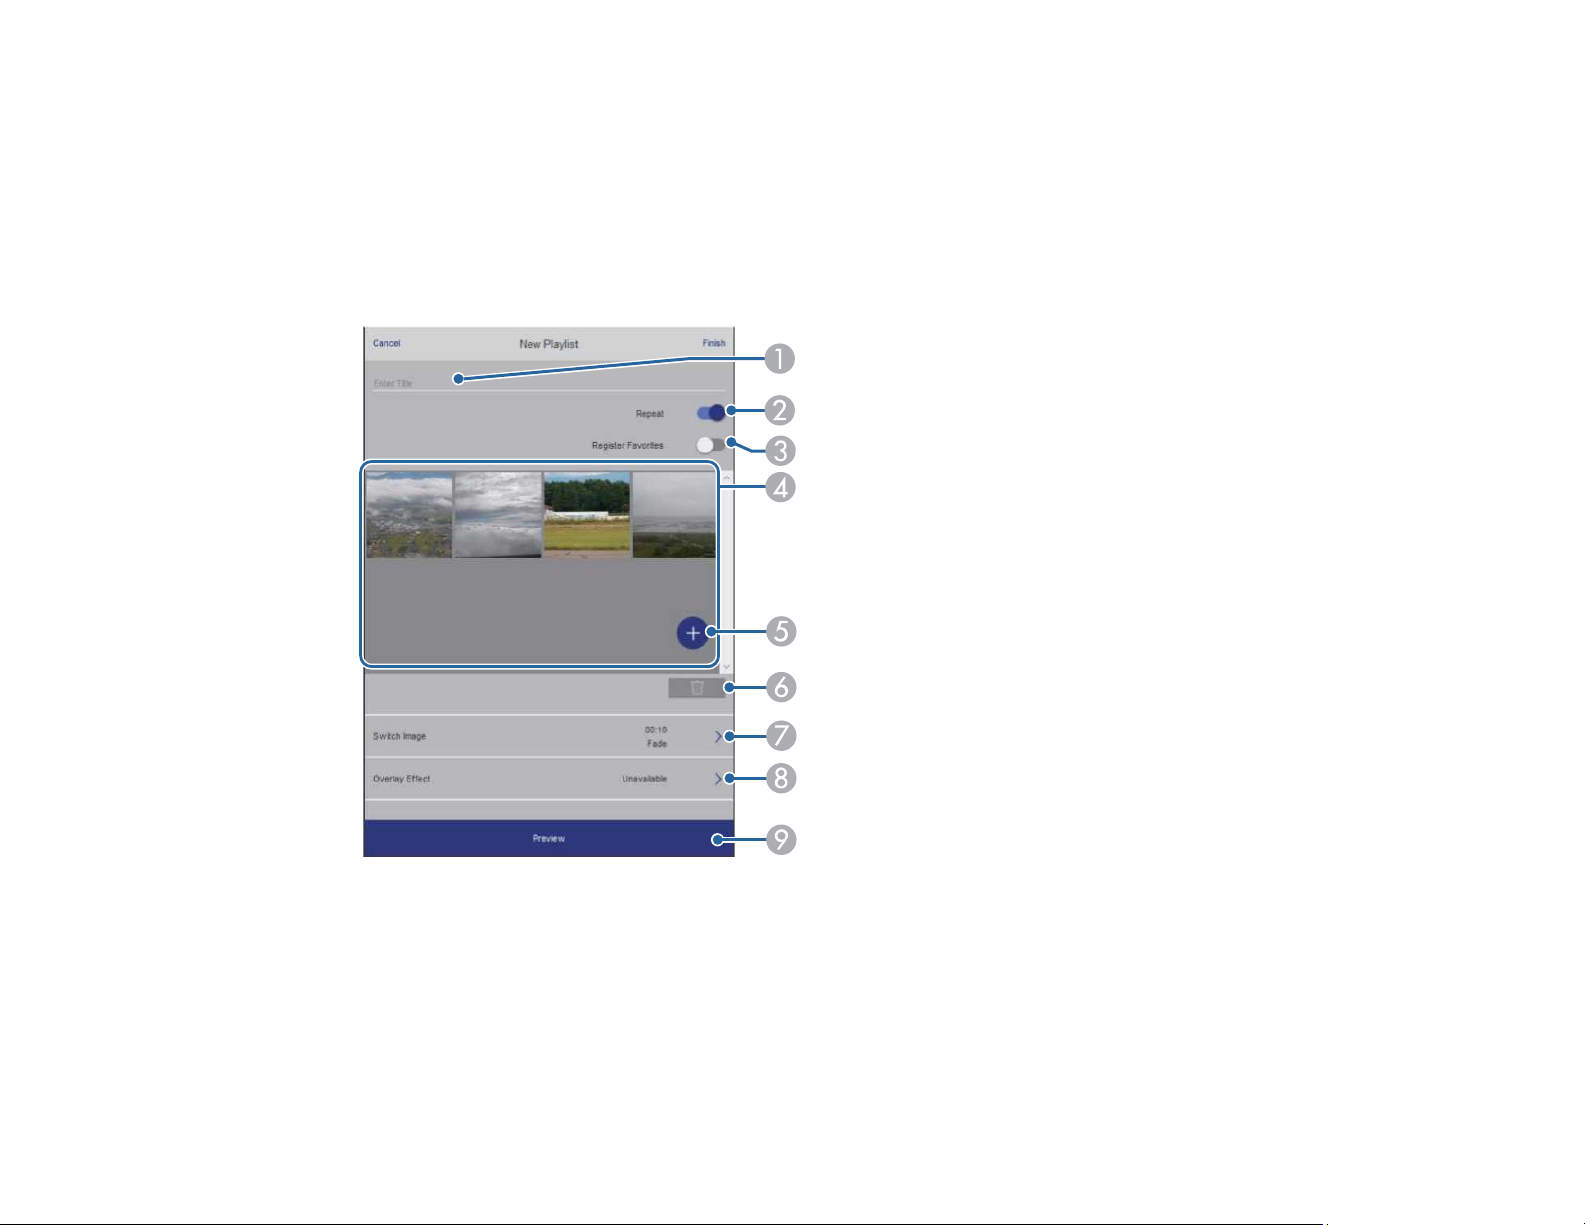
6 Displays the screen settings
7 Selects your favorite playlists
8 Adjusts the speaker volume
Playlists
Create or Edit Playlist
93
Page 94
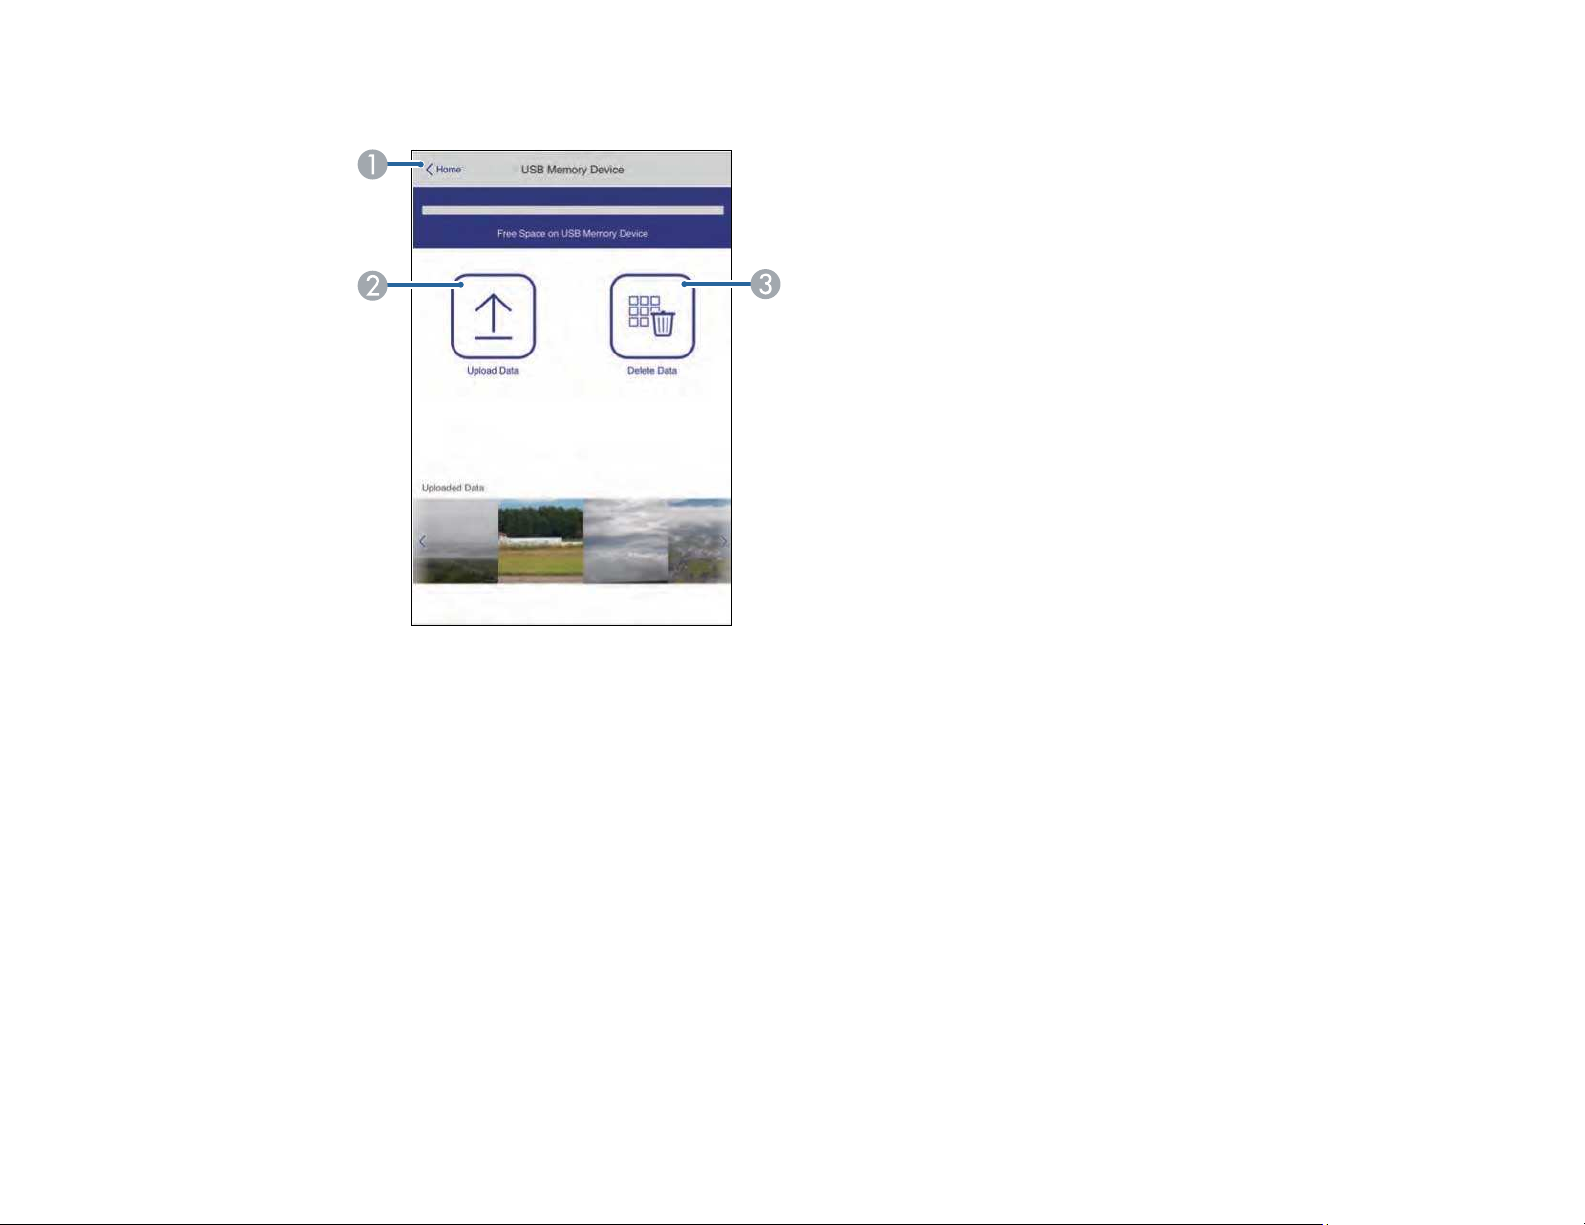
USB Memory Device
1 Returns to the Epson Web Control screen
2 Uploads images or videos to add to playlists on a USB device
3 Deletes images or videos on the USB device
Note: You can upload .avi, .jpeg (.jpg), .png, .bmp, or .gif files using Epson Web Control. If you want to
add .mp4 or .mov files to the playlist, use the Epson Projector Content Manager software or the Epson
Creative Projection app.
94
Page 95
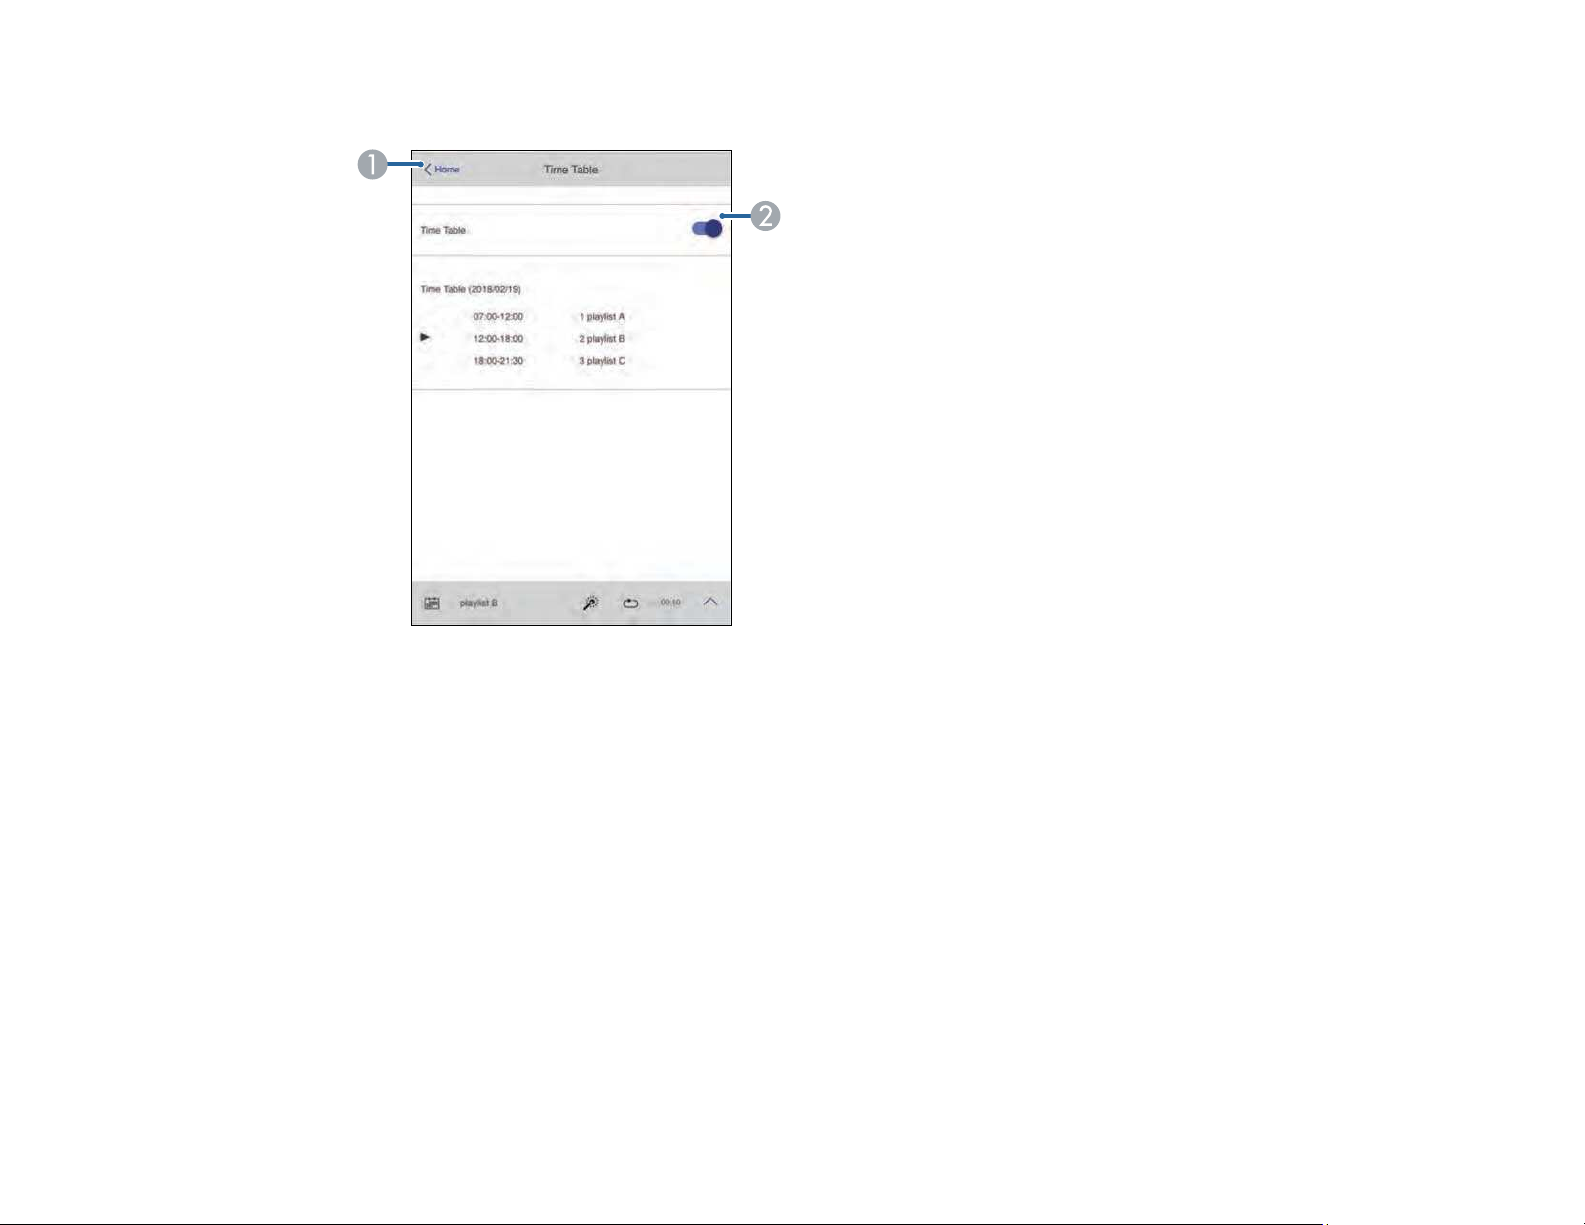
Time Table
1 Returns to the Epson Web Control screen
2 Turns the time table on or off (see the online Epson Projector Content Manager Operation Guide
for more information)
95
Page 96
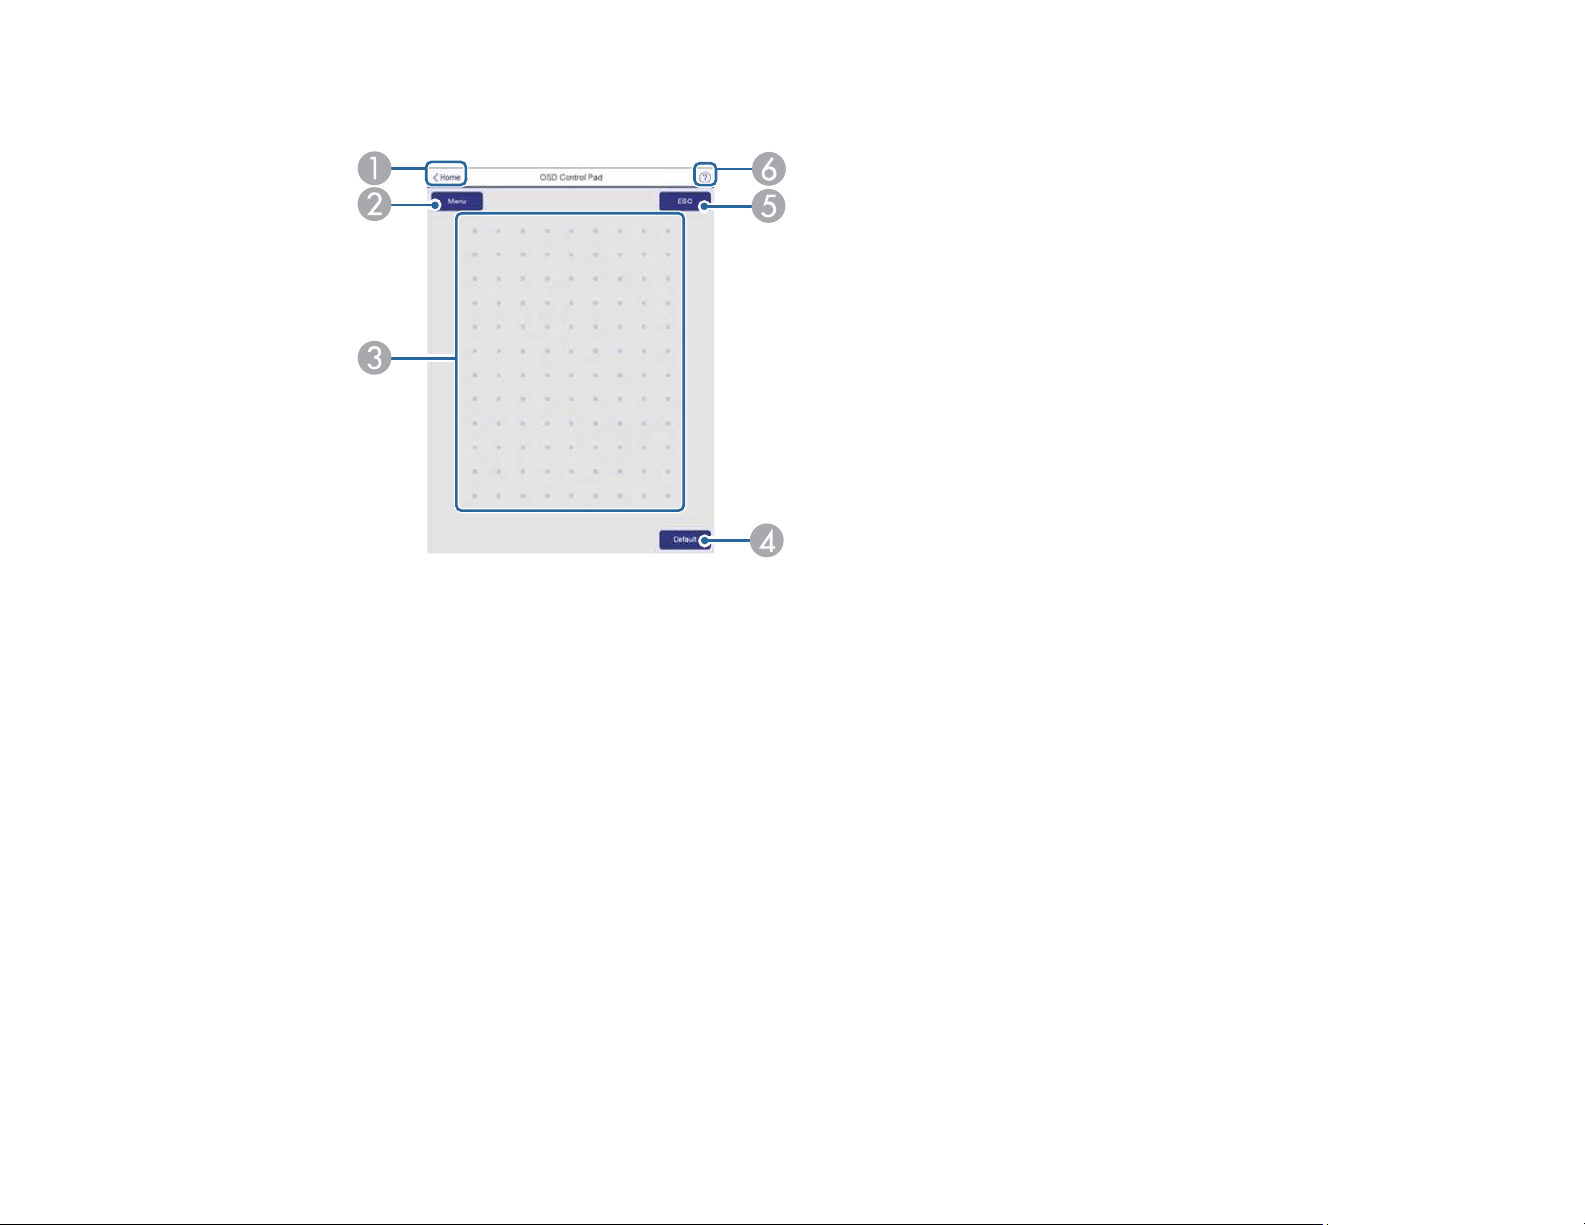
OSD Control Pad
1 Returns to the Epson Web Control screen
2 Displays the projector's setting menus
3 Use your finger or mouse to navigate the menus
4 Returns projector to default settings
5 Returns to the previous menu
6 Displays help topics
Note: You cannot change some settings using Epson Web Control.
Parent topic: Controlling a Networked Projector in Content Playback Mode
Using Crestron Connected
If you are using the Crestron Connected network monitoring and control system, you can set up your
projector for use on the system. Crestron Connected lets you control and monitor your projector using a
web browser.
96
Page 97
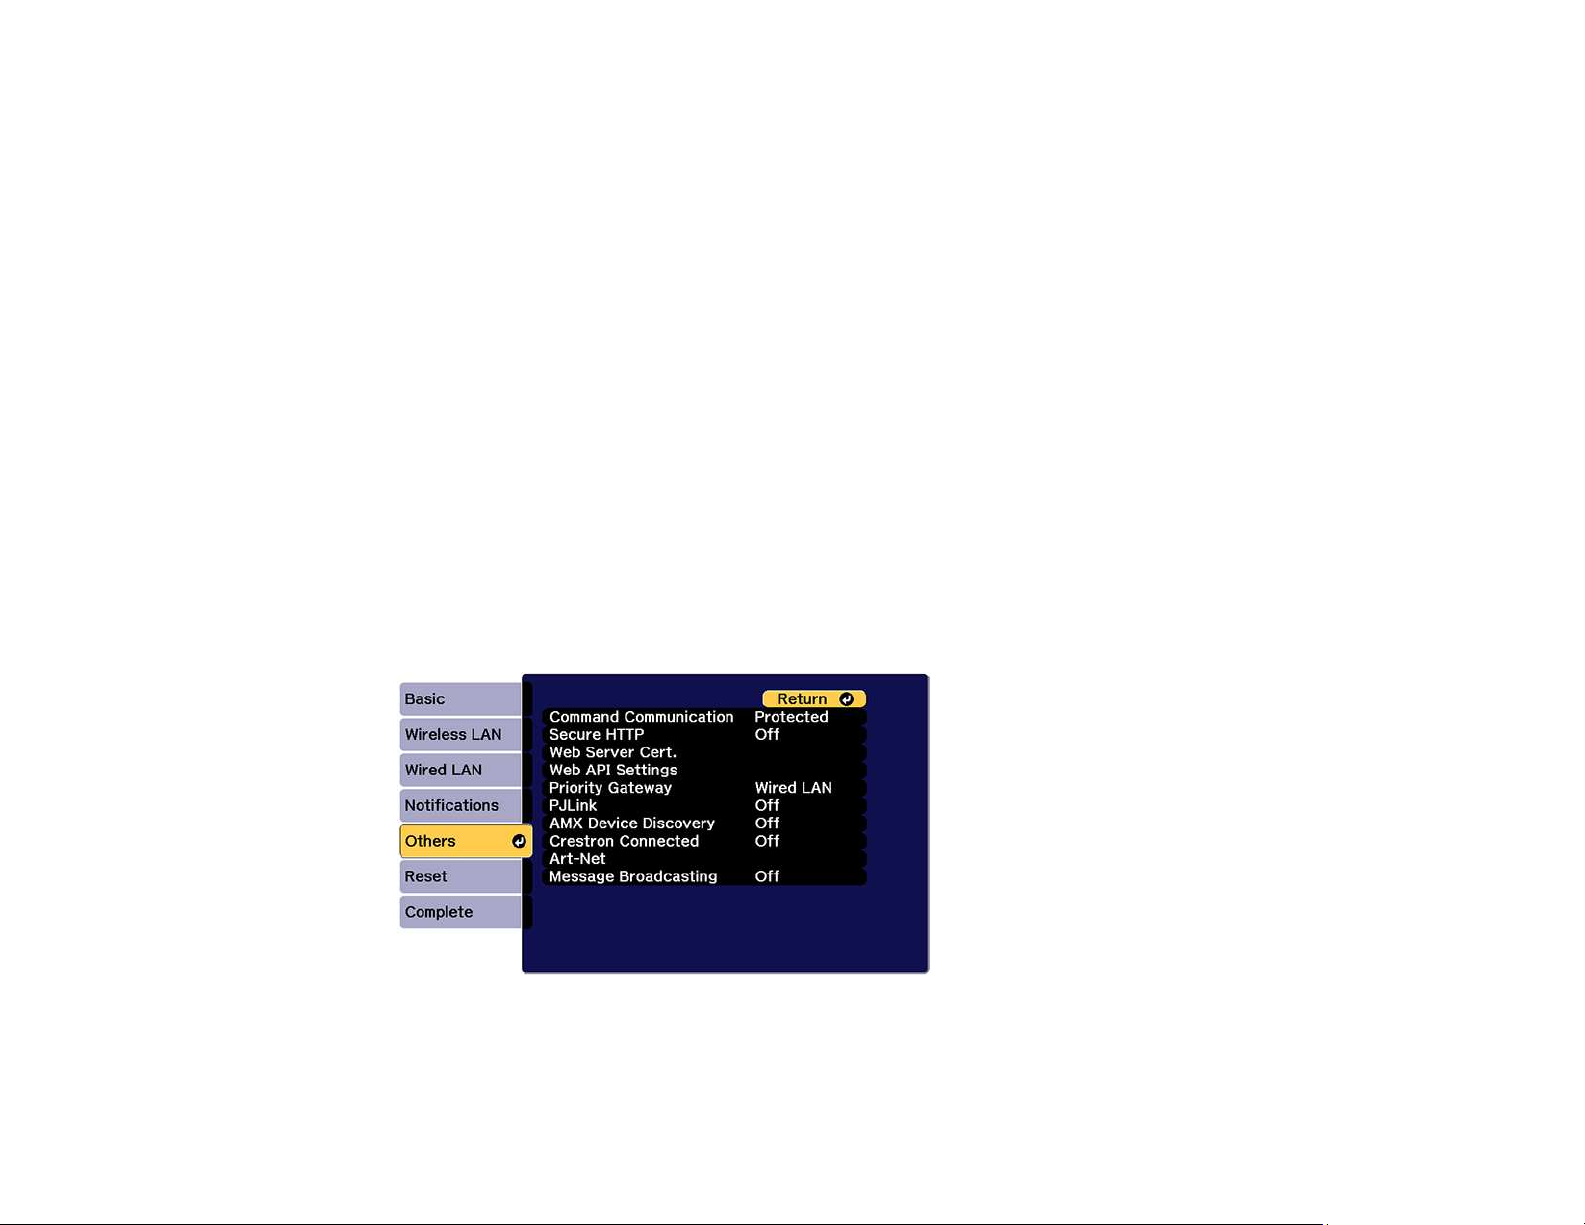
Note: You cannot use the Message Broadcasting feature in the Epson Projector Management software
when you use Crestron Connected.
For additional information on Crestron Connected, contact Crestron.
Setting Up Crestron Connected
Controlling a Networked Projector Using Crestron Connected
Parent topic: Using the Projector on a Network
Setting Up Crestron Connected
To set up your projector for monitoring and control using a Crestron Connected system, make sure your
computer and projector are connected to the network.
Note: If you want to use the Crestron Connected system when the projector is turned off, you need to
adjust the Standby Mode settings in the Extended menu.
1. Press the Menu button.
2. Select the Network menu and press Enter.
3. Select Network Configuration and press Enter.
4. Select the Others menu and press Enter.
5. Set the Crestron Connected setting to On to allow the projector to be detected.
97
Page 98

Note: Enabling Crestron Connected disables the Message Broadcasting feature in the Epson
Projector Management software.
6. When you are finished selecting settings, select Complete and follow the on-screen instructions to
save your settings and exit the menus.
7. Turn off the projector, then turn it on again to enable the setting.
8. Start your Web browser on a computer or device connected to the network.
9. Go to the Epson Web Control screen by entering the projector's IP address into the browser's
address box.
10. Select the Crestron Connected settings. See the Crestron Web site for details.
Parent topic: Using Crestron Connected
Related references
Projector Setup Settings - Extended Menu
Controlling a Networked Projector Using Crestron Connected
Once you have set up your projector to use Crestron Connected, you can control and monitor your
projector using a compatible web browser.
1. Start your web browser on a computer connected to the network.
2. Type the projector's IP address into the browser's address box and press the computer's Enter key.
You see the Epson Web Control screen:
98
Page 99

3. Select Crestron Connected to view the configuration page. Please see your network administrator
for setting up the configuration page.
Note: If you see a login window, enter your user name and password. (The default user name is
EPSONWEB and the default password is the projector's serial number. Enter the serial number with
uppercase letters.)
Parent topic: Using Crestron Connected
Registering a Digital Certificate on the Projector
Follow the instructions here if you need to install a digital certificate on the projector to provide security
for your presentation files.
Note: You can register a digital certificate over a network or from a connected USB device. However, be
sure to register just once from either a USB device or network, or the certificate may not install correctly.
Importing a Web Server Certificate Using the Projector Menus
Registering Digital Certificates from a USB Device
Registering Digital Certificates from a Web Browser
Digital Certificate Types
Parent topic: Using the Projector on a Network
Importing a Web Server Certificate Using the Projector Menus
You can create your web server certificate and import it using the projector menus and a USB flash
drive.
Note: You can also register digital certificates from your web browser. Make sure to only register once,
or the certificate may not install correctly.
1. Make sure your digital certificate file is compatible with projector registration and saved in the root
directory of the USB flash drive.
2. Press the Menu button on the remote control.
3. Select the Network menu and press Enter.
4. Select the Network Configuration setting and press Enter.
99
Page 100
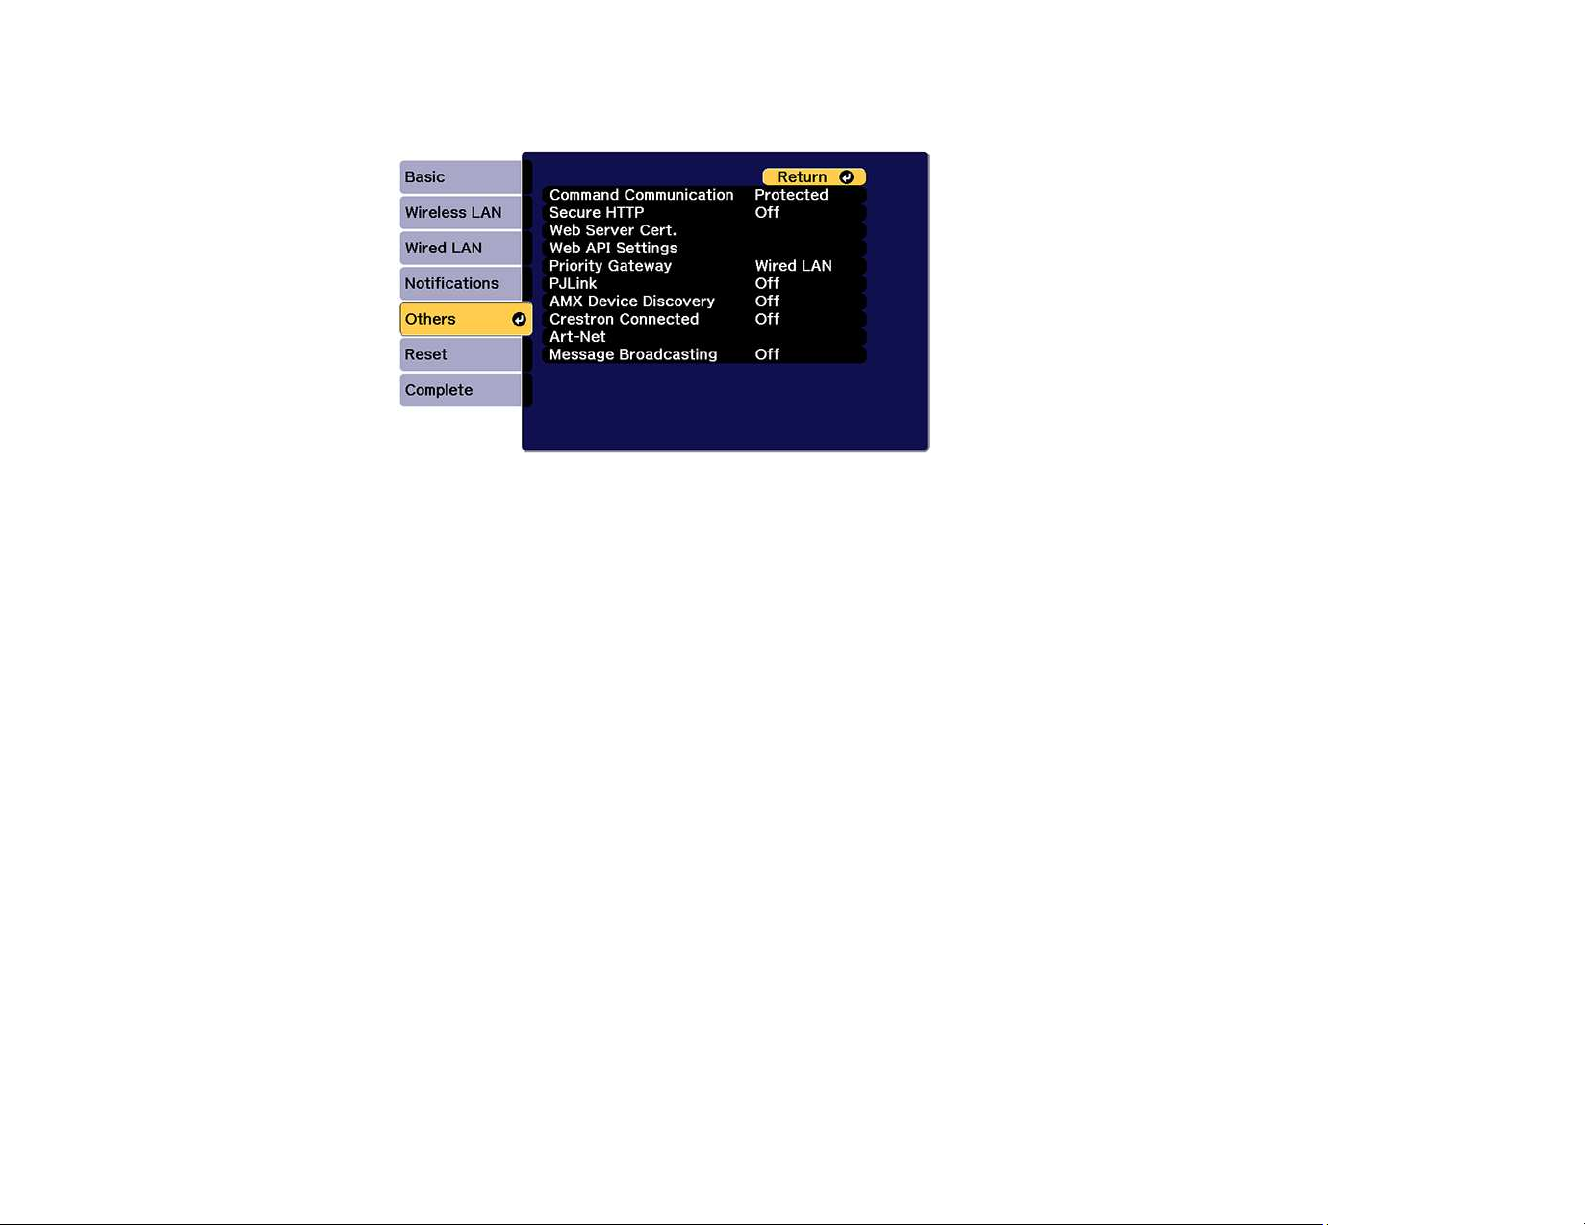
5. Select the Others menu and press Enter.
6. Select On as the Secure HTTP setting.
7. Select the Web Server Cert. setting and press Enter.
8. Select Register and press Enter.
9. Remove the screw securing the wireless LAN module port cover, then remove the port cover.
10. Insert a USB flash drive into the projector's USB-A port. If the wireless LAN module is installed,
remove it before inserting the USB flash drive.
11. Press Enter to display the certificate list.
12. Select the certificate you want to import from the displayed list.
A message is displayed prompting you to enter the password for the certificate.
13. Enter the password and press Enter.
The certificate is imported and a completion message appears.
14. Remove the USB flash drive, then re-insert the wireless LAN module and secure the port cover.
Parent topic: Registering a Digital Certificate on the Projector
Registering Digital Certificates from a USB Device
You can register the digital certificates for files on a USB device connected to the projector.
1. Make sure your digital certificate file is compatible with projector registration.
100
 Loading...