

Page 1

EB-760W/EB-770F/EB-775F
User's Guide
Page 2

Page 3

Contents
EB-760W/EB-770F/EB-775F User's Guide ............................................................................................... 11
Introduction to Your Projector ................................................................................................................. 12
Projector Features.............................................................................................................................. 12
Product Box Contents.................................................................................................................... 13
Additional Components ................................................................................................................ 14
Optional Equipment and Replacement Parts................................................................................. 15
Warranty and Registration Information (U.S. and Canada) ........................................................... 16
Warranty and Registration Information (Latin America)................................................................. 17
Notations Used in the Documentation ................................................................................................ 17
Where to Go for Additional Information .............................................................................................. 17
Additional Projector Software and Manuals........................................................................................ 18
Projector Part Locations ..................................................................................................................... 19
Projector Parts - Front/Side ........................................................................................................... 20
Projector Parts - Top/Side ............................................................................................................. 21
Projector Parts - Back Panel.......................................................................................................... 22
Projector Parts - Base.................................................................................................................... 23
Projector Parts - Control Panel ...................................................................................................... 24
Projector Parts - Remote Control ................................................................................................... 25
Setting Up the Projector ........................................................................................................................... 27
Projector Placement........................................................................................................................... 27
Projector Setup and Installation Options ....................................................................................... 28
Projection Distance........................................................................................................................ 30
Projector Connections........................................................................................................................ 31
Connecting to Computer Sources.................................................................................................. 31
Connecting to a Computer for HDMI Video and Audio .............................................................. 31
Connecting to a Computer for VGA Video and Audio................................................................ 32
Connecting to a Computer for USB Video and Audio................................................................ 33
Connecting to Video Sources ........................................................................................................ 34
Connecting to an HDMI Video Source ...................................................................................... 35
Connecting to a Streaming Media Player.................................................................................. 36
3
Page 4

Connecting to a Composite Video Source ................................................................................ 36
Connecting to a Video Source for Sound .................................................................................. 37
Connecting External Output Devices............................................................................................. 37
Connecting to an External Computer Monitor ........................................................................... 38
Connecting to External Speakers.............................................................................................. 38
Connecting a Microphone ......................................................................................................... 39
Connecting to External USB Devices ............................................................................................ 40
USB Device Projection.............................................................................................................. 41
Connecting a USB Device or Camera to the Projector.............................................................. 41
Selecting the Connected USB Source ...................................................................................... 42
Disconnecting a USB Device or Camera From the Projector .................................................... 42
Connecting to a Document Camera .............................................................................................. 43
Installing Batteries in the Remote Control .......................................................................................... 43
Using the Projector on a Network ............................................................................................................ 45
Wired Network Projection................................................................................................................... 45
Connecting to a Wired Network ..................................................................................................... 45
Selecting Wired Network Settings ................................................................................................. 46
Wireless Network Projection .............................................................................................................. 49
Connecting Directly to a Smartphone or Tablet ............................................................................. 50
Using Quick Wireless Connection (Windows)................................................................................ 53
Selecting Wireless Network Settings Manually.............................................................................. 55
Wireless LAN Menu Settings .................................................................................................... 60
Selecting Wireless Network Settings in Windows.......................................................................... 62
Selecting Wireless Network Settings on Mac ................................................................................ 63
Setting Up Wireless Network Security ........................................................................................... 63
Installing the Additional Wireless LAN Module .............................................................................. 65
Wireless Network Projection from a Mobile Device or Windows Computer (Screen Mirroring) .......... 67
Screen Mirroring Restrictions ........................................................................................................ 67
Selecting Screen Mirroring Settings .............................................................................................. 67
Connecting for Screen Mirroring with a Windows 8.x/Windows 10/Windows 11 Computer ........... 70
Connecting for Screen Mirroring with Miracast .............................................................................. 71
Screen Sharing .................................................................................................................................. 72
Sharing Your Screen ..................................................................................................................... 72
4
Page 5

Setting Up Projector Network E-Mail Alerts ........................................................................................ 73
Network Projector E-mail Alert Messages ..................................................................................... 75
Setting Up Monitoring Using SNMP ................................................................................................... 75
Controlling a Networked Projector Using a Web Browser .................................................................. 76
Using Crestron Connected................................................................................................................. 79
Setting Up Crestron Connected..................................................................................................... 79
Controlling a Networked Projector Using Crestron Connected ...................................................... 80
Registering a Digital Certificate on the Projector ................................................................................ 82
Importing a Web Server Certificate Using the Projector Menus..................................................... 82
Registering Digital Certificates from a Web Browser ..................................................................... 83
Digital Certificate Types................................................................................................................. 84
Art-Net Channel Definitions................................................................................................................ 86
Setting Up Web API ........................................................................................................................... 90
Using Basic Projector Features ............................................................................................................... 91
Turning On the Projector .................................................................................................................... 91
Using the Home Screen................................................................................................................. 93
Turning Off the Projector .................................................................................................................... 95
Selecting the Language for the Projector Menus................................................................................ 96
Setting the Date and Time.................................................................................................................. 97
Image Shape...................................................................................................................................... 99
Correcting Image Shape with the Keystone Buttons...................................................................... 99
Correcting Image Shape with Quick Corner ................................................................................ 101
Correcting Image Shape with Arc Correction............................................................................... 104
Correcting Image Shape with Point Correction............................................................................ 107
Applying Saved Image Shape Settings ....................................................................................... 108
Resizing the Image with the Wide and Tele Buttons ........................................................................ 109
Adjusting the Image Position............................................................................................................ 110
Focusing the Image.......................................................................................................................... 111
Remote Control Operation ............................................................................................................... 114
Selecting an Image Source .............................................................................................................. 116
Projection Modes ............................................................................................................................. 117
Changing the Projection Mode Using the Remote Control .......................................................... 118
Changing the Projection Mode Using the Menus......................................................................... 118
5
Page 6

Image Aspect Ratio .......................................................................................................................... 119
Changing the Image Aspect Ratio ............................................................................................... 120
Available Image Aspect Ratios .................................................................................................... 120
Color Mode....................................................................................................................................... 121
Changing the Color Mode............................................................................................................ 122
Available Color Modes................................................................................................................. 122
Adjusting the Hue, Saturation, and Brightness ................................................................................. 123
Adjusting Gamma............................................................................................................................. 124
Adjusting the Image Resolution........................................................................................................ 126
Adjusting the Projector's Brightness Level ....................................................................................... 128
Light Source Life Span ................................................................................................................ 130
Turning On Dynamic Contrast.......................................................................................................... 131
Controlling the Volume with the Volume Buttons.............................................................................. 132
Selecting a Quick Startup Setting..................................................................................................... 133
Projecting a PC Free Presentation ................................................................................................... 134
PC Free Precautions ................................................................................................................... 135
Supported PC Free File Types .................................................................................................... 135
Starting a PC Free Slideshow...................................................................................................... 137
Starting a PC Free Movie Presentation ....................................................................................... 139
PC Free Display Options ............................................................................................................. 141
Projecting in Content Playback Mode (EB-770F/EB-775F) .............................................................. 142
Switching to Content Playback Mode .......................................................................................... 142
Projecting a Playlist in Content Playback Mode........................................................................... 143
Creating a Playlist Using Epson Web Control.............................................................................. 144
Adding Effects to the Projected Image......................................................................................... 145
Adjusting Projector Features ................................................................................................................. 147
Shutting Off the Picture and Sound Temporarily .............................................................................. 147
Stopping Video Action Temporarily .................................................................................................. 148
Zooming Into and Out of Images ...................................................................................................... 148
Using Multiple Projectors ................................................................................................................. 149
Projector Identification System for Multiple Projector Control ...................................................... 150
Setting the Projector ID ........................................................................................................... 150
Setting the Remote Control ID ................................................................................................ 151
6
Page 7

Adjusting Color Uniformity ........................................................................................................... 152
Blending the Image Edges........................................................................................................... 155
Matching the Image Colors.......................................................................................................... 157
Adjusting the Black Level............................................................................................................. 159
Adjusting RGBCMY..................................................................................................................... 162
Scaling an Image......................................................................................................................... 164
Configuring Tiling Manually ......................................................................................................... 166
Projecting Multiple Images Simultaneously...................................................................................... 168
Input Sources for Split Screen Projection .................................................................................... 171
Split Screen Projection Restrictions............................................................................................. 171
Projector Security Features.............................................................................................................. 172
Password Security Types ............................................................................................................ 172
Setting a Password ................................................................................................................. 172
Selecting Password Security Types........................................................................................ 174
Entering a Password to Use the Projector............................................................................... 175
Saving a User's Logo Image to Display................................................................................... 176
Locking the Projector's Buttons ................................................................................................... 178
Unlocking the Projector's Buttons ........................................................................................... 179
Installing a Security Cable ........................................................................................................... 179
Creating a User Pattern to Display ................................................................................................... 180
Adjusting the Color Convergence (Panel Alignment) (EB-770F/EB-775F)....................................... 181
Saving Settings to Memory and Using Saved Settings .................................................................... 183
Copying Menu Settings Between Projectors .................................................................................... 185
Saving Settings to a USB Flash Drive.......................................................................................... 185
Transferring Settings from a USB Flash Drive ............................................................................. 187
Saving Settings to a Computer .................................................................................................... 188
Transferring Settings from a Computer ....................................................................................... 189
Scheduling Projector Events ............................................................................................................ 191
Saving a Scheduled Event........................................................................................................... 191
Viewing Scheduled Events .......................................................................................................... 192
Editing a Scheduled Event........................................................................................................... 194
Adjusting the Menu Settings .................................................................................................................. 196
Using the Projector's Menus............................................................................................................. 196
7
Page 8

Image Quality Settings - Image Menu .............................................................................................. 198
Input Signal Settings - Signal I/O Menu............................................................................................ 203
Installation Settings - Installation Menu ............................................................................................ 207
Display Settings - Display Menu....................................................................................................... 211
Feature Settings - Operation Menu .................................................................................................. 214
Administration Settings - Management Menu................................................................................... 220
Event ID Code List....................................................................................................................... 226
Network Settings - Network Menu .................................................................................................... 229
Multiple Projector Operation Settings - Multi-Projection Menu (EB-770F/EB-775F)......................... 232
Image Quality Memory Settings - Memory Menu ............................................................................. 236
Setup Settings - ECO Menu ............................................................................................................. 237
Initial Settings and Reset Options - Initial/All Settings Menu ............................................................ 240
Maintaining and Transporting the Projector ......................................................................................... 242
Projector Maintenance ..................................................................................................................... 242
Cleaning the Lens........................................................................................................................ 242
Cleaning the Projector Case........................................................................................................ 243
Air Filter and Vent Maintenance ....................................................................................................... 243
Cleaning the Air Filter and Vents ................................................................................................. 244
Replacing the Air Filter ................................................................................................................ 247
Replacing the Remote Control Batteries .......................................................................................... 249
Updating the Firmware ..................................................................................................................... 251
Transporting the Projector................................................................................................................ 252
Solving Problems .................................................................................................................................... 253
Projection Problem Tips ................................................................................................................... 253
Projector Light Status ....................................................................................................................... 254
Using the Projector Menu Displays .................................................................................................. 257
Solving Image or Sound Problems ................................................................................................... 257
Solutions When No Image Appears............................................................................................. 258
Solutions When Image is Incorrect Using the USB Display Function .......................................... 259
Solutions When "No Signal" Message Appears........................................................................... 260
Displaying From a PC Laptop ................................................................................................. 261
Displaying From a Mac Laptop ............................................................................................... 261
Solutions When "Not Supported" Message Appears ................................................................... 261
8
Page 9

Solutions When Only a Partial Image Appears ............................................................................ 262
Solutions When the Image is Not Rectangular ............................................................................ 263
Solutions When the Image Contains Noise or Static ................................................................... 263
Solutions When the Image is Fuzzy or Blurry .............................................................................. 264
Solutions When the Image Brightness or Colors are Incorrect .................................................... 265
Solutions When an Afterimage Remains On the Projected Image............................................... 266
Solutions to Sound Problems ...................................................................................................... 266
Solutions to Microphone Problems .............................................................................................. 267
Solutions to Problems Using Content Playback........................................................................... 267
Solving Projector or Remote Control Operation Problems ............................................................... 268
Solutions to Projector Power or Shut-Off Problems ..................................................................... 269
Solutions to Remote Control Problems........................................................................................ 270
Solutions to Password Problems ................................................................................................. 270
Solutions When a Battery Message Appears .............................................................................. 271
Solutions to HDMI Link Problems ................................................................................................ 271
Solving Network Problems ............................................................................................................... 272
Solutions When Wireless Authentication Fails ............................................................................ 272
Solutions When You Cannot Access the Projector Through the Web ......................................... 273
Solutions When Network Alert E-Mails are Not Received............................................................ 273
Solutions When the Image Contains Static During Network Projection ....................................... 274
Solutions When You Cannot Connect Using Screen Mirroring .................................................... 274
Solutions When the Image or Sound Contains Static When Using Screen Mirroring ................... 274
Solutions When the Projected Screen is not Shared Correctly .................................................... 275
Where to Get Help (U.S. and Canada) ............................................................................................. 275
Where to Get Help (Latin America)................................................................................................... 276
Technical Specifications ........................................................................................................................ 279
General Projector Specifications ...................................................................................................... 279
Projector Light Source Specifications............................................................................................... 281
Remote Control Specifications ......................................................................................................... 282
Projector Dimension Specifications.................................................................................................. 282
Projector Electrical Specifications .................................................................................................... 282
Projector Environmental Specifications............................................................................................ 283
Projector Safety and Approvals Specifications (U.S. and Canada) .................................................. 284
9
Page 10

Supported Video Display Formats.................................................................................................... 284
USB Display System Requirements................................................................................................. 286
Notices ..................................................................................................................................................... 288
Recycling (U.S. and Canada)........................................................................................................... 288
Important Safety Information ............................................................................................................ 288
Laser Safety Information .................................................................................................................. 288
Important Safety Instructions............................................................................................................ 291
Restriction of Use ........................................................................................................................ 294
List of Safety Symbols (corresponding to IEC60950-1 A2)............................................................... 295
FCC Compliance Statement............................................................................................................. 299
Binding Arbitration and Class Waiver ............................................................................................... 300
Trademarks...................................................................................................................................... 303
Copyright Notice............................................................................................................................... 304
A Note Concerning Responsible Use of Copyrighted Materials................................................... 304
Copyright Attribution.................................................................................................................... 304
10
Page 11

EB-760W/EB-770F/EB-775F User's Guide
Welcome to the EB-760W/EB-770F/EB-775F User's Guide.
For a printable PDF copy of this guide, click here.
Note: The EB-770F is shown in most illustrations in this manual, unless noted otherwise.
Note: Availability of products in this guide varies by country.
11
Page 12

Introduction to Your Projector
Refer to these sections to learn more about your projector and this manual.
Projector Features
Notations Used in the Documentation
Where to Go for Additional Information
Additional Projector Software and Manuals
Projector Part Locations
Projector Features
The EB-760W/EB-770F/EB-775F projectors include these special features:
Bright, high-resolution projection system
• Up to 4100 lumens of color brightness (color light output) and white brightness (white light output)
Note: Color brightness (color light output) and white brightness (white light output) will vary depending
on usage conditions. Color light output measured in accordance with IDMS 15.4; white light output
measured in accordance with ISO 21118.
• EB-760W: Native resolution of 1280 × 800 pixels (WXGA)
• EB-770F/EB-775F: Native resolution of 1920 × 1080 pixels (1080p)
Flexible connectivity
• Three HDMI ports for computer or video device connection
• Plug-and-play USB projection and audio for instant setup
• Wired and wireless network support for projection
• Screen mirroring to connect your mobile device wirelessly using Miracast technology
• 5V 2.0A USB-A port for powering connected streaming devices
• Projector monitoring and control via remote network computer
• PC Free video playback via connected USB memory devices
• PC Free photo slide shows via connected USB memory devices or Epson document camera
• Use Epson iProjection (Windows/Mac) to simultaneously project up to four images from network
computers or mobile devices using the Epson iProjection app
12
Page 13

• Projection from an iOS device, Android device, or Chromebook with the free Epson iProjection app;
visit epson.com/iprojection (U.S.), epson.ca/iprojection (Canada), or latin.epson.com/iprojection (Latin
America) for more information
Innovative display and operation features
• Long-life laser light source
• Support for side-by-side projector mounting
• High digital zoom ratio for larger images in shorter projection distances
• 2,500,000:1 contrast ratio and Dynamic Contrast control for sharp, detailed images
• Built-in closed captioning decoder
• Powerful 16 W speaker system with audio out port for connecting external speakers
• Epson's Direct Power On and Auto Power On features for quick and easy setup
• Epson Content Management software for signage includes preset overlay filters, customizable
options, playlist and scheduling functions with supplemental web app control (EB-770F/EB775F).
• Support for Crestron Connected network monitoring systems
• Network message broadcast system to project timely messages to all networked projectors
Product Box Contents
Additional Components
Optional Equipment and Replacement Parts
Warranty and Registration Information (U.S. and Canada)
Warranty and Registration Information (Latin America)
Parent topic: Introduction to Your Projector
Product Box Contents
Save all the packaging in case you need to ship the projector. Always use the original packaging (or
equivalent) when shipping.
13
Page 14
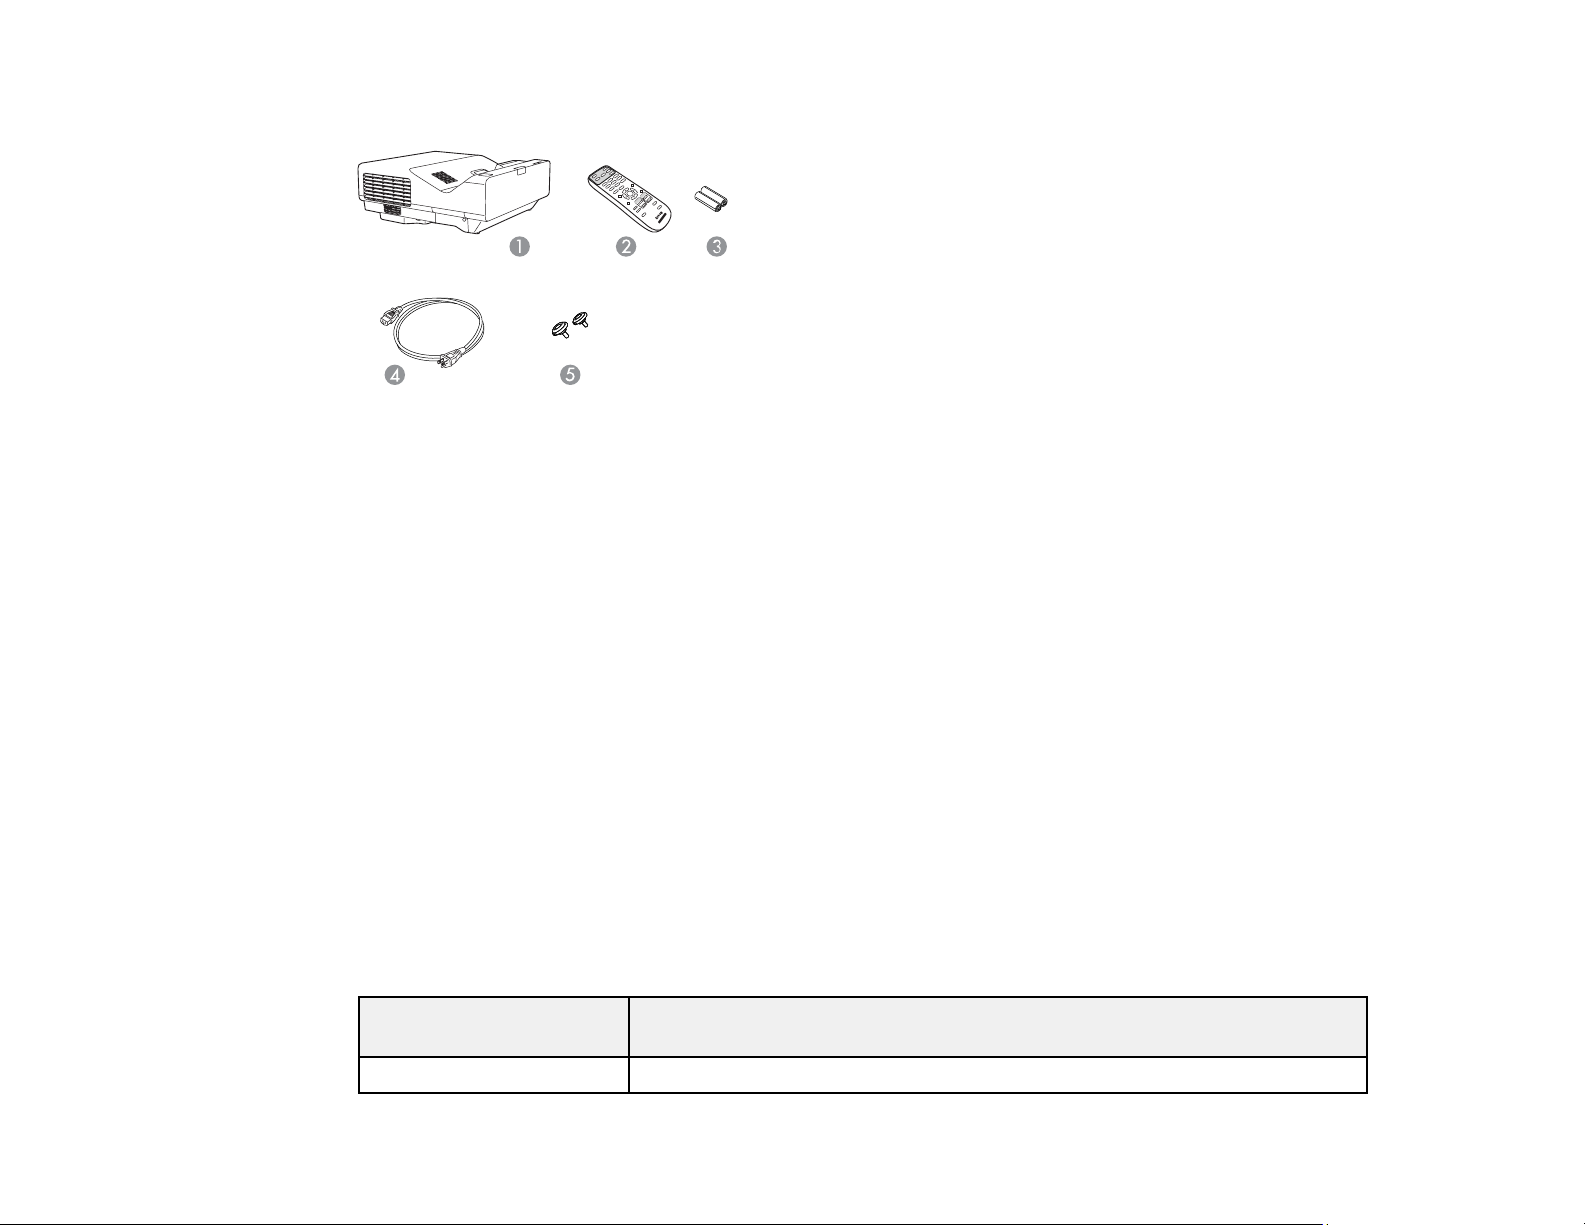
Make sure your projector box included all of these parts:
1 Projector
2 Remote control
3 Remote control batteries (2 AA alkaline)
4 Power cord
5 Projector feet
Parent topic: Projector Features
Additional Components
Depending on how you plan to use the projector, you may need to obtain additional components.
Note: To connect a Mac that does not include a compatible video output port, you need to obtain an
adapter that allows you to connect to an input port on the projector. Contact Apple for compatible
adapter options. To connect a smartphone or tablet, you may need to obtain an adapter that allows you
to connect to the projector. This allows you to mirror your smartphone or tablet screens, watch movies,
and more. Contact your device manufacturer for compatible adapter options.
Unless listed as available from Epson in this table, see your local computer or electronics dealer for
purchase information.
Signal or connection
type
Composite video RCA-style video or A/V cable
Additional component necessary
14
Page 15
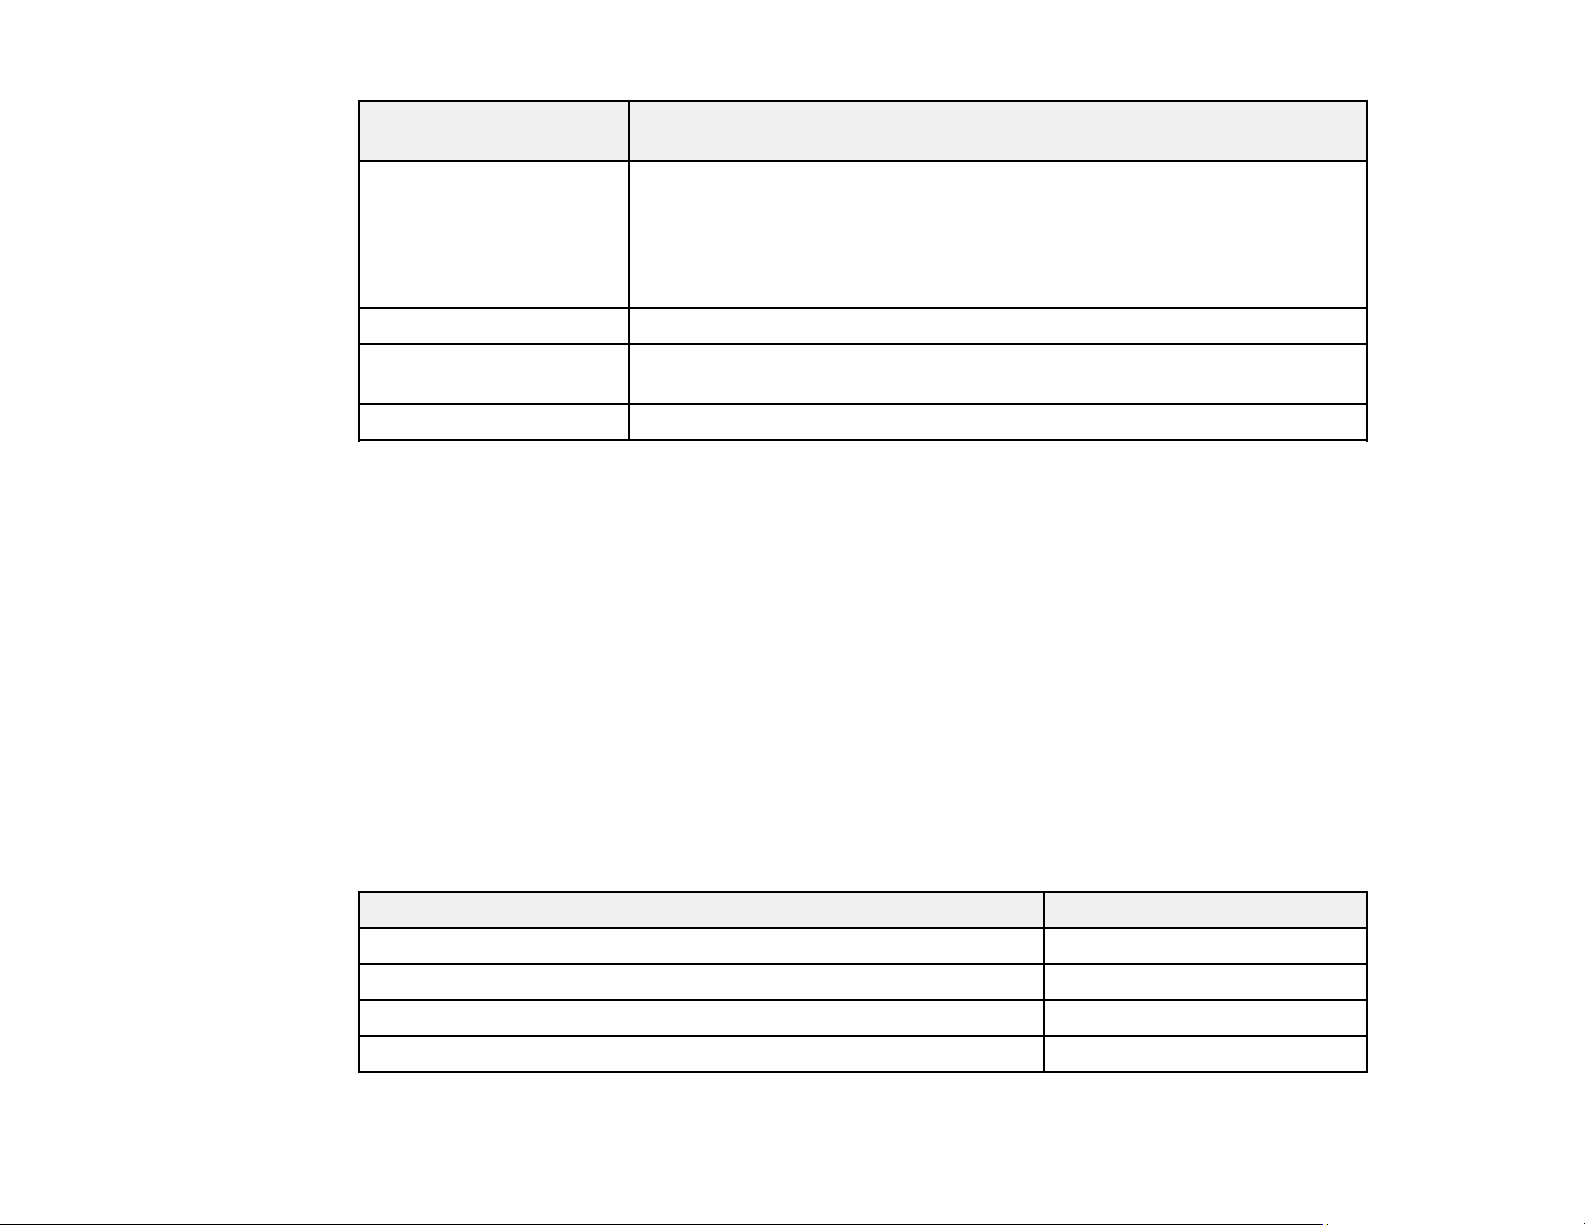
Signal or connection
type
HDMI Compatible HDMI cable
Audio from certain ports Commercially available audio cable compatible with your device
VGA To connect a computer through its VGA port to the projector's VGA video
USB Compatible USB cable
Parent topic: Projector Features
Additional component necessary
Available for purchase from Epson or an authorized Epson reseller.
Note: Older Mac computers (2009 and earlier) may not support HDMI
audio.
port, you need a VGA computer cable.
Optional Equipment and Replacement Parts
U.S. and Canada: You can purchase screens, other optional accessories, and replacement parts from
an Epson authorized reseller. To find the nearest reseller, call 800-GO-EPSON (800-463-7766) in the
U.S. or 800-807-7766 in Canada. Or you can purchase online at epsonstore.com (U.S. sales) or
epsonstore.ca (Canadian sales).
Latin America: You can purchase optional accessories and replacement parts from an Epson
authorized reseller. To find the nearest reseller, go to latin.epson.com. Or you can click the "Where to
Get Help" link below to contact your nearest sales office.
Note: Availability of accessories varies by country.
Epson offers the following optional accessories and replacement parts for your projector:
U.S. and Canada:
Option or part Part number
Replacement air filter (ELPAF60) V13H134A60
Ultra-short throw wall mount (ELPMB62) V12HA06A05
Wireless LAN module (ELPAP11) V12H005A02
100” Whiteboard 16:9 Aspect from MooreCo V12H006A02
15
Page 16
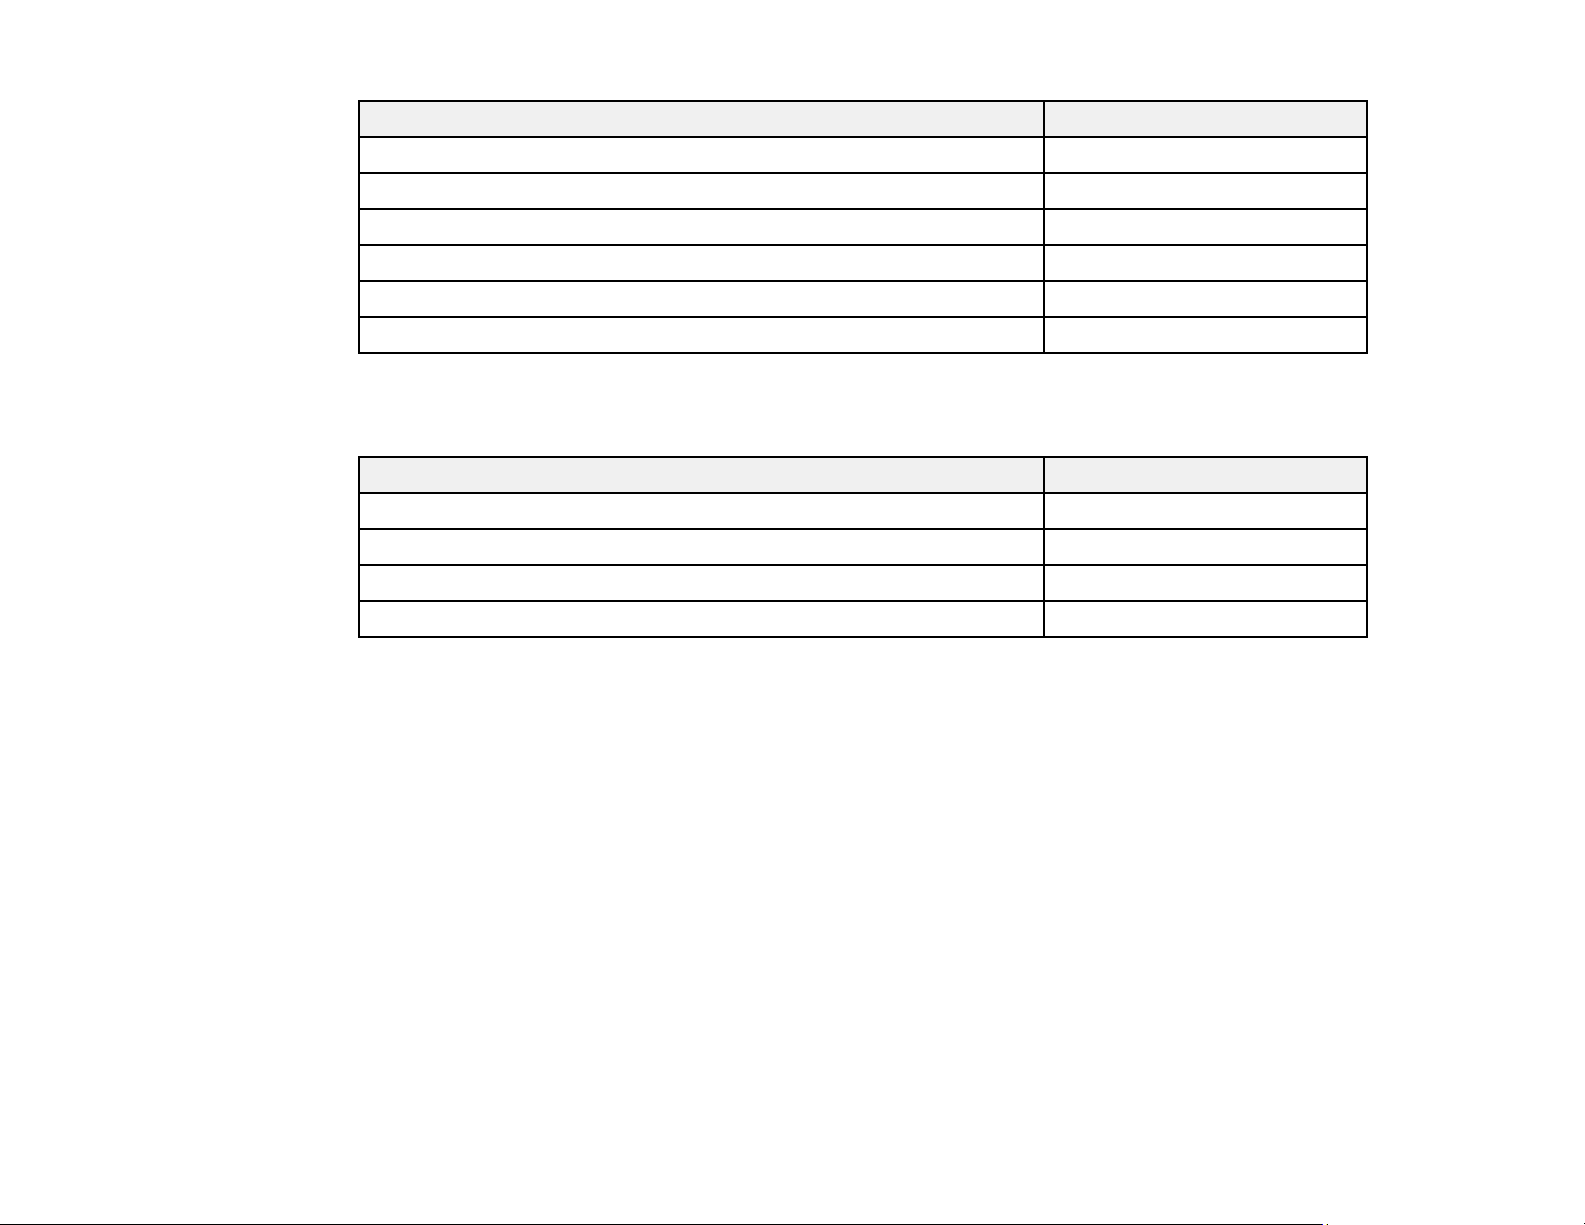
Option or part Part number
Epson DC-07 document camera (ELPDC07) V12H759020
Epson DC-13 document camera (ELPDC13) V12H757020
Epson DC-21 document camera (ELPDC21) V12H758020
Active speakers (ELPSP02) V12H467020
USB Extension Cable (ELPKC31) V12H525001
PowerLite Pilot 3 connection and control box (ELPCB03) V12H927020
In addition to the accessories listed above, 1-year and 2-year extended service plans are available.
Latin America:
Option or part Part number
Replacement air filter (ELPAF60) V13H134A60
Ultra-short throw wall mount (ELPMB62) V12HA06A05
Wireless LAN module (ELPAP11) V12H005A02
PowerLite Pilot 3 connection and control box (ELPCB03) V12H927020
Parent topic: Projector Features
Related references
Where to Get Help (U.S. and Canada)
Where to Get Help (Latin America)
Warranty and Registration Information (U.S. and Canada)
Your projector comes with a basic warranty that lets you project with confidence. For details, see the
warranty that came with your projector.
Register your product online at this site: epson.com/webreg
Registering also lets you receive special updates on new accessories, products, and services.
Parent topic: Projector Features
16
Page 17

Warranty and Registration Information (Latin America)
Your projector comes with a basic warranty that lets you project with confidence. For details, see the
warranty that came with your projector.
Register your product online at latin.epson.com/support, search for your product, and select Register.
Registering also lets you receive special updates on new accessories, products, and services.
Parent topic: Projector Features
Notations Used in the Documentation
Follow the guidelines in these notations as you read your documentation:
• Warnings must be followed carefully to avoid bodily injury.
• Cautions must be observed to avoid damage to your equipment.
• Notes contain important information about your projector.
• Tips contain additional projection information.
Parent topic: Introduction to Your Projector
Where to Go for Additional Information
Need quick help on using your projector? Here's where to look for help:
• Built-in help system
Press the Home button on the remote control or projector, select Help, and press Enter to get
quick solutions to common problems.
• epson.com/support (U.S.), epson.ca/support (Canada), or latin.epson.com/support (Caribbean)
View FAQs (frequently asked questions) and e-mail your questions to Epson technical support 24
hours a day.
• If you still need help after checking this manual and any other sources listed here, you can use the
Epson PrivateLine Support service to get help fast (U.S. and Canada only). For details, see "Where to
Get Help."
Parent topic: Introduction to Your Projector
Related references
Where to Get Help (U.S. and Canada)
Where to Get Help (Latin America)
17
Page 18

Additional Projector Software and Manuals
After connecting and setting up the projector, install the projector software as necessary. You may need
to install it from a software CD, if included, or download the software and manuals as necessary.
You can install the projector software programs listed here and view their manuals for instructions on
using them.
Note: If you still need help after checking this manual and the sources listed here, you can use the
Epson PrivateLine Support service to get help fast (U.S. and Canada only). For details, see "Where to
Get Help."
Projector software Manual Description
Epson Projector
Management (Windows
only)
Epson iProjection
(Windows/Mac)
Epson iProjection app Instructions are included
Epson Projector
Management Operation
Guide
Epson iProjection
Operation Guide
(Windows/Mac)
with the app (instructions
included with the app
available only in English)
Lets you update firmware and monitor and
control your projector through the network.
You can download the latest software and
documentation from the Epson web site. Go to
epson.com/support (U.S.), epson.ca/support
(Canada), or latin.epson.com/support
(Caribbean) and select your projector.
Lets you project the computer screens of
users over a network.
You can download the latest software and
documentation from the Epson web site. Go to
epson.com/support (U.S.), epson.ca/support
(Canada), or latin.epson.com/support
(Caribbean) and select your projector.
Lets you project from an iOS device, Android
device, or Chromebook if your projector is
connected to a network that includes a
wireless access point.
Visit epson.com/support (U.S.),
epson.ca/support (Canada), or
latin.epson.com/support (Caribbean) for more
information.
18
Page 19

Projector software Manual Description
— Open Source Software
License
Epson Projector Content
Manager
(EB-770F/EB-775F)
Epson Creative Projection
(iOS only)
(EB-770F/EB-775F)
Epson Projector Content
Manager Operation Guide
Instructions are included
with the app (instructions
included with the app
available only in English)
You can download this document from the
Epson web site. Go to epson.com/support
(U.S.), epson.ca/support (Canada), or
latin.epson.com/support (Caribbean) and
select your projector. (Document available
only in English.)
Lets you add images and movies to playlists,
and save them on a USB device; insert the
USB device into the projector to project your
playlist content without using a cable
connection.
You can download the latest software and
documentation from the Epson web site. Go to
epson.com/support (U.S.), epson.ca/support
(Canada), or latin.epson.com/support
(Caribbean) and select your projector.
Lets you create custom content using built-in
templates and stamps, and wirelessly transfer
it to the projector if it is connected to a network
that includes a wireless access point.
You can download the latest software and
documentation from the Apple App Store.
Parent topic: Introduction to Your Projector
Projector Part Locations
Check the projector part illustrations to learn about the parts on your projector.
Projector Parts - Front/Side
Projector Parts - Top/Side
Projector Parts - Back Panel
Projector Parts - Base
Projector Parts - Control Panel
Projector Parts - Remote Control
Parent topic: Introduction to Your Projector
19
Page 20
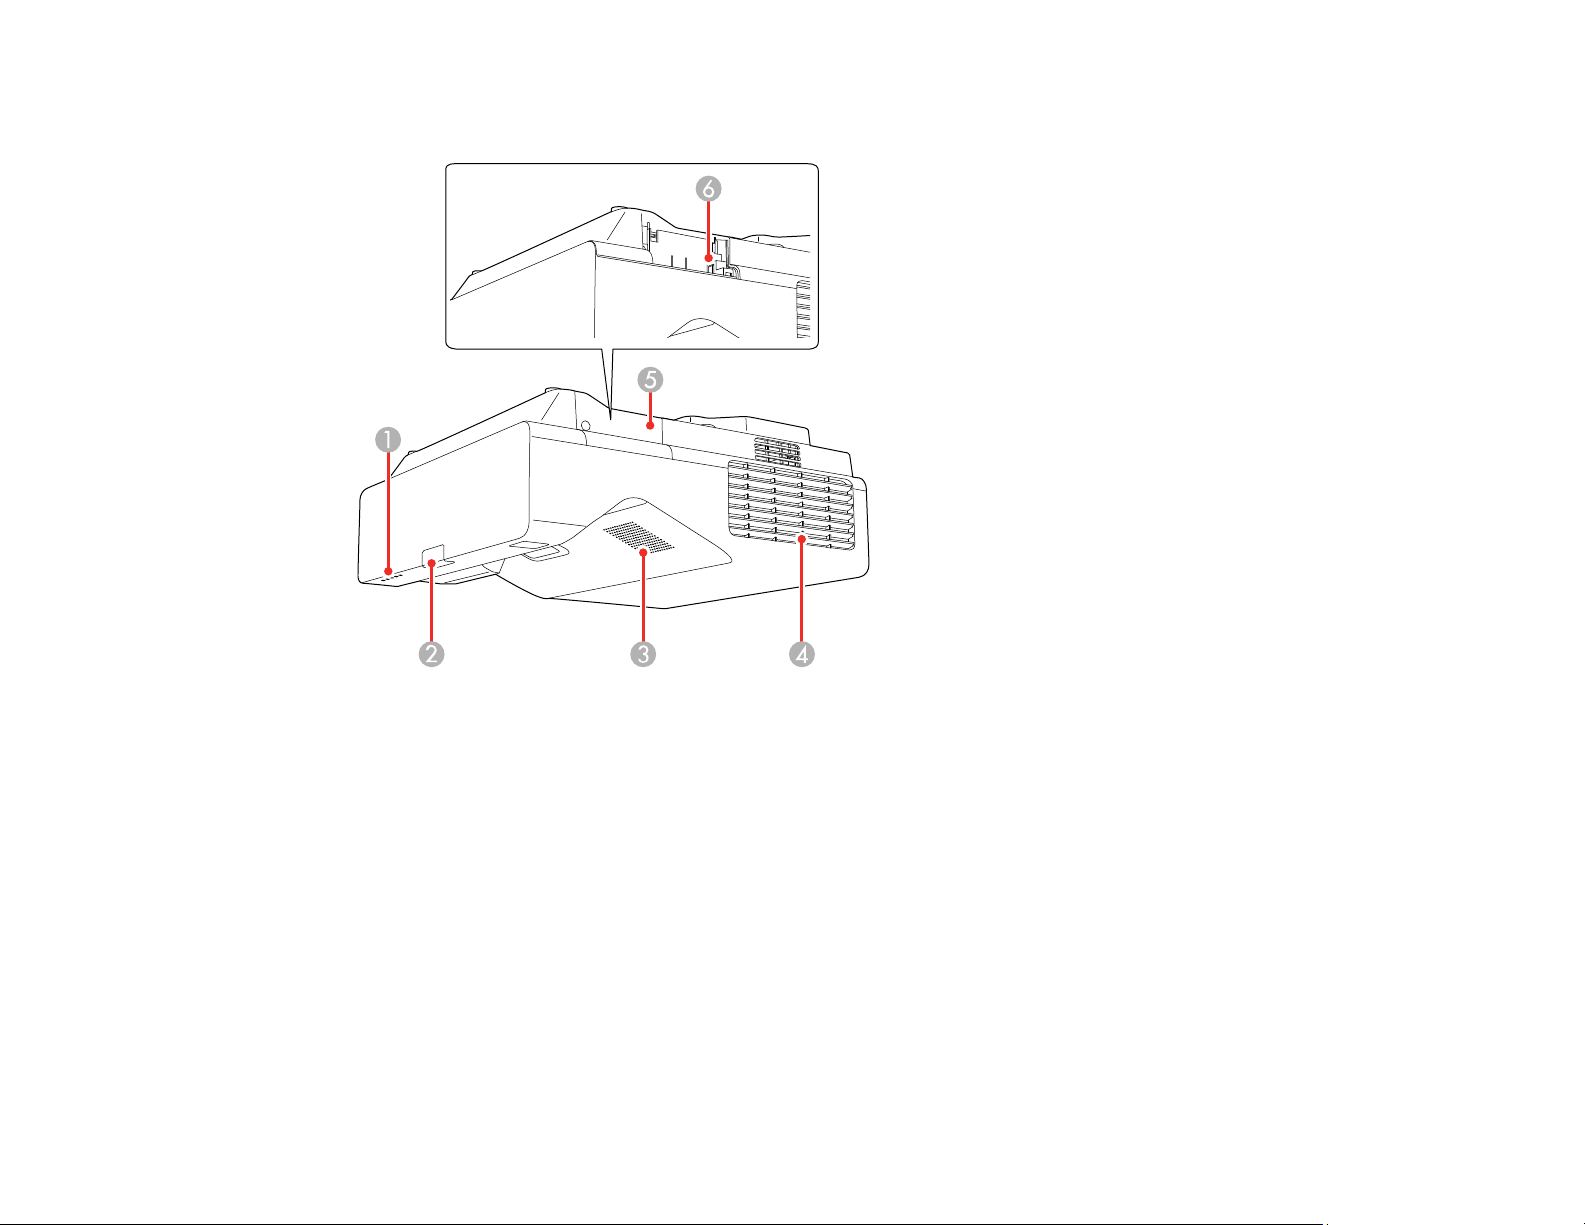
Projector Parts - Front/Side
1 Status lights
2 Remote control receiver
3 Speaker
4 Exhaust vent
5 Optional wireless LAN module cover
6 Optional wireless LAN module slot
Parent topic: Projector Part Locations
Related references
Projector Light Status
20
Page 21
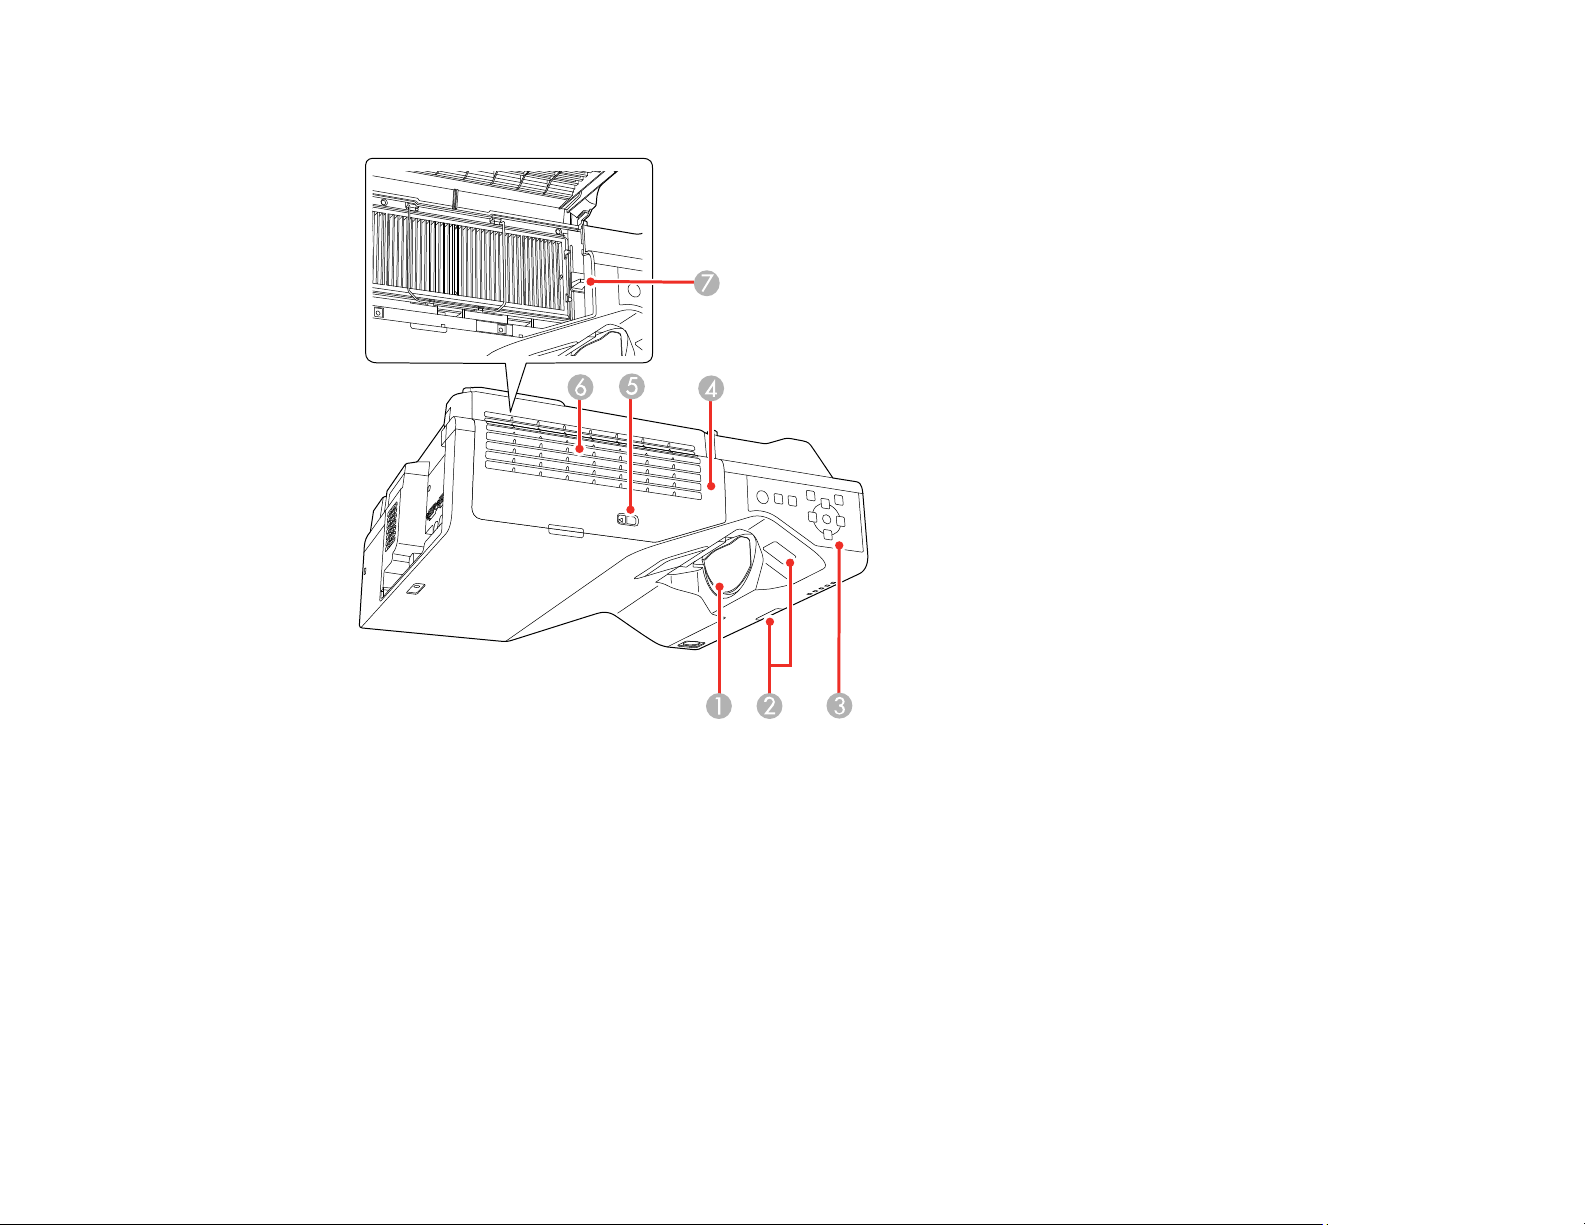
Projector Parts - Top/Side
1 Lens
2 Remote receiver
3 Control panel
4 Air filter cover
5 Air filter cover latch
6 Air intake vent (air filter)
7 Focus lever
Parent topic: Projector Part Locations
21
Page 22
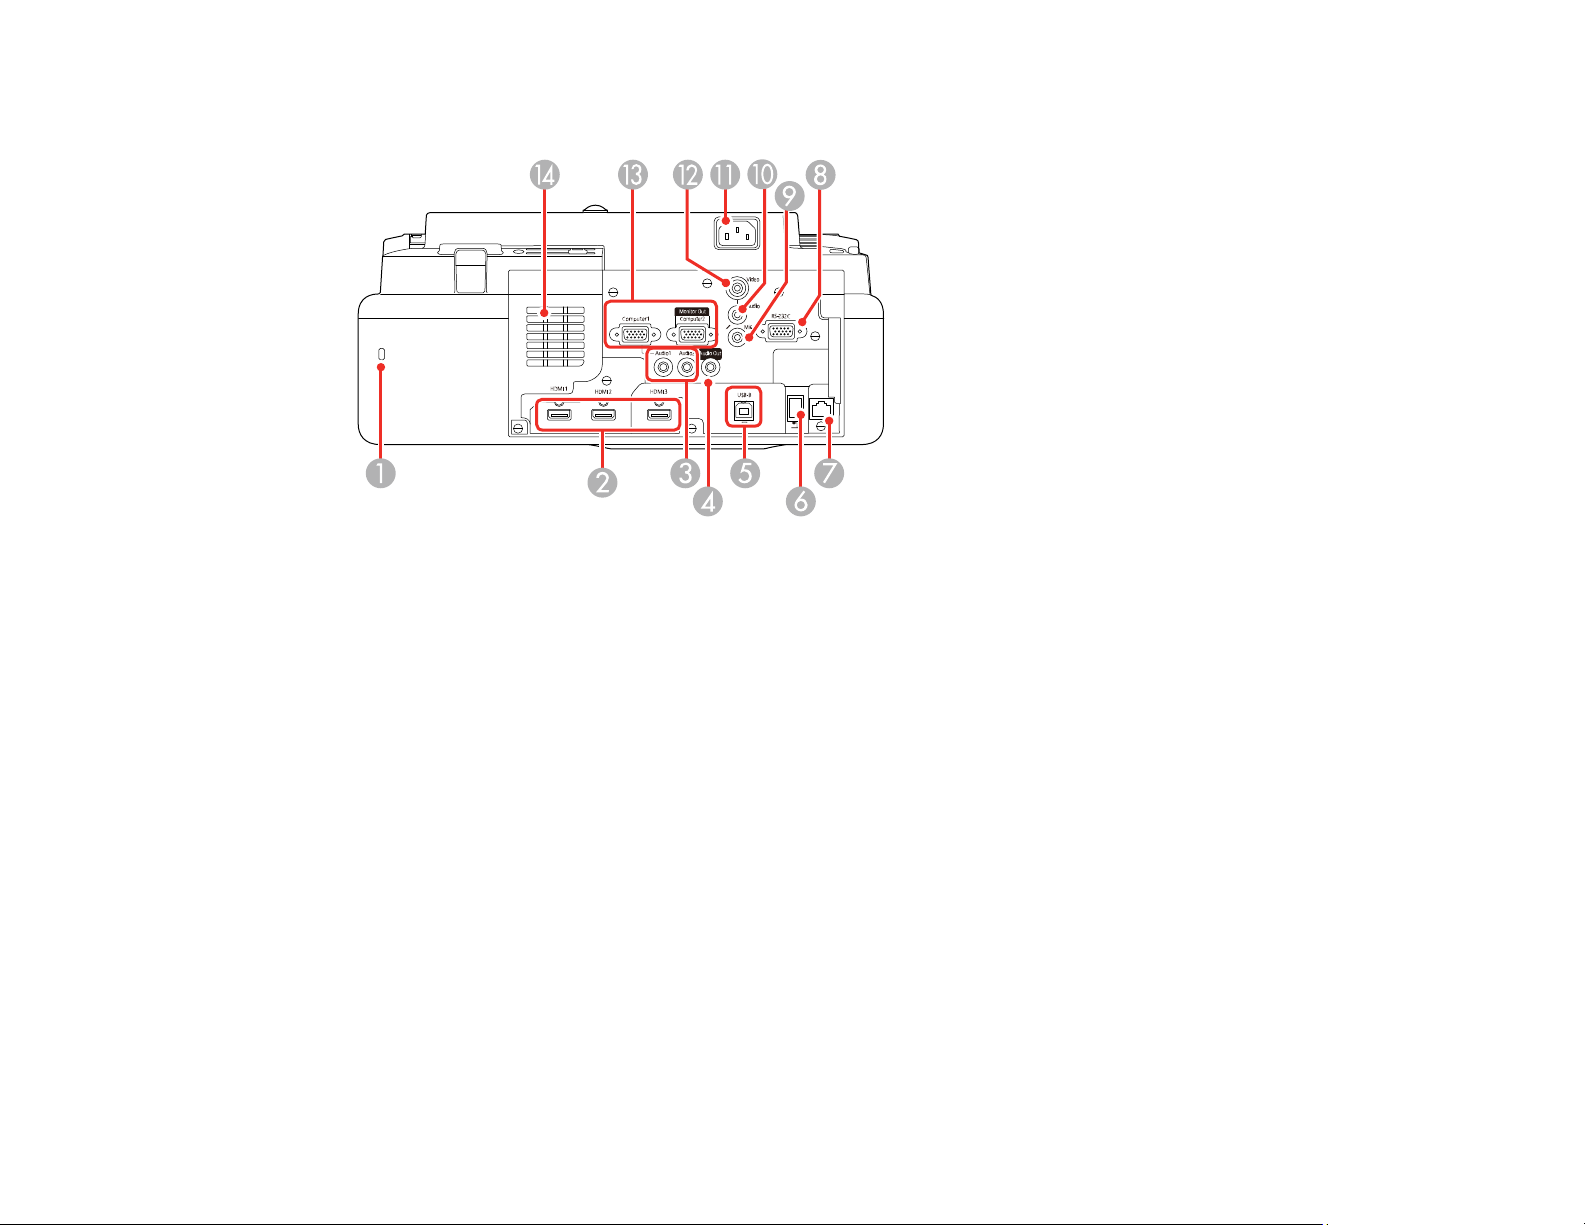
Projector Parts - Back Panel
1 Security slot
2 HDMI 1/HDMI 2/HDMI 3 ports
3 Audio 1/Audio 2 ports for use with the Computer 1/Computer 2 ports
4 Audio Out port
5 USB-B port for computer connection
6 USB-A port for USB memory device or document camera
7 Network (LAN) port
8 RS-232C port
9 Mic port (EB-760W/EB-770F)
10 Audio port for use with Video port
11 Power inlet
12 Video port
13 Computer 1 and Computer 2/Monitor Out ports
14 Air intake vent
22
Page 23
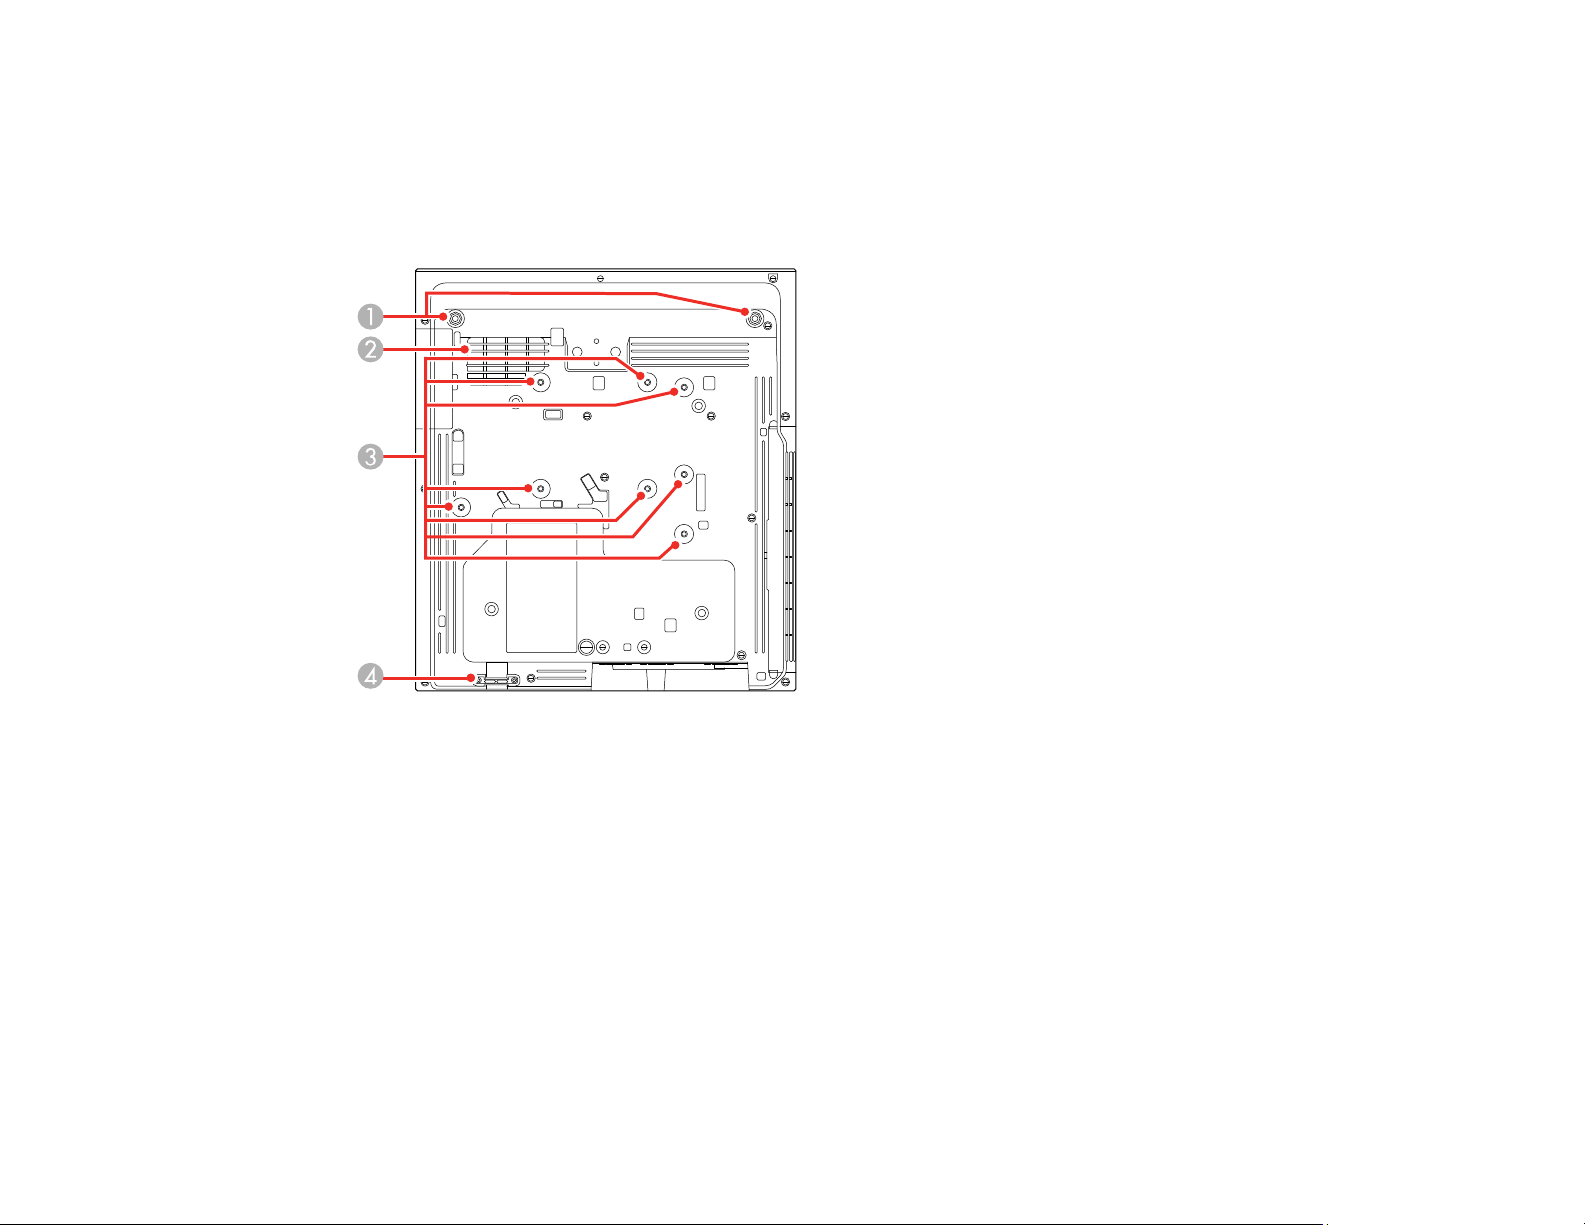
Parent topic: Projector Part Locations
Related concepts
Projector Connections
Projector Parts - Base
1 Front foot holes (2)
2 Air intake vent
3 Wall mounting plate holes (8)
4 Security cable attachment point
Parent topic: Projector Part Locations
23
Page 24
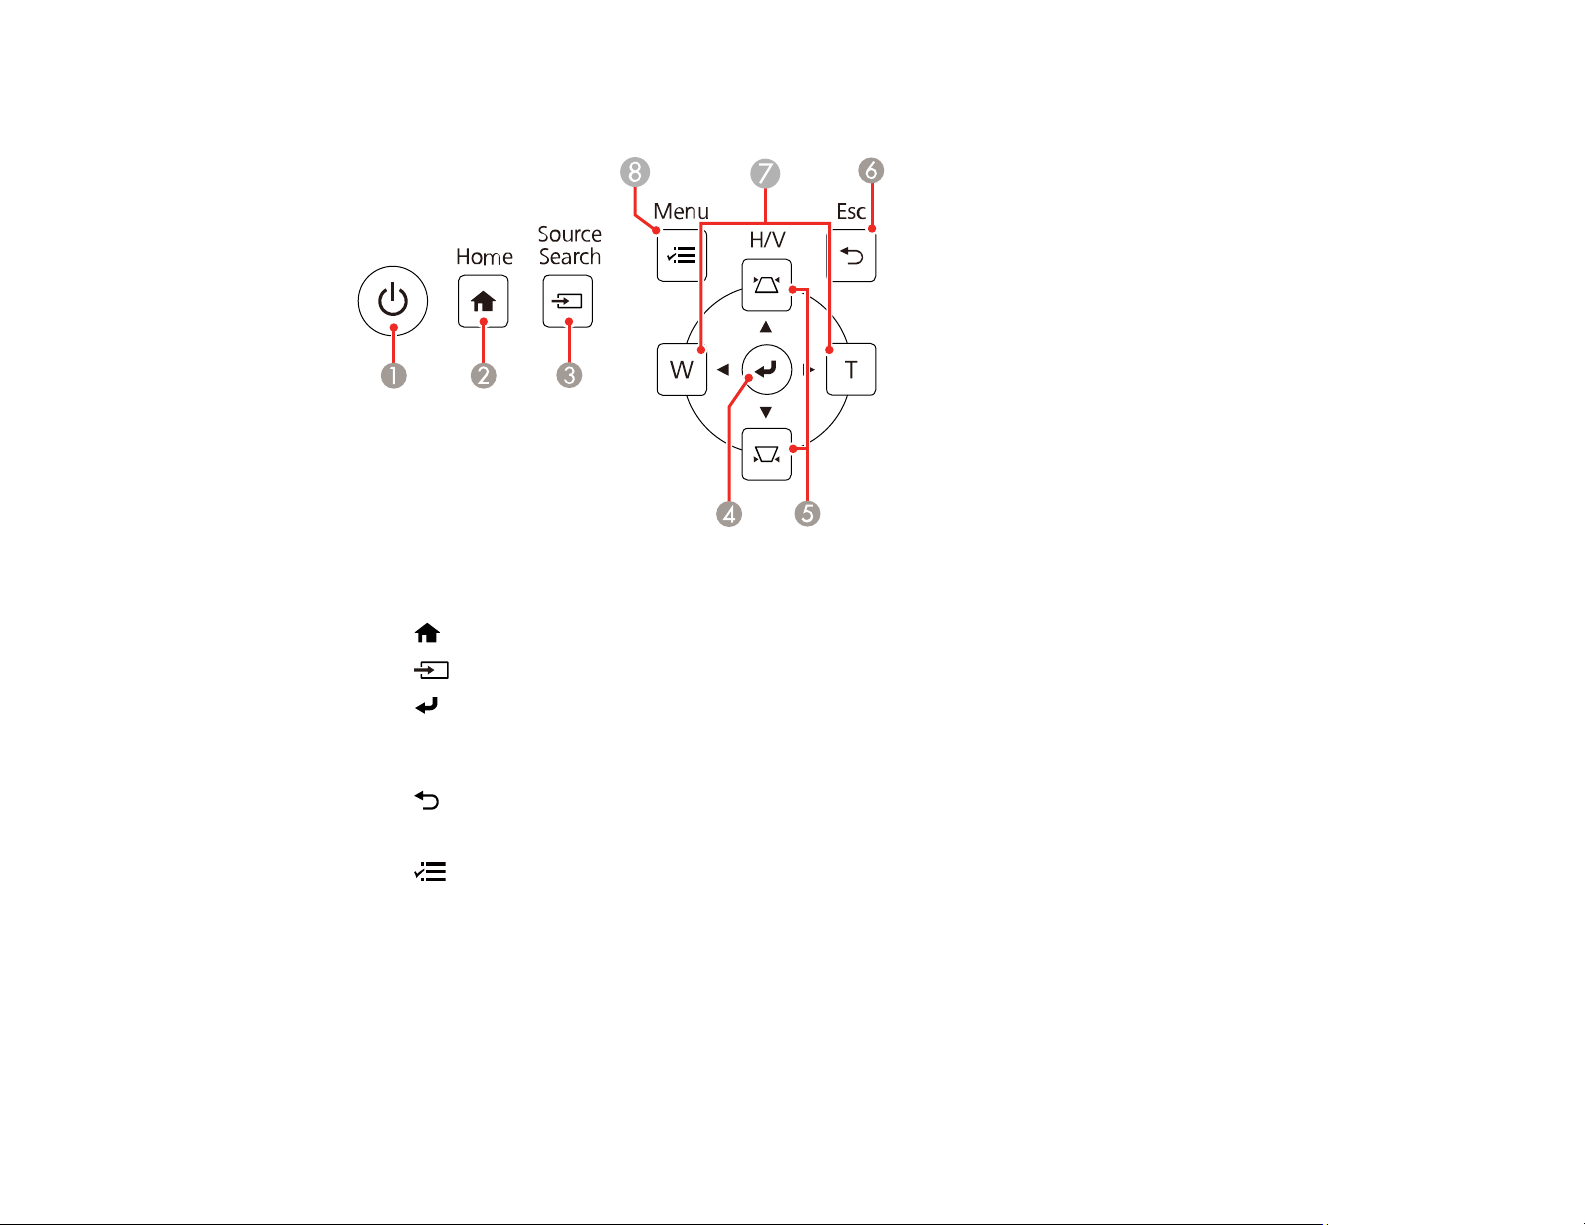
Projector Parts - Control Panel
1 Power button
2
3 Source Search button (searches for connected video sources)
4 Enter button (selects options)
5 Vertical keystone adjustment buttons (display the adjustment screen and adjust screen shape)
6 Esc button (cancels/exits functions)
7 W/T (Wide/Tele) buttons (adjust projected image size) and arrow buttons
8 Menu button (accesses projector menu system)
Parent topic: Projector Part Locations
Home button (accesses projector Home screen)
and arrow buttons
24
Page 25
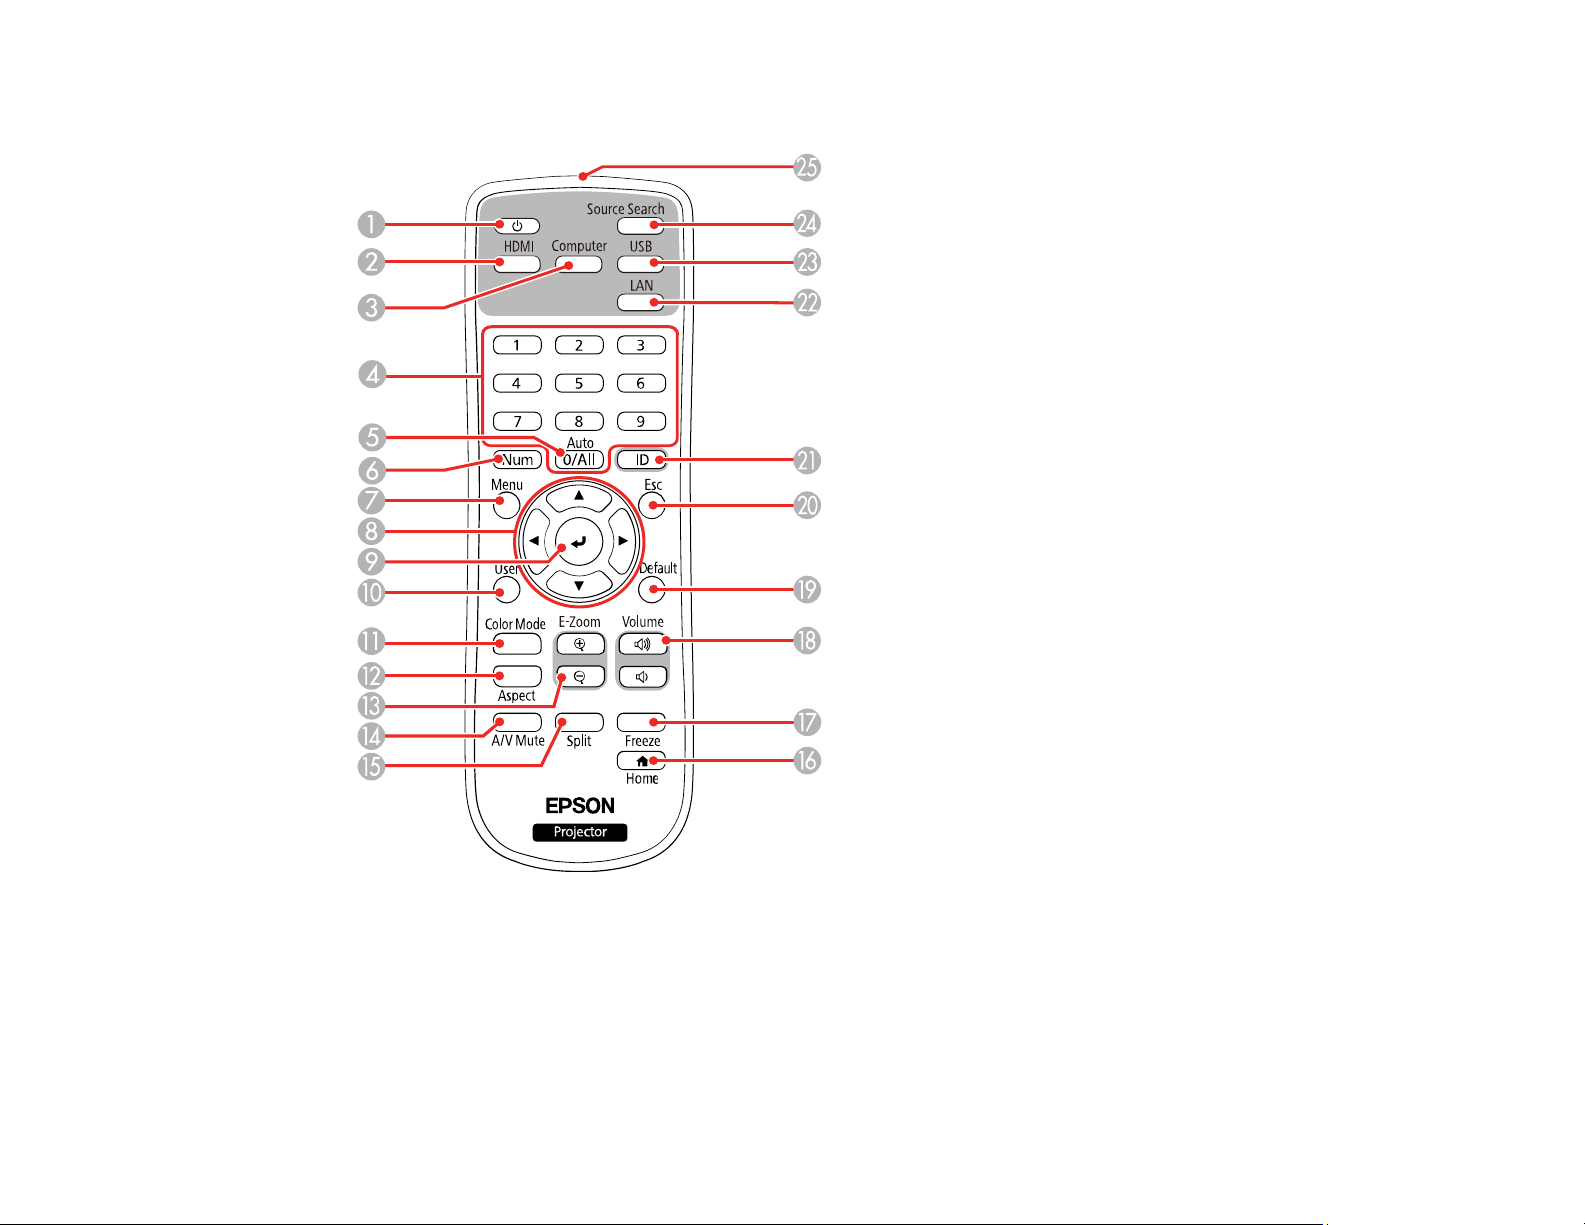
Projector Parts - Remote Control
1 Power button
2 HDMI/Video button (cycles through connected HDMI and video sources)
3 Computer button
4 Numeric buttons
25
Page 26

5 Auto button (automatically adjusts position, tracking, and sync settings for VGA inputs)
6 Num button (when held down, switches numeric buttons to number function)
7 Menu button (accesses projector menu system)
8 Arrow buttons (move through on-screen options)
9 Enter button (selects options)
10 User button (customizable for different functions)
11 Color Mode button (selects display modes)
12 Aspect button (selects the image aspect ratio)
13 E-Zoom +/- buttons (zoom into and out of the image)
14 A/V Mute button (turns off picture and sound)
15 Split button (splits the screen between up to four image sources)
16
Home button (accesses projector Home screen)
17 Freeze button (stops video action)
18 Volume up/down buttons (adjust speaker volume)
19 Default button (returns the current setting to its default)
20 Esc button (cancels/exits functions)
21 ID button (selects a projector to use with the remote control)
22 LAN button (connects to a network source)
23 USB button (cycles between USB Display and USB-A ports)
24 Source Search button (searches for connected sources)
25 Remote control emitter
Parent topic: Projector Part Locations
26
Page 27

Setting Up the Projector
Follow the instructions in these sections to set up your projector for use.
Projector Placement
Projector Connections
Installing Batteries in the Remote Control
Projector Placement
Your ultra-short throw projector is designed to be installed on a wall (with a wall mount).
You can also place the projector on a flat surface such as a desk or table to project in a portable setup.
Keep these considerations in mind as you select a projector location:
• Follow the instructions in the online Installation Guide to install the projector.
• Leave plenty of space around and under the projector for ventilation, and do not place it on top of or
next to anything that could block the vents.
• If you are using the projector at altitudes above 4921 feet (1500 m), set the High Altitude Mode
setting to On in the projector's Installation menu to ensure the projector's internal temperature is
regulated properly.
• Position the projector within reach of a grounded electrical outlet or extension cord.
• If installing vertically on a table, a commercially available mount compatible with the VESA Mounting
Interface Standard (100 x 100 mm) is required.
• If installing on a wall, the wall mount (V12HA06A05) is required.
• Place the projector so it squarely faces the screen, not at an angle. If you cannot install the projector
squarely facing the screen, correct any resulting image distortion by adjusting either the projector feet
or, if mounted, the adjustment dials on the projector mount. If the image is still not square, then use the
projector's digital correction methods.
• Try not to set up the projector in locations subject to high humidity and dust, or in locations subject to
smoke from fires or tobacco smoke.
Projector Setup and Installation Options
Projection Distance
Parent topic: Setting Up the Projector
27
Page 28
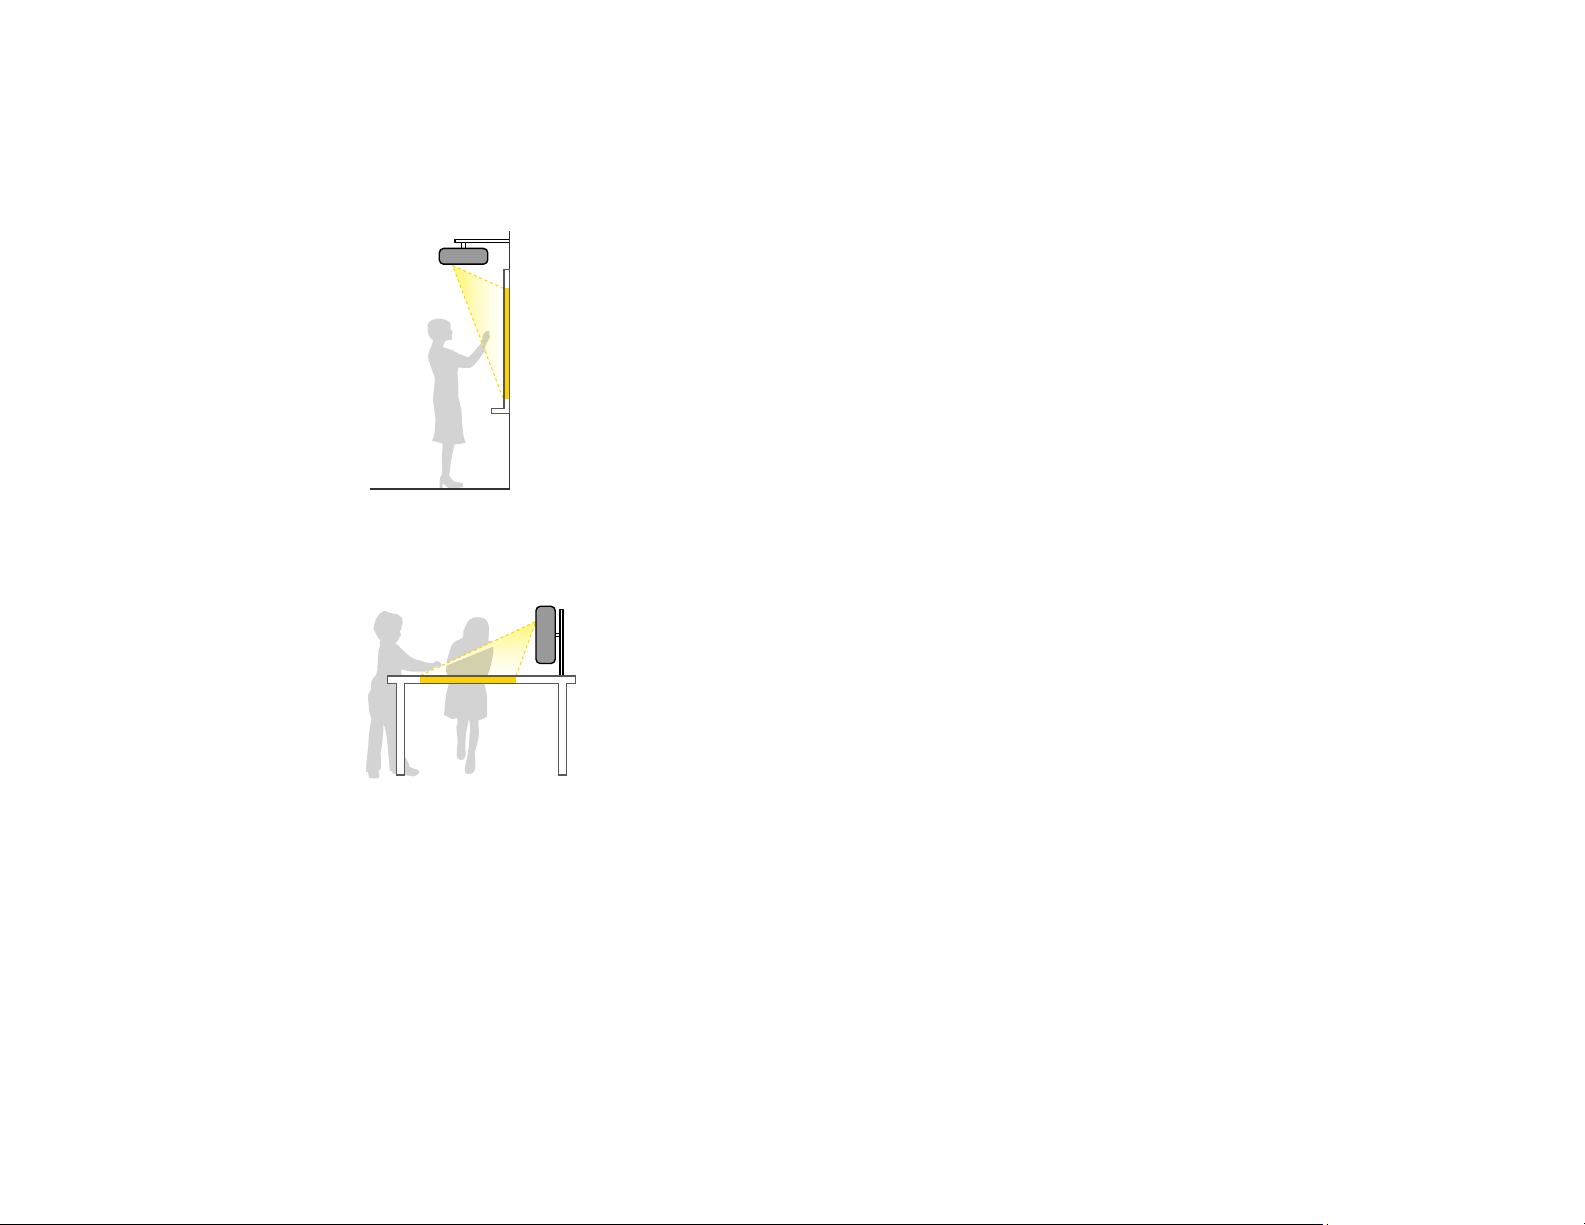
Projector Setup and Installation Options
You can set up or install your projector in the following ways:
Mounted on the wall or ceiling
Mounted vertically on a table
28
Page 29
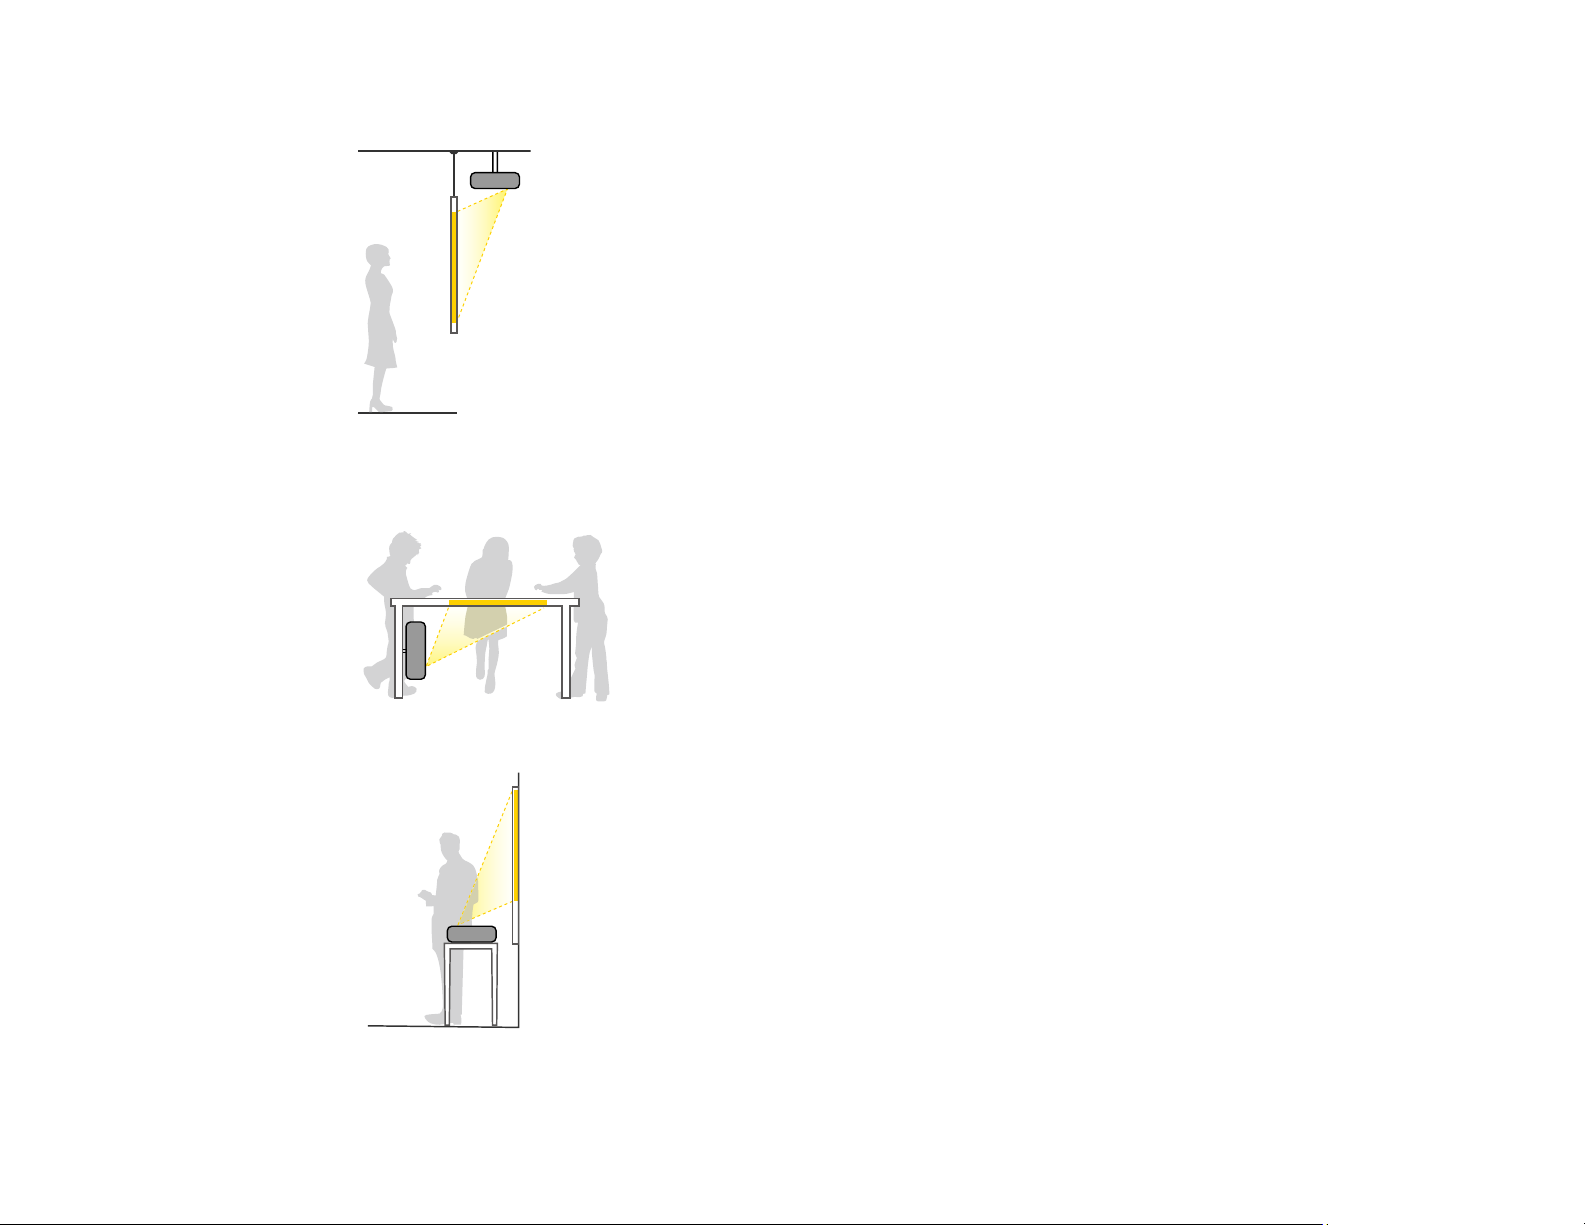
Mounted on the wall or ceiling and projecting from behind a translucent screen
Mounted vertically and projecting from underneath a table
Front projection from a table or portable cart
29
Page 30
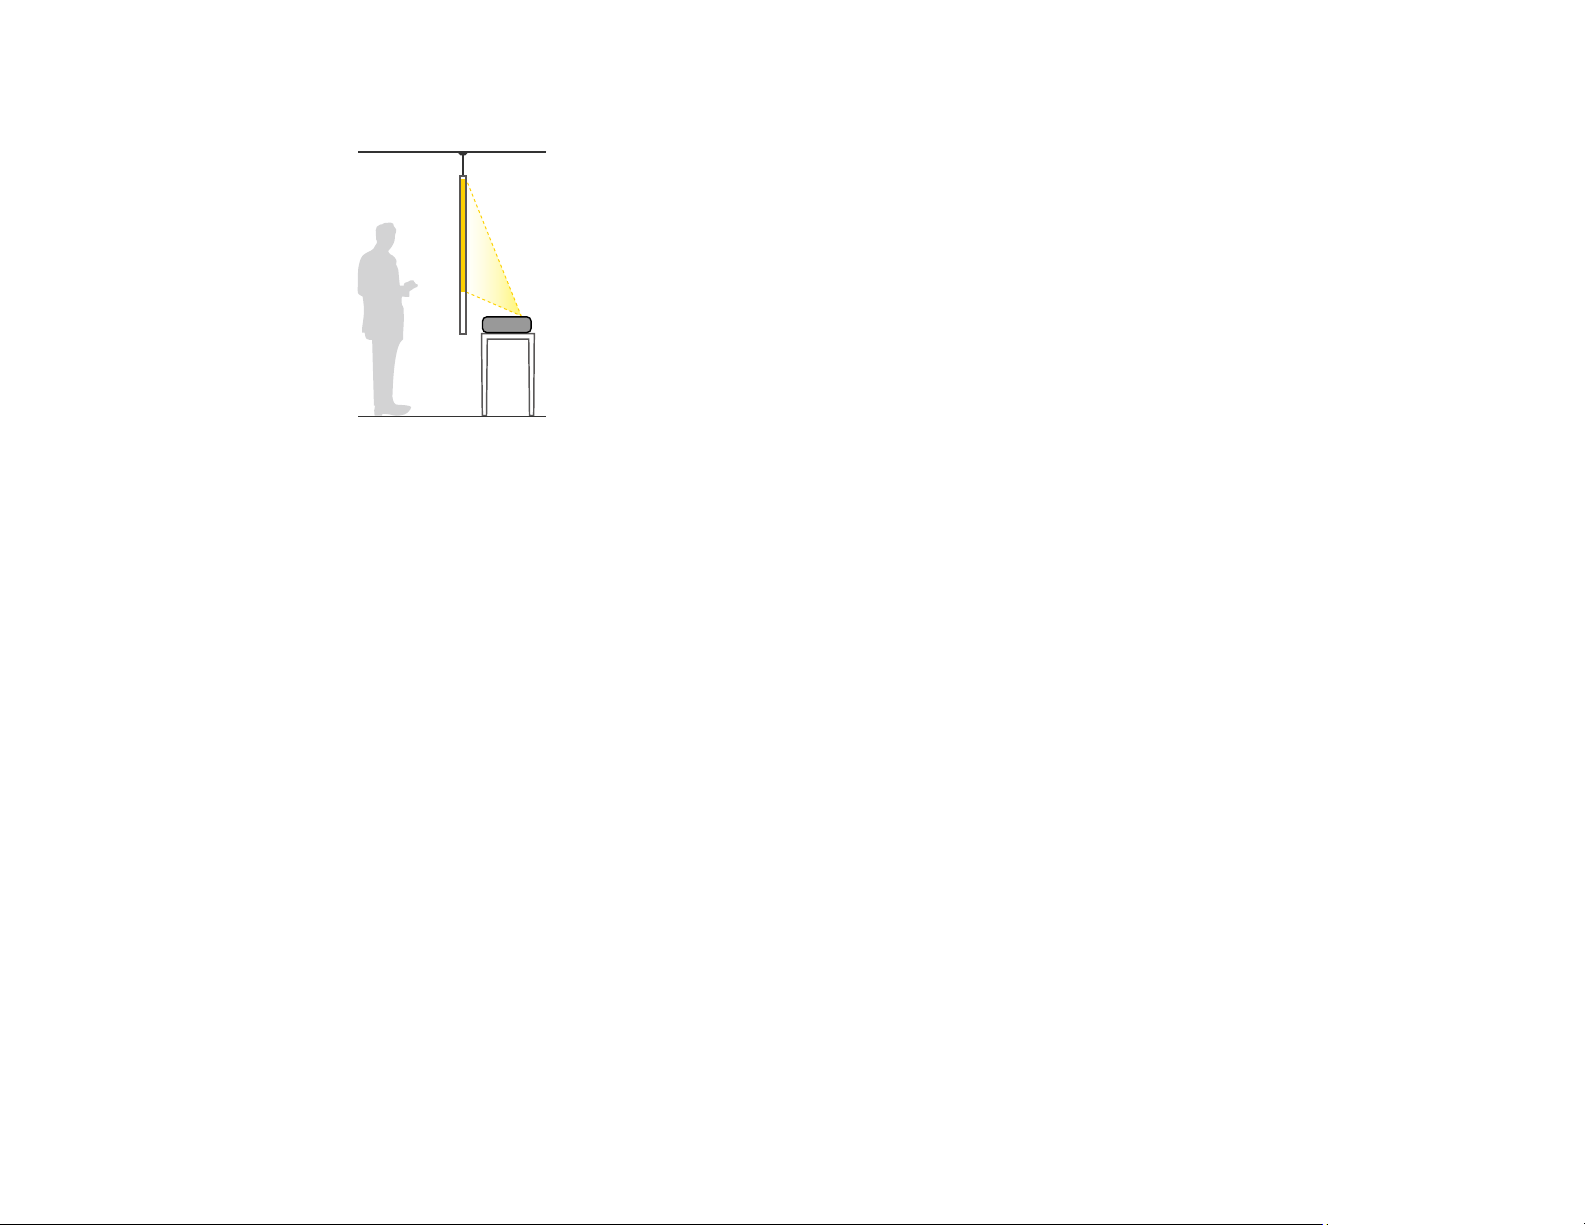
Rear projection from a table or portable cart behind a translucent screen
Wherever you set up the projector, make sure to position it squarely in front of the screen, not at an
angle.
If you place the projector vertically, turn on the Vertical Installation setting in the projector's Installation
menu.
If you install the projector to a fixed location, turn on the Fixed Installation setting in the projector's
Installation menu.
If you project from a table or portable cart, or from the rear, install the projector feet and be sure to select
the correct Projection option in the projector's menu system.
Parent topic: Projector Placement
Projection Distance
The distance at which you place the projector from the screen determines the approximate size of the
image. The image size increases the farther the projector is from the screen, but can vary depending on
the zoom factor, aspect ratio, and other settings.
Refer to the tables in the online Installation Guide to determine approximately how far to place the
projector from the screen based on the size of the projected image. (Conversion figures may have been
rounded up or down.) You can also use the Projection Distance Calculator here (U.S.), here (Canada),
or here (Caribbean).
Parent topic: Projector Placement
30
Page 31

Projector Connections
See these sections to connect the projector to a variety of projection sources.
Caution: If you will use the projector at altitudes above 4921 feet (1500 m), turn on High Altitude Mode
to ensure the projector's internal temperature is regulated properly.
Connecting to Computer Sources
Connecting to Video Sources
Connecting External Output Devices
Connecting to External USB Devices
Connecting to a Document Camera
Parent topic: Setting Up the Projector
Related references
Additional Components
Installation Settings - Installation Menu
Connecting to Computer Sources
Follow the instructions in these sections to connect a computer to the projector.
Connecting to a Computer for HDMI Video and Audio
Connecting to a Computer for VGA Video and Audio
Connecting to a Computer for USB Video and Audio
Parent topic: Projector Connections
Connecting to a Computer for HDMI Video and Audio
If your computer has an HDMI port, you can connect it to the projector using an HDMI cable (not
included).
Note: To connect a Mac that includes only a Mini DisplayPort, Thunderbolt port, USB-C port, or Mini-DVI
port for video output, you need to obtain an adapter that allows you to connect to the projector's HDMI
port. Contact Apple for compatible adapter options. Older Mac computers (2009 and earlier) may not
support audio through the HDMI port.
1. Connect the HDMI cable to your computer's HDMI output port.
31
Page 32
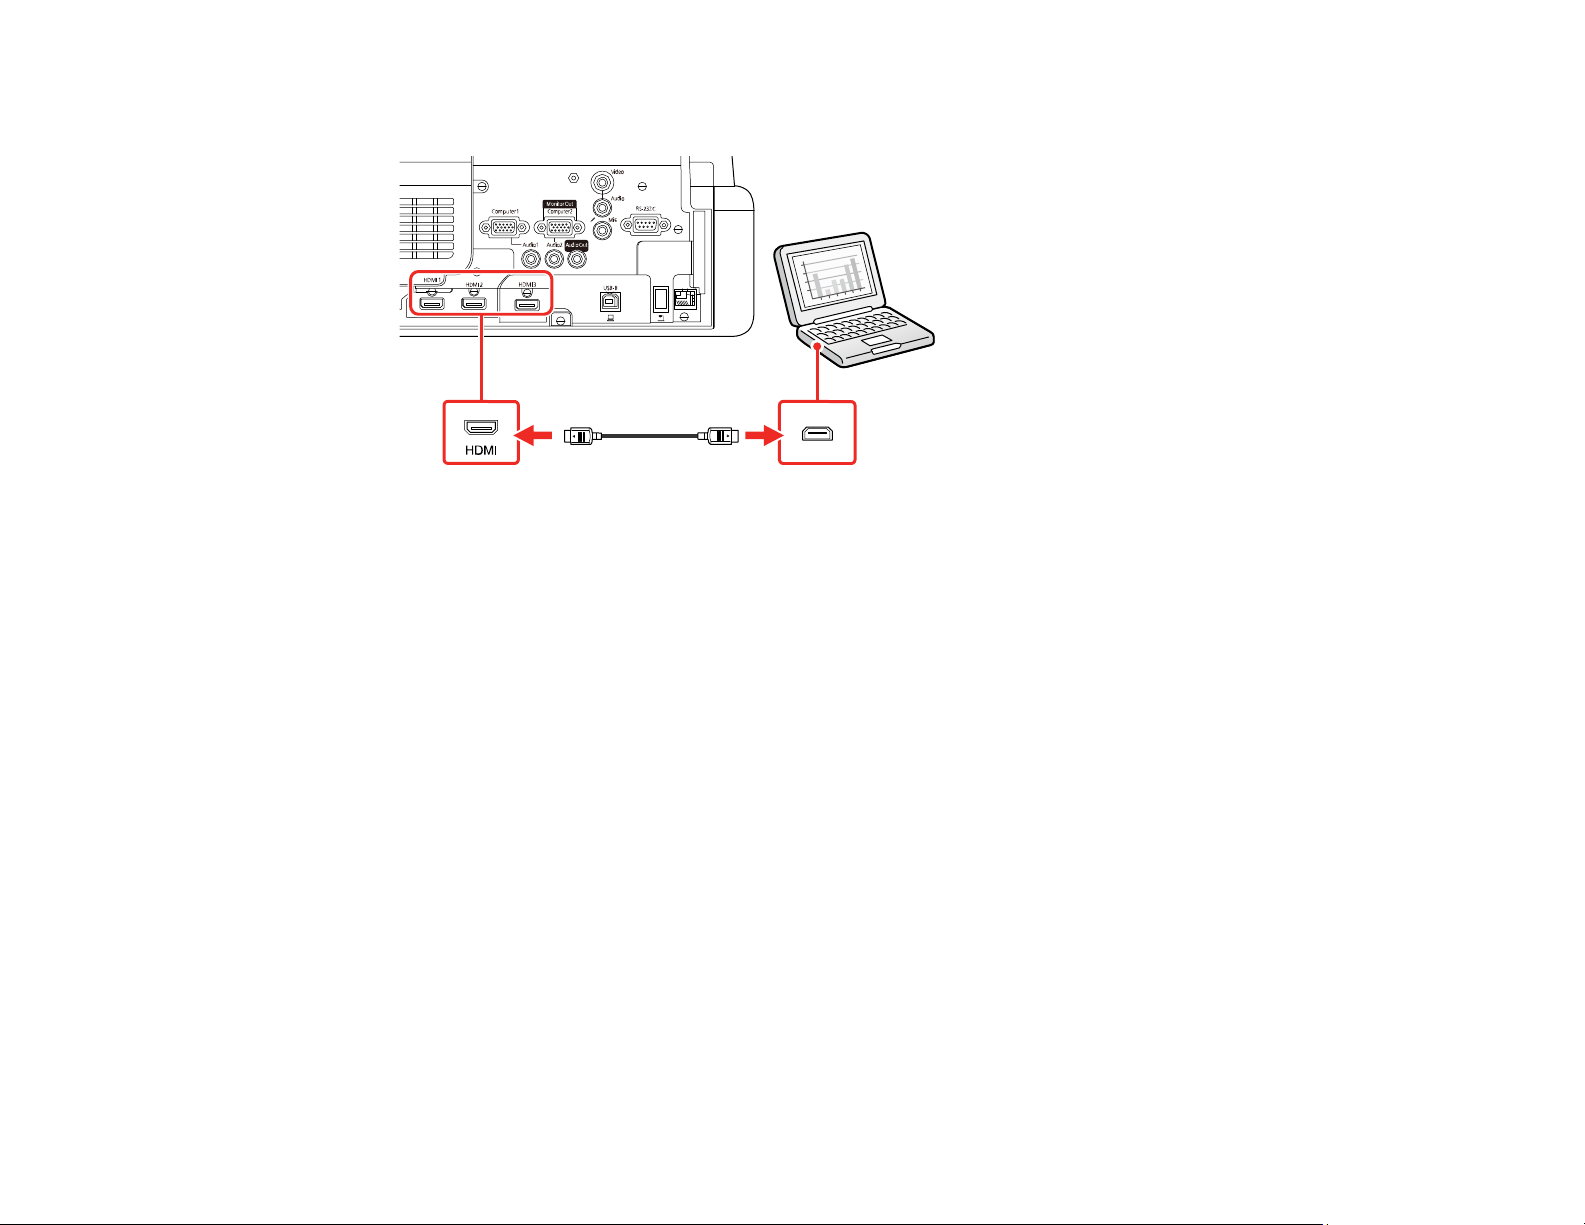
2. Connect the other end to one of the projector's HDMI ports.
Note: The projector converts the digital audio signal sent from your computer into a mono analog signal
for the internal speaker or a stereo analog signal if you are connecting to external speakers. (Make sure
the HDMI audio playback device on your computer's audio settings is set to EPSON PJ.)
Note: If you have problems hearing audio through the HDMI connection, you can use one of the
projector's audio ports instead to play sound. Connect one end of an optional 3.5 mm stereo mini-jack
audio cable to one of the projector's audio ports and the other end to your computer's audio out port.
Then select the audio port you connected to as the HDMI1 Audio Output, HDMI2 Audio Output or
HDMI3 Audio Output setting in the Signal I/O menu.
Parent topic: Connecting to Computer Sources
Connecting to a Computer for VGA Video and Audio
You can connect the projector to your computer using a VGA computer cable.
Note: To connect a Mac that includes only a Mini DisplayPort, Thunderbolt port, or Mini-DVI port for
video output, you need to obtain an adapter that allows you to connect to the projector's VGA video port.
Contact Apple for compatible adapter options.
1. If necessary, disconnect your computer's monitor cable.
2. Connect the VGA computer cable to your computer's monitor port.
32
Page 33
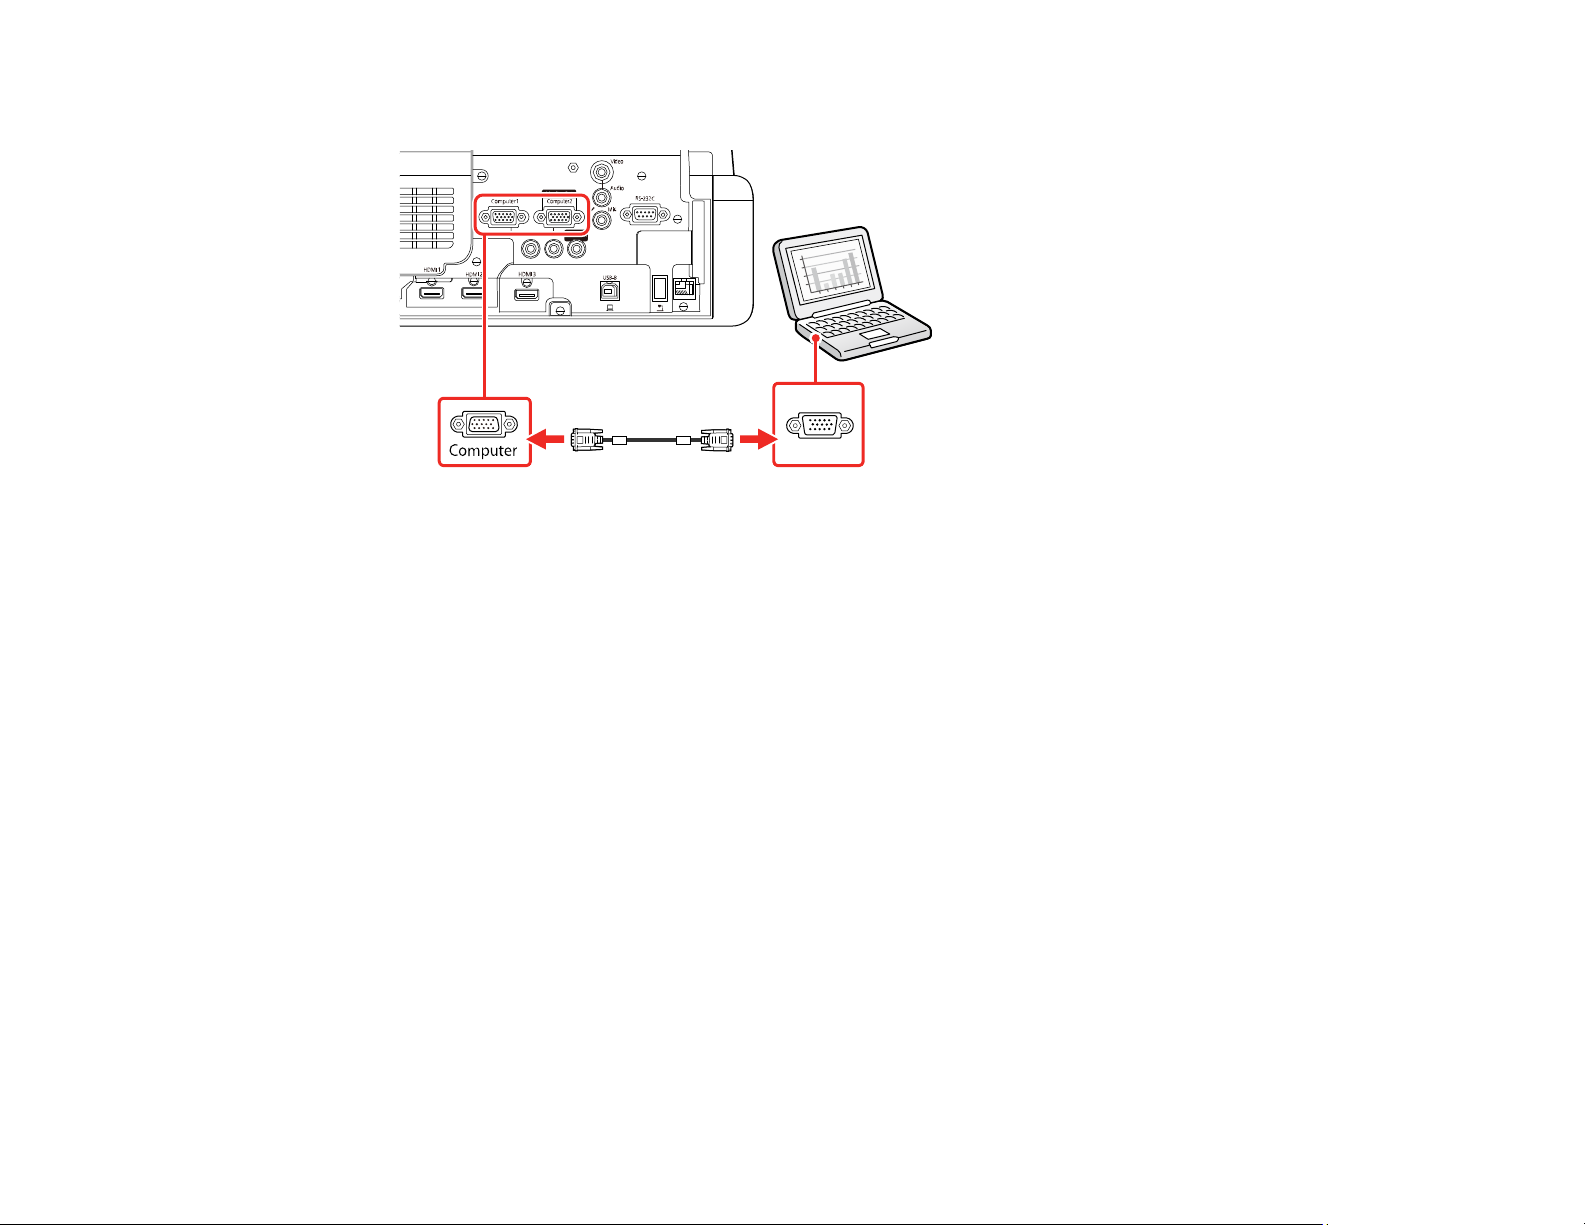
3. Connect the other end to a Computer port on the projector.
4. Tighten the screws on the VGA connector.
5. Connect an audio cable to your laptop's headphone or audio out jack, or your desktop's speaker or
audio out port.
6. Connect the other end to the Audio port that corresponds to the Computer port you are using.
Parent topic: Connecting to Computer Sources
Connecting to a Computer for USB Video and Audio
If your computer meets the system requirements, you can send video and audio output to the projector
through the computer's USB port (preferably USB 2.0). Connect the projector to your computer using a
USB cable.
Note: An HDMI connection is recommended for projecting content requiring high bandwidth.
Note: Connecting through a USB hub may not work properly. Connect the USB cable directly to the
projector.
1. Turn on the projector, if necessary.
2. Turn on your computer.
33
Page 34
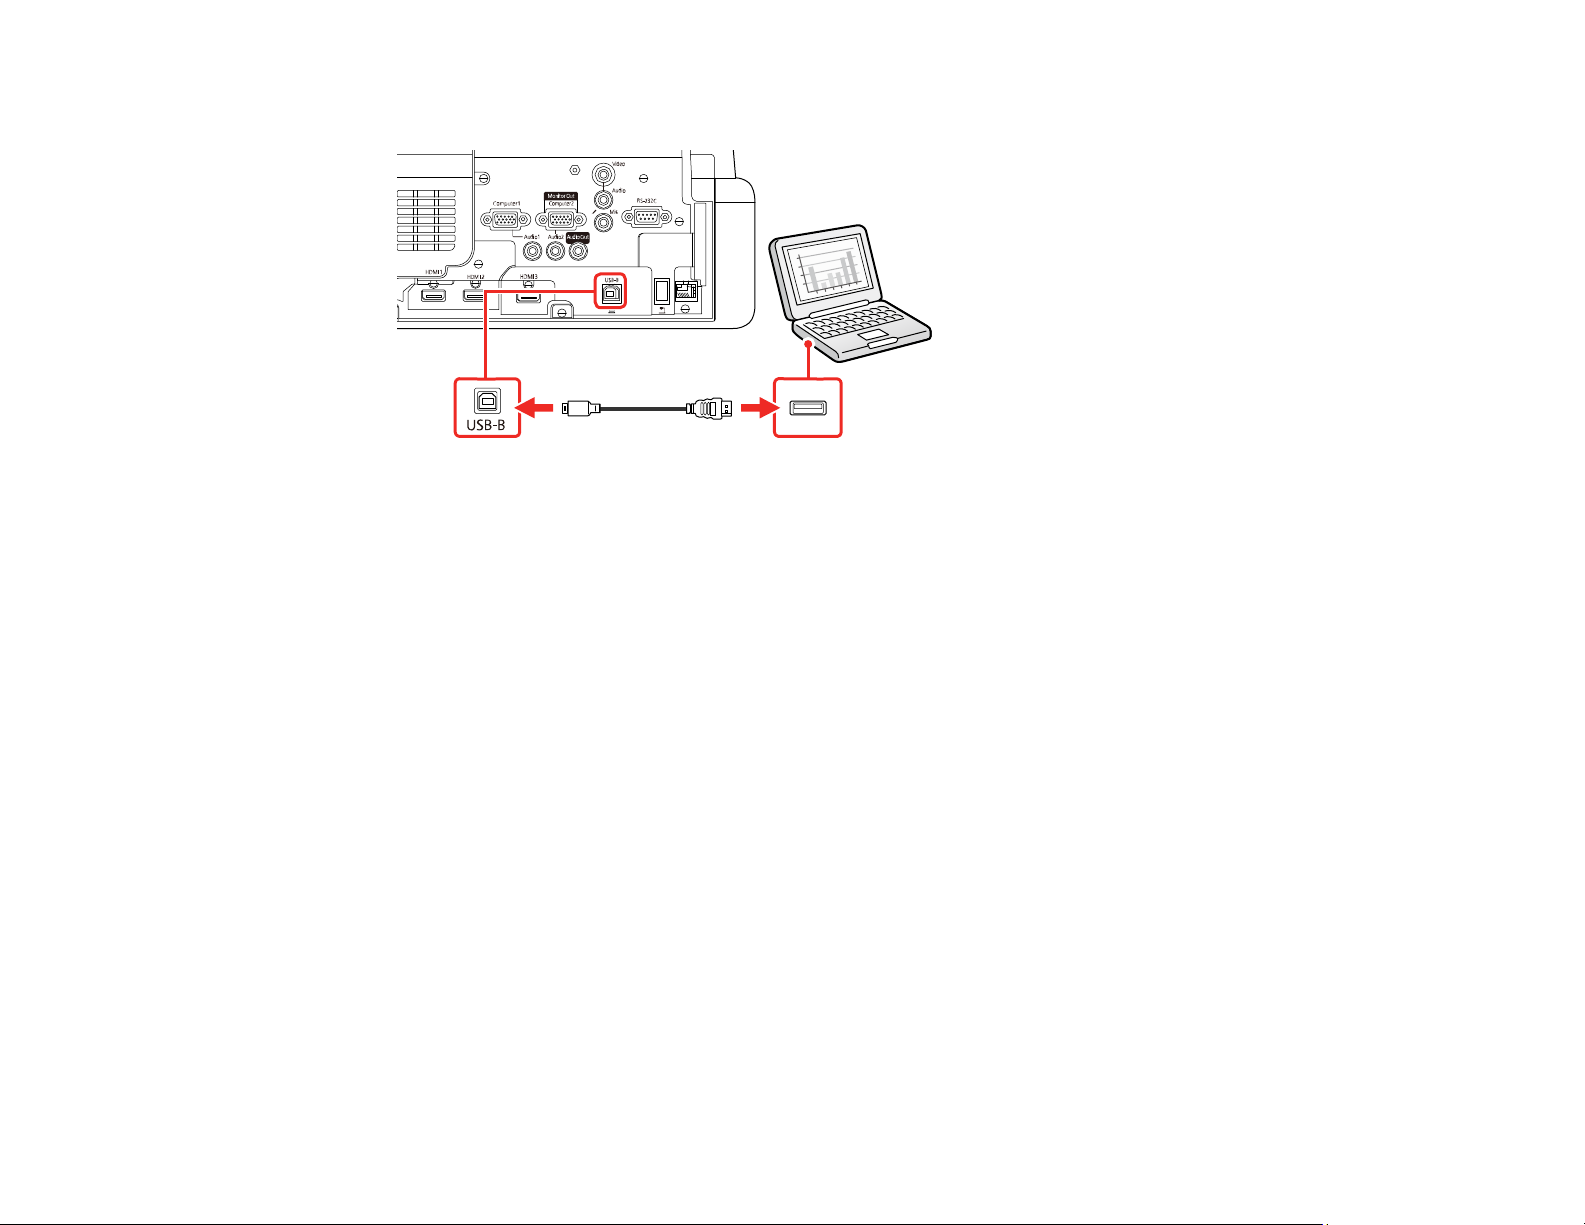
3. Connect the cable to your projector's USB-B port.
4. Connect the other end to any available USB port on your computer.
5. Do one of the following:
• Windows 10/Windows 8.x: Click EPSON_PJ_UD when it appears on the desktop, then select
Run EMP_UDSE.EXE in the dialog box that appears to install the Epson USB Display software.
• Windows 7/Windows Vista: Select Run EMP_UDSE.EXE in the dialog box that appears to
install the Epson USB Display software.
• Mac: The USB Display setup folder appears on your screen. Select USB Display Installer and
follow the on-screen instructions to install the Epson USB Display software.
Follow any on-screen instructions. You need to install this software only the first time you connect
the projector to the computer.
The projector displays the image from your computer's desktop and outputs sound, if your presentation
contains audio.
Parent topic: Connecting to Computer Sources
Related references
Input Signal Settings - Signal I/O Menu
Connecting to Video Sources
Follow the instructions in these sections to connect video devices to the projector.
Connecting to an HDMI Video Source
34
Page 35
Connecting to a Streaming Media Player
Connecting to a Composite Video Source
Connecting to a Video Source for Sound
Parent topic: Projector Connections
Connecting to an HDMI Video Source
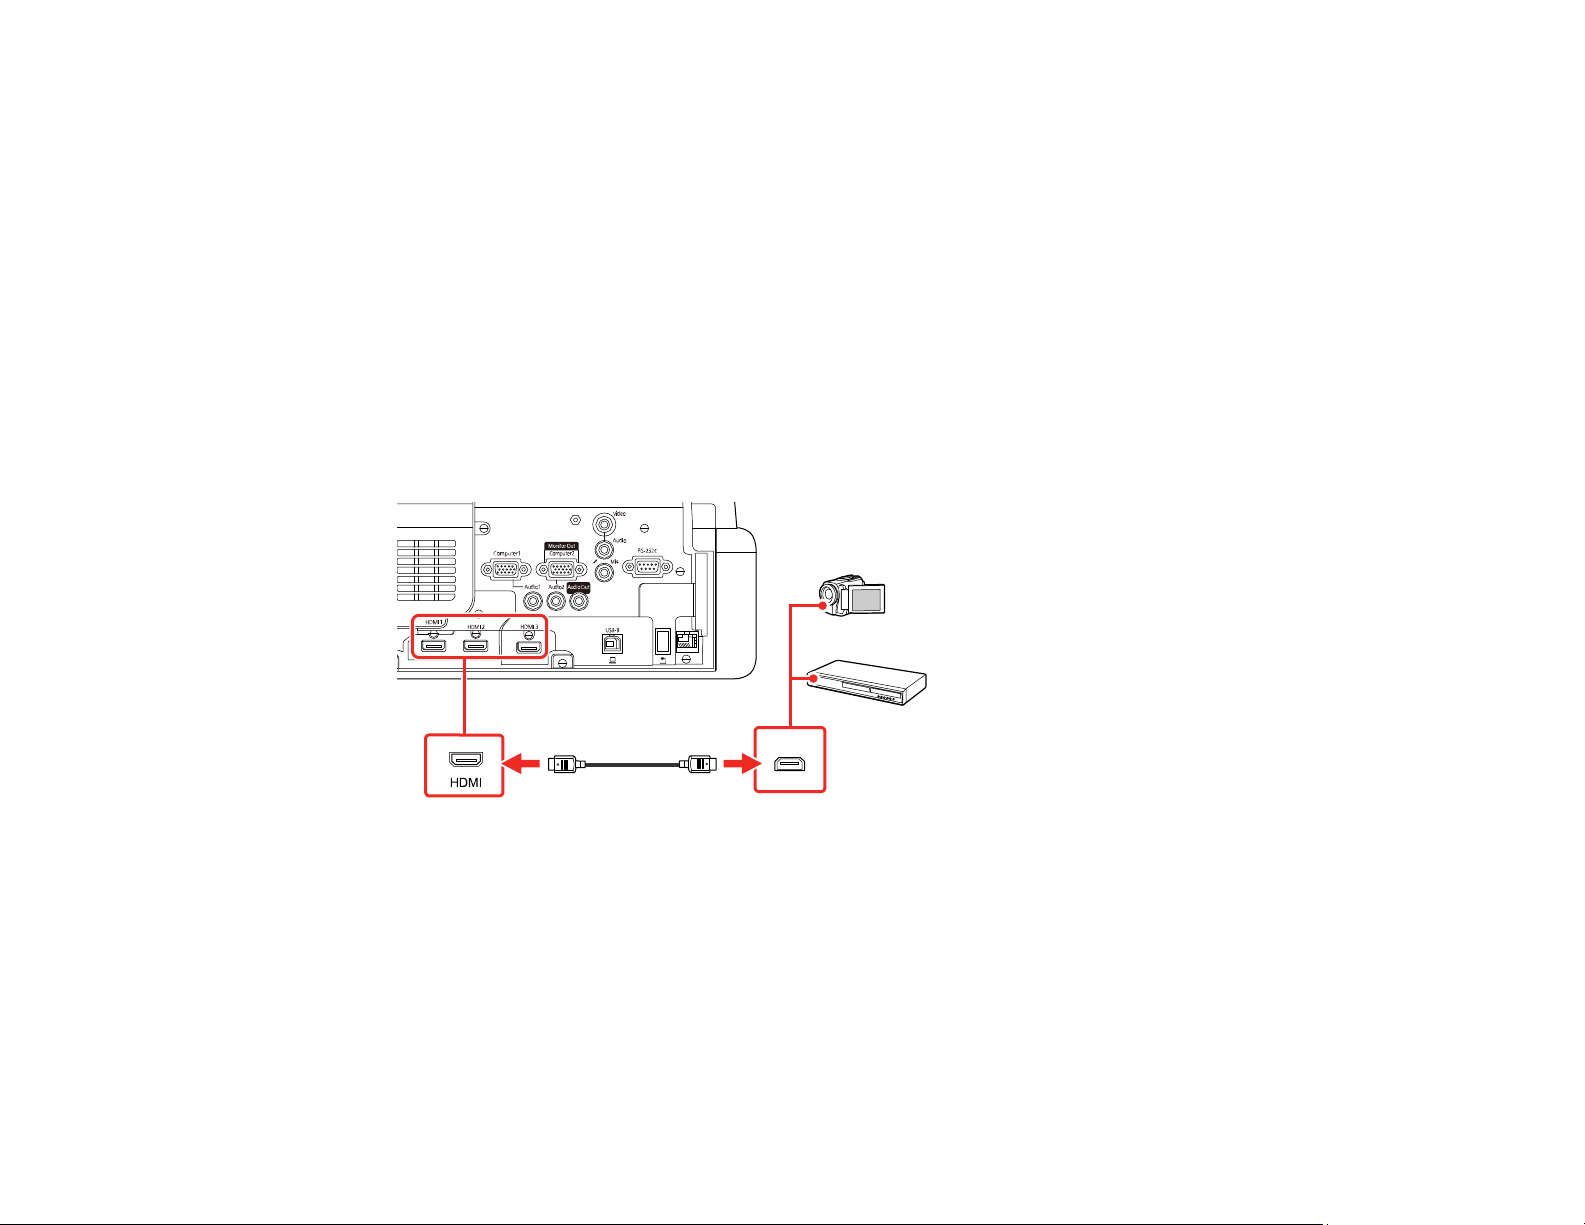
If your video source has an HDMI port, you can connect it to the projector using an HDMI cable (not
included). The HDMI connection provides the best image quality.
Caution: Do not turn on the video source before connecting it to the projector. Doing so could damage
the projector.
1. Connect the HDMI cable to your video source's HDMI output port.
2. Connect the other end to one of the projector's HDMI ports.
Note: The projector converts the digital audio signal sent from your video source into a mono analog
signal for the internal speaker or a stereo analog signal if you are connecting to external speakers.
Note: If you have problems hearing audio through the HDMI connection, you can use one of the
projector's audio ports instead to play sound. Connect one end of an optional 3.5 mm stereo mini-jack
audio cable to one of the projector's audio ports and the other end to your video source's audio out port.
Then select the audio port you connected to as the HDMI1 Audio Output, HDMI2 Audio Output or
HDMI3 Audio Output setting in the Signal I/O menu.
35
Page 36
Parent topic: Connecting to Video Sources
Related references
Input Signal Settings - Signal I/O Menu
Connecting to a Streaming Media Player
You can connect a streaming media player to the projector. By connecting the streaming media player's
power supply USB cable, you can power the streaming media player from the projector.
1. Connect the streaming media player to an HDMI port.
2. If necessary, connect the streaming media player's power supply USB cable to the USB-A port.
Connect the other end of the cable to the USB port on the streaming media player.
Note: To keep supplying power to the optional streaming media player when the projector is not
projecting images, select Always On as the USB Power setting in the projector's Operation menu.
Parent topic: Connecting to Video Sources
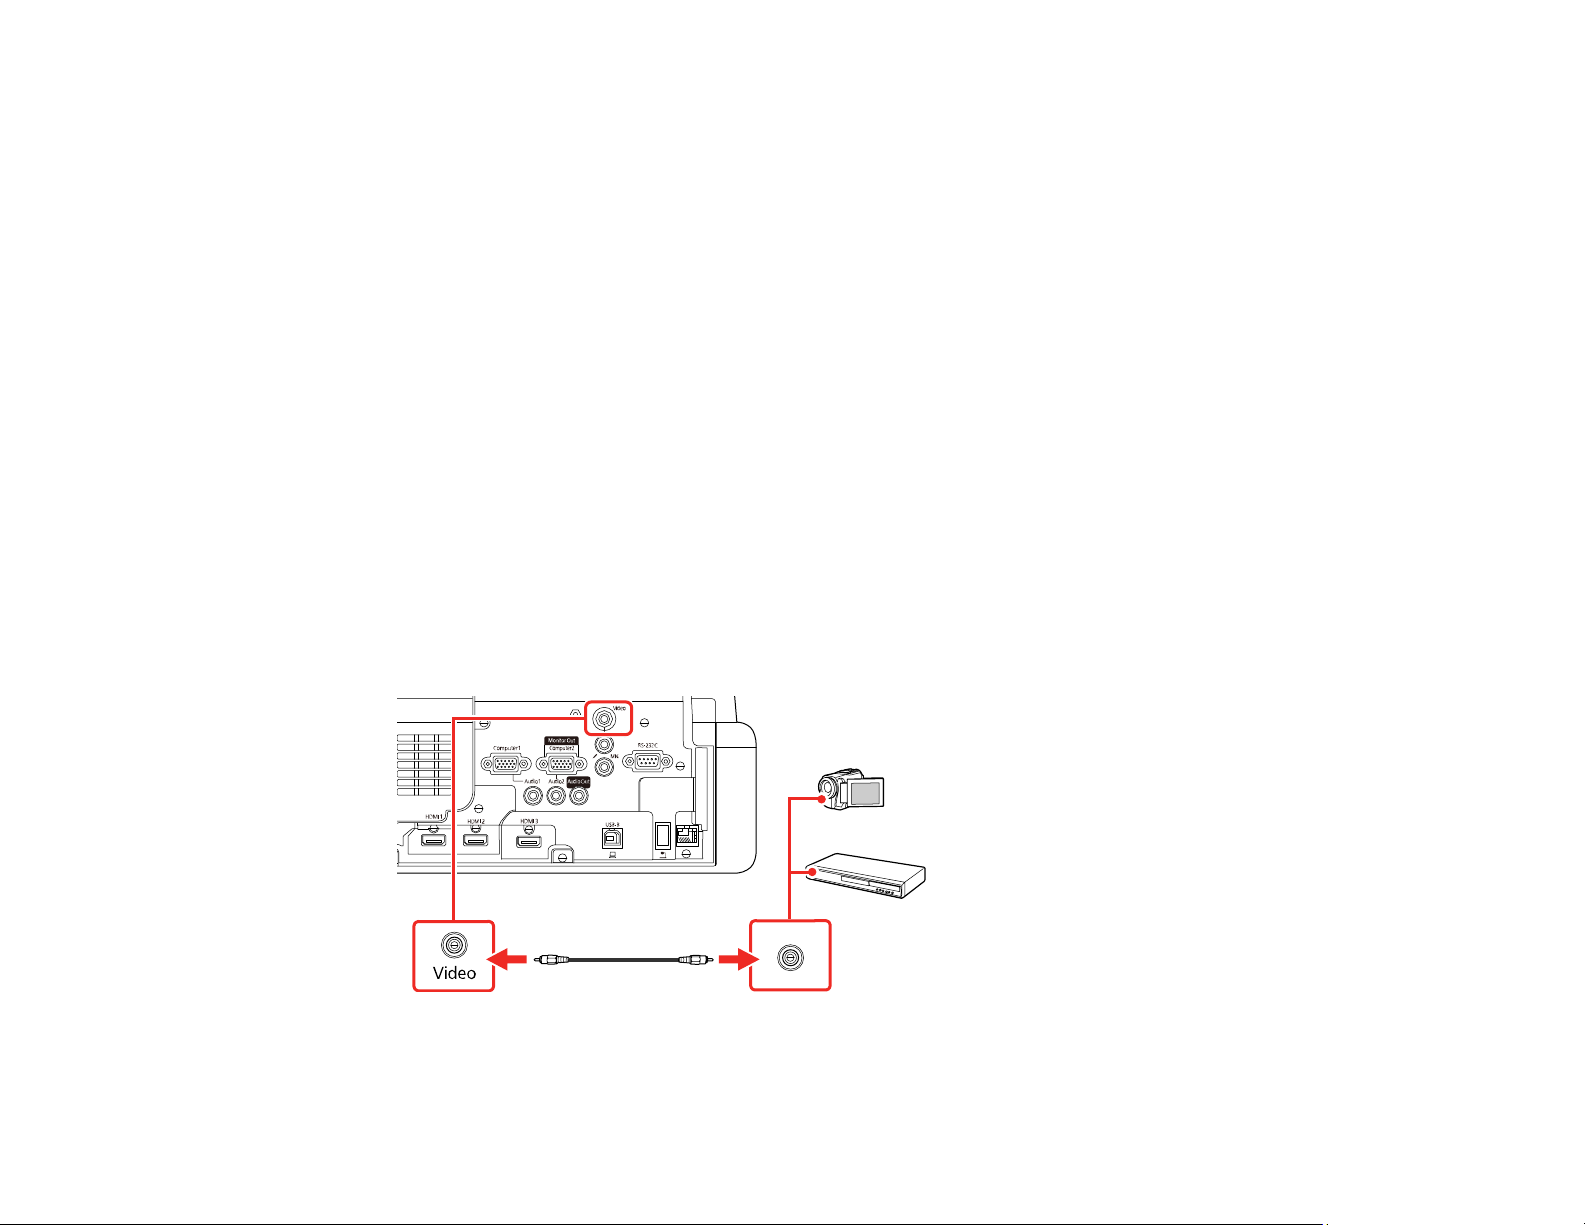
Connecting to a Composite Video Source
If your video source has a composite video port, you can connect it to the projector using an optional
RCA-style video or A/V cable.
1. Connect the cable with the yellow connector to your video source's yellow video output port.
2. Connect the other end to the projector's Video port.
Parent topic: Connecting to Video Sources
36
Page 37
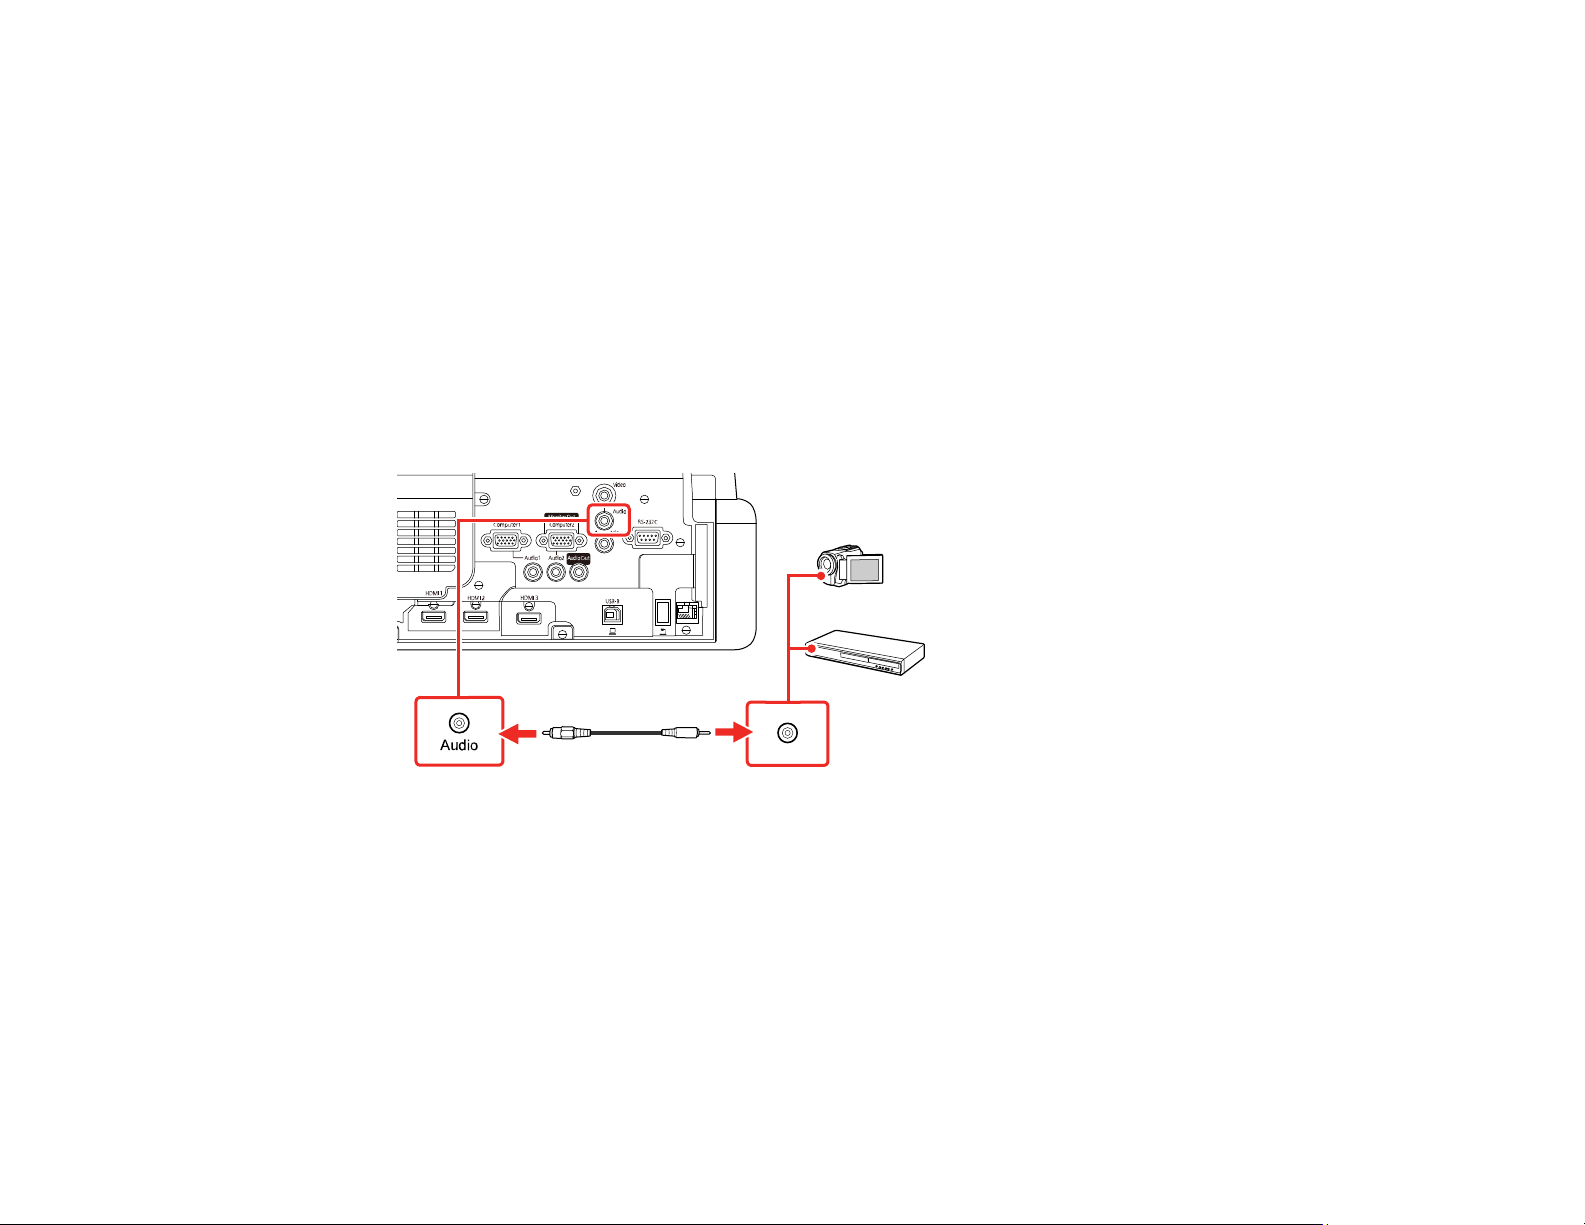
Connecting to a Video Source for Sound
You can play sound through the projector's speaker system if your video source has audio output ports.
If you are projecting video using the Video port, connect the projector to the video source using an
optional stereo mini-jack audio cable.
Note: Make sure the audio cable is labeled "No resistance."
Note: If you connected your video source to the projector using an HDMI cable, the audio signal is
transferred with the video signal; you do not need an additional cable for sound.
1. Connect the audio cable to your video source's audio-out ports.
2. Connect the other end of the cable to the projector's Audio port that corresponds to the port you are
using for video.
Parent topic: Connecting to Video Sources
Connecting External Output Devices
See these sections to connect the projector to external output devices.
Connecting to an External Computer Monitor
Connecting to External Speakers
Connecting a Microphone
Parent topic: Projector Connections
37
Page 38
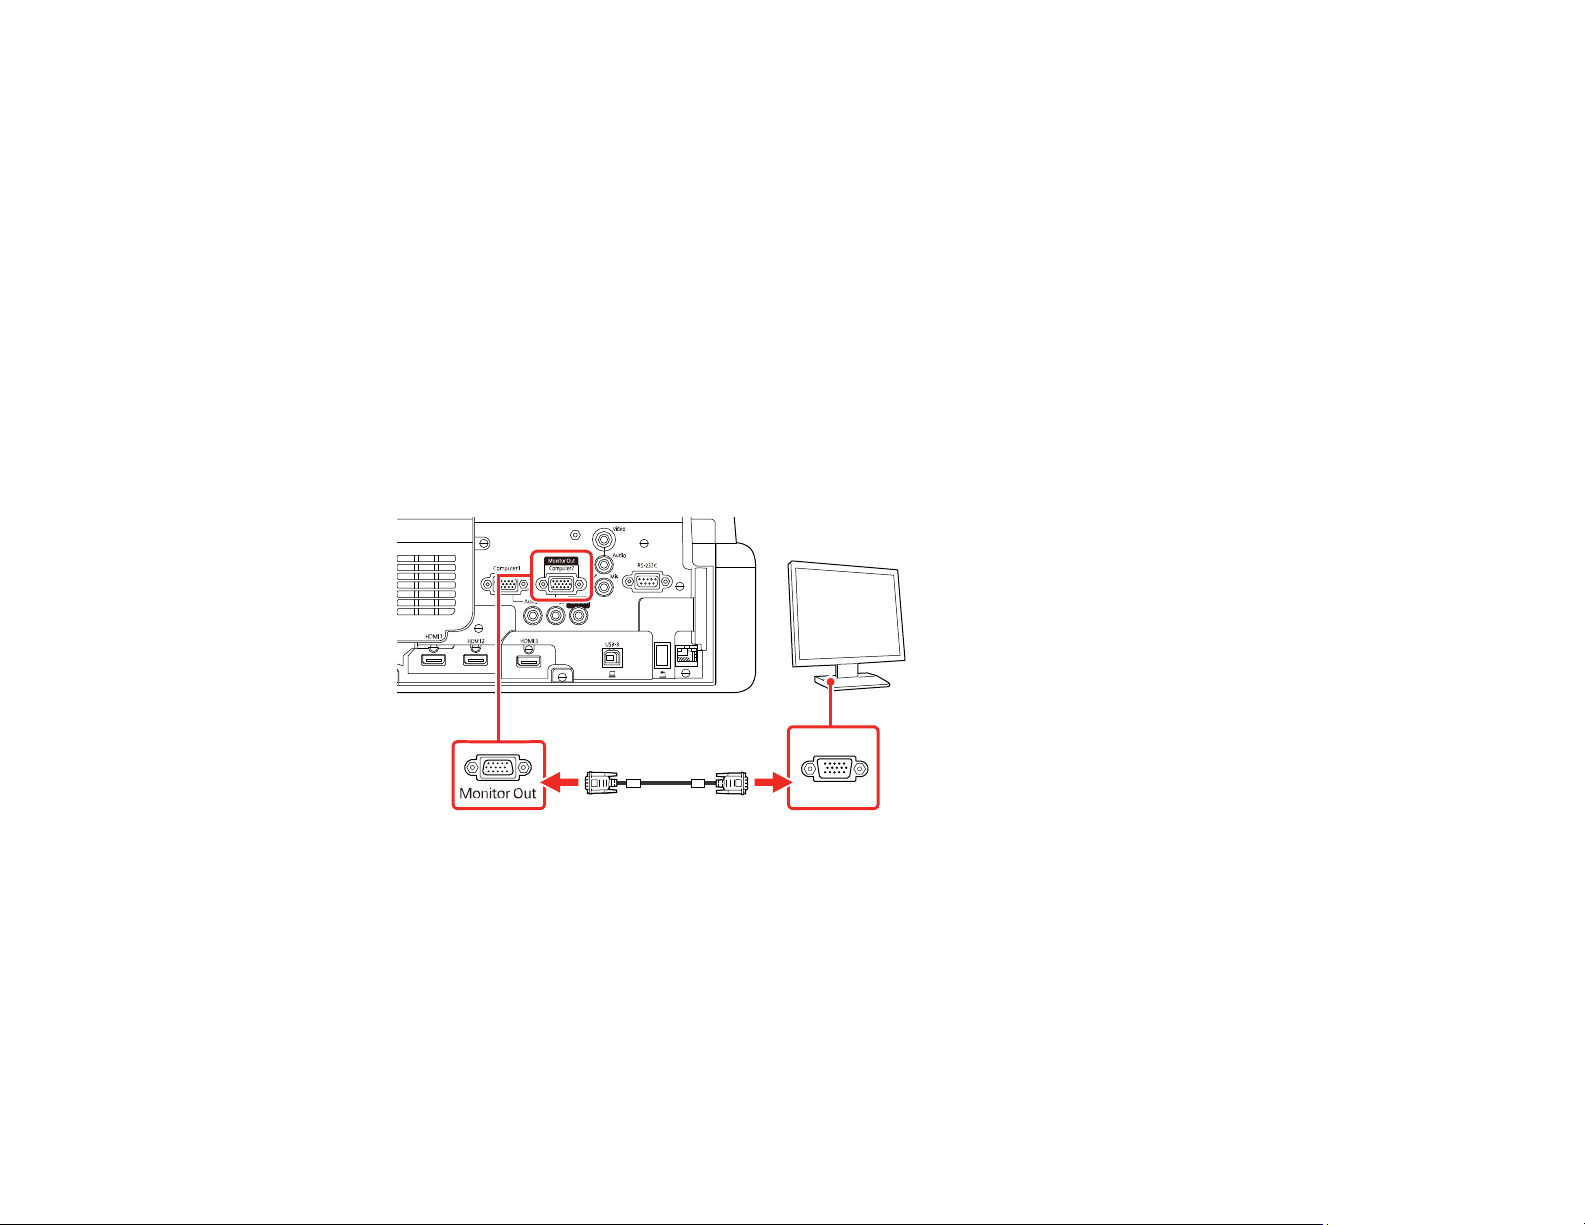
Connecting to an External Computer Monitor
If you connected a computer to the projector's Computer1 port, you can also connect an external
monitor to the projector. This lets you see your presentation on the external monitor even when the
projected image is not visible.
To output images to an external VGA monitor, set the Monitor Out Port setting to Monitor Out in the
projector's Signal I/O menu.
If you want to output images to an external monitor when the projector is turned off, you need to select
Always On as the A/V Output setting in the projector's Signal I/O menu.
Note: Monitors that use a refresh rate less than 60 Hz may not be able to display images correctly.
1. Make sure your computer is connected to the projector's Computer port. If there are two computer
ports, make sure you use the Computer1 port.
2. Connect the external monitor's cable to your projector's Computer2/Monitor Out port.
Parent topic: Connecting External Output Devices
Related references
Input Signal Settings - Signal I/O Menu
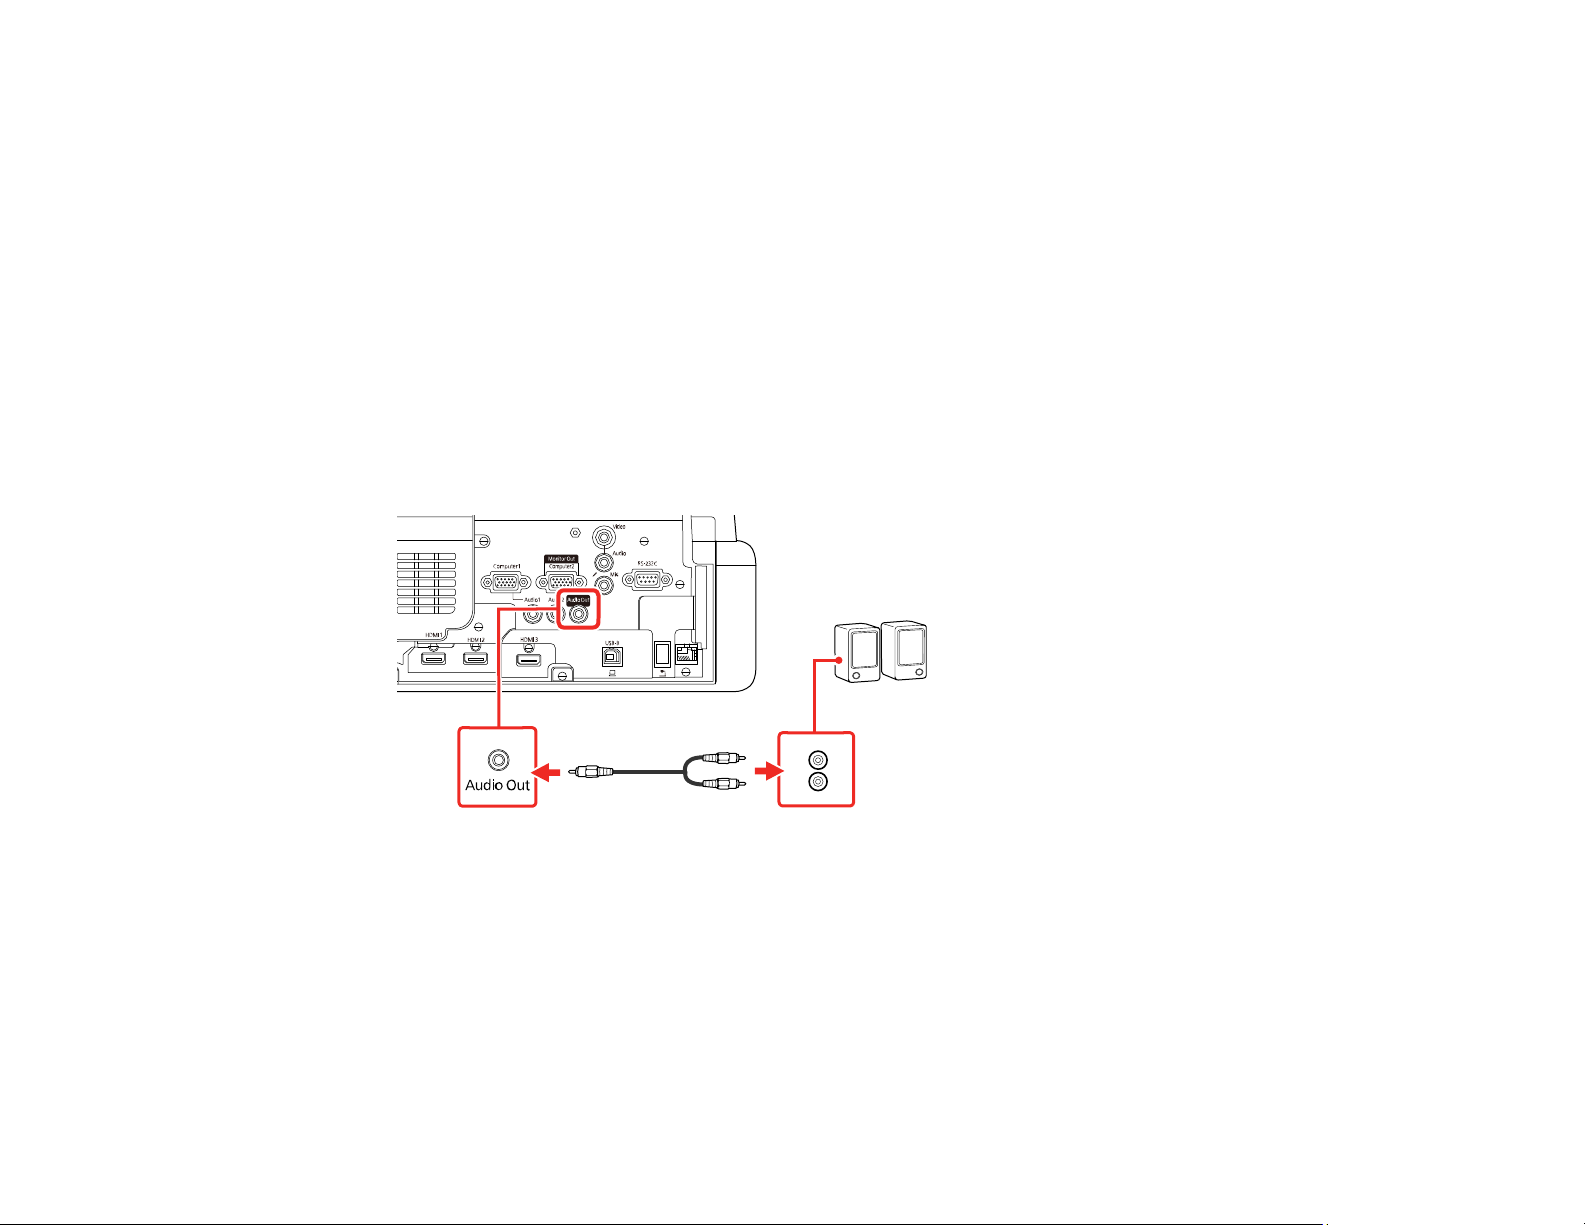
Connecting to External Speakers
You can connect the projector to external self-powered speakers and control the volume using the
projector's remote control.
You can also connect the projector to an amplifier with speakers.
38
Page 39
Set the Audio Out Device setting to Projector in the projector's Signal I/O > HDMI Link menu. When an
audio/video system is not connected to the projector, audio is output from the external speakers even if
Audio Out Device is set to AV System.
If you want to output audio from the external speakers when the projector is turned off, you need to
select Always On as the A/V Output setting in the projector's Signal I/O menu.
Note: The projector's built-in speaker system is disabled when you connect external speakers.
1. Make sure your computer or video source is connected to the projector with both audio and video
cables as necessary.
2. Locate the appropriate cable to connect your external speakers, such as a stereo mini-jack-to-pinjack cable, or another type of cable or adapter.
3. Connect one end of the cable to your external speakers as necessary.
4. Connect the stereo mini-jack end of the cable to your projector's Audio Out port.
Parent topic: Connecting External Output Devices
Related references
Input Signal Settings - Signal I/O Menu
Connecting a Microphone
You can connect a microphone to the projector's Mic port to provide audio support during presentations
(EB-760W/EB-770F).
39
Page 40
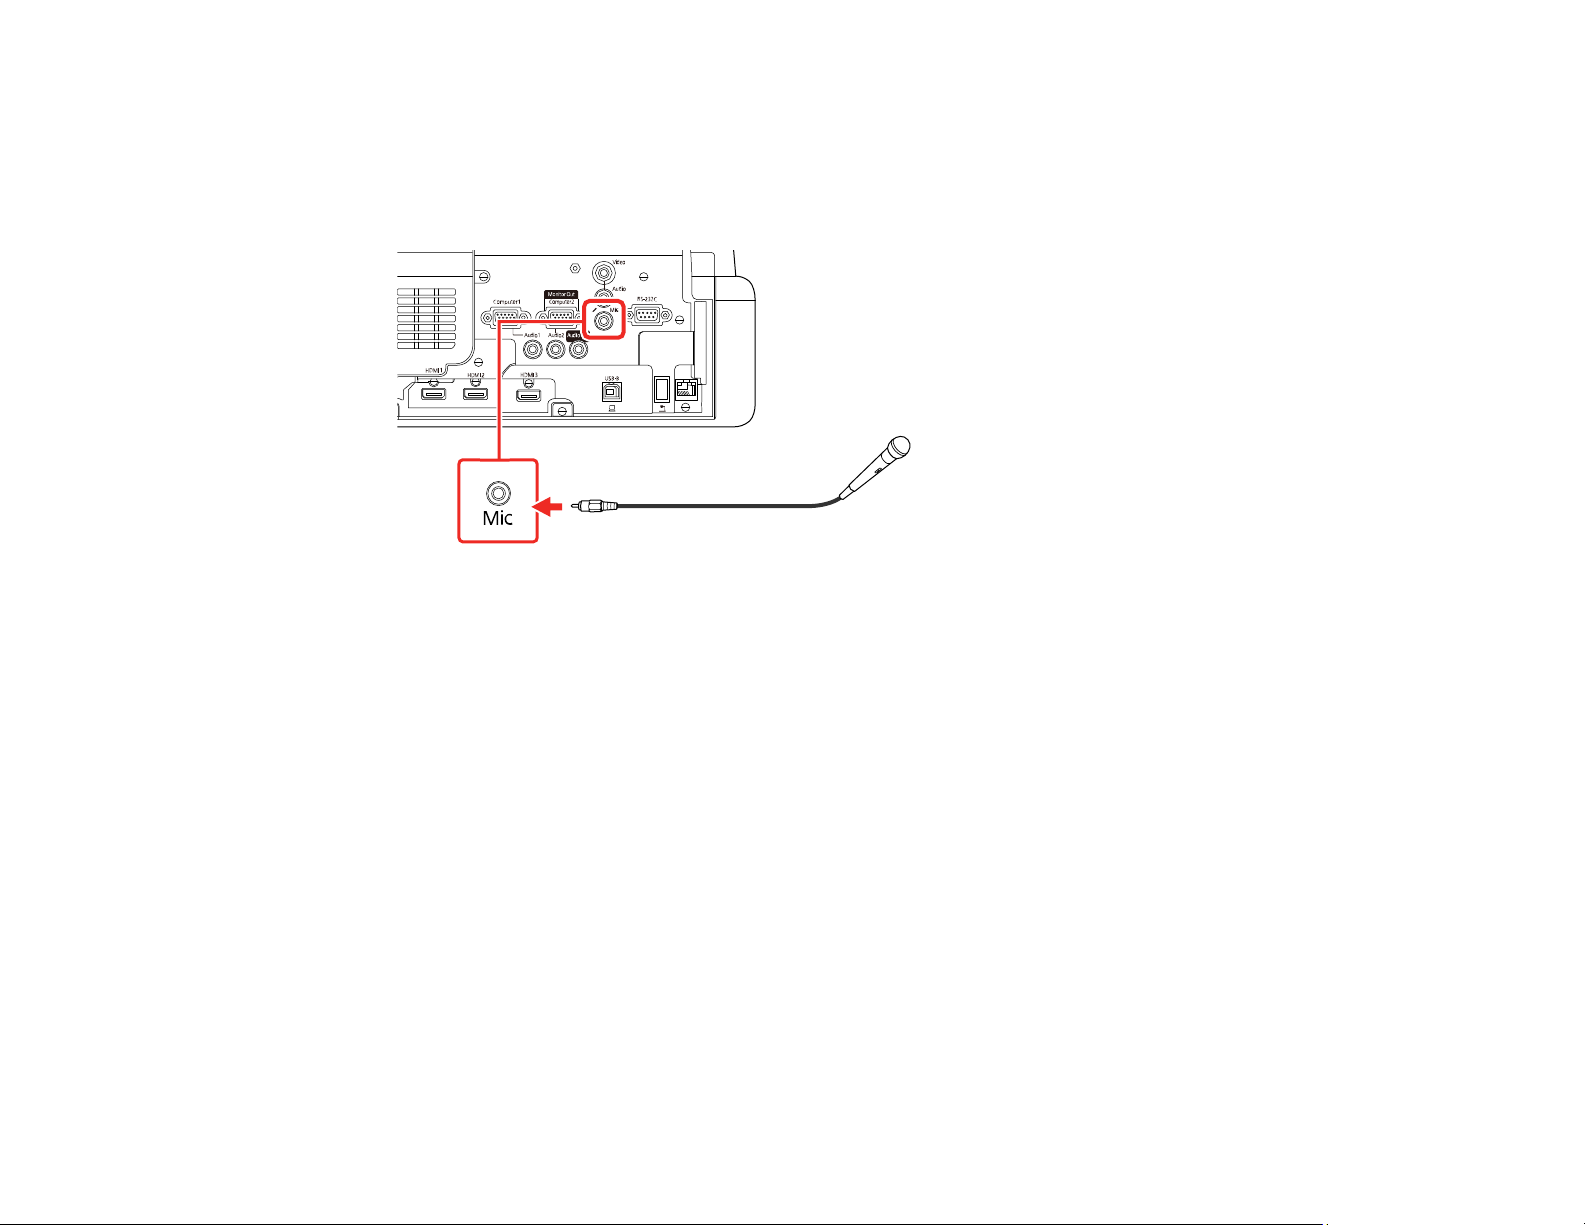
Note: The projector does not support plug-in-power microphones. If you want to output audio from the
microphone when the projector is off, select Always On as the A/V Output setting in the Signal I/O
menu.
1. Connect the microphone cable to the projector's Mic port.
2. Turn on the microphone, if necessary.
3. If you hear a crackling noise or the volume is too high or low, adjust the Mic Input Level setting in
the Signal I/O menu.
Parent topic: Connecting External Output Devices
Connecting to External USB Devices
Follow the instructions in these sections to connect external USB devices to the projector.
USB Device Projection
Connecting a USB Device or Camera to the Projector
Selecting the Connected USB Source
Disconnecting a USB Device or Camera From the Projector
Parent topic: Projector Connections
Related tasks
Starting a PC Free Slideshow
40
Page 41

USB Device Projection
You can project images and other content without using a computer or video device by connecting any of
these devices to your projector:
• USB flash drive
• Digital camera or smartphone
• USB hard drive
• Multimedia storage viewer
Note: Digital cameras or smartphones must be USB-mounted devices, not TWAIN-compliant devices,
and must be USB Mass Storage Class-compliant.
Note: USB hard drives must meet these requirements:
• USB Mass Storage Class-compliant (not all USB Mass Storage Class devices are supported)
• Formatted in FAT16 or FAT32
• Self-powered by their own AC power supplies (bus-powered hard drives are not recommended)
• Does not have multiple partitions
You can also project playlists that contain images and movies saved on a USB device when in Content
Playback mode (EB-770F/EB-775F).
Parent topic: Connecting to External USB Devices
Related tasks
Starting a PC Free Slideshow
Connecting a USB Device or Camera to the Projector
You can connect your USB device or camera to the projector's USB-A port and use it to project images
and other content.
1. If your USB device came with a power adapter, plug the device into an electrical outlet.
41
Page 42
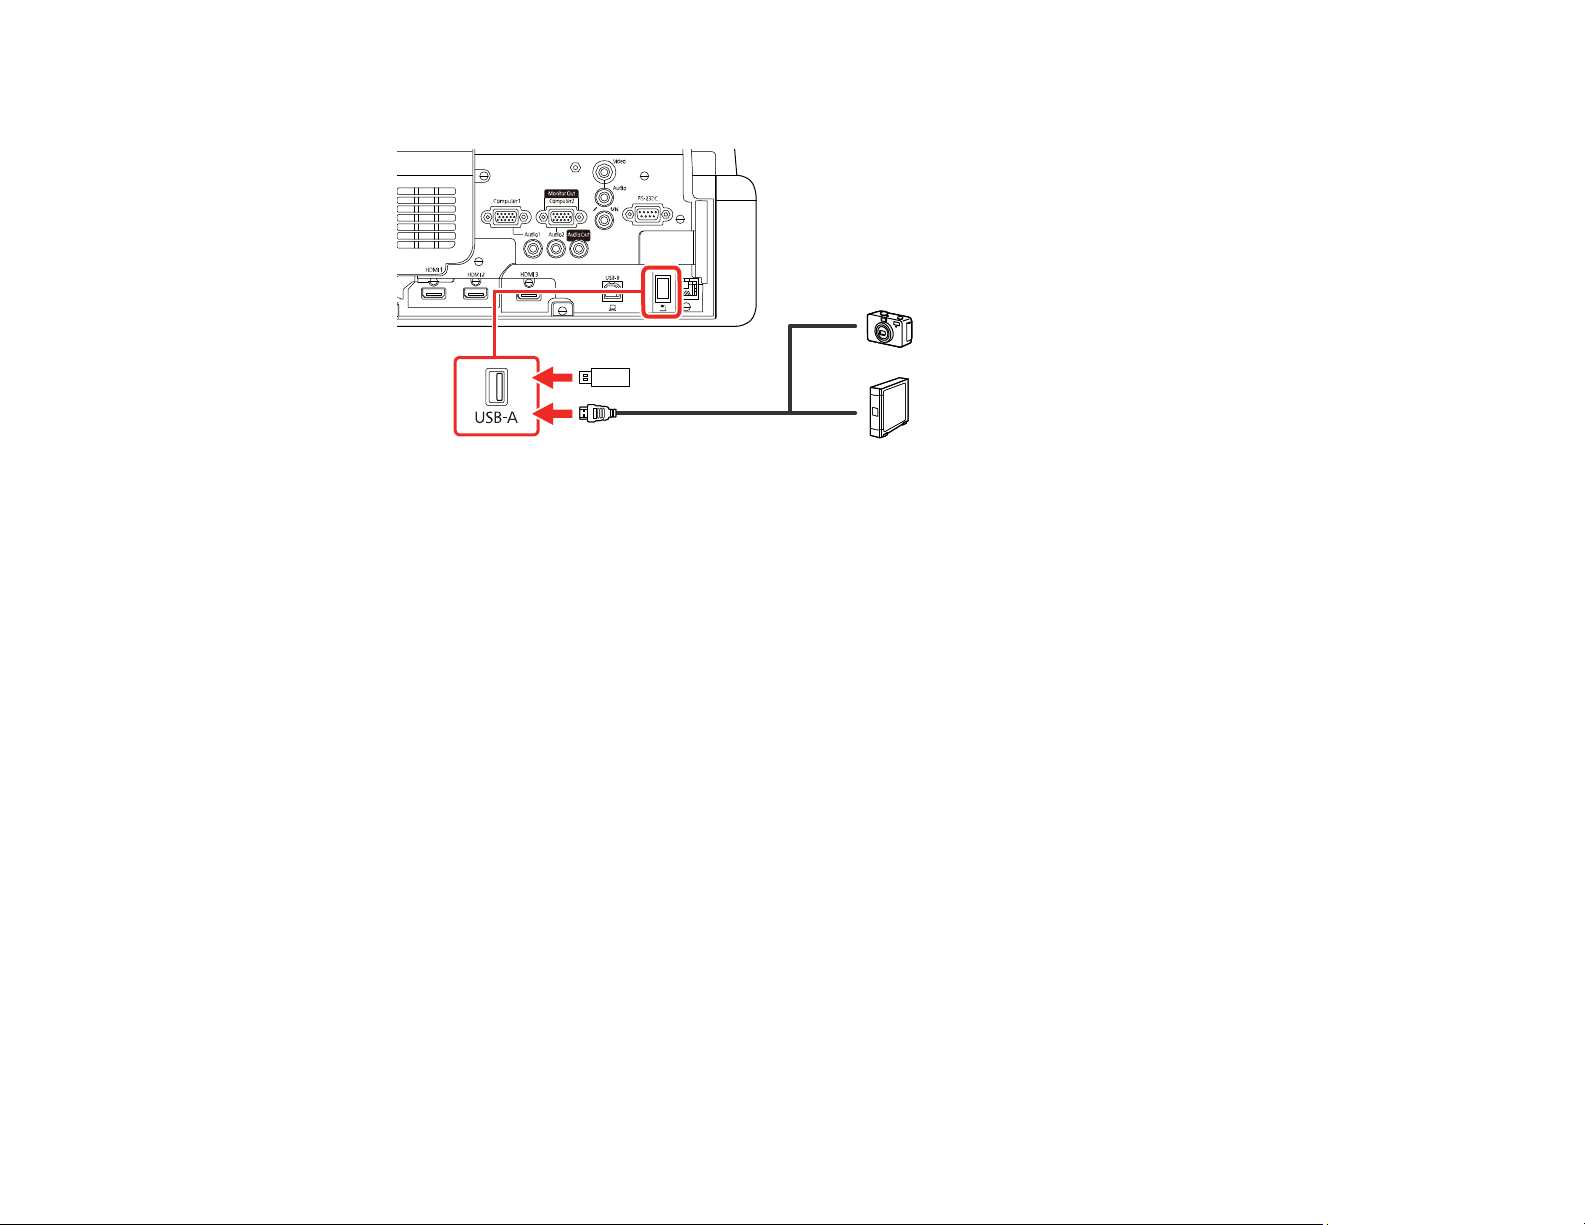
2. Connect the USB cable (or USB flash drive) to the projector's USB-A port.
Note: Use the USB cable supplied with or specified for use with your device. Do not connect a USB
hub or a USB cable longer than 10 feet (3 m), or the device may not operate correctly.
3. Connect the other end of the cable (if applicable) to your device.
Parent topic: Connecting to External USB Devices
Related tasks
Starting a PC Free Slideshow
Selecting the Connected USB Source
You can switch the projector's display to the source you connected to the USB-A port.
1. Make sure the connected USB source is turned on, if necessary.
2. Press the USB or Source Search button on the remote control.
Parent topic: Connecting to External USB Devices
Related tasks
Starting a PC Free Slideshow
Disconnecting a USB Device or Camera From the Projector
When you finish presenting with a connected USB device or camera, you must prepare to disconnect the
device from the projector.
1. If the device has a power button, turn off and unplug the device.
42
Page 43

2. Disconnect the USB device or camera from the projector.
Parent topic: Connecting to External USB Devices
Related tasks
Starting a PC Free Slideshow
Connecting to a Document Camera
You can connect a document camera to your projector to project images from the camera.
Note: The connection method varies depending on your document camera model. For additional
features supported by software, connect your document camera to your computer using the camera's
USB port instead of connecting the camera to the projector. See the document camera manual for
details.
Parent topic: Projector Connections
Installing Batteries in the Remote Control
The remote control uses the two AA batteries that came with the projector. Replace the batteries as soon
as they run out.
Caution: Use only the type of batteries specified in this manual. Do not install batteries of different types,
or mix new and old batteries.
1. Remove the battery cover.
43
Page 44
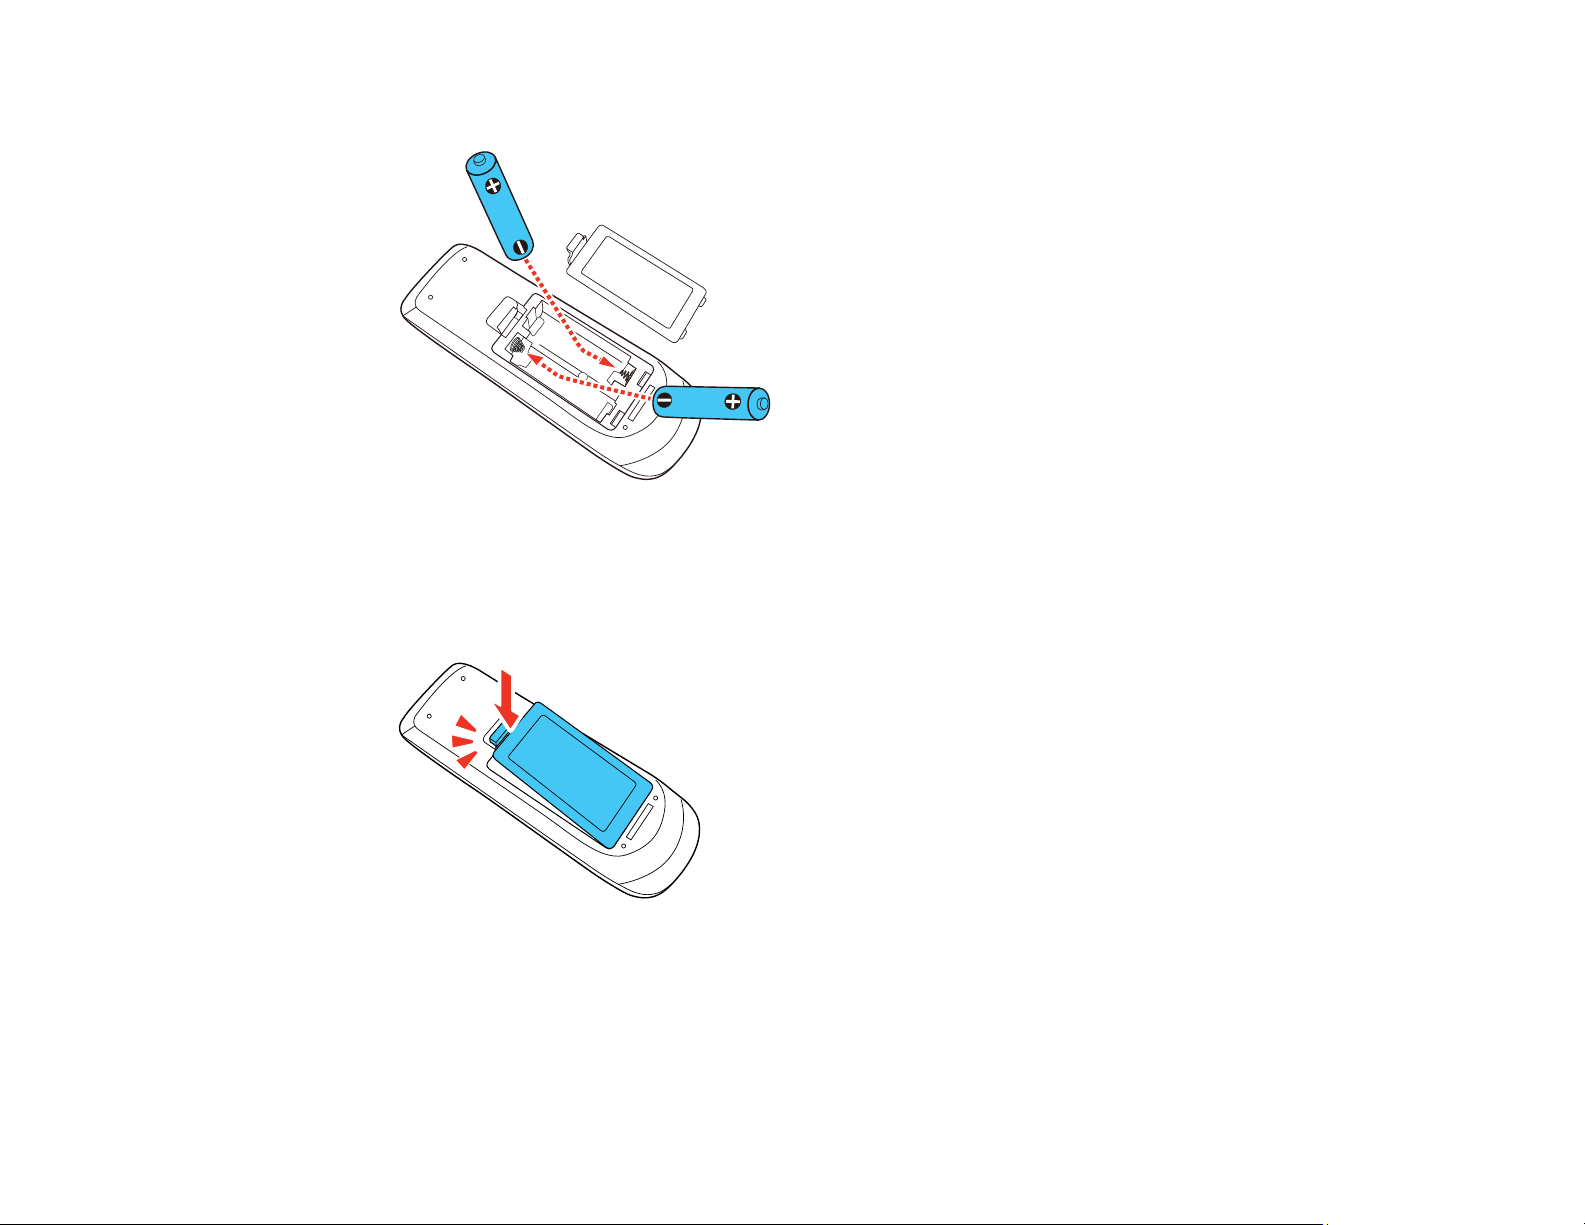
2. Insert the batteries with the + and – ends facing as shown.
Warning: Make sure the batteries are inserted in the correct positions. If the batteries are not
inserted correctly, they could explode or leak, causing a fire, injury, or damage to the product.
3. Replace the battery cover and press it down until it clicks into place.
Warning: Dispose of used batteries according to local regulations. Do not expose batteries to heat
or flame. Keep batteries out of the reach of children; they are choking hazards and are very
dangerous if swallowed.
Parent topic: Setting Up the Projector
44
Page 45

Using the Projector on a Network
Follow the instructions in these sections to set up your projector for use on a network.
Wired Network Projection
Wireless Network Projection
Wireless Network Projection from a Mobile Device or Windows Computer (Screen Mirroring)
Screen Sharing
Setting Up Projector Network E-Mail Alerts
Setting Up Monitoring Using SNMP
Controlling a Networked Projector Using a Web Browser
Using Crestron Connected
Registering a Digital Certificate on the Projector
Art-Net Channel Definitions
Setting Up Web API
Wired Network Projection
You can project through a wired network. To do this, you connect the projector to your network with an
Ethernet cable, and then set up your projector and computer for network projection.
After connecting and setting up the projector, install the projector software. You may need to install it
from a software CD, if included, or download the software and manuals as necessary.
Note: If your projector is connected via a LAN (Ethernet) cable to a network that includes a wireless
access point, you can connect wirelessly to the projector through the access point.
Connecting to a Wired Network
Selecting Wired Network Settings
Parent topic: Using the Projector on a Network
Related references
Additional Projector Software and Manuals
Connecting to a Wired Network
To connect the projector to a wired local area network (LAN), use a 100Base-TX or 10Base-T network
cable. To ensure proper data transmission, use a Category 5 shielded cable or higher.
45
Page 46
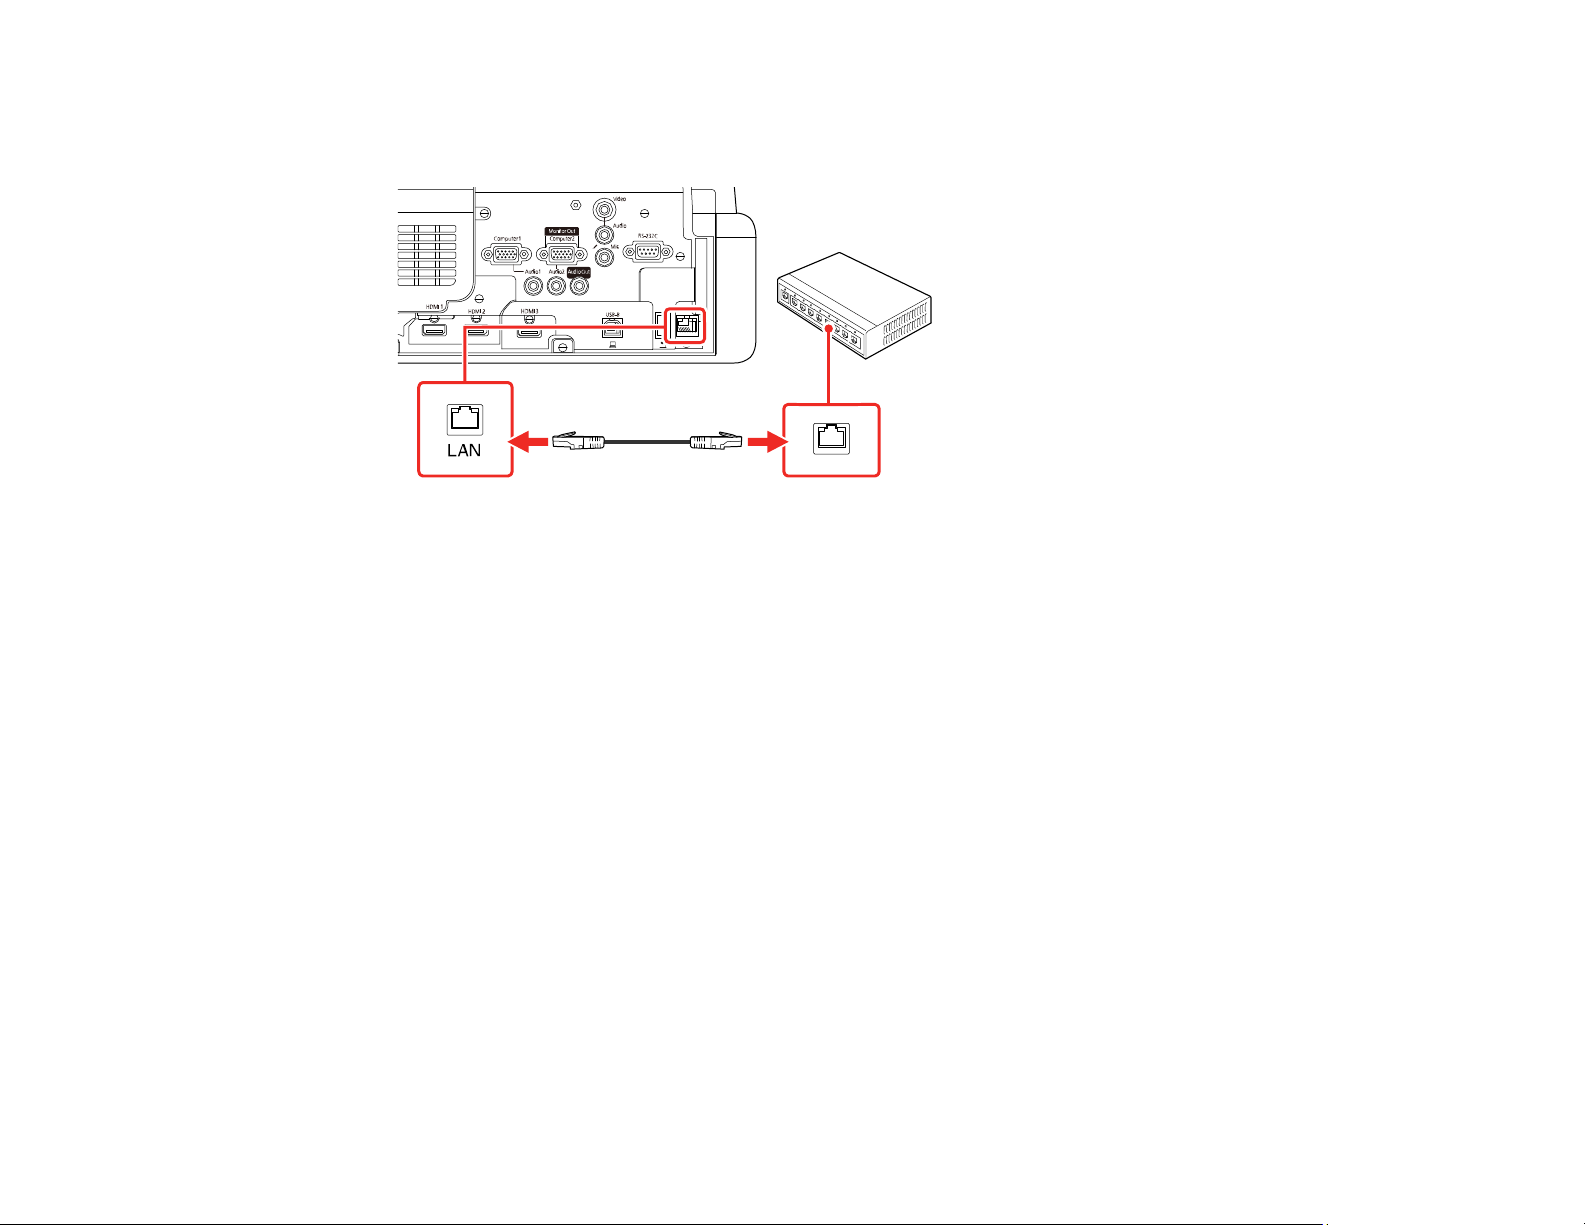
1. Connect one end of the network cable to your network hub, switch, or router.
2. Connect the other end of the cable to the projector's LAN port.
Parent topic: Wired Network Projection
Selecting Wired Network Settings
Before you can project from computers on your network, you must select the network settings for the
projector using its menu system.
Note: Make sure you already connected the projector to your wired network using the LAN port.
1. Turn on the projector.
2. Press the Menu button.
46
Page 47
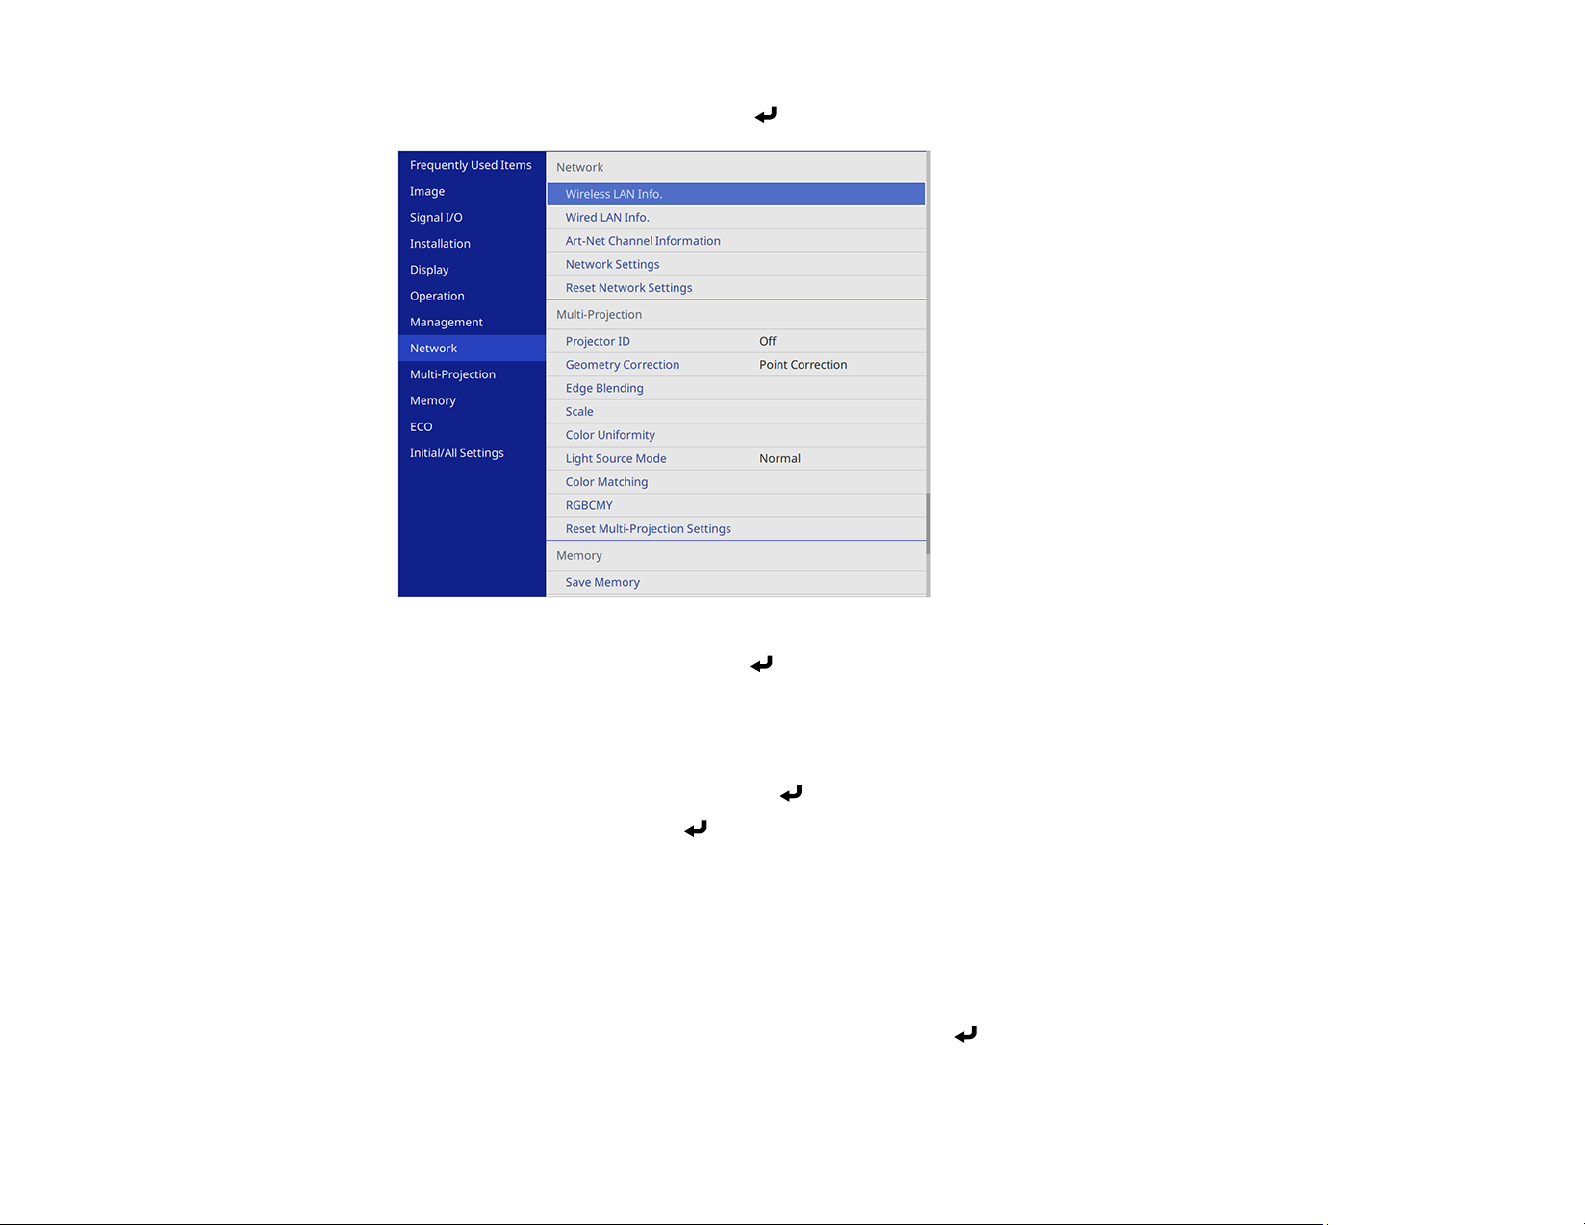
3. Select the Network menu and press Enter.
4. Select Network Settings and press Enter.
5. Select Projector Name and enter a name up to 16 alphanumeric characters long to identify the
projector on a network.
6. Set the Priority Control Interface setting to Wired LAN.
7. Select the Wired LAN menu and press Enter.
8. Select IP Settings and press Enter.
9. Select your IP settings as necessary:
• If your network assigns addresses automatically, turn on the DHCP setting.
• If you must set addresses manually, turn off DHCP and enter the projector's IP Address, Subnet
Mask, and Gateway Address as needed.
Note: To highlight the numbers you want from the displayed keyboard, press the arrow buttons on
the remote control. To select a highlighted number, press Enter. Alternatively, press and hold the
Num button on the remote control while entering the desired numbers.
47
Page 48
10. To prevent display of the IP address on the standby screen, turn off IP Address Display in the
Wired LAN menu.
11. Select Return and press Enter to return to the Network Settings menu.
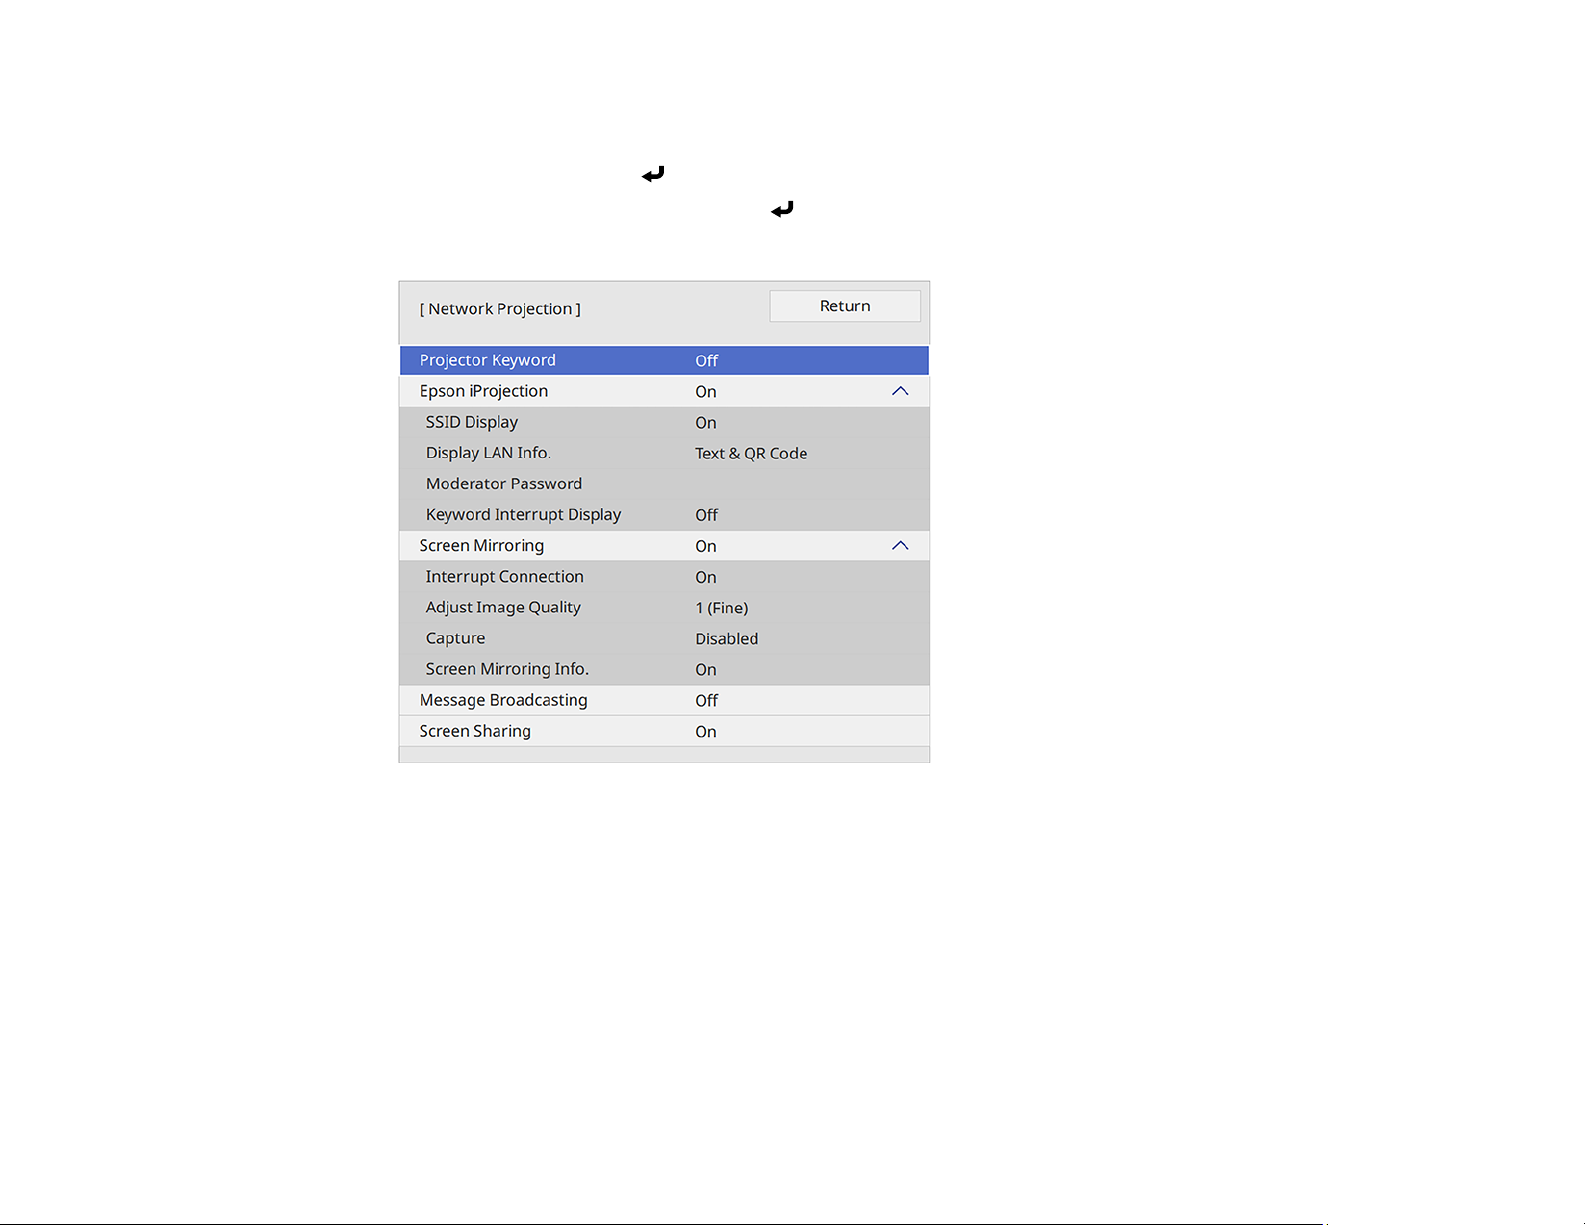
12. Select Network Projection and press Enter.
You see a screen like this:
13. Set the Epson iProjection setting to On.
14. Select the following options as necessary:
• SSID Display lets you display the SSID on the network information screen and home screen.
• Display LAN Info lets you select how the projector displays network information. You can select
an option to display a QR code that lets you quickly connect your iOS or Android devices using the
Epson iProjection app.
• Moderator Password lets you enter a password up to 4 numbers long for accessing the projector
as a moderator with the Epson iProjection (Windows/Mac) software or the Epson iProjection app.
(No default password.)
48
Page 49

• Keyword Interrupt Display lets you select whether to display a projector keyword on the
projected image when accessing the projector using Epson iProjection.
Note: Use the displayed keyboard to enter the password and keyword. Press the arrow buttons on
the remote control to highlight characters and press Enter to select them.
15. When you finish selecting settings, select Return and press Enter to return the Network
Settings menu.
16. Select Set, and follow the on-screen instructions to save your settings and exit the menus.
Parent topic: Wired Network Projection
Related references
Network Settings - Network Menu
Wireless Network Projection
You can project over a wireless network. To do this, you must set up your projector and computer for
wireless projection.
Note: Infrastructure mode supports 802.11b/g/n (2.4 GHz) and 802.11a/n/ac (5 GHz). Simple AP mode
supports 802.11g/n (2.4 GHz) and 802.11a/n/ac (5 GHz).
There are two ways to connect to your projector wirelessly:
• Creating a Quick Wireless Connection USB Key (Windows only) using the Epson iProjection software
• Configuring the connection manually using the projector's Network menus
After connecting and setting up the projector, install the projector software as necessary. You may need
to install it from a software CD, if included, or download the software and manuals as necessary.
Note: If your projector is connected via a LAN cable to a network that includes a wireless access point,
you can connect to the projector wirelessly through the access point.
Note: If you are monitoring or controlling the projector in standby mode using a wireless network
connection, connect your computer and projector via a wireless network router (infrastructure mode).
Connecting Directly to a Smartphone or Tablet
Using Quick Wireless Connection (Windows)
Selecting Wireless Network Settings Manually
49
Page 50
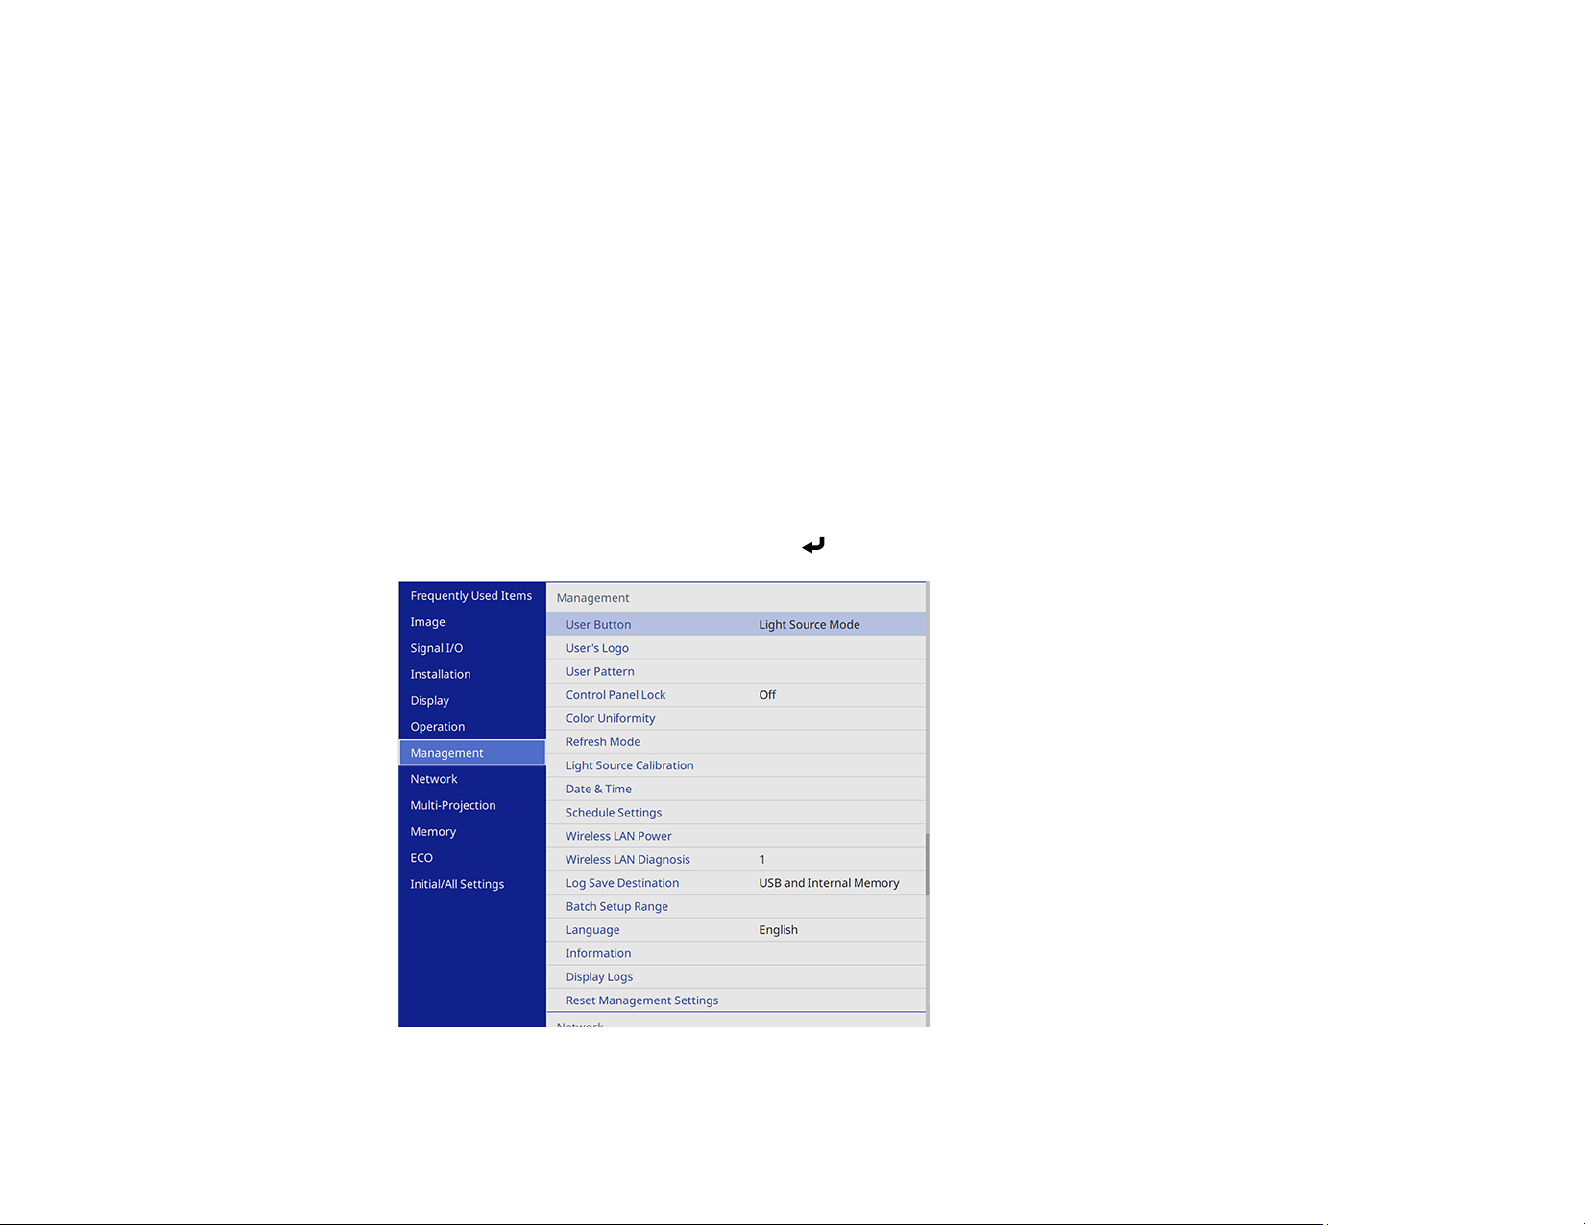
Selecting Wireless Network Settings in Windows
Selecting Wireless Network Settings on Mac
Setting Up Wireless Network Security
Installing the Additional Wireless LAN Module
Parent topic: Using the Projector on a Network
Related references
Additional Projector Software and Manuals
Connecting Directly to a Smartphone or Tablet
You can display a QR code on the screen and use it to connect a single smartphone or tablet to your
projector with the Epson iProjection app.
1. Download the latest version of the Epson iProjection app from the App Store or Google Play and
install it on your smartphone or tablet.
2. Press the Menu button on the projector or the remote control.
3. Select the Management menu and press Enter.
50
Page 51
4. Select On as the Wireless LAN Power setting.
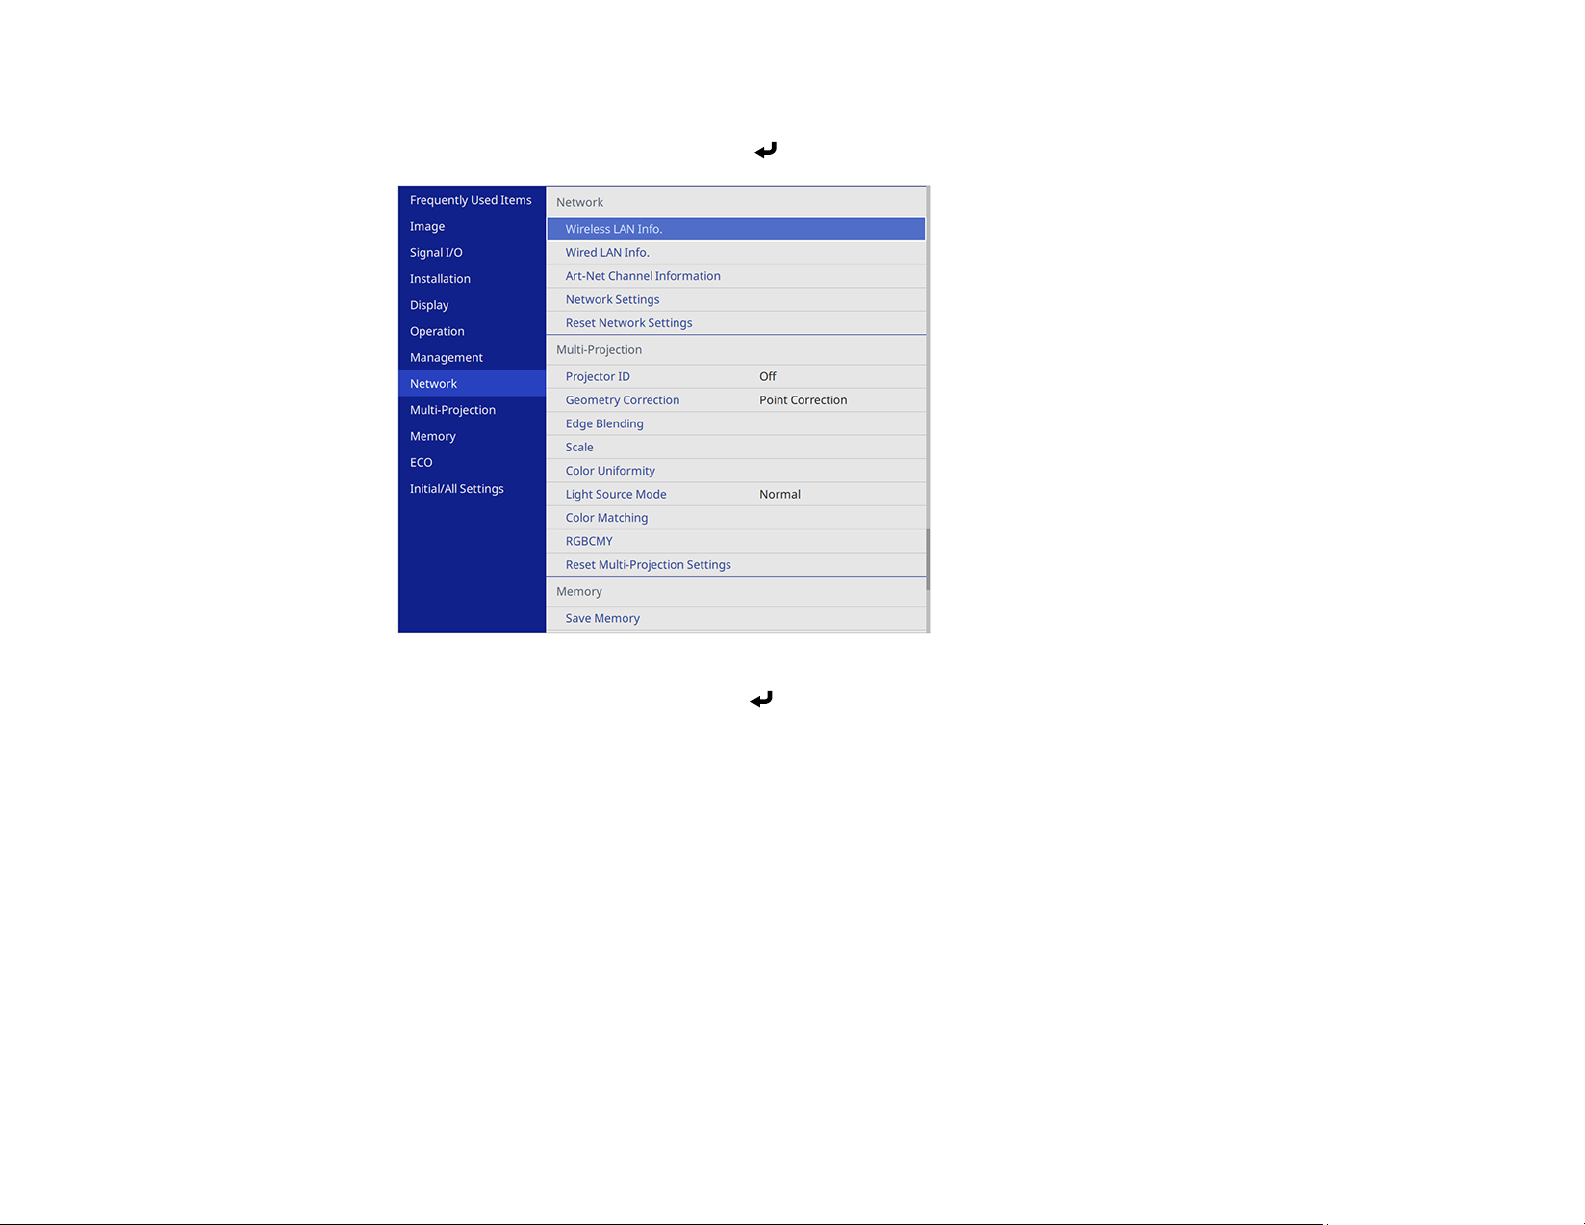
5. Select the Network menu and press Enter.
6. Select Network Settings and press Enter.
7. Set the Priority Control Interface setting to Wireless LAN.
51
Page 52
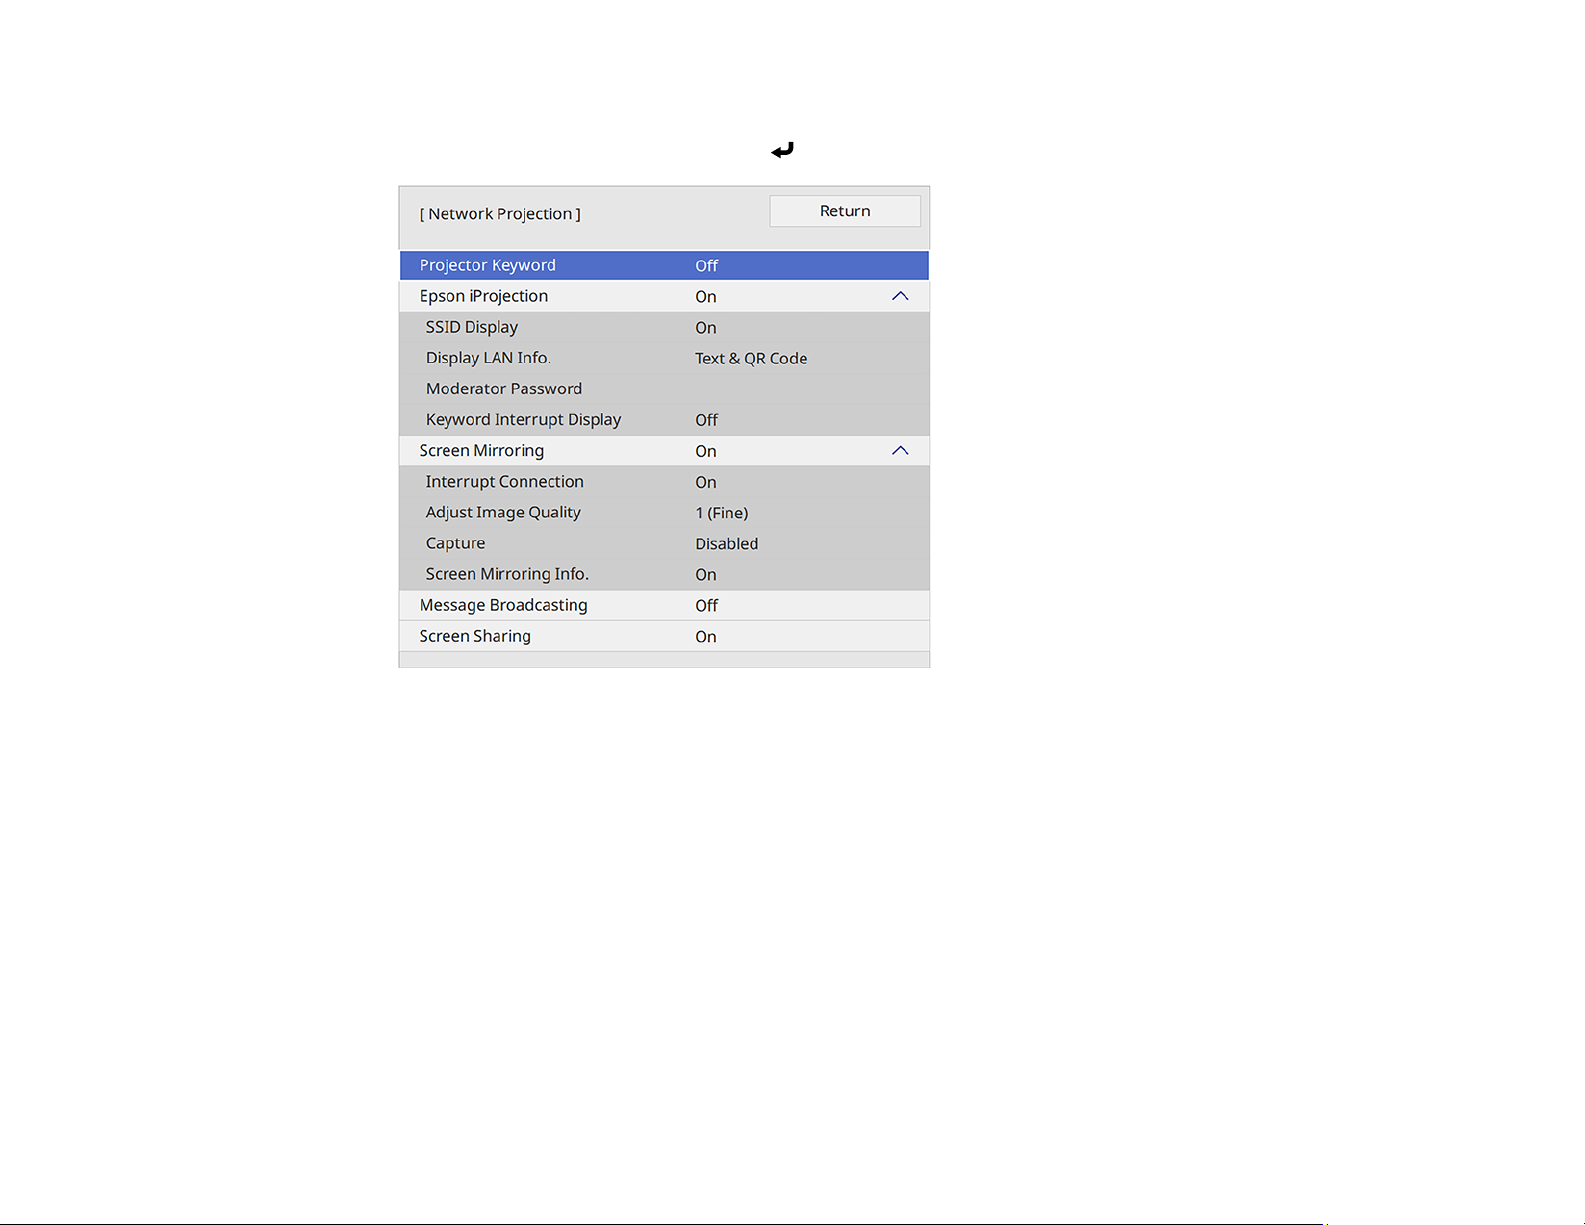
8. Make sure Simple AP is set to On.
9. Select Network Projection and press Enter.
10. Turn on the Projector Keyword setting if you want to prevent access to the projector by anyone not
in the room with it.
Note: The projector displays a random keyword that you must enter from a computer using the
Epson iProjection (Windows/Mac) software to access the projector.
11. Select On as the Epson iProjection setting.
12. Select the following settings as necessary:
• SSID Display selects whether to display the SSID on the network standby screen and Home
screen.
• Display LAN Info lets you select how the projector displays network information. You can select
an option to display a QR code that lets you quickly connect your iOS or Android devices using the
Epson iProjection app.
52
Page 53

• Moderator Password lets you enter a password up to 4 numbers long for accessing the projector
as a moderator with the Epson iProjection (Windows/Mac) software or the Epson iProjection app.
(No default password.)
Note: Make a note of the password and keep it in a safe place. If you forget the password, you
can select Reset Network Settings from the projector's Network menu, but all of the passwords
for settings in the Network menu will be reset.
• Keyword Interrupt Display lets you select whether to display a projector keyword on the
projected image when accessing the projector using Epson iProjection.
13. When you finish selecting settings, select Return and press Enter to return to the Network
Settings menu.
14. Select Set, and follow the on-screen instructions to save your settings and exit the menus.
15. Press the LAN button on the remote control.
Your projector displays a QR code on the projection surface. You can press Enter to hide and
show the QR code on the screen. If you do not see the QR code, set the Display LAN Info setting to
Text & QR Code in the Network menu.
16. Open the Epson iProjection app on your smartphone or tablet.
17. Use the QR code reader feature to read the QR code and connect your device to the projector.
Note: The projector and the smartphone must be on the same wireless network in order to establish
a connection.
Your smartphone or tablet is now connected to your projector. Visit epson.com/iprojection (U.S.),
epson.ca/iprojection (Canada), or latin.epson.com/iprojection (Latin America) for information on
controlling your projector with the Epson iProjection app.
Parent topic: Wireless Network Projection
Related references
Network Settings - Network Menu
Administration Settings - Management Menu
Initial Settings and Reset Options - Initial/All Settings Menu
Using Quick Wireless Connection (Windows)
You can create a Quick Wireless Connection USB Key to quickly connect the projector to a Windows
computer wirelessly. Then you can project your presentation and remove the key when you are done.
53
Page 54

1. Create a Quick Wireless Connection USB Key with a USB flash drive and the Epson iProjection
(Windows) software.
Note: A USB flash drive is not included with your projector.
Note: See the online Epson iProjection Operation Guide for instructions.
2. Turn on the projector.
3. Press the LAN button on the remote control.
The LAN standby screen is displayed.
4. Verify the SSID and IP address.
5. Insert the USB key into the projector's USB-A port.
You see a projected message that the network information update is complete.
6. Remove the USB key.
7. Insert the USB key into a USB port on your computer.
8. Follow the on-screen instructions to install the Epson iProjection software.
Note: If you see a Windows Firewall message, click Yes to disable the firewall. You need
administrator authority to install the software. If it is not installed automatically, double-click
MPPLaunch.exe in the USB key.
After a few minutes, your computer image is displayed by the projector. If it does not appear, press
the LAN or Source Search button on your remote control or restart your computer.
9. Run your presentation as necessary.
10. When you finish projecting wirelessly, select the Safely Remove Hardware option in the Windows
taskbar, then remove the USB key from your computer.
Note: You can share the USB key with other computers without disconnecting your computer. You
may need to restart your computer to reactivate your wireless LAN connection.
Parent topic: Wireless Network Projection
54
Page 55
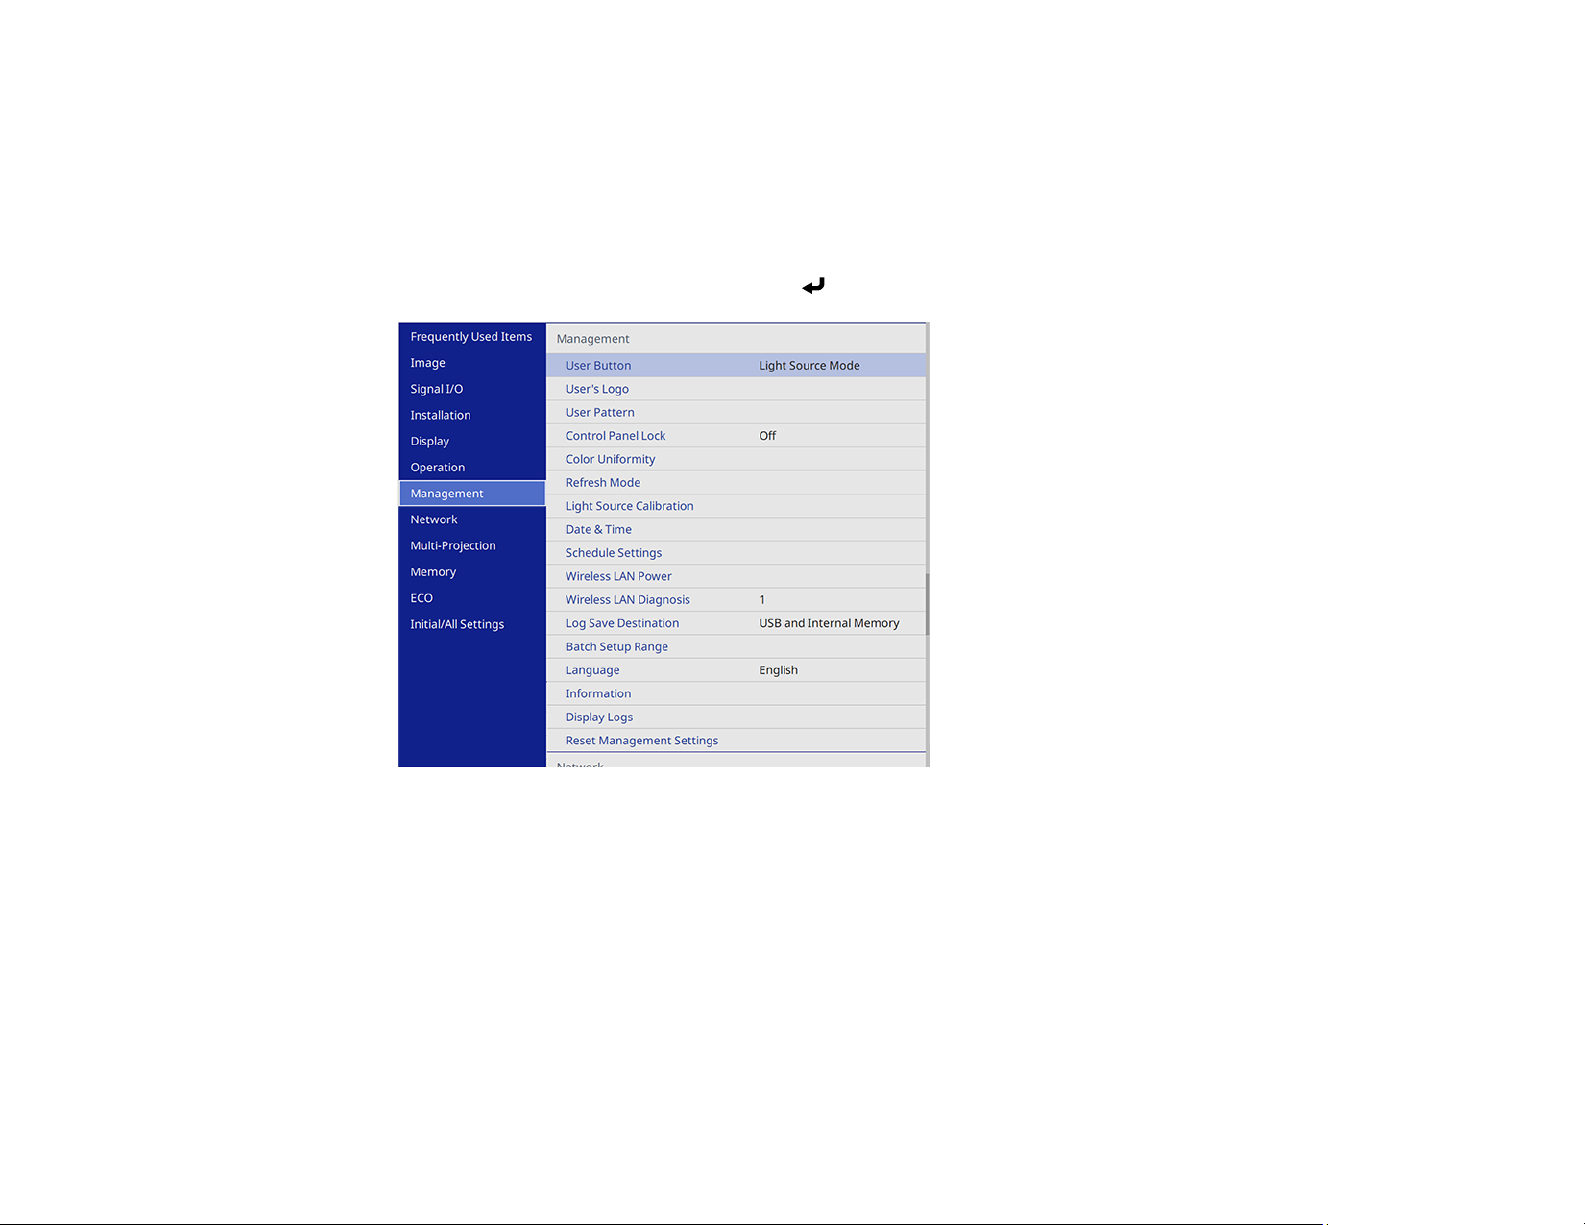
Selecting Wireless Network Settings Manually
Before you can project from your wireless network, you must select the network settings for the projector
using its menu system.
1. Turn on the projector.
2. Press the Menu button.
3. Select the Management menu and press Enter.
4. Select On as the Wireless LAN Power setting.
55
Page 56
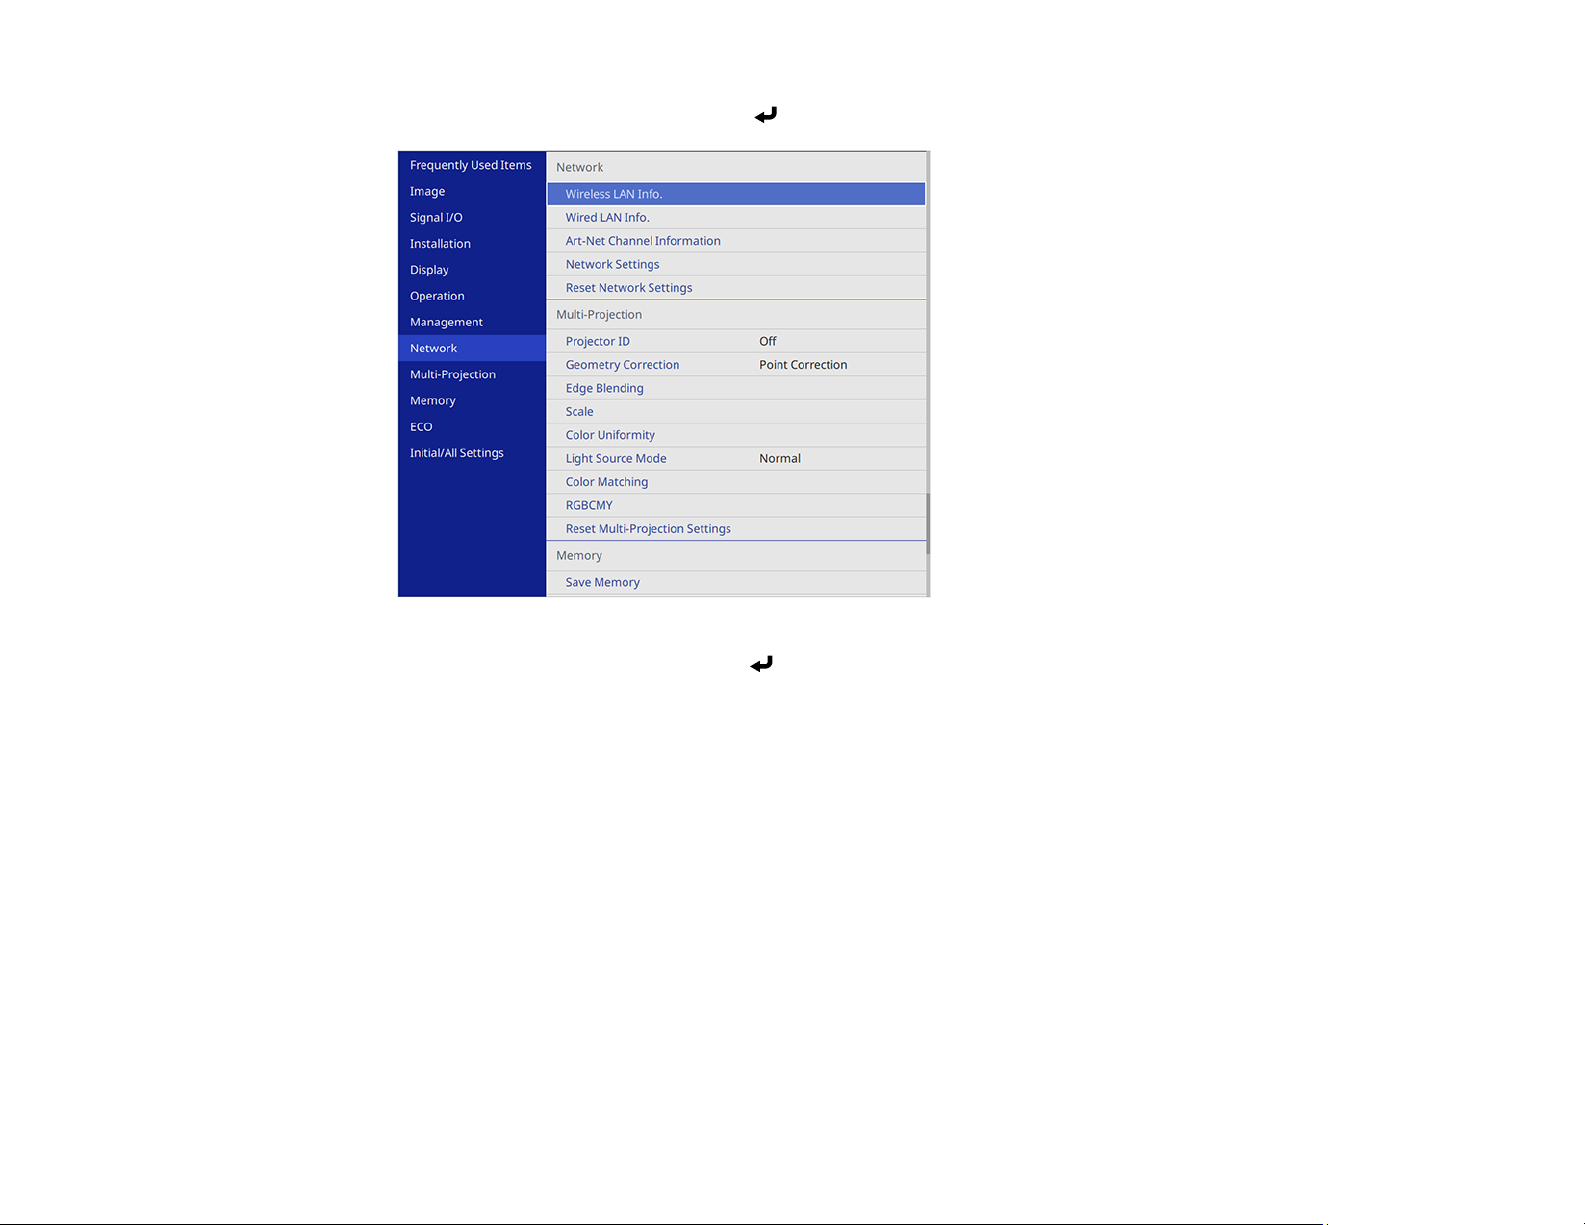
5. Select the Network menu and press Enter.
6. Select Network Settings and press Enter.
7. Select Projector Name and enter a name up to 16 alphanumeric characters long to identify the
projector on the network.
8. Set the Priority Control Interface setting to Wireless LAN.
9. Select the connection method:
• To connect directly to a wireless device (Simple AP mode), set the Simple AP setting to On and
go to step 17.
• To connect to a device via a wireless network router (infrastructure mode), set the Simple AP
setting to Off and go to the next step.
• If you installed the optional wireless LAN module and want to use both connection methods, set
the Simple AP setting to On and go to the next step.
56
Page 57
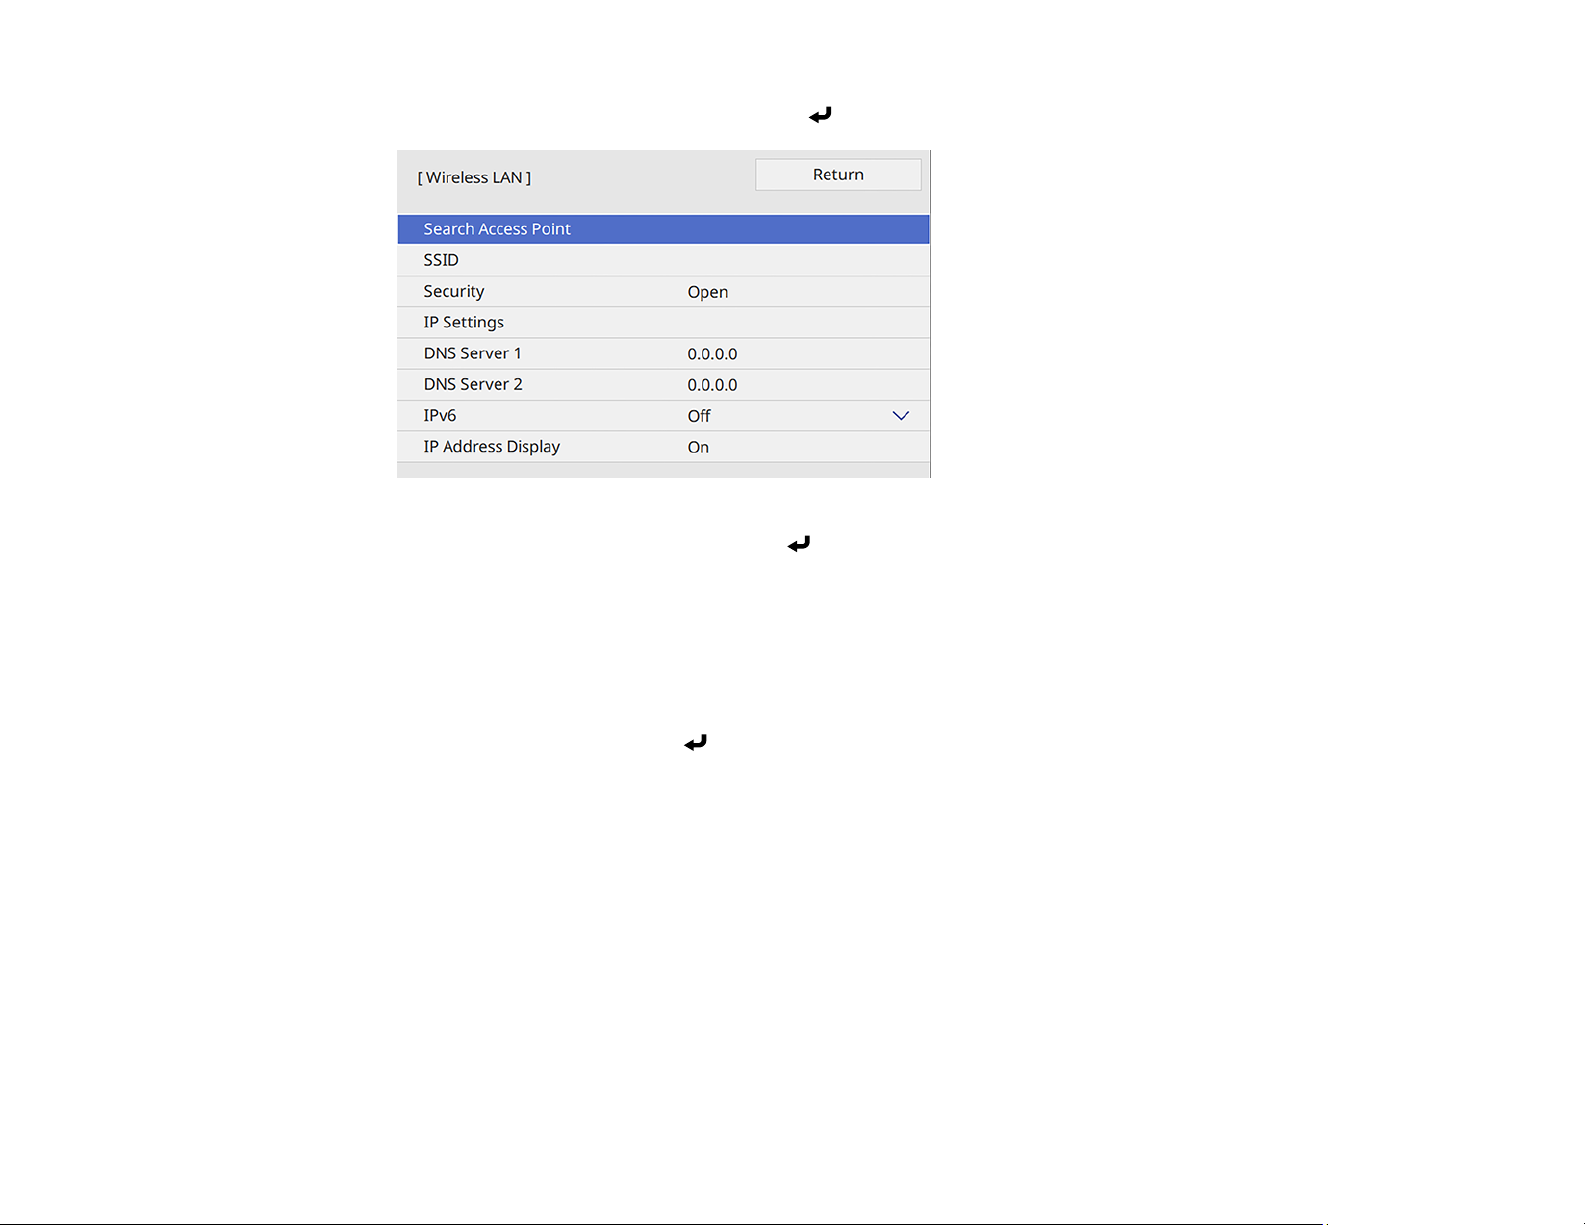
10. Select the Wireless LAN menu and press Enter.
11. Select Search Access Point and press Enter.
The projector searches for wireless networks.
12. Select the network you want to connect to and enter the password, if necessary.
Note: If you need to assign the SSID manually, select SSID to enter the SSID. The SSID and
password are case-sensitive. Make sure you enter them in the correct case.
13. Select IP Settings and press Enter.
14. Select your IP settings as necessary:
• If your network assigns addresses automatically, turn on the DHCP setting.
• If you must set addresses manually, turn off DHCP and enter the projector's IP Address, Subnet
Mask, and Gateway Address as needed.
Note: Do not use these addresses: 0.0.0.0, 127.x.x.x, 192.0.2.x or 224.0.0.0 through
255.255.255.255 (where x is a number from 0 to 255) for IP Address, 255.255.255.255 or 0.0.0.0
through 254.255.255.255 for Subnet Mask, and 0.0.0.0, 127.x.x.x or 224.0.0.0 through
255.255.255.255 for Gateway Address. For DNS Server addresses, do not use the following IP
57
Page 58
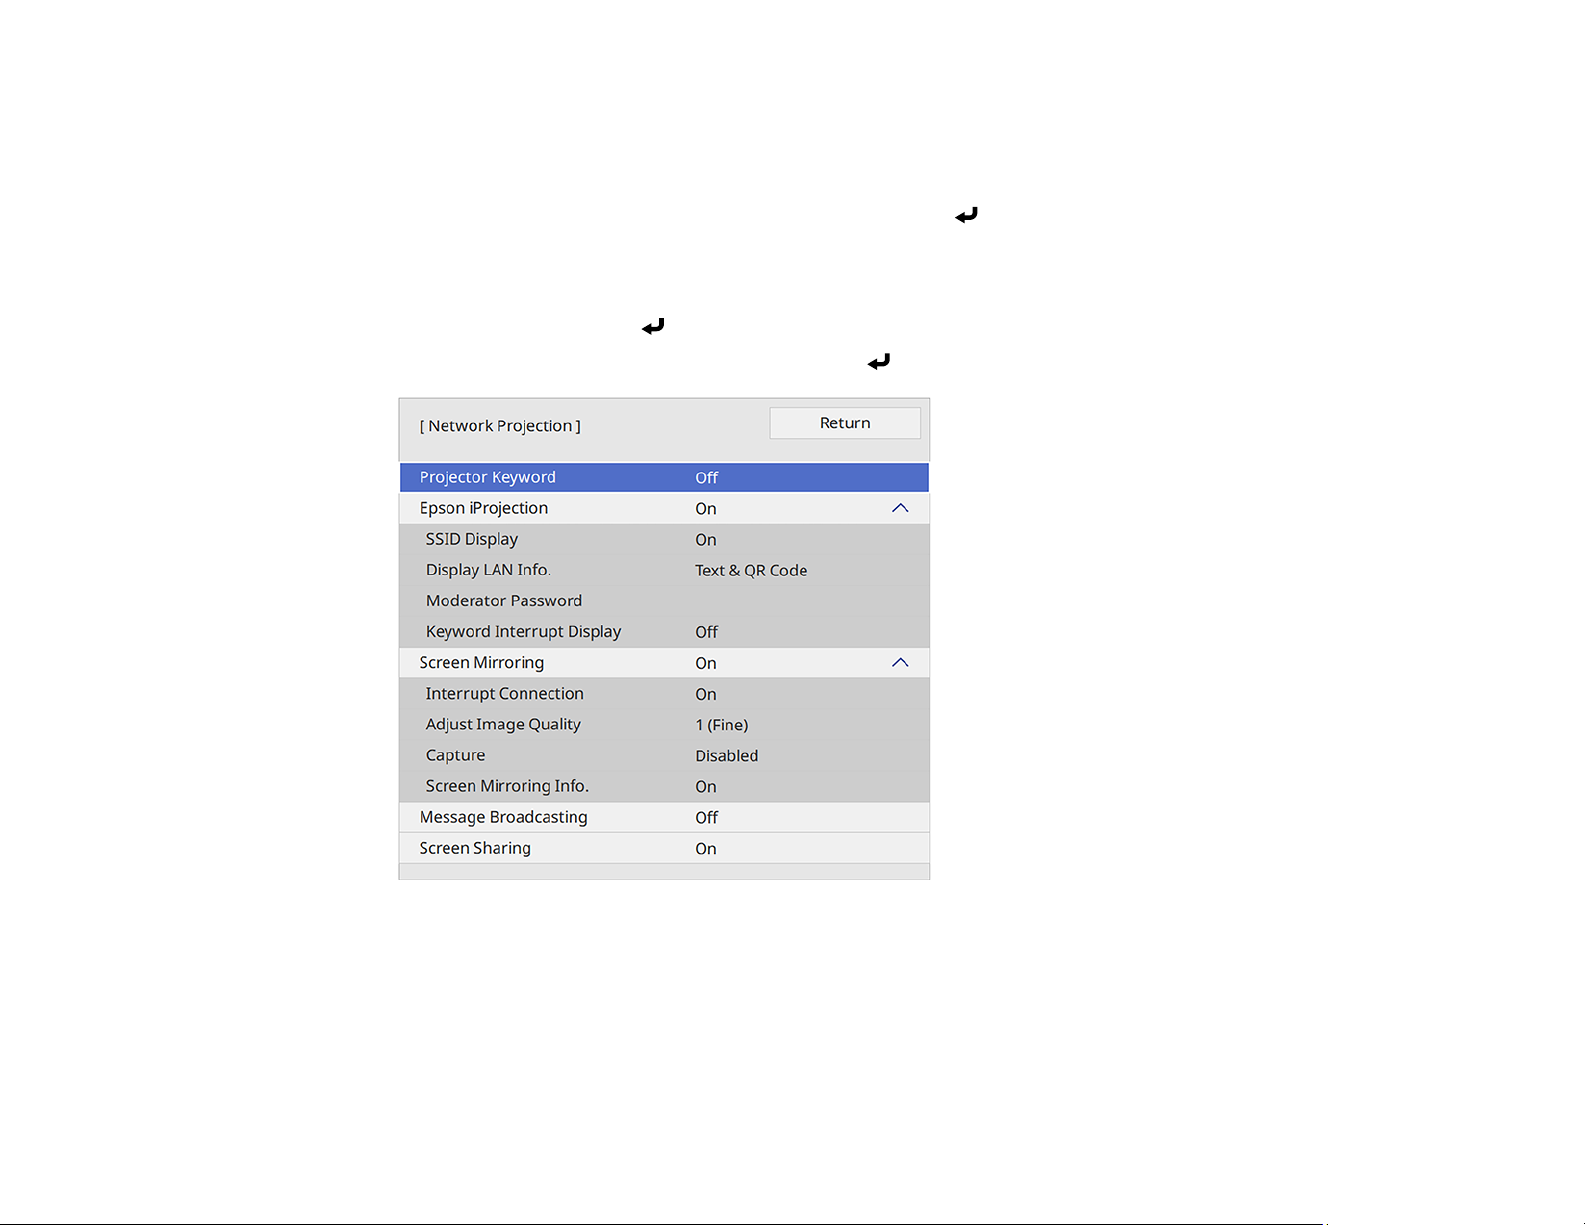
addresses: 127.x.x.x (where x is a number from 0 to 255). When these settings are not set, DNS
server information is acquired using DHCP.
Note: To highlight the numbers you want from the displayed keyboard, press the arrow buttons on
the remote control. To select a highlighted number, press Enter.
15. To prevent display of the IP address on the network information screen, turn off IP Address
Display.
16. Select Return and press Enter to return to the Network Settings menu.
17. Select the Network Projection menu and press Enter.
18. Turn on the Projector Keyword setting if you want to prevent access to the projector by anyone not
in the room with it.
Note: The projector displays a random keyword that you must enter from a computer using the
Epson iProjection (Windows/Mac) software to access the projector.
58
Page 59

19. Set the Epson iProjection setting to On.
20. Select the following options as necessary:
• SSID Display lets you select whether to display the projector's SSID on the standby screen and
Home screen.
• Display LAN Info lets you select how the projector displays network information. You can select
an option to display a QR code that lets you quickly connect your iOS or Android devices with the
Epson iProjection app.
• Moderator Password lets you enter a password up to 4 numbers long for accessing the projector
as a moderator with the Epson iProjection (Windows/Mac) software or the Epson iProjection app.
Note: Make a note of the password and keep it in a safe place. If you forget the password, you
can select Reset Network Settings from the projector's Network menu, but all of the passwords
for settings in the Network menu will be reset.
• Keyword Interrupt Display lets you select whether to display a projector keyword on the
projected image when accessing the projector using Epson iProjection.
Note: Use the displayed keyboard to enter the password and keyword. Press the arrow buttons on
the remote control to highlight characters and press Enter to select them.
21. When you finish selecting settings, select Return to return to the Network Settings menu.
22. Select Set and follow the on-screen instructions to save your settings and exit the menus.
After you complete the wireless settings for your projector, you need to select the wireless network on
your computer, or iOS or Android device.
Note: You can press the LAN button on the remote control to check your network security settings after
completing the wireless settings.
Wireless LAN Menu Settings
Parent topic: Wireless Network Projection
Related references
Network Settings - Network Menu
Initial Settings and Reset Options - Initial/All Settings Menu
59
Page 60

Wireless LAN Menu Settings
Setting Options Description
Search Access Point To Search View Search for available wireless
SSID Up 32 alphanumeric characters Manually set the SSID (network
network access points in
Advanced connection mode
name) of the wireless LAN
system the projector is
connecting to
Security WPA2/WPA3-PSK
WPA2/WPA3-EAP
WPA3-PSK
WPA3-EAP
Open
Selects the type of security used
on the wireless network
WPA2/WPA3-PSK: uses
WPA2/WPA3 personal mode;
encryption is dependent on the
access point settings;
Passphrase must be the same
as the access point
WPA2/WPA3-EAP: uses
WPA2/WPA3 enterprise mode;
encryption is dependent on the
access point settings
WPA3-PSK: uses WPA3
personal mode with AES for
encryption. Use the Passphrase
value to establish a connection
from a computer
WPA3-EAP: uses WPA3
enterprise mode; encryption is
dependent on the access point
settings
60
Page 61

Setting Options Description
Passphrase Various passphrases from 8 to
63 characters
EAP Method EAP Type
User name
Password
Client Certificate
Verify Server Certificate
CA certificate
RADIUS Server Name
IP Settings DHCP (On or Off)
IP Address
Subnet Mask
Gateway Address
Selects the pre-shared key used
on the network; passphrases are
case-sensitive. If the network
settings are reset after the
passphrase has been changed
more than once, the first
passphrase is restored. This
setting is only displayed when
Security is set to WPA3-PSK or
WPA2/WPA3-PSK.
Sets the EAP settings for WPA3EAP and WPA2/WPA3-EAP
security
Selects DHCP if your network
assigns IP addresses
automatically, or turns off DHCP
so you can enter the network's IP
address, subnet mask, and
gateway address as needed
61
Page 62

Setting Options Description
DNS Server 1/ DNS Server 2 Various IP addresses Sets the IP address for the DNS
server using 0 to 255 for each
address field. The DNS server
resolves the host name
Note: Do not use 127.x.x.x
(where x is a number from 0 to
255). When these settings are
not set and remain as 0.0.0.0,
DNS server information is
acquired using DHCP. After
acquiring the information, the
values remain as 0.0.0.0.
IPv6 On
Off
IP Address Display On
Off
Parent topic: Selecting Wireless Network Settings Manually
Selecting Wireless Network Settings in Windows
Before connecting to the projector, select the correct wireless network on your computer.
1. To access your wireless utility software, access the Desktop and double-click the network icon on
the Windows taskbar.
2. Do one of the following:
• If your projector is set up on an existing network (Advanced mode), select the network name
(SSID).
• If your projector is configured for Quick mode, select the projector's SSID.
3. Click Connect.
Parent topic: Wireless Network Projection
Enables IPv6 to allow monitoring
and control of the projector over
a network using Epson Web
Control and PJLink
Selects whether to display the IP
address on the network standby
screen and Home screen
62
Page 63

Selecting Wireless Network Settings on Mac
Before connecting to the projector, select the correct wireless network on your Mac.
1. Click the AirPort or Wi-Fi icon on the menu bar at the top of the screen.
2. Make sure AirPort or Wi-Fi is turned on, then do one of the following:
• If your projector is set up on an existing network (Advanced mode), select the network name
(SSID).
• If your projector is configured for Quick mode, select the projector's SSID.
Parent topic: Wireless Network Projection
Setting Up Wireless Network Security
You can set up security for your projector to use on a wireless network. Set up one of the following
security options to match the settings used on your network:
• WPA2-PSK (Simple AP mode only)
• WPA3-PSK
• WPA2/WPA3-PSK
• WPA3-EAP
• WPA2/WPA3-EAP
Note: To set up WPA3-EAP or WPA2/WPA3-EAP security, register your digital certificate file and place
it on a USB storage device for connection to your projector.
1. Press the Menu button.
63
Page 64
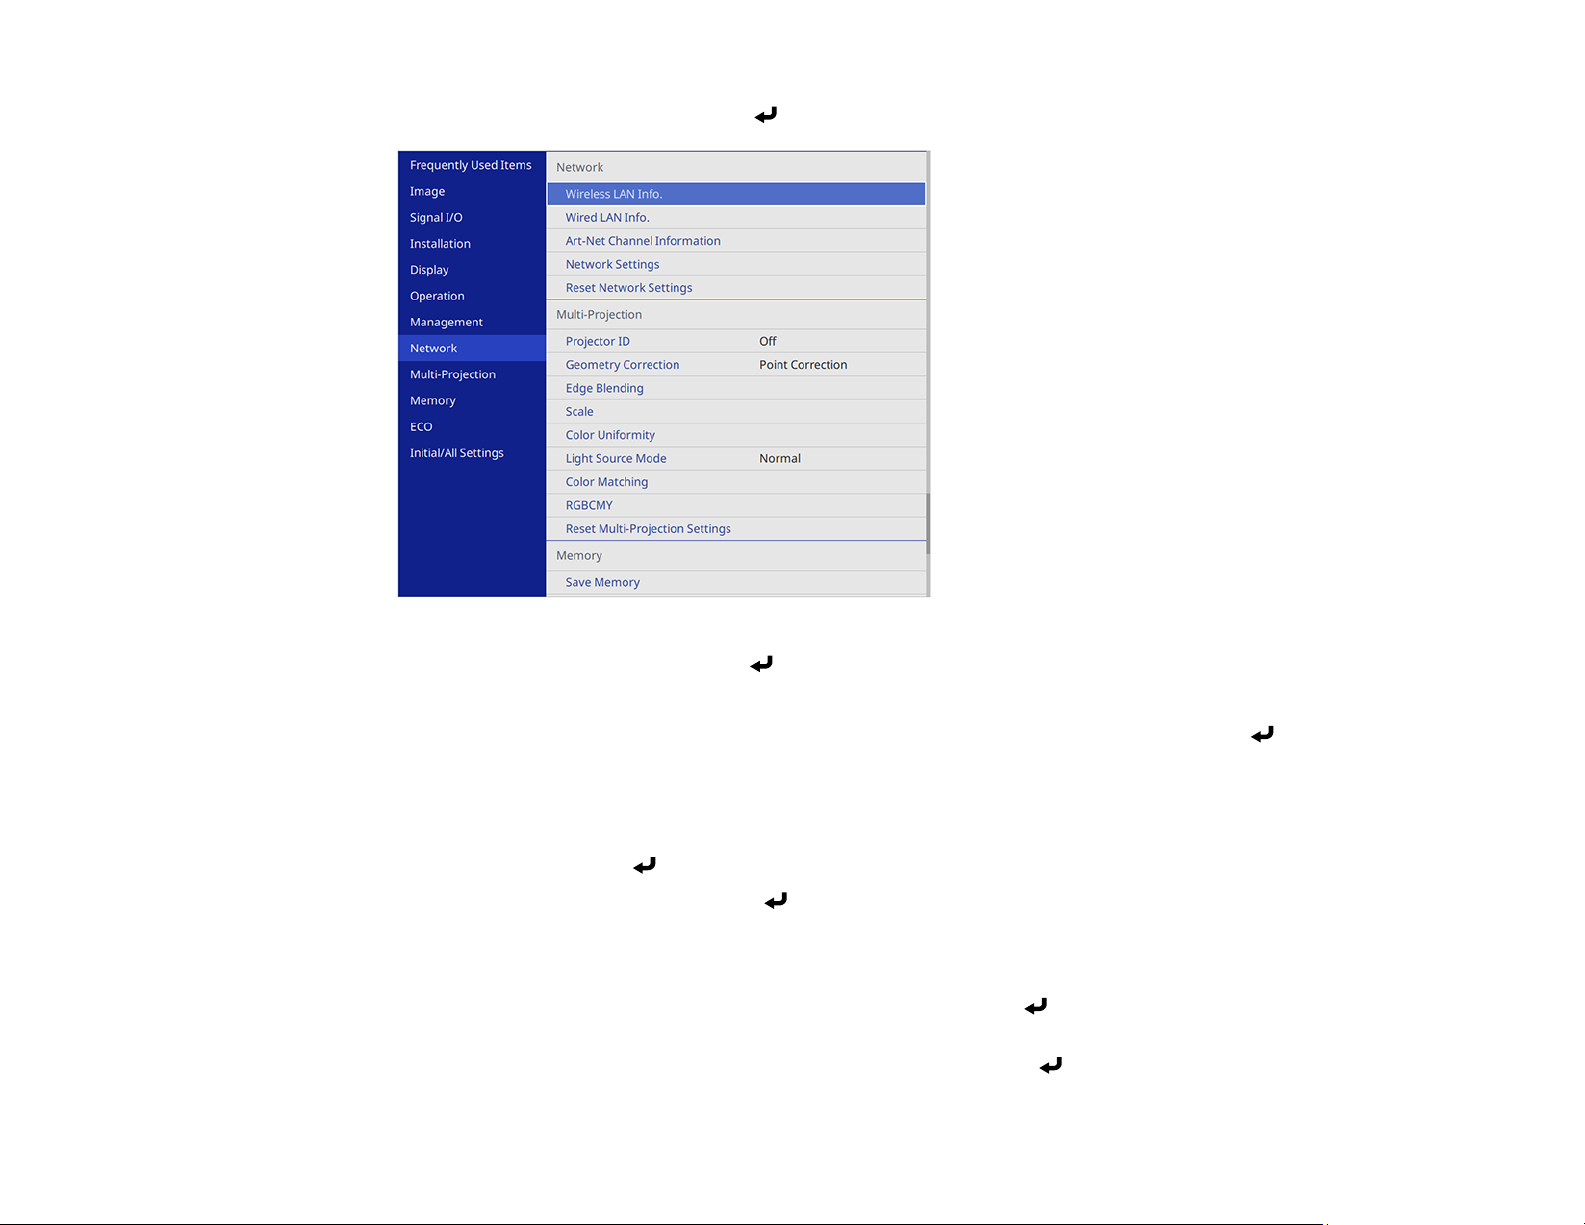
2. Select the Network menu and press Enter.
3. Select Network Settings and press Enter.
4. Do one of the following:
• To connect directly to a wireless device (Simple AP mode), select Passphrase, press Enter,
and enter a passphrase from 8 to 63 characters long. When you are done, return to the Network
Settings screen, select Set, and follow the on-screen instructions to save your settings and exit
the menus. Skip the rest of these steps.
• To connect to a device via a wireless network router (infrastructure mode), select the Wireless
LAN menu and press Enter. Continue with the next step.
5. Select the Security setting and press Enter.
6. Select the security settings for your network.
7. Do one of the following according to the security you selected:
• WPA3-PSK or WPA2/WPA3-PSK: Select Passphrase, press Enter, and enter a passphrase
from 8 to 63 characters long. Then continue with step 9.
• WPA3-EAP or WPA2/WPA3-EAP: Select EAP Type and press Enter.
64
Page 65

8. Select the protocol for authentication as the EAP Type setting.
9. When you are finished, select Return and press Enter to return to the Network Settings menu.
10. Select Set, and follow the on-screen instructions to save your settings and exit the menus.
Parent topic: Wireless Network Projection
Related tasks
Registering Digital Certificates from a Web Browser
Installing the Additional Wireless LAN Module
To use the additional wireless connections, install the optional Epson 802.11b/g/n wireless module in the
projector. Your projector has a built-in wireless LAN module. If you install an optional Epson 802.11b/g/n
wireless LAN module, you can use both network connection methods at the same time. When you install
the wireless LAN module, set the Simple AP setting to On. Do not install any other type of wireless
module.
Caution: Never remove the module while its indicator light is blue or flashing, or while you are projecting
wirelessly. You may damage the module or lose data.
Note: The wireless LAN module is not included with your projector.
1. Turn off the projector and unplug the power cord.
65
Page 66
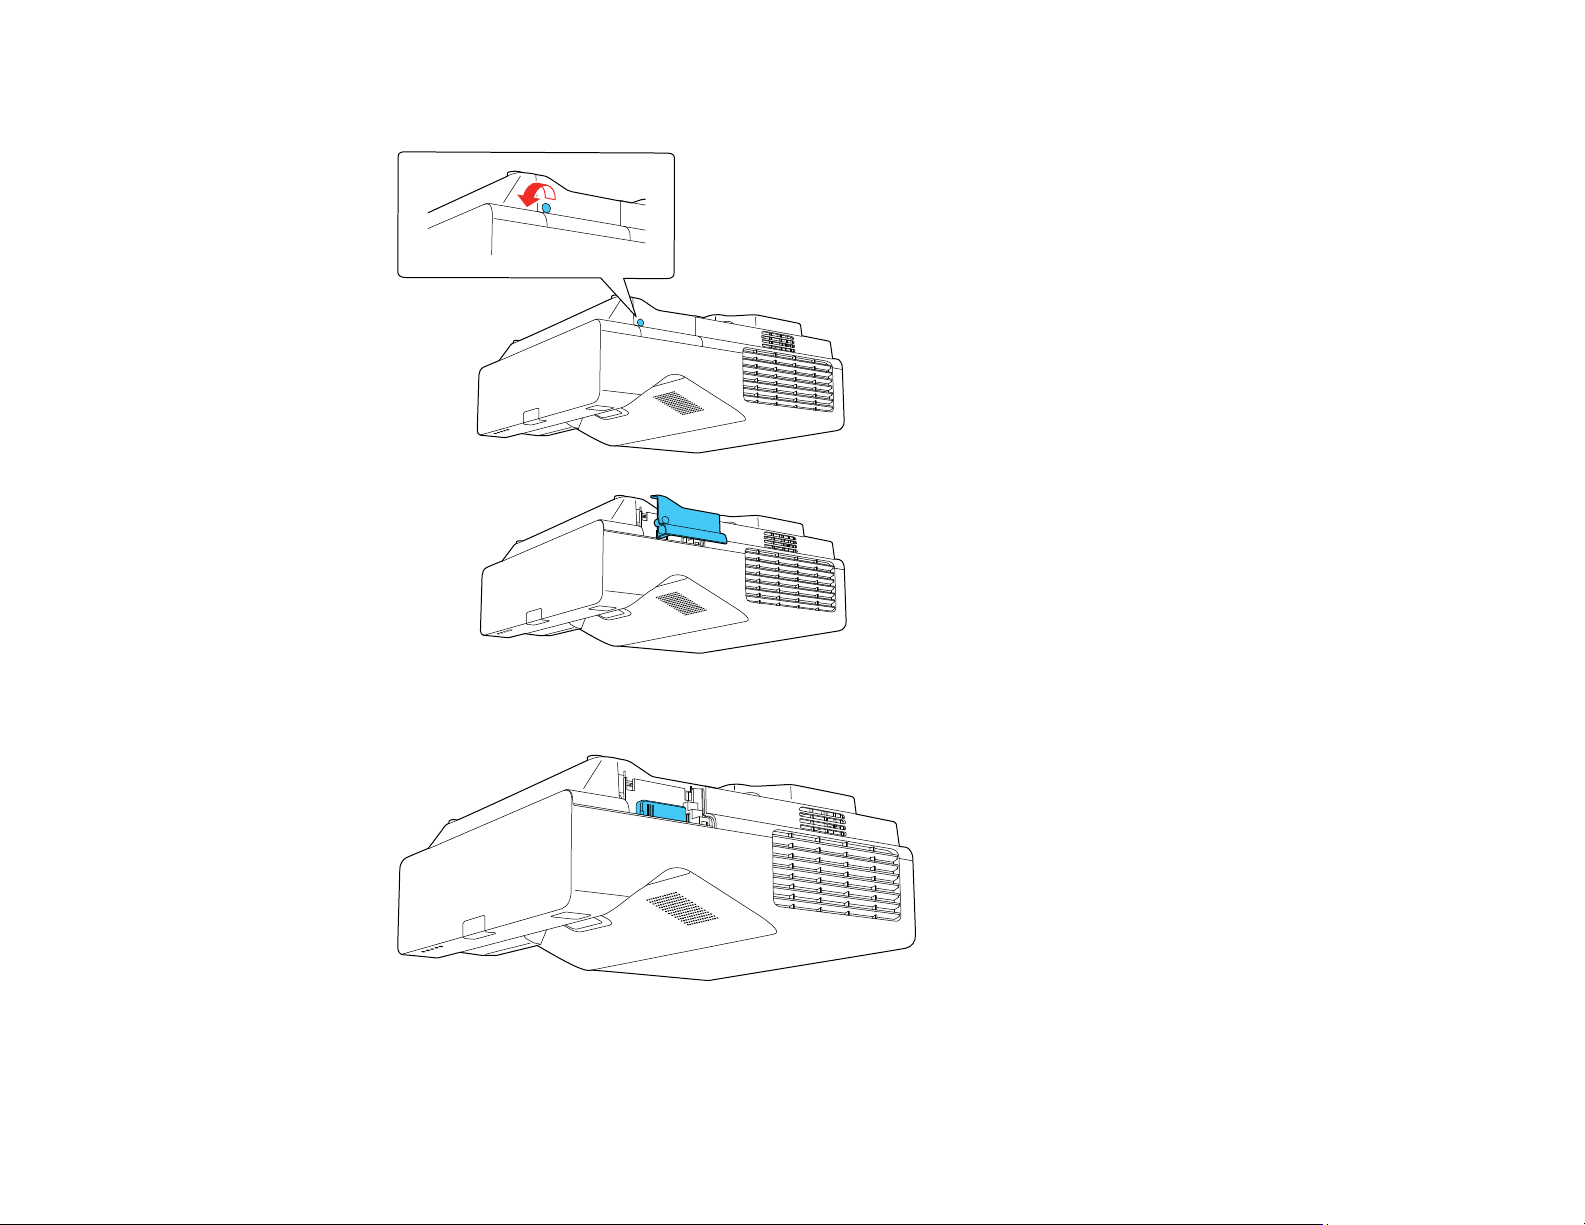
2. Loosen the screw securing the LAN module cover and lift off the cover, if it is attached.
3. Insert the wireless LAN module into the port shown here.
4. Replace the cable cover and tighten the cable cover screws.
5. Plug in and turn on the projector.
66
Page 67

Parent topic: Wireless Network Projection
Wireless Network Projection from a Mobile Device or Windows Computer (Screen Mirroring)
You can send images to your projector from mobile devices such as laptops, smartphones, and tablets
using Miracast technology or from a Windows computer. If your device supports Miracast, you do not
need to install any additional software.
The projector detects the input sources as Screen Mirroring1 and Screen Mirroring2.
Screen Mirroring Restrictions
Selecting Screen Mirroring Settings
Connecting for Screen Mirroring with a Windows 8.x/Windows 10/Windows 11 Computer
Connecting for Screen Mirroring with Miracast
Parent topic: Using the Projector on a Network
Screen Mirroring Restrictions
Note the following when using Screen Mirroring features:
• You cannot project an interlaced image.
• You cannot play audio with more than 3 channels.
• You may not be able to project images depending on the resolution and frame rate.
• You cannot project 3D video.
• You cannot use extended Miracast features on Windows 8.1.
• You may not be able to view contents with copyright protection using a Miracast connection.
• Do not change the projector's Screen Mirroring settings during Screen Mirroring projection. Doing so
may cause the projector to disconnect and delay reconnection.
• Do not turn off the electrical supply to the projector during Screen Mirroring projection.
Parent topic: Wireless Network Projection from a Mobile Device or Windows Computer (Screen
Mirroring)
Selecting Screen Mirroring Settings
You can select Screen Mirroring settings for your projector and then project images from your mobile
device.
1. Press the Menu button.
67
Page 68
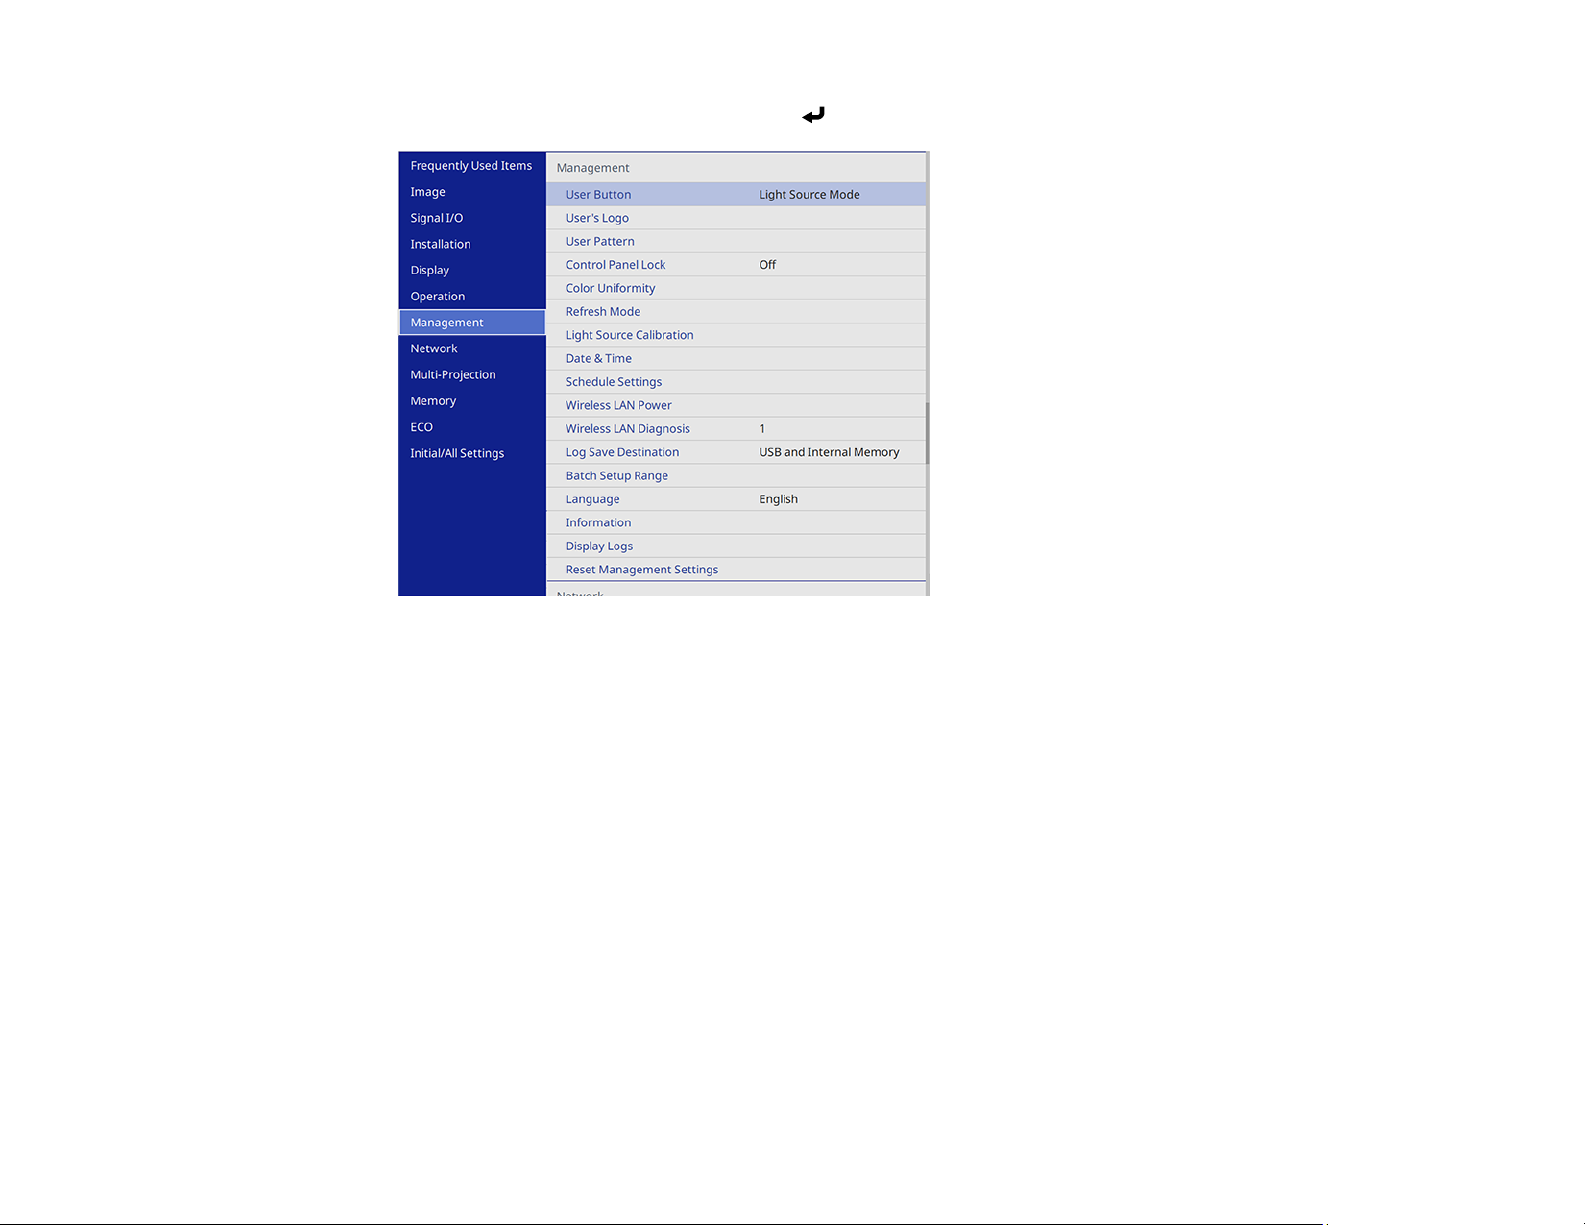
2. Select the Management menu and press Enter.
3. Set the Wireless LAN Power setting to On.
68
Page 69
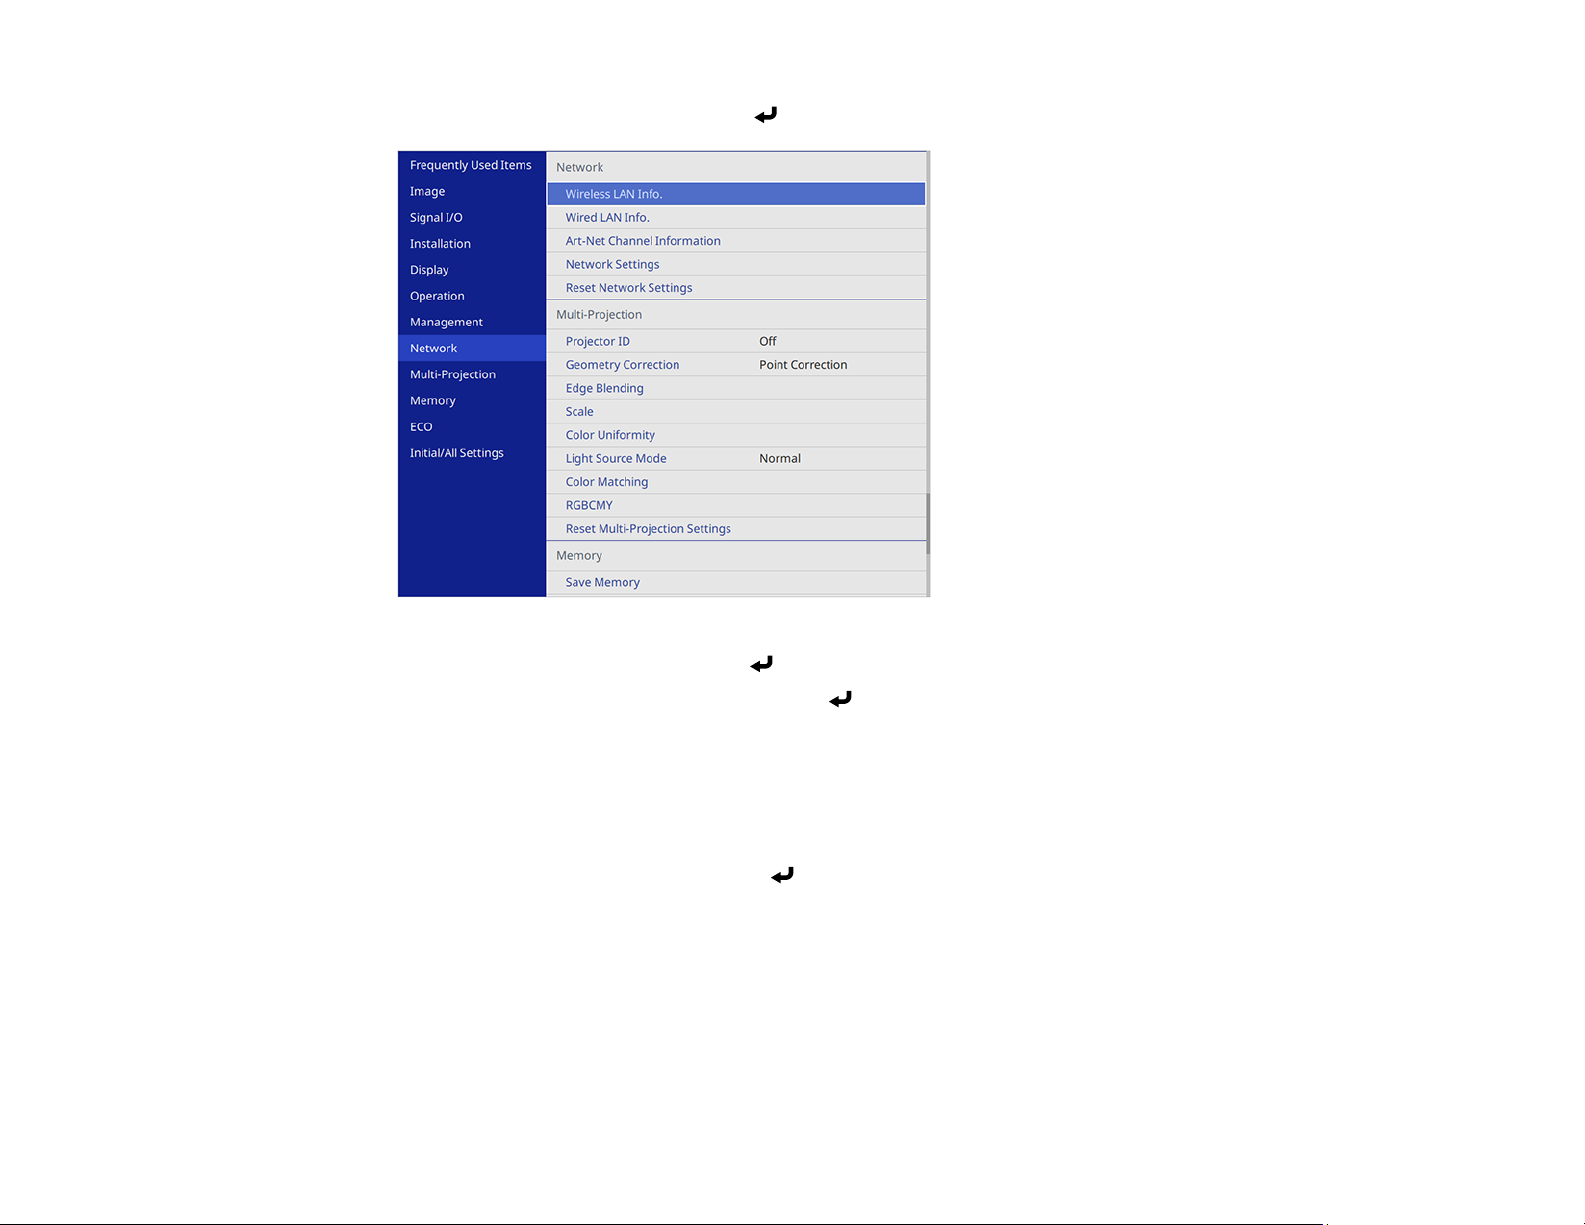
4. Select the Network menu and press Enter.
5. Select Network Settings and press Enter.
6. Select Priority Control Interface and press Enter.
7. Choose one of the following options:
• If you are casting images over a wired LAN, select Wired LAN.
• If you are casting images wirelessly directly or via a wireless network router, select Wireless LAN.
8. Set the Simple AP setting to On.
9. Select Network Projection and press Enter.
10. Set the Screen Mirroring setting to On.
11. Select these settings as necessary:
• Interrupt Connection lets you switch the screen to another device while projecting using Screen
Mirroring. If you want to connect two Screen Mirroring sources at once, select Off.
• Adjust Image Quality lets you adjust the screen mirroring speed and quality. Select a small
number to improve the quality or a large number to increase the speed.
69
Page 70

• Screen Mirroring Info displays connection information when projecting from a Screen Mirroring
source.
12. When you finish selecting settings, select Return and press Enter to return to the Network
Settings screen.
13. Select Set, and follow the on-screen instructions to save your settings and exit the menus.
Parent topic: Wireless Network Projection from a Mobile Device or Windows Computer (Screen
Mirroring)
Connecting for Screen Mirroring with a Windows 8.x/Windows 10/Windows 11 Computer
You can set up your computer to wirelessly project images and play sound using Screen Mirroring.
Note: If you are using Windows 10, you can cast images over a local area network or from your device to
the projector directly. When you cast images over a local area network, the connection is more stable
and secure. Connect the projector to the network with an Ethernet cable or install the optional wireless
LAN module and set the wireless LAN settings to connect to a wireless network.
1. Select the Screen Mirroring settings on your projector as necessary.
2. Press the LAN button on the remote control to switch to the Screen Mirroring source.
You see the Screen Mirroring standby screen.
3. Do one of the following:
• Windows 11: Open Settings and select System > Display > Multiple displays > Connect
• Windows 10: Hold down the Windows key and press K at the same time.
• Windows 8.x: Select Devices > Project > Add a wireless display.
4. Select your projector's Display Name from the list.
5. Select your projector from the list.
Note: You can check the Projector Name in the projector's Network menu (Menu > Network >
Network Settings > Projector Name) to identify your projector in the list.
6. If you see the PIN entry screen on your computer, enter the PIN code displayed on the Screen
Mirroring standby screen or at the bottom right of the projected image.
The projector displays the image from your computer or mobile device.
70
Page 71

Note: It may take some time to establish the connection. Do not disconnect the projector's power
cord while it is connecting to your device. This may cause your device to freeze or malfunction.
Parent topic: Wireless Network Projection from a Mobile Device or Windows Computer (Screen
Mirroring)
Related references
Optional Equipment and Replacement Parts
Network Settings - Network Menu
Related tasks
Selecting Screen Mirroring Settings
Connecting for Screen Mirroring with Miracast
If your mobile device supports Miracast, you can connect it to the projector wirelessly and project images
and sound.
1. Select the Screen Mirroring settings on your projector as necessary.
2. Press the LAN button on the remote control to switch to the Screen Mirroring source.
You see the Screen Mirroring standby screen.
3. On your mobile device, use the Miracast function to search for the projector.
Note: See your mobile device's documentation for information on accessing the Miracast function.
You see a list of available devices.
4. Select your projector from the list.
5. If you see the PIN entry screen on your mobile device, enter the PIN code displayed on the Screen
Mirroring standby screen or at the upper left of the projected image.
The projector displays the image from your mobile device.
Caution: It may take some time to establish the connection. Do not disconnect the projector's power
cord while it is connecting to your device. Doing so may cause your device to freeze or malfunction.
Note: Depending on the mobile device, you may need to delete a device when connecting. Follow
the on-screen instructions on your device.
71
Page 72

Parent topic: Wireless Network Projection from a Mobile Device or Windows Computer (Screen
Mirroring)
Related references
Network Settings - Network Menu
Related tasks
Selecting Screen Mirroring Settings
Screen Sharing
You can share the projected screen to up to four other compatible Epson projectors connected to the
same network with the screen sharing function.
The screen sharing function is limited by the following:
• You can only share the projected screen to other compatible projectors with the screen sharing
capability.
• If your projector's firmware version is older than the version installed on other projectors on the
network, you may not be able to project your screen or display a shared screen and may need to
update your projector's firmware.
• You cannot share images that are protected by HDCP.
• You cannot change the projector's Network settings while sharing your screen or displaying a shared
screen.
• This function is not available in Content Playback mode (EB-770F/EB-775F).
Sharing Your Screen
Parent topic: Using the Projector on a Network
Related concepts
Updating the Firmware
Sharing Your Screen
You can share your projected image to up to four projectors connected to the same network.
To use the Screen Sharing feature, the distributing and receiving projectors must be connected to the
same network and have the Screen Sharing setting enabled in the projector's Network menu.
Note: Make sure your projector is not connected to any devices via Epson iProjection before you use the
screen sharing function.
72
Page 73

1. Turn on the projector.
2. Press the Home button on the projector or the remote control.
3. Select Screen Sharing.
4. Select Start Screen Sharing.
5. Select the projector you want to share your screen with using one of the following methods:
• Enter the IP address of the projector using the numeric keypad.
• Enter the projector keyword using the numeric keypad, if required. The projector keyword is
displayed on the projected image of the receiving projector.
• Choose a previously selected projector by selecting an IP address from the connection history list.
6. Select Connect.
The connection is established and you see the Home screen. A status bar indicating the sharing
status appears on the screen.
7. Repeat steps 6 and 7 to add additional projectors as necessary.
8. When you are finished, select the input source from which to project images.
If you press the Esc button to stop sharing your screen, all connected projectors are disconnected. To
disconnect a specific projector, press the Home button and select Screen Sharing, then select the
projector you want to disconnect and select the icon next to the IP address.
Parent topic: Screen Sharing
Related references
Network Settings - Network Menu
Setting Up Projector Network E-Mail Alerts
You can set up the projector to send you an e-mail alert over the network if there is a problem with the
projector.
Note: If the Standby Mode setting is set to Communication On in the Operation menu, you can
receive e-mail alerts even if the projector is in standby mode (the power is off). The Standby Mode
setting is displayed only if the A/V Output setting in the Signal I/O menu is set to While Projecting.
1. Press the Menu button.
2. Select the Network menu and press Enter.
3. Select Network Settings and press Enter.
73
Page 74
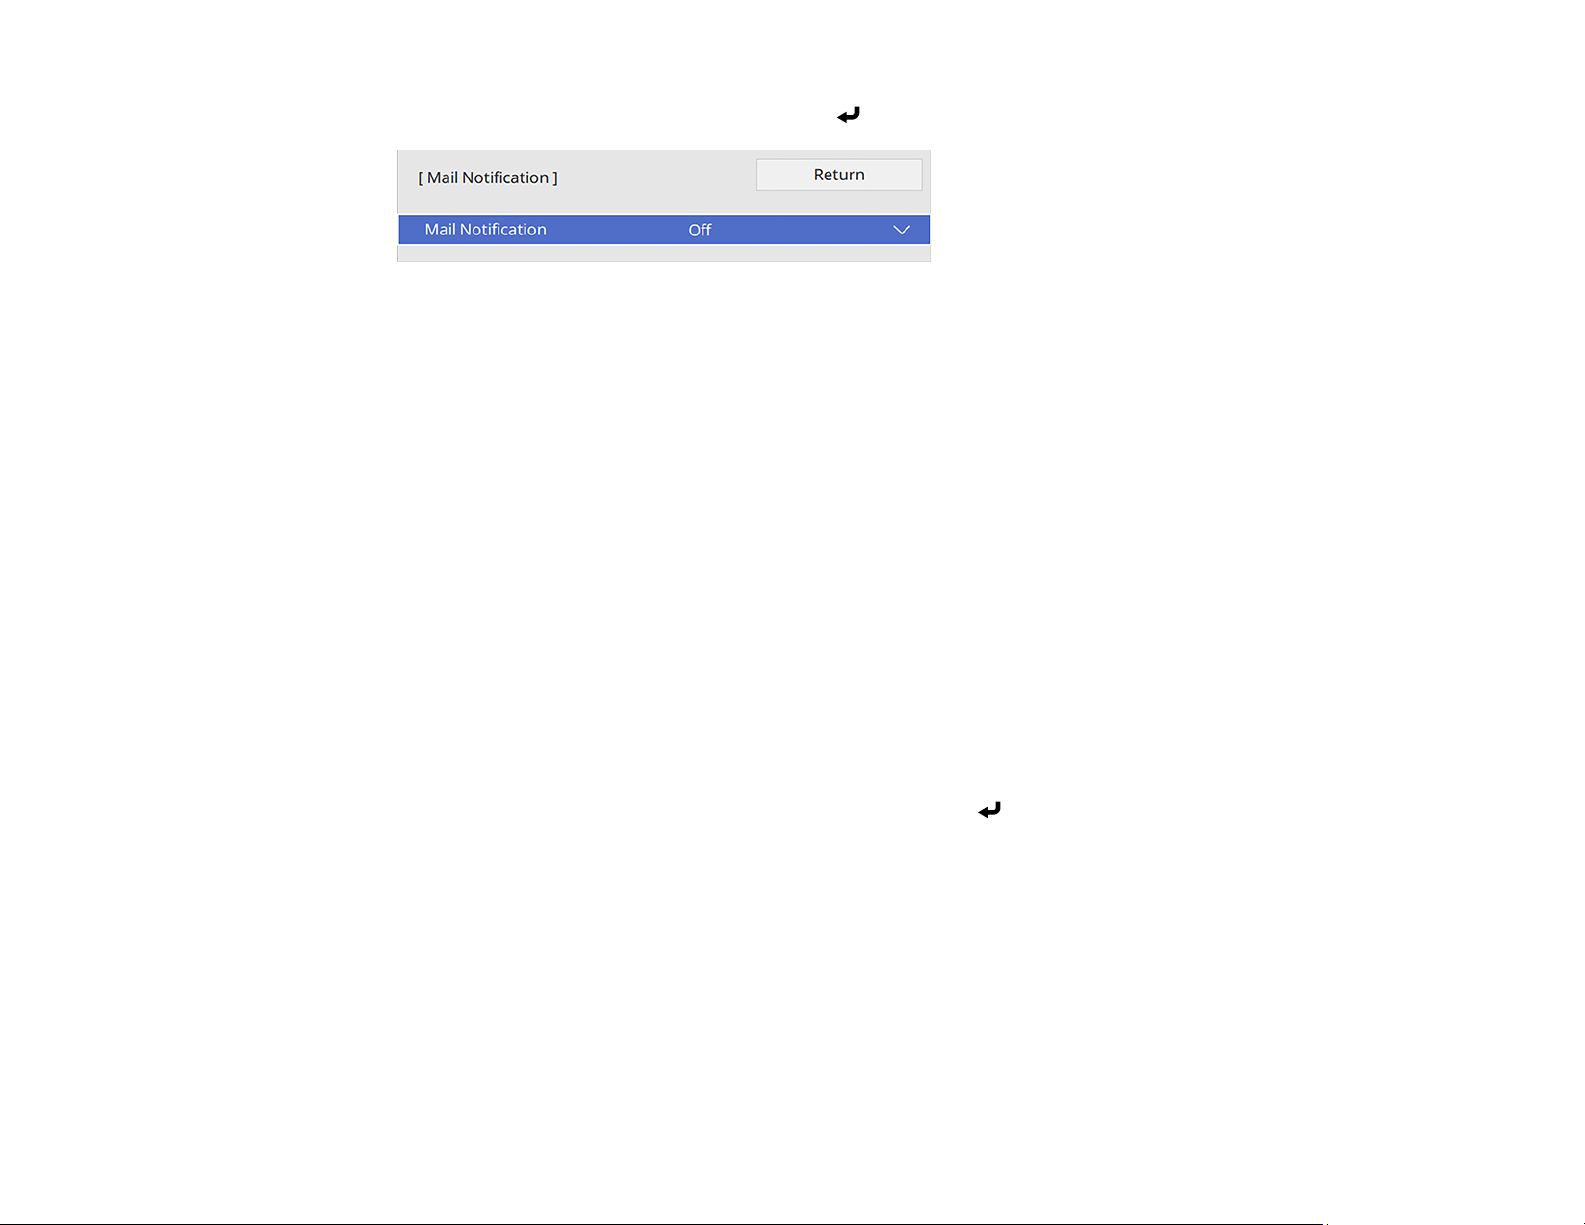
4. Select the Mail Notification menu and press Enter.
5. Turn on Mail Notification.
6. Enter the IP address for the SMTP Server setting.
Note: Do not use 127.x.x.x (where x is a number from 0 to 255).
7. Select a type of Authentication for the SMTP server.
8. Select a number for the SMTP server Port Number setting, from 0 to 65535 (default is 25).
9. Enter a User Name for the SMTP server.
10. Enter a Password for the SMTP server authentication.
11. Enter the sender's email address as the From setting.
12. Choose an Address field, enter the e-mail address, and select the alerts you want to receive there.
Repeat for up to three addresses. Your e-mail address can be up to 64 alphanumeric characters
long.
13. If you are using the PJLink protocol for projector control, turn on the PJLink setting in the Projector
Control menu and enter the IP address where you want to receive PJLink notifications as the
Notified IP Address setting.
14. When you finish selecting settings, select Return and press Enter to return to the Network
Settings menu.
15. Select Set, and follow the on-screen instructions to save your settings and exit the menus.
Note: If a critical problem causes a projector to shut down, you may not receive an e-mail alert.
Network Projector E-mail Alert Messages
Parent topic: Using the Projector on a Network
74
Page 75

Network Projector E-mail Alert Messages
When a problem occurs with a networked projector, and you selected to receive e-mail alerts, you
receive an e-mail containing the following information:
• The email address entered as the From setting
• Epson Projector on the subject line
• The name of the projector experiencing a problem
• The IP address of the affected projector
• Detailed information about the problem
Note: If a critical problem causes a projector to shut down, you may not receive an e-mail alert.
Parent topic: Setting Up Projector Network E-Mail Alerts
Setting Up Monitoring Using SNMP
Network administrators can install SNMP (Simple Network Management Protocol) software on network
computers so they can monitor projectors. If your network uses this software, you can set up the
projector for SNMP monitoring.
1. Press the Menu button.
2. Select Network > Network Settings > Projector Control > SNMP > On.
3. If no SNMP Community Name has been set, a screen appears prompting you to set one.
Enter the SNMP Community Name (up to 32 alphanumeric characters).
4. Enter up to two IP addresses to receive SNMP notifications as the Trap IP Address 1 and Trap IP
Address 2 settings, using 0 to 255 for each address field.
Note: To enter the IP address using the numeric keys on the remote control, press and hold the
Num button. Do not use these addresses: 224.0.0.0 through 255.255.255.255. This projector
supports SNMP agent version 1 (SNMPv1).
5. When you finish selecting settings, select Return and press Enter to return to the Network
Settings menu.
6. Select Set, and follow the on-screen instructions to save your settings and exit the menus.
Parent topic: Using the Projector on a Network
75
Page 76

Controlling a Networked Projector Using a Web Browser
Once you have connected your projector to your network, you can select projector settings and control
projection using a compatible web browser. This lets you access the projector remotely.
Note: The web setup and control features support Microsoft Edge, Google Chrome, and Safari on
networks that do not use a proxy server for connection. You cannot select all of the projector menu
settings or control all projector functions using a web browser.
Note: If you set Standby Mode to Communication On in the Operation menu, you can use a web
browser to select settings and control projection even if the projector is in standby mode (the power is
off). The Standby Mode setting is displayed only if the A/V Output setting in the Signal I/O menu is set
to While Projecting.
1. Make sure the projector is turned on.
2. Start your web browser on a computer or device connected to the network.
3. Type the projector's IP address into the browser's address box and press the computer's Enter key
(if you are entering an IPv6 address, wrap the address with [ and ]).
Note: You can find the projector's IP address in the projector's Network menu or on the LAN input
screen.
Note: If you attempt to connect to the Web Control screen via a proxy server, the screen will not be
displayed. Make a direct connection to the Web Control screen.
Caution: Do not remove the USB flash drive from the projector or disconnect the projector's power
cord when the Playlists or USB Memory Device screens are displayed in Content Playback mode
(EB-770F/EB-775F). Data saved on the flash drive may be damaged.
You see a Web Control screen like this.
76
Page 77
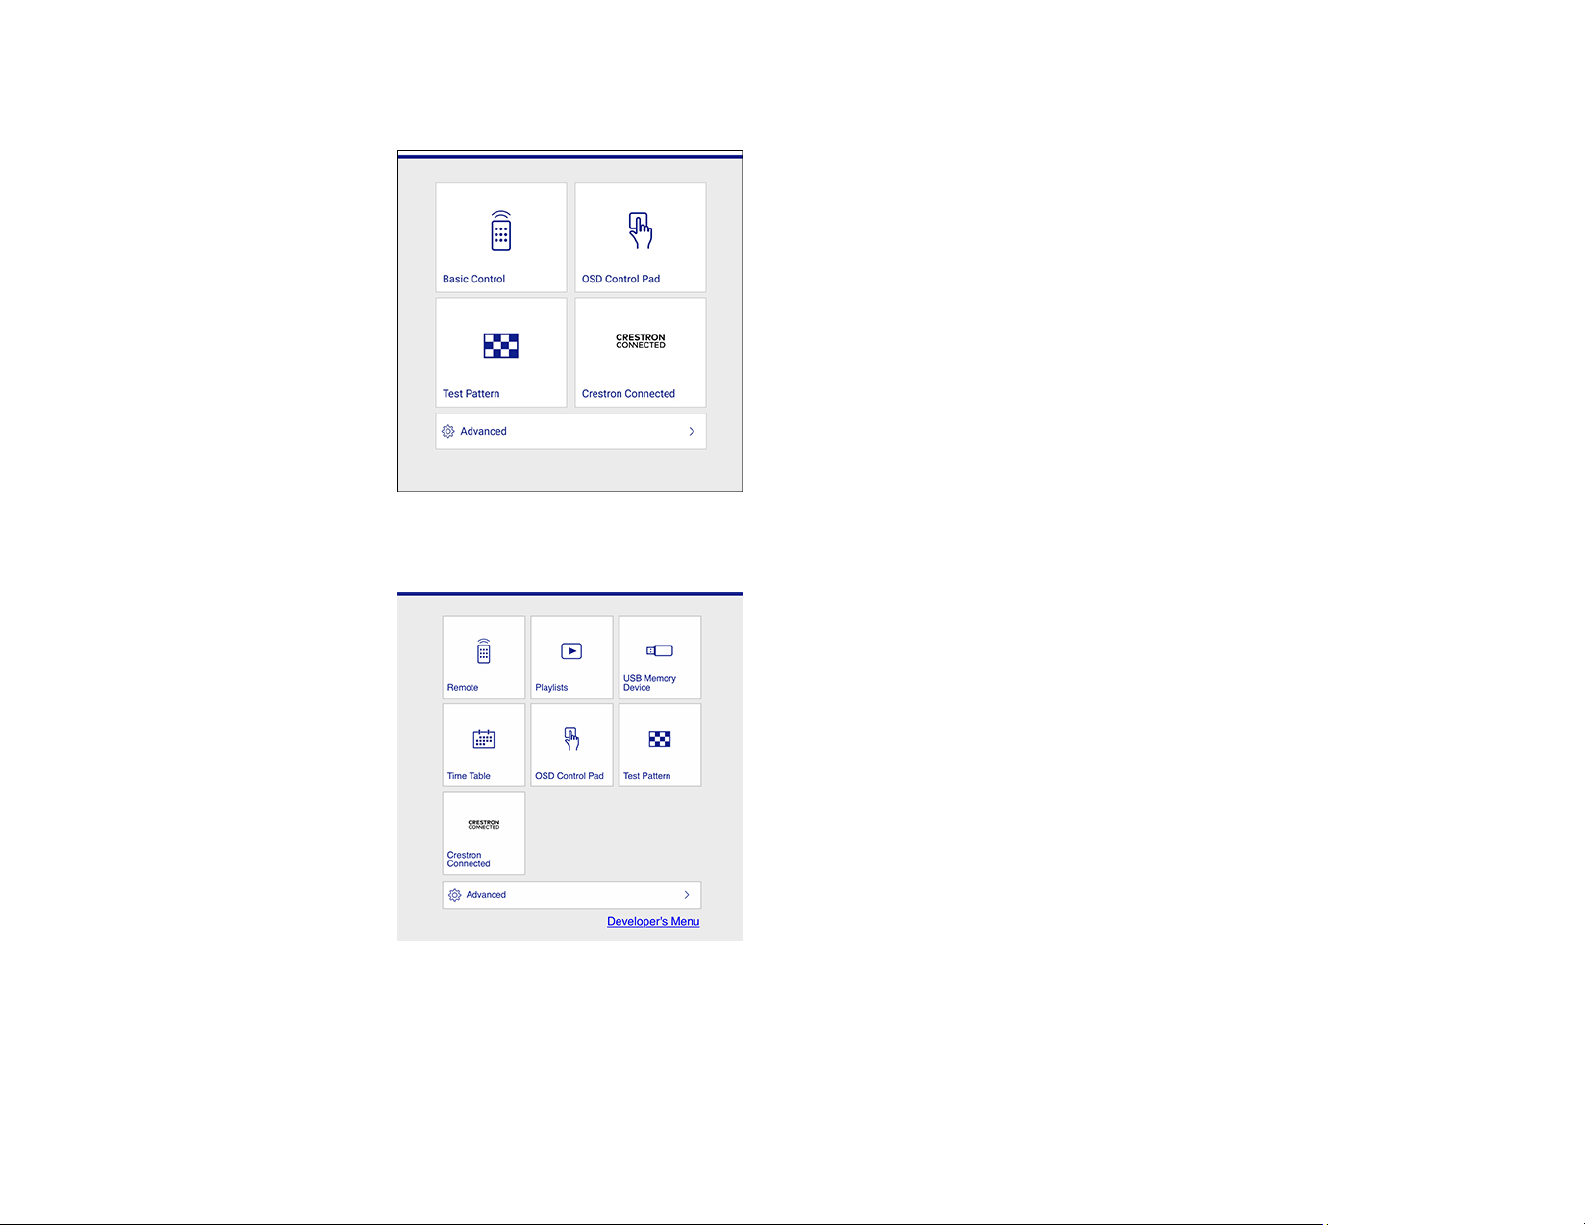
In normal mode:
In Content Playback mode (EB-770F/EB-775F):
Note: To disable this mode, set Content Playback to Off in the Operation menu.
77
Page 78
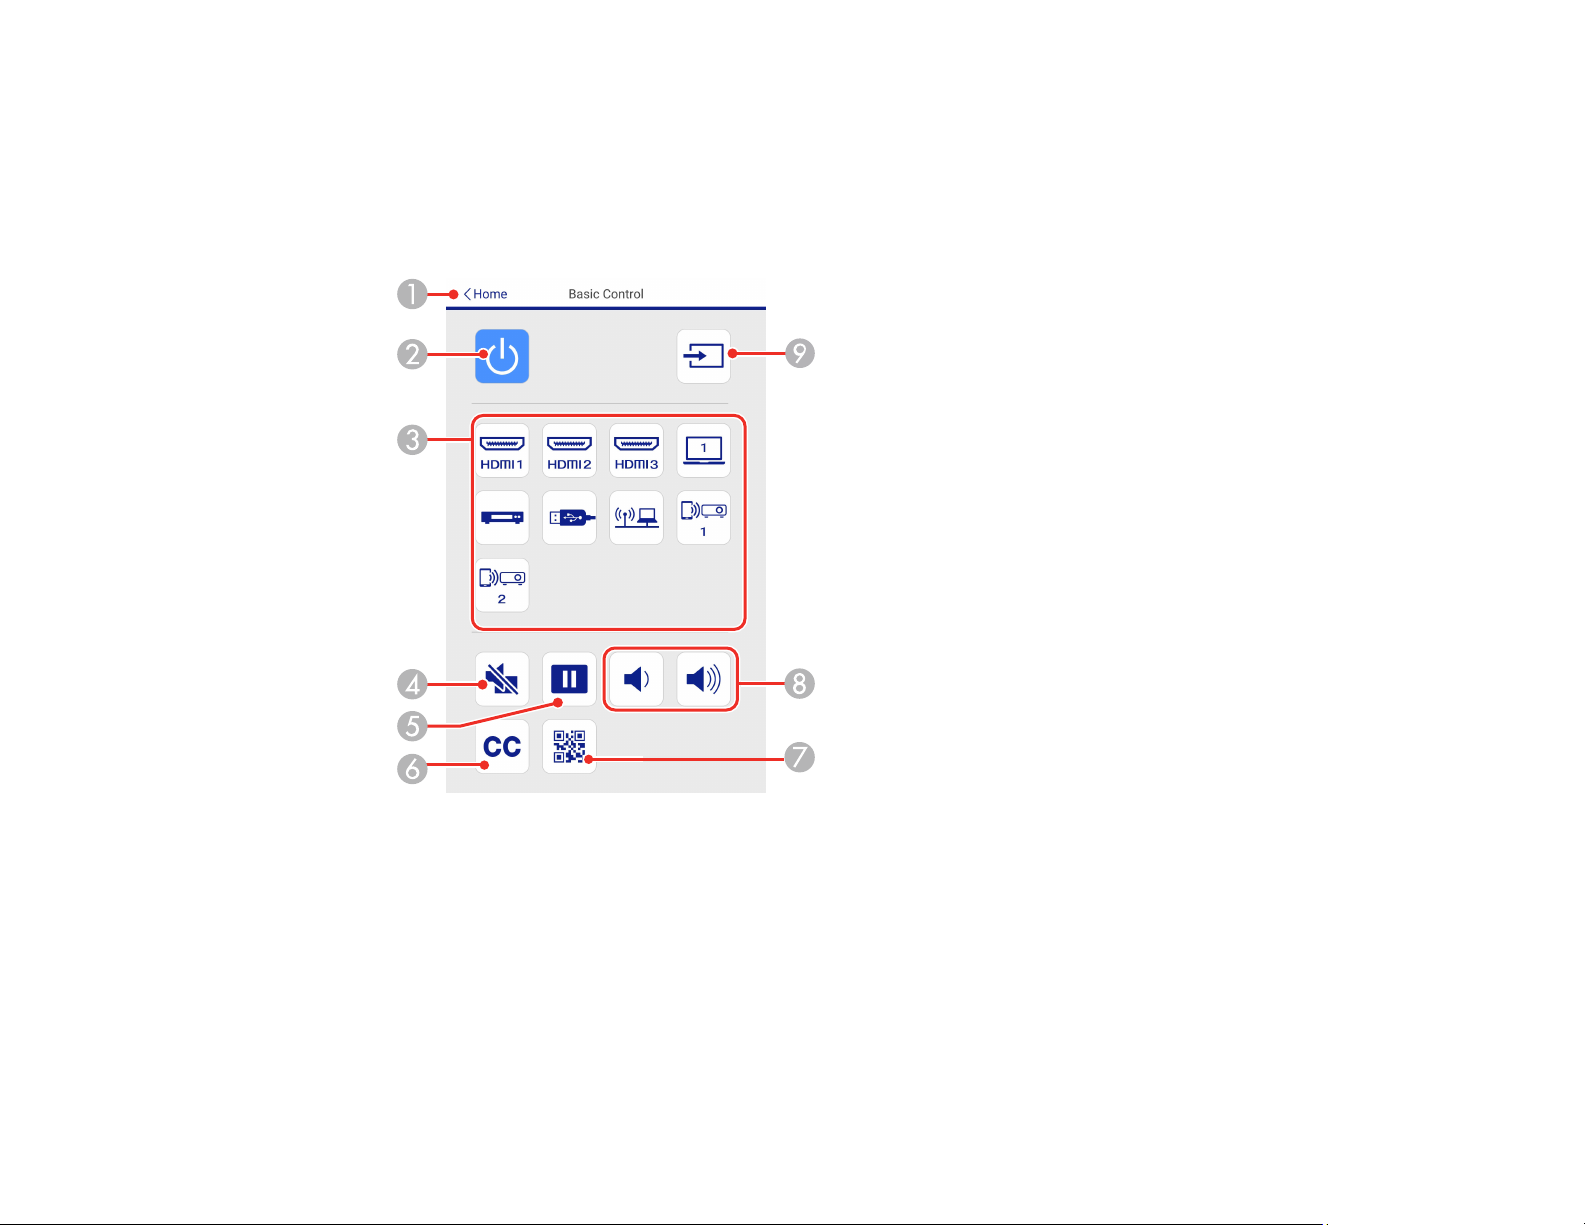
4. To control projection remotely, select the Basic Control option from the Web Control screen.
Note: If you see a log in window, enter your user name and password. (The default user name is
EPSONREMOTE and the default password is guest.)
You see a screen like this:
1 Returns to the Epson Web Control screen
2 Power button control
3 Selects the input source
4 A/V Mute button control
5 Freeze button control
6 Displays closed captions
78
Page 79

7 Displays a QR code for connecting with iOS or Android devices using the Epson iProjection
app
8 Volume button controls
9 Searches for connected sources
5. Select the icon corresponding to the projector function you want to control.
6. To select projector menu settings, select Advanced on the Web Control screen.
Note: If you see a log in window, enter your user name and password. (The default user name is
EPSONWEB and the default password is admin.)
7. Select the name of the menu and follow the on-screen instructions.
Parent topic: Using the Projector on a Network
Using Crestron Connected
If you are using the Crestron Connected network monitoring and control system, you can set up your
projector for use on the system. Crestron Connected lets you control and monitor your projector using a
web browser.
Note: You cannot use the Message Broadcasting feature in the Epson Projector Management software
when you use Crestron Connected. If you set Standby Mode to Communication On in the Operation
menu, you can control the projector even if the projector is in standby mode (when the power is off).
For additional information on Crestron Connected, contact Crestron.
Setting Up Crestron Connected
Controlling a Networked Projector Using Crestron Connected
Parent topic: Using the Projector on a Network
Setting Up Crestron Connected
To set up your projector for monitoring and control using a Crestron Connected system, make sure your
computer and projector are connected to the network.
Note: If you want to use the Crestron Connected system when the projector is turned off, you need to
adjust the Standby Mode setting in the Operation menu. The Standby Mode setting is displayed only if
the A/V Output setting in the Signal I/O menu is set to While Projecting.
79
Page 80

1. Press the Menu button.
2. Select the Network menu and press Enter.
3. Select Network Settings and press Enter.
4. Select the Projector Control menu and press Enter.
5. Set the Crestron Connected setting to On to allow the projector to be detected.
Note: Enabling Crestron Connected disables the Message Broadcasting feature in the Epson
Projector Management software. To enable the Crestron XiO Cloud service, set Crestron XiO
Cloud to On.
6. When you are finished selecting settings, select Return and press Enter to return to the Network
Settings menu.
7. Select Set, and follow the on-screen instructions to save your settings and exit the menus.
8. Turn off the projector, then turn it on again to enable the setting.
9. Start your Web browser on a computer or device connected to the network.
10. Go to the Epson Web Control screen by entering the projector's IP address into the browser's
address box.
11. Select the Crestron Connected settings. See the Crestron Web site for details.
Parent topic: Using Crestron Connected
Related references
Input Signal Settings - Signal I/O Menu
Network Settings - Network Menu
Feature Settings - Operation Menu
Controlling a Networked Projector Using Crestron Connected
Once you have set up your projector to use Crestron Connected, you can control and monitor projection
using a compatible web browser.
1. Start your web browser on a computer connected to the network.
2. Type the projector's IP address into the browser's address box and press the computer's Enter key.
80
Page 81
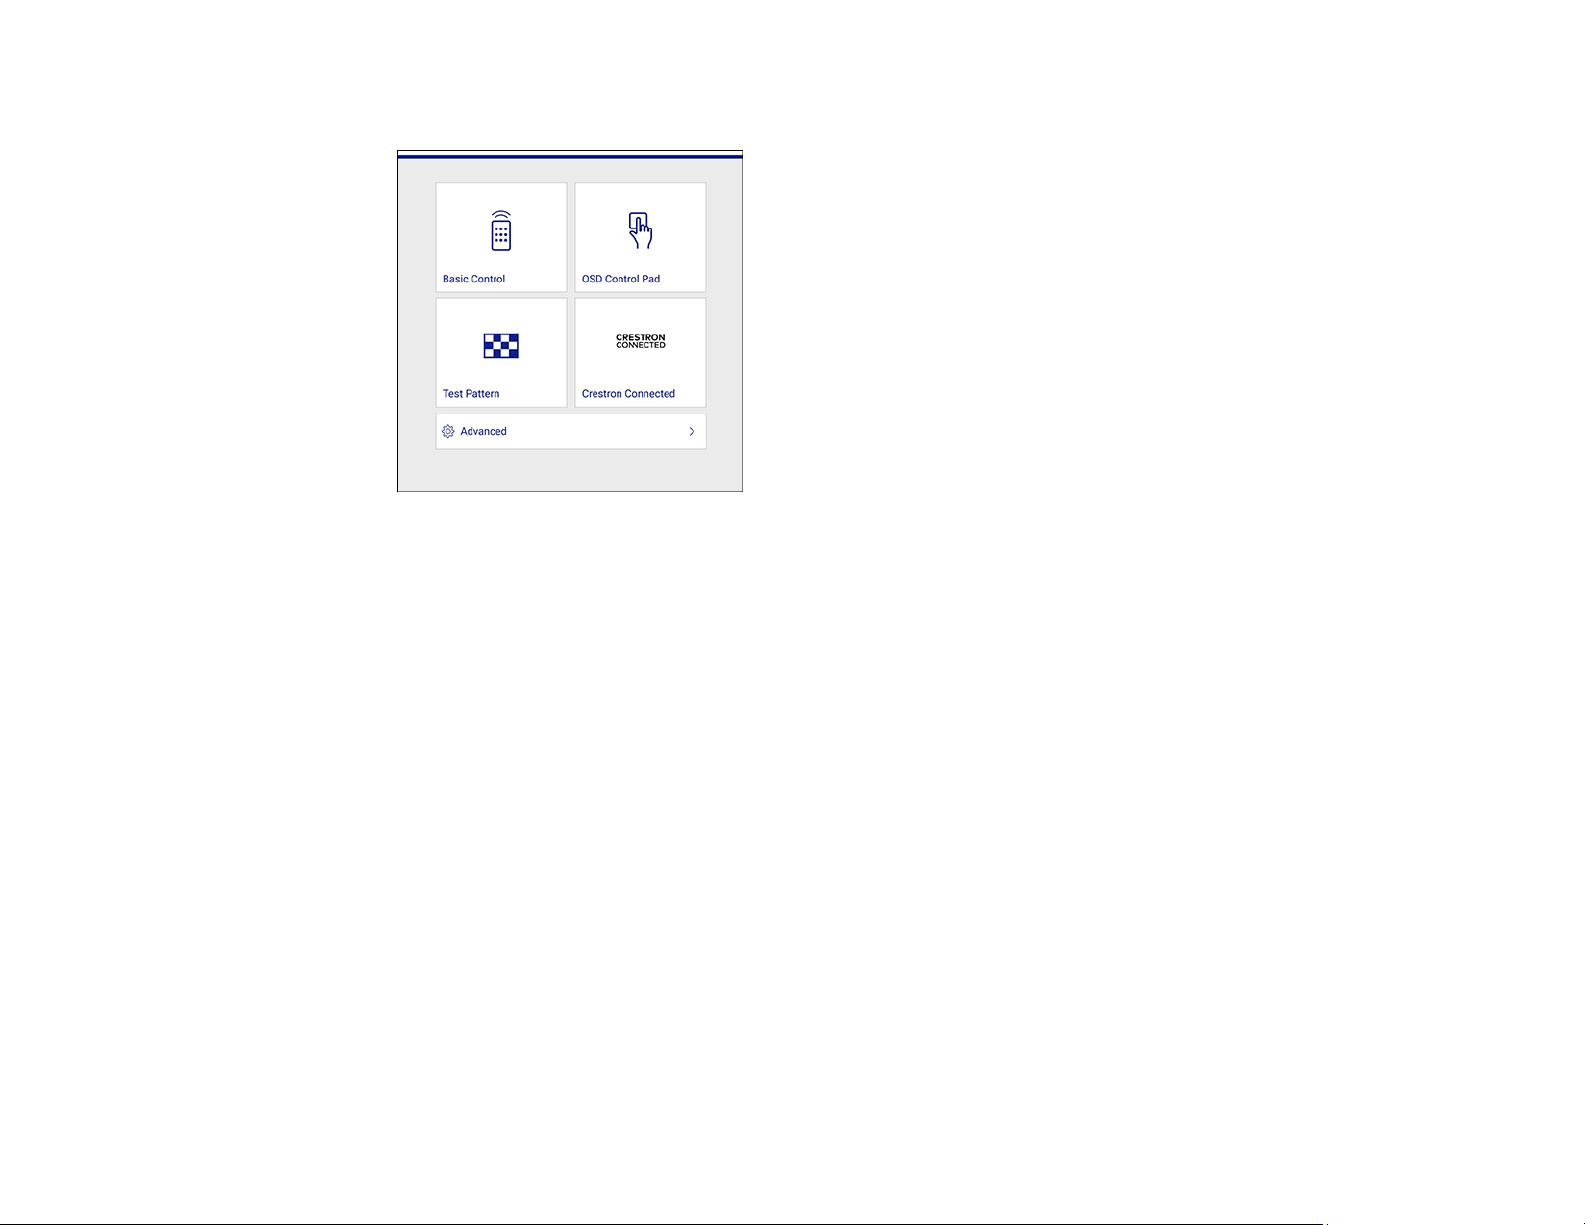
You see the Epson Web Control screen:
Note: You may need to log in to access some of the options on the Web Control screen. If you see a
log in window, enter your user name and password.
3. Select Crestron Connected.
4. Select the input source that you want to control in the Sources List box. You can scroll through
available sources using the up and down arrows in the box.
5. To control projection remotely, click the on-screen buttons that correspond to the projector's remote
control buttons. You can scroll through button options at the bottom of the screen.
Note: These on-screen buttons do not directly correspond to the projector's remote control buttons:
• OK acts as the Enter button
• Menu displays the projector's menu
6. To view information about the projector, click the Info tab.
7. To change projector, Crestron, and password settings, click the Tools tab, select settings on the
displayed screen, and click Send.
8. When you finish selecting settings, click Exit to exit the program.
Parent topic: Using Crestron Connected
81
Page 82

Registering a Digital Certificate on the Projector
Follow the instructions here if you need to install a digital certificate on the projector to provide security
for your presentation files.
Note: You can register a digital certificate over a network. However, be sure to register just once or the
certificate may not install correctly.
Importing a Web Server Certificate Using the Projector Menus
Registering Digital Certificates from a Web Browser
Digital Certificate Types
Parent topic: Using the Projector on a Network
Importing a Web Server Certificate Using the Projector Menus
You can create your web server certificate and import it using the projector menus and a USB flash
drive.
Note: You can also register digital certificates from your web browser. Make sure to only register once,
or the certificate may not install correctly.
1. Make sure your digital certificate file is compatible with projector registration and saved in the root
directory of the USB flash drive.
2. Press the Menu button on the projector or remote control.
3. Select Network > Network Settings > Projector Control > Secure HTTP > On.
4. Select the Web Server Certificate setting and press Enter.
5. Select Save and press Enter.
6. Follow the on-screen instructions to connect a USB flash drive to the USB-A port on the projector.
7. Press Enter to display the certificate list.
8. Select the certificate you want to import from the displayed list.
A message is displayed prompting you to enter the password for the certificate.
9. Enter the password and press Enter.
The certificate is imported and a completion message appears.
Parent topic: Registering a Digital Certificate on the Projector
82
Page 83

Registering Digital Certificates from a Web Browser
You can register the digital certificates on the projector for wireless LAN authentication.
Note: You can also register the digital certificates in the projector's Network menu. However, be sure to
register just once or the certificate may not install correctly.
1. Make sure your digital certificate file is compatible with projector registration.
2. Make sure the projector is turned on.
3. Start your web browser on a computer or mobile device connected to the network.
4. Type the projector's IP address into the browser's address box and press the computer's Enter key.
You see the Web Control screen and a prompt to enter a user ID and password.
5. Select Advanced and enter the following information in uppercase or lowercase letters, exactly as
shown:
• For the user ID, enter EPSONWEB. (You cannot change the user ID.)
• For the password, enter the default password admin. (You can change the Web Control password
using the projector's Network Settings menu.)
6. Under Network, select Certificate.
Note: You may need to select the menu icon to find Network, depending on your device.
83
Page 84
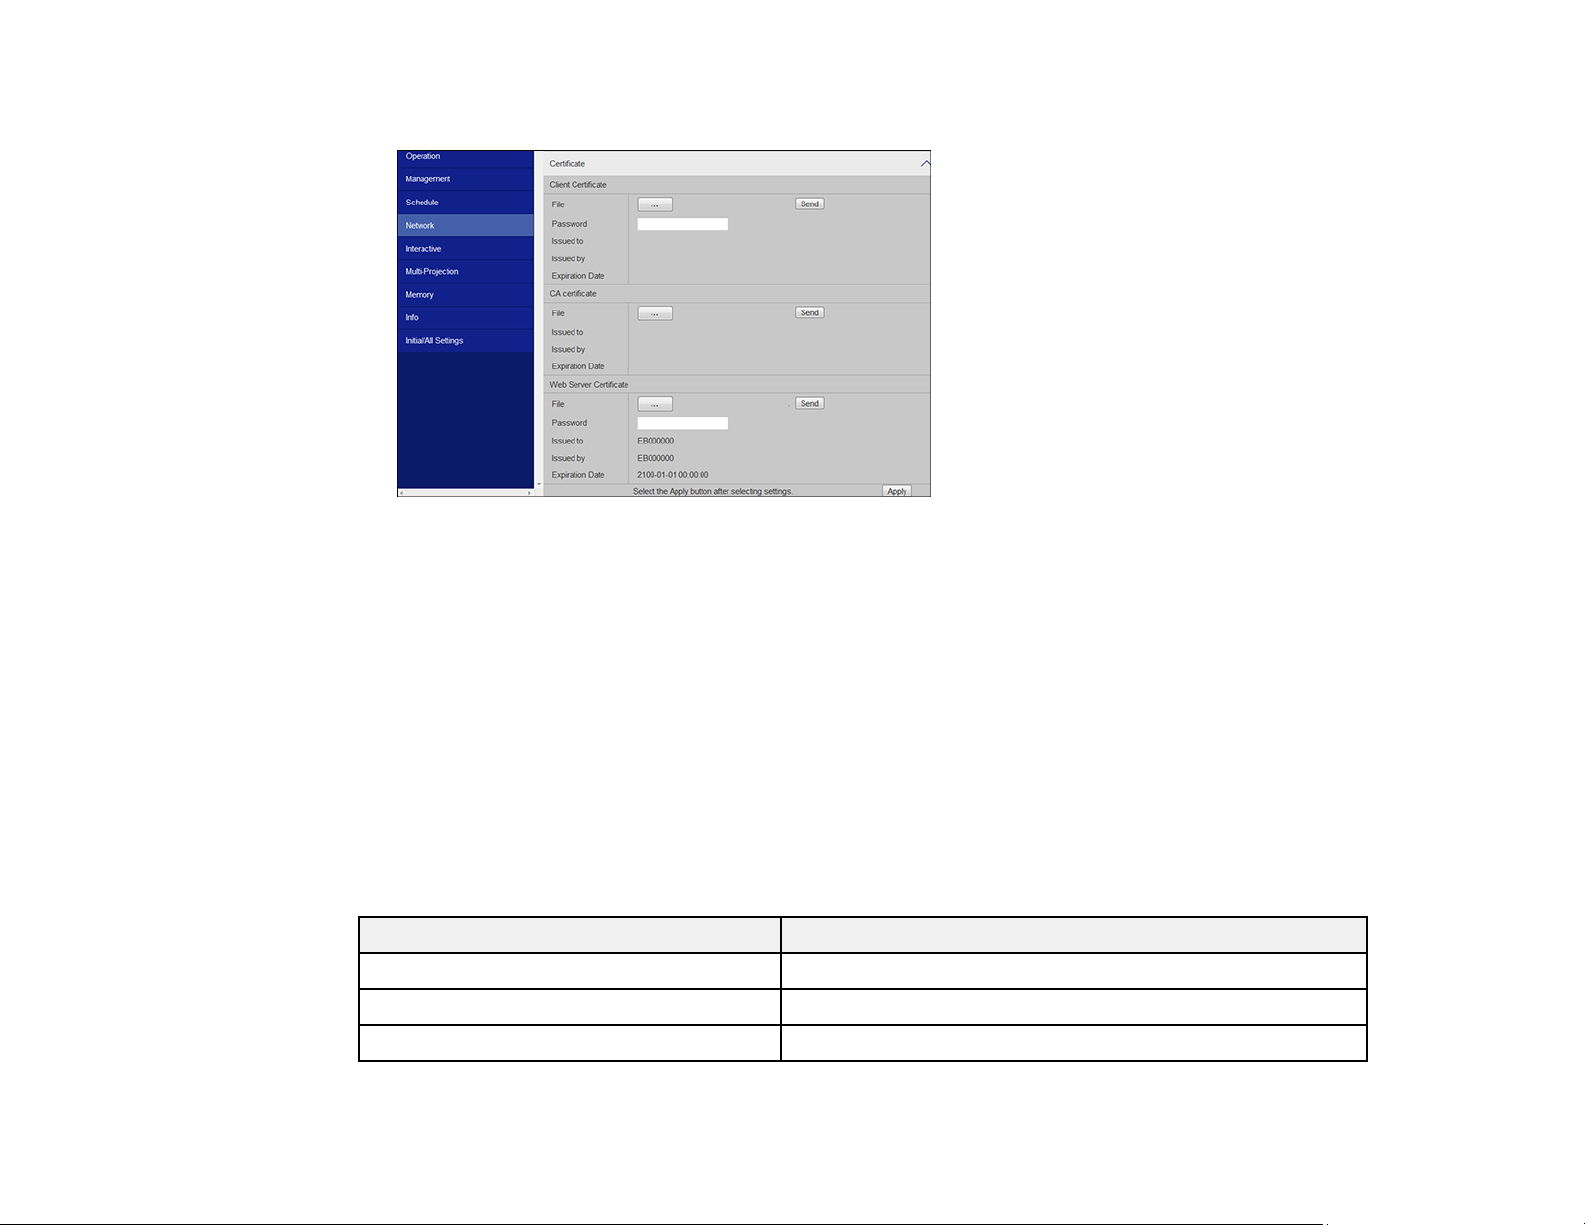
You see a screen like this:
7. Click the Choose File button, select the certificate file, and click Open.
Note: The button name may vary depending on the browser you are using.
8. Enter a password in the Password box and click Send.
9. When you finish registering the certificate, click Apply to finalize your changes and complete the
registration.
Parent topic: Registering a Digital Certificate on the Projector
Digital Certificate Types
You can register these types of digital certificates.
Client Certificate (PEAP-TLS/EAP-TLS)
Specification Description
Format PKCS#12
Extension PFX, P12
Encryption RSA
84
Page 85
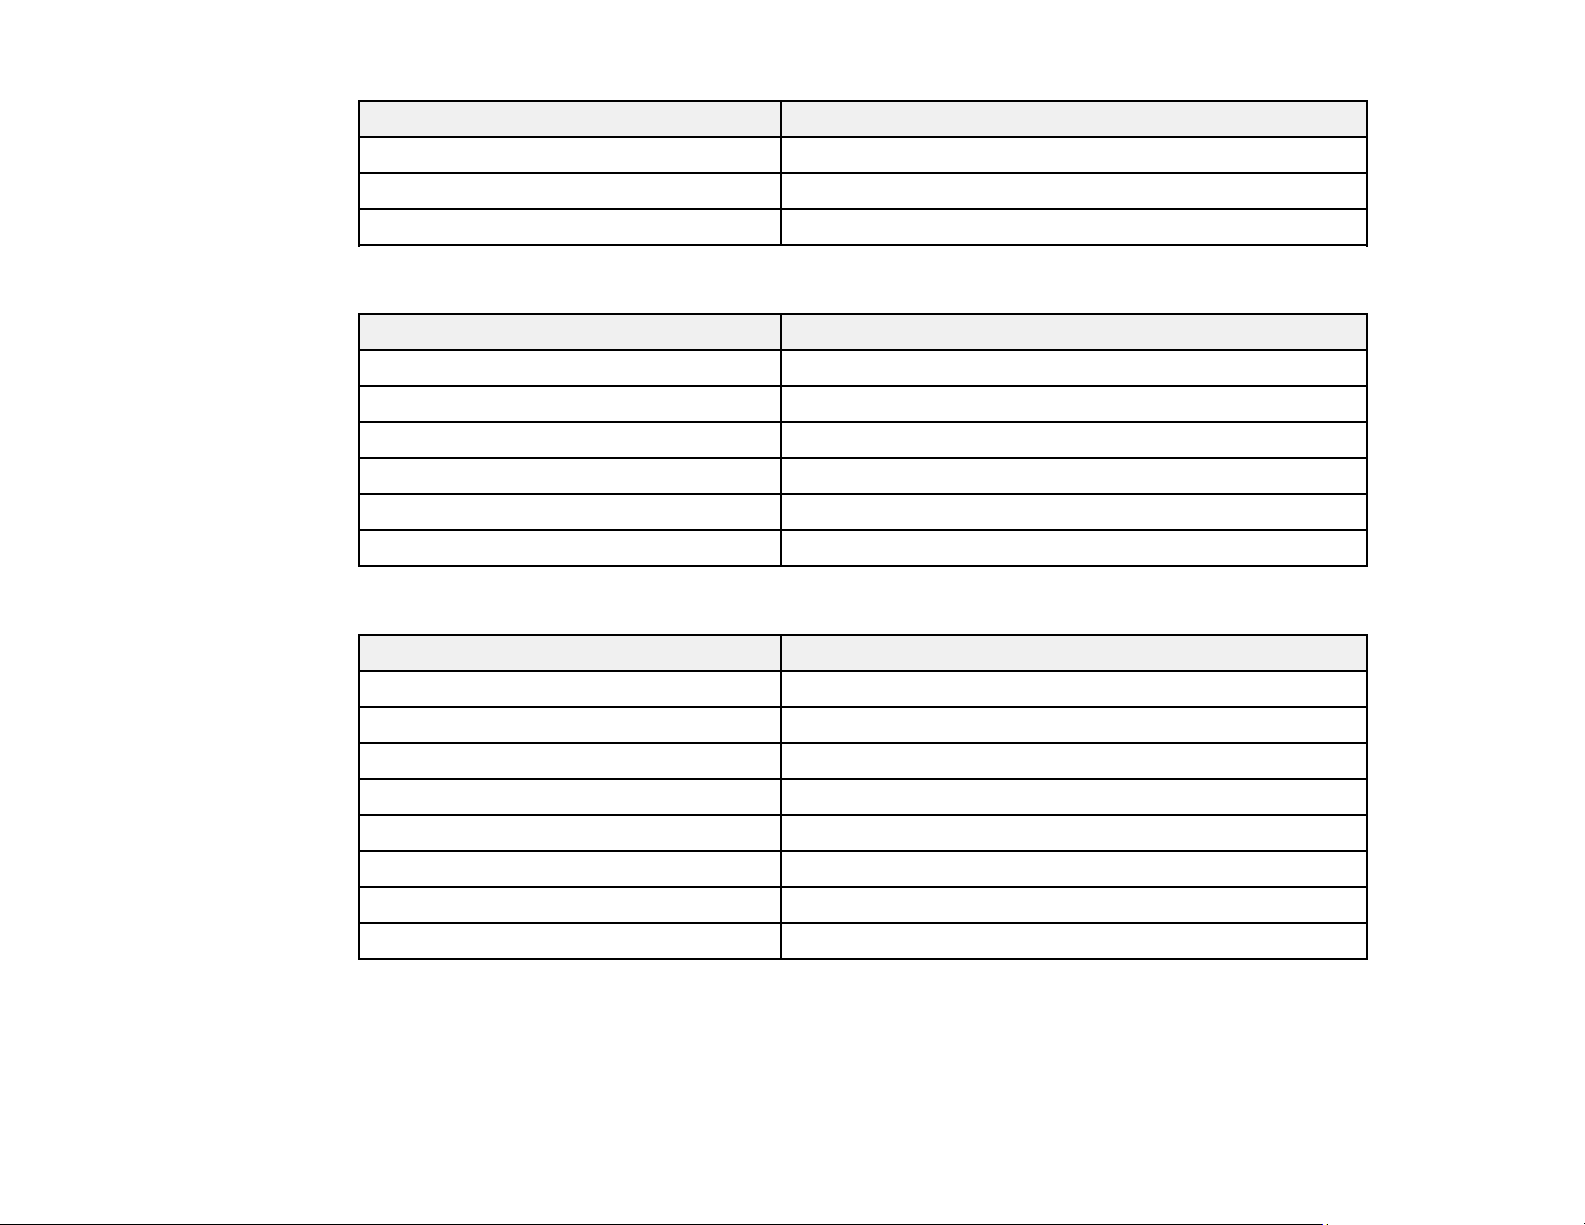
Specification Description
Hashes MD5/SHA-1/SHA-256/SHA-384/SHA-512
Key length 512/1024/2048/4096 bit
Password Up to 64 alphanumeric characters; required
CA Certificate (PEAP/PEAP-TLS/EAP-TLS/EAP-FAST)
Specification Description
Format X509v3
Extension DER/CER/PEM
Encryption RSA
Hashes MD5/SHA-1/SHA-256/SHA-384/SHA-512
Key length 512/1024/2048/4096 bit
Encoding BASE64/Binary
Web Server Certificate (Secure HTTP)
Specification Description
Format PKCS#12
Extension PFX, P12
Encryption RSA
Hashes MD5/SHA-1/SHA-256/SHA-384/SHA-512
Key length 512/1024/2048/4096 bit
Common name Network host name
Organization Optional
Password Up to 64 alphanumeric characters; required
Parent topic: Registering a Digital Certificate on the Projector
85
Page 86

Art-Net Channel Definitions
Art-Net is an Ethernet communication protocol based on the TCP/IP protocol. You can control the
projector by using a DMX controller or an application system.
The following table lists the channel definitions used to control the projector in Art-Net.
Channel/Function Operation Parameters Description
1 Adjusting light
(dimming)
2 Shutter control Shutter open
3 Switch source Non-operational
7 Zoom Electronic Tele/Wide 0 to 255 (default is 255) Zooms using the
0% to 100% 0 to 255 (default is 0) Adjusts the image
brightness
Non-operational
Shutter closed
HDMI
LAN
SD Player
Spotlight
Non-operational
0 to 63 (default is 128)
64 to 191
192 to 255
0 to 7 (default is 0)
8 to 15
16 to 23
24 to 31
32 to 39
40 to 255
Enables/disables A/V
Mute
Switches to the
specified source
specified amount of
movement
86
Page 87

Channel/Function Operation Parameters Description
10 Content playback Non-operational
Playlist 1
Playlist 2
Playlist 3
Playlist 4
Playlist 5
Playlist 6
Playlist 7
Playlist 8
Playlist 9
Playlist 10
Playlist 11
Playlist 12
Playlist 13
Playlist 14
Playlist 15
0 to 3 (default is 0)
4 to 7
8 to 11
12 to 15
16 to 19
20 to 23
24 to 27
28 to 31
32 to 35
36 to 39
40 to 43
44 to 47
48 to 51
52 to 55
56 to 59
60 to 63
Plays the specified
playlist
87
Page 88

Channel/Function Operation Parameters Description
10 Content playback Playlist 16
Playlist 17
Playlist 18
Playlist 19
Playlist 20
Playlist 21
Playlist 22
Playlist 23
Playlist 24
Playlist 25
Playlist 26
Playlist 27
Playlist 28
Playlist 29
Playlist 30
Playlist 31
Playlist 32
64 to 67
68 to 71
72 to 75
76 to 79
80 to 83
84 to 87
88 to 91
92 to 95
96 to 99
100 to 103
104 to 107
108 to 111
112 to 115
116 to 119
120 to 123
124 to 127
128 to 131
Playlist 33
Playlist 34
Playlist 35
Playlist 36
Playlist 37
Playlist 38
Playlist 39
Playlist 40
132 to 135
136 to 139
140 to 143
144 to 147
148 to 151
152 to 155
156 to 159
160 to 163
88
Page 89
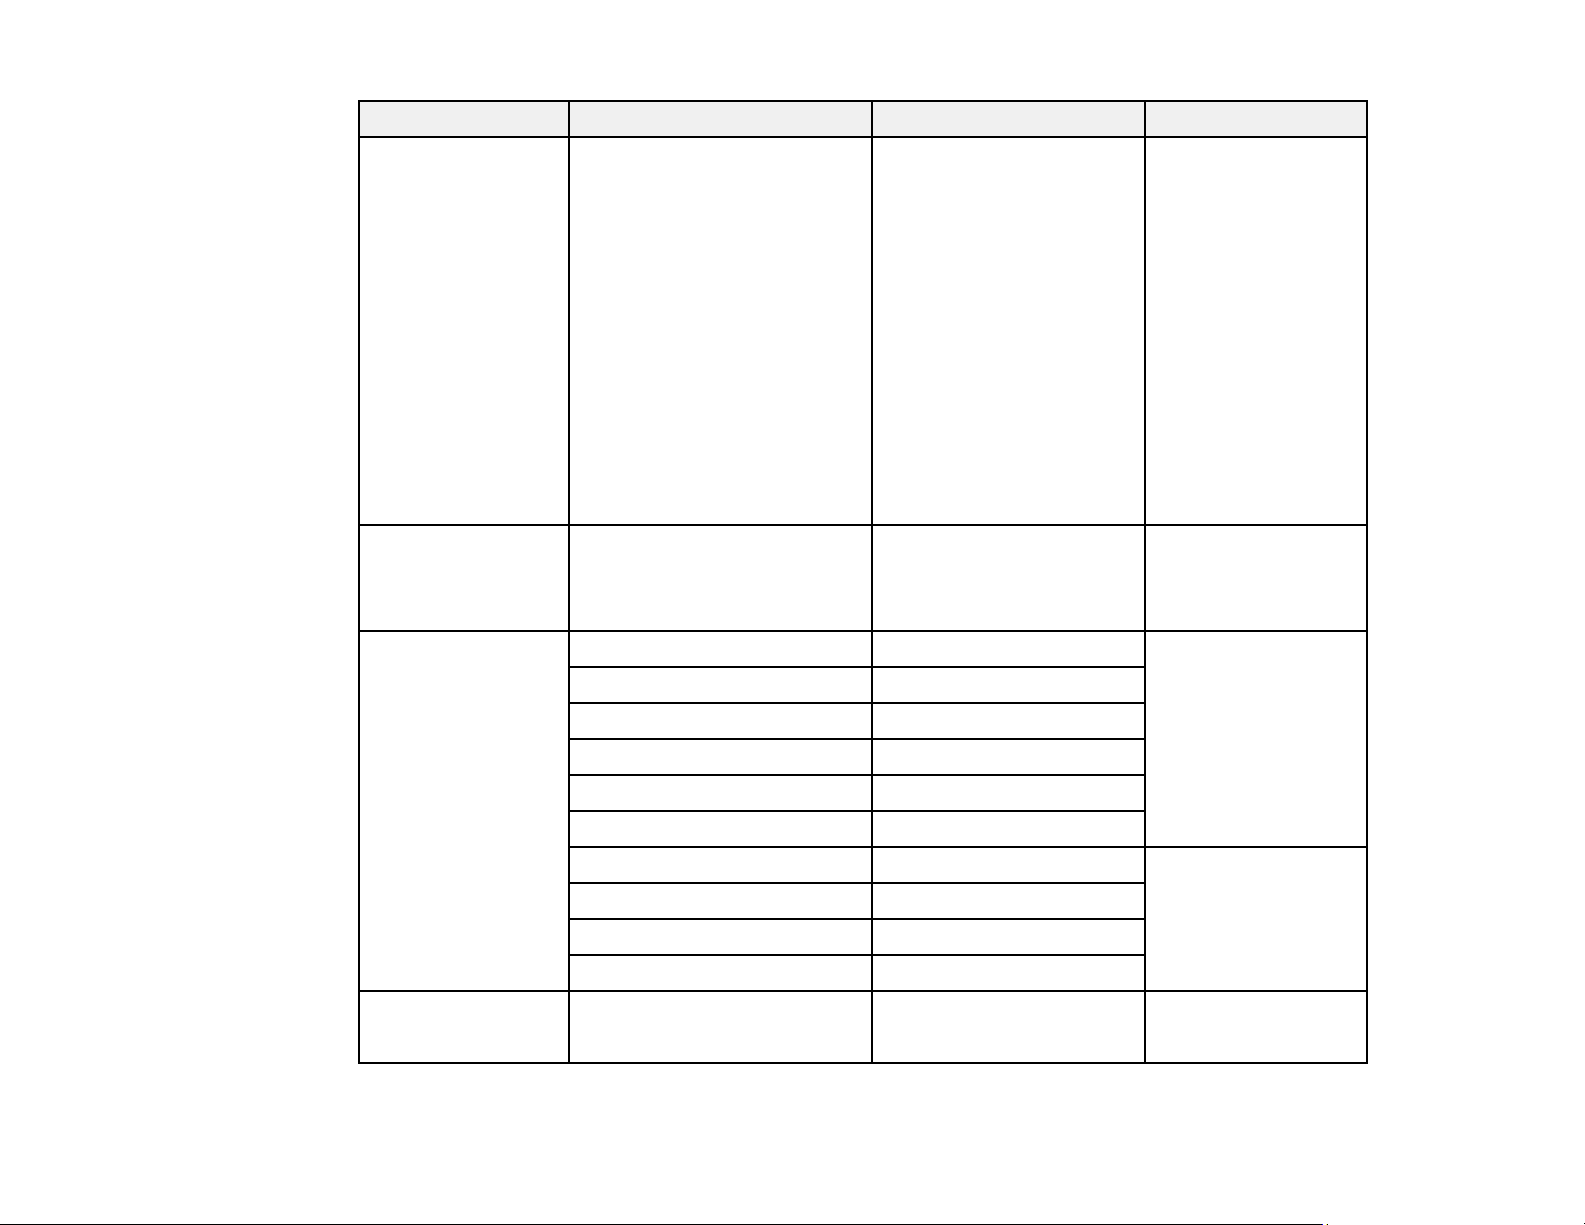
Channel/Function Operation Parameters Description
10 Content playback Playlist 41
Playlist 42
Playlist 43
Playlist 44
Playlist 45
Playlist 46
Playlist 47
Playlist 48
Playlist 49
Playlist 50
Non-operational
11 Power control Power off
Non-operational
Power on
12 Geometry
Correction
Non-operational 0 to 15 (default is 255) Corrects the image
H/V-Keystone 16 to 31
Quick Corner 32 to 47
164 to 167
168 to 171
172 to 175
176 to 179
180 to 183
184 to 187
188 to 191
192 to 195
196 to 199
200 to 203
204 to 255
0 to 63 (default is 128)
64 to 191
192 to 255
Turns the projector
power on or off
shape
Point Correction 48 to 63
Arc Correction 64 to 79
Non-operational 80 to 95
Load Memory1 96 to 111 Loads saved image
Load Memory2 112 to 127
Load Memory3 128 to 143
Non-operational 144 to 255
13 Lock Cannot control
Can control
89
0 to 127 (default is 0)
128 to 255
shape settings
Enables/disables ArtNet operations
Page 90

Note: If you are controlling the projector using Art-Net and operating it from the remote control, settings
made by the DMX controller or application software may differ from the projector's actual status. If you
want to apply all the channel controls to the projector, set Channel 13 to Cannot control, then set it back
to Can control.
Parent topic: Using the Projector on a Network
Setting Up Web API
You can setup Web API from the projector menu and operate the projector using Web API.
Note: You can authenticate Web API communications using API authentication (Digest authentication).
The user name for API authentication is EPSONWEB; use the password that is set for Web Control
Password.
1. Turn on the projector, if necessary.
2. Press the Menu button on the projector or remote control.
3. Select the Network menu and press Enter.
4. Select Network Settings > Projector Control.
5. Select Web API Settings and then set Web API to On.
Parent topic: Using the Projector on a Network
90
Page 91

Using Basic Projector Features
Follow the instructions in these sections to use your projector's basic features.
Turning On the Projector
Turning Off the Projector
Selecting the Language for the Projector Menus
Setting the Date and Time
Image Shape
Resizing the Image with the Wide and Tele Buttons
Adjusting the Image Position
Focusing the Image
Remote Control Operation
Selecting an Image Source
Projection Modes
Image Aspect Ratio
Color Mode
Adjusting the Hue, Saturation, and Brightness
Adjusting Gamma
Adjusting the Image Resolution
Adjusting the Projector's Brightness Level
Turning On Dynamic Contrast
Controlling the Volume with the Volume Buttons
Selecting a Quick Startup Setting
Projecting a PC Free Presentation
Projecting in Content Playback Mode (EB-770F/EB-775F)
Turning On the Projector
Turn on the projector before you turn on the computer or video equipment you want to use.
Note: When first powering on the projector, the initial setup wizard is displayed. Use the arrow and
Enter buttons on the control panel or remote control to follow the on-screen instructions.
91
Page 92
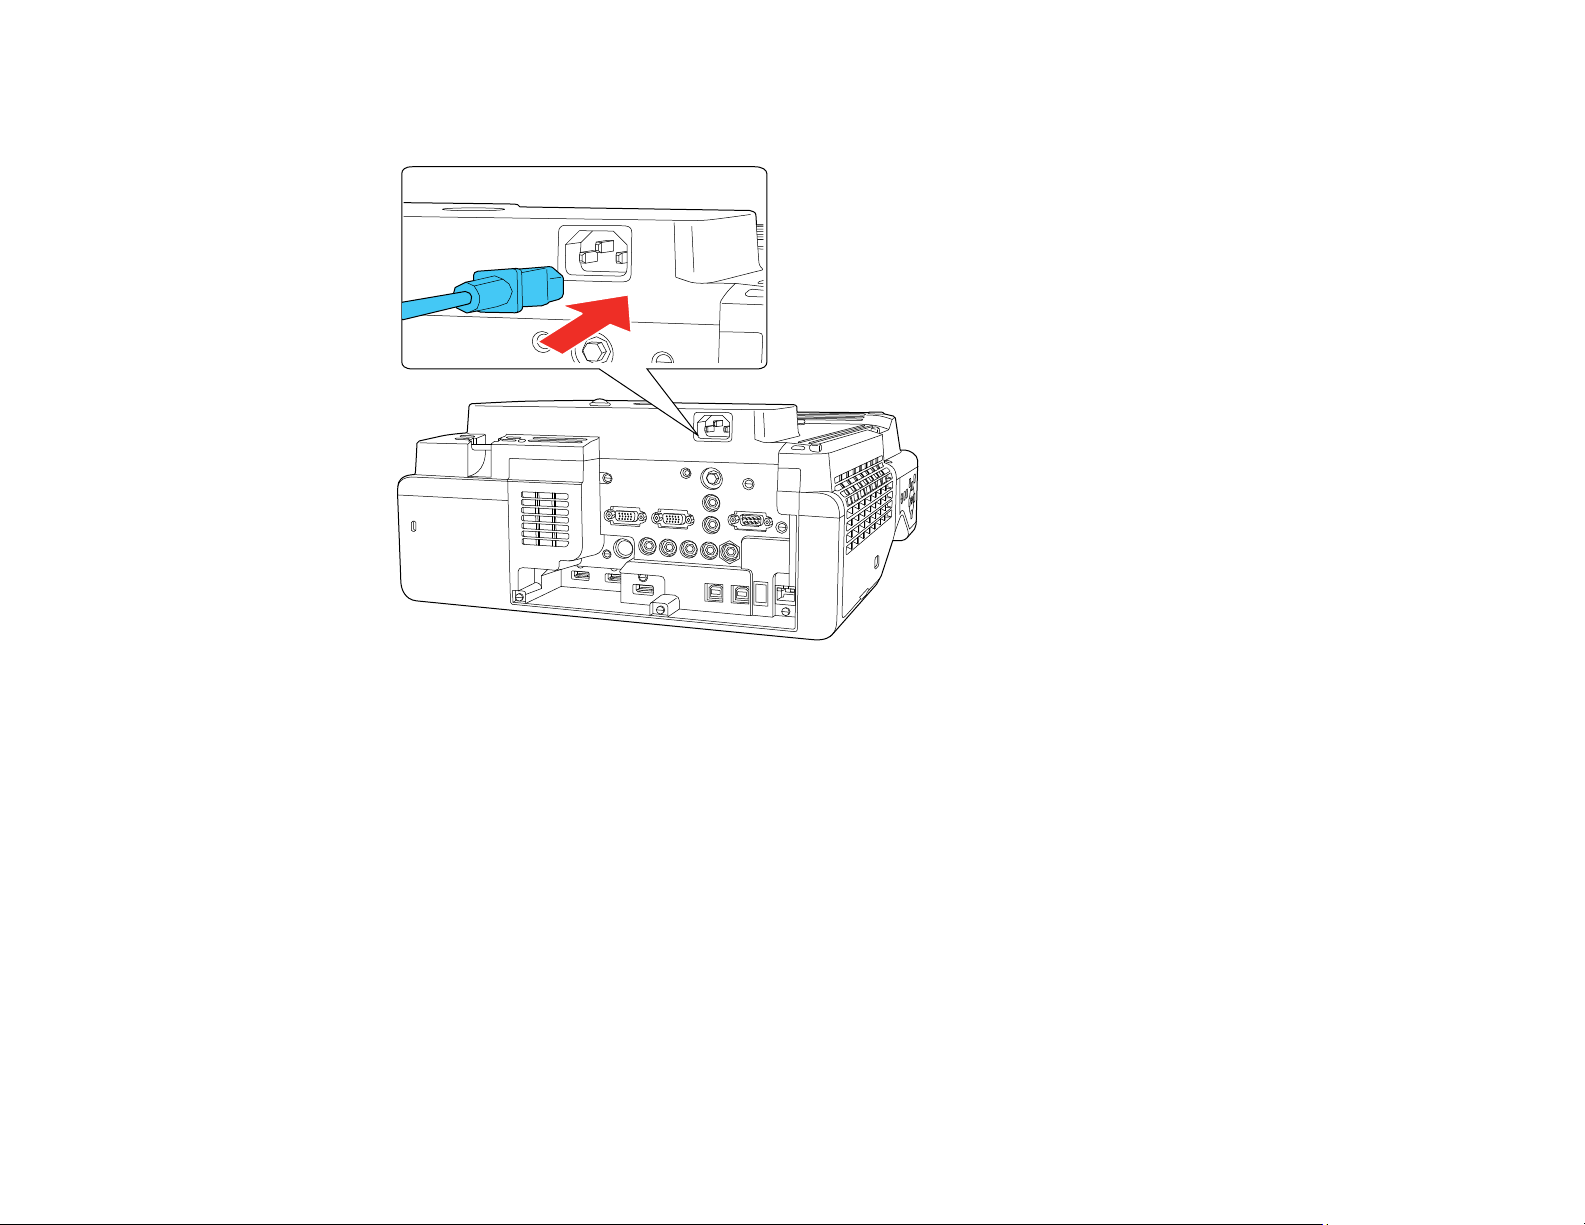
1. Connect the power cord to the projector's power inlet.
2. Plug the power cord into an electrical outlet.
The projector's On/Standby light turns blue. This indicates that the projector is receiving power.
Note: With Direct Power On turned on, the projector turns on as soon as you plug it in. If you enable
the Auto Power On setting in the projector's Operation menu, the projector turns on when it detects
a signal or cable connection from the selected port.
3. Press the power button on the projector or remote control to turn on the projector.
The projector beeps and the Status light flashes blue as the projector warms up. After about 30
seconds, the Status light stops flashing and turns blue.
Note: When Quick Startup is enabled in the projector's Operation menu, the projector becomes
ready for use in several seconds the next time you press the power button.
92
Page 93

Warning: Never look into the projector lens when the laser is on. This can damage your eyes and is
especially dangerous for children and pets. If you are using the remote control to turn the projector
on, make sure no one is looking into the lens or in front of the projector before turning it on.
Caution: Make sure no objects are blocking the light from the projector lens. Objects blocking the
lens for an extended time can melt and light that is reflected back into the lens can cause the
projector to malfunction.
If you do not see a projected image right away, try the following:
• Turn on the connected computer or video device.
• Insert a DVD or other video media and press the play button, if necessary.
• Press the Source Search button on the projector or remote control to detect the video source.
Note: If the Auto Source Search setting in the Operation menu is enabled, the projector
automatically detects the input signal when you turn it on.
• Change the screen output from the computer when using a laptop.
• Press the button for the video source on the remote control.
• If the Home screen is displayed, select the source you want to project.
Using the Home Screen
Parent topic: Using Basic Projector Features
Related references
Feature Settings - Operation Menu
Using the Home Screen
You can select input sources and other frequently used options from the Home screen.
1. To display the Home screen, do one of the following:
• Press the Home button on the remote control.
• Turn on the projector with the Home Screen Auto Disp setting enabled.
• Turn on the projector when no signal is received from the selected input source.
93
Page 94
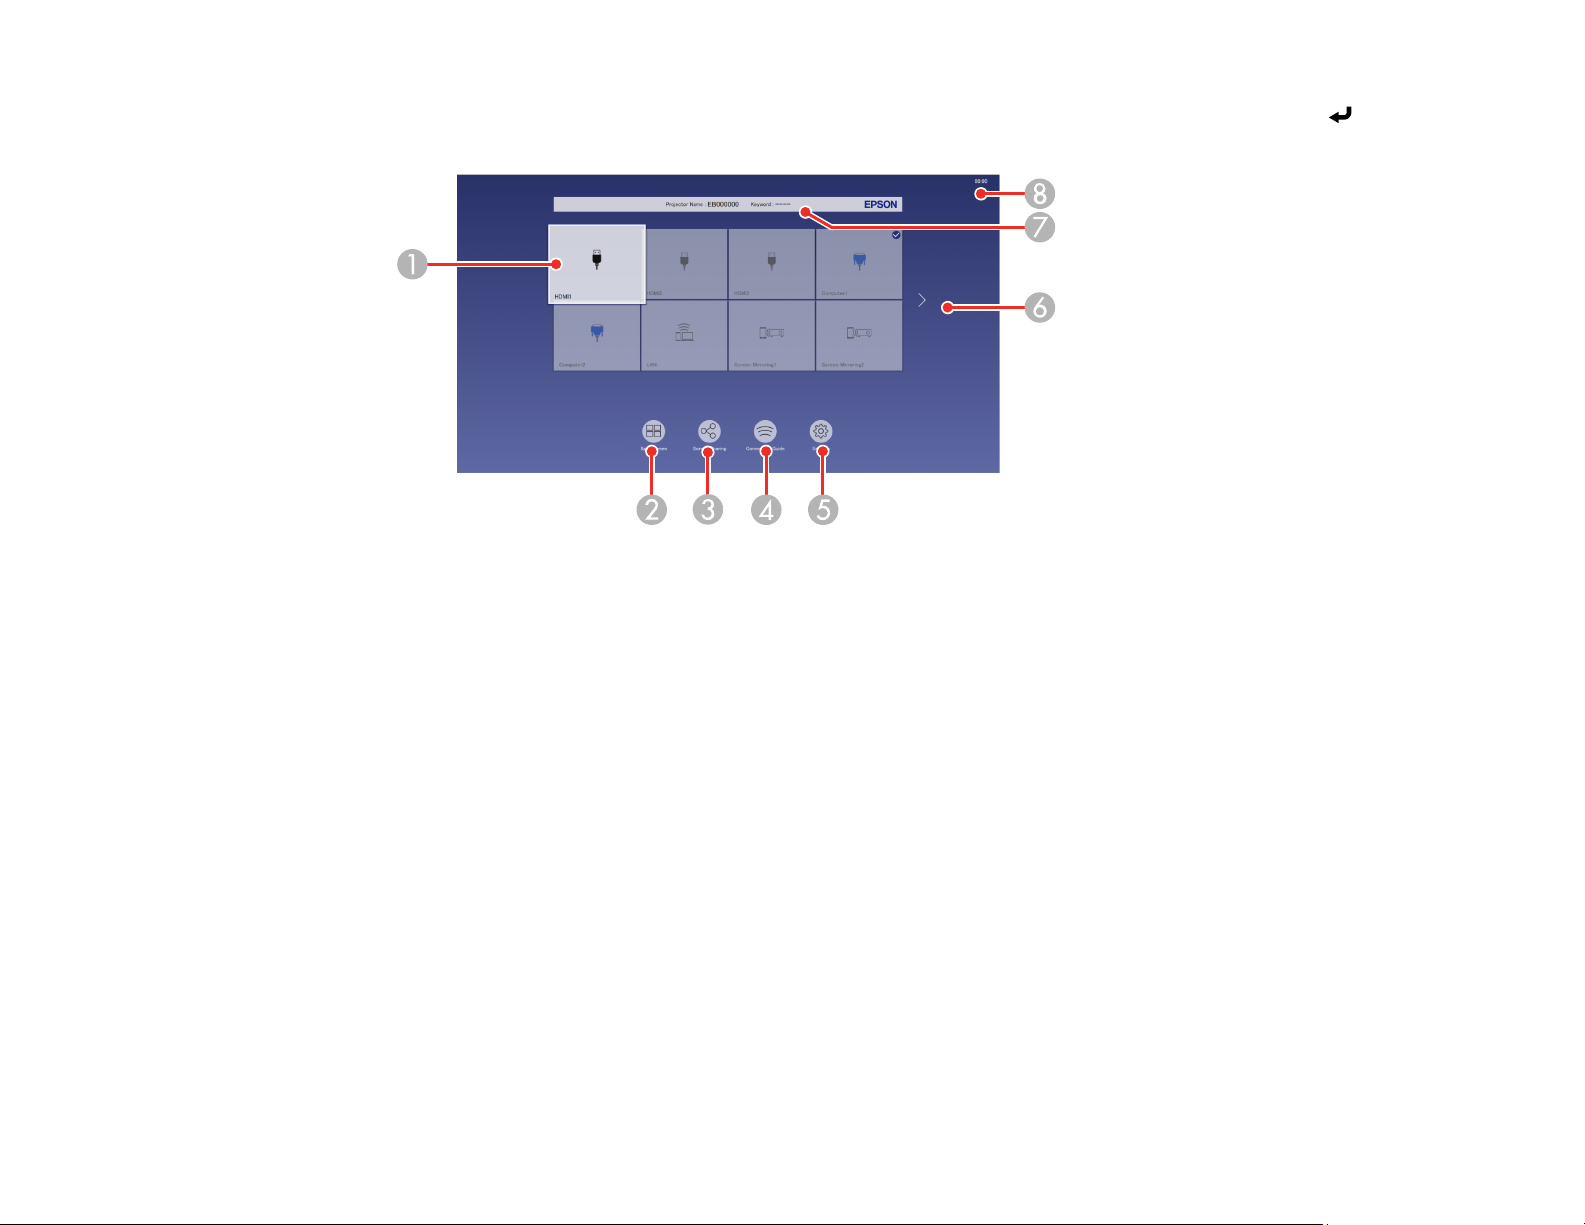
2. Press the arrow buttons on the remote control or control panel to navigate the screen, and press
Enter to select an option.
1 Selects the source you want to project
A checkmark appears in the upper right corner of the current input source. For most sources,
a preview of the input image appears as a thumbnail.
2 Projects images from two or four input sources simultaneously in a grid format
3 Shares your projected image with other projectors connected to the same network
4 Displays the Connection Guide
You can view steps for different wireless connection methods depending on the devices you
are using, such as smartphones or computers.
5 Lets you select the following common projector settings (these settings may vary depending
on other selected settings):
• Color Mode
• Brightness Level
• Volume
• Geometry Correction (H/V-Keystone and Quick Corner are available)
• Aspect
94
Page 95

6 Moves to the previous or next page if there are more available input sources
7 Displays the projector name and the projector keyword
8 Displays the current time
Note: The Home screen closes after 10 minutes of inactivity.
Parent topic: Turning On the Projector
Turning Off the Projector
Before turning off the projector, shut down any computer connected to it so you can see the computer
display during shutdown.
Note: Turn off this product when not in use to prolong the life of the projector. Laser life will vary
depending upon mode selected, environmental conditions, and usage. Brightness decreases over time.
1. Press the power button on the projector or remote control.
The projector displays a shutdown confirmation screen.
2. Press the power button again. (To leave it on, press any other button.)
The projector beeps twice, the laser turns off, and the Status light turns off.
Note: If the Light Source Calibration (EB-770F/EB-775F) setting is set to Run Periodically in the
projector's Management menu, light source calibration starts automatically if you turn off the
projector and the following conditions are present:
• 100 hours have passed since the last light source calibration.
• You have used the projector continuously for at least 20 minutes.
95
Page 96
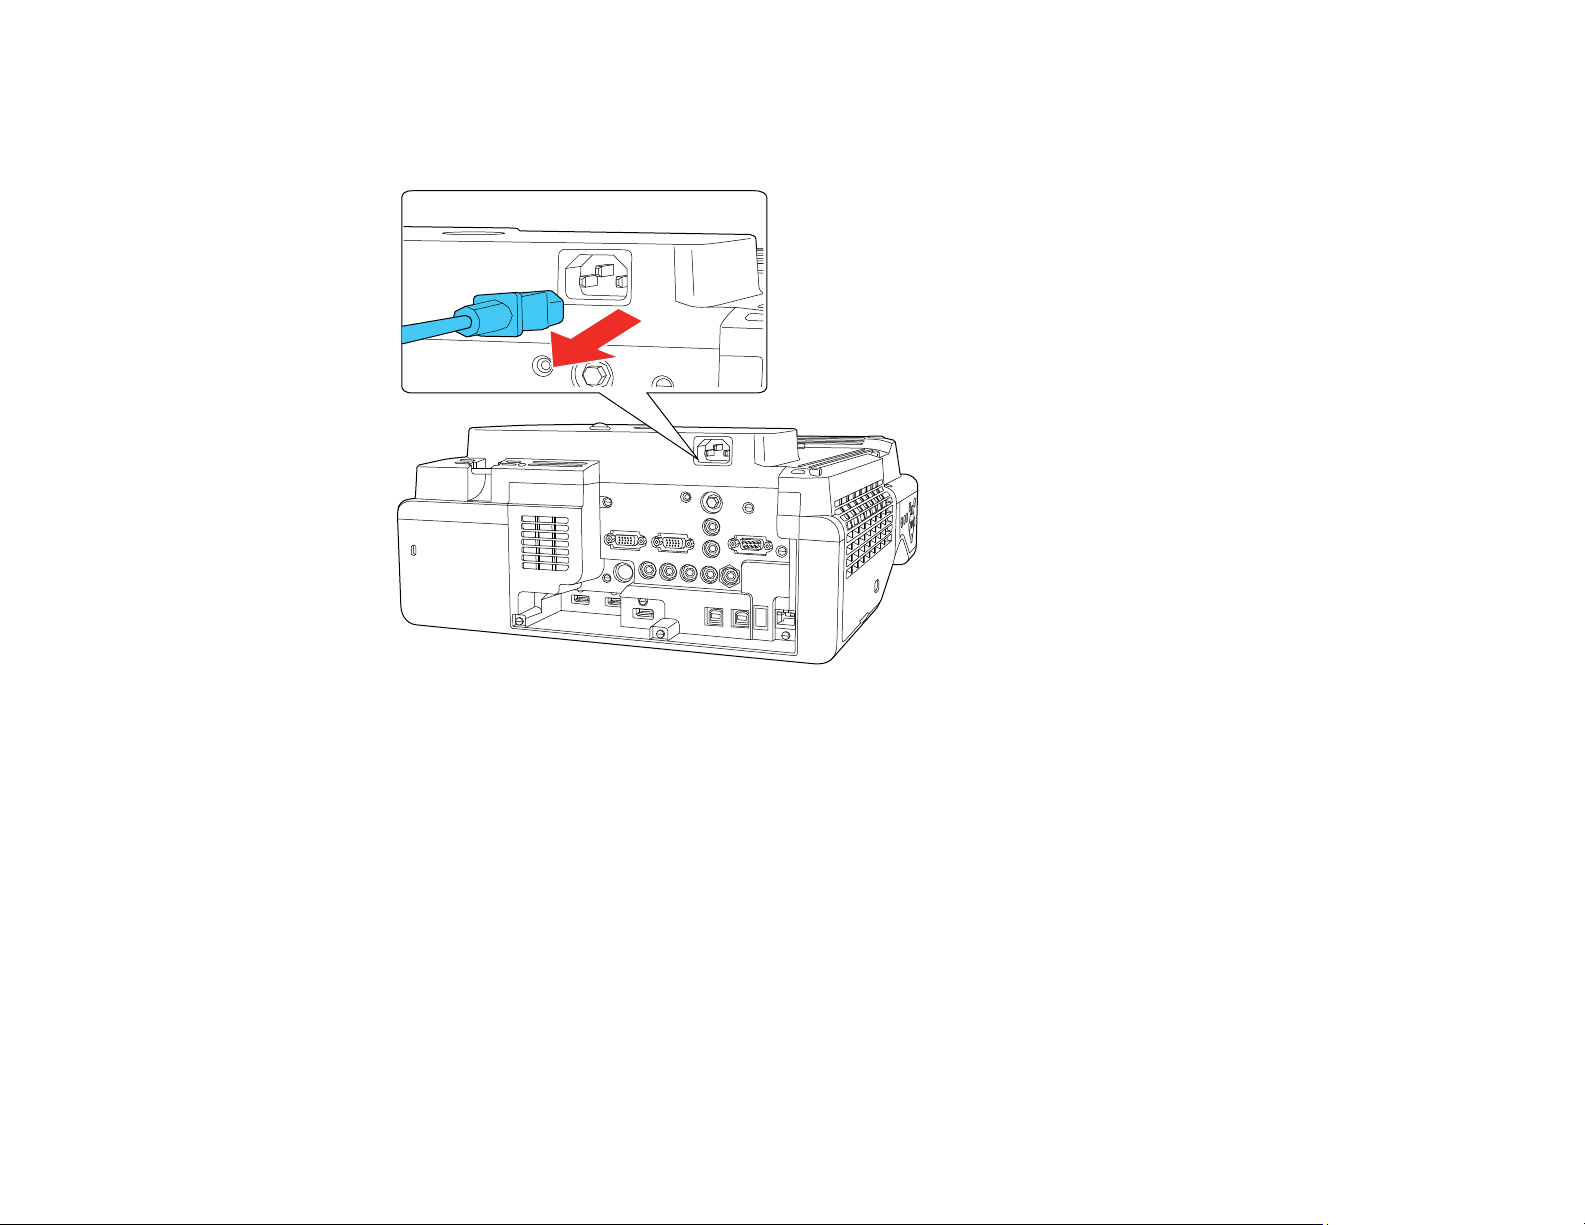
3. To transport or store the projector, make sure the On/Standby light is blue (not flashing) and the
Status light is off, then unplug the power cord.
Caution: To avoid damaging the projector or laser, never unplug the power cord when the Status
light is on or flashing.
Parent topic: Using Basic Projector Features
Related references
Administration Settings - Management Menu
Selecting the Language for the Projector Menus
If you want to view the projector's menus and messages in another language, you can change the
Language setting.
1. Turn on the projector.
2. Press the Menu button.
96
Page 97
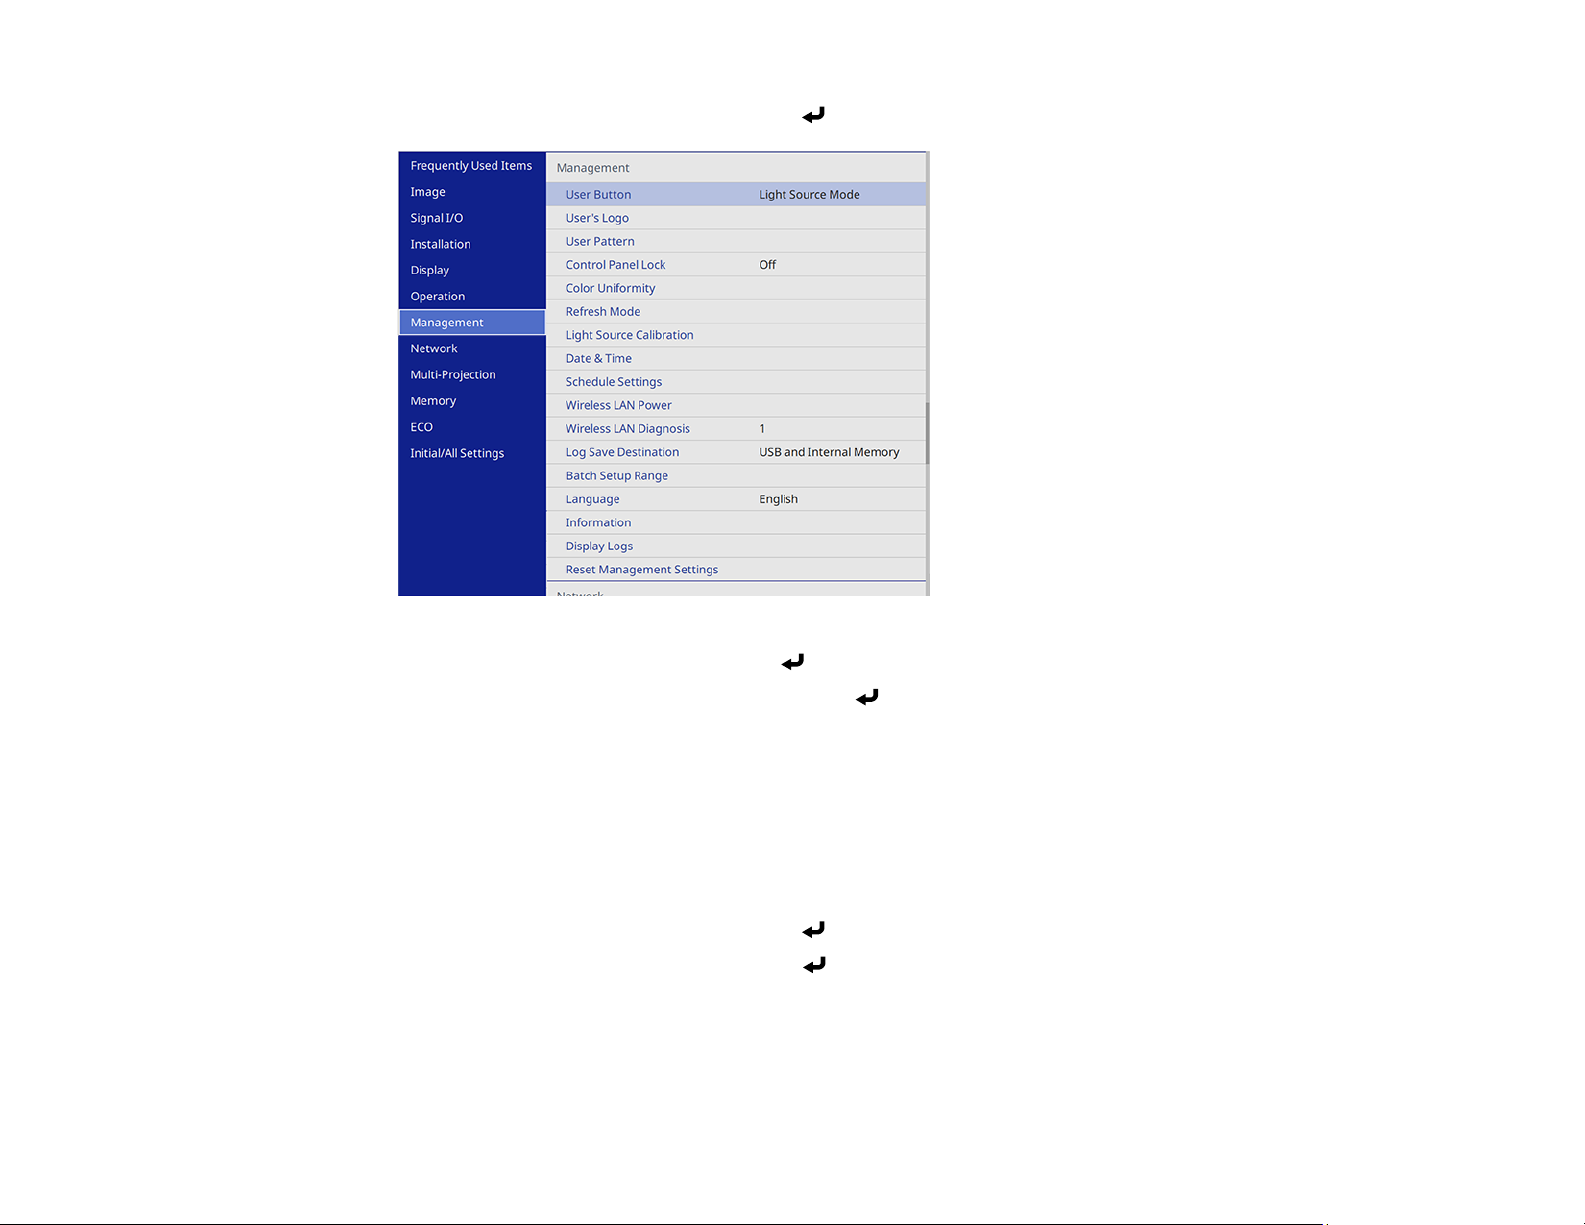
3. Select the Management menu and press Enter.
4. Select the Language setting and press Enter.
5. Select the language you want to use and press Enter.
6. Press Menu or Esc to exit the menus.
Parent topic: Using Basic Projector Features
Setting the Date and Time
You can set the date and time for the projector.
1. Press the Menu button.
2. Select the Management menu and press Enter.
3. Select the Date & Time setting and press Enter.
97
Page 98
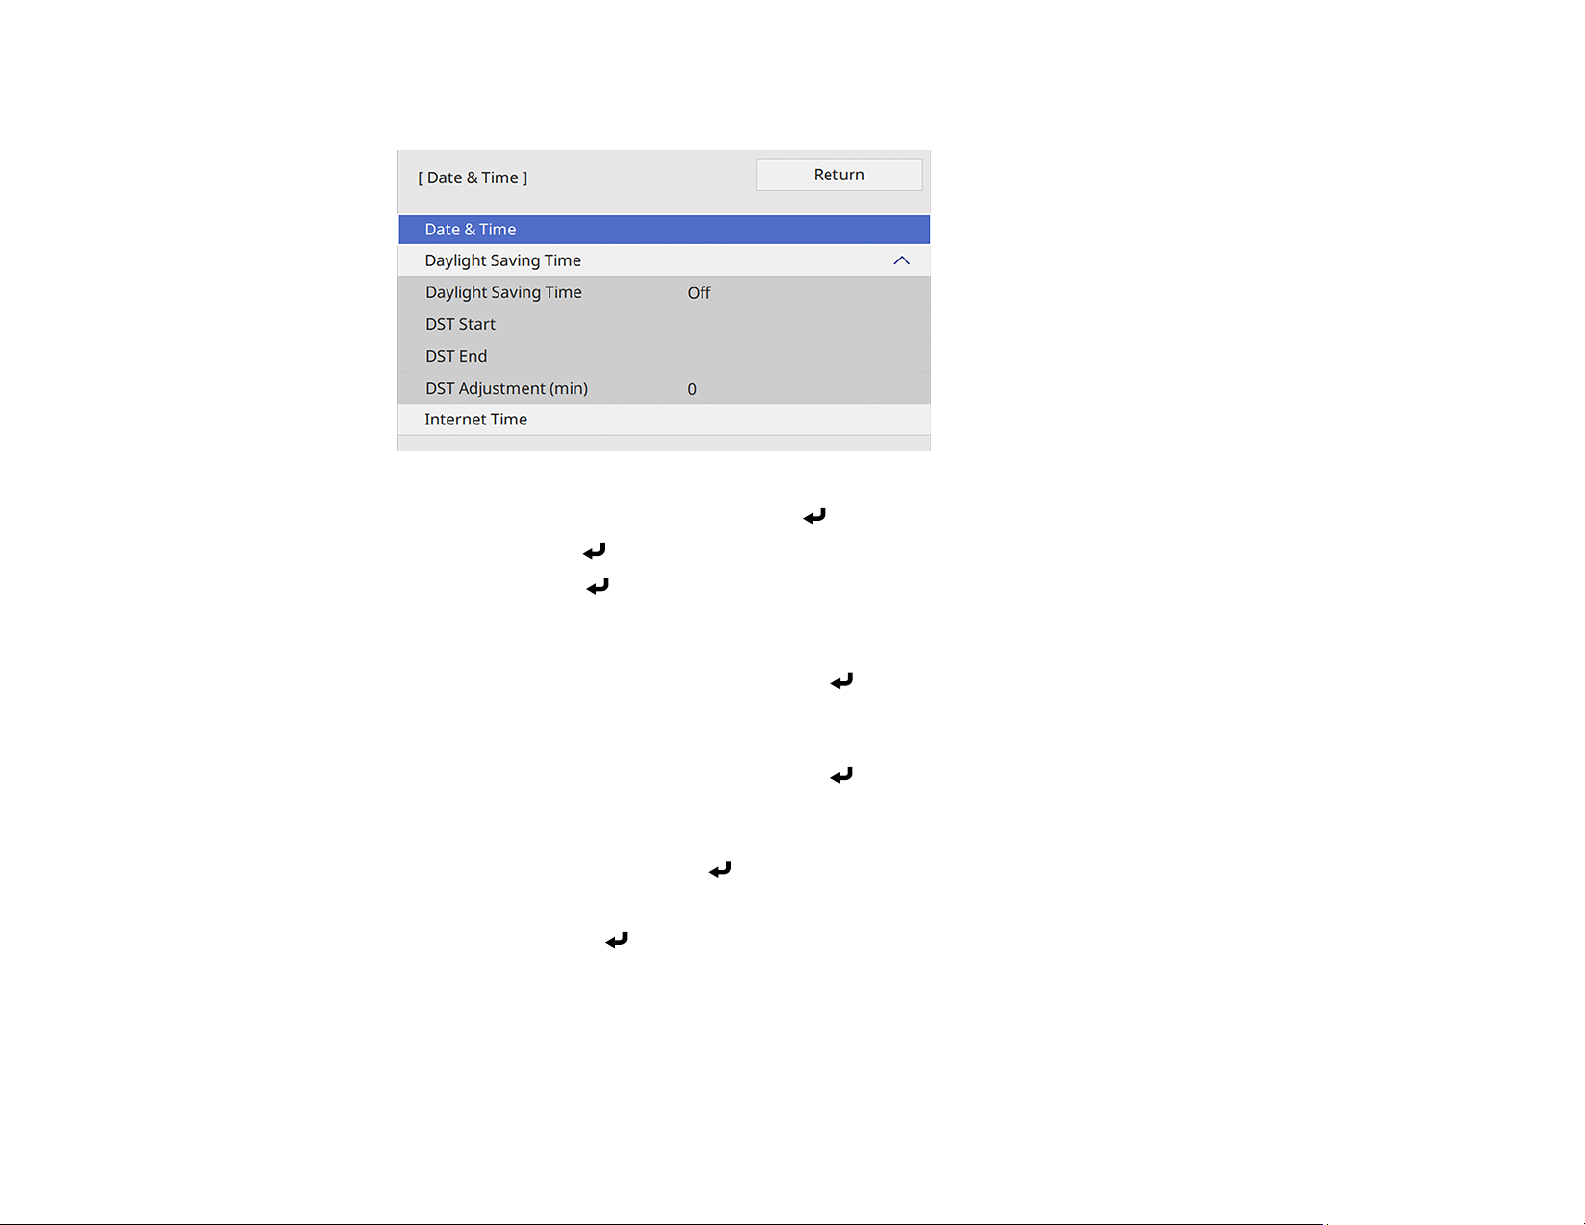
You see a screen like this:
4. Select the Date & Time setting and press Enter.
5. Select Date, press Enter, and use the displayed keyboard to enter today's date.
6. Select Time, press Enter, and use the displayed keyboard to enter the current time.
7. Adjust the Time Difference (UTC) settings to set the time difference from the Coordinated Universal
Time.
8. When you are finished, select Set and press Enter.
9. To activate daylight saving time, select the Daylight Saving Time setting and set it to On. Then
select settings.
10. When you are finished, select Set and press Enter.
11. To update the time automatically through an internet time server, select the Internet Time setting
and set it to On.
12. Select Internet Time and press Enter.
13. Enter the IP address for the Internet time server you want to use and select OK.
14. Select Set and press Enter.
15. Press Menu or Esc to exit the menus.
Parent topic: Using Basic Projector Features
Related references
Administration Settings - Management Menu
98
Page 99

Image Shape
You can project an evenly rectangular image by placing the projector directly in front of the center of the
screen and keeping it level. If you place the projector at an angle to the screen, or tilted up or down, or off
to the side, you may need to correct the image shape for the best display quality. After correction, your
image is slightly smaller.
For the best quality images, try to adjust the projector's position to achieve the correct image size and
shape. After you have corrected the position of the projector, you can use the adjustments in this section
to correct the image shape.
Note: If your projector uses the ELPMB62 wall mount, use the adjustment dials on the wall mount to
correct the screen image before using any other digital correction methods. You can select Menu >
Installation > Setting Plate Installation Guide for information on the mount adjustments.
Correcting Image Shape with the Keystone Buttons
Correcting Image Shape with Quick Corner
Correcting Image Shape with Arc Correction
Correcting Image Shape with Point Correction
Applying Saved Image Shape Settings
Parent topic: Using Basic Projector Features
Correcting Image Shape with the Keystone Buttons
You can use the projector's keystone correction buttons to correct the shape of an image that is
unevenly rectangular on the sides.
Note: You can use the keystone buttons to correct the image up to ± 3° horizontally or vertically. If the
projector is mounted on the wall, use the adjustment dials on the wall mount to correct the screen image
before using any other digital correction methods.
Note: You cannot combine keystone correction with other correction methods at the same time.
Note: If you change the Screen Type setting or adjust the image position, your image adjustments are
reset.
99
Page 100
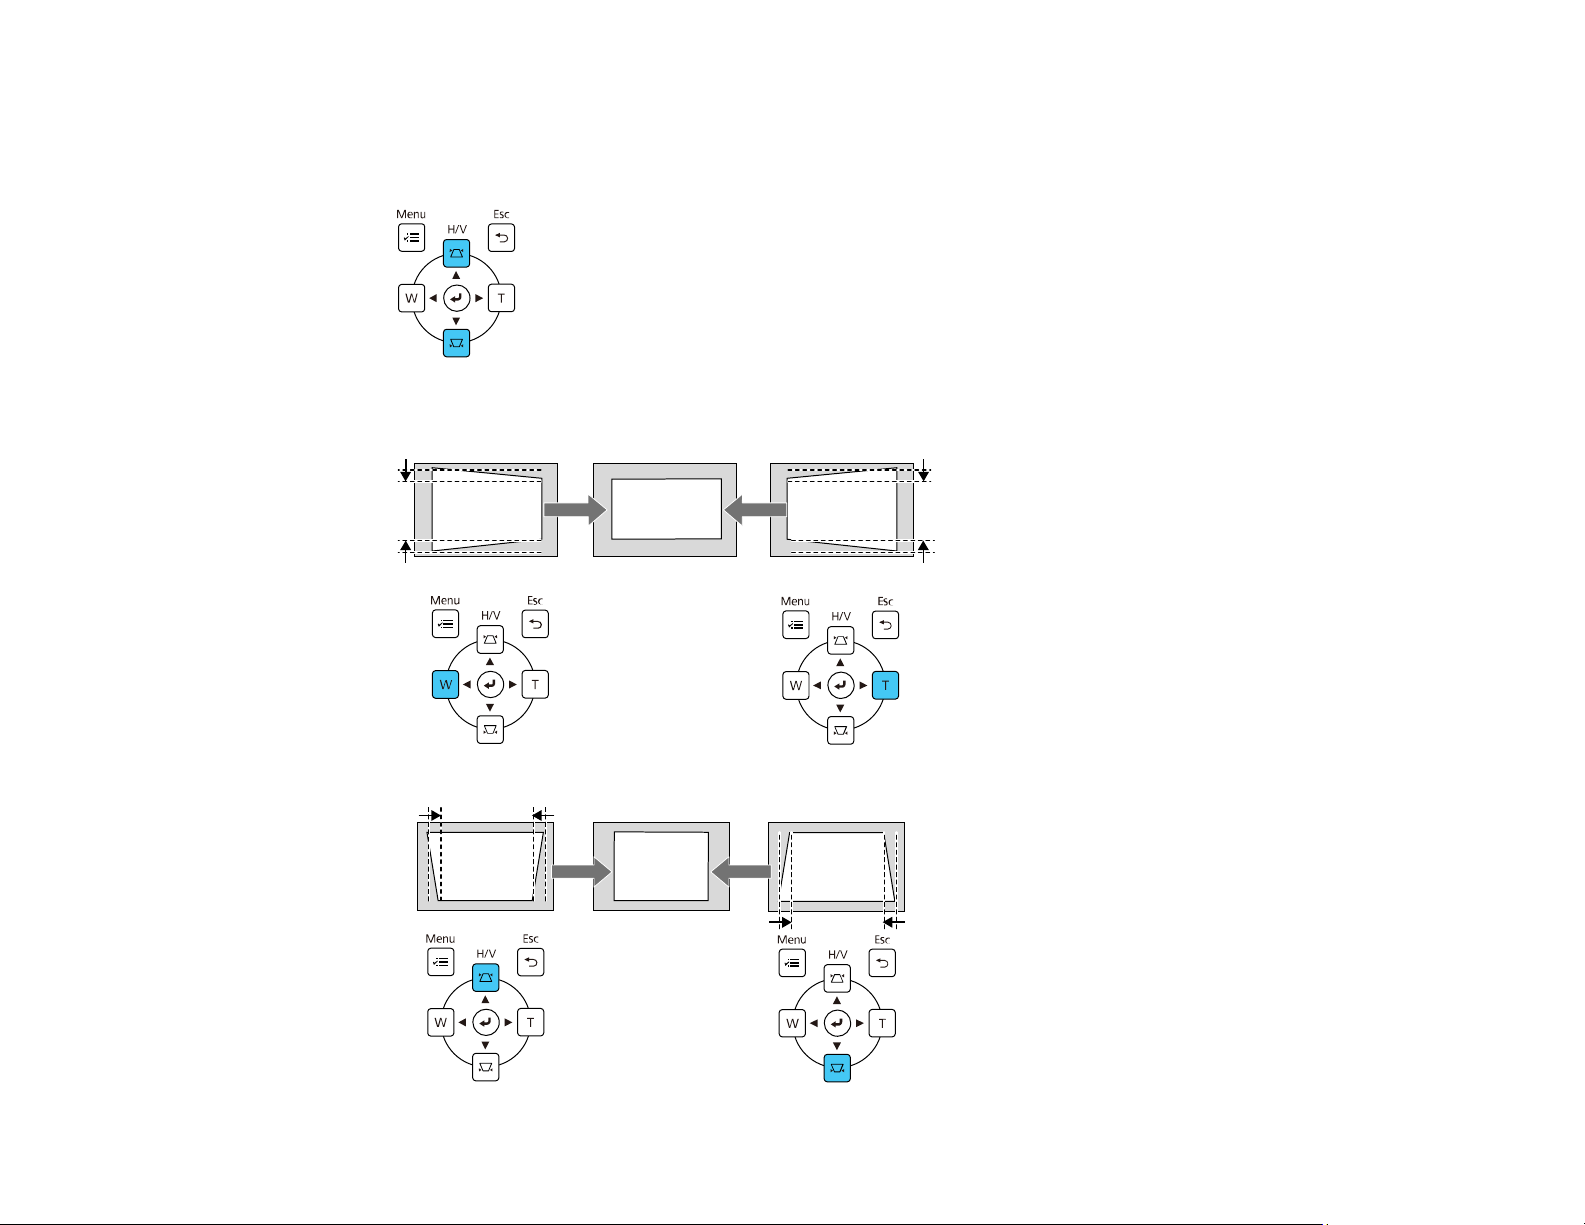
1. Turn on the projector and display an image.
2. Press one of these keystone buttons on the control panel to display the Keystone adjustment
screen.
3. Press a keystone button on the projector's control panel to adjust the image shape.
100
 Loading...