

Page 1
User's Guide
Page 2

Contents
2
Notations Used in This Guide 8
Using the Manual to Search for Information .................................. 9
Searching by Keyword................................................................................................................... 9
Jumping Directly from Bookmarks............................................................................................ 9
Printing Only the Pages You Need............................................................................................ 9
Getting the Latest Version of the Documents............................... 10
Introduction to Your Projector 11
Projector Features............................................................................ 12
Long-life Laser Light Source...................................................................................................... 12
Unique Interactive Functions.................................................................................................... 12
Quick and Easy Setup .................................................................................................................. 13
Flexible Connectivity.................................................................................................................... 13
Connect with Computers ..................................................................................................... 13
Connect with Mobile Devices ............................................................................................. 14
Easy Operation from the Control Pad ................................................................................... 14
Large-scale Presentation from the Whiteboard ................................................................ 15
Projector Parts and Functions ........................................................ 16
Projector Parts - Front/Side ....................................................................................................... 16
Projector Parts - Top/Side .......................................................................................................... 17
Projector Parts - Interface........................................................................................................... 18
Projector Parts - Base ................................................................................................................... 19
Projector Parts - Control Panel................................................................................................. 20
Projector Parts - Remote Control ............................................................................................ 21
Projector Parts - Interactive Pens ............................................................................................ 22
Projector Parts - Pen Stand........................................................................................................ 23
Projector Parts - Control Pad..................................................................................................... 24
Projector Parts - Touch Unit ...................................................................................................... 25
Safety Instructions for Magnet ................................................................................................. 26
Setting Up the Projector 27
Projector Placement ........................................................................ 28
Projector Setup and Installation Options............................................................................. 28
Settings when Using the Interactive Features ................................................................... 29
Settings when Using the Touch Unit ............................................................................... 30
Projector Connections ..................................................................... 31
Connecting to a Computer........................................................................................................ 31
Connecting to a Computer for VGA Video and Audio.............................................. 31
Connecting to a Computer for USB Video and Audio............................................... 32
Connecting to a Computer for HDMI Video and Audio ........................................... 33
Connecting a Computer to the Control Pad................................................................. 33
Connecting to a Mini PC Installed on a Wall Plate...................................................... 34
Connecting a Computer for Use with PC Interactive Features.............................. 35
Connecting to Video Sources ................................................................................................... 35
Connecting to an HDMI Video Source ............................................................................ 35
Connecting to a Composite Video Source..................................................................... 36
Connecting a Video Source to the Control Pad........................................................... 36
Connecting to External USB Devices ..................................................................................... 37
USB Device Projection ........................................................................................................... 37
Connecting to a USB Device ............................................................................................... 38
Connecting a USB Flash Drive to the Control Pad...................................................... 38
Disconnecting a USB Device ............................................................................................... 39
Connecting to a Document Camera ...................................................................................... 39
Connecting a Printer .................................................................................................................... 39
Connecting to External Output Devices............................................................................... 39
Connecting to an External HDMI Monitor ..................................................................... 39
Connecting to a VGA Monitor ............................................................................................ 40
Connecting to External Speakers ...................................................................................... 41
Connecting a Microphone ................................................................................................... 41
Connecting Multiple Projectors of the Same Model ....................................................... 42
Menu Settings for Multiple Projector Connections .................................................... 43
Installing Batteries in the Remote Control .................................... 45
Page 3

Contents
3
Installing Batteries in the Pens ....................................................... 46
Remote Control Operation .............................................................. 47
Using Basic Projector Features 48
Turning On the Projector ................................................................ 49
Home Screen ................................................................................................................................... 50
Turning Off the Projector ................................................................ 51
Setting the Date and Time .............................................................. 52
Selecting the Language for the Projector Menus ......................... 54
Projection Modes ............................................................................. 55
Changing the Projection Mode Using the Remote Control.......................................... 55
Changing the Projection Mode Using the Menus ............................................................ 55
Setting the Screen Type .................................................................. 57
Adjusting the Image Position Using Screen Position...................................................... 57
Focusing the Image.......................................................................... 59
Image Shape..................................................................................... 61
Correcting the Image Shape with the Keystone Buttons .............................................. 61
Correcting the Image Shape with Quick Corner ............................................................... 62
Correcting Image Shape with Arc Correction..................................................................... 64
Correcting Image Shape with Point Correction................................................................. 66
Loading Image Shape Setting from Memory ..................................................................... 68
Correcting Image Shape with Corner Markers................................................................... 68
Resizing the Image with the Buttons ............................................. 70
Adjusting the Image Position ......................................................... 71
Selecting an Image Source .............................................................. 72
Image Aspect Ratio .......................................................................... 74
Changing the Image Aspect Ratio.......................................................................................... 74
Available Image Aspect Ratios ................................................................................................. 74
Projected Image Appearance with Each Aspect Mode .................................................. 75
Adjusting Image Quality (Color Mode).......................................... 78
Changing the Color Mode ......................................................................................................... 78
Available Color Modes................................................................................................................. 78
Turning On Automatic Luminance Adjustment................................................................ 78
Adjusting the Image Color .............................................................. 80
Adjusting the Hue, Saturation, and Brightness.................................................................. 80
Adjusting the Gamma ................................................................................................................. 81
Adjusting the Brightness................................................................. 83
Constant Brightness Usage Hours .......................................................................................... 84
Light Source Life Span................................................................................................................. 85
Controlling the Volume with the Volume Buttons ....................... 86
Inverting the Audio Channels ......................................................... 87
Using the Interactive Features 88
Interactive Feature Modes .............................................................. 89
Preparing Before Using Interactive Features................................ 91
Safety Instructions for Interactive Features......................................................................... 91
Using the Interactive Pens ......................................................................................................... 91
Using Interactive Touch Operations with Your Finger ................................................... 93
Safety Instructions for Interactive Touch Operations ................................................ 94
Whiteboard Screens (Whiteboard Mode) ...................................... 96
Safety Instructions for Whiteboard Mode............................................................................ 96
Starting Whiteboard Mode........................................................................................................ 96
Whiteboard Mode Toolbar................................................................................................... 97
Importing Images in Whiteboard Mode......................................................................... 99
Compatible File Types for Opening in Whiteboard Mode .................................... 101
Draw on the Projected Image Using Annotation Mode............. 102
Starting Annotation Mode ...................................................................................................... 102
Annotation Mode Toolbar ................................................................................................. 103
Sharing Drawings........................................................................... 106
Page 4

Contents
4
Sending Drawing Contents via Email.................................................................................. 106
Creating an Address Book ................................................................................................. 107
Available Directory Service................................................................................................ 108
Saving Drawing Contents........................................................................................................ 108
Available File Format in Whiteboard Mode ................................................................ 110
Printing Drawing Contents ..................................................................................................... 110
Available Printer Control Commands in Whiteboard Mode................................. 111
Control Computer Features from a Projected Screen
(Computer Interactive Mode) ....................................................... 112
Computer Interactive Mode System Requirements ...................................................... 112
Using Computer Interactive Mode....................................................................................... 113
Adjusting the Pen Operation Area....................................................................................... 113
Installing Easy Interactive Driver on Mac........................................................................... 115
Controlling a Document Camera .................................................. 116
Selecting Network Device Display ............................................... 117
Using the Interactive Features over a Network.......................... 119
Precautions when Connecting to a Projector on a Different Subnet ..................... 119
Using Split Screen Projection ....................................................... 120
Adjusting Projector Features 121
Projecting Multiple Images Simultaneously ............................... 122
Unsupported Input Source Combinations for Split Screen Projection .................. 124
Split Screen Projection Restrictions ..................................................................................... 124
Stopping Video Action Temporarily ............................................ 131
Zooming Images............................................................................. 132
Saving a User's Logo Image .......................................................... 133
Saving a User Pattern .................................................................... 135
Saving Settings to Memory and Using Saved Settings ............. 137
Using Multiple Projectors ............................................................. 138
Projector Identification System for Multiple Projector Control................................. 138
Setting the Projector ID ...................................................................................................... 138
Selecting the Projector You want to Operate............................................................ 139
Adjusting Color Uniformity ..................................................................................................... 140
Blending the Image Edges ...................................................................................................... 142
Matching the Image Colors..................................................................................................... 144
Adjusting the Black Level......................................................................................................... 145
Modifying the Black Level Adjustment Area .............................................................. 147
Adjusting RGBCMY ..................................................................................................................... 148
Scaling an Image......................................................................................................................... 149
Projector Security Features .......................................................... 152
Password Security Types.......................................................................................................... 152
Setting a Password ............................................................................................................... 152
Selecting Password Security Types ................................................................................ 153
Entering a Password to Use the Projector................................................................... 154
Locking the Projector's Buttons ............................................................................................ 154
Unlocking the Projector's Buttons .................................................................................. 155
Installing a Security Cable ....................................................................................................... 155
Projecting a PC Free Presentation ............................................... 125
Supported PC Free File Types ................................................................................................ 125
Precautions on PC Free Projection....................................................................................... 125
Starting a PC Free Slide Show ................................................................................................ 126
Starting a PC Free Movie Presentation ............................................................................... 127
PC Free Display Options ........................................................................................................... 128
Shutting Off the Image and Sound Temporarily ........................ 130
Using the Projector on a Network 157
Wired Network Projection............................................................. 158
Connecting to a Wired Network ........................................................................................... 158
Selecting Wired Network Settings........................................................................................ 158
Wireless Network Projection ........................................................ 162
Safety Instructions for Built-in Wireless LAN Module.................................................... 162
Page 5

Contents
5
Connection Methods for Wireless Network Projection ................................................ 162
Installing the Wireless LAN Module..................................................................................... 163
Selecting Wireless Network Settings Manually ............................................................... 164
Selecting Wireless Network Settings in Windows .......................................................... 167
Selecting Wireless Network Settings in Mac .................................................................... 167
Setting Up Wireless Network Security for Simple AP Mode....................................... 167
Setting Up Wireless Network Security for Infrastructure Mode ................................ 168
Supported Client and CA Certificates............................................................................ 170
Using a QR Code to Connect a Mobile Device ................................................................ 170
Using a USB Key to Connect a Windows Computer...................................................... 171
Wireless Network Projection from a Mobile Device (Screen
Mirroring)........................................................................................ 172
Selecting Screen Mirroring Settings .................................................................................... 172
Connecting Using Screen Mirroring with the Miracast Function ............................. 174
Connecting Using Screen Mirroring in Windows 10..................................................... 175
Connecting Using Screen Mirroring in Windows 8.1 .................................................... 175
Secure HTTP.................................................................................... 177
Importing a Web Server Certificate Using the Menus .................................................. 177
Supported Web Server Certificates ................................................................................ 178
Screen Sharing ............................................................................... 179
Preparing For Screen Sharing ................................................................................................ 179
Sharing the Screen ..................................................................................................................... 180
Receiving Shared Screen Images .......................................................................................... 181
Setting Up Monitoring Using SNMP............................................. 191
Using ESC/VP21 Commands ........................................................ 192
ESC/VP21 Command List ......................................................................................................... 192
Cable Layouts ............................................................................................................................... 192
PJLink Support ............................................................................... 193
Crestron Connected Support........................................................ 194
Setting Up Crestron Connected Support........................................................................... 194
Controlling a Networked Projector Using Crestron Connected ............................... 194
Crestron Connected Operation Window ..................................................................... 196
Crestron Connected Tools Window ............................................................................... 197
Setting Projector Event Schedules ............................................... 199
Adjusting the Menu Settings 202
Using the Projector's Menus ......................................................... 203
Using the Displayed Keyboard..................................................... 204
Available Text Using the Displayed Keyboard................................................................. 204
Image Quality Settings - Image Menu ......................................... 205
Input Signal Settings - Signal I/O Menu....................................... 207
Projector Installation Settings - Installation Menu .................... 209
Projector Display Settings - Display Menu .................................. 211
Monitoring and Controlling the Projector 182
Epson Projector Management ...................................................... 183
Controlling a Networked Projector Using a Web Browser ........ 184
Web Control Options................................................................................................................. 185
Registering Digital Certificates from a Web Browser................. 189
Setting Up Projector Network E-Mail Alerts ............................... 190
Network Projector E-mail Alert Messages ......................................................................... 190
Projector Feature Settings - Operation Menu............................. 213
Projector Administration Settings - Management Menu .......... 215
Event ID Code List....................................................................................................................... 217
Projector Network Settings - Network Menu.............................. 219
Network Menu - Network Settings Menu.......................................................................... 220
Network Menu - Wireless LAN Menu............................................................................. 221
Network Menu - Wired LAN Menu ................................................................................. 223
Network Menu - Mail Notification Menu ..................................................................... 224
Network Menu - Projector Control Menu .................................................................... 224
Page 6

Contents
6
Network Menu - Network Projection Settings ........................................................... 225
Projector Pen And Touch Setup Settings - Pen/Touch Menu .... 227
Projector Interactive Settings - Interactive Menu ...................... 229
Interactive Menu - Print Menu............................................................................................... 229
Interactive Menu - Save Menu............................................................................................... 230
Interactive Menu - Mail Menu................................................................................................ 231
Interactive Menu - Directory Menu...................................................................................... 231
Multiple Projector Operation Settings - Multi-Projection
Menu ............................................................................................... 233
Image Quality Memory Settings - Memory Menu....................... 235
Projector Setup Settings - ECO Menu .......................................... 236
Projector Initial Settings and Reset Options - Initial/All
Settings Menu ................................................................................ 237
Copying Menu Settings Between Projectors (Batch Setup) ...... 238
Transferring Settings From a USB Flash Drive ................................................................. 238
Transferring Settings From a Computer ............................................................................ 239
Batch Setup Error Notification ......................................................................................... 240
Maintaining the Projector 241
Projector Maintenance .................................................................. 242
Cleaning the Lens........................................................................... 243
Cleaning the Projector Case.......................................................... 244
Air Filter and Vent Maintenance .................................................. 245
Cleaning the Air Filter ............................................................................................................... 245
Replacing the Air Filter ............................................................................................................. 247
Replacing the Interactive Pen Tip ................................................ 249
Replacing the Soft Pen Tip...................................................................................................... 249
Replacing the Soft Pen Tip with the Hard Pen Tip......................................................... 250
Solving Problems 251
Projection Problems ...................................................................... 252
Projector Indicator Status ............................................................. 253
Solving Image or Sound Problems............................................... 255
Solutions When No Image Appears..................................................................................... 255
Solutions When Image is Incorrect Using the USB Display Function ..................... 255
Solutions When "No Signal" Message Appears ............................................................... 256
Displaying From a Laptop.................................................................................................. 256
Displaying From a Mac Laptop........................................................................................ 256
Solutions When "Not Supported" Message Appears .................................................... 257
Solutions When Only a Partial Image Appears................................................................ 257
Solutions When the Image is not Rectangular................................................................ 257
Solutions When the Image Contains Noise or Static..................................................... 258
Solutions When the Image is Fuzzy or Blurry .................................................................. 258
Solutions When the Image Brightness or Colors are Incorrect ................................. 259
Solutions When an Afterimage Remains on the Projected Image .......................... 259
Solutions to Sound Problems................................................................................................. 259
Solutions to Microphone Problems ..................................................................................... 260
Solutions When Image File Names are not Displayed Correctly in PC Free......... 260
Solving Projector or Remote Control Operation Problems....... 261
Solutions to Projector Power or Shut-Off Problems...................................................... 261
Solutions to Problems with the Remote Control............................................................ 261
Solutions to Password Problems........................................................................................... 262
Solution When "The Battery that Saves Your Clock Settings is Running Low"
Message Appears ........................................................................................................................ 262
Solving Interactive Features Problems........................................ 263
Solutions When "Error Occurred in the Easy Interactive Function" Message
Appears........................................................................................................................................... 263
Solutions When the Interactive Pens do not Work........................................................ 263
Solutions When You Cannot Operate a Computer from the Projected Screen . 264
Solutions When the Interactive Pen Position is not Accurate ................................... 264
Solutions When the Interactive Pens are Slow or Difficult to Use ........................... 264
Page 7

Contents
7
Solutions When the Interactive Touch Operation does not Work........................... 264
Solutions for Problems with Capturing, Printing, Saving, or Scanning.................. 265
Solutions When the Time is Incorrect in Whiteboard Settings ................................. 265
Solutions When Whiteboard Mode does not Start........................................................ 266
Solving Network Problems ........................................................... 267
Solutions When Wireless Authentication Fails ................................................................ 267
Solutions When You Cannot Access the Projector Through the Web ................... 267
Solutions When Network Alert E-Mails are not Received............................................ 267
Solutions When the Image Contains Static During Network Projection............... 268
Solutions When You Cannot Connect Using Screen Mirroring................................. 268
Solutions When the Image or Sound Contains Static During Screen Mirroring
Connection.................................................................................................................................... 268
Solutions When the Projected Screen is not Shared Correctly ................................. 269
Solving HDMI Link Problems ........................................................ 270
Solutions When HDMI Link does not Function ............................................................... 270
Appendix 271
Optional Accessories and Replacement Parts............................. 272
Screens............................................................................................................................................ 272
Cables .............................................................................................................................................. 272
Mounts............................................................................................................................................ 272
For Interactive Feature.............................................................................................................. 272
External Devices .......................................................................................................................... 272
Replacement Parts...................................................................................................................... 273
For Wireless Connection .......................................................................................................... 273
Compatible Accessories from Other Projectors .............................................................. 273
USB Display System Requirements .............................................. 285
Easy Interactive Driver System Requirements ............................ 286
List of Safety Symbols and Instructions ...................................... 287
Laser Safety Information............................................................... 289
Laser Warning Labels................................................................................................................. 289
Glossary .......................................................................................... 291
Notices ............................................................................................ 293
FCC Compliance Statement.................................................................................................... 293
Indication of the manufacturer and the importer in accordance with
requirements of EU directive.................................................................................................. 294
Restriction of Use........................................................................................................................ 295
Operating System References................................................................................................ 295
Trademarks.................................................................................................................................... 295
Copyright Notice ......................................................................................................................... 296
Copyright Attribution................................................................................................................ 296
Screen Size and Projection Distance ............................................ 274
Supported Monitor Display Resolutions ..................................... 276
Projector Specifications ................................................................ 281
Connector Specifications ......................................................................................................... 282
External Dimensions...................................................................... 283
Page 8
Notations Used in This Guide
Safety Symbols
The projector and its manuals use graphical symbols and labels to indicate content that tells you how to use the projector safely.
Read and carefully follow the instructions that are marked with these symbols and labels to avoid injury to persons or damage to property.
This symbol indicates information that, if ignored, could possibly result in personal injury or even death.
Warning
This symbol indicates information that, if ignored, could possibly result in personal injury or physical damage due to incorrect handling.
Caution
General Information Notations
This label indicates procedures that may result in damage or injury if sufficient care is not taken.
Attention
This label indicates additional information that may be useful to know.
[Button name] Indicates the name of the buttons on the remote control or the control panel.
Example: [Esc] button
Menu/Setting name Indicates projector menu and setting names.
Example:
Select the Image menu
s Image > Advanced
This label indicates links to the related pages.
s
This label indicates the projector's current menu level.
gg Related Links
• "Using the Manual to Search for Information" p.9
• "Getting the Latest Version of the Documents" p.10
Page 9
Using the Manual to Search for Information
9
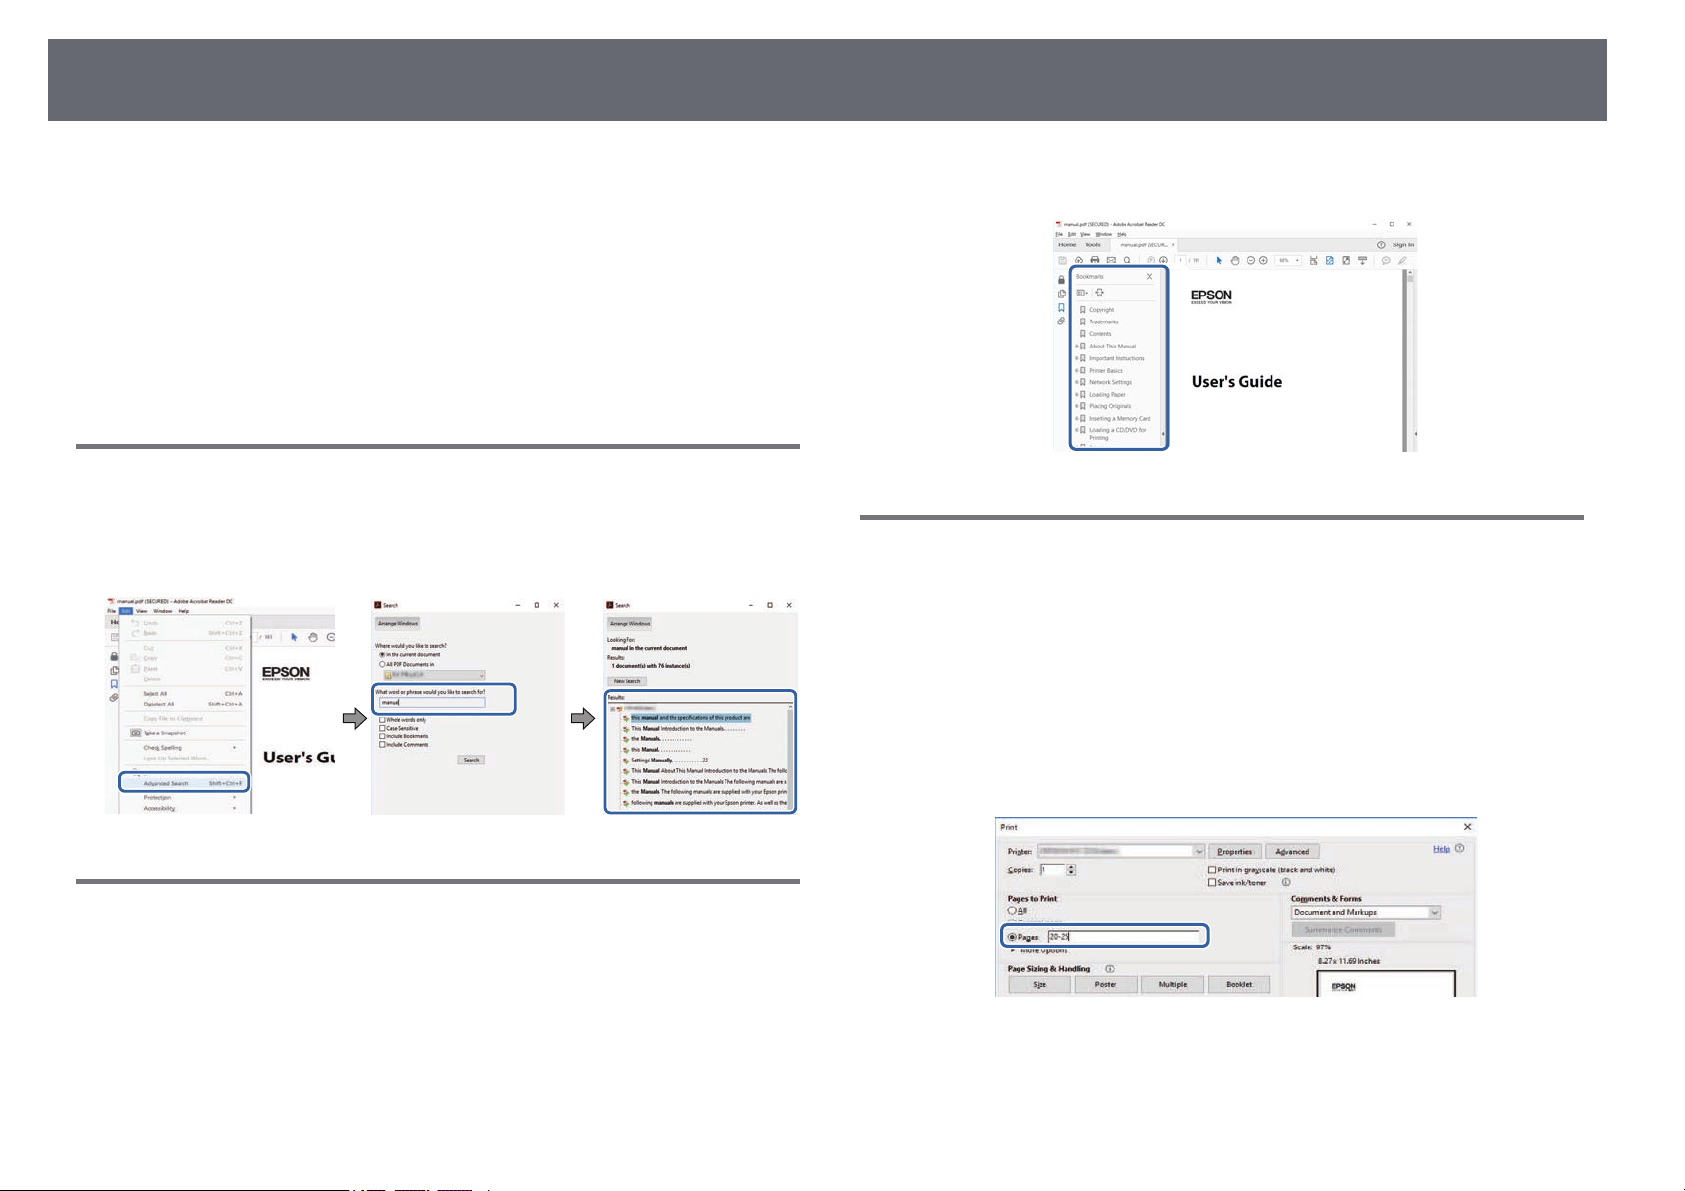
The PDF manual allows you to search for information you are looking for by
keyword, or jump directly to specific sections using the bookmarks. You can
also print only the pages you need. This section explains how to use a PDF
manual that has been opened in Adobe Reader X on your computer.
gg Related Links
• "Searching by Keyword" p.9
• "Jumping Directly from Bookmarks" p.9
• "Printing Only the Pages You Need" p.9
Searching by Keyword
Click Edit > Advanced Search. Enter the keyword (text) for information you
want to find in the search window, and then click Search. Hits are displayed
as a list. Click one of the displayed hits to jump to that page.
• Mac OS: Hold down the command key, and then press ←.
Printing Only the Pages You Need
You can extract and print only the pages you need. Click Print in the File
menu, and then specify the pages you want to print in Pages in Pages to
Print.
• To specify a series of pages, enter a hyphen between the start page and the
end page.
Example: 20-25
• To specify pages that are not in series, divide the pages with commas.
Example: 5, 10, 15
Jumping Directly from Bookmarks
Click a title to jump to that page. Click + or > to view the lower level titles in
that section. To return to the previous page, perform the following operation
on your keyboard.
• Windows: Hold down Alt, and then press ←.
Page 10

Getting the Latest Version of the Documents
You can get the latest version of the manuals and specifications on the Epson
Web site.
Visit epson.sn, and enter your projector's name.
10
Page 11

Introduction to Your Projector
Refer to these sections to learn more about your projector's features and part names.
gg Related Links
• "Projector Features" p.12
• "Projector Parts and Functions" p.16
Page 12
Projector Features
12
This projector comes with these special features. Refer to these sections for
more details.
gg Related Links
• "Long-life Laser Light Source" p.12
• "Unique Interactive Functions" p.12
• "Quick and Easy Setup" p.13
• "Flexible Connectivity" p.13
• "Easy Operation from the Control Pad" p.14
• "Large-scale Presentation from the Whiteboard" p.15
Long-life Laser Light Source
A solid-state laser light source provides virtually maintenance-free operation
until light source brightness is reduced.
Unique Interactive Functions
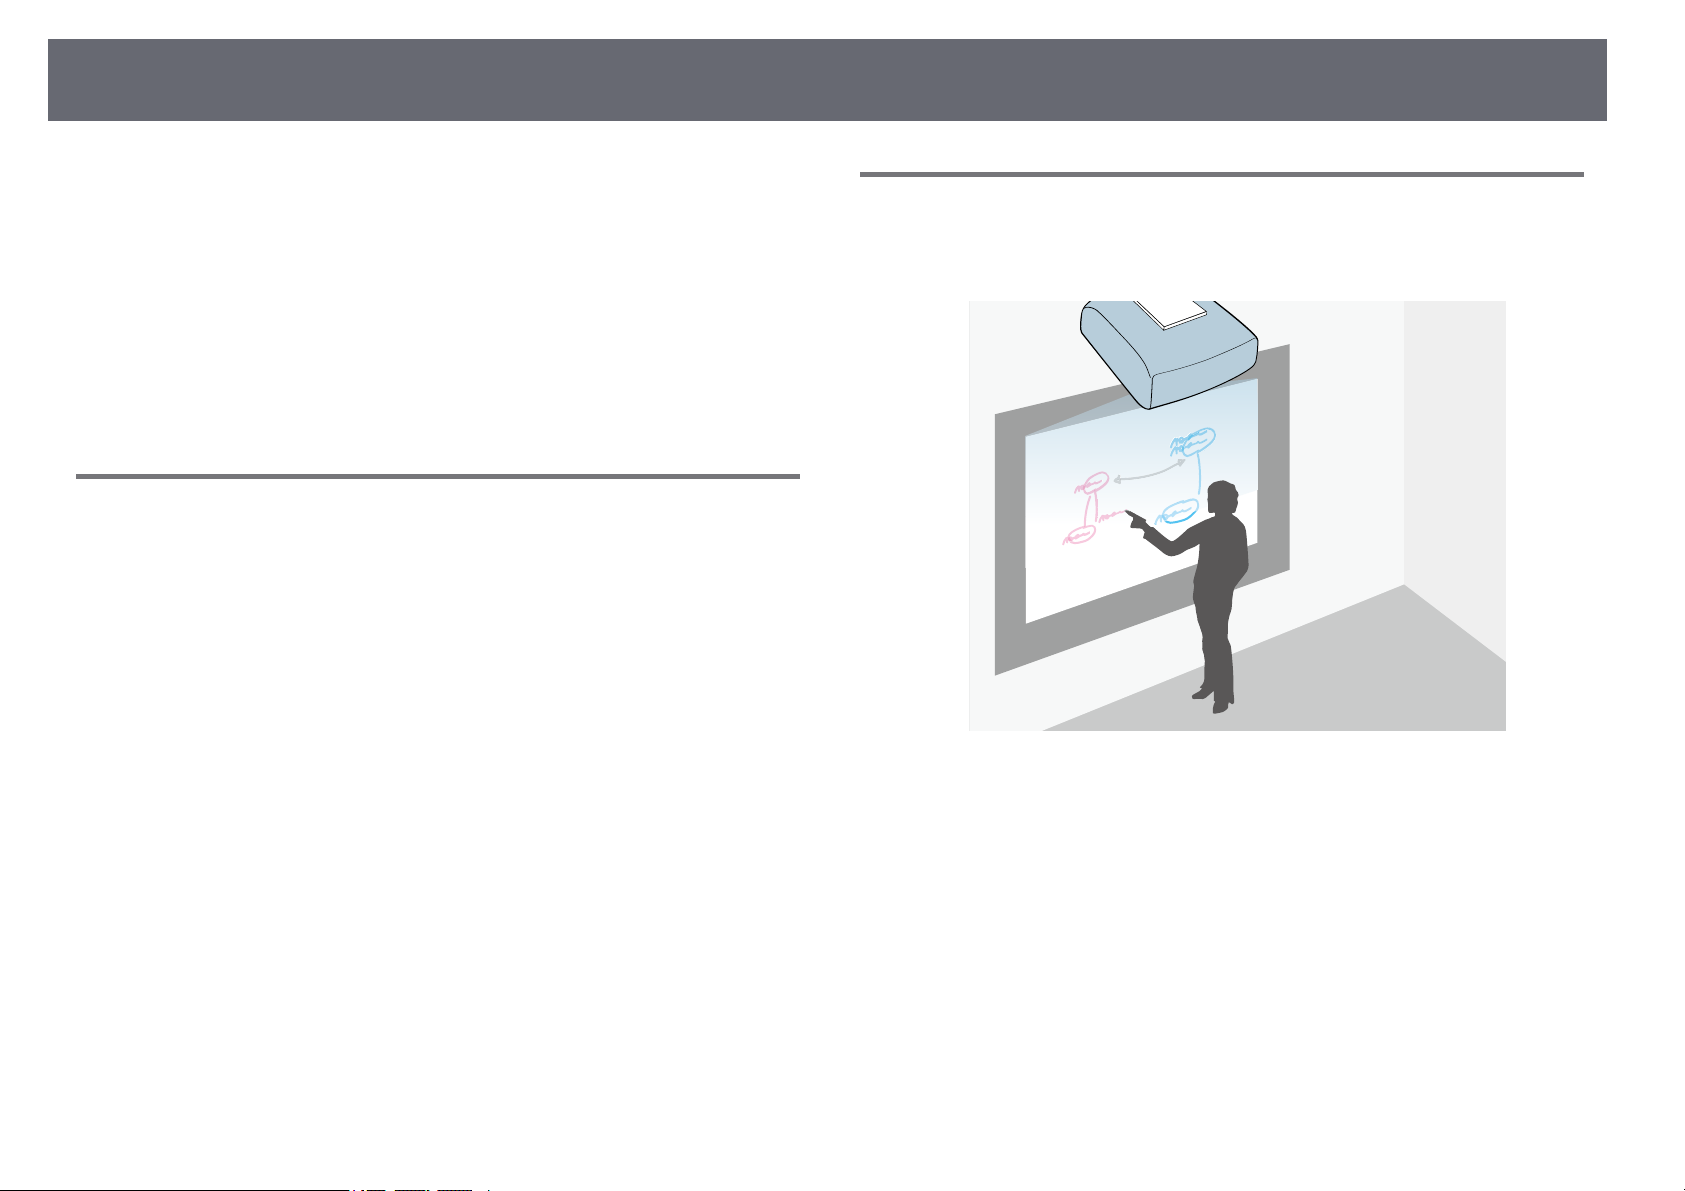
Easy annotation on the projected screen using the interactive pen or your
finger.
• Annotation with or without a computer.
• Annotation with two pens at the same time.
• Projector operations from the projected screen.
• Scan and display content from a connected scanner.
• Email, save, or print your content without a computer.
• Import content from a USB drive.
• Computer operations from the projected screen.
• Touch-based interactivity using your finger.
gg Related Links
• "Using the Interactive Features" p.88
Page 13
Projector Features
13
Quick and Easy Setup
• Direct Power On feature to turn on the projector as soon as you plug it in.
• Auto Power On feature to turn on the projector when the projector detects
an image signal from the port you specified as the Auto Power On source.
• Home screen feature to easily select an input source and useful functions.
gg Related Links
• "Home Screen" p.50
• "Turning On the Projector" p.49
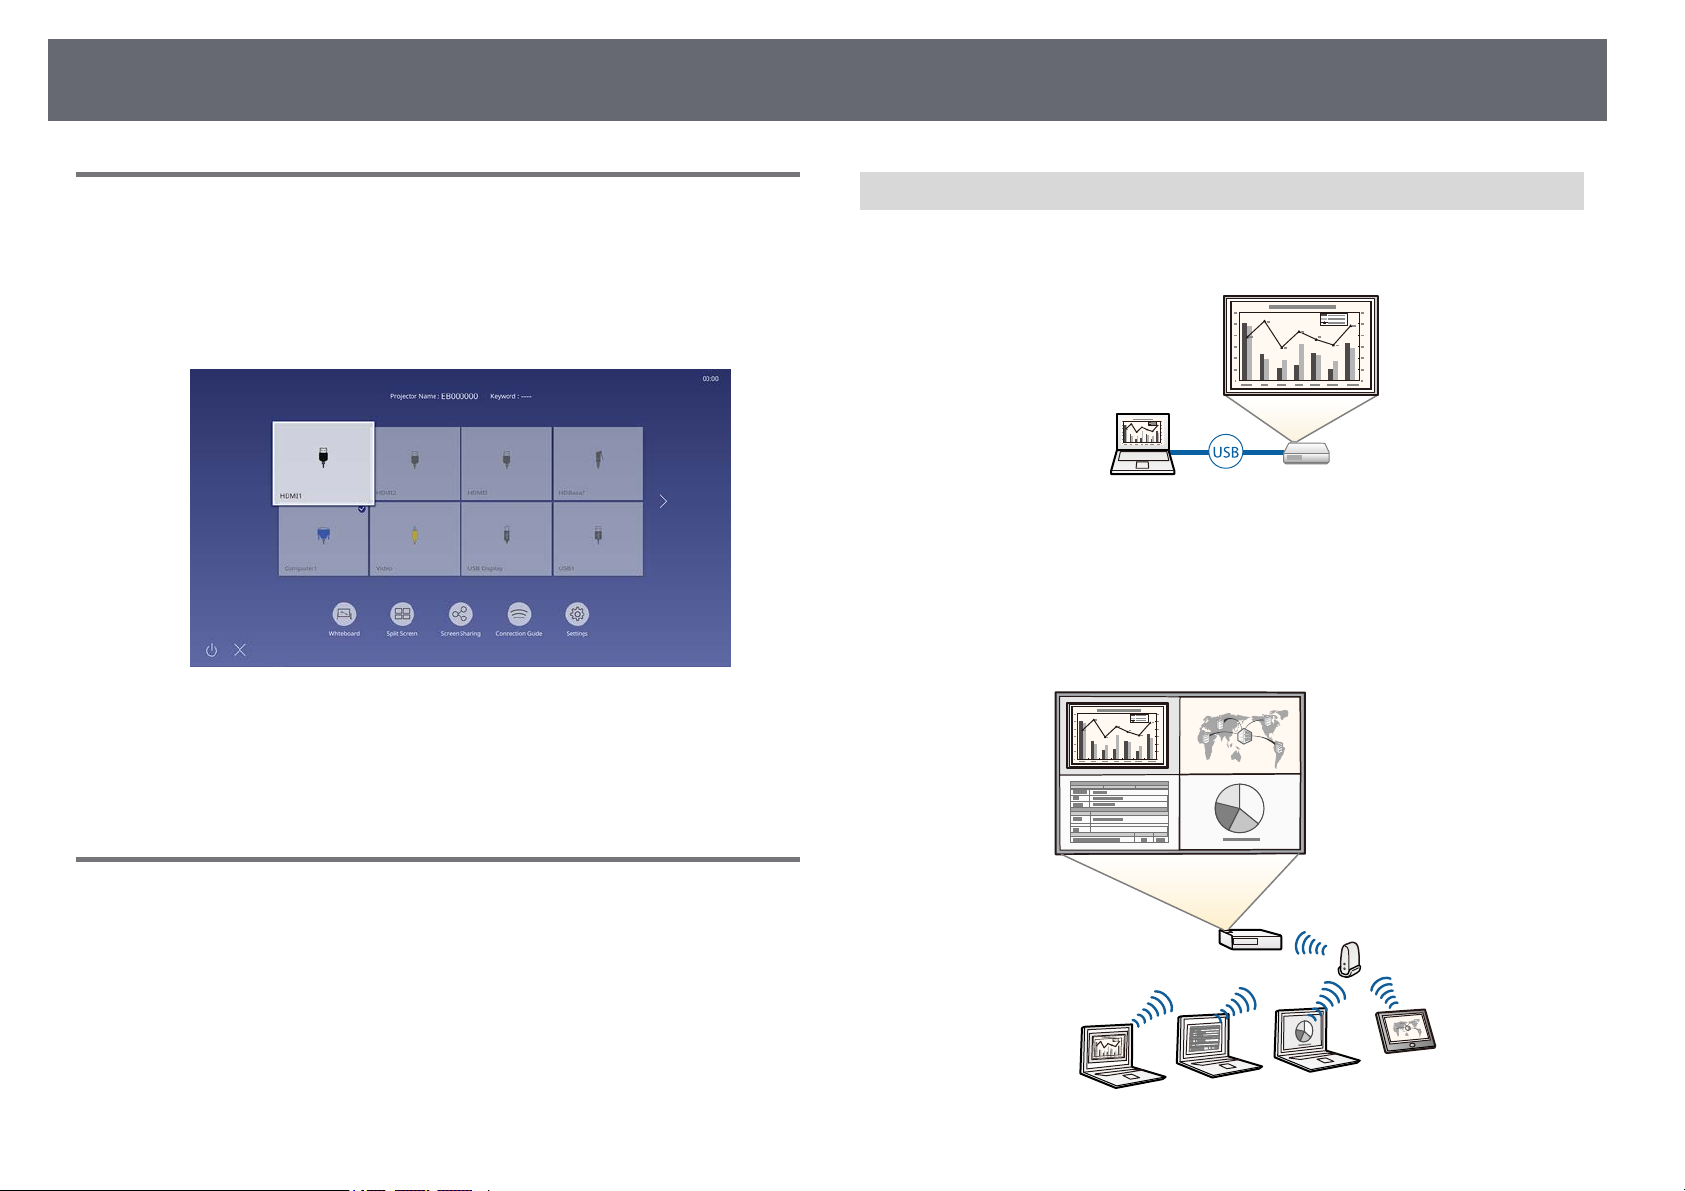
Connect with Computers
• Connect with one USB cable to project images and output audio (USB
Display).
• Epson iProjection (Windows/Mac) to project up to four images at the same
time by splitting the projected screen. You can project images from
computers on the network, or from smartphones or tablet devices on which
Epson iProjection is installed.
See the Epson iProjection Operation Guide (Windows/Mac) for details.
Flexible Connectivity
This projector supports a wide variety of easy-to-use connectivity options as
shown below.
gg Related Links
• "Connect with Computers" p.13
• "Connect with Mobile Devices" p.14
Page 14
Projector Features
14
• You can download the necessary software and manuals from the
a
gg Related Links
• "Wired Network Projection" p.158
• "Wireless Network Projection" p.162
• "Connecting to a Computer for USB Video and Audio" p.32
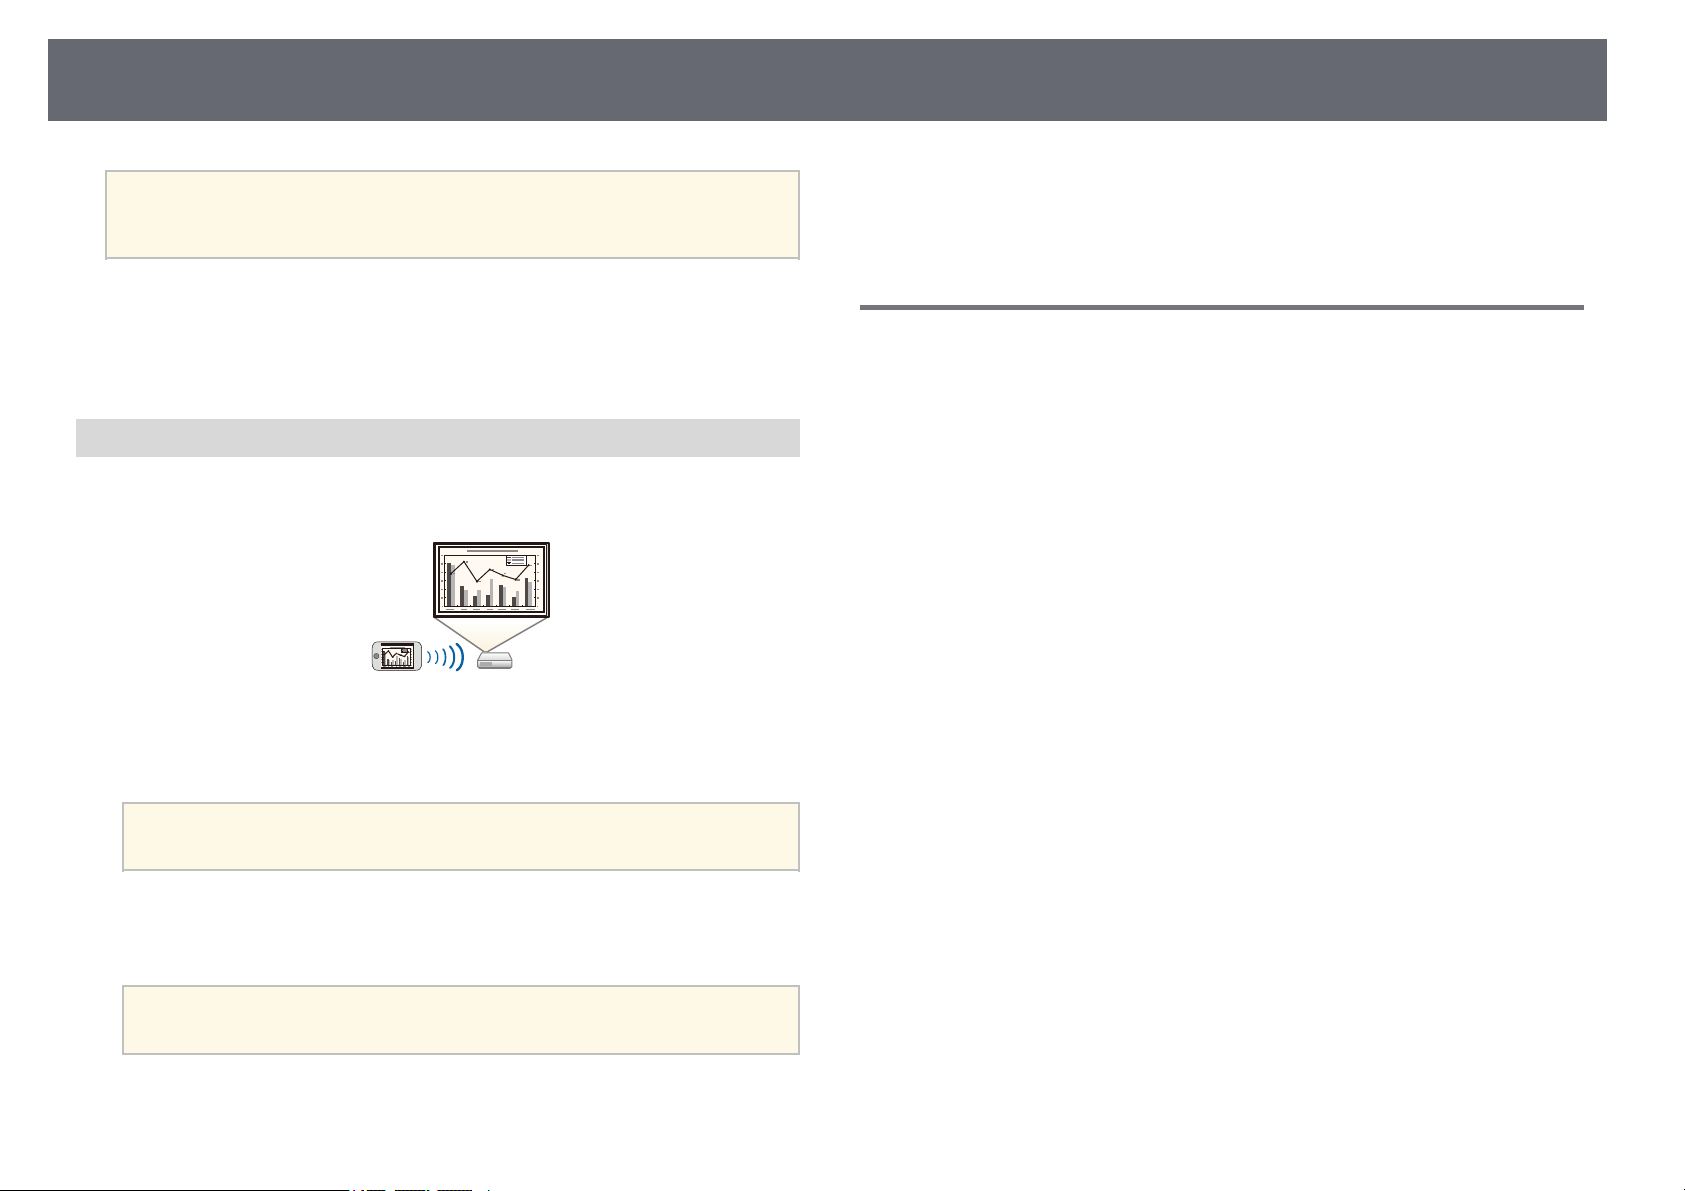
Connect with Mobile Devices
• Screen Mirroring to connect your projector and mobile device wirelessly
using Miracast technology.
• Epson iProjection (iOS/Android) to connect your projector and mobile
device wirelessly using the app available on the App Store or Google Play.
following Web site:
epson.sn/
gg Related Links
• "Wireless Network Projection from a Mobile Device (Screen Mirroring)"
p.172
Easy Operation from the Control Pad
You can easily perform frequently used operations such as turning the power
on/off and changing the source using the control pad (EB-1485Fi only).
By connecting the control pad and the projector using the HDBaseT port, you
can operate the projector and input signals to it from a distant location, such
as a large hall or event site.
gg Related Links
• "Projector Parts - Control Pad" p.24
• "Connecting a Computer to the Control Pad" p.33
• "Connecting a Video Source to the Control Pad" p.36
• "Connecting a USB Flash Drive to the Control Pad" p.38
Any fees incurred when communicating with the App Store or
a
• Epson iProjection (Chromebook) to connect your projector and
Chromebook device wirelessly using the app available on the Chrome Web
Store.
a
Google Play are the responsibility of the customer.
Any fees incurred when communicating with the Chrome Web Store
are the responsibility of the customer.
Page 15
Projector Features
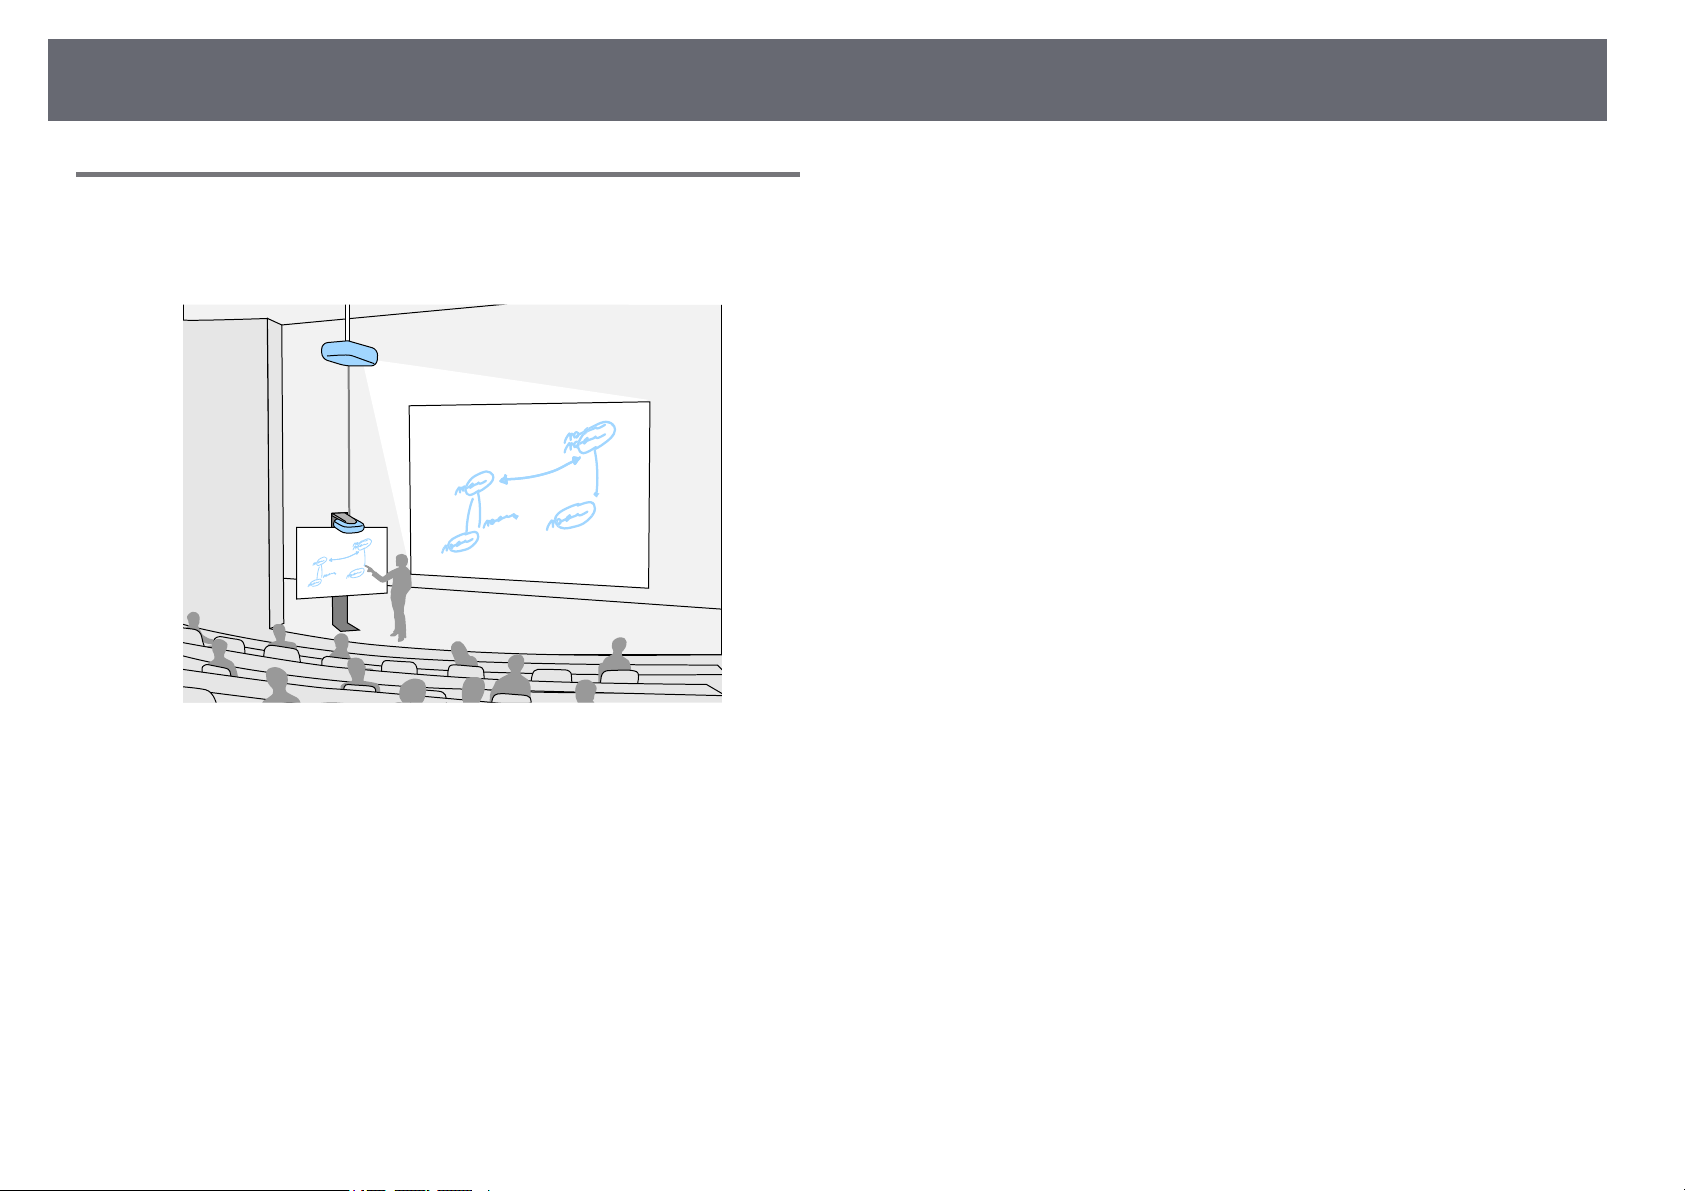
Large-scale Presentation from the Whiteboard
By connecting your projector to other projectors using the HDMI Out port,
you can easily project your whiteboard image live onto a large screen.
15
gg Related Links
• "Projector Parts - Interface" p.18
• "Connecting to an External HDMI Monitor" p.39
Page 16
Projector Parts and Functions
16
The following sections explain the projector parts and their functions.
All of the features in this guide are explained using illustrations of EB-1485Fi
unless otherwise mentioned.
gg Related Links
• "Projector Parts - Front/Side" p.16
• "Projector Parts - Top/Side" p.17
• "Projector Parts - Interface" p.18
• "Projector Parts - Base" p.19
• "Projector Parts - Control Panel" p.20
• "Projector Parts - Remote Control" p.21
• "Projector Parts - Interactive Pens" p.22
• "Projector Parts - Pen Stand" p.23
• "Projector Parts - Control Pad" p.24
• "Projector Parts - Touch Unit" p.25
• "Safety Instructions for Magnet" p.26
Projector Parts - Front/Side
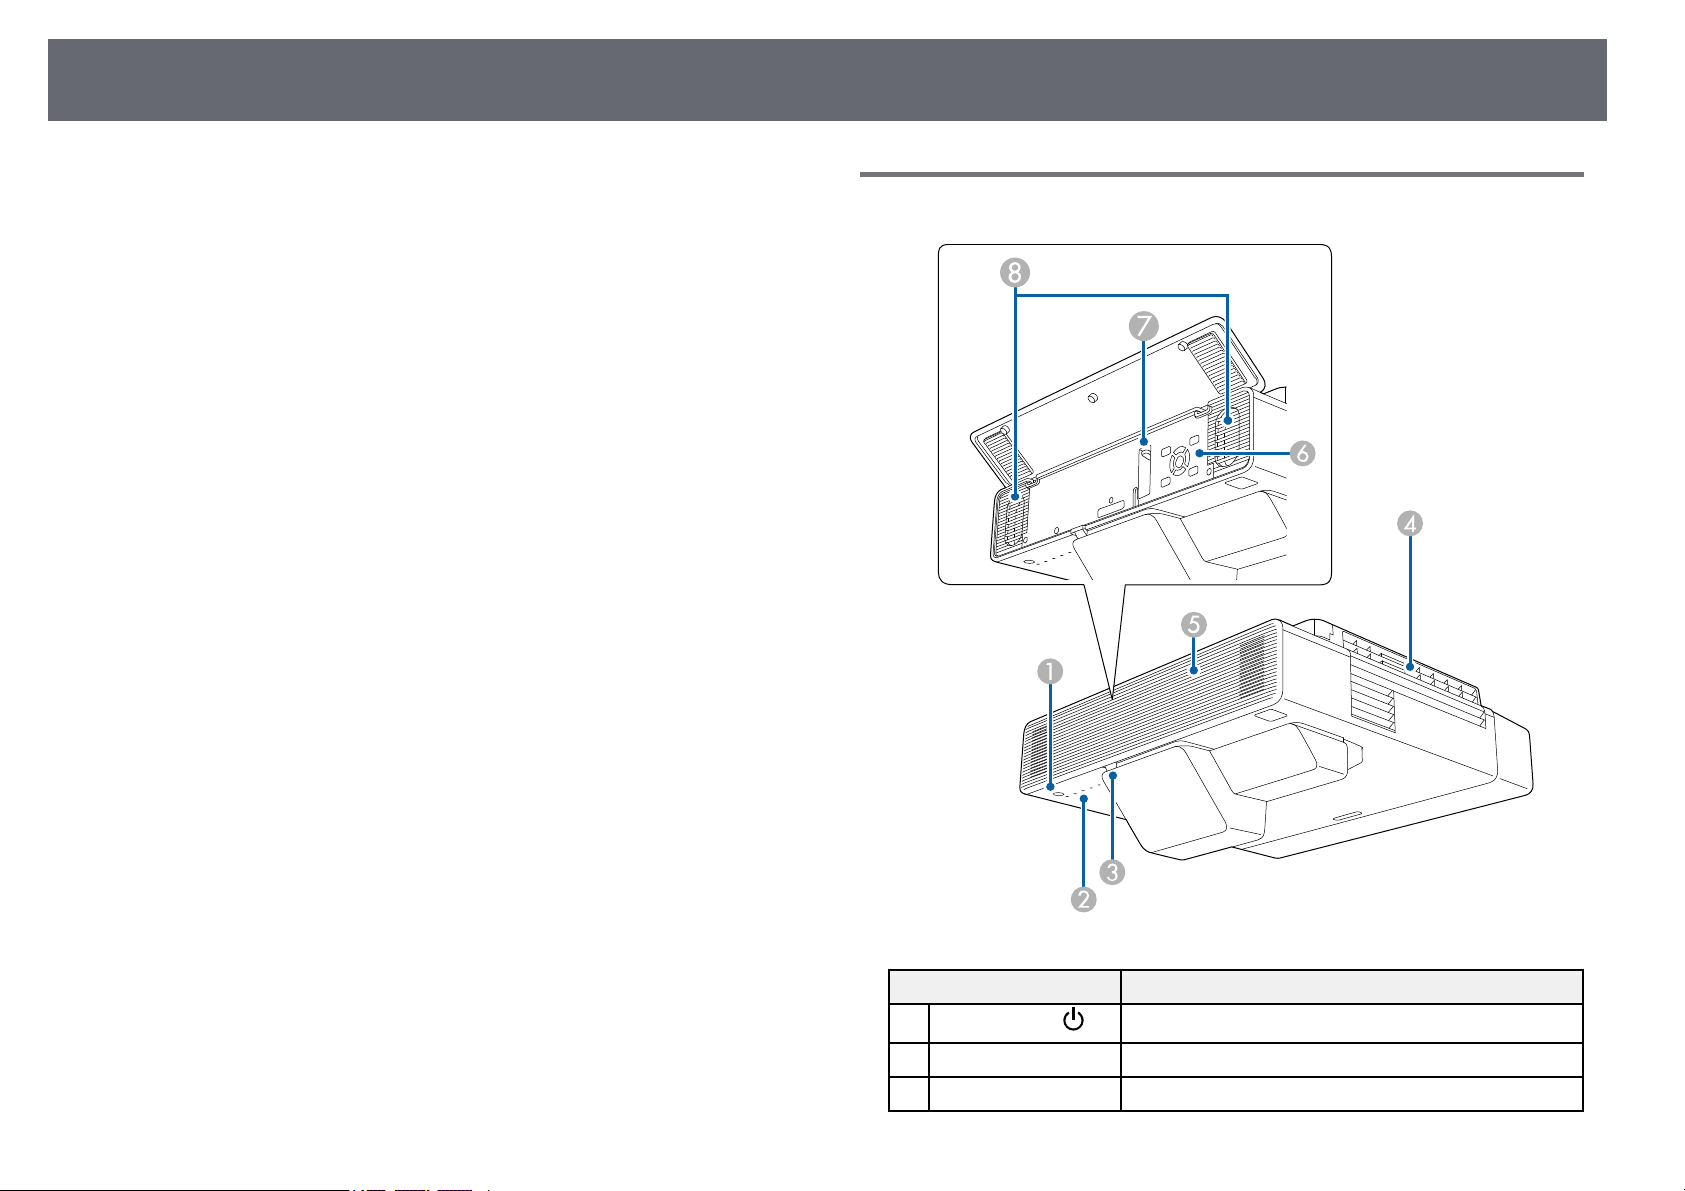
Name Function
A
Power button [ ]
Indicator lights Indicates the projector's status.
B
Remote receiver Receives signals from the remote control.
C
Turns the projector on or off.
Page 17
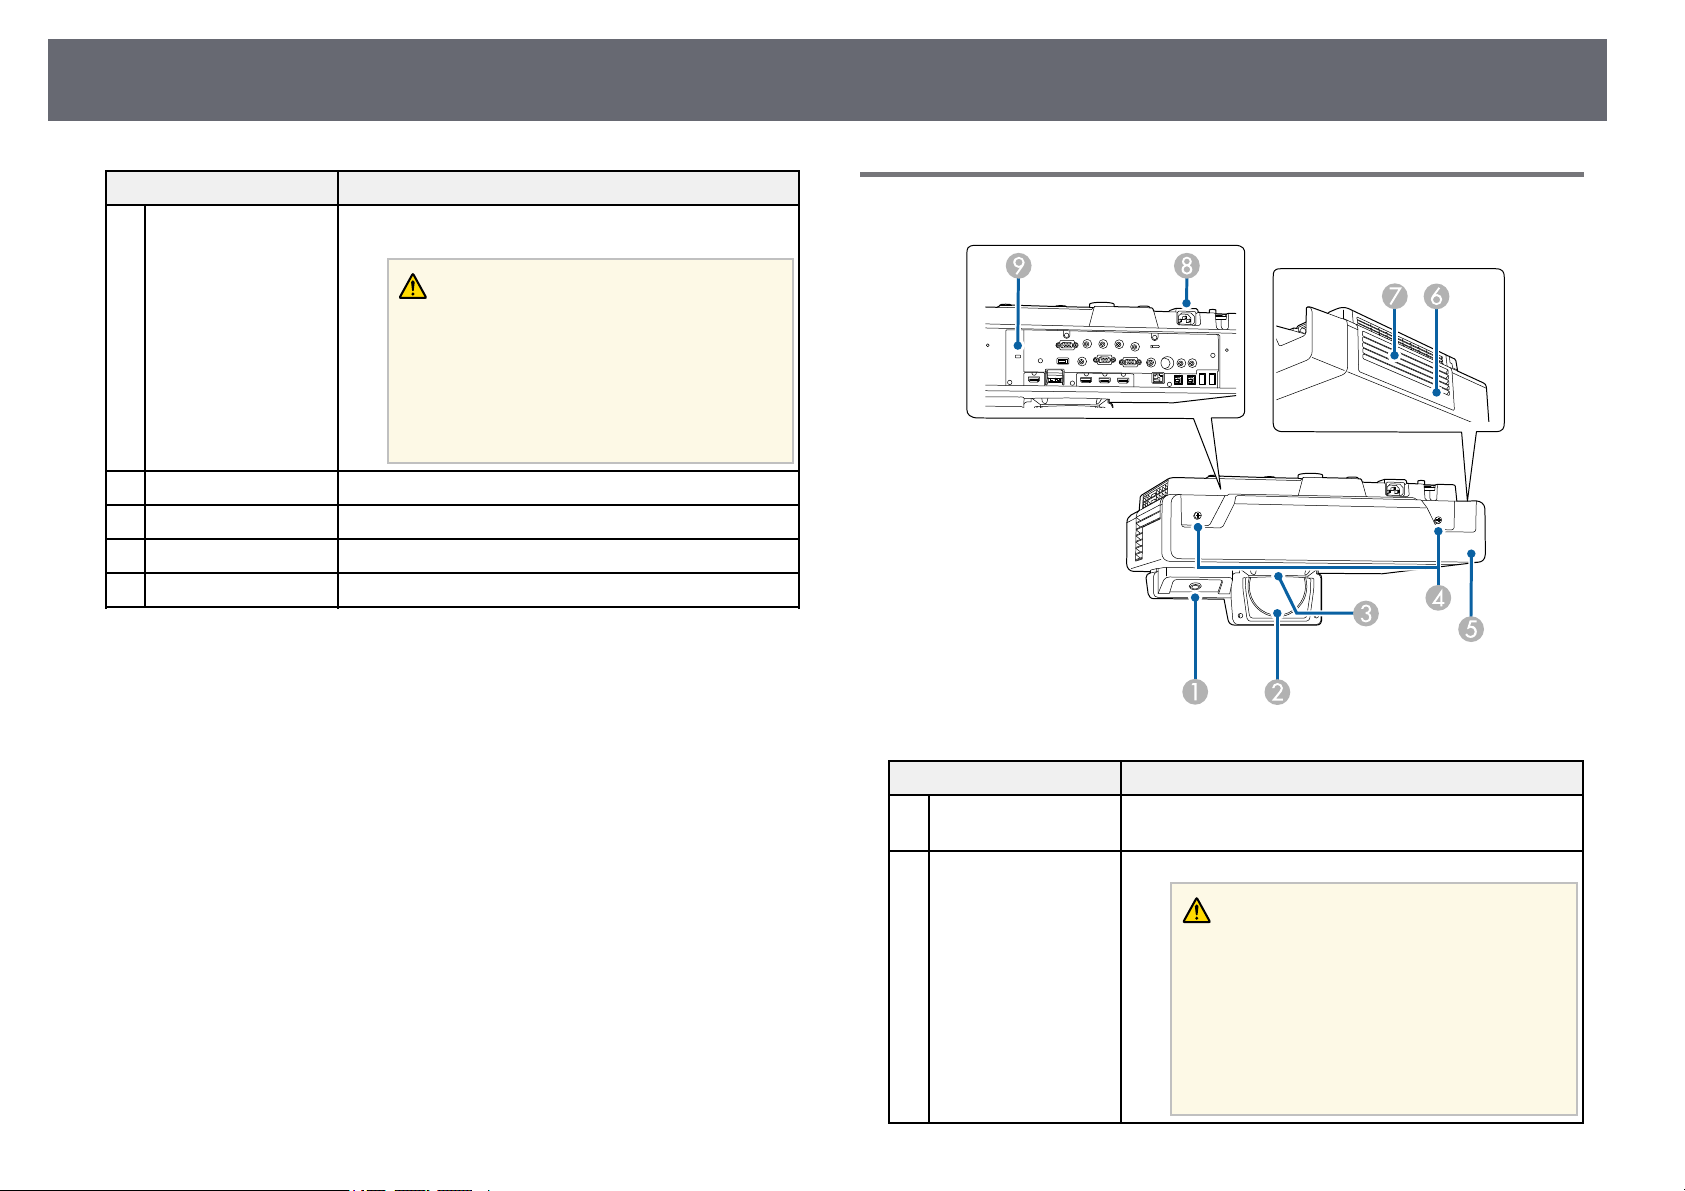
Projector Parts and Functions
17
Name Function
Air exhaust vent Exhaust vent for air used to cool the projector
D
internally.
Caution
While projecting, do not put your face or
hands near the air exhaust vent, and do not
place objects that may become warped or
damaged by heat near the vent. Hot air from
the air exhaust vent could cause burns,
warping, or accidents to occur.
Front cover Open to access the focus lever and control panel.
E
Control panel Operates the projector.
F
Focus lever Adjusts the image focus.
G
Speakers Outputs audio.
H
gg Related Links
• "Projector Indicator Status" p.253
• "Projector Parts - Control Panel" p.20
• "Focusing the Image" p.59
Projector Parts - Top/Side
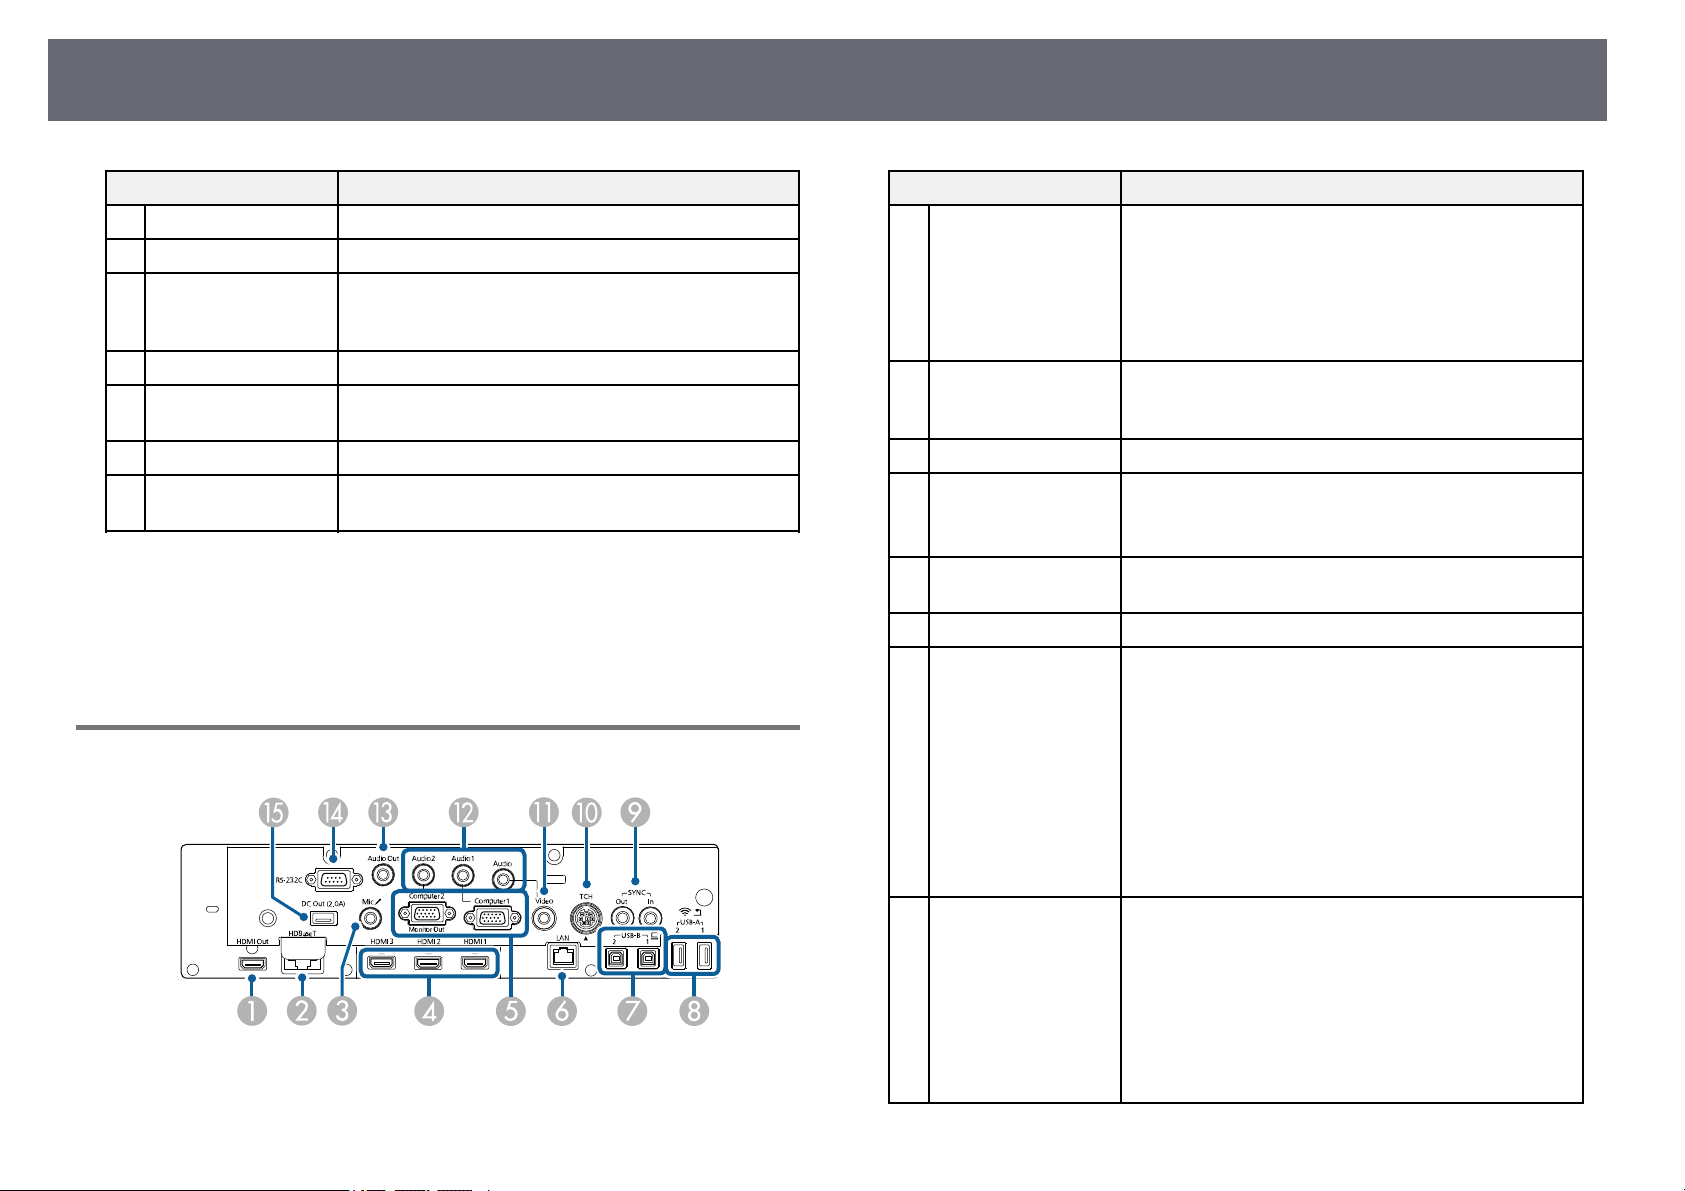
Name Function
Interactive pen
A
receiver
Projection lens Images are projected from here.
B
Receives signals from the interactive pen.
Warning
• Do not look into the projection lens while
projecting.
• Do not place any objects or put your hand
near the projection lens. It could cause
burns, fire, or the object to warp because this
area reaches a high temperature due to the
concentrated projection light.
Page 18
Projector Parts and Functions
18
Name Function
Remote receiver Receives signals from the remote control.
C
Cable cover screws Screws to fix the cable cover in place.
D
Cable cover Loosen the two screws and open the cover when
E
Air filter cover Open to access the air filter.
F
Air intake vent (air
G
filter)
Power inlet Connects the power cord to the projector.
H
Security slot The security slot is compatible with the Microsaver
I
connecting cables for external devices or installing the
wireless LAN module.
Takes in air to cool the projector internally.
Security System manufactured by Kensington.
gg Related Links
• "Air Filter and Vent Maintenance" p.245
• "Using the Interactive Pens" p.91
• "Installing a Security Cable" p.155
Projector Parts - Interface
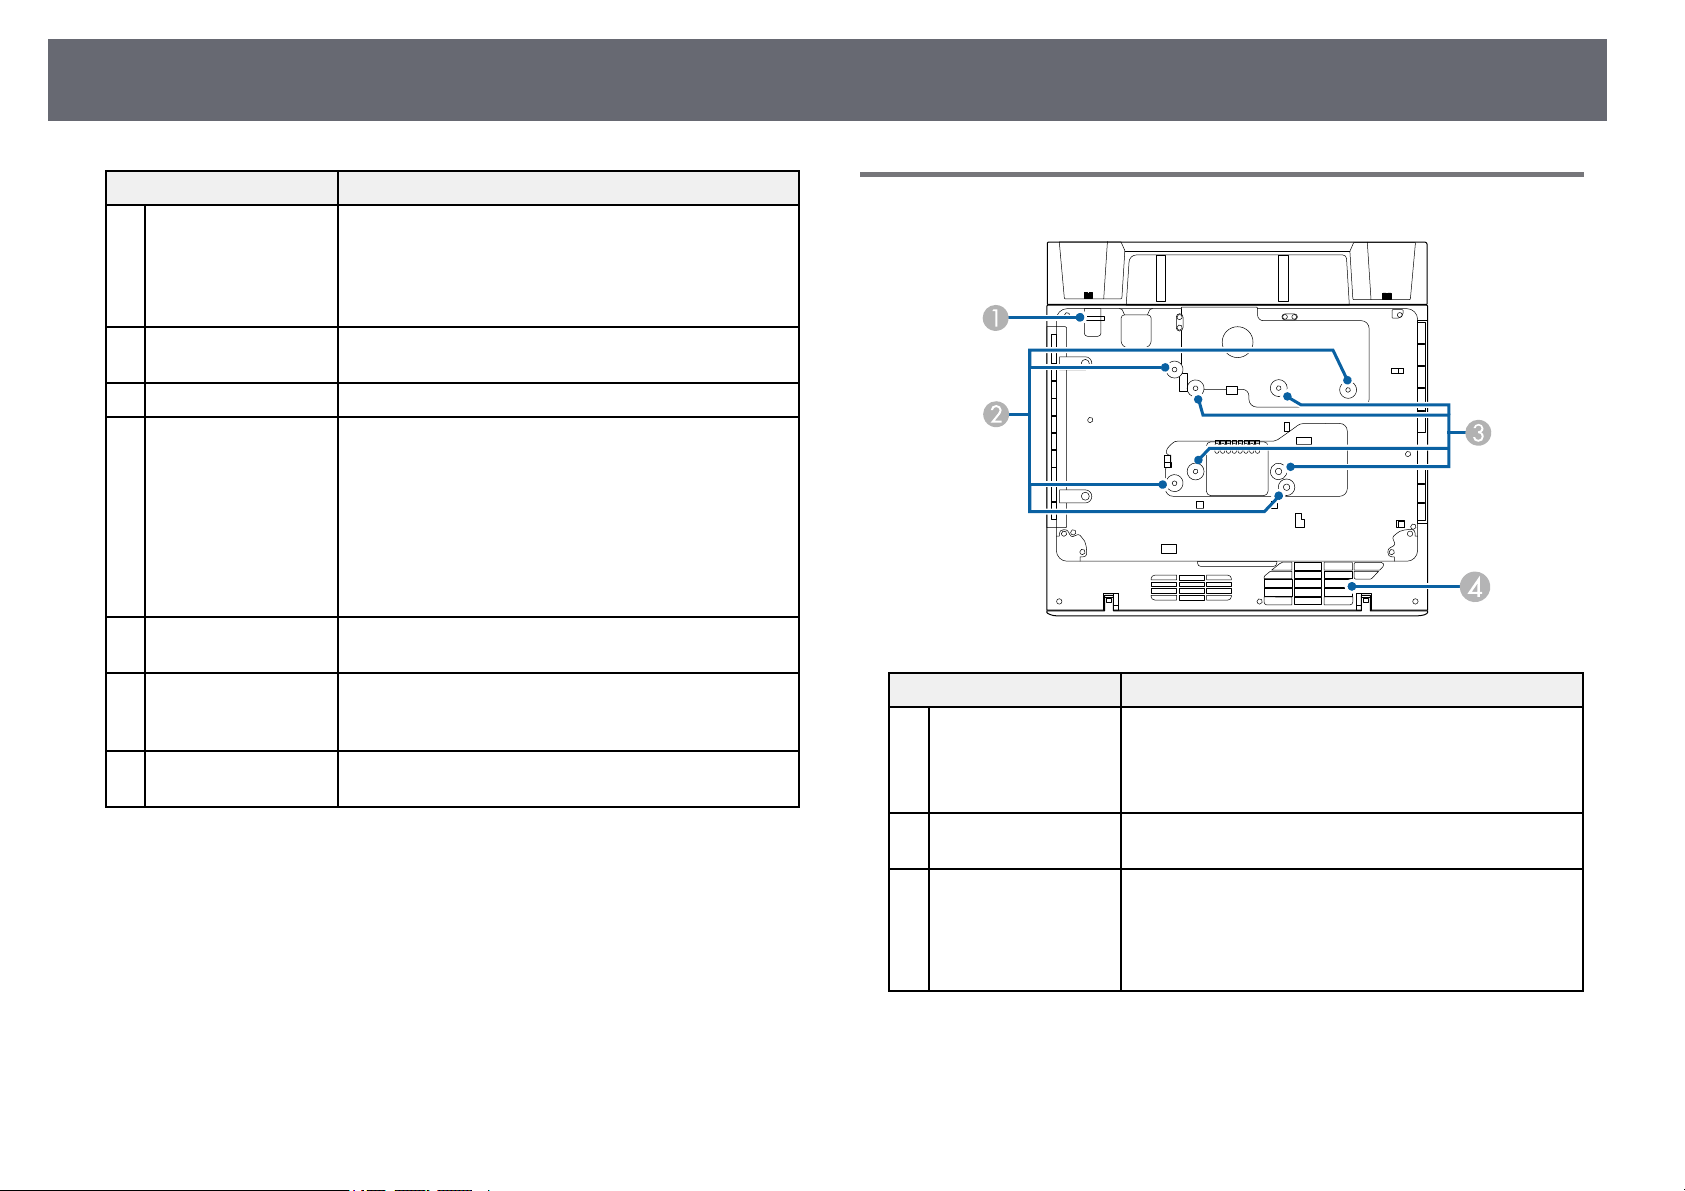
Name Function
HDMI Out port Outputs video signals to an external monitor.
A
Connecting an HDMI cable from this port to the
HDMI port of another projector lets you project a
unified image area from both projectors (EB-1485Fi
only).
This port is compatible with HDCP2.3.
HDBaseT port (EB-
B
1485Fi only)
Mic port Inputs audio from the microphone.
C
HDMI1/HDMI2/HD
D
MI3 port
Computer1/Compute
E
r2 port
LAN port Use to connect a LAN cable to connect to a network.
F
USB-B1/USB-B2 port USB-B1: Use to connect a USB cable to a computer to
G
USB-A1/USB-A2 port Use to connect a USB memory device or digital camera
H
If you are using the control pad, open the port cover to
connect a LAN cable between the projector and the
control pad.
Inputs video signals from HDMI compatible video
equipment and computers.
This port is compatible with HDCP2.3.
Inputs image signals from a computer.
use the interactive pen as a mouse.
Use to connect a USB cable to the computer to project
computer images. (Turn on the USB Display setting in
the projector's Signal I/O menu first.)
USB-B2: Use to connect a USB cable to enable use of
interactive features with a mini-PC. Select the USB-B2
settings in the projector's Pen/Touch menu to select
this input port.
s Pen/Touch > PC Interactivity > USB-B2
for projecting movies or images using the PC Free
feature.
Use to connect the optional document camera.
Use to connect a USB cable to the control pad when
connecting a USB storage device, printer, or USB
keyboard to the control pad.
Install the wireless LAN module.
Page 19
Projector Parts and Functions
19
Name Function
SYNC IN/OUT ports When using the interactive features in the same room
I
TCH port Use to connect the supplied Touch Unit connection
J
Video port Inputs composite video signals from video sources.
K
Audio 1/Audio
L
2/Audio port
Audio Out port Outputs audio from the current input source to an
M
RS-232C port Use to connect an RS-232C cable to control the
N
DC Out port Provides a connection for a streaming media player to
O
as multiple versions of the same projector, you need to
connect the optional remote control cable set to the
projectors. When the cable set is connected, the
interactive pen operates stably.
cable to the Touch Unit.
Audio 1: Inputs audio from equipment connected to
the Computer1 port.
Audio 2: Inputs audio from equipment connected to
the Computer2 port. When you project image from the
optional document camera, the audio is input from this
port.
Audio: Inputs audio from equipment connected to the
Video port.
external speaker.
projector from a computer. (This port is for control use
and should not normally be used.)
power it.
gg Related Links
• "Projector Connections" p.31
Projector Parts - Base
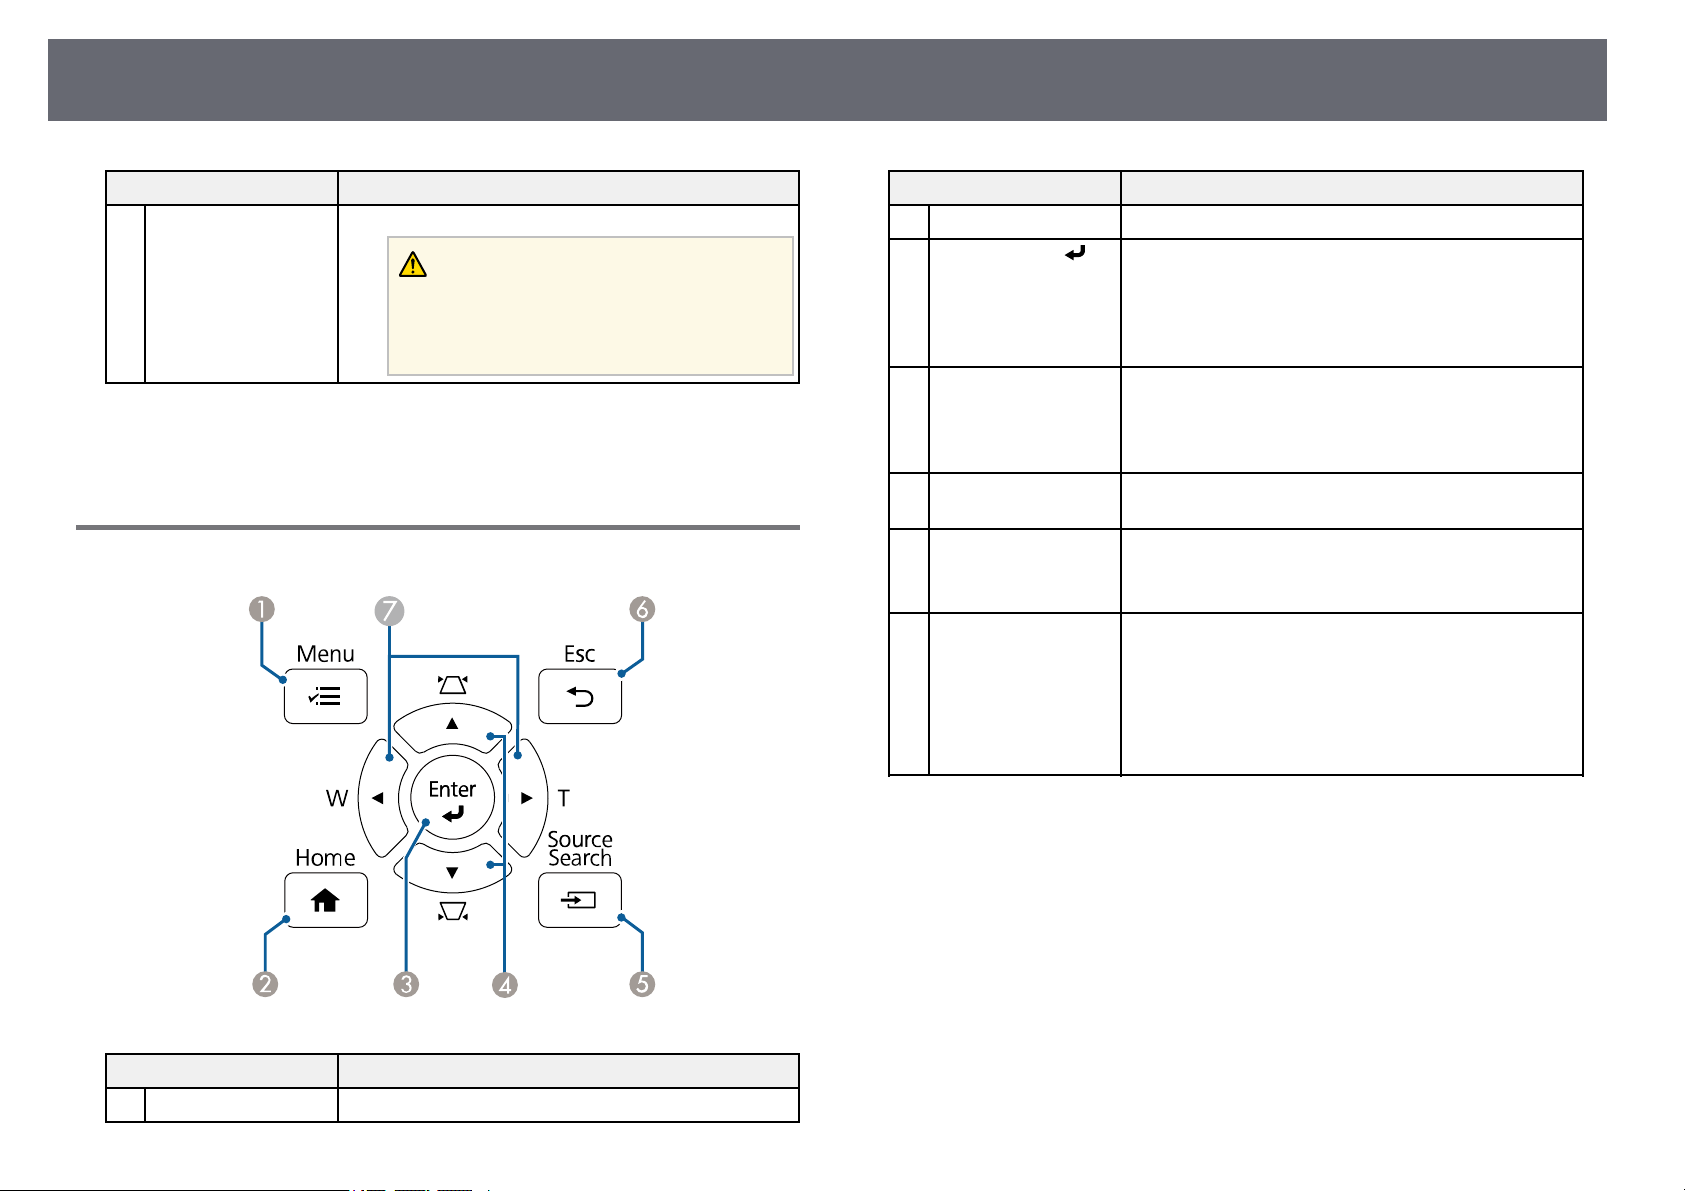
Name Function
Security cable
A
attachment point
Wall mount fixing
B
points (four points)
VESA mount fixing
C
points (four points)
Pass the theft-prevention wire lock through here and
lock it in place.
You can also attach the safety wire here to prevent the
projector from falling from the ceiling or wall.
Attach the supplied or optional setting plate when
mounting on a wall.
When mounting the projector from the ceiling or
vertically on a desk using a commercially available
mount compatible with the VESA Mounting Interface
Standard (100 × 100 mm), use these point to attach the
mount.
Page 20
Projector Parts and Functions
20
Name Function
Air intake vent Takes in air to cool the projector internally.
D
Warning
To avoid blocking the air intake vent beneath
the projector, do not allow objects such as
cloth or paper to lay under the projector.
gg Related Links
• "Installing a Security Cable" p.155
Projector Parts - Control Panel
Name Function
[Home] button Displays and closes the Home screen.
B
[Enter] button [ ] Enters the current selection and moves to the next level
C
Keystone adjustment
D
buttons and arrow
buttons
[Source Search]
E
button
[Esc] button Stops the current function.
F
Wide/Tele buttons
G
and arrow buttons
while displaying the projector's menu.
When projecting an analog RGB signal from the
Computer port, optimizes the Analog Signal
Adjustment settings (Tracking, Sync., and Position).
Displays the Keystone screen allowing you to correct
keystone distortion.
Selects menu items while displaying the projector's
menu.
Changes to the next input source.
Moves back to the previous menu level while
displaying the projector's menu.
[W]: Enlarges the size of the projected image.
[T]: Reduces the size of the projected image.
Corrects keystone distortion in the horizontal direction
when the Keystone screen is displayed.
Selects menu items while displaying the projector's
menu.
Name Function
[Menu] button Displays and closes the projector's menu.
A
gg Related Links
• "Home Screen" p.50
• "Correcting the Image Shape with the Keystone Buttons" p.61
• "Selecting an Image Source" p.72
• "Resizing the Image with the Buttons" p.70
• "Adjusting the Menu Settings" p.202
Page 21
Projector Parts and Functions
21
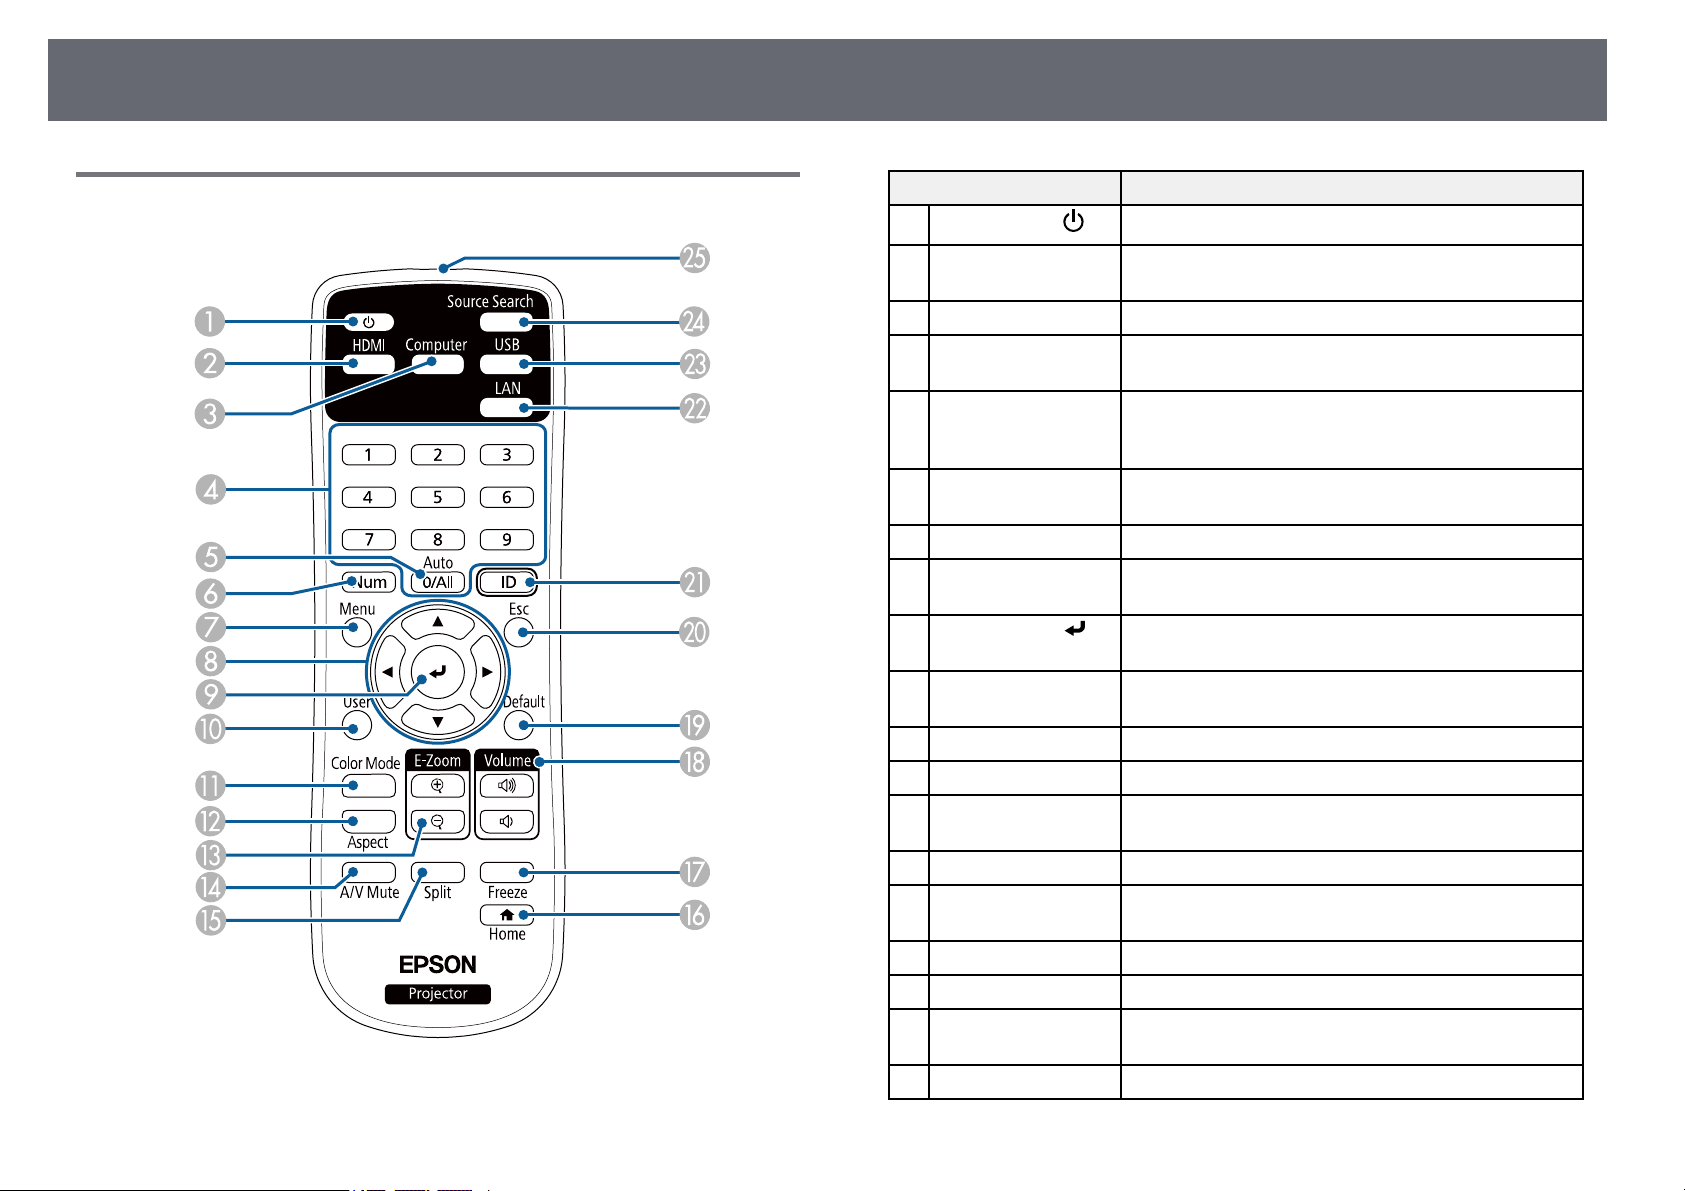
Projector Parts - Remote Control
Name Function
A
Power button [ ]
[HDMI] button Switches the image source between the HDMI and
B
[Computer] button Switches the image source to the Computer ports.
C
Numeric buttons Enters numbers in the projector's menu while holding
D
[Auto] button When projecting an analog RGB signal from the
E
[Num] button Hold down this button to enter numbers using the
F
[Menu] button Displays and closes the projector's menu.
G
Arrow buttons Selects menu items while displaying the projector's
H
[Enter] button [ ] Enters the current selection and moves to the next level
I
[User] button Performs settings assigned in the User Button setting
J
[Color Mode] button Changes the color mode.
K
[Aspect] button Changes the aspect mode.
L
[E-Zoom] +/–
M
buttons
[A/V Mute] button Turns the video and audio on or off temporarily.
N
[Split] button Projects up to four images from different image sources
O
[Home] button Displays and closes the Home screen.
P
[Freeze] button Pauses or resumes images.
Q
[Volume] up/down
R
buttons
[Default] button Returns the selected setting to its default value.
S
Turns the projector on or off.
HDBaseT (EB-1485Fi only) ports.
down the [Num] button.
Computer port, optimizes the Analog Signal
Adjustment settings (Tracking, Sync., and Position).
numeric buttons.
menu.
while displaying the projector's menu.
in the projector's Management menu.
Resizes the projected image.
simultaneously by splitting the projected screen.
Adjusts the speaker volume.
Page 22
Projector Parts and Functions
22
Name Function
[Esc] button Stops the current function.
T
Moves back to the previous menu level while
displaying the projector's menu.
[ID] button Hold down this button and press the numeric buttons
U
[LAN] button Switches the image source between the network
V
[USB] button Switches the image source between the USB Display
W
[Source Search]
X
button
Remote control light
Y
emitting area
to select the ID for the projector you want to operate
using the remote control.
connected devices.
and USB-A port.
Switches to the next input source.
Outputs remote control signals.
gg Related Links
• "Adjusting Image Quality (Color Mode)" p.78
• "Image Aspect Ratio" p.74
• "Home Screen" p.50
• "Selecting an Image Source" p.72
• "Zooming Images" p.132
• "Shutting Off the Image and Sound Temporarily" p.130
• "Projecting Multiple Images Simultaneously" p.122
• "Stopping Video Action Temporarily" p.131
• "Controlling the Volume with the Volume Buttons" p.86
• "Setting the Projector ID" p.138
• "Adjusting the Menu Settings" p.202
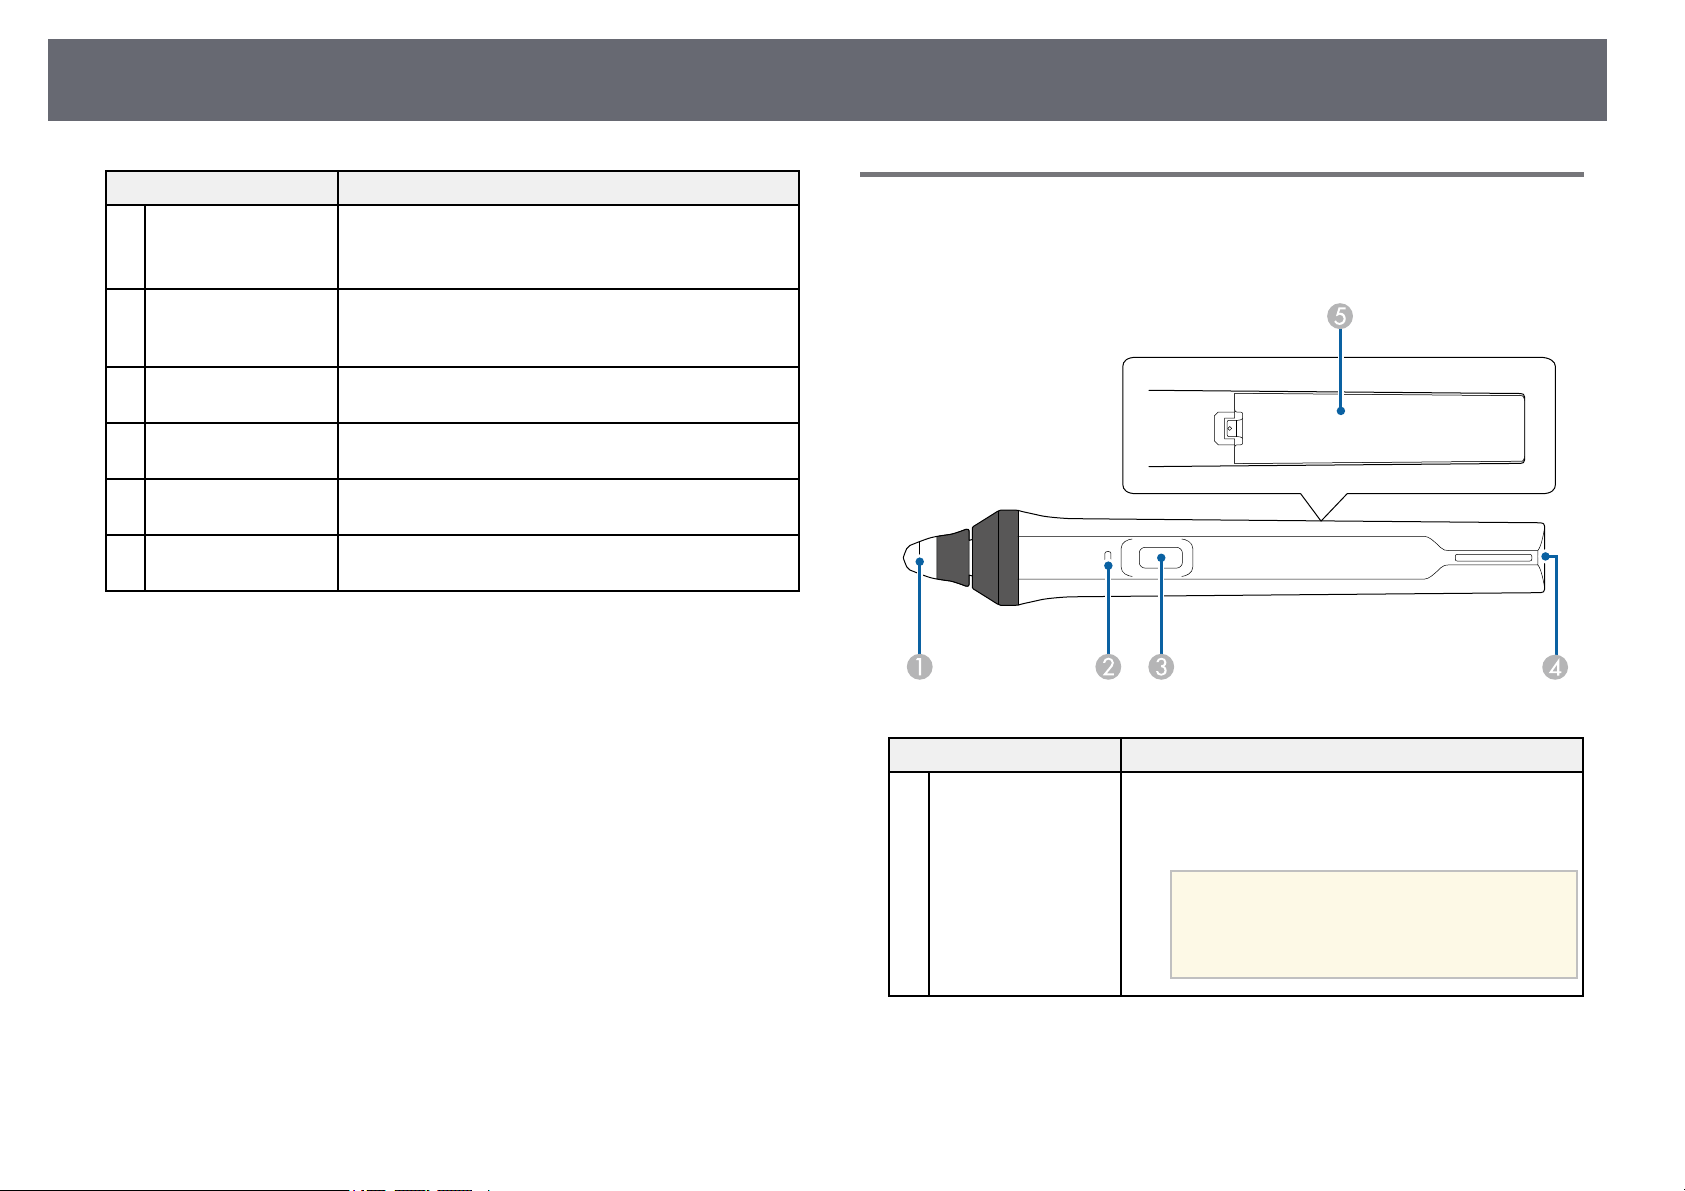
Projector Parts - Interactive Pens
Hold the pen to turn it on automatically. Pens turn off automatically after 15
seconds when you put them down.
Name Function
Pen tip Replaceable soft pen tip.
A
If the soft tip is hard to use on a textured surface,
replace it with the hard tip.
If you are using an ultra-wide
a
display screen with an aspect ratio of
16:6, use only the hard pen tip (EB1485Fi only).
Page 23
Projector Parts and Functions
23
Name Function
Battery indicator Press the button on the side of the pen to indicate the
B
Button Performs function assigned as the Pen Button
C
Strap attachment
D
point
Battery cover Open this cover when replacing the battery.
E
remaining battery power.
• When the battery is charged, the indicator turns blue
until you release the button.
• When the battery is running low, the indicator
flashes blue until you release the button.
• Does not light when the battery is exhausted. Change
the battery.
Function setting in the projector's Interactive menu.
Press the button to perform a right-click operation
while using the pen as a mouse.
Allows you to attach a commercially available strap.
gg Related Links
• "Replacing the Interactive Pen Tip" p.249
• "Using the Interactive Pens" p.91
• "Installing Batteries in the Pens" p.46
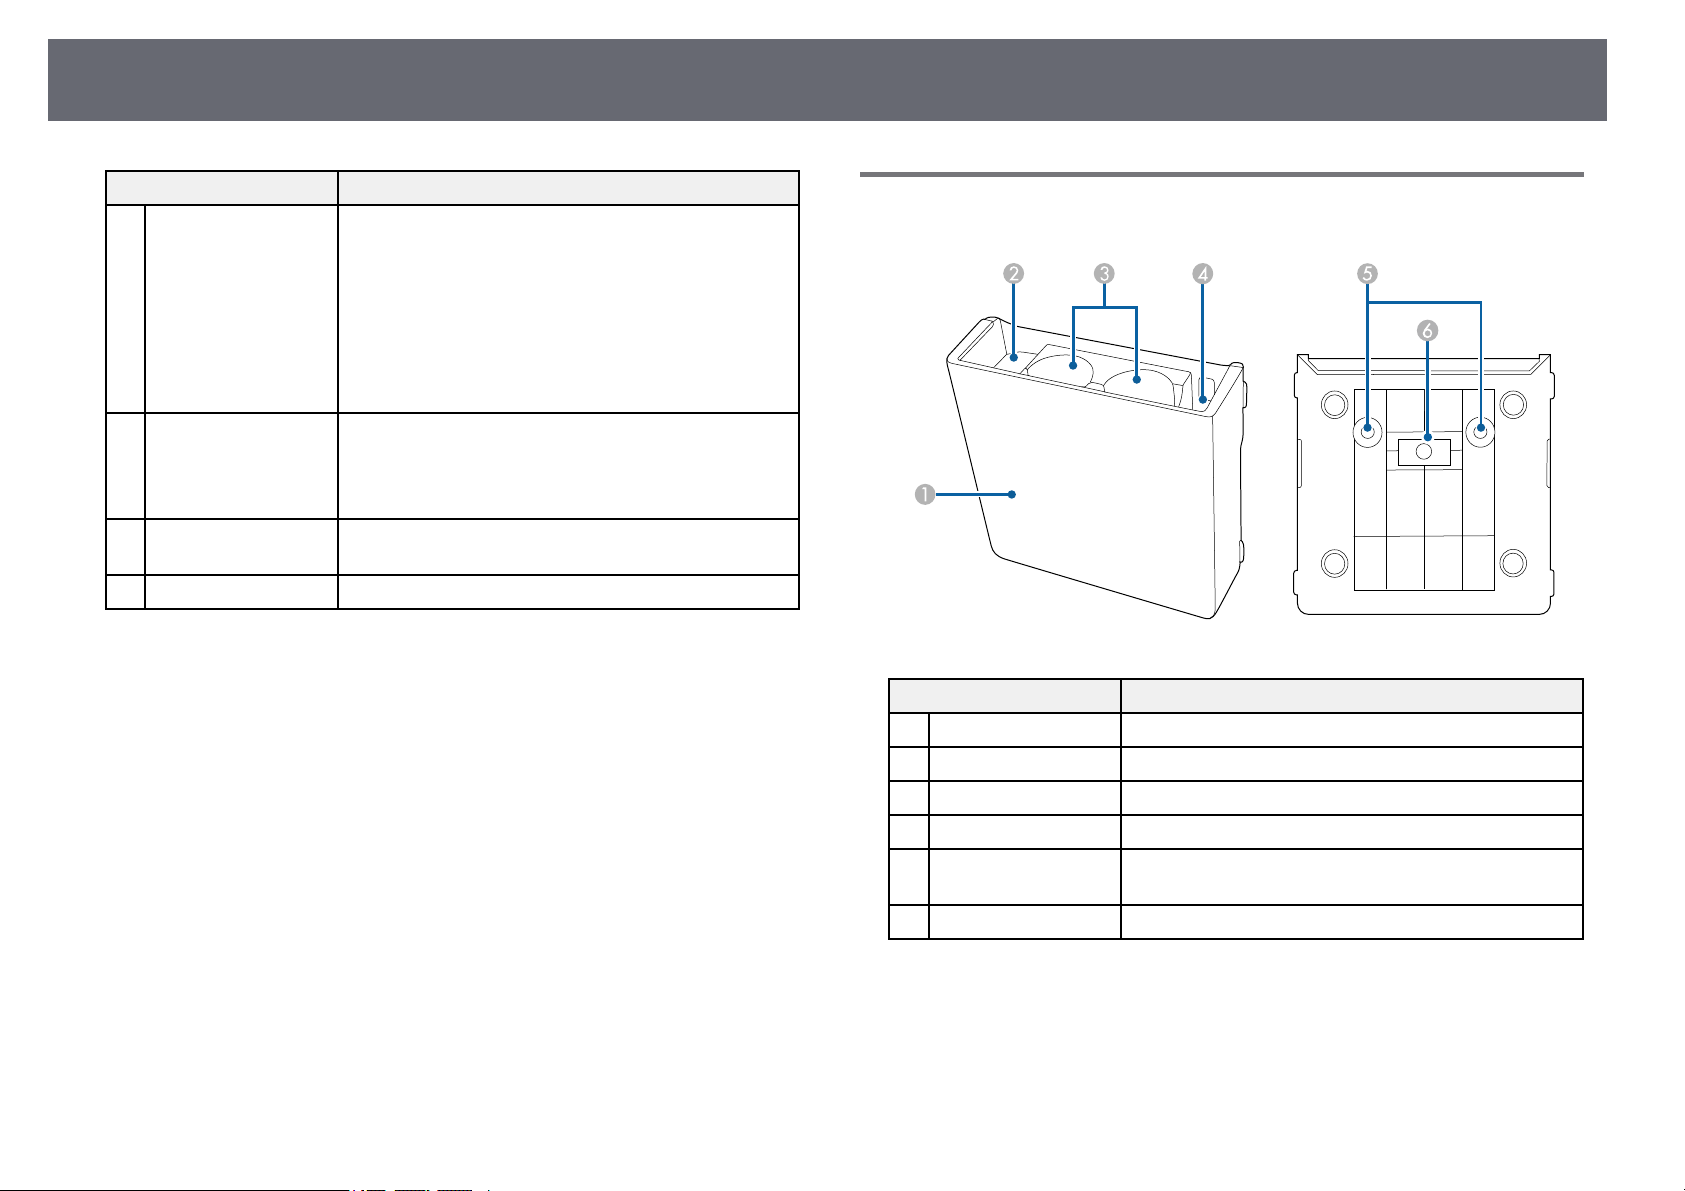
Projector Parts - Pen Stand
Name Function
Front cover Attach it after installing the pen stand.
A
Pen tip storage space Keep the pen tips here.
B
Pen storage space Keep the pens here.
C
Battery storage space Keep the AA batteries here.
D
Screw holes (for
E
installation)
Installation magnets Magnets used for installation.
F
The screw holes for securing the pen stand.
Page 24
Projector Parts and Functions
24
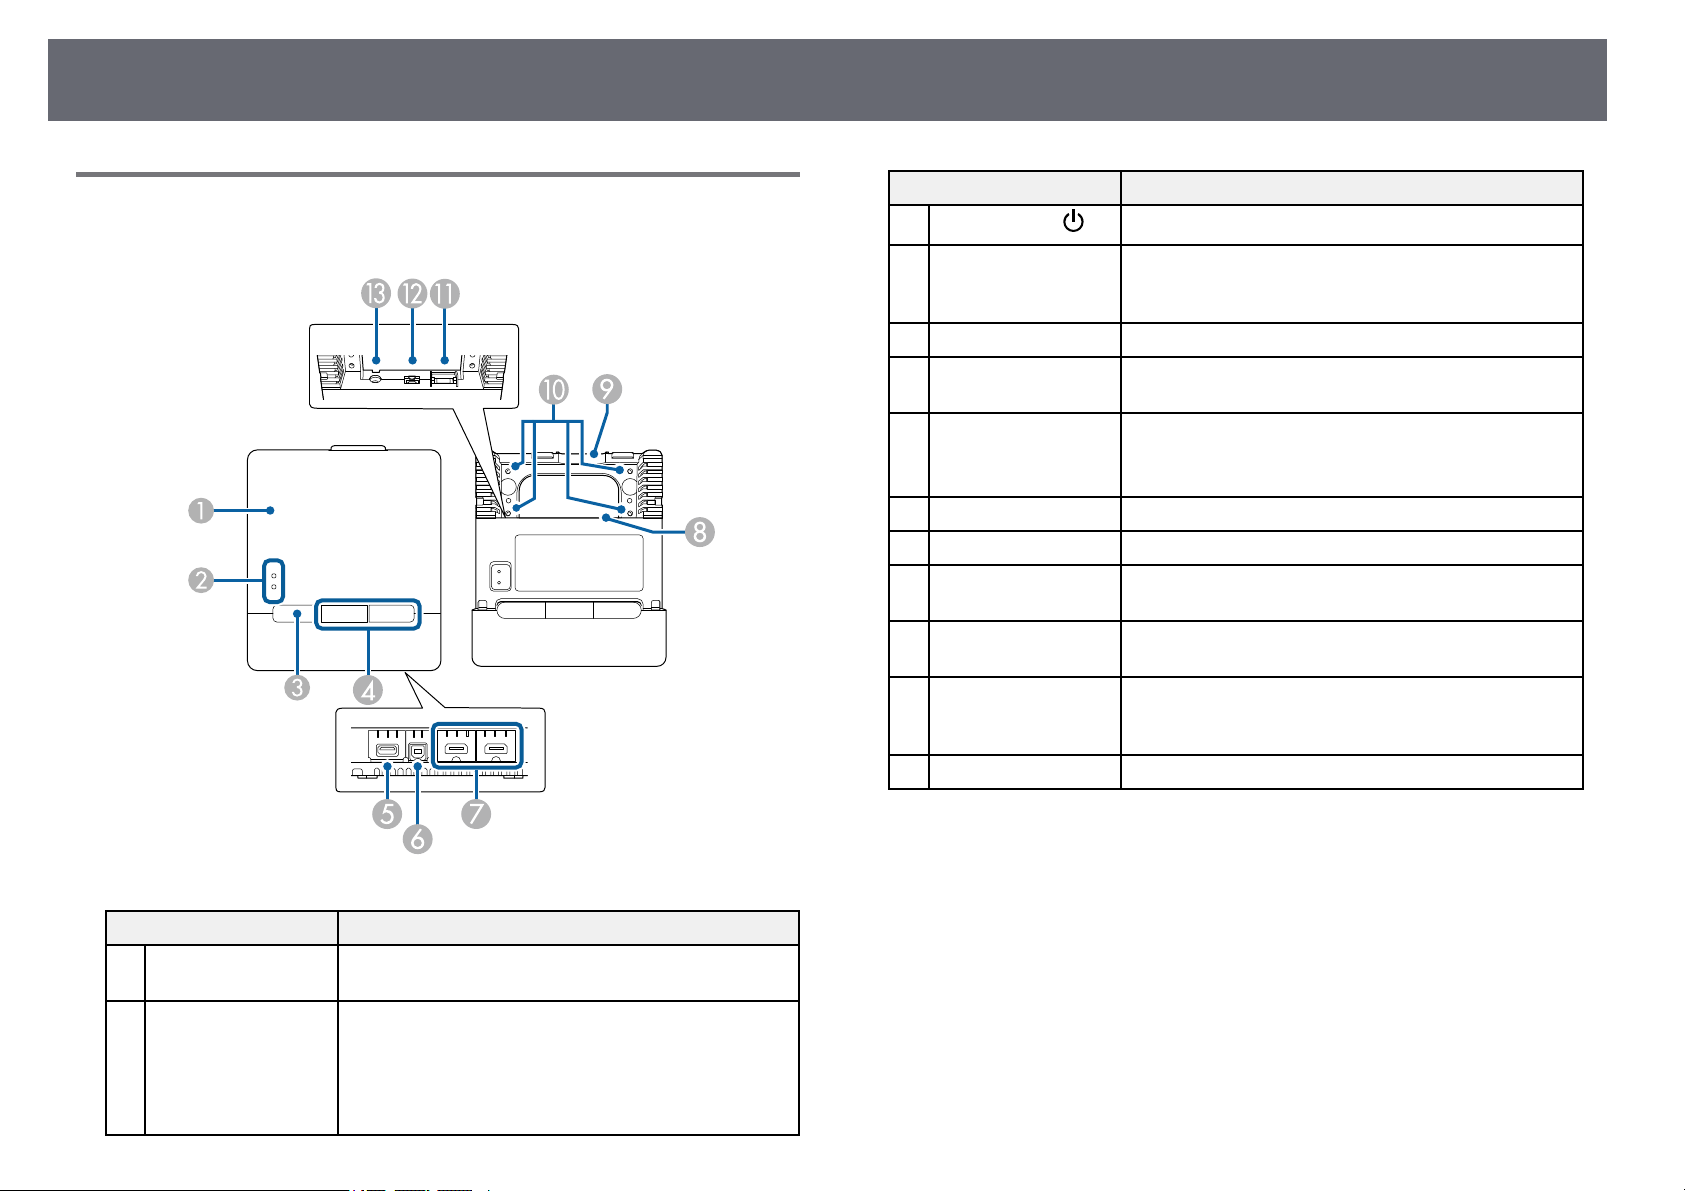
Projector Parts - Control Pad
The Control Pad comes with the EB-1485Fi only.
Name Function
C
Power button [ ]
HDMI1/HDMI2
D
button
USB-A port Use to connect a USB storage device.
E
USB-B port Use to connect a USB cable to the computer to use the
F
HDMI1/HDMI2 port Inputs video signals from HDMI compatible video
G
Cable path Route cables through here.
H
Cable path (upper) Route cables through here.
I
Screw holes (for
J
installation)
HDBaseT port Open a port cover to connect a LAN cable to the
K
USB-B port Use to connect a computer to the projector using a
L
Power inlet Use to connect the power cord to the control pad.
M
Turns the projector on or off.
Switches the input source to HDBaseT and projects
from the device connected to the HDMI1 or HDMI2
port on the control pad.
interactive pen as a mouse.
equipment and computers.
This port is compatible with HDCP2.3.
The screw holes for securing the control pad.
projector.
USB cable when you connect a USB device to the
control pad.
Name Function
Front cover To connect cables, open the cover by pulling forward
A
Indicator lights Indicates the control pad's status.
B
on the tab at the top of the front cover.
Power: Lit blue means the power is supplied to the
control pad.
Link: Lit blue means the control pad is communicating
with projector.
gg Related Links
• "Projector Parts - Control Pad" p.24
• "Connecting a Computer to the Control Pad" p.33
• "Connecting a Video Source to the Control Pad" p.36
• "Connecting a USB Flash Drive to the Control Pad" p.38
Page 25
Projector Parts and Functions
25
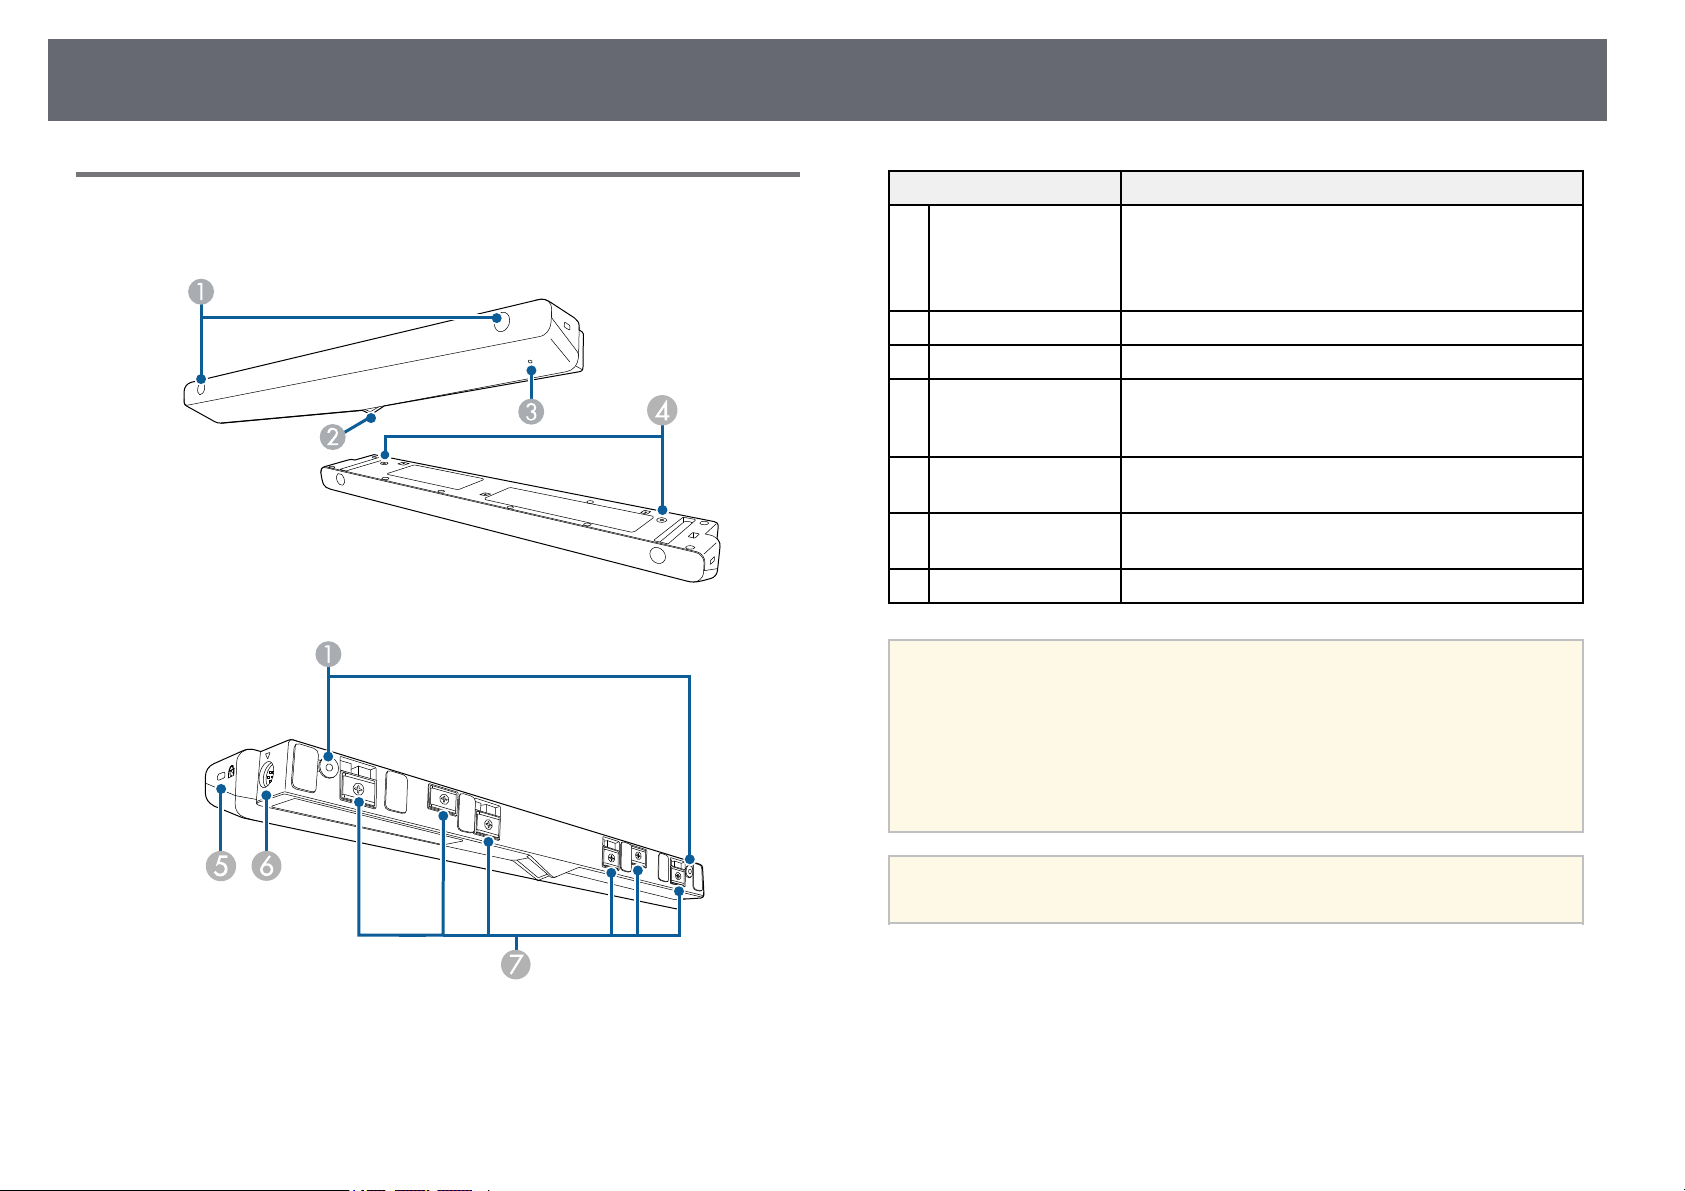
Projector Parts - Touch Unit
The Touch Unit comes with the EB-1485Fi only.
Name Function
Screw holes (for
A
installation)
Laser diffusion ports Diffuse laser light to detect the position of fingers.
B
Indicator light Lit when the Touch Unit is turned on.
C
Screw holes (for
D
installation)
Security slot The security slot is compatible with the Microsaver
E
TCH port Connects the projector to the Touch Unit with the
F
Installation magnets Magnets used for installation.
G
The screw holes for securing the Touch Unit.
Remove the rubber caps from the screw holes, attach
the Touch Unit, and replace the rubber caps to hide the
screws.
The screw holes for securing the Touch Unit to a
commercially available table mount when installing
vertically on a desk.
Security System manufactured by Kensington.
Touch Unit connection cable.
Attention
• Do not connect the Touch Unit to any devices except for this projector. The
device could malfunction, or laser light could leak beyond the limit.
• Make sure you use the supplied Touch Unit connection cable. Operations are
not possible with a commercially available cable.
• When disposing of the Touch Unit, do not disassemble it. Dispose according to
your local or national laws and regulations.
See your projector's Installation Guide for the Touch Unit installation
a
methods and angle adjustment methods.
gg Related Links
• "Safety Instructions for Interactive Touch Operations" p.94
• "Using Interactive Touch Operations with Your Finger" p.93
Page 26
Projector Parts and Functions
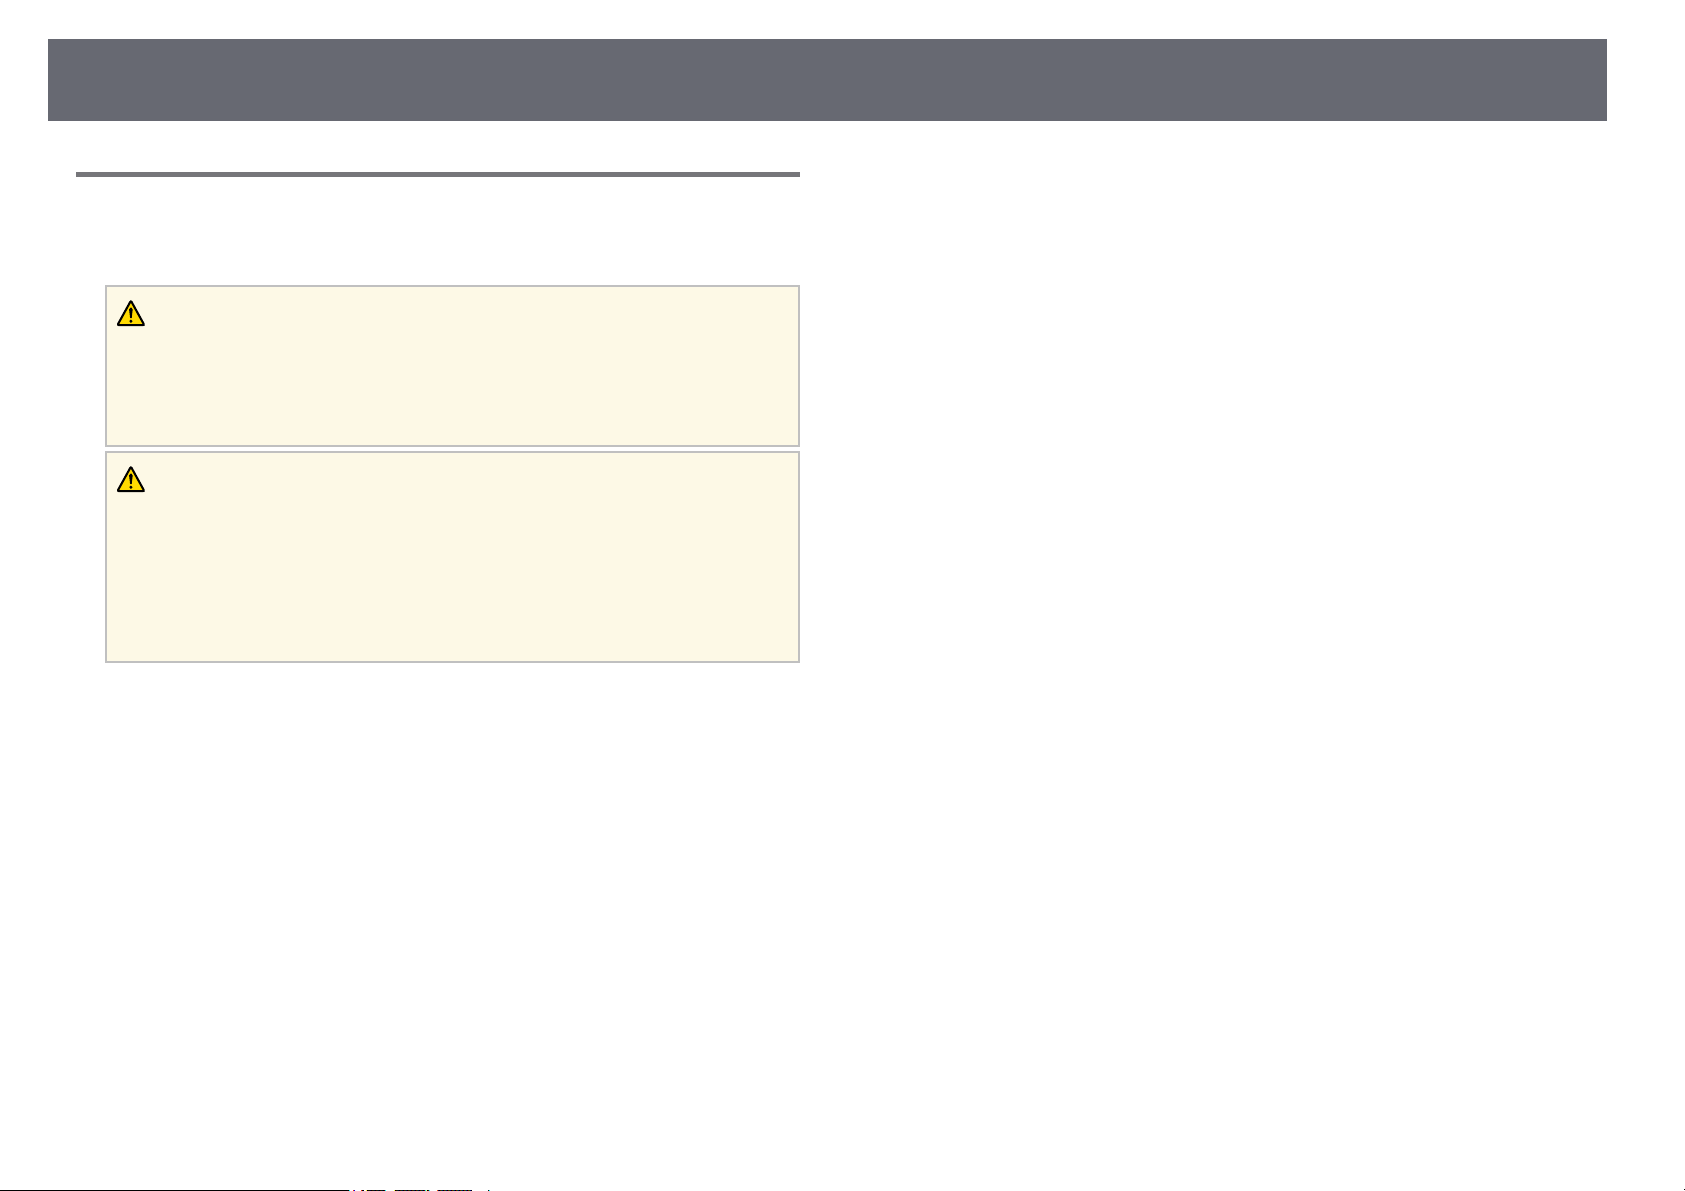
Safety Instructions for Magnet
Both the pen stand and touch unit contain powerful magnets. Be sure to
follow these important guidelines when using these devices.
Warning
Do not use the device near medical equipment such as pace makers. Furthermore,
when using the device, make sure there is no medical equipment such as
pacemakers, in the surrounding area. Electromagnetic interference may cause
medical equipment to malfunction.
Caution
• Do not use the device near magnetic storage media such as magnetic cards, or
precision electronic devices such as computers, digital watches, or cell phones.
Data could be corrupted or a malfunction could occur.
• When installing the device on a magnetic surface, be careful not to trap your
fingers or any other part of your body between the magnet and the installation
surface.
26
Page 27

Setting Up the Projector
Follow the instructions in these sections to set up your projector.
gg Related Links
• "Projector Placement" p.28
• "Projector Connections" p.31
• "Installing Batteries in the Remote Control" p.45
• "Installing Batteries in the Pens" p.46
• "Remote Control Operation" p.47
Page 28
Projector Placement
You can install the projector on a wall or ceiling, or place it on a table to
project images.
28
Warning
To install the projector on a wall, you must use an optional mount. To mount
the projector from a ceiling or vertically on a desk, you can use a
commercially available mount compatible with the VESA Mounting Interface
Standard (100 × 100 mm).
Note the following points when selecting a projector location:
• Place the projector on a sturdy, level surface or install it using a compatible
mount.
• Leave plenty of space around and under the projector for ventilation, and
do not place it on top of or next to anything that could block the vents.
• Place the projector so it squarely faces the screen, not at an angle.
If you cannot install the projector squarely facing the screen, correct
a
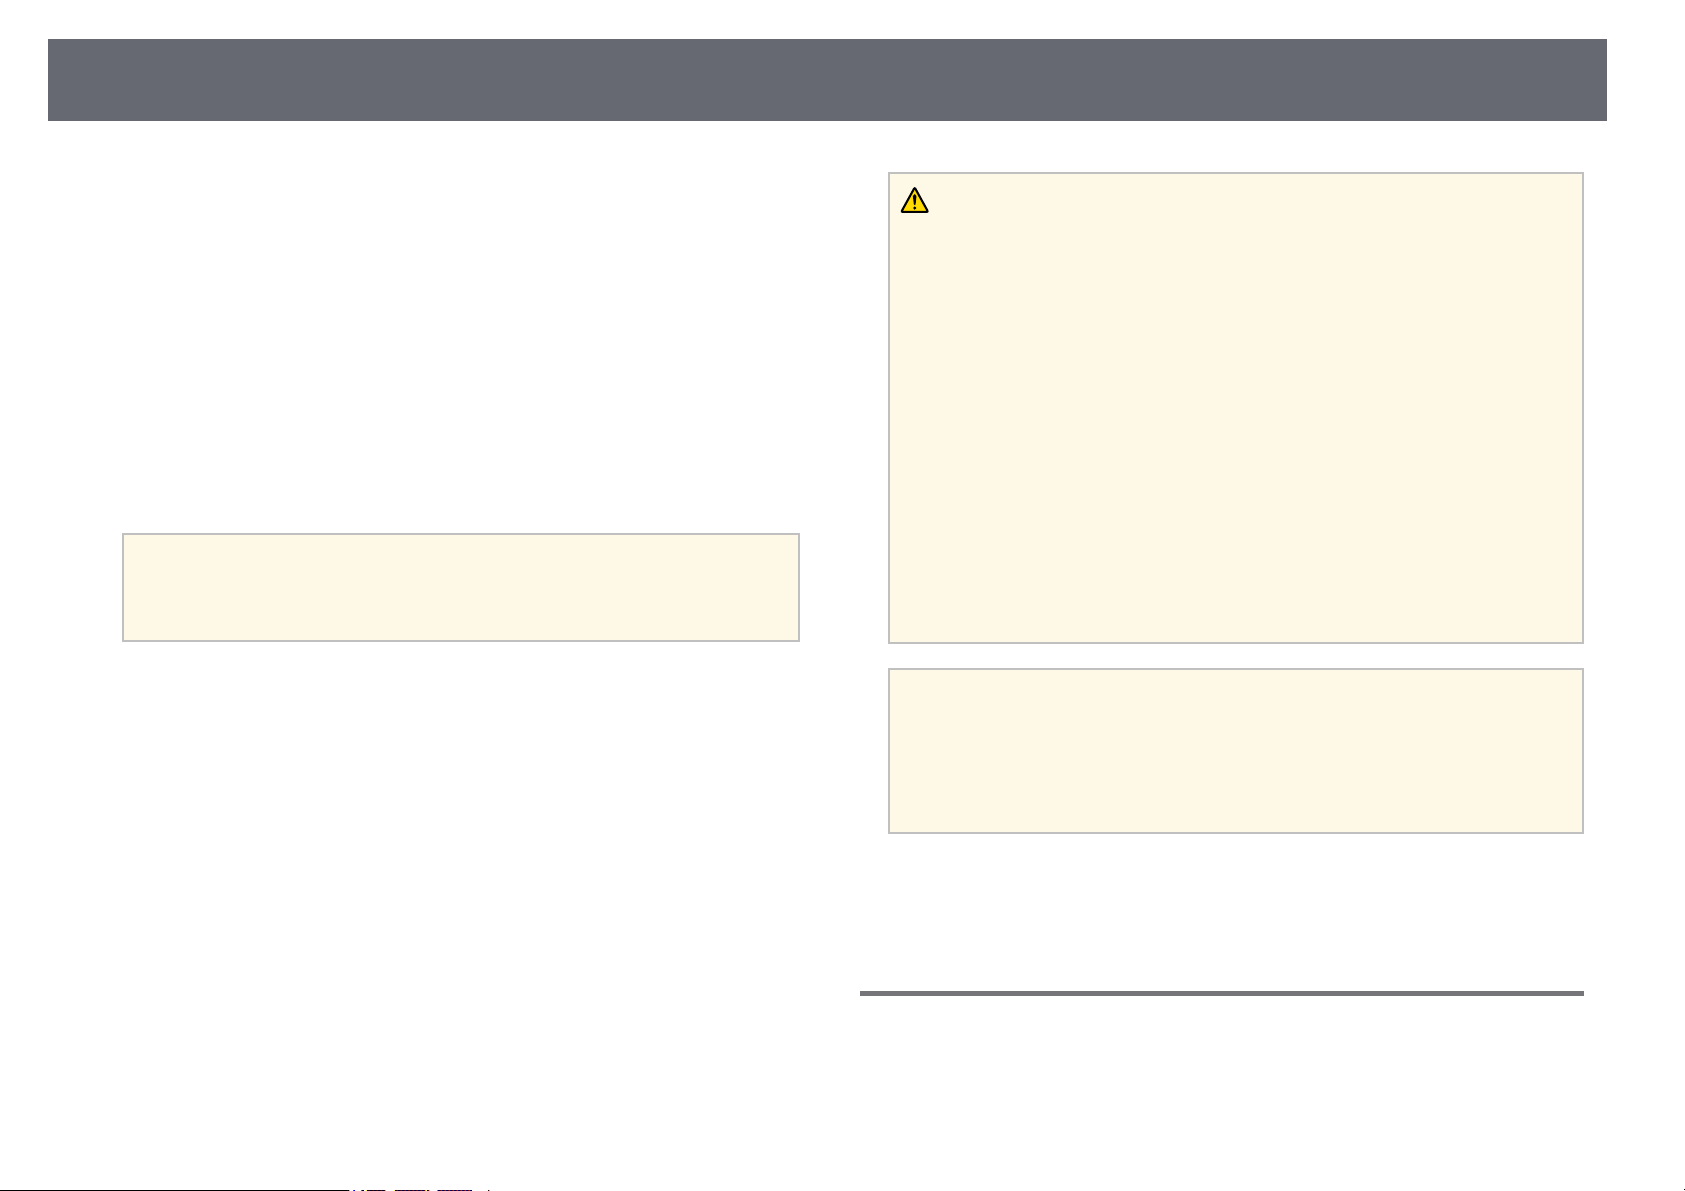
• When you install the projector to a fixed location, turn on the Fixed
Installation setting in the projector's Installation menu.
• When you place the projector vertically, turn on the Vertical Installation
setting in the projector's Installation menu.
any resulting keystone distortion using the projector controls. For the
best quality images, we recommend adjusting the installation position
of the projector to achieve the correct image size and shape.
• A special method of installation is required when suspending the projector from
a wall or ceiling. If you do not install the projector correctly, it could fall and
cause damage or injury.
• Do not use adhesives on the wall mount plate fixing points or other mount
fixing points to prevent the screws from loosening, or use lubricants, oils, or
similar substances on the projector; the projector case may crack causing it to fall
from its mount. This could cause serious injury to anyone under the mount and
could damage the projector.
• Do not cover the projector's air intake or air exhaust vents. If the vents are
covered, the internal temperature could rise and cause a fire.
• Do not install the projector on an unstable surface or in a location beyond the
weight specifications of the projector. Otherwise, it could fall or topple causing
an accident and injury.
• When installing the projector in a high position, take measures to prevent falling
by using wires to ensure safety in an emergency, such as an earthquake, and to
prevent accidents. If it is not installed correctly, it could fall causing an accident
and injury.
Attention
• If you are using the projector at altitudes above 1500 m, set the High Altitude
Mode setting to On in the projector's Installation menu to ensure the projector's
internal temperature is regulated properly.
• Try not to setup the projector in locations subject to high humidity and dust, or
in locations subject to smoke from fires or tobacco smoke.
gg Related Links
• "Projector Setup and Installation Options" p.28
• "Settings when Using the Interactive Features" p.29
Projector Setup and Installation Options
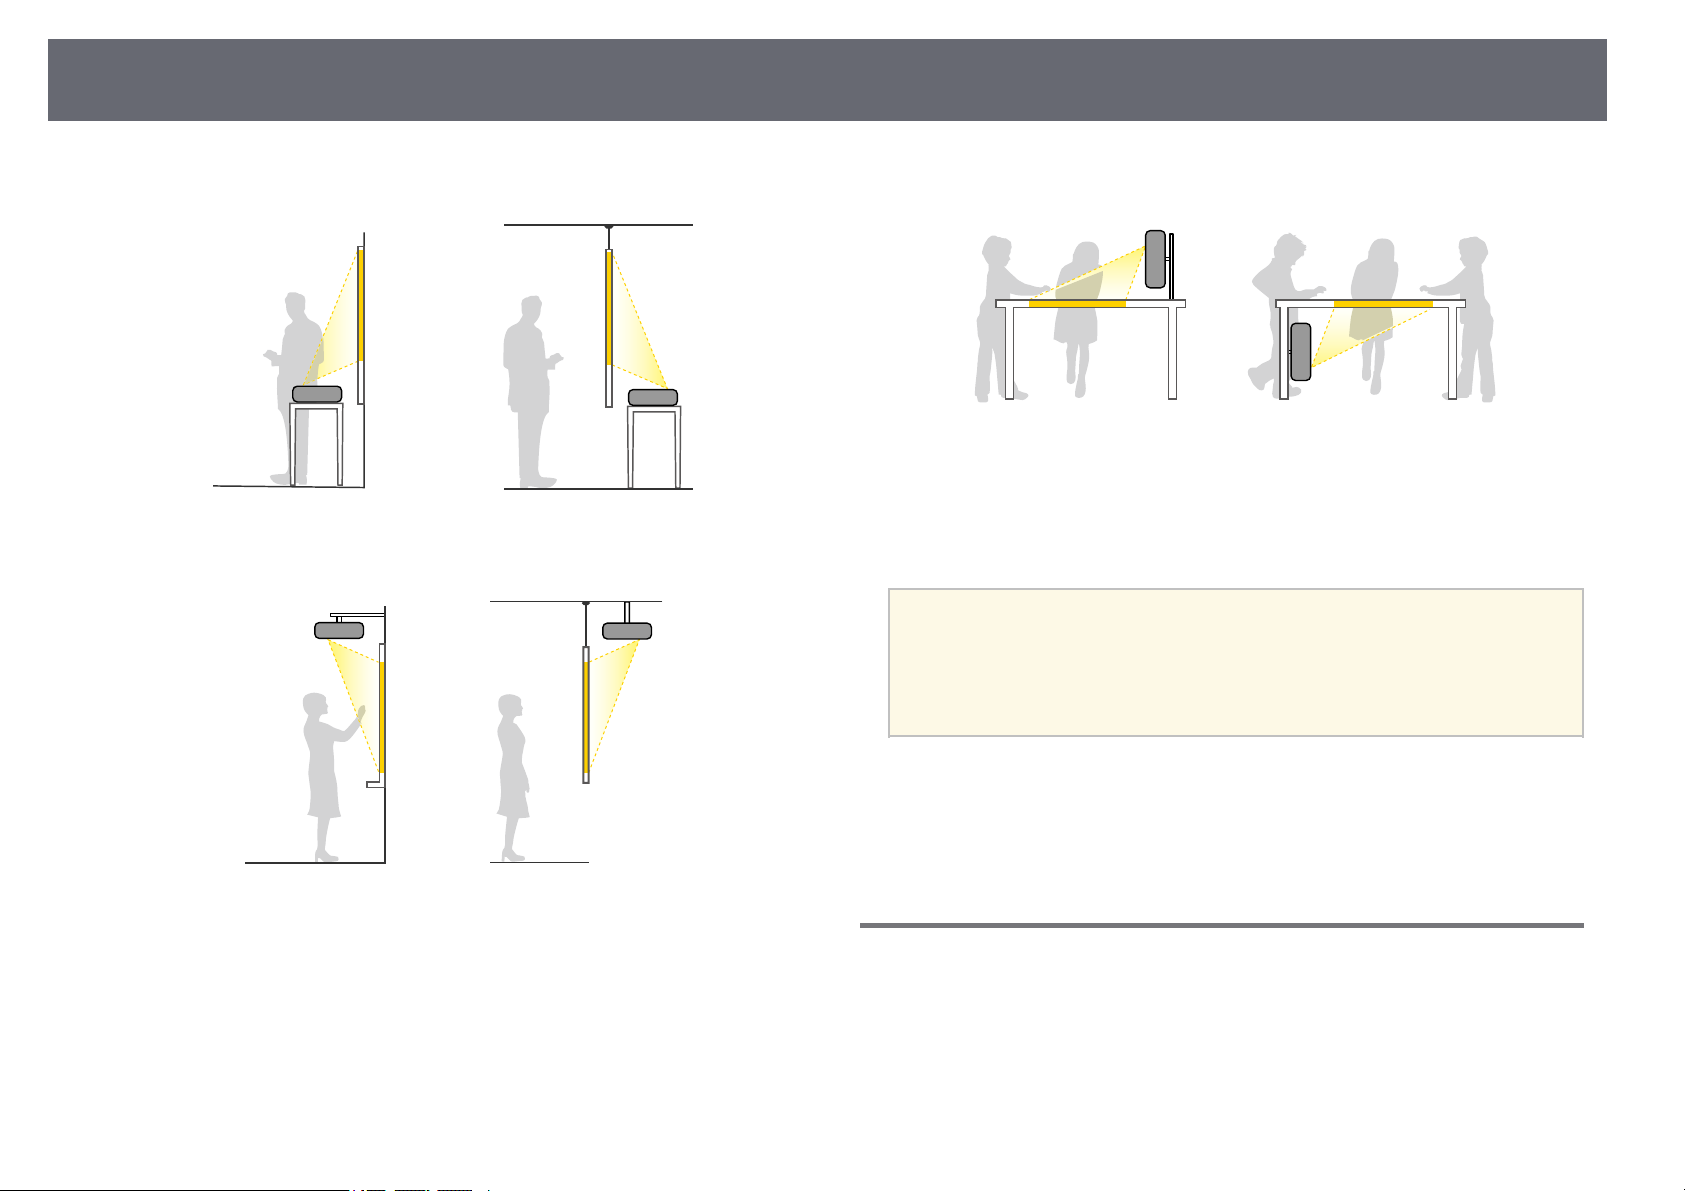
You can set up or install your projector in the following ways:
Page 29
Projector Placement
29
Front/Rear
Front Upside Down/Rear Upside Down
Front Upside Down/Rear Upside Down (Vertically)
Select the correct Projection option in the projector's Installation menu
according to the installation method being used. If necessary, turn on the Inv
Direction Button setting in the projector's Operation menu and adjust the
Menu Rotation setting in the projector's Display menu.
• The default Projection setting is Front/Upside Down.
a
• You can change the Projection setting as follows by pressing down
the [A/V Mute] button on the remote control for about five seconds.
• Switch Front to/from Front/Upside Down
• Switch Rear to/from Rear/Upside Down
gg Related Links
• "Projection Modes" p.55
• "Changing the Projection Mode Using the Remote Control" p.55
• "Changing the Projection Mode Using the Menus" p.55
Settings when Using the Interactive Features
When using the interactive features, project from in front of the screen.
Set Projection to Front/Upside Down or Front.
Page 30

Projector Placement
30
Attention
The interactive features are operated using infrared communication. Note the
following points when installing the projector.
• Do not install the projector tilted at an angle of 3˚ or more. The interactive
features may not operate correctly.
• Make sure there is no strong light or sunlight shining on the interactive pen
receiver, the projection screen, the projector itself, or the rear of the projector.
• Do not install the projector where it could be subjected to direct sunlight
through a window. This could cause the interactive features to malfunction.
• Install the projector so that the interactive pen receiver is not too close to
fluorescent lights. If the surrounding area is too bright, the interactive features
may not operate correctly.
• If there is any dust stuck to the interactive pen receiver, it could interfere with
infrared communication and the interactive features may not operate correctly.
Clean the receiver if it is dirty.
• Do not put paint or any stickers on the cover of the interactive pen receiver.
• When using the interactive features, do not use an infrared remote control or
microphone in the same room. The interactive pen could malfunction.
• Do not use devices that generate powerful noise, such as rotary devices or
transformers, near the projector, as the interactive features may not operate
correctly.
• We recommend using a smooth, board type screen without any
a
unevenness. If the projection screen is uneven, there may be
distortions in the projected image.
• Distortions may occur in the projected image depending on the
material of the screen and the installation method.
• When using the interactive features, install the projector so that the
projected screen is a rectangle without any distortion.
• When using the interactive features in the same room as multiple
projectors, interactive pen operations may become unstable. In this
case, connect the optional remote control cable set to the projectors,
and change Sync of Projectors to Wired in the projector's
Pen/Touch menu.
s Pen/Touch > Installation of Projectors > Sync of Projectors
• "Connecting a Computer for Use with PC Interactive Features" p.35
Settings when Using the Touch Unit
When using the Touch Unit, install the projector using one of the following
methods. The Touch Unit cannot be used if another installation method is
used.
• Mount the projector on a wall or suspend it from a ceiling and project
images from in front of the screen (the setting plate or a commercially
available ceiling mount is required).
• Install vertically on a desk and project from the front of the desk (a
commercially available table mount is required).
gg Related Links
• "Safety Instructions for Interactive Touch Operations" p.94
• "Using Interactive Touch Operations with Your Finger" p.93
gg Related Links
• "Settings when Using the Touch Unit" p.30
Page 31
Projector Connections
31
You can connect the projector to a variety of computer, video, and audio
sources to display presentations, movies, or other images, with or without
sound.
Attention
Check the shape and orientation of the connectors on any cable you plan to
connect. Do not force a connector into a port if it does not fit. The device or your
projector could be damaged or could malfunction.
See the Quick Start Guide for a list of cables supplied with your
a
• Connect a computer that has a USB port, standard video output (monitor)
port, or HDMI port.
• For video projection, connect devices such as DVD players, gaming
consoles, digital cameras, and smartphones with compatible video output
ports.
• If your presentation or video includes sound, you can connect audio input
cables.
• For slide shows or presentations without a computer, you can connect USB
devices (such as a flash drive or camera) or the optional Epson document
camera.
gg Related Links
• "Connecting to a Computer" p.31
• "Connecting to Video Sources" p.35
• "Connecting to External USB Devices" p.37
• "Connecting to a Document Camera" p.39
• "Connecting a Printer" p.39
• "Connecting to External Output Devices" p.39
• "Connecting Multiple Projectors of the Same Model" p.42
• "Getting the Latest Version of the Documents" p.10
projector. Purchase optional or commercially available cables when
necessary.
Connecting to a Computer
Follow the instructions in these sections to connect a computer to the
projector.
gg Related Links
• "Connecting to a Computer for VGA Video and Audio" p.31
• "Connecting to a Computer for USB Video and Audio" p.32
• "Connecting to a Computer for HDMI Video and Audio" p.33
• "Connecting a Computer to the Control Pad" p.33
• "Connecting to a Mini PC Installed on a Wall Plate" p.34
• "Connecting a Computer for Use with PC Interactive Features" p.35
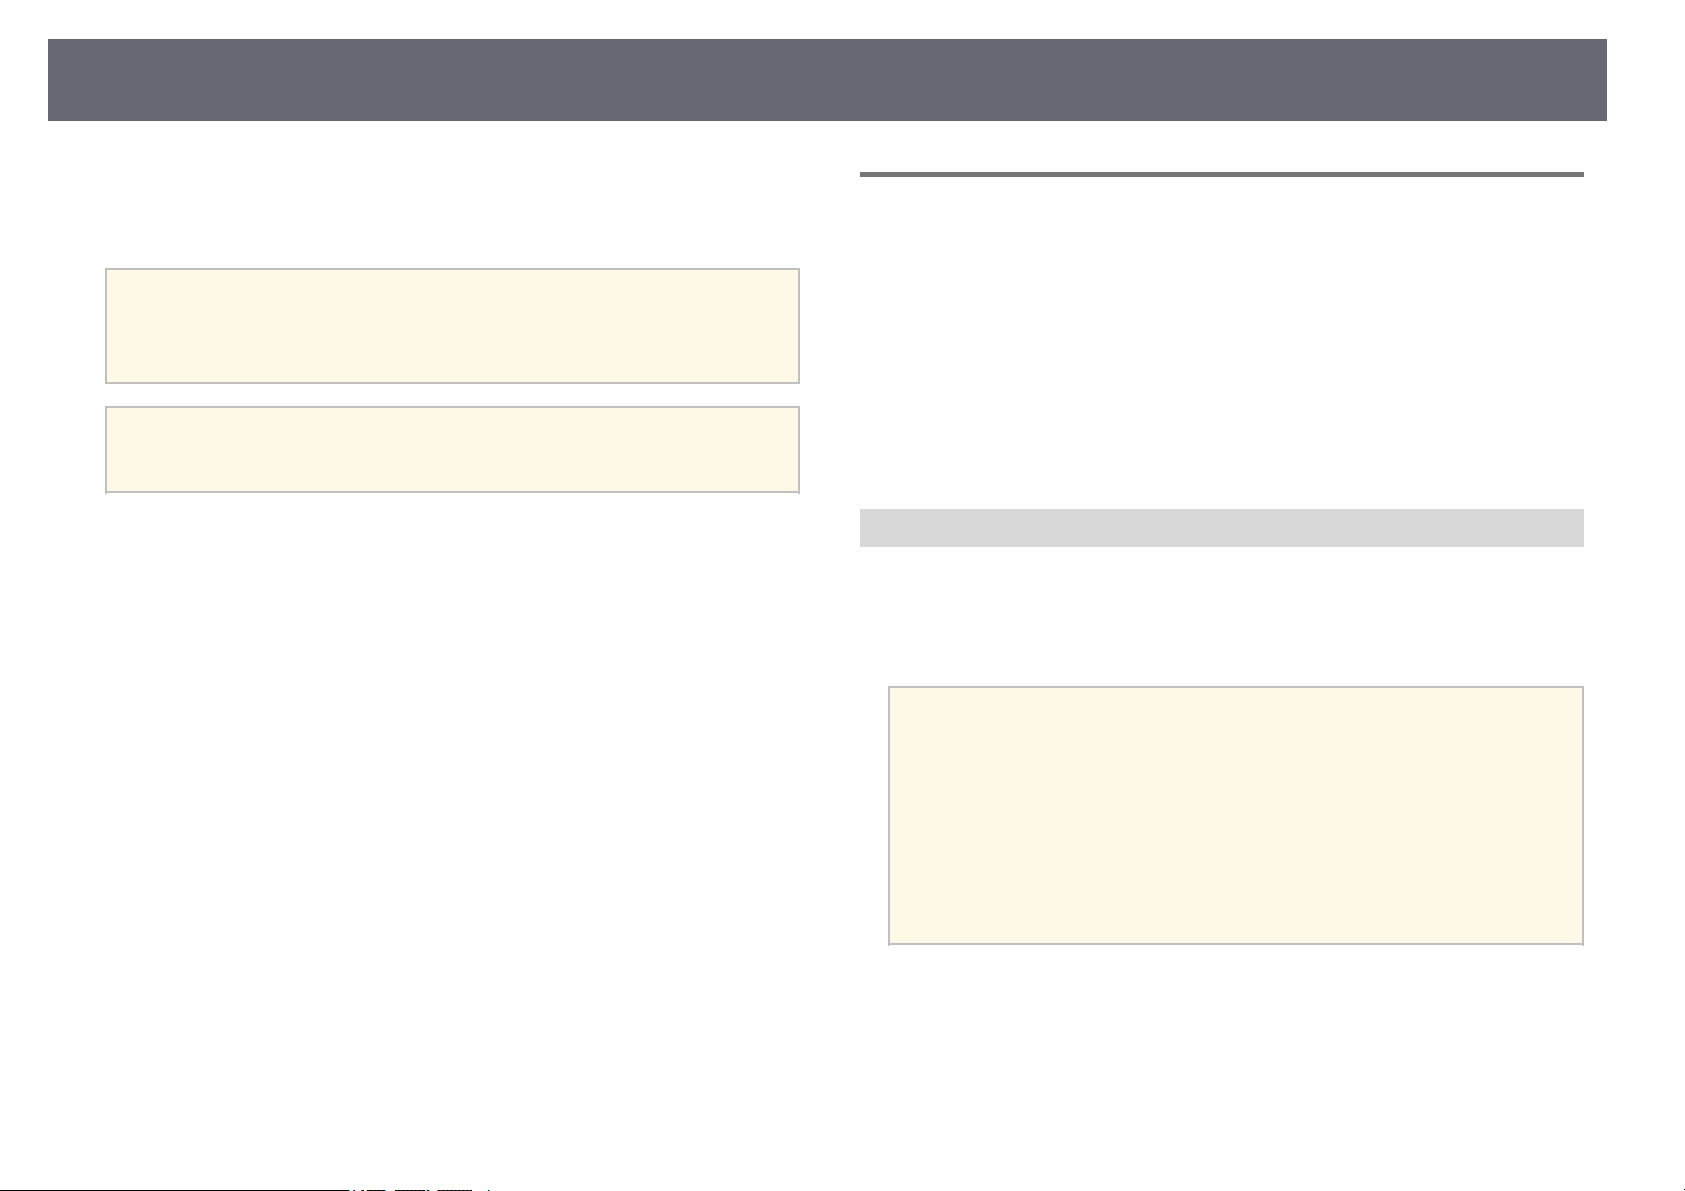
Connecting to a Computer for VGA Video and Audio
You can connect the projector to your computer using a VGA computer
cable.
You can play sound through the projector's speaker system by connecting a
commercially available 3.5 mm stereo mini-jack audio cable.
• To connect a computer that does not have a VGA video port, you
a
Connect the VGA computer cable to your computer's monitor port.
a
need an adapter that allows you to connect to the projector's VGA
video port.
• To project an image source connected to the Computer2/Monitor
Out port, set Monitor Out Port to Computer2 in the projector's
Signal I/O menu.
• You can also set the port to input audio when projecting the
computer source as the Audio Output setting in the projector's
Signal I/O menu.
• Make sure the audio cable is labeled "No resistance".
Page 32
Projector Connections
32
Connect the other end to a Computer port on the projector.
b
Tighten the screws on the VGA connector.
c
Connect the audio cable to your laptop's headphone or audio-out jack,
d
or your desktop's speaker or audio-out port.
Connect the other end to the Audio port that corresponds to the
e
Computer port you are using.
• If you use a USB hub, the connection may not operate correctly.
a
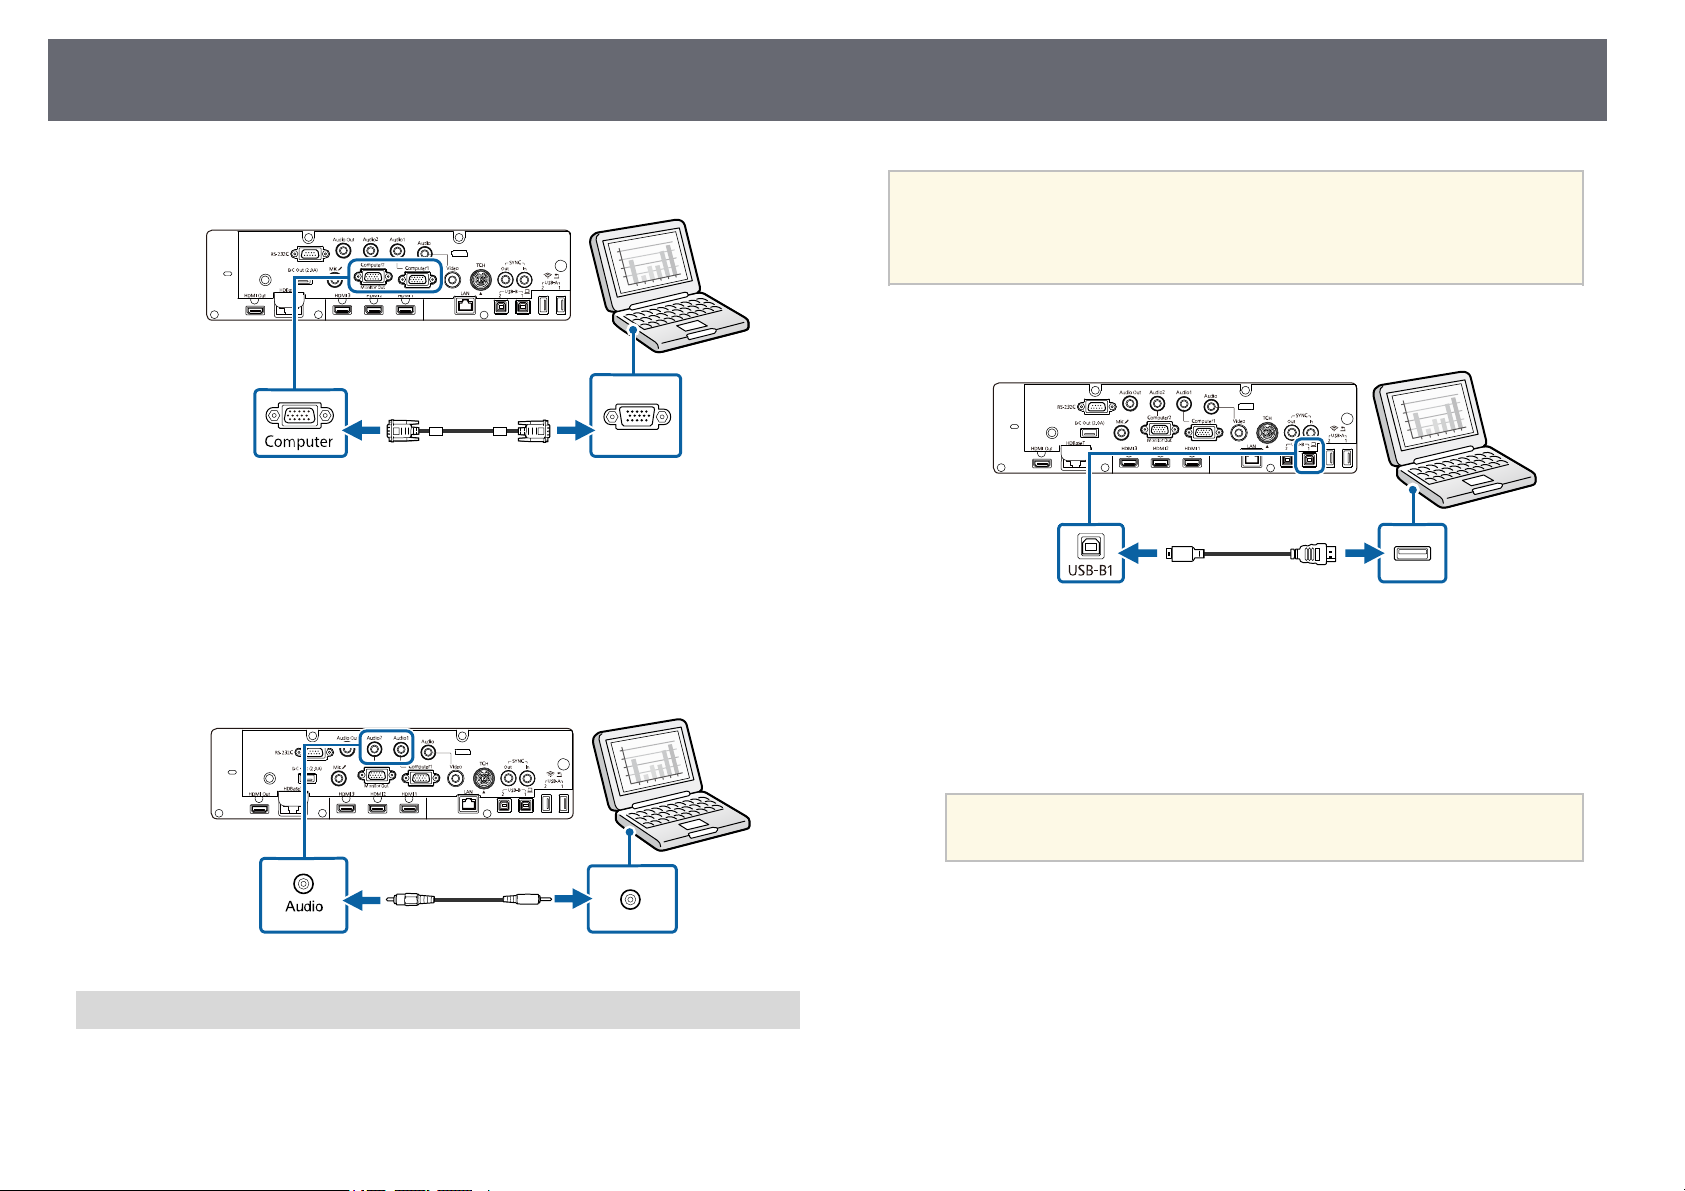
Connect the cable to your projector's USB-B1 port.
a
Connect the other end to any available USB port on your computer.
b
Turn on the projector and your computer.
c
Do one of the following to install the Epson USB Display software:
d
Connect the USB cable directly to the projector.
• To use the USB Display function, set the USB Display setting to On
in the projector's Signal I/O menu.
Connecting to a Computer for USB Video and Audio
If your computer meets the system requirements, you can send video and
audio output to the projector through the computer's USB port. This function
is called USB Display. Connect the projector to your computer using a USB
cable.
You only need to install this software the first time you connect
a
• Windows: Select Run EMP_UDSE.EXE in the dialog box that is
displayed to install the Epson USB Display software.
• Mac: The Epson USB Display setup folder is displayed on your
screen. Select USB Display Installer and follow the on-screen
instructions to install the Epson USB Display software. If the USB
Display Setup folder is not displayed automatically, double-click
EPSON_PJ_UD > USB Display Installer.
Follow any on-screen instructions.
e
the projector to the computer.
Page 33
Projector Connections
33
Do not disconnect the USB cable or turn off the projector until the
projector displays an image.
The projector displays the image from your computer's desktop and outputs
sound if your presentation contains audio.
• If the projector does not project any images, do one of the following:
a
gg Related Links
• "USB Display System Requirements" p.285
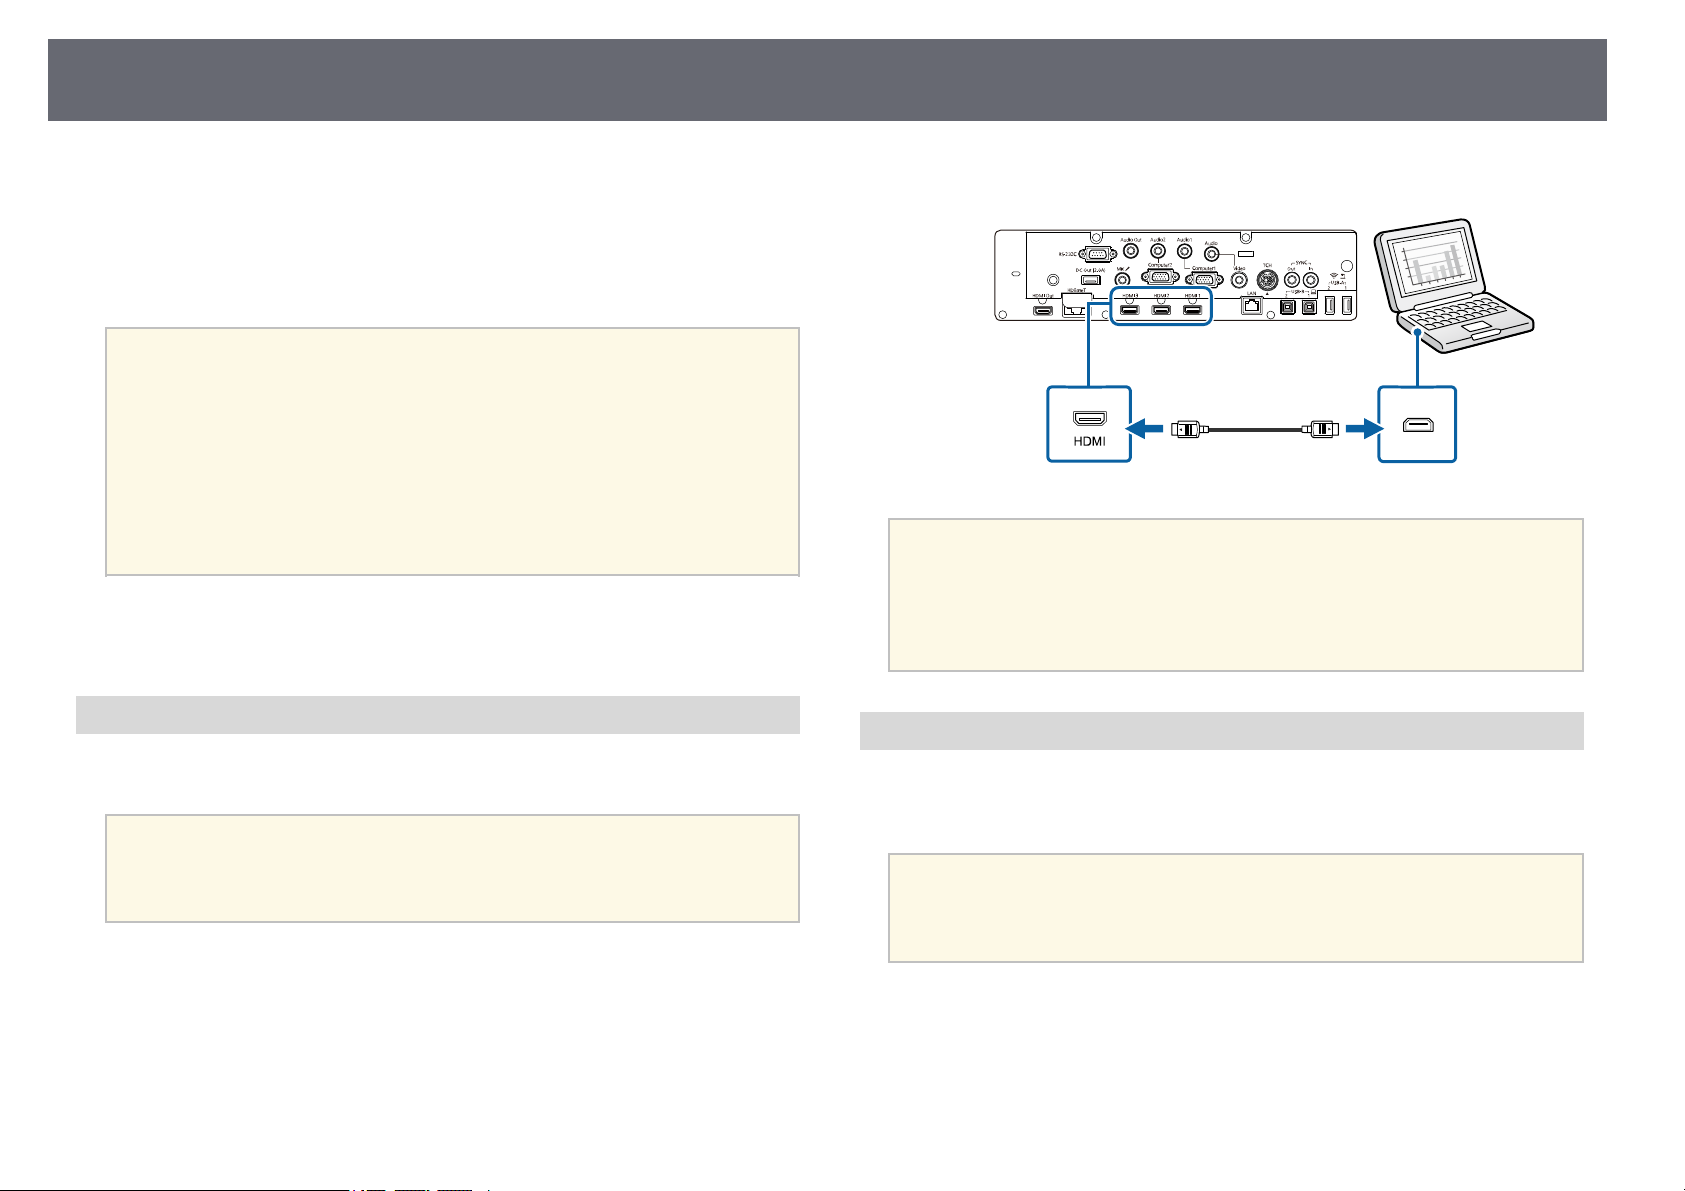
Connecting to a Computer for HDMI Video and Audio
If your computer has an HDMI port, you can connect it to the projector using
an HDMI cable and send the computer's audio with the projected image.
a
Connect the HDMI cable to your computer's HDMI output port.
a
• Windows: Click All Programs > EPSON Projector > Epson USB
Display > Epson USB Display Ver.x.xx.
• Mac: Double-click the USB Display icon in the Application folder.
• When you finish projection, do one of the following:
• Windows: Disconnect the USB cable. You do not need to operate
Safely Remove Hardware.
• Mac: Select Disconnect from the USB Display icon menu on the
menu bar or Dock, and then disconnect the USB cable.
To connect a Mac that does not have an HDMI port, you need an
adapter that allows you to connect to the projector's HDMI port.
Contact Apple for compatible adapter options. Older Mac computers
(2009 and earlier) may not support audio through the HDMI port.
Connect the other end to the projector's HDMI port.
b
If you have problems hearing audio through the HDMI connection,
a
Connecting a Computer to the Control Pad
If your computer has an HDMI port, you can connect it to the projector using
an HDMI cable and send the computer's audio with the projected image
through the control pad (EB-1485Fi only).
a
a
connect one end of a commercially available 3.5 mm stereo mini-jack
audio cable to the projector's Audio port and the other end to your
computer's audio out port. Select the audio input port you connected
to as the HDMI Audio Output setting in the projector's Signal I/O
menu.
To connect a Mac that does not have an HDMI port, you need an
adapter that allows you to connect to the projector's HDMI port.
Contact Apple for compatible adapter options. Older Mac computers
(2009 and earlier) may not support audio through the HDMI port.
Connect the projector to the control pad.
See your projector's Installation Guide for details on the cable
connection between the projector and the control pad.
Turn on the projector and your computer.
b
Page 34
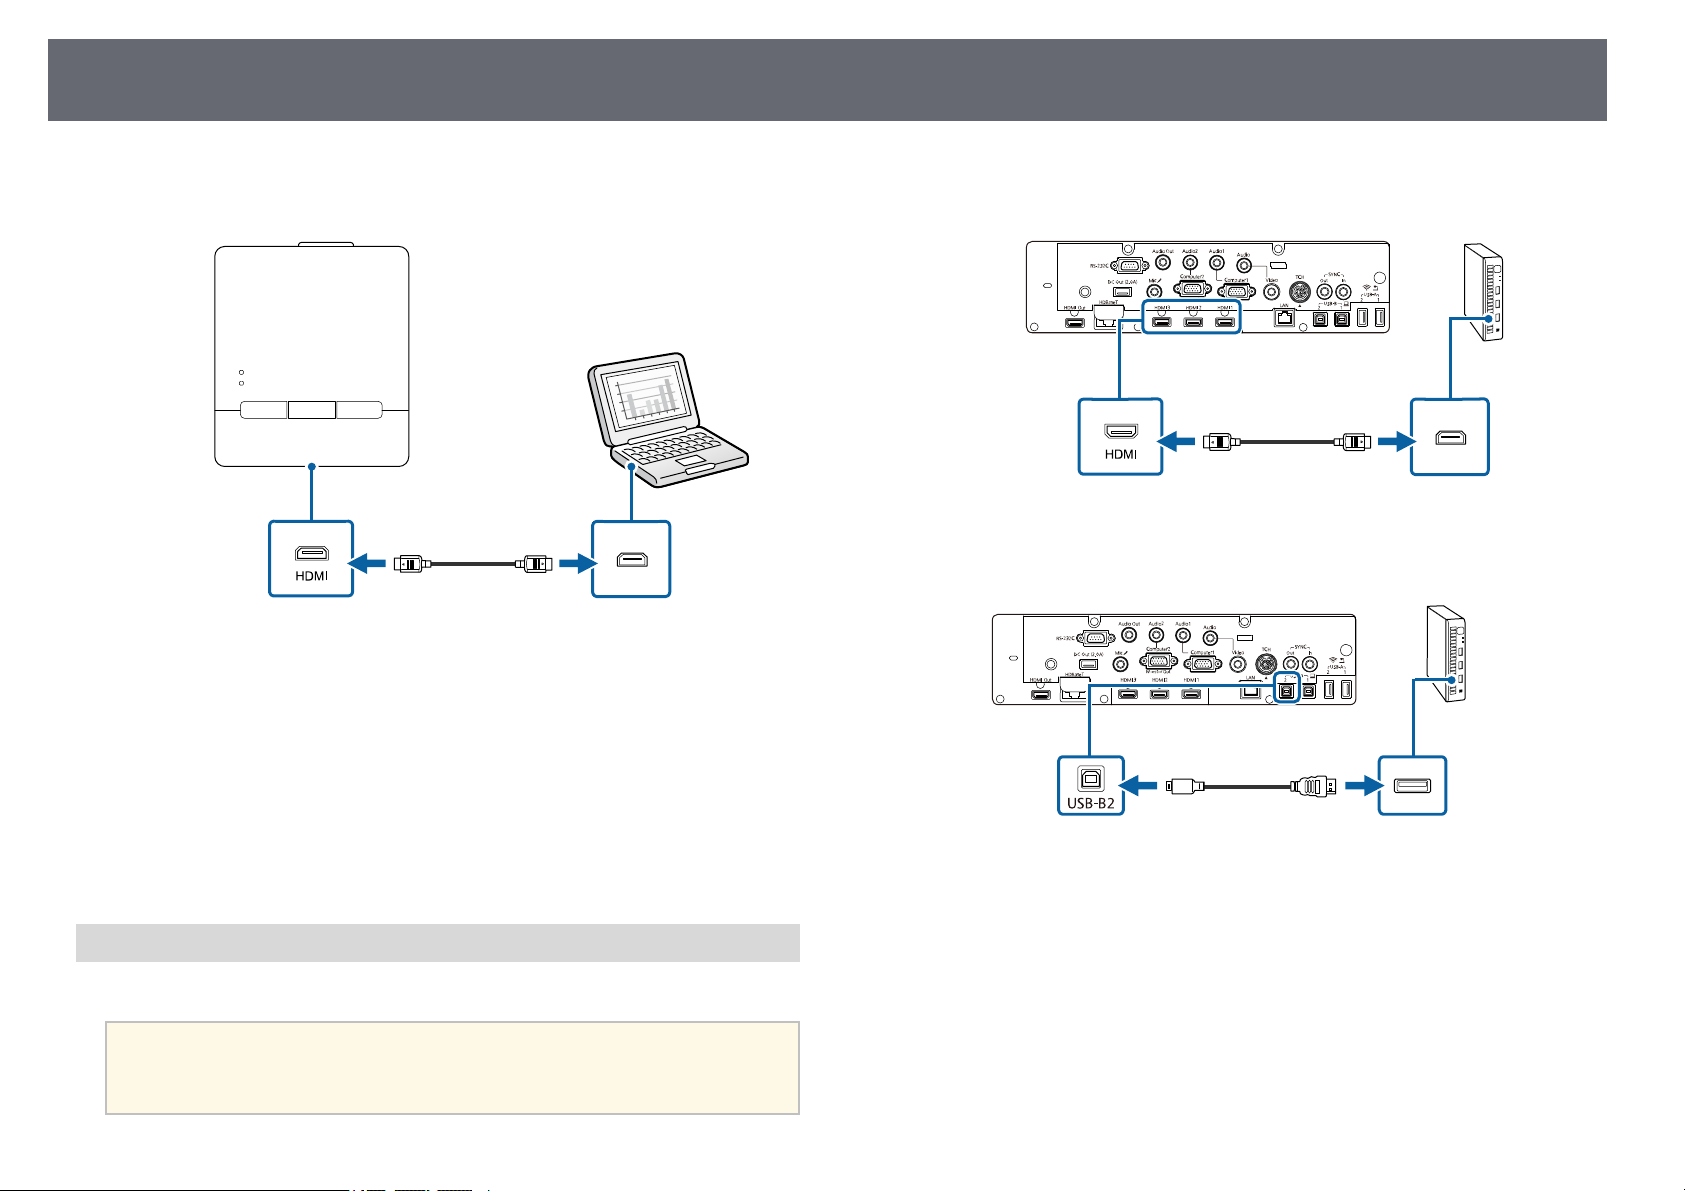
Projector Connections
34
Connect HDMI cable to the HDMI1 or HDMI2 port on the bottom of
c
the control pad and any available HDMI port on your computer.
Press the HDMI1 or HDMI2 button on the control pad to select the
d
input device.
The projector switches the input source to HDBaseT, displays the image from
your computer's desktop, and outputs sound, if your presentation contains
audio.
Connect the mini PC and the projector's HDMI port using the HDMI
a
cable.
If you use the interactive features, connect the USB cable to your
b
projector's USB-B2 port.
gg Related Links
• "Getting the Latest Version of the Documents" p.10
Connecting to a Mini PC Installed on a Wall Plate
You can connect your projector to a mini PC that is installed on a wall plate.
Attention
Do not cover the mini PC's air intake vents or air exhaust vents. If the vents are
covered, the internal temperature could rise and malfunction.
Connect the other end to any available USB port on your computer.
c
Turn on the projector and your computer.
d
If you connected a USB cable, set the USB-B2 setting in the Pen/Touch
e
menu to the HDMI port you used to connect your mini PC to the
projector.
s Pen/Touch > PC Interactivity > USB-B2
Page 35
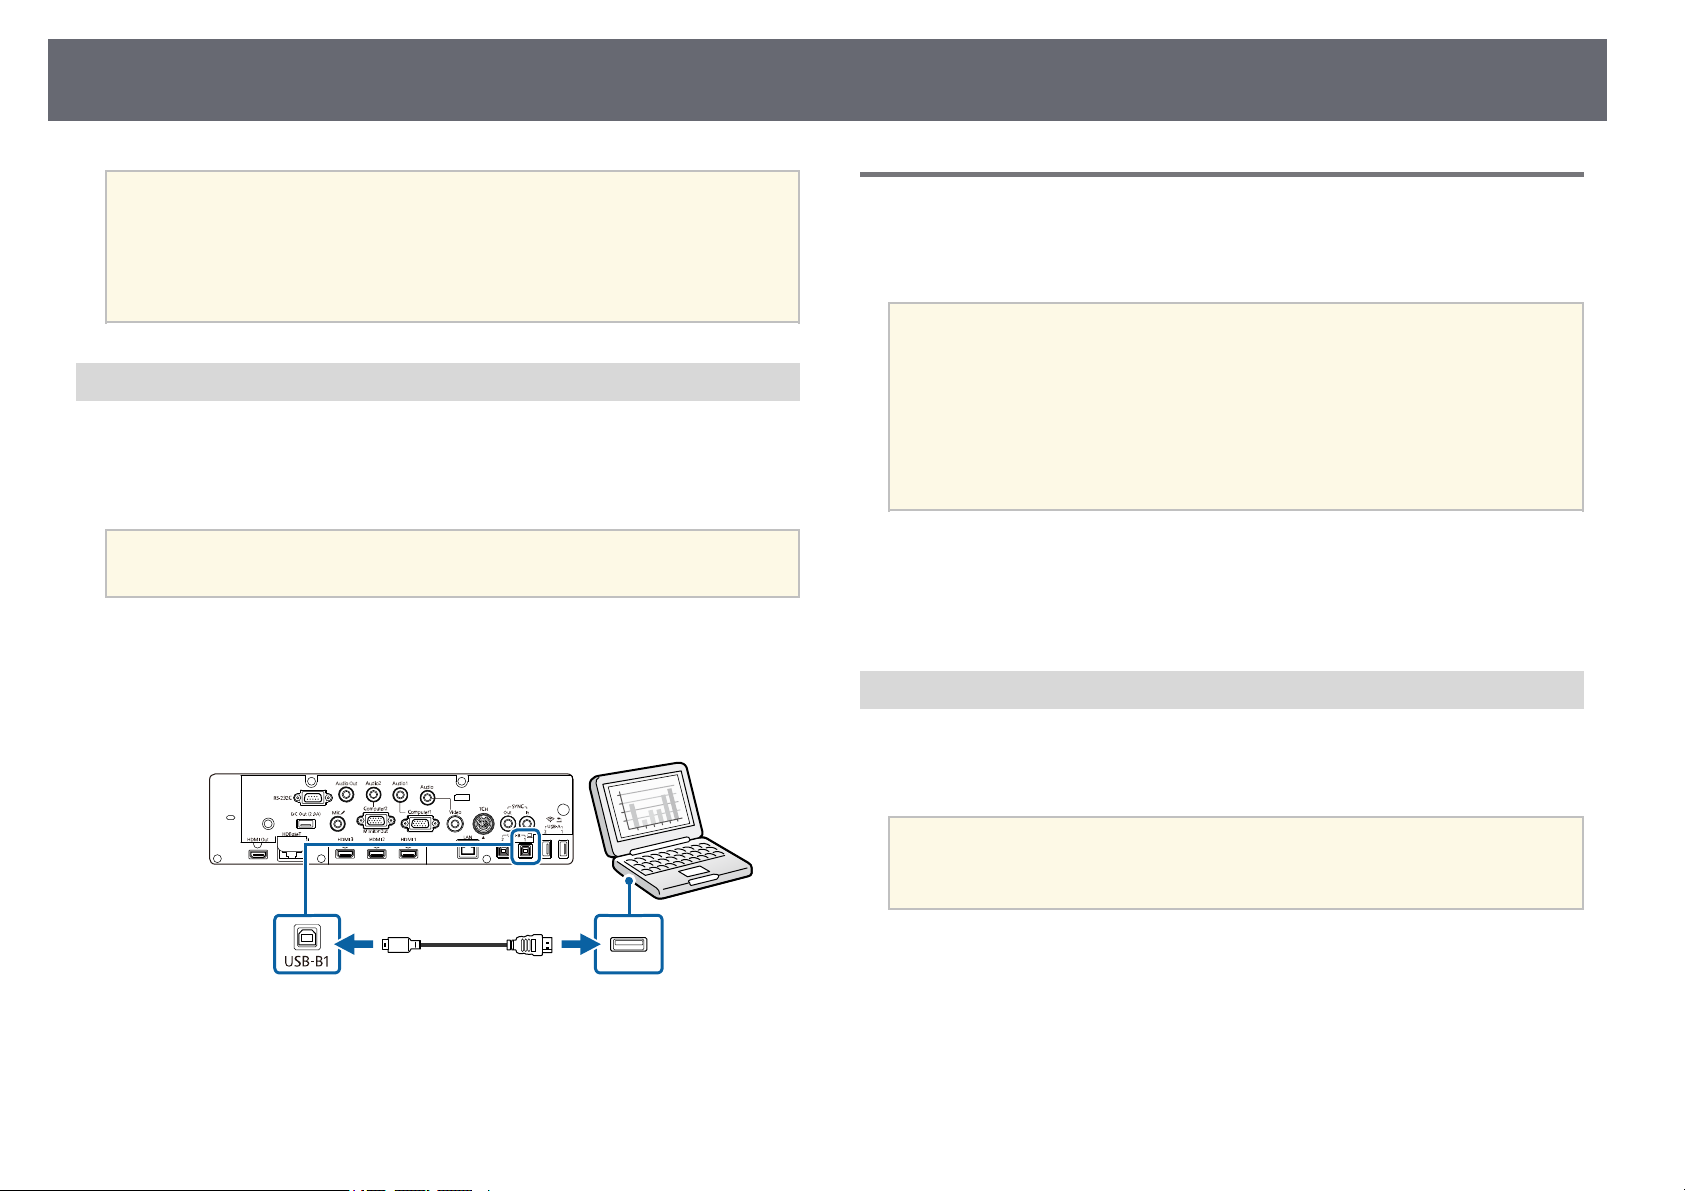
Projector Connections
35
If you have problems hearing audio through the HDMI connection,
a
Connecting a Computer for Use with PC Interactive Features
When the projector is connected to a computer with a USB cable, you can
operate the computer from the projected screen using the interactive pens or
your finger, just as you would with a mouse. You can navigate, select, and
interact with your computer programs from the projected screen.
a
a
b
connect one end of a commercially available 3.5 mm stereo mini-jack
audio cable to the projector's Audio port and the other end to your
computer's audio out port. Select the audio input port you connected
to as the HDMI Audio Output setting in the projector's Signal I/O
menu.
If you use a USB hub, the connection may not operate correctly.
Connect the USB cable directly to the projector.
Connect the computer to your projector using an image signal cable
other than a USB cable.
Connect a USB cable to your projector's USB-B1 port.
Connecting to Video Sources
Follow the instructions in these sections to connect video devices to the
projector.
• If the port on the device you connect has an unusual shape, use the
a
gg Related Links
• "Connecting to an HDMI Video Source" p.35
• "Connecting to a Composite Video Source" p.36
• "Connecting a Video Source to the Control Pad" p.36
Connecting to an HDMI Video Source
If your video source has an HDMI port, you can connect it to the projector
using an HDMI cable and send the image source's audio with the projected
image.
cable supplied with the device or an optional cable to connect to the
projector.
• The cable differs depending on the output signal from the connected
video devices.
• Some video devices are capable of outputting different types of
signals. See your video device manual to confirm what type of signals
can be output.
Connect the other end to any available USB port on your computer.
c
Attention
Do not turn on the video source before connecting it to the projector. Doing so
could damage the projector.
Connect the HDMI cable to your video source's HDMI output port.
a
Page 36
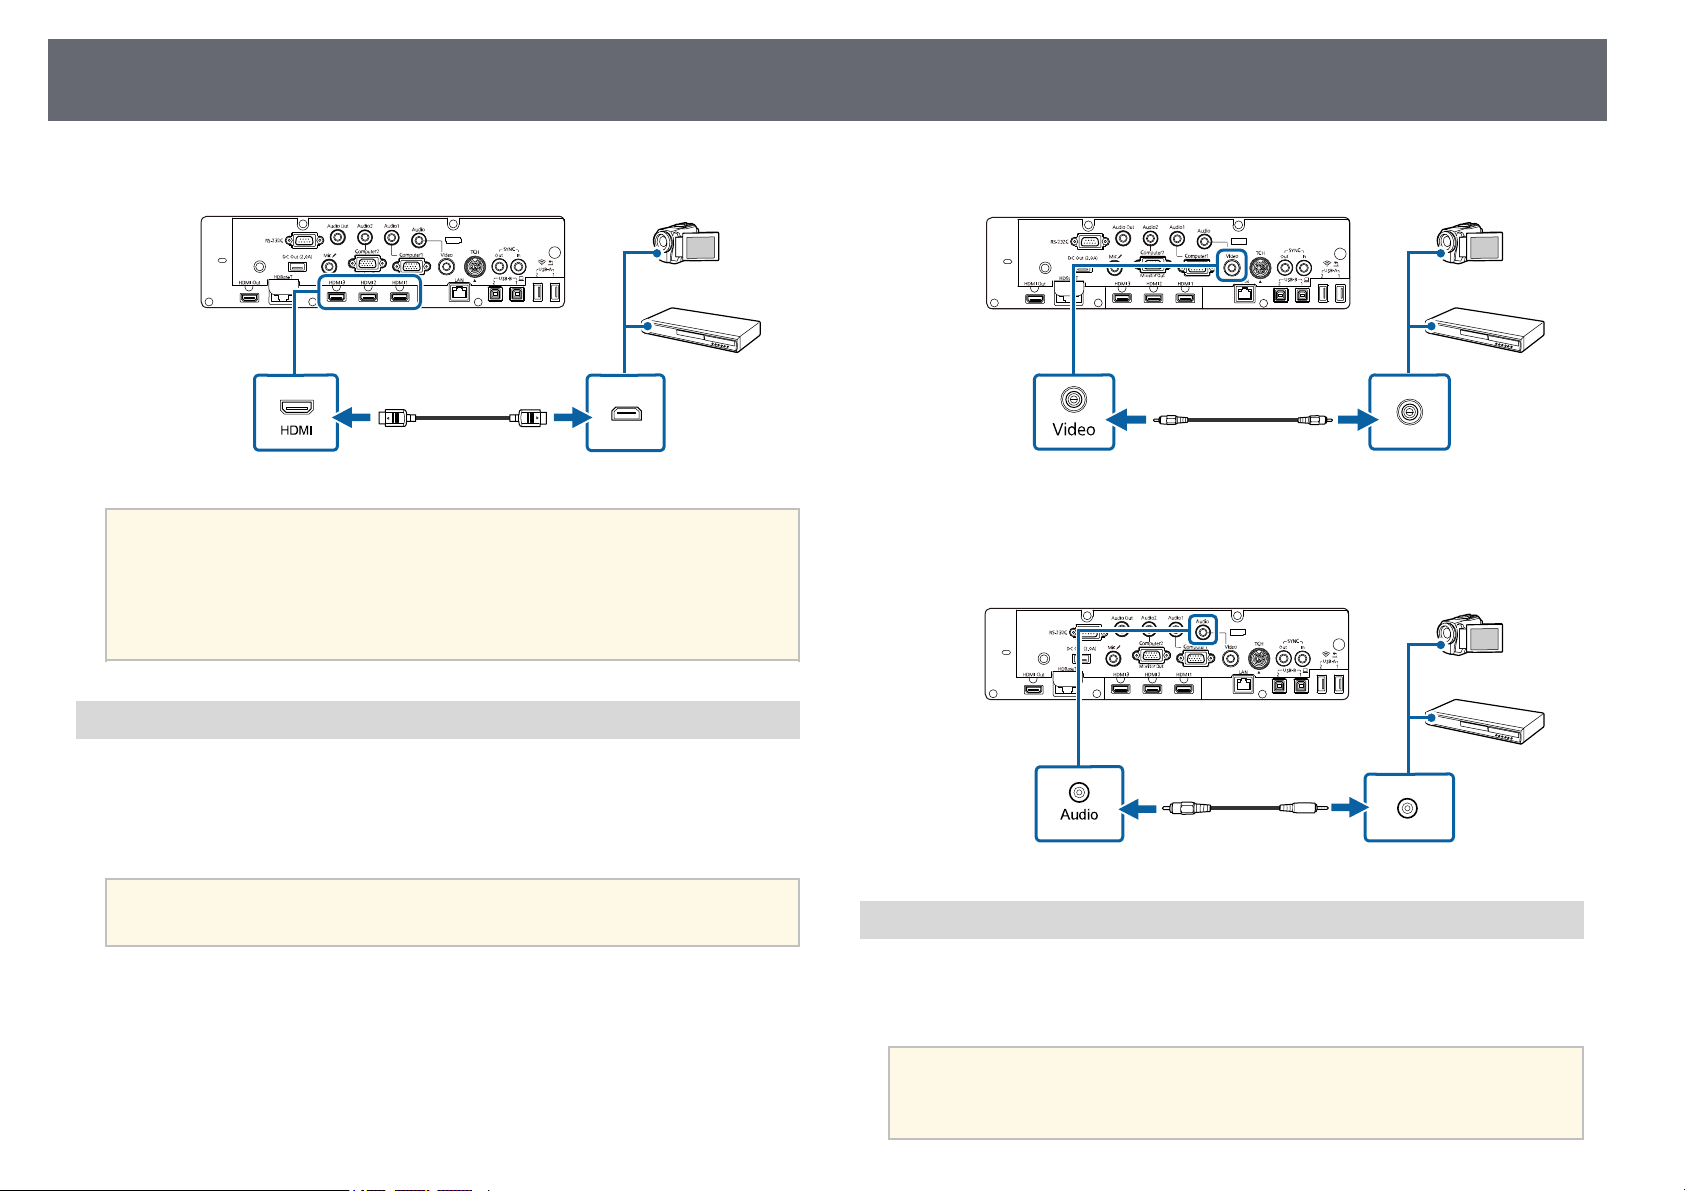
Projector Connections
36
Connect the other end to the projector's HDMI port.
b
If you have problems hearing audio through the HDMI connection,
a
Connecting to a Composite Video Source
If your video source has a composite video port, you can connect it to the
projector using a RCA-style video or A/V cable.
connect one end of a commercially available 3.5 mm stereo mini-jack
audio cable to the projector's Audio port and the other end to your
video source's audio out port. Select the audio input port you
connected to as the HDMI Audio Output setting in the projector's
Signal I/O menu.
Connect the other end to the projector's Video port.
b
Connect the audio cable to your video source's audio-out ports.
c
Connect the other end to the projector's Audio port.
d
You can play sound through the projector's speaker system by connecting a
stereo mini-jack audio cable.
Make sure the audio cable is labeled "No resistance".
a
Connect the cable with the yellow connector to your video source's
a
yellow video output port.
Connecting a Video Source to the Control Pad
If your video source has an HDMI port, you can connect it to the projector
using an HDMI cable and send the image source's audio with the projected
image through the control pad (EB-1485Fi only).
Attention
Do not turn on the video source before connecting it to the projector. Doing so
could damage the projector.
Page 37
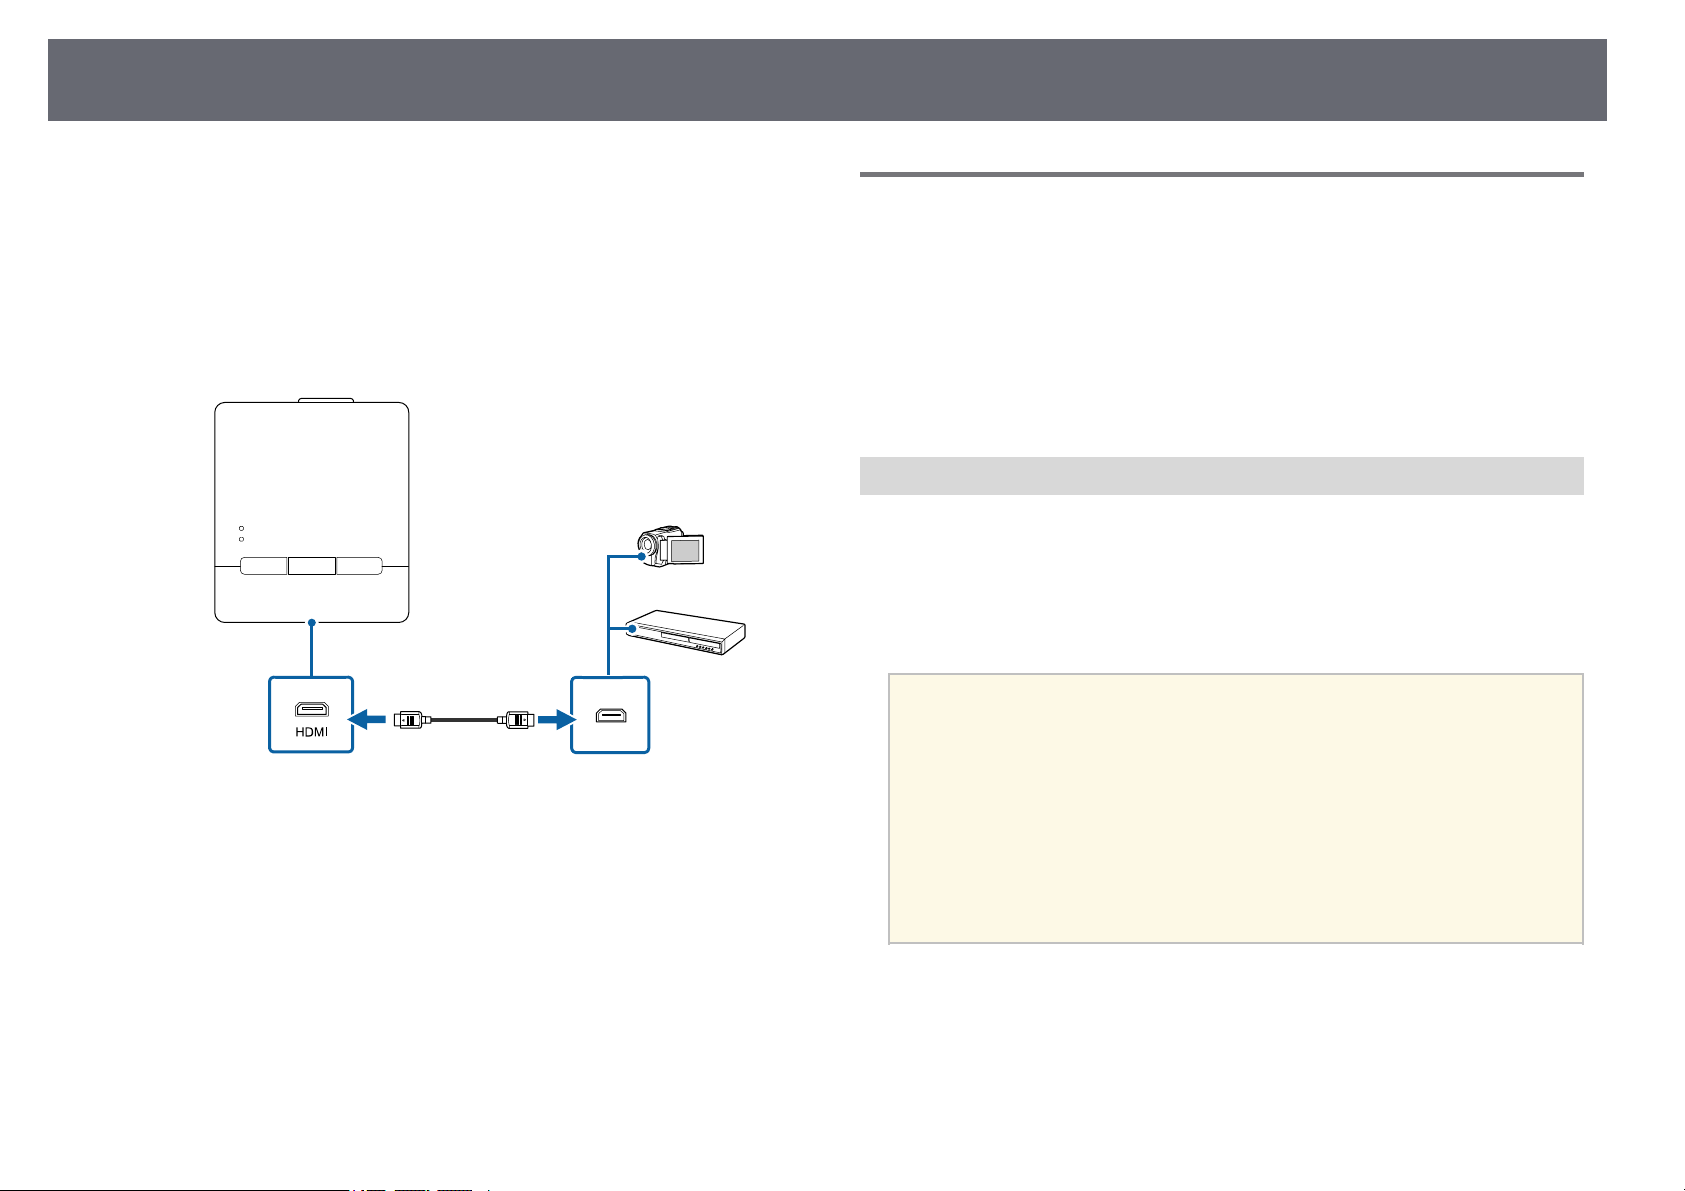
Projector Connections
37
Connect the projector to the control pad.
a
See your projector's Installation Guide for details on the cable
connection between the projector and the control pad.
Turn on the projector and your video source.
b
Connect HDMI cable to the HDMI1 or HDMI2 port on the bottom of
c
the control pad and any available HDMI port on your video source.
Press the HDMI1 or HDMI2 button on the control pad to select the
d
input device.
The projector switches the input source to HDBaseT, displays the image from
your video source, and outputs sound, if your presentation contains audio.
Connecting to External USB Devices
Follow the instructions in these sections to connect external USB devices to
the projector.
gg Related Links
• "USB Device Projection" p.37
• "Connecting to a USB Device" p.38
• "Connecting a USB Flash Drive to the Control Pad" p.38
• "Disconnecting a USB Device" p.39
USB Device Projection
You can project images and other content without using a computer or video
device by connecting any of these devices to your projector:
• USB flash drive
• Digital camera or smartphone
• USB hard drive
• Digital cameras or smartphones must be USB-mounted devices, not
a
TWAIN-compliant devices, and must be USB Mass Storage Classcompliant.
• USB hard drives must meet these requirements:
• USB Mass Storage Class-compliant (not all USB Mass Storage
Class devices are supported)
• Formatted in FAT16/32
• Self-powered by their own AC power supplies (bus-powered hard
drives are not recommended)
• Avoid using hard drives with multiple partitions
gg Related Links
• "Getting the Latest Version of the Documents" p.10
You can project slide shows from image files on a connected USB device.
gg Related Links
• "Projecting a PC Free Presentation" p.125
Page 38
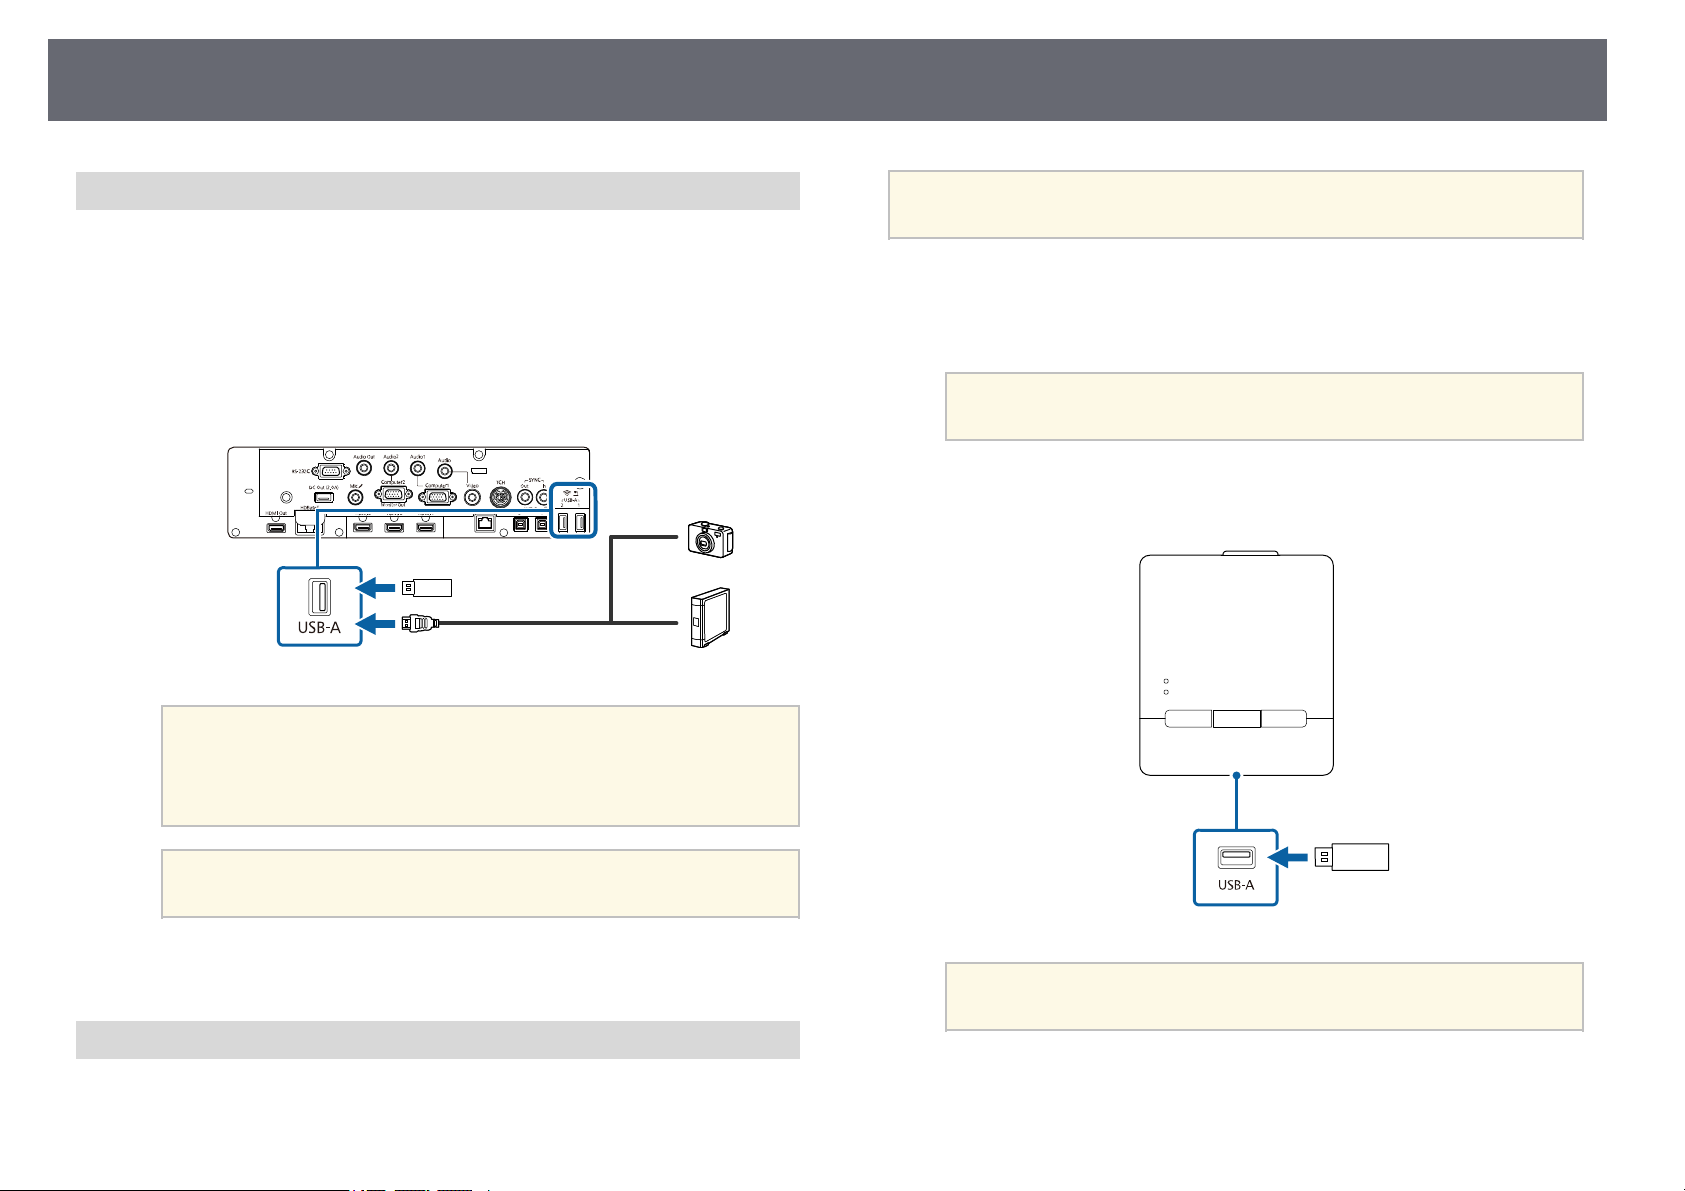
Projector Connections
38
Connecting to a USB Device
You can connect your USB device to the projector's USB-A port and use it to
project images and other content.
If your USB device came with a power adapter, plug the device into an
a
electrical outlet.
Connect the USB cable or USB flash drive to the projector's USB-A port
b
as shown.
Attention
• Use the USB cable supplied with or specified for use with the device.
• Do not connect a USB hub or a USB cable longer than 3 meters, or the
device may not operate correctly.
You can also connect a USB flash drive directly to the projector's USB-
a
a
b
A port.
Connect the projector to the control pad.
See your projector's Installation Guide for details on the cable
connection between the projector and the control pad.
Make sure that the projector and the control pad are connected
a
Connect the USB flash drive into the USB-A port on the bottom of the
control pad.
with the USB cable.
Select USB1 as the image source when you connect a USB device
a
Connect the other end to your device, if necessary.
c
Connecting a USB Flash Drive to the Control Pad
You can connect your USB flash drive to the USB-A port on the control pad
and use it to project images and other content.
to one of the USB-A ports.
Select USB1 as the image source to project images on the USB
a
gg Related Links
• "Getting the Latest Version of the Documents" p.10
flash drive.
Page 39
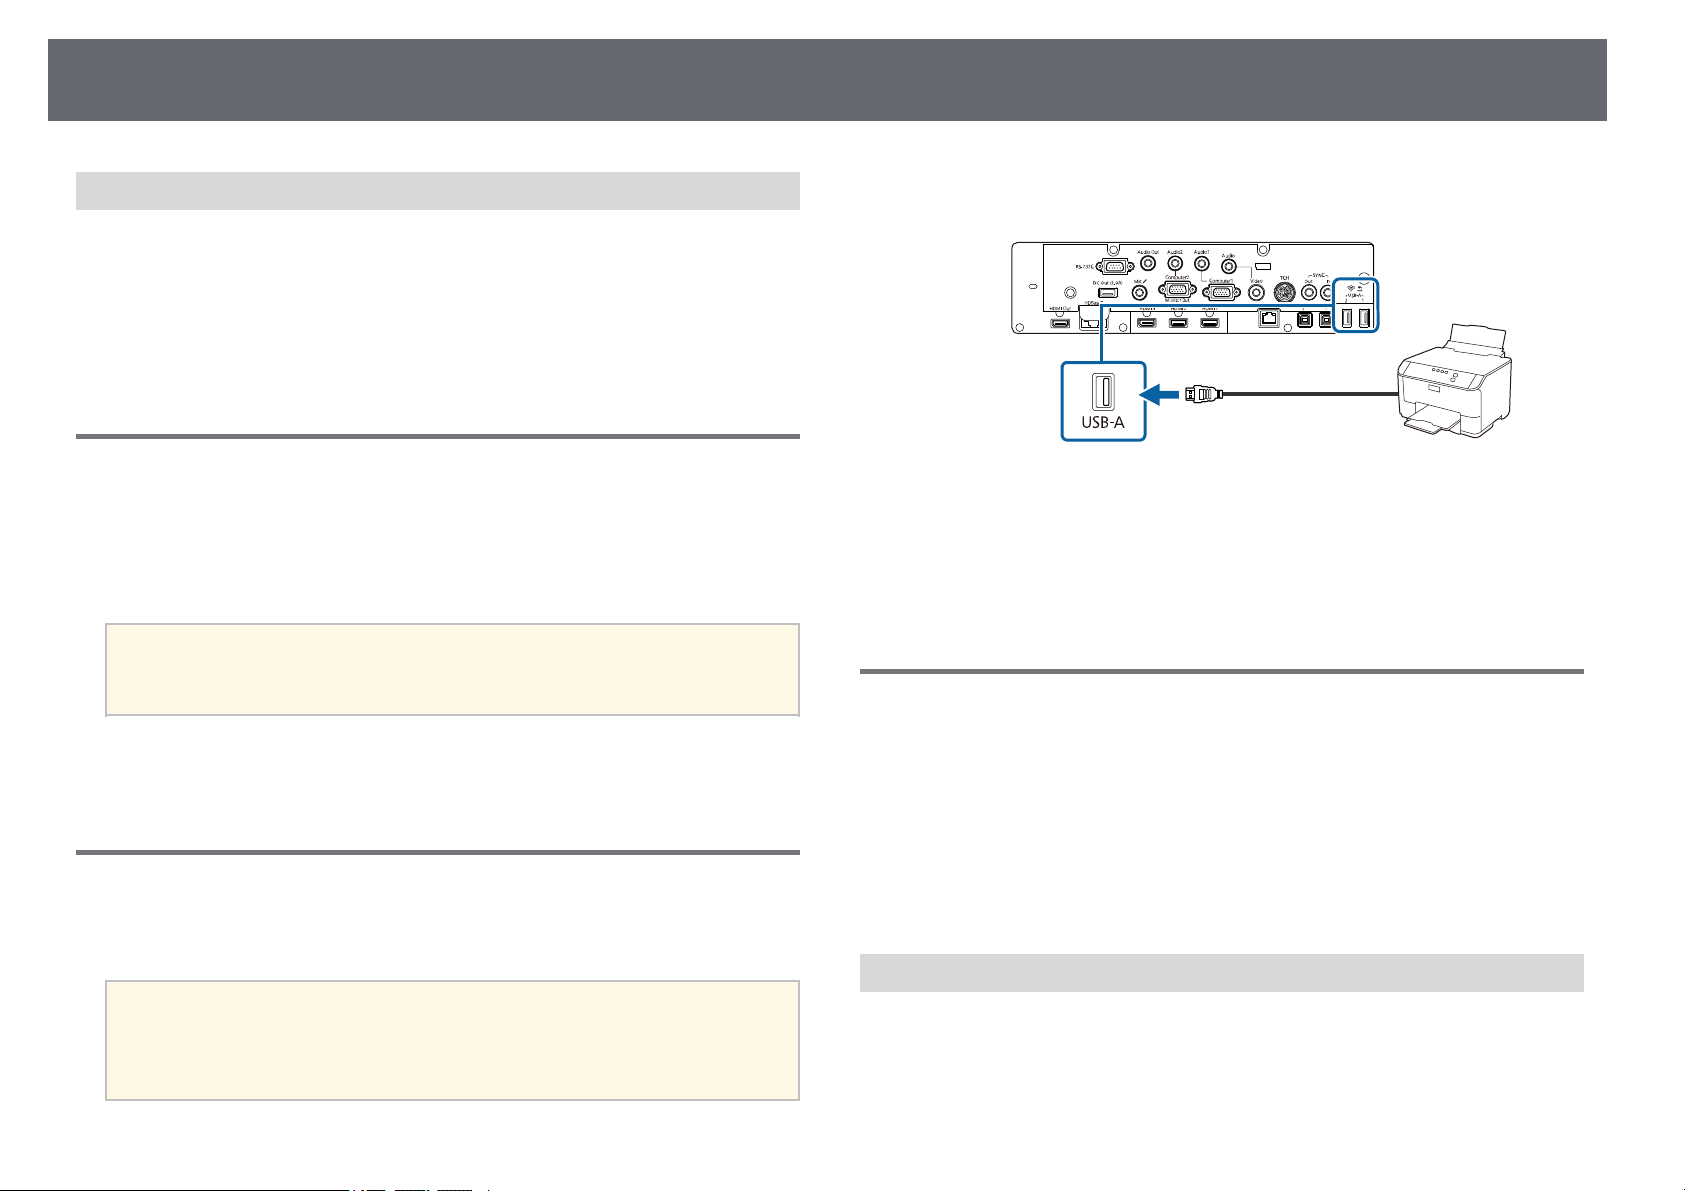
Projector Connections
39
Disconnecting a USB Device
When you have finished presenting with a connected USB device, disconnect
the device from the control pad or projector.
Turn off and unplug the device, if necessary.
a
Disconnect the USB device from the control pad or projector.
b
Connecting to a Document Camera
You can connect a document camera to your projector to project images
viewed by the camera.
The connection method varies depending on your Epson document camera
model. See the document camera manual for details.
• Select USB2 as the image source when you connect a USB document
a
gg Related Links
• "Controlling a Document Camera" p.116
camera to one of the USB-A ports.
• You cannot use multiple USB document cameras at the same time.
Connecting a Printer
You can connect an Epson printer or all-in-one device to the USB-A port and
use it to print your projected and annotated content from the whiteboard.
• Make sure the printer meets the control command requirements.
a
• You can also connect a network printer through the Print setting in
the projector's Interactive menu.
• You can also connect a printer through the control pad.
Connect the USB cable to projector's USB-A port on the projector.
a
Make sure the cable is no longer than 5 m.
Connect the other end of the cable to printer's USB type B port.
b
gg Related Links
• "Printing Drawing Contents" p.110
Connecting to External Output Devices
Follow the instructions in these sections to connect external devices to the
projector.
gg Related Links
• "Connecting to an External HDMI Monitor" p.39
• "Connecting to a VGA Monitor" p.40
• "Connecting to External Speakers" p.41
• "Connecting a Microphone" p.41
Connecting to an External HDMI Monitor
You can connect an external HDMI monitor to the projector's HDMI Out
port and use it to display the drawing content you create in whiteboard mode.
Page 40
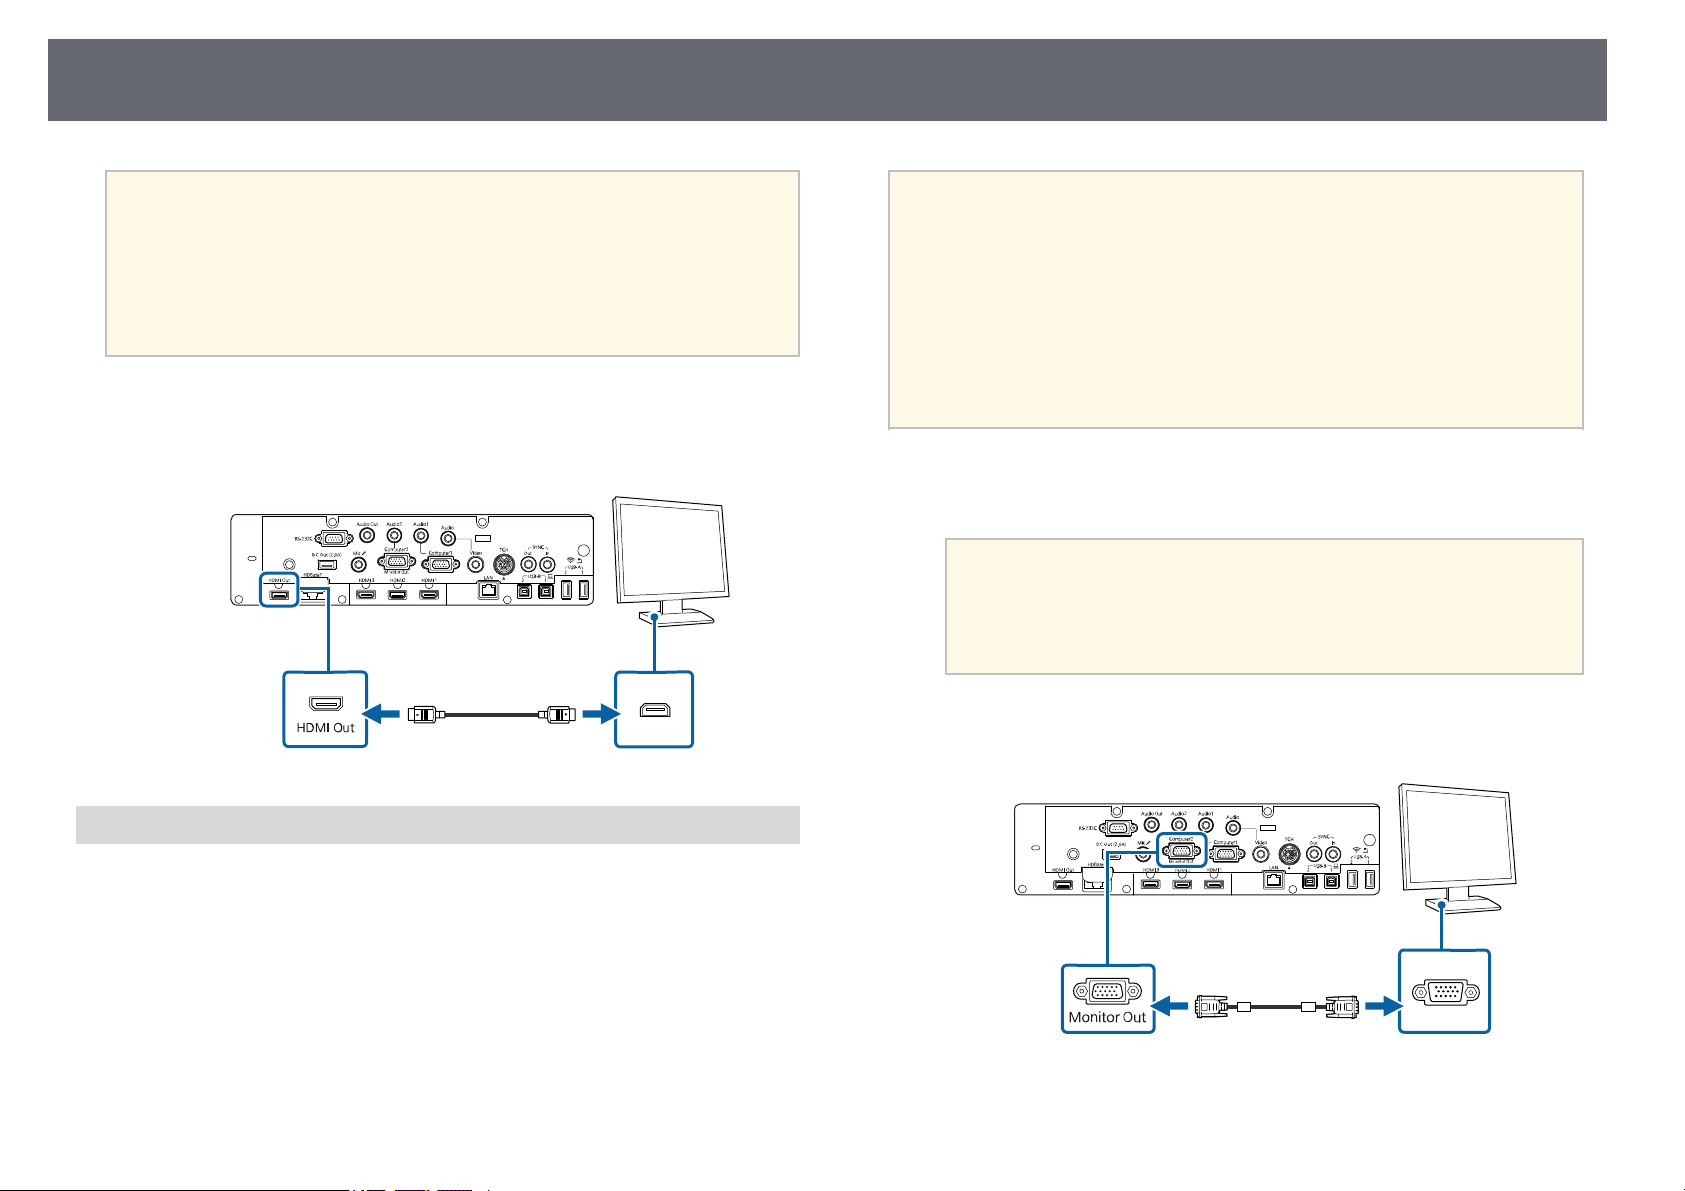
Projector Connections
40
• You can display drawing content and images from the current input
a
Connect the HDMI cable to your monitor's HDMI input port.
a
Connect the other end to the projector's HDMI Out port.
b
source (except the Home screen and images from a Screen Mirroring
source) on an external HDMI monitor.
• You can display the whole whiteboard screen during split screen
projection.
• There is a delay for whiteboard images displayed on an external
HDMI monitor.
• If you want to output images to an external monitor when the
a
Make sure your computer is connected to the projector's Computer
a
port.
Connect the external monitor's cable to your projector's Monitor Out
b
port.
projector is turned off, set the A/V Output setting to Always On in
the projector's Signal I/O menu.
• To output images to an external monitor, set Monitor Out Port to
Monitor Out in the projector's Signal I/O menu.
• Content drawn on the screen using the interactive features is not
displayed on an external monitor. To display the drawn content on
an external monitor, use Easy Interactive Tools.
• Monitors that use a refresh rate of less than 60 Hz may not be able to
display images correctly.
• If there are two computer ports, make sure you use the
a
Computer1 port.
• Only analog RGB signals from the Computer1 port can be
output to an external monitor. You cannot output signals
input from other ports.
Connecting to a VGA Monitor
If you connected the projector to a computer using a Computer port, you can
also connect an external monitor to the projector. This lets you see your
presentation on the external monitor even when the projected image is not
visible.
Page 41
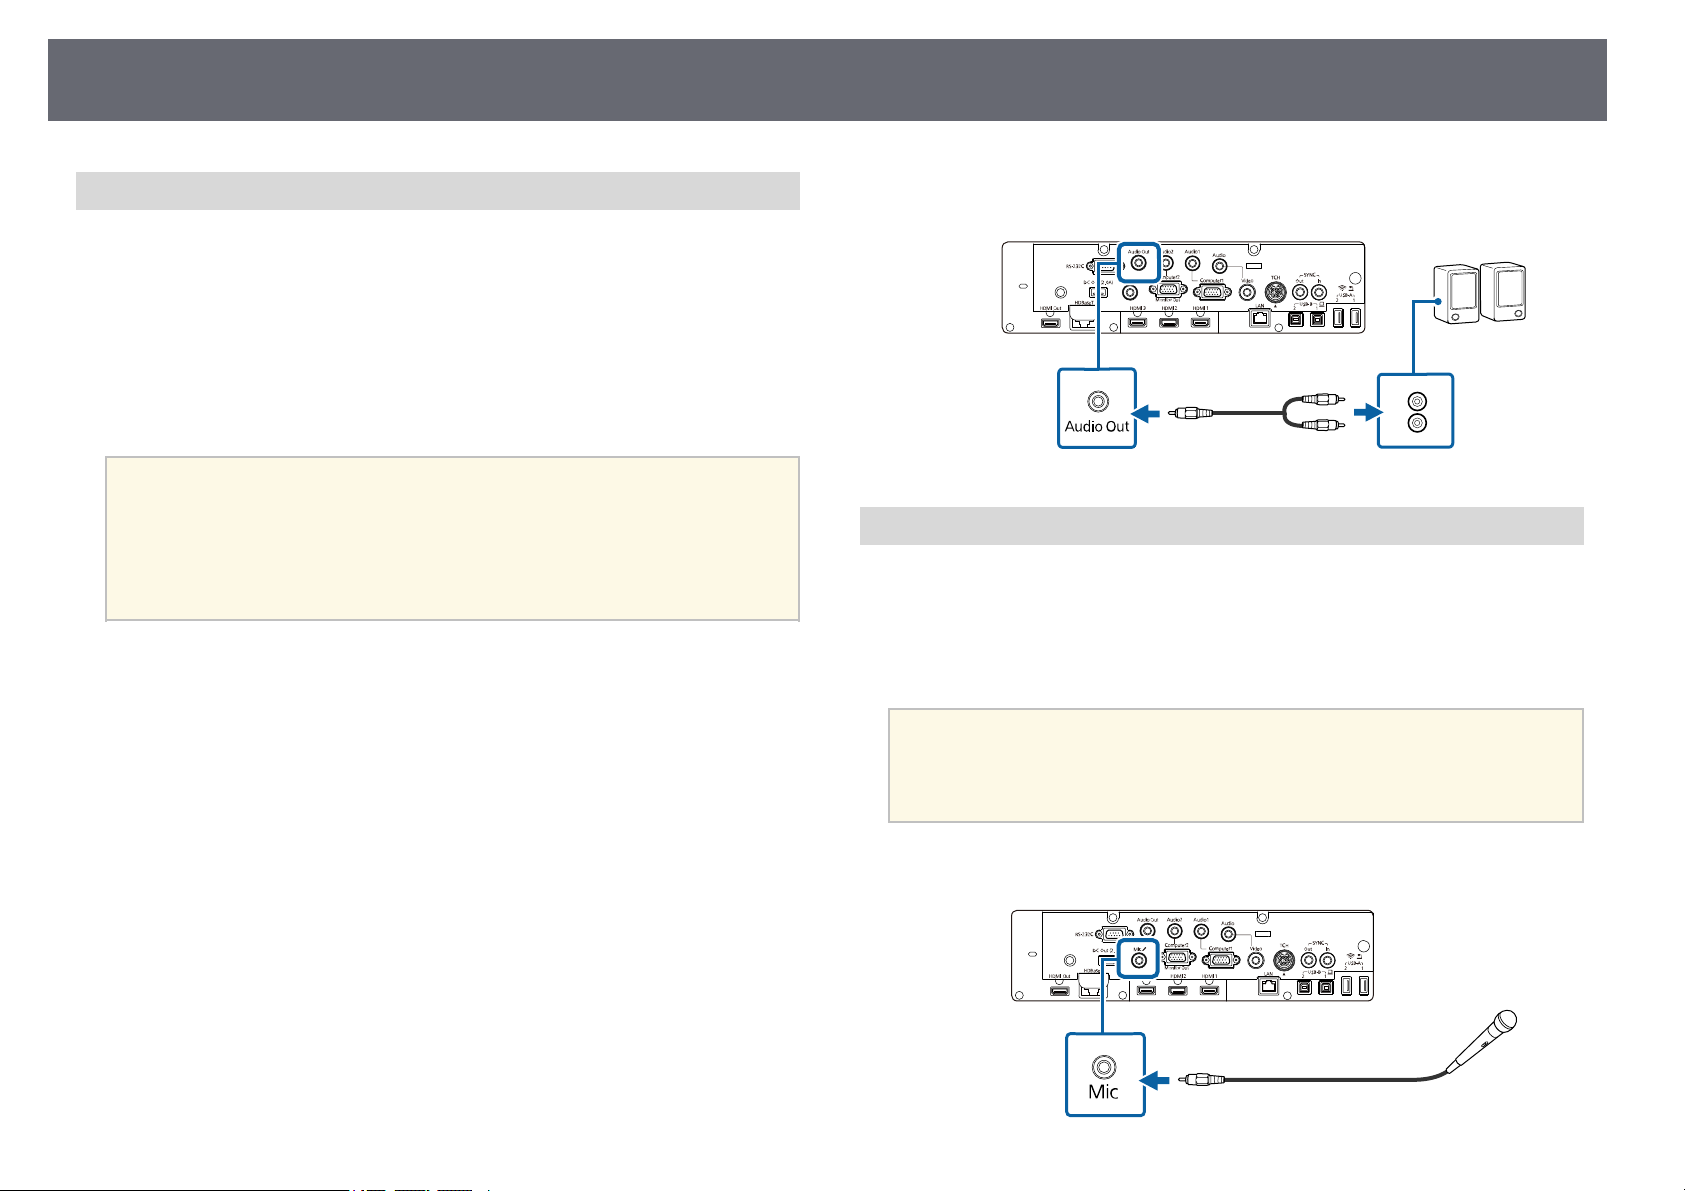
Projector Connections
41
Connecting to External Speakers
To enhance the sound from your presentation, you can connect the projector
to external self-powered speakers. You can control the volume using the
projector's remote control.
To output audio from external speakers, set the Audio Out Device setting to
AV System in the projector's Signal I/O menu. When an audio/video system
is not connected to the projector, audio is output from the external speakers
even if Audio Out Device is set to AV System.
s Signal I/O > HDMI Link > Audio Out Device
• If you want to output audio from the external speakers when the
a
Make sure your computer or video source is connected to the projector
a
with both audio and video cables as necessary.
Locate the appropriate cable to connect your external speakers, such as
b
a stereo mini-jack-to-pin-jack cable, or another type of cable or adapter.
Connect one end of the cable to your external speakers as necessary.
c
projector is turned off, set the A/V Output setting to Always On in
the projector's Signal I/O menu.
• You can also connect the projector to an amplifier with speakers.
• The projector's built-in speaker system is disabled when you connect
external speakers.
Connect the stereo mini-jack end of the cable to your projector's Audio
d
Out port.
Connecting a Microphone
You can connect a microphone to the projector's Mic port to provide audio
support during presentations.
If you want to output audio from a microphone when the projector is turned
off, set the A/V Output setting to Always On in the projector's Signal I/O
menu.
• Plug-in-power is not supported.
a
a
• Adjust the Mic Input Level setting in the projector's Signal I/O
menu if the microphone audio is difficult to hear, or if it is too loud
resulting in a crackling sound.
Connect the microphone cable to the projector's Mic port.
Page 42
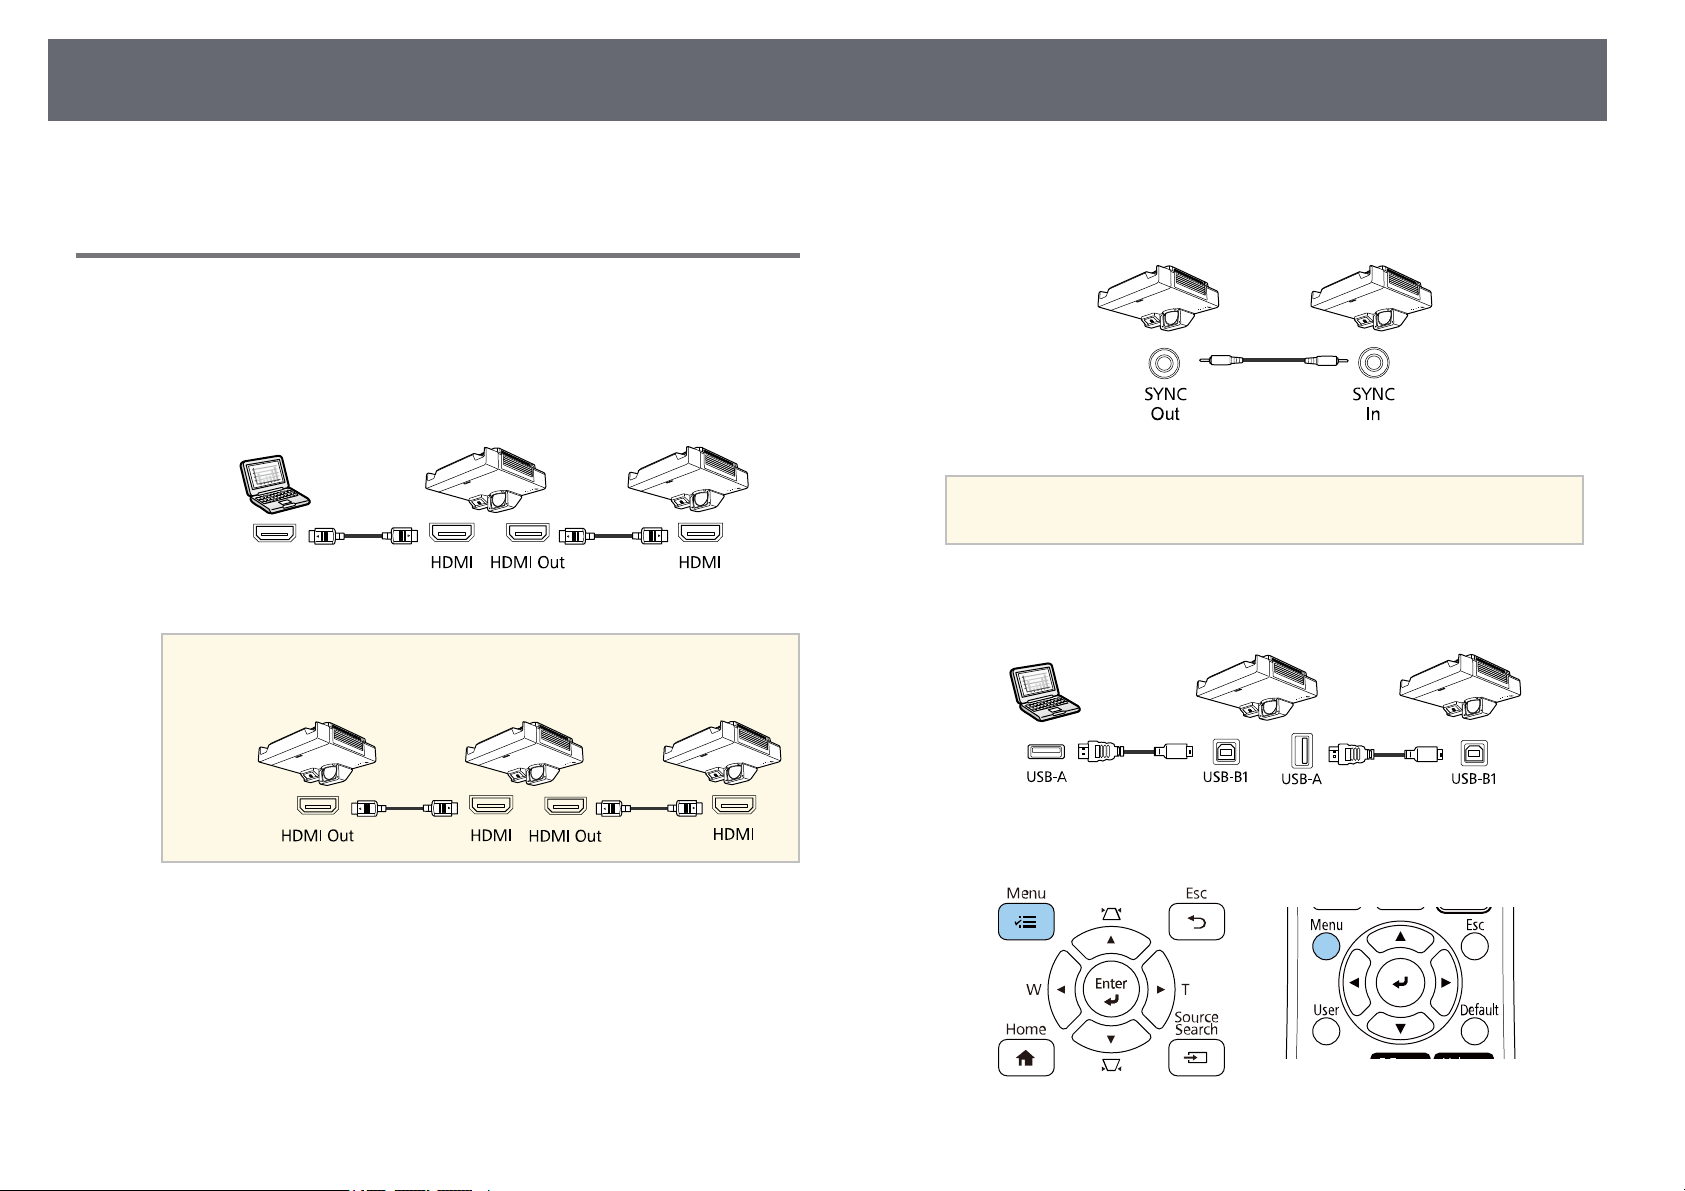
Projector Connections
42
Turn on the microphone, if necessary.
b
Connecting Multiple Projectors of the Same Model
You can create a single unified image projected from multiple projectors (EB1485Fi only). The image is unified horizontally.
Connect the computer and the projectors using HDMI cables as shown.
a
If you are connecting three or more projectors, connect the
a
projectors in a chain as shown.
If you will use interactive features, connect one end of the cable to the
b
SYNC OUT port on one projector, and connect the other end to the
SYNC IN port on the other projector as shown.
If you are connecting three or more projectors, you cannot use
a
If you will use interactive features, connect the computer and the
c
projectors using USB cables as shown.
the interactive features.
Press the [Menu] button on the control panel or remote control.
d
Page 43
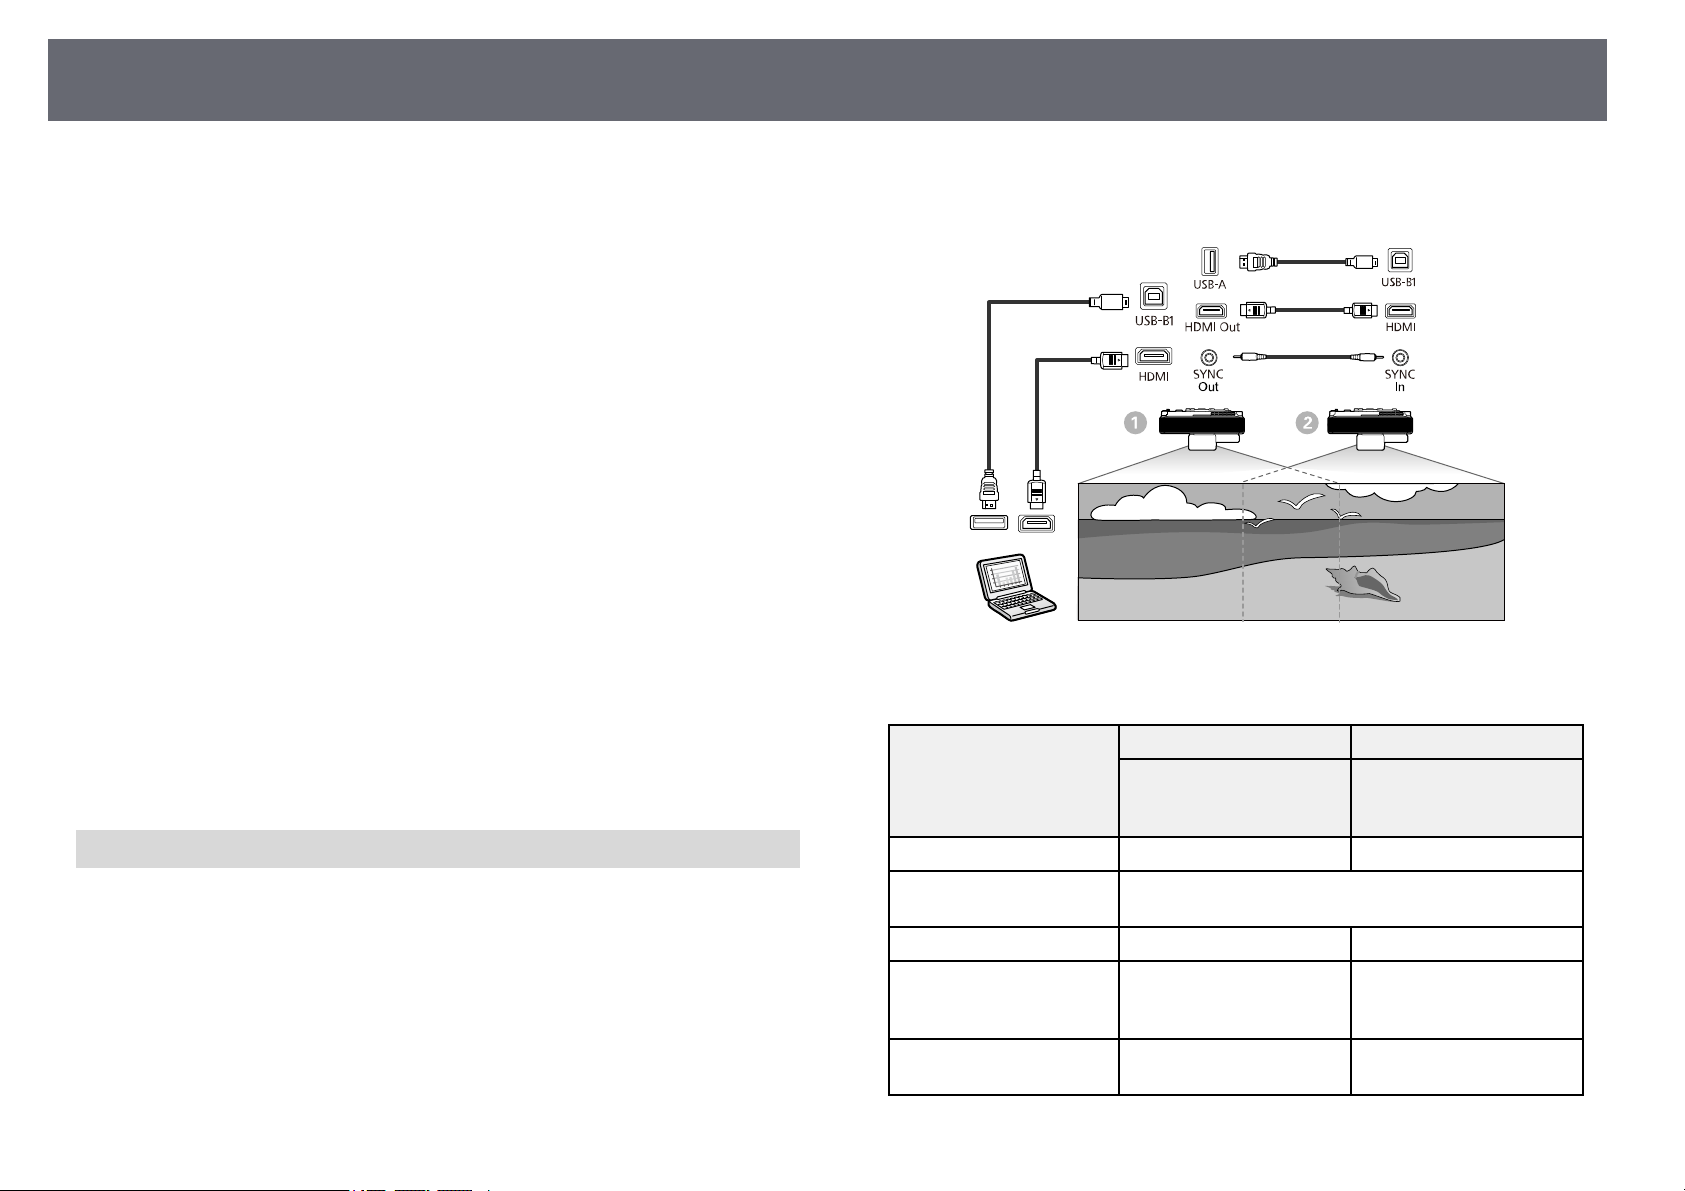
Projector Connections
43
Select the necessary HDMI Out Setting and Sync of Projectors settings
e
in the projector's menus. See the list of settings for more details.
Select the necessary settings in the projector's Multi-Projection menu
f
to create a seamless unified image area (EB-1485Fi only).
If you will use interactive features, set the EDID setting to
g
3240×1080/60Hz in the projector's Signal I/O menu.
Select the necessary settings in the projector's Pen/Touch menu to
h
calibrate the interactive pen position and finger touch position.
See your projector's Installation Guide for instructions on calibrating
the interactive pen and finger touch positions.
Press [Menu] or [Esc] to exit the menus.
i
gg Related Links
• "Menu Settings for Multiple Projector Connections" p.43
• "Blending the Image Edges" p.142
• "Adjusting the Black Level" p.145
• "Scaling an Image" p.149
• "Adjusting Color Uniformity" p.140
• "Matching the Image Colors" p.144
• "Getting the Latest Version of the Documents" p.10
Menu Settings for Multiple Projector Connections
For Use with Interactive Features (EB-1485Fi only)
See the following tables for more details on menu settings when you connect
multiple projectors and use the interactive feature in a unified image area.
When you use the interactive features, you can connect two projectors in a
chain.
Multi-Projection Settings
Setting Item
HDMI Out Setting Process Out Process Out
Order Specifies the position of this projector in number order
Connect Computer Yes No
Edge Blending > Any
Edges > Blend Start
Position
Edge Blending > Any
Edges > Blend Range
A B
Projector on the left
(connected to the
computer)
from left to right
0 0
300 300
Projector on the right
Page 44
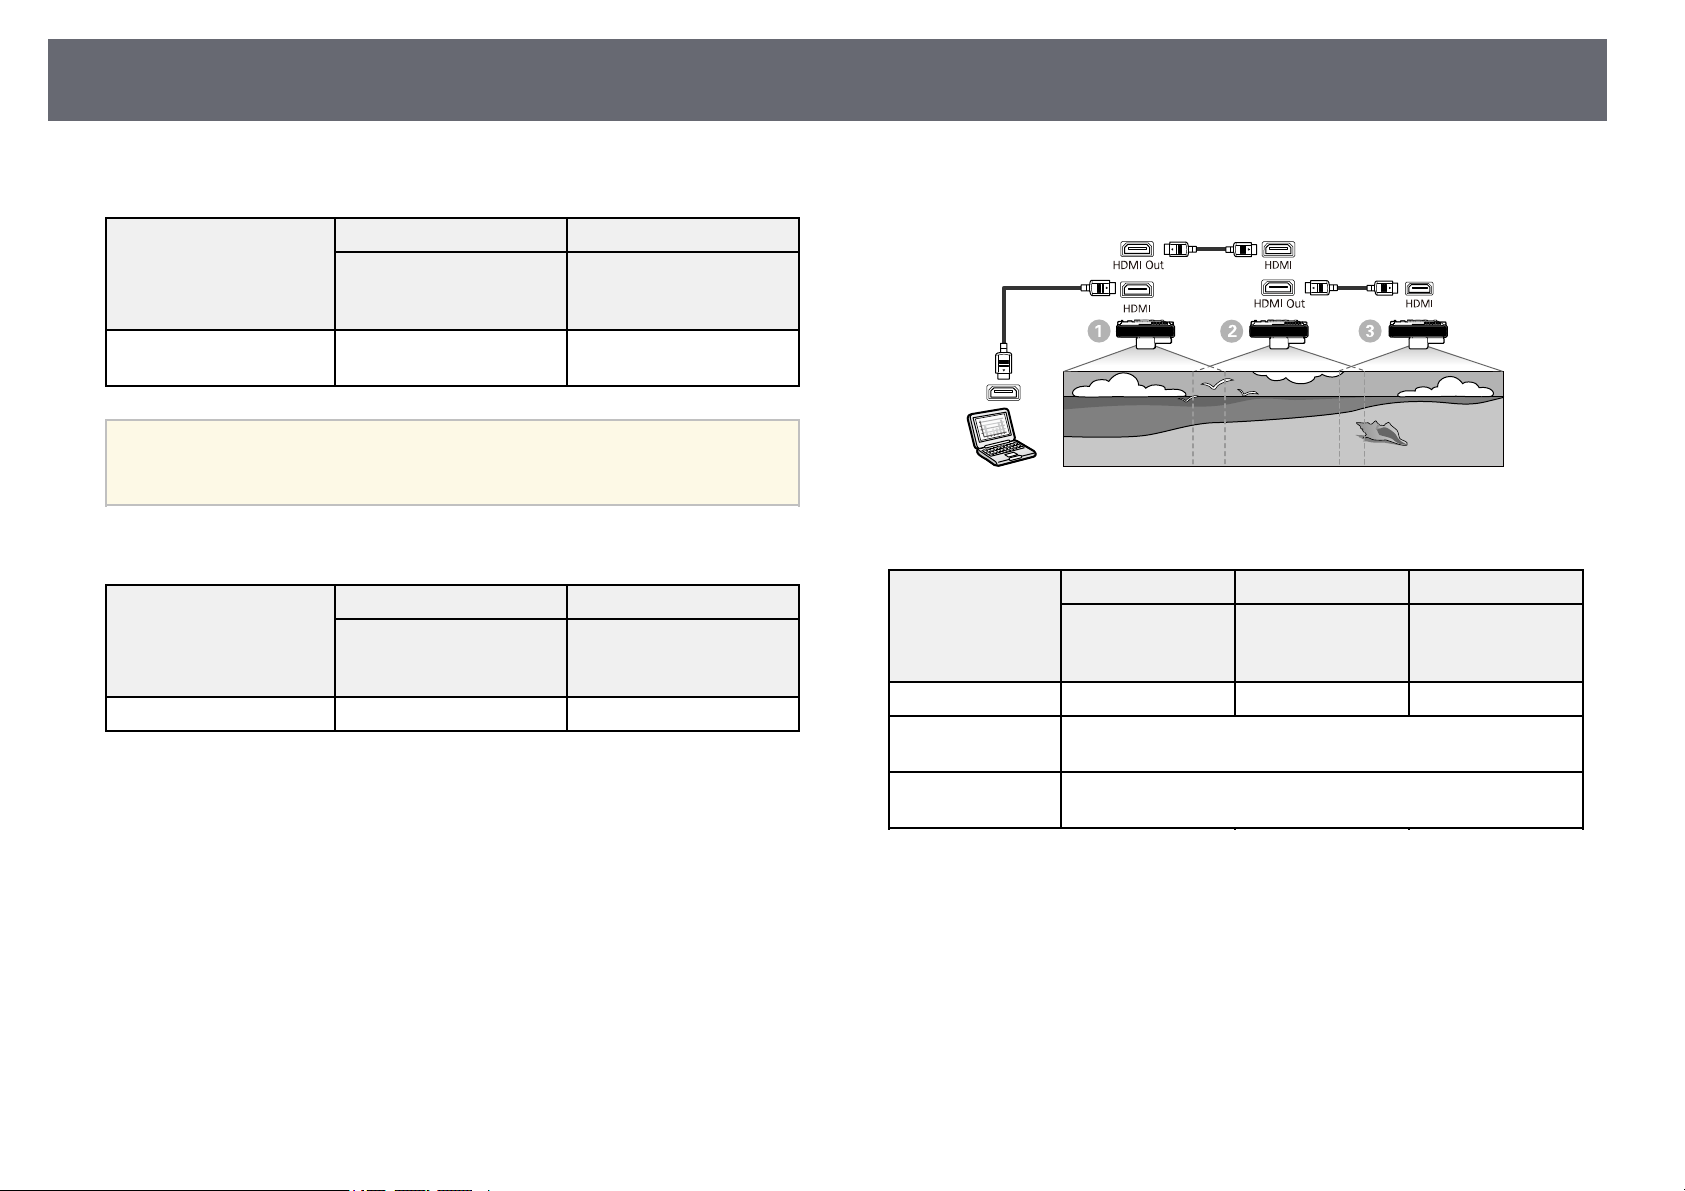
Projector Connections
44
Pen/Touch Settings
Setting Item
Installation of Projectors >
Sync of Projectors
If you are using the projector in the same room as another projector
a
that does not support cable connection, set the Infrared Intensity
setting to Strong.
A B
Projector on the left
(connected to the
computer)
Wired Wired
Projectors on the right
Signal I/O Settings
Setting Item
EDID 3240×1080/60Hz 3240×1080/60Hz
A B
Projector on the left
(connected to the
computer)
Projectors on the right
For Use without Interactive Features
See the following tables for more details on menu settings when you connect
multiple projectors to create a horizontally wide screen without the interactive
feature. When you do not use the interactive features, you can connect up to
four projectors in a chain.
Multi-Projection Settings
Setting Item
HDMI Out Setting Pass Through Pass Through Pass Through
Number of
Projectors
Order Specifies the position of this projector in number order from
A B C
Projector on the left
(connected to the
computer)
Specifies the number of projectors connected in a chain.
left to right
Projectors in the
middle
Projector on the
right
Page 45
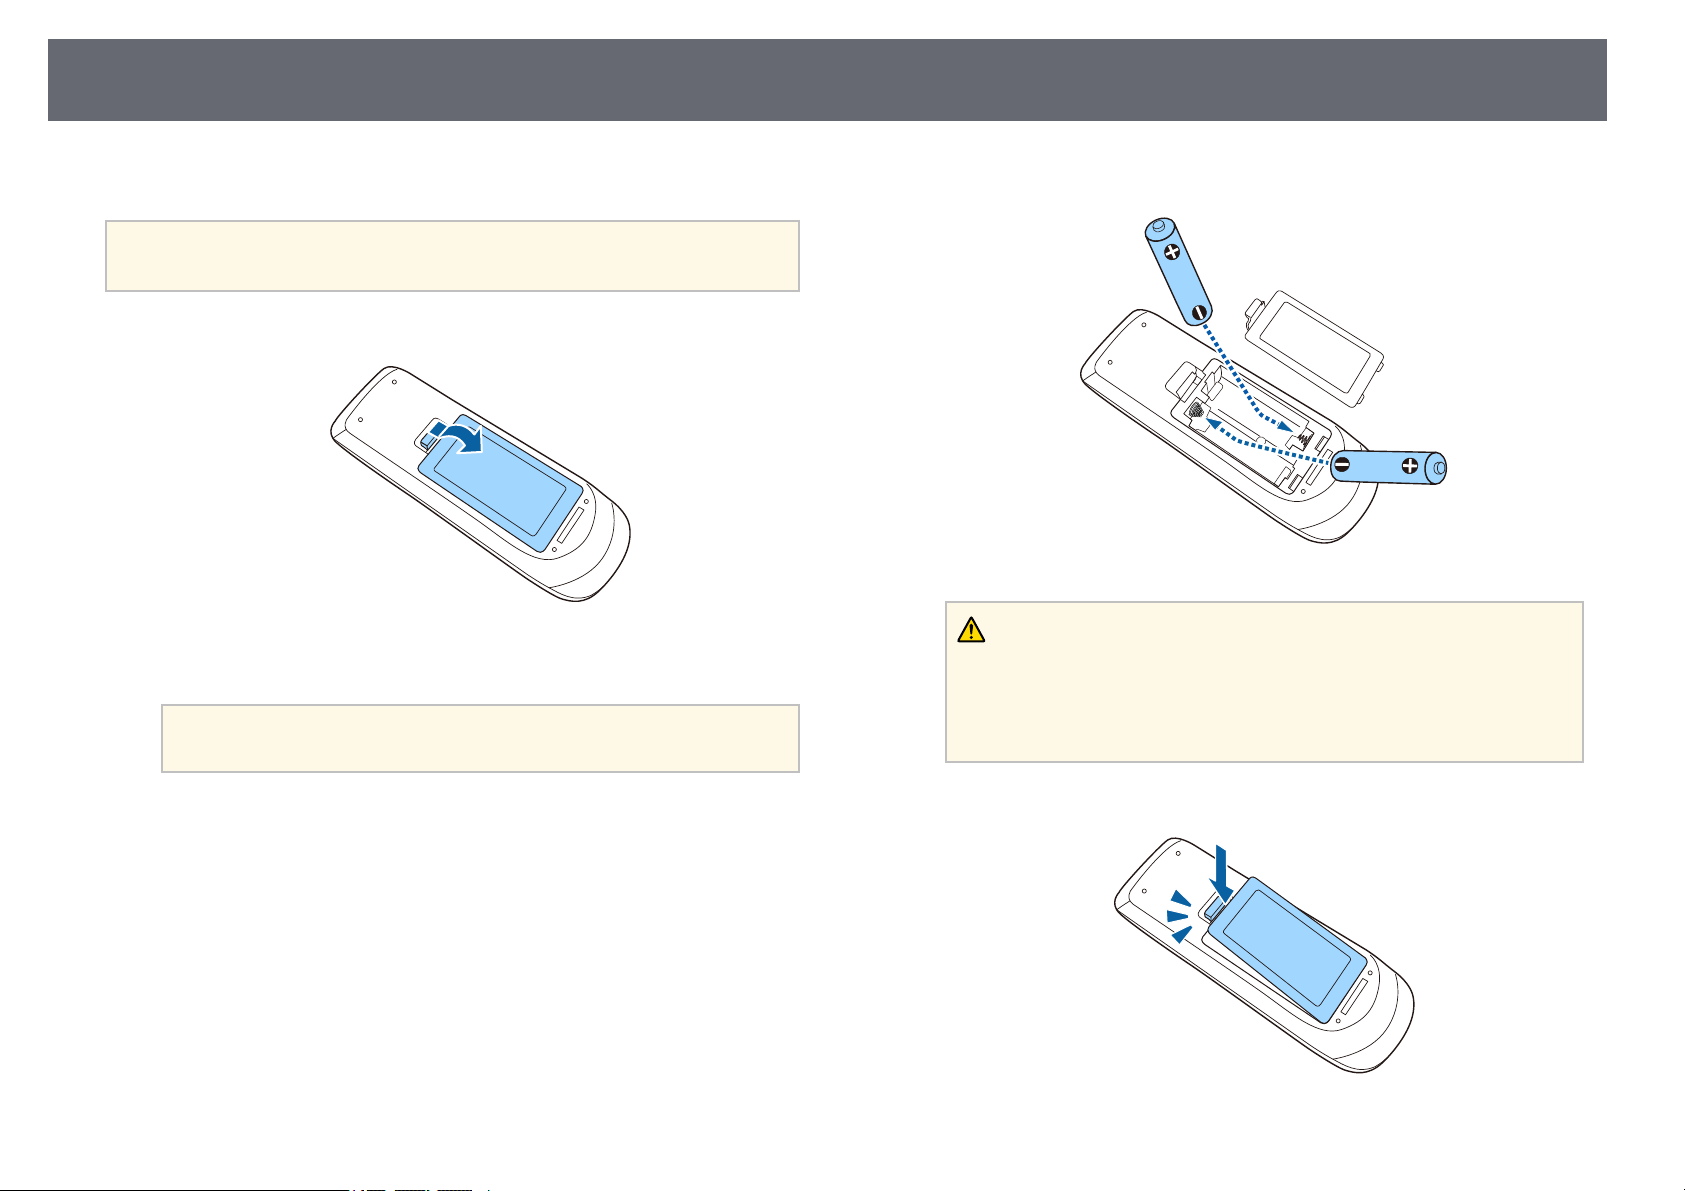
Installing Batteries in the Remote Control
45
The remote control uses the two AA batteries that came with the projector.
Attention
Make sure you read the Safety Instructions before handling the batteries.
Remove the battery cover as shown.
a
Remove the old batteries, if necessary.
b
Dispose of used batteries according to local regulations.
a
Insert the batteries with the + and – ends facing as shown.
c
Warning
Check the positions of the (+) and (–) marks inside the battery holder to
ensure the batteries are inserted the correct way. If the batteries are not used
correctly, they could explode or leak causing a fire, injury, or damage to the
product.
Replace the battery cover and press it down until it clicks into place.
d
Page 46
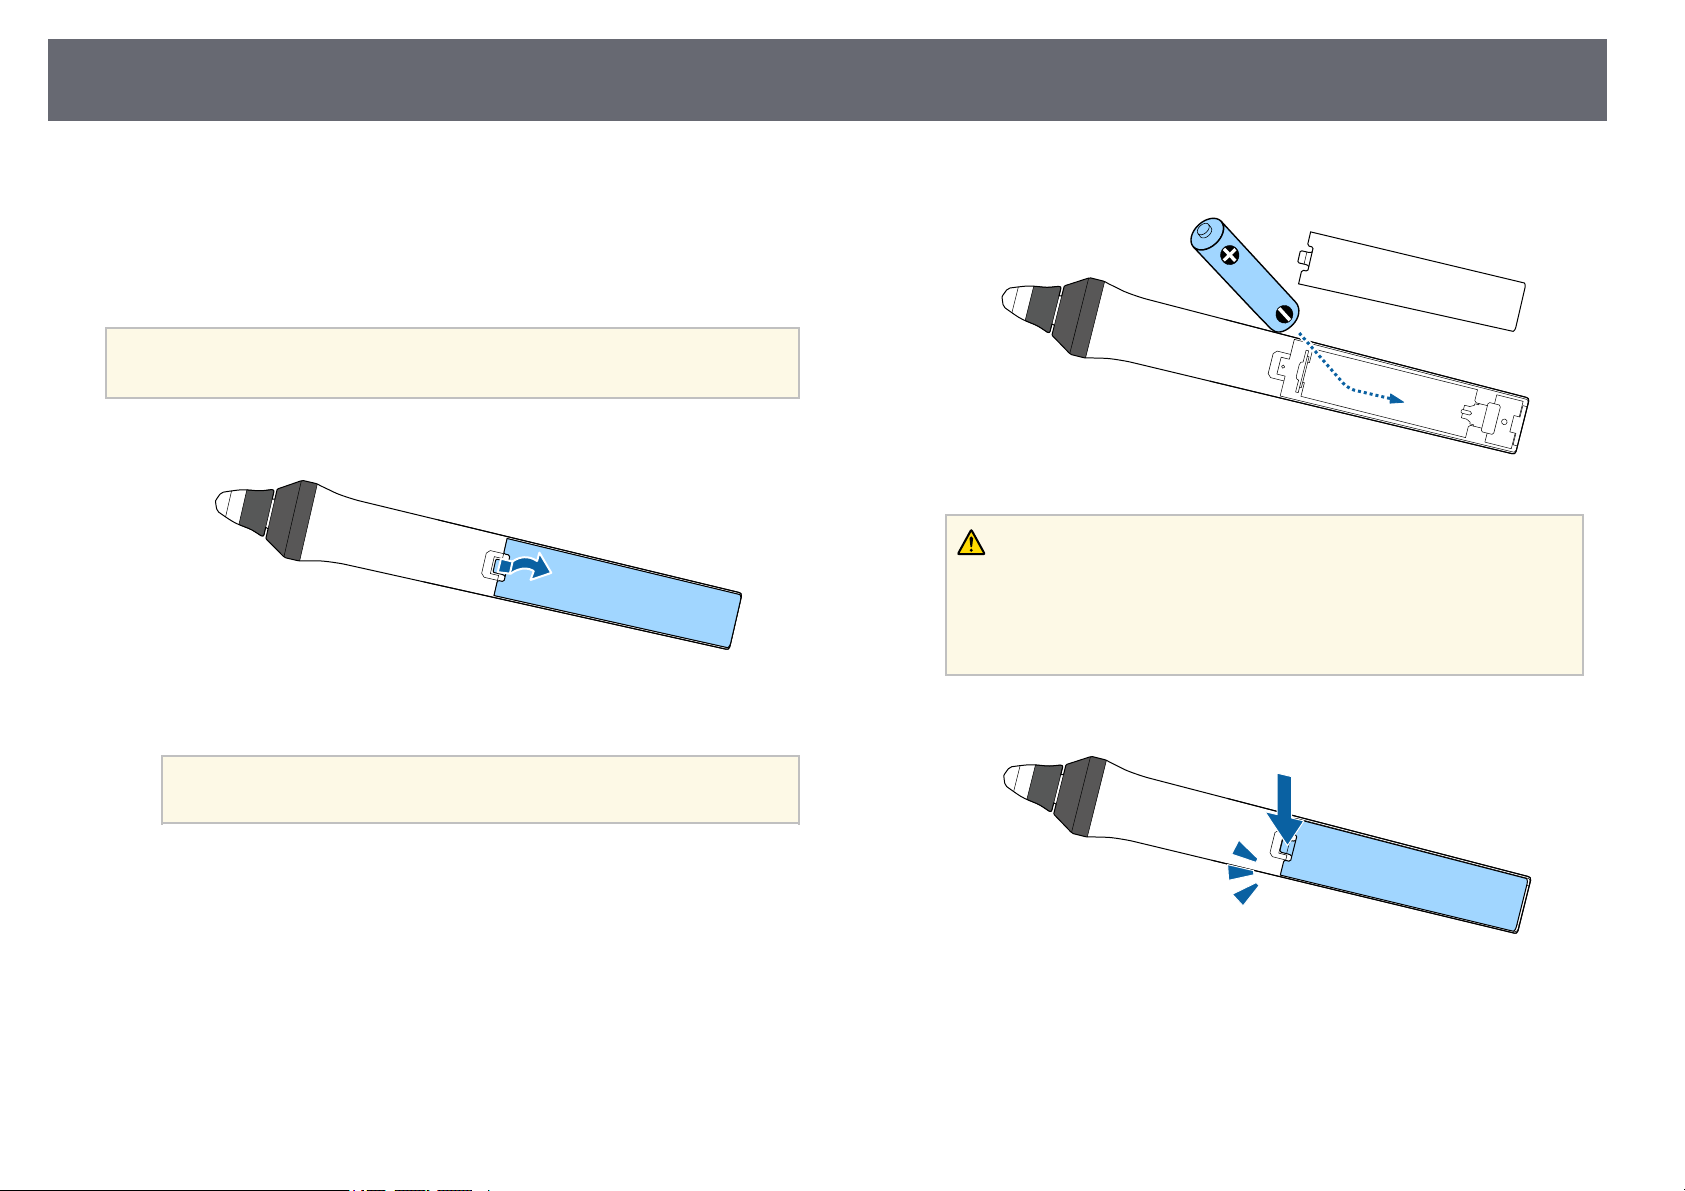
Installing Batteries in the Pens
46
The Interactive pen uses one AA manganese battery, AA alkaline battery, or
Eneloop (BK-3MCC) rechargeable battery.
When the battery is low, the pen indicator flashes when you press the button
on the side of the pen. When the battery runs out, the pen indicator turns off.
Replace the battery as soon as it runs out.
Attention
Make sure you read the Safety Instructions before handling the battery.
Open the battery cover as shown.
a
Remove the old batteries, if necessary.
b
Insert the battery with the + and – ends facing as shown.
c
Warning
Check the positions of the (+) and (–) marks inside the battery holder to
ensure the battery are inserted the correct way. If the battery is not used
correctly, it could explode or leak causing a fire, injury, or damage to the
product.
Replace the battery cover and press it down until it clicks into place.
d
a
Dispose of used batteries according to local regulations.
Page 47
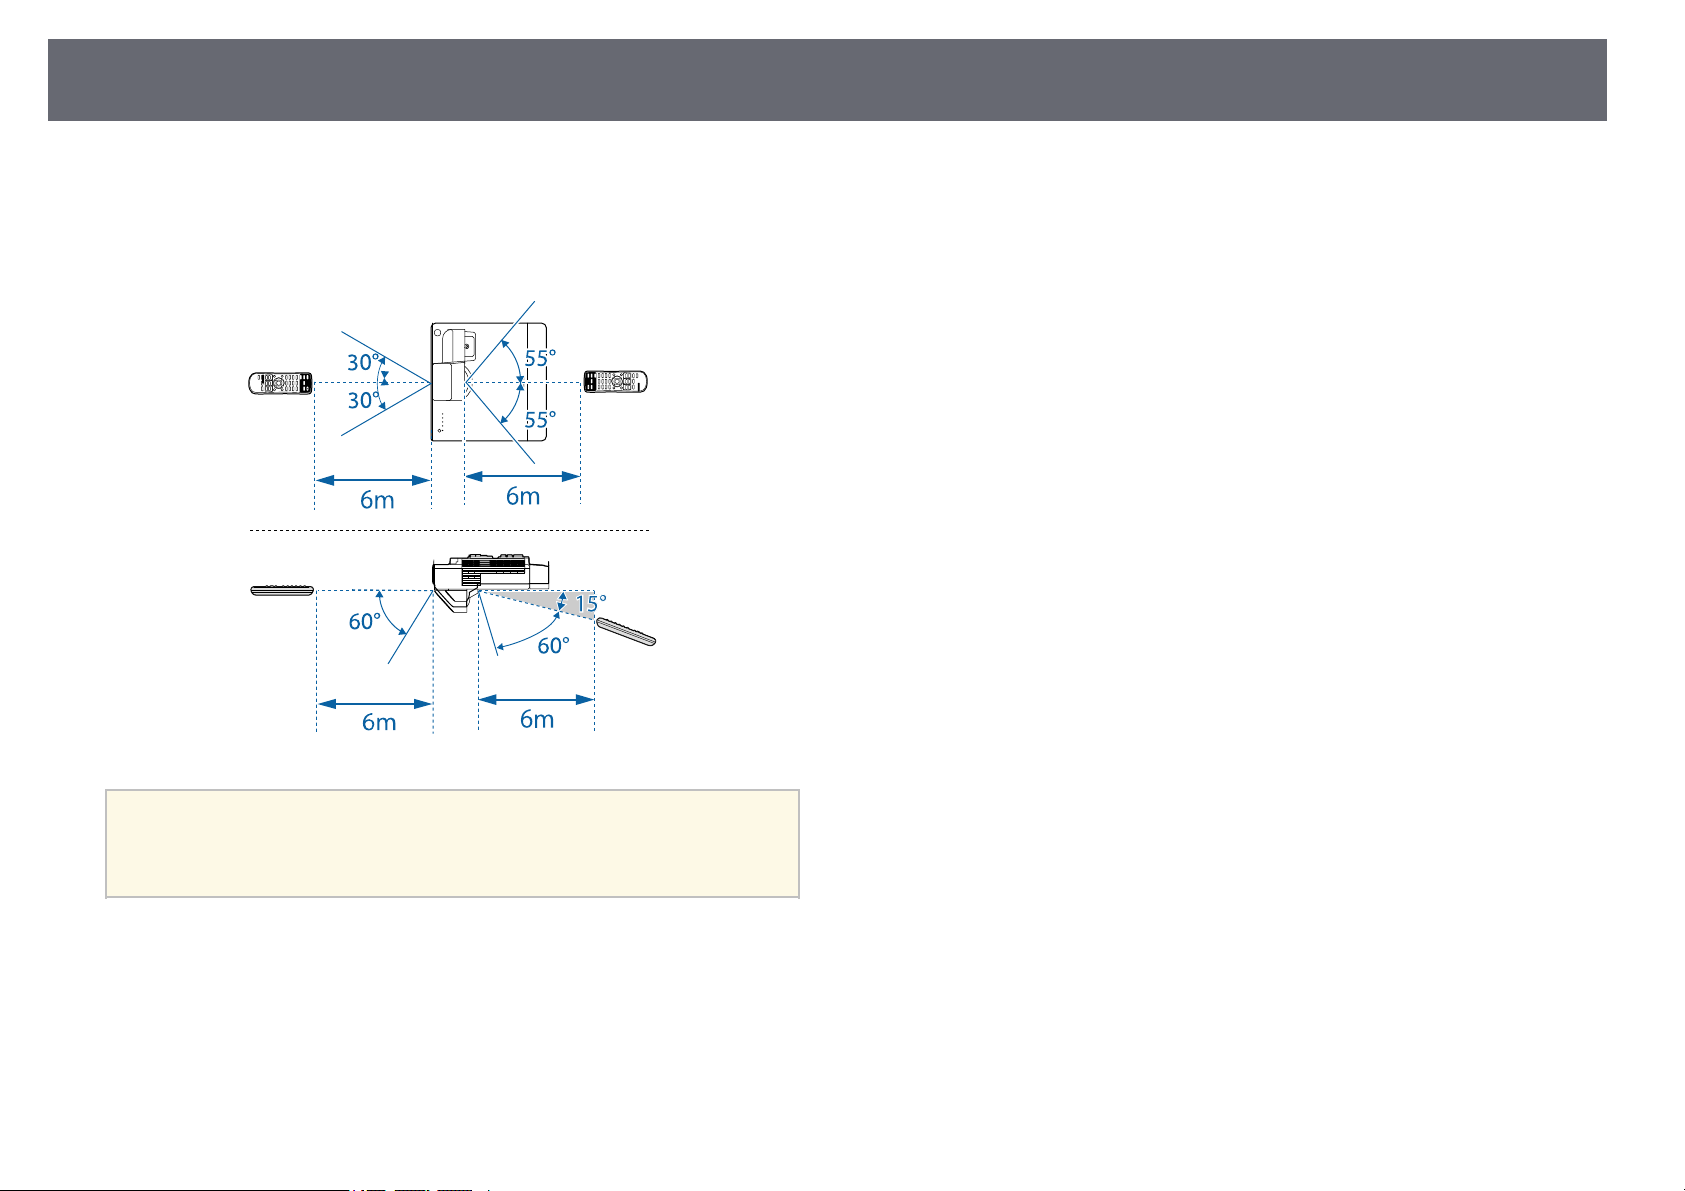
Remote Control Operation
The remote control lets you control the projector from almost anywhere in
the room.
Make sure that you aim the remote control at the projector's receivers within
the distance and angles listed here.
47
a
Avoid using the remote control in conditions with bright fluorescent
lights or in direct sunlight, or the projector may not respond to
commands. If you are not going to use the remote control for a long
time, remove the batteries.
Page 48

Using Basic Projector Features
Follow the instructions in these sections to use your projector's basic features.
gg Related Links
• "Turning On the Projector" p.49
• "Turning Off the Projector" p.51
• "Setting the Date and Time" p.52
• "Selecting the Language for the Projector Menus" p.54
• "Projection Modes" p.55
• "Setting the Screen Type" p.57
• "Focusing the Image" p.59
• "Image Shape" p.61
• "Resizing the Image with the Buttons" p.70
• "Adjusting the Image Position" p.71
• "Selecting an Image Source" p.72
• "Image Aspect Ratio" p.74
• "Adjusting Image Quality (Color Mode)" p.78
• "Adjusting the Image Color" p.80
• "Adjusting the Brightness" p.83
• "Controlling the Volume with the Volume Buttons" p.86
• "Inverting the Audio Channels" p.87
Page 49
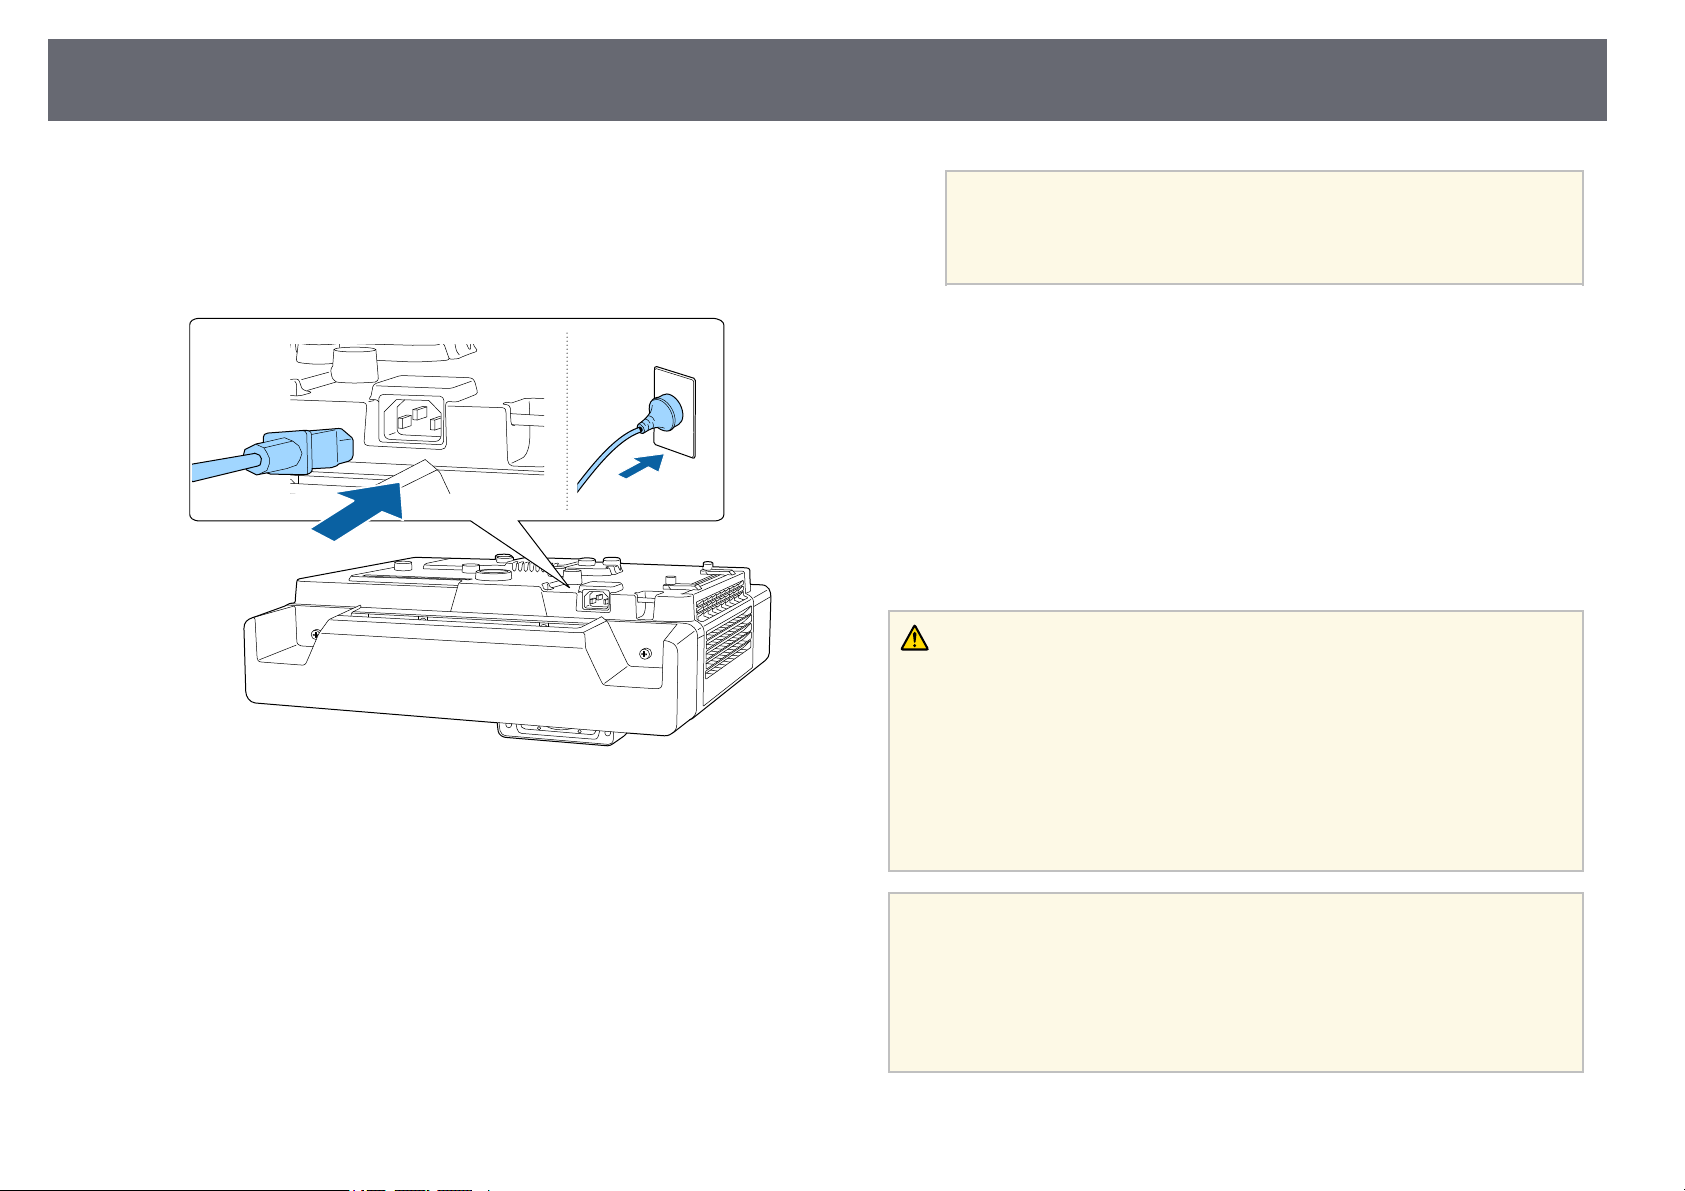
Turning On the Projector
49
Turn on the computer or video equipment you want to use after you turn on
the projector.
Connect the power cord to the projector's power inlet and plug it into
a
an electrical outlet.
The projector's power indicator turns blue. This indicates that the
projector is receiving power, but is not yet turned on (it is in standby
mode).
• You can also press the power button on the control pad.
a
Try the following if you do not see a projected image.
• Turn on the connected computer or video device.
• Change the screen output from the computer when using a laptop
computer.
• Insert a DVD or other video media, and press play (if necessary).
• Press the [Source Search] button on the control panel or remote control to
detect the source.
• Press the button for the desired video source on the remote control.
• If the Home screen is displayed, select the source you want to project.
• When Quick Startup is enabled in the projector's Operation
menu, the projector becomes ready for use in several seconds
the next time you press the power button.
Warning
• Never look into the projector lens when the light source is on. This can damage
your eyes and is especially dangerous for children.
• When turning on the projector at a distance using the remote control, make sure
there is no one looking into the lens.
• If the light from the projector is blocked, the area on which the light shines
becomes hot which could cause it to melt, burn, or start a fire. Also, the lens may
get hot due to the reflected light which could cause the projector to malfunction.
To stop projection, use the A/V Mute function, or turn off the projector.
Press the power button on the projector or remote control to turn on
b
the projector.
The projector beeps and the status indicator flashes blue as the
projector warms up. Once the projector is warmed up, the status
indicator stops flashing and turns blue.
a
• When the Direct Power On setting is set to On in the projector's
Operation menu, the projector turns on as soon as you plug it in.
Note that the projector also turns on automatically in cases such as
recovery from a power outage.
• If you select a specific port as the Auto Power On setting in the
projector's Operation menu, the projector turns on as soon as it
detects a signal or cable connection from that port.
Page 50
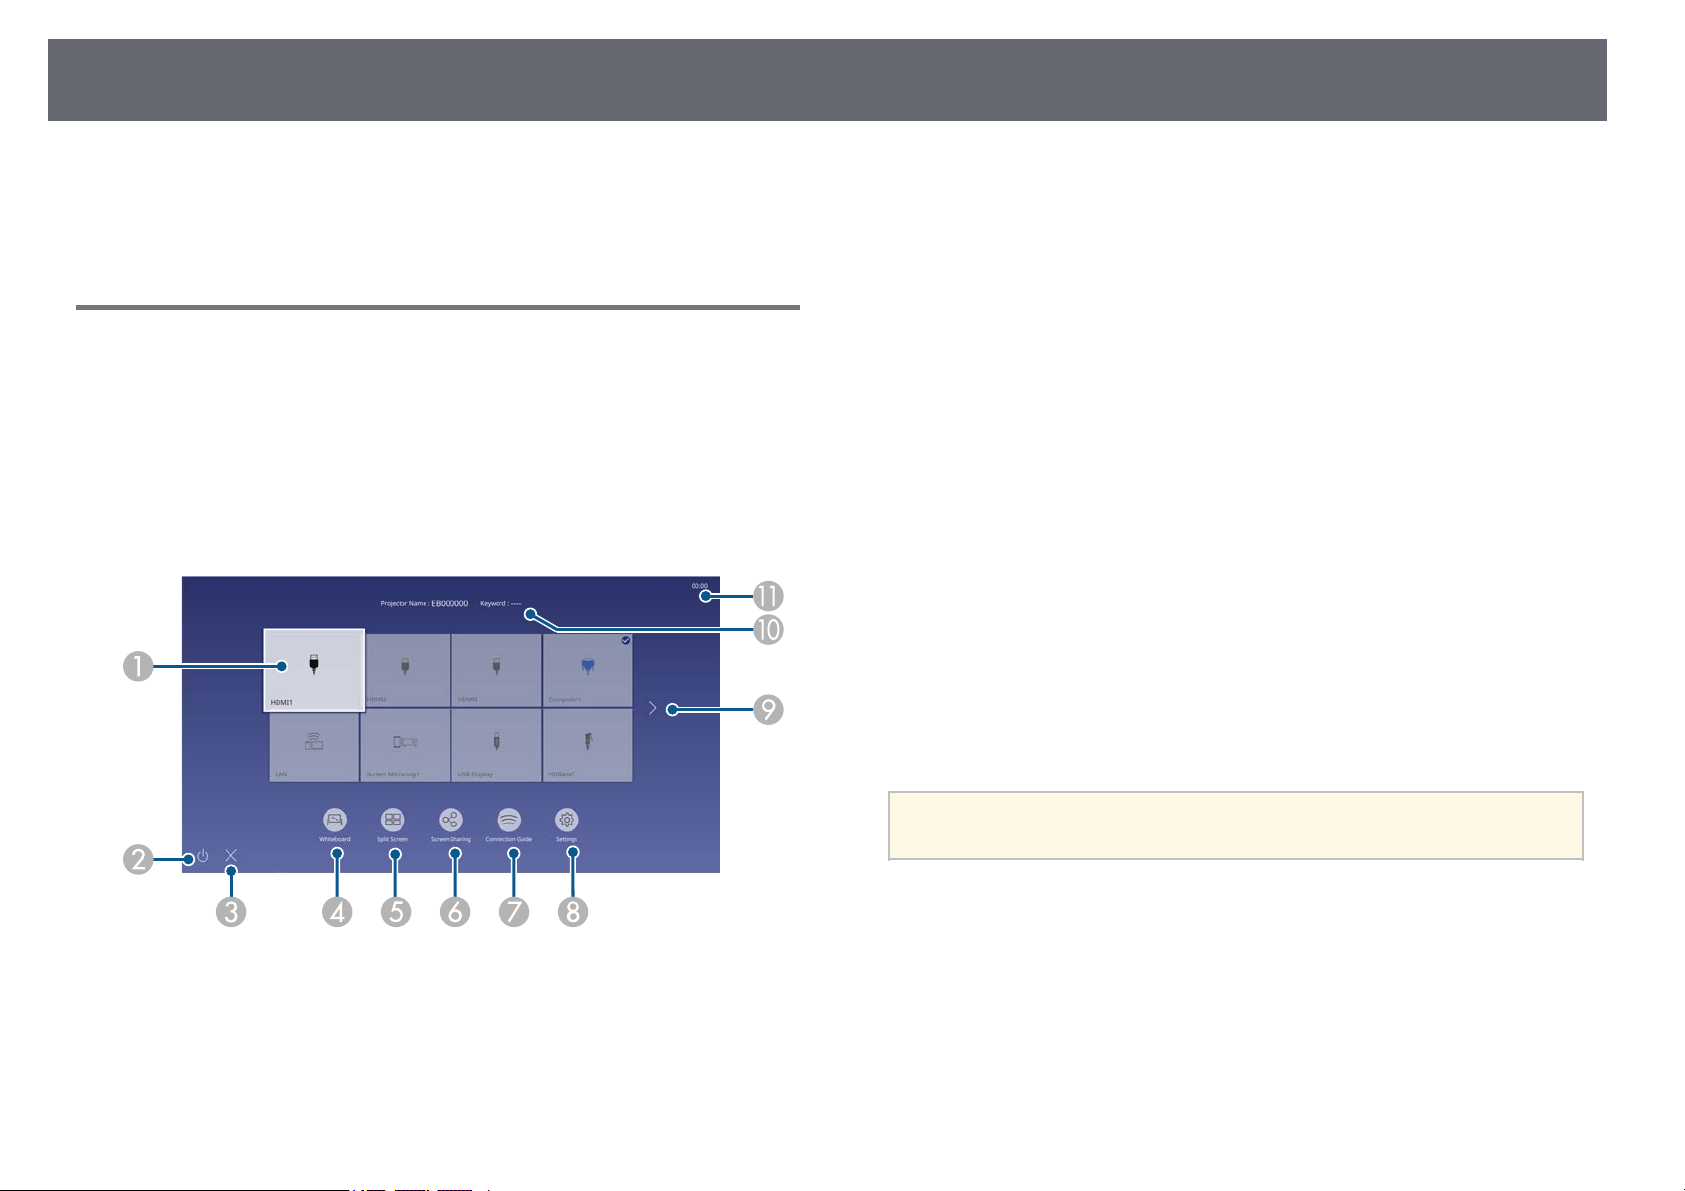
Turning On the Projector
50
gg Related Links
• "Home Screen" p.50
• "Projector Feature Settings - Operation Menu" p.213
Home Screen
The Home screen feature allows you to easily select an image source and
access useful functions. You can display the Home screen by pressing the
[Home] button on the control panel or remote control. The Home screen is
also displayed when you turn on the projector and no signal is being input.
Press the arrow buttons on the control panel or remote control to select a
menu item, and then press [Enter].
You can also select menu items using the interactive pen or your finger.
Closes the home screen.
C
Starts the whiteboard mode.
D
Projects images from two or four different image sources simultaneously in a
E
grid format.
Shares your projected screen image with other projectors connected to the same
F
network.
Displays the Connection Guide. You can select the wireless connection methods
G
according to the devices you are using, such as smartphones or computers.
Lets you select the following common projector settings (settings may vary
H
depending on other selected settings):
• Color Mode
• Brightness Level
• Volume
• Geometry Correction (H/V-Keystone and Quick Corner are available.)
• Auto Calibration
• Aspect
Moves to the previous or next page if there are more than nine available input
I
sources.
Displays the projector name and the projector keyword.
J
Displays the current time.
K
Selects the source you want to project.
A
A check mark appears on the upper right of the current input source.
You can check a preview of the current input image for most sources as a
thumbnail.
Turns off the projector.
B
The Home screen disappears after 10 minutes of inactivity.
a
gg Related Links
• "Whiteboard Screens (Whiteboard Mode)" p.96
• "Screen Sharing" p.179
• "Projecting Multiple Images Simultaneously" p.122
Page 51
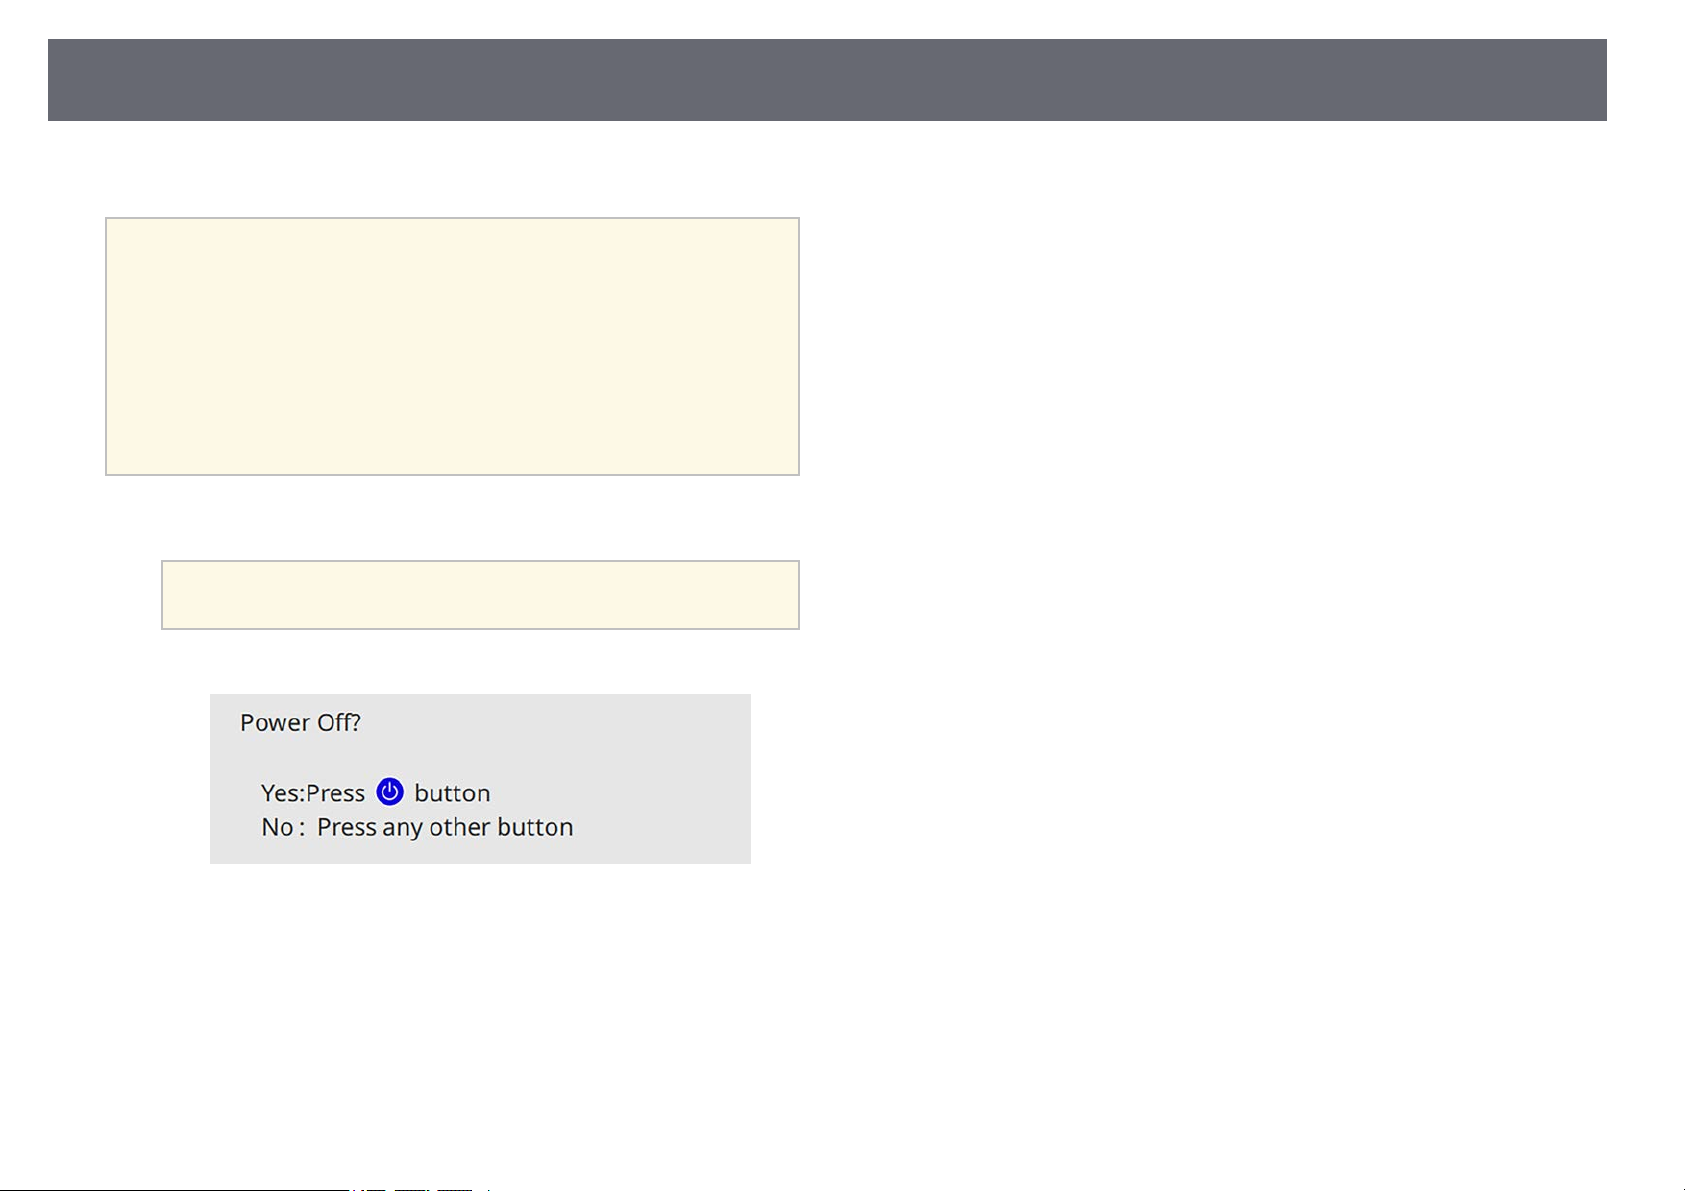
Turning Off the Projector
Turn off the projector after use.
• Turn off this product when it is not in use to prolong the life of the
a
Press the power button on the control panel or remote control.
a
projector. Light source life varies depending on the mode selected,
environmental conditions, and usage. Brightness decreases over time.
• If the Light Source Calibration setting is set to Run Periodically in
the projector's Management menu, light source calibration starts
automatically if you turn off the projector and the following
conditions are present:
• 100 hours have passed since the last light source calibration
• You have used the projector continuously for more than 20
minutes
You can also press the power button on the control pad.
a
The projector displays a shutdown confirmation screen.
51
Press the power button again. (To leave it on, press any other button.)
b
The projector beeps twice, the light source turns off, and the status
indicator turns off.
To transport or store the projector, make sure the power indicator is
c
blue (but not flashing) and the status indicator is off, then unplug the
power cord.
Page 52
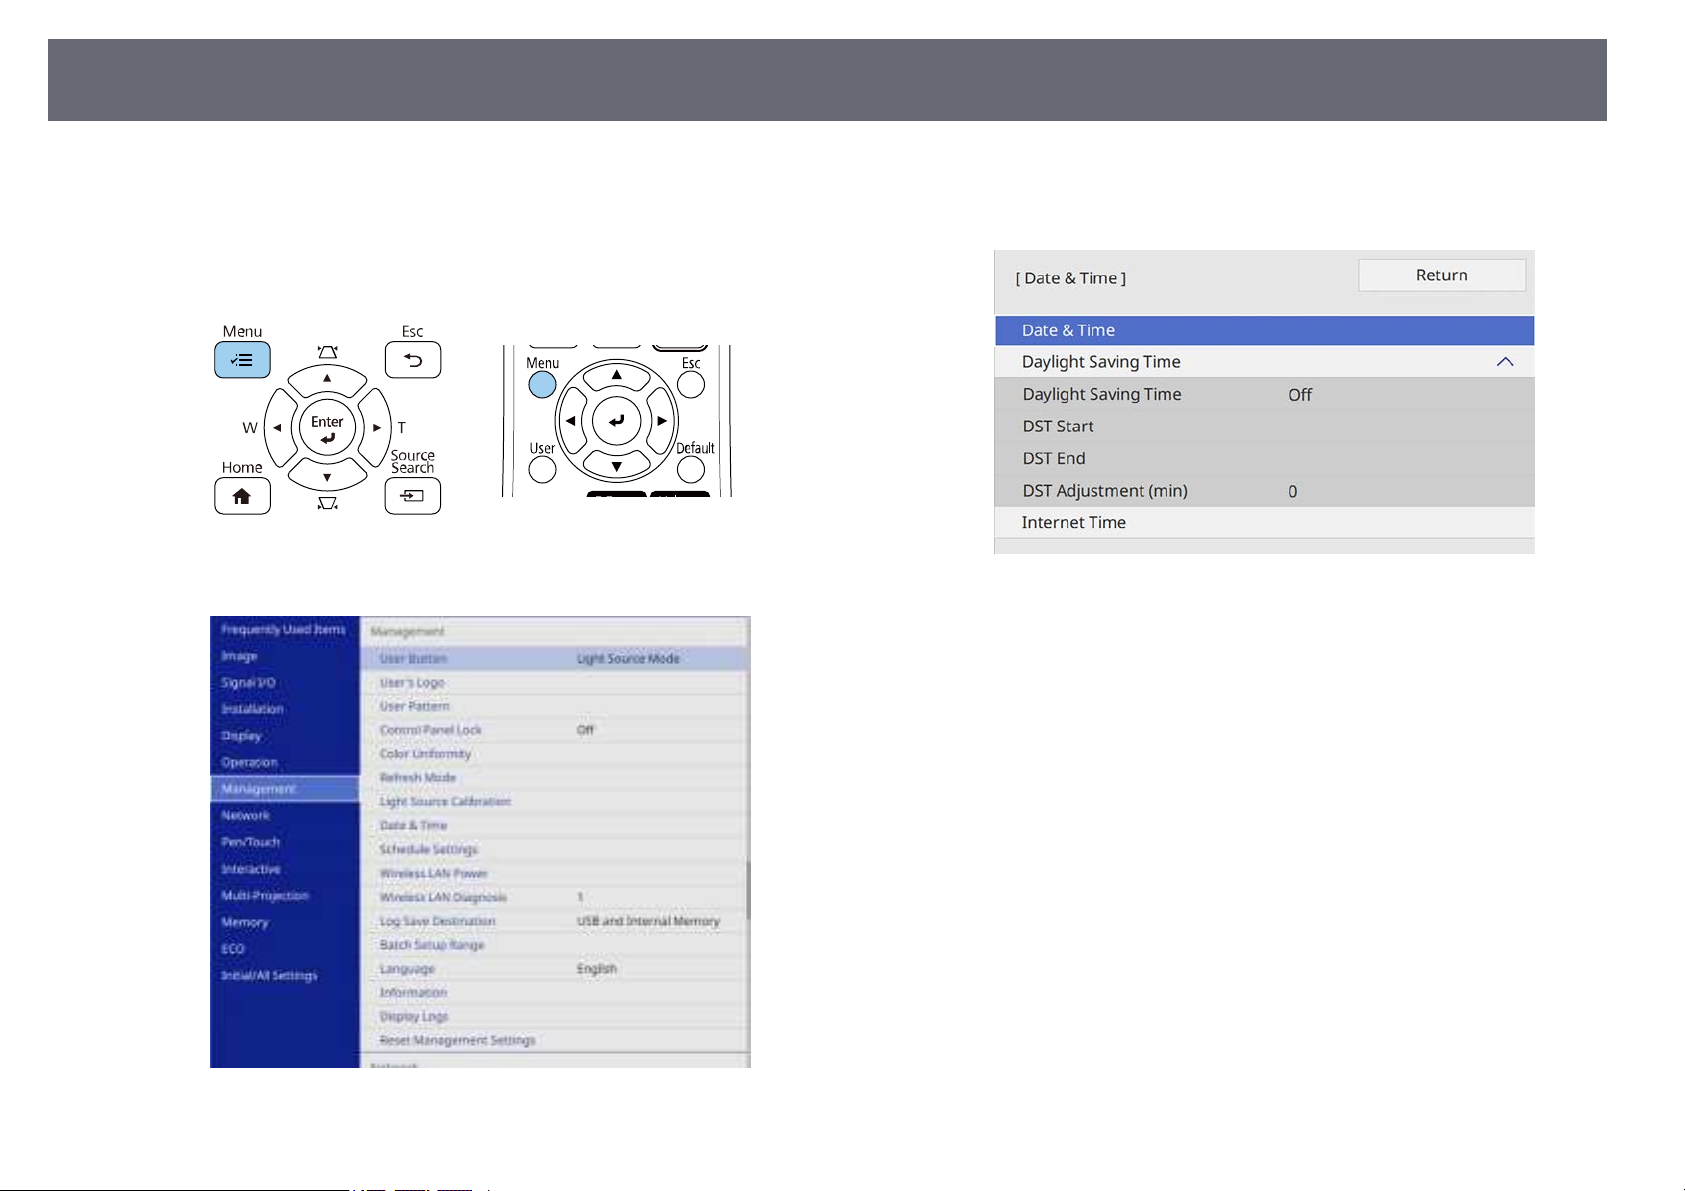
Setting the Date and Time
52
You can set the date and time for the projector.
Turn on the projector.
a
Press the [Menu] button on the control panel or remote control.
b
Select the Management setting and press [Enter].
c
Select the Date & Time setting and press [Enter].
e
You see this screen:
Select Date, press [Enter], and use the displayed keyboard to enter
f
today's date.
Select Time, press [Enter], and use the displayed keyboard to enter the
g
current time.
Select the Date & Time setting and press [Enter].
d
Select Time Difference (UTC), press [Enter], and set the time
h
difference from Coordinated Universal Time.
When you are finished, select Set and press [Enter].
i
Page 53
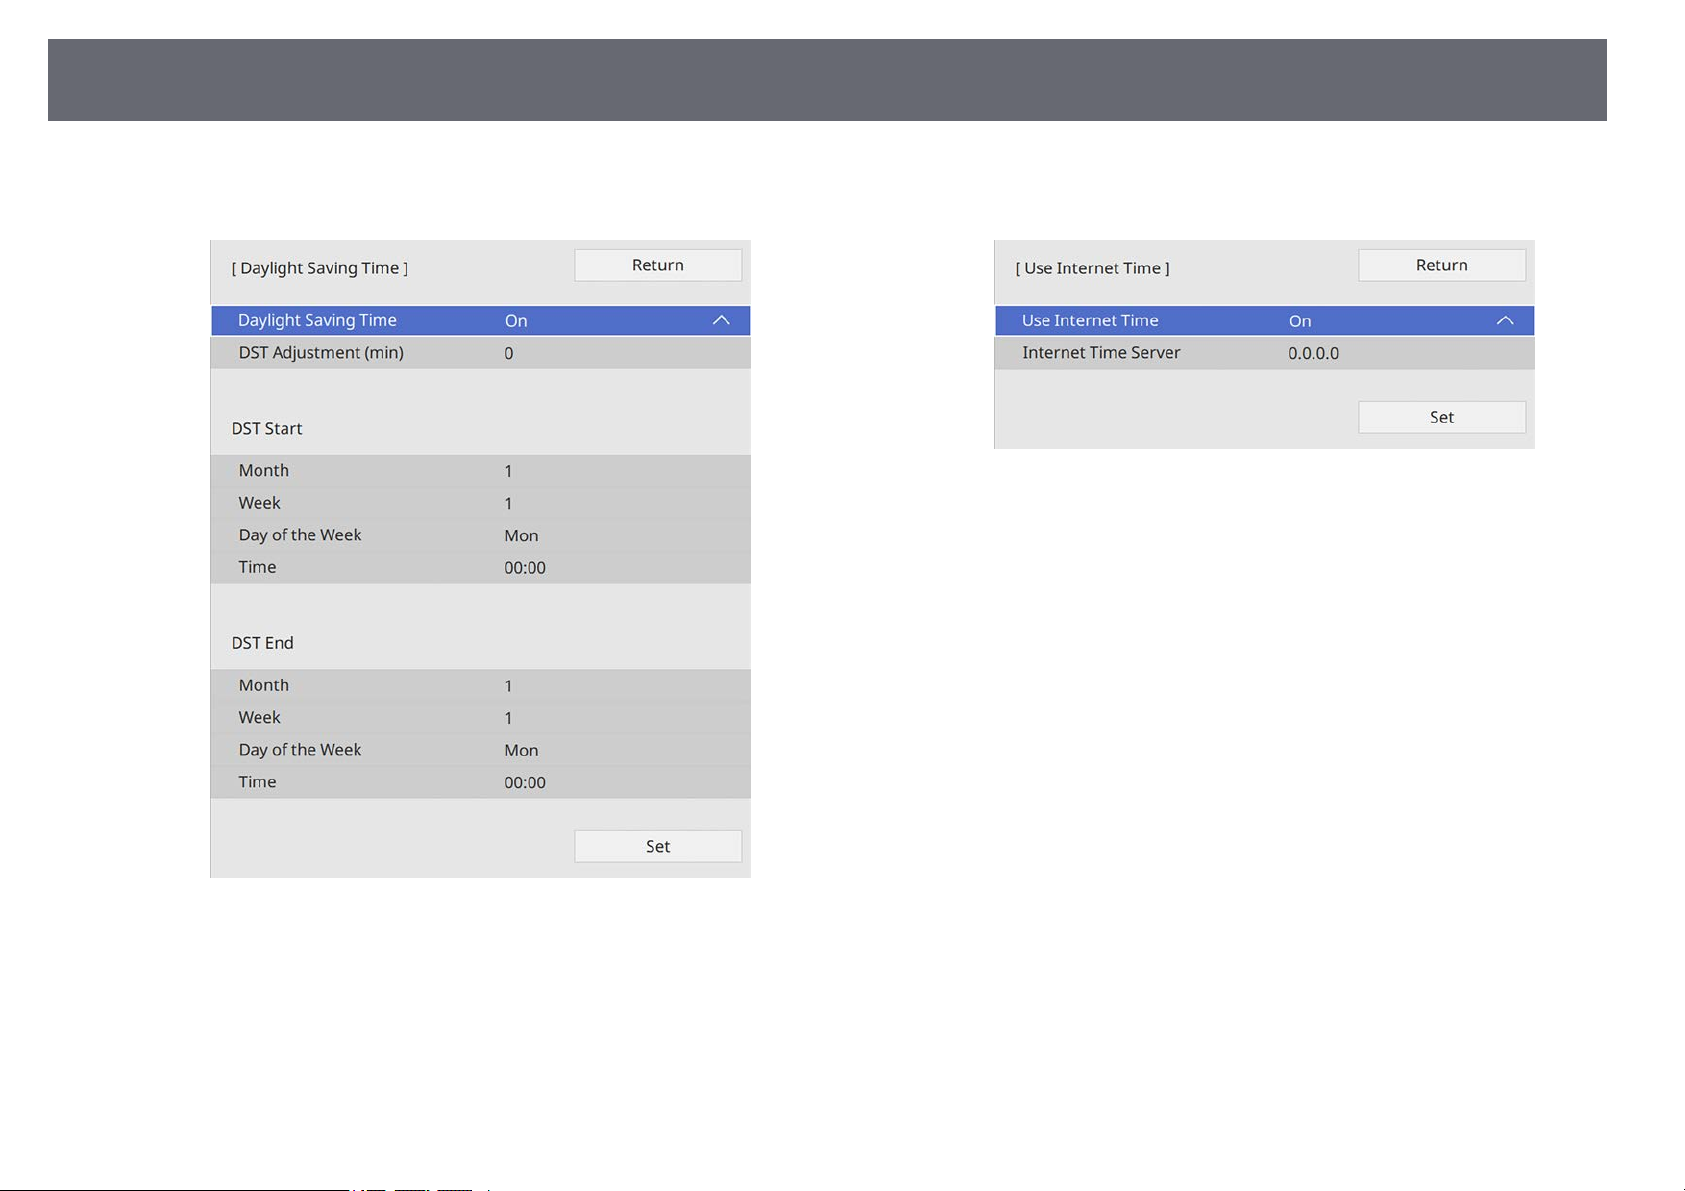
Setting the Date and Time
53
To activate daylight saving time, select the Daylight Saving Time
j
setting and set it to On. Then select settings.
To update the time automatically through an Internet time server,
l
select the Internet Time setting and set it to On. Then select settings.
When you are finished, select Set and press [Enter].
m
Press [Menu] or [Esc] to exit the menus.
n
When you are finished, select Set and press [Enter].
k
Page 54
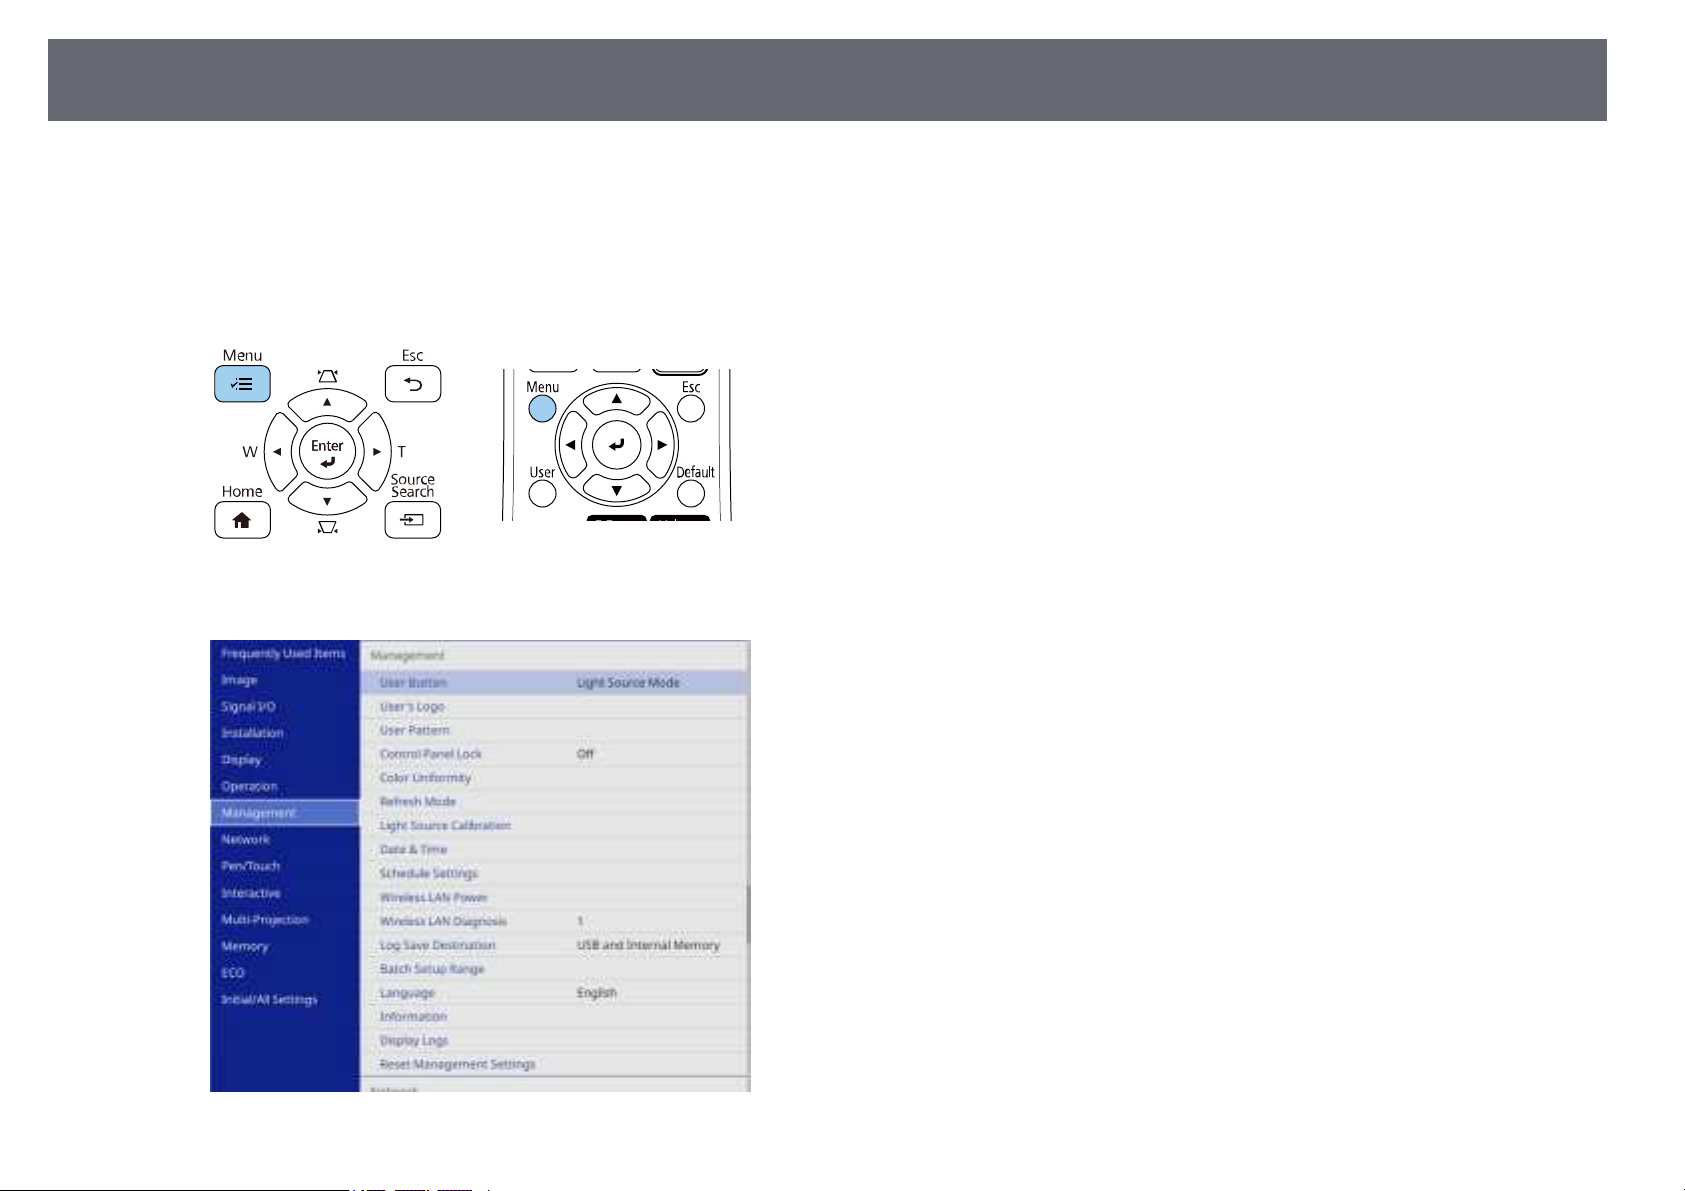
Selecting the Language for the Projector Menus
54
If you want to view the projector's menus and messages in another language,
you can change the Language setting.
Turn on the projector.
a
Press the [Menu] button on the control panel or remote control.
b
Select the Management setting and press [Enter].
c
Select the Language setting and press [Enter].
d
Select the language you want to use and press [Enter].
e
Press [Menu] or [Esc] to exit the menus.
f
Page 55
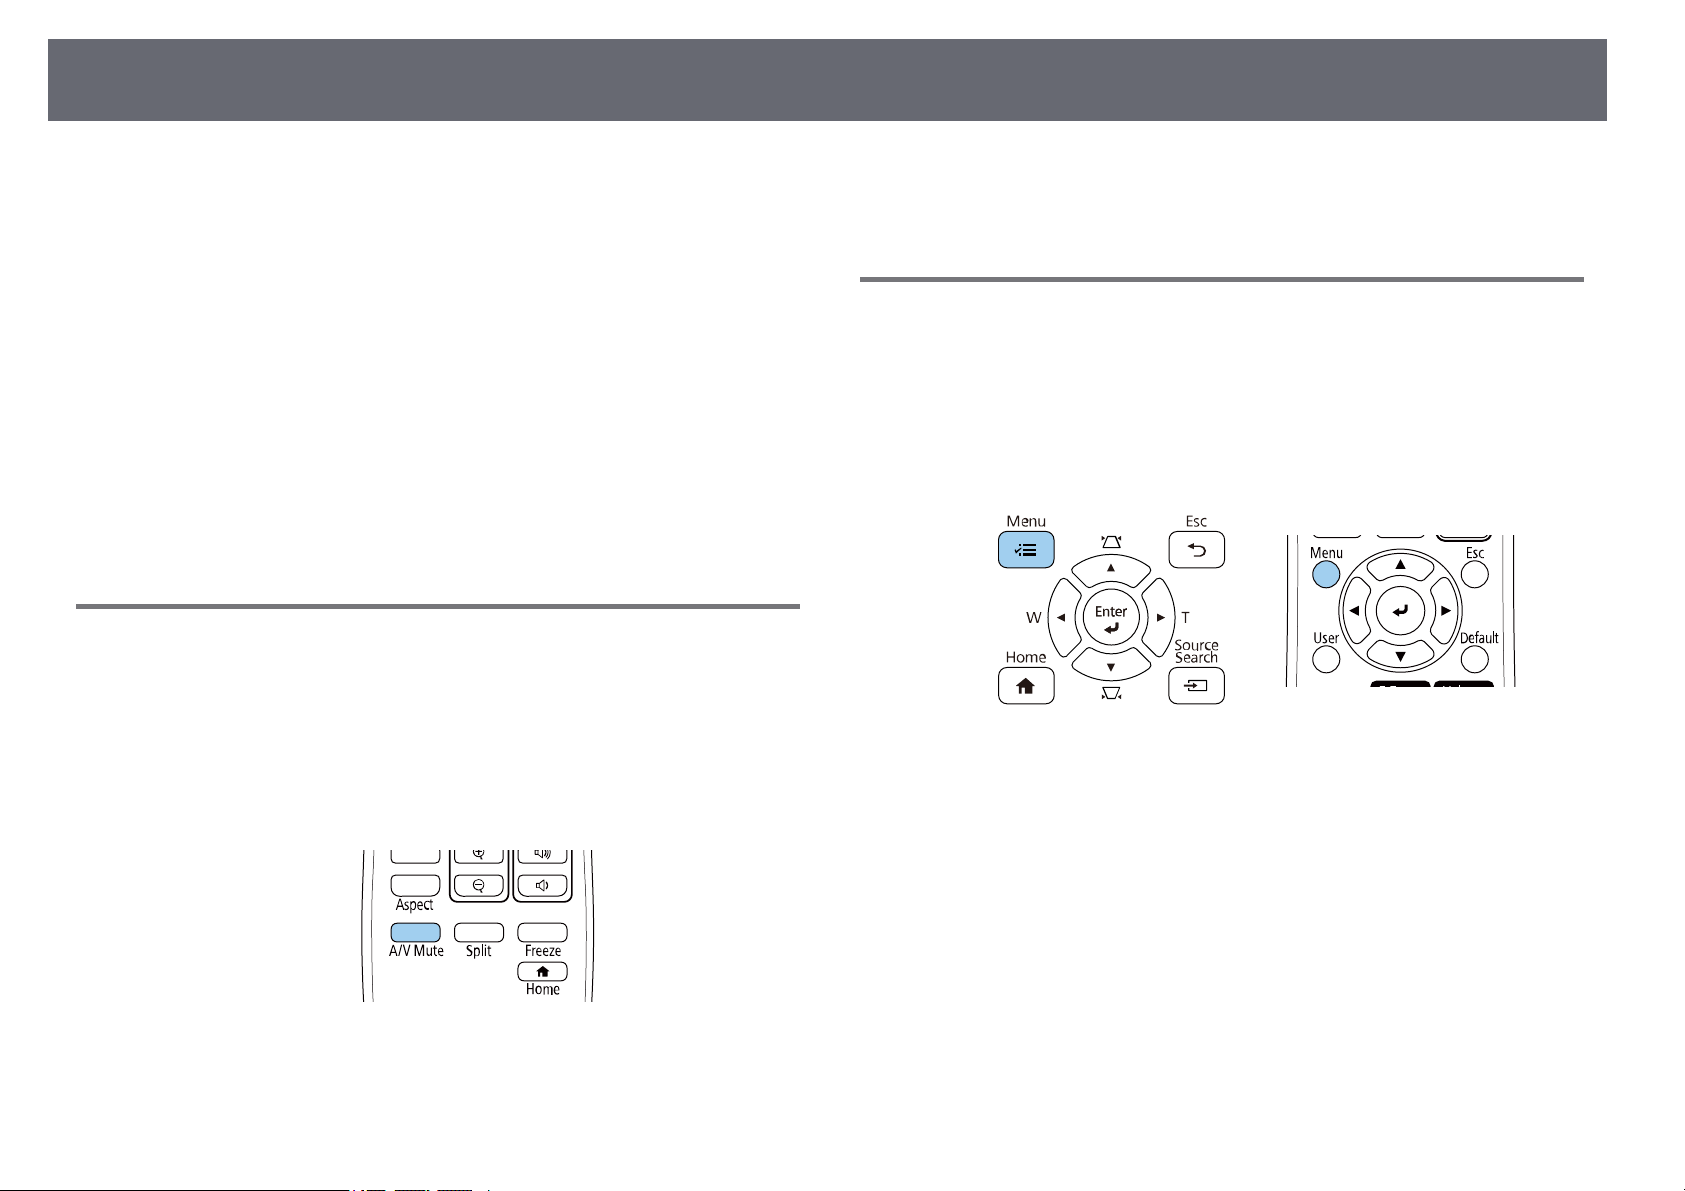
Projection Modes
55
Depending on how you positioned the projector, you may need to change the
projection mode so your images project correctly.
• Front lets you project from a table in front of the screen.
• Front/Upside Down flips the image over top-to-bottom to project upsidedown from a wall mount or ceiling.
• Rear flips the image horizontally to project from behind a translucent
screen.
• Rear/Upside Down flips the image over top-to-bottom and horizontally to
project from a wall mount or ceiling and behind a translucent screen.
gg Related Links
• "Changing the Projection Mode Using the Remote Control" p.55
• "Changing the Projection Mode Using the Menus" p.55
• "Projector Setup and Installation Options" p.28
Changing the Projection Mode Using the Remote Control
You can change the projection mode to flip the image over top-to-bottom.
Turn on the projector and display an image.
a
To change projection back to the original mode, hold down the [A/V
c
Mute] button for 5 seconds again.
Changing the Projection Mode Using the Menus
You can change the projection mode to flip the image over top-to-bottom
and/or left-to-right using the projector menus.
Turn on the projector and display an image.
a
Press the [Menu] button on the control panel or remote control.
b
Hold down the [A/V Mute] button on the remote control for 5 seconds.
b
The image disappears briefly and reappears flipped top-to-bottom.
Page 56
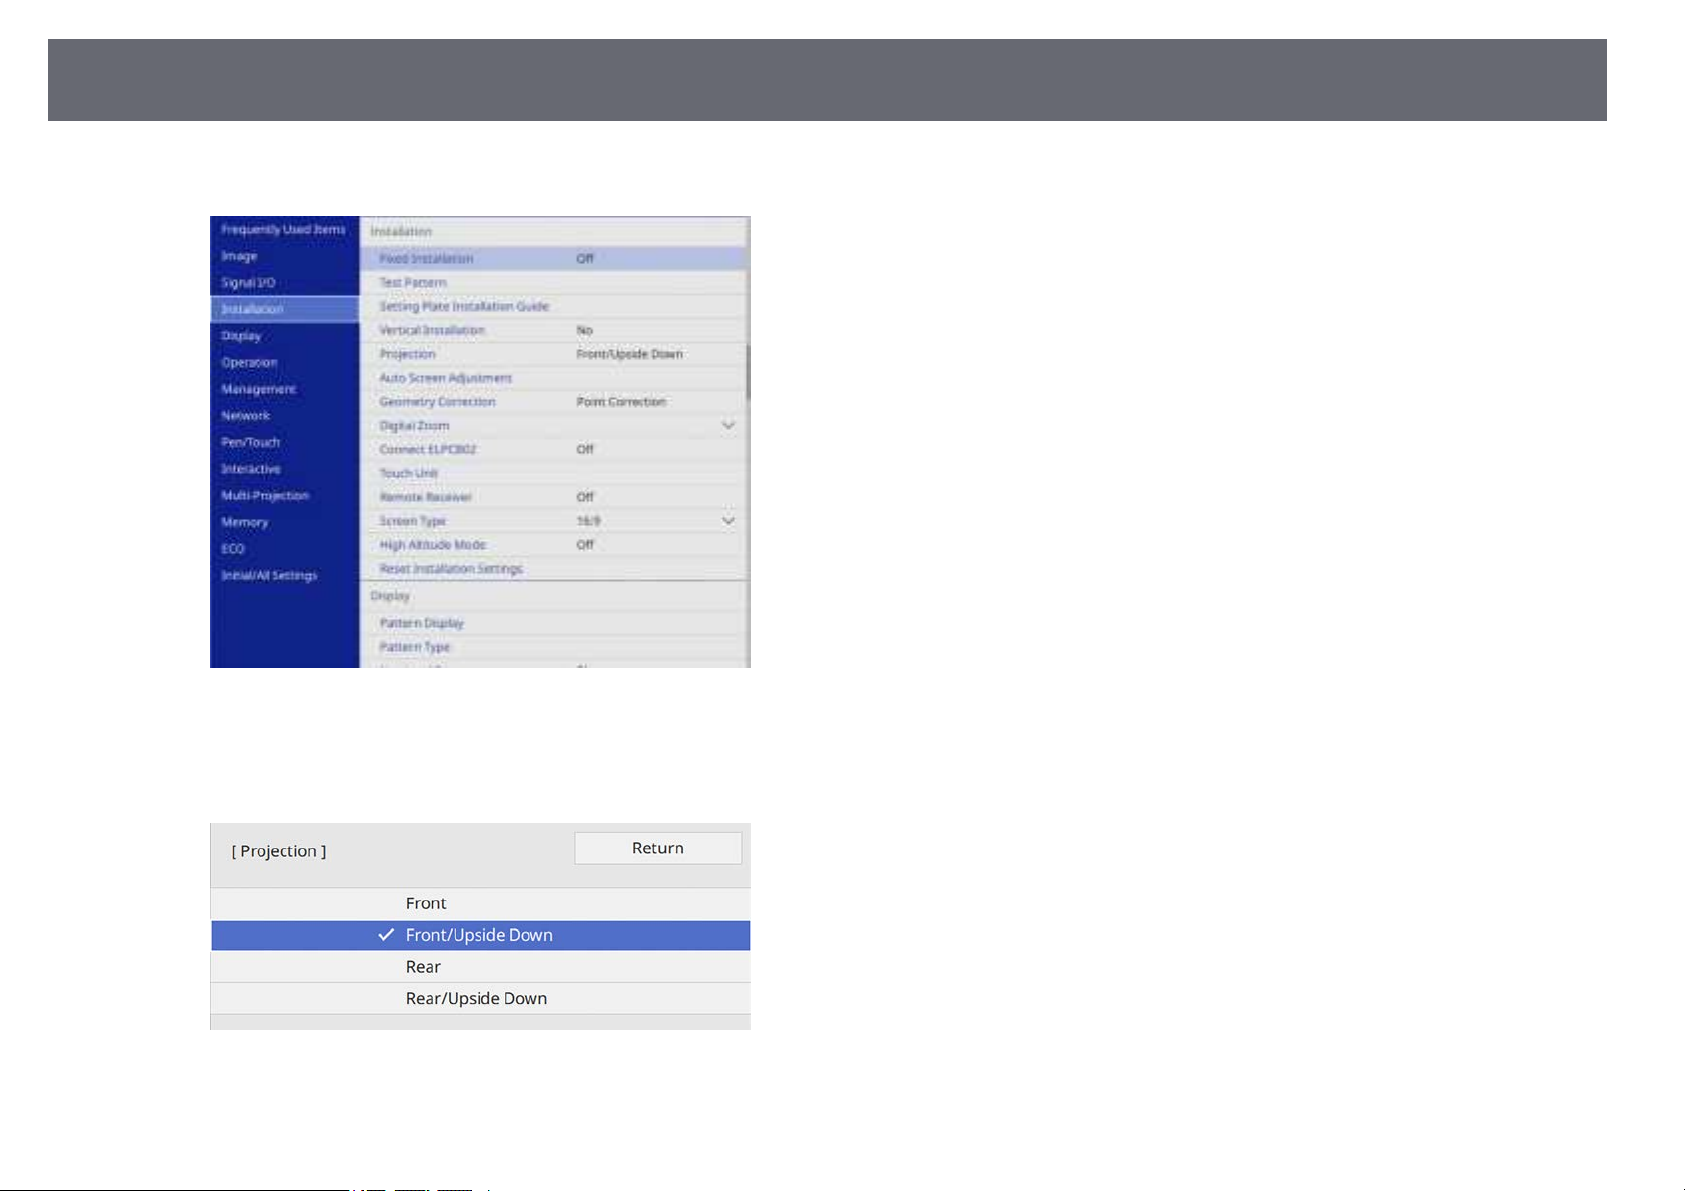
Projection Modes
Select the Installation menu and press [Enter].
c
56
Select Projection and press [Enter].
d
Select a projection mode and press [Enter].
e
Press [Menu] or [Esc] to exit the menus.
f
Page 57
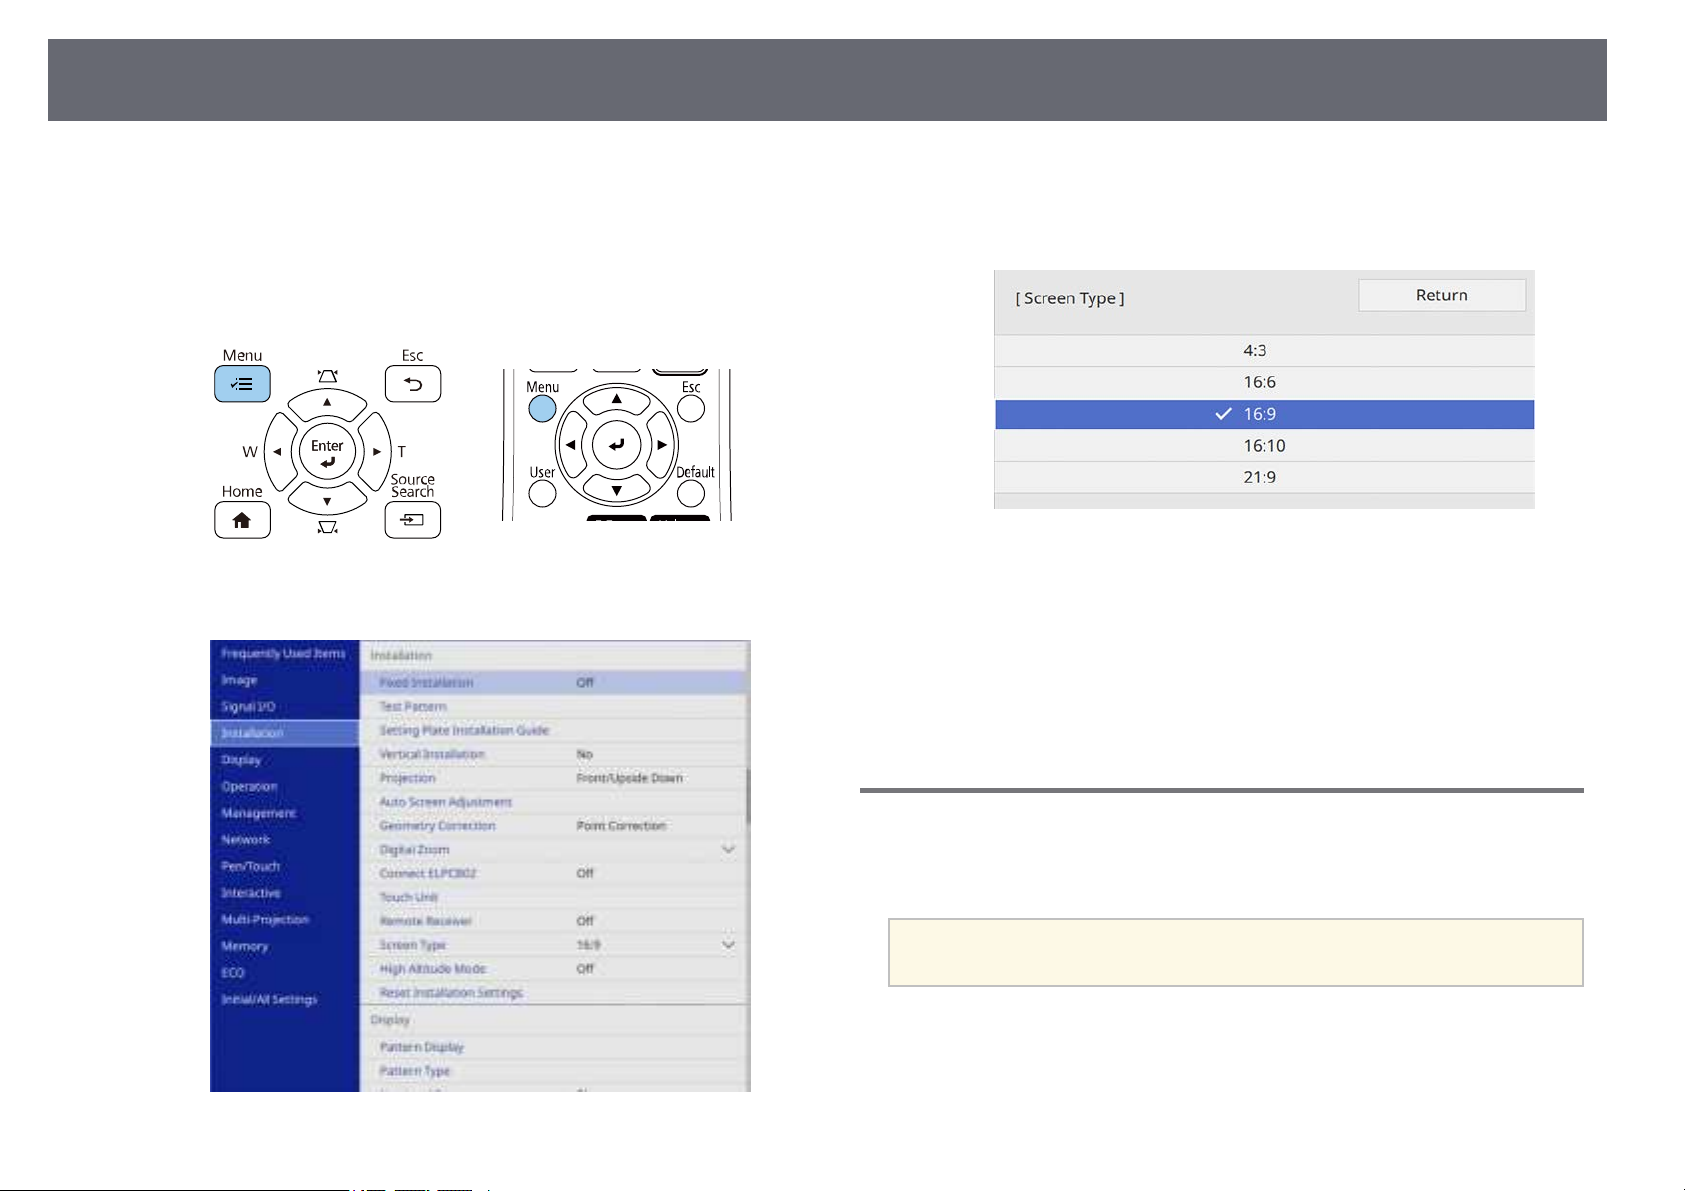
Setting the Screen Type
57
You can use the Screen Type setting to match the aspect ratio of the displayed
image to the screen you are using.
Turn on the projector and display an image.
a
Press the [Menu] button on the control panel or remote control.
b
Select the Installation menu and press [Enter].
c
Select Screen Type and press [Enter].
d
Select your screen's aspect ratio and press [Enter].
e
Press [Menu] to exit the menus.
f
Adjust the aspect ratio for the projected image, if necessary.
g
gg Related Links
• "Adjusting the Image Position Using Screen Position" p.57
Adjusting the Image Position Using Screen Position
You can adjust the image position if there are margins between the edge of
the image and the projected screen frame.
You cannot adjust the screen position if the Screen Type setting is set
a
a
to 16:9.
Turn on the projector and display an image.
Page 58
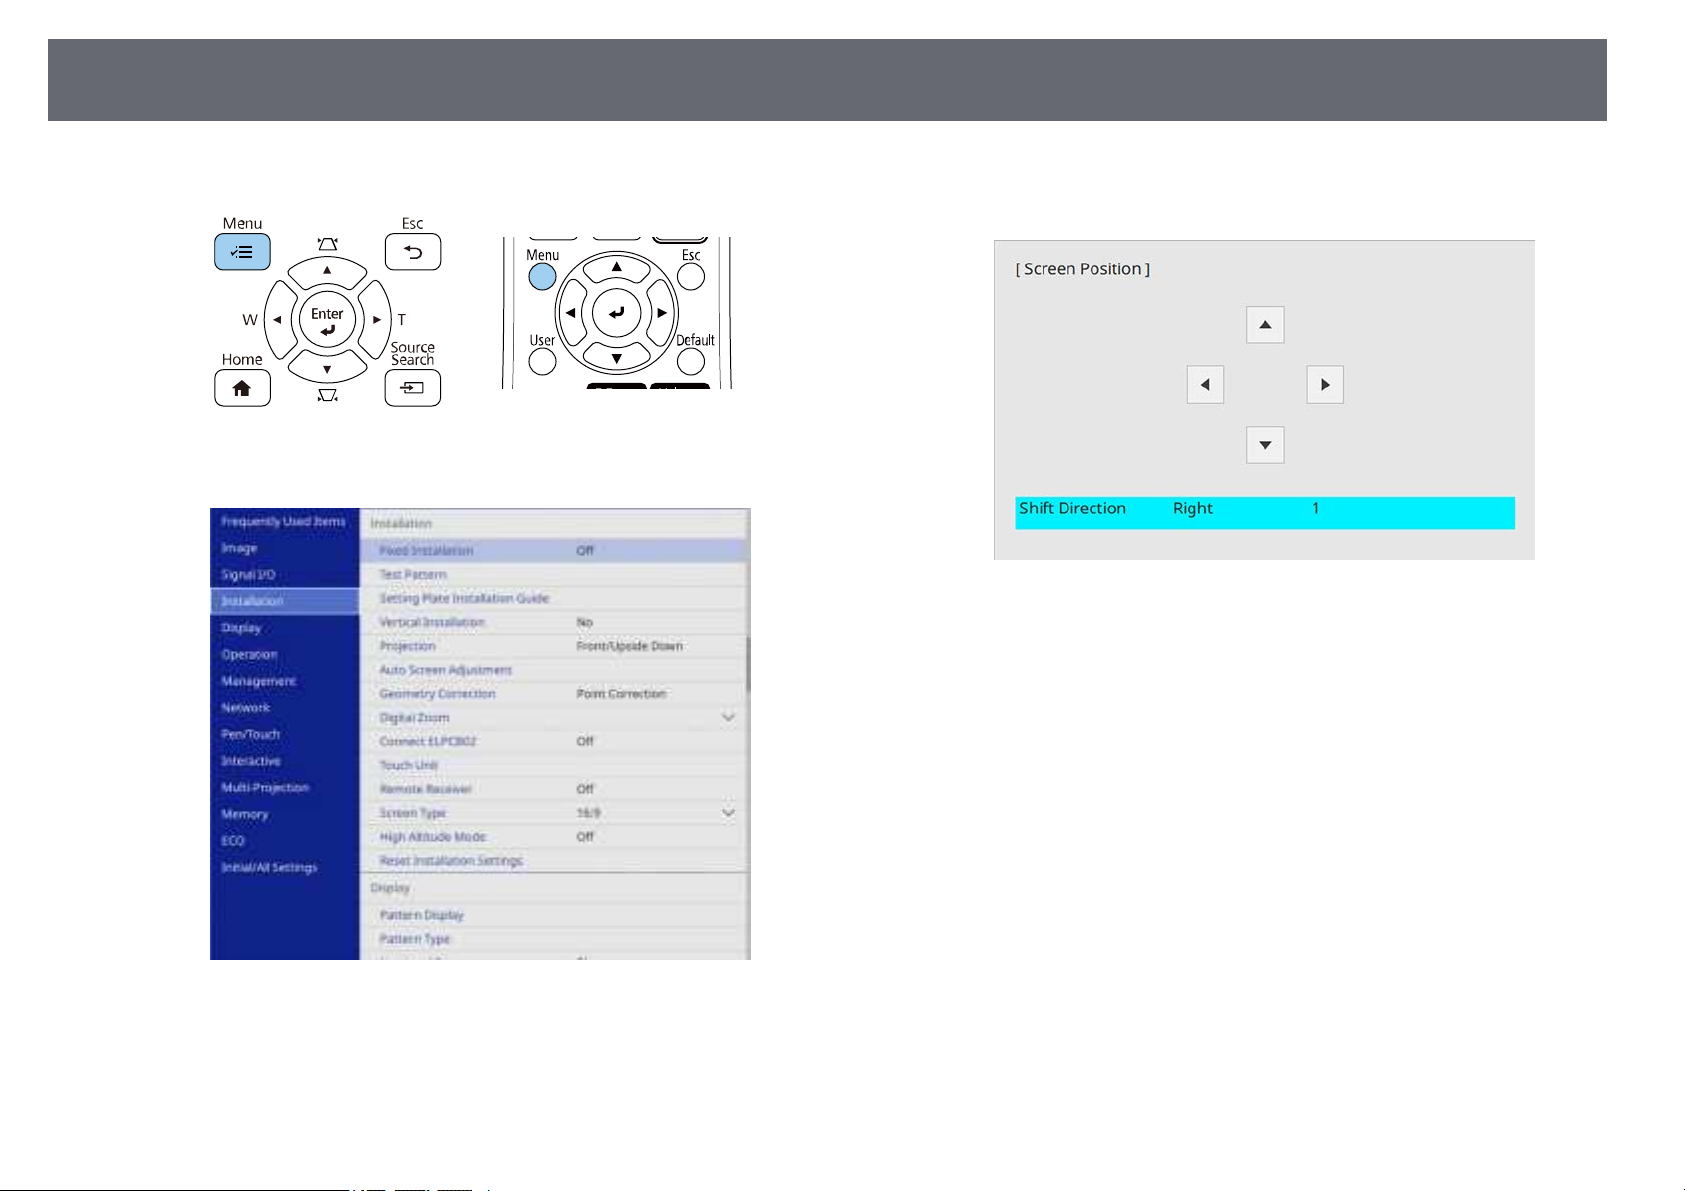
Setting the Screen Type
58
Press the [Menu] button on the control panel or remote control.
b
Select the Installation menu and press [Enter].
c
Use the arrow buttons on the control panel or remote control to adjust
e
the position of the image.
When you are finished, press [Menu].
f
Select Screen Position, and press [Enter].
d
Page 59
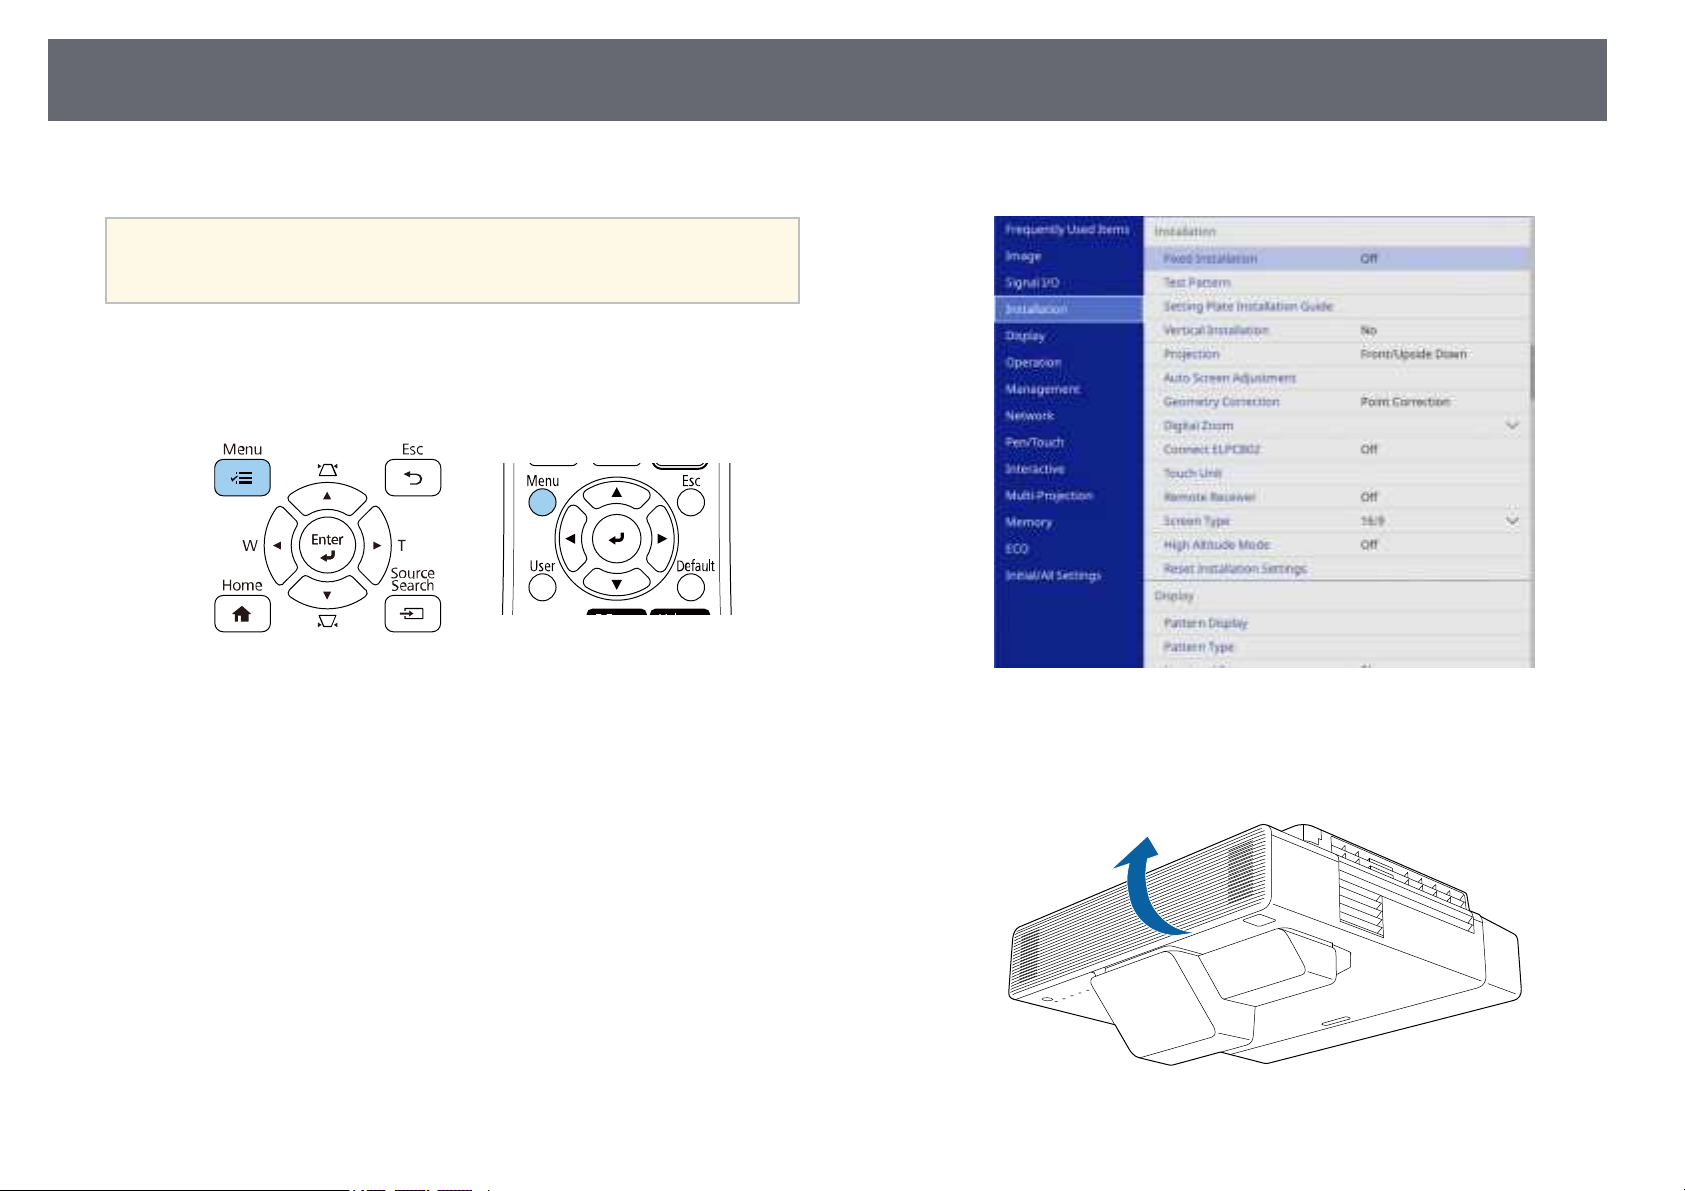
Focusing the Image
59
You can display the test pattern, and then adjust the focus.
We recommend adjusting the focus at least 20 minutes after you start
a
a
b
projecting, because images are not stable right after turning on the
projector.
Turn on the projector.
Press the [Menu] button on the control panel or remote control.
Select the Installation menu and press [Enter].
c
Select Test Pattern and press [Enter].
d
Open the front cover.
e
Page 60
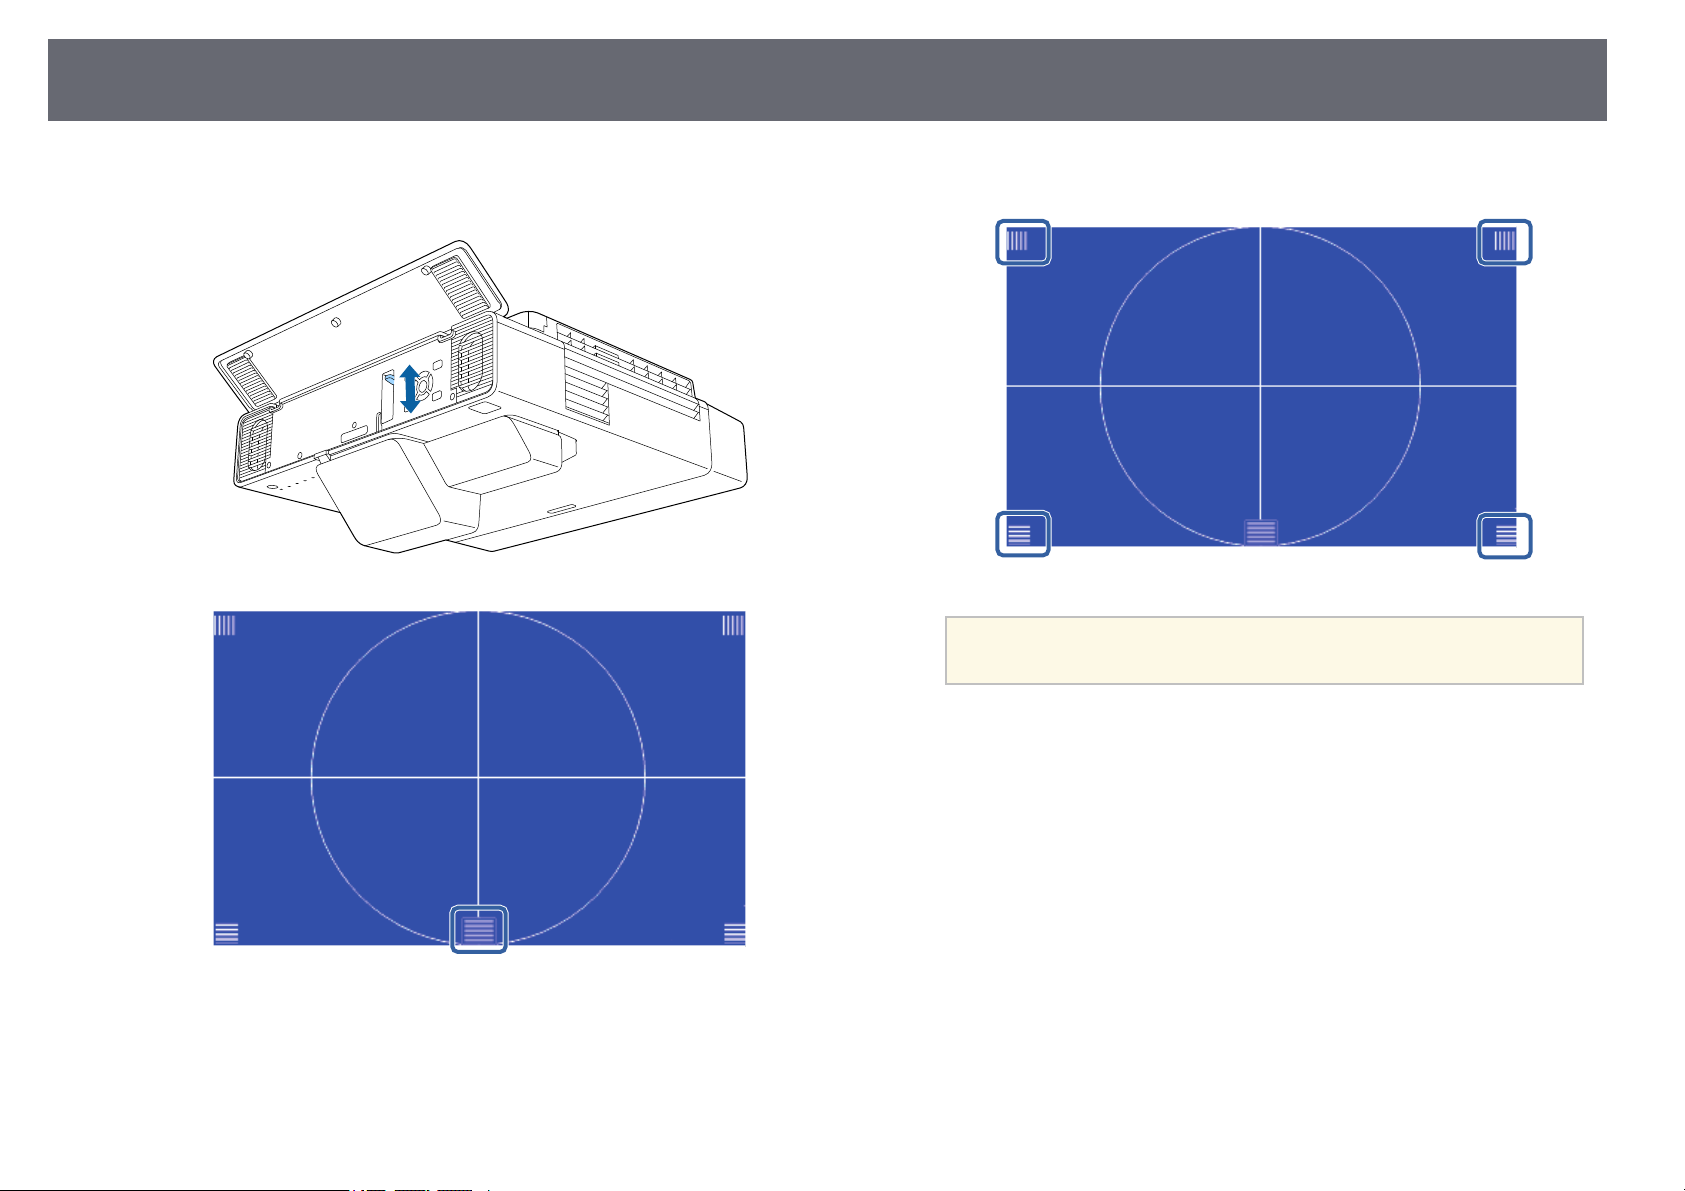
Focusing the Image
60
Move the focus lever and focus to the center-bottom of the projected
f
screen.
Check that the focus matches the corners of the projected screen.
g
If any areas are out of focus, use the focus lever to adjust until
a
To remove the test pattern, press [Esc].
h
the corners are the same focus.
Page 61
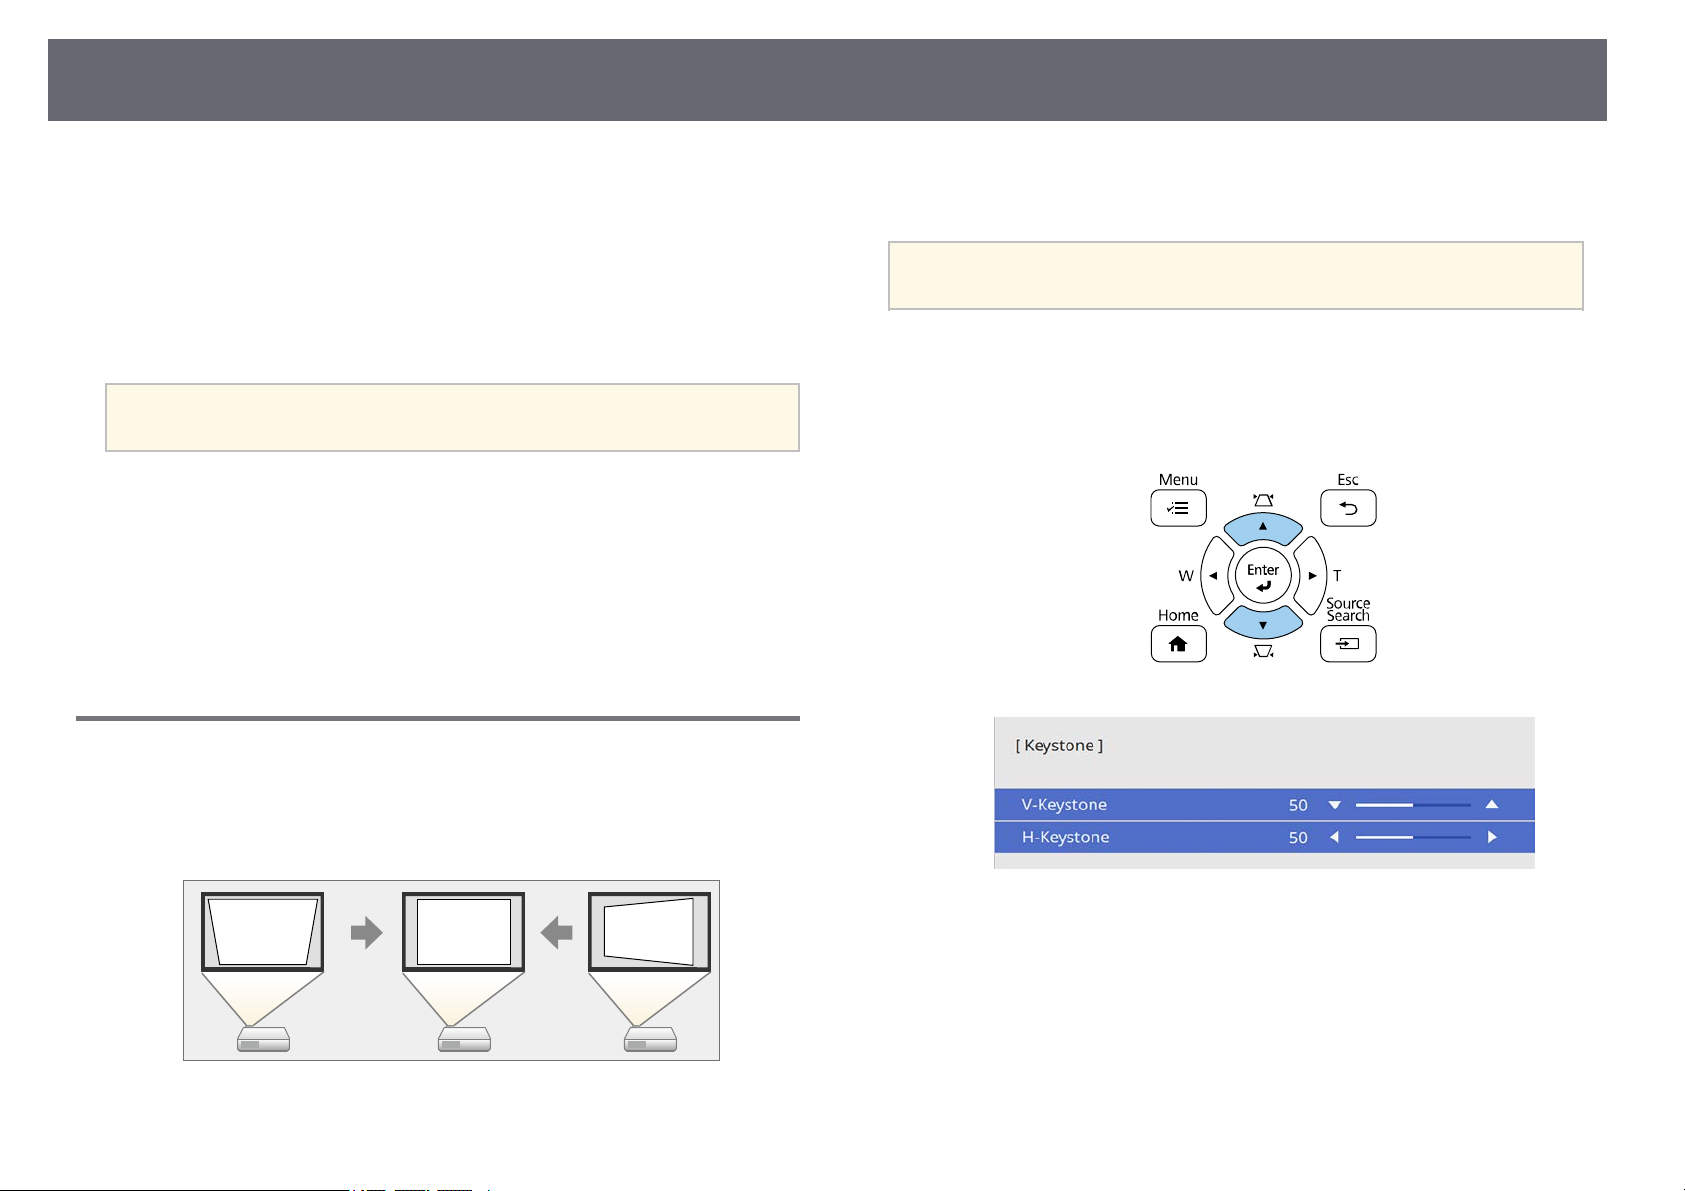
Image Shape
61
You can project an even, rectangular image by placing the projector directly
in front of the center of the screen and keeping it level. If you place the
projector at an angle to the screen, or tilt it up or down, or off to the side, you
may need to correct the image shape.
After correction, your image is slightly smaller.
For the best quality images, we recommend adjusting the installation position
of the projector to achieve the correct image size and shape.
You cannot correct an image shape using multiple correction methods
a
gg Related Links
• "Correcting the Image Shape with the Keystone Buttons" p.61
• "Correcting the Image Shape with Quick Corner" p.62
• "Correcting Image Shape with Arc Correction" p.64
• "Correcting Image Shape with Point Correction" p.66
• "Loading Image Shape Setting from Memory" p.68
• "Correcting Image Shape with Corner Markers" p.68
at the same time.
Correcting the Image Shape with the Keystone Buttons
You can use keystone buttons to correct images up to 3º right, left, up, or
down.
If you change the Screen Type setting or adjust the image position, the
a
a
b
adjustments are reset.
Turn on the projector and display an image.
Press one of the keystone adjustment buttons on the control panel to
display the Keystone adjustment screen.
You can use the projector's keystone correction buttons to correct the shape
of an image that is unevenly rectangular.
Page 62
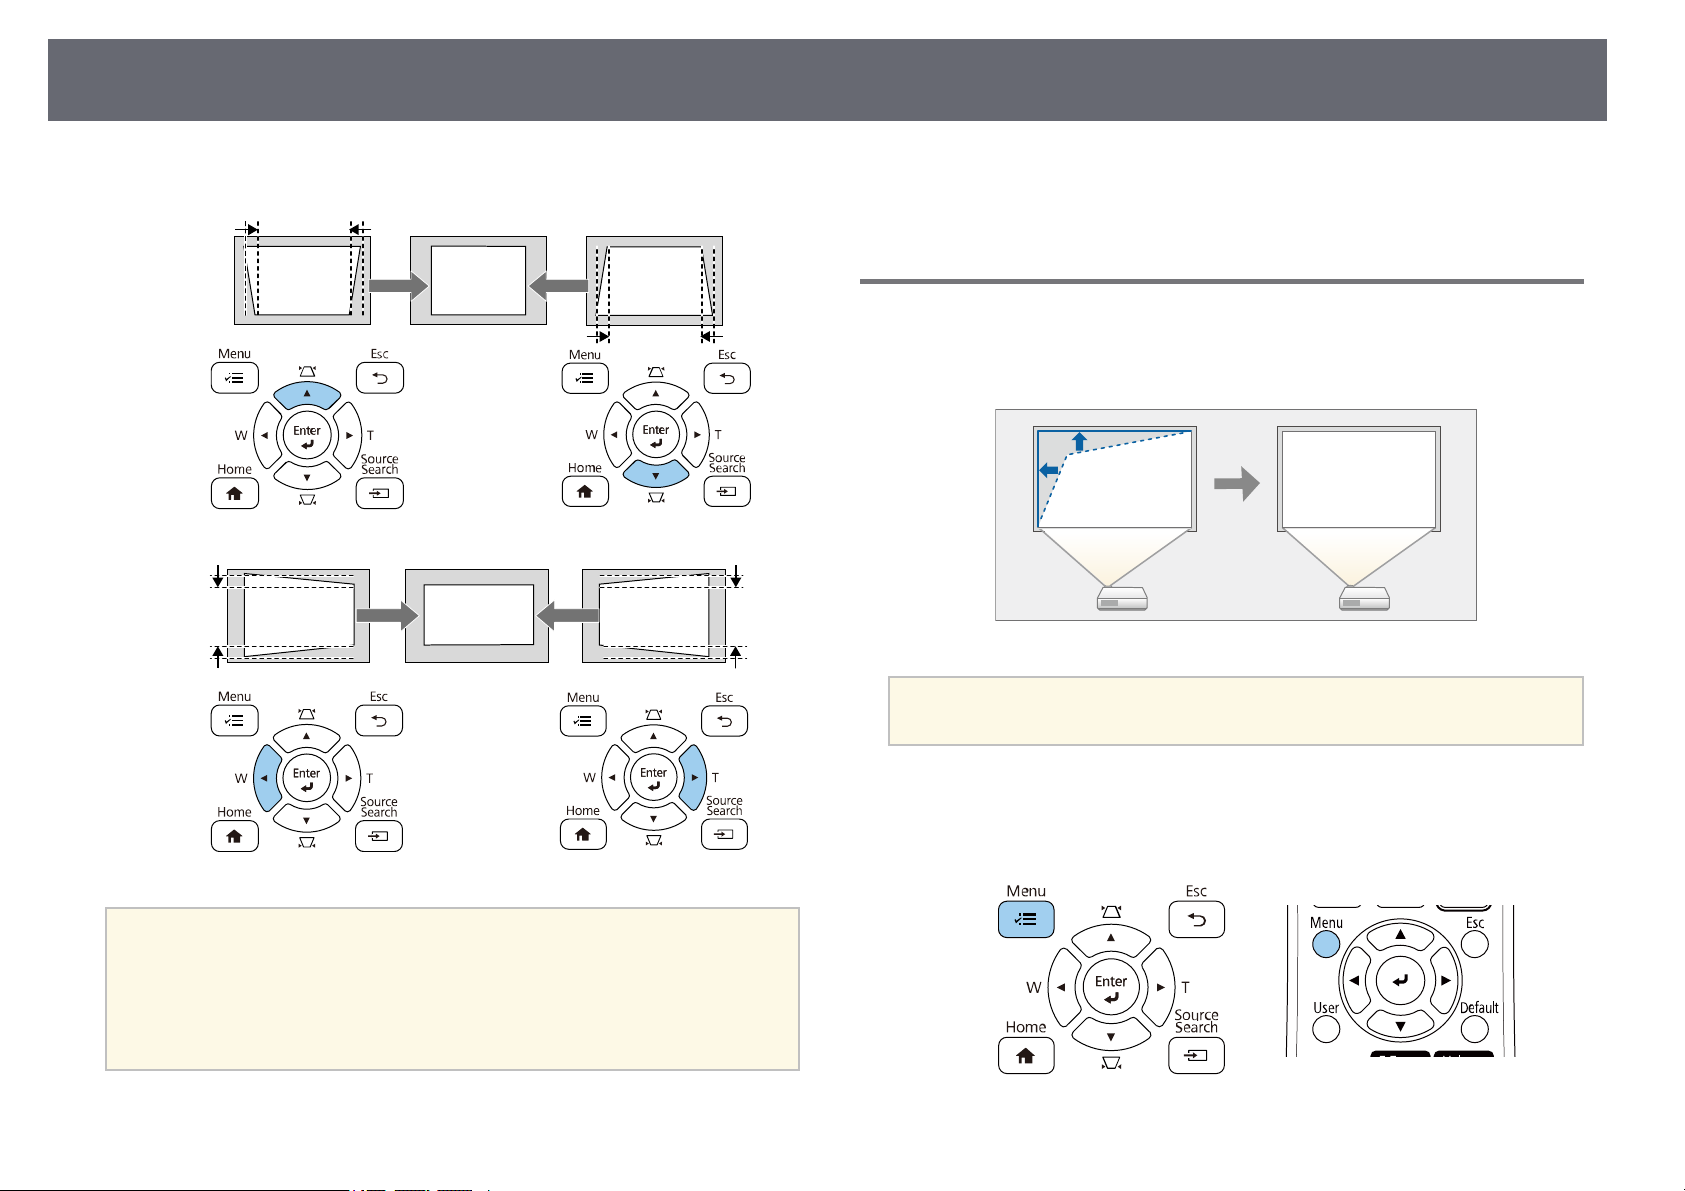
Image Shape
62
Press a keystone button to adjust the image shape.
c
gg Related Links
• "Projector Installation Settings - Installation Menu" p.209
Correcting the Image Shape with Quick Corner
You can use the projector's Quick Corner setting to correct the shape and size
of an image that is unevenly rectangular.
If you change the Screen Type setting or adjust the image position, the
a
adjustments are reset.
a
• If the projector is installed out of your reach, you can also correct the
shape of the image using the remote control.
s Installation > Geometry Correction > H/V-Keystone
• To save the current shape of an image you have adjusted, select Save
Memory. You can save up to three image shapes in the memory.
s Installation > Geometry Correction > Memory > Save Memory
Turn on the projector and display an image.
a
Press the [Menu] button on the control panel or remote control.
b
Page 63
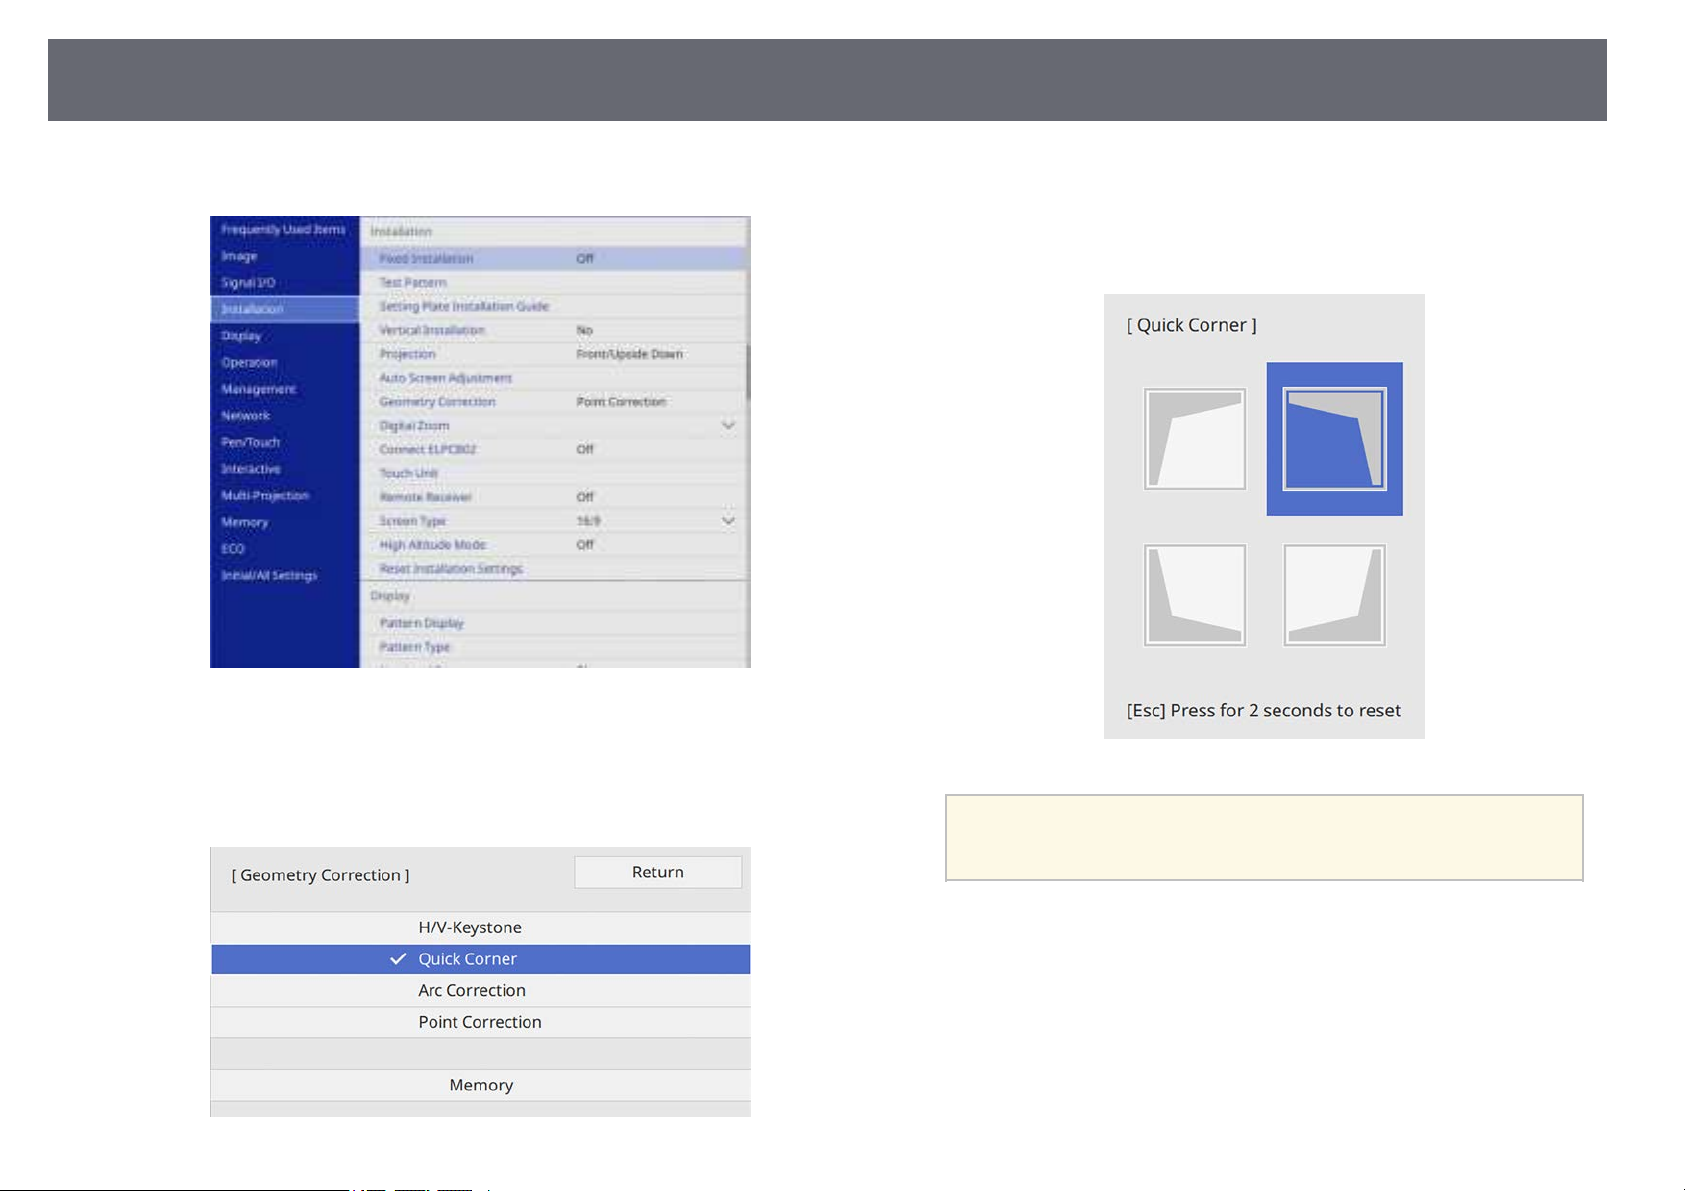
Image Shape
63
Select the Installation menu and press [Enter].
c
Select Geometry Correction and press [Enter].
d
You see the area selection screen.
Use the arrow buttons to select the area of the image you want to
f
adjust. Then press [Enter].
Select Quick Corner and press [Enter]. Then press [Enter] again if
e
necessary.
To reset the Quick Corner corrections, hold down [Esc] for
a
Press the arrow buttons to adjust the image shape as necessary.
g
To return to the area selection screen, press [Enter].
about two seconds while the area selection screen is displayed,
and then select Yes.
Page 64
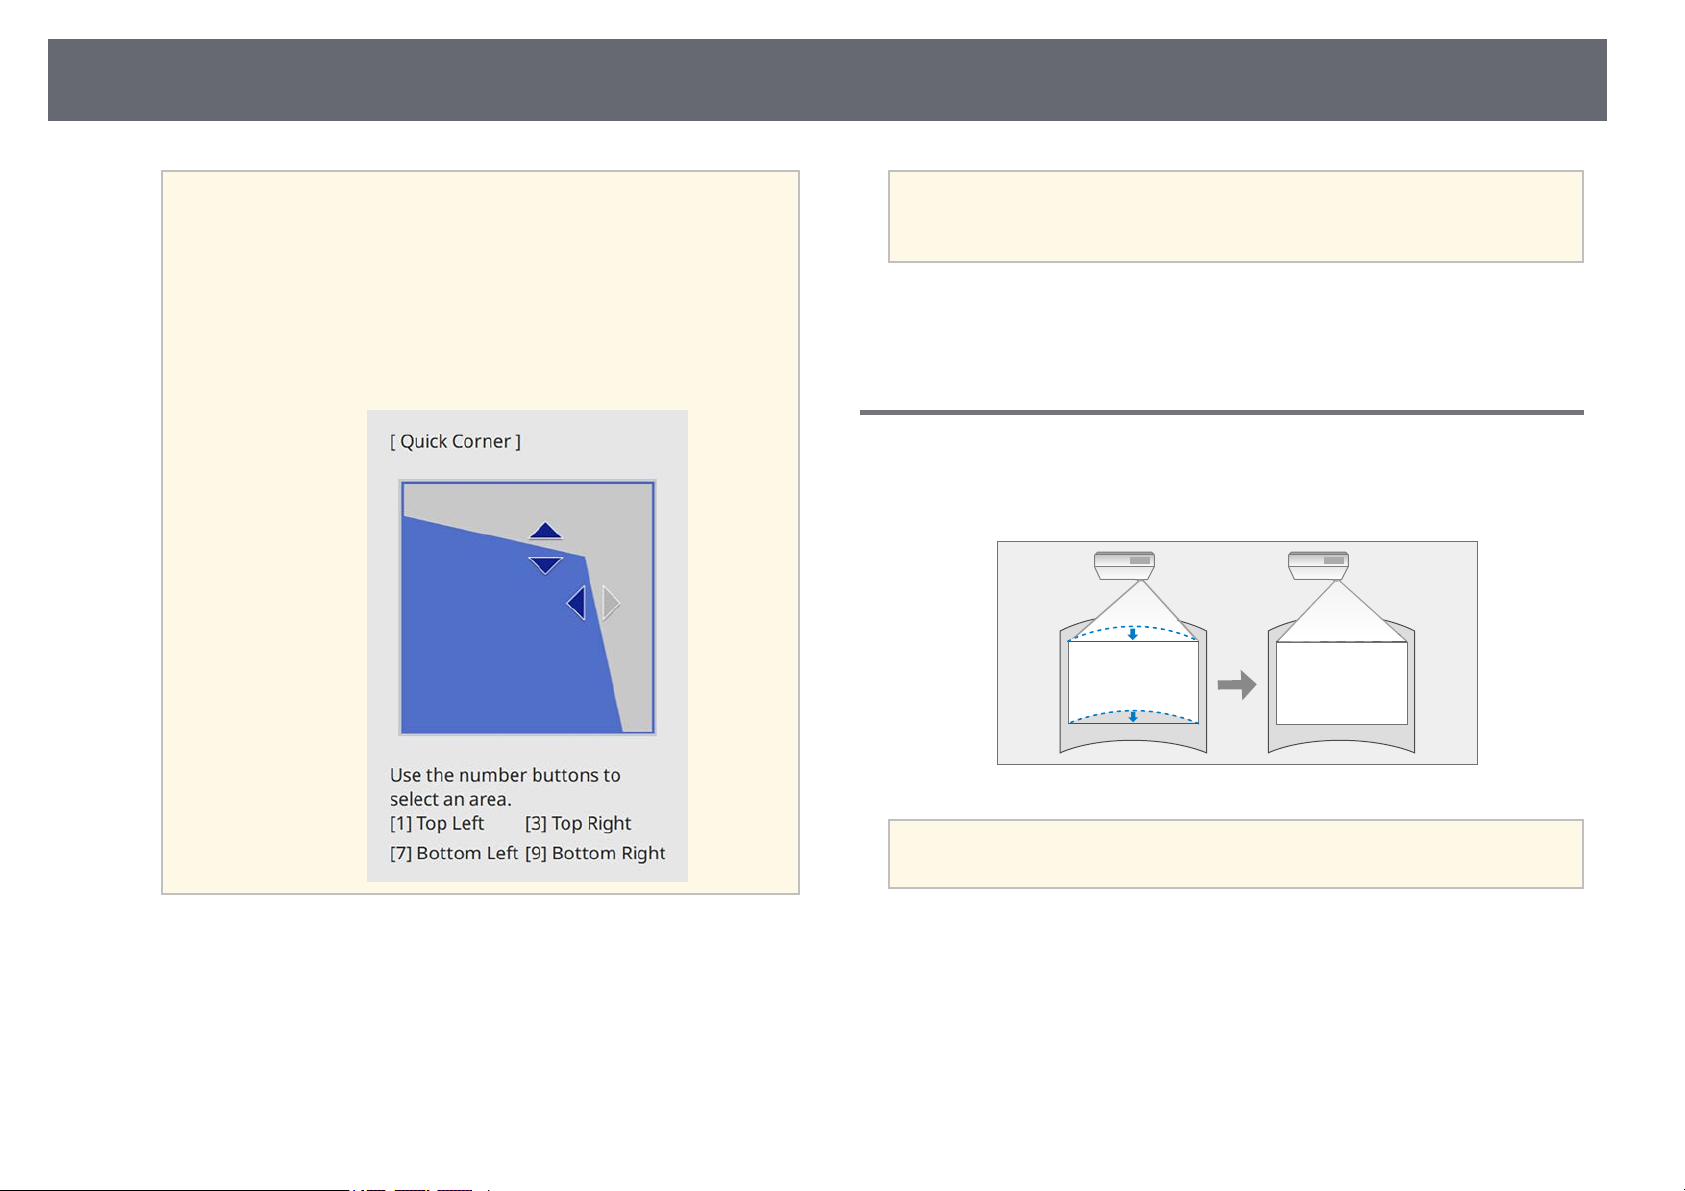
Image Shape
64
a
• You can also select the area by pressing the following numeric
buttons on the remote control:
• [1] selects the upper left area.
• [3] selects the upper right area.
• [7] selects the lower left area.
• [9] selects the lower right area.
• If you see this screen, you cannot adjust the shape any further
in the direction indicated by the gray triangle.
To save the current shape of an image you have adjusted, select Save
a
gg Related Links
• "Projector Installation Settings - Installation Menu" p.209
Memory. You can save up to three image shapes in the memory.
s Installation > Geometry Correction > Memory > Save Memory
Correcting Image Shape with Arc Correction
You can use the projector's Arc Correction setting to adjust the shape of an
image projected on a curved or spherical surface.
Repeat steps 6 and 7 as needed to adjust any remaining corners.
h
When you are finished, press [Esc].
i
The Geometry Correction setting is now set to Quick Corner in the
projector's Installation menu. The next time you press the keystone
adjustment buttons on the control panel, the area selection screen is
displayed.
If you change the Screen Type setting or adjust the image position, the
a
a
adjustments are reset.
Turn on the projector and display an image.
Page 65
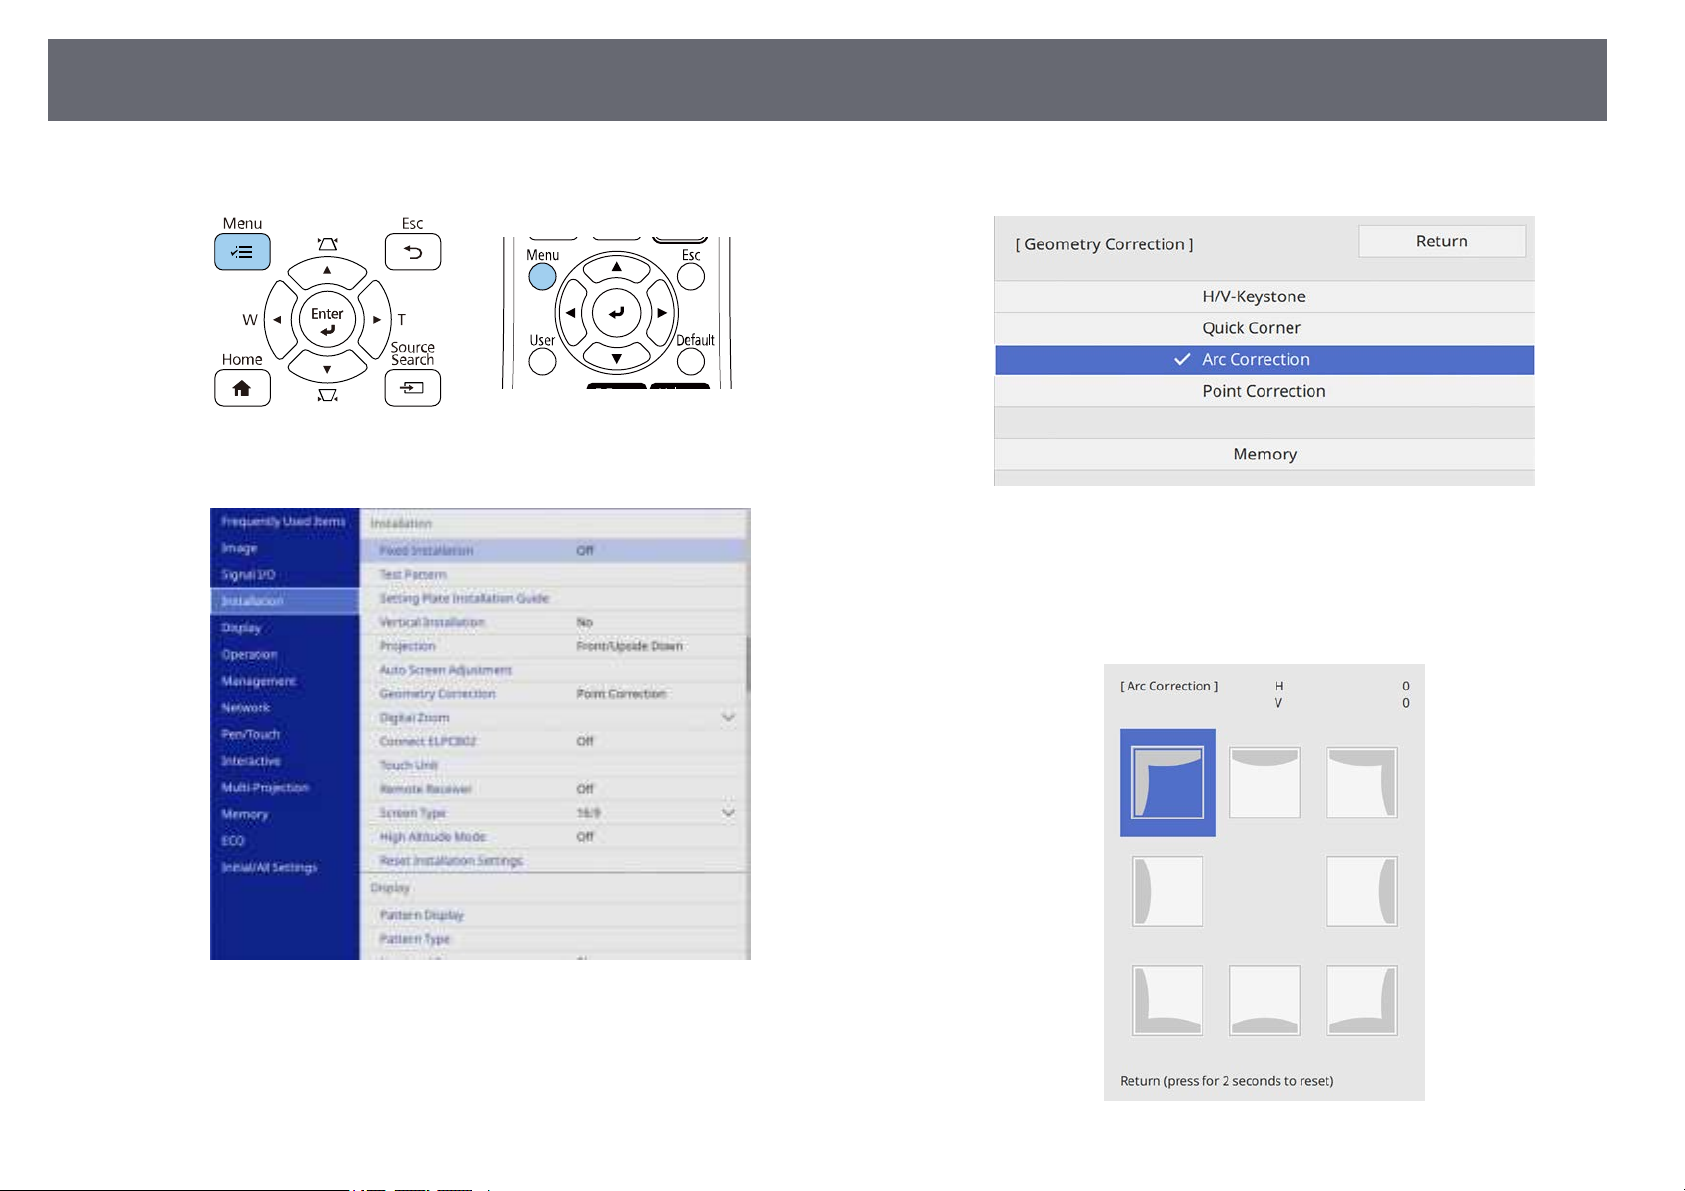
Image Shape
65
Press the [Menu] button on the control panel or remote control.
b
Select the Installation menu and press [Enter].
c
Select Arc Correction and press [Enter].
e
You see the area selection screen.
Use the arrow buttons to select the area of the image you want to
f
adjust, then press [Enter].
Select Geometry Correction and press [Enter].
d
Page 66
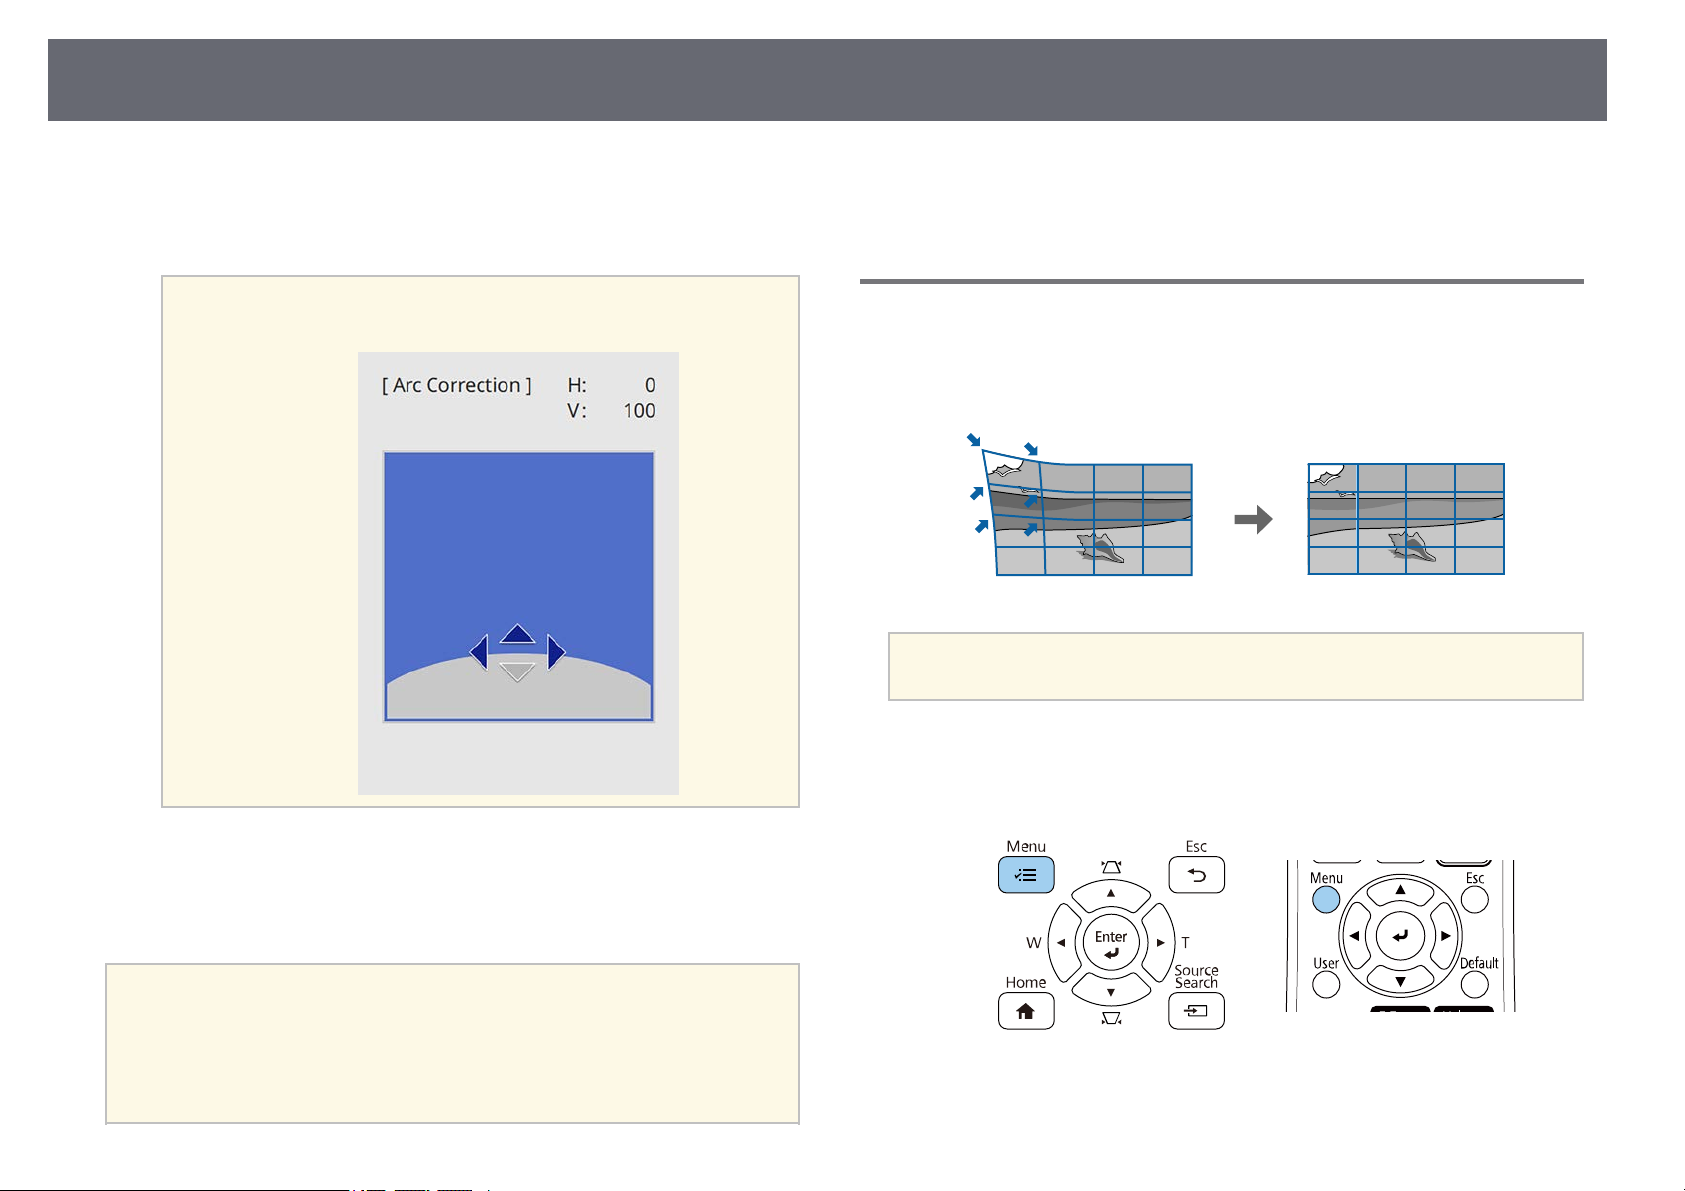
Image Shape
66
Press the arrow buttons to adjust the image shape of the selected area as
g
necessary.
To return to the area selection screen, press [Enter].
If you see this screen, you cannot adjust the shape any further in
a
the direction indicated by the gray triangle.
gg Related Links
• "Projector Installation Settings - Installation Menu" p.209
Correcting Image Shape with Point Correction
You can use the projector's Point Correction setting to fine-tune the image
shape in portions of an image. The image is divided into a grid which allows
you to move intersection points on the grid as necessary to correct distortion.
If you change the Screen Type setting or adjust the image position, the
a
a
adjustments are reset.
Turn on the projector and display an image.
Repeat steps 6 and 7 as needed to adjust any remaining corners.
h
When you are finished, press [Esc].
i
• To save the current shape of an image you have adjusted, select Save
a
Memory. You can save up to three image shapes in the memory.
s Installation > Geometry Correction > Memory > Save Memory
• To reset the Arc Correction settings, hold down [Esc] for about two
seconds while the area selection screen is displayed, and then select
Yes.
Press the [Menu] button on the control panel or remote control.
b
Page 67
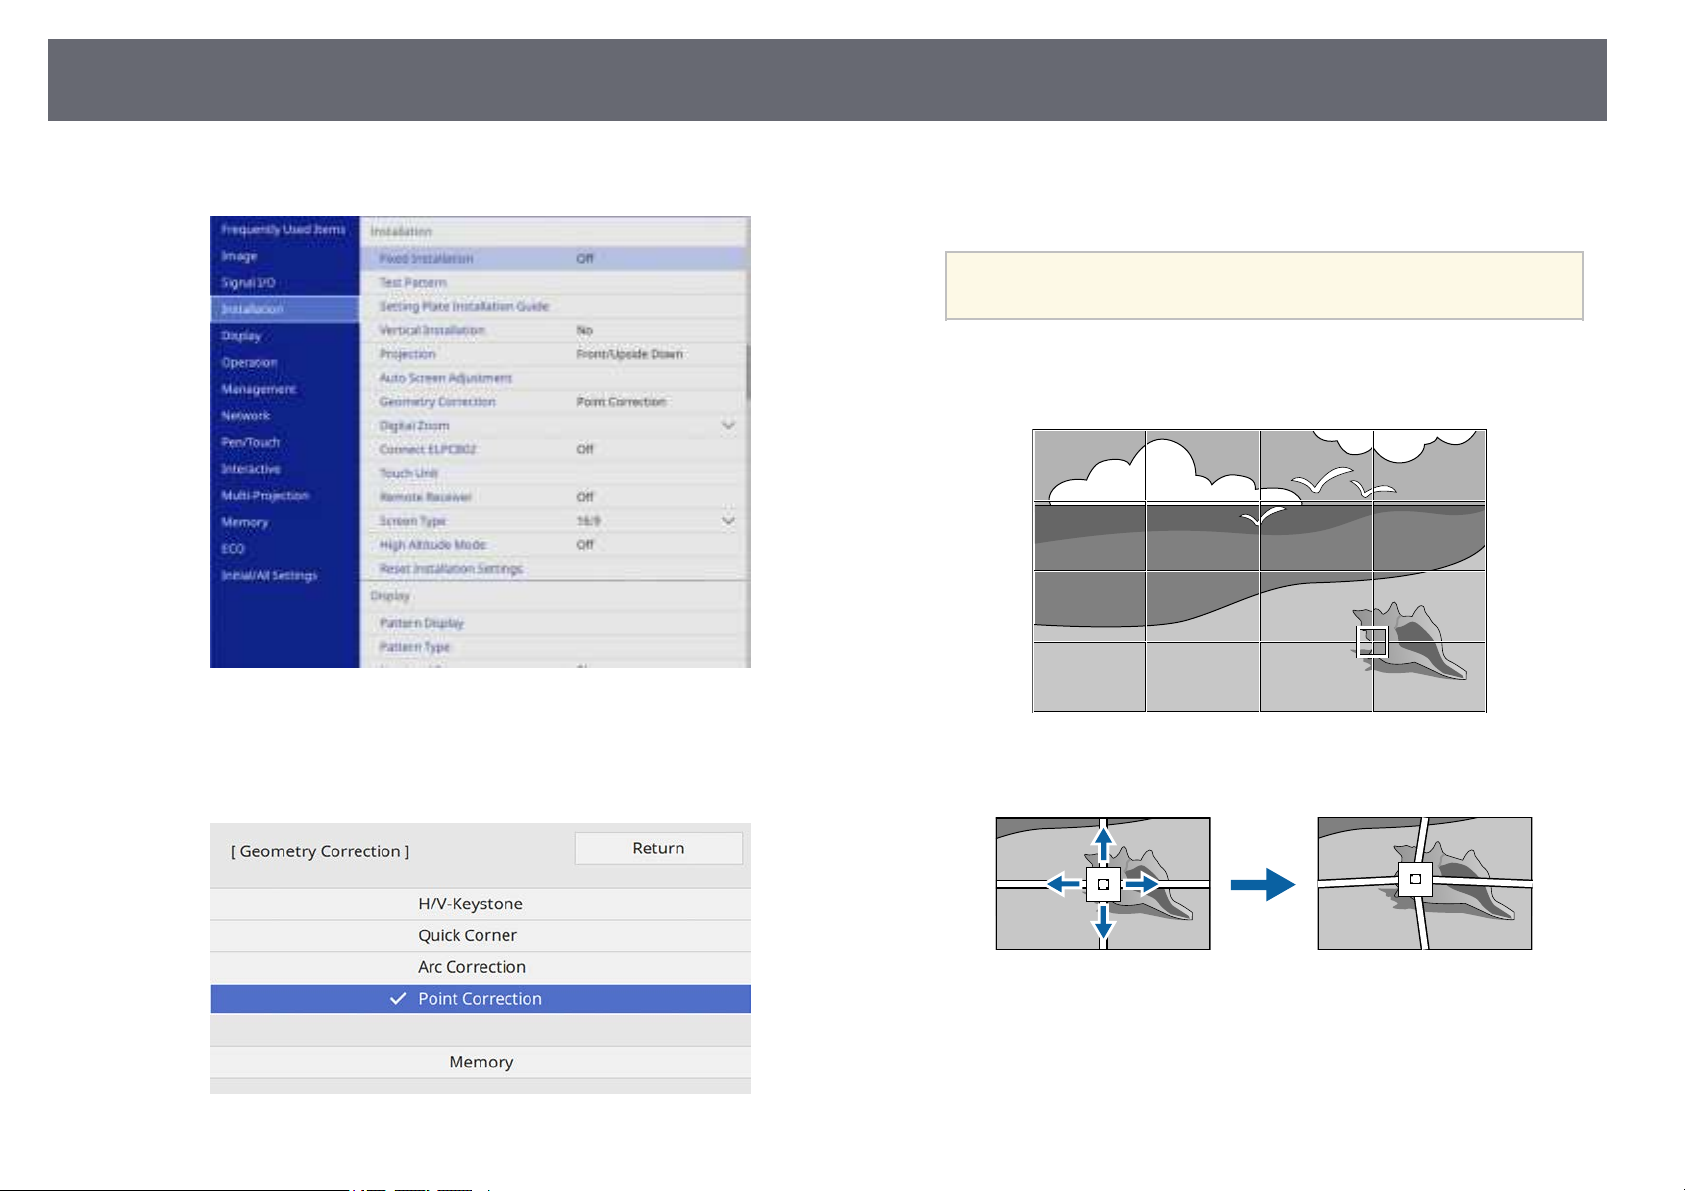
Image Shape
67
Select the Installation menu and press [Enter].
c
Select Geometry Correction and press [Enter].
d
Select Point Correction and press [Enter].
e
Select the point number and press [Enter].
f
You see the grid on the projected image.
If you want to change the grid color for visibility, select a
a
Use the arrow buttons to move to the point you want to correct, then
g
press [Enter].
Use the arrow buttons to correct distortion as necessary.
h
different Pattern Color setting.
To correct any remaining points, press [Esc] to return to the previous
i
screen, then repeat steps 8 and 9.
When you are finished, press [Esc].
j
Page 68
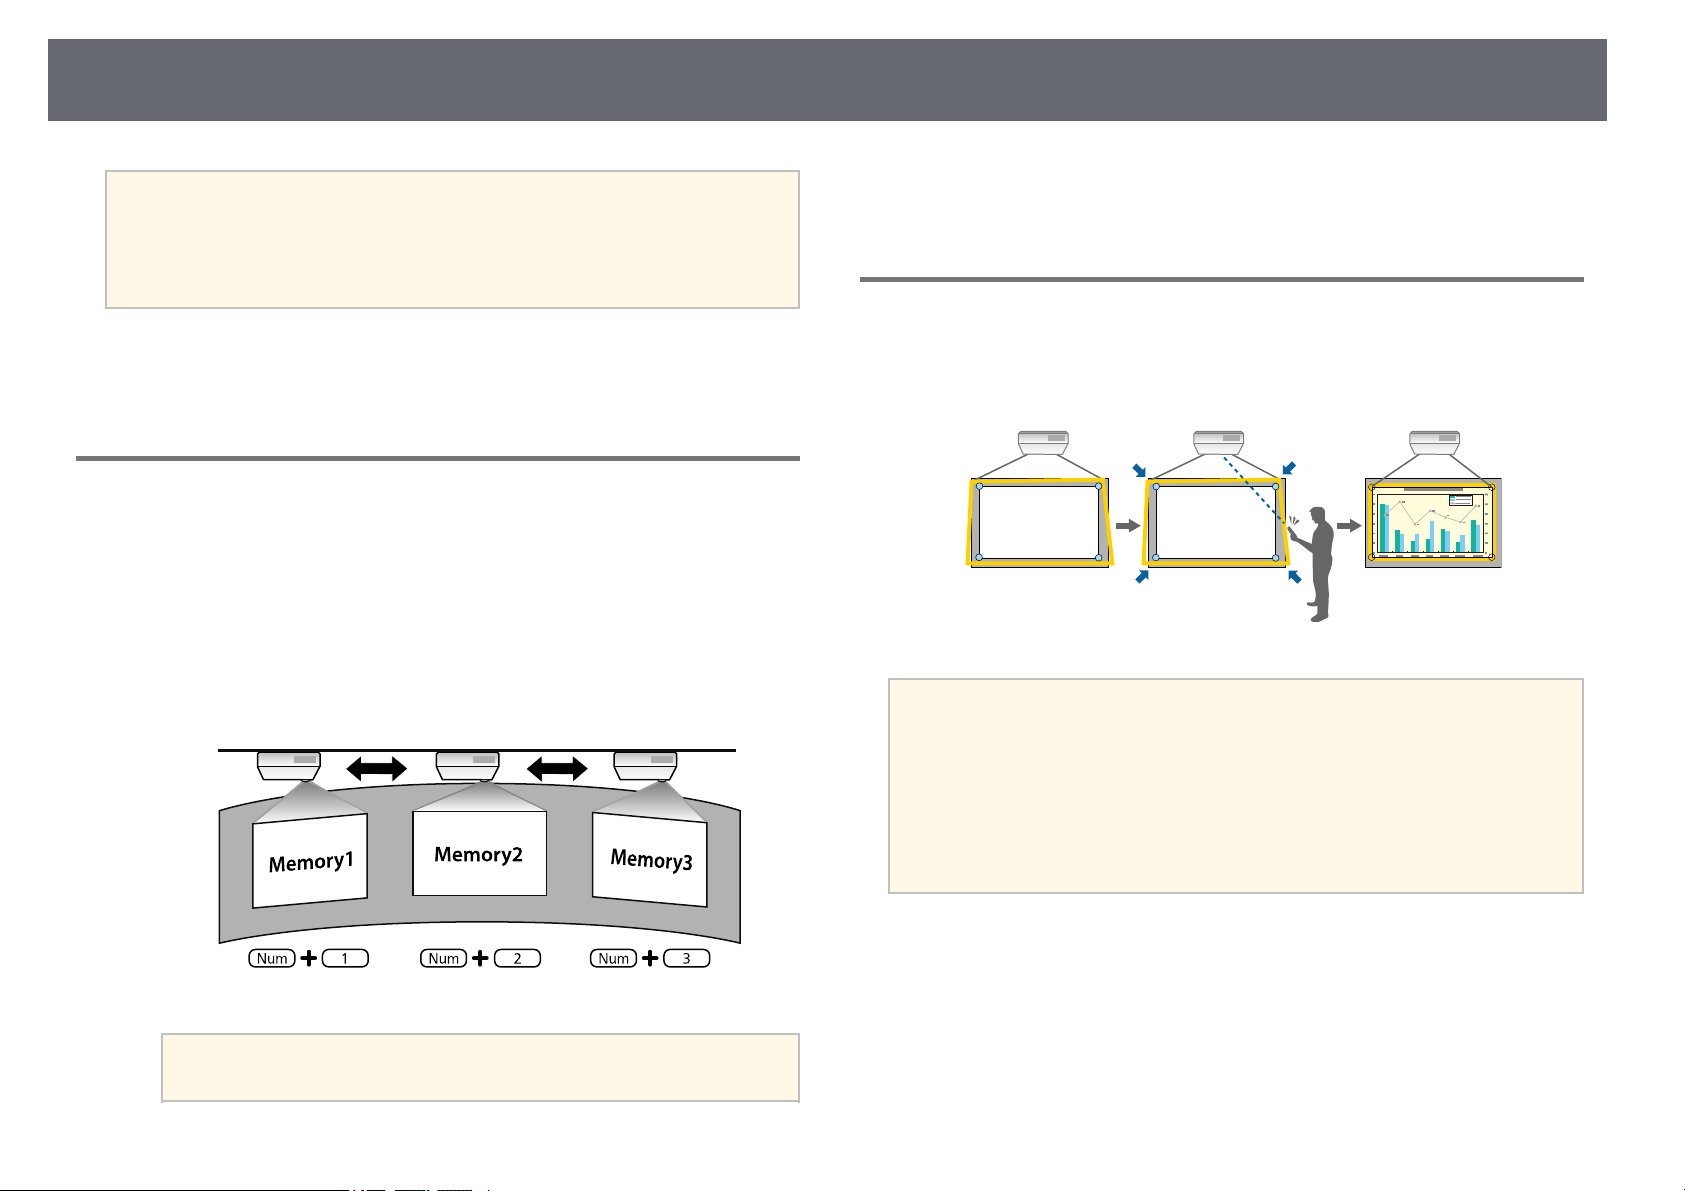
Image Shape
68
• To save the current shape of an image you have adjusted, select Save
a
gg Related Links
• "Projector Installation Settings - Installation Menu" p.209
Memory. You can save up to three image shapes in the memory.
s Installation > Geometry Correction > Memory > Save Memory
• To reset the Point Correction settings to their original positions,
select Reset on the Point Correction screen.
Loading Image Shape Setting from Memory
You can load the image shape settings you selected and saved to the
projector's memory and apply them to the current image.
Turn on the projector and display an image.
a
Hold down the [Num] button on the remote control, and then press
b
the numeric button (1, 2, or 3) that matches the number of the saved
setting.
When you have finished loading the settings, follow the on-screen
c
instructions.
Correcting Image Shape with Corner Markers
If you have installed corner markers on the projection surface, you can use the
projector's Auto Screen Adjustment setting to correct the shape of an image
automatically.
• The Auto Screen Adjustment may not work properly depending on
a
the surface of the projected screen. You can perform the Auto Screen
Adjustment in the following situations:
• The screen surface is flat.
• The projection surface is not patterned or dirty and there are no
other obstructions on the screen surface.
• Before performing the Auto Screen Adjustment, set the screen type
setting. The adjustments reset when you change the Screen Type.
a
The illustration above is only an example.
Auto Screen Adjustment can correct projected image distortion in these
conditions:
• Screen size is 110 inches or less
• Projection angle is within about 3° of squarely facing the projection surface
in all directions
Turn on the projector and display an image.
a
Page 69
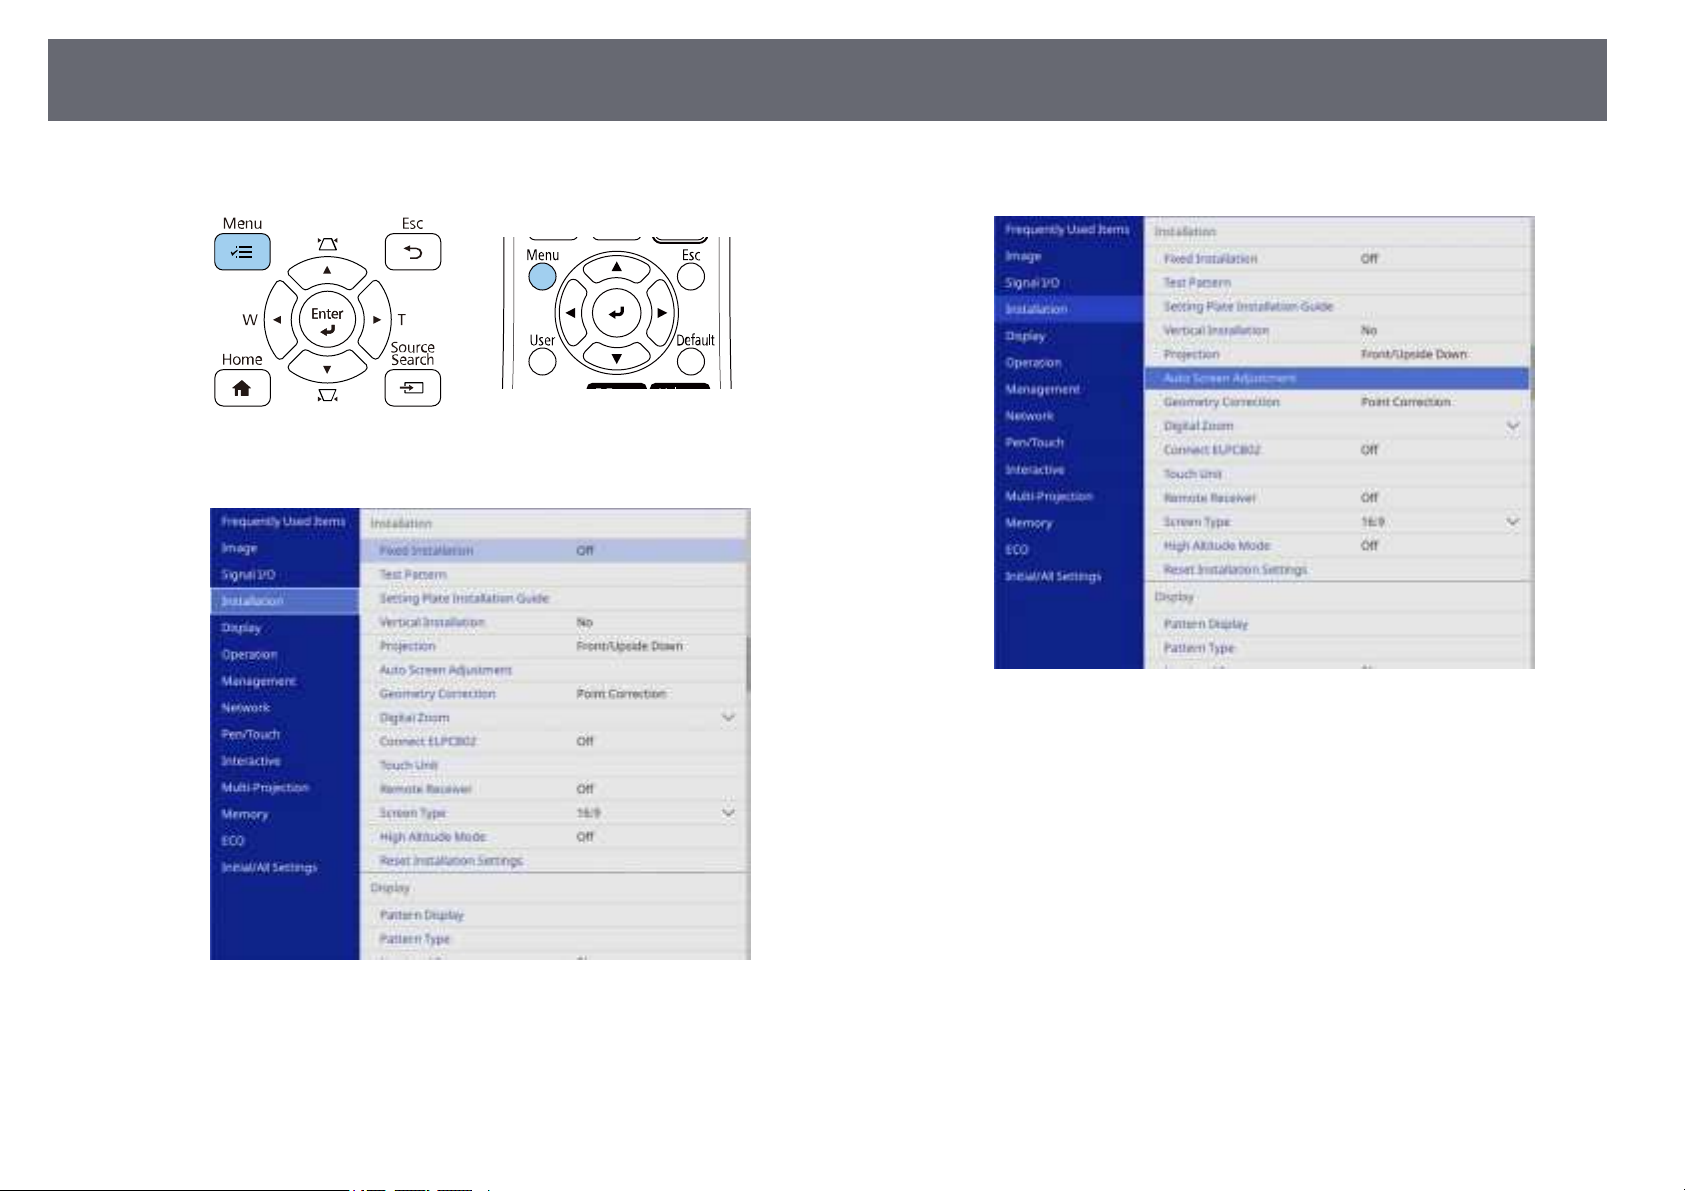
Image Shape
69
Press the [Menu] button on the control panel or remote control.
b
Select the Installation menu and press [Enter].
c
Select Auto Screen Adjustment and press [Enter].
d
You see a guide screen.
Follow the on-screen instructions to adjust the position of the projected
e
image so that the corner markers appear just inside the yellow area.
Press [Enter].
f
The guide pattern appears and the projector starts adjusting the image
shape.
If there are any distortions in the shape of the projected images as a result of
the adjustments, correct the image shape using the Quick Corner correction.
Page 70
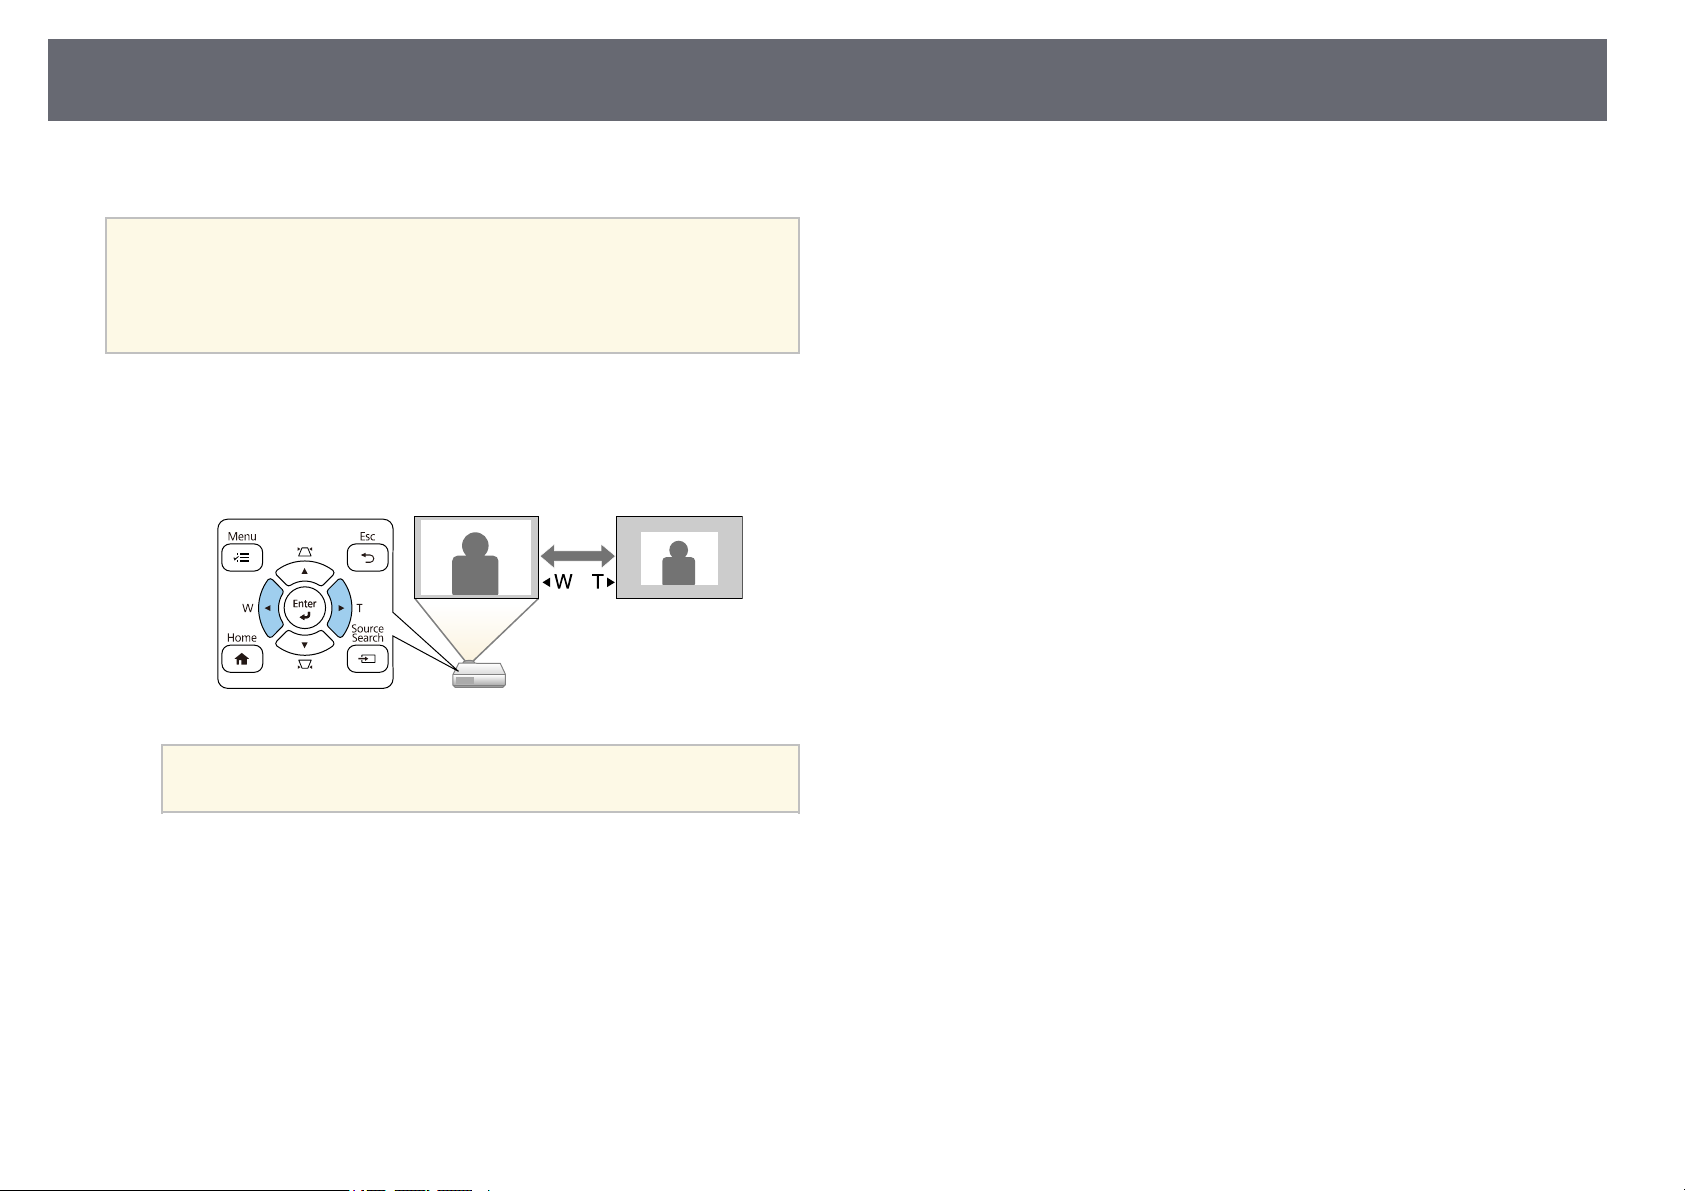
Resizing the Image with the Buttons
You can resize the image using the Wide and Tele buttons.
• For the best quality images, we recommend adjusting the installation
a
Turn on the projector and display an image.
a
Press the Wide button on the projector's control panel to enlarge the
b
image size. Press the Tele button to reduce the image size.
position of the projector to achieve the correct image size and shape.
• We recommend adjusting the image size at least 20 minutes after you
start projecting, because images are not stable right after turning on
the projector.
70
You can also adjust the Digital Zoom setting in the projector's
a
gg Related Links
• "Projector Installation Settings - Installation Menu" p.209
Installation menu.
Page 71
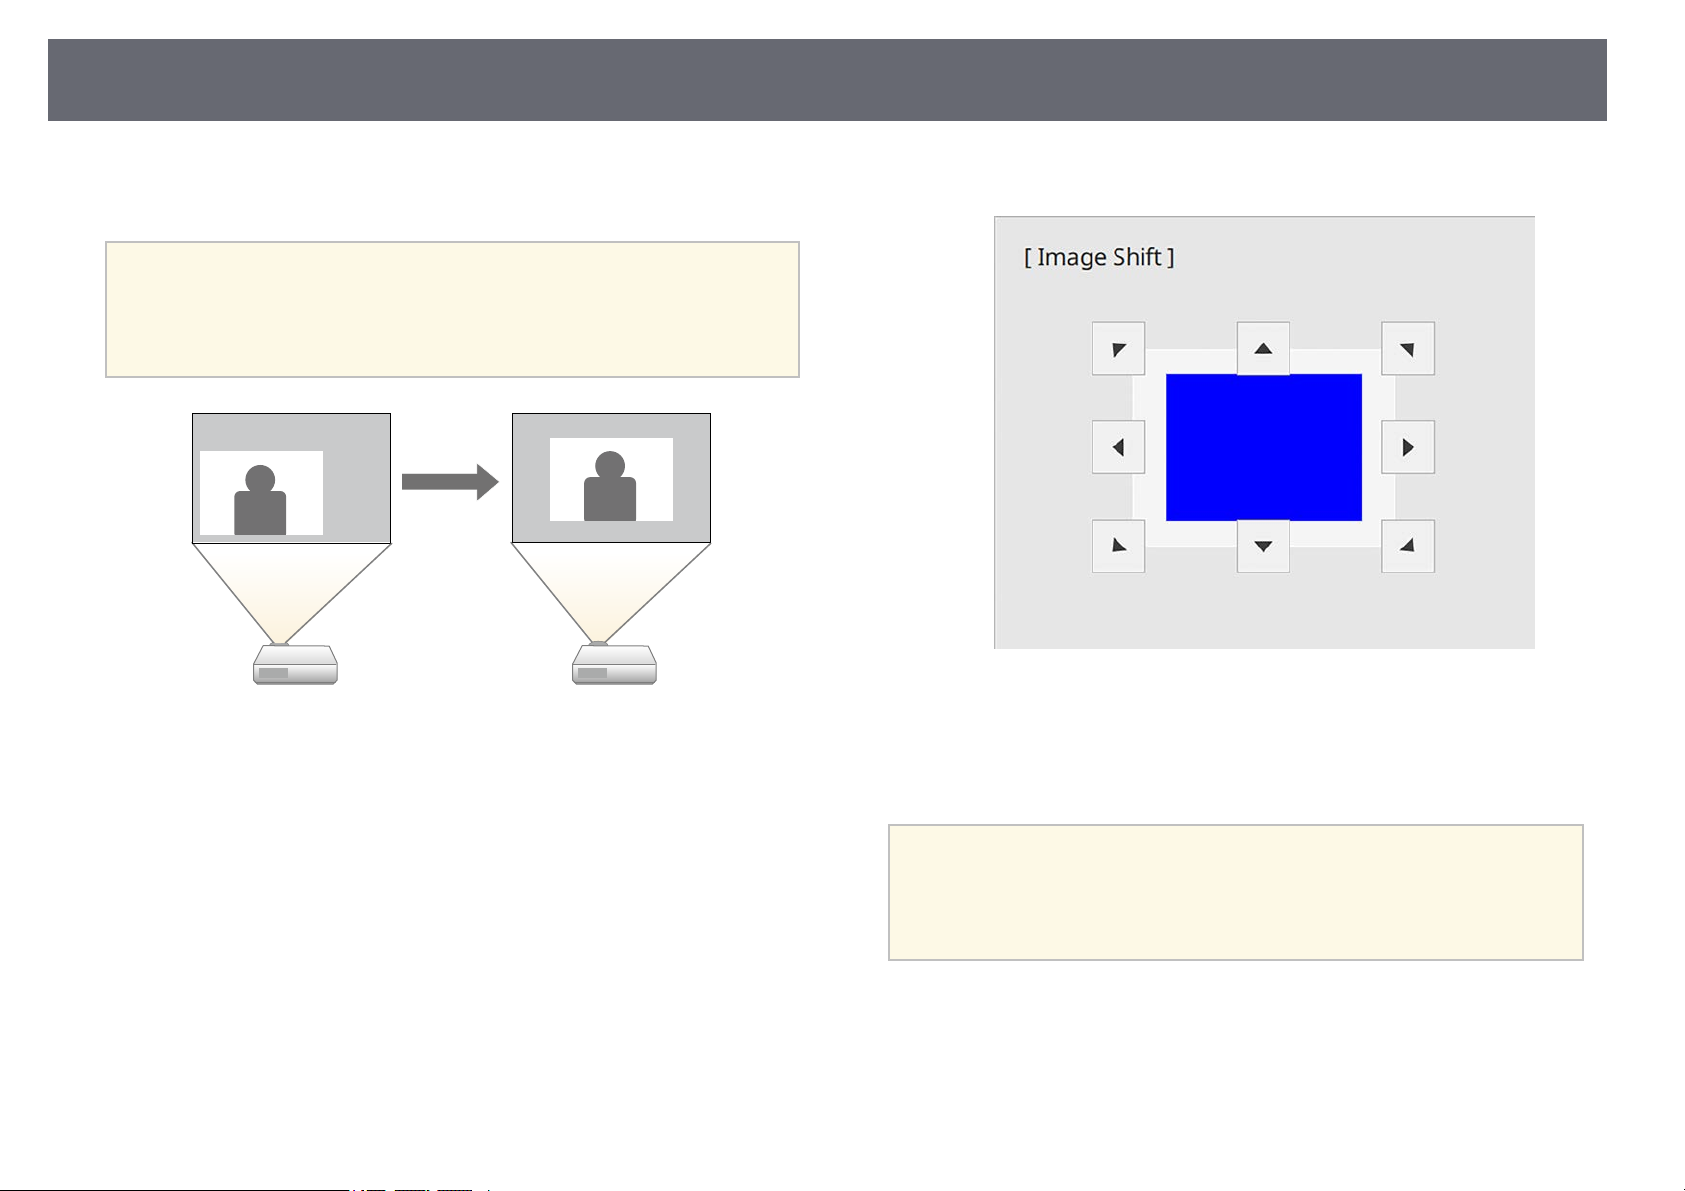
Adjusting the Image Position
71
You can use the Image Shift feature to adjust the image position without
moving the projector.
• This feature is not available if the Zoom option is set to the widest
a
Turn on the projector and display an image.
a
Adjust the image size using the Wide and Tele buttons.
b
After you adjust the image size, the Image Shift screen is displayed
automatically.
setting.
• We recommend adjusting the image position at least 20 minutes after
you start projecting, because images are not stable right after turning
on the projector.
Use the arrow buttons to adjust the image position.
c
Press the [Esc] button to close the adjustment screen.
d
The adjustment screen disappears if no operation is performed after
approximately 10 seconds.
• The Image Shift setting is retained even if the projector is turned off.
a
You need to re-adjust the position if you change the installation
location or angle of the projector.
• You can also adjust the Image Shift setting in the projector's
Installation menu.
gg Related Links
• "Projector Installation Settings - Installation Menu" p.209
Page 72
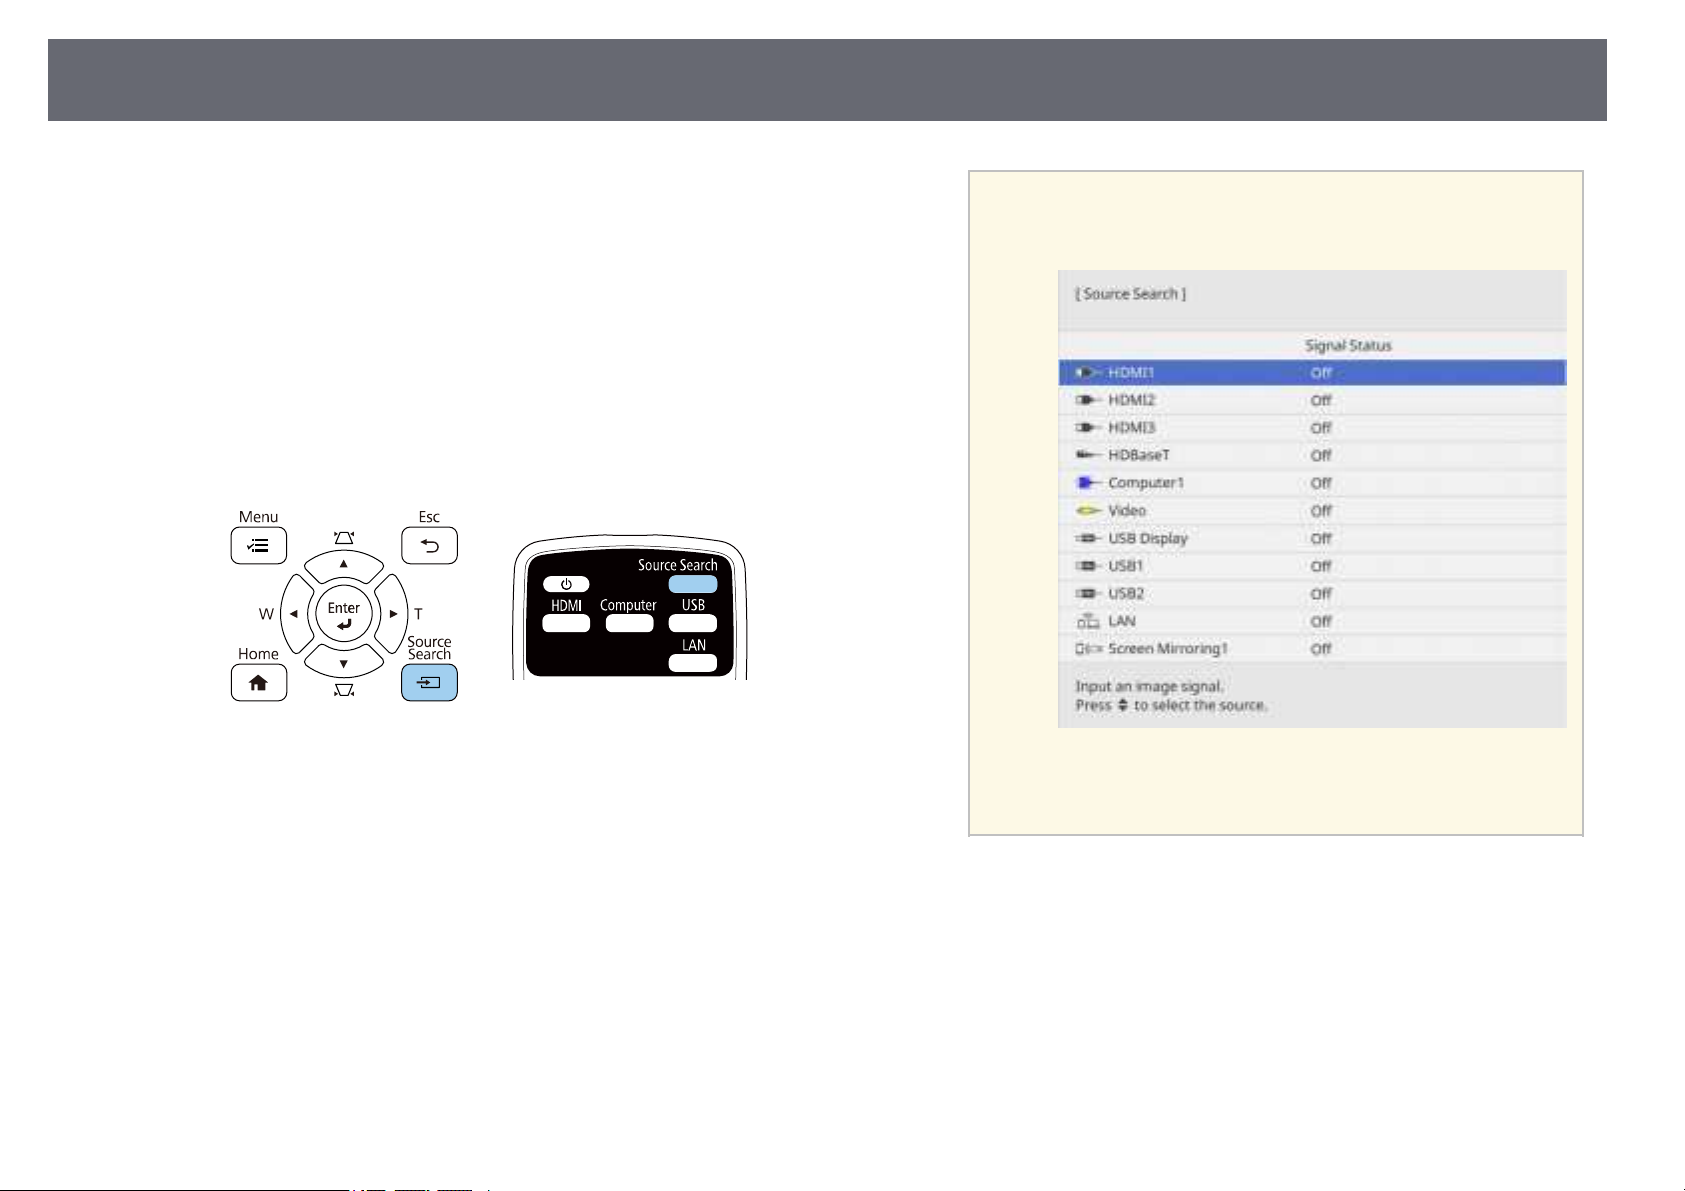
Selecting an Image Source
72
When multiple image sources are connected to the projector, such as a
computer and DVD player, you can switch from one image source to the
other.
Make sure the connected image source you want to use is turned on.
a
For video image sources, insert a DVD or other video media and press
b
play.
Do one of the following:
c
• Press the [Source Search] button on the control panel or remote
control until you see the image from the source you want.
a
This screen is displayed when no image signal is detected.
Check the cable connections between the projector and image
source.
Any devices connected to the control pad's HDMI ports are
displayed as the HDBaseT image source (EB-1485Fi only).
Page 73
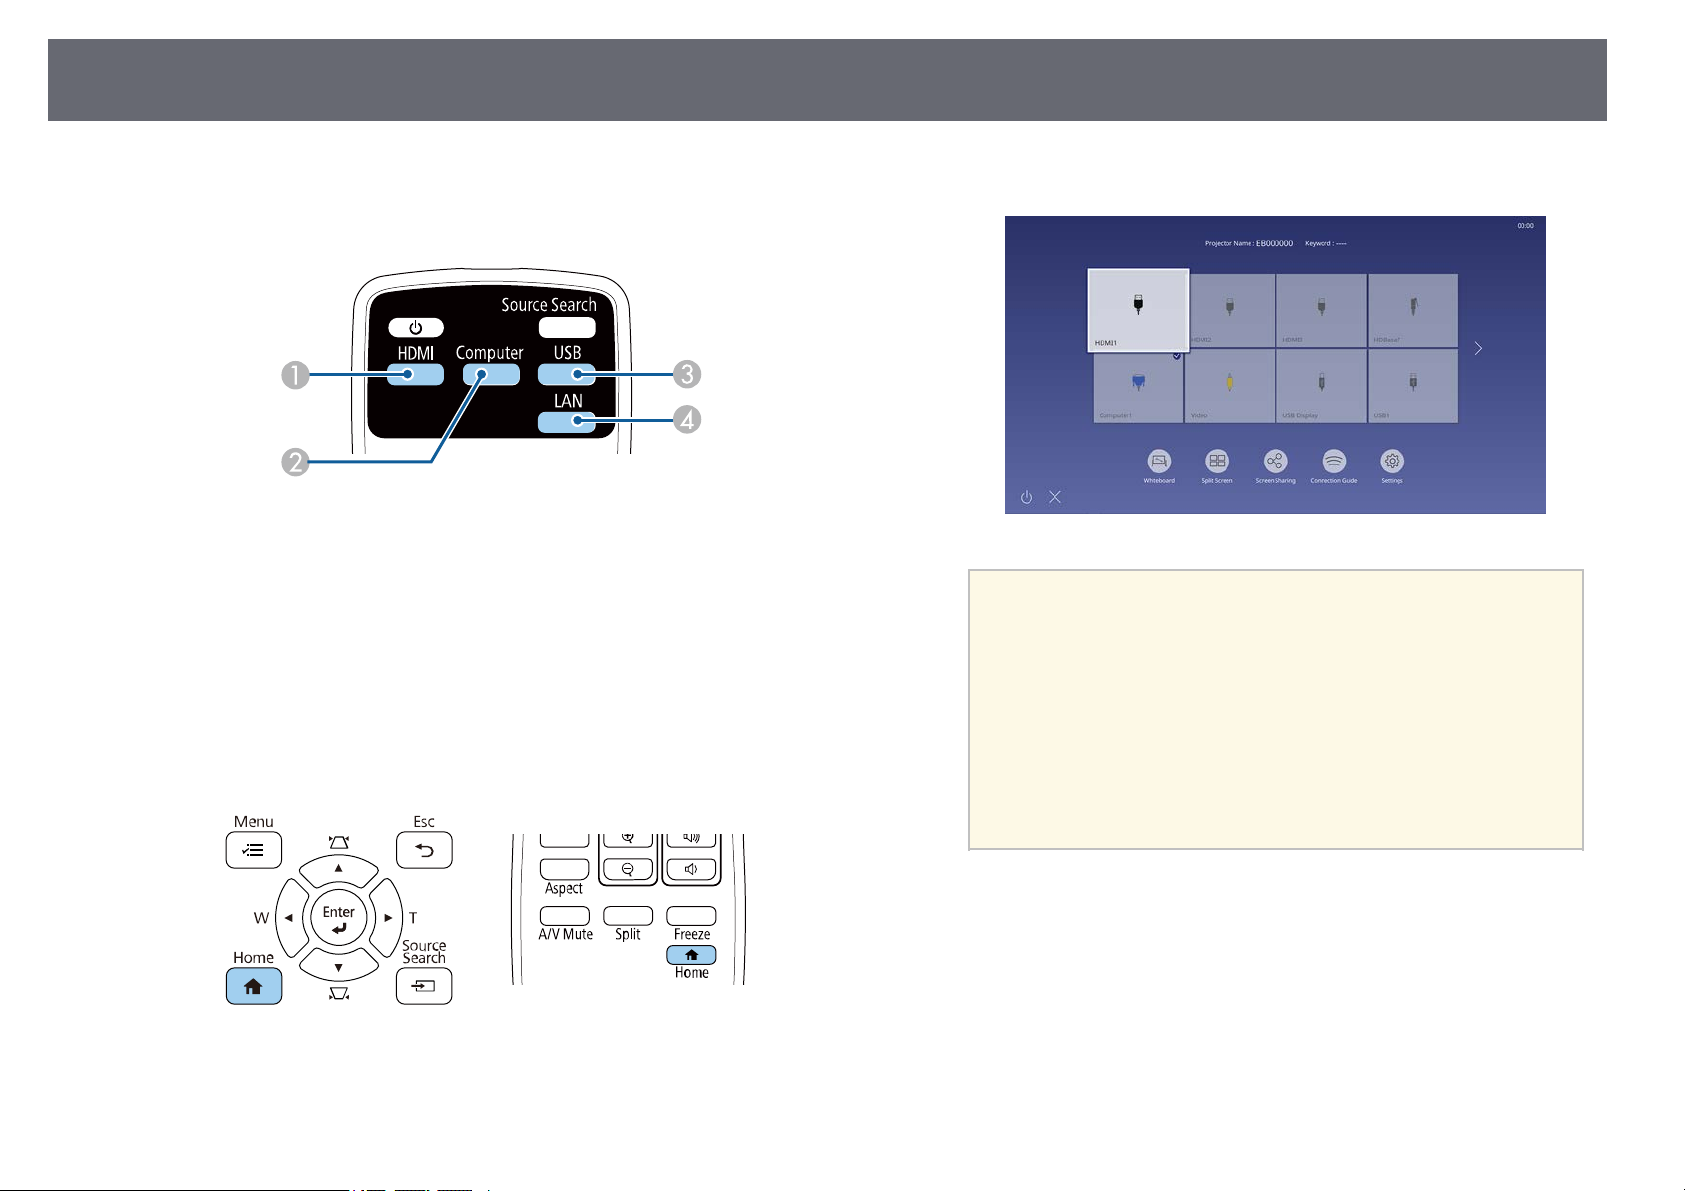
Selecting an Image Source
73
• Press the button for the source you want on the remote control. If
there is more than one port for that source, press the button again to
cycle through the sources.
Video, HDMI, and HDBaseT (EB-1485Fi only) sources (Video,
A
HDMI1, HDMI2, HDMI3 ports, and devices connected to the control
pad's HDMI ports)
Computer port source (Computer1 and Computer2 ports)
B
USB port sources (USB-B port and external devices connected to the
C
USB-A ports)
Network source (LAN and Screen Mirroring)
D
• Press the [Home] button on the control panel or remote control.
Then select the source you want to use from the screen displayed.
• The display order of the input sources changes when the
a
projector detects an input signal. (The detected input source
appears in the upper left position.)
• A check mark appears on the image from the current input
source. You can check a preview of the current input image
for most sources as a thumbnail.
• If there are more than nine available input sources, your
desired source may appear on the next page. Select the right
arrow to move to the next page.
• Any devices connected to the control pad's HDMI ports are
displayed as the HDBaseT image source (EB-1485Fi only).
Page 74
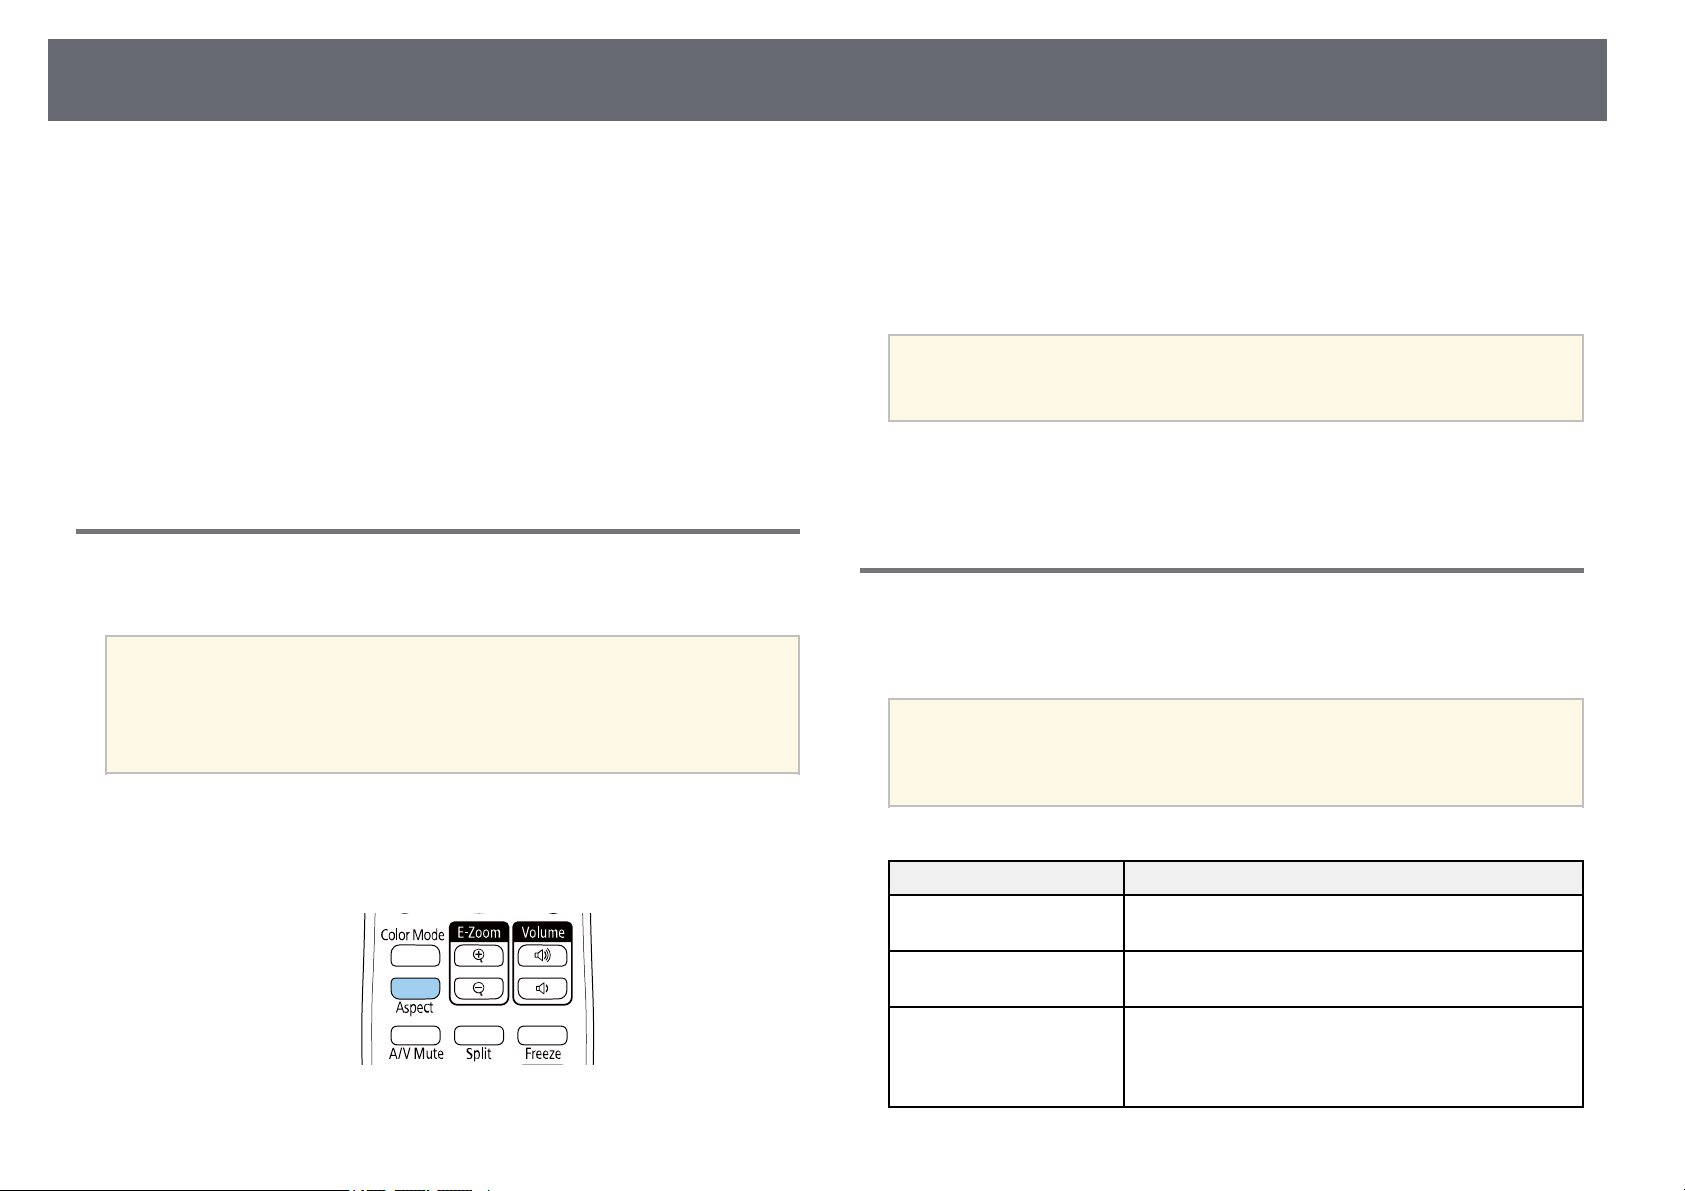
Image Aspect Ratio
74
The projector can display images in different width-to-height ratios called
aspect ratios. Normally, the input signal from your video source determines
the image's aspect ratio. However, for certain images you can change the
aspect ratio to fit your screen.
If you always want to use a particular aspect ratio for a certain video input
source, you can select it using the projector's Image menu.
gg Related Links
• "Changing the Image Aspect Ratio" p.74
• "Available Image Aspect Ratios" p.74
• "Projected Image Appearance with Each Aspect Mode" p.75
• "Image Quality Settings - Image Menu" p.205
Changing the Image Aspect Ratio
You can change the aspect ratio of the displayed image.
• Set the Screen Type setting in the projector's Installation menu
a
before changing the aspect ratio.
• This setting is available only when the Scale setting is turned off or
the Scale Mode setting is set to Full Display (EB-1485Fi only).
s Image > Scale > Scale Mode
The shape and size of the displayed image changes, and the name of the
aspect ratio appears briefly on the screen.
To cycle through the available aspect ratios for your input signal, press
c
the [Aspect] button repeatedly.
To display images without black bars, set Resolution to Wide or
a
gg Related Links
• "Image Quality Settings - Image Menu" p.205
Normal in the projector’s Image menu according to the computer’s
resolution.
Available Image Aspect Ratios
You can select the following image aspect ratios, depending on the selected
Screen Type setting and the input signal from your image source.
• Note that using the aspect ratio function of the projector to reduce,
a
enlarge, or split the projected image for commercial purposes or for
public viewing may infringe upon the rights of the copyright holder
of that image based on copyright law.
Turn on the projector and switch to the image source you want to use.
a
Press the [Aspect] button on the remote control.
b
Aspect mode Description
Auto Automatically sets the aspect ratio according to the
input signal and the Resolution setting.
Full Displays images using the full size of the projection
area, but does not maintain the aspect ratio.
Zoom Displays images using the full width of the projection
area and maintains the aspect ratio of the image. Areas
that exceed the edges of the projected screen are not
projected.
Page 75
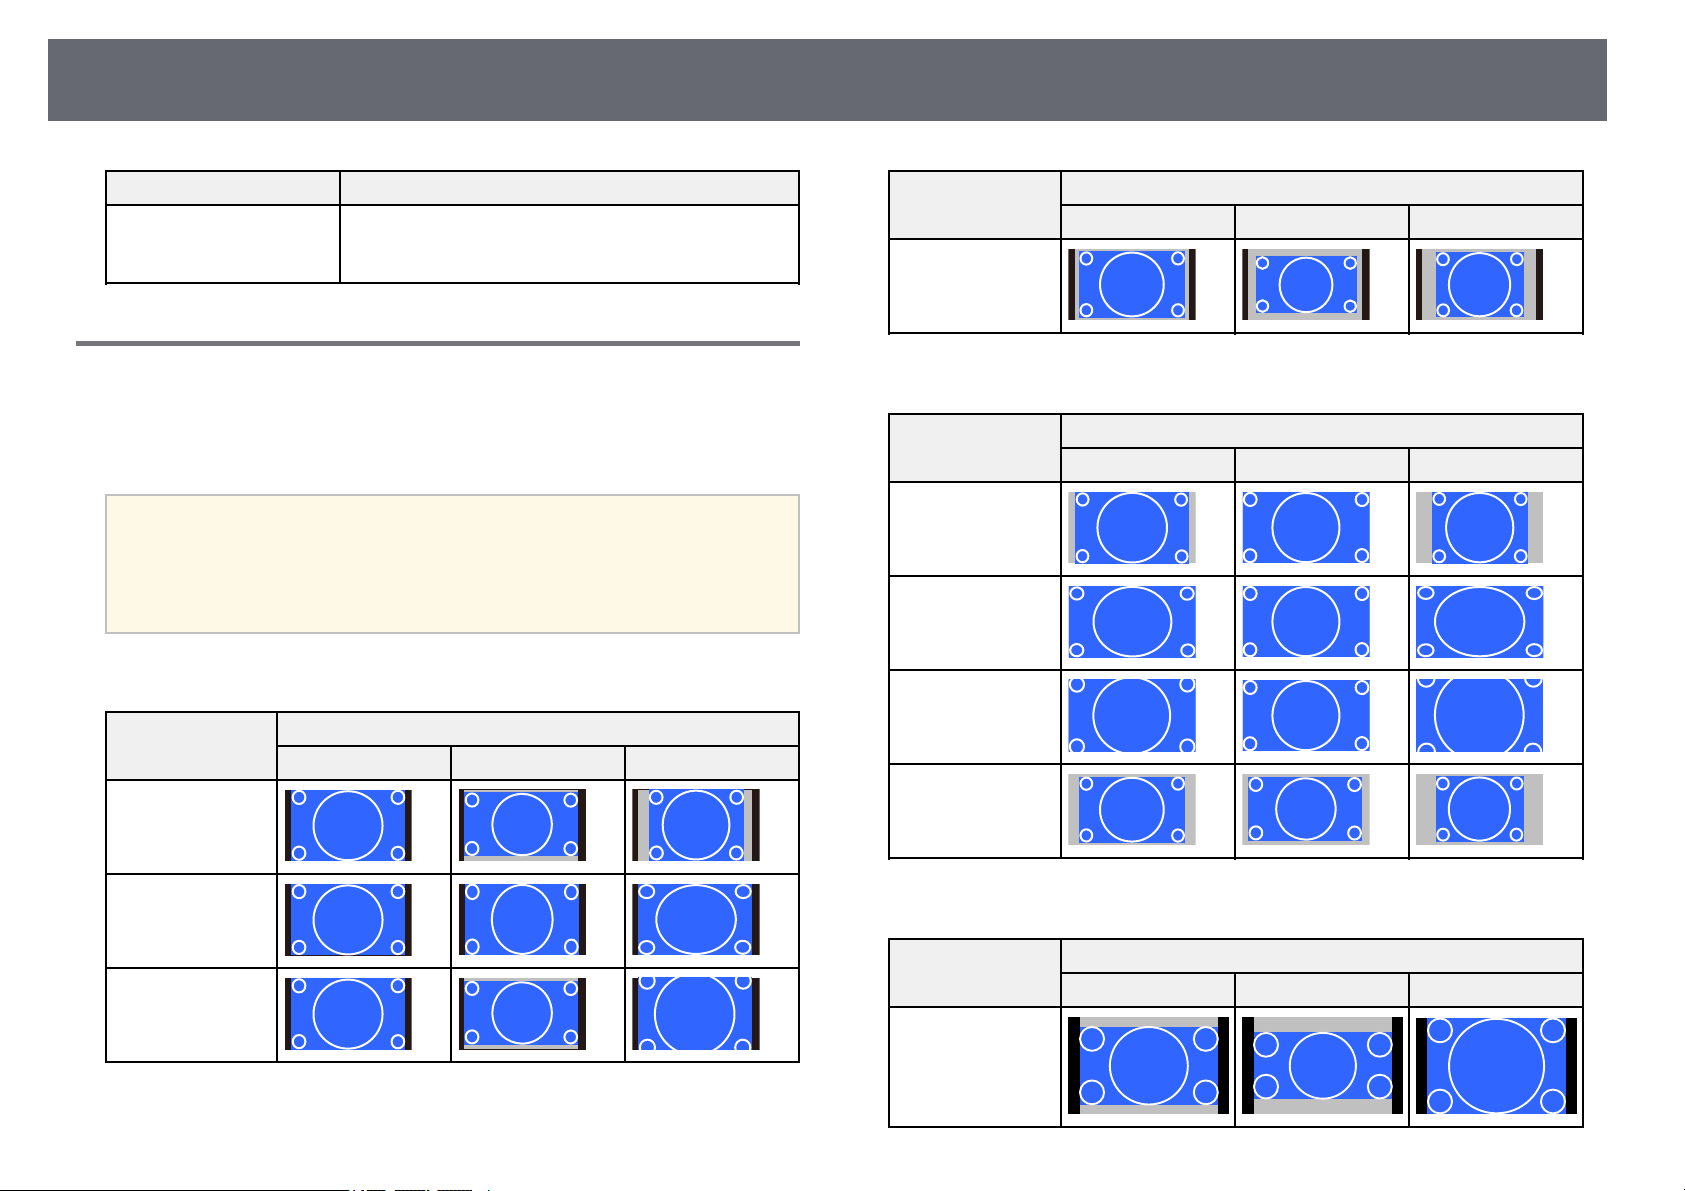
Image Aspect Ratio
75
Aspect mode Description
Native Displays images as is (aspect ratio and resolution are
maintained). Areas that exceed the edges of the
projected screen are not projected.
Projected Image Appearance with Each Aspect Mode
Black bands and cropped images may project in certain aspect ratios,
depending on the aspect ratio and resolution of your input signal. See the
following table to confirm the position of black bands and cropped images.
• The image for Native varies depending on the input signal.
a
Screen type setting: 16:10
Aspect mode Aspect ratio for input signals
Auto
• If there are margins between the edge of the image and the projected
screen frame, you can adjust the position of the image using the
Screen Position setting in the projector's Installation menu.
s Installation > Screen Type > Screen Position
16:10 16:9 4:3
Aspect mode Aspect ratio for input signals
16:10 16:9 4:3
Native
Screen type setting: 16:9
Aspect mode Aspect ratio for input signals
16:10 16:9 4:3
Auto
Full
Zoom
Native
Full
Zoom
Screen type setting: 4:3
Aspect mode Aspect ratio for input signals
16:10 16:9 4:3
Auto
Page 76
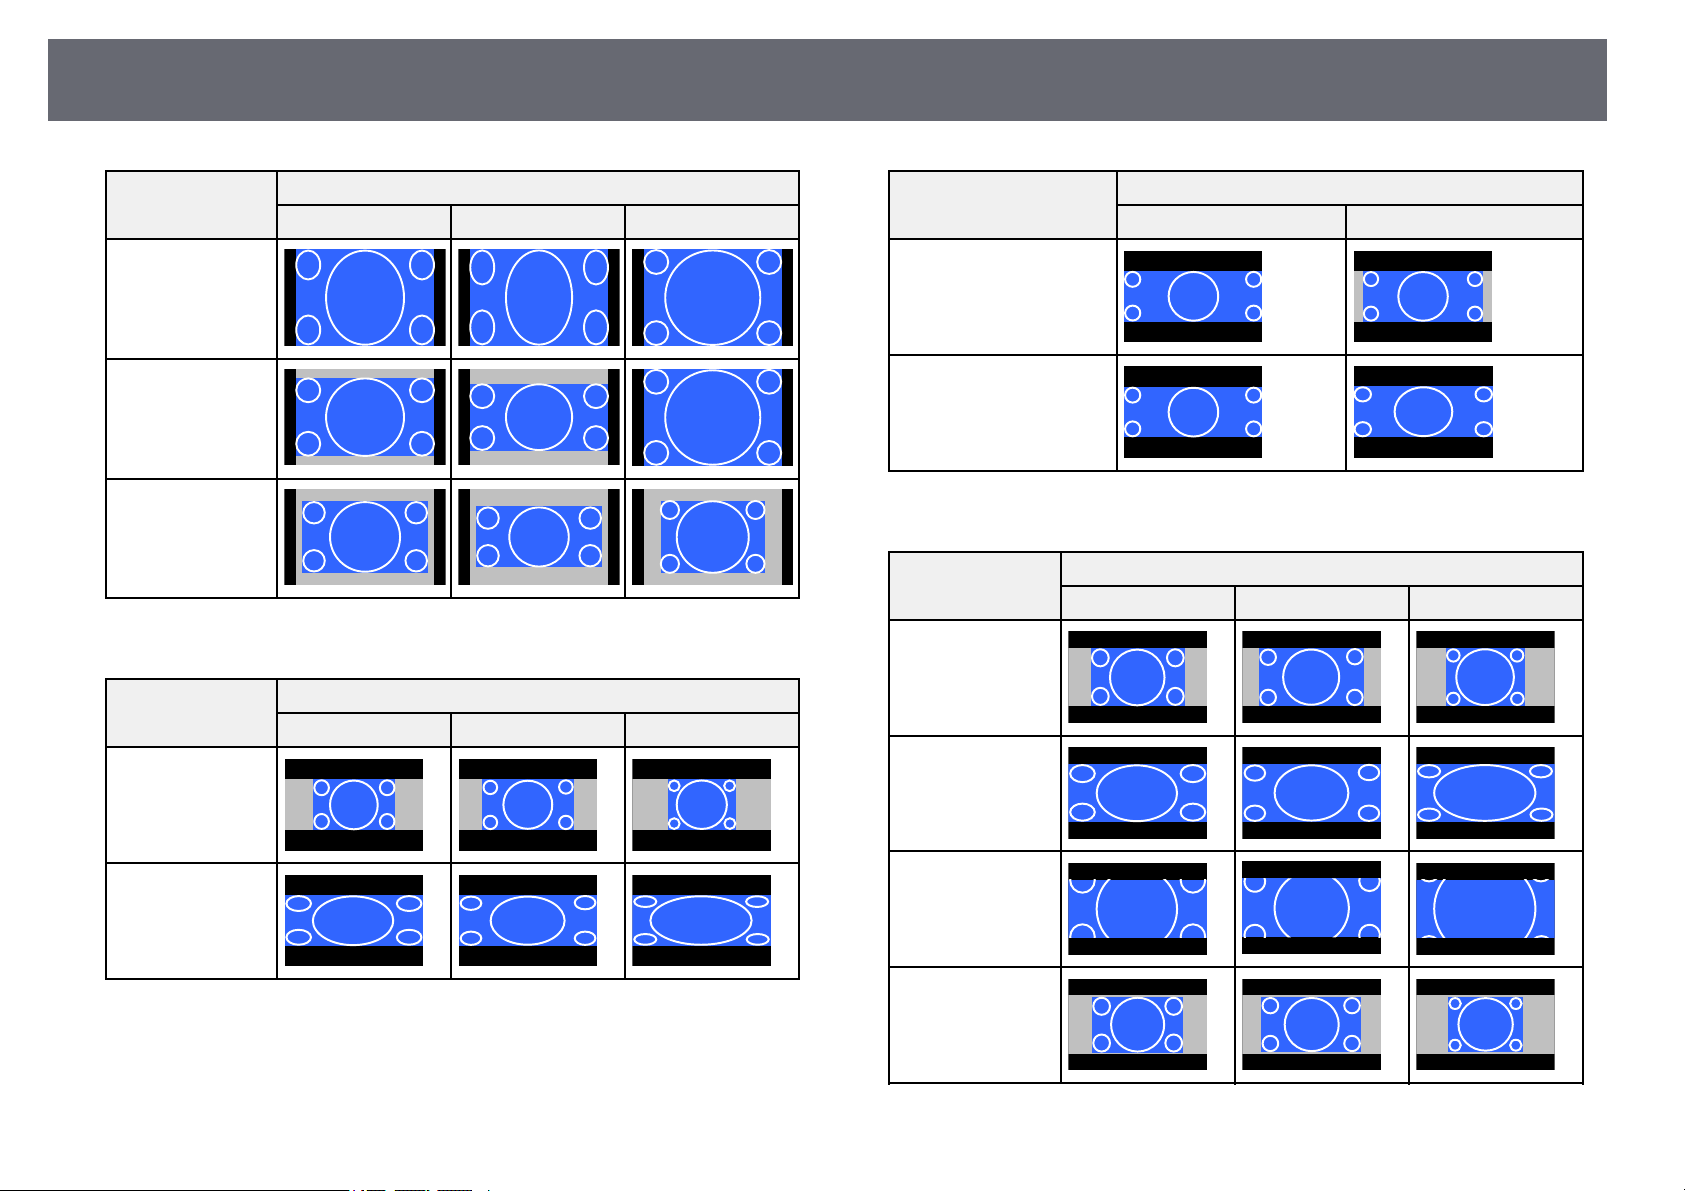
Image Aspect Ratio
76
Aspect mode Aspect ratio for input signals
16:10 16:9 4:3
Full
Zoom
Native
Screen type setting: 16:6 (EB-1485Fi only)
Aspect mode Aspect ratio for input signals
16:10 16:9 4:3
Auto
Aspect mode Aspect ratio for input signals
16:6 21:9
Auto
Full
Screen type setting: 21:9
Aspect mode Aspect ratio for input signals
16:10 16:9 4:3
Auto
Full
Full
Zoom
Native
Page 77
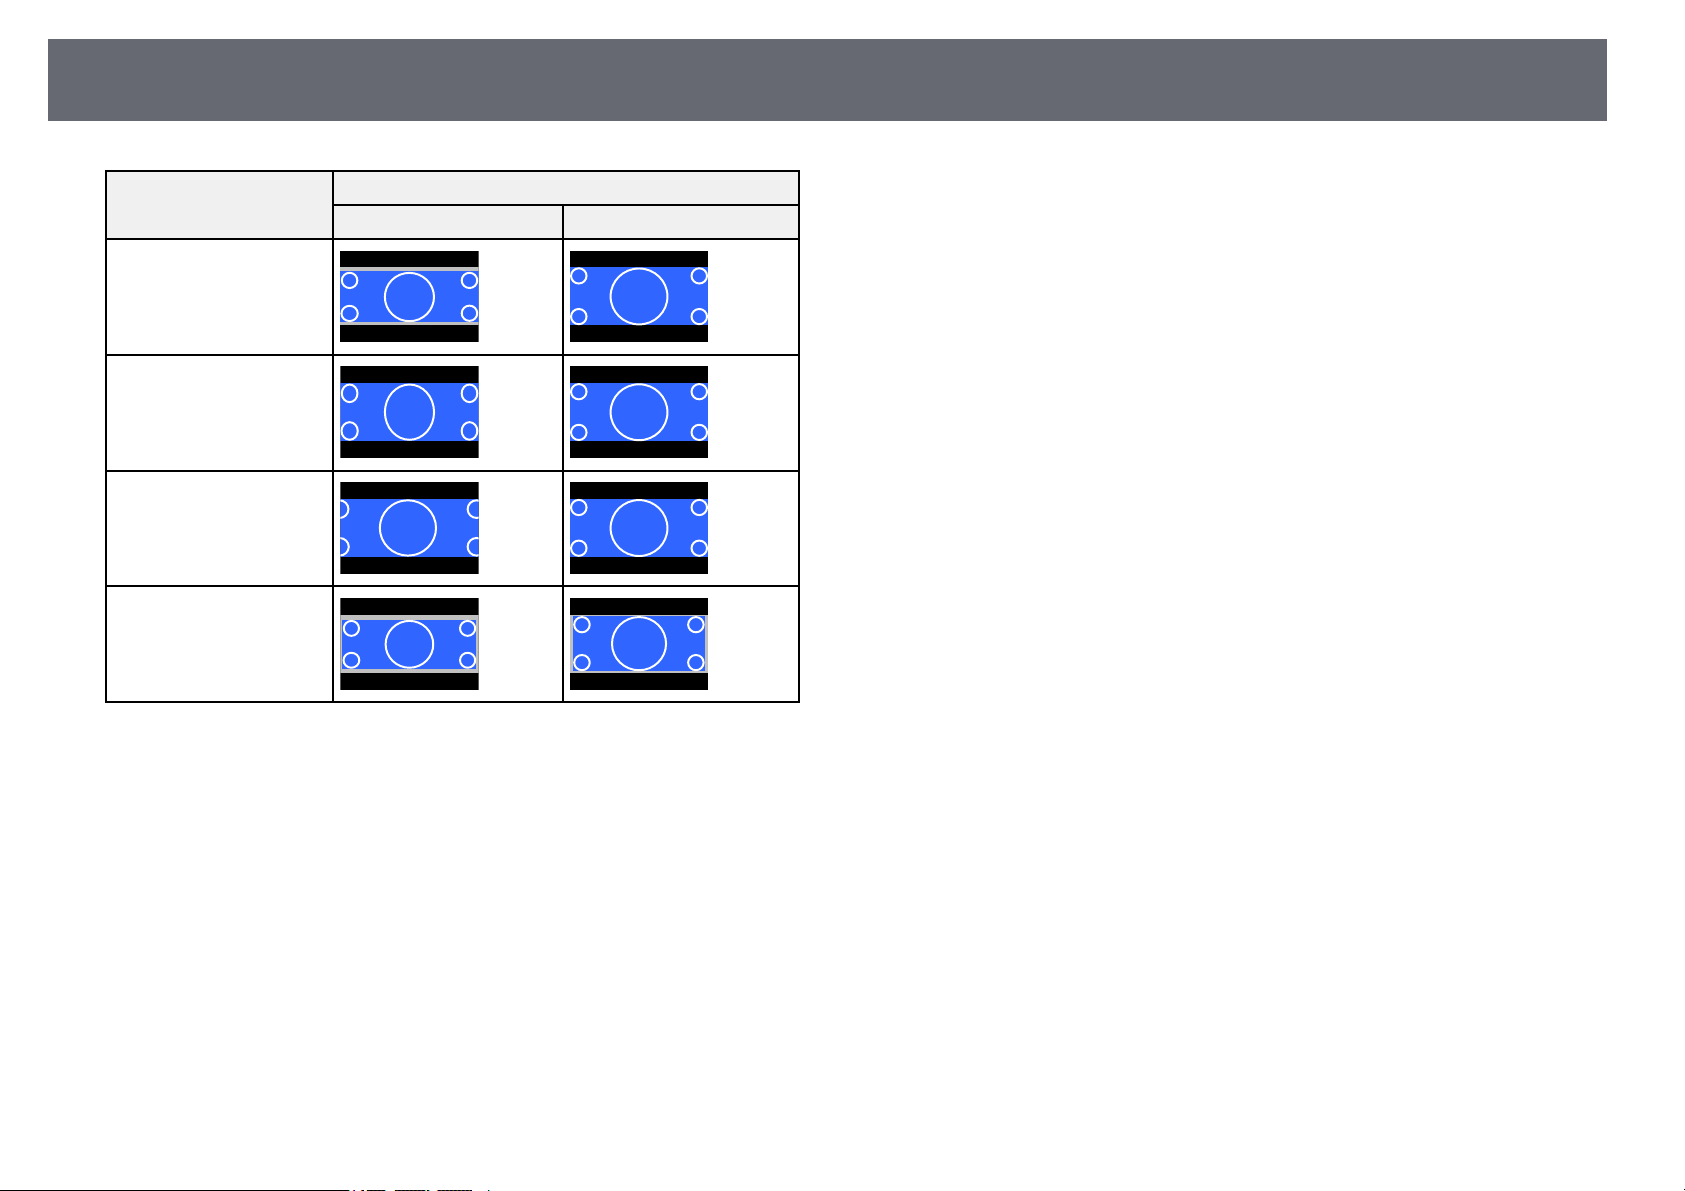
Image Aspect Ratio
Aspect mode Aspect ratio for input signals
16:6 21:9
Auto
Full
Zoom
Native
77
gg Related Links
• "Projector Installation Settings - Installation Menu" p.209
Page 78
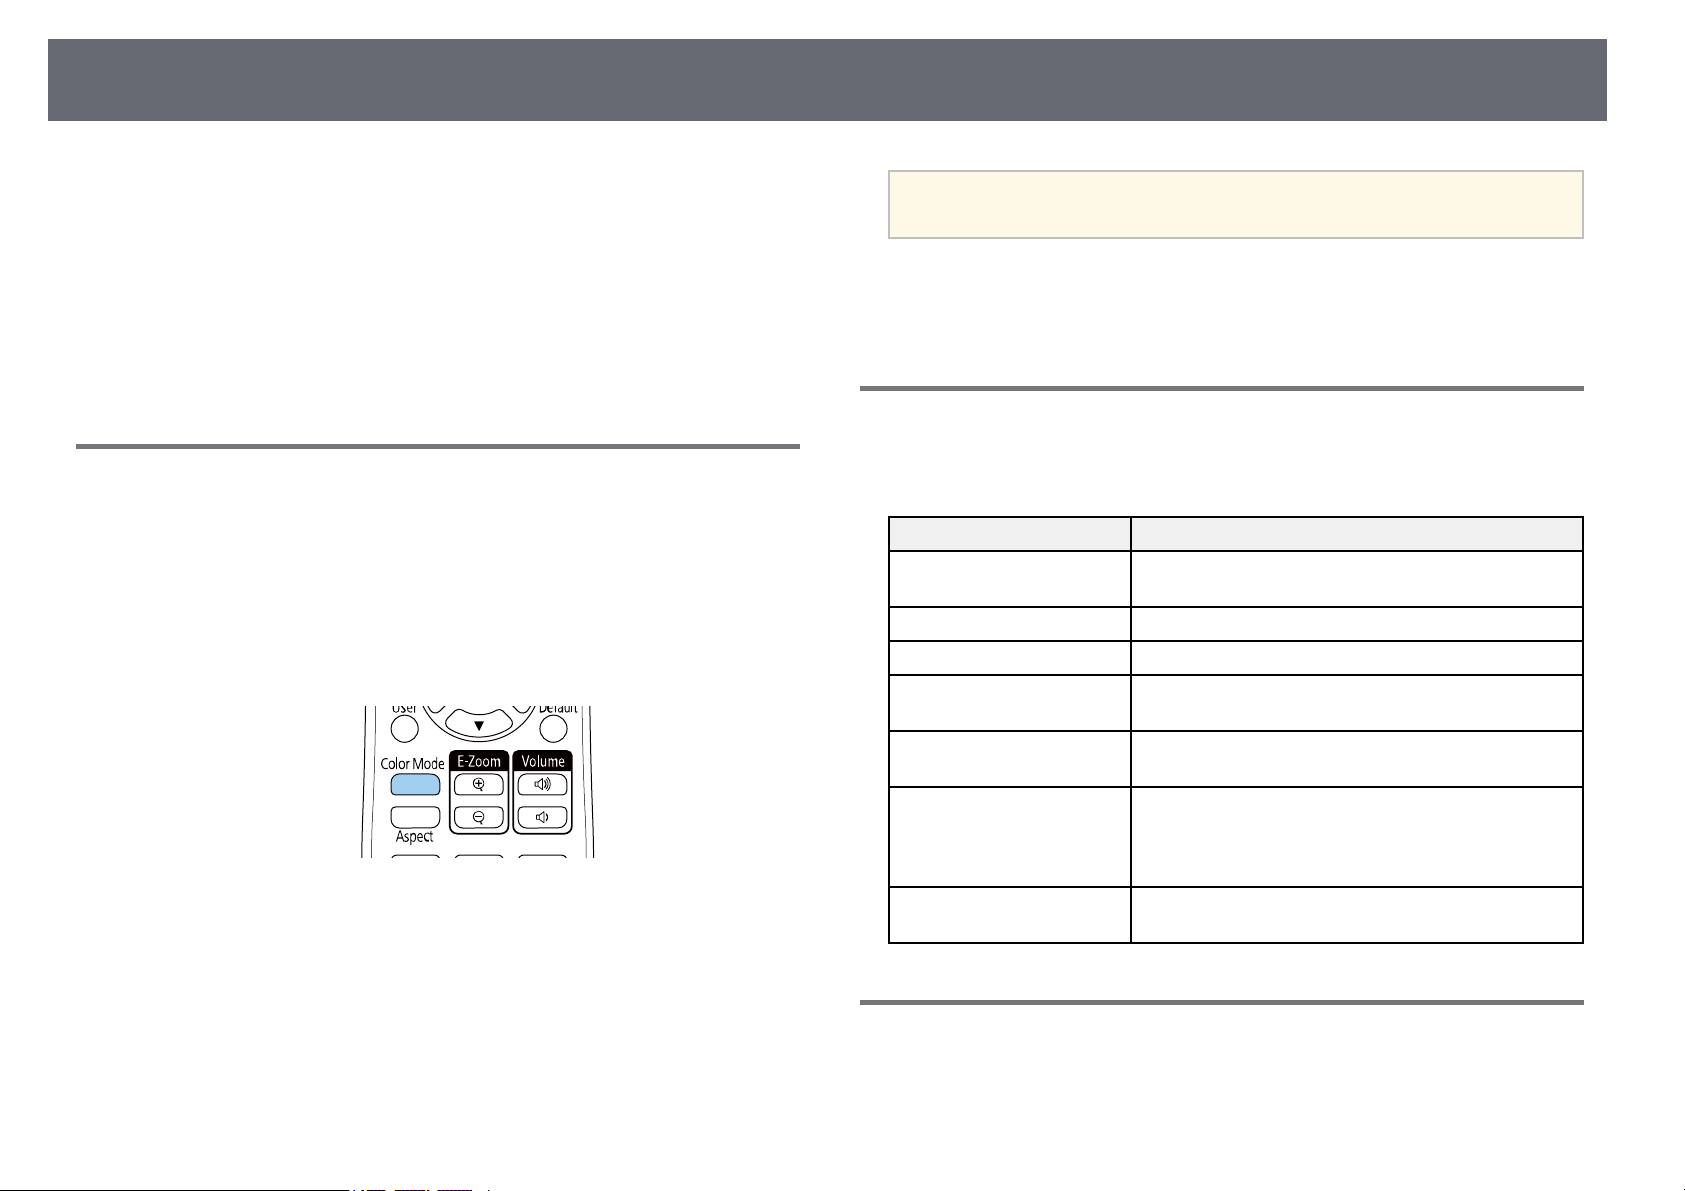
Adjusting Image Quality (Color Mode)
78
The projector offers different color modes to provide optimum brightness,
contrast, and color for a variety of viewing environments and image types.
You can select the mode designed to match your image and environment, or
experiment with the available modes.
gg Related Links
• "Changing the Color Mode" p.78
• "Available Color Modes" p.78
• "Turning On Automatic Luminance Adjustment" p.78
Changing the Color Mode
You can change the projector's Color Mode using the remote control to
optimize the image for your viewing environment.
Turn on the projector and switch to the image source you want to use.
a
Press the [Color Mode] button on the remote control to change the
b
Color Mode.
The name of the Color Mode appears briefly on the screen and then
image appearance changes.
You can also set the Color Mode setting in the projector's Image
a
gg Related Links
• "Image Quality Settings - Image Menu" p.205
menu.
Available Color Modes
You can set the projector to use these color modes, depending on the input
source you are using:
Color mode Description
Dynamic This is the brightest mode. Best for prioritizing
brightness.
Presentation Best for projecting vivid images.
Cinema Best for enjoying content such as movies.
sRGB Best for faithfully reproducing the color of the source
image.
Blackboard Best for projecting images directly on a green
chalkboard.
DICOM SIM Best for projecting X-ray photographs and other
medical images. This mode is for reference purposes
only and should not be used to make medical
diagnoses.
Multi-Projection (EB1485Fi)
Best for projecting from multiple projectors (reduces
the color tone difference between images).
To cycle through all of the available color modes for your input signal,
c
press the [Color Mode] button repeatedly.
Turning On Automatic Luminance Adjustment
You can turn on Dynamic Contrast to automatically optimize the image
luminance. This improves the image contrast based on the brightness of the
content you project.
Page 79
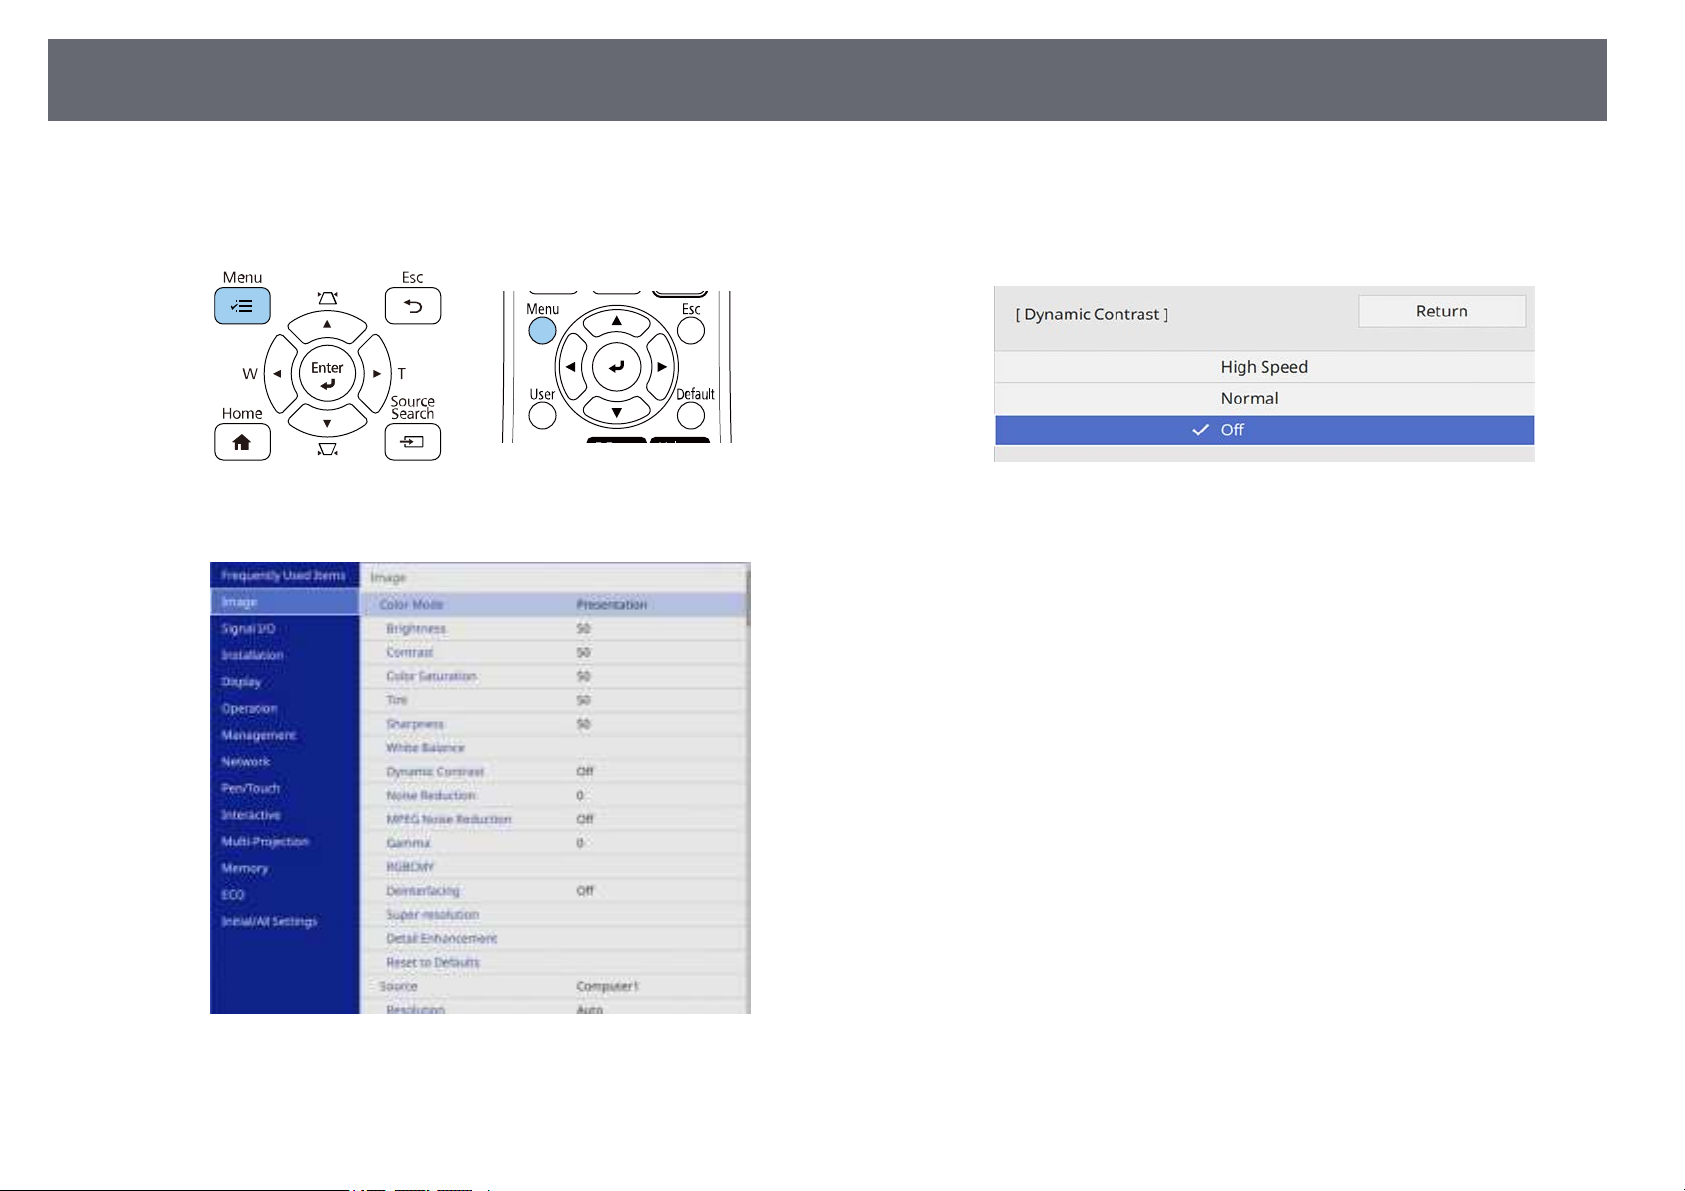
Adjusting Image Quality (Color Mode)
79
Turn on the projector and switch to the image source you want to use.
a
Press the [Menu] button on the control panel or remote control.
b
Select the Image menu and press [Enter].
c
Choose one of the following options and press [Enter]:
e
• Normal for standard brightness adjustment.
• High Speed to adjust brightness as soon as the scene changes.
Press [Menu] or [Esc] to exit the menus.
f
Select Dynamic Contrast and press [Enter].
d
Page 80
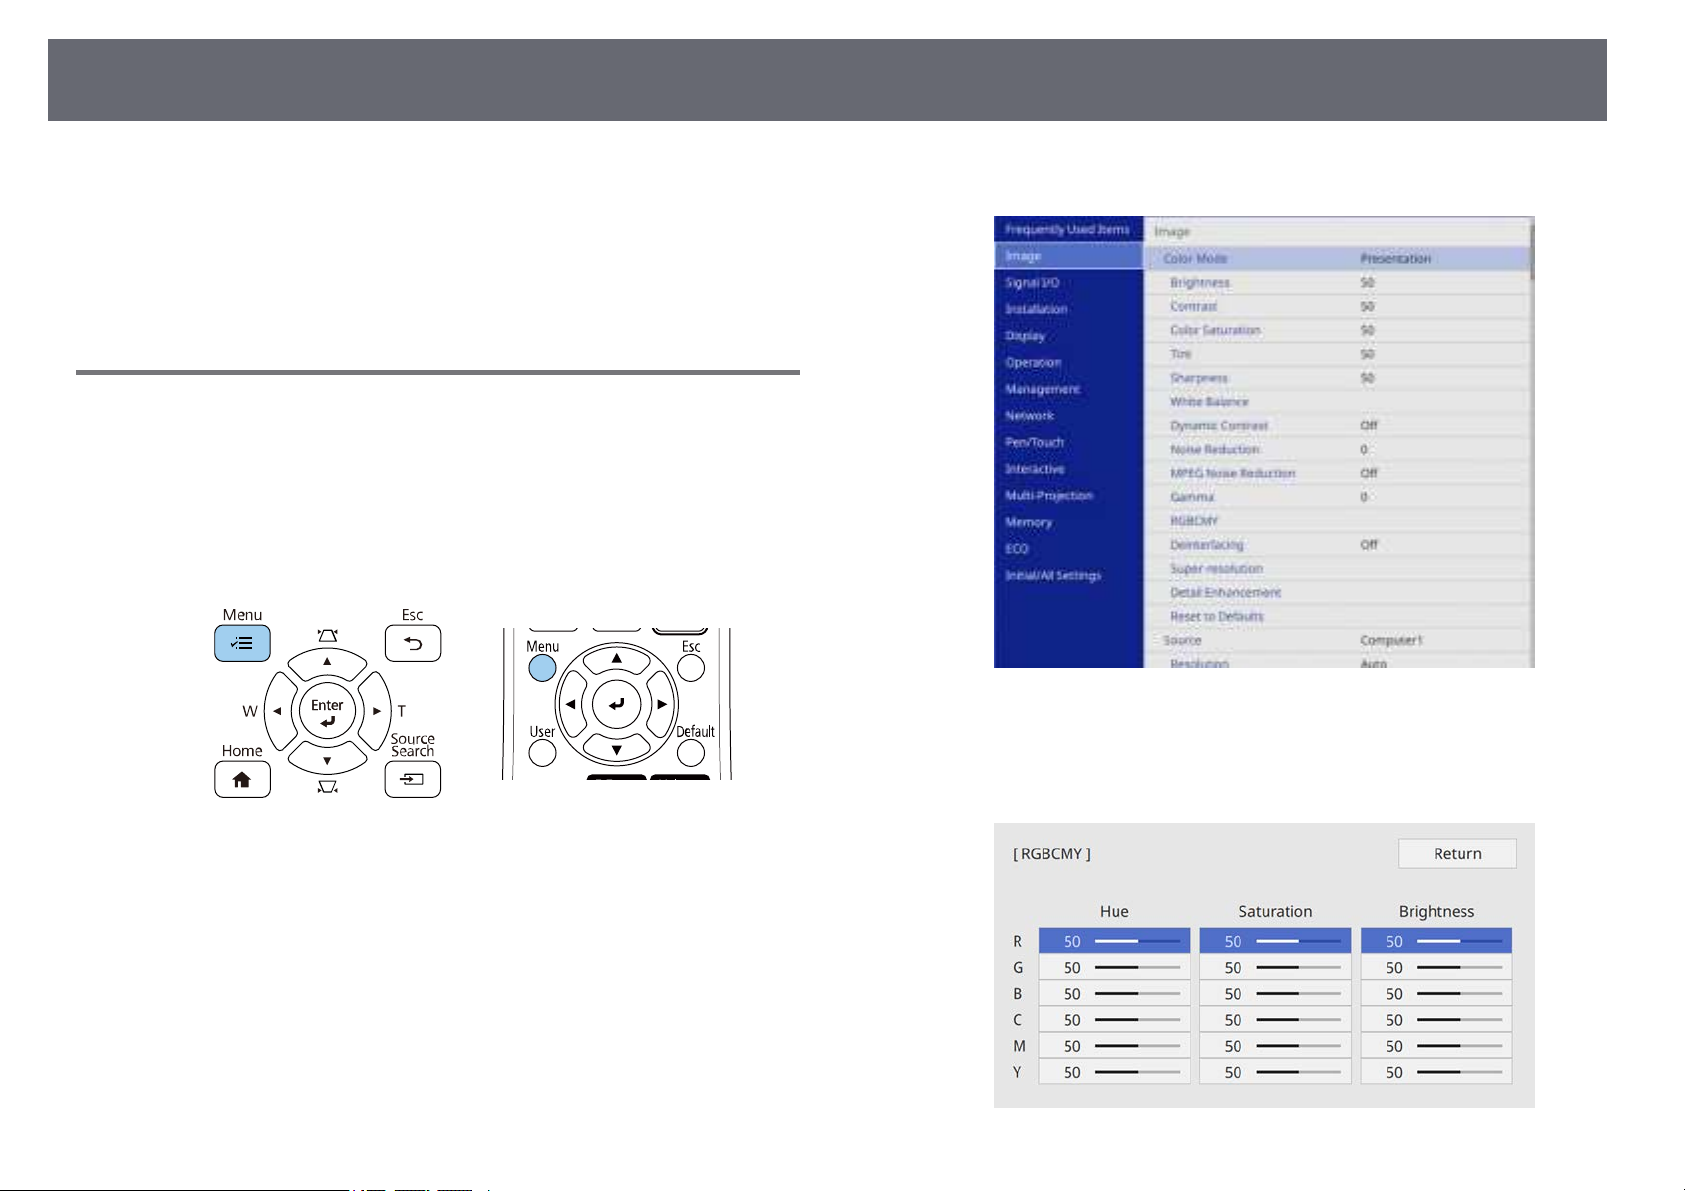
Adjusting the Image Color
80
You can fine-tune various aspects of how colors are displayed in your
projected images.
gg Related Links
• "Adjusting the Hue, Saturation, and Brightness" p.80
• "Adjusting the Gamma" p.81
Adjusting the Hue, Saturation, and Brightness
You can adjust the Hue, Saturation, and Brightness settings for individual
image colors.
Turn on the projector and switch to the image source you want to use.
a
Press the [Menu] button on the control panel or remote control.
b
Select the Image menu and press [Enter].
c
Select RGBCMY and press [Enter].
d
Select the color to adjust, and press [Enter].
e
Page 81
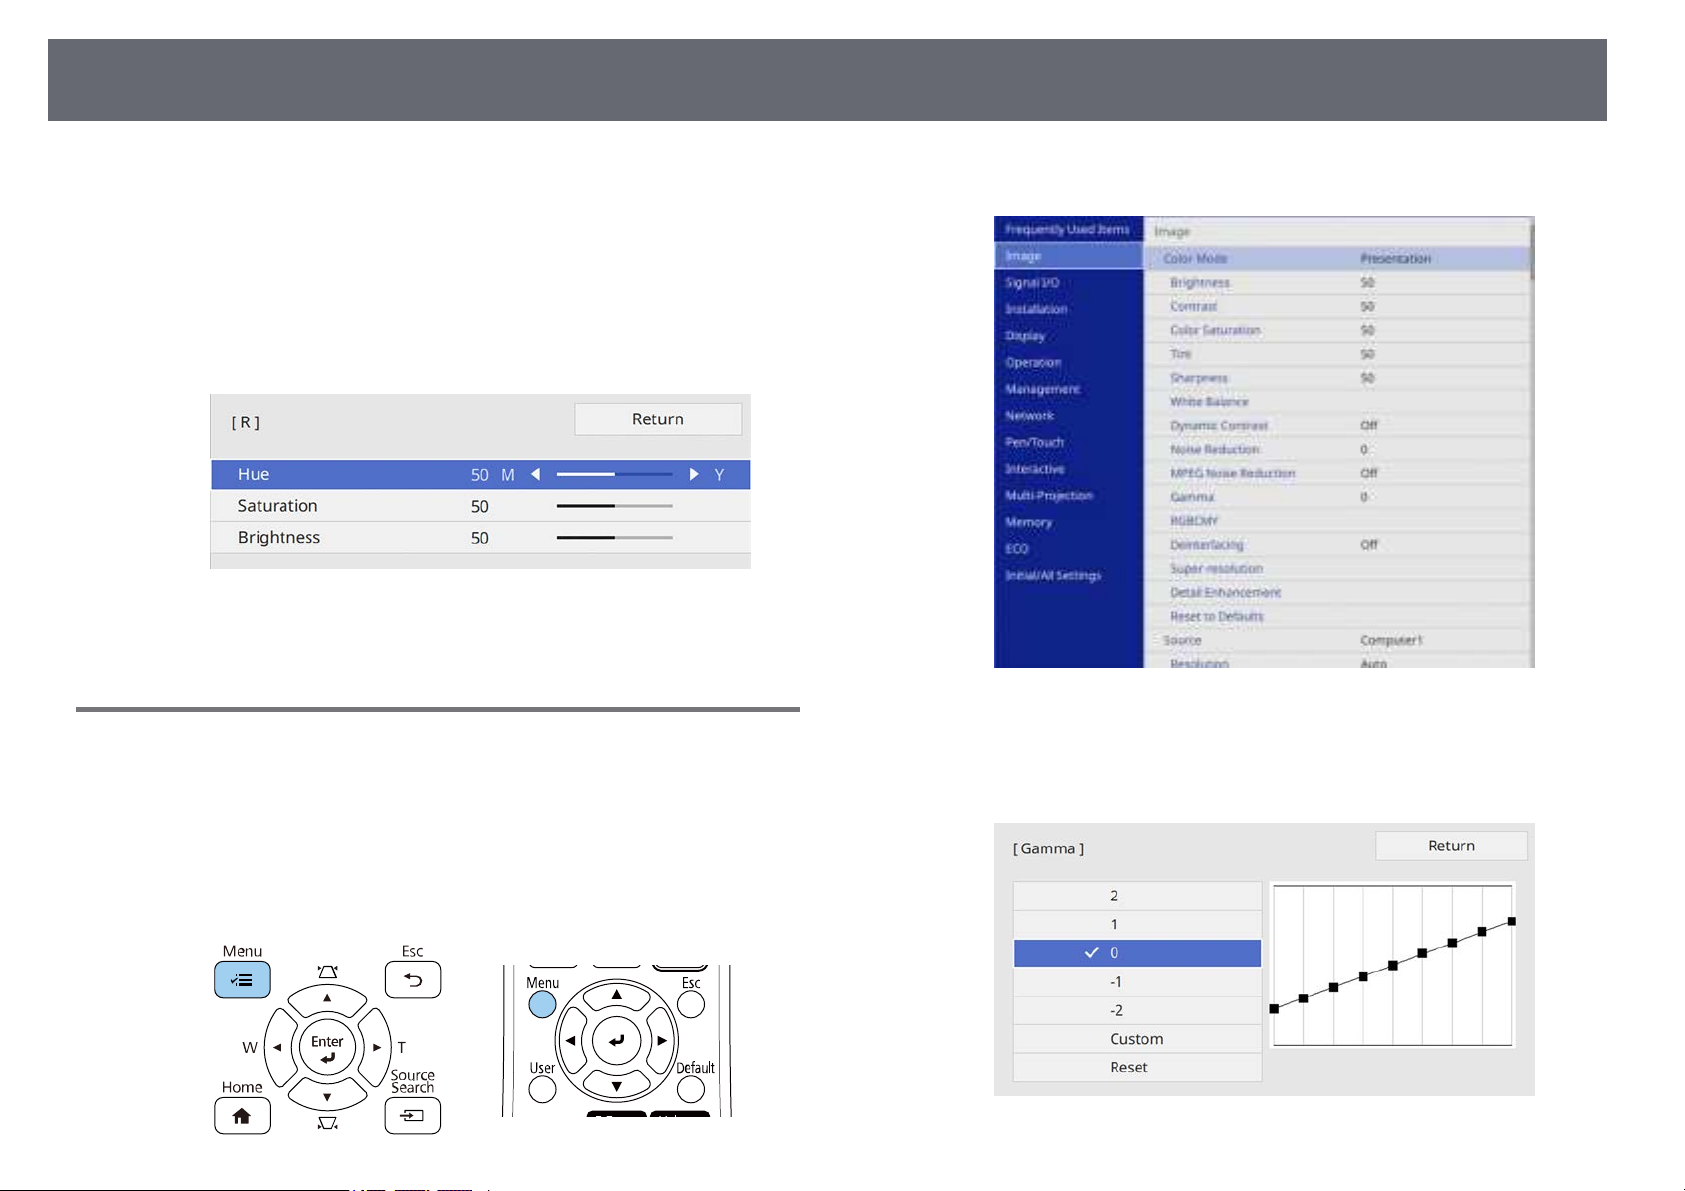
Adjusting the Image Color
81
Do the following as necessary for each setting:
f
• To adjust the overall hue of the color, bluish - greenish - reddish,
adjust the Hue setting.
• To adjust the overall vividness of the color, adjust the Saturation
setting.
• To adjust the overall color brightness of the color, adjust the
Brightness setting.
Press [Menu] or [Esc] to exit the menus.
g
Adjusting the Gamma
You can correct differences in projected image colors that occur between
different image sources by adjusting the Gamma setting.
Select the Image menu and press [Enter].
c
Select Gamma and press [Enter].
d
Select and adjust the correction value.
e
Turn on the projector and switch to the image source you want to use.
a
Press the [Menu] button on the control panel or remote control.
b
Page 82
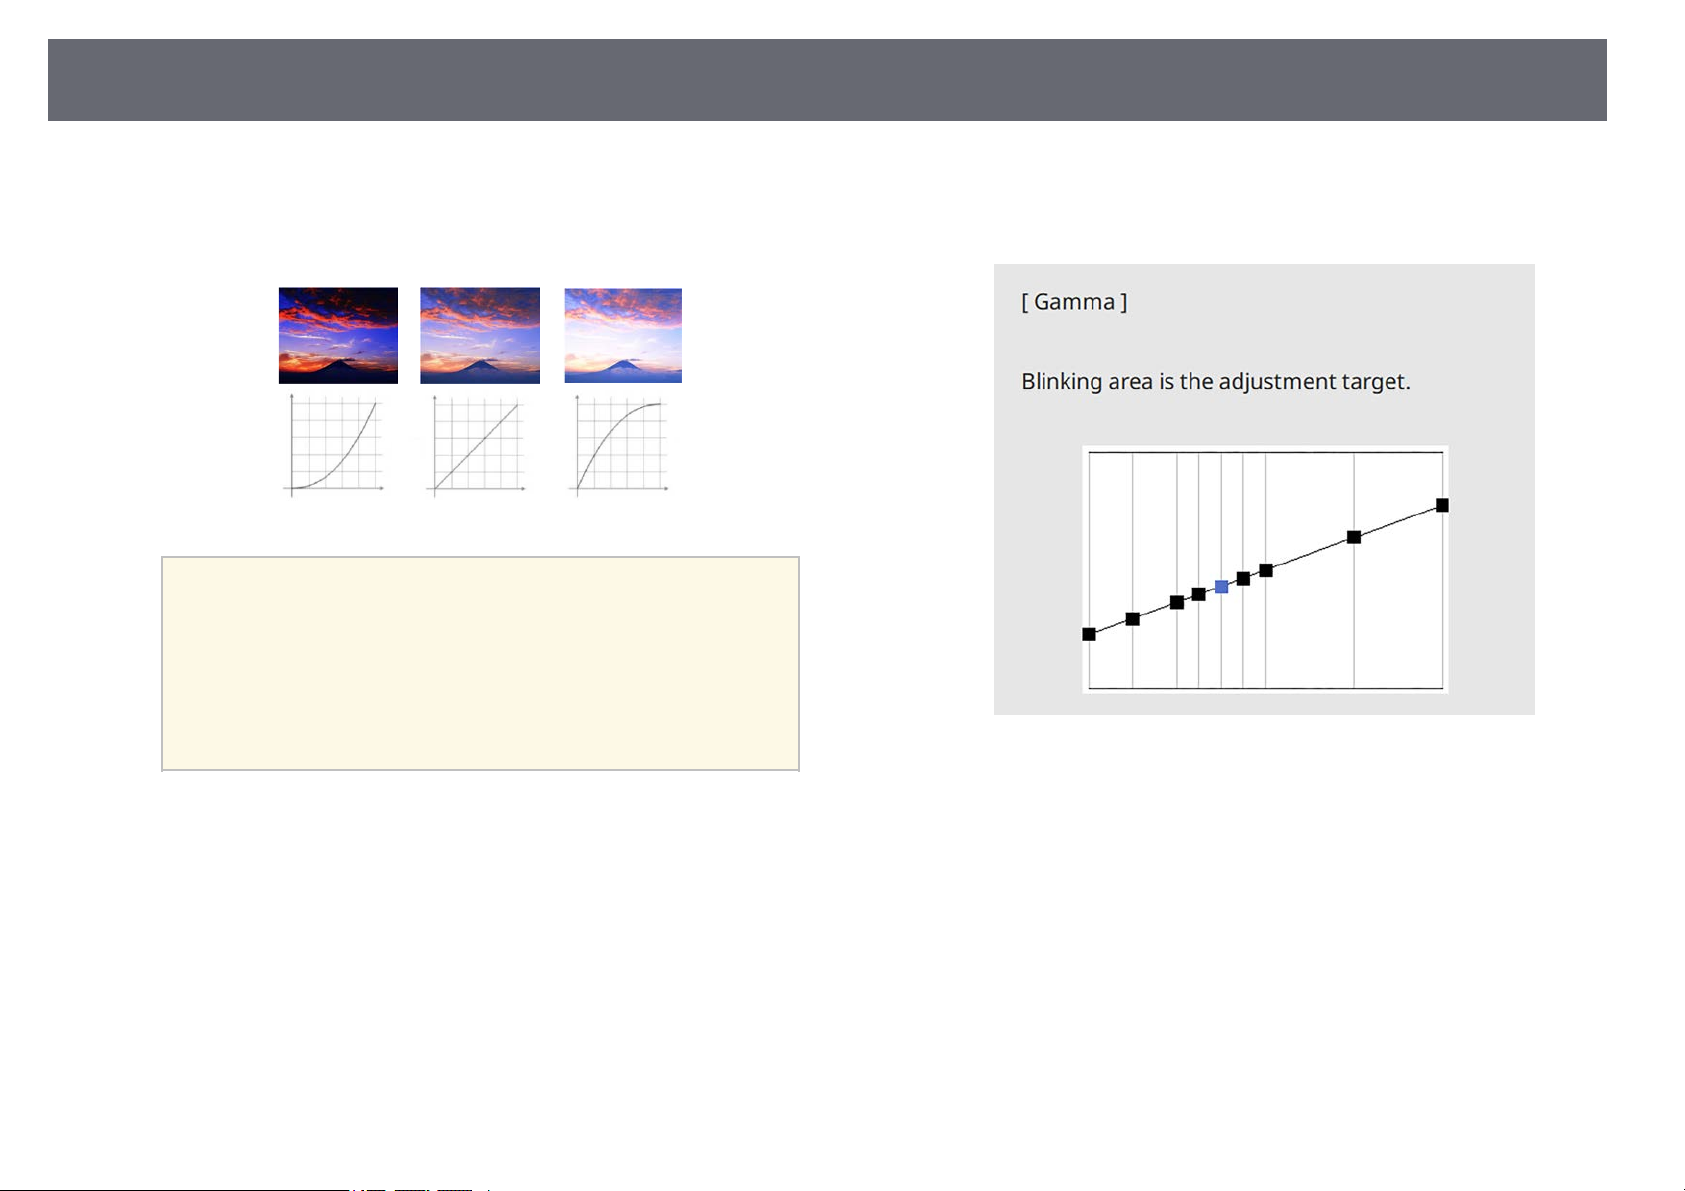
Adjusting the Image Color
82
When you select a smaller value, you can reduce the overall brightness
of the image to make the image sharper. When you select a larger value,
the dark areas of images become brighter, but the color saturation for
lighter areas may become weaker.
• If you set the Color Mode setting to DICOM SIM in the
a
If you want to make finer adjustments, select Customized and press
f
[Enter].
projector's Image menu, select the adjustment value according
to the projection size.
• If the projection size is 80 inches or less, select a small value.
• If the projection size is 80 inches or more, select a large
value.
• Medical images may not be reproduced correctly depending on
your settings and screen specifications.
Press the left or right arrow buttons to select the color tone you want to
g
adjust on the gamma adjustment graph. Then press the up or down
arrow button to adjust the value and press [Enter].
Press [Menu] or [Esc] to exit the menus.
h
Page 83
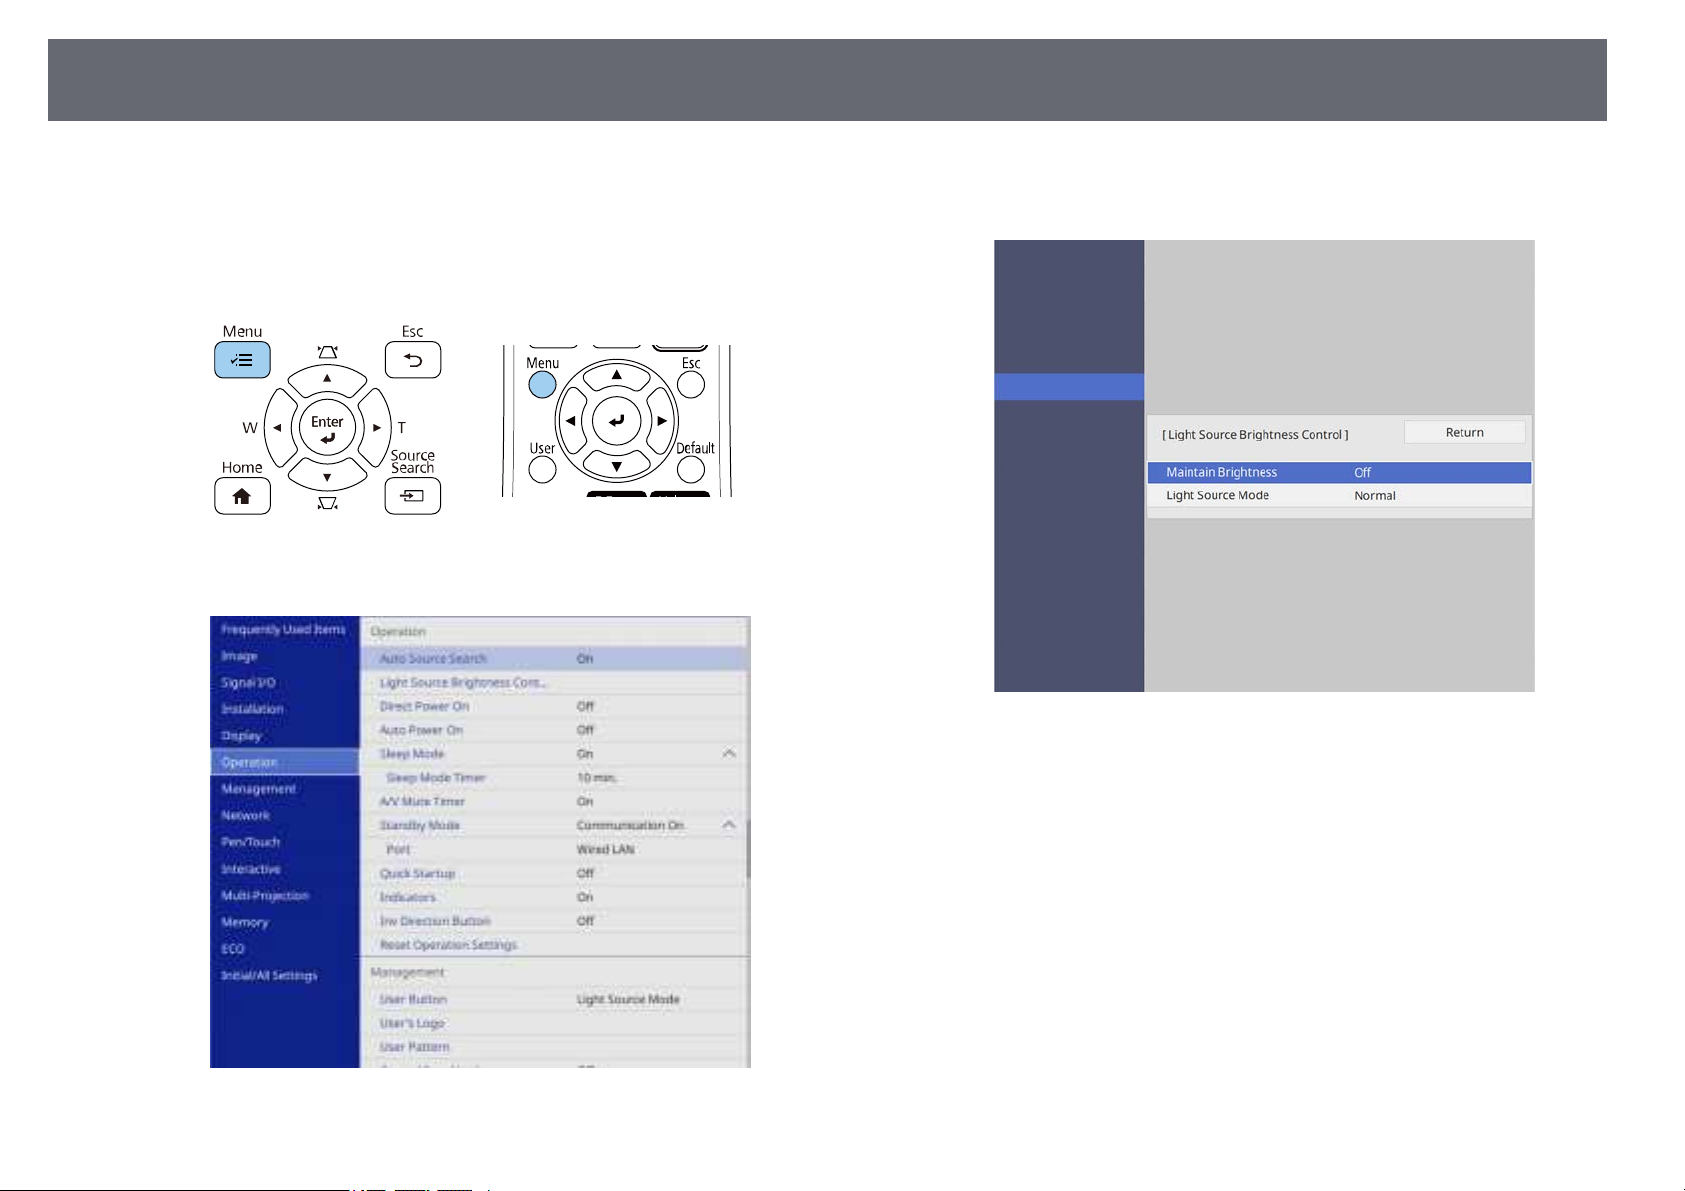
Adjusting the Brightness
83
You can adjust the brightness of your projector's light source.
Turn on the projector and switch to the image source you want to use.
a
Press the [Menu] button on the control panel or remote control.
b
Select the Operation menu and press [Enter].
c
If you want to maintain the brightness at a specific level, select the
e
Maintain Brightness setting and select On.
If you turn on Maintain Brightness, select the Maintain Brightness
f
Level setting and check the Estimated Remains information.
Select Light Source Brightness Control and press [Enter].
d
If you turn off Maintain Brightness, select the Light Source Mode
g
setting:
• Normal lets you set the brightness to the maximum level. This makes
the estimated life span of the light source approximately 20,000
hours.
• Quiet lets you set the brightness to 70% and reduces fan noise. This
makes the estimated life span of the light source approximately
20,000 hours.
• Extended lets you set the brightness to 70% and extends the life
expectancy of the light source. This makes the estimated life span of
the light source approximately 30,000 hours.
Page 84
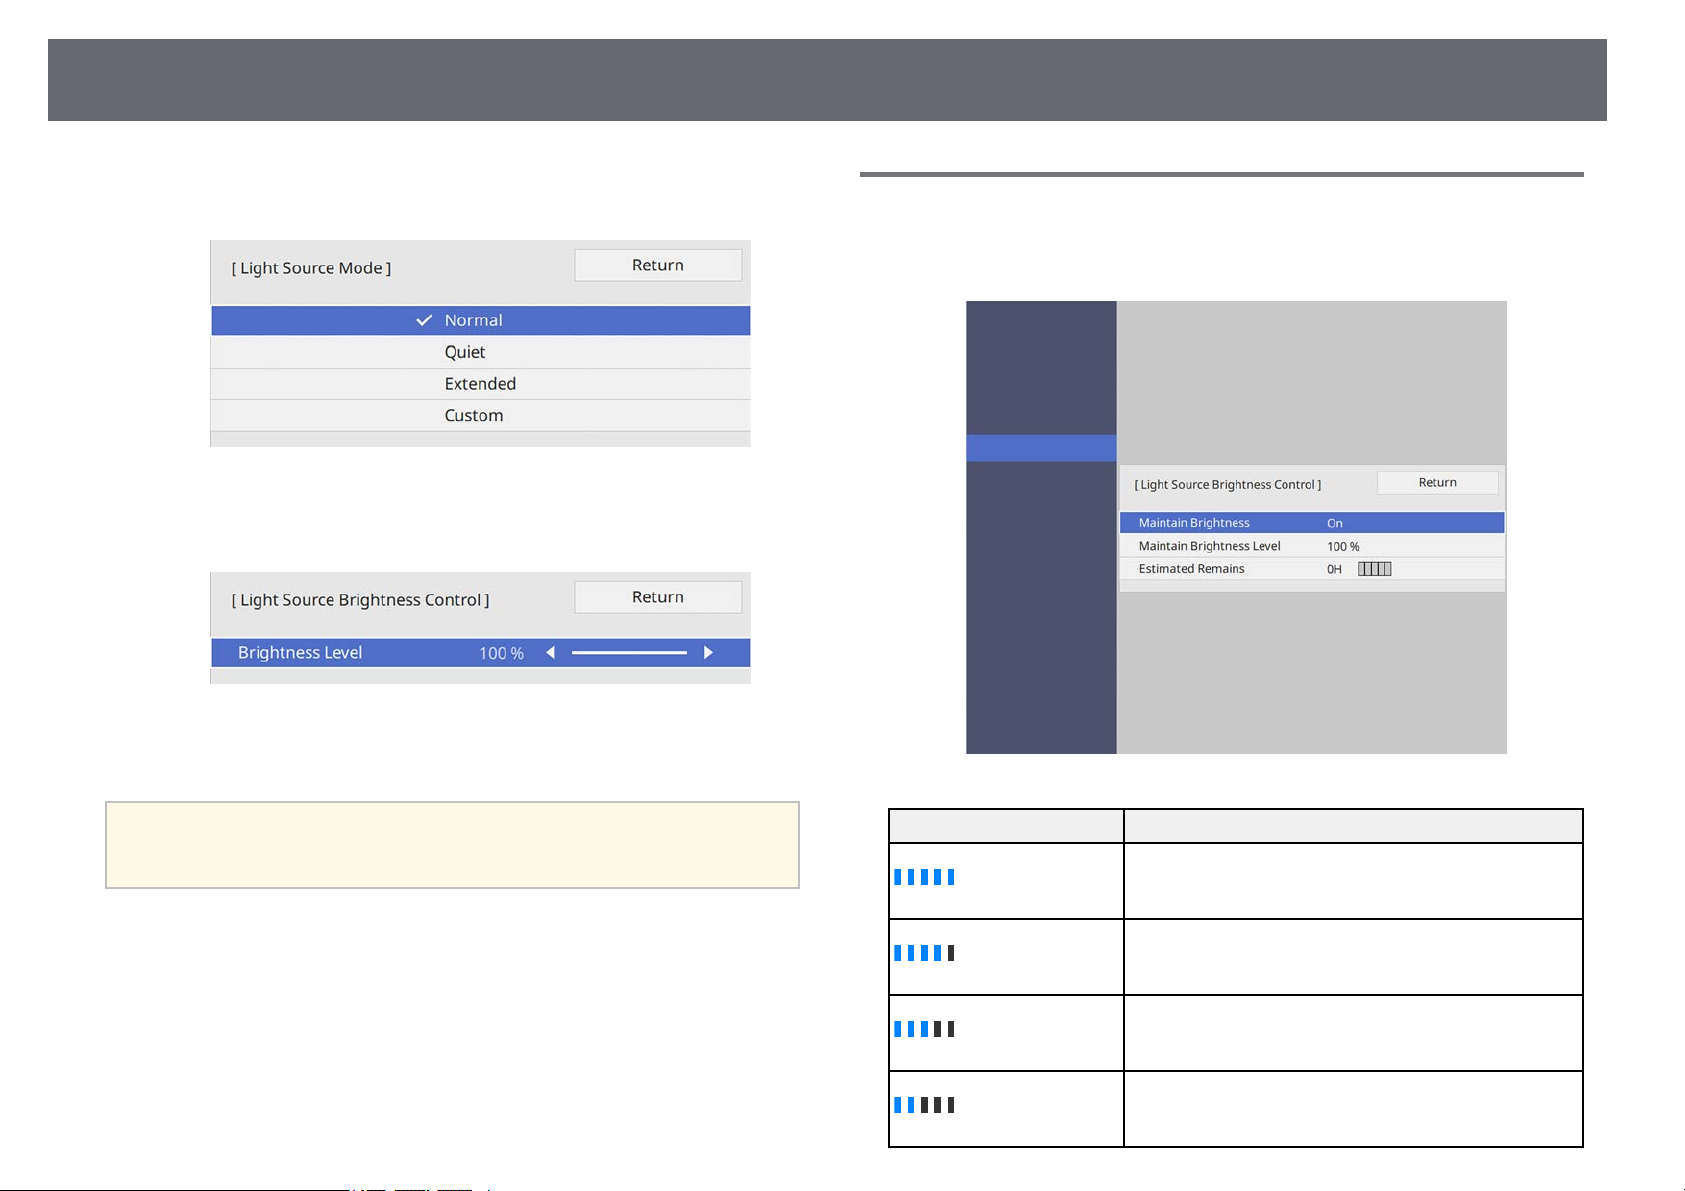
Adjusting the Brightness
84
• Custom lets you to select a custom brightness level between 70 to
100%.
If you set the Light Source Mode setting to Custom, select Brightness
h
Level and use the left and right arrow buttons to select the brightness.
Press [Menu] or [Esc] to exit the menus.
i
Constant Brightness Usage Hours
If you turn on Maintain Brightness, the number of hours the projector can
maintain constant brightness is displayed as Estimated Remains.
For the best results in maintaining a constant brightness, set the Light
a
gg Related Links
• "Constant Brightness Usage Hours" p.84
• "Light Source Life Span" p.85
• "Projector Specifications" p.281
• "Projector Administration Settings - Management Menu" p.215
Source Calibration setting to Run Periodically in the projector's
Management menu.
Display level Estimated remaining hours
10000 or more hours
8000 to 9999 hours
6000 to 7999 hours
4000 to 5999 hours
Page 85
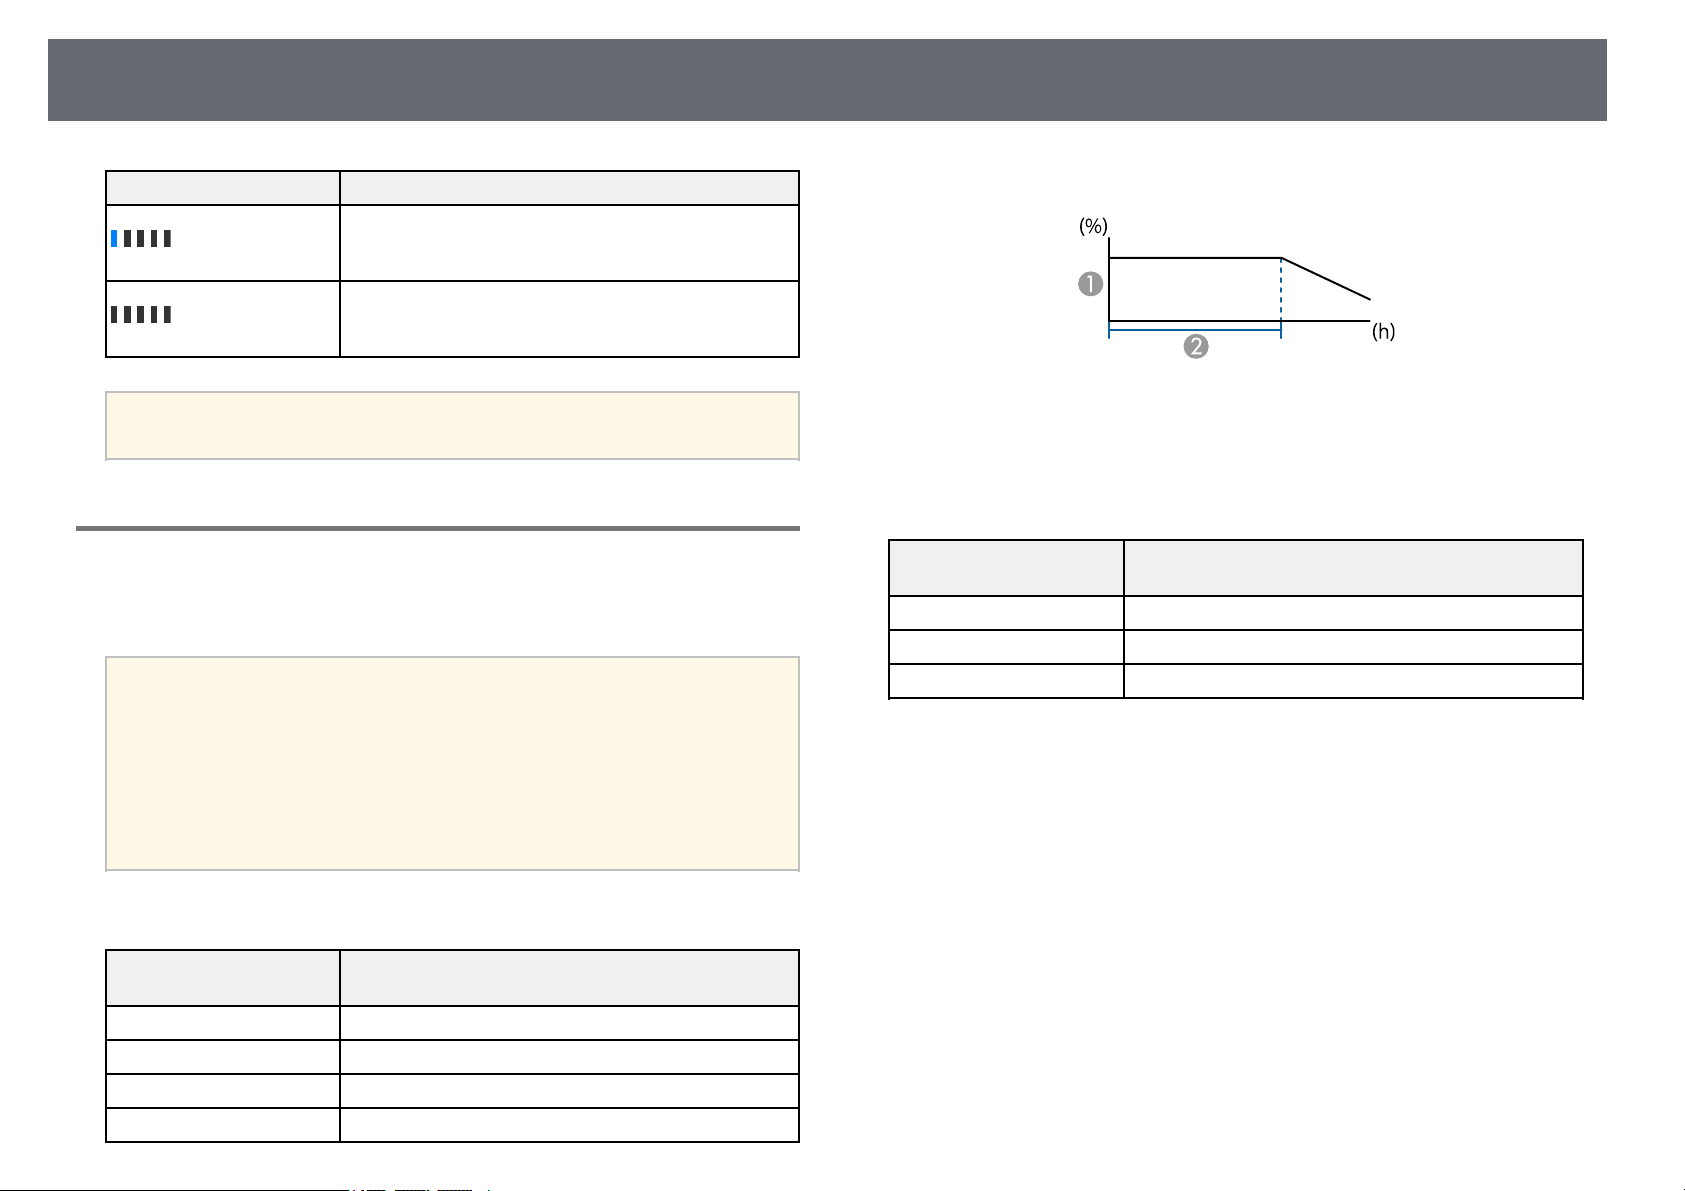
Adjusting the Brightness
85
Display level Estimated remaining hours
2000 to 3999 hours
0 to 1999 hours
The number of hours displayed as Estimated Remains is just a guide.
a
Light Source Life Span
The estimated life span of the light source varies depending on the Brightness
Level setting and whether Maintain Brightness is on or off.
• The light source life span varies depending on the environmental
a
conditions and usage.
• The hours listed here are an approximate and are not guaranteed.
• After 20,000 hours of use, you may need to replace parts in the
projector.
• If Maintain Brightness is turned on, and you have exceeded the
usage hours listed here, you may not be able to select a high
Maintain Brightness Level setting.
Maintain Brightness on
Maintain brightness level
A
Time the projector can maintain constant brightness (approximate)
B
Maintain Brightness Level
setting
85% 6000 hours
80% 10000 hours
70% 19000 hours
Time the projector can maintain constant brightness
(approximate)
Maintain Brightness off
Brightness Level setting Time before the brightness of the light source is
reduced by half (approximate)
100% 20000 hours
90% 21000 hours
80% 24000 hours
70% 30000 hours
Page 86
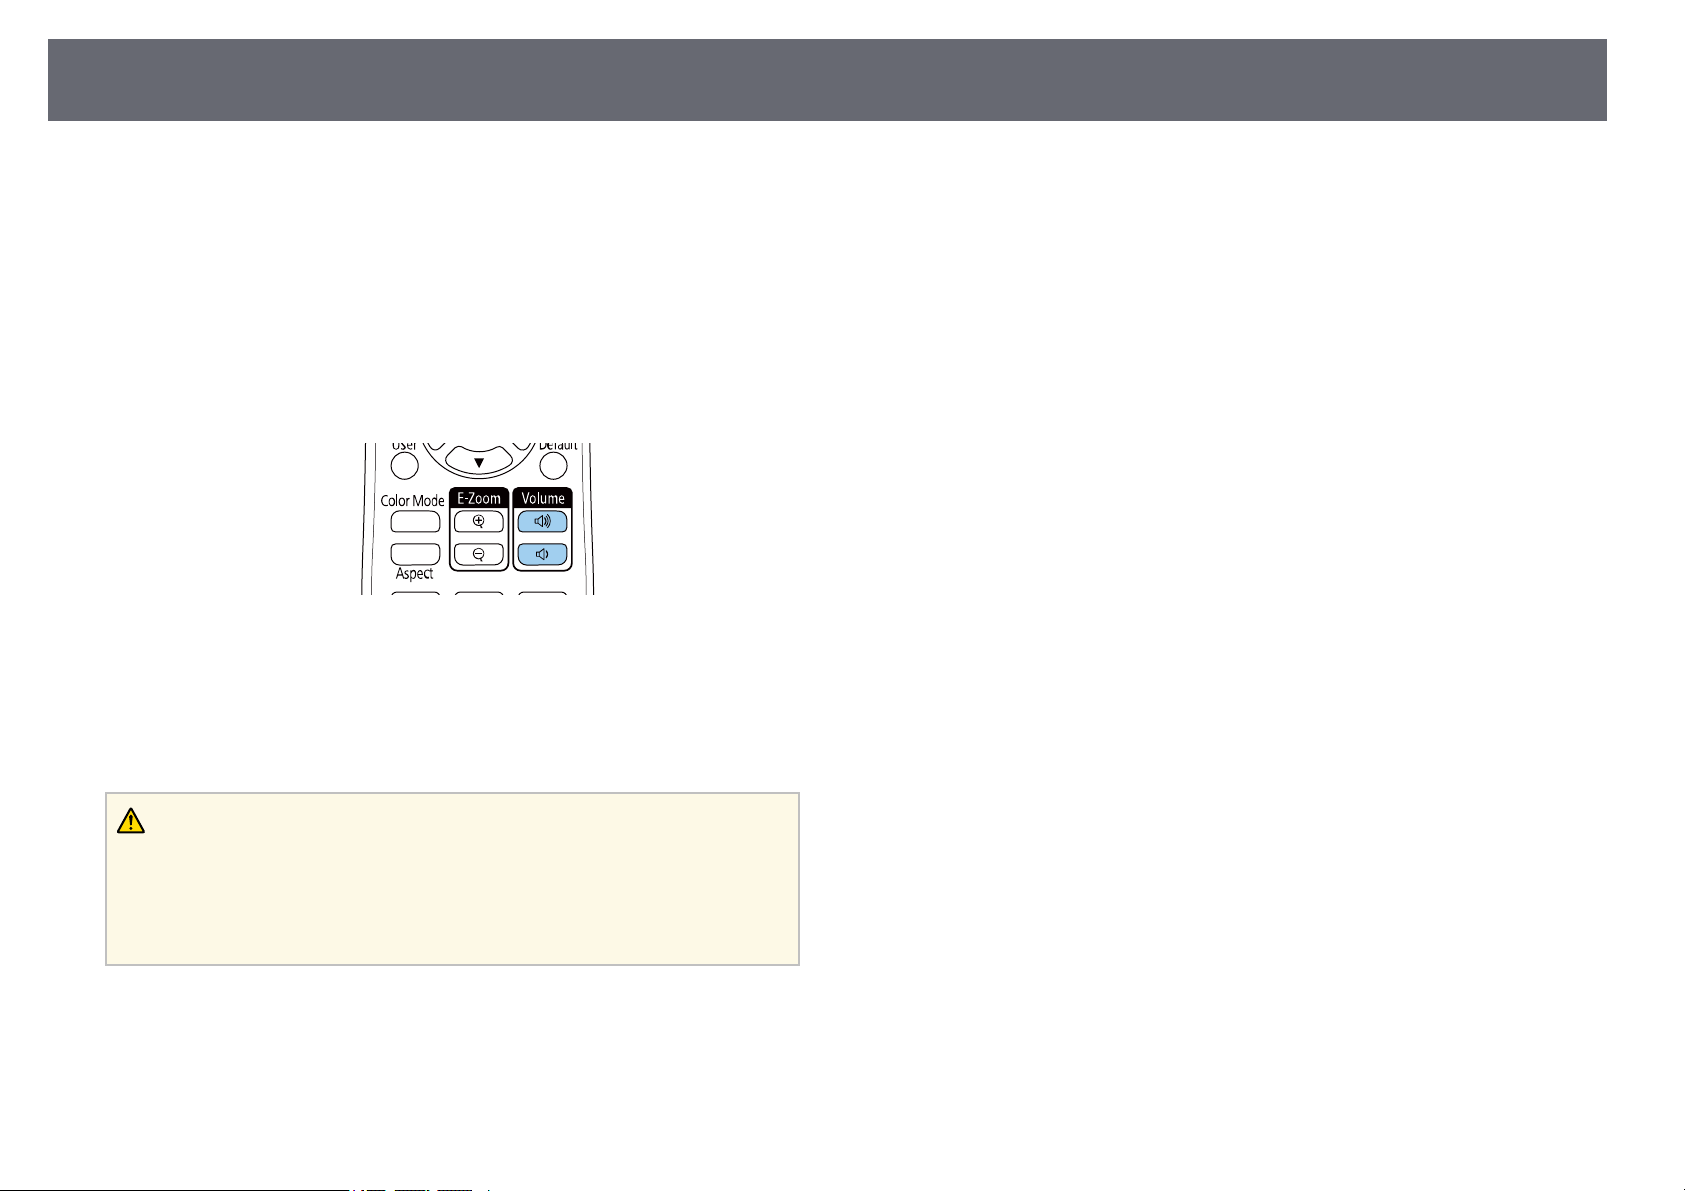
Controlling the Volume with the Volume Buttons
The volume buttons control the projector's internal speaker system.
You can also control the volume of any external speakers you connected to
the projector.
You must adjust the volume separately for each connected input source.
Turn on the projector and start a presentation.
a
To lower or raise the volume, press the [Volume] buttons on the
b
remote control as shown.
A volume gauge appears on the screen.
86
To set the volume to a specific level for an input source, select Volume
c
in the projector's Signal I/O menu.
Caution
Do not start a presentation at a high volume setting. Sudden loud noises may cause
hearing loss.
Always lower the volume before powering off, so that you can power on and then
gradually increase the volume.
gg Related Links
• "Input Signal Settings - Signal I/O Menu" p.207
Page 87
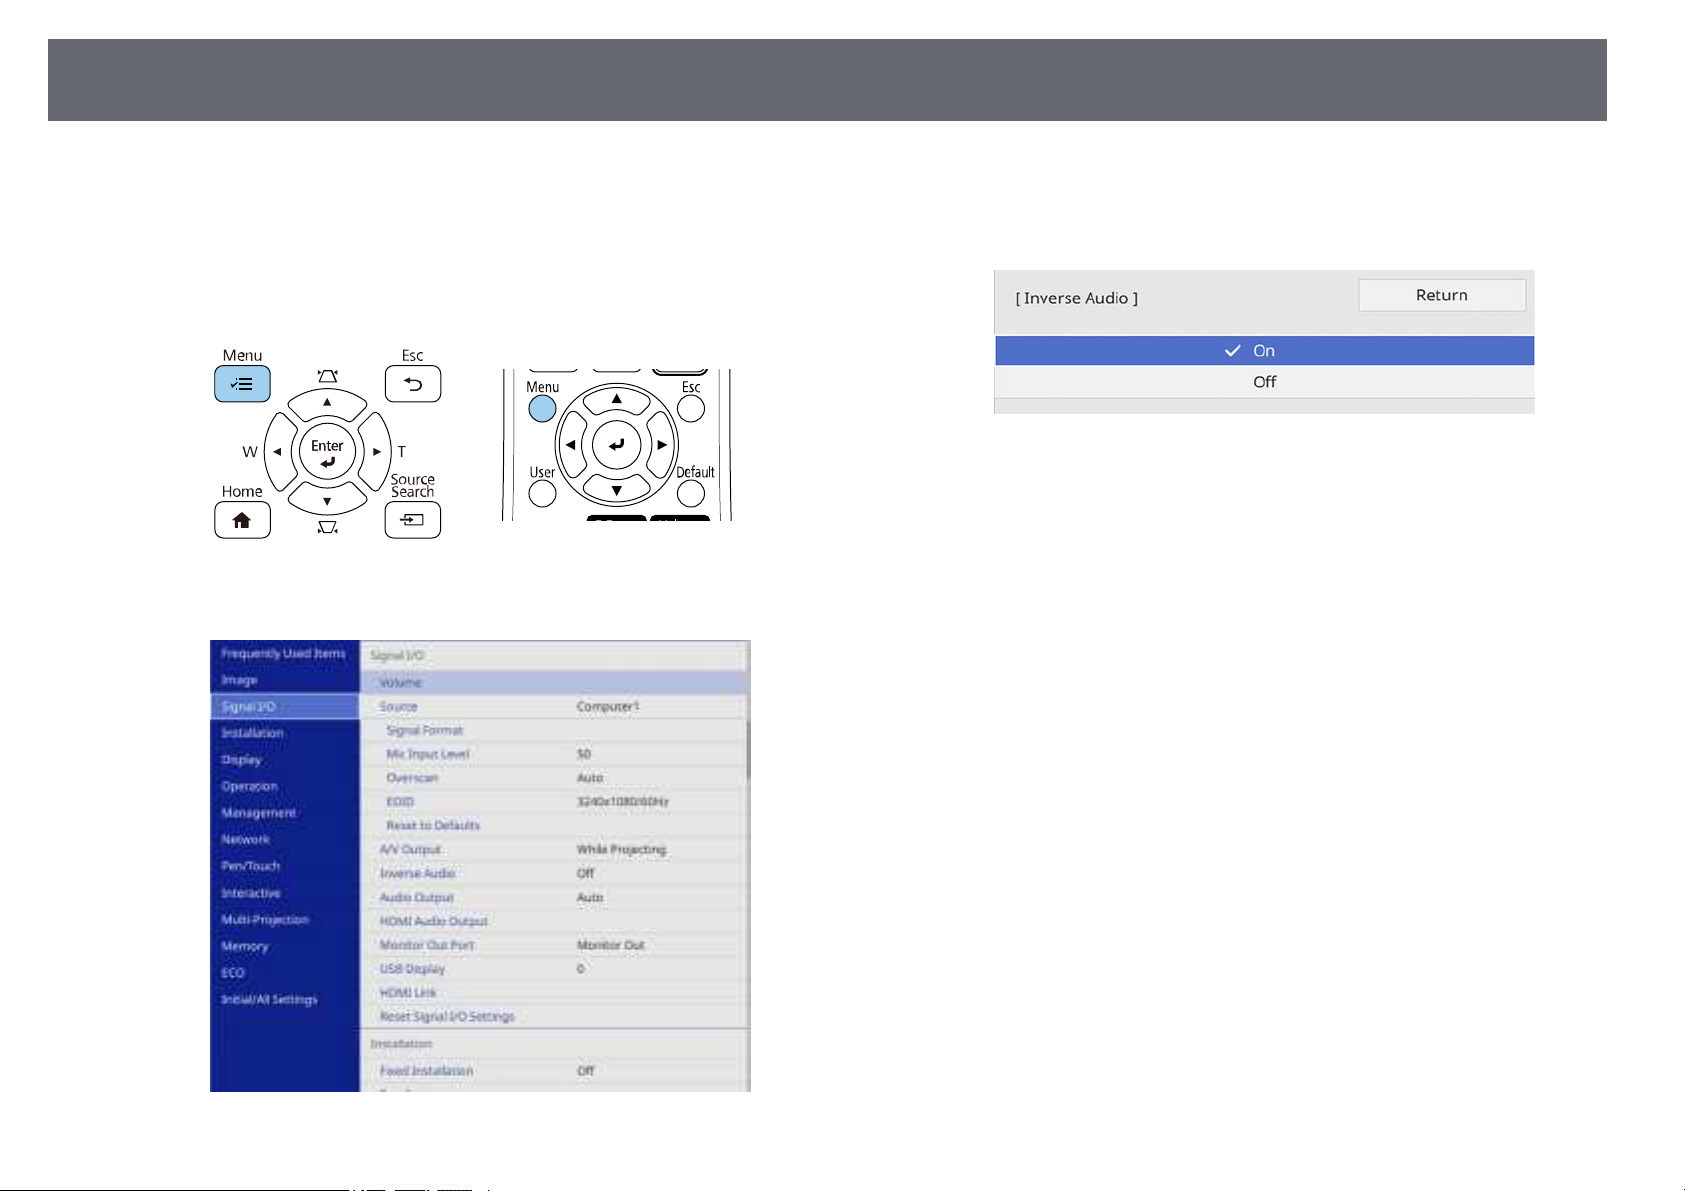
Inverting the Audio Channels
87
You can invert the audio's left and right channels to match the projector
installation position.
Turn on the projector and start a presentation.
a
Press the [Menu] button on the control panel or remote control.
b
Select the Signal I/O menu and press [Enter].
c
Select Inverse Audio and press [Enter].
d
Select On and press [Enter].
e
Press [Menu] or [Esc] to exit the menus.
f
Page 88

Using the Interactive Features
Follow the instructions in these sections to use the interactive features.
gg Related Links
• "Interactive Feature Modes" p.89
• "Preparing Before Using Interactive Features" p.91
• "Whiteboard Screens (Whiteboard Mode)" p.96
• "Draw on the Projected Image Using Annotation Mode" p.102
• "Sharing Drawings" p.106
• "Control Computer Features from a Projected Screen (Computer Interactive Mode)" p.112
• "Controlling a Document Camera" p.116
• "Selecting Network Device Display" p.117
• "Using the Interactive Features over a Network" p.119
• "Using Split Screen Projection" p.120
Page 89
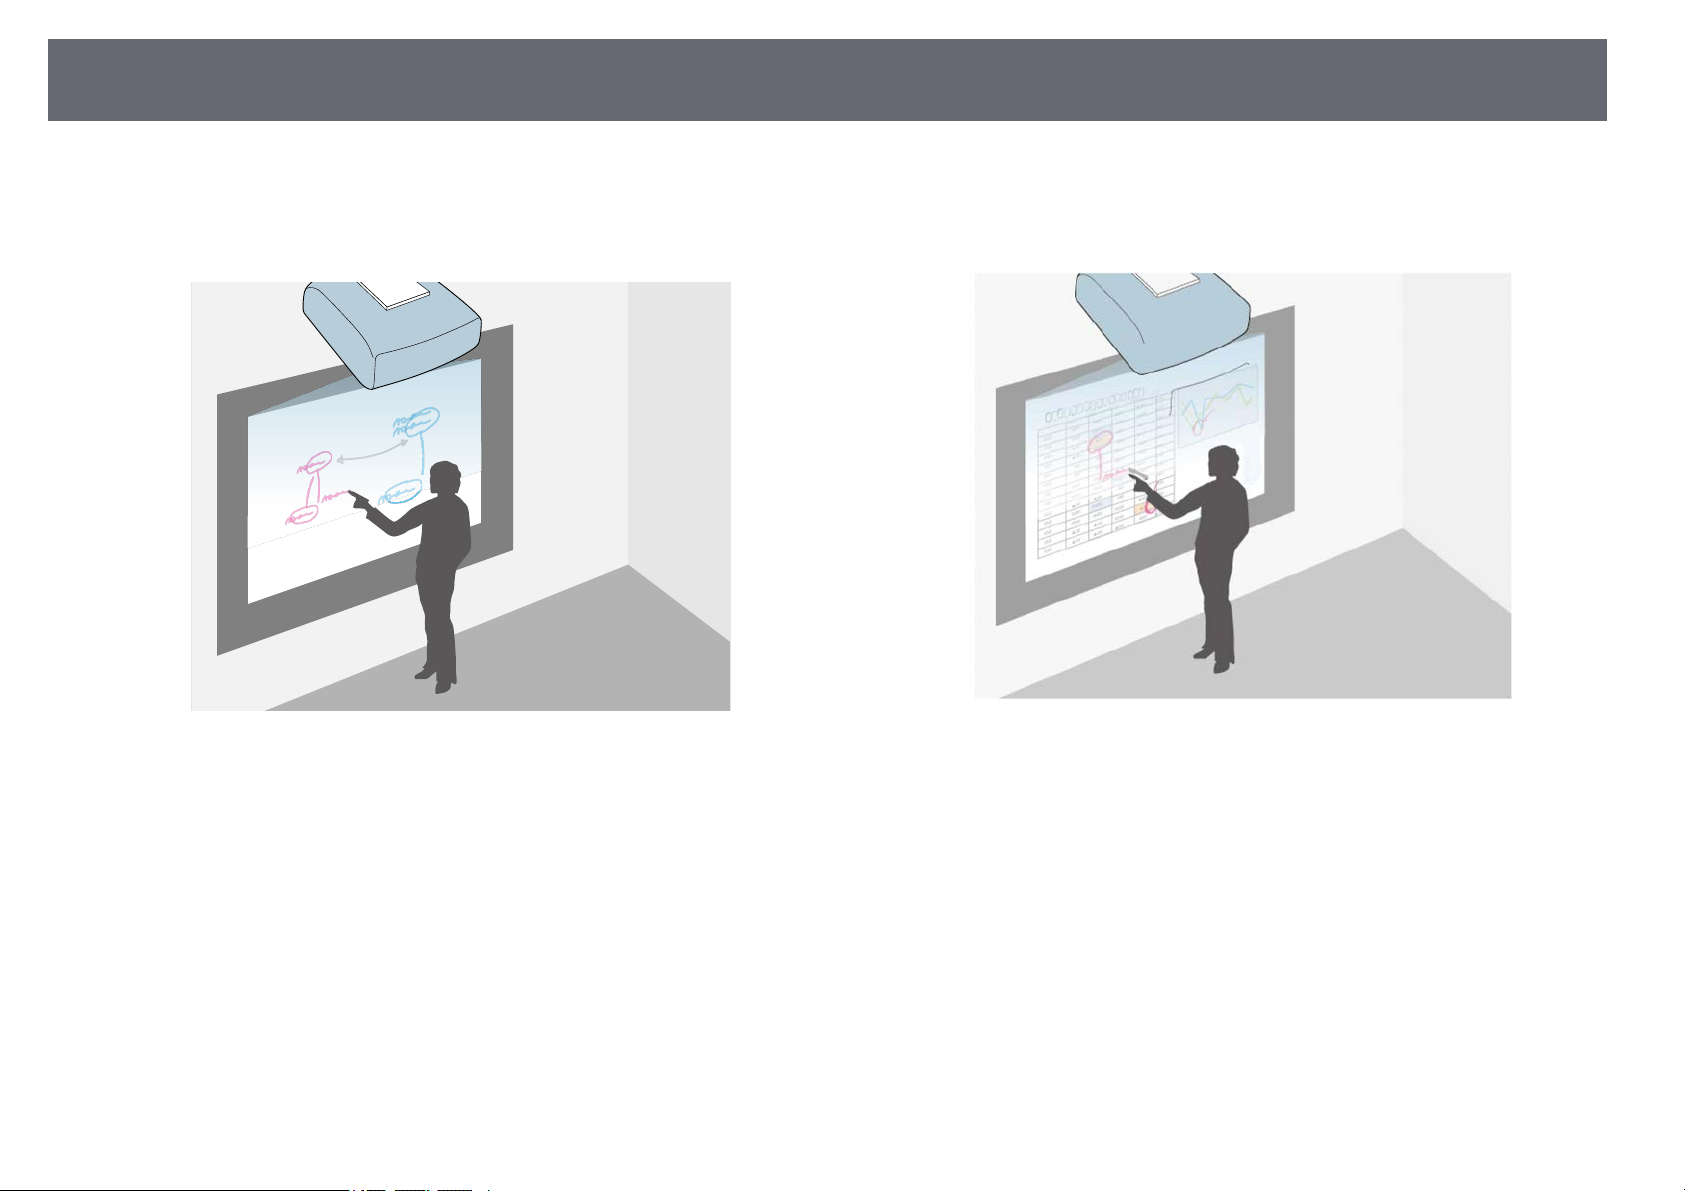
Interactive Feature Modes
89
You can perform the following operations with the interactive features.
• In whiteboard mode, you can use interactive pens or your finger to write on
the projected "whiteboard".
• In annotation mode, you can use interactive pens or your finger to add
notes to content projected from a computer, tablet, document camera, or
other source.
You do not need to use a computer or install any additional software to use
the built-in whiteboard drawing feature. This is useful in meetings as a
substitute for a whiteboard.
You can share the drawing contents you create with other projectors, save it
as a PDF or PNG file, and print it or send it as an email.
This helps you emphasize projected information or include additional notes
for more effective lessons or presentations.
You can capture your annotated pages, then save or print them.
Page 90
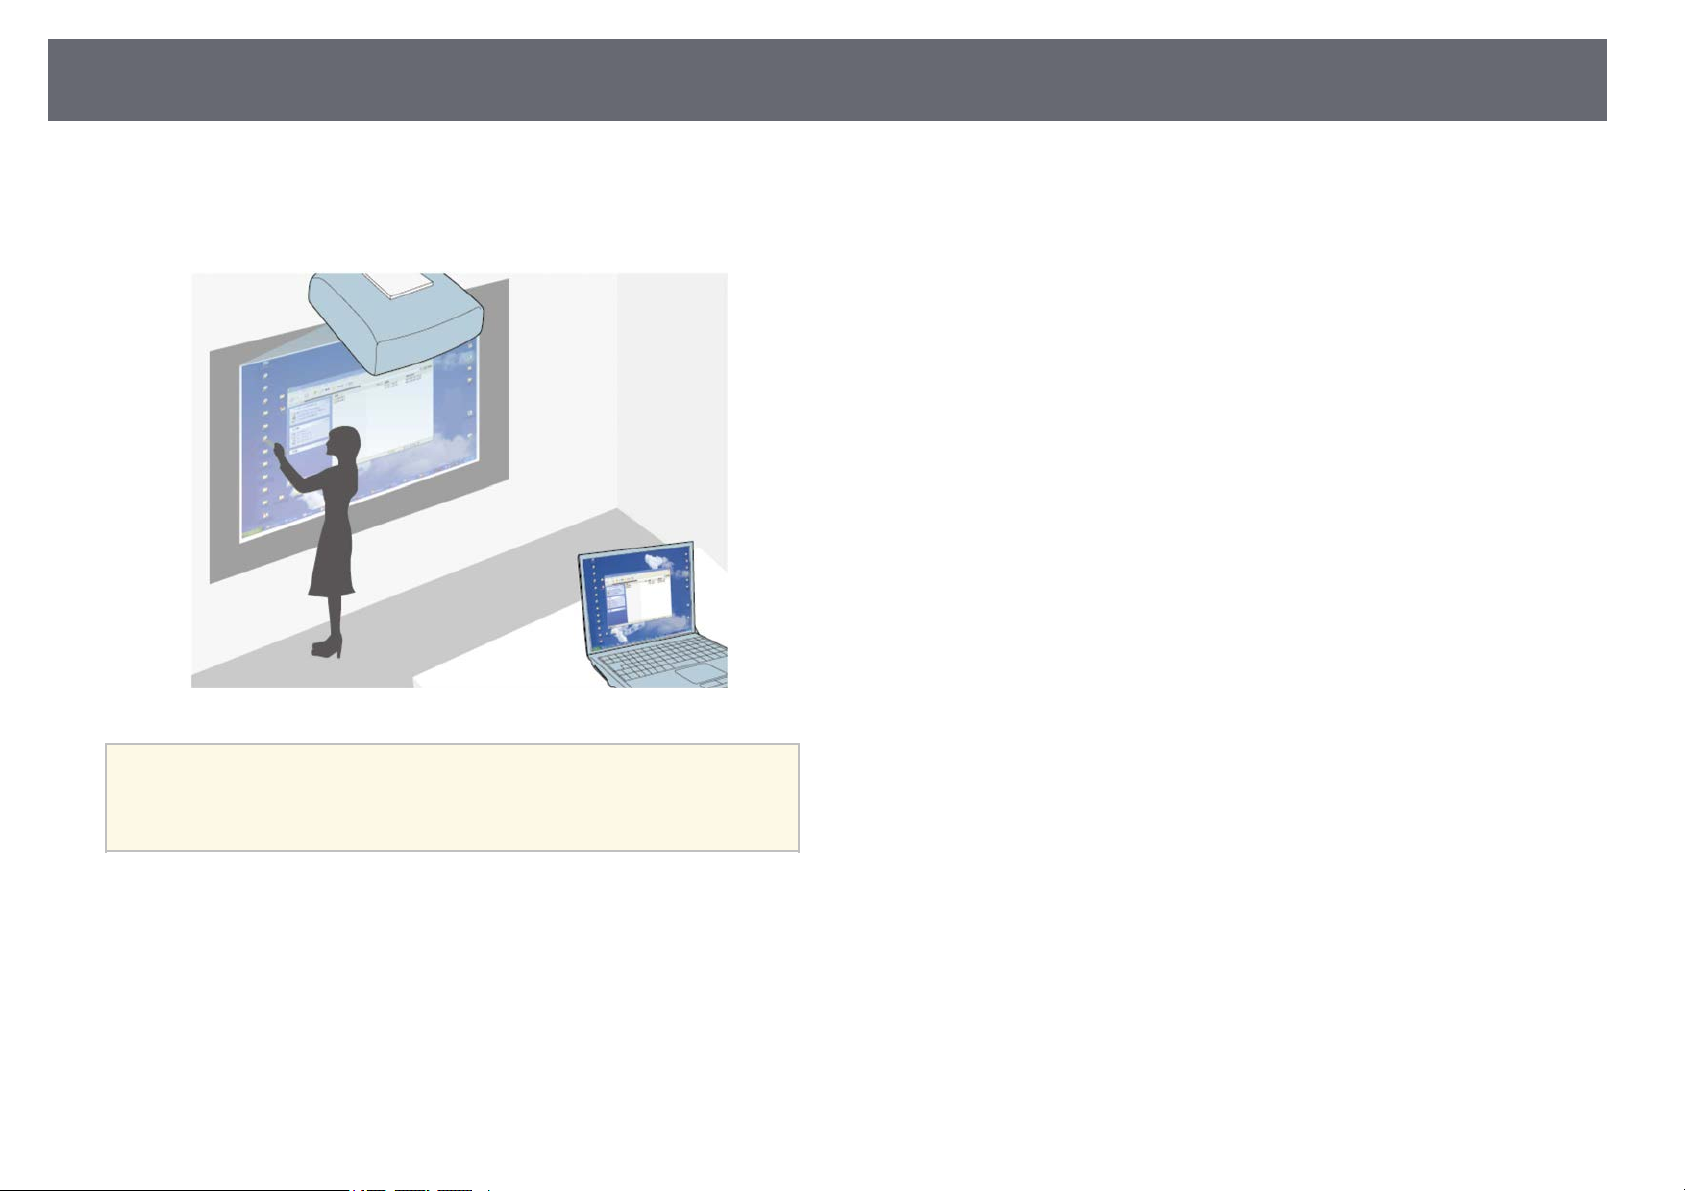
Interactive Feature Modes
• In computer interactive mode, you can use interactive pens or your finger as
you would use a mouse. This allows you to navigate, select, and scroll
through content projected from your computer.
90
You can also use the Easy Interactive Tools software to provide
a
gg Related Links
• "Whiteboard Screens (Whiteboard Mode)" p.96
• "Draw on the Projected Image Using Annotation Mode" p.102
• "Control Computer Features from a Projected Screen (Computer Interactive
Mode)" p.112
• "Getting the Latest Version of the Documents" p.10
additional interactive features, such as saving and printing your
annotations. See the Easy Interactive Tools Operation Guide for
instructions.
Page 91
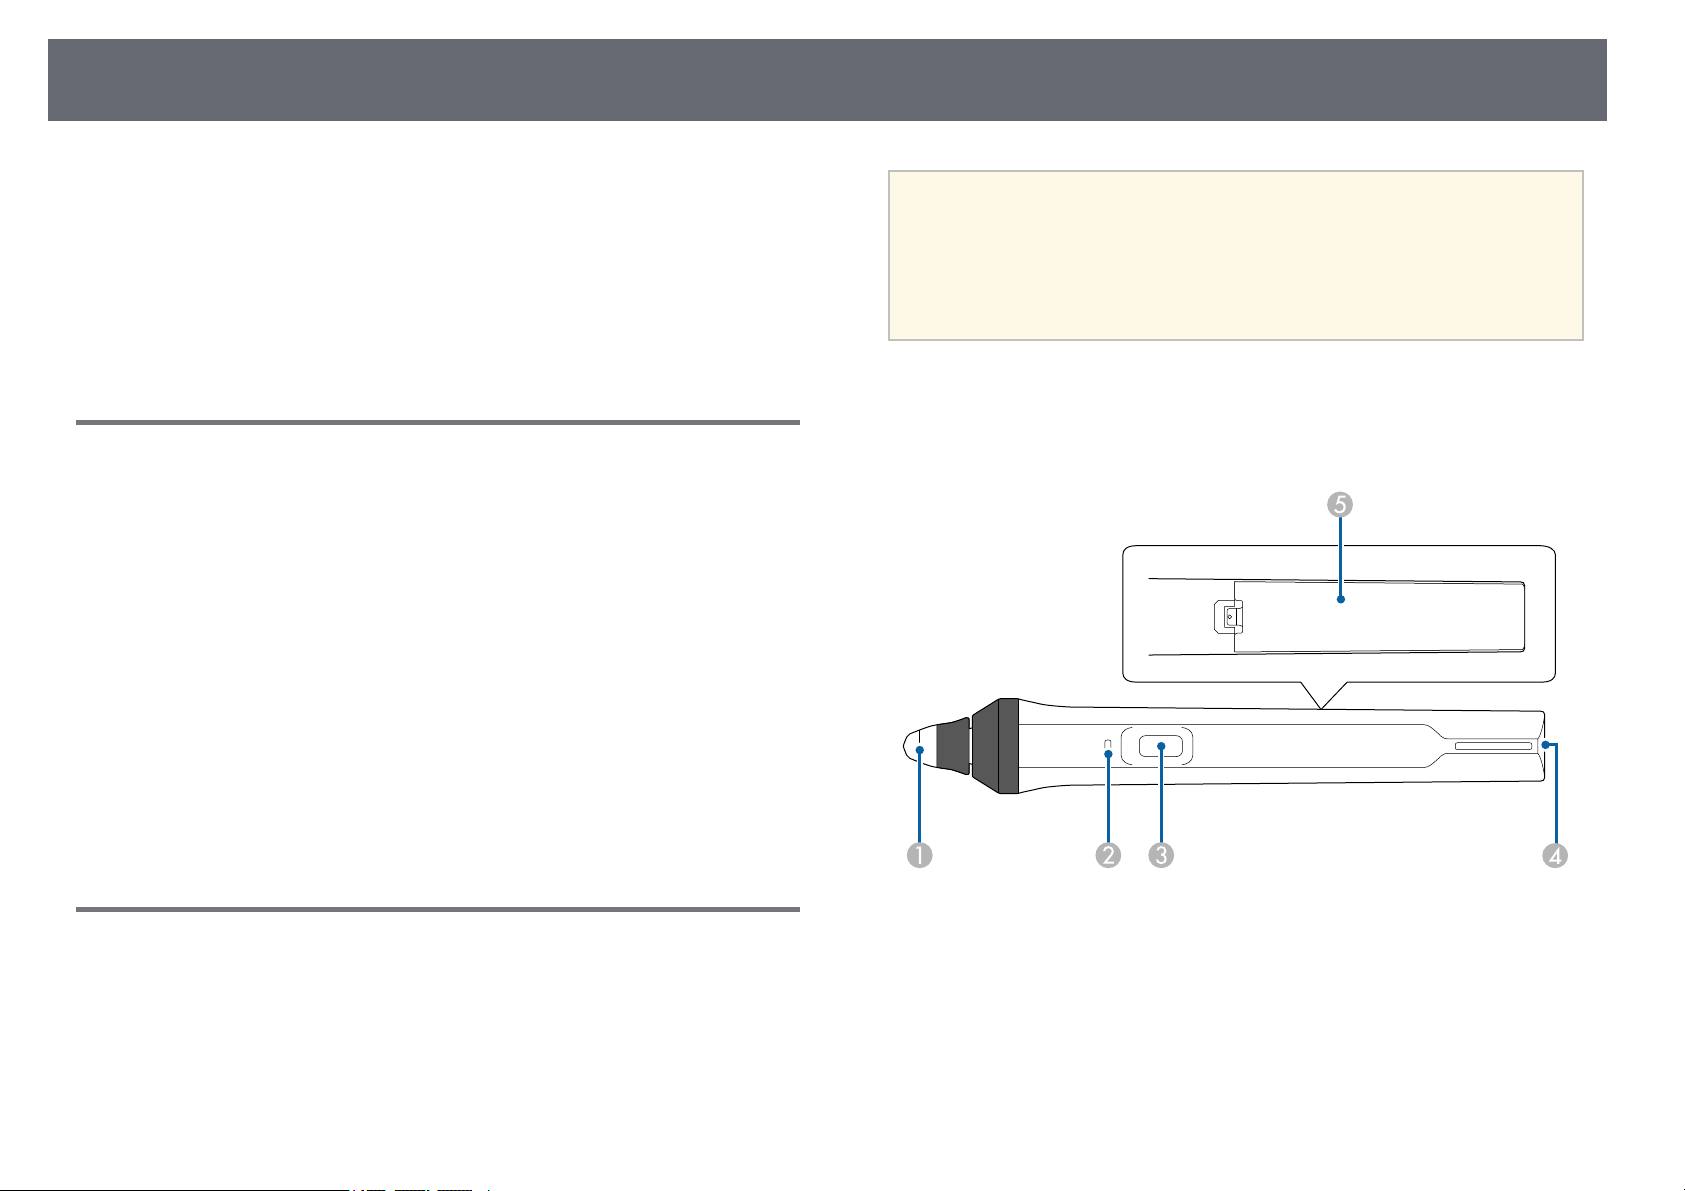
Preparing Before Using Interactive Features
91
This section provides safety instructions on setting up and using the
interactive pens or performing touch operations with your finger. Read these
instructions before using the interactive features.
gg Related Links
• "Safety Instructions for Interactive Features" p.91
• "Using the Interactive Pens" p.91
• "Using Interactive Touch Operations with Your Finger" p.93
Safety Instructions for Interactive Features
The interactive feature operates by infrared communication. Note the
following important points when using this feature.
• Make sure there is no strong light or sunlight shining on the interactive pen
receiver and the projection screen.
• If there is any dust stuck to the interactive pen receiver, it could interfere
with infrared communication and you may not be able to use the features
normally. Clean the receiver if it is dirty.
• Do not put paint or any stickers on the cover of the interactive pen receiver.
• Do not use an infrared remote control or infrared microphone in the same
room because the interactive pen may malfunction.
• Do not use devices that generate powerful noise, such as rotary devices or
transformers, near the projector. You may not be able to operate the
interactive features.
You need to calibrate the system again if you notice any discrepancy in
a
Your projector comes with a blue pen and an orange pen, identified by the
color on the end of the pen. You can use either pen, or both at the same time
(one of each color).
Make sure the pen batteries are installed.
positioning after doing any of the following:
• Performing Geometry Correction
• Adjusting the image size
• Using the Image Shift feature
• Changing the projector position
Using the Interactive Pens
Before using the interactive pens, set up the system and calibrate the pens. See
your projector's Installation Guide for instructions.
Pen tip
A
Battery indicator
B
Button
C
Strap attachment point
D
Battery cover
E
Page 92
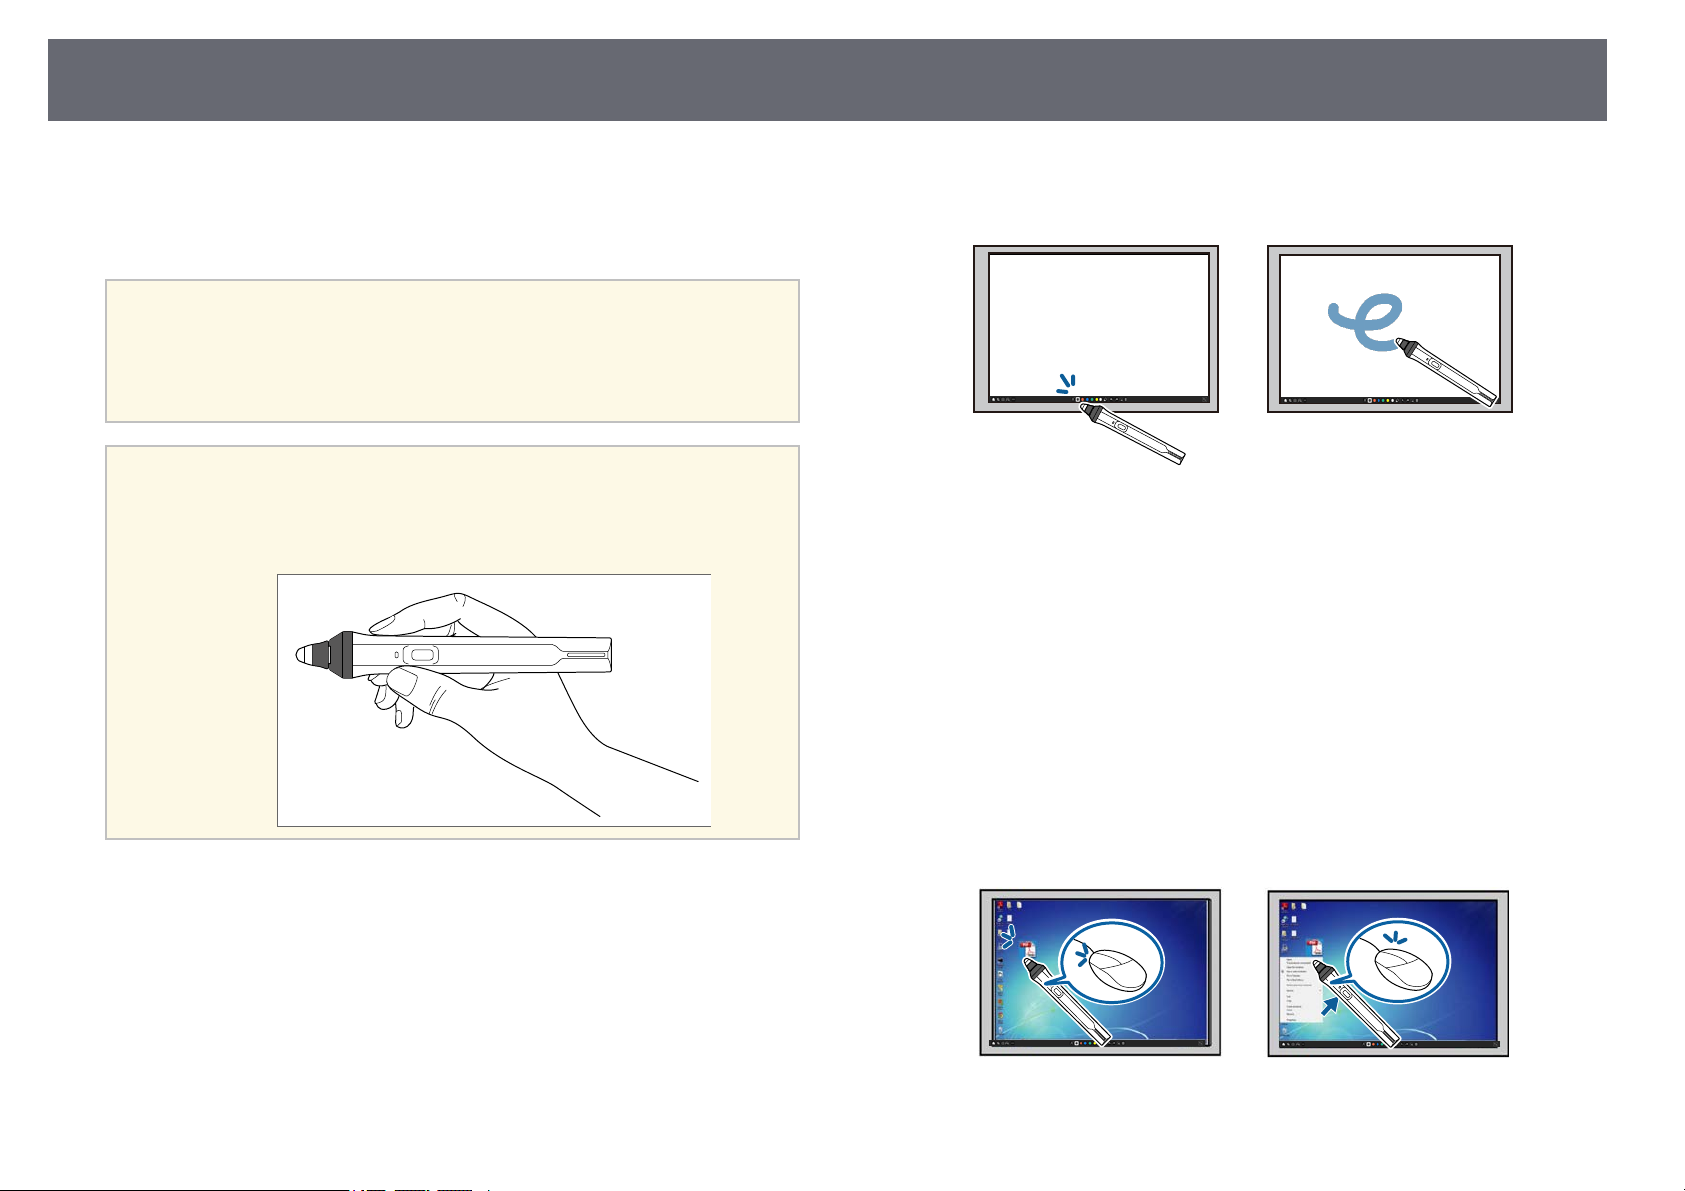
Preparing Before Using Interactive Features
92
Hold the pen to turn it on.
When you are finished using the pen, leave the pen as it is far from the
projection screen.
Attention
• Do not use interactive pens with wet hands or in locations where the pens may
get wet. The interactive pens are not waterproof.
• Keep the projector and projection screen out of direct sunlight, or the interactive
features may not work.
• Pens turns off automatically after 15 seconds when they are placed
a
on. Hold the pen to turn it back on.
• For best performance, hold the pen perpendicular to the board, as
shown below. Do not cover the black band near the tip of the pen.
• Write or draw on the projection surface in whiteboard mode and
annotation mode.
• To select a projected item, such as an icon, tap the projection surface with
the pen tip.
• To draw on the projected screen, tap the projection surface with the pen
and drag it as necessary.
• To move the projected pointer, hover over the surface without touching
it.
• To switch the pen operation from a drawing tool to an eraser or other
functions selected in the projector's Interactive menu, press the button
on the side.
You can do the following using the pen:
s Interactive > Pen Button Function
• Use the pen as a mouse in computer interactive mode.
• To left-click, tap the board with the pen tip.
Page 93
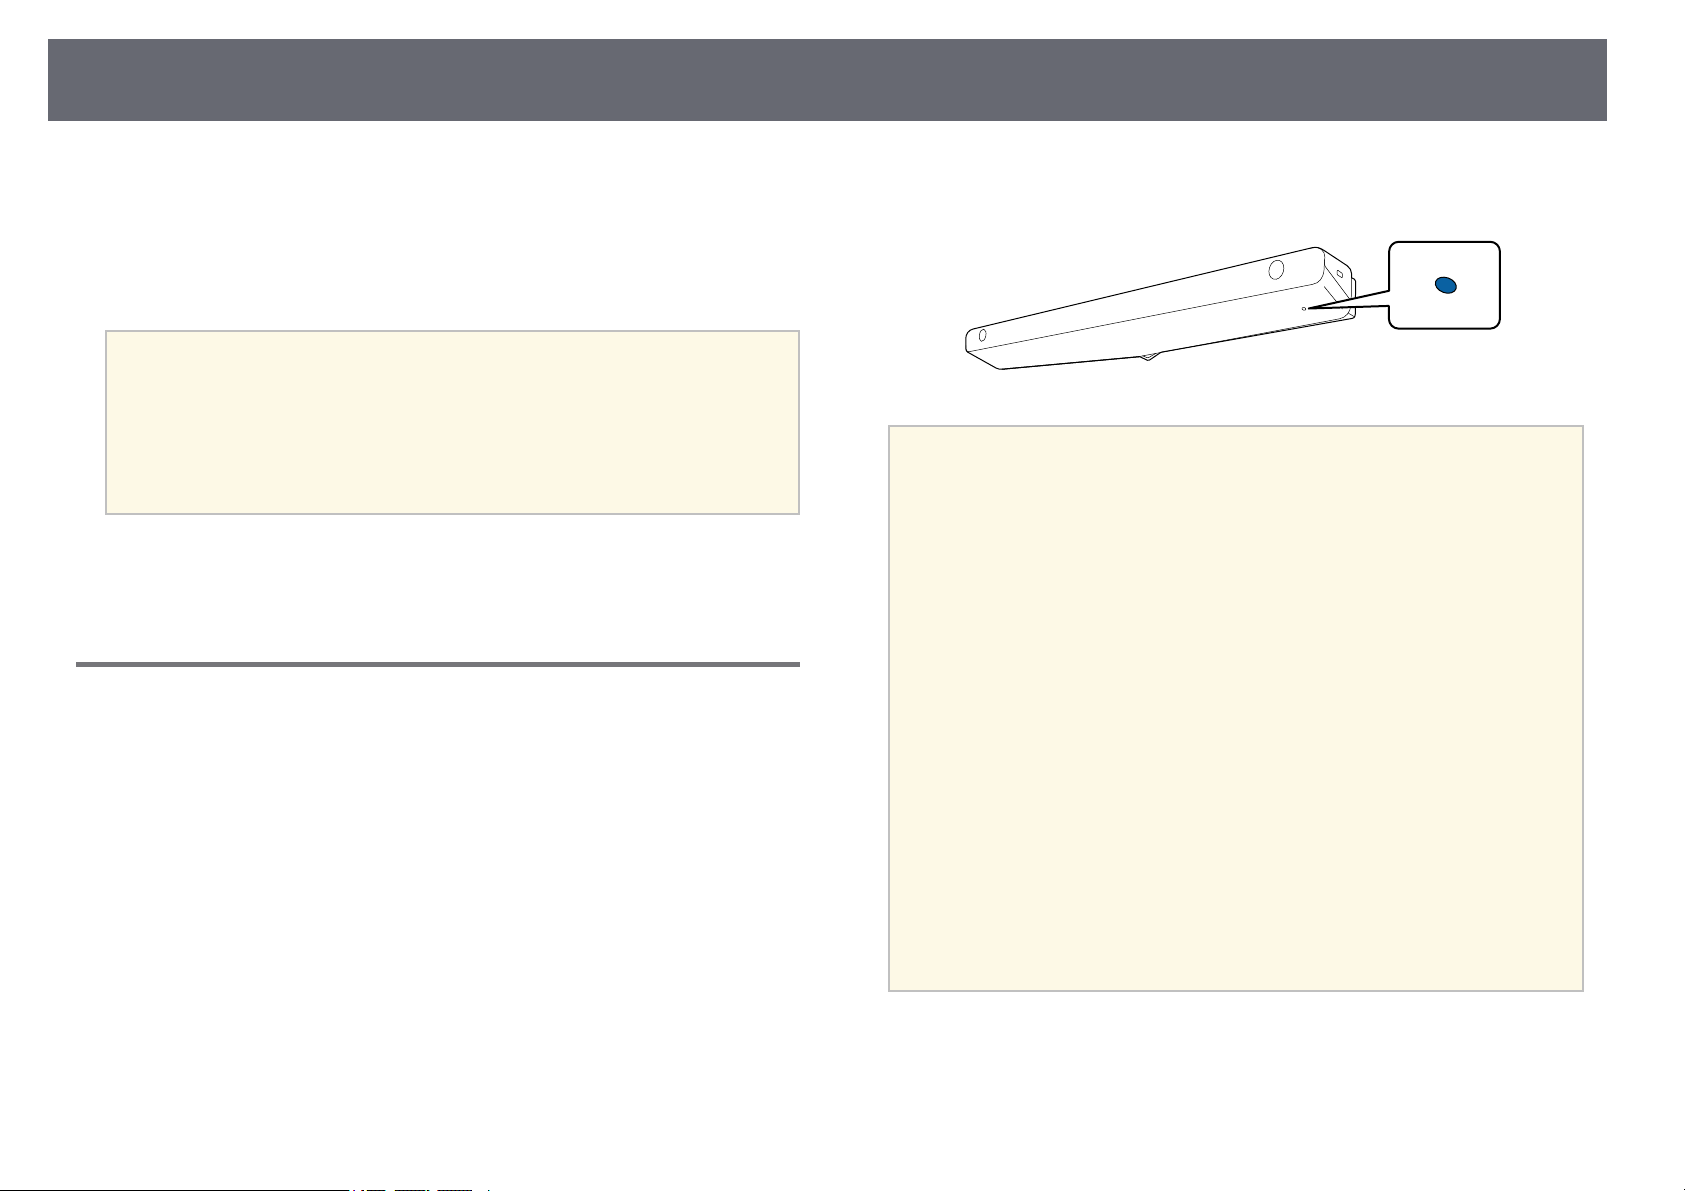
Preparing Before Using Interactive Features
93
• To double-click, tap twice with the pen tip.
• To right-click, press the button on the side.
• To click and drag, tap and drag with the pen.
• To move the cursor, hover over the board without touching it.
• If you do not want to use the hovering feature, you can turn it off
a
gg Related Links
• "Getting the Latest Version of the Documents" p.10
using the Pen Hovering setting in the projector's Pen/Touch menu.
• To make a long press of the pen act as a right-click, set the Pen
Tracking Mode setting to Mouse Mode and set the Press and Hold
setting to Right Click in the projector's Pen/Touch menu.
s Pen/Touch > PC Interactivity > Pen Tracking Mode
s Pen/Touch > PC Interactivity > Press and Hold
Using Interactive Touch Operations with Your Finger
You can use your finger to interact with the projected screen, just as you
would use an interactive pen. You can use either a pen or your finger, or use
both at the same time.
The projector recognizes up to six touch points in computer interactive mode.
When performing touch operations with your finger, you can use two fingers
in annotation and whiteboard modes.
Do the following before using your finger for touch operations:
• Install the Touch Unit
• Calibrate the system manually for the pen
• Perform angle adjustment for the Touch Unit
• Calibrate the system for touch operations
See your projector's Installation Guide for details on these operations.
The Touch Unit turns on and is ready for touch operation with your finger
when you turn on the projector and the indicator lights up in blue.
• Check the following if the Touch Unit does not turn on.
a
You can perform the following touch operations with your finger:
• The projector is operating normally.
• When the Vertical Installation setting is set to Yes, make sure the
Projection setting is set to Front or Front/Upside Down in the
Installation menu.
• When the Vertical Installation setting is set to No, make sure the
Projection setting is set to Front/Upside Down or Rear/Upside
Down in the Installation menu.
• The Power setting is set to On in the Touch Unit menu.
s Pen/Touch > Touch Unit > Power
• The Touch Unit is connected to the projector's TCH port with a
Touch Unit connection cable.
• Positioning discrepancies may occur depending on the angle of your
finger or the direction you point.
• Touch operations with your finger may not work properly with long
or artificial nails, or with your fingers wrapped in bandages.
• Touch operations may not be recognized correctly if your fingers or
the pens are too close together or crossed.
• If clothing or another part of your body comes close to or touches
the screen, the touch operations may work incorrectly.
• If you touch the screen with your free hand during touch operations,
the touch operations may work incorrectly.
Page 94
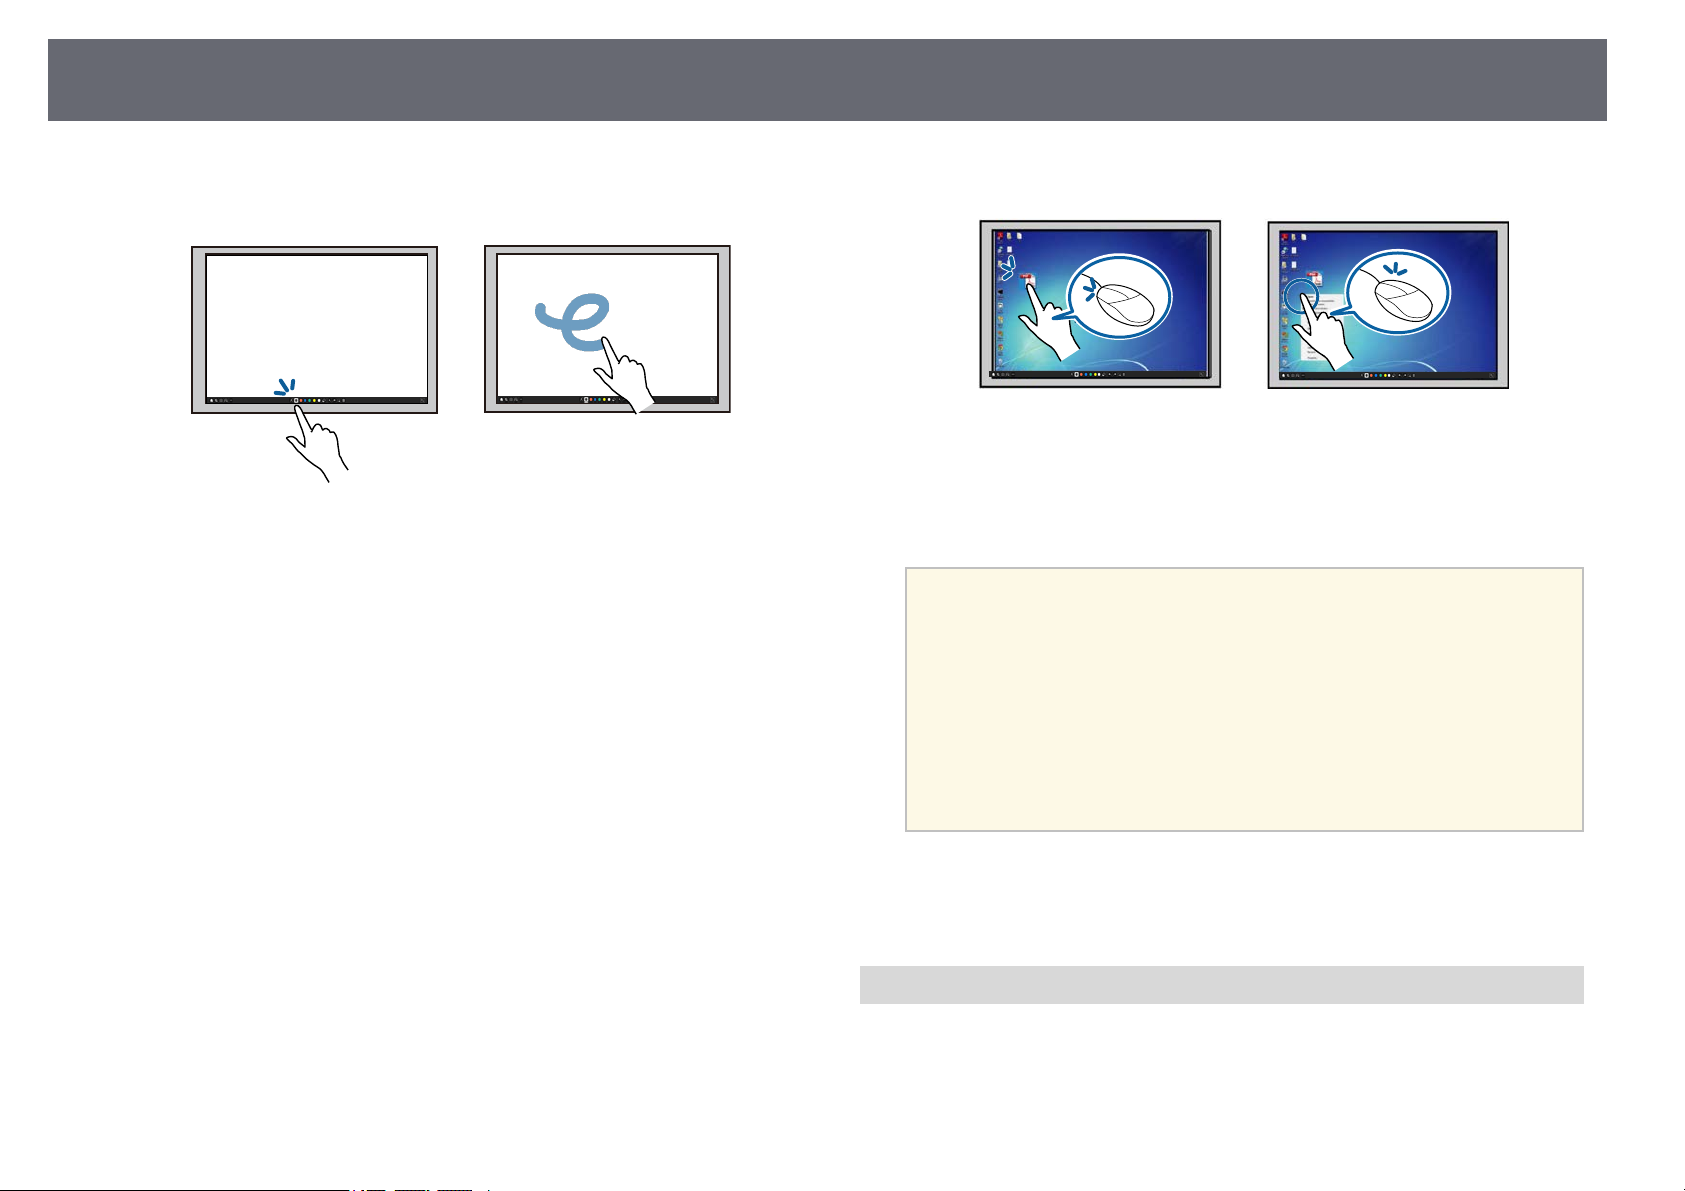
Preparing Before Using Interactive Features
94
• Write or draw on the projection surface in annotation mode and
whiteboard mode.
• To select a projected item, such as an icon, tap the projection surface with
your finger.
• To draw on the projected screen for the first time after turning on the
projector, select a pen in the toolbar and tap the projection surface with
your finger. If you do not do this, your finger works as an eraser the first
time you use touch operations.
• To zoom in or out, touch an item using two fingers, and either move
your fingers away from each other (stretch to zoom in) or toward each
other (pinch to zoom out).
• To rotate the image, touch the image using two fingers and then rotate
your hand.
• Use your finger as a mouse in computer interactive mode.
• To left-click, tap the board with your finger.
• To double-click, tap twice with your finger.
• To click and drag, press on and drag an item with your finger.
• If your device supports these functions, you can also do the
a
gg Related Links
• "Safety Instructions for Interactive Touch Operations" p.94
• "Getting the Latest Version of the Documents" p.10
following:
• To zoom in or out, touch an item using two fingers, and either
move your fingers away from each other (stretch to zoom in) or
toward each other (pinch to zoom out).
• To rotate the image, touch the image using two fingers and then
rotate your hand.
• To scroll up or down the page, or move backward or forward in a
browser window, use gestures such as flicks.
• You can only use one tool with one finger at a time.
Safety Instructions for Interactive Touch Operations
Touch operation with your finger is enabled by installing the Touch Unit with
a built-in high-power laser.
Page 95
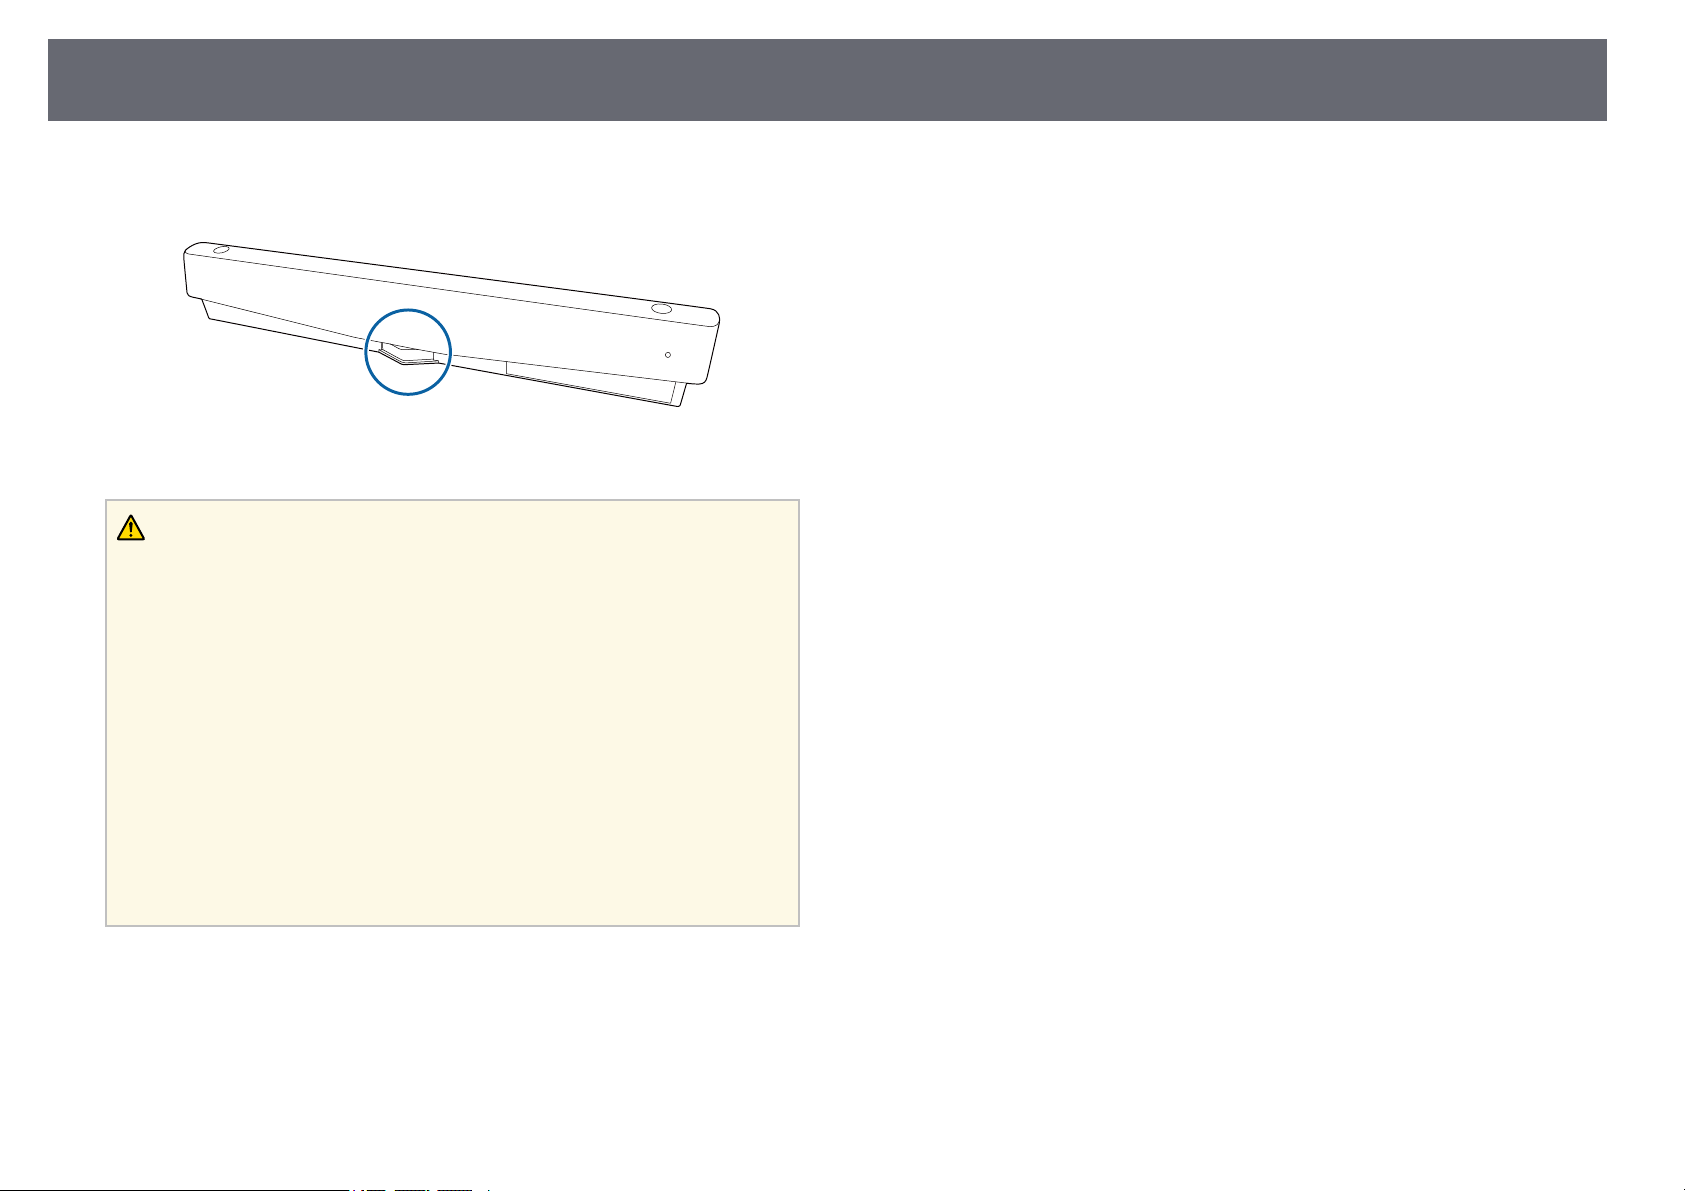
Preparing Before Using Interactive Features
The laser radiates from the laser diffusion ports on the bottom of the Touch
Unit:
Note the following important points when performing touch operations.
Warning
• Children using touch operations with their fingers should always be
accompanied by an adult.
• Never open any cases on the projector or the Touch Unit. Never attempt to
disassemble or modify the projector or the Touch Unit. Electrical voltages inside
the projector can cause severe injury.
• Do not allow the laser light emitted from the Touch Unit to pass through or be
reflected by any optical object, such as a magnifying glass or mirror. Continued
use of the Touch Unit may result in fire or accidents, and also cause injury.
• Unplug the projector from the outlet and refer all repairs to qualified service
personnel if any problems occur with the projector or the Touch Unit.
Continued use of the Touch Unit may result in fire or accidents, and can also
damage your eyes.
• Do not look at the laser light using an optical device (for example, eye lope,
magnifying glass, or microscope) within a distance of 70 mm from the laser
diffusion ports of the Touch Unit. This could damage your eyes.
95
Page 96
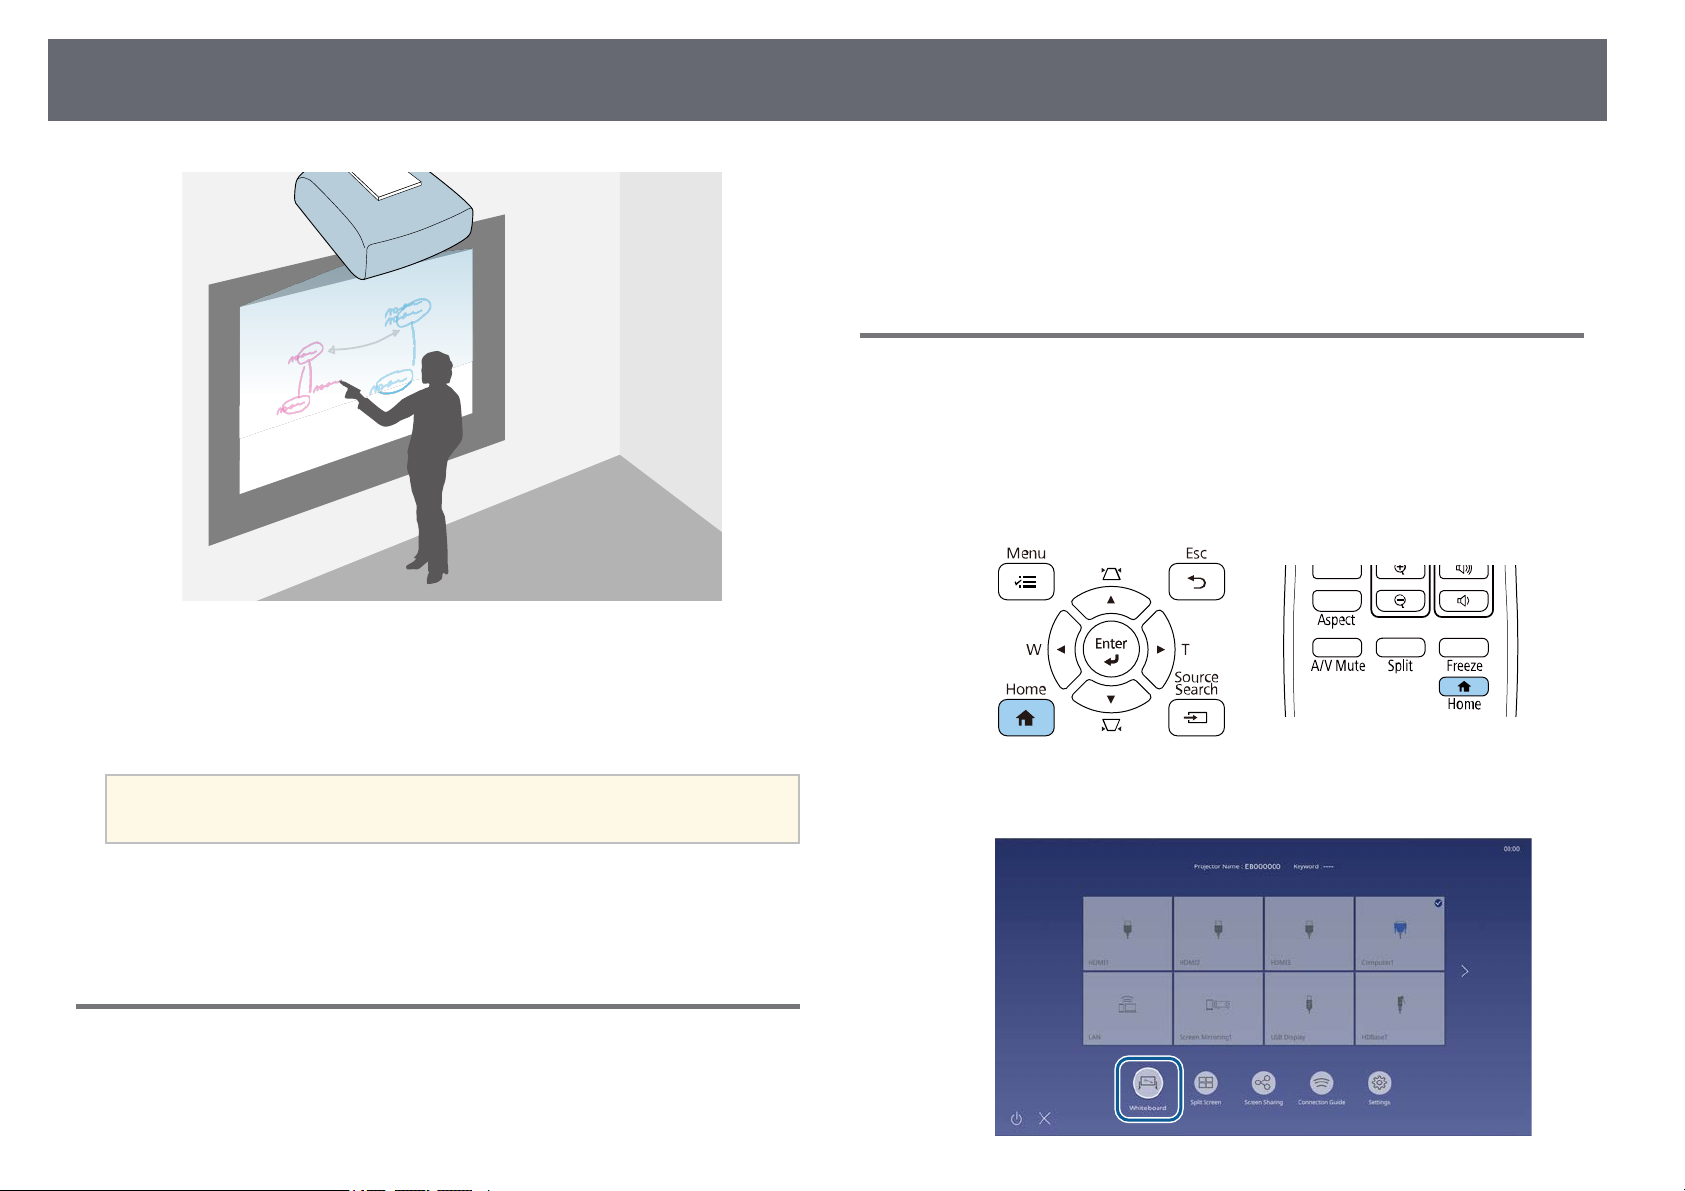
Whiteboard Screens (Whiteboard Mode)
• Users are responsible for managing this data. Epson takes no responsibility
for direct or indirect damage caused by loss, damage, or disclosure of the
user's data or data for third parties through the use of this projector. Make
sure you understand these points before use.
Starting Whiteboard Mode
You can draw on the whiteboard screen using the whiteboard mode toolbar.
Turn on the projector.
a
Press the [Home] button.
b
96
You can use your projector to project a whiteboard image onto a plain
surface. You can then use the interactive pens or your finger to draw letters
and shapes on the image as if it were a whiteboard. This is useful in locations
that do not have a whiteboard.
In whiteboard mode, you can also use both pens, or both pens and
a
gg Related Links
• "Safety Instructions for Whiteboard Mode" p.96
• "Starting Whiteboard Mode" p.96
your finger, at the same time.
Safety Instructions for Whiteboard Mode
Note the following important points when using this feature.
• All drawing data is cleared when the projector is turned off.
Select Whiteboard.
c
Page 97
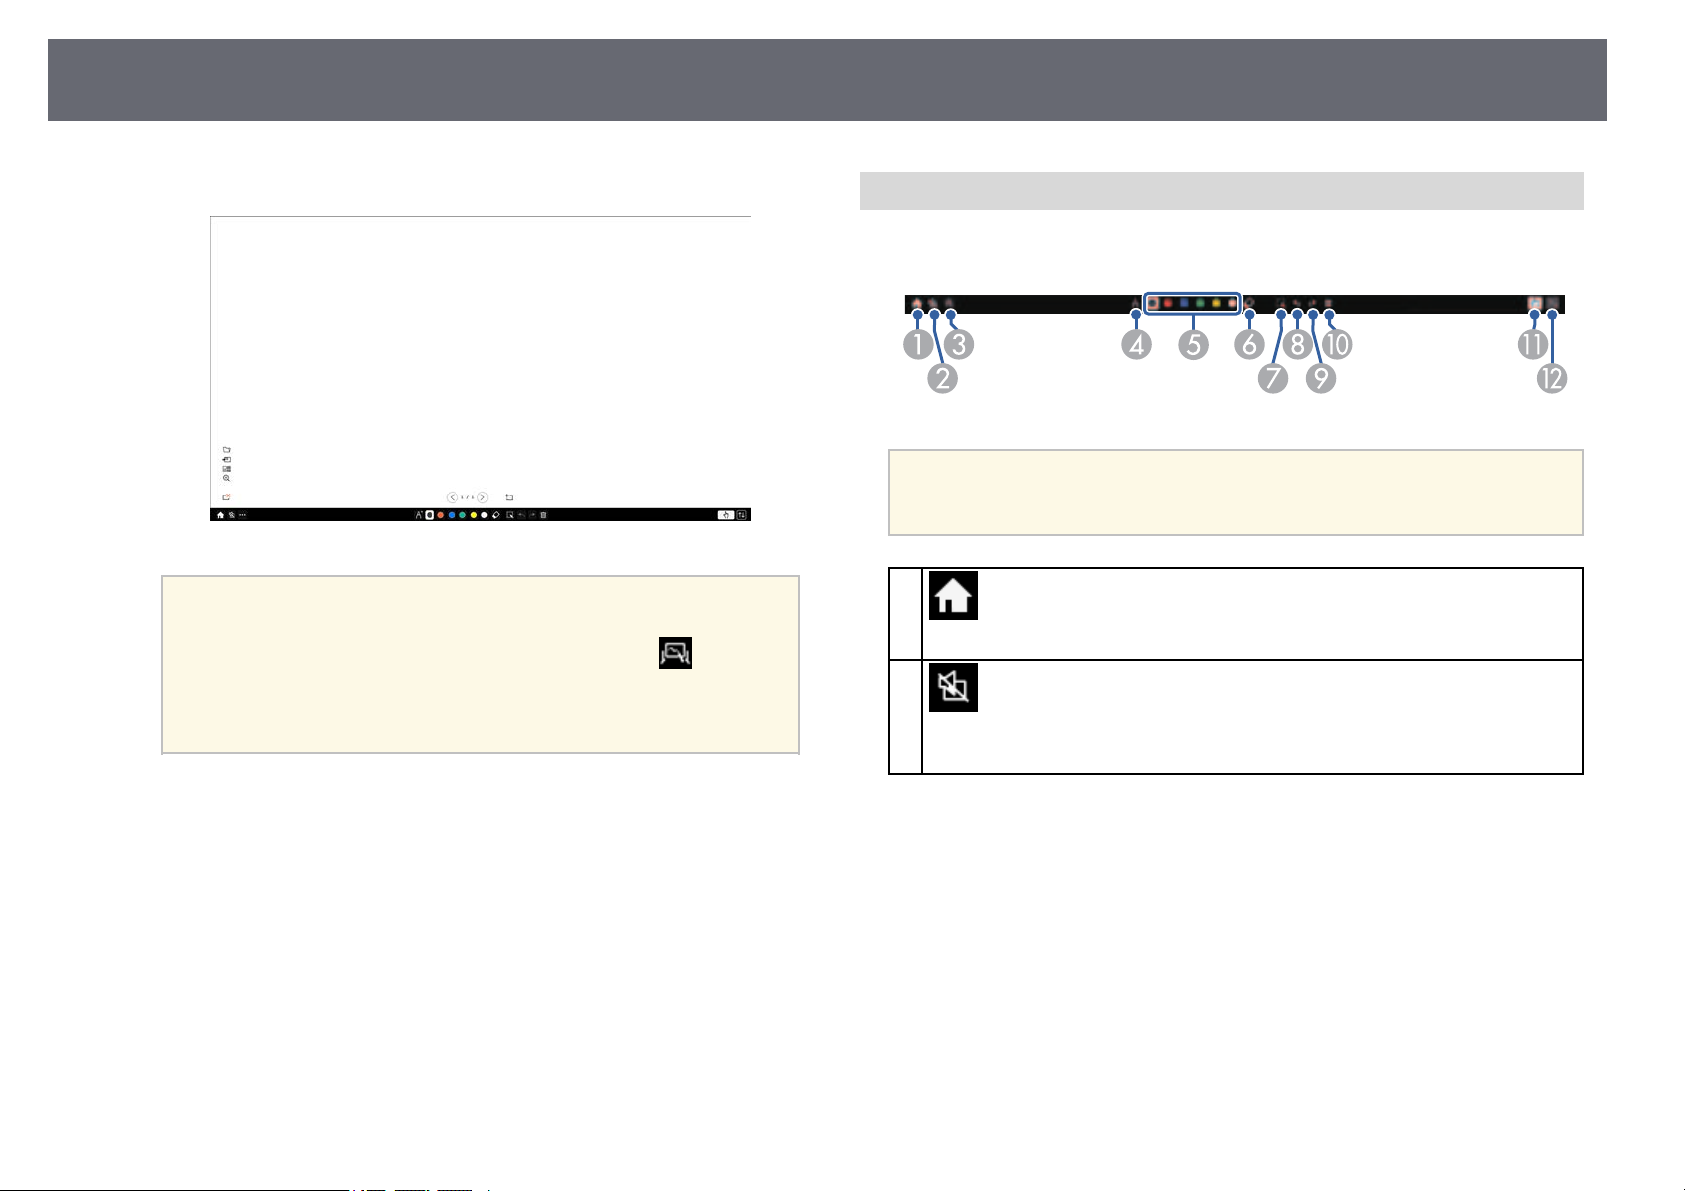
Whiteboard Screens (Whiteboard Mode)
97
You see the whiteboard screen and toolbar.
• You can move the toolbar to the right, left, top, or bottom of
a
the screen by dragging it.
• You can also start whiteboard mode by clicking on the
toolbar.
• Any drawings that you create in whiteboard mode are retained
if you change to annotation mode or other image sources.
Whiteboard Mode Toolbar
The whiteboard mode toolbar lets you draw and write on the projected
screen. The whiteboard mode toolbar is shown in the following illustration.
• You can also use the mini toolbox by pressing the button on the side
a
A
Displays the Home screen.
B
Turns the video and audio off. Tap the button again to turn the video and audio
back on.
of the pen anywhere in the drawing area. You can switch the type of
pen or eraser on the mini toolbox.
Home
A/V Mute
Select the drawing tool you want to use from the toolbar displayed on
d
the bottom of the screen and draw on the projected screen using the
interactive pen or your finger.
gg Related Links
• "Whiteboard Mode Toolbar" p.97
• "Importing Images in Whiteboard Mode" p.99
• "Compatible File Types for Opening in Whiteboard Mode" p.101
Page 98
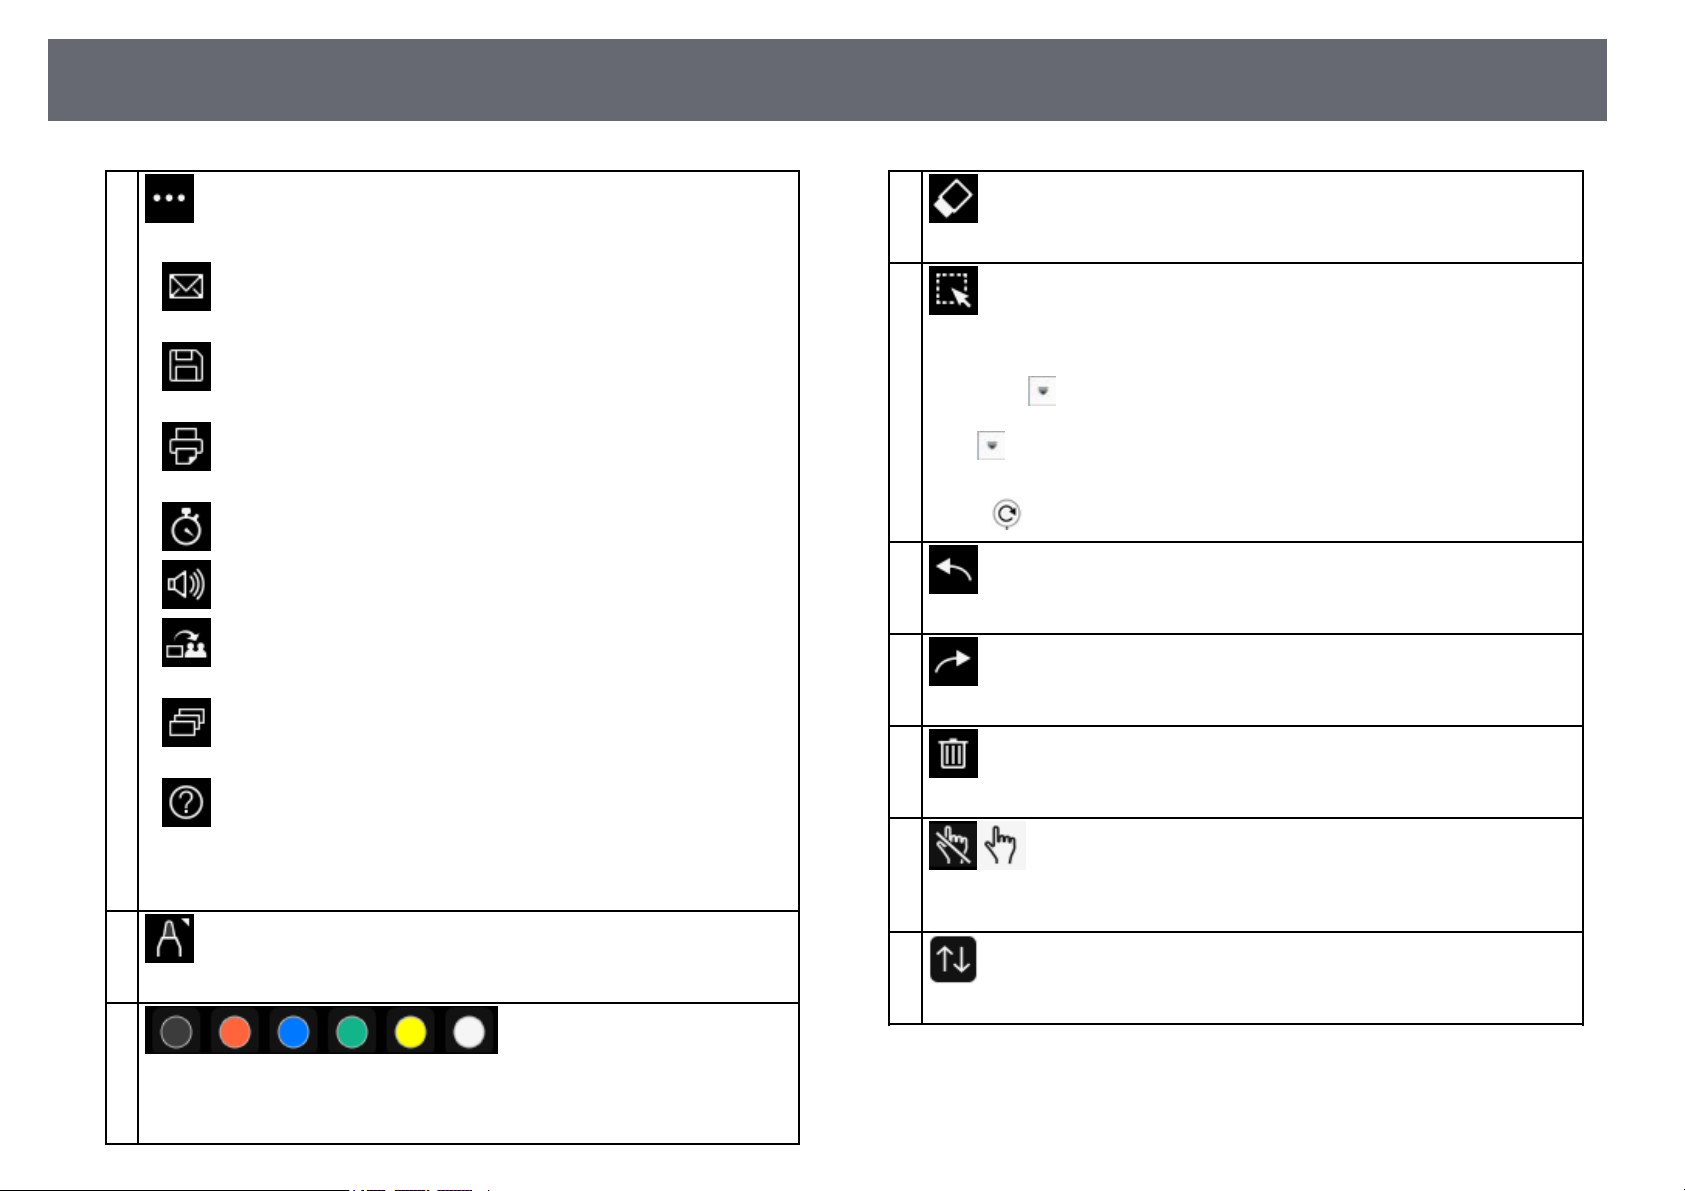
Whiteboard Screens (Whiteboard Mode)
98
C
Other tools
Displays additional tools.
• Mail: Sends the projected screen by email. Set up the Mail settings in
the projector's Interactive menu first.
• Save: Saves the displayed screen. Set up the Save settings in the
projector's Interactive menu first.
• Print: Prints the projected screen. Set up the Print settings in the
projector's Interactive menu first.
• Timer: Counts the time up or down.
• Volume: Adjusts the volume of projector’s speaker system.
• Deliver screen: Shares the current screen using Epson iProjection
software.
• Participant List: Displays the user selection screen so you can project
from devices connected to the projector over a network.
• Help: Displays the help screen for the toolbar functions. Select Close to
close the help screen.
• Clear all drawing contents: Clears all the current drawing content and
images, and returns whiteboard mode to its default status.
D
Pen
Displays the available pen type, thickness, or shape.
E
F
Eraser
Switches to an eraser. Select the size of the eraser.
G
Select
Selects drawn content or an inserted image so you can perform operations such
as moving the item or adjusting its size.
• Select the icon at the bottom right of the selected object or image to
perform operations. To paste the copied object or image, tap the screen, select
the icon, and select Paste.
• Drag the edge of the area to enlarge or reduce the object or image.
• Drag at the top of the area to rotate the selected object or image.
H
Undo
Undoes the previous operation
I
Redo
Cancels an undo operation and restores the previous status.
J
Clear screen
Clears all drawing from the displayed page.
K
Turn off Touch/Turn on Touch
Disables touch operations temporarily to prevent any unintended operation.
Also enables touch operations that you disabled.
L
Minimize
Hides the toolbar.
Black/Red/Blue/Green/Yellow/White
(Yellow/Green/Aqua/Pink/Red/Blue for highlighter pen)
Switches the color for the drawings.
Page 99
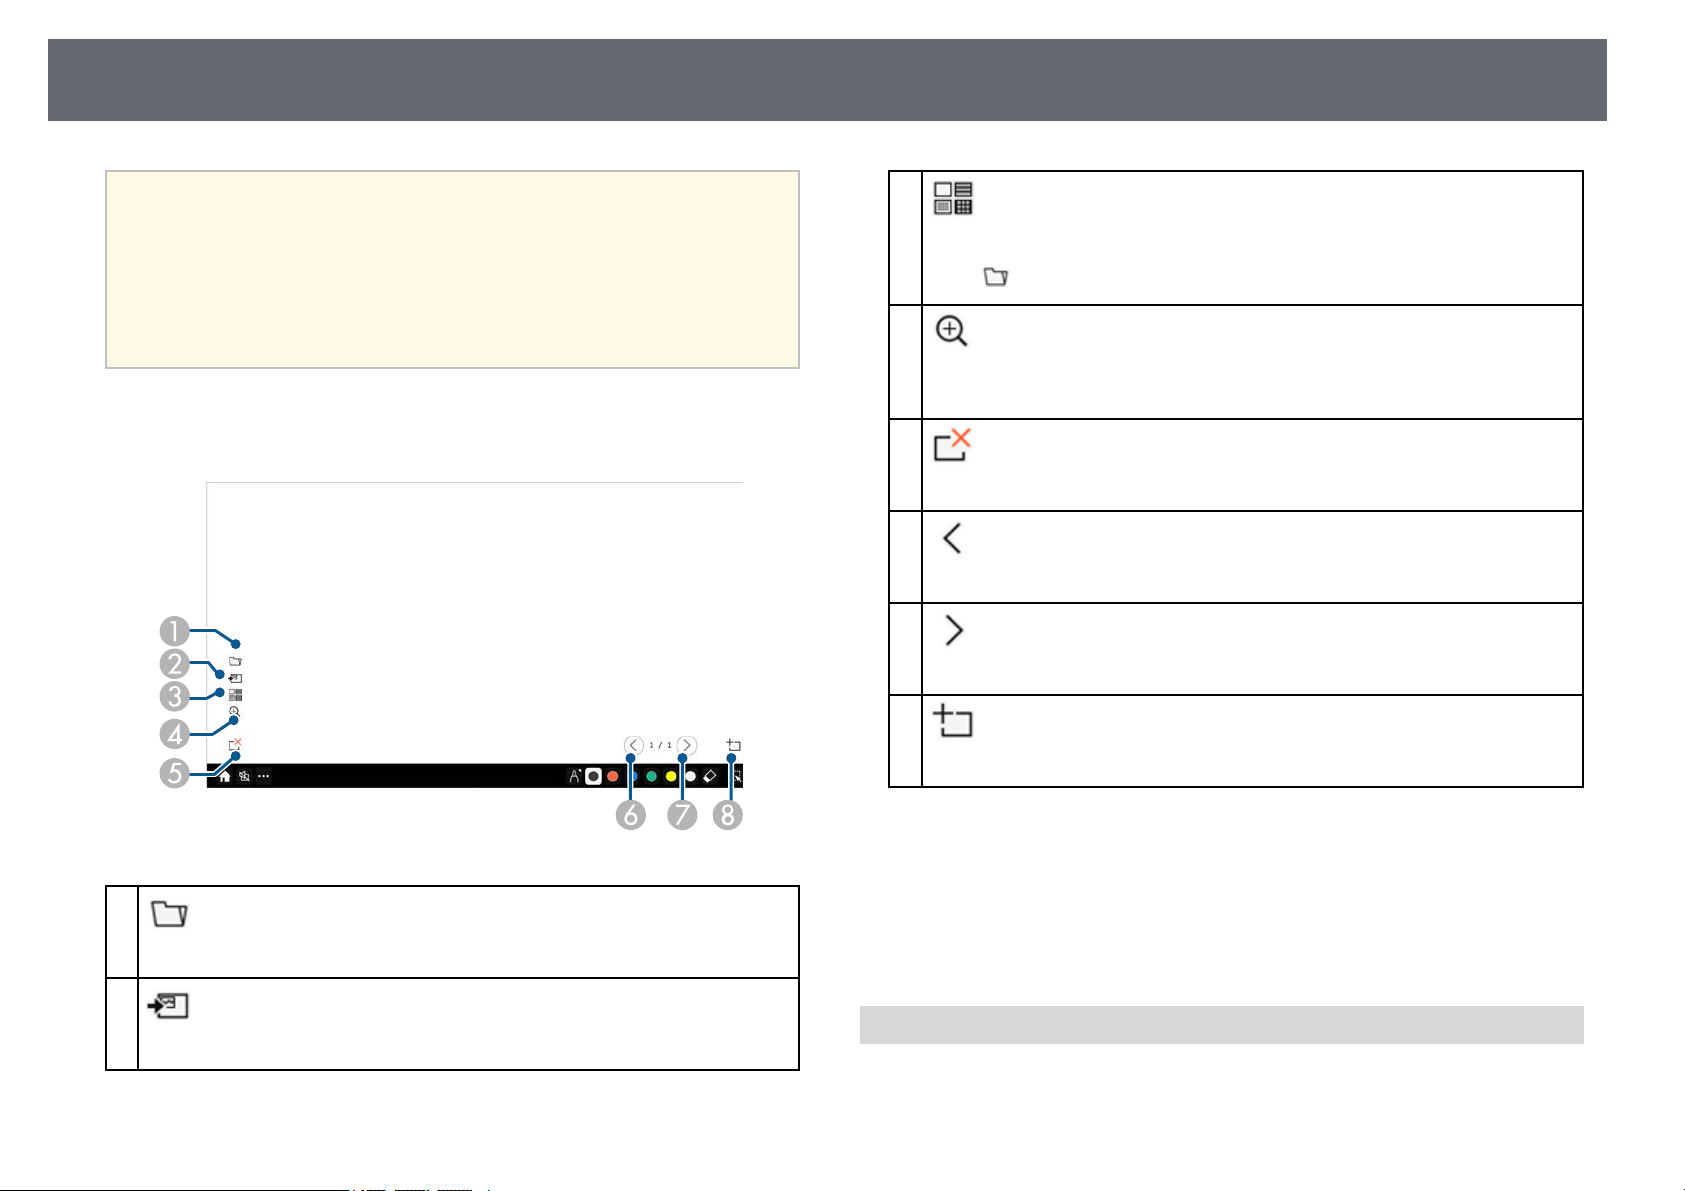
Whiteboard Screens (Whiteboard Mode)
99
• You can display the following number and size of images on the
a
whiteboard screen.
• Up to 1920 × 1080 pixels × 2 files for one page
• Up to 20 pages
• Drawn objects are displayed at the front of the projected image.
• If objects or images are moved out of the projected screen, you may
not be able to select them.
Additional Buttons for Use in Whiteboard Mode
The buttons on the whiteboard mode lets you use whiteboard mode features.
C
Background
Selects a background template.
Select to add user templates.
D
Zoom (Not available when you split the screen with whiteboard screen
and annotation screen)
Enlarges or reduces the projected image.
E
Delete page
Deletes the current page.
F
Previous page
Displays the previous page.
G
Next page
Displays the next page.
H
New page
Adds a new page after the currently displayed page. You can add up to 20 pages.
A
Open
Opens a file and reads the data into a new page.
B
Add image
Imports an image file to the current page.
gg Related Links
• "Home Screen" p.50
• "Shutting Off the Image and Sound Temporarily" p.130
• "Sending Drawing Contents via Email" p.106
• "Saving Drawing Contents" p.108
• "Printing Drawing Contents" p.110
Importing Images in Whiteboard Mode
You can import images into the current page in whiteboard mode. You can
import files from a connected USB storage device or network folder, or you
can scan an image from a network scanner and import it.
Page 100
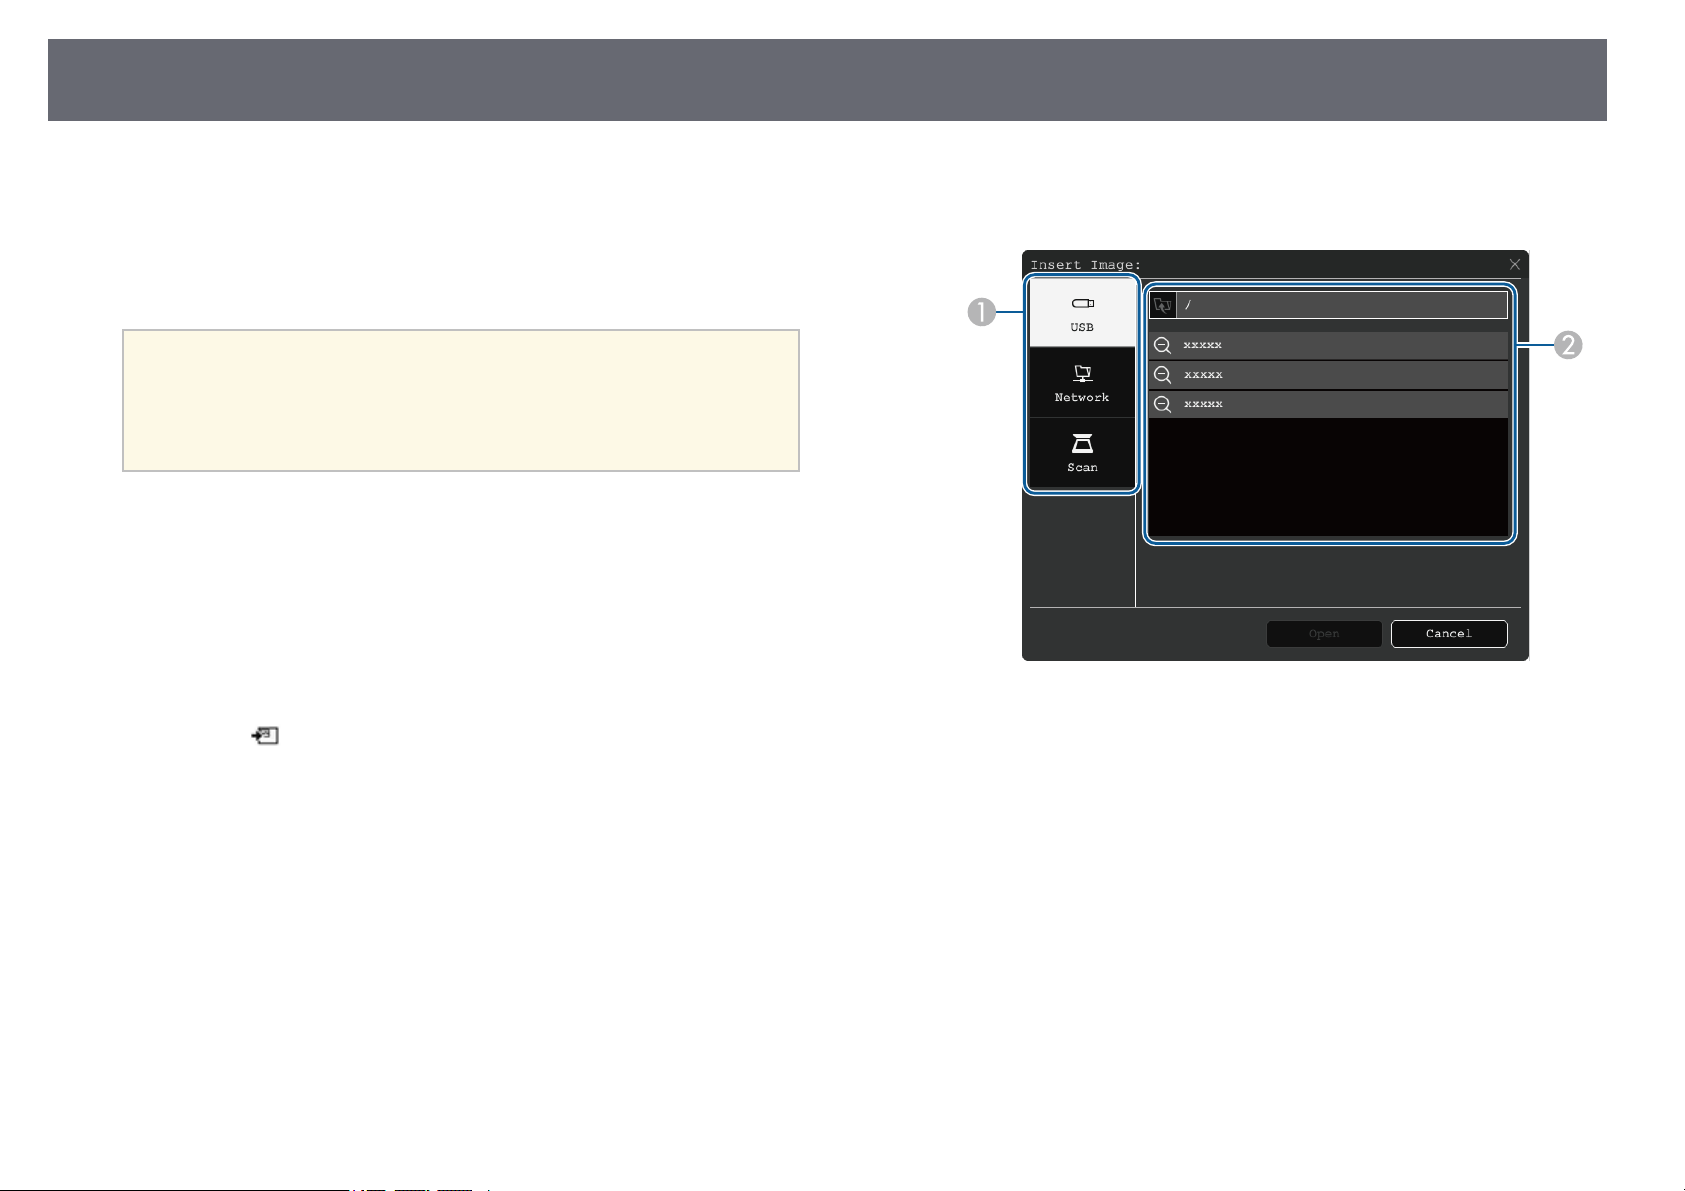
Whiteboard Screens (Whiteboard Mode)
100
• To import images from a USB storage or a network folder, setup the Save
settings in the projector's Interactive menu first.
• To scan a paper document, make sure a supported printer with scanning
capabilities is connected to the projector and setup the Print settings in the
projector's Interactive menu first.
• Printers with ESC/P-R commands are supported.
a
When scanning using your product, you cannot use the following scanning
functions even if they are available:
• Using the scan button on your product.
• Scanning parts of the document.
• Scanning originals using an Automatic Document Feeder (ADF).
a
b
• Certain products, such as standalone scanners, cannot use this
feature. For a list of supported products, contact Epson for help.
• You cannot scan documents when the printer is in an unprintable
status such as when ink has run out.
If you scan a paper document, load your original in the product.
Select the icon on the lower left of the whiteboard.
You see the Add image screen.
Select the following save settings on the Scan screen.
c
• From a USB storage or a network folder
 Loading...