

Page 1
Facsimile User’s Guide
NPD4212-00 EN
Page 2

AcuLaser CX16NF Facsimile User’s Guide
Copyright Notice
No part of this publication may be reproduced, stored in a retrieval system, or transmitted in any form or by any means,
mechanical, photocopying, recording, or otherwise, without the prior written permission of Seiko Epson Corporation. No
patent liability is assumed with respect to the use of the information contained herein. Neither is any liability assumed for
damages resulting from the use of the information contained herein.
Neither Seiko Epson Corporation nor its affiliates shall be liable to the purchaser of this product or third parties for damages,
losses, costs, or expenses incurred by purchaser or third parties as a result of: accident, misuse, or abuse of this product or
unauthorized modifications, repairs, or alterations to this product, or (excluding the U.S.) failure to strictly comply with Seiko
Epson Corporation’s operating and maintenance instructions.
Seiko Epson Corporation and its affiliates shall not be liable against any damages or problems arising from the use of any options
or any consumable products other than those designated as Original Epson Products or Epson Approved Products by Seiko
Epson Corporation.
EPSON is a registered trademark and EPSON AcuLaser is a trademark of Seiko Epson Corporation.
Copyright Notice 2
Page 3

AcuLaser CX16NF Facsimile User’s Guide
Contents
Chapter 1 Introduction
Part Names............................................................................. 7
Front View......................................................................... 7
Rear View.......................................................................... 8
Chapter 2 Control Panel and Configuration Menu
Fax Mode Screen....................................................................... 10
Main Screen....................................................................... 10
Entering Fax Mode................................................................. 12
Symbol list........................................................................ 12
UTILITY Menu........................................................................ 13
Specifying Settings in UTILITY Menu..................................................... 13
General Procedure for Specifying Settings in Utility Menu................................ 13
Memory Reception................................................................. 14
Setting Up the Memory RX Mode..................................................... 14
Turning Off the Memory RX Mode................................................... 15
Specifying Forwarding Settings....................................................... 16
Chapter 3 Sending Faxes
Basic Fax Operation.................................................................... 17
Sending a Fax Using the ADF........................................................ 17
Sending a Fax Using the Original Glass................................................ 19
Adjusting the Image Quality............................................................. 21
Adjusting the Resolution............................................................ 21
Adjusting the Scan Density.......................................................... 22
Specifying a Recipient................................................................... 22
Directly Entering a Fax Number...................................................... 23
Using the Favorite List.............................................................. 23
Using the Speed Dial Function....................................................... 24
Using the List Function of the Phone Book............................................. 25
Using the Search Function of the Phone Book........................................... 26
Using the Redial Function........................................................... 27
Contents 3
Page 4

AcuLaser CX16NF Facsimile User’s Guide
Specifying Multiple Recipients............................................................ 27
Sending a Fax to Multiple Recipients (Broadcast Transmission). ........................... 27
Sending a Fax to Multiple Recipients (Group Dial)....................................... 29
Sending a Fax at a Specified Time (Timer Transmission)...................................... 30
Sending a Batch Transmission............................................................ 31
Memory Transmission and Direct Transmission............................................ 32
Memory Transmission.............................................................. 32
Direct Transmission................................................................ 32
Changing the Transmission Method. . . . . . ............................................ 32
Sending a Fax Manually................................................................. 33
Sending a Fax Manually After Using the Telephone...................................... 33
Sending a Fax Manually Using the On hook Key........................................ 35
Sending a Fax to a Combination of Fax Numbers (Chain Dial)................................. 35
Canceling a Queued Transmission........................................................ 36
About the Fax Header................................................................... 37
Chapter 4 Faxing From a Computer (PC-FAX)
Sending a Fax Directly From a Computer (PC-FAX)......................................... 39
PC-FAX Settings....................................................................... 39
Common Buttons.................................................................. 39
Settings Tab....................................................................... 39
Sender Information Tab............................................................. 40
Address Book Tab.................................................................. 40
Basic PC-FAX Transmissions............................................................ 40
Uninstalling the FAX Driver (for Windows)................................................ 41
Chapter 5 Receiving Faxes
Receiving Faxes Automatically........................................................... 43
Receiving Faxes Manually............................................................... 43
Forwarding Received Faxes.............................................................. 44
Printing Received Faxes................................................................. 45
Printable Area..................................................................... 45
Adding the Sender’s Information When Printing Faxes................................... 45
Contents 4
Page 5

AcuLaser CX16NF Facsimile User’s Guide
Chapter 6 Registering Recipients
About the Dial Register Function......................................................... 53
Favorite List........................................................................... 53
Registering Destinations in the Favorite List............................................ 53
Deleting Destinations from the Favorite List............................................ 55
Speed Dialing.......................................................................... 55
Registering a Speed Dial Destination.................................................. 55
Changing/Deleting Speed Dial Information............................................ 57
Group Dialing......................................................................... 58
Registering a Group Dial Destination.................................................. 58
Changing/Deleting Group Dial Information............................................ 60
Chapter 7 Confirmation Mode
About the Machine’s Counters........................................................... 62
Checking the Counter for Fax Printing. . . ............................................. 62
Checking the Counter for Total Scans................................................. 62
Checking the Transmission/Reception Result From the Message Window. . ..................... 63
About the Reports and Lists.............................................................. 63
Printing the Reports and Lists. ....................................................... 63
TX RESULT REPORT.............................................................. 64
RX RESULT REPORT. . . . . . ........................................................ 64
ACTIVITY REPORT............................................................... 65
MEMORY DATA LIST............................................................. 65
MEMORY IMAGE PRINT.......................................................... 65
FAVORITE LIST.................................................................. 66
SPEED DIAL LIST................................................................. 66
GROUP DIAL LIST................................................................ 66
Chapter 8 Troubleshooting
Problems When Sending Faxes. .......................................................... 68
Problems When Receiving Faxes.......................................................... 69
Other Problems........................................................................ 70
Error Messages on the Message Window................................................... 70
Contents 5
Page 6

AcuLaser CX16NF Facsimile User’s Guide
Appendix A Appendix
Technical Specifications................................................................. 73
Entering Text.......................................................................... 74
Key Operation..................................................................... 74
Changing Input Mode.............................................................. 78
Inputting Example................................................................. 78
Correcting Text And Input Precautions................................................ 79
Index
Contents 6
Page 7
AcuLaser CX16NF Facsimile User’s Guide
Chapter 1
Introduction
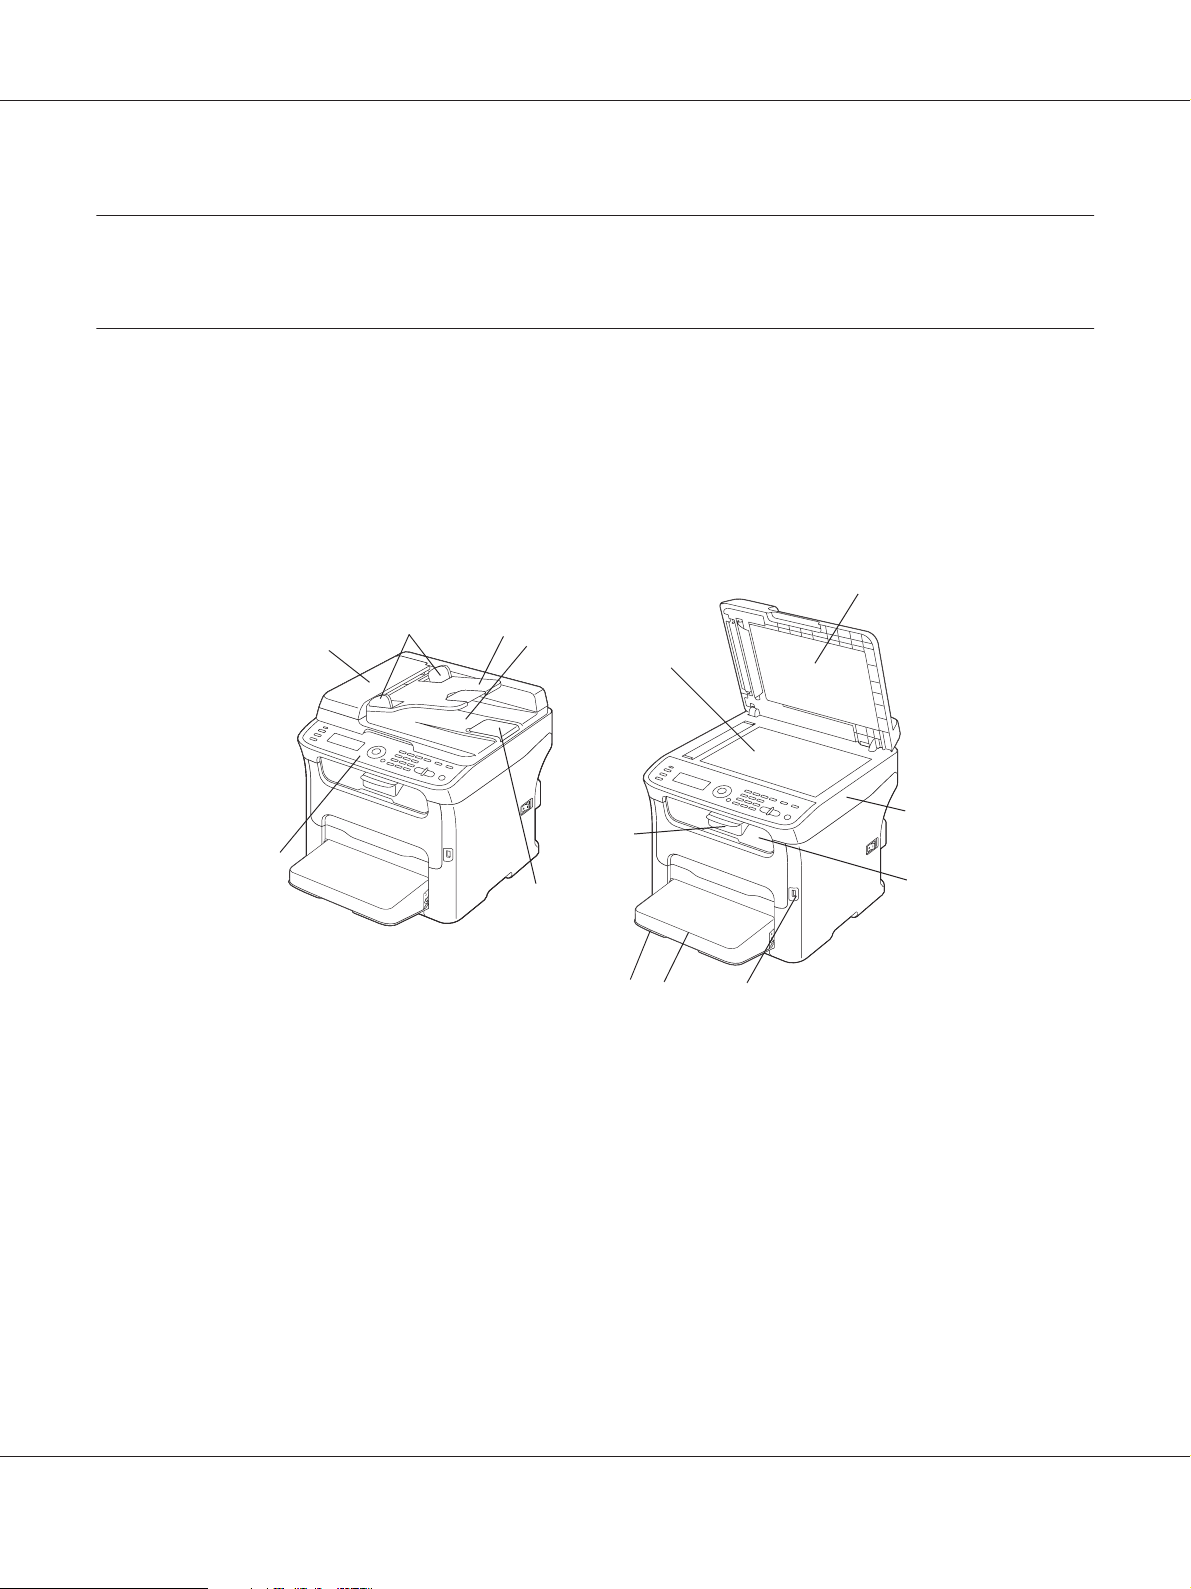
Part Names
The parts of the machine referred to throughout this manual are illustrated below. Please take some
time to become familiar with them.
Front View
8
2-a
1
2-b
2-c
1–Control Panel
2–Automatic document Feeder (ADF)
2–a:ADF feed cover
2-d
2-e
7
9
6
5
4
3
10
2–b:Document guide
2–c:Document feed tray
2–d:Document output tray
Introduction 7
Page 8
AcuLaser CX16NF Facsimile User’s Guide
2–e:Document stopper
Note:
❏ The ADF may appear as “document cover” in some status and error messages.
❏ Lower the document stopper when scanning Legal-size paper with the ADF.
3–Dust cover
4–Tray 1 (Manual feed tray)
5–Output tray
6–Extension tray
7–Original glass
8–Original cover pad
9–Scanner unit
10–USB memory port
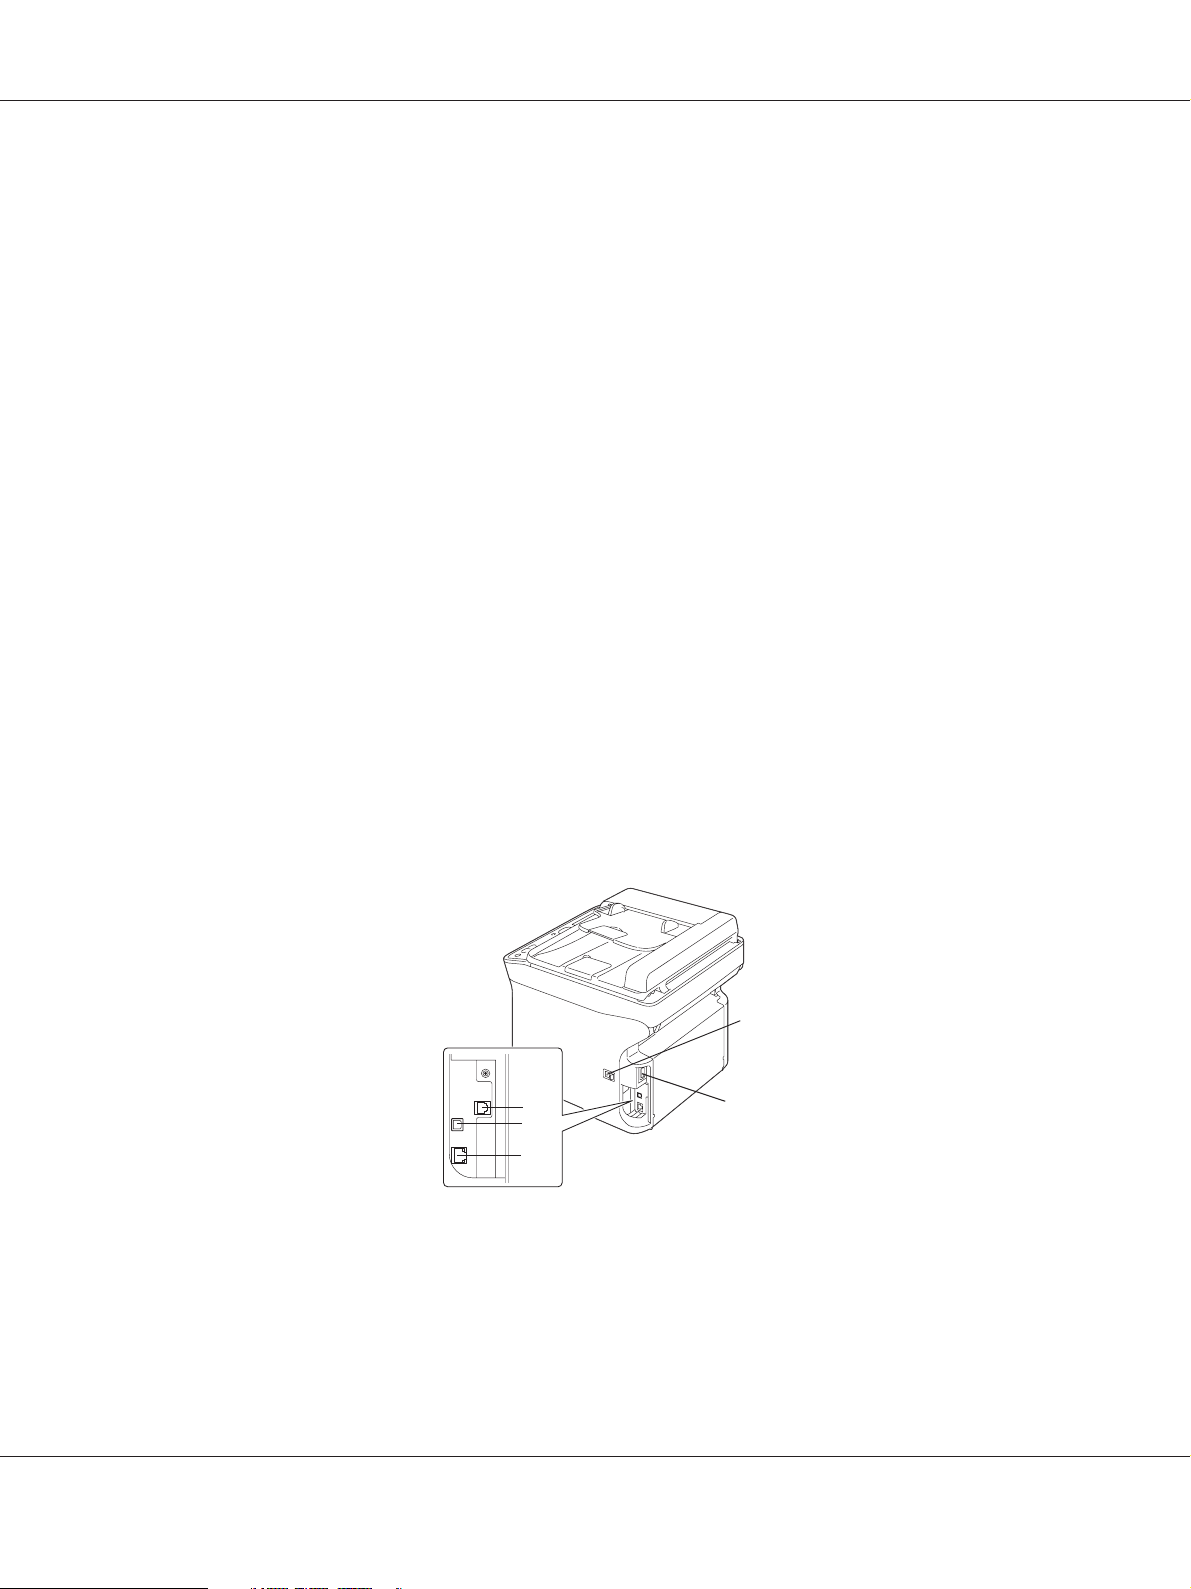
Rear View
1–Power switch
1
3
4
5
2
2–Power connection
3–LINE (telephone line) jack
Introduction 8
Page 9

4–USB port
5–10Base-T/100Base-TX Ethernet Interface port
AcuLaser CX16NF Facsimile User’s Guide
Introduction 9
Page 10
Chapter 2
Control Panel and Configuration Menu
Fax Mode Screen
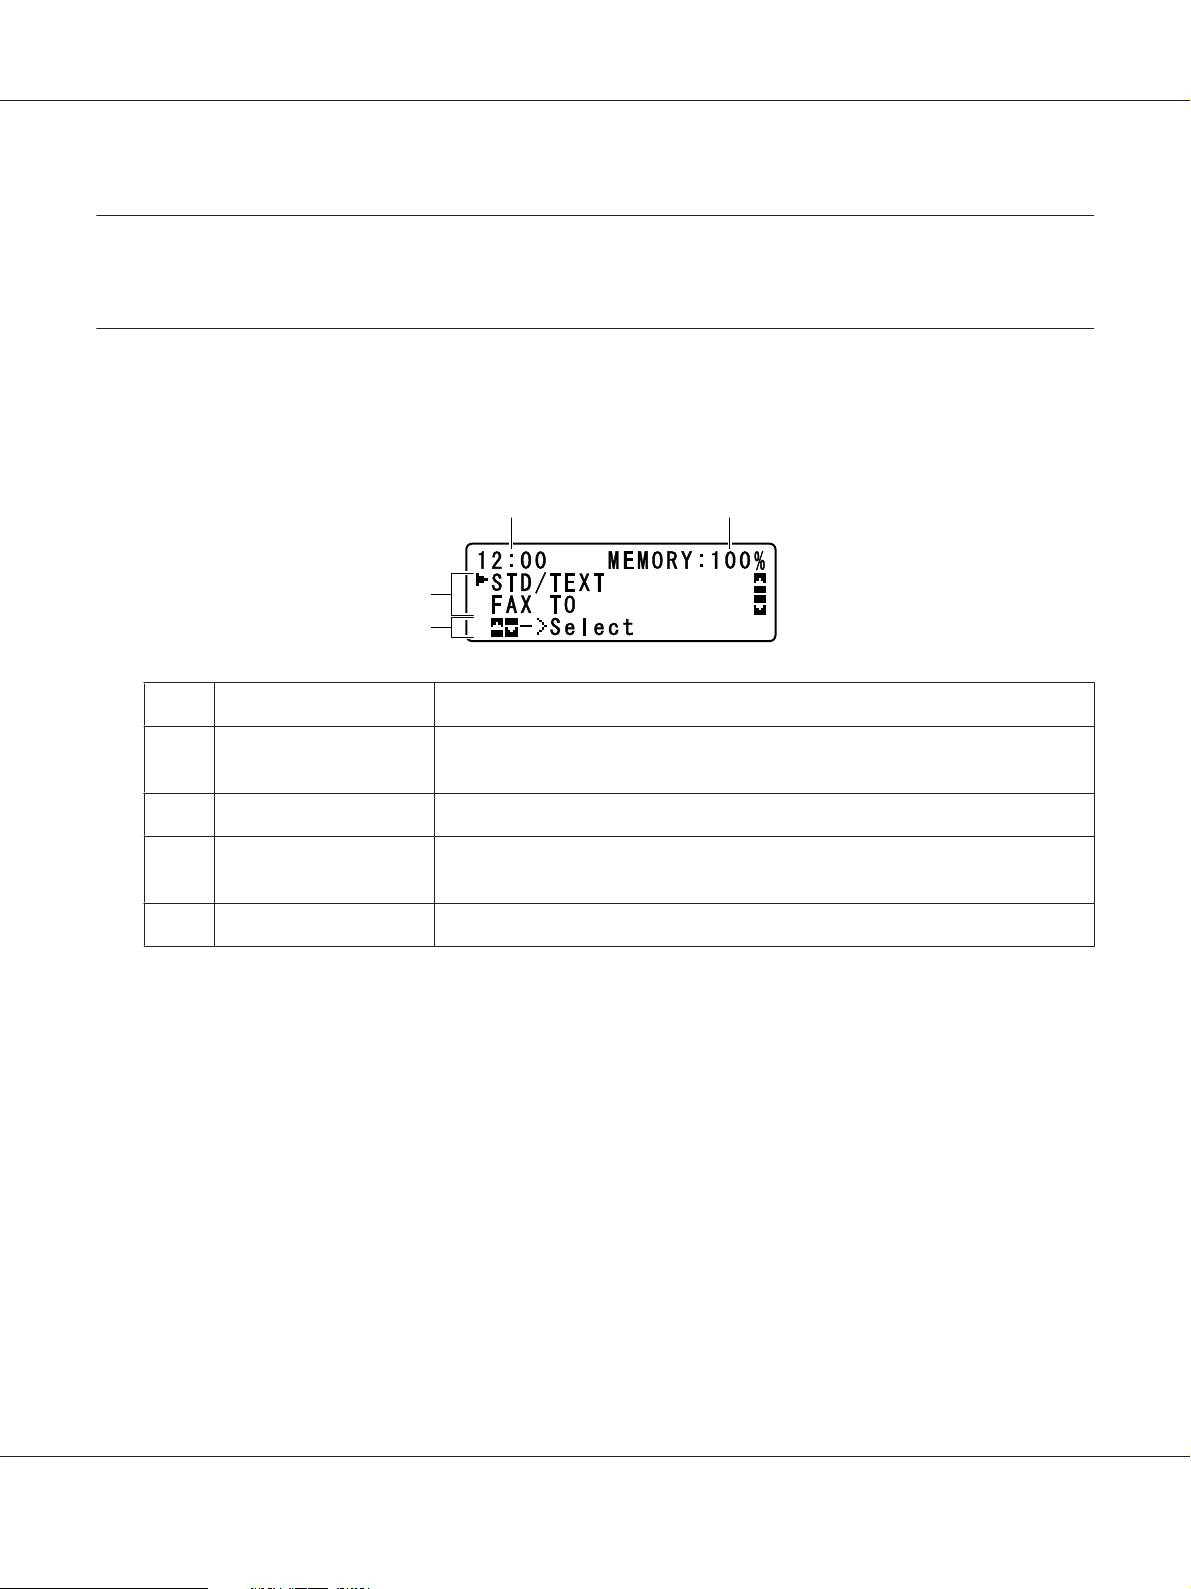
Main Screen
3
4
AcuLaser CX16NF Facsimile User’s Guide
21
No. Indication Description
1 Time Displays the time currently specified with ADMIN. MANAGEMENT/USER SETTING/
DATE&TIME in the UTILITY menu.
2 Available memory Indicates the percentage of memory available for fax operations.
3 Fax settings Allows the current settings to be checked and the various settings to be changed.
For details, refer to “Main Screen” on page 10.
4 Status Depending on the situation, the machine status or an error message may appear.
Control Panel and Configuration Menu 10
Page 11
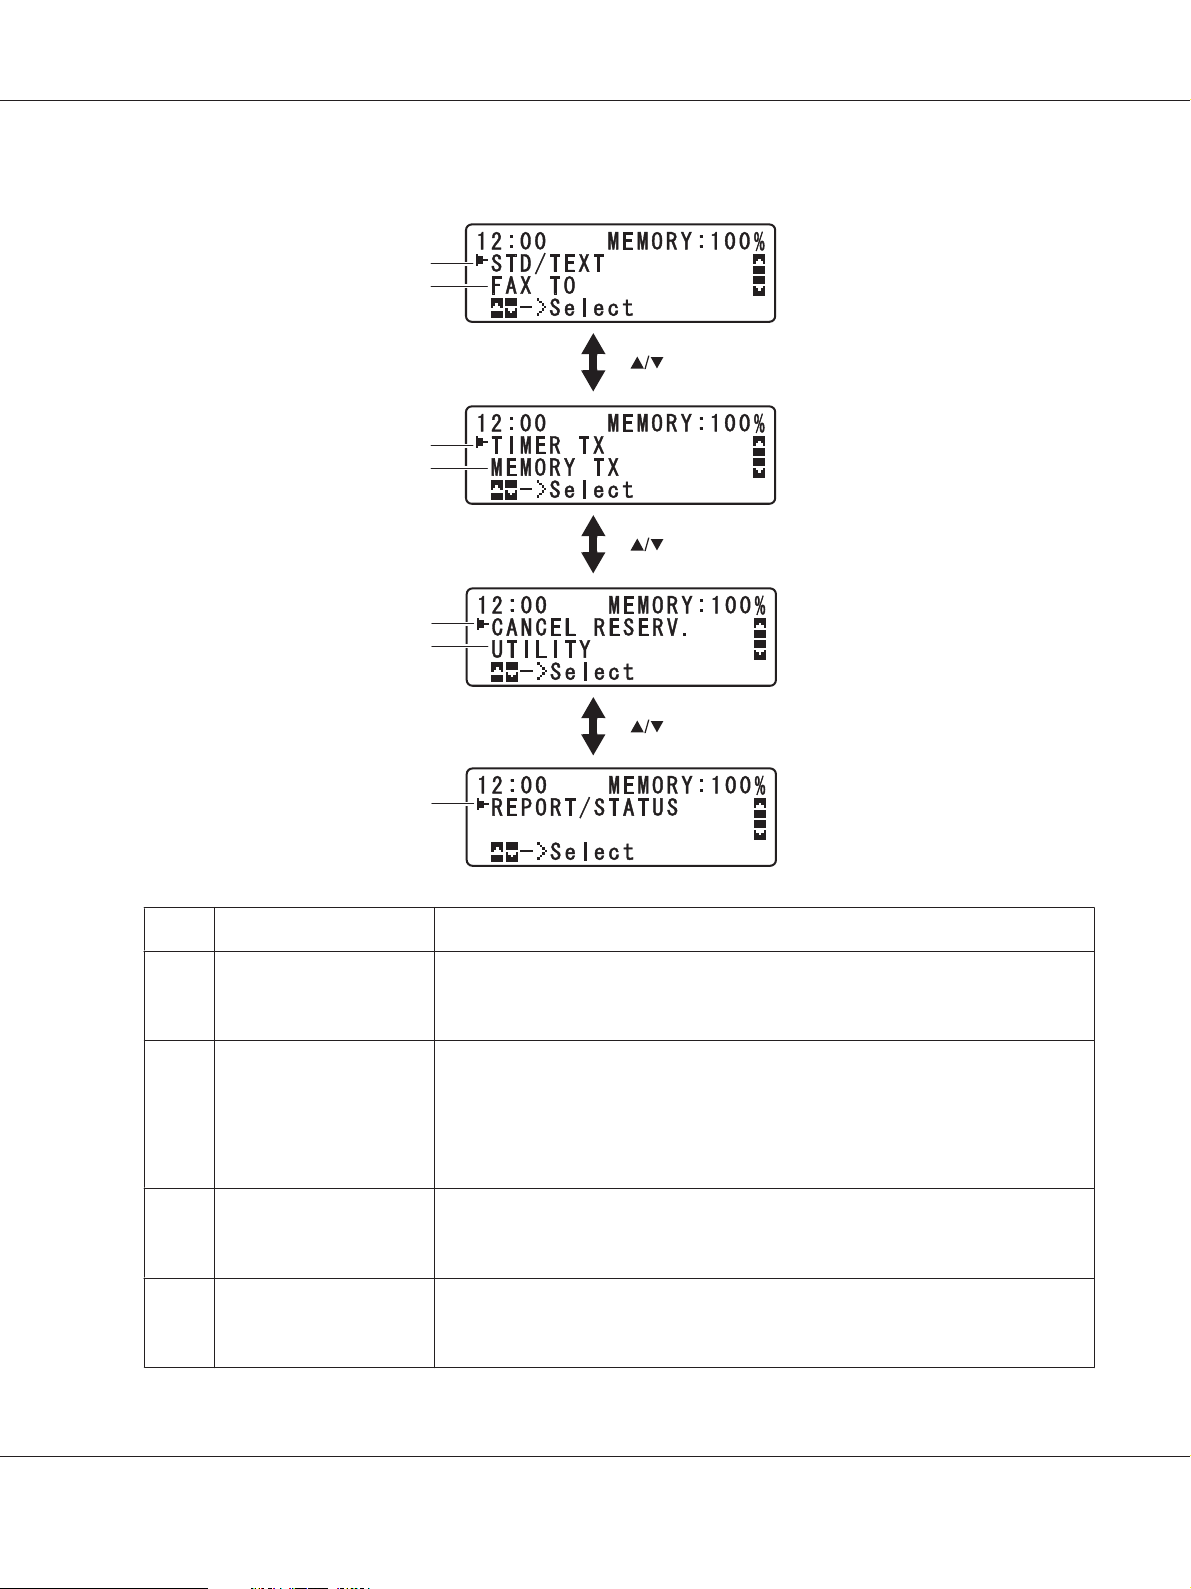
❏ Fax settings
AcuLaser CX16NF Facsimile User’s Guide
1
2
3
4
5
6
7
No. Indication Description
1 Fax quality Indicates the fax quality that is selected. For details on selecting the fax quality,
refer to the Printer/Copier/Scanner User’s Guide and “Adjusting the Image
Quality” on page 21.
2 Fax destination Indicates the specified fax destination. For details on specifying the destination,
refer to “Specifying a Recipient” on page 22 and “Specifying Multiple Recipients”
on page 27.
Note:
If no destination has been specified, FAX TO appears.
3 TIMER TX Select this menu item to specify the time when the fax is to be sent. For details on
specifying settings for a timer transmission, refer to “Sending a Fax at a Specified
Time (Timer Transmission)” on page 30“.
4 Transmission mode Indicates the fax transmission mode that is selected. For details on the
transmission modes, refer to the Printer/Copier/Scanner User’s Guide and
“Memory Transmission and Direct Transmission” on page 32.
Control Panel and Configuration Menu 11
Page 12
AcuLaser CX16NF Facsimile User’s Guide
No. Indication Description
5 CANCEL RESERV. Select this menu item to display the list of jobs queued for transmission and to
delete a job. For details, refer to “Canceling a Queued Transmission” on page
36.
Note:
This menu item does not appear if a destination has been specified.
6 UTILITY Select this menu item to change the various machine settings. For details, refer to
“UTILITY Menu” on page 13.
Note:
This menu item does not appear if a destination has been specified.
7 REPORT/STATUS Select this menu item to view the total number of pages printed by this machine
and the results of fax transmissions/receptions as well as to print reports. For
details, refer to “Confirmation Mode” on page 62.
Note:
This menu item does not appear if a destination has been specified.
Entering Fax Mode
Before using the Fax function, make sure that the Fax key lit green. Otherwise, press it to enter the Fax
mode.
Pressing the Redial/Pause key or On hook key switches the machine to Fax mode when it is in any
mode other than Fax mode.
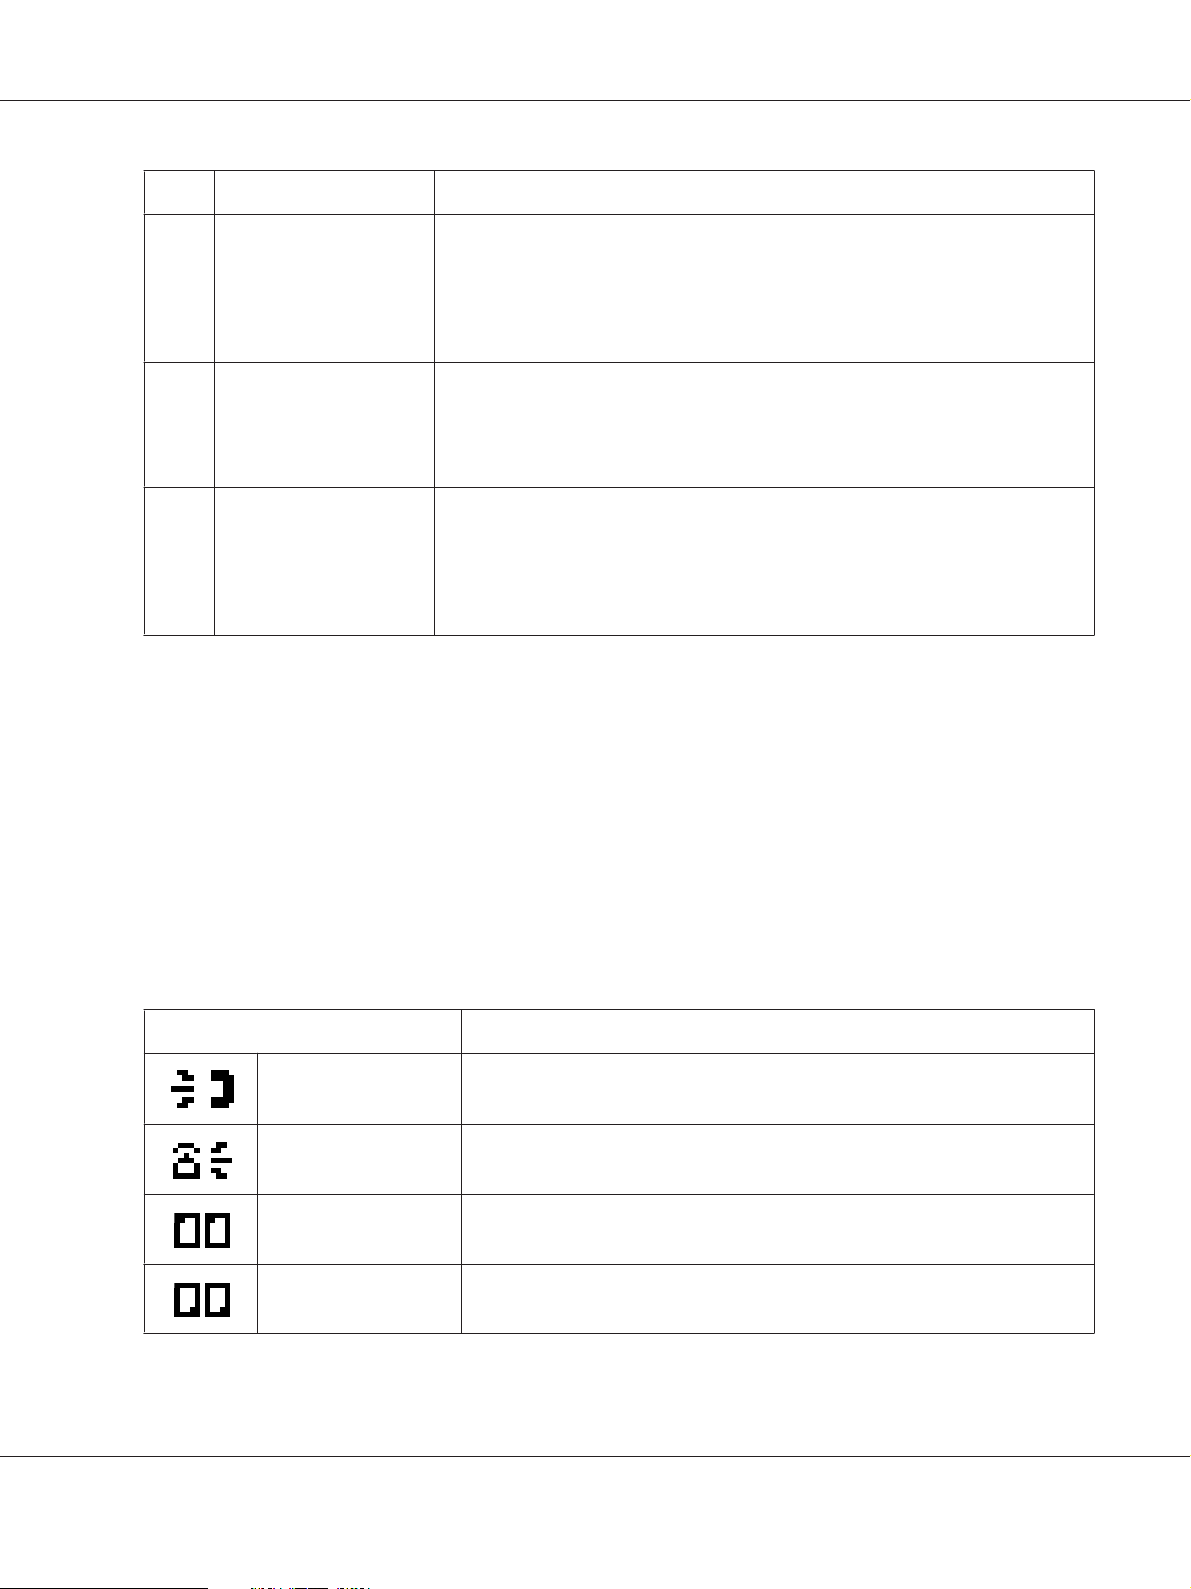
Symbol list
Symbol Description
Dialing A fax number is being dialed.
Ringing The machine is being called.
Sending The document is being sent.
Receiving A document is being received.
Control Panel and Configuration Menu 12
Page 13
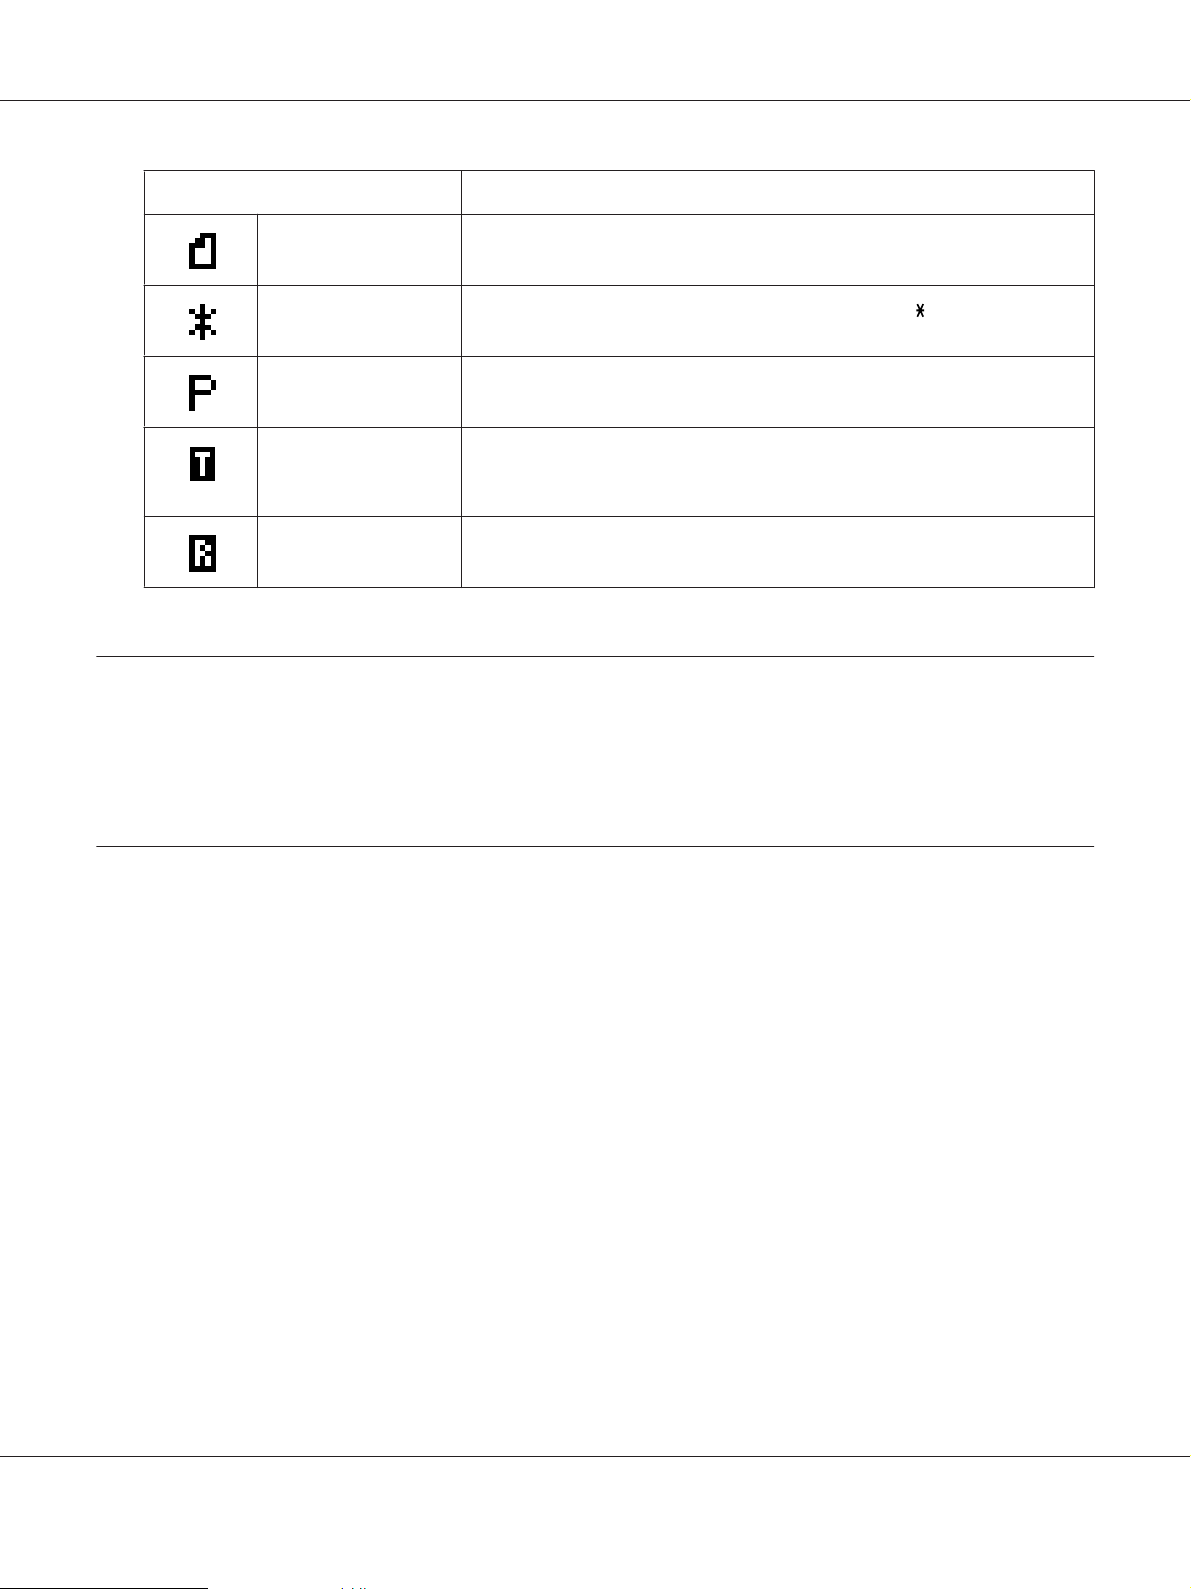
Symbol Description
AcuLaser CX16NF Facsimile User’s Guide
Number of scanning
document pages
Tone If Pulse is selected as the telephone line type, press the key to temporarily
Pause A pause is inserted.
Queued timer
transmission or batch
transmission
Memory reception A document is queued for memory reception.
The number of scanning document pages appears next to the icon.
change the line type to Tone.
A document is queued for timer transmission or batch transmission.
UTILITY Menu
The machine settings can be changed according to the desired normal operations. For details on the
menu settings, refer to the Printer/Copier/Scanner User’s Guide.
Specifying Settings in UTILITY Menu
General Procedure for Specifying Settings in Utility Menu
1. Press the u or d key to select UTILITY, and then press the Select key.
2. Press the u or d key to select the desired menu, and then press the Select key to display the
selected menu.
Note:
Refer to the Printer/Copier/Scanner User’s Guide to display the desired menu.
3. To select a setting, press the u, d, l or r key.
To enter a setting, use the keypad to type in the number.
4. Press the Select key.
The setting is applied.
Control Panel and Configuration Menu 13
Page 14

AcuLaser CX16NF Facsimile User’s Guide
Note:
To cancel the settings, press the Back key.
Memory Reception
Received faxes can be stored in the memory and printed at a specified time. This is convenient, for
example, when confidential documents are received.
Memory reception can be used with the following settings.
❏ Start/end time settings: Not set
MEMORY RX MODE function is normally set to ON. To print a fax saved in memory, set
MEMORY RX MODE function to OFF.
❏ Start/end time settings: Set
Memory reception mode begins and ends at the specified time.
Example 1: When On Time setting is set to 18:00 and OFF TIME setting is set to 8:00
❏ The machine is in memory reception mode from 18:00 to 8:00 and in normal reception mode,
where faxes are printed after being received, from 8:00 to 18:00.
Example 2: When On Time setting is set to 12:00 and OFF TIME setting is set to 12:00 (the start
time and end time are the same)
❏ MEMORY RX MODE function is normally set to ON; however, faxes saved in memory are
printed at 12:00.
Setting Up the Memory RX Mode
1. Press the u or d key to select UTILITY, and then press the Select key.
Note:
For details on selecting a menu, refer to “General Procedure for Specifying Settings in Utility Menu”
on page 13.
2. Press the u or d key to select FAX RX OPERATION, and then press the Select key.
3. Check that MEMORY RX MODE is selected, and then press the Select key.
4. Using the u or d keys, select ON, and then press the Select key.
Control Panel and Configuration Menu 14
Page 15

AcuLaser CX16NF Facsimile User’s Guide
5. Use the keypad to type in the time when memory reception mode begins, and then press the Select
key.
The ending time input box appears.
Note:
To specify no start time, press the Select key without specifying a time. The password input box
appears. Continue with step 7.
6. Use the keypad to type in the time when memory reception mode ends, and then press the Select
key.
The password input box appears.
7. Enter the password, and then press the Select key.
Memory reception mode is set.
Note:
❏ The password is required for turning off memory reception mode or changing the start/end times.
Enter a 4-digit number.
❏ To specify no password, press the Select key without specifying a password.
Turning Off the Memory RX Mode
1. Press the u or d key to select UTILITY, and then press the Select key.
Note:
For details on selecting a menu, refer to “General Procedure for Specifying Settings in Utility Menu”
on page 13.
2. Press the u or d key to select FAX RX OPERATION, and then press the Select key.
3. Check that MEMORY RX MODE is selected, and then press the Select key.
4. Using the u or d keys, select OFF, and then press the Select key.
The password input box appears.
Control Panel and Configuration Menu 15
Page 16

AcuLaser CX16NF Facsimile User’s Guide
Note:
If no password was specified, memory reception mode is canceled.
5. Enter the password, and then press the Select key.
Memory reception mode is canceled.
Note:
If faxes are saved in memory, printing of the faxes begins.
Specifying Forwarding Settings
1. Press the u or d key to select UTILITY, and then press the Select key.
Note:
For details on selecting a menu, refer to “General Procedure for Specifying Settings in Utility Menu”
on page 13.
2. Press the u or d key to select FAX RX OPERATION, and then press the Select key.
3. Press the u or d key to select FORWARD, and then press the Select key.
The FORWARD setting appears.
4. Press the u or d key to select ON or ON(PRINT), and then press the Select key.
5. Enter the destination, or select from the speed dial destinations.
Note:
❏ To select from the speed dial destinations, press the Addressbook key, type in the speed dial
number, and then press the Select key.
❏ An e-mail address can also be specified.
6. Press the Select key.
The forwarding settings are specified.
Control Panel and Configuration Menu 16
Page 17

Chapter 3
Sending Faxes
Basic Fax Operation
This section contains basic information of fax transmission.
Note:
Documents with the following paper sizes can be faxed.
Original size: A5/A4/Statement/Letter (when using the original glass)
Width: 140 to 216 mm
Length: 148 to 500 mm (when using the ADF)
AcuLaser CX16NF Facsimile User’s Guide
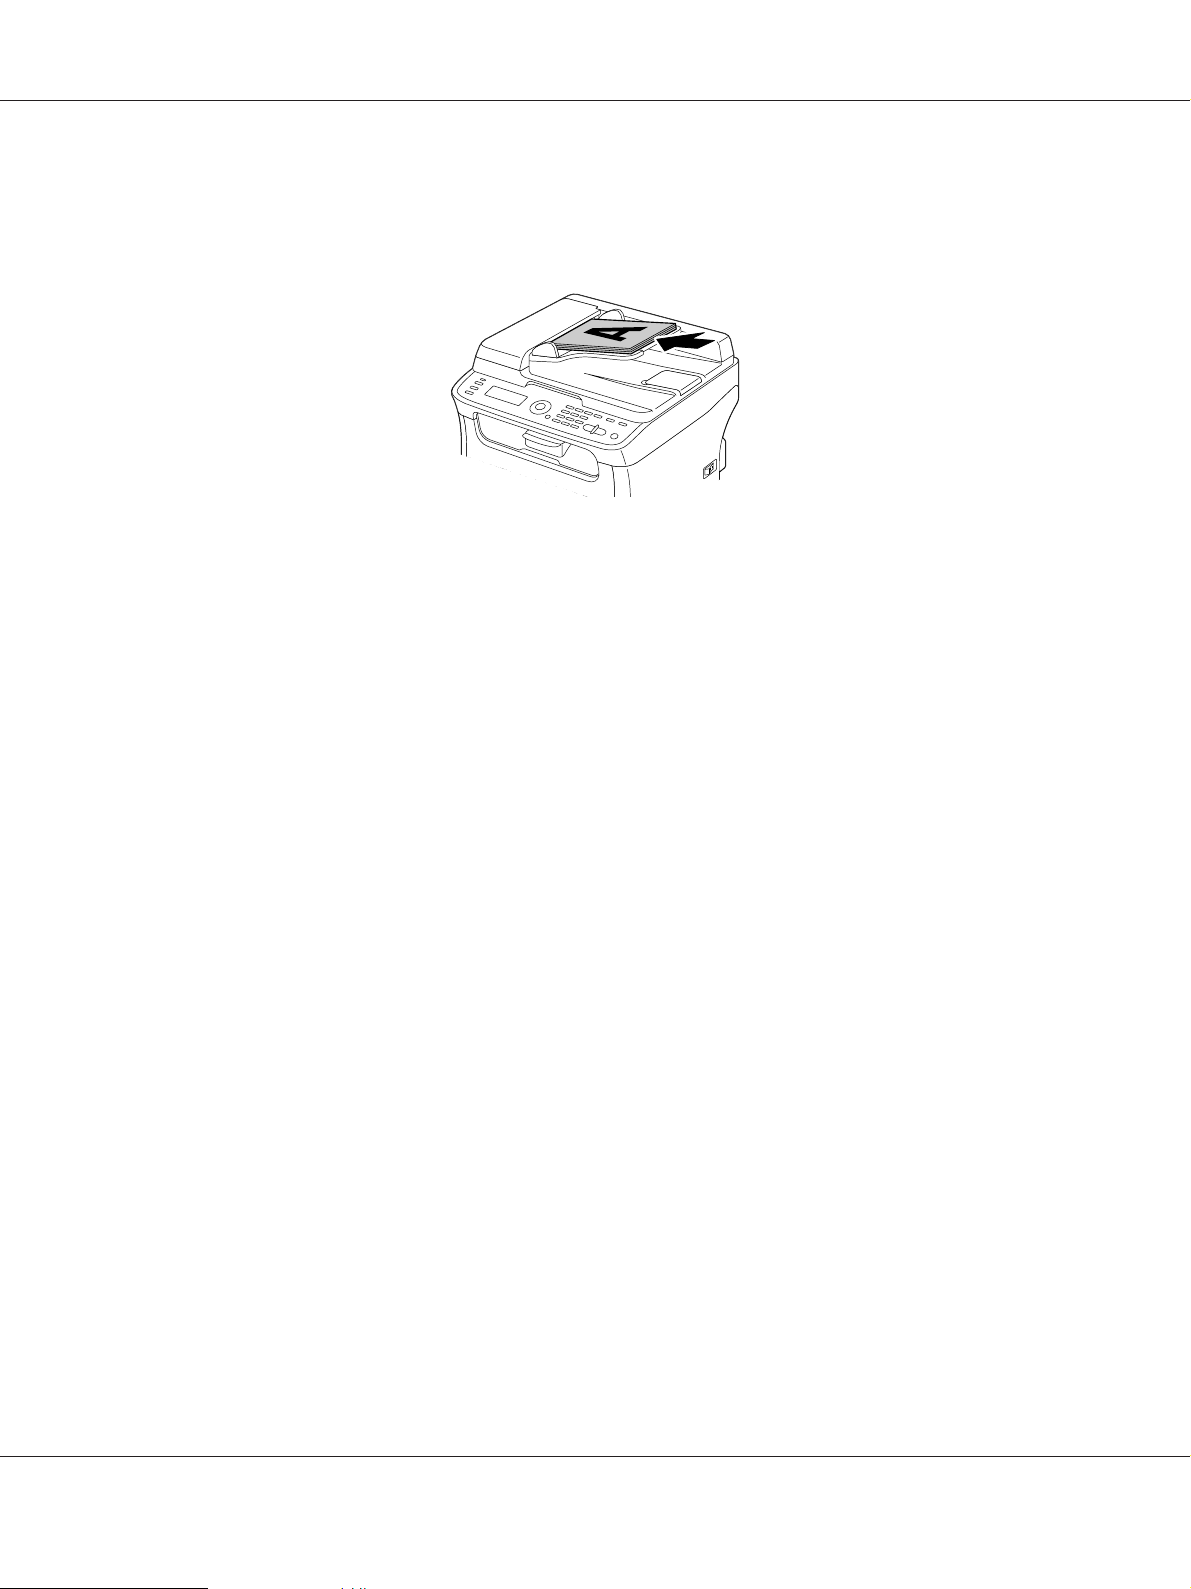
Sending a Fax Using the ADF
If the ADF is used, original documents containing multiple pages can be automatically scanned.
Note:
❏ Do not load original documents that are bound together, for example, with paper clips or staples.
❏ Do not load more than 35 sheets; otherwise an original document misfeed or damage to the
document or machine may occur.
❏ If the original document is not loaded correctly, it may not be fed in straight, or an original document
misfeed or damage to the document may occur.
❏ Do not open the ADF cover while documents loaded into the ADF are being scanned.
1. Press the Fax key to enter Fax mode.
Note:
If the initial mode (UTILITY - MACHINE SETTING - INITIAL MODE) is set to FAX, this step can be
skipped.
2. Make sure that there is no document on the original glass.
Sending Faxes 17
Page 18
AcuLaser CX16NF Facsimile User’s Guide
3. Put the document into the ADF document feed tray face up.
4. Adjust the document guides to the document size.
5. Adjust the document image quality.
Note:
For details on adjusting the document image quality, refer to “Adjusting the Image Quality” on page
21.
6. Specify the fax number of the recipient in one of the following ways:
❏ Direct dialing
❏ Using the favorite list
❏ Using the Speed Dial function
❏ Using the Group Dial function
❏ Using the Phone Book function
❏ Using the Redial/Pause key
Note:
❏ For details on specifying the recipient, refer to “Specifying a Recipient” on page 22. For details
on using the Redial/Pause key, refer to “Using the Redial Function” on page 27.
❏ A transmission can also be sent to multiple recipients with the Broadcast function. For details on
sending a broadcast transmission, refer to “Sending a Fax to Multiple Recipients (Broadcast
Transmission)” on page 27.
Sending Faxes 18
Page 19

AcuLaser CX16NF Facsimile User’s Guide
7. Press the Start key.
The document is scanned, and then the fax is sent.
Note:
❏ To stop the transmission, press the Stop/Reset key. A message appears, requesting confirmation
to cancel the setting. Select YES, and then press the Select key.
❏ If the fax could not be sent (for example, because the line was busy), the automatic redial function
will try sending the transmission again.
If the fax could not be sent with the automatic red ia l fu nc ti on , a T X R es ul t Re po rt ca n be pr in te d.
For details, refer to “TX RESULT REPORT” on page 64.
❏ If you want to cancel a scanned document queued for transmission or a fax waiting to be
redialed, select CANCEL RESERV. from the menu. For details, refer to “Canceling a Queued
Transmission” on page 36.
❏ If memory is nearly full, scanning of the document is stopped and a message appears, allowing
you to select whether to start the transmission or cancel that transmission job. If the selection is
made to cancel the job, the pages of the document th at hav e b ee n s ca nn ed fo r t ha t j ob are de le te d.
If the selection is made to begin the transmission, transmission begins. After the scanned pages
have been sent, scanning of the document starts again.
Sending a Fax Using the Original Glass
1. Press the Fax key to enter Fax mode.
Note:
If the initial mode (UTILITY - MACHINE SETTING - INITIAL MODE) is set to FAX, this step can be
skipped.
2. Remove all documents from the ADF.
Note:
If you are using the original glass to scan, do not load any documents into the ADF.
3. Lift to open the ADF cover.
4. Place the original document face down on the original glass and align the document on the scales
above and to the left of the original glass.
5. Gently close the ADF cover.
Sending Faxes 19
Page 20

AcuLaser CX16NF Facsimile User’s Guide
Note:
Closing it too quickly may cause the document to move on the original glass.
6. Adjust the document image quality.
Note:
For details on adjusting the document image quality, refer to “Adjusting the Image Quality” on page
21.
7. Specify the fax number of the recipient in one of the following ways:
❏ Direct dialing
❏ Using the favorite list
❏ Using the Speed Dial function
❏ Using the Group Dial function
❏ Using the Phone Book functions
❏ Using the Redial/Pause key
Note:
❏ For details on specifying the recipient, refer to “Specifying a Recipient” on page 22. For details
on using the Redial/Pause key, refer to “Using the Redial Function” on page 27.
❏ A transmission can also be sent to multiple recipients with the Broadcast function. For details on
sending a broadcast transmission, refer to “Sending a Fax to Multiple Recipients (Broadcast
Transmission)” on page 27.
8. Press the Start key.
A screen appears, requesting confirmation of the scanning area.
9. To scan the displayed scanning area, press the Select key. The document is scanned.
Note:
To change the displayed scanning area, press the u or d key, select the desired scanning area. Press
the Select key again to start scanning.
10. To scan multiple pages from the original glass, check that the message NEXT PAGE? appears,
replace the document, and then press the Select key. When scanning of the document is finished,
press the Start key.
The document is scanned, and then the fax is sent.
Sending Faxes 20
Page 21

AcuLaser CX16NF Facsimile User’s Guide
Note:
❏ To stop the transmission, press the Stop/Reset key. A message appears, requesting confirmation
to cancel the setting. Select YES, and then press the Select key.
❏ If the fax could not be sent (for example, because the line was busy), the automatic redial function
will try sending the transmission again.
If the fax could not be sent with the automatic red ia l fu nc ti on , a T X R es ul t Re po rt ca n be pr in te d.
For details, refer to “TX RESULT REPORT” on page 64.
❏ If you want to cancel a scanned document queued for transmission or a fax waiting to be
redialed, select CANCEL RESERV. from the menu. For details, refer to “Canceling a Queued
Transmission” on page 36.
❏ If memory is nearly full, scanning of the document is stopped and a message appears, allowing
you to select whether to start the transmission or cancel that transmission job. If the selection is
made to cancel the job, the pages of the document th at hav e b ee n s ca nn ed fo r t ha t j ob are de le te d.
If the selection is made to begin the transmission, transmission begins. After the scanned pages
have been sent, scanning of the document starts again.
Adjusting the Image Quality
The image quality of a document can be adjusted before it is sent as a fax.
Adjusting the Resolution
1. Press the u or d key to select the current fax image quality, and then press the Select key.
Note:
STD/TEXT, FINE/TEXT, S-FINE/TEXT, STD/PHOTO, FINE/PHOTO or S-FINE/PHOTO may
appear, depending on the setting selected for FAX TX OPERATION in the UTILITY menu.
2. Check that QUALITY(ORIGINAL) is selected, and then press the Select key.
3. Press the u or d key to select the fax resolution, and then press the Select key.
The resolution is adjusted.
Note:
Select the resolution appropriate for the document.
❏ STD/TEXT: Select this setting for documents containing handwriting or for computer printouts.
Sending Faxes 21
Page 22

AcuLaser CX16NF Facsimile User’s Guide
❏ FINE/TEXT: Select this setting for documents containing small print.
❏ S-FINE/TEXT: Select this setting for documents containing small print, such as newspapers, and
documents containing detailed illustrations.
❏ STD/PHOTO: Select this setting for photo documents containing regular photos.
❏ FINE/PHOTO: Select this setting for photo documents containing fine images.
❏ S-FINE/PHOTO: Select this setting for photo documents containing finer images.
The resolution returns to the default setting after the document is scanned with a normal
transmission or after transmission after manual transmission. The default setting can be changed.
This is useful for specifying a frequently used resolution setting as the default. For details, refer to the
Printer/Copier/Scanner User’s Guide.
Adjusting the Scan Density
1. Press the u or d key to select the current fax image quality, and then press the Select key.
Note:
STD/TEXT, FINE/TEXT, S-FINE/TEXT, STD/PHOTO, FINE/PHOTO or S-FINE/PHOTO may
appear, depending on the setting selected for FAX TX OPERATION function in the UTILITY menu.
2. Press the u or d key to select DENSITY, and then press the Select key.
3. Press the l or r key to select the scan density, and then press the Select key.
The scan density is adjusted.
Specifying a Recipient
The recipients can be specified in any of the following ways.
❏ Direct dialing: Directly type in the fax number.
❏ Using the favorite list: Recall a speed dial destination or group dial destination registered on the
favorite list.
❏ Using the Speed Dial function: Specify a recipient registered with a speed dial.
❏ Using group dial numbers: Recall a registered group dial destination.
Sending Faxes 22
Page 23

AcuLaser CX16NF Facsimile User’s Guide
❏ Using the phone book functions: List or search for recipients registered as speed dial numbers or
group dial numbers, and then select a recipient.
❏ Using the Redial/Pause key: Specify the number of the recipient dialed last.
Directly Entering a Fax Number
1. Use the numeric keypad to type in the fax number for the recipient.
Note:
❏ The keys that can be used to enter the fax number are: the number keys (0 through 9),
If the Redial/Pause key is pressed while entering the fax number, a 2.5-second pause is added. A
pause appears as P in the message window.
❏ If the machine is connected to a PBX line and the prefix number (outside line access number) has
been specified in the COMM. SETTING, enter “#” to dial the outside line access number
automatically.
and #.
❏ To erase the entered number, hold down the Back key for about one second, or press the Stop/
Reset key.
2. Press the Select key.
3. Press the u or d key to select FINISH, and then press the Select key.
The destination is specified.
Note:
To erase the selected destinations, press the Stop/Reset key.
Using the Favorite List
If frequently specified speed dial destinations and group dial destinations are registered in the favorite
list, press the Addressbook key, and then press the u or d key to quickly select the desired
destination.
Note:
The destination must have been previously registered on the favorite list. For details, refer to “Registering
Destinations in the Favorite List” on page 53.
Sending Faxes 23
Page 24

AcuLaser CX16NF Facsimile User’s Guide
1. Press the Addressbook key.
Note:
The Addressbook key can be used if the main screen or Can Use AddressBook is displayed.
2. Press the u or d key to select the desired destination, and then press the Select key.
Note:
If a destination was incorrectly selected, press the Back key, press the Addressbook key, and then
select the correct destination.
3. When EDIT=Select appears, press the Select key again.
4. Press the u or d key to select FINISH, and then press the Select key.
The destination is specified.
Note:
❏ If a group dial destination was selected, multiple destinations are specified.
❏ To erase the selected destinations, press the Stop/Reset key.
Using the Speed Dial Function
If a recipient has been registered with a speed dial number, the recipient’s fax number can be dialed
simply by pressing a speed dial number key.
Note:
The recipient must have been registered with a speed dial in advance. For details, refer to “Registering a
Speed Dial Destination” on page 55.
1. Press the Addressbook key 2 times.
Note:
The Addressbook key can be used if the main screen or Can Use AddressBook is displayed.
2. Use the keypad to type in the speed dial number (1-220), and then press the Select key.
Note:
❏ If a number was incorrectly entered, press the Back key, and then type in the correct number of
the speed dial destination.
Sending Faxes 24
Page 25

AcuLaser CX16NF Facsimile User’s Guide
❏ If the entered speed dial number is not registered with a fax number, the message NOT FAX NO.
appears. In addition, if the entered speed dial number is not registered with a recipient, the
message NOT REGISTERED! appears. Enter a speed dial number registered with a fax number.
3. When EDIT=Select appears, press the Select key again.
4. Press the u or d key to select FINISH, and then press the Select key.
The destination is specified.
Note:
To erase the selected destinations, press the Stop/Reset key.
Using the List Function of the Phone Book
If a recipient is registered with a speed dial number or a group dial number, the recipient can be found
by using the List or Search function of the phone book.
Follow the procedure described below to search using the List function of the phone book.
1. Press the Addressbook key 4 times.
Note:
The Addressbook key can be used if the main screen or Can Use AddressBook is displayed.
2. Check that LIST is selected, and then press the Select key.
The list of programmed speed dial numbers and group dial numbers is displayed.
3. Press the u or d key to select the desired destination, and then press the Select key.
Note:
If a destination was incorrectly selected, press the Back key, and then perform the operation again
from step 1.
4. When EDIT=Select appears, press the Select key again.
5. Press the u or d key to select FINISH, and then press the Select key.
Note:
To erase the selected destinations, press the Stop/Reset key.
Sending Faxes 25
Page 26

AcuLaser CX16NF Facsimile User’s Guide
Using the Search Function of the Phone Book
If a recipient is registered with a speed dial number or a group dial number, the recipient can be found
by using the List or Search function of the phone book.
Follow the procedure described below to search using the Search function of the phone book.
1. Press the Addressbook key 4 times.
Note:
The Addressbook key can be used if the main screen or Can Use AddressBook is displayed.
2. Press the u or d key to select SEARCH, and then press the Select key.
A screen appears, allowing you to enter the text to be searched for.
3. Using the keypad, enter the first few characters of the name programmed for the desired recipient.
Note:
❏ Enter the name programmed in the speed dial number or the group dial number. For details on
entering text, refer to “Entering Text” on page 74.
❏ Text up to 10 characters long can be entered.
4. Press the Select key.
The number of names beginning with the text entered in step 3 is displayed.
Note:
If no names beginning with the entered text are found, NOT FOUND is displayed.
5. Press the u or d key to select the desired destination, and then press the Select key.
Note:
If the desired recipient name does not appear in the search results, press the Back key twice to return
to the screen allowing you to enter the text to be searched for, and then try searching for different
text.
6. When EDIT=Select appears, press the Select key again.
7. Press the u or d key to select FINISH, and then press the Select key.
Note:
To erase the selected destinations, press the Stop/Reset key.
Sending Faxes 26
Page 27

AcuLaser CX16NF Facsimile User’s Guide
Using the Redial Function
To send a fax to the last number dialed, press the Redial/Pause key to recall the fax number.
1. Press the Redial/Pause key. Check that the desired fax number appears in the message window.
Specifying Multiple Recipients
A fax can be sent to multiple recipients in a single transmission. There are two methods for sending a
fax to multiple recipients in a single transmission.
❏ Using group dial function
❏ Using Broadcast function
Sending a Fax to Multiple Recipients (Broadcast Transmission)
Directly type in multiple destinations, or select from the favorite list, speed dial destinations or address
book.
Note:
❏ A maximum of 236 destinations can be specified at one time.
❏ With the transmission result report, you can check whether the fax was sent to all recipients. For
details on the transmission result report, refer to “Checking the Transmission/Reception Result From
the Message Window” on page 63 and “About the Reports and Lists” on page 63.
1. Position the document to be faxed.
2. If desired, adjust the image quality.
Note:
The document image quality can be adjusted. For details, refer to “Adjusting the Image Quality” on
page 21.
3. Specify the fax number of the recipient.
❏ Direct dialing: Enter the fax number of the recipient directly using the keypad. Press the Select
key.
Sending Faxes 27
Page 28

AcuLaser CX16NF Facsimile User’s Guide
❏ Using the favorite list (including group dial destinations): Press the Addressbook key, press
the u or d key to select the number of the desired speed dial or group dial destination, and then
press the Select key. Then, press the Select key again.
❏ Using speed dial numbers: Press the Addressbook key 2 times, use the keypad to type in the
number of the desired speed dial destination, and then press the Select key. Then, press the
Select key again.
❏ Using group dial numbers: Press the Addressbook key 3 times, use the keypad to type in the
number of the desired group dial destination, and then press the Select key. Then, press the
Select key again.
❏ Using the address book: Press the Addressbook key 4 times, and then use the List function or
Search function to search for the desired destination. (For details, refer to “Using the List
Function of the Phone Book” on page 25 or “Using the Search Function of the Phone Book” on
page 26.) Then, press the Select key.
4. To add a destination, check that ADD is selected, and then press the Select key. Repeat step 3 until
all desired destinations are specified.
❏ To finish specifying destinations, select FINISH, and then press the Select key.
❏ To check the specified destinations, select CHECK/EDIT. After checking the destinations, press
the Back key.
❏ To delete a destination, press the u or d key to select the destination to be deleted after
selecting CHECK/EDIT to check the destinations, and then press the Stop/Reset key. When a
message appears, requesting confirmation to delete the destination, select YES, and then press
the Select key to delete the destination. After the destination is deleted, press the Back key.
Note:
The Addressbook key can be used if Can Use AddressBook is displayed.
5. Press the Start key.
The document is scanned, and then the fax is sent.
Note:
To stop the transmission, press the Stop/Reset key. A message appears, requesting confirmation to
cancel the setting. Select YES, and then press the Select key. If this is done, all selected recipients are
cleared.
Sending Faxes 28
Page 29

AcuLaser CX16NF Facsimile User’s Guide
Sending a Fax to Multiple Recipients (Group Dial)
Multiple destinations can be selected with a group dial destination.
Note:
Multiple destinations must have been previously registered with a group dial destination. For details,
refer to “Registering a Group Dial Destination” on page 58.
1. Press the Addressbook key 3 times.
Note:
The Addressbook key can be used if the main screen or Can Use AddressBook is displayed.
2. Use the keypad to type in the group dial number (1-20), and then press the Select key.
Note:
❏ If a number was incorrectly entered, press the Back key, and then type in the correct number of
the group dial destination.
❏ If the entered group dial number is not registered with a fax number, the message NOT FAX NO.
appears. In addition, if the entered group dial number is not registered with a recipient, the
message NOT REGISTERED! appears. Enter a group dial number registered with a fax number.
3. When EDIT=Select appears, press the Select key again.
4. Press the u or d key to select FINISH, and then press the Select key.
Note:
To erase the selected destinations, press the Stop/Reset key.
5. Press the Start key.
The document is scanned, and then the fax is sent.
Note:
To stop the transmission, press the Stop/Reset key. A message appears, requesting confirmation to
cancel the setting. Select YES, and then press the Select key. If this is done, all selected recipients are
cleared.
Sending Faxes 29
Page 30

AcuLaser CX16NF Facsimile User’s Guide
Sending a Fax at a Specified Time (Timer Transmission)
A document can be scanned and stored in memory to be sent at a specified time. This feature is
convenient for sending faxes at discounted calling times.
Note:
❏ When sending multiple documents together to a single destination at a specified time, batch
transmission is useful since only a single connection is required.
❏ If the machine is not programmed with the current time, the fax cannot be sent at the specified time.
For details on specifying the time, refer to the Printer/Copier/Scanner User’s Guide.
❏ Timer transmission can be combined with broadcast transmission.
1. Position the document to be faxed.
2. If desired, adjust the image quality.
Note:
The document image quality can be adjusted. For details, refer to “Adjusting the Image Quality” on
page 21.
3. Press the u or d key to select TIMER TX, and then press the Select key.
The TIMER TX SETTING screen appears.
4. Using the keypad, enter the desired transmission time, and then press the Select key.
Note:
❏ The time is set in the 24-hour format.
❏ If you want to correct the time, press the Back key, and then enter the correct time.
5. Specify the fax number of the recipient.
Note:
❏ Refer to “Specifying a Recipient” on page 22.
❏ To send a broadcast transmission to multiple destinations, refer to “Sending a Fax at a Specified
Time (Timer Transmission)” on page 30. After all recipients have been specified, press the Start
key to begin scanning. After scanning is finished, the machine with enter a standby state.
❏ If the specified speed dial number is registered with batch transmission settings, the fax will be
sent at the time specified for the batch transmission.
Sending Faxes 30
Page 31

AcuLaser CX16NF Facsimile User’s Guide
6. Press the Start key to begin scanning, and then the machine enters transmission standby mode.
appears in the screen when the machine is in standby mode.
Note:
If you want to cancel a timer transmission, select CANCEL RESERV.. For details, refer to “Canceling
a Queued Transmission” on page 36.
Sending a Batch Transmission
Multiple documents can be scanned and stored in the memory of this machine to be sent together to a
single destination at a specified time.
Note:
From the UTILITY menu, batch transmission settings (transmission time) must have been registered
with a speed dial number in advance. For details, refer to “Using the Speed Dial Function” on page
24.
1. Position the document to be faxed.
2. If desired, adjust the image quality.
Note:
For details, refer to “Adjusting the Image Quality” on page 21.
3. Select destinations for the batch transmission from the favorite list, or specify their speed dial
number.
Note:
❏ For details on selecting destinations from the favorite list, refer to “Using the Favorite List” on
page 23.
❏ For details on specifying destinations by their speed dial number, refer to “Using the Speed Dial
Function” on page 24.
4. Press the Start key to begin scanning, and then the machine enters transmission standby mode.
appears in the screen when the machine is in standby mode.
Sending Faxes 31
Page 32

AcuLaser CX16NF Facsimile User’s Guide
Note:
To cancel a batch transmission, select CANCEL RESERV.. For details, refer to “Canceling a Queued
Transmission” on page 36.
Memory Transmission and Direct Transmission
There are two methods for sending documents with this machine: memory transmission and direct
transmission.
Memory Transmission
With this method, the fax transmission starts after the entire document is scanned and stored in the
memory. The total number of pages is automatically printed with the page number in the header.
However, the memory may become full if there are many pages in the document or if the data is large
due to the fine image quality (resolution).
Direct Transmission
With this method, the transmission is performed in real time in the transmission sequence of the
destinations. If there are many pages in the document, the fax can be sent with this method without the
memory becoming full.
Note:
❏ As a default, MEMORY TX (memory transmission) is selected. The default setting can be changed from
the UTILITY menu. For details, refer to the Printer/Copier/Scanner User’s Guide.
❏ Direct transmission cannot be used together with duplex (double-sided) document transmission.
Changing the Transmission Method
The transmission method can be temporarily changed from the default setting.
1. Position the document to be faxed.
2. If desired, adjust the image quality.
Sending Faxes 32
Page 33

AcuLaser CX16NF Facsimile User’s Guide
Note:
The document image quality can be adjusted. For details, refer to “Adjusting the Image Quality” on
page 21.
3. Press the u or d key to select the current transmission method, and then press the Select key.
The TX MODE screen appears.
Note:
If memory transmission has been specified as the default, MEMORY TX appears. If direct transmission
has been specified as the default, DIRECT TX appears.
4. Press the u or d key to select the desired transmission method, and then press the Select key.
5. Specify the fax number of the recipient.
Note:
❏ Refer to “Specifying a Recipient” on page 22.
❏ To send a broadcast transmission to multiple destinations, refer to “Sending a Fax to Multiple
Recipients (Broadcast Transmission)” on page 27.
6. Press the Start key to begin scanning and sending the fax.
Note:
❏ To stop the transmission, press the Stop/Reset key. A message appears, requesting confirmation
to cancel the setting. Select YES, and then press the Select key.
❏ The transmission method returns to the default setting after the document is scanned with a
normal transmission or after transmission with a manual transmission. It is useful if the most
frequently used transmission method is selected as the default. For details, refer to the Printer/
Copier/Scanner User’s Guide.
Sending a Fax Manually
Sending a Fax Manually After Using the Telephone
If the machine is connected to a telephone and the same line is used for both phoning and faxing, the
document can simply be sent after talking with the recipient over the phone.
This is useful, for example, if you want to tell the recipient that you are sending a fax.
Sending Faxes 33
Page 34

AcuLaser CX16NF Facsimile User’s Guide
Note:
Manual transmission cannot be used together with duplex (double-sided) document transmission.
1. Load the document into the ADF.
Note:
❏ When sending a fax manually, load the document into the ADF. An error will occur if the
document is placed on the original glass.
❏ For details on loading the document into the ADF, refer to “Sending a Fax Using the ADF” on
page 17.
2. If desired, adjust the image quality.
Note:
The document image quality can be adjusted. For details, refer to “Adjusting the Image Quality” on
page 21.
3. Pick up the handset and check that the dial tone can be heard.
4. Specify the fax number of the recipient by using the telephone to dial the fax number.
Note:
❏ The fax number of the recipient can also specified using the keypad in the control panel of this
machine.
❏ If Pulse is selected as the telephone line type, press the
key to temporarily change the line type to
Tone.
5. After finishing talking on the phone, the recipient should press the necessary key to start receiving
the fax.
Once the recipient’s fax machine is ready, a beep is sounded.
6. Press the Start key to begin scanning and sending the fax.
7. Replace the handset to its cradle.
Note:
To stop the transmission, press the Stop/Reset key. A message appears, requesting confirmation to
cancel the setting. Select YES, and then press the Select key.
Sending Faxes 34
Page 35

AcuLaser CX16NF Facsimile User’s Guide
Sending a Fax Manually Using the On hook Key
Note:
Manual transmission cannot be used together with duplex (double-sided) document transmission.
1. Load the document into the ADF.
Note:
❏ When sending a fax manually, load the document into the ADF. An error will occur if the
document is placed on the original glass.
❏ For details on loading the document into the ADF, refer to “Sending a Fax Using the ADF” on
page 17.
2. If desired, adjust the image quality.
Note:
The document image quality can be adjusted. For details, refer to “Adjusting the Image Quality” on
page 21.
3. Press the On hook key.
4. Specify the fax number of the recipient.
Note:
❏ The keys for registered destinations can be used even if the On hook key has been pressed. For
details, refer to “Specifying a Recipient” on page 22. (Group dial destinations cannot be
specified.)
❏ If Pulse is selected as the telephone line type, press the
Tone.
5. Press the Start key to begin scanning and sending the fax.
Note:
To stop the transmission, press the Stop/Reset key. A message appears, requesting confirmation to
cancel the setting. Select YES, and then press the Select key.
key to temporarily change the line type to
Sending a Fax to a Combination of Fax Numbers (Chain Dial)
Multiple fax numbers can be combined to specify the recipients. This is called “chain dialing”.
Sending Faxes 35
Page 36

AcuLaser CX16NF Facsimile User’s Guide
For example, if the phone number and the extension number of a recipient are registered as different
speed dial destinations, the fax number of the recipient can be specified by combining the two
numbers.
1. Position the document to be faxed.
2. If desired, adjust the image quality.
Note:
The document image quality can be adjusted. For details, refer to “Adjusting the Image Quality” on
page 21.
3. Press the On hook key.
4. Directly type in the first number, or select it from the favorite list or speed dial destinations.
Note:
Refer to “Specifying a Recipient” on page 22.
5. Directly type in the second number, or select it from the favorite list or speed dial destinations.
6. Press the Start key to begin scanning and sending the fax.
Note:
To stop the transmission, press the Stop/Reset key. A message appears, requesting confirmation to
cancel the setting. Select YES, and then press the Select key.
Canceling a Queued Transmission
Of the documents stored in memory and waiting to be sent, a specific document can be selected and
deleted.
1. Press the u or d key to select CANCEL RESERV., and then press the Select key.
The CANCEL RESERV. screen appears.
Note:
If no jobs have been queued in memory, the message NONE appears.
2. Using the u or d key, select the job to be deleted.
Sending Faxes 36
Page 37

AcuLaser CX16NF Facsimile User’s Guide
Note:
The following types of job are displayed.
❏ MEMORY: Normal transmission queued in memory
❏ BROADCAST: Broadcast transmission
❏ TIMER TX: Timer transmission (fax)
❏ FORWARD: Forwarding transmission
To check the recipients for the currently displayed broadcast transmission job, press the r key. After
checking, press the Back key to return to the previous screen.
3. Press the Select key.
A message requesting confirmation to delete the job appears.
4. Check that YES is selected, and then press the Select key.
The job is deleted.
About the Fax Header
If transmission source information is set in Header setting to be printed, information such as the
sender’s name, fax number, transmission date/time, session number and page number can be printed
by the recipient.
The following items in the header.
Element Description
Transmission date/
time
Fax number Shows the sender’s fax number.
Sender’s name Shows the sender’s name.
Session number Shows the session number used to manage the sent fax.
Shows the date/time that the fax was sent. The time is indicated in the 24-hour format.
Sending Faxes 37
Page 38

AcuLaser CX16NF Facsimile User’s Guide
Element Description
Page number Shows the page number.
Shown as page number/total number of pages.
Note:
With a transmission using the telephone or the On hook key or with a direct transmission,
multiple pages are not shown.
Note:
To print the header, specify the transmission source settings with ADMIN. MANAGEMENT/USER
SETTING in the UTILITY menu, and then set FAX TX OPERATION/HEADER to ON. For details, refer to
the Printer/Copier/Scanner User’s Guide.
Sending Faxes 38
Page 39

AcuLaser CX16NF Facsimile User’s Guide
Chapter 4
Faxing From a Computer (PC-FAX)
Sending a Fax Directly From a Computer (PC-FAX)
A fax can be sent directly from a computer through USB or Network, instead of the computer
document being printed, then loaded to be faxed.
Note:
❏ In order to perform a PC-FAX operation, the fax driver must be installed. For details on installing the
driver, refer to the Setup Guide.
❏ The fax driver is not compatible with IPP (Internet Printing Protocol).
PC-FAX Settings
Common Buttons
The buttons described below appear on each tab.
❏ OK: Click to exit the Printing Preferences dialog box, saving any changes made.
❏ Cancel: Click to exit the Printing Preferences dialog box without saving any changes made.
❏ Apply: Click to save all changes without exiting the Printing Preferences dialog box.
❏ Help: Click to view the help.
Settings Tab
The Settings tab allows you to
❏ Specify the paper size
❏ Specify the paper orientation
❏ Specify the resolution
Faxing From a Computer (PC-FAX) 39
Page 40

AcuLaser CX16NF Facsimile User’s Guide
Sender Information Tab
The Sender Information tab allows you to
❏ Enter sender information (for example, the sender name and sender fax number)
Address Book Tab
The Address Book tab allows you to
❏ Register frequently used destinations
❏ Register multiple frequently used destinations
❏ Edit/delete recipient information
❏ Import/export recipient information
Basic PC-FAX Transmissions
1. Click Print in the menu of the document to be faxed.
A dialog box appears, allowing you to specify the print settings.
2. Select EPSON AL-CX16NF (FAX) as the printer.
3. Click the Print button.
The Destination Settings dialog box appears.
Note:
The names of buttons that appear differ depending on the application.
4. In the Destination Settings tab, specify the destination.
❏ When directly typing in the fax number of the recipient, enter the information in the Name
and Fax Number boxes under User/Group List.
❏ When selecting the recipient fax number from the address book, click the desired recipient in
the list.
5. Click the > button.
The recipient moves under Destination List.
Faxing From a Computer (PC-FAX) 40
Page 41

AcuLaser CX16NF Facsimile User’s Guide
Note:
❏ The fax will be sent to all destinations displayed under Destination List.
❏ To remove a destination from under Destination List, click the < button.
6. Click the Cover Sheet tab.
7. Under Select Cover Sheet, select the desired cover page format.
8. If Select Cover Sheet is set to any setting other than No Cover Sheet, settings can be specified for
the following.
❏ To insert an image in the cover page, select the Insert Image check box, and then specify
settings for the following.
Zoom: Specify the size of the image.
X: Specify the horizontal position of the image.
Y: Specify the vertical position of the image.
❏ Under Cover Sheet Information, select the information to be printed on the cover page.
Subject: A subject can be printed on the fax. Type the subject in the text box.
Destination List : The recipient of the fax transmission can be printed.
Sender: The information for the sender of the fax can be printed. The PC-FAX settings
specified on the Sender Information tab are printed. Click the Edit button to change the
information in the dialog box that appears.
Date/Time: The date and time of the fax transmission can be printed.
9. Click the OK button.
The PC-FAX transmission is sent.
Uninstalling the FAX Driver (for Windows)
This section describes how to uninstall the fax driver, if necessary.
Note:
❏ You must have administrator privileges in order to uninstall the fax driver.
❏ If the User Account Control window appears when uninstalling on Windows Vista, click the Allow
button or the Continue button.
1. Close all applications.
Faxing From a Computer (PC-FAX) 41
Page 42

AcuLaser CX16NF Facsimile User’s Guide
2. Choose Uninstall Program.
3. When the Uninstall dialog box appears, select the printer to be deleted, and then click Uninstall
button.
4. The printer driver will be uninstalled from your computer.
Faxing From a Computer (PC-FAX) 42
Page 43

AcuLaser CX16NF Facsimile User’s Guide
Chapter 5
Receiving Faxes
Receiving Faxes Automatically
Note:
❏ When the machine is turned off, faxes cannot be received. Therefore, be sure to leave the machine
turned on.
❏ To print a received fax, change the paper type to PLAIN PAPER and the paper size to A4, LEGAL,
LETTER or OFICIO.
If the RX Mode parameter on the FAX RX OPERATION menu is set to AUTO RX, no special operation
is needed in order to receive the fax. Reception begins after the specified number of rings.
Note:
❏ If the RX Mode parameter on the FAX RX OPERATION menu is set MANUAL RX, the fax is not
received automatically. For details, refer to the Printer/Copier/Scanner User’s Guide.
❏ If MEMORY RX MODE function is set to ON, printing does not begin automatically after the fax is
received. A received document is saved in memory and is printed at the time specified for MEMORY
RX MODE function. In addition, if MEMORY RX MODE function is set to OFF, the fax is printed.
For details on MEMORY RX MODE function in the UTILITY menu, refer to the Printer/Copier/
Scanner Us er’s Guid e. For det ails on sp ecifyin g the setti ngs for MEMORY RX MODE func tion, re fer
to “Setting Up the Memory RX Mode” on page 14.
❏ This machine does not support polling reception.
Receiving Faxes Manually
Note:
❏ When the machine is turned off, faxes cannot be received. Therefore, be sure to leave the machine
turned on.
❏ To print a received fax, change the paper type to PLAIN PAPER and the paper size to A4, LEGAL,
LETTER or OFICIO.
If a telephone is connected to this machine and the same line is used for phoning and faxing, the fax can
be received after picking up the handset.
Receiving Faxes 43
Page 44

AcuLaser CX16NF Facsimile User’s Guide
1. After the telephone rings, pick up the handset.
Note:
If RX MODE setting on the FAX RX OPERATION menu is set to MANUAL RX, the machine will
continue ringing whether the call is being received from a fax machine or a telephone.
2. Press the Start key.
The machine starts receiving the fax.
Note:
❏ If the machine is in any mode other than Fax mode, press the Fax key to enter Fax mode before
pressing the Start key.
❏ After completing the telephone conversation, press the Start key to begin receiving the fax.
❏ If the handset is picked up and the call is being received from a fax machine, press the Start key to
begin receiving the fax.
3. Replace the handset to its cradle.
Forwarding Received Faxes
With forwarding, the received document is sent to the destination specified with this machine.
A fax number or e-mail address can be specified as the forwarding destination.
Note:
For details on specifying the forwarding destination, refer to “Specifying Forwarding Settings” on page
16.
Receiving Faxes 44
Page 45

Printing Received Faxes
Printable Area
AcuLaser CX16NF Facsimile User’s Guide
a
a
a
*
a
a=4.0 mm
* Printable Area
The printable area on all media sizes is up to 4.0 mm (0.157") from the edges of the media.
Each media size has a specific printable area (the maximum area on which the machine can print
clearly and without distortion).
This area is subject to both hardware limits (the physical media size and the margins required by the
machine ) and software constraints (the amount of memory available for the full-page frame buffer).
The printable area for all media sizes is the page size minus 4.0 mm (0.157") from all edges of the
media.
Note:
When printing in color on legal-size media, the bottom margin is 16.0 mm (0.63").
Adding the Sender’s Information When Printing Faxes
If FOOTER setting in the UTILITY menu is set to ON, information such as the sender’s fax number,
reception date/time, session number and page number can be printed 4.0 mm (0.157") from the
bottom edge of the fax that is received and printed.
The following items in the footer.
Receiving Faxes 45
Page 46

Item Description
AcuLaser CX16NF Facsimile User’s Guide
This machine’s fax
number
Reception date/time Shows the date/time that the fax was received. The time is indicated in the 24-hour format.
Sender’s fax number Shows the sender’s fax number.
Session number Shows the session number used to manage the received fax.
Page number Shows the page number.
Shows the fax number specified for this machine with ADMIN. MANAGEMENT/USER SETTING in
the UTILITY menu.
Note:
To print the footer, set FAX RX OPERATION/FOOTER to ON. For details, refer to the Printer/Copier/
Scanner User’s Guide.
Method of printing during reception
The relationship between the length of the received document and the document that is actually
printed is shown below.
The document is printed differently depending on the setting selected for the REDUCTION RX
parameter on the FAX RX OPERATION menu.
REDUCTION RX: ON
Note:
Images are only reduced in the vertical direction.
Receiving Faxes 46
Page 47

AcuLaser CX16NF Facsimile User’s Guide
Recording
paper size
A4 OFF Less than 289 1 page with 100%
Letter OFF Less than 271 1 page with 100%
Footer Length of received image
[mm]
290 – 313 1 page with (289/image length)% reduction
314 – 570 Divide into 2 pages with 100%
571 – 851 Divide into 3 pages with 100%
852 - Divide into 4 pages with 100%….
ON Less than 285 1 page with 100%
286 – 309 1 page with (285/image length)% reduction
310 – 562 Divide into 2 pages with 100%
563 – 839 Divide into 3 pages with 100%
840 - Divide into 4 pages with 100%….
272 – 295 1 page with (271/image length)% reduction
Printing
296 – 534 Divide into 2 pages with 100%
535 – 797 Divide into 3 pages with 100%
798 - Divide into 4 pages with 100%….
ON Less than 267 1 page with 100%
268 – 291 1 page with (267/image length)% reduction
292 – 526 Divide into 2 pages with 100%
527 – 785 Divide into 3 pages or more
786 - Divide into 4 pages with 100%….
Receiving Faxes 47
Page 48

AcuLaser CX16NF Facsimile User’s Guide
Recording
paper size
Legal OFF Less than 348 1 page with 100%
Oficio OFF Less than 335 1 page with 100%
Footer Length of received image
[mm]
349 – 371 1 page with (347/image length)% reduction
372 – 688 Divide into 2 pages with 100%
689 – 1028 Divide into 3 pages with 100%
1029 - Divide into 4 pages with 100%….
ON Less than 344 1 page with 100%
345 – 367 1 page with (343/image length)% reduction
368 – 680 Divide into 2 pages with 100%
681 – 1016 Divide into 3 pages with 100%
1017 - Divide into 4 pages with 100%….
336 – 359 1 page with (335/image length)% reduction
Printing
360 – 662 Divide into 2 pages with 100%
663 – 989 Divide into 3 pages with 100%
990 - Divide into 4 pages with 100%….
ON Less than 331 1 page with 100%
332 – 355 1 page with (331/image length)% reduction
356 – 654 Divide into 2 pages with 100%
655 – 977 Divide into 3 pages with 100%
978 Divide into 4 pages with 100%….
Receiving Faxes 48
Page 49

REDUCTION RX: OFF
AcuLaser CX16NF Facsimile User’s Guide
Recording
paper size
A4 OFF Less than 289 1 page
Letter OFF Less than 271 1 page
Footer Length of received image
[mm]
290 – 570 Divide into 2 pages
571 – 851 Divide into 3 pages
852 - Divide into 4 pages or more
ON Less than 285 1 page
286 – 562 Divide into 2 pages
563 – 839 Divide into 3 pages
840 - Divide into 4 pages or more
272 – 534 Divide into 2 pages
535 – 797 Divide into 3 pages
798 - Divide into 4 pages or more
Printing
ON Less than 267 1 page
268 – 526 Divide into 2 pages
527 – 785 Divide into 3 pages
786 - Divide into 4 pages or more
Legal OFF Less than 348 1 page
349 – 688 Divide into 2 pages
689 – 1028 Divide into 3 pages
1029 - Divide into 4 pages or more
ON Less than 344 1 page
345 – 680 Divide into 2 pages
681 – 1016 Divide into 3 pages
1017 - Divide into 4 pages or more
Receiving Faxes 49
Page 50

AcuLaser CX16NF Facsimile User’s Guide
Recording
paper size
Oficio OFF Less than 335 1 page
Footer Length of received image
[mm]
356 – 662 Divide into 2 pages
663 – 989 Divide into 3 pages
990 - Divide into 4 pages or more
ON Less than 331 1 page
332 – 654 Divide into 2 pages
655 – 977 Divide into 3 pages
978 - Divide into 4 pages or more
Printing
REDUCTION RX: CUT
Note:
If an image does not fit within a page, any part of the image exceeding 24 mm is cut off and printed on the
next page.
Recording
paper size
A4 OFF Less than 289 1 page
Footer Length of received image
[mm]
290 – 313 Print into 1 page. 1-24mm of end is cut.
314 – 570 Divide into 2 pages
571 – 594 Divide into 2 pages. 1-24mm of end is cut.
595 – 851 Divide into 3 pages
852 - Divide into 3 pages....
ON Less than 285 1 page
286 – 309 Print into 1 page. 1-24mm of end is cut.
310 – 562 Divide into 2 pages
563 – 586 Divide into 2 pages. 1-24mm of end is cut.
587 – 839 Divide into 3 pages
840 - Divide into 3 pages....
Printing
Receiving Faxes 50
Page 51

AcuLaser CX16NF Facsimile User’s Guide
Recording
paper size
Letter OFF Less than 271 1 page
Footer Length of received image
[mm]
272 – 295 Print into 1 page. 1-24mm of end is cut.
296 – 534 Divide into 2 pages
535 – 558 Divide into 2 pages. 1-24mm of end is cut.
559 – 797 Divide into 3 pages
798 - Divide into 3 pages....
ON Less than 267 1 page
268 – 291 Print into 1 page. 1-24mm of end is cut.
292 – 526 Divide into 2 pages
527 – 550 Divide into 2 pages. 1-24mm of end is cut.
551 – 785 Divide into 3 pages
786 - Divide into 3 pages....
Printing
Legal OFF Less than 348 1 page
349 – 371 Print into 1 page. 1-24mm of end is cut.
372 – 688 Divide into 2 pages
689 – 712 Divide into 2 pages. 1-24mm of end is cut.
713 – 1028 Divide into 3 pages
1029 - Divide into 3 pages....
ON Less than 344 1 page
345 – 368 Print into 1 page. 1-24mm of end is cut.
369 – 680 Divide into 2 pages
681 – 704 Divide into 2 pages. 1-24mm of end is cut.
705 – 1016 Divide into 3 pages
1017 - Divide into 3 pages....
Receiving Faxes 51
Page 52

AcuLaser CX16NF Facsimile User’s Guide
Recording
paper size
Oficio OFF Less than 335 1 page
Footer Length of received image
[mm]
336 – 359 Print into 1 page. 1-24mm of end is cut.
360 – 662 Divide into 2 pages
663 – 686 Divide into 2 pages. 1-24mm of end is cut.
687 – 989 Divide into 3 pages
990 - Divide into 3 pages....
ON Less than 331 1 page
332 – 355 Print into 1 page. 1-24mm of end is cut.
356 – 654 Divide into 2 pages
655 – 678 Divide into 2 pages. 1-24mm of end is cut.
679 – 977 Divide into 3 pages
978 - Divide into 3 pages....
Printing
Receiving Faxes 52
Page 53

AcuLaser CX16NF Facsimile User’s Guide
Chapter 6
Registering Recipients
About the Dial Register Function
Frequently used fax numbers can be registered with the DIAL REGISTER function so that the fax
number can be easily accessed. In addition, this reduces input errors.
The following registration methods are available:
❏ Favorite: Frequently used speed dial and group dial destinations can be registered on the favorite
list to allow the fax number to quickly be recalled. For details on registering destinations, refer to
“Favorite List” on page 53.
❏ Speed Dial: Fax numbers can be registered as speed dial destinations. When sending a fax
transmission, type in the speed dial number to recall the fax number. For details on registering
destinations, refer to “Speed Dialing” on page 55.
❏ Group Dial: Multiple destinations can be registered together as a group dial destination. When
sending a fax transmission, type in the group dial number to recall fax numbers for a broadcast
transmission. For details on registering destinations, refer to “Group Dialing” on page 58.
Note:
When registering destinations as speed dial or group dial destinations, use the Search function to search
for the recipients. For details on using the Search Function, refer to “Using the List Function of the Phone
Book” on page 25 and “Using the Search Function of the Phone Book” on page 26.
Favorite List
Registering Destinations in the Favorite List
Frequently used speed dial and group dial destinations can be registered on the favorite list to allow the
fax number to quickly be recalled. A maximum of 20 destinations can be registered on the favorite
list.
Note:
Before registering destinations in the favorite list, register them as speed dial or group dial destinations.
Registering Recipients 53
Page 54

AcuLaser CX16NF Facsimile User’s Guide
1. Press the u or d key to select UTILITY, and then press the Select key.
Note:
For details on selecting a menu, refer to “General Procedure for Specifying Settings in Utility Menu”
on page 13.
2. Press the u or d key to select DIAL REGISTER, and then press the Select key.
3. Check that FAVORITE is selected, and then press the Select key.
The FAVORITE screen appears.
Note:
When registering the first destination in the favorite list, continue with step 5.
4. Check that ADD is selected, and then press the Select key.
5. Type in the speed dial number (1-220), and then press the Select key.
❏ To program a group dial number, press the Addressbook key, type in the group dial num ber
(1-20), and then press the Select key.
Note:
❏ If a destination is already registered in the favorite list, select ADD, and then press the Select key to
display a screen for entering the speed dial number.
❏ For details on entering/editing text and the characters that can be entered, refer to “Entering
Text” on page 74.
6. Press the Select key again.
7. Press the u or d key to select FINISH, and then press the Select key.
❏ To add another destination to the favorite list, select ADD, press the Select key, and then repeat
steps 4 through 6.
The destination is registered in the favorite list.
Note:
To return to the Fax mode screen, continue pressing the Back key until the Fax mode screen appears,
or press the Stop/Reset key.
Registering Recipients 54
Page 55

AcuLaser CX16NF Facsimile User’s Guide
Deleting Destinations from the Favorite List
A destination registered in the favorite list can be deleted.
1. Press the u or d key to select UTILITY, and then press the Select key.
Note:
For details on selecting a menu, refer to “General Procedure for Specifying Settings in Utility Menu”
on page 13.
2. Press the u or d key to select DIAL REGISTER, and then press the Select key.
3. Check that FAVORITE is selected, and then press the Select key.
The FAVORITE screen appears.
4. Press the u or d key to select CHECK/EDIT, and then press the Select key.
5. Press the u or d key to select the destination to be deleted, and then press the Stop/Reset key.
6. Check that YES is selected, and then press the Select key.
7. Press the Back key.
Note:
To delete another destination, repeat the procedure from step 5.
8. Press the u or d key to select FINISH, and then press the Select key.
The destination is deleted from the favorite list.
Note:
To return to the Fax mode screen, continue pressing the Back key until the Fax mode screen appears,
or press the Stop/Reset key.
Speed Dialing
Registering a Speed Dial Destination
Frequently specified fax numbers (maximum of 220) can be registered as speed dial destinations. In
addition, batch transmission settings can be specified.
Registering Recipients 55
Page 56

AcuLaser CX16NF Facsimile User’s Guide
1. Press the u or d key to select UTILITY, and then press the Select key.
Note:
For details on selecting a menu, refer to “General Procedure for Specifying Settings in Utility Menu”
on page 13.
2. Press the u or d key to select DIAL REGISTER, and then press the Select key.
3. Press the u or d key to select SPEED DIAL, and then press the Select key.
The SPEED DIAL screen appears.
4. Use the keypad to type in the speed dial number (1-220), and then press the Select key.
Note:
❏ If LDAP search settings have been specified, a screen allowing MANUAL SETTING or LDAP
SEARCH to be selected appears after the Select key is pressed. Select MANUAL SETTING, and then
press the Select key.
❏ For details on entering/editing numbers, refer to “Entering Text” on page 74.
❏ If the destination is already registered with the specified speed dial number, REGISTERED!
appears. Press the Back key to return to the DIAL REGISTER screen, and then continue with step
3.
5. Enter the name of the speed dial destination to be registered, and then press the Select key.
Note:
❏ Text up to 20 characters long can be entered for the name.
❏ For details on entering/editing text and the characters that can be entered, refer to “Entering
Text” on page 74.
6. Use the keypad to enter the fax number of the recipient.
Note:
❏ The fax number can contain a maximum of 50 characters.
❏ For details on entering/editing numbers, refer to “Entering Text” on page 74.
7. Press the d key.
8. Press the u or d key to select an item whose settings have already been specified.
Registering Recipients 56
Page 57

AcuLaser CX16NF Facsimile User’s Guide
❏ To specify batch transmission settings, select BATCH TIME, press the Select key, and then
continue with step 9.
❏ To specify the modem speed, select MODEM SPEED, press the Select key, and then continue
with step 10.
9. Use the keypad to type in the batch transmission time, and then press the Select key.
The batch transmission settings are specified. Continue with step 11.
Note:
For details on entering/editing text and the characters that can be entered, refer to “Entering Text”
on page 74.
10. Press the u or d key to select the desired modem speed, and then press the Select key.
The modem speed is specified. Continue with step 11.
Note:
If a transmission error occurs, select 14.4 or 9.6 for the modem speed.
11. Press the Back key.
12. Press the Select key.
The entered information is registered with the speed dial number.
Note:
To return to the Fax mode screen, continue pressing the Back key until the Fax mode screen is
displayed.
Changing/Deleting Speed Dial Information
The registered speed dial information can be changed.
1. Press the u or d key to select UTILITY, and then press the Select key.
Note:
For details on selecting a menu, refer to “General Procedure for Specifying Settings in Utility Menu”
on page 13.
2. Press the u or d key to select DIAL REGISTER, and then press the Select key.
3. Press the u or d key to select SPEED DIAL, and then press the Select key.
The SPEED DIAL screen appears.
Registering Recipients 57
Page 58

AcuLaser CX16NF Facsimile User’s Guide
4. Use the keypad to type in the speed dial number (1-220) to be edited/deleted, and then press the
Select key.
Note:
For details on entering/editing text and the characters that can be entered, refer to “Entering Text”
on page 74.
5. Press the u or d key to select EDIT or DELETE, and then press the Select key.
❏ If EDIT was selected, the name is displayed. Continue with step 6.
❏ If DELETE was selected, the settings registered with the speed dial number are deleted. This
completes the procedure when it is deleted.
6. If desired, edit the name, fax number, modem speed and batch transmission settings, and then
press the Select key.
The edited information is registered with the speed dial number.
Note:
❏ If the edited speed dial destination is registered in the favorite list, with a group dial destination
or as forwarding settings, a message appears, requesting confirmation to leave the edited speed
dial destination registered as it is. To leave it registered as it is, select YES. To not leave it
registered as it is, select NO. Then, press the Select key.
❏ If a document is queued in the memory for a batch transmission and the batch transmission time
is changed, the document in the memory will be sent at the time before the setting was changed.
❏ For details on editing text, refer to “Entering Text” on page 74.
Group Dialing
Registering a Group Dial Destination
Fax numbers frequently specified for broadcast transmission can be registered as a group dial
destination. A maximum of 50 destinations can be registered together as one group.
Note:
Before registering a group dial destination, register the destinations as speed dial destinations.
1. Press the u or d key to select UTILITY, and then press the Select key.
Registering Recipients 58
Page 59

AcuLaser CX16NF Facsimile User’s Guide
Note:
For details on selecting a menu, refer to “General Procedure for Specifying Settings in Utility Menu”
on page 13.
2. Press the u or d key to select DIAL REGISTER, and then press the Select key.
3. Press the u or d key to select GROUP DIAL, and then press the Select key.
The GROUP DIAL screen appears.
4. Use the keypad to type in the group dial number (1-20), and then press the Select key.
Note:
❏ For details on entering/editing numbers, refer to “Entering Text” on page 74.
❏ If the destination is already registered with the specified group dial number, REGISTERED!
appears. Press the Back key to return to the DIAL REGISTER screen, and then continue with step
3.
5. Enter the name of the group dial destination to be registered, and then press the Select key.
Note:
❏ Text up to 20 characters long can be entered for the name.
❏ For details on entering/editing text and the characters that can be entered, refer to “Entering
Text” on page 74.
6. Use the keypad to type in the speed dial number to be registered with the group dial destination,
and then press the Select key.
Note:
❏ To program a group dial number registered with a group dial destination, press the
Addressbook key, type in the group dial number and then press the Select key.
❏ For details on entering/editing text and the characters that can be entered, refer to “Entering
Text” on page 74.
7. Press the Select key again.
8. Check that ADD is selected, and then press the Select key. Repeat steps 6 through 8 until all desired
destinations are specified.
❏ If no more recipients are to be specified, continue with step 9.
Registering Recipients 59
Page 60

AcuLaser CX16NF Facsimile User’s Guide
9. Select FINISH, and then press the Select key.
The destinations are registered as the group dial destination.
Note:
To return to the Fax mode screen, continue pressing the Back key until the Fax mode screen appears,
or press the Stop/Reset key.
Changing/Deleting Group Dial Information
The registered group dial information can be changed.
1. Press the u or d key to select UTILITY, and then press the Select key.
Note:
For details on selecting a menu, refer to “General Procedure for Specifying Settings in Utility Menu”
on page 13.
2. Press the u or d key to select DIAL REGISTER, and then press the Select key.
3. Press the u or d key to select GROUP DIAL, and then press the Select key.
The GROUP DIAL screen appears.
4. Use the keypad to type in the number of the group dial destination to be edited/deleted, and then
press the Select key.
Note:
For details on entering/editing text and the characters that can be entered, refer to “Entering Text”
on page 74.
5. Press the u or d key to select EDIT or DELETE, and then press the Select key.
❏ If EDIT was selected, the name is displayed. Continue with step 6.
❏ If DELETE was selected, the settings programmed for the group dial number are deleted. This
completes the procedure when it is deleted.
6. If you want to change the name of the group, enter the new name, and then press the Select key.
Note:
For details on editing text, refer to “Entering Text” on page 74.
7. Add/delete destinations.
Registering Recipients 60
Page 61

AcuLaser CX16NF Facsimile User’s Guide
❏ To add a destination, check that ADD is selected, and then press the Select key. Type in the
speed dial number, press the Select key, and then press the Select key again.
❏ To delete a destination, press the u or d key to select CHECK/EDIT, and then press the Select
key.
Press the u or d key to select the destination to be deleted, and then press the Stop/Reset key.
Check that YES is selected, and then press the Select key.
The destination is deleted from the group dial list.
8. Press the u or d key to select FINISH, and then press the Select key.
The edited information is registered with the group dial number.
Registering Recipients 61
Page 62

AcuLaser CX16NF Facsimile User’s Guide
Chapter 7
Confirmation Mode
About the Machine’s Counters
The operations performed since this machine was installed can be checked with REPORT/STATUS in
the menu. Follow the procedure described below to check the fax-related counters.
Checking the Counter for Fax Printing
This counter shows the total number of fax prints made since this machine was installed.
1. Press the u or d key to select REPORT/STATUS, and then press the Select key.
2. Check that TOTAL PRINT is selected, and then press the Select key.
The TOTAL PRINT screen appears.
3. Press the u or d key to scroll through the screen until FAX PRINT appears.
Check the total number of pages printed as faxes.
Note:
To return to the Fax mode screen, press the Stop/Reset key.
Checking the Counter for Total Scans
This counter shows the total number of scans made, excluding copies, since this machine was
installed.
1. Press the u or d key to select REPORT/STATUS, and then press the Select key.
2. Check that TOTAL PRINT is selected, and then press the Select key.
The TOTAL PRINT screen appears.
3. Press the u or d key to scroll through the screen until TOTAL SCAN appears.
Check the total number of scans made with faxes.
Confirmation Mode 62
Page 63

AcuLaser CX16NF Facsimile User’s Guide
Note:
To return to the Fax mode screen, press the Stop/Reset key.
Checking the Transmission/Reception Result From the Message Window
The results of a maximum of 60 fax transmissions/receptions can be viewed.
In addition, the transmission/reception results that are displayed can be printed by pressing the Start
(B&W) key.
1. Press the u or d key to select REPORT/STATUS, and then press the Select key.
2. Press the u or d key to select TX/RX RESULT, and then press the Select key.
The TX/RX RESULT screen appears and displays the communications log.
Note:
To return to the Fax mode screen, press the Select key.
About the Reports and Lists
Reports on the status of fax transmissions/receptions and the speed dial settings can be printed.
The following reports and lists can be printed with this machine.
Note:
For details on printing the reports and the lists, refer to the following section.
Printing the Reports and Lists
1. Press the u or d key to select REPORT/STATUS, and then press the Select key.
2. Press the u or d key to select REPORT, and then press the Select key.
3. Press the u or d key to select the desired report, press the Select key, and then Start key.
The report is printed
Confirmation Mode 63
Page 64

AcuLaser CX16NF Facsimile User’s Guide
TX RESULT REPORT
The session number, recipient name, date sent, starting time of transmission, number of document
pages, time required, mode, and transmission result are printed.
Note:
The machine can also be set to print this report with each transmission, only when an error occurs, or not
at all. For details, refer to the Printer/Copier/Scanner User’s Guide.
SESSION FUNCTION NO.
0001 TX 001
DESTINATION
STATION
AAA NEWYORK
012345678
00A0: TX CANCEL
DATE TIME PAGE DURATION MODE RESULT
APR.19 18:00 010 00h02min21s G3 STOP
RX RESULT REPORT
The session number, date received, starting time of reception, number of pages received, time
required, mode, and reception result are printed.
Note:
The machine can also be set to print this report with each reception, only when an error oc curs, or not at
all. For details, refer to the Printer/Copier/Scanner User’s Guide.
SESSION FUNCTION NO.
0001 RX 001
DESTINATION
STATION
098765432 APR.19 18:00 001 00h02min21s ECM NG
0014:ERROR DURING RX
DATE TIME PAGE DURATION MODE RESULT
Confirmation Mode 64
Page 65

AcuLaser CX16NF Facsimile User’s Guide
ACTIVITY REPORT
The operation number, session number, date of operation, starting time of transmission/reception,
type of operation (transmission or reception), recipient name, number of pages sent/received, mode,
and transmission/reception result are printed.
Note:
The machine can also be set to print this report automatically after every 60 transmissions/receptions.
For details, refer to the Printer/Copier/Scanner User’s Guide.
NO. SESSION DATE TIM
E
01 0001 APR.19 16:32 TX--- AAA NEWYORK
02 0002 APR.19 18:00 ---RX 098765432 001 00h02min21s ECM NG
03 0003 APR.19 18:00 ---RX 098765432 012 00h02min48s ECM OK
04 0004 APR.19 19:12 TX--- HEAD OFFICE
TX/RX DESTINATION
STATION
012345678
024682468
PAG
E
006 00h01min16s ECM OK
001 00h00min56s ECM OK
DURATION MODE RESUL
MEMORY DATA LIST
This is a list of documents queued to be sent and documents specified for timer transmission
(including batch transmission).
The session number, type of operation being performed, time, recipient name, and number of
document pages are printed.
T
0034
SESSION FUNCTION TIME NO. DESTINATION STATION PAGE
0001 TX 18:00 001 SP-001 AAA NEWYORK
012345678
012
MEMORY IMAGE PRINT
A reduced image of the first page of the document waiting to be sent in addition to the session number,
type of operation being performed, recipient name, date, time, and number of document pages are
printed.
Confirmation Mode 65
Page 66

AcuLaser CX16NF Facsimile User’s Guide
FAVORITE LIST
The destinations registered in the favorite list are printed in the order that they appear in the favorite
list.
FA-NO. DESTINATION STATION DESTINATION NUMBER SPEED SET DATE
FA-01 AAA NEWYORK 012345678 33.6 JAN.20.2006
FA-02 AAA TOKYO 098765432 33.6 JAN.20.2006
FA-03 HEAD OFFICE 024682468 33.6 FEB.12.2006
FA-04 0P02345678 0224466880 12.8 FEB.12.2006
SPEED DIAL LIST
The recipients programmed for the speed dial numbers are printed in numerical order. The time
specified for speed dial numbers registered with batch transmission settings appears below
“DETAIL”.
SP-NO. DESTINATION STATION DESTINATION NUMBER DETAIL SET DATE
SP-001 AMSTERDAM OFFICE 0P09876543 23:00 33.6 JAN.20.2006
SP-002 KOREA OFFICE 0P01357913 33.6 JAN.20.2006
SP-003 ABCDEF 024682468 33.6 FEB.12.2006
SP-004 POST OFFICE 0224466880 14.4 FEB.12.2006
GROUP DIAL LIST
The group dialing settings are printed in numerical order.
Confirmation Mode 66
Page 67

AcuLaser CX16NF Facsimile User’s Guide
KEY-NO. NAME NO. DESTINATION STATION
GP-01 GROUP-01 01 SP-002 AAA TOKYO
098765432
02 SP-004 NJ OFFICE
0P02345678
03 SP-001 AMSTERDAM OFFICE
0P09876543
Confirmation Mode 67
Page 68

AcuLaser CX16NF Facsimile User’s Guide
Chapter 8
Troubleshooting
Problems When Sending Faxes
If the fax cannot be sent correctly, refer to the following table, and then perform the indicated
operation. If the fax still cannot be sent correctly, even after performing the described operations,
contact your technical representative.
Note:
For details on the error messages, refer to “Error Messages on the Message Window” on page 70. For
details on troubleshooting procedures for document misfeeds, paper misfeeds, poor print quality, or
empty consumables, refer to the Printer/Copier/Scanner User’s Guide.
Symptom Cause Solution
The document is
not scanned.
The document is
scanned at an
angle.
The fax received by
the recipient is
blurry.
The fax received by
the recipient is
blank.
The document is too thick, too
thin or too small.
The document guides are not
adjusted to the width of the
document.
The document is incorrectly
positioned.
The original glass is dirty. Clean the original glass.
The text in the document is
written too faint.
There may be a problem with the
telephone connection.
There may be a problem with the
recipient’s fax machine.
The document was sent with the
front side facing down (when the
ADF is used).
Use the original glass to send the fax.
Slide the document guides to fit the width of the document.
Position the document correctly.
Adjust the resolution.
Check the telephone line, and then try sending the fax again.
Make a copy to check that this machine is operating
correctly, and then, if the copy was printed correctly, have
the recipient check the condition of their fax machine.
Load the document to be faxed facing up.
Troubleshooting 68
Page 69

Symptom Cause Solution
AcuLaser CX16NF Facsimile User’s Guide
Transmission is not
possible.
The transmission procedure may
have been performed
incorrectly.
The fax number may be wrong. Check the fax number.
The destination in the favorite
list, the speed dial destination or
the group dial destination may
be incorrectly programmed.
The telephone line may be
incorrectly connected.
There may be a problem with the
recipient’s fax machine (such as,
no paper or turned off).
Check the transmission procedure, and then try sending the
fax again.
Check that the keys were correctly programmed.
Check the telephone line connection. If it is disconnected,
connect it.
Contact the recipient.
Problems When Receiving Faxes
If the fax cannot be received correctly, refer to the following table, and then perform the indicated
operation. If the fax still cannot be received correctly, even after performing the described operations,
contact your technical representative.
Note:
For details on the error messages, refer to “Error Messages on the Message Window” on page 70. For
details on troubleshooting procedures for document misfeeds, paper misfeeds, poor print quality, or
empty toner, refer to the Printer/Copier/Scanner User’s Guide.
Symptom Cause Solution
The received fax is
blank.
There may be a problem with the
telephone connection or with
the caller’s fax machine.
The caller may have loaded the
pages backward.
Check that the machine can make clean copies. If it can, have
the caller send the fax again.
Contact the caller.
Troubleshooting 69
Page 70

Symptom Cause Solution
AcuLaser CX16NF Facsimile User’s Guide
Faxes cannot be
received
automatically.
Other Problems
Symptom Cause Solution
The number of
document pages
indicated in the
transmission result
report is different
from the number
of pages in a batch
transmission.
The machine is set to receive
faxes manually.
Memory is full. Load paper if it is empty, and then print the faxes stored in
The telephone line is incorrectly
connected.
There may be a problem with the
caller’s fax machine.
Memory is full. During batch transmission, the number of document pages
Set the machine to automatic reception.
memory.
Check the telephone line connection. If it is disconnected,
connect it.
Make a copy to check that this machine is operating
correctly, and then, if the copy was printed correctly, have
the recipient check the condition of their fax machine.
indicated in the transmission result report may be different
from the number of pages in the transmission if the memory
is full.
Error Messages on the Message Window
Error message Cause Solution
ADMINISTERED BY PC
PLEASE WAIT!
COMMUNICATION ERROR
(####)
This machine is accessing Local
Setup Program or the Admin.
Mode of EpsonNet Config.
❏ Communication is not
possible because of some
problem in the machine.
❏ Communication is not
possible because of a
problem with the recipient/
caller’s fax machine.
❏ Log off from EpsonNet Config.
❏ Exit Local Setup Program.
❏ If no operation is performed for 600
seconds, the main screen appears.
Check the transmission results.
Troubleshooting 70
Page 71

AcuLaser CX16NF Facsimile User’s Guide
Error message Cause Solution
Check Fax Mode A fax error occurred while an
operation was being performed
in Copy mode or Scan mode.
DESTINATION SET
BY MANUAL UP TO 16
DUPLICATE SETTING Same destinations are specified
FAX DATA LOST Data stored in the memory has
HANG UP THE PHONE The receiver of the connected
LINE PROBLEM
CHECK LINE
MEMORY FILE FULL The number of items registered in
More than 16 recipient fax
numbers have been typed in
directly.
by registered dial.
been erased.
telephone is lifted.
❏ The telephone dialing
system or telephone wiring
system is not set correctly.
❏ The telephone cable is not
attached correctly.
the memory has exceeded the
maximum allowed.
Press the Fax key to check the error condition,
and take appropriate measures.
Specify no more than 16 recipient fax
numbers.
Specify the destination address again.
Check the printed lost data report. If
transmission data was erased, scan the
transmission data again. If received data was
erased, have the fax sent again.
Replace the receiver of the connected
telephone on the hook.
❏ Check the telephone dialing system or
telephone wiring system and use the
appropriate configuration menu to make
the correct settings.
❏ Correctly connect the telephone cable.
If MEMORY RX MODE is set to ON, cancel memory
reception mode, and print received
documents stored in the memory.
MEMORY FULL ❏ While sending a fax, the size
of the data for the scanned
image has exceeded the
capacity of the memory.
❏ While receiving a fax, the size
of the data for the scanned
image has exceeded the
capacity of the memory.
NOT AVAILABLE The menu cannot be set. For details on the menu settings, refer to
NOT FAX NO. When the destination for the scan
data was specified, an e-mail
address registered in the favorite
list or as a speed dial destination
or group dial destination has
been selected.
❏ If MEMORY RX MODE is set to ON, cancel
memory reception mode, and print
received documents stored in the
memory.
❏ Send the fax manually.
“UTILITY Menu” on page 13
Directly type in the destination for the fax data,
or specify a fax number registered in the
favorite list or as a speed dial destination or
group dial destination.
Troubleshooting 71
Page 72

AcuLaser CX16NF Facsimile User’s Guide
Error message Cause Solution
NOT REGISTERED No speed dial destination or
group dial destination is
registered.
Otherwise, no destination has
been registered with the
specified speed dial or group dial
number.
REDIAL ALL FAILED All redial attempts failed because
either the recipient’s line is busy
or there was no answer.
THE PARTY IS FULL The maximum number of 236
destinations for the fax data has
been reached.
WRONG PASSWORD The password is incorrect. Check the password, and then specify the
REGISTERED! GROUP DIAL This error message appears if a
group dial destination was
selected from the favorite list
when specifying a recipient for a
fax being sent using the On hook
key.
Directly type in the destination address for the
fax data, or register a speed dial destination or
group dial destination and try specifying the
destination address again.
Check the condition of the recipient’s line, and
then try sending the fax again.
Send the fax, and then try scanning again.
Otherwise, delete unnecessary destinations
before adding the desired ones.
correct one.
Select a recipient from the favorite list that has
been programmed with a single destination.
Troubleshooting 72
Page 73

Appendix A
Appendix
Technical Specifications
Compatible lines PSTN (Public Switched Telephone Network), PBX (Private Branch eXchange)
(The others are not guaranteed.)
Compatibility ECM/Super G3
Modem speed V.34 (up to 33.6 Kbps)
Fax transmission speed 3 sec/page (at V.34)
Coding method MH, MR, MMR, JBIG
Memory for receiving 6 MB (approx. 384 pages)
AcuLaser CX16NF Facsimile User’s Guide
Original ❏ ADF
Maximum size: Legal
Width: 140 to 216 mm
Length: 148 to 500 mm (500 mm: Fax mode with ADF)
❏ Original Glass
A5/A4/Statement/Letter
Paper size Maximum size: Legal
Edge erase 4 mm (top, bottom, left, right)
Transmission resolution
Standard: 203 × 98 dpi
Fine: 203 × 196 dpi
Super Fine: 203 × 392 dpi
Appendix 73
Page 74

PC-FAX Operating system:
Windows 2000 Service Pack 4
Windows Server 2003 (32-bit/64-bit)
Windows Server 2008 (32-bit/64-bit)
Windows XP (32-bit/64-bit)
Windows VISTA (32-bit/64-bit)
Windows 7 (32-bit/64-bit)
Interface:
USB 2.0
Network (TCP/IP(RAW port, LPR))
PC requirements:
Minimum specifications:
CPU speed: Pentium 200MHz
RAM: 128 MB
Recommended specifications:
CPU speed: Pentium 4/1.6GHz
RAM: 256 MB
Driver command language:
GDI
Driver compression:
JBIG
AcuLaser CX16NF Facsimile User’s Guide
Note:
For details on other specifications, refer to the Printer/Copier/Scanner User’s Guide.
Entering Text
When specifying the user name or programming the recipient name, letters, accented characters,
numbers and symbols can be entered.
Key Operation
Use the keypad to enter numbers, letters, and symbols.
List of characters available with each key of the keypad
Appendix 74
Page 75

Entering Fax Numbers
Keypad Key Available characters Available characters
11-11 -1
2222 2
3333 3
4444 4
5555 5
6666 6
7777 7
8888 8
AcuLaser CX16NF Facsimile User’s Guide
(Registration of USER FAX NO.) *
[1] [A] [1] [A]
9999 9
0 0 (space)0 0 (space)0
###* +
* To display your fax number, select ADMIN. MANAGEMENT/USER SETTING/USER FAX NUMBER in the UTILITY menu.
Entering Names
English, French, German, Italian, Spanish, Portuguese, Turkish
Keypad Key Available characters
[1] [A]
1 1 .,‘?¿!¡“1-()@/:;_
2 2 ABC2abcЖЗабвгдежз
3 3 DEF3defРийклр
4 4 GHI4ghiìíîï
55
Appendix 75
Page 76

Keypad Key Available characters
6 6 MNO6mnoШŒстуфхцшœ˚
77
8 8 TUV8tuvùúûü
99WXYZ9wxyzþýÞ
0 0 (space)0
# # *+×÷=#%&<>[]{}\|μ^`~
Czech, Slovak, Hungarian, Polish
AcuLaser CX16NF Facsimile User’s Guide
[1] [A]
Keypad Key Available characters
[1] [A]
1 1 .,‘?!“1-()@/:;_
22
33
44
55
66
77
88
99
0 0 (space)0
# # *+×÷=#%&<>[]{}\|μ^`~
Appendix 76
Page 77

Russian
AcuLaser CX16NF Facsimile User’s Guide
Keypad Key Available characters
[1] [A]
1 1 .,‘?!“1-()@/:;_
22
33
44
55
66
77
88
99
0 0 (space)0
# # *+=#%&<>[]{}\|^`~
Entering Email Addresses
Keypad Key Available characters
11.@_-1
22ABC2abc
33DEF3def
44GHI4ghi
[1] [A]
55JKL5jkl
6 6 MNO6mno
77PQRS7pqrs
Appendix 77
Page 78

AcuLaser CX16NF Facsimile User’s Guide
Keypad Key Available characters
[1] [A]
88TUV8tuv
99WXYZ9wxyz
0 0 (space)0
# # +&/*=!?()%[]^`´{}|~$,:
Changing Input Mode
Each press of the key switches the input mode between numbers and letters.
[1…]: Numbers can be typed in.
[A…]: Letters can be typed in.
Inputting Example
The procedure for entering text is described below, using “NJ Office” as an example.
1. Press the 6 key twice.
“N” is entered.
2. Press the 5 key once.
“J” is entered.
3. Press the 0 key once.
A space is entered.
4. Press the 6 key three times.
“O” is entered.
5. Press the 3 key seven times.
“f” is entered.
Appendix 78
Page 79

6. Press the r key.
The cursor moves to the right.
7. Press the 3 key seven times.
“f” is entered.
8. Press the 4 key seven times.
“i” is entered.
9. Press the 2 key seven times.
“c” is entered.
10. Press the 3 key six times.
“e” is entered.
Correcting Text And Input Precautions
AcuLaser CX16NF Facsimile User’s Guide
❏ To erase all entered text, hold down the Back key.
❏ To delete only part of the entered text, use the l or r key to move the cursor (_) to the character
that you want to delete, and then press the Back key.
❏ If the same key is to be used to enter two characters in a row, press the r key after selecting the first
character. (Refer to the above inputting example.)
❏ To enter a space, press the 0 key.
Appendix 79
Page 80

Index
AcuLaser CX16NF Facsimile User’s Guide
A
ADF.........................................................................................7
Sending faxes....................................................................17
Adjusting
Density...............................................................................22
Image Quality...................................................................21
Resolution.........................................................................21
B
Batch transmission..............................................................31
C
Canceling
Memory.............................................................................36
Chain dial.............................................................................35
Changing/deleting
Favorite list.......................................................................55
Group dial.........................................................................60
Speed dial..........................................................................57
Confirm................................................................................62
Control panel.........................................................................7
Counters...............................................................................62
Fax printing......................................................................62
Total scans........................................................................62
Input mode.......................................................................78
Input precautions.............................................................79
Error messages.....................................................................70
F
Favorite list
Deleting.............................................................................55
Registering........................................................................53
Specifying recipient.........................................................23
Fax mode screen..................................................................10
Footer....................................................................................45
Forwarding...........................................................................44
Specifying..........................................................................16
G
Group dial
Changing/deleting...........................................................60
Registering........................................................................58
Specifying recipient.........................................................29
H
Header...................................................................................37
I
D
Deleting
Memory.............................................................................36
Density, Adjusting...............................................................22
Dialing, direct......................................................................23
Direct transmission.............................................................32
Document feed tray...............................................................7
Document guide....................................................................7
E
Entering text.........................................................................74
Correcting text.................................................................79
Image Quality, Adjusting...................................................21
Imageable area.....................................................................45
Input mode...........................................................................78
K
Key operation.......................................................................74
L
Lists........................................................................................63
FAVORITE LIST.............................................................66
GROUP DIAL LIST.........................................................66
Index 80
Page 81

AcuLaser CX16NF Facsimile User’s Guide
MEMORY DATA LIST..................................................65
Printing..............................................................................63
SPEED DIAL LIST...........................................................66
M
Manual
Reception..........................................................................43
Transmission....................................................................33
Manual transmission
On hook key.....................................................................35
Using telephone...............................................................33
Memory
Cancel/delete....................................................................36
Queue.................................................................................36
Memory reception...............................................................14
Memory RX mode...............................................................14
Setting up..........................................................................14
Turning off........................................................................15
Memory transmission.........................................................32
Menu
Utility.................................................................................13
Multiple recipients
Broadcast...........................................................................27
Group dial.........................................................................29
O
Original glass..........................................................................7
Sending faxes....................................................................19
Search................................................................................26
R
Receiving faxes
Automatic reception........................................................43
Forwarding.......................................................................44
Manual reception.............................................................43
Memory reception...........................................................14
Method of printing..........................................................46
Printing..............................................................................45
Reception result.............................................................63, 64
Recipients
Dial register function.......................................................53
Favorite list.......................................................................53
Group dial.........................................................................58
Multiple recipients...........................................................27
Registering........................................................................53
Speed dial..........................................................................55
Redial.....................................................................................27
Registering recipients..........................................................53
Favorite list.......................................................................53
Group dial.........................................................................58
Speed dial..........................................................................55
Reports..................................................................................63
ACTIVITY REPORT.......................................................65
MEMORY IMAGE PRINT............................................65
Printing..............................................................................63
RX RESULT REPORT.....................................................64
TX RESULT REPORT.....................................................64
Resolution, Adjusting.........................................................21
P
Parts.........................................................................................7
PC-FAX.................................................................................39
Basic transmission...........................................................40
Settings..............................................................................39
Uninstalling......................................................................41
PC-FAX Settings
Address Book tab.............................................................40
Common buttons.............................................................39
Sender Information tab...................................................40
Settings tab........................................................................39
Phone book
List......................................................................................25
S
Sending faxes
Basic fax operation...........................................................17
Batch transmission..........................................................31
Chain dial..........................................................................35
Direct transmission.........................................................32
Manual transmission.......................................................33
Memory transmission.....................................................32
PC-FAX transmission.....................................................40
Redial.................................................................................27
Timer.................................................................................30
Using ADF........................................................................17
Index 81
Page 82

Using original glass..........................................................19
Specifications.......................................................................73
Specifying a recipient
Direct dialing....................................................................23
Favorite list.......................................................................23
Group dial.........................................................................29
Speed dial..........................................................................24
Specifying recipient.............................................................22
List......................................................................................25
Phone book.................................................................25, 26
Search................................................................................26
Speed dial
Changing/deleting...........................................................57
Registering........................................................................55
Registering (manual setting)..........................................55
Specifying recipient.........................................................24
Symbol, Message window...................................................12
AcuLaser CX16NF Facsimile User’s Guide
T
Timer transmission.............................................................30
Transmission method.........................................................32
Changing transmission method.....................................32
Direct transmission.........................................................32
Memory transmission.....................................................32
Transmission result.......................................................63, 64
Troubleshooting..................................................................68
Error messages.................................................................70
Receiving faxes.................................................................69
Sending faxes....................................................................68
U
Utility
Specifying Settings...........................................................13
Index 82
 Loading...