

Page 1
EPSON Color Calibrator User’s Guide
CPD-8407
Page 2

®
Color Calibrator
All rights reserved. No part of this publication may be reproduced, stored in a retrieval
system, or transmitted in any form or by any means, electronic, mechanical, photocopying,
recording, or otherwise, without the prior written permission of SEIKO EPSON
CORPORATION. No patent liabi lity is assumed with respect to the use of the information
contained herein . Neither is any liab ility assume d for damages r esultin g from the us e of the
information contained herein.
Neither SEIKO EPSON CORPORATION nor its affiliates shall be liable to the purchaser of
this product or third parties for damages, losses, costs, or expenses incurred by purchaser or
third parties as a result of: accident, misuse, or abuse of this product or unauthorized
modifications, repairs, or alterations to this product.
SEIKO EPSON CORPORATI O N and its affiliates shall not be liable agains t any damages o r
problems arising from the use of any options or any consumable products other than those
designated as Original EPSON Products or EPSON Approved Products by SEIKO EPSON
CORPORATION.
EPSON and EPSON Stylus are register e d trademarks of SEIKO EPSON CORPORATION .
EFI, the EFI logo, Fiery, and the Fiery logo are U.S. registered trademarks of Electron ics for
Imaging, Inc.
Macintosh is a registered trademark of Apple Computer, Inc.
Microsoft and Windows are registered trademarks of Microsoft Corporation in the United
States of America and other countries.
The ENERGY STAR emblem does not represent EPA endorsement of any product or service.
General Notice: Other product names used herein are for identification purposes only and
may be trademarks of their respective companies.
Copyri ght © 1999 by Epson America, Inc. CPD-8407
4/99
Page 3

Declaration of Conformity
According to ISO/IEC Guid e 22 and EN 45014
Manufacturer: SEIKO EPSON CORPORATION
Address: 3-5, Owa 3-chome, Suwa-shi,
Nagano-ken 392-8502 Japan
Representative: EPSON EUROPE B.V.
Address: Prof. J. H. Bavincklaan 5 1183
AT Amstelveen
The Netherlands
Declares that the Product:
Product Name: Color Calibrator
Model: G740A
Confo rms to the fo llowing Di re ctive(s) a nd Norm(s):
Directive 89/336/EEC:
EN 55022 Class B
EN 50082-1
EN 61000-3-2 (Using AC Adapter Model EU-20)
EN 61000-3-3 (Using AC Adapter Model EU-20)
IEC 801-2
IEC 801-3
IEC 801-4
January, 1999
H. Horiuchi
President of EPSON EUROPE B.V.
ii
Page 4

FCC Compliance Statement
For United St ates User s
This equipment has been tested and found to comply with the limits for a Class B digital
device, pursuant to Part 15 of the FCC Rules. These limits are designed to provide reasonable
protection ag ains t harmful interference in a residenti al inst allati on. This equip ment
generates, uses, and can radiate radio frequency energy and, if not installed and used in
accordance with the instructions, may cause harmful interference to radio or television
reception. However, there is no guarantee that interference will not occur in a particula r
installation. If t his equipment does cause interference to radio and television reception, which
can be determined by turning the equipment off and on, the user is encouraged to try to
correct the interference by one or more of the following measures:
Reorient or relocate the receiving antenna;
Increase the separation between the equipment and receiver;
Connect the equipment to an outlet on a circuit different from that to which the receiver is
connected;
Consult the dealer or an experienced radio/TV technician for help.
WARNING
The connectio n of a no n-shielded equipment in terface c able to this e quipment w ill invali date
the FCC Certificati on of this devi ce and may cause interference levels which exceed the li mits
established by the FCC for this equipment. It is the responsibility of the user to obtain and
use a shielded equipment interface cable with this device. If this equipment has more than
one interface connector, do not leave cables connected to unused interfaces.
Changes or modifications not expressly approved by the manufacturer could void the user’s
authority to operate the equipment.
For Canadian Users
This Class B digital apparatus complies with Canadi an ICES-003.
Cet appareil numérique de la classe B est conforme à la norme NMB-003 du Canada.
iii
Page 5

Declaration of Conformity
Accord ing to 47CFR, Part 2 and 15 for
Class B Pers onal Computers and Peri pherals;
CPU Boards and Power Supplies used with Class B Personal
Computers:
We: EPSON AMERICA, INC.
Located at: 20770 Madrona Avenue,
MS: B2-11
Tel: 310-782-5254
Declare under so le respo nsibility that the prod uct identi fied
herein, complies with 47CFR Part 2 and 15 of the FCC rules as a
Class B digital device. Each product marketed, is identical to the
representative uni t te sted and found to be co mpliant with the
standards. Records maintained continue to reflect the equipment
being produced can be expected to be within the variation
accepted, due to quantity production and test ing on a statistical
basis as required by 47CFR §2.909 Operation is subject to the
following two co nditions: (1) this device may not cause harmful
interference, and (2) this device must accept any interference
receive d, includi ng interfe re nce that may cause undesired
operation.
and/or
iv
Trade Name: EPSON
Type of Produc t: EPSON Color Calibrator
Model: G740A
Page 6

Contents
Introduction
Features. . . . . . . . . . . . . . . . . . . . . . . . . . . . . . . . . . . . . . . . . . . . . . . .1
Safety Instructions. . . . . . . . . . . . . . . . . . . . . . . . . . . . . . . . . . . . . . .2
ENERGY STAR Compliance . . . . . . . . . . . . . . . . . . . . . . . . . . . . . .3
System Requiremen ts . . . . . . . . . . . . . . . . . . . . . . . . . . . . . . . . . . . .4
Where to Get Help. . . . . . . . . . . . . . . . . . . . . . . . . . . . . . . . . . . . . . .5
Chapt er 1
Contents . . . . . . . . . . . . . . . . . . . . . . . . . . . . . . . . . . . . . . . . . . . . . . .1-1
Parts. . . . . . . . . . . . . . . . . . . . . . . . . . . . . . . . . . . . . . . . . . . . . . . . . . .1 - 2
Calibrator. . . . . . . . . . . . . . . . . . . . . . . . . . . . . . . . . . . . . . . . . .1-2
Y-cable . . . . . . . . . . . . . . . . . . . . . . . . . . . . . . . . . . . . . . . . . . . .1-2
Chapt er 2
Connecting the C alibrator to Yo ur Co mputer. . . . . . . . . . . . . . . .2-2
Installing the Utility Software . . . . . . . . . . . . . . . . . . . . . . . . . . . . .2-5
Chapt er 3
Calibrating the EPSON Color Calibrator . . . . . . . . . . . . . . . . . . . .3-2
Printing a Calibration Sheet. . . . . . . . . . . . . . . . . . . . . . . . . . . . . . .3-5
Creating a Color Profile . . . . . . . . . . . . . . . . . . . . . . . . . . . . . . . . . .3-8
Implementing You r Prof ile . . . . . . . . . . . . . . . . . . . . . . . . . . . . . . . 3 - 10
Unpacking the Color Calibrator
Setting up Your Color Calibrator
Calibrating Your Printing System
Contents
v
Page 7

Chapter 4 Calibrating You r System to Another
Modifying the ICC P rofile. . . . . . . . . . . . . . . . . . . . . . . . . . . . . . . . 4-1
Preparing to measure th e stan dard color chart . . . . . . . . . 4-1
Measuring the chart and updating the profile . . . . . . . . . . 4-4
Using a custom color chart to update your ICC profile . . 4-6
Applying the Modified ICC Profile. . . . . . . . . . . . . . . . . . . . . . . . 4-8
Index
vi
Contents
Page 8

Introduction
Features
The EPSON Color Calibrator restores y our EPSON Stylus® Pro
5000 or 9000 printer to its originally designed color settings. By
creating a color profile for your printer and then implementing it
on your EPSON RS-5 000 Fiery
RS-5100 Fiery X2 RIP, the calibrator helps y ou ac h ieve co nsist ent
color output.
You ca n also calib rate your system to match your printing
vendor’s system using ICC profiles. This lets you preview your
output at the earliest possible stage in your prepress workflow.
Note:
The calibrator can o nly adjust to ICC profiles that are based o n
JapanColor, SWOP , or E U RO profiles.
®
RIP version 1.3 or your EPSON
Introduction
1
Page 9

Safety Instructions
Read the se instructions befo re using your Color C alibrator, and
save them for later reference. Follow all warnings and instructions
in this
❏ Unplug the AC adapter before cleaning . Clean with a damp
❏ Do not place the ca librator on an unstable surface, or near a
❏ Do not i nsert obje cts into the sensor tip.
❏ Use only the type of power source indicated on the AC
❏ Connect all equipment to properly grounded power outlets.
User’s Guide
cloth only. Do not spill liquid on the calibrator.
radiator or heat source.
adapte r’s label.
Avoid using out lets on the same circuit as photocopiers or air
control systems that regularly switch on and off.
.
❏ Do not let the power cord become damage d or frayed.
❏ If you use an extension cord with the AC adapter, make sure
the total ampere rating of the devices pl ugged into the
extension cord does no t exceed the cord’s ampere rat ing. Also,
make su r e the tot al amper e r ati ng o f all de vic es p lugg ed i nto
the wall outlet does not exceed the wall outlet's ampere rating.
❏ Do not a ttempt to service the products yourself.
❏ Unplug the AC adapte r and refer servicing to qualified
service personnel under the following conditions:
❏ If th e powe r cord or plug is d amaged ; if liq uid has entere d the
AC adapter; if the AC adapter has been dropped or the cabinet
damaged; if th e AC adapter does not operate normally or
exhibits a distinct change in performance. (Do not adjust
contro ls that are not cov ered by the operating instructions.)
2
Introduction
Page 10

❏ If you plan to use the AC adapter in Germany, observe the
following:
To provide adequate short-circuit protection and overcurren t protection f or this AC a dapter, the building
installation must be p rotected by a 16 Amp circuit breaker.
Note for German-speaki ng users:
Bei Anschluß d es AC adapters an die Stromversorgung muß
sichergestellt werden, daß die Gebäudeinstallation mit einem 16 AÜberstromschalter a bg esic h ert ist.
NERGY STAR Compliance
E
As an ENERGY STAR Partner, EPSO N has
determined that this product meets the
E
NERGY STAR guidelines for energy
efficiency.
E
The International
a voluntary p artnership wi th the computer an d off ice equipment
industry to pr omote the introduc tion of energy-ef ficient persona l
computers, monitors, printers, fax machines, copiers, and AC
adapters, in an effo rt to reduce air pollutio n caused by power
generation.
NERGY STAR Office Equipment Program is
Introduction
3
Page 11

System R equirements
Before using this product, make sure that your system meets the
followi ng requir e ments.
For Windows Users
System:
Display: Color monitor, 800 ×
CPU: Pentium or higher
Memory: 16 MB RAM (32 MB recommended)
Hard disk: 50 MB or more free space
Microsoft® Windows® 95, Windows 98, or
Windows NT 4.0
600 screen resolu tion
(hig he r rec o mm e nded), an d 6 5,0 00 co lo rs
(higher recommended)
Note:
Color and t one reproduction are subject to the
display capability of your computer system,
including the video card, display monitor, and
software. See the documentation for t ho se
products for details.
4
Introduction
Page 12

For Macintosh User s
System:
Apple® Macintosh® comput e r wit h
PowerPC proc essor running Sy stem 8.1 or
late r
Display: Color monitor, 800 ×
resolution (higher recommended)
and 32,000 colors (higher recomme nded)
Note:
Color and t one reproduction are subject to
the display capability of your computer
system, includi ng the v ideo card, display
monitor, and soft ware. See the
documentatio n for those produ cts for detail s.
CPU: PowerPC
Memory: 32 MB
Hard disk: 50 MB free space
600 screen
Where to Get Help
EPSO N provides technical support and information on the
installation, configuration, and operation of professional graphics
arts products through the EPSON Preferred Protection Plan. Dial
(888) 377-6611, 6
Friday, an d 7
Before you call, make sure you have your Unit ID number, which
is included with the EPSON Preferred Protecti on Plan
information that came with your printer.
A.M.
A.M.
to 4
to 8
P.M.
., Pacific Time, Monda y th ro ugh
P.M
, Pacific Time, Saturday and Sunday.
Introduction
5
Page 13

6
Introduction
Page 14
Chapter 1
Unpacking the Color Calibr at or
Contents
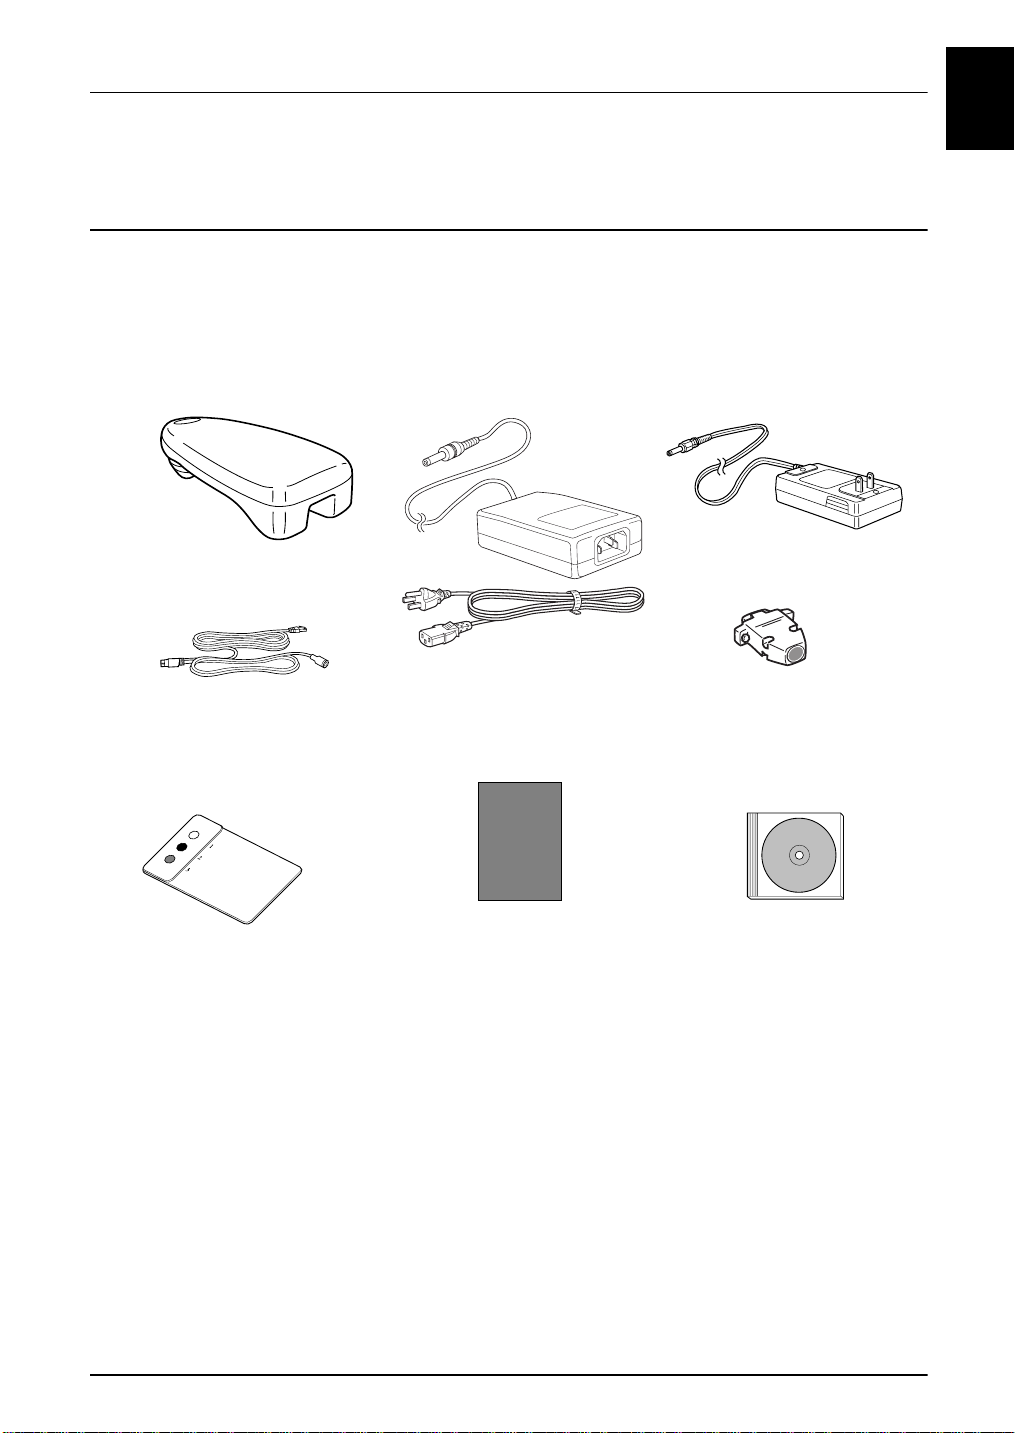
When unpacking your EPSON Color Calib ra tor, make sure the
following items are included:
calibrator
Y-cable
AC adapter and AC
cable
(127 , 220 , 230, 240 vol ts )
AC adapter
(110, 120 volts)
Mac-PC serial
converter
1
color pad
black ba se paper
Unpacking the Color Calibrator
software
CD-ROM
1-1
Page 15

Parts
Calibrator
sensor tip
measure button
Y-cable
serial connector
modular plug
DC connector
1-2
Unpacking the Color Ca librator
Page 16

Chapter 2
Setting up Y our Color Calibrator
To set up your calibrator you need to connect it to your computer,
then install the utility software.
Note:
❏
Before you install t h e calibrator software, the RS-5000 version 1.3
or RS-5100 user software must be installed. See your RIP
documentation for installation instructions.
❏
The illustrations in this manual are taken from both Windows and
Macintosh computers and may vary slightly from what appears on
your screen.
2
Setting up Your Color Calibrator
2-1
Page 17

Connecting the Calibrator to Your Computer
Follow the steps below to connect the calibrator to your computer:
1. Make sure your compu te r i s turned off.
2. If you ar e usin g a P C, c onnec t the Mac- PC ser ial co nverter to
the Y-cable as shown below.
Then connect the Y-cable to one of your serial ports and
tighten the screws to sta b ilize the connectio n.
2-2
Setting up Your Color Calibrat or
Page 18

If you are using a Macintosh, connect the Y-cable to your
modem port.
3. Connect the Y-cable’s 8-pin connector to the back of the
calibrator as shown below:
2
Setting up Your Color Calibrator
2-3
Page 19

4. Connect the DC connector to the AC adapter.
5. Insert the AC adapter into a properly grounded outlet.
6. Press the measure button at the top of the calibrator. The
sensor tip of the calibrator flashes light if t he calibrato r is
properly connected to your computer.
You are now ready to install the utility soft ware. See th e next
section for instructions.
2-4
Note:
If the sensor tip does not flas h lig ht, m ak e sure the outlet you are
using is working properly.
Setting up Your Color Calibrat or
Page 20

Installing the Utility Software
Follow the steps below to install the calibrator software:
1. Turn on your computer.
2. Insert the software CD-ROM included with your Color
Calib rator into y our drive.
3. Start the installation program and follow the on-screen
instructions.
Note:
Although you can install the utility software when the calibrator is
not connected to your c omp uter, you can’t use the software unless
the calibrator is c onnected.
2
Setting up Your Color Calibrator
2-5
Page 21

Chapter 3
Calibrating Your Pr inting System
Use your Color Calibrator to calibrate your EPSON Stylus Pro
printing system at the fol lowing tim es:
❏ When you set up the system f or the first time
❏ After the system has been overhauled or repaired
❏ Before using the system after a long pe riod of ina cti vity
Cali bra t in g y o u r pri n ting system i s a m ulti-step p roc e s s. Be s ur e
to follo w all the ins truction s i n this chapte r in the order they
appear.
3
Calibrating Your Printing System
3-1
Page 22

Calibrating the EPSON Color Calibrator
Measure the included color pad to calibrate your Colo r Calibrator.
Follow the steps below:
1. Double-click the EPSON Color Calibrator folder.
2. Double-click the Printer Calibrator utility icon. The following
dialog box appears:
3. To begi n calibrating your Color Calibrator, click the
3-2
Calibration button. The following window appears:
Calibrating Your Printing System
Page 23

4. Place the color pad included with your calibrator on a flat
surface. Then place the sensor tip of the calibrator on the black
circle in the pad.
3
Note:
Make sure the sensor tip is placed flat and firmly on the pad .
Calibrating Your Printing System
3-3
Page 24

5. Click the Calibration button, or press the measure butt on at
the top of the calib rator to me asure the color.
Note:
Do not measure the pad under strong light or direct daylight as this
may render the measurement inaccurate.
After you finish measuring the black circle, the message in the
window changes to Please calibrate white point.
6. Place the sensor tip on the color pad’s white circle. Repeat step
5 to measure the color.
7. Afte r you finish measuring the white circle, click the Done
button. Without closing the ColorWise Pro Tools utility,
continue on to the next section.
3-4
Calibrating Your Printing System
Page 25

Printing a Calibration Sheet
Before you start, make su re you have coated or glossy paper
loaded in your printer. Cut sheet paper is recommended if you’re
using the EPSON Stylus Pro 9000. Follow these steps:
1. If necessary, start the ColorWise Pro Tools application.
Note:
The location and typ e of fil e that y ou need to click to start the
program depend s on w h ere it was installed on your compu ter a nd
your computer’s operating system. If you need help st arting the
program, consult the p erson who installed it on your computer, or
refer to your EPSON RS-5000 or RS-5100 documentation.
2. In the dialog box that appears, click the name of the printer
you want to calibrate, then click the Select button. The
following window appears:
3
Calibrating Your Printing System
3-5
Page 26

3. Click the Calibrator button. The follow ing dialog box
appears:
4. Make sure EPSON Color Calibrator is selected in the list box
under Select Measurement Method. Then select a paper type
from the Calibration Set list box. You can choose from the
following paper types:
PQ Ink Je t Paper
PQ Glossy Paper
Dupont EPSON Glossy Paper
Dupont EPSON Matte Paper
Dupont EPSON Publication Paper
5. Click the Print button under Ge nerate Measurement Page.
3-6
Calibrating Your Printing System
Page 27

6. Choose the Paper Size and Input Tray (or Paper Source) for
pr inti ng, then click the Print button to print the calibration
sheet.
Following is a sample of the calibration sheet printed from
your EPSON Stylus Pro 5000 or 9000:
3
Calibrating Your Printing System
3-7
Page 28

Creating a Color Profile
To make a co lor profile , yo u must use the calibration sheet you
printed in the previous section. Make sure your Color Calibrator
has been calibrated as described in “Calibrating the EPSO N Color
Calibrator” on page 3-2, then follow the steps below:
1. Place the calibra tion sheet you printed in the previ ous section
on a flat surfac e, with the included blac k base paper behind it.
Note:
Wait for at least 30 minutes after printing a calibration sheet before
using it to create a color profi le.
2. Select an empty block in the EPSON Printer Calibrator dial og
3. Place the sensor tip of the calibrator on the corresponding
3-8
box by clicking it with your mouse.
block of the calibr ation sh eet.
Note:
Make sure the sensor tip is placed flat and firmly on the sheet.
Calibrating Your Printing System
Page 29

4. Click the Calibration button, or press the measure button at
the top of the calib rator to me asure the color.
Note:
Do not measure the sh eet u nd er strong light or direct daylight;
otherwise the measurement may be inaccura te.
5. Repeat steps 2 and 3 unti l every block of the calibrati on sheet
is measured, then click Save File.
Note:
You can’t sa ve t h e file until every block is measured.
6. Name the file and select a folder, then click Save.
You can now use this fi le t o i mplement your prof ile. See t he next
section for instructions.
3
Calibrating Your Printing System
3-9
Page 30

Implementing Your Profile
To implement the profile you made in the last section, follow the
steps below:
1. Start the ColorW ise Pro Tools application.
Note:
The location and type of file that you need to click to sta r t the
program depends on where it was installed on your com p uter and
your computer ’s operating sy stem. If you need help starting the
progam, consult t he perso n who installed it on your com pu ter, or
refer to you r EPSON RS-5000 or RS-5100 document ation.
2. In the dialog box that appears, click the name of the printer
you want to calibrate , the n click the Select button. The
following screen a p pears:
w
3-10
Calibrating Your Printing System
Page 31

3. Click the Calibrator button. The following dialog box
appears:
3
4. Click the From File button under Ge t M easurem e nts.
5. Select the file you saved in the last section, then click the
Open button. A window appears confirming that the
measuremen ts were read succe ssfully.
6. Click OK.
7. Click Apply to implement the new profile.
If you wa nt to restore the def ault settings, click the Restore
Device button. A warning message appears.
Click OK to restore the factory d efault cal ibrations .
Calibrating Your Printing System
3-11
Page 32

3-12
Calibrating Your Printing System
Page 33

Chapter 4
Calibrating Yo ur S ystem to Another
Modifying the ICC Profile
To calibrate your RS-5000 or RS-5100 to the printer you will
ultima te l y use for your f in al product, you need to obta i n a
printout from your vendor. EPSON recommends using a printout
of one the standa rd color c harts. See the instructions below.
If you want to use a printout of a color chart from your printing
vendor, rather than the provided chart, see “Using a custom color
chart to update your ICC profile” on page 4-6.
Preparing to measure the standard color chart
4
First you need to obtain the printed color chart from your vendor.
Then you prepare for mea suring by ca librating the black a nd
white points. Follow these steps:
1. Have your printing v endor print a c olor chart using one of the
files provided with your calibrator. These files are in the Chart
folder of your EP SON Color Cali brator f older and are named
chart.tif and chart.eps.
Note:
Be sure to have the chart printed on the same type of paper as that
of your fin al p r int.
Calibrating Your System to Another
4-1
Page 34

2. Start EPSON Profile Updater. You see a dialog box like the
following:
3. Select the ICC profile t hat your printing vendor used from the
Base Profile list.
If you don’t fin d the profile your vend o r used in the list, use
the profile that matches your location:
JapanColor: As ia
SWOP: North/S outh America
EURO
4. For Measurem e nt Mode, select Standard Chart. Then click
the Measure Chart button. You see the following di alog box:
Europe
:
4-2
Calibrating Your System t o A nother
Page 35

5. Click the Calibration button.
6. Plac e t he color pad pa cked with your calibrator on a fla t
surface. Place t he sensor tip of the cali brator on the color pad’s
black ci rcle.
Note:
Make sure the sensor tip is placed flat and firmly on the pad .
7. Click the Calibration button, or press the measure button at
the top of the calib rator to me asure the color.
Note:
Do not measure the pad under strong light or direct daylight as this
may render the measu rem ent inaccurate.
Afte r you f inish measur ing th e black cir cle, th e messa ge in the
window changes to Please calibrate white point.
4
8. Place the sensor tip on the color pad’s white circle. Repeat step
7 to measure the color.
9. Afte r you finish measuring the white circle, cl i ck the Done
button.
You’re now ready to measure the color chart. See the next section
for instructio ns.
Calibrating Your System to Another
4-3
Page 36

Measuring the chart and updating the profile
Follow these steps to complete the profile modification process:
1. Place the printo ut of the sta ndard color chart y ou received
from your printi ng vendor on a flat surface with the incl uded
black base pa per behind it.
2. Select an empty block in the EPSON Profile Updater dialog
box by clicking it. Place the sensor tip of the cal ibr ator on the
correspondin g b lock of the color chart.
Note:
Make sure the sensor tip is placed flat and firmly on the pap er.
3. Click the Calibration button, or press the measure butt on at
the top of the calib rator to me asure the color.
Note:
Do not measure the samp le c hart under strong light or direct
sunlight as this cou ld rend er the me asurement inaccurate.
4. Repeat steps 2 and 3 until every block of the color chart is
measured, then click the Done button, or click Save File.
Note:
You can’t save the file until you measure every block .
5. Type a name for the new file in the File Name box and click
Save.
4-4
Calibrating Your System t o A nother
Page 37

After the measurement file is saved, the file name is shown
on the screen.
file name appears here
6. Click the Update Pr of ile button.
7. Give a name to your new profile and select the appropriate
fold er, as indicated below.
4
For Win dows users:
C:\WINDOWS\SYSTEM\Color
Note:
Substitute th e letter of your disk drive if it is not drive C.
For Macintosh users:
System Folder\System\ColorSync Profiles
Or:
System Folder\System\Preferences\ColorSync Profiles
Calibrating Your System to Another
4-5
Page 38

If the profile is updated corre ctly, the profile curve chart
appears.
8. Click OK.
You are now ready to apply your new profile. See “Applying the
Modified ICC Profile” on page 4-8.
Using a custom color chart to update your ICC profile
You can modify your ICC profile using a pri ntout from yo ur
printing vend or of a custom color chart. The pr intout of the
cust om color c hart must meet the f ollowing requirements:
❏ The chart must be printed by your vendor on the same
type of paper as the final print.
❏ The chart must show color density measured in
percentages.
Using the custom color chart printout, fo llow the step s below:
1. Start EPSON Profile Updater.
2. Choose Custom Chart.
4-6
Calibrating Your System t o A nother
Page 39

The following dialog box appears:
number of steps
between 0% and 100%
Before measu ring the cu stom chart, you ne e d to enter
information about the ch art in this dialog box.
3. Enter th e number of color density st eps between 0% and 100%
in your chart. If there are four or more steps, type 4.
4. Enter the density percentage for each step in the boxes as
shown below. If your sample has more than six total steps,
choose four suitable steps.
4
percentage of color density for each step
5. After yo u finish making the setti ngs, click Apply.
6. Follow the steps under “Prepari ng to measure the standard
color chart” on page 4-1 from step 5. Then follow the steps
under “Measuring the c ha rt and updating the profile” on
page 4-4
Calibrating Your System to Another
4-7
Page 40

Applying the Modified ICC Profile
Follow the steps below to implement your new profile:
1. Start the ColorW ise Pro Tools application.
Note:
The location and type of file that you need to click to sta r t the
program depends on where it was installed on your com p uter and
your computer ’s operating sy stem. If you need help starting the
program, consult the pe rson who installed it on your computer, or
see your EPSON RS-5000 or RS-5100 do cumentation.
2. In the dialog box that appears, click the name of the printer
you want to calibrate , the n click the Select button. The
following window appears:
3. Click the Pr o file Manager b utt on. Th e fol lowi ng dialog box
4-8
appears:
Calibrating Your System t o A nother
Page 41

4. Click the name of your c ust om prof ile in the D esc ription box
on the left.
5. Click the green triangle at the center of the Profile Manager
window. A message appears confirming that your custom
profile was downloaded successfully.
4
6. Click OK. Your custom profile appears in the right window.
7. Click the name of your custom profile in the right window.
The green arrow’s direction reverses.
Calibrating Your System to Another
4-9
Page 42

8. Click the Profile Settings button in the right window. The
Simulation Profile Settings dialog box appears:
9. Select Appear in Driver as, then choose a setting from
SIMULATION-1 to SIMULATION-10 and click Apply. If the
same name is already ass igned to another profile, a window
appears askin g you to confirm your command.
10. Click OK, then click Done to exit Profile Manager.
Note:
See your ColorWise Pro Tools documentation for further details on
using this prog ram.
4-10
Calibrating Your System to Anot her
Page 43

Index
A
AC adapter, 1-1, 2-4
B
Black base paper, 1-1, 3-8, 4-4
C
Calibrating
Color Calibrator
RIP to prin ter
RIP to vendor ’s printe r
Calibration sheet
Color Calibrator
calibrating
connecting to computer
,
parts
Color charts
custom
standard
Color pad
Color profiles
applying
creating
See also
ColorWise Pro Tools
4-8 to 4-10
Custom color chart
1-2
,
4-6 to 4-7
,
4-1 to 4-6
,
1-1, 3-2 to 3-4
,
3-10 to 3-11
,
3-8 to 3-9
ICC profiles
,
,
3-1 to 3-11
,
3-5 to 3-9
,
3-2 to 3-4
,
3-2 to 3-4
,
4-1 to 4-10
,
2-2
,
2-5, 3-5, 3-10
4-6 to 4-7
E
ENERGY STAR, 3
EPSON
, 1,
,
4-1
Preferred Protection Plan
Profile Updater
RS-5000 Fi er y R IP version 1.3
1,
4-1
RS-5100 Fi er y X2 R IP
,
4-2
Stylus Pro 5000
Stylus Pro 9000
EURO
, 1,
4-2
, 1,
, 1,
3-7
3-5, 3-7
I
ICC profiles, 1
applying
EURO
JapanColor
modifying
SWOP
using
,
,
4-2
,
4-2
,
1
4-8 to 4-10
,
4-2
,
4-1 to 4-7
J
JapanColor, 1, 4-2
M
Macintosh, system requirements, 5
Mac-PC serial converter
Measure butto n
location
using
,
1-2
,
3-4, 3-9, 4-3 to 4-4
,
1-1, 2-2
P
,
Profile Updater, 4-2
R
RS-5000 Fi er y R IP version 1.3, 1, 4-1
RS-5100 Fi er y X2 R IP
5
,
S
Safety instructions, 2
Sensor tip
location
using
,
1-2
,
2-4, 3-3, 3-8
, 1,
4-1
Index
1
Page 44

Serial converter, 1-1, 2-2
Software CD-ROM
Standard colo r chart
SWOP
System requirements
, 1,
4-2
Macint os h
Windows
,
,
1-1, 2-5
,
4-1 to 4-6
,
5
4
T
Technical support, 5
U
Unit ID number, 5
W
Windows, system requirement s, 4
Y
Y-cable, 1-1, 1-2, 2-2 to 2-3
2
Index
 Loading...