

Page 1

EPSON® Ethernet Card Supplement
This guide includes new information about your EPSON
multiprotocol Ethernet interface card and software.
If you are using the card with Apple® Macintosha computers on
AppleTalk® or TCP/IP networks, please disregard the Macintosh
section in your EPSON Type B Ethernet Interface Card
and follow the steps in this supplement.
In addition to the operating systems mentioned in the Ethernet card
®
User's
Guide
User’s Guide, the card also supports Windows 95 and Windows NT
4.x.
You’ll find the following information in this Supplement:
CI
Initializing the Ethernet card
Cl
Using the Ethernet Card with NetWare® on a WAN
Q
Using Macintosh with the Ethernet Card
Q
Using TCP/IP with Windows 95
CPD5719
Page 2
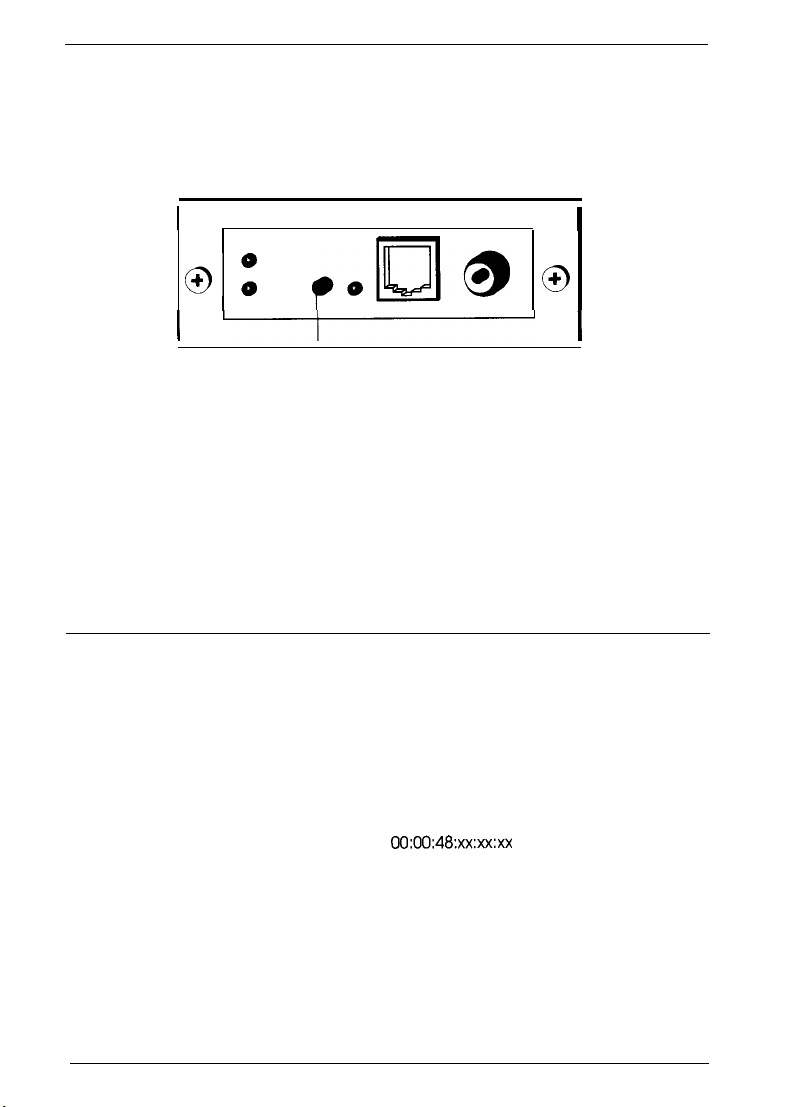
Initializing the Ethernet Card
After you install the Ethernet card in a printer or reinstall it in a new
printer, plug in the printer while pressing down the status sheet
button for at least three seconds to initialize the card.
I
0:
I
I
status sheet button
Printing a Status Sheet
You can print a status sheet after you finish initializing the card.
Turn on the printer and press the status sheet button. The status
sheet gives you information about the Ethernet card including the
current configuration, serial number, and address of the card. Keep
the status sheet; you need the information to configure the card.
Using the Ethernet Card With NetWare on a WAN
If you use the Ethernet card in a NetWare environment over a WAN
(Wide Area Network) and connect it to a general phone line
(including ISDN), the card may open the dial-up-router and packets
may be sent to the WAN. To avoid this problem and possible phone
fees, mask the vendor code in the dial-up-router as shown below:
,.Ds
I
@
I
I
Vendor code
For details on how to mask the vendor code, ask your network
administrator or see your NetWare documentation.
2
EPSON Ethernet Card Supplement
00:00:48:xx:xx:xx
Page 3

Using Macintosh with the Ethernet Card
Before configuring the Ethernet card, check to see if the correct
printer driver is installed in the Macintosh. Make sure the printer is
turned on and the Ethernet card is connected to the network. (See
your Ethernet card User’s Guide and your printer User’s Guide for
more information.)
The information on Macintosh is explained in the following
sections:
Ct
Installing EPSON Net!
Ll
Monitoring the Printers on Your Network
Ll
Configuring the Ethernet Card for AppleTalk
Cl
Configuring the Ethernet Card for TCP/IP Using EPSON Net!
for Macintosh
Note:
lf you are using Macintosh computers on a NetWare network, configure
the card using EPSON Net! for NetWare Windows from a Windows
workstation or EPSON Net! for NetWare DOS from a DOS
workstation. See your Ethernet card User’s Guide for instructions.
lnstalling EPSON Net!
To install EPSON Net! for Macintosh, follow these steps:
1.
Turn on your Macintosh.
2.
Create a folder for EPSON Net! on your hard drive.
3.
Insert the EPSON Net! for Macintosh disk in the drive.
4.
Copy the program from the disk to the folder.
Monitoring the Printers on Your Network
You can monitor and check the status of all printers connected to
your network according to the protocol you use.
EPSON Ethernet Card Supplement
3
Page 4
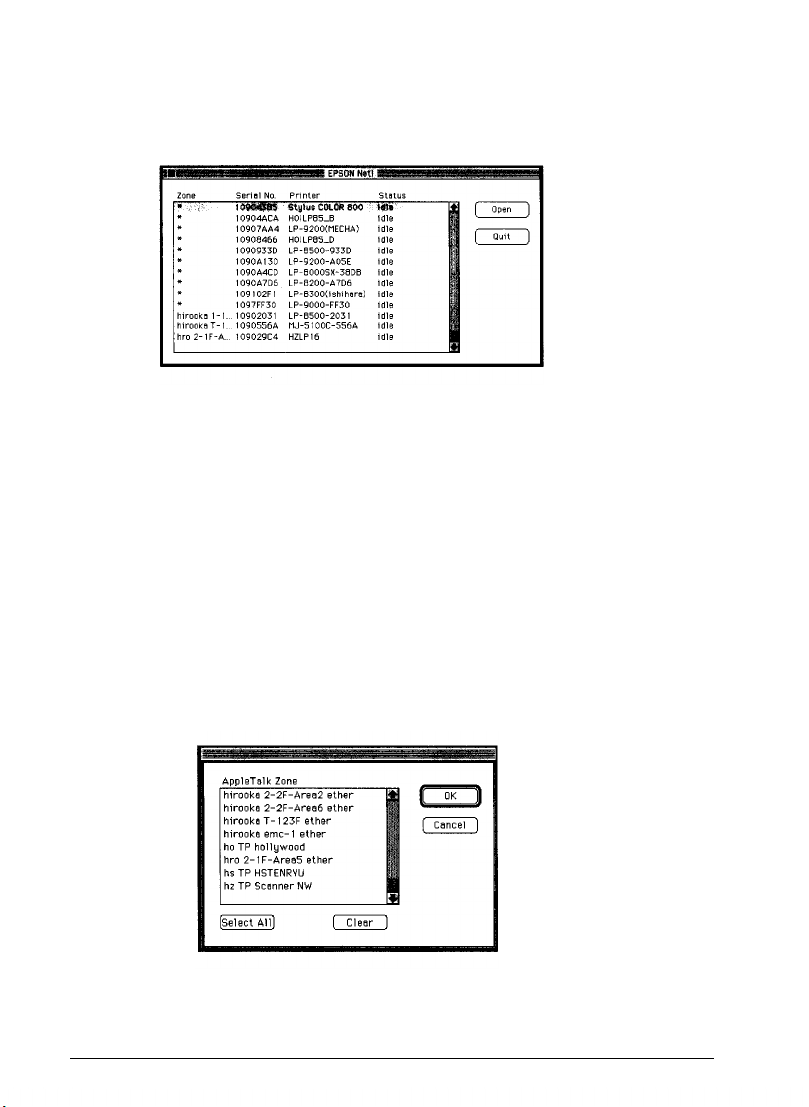
To check the status of all printers that are turned on and enabled for
a protocol, follow the steps below:
1.
Open the EPSON Net! folder and click the EPSON Net! icon.
The following window appears:
Note:
If you don‘t see any printers in the list, try selecting the zone that the
printer is in or all zones by following the steps in the next section.
2.
To exit EPSON Net!, click Quit.
Selecting a Zone
You can select which printers to monitor according to their zone or
address. You must select a zone before you configure the Ethernet
card in the Configuration dialog box. Follow these steps:
1.
With the EPSON Net! dialog box open, choose Zone from the
Options menu bar.
4
EPSON Ethernet Card Supplement
Page 5

2.
Click a zone to select it, press and hold the Shift key while
clicking multiple zones to select them, or click Select All.
3. Click OK.
EPSON Net! sends a packet to the selected zones and detects the
current printer’s status. The EPSON Net! dialog box shows the
latest information about the printers located in that zone.
Sorting the Printers
Follow these steps to sort the printers in the EPSON Net! dialog box:
1.
With the EPSON Net! dialog box open, choose Sort from the
Options menu bar.
2.
Click any of the sort options and click OK.
The EPSON Net! dialog box displays the printers according to the
selected sort option.
EPSON Ethernet Card Supplement 5
Page 6

Setting the Refresh lnterval
Follow these steps to set the refresh interval for the settings in the
EPSON Net! dialog box:
1.
With the EPSON Net! dialog box open, choose Preferences
from the Options menu bar.
Refresh interval (sec)
2.
Type any value from 5 (default) to 90 seconds and click OK.
pq
(DKI
[Cancel)
EPSON Net! monitors the printers by polling the network at the
intervals you specified.
Configuring the Ethernet Card for AppleTalk
Follow these steps to use EPSON Net! for Macintosh to configure
the Ethernet card for AppleTalk:
Note:
You must select a zone before you can configure the Ethernet card. See
page 4 for instructions.
1.
Open the EPSON Net! folder and double-click the EPSON Net!
icon. The following window appears:
[o,,,]
(T)
6
EPSON Ethernet Card Supplement
Page 7

2.
Highlight the printer you want to configure in the list.
3.
Click Open. You see the Configuration dialog box:
4. Click the AppleTalk icon. Make sure the correct serial number of
your Ethernet card is displayed.
5.
Set the following options in the AppleTalk Configuration box:
CL
Available Zone: Select the network zone that you want
the printer to appear in.
Ll
Printer Name: The default printer name appears. You
can rename it. If the same types of printers are connected
to the network, be sure to give them unique names.
Ll
Entity Type: EPSON Net! displays the printer’s Entity
type on an AppleTalk network. You don’t have to set
these options.
Li
Network No.: You may not see this option. If you do,
you should keep Auto selected. If you want to change it,
click Manual and enter a number.
Ll
AppleTalk I’S: You may not see this option. It is only
available when an EPSON PostScript® printer that is
connected to the network cannot make AppleTalk active
or inactive automatically.
EPSON Ethernet Card Supplement 7
Page 8

6.
Click OK to send the new settings to the Ethernet card and
return to the EPSON Net! dialog box. Click Update to send the
new settings to the card without closing the Configuration
dialog box.
Caution:
Once you make changes to the Ethernet card, wait at least five
minutes before turning off or restarting your printer.
7.
Click Exit to exit EPSON Net! for Macintosh.
Configuring the Ethernet Card for TCP/IP Using EPSON Net! for Macintosh
To configure the Ethernet Card for TCP/IP using EPSON Net! for
Macintosh, follow these steps:
1.
Open the EPSON Net! folder and double-click the EPSON Net!
icon.
Note:
If you do not know how to find out your computer’s IP address or the IP
address for the Ethernet card, ask your network administrator, or follow
the instructions on page 11.
2.
Highlight the printer you want to configure in the list.
3.
Click Open to open the Configuration dialog box.
EPSON Ethernet Card Supplement
8
Page 9

4.
Click the TCP/IP icon. Make sure the Configuration dialog box
shows the correct serial number of the target Ethernet card.
5.
Set the following options in the TCP/IP Configuration dialog
box:
U
IP address: Determine and assign an IP address for the
Ethernet card.
Q
Subnet mask: Assign the subnet mask.
tl
Auto IP set: Click Off.
6.
Click Update to send the new settings to the Ethernet card
without closing the Configuration dialog box. Or, click OK to
send the new settings and return to the EPSON Net! dialog box.
7.
Click Exit to exit EPSON Net! for Macintosh.
After configuring the Ethernet card for TCP/IP, set up your printer
on each Macintosh and make sure that the TCP/IP network works
correctly.
Using TCP/IP in Windows 95
You can configure the Ethernet card for TCP / IP if you are using
Windows 95 on a TCP / IP network, or a Windows 95 peer-to-peer
network.
Installing TCP/IP in Windows 95
1.
Click Start, point to Settings, and click Control Panel.
2.
Double-click the Network icon.
3.
If TCP/IP appears in the list of installed network components on
the Configuration menu, you can skip to “Configuring the
Ethernet Card for TCP/IP and Windows 95.” If TCP/IP does not
appear in the list, click Add.
EPSON Ethernet Card Supplement 9
Page 10

4.
segment as the workstation
If you don’t have a network
have a unique IP number. T
However, you should not u
Click Protocol and then the Add button.
5.
Select Microsoft from the Manufacturers list and TCP/IP from
the Network Protocols list. Then click OK.
6.
Click OK again and follow any on-screen instructions to enable
TCP/IP.
Configuring the Ethernet Card for TCP/IP and Windows 95
Make sure that the Ethernet card installed in the printer is on the
same network segment as the computer you are using to configure
the card. Also, find out that computer’s IP address and the IP
address that you will assign to the Ethernet card.
Note:
lf you do not know how to find out your computer’s IP address
address for the Ethernet card, ask your network administrator, or follow
the instructions that follow this section.
Follow these steps to configure the card:
1.
Find the hardware address (node number) on the top of the
status sheet you printed out after initializing the card. (See
page 2.) If you need to, print out another status sheet.
or
the IP
2.
Double-click the MS-DOS Prompt icon to open a DOS prompt.
3.
Set up the routing table, using the following command:
ping <IP address>
for example: ping 127.0.1.1
4.
Add an entry in the ARP table that assigns an IP address to the
hardware address of the Ethernet card. Use the following
command:
-s <IP address> <node address>
arp
for example: arp -s 127.0.1.200 00:00:48:92:BD:9A
5.
Start a continuous “ping” to the card, using the following
command with the card IP address:
10
EPSON Ethernet Card Supplement
Page 11

ping <IP address>
for example: ping 127.0.1.200
You see a message similar to the following:
Reply from 127.0.1.200: bytes=32 time<10ms TTL=30
Reply from 127.0.1.200: bytes=32 time<10ms TTL=30
Reply from 127.0.1.200: bytes=32 time<l0ms TTL=30
Reply from 127.0.1.200: bytes=32 time<l0ms TTL=30
This shows that the Ethernet card is set up for TCP/IP correctly.
If you receive 4 lines of “Request Timed Out,” The card is not set up
correctly. Check to make sure the card is on the same network
segment as the workstation you are using to configure it and that
you typed in the correct IP and hardware addresses.
Before you can print using TCP/IP, you need to install the Status
Monitor and add a printer port. See your EPSON Status Monitor 2
User’s Guide for instructions.
Note About IP Addresses and Subnet Masks
If you don’t have a network administrator, you can assign IP
addresses in the range of 192.168.1.1 to 192.168.1.254. Each
computer or other device connected directly to the network must
have a unique IP number. The subnet mask should be 255.255.255.0.
However, you should not use these addresses if your network has a
direct (rather than dial-up) connection to the Internet.
EPSON Ethernet Card Supplement
11
Page 12

EPSON is a registered trademark of SEIKO EPSON CORPORATION.
General Notice: Other product names used herein are for identification purposes
only and may be trademarks of their respective owners. EPSON disclaims any
and all rights in those marks.
Copyright 0 1997 by Epson America, Inc.
Printed on recycled paper with at least 10% post-consumer content.
6B
10/97
 Loading...