

Page 1

WorkForce
®
WF-7510/WF-7520
User's Guide
Page 2

Page 3

Contents
WorkForce WF-7510/WF-7520 User's Guide ........................................................................................... 13
Product Basics .......................................................................................................................................... 14
Loading Paper ........................................................................................................................................... 27
Setting Up the Control Panel.............................................................................................................. 14
Control Panel Buttons and Lights.................................................................................................. 14
Adjusting Control Panel Position ................................................................................................... 16
Changing LCD Screen Language.................................................................................................. 16
Turning Off Control Panel Sounds................................................................................................. 16
Product Parts Locations..................................................................................................................... 17
Product Parts - Top and Front ....................................................................................................... 18
Product Parts - Paper Cassettes and Output Tray......................................................................... 20
Product Parts - Inside.................................................................................................................... 21
Product Parts - Back...................................................................................................................... 22
Two-Sided Printing, Scanning, Copying, and Faxing ......................................................................... 22
Selecting Wireless Network Settings From the Control Panel............................................................ 24
Loading Paper for Documents............................................................................................................ 27
Loading Paper for Photos................................................................................................................... 32
Loading Envelopes............................................................................................................................. 37
Paper Loading Capacity..................................................................................................................... 41
Available EPSON Papers................................................................................................................... 42
Borderless Paper Type Compatibility................................................................................................. 45
Paper or Media Type Settings............................................................................................................ 46
Setting the Paper Size for Each Source............................................................................................. 47
Setting the Paper Size for Each Source - Windows....................................................................... 47
Setting the Paper Size for Each Source - Mac OS X ..................................................................... 49
Placing Originals on the Product............................................................................................................. 52
Placing Originals on the Scanner Glass............................................................................................. 52
Placing Originals in the Automatic Document Feeder........................................................................ 53
Copying...................................................................................................................................................... 57
Copying Documents........................................................................................................................... 57
3
Page 4

Copying Photos.................................................................................................................................. 58
Paper Type Settings - Copying........................................................................................................... 61
Paper Size Settings - Copying............................................................................................................ 61
Copying Options................................................................................................................................. 62
Printing From a Computer........................................................................................................................ 64
Printing with Windows........................................................................................................................ 64
Selecting Basic Print Settings - Windows...................................................................................... 64
Paper Source Options - Windows............................................................................................. 67
Print Quality Options - Windows ............................................................................................... 67
Multi-Page Printing Options - Windows..................................................................................... 67
Selecting Double-sided Printing Settings - Windows..................................................................... 68
Double-sided Printing Options - Windows................................................................................. 70
Print Density Adjustments - Windows....................................................................................... 71
Selecting Additional Layout and Print Options - Windows............................................................. 71
Custom Color Correction Options - Windows............................................................................ 72
Additional Settings Options - Windows ..................................................................................... 74
Selecting a Printing Preset - Windows........................................................................................... 74
Printing Your Document or Photo - Windows................................................................................. 75
Selecting Default Print Settings - Windows.................................................................................... 76
Changing the Language of the Printer Software Screens......................................................... 77
Changing Automatic Update Options ............................................................................................ 78
Printing with Mac OS X 10.5, 10.6, or 10.7......................................................................................... 79
Selecting Basic Print Settings - Mac OS X 10.5/10.6/10.7............................................................. 80
Paper Source Options - Mac OS X 10.5/10.6/10.7.................................................................... 84
Print Quality Options - Mac OS X 10.5/10.6/10.7...................................................................... 84
Print Options - Mac OS X 10.5/10.6/10.7.................................................................................. 85
Selecting Page Setup Settings - Mac OS X 10.5/10.6/10.7........................................................... 85
Selecting Print Layout Options - Mac OS X 10.5/10.6/10.7 ........................................................... 86
Sizing Printed Images - Mac OS X 10.5/10.6/10.7......................................................................... 87
Selecting Double-sided Printing Settings - Mac OS X 10.5/10.6/10.7............................................ 87
Double-sided Printing Options and Adjustments - Mac OS X.................................................... 89
Managing Color - Mac OS X 10.5/10.6/10.7.................................................................................. 90
Color Matching and Color Options - Mac OS X 10.5/10.6/10.7................................................. 91
4
Page 5

Printing Your Document or Photo - Mac OS X 10.5/10.6/10.7....................................................... 92
Checking Print Status - Mac OS X 10.5/10.6/10.7 .................................................................... 93
Selecting Printing Preferences - Mac OS X 10.5/10.6/10.7........................................................... 94
Printing Preferences - Mac OS X 10.5/10.6/10.7 ...................................................................... 95
Printing with Mac OS X 10.4............................................................................................................... 95
Selecting Page Setup Settings - Mac OS X 10.4........................................................................... 96
Selecting Basic Print Settings - Mac OS X 10.4............................................................................. 98
Paper Source Options - Mac OS X 10.4.................................................................................. 100
Print Quality Options - Mac OS X 10.4.................................................................................... 100
Print Options - Mac OS X 10.4................................................................................................ 101
Selecting Print Layout Options - Mac OS X 10.4 ......................................................................... 101
Sizing Printed Images - Mac OS X 10.4....................................................................................... 102
Selecting Double-sided Printing Settings - Mac OS X 10.4.......................................................... 102
Managing Color - Mac OS X 10.4................................................................................................ 104
Color Options - Mac OS X 10.4............................................................................................... 104
Selecting Printing Preferences - Mac OS X 10.4......................................................................... 105
Printing Preferences - Mac OS X 10.4 .................................................................................... 105
Printing Your Document or Photo - Mac OS X 10.4..................................................................... 106
Checking Print Status - Mac OS X 10.4 .................................................................................. 106
Cancelling Printing Using a Product Button...................................................................................... 107
Scanning.................................................................................................................................................. 108
Starting a Scan................................................................................................................................. 108
Starting a Scan Using the Product Control Panel........................................................................ 108
Scan to Memory Card Options................................................................................................ 110
Starting a Scan Using the EPSON Scan Icon.............................................................................. 111
Starting a Scan from a Scanning Program................................................................................... 113
Selecting EPSON Scan Settings...................................................................................................... 115
Scan Modes................................................................................................................................. 115
Selecting the Scan Mode............................................................................................................. 115
Scanning in Home Mode ............................................................................................................. 116
Selecting a Scan Area - Home Mode...................................................................................... 119
Available Image Adjustments - Home Mode........................................................................... 122
Selecting a Scan Size - Home Mode....................................................................................... 123
5
Page 6

Scanning in Office Mode.............................................................................................................. 125
Selecting a Scan Area - Office Mode ...................................................................................... 126
Available Image Adjustments - Office Mode ........................................................................... 128
Scanning in Professional Mode................................................................................................... 129
Available Image Types - Professional Mode........................................................................... 132
Selecting a Scan Area - Professional Mode............................................................................ 132
Available Image Adjustments - Professional Mode................................................................. 135
Selecting a Scan Size - Professional Mode............................................................................. 136
Image Preview Guidelines........................................................................................................... 140
Scan Resolution Guidelines ........................................................................................................ 140
Selecting Scan File Settings........................................................................................................ 141
Available Scanned File Types and Optional Settings.............................................................. 142
Scanning with Mac OS X 10.6/10.7 Using Image Capture ............................................................... 143
Available Scan Settings - Mac OS X 10.6/10.7 Image Capture ................................................... 145
Scanning to a PDF File..................................................................................................................... 145
Restoring Photo Colors as You Scan............................................................................................... 148
Convert Scanned Documents to Editable Text (OCR) ..................................................................... 149
Scanning Using OCR - Windows................................................................................................. 149
Scanning Using OCR - Mac OS X ............................................................................................... 151
Faxing....................................................................................................................................................... 154
Connecting a Telephone or Answering Machine.............................................................................. 154
Setting Up Fax Features .................................................................................................................. 156
Setting Up Fax Features Using the Product Control Panel.......................................................... 156
Selecting Your Country or Region........................................................................................... 157
Selecting the Date and Time................................................................................................... 158
Entering Fax Header Information............................................................................................ 159
Entering Numbers and Characters for Faxing......................................................................... 161
Selecting Fax Send and Receive Settings.............................................................................. 162
Selecting Fax Communication Settings .................................................................................. 162
Printing Fax Reports............................................................................................................... 163
Restoring Default Fax Settings ............................................................................................... 164
Fax Sending Options .............................................................................................................. 165
Fax Receiving Options............................................................................................................ 166
6
Page 7

Fax Communications Options................................................................................................. 166
Fax Report Options................................................................................................................. 167
Restore Default Settings Options............................................................................................ 168
Setting Up Fax Features Using the Fax Utility - Windows............................................................ 168
Setting Up Fax Features Using the Fax Utility - Mac OS X.......................................................... 170
Setting Up Speed Dial and Group Dial Lists..................................................................................... 171
Setting Up Speed/Group Dial Lists Using the Product Control Panel .......................................... 171
Creating Speed Dial List Entries............................................................................................. 171
Printing Your Speed Dial List.................................................................................................. 173
Creating Group Dial List Entries.............................................................................................. 175
Printing Your Group Dial List................................................................................................... 177
Setting Up Speed/Group Dial Lists Using the Fax Utility - Windows............................................ 179
Setting Up Speed/Group Dial Lists Using the Fax Utility - Mac OS X .......................................... 182
Sending Faxes................................................................................................................................. 183
Sending Faxes from the Product Control Panel........................................................................... 184
Manually Dialing or Redialing Fax Numbers........................................................................... 184
Selecting Fax Numbers From Speed or Group Dial Lists........................................................ 185
Dialing Fax Numbers from a Connected Telephone ............................................................... 186
Broadcasting a Fax................................................................................................................. 188
Fax Send Options................................................................................................................... 189
Sending Faxes Using the Fax Utility - Windows .......................................................................... 189
Sending Faxes Using the Fax Utility - Mac OS X......................................................................... 191
Receiving Faxes............................................................................................................................... 194
Fax Reception ............................................................................................................................. 194
Receiving Faxes Automatically (Auto Answer)............................................................................ 195
Receiving Faxes Manually........................................................................................................... 195
Using Memory Cards With Your Product .............................................................................................. 197
Inserting a Memory Card.................................................................................................................. 197
Memory Card Types.................................................................................................................... 198
Memory Card File Specifications................................................................................................. 199
Removing a Memory Card........................................................................................................... 199
Printing from a Memory Card ........................................................................................................... 200
Viewing and Printing Photos........................................................................................................ 201
7
Page 8

Viewing and Printing Individual Photos................................................................................... 201
Printing All Photos................................................................................................................... 203
Printing Photos by Date .......................................................................................................... 204
Viewing and Printing Photos From a Slide Show.................................................................... 207
Cropping Photos Displayed on the LCD Screen ..................................................................... 208
Modifying Photos Displayed on the LCD Screen..................................................................... 209
Photo Adjustment Options...................................................................................................... 210
Selecting Print Settings for Photos Displayed on the LCD Screen.......................................... 211
Print Setting Options - Photo Mode......................................................................................... 211
Printing Photo Layouts ................................................................................................................ 212
Photo Layout Options ............................................................................................................. 214
Printing Photo Greeting Cards..................................................................................................... 214
Creating and Printing a Greeting Card Template.................................................................... 215
Printing a Greeting Card From a Template ............................................................................. 216
Printing Photo Proofsheets.......................................................................................................... 218
Transferring Photos on a Memory Card ........................................................................................... 218
Setting Up File Sharing for Photo Transfers From Your Computer.............................................. 219
Transferring Photos from a Memory Card to Your Computer ...................................................... 219
Transferring Photos From a Memory Card to an External Device ............................................... 220
Using an External Device with Your Product........................................................................................ 222
Printing from a Camera Connected to Your Product ........................................................................ 222
Selecting Print Settings for Printing From a Camera ................................................................... 222
Print Settings - Camera........................................................................................................... 224
Photo Adjustments - Camera.................................................................................................. 225
Connecting and Printing From a Camera .................................................................................... 226
Viewing or Printing from a USB Flash Drive or External Device....................................................... 228
USB Device File Specifications ................................................................................................... 228
Connecting and Using a USB Flash Drive or External Device..................................................... 228
Charging a USB Device Using Your Product.................................................................................... 229
Wireless Printing from a Mobile Device............................................................................................ 230
Using EPSON Connect Email Print ................................................................................................. 231
Printing Personalized Projects............................................................................................................... 232
Printing Personalized Note Paper .................................................................................................... 232
8
Page 9

Printing Lined Paper and Graph Paper............................................................................................. 233
Replacing Ink Cartridges........................................................................................................................ 236
Check Cartridge Status.................................................................................................................... 236
Checking Cartridge Status on the LCD Screen............................................................................ 236
Checking Cartridge Status with Windows.................................................................................... 237
Checking Cartridge Status with Mac OS X .................................................................................. 240
Purchase EPSON Ink Cartridges ..................................................................................................... 241
Ink Cartridge Part Numbers......................................................................................................... 241
Removing and Installing Ink Cartridges............................................................................................ 242
Printing With Black Ink and Expended Color Cartridges................................................................... 248
Printing With Expended Color Cartridges - Windows................................................................... 248
Printing With Expended Color Cartridges - Mac OS X 10.5/10.6/10.7......................................... 249
Conserving Low Black Ink with Windows ......................................................................................... 249
Adjusting Print Quality............................................................................................................................ 251
Print Head Maintenance................................................................................................................... 251
Print Head Nozzle Check............................................................................................................. 251
Checking the Nozzles Using the Product Control Panel ......................................................... 251
Checking the Nozzles Using a Computer Utility...................................................................... 254
Print Head Cleaning .................................................................................................................... 257
Cleaning the Print Head Using the Product Control Panel...................................................... 257
Cleaning the Print Head Using a Computer Utility................................................................... 259
Print Head Alignment ....................................................................................................................... 262
Aligning the Print Head Using the Product Control Panel............................................................ 262
Aligning the Print Head Using a Computer Utility......................................................................... 264
Cleaning the Paper Path .................................................................................................................. 267
Cleaning and Transporting Your Product ............................................................................................. 268
Cleaning Your Product..................................................................................................................... 268
Transporting Your Product............................................................................................................... 270
Solving Problems.................................................................................................................................... 273
Checking for Software Updates........................................................................................................ 273
Product Status Messages ................................................................................................................ 274
Running a Product Check ................................................................................................................ 275
9
Page 10

Resetting Control Panel Defaults ..................................................................................................... 277
Solving Setup Problems................................................................................................................... 278
Noise After Ink Installation........................................................................................................... 279
Software Installation Problems.................................................................................................... 279
Control Panel Setup Problems .................................................................................................... 280
Solving Network Problems............................................................................................................... 280
Product Cannot Connect to a Wireless Router or Access Point .................................................. 280
Network Software Cannot Find Product on a Network................................................................. 281
Product Does Not Appear in Mac OS X Printer Window.............................................................. 281
Cannot Print Over a Network....................................................................................................... 281
Cannot Scan Over a Network...................................................................................................... 282
Printing a Network Status Sheet.................................................................................................. 283
Solving Copying Problems............................................................................................................... 284
Product Makes Noise, But Nothing Copies.................................................................................. 284
Product Makes Noise When It Sits for a While............................................................................. 284
Solving Paper Problems................................................................................................................... 284
Paper Feeding Problems............................................................................................................. 285
Paper Jam Problems Inside the Product ..................................................................................... 285
Paper Jam Problems in the Main Tray......................................................................................... 289
Paper Jam Problems in the Automatic Document Feeder........................................................... 292
Paper Ejection Problems............................................................................................................. 296
Solving Problems Printing from a Computer..................................................................................... 297
Nothing Prints.............................................................................................................................. 297
Product Icon Does Not Appear in Windows Taskbar................................................................... 298
Error After Cartridge Replacement.............................................................................................. 299
Printing is Slow............................................................................................................................ 299
Solving Page Layout and Content Problems.................................................................................... 300
Inverted Image............................................................................................................................. 300
Too Many Copies Print................................................................................................................ 301
Blank Pages Print........................................................................................................................ 301
Incorrect Margins on Printout....................................................................................................... 302
Border Appears on Borderless Prints.......................................................................................... 302
Incorrect Characters Print............................................................................................................ 303
10
Page 11

Incorrect Image Size or Position.................................................................................................. 303
Slanted Printout........................................................................................................................... 304
Solving Print Quality Problems......................................................................................................... 304
White or Dark Lines in Printout.................................................................................................... 305
Blurry or Smeared Printout.......................................................................................................... 305
Faint Printout or Printout Has Gaps............................................................................................. 307
Grainy Printout............................................................................................................................. 307
Incorrect Colors........................................................................................................................... 308
Solving Scanning Problems ............................................................................................................. 309
Scanning Software Does Not Operate Correctly ......................................................................... 309
Cannot Start EPSON Scan.......................................................................................................... 310
Solving Scanned Image Quality Problems....................................................................................... 310
Image Consists of a Few Dots Only............................................................................................. 311
Line of Dots Appears in All Scanned Images............................................................................... 311
Straight Lines in an Image Appear Crooked................................................................................ 312
Image is Distorted or Blurry......................................................................................................... 312
Image Colors are Patchy at the Edges ........................................................................................ 312
Image is Too Dark ....................................................................................................................... 312
Back of Original Image Appears in Scanned Image .................................................................... 313
Ripple Patterns Appear in an Image............................................................................................ 313
Image is Scanned Upside-Down ................................................................................................. 313
Scanned Image Colors Do Not Match Original Colors................................................................. 313
Scan Area is Not Adjustable in Thumbnail Preview..................................................................... 314
Scanned Image Edges are Cropped ........................................................................................... 314
Solving Memory Card Problems....................................................................................................... 314
Memory Card Does Not Fit Into a Slot......................................................................................... 315
Cannot View or Print Photos from a Memory Card...................................................................... 315
Cannot Transfer Photos To or From a Memory Card................................................................... 315
Solving Faxing Problems.................................................................................................................. 316
Cannot Send or Receive Faxes................................................................................................... 316
Cannot Receive Faxes with a Telephone Connected to Your Product ........................................ 317
When to Uninstall Your Product Software ........................................................................................ 317
Uninstalling Product Software - Windows.................................................................................... 318
11
Page 12

Uninstalling Product Software - Mac OS X .................................................................................. 318
Where to Get Help............................................................................................................................ 319
Technical Specifications ........................................................................................................................ 321
Windows System Requirements ...................................................................................................... 321
Mac System Requirements.............................................................................................................. 322
Printing Specifications...................................................................................................................... 322
Scanning Specifications................................................................................................................... 322
Automatic Document Feeder (ADF) Specifications.......................................................................... 323
Fax Specifications............................................................................................................................ 323
Paper Specifications ........................................................................................................................ 324
Printable Area Specifications ........................................................................................................... 325
Ink Cartridge Specifications.............................................................................................................. 327
Memory Card Specifications ............................................................................................................ 327
Dimension Specifications................................................................................................................. 329
Electrical Specifications ................................................................................................................... 330
Environmental Specifications........................................................................................................... 330
Interface Specifications.................................................................................................................... 331
External USB Device Specifications................................................................................................. 331
Network Interface Specifications...................................................................................................... 331
Safety and Approvals Specifications................................................................................................ 332
Notices ..................................................................................................................................................... 333
FCC Compliance Statement............................................................................................................. 333
Software Notices.............................................................................................................................. 335
Trademarks...................................................................................................................................... 339
Copyright Notice............................................................................................................................... 339
libTIFF Software Acknowledgment.............................................................................................. 340
A Note Concerning Responsible Use of Copyrighted Materials................................................... 340
Default Delay Times for Power Management for EPSON Products............................................. 340
Copyright Attribution.................................................................................................................... 341
12
Page 13

WorkForce WF-7510/WF-7520 User's Guide
Welcome to the WorkForce WF-7510/WF-7520 User's Guide.
13
Page 14
Product Basics
See these sections to learn about the basic features of your product.
Setting Up the Control Panel
Product Parts Locations
Two-Sided Printing, Scanning, Copying, and Faxing
Selecting Wireless Network Settings From the Control Panel
Setting Up the Control Panel
See these sections to set up the control panel for use.
Control Panel Buttons and Lights
Adjusting Control Panel Position
Changing LCD Screen Language
Turning Off Control Panel Sounds
Parent topic: Product Basics
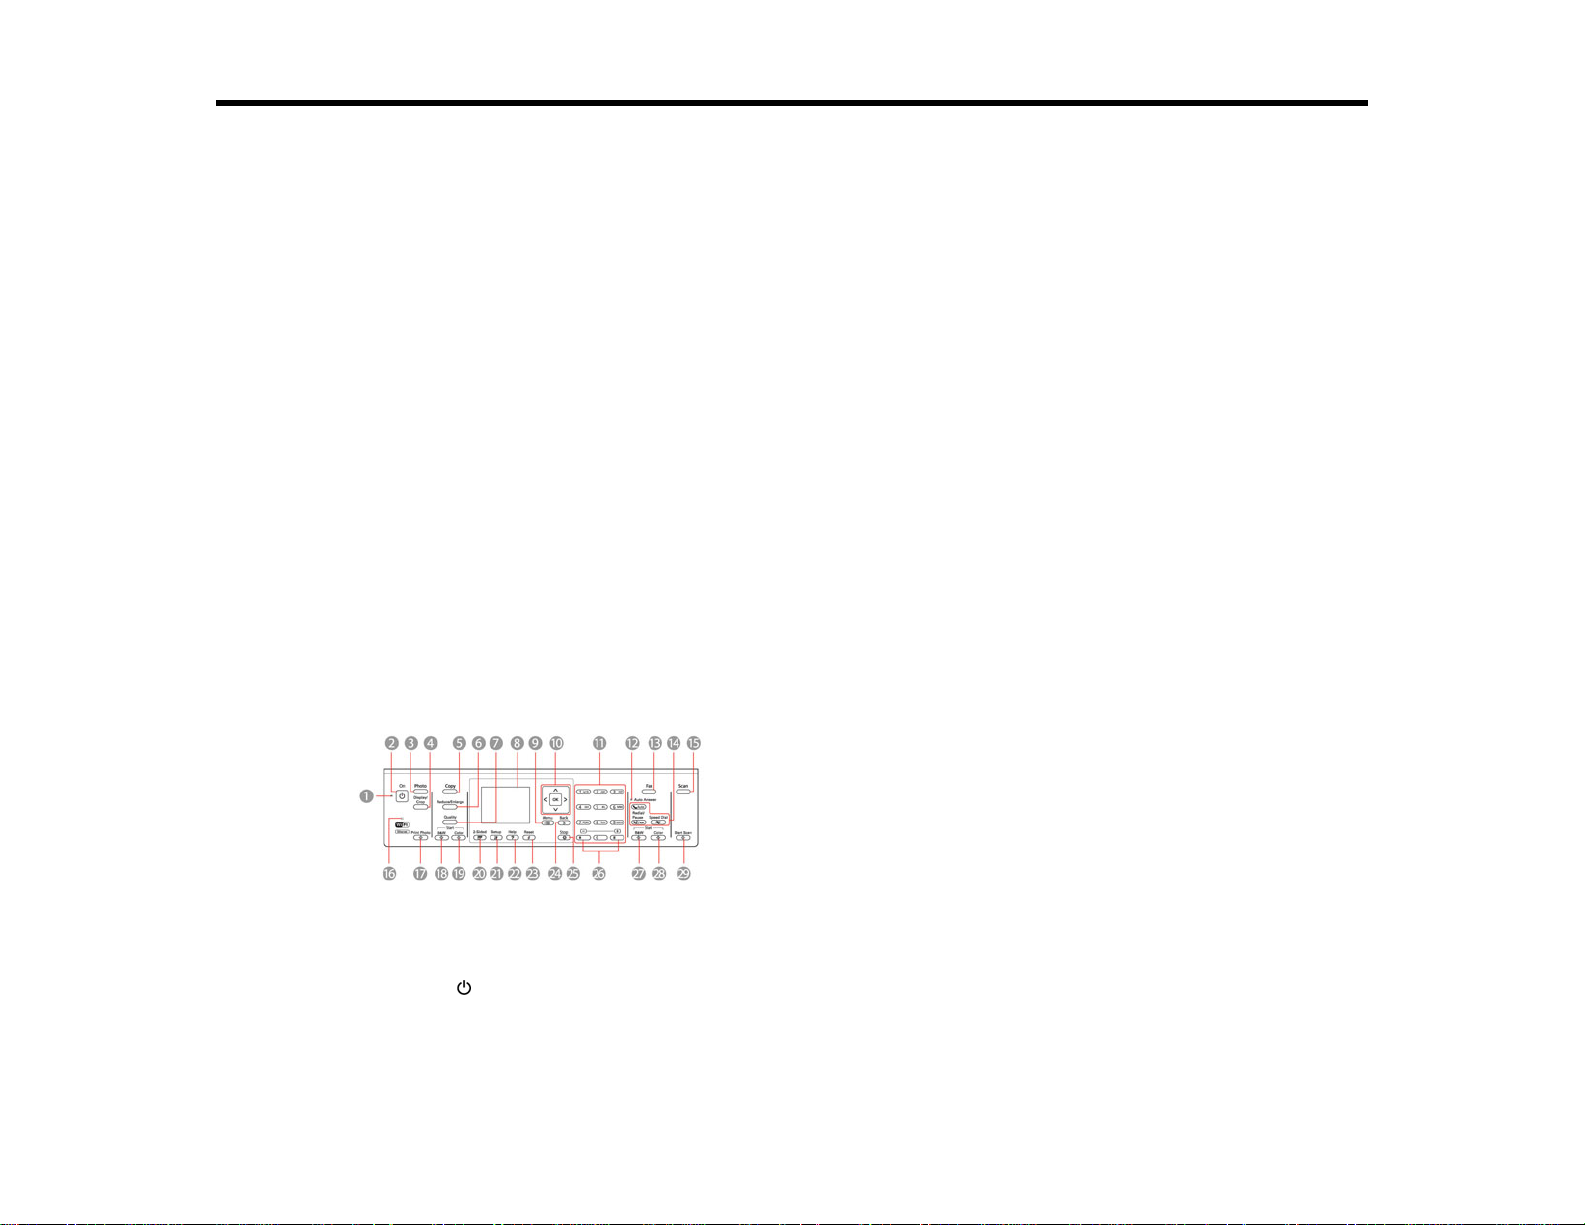
Control Panel Buttons and Lights
Note: The illustrations in this manual show the WorkForce WF-7520. The instructions apply to both the
WorkForce WF-7510 and WF-7520 unless otherwise noted.
1 The On light
2 The On button
3 The Photo button
4 The Display/Crop button
14
Page 15

5 The Copy button
6 The Reduce/Enlarge button
7 The Quality button
8 The LCD screen
9 The Menu button
10 The arrow buttons and the OK button
11 The number pad
12 The Auto Answer light
13 The Fax button
14 The auto answer button, the Redial/Pause button, and the Speed Dial button
15 The Scan button
16 The WiFi light
17 The Print Photo button
18 The Start B&W button in the Copy section of the control panel
19 The Start Color button in the Copy section of the control panel
20 The 2-Sided button(WorkForceWF-7520only)
21 The Setup button
22 The ? Help button
23 The Reset button
24 The Back button
25 The Stop button
26 The + and – buttons (increase or decrease the number of copies)
27 The Start B&W button in the Fax section of the control panel
28 The Start Color button in the Fax section of the control panel
29 The Start Scan button
Parent topic: Setting Up the Control Panel
15
Page 16
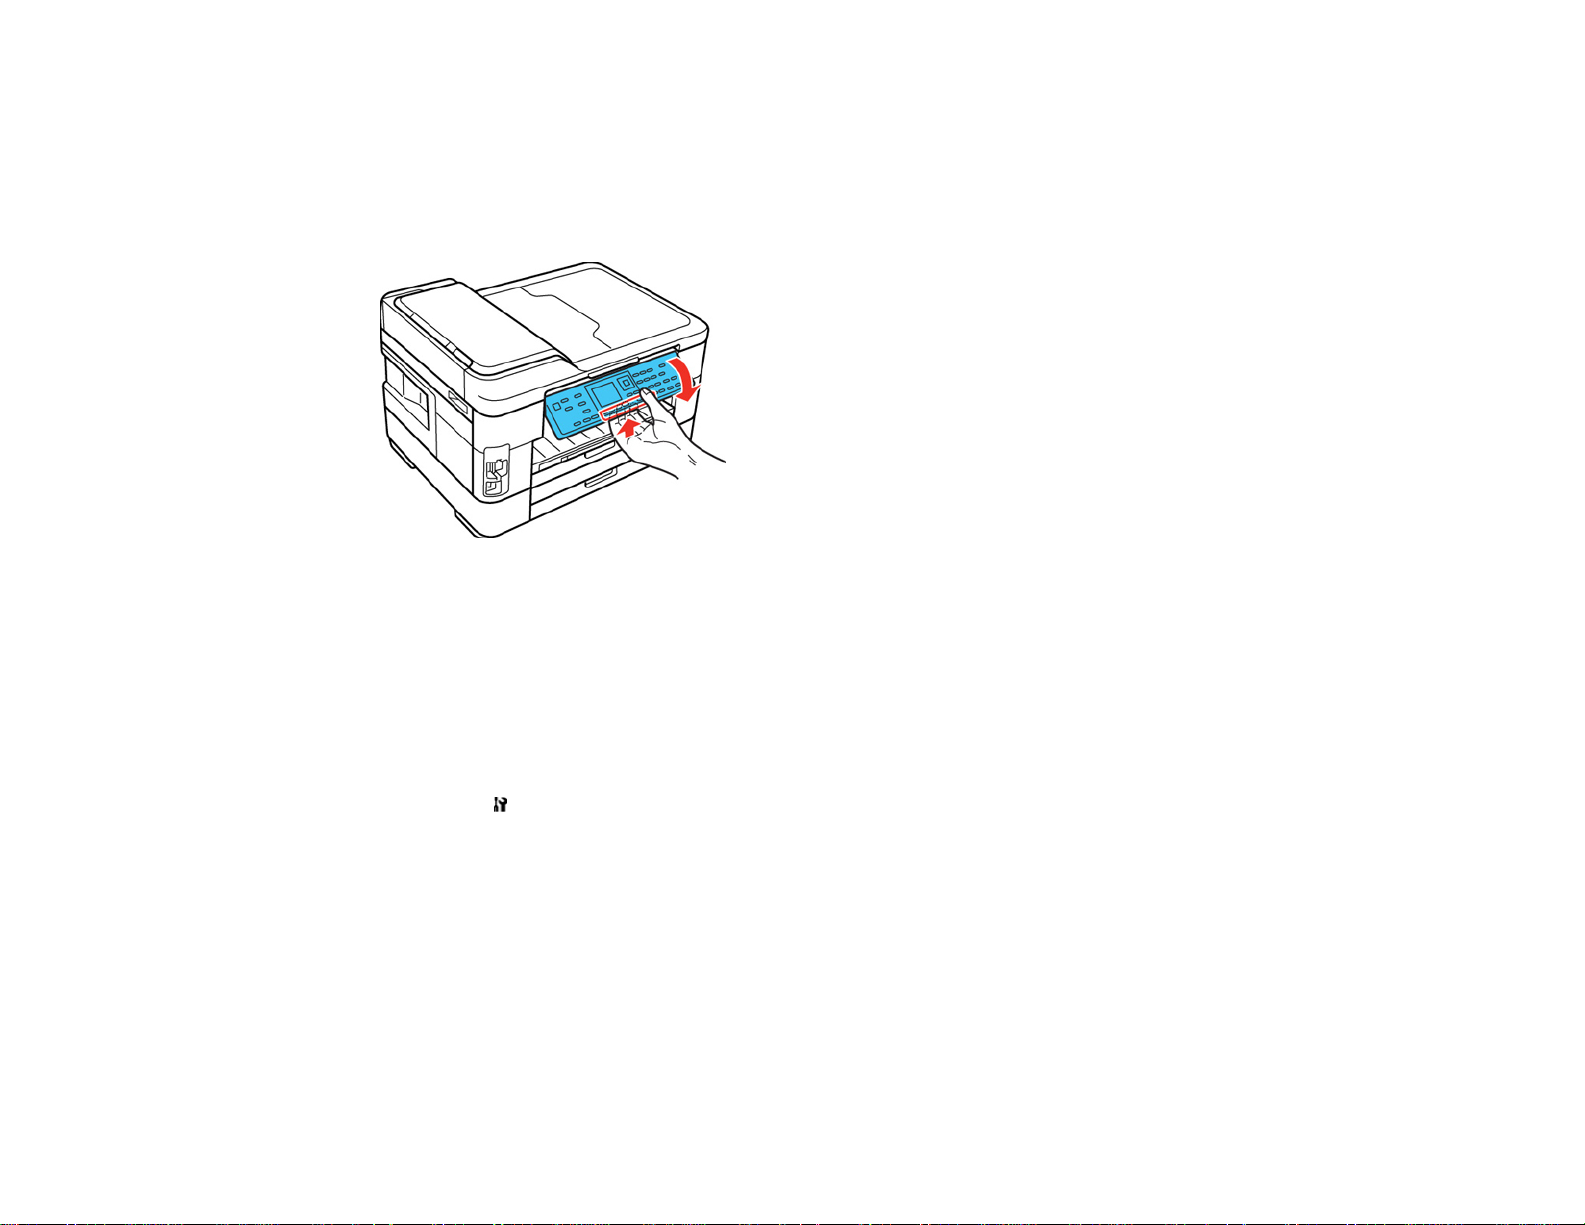
Adjusting Control Panel Position
You can adjust the position of the control panel to make it easier to use.
• To raise the control panel, lift it up from the bottom.
• To lower the control panel, squeeze the release bar and gently push the panel down.
Caution: Do not lower the control panel without first squeezing the release bar or you may damage
your product.
Parent topic: Setting Up the Control Panel
Changing LCD Screen Language
You can change the language used on the LCD screen.
1. Press the Setup button.
2. Press the arrow buttons to select Printer Setup and press the OK button.
3. Press the arrow buttons to select Language and press the OK button.
4. Select a language and press the OK button.
5. Press the Copy button to exit.
Parent topic: Setting Up the Control Panel
Turning Off Control Panel Sounds
You can turn off the sound heard when you press buttons on the control panel.
16
Page 17

1. Press the Setup button.
2. Press the arrow buttons to select Printer Setup and press the OK button.
3. Select Sound and press the OK button.
4. Select the Off setting and press the OK button.
5. Press the Copy button to exit.
Parent topic: Setting Up the Control Panel
Product Parts Locations
See these sections to identify the parts on your product.
Product Parts - Top and Front
Product Parts - Paper Cassettes and Output Tray
Product Parts - Inside
Product Parts - Back
Parent topic: Product Basics
17
Page 18

Product Parts - Top and Front
1 Automatic Document Feeder (ADF)
2 Edge guides
3 ADF paper support
4 ADF output tray
5 Paper cassette 1
6 Paper cassette 2 (WF-7520 only)
7 ADF cover release
8 ADF cover
18
Page 19
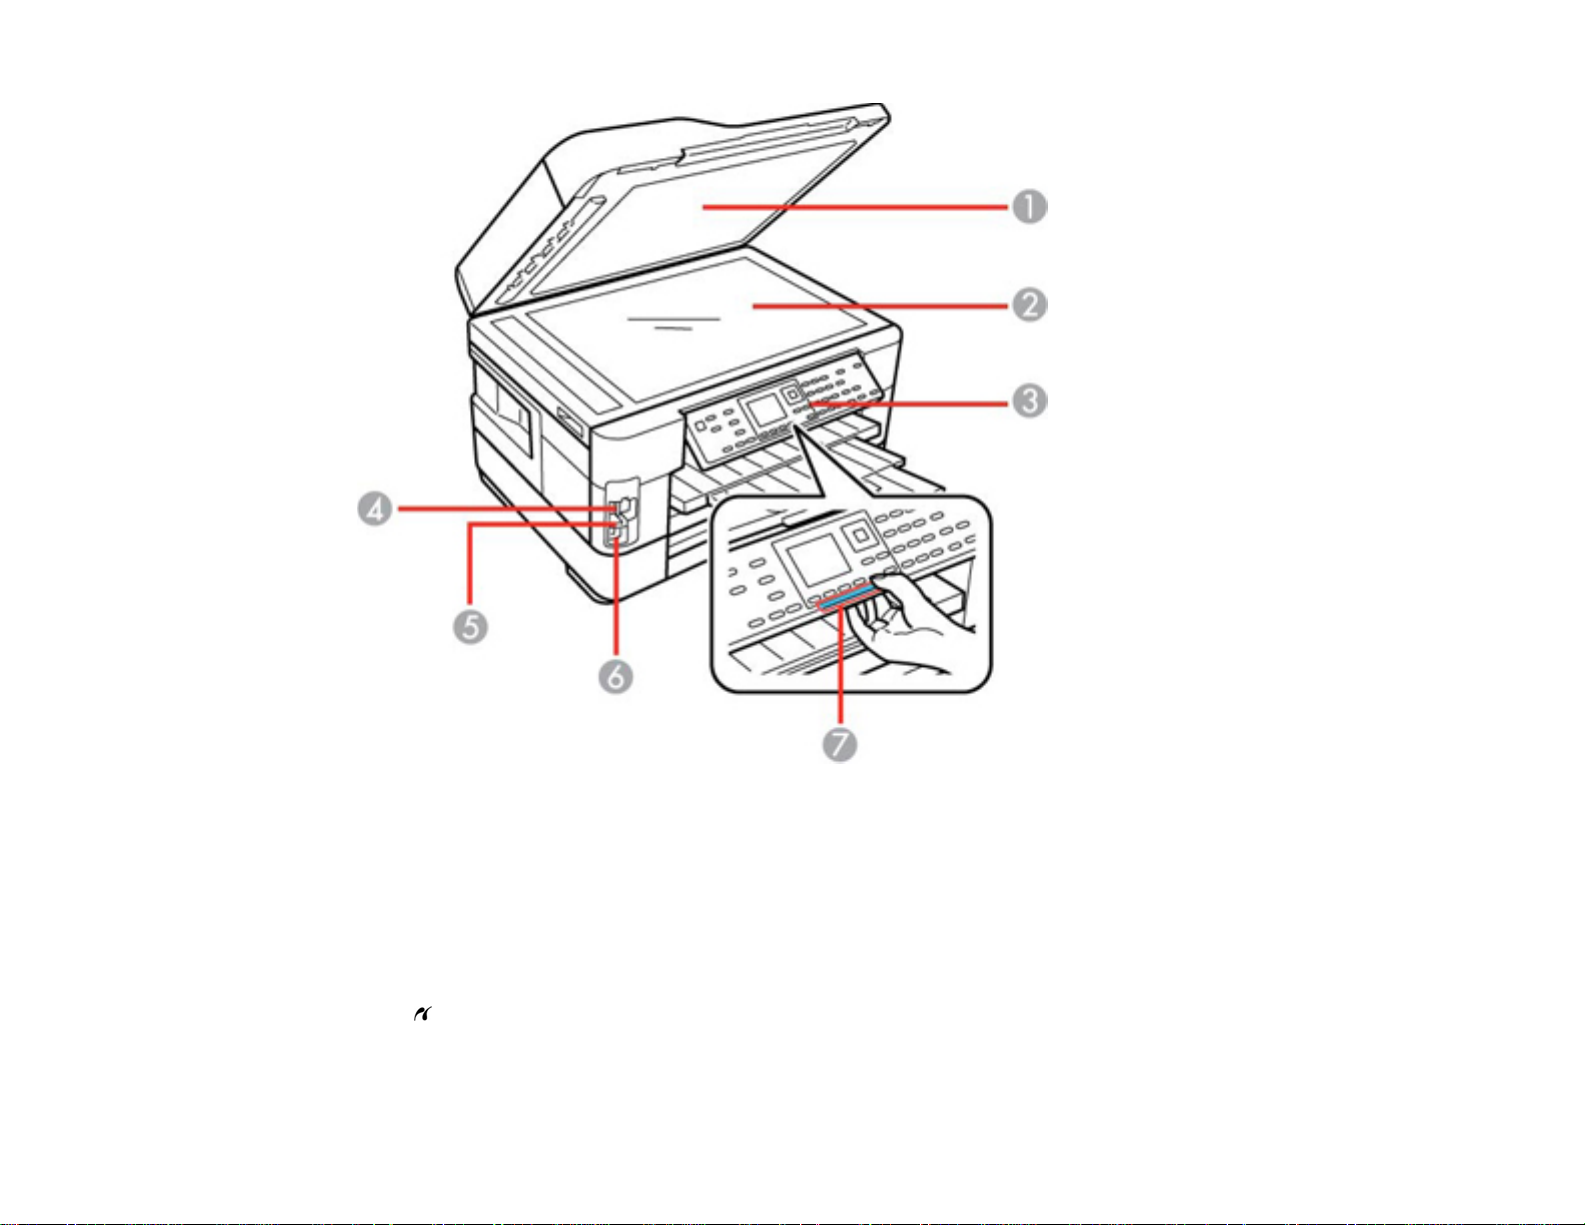
1 Document cover
2 Scanner glass
3 Control panel
4 Memory card slots
5 Memory card access light
6 USB Type A port for external devices
7 Control panel release bar
19
Page 20

Parent topic: Product Parts Locations
Product Parts - Paper Cassettes and Output Tray
1 Output tray
2 Output tray extension
3 Stopper
4 Paper cassette
5 Edge guides
6 Tray release button
Parent topic: Product Parts Locations
20
Page 21
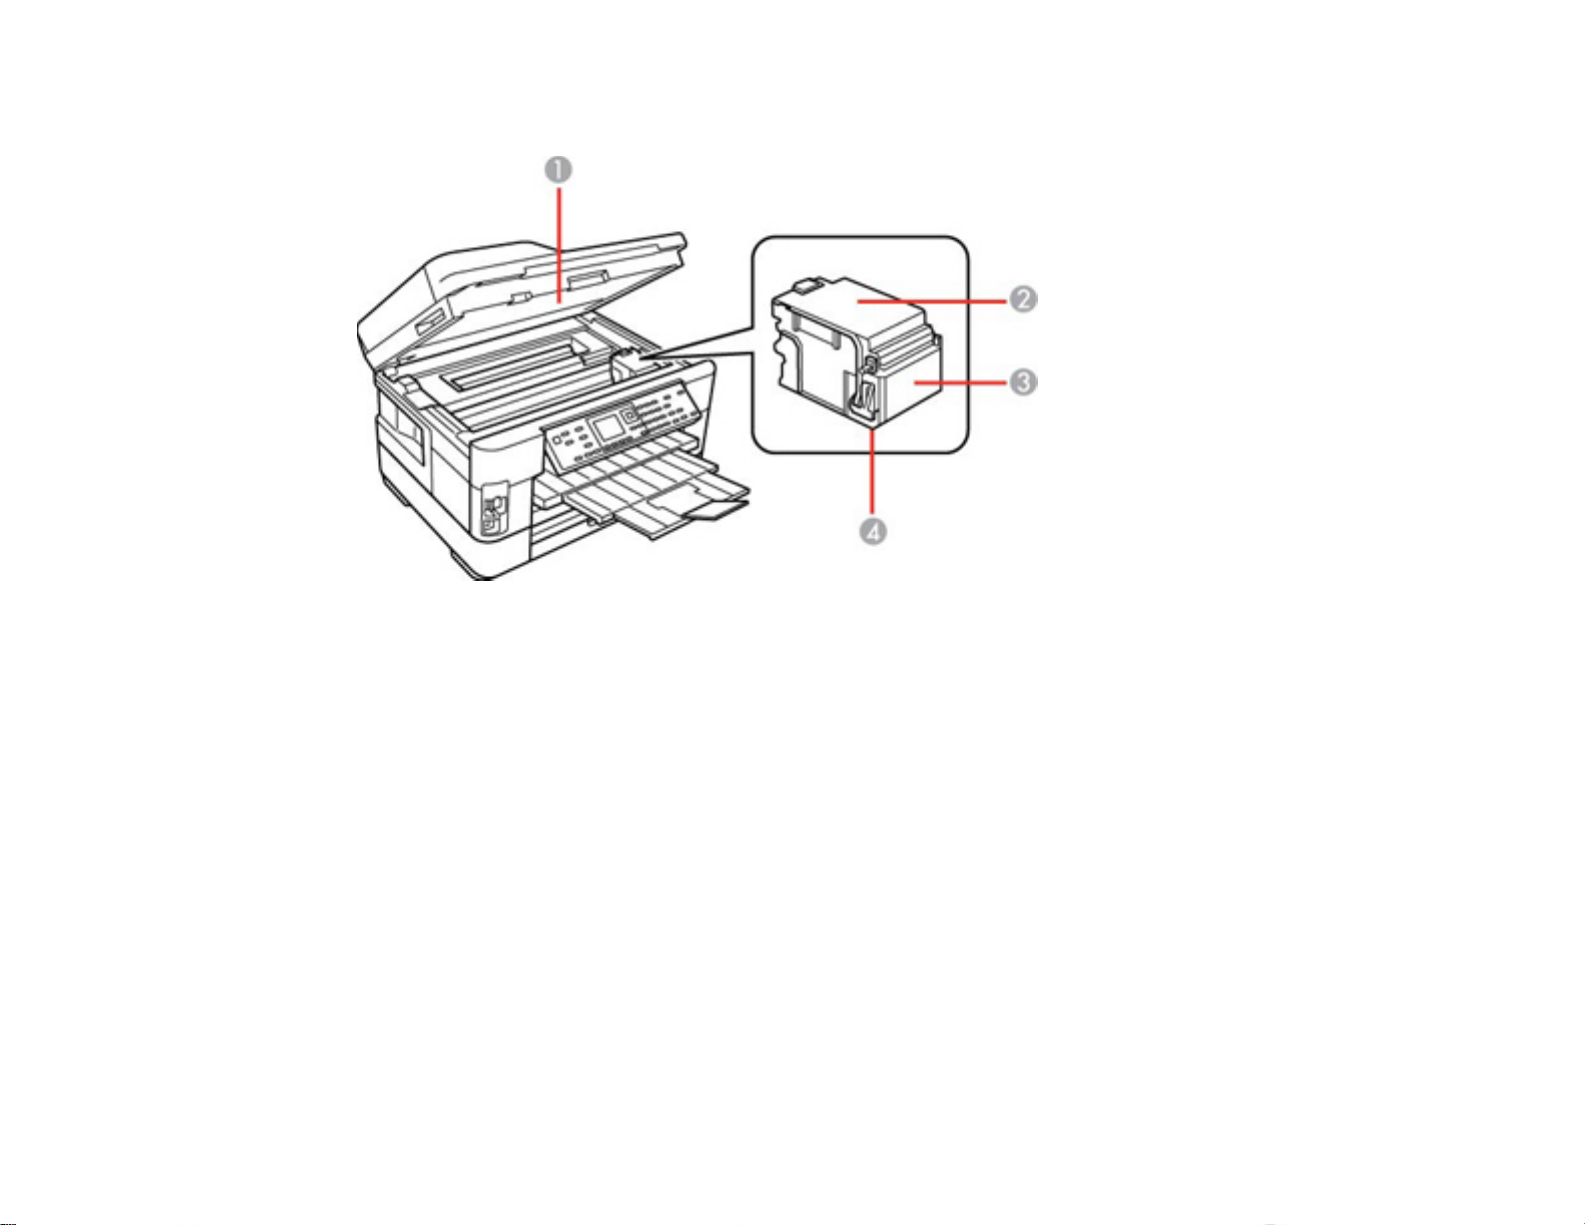
Product Parts - Inside
1 Scanner unit
2 Ink cartridge cover
3 Ink cartridge holder
4 Print head (do not remove)
Parent topic: Product Parts Locations
21
Page 22
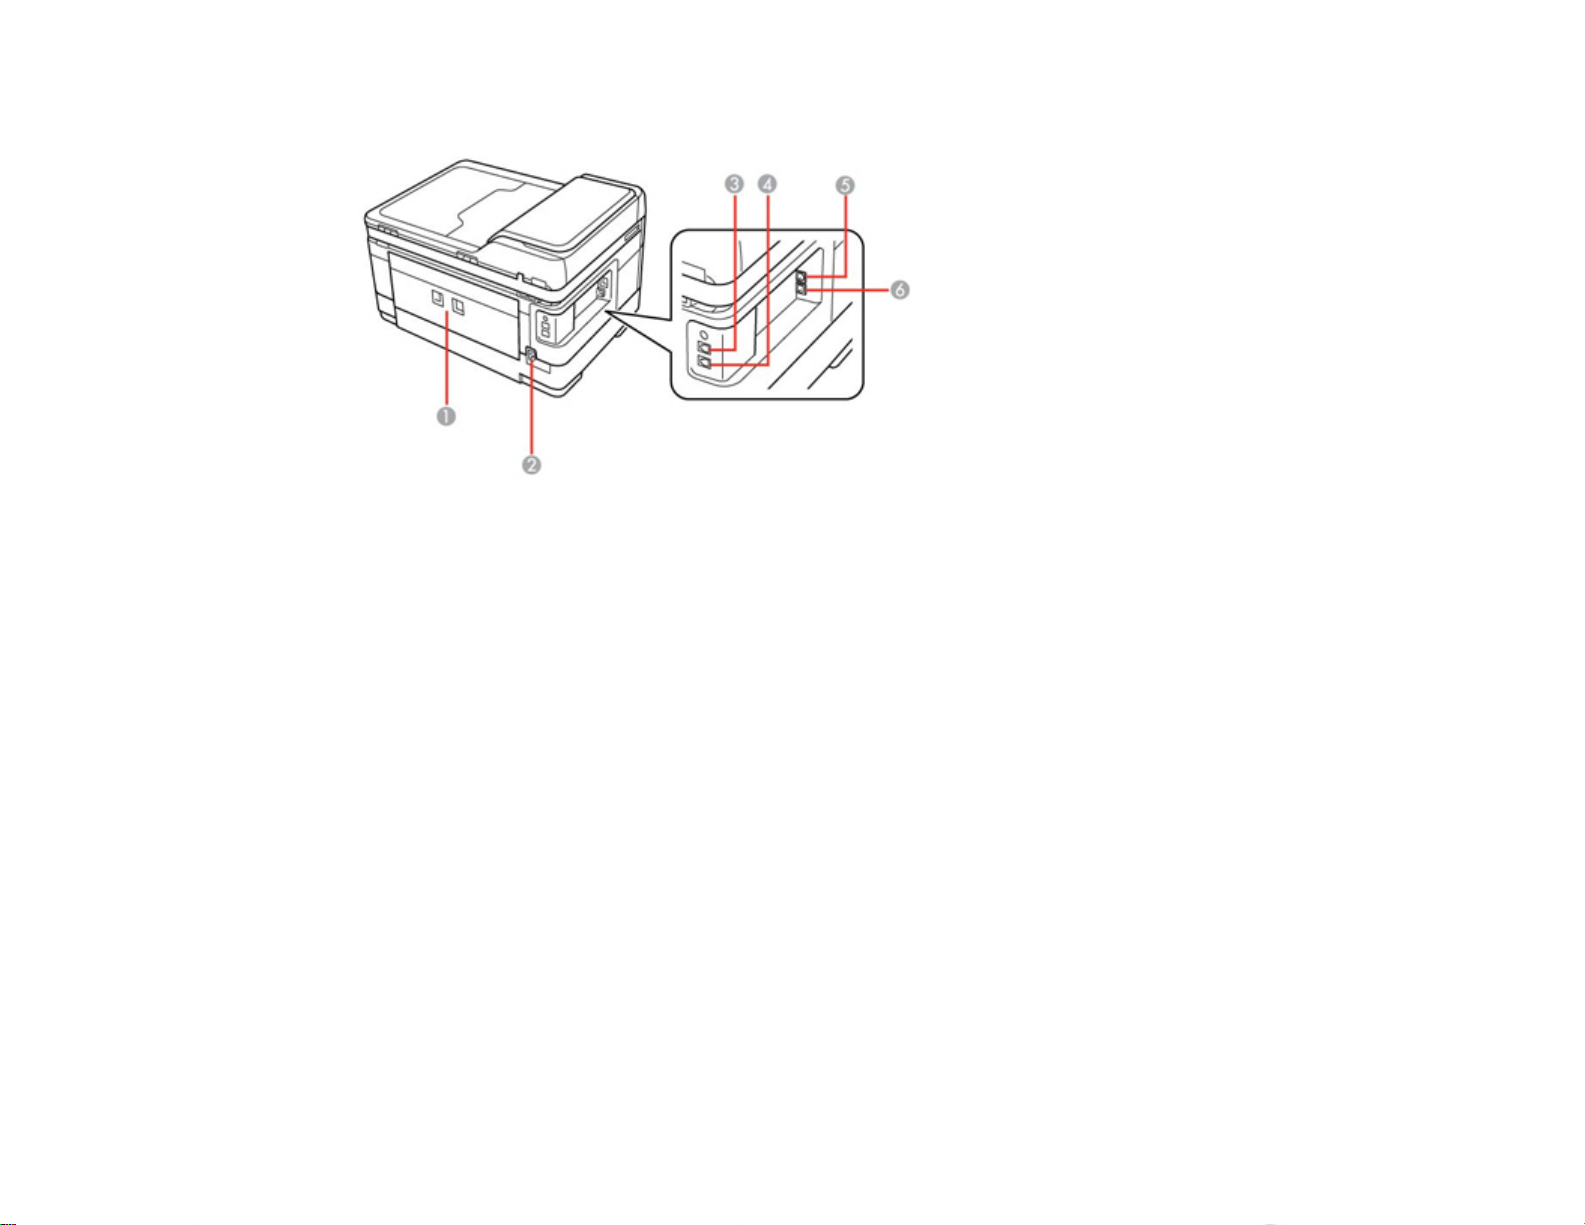
Product Parts - Back
1 Rear cover (Auto duplexer on the WorkForce WF-7520)
2 AC inlet
3 LINE port
4 EXT port
5 LAN port
6 USB port
Parent topic: Product Parts Locations
Two-Sided Printing, Scanning, Copying, and Faxing
You can print on both sides of the page automatically, using the product's built-in duplexer (WorkForce
WF-7520 only). By loading your pages in the automatic document feeder (ADF), you can also scan,
copy, and fax double-sided documents (WorkForce WF-7520 only).
22
Page 23

Note: You can also print double-sided manually. With Windows, you can select the 2-Sided Printing
option in the driver to help you with manual double-sided printing.
• To print on both sides of the page from your computer, load plain paper or EPSON Bright White
Paper, and select 2-Sided Printing (Windows) or one of the Two-sided Printing Settings (Mac
OS X).
Note: If you are using EPSON Premium Presentation Paper Matte Double-sided or EPSON Brochure
& Flyer Paper Matte Double-sided you must print double-sided manually; this type of paper is not
designed to work with the duplexer.
• To scan a double-sided document in the ADF, press the Scan button and select your scanning
method. If you selected a Scan to PC option, additionally press the Menu button and select Scan
settings. Then select one of the 2-Sided settings. If you are using the EPSON Scan software, select
ADF - Double-sided as the Document Source (Office or Professional Modes only).
• To copy a double-sided document in the ADF, press the Copy button, then press the Menu button.
Select Paper and Copy Settings, then select one of the 2-Sided Copying settings.
• To fax a double-sided document in the ADF, press the Fax button, then press the Menu button.
Select Send Settings, then select one of the 2-Sided Faxing settings.
Note: For quicker access, you can also press the 2-Sided button(WorkForceWF-7520only)to
access double-sided scan, copy, or fax settings.
Parent topic: Product Basics
Related references
Copying Options
Fax Sending Options
Related tasks
Selecting Double-sided Printing Settings - Windows
Selecting Double-sided Printing Settings - Mac OS X 10.5/10.6/10.7
Selecting Double-sided Printing Settings - Mac OS X 10.4
Scanning in Office Mode
Scanning in Professional Mode
Related topics
Placing Originals on the Product
23
Page 24
Selecting Wireless Network Settings From the Control Panel
You can select or change wireless network settings using your product control panel.
To install your product on a wireless network, follow the instructions on the Start Here sheet and install
the necessary software from the product CD. The installer program guides you through network setup.
Note: Breakdown or repair of this product may cause loss of fax and network data and settings. Epson is
not responsible for backing up or recovering data and settings during or after the warranty period. We
recommend that you make your own backup or print out your fax and network data and settings.
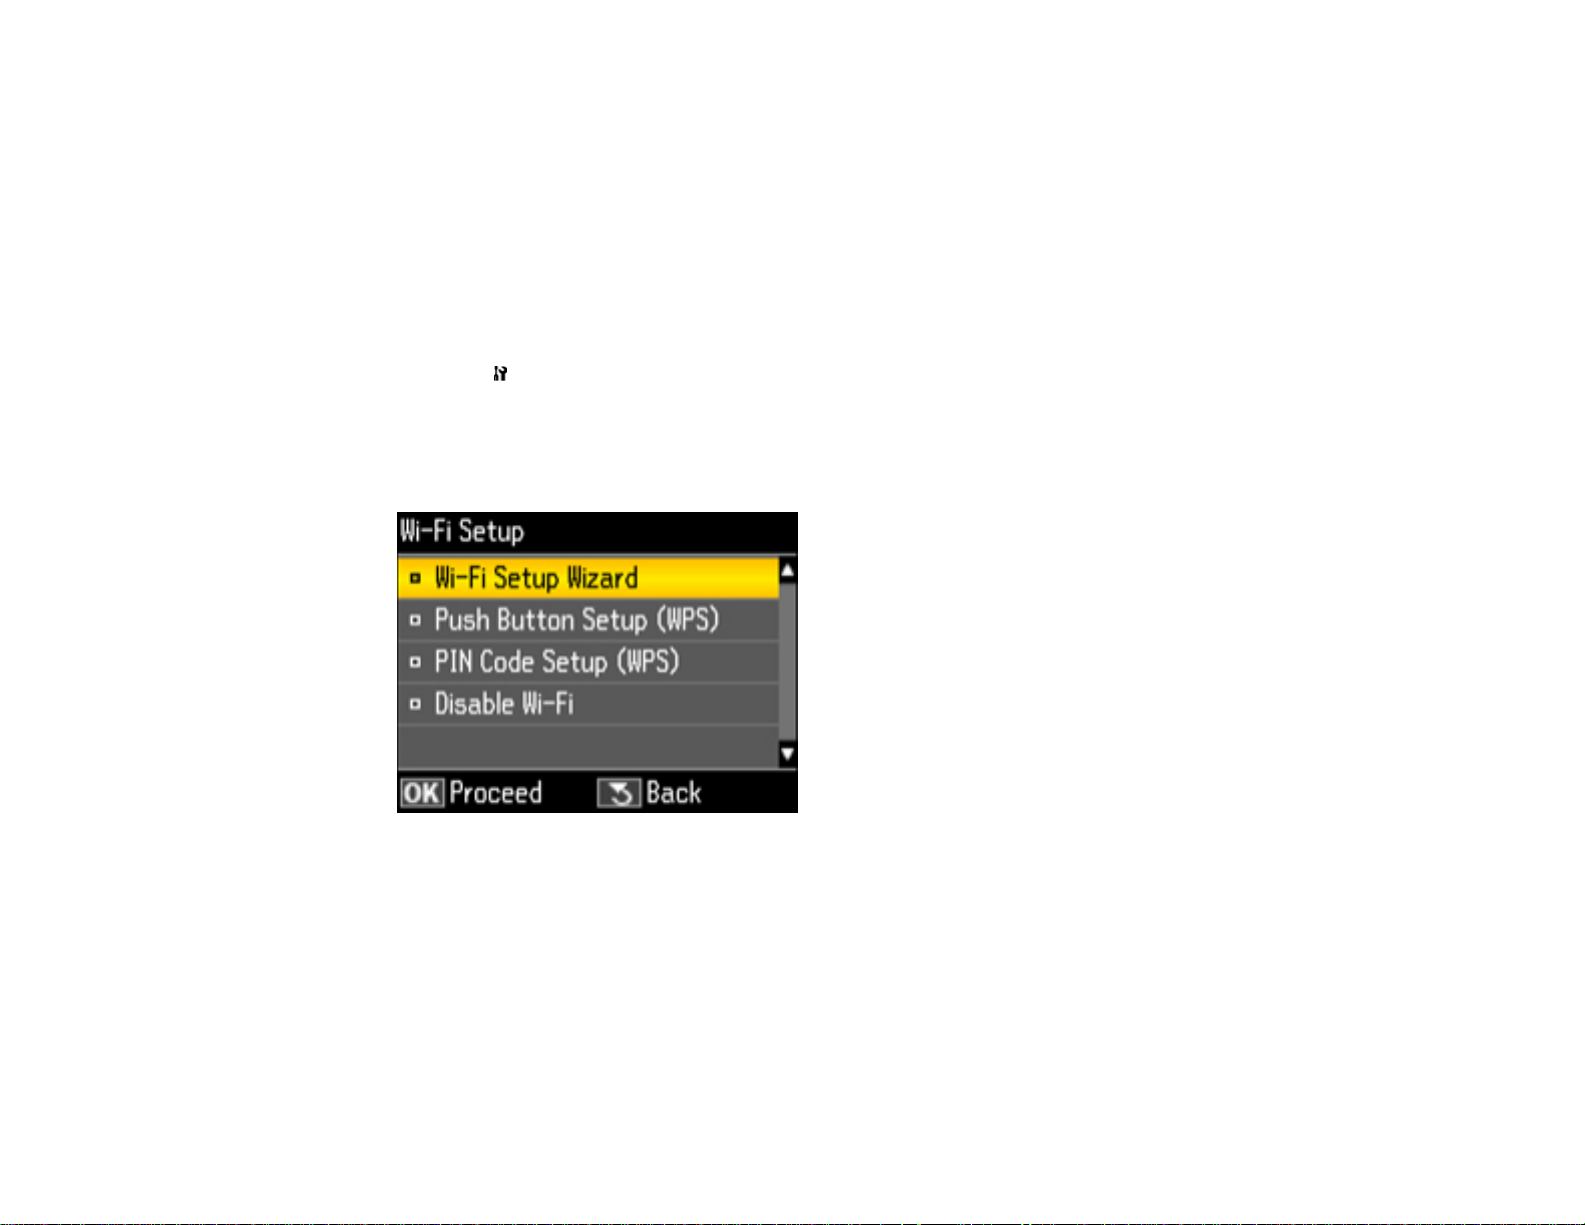
1. Press the Setup button.
2. Press the arrow buttons to select Wi-Fi/Network Settings and press the OK button.
3. Select Wi-Fi Setup and press the OK button.
You see this screen:
4. Select Wi-Fi Setup Wizard and press the OK button.
Note: If you need to disable the wireless network to set up your product on an Ethernet network,
select Disable Wi-Fi instead. Then follow the instructions on the Start Here sheet to set up your
product on a wired network and install the necessary software from the product CD. The installer
program guides you through network setup.
24
Page 25
5. Select the name of your wireless network (SSID) or enter the name manually.
Note: To enter the wireless network name manually, press the arrow buttons to select Other SSIDs
and press the OK button. Use the displayed keypad to enter your network name, as described in the
next step.
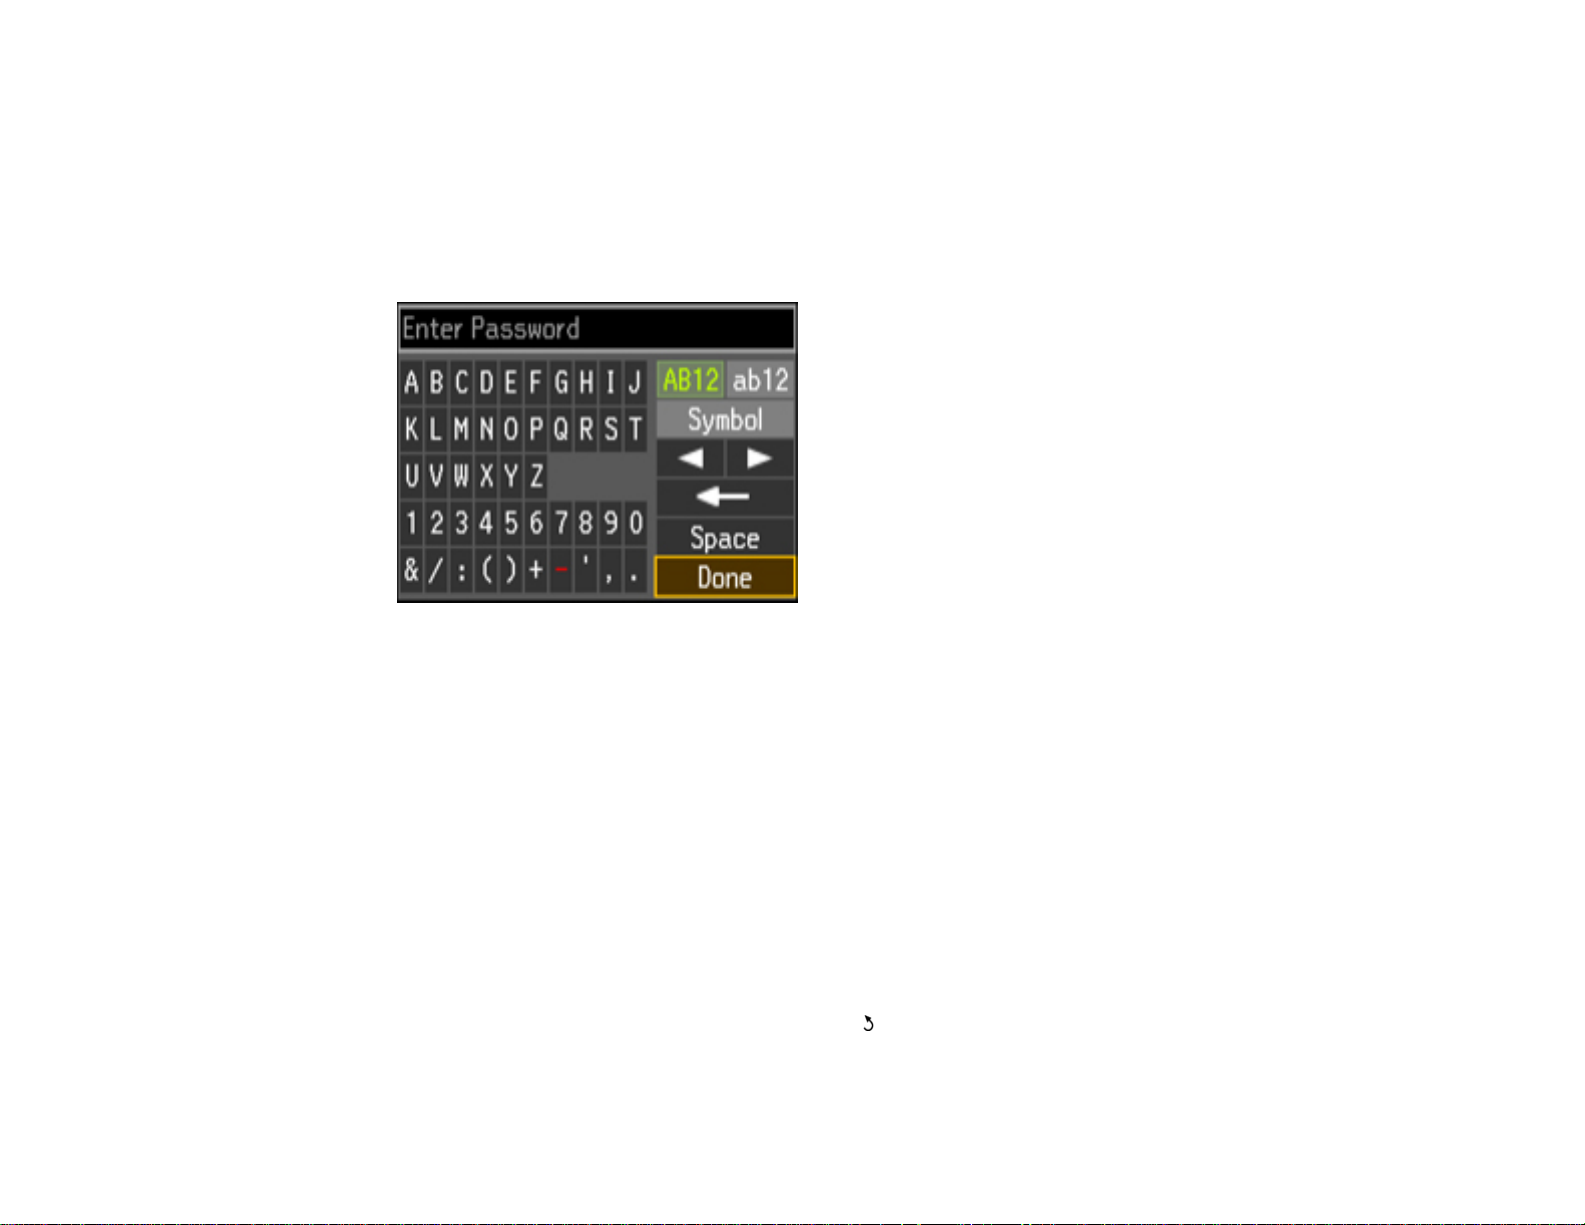
6. Enter your wireless password (or network name and then password) using the displayed keypad.
Note: If your password has uppercase (ABC) or lowercase (abc) letters, make sure you enter them
correctly.
• Press the arrow buttons to highlight a character or a function button displayed on the keypad.
Then press the OK button to select it.
• To change the case of letters or select symbols, select AB12 (uppercase), ab12 (lowercase), or
Symbol and press the OK button. Then highlight an option and press the OK button to select it.
• To enter a space, select Space and press the OK button.
• To delete characters, select the back arrow and press the OK button.
• When you finish entering characters, select Done and press the OK button.
7. Confirm the displayed network settings and press the OK button to save them.
Note: If you need to change a setting, press the Back button.
25
Page 26

8. If you want to print a network setup report, select Yes and press the OK button. (Otherwise, select
No.)
9. Press the Back button to exit.
The WiFi light should now be on, but not flashing.
Note: If the WiFi light is off, you may have selected the wrong network name (SSID) or entered the
password incorrectly. Repeat these steps to try again.
Parent topic: Product Basics
26
Page 27
Loading Paper
Before you print, load paper for the type of printing you will do.
Loading Paper for Documents
Loading Paper for Photos
Loading Envelopes
Paper Loading Capacity
Available EPSON Papers
Borderless Paper Type Compatibility
Paper or Media Type Settings
Setting the Paper Size for Each Source
Loading Paper for Documents
You can print documents on a variety of paper types and sizes. For the WF-7520, you can load custom
paper sizes in Cassette 1 only.
1. Close the output tray, if necessary.
27
Page 28
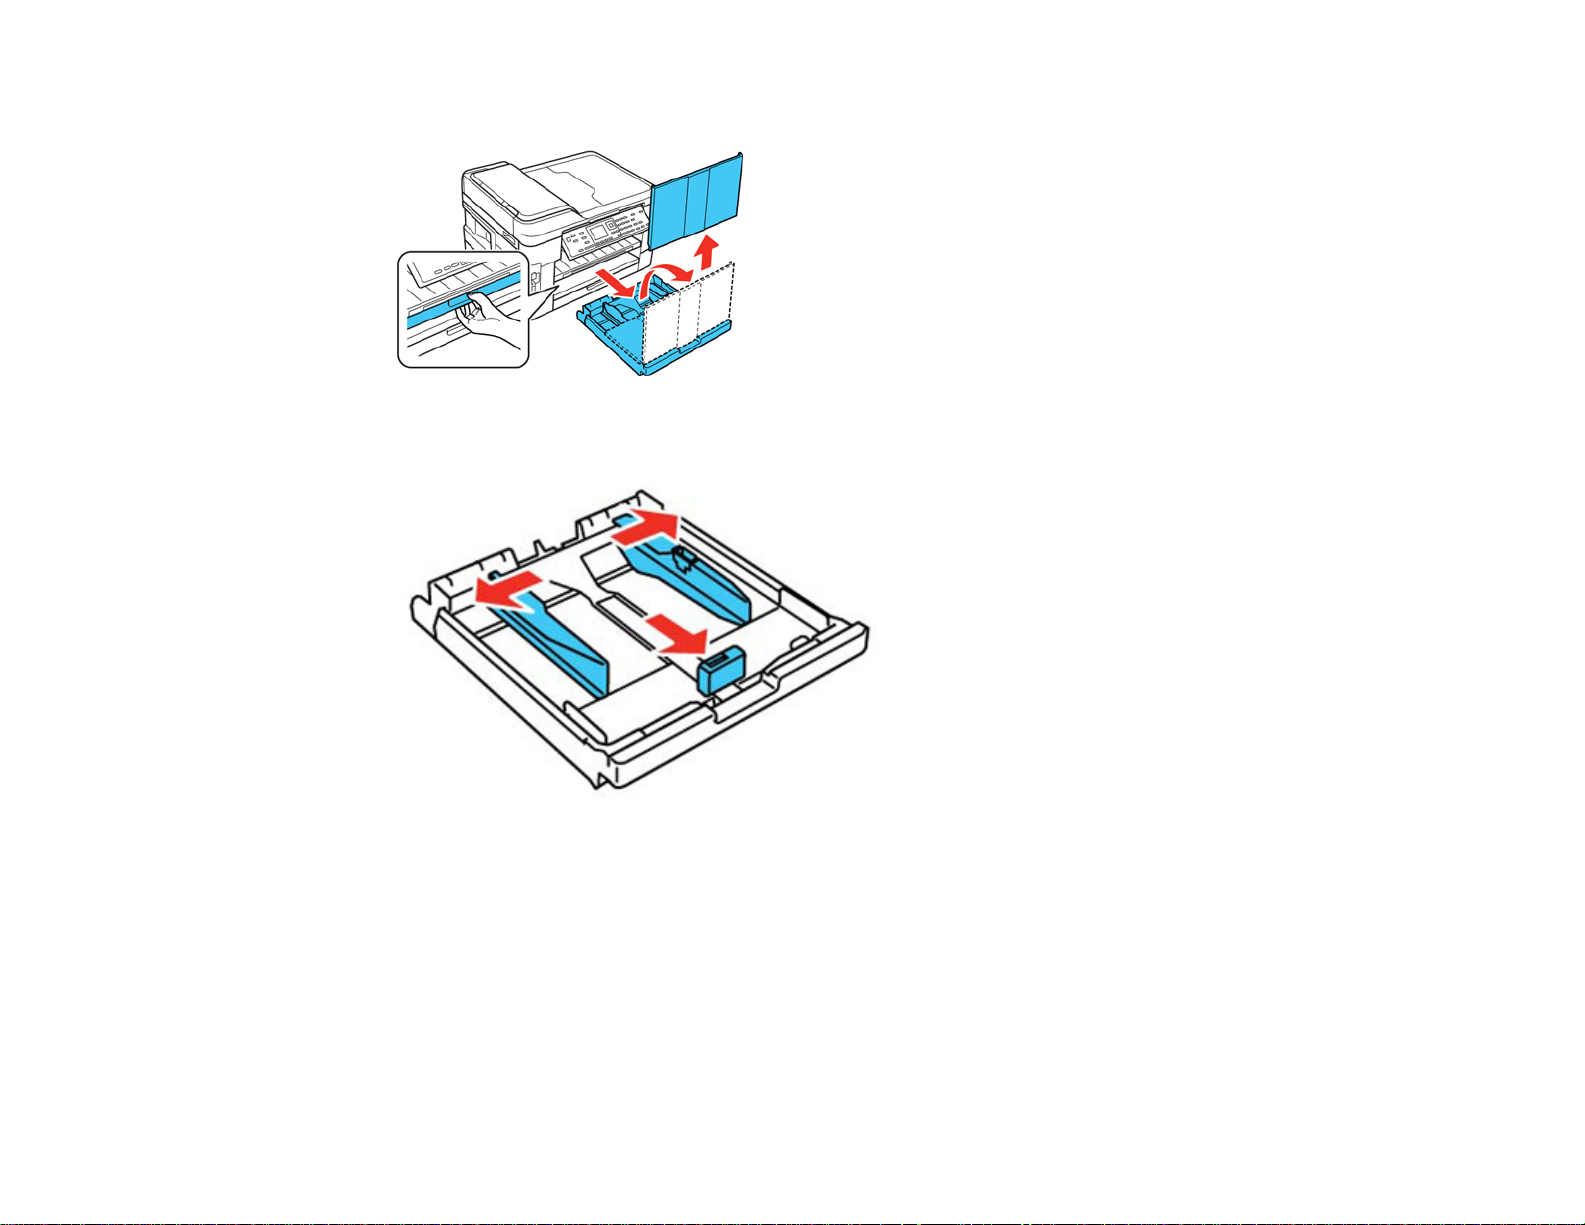
2. Pull out the paper cassette and remove the paper cassette cover.
3. Slide the edge guides outward.
Note: If you are using legal-size paper or larger, press the tray release button and extend the paper
cassette.
28
Page 29
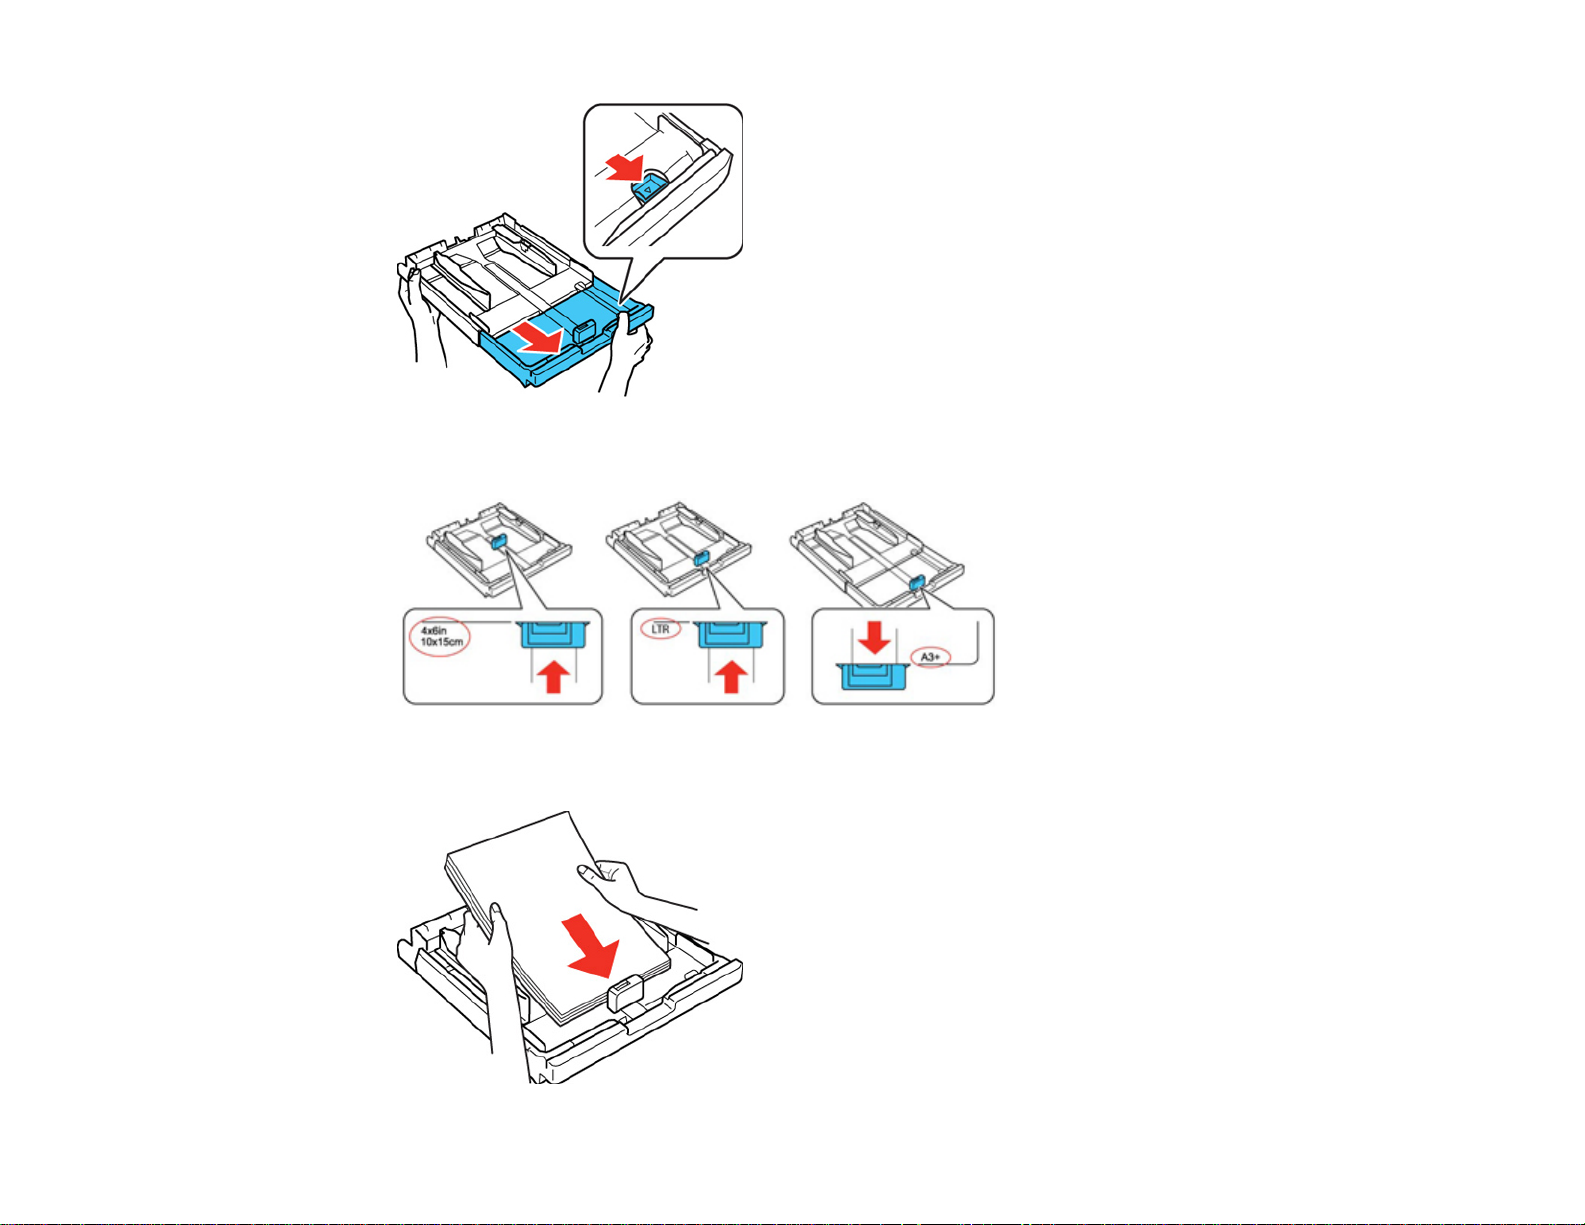
4. Slide the edge guide shown below to your paper size.
5. Load a stack of paper, printable side down, against the edge guide as shown.
29
Page 30
Note: Make sure the paper is loaded against the edge guide and not sticking out from the end of the
cassette.
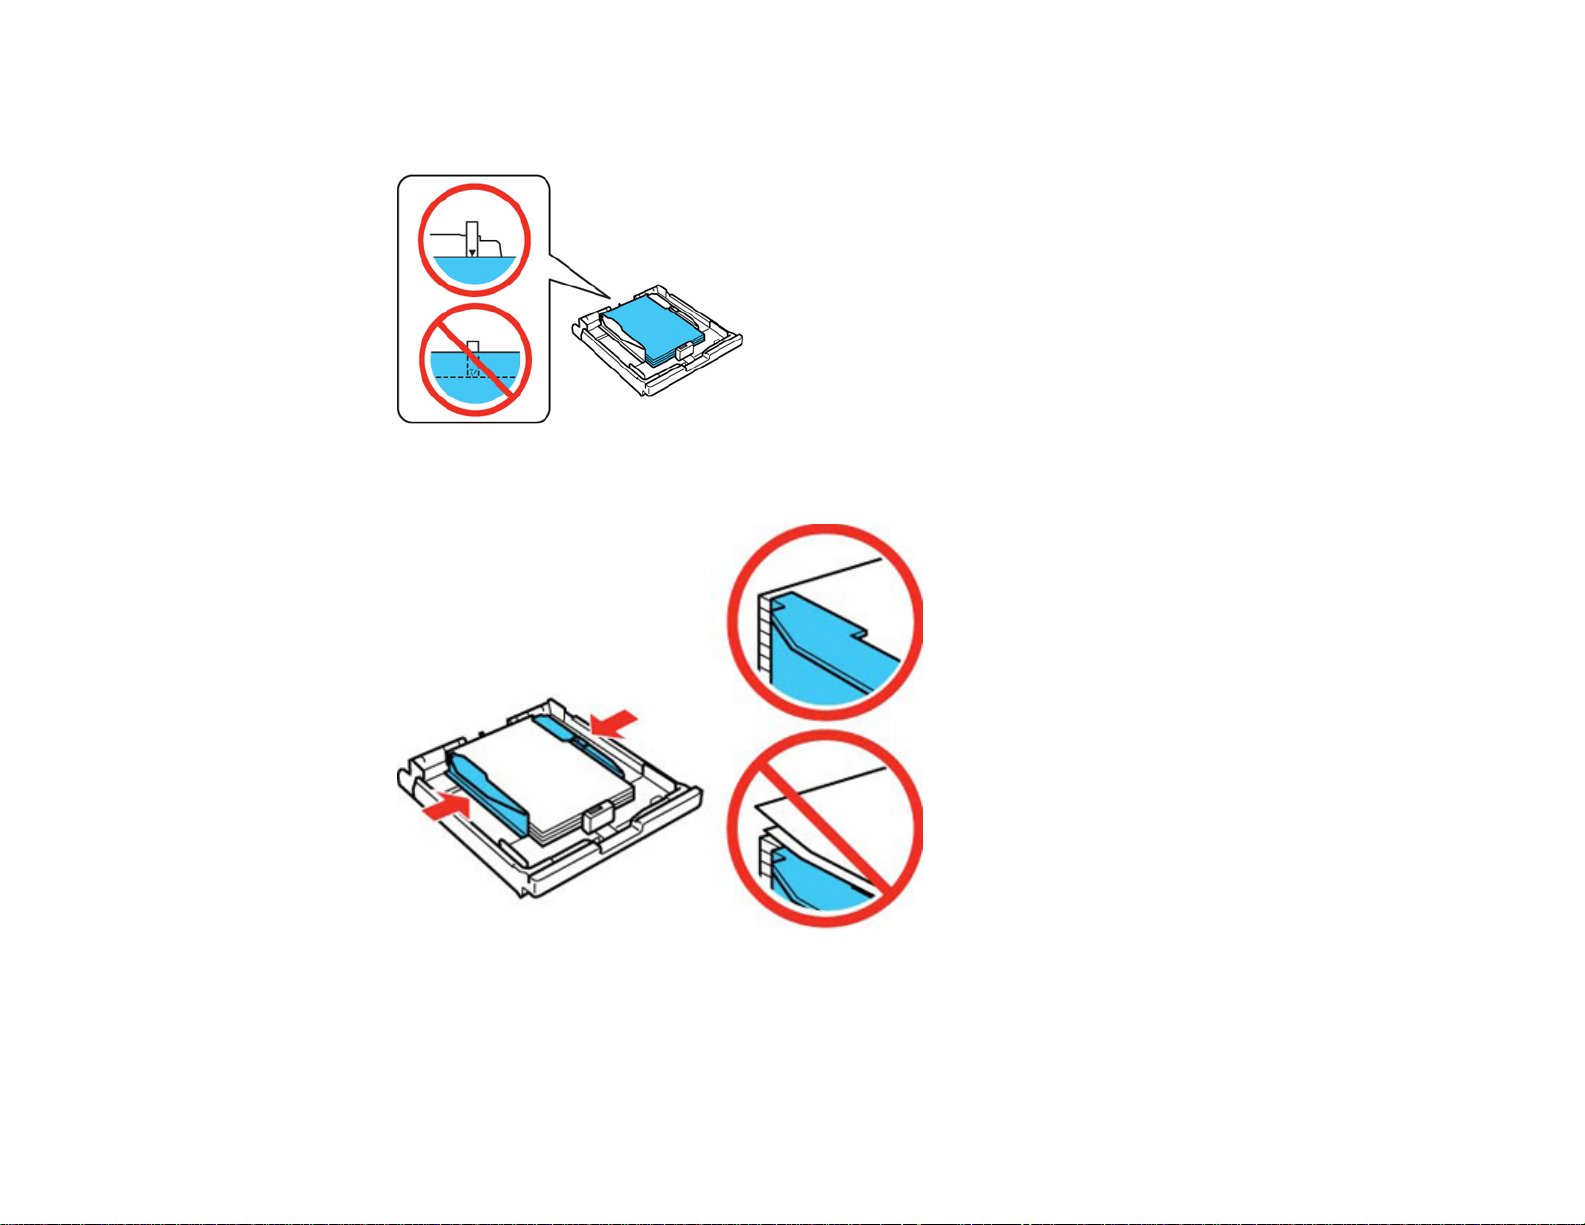
6. Slide the edge guides against the paper, but not too tightly.
Note: Make sure the paper fits beneath the top edges of the guide.
Caution: To prevent paper feeding problems, make sure you do not load too much paper in the
cassette.
30
Page 31

7. Gently replace the paper cassette cover and insert the paper cassette.
Note: The paper may slide forward slightly as you insert the cassette. This is normal.
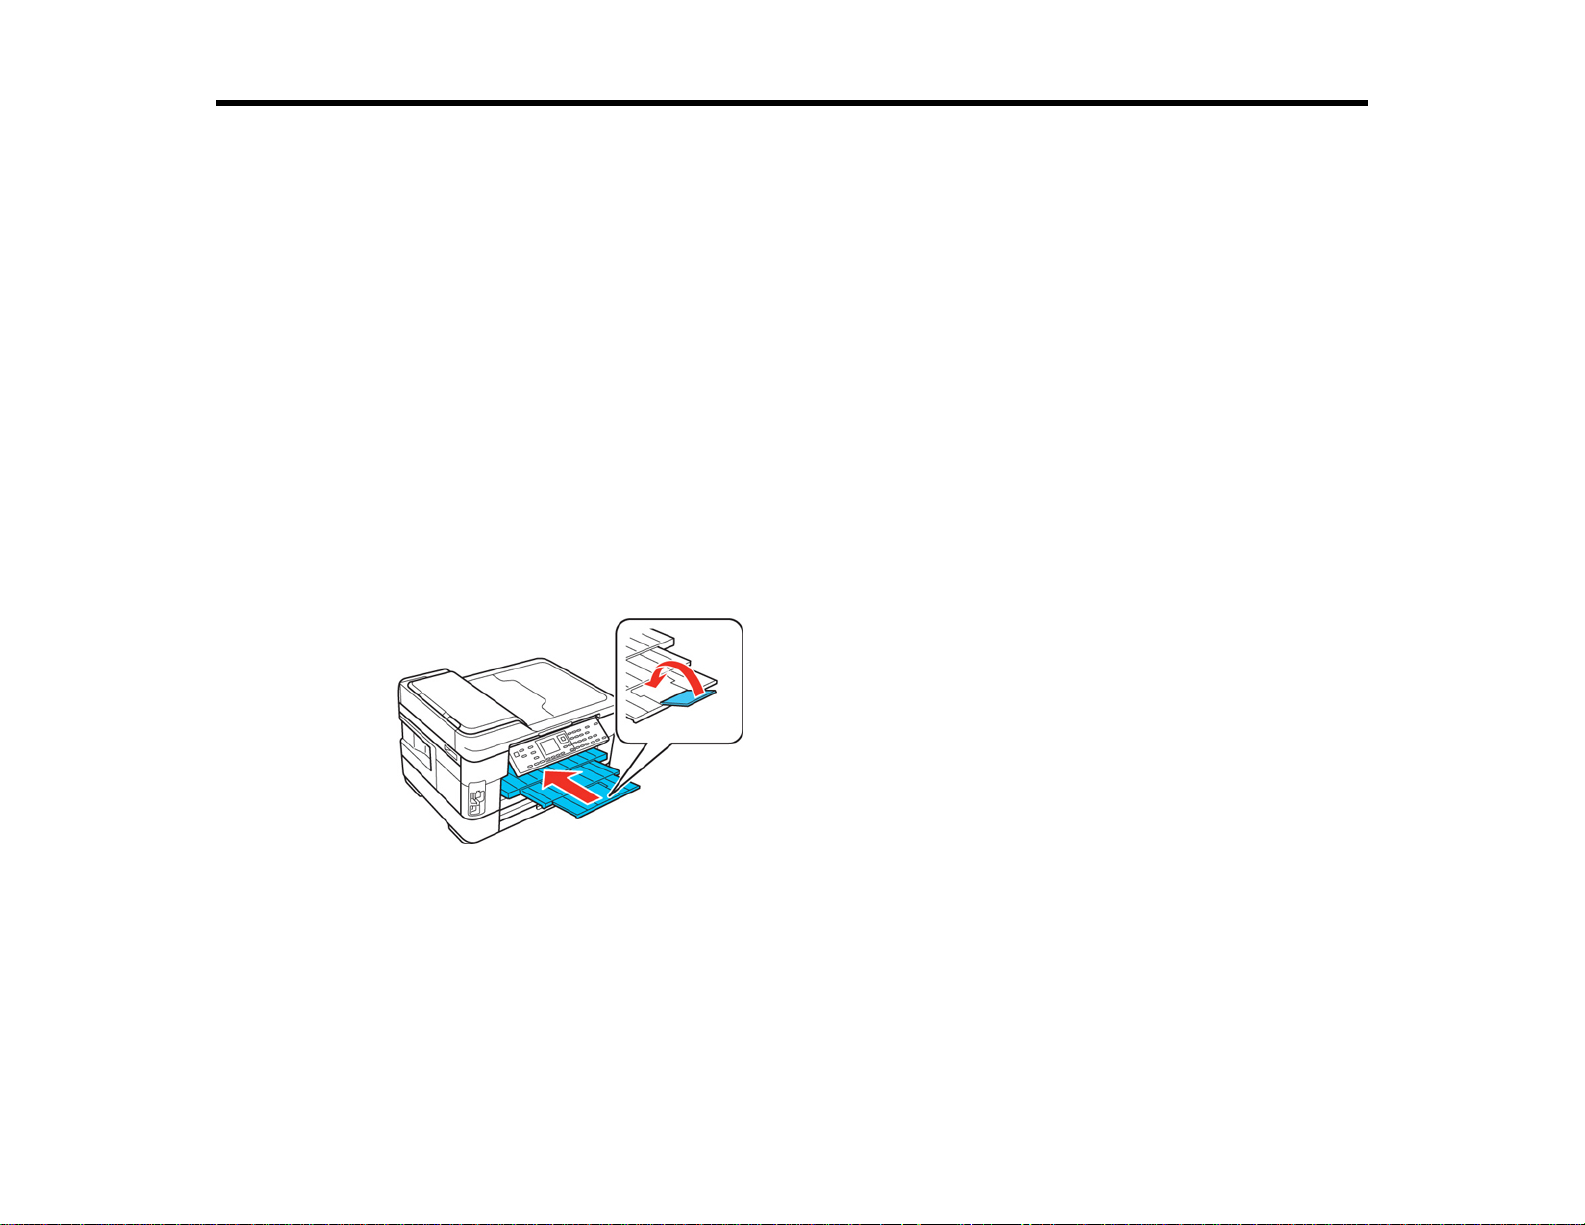
8. Extend the output tray and open the paper stopper.
Note: If you are using legal-size or longer paper, do not open the paper stopper. Do not remove or
insert the paper cassette during printing.
Always follow these paper loading guidelines:
• Load only the recommended number of sheets.
• Load paper short edge first, no matter which way your document faces.
• Load letterhead or pre-printed paper top edge first.
• Do not load paper above the arrow mark inside the edge guide.
31
Page 32

• Check the paper package for any additional loading instructions.
Parent topic: Loading Paper
Related references
Paper Loading Capacity
Loading Paper for Photos
You can print photos on a variety of paper types and sizes. For the WF-7520, you can load 4 × 6 inches
(102 × 152 mm) or 5 × 7 inches (127 × 178 mm) photo paper in Cassette 1 only.
1. Close the output tray, if necessary.
2. Pull out the paper cassette and remove the paper cassette cover.
32
Page 33

3. Slide the edge guides outward.
33
Page 34

4. Slide the edge guide shown below to your paper size.
5. Load photo paper, printable side down, against the edge guide as shown.
34
Page 35

Note: Make sure the paper is loaded against the edge guide and not sticking out from the end of the
cassette.
6. Slide the edge guides against the paper, but not too tightly.
Note: Make sure the paper is loaded against the edge guide and not sticking out from the end of the
cassette and that the paper fits beneath the top edges of the guide.
Caution: To prevent paper feeding problems, make sure you do not load too much paper in the
cassette.
35
Page 36

7. Gently replace the paper cassette cover and insert the paper cassette.
Note: The paper may slide forward slightly as you insert the cassette. This is normal.
8. Extend the output tray and open the paper stopper.
Note: Do not open the paper stopper for legal size paper or larger.
Always follow these paper loading guidelines:
• Load only the recommended number of sheets.
• Load paper short edge first, no matter which way your document faces.
• Do not load paper above the arrow mark inside the edge guide.
• Check the paper package for any additional loading instructions.
36
Page 37

Parent topic: Loading Paper
Related references
Paper Loading Capacity
Loading Envelopes
You can print on plain paper envelopes in this size: No. 10 (4.1 × 9.5 inches [105 × 241 mm]) For the
WF-7520, you can load No. 10 size envelopes in Cassette 1 only.
1. Close the output tray, if necessary.
2. Pull out the paper cassette and remove the paper cassette cover.
37
Page 38

3. Slide the edge guides outward.
38
Page 39

4. Slide the edge guide shown below to your envelope size.
5. Load envelopes, printable side down, against the edge guide as shown.
Note: Make sure the envelopes are loaded against the edge guide and not sticking out from the end
of the cassette.
39
Page 40

6. Slide the edge guides against the envelopes, but not too tight.
Note: Make sure the envelopes fit beneath the top edges of the guide.
Caution: To prevent paper feeding problems, make sure you do not load too many envelopes in the
cassette.
7. Gently replace the paper cassette cover and insert the paper cassette.
40
Page 41

Note: The envelopes may slide forward slightly as you insert the cassette. This is normal.
8. Extend the output tray and open the paper stopper.
Always follow these paper loading guidelines:
• If you have trouble loading a stack of envelopes, press each envelope flat before loading it or load
one envelope at a time.
• If print quality declines when printing multiple envelopes, try loading one envelope at a time.
• Do not load envelopes that are curled, folded, or too thin.
Parent topic: Loading Paper
Related references
Paper Loading Capacity
Paper Loading Capacity
Note: For custom paper sizes, load 1 sheet in Cassette 1.
Paper type Loading capacity
Plain paper Approximately 250 sheets*, **
EPSON Bright White Paper 200 sheets**
30 sheets for Legal (8.5 × 14 inches
[216 × 357 mm]) to 13 × 19 inches (330 × 483 mm)
sized paper***
41
Page 42

Paper type Loading capacity
EPSON Presentation Paper Matte 80 sheets
EPSON Photo Paper Glossy 20 sheets
EPSON Premium Photo Paper Glossy
EPSON Ultra Premium Photo Paper Glossy
EPSON Premium Photo Paper Semi-gloss
EPSON Premium Presentation Paper Matte
EPSON Premium Presentation Paper Matte
Double-sided
EPSON Ultra Premium Presentation Paper Matte
EPSON Brochure & Flyer Paper Matte Double-
sided
EPSON Photo Quality Self-adhesive Sheets 1 sheet
EPSON Iron-on Cool Peel Transfer paper
Envelopes 10 envelopes
* Based on 20-lb (75 g/m2) paper weight. Do not load paper above the arrow mark inside the edge guide.
** For one-sided printing or two-sided printing with the auto duplexer (WorkForce WF-7520 only). For
manual two-sided printing, load up to 30 sheets.
*** For one-sided printing or two-sided printing with the auto duplexer (WorkForce WF-7520 only). For
manual two-sided printing, load 1 sheet.
Parent topic: Loading Paper
Available EPSON Papers
You can purchase genuine EPSON ink and paper at EPSON Supplies Central at www.epson.com/ink3
(U.S. sales) or www.epson.ca (Canadian sales). You can also purchase supplies from an EPSON
authorized reseller. To find the nearest one, call 800-GO-EPSON (800-463-7766).
Note: Paper (or media) availability varies by country.
42
Page 43

Paper Type Size Part number Sheet count
EPSON Bright White Paper Letter (8.5 × 11 inches S041586 500
[216 × 279 mm])
EPSON Brochure & Flyer Paper Letter (8.5 × 11 inches S042384 150
Matte Double-sided [216 × 279 mm])
EPSON Ultra Premium Letter (8.5 × 11 inches S041341 50
Presentation Paper Matte [216 × 279 mm])
11.7 × 16.5 inches (297 × 420 S041343 50
mm)
13 × 19 inches S041339 50
(330 × 483 mm)
EPSON Premium Presentation Letter (8.5 × 11 inches S041568 50
Paper Matte Double-sided [216 × 279 mm])
EPSON Premium Presentation 8 × 10 inches (203 × 254 mm) S041467 50
Paper Matte
Letter (8.5 × 11 inches S041257 50
[216 × 279 mm])
S042180 100
11 × 14 inches S041468 50
(279 × 356 mm)
11.7 × 16.5 inches (297 × 420 S041260 50
mm)
13 × 19 inches S041263 50
(330 × 483 mm)
EPSON Presentation Paper Matte Legal (8.5 × 14 inches S041067 100
[216 × 357 mm])
Letter (8.5 × 11 inches S041062 100
[216 × 279 mm])
11 × 17 inches S041070 100
(279 × 432 mm)
13 × 19 inches S041069 100
(330 × 483 mm)
43
Page 44

Paper Type Size Part number Sheet count
EPSON Photo Paper Glossy 4 × 6 inches (102 × 152 mm) S041809 50
S042038 100
Letter (8.5 × 11 inches S041141 20
[216 × 279 mm])
S041649 50
S041271 100
11 × 17 inches S041156 20
(279 × 432 mm)
13 × 19 inches S044143 20
(330 × 483 mm)
EPSON Premium Photo Paper 4 × 6 inches (102 × 152 mm) S041808 40
Glossy
S041727 100
5 × 7 inches (127 × 178 mm) S041464 20
8 × 10 inches (203 × 254 mm) S041465 20
Letter (8.5 × 11 inches S042183 25
[216 × 279 mm])
S041667 50
11 × 14 inches S041466 20
(279 × 356 mm)
11 × 17 inches S041290 20
(279 × 432 mm)
11.7 × 16.5 inches (297 × 420 S041288 20
mm)
13 × 19 inches S041289 20
(330 × 483 mm)
44
Page 45

Paper Type Size Part number Sheet count
EPSON Ultra Premium Photo 4 × 6 inches (102 × 152 mm) S042181 60
Paper Glossy
5 × 7 inches (127 × 178 mm) S041945 20
8 × 10 inches (203 × 254 mm) S041946 20
Letter (8.5 × 11 inches S042182 25
[216 × 279 mm])
EPSON Premium Photo Paper 4 × 6 inches (102 × 152 mm) S041982 40
Semi-gloss
EPSON Photo Quality Self- A4 (8.3 × 11.7 inches S041106 10
adhesive Sheets [210 × 297 mm])
EPSON Iron-on Cool Peel Transfer Letter (8.5× 11 inches S041153 10
paper [216 × 279 mm])
Parent topic: Loading Paper
Letter (8.5 × 11 inches S041331 20
[216 × 279 mm])
13 × 19 inches S041327 20
(330 × 483 mm)
S042174 100
S042175 50
Borderless Paper Type Compatibility
You can print borderless photos on compatible paper types in compatible sizes:
Borderless Paper Types
• EPSON Brochure & Flyer Paper Matte Double-sided
• EPSON Ultra Premium Presentation Paper Matte
• EPSON Premium Presentation Paper Matte
• EPSON Premium Presentation Paper Matte Double-sided
• EPSON Ultra Premium Photo Paper Glossy
• EPSON Premium Photo Paper Semi-gloss
• EPSON Premium Photo Paper Glossy
• EPSON Photo Paper Glossy
45
Page 46

Borderless Paper Sizes
• 4 × 6 inches (102 × 152 mm)
• 5 × 7 inches (127 × 178 mm)
• 8 × 10 inches (203 × 254 mm)
• Letter (8.5 × 11 inches [216 × 279 mm])
• 16:9 wide (4 × 7.1 inches [102 × 181 mm])
• 11.7 × 16.5 inches (297 × 420 mm)
• 13 × 19 inches (330 × 483 mm)
Parent topic: Loading Paper
Paper or Media Type Settings
For this paper Select this paper Type or Media Type setting
Plain paper Plain Paper/Bright White Paper
EPSON Bright White Paper
EPSON Presentation Paper Matte
EPSON Photo Quality Self-adhesive Sheets
EPSON Iron-on Cool Peel Transfer paper
EPSON Ultra Premium Photo Paper Glossy Ultra Premium Photo Paper Glossy
EPSON Premium Photo Paper Glossy Premium Photo Paper Glossy
EPSON Photo Paper Glossy Photo Paper Glossy
EPSON Premium Photo Paper Semi-gloss Premium Photo Paper Semi-Gloss
EPSON Premium Presentation Paper Matte Premium Presentation Paper Matte
EPSON Premium Presentation Paper Matte
Double-sided
EPSON Brochure & Flyer Paper Matte Double-
sided
EPSON Ultra Premium Presentation Paper Matte
Envelopes Envelope
46
Page 47

For this paper Select this paper Type or Media Type setting
Cardstock up to 68 lb Thick-Paper
Parent topic: Loading Paper
Related references
Paper Type Settings - Copying
Setting the Paper Size for Each Source
You can set the paper size for each paper source using the control panel or your printer software. The
settings apply to all print jobs sent to the product.
Setting the Paper Size for Each Source - Windows
Setting the Paper Size for Each Source - Mac OS X
Parent topic: Loading Paper
Setting the Paper Size for Each Source - Windows
You can change the default paper size for each source in Windows.
1. Do one of the following:
• Windows 7: Click and select Devices and Printers. Right-click your product name, and select
Printer properties.
• Windows Vista: Click and select Control Panel. Click Printer under Hardware and Sound,
right-click your product name, and select Properties.
• Windows XP: Click Start and select Printers and Faxes. (Or open the Control Panel, select
Printers and Other Hardware if necessary, and select Printers and Faxes.) Right-click your
product name and select Properties.
2. Click the Optional Settings tab.
3. Click Printer Settings.
You see this screen:
47
Page 48

4. Select the paper size you loaded in each paper source as the Paper Size Loaded. On the WF-7520,
do one of the following:
• If you loaded one of these paper sizes, select the size you loaded:Letter (8.5 × 11 inches
[216 × 279 mm]), Legal (8.5 × 14 inches [216 × 357 mm]), A4 (8.3 × 11.7 inches [210 × 297 mm]),
4 × 6 inches (102 × 152 mm), 5 × 7 inches (127 × 178 mm), 8 × 10 inches (203 × 254 mm), 16:9
wide (4 × 7.1 inches [102 × 181 mm]), A3 (11.7 × 16.5 inches [297 × 420 mm]), 11 × 17 inches
(279 × 432 mm), or 13 × 19 inches (330 × 483 mm).
• If you loaded one of these paper sizes or a user-defined size in Cassette 1, select Others as the
Paper Size Loaded setting: 3.5 × 5 inches (89 × 127 mm), 11 × 14 inches (279 × 356 mm),
Envelope No. 10 (4.1 × 9.5 inches [105 × 241 mm]), A6 (4.1 × 5.8 inches [105 × 148 mm]), or Half
Letter (5.5 × 8.5 inches [140 × 279 mm]).
48
Page 49

5. If you want the printer software to warn you if you try to print with the wrong paper size, select the
Paper Size Notice checkbox.
Note: If you turn on Paper Size Notice, your product will prevent you from printing with the wrong
paper size settings. If you turn this option off and you try to print with the wrong settings, your
product will print even if the image size exceeds the printable area, and your printout may be
smudged.
6. Click Apply.
7. When you see the confirmation message, click Yes.
8. Close the Printer Settings window.
Parent topic: Setting the Paper Size for Each Source
Related tasks
Selecting Basic Print Settings - Windows
Setting the Paper Size for Each Source - Mac OS X
You can change the default paper size for each source in Mac OS X.
1. Do one of the following:
• Mac OS X 10.6/10.7: In the Apple menu or the Dock, select System Preferences. Select Print &
Fax or Print & Scan, select your product, and select Options & Supplies. Select Utility and
select Open Printer Utility.
• Mac OS X 10.4/10.5: In the Apple menu or the Dock, select System Preferences. Select Print &
Fax or Print & Scan, select your product, and select Open Print Queue or Print Queue. Select
Utility.
2. Click the Printer Settings button.
You see this screen:
49
Page 50

3. Select the paper size you loaded in each paper source as the Paper Size Loaded. On the WF-7520,
do one of the following:
• If you loaded one of these paper sizes, select the size you loaded:Letter (8.5 × 11 inches
[216 × 279 mm]), Legal (8.5 × 14 inches [216 × 357 mm]), A4 (8.3 × 11.7 inches [210 × 297 mm]),
4 × 6 inches (102 × 152 mm), 5 × 7 inches (127 × 178 mm), 8 × 10 inches (203 × 254 mm), 16:9
wide (4 × 7.1 inches [102 × 181 mm]), A3 (11.7 × 16.5 inches [297 × 420 mm]), 11 × 17 inches
(279 × 432 mm), or 13 × 19 inches (330 × 483 mm).
• If you loaded one of these paper sizes or a user-defined size in Cassette 1, select Others as the
Paper Size Loaded setting: 3.5 × 5 inches (89 × 127 mm), 11 × 14 inches (279 × 356 mm),
Envelope No. 10 (4.1 × 9.5 inches [105 × 241 mm]), A6 (4.1 × 5.8 inches [105 × 148 mm]), or Half
Letter (5.5 × 8.5 inches [140 × 279 mm]).
4. If you want the printer software to warn you if you try to print with the wrong paper size, select the
Paper Size Notice checkbox.
Note: If you turn on Paper Size Notice, your product will prevent you from printing with the wrong
paper size settings. If you turn this option off and you try to print with the wrong settings, your
product will print even if the image size exceeds the printable area, and your printout may be
smudged.
50
Page 51

5. Click Apply.
6. When you see the confirmation message, click Yes.
7. Close the Printer Settings window.
Parent topic: Setting the Paper Size for Each Source
Related tasks
Selecting Basic Print Settings - Mac OS X 10.5/10.6/10.7
Selecting Basic Print Settings - Mac OS X 10.4
51
Page 52

Placing Originals on the Product
Follow the instructions here to place your original documents or photos on the product.
Caution: Do not place anything on top of your product or use its cover as a writing surface to avoid
damaging it.
Placing Originals on the Scanner Glass
Placing Originals in the Automatic Document Feeder
Placing Originals on the Scanner Glass
You can place originals up to this size on the scanner glass: 11.7 × 16.5 inches (297 × 420 mm)
1. Open the document cover.
2. Place your original facedown on the scanner glass with the top facing as shown. Slide the original to
the edges of the indicated corner.
Note: You can place multiple originals on the scanner glass. Just make sure they are at least 0.2
inch (5 mm) away from each other.
3. Close the document cover gently to keep your original in place.
Parent topic: Placing Originals on the Product
Related topics
Copying
52
Page 53

Scanning
Placing Originals in the Automatic Document Feeder
You can place multi-page original documents in the Automatic Document Feeder (ADF). Make sure the
originals meet the Automatic Document Feeder specifications before loading them.
Caution: Make sure your originals are not creased or folded, and do not contain holes, staples, tape, or
other materials that could obstruct the feeder.
1. Open the ADF cover.
53
Page 54

2. Slide the ADF edge guide outward.
3. Fan your stack of originals and tap them gently on a flat surface to even the edges.
54
Page 55

4. Insert the originals into the ADF faceup and top-edge first.
5. Slide the ADF edge guide against the originals, but not too tightly.
Parent topic: Placing Originals on the Product
55
Page 56

Related topics
Copying
Scanning
56
Page 57

Copying
See the information here to copy documents or photos using your product.
Note: Copies may not be exactly the same size as your originals.
Copying Documents
Copying Photos
Paper Type Settings - Copying
Paper Size Settings - Copying
Copying Options
Copying Documents
You can copy documents onto plain paper or Epson special papers.
1. Place your original document on the scanner glass, or place multi-page documents in the ADF.
2. Load the paper you want to print on.
Note: Load only the recommended number of sheets.
3. Press the Copy button.
You see this screen:
57
Page 58

4. To print more than one copy, press the + or – buttons to select the number (up to 99).
5. If you need to adjust the darkness of your copy, press the left or right arrow buttons to change the
Density setting.
6. To change any of the print settings displayed on the LCD screen, press the Menu button, select
Paper and Copy Settings, press the OK button, and select the necessary settings.
Note: For quicker access, you can also press the 2-Sided button(WorkForceWF-7520only)to
set two-sided print settings, the Reduce/Enlarge button to set print size settings, or the Quality
button to set quality settings.
7. When you are ready to copy, press one of the Start buttons in the Copy section of the control
panel.
Note: To cancel printing, press the Stop button.
Parent topic: Copying
Related references
Paper Type Settings - Copying
Paper Size Settings - Copying
Copying Options
Related topics
Loading Paper
Placing Originals on the Product
Copying Photos
You can copy color or black-and-white photos onto specific sizes and types of paper, including Epson
special papers, for instant photo reprints. You can also restore the colors in faded photos as you copy.
1. Place your original photo on the scanner glass.
2. Load the paper you want to print on.
Note: Load only the recommended number of sheets.
3. Press the Copy button.
You see this screen:
58
Page 59

4. Press the Menu button, select Copy/Restore Photos, and press the OK button. You see this
screen:
5. To restore colors in faded photos as you copy, select On. If your photo or photos are not faded,
leave this setting off. Then press the OK button.
6. After you read the message, press the OK button to see how to place up to three photos on the
scanner glass.
7. Place up to three photos on the glass as shown on the LCD screen. For multiple photos, place them
at least 0.2 inch (5 mm) apart.
8. Press the OK button to prescan your photo or photos.
59
Page 60

9. When you see your scanned image on the LCD screen, you can do one of the following:
• To print more than one copy of the photo, press the + or – button to select the number (up to 99).
• To crop or zoom into your photo, press the Display/Crop button.
• If you're copying more than one photo, press the arrow buttons to select the next photo. Then
repeat the selections above.
10. Press the OK button to continue.
You see a screen like this:
11. To change any of the settings displayed on the LCD screen, press the Menu button, select Paper
and Copy Settings, press the OK button, and select the necessary settings.
12. When you are ready to print, press one of the Start buttons in the Copy section of the control
panel.
Note: To cancel printing, press the Stop button.
Parent topic: Copying
Related references
Paper Type Settings - Copying
Paper Size Settings - Copying
Copying Options
60
Page 61

Related topics
Loading Paper
Placing Originals on the Product
Paper Type Settings - Copying
Select a Paper Type setting that matches the paper you loaded.
Paper type loaded Paper Type setting
Plain paper Plain Paper
EPSON Bright White Paper
EPSON Presentation Paper Matte
EPSON Photo Quality Self-adhesive Sheets
EPSON Iron-on Cool Peel Transfer paper
EPSON Photo Paper Glossy Glossy
EPSON Premium Photo Paper Glossy Prem. Glossy
EPSON Premium Photo Paper Semi-gloss
EPSON Ultra Premium Photo Paper Glossy Ultra Glossy
EPSON Premium Presentation Paper Matte Matte
EPSON Premium Presentation Paper Matte Double-sided
EPSON Ultra Premium Presentation Paper Matte
EPSON Brochure & Flyer Paper Matte Double-sided
Parent topic: Copying
Paper Size Settings - Copying
Select the Paper Size setting that matches the paper you loaded.
Note: You can copy photos only on these paper sizes.
• 4 × 6 inches (102 × 152 mm)
• 5 × 7 inches (127 × 178 mm)
61
Page 62

• 8 × 10 inches (203 × 254 mm)
• Letter (8.5 × 11 inches [216 × 279 mm])
• A4 (8.3 × 11.7 inches [210 × 297 mm])
• 11.7 × 16.5 inches (297 × 420 mm)
• Legal (8.5 × 14 inches [216 × 357 mm])
• 11 × 17 inches (279 × 432 mm)
• 11.7 × 16.5 inches (297 × 420 mm)
Parent topic: Copying
Copying Options
Select the Paper and Copy Settings you want to use for your copies.
Note: Not all options or settings may be available, depending on other copying settings.
Copying option Available settings Description
2-Sided Printing 1>1-Sided Uses the duplexer and ADF to make 2-sided copies
(WorkForce WF7520 only)
1>2-Sided
2>1-Sided
2>2-Sided
Collate Copying On Specifies the page order for multiple copies of documents
Off
Layout Borderless Expandsthe image to the edge of the paper (slight cropping
may occur)
With Border Leaves a small margin around the image
2-up Copy Copies 2 originals on a single sheet
62
Page 63

Copying option Available settings Description
Reduce/Enlarge Custom Size Automatically sizes the image by the percentage you select
Actual Size Copies at 100% size, unless you select a different
percentage as the Custom Size setting
Auto Fit Page Automatically sizes the image to fit the selected paper size
setting
Legal->Letter and Automatically converts from one size to another
other conversions
Paper Size Multiple options Select the paper size loaded in the paper cassette.
Paper Type Multiple options Select the paper type loaded in the paper cassette.
Quality Draft Provideslower quality for draft copies (plain paper only)
Standard Quality Provides good quality for most copies
Best Provides the highest quality for special copies
Document Portrait Specifies the orientation of your originals (only available
Orientation when 2>1-Sided or1>2-Sided isselected)
Landscape
Binding Left Specifies the orientation of your originals when you are
Direction(WorkFo making2-sided copies
rce WF-7520 only)
Top
Binding Left Specifies the orientation of 2-sided copies (only available
Margin(WorkForc when 1>2-Sided is selected)
e WF-7520 only)
Top
Dry Standard Provides longer drying time for 2-sided copies, if smudges
Time(WorkForce or marks appear on the front of the paper when you print on
WF-7520 only) the second side
Long
Longer
Expansion Standard Adjusts the amount of expansion for printing borderless
Medium
photos
Minimum
Parent topic: Copying
63
Page 64

Printing From a Computer
Before printing documents or photos from your computer, make sure you have set up your product and
installed its software as described on the Start Here sheet.
Note: If you have an internet connection, it is a good idea to check for updates to your product software
on Epson's support website.
Printing with Windows
Printing with Mac OS X 10.5, 10.6, or 10.7
Printing with Mac OS X 10.4
Cancelling Printing Using a Product Button
Related tasks
Checking for Software Updates
Printing with Windows
You can print with your product using any Windows printing program, as described in these sections.
Selecting Basic Print Settings - Windows
Selecting Double-sided Printing Settings - Windows
Selecting Additional Layout and Print Options - Windows
Selecting a Printing Preset - Windows
Printing Your Document or Photo - Windows
Selecting Default Print Settings - Windows
Changing Automatic Update Options
Parent topic: Printing From a Computer
Selecting Basic Print Settings - Windows
Select the basic settings for the document or photo you want to print.
1. Open a photo or document for printing.
2. Select the print command in your application.
Note: You may need to select a print icon on your screen, the Print option in the File menu, or
another command. See your application's help utility for details.
64
Page 65

3. If necessary, select your product name as the printer you want to use.
Note: You may also need to select Properties or Preferences to view your print settings.
You see the Main tab of your printer settings window:
Note: The driver images in this manual reflect the WorkForce WF-7520. The instructions apply to
both the WF-7510 and WF-7520 unless otherwise noted.
4. For the Paper Source setting, select the cassette that you want to print from (WF-7520 only). If you
use the Auto Select setting, you need to set a paper size for each source. See the topic on setting
the paper size for each source.
5. Select the size of the paper you loaded as the Document Size setting.
Note: You can also select the User-Defined setting to create a custom paper size. (On the WF-
7520, custom paper sizes are only available for Cassette 1.)
65
Page 66

6. Select the orientation of your document.
Note: If you are printing an envelope, select Landscape.
7. Select the type of paper you loaded as the Paper Type setting.
Note: The setting may not exactly the name of your paper. Check the paper type settings list for
details.
8. Select the Quality setting that matches the print quality you want to use.
9. Select a Color option:
• To print a color document or photo, select the Color setting.
• To print text and graphics in black or shades of gray, select the Black/Grayscale setting.
10. To print on both sides of the paper, select the 2-Sided Printing checkbox and select the options you
want.
11. To print multiple pages on one sheet of paper, or print one image on multiple sheets of paper, select
one of the settings in the Multi-Page menu and select the printing options you want.
12. To print multiple copies and arrange their print order, select the Copies options.
13. To preview your job before printing, select Print Preview.
14. To save your print job as a project that can be modified and combined with other print jobs, select
Job Arranger Lite.
15. To reduce noise during printing when you select Plain Paper/Bright White Paper, select Quiet
Mode.
Paper Source Options - Windows
Print Quality Options - Windows
Multi-Page Printing Options - Windows
Parent topic: Printing with Windows
Related references
Borderless Paper Type Compatibility
Paper or Media Type Settings
Related tasks
Setting the Paper Size for Each Source - Windows
Printing Your Document or Photo - Windows
66
Page 67

Selecting Double-sided Printing Settings - Windows
Paper Source Options - Windows
You can select any of the available options in the Paper Source menu to print from paper loaded in that
source.
Auto Select
Automatically selects the paper source based on the selected paper size.
Paper Cassette 1
Selects the paper in cassette 1 as the paper source.
Paper Cassette 2
Selects the paper in cassette 2 as the paper source.
Parent topic: Selecting Basic Print Settings - Windows
Print Quality Options - Windows
You can select any of the available Quality options to fine-tune the quality of your print. Some settings
may be unavailable, depending on the paper type and border setting you have chosen.
Fast Economy
For the fastest printing with draft quality.
Economy
For fast printing with reduced quality.
Normal
For everyday text and image printing.
Fine
For text and graphics with good quality and print speed.
Quality
For photos and graphics with good quality and print speed.
High Quality
For photos and graphics with high print quality.
Best Quality
For the best print quality, but the slowest print speed.
Parent topic: Selecting Basic Print Settings - Windows
Multi-Page Printing Options - Windows
You can select any of the available options in the Multi-Page menu to set up your multi-page print job.
67
Page 68

2-Up and 4-Up
Prints 2 or 4 pages on one sheet of paper. Click the Page Order button to select page layout and
border options.
2×1 Poster, 2×2 Poster, 3×3 Poster, 4×4 Poster
Prints one image on multiple sheets of paper to create a larger poster. Click the Settings button to
select image layout and guideline options.
Parent topic: Selecting Basic Print Settings - Windows
Selecting Double-sided Printing Settings - Windows
You can print on both sides of the paper by selecting the 2-Sided Printing checkbox on the Main tab.
Note: Some options may be pre-selected or unavailable, depending on other settings you have chosen
or if you are accessing the product over a network.
1. Select the 2-Sided Printing checkbox.
2. WorkForce WF-7520 only: If the Auto checkbox is not automatically selected, do one of the
following:
• Select the Auto checkbox to automatically print your double-sided print job.
• Deselect the Auto checkbox to print your double-sided print job manually by printing one side and
flipping the paper over to print the other side (recommended for paper types that do not support
automatic duplexing).
3. Click the Settings button.
You see this window:
68
Page 69

4. Select the double-sided printing options you want to use.
5. Click OK to return to the Main tab.
6. Click the Print Density button.
You see this window:
69
Page 70

7. Select the type of document you are printing as the Document Type setting. The software
automatically sets the Adjustments options for that document type.
8. If you selected the User-Defined document type, select the Adjustments options you want to use.
9. Click OK to return to the Main tab.
10. Print a test copy of your double-sided document to test the selected settings.
11. Follow any instructions displayed on the screen during printing.
Double-sided Printing Options - Windows
Print Density Adjustments - Windows
Parent topic: Printing with Windows
Double-sided Printing Options - Windows
You can select any of the available options on the 2-Sided Printing Settings window to set up your
double-sided print job.
Binding Edge Options
Select a setting that orients double-sided print binding in the desired direction.
Binding Margin Options
Select options that define a wider margin to allow for binding.
Create Folded Booklet Options
Select the Booklet checkbox and a binding option to print double-sided pages as a booklet.
Parent topic: Selecting Double-sided Printing Settings - Windows
70
Page 71

Print Density Adjustments - Windows
When you select the User-Defined setting(WorkForce WF-7520 only), you can select any of the
available options on the Print Density Adjustment window to adjust the print quality of your double-sided
print job.
Print Density
Sets the level of ink coverage for double-sided printing.
Increase Ink Drying Time
Sets the amount of time required for drying ink after printing on one side of the paper before printing
the other side in double-sided printing to prevent ink smearing.
Parent topic: Selecting Double-sided Printing Settings - Windows
Selecting Additional Layout and Print Options - Windows
You can select a variety of additional layout and printing options for your document or photo on the More
Options tab.
71
Page 72

1. To change the size of your printed document or photo, select the Reduce/Enlarge Document
checkbox and select one of these sizing options:
• Select the Fit to Page option to size your image to fit the paper you loaded. Select the size of the
your document or photo as the Document Size setting, and the size of your paper as the Output
Paper setting.
• Select the Zoom to option to reduce or enlarge your document or photo by a specific percentage.
Select the percentage in the % menu.
2. Select one of the following Color Correction options:
• Select Automatic to automatically adjust the sharpness, brightness, contrast, and color saturation
for your image.
• Select Custom and click the Advanced button to manually adjust the color correction settings or
turn off color management in your printer software.
3. To add a watermark to your printout, select Watermark settings.
4. Select any of the Additional Settings options to customize your print.
Custom Color Correction Options - Windows
Additional Settings Options - Windows
Parent topic: Printing with Windows
Related references
Borderless Paper Type Compatibility
Paper or Media Type Settings
Related tasks
Printing Your Document or Photo - Windows
Custom Color Correction Options - Windows
You can select any of the available options in the Color Correction window to customize the image colors
for your print job.
72
Page 73

Color Controls
Lets you select a Color Mode setting, individual settings for Brightness, Contrast, Saturation, and
Density, and individual color tones. If you select the Adobe RGB color mode, you can also adjust the
midtone density using the Gamma setting.
Fix Photo
Improves the color, contrast, and sharpness of flawed photos.
Note: Fix Photo uses a sophisticated face recognition technology to optimize photos that include
faces. For this to work, both eyes and the nose must be visible in the subject's face. If your photo
includes a face with an intentional color cast, such as a statue, you may want to turn off Fix Photo to
retain the special color effects.
ICM
Lets you manage color using installed color printing profiles.
No Color Adjustment
Turns off color management in your printer software so you can manage color using only your
application software.
73
Page 74

Parent topic: Selecting Additional Layout and Print Options - Windows
Additional Settings Options - Windows
You can select any of the Additional Settings options to customize your print. Some options may be preselected or unavailable, depending on other settings you have chosen.
Rotate 180º
Prints the image rotated 180º from its original orientation.
High Speed
Speeds up printing, but may reduce print quality.
Mirror Image
Flips the printed image left to right.
Edge Smoothing
Smooths jagged edges in low-resolution images such as screen captures or images from the Web.
Fix Red-Eye
Reduces or removes red-eye in photos.
Parent topic: Selecting Additional Layout and Print Options - Windows
Selecting a Printing Preset - Windows
For quick access to common groups of print settings, you can select a printing preset on the Main or
More Options tab.
Note: You can create your own preset by clicking the Add/Remove Presets button.
1. Click the Main or More Options tab.
You see the available Printing Presets options on the left:
74
Page 75

Note: Printing presets may vary depending on model.
2. Place your cursor over a Printing Presets option to view its list of settings.
3. Use any of the available options on the screen to control your printing presets.
4. To choose an option for printing, select it.
5. Click OK.
Parent topic: Printing with Windows
Printing Your Document or Photo - Windows
Once you have selected your print settings, you are ready to save your settings and print.
1. Click OK to save your settings.
75
Page 76

You see your application's Print window, such as this one:
2. Click OK or Print to start printing.
Parent topic: Printing with Windows
Selecting Default Print Settings - Windows
When you change your print settings in a program, the changes apply only while you are printing in that
program session. If you want to change the print settings you use in all your Windows programs, you can
select new default print settings.
1. Right-click the product icon in the Windows taskbar.
2. Select Printer Settings.
You see the printer settings window:
76
Page 77

3. Select the print settings you want to use as defaults in all your Windows programs.
4. Click OK.
These settings are now the defaults selected for printing. You can still change them as needed for
printing in any program session.
Changing the Language of the Printer Software Screens
Parent topic: Printing with Windows
Changing the Language of the Printer Software Screens
You can change the language used on the Windows printer software screens.
1. Right-click the product icon in the Windows taskbar.
2. Select Printer Settings.
You see the printer settings window.
3. Click the Maintenance tab.
77
Page 78

You see the maintenance options:
4. Select the language you want to use as the Language setting.
5. Click OK to close the printer software window.
The printer software screens appear in the language you selected the next time you access them.
Parent topic: Selecting Default Print Settings - Windows
Changing Automatic Update Options
Your printer software for Windows automatically checks for updates to the product driver and firmware.
You can change how often the software checks for updates or disable this feature.
1. Right-click the product icon in the Windows taskbar.
2. Select Auto Update Settings.
You see a window like this:
78
Page 79

3. Do one of the following for each type of update:
• To change how often the software checks for updates, select a setting in the Check every menu.
• To disable the automatic update feature, select the Never option.
4. Click Apply.
5. Click OK to exit.
Note: If you choose to disable the automatic update feature, it's a good idea to periodically check for
updates.
Parent topic: Printing with Windows
Related tasks
Checking for Software Updates
Printing with Mac OS X 10.5, 10.6, or 10.7
You can print with your product using any Mac OS X printing program, as described in these sections.
Selecting Basic Print Settings - Mac OS X 10.5/10.6/10.7
79
Page 80

Selecting Page Setup Settings - Mac OS X 10.5/10.6/10.7
Selecting Print Layout Options - Mac OS X 10.5/10.6/10.7
Sizing Printed Images - Mac OS X 10.5/10.6/10.7
Selecting Double-sided Printing Settings - Mac OS X 10.5/10.6/10.7
Managing Color - Mac OS X 10.5/10.6/10.7
Printing Your Document or Photo - Mac OS X 10.5/10.6/10.7
Selecting Printing Preferences - Mac OS X 10.5/10.6/10.7
Parent topic: Printing From a Computer
Selecting Basic Print Settings - Mac OS X 10.5/10.6/10.7
Select the basic settings for the document or photo you want to print.
1. Open a photo or document for printing.
2. Select the print command in your application.
Note: You may need to select a print icon on your screen, the Print option in the File menu, or
another command. See your application's help utility for details.
3. Select your product as the Printer setting.
4. If necessary, click the arrow next to the Printer setting or the Show Details button to expand the
print window.
You see the expanded printer settings window for your product:
80
Page 81

Note: The print window may look different, depending on the version of Mac OS X and the
application you are using.
5. Select the Copies and Pages settings as necessary.
Note: If you do not see these settings in the print window, check for them in your application before
printing.
6. Select the page setup options: Paper Size and Orientation.
Note: If you do not see these settings in the print window, check for them in your application before
printing. They may be accessible by selecting Page Setup from the File menu.
81
Page 82

7. Select any application-specific settings that appear on the screen, such as those shown in the image
above for the Preview application.
8. Select Print Settings from the pop-up menu.
You see these settings:
82
Page 83

9. Select the Paper Source you wish to print from.
Note: On the WF-7520, if you use the Auto Select setting, you need to set a paper size for each
source. See the topic on setting a paper size for each source.
10. Select the type of paper you loaded as the Media Type setting.
Note: The setting may not exactly match the name of your paper. Check the paper type settings list
for details.
11. Select the Print Quality setting you want to use.
12. Select any of the available print options.
Paper Source Options - Mac OS X 10.5/10.6/10.7
Print Quality Options - Mac OS X 10.5/10.6/10.7
Print Options - Mac OS X 10.5/10.6/10.7
83
Page 84

Parent topic: Printing with Mac OS X 10.5, 10.6, or 10.7
Related references
Paper or Media Type Settings
Related tasks
Setting the Paper Size for Each Source - Mac OS X
Selecting Page Setup Settings - Mac OS X 10.5/10.6/10.7
Printing Your Document or Photo - Mac OS X 10.5/10.6/10.7
Paper Source Options - Mac OS X 10.5/10.6/10.7
You can select any of the available options in the Paper Source menu to print from paper loaded in that
source.
Auto Select
Automatically selects the paper source based on the selected paper size.
Paper Cassette 1
Selects the paper in cassette 1 as the paper source.
Paper Cassette 2
Selects the paper in cassette 2 as the paper source.
Parent topic: Selecting Basic Print Settings - Mac OS X 10.5/10.6/10.7
Print Quality Options - Mac OS X 10.5/10.6/10.7
You can select any of the available Print Quality options to fine-tune the quality of your print. Some
settings may be unavailable, depending on the paper type and border setting you have chosen.
Fast Economy
For the fastest printing with draft quality.
Economy
For fast printing with reduced quality.
Normal
For everyday text and image printing.
Fine
For text and graphics with good quality and print speed.
Quality
For photos and graphics with good quality and print speed.
High Quality
For photos and graphics with high print quality.
84
Page 85
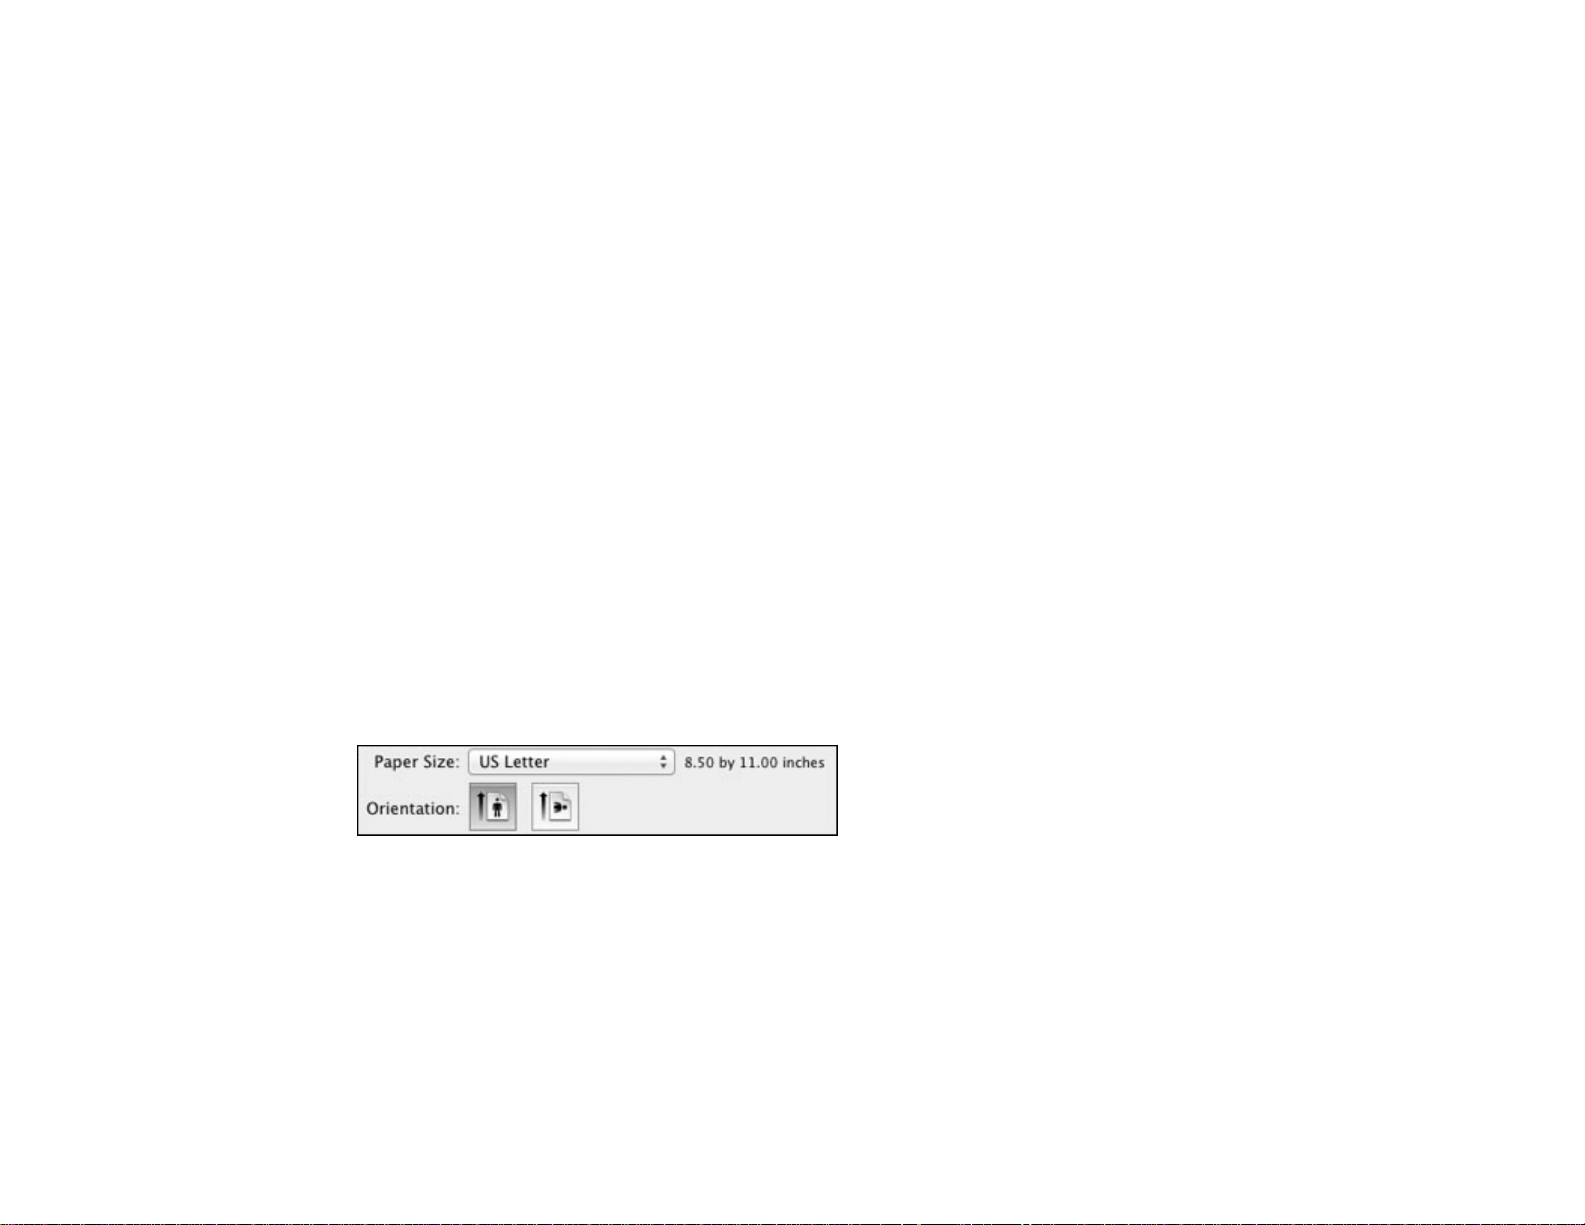
Best Quality
For the best print quality, but the slowest print speed.
Parent topic: Selecting Basic Print Settings - Mac OS X 10.5/10.6/10.7
Print Options - Mac OS X 10.5/10.6/10.7
You can select any of the print options to customize your print. Some options may be unavailable,
depending on other settings you have chosen.
Expansion
If you selected a borderless paper size setting, adjusts the image expansion settings to control
printing at the edges of borderless prints.
Grayscale
Prints text and graphics in black or shades of gray.
Mirror Image
Flips the printed image left to right.
Note: If you select the Min option for the Expansion setting, you may see white borders on your printed
photo.
Parent topic: Selecting Basic Print Settings - Mac OS X 10.5/10.6/10.7
Selecting Page Setup Settings - Mac OS X 10.5/10.6/10.7
Depending on your application, you may be able to select the paper size and orientation settings from
the print window.
Note: If you do not see these settings in the print window, check for them in your application before
printing. They may be accessible by selecting Page Setup from the File menu.
85
Page 86

1. Select the size of the paper you loaded as the Paper Size setting. If you are printing a borderless
photo, select a paper size with a Borderless option. You may also select Manage Custom Sizes to
create a custom paper size. On the WF-7520, custom paper sizes are only available for Cassette 1.
Note: You must select a compatible borderless paper type and size to print borderlessly. Check the
borderless paper compatibility list for details.
2. Select the orientation of your document or photo as shown in the print window.
Note: If you are printing an envelope, select the icon.
Note: You can reduce or enlarge the size of the printed image by selecting Paper Handling from the
pop-up menu and selecting a scaling option.
Parent topic: Printing with Mac OS X 10.5, 10.6, or 10.7
Related references
Borderless Paper Type Compatibility
Selecting Print Layout Options - Mac OS X 10.5/10.6/10.7
You can select a variety of layout options for your document or photo by selecting Layout from the popup menu on the print window.
86
Page 87

• To print multiple pages on one sheet of paper, select the number of pages in the Pages per Sheet
pop-up menu. To arrange the print order of the pages, select a Layout Direction setting.
• To print borders around each page on the sheet, select a line setting from the Border pop-up menu.
• To invert or flip the printed image, select the Reverse page orientation or Flip horizontally settings.
Parent topic: Printing with Mac OS X 10.5, 10.6, or 10.7
Sizing Printed Images - Mac OS X 10.5/10.6/10.7
You can adjust the size of the image as you print it by selecting Paper Handling from the pop-up menu
on the Print window.
• To print only selected pages in a multi-page document, select an option from the Pages to Print pop-
up menu.
• To adjust the order in which pages are printed, select an option from the Page Order pop-up menu.
• To scale the image to fit on a specific paper size, select the Scale to fit paper size checkbox and
select a paper size from the Destination Paper Size pop-up menu.
Parent topic: Printing with Mac OS X 10.5, 10.6, or 10.7
Selecting Double-sided Printing Settings - Mac OS X 10.5/10.6/10.7
You can print on both sides of the paper by selecting Two-sided Printing Settings from the pop-up
menu on the print window(WorkForce WF-7520 only).
87
Page 88

Note: Some options may be pre-selected or unavailable, depending on other settings you have chosen
or if you are accessing the product over a network. This screen may be different, depending on the
version of Mac OS X you are using.
1. Select one of the Two-sided Printing options.
88
Page 89

2. Select the type of document you are printing as the Document Type setting. The software
automatically sets the Adjustments options for that document type.
3. If necessary, customize the Adjustments settings as instructed on the screen.
4. Print a test copy of your double-sided document to test the selected settings.
5. Follow any instructions displayed on the screen during printing.
Double-sided Printing Options and Adjustments - Mac OS X
Parent topic: Printing with Mac OS X 10.5, 10.6, or 10.7
Double-sided Printing Options and Adjustments - Mac OS X
You can select any of the available options in the Two-sided Printing Settings or Output Settings
pop-up menu to set up your double-sided print job.
Two-sided Printing Options
Long-Edge binding
Orients double-sided printed pages to be bound on the long edge of the paper.
89
Page 90

Short-Edge binding
Orients double-sided printed pages to be bound on the short edge of the paper.
Adjustments
Print Density
Sets the level of ink coverage for double-sided printing.
Increased Ink Drying Time
Sets the amount of time required for drying ink after printing on one side of the paper before printing
the other side in double-sided printing.
Parent topic: Selecting Double-sided Printing Settings - Mac OS X 10.5/10.6/10.7
Managing Color - Mac OS X 10.5/10.6/10.7
You can adjust the Color Matching and Color Options settings to fine-tune the colors in your printout, or
turn off color management in your printer software.
1. Select Color Matching from the pop-up menu in the print window.
2. Select one of the available options.
90
Page 91

3. Select Color Options from the pop-up menu in the print window.
Note: The available settings on the Color Options menu depend on the option you selected on the
Color Matching menu.
4. Select one of the available options.
Color Matching and Color Options - Mac OS X 10.5/10.6/10.7
Parent topic: Printing with Mac OS X 10.5, 10.6, or 10.7
Color Matching and Color Options - Mac OS X 10.5/10.6/10.7
You can select from these settings on the Color Matching and Color Options menus.
Color Matching Settings
EPSON Color Controls
Lets you manage color using controls in your printer software, or turn off color management.
ColorSync
Prints using standard color profiles for your product and paper to help match image colors. You can
customize the conversion method and filter settings on the ColorSync pop-up menu in the print
window.
91
Page 92

Color Options Settings
Manual Settings
Lets you select manual color adjustments. Click the arrow next to Advanced Settings and select
settings for Brightness, Contrast, Saturation, and individual color tones. You can also select a color
Mode setting for printing photos and graphics. If you select the Adobe RGB color mode, you can also
adjust the midtone density using the Gamma setting.
Fix Photo
Improves the color, contrast, and sharpness of flawed photos.
Note: Fix Photo uses a sophisticated face recognition technology to optimize photos that include
faces. For this to work, both eyes and the nose must be visible in the subject's face. If your photo
includes a face with an intentional color cast, such as a statue, you may want to turn off Fix Photo to
retain the special color effects.
Fix Red-Eye
Reduces or removes red-eye in photos.
Off (No Color Adjustment)
Turns off color management in your printer software so you can manage color using only your
application software.
Parent topic: Managing Color - Mac OS X 10.5/10.6/10.7
Printing Your Document or Photo - Mac OS X 10.5/10.6/10.7
Once you have selected your print settings, you are ready to print.
Click Print at the bottom of the print window.
92
Page 93
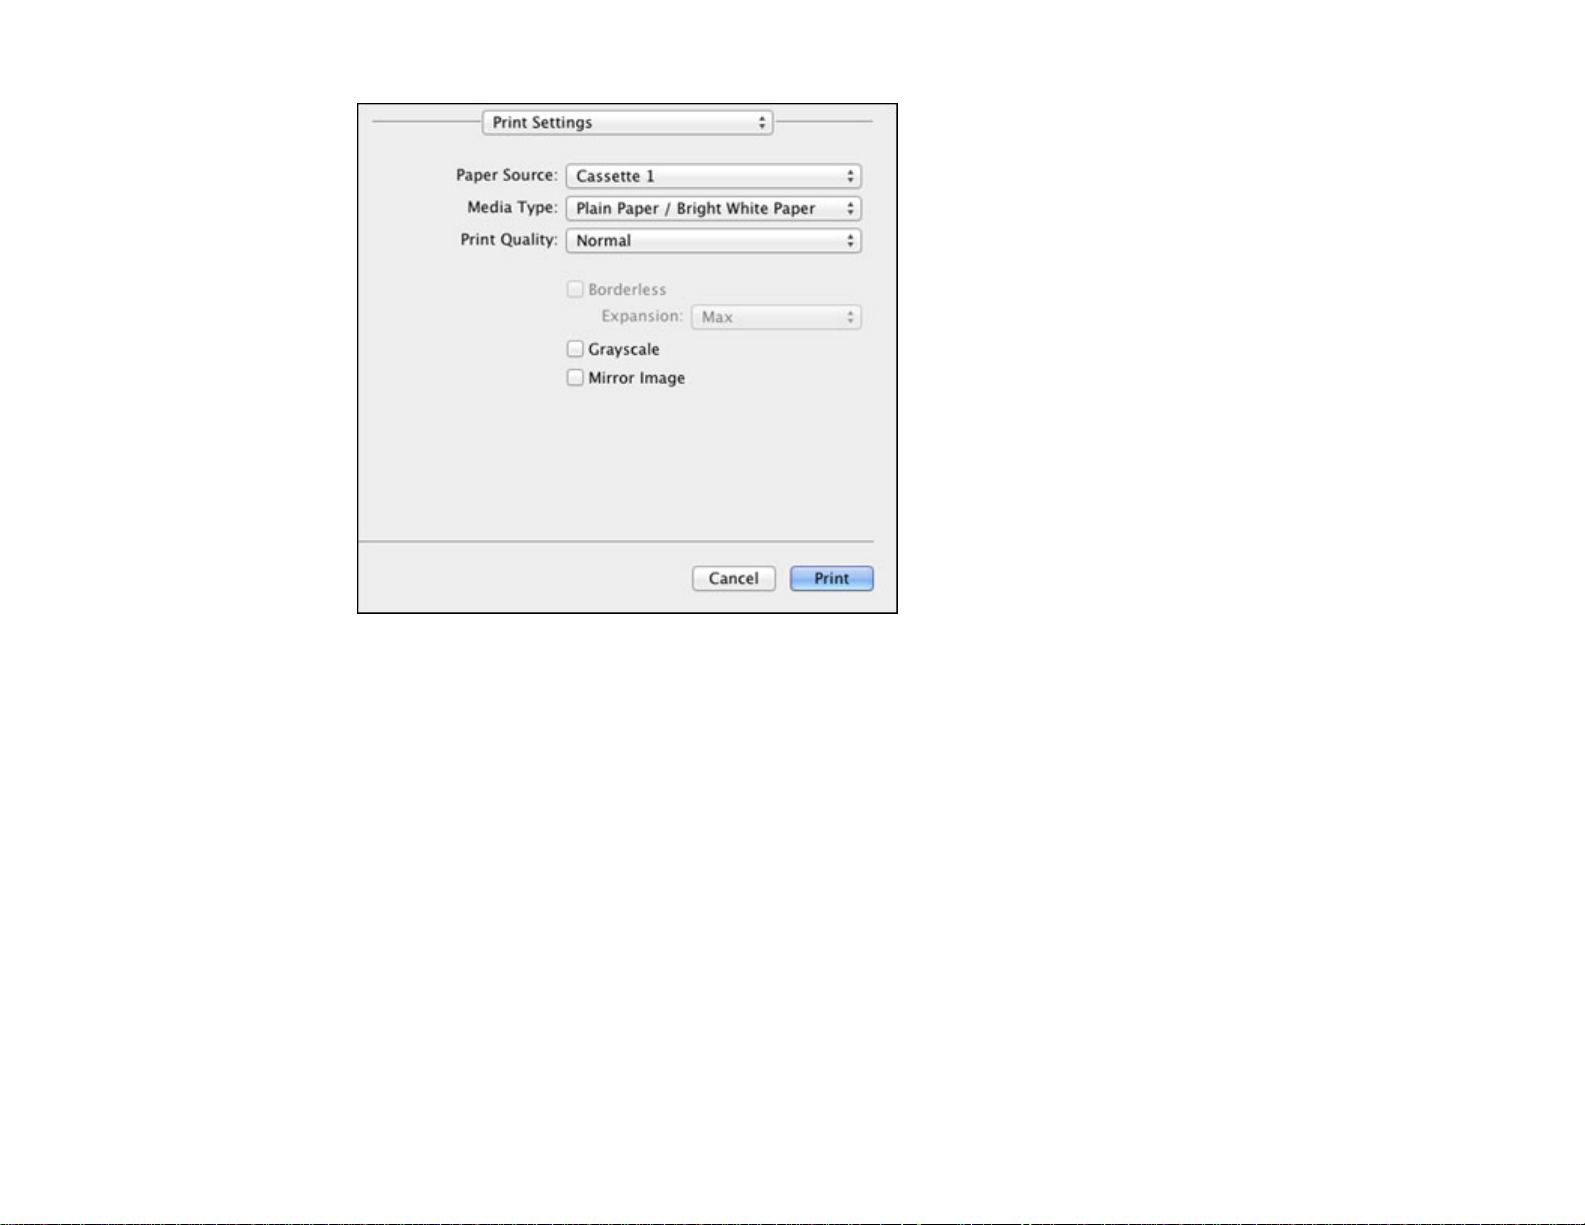
Checking Print Status - Mac OS X 10.5/10.6/10.7
Parent topic: Printing with Mac OS X 10.5, 10.6, or 10.7
Checking Print Status - Mac OS X 10.5/10.6/10.7
During printing, you can view the progress of your print job, control printing, and check ink cartridge
status.
1. Click the printer icon when it appears in the Dock.
You see the print status window:
93
Page 94

2. Select the following options as necessary:
• To cancel printing, click the print job and click Delete.
• To pause a print job, click the print job and click Hold. To resume a print job, click the print job
marked "Hold" and click Resume.
• To pause printing for all queued print jobs, click Pause Printer.
• To check ink status, click Supply Levels.
Parent topic: Printing Your Document or Photo - Mac OS X 10.5/10.6/10.7
Selecting Printing Preferences - Mac OS X 10.5/10.6/10.7
You can select printing preferences that apply to all the print jobs you send to your product.
1. In the Apple menu or the Dock, select System Preferences.
2. Select Print & Fax or Print & Scan, select your product, and select Options & Supplies.
3. Select Driver.
You see this screen:
94
Page 95

4. Select any of the available printing preferences.
5. Click OK.
Printing Preferences - Mac OS X 10.5/10.6/10.7
Parent topic: Printing with Mac OS X 10.5, 10.6, or 10.7
Printing Preferences - Mac OS X 10.5/10.6/10.7
You can select from these settings on the Driver tab.
Skip Blank Page
Ensures that your product does not print pages that contain no text or images.
Quiet Mode
Lessens noise during printing when you select Plain Paper/Bright White Paper as the paper Type or
Media Type setting.
High Speed Printing
Speeds up printing, but may reduce print quality.
Parent topic: Selecting Printing Preferences - Mac OS X 10.5/10.6/10.7
Printing with Mac OS X 10.4
You can print with your product using any Mac OS X printing program, as described in these sections.
95
Page 96

Note: For the WF-7510, the printer driver software is not supported on Mac OS X 10.4
Selecting Page Setup Settings - Mac OS X 10.4
Selecting Basic Print Settings - Mac OS X 10.4
Selecting Print Layout Options - Mac OS X 10.4
Sizing Printed Images - Mac OS X 10.4
Selecting Double-sided Printing Settings - Mac OS X 10.4
Managing Color - Mac OS X 10.4
Selecting Printing Preferences - Mac OS X 10.4
Printing Your Document or Photo - Mac OS X 10.4
Parent topic: Printing From a Computer
Selecting Page Setup Settings - Mac OS X 10.4
Select the page setup settings for the document or photo you want to print.
1. Open a photo or document for printing.
2. Select the Page Setup command in your application.
Note: You may need to select a print icon on your screen, the Page Setup option in the File menu,
or another command. See your application's help utility for details.
96
Page 97

3. Select your product as the Format for setting.
4. Select the size of the paper you loaded as the Paper Size setting. If you are printing a borderless
photo, select a paper size with a (Borderless) option. You can also select Manage Custom Sizes
to create a custom paper size. (Custom paper sizes are only available for Cassette 1.)
Note: You must select a compatible borderless paper type and size to print borderlessly. Check the
borderless paper compatibility list for details.
5. Select the orientation of your document or photo as shown in the page setup window.
Note: If you are printing an envelope, select the icon.
6. To reduce or enlarge the size of the printed image, select a different Scale setting.
7. Click OK to close the window.
Parent topic: Printing with Mac OS X 10.4
Related references
Borderless Paper Type Compatibility
97
Page 98

Related tasks
Selecting Basic Print Settings - Mac OS X 10.4
Selecting Basic Print Settings - Mac OS X 10.4
Select the basic settings for the document or photo you want to print.
1. Select the print command in your application.
Note: You may need to select a print icon on your screen, the Print option in the File menu, or
another command. See your application's help utility for details.
2. Select your product as the Printer setting.
3. Select the Copies and Pages settings as necessary.
Note: If you do not see these settings in the print window, check for them in your application before
printing. In some applications, you may need to select Advanced before you can see these settings.
98
Page 99

4. Select Print Settings from the pop-up menu.
5. Select the Paper Source you wish to print from (WF-7520 only).
Note: If you use the Auto Select setting, you need to set a paper size for each source. See the topic
on setting a paper size for each source.
6. Select the type of paper you loaded as the Media Type setting.
Note: The setting may not exactly match the name of your paper. Check the paper type settings list
for details.
7. Select the Print Quality setting you want to use.
8. Select any of the available print options.
Paper Source Options - Mac OS X 10.4
Print Quality Options - Mac OS X 10.4
99
Page 100

Print Options - Mac OS X 10.4
Parent topic: Printing with Mac OS X 10.4
Related references
Paper or Media Type Settings
Related tasks
Setting the Paper Size for Each Source - Mac OS X
Printing Your Document or Photo - Mac OS X 10.4
Paper Source Options - Mac OS X 10.4
You can select any of the available options in the Paper Source menu to print from paper loaded in that
source.
Auto Select
Automatically selects the paper source based on the selected paper size.
Paper Cassette 1
Selects the paper in cassette 1 as the paper source.
Paper Cassette 2
Selects the paper in cassette 2 as the paper source.
Parent topic: Selecting Basic Print Settings - Mac OS X 10.4
Print Quality Options - Mac OS X 10.4
You can select any of the available Print Quality options to fine-tune the quality of your print. Some
settings may be unavailable, depending on the paper type and border setting you have chosen.
Fast Economy
For the fastest printing with draft quality.
Economy
For fast printing with reduced quality.
Normal
For everyday text and image printing.
Fine
For text and graphics with good quality and print speed.
Quality
For photos and graphics with good quality and print speed.
High Quality
For photos and graphics with high print quality.
100
 Loading...