

Page 1

Artisan
®
1430 User's Guide
Page 2

Page 3

Contents
Artisan 1430 User's Guide.......................................................................................................................... 9
Product Basics .......................................................................................................................................... 10
Loading Paper ........................................................................................................................................... 16
Printing From a Computer........................................................................................................................ 28
Printer Parts Locations....................................................................................................................... 10
Printer Parts - Top ......................................................................................................................... 10
Printer Parts - Back........................................................................................................................ 11
Printer Parts - Inside...................................................................................................................... 12
Printer Parts - Control Panel Buttons and Lights ........................................................................... 13
The Power Off Timer.......................................................................................................................... 13
Changing the Power Off Timer Setting - Windows......................................................................... 14
Changing the Power Off Timer Setting - Mac OS X....................................................................... 14
Loading Paper ................................................................................................................................... 16
Loading Envelopes ............................................................................................................................ 19
Paper Loading Capacity..................................................................................................................... 21
Available EPSON Papers................................................................................................................... 22
Borderless Paper Type Compatibility................................................................................................. 25
Paper or Media Type Settings............................................................................................................ 26
Printing with Windows........................................................................................................................ 28
Selecting Basic Print Settings - Windows...................................................................................... 28
Basic Print Options - Windows.................................................................................................. 30
Selecting Advanced Print Settings - Windows............................................................................... 31
Advanced Print Quality Settings - Windows.............................................................................. 33
Advanced Print Options - Windows........................................................................................... 33
Color Management Options - Windows .................................................................................... 34
Selecting Print Layout Options - Windows..................................................................................... 34
Selecting a Printing Preset - Windows........................................................................................... 36
Printing Your Document or Photo - Windows ................................................................................ 37
Checking Print Status - Windows.............................................................................................. 38
Selecting Default Print Settings - Windows.................................................................................... 39
3
Page 4

Changing the Language of the Printer Software Screens......................................................... 40
Changing Automatic Update Options ............................................................................................ 42
Printing with Mac OS X 10.5, 10.6, or 10.7......................................................................................... 43
Selecting Basic Print Settings - Mac OS X 10.5/10.6/10.7............................................................. 43
Print Quality Settings - Mac OS X 10.5/10.6/10.7 ..................................................................... 47
Print Options - Mac OS X 10.5/10.6/10.7.................................................................................. 47
Selecting Page Setup Settings - Mac OS X 10.5/10.6/10.7........................................................... 47
Selecting Print Layout Options - Mac OS X 10.5/10.6/10.7........................................................... 48
Managing Color - Mac OS X 10.5/10.6/10.7.................................................................................. 49
Color Matching and Color Options - Mac OS X 10.5/10.6/10.7................................................. 50
Selecting Printing Preferences - Mac OS X 10.5/10.6/10.7........................................................... 51
Printing Preferences - Mac OS X 10.5/10.6/10.7...................................................................... 52
Printing Your Document or Photo - Mac OS X 10.5/10.6/10.7....................................................... 52
Checking Print Status - Mac OS X 10.5/10.6/10.7 .................................................................... 53
Printing with Mac OS X 10.4............................................................................................................... 54
Selecting Page Setup Settings - Mac OS X 10.4........................................................................... 55
Selecting Basic Print Settings - Mac OS X 10.4............................................................................. 56
Print Quality Settings - Mac OS X 10.4 ..................................................................................... 58
Print Options - Mac OS X 10.4.................................................................................................. 58
Selecting Print Layout Options - Mac OS X 10.4........................................................................... 59
Managing Color - Mac OS X 10.4.................................................................................................. 59
Color Options - Mac OS X 10.4................................................................................................. 60
Selecting Printing Preferences - Mac OS X 10.4........................................................................... 60
Printing Preferences - Mac OS X 10.4...................................................................................... 61
Printing Your Document or Photo - Mac OS X 10.4....................................................................... 61
Checking Print Status - Mac OS X 10.4 .................................................................................... 62
Cancelling Printing Using a Product Button........................................................................................ 63
Using an External Device with Your Product.......................................................................................... 64
Wireless Printing from a Mobile Device.............................................................................................. 64
Printing From a Camera Connected to Your Product......................................................................... 64
Printing on CDs/DVDs............................................................................................................................... 66
Loading a CD/DVD............................................................................................................................. 66
Removing a Printed CD/DVD............................................................................................................. 70
4
Page 5

Printing on CDs/DVDs from a Computer............................................................................................ 70
Printing on a CD/DVD with Windows............................................................................................. 70
Designing a CD/DVD - Windows............................................................................................... 71
Printing Your CD/DVD Design - Windows................................................................................. 71
Adjusting CD/DVD Print Position - Windows............................................................................. 72
Adjusting CD/DVD Print Quality - Windows .............................................................................. 74
Printing on a CD/DVD with Mac OS X ........................................................................................... 76
Designing a CD/DVD - Mac OS X ............................................................................................ 76
Printing Your CD/DVD Design - Mac OS X............................................................................... 77
Adjusting CD/DVD Print Position - Mac OS X........................................................................... 78
Adjusting CD/DVD Print Quality - Mac OS X............................................................................. 80
Replacing Ink Cartridges.......................................................................................................................... 82
Check Cartridge Status...................................................................................................................... 82
Checking Cartridge Status Lights.................................................................................................. 82
Checking Cartridge Status with Windows...................................................................................... 82
Checking Cartridge Status with Mac OS X.................................................................................... 85
Purchase EPSON Ink Cartridges....................................................................................................... 86
Ink Cartridge Part Numbers........................................................................................................... 86
Removing and Installing Ink Cartridges.............................................................................................. 87
Adjusting Print Quality.............................................................................................................................. 93
Print Head Maintenance..................................................................................................................... 93
Print Head Nozzle Check............................................................................................................... 93
Checking the Nozzles Using the Product Buttons..................................................................... 93
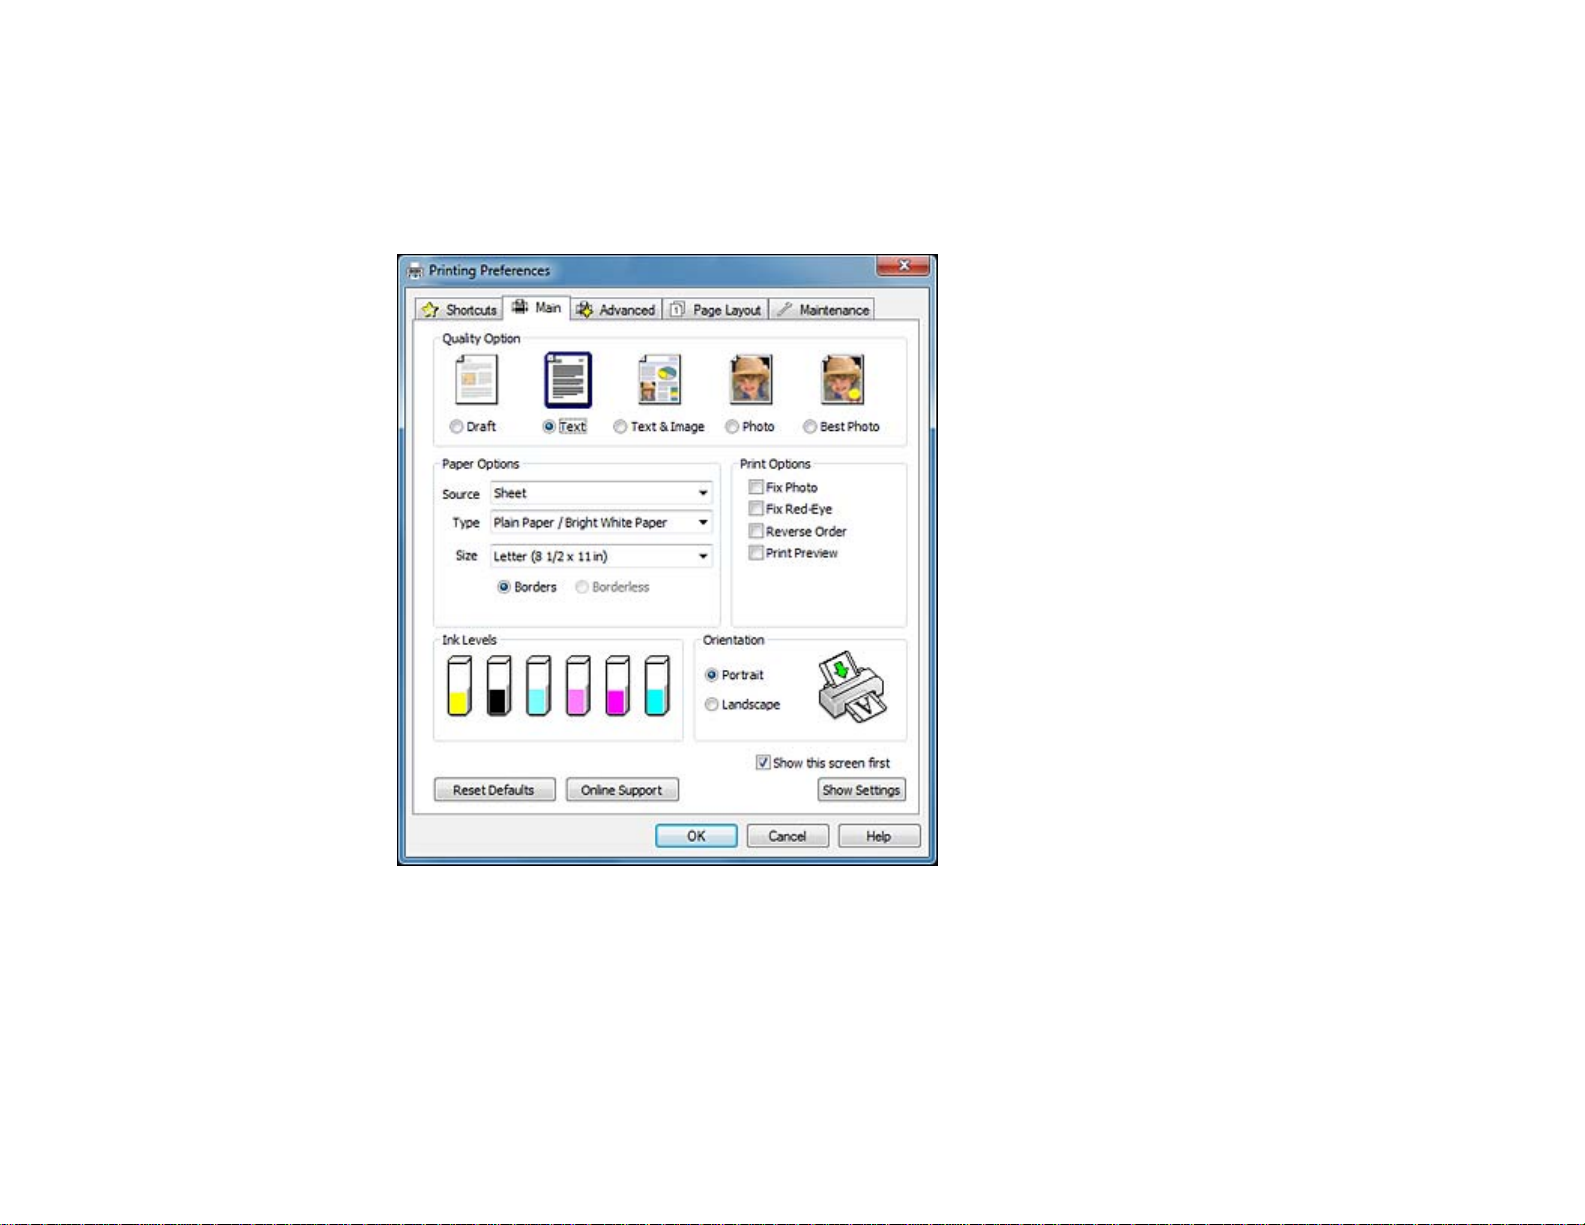
Checking the Nozzles Using a Computer Utility........................................................................ 95
Print Head Cleaning ...................................................................................................................... 98
Cleaning the Print Head Using the Product Buttons.................................................................. 98
Cleaning the Print Head Using a Computer Utility................................................................... 100
Print Head Alignment ....................................................................................................................... 102
Aligning the Print Head Using a Computer Utility......................................................................... 103
Cleaning the Paper Path.................................................................................................................. 105
Cleaning and Transporting the Product................................................................................................ 107
Cleaning the Product........................................................................................................................ 107
Transporting the Product.................................................................................................................. 107
5
Page 6

Solving Problems.................................................................................................................................... 110
Checking for Software Updates........................................................................................................ 110
Printer Light Status........................................................................................................................... 110
Running a Printer Check.................................................................................................................. 113
Solving Setup Problems................................................................................................................... 114
Noise After Ink Installation........................................................................................................... 114
Software Installation Problems.................................................................................................... 115
Solving Network Problems............................................................................................................... 115
Product Cannot Connect to a Wireless Router or Access Point .................................................. 115
Network Software Cannot Find Product on a Network................................................................. 116
Product Does Not Appear in Mac OS X Printer Window.............................................................. 116
Cannot Print Over a Network....................................................................................................... 117
Printing a Network Status Sheet.................................................................................................. 117
Solving Paper Problems................................................................................................................... 117
Paper Feeding Problems............................................................................................................. 118
Paper Jam Problems................................................................................................................... 118
Paper Ejection Problems............................................................................................................. 119
Solving Problems Printing from a Computer .................................................................................... 119
Nothing Prints.............................................................................................................................. 120
Noise Occurs, But Nothing Prints................................................................................................ 120
Noise When Product Sits for a While........................................................................................... 121
Product Icon Does Not Appear in Windows Taskbar................................................................... 121
Error After Cartridge Replacement.............................................................................................. 121
Printing is Slow............................................................................................................................ 122
Solving Page Layout and Content Problems.................................................................................... 123
Inverted Image ............................................................................................................................ 123
Too Many Copies Print................................................................................................................ 123
Blank Pages Print........................................................................................................................ 124
Incorrect Margins on Printout....................................................................................................... 124
Incorrect Characters Print............................................................................................................ 125
Incorrect Image Size or Position.................................................................................................. 125
Slanted Printout........................................................................................................................... 126
Solving Print Quality Problems......................................................................................................... 126
6
Page 7

White or Dark Lines in Printout.................................................................................................... 127
Blurry or Smeared Printout.......................................................................................................... 127
Faint Printout or Printout Has Gaps............................................................................................. 129
Grainy Printout............................................................................................................................. 129
Incorrect Colors........................................................................................................................... 130
When to Uninstall Your Product Software ........................................................................................ 131
Uninstalling Printing Software - Windows.................................................................................... 131
Uninstalling Product Software - Mac OS X.................................................................................. 131
Where to Get Help............................................................................................................................ 132
Technical Specifications ........................................................................................................................ 134
Windows System Requirements ...................................................................................................... 134
Mac System Requirements.............................................................................................................. 135
Printing Specifications...................................................................................................................... 135
Paper Specifications ........................................................................................................................ 135
Printable Area Specifications ........................................................................................................... 137
Ink Cartridge Specifications.............................................................................................................. 140
Dimension Specifications................................................................................................................. 140
Electrical Specifications ................................................................................................................... 141
Environmental Specifications........................................................................................................... 141
Interface Specifications.................................................................................................................... 142
Network Interface Specifications...................................................................................................... 142
Safety and Approvals Specifications................................................................................................ 142
Notices ..................................................................................................................................................... 144
FCC Compliance Statement............................................................................................................. 144
Software Notices.............................................................................................................................. 145
Trademarks...................................................................................................................................... 149
Copyright Notice............................................................................................................................... 150
A Note Concerning Responsible Use of Copyrighted Materials................................................... 151
Default Delay Times for Power Management for EPSON Products ............................................ 151
Copyright Attribution.................................................................................................................... 151
7
Page 8

Page 9

Artisan 1430 User's Guide
Welcome to the Artisan 1430 User's Guide.
9
Page 10
Product Basics
See these sections to learn about the basic features of your product.
Printer Parts Locations
The Power Off Timer
Printer Parts Locations
See these sections to identify the parts on your printer.
Printer Parts - Top
Printer Parts - Back
Printer Parts - Inside
Printer Parts - Control Panel Buttons and Lights
Parent topic: Product Basics
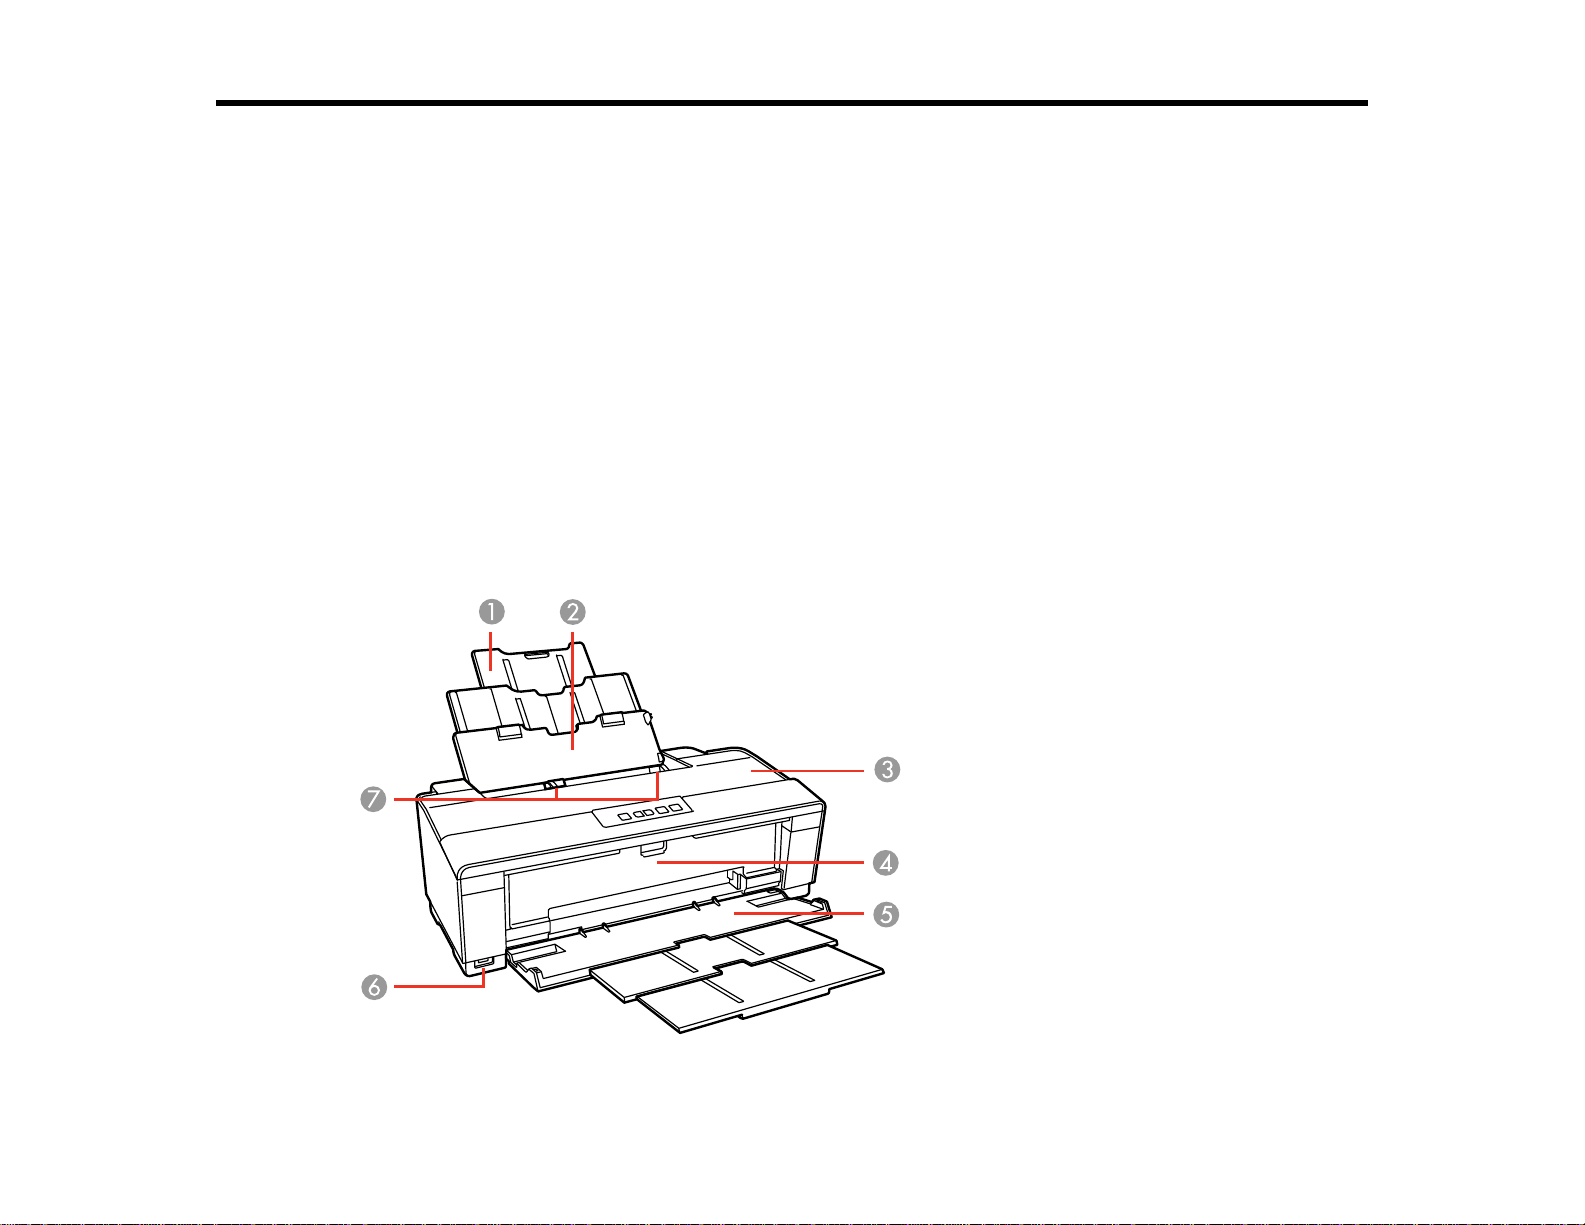
Printer Parts - Top
10
Page 11
1 Paper support
2 Sheet feeder
3 Printer cover
4 CD/DVD feed tray
5 Output tray
6 USB Type A port for external devices
7 Edge guides
Parent topic: Printer Parts Locations
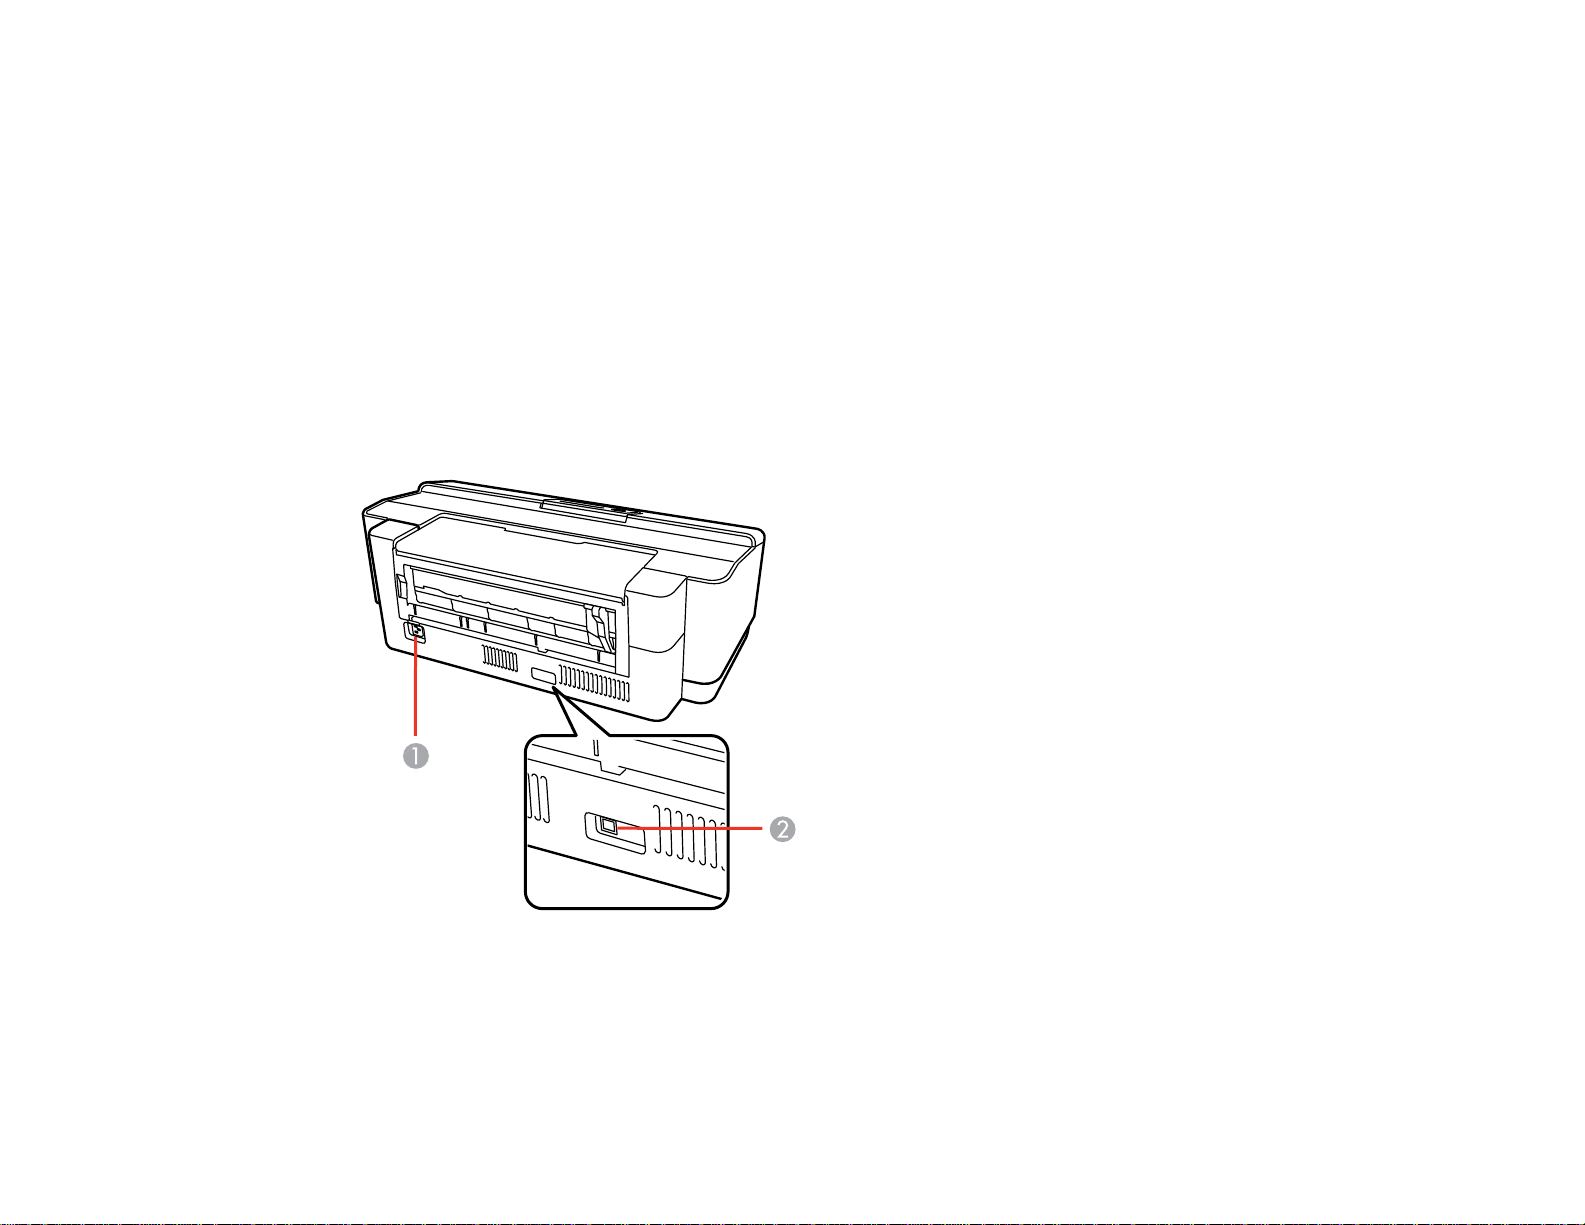
Printer Parts - Back
1 AC inlet
2 USB port for computer connection
Parent topic: Printer Parts Locations
11
Page 12
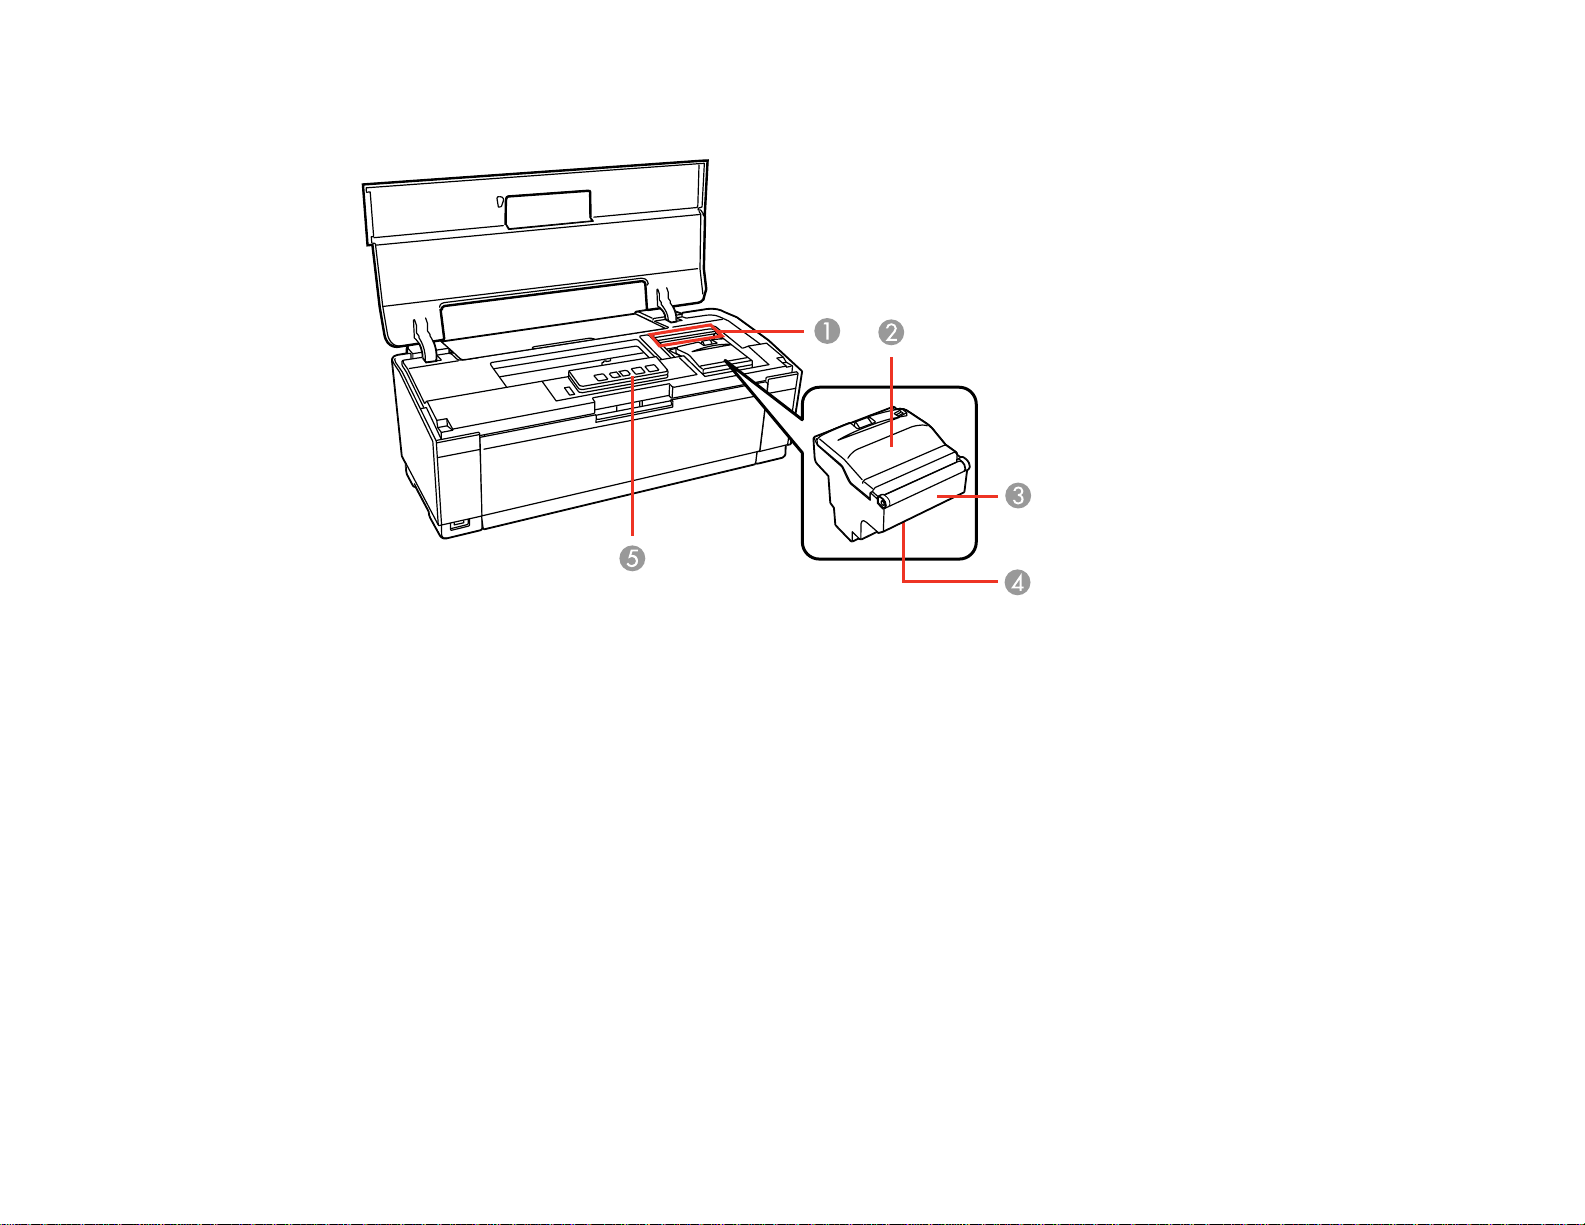
Printer Parts - Inside
1 Ink cartridge lights
2 Ink cartridge cover
3 Ink cartridge holder (do not remove)
4 Print head
5 Control panel
Parent topic: Printer Parts Locations
12
Page 13
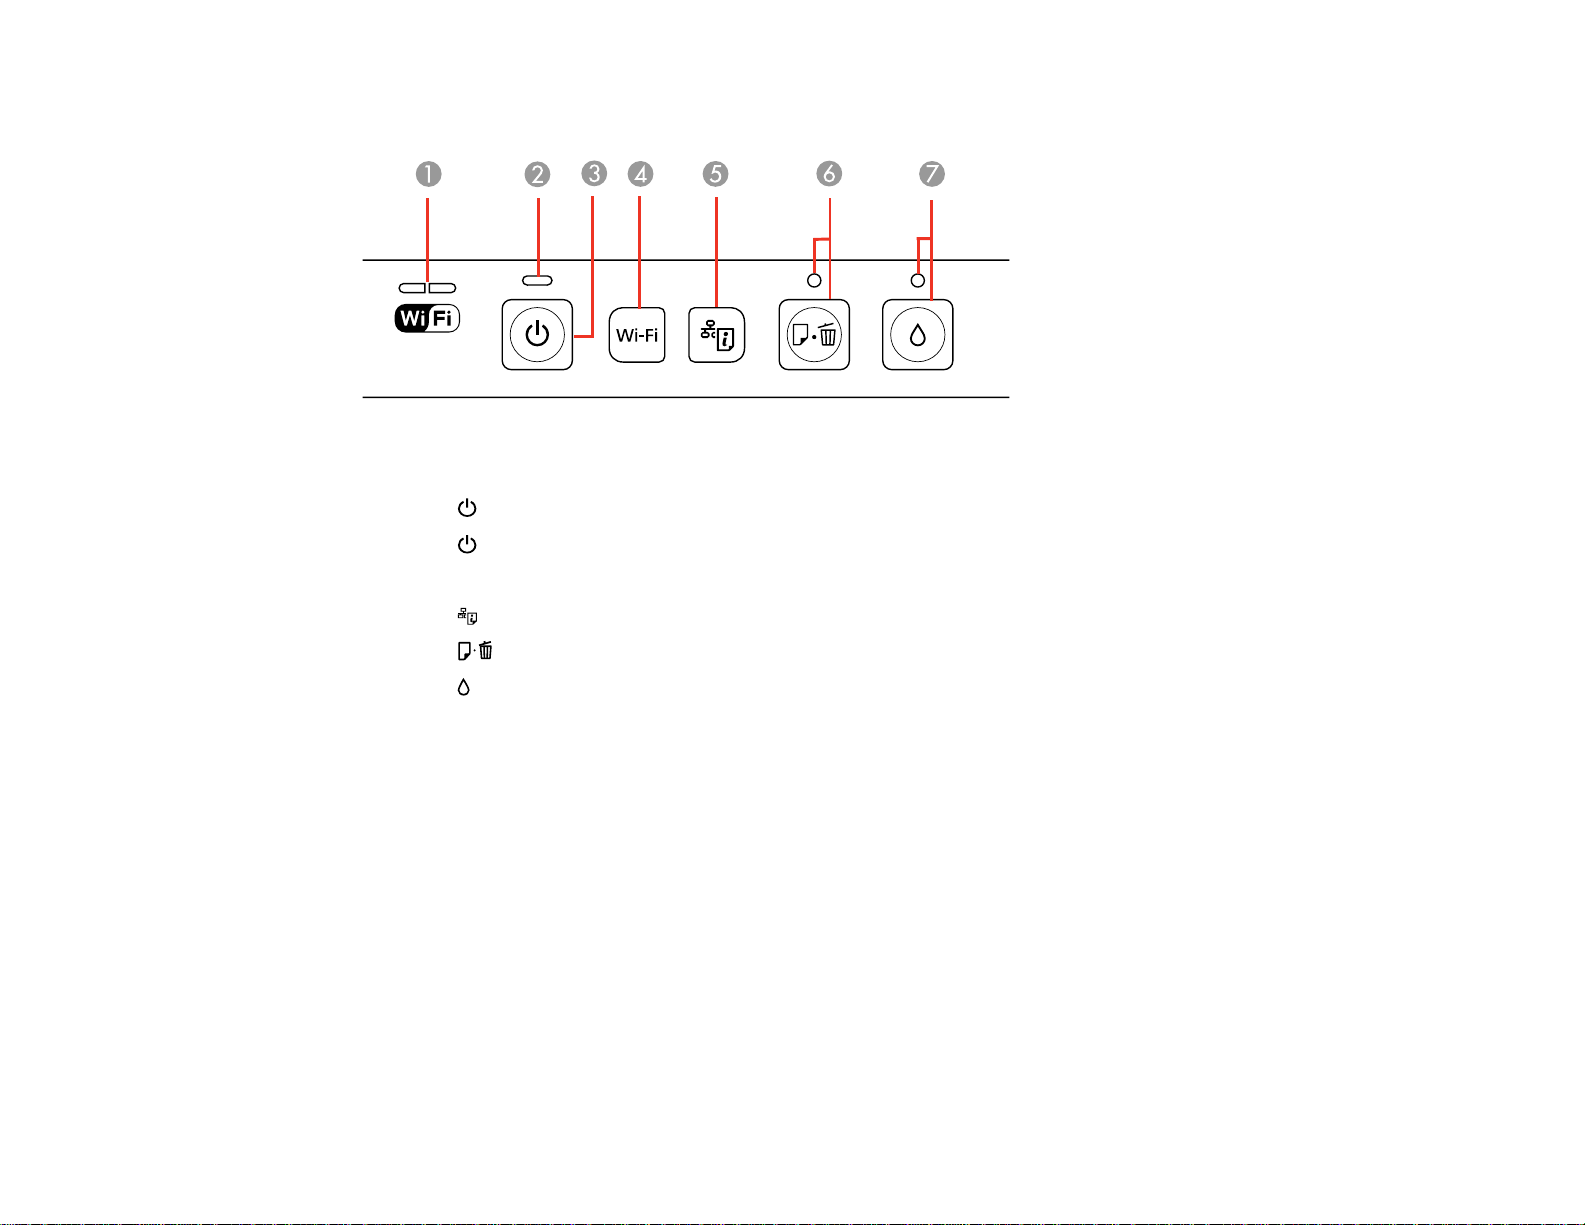
Printer Parts - Control Panel Buttons and Lights
1 The WiFi light
2
The power light
3
The power button
4 The Wi-Fi button
5 The network status button
6
The paper/cancel button and light
7 The ink button and light
Parent topic: Printer Parts Locations
Related references
Printer Light Status
The Power Off Timer
The product turns off automatically if it is not used for a period of time after it enters sleep mode. You can
adjust the time period before power off, but increasing the time reduces the product's energy efficiency.
Changing the Power Off Timer Setting - Windows
Changing the Power Off Timer Setting - Mac OS X
Parent topic: Product Basics
13
Page 14
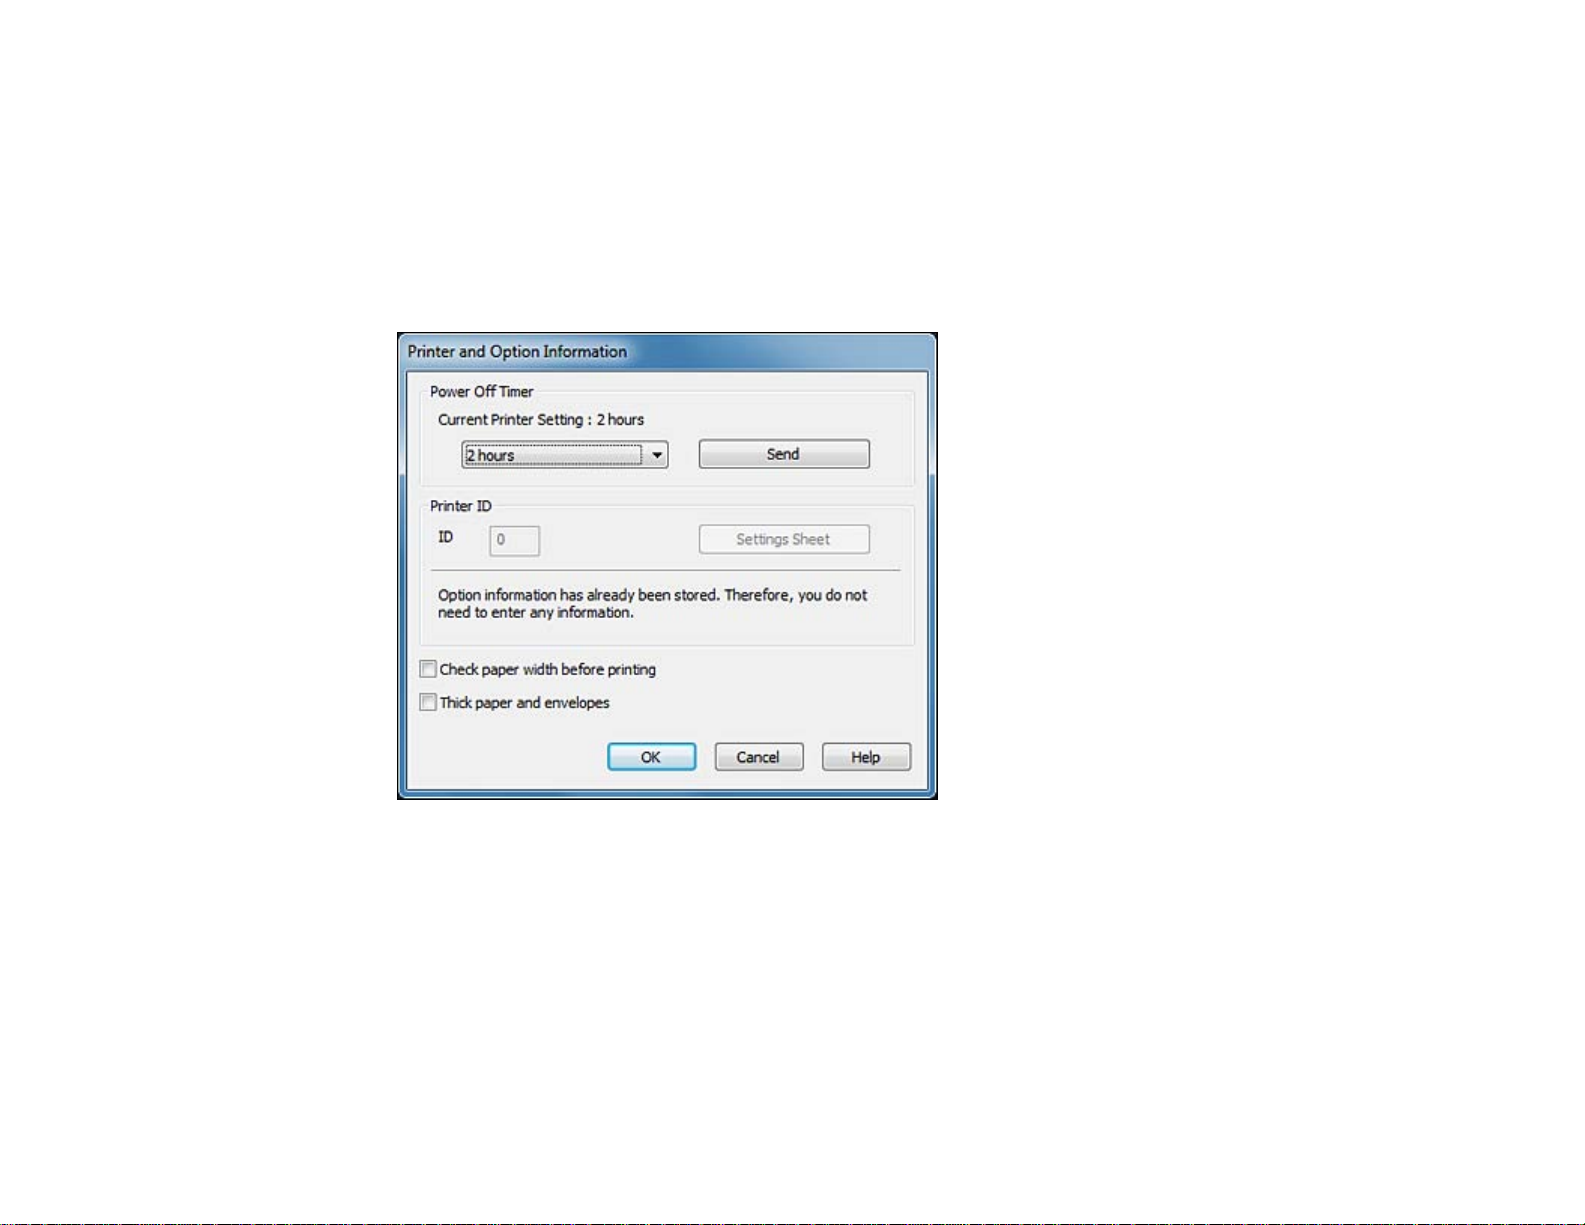
Changing the Power Off Timer Setting - Windows
You can use the printer software to change the time period before the product turns off automatically.
1. Right-click the product icon in the Windows taskbar and select Printer Settings.
2. Click the Maintenance tab.
3. Click the Printer and Option Information button.
You see this screen:
4. Select the time period you want as the Power Off Timer setting.
5. Click Send.
6. Click OK to exit.
Parent topic: The Power Off Timer
Changing the Power Off Timer Setting - Mac OS X
You can use the printer software to change the time period before the product turns off automatically.
14
Page 15
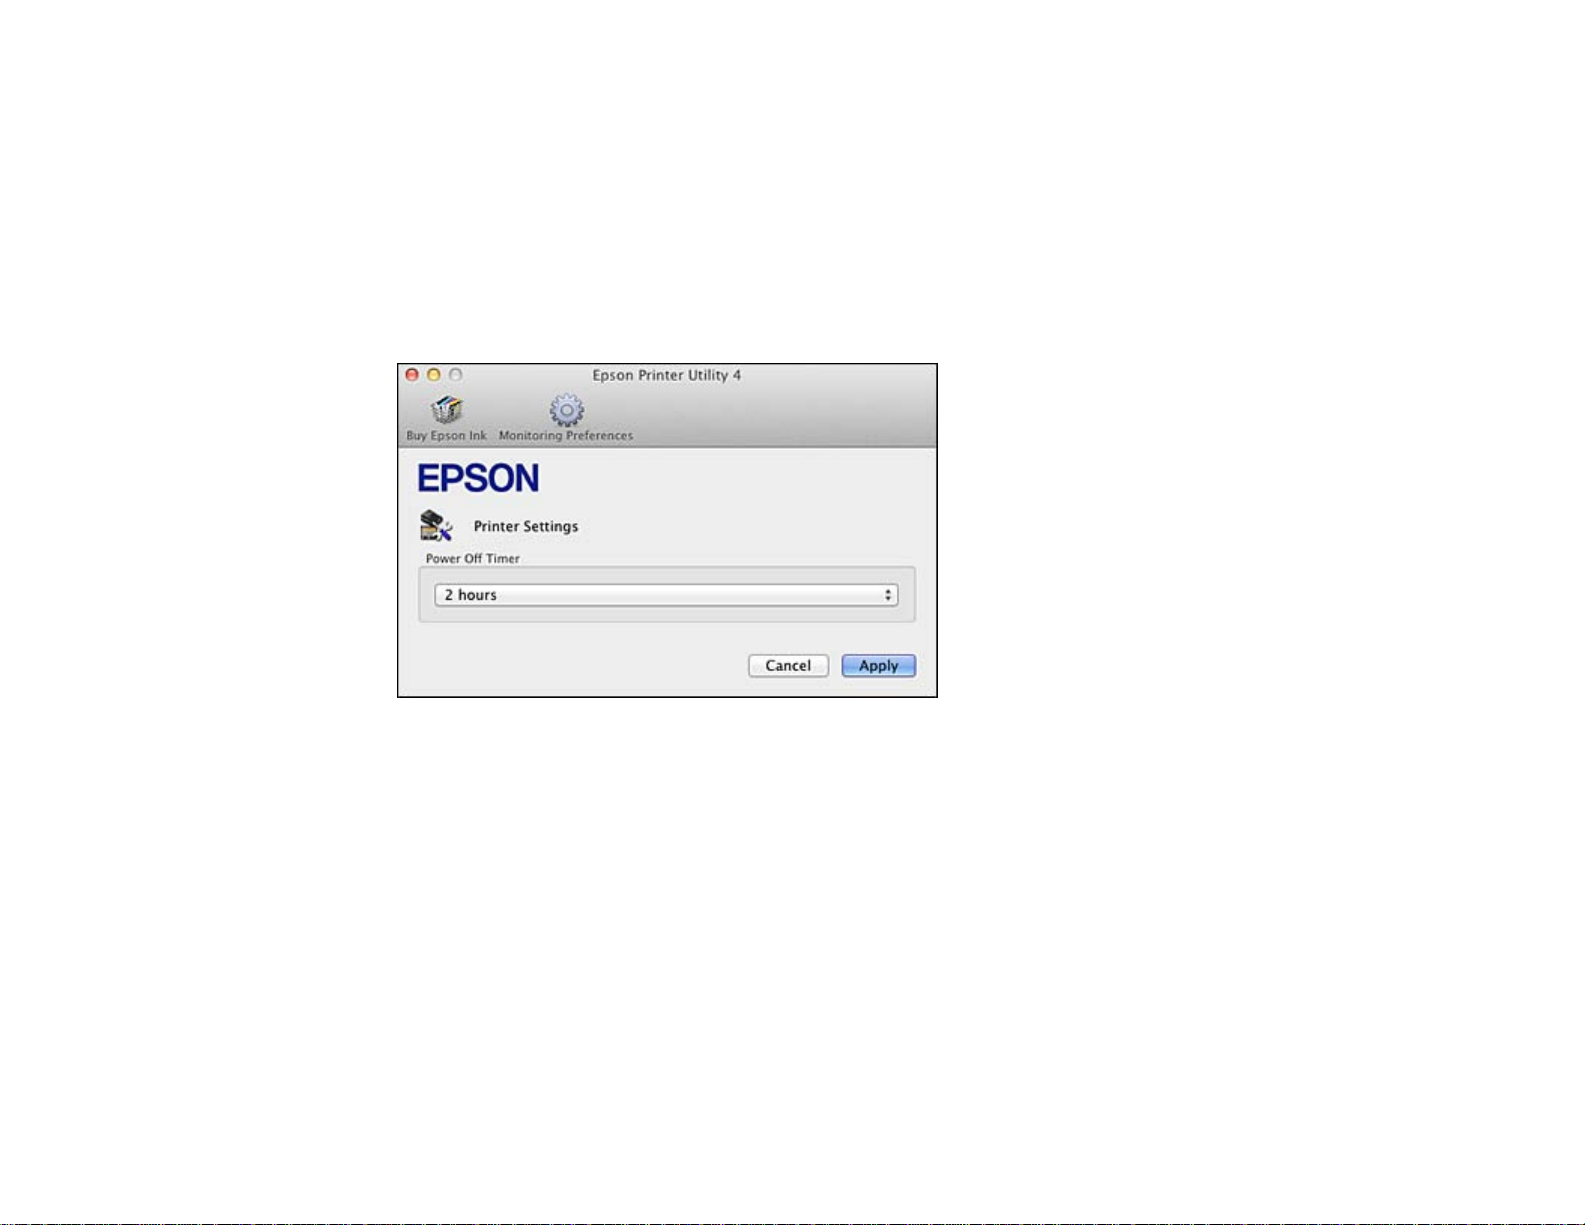
1. Do one of the following:
• Mac OS X 10.6/10.7: In the Apple menu or the Dock, select System Preferences. Select Print &
Fax or Print & Scan, select your product, and select Options & Supplies. Select Utility and
select Open Printer Utility.
• Mac OS X 10.4/10.5: In the Apple menu or the Dock, select System Preferences. Select Print &
Fax, select your product, and select Open Print Queue or Print Queue. Select Utility.
2. Select Printer Settings.
You see this screen:
3. Select the time period you want as the Power Off Timer setting.
4. Click Apply.
Parent topic: The Power Off Timer
15
Page 16
Loading Paper
Before you print, load paper for the type of printing you will do.
Loading Paper
Loading Envelopes
Paper Loading Capacity
Available EPSON Papers
Borderless Paper Type Compatibility
Paper or Media Type Settings
Loading Paper
You can print on a variety of paper types and sizes.
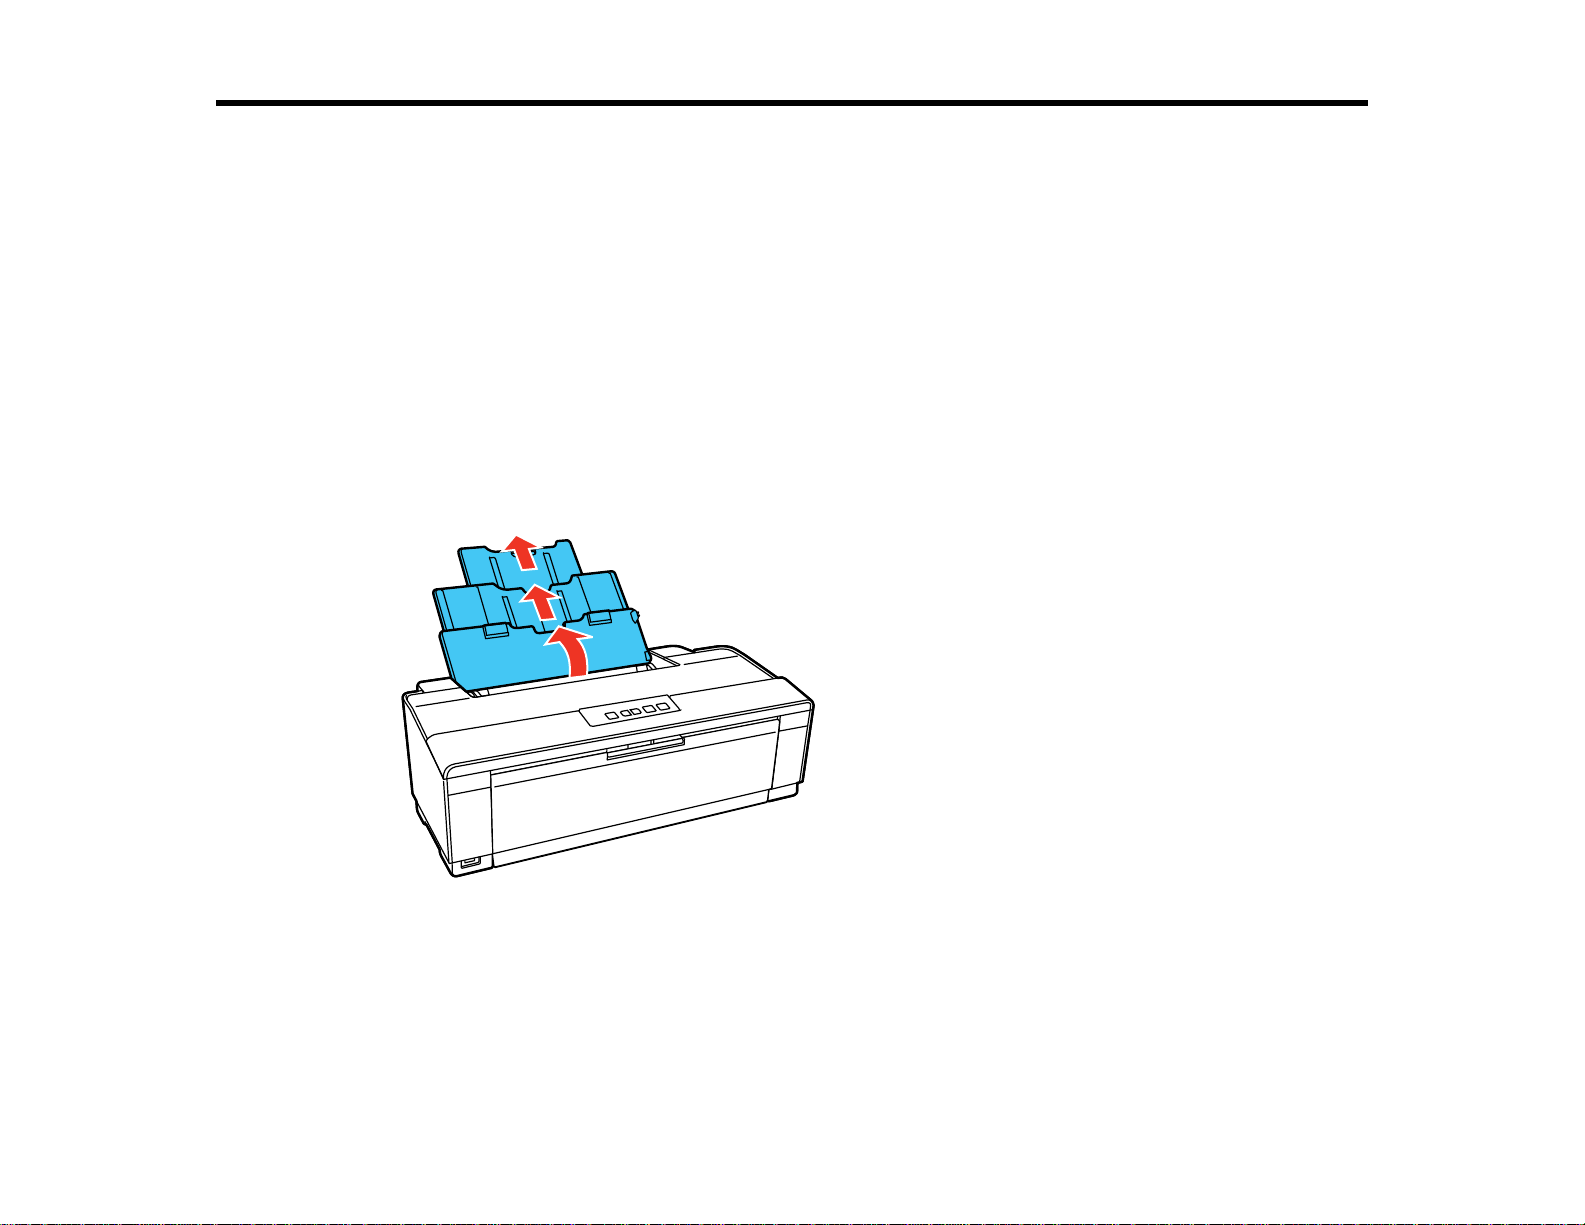
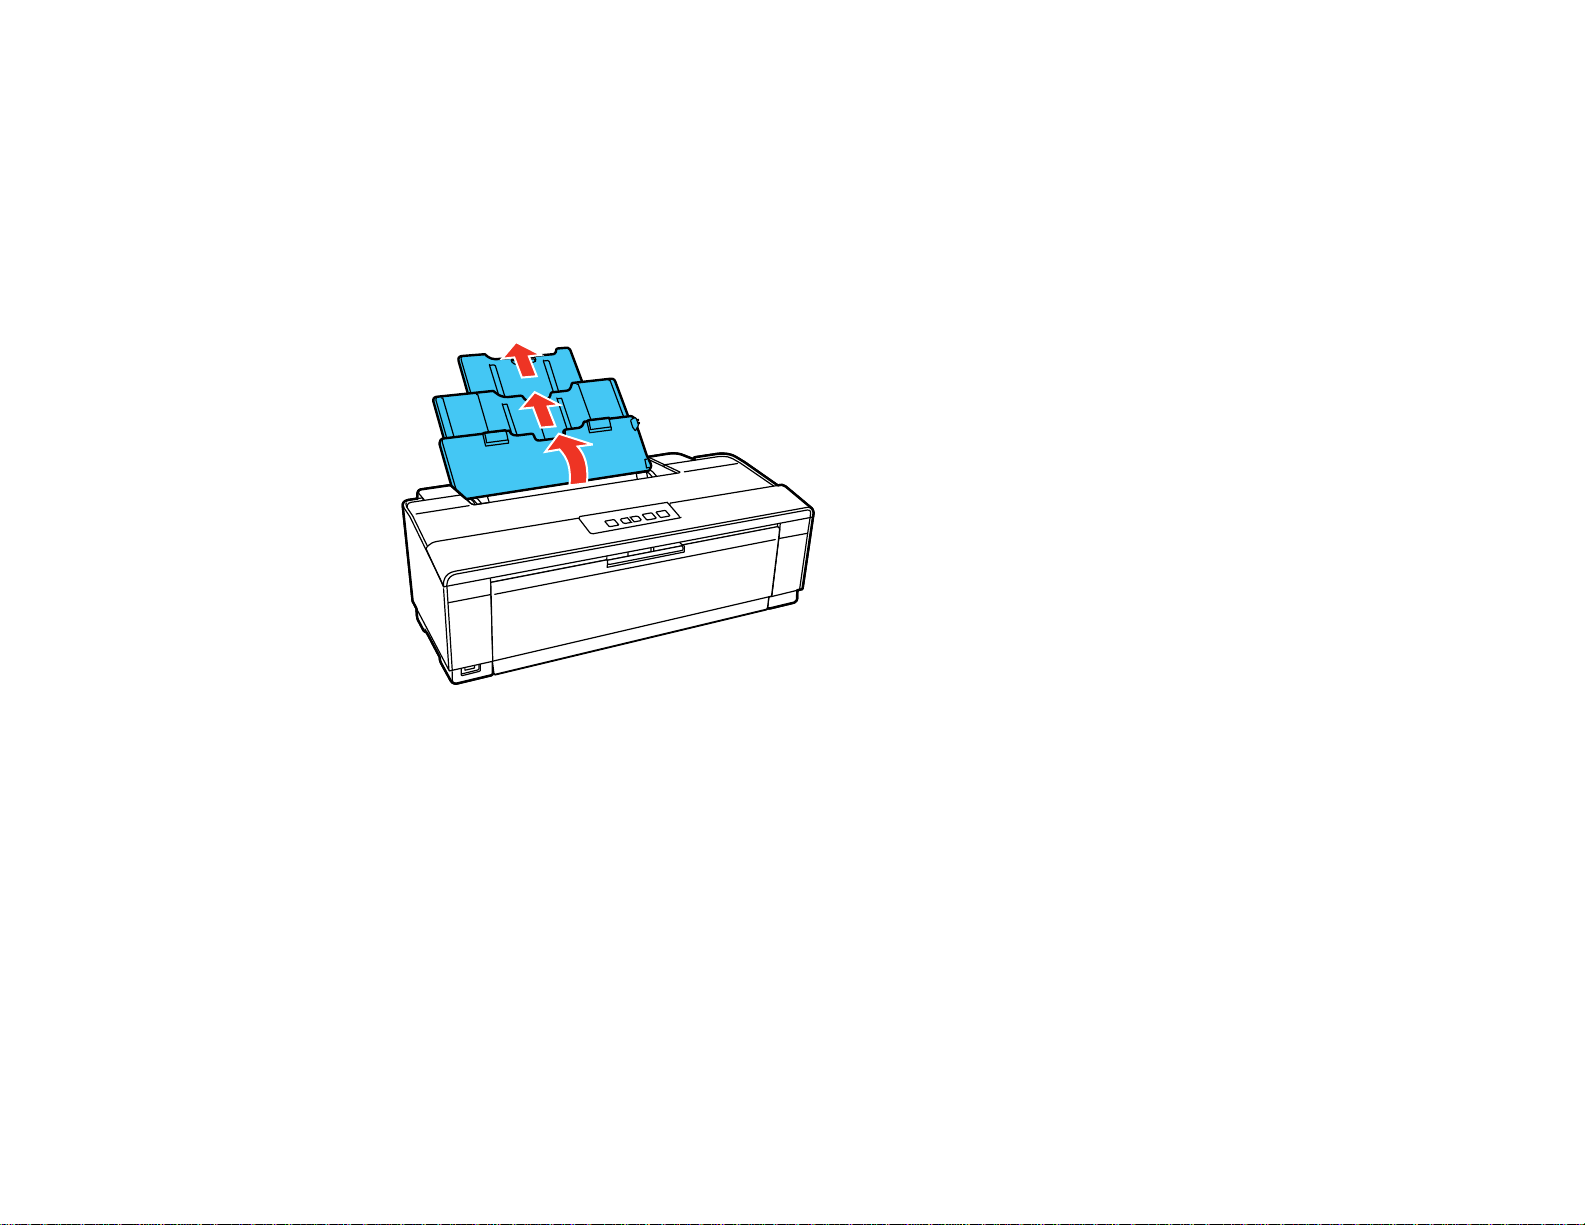
1. Open the paper support and pull up the extensions.
16
Page 17
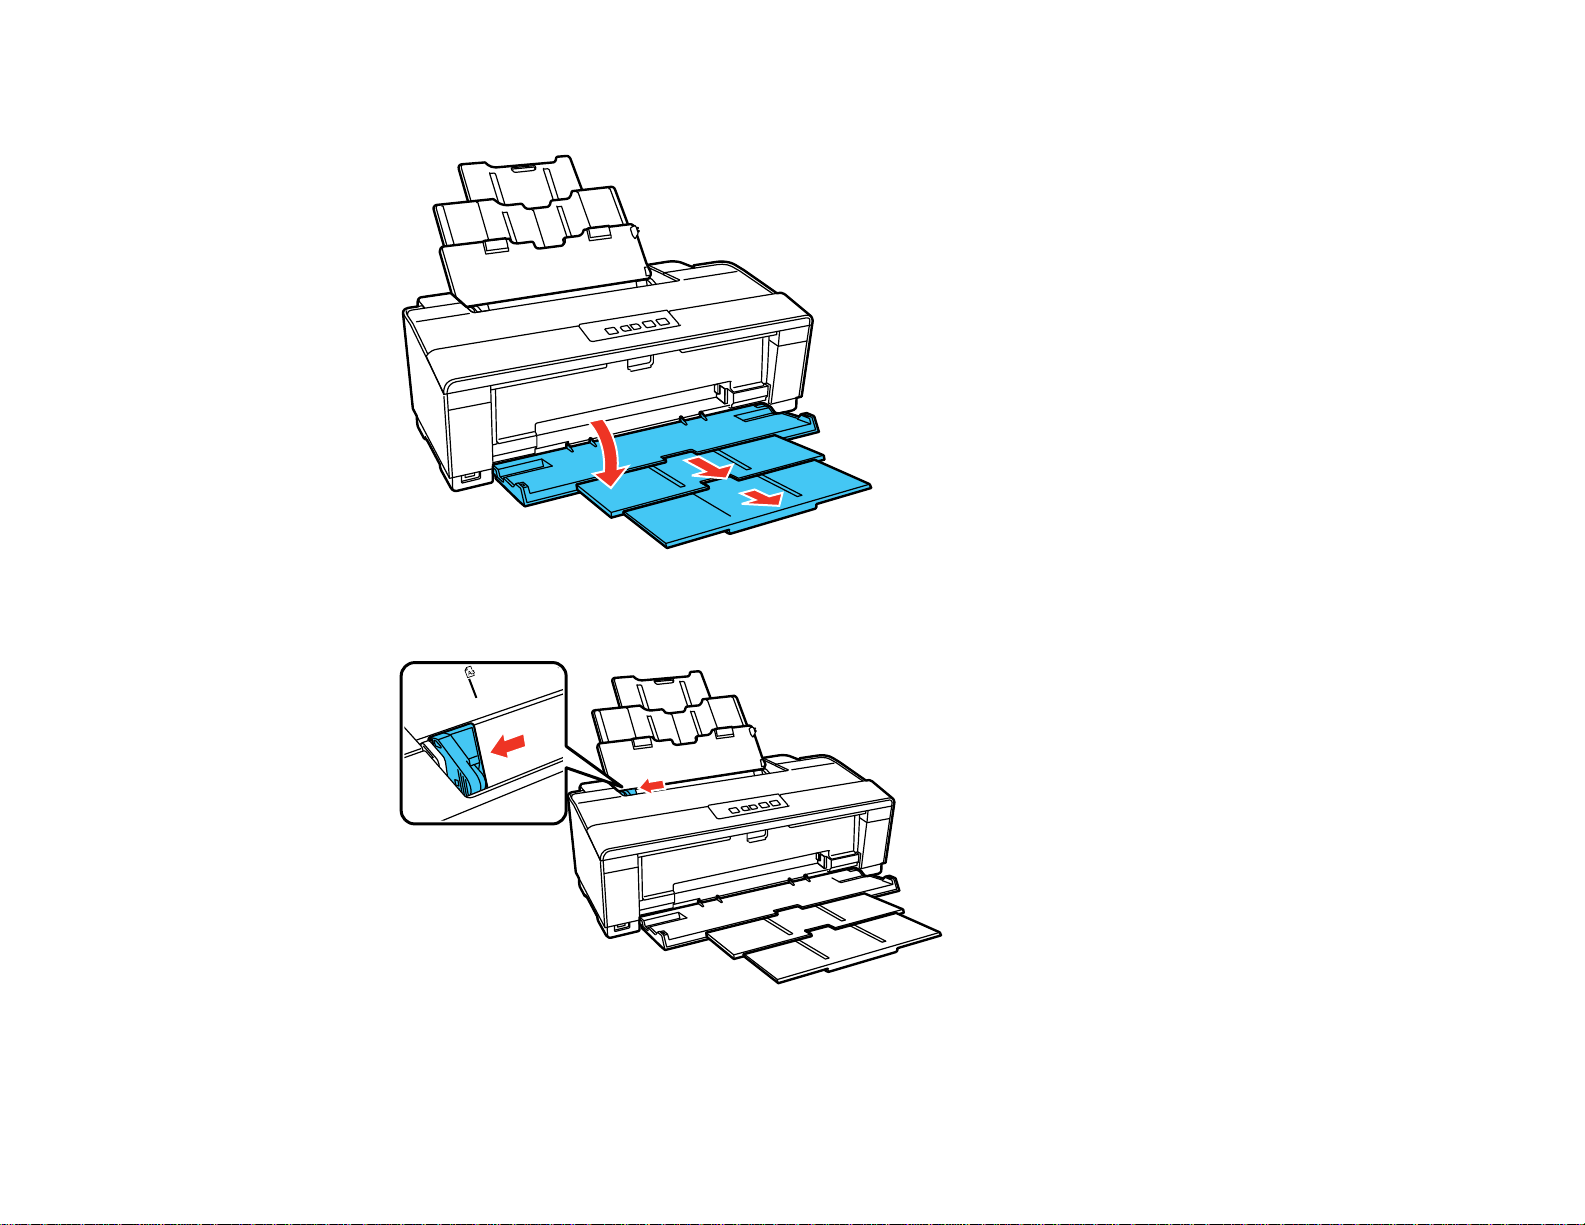
2. Open the output tray and pull out the extensions.
3. Slide the edge guide left.
17
Page 18
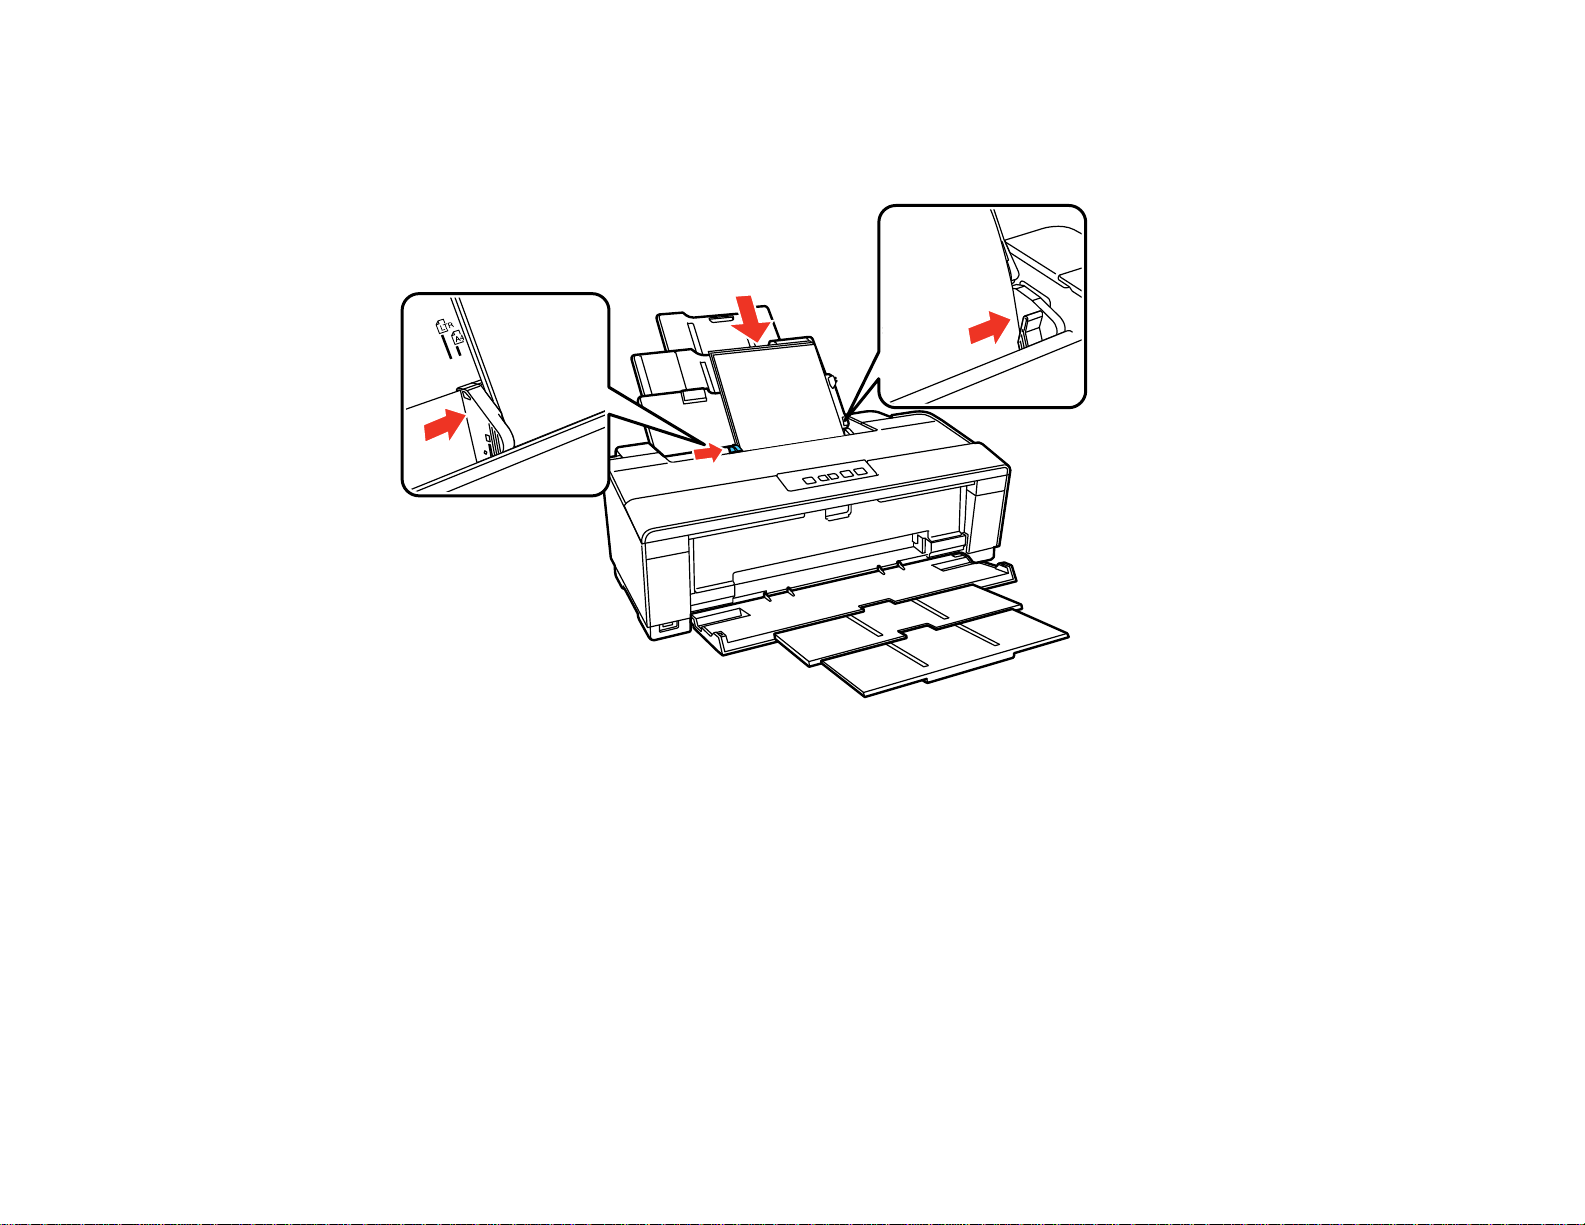
4. Insert paper, glossy or printable side up and short edge first, against the right side and behind the
tab. Then, slide the edge guide against the paper, but not too tightly. If you are inserting a stack of
paper, fan the sheets first and tap the stack on a flat surface to even the edges.
Note: During printing the left edge guide automatically moves 0.12 inch (3 mm) to the left. Do not
move it back manually.
Always follow these paper loading guidelines:
• Load only the recommended number of sheets.
• Load paper short edge first, no matter which way your document or photo faces.
• Load letterhead or pre-printed paper top edge first.
• Do not load paper past the arrow mark inside the edge guide.
• Do not load paper with holes punched in it.
• Check the paper package for any additional loading instructions.
18
Page 19
Parent topic: Loading Paper
Related references
Paper Loading Capacity
Loading Envelopes
You can print on plain paper envelopes in this size: No. 10 (4.1 × 9.5 inches [105 × 241 mm]).
1. Open the paper support and pull up the extensions.
19
Page 20

2. Open the output tray and pull out the extensions.
3. Slide the edge guide left.
20
Page 21
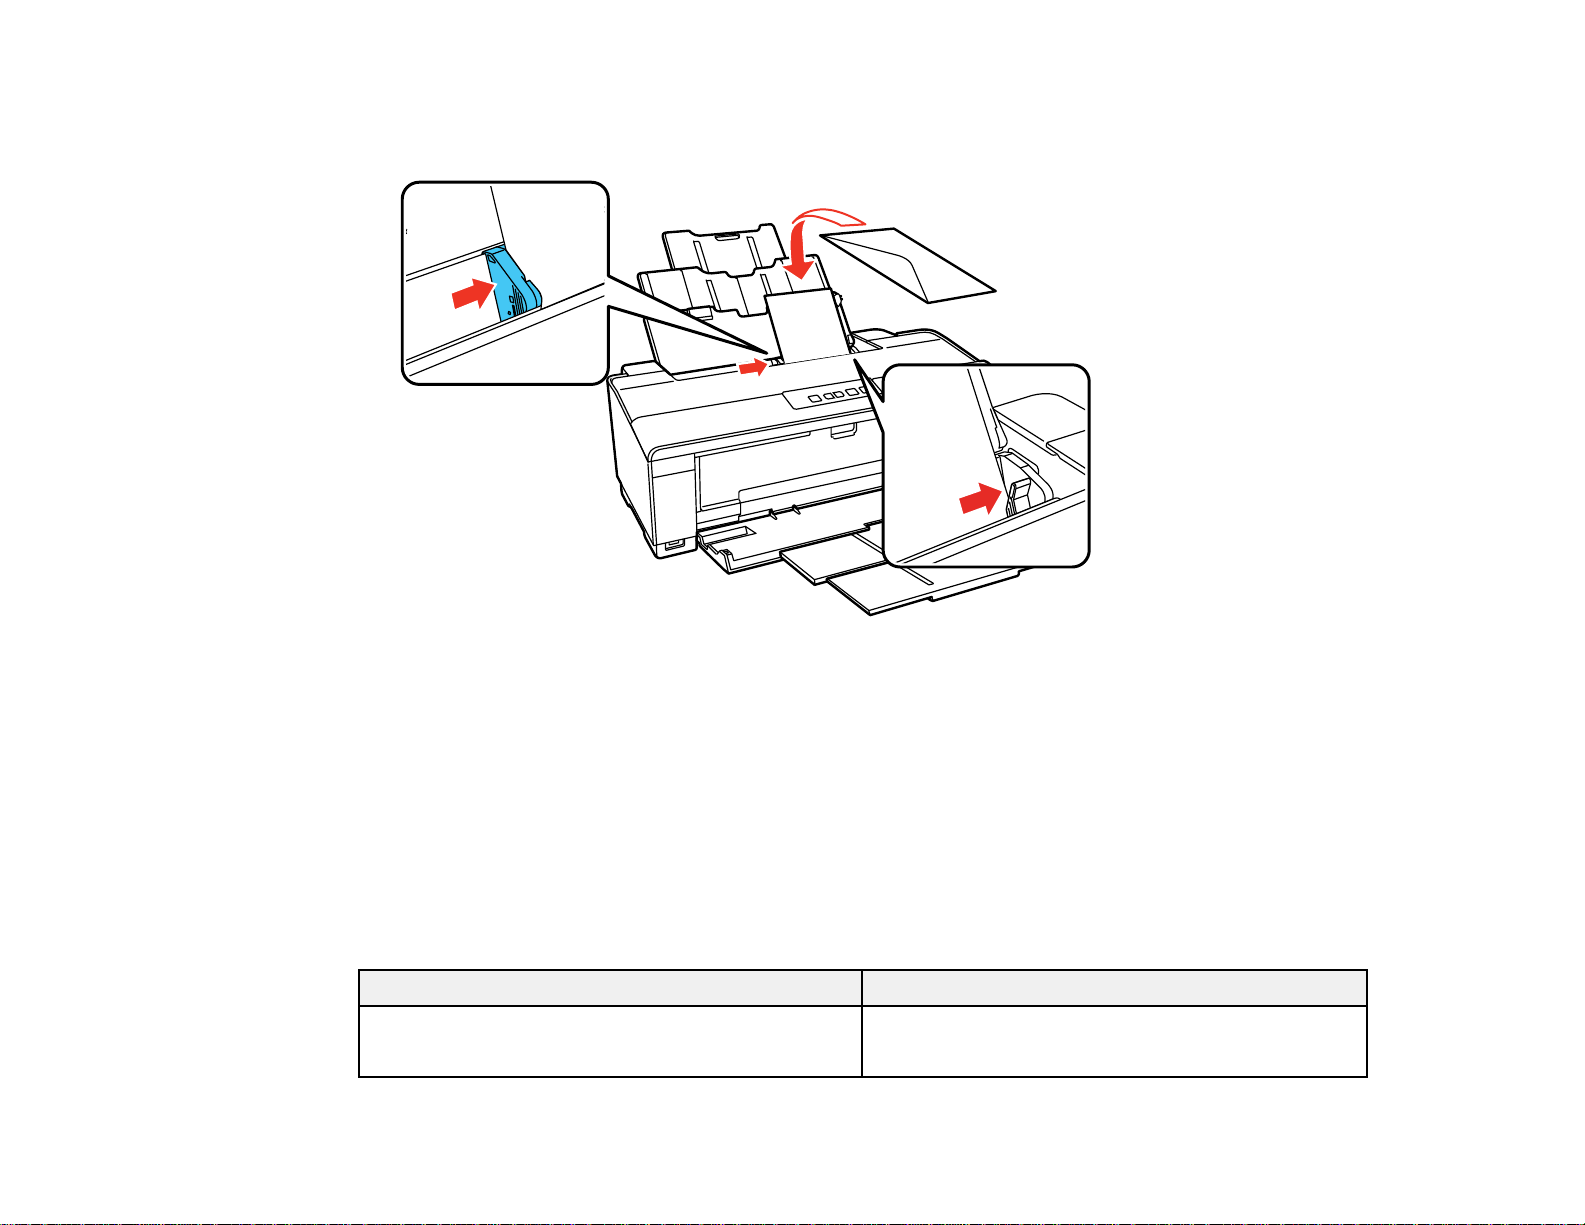
4. Load up to 10 envelopes against the right side, printable side up, and flap edge left. Then, slide the
edge guide against the envelopes, but not too tightly.
Always follow these envelope loading guidelines:
• If you have trouble loading a stack of envelopes, press each envelope flat before loading it or load one
envelope at a time.
• Do not load envelopes that are curled, folded, or too thin.
Parent topic: Loading Paper
Related references
Paper Loading Capacity
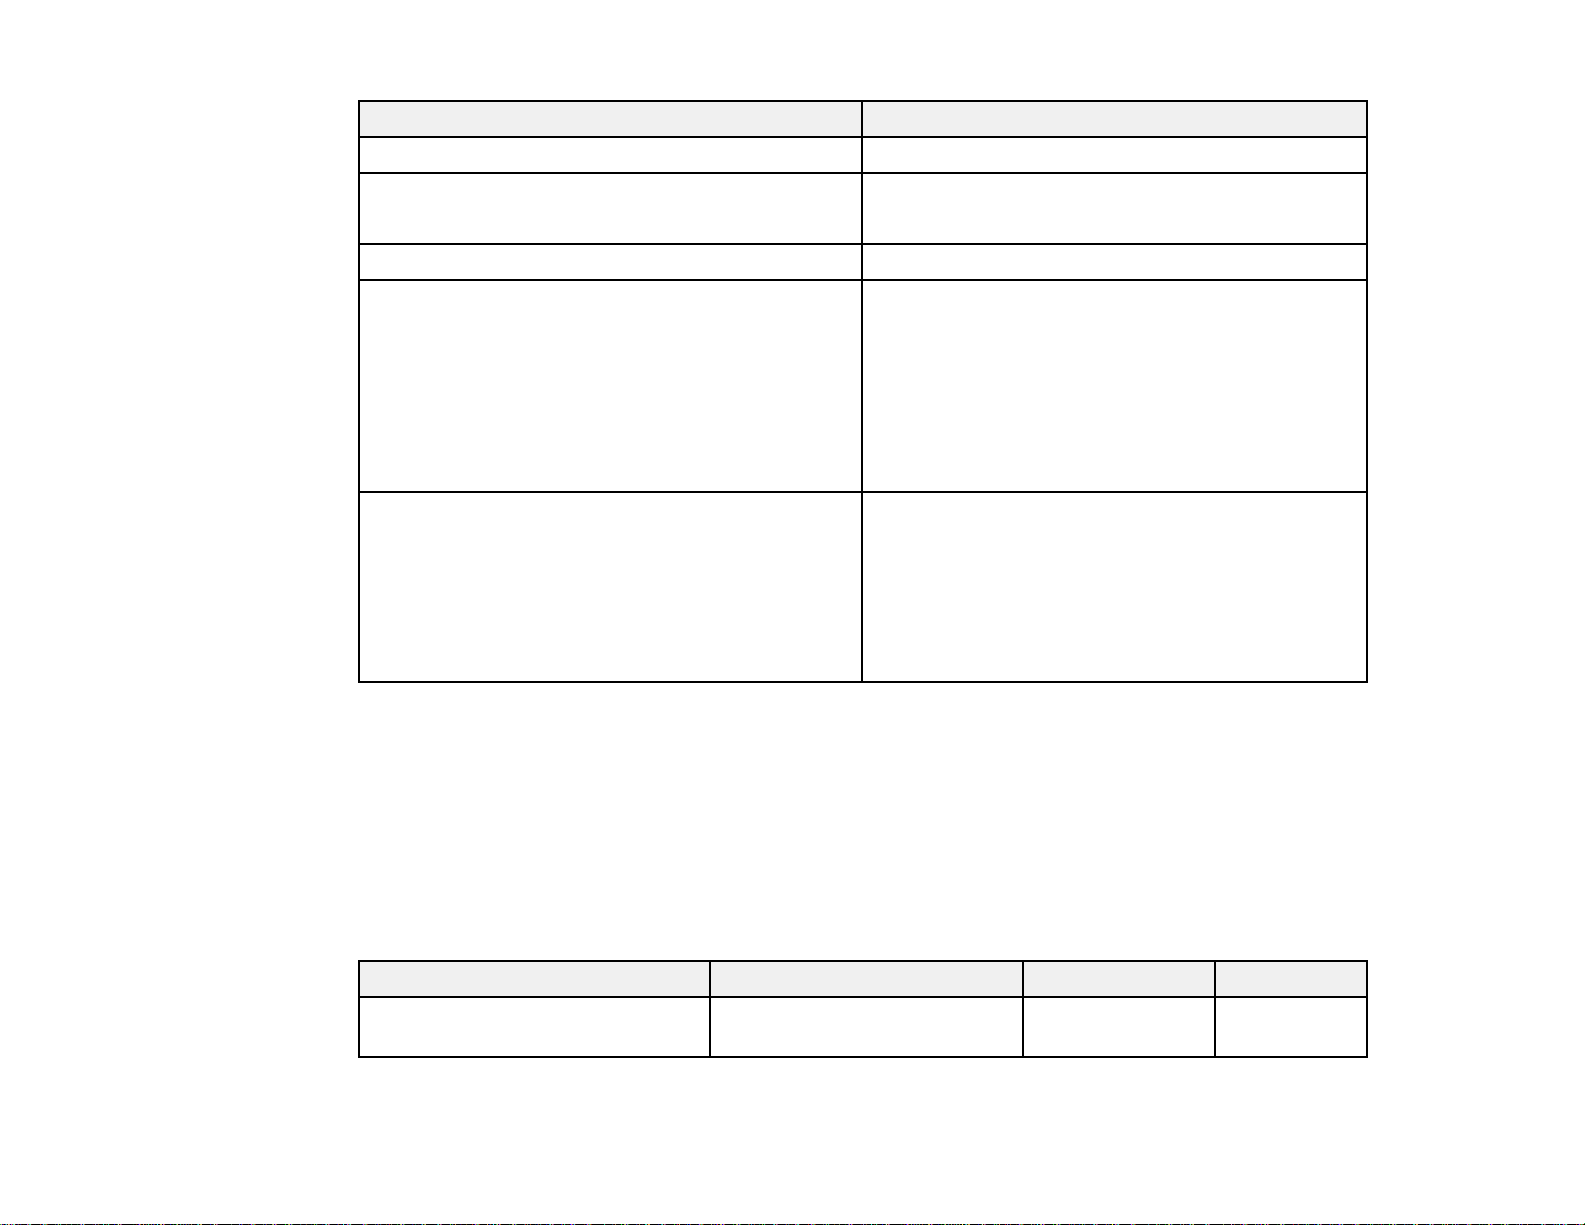
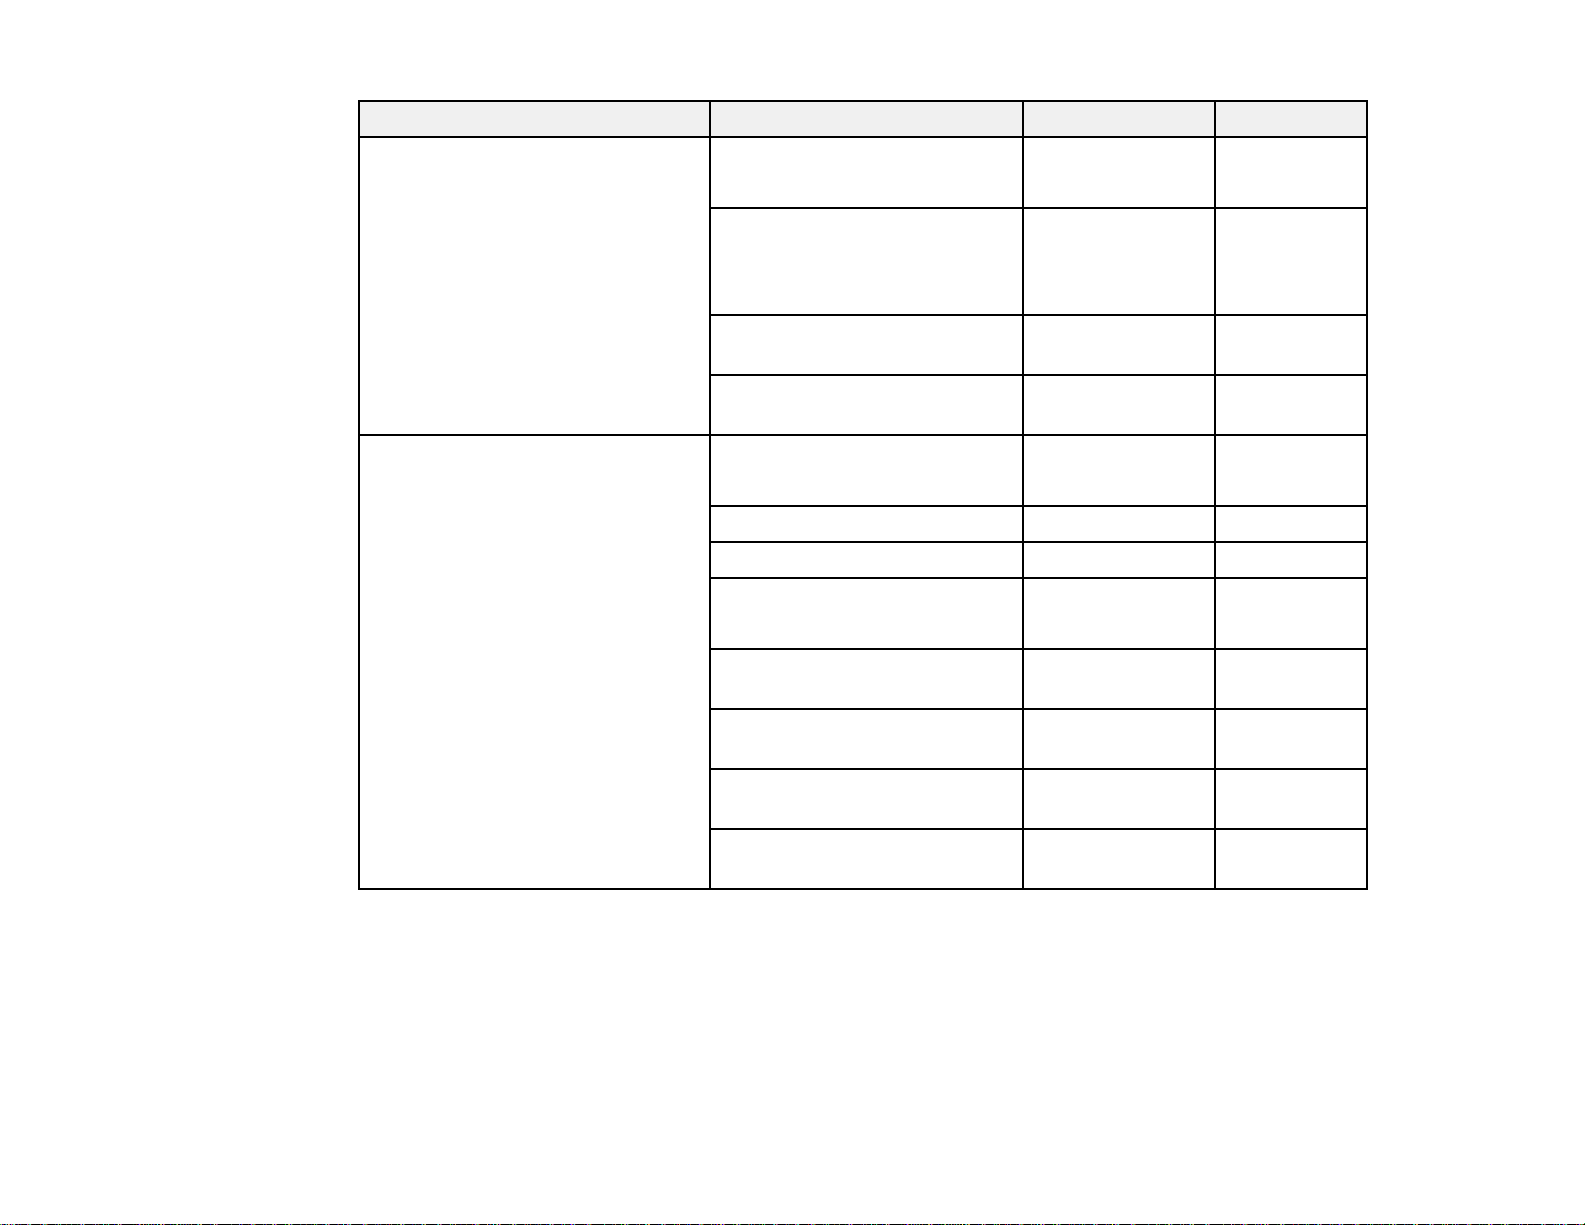
Paper Loading Capacity
Paper type Load up to this many sheets
Plain paper* Approximately 100 sheets**
Letter (8.5 × 11 inches [216 × 279 mm])
21
Page 22
Paper type Load up to this many sheets
EPSON Bright White Paper 80 sheets
EPSON Presentation Paper Matte A3 or larger sizes: 50 sheets
Smaller sizes: 100 sheets
EPSON Ultra Premium Photo Paper Glossy 20 sheets
EPSON Photo Paper Glossy A3 or larger sizes: 10 sheets
EPSON Premium Photo Paper Glossy Smaller sizes: 20 sheets
EPSON Premium Photo Paper Semi-gloss
EPSON Premium Presentation Paper Matte
EPSON Ultra Premium Presentation Paper Matte
EPSON Ultra Premium Photo Paper Luster
EPSON Premium Presentation Paper Matte 1 sheet
Double-sided
EPSON Brochure & Flyer Paper Matte Double-
sided
EPSON Photo Quality Self-adhesive Sheets
EPSON Iron-on Cool Peel Transfer paper
* Based on 20 lb (75 g/m²) paper weight. Do not load paper above the arrow mark inside the edge guide.
** For two-sided printing, load up to 80 sheets.
Parent topic: Loading Paper
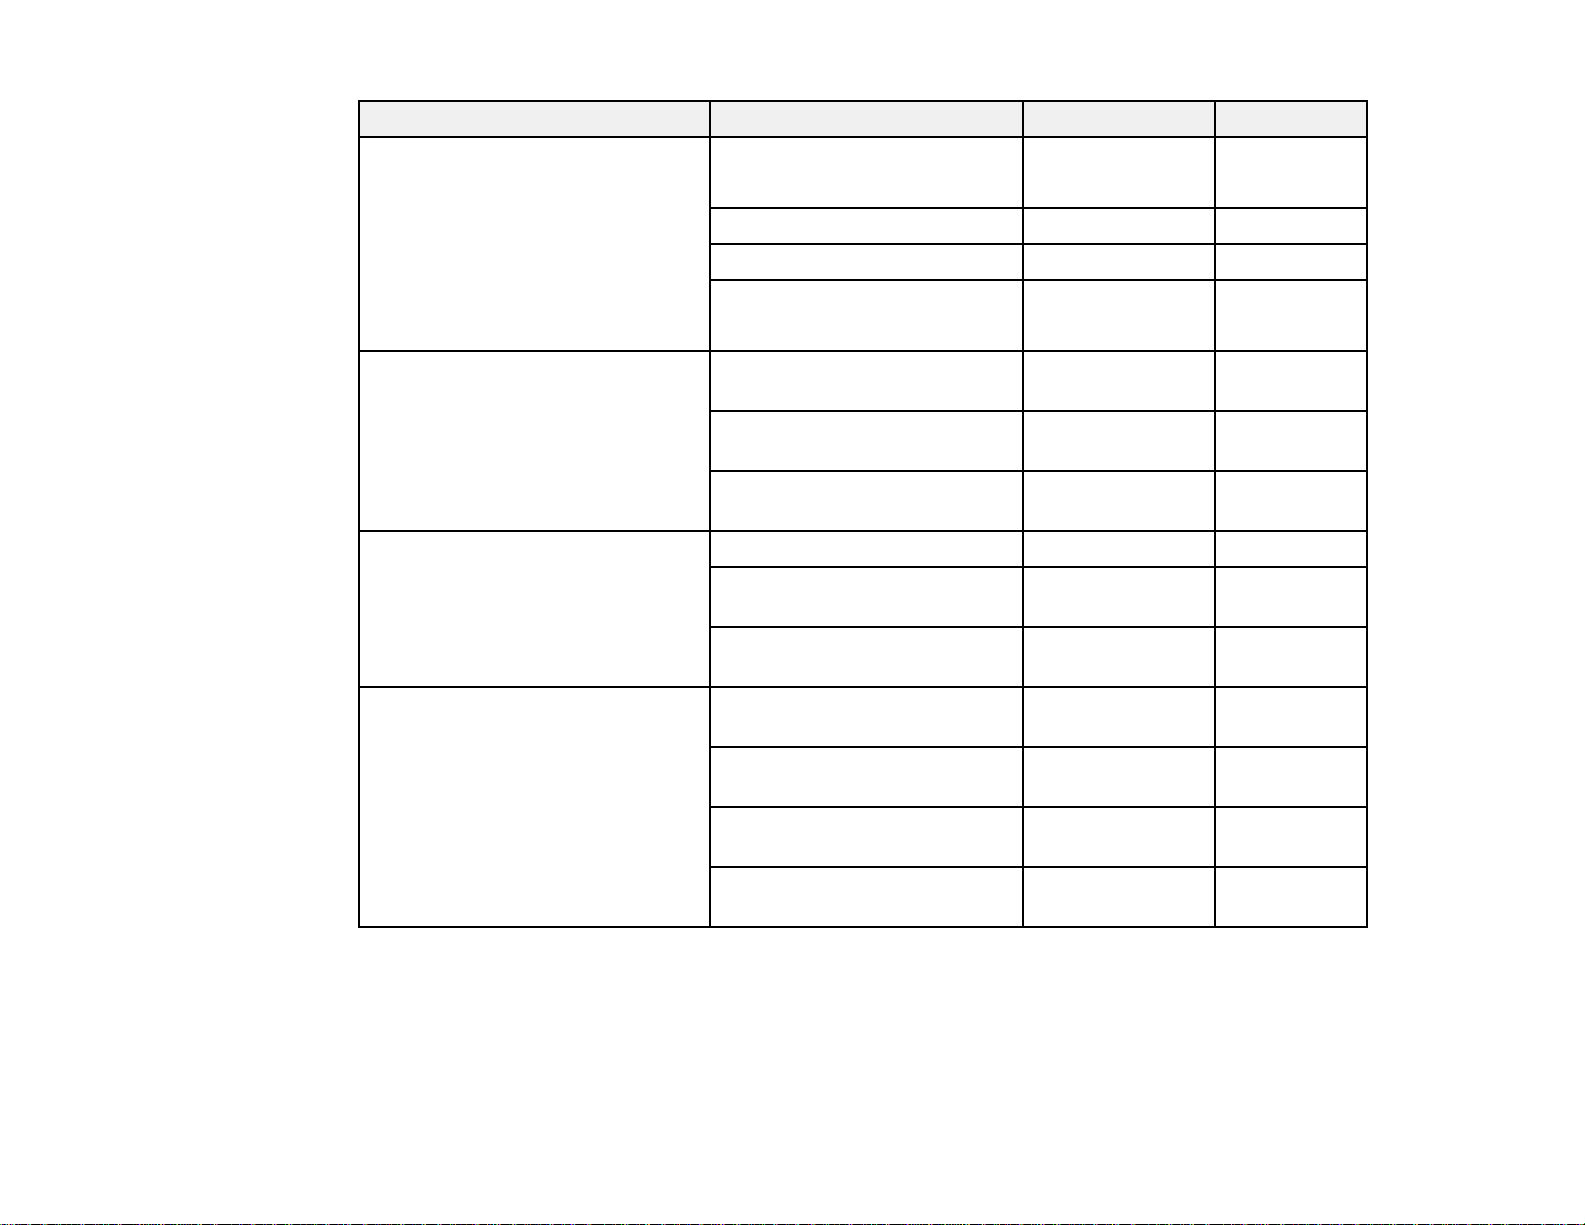
Available EPSON Papers
You can purchase genuine EPSON ink and paper at EPSON Supplies Central at www.epson.com/ink3
(U.S. sales) or www.epson.ca (Canadian sales). You can also purchase supplies from an EPSON
authorized reseller. To find the nearest one, call 800-GO-EPSON (800-463-7766).
Paper Type Size Part number Sheet count
EPSON Bright White Paper Letter (8.5 × 11 inches S041586 500
[216 × 279 mm])
22
Page 23
Paper Type Size Part number Sheet count
EPSON Photo Paper Glossy 4 × 6 inches (102 × 152 mm) S041809 50
S042038 100
Letter (8.5 × 11 inches S041141 20
[216 × 279 mm])
S041649 50
S041271 100
11 × 17 inches (279 × 432 S041156 20
mm)
13 × 19 inches (330 × 483 S041143 20
mm)
EPSON Premium Photo Paper 4 × 6 inches (102 × 152 mm) S041808 40
Glossy
S041727 100
5 × 7 inches (127 × 178 mm) S041464 20
8 × 10 inches (203 × 254 mm) S041465 20
Letter (8.5 × 11 inches S042183 25
[216 × 279 mm])
S041667 50
11 × 14 inches (279 × 356 S041466 20
mm)
11 × 17 inches (279 × 432 S041290 20
mm)
11.7 × 16.5 inches (297 × 420 S041288 20
mm)
13 × 19 inches (330 × 483 S041289 20
mm)
23
Page 24
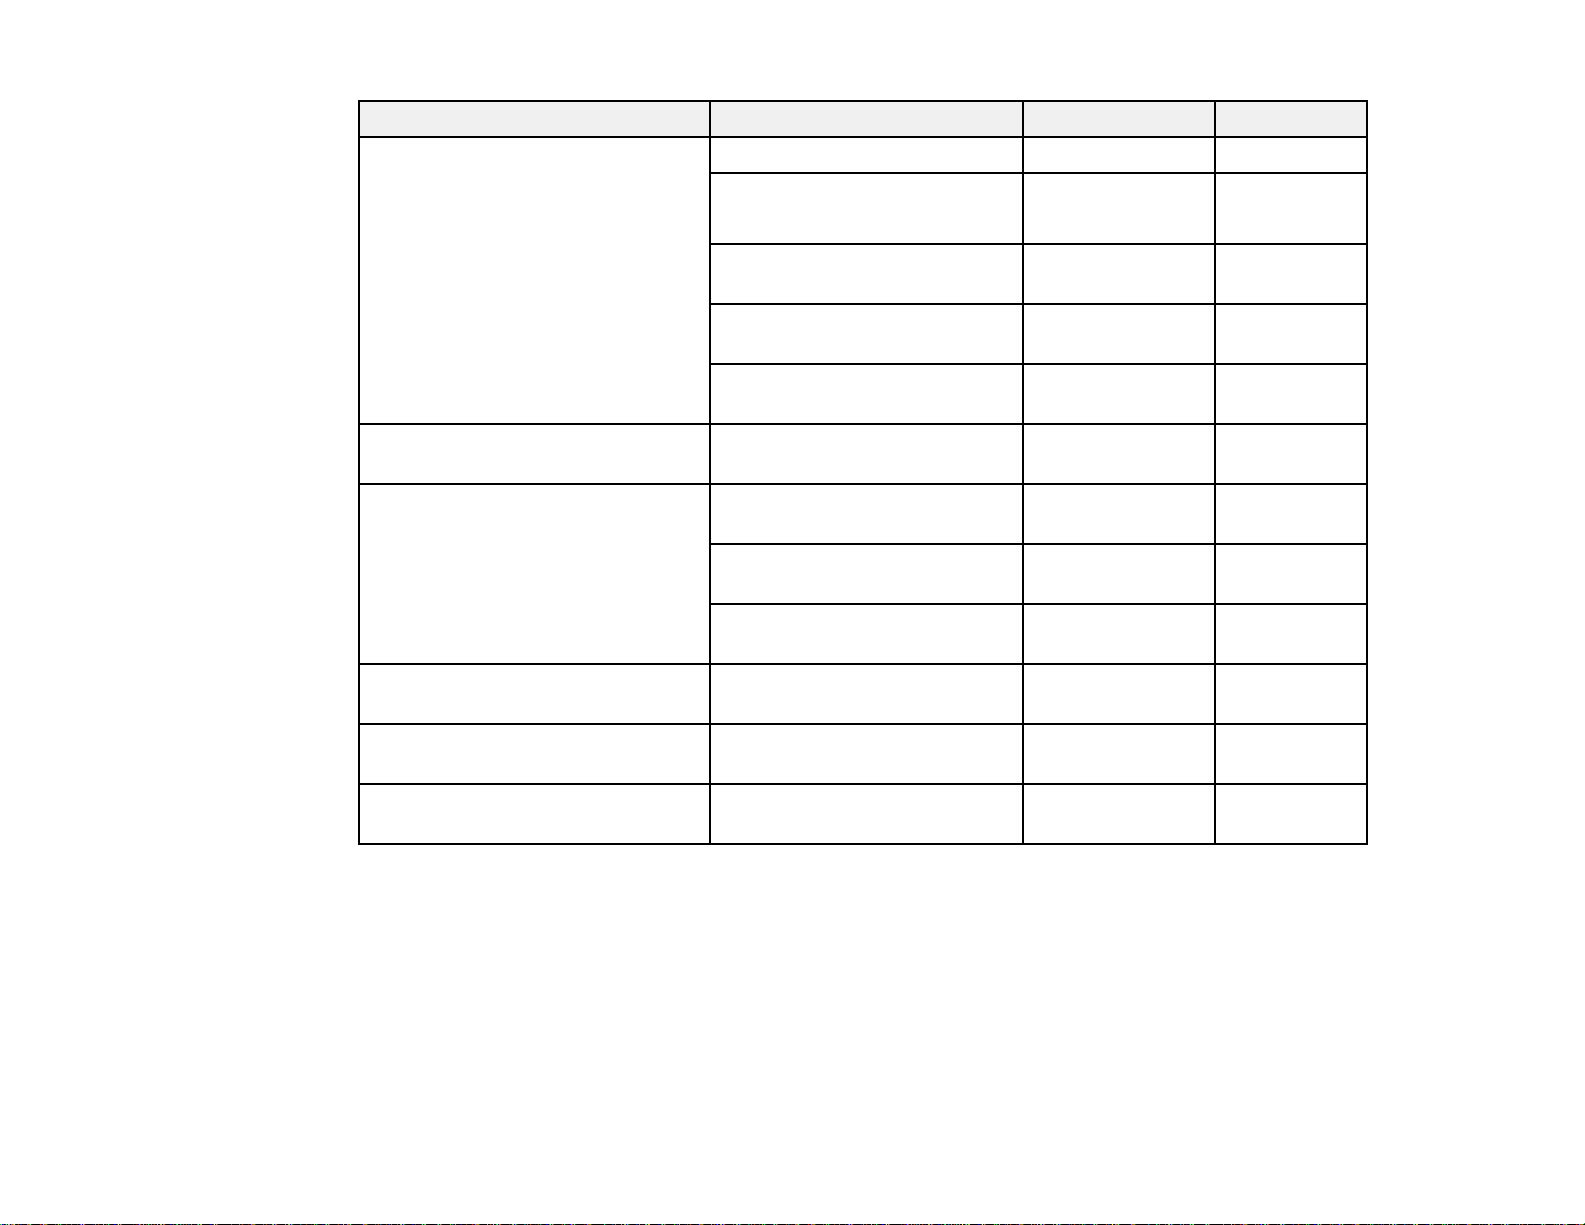
Paper Type Size Part number Sheet count
EPSON Ultra Premium Photo 4 × 6 inches (102 × 152 mm) S042181 60
Paper Glossy
S042174 100
5 × 7 inches (127 × 178 mm) S041945 20
8 × 10 inches (203 × 254 mm) S041946 20
Letter (8.5 × 11 inches S042182 25
[216 × 279 mm])
S042175 50
EPSON Ultra Premium Photo Letter (8.5 × 11 inches S041405 50
Paper Luster [216 × 279 mm])
11.7 × 16.5 inches (297 × 420 S041406 50
mm)
13 × 19 inches (330 × 483 S041407 50
mm)
EPSON Premium Photo Paper 4 × 6 inches (102 × 152 mm) S041982 40
Semi-gloss
Letter (8.5 × 11 inches S041331 20
[216 × 279 mm])
13 × 19 inches (330 × 483 S041327 20
mm)
EPSON Presentation Paper Matte Letter (8.5 × 11 inches S041062 100
[216 × 279 mm])
Legal (8.5 × 14 inches S041067 100
[216 × 357 mm])
11 × 17 inches (279 × 432 S041069 100
mm)
13 × 19 inches (330 × 483 S041070 100
mm)
24
Page 25
Paper Type Size Part number Sheet count
EPSON Premium Presentation 8 × 10 inches (203 × 254 mm) S041467 50
Paper Matte
EPSON Premium Presentation Letter (8.5 × 11 inches S041568 50
Paper Matte Double-sided [216× 279 mm])
EPSON Ultra Premium Letter (8.5 × 11 inches S041341 50
Presentation Paper Matte [216 × 279 mm])
EPSON Brochure & Flyer Paper Letter (8.5 × 11 inches S042384 150
Matte Double-sided [216 × 279 mm])
Letter (8.5 × 11 inches S041257 50
[216 × 279 mm])
11 × 14 inches (279 × 356 S041468 50
mm)
11.7 × 16.5 inches (297 × 420 S041260 50
mm)
13 × 19 inches (330 × 483 S041263 50
mm)
11.7 × 16.5 inches (297 × 420 S041339 50
mm)
13 × 19 inches (330 × 483 S041343 50
mm)
S042180 100
EPSON Photo Quality Self- A4 (8.3 × 11.7 inches S041106 10
adhesive Sheets [210 × 297 mm])
EPSON Iron-on Cool Peel Transfer Letter (8.5 × 11 inches S041153 10
paper [216 × 279 mm])
Parent topic: Loading Paper
Borderless Paper Type Compatibility
You can print borderless photos on compatible paper types in compatible sizes:
Borderless Paper Types
• EPSON Photo Paper Glossy
25
Page 26
• EPSON Premium Photo Paper Glossy
• EPSON Ultra Premium Photo Paper Glossy
• EPSON Premium Photo Paper Semi-gloss
• EPSON Ultra Premium Photo Paper Luster
• EPSON Premium Presentation Paper Matte
• EPSON Ultra Premium Presentation Paper Matte
Borderless Paper Sizes
• 4 × 6 inches (102 × 152 mm)
• 5 × 7 inches (127 × 178 mm)
• 8 × 10 inches (203 × 254 mm)
• 11 × 14 inches (279 × 356 mm)
• 11 × 17 inches (279 × 432 mm)
• 11.7 × 16.5 inches (297 × 420 mm)
• 12 × 12 inches (305 × 305 mm)
• 13 × 19 inches (330 × 483 mm)
Parent topic: Loading Paper
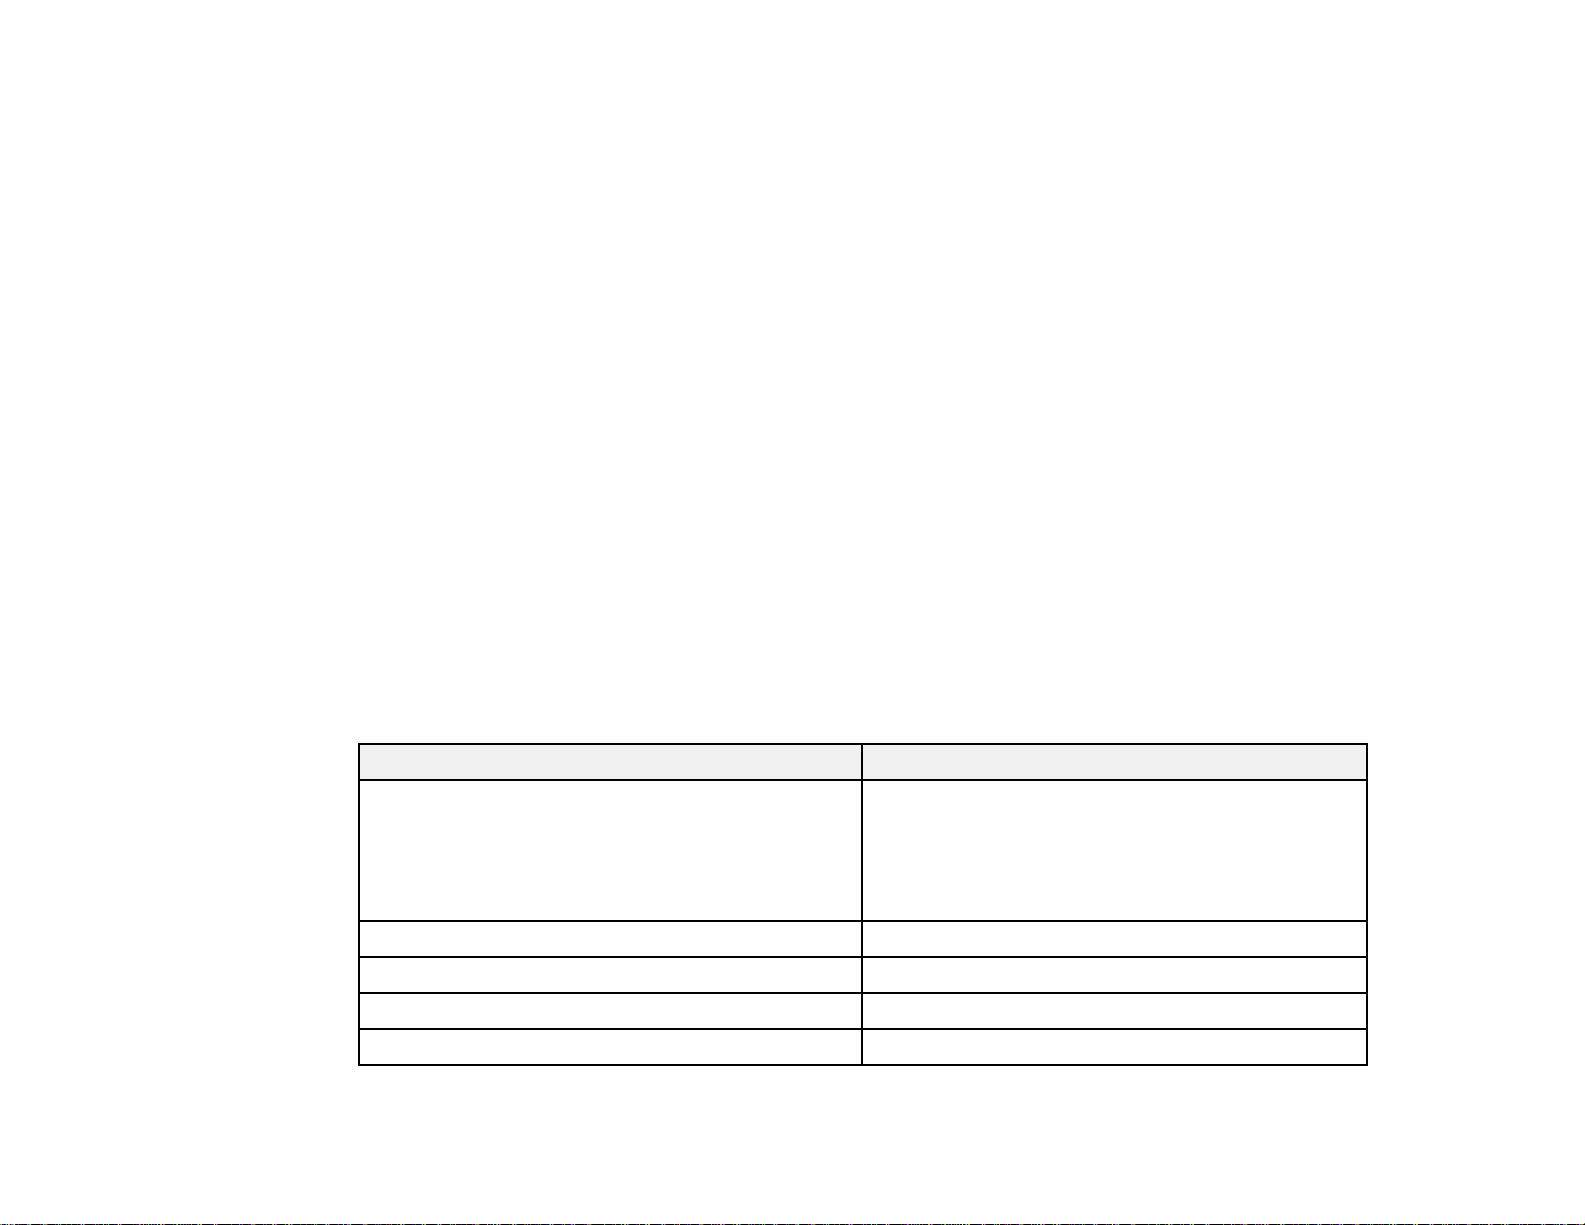
Paper or Media Type Settings
For this paper Select this paper Type or Media Type setting
Plain paper Plain Paper/Bright White Paper
EPSON Bright White Paper
EPSON Iron-on Cool Peel Transfer paper
EPSON Photo Quality Self-adhesive Sheets
EPSON Photo Paper Glossy Photo Paper Glossy
EPSON Premium Photo Paper Glossy Premium Photo Paper Glossy
EPSON Ultra Premium Photo Paper Glossy Ultra Premium Photo Paper Glossy
EPSON Premium Photo Paper Semi-gloss Premium Photo Paper Semi-Gloss
26
Page 27
For this paper Select this paper Type or Media Type setting
EPSON Ultra Premium Photo Paper Luster Ultra Premium Photo Paper Luster
EPSON Presentation Paper Matte Presentation Paper Matte
EPSON Premium Presentation Paper Matte Premium Presentation Paper Matte
EPSON Premium Presentation Paper Matte
Double-sided
EPSON Brochure & Flyer Paper Matte Double-
sided
EPSON Ultra Premium Presentation Paper Matte Ultra Premium Presentation Matte
Envelopes Envelope
Parent topic: Loading Paper
27
Page 28

Printing From a Computer
Before printing documents or photos from your computer, make sure you have set up your product and
installed its software as described on the Start Here sheet.
Note: It is a good idea to check for updates to your product software on Epson's support website.
Printing with Windows
Printing with Mac OS X 10.5, 10.6, or 10.7
Printing with Mac OS X 10.4
Cancelling Printing Using a Product Button
Printing with Windows
You can print with your product using any Windows printing program, as described in these sections.
Selecting Basic Print Settings - Windows
Selecting Advanced Print Settings - Windows
Selecting Print Layout Options - Windows
Selecting a Printing Preset - Windows
Printing Your Document or Photo - Windows
Selecting Default Print Settings - Windows
Changing Automatic Update Options
Parent topic: Printing From a Computer
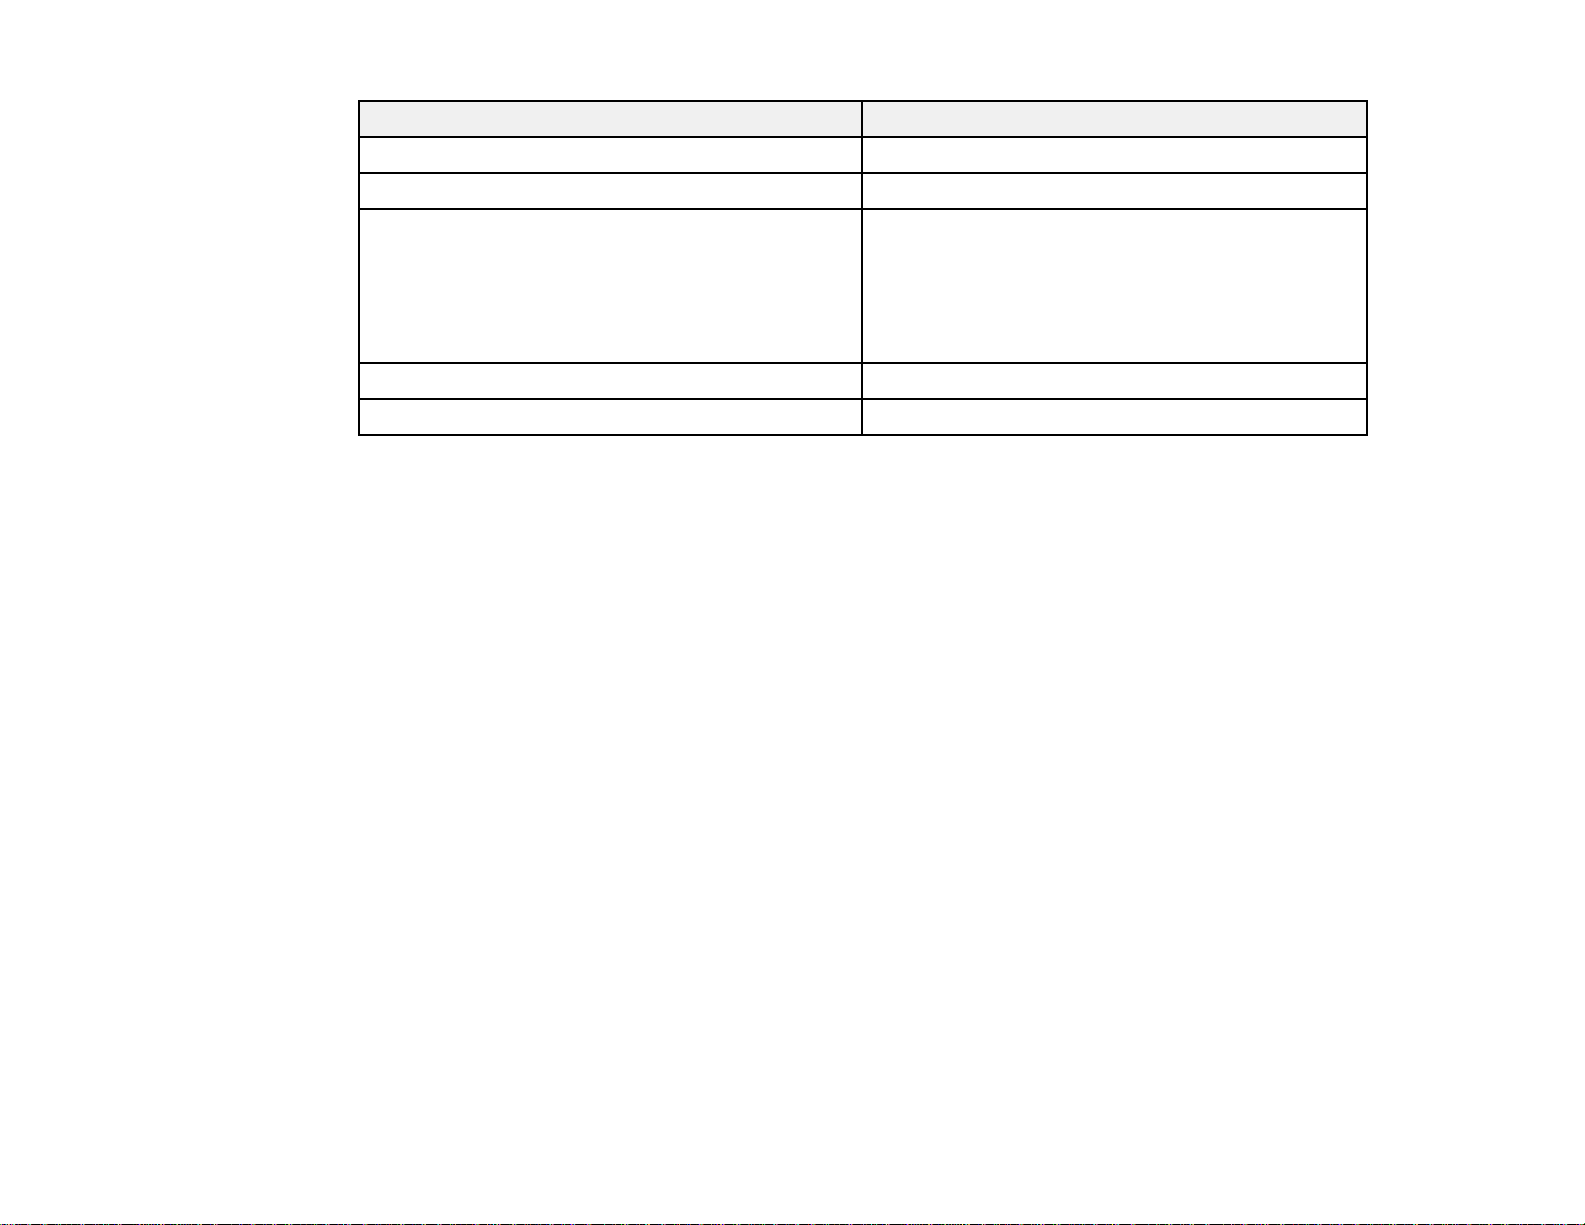
Selecting Basic Print Settings - Windows
Select the basic settings for the document or photo you want to print.
1. Open a photo or document for printing.
2. Select the print command in your application.
Note: You may need to select a print icon on your screen, the Print option in the File menu, or
another command. See your application's help utility for details.
28
Page 29
3. If necessary, select your product name as the printer you want to use.
Note: You may also need to select Properties or Preferences to view your print settings.
You see the Main tab of your printer settings window:
4. If necessary, select Sheet for the Source setting.
5. Select the Quality Option setting that matches your print content and the print quality you want to
use.
29
Page 30

6. Select the type of paper you loaded as the Type setting.
Note: The setting may not exactly match the name of your paper. Check the paper type settings list
for details.
7. Select the size of the paper you loaded as the Size setting.
Note: You can also select the User Defined setting to create a custom paper size.
8. Select one of the border options:
• If you are printing a borderless photo, select Borderless.
Note: You must select a compatible borderless paper type and size to print borderlessly. Check
the borderless paper compatibility list for details.
• If you are printing a document or a photo with borders, select Borders.
9. Select the orientation of your document or photo as shown in the printer settings window.
Note: If you are printing an envelope, select Landscape.
10. Select any of the available print options.
Note: If you need to access the Epson product support website, click the Online Support button.
Basic Print Options - Windows
Parent topic: Printing with Windows
Related references
Borderless Paper Type Compatibility
Paper or Media Type Settings
Related tasks
Printing Your Document or Photo - Windows
Basic Print Options - Windows
You can select any of the basic print options to customize your print. Some options may be pre-selected
or unavailable, depending on other settings you have chosen.
30
Page 31

Fix Photo
Improves the color, contrast, and sharpness of flawed photos.
Note: Fix Photo uses a sophisticated face recognition technology to optimize photos that include
faces. For this to work, both eyes and the nose must be visible in the subject's face. If your photo
includes a face with an intentional color cast, such as a statue, you may want to turn off Fix Photo to
retain the special color effects.
Fix Red-Eye
Reduces or removes red-eye in photos.
Reverse Order
Prints multi-page print jobs last page first.
Print Preview
Displays a preview of your printout before printing.
Parent topic: Selecting Basic Print Settings - Windows
Selecting Advanced Print Settings - Windows
Select print settings on the Advanced tab to customize the quality and color settings for your printout,
and save your own printing presets.
1. Click the Advanced tab.
You see the advanced print settings:
31
Page 32

2. Select the Paper & Quality Options settings for your printout:
• Make sure Sheet is selected.
• Select the type of paper you loaded.
Note: Check the paper type settings list for details.
• Select the print quality setting you want to use.
Note: Check the print quality setting list for details.
• Select the size of the paper you loaded.
32
Page 33

• Select Borderless to print a borderless photo, or Borders to print a document or a photo with
borders.
Note: You must select a compatible borderless paper type and size to print borderlessly. Check
the borderless paper compatibility list for details.
3. Select Portrait or Landscape as the orientation of your document or photo.
Note: If you are printing an envelope, select Landscape.
4. Select any of the available advanced print options.
5. Select any of the available color management options, or turn off color management.
Advanced Print Quality Settings - Windows
Advanced Print Options - Windows
Color Management Options - Windows
Parent topic: Printing with Windows
Advanced Print Quality Settings - Windows
You can select any of the print quality settings to fine-tune the quality of your print. Some settings may
be unavailable, depending on the paper type and border setting you have chosen.
Economy
For fast printing with reduced quality.
Normal
For everyday text and image printing.
Fine
For text and graphics with good quality and print speed.
Photo
For photos and graphics with good quality and print speed.
Photo RPM
For the best print quality, but the slowest print speed.
Parent topic: Selecting Advanced Print Settings - Windows
Advanced Print Options - Windows
You can select any of the print options to customize your print. Some options may be unavailable,
depending on other settings you have chosen.
33
Page 34

Fix Red-Eye
Reduces or removes red-eye in photos.
High Speed
Speeds up printing, but may reduce print quality.
Edge Smoothing
Smooths jagged edges in low-resolution images such as screen captures or images from the Web.
Print Preview
Displays a preview of your printout before printing.
Black/Grayscale
Prints text and graphics in black or shades of gray.
Parent topic: Selecting Advanced Print Settings - Windows
Color Management Options - Windows
You can adjust the Color Management settings on the Advanced tab to fine-tune the colors in your
printout, or turn off color management in your printer software.
Color Controls
Lets you select a Color Mode setting, individual settings for Brightness, Contrast, Saturation, and
Density, and individual color tones. If you select the Adobe RGB color mode, you can also adjust the
midtone density using the Gamma setting.
Fix Photo
Improves the color, contrast, and sharpness of flawed photos.
Note: Fix Photo uses a sophisticated face recognition technology to optimize photos that include
faces. For this to work, both eyes and the nose must be visible in the subject's face. If your photo
includes a face with an intentional color cast, such as a statue, you may want to turn off Fix Photo to
retain the special color effects.
ICM
Lets you turn off color management in your printer software using the Off (No Color Adjustment)
option. You can then manage color using only your application software.
Parent topic: Selecting Advanced Print Settings - Windows
Selecting Print Layout Options - Windows
You can select a variety of sizing and layout options for your document or photo on the Page Layout tab.
34
Page 35

• To change the size of your printed document or photo, select the Reduce/Enlarge Document
checkbox and select sizing options.
• To print on both sides of your paper, select the 2-sided printing options.
• To print multiple pages on one sheet of paper, or print one image on multiple sheets of paper, select
the Multi-Page checkbox and select the options you want.
• To print multiple copies and arrange their print order, select the Copies options.
• To control printing at the edges of borderless images, select a Borderless option:
• To adjust the automatic settings, select Auto Expand as the Enlargement Method setting, then
adjust the Expansion slider (if necessary) to control the amount of image expansion.
35
Page 36

Note: If you select the Min option for the Expansion setting, you may see white borders on your
printed photo.
• To print the borderless image at its actual size without scaling, select Retain Size as the
Enlargement Method setting.
• To add a watermark to your printout, select Watermark settings.
• To rotate or flip the printed image, select the Rotate 180°or Mirror Image checkboxes.
Parent topic: Printing with Windows
Selecting a Printing Preset - Windows
For quick access to common groups of print settings, you can select a printing preset.
Note: You can create your own preset by clicking the Save Settings button on the Advanced tab.
1. Click the Shortcuts tab.
You see the available Printing Presets options:
36
Page 37

2. Place your cursor over a Printing Presets option to view its list of settings.
3. Use any of the available options on the screen to control your printing presets.
4. To choose an option for printing, select it.
5. Click OK.
Parent topic: Printing with Windows
Printing Your Document or Photo - Windows
Once you have selected your print settings, you are ready to save your settings and print.
1. Click OK to save your settings.
You see your application's Print window, such as this one:
37
Page 38

2. Click OK or Print to start printing.
Checking Print Status - Windows
Parent topic: Printing with Windows
Checking Print Status - Windows
During printing, you see this window showing the progress of your print job. It allows you to control
printing and check ink cartridge status.
38
Page 39

• To cancel printing, click Stop.
• To see print jobs lined up for printing, click Print Queue.
• To check ink status, click Check Ink Levels.
Parent topic: Printing Your Document or Photo - Windows
Selecting Default Print Settings - Windows
When you change your print settings in a program, the changes apply only while you are printing in that
program session. If you want to change the print settings you use in all your Windows programs, you can
select new default print settings.
1. Right-click the product icon in the Windows taskbar.
2. Select Printer Settings.
You see the printer settings window:
39
Page 40

3. Select the print settings you want to use as defaults in all your Windows programs.
4. Click OK.
These settings are now the defaults selected for printing. You can still change them as needed for
printing in any program session.
Changing the Language of the Printer Software Screens
Parent topic: Printing with Windows
Changing the Language of the Printer Software Screens
You can change the language used on the Windows printer software screens.
1. Right-click the product icon in the Windows taskbar.
2. Select Printer Settings.
40
Page 41

You see the printer settings window.
3. Click the Maintenance tab.
You see the maintenance options:
4. Select the language you want to use as the Language setting.
5. Click OK to close the printer software window.
The printer software screens appear in the language you selected the next time you access them.
Parent topic: Selecting Default Print Settings - Windows
41
Page 42

Changing Automatic Update Options
Your printer software for Windows automatically checks for updates to the product driver and firmware.
You can change how often the software checks for updates or disable this feature.
1. Right-click the product icon in the Windows taskbar.
2. Select Auto Update Settings.
You see this window:
3. Do one of the following for each type of update:
• To change how often the software checks for updates, select a setting in the Check every menu.
• To disable the automatic update feature, select the Never option.
4. Click Apply.
5. Click OK to exit.
Note: If you choose to disable the automatic update feature, it's a good idea to periodically check for
updates on Epson's support website.
42
Page 43

Parent topic: Printing with Windows
Related tasks
Checking for Software Updates
Printing with Mac OS X 10.5, 10.6, or 10.7
You can print with your product using any Mac OS X printing program, as described in these sections.
Selecting Basic Print Settings - Mac OS X 10.5/10.6/10.7
Selecting Page Setup Settings - Mac OS X 10.5/10.6/10.7
Selecting Print Layout Options - Mac OS X 10.5/10.6/10.7
Managing Color - Mac OS X 10.5/10.6/10.7
Selecting Printing Preferences - Mac OS X 10.5/10.6/10.7
Printing Your Document or Photo - Mac OS X 10.5/10.6/10.7
Parent topic: Printing From a Computer
Selecting Basic Print Settings - Mac OS X 10.5/10.6/10.7
Select the basic settings for the document or photo you want to print.
1. Open a photo or document for printing.
2. Select the print command in your application.
Note: You may need to select a print icon on your screen, the Print option in the File menu, or
another command. See your application's help utility for details.
3. Select your product as the Printer setting.
4. If necessary, click the arrow next to the Printer setting or the Show Details button to expand the
print window.
43
Page 44

You see the expanded printer settings window for your product:
Note: The print window may look different, depending on the version of Mac OS X and the
application you are using.
5. Select the Copies and Pages settings as necessary.
Note: If you do not see these settings in the print window, check for them in your application before
printing.
6. Select the page setup options: Paper Size and Orientation.
Note: If you do not see these settings in the print window, check for them in your application before
printing. They may be accessible by selecting Page Setup from the File menu.
44
Page 45

7. Select any application-specific settings that appear on the screen, such as those shown in the image
above for the Preview application.
8. Select Print Settings from the pop-up menu.
You see these settings:
45
Page 46

9. Select the type of paper you loaded as the Media Type setting.
Note: The setting may not exactly match the name of your paper. Check the paper type settings list
for details.
10. Select the Print Quality setting you want to use.
11. Select any of the available print options.
Print Quality Settings - Mac OS X 10.5/10.6/10.7
Print Options - Mac OS X 10.5/10.6/10.7
Parent topic: Printing with Mac OS X 10.5, 10.6, or 10.7
Related references
Paper or Media Type Settings
Related tasks
Selecting Page Setup Settings - Mac OS X 10.5/10.6/10.7
Printing Your Document or Photo - Mac OS X 10.5/10.6/10.7
46
Page 47

Print Quality Settings - Mac OS X 10.5/10.6/10.7
You can select any of the print quality settings to fine-tune the quality of your print. Some settings may
be unavailable, depending on the paper type and border setting you have chosen.
Economy
For fast printing with reduced quality.
Normal
For everyday text and image printing.
Fine
For text and graphics with good quality and print speed.
Photo
For photos and graphics with good quality and print speed.
Photo RPM
For the best print quality, but the slowest print speed.
Parent topic: Selecting Basic Print Settings - Mac OS X 10.5/10.6/10.7
Print Options - Mac OS X 10.5/10.6/10.7
You can select any of the print options to customize your print. Some options may be unavailable,
depending on other settings you have chosen.
Expansion
If you selected a borderless paper size setting, adjusts the image expansion settings to control
printing at the edges of borderless prints.
Grayscale
Prints text and graphics in black or shades of gray.
Mirror Image
Lets you flip the printed image horizontally.
Note: If you select the Min option for the Expansion setting, you may see white borders on your printed
photo.
Parent topic: Selecting Basic Print Settings - Mac OS X 10.5/10.6/10.7
Selecting Page Setup Settings - Mac OS X 10.5/10.6/10.7
Depending on your application, you may be able to select the paper size and orientation settings from
the print window.
47
Page 48

Note: If you do not see these settings in the print window, check for them in your application before
printing. They may be accessible by selecting Page Setup from the File menu.
1. Select the size of the paper you loaded as the Paper Size setting. If you are printing a borderless
photo, select a paper size with a Sheet Feeder - Borderless option. You can also select a custom
setting to create a custom paper size.
Note: You must select a compatible borderless paper type and size to print borderlessly. Check the
borderless paper compatibility list for details.
2. Select the orientation of your document or photo as shown in the print window.
Note: If you are printing an envelope, select the icon.
Note: You can reduce or enlarge the size of the printed image by selecting Paper Handling from the
pop-up menu and selecting a scaling option.
Parent topic: Printing with Mac OS X 10.5, 10.6, or 10.7
Related references
Borderless Paper Type Compatibility
Selecting Print Layout Options - Mac OS X 10.5/10.6/10.7
You can select a variety of layout options for your document or photo by selecting Layout from the popup menu on the print window.
48
Page 49

• To print multiple pages on one sheet of paper, select the number of pages in the Pages per Sheet
pop-up menu. To arrange the print order of the pages, select a Layout Direction setting.
• To print borders around each page on the sheet, select a line setting from the Border pop-up menu.
• To invert or flip the printed image, select the Reverse page orientation or Flip horizontally settings.
Parent topic: Printing with Mac OS X 10.5, 10.6, or 10.7
Managing Color - Mac OS X 10.5/10.6/10.7
You can adjust the Color Matching and Color Options settings to fine-tune the colors in your printout, or
turn off color management in your printer software.
1. Select Color Matching from the pop-up menu in the print window.
2. Select one of the available options.
49
Page 50

3. Select Color Options from the pop-up menu in the print window.
Note: The available settings on the Color Options menu depend on the option you selected on the
Color Matching menu.
4. Select one of the available options.
Color Matching and Color Options - Mac OS X 10.5/10.6/10.7
Parent topic: Printing with Mac OS X 10.5, 10.6, or 10.7
Color Matching and Color Options - Mac OS X 10.5/10.6/10.7
You can select from these settings on the Color Matching and Color Options menus.
Color Matching Settings
EPSON Color Controls
Lets you manage color using controls in your printer software, or turn off color management.
ColorSync
Prints using standard color profiles for your product and paper to help match image colors. You can
customize the conversion method and filter settings on the ColorSync pop-up menu in the print
window.
50
Page 51

Color Options Settings
Manual Settings
Lets you select manual color adjustments. Click the arrow next to Advanced Settings and select
settings for Brightness, Contrast, Saturation, and individual color tones. You can also select a color
Mode setting for printing photos and graphics. If you select the Adobe RGB color mode, you can also
adjust the midtone density using the Gamma setting.
Fix Photo
Improves the color, contrast, and sharpness of flawed photos.
Note: Fix Photo uses a sophisticated face recognition technology to optimize photos that include
faces. For this to work, both eyes and the nose must be visible in the subject's face. If your photo
includes a face with an intentional color cast, such as a statue, you may want to turn off Fix Photo to
retain the special color effects.
Off (No Color Adjustment)
Turns off color management in your printer software so you can manage color using only your
application software.
Parent topic: Managing Color - Mac OS X 10.5/10.6/10.7
Selecting Printing Preferences - Mac OS X 10.5/10.6/10.7
You can select printing preferences that apply to all the print jobs you send to your product.
1. In the Apple menu or the Dock, select System Preferences.
2. Select Print & Fax or Print & Scan, select your product, and select Options & Supplies.
3. Select Driver.
You see this screen:
51
Page 52

4. Select any of the available printing preferences.
5. Click OK.
Printing Preferences - Mac OS X 10.5/10.6/10.7
Parent topic: Printing with Mac OS X 10.5, 10.6, or 10.7
Printing Preferences - Mac OS X 10.5/10.6/10.7
You can select from these settings on the Driver tab.
Thick paper and envelopes
Prevents ink from smearing when you print on envelopes or other thick paper.
Skip Blank Page
Ensures that your product does not print pages that contain no text or images.
High Speed Printing
Speeds up printing, but may reduce print quality.
Parent topic: Selecting Printing Preferences - Mac OS X 10.5/10.6/10.7
Printing Your Document or Photo - Mac OS X 10.5/10.6/10.7
Once you have selected your print settings, you are ready to print.
Click Print at the bottom of the print window.
52
Page 53

Checking Print Status - Mac OS X 10.5/10.6/10.7
Parent topic: Printing with Mac OS X 10.5, 10.6, or 10.7
Checking Print Status - Mac OS X 10.5/10.6/10.7
During printing, you can view the progress of your print job, control printing, and check ink cartridge
status.
1. Click the printer icon when it appears in the Dock.
You see the print status window:
53
Page 54

2. Select the following options as necessary:
• To cancel printing, click the print job and click Delete.
• To pause a print job, click the print job and click Hold. To resume a print job, click the print job
marked "Hold" and click Resume.
• To pause printing for all queued print jobs, click Pause Printer.
• To check ink status, click Supply Levels.
Parent topic: Printing Your Document or Photo - Mac OS X 10.5/10.6/10.7
Printing with Mac OS X 10.4
You can print with your product using any Mac OS X printing program, as described in these sections.
Selecting Page Setup Settings - Mac OS X 10.4
Selecting Basic Print Settings - Mac OS X 10.4
Selecting Print Layout Options - Mac OS X 10.4
Managing Color - Mac OS X 10.4
Selecting Printing Preferences - Mac OS X 10.4
Printing Your Document or Photo - Mac OS X 10.4
Parent topic: Printing From a Computer
54
Page 55

Selecting Page Setup Settings - Mac OS X 10.4
Select the page setup settings for the document or photo you want to print.
1. Open a photo or document for printing.
2. Select the Page Setup command in your application.
Note: You may need to select a print icon on your screen, the Page Setup option in the File menu,
or another command. See your application's help utility for details.
3. Select your product as the Format for setting.
4. Select the size of the paper you loaded as the Paper Size setting. If you are printing a borderless
photo, select a paper size with a Sheet Feeder - Borderless option. You can also select a custom
setting to create a custom paper size.
Note: You must select a compatible borderless paper type and size to print borderlessly. Check the
borderless paper compatibility list for details.
55
Page 56

5. Select the orientation of your document or photo as shown in the page setup window.
Note: If you are printing an envelope, select the icon.
6. To reduce or enlarge the size of the printed image, select a different Scale setting.
7. Click OK to close the window.
Parent topic: Printing with Mac OS X 10.4
Related references
Borderless Paper Type Compatibility
Related tasks
Selecting Basic Print Settings - Mac OS X 10.4
Selecting Basic Print Settings - Mac OS X 10.4
Select the basic settings for the document or photo you want to print.
1. Select the print command in your application.
Note: You may need to select a print icon on your screen, the Print option in the File menu, or
another command. See your application's help utility for details.
2. Select your product as the Printer setting.
56
Page 57

3. Select the Copies and Pages settings as necessary.
Note: If you do not see these settings in the print window, check for them in your application before
printing. In some applications, you may need to select Advanced before you can see these settings.
4. Select Print Settings from the pop-up menu.
5. Select the type of paper you loaded as the Media Type setting.
Note: The setting may not exactly match the name of your paper. Check the paper type settings list
for details.
6. Select the Print Quality setting you want to use.
7. Select any of the available print options.
Print Quality Settings - Mac OS X 10.4
Print Options - Mac OS X 10.4
Parent topic: Printing with Mac OS X 10.4
57
Page 58

Related references
Paper or Media Type Settings
Related tasks
Printing Your Document or Photo - Mac OS X 10.4
Print Quality Settings - Mac OS X 10.4
You can select any of the print quality settings to fine-tune the quality of your print. Some settings may
be unavailable, depending on the paper type and border setting you have chosen.
Economy
For fast printing with reduced quality.
Normal
For everyday text and image printing.
Fine
For text and graphics with good quality and print speed.
Photo
For photos and graphics with good quality and print speed.
Photo RPM
For the best print quality, but the slowest print speed.
Parent topic: Selecting Basic Print Settings - Mac OS X 10.4
Print Options - Mac OS X 10.4
You can select any of the print options to customize your print. Some options may be unavailable,
depending on other settings you have chosen.
Expansion
If you selected a borderless paper size setting, adjusts the image expansion settings to control
printing at the edges of borderless prints.
Grayscale
Prints text and graphics in black or shades of gray.
Mirror Image
Lets you flip the printed image horizontally.
Note: If you select the Min option for the Expansion setting, you may see white borders on your printed
photo.
Parent topic: Selecting Basic Print Settings - Mac OS X 10.4
58
Page 59

Selecting Print Layout Options - Mac OS X 10.4
You can select layout options for multi-page documents by selecting Layout from the pop-up menu on
the print window.
• To print multiple pages on one sheet of paper, select the number of pages in the Pages per Sheet
pop-up menu. To arrange the print order of the pages, select a Layout Direction setting.
• To print borders around each page on the sheet, select a line setting from the Border pop-up menu.
Parent topic: Printing with Mac OS X 10.4
Managing Color - Mac OS X 10.4
You can adjust the Color Options settings to fine-tune the colors in your printout, or turn off color
management in your printer software.
1. Select Color Options from the pop-up menu in the print window.
59
Page 60

2. Select one of the available options.
Color Options - Mac OS X 10.4
Parent topic: Printing with Mac OS X 10.4
Color Options - Mac OS X 10.4
You can select from these settings on the Color Options menu.
Manual Settings
Lets you select manual color adjustments. Click the arrow next to Advanced Settings and select
settings for Brightness, Contrast, Saturation, and individual color tones. You can also select a color
Mode setting for printing photos and graphics. If you select the Adobe RGB color mode, you can also
adjust the midtone density using the Gamma setting.
ColorSync
Prints using standard color profiles for your product and paper to help match image colors. You can
customize the conversion method and filter settings on the ColorSync pop-up menu in the print
window.
Off (No Color Adjustment)
Turns off color management in your printer software so you can manage color using only your
application software.
Parent topic: Managing Color - Mac OS X 10.4
Selecting Printing Preferences - Mac OS X 10.4
You can select various printing preferences from the Extension Settings menu.
1. Select Extension Settings from the pop-up menu in the print window.
60
Page 61

2. Select any of the available printing preferences.
Printing Preferences - Mac OS X 10.4
Parent topic: Printing with Mac OS X 10.4
Printing Preferences - Mac OS X 10.4
You can select from these options on the Extension Settings menu.
Thick paper and envelopes
Prevents ink from smearing when you print on envelopes or other thick paper.
Skip Blank Page
Ensures that your product does not print pages that contain no text or images.
High Speed Printing
Speeds up printing, but may reduce print quality.
Parent topic: Selecting Printing Preferences - Mac OS X 10.4
Printing Your Document or Photo - Mac OS X 10.4
Once you have selected your print settings, you are ready to print.
Click Print at the bottom of the print window.
61
Page 62

Checking Print Status - Mac OS X 10.4
Parent topic: Printing with Mac OS X 10.4
Checking Print Status - Mac OS X 10.4
During printing, you can view the progress of your print job, control printing, and check ink cartridge
status.
1. Click the printer icon when it appears in the Dock.
You see the print status window:
62
Page 63

2. Select the following options as necessary:
• To cancel printing, click the print job and click Delete.
• To pause printing, click the print job and click Hold. To resume printing, click the print job marked
"Hold" and click Resume.
• To check ink status, click Supply Levels.
Parent topic: Printing Your Document or Photo - Mac OS X 10.4
Cancelling Printing Using a Product Button
If you need to cancel printing, press the paper/cancel button on your product for 3 seconds.
Parent topic: Printing From a Computer
63
Page 64

Using an External Device with Your Product
Follow the instructions in these sections to use your product with an external device, such as a camera,
smartphone, or other device.
Wireless Printing from a Mobile Device
Printing From a Camera Connected to Your Product
Wireless Printing from a Mobile Device
You can print photos, documents, web pages, and more from smartphones or tablets, such as iPhones,
iPads, and Android devices.
1. Set up your product for wireless printing as described on the Start Here sheet.
2. Visit www.epson.com/connect to learn more about mobile device printing and check the compatibility
of your mobile device.
3. Connect your mobile device to the same wireless network that your product is using.
4. Print from your mobile device to your EPSON product.
Parent topic: Using an External Device with Your Product
Printing From a Camera Connected to Your Product
If you have a digital camera that supports PictBridge printing, you can connect it to the product and print
your photos directly from the camera. Check your camera manual to see if it is compatible.
Note: Your photos must be in JPG format and sized from 80 × 80 to 9200 × 9200 pixels. Epson cannot
guarantee the compatibility of your camera. Some combinations of paper type, size, and layout may not
be supported, depending on your camera and the product settings.
1. Load the paper you want to use for printing.
2. Connect the USB cable that came with your camera to the USB port on the front of your product.
Note: You cannot use the USB port to transfer images from your camera to your computer.
64
Page 65

3. Turn on your camera.
4. Follow the instructions that came with your camera to select your photos and settings, and print.
When you finish printing, turn off your camera and disconnect it from the product.
Parent topic: Using an External Device with Your Product
Related tasks
Loading Paper
65
Page 66

Printing on CDs/DVDs
Follow the instructions here to print a design onto ink jet-printable CDs or DVDs to create a custom label.
Loading a CD/DVD
Removing a Printed CD/DVD
Printing on CDs/DVDs from a Computer
Loading a CD/DVD
You can print on any compatible, ink jet-printable CDs or DVDs (including Blu-ray Discs), preferably with
a white surface.
Note: If you are using discs where the printable area extends to within 0.16 inch (4 mm) of the center
hole, you may need to adjust the inner diameter setting using the EPSON Print CD software.
1. Make sure you burn your files, music, or video onto your disc before printing on it.
2. Turn on the product.
3. Remove any paper loaded in the sheet feeder, and close the paper support if it's open.
66
Page 67

4. Open the output tray, but do not pull out the extensions. Then open the CD/DVD feed tray.
67
Page 68

5. Place your disc on the included CD/DVD tray with the label side up.
1 12-cm discs
2 8-cm discs
Note: For small 8-cm discs, place the adapter on the tray and then place the disc in the adapter.
Caution: Before placing the CD/DVD, make sure no foreign particles or substances are on the
CD/DVD tray. Otherwise, the CD/DVD and the data on it may be damaged.
68
Page 69

6. Gently insert the CD/DVD tray into the CD/DVD feed tray. Push in the tray until the arrows on the
tray and feed tray are aligned.
Caution: Do not insert the CD/DVD tray while the power light is flashing. Otherwise, the product
or your CD/DVD may be damaged. Do not turn off the product with the CD/DVD tray inserted in it.
Always remove the tray first.
Parent topic: Printing on CDs/DVDs
69
Page 70

Removing a Printed CD/DVD
After your CD/DVD is printed, the CD/DVD tray ejects partially from the product. Pull out the tray and
remove the disc. Then close the CD/DVD feed tray.
Note: If the CD/DVD tray gets any ink on it, immediately wipe it off.
After printing, handle the CD/DVD carefully. You may need to wait up to 24 hours for the ink to dry fully
before inserting it in a drive, depending on the type of disc you used. Keep printed discs away from
moisture and direct sunlight.
Caution: Do not turn off the product with the CD/DVD tray inserted in it. Always remove the tray first.
Store the CD/DVD tray flat. A warped or damaged CD/DVD tray may stop your product from operating
normally.
Parent topic: Printing on CDs/DVDs
Printing on CDs/DVDs from a Computer
Before printing directly on CDs or DVDs from your computer, make sure you have set up your product
and installed the EPSON Print CD software as described on the Start Here sheet.
Note: Use only an application that supports CD/DVD printing or ink may get on the CD/DVD tray or
inside your product. Check the CD/DVD package for any additional instructions.
Printing on a CD/DVD with Windows
Printing on a CD/DVD with Mac OS X
Parent topic: Printing on CDs/DVDs
Printing on a CD/DVD with Windows
You can print with your product using the EPSON Print CD software, as described in these sections.
Designing a CD/DVD - Windows
Printing Your CD/DVD Design - Windows
Adjusting CD/DVD Print Position - Windows
Adjusting CD/DVD Print Quality - Windows
Parent topic: Printing on CDs/DVDs from a Computer
70
Page 71

Designing a CD/DVD - Windows
You can use EPSON Print CD to design your disc by importing photos, adding text, and creating special
effects.
1. Open the EPSON Print CD program on your computer.
You see this screen:
2. Use the buttons on the left side of the screen to select a pre-designed template or add a background
image, picture, text, or graphic elements. For more information, select the Help menu.
3. When you are finished creating your design, click Save and save your design file.
Parent topic: Printing on a CD/DVD with Windows
Related tasks
Printing Your CD/DVD Design - Windows
Printing Your CD/DVD Design - Windows
After you create your design, you can print it on paper to test it, then print it on the CD or DVD that
contains your data, photos, video, or music. Make sure the disc is loaded for printing before you start.
1. Open your file in EPSON Print CD and click Print.
You see this screen:
71
Page 72

2. Make sure your product is selected as the Printer setting.
3. To see how your design will look without printing on the disc, click Test Print and follow the
instructions on the screen.
Note: If printing a test design on a sheet of paper, make sure that the CD/DVD tray is not inserted in
the product and the CD/DVD feed tray is closed.
4. When you are ready to print on the disc, click the Print button on the screen.
5. Click Print.
Parent topic: Printing on a CD/DVD with Windows
Adjusting CD/DVD Print Position - Windows
If your printed design is not positioned correctly on the disc, you can adjust the print position. First, load
an extra CD/DVD to use for printing test patterns.
1. Open your file in EPSON Print CD and click Print.
You see this screen:
72
Page 73

2. Select Print Position Confirmation Pattern.
3. Click Print.
4. Remove the disc after printing.
5. Using a metric ruler, measure the distance from the hole to the cross marks labeled Top and Right.
Note: Be sure to measure from the edge of the hole and not the edge of the printable area.
6. Click Print again, then select Adjust Print Position.
You see this screen:
73
Page 74

7. Click Enter Values, then select the distance for Top into the Height (Top) box and the distance for
Right in the Width (Right) box.
8. Click OK.
Parent topic: Printing on a CD/DVD with Windows
Related tasks
Printing Your CD/DVD Design - Windows
Adjusting CD/DVD Print Quality - Windows
If ink smears on your disc or is sticky after it dries, you can adjust the color saturation and ink density.
This may be necessary to make sure your designs look their best on the particular brand of discs you are
using. First, load an extra CD/DVD to use for printing test patterns.
1. Open your file in EPSON Print CD and click Print.
You see this screen:
74
Page 75

2. Select Print Density Confirmation Pattern.
3. Click Print.
4. Remove the disc after printing and check to see if you need to make the density darker or lighter.
5. Load the same disc in the product again.
6. Click Print.
7. Adjust the Print Color Correction slider to a darker or lighter setting as necessary.
8. Select Print Density Confirmation Pattern and select the Second radio button.
9. Click Print to print another test pattern
10. Examine the disc after printing to see if further adjustment is needed.
When the ink density looks good, you are ready to print on your burned CD or DVD.
Parent topic: Printing on a CD/DVD with Windows
Related tasks
Printing Your CD/DVD Design - Windows
75
Page 76

Printing on a CD/DVD with Mac OS X
You can print with your product using the EPSON Print CD software, as described in these sections.
Designing a CD/DVD - Mac OS X
Printing Your CD/DVD Design - Mac OS X
Adjusting CD/DVD Print Position - Mac OS X
Adjusting CD/DVD Print Quality - Mac OS X
Parent topic: Printing on CDs/DVDs from a Computer
Designing a CD/DVD - Mac OS X
You can use EPSON Print CD to design your disc by importing photos, adding text, and creating special
effects.
1. Open the EPSON Print CD program in the Applications > Epson Software > Print CD folder on
your Mac.
You see this screen:
76
Page 77

2. Use the icons on the left side of the screen to add a background image, picture, text, or graphic
elements.
3. When you are finished creating your design, make sure you save it.
Parent topic: Printing on a CD/DVD with Mac OS X
Related tasks
Printing Your CD/DVD Design - Mac OS X
Printing Your CD/DVD Design - Mac OS X
After you create your design, you can print it on paper to test it, then print it on the CD or DVD that
contains your data, photos, video, or music. Make sure the disc is loaded for printing before you start.
1. Open your file in EPSON Print CD and select Print from the File menu.
You see this screen:
2. Make sure your product is selected as the Printer setting.
3. To see how your design will look without printing on the disc, select Test Print and follow the
instructions on the screen.
77
Page 78

Note: If printing a test design on a sheet of paper, make sure that the CD/DVD tray is not inserted in
the product and the CD/DVD feed tray is closed.
4. When you are ready to print on the disc, click the Print button on the screen.
Parent topic: Printing on a CD/DVD with Mac OS X
Adjusting CD/DVD Print Position - Mac OS X
If your printed design is not positioned correctly on the disc, you can adjust the print position. First, load
an extra CD/DVD to use for printing test patterns.
1. Open your file in EPSON Print CD and select Print from the File menu.
You see this screen:
2. Select Print Position Check Pattern.
3. Click Print.
78
Page 79

4. Remove the disc after printing.
5. Using a metric ruler, measure the distance from the hole to the cross marks labeled Top and Right.
Note: Be sure to measure from the edge of the hole and not the edge of the printable area.
6. Select Print from the File menu.
7. Select Position Adjustment.
You see this screen:
8. Click Value Entry, then select the distance for Top into the Top Space box and the distance for
Right in the Right Space box.
9. Click OK.
Parent topic: Printing on a CD/DVD with Mac OS X
Related tasks
Printing Your CD/DVD Design - Mac OS X
79
Page 80

Adjusting CD/DVD Print Quality - Mac OS X
If ink smears on your disc or is sticky after it dries, you can adjust the color saturation and ink density.
This may be necessary to make sure your designs look their best on the particular brand of discs you are
using. First, load an extra CD/DVD to use for printing test patterns.
1. Open your file in EPSON Print CD and select Print from the File menu.
You see this screen:
2. Select Print Density Check Pattern.
3. Click Print.
4. Remove the disc after printing and check to see if you need to make the density darker or lighter.
5. Load the same disc in the product again.
6. Select Print from the File menu.
7. Select a darker or lighter setting in the Color Correction box as necessary.
8. Select Print Density Check Pattern and select Second Time.
9. Click Print to print another test pattern.
80
Page 81

10. Examine the disc after printing to see if further adjustment is needed.
When the ink density looks good, you are ready to print on your burned CD or DVD.
Parent topic: Printing on a CD/DVD with Mac OS X
Related tasks
Printing Your CD/DVD Design - Mac OS X
81
Page 82

Replacing Ink Cartridges
When an ink cartridge is expended, you need to replace it.
You may also need to replace a cartridge that is more than six months old, if your printouts do not look
their best, even after cleaning and aligning the print head.
Note: Please dispose of your used EPSON branded ink cartridges responsibly and in accordance with
local requirements. If you would like to return your used ink cartridges to Epson for proper disposal,
please go to www.epson.com/recycle for more information.
Check Cartridge Status
Purchase EPSON Ink Cartridges
Removing and Installing Ink Cartridges
Check Cartridge Status
Your product and its printing software will let you know when an ink cartridge is low or expended.
Checking Cartridge Status Lights
Checking Cartridge Status with Windows
Checking Cartridge Status with Mac OS X
Parent topic: Replacing Ink Cartridges
Checking Cartridge Status Lights
You can check the status of your ink cartridges by checking the lights on your product.
• If the ink light is flashing, a cartridge is low. You can continue printing until the cartridge needs
replacement.
• If the ink light is on, a cartridge is expended. You must replace the cartridge before you can print.
Parent topic: Check Cartridge Status
Checking Cartridge Status with Windows
A low ink reminder appears if you try to print when ink is low, and you can check your cartridge status at
any time using a utility on your Windows computer.
1. To check your cartridge status, double-click the product icon in the Windows taskbar.
You see this window:
82
Page 83

2. Replace or reinstall any ink cartridge indicated on the screen.
Note: If any of the cartridges installed in the product is broken, incompatible with the product model,
or improperly installed, EPSON Status Monitor will not display an accurate cartridge status.
3. To disable the low ink reminder, right-click the product icon in the Windows taskbar and select
Monitoring Preferences.
You see this window:
83
Page 84

4. Deselect the See Low Ink Reminder alerts checkbox at the bottom of the screen.
5. To disable promotional offers, deselect the Display Epson Offers checkbox.
Parent topic: Check Cartridge Status
Related tasks
Removing and Installing Ink Cartridges
84
Page 85

Checking Cartridge Status with Mac OS X
You can check the status of your ink cartridges using a utility on your Mac.
1. Do one of the following:
• Mac OS X 10.6/10.7: In the Apple menu or the Dock, select System Preferences. Select Print &
Fax or Print & Scan, select your product, and select Options & Supplies. Select Utility and
select Open Printer Utility.
• Mac OS X 10.4/10.5: In the Apple menu or the Dock, select System Preferences. Select Print &
Fax, select your product, and select Open Print Queue or Print Queue. Select Utility.
2. Select EPSON Status Monitor.
You see this window:
85
Page 86

3. Do the following as necessary:
• You can update the ink cartridge status by clicking Update.
• Replace or reinstall any ink cartridge indicated on the screen.
Note: If any of the cartridges installed in the product is broken, incompatible with the product model,
or improperly installed, EPSON Status Monitor will not display an accurate cartridge status.
Parent topic: Check Cartridge Status
Related tasks
Removing and Installing Ink Cartridges
Purchase EPSON Ink Cartridges
You can purchase genuine EPSON ink and paper at EPSON Supplies Central at www.epson.com/ink3
(U.S. sales) or www.epson.ca (Canadian sales). You can also purchase supplies from an EPSON
authorized reseller. To find the nearest one, call 800-GO-EPSON (800-463-7766).
Note: We recommend that you use genuine EPSON cartridges and do not refill them. The use of other
products may affect your print quality and could result in printer damage.
The printer ships with full cartridges and part of the ink from this first set of cartridges is used for priming
the printer. Yields vary considerably based on images printed, print settings, paper type, frequency of
use, and temperature. For print quality, a variable amount of ink remains in the cartridge after the
"replace cartridge" indicator comes on.
Ink Cartridge Part Numbers
Parent topic: Replacing Ink Cartridges
Ink Cartridge Part Numbers
Use these part numbers when you order or purchase new ink cartridges, and use the cartridges within
six months of installing them.
Ink color Part number (High Capacity)
Black 79
Cyan 79
Magenta 79
86
Page 87

Ink color Part number (High Capacity)
Yellow 79
Light Magenta 79
Light Cyan 79
Parent topic: Purchase EPSON Ink Cartridges
Removing and Installing Ink Cartridges
Make sure you have your replacement cartridges handy before you begin. You must install new
cartridges immediately after removing the old ones.
Caution: Leave your old cartridges in the product until you are ready to replace them to prevent the print
head nozzles from drying out. Do not open ink cartridge packages until you are ready to install the ink.
Cartridges are vacuum packed to maintain reliability.
1. Make sure the CD/DVD tray is not inserted in the product, and the power light is on but not
flashing.
2. Open the printer cover.
3. Press the ink button to move the print head to the ink replacement position.
If a cartridge is expended, a solid light appears above it.
87
Page 88

Note: If an ink cartridge is low, a flashing light appears above it. You can continue to use the low ink
cartridge until it is expended. Do not hold the ink button for more than three seconds, or the
product may start cleaning the print head.
Caution: Do not move the print head by hand; otherwise, you may damage your product. Do not
touch the flat white cable inside the product.
88
Page 89

4. Open the ink cartridge cover.
5. Squeeze the tab on the cartridge and lift the cartridge straight up to remove it.
Note: Dispose of used cartridges carefully. Do not take the used cartridge apart or try to refill it.
Warning: If ink gets on your skin, wash it thoroughly with soap and water. If ink gets into your eyes,
flush them immediately with water. If ink gets into your mouth, spit it out and see a doctor right away.
Keep ink cartridges out of the reach of children.
89
Page 90

6. Remove the cartridge from the package.
Caution: Do not touch the green chip on the cartridge. Install the new cartridge immediately after
removing the old one; if you do not, the print head may dry out and be unable to print.
7. Remove the yellow tape from the bottom of the cartridge.
Caution: Do not remove any other labels or seals, or ink will leak.
90
Page 91

8. Insert the new cartridge into the holder and push it down until it clicks into place.
9. Once you replace all the cartridges that need replacing, close the cartridge cover and the printer
cover.
10. Press the ink button to begin charging the ink. This takes about 2 minutes.
When the power light stops flashing and remains on, ink charging is finished.
Caution: Never turn off the product while the power light is flashing or you will waste ink.
Note: If the ink light is on after the print head moves to its home position, the ink cartridge may not
be installed properly. Press the ink button again, and press down the ink cartridge until it clicks into
place.
If you remove a low or expended ink cartridge, you cannot re-install and use the cartridge.
91
Page 92

Caution: If you remove an ink cartridge for later use, protect the ink supply area from dirt and dust and
store it in the same environment as the printer. The valve in the ink supply port is designed to contain
any excess ink, but do not touch the ink supply port or surrounding area. Always store ink cartridges with
the label facing up; do not store cartridges upside-down.
Parent topic: Replacing Ink Cartridges
Related concepts
Purchase EPSON Ink Cartridges
92
Page 93

Adjusting Print Quality
If your print quality declines, you may need to run a utility to clean or align the print head.
If running these utilities does not solve the problem, you may need to replace the ink cartridges.
Print Head Maintenance
Print Head Alignment
Cleaning the Paper Path
Related topics
Replacing Ink Cartridges
Print Head Maintenance
If your printouts become too light, or you see dark or light bands across them, you may need to clean the
print head nozzles. Cleaning uses ink, so clean the nozzles only if print quality declines.
You can check for clogged nozzles before you clean them so you don’t clean them unnecessarily.
Note: You cannot clean the print head if an ink cartridge is expended, and may not be able to clean it
when a cartridge is low. You must replace the cartridge first.
Print Head Nozzle Check
Print Head Cleaning
Parent topic: Adjusting Print Quality
Related topics
Replacing Ink Cartridges
Print Head Nozzle Check
You can print a nozzle check pattern to check for clogged nozzles.
Checking the Nozzles Using the Product Buttons
Checking the Nozzles Using a Computer Utility
Parent topic: Print Head Maintenance
Checking the Nozzles Using the Product Buttons
You can check the print head nozzles using the buttons on your product.
93
Page 94

1. Make sure that no product lights indicate errors, the CD/DVD tray is not inserted in the product, and
the CD/DVD feed tray is closed.
2. Load a few sheets of plain paper in the product.
3. Turn off the product.
4. Hold down the paper/cancel button as you press the power button to turn the product back
on. Hold down both buttons until the power light begins to flash, then release the buttons.
5. Check the printed pattern to see if there are gaps in the lines.
Print head is clean
94
Page 95

Print head needs cleaning
6. If there are no gaps, the print head is clean and you can continue printing.
If there are gaps or the pattern is faint, clean the print head.
Parent topic: Print Head Nozzle Check
Related concepts
Print Head Cleaning
Checking the Nozzles Using a Computer Utility
You can check the print head nozzles using a utility on your Windows or Mac computer.
1. Make sure that no product lights indicate errors, the CD/DVD tray is not inserted in the product, and
the CD/DVD feed tray is closed.
2. Load a few sheets of plain paper in the product.
3. Do one of the following:
• Windows: Right-click the product icon in the Windows taskbar.
• Mac OS X 10.6/10.7: In the Apple menu or the Dock, select System Preferences. Select Print &
Fax or Print & Scan, select your product, and select Options & Supplies. Select Utility and
select Open Printer Utility.
• Mac OS X 10.4/10.5: In the Apple menu or the Dock, select System Preferences. Select Print &
Fax or Print & Scan, select your product, and select Open Print Queue or Print Queue. Select
Utility.
4. Select Nozzle Check.
95
Page 96

You see one of these windows:
96
Page 97
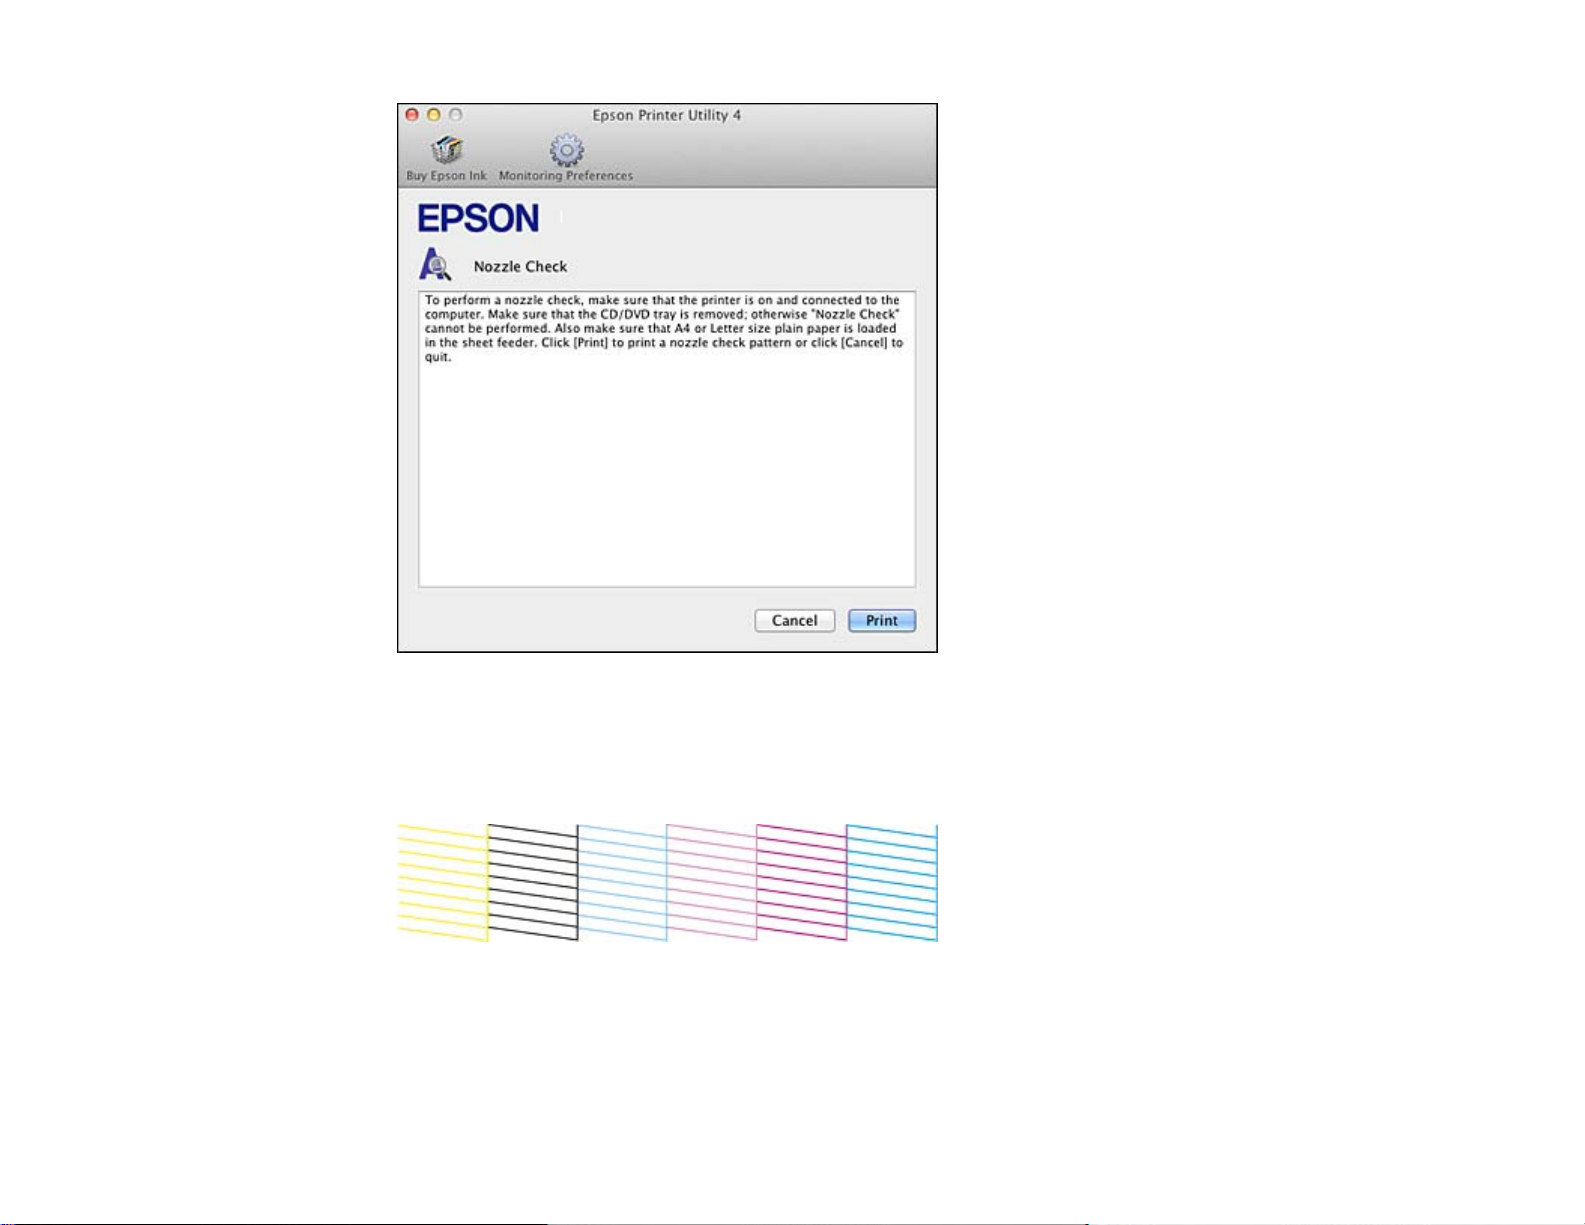
5. Click Print.
6. Check the printed pattern to see if there are gaps in the lines.
Print head is clean
Print head needs cleaning
97
Page 98

7. If there are no gaps, click Finish.
If there are gaps or the pattern is faint, clean the print head.
Parent topic: Print Head Nozzle Check
Related concepts
Print Head Cleaning
Print Head Cleaning
If print quality has declined and the nozzle check pattern indicates clogged nozzles, you can clean the
print head.
Note: You cannot clean the print head if an ink cartridge is expended, and may not be able to clean it
when a cartridge is low. You must replace the cartridge first.
Cleaning the Print Head Using the Product Buttons
Cleaning the Print Head Using a Computer Utility
Parent topic: Print Head Maintenance
Related topics
Replacing Ink Cartridges
Cleaning the Print Head Using the Product Buttons
You can clean the print head using the buttons on your product.
1. Make sure that no product lights indicate errors, the CD/DVD tray is not inserted in the product, and
the CD/DVD feed tray is closed.
98
Page 99

2. Hold down the ink button for 3 seconds to start the cleaning cycle, which lasts around 1 minute.
The power light flashes throughout the cleaning cycle and stays on when the cleaning cycle is
finished.
Caution: Never turn off the product during a cleaning cycle or you may damage it.
3. Load a few sheets of plain paper in the product.
4. Run a nozzle check to confirm that the print head is clean.
If you don’t see any improvement after cleaning the print head up to 4 times, turn off the product and wait
at least 6 hours. Then try cleaning the print head again. If quality still does not improve, one of the ink
cartridges may be old or damaged and needs to be replaced.
Parent topic: Print Head Cleaning
Related concepts
Print Head Nozzle Check
99
Page 100

Related topics
Replacing Ink Cartridges
Cleaning the Print Head Using a Computer Utility
You can clean the print head using a utility on your Windows or Mac computer.
1. Make sure that no product lights indicate errors, the CD/DVD tray is not inserted in the product, and
the CD/DVD feed tray is closed.
2. Load a few sheets of plain paper in the product.
3. Do one of the following:
• Windows: Right-click the product icon in the Windows taskbar.
• Mac OS X 10.6/10.7: In the Apple menu or the Dock, select System Preferences. Select Print &
Fax or Print & Scan, select your product, and select Options & Supplies. Select Utility and
select Open Printer Utility.
• Mac OS X 10.4/10.5: In the Apple menu or the Dock, select System Preferences. Select Print &
Fax, select your product, and select Open Print Queue or Print Queue. Select Utility.
4. Select Head Cleaning.
You see one of these windows:
100
 Loading...