

Page 1
Start Here
EPSON Stylus®Photo R200
1
4046837-00 XXX
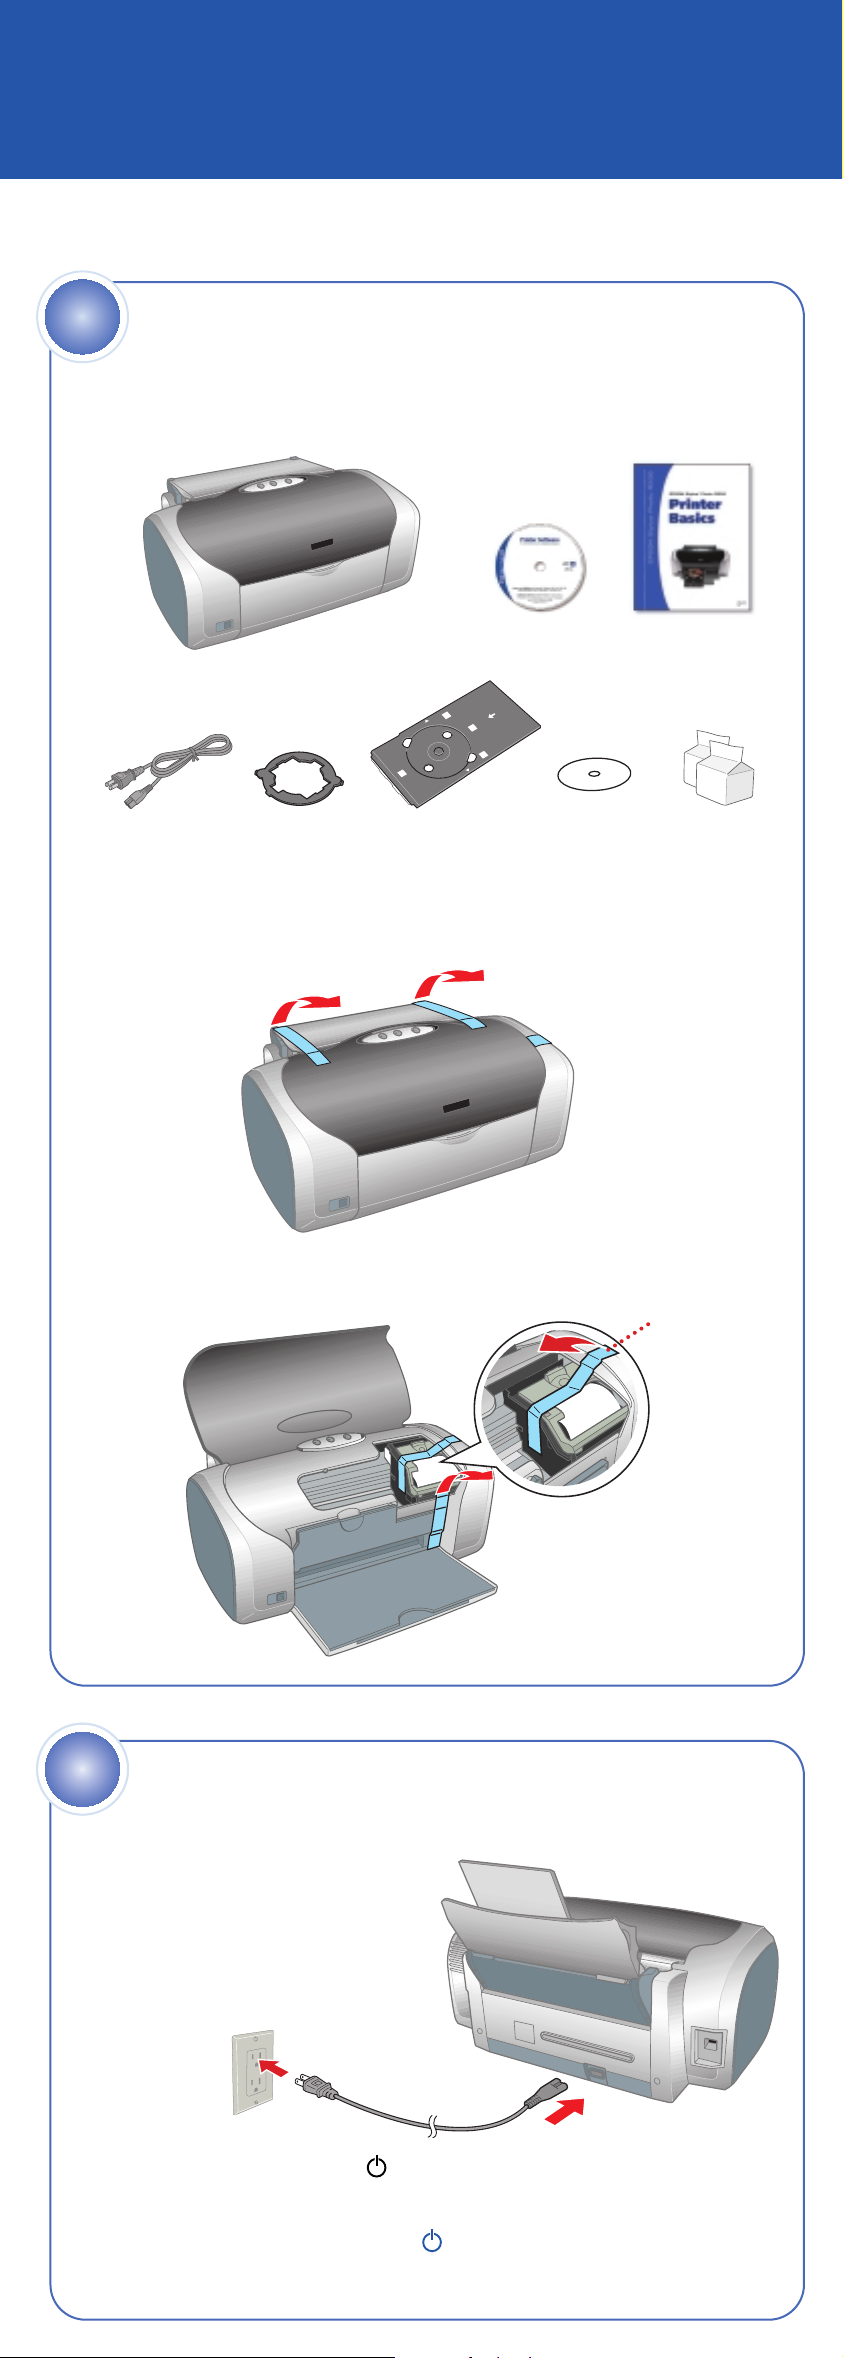
1 Remove everything from the box.
2 Remove any tape and packing material inside and around the printer.
Unpack
Printer
Power cord
The tape may be in slightly different places on your printer, so check
carefully.
Small CD insert
CD/DVD tray
Software
CD-ROM
CD position
check disk
Printer Basics
Ink cartridges
3 Lift the printer cover and remove the tape securing the ink
cartridge holder.
2
2
Power On
1 Connect the printer’s power cord
to the printer, then plug it into a
grounded electrical outlet.
Remove tape
2 Press the printer’s power button until the green power light
comes on.
Caution: Use only the printer’s power button to turn the
printer on and off.
Page 2
2
3
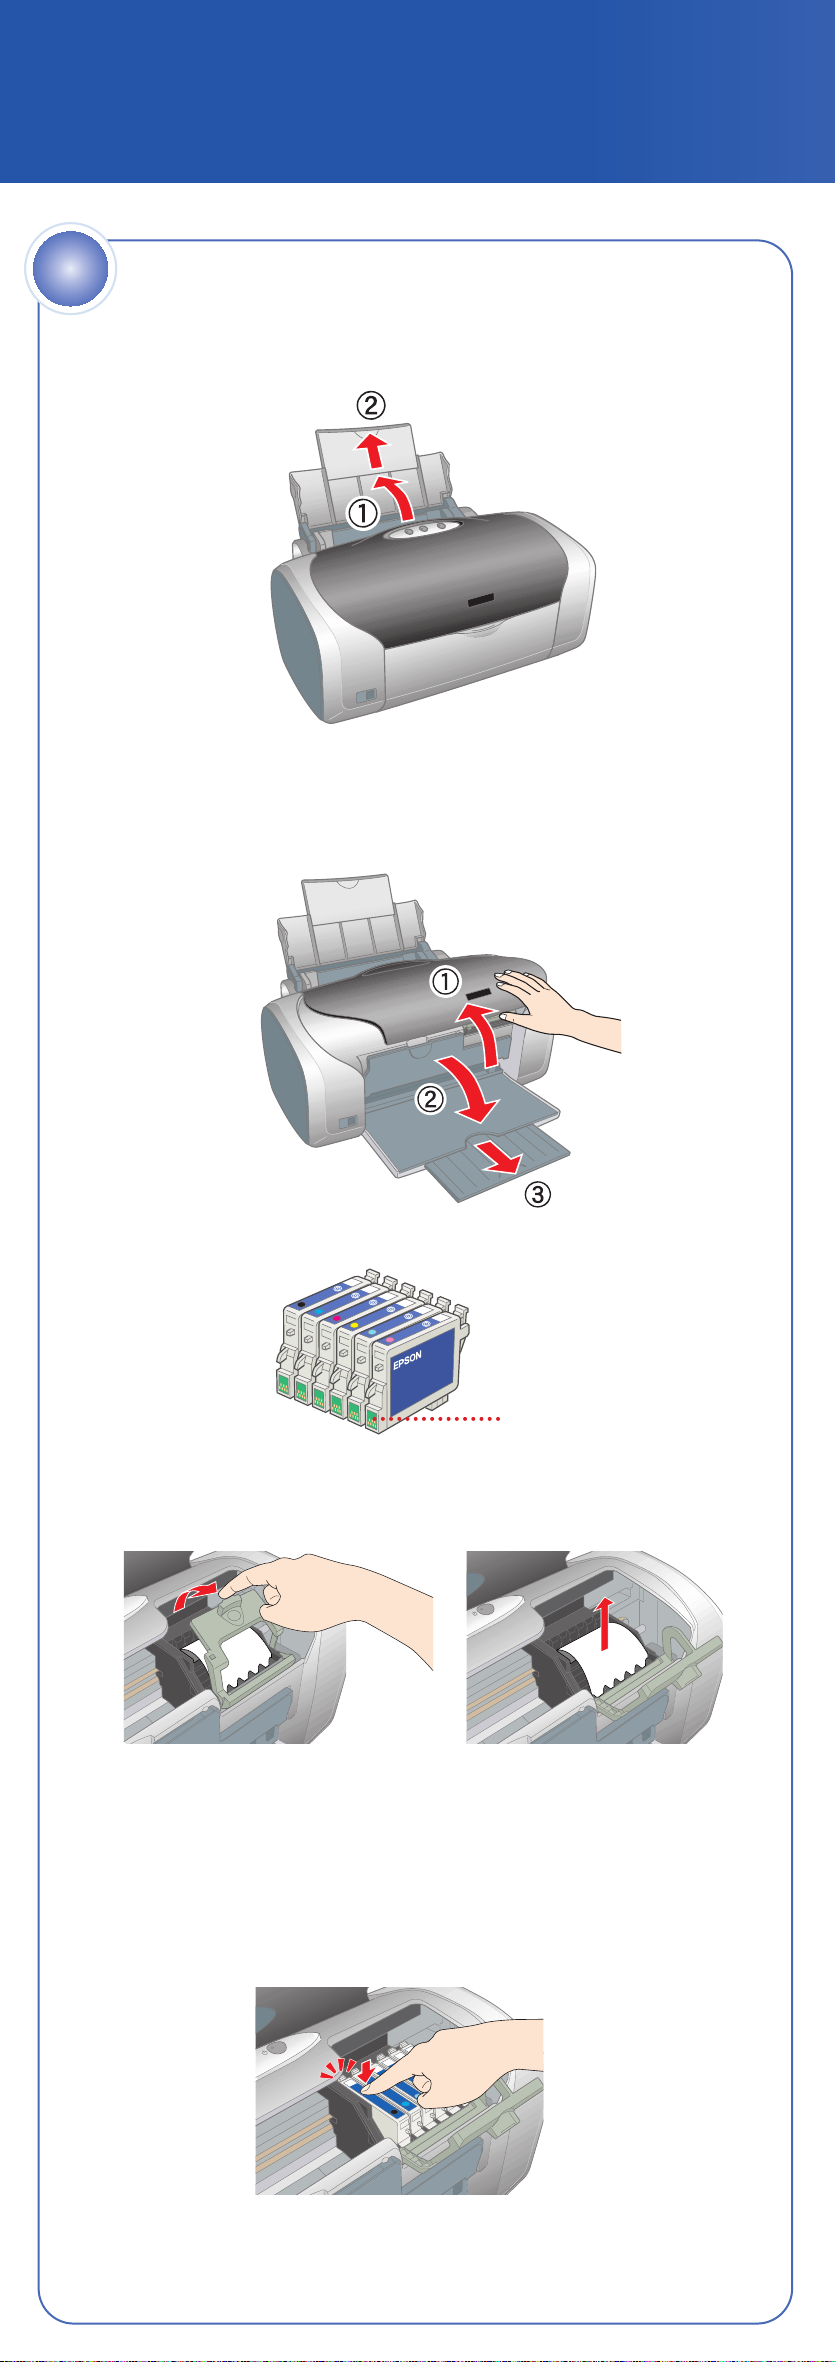
Install Ink Cartridges
1 Flip open the paper support and pull up the extension.
2 Lift the printer cover.
3 Open the output tray and pull out the extension.
4 Unwrap the ink cartridges.
Don’t touch the green circuit
boards or remove any labels
5 Open the cartridge cover and remove the paper insert.
6 Lower each cartridge into its holder with the green circuit board
facing the front.
The color of the cartridge label should match the marker above
the holder.
Gently push each ink cartridge until it clicks into place.
continue
Page 3
continued
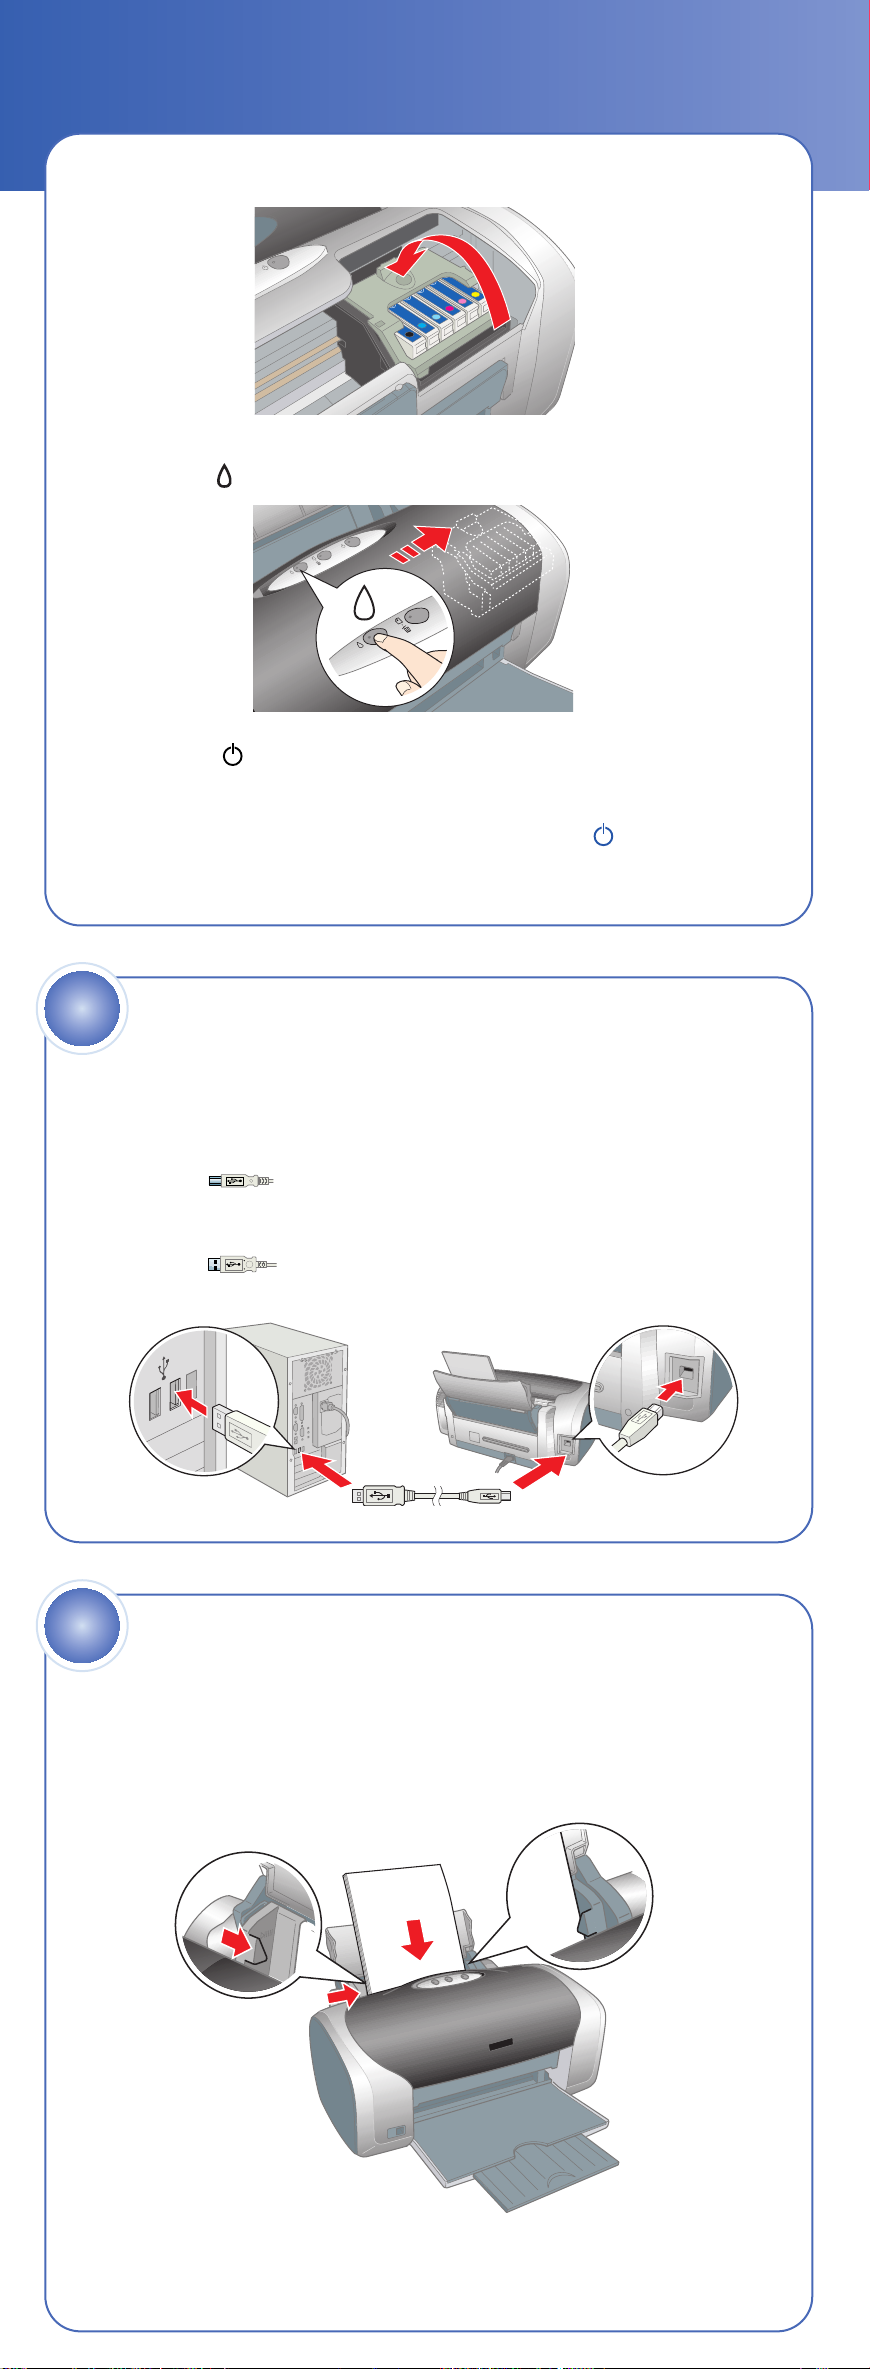
7 Close the cartridge cover.
8 Press the ink button and close the printer cover.
The green power light flashes as your printer charges ink
for several seconds.
Caution: Don’t turn off the printer while the green power light
is flashing, unless the printer hasn’t moved or made noise for
more than 5 minutes.
4
1 Make sure your computer is turned off. Keep it turned off until
2 Plug the square end of the cable into the USB port
3 Plug the flat end of the cable into any available USB port
Connect the Printer
section 6, “Install Software.”
on the back (or front) of your printer.
on your computer.
5
1 Fan a few sheets of paper and place them under the tab against
2 Slide the left edge guide against the paper, but not too tightly.
Load Paper
the right edge guide.
Note: For instructions on loading and printing on CDs or DVDs,
see your Printer Basics book.
Page 4

6
Install Software
Windows
®
Follow the steps below to install the software for your operating system.
Windows XP
1
Make sure your printer is connected and turned on.
Then turn on your computer.
2 Wait for Windows to detect your printer and display a screen like this:
DON’T CLICK ANY BUTTONS ON THIS SCREEN.
Note: If a screen like this doesn’t appear, make sure your printer
is turned on and connected.
3 Put the EPSON
seconds for the CD to be recognized.
Your printer software installs automatically and various messages
appear on the screen.
®
CD in your CD-ROM or DVD drive and wait a few
4 When installation halts, click Finish.
5 You see the license agreement. Read the agreement and click Agree.
You see the Options Menu. Continue with the instructions in
“Finishing Windows Installation” on the back of this sheet
to complete the software installation.
Windows Me and 98
1
Make sure your printer is connected and turned on. Then turn on
your computer.
2 Wait for Windows to detect your printer and display a screen like this:
DON’T CLICK ANY BUTTONS ON THIS SCREEN YET.
Note: If a screen like this doesn’t appear, make sure your printer
is turned on and connected.
3 Put the EPSON CD in your CD-ROM or DVD drive and wait a few
seconds for the CD to be recognized.
4 Click Next on the Add New Hardware Wizard Screen.
(In Windows Me, you may not need to click Next.)
If you’re using Windows Me, installation proceeds automatically;
Me
go to step 8.
If you’re using Windows 98, continue with step 5.
98
continue
Page 5

5 Click the Search for option, then click Next.
6 Click CD-ROM drive, then click Next. Make sure Specify a location
is not checked.
7 At the next screen, click Next. Installation proceeds automatically.
8 When installation halts, click Finish.
9 Your computer detects your printer again. Do one of the following:
Click Next on the next screen. The Add Printer Wizard screen
Me
appears; click Finish.
Click Next on each of the four screens that follow,
98
then click Finish.
10 When installation halts, click Finish.
11 You see the license agreement. Read the agreement and click Agree.
You see the Options Menu. Continue with the instructions in
“Finishing Windows Installation” in the next column to complete
the software installation.
Windows 2000
1
Make sure your printer is connected and turned on. Then turn on
your computer.
2 Wait for Windows to detect your printer and display a screen like this:
DON’T CLICK ANY BUTTONS ON THIS SCREEN YET.
Note: If a screen like this doesn’t appear, make sure your printer
is turned on and connected.
3 Put the EPSON CD in your CD-ROM or DVD drive and wait
a few seconds for the CD to be recognized.
4 Click Next on the Found New Hardware Wizard Screen.
5 Click the Search for option, then click Next.
Page 6

6 Click CD-ROM drive, then click Next. Make sure Specify a location
is not checked.
7 At the next screen, click Next. Installation proceeds automatically.
8 When installation halts, click Finish.
9 You see the license agreement. Read the agreement and click Agree.
You see the Options Menu. Continue with the instructions below
to complete the software installation.
Finishing Windows Installation
1
Make sure you have paper loaded in the printer. Then click Print a
Test Page to check that your printer is set up correctly.
2 Click Install Optional Software. You see this screen:
3 Click the option for the software you want to install, then follow the
instructions on the screen to install it on your computer.
Note: At the end of Film Factory installation, deselect the option to
launch Film Factory.
4 When you’re finished, click the Back button, then click Install
Printer Manual.
Note: You need a browser—such as Microsoft®Internet Explorer®4.0
or later or Netscape Navigator®4.0 or later—to view the manual.
5 When you’re finished, click Exit.
6 When you see the EPSON Product Registration screen, register your
printer as instructed, then remove the EPSON CD.
You’re ready to print! See your Printer Basics book for details.
®
Macintosh
Follow the steps below to install the software on your Macintosh.
1 Make sure your printer is connected and turned on. Then turn on
your Macintosh.
2 Put the EPSON CD in your CD-ROM or DVD drive and wait a few
seconds for the CD to be recognized.
3 If the CD-ROM window doesn’t open automatically, double-click the
SPR200 CD-ROM icon. Then double-click EPSON.
4 You see the license agreement. Read the agreement and click Agree.
continuecontinue
Page 7

5 You see the Install Menu. Click Install Printer Driver and Utilities.
In Mac®OS X, enter your administrator password and click OK.
6 Follow the instructions on the screen to install the software and
restart your Macintosh.
7 After your Macintosh restarts, double-click the SPR200 CD-ROM icon
(if necessary). Then double-click EPSON.
8 Click Install Optional Software.
9 Click the option for the software you want to install, then follow the
instructions on the screen to install it on your Macintosh.
10 When you’re finished, click the Back button, then click Install
Printer Manual.
Note: You need a browser—such as Microsoft Internet Explorer 4.0
or later, Netscape Navigator 4.0 or later, or Safari
view the manual.
™
1.0 or later—to
11 When you’re finished, click Exit to close the Install Menu.
12 When you see the EPSON Product Registration screen, register your
printer as instructed, then remove the EPSON CD.
Go to the section below for your OS to finish setting up your printer.
Mac OS X
1
Open the Applications folder on your hard drive, then open the
Utilities folder and select Print Center.
2 Select Stylus Photo R200 in the Printer List window, then click
the Add icon.
Note: If you don’t see your printer in the Printer List, make sure
the printer is turned on and connected.
3 Select EPSON USB from the pull-down list, click Stylus Photo R200,
then select All from the Page Setup drop-down list.
4 Click Add. You see the printer list with the Stylus Photo R200 and
Stylus Photo R200(Sheet Feeder - Borderless) printer options.
5 Close the Print Center.
You’re ready to print! See your Printer Basics book for details.
Note: To print from Macintosh Classic applications in OS X, restart your
Macintosh in OS 9 and follow the steps under the “Macintosh” section (to
the left) to install your printer software.
Mac OS 9.x or Earlier
1
Open the Apple®menu and select Chooser.
2 Click the SP R200 Series icon, click your USB port, and turn on
background printing.
3 Close the Chooser.
You’re ready to print! See your Printer Basics book for details.
Page 8

Questions?
Here’s where to look for answers:
EPSON Stylus Photo R200 Printer Basics book
On-screen Reference Guide
Double-click the SP R200 Reference Guide icon on your
desktop to view the Reference Guide.
On-screen Help for EPSON Software
Click the Help button or question mark that appears on the screen
when you’re using the program. You can also view the Getting Started
Guide in the Film Factory program group or folder.
EPSON Technical Support
• World Wide Web
From the Internet, you can reach EPSON Support at
http://support.epson.com. Here you can download drivers and other
files, look at product documentation and troubleshooting information,
and receive technical advice through e-mail.
• Automated Telephone Services
A variety of automated help services are available 24 hours a day,
7 days a week. To use these services, you must have a touch tone
telephone and call (800) 922-8911. Your EPSON SoundAdvice
Express Code is 70510. Use this code to quickly select the
EPSON Stylus Photo R200 in SoundAdvice.
™
Film Factory
™
SM
How To Get Paper and Ink
Use genuine EPSON inks and paper to get the best results from your EPSON
printer! You can purchase ink cartridges, paper, and accessories from your
local retailer or from the EPSON StoreSMat (800) 873-7766, or visit
www.epsonstore.com (U.S. sales only). In Canada, please call
(800) 463-7766 for dealer referral.
Look for these cartridges and paper:
T048120
Black Ink
Cartridge
T048420
Yellow Ink
Cartridge
Premium Bright White Paper
Sleek, ultra-smooth surface with 108+brightness.
Delivers crisp black text and vivid, colorful images.
Perfect for everyday printing—especially two-sided
documents.
T048220
Cyan Ink
Cartridge
T048520
Light Cyan
Ink Cartridge
T048320
Magenta Ink
Cartridge
T048620
Light Magenta
Ink Cartridge
Matte Paper Heavyweight
Heavyweight, bright white, ultra-smooth coated
paper with a matte finish. Perfect for enlargements
and framing of cherished photographs.
Premium Glossy Photo Paper
Water-resistant, photographic-weight paper with
a high gloss finish. Perfect for all photographic
applications and available in a variety of cut-sheet
paper sizes. Framing is recommended for this
paper type.
EPSON and EPSON Stylus are registered trademarks of SEIKO EPSON CORPORATION.
EPSON Software is a trademark, and EPSON Store and SoundAdvice are service marks of
Epson America, Inc.
General Notice: Other product names used herein are for identification purposes only and may be
trademarks of their respective owners. EPSON disclaims any and all rights in those marks.
© 2003 Epson America, Inc. 10/03
CPD-17239 Printed in XXXXXX XX.XX-XX
 Loading...