

Page 1

®
EPSON
ActionLaser™ 1600
Reference Guide
Page 2
Allrights
q&em,
or otherwise, without the prior written permission
liability is
y~bility
Neither Seiko Epson Corporation nor its affiliates shall be liable to the purchaser of this
product or third parties
thirdpartiesasaresultdaccident,
modScations,
Seiko Epson Corporation and its affiliates shall not be liable against any damages or
problems arising from the use of any options or any
designated as Original Epson Products or Epson Approved Products by
Corporation.
ActionLaser, Epson Talk, and SelecType are trademarks of Epson America, Inc.
Epson Connection is a service mark of Epson America,
Epson and Epson
reserved. No part of this publication may be reproduced, stored in a retrieval
or transmitted in any form or by any means, mechanical, photocopying, recording,
assumd
with respect to the use of the information contained herein. Neither is
assumed for damages resulting from the use of the information contained
for
damages, losses, costs, or expenses incurred by pm-chaser or
misuse, or abuse of this product or unauthorized
repairs, or alterations to this product.
ESC/P
2 are registered
tradema&
of Seiko Epson Corporation. No patent
consumable products other than those
!Xko
Epson
Inc.
of Seiko Epson Corporation.
Hewlett-Packard, HP, LaserJet, HP-GL, and
Hewlett-Packard Company.
General Notice: Other product names used harein are for identification purposes only and
may be trademarks of their respective companies.
Copyright 0 1993 by Epson America, Inc., Torrance, California.
HPGL/Z
are registered trademarks of
ii
Page 3
FCC COMPLIANCE STATEMENT
FOR AMERICAN USERS
This equipment has been tested and found to comply with the limits for a class B
digital device, pursuant to Part 15 of the FCC Rules. These
reasonable protection against harmful interference in a residential installation.
provide
This equipment generates, uses and can radiate radio frequency energy and, if not
installed and used in accordance with the instructions, may cause harmful interfemnce
to radio or television reception. However, there is no guarantee that interference will
not occur in a particular installation. If this equipment does cause interference to radio
and television reception, which can be determined by turning the equipment off and
on, the user is encouraged to try to correct the interference by one or more of the
following measures:
0
Reorient or relocate the receiving antenna
0
Increase the separation between the equipment and receiver
0
Connect the equipment into an outlet on a circuit different from that to which the
receiver is connected
0
Consult the dealer or an experienced radio/TV technician for help.
Bmits
are designed to
WARNING
The connection of a non-shielded equipment interface cable to this equipment will
invalidate the KC Certification of this device and may cause interference levels which
exceed the Emits established by the FCC for this equipment. It is the responsibility of
the
user to obtain and use
rAp;zore
Changes or modifications not expressly approved by Epson America, Inc., could void
the user’s authority to operate the equipment.
than one interface connector, do not leave cables connected to
a shielded equipment interface cable with this device. If this
FOR CANADIAN USERS
‘MS
digital
digital apparatus as set out in the radio interference regulations of the Canadian
Department of communications.
Le present appareil num&ique n’kmet pas de bruits
limites applicables
sur le brouillage radio6lecuique
Canada.
apparatus does not exceed the class B limits for radio noise emissions from
radio&ctriques d&passant
aux
appareils numkriques de Classe B prescritcs dans le r&glement
&ii& par le
Ministere des Communications
les
du
Page 4

Contents
Where to Get Help
CompuServe On-line Support
safety Information
Laser safety
CDRH regulations
Internal laser radiation
Ozone emission
Laser Printer Precautions
Important Safety Instructions
About this Guide
Chapter 1 using Your printer
About Your Printer
Features
Controlling the Printer
Control Panel
SelecType mode..
Control panel components
Changing the language of display messages
Controlling the Printer with Software
Sharing the Printer
Sharing printer settings
Sharing emulations
.............................
.........................
................
.........................
...........................
.......................
....................
........................
......................
...................
..........................
.........................
.......................
............................
......................
..................1-6
..............
.........................
....................
......................
........
1
2
3
3
3
4
4
5
7
9
1-2
1-2
1-5
1-5
1-6
1-10
1-11
1-11
1-12
1-13
Chapter 2 Paper Handling
Standard and Optional Paper Trays
Choosing Paper . . . . . . . . . . . . . . . . . . . . . . . . . . . 2-2
. . . . . . . . . . . . . . . 2-2
iii
Page 5

Loading Paper
Setting the paper tray’s paper size
selecting the Paper Source
Using Windows software
Using DOS software
Printing on Special Paper
Choosing special paper
using manual feed
Chapter 3 Fonts
.............................
......................
...................
......................
......................
.....................
......................
..............
2-3
2-4
2-5
2-5
2-6
2-6
2-7
2-8
What You Need to Know about Fonts
Font Overview
Choosing a Font
Printer and Screen Fonts
When the printer and screen fonts don’t match
Bitmap and outline fonts
TrueType fonts
Available Fonts
Adding More Fonts
Installing a font cartridge
Removing the font cartridge
Downloading soft fonts
selecting Fonts
Font Samples
Chapter 4 SelecType
SelecType Overview
When to use SeIecType
SelecType menus and items
Using SeIecType
Changing and saving SelecType settings
Resetting SelecType settings to the factory defaults
SelecType tutorial
PRINTING MENU
LJ4 Emulation Menu
ESC/P2 MENU
............................
............................
.......................
...................
.........................
............................
..........................
...................
....................
............................
.............................
.........................
.....................
...........................
........................
..........................
.........................
.............................
...............
.......
..................
..................
..........
....
3-2
3-2
3-4
3-4
3-6
3-6
3-7
3-7
3-9
3-9
3-11
3-11
3-12
3-13
4-2
4-2
4-3
4-4
4-5
4-5
4-6
4-7
4-10
4-12
Page 6

FX MENU
GL2 MENU
JOB MENU
..............................
..............................
..............................
EMULATION MENU
TRAY SIZE MENU
CONFIG MENU
PARALLEL MENU
SERIAL MENU
TEST MENU
.............................
.........................
...........................
.........................
...........................
........................
4-12
4-12
4-13
4-14
4-15
4-16
4-21
4-21
4-24
Chapter 5
When to Use Other Emulations
Other Available Emulations
Changing the Emulation
Epson ESC/P2 and FX Emulations
Operating as an LQ or Fx printer
EscP2 and FX Menu items
Epson GL/2 Emulation
The two Epson GL/2 emulations
Operating in GL/2 emulation
GL2 MENU items
using Other Printer Emulation
..................
....................
......................
................
..............
..................
.......................
..............
................
.......................
Chapter 6 Troubleshooting and Maintenance
Resetting and Initializing the Printer
Resetting the printer
Initializing the printer
General Problems
..........................
Print Quality Problems
Option Problems
..........................
Status and Error Messages
Data Dump Mode
..........................
optimizing Print Quality
......................
.....................
.......................
.....................
.......................
Adjusting the RITech setting
Adjusting print density
....................
...............
.................
5-2
5-2
5-3
5-4
5-4
5-5
5-10
5-10
5-12
5-12
6-2
6-2
6-3
6-3
6-7
6-12
6-14
6-20
6-21
6-21
6-23
V
Page 7

Cleaning the Printer
Cleaning the inside of the printer
Removing spilled toner
Cleaning the printer case
.........................
.....................
....................
...............
6-24
6-25
6-26
6-26
Appendix A
Paper
Printer
Interface
Options and Consumables
Appendix B Command Summary
Supported Emulations and Control Languages
LJ4 Emulation
Epson ESC/P 2 and FX Emulations
Epson GL/2 Emulation
PJL Mode
EJL Mode
..................................
Paper specifications
Paperfeed
General..
Environmental.
Mechanical
Electrical
Parallel interface
Serial interface
Lower paper cassette (C812301)
Imaging cartridge (S051016)
LJ4 emulation commands
GL/2 emulation context commands
Epson ESC/P 2 emulation
Epson FX emulation
Technical
..........................
.................................
............................
............................
.............................
................................
.............................
.............................
.........................
$N?CifkUfiOt?S
.......................
.........................
.........................
..........................
......................
................
..................
.........
...................
.............
................
...................
......................
.......................
.
....
A-2
A-2
. . A-3
A-4
A-4
A-4
A-5
A-5
A6
A-6
A-8
A-11
A-11
A-12
B-2
B-2
B-2
B-14
B-17
B-17
B-21
B-26
. . B-26
. B-27
Page 8

Appendix C Option Installation
vii
Installing the Options
Lower Paper Cassette
Installing the lower paper cassette
........................
........................
..............
Loading paper into the lower paper cassette
Face-Up Output Tray
Optional Interface Card
Installing an interface board
Memory Module
Removing the controller board.
Installing the memory module
Reinserting the controller board
Checking the memory
Font Cartridges
Index
........................
.......................
.................
...........................
...............
................
...............
.....................
...........................
........
C-2
C-2
C-2
C-4
C-6
C-7
C-7
C-10
C-11
C-13
C-15
C-17
C-18
Page 9

Getting Started
Getting Started 1
The Epson® ActionLaser™ 1600 printer combines high
performance and reliability with a wide range of features.
To get started with your ActionLaser printer, please:
Lt
Read the safety information, laser printer precautions, and
important safety instructions in this introduction.
0
Use your
printer.
0
Refer to this Reference Guide for detailed information about
your printer.
If you require additional assistance, see “Where to Get Help”
below.
where to Get Help
Epson America provides local customer support and service
through a nationwide network of authorized Epson dealers
and Service Centers.
Read This First
guide to set up and test your new
If you need to call for technical assistance, please print a status
sheet and have it handy. See Chapter 4 for information on
printing a status sheet.
Epson also provides the following support services through
Epson Connectionsm at (800) 922-8911:
Cl
Assistance in locating your nearest Authorized Epson
Reseller or Service Center
P
Technical assistance with the installation, configuration,
and operation of Epson products
Page 10

0
2 Getting Started
Epson technical information library fax service
Product literature with technical specifications on Epson’s
0
current and new products
0
Sales of supplies, parts, documentation, and accessories for
your Epson product
0
Customer Relations
CompuServe® On-line Support
The fastest way to access helpful tips, specifications, drivers,
application notes, and bulletins is through the Epson America
Forum on CompuServe.
If you are not currently a member of CompuServe, you are
eligible for a free introductory membership as an owner of an
Epson product. This membership entitles you to:
P
An introductory $15 credit on CompuServe
Q
Your own user ID and password
D
A complimentary subscription to CompuServe
CompuServe’s monthly publication
To take advantage of this offer, call (800) 848-8199 in the United
States and Canada and ask for representative #529. In other
counties, call (614) 529-1611 or your local CompuServe access
number.
If you are already a CompuServe member, simply type
GO EPSON at the menu prompt to reach the Epson America
Forum.
Magazine,
_
Page 11
Safety
Getting Started 3
Information
laser safety
This printer is certified as a Class 1 laser product under the U.S.
Department of Health and Human Services (DHHS) Radiation
Performance Standard according to the Radiation Control for
Health and Safety Act of 1968. This means that the printer does
not produce hazardous laser radiation.
Since radiation emitted by the laser is completely confined
within protective housings and external covers, the laser beam
cannot escape from the machine during any phase of user
operation.
CDRH
regulations
The Center for Devices and Radiological Health (CDRH) of the
U.S. Food and Drug Administration implemented regulations
for laser products on August 2, 1976. Compliance is mandatory
for products marketed in the United States. The label shown
below indicates compliance with the CDRH regulations and
must be attached to laser products marketed in the United
States.
Page 12
Warning
4
Getting started
Use of controls, adjustments, or performance of procedures
other than those specified in this guide may result in
hazardous radiation exposure.
Your printer is a Class 1 laser product as defined in IEC 825
specifications. The label shown below is attached in countries
where required.
Max. Radiation Power
Wave Length
This is a Class IIIb Laser Diode Assembly that has an invisible
laser beam. The printer head unit is NOT A FIELD SERVICE
ITEM. Therefore, the printer head unit should not be opened
under any circumstance.
Ozone emission
During printer operation, a small amount of ozone is released.
This amount is not large enough to affect human beings
adversely.
However, it is best to make sure the room where you are using
the printer has adequate circulation, especially when you are
printing a high volume of materials or using the printer
continuously over a long period of time.
5.7 x 10⁻⁴ w
780nm
Page 13
Laser printer Precautions
Gettiw
Stmted
5
This printer uses laser technology. The following list of
precautions applies whenever you open the printer cover.
Even if you are familiar with other types of printers, be sure
to follow these precautions carefully to ensure safe, efficient
operation.
Be careful not to touch the fuser, which is marked by a
0
CAUTION HOT SURFACE label. If the printer has been in
use, the fuser can be very hot.
Cl
Avoid touching the components inside the printer unless
instructed to do so in this guide.
0
Do not scratch the surface of the drum. Avoid touching the
drum, since oils from your skin can permanently damage
its surface and may affect print quality.
0
Avoid pressing on the top of the imaging cartridge.
Pressing directly on the cartridge may cause toner to spill
into the printer. If there is a spill, see Chapter 6 for cleaning
instructions.
0
Never force the printer’s components into place. Although
the printer is designed to be sturdy, rough handling can
damage it.
Page 14
The imaging cartridge is the part of the printer mechanism that
forms the image and transfers it onto the paper. Keep the
following guidelines in mind whenever you handle the
imaging cartridge:
0
When removing the imaging cartridge, avoid exposing it to
room light any longer than necessary. If you need to keep
the cartridge out of the printer for long periods, cover it
with a cloth. The imaging cartridge contains a
light-sensitive drum, which is the green cylinder that can
be seen through the openings of the cartridge. Exposure to
light can damage the drum, causing dark or light areas to
appear on the printed page and reducing the service life of
the drum.
Do not turn the cartridge upside down or stand it on its
0
sides.
0
Do not attempt to modify or take apart the cartridge. It
Cannot be refilled.
0
Try not to touch the toner and avoid all contact with your
eyes.
0
Do not use a cartridge for at least one hour after moving it
from a cool to a warm environment.
To get the best print quality from your imaging cartridge, do
not store the cartridge in locations that are subject to direct
sunlight, dust, salty air, or corrosive gasses (such as ammonia).
Also avoid locations subject to high temperatures or humidity
or abrupt changes in temperature or humidity.
6
CMtino
Started
Page 15

Important Safety Instructions
1.
Read all of these instructions.
2.
Follow all warnings and instructions marked on the printer.
Unplug this printer from the wall outlet before cleaning. Use
3.
a damp cloth for cleaning and do not use liquid or aerosol
cleaners.
Do not use this printer near water.
4.
Do not place the printer on an unstable cart, stand, or table.
5.
Slots and openings in the cabinet and the back or bottom are
6.
provided for ventilation. Do not block or cover them. Do
not put the printer on a bed, sofa, rug, or other similar
surface or in a built-in installation unless proper ventilation
is provided.
7.
Use the type of power source indicated on the marking label.
If you are not sure of the type of power available, consult
your dealer or local power company.
8.
This product is equipped with a 3-wire grounding-type plug.
This plug will only fit into a grounding-type outlet. This is
a safety feature. If you are unable to insert the plug into the
outlet, contact your electrician to replace your obsolete
outlet. Do not defeat the purpose of the grounding-type
plug.
9.
Do not put your printer where the cord will be walked on.
10. If you use an extension cord, make sure that the total of the
ampere ratings on the products plugged into the extension
cord does not exceed the extension cord ampere rating.
Also, make sure that the total of all products plugged into
the wall outlet does not exceed 15 amperes.
Getting Started 7
Page 16

11. Never push objects of any kind through cabinet slots as they
Started
may touch dangerous voltage points or short out parts that
could result in a risk of fire or electric shock. Never spill
liquid of any kind on the printer.
12.
Except as specifically explained in this Reference Guide, do
not attempt to service this product yourself. Opening or
removing those covers that are marked “Do Not Remove”
may expose you to dangerous voltage points or other risks.
Refer all servicing in those compartments to service
personnel.
13. Unplug this printer from the wall outlet and refer servicing
to qualified service personnel under the following
conditions:
A.
When the power cord or plug is damaged or frayed.
B.
If liquid has been spilled into it.
C.
If it has been exposed to rain or water.
D.
If it does not operate normally when the operating
instructions are followed. Adjust only those controls
that are covered by the operating instructions since
improper adjustment of other controls may result in
damage and will often require extensive work by a
qualified technician to restore the product to normal
operation.
8
Gettina
E.
If it has been dropped or the cabinet has been damaged.
F.
If it exhibits a distinct change in performance, indicating
a need for service.
Page 17

About this Guide
Gettim
Started 9
This guide contains information for using, operating, and
maintaining the printer once it has been installed. For
information about installing and setting up the printer, see the
Read This First guide.
Chapter 1, “Using Your Printer,” describes the printer’s
features and the printer’s control panel, which allows you to
access the printer settings. This chapter also contains a section
that describes sharing the printer among multiple users.
Chapter 2, “Paper Handling,” contains information on loading
paper and setting up the printer for the type and size of paper
that is loaded.
Chapter 3, “Fonts,” provides basic information about fonts and
tells you how to select and add fonts.
Chapter 4, “SelecType,” describes the printer settings that can
be modified by using SelecType”’ in the control panel. Read this
chapter if you are not able to modify a printer setting from
your software.
Chapter 5, “Using Other Printer Emulations,” describes the
ESC/P2,™ FX, and GL/2 emulations. Read this chapter if you
need to print documents formatted for dot matrix printers or if
you are using a Hewlett-Packard® plotter application.
Chapter 6, “Troubleshooting and Maintenance,” gives helpful
information for what to do if you encounter a printer error.
Appendix A, “Technical Specifications,” contains the technical
specifications about the printer and the optional products that
can be used with the printer.
Appendix B, “Command Summary,” lists the commands that
can be embedded in print jobs to control the printer. This
appendix is intended for advanced users only.
Page 18

Appendix C, “Option Installation,” gives step-by-step
installation instructions for the optional products that can be
used with the printer.
Page 19

Chapter 1
Using Your Printer
About Your Printer
Features.
Controlling the Printer
Control Panel
SelecType mode
Control panel components
Changing the language of display messages
Controlling the Printer with Software
Sharing the Printer
Sharing printer settings
Sharing emulations
.............................
.............................
.........................
.......................
.........................
...................
.........
. . . . . . . . . . . . . .
.........................
.....................
.......................
1-2
1-2
1-5
1-3
1-4
1-4
1-10
1-11
1-11
1-12
1-13
Using Your Printer 1-1
Page 20

About Your Printer
1-2
Using Your Printer
The ActionLaser 1600 is the latest in Epson’s advanced line of
laser printers, giving you high-quality printing that is both fast
and quiet.
The imaging system is driven by a powerful RISC processor
that speeds up processing and gives you the ability to mix text
and graphics, create predefined forms, and print with a range
of fonts normally associated with typeset material.
The printer comes with a full set of features that contribute to
consistently highquality output. This section lists the main
features.
Energy Star Compliant
Your Epson ActionLaser 1600 printer complies with the U.S.
Environmental Protection Agency’s Energy Star program,
which promotes the manufacture of energy-efficient printers,
computers, and monitors. The ActionLaser 1600 conserves
electricity by automatically entering a low-power, standby
mode when not in use for fifteen minutes.
The EPA estimates that if all desktop computers, printers, and
other peripheral devices met Energy Star standards, energy
cost savings would exceed $1 billion annually and carbon
dioxide emissions would be reduced by 20 million tons.
All of Epson’s dot matrix and ink jet printers conform to
Energy Star standards, as do all ActionLaser printers produced
after June, 1993.
The Energy Star emblem does not represent EPA endorsement of any
product or service.
Page 21

High, 600-dpi resolution
The printer can run in one of two resolutions: 300 dpi or
600 dpi. both resolutions produce good-looking, crisp text and
graphics. At 600 dpi, the resolution is exceptionally sharp
because the dots that make up the text and graphics are smaller
and more numerous than those used in 300-dpi resolution.
Generally all text and graphics look better when printed at
600 dpi. This is especially true for grayscale images since
600-dpi resolution allows a finer halftone screen to be applied,
increasing the sharpness and clarity of the image. The higher
resolution of 600 dpi also means that more gray shades can be
represented, reducing the banding that is sometimes apparent
at lower resolutions.
HP® LaserJet®4 emulation and other emulation
The printer emulates the Hewlett-Packard LaserJet 4 (LJ4)
printer. This allows for easy access to the great variety of
software written for HP LaserJet printers.
Three other emulations are built in the printer: Epson ESC/P2,
Epson FX, and Epson GL/2. These emulations provide
compatibility with documents written for dot matrix printers
or for HPGL/2® plotters. For more information about these
emulations, see Chapter 5, “Using Other Printer Emulations.”
Wide selection of built-in fonts
The printer comes with a selection of 45 scalable fonts,
including 10 TrueType fonts, to provide you with the fonts
you need to create professional-looking documents and
publications.
Using Your Printer
1-3
Page 22

Bi-Resolution Improvement Technology (Bi-RITech)
The RITech feature is an Epson printer technology that
produces smoother, crisper lines, text, and graphics. RITech is
available for both the 300- and 600-dpi resolutions. For more
information about RITech, see Chapter 6.
Two built-in interfaces and optional interfaces
The printer comes equipped with two built-in interfaces: a
Centronics® parallel interface and a serial interface that can be
set to RS-232C or RS-422.
A variety of optional interfaces can also be installed. See
Appendix C, “Option Installation.”
Optional accessories
In addition to the optional interfaces, you can add a wide range
of additional accessories to further customize your printer:
cl
Faceup tray for straight-through feeding of envelopes,
transparencies, and heavy paper stock.
P
Additional 250-page paper tray to increase the paper
capacity to 400 pages.
1-4
m
Additional memory modules to allow you to print more
complex text and graphics.
P
Font cartridges for increasing the selection of fonts. Most
HP-compatible cartridges work with your printer. For a list,
see “Font Cartridges,” in Appendix C.
Using Your Printer
Page 23
Controlling the Printer
In general, there are three ways to control the settings of your
printer:
D
The Printer Setup menu in your software
Cl
The Printers icon in the Microsoft
Panel
P
The printer’s front control panel buttons
Which way you use depends on the type of printer settings you
want to change. The most commonly adjusted parameters,
such as the number of copies, resolution, and orientation, can
be
changed from your software or from the
Windows Control Panel. For more information about changing
printer settings from software, see the section “Controlling the
Printer with Software” later in this chapter.
Some settings cannot be changed from software and some
software might not allow you to control printer settings. In
these cases, you can use the printer’s control panel to adjust the
printer settings.
®
Windows™ Control
Printers
icon in the
Control Panel
The printer’s control panel is used most often for the following:
0
Viewing printer status and error messages
0
Taking the printer on and off line
Q
Resetting the printer to factory settings or initializing the
printer to clear print data
0
Changing the printer settings that cannot be changed
through software
Using Your Printer
1-5
Page 24
SelecType mode
One of the functions of the control panel is to enable you to use
SelecType mode. In this mode you can access menus that allow
you to change printer settings such as the resolution, the
number of copies, and the printer’s communication and
protocol settings. For a full list of the printer settings available
through SelecType and for information about changing settings
using SelecType, see Chapter 4.
Note:
You will not normally need to use SelecType. Most software
programs allow you to change printer settings.
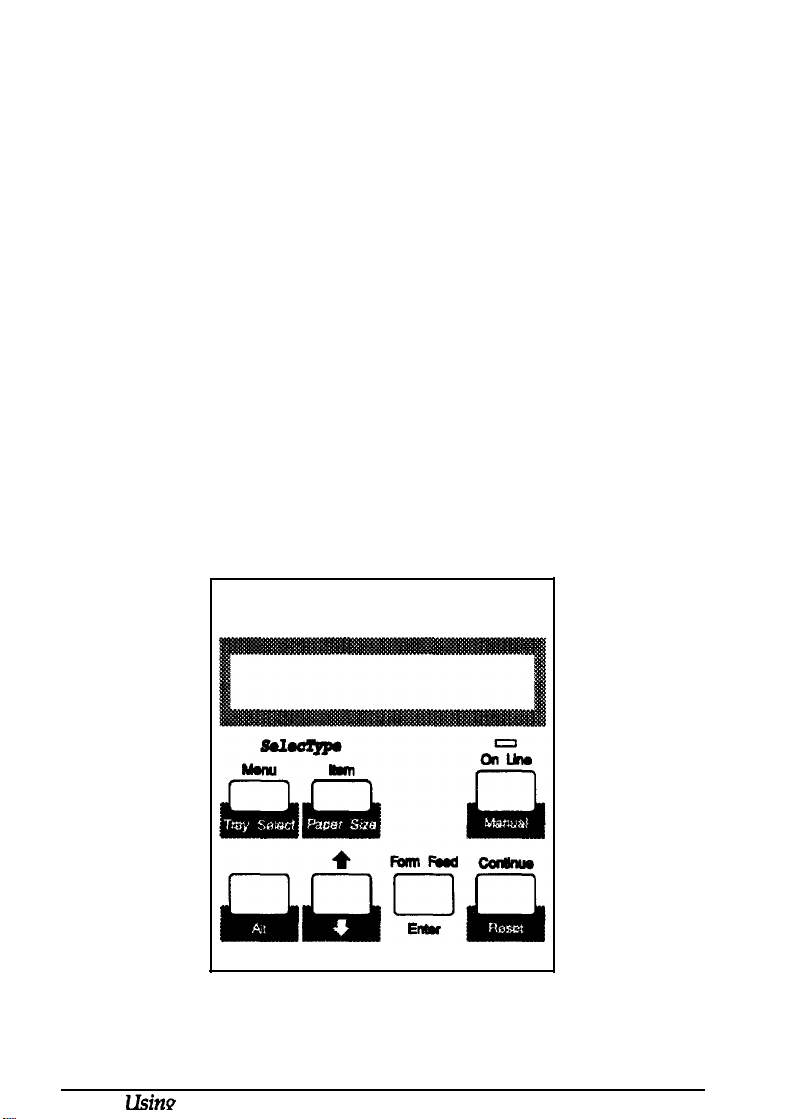
Control panel components
The main components of the control panel are the liquid crystal
display (LCD), indicator lights, and buttons.
1-6
UsinP
Your Printer
Page 25

The display shows the printer’s current status, an error
message, or the current SelecType menu or item.
Indicator lights
On Line
On when the printer is on line, indicating
that the printer can receive and print data.
The light flashes as the printer switches
between on-line and off-line status.
Continue
Flashes when an error is detected or a
maintenance procedure is needed. The error
or maintenance message appears on the
display at the same time. To correct the
problem described on the display, see
Chapter 6, “Troubleshooting and
Maintenance.”
Form Feed
On when data is received and stored in the
printer’s buffer but not yet printed. Rapid
flashing indicates the printer is receiving
data from the computer.
Buttons
The buttons on the control panel allow you to access printer
functions. Most buttons have two functions, one listed on top
of the button and the other below the button. The top function
is accessible by simply pressing the button. The bottom
function is accessible by pressing the button while you are
holding down the
Alt
button.
Using
Your Printer
1-7
Page 26

The buttons on the control panel function as follows:
1-8
Usina
Your Printer
On Line/
Manual
Menu/
Tray Select
Switches the printer between on-line and
off-line status. This switch is disabled when
the printer is in SelecType mode.
Pressing this button while holding down the
Alt
button turns on manual feed so you can
feed single sheets of special stock such as
envelopes, transparencies, and labels. See
Chapter 2, “Paper Handling,” for more
information about manual feed.
When manual feed is on, pressing this button
prints the next sheet.
The first time you press
Menu,
the printer
goes off line, and SelecType mode is turned
on. Each time you press
Menu,
you advance
to the next SelecType menu.
When the printer is on line, pressing this
button while holding down the
Alt
button
allows you to quickly change the selected
tray. For more information, see “Using the
control panel buttons” in Chapter 2.
Page 27

Item/
Paper Size
In SelecType mode, advances through the list
of items available for the currently selected
menu. An asterisk indicates the current
setting.
When the printer is on line, pressing this
button while holding down the
Alt
button
allows you to quickly change the selected
paper size. For more information, see “Using
the control panel buttons” in Chapter 2.
+
(arrow>
Alt
Enter/
Form Feed
Continue/
Reset
Advances through the settings that are
available for the current SelecType item.
Modifies the function of other buttons.
In SelecType mode, accepts the setting
currently shown on the display as the new
value.
When the printer is on line and data is
remaining, pressing this button while
holding down the
Alt
button prints out the
data and clears the buffer.
Enables the printer to resume printing after
certain error or maintenance-required
conditions.
Pressing this button while holding down the
Alt
button resets the printer with new
SelecType settings.
Using
Your
Printer
1-9
Page 28

Other common uses for these buttons are as follows:
1-10
Using
Your Printer
Q
On Line
P
Reset
P
Form Feed
Press to set the printer on line after you
reload paper. (The printer is off line when
the paper is out.)
Press to stop printing or to clear remaining
data.
Press to print out data in the printer’s
memory. (This button ejects the page even
though the printer has not received a form
feed command.)
Changing the language of display messages
By default, the display messages are in English as are the status
sheet and font sample printouts; however, you can change the
language to any one of the following: French, German, Italian,
Spanish, Swedish, Danish, Norwegian, Dutch, Finnish, or
Portuguese.
To change the language of display messages:
1.
Turn off the printer.
2.
3. Press the arrow button to select the language you want to use.
4.
5. Hold down the
While
holding down the
Do
not release the
CONFIG LANGUAGE.
Once the language you want to use is displayed, press the
Enter
button to save the new setting.
Alt
printer for the new language.
Menu
button, turn on the printer.
Menu
button until the display shows
button and press
Reset
to update the
Page 29
Controlling the Printer with Software
Most software programs have a Printer Setup menu that allows
you to adjust certain printer settings such as the number of
copies, orientation, and resolution. The settings you can change
depend on your particular software and the driver you are
using. See your software manual for specific information about
the Printer Setup menu.
If you are using Windows, you can control printer settings
through the
Double-clicking on the
allows you to do the following:
D
Install a new printer driver.
0
Change the type of printer interface port.
0
Modify certain printer settings.
See your Windows manual for specificinformation about
printer setup options.
Printers
icon in the Windows Control Panel.
Printers
icon brings up a dialog box that
Sharing the printer
Up to four computers can be connected directly to the printer if
you install optional interfaces and if each computer is
connected to a different interface port. If you need to connect
more than four computers or if you need to connect multiple
computers to the same port, you can indirectly connect the
computers to the printer by using a switch box.
usin~YourPriilter
1-11
Page 30

When multiple users are
connected
to the printer, you need to
be aware of the potential configuration and emulation conflicts
that can occur when different users have different print
requirements. The following potential conflicts can occur:
0
Users might be using different SelecType settings.
0
Users might be using different drivers and thus require
different emulations.
The conflicts occur because SelecType settings are shared by all
users of the printer, and the emulation is shared by all users of
the same interface port. Each time the SelecType settings or the
emulation is changed, other users are affected.
Sharing printer settings
If you modify printer settings from your software, the changes
affect only your print job. Except for resolution and page
protect, changes made from your software application will not
affect other users.
However, the SelecType printer settings are shared among all
users of the printer. The only SelecType settings that are not
shared among all ports are the EMULATION, PARALLEL, and
SERIAL menu settings.
If you change settings using SelecType, you also change
settings for all other users, so it’s important to keep other users
informed of the changes you make. Also, if your printout is not
what you expect, check first whether any SelecType settings
have been changed by another user.
1-12
13sino
Your
Fvintl?r
Page 31

Sharing emulations
Each interface port has an emulation assignment that is made
through SelecType. By default, the ports are configured for LJ4
emulation. However, you or other users might need to change
the emulation depending on your needs or the driver you are
using. See Chapter 5, “Using Other Printer Emulations,” for
more information about emulations.
Each time the emulation is changed, the printer reconfigures its
memory, erasing all printer settings stored in memory,
including downloaded fonts. Thus it is important to first warn
other users whenever you plan on changing the emulation.
Note:
when one user changes an emulation while the printer is in the
process of printing a job that has already been received, the printer
will not change the emulation until after the current job has finished
printing.
Usiq
Your Printer
1-13
Page 32

Chapter 2
Paper Handling
Standard and Optional Paper Trays . . . . . . . . . . . . . . . . 2-2
Choosing Paper
Loading Paper
. . . . . . . . . . . . . . . . . . . . . . . . .
............................
Setting the paper tray’s paper size
Selecting the Paper Source
Using Windows software.
Using DOS software.
Printing on Special Paper
Choosing special paper
Using manual feed
.....................
...................
......................
......................
.....................
. . . . . . . . . . . . . . . . . . . . . . . . . . . . .
..............
2-2
2-3
2-4
2-5
2-5
2-6
2-6
2-7
2-8
Paper Handling
2-1
Page 33

Standard and Optional/Paper Trays
2-2 Paver Handling
The printer’s standard paper tray holds up to 150 sheets of
various standard-size papers, including letter, legal, A4, and
executive. For other sizes and exact specifications, see
Appendix A.
In addition, you can print on special stock such as heavy paper,
envelopes, labels, or transparencies. To do so, you need to
manually feed single sheets one at a time. See the section
“Printing on Special Paper” later in this chapter.
Two optional paper trays are available. An optional lower
paper cassette holds up to 250 letter-size sheets, increasing the
printer’s paper capacity so that up to 400 sheets can be printed
without having to reload. An optional faceup output tray can
be installed to receive pages that have been printed face up. For
more information about the optional paper cassette and faceup
output tray, see Appendix C.
Choosing Paper
For best results, use paper made especially for laser printers or
plain-paper copiers. Paper should be of good quality and
relatively smooth with a weight between 60 and 90 g/m
(16 and 24 lb). Because the printer is sensitive to moisture,
always store paper in a dry place.
2
You may use colored paper but not paper to which a clear or
colored coating has been added. When using preprinted paper
stock such as letterheads, use papers and inks designed for
laser printers. Ordinary inks or dyes may smear or come off
when subjected to the high temperature of the fuser. Always
test samples of paper stock before purchasing large amounts.
Page 34

Note:
The quality of any particular brand or type of paper may be changed
by the manufacturer at any time, so Epson cannot guarantee any
particular one.
To print on heavy paper (greater than 90
print envelopes, labels, and transparencies, see “Printing on
Special Paper” later in this chapter.
g/m*
or 24 lb) or to
loading Paper
When the printer is out of paper, it goes off line so you can
reload paper in the tray.
To load a stack of paper in the printer’s paper tray, fan the
paper, open the paper cover, adjust the paper guides for the
proper width, and insert the paper into the tray. Then close the
cover.
Once you have loaded paper, put the printer back on line by
pressing the
On Line
button.
Paper Handling 2-3
Page 35

For information about loading heavy paper, envelopes, labels,
or transparencies, see ‘Printing on Special Paper” later in this
chapter. For information about loading paper in the optional
lower cassette, see Appendix C.
Setting the paper tray's paper size
By default, the printer is set up to expect letter-size paper to be
loaded in both the standard tray and optional lower paper
cassette. If you load paper of a different sire, you need to use
the control panel to update the printer for the paper size loaded
in the tray. This cannot be done from your software.
1.
Hold down the
button. This displays the standard tray’s current setting.
STD SIZE = LTR
To display the lower paper cassette’s paper size, press the
Item
button.
2.
Press the arrow button to change the paper size. Keep
pressing until the correct paper size is displayed.
Alt
button while you press the
Paper See
STD SIZE = LGL
3.
Press the
new paper size. An asterisk (*) at the right of the display
that indicates the setting shown is selected.
4.
Press the
If you see the message RESET TO SAVE, the new setting
cannot take place immediately. Press the
while you hold down the
printer with the new setting.
2-4 Paper Handling
Enter
On Line
button. This saves the displayed value as the
button to put the printer back on line.
Reset
button
Alt
button. This updates the
Page 36

Selecting the Paper Source
If you have installed the optional lower paper cassette, the
printer has two sources from which to print. Most software
applications have a Printer Setup menu which specifies the
paper source. The setup menu usually has an Auto Select
option that selects the tray based on paper availability and the
size of paper loaded in the tray. If paper is available in both
trays and is the same size, the printer’s standard tray is used.
However, you can also explicitly specify the tray from which
you want to print.
If you are using Windows, you can select the paper source
using the
paper source setting applies to all your Windows software. The
procedure to do so is discussed in the next section.
If for some reason you cannot choose the paper source from
your software, you can use the SelecType setting STD TRAY or
OPT TRAY in the TRAY SIZE MENU. For more information,
refer to Chapter 4.
Printers
icon in the Windows Control Panel so the
Using Windows software
1.
In the
icon.
2. Double-click on the
3.
Choose the
4. In the dialog box that appears, select the appropriate paper
source.
If you are using the HP LaserJet 4 driver, the dialog box
gives you several paper source options. These options
translate to the following paper sources available on your
printer.
Main
window, double-click on the
Setup
Printers
button.
icon.
Control Panel
Paper Handling 2-5
Page 37

Paper source on tinter
Auto select. The software decides
which tray to select based on paper
size and availability.
Lower paper cassette (option)
Paper Cassette
Manual Feed
Lower Cassette (option)
Envelope Feeder
5.
Choose the
6.
Close the
Printers dialog
OK
button.
Standard paper tray
Manual mode for standard paper tray.
Use manual feed for heavy paper.
envelopes, transparencies. and other
special papers.
Lower paper cassette (option)
Not available (page will be ejected).
Use manual feed for printing envelopes.
box.
Using DOS software
Since each MS-dos® program differs in its setup capabilities,
there is no standard way to select the paper source. See your
software documentation for information.
Printing on Special Paper
The printer’s manual feed feature allows you to print on special
paper stock such as heavy (over 90
envelopes, labels, and transparencies. When selecting special
types of paper or other stock, follow the recommendations
given in the next section.
2-6 Paper
Handling
g/m*
or 24 lb) paper,
Page 38

When printing on special paper, you might prefer to print face
up. To do so, set the paper path selector on the top left comer
of the printer to the faceup position. If you print on special
paper regularly, you might want to install the optional faceup
output tray. See Appendix C, “Option Installation.”
Choosing special paper
below are some recommendations for selecting paper and
other print media for the printer.
Envelopes
Load envelopes with the flap-side down. The printing quality
on envelopes may be irregular because different parts of an
envelope have different thicknesses. Print one or two
envelopes to check the print quality. If the printing is too light,
adjust the print density as described in Chapter 6. Using the
optional face-up output tray will keep envelopes from curling.
Do not use window envelopes unless they are specially
designed for laser printers. The plastic on most window
envelopes can melt when it comes in contact with the hot fuser.
Use only labels designed for laser printers or plain-paper
copiers. When printing labels, print in the face-up position; this
keeps the labels from curling or coming off the backing sheet.
To prevent the adhesive from coming into contact with printer
parts, always use labels that completely cover the backing
sheet, with no gaps between the individual labels.
You should test the label sheet for leaking adhesive by pressing
a sheet of paper on top of a sheet of labels. If the paper sticks,
do not use the labels.
Paper Handling 2-7
Page 39

Transparencies
You can use overhead projector transparencies and adhesive
drafting film if they are made for use with laser printers or
plain-paper copiers. When printing on these materials, print in
the faceup position.
Using manual feed
1.
Select the paper size and select manual feed as the paper
source.
If possible, use your software to select the paper source and
enter manual feed. Then skip to step 7.
If you are not able to select the paper source and manual
feed through your software, use the control panel buttons
as described in steps 2 through 6.
2.
Use the printer’s control panel to select the page size as
described in “Setting the paper tray’s paper size” earlier in
this chapter.
3.
To use the control panel buttons to select manual feed, first
hold down the
The display shows the following: MANUAL FEED=OFF.
Alt
button and press the
Manual
button.
4.
Press the arrow button once so the display now shows
MANUAL FEED = ON.
5.
Press
the
Enter
setting shown is selected.
6.
Press
the
On Line
Note:
If the
RESET TO SAVE
button while you hold down the Alt button.
2-8 Paper Handling
button. An asterisk (*) indicates that the
button to put the printer back on line.
message appears, press the
Reset
Page 40

7.
Open the paper cover and remove the paper currently loaded.
8.
Adjust the paper guides to match the width of the paper you
are using and insert a single sheet of paper into the paper
tray as far as it will go.
If you are printing envelopes, you can load up to ten
envelopes into the standard tray; the exact number
depends on the thickness of the envelopes.
9.
When the printer receives one page of data, the message
MANUAL FEED appears on the display followed by the
selected paper size.
10.
Press
the
Manual
button to print the sheet.
The printer stops after printing the single sheet. If you want to
print additional pages, load another sheet and press the
Manual
button. Repeat the above procedure for each sheet you
need to load manually.
Once you are finished manually printing sheets, replace the
paper in the paper tray and close the cover. To take the printer
out of manual feed, either use your software or the control
panel, depending on how you initially selected manual feed.
Paper
Handling
2-9
Page 41

Chapter 3
Fonts
What You Need to Know about Fonts
Font Overview . . . . . . . . . . . . . . . . . . . . . . . . . . . . 3-2
Choosing a Font
Printer and Screen Fonts
When the printer and screen fonts don’t match
Bitmap and outline fonts
TrueType fonts
Available Fonts
Adding More Fonts
Installing a font cartridge
Removing the font cartridge
Downloading soft fonts.
Selecting Fonts . . . . . . . . . . . . . . . . . . . . . . . . . . . .
Font Samples . . . . . . . . . . . . . . . . . . . . . . . . . . . . . 3-13
...........................
......................
....................
..........................
...........................
.........................
....................
....................
. . . . . . . . . . . . . . . . ..
.......
..................
3-2
3-4
3-4
3-5
3-4
3-7
3-7
3-9
3-9
3-11
3-11
3-12
Fonts 3-1
Page 42

What You Need to Know about Fonts
3-2 Fonts
This chapter provides basic information about fonts. If you are
new to fonts and desktop publishing, you might want to read
this chapter to understand fonts and the terminology used to
describe them.
However, an understanding of fonts is not necessary to use
fonts. To select a font, you simply make a selection from your
software’s Font menu. The font is then displayed on screen and
can be printed by using a software menu item.
The only time you might need to understand more about fonts
is if you are encountering font problems. The most common
font problems are the following:
0
The printer substitutes a font other than the one you
selected with your software.
0
The printed page does not exactly match what is on screen.
Such problems normally occur when you use an emulation
other than LJ4 or when you are trying to print fonts that are not
installed on the printer. If you are having font problems, read
the section “Printer and Screen Fonts” in this chapter to
understand how you can resolve and avoid font problems.
Font Overview
A font, or
a common typographic design and style. Popular fonts include
Times Roman, Times Roman Bold, Courier, and Arial.
The characters within a font come in a range of sizes, but they
share the same style. A style is a slight variation of a particular
font design, such as bold or
or phrases within a paragraph. Fonts with differing styles, such
typeface, is
a set of characters and symbols that share
italic, used
for emphasizing words
Page 43

as Times Roman and Times Bold, are similar enough in design
that you can mix them easily while retaining the same basic
font design throughout your document.
The entire set of all styles sharing a font design makes up the
font family. When you select a font using your software’s Font
menu, you are actually selecting the font family. A font family
normally contains four fonts: Roman (or Medium), Italic, Bold,
and Bold Italic. Some font families, however, contain other
styles such as oblique (similar to italic) and demi and book,
which have slightly different line weights from Roman.
Note:
Although this manual uses the term font as described here, other
sources attach a
used to
rejkr
other times, it
and style
d@krent
to a set of characters
encompasses
ofa
certain typographical design.
meaning to
this
with
the same style and same size;
the entire set of characters
term. Font is sometimes
0fezwt-y
size
Although fonts come in hundreds of designs, all fonts can be
classified either as serif or sans serif. Serifs are the short
decorative strokes that come off the main lines of a character,
such as the curl at the bottom of the letter n. Serif fonts are
commonly used for text. The text you are reading is Palatino, a
serif font.
Sans serif fonts, such as Arial, have no serifs and are often used
for
titles
and heads (as in this manual) and within tables and
dii3gl7UflS.
Fonts 3-3
Page 44

Choosing a Font
Although there are not many rules for choosing fonts, the
following guidelines will help you in creating attractive
documents that are easy to read:
a
Avoid using too many point sizes on one page. As a
general rule, use no more than three or four different point
sizes on one page.
a
Avoid using too many fonts. Having too many different
fonts on the page distracts the reader’s attention from the
meaning of the words.
a
Avoid using fonts that have designs similar to one another.
Generally a serif font is used for text and a sans serif font is
used for headings.
Printer and Screen Fonts
Fonts are installed on both the printer and the computer. The
printer fonts, which reside in printer memory or on a cartridge,
are used by the printer to print text. Screen fonts, which are
stored on your computer’s media, are used to display text on
screen to represent the fonts that will print. In most cases, each
printer font has a matching screen font, which ensures that the
screen display and the final printed output look exactly the
same.
Two separate sets of fonts are needed because the monitor and
printer have different requirements for producing fonts (for
more information, see “Bitmap and outline fonts” later in this
chapter).
3-4 Fonts
Page 45

Note:
The distinction between printer and screen fonts is not as important
when you are using TrueType fonts, which are included with
Windows 3.1. See “TrueType fonts” later in this chapter.
Each font installed on your printer has a matching screen font
that is accessible when you are using the LJ4 driver. The screen
fonts are installed when you install the printer driver.
When the printer and screen fonts don’t match
In some cases, you may have a printer font that does not have a
matching screen font, or you may have a screen font but not a
corresponding printer font. Such situations occur for the
following reasons:
a
You install a font cartridge that contains printer fonts but
no screen fonts.
a
You install a screen font on the computer without installing
a printer font.
a
You use a driver other than the LJ4 driver.
a
You move the screen fonts to a different directory and your
computer cannot find them.
If you have a printer font but not a matching screen font, the
computer uses an available screen font to display text on the
screen. In this case, the screen display will not exactly match
the printed output.
If you have a screen font but not a printer font, you will be able
to select the font and view it on screen. However, when you
send the job to the printer, the printer will not be able to print
the font and will substitute another font (Courier).
Fonts 3-5
Page 46

Bitmap and outline fonts
Fonts that are installed on the printer or computer are classified
in two groups according to the method used to create them:
bitmap fonts and outline (or scalable) fonts.
a
A bitmap font consists of a dot-by-dot representation of a
character or image. Bitmap fonts tell the printer or monitor
which dots or pixels to turn on and off to create a character.
Since a bitmap is a fixed pattern of pixels, a separate bitmap
font is needed for each point size. For example, 10-point
Times and 12-point Times require separate bitmap fonts.
If your computer does not have the correct bitmap size
installed, the system wilI substitute another font. The result
is often a jagged looking character.
P
An outline font is created from a mathematical formula that
describes the outline of each character. When the printer
needs a certain size of an outline font, it uses the formula to
render the character in the requested size, filling in the
outline. Only one outline is needed for each font since the
outline formula contains all the necessary information for
rendering at any size. Thus outline fonts always look
smooth and well-shaped, no matter the size.
3-6 Fonts
bibnap font outline font
Page 47

Outline fonts are preferred for the printer because the printer
must be able to print any point size requested from the
software while maintaining high-quality output. Since many
software programs allow you to select anywhere from 4-point
to
%-point
fonts, it would be impractical to store all possible
bitmaps at the printer.
Screen fonts, however, are normally bitmap fonts that are
designed specifically for screen’s resolution. Not all sizes of
bitmap fonts are stored at the computer, but the poor quality
that results from substituting bitmaps is less of a problem on
the screen than it would be at the printer. Also, many users
now rely on software programs, such as Adobe” ATM,“’ to
redraw screen fonts to the requested size.
TrueType fonts
If you are running Windows 3.1, you can also use TrueType
fonts. TrueType is an outline font format that allows the
computer to create screen fonts. TrueType fonts were
developed jointly by Microsoft Corporation and Apple
Computer for use in the Windows 3.1 and Macintosh
System 7 environments.
®
®
With TrueType fonts there is no need to install screen fonts.
The same outline used to create the font to be printed is used to
create the font displayed on screen, thus ensuring that the
screen display always matches the printed output and
eliminating the need to maintain multiple screen fonts.
Available Fonts
The following table lists the fonts that are installed on your
printer. The names of all the font families appear on your
software’s Font menu if you are using the LJ4 driver. If you are
using a different driver, not all font families will be available.
Fonts 3-7
Page 48

The fonts provided with the printer are shown in the following
table. For samples of each font family, see “Font Samples” at
the end of this chapter.
Font family
Flare Serif 821 SWC
Incised 901 SWC
Swll721
SWM
Fonts
Medium, Extra Bold
Medium, Eidd. italic
Medium. Bold, italic. Bold
Italic
Zapf Humanist 601
Demi SWC
Dutch 801 SWC
Medium, Bold, Italic, Bold
Italic
Medium, Bold, Italic. Bold
italic
Clarendon
Condensed
Condensed SWC
Ribbon 131 SWC
Courier SWC
Medium, Bold, italic. Bold Courier
Italic
Original Garamond
swc
Letter Gothic SWC
Antiqua, Halbfett. Kursiv.
Kursiv Halbfett
Medium, Bold, italic
Audrey Two SWC
Symbol Set
Dutch 801 SWM
SWA
Medium, Bold, italic. Bdd
Italic
Swiss742 SWC
Medium, Bold, Italic. Bold
Italic, Medium Condensed,
Bold Condensed, Medium
Condensed Italic. Bold
Condensed Italic
More Wingbats SWM
tine Printer (bitmao)
prestige (bitmap)
l
TrueType
l
*
Available only in ESC/P2 and FX emulations.
font
l
*
12cpi.2Ocpi
1 HPeauivalent 1
Albertus
I
Antique Olive
Aria1
l
CG Omega
CG
Time®
Clarendon
l
Garamond
I
Letter Gothic
Marigold
Symbol
l
Times New
l
Univer9
Wingdings
l
Line winter
F&tiae
I
I
I
1
Page 49

When selecting fonts in your software program, choose the
font name listed in the HP equivalent column.
Adding More Fonts
You can install additional fonts by doing one or both of the
following:
P
Installing a font cartridge in the printer.
P
Installing fonts in your computer.
Font cartridges are easy to install and the printer can print
them quickly. However, not all font cartridges are compatible
with the printer, and you can’t mix fonts that are on different
cartridges.
Fonts that reside on your computer’s hard disk can be
transferred, or downloaded, to the printer so they can be
printed. Downloaded fonts, also called soft fonts, remain in the
printer memory until you turn off the printer or otherwise
re-initialize
it.
With soft fonts you can install any combination of fonts you
want and as many fonts as your computer memory supports.
However, downloading fonts adds to the time it takes to print,
which can be a problem if multiple users are sharing the
printer. Also, if you plan on downloading many fonts, you
must make sure your printer has sufficient memory.
Installing a font
You install font cartridges in the slot located at the front of the
printer.
ccwfrfdge
Fonts 3-9
Page 50

Caution:
Do not touch the connectors on the cartridge or in the printer’s
cartridge slot; you could damage them.
1.
Make sure the printer is off or
light off.
2.
Hold the cartridge face up.
3.
Insert the cartridge into the slot and press firmly until it
snaps into place.
4.
Turn on the printer or set it on line. If READY appears, you
can use the font cartridge.
Caution:
e
A curt-ridge error occurred if you see one of the following
messages: REMOVE CART, ILLEGAL CART.
If the message REMOVE CART appears on the display, you
inserted the cartridge when the printer was on line or the
Form Feed
cartridge and press
If you see the message ILLEGAL CART, the cartridge you
installed is not compatible with the printer.
light was on. If you see this message, remove the
Continue;
off
line with the
then repeat steps 1 through 4.
Form Feed
Once the cartridge is installed, select the cartridge font with
your software. If you are using Windows, follow the procedure
below. For non-Windows software, see your software manual.
1.
In the
icon.
2.
Double-click on the
3.
In the
button.
3-10 Fonts
Main
window, double-click on the
Printers
Printers
dialog box that appears, choose the Setup
icon.
Control Panel
Page 51

4. In the dialog box that appears, select the cartridge you
installed.
5.
Choose the
6.
Close the Printers dialog box.
OK
button.
Removing the font cartridge
Follow these steps to remove a font cartridge:
Caution:
R
Never remove a font cartridge when the printer is on line,
SelecType
CART or REMOVE CART message appears on the display.
You will also see one of these messages if you remove a
cartridge while the
is off line).
1.
Turn off the printer or take it off line. If the Form
is on, press the Form-feed button to print out any data
before you remove the cartridge.
mode, or
resetting itself: If you do,
Form Feed
a REINSERT
light is on (even if the printer
Feed
in
light
2.
Remove the cartridge by grasping firmly and slowly pulling
it straight out of the slot.
Downloading soft fonts
Most font packages make it easy to install fonts by providing
their own installer. Normally the installer gives you the option
of having the fonts automatically downloaded whenever you
start your computer or having fonts downloaded only when
you need to print a particular font.
Fonts 3-11
Page 52

If you’re running Windows, you can also install soft fonts by
clicking on the
Fonts
dialog box. Once instalk& the fonts are available in all
Fonts
icon in the Control Panel to bring up the
your Windows applications.
Note:
The ActionLaser 1600 can print fonts generated by Bitstream
®
FaceLift® and Bitstream Fontware™ installation Kits using Bitstream
Fontware Typeface Packages for the PC, See your FaceLift or
Fontware User Guide for instructions on using Bitstream fonts with
HP LaserJet compatible printers.
Selecting Fonts
You almost always select fonts from the Font menu of your
software application. If you are unsure how to do this, check
the manual that comes with your software.
If you are sending unformatted text to the printer directly from
MS-DOS or if you are using a simple software package that
does not include font selection, you can select fonts by using
SelecType. For information on how to do this, see Chapter 4.
Note:
Selecting font using SelecType is not
from your software program is easier, and any font selection you make
from your software overrides the selection you make from SelecType.
recommended.
Selecting fonts
3-22 Fonts
Page 53

Font Samples
Audrey Two SWC
CIarendon Condensed SWC
courier swc
Fonts 3-23
Page 54

Page 55

Fnnts
3-15
Page 56

3-16 Fonts
Page 57

Chapter 4
4-1
SeIecType Overview
When to use SeIecType
SelecType menus and items
Using SeIecType
Changing and saving SelecType settings
Resetting SelecType settings to the factory defaults
SelecType tutorial. . . . . . . . . . . . . . . . . . . . . . . . 4-6
PRINTING MENU
LJ4 Emulation Menu
ESCP2 MENU
FX MENU
GL2 MENU
JOB MENU . . . . . . . . . . . . . . . . . . . . . . . . . . . . . . 4-13
EMULATION MENU . . . . . . . . . . . . . . . . . . . . . . . . 4-14
TRAY SIZE MENU
CON-FIG MENU
............................
...............................
..............................
........................
.....................
..................
...........................
...........
....
.........................
........................
.........................
...........................
4-2
4-2
4-3
4-4
4-5
4-5
4-7
4-10
4-12
4-12
4-12
4-15
4-16
PARALLEL MENU . . . . . . . . . . . . . . . . . . . . . . . . . 4-21
SERIAL MENU
TEST MENU . . . . . . . . . . . . . . . . . . . . . . . . . . . . . 4-24
. . . . . . . . . . . . . . . . . . . . . . . . . . . 4-21
SelecTme
Page 58

SelecType Overview
4-2
SelecTuve
If you are not able to change printer settings from your
software, use the printer’s SelecType mode as described in this
chapter. SelecType allows you to use the control panel buttons
to change printer settings, such as the print quantity, paper
size, and resolution. Other settings control the printer’s
configuration, including the protocol and communications
parameters. For a complete list of printer settings that are
accessed through SelecType, see the table later in this chapter.
When
to use SelecType
You do not normally need to use SelecType to change printer
settings. Most software programs allow you to change settings
that affect the final printed output, and any settings you make
from your software override the SelecType settings.
Some SelecType settings, including the printer’s configuration
parameters, cannot be controlled by software. However, such
settings do not normally have to be changed because they are
assigned default settings that are satisfactory for most
computer environments.
Normally the only times you need to use SelecType are the
following:
LI
To check the amount of toner remaining
P
To print a status sheet
D
To change the parallel or serial interface parameters
P
To change the emulation
Page 59

SelecType menus and items
The following table lists the items available on the SelecType
menus. Each menu is described in its own section later in this
chapter.
Note:
This table does
emulations. For SelecType
Chapter 5, “Using Other Printer Emulations.”
rwt
list the
menusfor
settingsfh
the
these
ESC/P
emlations,
2, FX, and
see
GM
COPIES
PAGE SIZE
ORIENTATION
MANUAL FEED
Rfiech
FoNTQ?c
FONT NUMBER
PITCH
HElGHl
SYMSET
PAGE PROTECT
Rl3OLUTlON
TIMEOUT
PARALLEL
SERIAL
vr
STDQZE
OPTSIZE’
MunJ
CONFIG
PARAUEL
QXIAL SERlAL
TEST
Items
STD TRAY’
OPTTRAY
SIZE IGNORE
AUTO
STANDBY
DENQTY
AUTO SENSE
TOP OFFSET
LEFroFFsET
TONER
TONER LIFE
PAGE COUNT
SelecTYPE INIT
SPEED
Q-D
WORD LENGTH
BAUD
PARITY
SToPsiT
DTR
XON/XOFF
DQ?
STATUS
L.!d
FONT SAMPLE
ESCP2
FX FONT SAMPLE
FACT
Rflech
CONT
TYPE
RATE
SHEI
FONTSAMPLE
SHM
TEST PAGE
l
Available only with option.
SfdecTum
4-3
Page 60

Using SelecType
The SelecType settings are organized as items on a series of
menus that are accessed by
buttons on the printer’s control panel.
The buttons have the following functions:
using the Menu, item,
and arrow
Menu
Item
4-4
Seleclbve
The first time you
goes off line, and SelecType mode is enabled.
The first menu in the series (PRINTING) is
then displayed. Each
you advance to the next menu.
Advances through the list of items available
for the currently selected menu.
Advances through the settings available for
the current item. The currently selected
setting is shown with an asterisk.
select Menu, the
time
you press
printer
Menu,
Page 61

To move through the menus, items, and settings in the reverse
5elecTwe
4-5
order, hold down the
arrow button.
Alt
button and press the
Menu, Item,
or
Changing and saving SelecType settings
To change a SelecType setting, first
advance to the appropriate menu, and then use the
button to select the item you want to change. With the item
selected, use the arrow button to change settings.
To save a new
On Line
setting and updates the printer for the new setting.
If you see the message RESET TO SAVE, the new setting
cannot be used immediately. Press the
hold down the
RESET. The printer is then updated with the new setting.
Any SelecType settings you change remain in effect until you
again change them or until you reset all SelecType settings to
the factory defaults as described in the next section.
button to put the printer back on line. This saves the
setting,
Alt
press the
button until the display shows the message
use
the
Menu
button to
Item
Enter
button. Then press the
Reset
button while you
Resetting SelecType settings to the factory defaults
All SelecType settings have default settings that have been set
at the factory. When you change the printer settings by using
SelecType, you are overriding the factory-set defaults.
If, after you have changed SelecType settings, you wish to reset
all SelecType settings back to the factory defaults, press the
Menu
panel. Then press the
displayed. Now press
factory defaults and erases all user-defined settings.
button until CONFIG MENU is displayed in the control
Item
button until SelecType INIT is
Enter.
This resets the printer to the
Page 62

SelecType tutorial
4-6
SelecTuve
This tutorial provides an example of how to use SelecType to
change the baud rate for the serial interface.
Press
the
Menu
1.
displays the PRINTING MENU, which is the first menu of
the series.
2.
Press
the
display.
button. This takes the printer off line and
Menu
button until SERIAL MENU appears in the
Press the
3.
Item
button until BAUD BATE item appears in the
display.
The display shows the current setting:
4.
BAUD RATE=
9600 *
The asterisk indicates that 9600 is the current setting.
5.
To change the baud rate to 19200, press the arrow button
until the display reads BAUD RATE=19200.
Press the
6.
7.
Press
If you see the message BESET TO SAVE, press the
Enter
the
On Line
button to add the value to printer memory.
button to put the printer back on line.
Reset
button while you hold down the Alt button.
Page 63

The PRINTING MENU contains print settings that you change
most often, including the number of copies, the page size, the
orientation, manual feed, and RITech settings. Normally these
items are set from software, so you usually do not need to
access the PRINTING MENU.
COPES
The COPIES item selects the number of copies to be printed.
Normally you set the number of copies from your software.
Pressing the arrow button once increases the number in
increments of 1. If you press and hold the arrow button, you
increase the number in increments of 10.
COPIES=
1 (Default) - 999
SelecType 4-7
Page 64

PAGE SIZE
SelecTme
The PAGE SIZE item selects the default paper size. You should
only change this item if you cannot change the paper size with
your software.
PAGE SIZE= LT (Default)
A4
AS
B5
HLT (Half letter)
LGL (Legal)
GLT (Government letter)
GLG (Government legal)
EXE (Executive)
F4
MON (Monarch)
C10 (Commercial 10)
::
I85
(International
85)
ORIENTATION
4-8
The ORIENTATION item selects whether the page is printed in
portrait or landscape orientation. In portrait orientation, the top
of the page is parallel to the short edge of the paper. In
landscape orientation, the top of the page is parallel to the long
edge of the paper. The pages in this manual are printed in
portrait orientation.
ORIENTATION=
PORT (Default)
LAND
Page 65

MANUAL FEED
When
MANUAL FEED is on, the printer
waits
for the
Manual
button to be pressed before printing. For more information
about manually feeding paper and envelopes, see Chapter 2,
“Paper Handling.”
MANUAL FEED=
OFF (Default)
ON
R/Tech
The RITech (Resolution Improvement Technology) item allows
you to adjust the RITech setting or to turn if off. See Chapter 6
for more information about RITech. The RITech setting should
not normally have to be changed.
RlTech=
LIGHT
MEDIUM (Default)
DARK
OFF
SelecType 4-9
Page 66

The LJ4 MENU configures settings that are relevant to
4-10
HP LaserJet 4 emulation, including the font source, font,
and symbol set. Usually you do not need to access the LJ4
emulation menu because most menu items are adjustable from
your software. The exception is the symbol set selection.
FONT SRC
The FONT SRC item specifies the font source.
FONT SRC=
RESIDENT (Default)
CARTRIDGE
DOWNLOAD
FONT NUMBER
The FONT NUMBER item selects a font from the selected font
source. Each font is associated with a number (the actual
number for each font differs from system to system). If you
don’t know the number of the font you want to use, you can
print a sample font sheet showing the fonts and their numbers.
See ‘TEST MENU” later in this chapter for more information.
FONT NUMBER=
0 (Default)-Available
PITCH
The PITCH item specifies the pitch of fixed-width, scalable
fonts (Courier and
Let&Gothic).
Pitch refers to the number of
characters that can be printed per inch. For example, if you set
the pitch to 12 cpi (characters per inch), 12 characters are
printed in one inch. Pitch can be specified from 0.44 to 99.99 cpi
in increments of 0.01 cpi.
PITCH= .44-10.00 (Default)-99.99
self?czin7e
Page 67

HEIGHT
The HEIGHT item specifies the point size for proportional and
scalable fonts. The range of point sizes is 4.00 to 999.75, in
increments of 0.25.
HEIGHT=
4.00-12.00 (Default)-999.75
SYMSET
The SYMSET item specifies the symbol set to use. If the font
you selected in FONT SRC and FONT NUMBER is not
available in the new SYMSET setting, the FONT SRC and the
FONT NUMBER are automatically replaced with the default
value. The following table lists the symbol sets available for LJ4
emulation.
SYMSET=
Roman-8’ (Dofault) Roman Extension
ECY94-1
9869.2 180 PsMath
6959-S 180
UsPublIshIng VI&lath
DeskTop Math-9
WIE.Europs PcTk437
Wlndows
IBM-US IEM-DN
YCfOXt
Volntornatlonal VeUS
PlFont
Symbol WlAnsl
Yore Wlngdlngs
Logal
WlTurklrh
Psfrxt
PcYultlllngual
PcE.Europe
The Roman-8 includes the following: Norweg l, Italian,
Swedsh2, ANSI ASCII, UK, French2, German, and Spanish.
Symbol sets can also be changed using a command language.
See Appendix B.
Page 68

FORM
SelecTme
The FORM item specifies the number of lines for the selected
paper size and orientation. This setting also determines the
spacing between lines.
FORM=
5-60 (Default)-128
ESCP2 MENU
The ESCP2 MENU configures settings that are relevant to
ESC/P2 emulation. The items on the ESCP2 MENU can be
changed only if you are
For more information about the ESCP2 MENU, see Chapter 5,
“Using other Printer Emulations.”
The FX MENU configures settings that are relevant to Epson
FX emulation. The items on the FX MENU can be changed only
if you are using FX emulation.
For more information about the FX MENU, see Chapter 5,
"Using other Printer Emulations.”
running ESC/P2 emulation.
GL2 MENU
The GL2 MENU configures settings that are relevant to Epson
GL/2 emulation. The items on the GL2 MENU can be changed
only if you are using GL/2 emulation.
For more information about the GL2 MENU, see Chapter 5,
“Using Other Printer Emulations.”
4-12
Page 69

JOB MENU
The items on the JOB MENU configure how the printer
manages print data, including whether to print oversized
pages, the print resolution, and how long the printer waits
before it takes a timeout. The items on the JOB MENU can be
changed through your software if you are using the LJ4 driver.
PAGE PROTECT
The PAGE PROTECT item allows you to allocate additional
printer memory. You normally use PAGE PROTECT if you are
printing a highly complex page and do not have sufficient
memory. To ensure sufficient memory, use PAGE PROTECT to
select the paper size for your job.
Normally PAGE PROTECT should be OFF.
Note:
Changing the PAGE PROTECT setting reconfigures the printer’s
memory and erases any downloaded fonts.
PAGE PROTECT= OFF (Default)
LT (Letter)
LG (Legal)
A4
RESOLUTION
The RESOLUTION item switches the printer resolution
between 300 dpi and 600 dpi. Both resolutions produce
good-looking, crisp text and graphics. At 600 dpi, however, the
resolution is exceptionally sharp because the dots that make up
the text and graphics are smaller and more numerous than
those used in 300-dpi resolution. The higher resolution of
600 dpi also improves the quality of grayscale images. To
obtain 600-dpi resolution, you must use a driver that supports
600-dpi resolution.
Page 70

Normally, you will want to run the printer in 600-dpi mode to
4-14
take advantage of the higher resolution. However, because
300-dpi uses less memory, you may sometimes want to use the
lower resolution if you encounter memory problems.
RESOLUTION=
TIMEOUT
The TIMEOUT item specifies how long the printer waits for
data from the active port before it terminates the print job. If
the printer waits the specified number of seconds without
receiving data, it switches automatically to another interface
port that has data ready to print. The timeout period is counted
only while the printer is on line.
TIMEOUT=
600 (Default)
300
5-60 (Default)-300
EMULATION MENU
The items on the EMULATION MENU specify which
emulation to use for the parallel, serial, L/T (LocalTalk”‘), and
AUX interfaces.
PARALLEL
The PARALLEL item specifies the emulation for print jobs
coming over the parallel interface.
PARALLEL=
SeZecTuve
LJ4 (Default)
FX
ESCP2
GL2
Page 71

SERIAL
The SERIAL item specifies the emulation for print jobs coming
over the serial interface. The default setting depends on your
serial interface. Print a status sheet (see “TEST MENU” at the
end of this chapter) to see the current setting.
The L/T item, which is available only if the Epson Talk option
is installed, specifies the emulation for print jobs coming over
the LocalTalk interface.
The default setting depends on the option you have installed.
Print a status sheet (see “TEST MENU” at the end of this
chapter) to see the current setting.
AUX
The AUX item, which is available only if an optional interface
is installed, specifies the emulation for print jobs coming over
the optional interface.
The default setting depends on the option you have installed.
Print a status sheet (see “TEST MENU” at the end of this
chapter) to see the current setting.
TRAY SIZE MENU
The items on the TRAY SIZE MENU specify the size of the
paper loaded in each paper tray. The TRAY SIZE MENU items
can be accessed more easily as described in “Setting the paper
tray’s paper size” in Chapter 2.
SelecQ7e
4-15
Page 72

STD SIZE
!MecTuve
The STD SIZE item sets the paper size for the standard tray.
STD SIZE=
OPT SIZE
The OPT SIZE item sets the paper size for the optional lower
paper
cassette.
OPT SIZE=
LT (Default)
A4
A5
B5
HLT (Half letter)
LGL (Legal)
GLT (Government letter)
GLG (Government legal)
EXE (Executive)
F4
MON
(Monarch)
C10 (Commercial 10)
DL
C5
IB5 (International B5)
LT (Default)
A4
CONFIG MENU
The items on the CONFIG MENU specify information needed
by the printer, including which paper source to use, how to
handle certain errors, how to use memory, what density setting
to use, where to begin printing on the page, and the lifetime
setting for the imaging cartridge.
4-16
Page 73

STD TRAY, OPT TRAY
SelecType
The STD TRAY and OPT TRAY items, which are available only
if the optional lower cassette is installed, select the paper
source when the selection is not made by software.
If you do not wish one of the trays to be available as a paper
source, use LOCK. Only one paper source can be set to LOCK;
when you set one paper tray for LOCK, the other source is
automatically set to UNLOCK. For more information about
selecting the paper tray, see “selecting the Paper Source” in
chapter 2.
If both STD TRAY and OPT TRAY are set to UNLOCK (the
default), the software selects the tray based on paper
availability and size.
STD TRAY or OPT TRAY=
UNLOCK (Default)
LOCK
Note:
Any settings made from your software override the tray settings
made using the control panel.
SIZE IGNORE
When SIZE IGNORE is set to ON, the printer ignores the paper
size error (CHECK PAPER SIZE) and prints the page even if
the print data exceeds the printable area for the specified page
size. If printing exceeds the printable area, toner may smudge
on the printed sheet.
When SIZE IGNORE is OFF, the printer stops if the page size
exceeds the printable area and does a self-cleaning once it
recovers from the error.
SIZE IGNORE= OFF (Default)
ON
4-17
Page 74

AUTO CONT
The AUTO CONT item permits the printer to automatically
continue printing after waiting five seconds when the
PAPER SET, PRINT OVERRUN, or MEM OVERFLOW error
occurs.
When AUTO CONT is OFF, you must press the
Continue
button to resume printing. In most cases, leave this option set
to OFF so you are aware of the error messages and can make
the necessary corrections. You might want to set AUTO CONT
to ON when printing long jobs or when you are away from the
printer for long periods.
AUTO CONT=
OFF (Default)
ON
STANDBY
STANDBY mode saves energy by reducing power to the
printer when it has received no data for 15 minutes. This
feature conforms to United States Environmental Protection
Agency guidelines for energy efficiency. The printer begins
warming up as soon as you send a print job or press the
On Line
button; warm-up takes approximately 30 seconds.
STANDBY=
ENABLE (Default)
DISABLE
DENSITY
The DENSITY item adjusts the print density to make it darker
or lighter.
DENSITY=
DARK
DARKEST
MIDDLE (Default)
LIGHT
LIGHTEST
4-18
SelecTwe
Page 75

Note:
hxwasing
the density
increases
the rate of toner consumption.
AUTO SENSE
The AUTO SENSE item specifies whether the printer can
receive data through all available interfaces or only through the
selected interface. Use AUTO SENSE to restrict use of an
interface.
AUTOSENSE=
ON (Default)
PARALLEL
SERIAL
L/T
AUX
TOP OFFSET
The TOP OFFSET item specitks in millimeters how far from
the top edge of the
printable area
the printer can begin printing.
The options are 0-99, adjustable in l-mm increments.
TOP OFFSET=
0 (Default)-99
LEFT OFFSET
The LEFT OFFSET item specifies in millimeters how far from
the left side of the
printable
area the printer can begin printing.
The options are 0-99, adjustable in l-mm increments.
LEFT OFFSET= 0 (Default)-99
SelecType
4-19
Page 76

TONER
The TONER item displays the amount of toner remaining in
the imaging cartridge; it does not allow you to make any
Selections.
TONER=
l ****F (80400%)
E
E”” F (60-60%)
l
** F (SO-SO%)
E
l
*F
E
E’
(20-40%)
F (O-20%)
If the TONER setting is between 0% and 20%, you must change
the imaging cartridge.
TONER LIFE
The TONER LIFE item specifies the lifetime in pages of the
imaging cartridge. This item is necessary only when you are
installing a cartridge whose lifetime is not 6000 pages. You do
not need to change this setting when you install the standard
imaging cartridge (S051016). The TONER LIFE setting is
adjustable in increments of 1000 pages.
TONER LIFE=
5000-6000 (Default)-9000
PAGE COUNT
When PAGE
COUNT is selected,
pressing the
Enter
button
displays the total number of pages printed by the printer since
it was installed.
SelecType INIT
When
SeIecType INIT is selected,
re4nitiaIizes
the printer, which erases all
pressing the
Enter
user-sekcted
and returns the printer to the default factory settings.
4-20
5elecTuve
button
settings
Page 77

PARALLEL MENU
The PARALLEL MENU items allow you to adjust the speed
and bidirectional settings for the parallel interface.
SPEED
The SPEED item specifies transfer speed by specifying the
delay period from the STROBE to the ACKNLG signal.
Normally you do not need to change the SPEED item;
however, if your computer uses the ACKNLG signal, you
sometimes need to set SPEED to SLOW. For more information
on the parallel interface signal, see “Parallel interface” in
Appendix A.
SPEED=
BI-D
The BI-D item enables or disables bidirectional communication.
If BI-D is set to OFF, LJ4 emulation will work as PCL 5
emulation. This means that some advanced features of LJ4
emulation will not be available.
BI-D= ON (Default)
FAST (Default)
SLOW
OFF
SERIAL MENU
The items on the SERIAL MENU specify the settings for the
serial interface, including the type of serial interface (RS-232C
or RS-422) and the settings for word length, baud rate, parity,
stop bit, XON/XOFF, DTR, and DSR. If you are using the serial
interface, these settings must match your computer’s serial
settings.
SelecType
4-21
Page 78

SERIAL
4-22
The SERIAL item selects between RS-232C and RS-422. This
option must match the serial interface of your computer.
SERIAL=
RS-232C (Default)
M-422
WORD LENGTH
The WORD LENGTH item specifies the number of bits
(excluding the parity bit) defining each character. The printer’s
word length setting must match the setting used by your
computer. See your computer manual and software
documentation for the proper setting.
WORD LENGTH= 8 (Default)
7
BAUD RATE
The BAUD RATE item sets the data transfer rate (baud) for
both the
R!X32C
and
RS422
serial interfaces. The baud rate is
measured in bits per second (bps). The printer’s baud rate
setting must match the baud rate of your computer. See your
computer manual and software documentation for
the correct
setting.
BAUD RATE=
300
800
1200
2400
4800
9800 (Default)
19200
38400
57800
115200
SelecTme
Page 79

PARITY
The PARITY item specifies whether to use parity checking and
the type of parity checking to use. The parity bit, if used,
provides a basic form of error detection. The printer’s parity
setting must match the parity setting of your computer. See
your computer manual and software documentation for the
proper setting.
PARITY =
NONE (Default)
EVEN
ODD
STOP
B/l
The STOP BIT item sets the number of stop bits on each
character of information sent to the printer. Stop bits signal the
end of a character. This setting must match the stop bit setting
of your computer.
STOP BITS= 1 (Default)
2
DTR
The DTR (Data Terminal Ready) item enables and disables the
printer’s ready communications protocol. Check your
computer manual for the setting you should be using. If
XON/XOPP is OFF, DTR must be set ON.
DTR=
OFF (Default)
ON
SelecType
4-23
Page 80

XON/XOFF
The XON/XOFF item specifies whether the printer uses
XON/XOFF communications protocol. Check your computer
manual for the setting you should be using. If DTR is OFF,
XON/XOFF must be set to ON.
XON/XOFF=
DSR
When the DSR (Data Set Ready) item is OFF, the signal level is
permanently set HIGH, allowing the printer to send data to the
computer. For most communications purposes, DSR should be
set OFF. When DSR is ON, data is sent to the computer only
when DSR is HIGH.
Check your computer manual for the setting you should be
using.
DSR=
ON (Default)
OFF
OFF (Default)
ON
TEST MENU
The items on the TEST MENU allow you to print sample pages
to test the printer or obtain information about the fonts and the
printer settings and features. To print a sample sheet, select the
item in the TEST MENU and
then
press the
Enter
button.
4-24 SelecType
Page 81

STATUS SHEET
Press the
printer’s current settings. Use this item to check whether your
printer is working correctly. The following is a portion of a
sample sheet. Your status sheet might vary slightly.
Enter
button to print a status sheet describing the
SelecType
4-25
Page 82

LJ4 FONT SAMPLE, ESCP2 FONT SAMPLE, FX FONT SAMPLE
Press the
Enter
button to print a sample of the fonts available in
the current emulation.
FACT SHEET
Press
the
Enter
button to print a demonstration page that
illustrates various printer features. FACT SHEET is available
only if the control panel language is set to one of the following:
English,
lTALJAN0, Espaiiol, SVENSKA, DANSK, SUOMI.
For
information about changing the language, see Chapter 1.
R/Tech TEST PAGE
Press
the
Enter
button to print a check pattern for the RITech
setting. RITech TEST PAGE is available only for 600-dpi
resolution. See Chapter 6 for more information.
4-26 SelecType
Page 83

Chapter 5
Using Other Printer Emulations
When to Use Other Emulations
Other Available Emulations
Changing the Emulation
Epson ESC/P2 and FX Emulations
Operating as an LQ or FX printer
ESCP2 and FX Menu items
Epson GL/2 Emulation
The two Epson GL/2 emulations
Operating in GL/2 emulation
GL2 MENU items
......................
.......................
........................
..................
....................
................
...............
..................
...............
.................
5-2
5-2
5-3
5-4
5-4
5-5
5-10
5-10
5-12
5-12
Using Other Printer Emulations
5-1
Page 84

When to Use Other Emulations
5-2
L?sinP
Other Printer Emulations
The printer is designed to work best using HP LaserJet 4 (LJ4)
emulation, so it is recommended that you use LJ4 emulation
whenever possible. However there may be some cases when
you want to use other emulations, including the following:
0
If you need to print documents already formatted for a dot
matrix printer.
Cl
If you are printing from software designed for an HP-GL/2
plotter.
P
If you need to use software programs that do not support
an HP LaserJet printer.
Other Available Emulations
In addition to the LJ4 emulation, the printer has three other
resident emulations:
Epson ESC/P 2
(LQ)
Epson FX
Epson GL/2
ESC/P 2 is an advanced version of the Epson
LQ mode available in previous Epson page
printers. It emulates Epson LQ-570 24-pin
dot matrix printers and features Epson
ESC/P 2 control codes. Use this emulation to
print data formatted for an Epson LQ series
printer.
FX mode emulates the Epson FX-870/1170
9-pin dot matrix printer. Use this emulation
to print data formatted for Epson FX or LX
series printers.
GL/2 mode features the HP-GL/2 plotter
commands. Use this emulation when
printing drawings created with plotter
applications.
Page 85

Changing the Emulation
Normally you change the emulation using SelecType.
Advanced users may send printer commands specific to each
emulation directly to the printer. See Appendix B for a list of all
available commands.
When changing the LJ4 emulation to another emulation, you
might need to change some SelecType settings to account for
differences between the ActionLaser 1600 and dot matrix
printers or GL/2 plotters. Also, some printer settings are
interpreted differently, depending on the emulation. For more
specific information about possible changes to printer settings,
see “Epson ESC/P 2 and FX Emulations” and “Epson GL/2
Emulation.”
Note:
Emulation settings are stored in printer memory. Each time the
emulation is changed, the printer must reconfigure its memory
new emulation. Any other printer data being stored in memoy, such
as downloaded fonts, will be lost.
To change the emulation using SelecType:
for the
1.
Press the
MENU.
2.
Press the
to configure.
3. Press the arrow button to select the emulation to be used for
the specified interface.
4. Press
5. Hold down the
printer with the new settings.
Menu
Item
button to select the interface port you want
the Enter
button to save the emulation.
button until you reach the EMULATION
Alt
button and press
Using Other Printer Emulations
Reset to
update the
5-3
Page 86

Epson ESC/P 2 and FX Emulations
The ESC/P 2 and FX em&&ions allow you to use the printer
with software that supports only Epson LQ or FX printers
without having to modify the software controlling your printer.
Operating as an LQ of
Before you can operate the printer as an LQ or FX printer, you
need to first select the appropriate driver. For ESC/P 2
emulation,
below in order of preference. If none of these drivers is
available, use any other LQ printer driver.
LQ570
LQ-510/550
LQ-500
LQ-860
LQ-850
For FX emulation, select one of the following drivers, which are
listed below in order of preference. If none of these drivers is
available, use any other FX or LX printer driver.
Fx870/1170
FX-850/1050
FX-8oo/looo
LX-100
LX-810/850
LX-800
sekct
one of the
Fx printer
following
drivers, which are
listed
Once you select the driver, you need to change the emulation
as described in “Changing the Emulation” earlier in this
chapter.
When you print documents formatted for dot matrix printers,
you might need to change some printer settings to account for
differences between the ActionLaser 1600 and dot matrix
5-4
U&p
Other Printer Emulations
Page 87

printers. For example, some dot matrix printers allow you to
print on oversize sheets that cannot be accommodated by the
ActionLaser 1600; if this is the case, be sure to change the
PAGE SIZE setting. Check also that ORIENTATION is correct.
Note:
In ESC/P 2 and FX emulations, the COPIES settingfunctions
d@wntly
one page of data and printing it the requested number
than when you are in
LJ4
emulation. Rather than creating
of
times
(as
is
done in LJ4 emulation), the printer creates as many pages of data as
requested, thus increasing the length of time it takes to print multiple
COpit?S.
!3ee
Chapter 4 for specific information about each SelecType
setting. SelecType settings that are specific to the ESC/P 2, FX,
and GL/2 emulations are described in this chapter.
ESCP2 and FX Menu items
If you are not able to use your software program to change
printer settings when using ESC/P 2 or FX emulation, use the
SelecType ESCP2 MENU and FX MENU. See Chapter 4 for
details on using SelecType. Normally, however, you should
use your software to change printer settings.
Except where otherwise noted, the same items are available for
either emulation. Be sure to reset the printer after you have
changed any setting; otherwise the new setting will not be
valid.
Using Other Printer Emulations
5-5
Page 88

Font
5-6
Usim
Other Printer Emulations
The Font item specifies the font to use.
Font=
Courier (Default)
Prestige
Orators (ESC/P 2 only)
RomanT (ESC/P 2 only)
SansH
(ESC/P 2 only)
After selecting the desired font, you can also adjust the
character spacing and size of the font with the Pitch and
Condensed items.
Pitch
The Pitch item allows you to select a character pitch of 10,12, or
15 characters per inch (cpi), or choose proportional spacing.
Pitch=
10 cpi (Default)
12
cpi
15
cpi
Prop
Condensed
The Condensed item changes the character spacing. Condensed
printing is useful for spreadsheets and other applications
where you need to fit a large amount of information on each
line. Fifteen cpi cannot be condensed.
Condensed=
OFF (Default)
ON
Page 89

The
T.Margin
item specifies the distance from the top of the
sheet to the baseline of the first printable line. This is measured
in 0.05-inch increments.
T.Margin=
0.40-0.50 (Default) -1.50 (inch)
Text
The Text item sets the page length. The unit of measure for this
option is l/6 inch. The default is 62 (line spacing is 6 lines per
inch).
Text
1 - 62 LINES (Default) - available
If you change the ORIENTATION, PAGE SIZE, or TMARGIN
settings with
SelecType, the page length setting automatically
returns to the default setting for each paper size.
CGTable
The CG (character generator) Table item selects the graphics
character table or the italics table. The graphics table contains
graphic characters for printing lines, comers, and shaded areas;
international characters; Greek characters; and mathematical
symbols. Selecting the italics table defines the upper half of the
character table as italic characters.
CGTabie
PcUSA (Dofault)
ITALIC
PcYultlllng
PcP0rtugu.r
PcCanFnnch
PcNorway
PoTurklrh2
PcEa~lEurop
BrBRASCll
BrAblcomp
Usiq
Other Printer Emulations
5-7
Page 90

Country
Use the Country item to select one of the fifteen international
symbol sets.
Country=
USA (Default)
Franc0
Germany
UK
Denmark
Swodrn
Italy
Spalnl
Japan
Norway
Denmark2
SpaIn
LatlnAmrrlc
Korea (ESCPZ only)
Legal
(ESCPI
only)
AutoCR
Use the AutoCR (automatic carriage return) item to perform a
carriage-return line-feed (CR-LF) operation whenever the print
position exceeds the right margin. If AutoCR is OFF, the printer
does not print characters beyond the right margin, and it does
not perform a linewrap until it receives a CR. Most software
programs take care of this function.
AutoCR= ON (Default)
OFF
AutoLF
Use the AutoLF (automatic line feed) item to perform an
automatic line feed (LF) command with each carriage return. If
AutoLF is OFF, the printer does not send an automatic line feed
with each carriage return. If your text lines overprint each
other, set AutoLF to ON.
5-8
AutoLF= OFF (Default)
ON
Using
Other Printer Emulations
Page 91

ZeroChar
The ZeroChar item determines whether the printer prints a
slashed zero 0) or an unslashed zero (0). This feature is useful
for clearly distinguishing between an uppercase letter 0 and a
zero when printing documents such as programming lists.
ZeroChar=
0 (Default)
6
BitImage
With BitImage set to Dark or Light, your printer can correctly
emulate the graphics densities set with the printer commands.
When you select Dark, the bit image density is high. When you
select Light, the bit image density is low.
Bitimage=
Dark (Default)
Light
Barcode
The BarCode setting converts bitmaps to bar codes by
automatically filling in any vertical gaps between dots. This
produces unbroken vertical lines that can be read by a bar code
reader.
Note:
This mode reduces the size of the image being printed and may cause
some distortion when printing bitmap graphics.
Using Other Printer Emulations
5-9
Page 92

Epson GL/2 Emulation
Epson GL/2 emulation features plotter commands that allow
you to use your printer with plotter software programs.
A list of the plotter
commands
that your printer supports is
included later in Appendix B. Unsupported commands are
ignored.
Epson GL/2 emulation is similar to the GL/2 mode included in
LJ4 emulation. The table below shows the differences between
the two emulations.
HP
PCL mode
Paper eject
Reduced printing
Switch
to PCL
(ESC % # A)
Reset (ESC
PJL and WL
Advance Full Page
(PG. Al3
E)
Epron GL/2
Does not exist
Supports PG. AF
commands
SelecType setting
Not supported
Ejects paper and
then initializes
SuDDorted
Supported
bmt.let
Exists as the initial
mode
Supported in PCL
Available in PCL
supported
Ejects paper,
switches to PCL, and
then initializes
Supported
Not supported
I
4
I
Using the SD and AD commands, you can select all the fonts
available in I-P LaserJet 4 emulation.
The two Epson GL/2 emulations
Epson GL/2 emulation has two operational emulations:
LJ4-GL/2 and GL-like.
5-10
Using Other Printer Emulations
Page 93

LJ4-GL/2 emulation
LJ4-GL/2 emulates GL/2 mode of the HP LJ4 emulation. While
in this emulation you can enter GL/2 emulation without
sending the ESC %#B (Enter GL/2 mode) command. If your
software cannot send the ESC %#B command, use this
emulation.
If your software supports a LaserJet 4 printer, you do not need
to use this emulation.
GL-like emulation
GL-like emulates some of the HP-GL plotter commands. It
features all of the co
mmands of the LJ4-GL2 mode, plus two
additional commands.
The table below shows the differences of the two GL/2
emulations.
Usin,q
Other Printer Emulations
5-11
Page 94

Operating in GL/2 emulation
When changing to GL/2 emulation from LJ4 emulation, check
that the SelecType settings are correct for GL/2 emulation.
Some settings, such as PAGE SIZE, ORIENTATION, and STD
TRAY, might have to be changed, depending on your
document. Check also that the printer settings specific to GL/2
emulation, which are located on the GL2 MENU, are set
correctly. Plotter-specific settings, such as PEN, JOIN, and
END, are described in this chapter.
For all other SelecType settings, see Chapter 4. Be aware,
however, that the descriptions in Chapter 4 assume you are in
LJ4 emulation. In some cases, the SelecType setting might
function differently, depending on the emulation.
Note:
Portrait orientation is
azx&ble
only in LI4-GLR emulation.
GL2 MENU items
If you are not able to use your software to control parameters
such as the number of pens, pen width, and plot origin, you
can use the SelecType
CL2
MEND.
Be sure to reset the printer after you have changed any setting,
otherwise the new setting will not be valid. See Chapter 4 for
details on using SelecType.
GLMODE
The GLMODE item selects the LJ4-GL2 or GL-like mode.
GLYODE= LJ4-GL2 (Default)
GL-LIKE
5-12
Using
Other Printer
EmuWions
Page 95

SCALE
The SCALE item determines the reduction scale for reduced
printing. You can print the data originally created for the paper
size of the SCALE setting onto the paper size selected in the
PAGE SIZE setting.
SCALE=
The ORIGIN item sets the origin for the plotter-unit coordinate
system. The origin can be set either to the lower left comer
(CORNER) or to the center of the hard-clip limit (CENTER).
ORIGIN= CORNER (Default)
OFF (Default)
A0
A1
A2
A3
CENTER
PEN
The PEN item selects the default pen from the seven available
pens.
PEN=
Pens 2-6 are available only for GL-like mode. If you change the
mode from GL-like to LJ4-GL/2, pen 1 is automatically
reselected as the default.
0 (Default) - 6
Using
Other Printer Emulations
5-13
Page 96

END
5-14
Usinp
Other Printer Emulations
The END item determines the type of line ending.
END=
BUTT (Default)
SQUARE
TRIANGULAR
ROUND
BUTT
SQUARE
TRIANGULAR
ROUND
The JOIN item defines the join shape.
JOIN=
MITERED (Default)
MITEREDBEVELED
TRIANGULAR
ROUND
BEVELED
NONE
MITERED
MITERED BEVELED
TRIANGULAR
ROUND
PENx
The PENx item specifies the pen width for each pen. You can
select the value in the range from 0.05 mm to 5.00 mm in
increments of 0.05 mm.
PENx=
.05 - .35 (Default) - 5.00
BEVELED
Page 97

Chapter 6
Troubleshooting and Maintenance
Resetting and Initializing the Printer
Resetting the printer
Initializing the printer
General Problems
Print Quality Problems
Option Problems
Status and Error Messages
Data Dump Mode
Optimizing Print Quality
Adjusting the RITech setting
Adjusting print density
Cleaning the Printer
Cleaning the inside of the printer
Removing spilled toner
Cleaning the printer case
..........................
...........................
......................
......................
.......................
.....................
..........................
......................
.....................
.........................
.....................
....................
...............
..................
...............
6-2
6-2
6-3
6-3
6-7
6-12
6-14
6-20
6-21
6-21
6-23
6-24
6-25
6-26
6-26
Troubleshooting and Maintenance
6-1
Page 98

Resetting and Initializing the Printer
6-2
In many cases, you can eliminate a problem by resetting or
initialking
Resetting the printer clears the printer memory without
affecting SelecType settings. Normally you reset the printer for
a problem related to a single print job.
Initialking the printer clears the memory and also returns all
SelecType settings to their factory default settings. Normally
you initialize the printer when the printer settings are not what
you want.
Resetting the printer
When you reset the printer, you clear the printer’s memory.
The print job currently loaded in memory is erased and the
printer is ready to accept another print job. SelecType settings
and downloaded fonts are not affected.
You might want to reset the printer if you suspect the print job
itself is bad and the printer cannot print it.
the printer.
To reset the printer for the currently active interface, hold
down the Alt button while you press
the active interface by turning off the printer for ten seconds,
and then turning it back on; however, all downloaded fonts
will be erased.
To reset all interfaces, hold down both the
buttons until the message RESET ALL appears on the display.
Troubleshooting and Maintenance
R-t.
You
can also reset
Alt
and
Reset
Page 99

Initializing the printer
When you initialize the printer, you clear the printer’s memory
and you reset all printer settings to the factory defaults. Any
downloaded fonts or SelecType settings that were changed
from the defaults are lost.
You might want to initialize the printer in the following cases:
LI
You have changed the SelecType settings, but you now
want to change everything back to the factory settings.
P
Another user has changed printer settings, but you prefer
to use the factory settings.
To initialize the printer:
1.
Press the
Menu
button until you reach the CONFIG MENU.
2. Press the
3.
Press
to the factory default settings.
4.
Press the
appears, press the
Item
button until you reach SelecType INIT.
the Enter
button. This resets the SelecType settings back
On Line
button. If the RESET TO SAVE message
Reset
button while holding down
Alt.
General Problems
Preventing paper feed and paper jam problems
If you have frequent paper feed or paper jam problems, use
this checklist of corrective measures:
P
Use a higher-quality paper that is not too thin or rough.
Some types of paper require single-sheet feeding. See
Chapter 2, “Paper Handling.”
Troubleshooting and
Maintenance
6-3
Page 100

0
Fan the stack of paper and then tap it on the edge to align it
before you load it.
P
Be sure that you do not load too much paper in the tray.
P
Be sure to adjust the paper guides so that the paper can
slide in and out freely.
P
Never let more than 100 sheets accumulate in the standard
facedown output tray on top of the printer.
0
Try turning over the stack of paper in the tray. Most paper
packages indicate which side should be face up.
Display panel stays blank when you turn printer on
Turn off the printer and check the power cable connections
between the printer and the electrical outlet; then turn the
printer back on.
If the electrical outlet is controlled by an outside source such as
a wall switch, make sure the switch is turned on or plug
another electrical device into the outlet to check whether the
outlet is operating properly.
The
On Line
Your computer may not be properly
light is on but nothing prints
connected
to the printer.
Perform the procedure “Testing the computer-to-printer
connection” in the Read 7%
First
guide.
The interface cable may not be plugged in securely. Check both
ends of the cable between the printer and the computer. If you
are using a parallel interface, secure the connector using the
wire retaining clips.
6-4
Trauble~hootin~
and Maintenance
 Loading...