

Page 1
Operation Guide
Page 2

EasyMP Operation Guide
Contents
Projecting Computer Images via a Network
(Network Screen)
Using the Toolbar............................................................3
Names and Functions of Each Icon..................................................... 3
Presentation Mode............................................................................... 4
Interrupt Disabled................................................................................ 5
E-Zoom................................................................................................ 6
Basic Settings ...................................................................................... 6
If No Connected Projectors Appear ................................8
Connecting by Specifying an IP Address............................................ 8
Creating Connection Groups............................................................. 11
Security Countermeasures for Wireless LAN ...............18
Using Encrypted Transmissions in Easy Connect Mode .................. 19
Preventing Unauthorised Access in Easy Connect Mode
(NS Protect)..................................................................................... 20
Setting the Encryption and Authentication Methods for
Wireless LAN Access Point Mode.................................................. 21
Disabling Automatic ESSID Search ................................................. 27
1
Showing the Presentation (Using the CardPlayer)
Files that Can be Projected by the CardPlayer ............ 45
Using CardPlayer ......................................................... 46
Starting CardPlayer ...........................................................................46
Closing CardPlayer............................................................................ 47
CardPlayer Basic Operation ..............................................................48
Projecting Scenarios..................................................... 52
Playing a Scenario .............................................................................52
Operation During a Presentation .......................................................53
Selecting and Projecting Slides from a Scenario............................... 53
Editing a Scenario.............................................................................. 54
Projecting Image and Movie Files ................................ 56
Projecting Image and Movie Files..................................................... 56
Projecting All Image and Movie Files in a Folder In Sequence
(Slideshow)......................................................................................57
Setting Image and Movie Files Display
Conditions and Operation Mode ................................. 59
Preparing a Presentation (Using EMP SlideMaker2)
Procedures for Making a Presentation without a
Computer.....................................................................29
Files that Can be Included in Scenarios .......................30
Creating a Scenario ......................................................31
Setting Scenario Properties ............................................................... 31
Including PowerPoint Files into Scenarios ....................................... 33
Including Image and Movie Files into Scenarios.............................. 35
Editing a Scenario ............................................................................. 37
Sending a Scenario.......................................................38
What Do You Do When ................................................40
Create a Scenario Easily.................................................................... 40
Checking the Scenario Projection Status at the Computer................ 41
Making Animation Settings .............................................................. 42
Using a Computer to Set Up, Monitor and
Control Projectors
Changing Settings Using a Web Browser (EasyWeb).. 62
Displaying EasyWeb .........................................................................62
Projector Setup ..................................................................................63
Projector Control ...............................................................................64
Using the Mail Notification Function to
Report Problems ......................................................... 65
Setting Mail Notification Function.................................................... 65
If a Problem Notification is Sent by Mail .........................................67
Management Using SNMP ........................................... 68
Page 3

Projecting Computer Images via a Network (Network Screen)
This chapter explains what to do if a projector that you would like to connect to cannot be found when using Network Screen, and
also explains wireless LAN security measures.
Using the Toolbar ................................................... 3
• Names and Functions of Each Icon............................... 3
• Presentation Mode ........................................................4
• Changing the image ..............................................................................5
•
Interrupt Disabled .......................................................... 5
• E-Zoom.......................................................................... 6
• Basic Settings................................................................ 6
If No Connected Projectors Appear ........................ 8
• Connecting by Specifying an IP Address ...................... 8
• Creating Connection Groups ....................................... 11
• Creating a Group .................................................................................11
• Connecting Using a Group..................................................................14
• Exporting Groups ................................................................................16
• Importing Groups ................................................................................17
Security Countermeasures for Wireless LAN........18
• Using Encrypted Transmissions in
Easy Connect Mode .................................................... 19
• Preventing Unauthorised Access in
Easy Connect Mode (NS Protect) ............................... 20
• Setting the Encryption and Authentication Methods for
Wireless LAN Access Point Mode.............................. 21
• Disabling Automatic ESSID Search ............................ 27
Page 4
EasyMP Operation Guide
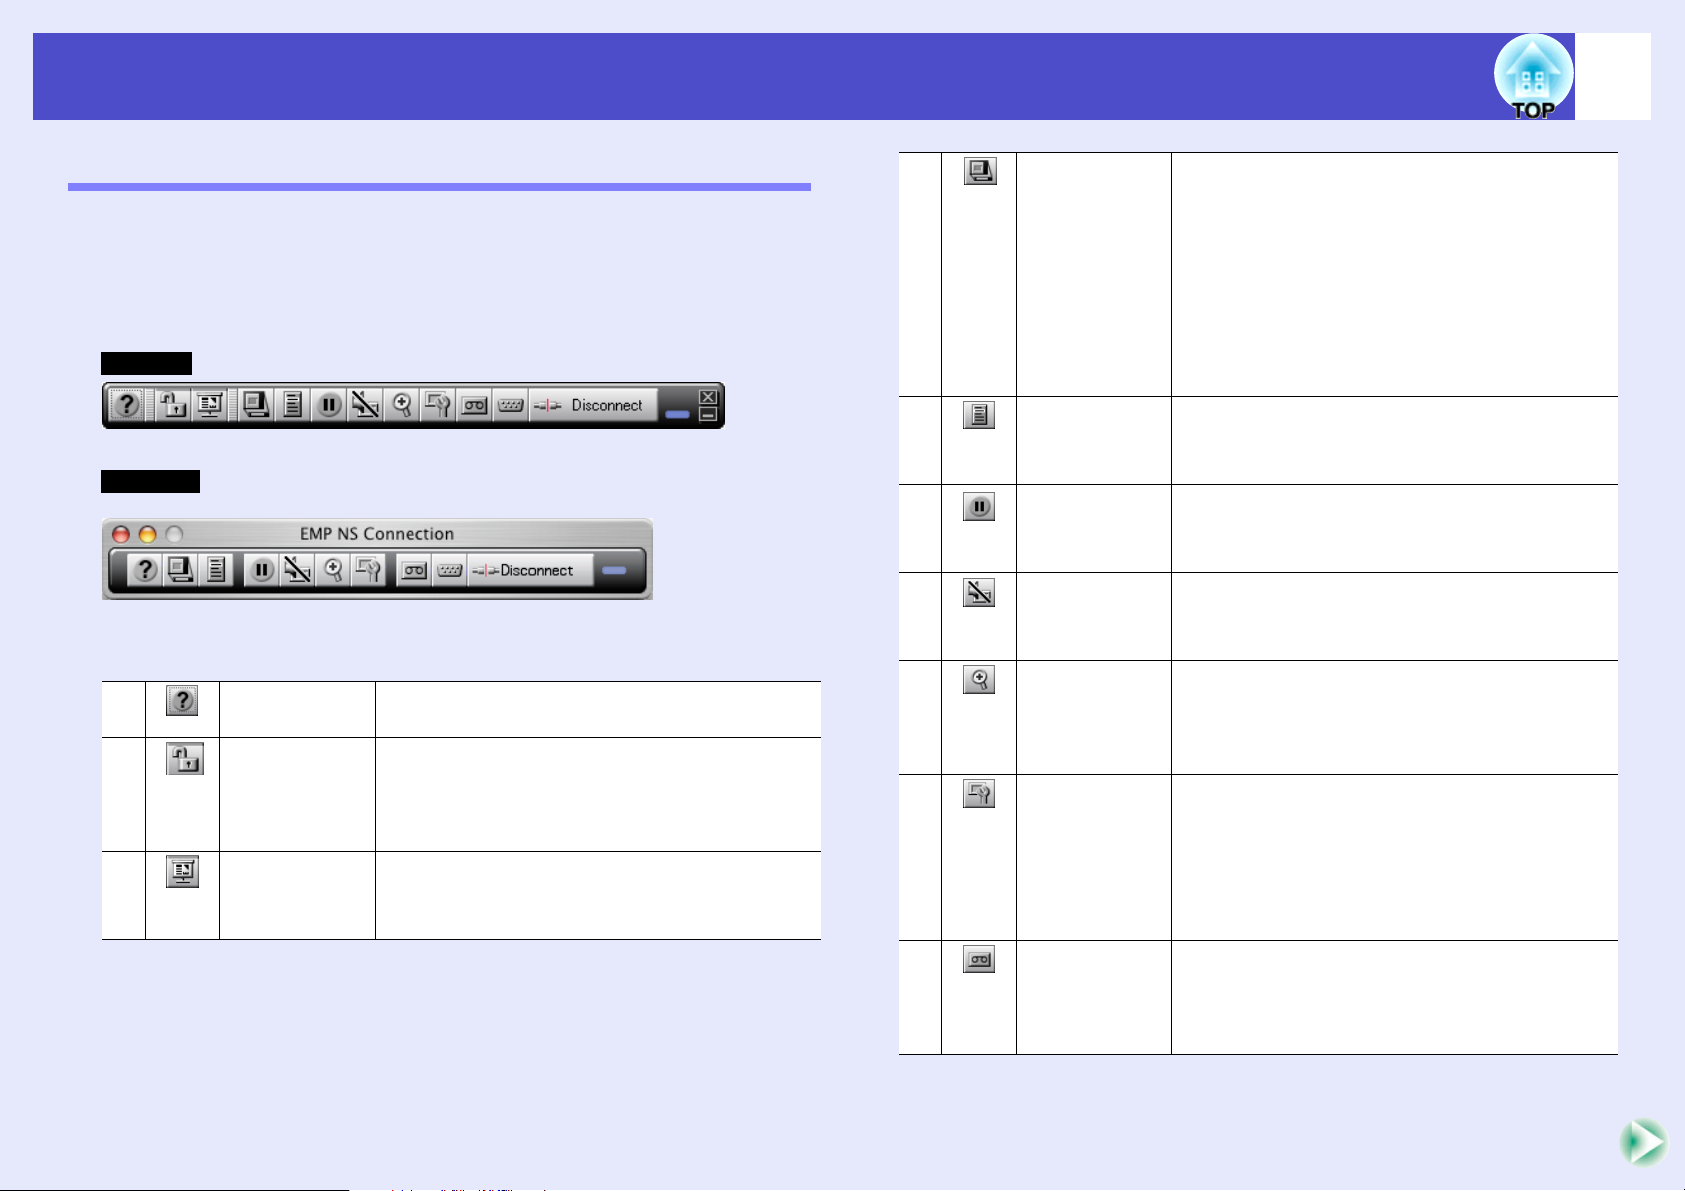
Using the Toolbar
Names and Functions of Each Icon
When the computer and the projector are connected to the network, the
following toolbar appears on the computer screen. Unless otherwise
indicated, the following descriptions show screens for Windows. A similar
screen appears on Macintosh computers.
Windows
(1) (2)
Macintosh
(14)(15)
(1) (4)
(5) (7) (8) (10)(9) (11) (12) (13)(6)
(12)(3) (5) (6) (8)(7) (9) (10)(4) (11)
The operation of each icon is described below.
(1) Help Displays EMP NS Connection help.
(2) Interrupt
Disabled (for
Windows)
(3) Presentation
mode (for
Windows)
Prevents interruptive connections to projectors
that are connected to the network. Interruption
prevention turns on and off each time you click
this icon.
Causes projectors to project only PowerPoint
slideshows. Presentation mode turns on and off each
time you click this icon.
sp.5
s
p.4
(14)
(13) (15)
(4) Connection
status screen
(5) Projector
operation
URL display
(6) Freeze Operates in the same way as the [Freeze]
(7) A/V Mute Operates in the same way as the [A/V Mute]
(8) E-Zoom Operates in the same way as the E-Zoom
(9) Basic settings This displays a setting window where you can
You can display or hide the connection status
window each time you click this icon. When the
connection status window is displayed, icons
with the names of the projectors that are
currently connected are displayed in green. The
connection status window cannot be used for
operations such as changing the connection
status of a projector or connecting new
projectors.
Shows EasyWeb.
sp.62
function of the projector
.
s"Freeze Function" in the User's Guide
function of the projector.
Function" in the User's Guide.
function of the projector. A setting window is
displayed so that you can enlarge the areas you
want to see.
change settings for items such as brightness,
contrast and colour mode.
Operates in the same way as the corresponding
items in the projector's "Image" configuration
menu.
sp.6
s "Image" in the User's Guide
s"A/V Mute
sp.6
3
(10) Switch video
source
This operates in the same way as the [Video/SVideo] button on the projector's control panel.
s"Turning the Power On and Projecting
Images" in the User's Guide
Page 5
EasyMP Operation Guide
Using the Toolbar
(11) Switch PC
source
This operates in the same way as the [Computer/
Component] button on the projector's control
panel.
s"Turning the Power On and Projecting
Images" in the User's Guide
(12) Disconnect This disconnects the projector that is currently
being communicated with from the network.
(13) Connection
status
indicators
(14) Exit This disconnects the projector that is currently
(15) Minimise Minimises the toolbar and (if using Windows)
When a projector is connected to the computer
via the network, the top, middle and bottom
indicators flash alternately. If the projector
cannot be connected correctly, the indicators turn
off.
being communicated with from the network and
then exits EMP NS Connection.
displays the icons within the windows taskbar. If
using a Macintosh, the toolbar is stored in the
Dock.
4
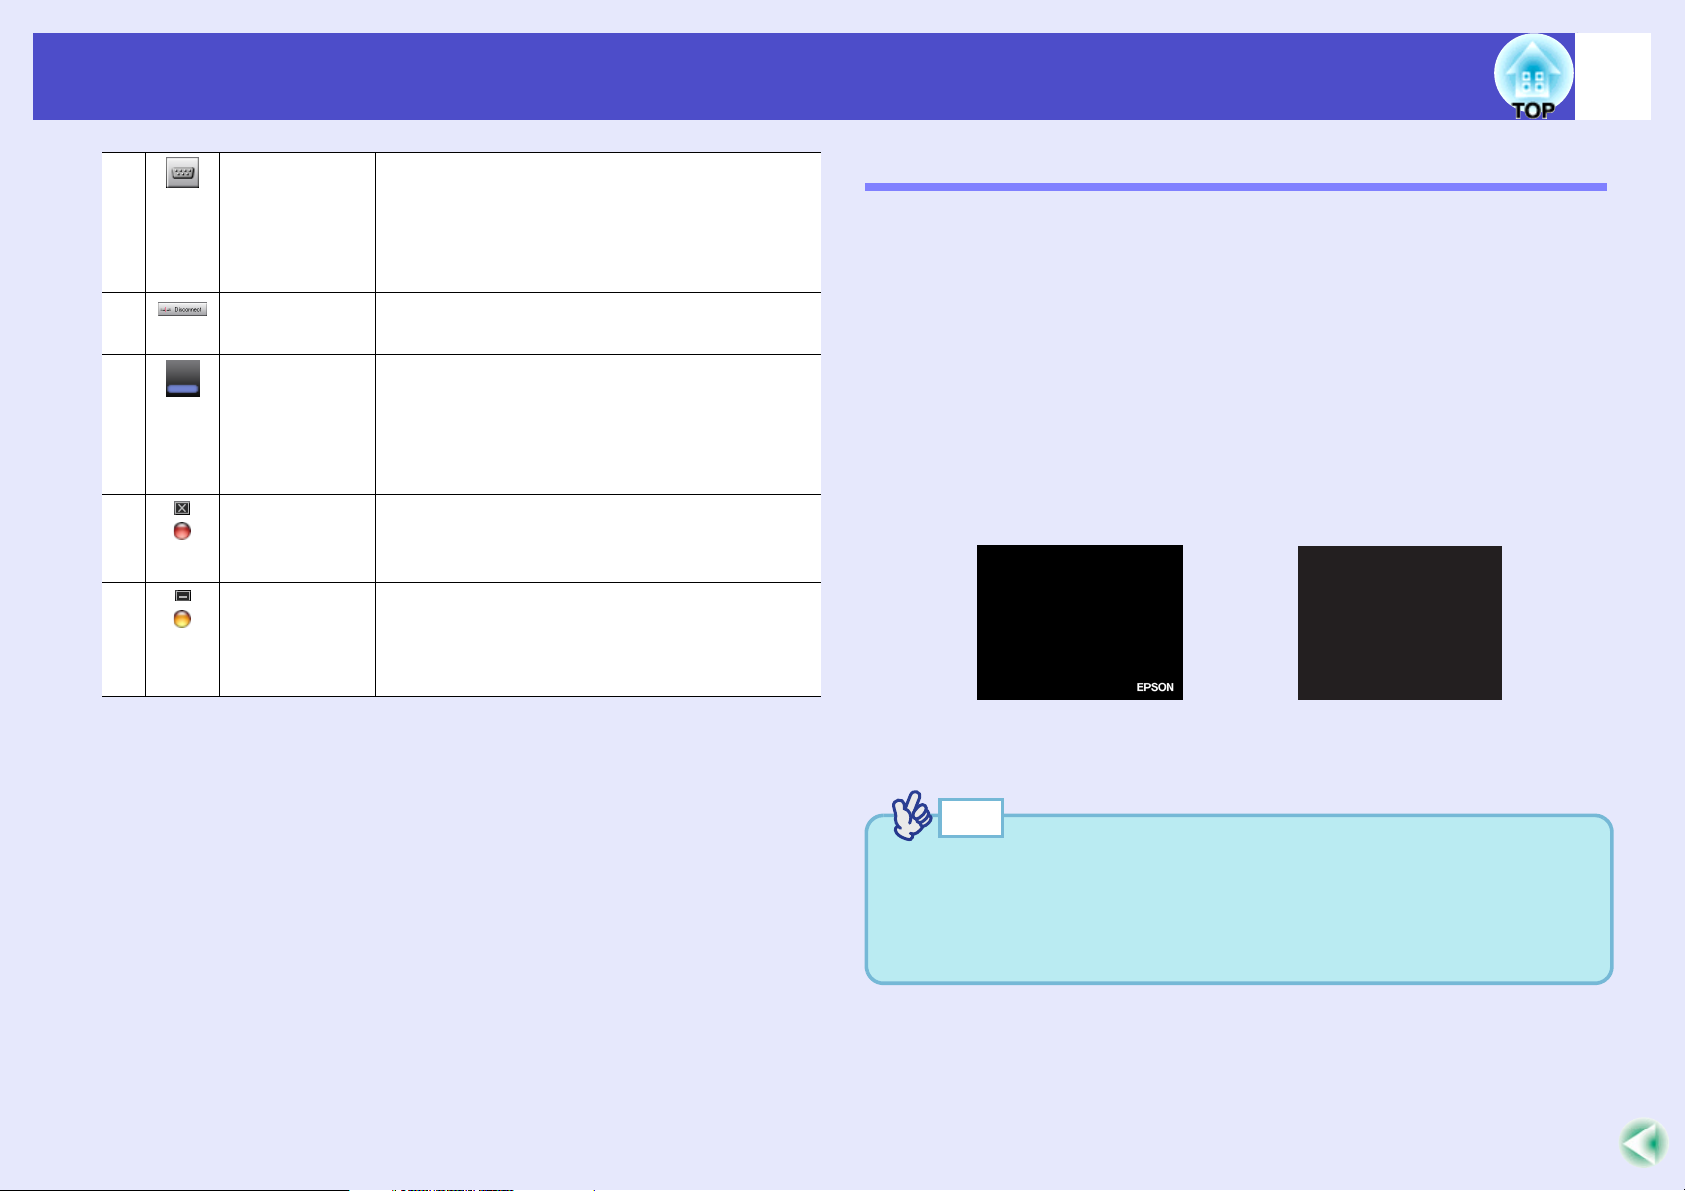
Presentation Mode
When "Presentation Mode" is set to "ON", the only images that are sent to
the projector when running a PowerPoint slideshow are the images from
the slideshow itself. Images that are not part of the slideshow are not
projected by the projector, so that the presentation can be given without
showing the viewers things like file selection operations that are carried out
before the slideshow is run.
The "Image.jpg" file that has been preset for the projector will be projected
whenever there is no slideshow being run (lower-left image). This image
can be changed to your own preferred image. If no "Image.jpg" file exists,
a black screen will be projected (lower-right image).
Black screenImage.jpg
TIP
• Presentation mode can be set to "ON" or "OFF" before the
projector is connected and while the projector is connected.
• Presentation mode is automatically set to "OFF" when EMP NS
Connection is exited.
Page 6
EasyMP Operation Guide
Using the Toolbar
f Changing the image
You can change the "Image.jpg" file to your own preferred image by the
following procedure.
PROCEDURE
The following types of image can be used.
1
File format JPEG (JPEG2000 images cannot be used.)
Max. size (Width x height) 1600 x 1200 pixels
Filename Image.jpg (Must be this filename)
Save the preferred image in the Image sub-folder of
2
the folder that EMP NS Connection has been installed
in.
Example of saving destination:
5
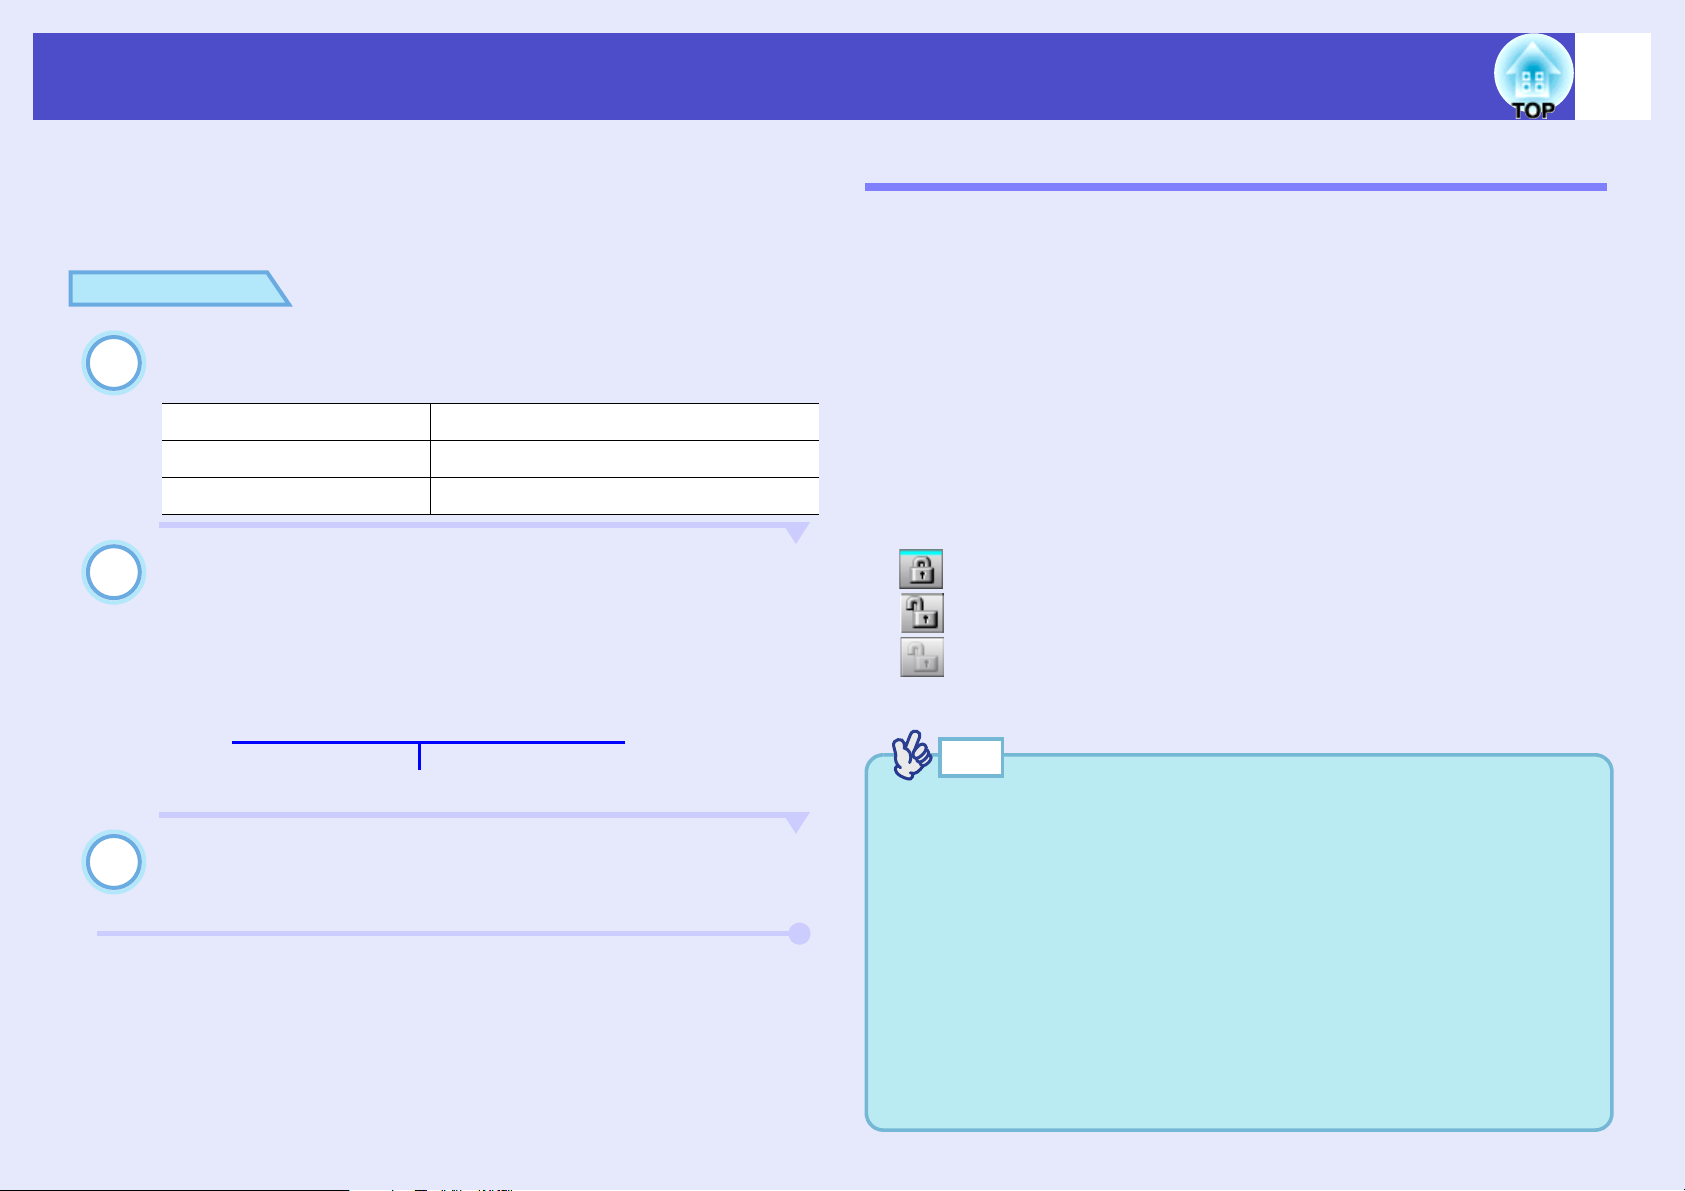
Interrupt Disabled
When the interruption prevention function is set to "ON" at a computer that
has projectors connected to it, it will no longer be possible to connect to
those projectors using other computers. If more than one projector is
connected to the computer, the interruption prevention function will be
applied to all of the connected projectors.
Other computers will be able to connect to the projectors as soon as the
interruption prevention function setting is changed to "OFF".
The interruption prevention function is enabled in automatic ESSID search
mode. The interruption prevention function is disabled during IP connect
mode.
:When the interruption prevention function is ON
:When the interruption prevention function is OFF
:When in IP connect mode (interruption prevention function is
disabled)
C:\Program files\EPSON\NSConnection\Image
Installation folder (default)
When EMP NS Connection is restarted, the new
3
image will be used for projecting.
TIP
•
The interruption prevention function can be set to "ON" or "OFF"
before the projector is connected and while the projector is connected.
•
The interruption prevention function is automatically set to "OFF"
when EMP NS Connection is exited.
•
If the connection between the projector and the computer is
terminated, other computers will then be able to access that projector
even if the interruption prevention function is still set to "ON".
•
If using Windows, the interruption prevention function may be
enabled for the projector being searched for. If this is the case, the
computer being used for the search will have priority in connecting to
the projector when the IP address is specified.
Page 7
EasyMP Operation Guide
Using the Toolbar
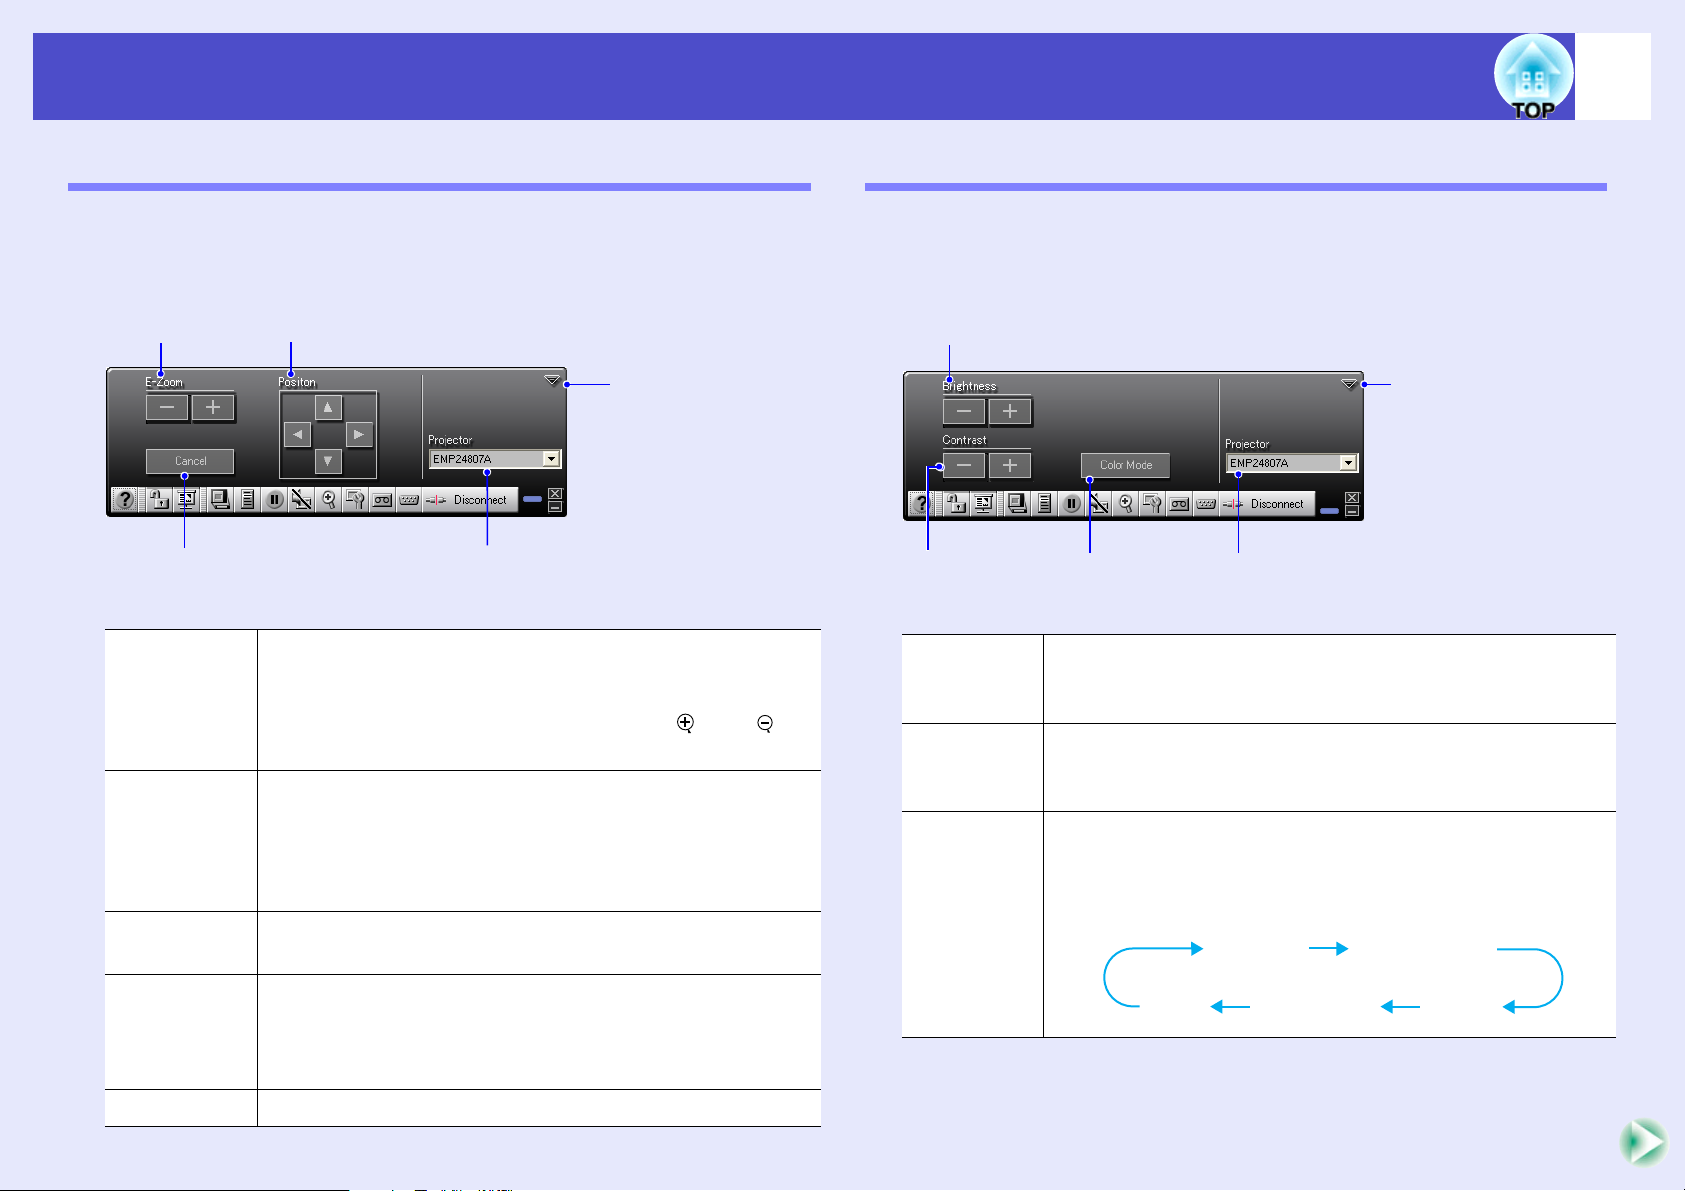
E-Zoom
When you click the "E-Zoom" icon, the following setting window appears,
and you can use this window to adjust settings such as the zoom ratio and
position.
E-Zoom Position
Close
Cancel Target projector
E-Zoom Adjusts the E-Zoom ratio.
[+] button: Enlarges images.
[–] button: Reduces images that have been enlarged.
These buttons operate in the same way as the [ ] and [ ] of
the projector.
Position This specifies an area that is to be enlarged or reduced.
This works in the same way as using the E-Zoom function of
the projector to move the cursor in order to specify the area to
be enlarged or reduced.
Guide
Cancel This cancels E-Zoom and returns the images to their original
size.
s"E-Zoom Function" in the User's
Basic Settings
When you click the "Basic settings" icon, the following setting window
appears so that you can make adjustments to items such as brightness,
contrast and colour mode.
Brightness
Close
Contrast
Brightness This adjusts the brightness of the projected images.
Contrast This adjusts the contrast of the projection area.
Color mode This operates in the same way as the [Color Mode] function of
Color mode
[+] button: Increases brightness.
[–] button: Decreases brightness.
[+] button: Increases the difference between light and dark shades.
[–] button: Decreases the difference between light and dark shades.
the projector.
The setting changes as follows each time the [Color Mode]
button is clicked.
Target projector
Dynamic Presentation
6
Target
projector
Close Closes the "E-Zoom" window.
This shows the name of the projector that is the current target
for operations.
If more than one projector is connected, you can select which
projector is to be the target projector for E-Zoom operations.
TheatreLiving RoomsRGB
Page 8
EasyMP Operation Guide
Using the Toolbar
Target
projector
Close Closes the "Basic settings" window.
This shows the name of the projector that is the current target
for operations. If more than one projector is connected, you can
select which projector is to be the target projector for basic
setting operations.
7
Page 9

EasyMP Operation Guide
If No Connected Projectors Appear
If no connected projectors appear in the projector selection window of EMP
NS Connection, check the following points.
• If using a wireless LAN, are the projectors set up where signals
cannot reach or where signals are weak?
• Has the connection mode been set correctly?
• Is the subnet correct?
If a projector is connected to a network that has a different subnet, you can
connect the projector using IP connect mode. IP connect mode lets you
connect projectors by specifying the projector's IP address
If using easy connect mode under Windows, check the following points.
• Has automatic ESSIDgsearching been disabled? (Windows 2000/XP
only) s"Computer Wireless LAN Settings" in the EasyMP Network
Setup Guide
• Is the computer's wireless LAN driver compatible with NDIS5.1?
(Windows 2000/XP only)
• For the following, is the ESSID (network name) that has been set at
the computer identical to the ESSID at the projector?
· When using Windows98/ME
· When setting the automatic ESSID searching to off
If using a Macintosh, check the following points also.
g.
Connecting by Specifying an IP Address
Use the following procedure to connect a projector using IP connect mode.
In the following procedure section, Window's screens are used to explain
unless otherwise noted. Similar screens will be displayed under Macintosh.
TIP
If using Windows, you can click the " " icon that is displayed in the
EMP NS Connection windows to display descriptions of various
functions.
PROCEDURE
Set the projector to EasyMP standby screen.
1
s"Setting the Projector to Connection Standby Mode" in the
EasyMP Network Setup Guide
Start running EMP NS Connection at the computer.
2
sSteps 1 to 3 in "Starting EMP NS Connection at the Computer"
in the "Connecting the Computer and Projector via the Network"
section of the EasyMP Network Setup Guide
8
• Is the network status correct?
· In easy connect mode, has "AirPort: On" been selected and has the
ESSID for the appropriate projector been selected?
· In access point mode, has "AirPort: On" been selected and has the
appropriate access point been selected?
· In wired LAN mode, has "AirPort: Off" been selected?
s"Starting EMP NS Connection at the Computer" in the EasyMP
Network Setup Guide
Page 10
EasyMP Operation Guide
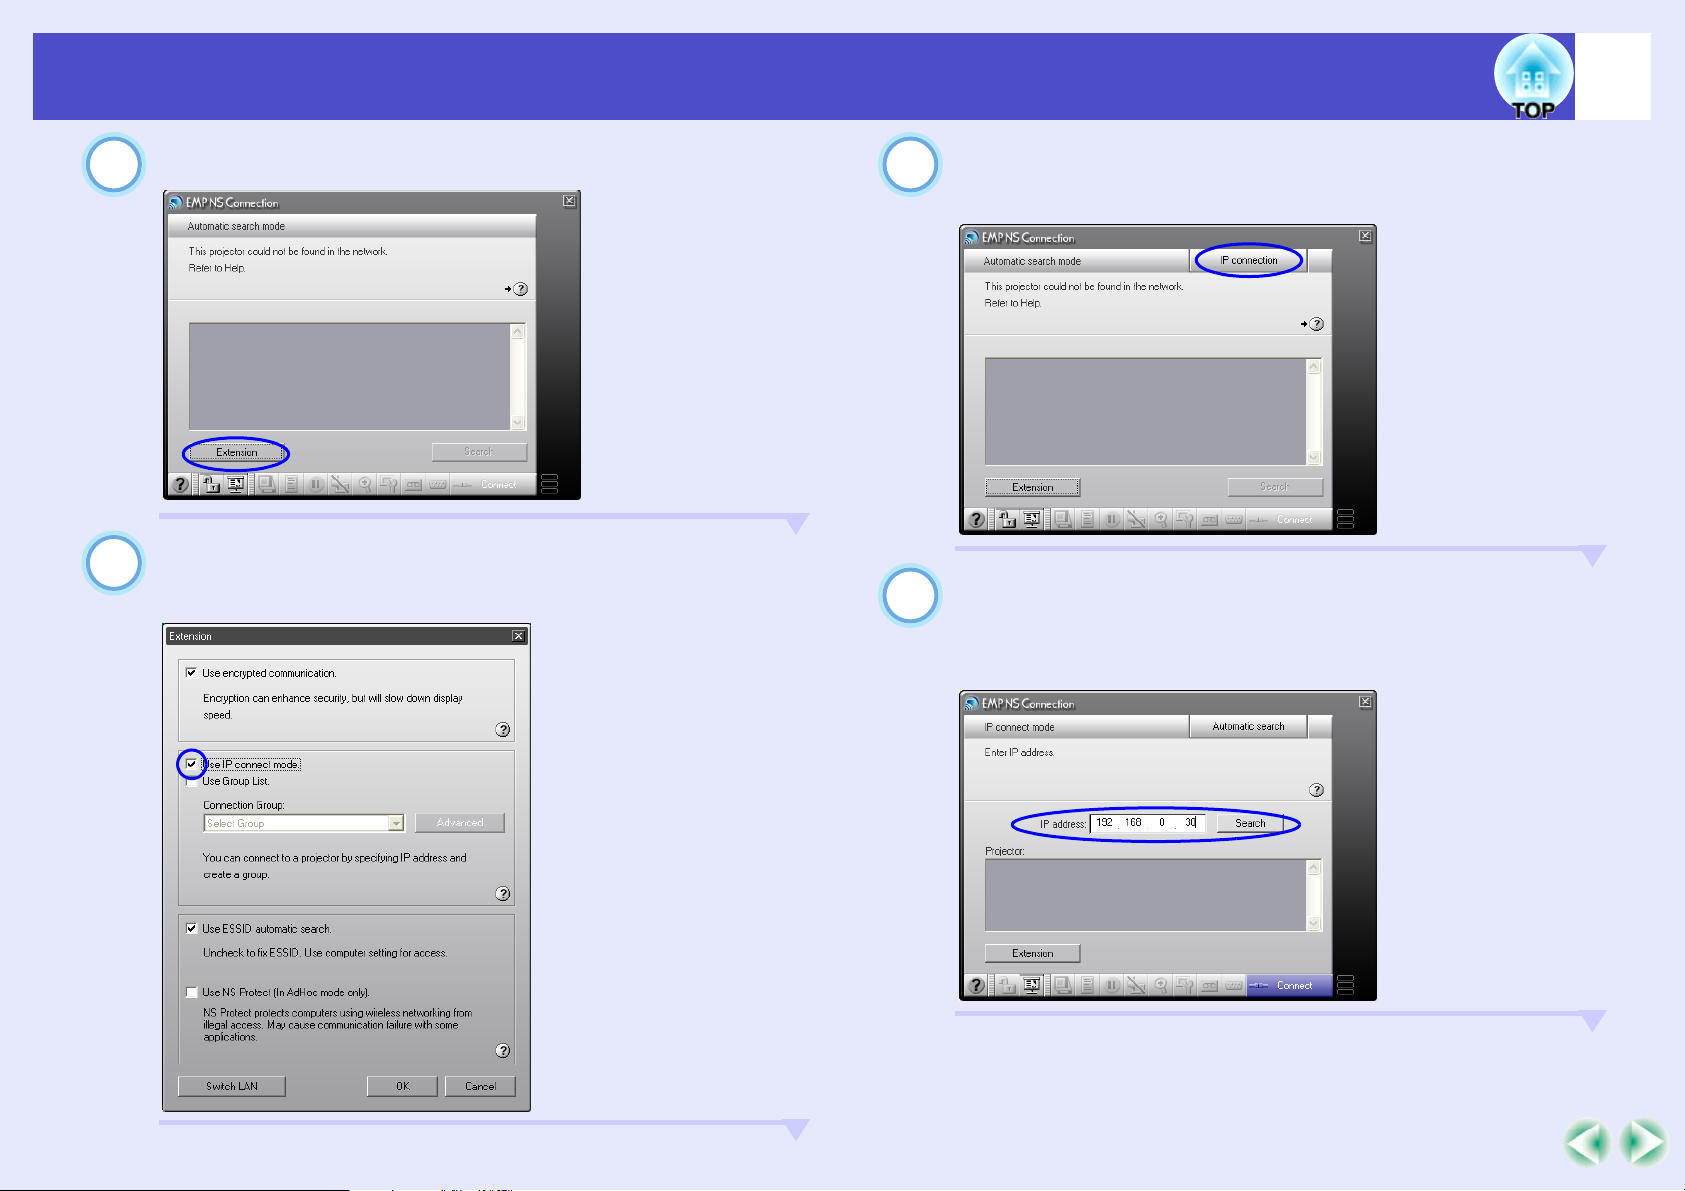
If No Connected Projectors Appear
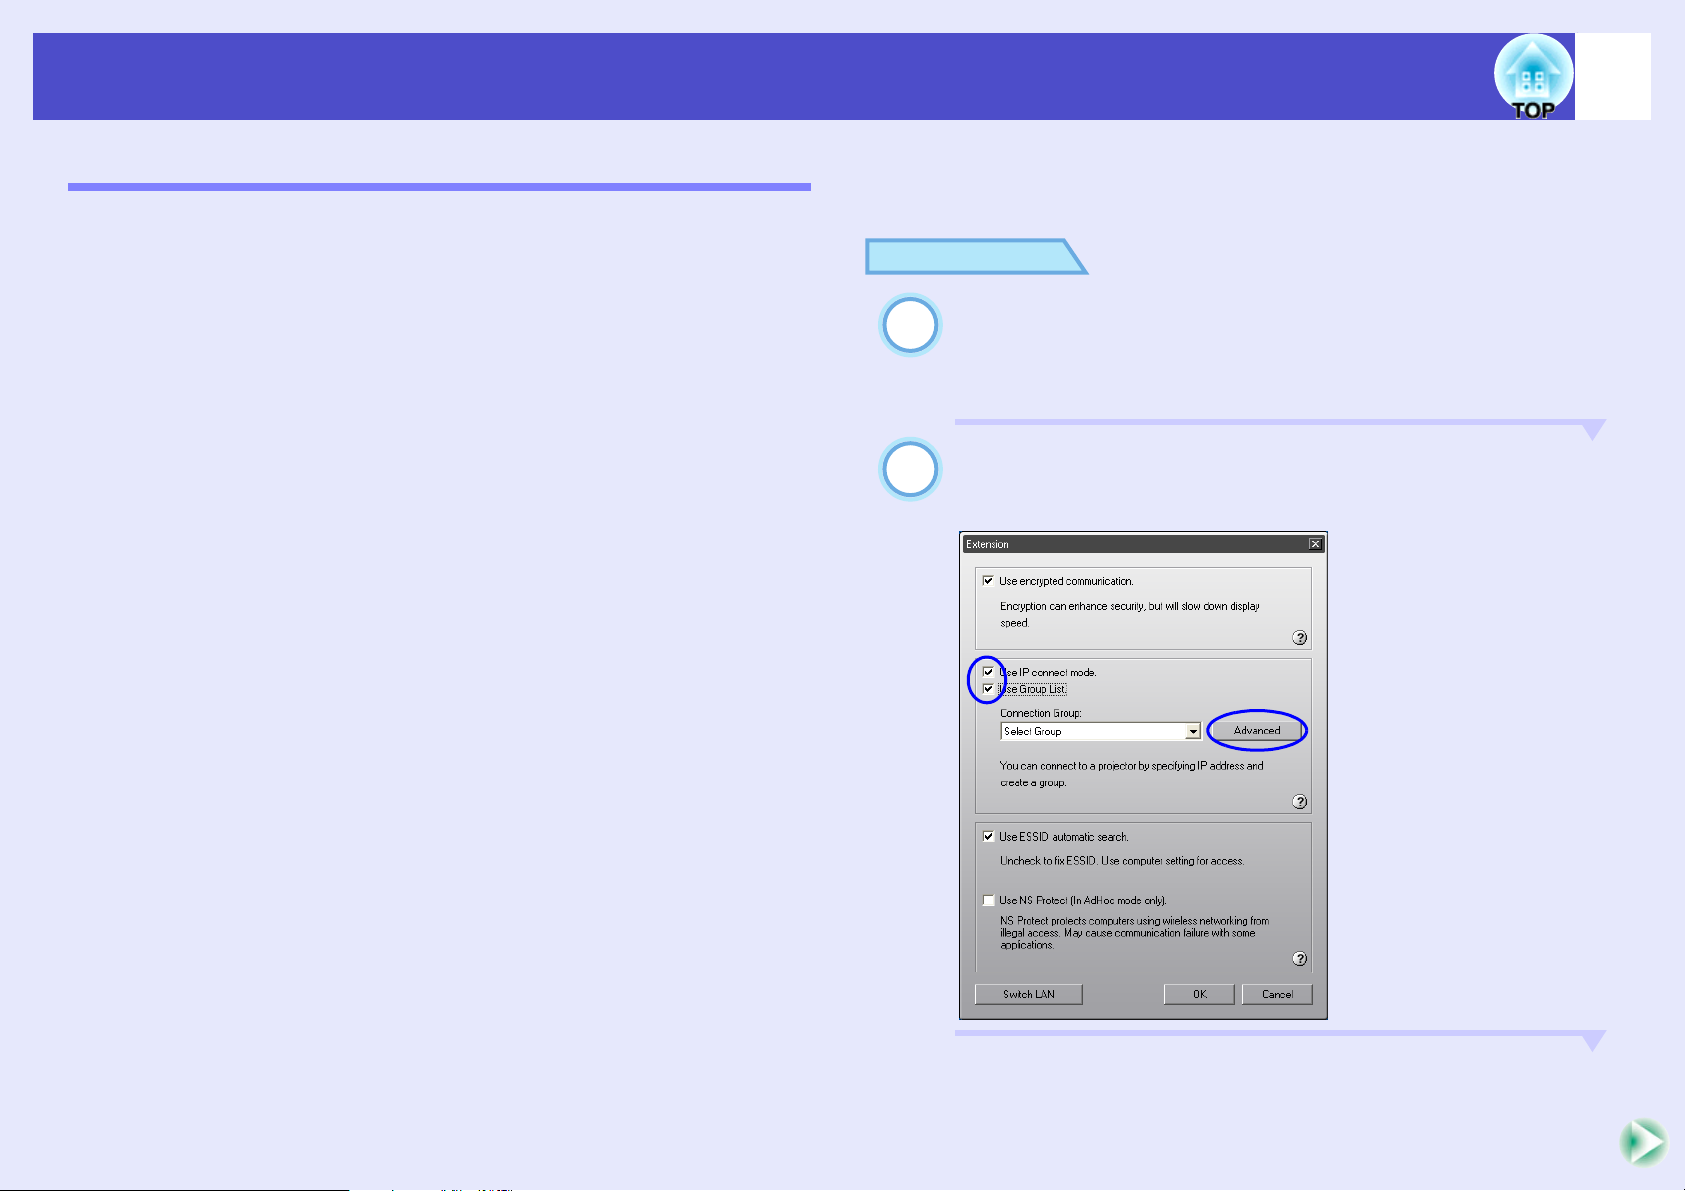
Click the "Extension" button in the following window.
3
Select "Use IP connect mode." and then click the
4
"OK" button.
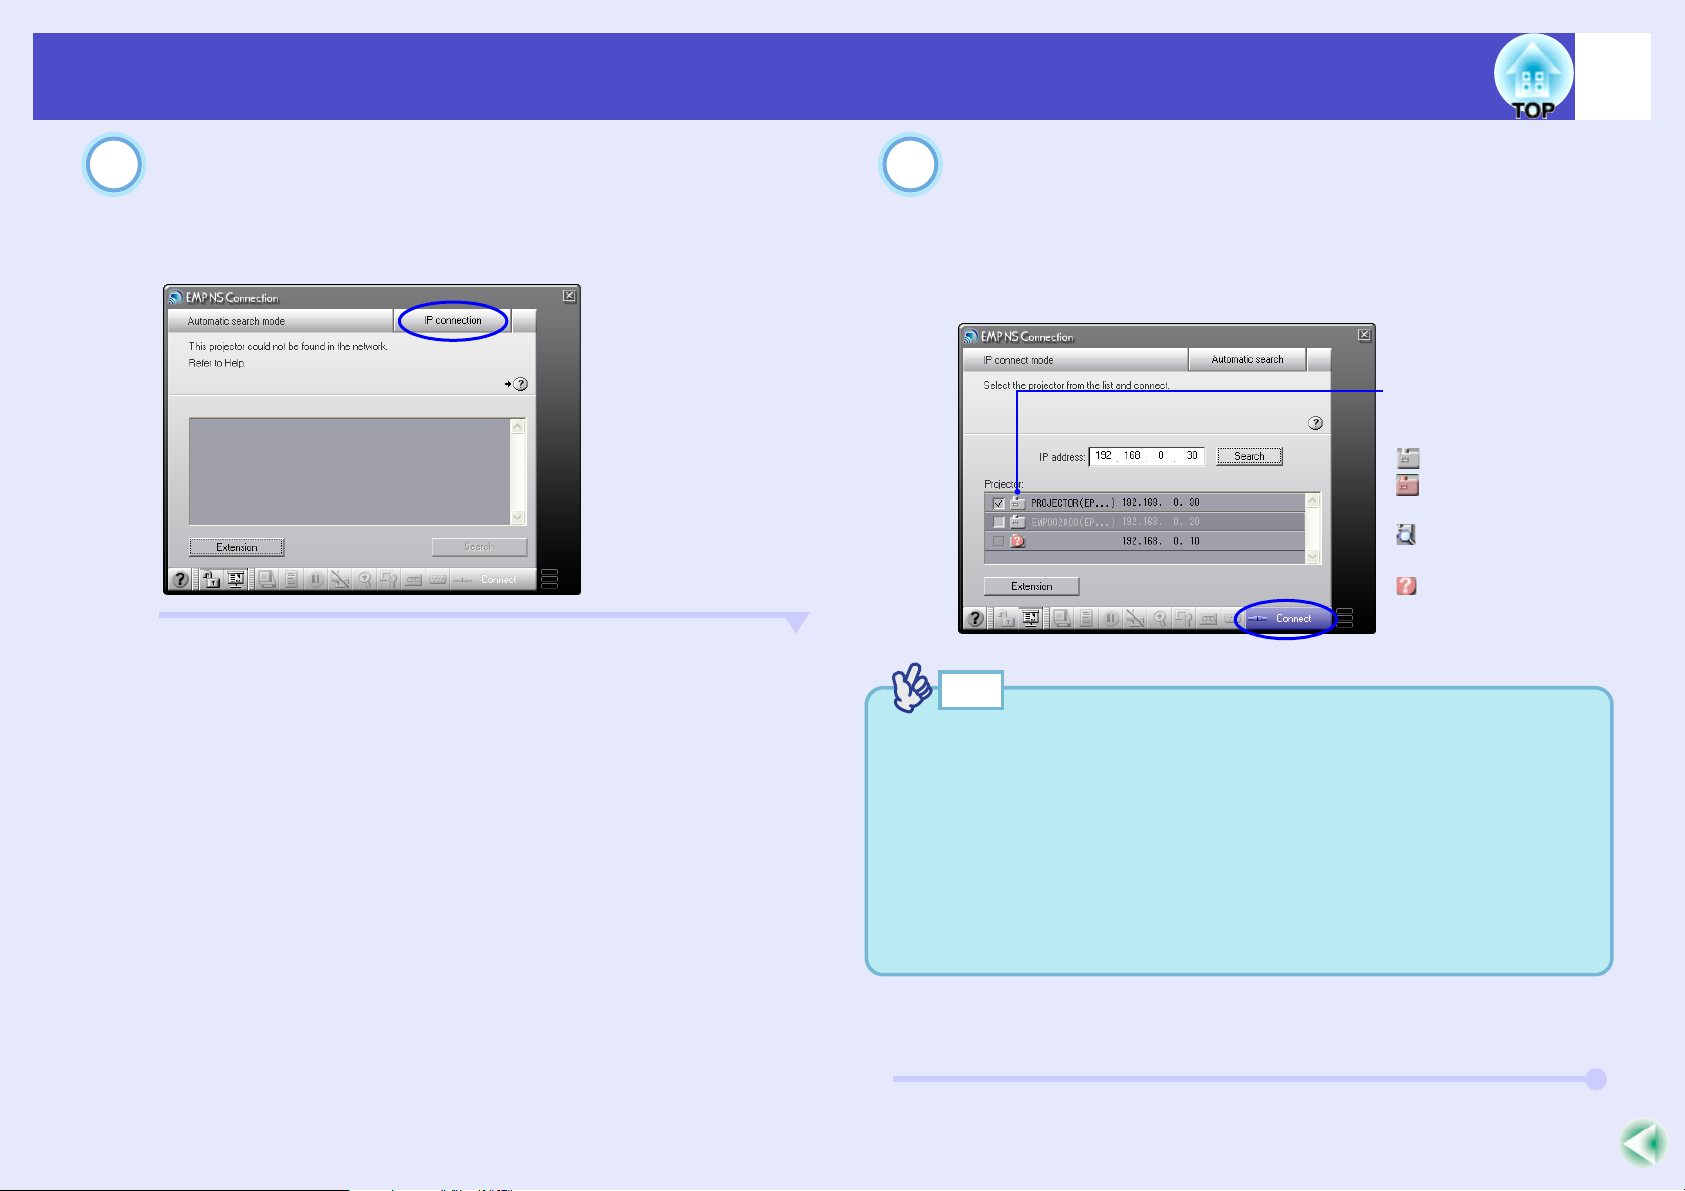
The following window will be displayed. Click "IP
5
connection" in the top-right corner of the window.
Enter the IP address of the projector that you would
6
like to connect to in the "IP address" box, and then
9
click the "Search" button.
Page 11
EasyMP Operation Guide
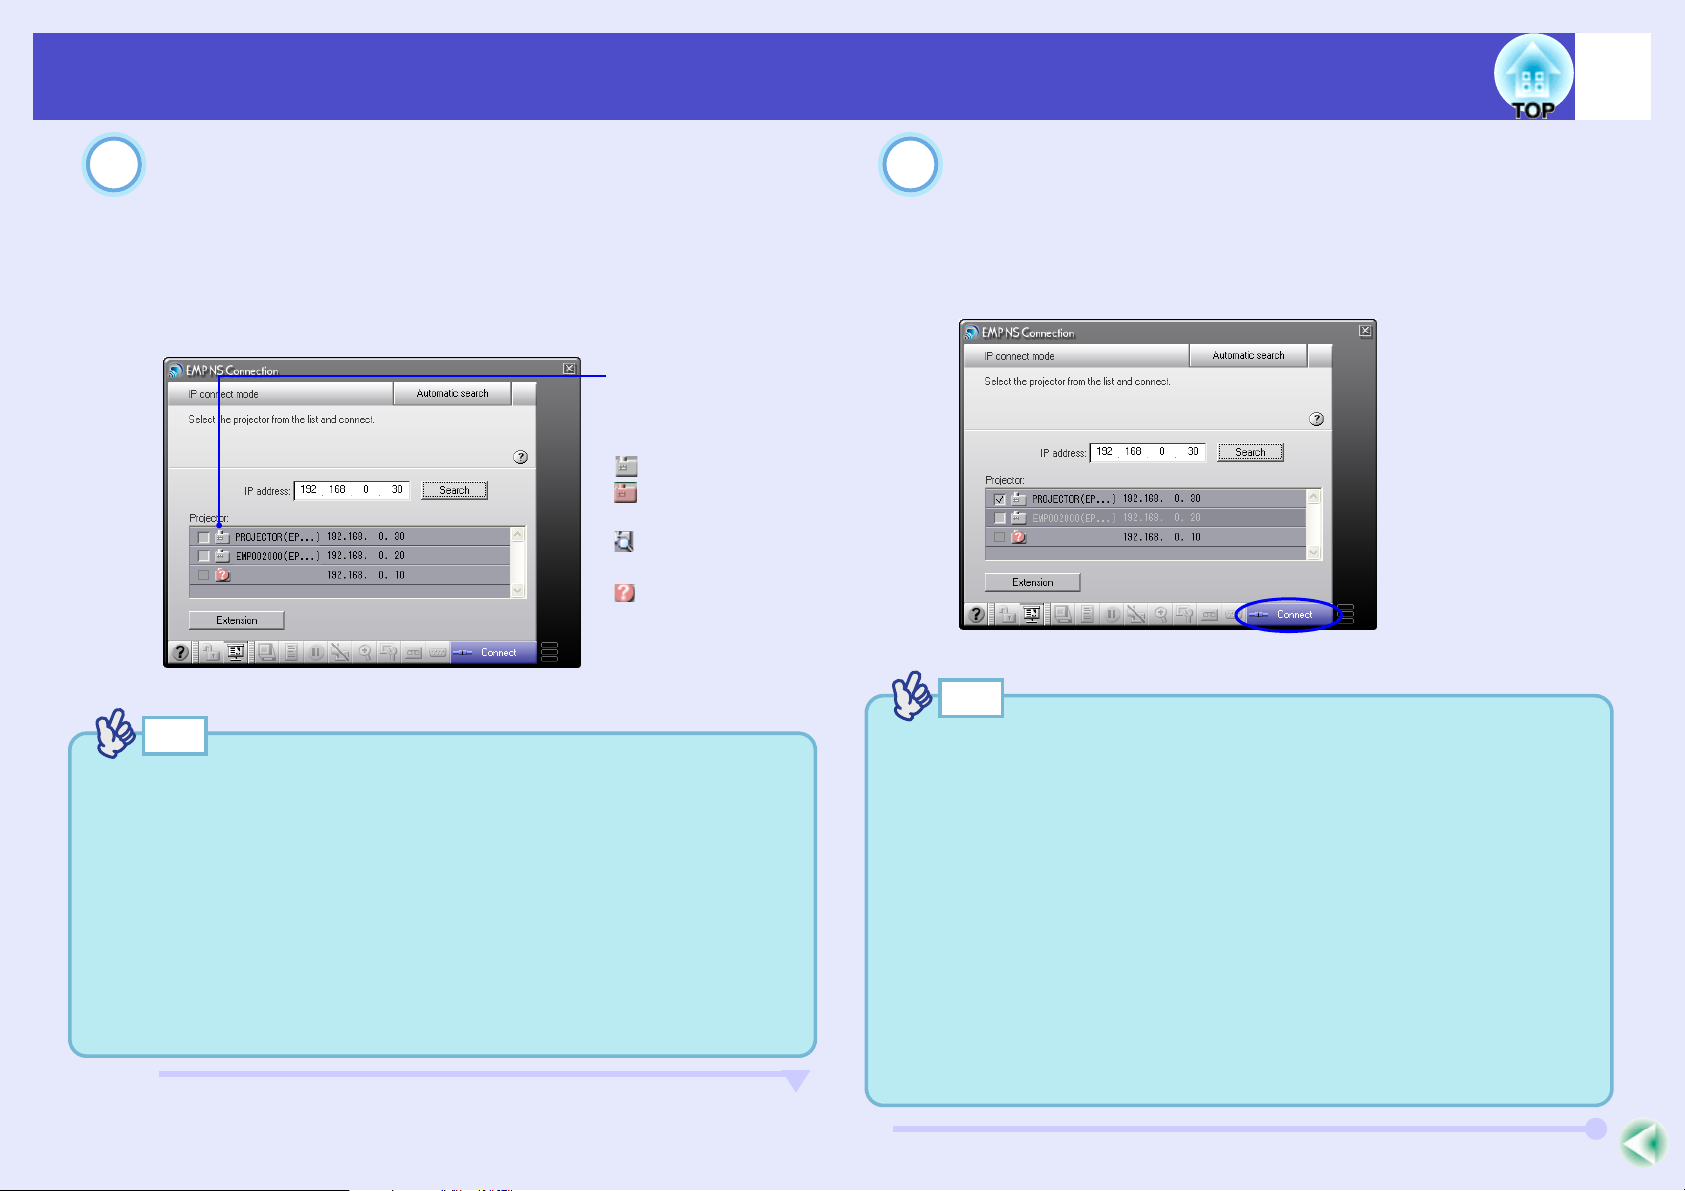
If No Connected Projectors Appear
The IP address will appear in the "Projector" list and
7
an icon will appear beside it to show that searching is
in progress. If the projector is found, the projector
name will be displayed in the "Projector" list. If you
would like to add another projector, repeat step 6.
Projectors that have been registered are added to the "Projector" list.
The connection
statuses are indicated
by the icon colour and
shape as follows.
:Not connected
:Connected to
other computer
:Currently being
searched for
:Specified
projector could
not be found
Click the name of the projector to be connected,
8
select the check box for that projector, and then click
the "Connect" button.
The computer and projector will be connected via the network, and
the computer screen will be projected by the projector.
10
TIP
• Up to a maximum of 16 projectors can be registered. If you try to
add 17 or more projectors, the existing projectors will be deleted
starting from the first projector that was registered. The maximum
number of projectors that can be connected at the same time is four.
• When you exit EMP NS Connection and start it the next time, the
projectors that were added to the "Projector" list will be deleted. If
you would like the same projectors to appear in the list each time
you start EMP NS Connection, create a group and register the
required projectors as part of that group. sp.11
TIP
• If you select a projector that is already connecting to another
computer, the other computer is automatically disconnected and
your computer's image will be projected.
• If using Windows, the interruption prevention function may be
enabled for the projector being searched for. If this is the case, the
computer being used for the search will have priority in connecting
to the projector when the IP address is specified.
• If you select more than one projector, you can project images from
one computer to several projectors. Up to a maximum of four
projectors can be used to project images from a single computer.
• After you have clicked the "Connect" button, you cannot connect
any more projectors.
Page 12
EasyMP Operation Guide
If No Connected Projectors Appear
Creating Connection Groups
You can register projectors that are frequently accessed via the network
into a single group. EMP NS Connection can register up to a maximum of
16 projectors in a single group.
For example, if you have a network where projectors in all branch offices
are connected and you would like to project images from projectors at
branch offices in a specific area, you can register the projectors at all
branch offices in that specific area into a single group. Once a group has
been registered, you can connect to the projectors in the specified area
simply by selecting that particular group, which eliminates the need to
search for projectors and connect them one by one.
Group information can be written (exported) to a file and loaded
(imported) from that file. In this way, a network administrator can create
and export different groups of projectors, and then the other users can
import the groups of projectors that need to be connected to, making it
easier to connect to the required projectors.
f Creating a Group
Use the following procedure to create a group.
PROCEDURE
Carry out steps 1 to 3 in "Connecting by Specifying
1
an IP Address" to display EMP NS Connection
extended function window. sp.8
Select "Use IP connect mode." and "Use Group List."
2
and then click the "Advanced" button.
11
Page 13
EasyMP Operation Guide
If No Connected Projectors Appear
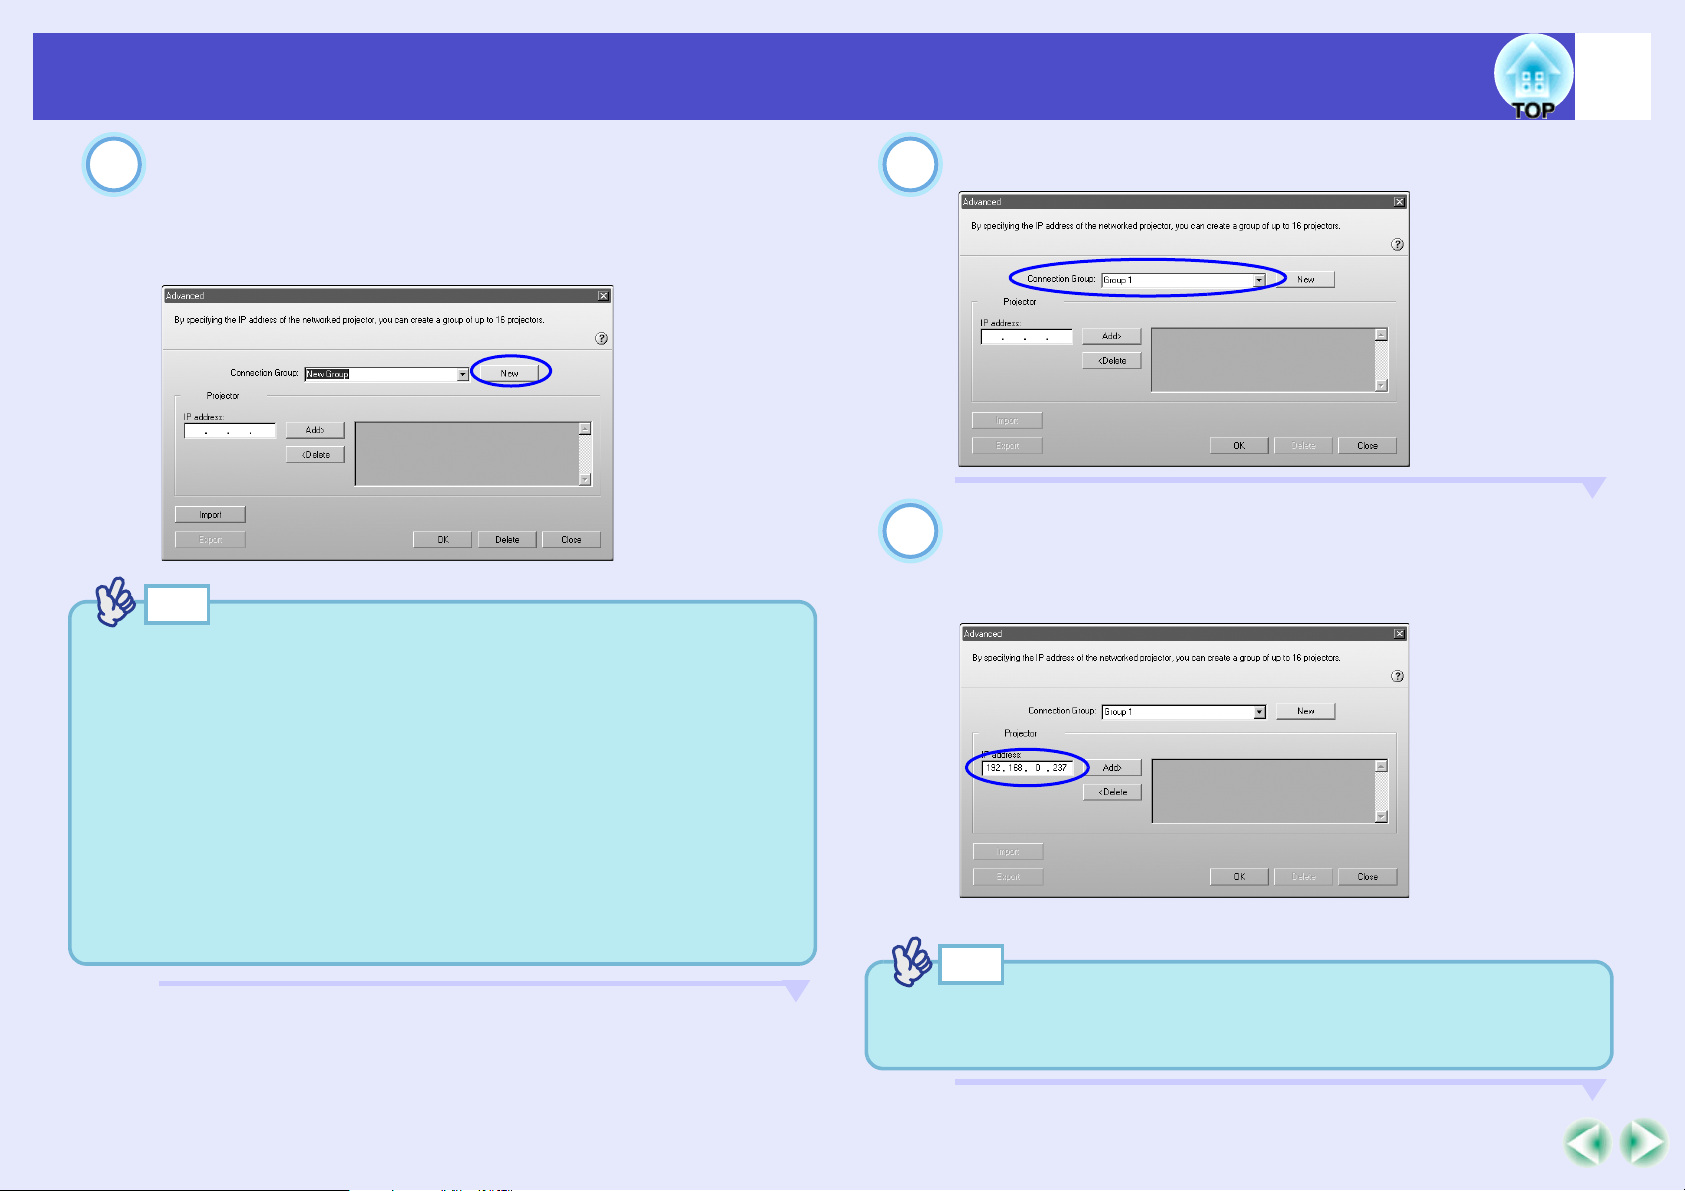
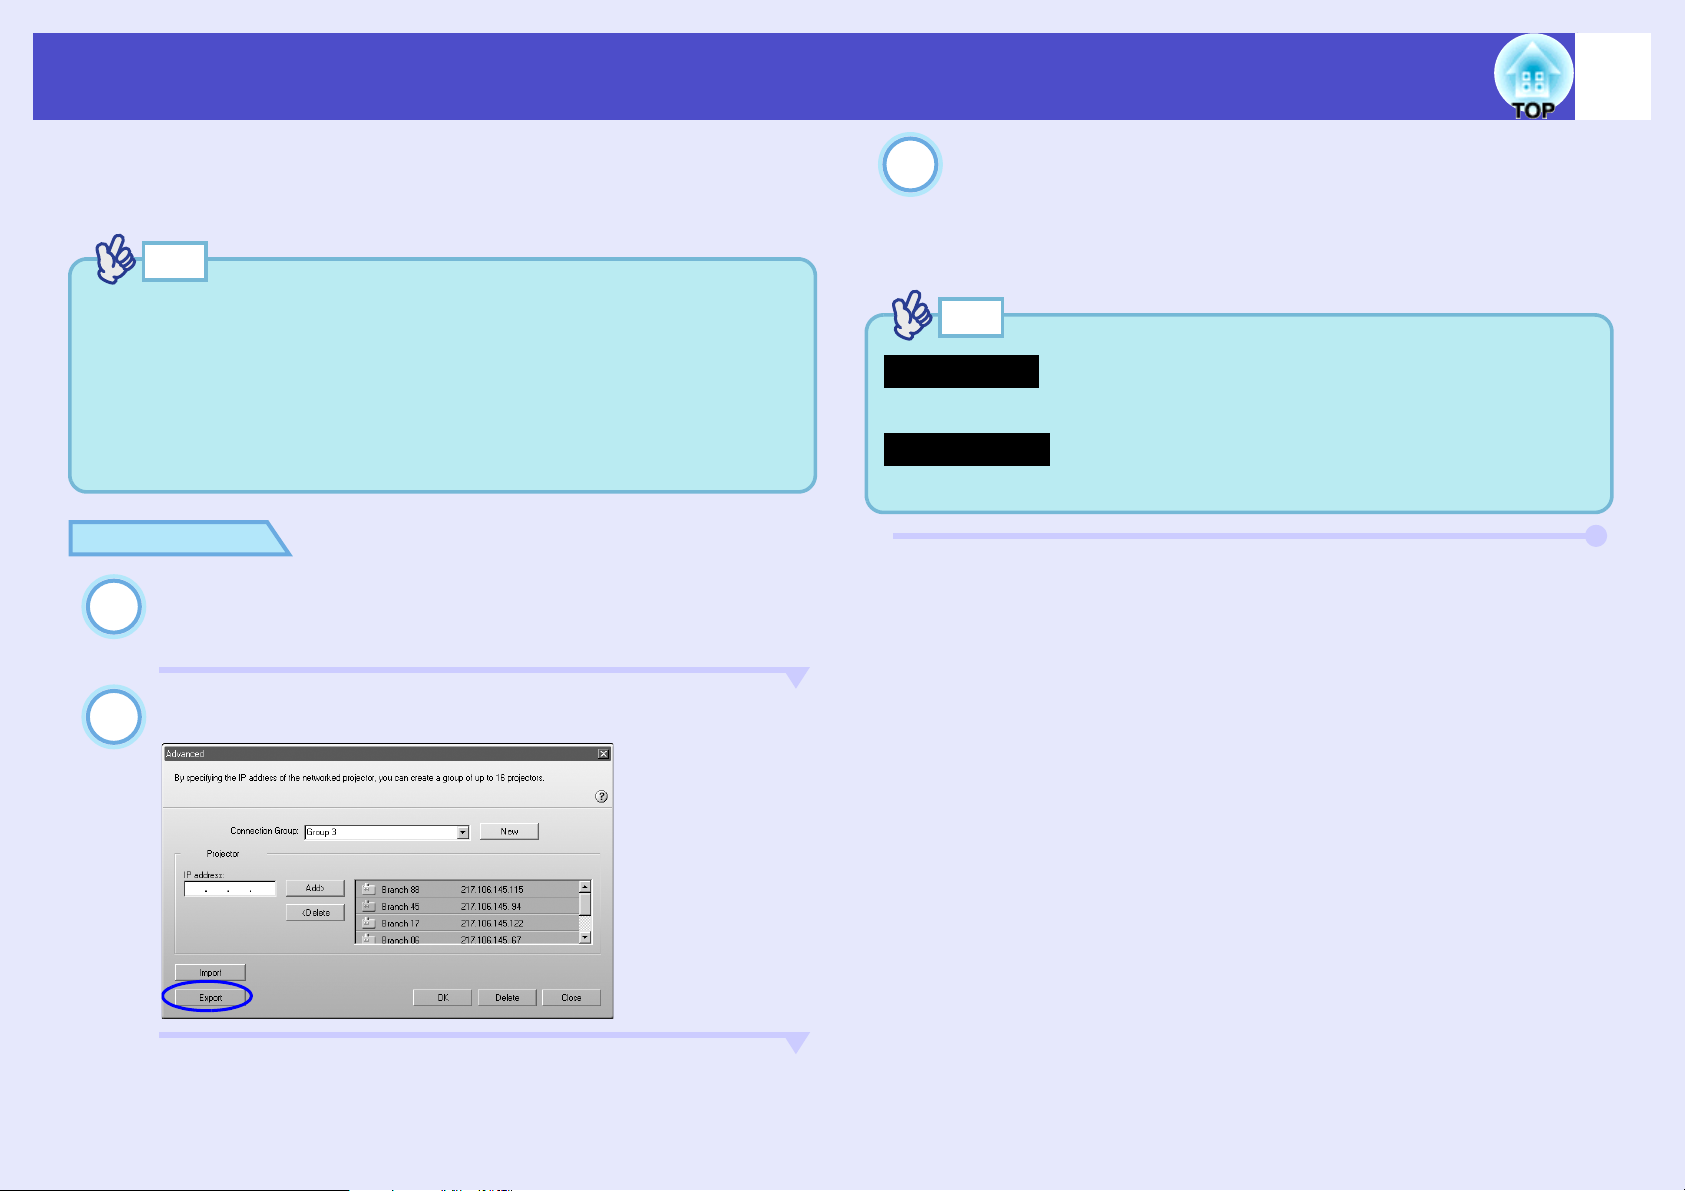
The group detail setting window will be displayed. If
3
creating a new group, click the "New" button.
"New Group" will be displayed in "Connection Group" and the "IP
address" and the list of registered projectors will be blank.
TIP
• To change the projectors that have been registered in a current
group, select the group name in "Connection Group" and then
continue from step 5.
• If you click the "New" button while creating a group or editing an
existing group, the message "Group is not saved. Save?" (Windows)
or "Save changes to group? If you do not save, all changes will be
lost." (Macintosh) will be displayed. If you click "Yes" button, the
group that is currently being edited will be saved. If you click "No"
button, the group that is currently being edited will not be saved and
any changes made to the group will be lost.
Enter the group name in "Connection Group".
4
Enter the IP address for the projector to be registered
5
in "IP address", and then click the "Add>" button.
You can enter numbers from 0 to 255 in each field of the IP address.
12
TIP
You cannot use the addresses "0.0.0.0", "127.x.x.x" or "224.0.0.0 to
255.255.255.255" (x is a number from 0 to 255).
Page 14
EasyMP Operation Guide
If No Connected Projectors Appear
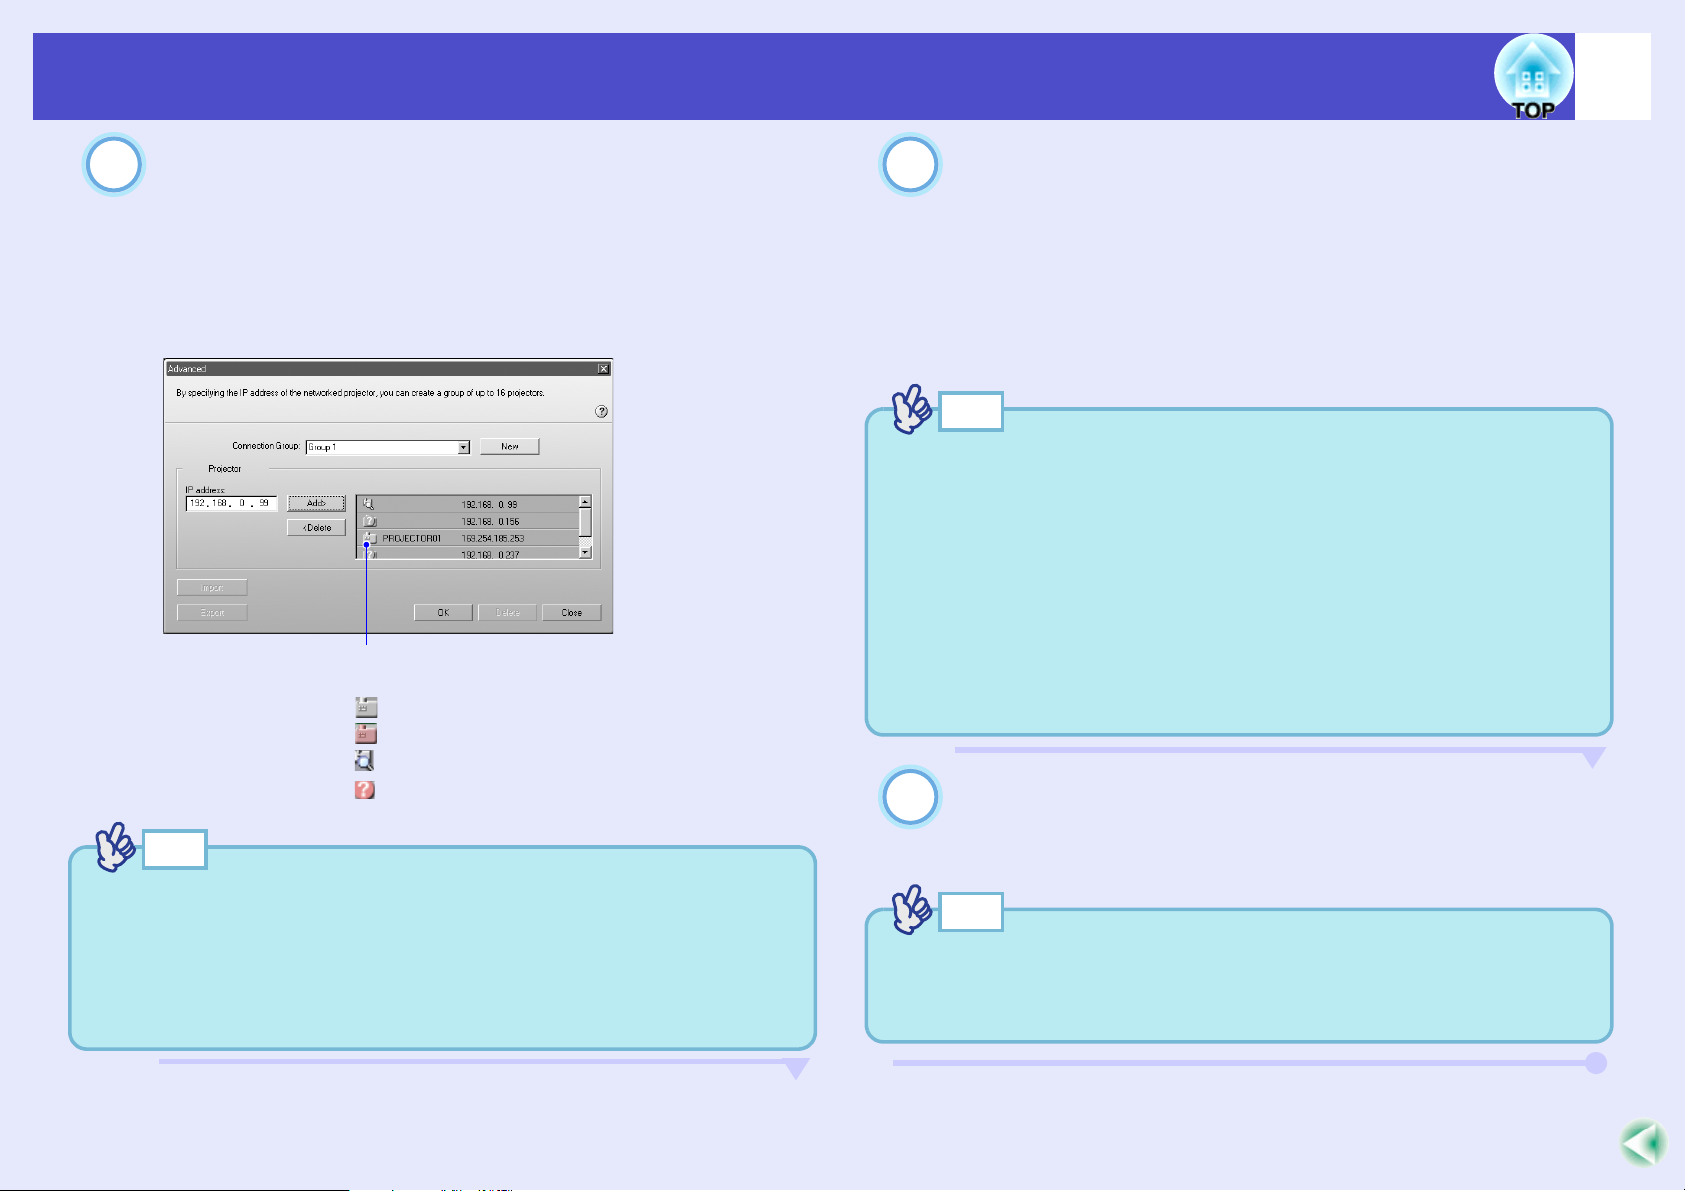
The IP address will appear in the "Projector" list and
6
an icon will appear beside it to show that searching is
in progress. If the projector is found, the projector
name will be displayed in the "Projector" list. If you
would like to add another projector, repeat step 5.
Projectors that have been registered are added to the "Projector" list.
The connection statuses are indicated by
the icon colour and shape as follows.
:Not connected
:Connected to other computer
:Currently being searched for
:Specified projector could not be found
TIP
Once all the projectors to be registered have been
7
added to the list, click the "OK" button. When the
message "Save group. OK?" is displayed, click the
"Yes" button.
The group will then be saved.
If you click the "No" button at the message prompt, the group will
not be saved.
TIP
If you are editing and saving an existing group or if a group with the
same name as the group you are saving already exists in the
"Connection Group" list, the message "This group name already
exists. Overwrite?" (for Windows) or "Okay to update details?" (for
Macintosh) will be displayed. Click the "Yes" button to overwrite the
existing group. If you would like to use a different name to save the
group, click the "No" button, enter the new group name in the
"Connection Group" box in the group detail setting window, and then
click the "OK" button again.
Click the "Close" button.
8
The group detail setting window will close and the display will
return to the extended function window.
13
• Up to a maximum of 16 projectors can be added into a single group.
A maximum of four projectors can be actually connected at the
same time.
• If you would like to delete a projector from the list, select the
projector to be deleted and then click the "<Delete" button.
TIP
If you would like to delete a group, select the group to be deleted in
"Connection Group" in the group detail setting window, and then
click the "Delete" button.
Page 15
EasyMP Operation Guide
If No Connected Projectors Appear
f Connecting Using a Group
Use the following procedure to connect to a projector in a group.
If you are continuing on to this procedure after having just created a group
by the procedure in "Creating a Group", start the following procedure from
step 3.
PROCEDURE
Carry out steps 1 to 3 in "Connecting by Specifying
1
an IP Address" to display EMP NS Connection
extended function window. sp.8
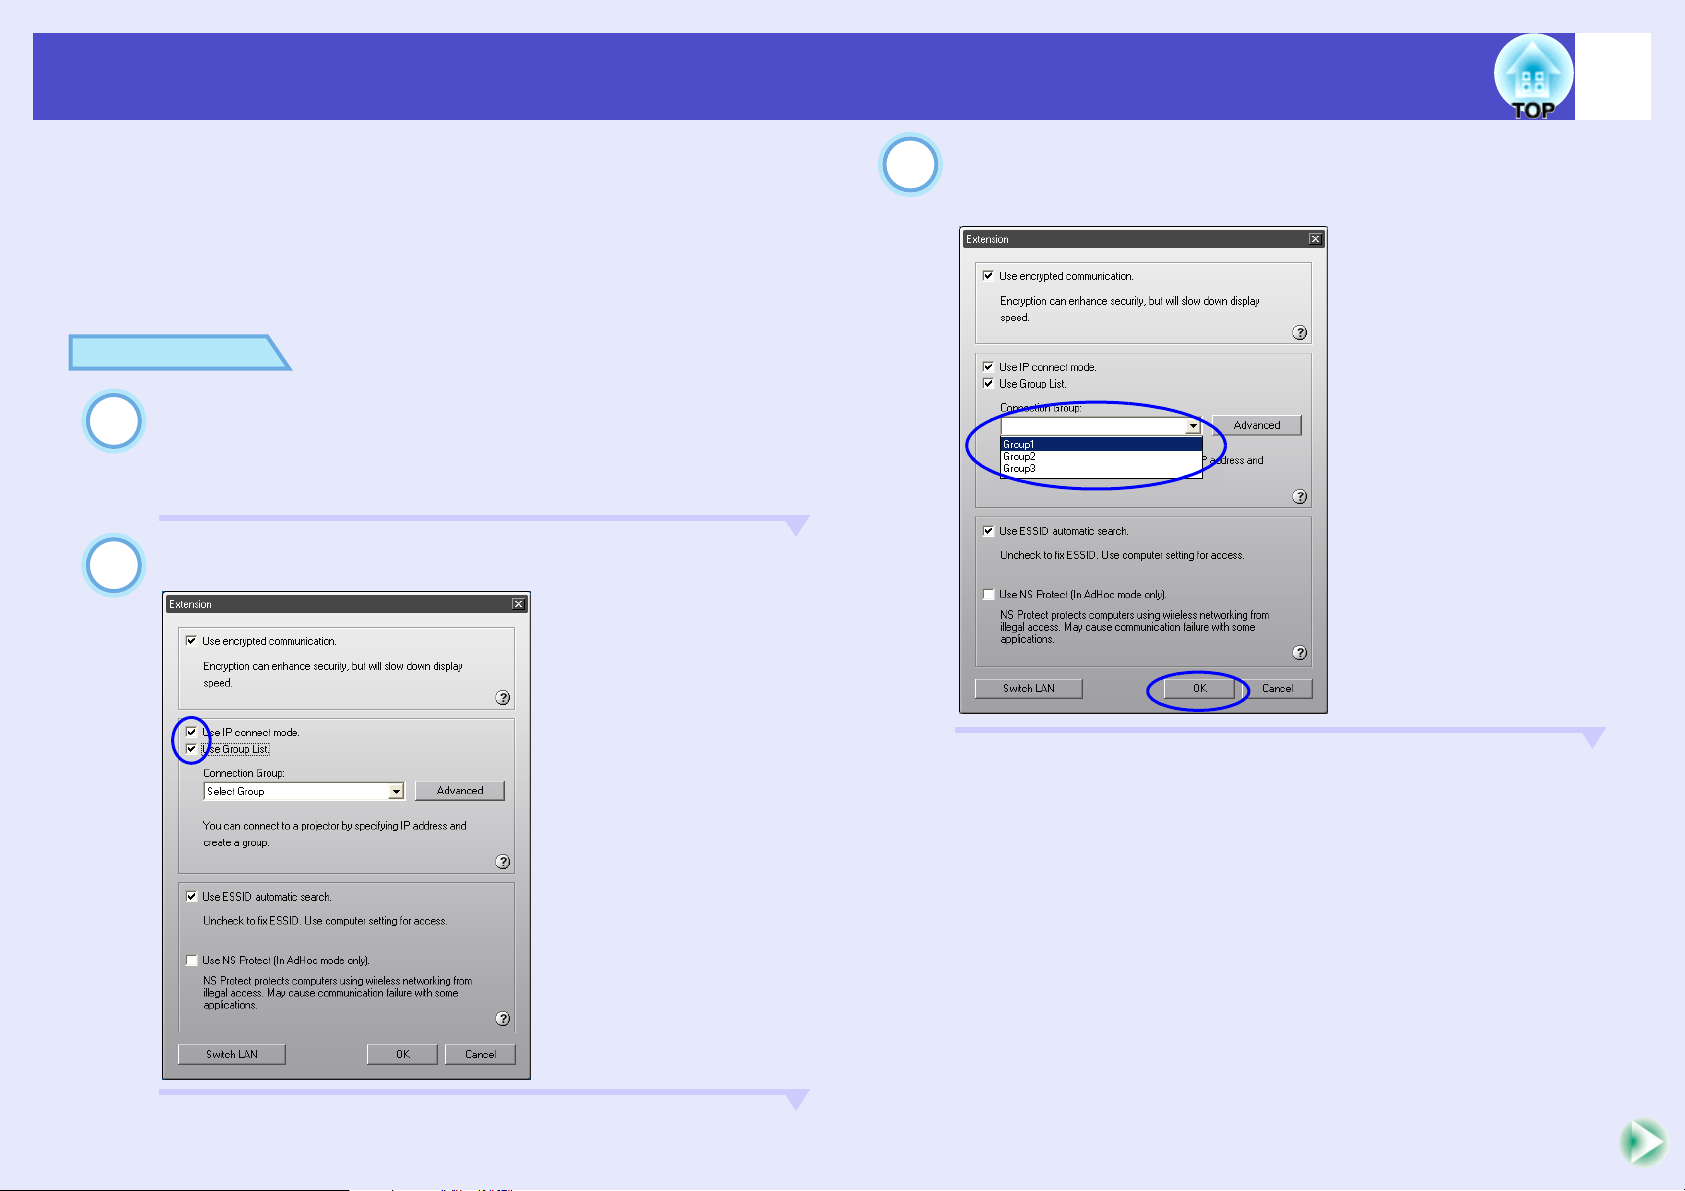
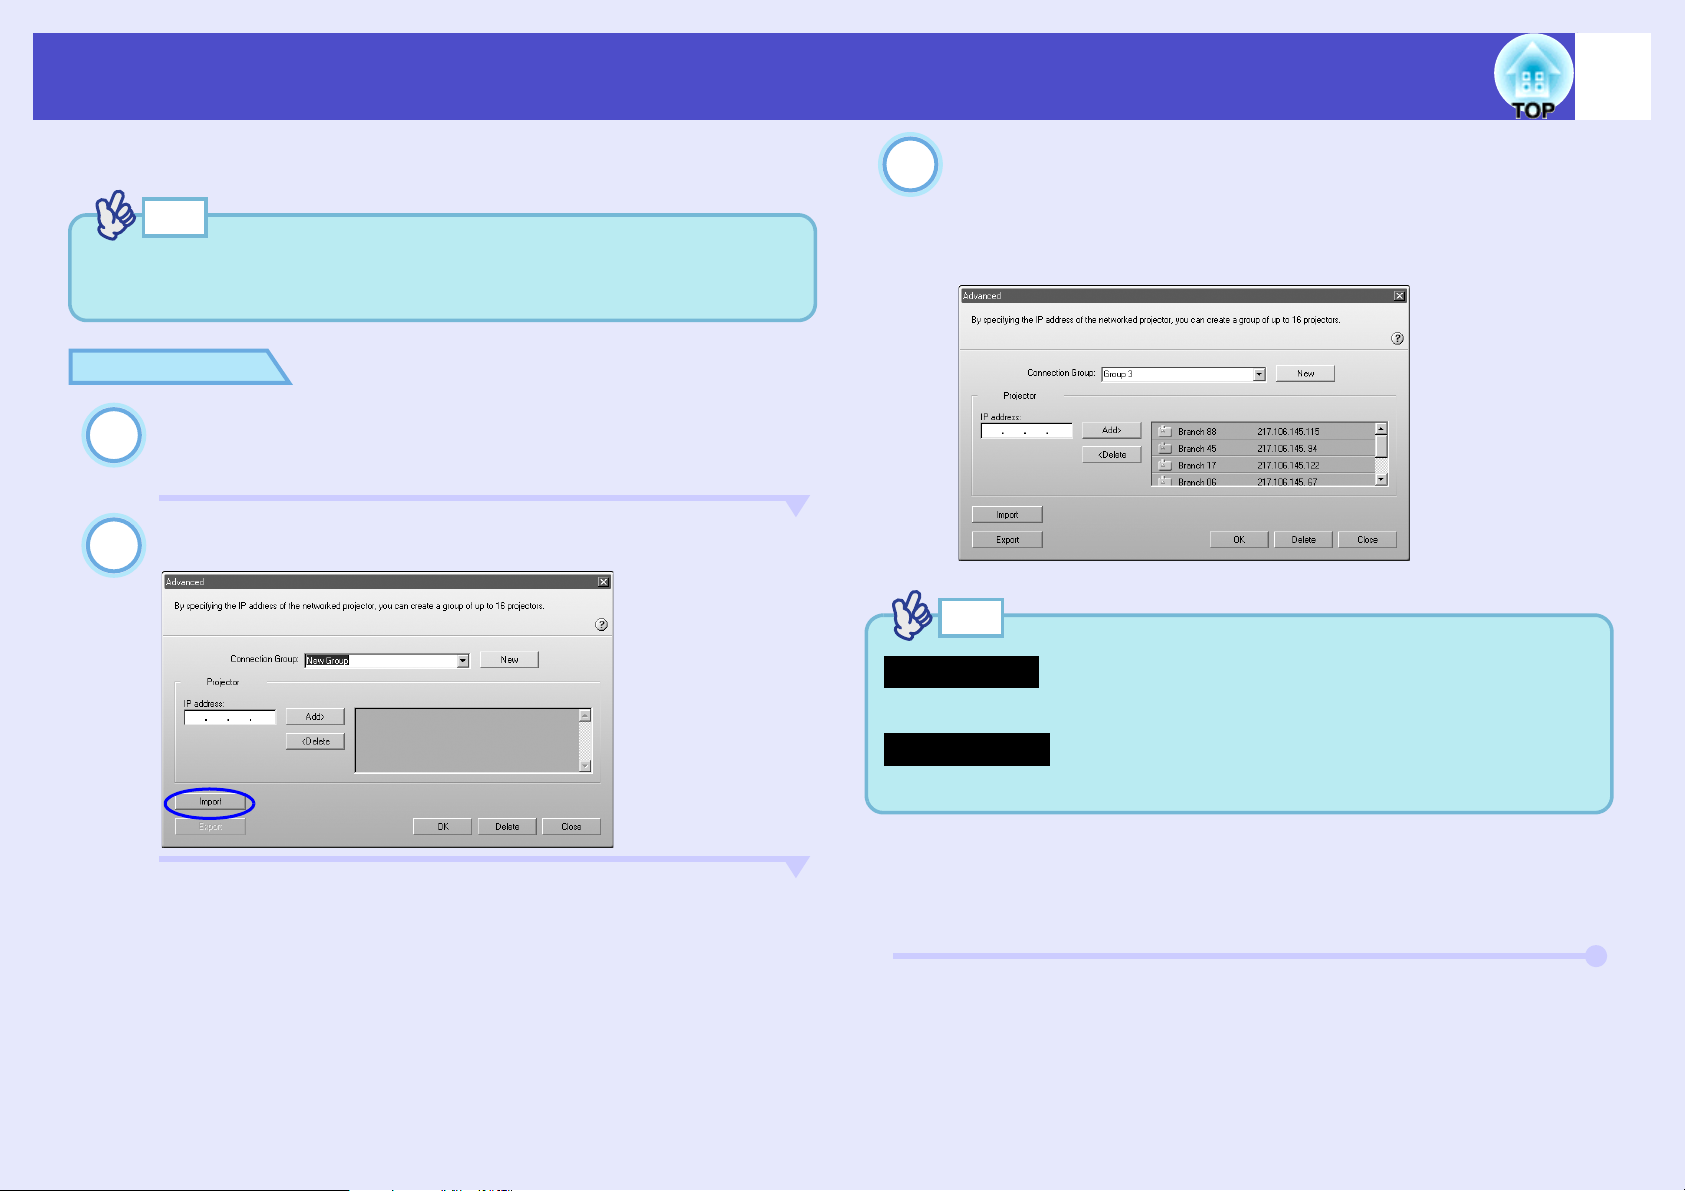
Select "Use IP connect mode." and "Use Group List.".
2
Select the group to connect to from the list in
3
"Connection Group", and then click the "OK" button.
14
Page 16
EasyMP Operation Guide
If No Connected Projectors Appear
If the following window is displayed, click "IP
4 5
connection" in the top-right corner of the window.
If "IP connect mode" appears in the top-left corner of the window,
continue on to step 5.
15
The projectors that have been registered in the group
will be displayed in the "Projector" list. Click the
names of the projectors you want to connect to, and
then click the "Connect" button.
The projector names are displayed in EasyMP standby screen.
The connection
statuses are indicated
by the icon colour and
shape as follows.
:Not connected
:Connected to other
computer
:Currently being
searched for
:Specified projector
could not be found
TIP
• If you select a projector that is already connecting to another
computer, the other computer is automatically disconnected and
your computer's image will be projected.
• If you select more than one projector, you can project images from
one computer to several projectors. Up to a maximum of four
projectors can be used to project images from a single computer.
• After you have clicked the "Connect" button, you cannot connect
any more projectors.
The computer and projector will be connected via the network, and the
computer screen will be projected by the projector.
Page 17
EasyMP Operation Guide
If No Connected Projectors Appear
f Exporting Groups
Groups are exported by the following procedure.
TIP
• This will export all groups in the "Connection Group" list. You
cannot export selected groups only.
• Create and save at least one group before exporting the groups.
sp.11
• Groups cannot be imported while creating a group or editing an
existing group.
PROCEDURE
Carry out steps 1 and 2 in "Creating a group" to
1
display the group detail setting window. sp.11
Select the export destination folder and enter the
3
filename in the window that is displayed, and then
click the "OK" button.
The groups will be exported with the specified filename.
TIP
For Windows
The only valid file extension is ".ini".
For Macintosh
The only valid file extension is ".prgp".
16
Click on the "Export" button.
2
Page 18
EasyMP Operation Guide
If No Connected Projectors Appear
f Importing Groups
TIP
Groups cannot be imported while creating a group or editing an
existing group.
PROCEDURE
Carry out steps 1 and 2 in "Creating a group" to
1
display the group detail setting window. sp.11
Click on the "Import" button.
2
Select the file to be imported in the window that is
3
displayed, and then click the "Open" button.
The groups will be imported and the names of the imported groups
will be added to the "Connection Group" list.
TIP
17
For Windows
The only valid file extension is ".ini".
For Macintosh
The only valid file extension is ".prgp".
If you would like to connect to projectors that are included in an
imported group, carry out steps 3 to 5 in "Connecting Using a
Group".
sp.14
Page 19

EasyMP Operation Guide
Security Countermeasures for Wireless LAN
Because wireless LANs use radio signals to send and receive data, they have
the advantage of allowing a device to connect to the network easily as long as
they are within range to receive the signals.
A disadvantage of this is that the radio signals can pass through barriers such
as walls, so that if security countermeasures are not implemented in some way,
transmissions can be intercepted and outsiders can get unauthorised access to
the network even without using special tools.
The following security functions are provided in order to solve such problems.
• Data encryption
Data is encrypted before it is transmitted. Even if data is intercepted, it
cannot be opened and viewed.
• Connection limitations (authentication)
A username and password are registered beforehand so that only registered
wireless LAN terminals can connect to the network, in order to prevent
unauthorised third parties from connecting to the network.
Security Type
Encryption Encrypted transmission
Authentication
Firewall NS Protect*1 sp.20 –
*1 This can only be used when connecting using a computer that is running
Windows XP.
*2 Only valid if the access point being connected to supports the same
functions.
For Easy Connect
Mode
sp.19
–
For Access Point Mode
WEPg, WPAg (TKIPg)
sp.21
WPA (Home Mode),
g s p.21
LEAP
18
*2
•Firewall
Prevent unauthorized access from outside of the LAN by blocking off
unused ports.
The security functions used by this projector vary depending on the mode used
to connect to the wireless LAN.
Page 20
EasyMP Operation Guide
Security Countermeasures for Wireless LAN
Using Encrypted Transmissions in Easy Connect Mode
You can encrypt the data that is sent from the computer to the projector
while Network Screen is running. When the data is encrypted, security can
be maintained, but the transmission speeds will become slower.
Follow the procedure below to set encryption. These settings only need to
be made once, and will be kept from then on.
PROCEDURE
Carry out steps 1 to 3 in "Connecting by Specifying
1
an IP Address" to display EMP NS Connection
extended function window. sp.8
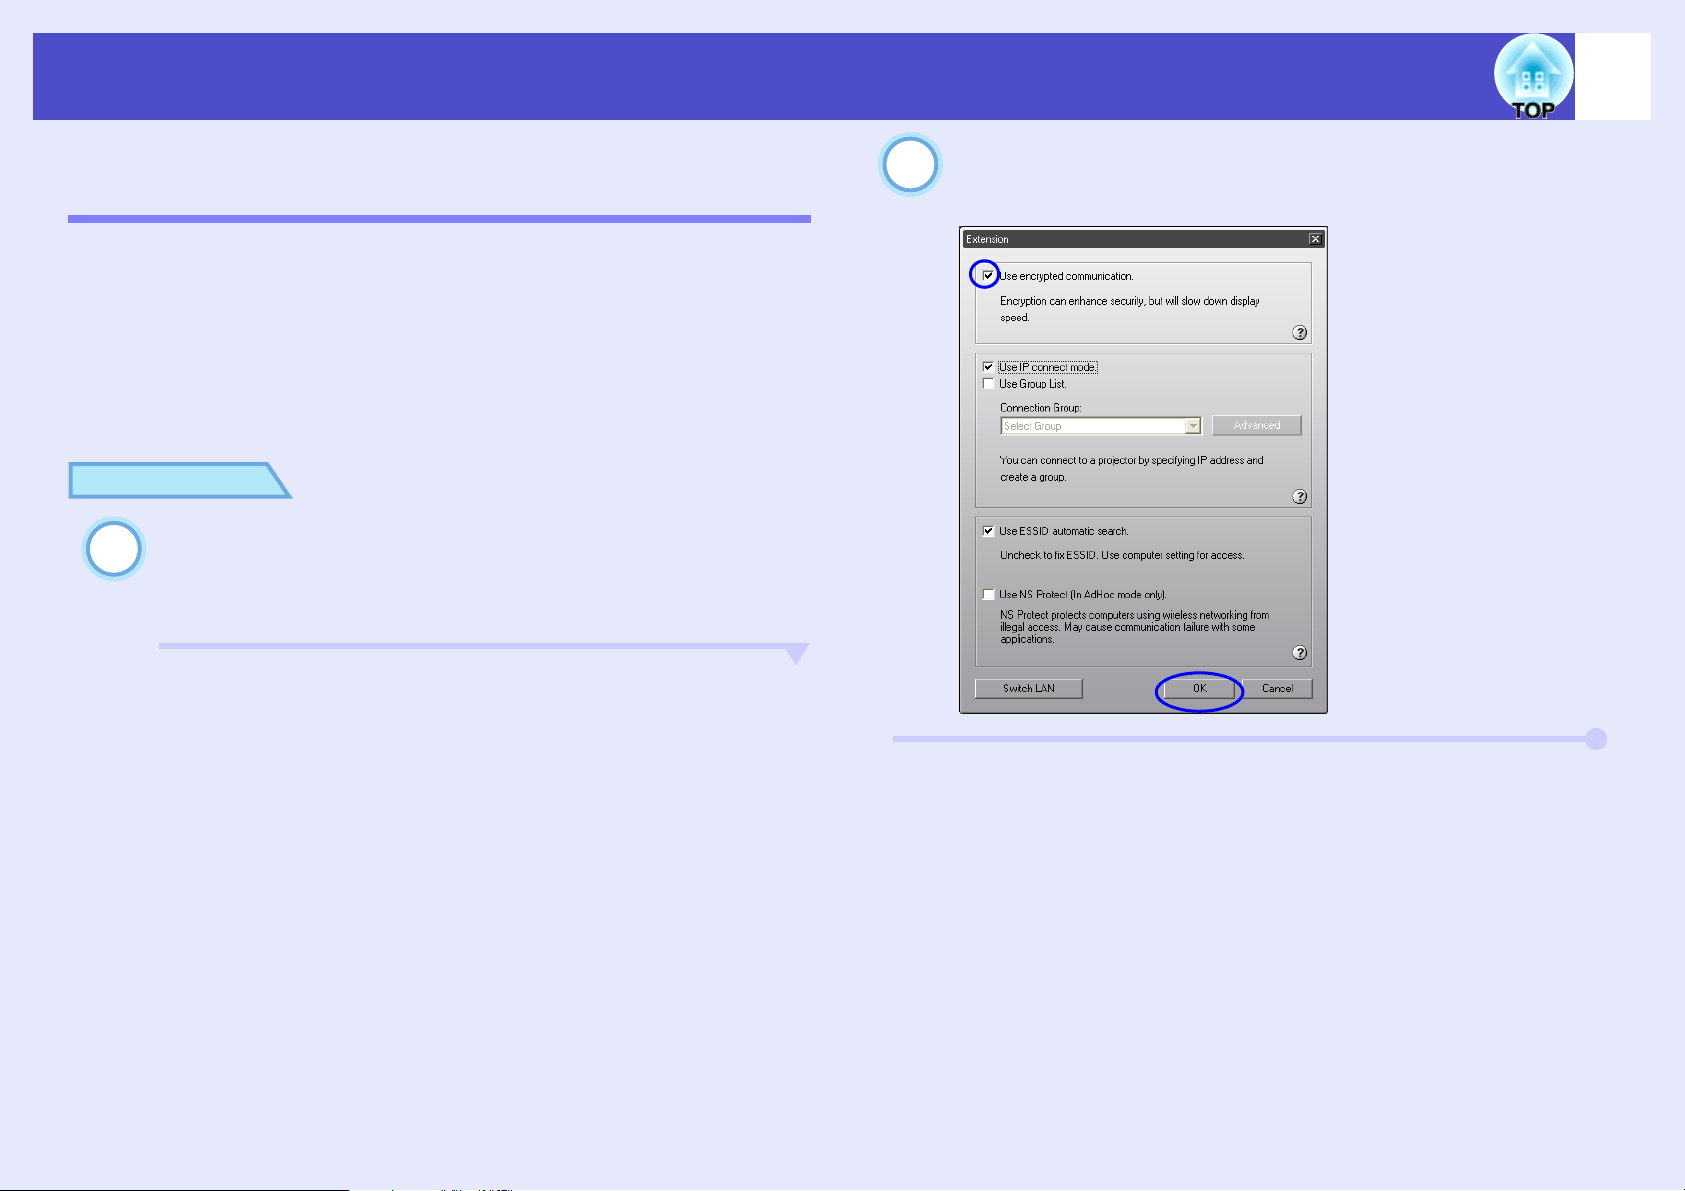
Select "Use encrypted communication." and then
2
click the "OK" button.
19
Page 21
EasyMP Operation Guide
Security Countermeasures for Wireless LAN
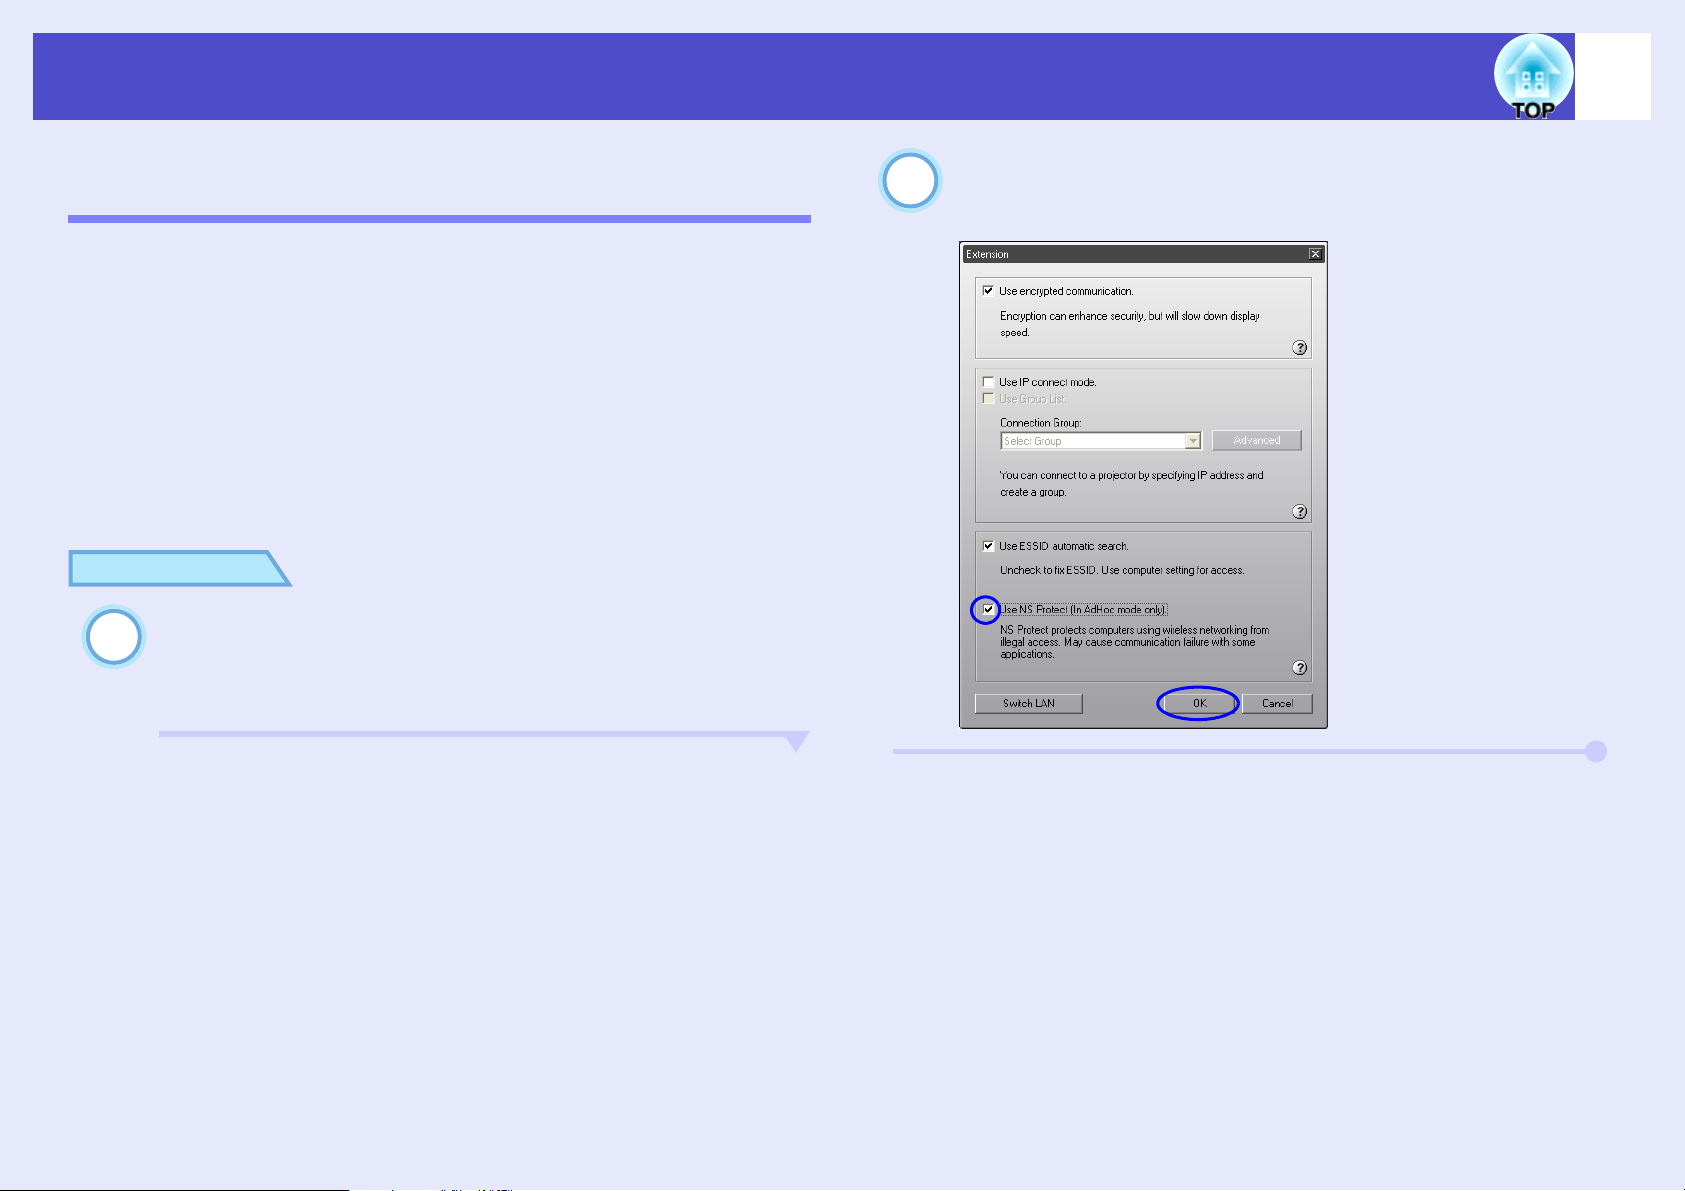
Preventing Unauthorised Access in Easy Connect Mode (NS Protect)
NS Protect is a personal firewall for Network Screen. NS Protect closes all
ports except the ports that are required for Network Screen connection and
control, so that unauthorised access from outside can be prevented.
To use NS Protect, a user with administrator privileges must login from a
Windows XP-based computer. Other users who do not have the privileges
can not use the function.
Follow the procedure given below to enable NS Protect. These settings
only need to be made once, and will be kept from then on.
PROCEDURE
Carry out steps 1 to 3 in "Connecting by Specifying
1
an IP Address" to display EMP NS Connection
extended function window. sp.8
Select "Use NS Protect (In AdHoc mode only)." and
2
then click the "OK" button.
20
Page 22

EasyMP Operation Guide
Security Countermeasures for Wireless LAN
Setting the Encryption and Authentication Methods for Wireless LAN Access Point Mode
You can select one encryption/authentication method from the following
available options when using wireless LAN access point mode and running
Network Screen.
• WEP
This uses an encryption key (WEP key) to encode the data.
It works so that if the encryption keys at the access point and the
projector are not identical to each other, data cannot be transmitted.
• WPA
This is an encryption standard that improves security which is a weak
point of WEP. Several different types of encryption method can be used
with WPA, and this projector uses TKIP
automatically update the encryption key at a regular fixed interval, which
makes it harder to break compared to WEP which uses a constant
encryption key.
WPA also includes user authentication functions. WPA authentication
provides two methods: using an authentication server, or authenticating
between a computer and an access point without the server. The EasyMP
supports the latter method (without the server).
• LEAP
This is an authentication method that uses the CCX
security technology developed by Cisco Systems which combines a
unique user authorisation function and an encryption function.
You can't use LEAP without an authentication server
serverg). LEAP uses passwords for authentication without using
electronic signatures.
g. TKIP uses PSK to
g wireless LAN
g (RADIUS
TIP
• Follow the instructions from the network administrator for the
network you are using when making these settings.
• If using LEAP, you need to make settings at the projector which
match the authentication server settings. Check with your network
administrator for details on RADIUS server settings.
• You can use an Internet web browser to access a browser page for
setting and controlling the projector, and you can make the network
settings on that browser page (EasyWeb). Because you can use the
keyboard to enter setting values with EasyWeb, it is useful to use in
order to avoid the inconvenience of entering values using the remote
control. sp.62
PROCEDURE
Insert a wireless LAN card into the card slot of the
1
projector.
Set the projector to EasyMP standby screen.
2
s"Setting the Projector to Connection Standby Mode" in the
EasyMP Network Setup Guide
21
Page 23

EasyMP Operation Guide
Security Countermeasures for Wireless LAN
Check that the "Config" button in the bottom-right
3 4
corner of the window is selected, and then press the
[Enter] button on the remote control.
22
Move the cursor to "Wireless LAN" - "Basic" button,
and then press the [Enter] button on the remote
control.
Page 24

EasyMP Operation Guide
Security Countermeasures for Wireless LAN
Move the cursor to "Access point mode", and then
5 6
press the [Enter] button on the remote control.
Access point mode will be selected.
23
Move the cursor to "Wireless LAN" - "Security"
button, and then press the [Enter] button on the
remote control.
Page 25

EasyMP Operation Guide
Security Countermeasures for Wireless LAN
Select the encryption method and authentication
7
method from "WEP", "WPA" or "LEAP".
Move the cursor to the item to be set and then make
8
the required settings.
Some menu items require characters or numerals to be entered.
See "Entering Characters and Numerals" (sp.26 ) for details on
entering characters and numerals.
WEP
WEPg
encryption
Format This sets the input method for the WEP encryption key.
Key ID The WEP encryption key ID can be set to either "1", "2", "3"
Encryption
key
This sets the encryption method for WEP encryption.
128bit: 128(104)-bit encryption is used.
64bit: 64(40)-bit encryption is used.
HEX: Hexadecimal input
ASCII: Text entry
The method of entering WEP encryption settings with text
varies depending on the access point. Check with the
administrator of the network being used, and try setting to
"ASCII" first.
or "4".
Enter the encryption key to be used for WEP encryption.
Enter the key using single-byte characters while following the
instructions given by the network administrator for the
network that the projector is connected to. The type and
number of characters to be entered will vary as follows
depending on the "WEP encryption" and "Format" settings.
If the maximum number of characters specified below are not
entered, the portion of data that exceeds the number of
characters entered will not be encoded.
For "128bit" and "HEX":
Up to 26 characters from the range of "0" to "9 and "A" to "F"
For "64bit" and "HEX":
Up to 10 characters from the range of "0" to "9 and "A" to
"F".
For "128bit" and "ASCII ": Up to 13 alphanumeric characters
For "64bit" and "ASCII ": Up to 5 alphanumeric characters
24
Page 26

EasyMP Operation Guide
Security Countermeasures for Wireless LAN
WPA
PSK Enter the PreSharedKey (cryptography key) using single-byte
alphanumeric characters.
You can enter from 8 up to a maximum of 63 characters.
However, the 64th character of hexadecimal numbers cannot
be entered.
When you enter the Pre Shared Key and press the [Enter]
button, the password will be displayed with asterisks (*).
You cannot enter any more than 32 characters at the EasyMP
configuration setting screen. You can enter more than 32
characters by making the setting using EasyWeb. sp.62
*If you would like to change any of the settings, select the "Clear" button
and press the [Enter] button on the remote control to clear the entered
settings, and then re-enter the settings.
LEAP
User name Enter the username to be used for authentication using single-
byte alphanumeric characters. (Spaces cannot be used.)
Up to a maximum of 64 characters can be entered.
You cannot enter any more than 32 characters at the EasyMP
configuration setting screen. You can enter more than 32
characters by making the setting using EasyWeb. sp.62
Press the [ ] button on the remote control to move
9
the cursor to the "OK" button, and then press the
[Enter] button.
The EasyMP standby screen will be displayed again.
25
Password Enter the username to be used for authentication using single-
byte alphanumeric characters.
Up to a maximum of 64 characters can be entered.
When you enter the password and press the [Enter] button,
the password will be displayed with asterisks (*).
You cannot enter any more than 32 characters at the EasyMP
configuration setting screen. You can enter more than 32
characters by making the setting using EasyWeb. sp.62
*If you would like to change any of the settings, select the "Clear" button
and press the [Enter] button on the remote control to clear the entered
settings, and then re-enter the settings.
Page 27

EasyMP Operation Guide
Security Countermeasures for Wireless LAN
Entering Characters and Numerals
Follow the procedure below to enter characters and numerals.
1.Move the cursor to the item to be entered, and then press the [Enter]
button on the remote control. The cursor will change to green and entry
mode will be enabled.
2.To enter only numerals, press the [Num] button on the remote control.
The [Num] button will light and the buttons shown in the diagram below
will switch to numeric keypad mode so that you can enter numerals. In
addition, for items that characters can be entered, use the [ ] button to
enter a period (.).
To enter characters, tilt the [ ] button on the remote control up to scroll
through the list of characters in the order "A" - "Z" → "0" - "9" →
symbols → "a" - "z" → space. If you tilt the [ ] button down, you can
scroll through the characters in reverse. Holding down the [ ] button
makes the scroll faster and you can find target characters quickly.
26
3.To enter two or more characters, tilt the [ ] button on the remote control
to the right. The character or numeral in the first position will be
accepted and the cursor will move to the position for entering the next
character.
4.Once you have entered all of the characters or numerals, press the [Enter]
button on the remote control to accept the entry. The cursor will change
to yellow.
Remote control
Period
When this button is lit, the
buttons inside the box will
change to numeric
keypad mode.
Numeric keypad
Page 28

EasyMP Operation Guide
Security Countermeasures for Wireless LAN
Disabling Automatic ESSID Search
If the ESSID is fixed on a computer that is running Windows 2000/XP, you
can disable the automatic ESSID search function. This setting only needs
to be made once, and will be kept from then on.
TIP
If the automatic ESSID search function is disabled, you may need to
set the ESSID for the computer manually.
PROCEDURE
Carry out steps 1 to 3 in "Connecting by Specifying
1
an IP Address", and display the extended function
window of EMP NS Connection. sp.8
Uncheck "Use ESSID automatic search" and then
2
click the "OK" button.
27
Page 29

Preparing a Presentation (Using EMP SlideMaker2)
This chapter describes how to create and send scenarios.
Procedures for Making a Presentation without a
Computer ............................................................ 29
Files that Can be Included in Scenarios ............... 30
Creating a Scenario .............................................. 31
• Scenario Creation Procedure...............................................................31
•
Setting Scenario Properties......................................... 31
• Including PowerPoint Files into Scenarios .................. 33
• Including All Slides in a PowerPoint File...........................................34
• Including Only Selected Slides while Checking Thumbnails.............35
•
Including Image and Movie Files into Scenarios ......... 35
• Editing a Scenario ....................................................... 37
• Adding Files and Slides ......................................................................37
• Deleting Items .....................................................................................37
• Changing the Order of Items...............................................................37
Sending a Scenario...............................................38
What Do You Do When ........................................40
• Create a Scenario Easily............................................. 40
• Checking the Scenario Projection Status at the
Computer..................................................................... 41
• Making Animation Settings.......................................... 42
Page 30

EasyMP Operation Guide
Procedures for Making a Presentation without a Computer
In this guide, a combination of PowerPoint, image and movie files arranged in
a projection order and saved as a single file is refferred to as "scenario".
Scenarios are created with EMP SlideMaker2. Using EMP SlideMaker2, it is
possible to easily and efficiently prepare presentation material by extracting
the necessary parts of files, and arranging them in order without editing the
original files.
PowerPoint
File 1
Scenario File
PowerPoint
File 2
PowerPoint
File 3
EMP SlideMaker2 should be installed into the computer.
s "Installing the EasyMP Software Into the Computer" in the
EasyMP Network Setup Guide for details on installing EMP
SlideMaker2.
TIP
EMP SlideMaker2
Creating a Scenario sp.31
(Create a Scenario Easily sp.40)
Sending a Scenario sp.38
29
On the Computer
The created scenarios will be sent to the memory card or USB storage device
(USB hard disk drive or USB memory device) that is installed to the computer.
The memory card or USB storage device can then be installed or connected to
the projector, and CardPlayer in the projector can be used to project the
scenario.
For Connection of USB storage devices s"Connecting USB Devices
(Digital Camera, Hard Disk Drive or Memory Devices)" in the User's Guide
CardPlayer
On the Projector
Projecting Scenarios sp.52
Page 31

EasyMP Operation Guide
Files that Can be Included in Scenarios
Any of the following file types can be merged into a single file to create a
scenario.
• The following slide transition effects and animation settings on the
Ty pe
PowerPoint .ppt Microsoft PowerPoint 2000/2002/2003
Image .bmp
Movie .mpg MPEG2-PS
Audio .wav PCM, 22.05/44.1/48.0kHz, 8/16bit
File Type
(Extension)
.jpg Any version. However, CMYK colour
formats and progressive formats cannot
be played back.
Movies that exceed a maximum size of
720 × 576, or are not in the same form
as a DVD (sequence header arranged for
each GOP) cannot be played back.
The reproducible audio format is
MPEG-1 Layer 2. Linear PCM and AC3 audio cannot be played back.
Notes
PowerPoint "Slideshow" menu are reflected in a scenario.
· Fly · Blinds · Box · Checkerboard
· Crawl · Dissolve · Peek · Random Bars
· Spiral · Split · Stretch · Strips
· Swivel · Wipe · Zoom
Effects and animations other than those listed above are converted
to "Cut".
• In the event that the image and movie files in the table on the left are
to be played back as file units, they need not be made into scenarios.
After saving the file to a memory card or USB storage device, direct
playback and projection with the CardPlayer function is possible by
inserting the memory card into the projector or connecting the USB
storage device to the projector. s p.56
• When playing back movie files, it is recommended that you use a
CompactFlash card or a card-type hard disk drive as the memory
card. If you use some other type of memory card, the movie files may
not play back correctly. In addition, if you use a CompactFlash card
with a slow access speed, the movie files may not play back correctly
or the sound may skip or not be output.
30
TIP
The following table indicates whether scenarios created by the included
software of other projectors can be opened by EMP SlideMaker2 of this
projector.
Projector Software Can be opened
EMP-7950/7850
EMP-765/755/745/737
EMP-735
EMP-8150/8150NL EMP Scenario No
EMP-715/505 EMP SlideMaker No
EMP SlideMaker2 Ye s
Page 32

EasyMP Operation Guide
Creating a Scenario
Verify the following points before creating a scenario.
• The data that is combined to create a scenario, such as PowerPoint,
image and movie files, must be created in advance.
• Only file types listed under "Files that Can be Included in Scenarios"
can be used. s p.30
f Scenario Creation Procedure
Scenarios are created by the following procedure.
Start EMP SlideMaker2 and set the scenario properties
(such as scenario name, background colour and image
quality). sp.31
Include the files to be used in the scenario.
s"Including PowerPoint Files into Scenarios" p.33
s"Including Image and Movie Files into Scenarios" p.35
Setting Scenario Properties
PROCEDURE
Start Windows on the computer, then select "Start" -
1
"Programs"(or, "All Programs") - "EPSON Projector" "EMP SlideMaker2".
EMP SlideMaker2 starts, and the scenario properties are displayed.
Enter each of the items with reference to the following
2
table, then click the "OK" button.
31
Sort the included files into the desired order to
complete the scenario. sp.37
TIP
Once the scenario has been created, carry out the steps in "Send
Scenario". sp.38
Scenario Name Enter the filename for the created scenario. Be sure to
enter the filename. The filename can consist of up to
8 uppercase alphabetic characters and numerals.
Limit the total characters of the file name and the
directory name for the work(scenario) folder to 127
or less.
Page 33

EasyMP Operation Guide
Creating a Scenario
Scenario Folder Specify where to create the scenario folder to be used
Configure BGM If you would like to play an audio file during the
Background
Color
Image Quality With EMP SlideMaker2, each slide in a PowerPoint
while creating the scenario. The name of the scenario
folder will be the same as the name of the scenario.
scenario, check the box. The audio file (WAVE
format) selection window is displayed if this is
selected. On this window, select the file to be used as
the background music.
After selecting the audio file, play the file by clicking
the " " button on the right. Stop playback by clicking
the " " button.
Selects the background colour for image data in the
scenario.
file will be converted into a JPEG file and saved. This
item lets you select the image quality when the slides
are converted to JPEG files.
You can select the quality from "Highest image
quality", "High Quality" and "Standard". If you select
"Standard", the quality will be lower compared to
other settings. "Highest image quality" and "High
Quality" are recommended.
If JPEG files have been included directly into a
scenario, this setting will be ignored and the JPEG
file will be projected at its original resolution.
The following window will be displayed.
3
Folder window
Scenario window
This window is used
to include
scenarios.
Cell
A scenario is made
up of a series of
single slides called
cells.
Animation check
window
Thumbnail window
Preview thumbnail images of the file that is clicked on in the file
window.
File window
The files in the folder that is selected in the folder window appear here.
TIP
Refer to the EMP Slidemaker2 help for details on the EMP
SlideMaker2 menu functions.
32
TIP
The setting details can be changed in the "File" - "Properties" menu
of EMP SlideMaker2.
Page 34

EasyMP Operation Guide
Creating a Scenario
Including PowerPoint Files into Scenarios
PowerPoint files can be included into scenarios by either of the following
two methods.
• Including All Slides in a PowerPoint File sp.34
• Including Only Selected Slides while Checking Thumbnails
sp.35
If all slides in a PowerPoint file are included into the scenario, the
animation settings that have been made using PowerPoint are retained and
they will appear as usual when the scenario is projected using CardPlayer.
If you include only a selection of slides, the animation settings that have
been made using PowerPoint will all be ignored.
TIP
Movie files included in a PowerPoint file cannot be played back on the
scenario.
Slides that retain their animation settings will be displayed in the cells of
the scenario window with an ".EMA" extension. If you click on a cell with
an ".EMA" extension, all of the animation operations will be displayed in
the animation check window.
Slides which have no animation settings will be displayed in the cells with
a ".JPG" extension.
33
.JPG:Cells with PowerPoint
animation settings
that have been
ignored
.EMA:Cells with PowerPoint
animation settings
that have been
retained
Animation check
window
TIP
• Thumbnails cannot be displayed if PowerPoint is not installed on the
computer.
• Although animations can be set in the properties window of EMP
SlideMaker2, animations set in advance in the PowerPoint file will
operate more smoothly when played in the scenario. To set
animations in PowerPoint slides, we recommend you to set them in
the PowerPoint file itself. If you would like to make animation
settings for images, or if you would like to add animation settings to
slides that had their animation settings lost when they were included
into the scenario, add the settings in the properties window of EMP
SlideMaker2. sp.42
• The following PowerPoint animations can be used in a scenario.
· Fly · Blinds · Box · Checkerboard
· Crawl · Dissolve · Peek · Random Bars
· Spiral · Split · Stretch · Strips
· Swivel · Wipe · Zoom
Animations other than those above are converted to "Cut".
Page 35

EasyMP Operation Guide
Creating a Scenario
f Including All Slides in a PowerPoint File
Use the following procedure to include all slides in a PowerPoint file into a
scenario. When this method is used to include the slides, any animations
that have been set using PowerPoint will be retained after the slides have
been imported into the scenario.
TIP
When creating a scenario with only one PowerPoint file, you can do
that easily by a drag and drop operation.
PROCEDURE
Double-click the required PowerPoint file icon in the
1
sp.40
file window.
Folder window
Check the message and then click the "OK" button.
2
The slideshow will run automatically.
If you press the [Esc] key on the computer's keyboard while the
slideshow is running, the slideshow will be paused. If you do this,
only the section of the slideshow that has been played back will be
imported into the scenario.
TIP
It takes longer to import a large PowrPoint file into a scenario.
Once the slideshow is finished, click the window.
3
All slides in the file will be imported into the scenario and displayed
in the scenario window.
s
34
Thumbnail window
File window
Scenario window
Page 36

EasyMP Operation Guide
Creating a Scenario
f
Including Only Selected Slides while Checking Thumbnails
Use the following procedure to include only selected slides from a
PowerPoint file into a scenario. Note that when this method is used to
include the slides, any animations that have been set using PowerPoint will
be lost.
PROCEDURE
Click the required PowerPoint file icon in the file
1
window.
Double-click the thumbnails that you would like to
2
include into the scenario.
The selected slides will be displayed in the scenario window.
35
Including Image and Movie Files into Scenarios
Image files and movie files can be included into a scenario.
Folder window
Scenario window
To select more than one slide and include them all at
3
once, click the additional slides one after the other in
the thumbnail window.
All slides that you click will be selected.
If you click a slide that is already selected, it will become unselected.
Once all the required slides have been selected, drag
4
one of the selected slides into the scenario window
and drop it at the place where it is to be added.
All of the selected slides will then be added to the scenario.
Thumbnail window
File window
PROCEDURE
Click the required folder in the folder window.
1
The files that are contained in the folder will be displayed in a list in
the file window.
Click the file icon in the file window.
2
The contents of an image file will be displayed in the thumbnail
window. In the case of a movie file, an icon will be displayed in the
thumbnail window.
Page 37

EasyMP Operation Guide
Creating a Scenario
Double-click the required file icon in the file window.
3
The selected file will be displayed in the scenario window and it will
be included into the scenario.
To add more files, drag and drop them into the
4
scenario window.
To add more than one file, hold down the [Ctrl] key on
5
the keyboard while selecting the files to be added.
Once all the files to be added have been selected,
drag one of the selected files into the scenario
window and drop it at the place where it is to be
added.
All of the selected files will then be added to the scenario.
TIP
To unselect all of the selected files, click in the white area outside the
icons.
36
You can drag and drop the desired files or slides to add them to
the scenario window.
Page 38

EasyMP Operation Guide
Creating a Scenario
Editing a Scenario
You can add and delete slides and files from a scenario and change their
order.
The CardPlayer project a scenario in accordance with the order in the
scenario window.
f Adding Files and Slides
PROCEDURE
Drag files that are displayed in the file window or
PowerPoint slides that are displayed in the thumbnail
window into the scenario window and drop them in the
place where they are to be added.
37
f Changing the Order of Items
PROCEDURE
Drag an drop a cell in the scenario window to change the
order of cells.
Alternatively, you can display the shortcut menu, select
"Cut", and then select "Paste".
f Deleting Items
PROCEDURE
Right-click in the cell to be deleted, and then select "Cut"
from the shortcut menu that is displayed.
Page 39

EasyMP Operation Guide
Sending a Scenario
To project a created scenario using the projector, it is necessary to send the
scenario to the memory card or USB storage device using "Send Scenario" in
EMP SlideMaker2.
Specify the destination between the following two.
• Memory card that is inserted into a card drive of the computer.
• USB hard disk drive or USB memory device that is connected to the
computer's USB port.
It is also possible to set automatic projection and continuous projection of a
scenario at projector startup. The automatic projection function is called
"autorun".
TIP
•When "Send Scenario" is performed, the scenario file is saved in the
destination under the name "scenario name. sit". In addition, a
folder with the same name as the scenario is created and each screen
is converted to image files and saved according to the image quality
settings.
• If you use "Send Scenario" without saving, a folder with the same
name as the scenario name and a "scenario name.sit" file are
created in the scenario folder. Each screen is converted to image
files and saved in the created folder according to the image quality
settings.
PROCEDURE
Once the scenario has been completed, install a
1
memory card or USB storage device to the computer
and then select "Scenario Options" - "Send
Scenario".
A window for designating the destination drive is
2
displayed. Select the drive or port where the memory
card or USB storage device is installed, and then click
the "OK" button.
A confirmation message is displayed. Click the "OK"
3
button.
The scenario will be sent to the selected drive.
38
Page 40

EasyMP Operation Guide
Sending a Scenario
Upon completion of transfer, a message is displayed
4
confirming whether autorun setup is to be performed.
If you would like to set autorun, click the "OK" button
and continue to the next procedure. To set nothing,
close out by clicking the "Cancel" button.
All scenario files within the destination drive are
5
displayed in the scenario list on the left.
When projecting a scenario repeatedly
If you would like to go back and start projecting from the first
scenario again once projection of all scenarios in the autorun
scenario file list is complete, select "Repeat".
TIP
• Autorun can also be set by selecting"Scenario Option" - "Edit
Autorun".
• Autorun setting cannot be designated in the EasyMP CardPlayer.
• If there are two or more files set for autorun, they will be played
back in order on the autorun scenario list.
After finished transferring your scenario, insert the
6
memory card or connect the USB storage device into/
to the projector to project the scenario with the
CardPlayer. sp.52
39
When using autorun
To set a scenario to run automatically at projector power ON, click
the desired scenario name in the scenario list, and click the " "
button. The scenario is displayed in the autorun scenario list on the
right, and is set as an autorun file.
Page 41

EasyMP Operation Guide
What Do You Do When ...
Create a Scenario Easily
To turn a single PowerPoint file into a scenario, drag and drop the
PowerPoint file icon onto the EMP SlideMaker2 program icon on the
desktop.
The slideshow will run and a scenario will be created automatically.
If you press the [Esc] key on the computer's keyboard while the slideshow
is running, the slideshow will be paused. If you do this, only the section of
the slideshow that has been played back will be imported into the scenario.
40
TIP
• Scenarios cannot be created in this way when EMP SlideMaker2 is
running. Be sure to close EMP SlideMaker2 first.
• It takes longer to import a large PowrPoint file into a scenario.
• The name "Scnxxxx" (xxxx are numbers) is given to the created
scenario. The image quality of the scenario is set to "Standard".
The image quality can be changed in the scenario settings window
displayed by selecting "File" - "Properties". For details about
image quality, sp.32
• In the event that multiple PowerPoint files are selected and dragged-
and-dropped onto the EMP SlideMaker2 program icon, only the file
whose icon is pointed at by the mouse cursor will be made into a
scenario.
• When easy scenario creation is performed, the scenario will be
created from all the slides in the PowerPoint file. If there are slides
you do not wish to project, right-click those cells and select
"Inactivate".
• The following PowerPoint animations can be used in a scenario.
· Fly · Blinds · Box · Checkerboard
· Crawl · Dissolve · Peek · Random Bars
· Spiral · Split · Stretch · Strips
· Swivel · Wipe · Zoom
Animations other than those above are converted to "Cut".
Page 42

EasyMP Operation Guide
What Do You Do When ...
Checking the Scenario Projection Status at the Computer
It is possible to verify on a computer how a created scenario will be played
back on a projector by using the CardPlayer. All the structural elements of
the scenario such as images, animation, background music, etc. can be
played.
PROCEDURE
Open the scenario to verify in EMP SlideMaker2.
1
Select "Scenario Options" - "Scenario Preview".
2
The scenario preview window is displayed.
3
RewindPause
Play
Fast-forwardStop
41
Status bar
Volume
Page 43

EasyMP Operation Guide
What Do You Do When ...
The following table shows the functions of each button.
Stop Stops play and returns to the first slide.
Pause Temporarily stops the slides when "Automatically" is
selected for "Advance". sp.43
Play Starts the scenario preview. In addition, this restarts
stopped or paused scenarios. The following slide is
displayed when "Advance" is set to "On mouse click".
sp.43
Rewind Returns the slide to the one previous to the currently
displayed slide or returns the screen previous to the
animation being executed. The animation effects are not
performed upon return.
Fastforward
Volu me Performs volume control. Adjust the volume of the
Shows the next slide (one after the current slide) or shows
the screen after animation execution. At this time the
animation effects are not executed.
background music.
42
Making Animation Settings
In EMP SlideMaker2, You can add animation effects like PowerPoint to
each cell in the scenario. For the slides with animations that have created in
the PowerPoint, you can set the projection time or other setting for each
divided animation panel. To do that, right-click the target animation in the
animation check window and open the "Cell Properties".
TIP
The animation effects look smoother when you create them in the
PowerPoint file itself and use that file to create a scenario. Use the
method described here to set an animation in a image file, or to set
animation in a slide included in a scenario without maintaining the
animation.
Status bar Displays the state of progress of the scenario on a bar. At
first there is no bar display, and then the bar extends from
left to right as the scenario progresses. The scenario ends at
the rightward end of the bar.
After verification is complete, click the " " button at
4
the top right of the window to close the scenario
preview window.
Page 44

EasyMP Operation Guide
What Do You Do When ...
PROCEDURE
Right-click the required cell or animation, and select
1
"Cell Properties".
To apply the same settings to multiple cells or animations, select
multiple cells by clicking while holding down the [Shift] key or the
[Ctrl] key, and then right-click to select "Cell Properties".
Cell
Displays the properties window. Set the items in the
2
following table, then click the "OK" button.
Advance You can set a transition time between 0 and 1800 seconds
when "Automatically" is selected. When "On mouse click"
is selected, switch slides by pressing the [ ] or [ ]
buttons on the remote control during projection.
Animation
Effects
Selects the effects used when changing screens during
projection.
Selects the "Direction" for the selected animation if needed.
The following are examples of the effects.
Slide In: Screen transition from a designated direction.
Box In: Screen transition from the inside.
43
Animation
Page 45

Showing the Presentation (Using the CardPlayer)
This chapter describes how to project the transferred scenario using EMP SlideMaker2, and how to project image
and movie files.
Files that Can be Projected by the CardPlayer..... 45
Using CardPlayer.................................................. 46
• Starting CardPlayer ..................................................... 46
• Closing CardPlayer...................................................... 47
• CardPlayer Basic Operation ........................................ 48
• Easy Menu Operation (Guide Mode)..................................................49
• Quick Mode Operation........................................................................50
• Rotating the Image ..............................................................................51
Projecting Scenarios............................................. 52
• Playing a Scenario....................................................... 52
• Operation During a Presentation ................................. 53
• Selecting and Projecting Slides from a Scenario.........53
• Editing a Scenario ....................................................... 54
Projecting Image and Movie Files .........................56
• Projecting Image and Movie Files ............................... 56
• Projecting All Image and Movie Files in a Folder In
Sequence (Slideshow) ................................................ 57
Setting Image and Movie Files Display
Conditions and Operation Mode..........................59
Page 46

EasyMP Operation Guide
Files that Can be Projected by the CardPlayer
The following files can be projected using CardPlayer.
TIP
Ty pe
Scenario .sit These are scenario files created by sending
Image .bmp Only 24-bit colour files can be played.
.gif Images with a resolution greater than
.jpg Any version. However, projection is not
File Type
(Extension)
Notes
scenarios.
Also plays audio (.wav) files set as BGM
at the time of scenario creation. You can
also project scenarios that have been
created using the EMP SlideMaker that is
included with the EMP-7950/7850/765/
755/745/737/735/715/505.
1024 × 768 cannot be projected.
possible for CMYK colour formats,
progressive formats, and images with a
resolution in excess of 2560 × 1920.
• JPEG files with the extension ".jpeg" and MPEG files with the
extension ".mpeg" cannot be projected.
• When projecting JPEG files, the image will not be projected clearly
if compression is set too high.
• When playing back movie files, it is recommended that you use a
CompactFlash card or a card-type hard disk drive as the memory
card. If you use some other type of memory card, the movie files may
not play back correctly. In addition, if you use a CompactFlash card
with a slow access speed or a USB storage device (when transmitting
at higher bit rates), the movie files may not play back correctly or the
sound may skip or not be output.
• Use the following formats when formatting the media to be used.
Memory cards: FAT16/32
USB memory device: FAT16
USB hard disk: FAT16
45
.png Projection is not possible for images with
a resolution in excess of 2560 × 1920.
Movie .mpg MPEG2-PS
If the movie exceeds a maximum size of
720 × 576, or is not in the same form as a
DVD (sequence header arranged for each
GOP) it cannot be played back.
The reproducible audio format is MPEG-1
Layer 2. Linear PCM and AC-3 audio
cannot be played back.
DPOFg .mrk For DPOF version 1.10, only files named
AUTPLAYx.mrk (where x is a number
between 0-9) can be projected.
Page 47

EasyMP Operation Guide
Using CardPlayer
CardPlayer lets you play back and project scenarios, image files and movie
files that are stored on memory cards or USB storage devices and images in
digital camera.
This section describes the basic operation of CardPlayer.
Starting CardPlayer
PROCEDURE
Press the [Power] button on the remote control to
1
turn the projector on.
Carry out any of the following procedures.
2
• Insert a memory card into the card slot of the projector.
s"Inserting and Removing Cards" in the User's Guide
Press the [EasyMP] button on the remote control and
3
confirm that "EasyMP" is displayed on the screen.
The CardPlayer will start and display the contents of the memory
card, digital camera or USB storage device. JPEG files are displayed
as thumbnails (file contents are displayed as small images). Other
files or folders are displayed as icons.
46
• Connect a digital camera or USB storage device to the
projector's [USB TypeA] port and turn on the connected
device.
s"Connecting USB Devices (Digital Camera, Hard Disk Drive or
Memory Devices)" in the User's Guide
Page 48

EasyMP Operation Guide
Using CardPlayer
TIP
• If the memory card contains a scenario that is set for autorun, this
scenario will be played back at highest priority. If you would like to
stop it playing back, press the [Esc] button on the remote control.
• If the memory card is not inserted in the card slot on the projector,
or the projector and digital camera (or USB storage device) are not
connected, the following screen will be displayed.
If this happens, insert a memory card or connect a digital camera or
USB storage device so that the screen in step 3 is displayed.
Closing CardPlayer
PROCEDURE
Tilt the [ ] button on the remote control up to point
1
the cursor to the "EJECT" button.
47
• If you connect a digital camera or other USB storage device to the
projector while a memory card is inserted into the projector and
CardPlayer is displaying the contents of the memory card, the
contents of the other device will not be displayed. In the same way, if
you connect a digital camera or other USB storage device and
CardPlayer displays the contents of that USB storage device, it will
not display the contents of a memory card if you subsequently insert
a memory card.
• Some JPEG file may be displayed as icons instead of thumbnails. In
this event, a file icon is displayed.
Page 49

EasyMP Operation Guide
Using CardPlayer
Press the [Enter] button on the remote control.
2
CardPlayer shuts down and the following screen is displayed.
Remove the memory card from the card slot.
3
If a digital camera or USB storage device is
connected, turn the power for the connected device
48
CardPlayer Basic Operation
CardPlayer has the following two operation modes:
• "Guide mode": Displays the Easy Menu for file operation. Play files
and set options by selecting items in the Easy
Menu.
• "Quick mode": Plays files, opens folders, select slides to move
during scenario editing, and select the move
destination by pressing the [Enter] button on the
remote control without using the Easy Menu.
"Guide mode" is the initial setting. See "Setting Image and Movie Files
Display Conditions and Operation Mode" to set the operation mode.
sp.59
See "Quick Mode Operation" for operation of the quick mode. sp.50
off and then disconnect it from the [USB Type A] port
of the projector.
TIP
If you leave the memory card inserted (or USB storage device
connected) when you close CardPlayer and the EasyMP standby
screen is displayed, remove the memory card (or disconnect the USB
storage device) and reinsert or reconnect it before starting
CardPlayer once more.
Page 50

EasyMP Operation Guide
Using CardPlayer
f Easy Menu Operation (Guide Mode)
This section describes the procedures for playing scenarios, image and
movies using the Easy Menu.
PROCEDURE
Tilt the [ ] button on the remote control to position
1
the cursor on the file or folder you want to access.
Cursor
TIP
If all files and folders cannot be displayed at the same time in the
current window, press the [ ] button on the remote control or move
the cursor to the "Next page" button and press the [Enter] button on
the remote control.
To return to the previous screen, press the [ ] button on the remote
control, or position the cursor on the "Previous page" button and
press [Enter] button on the remote control.
Press the [Enter] button on the remote control.
2
Easy Menu is displayed.
Scenario File
TIP
If a scenario, image or movie is played, or a folder opened by just
pressing the [Enter] button, the operation mode is in the "Quick
mode". sp.50
The items displayed on the Easy Menu differ according to the selection.
49
Page 51

EasyMP Operation Guide
Using CardPlayer
When a Scenario is Selected
Play Scenario Plays the scenario. sp.52
Edit Scenario Displays the edit scenario screen. sp.54
Cancel Closes the Easy Menu without doing anything.
When a Image File is Selected
View Image Plays the image. sp.56
Cancel Closes the Easy Menu without doing anything.
When a Movie File is Selected
Play Movie Plays the movie. sp.56
Cancel Closes the Easy Menu without doing anything.
When a Folder is Selected
Open Folder Opens a folder and displays the files within the folder. Select
the folder icon in the upper left, press the [Enter] button,
select "Previous layer" and then press the [Enter] button to
return to the prior screen, before a folder was opened.
50
f Quick Mode Operation
In the quick mode you can execute the main functions directly by pressing
[Enter] on the remote control. Press the [Esc] button on the remote control
to display the Easy Menu, making it possible to execute other functions.
When Selecting Folders or Files
[Enter] Folder: Open
Scenarios, Images, Movies: Play
[Esc] Display Easy Menu
During Editing Scenario
[Enter] Select slides to move, select the destination
[Esc] Display Easy Menu, Cancels the slide migration
Play Slideshow Plays the image and/or movie files inside the folder in order.
sp.57
Options Displays the options setting screen. Set display conditions and
operation mode for playing back slideshows in CardPlayer.
sp.59
Cancel Closes the Easy Menu without doing anything.
Page 52

EasyMP Operation Guide
Using CardPlayer
f Rotating the Image
You can rotate images in JPEG format in 90 degree increments during
playing them by CardPlayer. The rotating function is also available during
the slideshow.
Rotate JPEG images in the following way.
PROCEDURE
Play images or scenarios in JPEG format, or perform
1
a slide show.
To play JPEG format images: s"Projecting Image and Movie Files"
p.56
To play playing scenarios: s"Projecting Scenarios" p.52
To play slideshows: s"Projecting All Image and Movie Files in a
Folder In Sequence (Slideshow)" p.57
During projecting a JPEG image, tilt the [ ] button
2
on the remote control, to the left or right.
The image rotates when the [ ] button is tilted in a certain direction
as shown below.
Right
Left
LeftLeft
51
RightRight
Left
Right
Page 53

EasyMP Operation Guide
Projecting Scenarios
This chapter describes the method for playing a scenario sent to a memory
card or USB storage device, operations during scenario playback, and editing
a scenario.
Playing a Scenario
You need to have finished transferring the scenario to a memory card or
USB storage device using EMP SlideMaker2. sp.38
TIP
Autorun and continuous play can be set to the scenario. sp.38
PROCEDURE
Start the CardPlayer. sp.46
1
The contents of the inserted memory card or USB storage are
displayed.
Tilt the [ ] button on the remote control to position
2
the cursor on the target scenario folder.
Scenario File
Quick mode: Press the [Enter] button.
Play the scenario. If "Advance" is set to
4
"Automatically", once play has continued to the end,
control returns to the file list screen. If "Revive" is
selected, the scenario will repeat from the beginning.
See "Operation During a Presentation" for how to operate the
scenario when "Advance" is set to "On mouse click" and how to
cancel and stop.
52
Press the following buttons on the remote control
3
depending on the operation mode in use.
Guide mode: Press the [Enter] button to display the Easy Menu. Tilt
the [ ] button up and down to select "Play Scenario"
and press the [Enter] button.
TIP
• Change the projection order and display/hide settings in the edit
scenario screen. sp.54
• You can rotate JPEG format images in the scenario during they are
being projected. sp.51
• The movie files that are included in scenarios can be fast-forwarded,
rewound and paused during playback. sp.57
• The slide changing time for scenarios can be set using the
"Advance" command in EMP SlideMaker2. sp.43
Page 54

EasyMP Operation Guide
Projecting Scenarios
Operation During a Presentation
The following operations using the remote control are possible while
playing a scenario.
Screen
Switching
Stopping
Playing
The following functions of the projector can be used when projecting a
scenario or image file with CardPlayer. For details about the various
functions
• Freeze
For details concerning the various functions s"Freeze Function", "A/V
Mute Function", and "E-Zoom Function" in the User’s Guide.
Proceed to the next screen by pressing [Enter] or [ ].
Return to the previous screen by pressing [ ].
The message "Do you want to quit playing the scenario?" is
displayed when you press the [Esc] button. Close by selecting
the "Exit" button and pressing the [Enter] button. Continue
play by selecting the "Return" button and pressing the [Enter]
button.
•A/V Mute • E-Zoom
Tilt the [ ] button on the remote control to position
2
the cursor on the folder that has same name as the
scenario icon.
If you would like to view
slides in this scenario
Select the folder that has same
name as the scenario icon
Press one of the following buttons on the remote
3
control depending on which operating mode is being
used.
Guide mode: When you press the [Enter] button, the Easy menu is
displayed. Tilt the [ ] button up or down to select
"Open Folder" and then press the [Enter] button.
53
Selecting and Projecting Slides from a Scenario
You can list all slides in a scenario, and select image and movie files for
projection.
PROCEDURE
Start CardPlayer. sp.46
1
The contents of the inserted memory card or connected USB storage
device are displayed.
Quick mode: Press the [Enter] button.
Page 55

EasyMP Operation Guide
Projecting Scenarios
The slides contained in the folder will be displayed.
4
Tilt the [ ] button on the remote control to move the
cursor to the slide to be played back.
TIP
Slides that have animation settings (with .EMA extension) will appear
in the folders. Because the folders store an animation file as separate
slides, such slides cannot be specified and projected.
Press one of the following buttons on the remote
5
control depending on which operating mode is being
used.
Guide mode: When you press the [Enter] button, the Easy menu is
displayed. Select "View Image" or "Play Movie" in the
menu, and press the [Enter] button.
The selected slide will be played back. If you press
6
the [Enter] or [Esc] button on the remote control, the
list of slides will be displayed again. To play back a
different slide, repeat the procedure from step 4.
Editing a Scenario
You can make changes to a scenario in the memory card inserted in the
projector or in the USB storage device, such as changing the order of the
slides or hiding individual slides.
PROCEDURE
Tilt the [ ] button on the remote control to position
1
the cursor on the scenario icon to edit.
54
Quick mode: Press the [Enter] button.
Press the following buttons on the remote control
2
depending on the operation mode in use.
Guide mode: Press the [Enter] button to display the Easy Menu.
Select "Edit Scenario" in the menu, and press the
[Enter] button.
Quick mode: Press the [Esc] button to display the Easy Menu. Select
"Edit Scenario" in the menu, and press the [Enter]
button.
Page 56

EasyMP Operation Guide
Projecting Scenarios
This displays the edit scenario screen.
3
Position the cursor on the desired slide.
To change the order of slides → Continue to step 4
To hide the slides → Continue to step 6
Press the following buttons on the remote control
4
depending on the operation mode in use.
Guide mode: Press the [Enter] button to display the Easy Menu.
Select "Move Files" in the menu, and press the [Enter]
button.
Quick mode: Position the cursor on the slide to be moved and press
the [Enter] button.
Position the cursor on the destination and press the
5
[Enter] button on the remote control.
To hide slides, position the cursor on the desired
6
slide, and depending on the operation mode being
used, press the following buttons on the remote
control.
Guide mode: Press the [Enter] button to display the Easy Menu. In
the menu, select "Show/Hide" and press the [Enter]
button.
Quick mode: Press the [Esc] button to display the Easy Menu. In the
menu, select "Show/Hide" and press the [Enter] button.
Hide mark
55
Select the slide to be
moved
Cursor selecting the
destination
To exit editing, tilt the [ ] button on the remote
7
control to position the cursor on the "OK" button,
then press the [Enter] button on the remote control.
The scenario is saved with the edited content, and the display returns
to the file list screen.
In order not to save the changes, position the cursor on the "Cancel"
button and press the [Enter] button on the remote control.
Page 57

EasyMP Operation Guide
Projecting Image and Movie Files
Image files from a digital camera and image files and movie files that are
stored on a memory card or USB storage device can be projected using
CardPlayer by either of the following two methods.
• Projecting images and movie files
This is a function to project single file.
• Sequential projection of image and movie files in a folder (slideshow)
This is a function for projecting the file contents within a folder, in order, one
file at a time.
Caution
The memory card and the USB storage device are accessed
frequently when playing back movie files.
Do not remove the memory card from the card slot or disconnect the
USB storage device at this time, CardPlayer may not operate
correctly.
Projecting Image and Movie Files
PROCEDURE
Start the CardPlayer. sp.46
1
The contents of the inserted memory card, connected digital camera
or connected USB storage device are displayed.
Tilt the [ ] button on the remote control to move the
2
cursor to the image file or movie file to be projected.
Press the following buttons on the remote control
3
depending on the operation mode in use.
Guide mode: Press the [Enter] button to display the Easy Menu.
Select "View Image" or "Play Movie" in the menu, and
press the [Enter] button.
56
Quick mode: Press the [Enter] button.
Image file
Page 58

EasyMP Operation Guide
Projecting Image and Movie Files
The image file or movie file will be projected.
4
Pressing the [Enter] or [Esc] buttons on the remote
control returns the display to the file list screen.
TIP
• JPEG format images can be rotated during projection. sp.51
• The remote control can be used to carry out the following operations
when playing back movie files.
Fast-forward: Tilt the [ ] button to the right.
Rewind: Tilt the [ ] button to the left.
Freeze (pause): Tilt the [ ] button up.
Three fast-forward/rewind speeds are available, and the speed
changes each time the button is pressed.
To return to normal playback, press the [Enter] button.
Audio is not output while fast-forwarding, rewinding or pausing is
in progress.
Projecting All Image and Movie Files in a Folder In Sequence (Slideshow)
You can project the image and movie files in a folder one at a time, in
order. This function is called "Slideshow". Execute the slideshow by the
following procedure.
TIP
You can set the files to be projected repeatedly, and also set display
conditions such as what effects to display while files are being
switched. To change the movie files and image files automatically
when you run a slideshow, set the "Screen switching time" in
CardPlayer option menu to other than "No". Default setting:"No".
sp.59
PROCEDURE
Start the CardPlayer. sp.46
1
The contents of the inserted memory card, connected digital camera
or connected USB storage device are displayed.
Tilt the [ ] button to position the cursor on the folder
2
to perform the slideshow.
57
Page 59

EasyMP Operation Guide
Projecting Image and Movie Files
Press the following buttons on the remote control
3
depending on the operation mode in use.
Guide mode: Press the [Enter] button to display the Easy Menu.
Select "Play Slideshow" in the menu, and press the
[Enter] button.
Quick mode: Press the [Esc] button to display the Easy Menu. Select
"Play Slideshow" in the menu, and press the [Enter]
button.
The slideshow will be run and the image and movie
4
files in the folder will be projected in sequence one by
one.
When the last file is projected, the file list will be displayed again
automatically. If you set "Repeat Playback" to "ON" in the Options
window, projection will start from the beginning again when the end
is reached. sp.59
58
Just as with a scenario, You can proceed to the next screen, return to
the previous screen, or stop playback during projection of a
slideshow. s "Operation During a Presentation" p.53
TIP
If the "Screen switching time" setting has been set to "No", the files
will not change automatically when you run a slideshow. Press the
[Enter] or [ ] button on the remote control to continue to the next
file.
Page 60

EasyMP Operation Guide
Setting Image and Movie Files Display Conditions and Operation Mode
You can set the display conditions and operation mode for when playing back
image or movie files as a slideshow in CardPlayer. In this option, you can set:
Continuous Play, Screen switching time, Display order, Effect, and Mode
switching.
PROCEDURE
Tilt the [ ] button on the remote control to position
1
the cursor on the folder where display conditions are
to be set.
Press the following buttons on the remote control
2
depending on the operation mode in use.
Guide mode: Press the [Enter] button to display the Easy Menu.
Select "Options" on the menu, and press the [Enter]
button.
Quick mode: Press the [Esc] button to display the Easy Menu. Select
"Options" on the menu, and press the [Enter] button.
Set each of the items.
3
Enable settings by positioning the cursor on the desired item and
pressing the [Enter] button on the remote control.
Details of the items are given below.
Continuous
Play
Screen
switching time
Determines whether to repeat the slideshow.
This sets the time for a single file to be displayed
when running a slideshow. Once the time that is set
here has passed, the next file is displayed
automatically. If set to "No", the files will not change
automatically when you run a slideshow. When set to
"No", press the [Enter] or [ ] button on the remote
control to display the next file.
59
Display order Sets the order of the files to be displayed.
Effect This sets the transition effects between slides.
Page 61

EasyMP Operation Guide
Setting Image and Movie Files Display Conditions and Operation Mode
Mode switching Switches the operation mode in CardPlayer.
The initial setting is "Guide mode".
See "Easy Menu Operation (Guide Mode)"
(sp.49) for "Guide mode" operations.
See "Quick Mode Operation" (sp.50) for "Quick
mode" operations.
Position the cursor on the "OK" button by tilting the
4
[ ] button on the remote control up, then press the
[Enter] button.
The settings are applied.
If you do not wish to apply the settings, position the cursor on the
"Cancel" button and press the [Enter] button.
60
TIP
The CardPlayer option settings can also be carried out from the
configuration menus.
Page 62

Using a Computer to Set Up, Monitor and Control Projectors
This chapter describes how to use a computer that is connected to the network to change projector settings and to
control the projector.
Changing Settings Using a Web Browser
(EasyWeb) .......................................................... 62
• Displaying EasyWeb.................................................... 62
• Using the Network Screen Toolbar.....................................................62
• Entering the IP Address of the Projector ............................................63
•
Projector Setup............................................................ 63
• Configuration Menu Items that can not be set by the Web Browser ..63
• Network Setup Items that can be set by the Web Browser .................63
•
Projector Control.......................................................... 64
Using the Mail Notification Function to Report
Problems............................................................. 65
• Setting Mail Notification Function ................................ 65
• If a Problem Notification is Sent by Mail ...................... 67
Management Using SNMP ................................... 68
Page 63

EasyMP Operation Guide
Changing Settings Using a Web Browser (EasyWeb)
You can set up and control the projector using the web browser of a computer
that is connected to the projector via a network. Setup and control operations
can be performed remotely if this function is used. In addition, since you can
use the computer's keyboard, entering characters required for the setup is
easier than using the remote control.
Use Microsoft Internet Explorer 6.0 or later as the web browser. If using a
macintosh, you can also use safari. However, if using safari under Macintosh
10.2.8, some of the EasyWeb radio buttons may not display correctly.
TIP
Setup and control are possible using a web browser if "Standby
Mode" is set to"Network ON" in the "Extended" menu of the
projector's configuration menu, even if the projector is in standby
mode (when the power is off).
f Using the Network Screen Toolbar
PROCEDURE
Connects a computer to the projector via a network.
1
s"Connecting the Computer and Projector via the
Network" in the EasyMP Network Setup Guide
Click the "Projector Operation URL Display" icon in
2
the Network Screen toolbar.
Web browser starts and the browser page for setup and control is
displayed.
62
Displaying EasyWeb
Display EasyWeb by either of the following procedures.
TIP
If the web browser you are using is set up to connect via a proxy
server, the EasyWeb cannot be displayed. To use the EasyWeb, you
need to make network connection settings with other than a proxy
server.
Projector setup
Projector control
Page 64

EasyMP Operation Guide
Changing Settings Using a Web Browser (EasyWeb)
f Entering the IP Address of the Projector
When the projector’s network advanced settings have been set to "Access
point mode", or using "Wired LAN connection mode", You can specify the
target projector with its IP to open the EasyWeb.
PROCEDURE
Start the web browser on the computer.
1
Enter the IP address of the projector in the address
2
input box of the Web browser, and press the [Enter]
key on the computer keyboard.
EasyWeb is displayed.
• "Extended" - "Language"
• "Reset" - "All Reset", "Lamp-Hours Reset"
The items available on each menu are the same as on the configuration
menu of the projector.
s"List of Configuration Menu Commands" in the User's Guide
f Network Setup Items that can be set by the Web Browser
You can make all of the network-related settings in the EasyMP
configuration setting window. However, the "MAC Address" will not be
displayed.
The details for each setting are the same as for the EasyMP configuration
setting window.
LAN)" and "Connecting in Access Point Mode or Wired LAN Mode" in
the EasyMP Network Setup Guide
However, the following item can only be set using EasyWeb.
s"Connecting Using Easy Connect Mode (Wireless
63
Projector Setup
You can make settings of items in the projector's configuration menus and
the EasyMP configuration menu window. The setting contents are applied
to the configuration menus and the EasyMP configuration settings.
f Configuration Menu Items that can not be set by the Web
Browser
All configuration menu items can be set with the exception of the
following items.
• "Signal" - "Preset"
• "Setting" - "Pointer"
• "Setting" - "Keystone" - "Quick Corner"
• Registering a user's logo using "Extended" - "User's Logo"
Priority
gateway
If you change the settings, click the "Apply" button to apply the new
settings.
Specifies which network to use from "Wired LAN" or
"Wireless LAN" to send problem notifications by SNMP traps
or e-mail.
For network connections using EMP NS Connection, you can
also specify different network connections.
Page 65

EasyMP Operation Guide
"F
"P
Changing Settings Using a Web Browser (EasyWeb)
Projector Control
EasyRemote can be used to control the projector in the same way as the
remote control. s"Remote Control" in the User's Guide
reeze" button
Source buttons
"A/V Mute" button
ower" button
64
Page 66

EasyMP Operation Guide
Using the Mail Notification Function to Report Problems
By setting the mail notification function in the EasyMP network setting,
notification messages will be sent to preset e-mail addresses when a problem
or warning occurs with a projector. This will enable the operator to be notified
of problems with projectors even at locations away from the projectors.
TIP
• Up to a maximum of three notification destinations (addresses)
can be recorded, and notification messages can be sent to all three
destinations at once.
• If a critical problem develops with a projector which causes it to
suddenly stop working, it may not be possible for the projector to
send a message notifying an operator of the problem.
• If "Standby Mode" in the projector's "Extended" menu is set to
"Network ON", monitoring can be carried out even when the
projector is in standby mode (when the power is off).
Setting Mail Notification Function
Check the following points before making the mail notification function
settings.
• Network settings have been made to enable the computer and
projector to connect via access point mode or wired LAN connection
mode.
s"Connecting in Access Point Mode or Wired LAN Mode" in the EasyMP
Network Setup Guide
PROCEDURE
Set the projector to EasyMP standby screen.
1
s"Setting the Projector to Connection Standby Mode" in the
EasyMP Network Setup Guide
65
Check that the "Config" button in the bottom-right
2
corner of the screen is selected, and then press the
[Enter] button on the remote control.
Move the cursor to "Network" - "Mail", and then press
3
the [Enter] button on the remote control.
Page 67

EasyMP Operation Guide
Using the Mail Notification Function to Report Problems
Move the cursor to the item to be set, and then press
4
the [Enter] button to set the item.
Some menu items require characters or numerals to be entered.
See "Entering Characters and Numerals" (sp.26) for details on
entering characters and numerals.
Mail
Notification
Settings
IP address of
SMTP server
Port Number Enter the port number for the SMTP server. The default setting
Destination
address 1/2/3
Select "ON" to receive e-mail notifications.
Enter the IP address for the SMTP server used by the
projector.
You can enter numbers from 0 to 255 in each field of the IP
address. However, the following IP addresses cannot be used:
127.x.x.x, 224.0.0.0 to 255.255.255.255 (x is a number from 0
to 255.)
is "25".
You can enter a valid number from 1 to 65535.
A maximum of three e-mail addresses for destination
computers can be recorded.
An e-mail address can consist of up to 53 single-byte
alphanumeric characters.
You cannot enter any more than 32 characters at the EasyMP
configuration setting screen. You can enter more than 32
characters by making the setting using EasyWeb. sp.62
66
Setting a
Notification
Event
Use this to select the events that cause a mail notification to be
sent when a problem or warning occurs with the projector.
When a selected problem or warning occurs with the projector,
e-mail messages are sent to the addresses entered in
"Destination address 1/2/3" to give notification that a problem
or warning has occurred.
You can select more than one of the items displayed.
*For items which have a "Clear" button displayed, you can select the
"Clear" button and press the [Enter] button on the remote control to clear
the entered settings.
Page 68

EasyMP Operation Guide
Using the Mail Notification Function to Report Problems
Press the [ ] button on the remote control, move the
5
cursor to the "OK" button, and then press the [Enter]
button.
The EasyMP standby screen will be displayed again.
If a Problem Notification is Sent by Mail
If an e-mail message with "EPSON Projector" in the subject line is sent to
the IP addresses
message is a notification message saying that there is a problem with the
projector.
The following information will be contained in the body of the message.
Line 1 : The name of the projector where the problem has occurred
Line 2 : The IP address that has been set for the projector where the
problem has occurred
Line 3 : Details of the problem
The details of the problem are listed on separate lines. The following table
shows the details that are given in the message for each item.
g that have been set as mail notification destinations, the
67
Message*/Cause Remedy
Internal error s"Reading the Indicators "in the User’s Guide
Fan related error
Sensor error
Lamp cover is open.
Lamp timer failure
Lamp out
Internal temperature
error
High-speed cooling in
progress
Lamp replacement
notification
No-signal No image signals are being input to the projector.
Check the connection status or check that the
power for the signal source is turned on.
*A (+) or (–) will be appended to the start of the message.
(+) : When a projector problem has occurred
(–) : When a projector problem has been solved
Page 69

EasyMP Operation Guide
Management Using SNMP
By setting SNMP in the EasyMP network setting, notification messages will
be sent to preset e-mail addresses when a problem or warning occurs with
projectors. This is useful when controlling projectors centrally at a point
distant from them.
TIP
• The management using the SNMP must be handled by the network
administrator or someone who is familiar with network.
• The SNMP function to monitor the projector require SNMP
Manager to be installed in the computer.
• The managing function using SNMP cannot be used in a wireless
LAN Easy connect mode.
• Up to two destination IP addresses can be recorded, and so that if
the notification message cannot be sent to the first IP address
specified, it will be sent to the second IP address instead.
Move the cursor to the item to be set, and then press
4
the [Enter] button to set the item.
See "Entering Characters and Numerals" (sp.26) for details on
entering characters and numerals.
68
PROCEDURE
Set the projector to EasyMP standby screen.
1
s"Setting the Projector to Connection Standby Mode" in the
EasyMP Network Setup Guide
Check that the "Config" button in the bottom-right
2
corner of the screen is selected, and then press the
[Enter] button on the remote control.
Move the cursor to "Network" - "SNMP · PJLink", and
3
then press the [Enter] button on the remote control.
SNMPg
trap IP
addressg
1/2
*For items which have a "Clear" button displayed, you can select the
"Clear" button and press the [Enter] button on the remote control to
clear the entered settings.
Enter the IP address of the computer to use for
notification of SNMP traps
If a notification cannot be sent to the IP address that is set
for "SNMP trap IP address 1", then it is sent to the IP
address that has been set for "SNMP trap IP address 2".
You can enter numbers from 0 to 255 in each field of the
IP address. However, the following IP addresses cannot
be used: 127.x.x.x, 224.0.0.0 to 255.255.255.255 (x is a
number from 0 to 255.)
g.
Page 70

EasyMP Operation Guide
Management Using SNMP
Press the [ ] button on the remote control, move the
5
cursor to the "OK" button, and then press the [Enter]
button.
The EasyMP standby screen will be displayed again.
69
Page 71

EasyMP Operation Guide
70
All rights reserved. No part of this publication may be reproduced,
stored in a retrieval system, or transmitted in any form or by any
means, electronic, mechanical, photocopying, recording, or
otherwise, without the prior written permission of SEIKO EPSON
CORPORATION. No patent liability is assumed with respect to the
use of the information contained herein. Neither is any liability
assumed for damages resulting from the use of the information
contained herein.
Neither SEIKO EPSON CORPORATION nor its affiliates shall be
liable to the purchaser of this product or third parties for damages,
losses, costs, or expenses incurred by purchaser or third parties as a
result of: accident, misuse, or abuse of this product or unauthorized
modifications, repairs, or alterations to this product, or (excluding the
U.S.) failure to strictly comply with SEIKO EPSON
CORPORATION’s operating and maintenance instructions.
General Notice:
EPSON is a registered trademark of SEIKO EPSON
CORPORATION.
EasyMP is a trademark of SEIKO EPSON CORPORATION.
Macintosh, Mac, and iMac are registered trademarks of Apple
Computer, Inc.
IBM is a registered trademark of International Business Machines
Corporation.
Windows, WindowsNT and VGA are trademarks or registered
trademarks of Microsoft Corporation in the United States.
Dolby is a registered trademark of Dolby Laboratories.
Cisco Systems is a registered trademark of Cisco Systems Inc. in the
United States of America and other countries.
Pixelworks and DNX are trademarks of Pixelworks Inc.
Portions of this software are based in part on the work of the
Independent JPEG Group.
Portions Copyright©2003 Instant802 Networks Inc. All rights
SEIKO EPSON CORPORATION shall not be liable against any
damages or problems arising from the use of any options or any
consumable products other than those designated as Original EPSON
Products or EPSON Approved Products by SEIKO EPSON
CORPORATION.
SEIKO EPSON CORPORATION 2005. All rights reserved.
©
reserved.
Other product names used herein are also for identification purposes
only and may be trademarks of their respective owners. EPSON
disclaims any and all rights in those marks.
This product uses open source software.
 Loading...