

Page 1
®
SERVICE MANUAL
SERVICE MANUAL
SERVICE MANUALSERVICE MANUAL
Copy Server
EPSON Color Copy Station 8200
SEOT99005
Page 2

Notice
o
All rights reserved. No p art of t his manual may be reprod uced, stored i n a ret rieval syste m, or trans mit ted in any form or by any means electronic,
mechanical, photocopying, or otherwise, without the prior written permission of SEIKO EPSON CORPORATION.
o
All effort have been made to ensure the accuracy of the contents of this manual. However, should any errors be detected, SEIKO EPSON would
greatly appreciate being informed of them.
o
The contents of this manual are subject to change without notice.
o
All effort have been made to ensure the accuracy of the contents of this manual. However, should any errors be detected, SEIKO EPSON would
greatly appreciate being informed of them.
o
The above not withstanding SEIKO EPSON CORPORATION can assume no responsibility for any errors in this manual or the consequences
thereof.
EPSON is a registered trademark of SEIKO EPSON CORPORATION.
General Notice: Other product names used herein are for identification purpose only and may be trademarks or registered trademarks of their
respective owners. EPSON disclaims any and all rights in those marks.
Copyright © 1999 SEIKO EPSON CORPORA TION. Printed in Japan.
Page 3

PRECAUTIONS
Precautionary notations throughout the text are categorized relative to 1)Personal injury and 2) damage to equipment.
DANGER
WARNING
The precautionary measures itemized below should always be observed when performing repair/maintenance procedures.
Signals a precaution which, if ignored, could result in serious or fatal personal injury. Great caution should be exercised in
performing procedures preceded by DANGER Headings.
Signals a precaution which, if ignored, could result in damage to equipment.
DANGER
1. ALWAYS DISCONNECT THE PRODUCT FROM THE POWER SOURCE AND PERIPHERAL DEVICES PERFORMING ANY
MAINTENANCE OR REPAIR PROCEDURES.
2. NO WORK SHOULD BE PERFORMED ON THE UNIT BY PERSONS UNFAMILIAR WITH BASIC SAFETY MEASURES AS DICTATED
FOR ALL ELECTRONICS TECHNICIANS IN THEIR LINE OF WORK.
3. WHEN PERFORMING TESTING AS DICTATED WITHIN THIS MANUAL, DO NOT CONNECT THE UNIT TO A POWER SOURCE UNTIL
INSTRUCTED TO DO SO. WHEN THE POWER SUPPLY CABLE MUST BE CONNECTED, USE EXTREME CAUTION IN WORKING ON
POWER SUPPLY AND OTHER ELECTRONIC COMPONENTS.
WARNING
1. REPAIRS ON EPSON PRODUCT SHOULD BE PERFORMED ONLY BY AN EPSON CERTIFIED REPAIR TECHNICIAN.
2. MAKE CERTAIN THAT THE SOURCE VOLTAGES IS THE SAME AS THE RATED VOLTAGE, LISTED ON THE SERIAL NUMBER/
RATING PLATE. IF THE EPSON PRODUCT HAS A PRIMARY AC RATING DIFFERENT FROM AVAILABLE POWER SOURCE, DO NOT
CONNECT IT TO THE POWER SOURCE.
3. ALWAYS VERIFY THAT THE EPSON PRODUCT HAS BEEN DISCONNECTED FROM THE POWER SOURCE BEFORE REMOVING OR
REPLACING PRINTED CIRCUIT BOARDS AND/OR INDIVIDUAL CHIPS.
4. IN ORDER TO PROTECT SENSITIVE MICROPROCESSORS AND CIRCUITRY, USE STATIC DISCHARGE EQUIPMENT, SUCH AS
ANTI-STATIC WRIST STRAPS, WHEN ACCESSING INTERNAL COMPONENTS.
5. REPLACE MALFUNCTIONING COMPONENTS ONLY WITH THOSE COMPONENTS BY THE MANUFACTURE; INTRODUCTION OF
SECOND-SOURCE ICs OR OTHER NONAPPROVED COMPONENTS MAY DAMAGE THE PRODUCT AND VOID ANY APPLICABLE
EPSON WARRANTY.
Page 4
About This Manual
CAUTION
CHECK
PO INT
This manual describes basic functions, theory of electrical and mechanical operations, maintenance and repair procedures of EPSON Color Copy
Station 8200. The instructions and procedures included herein are intended for the experienced repair technici ans, and attention should be given to
the precautions on the preceding page.
Contents
This manual consists of six chapters and Appendix.
CHAPTER 1. PRODUCT DESCRIPTIONS
Provides a general overview and specifications of the
product.
CHAPTER 2. OPERATING PRINCIPLES
Describes the theory of electrical and mechanical
operations of the product.
CHAPTER 3. TROUBLESHOOTING
Provides the step-by-step procedures for the
troubleshooting.
CHAPTER 4. DISASSEMBLY AND ASSEMBLY
Describes the step-by-step procedures for
disassembling and assembling the product.
CHAPTER 5. ADJUSTMENTS
Provides Epson-approved methods for adjustment.
CHAPTER 6. MAINTENANCE
Provides preventive maintenance procedures and the
lists of Epson-approved lubricants and adhesives
required for servicing the product.
APPENDIX
Provides the following additional information for
reference:
• Connector pin assignments
• Electric circuit boards components layout
• Exploded diagram
• Electrical circuit boards schematics
Symbols Used in This Manual
Various symbols are used throughout this manual either to provide
additional information on a specif ic topic or to warn of possible danger
present during a procedure or an action. Be aware of all symbols when
they are used, and always read WARNING, CAUTION or NOTE
messages.
W ARNING
Indicates an operating or maintenance procedure, practice
or condition that, if not strictly observed, coul d result in in jury
or loss of life.
Indicates an operating or maintenance procedure, practice,
or condition that, if not strictly observed, could result in
damage to, or destruction of, equipment.
May indicate an operating or maintenance procedure,
practice or condition that is necessary to accomplish a task
efficiently. It may also provide additional information that is
related to a specific subject, or comment on the results
achieved through a previous action.
Page 5

Revision Status
Revision Issued Date Description
Rev. A August 4, 1999 First Release
Page 6

EPSON Color Copy Station 8200 Revision A
Product Description
Outline .............................. ...... .............................................. ...... ....... ...... ..... 4
Features ................................................................................................... 4
System Diagram ........................ ...... ....... ...... ....... ...... ....... ...... ....... ...... ..... 5
About EPL-C8200 ..................................................... ....... ...... ....... ........... 5
Basic Specifications .. ............................................. ...... ....... ...... .................. 6
Local Copy Speed .. ............................................. ...... ....... ...... .................. 6
Electric Specifications .............................................................................. 6
Safety, EMC ............................................................................................. 6
Mechanical Specifications ........................................................................ 6
Resistance to Electric Noise ..................................................................... 6
Environment Conditions ........................................................................... 6
Reliability ...................... ....................................................................... ..... 7
Control Panel Unit .................................................................................... 7
Interfaces ...................... ............. ............. ............. ............. ............. ........... 7
SCSI ..................................................................................................... 7
Printer Interface .................................................................................... 8
Control Panel Interface ... ....... ...... .............................................. ...... ..... 8
Functions ............ ....... ...... ...... .............................................. ...... ....... ........... 9
Functions Overview .................................................................................. 9
Local Copy ............................................................................................. 11
Network TWAIN ...................................................................................... 19
Web Status ............................................................................................. 20
Web Admin ............................................................................................. 22
Web Upgrade ......................................................................................... 24
Money Recognition ................................................................................. 25
User Settings .......................................................................................... 25
User Settings on the Operational Panel ............................................. 25
Machine Functions ................................................................................. 27
H/W Check ......................................................................................... 27
Fixed IP Setting .................................................................................. 27
Firmware Update by Board to Board Copy ......................................... 28
Appearance ................................................................................................ 29
Main Unit ................................................................................................ 29
Control Panel .......................................................................................... 29
Accessories ............................................................................................... 30
Product Component ............................................................................... 30
Bundled Software ......................................... ....... ...... ....... ...... ....... ...... ... 30
Attenti on fo r forgery ................................................................................. 31
Operating Principles
Operating Principles ................................................................................. 33
Copy System .......................................................................................... 33
Control Circuit ........................................................................................ 33
ISA Board ............................................................................................... 33
ECP Board ......................................................................................... 34
Trouble Shooting
Error Message ........................................................................................... 37
Printer Error of Local Copy Mode ........................................................... 37
Scanner Error of Local Copy Mode ........................................................ 43
Network TWAIN Error ............................................................................ 43
Copy System Error ................................................................................. 43
Disassembly and Assembly
Overview .................................................................................................... 45
Precaution .............................................................................................. 45
Tools ...................................................................................................... 45
Disassembly and Assembly ..................................................................... 46
Upper Case Removal ............................................................................. 46
Optional Board Removal ........................................................................ 46
ISA Board Removal ............................................................................ 46
SCSI Board Removal ......................................................................... 47
Network Board Removal .................................................................... 47
ECP Board Removal .......................................................................... 47
Power Supply Unit Removal .................................................................. 48
Mother Board Removal .......................................................................... 48
Panel Board Removal ............................................................................ 49
Firmware Version-Up ................................................................................ 50
BIOS Re-Setting ......................................................................................... 51
Lithium Battery Volume Check ............................................................... 51
Lithium Battery Exchange ...................................................................... 51
BIOS Re-Setting ..................................................................................... 52
1
Page 7

EPSON Color Copy Station 8200 Revision A
Mother Board Jumper Setting ................................................................ 55
Adjustment
Adjustment ................................................................................................. 57
Hardware Check ..................................................................................... 57
LCD Panel Check ........... ....... ...... ....... ...... ....... ...... ....... ...... ................ 57
ISA Board Check ................................................................................ 60
ECP Board Check .............................................................................. 60
Flash ROM Sum Check ...................................................................... 62
H/W All Check Printing ....................................................................... 62
Size Collection (Adjusting the Precision) ................................................ 63
Maintenance
Maintenance ............................................................................................... 66
Appendix
Unit Connection ......................................................................................... 68
Component Layout .................................................................................... 69
Exploded Diagram ..................................................................................... 71
Electric Circuit Diagrams .......................................................................... 72
2
Page 8

PRODUCT DESCRIPTION
CHAPTER
1
Page 9
EPSON Color Copy Station 8200 Revision A
n
1.1 Outline
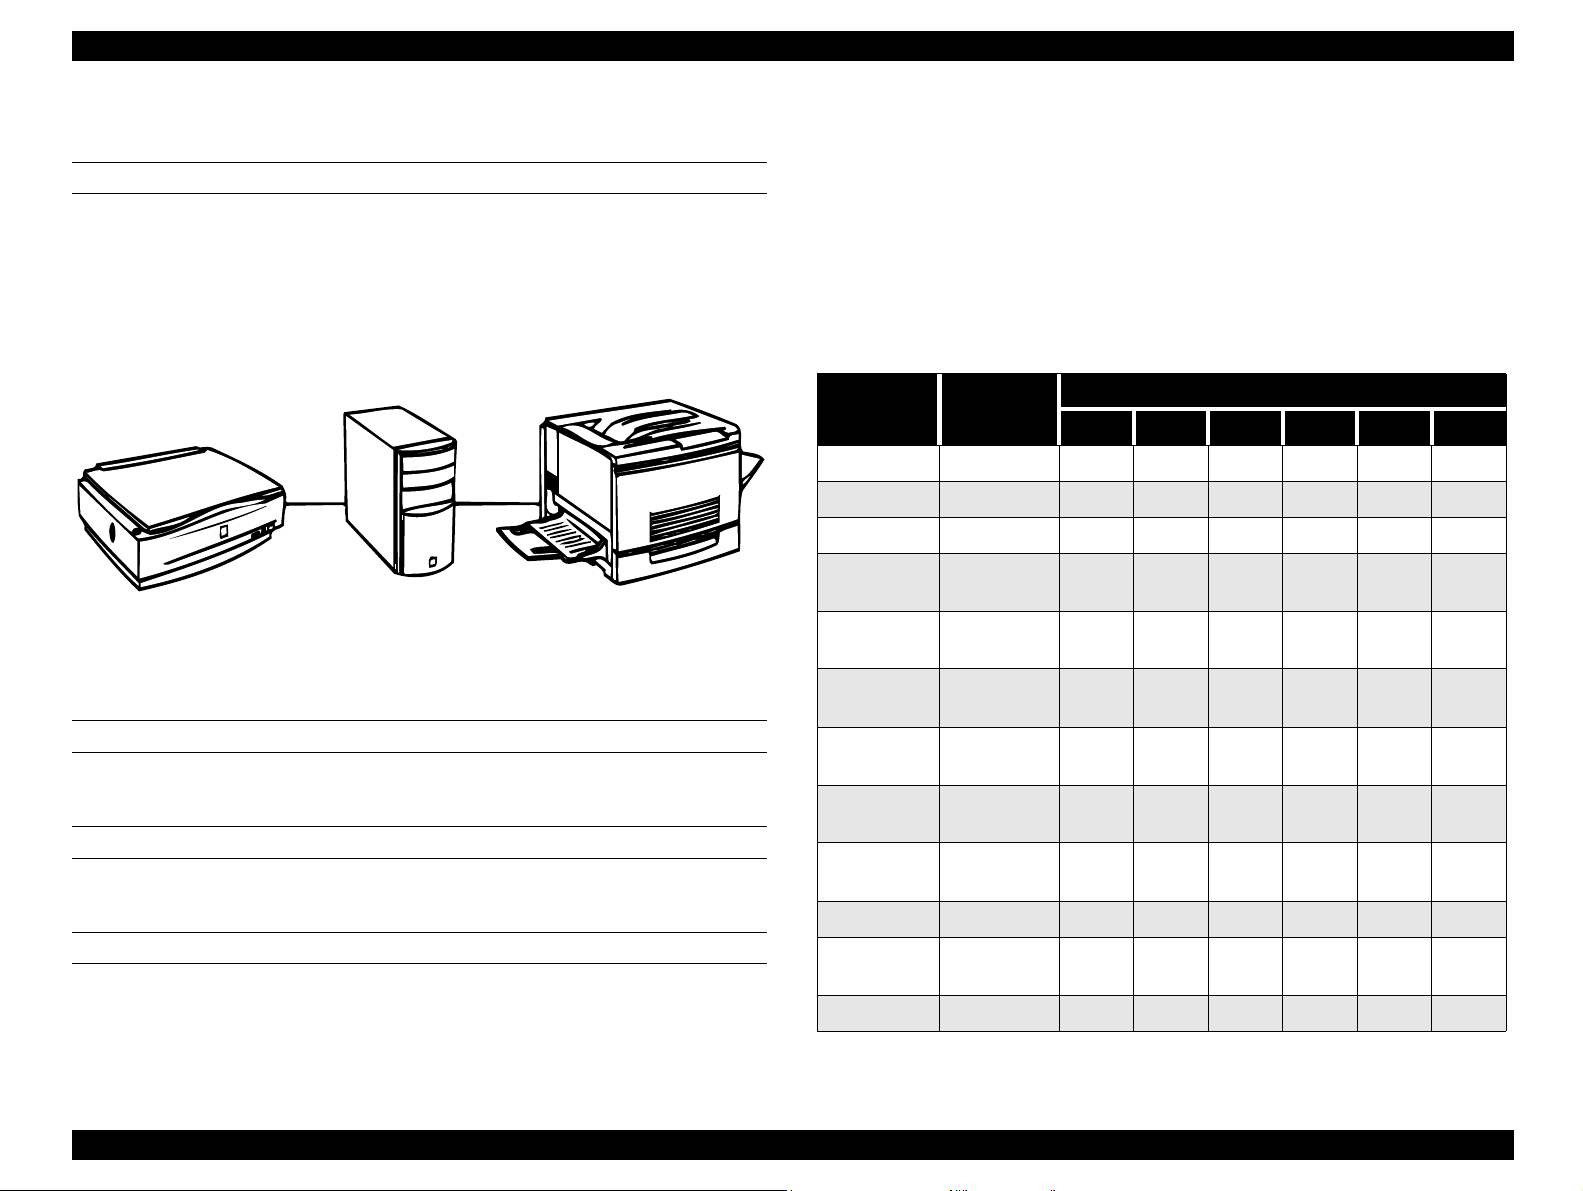
The Color Copy Station 8200 can be connected to EPSON scanner and EPSON
color laser printer. It works not only as a stand-alone copier also as network
scanner adapter. Further more, it offers some web-based functions to confirm
the status of the system, to set the initial parameters, and to update the
system firmware.
8 Job memories to save user-defined copy parameters
n
Standard copy protection for bills
n
Network Scanning via network TWAIN driver
n
Useful web-based utilities
WebStatus / WebAdmin / WebUpgrade
n
Flash-ROM update by Board to Board copy.
1.1.1 Features
o
Target Scanner and Printer
n
EPSON Color Laser Page Printer: EPL-C8200
n
EPSON A3-size Scanner: GT-10000
o
Controller
n
PC/AT architecture
n
CPU: K6-2 300MHz
n
RAM-DIMM 32MB, EEPROM 512B, Flash ROM 12MB
n
IEEE1284 ECP Bi-directional interface for printer
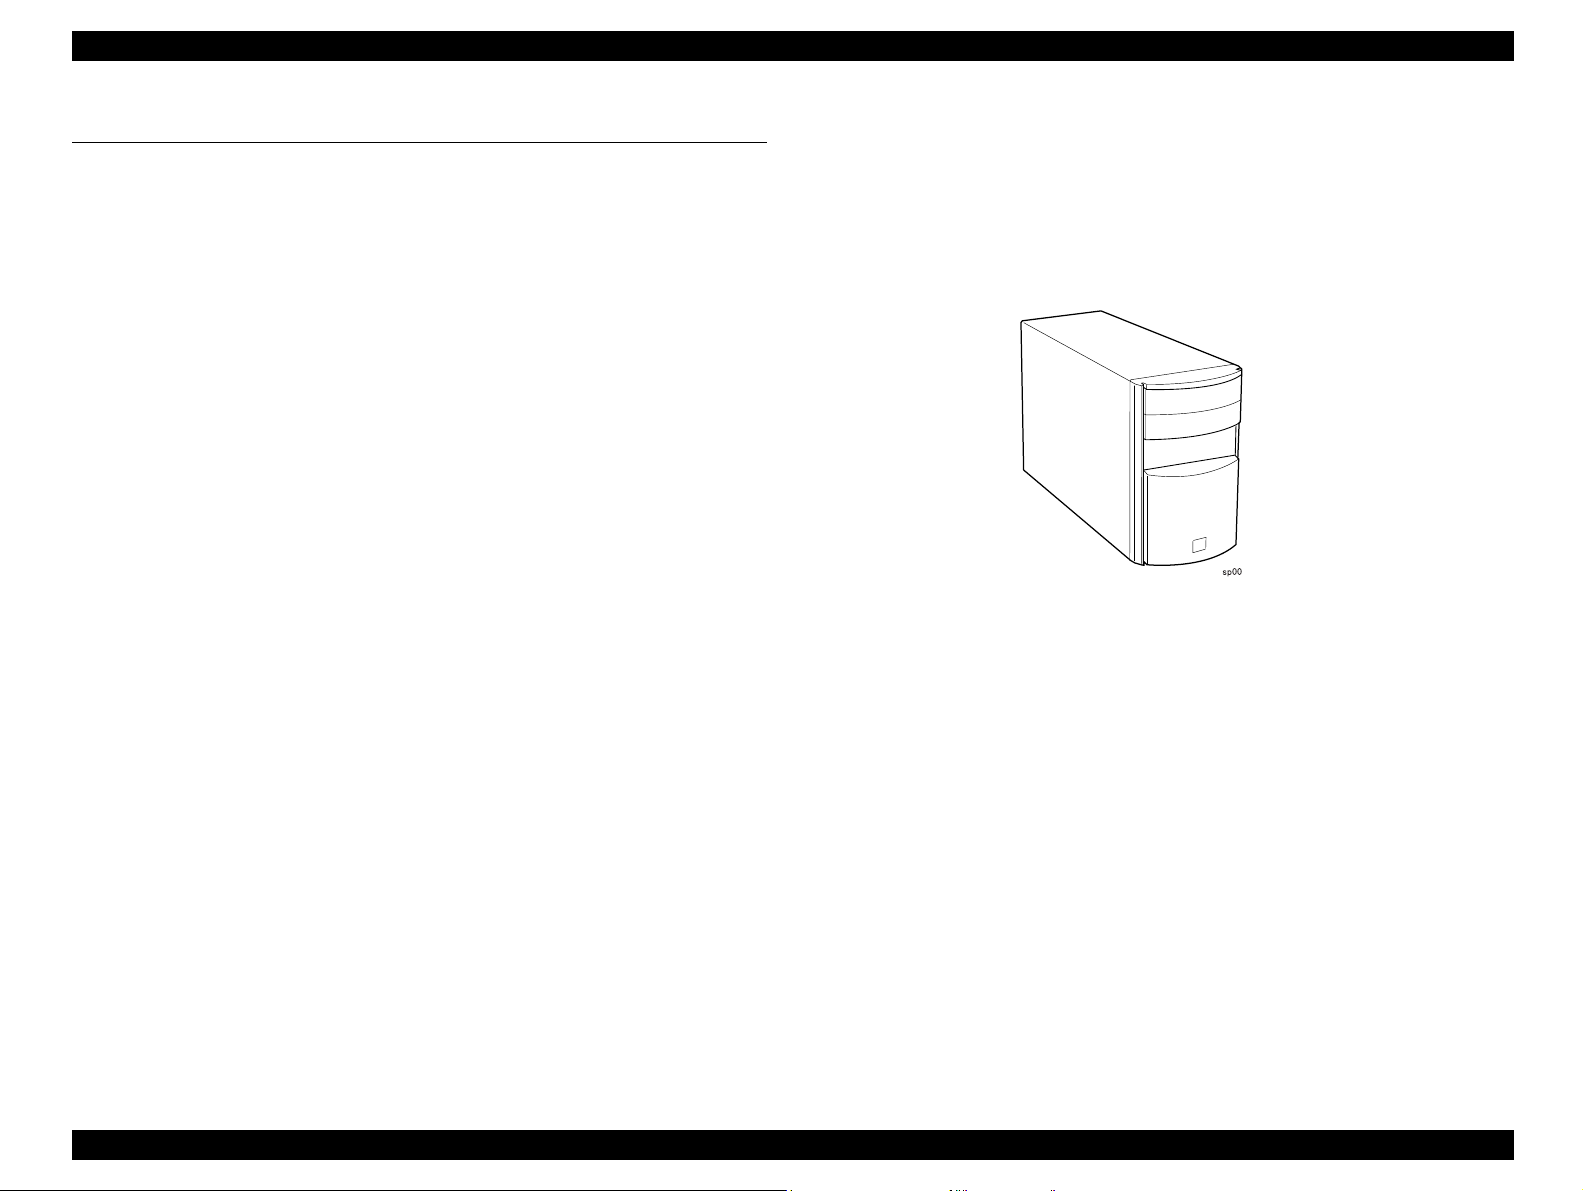
Figure 1-1. Exterior View of CCS 8200
n
Fast SCSI interface for scanner
n
Ethernet 100Base-TX / 10-Base-T interface
n
Special interface for control panel
n
High speed Text-enhancement processing ASIC
n
High speed Moire red uction processing ASIC
n
High speed Edge Sharpening processing ASIC
n
High speed color ma tching ASIC
o
Software
n
Copy mode matching with various kinds of documents
PHOTO / TEXT / MA GAZINE / MAP / FINE
n
Zoom 25% to 400% in increments of 1%
n
Image Quality Control
Contrast / Brightness / Sharpness / RGB Balance / Croma / Hue
Product Description Outline 4
Page 10
EPSON Color Copy Station 8200 Revision A
1.1.2 System Diagram
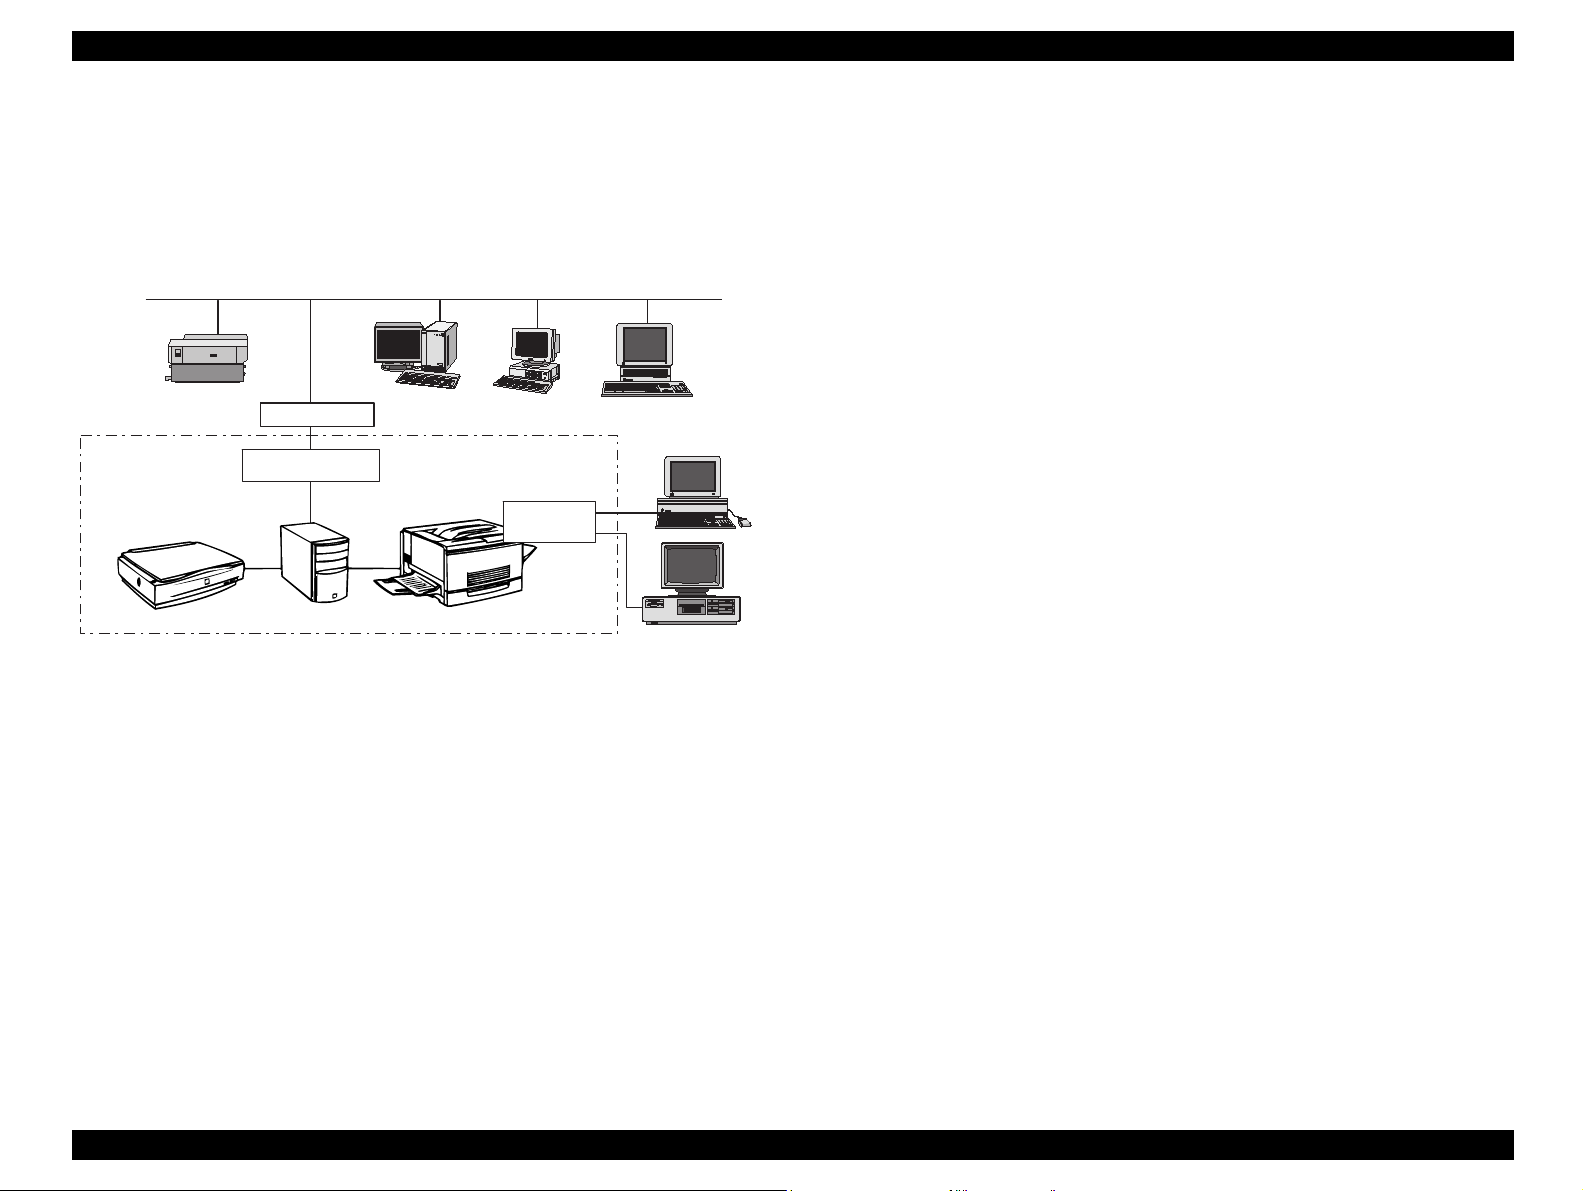
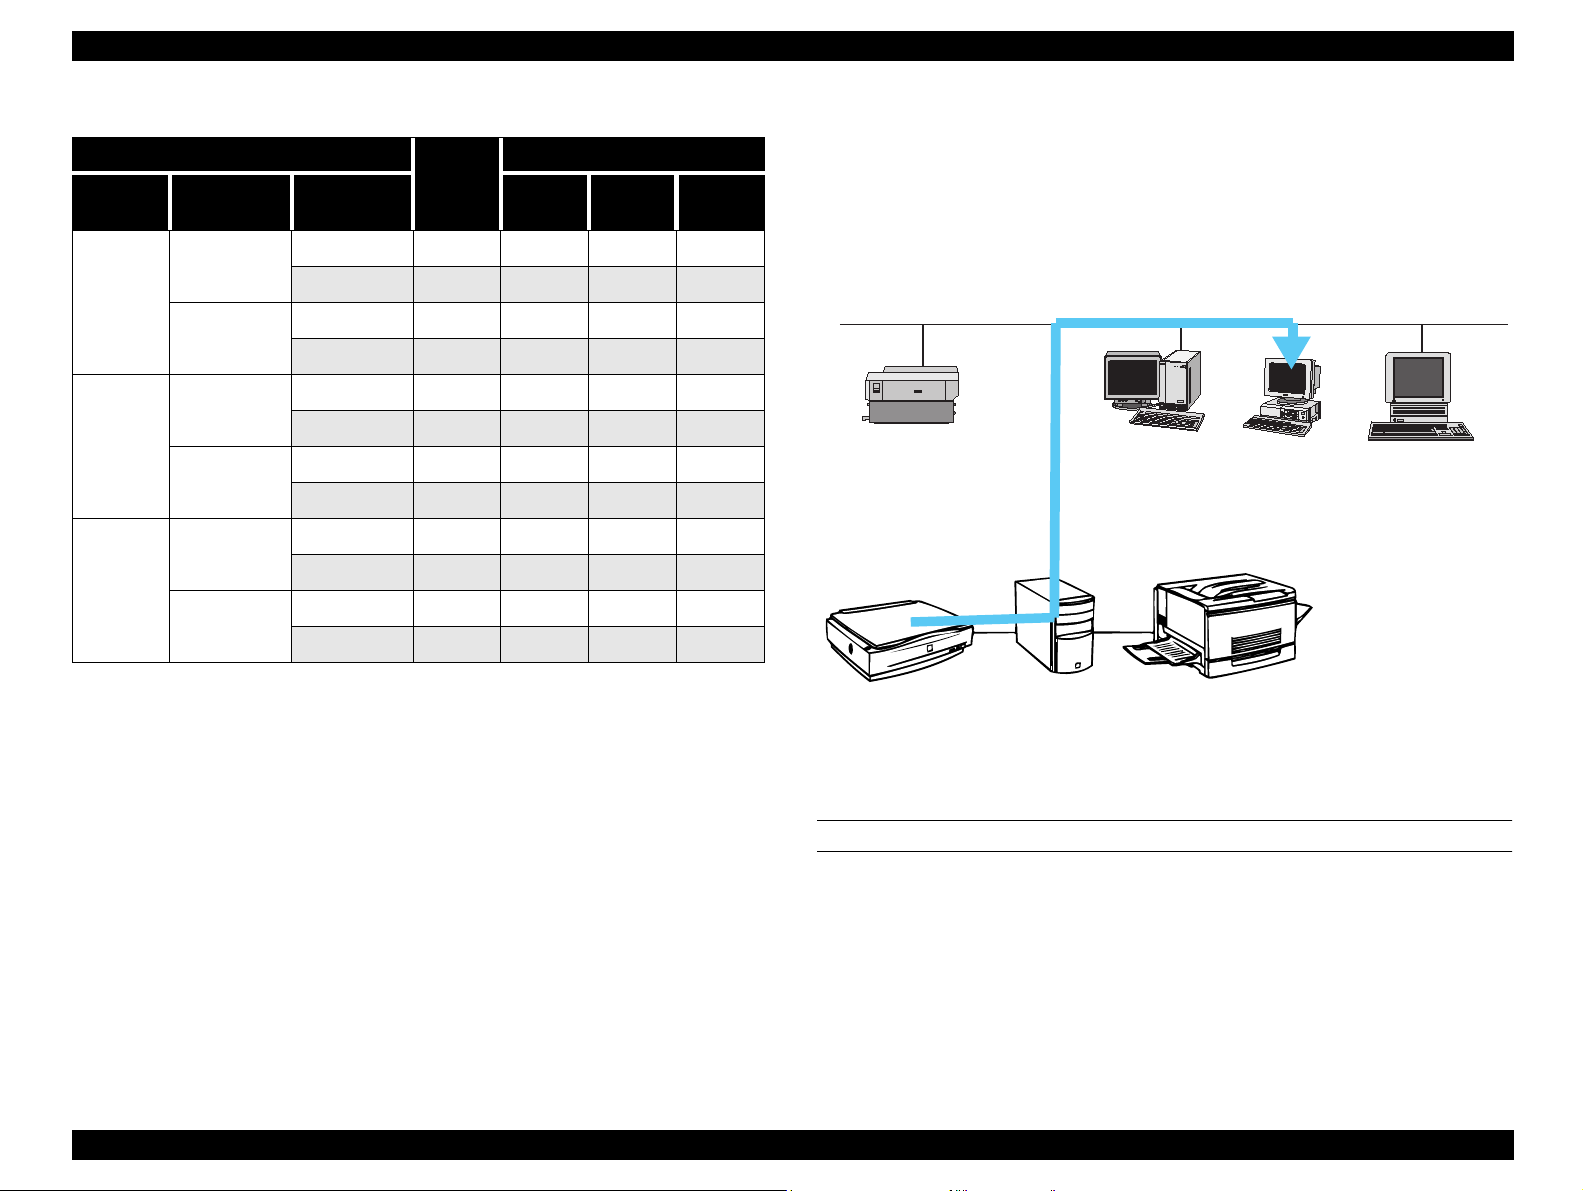
Figure 1-2 shows the color copy system diagram. The 100 base-TX
environment is recommended for using Network TWAIN on the Client PC,
because the very large amount of data flows on the network and the traffic
increases.
10Base T/100Base T
Network Printer
CCS 8200 System
GT-10000
Switching HUB
Network Board
SCSI
PC
ECP
EPL-C8200
PC PC
PC
Type-B
1.1.3 About EPL-C8200
Though EPL-C8200 has 64Mbyte memories as a default, the minimum size of
memories required for Color Copy System is 160MB. In the case that EPLC8200 has only the default memories, EPL -C8200 tries to compress the image
data to save memories, and coping speed is getting slow as a result.
Furthermore, sometimes the compressed image data is so large that the
image can’t be printed out to EPL-C8200.
CCS 8200 uses ECP mode interface with EPL-C8200. If EPL-C8200 isn’t set the
ECP mode, CCS 8200 sends the ECP set command to set this mode.
PC
Figure 1-2. System Diagram
Product Description Outline 5
Page 11

EPSON Color Copy Station 8200 Revision A
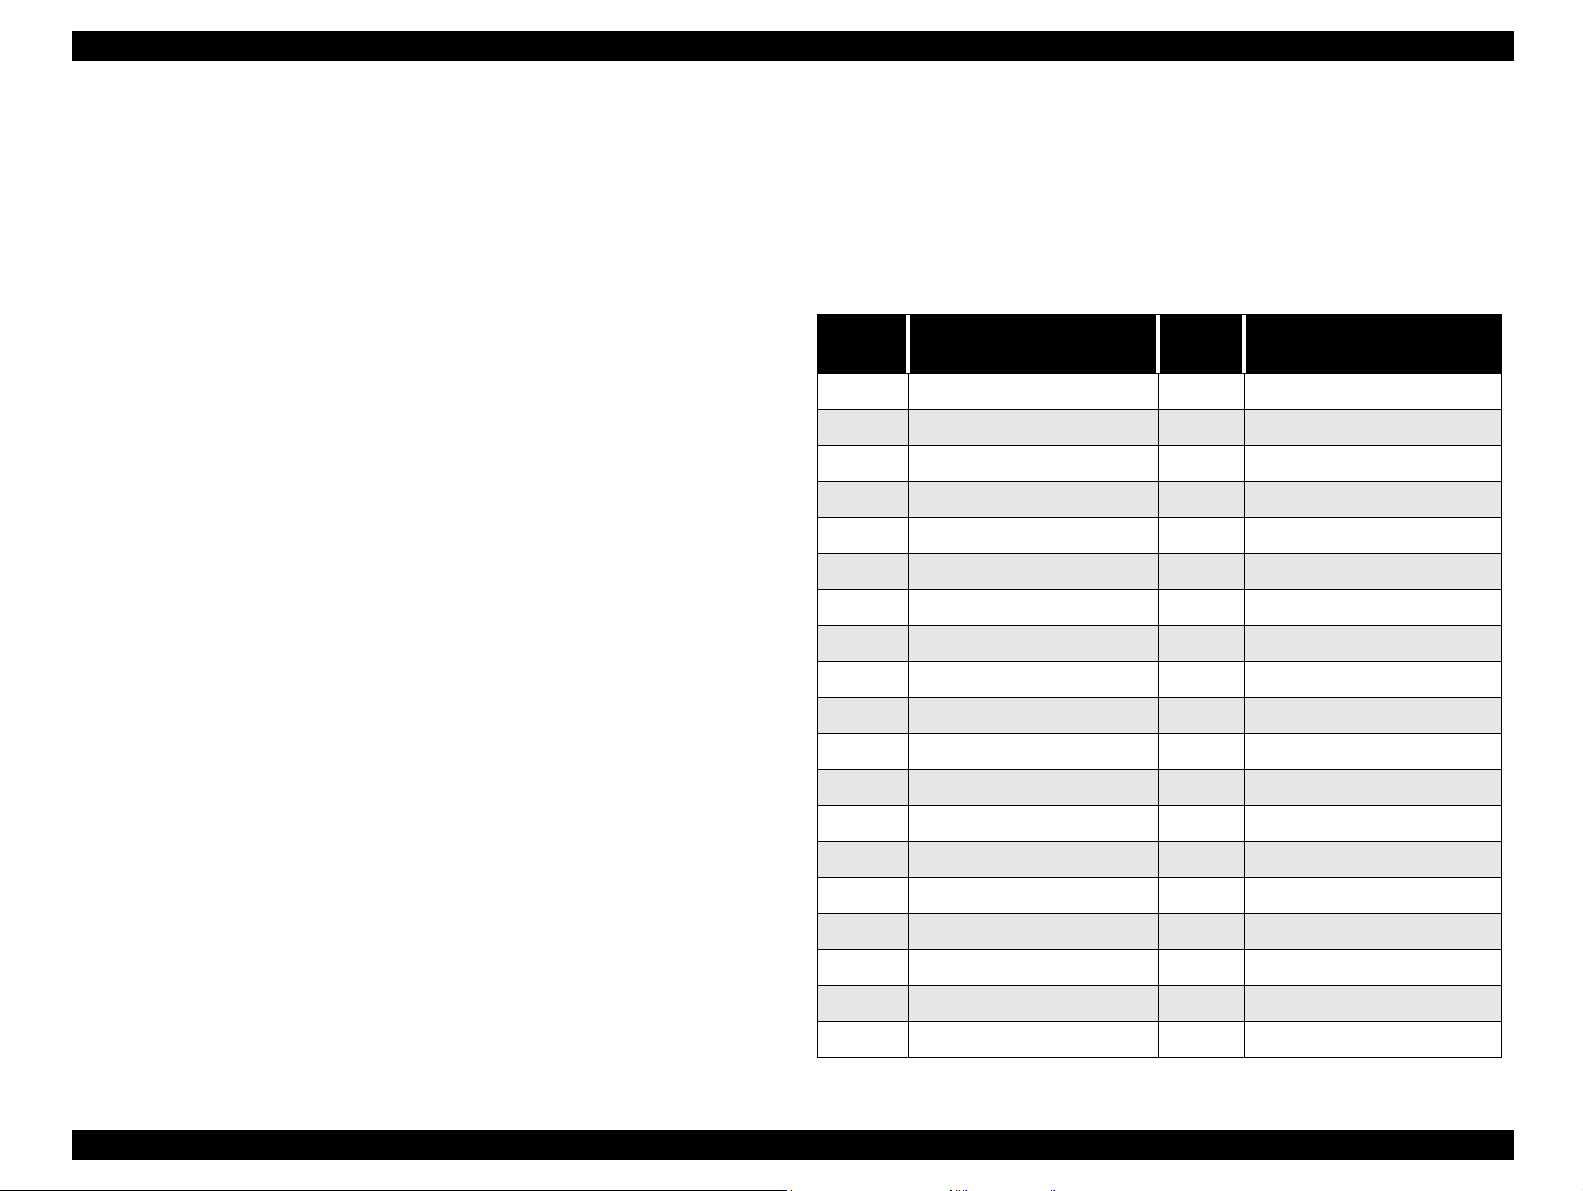
1.2 Basic Specifications
1.2.1 Local Copy Speed
THROUGH PUT
Table 1-1. Copy Speed (local copy)
Color Black and White
Copy Mode
A4/300dpi A4/600dp A4/300dpi A4/600dpi
First Copy 54sec 104sec 26sec 43sec
Multiple Copy 4ppm 4ppm 16ppm 16ppm
Multiple copy: multiple copies on scanner flatbed
Face-up: paper exit
1.2.2 Electric Specifications
Rated Voltage: AC100-120V / AC 220-240V
Input Voltage: AC100-120V 10% ± / AC220-240V ± 10%
Rated Current: 1A (Input AC100-120V) / 0.4A (Input AC220-240V)
1.2.3 Safety, EMC
Low Voltage Directive 73/23/EEC EN60950
EMC Directive 89/336/EEC EN55022 Class B
EN6100-3-2
EN61000-3-3
EN50082-1
IEC801-2
IEC801-3
IEC801-4
AS/NZS3458 Class B
CNS13438 Class B
Korean EMC
1.2.4 Mechanical Specifications
Physical dimensions 200x460x355mm (WxDxH)
Weight Approx. 10kg
The way to connect Panel connected by shield cable (length 2.0m)
1.2.5 Resistance to Electric Noise
Static electricity 10KV/ 150pF, 150 Ohms
1.2.6 Environment Conditions
o
Rated Frequency Range: 50/60Hz
Input Frequency Range: 49.5-60.5Hz
Power Consumption: Less than 80W
Insulation resistance: 10Mohms at 500VDC
(between AC line and chassis)
Dielectic strength: AC3.0KV, 1min
Leakage Current: Less than 3.5mA
Operating
n
n
n
o
Storage
n
Temperature
10 ~ 35
Humidity
20 ~ 80%, no condensation
Vibration
0.2G
Temperature
- 20 ~ 60
°C
°C
Product Description Basic Specifications 6
Page 12
EPSON Color Copy Station 8200 Revision A
n
Humidity
10 ~ 90%, no condensation
n
Vibration
1.0G
1.2.7 Reliability
o
MTBF
10000 hours (not including the EL intensity loss)
o
Life
Approx. 5 years
(It means the life of battery on Mother Board)
1.2.9 Interfaces
1.2.9.1 SCSI
o
Connector
D-Sub 50 pin half pitch (based on ANSI X3. 131-1986)
o
Signals
Table 1-2. Connector Pin Alignment
Pin
number
1GND26DB0
2 GND 27 DB1
Signal name
Pin
Number
Signal name
1.2.8 Control Panel Unit
LCD and Touch key with white EL-back-light
Display pixel 320 x 240
Display Area 76.785 x 57.585 (mm)
Pixel pitch 0.24 x 0.24 (mm)
Display pixel pitch 0.225 x 0.225 (mm)
Touch Key 8 x 6 matrix
Special Key Start, Stop, All Clear, 10-key (set the number)
LED lamp Power, Ready, Error
LCD contrast adjustment Volume
3GND28DB2
4 GND 29 DB3
5GND30DB4
6 GND 31 DB5
7GND32DB6
8 GND 33 DB7
9GND34DBP
10 GND 35 GND
11 GND 36 GND
12 GND 37 reserve
13 GND 38 TERM POWER
14 GND 39 reserve
15 GND 40 GND
16 GND 41 ATN
17 GND 42 GND
18 GND 43 BSY
19 GND 44 ACK
Product Description Basic Specifications 7
Page 13
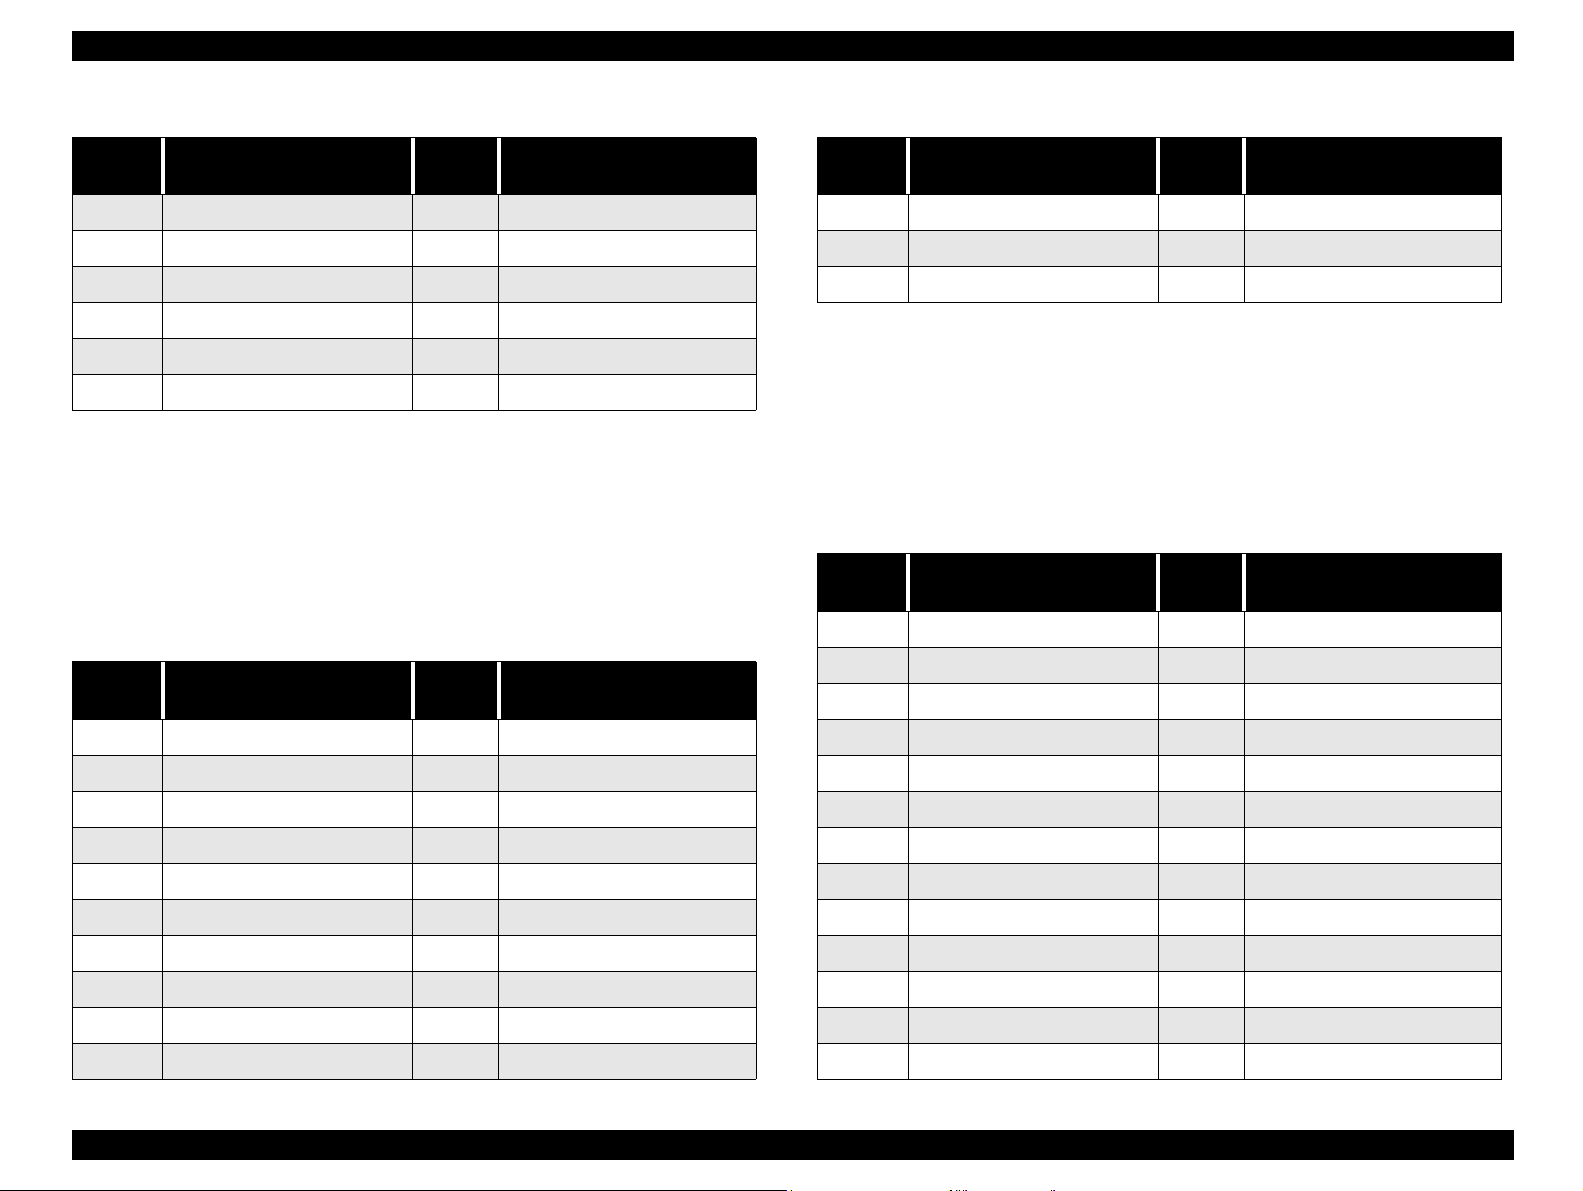
EPSON Color Copy Station 8200 Revision A
Table 1-2. Connector Pin Alignment
Pin
number
20 GND 45 RST
21 GND 46 MSG
22 GND 47 SEL
23 GND 48 C/D
24 GND 49 REQ
25 GND 50 I/O
o
Cable
Signal name
GTATSCCB3 (recommended)
Pin
Number
1.2.9.2 Printer Interface
o
Connector
D-Sub 25 pin (equivalent to DDK 17LE13250-27)
o
Signals
Table 1-3. Connector Pin Alignment
Pin
number
Signal name
Pin
Number
Signal name
Signal name
Table 1-3. Connector Pin Alignment
Pin
number
11 BUSY 24 GND
12 ERROR 25 GND
13 SELECT - -
o
Cable
Signal name
PRCB4N (recommended)
Pin
Number
Signal name
1.2.9.3 Control Panel Interface
o
Connector
AMP half-pitch 50pin
o
Signals
Table 1-4. Connector Pin Alignment
Pin
number
1 GND 26 VDD(+12V)
2 GND 27 VDD(+12V)
3 PAI7 (key-matrix input) 28 VDD(+12V)
Signal name
Pin
Number
Signal name
1 /STROBE 14 /SUTO FEED
2 DATA0 15 /FAULT
3 DATA1 16 /INIT
4 DATA2 17 /SELECT IN
5 DATA3 18 GND
6 DATA4 19 GND
7 DATA5 20 GND
8 DATA6 21 GND
9 DATA7 22 GND
10 /ACK 23 GND
4 PAI6 (key-matrix input) 29 GND
5 PAI5 (key-matrix input) 30 GND
6 PAI4 (key-matrix input) 31 DIN (LCD VSYNC)
7 PAI3 (key-matrix input) 32 LP (LCD HSYNC)
8 PAI2 (key-matrix input) 33 XSCL (LCD clock)
9 PAI1 (key-matrix input) 34 DOFF (LCD DIsplay ON/OFF)
10 PAI0 (key-matrix input) 35 ELON (EL ON/OFF)
11 GND 36 GND
12 GND 37 LD0 (LCD Display data)
13 PAO0 (key-matrix output) 38 LD1 (LCD Display data)
Product Description Basic Specifications 8
Page 14
EPSON Color Copy Station 8200 Revision A
Table 1-4. Connector Pin Alignment
Pin
number
14 PAO1 (key-matrix output) 39 LD2 (LCD Display data)
15 PAO2 (key-matrix output) 40 LD3 (LCD Display data)
16 PAO3 (key-matrix output) 41 LD4 (LCD Display data)
17 PAO4 (key-matrix output) 42 LD5 (LCD Display data)
18 PAO5 (key-matrix output) 43 LD6 (LCD Display data)
19 PAO6 (key-matrix output) 44 LD7 (LCD Display data)
20 PAO7 (key-matrix output) 45 GND
21 GND 46 GND
22 GND 47 ERROR (Error LED ON/OFF)
23 VCC (+5V) 48 READY (Ready LED ON/OFF)
24 VCC (+5V) 49 GND
25 VCC (+5V) 50 GND
o
Cable
Signal name
Parts Number 202637400 (recommended)
Pin
Number
Signal name
1.3 Functions
1.3.1 Functions Overview
Table 1-5. The Main Functions
No. Function Name Description Target User
1 Local Copy
2 Network TWAIN
3 WebStatus
4 WebAdmin
5 WebUpgrade(*1)
User
6
Configuration
Functions for
7
Maintenance
Copy function using directly
connected scanner and printer.
Scanning function using network
TWAIN driver via network.
Web-based utility to get the status
of scanner, printer, and CCS 8200.
Web-based utility to set the initial
parameters to CCS 8200 for
administrator.
Web-based utility to upgrade
CCS 8200 firmware via network.
Initial settings for network,
Language selection of message to
display on the control panel,
Retrieving factory settings.
Checking hardware board by board
to find hardware error in the
manufacturing stage or in the fields.
End user
End User
End User
End User or
Field supporter
End User
End User
Field supporter
or
Manufacturer
Temporary IP
8
setting
Firmware Update
9
by Board to Board
copy
Starting with the fixed temporary IP
address in the manufacturing stage
or in the fields.
Copy from Master board to Target
board for CCS 8200 firmware
version-up.
Field supporter
or
Manufacturer
Field supporter
(*1) This function is not disclosed for end user at first, and not described in
the CCS 8200 manual. When the update is required after shipping, firmware
ROM file and the manual, in which the op e ration is described, will be
released.
Product Description Functions 9
Page 15
EPSON Color Copy Station 8200 Revision A
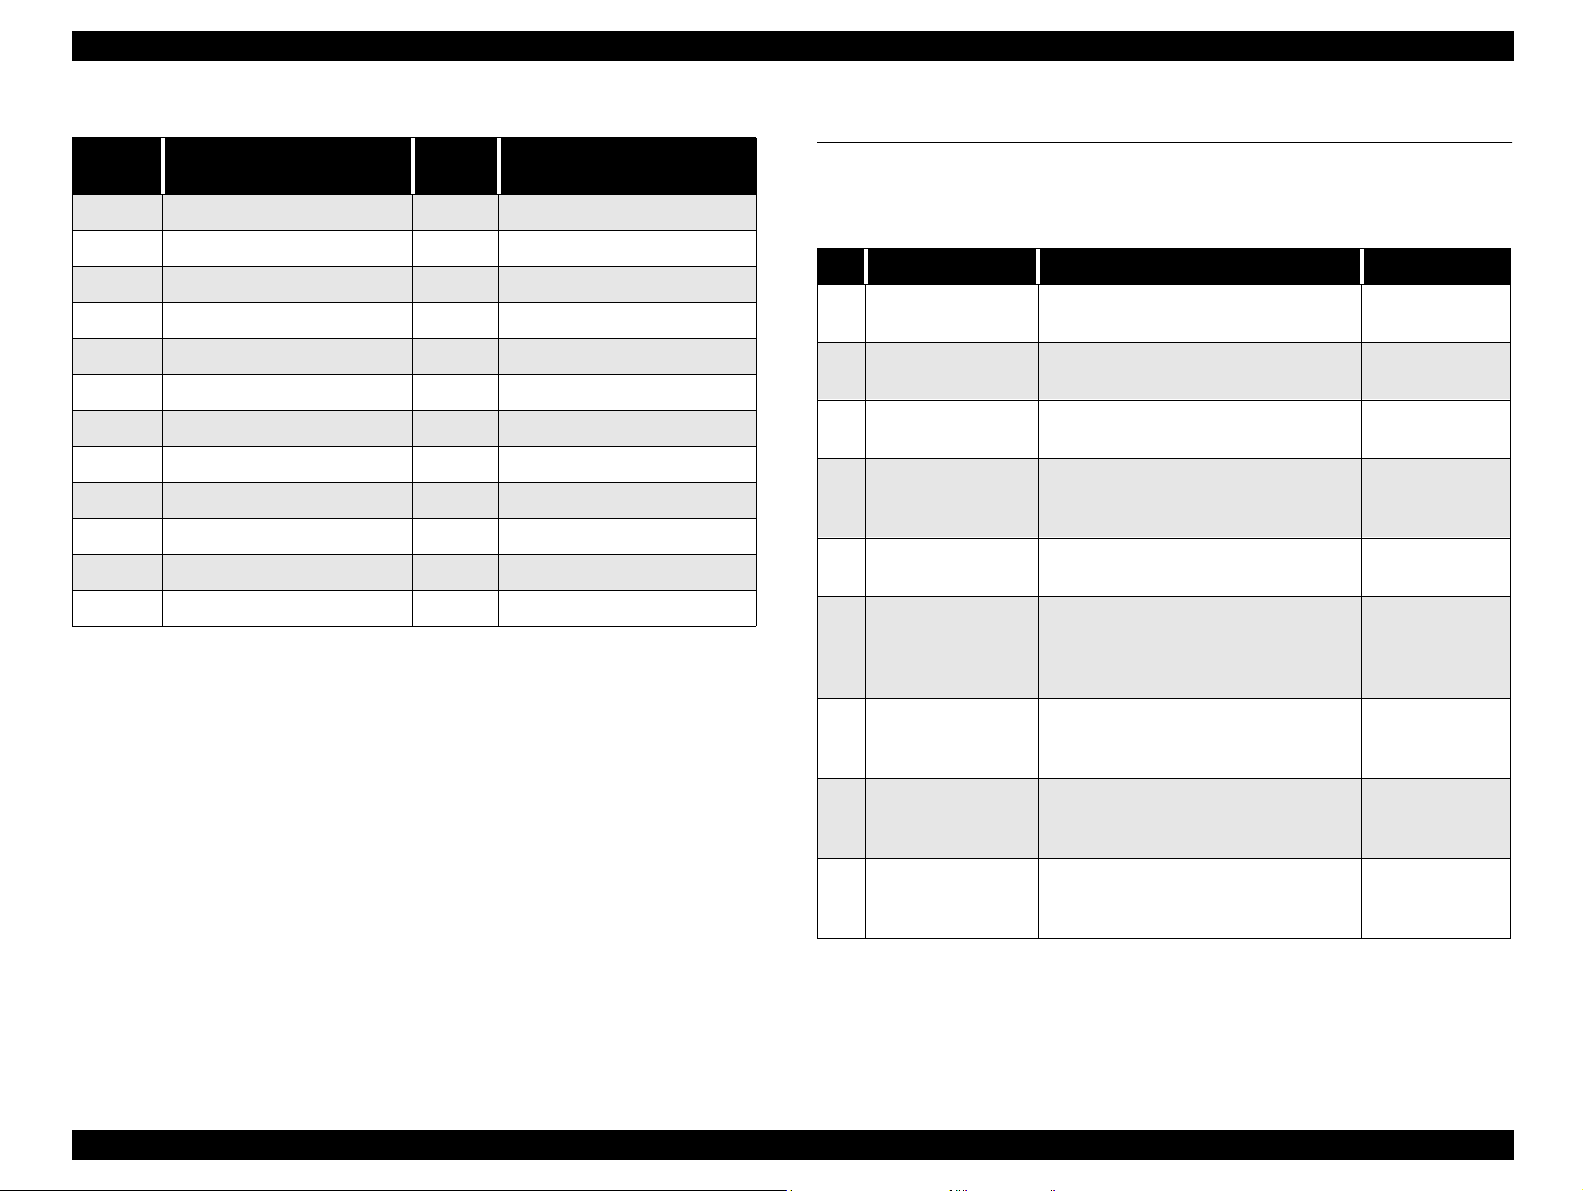
AVAILABLE COMBINATION OF EACH FUNCTION
Table 1-6. Hardware resources required for each function
Hardware
Resource
Printer
Scanner
¡
: Required
x: Not required
Local Copy
¡
¡ ¡
Note: Even if printer cannot be used, the function using scanner can be kept
alive.
Network
TWAIN
xxx
Web Admin Web Status
x x
Table 1-7. CONCURRENT USE
2nd
1st
Local Copy x x x
Network TWAIN x x x
Web Admin
Web Status
Local
Copy(*1)
¡¡
¡ ¡ ¡ ¡
Network
TWAIN
Web Admin
(*2)
x(*3)
Web Status
¡
¡
¡
Table 1-8. Scanner and Printer Option
Function
Option
Type-B x x x x
Large Capacity cassette
A3W cassette
ADF Single Side
ADF Double Side x
¡
: possible
x: impossible
Local
Copy(*1)
Printer
¡
¡
Scanner
¡ ¡
Network
TWAIN
xxx
x x x
¡
Web Admin Web Status
x x
xx
¡
: possible
x: impossible
(*1) Paper Money detection is done only for Local Copy.
(*2) Web Admin can not be used in the middle that CCS 8200 works for other
function.
(*3) When more than one Web Admin started, only the first Web Admin can
work and the time-out error occurs for the others.
Product Description Functions 10
Page 16
EPSON Color Copy Station 8200 Revision A
1.3.2 Local Copy
OPERATIONAL PRINCIPLE
Local copy function is responsible for the image data scanned by GT-1000 to
be processed by CCS 8200 and sent to the printer. Before starting copy, user
can set some parameters, number of copy, brightness, contrast and so on, on
the control pane l.
Scanner
(GT-1000)
Copy Server
CCS 8200
Figure 1-3. Local Copy Data Flow
START COPY
Press the “Start” key on the control panel to start local copy job.
CANCEL COPY
Press the “STOP” key on the control panel to cancel local copy job.
PAPER SIZE
CCS 8200 supports the following paper size.
Printer
EPL-C8200
A3W, Ledger, A3, B4, Legal, Letter (portrait), Letter (landscape), A4 (portrait),
A4 (landscape), B5 (portrait), B5 (landscape), Executive (portrait),
Executive (landscape)
The printing maximum size shown in Figure 1-4 is exactly the same as the
size EPL-C8200 guarantees for printing
The supported paper size doesn’t depend on the language, which is set in the
user configuration mode, but depends only on the paper size in the printer
cassette.
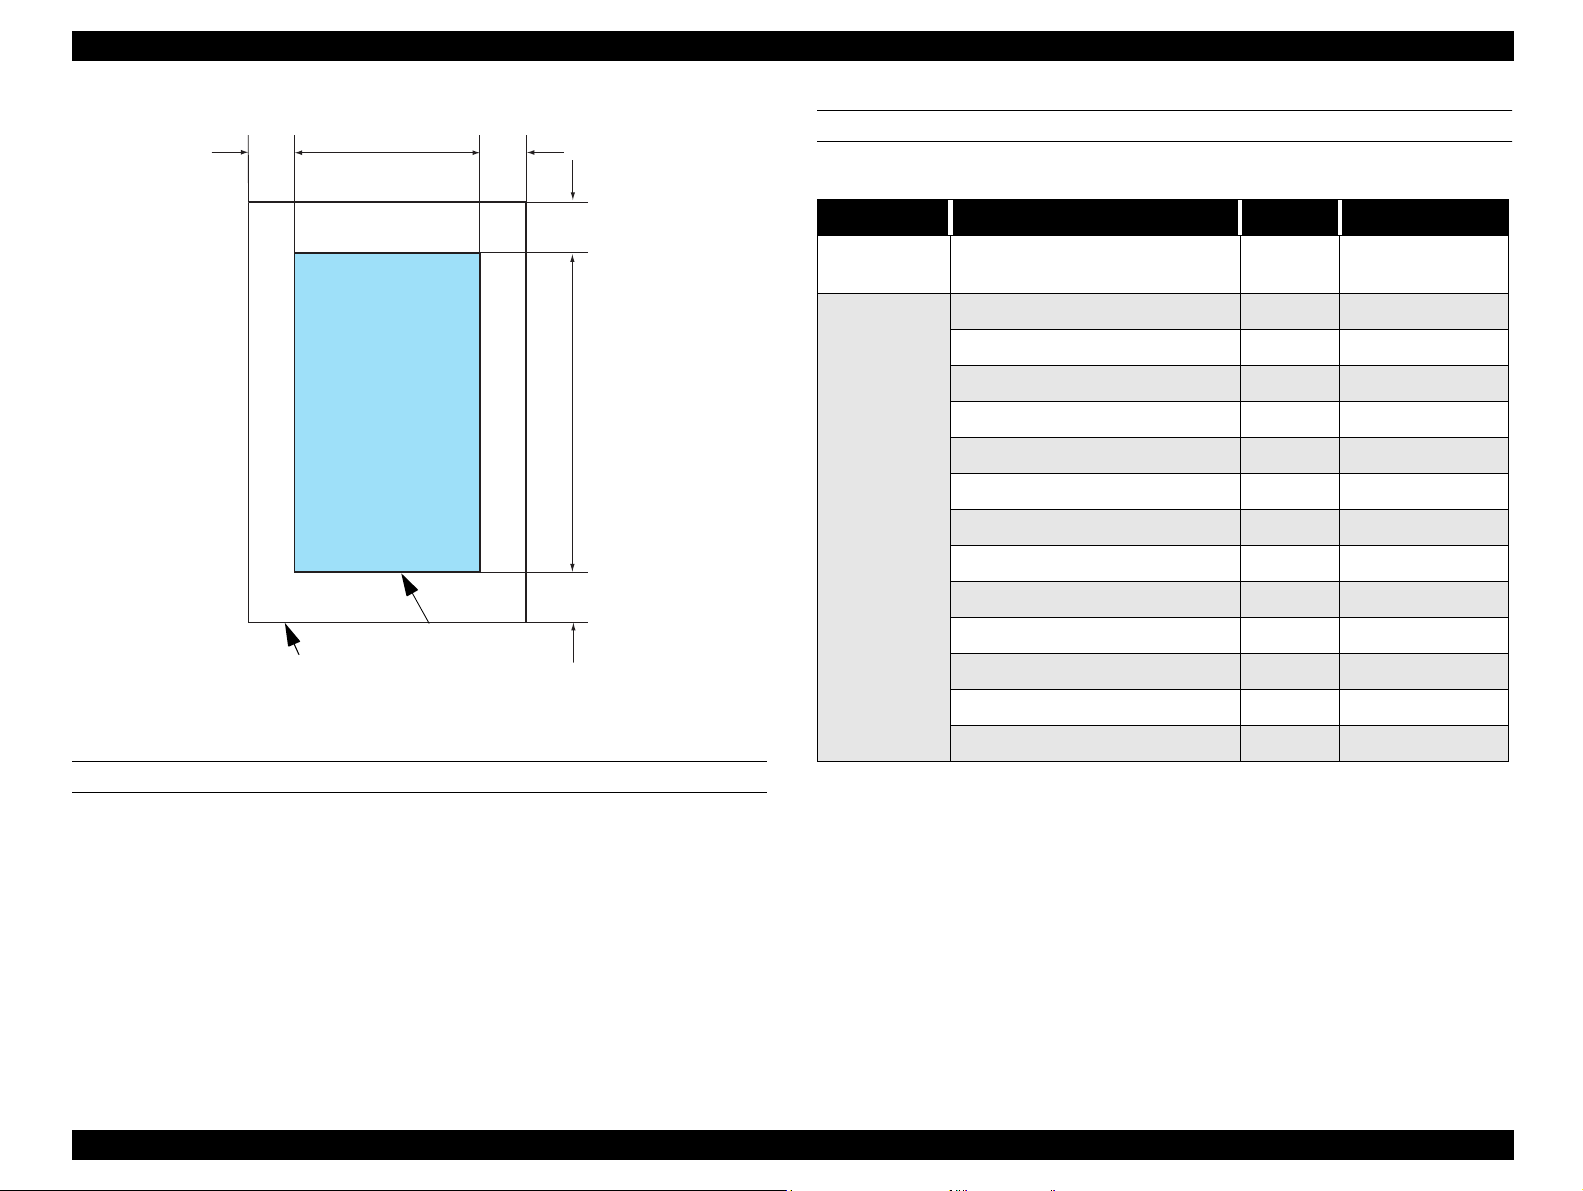
Table 1-9. Paper Size and Effective Printing Area (mm)
Paper Type
A3W 328x453 16.5 297 14.5 5 431 17
A3 297x420 5 287 5 5 410 5
B4 257x364 5 247 5 5 354 5
A4
(Landscape)
A4
(Portrait)
B5
(Landscape)
B5
(Portrait)
Letter
(Landscape)
Letter
(Portrait)
Legal 215.9x355.6 5 205 5 5 345 5
Executive
(Portrait)
Ledger 279.4x432.0 5 269 5 5 421 5
Size
(HxV)
297x210 5 287 5 5 200 5
210x297 5 200 5 5 287 5
257x182 5 247 5 5 172 5
182x257 5 172 5 5 247 5
279.4x215.9 5 269 5 5 205 5
215.9x279.4 5 205 5 5 269 5
184.2x266.7 5 173 5 5 256 5
a1 b a2 c1 d c2
Printing Area (HxV)
Note: B4 and B5 are Japanese original paper size
Product Description Functions 11
Page 17
EPSON Color Copy Station 8200 Revision A
a1 a2
b
c1
d
c2
Printing guaranteed
Paper Size
area
Figure 1-4. Effective Printing Area
ZOOM
Table 1-10. User-defined and Pre-set Zoom
Zoom User-Setting Ratio (%) Remarks
User-defined
Zoom
Pre-set Zoom LedgeràLetter 64
A3àA4/B4àB5 70
A3àB4/A4àB5 86
B4àA3/B5àA4 115
A4àA3/B5àB4 141
- 25-400
11x15àLetter 78
LegalàLetter 7 8
B4àA4 81
100% 100
LegalàLetter 121
A4àB4 122
LetteràLedger 129
5.5x8.5àLegal 154
in increments of
1%
PAPER BIN
The user can select either Face-Up or Face-Down as a paper bin on the local
copy menu. CCS 8200 supports the paper supply from printer’s MP Tray, C1,
C2, C3, and C4.
The scanning area is calculated from output paper size according to the zoom
ratio. When scanning area is larger than maximum scan area of the scanner,
CCS 8200 scans data to maximum scan area, and printed image will be
located at the center of the paper.
Product Description Functions 12
Page 18
EPSON Color Copy Station 8200 Revision A
For all pre-set zoom, user can select just-fitting copy option by touching the
just-fitting button on the control panel. When the just-fitting is valid, whole
area of the document (including non-printed area) is scanned and the area is
printed so that it is put in the print guaranteed area.
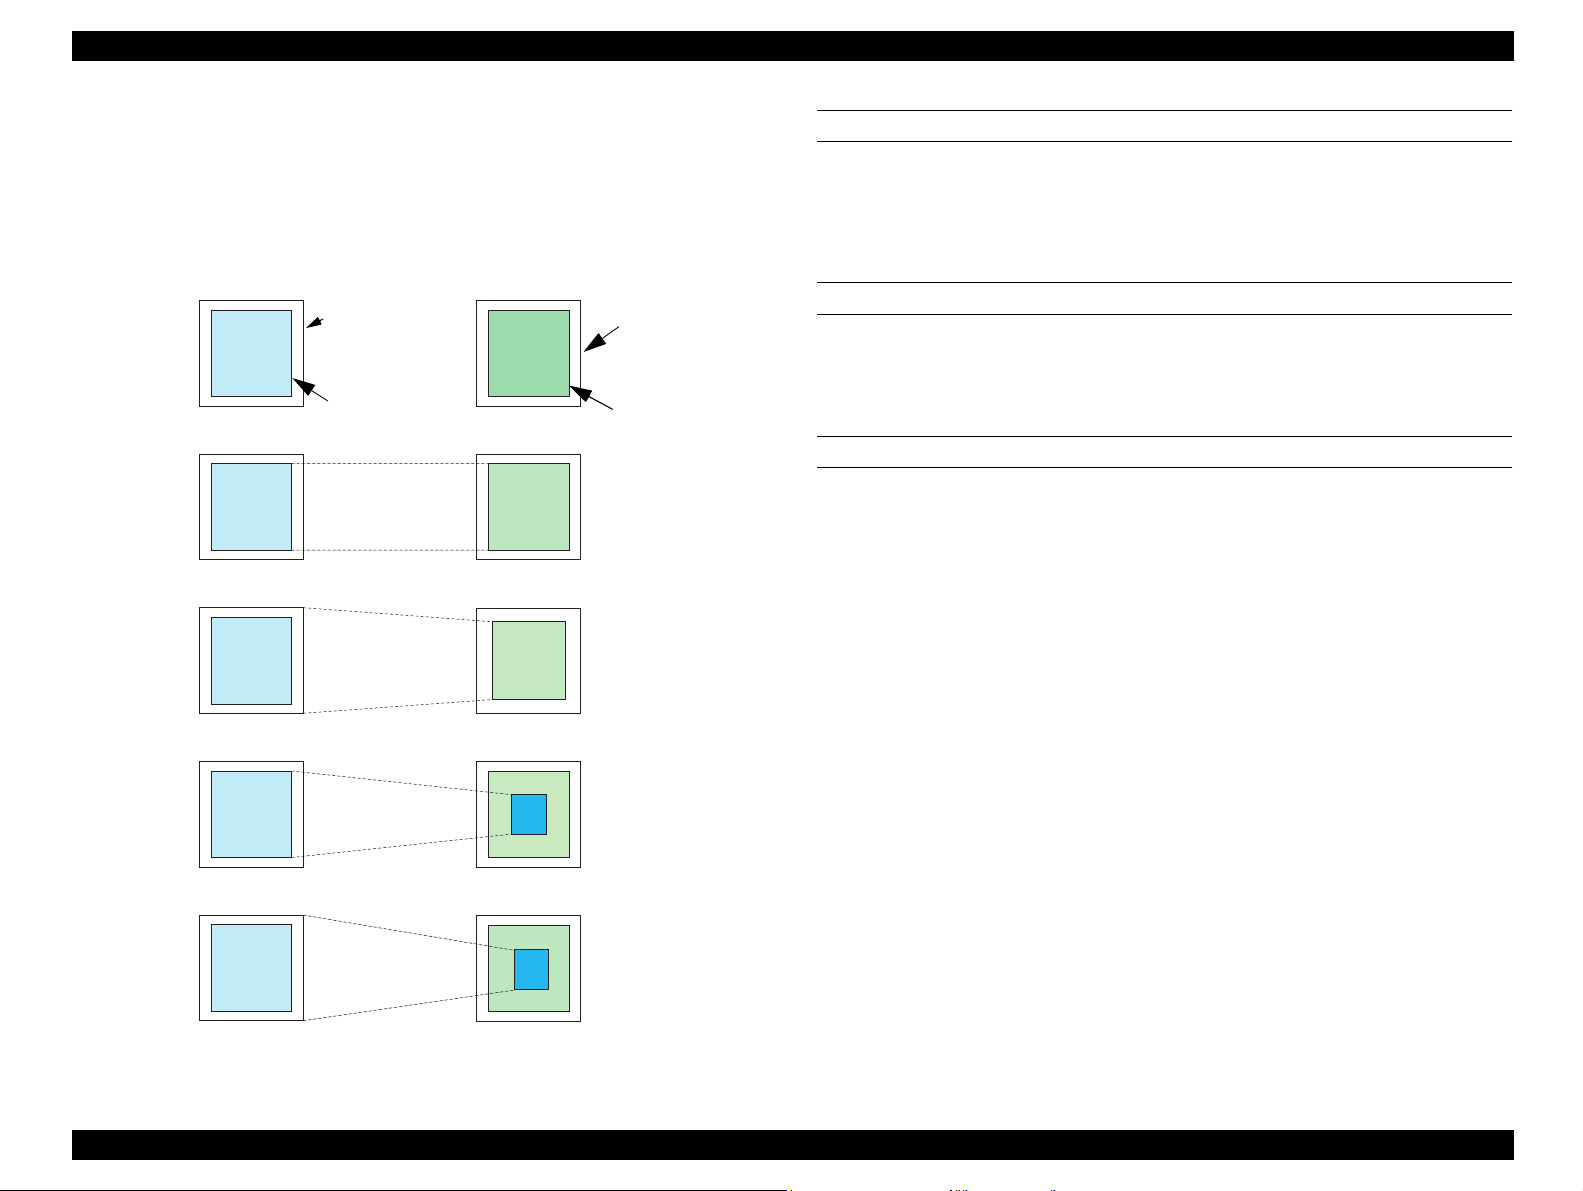
Document
(Scanner)
Document Si z e
Scanning Area
corresponding
to the
Guaranteed
Printing Area
Copy Paper
Paper Size
Guaranteed
Printing Area
Zoom 100%
(Just-fitting OFF)
Zoom 100%
(Just-fitting ON)
MULTIPLE COPIES
o
Setting Range: 1-99 (default: 1)
Scanning is done only one time.
The multiple copy function is accomplished by printer’s copy
function.
OPTION
If ADF (Auto Document Feeder) is set on the scanner, the CCS 8200 enters to
“ADF COPY” mode internally and automatically and starts copying until the
paper set on ADF comes to end.
MARGIN FOR BINDING
User can set the top, left, and right margin to keep the white area for binding.
This copy option is valid fo r all zoom ratio including pre-set and user defined
zoom.
Size-down,
size-up
(Just-fitting OFF)
Size-down,
size-up
(Just-fitting ON)
Figure 1-5. Magnification
Product Description Functions 13
Page 19
EPSON Color Copy Station 8200 Revision A
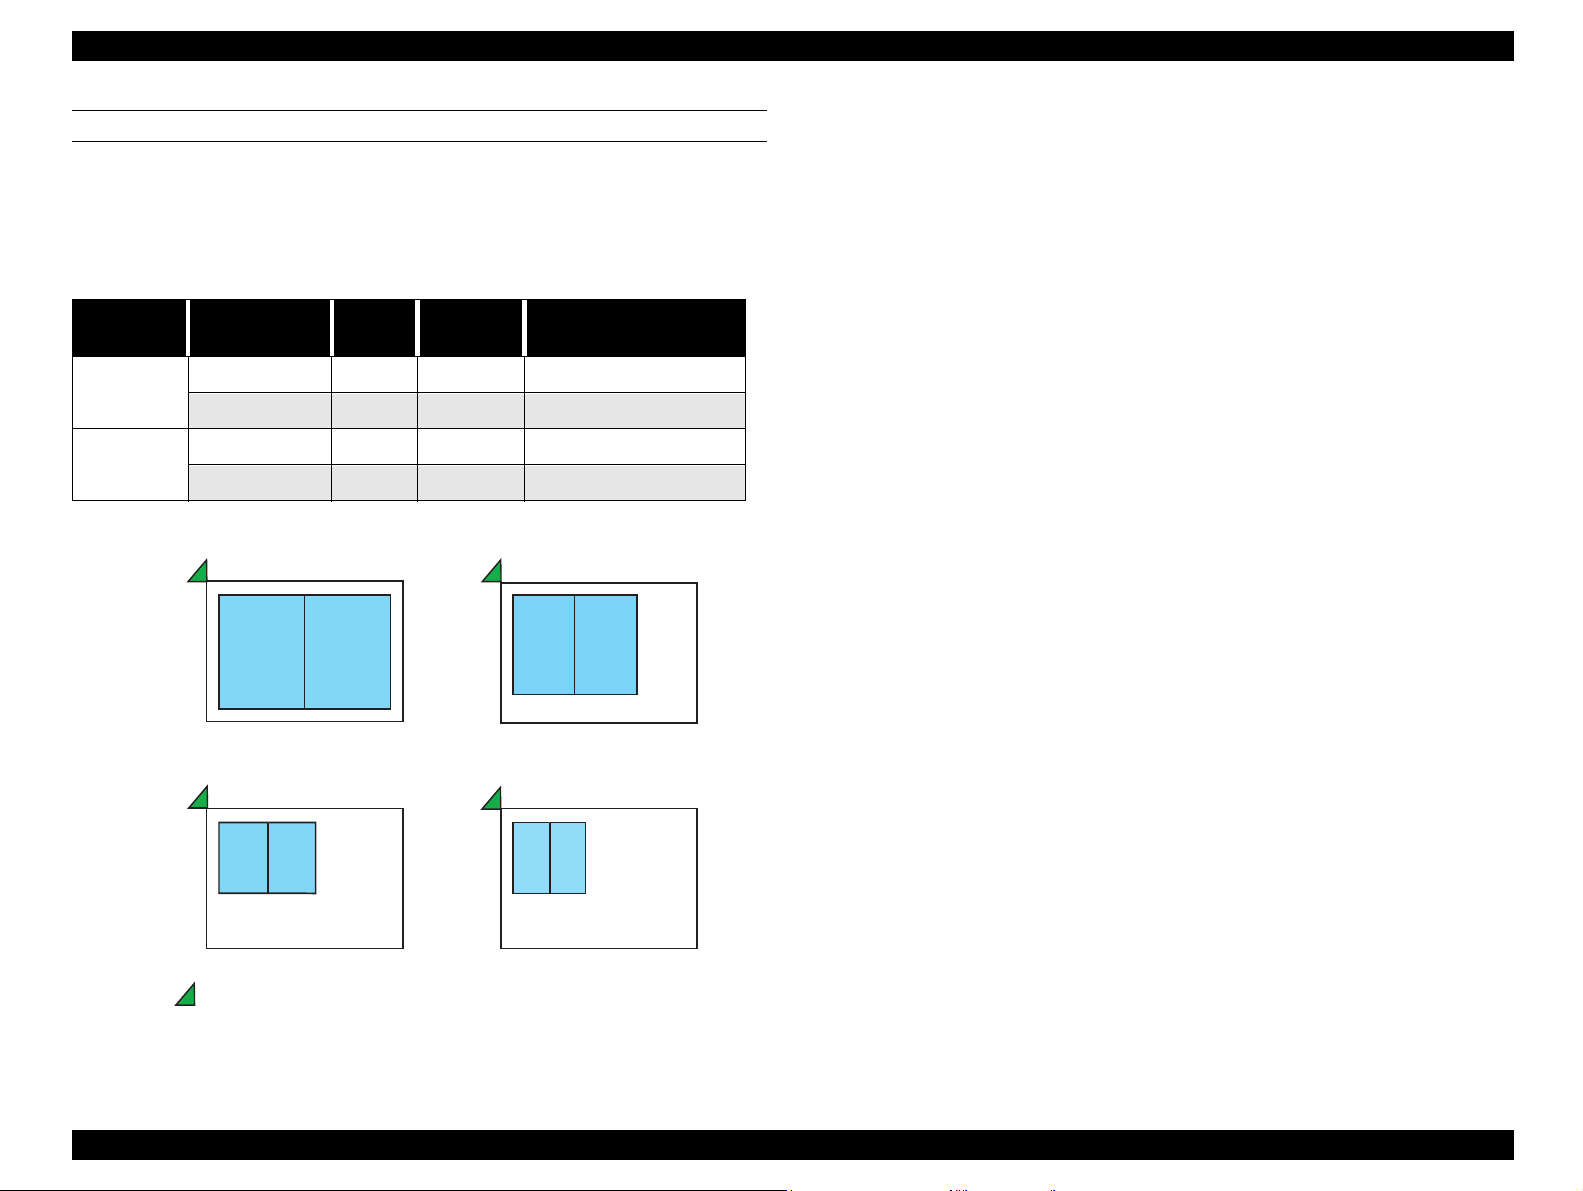
SPLIT COPY
This function enables to copy individual pages for opened-booklet located on
the flat-bed. There are limitations as follows such as pa per size must be one
of A4, B5, Letter, and Executive. The combinations of copy parameters other
than the following are not allowed and not supported by ADF either.
Table 1-11. Split Copy
Paper Size Scanning Area
A4 / Letter A3(A4x2) 100% (1) A4x2 pages
Letter 100% (3) Letter x 2 pages
B5 /
Executive
B4 (B5x2) 100% (2) B5 x 2 pages
Executive 100% (4) Executive x 2 pages
Zoom
Setting
(1)
A4
A4
(3)
A5
A5
Document
Location
B5
B6
B6
Copy Output
(2)
B5
(4)
Letter
Executive
Origin of Scanning
Figure 1-6. Paper Setting (Split Copy)
Product Description Functions 14
Page 20
EPSON Color Copy Station 8200 Revision A
INTERNAL PROCESSING
Table 1-12. Internal Processing
CCS 8200 Printer
Color/
B/W
Copy Mode Media
Color Photo Fine Paper
Thick Paper 300 300 - - Photo CPGI Transparency 300 300 - - Photo CPGI -
Text Fine Paper 300 300
Thick Paper 300 300
Transparency 300 300
Print Fine Paper 300 300
Thick Paper 300 300
Transparency 300 300
Map Fine Paper 300 300
Thick Paper 300 300
Transparency 300 300
Fine Fine Paper 600 600 - - Photo CPGI
Thick Paper 600 600 - - Photo CPGI
Scan
Resolution
c
300 300 - - Photo CPGI -
Print
Resolution
TET
(H/W)
¡
¡
¡
a
(H/W)
b
- Text CPGI
- Text CPGI
- Text CPGI
MOIRE
¡¡
¡ ¡
¡¡
¡
¡
¡
- Map CPGI
-MapCPGI
- Map CPGI
Color
Matching
Mode RIT
Table
Print CPGI Print CPGI Print CPGI -
Screen
(TBD)
¡
¡
¡
¡
¡
¡
¡
¡
Transparency 600 600 - - Photo CPGI
¡
Product Description Functions 15
Page 21
EPSON Color Copy Station 8200 Revision A
Table 1-12. Internal Processing
CCS 8200 Printer
Color/
B/W
B/W Photo Fine Paper 300 300 - - Photo CPGI -
Copy Mode Media
Thick Paper 300 300 - - Photo CPGI Transparency 300 300 - - Photo CPGI -
Text Fine Paper 300 300
Thick Paper 300 300
Transparency 300 300
Print Fine Paper 300 300
Thick Paper 300 300
Transparency 300 300
Map Fine Paper 300 300
Thick Paper 300 300
Transparency 300 300
Fine Fine Paper 600 600 - - Photo CPGI
Thick Paper 600 600 - - Photo CPGI
Scan
Resolution
Print
Resolution
TET
a
(H/W)
¡
¡
¡
¡ ¡
¡¡
¡ ¡
¡
¡
¡
MOIRE
b
(H/W)
- Text CPGI
- Text CPGI
- Text CPGI
-MapCPGI
- Map CPGI
-MapCPGI
Color
Matching
Table
Print CPGI Print CPGI Print CPGI -
Mode RIT
Screen
(TBD)
¡
¡
¡
¡
¡
¡
¡
¡
Transparency 600 600 - - Photo CPGI
¡
a.FinePaper:SpecialPaperforLaserPrinter
b.TET(H/W):TextEnhancementprocessingbyASIC
c.MOIRE(H/W):MoireReductionprocessingbyASIC
Note:ScanningConditionfromscannerisgamma=1,24bit/pixel(color,RGBx8bit),8bit/Pixel.
Product Description Functions 16
Page 22
EPSON Color Copy Station 8200 Revision A
COPY ADJUSTMENT MODE
Table 1-13. Copy Adjustment Mode
Color /
B/W
Color ±3 step ±3 step ±3 step ±3 step ±3 step
B/W ±3 step ±3 step N/A N/A N/A
Default value of each parameter is zero. (Center Value)
Brightness Contrast
RGB
Adjustmen
t
Saturation Hue
JOB MEMORY
CCS 8200 has 8 job memories to save some copy parameters.
Parameters can be saved are as follows.
Table 1-14. Job Memory
Item Value
Number of Copy 1-99 pages
Zoom Ratio 25-400%
Paper Tray MP Tray, Cassette 1-4
Media Plain Paper / Thick Paper / Transparency
Copy Mode Color / Black & White
Brightness -3 ~ +3
Contrast -3 ~ +3
Table 1-14. Job Memory
Item Value
Output Bin Face-up / Face-down
Split Copy ON / OFF
Margin for Binding Normal / Top / Left / Right
STATUS
CCS 8200 can display the status of itself, scanner, and printer on the control
panel. Furthermore, user can print the status sheet by pressing the status
button on the control panel. The items which can be displayed and printed are
as follows respectively.
Table 1-15. Status
Items Status display Status print
CCS 8200 Language NA A
Model Name A A
Current Status A NA
IP address A A
Gateway address NA A
Subnet Mask NA A
Mac address NA A
Contents of job memory NA A
R Balance -3 ~ +3
G Balance -3 ~ +3
B Balance -3 ~ +3
Croma -3 ~ +3
Hue G+3 ~ R+3
Document Type TEXT / PHOTO / MAGAZINE / MAP / FINE
Product Description Functions 17
Page 23
EPSON Color Copy Station 8200 Revision A
Table 1-15. Status
Items Status display Status print
Printer Model Name A A
Current status A NA
Tray 1 paper size A A
Tray 2 paper size A A
Tray 3 paper size A A
Tray 4 paper size A A
Toner Balance A A
Oil Roll Balance A A
Status of Waste Toner Box A A
Status of Photoconductor A A
Memory Capacity A A
Output bin A A
Scanner Model Name A A
A: available, NA: not available
PRINTER CONTROL
The maximum memories which can be allotted to the printer is 256MB and it
is not enough to print some combinations of paper size and copy mode. As
shown below, CCS 8200 sends image data to the printer in two different ways;
non-compressed and compressed data, according to the paper size and copy
mode.
Table 1-16. Printer Control
Copy Mode
Paper
Size
A3W B&W 300dpi 18 NC NC NC
A3 B&W 300dpi 16 NC NC NC
Color/
B/W
Color 300dpi 54 NC NC NC
Color 300dpi 49 NC NC NC
Resolution 192 224 256
600dpi 71 NC NC NC
600dpi 214 C C C
600dpi 66 NC NC NC
600dpi 197 C C C
Amount
of Data*
[MB]
Printer Memory [MB]
A4 B&W 300dpi 8 NC NC NC
600dpi 32 NC NC NC
Color 300dpi 24 NC NC NC
600dpi 96 NC NC NC
Letter B&W 300dpi 8 NC NC NC
600dpi 31 NC NC NC
Color 300dpi 23 NC NC NC
600dpi 93 NC NC NC
Product Description Functions 18
Page 24
EPSON Color Copy Station 8200 Revision A
Table 1-16. Printer Control
Copy Mode
Paper
Size
Legal B&W 300dpi 10 NC NC NC
Legal B&W 300dpi 16 NC NC NC
Legal B&W 300dpi 6 NC NC NC
Color/
B/W
Color 300dpi 30 NC NC NC
Color 300dpi 48 NC NC NC
Color 300dpi 19 NC NC NC
Resolution 192 224 256
600dpi 40 NC NC NC
600dpi 119 NC NC NC
600dpi 63 NC NC NC
600dpi 190 C C C
600dpi 25 NC NC NC
600dpi 75 NC NC NC
Amount
of Data*
[MB]
*: This rough value contains only image data, not control data.
192MB Printer Memory: Minimum memory size to use CCS 8200.
Printer Memory [MB]
1.3.3 Network TWAIN
Network TWAIN scans image data from scanner connected with CCS 8200 via
network. The user interface on network TWAIN driver is just th e same as the
one on the local TWAIN, and the only difference between local and network
TWAIN driver is device inter fac e, namely SCSI for local and TCP/IP for
network.
10/100 base
Client PC
Scanner
GT-10000
Copy Server
CCS 8200
Printer
EPL-C8200
Figure 1-7. Network TWAIN Data Flow
START COPY
Two ways to start scanning:
1) Press the scanning button on the TWAIN at the client PC.
2) Press START key on the control panel of CCS 8200.
In the case of (1), the scanning is processed using the scanning parameters
set on the TWAIN driver. Therefore the user must open TWAIN and set the
parameters on the client befor e scanning. In the case of (2), on the other
hand, the scanning parameters must be set on the control panel. In this copy
system, scan-navi button located on the scanner is not available.
Product Description Functions 19
Page 25
EPSON Color Copy Station 8200 Revision A
PROTOCOL
EPSON original protocol on TCP/IP (Peer to Peer connection)
CLIENT OS
Table 1-17. Client OS
Software Name EPSON TWAIN Pro Network
Client OS PC/AT
Compatible
machine
Windows95, Widows98
WindowsNT3.51 Workstation
WindowsNT4.0 Workstation
SCANNER OPTION
ADF: Available
TPU: Not Available (Scanner does not support TPU.)
TWAIN FUNCTIONS
Other functions including scanning mode, scanning size are just the same as
local TWAIN functions.
1.3.4 Web Status
OPERATIONAL PRINCIPLES
Web Status functions is the one of thr ee web-based utilities. Web Status
module is JAVA applet written by JAVA language and works on the web
master. When the user starts WebStatus, browser accesses to CCS 8200,
loads WebStatus applet, and executes it. By using this function, the user can
get the current status about scanner, printer, and CCS 8200.
10/100 base
Client PC
TIME OUT
After trying to connect, if no replay comes even after the fixed time passed,
the TWAIN driver disconnects the communication with CS-8200. This fixed
value is 30 seconds as a default in the initial setting . But the user can change
it on the TWAIN environment setting.
Scanner
GT-10000
Copy Server
CCS 8200
Printer
EPL-C8200
Figure 1-8. Web Status Data Flow
PROTOCOL
LOCALIZATION
HTTP on TCP/IP
TWAIN does not detect th e language used on OS and is localized for each
language as individual release.
Product Description Functions 20
Page 26

EPSON Color Copy Station 8200 Revision A
CLIENT OS
Table 1-18. Client OS
Software Name EPSON TWAIN Pro Network
Client OS PC/AT
Compatible
machine
Windows95, Widows98
WindowsNT3.51 Workstation
WindowsNT4.0 Workstation
URL
http://<host name>/WebStatus.html
host name: Name of CCS 8200
LOCALIZATION
WebAdmin detects the language used on OS, and uses the language if it is
one of the following: German, French, Spanish, Italian, and Portugue se. For
the other languages, WebAdmin uses English.
Table 1-19. Localization
Client PC OS Localization WebAdmin Localization
German German
French French
Spanish Spanish
Italian Italian
Portuguese Portuguese
All other local areas English
STATUS ITEMS
Table 1-20. Status Items
Items Remarks
CCS 8200 Registered Name Name registered by WebAdmin
Division Division registered by WebAdmin
IP address
Current Status
Printer Model Name
Current Status
Font Card Information Slot A, Slot B
Interface Card Information Slot A, Slot B
MP Tray Paper Size, Balance
C1 Cassette Paper Size, Balance
C2 Cassette Paper Size, Balance
C3 Cassette Paper Size, Balance
C4 Cassette Paper Size, Balance
Photo Conductor Life
Oil Roll Balance
Waste Toner Box status
Scanner Model Name
Current Status
ADF
Existence of document on ADF
Product Description Functions 21
Page 27

EPSON Color Copy Station 8200 Revision A
STATUS UPDATE TIMING
The status displayed on Web Status is updated at the timing below.
(Web Status doesn’t get the status from CCS 8200 periodically by itself)
n
When Web Status starts
n
When user clicks the icon of registered CCS 8200 on the WebStatus
n
When user press the re-load button on the web browser
1.3.5 Web Admin
OPERATIONAL PRINCIPLES
Web Admin function is the one of three web-based utilities for administrator.
WebAdmin module is JAVA applet written by JAVA language as is the case of
WebStatus. By using this function, the administrator can set some
parameters to CCS 8200.
10/100 base
Client PC
Scanner
GT-10000
Copy Server
CCS 8200
Printer
EPL-C8200
Figure 1-9. Web Admin Data Flow
PROTOCOL
HTTP on TCP/IP
Product Description Functions 22
Page 28

EPSON Color Copy Station 8200 Revision A
CLIENT OS
Table 1-21. Client OS
Software Name EPSON TWAIN Pro Network
Client OS PC/AT
Compatible
machine
Windows95, Widows98
WindowsNT4.0 Workstation
URL
http://<host name>/WebStatus.html
host name: Name of CCS 8200
CERTIFICATION
Web Admin is protected by certification mechanism.
The user name and password is fixed as follows as a default.
User Name: Administrator
Default Password: Administrator
LOCALIZATION
Web Admin detects the language used on OS, and uses it for German, French,
Spanish, Italian, and Portuguese. For the other languages, WebAdmin uses
English.
Table 1-22. Localization
Client PC OS Localization WebAdmin Localization
German German
French French
Spanish Spanish
Italian Italian
Portuguese Portuguese
All other local areas English
SETTING ITEMS
Table 1-23. Setting Items
Items Remarks
Main Unit Name of CCS 8200 possible (necessary)
Division possible
Model Name impossible
Memory Capacity of CCS 8200 impossible (32MB fixed)
Administrator Name possible
Administrator Login Name possible (necessary)
Administrator Password possible (necessary)
Administrator E-mail Address possible
Administrator Telephone Number possible
Product Description Functions 23
Page 29

EPSON Color Copy Station 8200 Revision A
Table 1-23. Setting Items
Items Remarks
TCP/IP IP Address possible (necessary)
Subnet Mask possible (necessary)
Mac Address impossible
Gateway Address possible
Registratio
n of
Machine
Printer
Initial
Settings
Name of Machine possible (necessary)
Division possible
a
IP Address possible (necessary)
Administrator Name possible
Administrator E-mail Address possible
Administrator Telephone Number possible
Output Tray
Right Margin
Left Margin
Upper Margin
possible
(Face-up/ Face-down)
possible(0~15mm, in
increments of 1mm)
possible (0~15mm, in
increments of 1mm)
possible 80~15mm, in
increments of 1mm)
1.3.6 Web Upgrade
OPERATIONAL PRINCIPLES
Web Admin function is the one of three web-based utilities for administrator.
WebAdmin module is JAVA applet written by JAVA language as well as
WebStatus. By using this function, the administrator can set some
parameters to CCS 8200.
10/100 base
Client PC
Scanner
GT-10000
Copy Server
CCS 8200
Printer
EPL-C8200
Figure 1-10. Web Admin Data Flow
a.Theusercanconfirmthestatusfortheregisteredmachine.
Themaximumnumberofmachineswhichcanberegisteredis8.
DATA VALID TIMING
PROTOCOL
HTTP on TCP/IP
The parameters are sent to the CCS 8200 after pressing SUBMIT button on the
Web Admin. After the CCS 8200 receives them and restarts by itself, those
parameters are valid.
Product Description Functions 24
Page 30

EPSON Color Copy Station 8200 Revision A
CLIENT OS
Table 1-24. Client OS
Software Name EPSON TWAIN Pro Network
Client OS PC/AT
Compatible
machine
Windows95, Widows98
WindowsNT4.0 Workstation
URL
http://<host name>/WebStatus.html
host name: Name of CCS 8200
LOCALIZATION
WebUpgrade doesn’t detect the language used on OS, and its language is
English only. (not localized)
1.3.7 Money Recognition
When CCS 8200 detects the feature of paper money in the scanned image in
the middle of local copy job, it cancels the job. Depending on the detection
timing, the copy output may be made and the printer outputs the image. But
even in this case, its image will not be complete money.
The specification of this fun ction is not open to the public.
1.3.8 User Settings
1.3.8.1 User Settings on the Operational Panel
HOW TO MOVE TO USER SETTING MODE
To enter the user setting mode, turn on the power switch while holding down
“start” and “stop” key on the operational panel simultaneously.
ITEMS
In the user setting mode, user can set the following parameters.
n
Language
n
IP address
n
Gateway address
n
Subnet mask
n
Network Speed (10 base / 100 base)
n
Retrieve factory settings
LANGUAGE SELECTION
At the user configuration mode, user can select the language from the ones
that CCS 8200 displays. At the same time, localization about operational
panel, web utilities, and pap e r size is determined according to the selec ted
language. The relation between the area and the localization for each function
is in the table below.
Table 1-25. Language Selection
Language Control Panel
English (default) English English English
French French French English
Italy Italy Italy English
Web Status
Web Admin
a
Web Upgrade
Product Description Functions 25
Page 31

EPSON Color Copy Station 8200 Revision A
Table 1-25. Language Selection
Language Control Panel
German German German English
Spain Spain Spain English
Portuguese Portuguese Portuguese English
a.These three web utilities detect OS language by itself and changes
its language to be used for user interface. For CCS 8200 the
languages which are not shown in the upper table, English is
selected.
Web Status
Web Admin
a
Web Upgrade
RELATIVE FACTORY SETTING
The menu “Retrieve Factory Settings” initializes all parameters about
CCS 8200.
n
Language Selection
n
Job Memory data
n
Parameters used in we b-based utilities
Factory settings are shown in the table below.
Table 1-26. Control Panel (No 1)
Parameters Default Value
Paper Size Paper Size of Cassette 1
Copy Mode Color
Document Type Magazine
Output Tray Face Up
Split Copy OFF
Print Margin Standard (Top, Left, Right = 100mm)
Forced continuation(*1) clear
Job memory clear for all
(*1) CCS 8200 can work even if scanner and /or printer is not connected to
CCS 8200. In this case, CCS 8200 doesn’t ask user because CCS 8200
remembers the previous setting of the existing scanner and printer. Forced
continuation indica tes this mark.
Table 1-27. Operational Panel (No.2)
Parameters Initial Value
Job memory clear for all
Table 1-26. Control Panel (No 1)
Parameters Default Value
Language English
IP address 000.000.000.000
Subnet Mask 000.000.000.000
Network Negotiation Automatic
Image Quality Parameters All 0 (standard settings)
Number of Copy 1
Zoom 100%
Parameters Initial Value
Main Unit - Name Color Copy Station
Main Unit - Division clear
Main Unit - Model CCS 8200
Main Unit - Administrator Name Clear
Main Unit - Administrator Login Name Administrator
Main Unit - Administrator Password Administrator
Main Unit - Administrator E-mail Address clear
Main Unit - Administrator Telephone clear
Table 1-28. Web Admin
Product Description Functions 26
Page 32

EPSON Color Copy Station 8200 Revision A
Table 1-28. Web Admin
Parameters Initial Value
Registered Machine clear for all registered machines
Output Tray Face Up
Print Margin 0mm for Upper, Left, Right margin
Server Scan Enable / Disable disable
1.3.9 Machine Functions
1.3.9.1 H/W Check
This function is used for manufacture and field supporter.
o
How to enter this mode
To enter user setting mode, turn on the power switch while holding
down “0”, “.”, and “stop” key on the operational panel
simultaneously.
o
Items to be checked
n
Panel unit check
n
ISA board check
n
ECP board check
n
Sum check for flash ROM
n
Print out the result of all H/W check
1.3.9.2 Fixed IP Setting
This function is used for manufacturer or field supporter. In this mode,
CCS 8200 starts with fixed IP address temporarily and user can use some
functions as well as in the normal mode. Once user turns CS-8200 off, the IP
address is cleared.
o
How to enter this mode
To move to user setting mode, turn on the power switch with pressing
“1”, “2”, and “3” key on the control panel simultaneously.
Product Description Functions 27
Page 33

EPSON Color Copy Station 8200 Revision A
o
Available functions
n
Local Copy
n
Network TWAIN
n
WebStatus
(WebAdmin and WebUpgrade can not be used in this mode.)
1.3.9.3 Firmware Update by Board to Board Copy
CCS 8200 supports two ways to upgrade the firmware, one is by
WebUpgrade, and the other is by Board to Board copy. The board to board
copy can execute the copy from master to target board even if target is just
brand-new board, but WebUpgrade supports the previous version of
firmware is written and runs in the CCS 8200. Please refer to Chapter 4 for
details.
UPGRADE SEQUENCE
1. O pen the ca se of CCS 8200, and insert two ISA boards setting the
MASTER mode and the Target mode. MASTER or TARGET is set by
jumper on the ISA Board as shown below.
Table 1-29. Jumper set on ISA BOARD
Jumper No. JP20 JP30 JP31 JP32
3. The LED lamp on the Control Panel turns on according to the sequence
below.
Table 1-30. Sequence turn on the LED
LED
Power
ON
Time
“Error”
LED (Red)
ll¡
l ¡ ¡
¡¡¡
l ¥ ¡
¥l¡
After the data in the flash ROM area is rewritten by executing WebUpgrade,
Board to Board, or Retrieve factor settings, the state in the ROM is changed as
follows.
“Ready”
LED (Green)
“Power”
LED (Green)
meaning
Power ON
Erasing the old firmware
Reading from MASTER,
and writing to TARGET
Finished successfully
Finished by failure
Table 1-31. ROM Area after rewritten
Control
Web Upgrade
ROM Area (*1)
Program Area Overwrite Overwrite Keep Previous State
Board to
Board Copy
Retrieve Factory
Settings
Master Mode 1-2 1-2 2-3 1-2
Target Mode 1-2 1-2 1-2 2-3
2. T urn on the power switch of CCS 8200.
Control Panel No. 1 Keep previous state Overwrite Overwrite
Control Panel No. 2 Keep previous state
Web Admin Keep previous state Overwrite Overwrite
Keep previous
state
Overwrite
(*1) Refer “User Settings” on page 25
Product Description Functions 28
Page 34

EPSON Color Copy Station 8200 Revision A
1.4 Appearance
1.4.1 Main Unit
Card Slot 6 (ISA Target Board)
Figure 1-11. CS-6000N Back
Table 1-32. Parts List
Power Switch
Power Connector
Card Slot 3 (ECP Board)
Card Slot 4 (SCSI Board)
Card Slot 5 (Network Board)
Table 1-32. Parts List
Name Remarks
Printer interface connector
Scanner interface connector
Network interface connector
Control Panel Interface connector
1.4.2 Control Panel
F
Doc Type
Zoom
Paper Size
Image
Density
G
Color
Adjust
CLR/
B&W
All Color
Start
H
I
1 2 3
4 5 6
7 8 9
0 . C
Name Remarks
Power Switch
AC inlet
Card Slot 1 (Blank)
Card Slot 2 (Blank)
Card Slot 3 PCI-bus ECP Card
Card Slot 4 PCI-bus SCSI Card
Card Slot 5 PCI-bus Network Card
Card Slot 6 ISA-bus ISA Board (Flash, Panel)
Card Slot 7 ISA-bus (Blank)
(A) Error Lamp (Red)
(B) Ready lump (Green)
B
A
CD
E
Figure 1-12. Appearance of Operational Panel
ON: means the error occurs in scanner, printer, or CCS 8200.
OFF: means no error occurs in scanner, printer, or CCS 8200.
ON: means the scanner, printer, and CCS 8200 are all standby.
OFF: means one of the scanner, printer, or CCS 8200 is not standby.
BLINK: means CCS 8200 is doing some job.
Product Description Appearance 29
Page 35

EPSON Color Copy Station 8200 Revision A
(C) Power lump (Green)
ON: means CCS 8200 is powered on.
OFF: means CCS 8200 is powered of.
(D) Intensity Adjustment volume
A volume switch to adjust LCD intensity.
(E) Ten key
There are keys to set copy numbers, zoom, and so on.
“C” key is used to clear copy numbers and so on for default.
(F) LCD and Touch key
LCD is 320x240 dot matrix, and Touch key is 8x6 matrix scan sensor.
LCD is used to display parameters, and Touch key is used to set
parameters.
(G) All Clear key
The parameters for local copy are all cleared by pressing this key.
(H) Start key
Local copy or Network TWAIN starts to copy or scan by pr essing this
key.
(I) Stop key
Local copy or Network TWAIN stops to copy or scan by pressing this
key.
1.5 Accessories
1.5.1 Product Component
The typical configuration contains the following components.
1. CC S 8200
2. Operational Panel
3. Operational Panel Cable
4. EPL-C8200
5. GT-10000
6. Printer Cable
7. Scanner C able (SCSI Cable)
8. Sys tem Rack (2 large capacity paper cassette type)
9. Power Supply Code for System Rack
10. Code Manuals (English Version)
11. Bundled Software CD-ROM
1.5.2 Bundled Software
1. EPSON TWAIN Pro Network for Windows
2. Microsoft Internet Explore for Windows
Product Description Accessories 30
Page 36

EPSON Color Copy Station 8200 Revision A
1.6 Attention for forgery
EPSON Color Copy Station 8200 is a Color Copier, and user can copy all kind
of documents. But the admin istrator must forbid all users from copying bills,
securities and so on which are inhibited by law. The system administrator has
duty not to make illegal copies.
Product Description Attention for forgery 31
Page 37

OPERATING PRINCIPLES
CHAPTER
2
Page 38

EPSON Color Copy Station 8200 Revision A
2.1 Operating Principles
This section explains the operating principles of CCS 8200. Refer to
each Service Manual for the operating principles of printer and scanner.
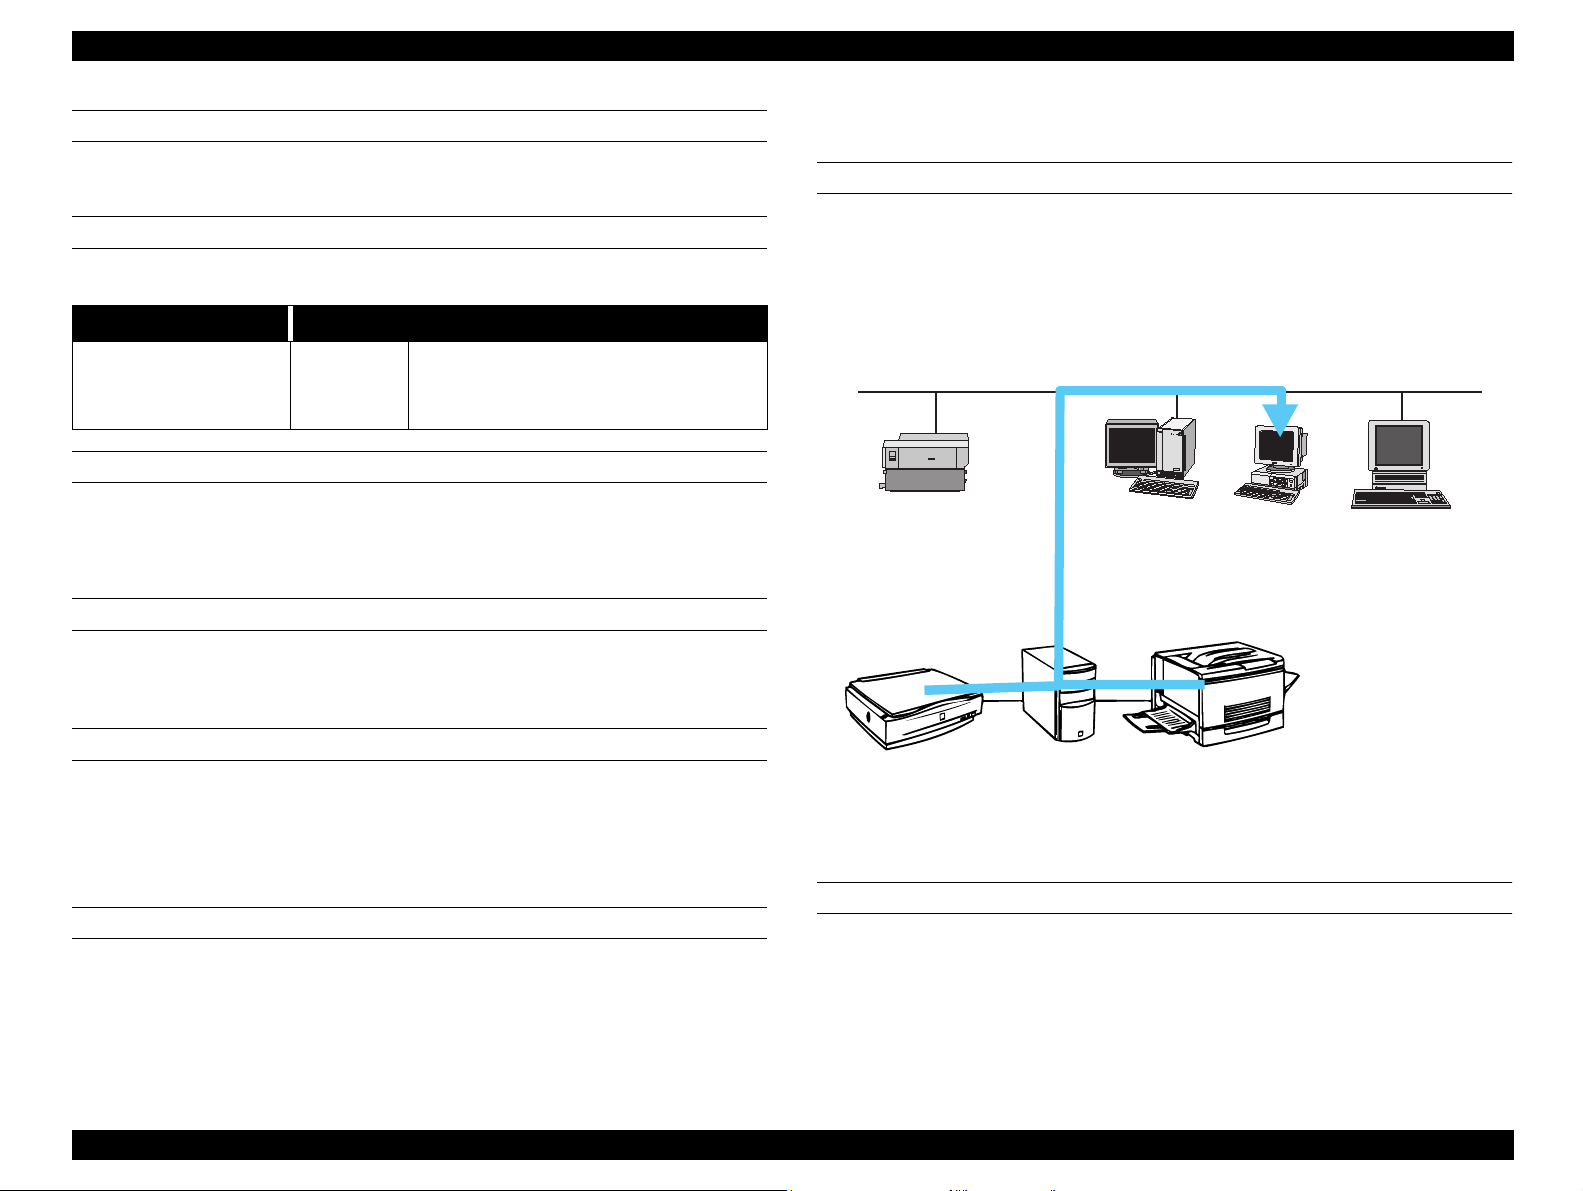
2.1.1 Copy System
Copy system of CCS 8200 is as follows.
CPU
L2
PCI
Bridge
ISA Board
ISA
Board
Control Panel
ISA
Bridge
Figure 2-1. System Connection
Main
Memory
32MB
NIC
DE-500B
Ethernet
10/100BaseT
PCI Bus
SCSI Board
AVA-290E
Scanner
ECP Board
Printer
2.1.2 Control Circuit
Hardware architecture of this product is PC/AT personal computer, and
interfaces of ISA and PCI for extension exist respectively.
CPU adopts AMD K6-2 processor, which is driven by 300 MHz Clock,
and has one 32MB RAM-DIMM on the mother board. On the mother
board, CMOS, which records the setting values of BIOS, and a lithium
battery for backing-up are mounted.
2.1.3 ISA Board
On the ISA Board (C85010 I/F), ASIC E02A27, Flash ROM (8Mbit x 12),
EEPROM (AT93C66) and SRAM (256 KB x 1) are mounted. ISA board
is connected to the mother board through ISA bus s lot. The figure bel ow
is ISA board block diagram.
ISA Board
E02A27
Flash ROM
8Mbitx12
SRAM
256kx1
Control Panel
ISA BUS
ROM
Control
LCD
Control
Touch Panel
Button Control
CCS-8200 connects the network by 10/100 Base Network Interface
Board (DE-500B) through the switching pab and operate copy server
function. Due to this, each PC on the network can use the common
Figure 2-2. ISA Board Block Diagram
scanner and printer.
Operating Principles Operating Principles 33
Page 39

EPSON Color Copy Station 8200 Revision A
o
ASIC E02A27:
Controls I/F of ISA board and ROM (to start the system), LCD of the
control panel (panel module), and the touch panel and control
bottom on the LCD.
o
Flash-ROM:
Stores firmware, table etc.
2.1.3.1 ECP Board
ECP Board (Image Processing Board, C850101/F-B) connects to the
mother board through the PCI bus of Color Copy Station 8200.
PCI bus
TO update firmware, connect the master ISA board to an open ISA
slot. Flash-ROM uses Board to Board copy function, which copies
the firmware from the master board to the target board. Also, FlashROM can be updated from the Web page.
o
SRAM:
Memory for LCD indicator
o
EEPROM:
Keeps the setting of the ISA board.
WAIT
WAIT
WAIT
PCI E09A06AB
176 pin (3.3v, 5V)
WAIT
INT
WAIT
WAIT
LOCAL BUS (ADDRESS)
LOCAL BUS (DATA)
INT
Clock
Super I/O
FDC87W23 (SMSC), 100pin (5V)
BILL
CPU, E09A12AA
DRAM
SRAM
TET
E09A12AA
144pin(3.3V)
RGB
STRB
BUSY
MOIRE
E09A09AB
144pin(3.3V)
RGB
SHARPNESS
E09A11EA
RGB
E09A11EA
RGB
E09A10AA
208pin(3.3V,5V)
STRB
CMM
STRB
DMA
BUSY
STRB
BUSY
BUSY
STRB
BUSY
RGB
SRAM (3.3V)
(32KWx8bit )x4
BUSY
STRB
Regulator
1284 Driver
IEEE1284
25pin
DSUB Connector
Figure 2-3. ECP Board Block
Operating Principles Operating Principles 34
Page 40

EPSON Color Copy Station 8200 Revision A
FUNCTIONAL EXPLANATION
GENERAL DESCRIPTION OF THE BOARD FUNCTION
o
PCI:
o
The board processes image data sent through PCI bus, and stores
Controls PCI BUS, LOCAL BUS, and RGB BUS.
the image processed data to the SRAM (total memory: 1Mbit)
o
mounted on the board. (DMA IN)
BILL (Bill recognition circuit):
BILL uses CPU, ASIC, and the program and data stored on the ISA
o
The board sends on the image processed data to the printer through
Super I/O. (DMA OUT)
ECP board processes image data by BILL (bill recognition circ uit), TET
board. When the system started, the programs and data are loaded
and stored in the DRAM inside BILL. The image data is input
through RGB BUS, and in case BILL recognizes it as a bill, BILL
informs this by interrupting into the LOCAL BUS.
(Text Enhancement Technology), MOIRE (deleting moire),
o
SHARPNESS (emphasizing edges), CMM (changing color). Each
treatment does not support al l r esol ution power. The ta ble below sho ws
whether respective treatment is valid at each resolution power.
Table 2-1. Resolution Power of Each Treatment
Resolution
Power** (dpi)
300 x 300
600 x 600
BILL TET MOIRE
¡
*
¡
¡(¡
)
x*(¡) x(¡)
¡(¡
)
SHARPNESS
¡(¡
)
¡(¡
)
CMM
¡(¡
¡(¡
)
)
TET (TEXT ENHANCED TECHNOLOGY):
Performs TET process.
o
MOIRE:
Performs MOIRE clearing process.
o
SHARPNESS:
Performs edge emphasizing treatment.
o
CMM:
Performs color translation process from RGB TO R’G’B’.
o
Note: *¡: supported x: Not supported
** Resolution Power: main-scanning x sub-scanning
(): when using processing by-pass
As shown in the table above, when using A3 wide (600 x 600 dpi), the
DMA:
Storing data sent from CMM in SRAM. (DMA IN)
Four 32Kw x 8bit SRAMs are mounted and total memory amounts
to 32Kw x 8bit.
ASIC (TET, MOIRE) treatment on the board are not supported, and
therefore it is supported by software. When the software is used to
process image data, in order to prevent input of the data processed by
TET and MOIRE against BILL (for processed image data cannot be
input to BILL), PCI output is provided with two types of strobe signal.
When performing this process, the software should alternately transmit
one line data processed by TET and MOIRE to PCI.
Operating Principles Operating Principles 35
Page 41

TROUBLE SHOOTING
CHAPTER
3
Page 42

EPSON Color Copy Station 8200 Revision A
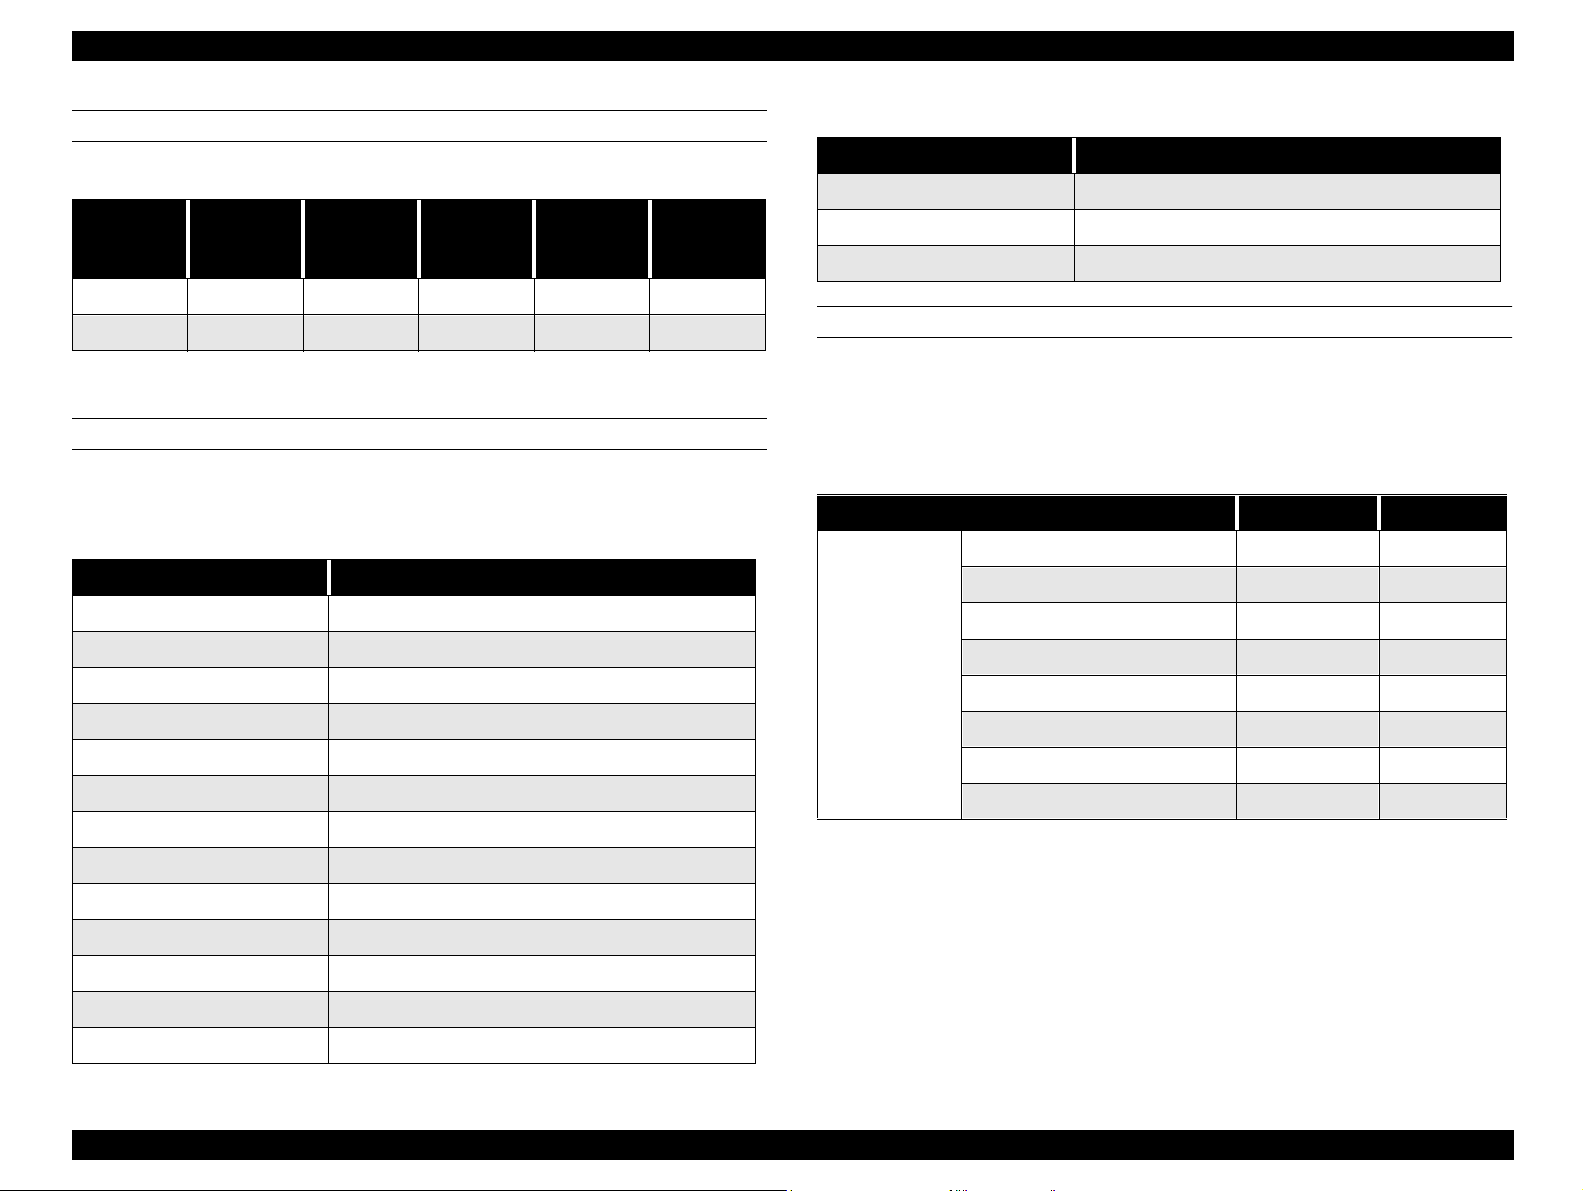
3.1 Error Message
Color Copy Station 8200 is equipped with a self-error-detection function, and
when an error occurs, it is in dicated by LCD on the control panel or an error
lamp.
3.1.1 Printer Error of Local Copy Mode
Table 3-1. Alert Message
Cause Copy Server Panel Screen Printer Panel Screen
A write-enabled ROM
module is inserted that
is not formatted.
Due to a memory
shortage, printing at the
specified resolution is
not possible, and the
printing resolution is
lowered..
Memory is insufficien t
during data processing
and memory
compression and
expansion is applied.
Selected paper size is
mismatched.
Selected paper size is
mismatched and printed
on a different size of
paper.
Printer Alert
ROM module
Press the Stop button
Job will Continue
Printer Alert
Insufficient Memory
Press the Stop button
Job will Continue
Printer Alert
Insufficient memory
Press the Stop button
Job will Continue
Printer Alert
Paper Size Error
Press the Stop button
Job will Continue
Printer Alert
Paper Size Error
Press the Stop button
Job will Continue
Format Error ROM A
or
Format Error ROM B
Image Optimum
Need Memory
Check Paper Size
Check Paper Type
Table 3-1. Alert Message
Cause Copy Server Panel Screen Printer Panel Screen
This message appears
only if selected paper
type is mismatched and
printed at different
cassette
Informs the user t hat th e
photoconductor unit has
almost reached the end
of its serv ice life.
The Waste Toner
Collector is nearly full.
There is on ly a little
fuser oil re maining.
Asigned number of
pages are not printed.
The remaining toner of
each color (Y, M, C, K) is
low.
A warning has been
generated which the
user cannot resolve.
Paper is prefed, but
since the print data is
not prepared within the
engine’s setting time,
the paper was forced to
be fed without printing.
Printer Alert
Paper Size Error
Press the Stop button
Job will Continue
Printer Alert
Photoconductor
Press the Stop button
Job will Continue
Printer Alert
Waste Toner Box
Press the Stop button
Job will Continue
Printer Alert
Oil Roll
Press the Stop button
Job will Continue
Printer Alert
Collate disabled
Press the Stop button
Job will Continue
Printer Alert
Toner Cartridge
Press the Stop button
Job will Continue
Printer Alert
Service Required
Press the Stop button
Job will Continue
Printer Alert
Pre-feed Error
Press the Stop button
Job will Continue
Outbin Select Error
Warning
Photoconductr
Waste T Box Nearfull
Oil Roll Near Empty
Collate was disabled
uuuu Toner Low
uuuu = CMYK
Maintenance Req
hhhh
Time exceeded
Trouble Shooting Error Message 37
Page 43

EPSON Color Copy Station 8200 Revision A
Table 3-2. Auto Recovery Error Message
Cause
During the printing procedure,
the print data were too compl ex
for image processing to keep
up with the printer engine
speed.
Memory was insufficient for a
processing task, and operation
cannot continue.
Selected paper size is
mismatched.
Table 3-3. Unrecoverable Error Message
Cause
The front cover is open.
A ROM module that cannot
be used with this printer is
inserted in slot.
The write process was not
completed successfully, or
there is no R O M module
inserted in slot.
Copy Server Panel
Screen
Printer Error
Printer Overrun
After Error Recovery
Job will Continue
Printer Error
Insufficient Memory
Press the Stop button
Printer Error
Printer Size Error
After Error Recovery
Job will Continue
Copy Server Panel
Screen
Printer Error
Cover Open
After Error Recovery
Job will Continue
Printer Error
ROM Module
After Error Recovery
Press the Stop
button
Printer Error
ROM Module
After Error Recovery
Press the Stop
button
Printer Panel
Screen
Print Overrun Continue
Mem Overflow Cancel
Paper Set sss ttt Cancel
Printer Panel
Screen
Front Cover Open Continue
Invalid ROM A
or
Invalid ROM B
Write Error ROM A
or
Write Error ROM B
Copy
Activity
Copy
Activity
Cancel
Cancel
Table 3-3. Unrecoverable Error Message
Cause
A paper concurred at the
location indicated.
(Feed, Fuser, Exit)
Printer attempted paper feed
but there was no pape r in t he
paper feed unit.
Printer attempted paper feed
but there was no pape r in t he
paper feed unit.
The OHP sheet was set
upside dow n and fed into the
printer, or an unspecified
OHP sheet was fed into the
printer.
An interface card that cannot
be used with this printer is
inserted.
The photoconductor unit is
not set or it is not set
correctly.
A Waste Toner Collector is
not set.
Copy Server Panel
Screen
Printer Error
Paper Jam
After Error Recovery
Job will Continue
Printer Error
Paper Out
After Error Recovery
Job will Continue
Printer Error
Paper Size Error
After Error Recovery
Job will Continue
Printer Error
Paper Size Error
After Error Recovery
Job will Continue
Printer Error
Aux I/F Error
After Error Recovery
Press the Stop
button
Printer Error
Photoconductor
After Error Recovery
Press the Stop
button
Printer Error
Waste Toner Box
After Error Recovery
Job will Continue
Printer Panel
Screen
Jam xxxxxxxxxxx
xxxxxxxxxxx =
Feed, Fuser, Exit
Paper Out sss ttt Continue
Manual Feed sss
ttt
Check OHP Sheet Continue
Invalid AUX I/F
Card
Insert
Photocondctr
Insert Waste T
Box
Copy
Activity
Continue
Continue
Cancel
Cancel
Continue
Printer Error
Oil Roll
After Error Recovery
Job will Continue
Insert Oil Roll Continue
The appointed cassette does
not exist.
Printer Error
Paper Out
After Error Recovery
Job will Continue
Insert sss Continue
The Fuser Oil Roll is not set.
Trouble Shooting Error Message 38
Page 44

EPSON Color Copy Station 8200 Revision A
Table 3-3. Unrecoverable Error Message
Cause
The paper output cover is
open.
The Fuser cover is open.
The paper feed unit is open.
Engine’s photoconductor
service life is detected to end.
The waste toner box is
sensed to be full of waste
toner from the engine.
Toner sensor detects there is
no fuser oil. .
Copy Server Panel
Screen
Printer Error
Cover Open
After Error Recovery
Job will Continue
Printer Error
Fuser Unit Open
After Error Recovery
Job will Continue
Printer Error
Paper Unit Open
After Error Recovery
Job will Continue
Printer Error
Photoconductor
After Error Recovery
Press the Stop
button
Printer Error
Waste Toner Box
After Error Recovery
Job will Continue
Printer Error
Oil Roll
After Error Recovery
Job will Continue
Printer Panel
Screen
Exit Cover Open Continue
Fuser Unit Open Continue
Paper Unit Open Continue
Replace
Photocondctr
Replace Waste T
Box
Replace Oil Roll Continue
Copy
Activity
Cancel
Continue
Table 3-3. Unrecoverable Error Message
Cause
The proper Photoconductor
Unit is not set.
The Photoconductor Unit is
malfunctioning.
The paper feed cover is ope n.
A Toner Cartridge is not set.
It is detected that there is no
toner remaining by the toner
and sensor for each engine
color.
Copy Server Panel
Screen
Printer Error
Photoconductor
After Error Recovery
Press the Stop
button
Printer Error
Photoconductor
After Error Recovery
Press the Stop
button
Printer Error
Cover Open
After Error Recovery
Job will Continue
Printer Error
Toner Cartridge
After Error Recovery
Job will Continue
Printer Error
Toner Cartridge
After Error Recovery
Job will Continue
Printer Panel
Screen
Wrong
Photoconductor
Photoconductor
Trouble
Feeder Cover
Open
uuuu Toner Crtg
Out
uuuu = CMYK
uuuu Toner Out
uuuu = CMYK
Copy
Activity
Cancel
Cancel
Continue
Continue
Continue
At the top of paper feed
direction, print data with a
YMCK total print da ta d ens it y
of 280% or greater exits, with
a printing high density error
occurring.
Printer Error
Paper Thickness
After Error Recovery
Press the Stop
button
Irregular Density Cancel
Trouble Shooting Error Message 39
Page 45

EPSON Color Copy Station 8200 Revision A
Table 3-3. Unrecoverable Error Message
Cause
The PostScript card that
cannot be used with this
printer is inserted.
HDD is in trouble.
An Error has been generated
which the user cannot
resolve.
Table 3-4. Details of Service Call Error
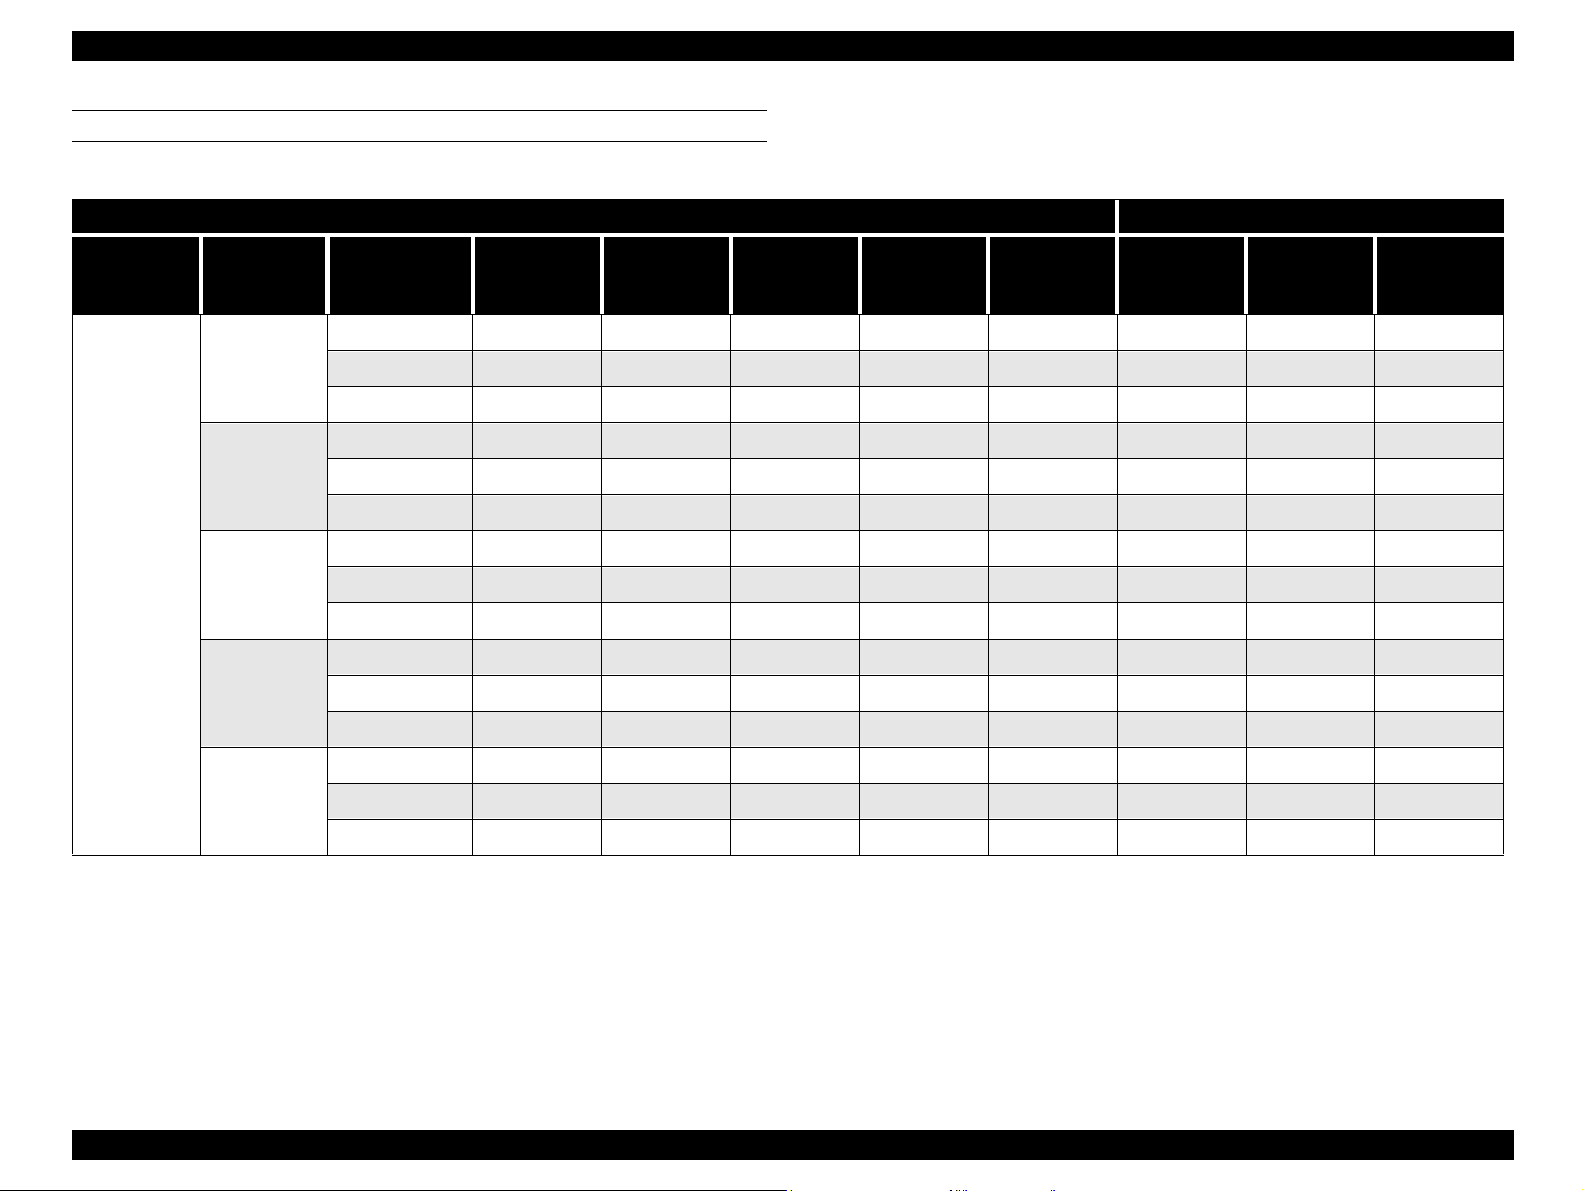
Error CategoryeError Code
ffff
E 0003 Fuser Unit Malfunction (Service Life)
E 0008 Engine NVRAM Malfunction
E 0014 Engine Communications Error
E 0020 ADC Sensor Dirty
E 0022 PCDC Defective
E 0023 IBT Cleaner Service Life
E 0024 Second BTR Service Life
E 0025 Spare
E 0030 Fuser Unit Malfunction (Time Out)
E 0031 Fuser Unit Malfunction (no Fuser Unit)
Copy Server Panel
Screen
Printer Error
Post Script Error
After Error Recovery
Press the Stop
button
Printer Error
HDD Error
After Error Recovery
Press the Stop
button
Printer Error
Service Required
After Error Recovery
Press the Stop
button
Printer Panel
Screen
Invalid PS3 Cancel
Invalid HDD Cancel
Service Req effff
effff: See the table
below
Explanation
Copy
Activity
Cancel
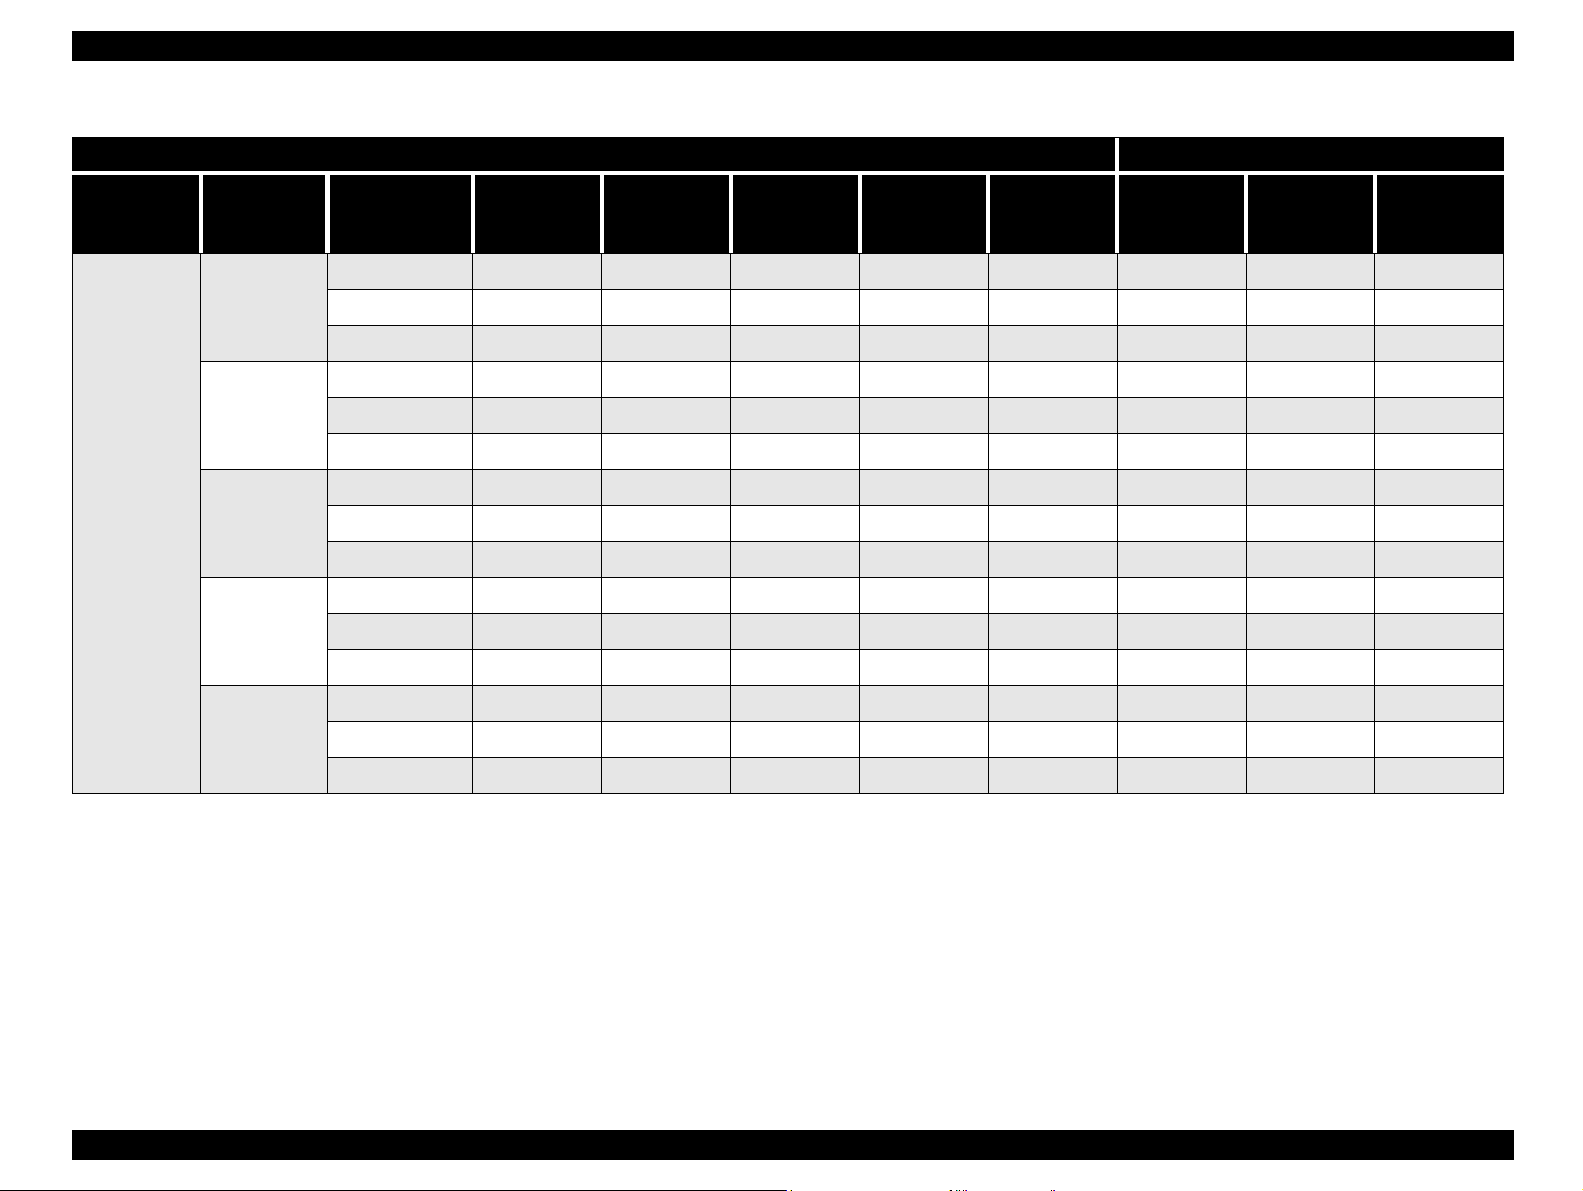
Table 3-4. Details of Service Call Error
Error CategoryeError Code
ffff
E 0032 Fuser Unit Malfunction (Overheat)
E 0033 Fuser Unit Malfunction (Lamp)
E 0034 Fuser Unit Malfunction (Low Temperature)
E 0035 Large Capacity Paper Unit Malfunction
E 0036 Second BTR Resistance Abnormal
E 0037 Spare
E 0038 Engine Memory Malfunction
E 0039 T hermosensor Malfunction
E 0040 ROS Motor Malfunction
E 0041 Motor 1 Malf unction (IBT Malfunction)
E 0042 Motor 2 Malfunction (P/H Motor malfunction)
E 0043 Toner Density Abnormal (High Density)
E 0044 Toner Density Abnormal (Low Density)
E 0045 Home Position Sensor Malfunction
C 0017 CPU Error (Undefined interrupt occurred)
C 0081 CPU Error (TLB correction exception)
C 0082 CPU Error (TLB miss exception [Load/Fetch])
C 0083 CPU Error (TLB miss exception [Store])
C 0084 CPU Error (Address error exception [Load/Fetch])
C 0085 CPU Error (Address Error exception [Store])
C 0086 CPU Error (Bus Error exception [Load/Fetch])
C 0087 CPU Error (Bus Error exception [Store])
C 0088 CPU Error (SYSCALL exception)
C 0089 CPU Error (Break exception)
Explanation
Trouble Shooting Error Message 40
Page 46

EPSON Color Copy Station 8200 Revision A
Table 3-4. Details of Service Call Error
Error CategoryeError Code
ffff
C 0090 CPU Error (Reserve Command exception)
C 0091 CPU Error (Coprocessor Not Used exception)
C 0092 CPU Error (FPU exception)
C 0093 CPU Error (TLB exception)
C 0094 CPU Error (XTLB exception)
C 0095 CPU Error (Cache exception)
C 0096 CPU Error (Trap exception)
C 0097 CPU Error (FPU exception)
C 0098 CPU Error (Watch exception)
C 0128-0254 CPU Error (Undefined Trap)
C 0255 CPU Error (NMI exception)
C 0256 CPU Error (Devide by 0)
C 0257 CPU Error (Computation Overflow)
C 0258 CPU Error (Break was generated)
C 0800 IPL Error (Controller defective)
C 1002
Standard ROM Error (When RAM equivalent to the
standard size is not installed, etc.)
Explanation
Table 3-4. Details of Service Call Error
Error CategoryeError Code
ffff
C 1122 ROM Check Sum Error (bit 16-23) (Program)
C 1123 ROM Check Sum Error (bit 24-31) (Program)
C 1170 Optional Font ROM Check Sum Error
C 1180 Optional ROM Module A Check Sum Error
C 1181 Optional ROM Module B Check Sum Error
C 1182 Optional ROM Module C Check Sum Error
C 1185 Unsupported ROM Module
C 1200 EEPROM Write Error
C 1210 EEPROM Write Count Limit
C 1400 Engine Initialization Malfunction
C 1500 CCNV Hardware Error
C 1550 Compression SRAM Initialization Hardware Error
C 1600
C 1700 Internal Network Hardware Error
C 1999 Other Hardware Error
C 2000 Software Error
Video Related Hardware Error (including RWM IC
calibration)
Explanation
C 1010 Verify Error
C 1020 RAM Error (slot 0)
C 1021 RAM Error (slot 1)
C 1022 RAM Error (slot 2)
C 1100 ROM Check Sum Error (bit 0-15) (Font)
C 1101 ROM Check Sum Error (bit 16-31) (Font)
C 1120 ROM Check Sum Error (bit 0-7) (Program)
C 1121 ROM Check Sum Error (bit 8-15) (Program))
Trouble Shooting Error Message 41
Page 47

EPSON Color Copy Station 8200 Revision A
Table 3-5. Other Error Message
Cause Copy Server Panel Screen
Printer Error
Network Communication is error
Printer is off-line
Printer is used by other AUX I/F or
printer is resetting.
Printer model is not right.
Other errors
Communication Error
After Error Recovery
Press the Stop button
Printer Error
Off-line
After Error Recovery
Job will Continue
Printer Error
Printer Busy
Press the Stop button
Printer Error
Model Error
After Error Recovery
Press the Stop button
Printer Error
Fatal Error
After Error Recovery
Press the Stop button
Copy
Activity
Cancel
Continue
Cancel
Cancel
Cancel
Trouble Shooting Error Message 42
Page 48

EPSON Color Copy Station 8200 Revision A
3.1.2 Scanner Error of Local Copy Mode 3.1.3 Network TWAIN Error
Table 3-6. Scanner Error of Local Copy Mode
Cause
Scanner is not connected.
Scanner ADF is in trouble.
A paper occurred at the ADF.
Scanner cover is open.
Scanner option is in trouble
Copy Server Panel
Screen
Scanner Error
Communication Error
After Error Recovery
Press the Stop button
Scanner Error
ADF Error
After Error Recovery
Press the Stop button
Scanner Error
Paper Jam
After Error Recovery
Press the Stop button
Scanner Error
Cover Open
After Error Recovery
Press the Stop button
Scanner Error
Option Error
After Error Recovery
Press the Stop button
Recovery
Impossible
Impossible
Impossible
Impossible
Impossible
Table 3-7. Network TWAIN Error
Cause
Network Communication is error
3.1.4 Copy System Error
Table 3-8. Copy System Error
Cause
Hardware is in trouble
Manuscript is abnormal
Other Errors
Copy Server Panel
Screen
Scanner Error
Communication Error
After Error Recovery
Press the Stop button
Copy Server Panel
Screen
System Error
Internal Error
Restart System
System Error
Paper Error
Press the Stop button
System Error
Fatal Error
Restart System
Recovery
Impossible
Recovery
Impossible
Impossible
Impossible
Scanner Error
Scanner model is different
Other Errors
Model Error
After Error Recovery
Press the Stop button
Scanner Error
Fatal Error
After Error Recovery
Press the Stop button
Impossible
Impossible
Trouble Shooting Error Message 43
Page 49

DISASSEMBLY AND ASSEMBLY
CHAPTER
4
Page 50

EPSON Color Copy Station 8200 Revision A
4.1 Overview
This section describes procedures for disassembling the main components of
Color Copy Station 8200. Unless otherwise specified, disassembly units or
components can be reassembled by reversing disassembly procedure.
Precautions for any disassembly or assembly procedures re described under
the heading “CAUTION” or “WARNING”. Any adjustments required after
disassembling the units are described under the heading “Required
Adjustment”. Also, read precautions below before starting.
4.1.1 Precaution
A lithium battery is installed on the other board of this product for backing up
the system clock. Since mishandling the battery may cause explosion or
short-circuit, read carefully the following precautions .
W ARNING
n Disconnect the power cable before disassembling or
assembling.
n A lithium battery is installed on the mother board of this
product. Be sure to observe the following instructions
when servi cing the battery:
1. Do not get the battery short-circuit.
2. Do not install the battery in the wrong direction.
3. Do not heat the battery or put it near fire.
4.1.2 Tools
Use only the specified tools to avoid damaging the product.
Table 4-1. Tools
Tool Name Supplier Parts No.L
Phillips Screw
Driver (no.1)
Phillips Screw
Driver (No.2)
Nipper EPSON B740500100
Tweezers EPSON B741000100
EPSON B743800400
EPSON B743800200
CAUTION
n Since the cooling fan inside of this product doesn’t have a
cover, do to touch it when it is running.
n Handle with care for the electric parts inside of this
product, since electrostatic may damage the elements.
CAUTION
Risque d’explositon sie la pile est remplacée
incorrectment.Ne remplacer que par une pile du même type
équivalent recommande par le fabricant. Eliminer les piles
déchargées selon les lois et les règles de sécurité en
vigueur.
Disassembly and Assembly Overview 45
Page 51

EPSON Color Copy Station 8200 Revision A
4.2 Disassembly and Assembly
This section explains disassembling procedure.
CAUTION
4.2.1 Upper Case Removal
1. Remove 5 screws (SMH/W#6 X 6N) located back of CCS8200.
2. Remove the upper case.
See “Precaution” on page -34 before starting disassembly
and assembly procedures.
Upper Case
3 Screws
2 Screws
4.2.2 Optional Board Removal
4.2.2.1 ISA Board Removal
1. Remove the upper case. (“Upper Case Removal” on page 46)
2. Remove one screw (SMH/W6# X 6N) securing ISA board to the body case.
3. Remove ISA board from the slot (SLOT1) of the mother “Disassembly and
Assembly” board
Connector for
Power Supply
Cable PS1
Connector for
Key Board
Connector for
Power Supply
Cable PS2
P C I1 :E CP Bo a r d
PCI 1: ECP Board
P C I2 :SCSI B o a r d
PCI 2: SCSI Board
P C I3 :Ne two rk Bo a rd
PCI 3: Network Board
P C I4 :Bla n k
PCI 4: Blank
SLOT1:ISA Board (for Target Board)
SLOT 1: ISA Board (Target Board)
DIMM RAM Slot
CPU
CPU
Mother
Mother
Board
Board
Body Case
SLOT 2:Blank (for Master Board)
SLOT2: Blank (Master Board)
Figure 4-1. Upper Case Removal
Figure 4-2. Position for Installing the Optional Board
NOTE:
Screw tightening tongue: 11 ± 0.5kgf.cm
NOTE:
Screw tightening tongue: 11 ± 0.5kgf.cm
Disassembly and Assembly Disassembly and Assembly 46
Page 52

EPSON Color Copy Station 8200 Revision A
Table 4-2. PCI/ISA Slot, installing board
Slot Type Installing Board
PCI1 PCI ECP Board (for printer interface)
PCI2 PCI SCSI Board (for scanner interface)
PCI3 PCI Network Board
PCI4/SLOT1 PCI/ISA ISA Board
SLOT2 ISA Blank (for installing ISA Master Board)
NOTE:
Leave SLOT2 available for installing ISA Master Board.
4.2.2.2 SCSI Board Removal
1. Remove the upper case. (See “Upper Case Removal” on page 46)
2. Remove one screw (SMH/W6#X6N) securing SCSI board to the body
case.
3. Remove SCSI board from the slot (PCI2) of the mother board. (See “ISA
Board Removal” on page 46)
4. Install the SCSI board to the appointed slot to stabilize operation.
NOTE:
NOTE:
Install SCSI Board to the specified slot for stable movement.
Screw tightening tongue: 11 ± 0.5kgf.cm
4.2.2.3 Network Board Removal
1. Remove the upper case. (See “Upper Case Removal” on page 46)
2. Remove one screw (SMH/W6#X6N) securing the Network board to the
body case.
3. Remove Network board from the slot (PCI3) of the mother board. (See
“ISA Board Removal” on page 46)
NOTE:
Screw tightening tongue: 11 ± 0.5kgf.cm
4.2.2.4 ECP Board Removal
1. Remove the upper case. (See “Upper Case Removal” on page 46)
2. Remove one screw (SMH/W6#X6N) securing the ECP board to the body
case.
3. Remove ECP board from the slot (PCI1) of the mother board. (See “ISA
Board Removal” on page 46)
NOTE:
Disassembly and Assembly Disassembly and Assembly 47
Screw tightening tongue: 11 ± 0.5kgf.cm
Page 53

EPSON Color Copy Station 8200 Revision A
4.2.3 Power Supply Unit Removal
1. Remove the upper case. (See “Upper Case Removal” on page 46)
2. Remove 4 screws (SMH/W6# X 6N) securing the power supply unit to the
body case, and pull out the power supply unit toward back of the CCS
8200 until its stoppers touches the body case.
3. Remove the harness PS1, which comes from the power supply unit, from
the outside of the connector on the mother board.
4. Remove he harness PS2, which comes from the power supply unit, from
the inside of the connector on the mother board.
5. Remove harness, which is connected to 2 cooling fans (CPU cooling fan
and fan) from the power supply unit, from the relay connector part.
6. By moving the rear edge of the power supply unit to the right, release the
connection between the stoppe r of the unit and the body cas e. Then
remove the power supply unit.
4 Screws
4.2.4 Mother Board Removal
1. Remove the upper case. (See “Upper Case Removal” on page 46)
2. Remove the optional board (ISA / SCSI / Network / ECP Board). (See
“Optional Board Removal” on page 46)
3. Remove the power supply unit. (See “Power Supply Unit Removal” on
page 48)
4. Remove the 5 screws (SMH/W6# X 6N) securing the mother board to the
body case. Then, remove the mother board.
Screw
KB_UP
DIP2
CPU
PCI1: E CP Bo a rd
PCI2: S CSI Bo a rd
DIP1
NOTE:
Figure 4-3. Power Supply Unit Removal
Screw tightening tongue: 11 ± 0.5kgf.cm
Body Case
PCI3 : Netwo rk Bo a rd
P C I4 : Bla n k
SLO T1: ISA Board (Target Board)
SLOT 2: Blank (Master B oard)
Figure 4-4. Screw positions securing the Mother Board
NOTE:
Screw tightening tongue: 11 ± 0.5kgf.cm
Disassembly and Assembly Disassembly and Assembly 48
Page 54

EPSON Color Copy Station 8200 Revision A
CAUTION
Upper Panel Case
Panel Board
LED
Panel
Board
4.2.5 Panel Board Removal
1. Remove the harness (control panel cable) from the CCS 8200.
2. Remove 8 CPB screws (3x12) securing the upper panel case and lower
panel case. Then remove the lower panel case.
CPB (3x8)
Lower Panel Case
CPB (3x8)
Upper Panel Case
Figure 4-5. Screws for Lower Panel Case
3. Remove 2 plain washers and 2 CPB screws (2x5) securing the panel board
to the upper panel case. Then remove the panel board.
Upper Panel Case
Panel Board
When tightening screws, use a hand in order to avoid
loosen screws. Do not use motor driver.
n When installing the panel board to the upper panel case,
electrolytic condensers on the board may touch the
upper panel case. Tilt the condenser as it is shown in
the figure below so that they do not touch the upper
panel case. (See the figure below)
Electrolytic Condenser
n
When installing the panel board to the upper panel case, make sure
that intensity adjustment volume moves.
n When installing the panel board to the upper panel case, tilt the lead
part of LED so that the LED on the board comes into the LED lens of
the upper panel case. (See the figure below)
UPB (2x5), plain washer
Figure 4-6. Screws securing the Panel Board
Disassembly and Assembly Disassembly and Assembly 49
Page 55

EPSON Color Copy Station 8200 Revision A
CAUTION
4.3 Firmware Version-Up
n Target Board can be used the same as Master Board by
Control program, each application, and tables for image processing are
stored in the Flash ROM mounted on the ISA board. Therefore, in case of
firmware version-up, it is necessar y to re-install the program by transferring
the firmware form the Master Board to the target board (originally installed in
ISA board).
CAUTION
1. Remove the upper case. (See “Upper Case Removal” on page 46)
2. Remove one screw securing the cover for an open ISA slot SLOT2, and
remove the cover.
3. Install the ISA Master Board to ISA slot SLOT2.,
Before starting the procedure, make sure to turn of f the
EPSON Color Copy Station 8200 and disconnect the power
cable.
setting the jumper switches of the target board same way
you set the Master Board jumper switches.
n However, the Master ISA Board does not function the
same way as the target board, so the Master Board cannot
operate the CCS 8200. Make sure the settings of the Target
board loaded in the Color Copy Station 8200 are set to the
Target board.
Jumper
Switch
CAUTION
n Do not connect the operational panel cable to Master
Board, while leaving the operational panel connected to
the target board.
ISA Board
n Make sure that the settings of the jumper switches of ISA
update board are as follows.
Table 4-3. Settings for the Jumper Switches of ISA Master Board
Jumper No. JP20 JP30 JP31 JP32
Master Board 1-2 1-2 2-3 2-3
Target Board 1-2 1-2 1-2 2-3
NOTE:
“1-2” in the table above means to connect 1 pin and 2 pin. Same
meaning for 2-3.
Disassembly and Assembly Firmware Version-Up 50
Page 56

EPSON Color Copy Station 8200 Revision A
CAUTION
4. Turn the Color Copy Station 8200 on. The LED indicators show the update
status; refer to the table below for details. Master Board
Table 4-4. Control Panel indicators
Update
Process
Power ON
â
Note:m: On, l: Off, ¥: Blink
5. When the version-up is completed successfully, turn off CCS 8200.
6. Remove ISA Master Board and set the cover again.
7. Install the upper cover.
CAUTION
n Do not turn off CCS 8200 during the version-up procedure.
n If an error occurs, turn off the power supply and re-insert
Error
(red)
llm
l m m
mmm
l ¥ m
¥lm
Ready
(green)
Power
(green)
Contents
Deleting Target Data
Reading from MASTER
Writing to TARGET
Update Successful
Update Failure
each board (mother board, target board) and re-perform
from step 4.
4.4 BIOS Re-Setting
A lithium battery is mounted on the Mother Board of the Color Copy Station
8200 for CMOS RAM, which stores setting values of BIOS. Therefore, if the life
of the battery ends, it is necessary to replace it. If the battery is replaced with
a new one, the CCS 8200 may not start correctly when the BIOS initializes.
Due to this, it is necessary to reset the BIOS. Also, it is necessary to reset the
BIOS if the BIOS settings are changed or written over for some reason.
4.4.1 Lithium Battery Volume Check
1. Remove the mother board. (Remove ISA and PCI boards, and connect the
power supply unit)
2. Insert the video card (EGA/VGA) into the open slot.
3. Connect the corresponding CRT to the video card.
4. Connect a key board connector to the mother board. Keyboard connector
is DIN 5-pin AT type.
5. Turn on the power supply, and if the following message appears on the
CRT, replace the battery.
CMOS checksum Error - Defaults loaded
CMOS battery failed
4.4.2 Lithium Battery Exchange
1. Make sure the power switch is OFF.
2. Remove the upper cover.
3. Replace the lithium battery mounted on the mother board with a new one.
Use battery CR2032 (Panasonic, 3V) or equivalents.
4. Perform BIOS Re-setting. (“BIOS Re-Setting” on page 51)
n When installing the lithium battery, put the printing face
up.
Disassembly and Assembly BIOS Re-Setting 51
Page 57

EPSON Color Copy Station 8200 Revision A
4.4.3 BIOS Re-Setting
1. Remove the mother board. (Remove SCSI, ISA and PCI boards and
connect the power supply unit)
2. Install the video card (EGA/VGA) to the open slot.
3. Connect the corresponding CRT to the video card.
4. Connect the keyboard to the keyboard connector on the mother
board. (Connector of the keyboard is DIN 5-pin AT type)
5. Turn on the power. When BIOS boots, press
board and enter the Set-up screen of BIOS.
6. Select “STANDARD CMOS SETUP”.
7. Check the BIOS setting value by referring the following table.
8. Input “Date” and “Time” and press
ESC
key.
9. Select “SAVE&EXIT SETUP”, and change “N” to “Y” and press
key.
Enter
10. Turn the power OFF and r emove the v ideo car d and key board, and
install the mother board to the CCS 8200 body.
BIOS re-setting is completed and it will opera te normally when the
power is turned on next time.
key on the key
DEL
Table 4-5. SP97 Mother Board BIOS Setting Value
Setting Item Setting Value
Primary Master Auto
Primary Slave Auto àNone
Secondary Master Auto àNone
Secondary Slave Auto àNone
Drive A 1.44M 3.5in
Drive B None
Floppy 3 Mode Support Disabled
Video EGA/VGA
Halt On All, But Disk/Key
BIOS FEATURE SETUP
Boot Virus Detection Disabled
CPU Internal Cache Enabled
External Cache Enabled
Quick Power On Self Test Enabled
HDD Sequence SCSI/IDE First IDE
Boot Sequence A,C
Boot Up Floppy Seek Disabled
Floppy Disk Access Control R/W
IDE HDD Block Mode Sectors HDD MAX
Table 4-5. SP97 Mother Board BIOS Setting Value
Setting Item Setting Value
STANDARD CMOS SETUP
Date :mm:dd:yy (Setting Date)
Time :hh:mm:ss (Setting Time)
HARD DISKS
HDD S.M.A.R.T Capability Disabled
PS/2 Mouse Function Control Auto
OS/2 Onboard Memory > 64M Disabled
PCI/VGA Pallete Snoop Disabled
Video BIOS Shadow Enabled
Disassembly and Assembly BIOS Re-Setting 52
Page 58

EPSON Color Copy Station 8200 Revision A
Table 4-5. SP97 Mother Board BIOS Setting Value
Setting Item Setting Value
C8000-CBFFF Shadow Disabled
CC000-CFFFF Shadow Disabled
D0000-D3FFF Shadow Disabled
D4000-D7FFF Shadow Disabled
D8000-DBFFF Shadow Disabled
DC000-DFFFF Shadow Disabled
Boot Up NumLock Status On
Typematic Rate Setting Disabled
Typematic Rate (Chars/Sec) 6
Typematic Delay (Msec) 250
Security Option System
CHIPSET FEATURE SETUP
SDRAM Configuration by SPD
SDRAM CAS Latency 2T
SDRAM RAS Precharge Time 2T
Table 4-5. SP97 Mother Board BIOS Setting Value
Setting Item Setting Value
Onboard FDC Controller Enabled
Onboard FDC Swap A&B No Swap
Onboard Serial Port 1 3F8H/IRQ4
Onboard Serial Port 2 2F8H/IRQ3
Onboard Parallel Port 378H/IRQ7
Parallel Port Mode ECP+ EPP
ECP DMA Select 3
UART2 Use Infrared Disabled
Onboard PCI IDE Enable Both
IDE Ultra DMA Mode Auto
IDE 0 Master PIO/DMA Mode Auto
IDE0 Slave PIO/DMA Mode Auto
IDE1 Master PIO/DMA Mode Auto
IDE 1 Slave PIO/DMA Mode Auto
POWER MANAGEMENT SETUP
SDRAM RAS to CAS Delay 2T
ROM Cycle Wait State 4-Wait à1-Wait
16-Bit 1/0 Recovery Time 5 BUSCLK à2 BUSCLK
8-Bit 1/0 Recovery Time 8 BUSCLK à3 BUSCLK
ISA Bus Clock PCICLK/4 àPCICLK/3
Graphics Aperture Size 64MB
Memory Hole At Address None
Delayed Transaction Enabled
VGA Shared Memory Size 4MB
Power Management User Define
Video Off Option Susp, Stby → off
Video Off Method DPMS OFF
** PM Timers **
HDD Power Down Disable
Doze Mode Disable
Standby Mode Disable
Suspend Mode Disable
** Fan Monitor **
Chassis Fan Speed xxxx RPM
Disassembly and Assembly BIOS Re-Setting 53
Page 59

EPSON Color Copy Station 8200 Revision A
Table 4-5. SP97 Mother Board BIOS Setting Value
Setting Item Setting Value
CPU Fan Speed xxxx RPM
** Thermal Monitor **
CPU Temperature xxC / xxxF
** Voltage Monitor **
VCORE Voltage 2.2V
+ 3.3V Voltage 3.3V
+5V Voltage 5.0V
+12V Voltage 12.0V
PNP AND PCI SETUP
PNP OS Installed No
Slot 1 IRQ Auto à5
Slot 2 IRQ Auto à10
Slot 3 IRQ Auto à9
Slot 4 IRQ Auto à11
PCI Lately Timer 32 PCI Clock
Table 4-5. SP97 Mother Board BIOS Setting Value
Setting Item Setting Value
IRQ 15 Used By ISA No / ICU
IRQ 1 Used by ISA No / ICU
IRQ 3 Used By ISA No / ICU
IRQ 5 Used By ISA No / ICU
ISA MEM Block BASE Auto
SYMBIOS SCSI BIOS Auto
USB Function Disabled
USB IRQ Auto
ONB VGA BIOS First No
IRQ 3 Used by ISA No / ICU
IRQ 4 Used By ISA No / ICU
IRQ 5 Used by ISA No / ICU
IRQ 7 Used By ISA No / ICU
IRQ 9 Used by ISA No / ICU
IRQ 10 Used By ISA No / ICU
IRQ 11 Used by ISA No / ICU
IRQ 12 Used By ISA No / ICU à Yes
IRQ 14 Used by ISA No / ICU
Disassembly and Assembly BIOS Re-Setting 54
Page 60

EPSON Color Copy Station 8200 Revision A
4.4.4 Mother Board Jumper Setting
Setting of the jumper switch (KB_UP, DIP1, DIP2) on the mother board
is as follows. (See “Mother Board Removal” on page 48)
Table 4-6. Jumper Switch Setting
Jumper Switch No.
KB_UP
DIP1
OFF
Between 1-2
Short
12345678910
OFF ON OFF OFF OFF OFF OFF OFF ON OFF
12345678910
ON ON OFF ON ON OFF ON OFF OFF OFF
Disassembly and Assembly BIOS Re-Setting 55
Page 61

ADJUSTMENT
CHAPTER
5
Page 62

EPSON Color Copy Station 8200 Revision A
5.1 Adjustment
This chapter explains the following adjus tments which are required to
do for maintenance.
o
Color Calibration Function
o
Mechanical Precision Adjustment
o
Hardware Check
5.1.1 Hardware Check
This function is used to check the hardware of the copy server. This
function presupposes to be used for the manufacture inspection and
when the servicemen consulting trouble or failure.
CHANGING THE MODE
Turn on the power supply of the copy server with “0”, “.”, and “C” on the
control panel is pushed at the same time. The screen changes to the
maintenance mode main screen.
TEST MODE
[1] PANE_IMOT_CHECK
[2] ISA_BOARD_CHECK
[3] ECP_BOARD_CHECK
[4] FLASH_SUM_CHECK
[5] H/W_CHECK_PRINT
[6] SIZE_CORRECT
VARIOUS HARDWARE CHECK
o
LCD panel check
o
ISA board check
o
ECP board check
o
Flash ROM check sum confirmation
o
H/W all check print
o
size collection
5.1.1.1 LCD Panel Check
This hardware check function checks each component of the control
panel. On the maintenance mode main screen, if you press the “1” of
ten key, the panel unit check main menu appears as shown below.
[1] PANEL_UNIT_CHECK
1. ALL BALCK
2. GRAY SHADE
3. DISPLAY ON/OFF
4. BLACK LIGHT ON/OFF
5. LED ON/OFF
6. TEN + SPECIAL KEY
7. TOUCH KEY
8. ALL CHECK
9. MAIN MENU
EXCIT STOP BUTTON
o
ALL BLACK Check
Adjustment Adjustment 57
Page 63

EPSON Color Copy Station 8200 Revision A
This function makes all the elements on the LCD show black. Due to
this, you can check dots missing on the LCD.
Press the “STOP” button and go back to the panel unit check main
menu.
o
GRAY SHADE Check
The LCD is divided into four screens and indicates four graduations.
You can check if LCD flickers or not on the graduation display.
Press “STOP” and go back to the panel unit check main menu.
o
DISPLAY Check
If you start this check, the sub-menu indicator blin ks off/on at twosecond intervals.
Press “STOP” button and go back to the panel unit check main
menu.
o
BACK LIGHT Check
If you start this check, the back-light of LCD blinks off/on at twosecond intervals.
Press “STOP” button to go back to the panel unit check main menu.
o
LED Check
If you start this check, the ready lamp blinks off/on at two-second
intervals.
Press “STOP” button to go back to the panel unit check main menu.
If you press twelve ten key and three special key, the press ed indi cator
will disappear.
When all the key pressed, the scr een goes ba ck to the panel unit che ck
main menu.
o
TEN KEY + SPECIAL KEY Check
If you start this check, the LCD indicates as shown below.
[CLEAR] [1] [2] [3]
[STOP] [4] [5] [6]
[START] [7] [8] [9]
[0] [.] [C]
Adjustment Adjustment 58
Page 64

EPSON Color Copy Station 8200 Revision A
o
TOUCH KEY Check
If you start this check, the LCD indicates as shown below. If you
touch the black TOUCH KEY, the black colo r at the touched posi tion
will become the back ground color.
If you clear all the black panel, the screen goes back to the panel
unit check main menu.
o
All Check
This function checks all from ALL BACK Check to TOUCH KEY
Check.
Go to check by “START” button.
From ALL BLACK Check to TOUCH KEY Check, Press “STOP”
button to suspend the process. After TOUCH KEY Check, the
process cannot be suspended.
When all the checks finished, the display goes back to the panel
unit check main menu.
Adjustment Adjustment 59
Page 65

EPSON Color Copy Station 8200 Revision A
[3] ECP_BOARD_CHECK
1. RGB CONTROL
2. B UNIT
3. MAIN MENU
[3.1] RGB CONTROL
1. MEMORY
2. INTERRUPT
3. RGB DATA PASS
4. PRINT B&W
5. ALL CHECK
6. MAIN MENU
5.1.1.2 ISA Board Check
This hardware check function connects and assures the per formance of
SRAM for ISA board indicator a nd EEPROM. If you press “2” of ten k ey,
the following panel unit check main menu appears.
If you select this mode, OK / NG is indicated with the following display.
[2] ISA_BOARD_CHECK
a. DISPLAY RAM CHECK
b. EEPROM CHECK
Press “STOP” button to go back to the maintenance main display.
5.1.1.3 ECP Board Check
This hard ware check function conceits and assures perfor ma nce of
various parts of PCI board.
If you press “3” of ten key, the following ECP board check main menu
appears.
o
RGB Board Check:
ECP board check main menu. If you press “1” of ten key, the
following RGB CONTROL menu appears.
Adjustment Adjustment 60
Page 66

EPSON Color Copy Station 8200 Revision A
3. RGB DATA PASS
a. PCI à TET OK
b. TET à MOIRE OK
c. MOIRE à SHARP OK
d. SHARP à CMN à DMAOK
n
MEMORY Check
On the RGB CONTROL menu, press “1” of ten key, and this
function checks TET, MOIRE, SHARP, CMM, SRAM on the ECP
board as shown below.
Based on its check result, the display indicates "OK" if it performs
right and indicates ’NG’ if it does not.
1. MEMORY
a. TET OK
b. MOIRE OK
c. SHARP OK
d. CMN OK
e. SRAM OK
Press “STOP” to go back to the RGB CONTROL menu.
n
INTERRUPT Check
On the RGB CONTROL menu, press “2” of ten key, and this
function checks if DMA interrupts rightly.
Based on the check result, the display indicates “OK” if it performs
right and indicates “NG” if it does not.
2. INTERRUPT
a.INTERRUPT DATA OK
n
RGB DATA PASS
On the RGB CONTROL menu, press “3” of ten key, this function
performs DMA transfer through ECP board in the following order:
ASIC PCI à TET à MOIRE à SHARP à CMN à DMA, and
checks BUS.
Based on the check result, the display indicates "OK" if it performs
right and indicates “NG” if it does not.
Press “STOP” button to go back to RGB CONTROL menu.
n
PRINT B&W Check
On the RGB CONTROL menu, press “4” of ten key, and this
function sets sample data for direct mono printi ng in SRAM us ed for
DMA and checks printing.
Based on the check result, the display indicates "OK" if it performs
right and indicates “NG” if it does not.
After the process, the display goes back to the maintenance mood
main display.
n
ALL CHECK
This function checks all, from MEMORY Check to PRINT B&W
Check. Press “START” to the next check. Press “STOP” t o suspend.
Press “STOP” to go back to RGB CONTROL menu.
Adjustment Adjustment 61
After finishing all, the displa y goes back to the immanencies mood
main display.
Page 67

EPSON Color Copy Station 8200 Revision A
1. RGB CONTROL CHECK
1) Memory
a. TET
b. MOIRE
c. SHARPNESS
d. CMM
e. SRAM
1) Interrupt
a. DMA
2) RGB Data Pass
a. PCI TET
b. TET MOIRE
c. MOIRE SHARP
d. SHARP CM N DMA
2. B UNIT CHECK
a. ROM
b. RAM
c. INTERRUPT
d. RGB1
e. RGB2
3. ISA CHECK
a. DISPLAY RAM
b. EEPROM
4. FLASH ROM SUM CHECK
a. SUM CHECK
b. SUM
o
B UNIT Check
This function checks i nterruption from bill recogniti on unit (BILL ) and
memory and RGB input.
Based on the test result, the display indicates "OK" i f it performs
right and indicates ’NG’ if it does not.
5.1.1.5 H/W All Check Printing
On the maintenance mood main view, press “5” of ten key. After the
hardware all check done inside, the check result will be printed out.
It takes about one minute to check all. The checking items are shown
below.
[3.2] B UNIT
a. ROM OK
b. RAM OK
c. INTERRUPT OK
d. RGB1 OK
e. RGB2 OK
Press “STOP” to go back to the maintenance board.
5.1.1.4 Flash ROM Sum Check
This hardware check sum check function checks the firmware check
sum housed by Flash ROM on the ECP board.
On the maintenance mood main display, press “4” of ten key, and the
Flash ROM sum check screen appears as shown below.
Based on the check r esult, the display indicates "OK" if it performs right
and indicates ’NG’ if it does not. Also, the display indicates the sum
value.
Press “STOP” to go back to the maintenance mood main menu.
Adjustment Adjustment 62
[4] FLASH_SUM_CHECK
SUM CHECK OK
SUM 65539
After all the process finishe d and the result printed out, the disp lay goes
back to the maintenance mood main view. The “STOP” button also let
you go back to the maintenance mood main view.
Page 68

EPSON Color Copy Station 8200 Revision A
[6] SIZE_CORRECT
Printing Chart
Please wait...
EXIT: STOP BUTTON
[6] SIZE_CORRECT
Put printed Chart
on Scanner
and press START button
EXIT: STOP BUTTON
5.1.2 Size Collection (Adjusting the Precision)
This function adjusts the mechanical precision (the individual
differences) between the scanner and the printer, and minimizes the
measurement gap between the original and the copy result. This
function outputs the pulse (the digital rectangle pattern) generated
inside of the copy server to the printer, reads these signals with the
scanner, calculates the adjustment scale, and reflect the result to the
scanning resolution for printing out.
Note that the adjusted value is valid only for printing out. Also, note this
function is not open to the end user, presupposing the servicemen use
this function for maintenance.
SHIFTING MOOD METHOD
With “0”, “.”, and “C” on the control panel all pressed, turn on the power
supply of the copy server to shift to the maintenance mood main view.
(See “Hardware Check” on page -57)
MECHANICAL PRECISION ADJUSTMENT PROCEDURE
2. Set the A3, Fine Paper on the paper tray of the printer, and push
down the “START” button. The following screen appears.
NOTE:
Use only EPSON Fine Paper.
3. When the printing of mechanical precision adjustment pattern
finished, the following screen appears.
1. On the maintenance mood main view, press “6” of ten key, and the
following screen appears.
[6] SIZE_CORRECT
NOTE:
If an error occurs while printing, the printing will be re-tryed
automatically.
Load A3, fine paper
in the MP Tray
and press START button
EXIT: STOP BUTTON
Adjustment Adjustment 63
Page 69

EPSON Color Copy Station 8200 Revision A
4. Set the printed mechanical precision adjustment pattern on the
scanner and push down the “START” button. The scanner scans the
data.
[6] SIZE_CORRECT
Size Correct in progress
Please wait
EXIT: STOP BUTTON
NOTE:
5. The adjusting measure is automatically calculated, and when the
NOTE:
If an error occurs while scanning, re-try function works.
process finishes, the display goes back to the maintenance mood
main view.
Also, “STOP” button can be used to go back to the maintenance
mood main view from any view.
The adjusted measures are valid from the next printing.
Adjustment Adjustment 64
Page 70

MAINTENANCE
CHAPTER
6
Page 71

EPSON Color Copy Station 8200 Revision A
6.1 Maintenance
For outer cases, wipe stain off with a clean and dry soft cloth. To remove
sever stain, use neutral detergent. For inner parts, use the vacuum cleaner to
remove dust or foreign objects.
CAUTION
Do not use chemical solvents, such as thinner and benzine
for cleaning. These chemicals may damage the plastic and
rubber parts.
Maintenance Maintenance 66
Page 72

APPENDIX
CHAPTER
7
Page 73

EPSON Color Copy Station 8200 Revision A
7.1 Unit Connection
CCS-8200 unit connection is as follows.
Mother
Board
P5S-B
Power Supply
Unit
TSS-1500NS
PCI
Slot
ISA
Slot
ISA
Slot
ISA
Slot
ECP Board
C85010*IF-B
CCS-8200
SCSI Board
AVA-2904BE
ISA Board
C85010*IF
100 Base TX
Interface
DE-500BA (DEC)
Figure 7-1. CCS-8200 Unit Connection
Printer
LP-8200C
SCANNER
ES-6000
Control
Panel
Switching
Hub
Appendix Unit Connection 68
Page 74

EPSON Color Copy Station 8200 Revision A
7.2 Component Layout
Figure 7-2. C85010 I/F (ISA Board) Component Layout (1)
Appendix Component Layout 69
Figure 7-3. C85010 I/F (ISA Board) Component Layout (2)
Page 75

EPSON Color Copy Station 8200 Revision A
Figure 7-4. C85010 I/F-B (ECP Board) Component Layout
Appendix Component Layout 70
Page 76

EPSON Color Copy Station 8200 Revision A
7.3 Exploded Diagram
112
100
113
450
104
104
104
104
include 100
410
(2 pcs CS-6000N)
104
110
106
300
109
104
108
104
331
111
100
114
104
210
111
112
113
101
102 200
107
104
A
220
104
250
104
260
104
104
240
103
104
104
230
400
402 INTERFACE CABLE
(Printer Cable)
105 LABEL CAUTION
(Stick on S canner)
CS-6000N
Rev.01 1942
Figure 7-5. Exploded DIagram
Appendix Exploded Diagram 71
Page 77

EPSON Color Copy Station 8200 Revision A
7.4 Electric Circuit Diagrams
Refer to the corresponding pages for the Electric Circuit Diagrams listed
below.
o
C85010*I/F :ISA Board
o
C85010*I/F-B :ECP Board (1~5)
Appendix Electric Circuit Diagrams 72
Page 78

Page 79
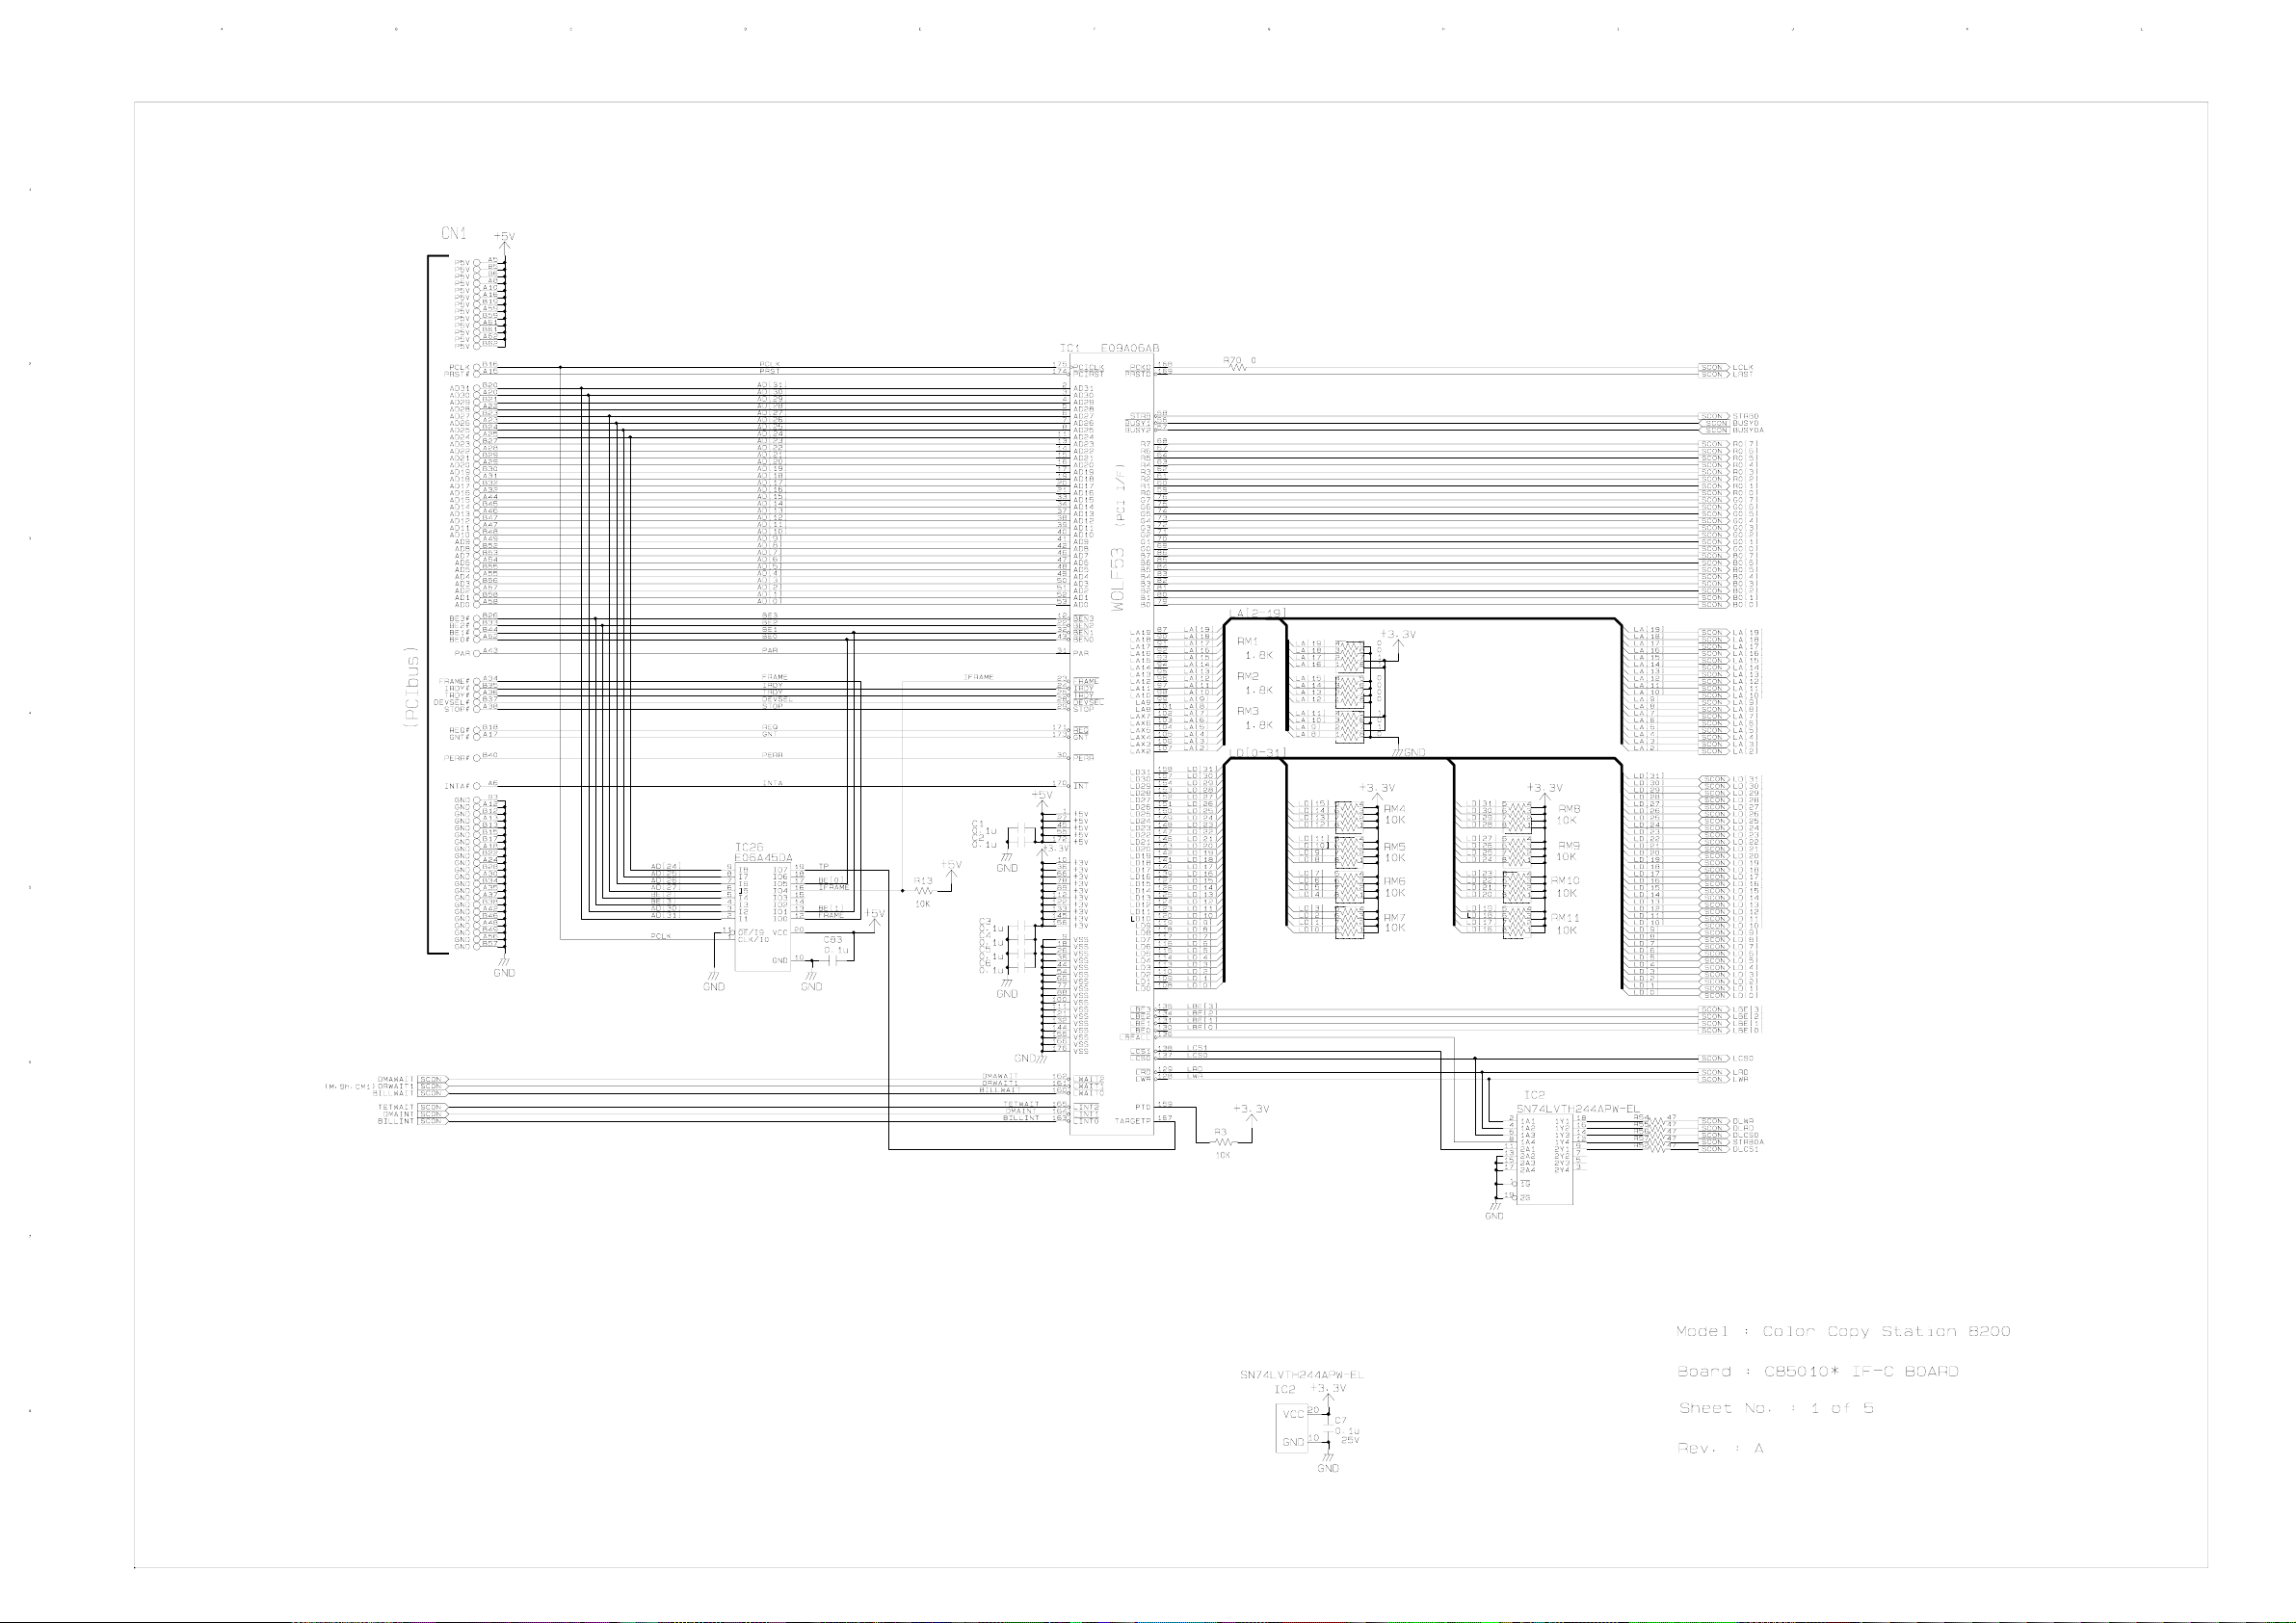
Page 80

Page 81

Page 82

Page 83

 Loading...