

Page 1
EPSON
®
®
PowerLite
User’s Guide
EPSON®PowerLite®8150i
8150i
Multimedia Projector
Page 2

EPSON® PowerLite® 8150i
Multimedia Projector
User’s Guide
Page 3

Important Safety Information
WARNING: Never look into the projector lens when the lamp is turned on; the bright light can damage your eyes.
Never let children look into the lens when it is on. Never open any cover on the projector, except the lamp and
filter covers. Dangerous electrical voltages inside the projector can severely injure you. Except as specifically
explained in this
personnel.
WARNING: The projector and its accessories come packaged in plastic bags. Keep plastic bags away from small
children to avoid any risk of suffocation.
Caution: When you replace the lamp, never touch the new lamp with your bare hands; the invisible residue left by
the oil on your hands may shorten the lamp life. Use a cloth or glove to handle the new lamp.
User’s Guide
, do not attempt to service this product yourself. Refer all servicing to qualified service
Copyright Notice
All rights reserved. No part of this publication may be reproduced, stored in a retrieval system, or transmitted in
any form or by any means, electronic, mechanical, photocopying, recording, or otherwise, without the prior
written permission of SEIKO EPSON CORPORATION. The information contained herein is designed only for
use with this EPSON product. EPSON is not responsible for any use of this information as applied to other
products.
Neither SEIKO EPSON CORPORATION nor its affiliates shall be liable to the purchaser of this product or third
parties for damages, losses, costs, or expenses incurred by purchaser or third parties as a result of: accident, misuse,
or abuse of this product or unauthorized modifications, repairs, or alterations to this product, or (excluding the
U.S.) failure to strictly comply with SEIKO EPSON CORPORATION’s operating and maintenance instructions.
SEIKO EPSON CORPORATION shall not be liable for any damages or problems arising from the use of any
options or any consumable products other than those designated as Original EPSON Products or EPSON
Approved Products by SEIKO EPSON CORPORATION.
EPSON is a registered trademark of SEIKO EPSON CORPORATION.
SizeWise is a trademark; Extra Care and EPSON Store are service marks; and PrivateLine and PowerLite are
registered trademarks of Epson America, Inc.
General Notice: Other product names used herein are for identification purposes only and may be trademarks of
their respective owners. EPSON disclaims any and all rights in those marks.
CPD-11971
Copyright © 2001 by Epson America, Inc. 4/01
ii
Page 4

Contents
Introduction
1
Presenting
Without a
Computer
Getting the Most from Your Projector . . . . . . . . . . . . . . . . . 2
Using Your Documentation . . . . . . . . . . . . . . . . . . . . . . . . . 4
Reading This Manual Online . . . . . . . . . . . . . . . . . . . . . 4
Getting Help . . . . . . . . . . . . . . . . . . . . . . . . . . . . . . . . . . . . . 5
Creating Your Presentation . . . . . . . . . . . . . . . . . . . . . . . . . . 8
Supported Applications and File Formats . . . . . . . . . . . 8
Creating Scenarios . . . . . . . . . . . . . . . . . . . . . . . . . . . . . 8
Transferring Your Presentation to the Projector . . . . . . . . . 11
Sending the Presentation from Your Office . . . . . . . . . 11
Downloading Your Presentation While
in the Meeting Room . . . . . . . . . . . . . . . . . . . . . . . 13
Copying Your Presentation Directly
to the Memory Card . . . . . . . . . . . . . . . . . . . . . . . 16
Delivering Your Presentation . . . . . . . . . . . . . . . . . . . . . . . 17
Highlighting Your Presentation . . . . . . . . . . . . . . . . . . . . . 20
Choosing a Drawing Tool . . . . . . . . . . . . . . . . . . . . . . 20
Drawing on the Screen . . . . . . . . . . . . . . . . . . . . . . . . . 23
Saving Your Drawings and Notes . . . . . . . . . . . . . . . . 25
2
Presenting
from a Laptop
or VCR
3
Displaying
and Adjusting
the Image
Positioning the Projector . . . . . . . . . . . . . . . . . . . . . . . . . . . 30
Connecting to a Laptop . . . . . . . . . . . . . . . . . . . . . . . . . . . 31
Connecting the Computer Video Cable . . . . . . . . . . . . 31
Connecting the Mouse Cable . . . . . . . . . . . . . . . . . . . . 34
Connecting the Audio Cable . . . . . . . . . . . . . . . . . . . . 35
Connecting to a Video Device . . . . . . . . . . . . . . . . . . . . . . 36
Displaying an Image . . . . . . . . . . . . . . . . . . . . . . . . . . . . . . 38
Turning On the Projector . . . . . . . . . . . . . . . . . . . . . . 38
Selecting the Image Source . . . . . . . . . . . . . . . . . . . . . 39
iii
Page 5

Adjusting the Image and Sound . . . . . . . . . . . . . . . . . . . . . . 41
Focusing and Zooming Your Image . . . . . . . . . . . . . . . 41
Adjusting the Height of Your Image . . . . . . . . . . . . . . . 42
Adjusting the Image Shape . . . . . . . . . . . . . . . . . . . . . . 43
Resizing the Image . . . . . . . . . . . . . . . . . . . . . . . . . . . . 44
Adjusting the Volume . . . . . . . . . . . . . . . . . . . . . . . . . 44
Turning On the Projector Automatically . . . . . . . . . . . . . . . 45
Shutting Down the Projector . . . . . . . . . . . . . . . . . . . . . . . . 47
Using the
4
Remote
Control
Solving
5
Problems
Turning On the Remote Control . . . . . . . . . . . . . . . . . . . . 50
Using the Remote Control as a Wireless Mouse . . . . . . . . . 51
Controlling the Picture and Sound . . . . . . . . . . . . . . . . . . . 53
Switching Between Picture Sources . . . . . . . . . . . . . . . . 53
Adjusting the Volume . . . . . . . . . . . . . . . . . . . . . . . . . . 53
Turning Off the Picture and Sound . . . . . . . . . . . . . . . 54
Stopping Action . . . . . . . . . . . . . . . . . . . . . . . . . . . . . . 54
Zooming Your Image . . . . . . . . . . . . . . . . . . . . . . . . . . 54
Displaying Picture-in-Picture Video . . . . . . . . . . . . . . . 55
Highlighting Your Presentation . . . . . . . . . . . . . . . . . . . . . . 56
Using the Pointer . . . . . . . . . . . . . . . . . . . . . . . . . . . . . 56
Using Box Highlights . . . . . . . . . . . . . . . . . . . . . . . . . . 57
Spotlighting Your Image . . . . . . . . . . . . . . . . . . . . . . . . 57
Using Horizontal and Vertical Highlights . . . . . . . . . . . 58
Clearing the Screen . . . . . . . . . . . . . . . . . . . . . . . . . . . . 58
Using On-Screen Help . . . . . . . . . . . . . . . . . . . . . . . . . . . . 60
What To Do When the Lights Flash . . . . . . . . . . . . . . . . . . 61
Solving Problems with the Image or Sound . . . . . . . . . . . . . 62
Solving Problems with the Remote Control . . . . . . . . . . . . . 69
Solving Problems with EasyMP.net . . . . . . . . . . . . . . . . . . . 70
Where To Get Help . . . . . . . . . . . . . . . . . . . . . . . . . . . . . . 72
Telephone Support Services . . . . . . . . . . . . . . . . . . . . . 72
iv
Index
. . . . . . . . . . . . . . . . . . . . . . . . . . . . . . . . . . . . . . . . . . . . . . 75
Page 6

Follow these guidelines when
N
reading this manual:
warnings
Warnings must be followed
carefully to avoid bodily
injury.
cautions
Cautions must be observed to
avoid damaging your
equipment.
notes
otes contain important
information and useful tips.
-
Introduction
T
he EPSON® PowerLite® 8150i is a highly versatile presentation
tool. You can connect it to one or two computer sources and up to
three video sources and easily switch between them. In addition, the
projector’s EasyMP.net features let you transfer presentations directly
to the projector (over a network) and then deliver them without
having to connect a PC or laptop.
See the following pages to learn about:
■
Getting the most from your projector
■
Using your documentation
■
Getting help
Introduction
1
Page 7
Getting the Most from Your Projector
Depending on how you plan to use the projector, you can take
advantage of the following options:
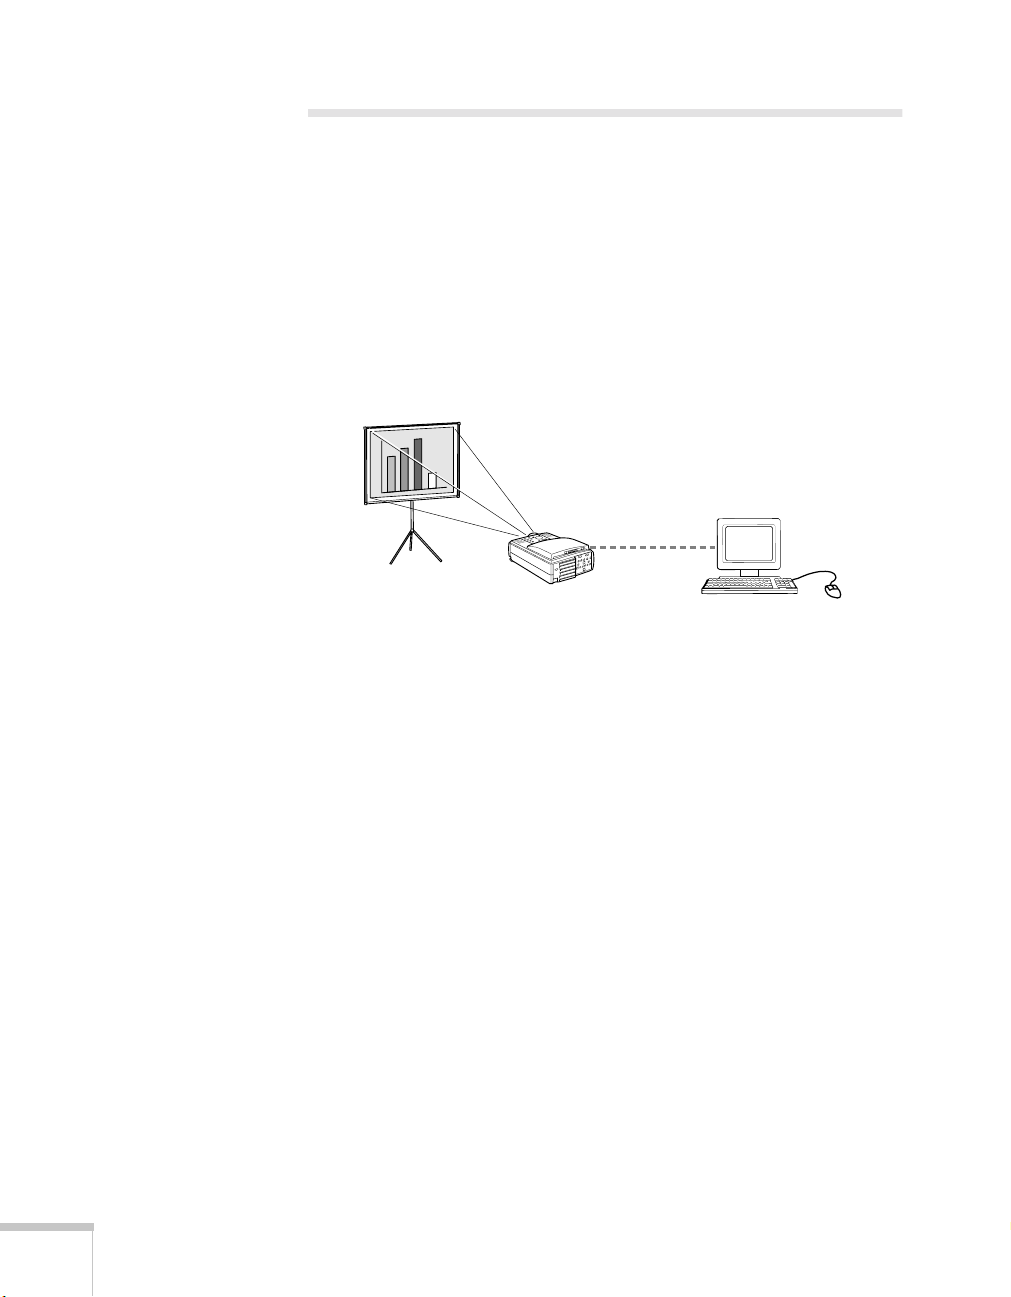
■
Presenting without a computer
If the projector is connected to your network, you can use its
EasyMP.net features to transfer your presentation directly to the
projector. This lets you walk into the meeting room hands-free
and deliver your presentation without having to connect a PC or
laptop.
office PC
meeting room
EasyMP.net lets you project various Microsoft® applications—
such as PowerPoint,
image files. For instructions, see Chapter 1 starting on page 7.
®
Excel, and Word—as well as certain types of
2
Introduction
■
Connecting a computer or video device
If you’re not using EasyMP.net, you’ll need to connect the
projector directly to a computer or video device. See page 30 for
guidelines on positioning the projector. Then turn to page 31 to
connect a Macintosh
®
or PC, or page 36 to connect a VCR,
DVD player, or other type of video device.
When done connecting your equipment, turn to Chapter 3
starting on page 37 for instructions on displaying and adjusting
the image.
■
Using the remote control
You can use the remote control to start and run your presentation,
control the picture and sound, and highlight your presentation by
using it as a digital pointer. If you’re giving a PowerPoint
presentation, you can use the remote as a wireless mouse to click
through from one slide to the next. See Chapter 4 starting on
page 49 for details.
Page 8
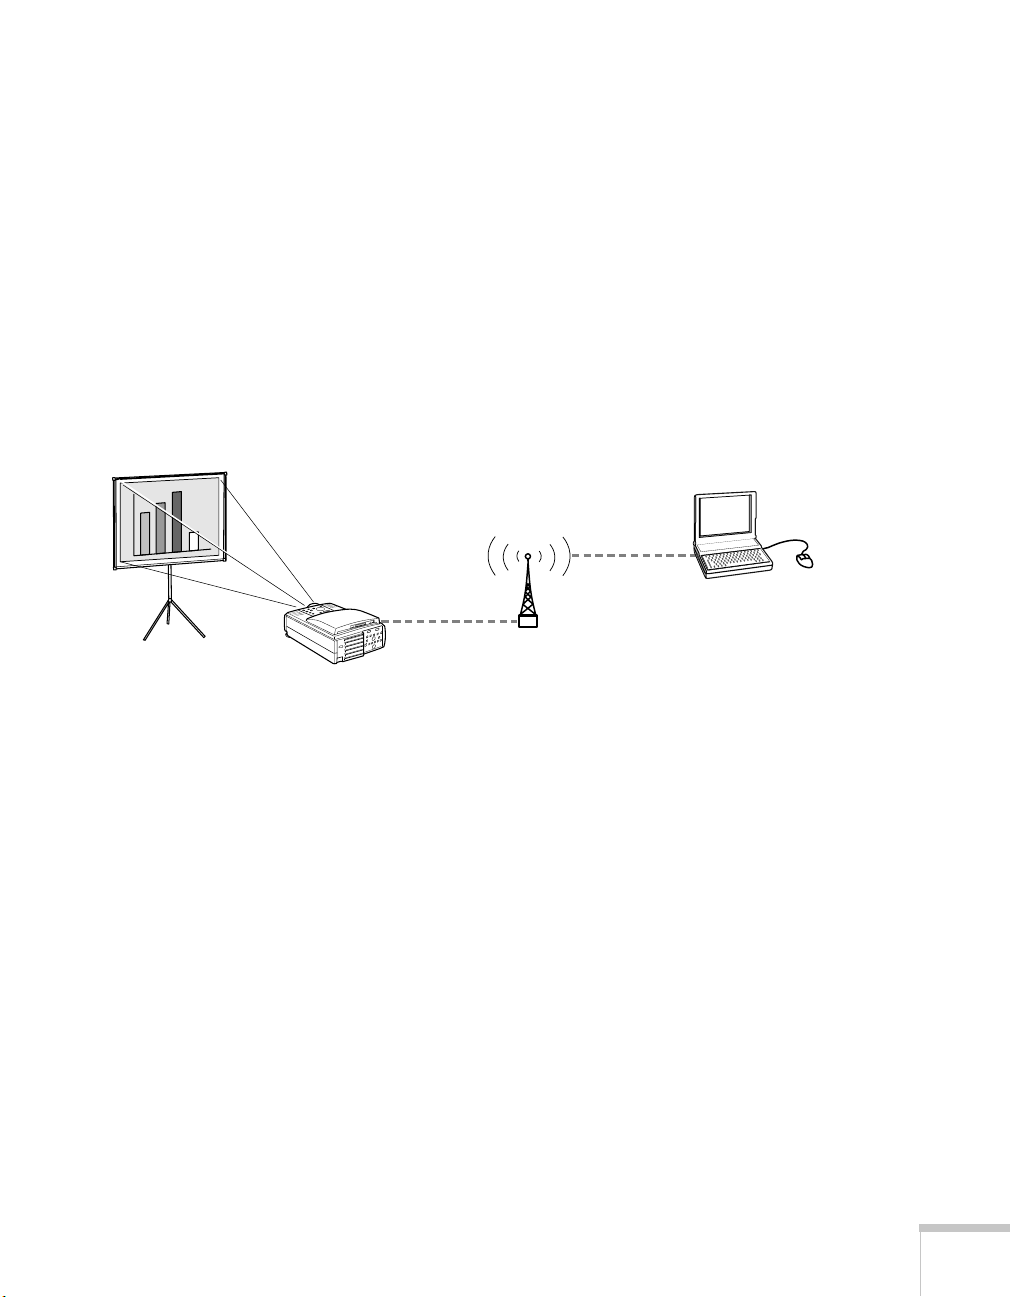
■
Drawing on the screen
If you’re using EasyMP.net, you can connect a USB device, such
as a mouse or drawing tablet, directly to the projector. This lets
you draw on the screen, make notes, and highlight your
presentation. See page 20.
If you don’t have access to a USB mouse or tablet, you can use the
projector’s EMP Tablet software to draw on screen using your
laptop’s mouse; see page 21. (You can also connect a drawing
tablet to your laptop.) Your laptop needs to be on the network,
but if it’s equipped with a wireless Ethernet card, you won’t have
to worry about connecting any cables before starting your
presentation.
wireless
LAN
Whichever drawing tool you choose, keep in mind that it can also
be used in place of the remote control to operate the EasyMP.net
software and deliver your presentation.
■
Including sound in your presentation
If you’ve connected a computer or video device and your
presentation includes sound, you can take advantage of the
projector’s built-in stereo speaker system. For details, see page 35
(for computers) or page 36 (for video devices).
mouse
(or drawing tablet)
Introduction
3
Page 9
Using Your Documentation
p
This book contains all the information you need to operate your
projector and its software. For complete setup and maintenance
information, or to order additional parts and accessories, see the
projector Administrator’s Manual.
Reading This Manual Online
The projector CD-ROM includes an electronic copy of this manual.
You may find it convenient to copy it onto your computer’s hard drive
so it’s always with you. Just insert the CD-ROM in your CD-ROM
drive, select the
Install User’s Guide
To view your electronic manual, you need to use Adobe
you don’t have it, you can install it from the CD-ROM.
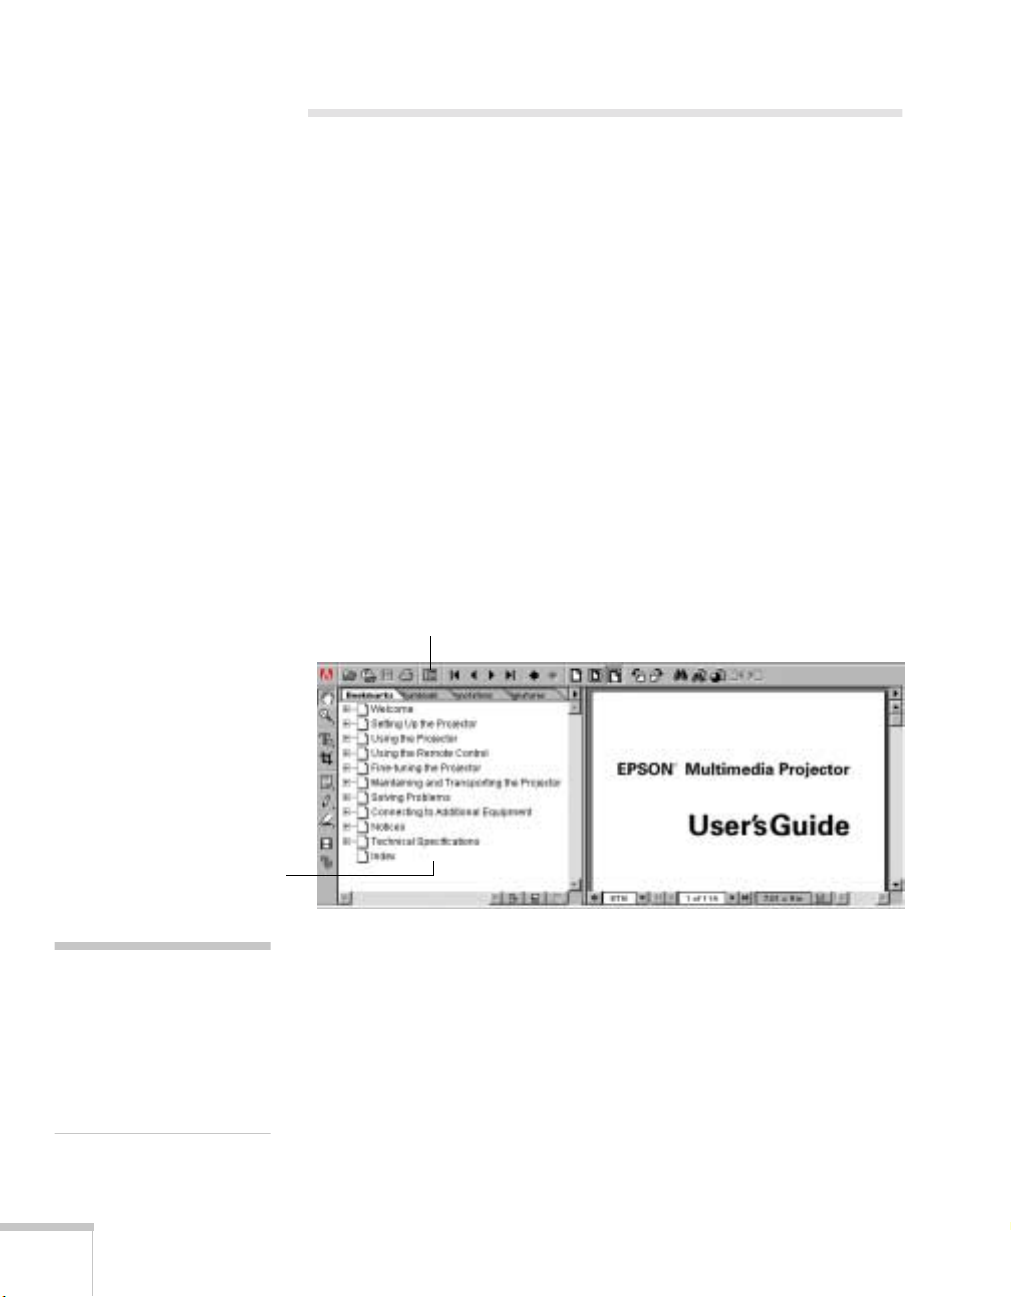
When you open the manual, you see this screen:
show table of contents
Install/View Documentation
View User’s Guide
or
button and click
.
®
Acrobat®. If
note
If the hand icon changes to
an index finger when you
ass the mouse pointer over a
text link, you can click the
link to jump to a related
topic.
4
Introduction
table
of contents
You can move quickly to the topic of your choice by clicking in the
table of contents on the left side of the screen. You can also use the
arrows in the toolbar or the vertical scroll bar on the right side of the
screen to move through the manual.
For more information, see your Adobe Acrobat online guide.
Page 10

Getting Help
If you experience a problem with the projector, check with your
network or projector administrator first. You can also check for
troubleshooting tips in Chapter 5 starting on page 59.
If you still need help after checking these sources, you can use the
EPSON PrivateLine
the PIN on the PrivateLine card in the projector Owner’s Kit. Or take
advantage of EPSON’s automated support services 24 hours a day. See
“Where To Get Help” on page 72 for more information.
®
Support service. Call (800) 637-7661 and enter
Introduction
5
Page 11

6
Introduction
Page 12

1
Presenting Without a
Computer
If the projector is connected to the network, you can use its
EasyMP.net features to deliver your presentation without having to
connect a PC or laptop. (If you plan to connect a computer or video
device, see Chapter 2 for instructions.)
If your network is set up for it, you can start your presentation
without having to download any files to the projector beforehand (the
projector can receive the data while your presentation is running); see
“Delivering Your Presentation” on page 17 for instructions.
Otherwise, you’ll have to copy your files to the projector’s memory
card (either directly or over the network) before starting your
presentation; see page 11.
Follow the instructions in this chapter to:
Create your presentation
■
Transfer your presentation to the projector
■
Deliver your presentation
■
Highlight your presentation with drawings and notes
■
Presenting Without a Computer
7
Page 13

Creating Your Presentation
p
note
For help designing your
resentation, log on to
www.presentersonline.com.
This site includes a library of
articles covering presentation
tips and tricks, and provides
templates and clip art you
can use.
Follow the guidelines below to create your presentation in a file
format that’s compatible with the projector. You can use a variety of
Microsoft application files and image files in their native formats, or
you can prepare a specially modified file called a scenario. The scenario
lets you combine different kinds of files in a slideshow format and set
certain automatic playback features.
Supported Applications and File Formats
EasyMP.net supports a variety of Microsoft applications and image
formats. You can create your presentation using any of the following:
■
PowerPoint 97 and 2000
■
Word 97, 98, and 2000
■
Excel 97 and 2000
■
text (including unicode) and rich text format (RTF)
■
jpeg (JPG), bitmap (BMP and DIB), and portable network
graphics (PNG)
EasyMP.net supports multi-page Word documents as well as
multi-sheet Excel files. Note that you can’t edit documents while
viewing them on screen, and certain applications’ formatting features
may look slightly different from how they appear on your monitor.
(For example, some PowerPoint special effects cannot be used; for
details, see the Notices section in the Administrator’s Manual.)
Creating Scenarios
Another type of file you can send to the projector is a scenario. You
can create this special-purpose file using the EMP Scenario software
included with the projector. This lets you combine in a slideshow
format any of the supported file types listed above. In addition, you
8
Presenting Without a Computer
can define certain playback attributes, such as how long each slide
remains on screen, and you can even set the scenario to begin playing
automatically—either when the projector is first turned on, or at a
preset time.
Page 14
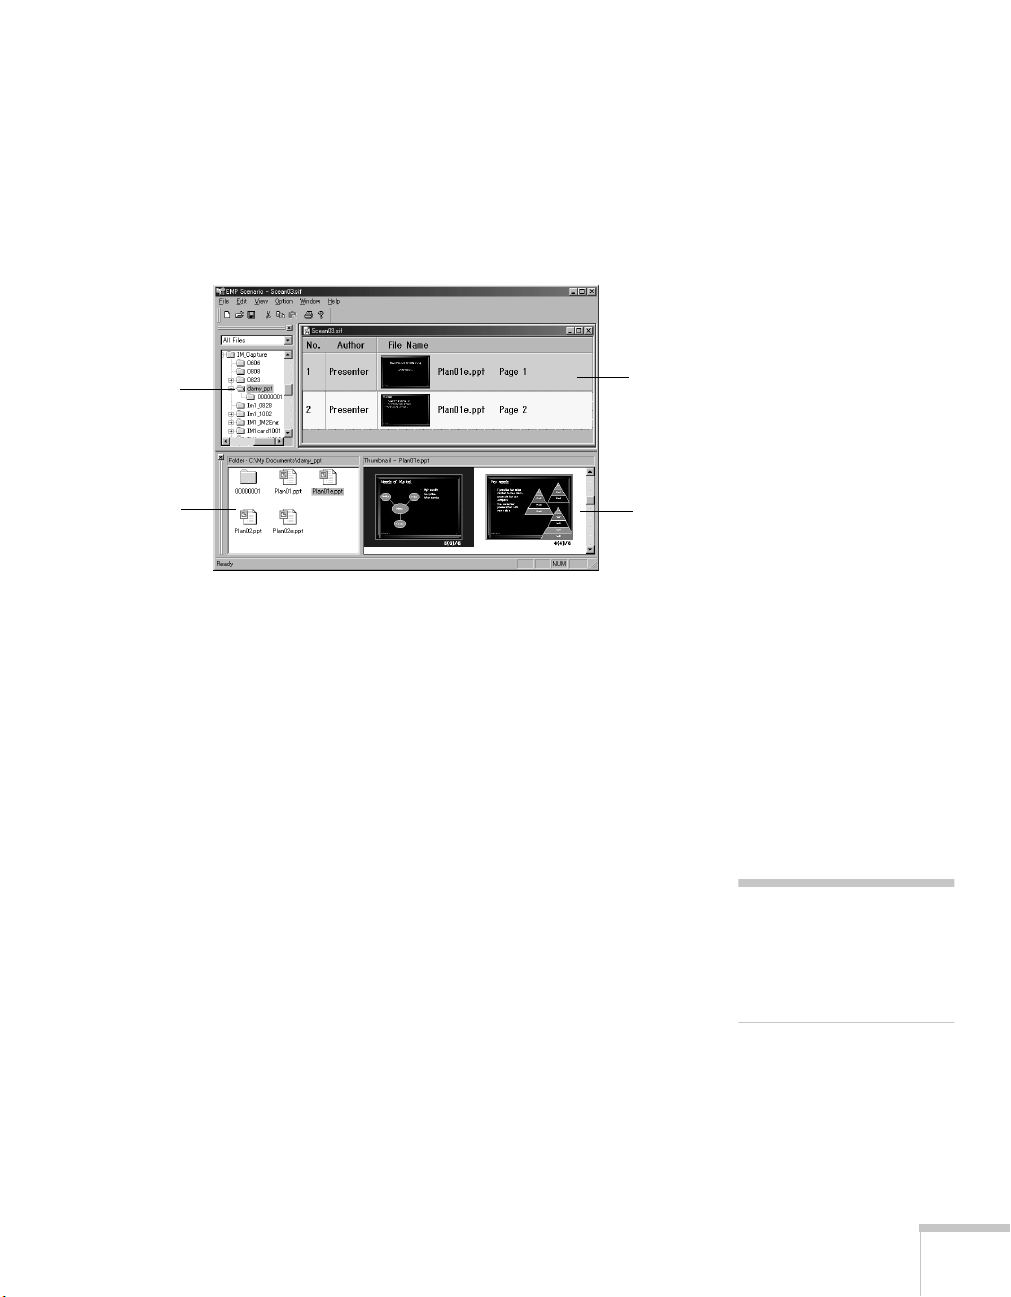
To create a scenario, follow these steps:
1. Open the EMP Scenario program from your desktop or from the
EasyMP programs folder.
2. To create a scenario, use the folder window to navigate to the files
you want to use. Available files appear in the file window:
folder
window
file
window
scenario
window
thumbnail
window
3. Drag the files you want to use from the file window to the
scenario window.
If you want to incorporate individual slides from a PowerPoint
file, double-click the file in the file window, then drag the slides
that open in the thumbnail window to the scenario window.
4. If you want the scenario’s slides to advance automatically when
played, select them in the scenario window. Right-click, choose
Properties
, then set the length of time you want each slide to
remain on the screen.
5. To transfer the completed scenario to the projector, select
Send scenario
; select the projector’s name from the list that
File
appears on screen. If you have a laptop with a PCMCIA slot, you
can also copy the scenario directly onto the memory card; select
Local Drive
instead of the projector’s name. See page 16 for
instructions on removing and inserting the card in the projector.
,
note
For more information on
creating scenarios, see the
online help in the EMP
Scenario program.
Presenting Without a Computer
9
Page 15
Once the scenario has been transferred to the projector, you can view
it using Easy View:
1. Start Easy View as described on page 17. Then highlight the
scenario’s file name and click
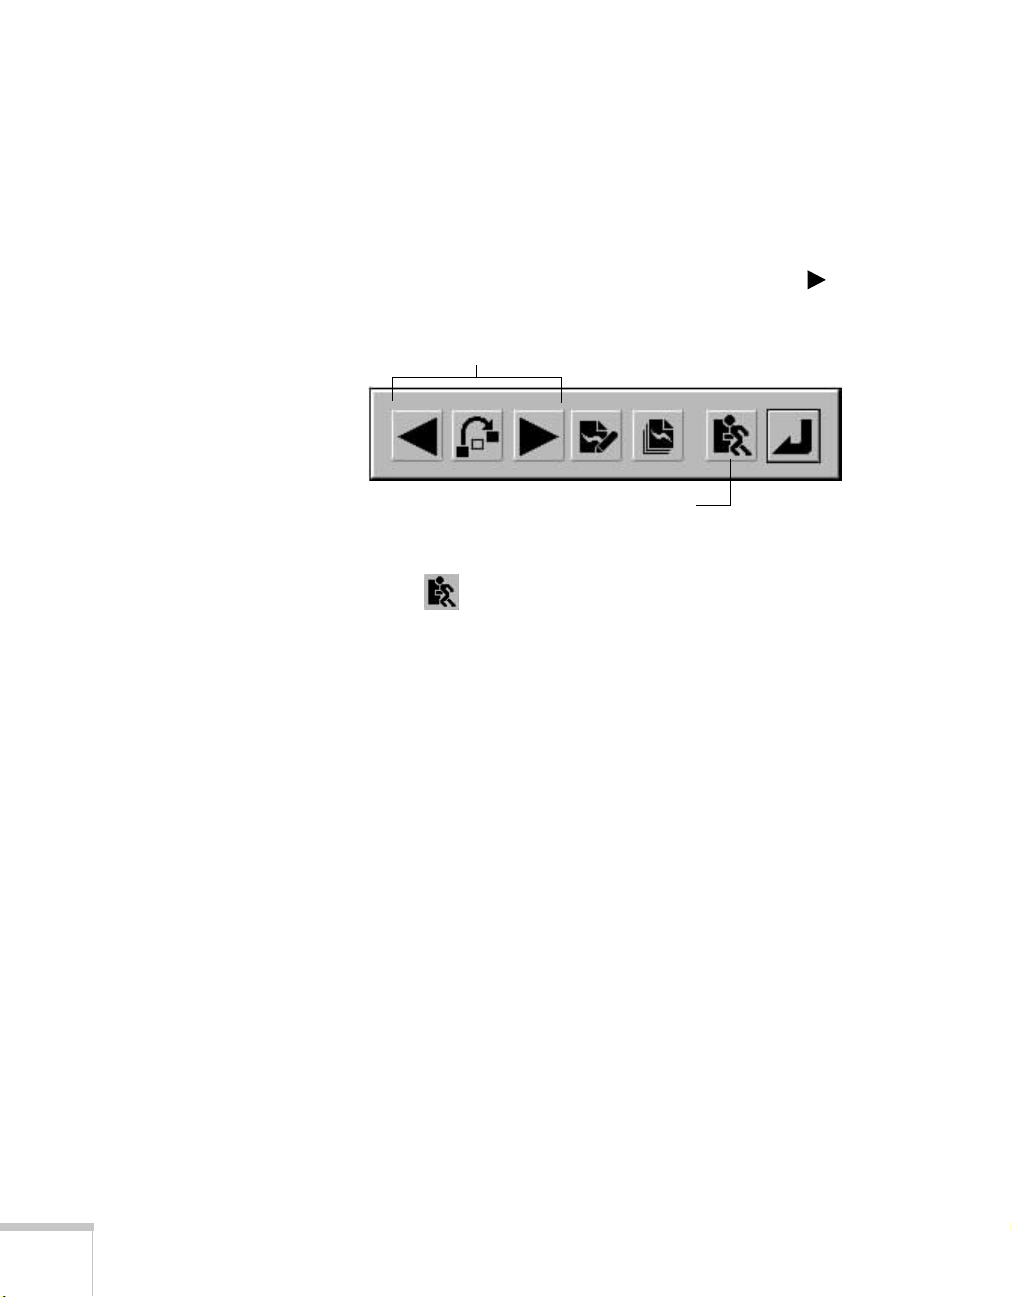
2. To advance to the next slide, press the
Play
.
Esc
button on the remote
control (or right-click with your mouse), then click the forward
arrow in the navigation menu that appears on the screen:
navigation buttons
click here to exit
3. To exit your presentation early (before showing the last slide),
click the exit icon.
If you want a scenario to start playing automatically when the
projector is first turned on, select it in Easy View and click
Properties
, then select
Play Automatically
. (You can also set the
scenario to repeat automatically or delete itself after playing.) To make
the projector itself turn on automatically (at a preset time), see
page 45.
10
Presenting Without a Computer
To delete a scenario, select it in Easy View and click the
Delete
icon.
Page 16

Transferring Your Presentation to the Projector
Follow the instructions in this section to transfer a supported
application or image file directly to the projector; to copy a scenario to
the projector, see the previous section.
When you send your presentation to the projector, it gets stored on
the projector’s removable memory card. Depending on how your
network is set up and where you’re located, choose one of these ways
to transfer your presentation to the projector:
■
To send your presentation from your office PC to the projector,
see below.
■
If you’re in the meeting room with the projector and you need to
download your presentation files from a remote location, see
page 13.
■
If you want, you can copy your presentation directly onto the
memory card; see page 16.
Sending the Presentation from Your Office
If you’ve created your presentation on your office PC, the easiest way
of getting it to the projector is by using the EMP File Utility software;
see below.
note
You may be able to launch
your presentation without
first transferring it to the
projector; see page 17.
If your network is set up to prevent sending a presentation directly to
the projector, you may have to upload it to a file server first. Use the
file utility you would normally use (such as Windows
transfer your presentation to the server; then see “Downloading Your
Presentation While in the Meeting Room” on page 13 to finish
getting your presentation to the projector.
®
Explorer) to
Using the EMP File Utility Software
Follow these steps to send your presentation to the projector:
1. Click
Start, Programs, EasyMP
, then select
EMP File Utility
Presenting Without a Computer
.
11
Page 17
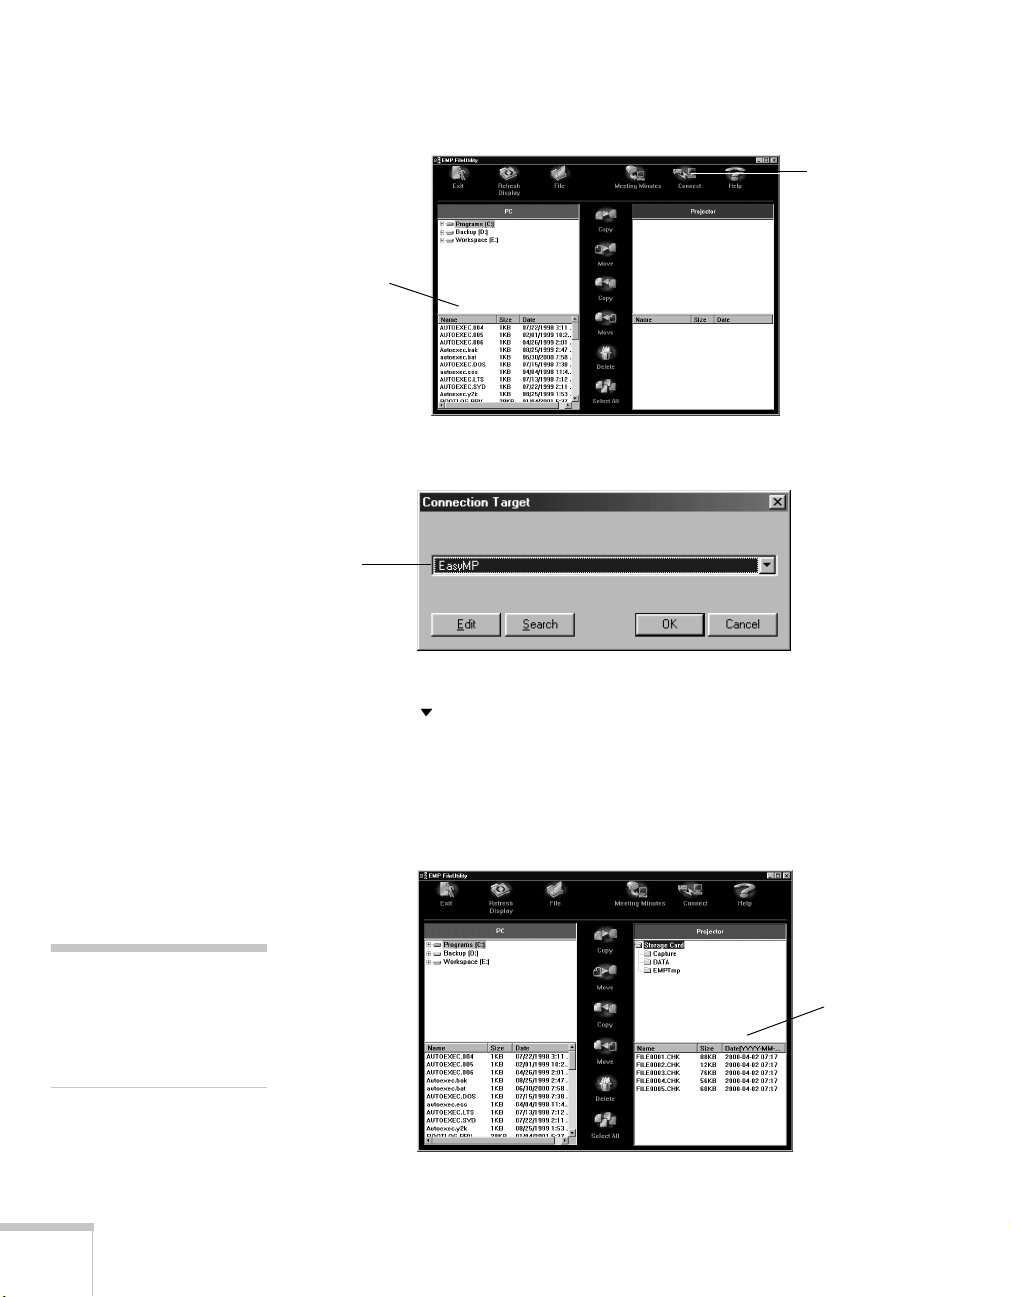
You see this screen, with the files on your PC listed on the left:
f
click here
PC files
select projector name
note
You can click the File icon to
create a new folder, or to
rename an existing file or
older.
2. Click the
and click OK
Connect
icon, as shown above. You see this screen:
3. Select the name of your projector, then click
click the drop-down arrow and select the correct projector from
the list. If it isn’t listed, you may need to click the
see the Administrator’s Manual for details.)
All files currently stored on the projector appear on the right, as
shown:
OK
. (If necessary,
Search
button;
projector
files
12
Presenting Without a Computer
Page 18

4. To copy your presentation to the projector, highlight its name on
the left side of the screen, then highlight the folder’s name where
you want to copy it on the right side of the screen. Then click the
copy icon.
When you’re done transferring your presentation, see page 17 for
instructions on projecting it. For additional information on using the
EMP File Utility, see the online help.
Downloading Your Presentation While in the Meeting Room
If you’re in the meeting room and want to copy files to the projector
that are in a remote location (such as on a file server or another PC on
the network), you can use the projector’s Easy File utility. You’ll need
to use one of the following to control the projector:
■
the remote control (see page 51)
■
a USB device (mouse, tablet, and/or keyboard) directly connected
to the projector (see page 20)
■
the EMP Tablet software (on a networked PC in the meeting
room); see page 21
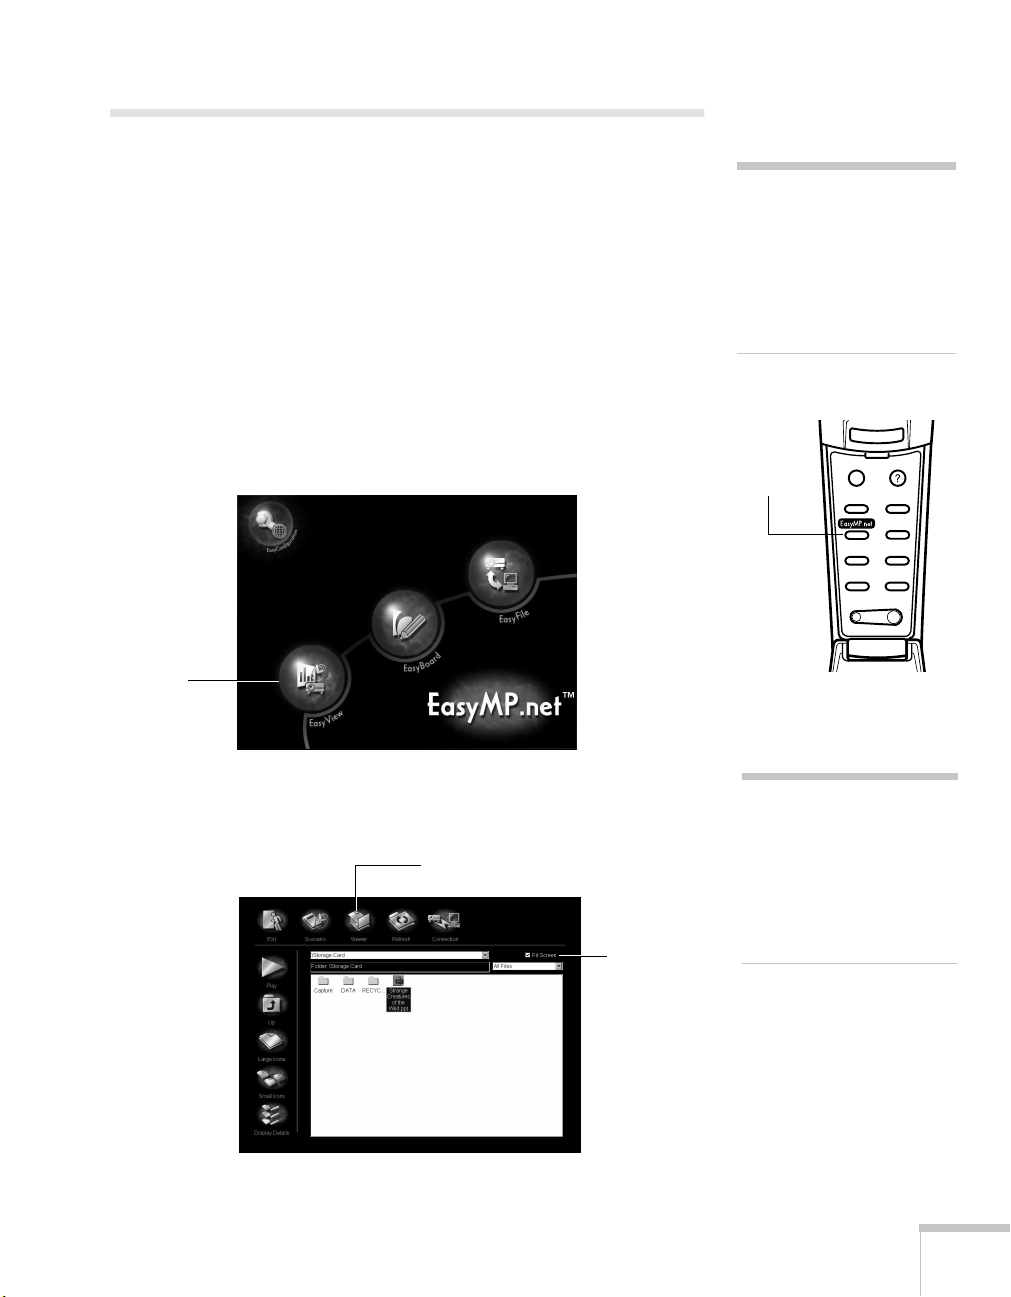
Follow these steps:
1. Turn on the projector as described in “Displaying and Adjusting
the Image” on page 37.
2. If necessary, select
EasyMP.net
button on the remote control.) You see this screen:
3. Click the Easy File
EasyMP.net
icon.
as the source. (Press the
click here
Presenting Without a Computer
press to
start
EasyMP
Esc
Menu
Comp2/YCbCr
Comp1
Capture
Auto
P in P Preset
- Volume +
Help
Video
APPs
Resize
13
Page 19
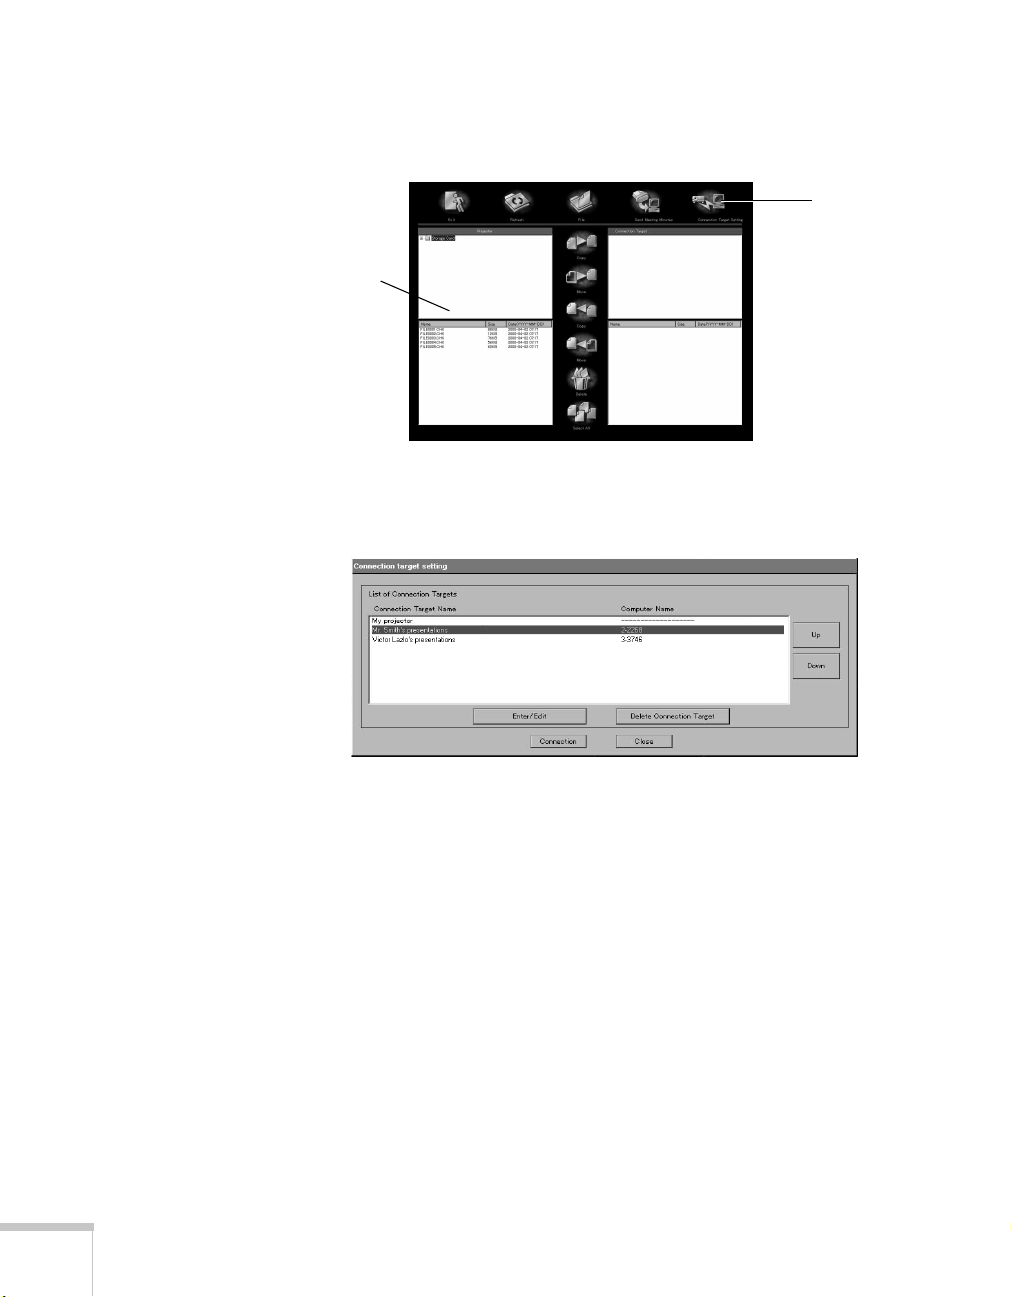
You see this screen, with the files on the projector listed on the
left:
projector
files
click
Connection
Target
Setting
4. Click
Connection Target Setting
, as shown above.
You see this screen:
5. Select the name of the PC (or shared folder) where your
presentation is located, then click
Connection
. (If the computer
or folder name isn’t listed, contact your projector or network
administrator to have it added.)
14
Presenting Without a Computer
Page 20
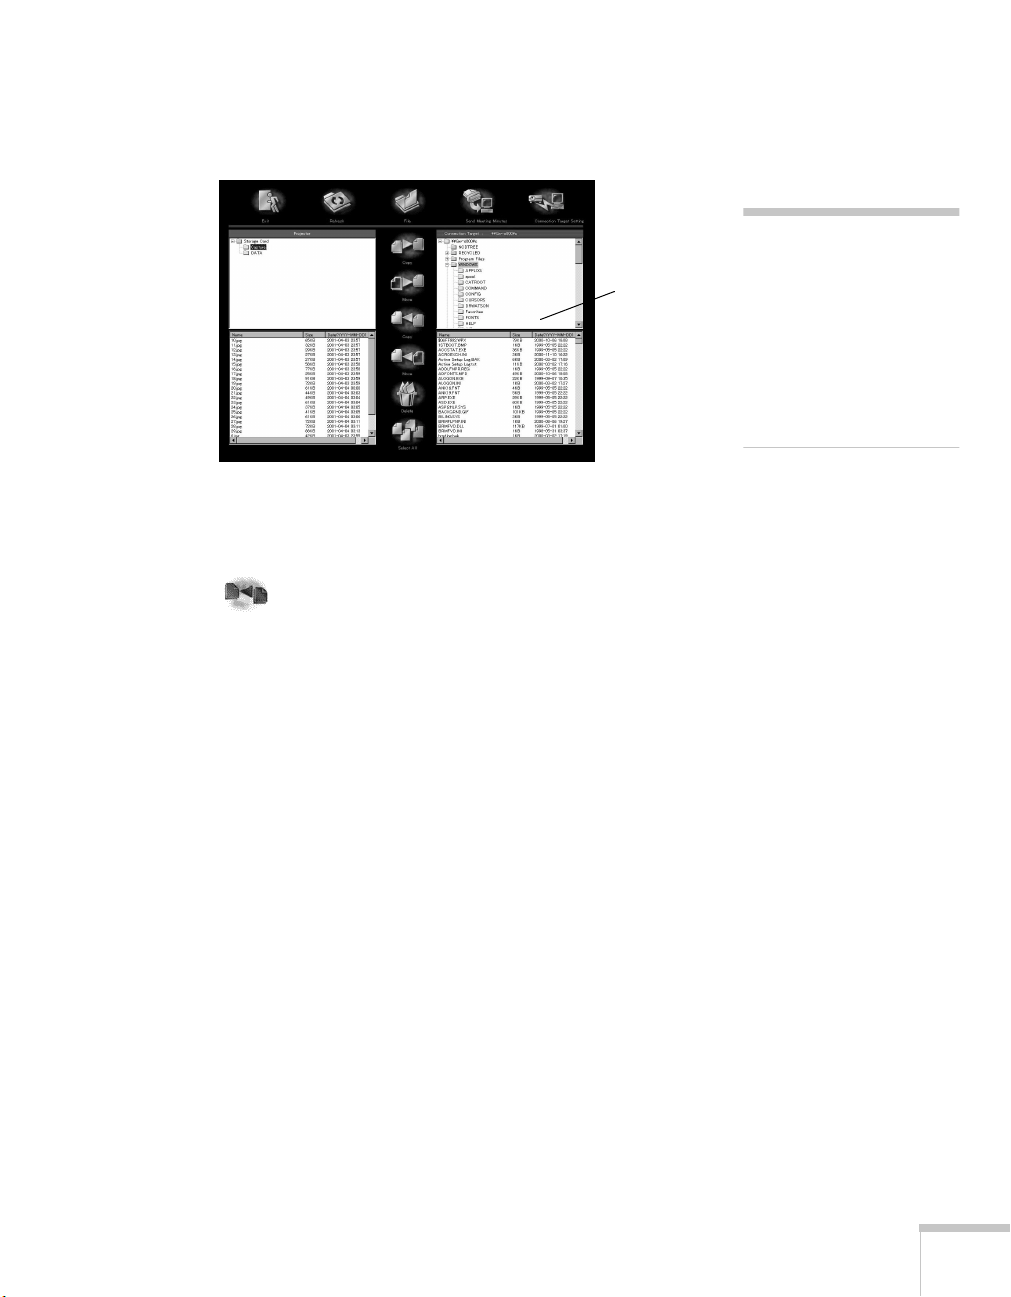
All files currently stored on the connected computer appear on
the right side of the screen:
files on
connected
PC
6. To copy your presentation to the projector, highlight its name on
the right side of the screen, then highlight the projector folder
where you want to copy it on the left side of the screen. Then
click the copy icon.
When you’re done transferring your presentation, see page 17 for
instructions on delivering it.
note
You can click the File icon to
create a new folder, or to
rename an existing file or
folder. If you need to type a
file or folder name, use a
USB keyboard or a PC
running the EMP Tablet
software.
Presenting Without a Computer
15
Page 21
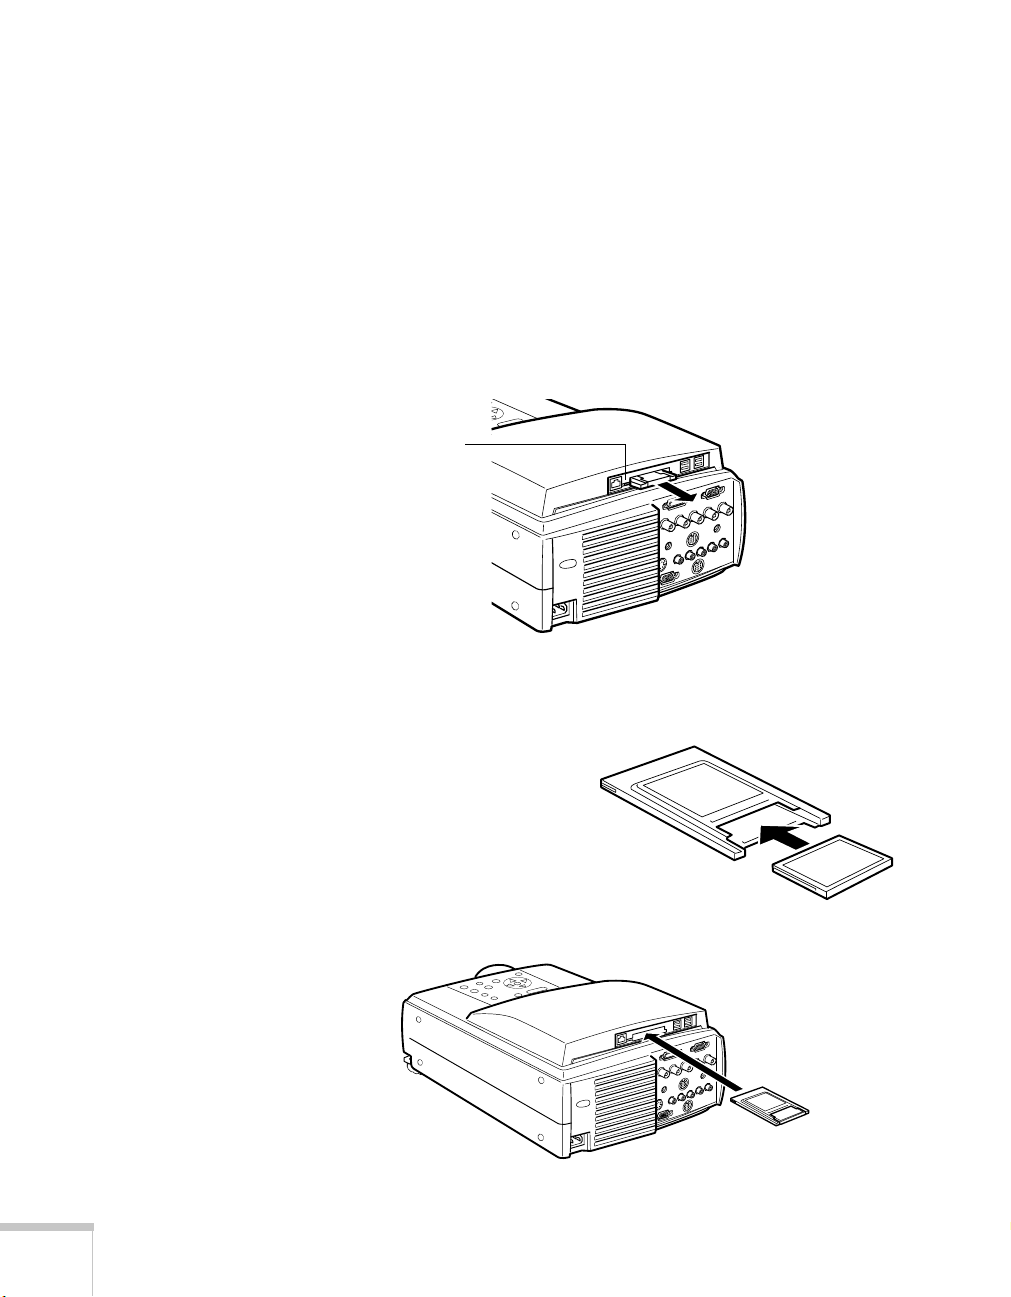
Copying Your Presentation Directly to the Memory Card
If you have a laptop with a PCMCIA slot, you can insert the
projector’s memory card in the slot and copy your presentation
directly onto the card. Before starting your presentation, you’ll need to
place the card in the projector as described below.
1. If necessary, remove the memory card that’s already in the
projector. Press the button to the left of the card slot to eject the
card:
press here
If the button is recessed, press and release it so that it extends.
Then press it a second time to eject the card.
2. If using a CompactFlash
card, place the card in the
card adapter:
™
16
Presenting Without a Computer
3. Insert the card (with the adapter) into the projector’s card slot:
Page 22
Delivering Your Presentation
If your presentation is on a remote PC (you haven’t copied it to the
projector’s memory card), you can start and run it as long as the
projector and the PC are on the same network. Otherwise, you’ll have
to copy your presentation to the projector’s memory card, as described
on page 11, before starting your presentation.
Follow these steps to start your presentation:
1. Turn on the projector as described in “Displaying and Adjusting
the Image” on page 37.
2. If necessary, select
EasyMP.net
click here
button on the remote control.) You see this screen:
EasyMP.net
as the source. (Press the
note
If you’re in the meeting room
and want to project a file
that’s on your laptop, simply
drag it onto the EMP Tablet
icon on your desktop. The file
opens automatically on screen.
press to
start
EasyMP
Esc
Menu
Comp2/YCbCr
Comp1
Capture
Auto
P in P Preset
- Volume +
Help
Video
APPs
Resize
3. Using the
Easy View
the
Enter
button on the remote control (see page 51), click
icon. You see this screen:
click here
note
You can also use a USB
mouse or drawing tablet
(page 20) or the EMP Tablet
software (page 21) instead of
make sure
this box is
checked
Presenting Without a Computer
the remote control to operate
the projector.
17
Page 23
note
To ensure that your images
display correctly, make sure
Fit to screen is selected in the
Viewer window.
4. Click
Viewer
as shown in the previous screen.
5. Do one of the following:
■
If your presentation is on the projector’s memory card, locate
its file name in the file window.
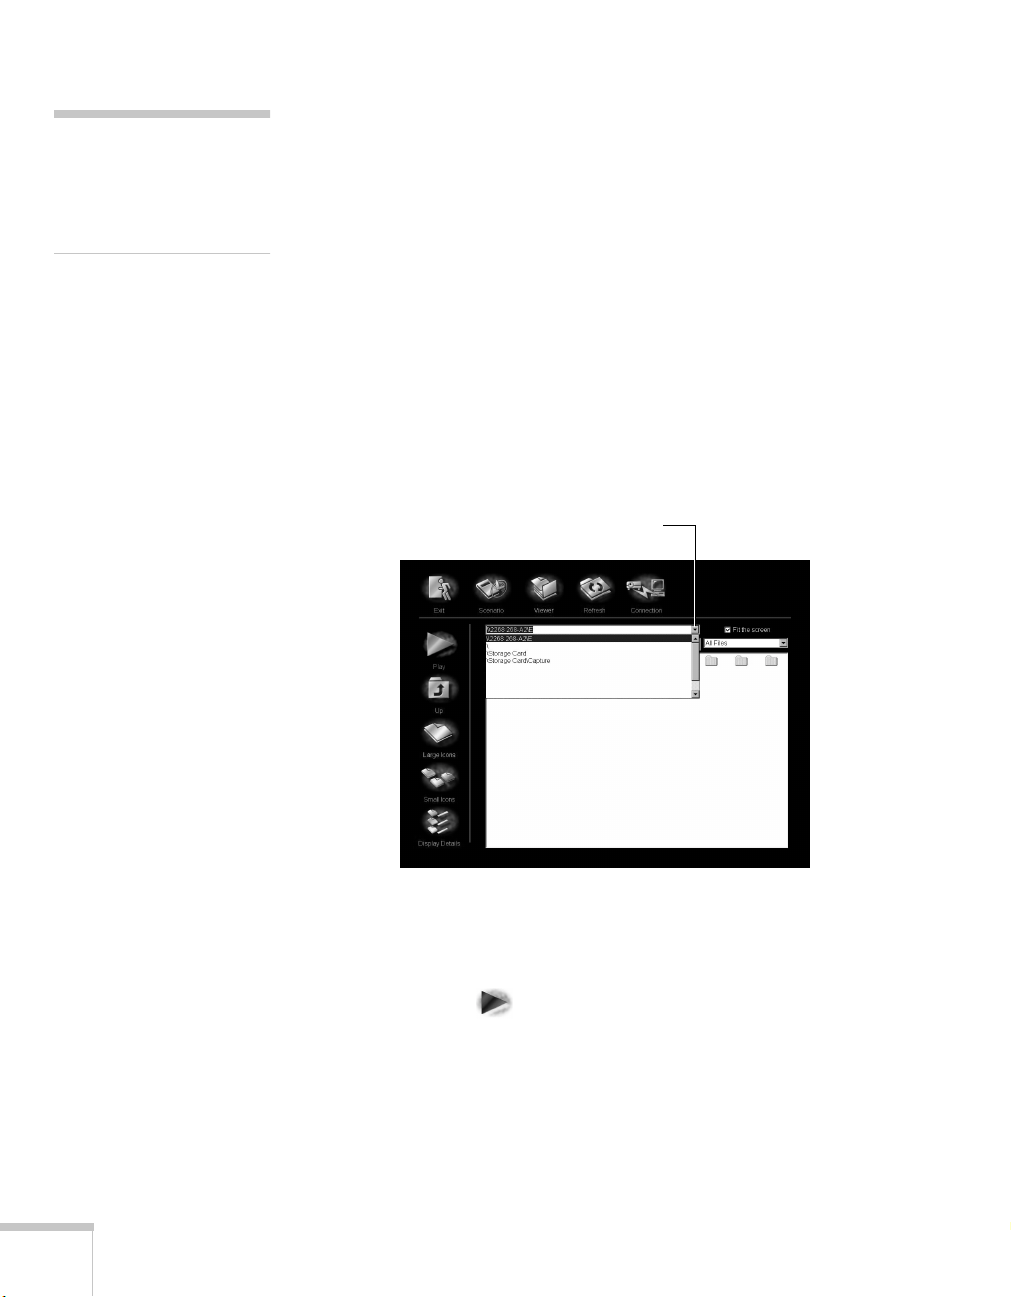
■
If your presentation is on a remote PC, click the
Connection
icon at the top of the screen. Enter the name of the remote
computer and its shared drive or folder name, then click
Connection
. You may need to contact your network
administrator for assistance in determining the computer’s
name.
If you’ve connected to this computer before, you can select its
name from the drop-down list as shown below:
then select computer name
click here,
18
Presenting Without a Computer
Once you’re connected, locate the presentation’s file name in
the file window.
6. To start your presentation, double-click its file name, or highlight
it and click the
Play
icon.
Page 24
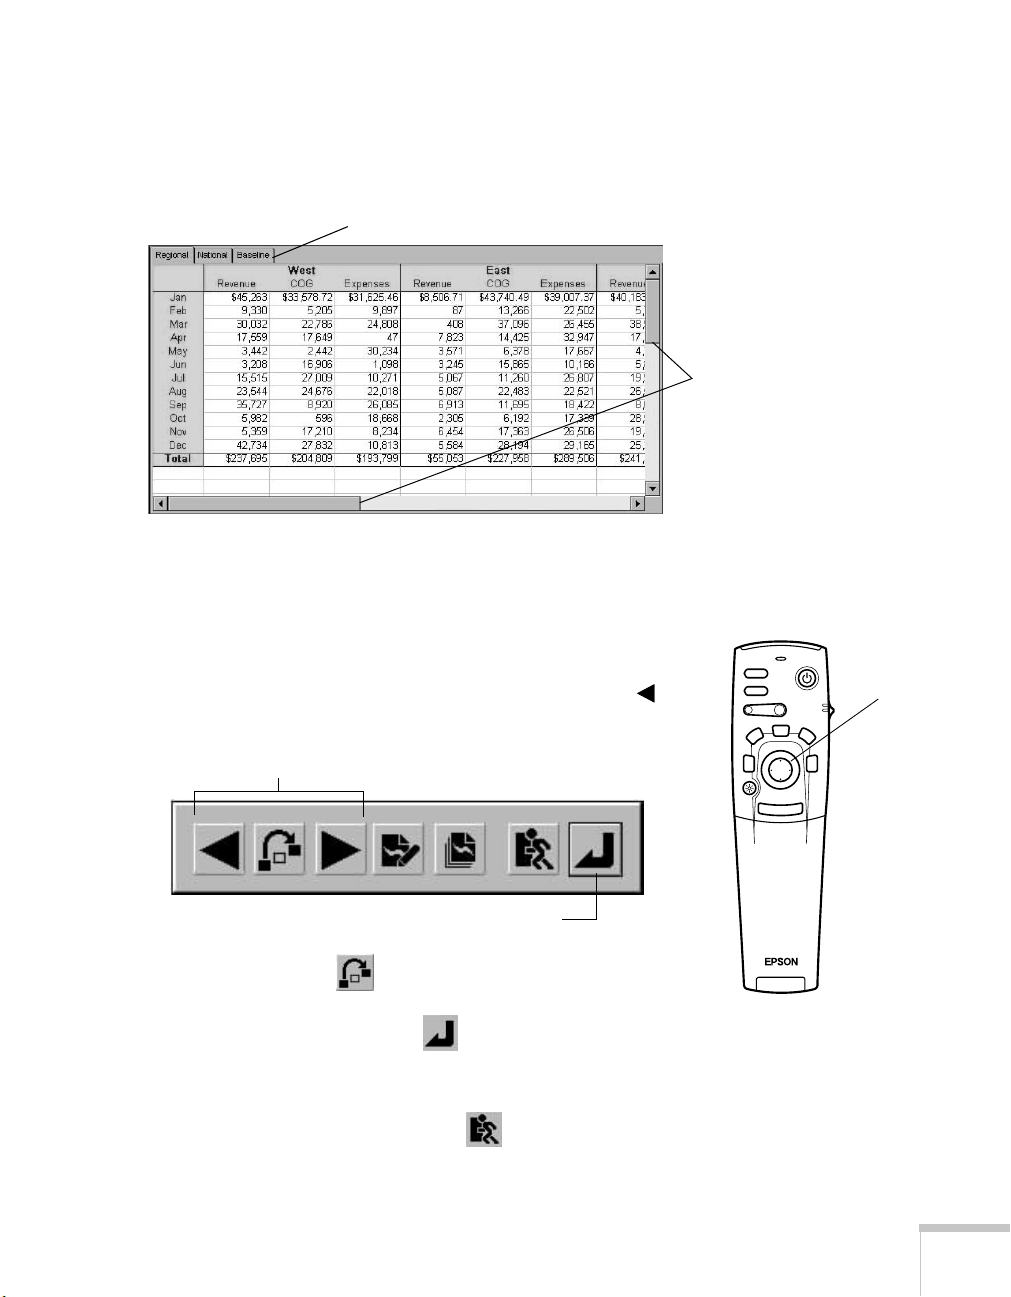
Follow these guidelines when viewing your presentation:
■
If you’re showing a Microsoft Word or Excel file, you can move
through it using the scroll bars on the sides of the screen.
Excel spreadsheet tabs
If you’re displaying a multi-page Excel spreadsheet, you can jump
to a different page by clicking one of the tabs at the top of the
screen.
scroll
bars
■
When viewing a PowerPoint presentation, press the
Enter
on the remote control to advance to the next slide. To return to
the previous slide, press the
Esc
button and then click the back
arrow in the menu that appears on the screen:
navigation buttons
click to close this menu
You can also click the jump icon and then use the arrow
buttons to go directly to the slide of your choice. When done
making your selection, click the return icon to close the
navigation menu and continue with your presentation.
When you’re done with your presentation, press the
Esc
on the remote control, then click the exit icon to return to
Easy View.
button
button
Freeze
A/V Mute
1
E-Zoom
2
Power
R/C ON
OFF
3
4
5
Enter
Esc
press to
go to
next slide
Presenting Without a Computer
19
Page 25
Highlighting Your Presentation
p
You can highlight your presentation with special symbols or your own
drawings, and you can annotate it with on-screen text. For simple
pointer effects, you can use the remote control, or for more
sophisticated effects you can use a mouse or drawing tablet.
Choosing a Drawing Tool
If all you want to do is place simple figures on the screen—such as an
arrow or an underline to highlight key points—you can use the
remote control to guide the cursor. For details, see page 52.
To make actual drawings, or to write text on the screen, you can use
either a mouse or drawing tablet. (A drawing tablet works best.) If you
have a USB mouse or a Wacom Graphire
directly to the projector’s USB port as described below. Otherwise
you’ll need to use the projector’s EMP Tablet program on a PC or
laptop that’s networked to the projector; see page 21.
Using a USB Mouse or Tablet
™
tablet, you can connect it
note
Other drawing tablet models
won’t work with this
rojector.
20
Presenting Without a Computer
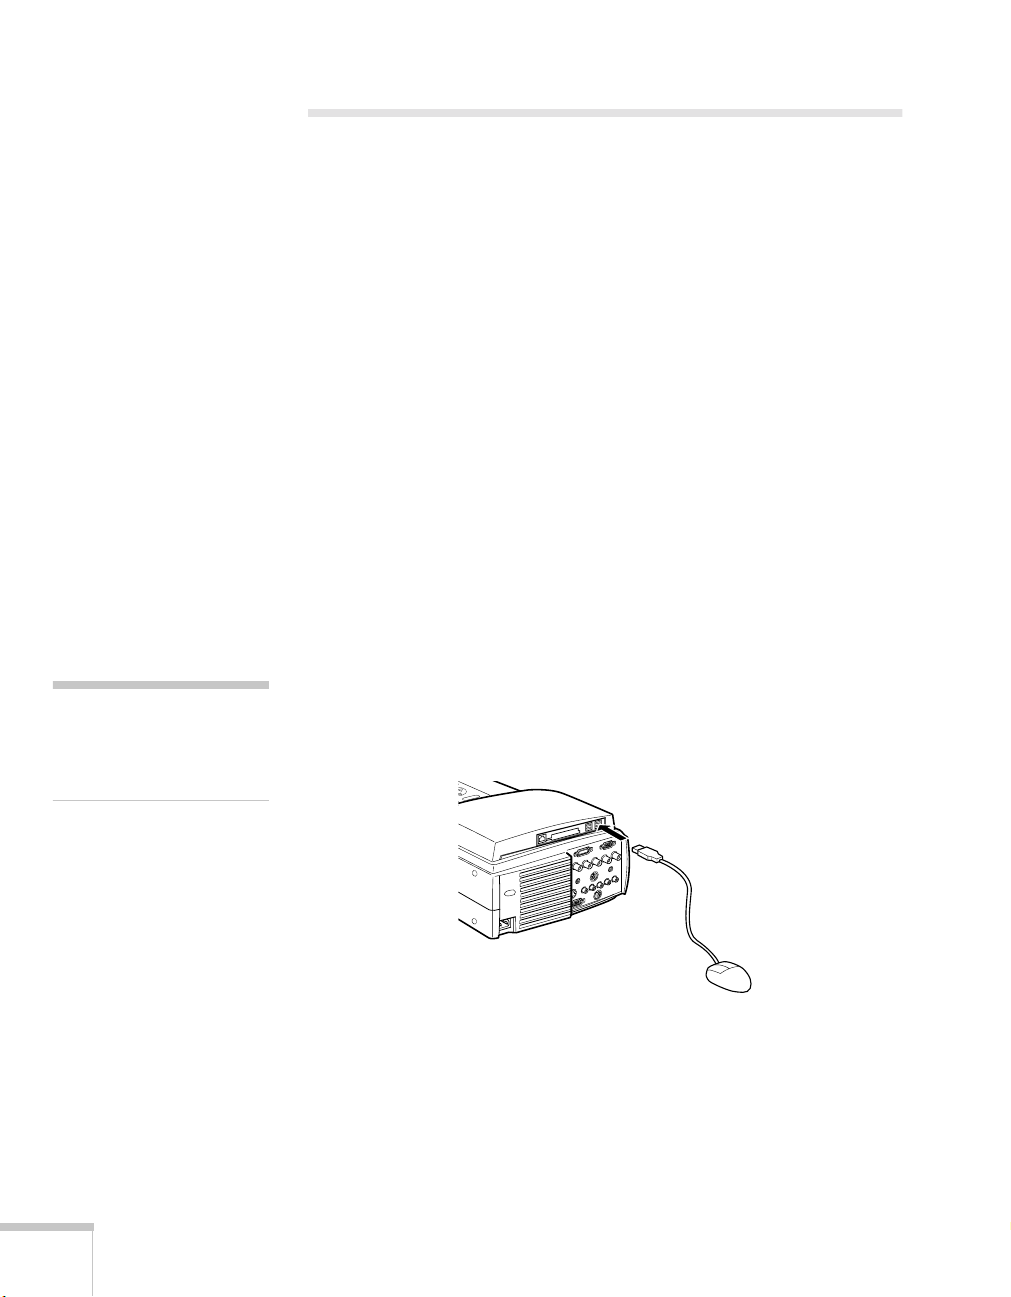
To connect a USB mouse or Wacom Graphire drawing tablet directly
to the projector, plug it into one of the four USB ports on the back of
the projector as shown:
When drawing with the tablet, note that you can use the upper end of
the pen as an eraser. Keep in mind that you can also use the pen to
click and double-click like a regular mouse. Tap the tip of the pen
against the tablet’s surface to click or double-click; to right-click, press
the lower part of the button on the side of the pen.
Page 26

A special template comes with the projector that you can place under
the tablet’s clear plastic overlay. The template includes the same
highlighting tool icons and toolbar functions as the EMP Tablet
software, described in the next section.
Using the EMP Tablet Software
If you have a PC or laptop on the same network as the projector, you
can use the EMP Tablet software to control the projector and draw on
the screen. You can use either your laptop’s mouse or a drawing tablet
connected to the laptop. Note that you can use any model of tablet
that’s compatible with your laptop.
To open EMP Tablet, follow these steps:
note
You can print additional
copies of the template from
the Tablet_sheet.pdf file on
your projector CD-ROM.
1. Click
Start, Programs, EasyMP
, then click
You see this screen:
2. Select the name of your projector, then click
Tablet software opens on your laptop:
highlighting tools
EMP Tablet
Connect
. The EMP
help
.
select projector name
and click Connect
exit
note
When EMP Tablet is open,
you can use your keyboard to
type text in dialog boxes on
screen.
Presenting Without a Computer
21
Page 27

3. While viewing the projected image, use your laptop’s mouse or
drawing tablet to control the cursor. In some cases, you may need
to move or resize the EMP Tablet window on your laptop to be
able to guide the cursor near the edge of the projected image.
You can use the buttons at the top of the screen to change the
cursor to various highlighting marks, as shown:
stamp or pointer
bar or underline
box
clear all highlights
The other buttons on the toolbar give you access to various
projector features. If you’re unsure of what a button is for, you
can hold the cursor over it until a mouseover text appears. Or
click the help button for more information.
4. When you’re done using EMP Tablet, click the exit icon to
close it.
22
Presenting Without a Computer
Page 28

Drawing on the Screen
You can draw and write either on a projected image, as described
below, or on a blank screen (using it like a digital white board). Follow
the instructions in the sections below.
Drawing on a Projected Image
Follow these steps to sketch or make notes on an image you’re
projecting:
1. Begin by displaying the image you want to view. It can be a
PowerPoint slide, Excel spreadsheet, or any other type of image
supported by the projector.
2. Right-click with the mouse. (If you’re using the drawing tablet,
press the lower part of the button on the side of the pen.)
You see the menu shown below:
click here
3. Click the drawing tool icon. The cursor changes to a pencil,
letting you draw.
4. To change from a pencil tool to a different drawing tool,
right-click. You see this menu:
drawing tools
clear screen and undo
drawing tool attributes
Presenting Without a Computer
23
Page 29

Select one of the other drawing tools as shown. You can adjust
drawing tool attributes by clicking the checkbox icon; a
second menu appears on screen. After making your selections,
click the return icon to close both menus and resume
drawing.
5. When done drawing on screen, right-click, then click the
exit icon to continue your presentation. (Your drawings and
notes will be erased; to save them, see page 25.)
Drawing on a Blank Screen
Esc
Menu
Comp2/YCbCr
Comp1
Capture
Auto
P in P Preset
- Volume +
Help
Video
APPs
Resize
press
to select
Easy Board
If you prefer, you can draw or make notes on a blank screen.
1. Do one of the following:
■
If using the remote control, press the
button, then select
■
If you’re using a drawing tablet or the EMP Tablet software,
click the
Board
.
■
If the EasyMP.net main menu screen is
visible, click the
Easy Board
APPs
icon on the toolbar, then select
Easy Board
icon:
APPs
(applications)
.
A white screen appears and the cursor
changes to a pencil, letting you draw.
2. To change from a pencil tool to a different drawing tool,
right-click. You see this menu:
drawing tools
drawing tool attributes
Easy
24
Presenting Without a Computer
clear screen and undo
Select one of the other drawing tools as shown. You can adjust
drawing tool attributes by clicking the checkbox icon; a
second menu appears on screen. After making your selections,
click the return icon to close both menus and resume
drawing.
Page 30

3. When done drawing on screen, right-click, then click the
exit icon. (Your drawings and notes will be erased; to save
them, see the next section.)
Saving Your Drawings and Notes
You can capture images displayed on the screen, including your
drawings and notes, and save them on the projector’s memory card.
This lets you view them at a later time.
You can also share your captured images by transferring them to other
systems on the network. You can copy them as individual JPEG files,
or you can use the projector’s “meeting minutes” function to combine
them into a single HTML file. This lets you (and others) view them
on a PC using a standard web browser.
Capturing an Image
To capture a displayed image, do one of the following:
■
Using the remote control, press the
■
If you’re using a drawing tablet or the EMP Tablet software, click
the capture icon.
■
If you’re currently using one of the drawing tools, right-click with
your mouse. You see this menu:
Capture
click here to capture image
button as shown.
press to
capture
image
Esc
Menu
Comp2/YCbCr
Comp1
Capture
Auto
P in P Preset
- Volume +
Help
Video
APPs
Resize
Click the capture icon as shown.
The image is saved as a numbered file (1.jpg, 2.jpg, etc.) in the
memory card’s Capture folder. If you wish to display it on screen, use
Easy View as described on page 17. To send it to other systems on the
network, see the next section.
Presenting Without a Computer
note
If you’re using the EMP
Tablet software, you can save
the image directly to your
laptop instead of to the
projector’s memory card.
Click this toolbar icon:
25
Page 31

Esc
Menu
Comp2/YCbCr
Comp1
Capture
Auto
P in P Preset
- Volume +
Help
Video
APPs
Resize
press
to select
Easy Review
Sharing Captured Images
If you wish to copy your captured JPEG files to another system
without first converting them to HTML, do one of the following:
■
If you’re in the meeting room, you can copy the files to a remote
PC or file server using Easy File as described on page 13.
■
If you’re in your office, you can download the files to your
computer using the EMP File Utility software as described on
page 11.
If you prefer to save the captured images as an HTML file (so you can
view them later using a web browser), follow these steps:
1. Do one of the following:
■
If using the remote control, press the
button, then select
■
If you’re using a drawing tablet or the EMP Tablet software,
click the
Review
■
If the EasyMP.net main menu screen is visible, click the
EasyMP.net
.
Easy Review
APPs
icon on the toolbar, then select
icon in the lower-right, then select Easy Review
from the applications menu:
APPs
(applications)
.
Easy
applications menu
26
Presenting Without a Computer
click here to
show the
applications
menu
Page 32

You see the Easy Review screen:
2. Delete any images you don’t want to save by selecting each image
and clicking the
3. To save the remaining images as an HTML file, click the
Delete
icon.
Save
icon. You see this screen:
note
You can enlarge an image by
selecting it and clicking the
Zoom icon. To return to
normal view, right-click and
select Exit Zoom Display.
4. Enter a name for your meeting minutes and, optionally, a
password. To type the name, use one of the following:
■
a USB keyboard directly connected to the projector (connect
it as you would a USB mouse or tablet, as shown on page 20)
■
your computer’s keyboard if you’re using the EMP Tablet
software (see page 21)
Save
5. Click
.
note
To enter a password for the
meeting minutes, you can use
the numbered buttons
(1 through 5) on the remote
control.
Presenting Without a Computer
27
Page 33

note
M
y
You can also download the
meeting minutes to your
office PC using the EMP File
Utility software. After
connecting to the projector
(see page 11), click the
eeting Minutes icon at the
top of the screen; make sure
our meeting minutes file is
selected, then click Copy to
transfer it to your PC.
Once the captured images have been saved, you can view them on the
projector at a later time by clicking the
Meeting Minutes
icon
at the top of the Easy Review screen. While viewing meeting minutes,
you can click
meeting minutes file, or click
Add
to append additional captured images to your
Delete
to remove an individual image
or delete the entire file.
To transfer the saved meeting minutes to another system on the
network, follow these steps:
1. Open Easy File, as described on page 13, and connect with the
computer to which you want to transfer the files.
2. Click the
Send Meeting Minutes
icon.
3. Make sure the meeting minutes file you want to transfer is
selected. Then select the folder on the computer to which you
want to transfer it and click
Copy
.
The meeting minutes are saved on the computer with the date and
time they were created as part of the file name. To view the file, use a
standard web browser such as Microsoft Internet Explorer.
28
Presenting Without a Computer
Page 34

2
Presenting from a Laptop or
VCR
If you’re presenting from a laptop, you’ll need to connect it to the
projector as described in this chapter. If you’re presenting a video,
you’ll need to connect your VCR, DVD player, or other video device.
Except as noted, all cables required for the connections described in
this chapter are included with the projector.
You’ll find instructions in this chapter for the following:
Positioning the projector
■
Connecting to a laptop (PC or Macintosh)
■
Connecting to a video device
■
Presenting from a Laptop or VCR
29
Page 35

Positioning the Projector
p
caution
■
Don’t hold or lift the
rojector by the lens, or you
may damage it.
■
Make sure there is plenty of
space for ventilation around
and under the projector.
You can place the projector approximately 3.1 to 48 feet from the
screen when equipped with the standard lens. Use the figure below as
a guideline to help you determine the projector’s placement.
4 ft8 ft43 ft distance from screen
Keep in mind that the image size generally increases with distance, but
may vary depending on how you position the zoom ring and whether
you have adjusted the image size with other settings.
After positioning the projector, you may wish to connect a
Kensington MicroSaver
®
anti-theft device to the lock port on the
projector’s left side. You can purchase this from EPSON; see the
Administrator’s Manual for details.
Kensington
lock port
30
Presenting from a Laptop or VCR
Page 36

Connecting to a Laptop
Follow the instructions in this section to connect a laptop (PC or
Macintosh) to the projector. The connections you make depend on
how you plan to use the projector:
■
To project computer images, you need to connect the computer
video cable as described below.
■
If you want to use the remote control in place of your computer’s
mouse (for example, to click through slideshow presentations),
you need to connect the mouse cable as described on page 34.
■
If you want to use the projector’s built-in sound system, you need
to connect an audio cable as described on page 35.
Before beginning, turn off the projector and computer if they are on.
When done making the connections, turn to “Displaying and
Adjusting the Image” on page 37 to start your presentation.
Connecting the Computer Video Cable
To project images output from your laptop, connect the computer
video cable as described below.
1. Connect one end of the VGA computer video cable to the
projector’s
Computer 1
(VGA) port.
note
If you have an iBook™ with
an RCA video-out port,
follow the instructions for
connecting to a video device
on page 36.
For other types of computer
connections, see the
Administrator’s Manual.
Computer 1
(VGA) port
VGA computer video cable
2. Connect the other end of the cable to the laptop’s video (monitor)
port.
3. Tighten the screws on the connectors.
Presenting from a Laptop or VCR
note
If you have an older
PowerBook,
special connector. See
page 32.
®
you may need a
31
Page 37

4. Make sure the
switch is flipped to the right, as
shown. If necessary, use the tip
of a pen or a small screwdriver
to slide it over.
Computer 1
Computer 1
Computer 1
Computer 2 /
Component Video
B/Cb/Pb H/C Sync V SyncG/Y
R/Cr/Pr
Remote
Mouse/Com
S-Video S-Audio/Audio2 L-Audio-RVideo
Monitor Out
Audio
Stack Out
switch
(slide to
right)
Connecting to an Older PowerBook
If you’re connecting to a Macintosh PowerBook and the computer
video cable doesn’t fit properly, you may need a special video-out
cable (available from Apple) or a Macintosh desktop adapter (available
from Epson; see the projector Administrator’s Manual).
Refer to the figure below to make the proper connections:
32
Presenting from a Laptop or VCR
Computer 1 port
video-out cable
(if needed)
Macintosh desktop
adapter (if needed)
VGA computer video cable
Page 38

1. To use the desktop adapter, remove its cover as shown and set the
DIP switches according to the resolution you want to use, such as
16-inch mode. See your Macintosh documentation for
instructions.
2. Replace the cover and connect the adapter to one end of the
computer video cable. Then plug the cable (with the adapter) into
the monitor port on your Macintosh.
3. If your PowerBook requires a video-out cable, connect its larger
end to the adapter, as shown below. Then plug the video-out
cable into the video port on your Macintosh.
video out cable
Macintosh desktop adapter
4. Tighten the screws on the connectors.
Presenting from a Laptop or VCR
33
Page 39

Connecting the Mouse Cable
If you want to use the remote control in place of your laptop’s mouse,
follow the steps below. This illustration shows the connections you’ll
be making:
mouse cable
Mouse/Com
port
main cable
1. Connect the round end of the main cable to the projector’s
Mouse/Com
port, as shown.
34
Presenting from a Laptop or VCR
2. To use the remote control as a wireless mouse, choose the correct
mouse cable for your laptop. (Note that some of the cables look
very similar, but are labeled with a tag as shown.)
■
PS/2 mouse
■
USB mouse
PS/2 MOUSE
■
PC serial mouse
SERIAL MOUSE
■
Mac mouse
MAC MOUSE
E
S
U
O
M
L
A
I
R
E
S
Page 40

3. Connect one end of the mouse cable to the
MOUSE
terminal on
the square end of the main cable.
4. Connect the other end of the mouse cable to the mouse port (or
USB port) on your laptop.
5. Tighten the screws on the connectors.
6. If necessary, configure your laptop to work with an external
mouse.
Connecting the Audio Cable
To use the projector’s built-in stereo speaker system, connect the
3.5-mm audio cable between the laptop’s speaker or audio-out port
and the projector’s
Audio
port.
Audio port
audio cable
Presenting from a Laptop or VCR
35
Page 41

Connecting to a Video Device
M
note
To connect using S-video or
component (BNC) video, see
the projector Administrator’s
anual.
Follow the steps below to connect the projector to a VCR, DVD
player, or any other video device that has RCA-style (composite video)
connectors. Before starting, make sure the projector and your video
device are turned off.
1. Connect the yellow RCA plug on one end of the RCA video cable
to the projector’s
Video
port. Connect the other end of the cable
to the video-out port of your video source.
RCA audio cable
RCA video cable
2. To use the projector’s built-in speaker system, connect the RCA
audio cable to the left and right
(insert the white plug into the
Audio
ports of the projector
L
port and the red plug into the R
port). Connect the plugs at the other end of the cable to the audio
output ports of the video source.
36
Presenting from a Laptop or VCR
When done making the connections, turn to “Displaying and
Adjusting the Image” on page 37 to start your presentation.
Page 42

3
Displaying and Adjusting
the Image
Once you’ve transferred your presentation to the projector (as
described in Chapter 1) or connected the projector to your computer
or other equipment (as described in Chapter 2), you’re ready to turn
on the projector and adjust the image.
This chapter covers the following:
Turning on the projector
■
Selecting the image source
■
Adjusting the image and sound
■
Shutting down the projector
■
Turning on the projector automatically
■
Displaying and Adjusting the Image
37
Page 43

note
p
You can also set the projector
to turn on automatically at a
reset time. See page 45.
Displaying an Image
Follow the steps below to turn on the projector and any connected
equipment, and to display an image.
Turning On the Projector
Follow these steps to turn on the projector:
1. Make sure the projector is plugged in and the lens cap is off.
power cord
The power light on the projector’s control panel glows orange,
indicating that the projector is receiving power but the lamp is not
turned on.
power light
38
Displaying and Adjusting the Image
Page 44

2. Press the red
Power
the
Power
button on the control panel. You can also use
button on the remote control, but make sure batteries
are installed and the remote control is turned on first. (For details,
see page 50.)
Freeze
A/V Mute
Power
R/C ON
E-Zoom
OFF
3
4
2
5
1
Enter
Esc
Power button
remote control
on/off switch
Power
Comp/
A/V mute
Resize
Help
Video
Menu
Shift
Esc
n
c
y
.
S
T
r
S
y
.
c
n
Keystone
Volume
a
c
k
i
n
g
g
n
i
k
c
a
r
T
The projector’s power light flashes green as the projector warms
up, and the projection lamp comes on in about 30 seconds. (To
turn off the lamp, see page 47.)
Selecting the Image Source
The screen you see when turning on the projector depends on which
image source was selected when the projector was last used. If
EasyMP.net was selected, you see the EasyMP.net main screen, as
shown below; if a computer or video source was selected, you see a
blue screen with the No Signal message.
warning
Never look into the lens when
the lamp is on. This can
damage your eyes.
No Signal
If necessary, follow these steps to display the correct image:
1. If you’re presenting from a computer or video device, turn on the
device. (If you’re projecting a video, press
Play
on the video
device.)
2. If you’ve connected a computer that’s running Windows and it
displays a New Hardware Found message saying that it has found
a plug-and-play monitor, click
Cancel
.
Displaying and Adjusting the Image
39
Page 45

3. To display the image, do one of the following:
p
p
note
It takes a few seconds for the
rojector to sync up after
selecting the source. After
ressing one of the source
buttons, wait a moment for
the image to appear.
■
On the projector’s control panel, press the
EasyMP.net
button to switch between EasyMP,
Computer 1, and Computer 2; or press the
Comp/
Video
button to
switch between the video sources (composite, component, or
S-video).
Power
source
buttons
■
On the remote control, press
the
EasyMP.net
Comp/
A/V mute
Resize
Comp1, Comp2/YCbCr
Video
, or
Help
Video
Menu
Shift
g
n
i
k
c
a
r
T
y
S
S
y
n
c
.
.
c
n
Keystone
Volume
Esc
T
r
a
c
k
i
n
g
select computer 2 or
,
select
computer 1
component video
button to switch sources.
If you see a blue screen with the
No Signal message, you may have
Menu
Esc
Help
to press the button again to select
Comp2/YCbCr
the correct source. If a projected
image fails to appear, see page 63
for help.
Comp1
Capture
Auto
P in P Preset
- Volume +
Video
APPs
Resize
select
select
EasyMP
RCA video
or S-video
40
Displaying and Adjusting the Image
Page 46

Adjusting the Image and Sound
If the projector is already installed in a meeting room, you probably
won’t need to make any adjustments. If you set up the projector
yourself, check the following:
■
To focus or zoom your image, see below.
■
If the image is too high or too low, you can reposition it. See
page 42.
■
If the image isn’t square, see page 43.
■
If only part of a computer image is displayed, you may need to
press the
■
If you’re using an audio source, see page 44 to adjust the sound.
Focusing and Zooming Your Image
Rotate the focus ring to sharpen the image.
Resize
button. See page 44 for more information.
focus ring
Rotate the zoom ring to reduce or enlarge the image.
zoom ring
If the image still isn’t large enough, you may need to move the
projector farther from the screen.
Displaying and Adjusting the Image
41
Page 47

Adjusting the Height of Your Image
You can adjust the height of the image using the lens shift knob and
the projector’s feet.
Using the Lens Shift Knob
If possible, set the projector flat on a table and use the lens shift knob
(instead of raising the projector’s feet) to position the image on-screen.
This delivers the best-looking picture.
You won’t need to tilt the projector upward as long as you position it
so that its lens is at least as high as the bottom of the screen, but no
higher than the middle of the screen, as shown:
no higher than
middle of screen
ideal
height
no lower than
bottom of screen
42
Displaying and Adjusting the Image
Use the lens shift knob to raise or lower the image. If the knob is
recessed, press and release it to make it extend; then turn it clockwise
or counterclockwise to move the image up or down. When you’re
finished, press the knob back in.
lens shift knob
Page 48

Using the Projector’s Feet
If the image is still too low, you can raise it by extending the
projector’s feet.
1. Stand behind the projector. Pull up the blue foot release levers
and lift the front of the projector. This unlocks the feet.
2. Once the image is positioned where you want it, release the levers
to lock the feet in position.
3. To fine-tune the height of the image, rotate the thumb wheels
attached to the projector’s feet.
If the image is no longer square after raising it, see the next section.
caution
Do not hold the projector by
the lens; this can damage it.
Adjusting the Image Shape
If the projected image isn’t square or has a “keystone” shape, do one or
more of the following:
■
If your image looks like or , you’ve placed the
projector off to one side of the screen, at an angle. Move it directly
in front of the center of the screen, facing the screen squarely.
■
If your image looks like or , press the + or – side of the
Keystone
correction, your image will be slightly smaller.
button to correct the shape of the image. After
Displaying and Adjusting the Image
Keystone
43
Page 49

Comp/
Power
Help
Video
Resizing the Image
Some computer images need to be resized to display in the projector’s
native resolution. If only part of your computer image is displayed,
you can correct it with the
Resize
button.
A/V mute
Resize button
Shift
Resize
Keystone
Volume
■
Press the
Resize
button on the control panel. The screen image is
automatically compressed.
■
Continue pressing the
Resize
button to pan around the screen in
the original resolution.
Resize
If you’re projecting from video equipment, pressing the
button switches the aspect ratio between 4:3 and 16:9.
Adjusting the Volume
If you’ve connected an audio source, you can adjust the projector’s
volume from the control panel. Hold the
pressing the
+ or –
side of the
Volume
volume using the remote control.
Shift
button down while
button. You can also adjust the
44
Displaying and Adjusting the Image
Page 50

Turning On the Projector Automatically
You can set the projector to turn on at a preset time. You can set either
a specific time for the projector to come on, or you can set it to come
on everyday or on certain days of the week.
When the projector comes on, it displays whichever source was
selected when last used. (See page 39 for instructions on switching
sources.) The only exception is if a scenario is set to begin playing
automatically (see page 8); in this case, the projector automatically
switches to EasyMP so that the scenario can begin playing.
Follow these instructions to set the timer:
1. Turn on the projector (page 38) and select EasyMP.net as the
source (page 39). You see this screen:
click here
2. Click the
You see this screen:
3. Click
Set Reservation
Easy Configuration
, as shown above.
icon, as shown above.
click here
Displaying and Adjusting the Image
45
Page 51

You see this screen:
select a
reservation
number
4. You can program up to seven different power-on times. Click one
of the reservation numbers, as shown above. Then select the
desired options for the day, start time, and end time.
When done, click
Delete
click
Set
. (If you want to cancel a programmed time,
.) The scheduled power-on time appears in the
Reservation Status window.
46
Displaying and Adjusting the Image
Page 52

Shutting Down the Projector
When done using the projector, turn off the projection lamp. If the
projector is connected to your network, leave it plugged in so that it
can continue to receive data over the network. If you need to unplug
the projector, as when moving it, be sure to turn off the projection
lamp (if it’s on) and let the projector cool before unplugging it.
Follow these steps to turn off the projection lamp:
1. Press the red
You see a confirmation message. (If you don’t want to turn it off,
press any other button.)
power light
Power
button on the projector or remote control.
power button
note
When the projector has not
received any input signals for
30 minutes, it automatically
turns off the projection lamp
and enters “sleep mode.” This
conserves electricity, cools the
projector, and extends the life
of the lamp.
2. Press the
Power
button again. The power light flashes orange for
about a minute as the projector cools down. Once the projector
has finished cooling, the orange light stays on and the exhaust fan
shuts off. This means the projector is in “sleep mode,” but it can
still receive data over the network.
3. If necessary, unplug the power cord. (When unplugged, the
projector won’t be accessible to users over the network.)
Displaying and Adjusting the Image
caution
To avoid damaging the
projector or lamp, never
unplug the power cord when
the power light is green or
flashing orange.
47
Page 53

48
Displaying and Adjusting the Image
Page 54

4
Using the Remote Control
Using the remote control, you can access your projector’s features
from anywhere in the room—up to 30 feet away. You can use it to
start and run your presentation, control the picture and sound, and
highlight your presentation by using it as a digital pointer. If you’re
giving a PowerPoint presentation, you can use the remote as a wireless
mouse to click from one slide to the next.
This chapter covers the following information:
Turning on the remote control
■
Using the remote control as a wireless mouse
■
Controlling the picture and sound
■
Highlighting your presentation
■
Using the Remote Control
49
Page 55

Freeze
A/V Mute
E-Zoom
2
1
Enter
Esc
Turning On the Remote Control
Power
R/C ON
OFF
3
4
5
on/off
switch
light
button
The remote control has an on/off switch on its side, as shown. Before
using it, make sure batteries are installed (as described in the
Administrator’s Manual), then push up the on/off switch to turn it on.
Turn off the remote control before transporting it or storing it with
the projector in a carrying case; this prevents the batteries from
discharging if something presses against one of the buttons.
Keep the following in mind when using the remote control:
■
Stand within about 30 feet of the projector.
■
Point the remote either at the front or back of the projector or at
the screen (the projector’s front sensor can detect signals bounced
off the screen).
■
When presenting in a darkened room, press the light button to
make the other buttons on the remote light up temporarily. (This
is also a good way of testing the batteries.)
■
To access additional buttons, pull open the cover as shown:
50
Using the Remote Control
pull here to
open cover
Page 56

Using the Remote Control as a Wireless Mouse
The remote control works as a wireless mouse to let you access various
projector features and control your presentations; see the next page for
instructions. You can use it as a mouse in the following situations:
■
when using EasyMP.net
The remote control lets you select the image you want to view,
click through your PowerPoint slides, and draw on screen to
highlight your presentation. See “Delivering Your Presentation”
on page 17 for details.
In some cases you may be asked to enter a number as a password;
if you don’t have a keyboard, you can use the numbered buttons
(1 through 5) on the remote control, as shown.
■
when presenting from a computer
If you’re presenting from a laptop instead of using EasyMP.net,
you can use the remote control’s built-in pointer and highlighting
features. These let you mark up your presentation on-screen. See
page 56.
you can
use the
numbered
buttons to
enter a
password
Freeze
A/V Mute
E-Zoom
2
1
Enter
Esc
Power
R/C ON
OFF
3
4
5
You can also use the remote control in place of your computer’s
mouse. This gives you more flexibility when delivering
PowerPoint and other slideshow-style presentations, since you
won’t need to stand next to your computer to change slides. To
use the remote control in this way, you have to connect the mouse
cable between your computer and the projector. See page 34.
■
when accessing the projector’s help and menu functions
The remote control lets you access and use the projector’s help
system; see “Using On-Screen Help” on page 60. It also lets you
navigate the menu system to fine-tune various projector features;
see the Administrator’s Manual for details.
Turn to the next page for details on using the remote control’s mouse
buttons.
Using the Remote Control
51
Page 57

Follow the guidelines in the figure below to use the remote control as
a mouse:
Enter
Esc
Power
to move the mouse
R/C ON
OFF
3
4
5
pointer on screen:
pivot the Enter button
like a joystick
to right-click:
Press Esc
Freeze
A/V Mute
E-Zoom
2
1
If you need to double-click, press down twice on the
click and drag, press down on the
Enter
button and tilt it the
direction you want to go.
to left-click:
press down on the
Enter button
Enter
button. To
52
Using the Remote Control
Page 58

Controlling the Picture and Sound
You can use the remote control to select your image source, adjust the
volume, temporarily turn off the picture and sound, freeze the action,
zoom in on the picture, or display a picture-in-picture video image.
Switching Between Picture Sources
If you’ve connected your projector to more than one computer and/or
video source, you can use the remote control to switch between the
different sources.
■
Press the
video source and an S-video source.
■
Press the
■
Press the
or a component video source.
■
Press
After you select a source, the screen goes dark for a moment before the
image appears.
Video
Comp1
Comp2/YCbCr
Easy-MP
to switch to the EasyMP.net main menu screen.
button to switch between a composite (RCA)
button to select your first computer.
button to select your second computer
select
computer 1
select computer 2 or
component video
Esc
Menu
Help
Comp2/YCbCr
Comp1
Video
Capture
APPs
Auto
Resize
P in P Preset
- Volume +
Adjusting the Volume
If you’ve connected an audio source to the projector, you can adjust
the sound that’s output through the projector’s speakers.
■
To increase the volume, press on the right (+) side of the
button.
■
To reduce the volume, press on the left (–) side of the
button.
Volume
Volume
select
EasyMP
adjust
volume
Using the Remote Control
select
RCA video
or S-video
53
Page 59

Turning Off the Picture and Sound
A
A
note
You can also have an image,
such as a company logo,
display on the screen
whenever you press the
/V Mute button. See the
dministrator’s Manual for
instructions.
stop
action
turn off
picture
zoom in
or out
Freeze
A/V Mute
E-Zoom
2
1
Enter
Esc
Power
R/C ON
OFF
3
4
5
You can use the
A/V Mute
button on the remote control to darken
your screen and turn off the sound. This is useful if you want to
temporarily re-direct your audience’s attention without the distraction
of a bright screen.
■
To turn off the picture and sound, press the
A/V Mute
button.
The screen goes dark.
■
To turn the image back on, press the button again.
Stopping Action
You can use the remote control to freeze the screen image when
projecting from a computer or video device.
■
Press the
Freeze
button to stop the action and keep the current
image on the screen. The sound will continue.
■
Press the
Freeze
button again to re-start it.
Zooming Your Image
You can zoom in on a portion of the image using the
on the remote control.
1. Press the right side of the
E-Zoom
button to zoom in on your
image; you can enlarge it up to four times its original size. You can
press the button repeatedly (up to 32 times), or press and hold the
button to zoom to the size you want.
E-Zoom
button
2. Use the
3. Press the left side of the
Enter
button to pan around the screen if necessary.
E-Zoom
button to zoom out. You can
press the button repeatedly, or press and hold it to zoom all the
way out. You can also press the
Resize
button to return to the
original size.
54
Using the Remote Control
Page 60

Displaying Picture-in-Picture Video
You can open a small video window on your computer image, and
view a video at the same time as your computer presentation.
First make sure you have connected your VCR or other video source
using an RCA cable as described on page 36. You can also use S-video,
but be sure to follow the instructions in the Administrator’s Manual to
connect the cable and select S-video in the
can’t display the picture-in-picture window using component video.)
P in P
1. Press the
button on the remote control. The screen may go
dark for a moment before you see your video image in a small
window on screen.
P in P
menu option. (You
Esc
Menu
Comp2/YCbCr
Comp1
Capture
Auto
Resize
P in P Preset
- Volume +
Help
Video
APPs
2. Use the
E-Zoom
Enter
button to reposition the video window; use the
button to reduce or enlarge it.
3. Once the window is located and sized the way you want, press the
Enter
button; your video plays on the screen.
video window
4. When you’re finished viewing the picture-in-picture, press the
P in P
button again. The video window disappears.
display
picture in
picture
Using the Remote Control
55
Page 61

Highlighting Your Presentation
note
EasyMP.net has its own
highlighting features. To use
them, see page 20.
If you’re presenting from a computer or video source (not
EasyMP.net), you can highlight areas on the screen using the
numbered buttons on the remote control. You can use these “special
effects” features to annotate your presentation or call attention to your
most important points. Five highlighting tools are available, as shown:
E-Zoom
2
1
Enter
Power
R/C ON
OFF
3
4
5
Esc
spotlight
bar
erase
Freeze
A/V Mute
box
pointer
You can customize the highlighting tools (by changing their color and
shape) through the Effect menu. See the Administrator’s Manual for
instructions.
56
Using the Remote Control
Using the Pointer
You can choose from three types of pointers and place them anywhere
on your screen.
1
1. To activate the pointer tool, press button
A colored pointer appears in the upper left corner of the
screen. To try a different look, press
the third one.
Enter
2. Use the
button to place the pointer wherever you want it.
3. To “paste” the pointer on the screen, press down in the center of
Enter
the
button. You can then continue to work with another
pointer, moving it around the screen or pasting it wherever you
want.
on the remote control.
1
again. Press 1 again to see
Page 62

4. To erase the pointers pasted on the screen, press button 5.
Esc
5. To cancel the pointer feature, press
.
Using Box Highlights
You can draw outline boxes on the screen to highlight areas of your
presentation or video.
2
1. To activate the box tool, press button
A colored square appears in the upper left corner of the
screen. This is the box-drawing tool.
on the remote control.
2. Use the
Enter
button to place the square where you want to begin
drawing the box.
Enter
3. Press down in the center of the
button. You see a corner
mark on the screen; this defines one corner of the box.
Enter
4. Use the
button to drag the square to where you want the
opposite corner of the box to be.
Enter
5. Press down in the center of the
button. You see the box
outlined on the screen.
You can continue placing boxes on the screen by repeating steps 2
through 5.
5
6. To erase the box(es), press button
7. To cancel the box drawing feature, press
.
Esc
.
Spotlighting Your Image
With the Spotlight tool, you can highlight part of the screen.
3
1. To activate the spotlight tool, press button
control. A spotlight appears on the image.
on the remote
You can continue pressing button
spotlight sizes.
Enter
2. Use the
button to move the spotlight where you want it.
3. To remove the spotlight, press
3
to switch between three
Esc
.
Using the Remote Control
57
Page 63

Using Horizontal and Vertical Highlights
With the bar tool, you can draw bold horizontal or vertical lines on
the screen to underline or highlight your presentation points. You can
choose from three types of bars.
1. To activate the bar tool, press button
4
on the remote control. A
horizontal bar appears across the screen. If you want a vertical bar,
4
press
again. If you want to try another horizontal bar, press 4
again.
Enter
2. Use the
button to move the bar up and down the screen (or
left and right if you are using the vertical bar).
3. After placing the bar where you want it, press down in the center
Enter
of the
4. To cancel the bar drawing feature, press
button to lock it in position on screen.
Esc
.
Clearing the Screen
When done highlighting your presentation, press button 5. This
erases any highlighting marks you’ve added to the screen.
58
Using the Remote Control
Page 64

5
y
warning
Except as specifically explained
in this User’s Guide, do not
attempt to service this product
ourself.
Solving Problems
This chapter helps you solve problems with the projector, and tells
you how to contact technical support for problems you can’t solve
yourself. This chapter explains the following:
Using the projector’s on-screen help system
■
What to do when the projector’s status lights flash
■
Solving problems with the image or sound
■
Solving problems with the remote control
■
Contacting technical support
■
Solving Problems
59
Page 65

Using On-Screen Help
f
caution
? Help button
Don’t hold the
or more than 5 seconds, or
the projector will enter the
mode for resetting the lamp
timer.
If you see a
get help by pressing the blue
No Signal
message or your audio isn’t working, you can
? Help
button on top of the projector or
under the cover on the remote control. The following choices are
available:
■
Help for the image
Tells you what to do if you see a
■
Help for the sound
No Signal
message
Tells you what to do when your audio isn’t working
■
Language selection
Lets you display the help information and projector menus in any
of nine different languages
Follow these steps to get help:
? Help
1. Press the blue
button. You see the help menu.
2. Use the up or down arrow buttons on the control panel (or
Enter
move the
highlight one of the options. Then press the or
button up or down on the remote control) to
Enter
button to
select it.
Enter
3. Press the or
Esc
if you need to back up.)
button again to view the solutions. (Press
4. Press the down arrow button on the control panel (or press down
Enter
on the
button on the remote control) to display additional
text.
5. To exit the Help system, press the blue
? Help
button.
If none of the suggestions solves your problem, see additional
solutions to problems in the following sections.
60
Solving Problems
Page 66

What To Do When the Lights Flash
The lights on top of the projector indicate the projector’s status and
let you know when a problem occurs.
power light
lamp light
temperature light
If the projector is not working correctly, first turn it off and unplug it.
Then plug the power cord back in and turn on the projector. If this
does not solve the problem, check the status lights on top of the
projector and try the solutions recommended below.
Light Status Description
does not come on Make sure the power cord is connected securely. If you’ve just
replaced the lamp, make sure its cover is fastened securely.
green The projector is operating normally.
flashing green The projector is warming up. Wait for the image to appear.
orange The projector is in sleep mode. You can unplug it to turn it off or press
the Power button to turn it on.
flashing orange The lamp is cooling down. Don’t unplug the projector until the light
stops flashing. If you want to turn the projector back on, wait until the
light stops flashing and press the Power button.
red Power is cut off because of an internal problem. Remove the power
cord and contact EPSON for help; see page 72.
flashing orange The lamp is almost burned out. This is a good time to replace it. See
the Administrator’s Manual for instructions.
flashing red The lamp is burned out. See the Administrator’s Manual for
replacement instructions.
Solving Problems
61
Page 67

Light Status Description
flashing orange The projector is getting too hot. Turn it off and let it cool for five
minutes. Make sure the temperature surrounding the projector does
not exceed 104 °F and there is plenty of space around and under the
projector for ventilation. You should also check the air filter; if
necessary, clean or replace it as described on in the Administrator’s
Manual.
red The projector has overheated and turned itself off. Let it cool for five
minutes, then turn it back on. Make sure there is plenty of space
around and under the projector for ventilation. If necessary, clean or
replace the air filter as described in the Administrator’s Manual. If the
projector continues to overheat, the problem may be caused by
damage to the cooling fan or internal circuits. Contact EPSON for help;
see page 72.
flashing red There is a problem with the cooling fan or temperature sensor. Turn
off the projector and unplug it. Contact EPSON for help; see page 72.
Solving Problems with the Image or Sound
No image appears on the screen.
■
Check that the power light is green, not flashing, and the lens
cover is off.
62
Solving Problems
■
The projector may be in sleep mode. If the power light is orange,
press the
■
If the power was switched off and then on again, the projector
Power
button to turn the projector on.
may still be cooling down. Wait until the power light stops
flashing and remains orange; then press the
■
Make sure the
Brightness
setting on the Video menu is correct.
Power
button again.
See the Administrator’s Manual for more information. Try
selecting the
Reset All
setting to return all setup menus to their
default values.
■
Press the
A/V Mute
button to make sure the picture has not been
turned off temporarily.
■
The attached computer may be in sleep mode or displaying a
black screen saver. Try pressing a key on the computer.
Page 68

You see a blue screen with the message No Signal
displayed.
■
Make sure the cables are connected correctly, as described in
Chapter 2.
■
You may need to switch image sources. Press the
Video
or
Comp2/YCbCr, Easy-MP
button (on the control panel) or the
Video
, or
button (on the remote
control) to select the correct source. Allow a few seconds for the
projector to sync up after pressing the button.
Comp/Easy-MP
Comp1
No Signal
,
■
Make sure the
Computer 1
selector switch on the projector’s
interface panel is flipped to the right for a computer outputting
standard video signals (analog VGA) or to the left for a computer
using DVI (digital video). See page 32.
■
Try restarting your computer.
If you’re using a PC laptop:
■
Hold down the Fn key and press the function key that lets you
display on an external monitor. It’s often labelled with an icon
such as or it may be labelled
CRT/LCD
. Allow a few
seconds for the projector to sync up after pressing it.
On most systems, the key lets you toggle between the LCD
screen and the projector, or to display on both at the same time.
Check your laptop’s manual or online help for details.
■
Depending on your computer’s video card, you might need to use
the Display utility in the Control Panel to make sure that both the
LCD screen and external monitor port are enabled. See your
computer’s documentation or online help for details.
Solving Problems
63
Page 69

If you’re using a PowerBook:
1. From the Apple menu, select
Control Panels
, then click
Monitors and Sound.
2. Click the
drag one monitor
icon on top of
the other
Arrange
icon.
click here
3. Drag one monitor icon on top of the other. This lets you
display on the projector screen as well as the LCD screen.
4. If the Arrange option isn’t available, click the
Monitor
icon.
64
Solving Problems
click here
5. Select one of the listed
Simulscan
moment for the projector to sync up.)
select a
Simulscan
resolution
resolutions. (It may take a
Page 70

The message Not Supported is displayed.
■
If you’ve connected a second computer or you’re using
component video, make sure the
BNC
option in the Setting menu
is correct. See the Administrator’s Manual.
■
Make sure your computer’s resolution doesn’t exceed UXGA
×
(1600
1200), and the frequency is supported by the projector
(see the Administrator’s Manual). If necessary, change your
computer’s resolution setting as described below.
Only part of the computer image is displayed.
■
Press the
■
Make sure the image
Resize
button on the control panel or remote control.
Position
setting is correct on the Video
menu. See the Administrator’s Manual for more information.
■
If you’ve connected a second computer, make sure the
option in the Setting menu is set to
RGB
. See the Administrator’s
BNC
Manual.
■
If you’re using a Macintosh adapter to connect the cable to your
computer’s video-out port, make sure the DIP switches on the
adapter are set correctly. (See your Macintosh documentation for
instructions.)
■
Make sure your computer’s resolution setting is correct. Ideally, it
should be 1024
×
768 to match the projector’s native resolution.
If this option isn’t available, select one of the other compatible
video formats listed in the Administrator’s Manual by doing the
following:
Windows:
■
Right-click the desktop, select
Properties
, click the
tab, and use the dialog box to select a different resolution.
Macintosh:
■
On the Apple menu, choose
Monitors and Sound
Control Panels
, then click
. Select a different resolution.
Settings
■
You also may need to modify existing presentation files if you
created them for a different resolution. See your software
documentation for specific information.
Solving Problems
65
Page 71

The image isn’t square, but trapezoid-shaped.
■
Make sure the projector isn’t placed off to one side of the screen,
at an angle. Place the projector directly in front of the center of
the screen, facing the screen squarely.
■
If you’ve tilted the projector upward by extending the legs, the
image will be broader at the top. Hold down the
Keystone
button on top of the projector until the image is
+
or – side of the
square.
The image contains static or noise.
■
If you’ve connected a device to the Computer 2/Component
Video port, make sure the
correct. See the Administrator’s Manual.
■
If you’re using a computer cable longer than 6 feet, the image
quality may be reduced.
■
Keep your computer and video cables separated from the power
cord as much as possible to prevent interference.
■
The video signal may be split between the computer and the
projector. If you notice a decline in the projected image quality
when the image is displayed simultaneously on your laptop
computer and the projector, turn off the laptop’s LCD display;
see your laptop’s manual for instructions.
BNC
option in the Setting menu is
66
Solving Problems
The image is blurry.
■
There may be dirt or smears on the lens. Clean the lens as
described in the Administrator’s Manual.
■
Adjust the focus using the focus ring.
■
Adjust the
Administrator’s Manual). If you’re projecting from a computer,
you may also need to adjust the
in the next section. If you don’t like the new settings, you can
always select
Sharpness
Reset
to return to the factory default settings.
setting in the Video menu (see the
Tracking
and
Sync
as described
Page 72

You see vertical stripes or the image still looks blurry after
trying the solutions in the previous section.
■
If you’re projecting from a computer and displaying an image that
contains a lot of fine detail (such as the body of a letter), you may
notice one or more vertical stripes or bands, or some of the
characters may look heavy or blurred. Press
control or the
Enter
button on the control panel. This resets
the projector’s tracking and sync settings.
Auto
on the remote
■
If further adjustment is needed, you can fine-tune the
Sync
and
settings manually using the buttons on the control
Tracking
panel (or using the Video menu as described in the Administrator’s
Manual):
1. Fill the screen with an image containing fine detail when
making these adjustments. For example, in Windows you can
Start, Settings
click
Display
; select a pattern to appear as your desktop
Control Panel
, and
, then double-click
background. If this option isn’t available, try projecting black
text on a white background (such as a letter).
2. Press the
Tracking –
and
Tracking +
buttons to eliminate
vertical stripes.
3. Press the
Sync –
and
Sync +
Menu
g
n
i
k
c
a
r
T
buttons to increase the
Esc
n
c
y
.
S
T
r
a
c
k
i
n
g
S
.
y
c
n
sharpness of the image.
Menu
Esc
n
c
y
.
S
T
r
g
n
i
k
c
a
r
T
a
c
k
i
n
g
S
.
y
c
n
Solving Problems
67
Page 73

note
p
y
Because of the different
technologies used, your
rojected image may not
exactly match the colors on
our laptop or computer
monitor.
The colors of the image are not right.
■
The color balance may be incorrect. If you’re displaying a
computer image, use the
Gamma
option in the projector’s Video
menu to adjust the balance of red, green, and blue. If you’re
displaying video, adjust the
Color, Tint
the Video menu. Also try adjusting the
Gamma
, and
Color Setting
settings on
option in
the Advanced menu.
■
Check your computer display settings to correct the color balance.
There is no sound.
■
Try turning up the volume. Hold down the
press the right side of the
the right side of the
■
Make sure the
■
If you’re using a VCR or other video source, make sure the
A/V Mute
Volume
Volume
button (control panel) or press
button (remote control).
button is not enabled.
Shift
button and
volume is not turned all the way down or muted. Also, make sure
the cables are connected correctly, as described in Chapter 2.
■
If your presentation includes computer audio, make sure the
volume control on your computer is not turned all the way down
or muted. Make sure the audio cable is securely connected to both
the projector and your computer’s headphone jack or
audio out jack. See page 35.
■
Make sure the Windows volume controls on your computer are
not turned all the way down or set to Mute. You may be able to
check this by right-clicking the sound icon on your Windows
desktop.
■
The wrong source may be selected. Press the
Video
button on the control panel—or the
Comp2/YCbCr, Easy-MP
, or
Video
button on the remote
Comp/Easy-MP
Comp1
,
control—to select the proper source. Allow a few seconds for the
projector to sync up after pressing the button.
or
68
Solving Problems
Page 74

Solving Problems with the Remote Control
The projector doesn’t respond to remote control commands.
■
Make sure the remote control is turned on.
■
Make sure you are within 30 feet of the projector, have a direct
line-of-sight to the projector’s front or back sensor, and are no
more than 30° to the left or right, or 15° above or below, the
sensor.
■
The remote control batteries may not be installed correctly or may
be low on power. To test the batteries, press the light button.
The other buttons on the remote should light up temporarily. If
they don’t, you need to change the batteries.
■
Dim the room lights and turn off any fluorescent lights. Make
sure the projector is not in direct sunlight. Strong lighting,
especially fluorescent lights, may affect the projector’s infrared
receivers.
■
Turn off any nearby equipment that emits infrared energy, such
as a radiant room heater.
You can’t control your computer’s cursor with the remote
control.
Freeze
A/V Mute
E-Zoom
2
1
Power
R/C ON
OFF
3
4
5
Enter
Esc
on/off
switch
■
Make sure the mouse cable is securely connected to both your
computer’s mouse port (using the main cable) and the projector’s
mouse port. See page 34 for details.
■
Make sure you’ve used the correct cable. The PS/2 mouse cable
and Macintosh mouse cable look similar, but they aren’t identical.
Check the label on the end of the cable.
Solving Problems
69
Page 75

Solving Problems with EasyMP.net
You cannot send your presentation to the projector.
■
Make sure the projector is plugged into a power outlet (the
projector doesn’t have to be turned on, though). It must also be
properly connected to your network, as described in the
Administrator’s Manual.
■
Make sure the memory card is inserted in the projector’s
PCMCIA slot. See page 16.
You’ve copied your presentation to the projector, but it
doesn’t show up in Easy View.
Make sure the presentation file is in one of the compatible formats
listed on page 8.
Projected images don’t fit on the screen.
Fit to screen
Select
in Easy View, as described on page 18.
70
Solving Problems
Your presentation doesn’t look exactly the same as it did on
your computer screen.
Certain PowerPoint special effects are unavailable when using
EasyMP.net, including sound effects. Microsoft Word and Excel files
may not display with the same font you used on your computer. See
Chapter 8 of the Administrator’s Manual for more information.
The remote control’s highlighting tools don’t work when
using EasyMP.net.
The numbered buttons on the remote control can be used to highlight
images only when you’re projecting directly from a computer or video
source. Use EasyMP’s highlighting tools instead; see page 20.
Page 76

When using the EMP Tablet software, you can’t move the
cursor all the way to the edge of the screen.
You may need to move or resize the EMP Tablet window on your
computer’s desktop. You can also drag the toolbar out of the way, if
necessary.
When using EMP Scenario, you can’t drag a PowerPoint file
into the scenario window.
You have to double-click the PowerPoint file in EMP Scenario’s file
window to open the individual slides; then drag each slide from the
thumbnail window into the scenario window.
Solving Problems
71
Page 77

Where To Get Help
EPSON provides technical assistance through electronic support
services and automated telephone services 24 hours a day, as listed in
the following table.
Electronic support and automated telephone services
Service Access
World Wide Web
Technical Support
From the Internet, you can reach EPSON’s product support page at
http://support.epson.com. After selecting your product, you can view
frequently asked questions and answers, download product documentation,
and receive technical advice through e-mail.
Automated Telephone
Services
Presenters Online Access tips, templates, and training for developing successful presentations at
A variety of automated help services are available 24 hours a day, seven days a
week. To use these services, you must have a touch tone telephone and call
(800) 922-8911.
http://www.presentersonline.com
Telephone Support Services
To use the EPSON PrivateLine Support service, call (800) 637-7661
and enter the PIN on the EPSON PrivateLine Support card included
in your Owner’s Kit. This is the fastest way of speaking to a live
representative, and it’s free. This service is available 6
Pacific Time, Monday through Friday, for the duration of your
warranty period.
You may also speak with a projector support specialist by dialing one
of these numbers:
■
U.S.: (562) 276-4394, 6AM to 6PM, Pacific Time, Monday
through Friday
■
Canada: (905) 709-3839, 6AM to 6PM, Pacific Time, Monday
through Friday
to 6PM,
AM
72
Solving Problems
Toll or long distance charges may apply.
Page 78

Before you call, please have the following information ready:
■
Product name (EPSON PowerLite 8150i)
■
Product serial number (located on the bottom of the projector)
■
Video source (computer, DVD player, etc.) and how it’s
connected
■
Description of the problem
You can purchase screens, carrying cases, and other accessories
from EPSON by calling (800) 873-7766; in Canada, please call
(800) 873-7766 for dealer referral. To purchase accessories online
or view EPSON’s complete product catalog, visit the EPSON Store
at www.epsonstore.com (U.S. sales only). To see our full line of
multimedia projectors, go to www.epson.com/mul_proj.
caution
See the Administrator’s
Manual for a list of optional
®
and included accessories.
Solving Problems
73
Page 79

74
Solving Problems
Page 80

Index
A
A/V Mute, 54
Accessories, 73
Adapter, Macintosh desktop, 32
Adobe Acrobat Reader, 4
Anti-theft device, 30
Aspect ratio, 44
Audio
adjusting volume, 44, 53
connecting cables, 35, 36
problems, 60, 68
turning off (using A/V Mute), 54
B
Bar tool, 58
Box tool, 57
C
Computer, connecting to, 31 to 35
EMP Scenario software, 8 to 10
EMP Tablet software, 21 to 22
Enter button, 52
EPSON
accessories, 73
PrivateLine Support, 72
technical support, 72 to 73
Esc button, 52
Excel, Microsoft, 8, 19
E-Zoom button, 54
F
Focusing, 41
Foot release levers, 43
Freeze button, 54
H
Height of image, adjusting, 42 to 43
Help, 5, 72 to 73
Help button, 60
Highlighting tools, 20 to 25, 56 to 58
D
Drawing on the screen, 20 to 25, 56 to 58
Drawing tablet, 3, 20
E
EasyMP.net
capturing an image, 25
drawing on screen, 20 to 25
Easy File, 13 to 15
Easy View, 17 to 19
introduction, 2
problems, 70
sharing captured images, 25 to 28
starting presentation, 17 to 19
supported file formats, 8
transferring presentation to projector,
11 to 16
EMP File Utility, 11 to 13
I
iBook, connecting to, 31
Image
adjusting, 41 to 44
correcting shape, 43, 66
focusing, 41
height, adjusting, 42 to 43
positioning, 42 to 43
problems, 62 to 68
raising, 42 to 43
resizing, 44
selecting source, 39 to 40, 53
turning off (using A/V Mute), 54
zooming, 41, 54
K
Kensington anti-theft device, 30
Keystone correction, 43, 66
Index
75
Page 81

L
Lamp status light, 61
Language setting, 60
Laptop computer, displaying on, 63
Lens shift knob, 42
Lights, status, 61 to 62
M
Macintosh
connecting to, 32 to 33
displaying on a PowerBook, 64
Manuals, 4
Meeting minutes, 25 to 28
Memory card, 16
Mouse, connecting to projector, 20
N
Network, wireless connection, 3
P
P in P (picture in picture) button, 55
Password
entering using remote control, 51
for meeting minutes, 27
Picture, see Image
Pointer tool, 56
Positioning
image, 42 to 43
projector, 30
Power
button, 39
status light, 61
PowerPoint, 8, 19
Presenters Online, 72
PrivateLine Support, 72
Projector
feet, adjusting height with, 43
troubleshooting, 60 to 68
turning off, 47
turning on, 38 to 39
turning on automatically, 45 to 46
R
Raising image, 42 to 43
Remote control
as wireless mouse, 51 to 52
problems, 69
using, 50 to 52
Resizing image, 44
S
Scenarios, creating, 8 to 10
Sleep mode, 47
Software, see EMP software
Sound
adjusting volume, 53
problems, 60, 68
turning off (using A/V Mute), 54
Source, selecting, 39 to 40, 53
Special effects buttons, 56 to 58
Spotlight tool, 57
Status lights, 61 to 62
Stopping action, 54
Supported file formats, 8
Switching picture source, 39 to 40, 53
T
Tablet, 20
Technical support, 72 to 73
Temperature status light, 61 to 62
Troubleshooting
EasyMP.net problems, 70
image problems, 62 to 68
remote control problems, 69
sound problems, 68
status lights, 61 to 62
using on-screen help, 60
Turning off picture (using A/V Mute), 54
Turning off projector, 47
Turning on projector
automatically, 45 to 46
manually, 38 to 39
76
Index
Page 82

V
Video
button, 53
selecting source, 39 to 40, 53
Video device, connecting to, 36
Volume, adjusting, 44, 53
W
Warning lights, 61 to 62
Wireless Ethernet card, 3
Word, Microsoft, 8, 19
Z
Zooming image, 41, 54
Index
77
Page 83

EPSON®PowerLite®8150i
Multimedia Projector
CPD-11971
 Loading...