

Page 1
Printer Specifications
Printing
Printmg
method:
Printing speed:
Ouality
Draft
NLQ
Y-pin impact dot matrix
Characters/inch
10
12
10
12
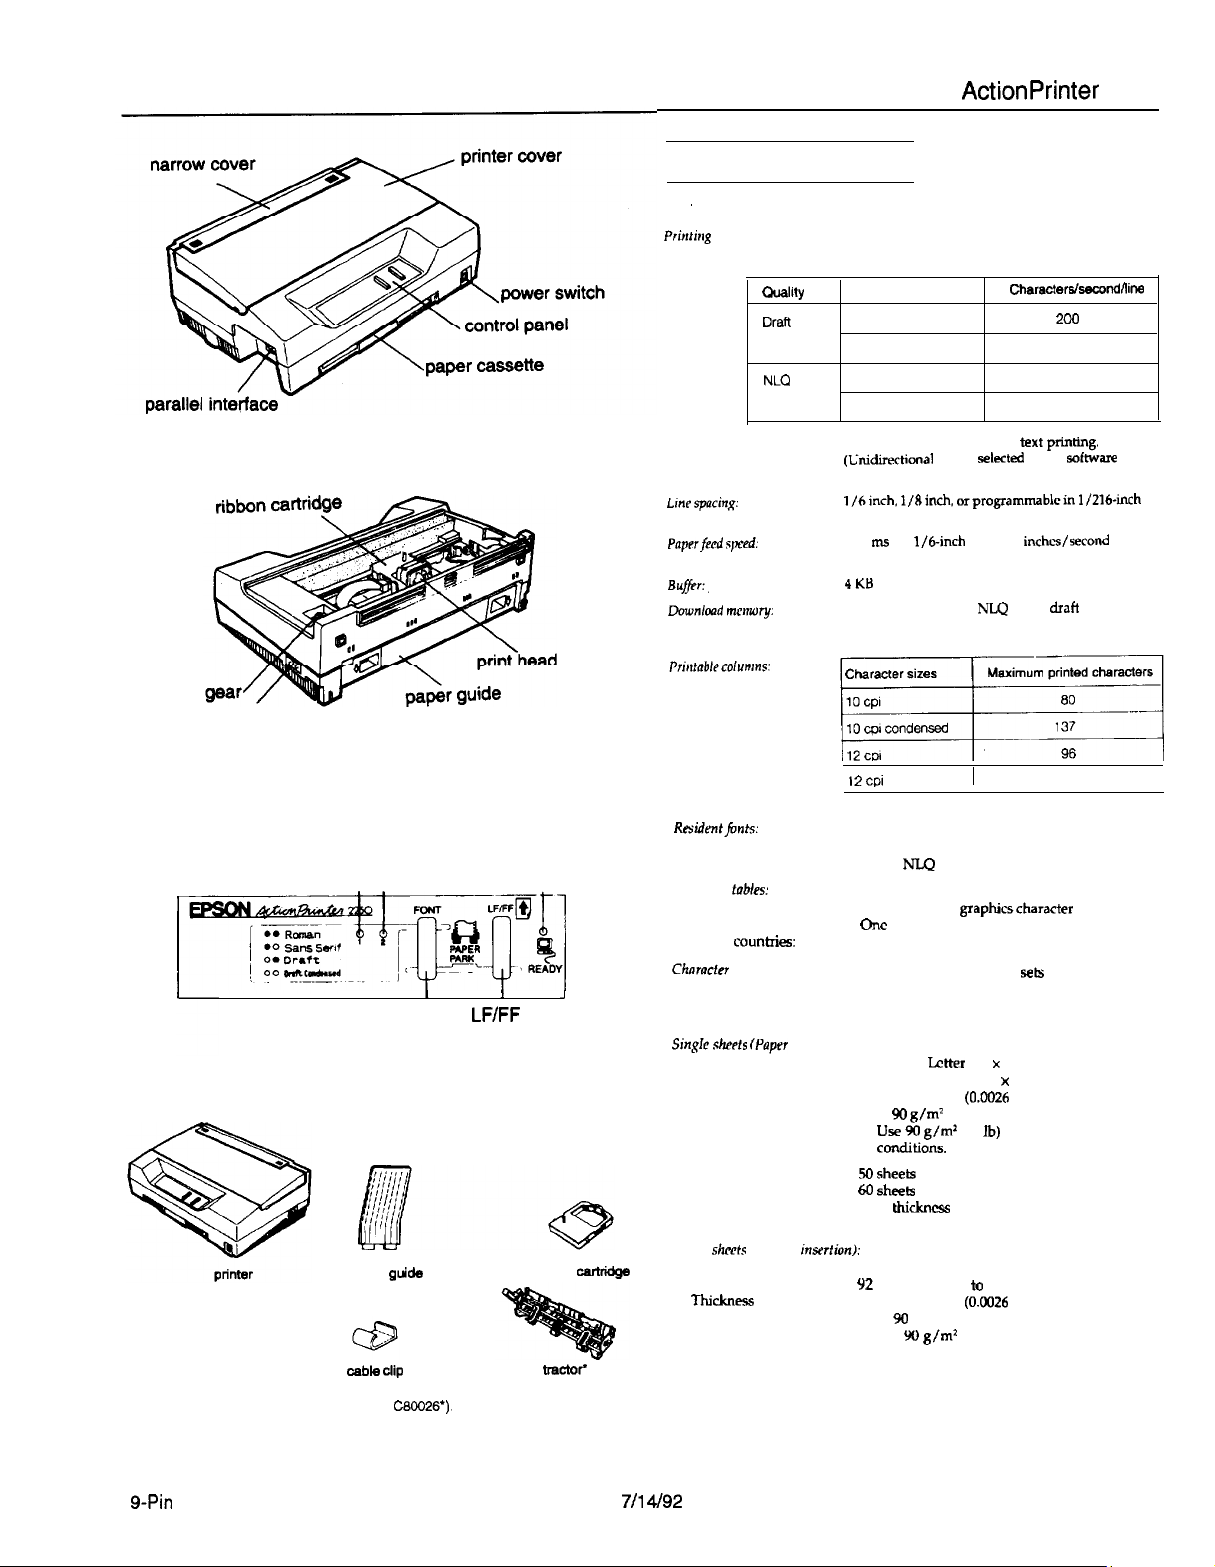
ActionPrinter 2250
Characters/sewndiline
200
240
40
48
AC inlet
FONT lights
I
l-l
Light 1 Light 2
Font button
Control panel
output
guide
cable clip
READY light
LF/FF
button
ribbon
push
bactof
Printing direction:
he Fciq:
PapPrfePd
spd:
BuJ/pr:,
Lkwnlmd merwry:
Residmtjmh:
Character
tables:
North/South America:
Europe:
Other
countxies:
Chnractn sets:
J
Bidirectional logic-seeking for text
(Lxdirectional can be
command.) Unidirectional for graphics.
l/hinch. l/dinch.
increments
86.5 ms per
continuous feed
4KB
Memory capacity for 6
characters
12 cpi
I
l/6-inch
condensed
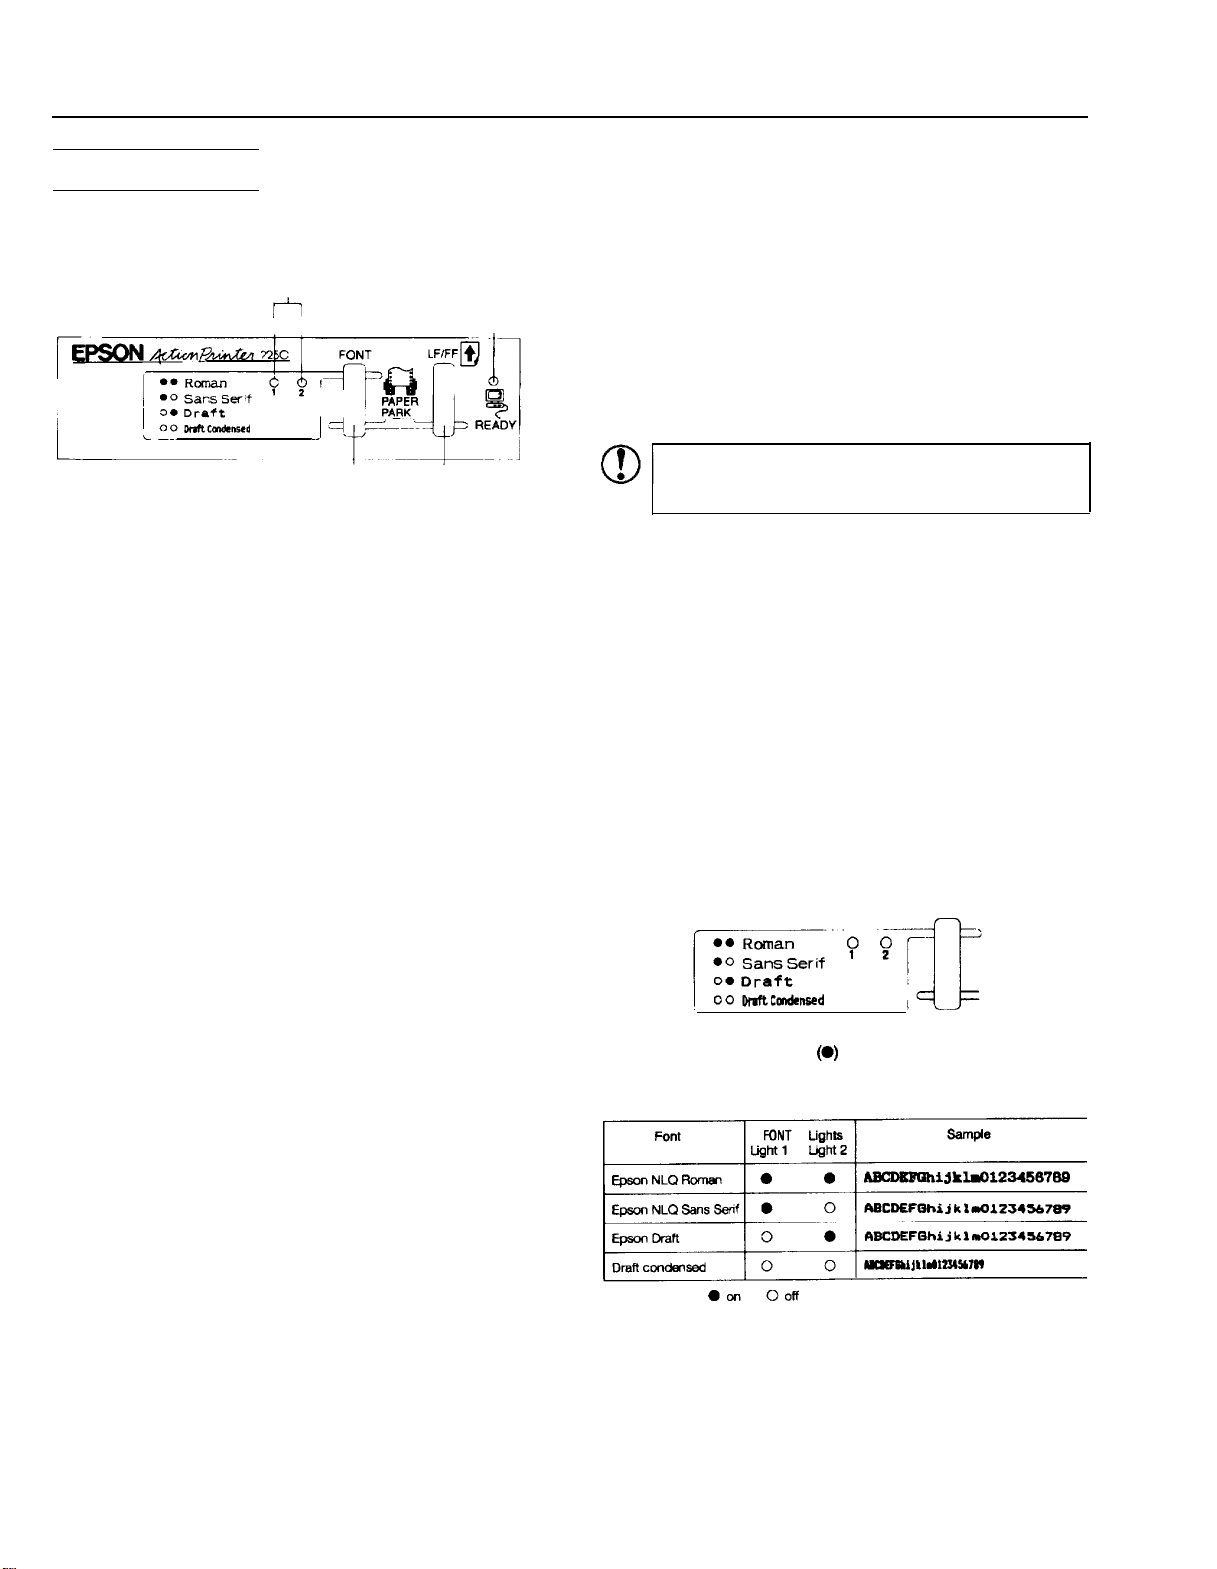
Epson Draft
Epson NLQ Roman
Epson
NLQ
One italic and 7 graphicscharacter tables
One
italic and 15 graphics character tables
One italic and 5 graphics character tables
13 international character sek
seleckd
orprogrammablein l/216-inch
line; 2.88
NLQ
I
Sans Serif
ptitig.
with a
sofhvare
inches/second
and 6 draft user-dcfincd
with
160
I
Paper
singrr
slwts
mper
cassette):
paper supply
US model: Lcttrr (8.5 x 11 inches)
Other models: A4 (210 x 297 mm)
0.065 to 0.14 mm (OS026 to 0.0055 inches)
64 to 90
g/m2
l
Use 90 g/m’
COditiOIlS.
50 sheets
60
sheek for 64 g/m* (17 lb)
Total
5 mm (0.2 inches).
148 to 257 mm (5.8 to 10.1 inches)
92
to 364 mm (3.6 to 14.3 inches)
0.065 to 0.14 mm (0.0026 to 0.0055 inches)
53 to %I g/m’ (14 to 24 lb)
l
Use W
conditions.
(17 to 24 lb)
(24
lb)
paper under normal
for 82 g/m’ (22 lb)
khickncss
of paper stack should be less than
g/m*
(24 lb) paper under normal
cart-
Size
Thickness
Weight
Input
Single shccb (Manual insrrtion):
Width
Length
Thickne?is
Weight
*The push tractor is an option (part number
g-Pin
Printers
CBOQ26’).
7/l 4192
AP-2250-1
Page 2
ActionPrinter 2250
Continuous paper:
Width
Copies
Thickness
Weight
Note: You can use recycled Paper under normal conditions. If you notice
increases in ribbon consumption and paper jamming, use a higher grade of
paper.
Labels:
Size
Thickness
Weight
Envelopes:
Size No. 6
No. 10
Thickness
Weight
Printable area:
Single sheets (paper cassette and manual insertion) and envelopes
101 to 254 mm (4 to
Three sheets (one original plus two copies)
0.065 to 0.25 mm (0.0026
53 to 82
g/m2 (14 to 22 lb) for one sheet
40 to 58 g/m2 (12 to 15 lb) per sheet in multi-part
forms
l Use only two or three-part carbonless multi-part
forms and use them with the push tractor.
101 to 254 mm (4 to 10 inches) width for backing
sheet
63.5 x 23.8 mm (2.50 x 0.94 inches) minimum for a
label
0.07 to 0.09 mm (0.0028 to 0.0035 inches) for backing
sheet
0.16 to 0.19 mm (0.0063 to 0.0075 inches) total
68 g/m2 (18 lb)
l
Use only continuous type labels and use them
only with the push tractor.
l Use labels only under normal temperature and
humidity conditions.
166 x 92 mm (6.5 x 3.6 inches)
240 x 104 mm (9.5 x 4.1 inches)
0.16 to 0.48 mm (0.0063 to 0.0197 inches)
45 to 75 g/m2 (12 to 20 lb)
l
Use envelopes only under normal temperature
and humidity conditions.
l Load envelopes manually, with the longer side
inserted into the rear slot.
printable
10 inches)
to
area
0.0098
inches) total
A
The minimum top and bottom margins above and below the perforation are
A
9 mm (0.35 inches).
B
The minimum left margin is 13 mm (0.51 inches).
The minimum right margin is 13.8
The maximum printable width is 203 mm (8 inches).
mm
(0.54 inches).
Mechanical
Paper-feed methods:
Ribbon:
MTBF:
Print head life:
Dimensions
and
weight:
Friction (paper cassette and manual insertion)
Push tractor
Black ribbon cartridge S015047
Life expectancy: 3 million characters at
14 dots/character
4000 power-on hours
200 million strokes/wire
Height 130 mm (5.1 inches)
Width
Depth
Weight 4.5 kg (10 lb) without push tractor
375 mm (14.8 inches)
252 mm (9.9 inches) without push tractor
307 mm (12.1 inches) with push tractor
4.9 kg (10.9 lb) with push tractor
Electrical
120 v model:
Rated voltage:
Input voltage range:
Rated frequency range:
Input frequency range:
Rated current
Power consumption:
Dielectric strength:
AC 120 V
AC 103.5 to 132 V
50 to 60 Hz
49.5 to 60.5 Hz
1.1 A
Approx. 30 W (during self-test printing in draft mode
at 10 cpi)
AC 1 kV rms, 1 minute or AC 1.2 kV rms, 1 second
(between AC line and chassis)
-
t
A The minimum top margin is 8.5 mm (0.33 inches).
B
The minimum left margin is 3 mm (0.12 inches).
The minimum right margin is:
3.8 mm (0.15 inches) for the A4-size paper cassette
9.7 mm (0.38 inches) for the letter-size paper cassette
3 mm (0.12 inches) for manual insertion
However. the maximum printable width is 203 mm (8 inches).
C The minimum bottom margin is 13.5 mm (0.53 inches).
AP-2250-2
Environmental
C
Temperature: Operation:
Storage:
Humidity (without condensation):
Operation:
Storage:
5 to 35°C (41 to 95°F)
-20 to 55°C (-4 to 131°F)
30 to 80% RH
5 to 85% RH
Safety approvals
Safety standards:
RFl: US model:
7114/92
US model:
UL1950 with D3, CSA22.2 No.220
FCC part 15
subpart
B class B
9-Pin Printers
Page 3
ActionPrinter 2250
-
Interface specifications
Your printer is equipped with an 8-bit parallel interface.
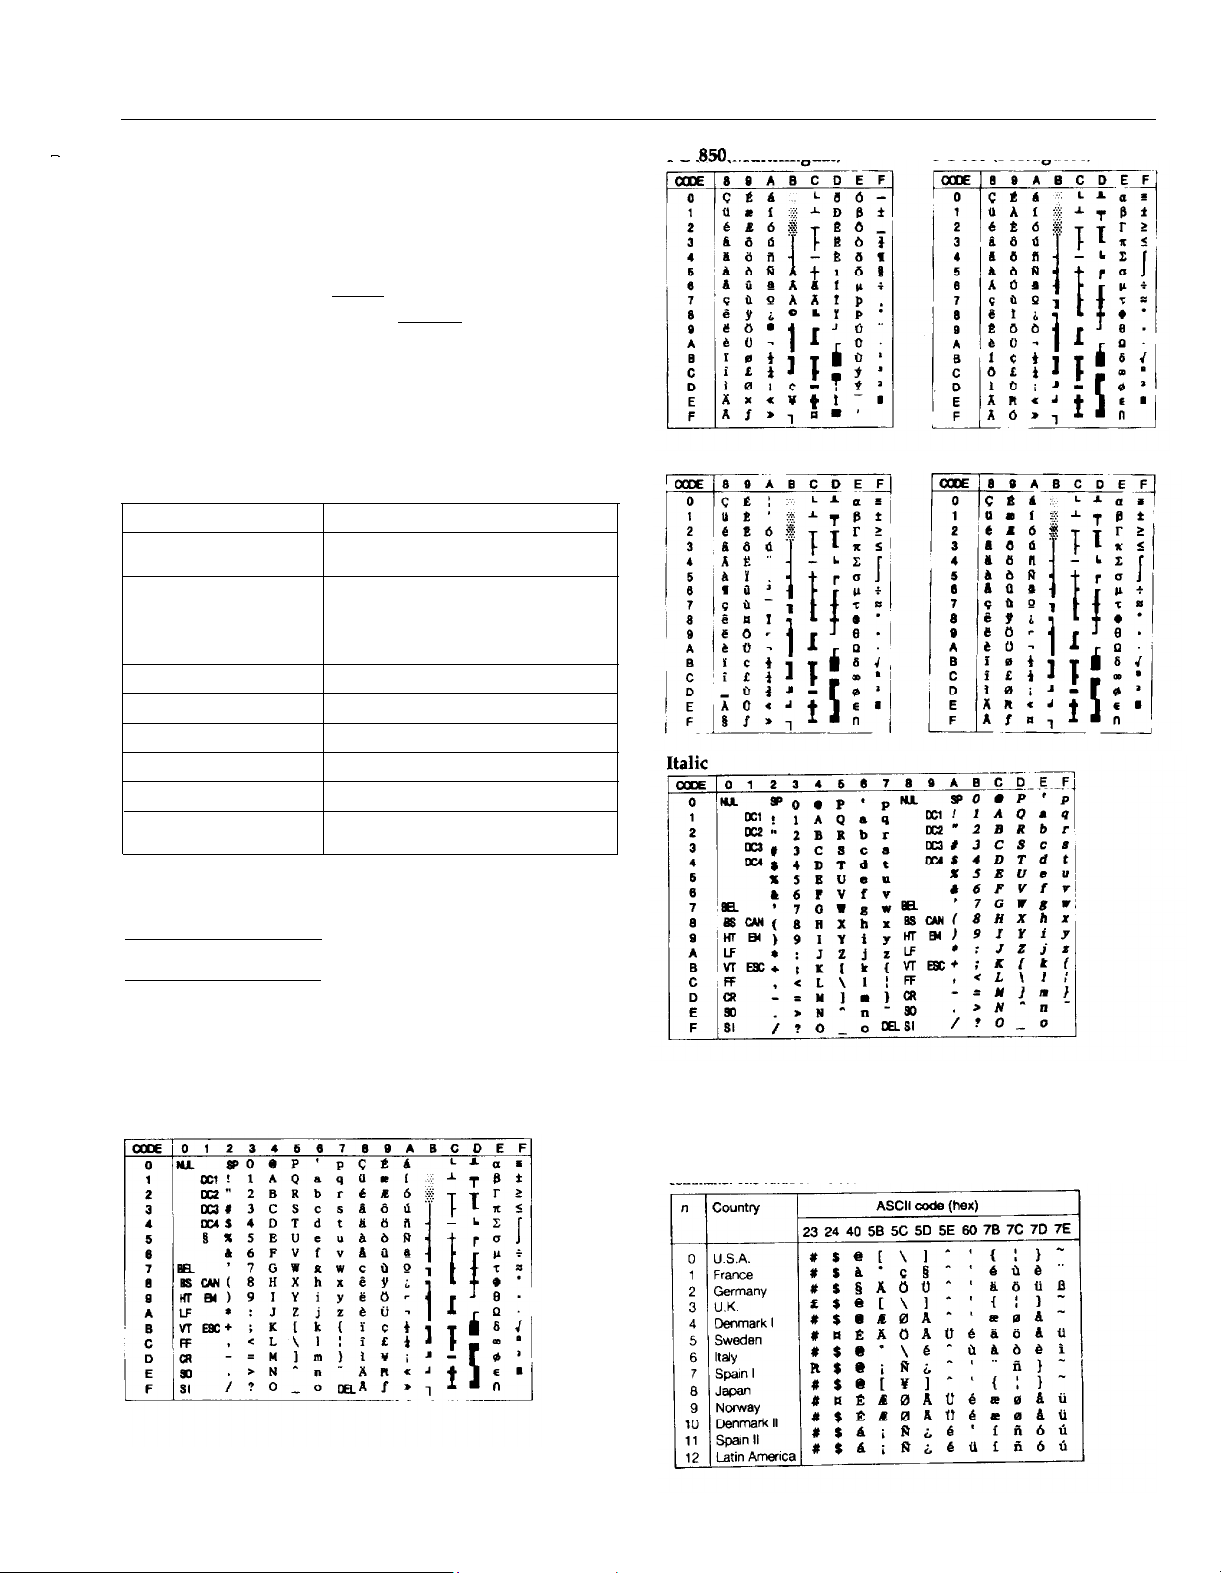
PC 850 (Multilingual)
PC 860 (Portuguese)
Specifications and pin assignments
The built-in parallel interface has the following characteristics:
Data format:
Synchronization:
Handshake timing:
Signal level:
Connector:
8-bit parallel
STROBE pulse
BUSY and ACKNLG signals
TTL compatible
36-pin 57-30360 Amphenol connector or
equivalent
Default settings
The table below shows the default settings that take effect when the printer is
initialized.
Item
Top-of-form position
Page Length
Left and right margins
Line spacing
Horizontal tab positions
Font selection Last font selected on control panel
Special printing effects
Download character set
Current paper position or setting in the defaultsetting mode.
Single sheets: 65 lines for A4-size paper,
61 lines for letter-size paper, 22 inches for
manual insertion
Continuous paper: Subject to control panel
setting in the default-setting mode
Canceled
1/6-inch
Every eight characters
Canceled [except condensed printing)
Hardware initialization: cleared
Software initialization deselected only
Default setting
line
spacing
PC 863 (Canadian-French) PC 865 (Nordic)
In
addition, hardware initialization clears the data buffer.
Character Tables
You can select these character tables with the default-setting mode or by using a
software command.
All tables except the italic character
codes 00 through 7F, so only the PC 437 and italic tables are shown completely. The
rest of the tables show only the characters for hex codes 80 through FF.
PC 437 (USA, standard Europe)
table are the same as the PC 437
table for hex
The
default-setting mode and the ESC R software command. For example, when you
select “Italic-France” in the default-setting mode, the characters of the “France”
column on the table below are used in the italic character table.
The fit eight character sets can be selected with both the default setting mode and
the ESC R comman
command. The value of n is used for the ESC R command.
table
below shows the international character sets you can select with the
d.
The last five sets are available only by using the ESC R
9-Pin Printers
7/14/92
AP-2250-3
Page 4
ActionPrinter 2250
The Control Panel
You can control basic printer operations - line feeding, form
feeding, paper loading and ejecting, and font selection - with the
buttons on the control panel. The indicator lights show the printer
status.
FONT lights
Y-l
Light 1 Light 2
READY
light
LF/FF
button
Press the LF/FF button during normal operation to feed paper line by
line. Hold down the LF/FF button to load a single sheet of paper or to
advance continuous paper to the next top-of-form. You can also
press the LF/FF button to eject a page.
When you are in the default-setting mode, use this button to change
the default settings.
PAPER PARK
If you are using continuous paper, you can press the
buttons at the same time to move the paper back to the paper-park
position.
LF/FF
and
FONT
FONT button
Lights
The panel lights provide information on certain printer conditions
and settings.
READY light
The READY light is on when the printer is ready to receive data from
the computer. It flashes briefly each time you turn on the printer.
The READY light also flashes under the following conditions:
. The printer is out of paper.
l The printer is in the tear-off mode (when the push tractor is
installed.)
When an error occurs, the READY light goes off.
FONT
lights
The FONT lights indicate the current font setting. These lights change
when you press the FONT button. Look at the font menu on the
control panel to see which font is selected.
The FONT lights (Light 1 and Light 2) also indicate your selection in
the default-setting mode.
LF/FF button
Buttons
The two buttons on the control panel perform different functions
depending on the printer mode.
FONT
button
Press the FONT button during normal operation to cycle through the
font choices on the font menu. The two
selections.
FONT
lights indicate current
!
0.
CAUTION:
off their backing sheet and damage the printer. Use the
LF/FF
Never feed labels backward; they may peel
button to feed them forward.
Other control-panel features
The control panel also gives you access to two special features:
Self Test
Data dump
The self test lets you check whether your printer is
operating properly.
The data dump allows advanced users to pinpoint
communications problems between the printer and
computer. Hold down the
while turning on the printer to enter data dump
mode. The printer prints the exact codes (in
hexadecimal format) reaching it from the
computer.
LFlFF
and
FONT
buttons
Selecting character fonts
To choose one of the fonts available with your printer, press the
FONT button.
FONT
The two
FONT
current selection. The table below lists the fonts and shows how the
FONT lights
lights come on
appear for each selection.
(a)
and go off (0) to indicate the
Hold down the FONT button while you turn on the printer to enter
the default-setting mode. When you are in the default-setting mode,
use this button to make your selection.
AP-2250-4
7/14/92
O-Pin Printers
Page 5

ActionPrinter 2250
Running the Self Test
You can run the self test with either continuous paper or single
sheets; this section describes the easier way, with single sheets.
1.
Make sure the printer is turned off.
2.
While holding down the LF/FF
The printer gives two long and two short beeps, and then it
loads the paper automatically and begins the
The printer prints characters in the current font and character
table. Here is part of a typical self test:
!“$$a&‘()*+,-
!“#$%dr-O*+,-./0123456789:;<=>7@ABCDEFCHIJKUl
“tr$%&-()*+,-./0123456789:;<=>78ABCDRFGHIJKI,HN
lt$x&- ( j*+.-
$X&-O*+,-./01234567B9:;<=>?8ABCDIWGHIJKI,HNOP
X&‘( j*+,&-O*+,-./0123456789:;<=>?@ABCDEFQHIJKLHNOPQR
Note: If the paper cassette is empty when you turn
the printer beeps three times and the READY Load
paper as described above and press the
self test.
3.
To stop the self test, turn off printer.
./0123456789:;<=>?8ABCDEPGHIJKL
./0123456789:;<=>7@ABCDEFGHIJKLMNO
./0123456789:;<=>?@ABCDEFCHIJKLMNOPQ
(m)
button, turn on the printer.
self
test.
- ....~_
the power on,
LF/FF
button to start the
Application Software
Most software programs let you specify the type of printer you use
so that the program can take full advantage of the printer’s features,
Many programs provide a printer selection menu.
Because the family of Epson printers shares a great many
commands, you can use a software program even if does not list
your printer on its printer selection menu. Choose from the
following list (the printers are listed in the order of preference).
ActionPrinter 2250
LX-810/850
LX-800
LX-86
LX-80
FX-850
FX-86e/800
EX-800
FX-85
FX-80+
FX-80
If none of these printers is listed, select the first one of these
available: LX, FX, EX, RX, MX, Epson printer, Standard printer,
Draft printer.
To use all of the features of the printer, however, it is best to choose
a program with the ActionPrinter 2250 or one of the LX printers on
its menu. If your program does not list one of these printers, contact
the software manufacturer to see if an update is available.
Paper Handling
Printing on single sheets
You can load standard-sized single sheets with the paper cassette
and you can load single sheets of paper from 148 mm (5.8 inches) to
257 mm (10.1 inches) wide with the manual insertion slot.
CAUTION:
!
0
Tips for using the paper cassette
The tips below will help you get the best performance when using
the cassette.
. Load paper in the cassette before you turn on the printer and
l If the printer runs out of paper during a print job, reload the
l
l You can adjust the top-of-form position with the gear under the
. Never move the small levers on the ends of the metal
shaft (shown below). They have already been adjusted
at the factory.
Never
move this lever.
l Disregard the numbers 0 and 1 under the printer cover
on the left side. They are not necessary for printer
operation.
L
send data. When the printer receives data from the computer, it
loads a single sheet automatically and begins to print.
paper cassette and press the
Press the
printer cover. It is marked by + and - signs. Open the printer
cover and turn the gear to adjust the position. The notches on the
ribbon mask indicate the base line of printed characters. The gear
adjustment affects only the loaded page. If you want to change
the top-of-form position permanently, you can adjust it in the
default-setting mode. However, most software programs take
care of the top and bottom margins. You usually don’t need to set
the top-of-form position on the printer.
print head
LF/FF
button to eject a sheet of loaded paper.
.+--# T
I{-
LF/FF
button to load the paper.
ribbon mask
-base line of characters
9-Pin Printers
7/l 4/92
AP-2250-5
Page 6

ActionPrinter 2250
l When you want to push the paper support back into the paper Using continuous paper with the push tractor
cassette, first remove paper from the cassette. Then hold down
the locking tab while pushing the paper support in.
l The default page length for the paper cassette is 65 lines (A4-size
paper) or 61 lines (letter-size paper). You can change it using
your software or printer commands, if necessary.
l You can switch to manual insertion or to the push tractor
without removing the paper cassette.
Loading paper manually
You can load single sheets of paper from the rear manual insertion
slot. (if you’ve installed the push tractor, remove it before loading
paper manually.)
1.
Place the printer in the upright position and turn it on.
2.
Next, lower the flap on the rear slot. Then insert a single sheet
into the slot, aligning the paper edge with the arrow mark on the
printer case. The page loads automatically. When the printer
receives data, it begins printing.
You can use the push tractor to print on continuous paper from
101 mm (4 inches) to 254 mm (10 inches) wide.
Note: The tractor is an option (part number C80026*).
Installing the push tractor
1.
Make sure the printer is turned off and is in the flat position.
Remove the paper guide.
2.
Make sure the paper-release lever on the left side of the push
tractor is lowered to the single-sheet position.
3.
Hold the tractor as shown and fit the edges of both sides into the
slots at the back of the printer. Then lift it straight up until
hear the unit snap into place.
YOU
tk sure to raise the flap when not using manual insertion.
CAUTION: Be sure to turn on the printer before you insert
the page into the slot. If you
insert paper, the printer prints on the platen without
a
~~
. You can adjust the top-of-form position in the same way that
you do for paper loaded from the cassette.
l
When you want to switch to the paper cassette, press the
button without inserting a page into the rear slot. The printer
loads a page from the cassette.
AP-2250-6
bun
on the printer after you
LF/FF
7/l 4/92
4.
Raise the paper-release lever and push it firmly into the
continuous-paper position.
9-Pin Printers
Page 7

Tips for using continuous paper
.
You can adjust the top-of-form position temporarily. Open the
printer cover and turn the gear marked by + and - signs to
adjust the position, This adjustment is lost when you turn off the
printer or feed the paper backward to the paper-park position.
paper-park position
l If you want to change the top-of-form position permanently,
adjust it with the default-setting mode.
l Each time you turn on the printer with paper loaded, it reverses
the continuous paper to the paper-park position and then
advances it to the next top-of-form. Always remove your printed
sheets before you turn off the printer to keep the top-of-form
position accurate.
Note: When you set the back-feed setting to Disable in the
default-setting mode, the printer does not feed the paper
backward even if you press the
)
turn on the printer with paper loaded.
LF/FF
and
FONT
buttons or you
Removing the push tractor
1.
Tear off any printed pages. Press the LF/FF and FONT buttons at
the same time to feed the remaining paper backward to the
paper-park position. Remove the paper from the push tractor.
CAUTION: Always tear off the printed document and
!
0
2.
excess paper before feeding paper backward. Never feed
more than one page backward through the printer.
Turn off the printer and lower the paper-release lever to the
single-sheet position. Then pull the push tractor straight down
and out of the printer.
ActionPrinter 2250
3.
Replace the paper guide.
Using the tear-off feature
When you use continuous paper, the tear-off feature makes it easier
to tear off the last printed sheet and save the paper normally lost
between documents.
Note:
l You can tell the printer to feed the perforation of your paper to
either the edge of the printer cover or approximately 80 mm
(three inches) beyond, by setting the tear-off option,
l When you set the back-feed setting to Disable in the default-
setting mode, the tear-off feature does not work.
Here’s how the tear-off feature works:
1.
When the printer finishes printing the last page and the print
head moves to the top-of-form position on the next page, the
printer automatically advances the paper to the tear-off position.
2.
The READY light ( m) blinks to indicate the printer is in tear-off
mode.
3.
You can then easily tear off the page along the perforation.
4.
When the printer receives data, it feeds the paper backward to
the top-of-form position and the printer begins printing.
Switching between continuous paper and single sheets
When you use the push tractor, you can easily switch to single-sheet
printing without removing the continuous paper supply.
-_
9
I
9-Pin Printers
Switching to single sheets
Here’s how to switch from continuous paper to single sheets:
1.
If you have a printed document still in the printer, tear off the
printed pages and then press the
same time to reverse the remaining paper back to the paper-park
position.
Always tear off printed pages before feeding paper
backward; feeding too many sheets backward can
Never feed labels backward. They can easily peel off of
7/14/92
LF/FF
and FONT buttons at the
AP-2250-7
Page 8

ActionPrinter 2250
2.
Lower the paper-release lever to the single-sheet position.
CAUTION: If you lower the paper-release lever while
!
0
continuous paper is still loaded, the printer beeps five
times and the READY light goes off. If this happens, raise
the paper-release lever and press the
buttons at the same time to reverse the paper to the paperpark position. You can then lower the lever again.
3.
The printer is ready to print. When it receives data, it
automatically loads a single sheet from the paper cassette and
begins to print.
LF/FF
and
FONT
Switching to continuous paper
To switch from single sheets back to continuous paper, follow these
steps:
1.
If a single sheet is in the paper path, hold the LF/FF button down
to eject it.
2.
Raise the paper-release lever and push it firmly into the
continuous-paper position.
CAUTION: If you raise the paper-release lever when a
!
0
single sheet is in the paper path, the printer beeps and the
READY light goes off. If this happens, lower the paper-
release lever and hold LF/FF down to eject the page
completely. Then raise the lever again.
3.
The printer is ready. When the printer receives data, it
automatically Loads continuous paper from the push tractor and
begins to print.
Printing on special paper
In addition to printing on single sheets and continuous paper, your
printer can print on a wide variety of other paper types, such as
envelopes
, labels, and multi-part forms. You need not adjust the
f
printer
or the paper thickness when you use these paper types.
r
CAUTION:
!
0
l Never move the small levers on the ends of the metal
shaft (shown below). They have already been adjusted
at the factory.
Never move this lever.
Envelopes
You can use the manual insertion slot to print on individual
envelopes.
l Always load envelopes manually through the rear slot.
l Before loading an envelope, lower the flap on the printer’s rear
slot.
l Always feed envelopes by inserting the wide edge into the
printer first, as shown.
. Use envelopes under normal operating conditions only.
. Printing on the edge of an envelope can damage the print head.
Make sure your software program keeps the printing entirely
within the printable area of the envelope.
Multi-part forms
You can use carbonless continuous multi-part forms of up to three
parts (one original plus two copies).
l Load multi-part forms with the push tractor only. You load
multi-part continuous paper the same way as ordinary
continuous paper.
l Use only multi-part forms joined with spot-gluing that is free of
wrinkles and waves. Never print on multi-part forms joined
with metal staples, tape, or continuous gluing.
l If you need to adjust the top-of-form position, use your software
or change the default top-of-form position. You may have to
experiment to get the setting you want.
Labels
This printer can print on labels, but you must use the push tractor.
CAUTION: When you use labels, always be sure that
!
0
To make sure that the labels do not peel off and jam the printer,
change the back-feed setting in the default-setting mode to Disable.
When the back-feed setting is Disable, the printer never feeds paper
backward.
they are not fed backward because backward feeding can
make them peel off their backing and jam the printer.
J
l Disregard the numbers 0 and 1 under the printer cover
AP-2250-8
on the left side. They are not necessary for printer
The back-feed setting of Disable produces the following results:
l The printer does not feed paper to the paper-park position even
if you press the LF/FF and FONT buttons.
v
The tear-off feature is disabled.
7/14/92
9-Pin Printers
Page 9

ActionPrinter 2250
l The printer does not feed paper back to the paper-park position
and then advance it to the top-of-form position between jobs
even if paper is loaded when you turn on the printer.
In addition to changing the back-feed setting, also follow the
instructions below when you print on labels:
l Always use labels designed for use with a tractor. Do not try to
print on single-sheet labels.
l Because labels are especially sensitive to extremes of
temperature and humidity, use them under normal operating
conditions only.
l Make sure that your printing stays entirely within the printable
area of the labels because printing on the edge of a label or on
the backing sheet can damage the printer.
Note: When you
want to remove labels from the printer, always
tear off the fresh supply of labels at the rear of the printer as
shown below and then press the LF/FF button to advance the
remaining labels out of the printer. This is necessary to prevent
the labels from being fed backward.
----
Note:
Most software programs control the printer features listed
here. If you can use your software program to control the printer,
you may never need to use the default-setting mode. In fact, you
may find that your program settings override your printer’s
default settings. See your software documentation for more
information.
Changing the default settings
If you do need to change any default settings, you can do as
described below. You press the control panel buttons, and the
control panel lights show your selections.
Light 1 Light 2
.
j
FONT button LF/FF button
Follow the steps below to make your changes.
Note: You can repeat steps 6 through 8 if you want to make more
than one change. Also, you can turn off the printer and start over
if you are not sure about a setting.
Make sure the printer is turned off and paper is loaded in the
paper cassette. If you installed the push tractor, always use
continuous paper for the default-setting mode.
2.
Slide the narrow cover off of the printer cover as shown. This
makes it easier to read the printed messages.
READY light
Using the default-setting mode
Your printer has internal settings that control such functions as top
of-form position and page length. These settings are called default
settings because they take effect each time you turn on the printer.
For most users, the factory settings are best, but you can change
these settings if necessary. The table below lists all the features you
can change in the default-setting mode; the next section tells you
how to change them; and the section after that describes each feature
in detail.
3.
To enter the default-setting mode, hold down the FONT button
while you turn on the printer.
The printer loads a sheet of paper automatically and prints the
first instruction and a table that shows you which languages you
can choose. You can print the default-setting mode messages in
English, French, German, Italian, or Spanish.
4.
To choose English, press the FONT button until light 1 is off and
light 2 is on; then press the LF/FF button.
To choose another language, use the table below and press the
FONT button until the lights indicate your selection; then press
the
LF/FF
button.
9-Pin Printers 7/14/92
AP-2250-9
Page 10

ActionPrinter 2250
Table A: Language selection
Language
English
French
German
Italian
Spanish
.-
Light 1
OFF ON
OFF
ON
ON
ON
Light 2
BLINK
OFF
ON
BUNK
-
Once you press the LF/FF button, the printer prints the current
default settings and the next instruction in the selected language
After printing is finished, go to the next step.
5.
If you want more help text to be printed, press the FONT button.
After printing is finished, go to the next step.
If you don’t want the help text, press the LF/FF button. You can
then go to the next step immediately.
Note: When you first use the default-setting mode, it’s a good
idea to press the FONT button to print the help text before
changing default settings. The printed text guides you through
the operation. Once you are familiar with the operation, press the
;
LF/FF button to skip printing.
6.
Use Table B to choose the feature you want to change. Then
2_
..-.
press the FONT button as many times as necessary until lights 1
and 2 match your selection.
Table C: Character
Table D: Page length
table
Table B: Default settings
7.
Press the LF/FF button to change the setting. The READY light
turns on or off to show your selection, as indicated in Table B,
and your new setting is saved automatically and remains in
effect until you change it.
If you are changing the character table, page length, or TOF
position, go to step 8 next. Otherwise, go to step 9.
8.
If you are changing the character table, page length, or TOF
position, you must make additional settings as shown in the
tables below. Press the LF/FF button until light 1, light 2, and the
READY light indicate your selection. Then press the FONT button
to set the feature.
Once you press the FONT button, the printer advances to the next
item in table B and your setting is saved automatically. The new
setting remains in effect until you change it.
AP-2250-10
7/14/92
Q-Pin Printers
Page 11

9.
Turn off the printer to exit the default-setting mode. Any
changes you have made remain in effect until you change them
again.
10. After you exit the default-setting mode, slide the narrow cover
back on the printer.
Default settings
This section describes all the features in the default-setting mode.
Character spacing
When you select 10 cpi, the printer prints 10 characters per inch
(cpi). When you select 12 cpi, it prints 12 characters per inch.
Shape of zero
The printer prints the zero character with a slash
setting is on, or no slash (0) when the setting is off. The slashed zero
allows you to easily distinguish between an uppercase “O” and a
zero when printing such items as program lists.
(8)
when the
Skip-over-perforation
When you turn on this feature, the printer skips over the
perforations of continuous paper, providing a l-inch margin
between the last line printed on one page and the first line printed
on the next. Because most software programs set their own top and
bottom margins, you should use this feature only if your program
does not provide them. This feature does not affect single-sheet
paper.
Tear-off position
When you use continuous paper with the push tractor, this feature
advances the paper perforation to the tear-off position where you
can easily tear off the printed page. When the printer receives data,
it automatically reverses the paper to the top-of-form position and
starts printing, so you can use all of the next sheet.
ActionPrinter 2250
Back
feed
When you set this feature to Disable, the printer never feeds
paper backward.
The printer does not feed paper to the paper-park position even
if you press the
The tear-off feature is disabled.
The printer does not feed paper back to the paper-park position
and then advance it to the top-of-form position between jobs
even if paper is loaded when you turn on the printer.
Set this feature to Disable when you use labels, or when you do not
want to tear off continuous paper after each print job.
Character table
Character tables contain the characters and symbols used in
different languages. Your printer includes a wide variety of
character tables. You can choose from these options:
Italic character table:
l U.S.A.
l
U.K.
l
Italy
Graphic character table:
l
PC 437 (USA, standard Europe)l PC 850 (Multilingual)
l
PC 860 (Portuguese)
l
PC 865 (Nordic)
l
Abicomp
(Brazilian Portuguese)
Page length
This option is available only when you use continuous paper
with the push tractor. You can set the page length to 8.5, 11,
12, or 70/6 (A4) inches.
TOF (top-of-form) position
Whenever you press the LF/FF button or send the form feed
command, the printer loads paper to the top-of-form (TOF) position.
The TOF position is factory set to the ±0 position (8.5 mm - 0.33
inch - from the top edge of paper). You can set this position from
-
3 to +3 in l-mm (0.04-inch) increments.
LF/FF
l
France
l
Denmark 1
l
Spain 1
and
FONT
buttons.
l
Germany
l
Sweden
l
PC 863 (Candian French)
. BRASCII
(Brazilian Portuguese)
You can choose from two tear-off positions with the feature. If you
select On cutter, the printer feeds the paper perforation to the edge of
the printer cover. If you select Above cutter, the printer feeds the
perforation about 80 mm (3 inches) beyond the printer cover’s edge.
Auto line feed
When the auto line feed feature is on, each carriage return (CR) code
is accompanied by a line feed (LF) code. If your printed text is
unexpectedly double-spaced, set this feature to off. If text lines print
on top of each other, set it to on.
9-Pin Printers
7/14/92
AP-2250-11
Page 12

ActionPrinter 2250
Installation/Support Tips
AP-2250 Beep Codes
2 Long & 2 Short
1 Short
3 Short
5 Long
*
Paper out occurs in any of the following conditions:
1.
Paper is not loaded after loading is attempted.
2.
The printer has completed printing after loading single sheet
paper by manual insertion.
3.
The end of continuous paper.
**
Operation error occurs in any of the following conditions:
1.
The release lever is set to TRACTOR position when single
sheet paper has not been ejected or elected completely.
2.
The release lever is set to FRICTION position when
continuous paper has not been elected or elected completely.
*** Fatal error occurs in any of the following conditions:
1. Power supply voltage error.
Indicates the printer has completed its
power-on initialization process and is ready
to print.
The Escape code for “BEL” has been received.
Paper out error.*
Operating error indication **
or a printer fatal error indication.***
Information Reference List
Engineering Change Notices
None
Product Support Bulletins
None
Technical Support Bulletins
None
Related Documentation
TM-AP2250
PL-AP2250
4001243
ActionPrinter 2250 Service Manual
ActionPrinter 2250 Parts/Price List
ActionPrinter 2250 User’s Guide
AP-2250-12
7/14/92
9-Pin Printers
 Loading...