

Page 1

®
COLOR
®
COLOR INK JET PRINTER
All rights reserved. No part of this publication may be reproduced, stored in a retrieval
system, or transmitted in any form or by any means, electronic, mechanical, photocopying,
recording, or otherwise, without the prior written permission of Seiko Epson Corporation.
No patent liability is assumed with respect to the use of the information contained herein.
Neither is any liability assumed for damages resulting from the use of the information
contained herein.
Neither Seiko Epson Corporation nor its affiliates shall be liable to the purchaser of this
product or third parties for damages, losses, costs, or expenses incurred by purchaser or
third parties as a result of: accident, misuse, or abuse of this product or unauthorized
modifications, repairs, or alterations to this product, or (excluding the U.S.) failure to
strictly comply with Seiko Epson Corporation’s operating and maintenance instructions.
Seiko Epson Corporation shall not be liable against any damages or problems arising from
the use of any options or any consumable products other than those designated as
Original EPSON Products or EPSON Approved Products by Seiko Epson Corporation.
EPSON Connection is a service mark of Epson America, Inc.
EPSON and EPSON Stylus are registered trademarks of Seiko Epson Corporatio n .
General Notice: Other product names used herein are for identification purposes only and may be
trademarks of their respective owners. EPSON disclaims any and all rights in those marks.
Copyright © 1994 by Epson America, In c.
Printed on recycled paper
Page 2

FCC Compliance Statement
For United States Users
This equipment has been test ed and found to comply with the limits for a Class B digital
device, pursuant to Part 15 of the FCC Rules. These limits are designed to provide
reasonable protection against harmful interference in a residential installation. This
equipment generates, uses, and can radiate radio frequency energy and, if not installed
and used in accordance with the instructions, may cause harmful interference to radio or
television reception. However, there is no guarantee that interference will not occur in a
particular installation. If this equipment does cause interference to radio and television
reception, which can be determined by turning the equipment off and on, the user is
encouraged to try to correct t he interference by one or more of the following measures.
❑ Reorient or relocate the receiving antenna.
❑ Increase the separation between the equipment and receiver.
❑ Connect the equipment into an outlet on a circuit different from that to which the
receiver is connected.
❑ Consult the dealer or an experienced radio/TV technician for help.
WARNING
The connection of a non-shielded equipment interface cable to this equipment will
invalidate the FCC Certification of this device and may cause interference level s which
exceed the limits established by the FCC for this equipment. It is the responsibility of the
user to obtain and use a shielded equipment interface cable with this device. If this
equipment has more than one interface connector, do not leave cables connected to unused
interfaces. Changes or modi fications not expressly approved by the manufacturer co uld
void the user’s authority to operate the equipment.
For Canadian Users
This digital apparatus does not exceed the Class B limits for radio noise emissions from
digital apparatus as set out in the radio interference regulations of the Canadian
Department of Communications.
Le présent appareil numériqu e n’ém et pa s de bruits radioélec triqu e s dépassant les limites
applicables aux appareils numériques de Classe B prescrites dans le règlement sur le
brouillage radioélectrique édicté par le Ministère des Communications du Canada.
Apple Warranty Disclaimer
Apple Computer, Inc. (“Apple”) makes no warranties, express or implied, including
without limitation the implied warranties of merchantability and fitness for a particular
purpose, regarding the Apple software. Apple does not warrant, guarantee or make any
representations regarding the us e or th e results of the use of the Apple software in terms
of its correctness, accuracy, reliability, currentness or otherwise. The entire risk as to the
results and performance of the Apple software is assumed by you. The exclusion of implied
warranties is not permitted by some states. The above exclusion may not apply to you.
In no event will Apple, its directors, offi cers, employees or agents be liable to you for any
consequential, incidental or indirect damages (including damages for loss of business
profits, business interruption, loss of business information, and the like) arising out of the
use or inability to use the Apple soft ware even i f Apple has been advised of the possibil ity
of such damages. Because some st at es do not allow the e xc lusion or limitation of liability
for consequential or incidental damages, the above limitations may not apply to you.
Apple’s liability to you for actual damages from any cause whatsoever, and regardless of
the form of the action (whether in contract, tort (including negligence), product liability or
otherwise), will be limited to $50.
ii
Page 3

Contents
Introduction
About this Manual . . . . . . . . . . . . . . . . . . . . . . . . . 0-1
Getting the Most Out of Your Printer . . . . . . . . . . . . . . . 0-2
Resolution . . . . . . . . . . . . . . . . . . . . . . . . . . . . 0-2
Paper . . . . . . . . . . . . . . . . . . . . . . . . . . . . . . . 0-2
MicroWeave . . . . . . . . . . . . . . . . . . . . . . . . . . . 0-3
High-Speed Mode . . . . . . . . . . . . . . . . . . . . . . . . 0-4
Deciding what printer settings to use . . . . . . . . . . . . . 0-4
Where to Get Help for U.S. and Canadian Users . . . . . . . . 0-5
Chapter 1
System Requirements . . . . . . . . . . . . . . . . . . . . . . . . 1-2
Installation . . . . . . . . . . . . . . . . . . . . . . . . . . . . . . 1-2
Unpacking the printer . . . . . . . . . . . . . . . . . . . . . 1-3
Attaching the input tray and output tray supports . . . . . 1-4
Plugging in and turning on the printer . . . . . . . . . . . 1-5
Installing the ink cartridges . . . . . . . . . . . . . . . . . . 1-5
Loading plain paper . . . . . . . . . . . . . . . . . . . . . . 1-10
Testing the printer . . . . . . . . . . . . . . . . . . . . . . . 1-12
Connecting the printer to your Macintosh . . . . . . . . . 1-12
Installing the Macintosh driver . . . . . . . . . . . . . . . . 1-13
Choosing the Stylus COLOR printer . . . . . . . . . . . . . 1-16
Calibrating the printer . . . . . . . . . . . . . . . . . . . . . 1-17
Setting Up the Printer
iii
Page 4

Chapter 2
Changing Printer Settings . . . . . . . . . . . . . . . . . . . . . . 2-2
Using the Printer Driver . . . . . . . . . . . . . . . . . . . . . . . 2-3
Controlling the color and halftone settings . . . . . . . . . . 2-4
Controlling print quality . . . . . . . . . . . . . . . . . . . . . 2-5
Controlling visual effects . . . . . . . . . . . . . . . . . . . . 2-7
Selecting paper sizes . . . . . . . . . . . . . . . . . . . . . . . 2-7
Using the Control Panel . . . . . . . . . . . . . . . . . . . . . . . 2-9
Lights . . . . . . . . . . . . . . . . . . . . . . . . . . . . . . . . 2-10
Buttons . . . . . . . . . . . . . . . . . . . . . . . . . . . . . . . 2-11
Using the EPSON Monitor Utility to Manage Print Jobs . . . . . 2-12
Controlling the Printer
Chapter 3
Choosing Paper . . . . . . . . . . . . . . . . . . . . . . . . . . . . 3-2
Loading Special Coated Paper and Transparencies . . . . . . . 3-3
Loading Envelopes and Heavy Paper . . . . . . . . . . . . . . . 3-4
Chapter 4
Cleaning the Print Heads . . . . . . . . . . . . . . . . . . . . . . 4-2
Replacing an Ink Cartridge . . . . . . . . . . . . . . . . . . . . . 4-3
Transporting the Printer . . . . . . . . . . . . . . . . . . . . . . . 4-6
Troubleshooting . . . . . . . . . . . . . . . . . . . . . . . . . . . 4-7
Print quality problems . . . . . . . . . . . . . . . . . . . . . . 4-8
Problems with printing . . . . . . . . . . . . . . . . . . . . . 4-10
Paper handling problems . . . . . . . . . . . . . . . . . . . . 4-12
Paper Handling
Maintenance and Troubleshooting
Appendix A
When to Use the Optional LocalTalk Interface . . . . . . . . . . A-2
Installing the Optional LocalTalk Interface Board . . . . . . . . A-2
Assigning a Name to the Printer . . . . . . . . . . . . . . . . . . A-4
Turning on the Printer’s Network Mode . . . . . . . . . . . . . A-4
Using the LocalTalk Interface
iv
Page 5

Appendix B
Printing . . . . . . . . . . . . . . . . . . . . . . . . . . . . . . . . B-2
Paper . . . . . . . . . . . . . . . . . . . . . . . . . . . . . . . . . . B-3
Ink Cartridges . . . . . . . . . . . . . . . . . . . . . . . . . . . . B-6
Mechanical . . . . . . . . . . . . . . . . . . . . . . . . . . . . . . B-7
Electrical . . . . . . . . . . . . . . . . . . . . . . . . . . . . . . . . B-7
Environmental . . . . . . . . . . . . . . . . . . . . . . . . . . . . B-8
Safety Approvals . . . . . . . . . . . . . . . . . . . . . . . . . . . B-8
Technical Specifications
Index
v
Page 6
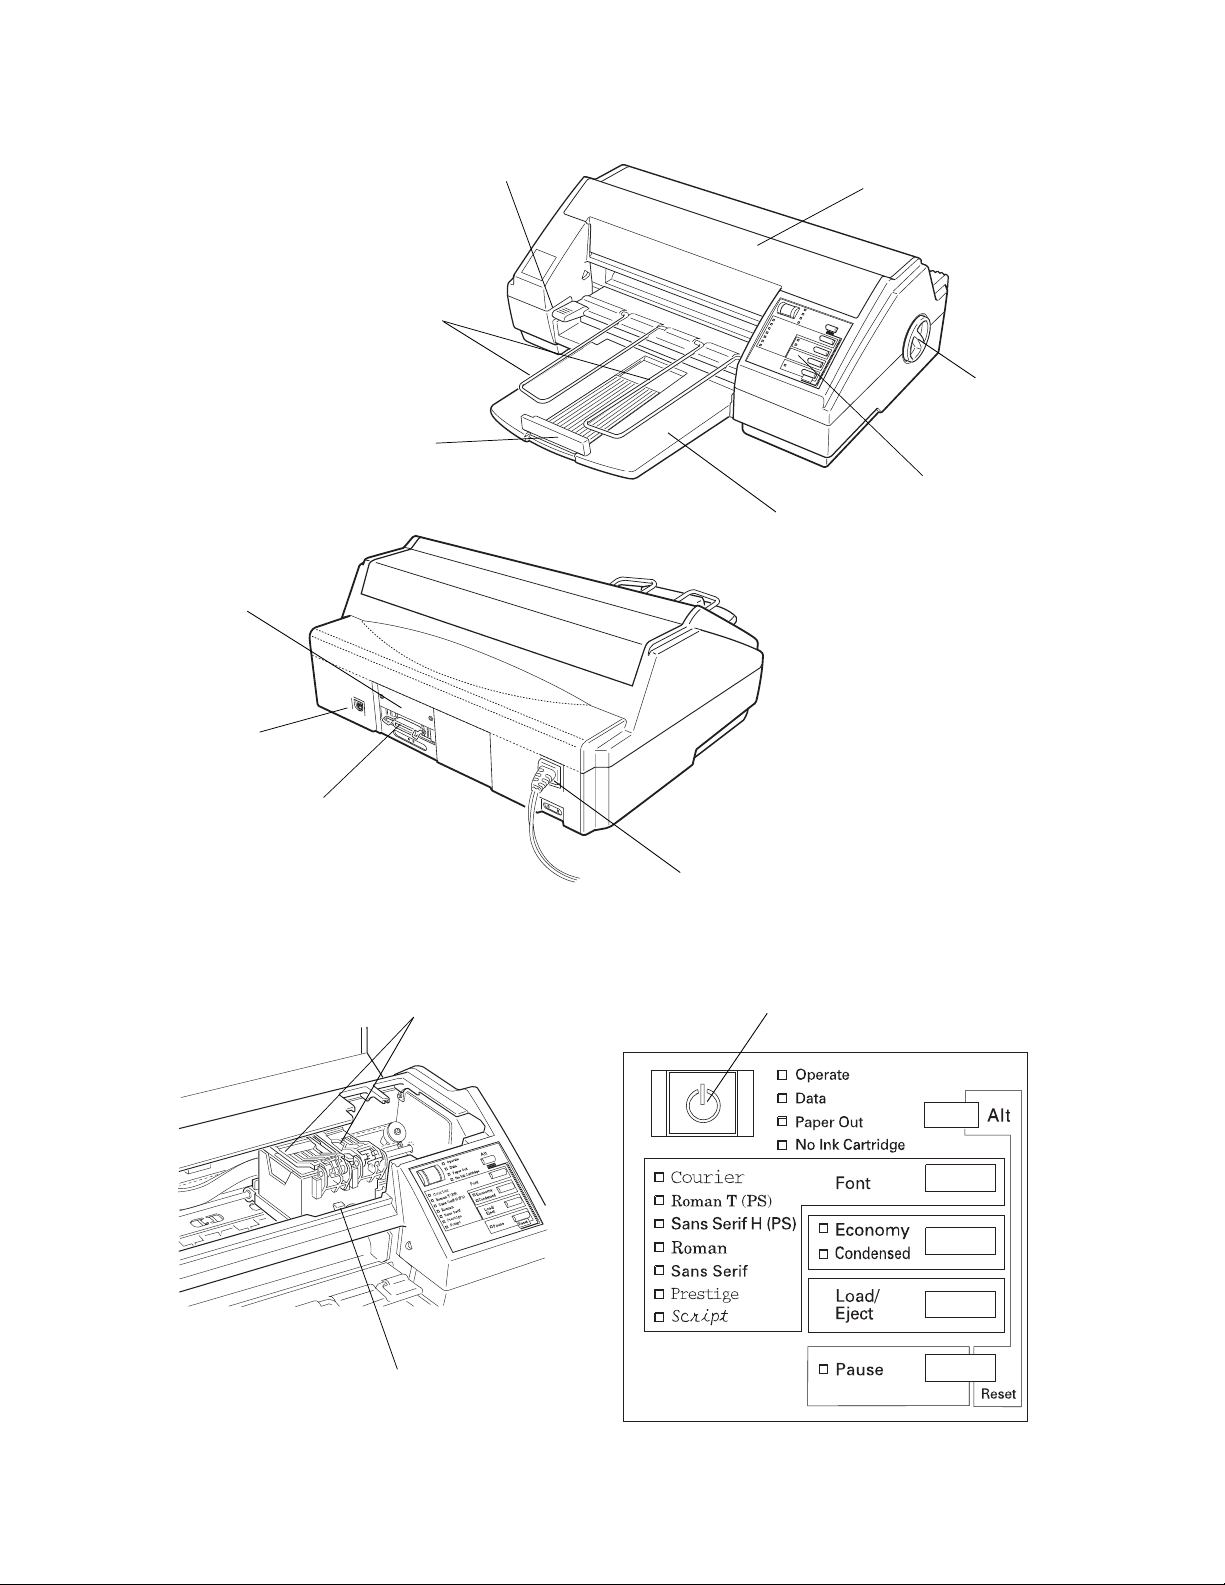
Printer Parts
output tray
interface
card cover
rear
edge
guide
output
tray lever
printer cover
knob
control panel
input tray
serial
interface
parallel
interface
ink cartridge
clamps
(AC inlet)
Control Panel
Operate button
paper
thickness lever
Page 7

Changing Printer Settings
The printer settings allow you to control your print job. With
them you can specify the number of copies, a page range, and
the paper size. You can also specify high-quality by turning on
MicroWeave or fast printing by turning on High Speed.
All printer settings have default settings that are sufficient for
most print jobs. For this reason, you do not need to change
printer settings often. The only times you need to change
printer settings are to do the following:
Print multiple copies or specify a specific page range (such as
pages 2 through 6). By default, the printer prints one copy of all
pages.
Change the resolution from 360 dpi to 720dpi or 180 dpi.
Turn on MicroWeave and turn off High Speed for the highest
possible quality. MicroWeave is turned on automatically when
you select 720 dpi.
Use coated or transparency paper. The default is normal copier
paper. When using coated paper or transparencies, change the
paper type.
Use a paper size other than letter (8.5 x 11 inches). By default
the printer is set up to print letter size paper. For all other
paper sizes, you need to change the paper size setting or define
a new one.
Additional printer settings are described later in this chapter.
Almost always, you use the printer driver to change the
resolution and color settings. However, other printer settings
are also available through the printer’s control panel. You use
the control panel to do the following:
Page 8

Turn the printer on and off
Turn on economy mode
Clean the black and col or pr int heads
Pause the printer temporarily.
For more information about the control panel, see "Using the
Control Panel" later in this chapter.
Page 9

Introduction
The EPSON® Stylus® COLOR is a high-quality, high-resolution
ink jet printer that can print up to 16 million colors at a
resolution of 720 dpi to produce full-color, near-photographic
images. It also produces realistic grayscale images and sharp
text and line art.
The printer is quiet and easy to install and use. You simply set
it up and connect it to your Apple
Chapter 1.
Both a serial and a parallel interface are provided. You can use
both interfaces to simultaneously connect the printer to a
Macintosh and a PC. The printer automatically switches
between interfaces as print data is received.
®
Macintosh® as described in
An optional EPSON Talk kit, which contains a LocalTalk
interface board, is available for connecting the printer to an
AppleTalk
®
network so it can be shared by multiple Macintosh
computers. If you install the LocalTalk board, you can use all
three interfaces—serial, parallel, and LocalTalk—
simultaneously. See Appendix A for more information about
the LocalTalk interface.
About this Manual
This manual provides all the information you need for using
your Stylus COLOR with a Macintosh. If you have a PC, see the
PC user’s guide, which is also provided with the printer.
For information about using color effectively, choosing paper,
®
and other tips that will help you get the results you want, see
the Color Printing Tips booklet. Although this booklet was
®
written for the Microsoft
Windows driver, it provides many
helpful tips on using color that you may find useful.
Introduction
1
Page 10

Getting the Most Out of Your Printer
Color printing takes time. How much time depends on the type
of image and the final output quality you require. Simple
graphics such as bar graphs pri nt quic kly. Complex graphics
such as grayscale or full-color images take longer, especially
when you want the highest possible quality. For this reason,
the printer driver settings allow you to exactly specify the level
of print quality and the print speed.
Resolution
The printer offers three resolutions: 720, 360, and 180 dpi. Each
resolution has its advantages.
Printing at 720 dpi provides the highest possible quality. Use
this resolution when you require near-photographic result s.
Special coated paper is required for 720-dpi printing.
For good quality images in less time, use 360-dpi resolution.
This setting is the default and is sufficient for most print jobs.
When speed is more important than quality, use 180-dpi
resolution. This resolution provides sufficient quality for draft
documents and is faster than the other resolutions.
Paper
One of the keys to getting great results with your Stylus
COLOR is selecting the right paper. Paper absorbency is
especially important. With paper that is too absorbent, the ink
can bleed slightly, causing characters and the edges of images
2
to blur. However, with paper that is not absorbent enough, the
ink may take too long to dry and smear easily.
Introduction
Page 11

Although you can achieve satisfactory results with most plain
paper, coated papers give you better results because they
reduce the amount of ink that is absorbed. You will not achieve
720 dpi unless you use special coated paper for 720 dpi.
EPSON provides special coated papers that are formulated
specifically for the inks used in this printer. These papers are
part of the complete EPSON printing system, in which the
printer inks, papers, and software driver all work together to
deliver the world’s finest color ink jet output. For this reason,
you will get the best results when you use special EPSON
papers. See Chapter 3 for more information about choosing
paper.
If you use paper from other manufacturers, you should test a
few sheets before buying large quantities. Also, check the finish
and thickness before purchasing paper. Avoid paper that has a
rough finish or that is too thick or thin.
MicroWeave
The printer’s MicroWeave feature is a special printing mode
you can use to enhance your printed output. When
MicroWeave is on, the printer selectively applies ink in an
intricate pattern to eliminate the banding that can sometimes
occur in normal mode.
Since the MicroWeave mode slows the print speed, turn it off
for fast printing.
Introduction
3
Page 12

High-Speed Mode
When High-Speed Mode is on, the printer prints in
bidirectional mode: it prints a line from right to left and the
next line from left to right. If High-Speed Mode is not on, all
lines are printed in the same direction.
Printing is faster when High-Speed Mode is on. However, the
vertical alignment may not be as precise. For this reason, turn
off High-Speed Mode when you need to increase print quality.
Deciding what printer settings to use
To get the highest-quality printing, use 720-dpi resolution and
make sure MicroWeave is on and High-Speed Mode is off. Be
sure to use EPSON Special coated paper for 720 dpi. If you use
any other paper type, the ink may spread and so reduce the
print quality.
For fast printing, use 360- or 180-dpi resolution (180 dpi is
faster than 360 dpi), turn on High-Speed Mode, and turn off
MicroWeave.
4
Introduction
Page 13

Where to Get Help for U.S. and Canadian Users
Epson America provides local customer support and service
through a nationwide network of authorized EPSON dealers
and Service Centers.
EPSON also provides the support services listed below through
EPSON Connection.
Canadian users can call (800) GO-EPSON.
❑ Assistance in locating your nearest Authorized EPSON
Reseller or Service Center
❑ Technical assistance with the installation, configuration,
and operation of EPSON products
❑ EPSON technical information library fax service
SM
U.S. users can call (800) 922-8911;
❑ Product literature with technical specifications on EPSON’s
current and new products
❑ Customer Relations.
You can purchase supplies, parts, documentation, and
accessories by calling EPSON Accessories at (800) 873-7766
(U.S. sales only). In Canada, call (800) GO-EPSON for sales
locations.
When you call for technical assistance, be ready to identify
your system and its configuration, and describe any error
conditions to the support staff.
If you need help with any software program you are using, see
the documentation that came with that program for technical
support information.
Introduction
5
Page 14

Chapter 1
Setting Up the Printer
System Requirements . . . . . . . . . . . . . . . . . . . . . . . . 1-2
Installation . . . . . . . . . . . . . . . . . . . . . . . . . . . . . . 1-2
Unpacking the printer . . . . . . . . . . . . . . . . . . . . . 1-3
Attaching the input tray and output tray supports . . . . . 1-4
Plugging in and turning on the printer . . . . . . . . . . . 1-5
Installing the ink cartridges . . . . . . . . . . . . . . . . . . 1-5
Loading plain paper . . . . . . . . . . . . . . . . . . . . . . 1-10
Testing the printer . . . . . . . . . . . . . . . . . . . . . . . 1-12
Connecting the printer to your Macintosh . . . . . . . . . 1-12
Installing the Macintosh driver . . . . . . . . . . . . . . . . 1-13
Choosing the Stylus COLOR printer . . . . . . . . . . . . . 1-16
Calibrating the printer . . . . . . . . . . . . . . . . . . . . . 1-17
1
Setting Up the Printer
1-1
Page 15

System Requirements
To use the Stylus COLOR with your Macintosh using the
built-in serial interface, you need the following:
❑
System 6.0.7 or later, or System 7.0 or later.
❑
4MB RAM if you are running System 6.x or 5MB RAM if
you are running System 7.x.
❑
Plenty of hard disk space to store and print color images.
The amount you need depends on the number and size of
your color images.
❑
A standard Apple System/Peripheral-8 cable (8-pin mini
din male/male) or equivalent.
To connect the printer to an AppleTalk network, you need the
optional EPSON Talk kit, which contains a LocalTalk interface
board. To order the EPSON Talk kit, contact EPSON
Accessories or your dealer. You will also need two LocalTalk
Locking Connector Kits.
Installation
The following installation procedures describe how to set up
the printer if you are using the serial interface. If you are using
the optional LocalTalk interface, you first need to install the
LocalTalk interface board as described in Appendix A.
When choosing a location for the printer, use a surface that is
flat, horizontal, and stabl e.
Always leave approximately 2 inches of clear area next to the
knob on the printer’s right side. The printer will not print if
anything is pressing against the knob.
1-2
Setting Up the Printer
Page 16
Avoid places subject to rapid changes in temperature and
humidity. Also keep the printer away from direct sunlight and
heat sources.
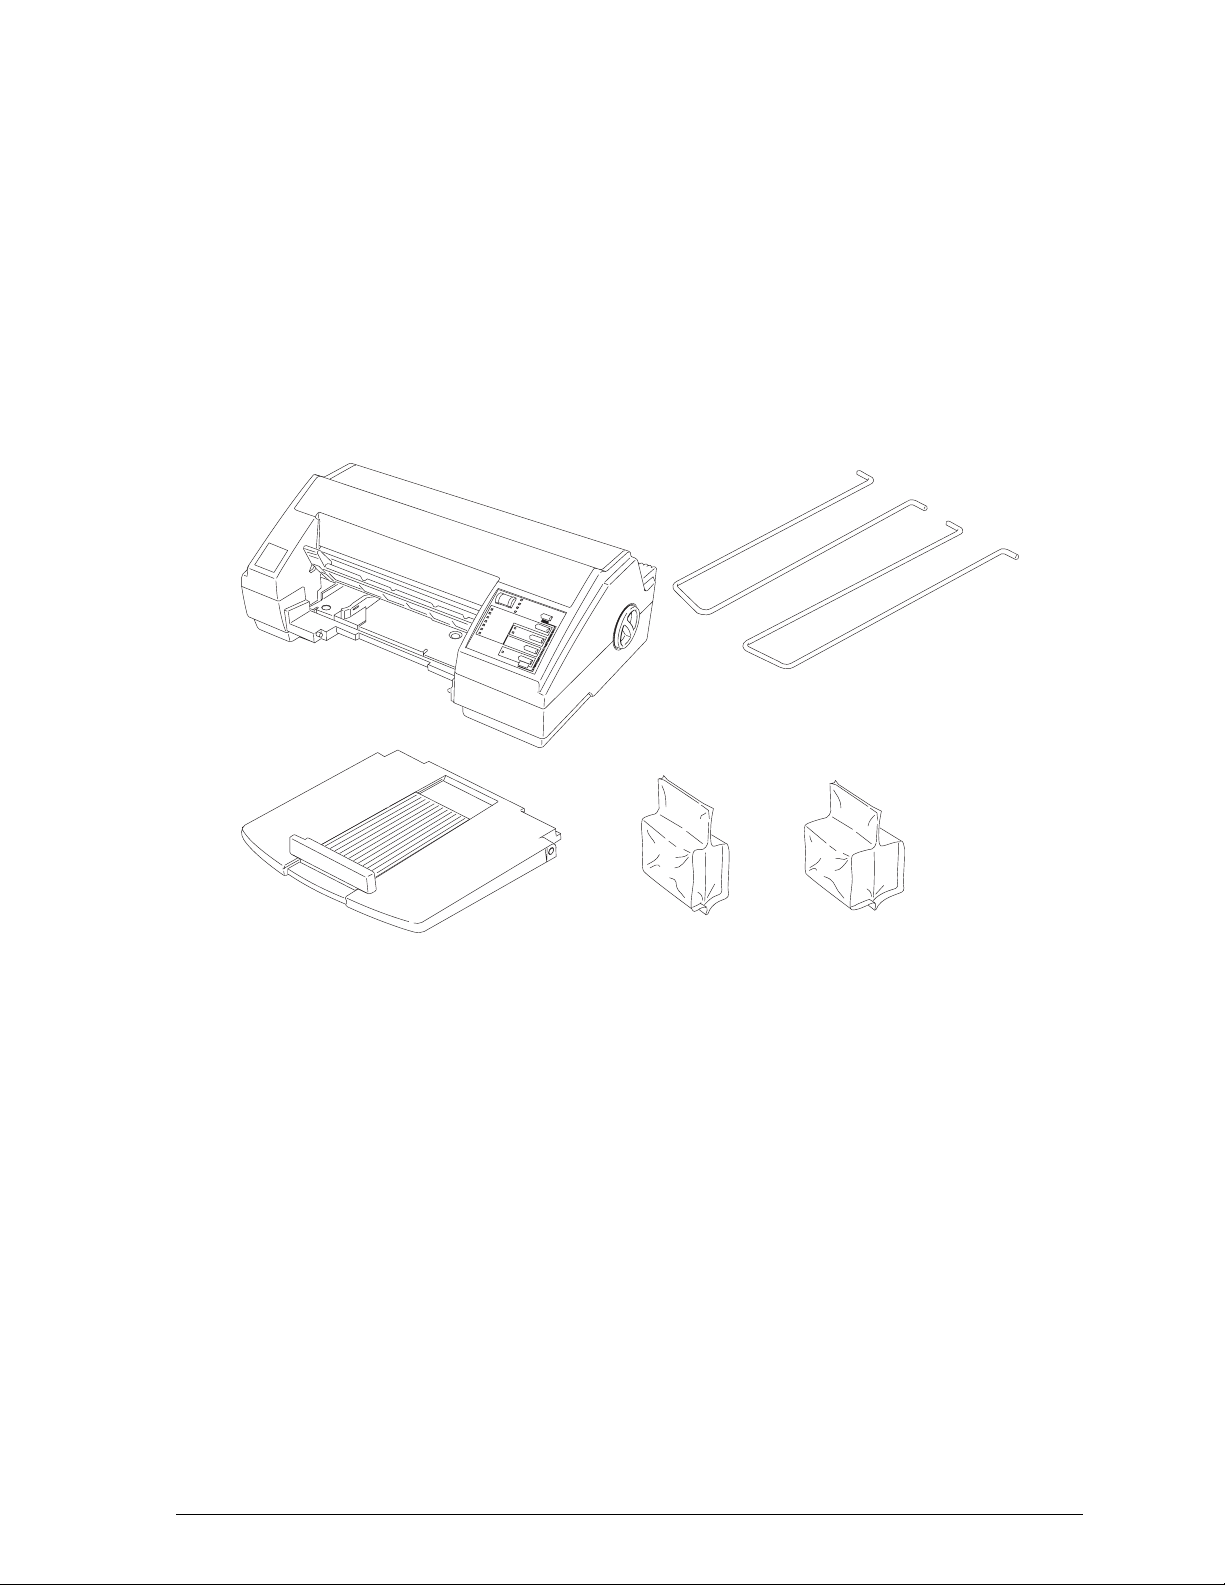
Unpacking the printer
In addition to this guide, your printer box should include two
EPSON printer driver diskettes, the Color Printing Tips booklet,
a user’s guide for PC users, a Notice Sheet, and these items:
printer
output tray
supports
black ink
cartridge
input
tray
color ink
cartridge
You must remove all protective materials packed with your
printer before you set it up and turn on the power. Follow the
directions on the Notice Sheet (inserted with the printer) to
remove these materials.
Save all packaging and protective materials in case you need to
ship the printer in the future. It should always be transported
in its original packaging or the equivalent.
Setting Up the Printer
1-3
Page 17
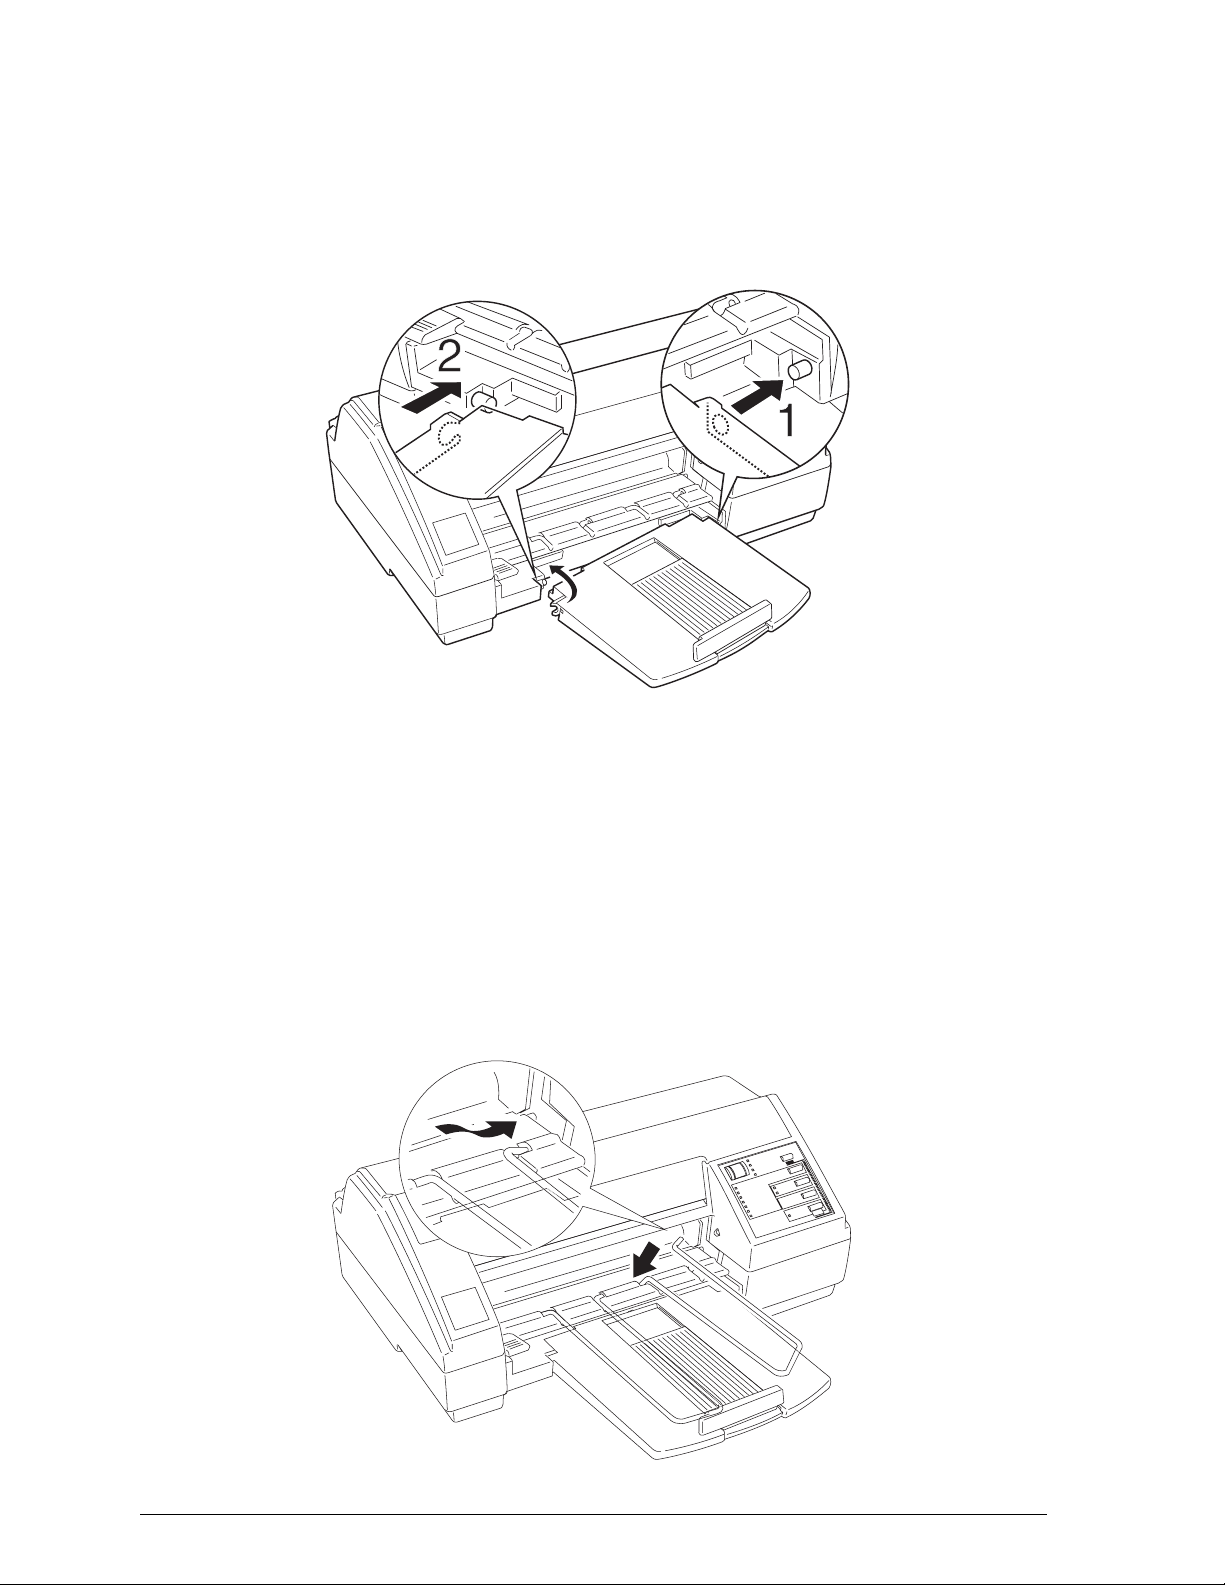
Attaching the input tray and output tray supports
1. Place the right side hole of the input tray over the mounting
post as shown below. Then push the paper tray’s left side
notch onto the mounting post until it snaps in place.
2. Install the output tray supports into the notches provided
for them.
Each support is marked with an L or R on one of its tips.
Install the L support into the two leftmost notches, first
inserting the long tip into the first notch on the left and
slightly twisting the support to insert the other tip. In a
similar fashion, insert the R support.
1-4
Setting Up the Printer
Page 18

Plugging in and turning on the printer
1. Make sure you have removed all protective packing
materials from inside the printer.
2. Plug the power cord into a properly grounded electrical
outlet.
3. Turn on the printer by pressing the Operate button.
Installing the ink cartridges
Caution:
c
Note:
Install both ink cartridges. If only one cartridge is installed, the
printer will not work.
The ink cartridges are self-contained units. Under ordinary
use, ink will not leak from a cartridge. If ink does get on your
hands, wash them thoroughly with soap and water. If ink gets
into your eyes, flush them immediately with water.
Setting Up the Printer
1-5
Page 19
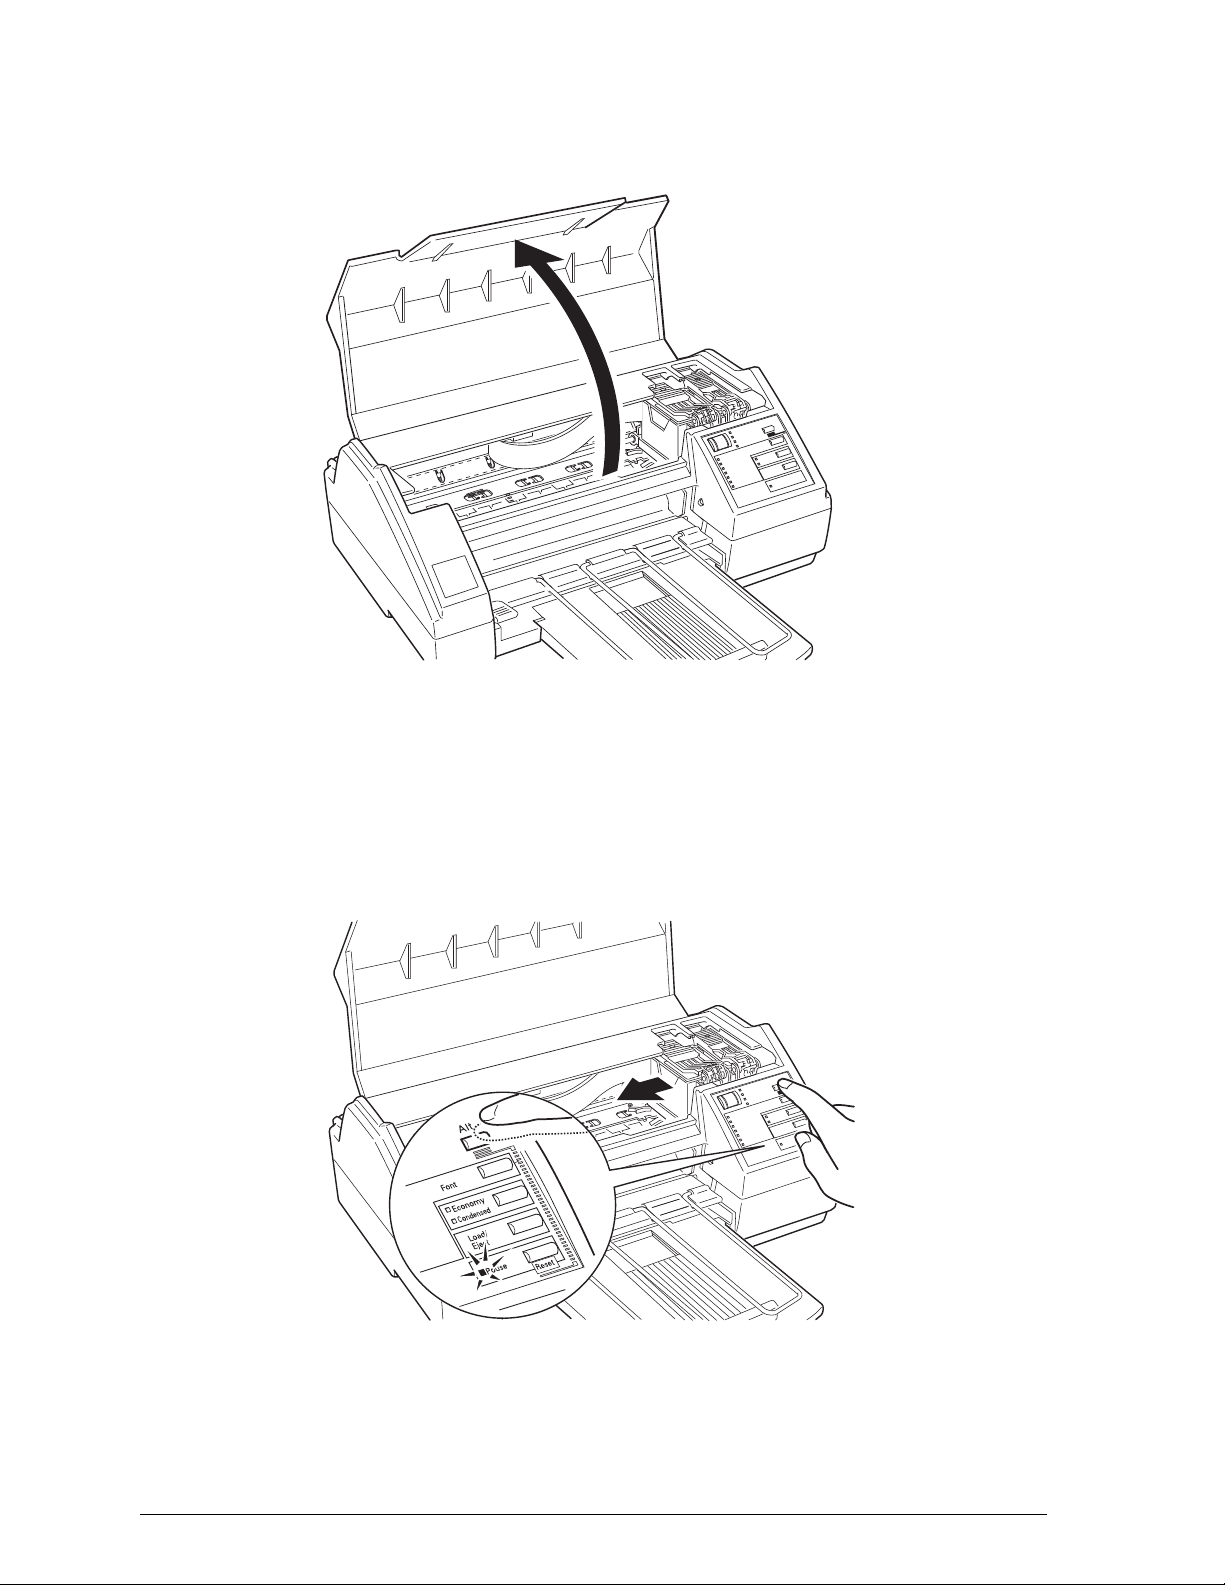
1. Make sure the printer is turned on, and then open the
printer cover.
2. Press the Pause button.
3. Hold down the Alt button for about five seconds until the
print head moves slightly to the left, which is the ink
cartridge install position.
1-6
Setting Up the Printer
Page 20
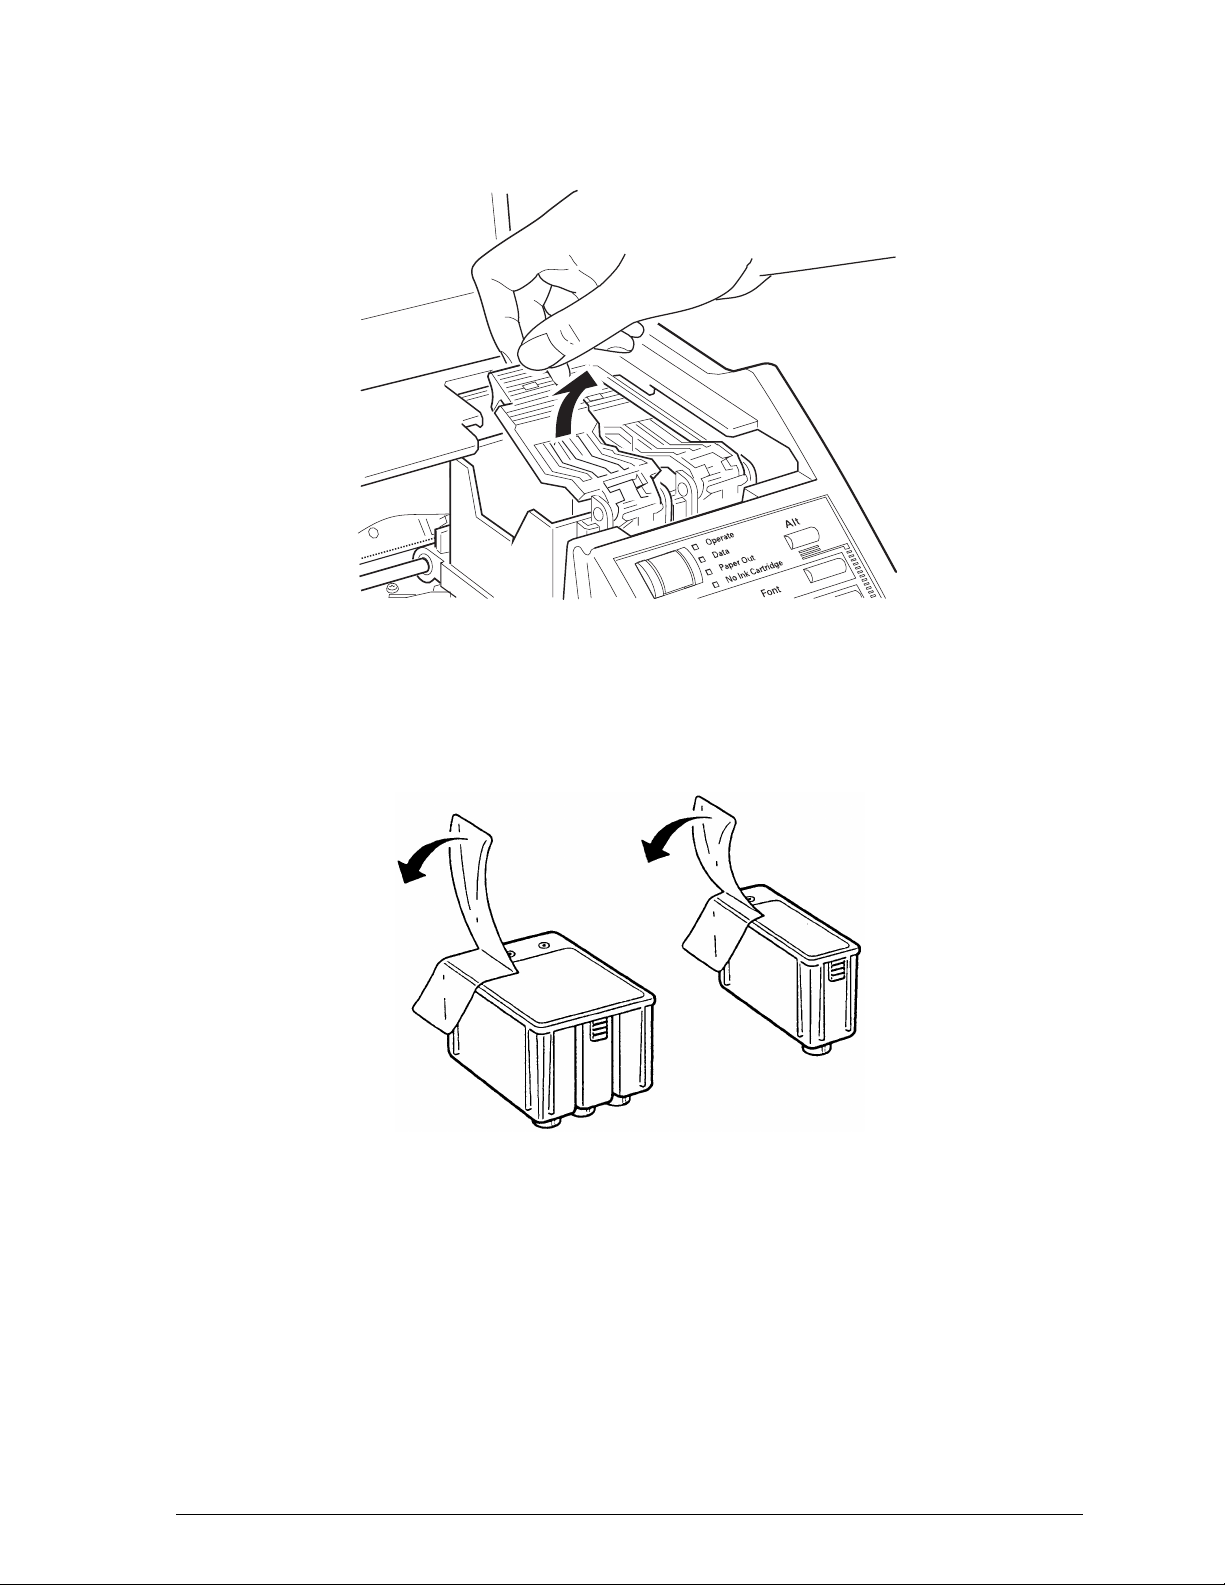
4. Pull each of the ink cartridge clamps toward you to open
them.
5. Open the foil ink cartridge packages and remove the
cartridges from their protective cardboard. Remove the
tape seal from each ink cartridge.
Caution:
c
You must remove the tape seal from the cartridges.
Leaving the tape on will permanently damage them.
Setting Up the Printer
1-7
Page 21
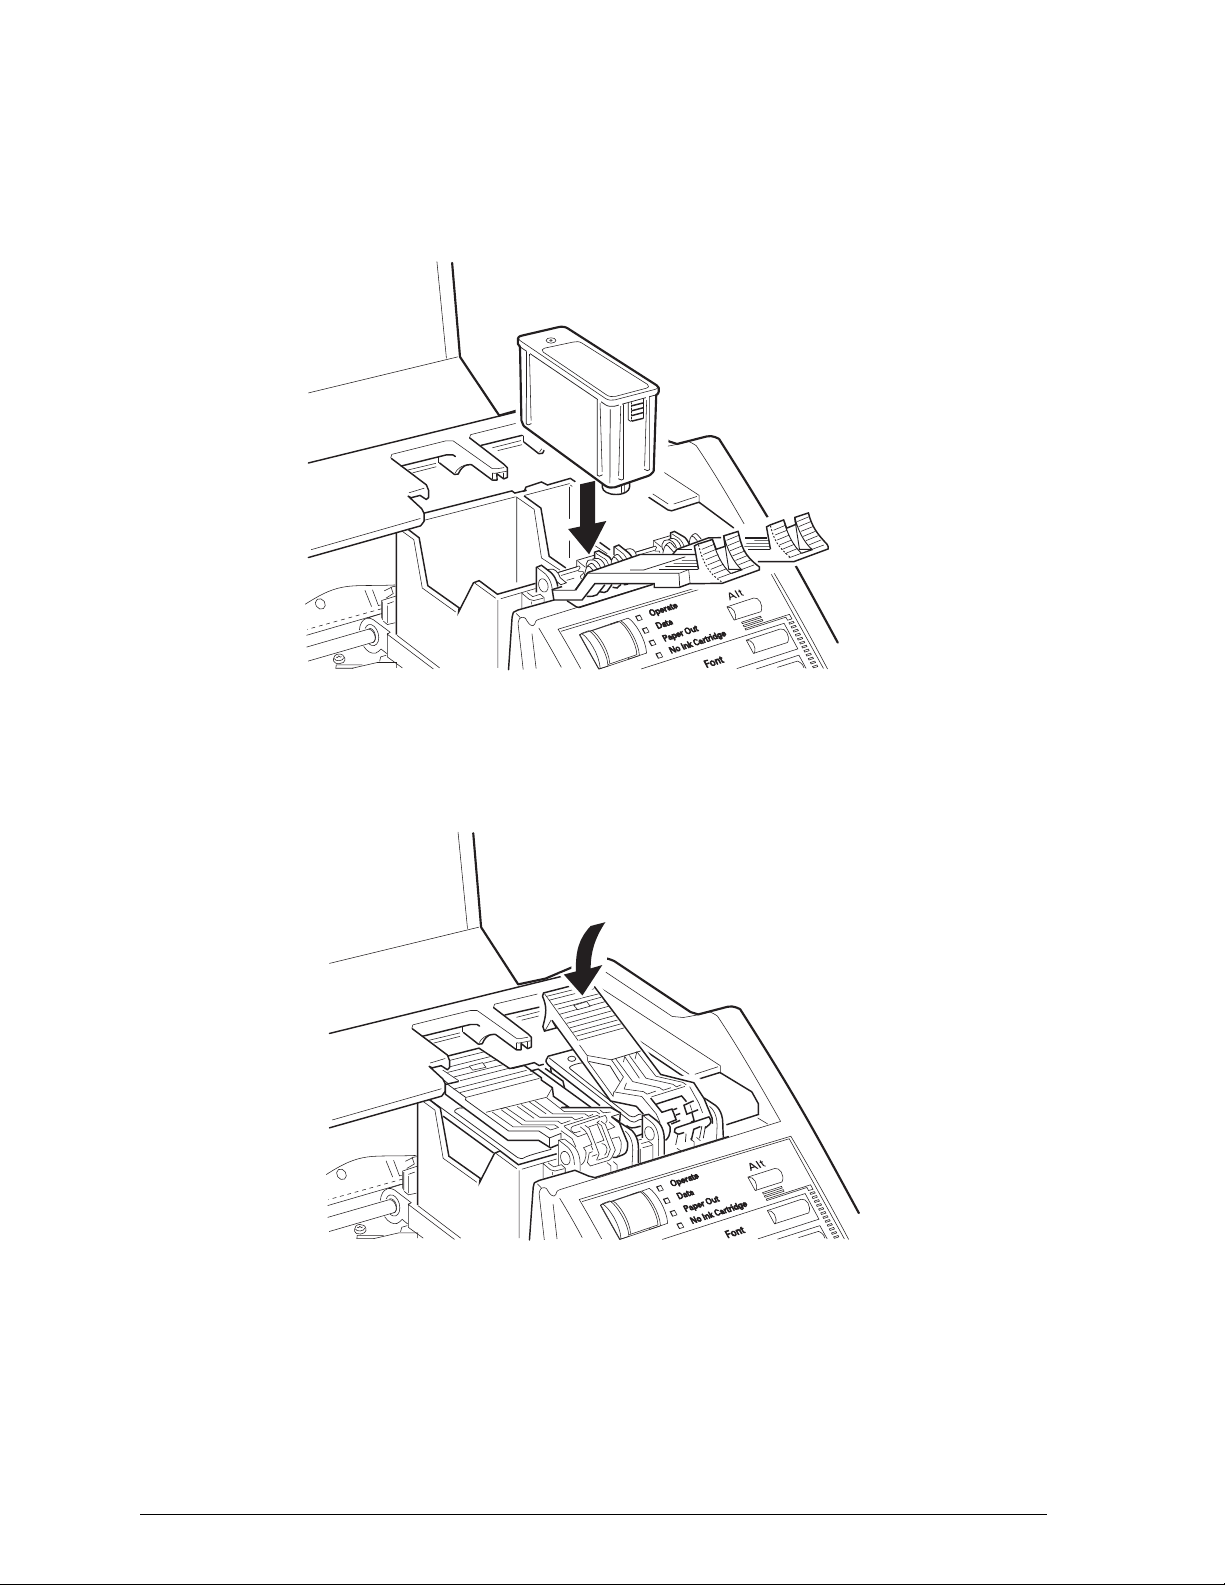
6. Lower the cartridges into their holders with the labels face
up and the arrow on the top of the cartridge pointing
toward the rear of the printer. The color ca rtri dge, which is
larger, goes on the left, the black ink cartridg e on the right.
7. Push the ink cartridge clamps toward the back of the printer
until they lock in place.
Caution:
1-8
c
Setting Up the Printer
Once you install the ink cartridges, do not open the clamps
or remove the cartridges except to replace them with new
ones. Once you remove a cartridge, you cannot re-use it.
Page 22

8. Press the Alt button again to return the print head to its
home position. (Even if you do not press Alt, the printer
moves the print head back to its home position about
60 seconds after you close the clamps.)
9. Close the printer cover.
After you install the ink cartridges, the printer charges the
ink delivery system. This takes about one minute. During
this time, the Pause light flashes. When the printer is
finished charging, the Pause light co mes o n without
flashing.
Caution:
c
In order to maintain optimum print quality, the printer
periodically performs a cleaning operation. You may notice
the cleaning cycle being performed when the printer has
been on for a while without being used or when you turn
on the printer after it has been off a while.
10. After the printer completes the charging cycle, press the
Pause button.
After you install the ink cartridges, you should make sure that
the paper thickness lever, which controls the dista nce betw een
the paper and the printer carriage, is set correctly.
1. Open the printer cover and press the Pause button.
Never turn off the printer while the
flashing.
Pause
light is
2. While holding down the Alt button, press the Font button.
The carriage moves to the left.
3. Locate the small blue lever in front of the ink cartridges. Try
rotating this lever to the left. If it cannot be rotated any
further, it is in the correct position.
Setting Up the Printer
1-9
Page 23
4. Press the Alt button. Then press Pause.
5. Close the printer cover.
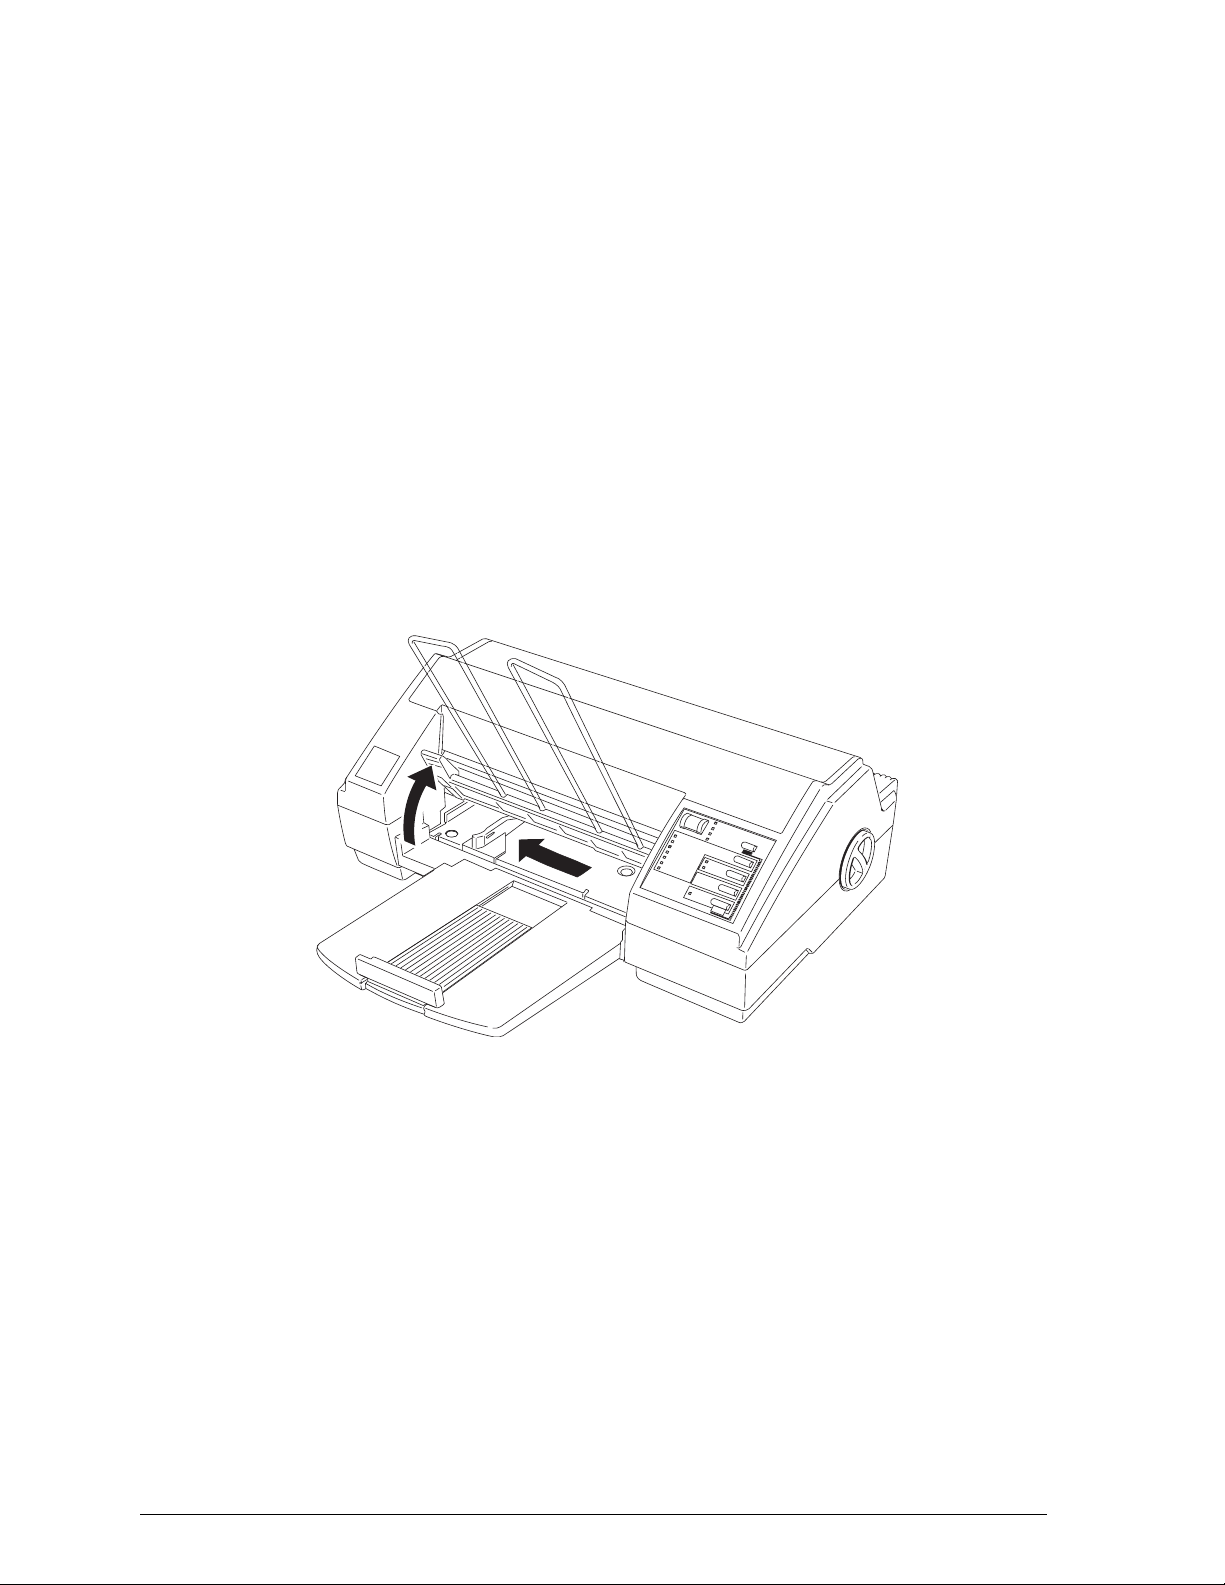
Loading plain paper
The following procedure describes how to load plain bond
paper. You can load up to 100 sheets of plain paper. For
information on loading coated paper, envelopes, or
transparencies, see Chapter 3.
1. Raise the output tray by lifting the lever on the left until it
clicks into place. Then slide the left edge guide as far to the
left as it will go.
2. Fan a stack of paper; then tap it on a flat surface to even the
1-10
edges.
Setting Up the Printer
Page 24
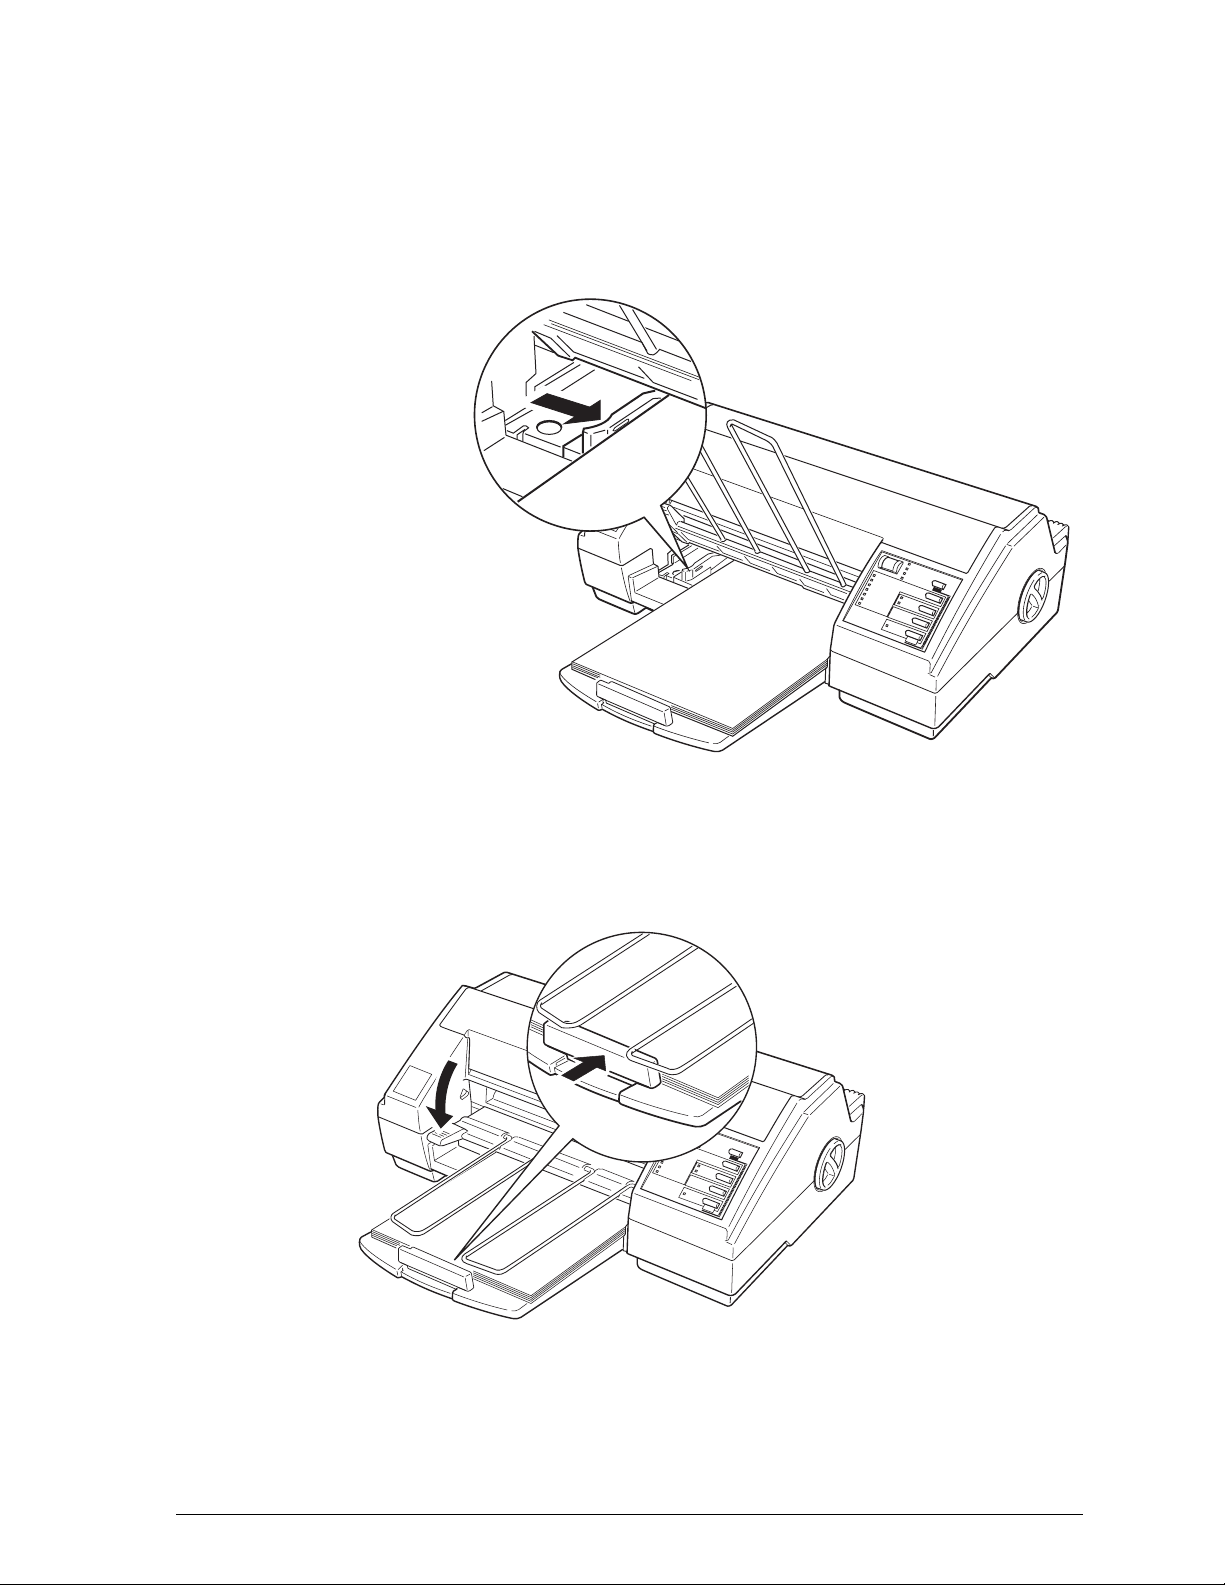
3. While aligning the paper’s edge with the right edge guide,
insert it with the printable surface face down into the input
tray until it meets resistance. (The printable surface is
marked with an arrow on most plain paper packaging.
Then adjust the left edge guide as shown.)
4. Adjust the rear edge guide to match the length of your
paper as shown below. Then lower the output tray.
Setting Up the Printer
1-11
Page 25

Testing the printer
Use paper that is at least 8.25 inches (210 mm) wide. Otherwise
ink is sprayed directly on the platen and can smear subsequent
pages.
1. Turn off the printer.
2. While holding down the Load/Eject button, press the
Operate ( ) button.
The self test begins by printing on the first and last lines of
the first sheet of paper to measure the page length. Then it
prints character samples using availa ble fonts and colors on
the next sheet of paper.
3. To end the self test, press the Pause button and turn off the
printer by pressing the Operate button. Otherwise, the
test continues until the paper in the input tray runs out.
Note:
Do not turn off the printer before pressing the
If the quality of the test output is not good, clean the print
heads as described in Chapter 4. It might take as many as
three cleaning cycles to fully solve the problem.
Pause
Connecting the printer to your Macintosh
If you’re using the printer’s built-in serial interface, you need to
obtain an Apple System/Peripheral-8 cable or equivalent. Then
follow the procedure below to connect the printer to your
Macintosh.
button.
1-12
Setting Up the Printer
Page 26

If you installed the optional LocalTalk interface board, you
need to obtain two LocalTalk Locking Connector Kits (DIN-8
version). Attach a connector box both to the LocalTalk interface
on the printer and to the printer port on the Macintosh. Then
attach the LocalTalk cable between the two connector boxes.
For specific instructions, see the owner’s guide that comes with
the LocalTalk Locking Connector Kits.
To connect the printer to your Macintosh using the serial
interface:
1. Make sure both your printer and Macintosh are turned off.
2. Connect one end of the interface cable to the serial
connector, which is located on the back of the printer
immediately behind the control panel.
3. Connect the other end of the interface cable into either the
modem or printer port on the Macintosh. The Maci ntosh
ports are indicated with the following icons:
Modem port Printer port
Normally it is recommended that you use the modem port
if you are not using an external modem. This frees up your
printer port for connecting to an AppleTalk network.
4. Turn on the printer by pressing the Operate button.
Installing the Macintosh driver
Always use the EPSON Stylus COLOR Macintosh driver when
you print with the Stylus COLOR. This driver is specifically
designed for the printer and allows you to easily access all its
features.
Setting Up the Printer
1-13
Page 27

Caution:
c
Before you begin installation, make a backup of the EPSON
Macintosh printer disk. Then do the following:
1. Turn on your Macintosh and insert the EPSON Macintosh
2. Double-click the Installer icon. When you see the initial
Turn off any virus protection programs before you install
printer software. You do this by holding down the Shift key
while you restart your Macintosh. After installation, you can
use the protection programs again.
driver diskette into a diskette drive.
screen, click OK to continue and bring up the following
screen:
3. Choose what software components to install as described
1-14
below:
The Serial and Network Driver Packages contain a ll the
software components needed for the serial or LocalTalk
interface. Normally you should choose the Serial Driver
Package if you’re using the serial interface, or the Network
Driver Package if you’re using LocalTalk. This ensures you
have all the software you need to use the printer.
Setting Up the Printer
Page 28

If you are low on disk space and wish to specify what
components to install, choose one or more of the following:
AT-Stylus COLOR This driver allows you to use
the optional LocalTalk interface
to connect the printer to an
AppleTalk network.
Stylus COLOR This driver allows you to use
the serial interface to connect the
printer directly to the Macintosh.
BI-D Calibration Utility This utility calibrates the printer
so vertical lines are aligned.
EPSON Monitor This utility monitors and manages
print jobs that have been sent to
the printer. For more information,
see “Using the EPSON Monitor
Utility to Manage Print Jobs” in
Chapter 2.
EPSON Namer This utility assigns a unique name
to the printer.
You must install either the Stylus COLOR driver or the
AT-Stylus COLOR driver. The three utilities are optional. If
you do not install these utilities on your hard disk, you can
run them from the diskette drive when needed.
4. Click Install to copy the software to your hard disk.
5. When installation is complete, choose Quit to quit the
installer.
6. Restart your Macintosh.
7. If you installed the AT-Stylus driver, you need to assign
a name to the printer using the EPSON Namer utility. See
Appendix A for more information.
Setting Up the Printer
1-15
Page 29

Choosing the Stylus COLOR printer
After you install the printer driver, open the Chooser to select it
before you begin printing. You need to choose the printer only
the first time you use it or whenever you want to use another
printer. Your Macintosh will always print using the last printer
selected.
1. Open the Chooser under the Apple menu.
2. If you are using the serial interface and are using the printer
port on the Macintosh, make AppleTalk inactive by clicking
the Inactive radio button.
If you are using the modem port, you do not need to make
AppleTalk inactive. I n fact, Appl eT al k must be active if
your Macintosh is connected to an AppleTalk network.
3. Click on the Stylus COLOR or the AT-Stylus COLOR icon.
If you select the Stylus COLOR icon, you are prompted to
select the printer or the modem port.
1-16
Setting Up the Printer
Page 30

If you select the AT-Stylus COLOR icon, a list of printers
appears at the right of the dialog box. Click the name of the
printer you want to use.
4. If you wish, turn on background printing. When
background printing is on, you can print in the background
while using your Macintosh for other tasks. You must turn
on background printing to use the EPSON Monitor Utility
to manage print jobs.
Turning on background printing slows the print speed
and may also slow any software program you use while
printing in the background.
5. Close the Chooser.
Calibrating the printer
Use the BI-D Calibration Utility to adjust your printer so
vertical lines i n text and graphi c s a re co rrec tl y al ig ned.
1. Double-click the BI-D Calibration Utility icon.
If you installed the BI-D Calibration Utility, it is located on
your hard drive. If you did not install it, insert the EPSON
Macintosh printer driver diskette into a diskette drive.
2. In the screen that opens, choose the interface type.
Choose Serial if you are using the serial interface. You are
then prompted to specify the printer or modem port.
Choose Network if you are using the optional LocalTalk
interface. (Select Network even if you are using LocalTalk
to connect to a single Macintosh.) You are then prompted
to select the Stylus COLOR printer you want to calibrate.
Setting Up the Printer
1-17
Page 31

3. Choose the Test 1 button to align the print heads.
The printer prints a page that displays 16 alignment
patterns of vertical lines. Each pattern is associated with an
offset value. Look for the alignment pattern that is most
closely aligned.
||
| |
Aligned Not aligned
Enter the appropriate offset value in the screen that
appears on your monitor.
4. Choose Test 2 to align High-Speed Mode.
As you did in step 3, enter the offset value of the pattern
that is most closely aligned.
5. Once the alignments have been completed , c lick Exit.
1-18
Setting Up the Printer
Page 32

Chapter 2
Controlling the Printer
Changing Printer Settings . . . . . . . . . . . . . . . . . . . . . 2-2
Using the Printer Driver . . . . . . . . . . . . . . . . . . . . . . 2-3
Controlling the color and halftone settings . . . . . . . . . 2-4
Controlling print quality . . . . . . . . . . . . . . . . . . . . 2-5
Controlling visual effects . . . . . . . . . . . . . . . . . . . . 2-7
Selecting paper sizes . . . . . . . . . . . . . . . . . . . . . . 2-7
Using the Control Panel . . . . . . . . . . . . . . . . . . . . . . 2-9
Lights . . . . . . . . . . . . . . . . . . . . . . . . . . . . . . . 2-10
Buttons . . . . . . . . . . . . . . . . . . . . . . . . . . . . . . 2-11
Using the EPSON Monitor Utility to Manage Print Jobs . . . . 2-12
2
Controlling the Printer
2-1
Page 33

Changing Printer Settings
The printer settings allow you to control your print job. With
them you can specify the number of copies, a page range, and
the paper size. You can also change the resolution and specify
high-quality by turning on MicroWeave or turning off High
Speed.
All printer settings have default settings that are sufficient for
most print jobs. For this reason, you do not need to change
printer settings often. The only times you need to change
printer settings are to do the following:
❑ Print multiple copies or specify a specific page range
(for example, pages 2 through 6). By default, the printer
prints one copy of all pages.
❑ Change the resolution from 360 dpi to 720 dpi or 180 dpi.
❑ Turn on MicroWeave and turn off High Speed for the
highest possible quality. MicroWeave is turned on
automatically when you select 720 dpi.
❑ Use coated or transparency paper. The default is normal
copier paper. When using coated paper or transparencies,
change the paper type.
❑ Use a paper size other than letter (8.5 x 11 inches). By
default the printer is set up to print letter size paper. For all
other paper sizes, you need to change the paper size setting
or define a new one.
Additional printer driver settings are described later in this
chapter.
2-2
Controlling the Printer
Page 34

Some printer settings are available through the printer’s
control panel. You use the control panel to do the following:
❑ Turn the printer on and off
❑ Turn on economy mode
❑ Clean the black and color print heads
❑ Pause the printer temporarily.
For more information about the control panel, see “Using the
Control Panel” later in this chapter.
Using the Printer Driver
The printer driver settings are accessible from two dialog
boxes: Print and Page Setup. Most settings are available from
the Print dialog box; however, to change the paper size or
define a new one, use the Page Setup dialog box as described
later in this section.
To bring up the Print dialog box, choose Print from the File
menu of your software program. This brings up a dialog box
similar to the one shown below. The dialog box you see might
differ, depending on your software program.
Controlling the Printer
2-3
Page 35

To access the printer driver settings for the Stylus COLOR,
choose the Options button of the Print dialog box. This brings
up the following dialog box:
Controlling the color and halftone settings
The following settings control colo r quality and the halftone
pattern.
Inks
Specifies color (CMYK) or monochrome printing. When you
select monochrome, colors are converted to graysc a le val ues.
Method
Selects one of four halftone settings: Black and White, Diffused
(default), Pattern 1 Dither, and Pattern 2 Dither. Normally you
should not change the default halftone method, which is
Diffused.
Black and white uses no halftoning pattern and should be used
only with text. Black and white is fast, but it should never be
used with color.
2-4
Controlling the Printer
Page 36

The Diffused setting is best for photographic images. This
setting is the default and should be used for most color images.
Pattern 1 Dither is a fine dither pattern that can be used for
printing images with significant detail but limited shading.
Pattern 2 Dither is a coarse dither pattern for images with
limited detail and shading.
Light/Dark slider
Controls how much ink is applied to the paper. The slider has
five settings that allow you to apply more or less ink. The more
ink, the darker the colors. Move the slider to the left for more
ink and darker colors; slide it to the right for less ink and
lighter colors.
Note:
The slider is not accessible for monochrome printing or when the
black and white halftone is selected.
Controlling print quality
The following settings allow you to adjust print quality.
Resolution
Specifies the resolution to be 720 dpi, 360 dpi, or 180 dpi.
Resolution is the amount of detail used to create an image.
The higher the resolution, the sharper and finer the image.
For the highest quality, use 720-dpi resolution with EPSON
special coated paper. When you select this resolution,
MicroWeave is turned on and High-Speed Mode is turned off.
For most color printing, use 360-dpi resolution. This resolution
produces good-quality, full-color images using less memory
and in less time than 720 dpi. Special paper is not required for
360 dpi; however, for better results, use EPSON coated paper.
Controlling the Printer
2-5
Page 37

When speed is more important than quality and when a draft is
good enough, use 180-dpi resolution.
Note:
Printing at lower resolutions conserves ink.
Media Type
Sets up the printer for plain paper, coated paper, or
transparencies. Media Type can be one of the following:
Plain paper
Transparency
Coated Paper - 360 dpi
Coated Paper - 720 dpi
When 720-dpi resolution is selected, Coated Paper - 720 dpi is
automatically selected. No other Media Type can be selected.
MicroWeave mode
Reduces the possibility of banding, the light horizontal lines
that can mar an image.
MicroWeave is recommended for printing in color. I n
monochrome mode, MicroWeave slows the print speed. For
this reason, you may not want to use it for monochrome
printing.
MicroWeave is turned on automatically for 720 dpi. It is not
available for 180 dpi.
High-Speed Mode
When you turn on High-Speed Mode, the printer uses
bidirectional printing, reducing the time it takes to print an
image. Bidirectional printing is fast, but for highest quality,
always turn off High-Speed Mode.
2-6
Controlling the Printer
Page 38

Note:
If the vertical lines in printing appear misaligned when you print
with High-Speed Mode on, you might need to calibrate the printer as
described in Chapter 1.
Controlling visual effects
The following settings allow you to change the printed image.
Normally you only need to use these settings for achieving
special effects.
Flip Horizontal and Flip Vertical rotate the p ag e 1 80° along
❑
the horizontal or vertical axis. Text will appear backwards
or upside down.
Invert Image changes black areas to white and white
❑
areas to black. Invert Image is selectable when using
monochrome printing and black-and-white halftone
pattern.
Screen Pattern changes the halftone dot pattern.
❑
Normally you should turn off Screen Pattern when
printing.
Selecting paper sizes
By default, the printer is set up to expect letter-size
(8.5 × 11 inches) paper. To select a different paper or envelope
size, choose Page Setup on the File menu of your software
program. This brings up the following dialog box:
Controlling the Printer
2-7
Page 39

You can select from the following predefined sizes:
Letter (8.5 × 11 inches) Executive (10 × 7.5 inches)
A4 (210 × 297 mm) #10 envelope (9.5 × 4 1/8 inches)
Legal (8.5 × 14 inches) DL envelope (220 × 110 mm)
A5 (148 × 210 mm) C5 envelope (229 × 162 mm)
B5 (182 × 257 mm) 6 3/4 envelope (6.5 × 3.6 inches)
Statemen t (8.5 × 5.5 inches)
You can also define other paper sizes by choosing the Paper
button. This brings up the following dialog box:
To define a new size, choose New. The dialog box updates to
allow you to enter a name for the new size and enter the width
and height in inches or centimeters. The width must be between
4 and 8.5 inches, and the height must be between 4 and 22 inches.
Thus the largest paper size you can define is 8.5 × 22 inches.
Once you enter a name and specify the size, choose OK.
2-8
Controlling the Printer
Page 40

You can define up to eight paper sizes. All paper sizes you
define are listed in the left column and appear in the list of
paper sizes in the Page Setup dialog box.
Using the Control Panel
The printer’s front control panel contains lights for displaying
the printer status and buttons for controlling certain settings.
Normally the only times you need to use the control panel are
when you need to do the following:
❑ Turn the printer on or off
❑ Turn on economy mode
❑ Clean the black or color print heads
❑ Pause the printer temporarily.
Controlling the Printer
2-9
Page 41

Lights
Operate On when the printer is on. Flashes when the printer
is turning on or off.
Data On when data is being received by the printer or
when data remains in printer memory.
Paper Out On when the printer runs out of paper. Rapid
flashing indicates a paper jam.
No Ink Cartridge
On when one or both ink cartridges are not installed.
The printer will not work unless both cartridges are
installed.
Font Does not apply to Macintosh computers.
Economy On when the economy printing mode is selected. In
economy mode the printer uses less ink by printing
fewer dots per character. Use this mode for rough
drafts of text only.
Condensed Does not apply to Macintosh computers.
Pause On when printing is paused. This light flashes when
you clean the print heads or replace ink cartridges.
Never turn off the printer when the Pause light is
flashing.
The Pause light also flashes when an error occurs.
2-10
Controlling the Printer
Page 42

Buttons
Operate Turns the printer on and off.
Caution:
c
Font Does not apply to Macintosh computers. Use your
Load/Eject Loads or ejects a sheet of paper. Paper normally
Pause Stops printing temporarily. Press it again to resume
Always turn off the printer by pressing the
button. Then wait until the
before unplugging the printer.
Never turn off the printer while the
flashing.
software program to select fonts.
loads and ejects automatically.
printing.
Operate
light stops flashing
Pause
Operate
light is
Economy/Condensed
Selects economy mode. Condensed mode does not
apply to Macintosh computers.
Alt
Used to reset the printer. Press Alt + Pause to clear
the printer’s buffer and reset the printer settings to
their factory settings.
You also use the Alt button in combination with
other buttons when cleaning the print heads or
adjusting the paper thickness lever. See “Cleaning
the Print Heads” in Chapter 4 and “Loading
Envelopes and Heavy Paper” in Chapter 3 for more
information.
Controlling the Printer
2-11
Page 43

Using the EPSON Monitor Utility to Manage Print Jobs
After you send a print job to the printer, you can use the
EPSON Monitor Utility to see what print jobs are queued for
printing and cancel a print job. You can also use the progress of
the job currently being printed.
To use the EPSON Monitor Utility, you must specify
background printing in the Chooser. Then when you send print
jobs, you can access the utility from the Application menu. To
open this menu, click the icon in the upper right corner of your
screen (the icon you see depends on your program). When you
select the EPSON Monitor Utility, you see a dialog box similar
to the following:
To cancel a print job, select a job and choose Cancel Printing.
By default, the EPSON Monitor screen does not appear unless
you open it from the Application menu. If you want the
EPSON Monitor to open automatically whenever you send a
print job, choose Preferences in the File menu and make the
appropriate selection.
2-12
Controlling the Printer
Page 44

Chapter 3
Paper Handling
Choosing Paper . . . . . . . . . . . . . . . . . . . . . . . . . . . 3-2
Loading Special Coated Paper and Transparencies . . . . . . . 3-3
Loading Envelopes and Heavy Paper . . . . . . . . . . . . . . 3-4
3
Paper Handling
3-1
Page 45

Choosing Paper
You can use most plain paper with the Stylus COLOR and
achieve good results. However, for better quality printing, use
EPSON coated paper or paper especially designed for ink jet
printers. Coated paper reduces the amount of ink that is
absorbed by the paper to produce sharper, clearer printing.
For the highest quality print output and overhead
presentations, EPSON offers the following special papers:
❑ EPSON Special coated paper for 360 dpi
(S041028 for letter, S04102 5 for A4 )
❑ EPSON Special coated paper for 720 dpi
(S041029 for letter, S04102 6 for A4 )
❑ EPSON Transparency film
(S041030 for letter, S04102 7 for A4 ).
Samples of each type are included with the printer.
When choosing special paper, keep the following in mind:
❑ When printing at 720-dpi resolution, use only EPSON
Special coated paper for 720-dpi printing. No other paper
is suitable for this resolution.
❑ When using special coated paper for 720 dpi, do not print
at 360 dpi; likewise, when using special coated paper for
360 dpi, do not print at 720 dpi.
❑ When printing on transparencies, use only EPSON
Transparency film. For best results, use transparencies
within six months of opening the package.
❑ Do not use 720 dpi when printing transparencies.
3-2
Paper Handling
Page 46

Loading Special Coated Paper and Transparencies
Note:
Loading plain paper is described in Chapter 1.
1. Make sure the printable surface is face down. For coated
papers, the printable side is whiter than the other side.
For transparencies, the printable side is face down when
the cut corner is as shown below.
Caution:
c
2. Insert the paper into the input tray until it meets resistance.
You can insert up to 70 sheets of coated paper or up to
50 transparencies.
3. Adjust the left and rear edge guides so that the paper or
transparencies feed straight into the paper path. Then
adjust the rear edge guide to match the length of your
paper.
Do not touch the printable surface; hold sheets by their
edges.
Paper Handling
3-3
Page 47

4. Change the Media Type setting and check other settings to be
sure they are appropriate for the paper you loaded.
You must change the Media Type setting in the printer
driver to ensure it matches the paper you just loaded. To
change the Media Type setting, choose
menu, then choose the
that appears, use the Media Type setting to select Coat ed
paper - 360 dpi, Coated Paper - 720 dpi, or Transparency.
Then choose
You might also need to change the following settings:
❑ Resolution. If you’re using a paper that requires 720 or
360 dpi, make sure the resolution is set correctly.
❑ Paper size. If the paper you loaded differs in size from
the paper previously loaded, choose
File menu to select or define the paper size.
Once your software settings are correct, choose
menu to print on the sheets you loaded. When you are finished
OK
.
Options
button. In the dialog box
Print
in the File
Page Setup
Print
in the File
in the
printing, return unused sheets to the original packaging.
Unfavorable storage conditions, especially high temperature,
humidity, and direct sunlight can damage special paper.
Loading Envelopes and Heavy Paper
When printing on envelopes, follow these guidelines:
❑ Do not use envelopes that are too thin; they may curl
during printing.
❑ Return unused envelopes to the original packaging.
Unfavorable storage conditio ns, especi a ll y high
temperature, humidity, and direct sunlight can damage
envelopes.
❑ Do not choose 720-dpi resolution for envelope printing.
3-4
Paper Handling
Page 48

When printing on envelopes and heavy paper, you need to
adjust the paper thickness lever to compensate for the extra
paper weight.
1. Make sure the printer is turned on. Then press the
Pause
button and open the cover.
2. While holding down the
button, press the
Alt
Font
button.
The carriage moves to the lever-adjusting position. Paper
loaded in the printer is ejected when you adjust this lever.
3. Turn the paper thickness lever clockw ise as far as i t w il l go.
4. Press the
button. Then press
Alt
Pause
.
5. If you are printing onto envelopes, remove the rear edge
guide from the input tray and reinstall it as shown.
Paper Handling
3-5
Page 49

6. Insert the paper or envelopes into the printer. If you’re
loading envelopes, insert them as shown. You can insert
up to 10 envelopes. The number of sheets of heavy paper
depends on the thickness of the paper.
Adjust the rear and left edge guides so the paper or
envelopes feed straight into the paper path.
7. From your software program, choose
Page Setup
in the
File menu and select the appropriate paper or envelope size
if you are not using letter size.
Once you select the paper size and change any appropriate
printer settings, choose
Print
in the File menu to print on the
envelopes or paper you loaded.
After you are finished printing on heavy paper or envelopes,
return the paper thickness lever to its original position.
3-6
Paper Handling
Page 50

Chapter 4
Maintenance and Troubleshooting
Cleaning the Print Heads . . . . . . . . . . . . . . . . . . . . . . 4-2
Replacing an Ink Cartridge . . . . . . . . . . . . . . . . . . . . 4-3
Transporting the Printer . . . . . . . . . . . . . . . . . . . . . . 4-6
Troubleshooting . . . . . . . . . . . . . . . . . . . . . . . . . . . 4-7
Print quality problems . . . . . . . . . . . . . . . . . . . . . 4-8
Problems with printing . . . . . . . . . . . . . . . . . . . . 4-10
Paper handling problems . . . . . . . . . . . . . . . . . . . 4-12
Maintenance and Troubleshooting
4
4-1
Page 51

Cleaning the Print Heads
The printer periodically cleans its print heads, so normally you
should not need to clean them. However, if print quality
diminishes, use the built-in print head cleaning cycle to enable
the nozzles to deliver ink properly.
You can clean either or both print heads. Each cleaning cycl e
takes about one minute. The Pause light flashes throughout
the cycle and then stays on when the cleaning cycle is finished.
To clean the black print head:
1. Make sure the printer is turned on and press the Pause
button.
2. Hold down the Alt button and press Load/Eject.
3. Press the Pause button to resume printing.
To clean the color print head:
1. Make sure the printer is turned on and press the Pause
button.
2. Hold down the Alt button and press Economy/Condensed.
3. Press the Pause button to resume printing.
If the print quality does not improve after you clean the print
heads three times, replace one or both ink cartridges as
described in the next section.
4-2
Maintenance and Troubleshooting
Page 52

Replacing an Ink Cartridge
If print quality has declined and three attempts to clean the
print heads did not improve the quality, replace one or both
ink cartridges. You can check print quality by doing a printer
self test as described in Chapter 1.
Use these EPSON ink cartridges or cartridges manufactured to
EPSON’s specifications only:
Black ink cartridge S020034
Color ink cartridge S020036
When you need new ink cartridges, contact your dealer or call
EPSON Accessories at (800) 873-7766.
Caution:
c
Any paper in the paper path is ejected automatically when you
replace the cartridge.
1. Make sure the printer is on.
2. Open the printer cover.
The printer will be damaged if you use ink or cartridges
not manufactured by EPSON or which do not meet
EPSON’s specifications. Do not attempt to refill ink
cartridges manually. If you use substandard products
with your EPSON printer, you will damage the print
heads and void your warranty.
Leave the old cartridge installed in the printer until you
are ready to replace it with a new one. Attempting to print
without a cartridge installed can damage the printer.
3. Press the Pause button (check that the Pause light comes on).
4. Hold down the Alt button for about five seconds until the
print head moves slightly left to the ink cartridge install
position. The Pause light begins blinking.
Maintenance and Troubleshooting
4-3
Page 53

The carriage returns to the home position after 60 seconds
if the ink cartridges are not removed.
5. Lift the blue cartridge clamp up as far as it will go. The
cartridge rises partly out of the carriage.
6. Lift the cartridge out of the printer and dispose of it properly.
Do not take the used cartridge apart or try to refill it.
Caution:
c
7. Open the package containi ng the ink ca rtri dg e and remove
the cartridge from its protective cardboard. Remove the
tape seal from the cartridge.
c
If ink gets on your hands, wash them thoroughly with soap
and water. If ink gets into your eyes, flush them
immediately with water.
Caution:
You must remove the tape seal from the cartridge. Leaving
the tape on when you install the cartridge will
permanently damage the cartridge.
4-4
Maintenance and Troubleshooting
Page 54

8. Lower the ink cartridge into the cartridge holder so the label
is face up and the arrow on the cartridge points to the rear
of the printer. The larger (color) cartridge goes on the left.
9. Push the ink cartridge clamp toward the back of the printer
until it locks in place.
10. Clean the print heads (optional).
Cleaning the print head ensures that ink is properly delivered
to each nozzle. Cleaning is recommended but not required.
Maintenance and Troubleshooting
4-5
Page 55

If you replaced the black cartridge, hold down the Alt button
while you press the Load/Eject button. This cleans the
black print head.
If you replaced the color cartridge, hold down the Alt button
while you press the Economy/Condensed button. This
cleans the color print head.
After you clean the print head, skip to step 12.
11. Press the Alt button again. The Pause light flashes as the
printer charges the ink delivery system.
12. Close the printer cover. When the charging cycle finishes
and the Pause light stops flashing and stays on, press the
Pause button.
Transporting the Printer
If you need to transport your printer some distance, carefully
repack it using the original box and packing materials as
follows:
1. Open the printer cover and make sure that the print head
is locked in the far right position. If it isn’t, turn on the
printer, wait, and turn it off.
Caution:
c
2. Unplug the power cord from the electrical outlet; then
disconnect the interface cable from the printer.
Do not remove the ink cartridges when transporting the
printer. Transporting the printer without the cartridges
installed can damage the printer.
3. Remove paper from the input tray.
4-6
Maintenance and Troubleshooting
Page 56

4. Attach the protective material to the printer. See the Notice
Sheet that came in the box.
5. Repack the printer in the original box.
When you first use the printer after transporting it, if the
printed image is faint, has gaps, or nothing prints, clean the
print heads as described at the beginning of this chapter. If the
printed image is misaligned, calibrate the printer as described
in Chapter 1.
Troubleshooting
This section describes what you can do if you are having
problems printing. It is divided into the following subsections:
❑ Print quality problems. See this section if the print quality
is not good or not what you expect.
❑ Problems with printing. See this section if your printer is
not printing.
❑ Paper handling problems. See this section if you have
paper jams or other problems with paper feeding
incorrectly.
If you have a printing problem, check the appropriate section
and follow all suggestions that apply to your problem. If
none of the suggested solutions solve your problem, call the
EPSON Connection at (800) 922-8911. Canadian users can call
(800) GO-EPSON.
Maintenance and Troubleshooting
4-7
Page 57

Print quality problems
Print quality problems can often be solved by cleaning the print
heads as described earlier in this chapter. Note that it may take
as many as three cleaning cycles to solve a print quality
problem. If cleaning the print heads does not improve the print
quality, try the following:
❑ Check whether the ink cartridges are empty. Print a self test
as described in Chapter 1. After the first page prints, the
printer prints an entire page of text lines in various colors,
including black, ma genta, cyan, and yellow. If the black
lines don’t print, replace the black ink cartridge; if the
magenta, cyan, or yellow lines don’t print, change the color
ink cartridge.
❑ For color or complex grayscale images, turn on
MicroWeave and turn off High Speed.
❑ Use a higher-quality paper.
❑ Make sure the Media Type setting matches the type of
paper loaded in the printer.
If you’re printing a scanned image and the colors are not right,
see if the problem can be fixed from your scanning software
program.
If print quality does not improve, see the following specific
items.
Printed output is not what you expect or is faint or blurred.
Clean one or both print heads as described earlier in this
chapter.
Replace one or both ink cartridges.
Make sure MicroWeave is on and High Speed is off.
4-8
Maintenance and Troubleshooting
Page 58

Use a higher quality paper. Also, check that the Media Type
setting in the driver is selected for the type of paper loaded. If
you are using 720-dpi resolution, be sure to load special coated
720-dpi paper. Always use this special paper when printing at
720 dpi.
Check that the paper thickness lever is set correctly for the type
of paper. (See “Loading Envelopes and Heavy Paper” in
Chapter 3 for more information.) Faint printouts can result if
you print on plain paper when the paper thickness lever is set
for thick paper.
Check whether your paper is moist or damp. Ink jet printers
are sensitive to moisture absorbed by paper. Do not store paper
in damp or humid places.
Check whether economy printing mode is on. To turn off this
mode, press the Economy/Condensed button until the
Economy light goes off.
You might not be printing on the right side of the paper. Flip
the paper so the side that was down is up and reload it.
Vertical lines do not align or you see white banding.
Calibrate your printer as described in Chapter 1.
Printing starts too high or too low on the page, or the page length
is not what you expect.
Use your software program to adjust the top and bottom
margins. Change the number of lines per page in your software.
The page length setting may not match the length of the paper
loaded in the printer. Change the page length setting within
your software to match the paper you are using.
Maintenance and Troubleshooting
4-9
Page 59

Problems with printing
If you cannot get the printer to print, first check that paper is
loaded in the printer. Then check that the printer is plugged
into a working electrical outlet that is not controlled by a switch
or timer. Verify that the interface cable is securely connected to
the printer and computer.
After you have done all this, see the following specific
problems.
Printing has stopped and the Pause light is on.
Printing is temporarily suspended. Press the Pause button to
continue.
Printing has stopped but the Pause light is off.
One or both ink cartridges may be empty or too old. A
cartridge is too old if it has been used longer than six months or
beyond the date on its packaging. First clean the print heads as
described earlier in this chapter. If this does not solve the
problem, repla ce the ink cartrid g es.
The peripheral cable between the printer and Macintosh might
not meet the specifications for the printer or computer.
Turn off the printer and perform a self test as described in
Chapter 1. If the self test does not print, the problem is with the
printer. If the self test prints correctly, the problem is probably
with your software.
The No Ink Cartridge light is on, and the printer does not print.
One or both ink cartridges are not installed. Install both ink
cartridges.
4-10
Maintenance and Troubleshooting
Page 60

The printer makes a grinding noise and does not feed paper.
Something is pressing against the knob on the printer’s right side.
Turn off the printer and move it, l eavi ng approximately 2 inches
of open area next to the knob on the printer’s right side. The
printer will not work if anything is pressing against the knob.
All lights except the Operate light flash and nothing prints.
Contact your dealer or EPSON.
Printing stops and the Data and Pause lights flash.
There is a problem with the carriage. Turn off the printer. After
a few seconds, turn it back on and try printing again. If this does
not solve the prob lem, contact your dealer o r a qu alified service
person.
The printer sounds like it is printing, but nothing prints.
The print heads may need cleaning. See “Cleaning the Print
Heads” earlier in this chapter for instructions.
One or both ink cartridges are empty or too old. A cartridge is
too old if it has been used longer than six months or beyond
the date on its packaging. First clean the print heads as
described earlier in this chapter. If this does not solve the
problem, replace the ink cartridges.
Ink cartridges do not last as long as expected.
The ink cartridge life varies, based on the amount of ink used
in printing. If you often print pages with large graphics and
dense text with little white space, you will use up cartridges
faster than if you print pages with lots of white space.
Maintenance and Troubleshooting
4-11
Page 61

Paper handling problems
This section describes how to clear paper jams inside your
printer and how to ensure that paper feeds properly.
Clearing and preventing paper jams
If paper has jammed inside the printer, clear the paper as
follows:
1. Turn off the printer.
2. Open the printer cover.
3. Rotate the knob on the right side of the printer while
pushing it in as shown below.
Turn the knob in the direction, otherwise ink from the
printed sheet can come off onto the printer and smear other
sheets.
4. Pull the paper out carefully. If it tears, make sure you
4-12
remove any remaining pieces.
Maintenance and Troubleshooting
Page 62

5. If paper is caught in the paper eject area, gently pull it out
of the printer.
6. Close the printer cover.
7. Turn on the printer to move the print heads to the correct
positions.
8. Adjust the left and rear paper edge guides.
If you have frequent paper jams, try the following:
❑ Use a higher-quality paper, one that is not too thin or
rough. Make sure it is suitable for ink jet printers. Also,
thicker paper should be fed one sheet at a time. See
Chapter 3 for more information about loading paper.
❑ Fan the stack of paper before you load it.
❑ Do not load too many sheets in the input tray. You can
load up to 100 sheets of plain paper, 70 sheets of special
coated paper, or 50 sheets of transparency film.
Paper feeding problems
If paper is not feeding properly, the most likely causes are the
following:
❑ Paper is curled or folded. Use flat, nondamaged paper.
❑ Too many sheets are loaded in the input tray. Do not load
more than 100 plain paper sheets or more than 70 special
coated sheets.
❑ The paper is too thin or thick. See Appendix B for exact
specifications.
❑ The edge guides are too tight or too loose. Adjust the edge
guides for the size of the paper.
Maintenance and Troubleshooting
4-13
Page 63

If you still have paper feeding problems, see the following:
The printer loads more than one sheet at a time.
Remove the stack of paper and fan it. Tap it on a flat surface to
even the edges. Then reload the paper.
The paper is too thin or thick. See Appendix B for exact
specifications.
Ejected paper is wrinkled.
The paper is too thin or damp. Do not store paper in damp or
humid places.
Single-sheet paper does not fully eject.
Use the Load/Eject button to eject the page.
The paper is too long. Use paper that is within the specified
size. See Appendix B for exact specifications.
Paper is feeding crooked.
The paper is old or creased. Use only new, smooth sheets of
paper.
Too much paper is loaded in the input tray. Remove a few
sheets.
The paper is not the proper size and quality. See Appendix B
for exact specifications.
4-14
Maintenance and Troubleshooting
Page 64

Appendix A
Using the LocalTalk Interface
When to Use the Optional LocalTalk Interface . . . . . . . . . A-2
Installing the Optional LocalTalk Interface Board . . . . . . . A-2
Assigning a Name to the Printer . . . . . . . . . . . . . . . . . A-4
Turning on the Printer’s Network Mode . . . . . . . . . . . . . A-4
A
Using the LocalTalk Interface
A-1
Page 65

When to Use the Optional LocalTalk Interface
If you want to connect the printer to an AppleTalk network
so multiple Macintosh computers can share the printer, you
need to obtain an EPSON Talk kit for the Stylus COLOR. To
purchase one, contact your dealer or call EPSON Accessories
at (800) 873-7766.
You can also use LocalTalk to connect the printer to a single
Macintosh. However, you must still create an AppleTalk
network using the LocalTalk Locking Connector Kits. See the
owner’s manual that comes with the LocalTalk ki ts for more
information about setting up an AppleTalk network.
Installing the Optional LocalTalk Interface Board
To install the LocalTalk interface board in your printer:
1. Turn off the printer.
2. Unplug the power cord from the electrical outlet.
Warning:
w
3. Turn the printer around so that its rear panel faces you and
disconnect any interface cables.
Do not install or remove an interface board when the
printer is connected to the electrical outlet. If you do, you
may damage your printer or Macintosh.
A-2
Using the LocalTalk Interface
Page 66

4. Use a cross-head screwdriver to remove the two screws
securing the shield plate to the optional interface slot; then
lift out the plate.
5. Slide the LocalTalk interface board along the slots on
both sides of the interface compartment. Push it in firmly to
fully insert the connector at the rear of the interface board
into the printer’s internal socket.
6. Secure the interface board in the slot with the two screws
included with the board.
7. Attach a LocalTalk connector box to the LocalTalk
connector on the back of the printer. Attach one end of a
LocalTalk cable to this connector box.
Attach the other end of the cable to an available port on
any connector box that is part of the network. For more
information about creating an AppleTalk network, see the
owner’s guide that comes with the LocalTalk Locking
Connector Kits.
8. Connect interface cables to the serial or parallel port if you
are using more than one computer.
9. Make sure the printer is turned off. Then plug in the power
cord.
Using the LocalTalk Interface
A-3
Page 67

Assigning a Name to the Printer
After you install the LocalTalk interface board and install the
driver as described in Chapter 1, you must assign a name to
your printer before you can select it in the Chooser.
To assign a name to your printer:
1. Double-click the
If you installed the EPSON Namer in Chapter 1, look on
your hard disk for the icon.
If you did not install the EPSON Namer, insert the EPSON
Macintosh driver diskette into a diskette drive.
2. Under Device Types, select the
3. If there are multiple AppleTalk zones at your site, select the
zone in which your printer is located.
4. Under New Name, enter a name for your printer.
5. Choose
Namer.
Rename
EPSON Namer
. Then choose
icon.
AT-Stylus COLOR
Done
to exit the EPSON
icon.
Turning on the Printer’s Network Mode
If you encounter problems when using the printer on an
AppleTalk network, you may need to turn on the printer’s
network mode by using the buttons on the control panel. To
turn on the network interface mode:
1. Make sure the printer is off and that paper is loaded in the
input tray.
2. While holding down the
A-4
turn on the printer.
Using the LocalTalk Interface
Economy/Condensed
button,
Page 68

After the printer warms up, it prints a page listing the
available languages.
3. Unless you want to change the language of the control
panel, press the
button. (Press the
Alt
Font
button to
change the language selection.)
The printer prints two instruction sheets that describe how
to change default printer settings.
4. Press the
Font
lights are on and the
5. Press the
Data
Alt
and
button until the
Roman T
button until the
Paper Out
lights are off.
Courier
light is off.
Operate
and
Sans Serif H
light is on and the
6. Turn off the printer.
Using the LocalTalk Interface
A-5
Page 69

Appendix B
Technical Specifications
Printing . . . . . . . . . . . . . . . . . . . . . . . . . . . . . . . . B-2
Paper . . . . . . . . . . . . . . . . . . . . . . . . . . . . . . . . . B-3
Ink Cartridges . . . . . . . . . . . . . . . . . . . . . . . . . . . . B-6
Mechanical . . . . . . . . . . . . . . . . . . . . . . . . . . . . . . B-7
Electrical . . . . . . . . . . . . . . . . . . . . . . . . . . . . . . . . B-7
Environmental . . . . . . . . . . . . . . . . . . . . . . . . . . . . B-8
Safety Approvals . . . . . . . . . . . . . . . . . . . . . . . . . . . B-8
B
Technical Specifications
B-1
Page 70

Printing
Printing method: On-demand ink jet
Nozzle configuration: Monochrome (black) 64 nozzles
Print speed (color)*:
Best print quality 5.5 MPP (minutes per page)
Faster print quality 3 MPP
(16 × 4 staggered)
Color 48 nozzles
(16 × 3, Cyan, Magenta, Yellow)
* Print speeds vary depending on system configuration, software
application, and amount of page covered.
Resolution:
Paper feed speed: 89 milliseconds per 1/6-inch line
Input buffer: 64KB
720 × 720 dpi,
360 × 360 dpi,
180 × 180 dpi
The resolution is specified by using the
printer driver. All resolutions are available
for color and monochrome modes.
B-2
Technical Specifications
Page 71

Paper
Note:
Since the quality of any particular brand or type of paper may be changed by the
manufacturer at any time, EPSON cannot guarantee the use of any particular
brand or type of paper. Always test samples of paper stock before purchasing large
quantities or printing large jobs.
Paper path: Sheet feeder, front entry
Single sheets:
Capacity 100 sheets at 64 g/m
10 envelopes
50 transparency films
70 sheets of EPSON Special coated paper
2
(17 lb) paper
Size
A4 (210 mm × 297 mm)
Letter (8.5 × 11 inches)
Legal (8.5 × 14 inches)
B5 (182 mm × 257 mm)
Paper types Plain paper and special papers distributed
by EPSON (special coated paper and
transparencies)
Paper thickness 0.08 to 0.11 mm (0.003 to 0.004 inches)
2
Paper weight 64 to 90 g/m
Use 90 g/m
(17 to 24 lb)
2
(24 lb) paper under nor m al
temperature and humidity conditions.
Envelopes:
Capacity 10 envelopes
Size
No. 6 166 × 92 mm ( 6.5 × 3.6 inches)
No. 10 240 × 104 mm (9.5 × 4.1 inches)
C5 162 mm × 229 mm
Paper types Bond paper
Paper thickness Less than 0.52 mm (0.020 inches)
2
Paper weight 75 to 90 g/m
(20 to 24 lb)
Technical Specifications
B-3
Page 72

Note:
❑
Use recycled paper under normal temperature and humidity conditions only.
Poor quality paper may reduce print quality and cause paper jams and other
problems. If you encounter problems, switch to a higher grade of paper.
❑
Envelope and transparency printing are available only under normal
conditions:
Temperature 15 to 25°C (59 to 77°F)
Humidity 40 to 60% RH
❑
Use envelopes that do not curl.
❑
The following EPSON genuine papers are available:
S041025 Special coated paper for 360 dpi printing (A4)
S041028 Special coated paper for 360 dpi printing (Letter)
S041026 Special coated paper for 720 dpi printing (A4)
S041029 Special coated paper for 720 dpi printing (Letter)
S041027 Transparency film (A4)
S041030 Transparency film (Letter)
S041032 Starter Pack (samples of 360, 720, and transparency film special
media)
B-4
Technical Specifications
Page 73

Printable area:
Single sheets
Envelopes
A
A
B
C
B
B
C
A T he minimum top margin is 3.0 mm (0.12 inches).
B The minimum left margin is 3.0 mm (0.12 inches).
The right margin is:
3.8 mm (0.15 inches) for A4, B5 size paper, and No. 6 envelope.
9.8 mm (0.38 inches) for Letter and Legal size paper.
13.8 mm (0.54 inches) for DL envelope.
33.8 mm (1.33 inches) for No. 10 envelope.
C The minimum bottom margin is 13.0 mm (0.51 inches).
Technical Specifications
B-5
Page 74

Ink Cartridges
Black ink cartri dge (S020034):
Color Black
Print capacity* Approximately 1.5 mi llion characters
Cartridge life* 2 years from production date and up to
(840 sheets, letter, 5% duty at 360 dpi)
6 months after opening the package, at
25°C (77°F)
Temperature
Dimensions
Color ink cartridge (S020036):
Colors Cyan, Magenta, and Yellow
Print capacity* In each color, approximately 1.2 million
Cartridge life* 2 years from production date and up to
Temperature
Storage: −30 to 40°C (−22 to 104°F)
1 month at 40°C (104°F)
Transit: −30 to 60°C (−22 to 140°F)
1 month at 40°C (104°F)
120 hours at 60°C (140°F)
Freezing:** −4°C (24.8°F)
1.1 inches (W) × 2.7 inches (D) × 1.7 inches (H)
characters (670 sheets/color, letter, 5% duty
at 360 dpi)
6 months after opening the package at
25°C (77°F)
Storage: −30 to 40°C (−22 to 104°F)
1 month at 40°C (104°F)
Transit: −30 to 60°C (−22 to 140°F)
1 month at 40°C (104°F)
120 hours at 60°C (140°F)
Freezing:** −6°C (21.2°F)
B-6
Dimensions
* The cartridge life may vary. If you often print large graphics and
dense text with little white space, you will use up ink cartridges
faster than if you print pages with lots of white space.
** The ink freezes at −4°C (25°F) for black ink and −6°C (21°F) for
color ink. It thaws in approximately 2 hours at 25°C (77°F).
2.1 inches (W) × 2.7 inches (D) × 1.7 inches (H)
Technical Specifications
Page 75

Caution:
❑
c
The printer will be damaged if you use ink or cartridges not
manufactured by EPSON or to EPSON’s specifications. Do not
attempt to refill ink cartridges manually. If you use substandard
products with your EPSON printer, you will damage the print
heads and void your warranty.
❑
Do not use an ink cartridge after the expiration date on the package.
Mechanical
Paper feed method: Friction
MTBF: 4,000 power-on hours
Print head life: 1,000 million dots per nozzle
Total print volume: 75,000 pages
Dimensions and weight: Printing
Weight: 15.9 lb (7.4 kg) including the ink cartridges
Electrical
Input voltage range: 103.5 to 132 V
Rated frequency range: 50 to 60 Hz
Input frequency range: 49.5 to 60.5 Hz
Rated current: 0.6 A
Width 470 mm (18.5 inches)
Depth 525 mm (20.7 inches)
Height 192 mm (7.56 inches)
No paper
Width 470 mm (18.5 inches)
Depth 344 mm (13.5 inches)
Height 294 mm (11.6 inches)
Power consumption: Approx. 20 W (duri ng self-test)
Technical Specifications
B-7
Page 76

Environmental
Temperature: Operation 10 to 35°C (50 to 95°F)
Humidity: Operation 20 to 80% RH
* Stored in shipping container
** Without condensation
Safety Approvals
Safety standards: UL 1950 with D3, CSA 22. 2 950 wi th D3
R.F.I.: FCC part 15 subpart B c lass B
Storage* −20 to 60°C (14 to 140°F)
1 month at 40°C (104°F)
120 hours at 60°C (140°F)
Storage* ** 5 to 85% RH
B-8
Technical Specifications
Page 77

Index
A
Accessories, EPSON, 4
Aligning the printer, 1-16
Alignment problems, 4-9
Alt button, 2-11
B
Background printing, 1-15
Banding, 4-9
Best print quality, 2, 2-4
BI-D Calibration Utility, 1-13, 1-16
Blurred image, 4-8
Brightness, 2-7
Buttons, control panel, 2-11
C
Cable, 1-2
installing, 1-12–13
Calibrating the print er, 1-16
Canceling print jobs, 2-12
Cartridges, see Ink cartridges
Chooser, 1-15
Cleaning the print heads, 4-2
Clearing paper jams, 4-12–13
Cluster, 2-7
Coated papers, 3, 3-2
loading, 3-3–4
Colors, 2-7
Condensed light, 2-12
Control panel, 2-3, 2-11–13
Controlling the printer
through the software driver, 2-3–10
using the control panel, 2-11–13
Copies, 2-4
Custom, 2-9
D
Darker colors, 2-6
Data light, 2-12
Draft print quality, 2, 2-4
Driver, see Printer driver
E
Economy light, 2-12
Economy/Condensed button, 2-11
Ejecting a page, 2-11
Electrical specifications, B-7
Enlarge, 2-10
Envelopes, 3-4
loading, 3-6–7
printable area, A-5
specifications, A-3
Environmental specifications, B-8
EPSON Connection, 3
EPSON Special coated paper, 3-2
loading, 3-3–4
Expiration date, ink cartridge, 4-11
F
Faint images, 4-8
Faster print quality, 2, 2-4
Flip Horizontal, 2-10
Font button, 2-13
Font light, 2-12
Font Substitution, 2-10
G
Graphics, choo sing a ha lftone
method, 2-6–7
IN-1
Page 78

H
O
Halftone methods, 2-6–7
Heavy papers, loading, 3-5–7
Help, getting, 3
Horizontal flipping of image, 2-10
I
Ink
conserving, 2-12
controlling the amount applied , 2-7
Ink cartridges, 4-3
installing, 1-5–10
life expectancy, B-6
replacing, 4-3–6
specifications, B-6
Input buffer, A-2
Input tray
capacity, 4-13, A-3
installing, 1-4
Installation
ink cartridges, 1-5–10
LocalTalk, 1-2–4
printer driver, 1-13–14
L
Light images, 4-8
Lighter colors, 2-6
Lights, control panel, 2-11
Load/Eject button, 2-11
M
Maintenance, 4-2–6
Manual Feed, 2-5
Modem port, 1-13
Monitoring print jobs, 2-12
N
No Ink Cartridge light, 2-10, 4-10
Normal print quality, 2, 2-4
180-dpi resolution, 2-4
Operate button, 2-11
Operate light, 2-12
Orientation, 2-10
Output tray, installing, 1-4
P
Pages, 2-4
Paper, 3, 3-2
clearing paper jams, 4-12–13
loading coated papers, 3-3–4
loading heavy paper, 3-4–6
loading plain paper, 1-10–11
printable area, A-5
problems with ejecting, 4-14
selecting the paper type, 2-5
specifications, A-3
specifying the size, 2-8–9
storing special paper, 3-2
Paper Feed, 2-5
Paper jams
clearing, 4-12–13
preventing, 4-13
Paper Out light, 2-12
Paper size
defining a new size, 2-9–10
specifying, 2-8–9
Paper thickness lever
adjusting for heavy paper and
envelopes, 3-5
checking the position, 1-10
Parallel interface, 1
Pattern 2-6
Pause button, 2-11
Pause light, 2-12
problems with, 4-10
Preview, 2-6
Print back to Front, 2-5
Print dialog box, 2-3
Print heads, cleaning, 4-2
IN-2
Page 79

Print jobs
canceling, 2-12
changing the order, 2-12
viewing, 2-12
Print quality, 2, 2-4
problems with, 4-8–9
Print speed, A-2
Printable area, A-5
Printer, 1
calibrating, 1-16
cleaning the print heads, 4-2
connecting to the Macintosh , 1-12–13
controlling, 2-2–13
problems with, 4-7–14
resetting, 2-11
setting up, 1-2–5
software installation, 1-13–14
specifications, A-2–8
system requirements, 1-2
testing, 1-12
transporting, 4-6–7
turning on/off, 1-5, 2-11
unpacking, 1-3
Printer driver
choosing, 1-14–15
installing, 1-13–14
when to change settings, 2-2
Printer port, 1-13
Printer settings, 2-2–10
Printing
canceling a print job, 2-12
changing settings, 2-2
coated paper, 3-3–4
envelopes, 3-4–6
heavy paper, 3-4–6
problems with, 4-10–12
transparencies, 3-3–4
Protective materials, 1-3
Q
Qualitysettings, 3, 2-4
Queue Kit, 1-13
Queue Monitor, 1-13, 2-14–15
setting preferences, 2-15
R
RAM, 1-2
Reduce, 2-10
Requirements, system, 1-2
Resetting the printer, 2-11
Resolution, A-2
choosing, 2-4
S
Safety standards, B-8
Scatter, 2-7
Self test, 1-12
Setting up, 1-2–5
Settings
accessing, 2-3
when to change, 2-2
720-dpi resolution, 2-4
System requirements, 1-2
T
Telephone, toll-free number, 3
Testing the printer, 1-12
360-dpi resolution, 2-4
Transparency film, 3-2
loading, 3-3–4
Transporting the printer, 4-6–7
Troubleshooting, 4-7–14
Turning the printer on/off, 1-5, 2-11
U
Unpacking the printer, 1-3
IN-3
Page 80

V
Vertical lines in image, 4-9
W
Warranty, 4-3
Wrinkled paper, 4-14
IN-4
 Loading...