

Page 1
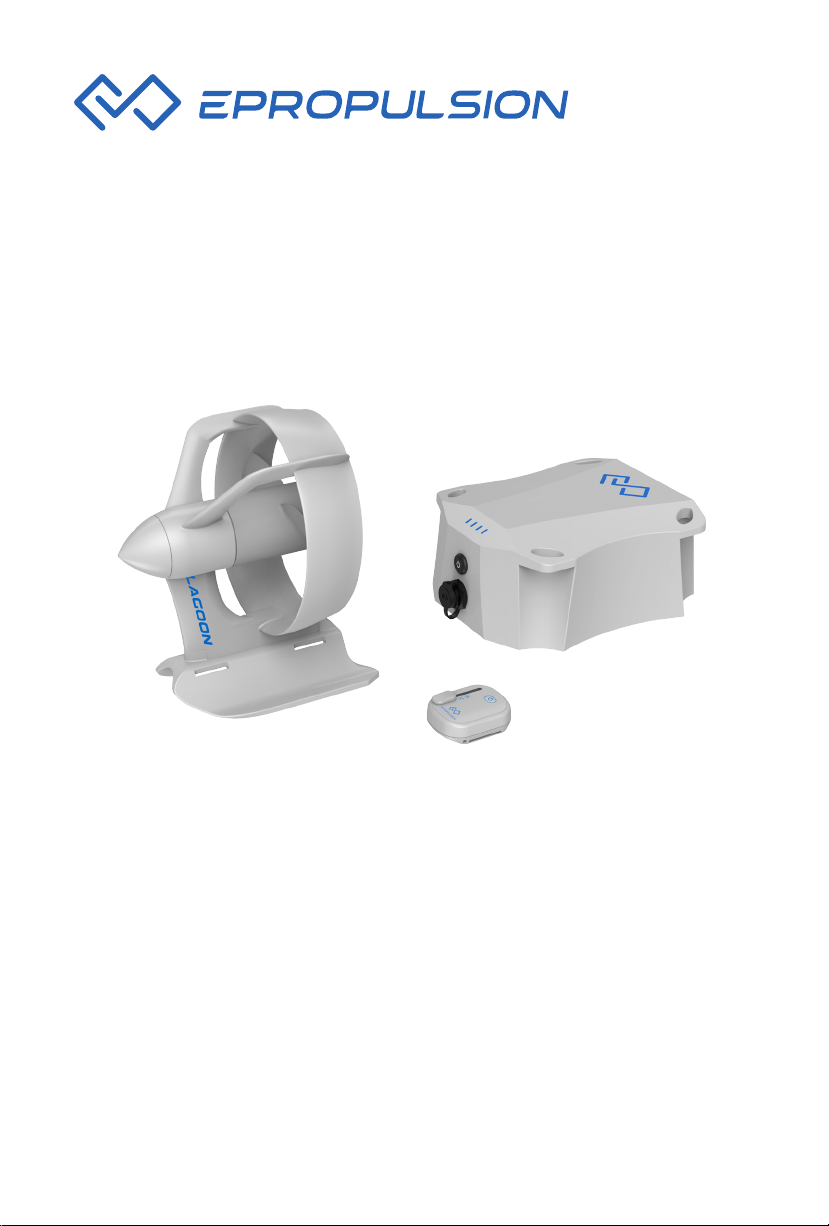
LAGOON USER MANUAL
January, 2017 Version 1.1
Copyright © 2017 ePropulsion All Rights Reserved
Page 2

Page 3

Acknowledgements
Thanks for choosing ePropulsion products, your trust and support in our
company are sincerely appreciated. We are dedicated to providing highperformance underwater thrusters, as well as electric outboards, reliable
lithium batteries and accessories.
Welcome to visit www.epropulsion.com and contact us if you have any
concerns.
Using this Manual
Before use of the product, please read this reference manual thoroughly
to understand the correct and safe operations. By using this product, you
hereby agree that you have fully read and understood all contents of this
manual. ePropulsion accepts no liability for any damage or injury caused by
operations that contradict this manual.
Due to ongoing optimization of our products, ePropulsion reserves the rights
of constantly adjusting the contents described in the manual. ePropulsion
also reserves the intellectual property rights and industrial property rights
including copyrights, patents, logos and designs, etc.
This manual is subject to update without prior notice, please visit our webstie
www.epropulsion.com for the latest version. If you find any discrepancy
between your products and this manual, or should you have any doubts
concerning the product or the manual, please visit www.epropulsion.com.
ePropulsion reserves the rights of nal interpretation of this manual.
This manual is multilingual, in the case of any discrepancy in the
interpretation of different language versions, the English version shall prevail.
Symbols
The following symbols will help to acquire some key information.
Important instructions or warnings
Useful information or tips
1
Page 4
Product Identication
CAUTIONS
FCC ID: 2AKHE-LAGOON
READ USER
MANUAL FIRST
DO NOT
DISASSEMBLE
Model: 24V Li-ion Battery
Rated Capacity: 333Wh
Rated Voltage: 22.2 V
Charging Temperature:
0°C~45°C(32°F~113°F)
Discharging Temperature:
-20°C~60°C(-4°F~140°F)
KEEP AWAY FROM
FIRE/HEAT SOURCE
DL AB1FC0001
CAUTIONS
FCC ID: 2AKHE-LAGOON
READ USER
MANUAL FIRST
DO NOT
DISASSEMBLE
Model: 24V Li-ion Battery
Rated Capacity: 333Wh
Rated Voltage: 22.2 V
Charging Temperature:
0°C~45°C(32°F~113°F)
Discharging Temperature:
-20°C~60°C(-4°F~140°F)
KEEP AWAY FROM
FIRE/HEAT SOURCE
DLAB1FC0001
S/N: DLAB1FC0001
FCC ID: 2AKHE-LAGOON
MODEL: LAGOON
S/N: DLAR1FC0001
FCC ID: 2AKHE-LAGOON
MODEL: LAGOON
S/N:
DLAR1FC0001
FCC ID: 2AKHE-LAGOON
MODEL: LAGOON
S/N: DLAM1FC0001
MODEL: LAGOON
S/N: DLAM1FC0001
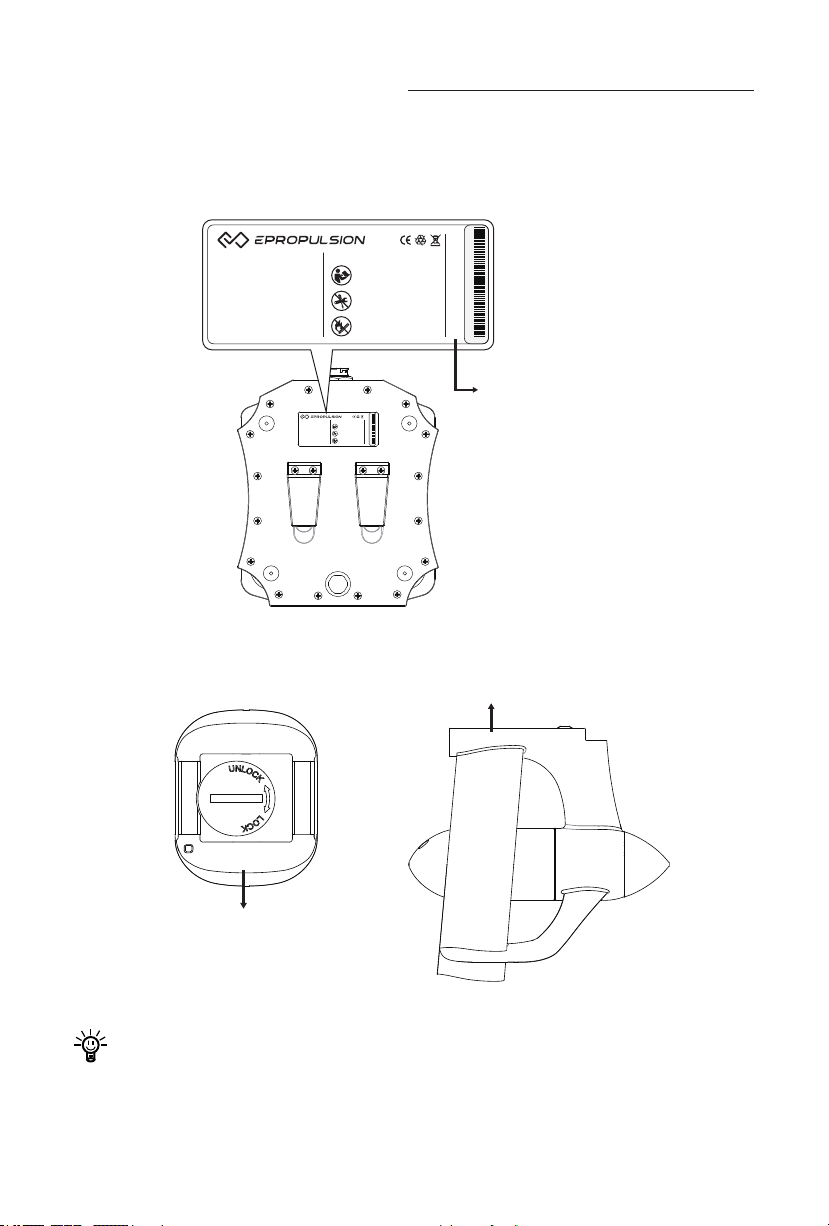
Below Figure 0-1 indicates the position of the label for LAGOON Battery.
Figure 0-2 and Figure 0-3 indicate the position of serial numbers for
LAGOON Controller and LAGOON Motor.
Fi gure 0 -1
The above three parts have different serial numbers. Please record all
the three serial numbers for access to maintenance or other after-sale
services.
Figure 0-2 Figure 0-3
2
Page 5

Table of Contents
Acknowledgements .................................................................................. 1
Using this Manual...................................................................................... 1
Symbols ..................................................................................................... 1
Product Identication ............................................................................... 2
Table of Contents ...................................................................................... 3
1. Important Safety Instructions .............................................................. 5
2. Product Overview.................................................................................. 7
2.1 In the Package ................................................................................. 7
2.2 Parts and Diagrams ..................................................................... 9
2.3 Technical Data ............................................................................. 11
2.4 Declaration .................................................................................. 12
3. Installation ............................................................................................. 14
3.1 Installation of LAGOON Motor ......................................................... 14
3.1.1 Install with a Standard Adapter ................................................................ 14
3.1.2 Install with LAGOON Universal Adapter ................................................. 16
3.2 Fix LAGOON Battery ....................................................................... 18
3.3 Connect LAGOON Battery to LAGOON Motor ................................ 20
3.4 Attach the LAGOON Controller ....................................................... 20
4. Operation ............................................................................................... 22
4.1 Use of LAGOON Battery .................................................................. 22
4.1.1 Bat t e r y LED s ............................................................................................ 22
4.1.2 Switch On/Off the LAGOON Battery ....................................................... 24
4.1.3 Charge the Battery .................................................................................. 25
4.2 Use of LAGOON Controller ............................................................. 26
4.2.1 Switch On/Off the LAGOON Controller ................................................... 26
4.2.2 Wirelessly Control the LAGOON Motor .................................................. 27
4.2.3 Replace Button Cell for LAGOON Controller.......................................... 28
4.3 Pair LAGOON Controller with LAGOON Battery ............................. 28
5. Detaching LAGOON Motor ................................................................... 30
3
Page 6

6. Transport and Storage .......................................................................... 36
6.1 Transport .......................................................................................... 36
6.2 Storage ............................................................................................ 36
7. Routine Maintenance ............................................................................ 37
8. Warranty Claims .................................................................................... 38
8.1 Warranty Policies ............................................................................. 38
8.2 Out of Warranty ............................................................................... 39
8.3 Warranty Claim Procedures ............................................................. 39
4
Page 7
1. Important Safety Instructions
This user manual contains important information pertaining equipment
installation and safety instructions. Before starting to use the product, please
read this manual fully and pay special attention to the following safety
instructions:
Before Operation
Users who are allowed to use LAGOON should be in good physical state,
know how to swim and how to paddle.
Always wear a life vest and always wear a leash when operating.
Always take a paddle on board.
Only adults who have thoroughly read and fully understood this manual
are allowed to operate this product.
Check the status and function of LAGOON before use and make sure all
components are in good condition.
Make sure the LAGOON Motor is securely mounted on the bottom of the
SUP/kayak, etc. before operation.
Make sure the LAGOON Controller works well by wireless connection.
Familiarize yourself with all the operations related to this product.
Check applicable local water safety rules and boating regulations before
use.
Observe the surrounding environment in advance to avoid unfavorable
conditions such as strong winds, waves, currents or rapids, etc.
During Operation
Do not rotate the motor in shallow water or out of water. Only operate it in
water with enough depth and avoid all possible obstacles.
Follow the correct operating instructions in this user manual.
Attach the LAGOON Controller to your wrist or paddle for easy access.
Do not run the motor if swimmers or other watercrafts are near the boat.
Press the on/off button on the LAGOON Controller immediately in
emergency situations.
Observe local water safety rules and boating regulations while operating
the product.
Do not run the motor under the inuence of alcohol or drugs.
Switch off the LAGOON Battery and LAGOON Controller before detaching
5
Page 8
the LAGOON Motor from the SUP/kayak, etc.
Handling
Never run the motor in the air as it will seriously shorten the motor
service life, generate loud noise and possibly cut fingers. Even if
users unintentionally run the motor in the air, the motor will stop
running immediately in 5 seconds for protective purpose, and the
motor may be unable to start normally. Never get close to the running
propeller.
Never dismantle or repair the product on your own or by any unauthorized
th ird par t y.
Keep it away from flammable gas, corrosive and other dangerous
substance.Store it in a dry and ventilated place without direct sun/rain
exposure and store it far away from dangerous substances.
Pay attention to battery safety and operate it in the right way to avoid
short-circuit, overheat, overcharge and over-discharge. Never drop the
battery.
Only use LAGOON Charger designed for the battery. Other chargers
may lead to shortened runtime, premature battery failure, or even re or
explosion.
Clean the LAGOON Motor with fresh water after each use.
6
Page 9
2. Product Overview
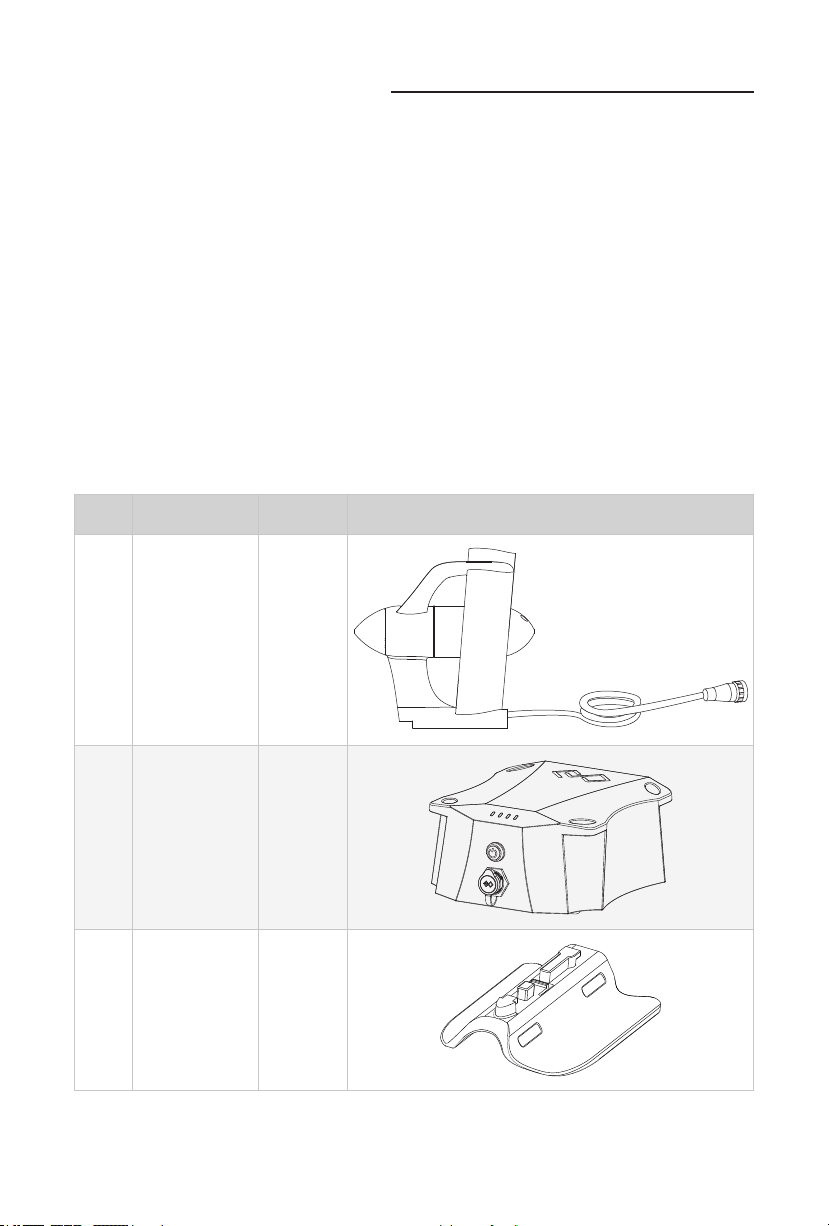
LAGOON is a lightweight underwater electric propulsion system. The welladapted LAGOON can be mounted on the back of nearly all kinds of SUPs,
kayaks, canoes, etc. that traditionally rely on human paddling. This product
mainly consists of a LAGOON Motor, a LAGOON Battery and a wireless
LAGOON Controller. This small but mighty propulsion system supports
about 1 hour of full-speed running, perfectly backing you up whether you
need a rest or want to go further.
2.1 In the Package
Unpack the package and check if there is any damage caused during
transport. Check all the items inside the package against the below list. If
there is any transport damage or lack of any listed item, please contact your
dealer immediately.
No. Items Qty./Unit Figure
LAGOON
1
Motor
1 set
2
3
LAGOON
Battery
LAGOON
Universal
Adapter
1 set
1 set
7
Page 10
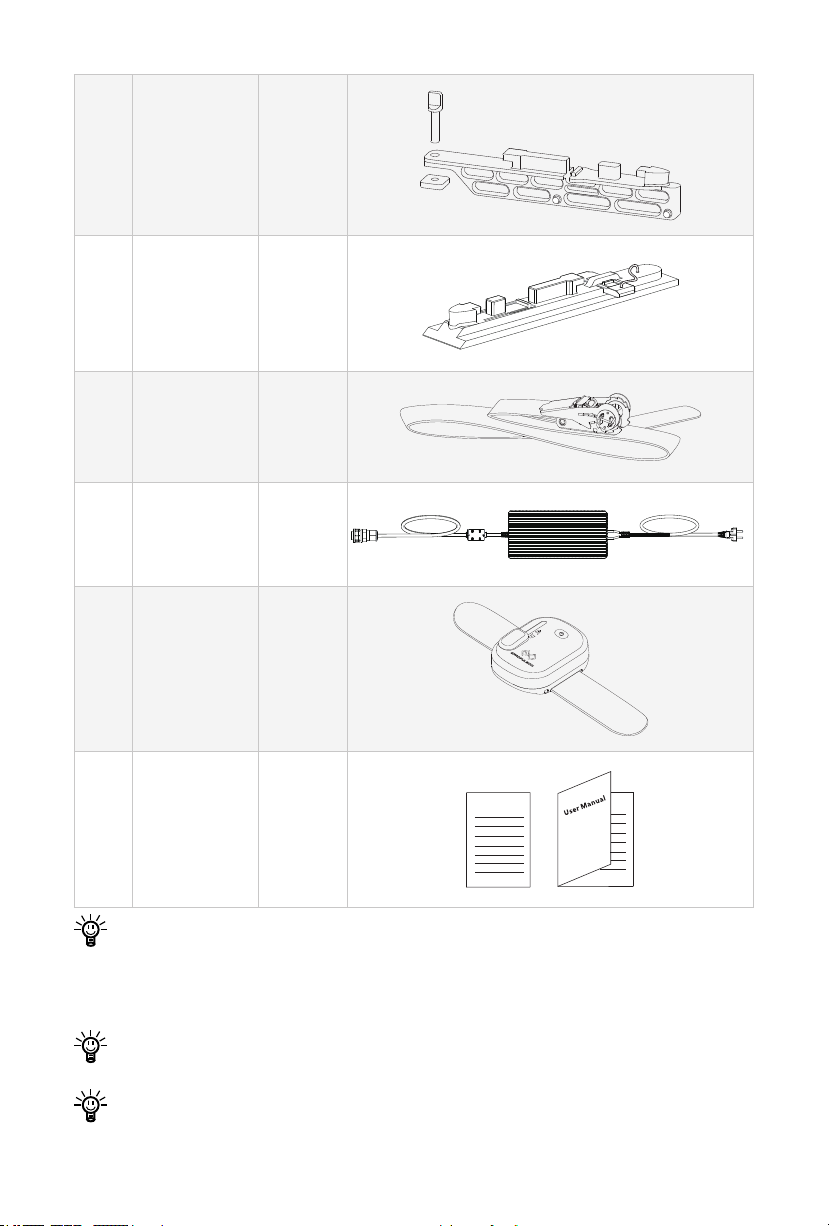
US Fin Box
Warranty
4
(standard)
5
Box Adapter
(standard)
Adapter
Inatable
SUP Fin
1 set
1 set
6
Ratchet
Strap
2 pieces
LAGOON
7
Battery
1 set
Charger
LAGOON
Controller
8
with a
1 set
Velcro Tape
User Manual
9
& Warranty
1 set
Claim Card
Attach the LAGOON Motor to the bottom of the watercrafts by using a
standard adapter which is compatible with the n box on the watercraft,
or using the LAGOON universal adapter for watercrafts that have
different n boxes or without a n mounting system.
Other accessories mentioned in this manual are not included in the
package. Please place additional orders if you need them.
Save the original package for transport and storage.
8
Page 11
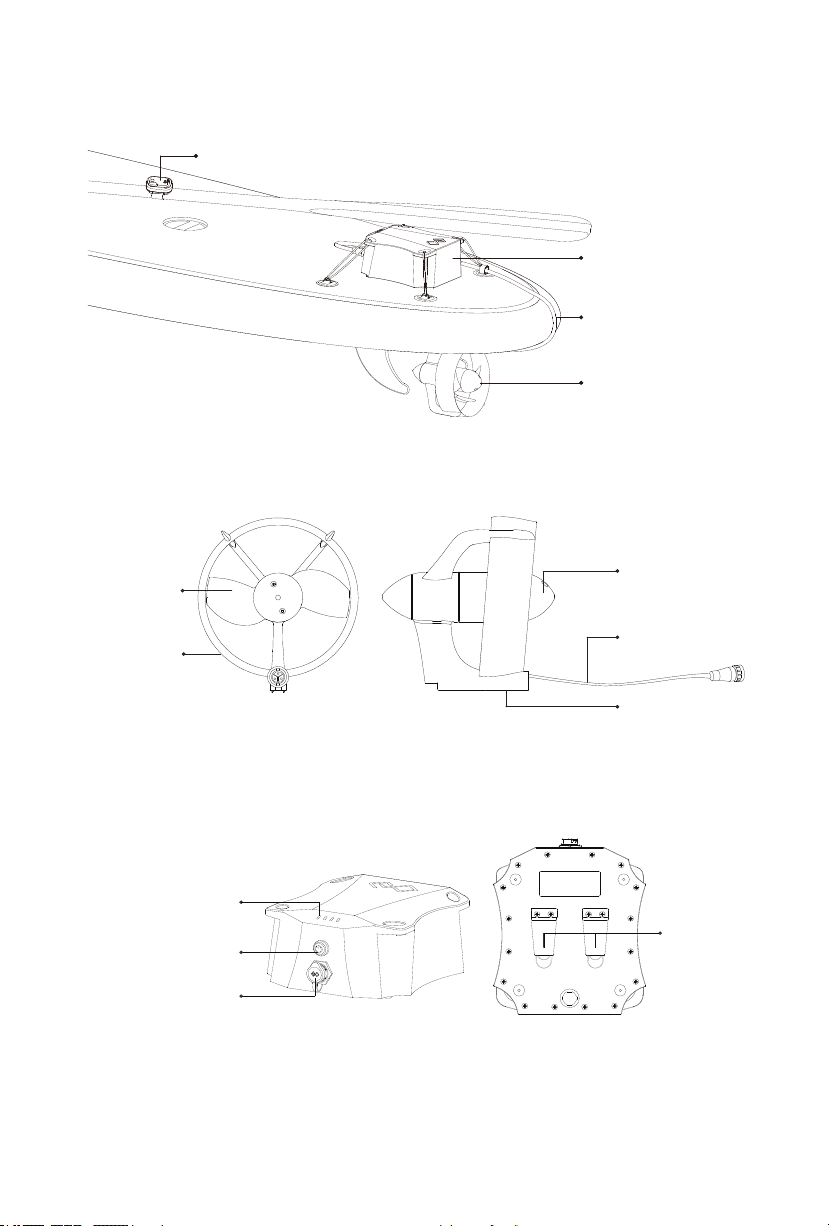
2.2 Parts and Diagrams
LAGOON Controller
LAGOON Motor
Power Cable
LAGOON Battery
Propeller
Motor Module
Power Cable
Motor Base
Protective
Frame
Side ViewFront View
Power Button
LED Lights
Charge/Discharge
Port
Battery
Buckles
Bottom ViewFront View
Figure 2-1 LAGOON
Figure 2-2 LAGOON Motor
Figure 2-3 LAGOON Battery
9
Page 12
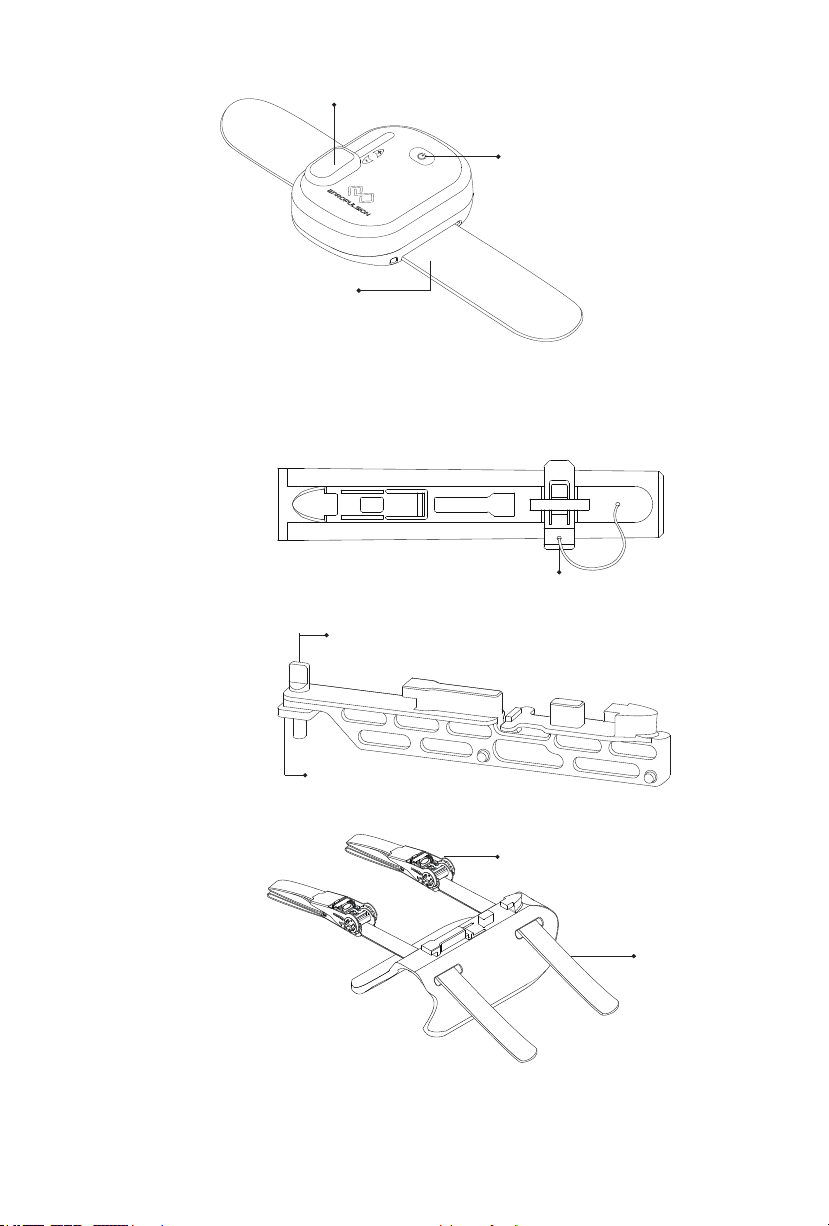
Throttle Slide Block
On/Off Button
Velcro Tape
Inflatable SUP
fin box adapter
US fin box
adapter
LAGOON
universal
adapter
Ratchet
Strap
Strap Buckle
Screw
Back Nut
Retaining Chip
Figure 2-4 LAGOON Controller
Figure 2-5 Adapters
10
Page 13
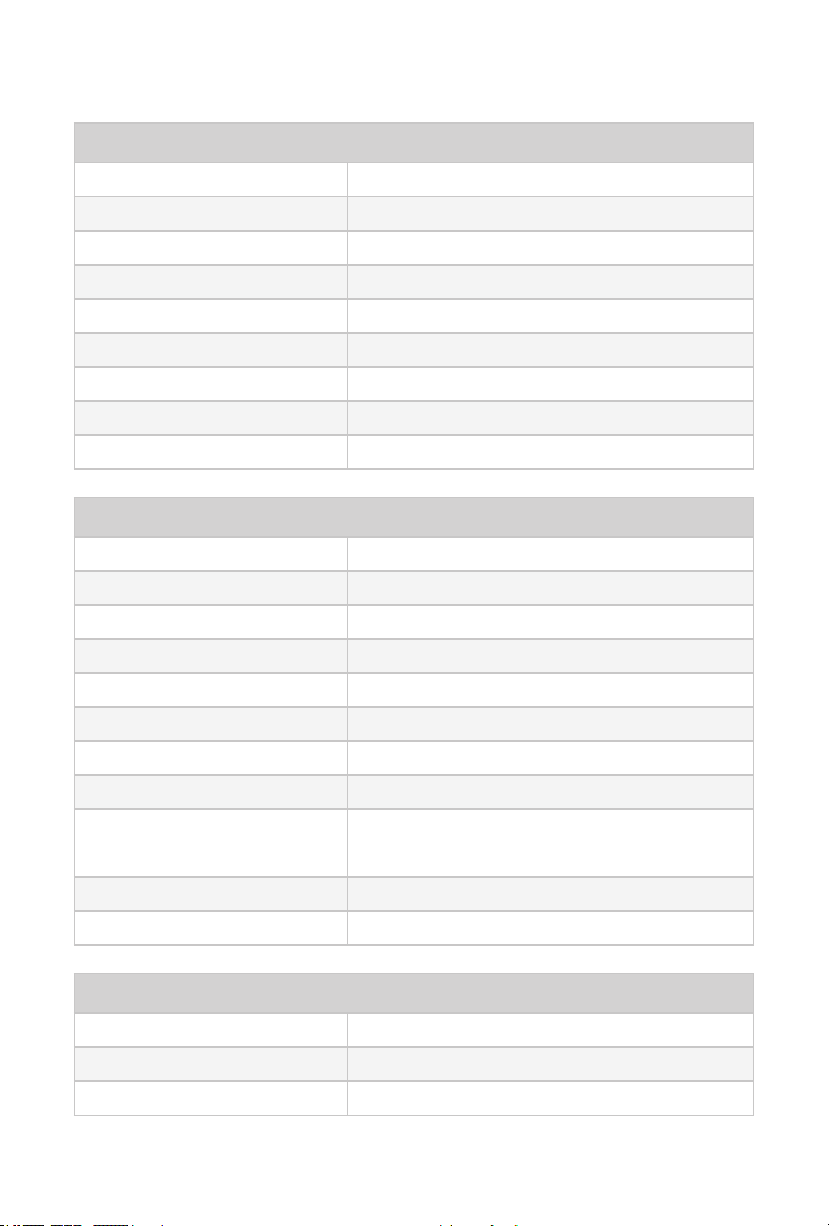
2.3 Technical Data
LAGOON General Data
Input power 300W
Static thrust 23lbs
Total weight 4Kg / 8.8lbs
LAGOON Motor weight 1.5Kg / 3.3lbs
Dimension 162mmx167mmx182 mm / 6.4”x6.6”x7.2”
Propeller diameter 150mm / 5.9”
Propeller pitch 115mm / 4.5”
Max propeller speed in rpm 180 0rpm
Control method Wireless
LAGOON Battery
Battery type Lithium-ion
Rated capacity 333Wh
Rated voltage 22.2V
Final charging voltage 25.2V
Cutoff voltage 18V
Weight 2.5Kg
Cycle life ≥500 cycles (80% of rated capacity)
Charging time 3hrs
Temperature range
Relative humidity 65 ± 20%RH
Dimension 216mmx178mmx100mm / 8.5”x7”x4”
LAGOON Controller
Throttle Stepless throttle
Forward/Reverse control Forward control available
Power source One built-in button cell (CR2032)
Charging: 0˚C ~ 45˚C / 32˚F ~ 113˚F
Discharging: -20˚C ~ 60˚C / -4˚F ~ 140˚F
11
Page 14
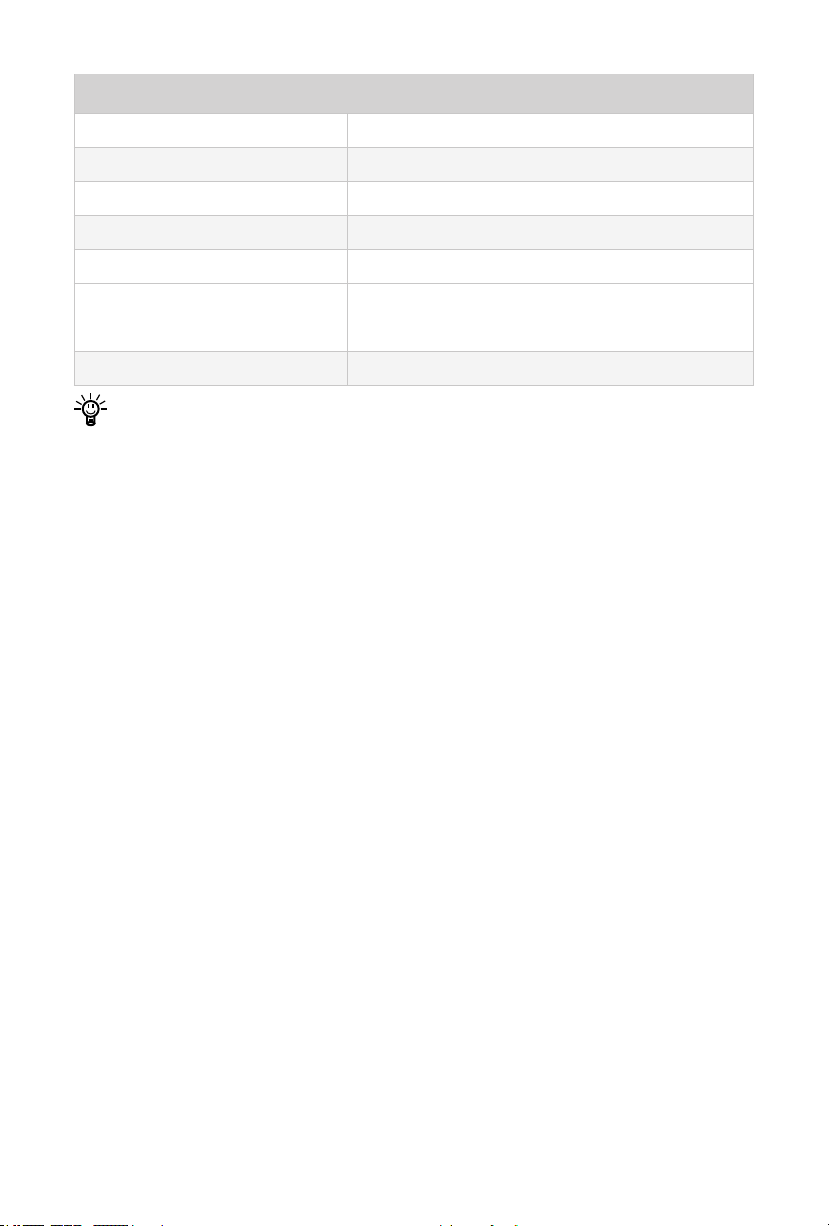
LAGOON Charger
Input power 180W
Input voltage (AC) 100V ~ 240V
Input frequency 50Hz / 60Hz
Input current ≤ 3A
Output voltage (DC) 25.2V / 7A
Temperature range
Efciency ≥87 %
Battery performance is dependent on many external factors such as
operating environment and conditions of SUP/kayak, etc.
Operating: -29˚C ~ 45.5˚C / -20.2˚F ~ 113.9˚F
Storage: -40˚C ~ 75˚C / -40˚F ~ 167˚F
2.4 Declaration
ePropulsion Innovation (HK) Ltd.
Rm.1501 (682), 15/F Spa CTR 53 - 55, Lockhart Rd., WanChai, Hong Kong
Declare conformity of design in LAGOON
With the following directives:
EMC-directive 2014/30/EC
MD-directive 2006/42/EC
LVD-directive 2014/35/EU
R&TTE-directive 2014/30/EU
Applied standards:
EN 55014-1: 2016
EN 55014-2: 2015
EN 61000-3-2:2014
EN 61000-3-3: 2013
EN 60204-1: 2006+A1 :2009
EN ISO 12100:2010
EN 60204-1: 2006+A1 :2009
EN ISO 12100:2010
EN ISO 6185-2: 2001
EN ISO 8665:2006
12
Page 15

EN ISO 9093-1:1998
EN 28848-1:993
ETSI EN 301 489-3: 2002 V1.4.1
ETSI EN 301 489-1:2008 V1.8.1
This device complies with part 15 of the FCC Rules. Operation is subject to
the following two conditions:
(1). This device may not cause harmful interference and,
(2). This device must accept any interference received, including interference
that may cause undesired operation.
The origninal FCC certicate was issued by Global-Standard Testing Service
Co., Ltd. in Shenzhen, Guangdong.
The original CE certicate was issued by Shenzhen An-Teng Testing Service
Co., Ltd.
Certificate NO.: ATT1612160218E, ATT1612160218M, ATT1612160218S,
ATT1612160218RF.
Issued Date: Dec 22nd, 2016
Signature:
Mr. Danny Tao, CEO & Cofounder of ePropulsion Innovation (HK) Ltd.
13
Page 16
3. Installation
21
LAGOON comes with two adapters that can be t into two major standard
n boxes which are widely used on most SUPs and a universal adapter for
kayaks and any small watercraft without standard n boxes.
3.1 Installation of LAGOON Motor
Before installing the LAGOON Motor to an SUP/kayak, etc., note that the
SUP/kayak, etc. must be strong enough to support the LAGOON Motor and
LAGOON B attery.
3.1.1 Install with a Standard Adapter
Two standard adapters are included in the LAGOON package: US fin box
adapter and inflatable SUP fin box adapter. These two standard adapters
can be used with the corresponding standard fin boxes in the market.
Choose a suitable one and follow the below steps to attach the LAGOON
Motor to the standard n box on the bottom of the SUP/kayak.
a. Install with a US n box adapter
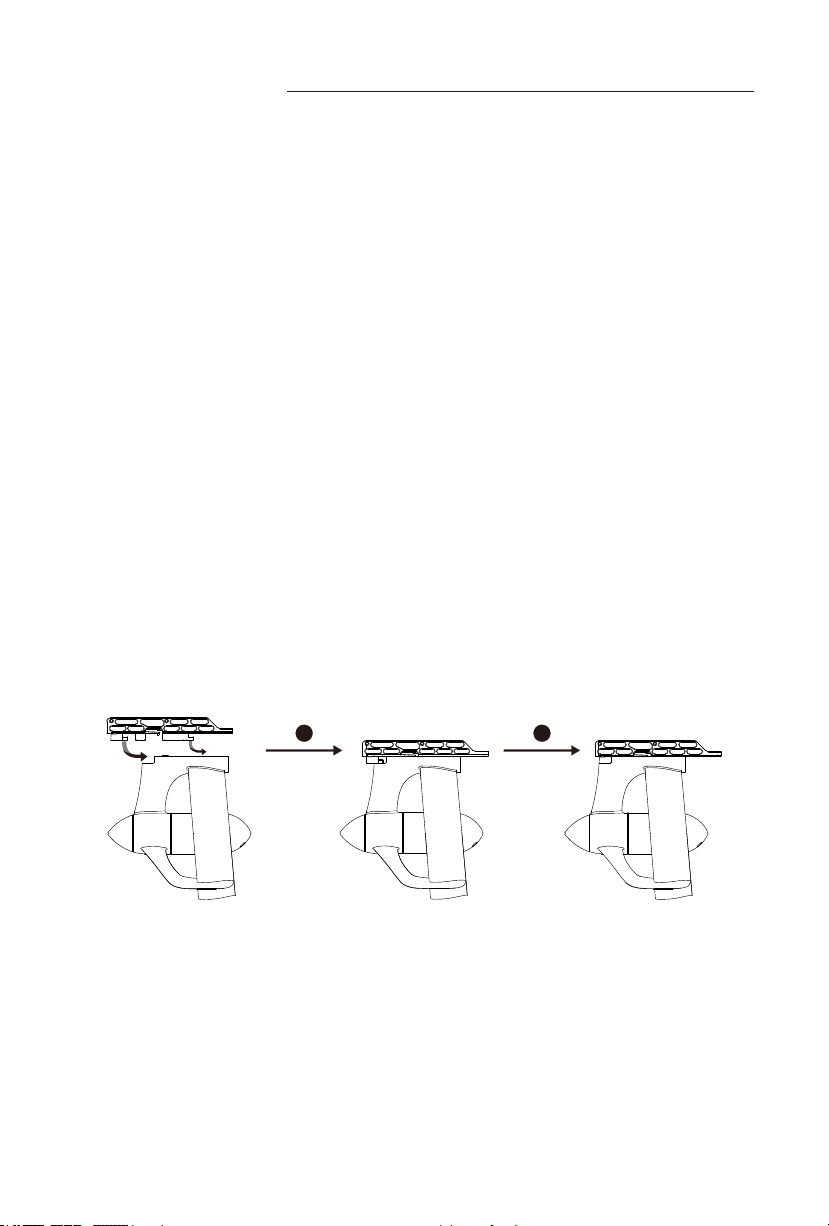
1) Attach a US n box adapter onto the motor module base as shown in the
Figure 3-1. First align the adapter with the motor base; then insert the
adapter into the motor base until it is well attached.
Fi gure 3 -1
2) Turn the SUP/kayak bottom up to attach the US n box adapter.
Step1: Place the back nut into the slot of the US n box, and move the nut to
the slot end near the tail of the SUP/kayak, etc.
Step2: Insert the adapter into the US n box in the direction of the arrow, and
slide it in until it fully enters;
14
Page 17
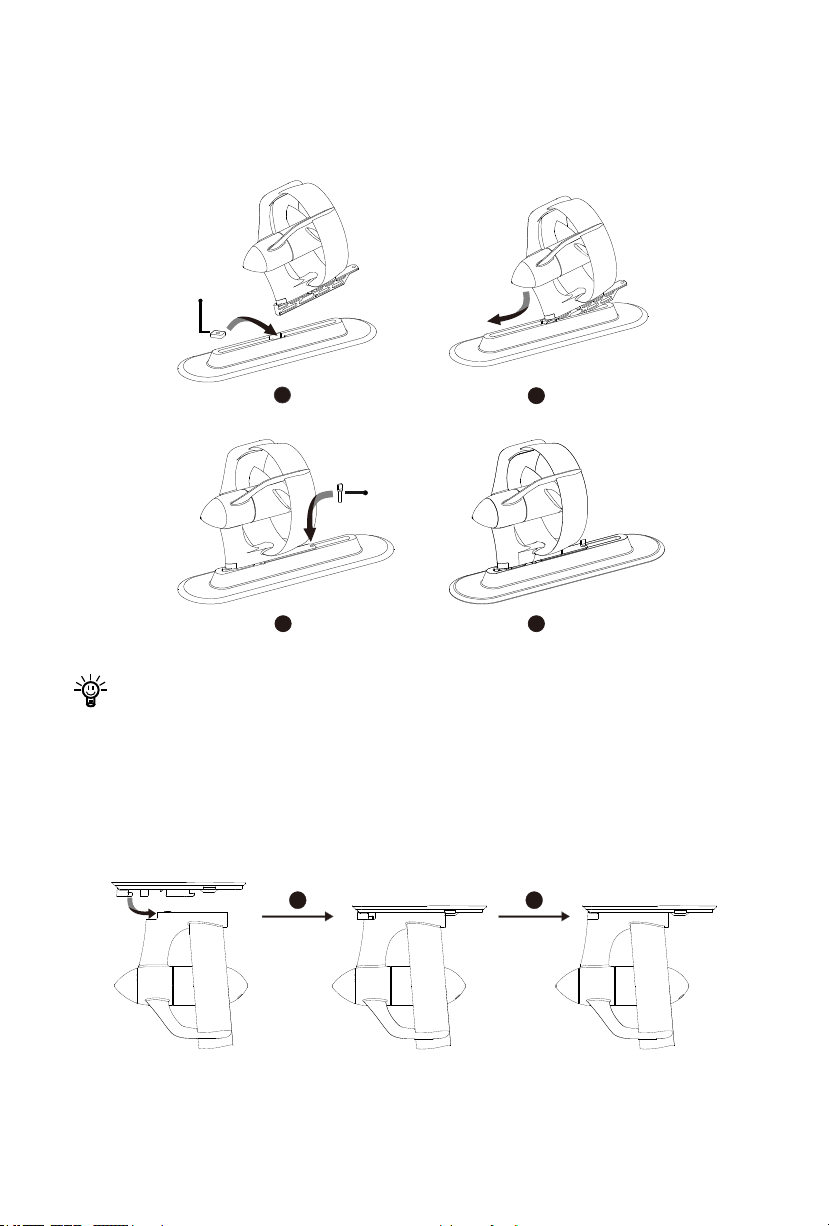
Step3: Move the back nut in the slot to align it with the hole on the adapter,
1
2
4
3
back nut
screw
21
then insert the screw into the hole and screw it tightly into the back nut.
Step4: The LAGOON motor is well attached to the US n box.
Figure 3-2
The propeller should face the tail of the SUP/kayak, etc.
b. Install with an inatable SUP n box adapter
1) Attach an inatable SUP n box adapter onto the motor module base as
shown in Figure 3-3. First align the adapter with the motor base; then
insert the adapter into the motor base until it is well attached.
Figure 3-3
15
Page 18
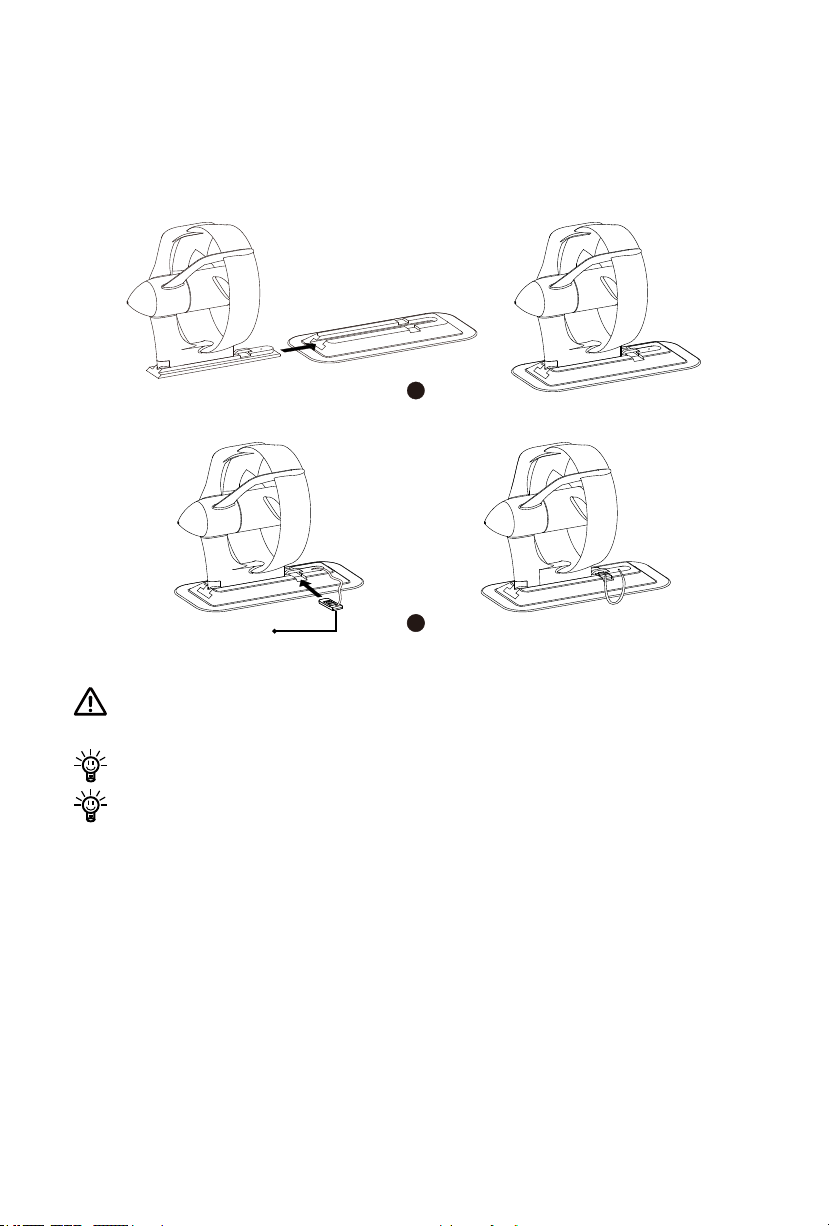
2) Turn the SUP/kayak bottom up to attach the inatable SUP n box.
1
retaining chip
2
Step1: Slide the standard adapter into the cave of the inatable SUP n box.
Step2: Insert the retaining chip into the place indicated in Figure 3-4 to x
the adapter.
Figure 3-4
Do not force the adapter into the n box. If the adapter can’t t into the
n box properly, slide it out and check if the installing direction is correct.
The propeller should face the tail of the SUP/kayak, etc.
Make sure the n box is clean before installation of the motor module.
3.1.2 Install with LAGOON Universal Adapter
If the SUP/kayak, etc. has no n box or if both the two standard adapters
can’t t into the existing n mounting system, it’s suggested to use LAGOON
universal adapter to attach the LAGOON Motor. While mounting with the
LAGOON universal adapter, please follow the below steps.
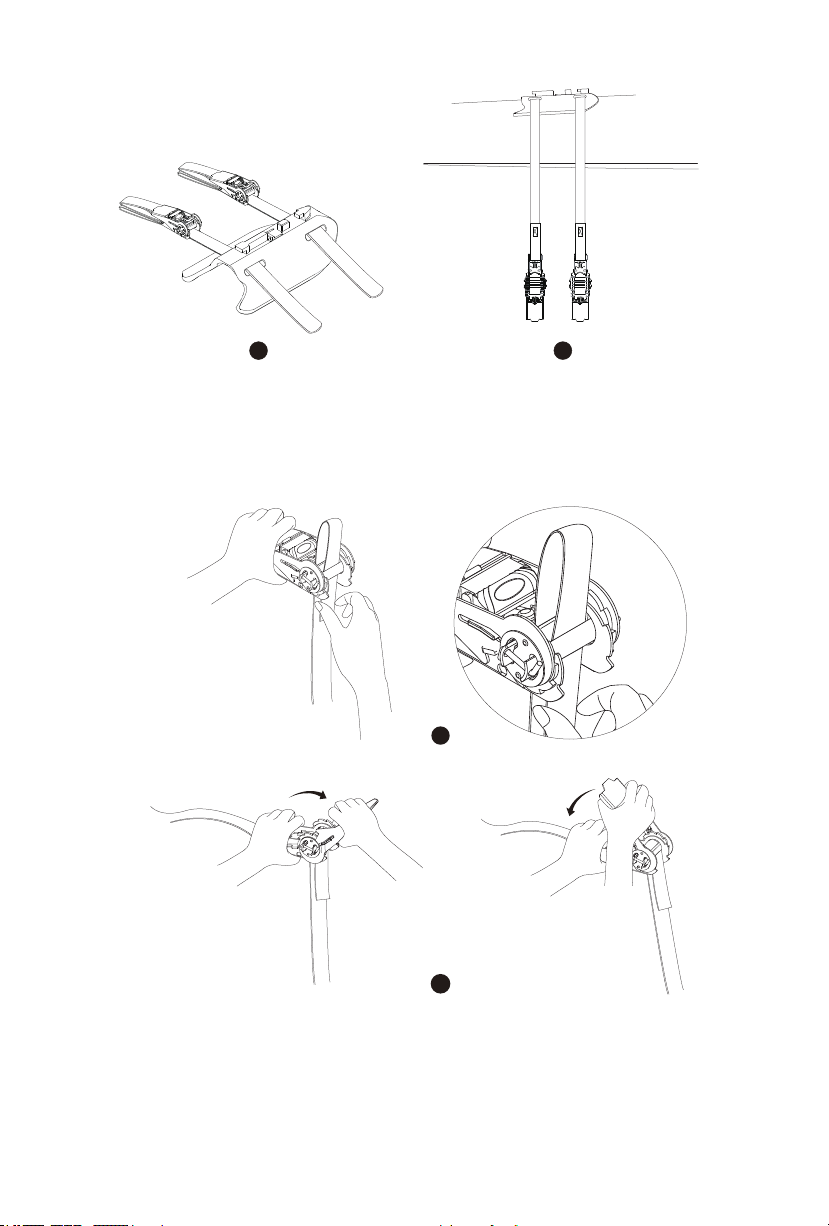
1) Turn the SUP/kayak, etc. bottom up.
2) Penetrate the two ratchet straps through the side opening of the universal
adapter and attach the universal adapter onto the relatively at part on the
bottom.
16
Page 19
1 2
Figure 3-5
3) Fix the two ratchet straps: rst, penetrate the strap into the buckle; then,
repeat unfolding and folding the buckle to tense the strap. Fold the buckle
when the strap is tensed.
1
2
Figure 3-6
4) Attach the motor module to the universal adapter in the arrow direction.
17
Page 20
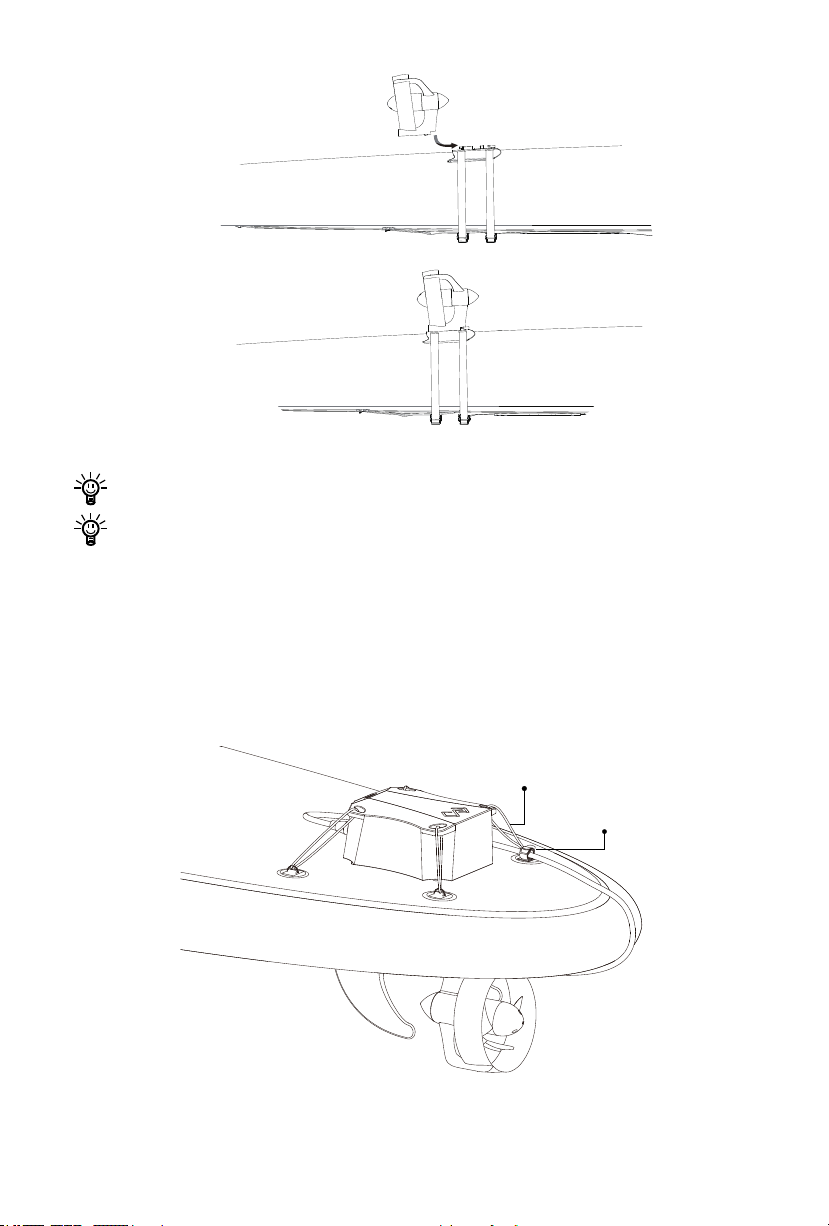
Figure 3-7
SUP bungee cord
Velcro tape
The propeller should face the tail of the SUP/kayak, etc.
While installing the universal adapter, make sure the adapter is in
alignment with the bottom centerline of the SUP/kayak, etc.
3.2 Fix LAGOON Battery
a. Fix LAGOON Battery on SUPs
There are two major methods of xing the LAGOON Battery on an SUP. For
SUP with a bungee system, the battery can be xed with the bungee cords.
Figure 3-8 Fix the battery with the SUP bungee cords
18
Page 21
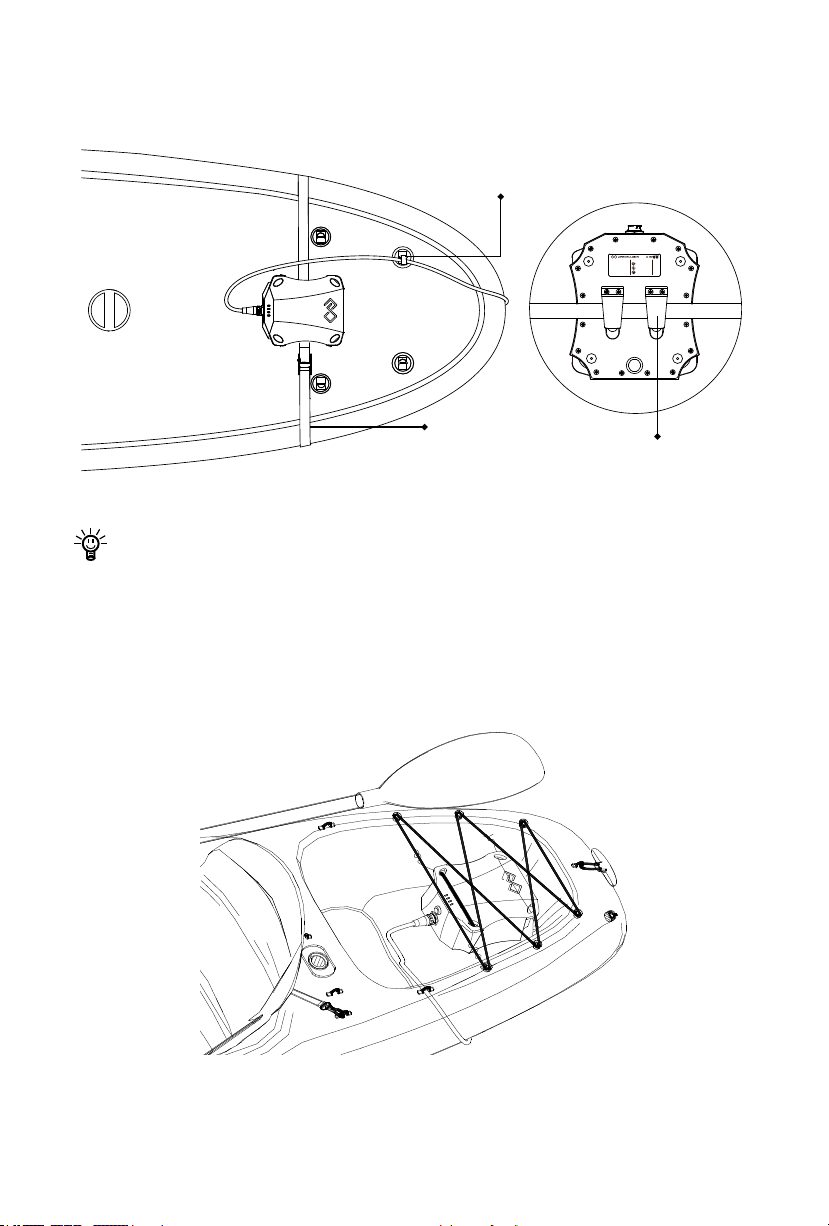
For SUPs without bungee system, users can make use of the buckles on the
CAUTIONS
S/N:
FCC:
READ USER
MANUAL FIRST
OPENING IS
FORBIDDEN
KEEP AWAY FROM
FIRE/HEAT SOURCE
Model: 24V Li-ion Battery
Rated Capacity: 333Wh
Rated Voltage: 22.2 V
Charging Temperature:
0°C~45°C(32°F~113°F)
Discharging Temperature:
-20°C~60°C(-4°F~140°F)
Fix the redundant cable with a Velcro tape
Ratchet strap
Battery bottom buckles
bottom of the LAGOON Battery to clip a ratchet strap tied around the SUP.
Figure 3-9 Fix the battery by ratchet strap
Fix the redundant power cable with a Velcro tape.
b. Fix LAGOON Battery on Kayaks
For kayaks with enough cabin space, the battery can be simply placed inside
the cabin. For some kayaks, the battery can also be xed on the rear part of
the kayak with its bungee cords as shown in below gure.
Fi gure 3 -10
19
Page 22
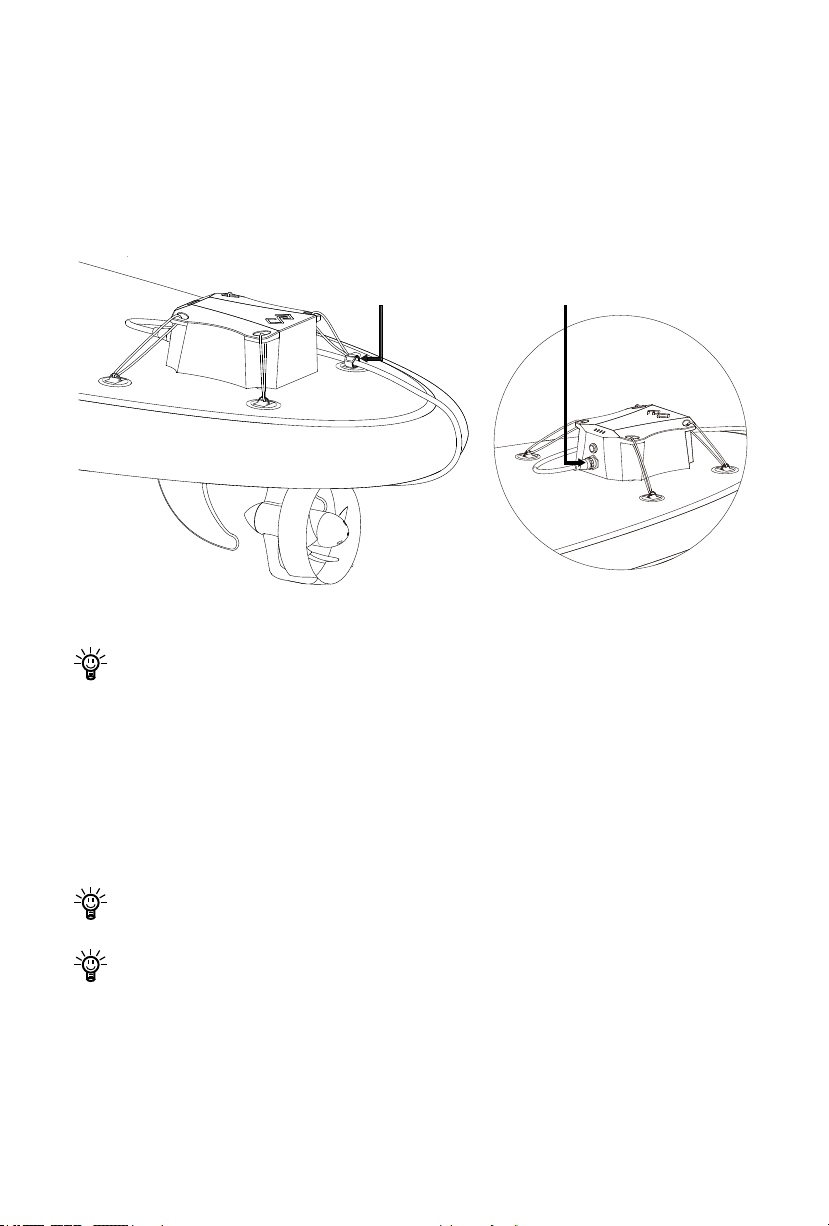
3.3 Connect LAGOON Battery to LAGOON Motor
Fix the power cable on the
SUP with a Velcro tape
Plug the power cable into
the charge/discharge port
Flip the SUP/kayak, etc. over after the motor module is firmly installed on
the bottom. Plug the motor cable connector into the charge/discharge port of
the LAGOON Battery and tighten the connector. Fix the power cable with a
Velcro tape.
Fig u r e 3 -11
Pay attention not to hit the thruster against the ground or other objects
while ipping the SUP/kayak, etc.
3.4 Attach the LAGOON Controller
The LAGOON Controller can be attached to a paddle or wrist for easy
access. You need to penetrate a Velcro tape through the side opening of the
LAGOON Controller and bind the strap tightly around the wrist or paddle as
shown in Figure 3-12.
Make sure the Velcro tape is tightly bound if you wear it or attach it to a
paddle to avoid it falling into water.
If the LAGOON Controller falls into water by accident, a wireless
communication failure may occur and the LAGOON Motor will stop
rotation at once.
20
Page 23
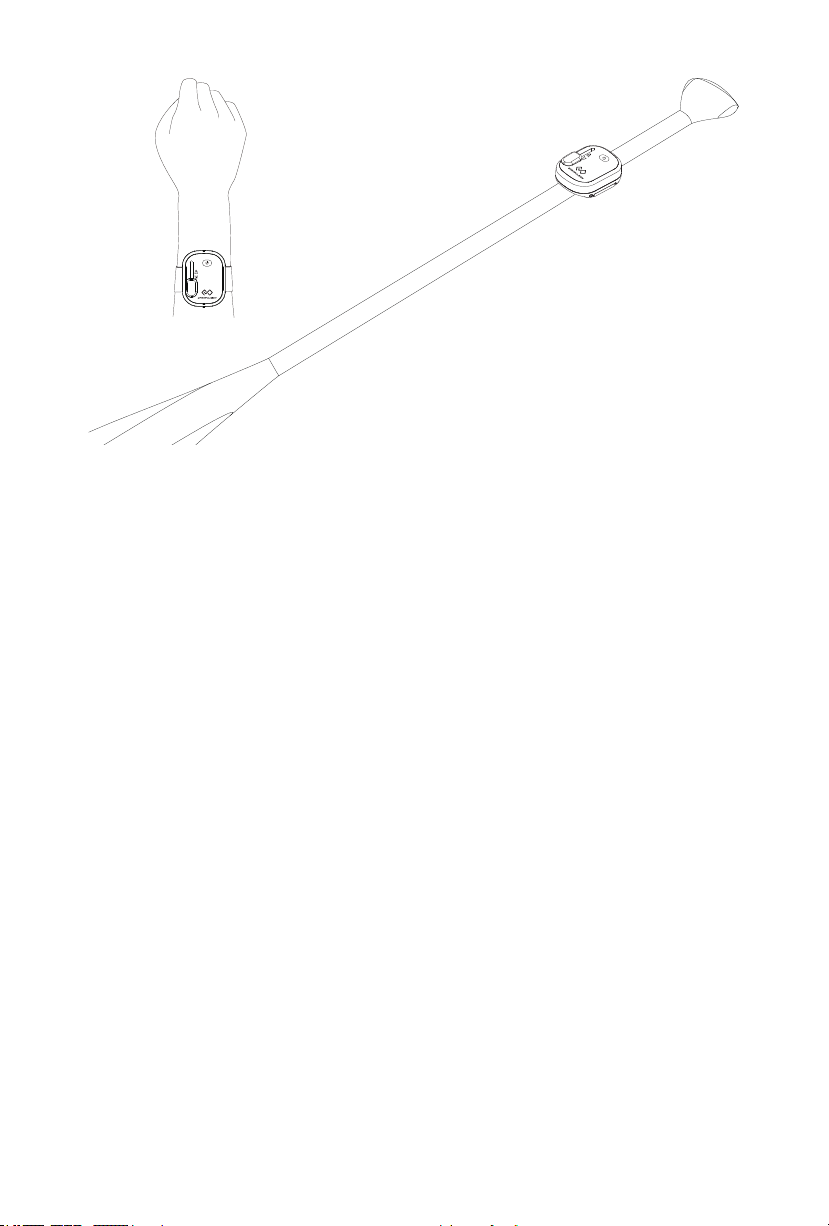
Method1:
Wear the LAGOON
Controller on the wrist
Method2:
Attach the LAGOON
Controller to a paddle
Fi gure 3 -12
21
Page 24
4. Operation
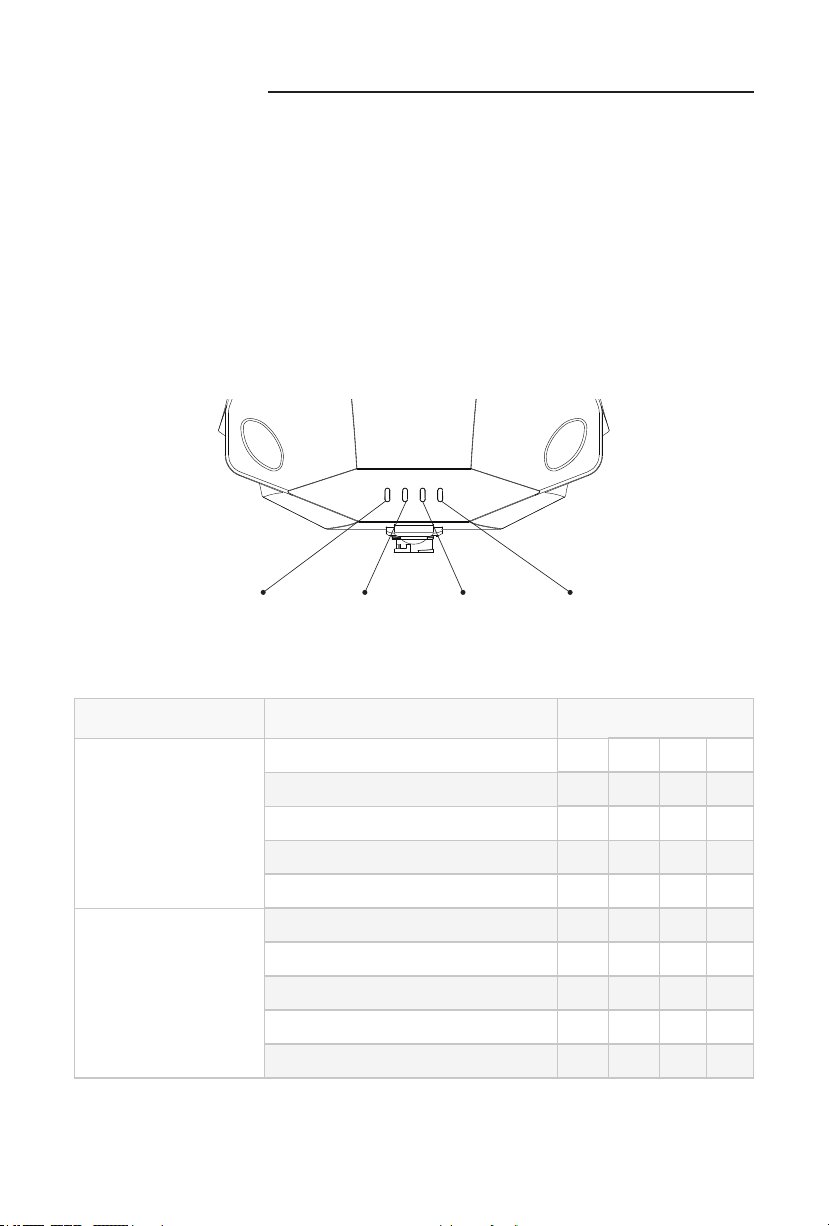
LED 0 LED 1 LED 2 LED 3
To operate LAGOON, it’s critical to understand how to use the battery
and controller correctly. This part first introduces the usage of LAGOON
Controller and LAGOON Battery, then gives correct pairing procedures.
4.1 Use of LAGOON Battery
4.1.1 Battery LEDs
The four LEDs on LAGOON Battery can display battery level while charging
and discharging and indicate errors during operation. The below figure
indicates the position of the four LEDs on LAGOON Battery.
Fi gure 4 -1
Below table illustrates the state of the LEDs while charging and discharging.
Battery Condition Description Battery Level (L-R)
0%~40%
40%~60%
Charging
Discharging
Note: ●refers to steady light, refers to ashing light (1Hz).
60%~80%
80%~99%
100%
0%~20%
20%~40%
40%~60%
60%~80%
80%~100%
22
●
● ●
● ● ●
● ● ● ●
●
● ●
● ● ●
● ● ● ●
Page 25
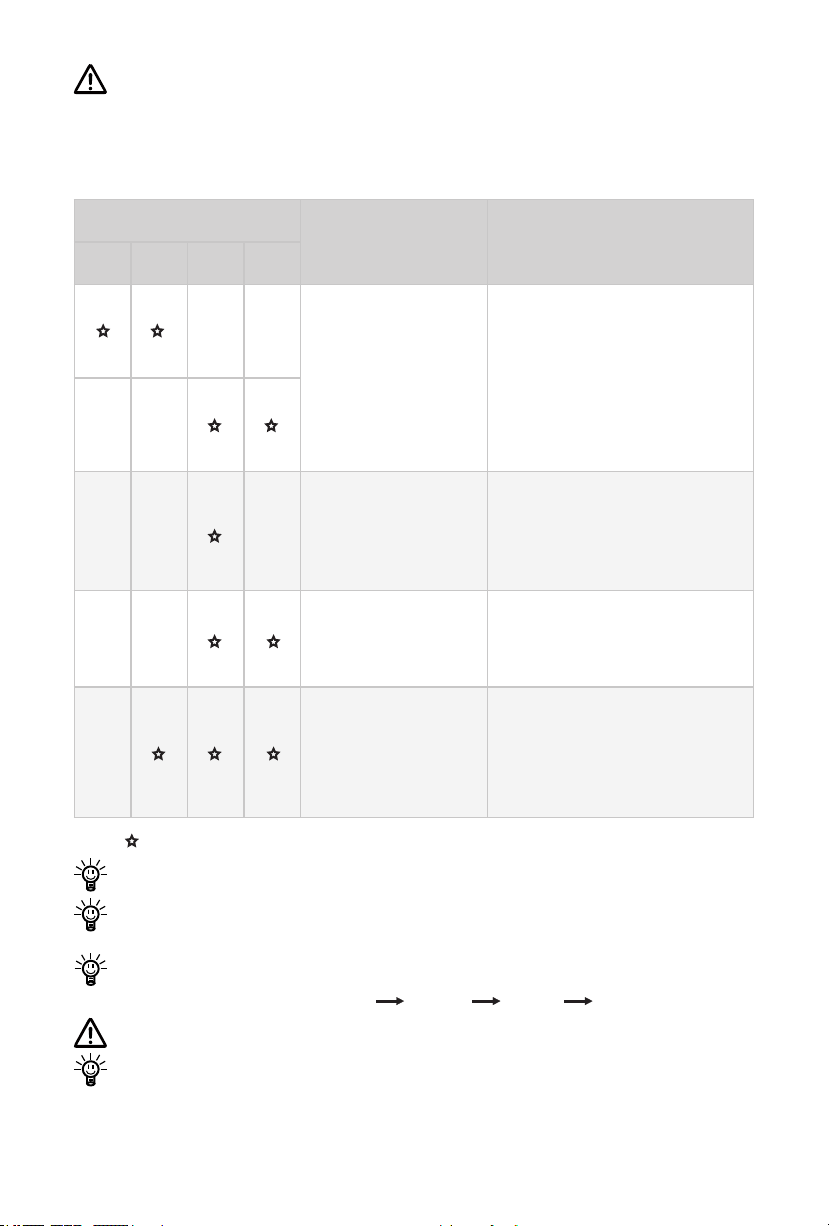
If the battery is between 0% ~ 20% when discharging, all LEDs will ash
simultaneously to remind you to charge the battery as soon as possible.
If the LEDs present abnormal flashing states, please consult the below
troubleshooting table for possible errors and corresponding solutions.
Abnormal LED States
Errors Solutions
L0 L1 L2 L3
Error1:
LAGOON
Controller
communication
failure
Error2:
LAGOON Battery
communication
failure
Error3:
Other errors of
the battery
Error4
:
LAGOON Battery
over-temperature
Note: refers to ashing light (an interval of 0.2s, a frequency of 5Hz).
If error1 occurs, L0 and L1 ash alternately with L2 and L3.
1. Make sure the LAGOON
Controller is powered on.
2. Please refer to section 4.3
Pairing LAGOON Controller
with LAGOON Battery to
conduct pairing.
Please restart the LAGOON
Battery.
Please restart the LAGOON
Battery.
Stop operation and wait
until the temperature falls
within the normal operating
temperature range.
If an error occurs in a non-charging state, the LEDs will display the
battery level (for 3s) and the error (for 3s) alternately.
If multiple errors occur simultaneously, the errors will be displayed in
this priority sequence: Error4 Error3 Error1 Error2.
Error4 LAGOON Battery over-temperature may occur during charging.
If the problem persists, please consult ePropulsion authorized dealers
for assistance.
23
Page 26
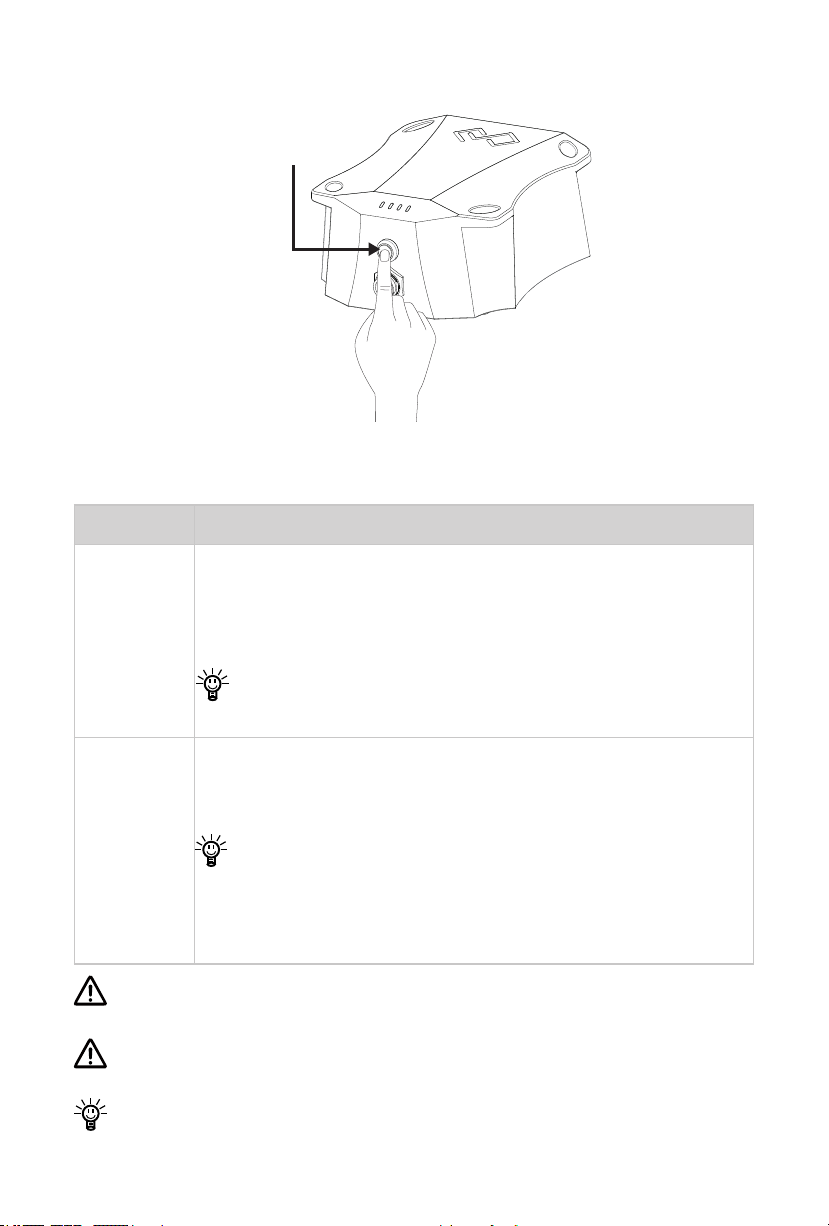
4.1.2 Switch On/Off the LAGOON Battery
Power Button
Figure 4-2
The below table indicates how to switch on/off the LAGOON Battery.
Operation Description
In power-off state, long press the power button until all the
four LEDs light up one by one from left to right with an inter-
Switch on
val of 0.5s. Then release the button, and the LEDs will display the actual battery level.
It will fail to switch on the battery if the power button is
released before all the four LEDs light up.
Switch off
In power-on state, long press the power button for over 2s
until all the four LEDs light up rst and then light off one by
one from right to left with an interval of 0.5s.
It will fail to switch off the battery if the power button is
released before all the four LEDs light off, and all the four
LEDs will simultaneously enter the ashing state with a
frequency of 0.5s.
Make sure the LAGOON Battery is switched off before mounting the
LAGOON Motor.
Before switching on the LAGOON Battery, make sure the LAGOON
Motor is safely mounted on the bottom of the SUP/kayak, etc.
If no electrical activity is detected within an hour after the battery is
24
Page 27
switched on, the battery will enter sleep mode automatically, then the
four LEDs will all go off. The battery should be restarted if it is going to
be used again.
4.1.3 Charge the Battery
Important notes before charging
Only use LAGOON Charger to charge LAGOON Battery. Do not use any
third party chargers.
Only charge the LAGOON Battery in within 0˚C~45˚C (32˚F~113 ˚F).
Avoid water contact during charging process.
Avoid direct sun/rain exposure during charging process.
Do not overcharge the battery.
Keep the battery away from flammable substance like a carpet or wood
during charging process.
In any case of emergency, please stop charging the battery immediately.
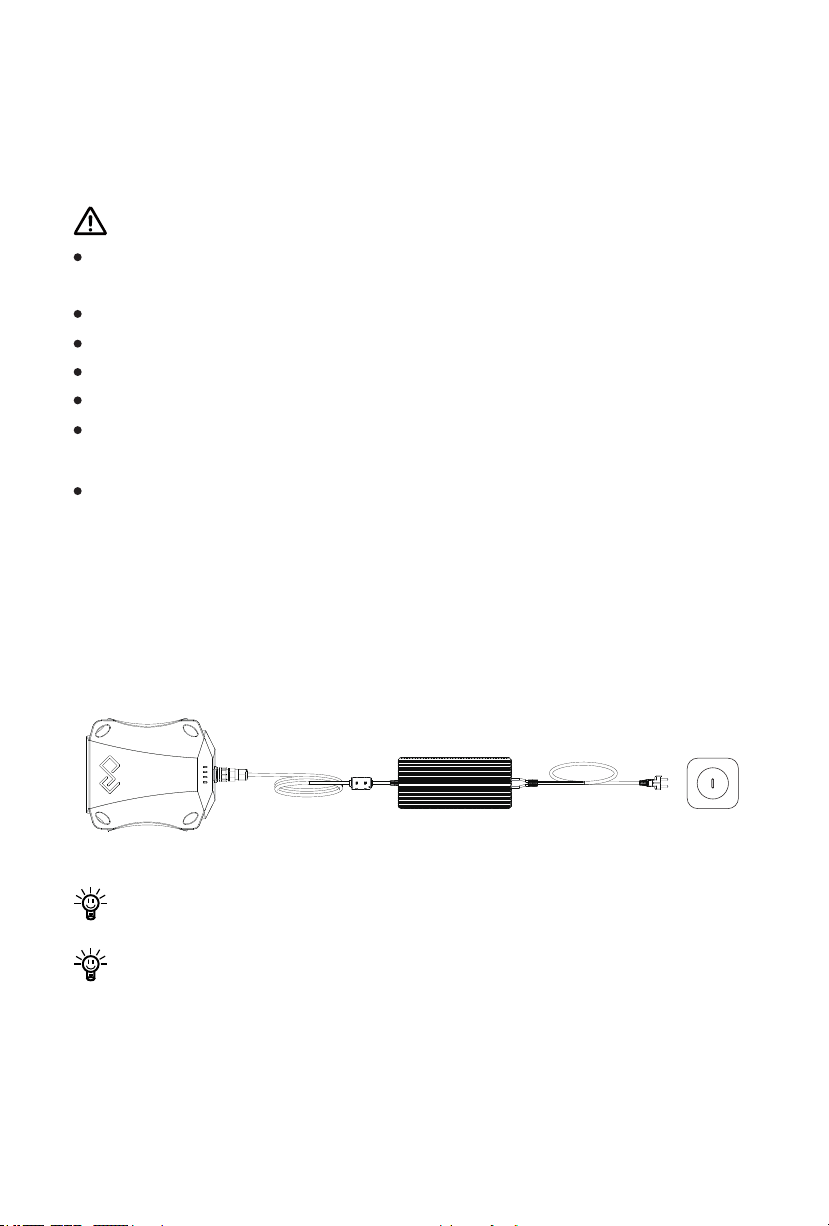
Charge the LAGOON Battery following the below steps:
1) Power off the battery, disconnect the battery power cable with the motor.
Remove the battery off the SUP/kayak and take it to a dry and safe place.
2) Plug the output cable of LAGOON Charger into the charge/discharge port
of LAGOON Battery and tighten the connector. Then plug the input cable
of LAGOON Charger into the socket.
Figure 4-3
Self-discharge may occur in the process of transportation and storage.
Therefore, it is advised to fully charge the battery before each use.
It takes about 3 hours to fully charge a completely depleted battery.
25
Page 28
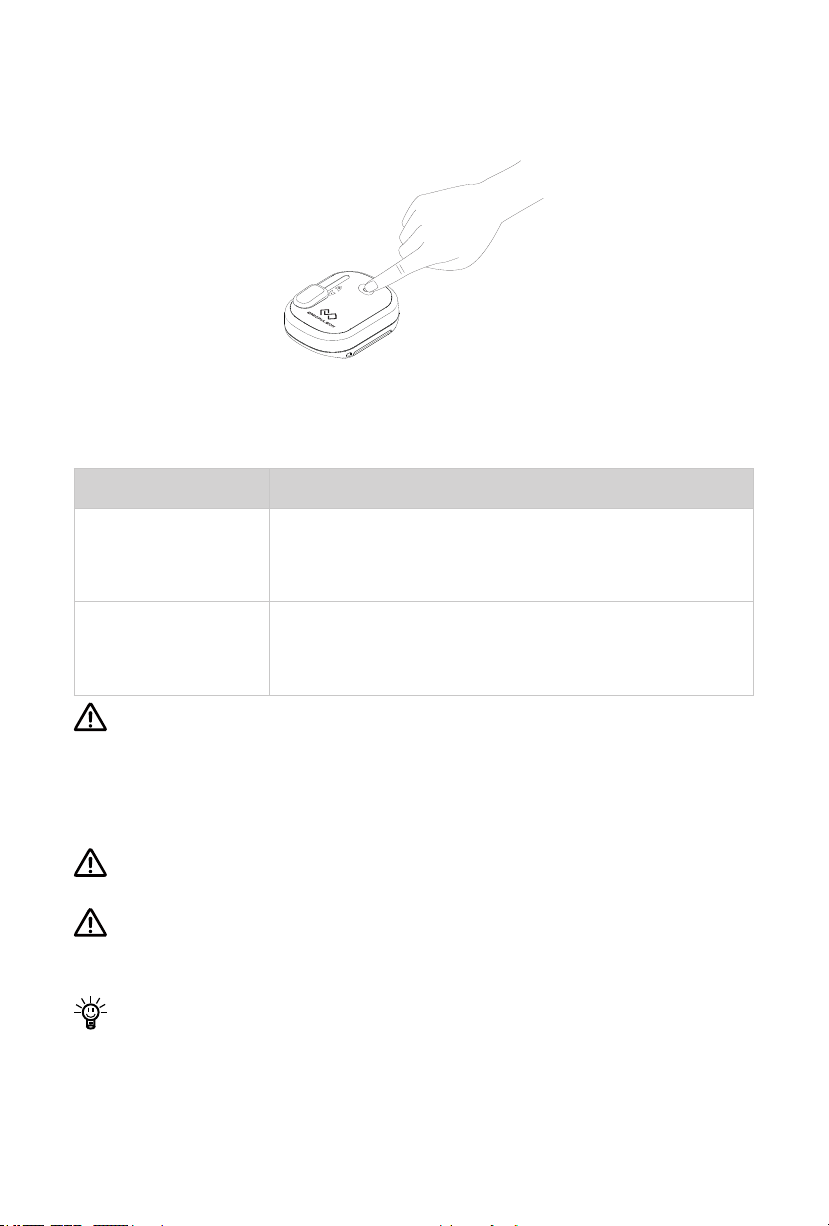
4.2 Use of LAGOON Controller
4.2.1 Switch On/Off the LAGOON Controller
Figure 4-4
Below table displays how to switch on/off the LAGOON Controller by
pressing the on/off button in normal situations.
Operations Description
Switch on
the controller
Switch off
the controller
If the buzzer beeps continuously (and the system powers off
automatically after 10 seconds), it indicates that the battery built inside
the LAGOON Controller is running out and replacement of a new button
cell battery (model: CR2032) is required. Please refer to section 4.2.3
Replacing Button Cell for LAGOON Controller.
If you want to stop the running motor at once, please short press the on/
off button.
Before powering on the LAGOON Controller, make sure the LAGOON
Motor is safely attached to the bottom of the SUP/kayak, etc. and do not
approach the motor to avoid getting hurt by the rotating propeller.
If a communication failure occurs, the LAGOON Controller will switch off
in 10s. In normal communication conditions, if the motor stops rotating
for 30min, the LAGOON Controller will also switch off automatically.
In switch-off state, short press the on/off button.
If only one beep is issued, it indicates that the
controller starts normally.
In switch-on state, long press the on/off button until
a beep is heard, which indicates the controller is
switched off.
26
Page 29
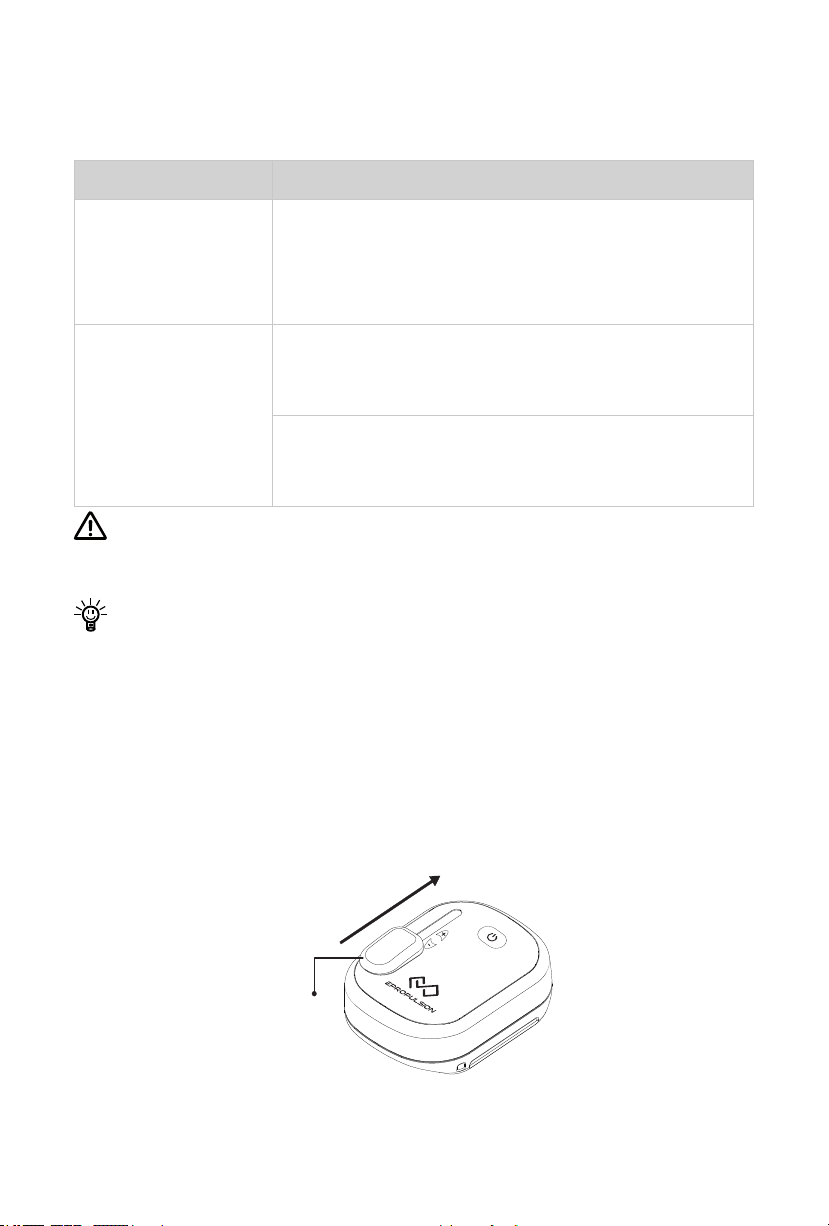
4.2.2 Wirelessly Control the LAGOON Motor
S
te
p
less
sp
e
e
d
u
p
Zero
Position
a. Start/Stop the LAGOON Motor
Operations Description
In power-off state, rst short press the on/off button
Start the motor
Stop the motor
For emergency stop, also make sure to push the throttle block back to
zero position after short pressing the on/off button. To resume rotation
of motor, just slowly push the throttle slide block forward.
If the LAGOON Controller falls into water by accident, the system will
stop automatically to protect the safety of users.
to switch on the LAGOON Controller. Then push
the throttle slide block slowly upward to start the
LAGOON Motor.
In normal conditions:
Push the throttle slide block back to zero position to
gradually stop the rotating motor.
In emergency:
Short press the controller on/off button to achieve
emergency stop of the motor.
b. Speed Control
The LAGOON Controller supports stepless forward speed control. After
the motor is started, slide the throttle slide block slowly forward to speed
up. When it is slid to the top position, the motor will generate a max speed.
For SUPs/kayaks, etc. without a steering system, users can make use of a
paddle to steer.
Figure 4-5
27
Page 30
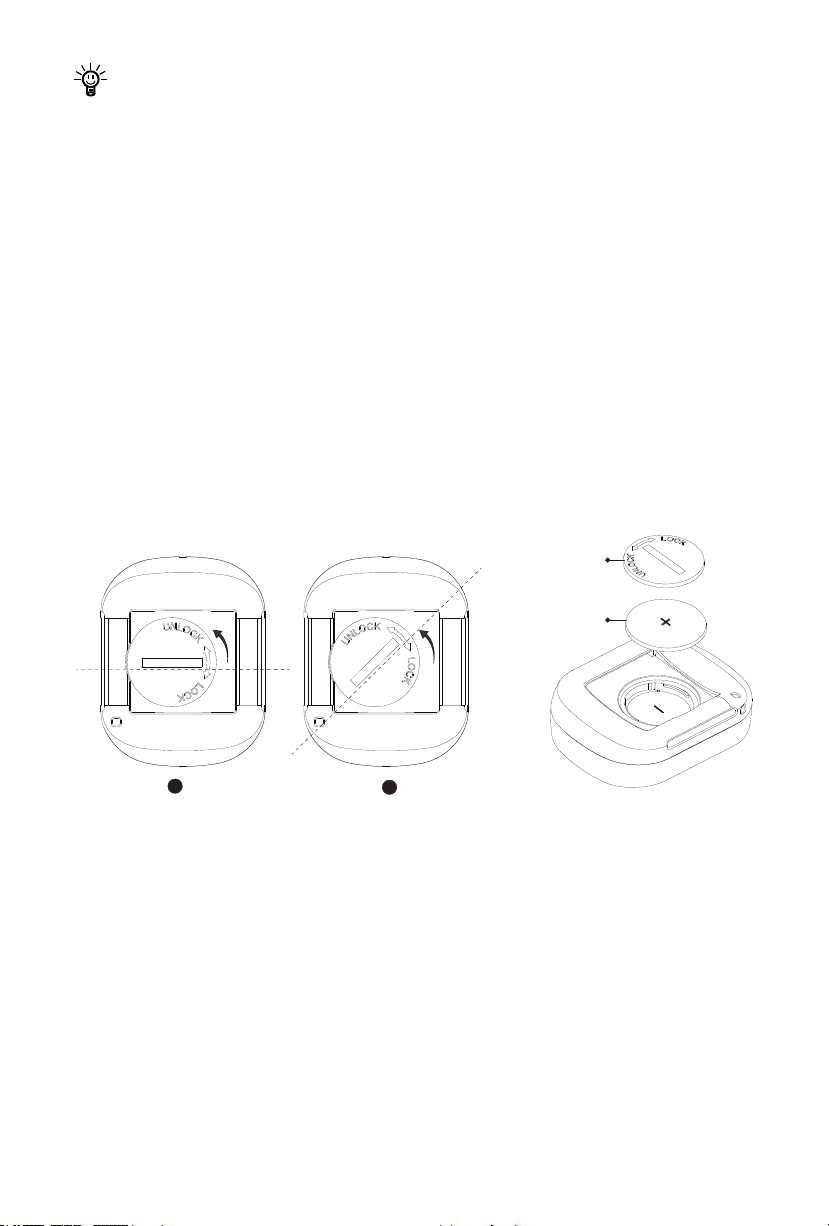
Reset the throttle slide block back to the zero position before restarting
Button Cell
Cell Cover
1
2
the system.
4.2.3 Replace Button Cell for LAGOON Controller
LAGOON Controller is powered by a built-in button cell (model: CR2032).
Short press the on/off button in power-off state. If the buzzer beeps
continuously (the system powers off automatically after 10 seconds), it
indicates that the button cell built inside LAGOON Controller is running out
of battery and replacement of a new button cell (model: CR2032) is required.
You can replace a new button cell referring to the below steps:
Step1: Unlock the cell cover by rotating it in counterclockwise direction (from
position① to position②).
Step2: Open the cover and replace a new button cell with the positive side
facing up.
Step3: Lock the cell cover in clockwise rotation.
Figure 4-6 Unlock the Cover
4.3 Pair LAGOON Controller with LAGOON Battery
The LAGOON Controller has been paired with the LAGOON Battery prior to
delivery, but pairing job has to be carried out if the original LAGOON Battery
or LAGOON Controller is replaced with a new one. Users can follow the
following instructions to nish pairing.
1) Switch off the LAGOON Controller. Hold the LAGOON Controller close
to the battery LEDs; make sure the distance between the LAGOON
Controller and the LAGOON Battery is within 10cm;
28
Page 31

2) Put LAGOON Battery into pairing status. First switch on the battery.
Then short press the power button of the battery; when the four LEDs ash
simultaneously with an interval of 0.5s, quickly press and hold the button for
over 5s until the four LEDs ash more quickly with an interval of 0.2s, which
indicates the wireless module embedded in the battery having entered the
pairing status.
3) Put LAGOON Controller into pairing status. In switch-off status, long
press the on/off button on the LAGOON Controller until a beep is issued,
which indicates the LAGOON Controller having entered the pairing
status; then release the button.
4) If pairing succeeds, another beep will be issued by the LAGOON
Controller and all the four LEDs on the LAGOON Battery will light up one
by one, otherwise the pairing fails.
Hold the LAGOON Controller close to the LEDs of the LAGOON Battery
while pairing.
Do not use the LAGOON Controller out of the SUP/kayak, etc. as the
LAGOON Battery may fail to receive wireless communication signal
from the LAGOON Controller.
29
Page 32
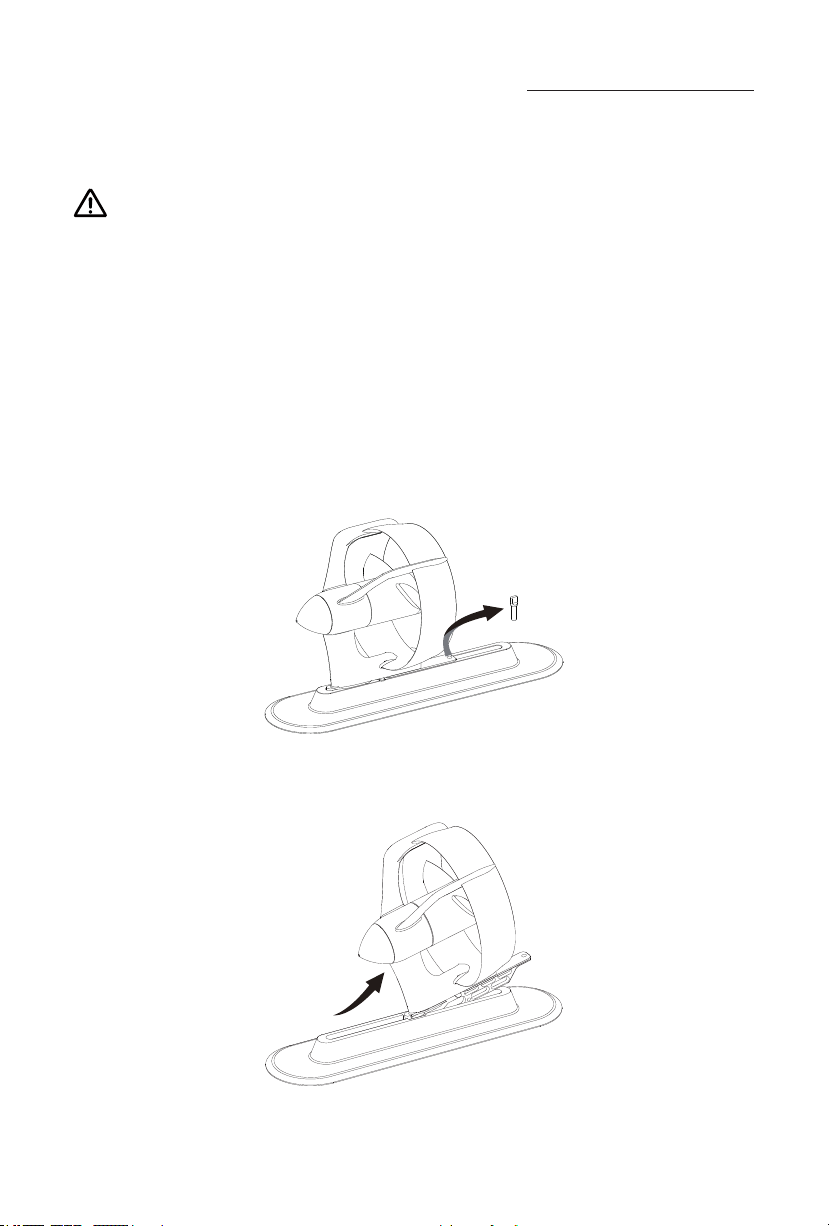
5. Detaching LAGOON Motor
After use of LAGOON, please detach the LAGOON Motor from the SUP/
kayak, etc. in correct procedures.
Notes before detaching the LAGOON Motor.
First, take the LAGOON Battery out of your SUP/kayak, etc. by below
procedures:
1) Long press the power button to switch off the LAGOON Battery.
2) Disconnect the LAGOON Motor with the LAGOON Battery.
3) Take out the battery and place it in a dry and safe place.
Then, place your SUP/kayak, etc. bottom up in a at.
a. Detach from a US n box adapter
Step1: Loosen and take out the screw.
Fi gure 5 -1
Step2: Take the LAGOON Motor and adapter out of the n box.
Figure 5-2
30
Page 33
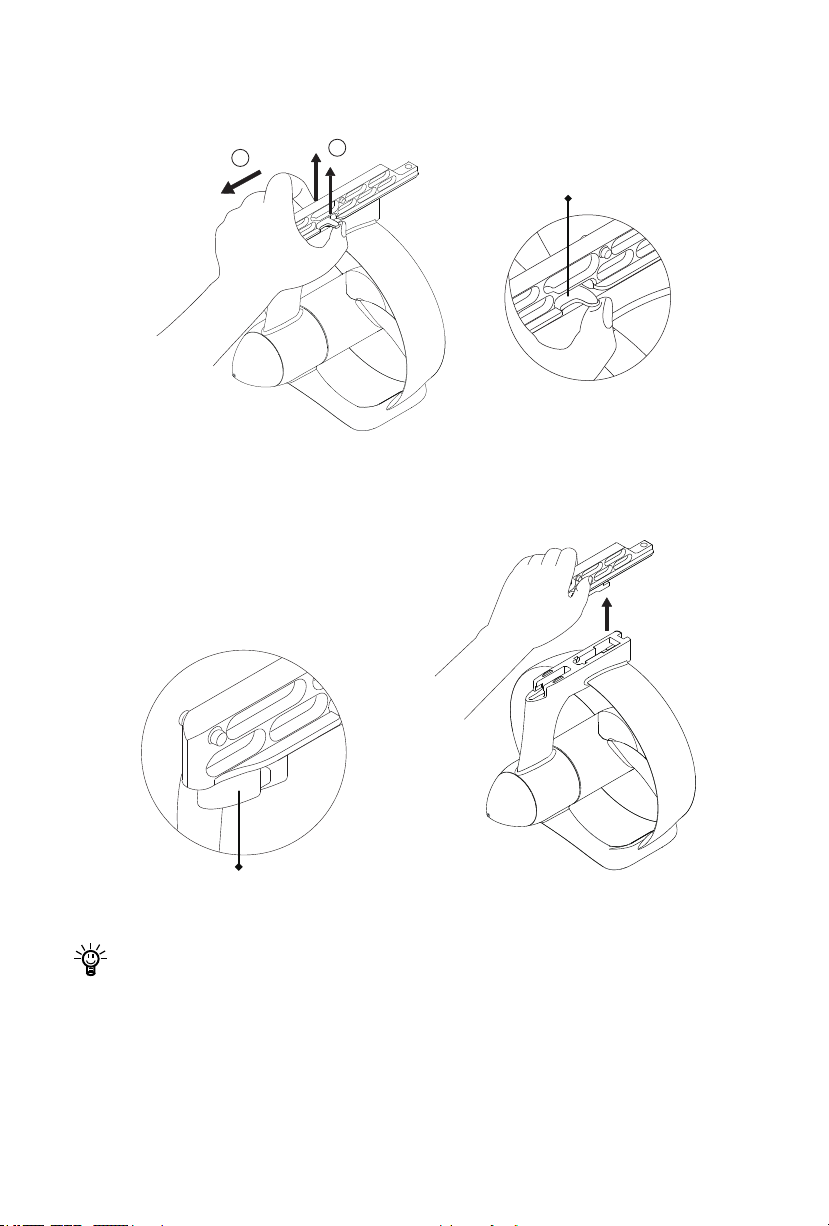
Step3: Pull the release buckles in the direction of ① ; meanwhile, slide the
adapter in the direction of ②.
2
1
Release buckle
Figure 5-3
Step4: When the rear part of the adapter is slid to the positio as shown in
below left gure, take out the adapter.
Rear part of the adapter
Figure 5-4
Clean the motor and adapter with fresh water after the motor is
detached.
b. Detach from an inatable SUP n box adapter
Step1: Draw out the retaining chip from the inatable SUP n box.
31
Page 34
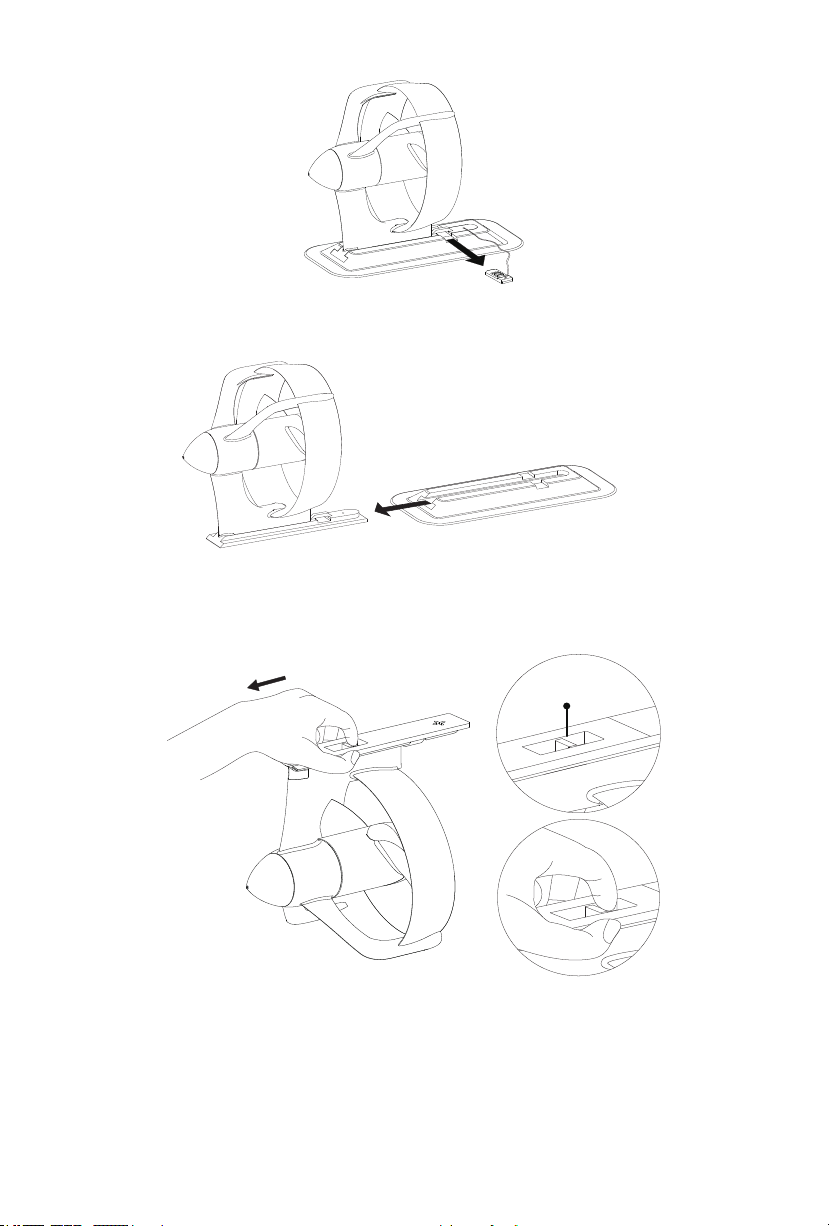
Figure 5-5
Release buckle
Step2: Slide the LAGOON Motor and adapter out of the n box.
Figure 5-6
Step3: Pull the release buckle and slide the adapter backward in the
direction of the arrow.
Figure 5-7
Step4: When the rear part of the adapter is slid to the postion as shown in
below left gure, take out the adapter.
32
Page 35
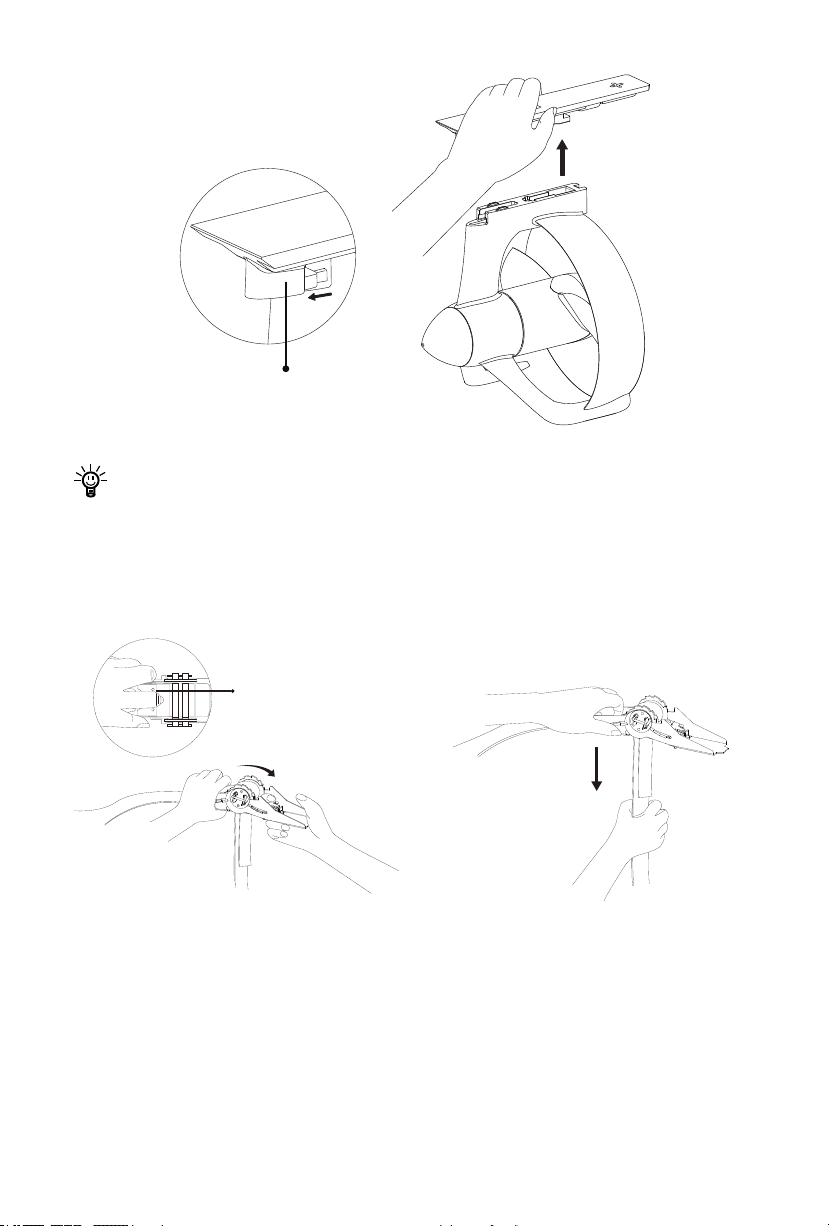
Rear part of the adapter
First, unfold the strap buckle by 180°
by pressing the limiting stopper.
Second, pull the longer side of the strap
180°
Press the limiting stopper
Figure 5-8
Clean the motor and adapter with fresh water after getting them
detached.
c. Detach from a universal adapter
Step1: Loosen the ratchet strap buckles (Figure 5-9).
Figure 5-9
33
Page 36
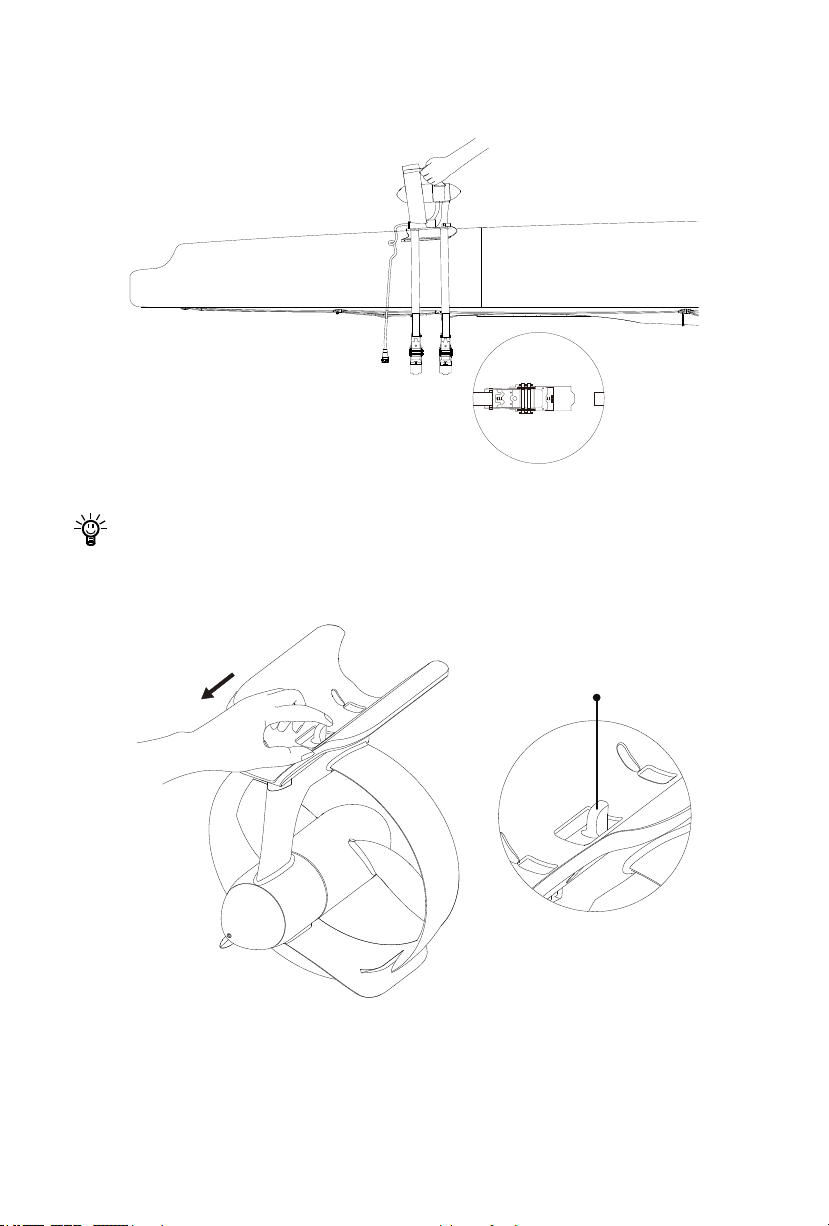
Step2: Detach the LAGOON universal adapter and LAGOON Motor from the
Release buckle
SUP/kayak, etc.
Fi gure 5 -10
Hold the LAGOON Motor while loosening the ratchet strap.
Step3: Pull the release buckle and slide the universal adapter in the
direction of the arrow.
Fig u r e 5 -11
Step4: When the rear part of the universal adapter is slid to the position as
shown in below left gure, take out the adapter.
34
Page 37
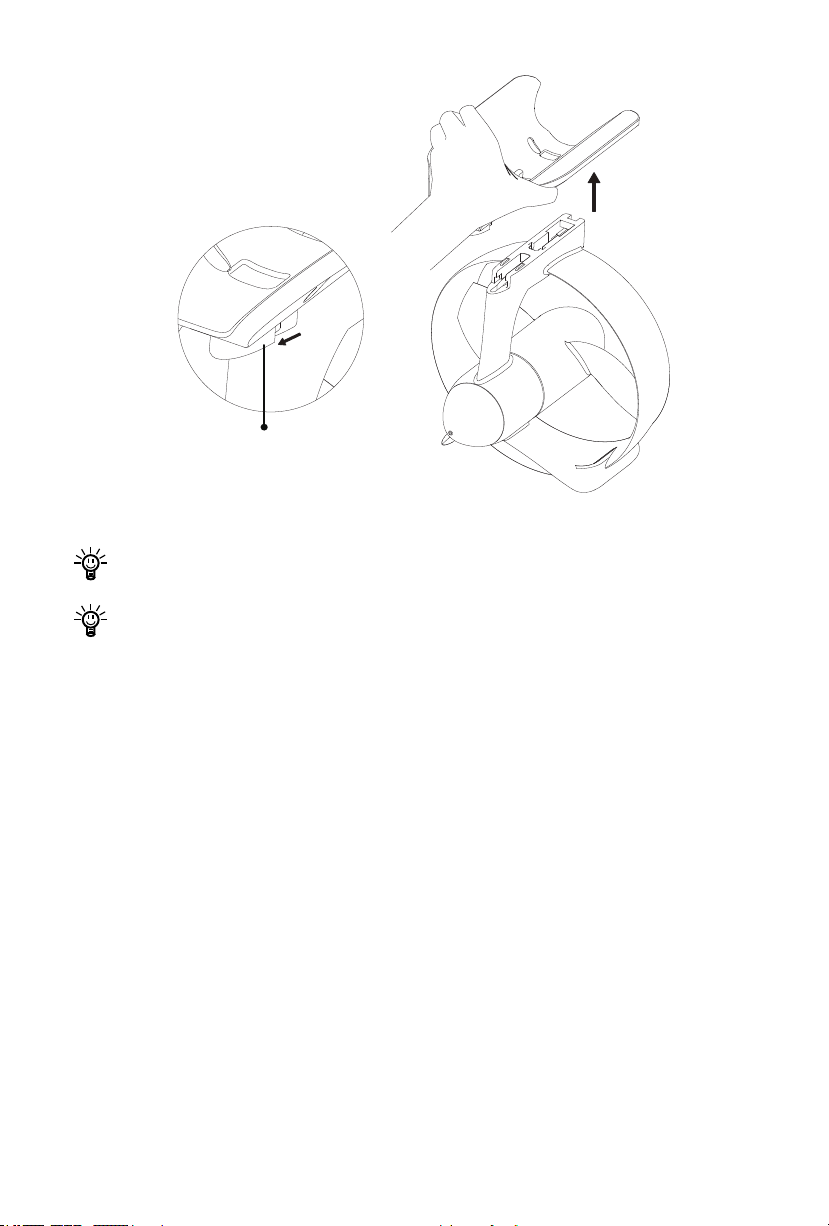
Rear part of the adapter
Fi gure 5 -12
If you are not going to use the universal adapter very soon, it’s advised
to detach the ratchet straps from the adapter.
Clean the motor and adapter with fresh water after getting them
detached.
35
Page 38
6. Transport and Storage
6.1 Transport
For long-distance transport, please apply the original package of LAGOON
to pack the product prior to delivery.
Important notes before transport:
Check and ensure the package is intact without any damage.
Avoid violent vibration, strike or squeeze during transport. Get adequate
damping protection measures before transport.
Do not expose the LAGOON Battery to the sun or rain during transport.
Check applicable laws and regulations before transport.
6.2 Storage
If you are not going to use LAGOON for a long time, it is advised to clean
and check it prior to storage. It is recommended to pack LAGOON with its
original package for storage.
Important notes before storage:
Make sure that each part of the product is dry before storing it in the
package.
Get adequate damping protection before storage.
Store LAGOON Battery in a clean, dry and well-ventilated area without
direct sun exposure.
Avoid contact with corrosive substance which may cause permanent
damage, weaken or destroy the plastic of LAGOON.
Keep the LAGOON Battery away from any sources of re, sparks, open
ame or heat.
Fully charge the LAGOON Battery before use after long-time storage.
36
Page 39

7. Routine Maintenance
Various factors like operation environment (such as temperature,
humidity, dust, etc.), aging and wear of internal components, will affect the
performance of the product. Routine maintenance is very important for
keeping LAGOON in its optimal operating state.
It’s suggested to take the LAGOON Motor out of the water after use.
Check the cable regularly for damage.
Charge the LAGOON Battery after each use.
Do not run the LAGOON Motor in the air or in shallow water.
Do not run the LAGOON Motor in water area with thick sediment.
Clean the exterior of LAGOON Motor with fresh water after each use.
Clean the debris in the cave of the adapters after each use.
Do not drop LAGOON Battery and avoid it from direct sun/rain exposure
for a long time.
Check the battery level on a regular basis.
Stop discharging the LAGOON Battery and charge it soon if the battery
gets low.
Before the first time use or reuse after long-term storage, charge
the LAGOON Battery to its full capacity in order to achieve its best
performance.
Only use LAGOON Charger designed for the LAGOON Battery. Other
chargers may lead to shortened runtime, premature battery failure, or even
re or explosion.
Use the battery in moderate temperature to avoid negative effects of
extreme temperature posed on battery lifespan and useful cycles.
Once a fault occurs, deal with the problem in time to avoid any further
damage. If necessary, consult the ePropulsion authorized dealer for repair
or parts replacement.
Always follow the instructions in this user manual.
37
Page 40
8. Warranty Claims
The ePropulsion limited warranty is provided for the rst end purchaser of an
ePropulsion product. Consumers are entitled to a free repair or replacement
of defective parts or parts which do not conform with the sales contract.
This warranty operates in addition to your statutory rights under your local
consumer law.
8.1 Warranty Policies
ePropulsion Innovation (HK) Ltd. keeps its products free of defects in
material and workmanship for a limited period since the date of purchase.
Once a fault is discovered, the user has the right to make a warranty claim
under the warranty policies of ePropulsion.
Product Warranty Expiry Date
LAGOON One year after the date of purchase
Three months since the date of maintenance.
Notes:
1. If the three-month period overlaps with the
original product warranty period, the warranty
Repaired or
replaced parts
against these replaced or repaired parts still
expire one year after the date of purchase.
2. If the three-month period exceeds the original
product warranty period, the repaired or replaced
parts continue applying to warranty during the
extended period.
In order to validate the warranty, users are required to ll in the Warranty
Claim Card in advance.
Keep the product label in an intact state and record the serial number on
the label. Never tear the label off the product. An ePropulsion product
without the original product label will not be applicable to warranty
services provided by ePropulsion.
The warranty is valid only when the information on the Warranty Card is
lled in correctly and completely.
Free warranty is only validated upon the presentation of legal serial
38
Page 41

number, Warranty Claim Card, and evidence of purchase from an
authorized ePropulsion dealer.
Valid date of purchase should be established by the rst-hand purchaser
with original sales slip.
Free warranty is not transferable and will not be reissued.
8.2 Out of Warranty
Make sure the product is properly packed during delivery, the original
product package is recommended. If the product got further damaged due to
improper packing during delivery, the furtherly damaged part will be deemed
as out of warranty coverage.
In addition, faults or damages caused by the following reasons are also
excluded from warranty scope within the covered period:
Any improper operation contradicts the user manual.
Accident, misuse, wishful abuse, physical damage overcharging or
unauthorized repair.
Dropping, improper care or storage.
You should be noted that minor faults like normal wear and tear that
pose no inuence on the intended function of the product are also not
covered by the warranty.
Consumables are out of warranty scope.
8.3 Warranty Claim Procedures
If you find your product defective, you can make a claim to your dealer
following below procedures:
1. Fill in the Warranty Claim Card correctly and completely in advance.
Then make your warranty claim by sending it to your authorized
ePropulsion service partner together with valid proof of purchase. Usually
these documents are required when making a warranty claim: the
Warranty Claim Card, ex-factory serial number, and evidence of purchase.
2. Send the defective product to your authorized ePropulsion service point
after getting the conrmation. Note that the label should be kept intact.
You can also deliver the product to your authorized ePropulsion dealer
after getting conrmation.
39
Page 42

3. The defective components or parts will be either repaired or replaced
according to the diagnosis made by the ePropulsion authorized service
par tner.
4. If your warranty claim is accepted, the equipment will be repaired or
replaced free of charge.
5. After careful examination and confirmation by ePropulsion authorized
dealer, the defective or faulty components will be repaired or replaced
based on actual condition.
6. In case your warranty claim be rejected (please refer to out of warranty
policies), an estimated repair charge with delivery cost included will be
sent for confirmation. ePropulsion authorized service point will conduct
maintenance accordingly only after your conrmation.
If warranty expires, you can still enjoy maintenance serivces
from authorized ePropulsion service partners with corresponding
maintenance charge.
40
Page 43

Page 44

Thanks for reading this user manual.
If you have any concerns or find any problems while reading,
please don't hesitate to contact us. We are delighted to offer
service for you.
ePropulsion Innovation (HK) Ltd.
Website: www.epropulsion.com
Email: [email protected]
 Loading...