


POWER ASSISTED BICYCLES
OWNERS MANUAL

POWER ASSISTED BICYCLES
Firstly may we congratulate you on purchasing your new electric power assisted e.bike.
Please take time to read your manual. We have tried to write it in a way that is simple and easy to follow, whilst explaining how your bike works and how it is maintained.
At any point if you feel you need help we have a tehnical helpline for support.
Please call our Technical help line:
(weekdays 9am-5pm)
01702 208187
(standard call rate charge applies)
Welcome to the World of e.plus cycling.
Simply explained this is how your e.plus bike basically works.
1.Switch the battery to ON, with the switch on the side of the battery, and switch the power on by pressing the top power button on your controller on the handlebars. (Fig.16)
2.As you begin to pedal a sensor will read the level of effort needed to turn the wheels of your bike.
3.After one complete turn of the pedal the electric motor kicks in making pedaling much easier.
4.There are 3 setting on your controller on the handlebar, allowing you to set the level of assistance you require. (Fig.16)
For example: Riding up a hill you’ll probably use ‘3’, mode.
5.You can change the level of assistance you need at any time and as often as you wish.
6.The motor works to assist pedalling, stop pedalling and the motor stops too.
7.Applying the brakes cuts the motor (Fig.15)
8.You can also choose to switch the assist OFF and ON on the controller at any point in your journey. This helps to save battery power when its not needed.
The more you use the assist, the more power it uses, each rider is di erent so gures can vary considerably with di erent rider weight and the terrain you ride. Generally with normal use, you should be able to obtain around 20 miles, before you need to re-charge your battery.
We Recommend that you get used to your new e.plus bike and the level of assit you place on it, you’ll soon be able to work out how long a journey you can make and safely return under assist. You can of course ride as you would a normal bike if the charge runs out.
2

Contents check list
1.Your E.plus
2.Saddle & Seatpost
2.Box containing:
a. Battery Charger
b. Battery Lead
3. Box containing:
a.Tool kit and bag
b.This Manual
4. Set of Keys
( attached to Rear Carrier)
IMPORTANT!
PLEASE REMEMBER THAT IT IS IMPORTANT TO KEEP THE CARTON YOUR BIKE ARRIVED IN , COURIERS CANNOT COLLECT YOUR BIKE WITHOUT A CARTON SHOULD YOU HAVE NEED TO RETURN IT TO US.
INDEX
Page 2 |
Welcome |
to |
Eplus |
Page 3 |
Index & |
Check |
List |
Page 4 |
Unpacking your new E.plus |
||
Page 4-6 |
Unfolding your E.plus |
||
Page 6 |
Fitting the saddle |
|
|
Page 7 |
Pre-Ride checks |
|
|
Page 7 |
Getting Started |
|
|
Page 8 |
Understanding your controller |
||
Page 9-10 |
Understanding your Battery |
||
Page 11 |
Charging your Battery |
||
Page 12 |
Understanding your Gears |
||
Page 13 |
Maintenance of your E.plus |
||
Page 14 |
Simple Troubleshooting |
||
Page 15 |
Warranty |
|
|
Page 16 |
National Service Centre |
||
|
Replacement Batteries & Chargers |
||
POWER ASSISTED BICYCLES
There are video tutorials online or on Argos' website designed to assist you if you need help.
Please call our Technical help line:
(weekdays 9am-5pm)
01702 208187
(standard call rate charge applies)
3
POWER ASSISTED BICYCLES
Fig.1
Fig.2
Fig.3
Unpacking your new e.bike
Your bike comes 100% assembled in the Carton
1.Before you begin to unpack your e.bike we recommend you get another person to assist you as it s much easier with 2 persons to lift out of the box.
2.Remove all the packing materials used to protect the bike and dispose of it later in a responsible manner.
3.Once you have unpacked the bike it is a good idea to check to make sure there has not been any damage in transit.
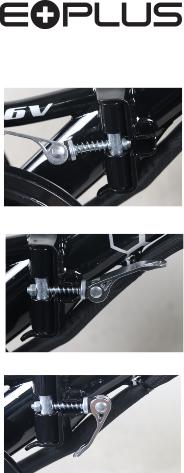
Unfolding your e.bike (City folder and Commute)
Step 1. Frame
1.Unfold the frame lifting the locking pin, close the frame, releasing the pin into the location hole (Fig.1)
2.Swing the quick release bar around into the slot on the front frame section as shown. (Fig.2)
3.Close the quick release arm which tightens and locks the 2 frame sections together (Fig.3)
4.To fold your frame for transport of storage simply reverse steps 1-3.
PLEASE NOTE:
When you have unfolded your frame its a good idea to rest your bike on the bike stand which is attached to the left rear chainstay, this makes it much easier to complete the other steps.
4

Fig.4
before the bike is folded, Please lower the seat post to protect the chain wheel
Unfolding your e.plus
City folder only
Step 2. Handlebars and Stem
1.Unfold by lifting the handlebars and Stem until it is sitting vertically.
2.Raise the clamp arm up towards the stem to lock inplace.
POWER ASSISTED BICYCLES
There are video tutorials online or on Argos' website designed to assist you if you need help.
Fig.5 |
Fig.6 |
Fig.7 |
Fig.8 |
|
|
|
5
POWER ASSISTED BICYCLES
Fig.9 |
Fig.10 |
Fig.11 |
Fig.12 |
Knurled adjustment nut a quater of a turn until required tightness is obtained.
Unfolding your e.bike |
|
remember the right pedal tightens clockwise and |
|
|
NOTE: Should you ever need to replace the pedals |
|
the left pedal anti-clockwise. |
|
|
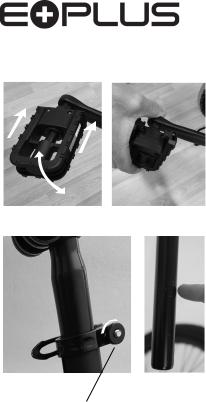
Step 3. Pedals (Mantra, City folder, Commute)
1.Pull out the pedal from folded position till it springs into at position (Fig.9)
2.To fold the pedals for storage or for transportation you must press the pedal inwards towards the bike and the upwards/downwards once it has cleared the locking mechanism. (Fig.10)
Photo shows pedal movement direction
Fitting the Saddle |
|
the minimum insertion mark clearly on the |
|
(Fig.11) |
NOTE: Be sure not raise the seatpost higher than |
Mantra,City folder, Commute |
|
seatpost. |
|
|
|
|
|
The Saddle and Seatpost are already tted together.
2.Slide the seatpost into the seatbube and close the tension lever on the quick release clamp to lock your seat in place. (Fig.12)
3.Adjust the saddle height to suit you by releasing the clamp and tightening when at the correct height.
4.If the clamp does not tight enough to hold the saddle in position simply release the tension lever and turn a quater of a turn on the wheel nut and close the tension lever. Repeat as necessarry.
6
 Loading...