

Page 1
Epiphan Pearl Mini
User Guide
Release 4.19
June 21, 2023
UG122-17
© and ™ 2023, Epiphan Systems, Inc
Page 2

Thank you for choosing Epiphan!
At Epiphan Video (“Epiphan”), building reliable video systems with pro features that perform above your
expectations is our mission.
We value your feedback! Email us your suggestions and let us know how you think we're doing and where you'd
like to see our products improve: [email protected]
Warranty
All Epiphan Video systems have a 100% return to depot warranty for one year from the date of purchase.
Technical support
Epiphan’s products are backed by our professional support team. You can reach our team several ways:
l
Email [email protected]
l
Live chat from our support site https://www.epiphan.com/support/
l
Phone toll free at 1-877-599-6581 or call +1-613-599-6581
Gather as much information about your problem as you can before you contact us so we can help you better,
including:
l
A description of the problem
l
Details about your video or audio source (type, connection, resolution, refresh rate, etc.)
l
Product serial number
l
Product firmware version (using the admin interface)
l
Product LED lights
BETADRAFT- ii
Page 3

Table of contents
Thank you for choosing Epiphan! ii
Start here 1
Release notes 2
Product overview 8
What is Pearl Mini? 8
Front and back view of Pearl Mini 10
Monitoring audio 12
Live video mixing / switching 14
SD card installation and file management 15
Quick start 15
Selecting an audio source for Pearl Mini 17
Install the power button shield 19
Specifications 20
Pearl Mini AV inputs 20
Pearl Mini tech specs 22
Pearl Mini power adapter specifications 29
Optimum System Load 29
International character support 30
Vesa mounting the device 31
User interfaces and remote access 32
The touch screen - Pearl-2 and Pearl Mini 32
About the touch screen 33
The touchscreen channel view 34
Record a channel using the touch screen 36
Stream a channel using the touch screen 37
Switching and mixing using the touch screen 38
Single Touch streaming and recording control 40
About Single Touch streaming and recording 40
Customize the Single Touch control display 42
Specify channels and recorders for Single Touch recording 43
Specify channels for Single Touch streaming 44
CMS event controls using the touch screen 45
Configure the touch screen 49
Disable or enablethe touch screen 51
Hide or show channel previews on the touch screen 51
Disable or enable the system status screen 51
Disable or enable configuration using the touch screen 52
BETADRAFT - iii
Page 4

Disable or enable recording, streaming, and switching from the touch screen 52
Rotate the Pearl Mini's touch screen orientation 53
Set the Pearl device screen timeout 53
Set a PIN security code 54
The Admin panel 54
About the Admin panel 55
Connect to the Admin panel 58
Enable local console access to the Admin panel 59
Connect using a DNS-based service discovery 61
Connect using persistent static IP address 62
Switching / mixing using the Admin panel 63
EpiphanLive 64
About Epiphan Live 65
The Dashboard interface 66
Access EpiphanLive using a web browser or mobile device 67
Access EpiphanLive from the Admin panel 68
Stream, record, and monitor using the Dashboard interface 69
Configure Dashboard panels 69
Monitor video and audio input sources using Epiphan Live 71
Monitor and select the video output source using Epiphan Live 72
Control streaming and recording using EpiphanLive 74
Switching / mixing using Epiphan Live 76
About the Switcher interface 76
Switching while live streaming and recording using Epiphan Live 77
Your recordings 80
Cloud-based device management 81
About Epiphan Edge 81
Enable or disable Epiphan Edge access 82
Pair and unpair from Epiphan Edge 83
Remote login to the Admin panel and Epiphan Live 84
Setup 87
Configure network settings 88
Network ports used by Pearl Mini 88
Verify IP address and MAC address 89
Configure a static IP address 91
Configure DHCP 93
Configure DHCP Option 81 95
Configure Dynamic DNS 96
BETADRAFT - iv
Page 5

Change the HTTP/HTTPS port values 99
Perform network diagnostics 99
Disable the network discovery port 100
Enable an NDI discovery server 101
Configure network security 101
Configure 802.1x network security and manage user certificates 102
Manage CA and self-signed certificates 104
Configure HTTPS 104
Configure system settings 106
Configure date and time 107
View the current date and time settings 107
Configure a time server 108
Manually set the date, time, and time zone 110
Configure device info, name, description, and location 110
Format the SD card 111
Audio input ports 113
Enable or disable phantom power onPearl Mini 114
Configure audio ports for stereo or mono 115
Assign audio sources to an input 116
Adjust audio gain and delay 117
Mute audio 119
Video output ports 120
About video output ports 120
Video output port resolution 122
Set up the video output port using the Admin panel 123
Set up and enable MultiViewer 125
MultiViewer system information 127
Select the video output source using the device screen 128
Preview the video output port 129
Disable the video output port 130
Disable or enable audio and output port volume 131
Display and reposition the audio VUmeter 133
Rename a video output port 134
Mirror the video output port display 135
Connect external devices 136
Connect an external keyboard 136
Connect a USB status light 137
User administration 138
User types and privileges 138
Change user passwords 143
BETADRAFT - v
Page 6

Overcome lost passwords 144
Remove user password 144
Log in using a different user account 145
Assign administrator privileges to operators 145
Configure LDAP user authentication 147
Restrict viewers by IPaddress 149
Configuration presets 153
About configuration presets 153
Configurationpreset considerations 155
Configuration groups 157
TheFactory default configuration preset and Factory reset 157
Create a configuration preset 159
Apply a configuration preset using the Admin panel 160
Apply a configuration preset using the touch screen 160
Export and import configuration presets 162
Update a configuration preset 163
Delete a configuration preset 164
Capture 165
What is a channel? 166
Channel layout examples 166
Channel configuration 169
Create a channel 170
Add video sources or a channel as a source 172
Add an audio source to a layout 176
Duplicate a channel 177
Rename a channel 178
Delete a channel 179
Preview a channel 180
Add or remove channel metadata 181
Configure encoding 182
Codecs and file format compatibility 183
Configure video encoding 185
Configure audio encoding 188
Multi-encoding and channel as a source 190
Custom layout configuration 191
About the custom layout editor 191
Resize and position items using percents or pixels 194
Open the custom layout editor for a channel 200
BETADRAFT - vi
Page 7

Configure a custom layout for a channel 201
Rename a layout 203
Delete, move, or duplicate a layout 203
Set the background color 205
Add an image to a layout 205
Add a video file to a layout 207
Upload or remove an image or video file using the Media page 209
Add a text overlay 210
Custom system variables for text overlays 213
Crop a video source 214
Video and audio input sources 217
About connecting video and audio sources 217
Tested RTSP-based IP cameras 219
Supported web cameras 220
Connect an RTSP source 221
Connect an SRT stream as an input 222
Connect an NDI|HX source 225
Connect a web URL as a video source 227
Connect an AV.io video grabber 228
Preview a video source using the Admin Panel 228
Rename an input port 228
Configure a video input source 229
Add a custom No Signal image 230
Stream 232
What is streaming? 233
Streaming to a CDN, multicasting, and streaming to multiple destinations 234
Directly sharing channel stream URLs with viewers 236
About streaming using SRT 237
Secure streaming 239
Suggested stream settings 240
Streaming a channel direct to viewers 242
Share a live broadcast stream (HTTP, HTTPS, or RTSP) 243
Enable HLS(pull) 244
Restrict viewer access to channel streams 245
Restrict viewers by IPaddress 246
Change HTTP and RTSP streaming port values 250
Disable and enable direct channel streaming 251
Viewing a channel's live broadcast stream 253
BETADRAFT - vii
Page 8

View the live broadcast URL using a web browser 254
View the streaming URL using a media player 255
Streaming to servers, CDNs, and other devices 257
Set up an RTMP or RTMPS (push) stream 257
Set up an SRT stream using rendezvous mode 258
Set up an SRT stream using caller and listener modes 262
Adjust latency and view the SRT stream status 265
Set AES encryption and a passphrase for SRT 268
Set up an HLS (push) stream 268
Set up an RTSP announce stream 270
Set up a stream to the CDN using an XML profile 271
Start and stop streaming to a CDN 272
Multicast streaming 274
MPEG-TS streams using RTP/UDP push 274
MPEG-TS streams using UDP push 276
Multicast streaming using RTP/UDP 278
Set up traffic shaping 278
Viewing with Session Announcement Protocol (SAP) 280
Streaming to a media player or smart TV 282
Record 283
About recording 283
Record a channel 285
Record using Single Touch control onPearl-2 and Pearl Mini 286
Configure recording settings, file size, and type 287
Restart recording to a new file 289
Recorders 290
Add a recorder 290
Select channels to record 291
Start and stop a recorder 291
Rename a recorder 292
Duplicate a recorder 293
Delete a recorder 294
Manage recorded files 295
View list of recorded files 296
Download recorded files manually 297
Join recorded files together 298
Extract tracks from a recording 299
Rename recorded files 300
Delete recorded files 301
Automatic file transfers 303
BETADRAFT - viii
Page 9

About Automatic File Upload (AFU) 303
Set channels and recorders to include in AFU 304
Enable AFU, schedule, and set options 305
Configure AFU to FTP server parameters 307
Configure AFU to SFTP server parameters 308
Configure AFU to RSync server parameters 310
Configure AFU to CIFS server parameters 311
Configure AFU to SCP client parameters 313
Configure AFU to AWS S3 parameters 315
Configure AFU to WebDav server parameters 317
AFU or copy to USB 318
Manage USB file transfer queue 325
Add recordings to an AFU queue 327
View the AFU log 327
Manage the AFU queue 328
Integration 329
Kaltura registration 329
Enable CMS and register with Kaltura 329
Disable or deregister from Kaltura 332
Change the resource name used for Kaltura 333
Reassign a registered resource 333
Kaltura recording and webcasting setup 334
About Kaltura recording and webcasting 335
Kaltura settings 338
Select channels for Kaltura VOD events 339
Select a channel and URLs for Kaltura webcasting events 340
Set Kaltura ad hoc event parameters 342
Set the extend Kaltura CMS event interval 344
Change the events schedule refresh interval 344
Use RTMPS for a Kaltura webcasting event 345
Panopto registration 345
Enable CMS and register with Panopto 346
Disable CMS and disconnect from Panopto 347
Panopto recording and webcasting setup 348
About Panopto recording and webcasting 348
Set up Panopto authentication for ad hoc events 351
Set Panopto ad hoc event parameters 354
Set the extend Panopto CMS event interval 355
BETADRAFT - ix
Page 10

Enable mute and display image on pause 356
Disable low disk space Panopto alerts 358
YuJa setup 361
YuJa known issues 361
YuJa registration 361
YuJa settings 363
Creating, modifying, and deleting YuJa events 364
Accessing YuJa recordings 364
View YuJa events 364
Set the extend YuJa CMS event interval 365
CMS recording and webcasting control 365
Set up a CMS start screen 366
Start/stop scheduled CMS events using the Admin panel 367
Stop/start scheduled CMS events using the touch screen 368
Extend or pause CMS recordings and webcasts 370
Create ad hoc events using the Admin panel 372
Create ad hoc events using the touch screen 375
Log out of an ad hoc session 377
Schedule when CMS event recordings upload 378
Upload the local Panopto webcast recording 379
Recover channel backup recordings 379
Status and monitoring 383
Monitoring audio and VU sensitivity 383
Channel monitoring using the touch screen 384
View system information using the touch screen 386
View system information using the Admin panel 389
View device information using the touch screen 389
View network status 390
View 802.1x network connection status 391
View channel status and stream information 392
View the video output port status 393
View AFU and file transfer progress 394
View scheduled CMS events and history 396
Maintenance 399
Power down and system restart 399
Back up your Pearl device setup 401
Perform a factory reset 402
Firmware upgrade 402
BIOS update 405
Register your device 407
Support 408
BETADRAFT - x
Page 11

Storage capacity and maintenance 411
Troubleshooting 414
Diagnostic tools 414
Connectivity status results 416
Run diagnostic tests using the Admin panel 417
Run diagnostic tests using the device screen 418
Troubleshooting Quick Reference 421
Remove black bars (matte) from the video 426
Use a specific EDID for the video input port 429
Unstretch the output video 431
Remove the combing effect on images 432
External keyboard shortcuts 433
Limitations and known issues 436
Software license 441
Thank you for choosing Epiphan! 448
BETADRAFT - xi
Page 12
Pearl Mini User Guide Start here
Start here
Welcome, and thank you for buying an Epiphan Pearl device.
See the Quick start for basic steps to get a single video source (and optional audio) set up so you can stream and
record some output right away. The rest of the guide shows you how to tweak the system exactly how you want it
so you can take advantage of the many advanced features.
l
For a product description of the Pearl Mini, see What is Pearl Mini?.
Pearl devices are fully integrated with Kaltura, Panopto, and YuJa Content Management Systems (CMSs) and is
easily setup using the Admin panel. The Integration section of this guide details how to register and set up the
Pearl device as a remote recording and streaming device withthese CMSs.
For information about using the Pearl device's RS-232 API, HTTP API, and HTTPS API with third-party
applications, refer to the Pearl System API Guide.
About this Guide
After the introductory section, the next section describes the setup and main user interfaces that are used to
operate and configure the Pearl device. You'll find everything that you need to use and setup these interfaces :
l
Touch screen for Pearl Mini and Pearl-2
l
Admin Panel
l
Epiphan Live
The rest of the user guide covers setting up and operating your Pearl system for a successful experience. The
sections are organized into these main categories: Setup, Capture, Stream, Record, Integration, Maintenance,
and Troubleshooting.
BETA DRAFT - 1
Page 13

Pearl Mini User Guide Release notes
Release notes
Release 4.20.0
l
Added ability to apply a Pearl Configuration preset from an attached USB drive.
l
Re-branded Epiphan Cloud to Epiphan Edge on web admin interface and touch screen.
l
To improve the user experience and readability configuration presets, icons representing sections of the
preset are no longer shown on the touch screen.
l
Resolved an issue in which Pearl times out when attempting to discover NDI sources on the network.
l
Resolved an issue that leads to loss of input video signal when the name of a video source on Pearl web
UI is changed to reserved key words.
l
Provided better handling of HTTP error code 401 from YuJa Enterprise Video Platform.
Previous releases and features
This section lists features and updates introduced in previous product releases.
Release 4.19.0
l
Added support for media playback enabling you to add an MP4 video file to a layout within a channel.
l
Added support for web URL as input for use with graphics solutions such as Singular.live, Uno, and
Flowics. This can be used for use cases such as lower-thirds and bugs.
l
Implemented a fix for an issue that prevented the upload of recorded files to Panopto. This problem is
encountered when Pearl is rebooted while in the middle of uploading a recorded file to Panopto.
l
Implemented a solution to identify and restore the XLR analog audio input capture when it fails due to
grounding and/or external environmental issues.
l
Resolved an issue that prevented Pearl from uploading files to existing subdirectories in an S3 bucket
using AFU.
Release 4.18.0
l
Added support for NDI|HX inputs
l
Pearl Mini can register itself with an NDI discovery server if one is set up on the network, this functionality
can be enabled in the Network section
BETA DRAFT - 2
Page 14

Pearl Mini User Guide Release notes
l
Added support for quickly connecting SRT inputs to EpiphanConnect
l
Enhanced SRT inputs and outputs with buttons to quickly copy information to clipboard
l
Enhancements made to Panopto integration; Pearls configured to record webcast events will now begin
recording to local storage if Panopto cannot be reached at the scheduled start time.
l
Improved discoverability of the Epiphan Live dashboard
l
Resolved an issue in which some scheduled back to back events with Panopto, Kaltura, or YuJa CMS
may not get recorded
l
Bug fixes
l
MPEG-DASH is no longer supported on Pearl devices
l
UPnP is no longer supported on Pearl devices
Release 4.17.3
l
An issue has been resolved wherein configuration presets that contained Epiphan Cloud data from one
Pearl were applied to another Pearl which then caused a hard lock of that Pearl upon reboot. A better
handling of this information has been implemented in this release to prevent the hard locking of these
Pearls on reboot.
l
An issue has been resolved wherein occasionally Epiphan Cloud team members were not able to access
the Admin interface of a paired Pearl unit
l
An issue has been resolved with Pearl Mini where using an HDMI extender could cause the HDMI video
signal to drop before it reached the Pearl Mini
l
Bug fixes
Release 4.17.2
l
Bug fix for the full frame rate preview in Epiphan Cloud Pro. HLSpreview stream from Pearl to Cloud was
not closing properly when preview was stopped, this has been resolved
Release 4.17
l
Firmware version 4.17 is the last version to support connections to UPnP enabled devices
l
Support for Kuando BusyLight Alpha and Omega model 2
l
Support for starting and stopping scheduled YuJa events early using Pearl
l
Support for pausing and resuming YuJa events in progress using Pearl
l
Support for extending a YuJa event in progress using Pearl management interface
BETA DRAFT - 3
Page 15

Pearl Mini User Guide Release notes
l
Addition of brute force password attack prevention. If the same IP address tries and fails to log in to Pearl
50 times in a row within 60 seconds, Pearl will block further attempts to log in from that IP address for 60
seconds
l
Security vulnerability fixes
l
Bug fixes
Release 4.15
l
Direct integration with the YuJa content management system lets you streamline your YuJa workflows for
even more efficiency. Pearl can automatically start recording or streaming based on your schedule in
YuJa and push files to the right folder on the platform
l
Kaltura updates including Improved ad hoc events and My Dashboard integration
l
MultiViewer onscreen options including on-air status, audio meters, channel status, and CMS event status
l
SRT support upgraded to version 1.4.3 (better stability, more accurate statistics, and other improvements)
l
Support for automatic file uploading via secure SMB2 and SMB3, improving compatibility with Windowsbased systems
l
Preset optimizations allow you to select which aspects of a created preset to apply to a Pearl device
Release 4.14.2
l
MultiViewer displays a custom mix of up to four video sources including channels on the HDMI output port
in a convenient grid for confidence monitoring with minimal impact to the system's processor.
l
Pause and extend CMS events
l
Panopto device templates
l
Live channel RTSP stream transport option
l
Keyboard shortcuts
l
Pearl as FTP server functionality removed.
Release 4.14.1
l
Upload local webcast recordings to Panopto
l
Locking the CMS start screen
l
Pre-configured stream URLs for Kaltura webcasts
l
Schedule CMS event uploads
l
Rotate the touch screen display 180 degrees without affecting the video at the output port
BETA DRAFT - 4
Page 16

Pearl Mini User Guide Release notes
Release 4.13.0
l
Epiphan Edge support replacing AV Studio
l
Diagnostic tools added to the touch screen and Admin panel
l
Scheduled Automatic File Upload (AFU)
l
DHCP option 81 (FQDN) support
l
Dynamic DNS (DDNS) support
l
Configure Pearl Mini to not send low storage alerts to Panopto
l
SHA hashing algorithm support
Release 4.12.1
l
External keyboard control for the touch screen
l
Status light indicator support for select models of Kuando BusyLight and Delcom Product's USB HID
status indicators
l
Email address lookup for Kaltura ad hoc events
Release 4.12
l
Secure Reliable Transport (SRT) streaming protocol support
l
HTTP Live Streaming (HLS) streaming protocol support
l
MPEG-DASH streaming protocol support
l
Additional HLS (pull) options to configure the segment size and playlist duration
l
Multiple multicast publishers support in the same Pearl Mini channel and the ability to start and stop the
publishers
l
Adding pre-existing recordings to an Automatic File Upload (AFU) queue
l
Changed some status fields on the Admin Panel's Info page and changed the bitrate status to now show
the total combined bitrate of the video plus audio.
l
Enhanced streaming error messages
Release 4.11
l
Extend certain admin privileges to operators
l
Monitor status of file transfers using touch screen and cancel file transfers using the Admin panel
l
Added support for Kaltura's lecture capture plus live event type
BETA DRAFT - 5
Page 17

Pearl Mini User Guide Release notes
Release 4.10
l
Local Admin panel access using a USB keyboard, mouse, and monitor connected directly to Pearl Mini
plus a built-in virtual keyboard, multiple keyboard language layouts, and support for touch screen monitors
l
Assigning Pearl Mini a unique device name, description, and location
l
Using a Kaltura application token to register Pearl Mini as a remote recorder
l
Selecting a video output source using the touch screen
Release 4.9.1
l
Kaltura ad hoc event details and configurable event schedule refresh interval
l
Panopto support for ad hoc event authentication from Pearl Mini's touch screen using credentials for
external identity providers
l
Panopto ad hoc event folder selection from the Pearl Mini's touch screen
l
Automatic user logout when an ad hoc event ends
l
International character support in channel names, layout names, video and audio input names, text
overlays, and recorded file names. For a list, see Release notes
l
Epiphan Discovery Utility support deprecation
Releases 4.9.0 and 4.9.0h
l
Full Panopto integration
l
Kaltura ad hoc event creation using the touch screen
l
Toggle Temperature/CPU load on the touch screen
l
Automatic EDID verification of connected sources upon start up
l
USB tethering removed
l
Confirmation before AFU queue file deletion
l
Kaltura users who are only defined in MediaSpace are allowed to start unsheduled ad hoc events using
both the touch screen and the Admin panel (4.9.0h)
Release 4.8.1
l
Traffic shaping to improve video output quality when streaming over a Gibabit Ethernet network to 10/100
Mbps set-top boxes. If the API is used for traffic shaping, see the Technical Notes for your Pearl Mini
model for instructions. They're available from the product resources page on the Epiphan.com website.
l
Improved video smoothness of the HDMI outputs
l
We improved the smoothness and quality of interlaced video from SDI inputs
BETA DRAFT - 6
Page 18

Pearl Mini User Guide Release notes
Release 4.8.0
l
USB input device (UVC/UAV) support
l
RTSP inputs
l
Hardware acceleration
l
Live switching improvement
l
Audio inputs as playback audio sources for HDMI outputs
l
Product registration changes
l
Pairing to AV Studio changes
l
Original Livestream and Wowza Cloud streaming presets removed
l
Switching performance improvement
Release 4.7.1
l
AFU to SFTP server stability improvement
Release 4.7.0
l
Integration with Kaltura CMS
l
International character support in text overlays
l
RTMPS certificate update
l
EAP-TLS user name field update
Release 4.6.0
l
802.1x network security compliance
l
RTMPS AV encryption
l
HTTPS
l
Discovery utility port disabled
Release 4.5.1
l
Constant volume for layouts with multiple audio sources
l
Assign RCA/3.5 mm audio sources to an input
l
Mute audio
l
Remote login
BETA DRAFT - 7
Page 19
Pearl Mini User Guide Product overview
Release 4.5.0
l
Inaugural release of Pearl Mini.
Product overview
Learn about your Pearl device and get familiar with the various connectors and features.
Topics include:
l
What is Pearl Mini?
l
Front and back view of Pearl Mini
l
Live video mixing / switching
l
Monitoring audio
l
Selecting an audio source for Pearl Mini
l
SD card installation and file management
What is Pearl Mini?
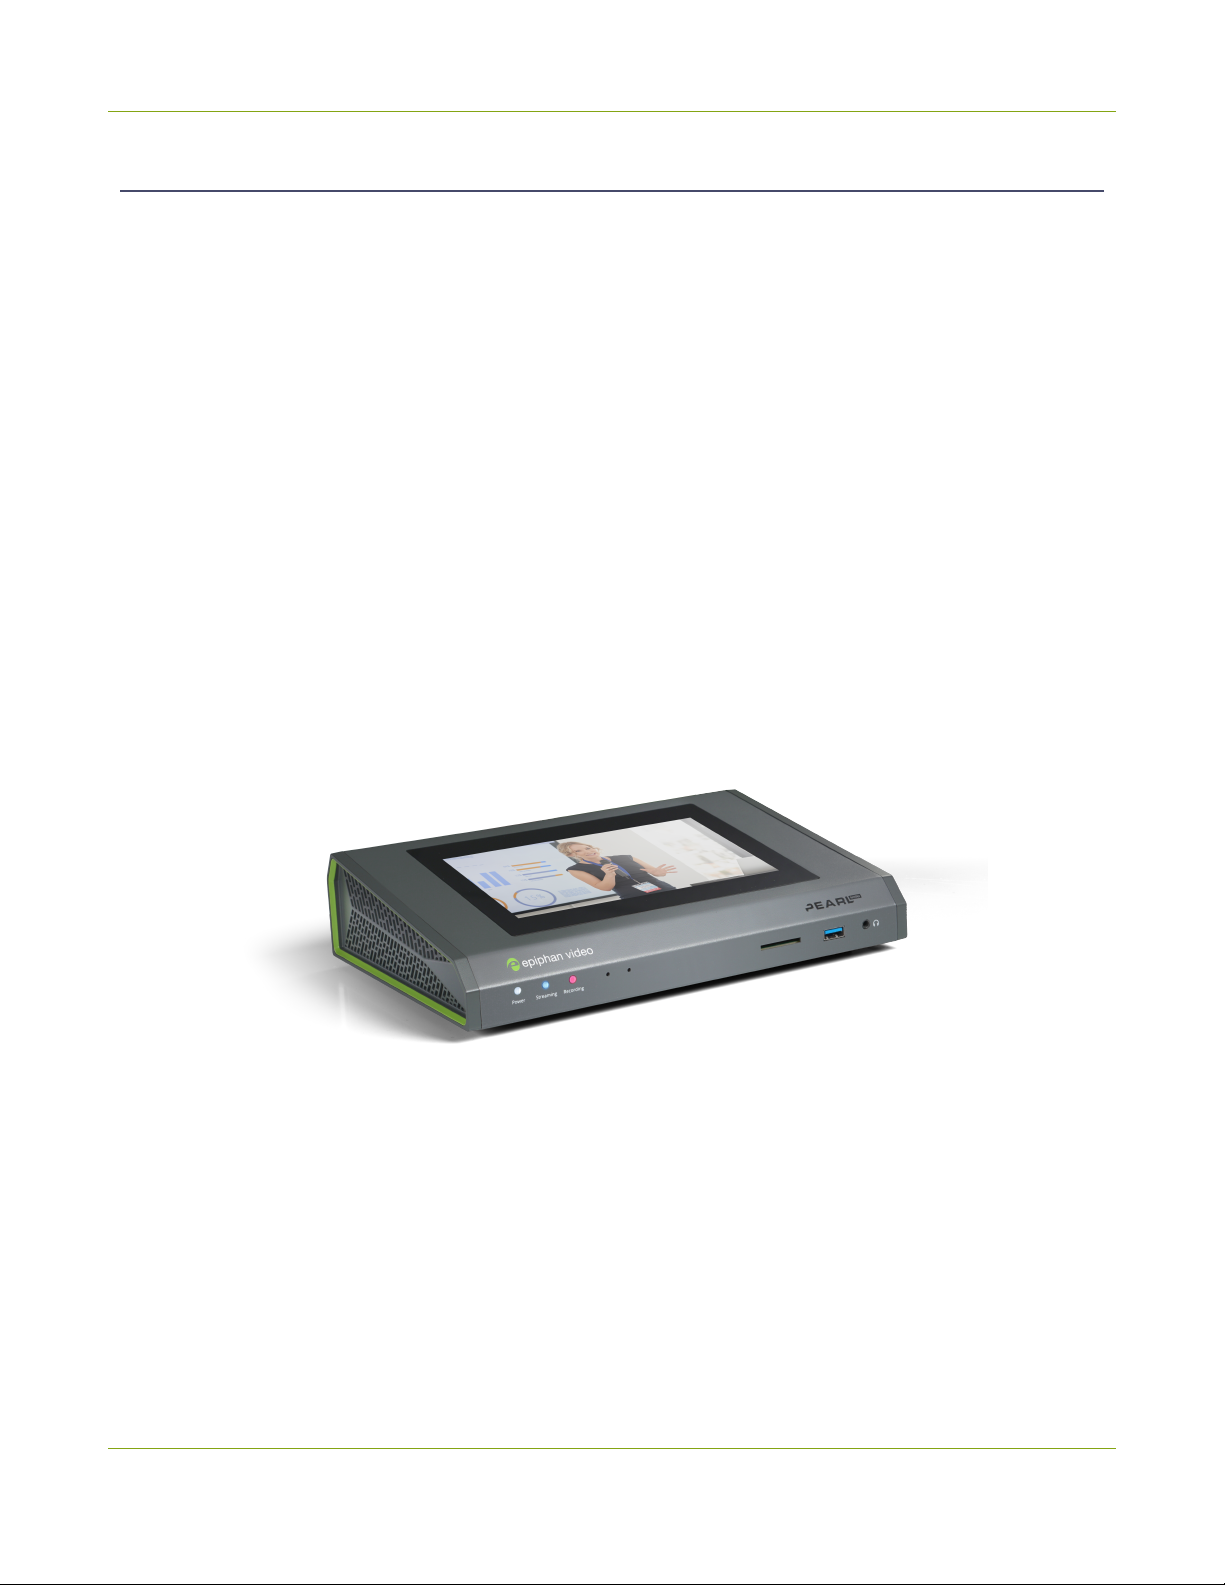
Pearl Mini is a versatile live video production device that's a video encoder, video streamer, live switcher, and
video recorder all in one. Pearl Mini is great for lecture capture applications.
With Pearl Mini, you can capture, record and stream computer monitors, radar displays, or anything with a wide
variety of supported video input signals, including:
l
SDI
l
HDMI™
l
DVI-I(single link)
l
USB
l
SRT and RTSP
l
NDI|HX
BETA DRAFT - 8
Page 20
Pearl Mini User Guide What is Pearl Mini?
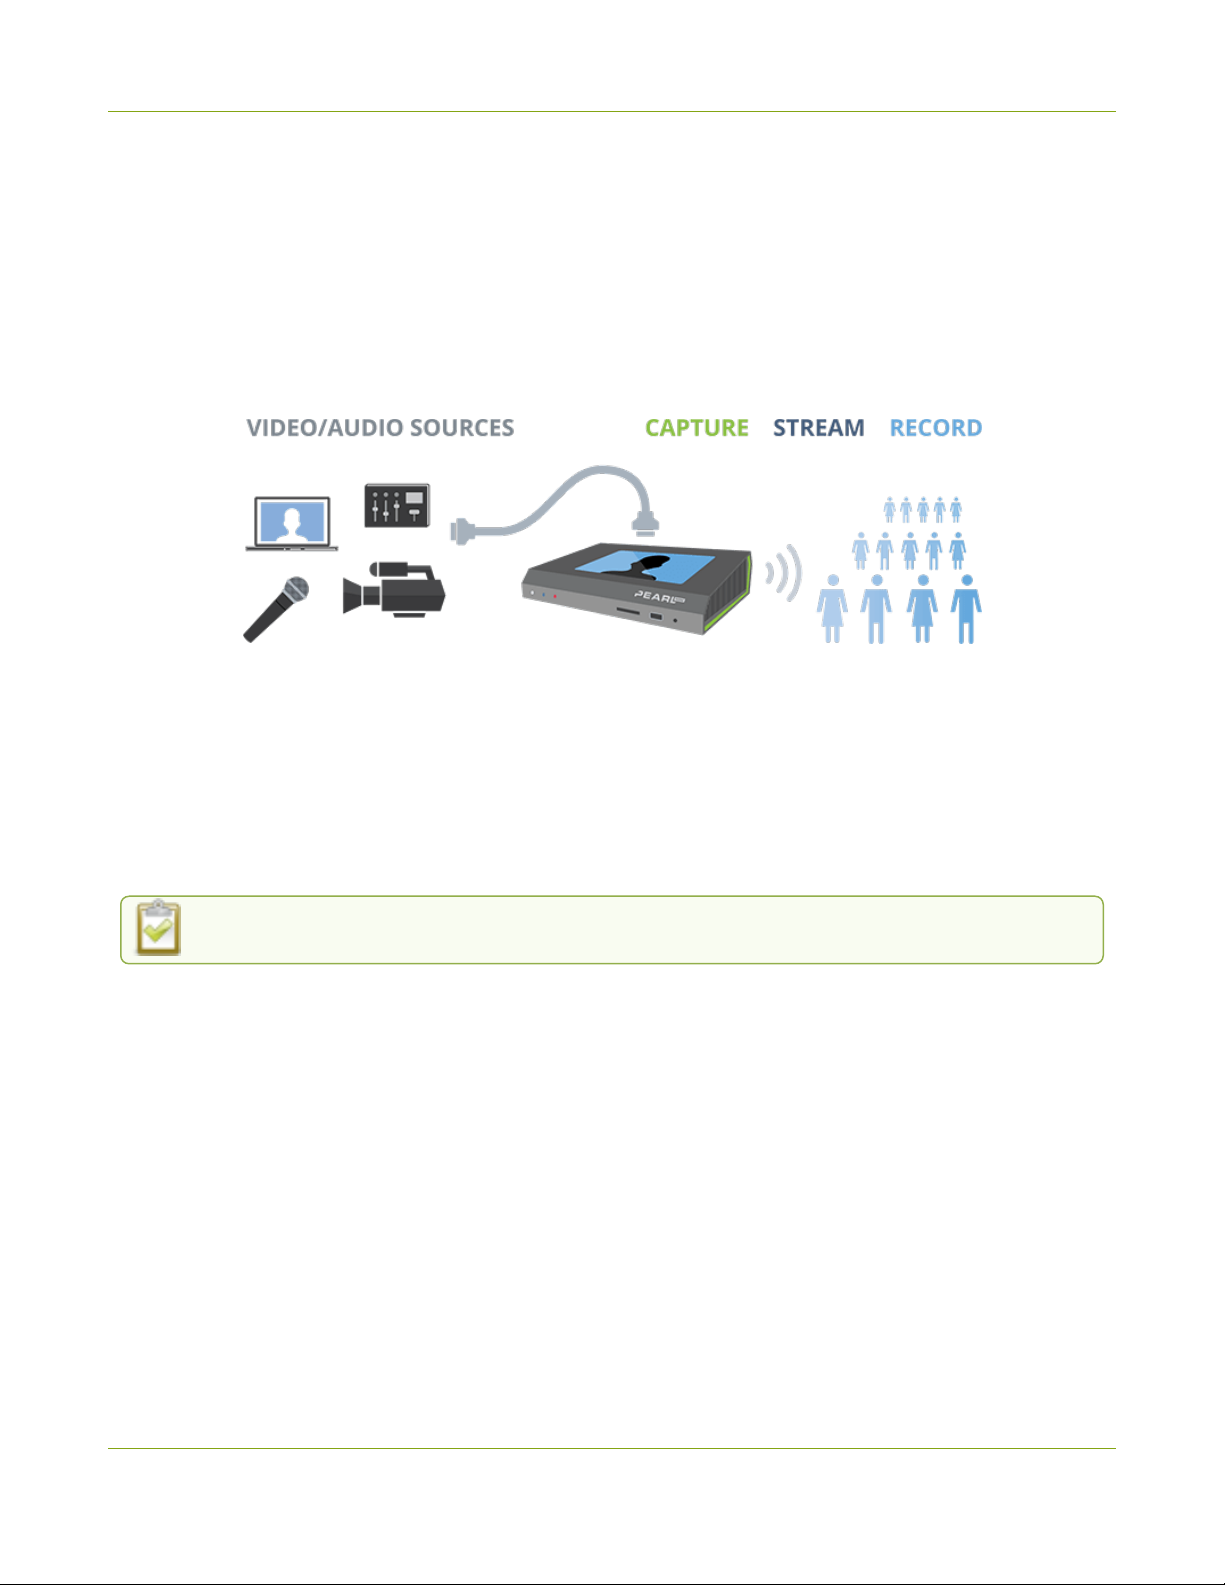
Capture audio via XLR, ¼ TRS, USB, RCA, 3.5 mm, SDI, HDMI, and network sources (SRT, NDI|HX, and
RTSP).
Simultaneously capture up to *three audiovisual sources and choose how you want to record and stream them.
Have separate ISOs or create custom layouts with multiple video sources for live switching. You can do all that
using Pearl Mini.
Stream to Content Distribution Networks (CDNs) worldwide using modern protocols SRT and HLS. At the same
time, you can stream to other destinations using RTMP/RTMPS or RTSP. Even multicast directly to viewers on
your LAN so they can watch the live channel broadcast using a web browser or media player on smart devices
connected to the same private network as Pearl Mini.
Download recordings using your web browser, or set Pearl Mini to automatically upload recorded files directly to
a network server using FTP, RSYNC, CIFS, WebDav, and more. Pearl Mini is also fully integrated with Kaltura,
Panopto, and YuJa Content Management Systems (CMSs) and can be registered as a video remote recorder
resource for seamless lecture capture plus user authentication directly from Pearl Mini's touch screen.
Network security compliance with 802.1x protocols, passwords, and certificate authentication means an easier
setup for IT friendly live streaming over enterprise networks. Pearl Mini is HTTPS enabled for secure
administration and control over the LAN, and supports secure live streaming protocols like SRT with AES
encryption and RTMPS.
Pearl Mini does not capture from HDCP encrypted sources.
* Pearl Mini supports up to three video inputs with certain conditions, see Pearl Mini AV inputs.
BETA DRAFT - 9
Page 21
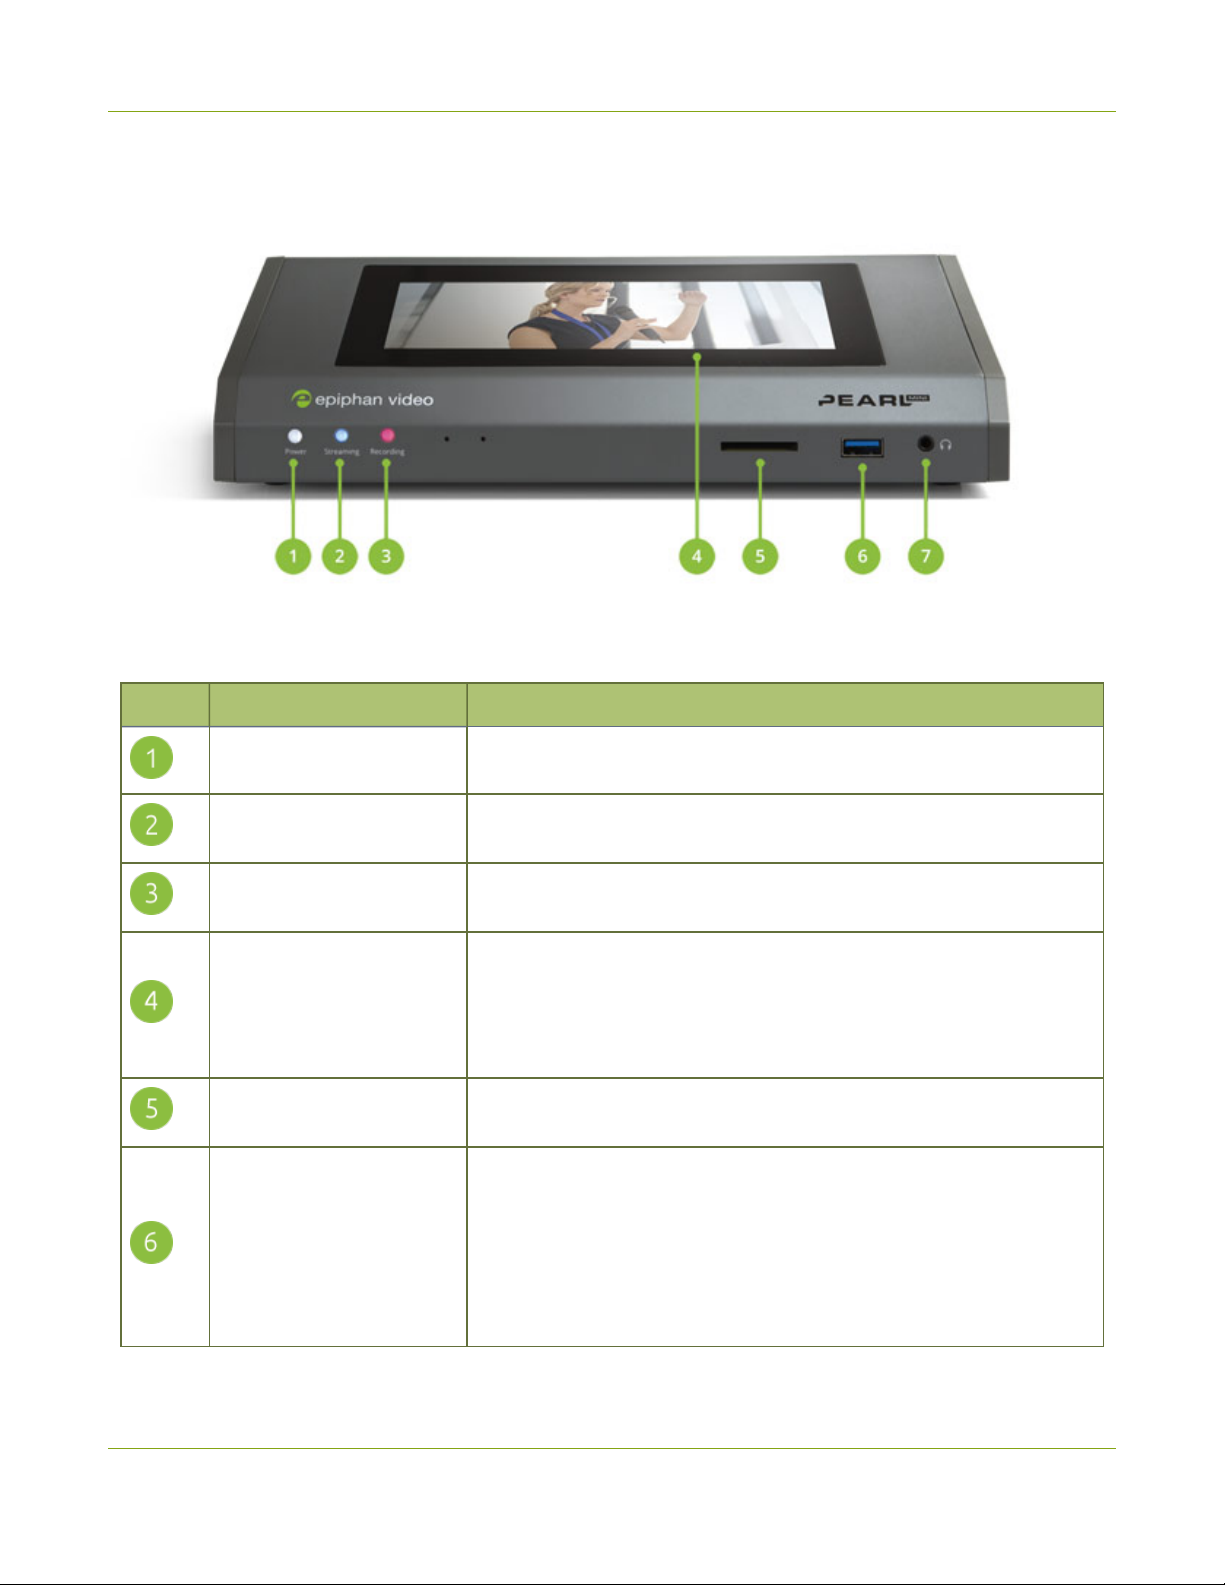
Pearl Mini User Guide Front and back view of Pearl Mini
Front and back view of Pearl Mini
Table 1 Pearl Mini front panel descriptions
Label Name Description
Power light Glows when the system is powered on.
Streaming light
Recording light
Touch screen front panel
display
SD card slot
USB3.0 port
Glows when the system is streaming. Flashing means that user action
is required and streaming has either stopped or won't start.
Glows when the system is recording. Flashing means that user action
is required and recording has either stopped or won't start.
Used for confidence monitoring and simple configuration, obtaining
system information, and starting/stopping recordings and streams.
Users can also authenticate with one of the integrated Content
Management Systems (CMSs) to create unscheduled ad hoc
recordings and webcasts.
Used to store up to 512 GB of recordings and user uploaded media
files. For recommendations, see Pearl Mini tech specs.
For connection of external hard drives, flash drives, USB keyboards,
and supported USB status light indicators.
Can be used to connect a USB mouse or keyboard when the local
console feature is enabled.
A web camera or USB microphone cannot be connected to this port,
only to the ports on the rear panel.
BETA DRAFT - 10
Page 22
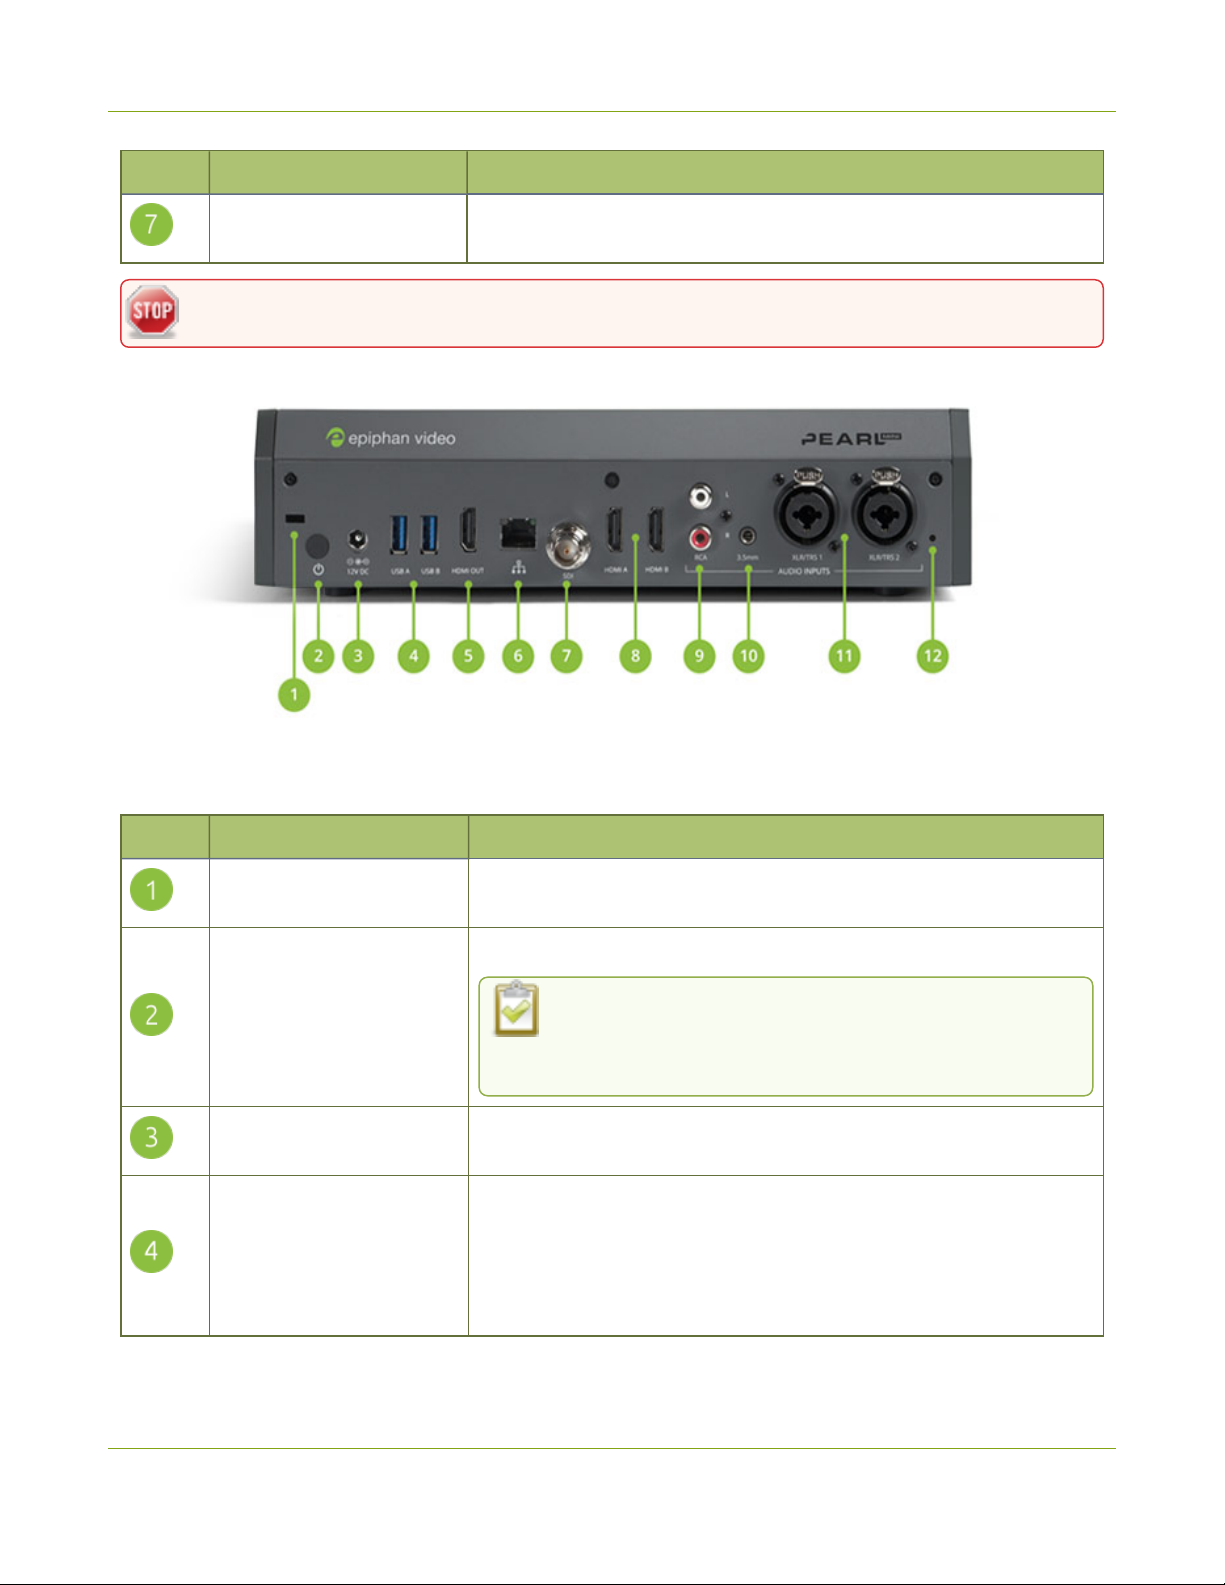
Pearl Mini User Guide Front and back view of Pearl Mini
Label Name Description
3.5 mm audio output jack
Do not insert objects in to the two, pin-sized holes that are located beside the LEDs.
Table 2 Pearl Mini back panel descriptions
For audio confidence monitoring. Plays the audio for the currently
visible channel.
Label Name Description
Lock
Power button
Power jack
USB3.0 ports
Allows Pearl Mini to be locked to a desk or surface using a laptop lock
cable.
Press to toggle Pearl Mini on and off.
If a software shutdown is performed when the toggle
switch is in the on position, double press the power button
to turn on Pearl Mini.
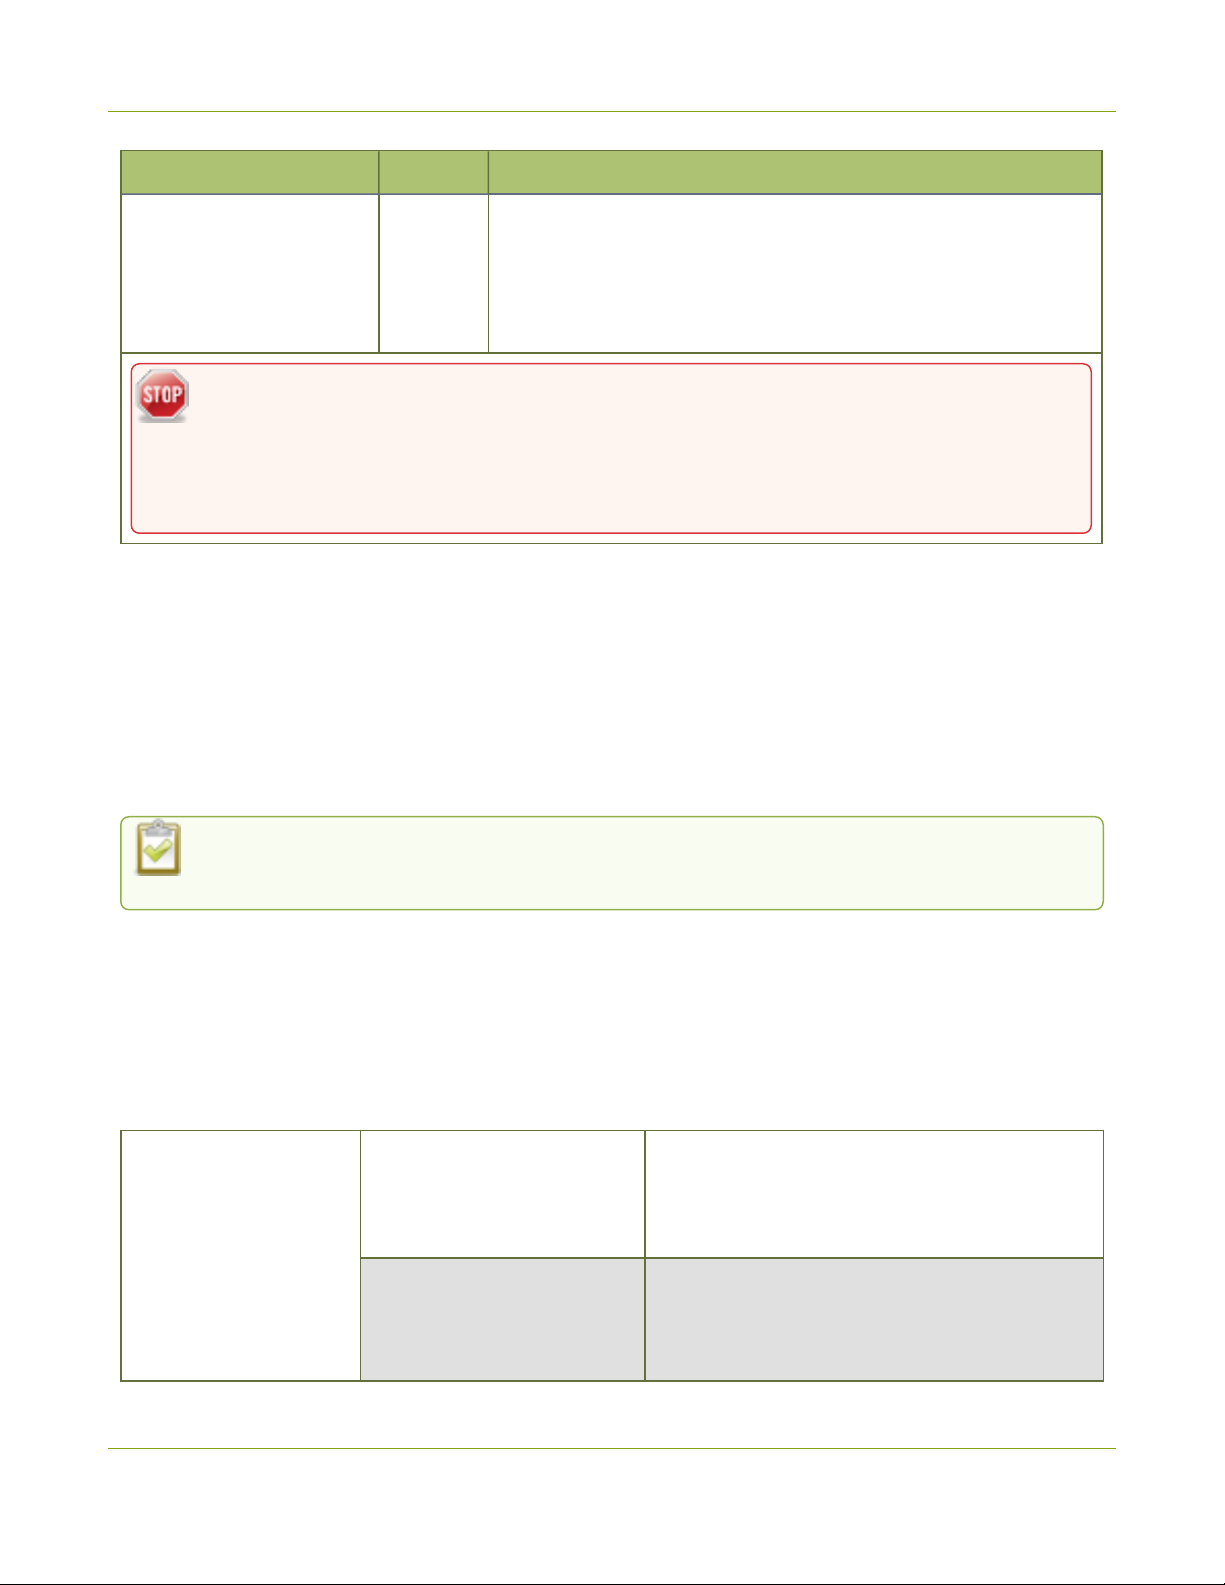
Plug the power supply in here. The port requires a 12 V DC power
source (center-positive). Always use the provided power supply.
For connection of external hard drives, flash drives, USB web
cameras, USB microphones, keyboards, or supported USB status
light indicators.
Can be used to connect a USB mouse or keyboard when the local
console feature is enabled.
BETA DRAFT - 11
Page 23
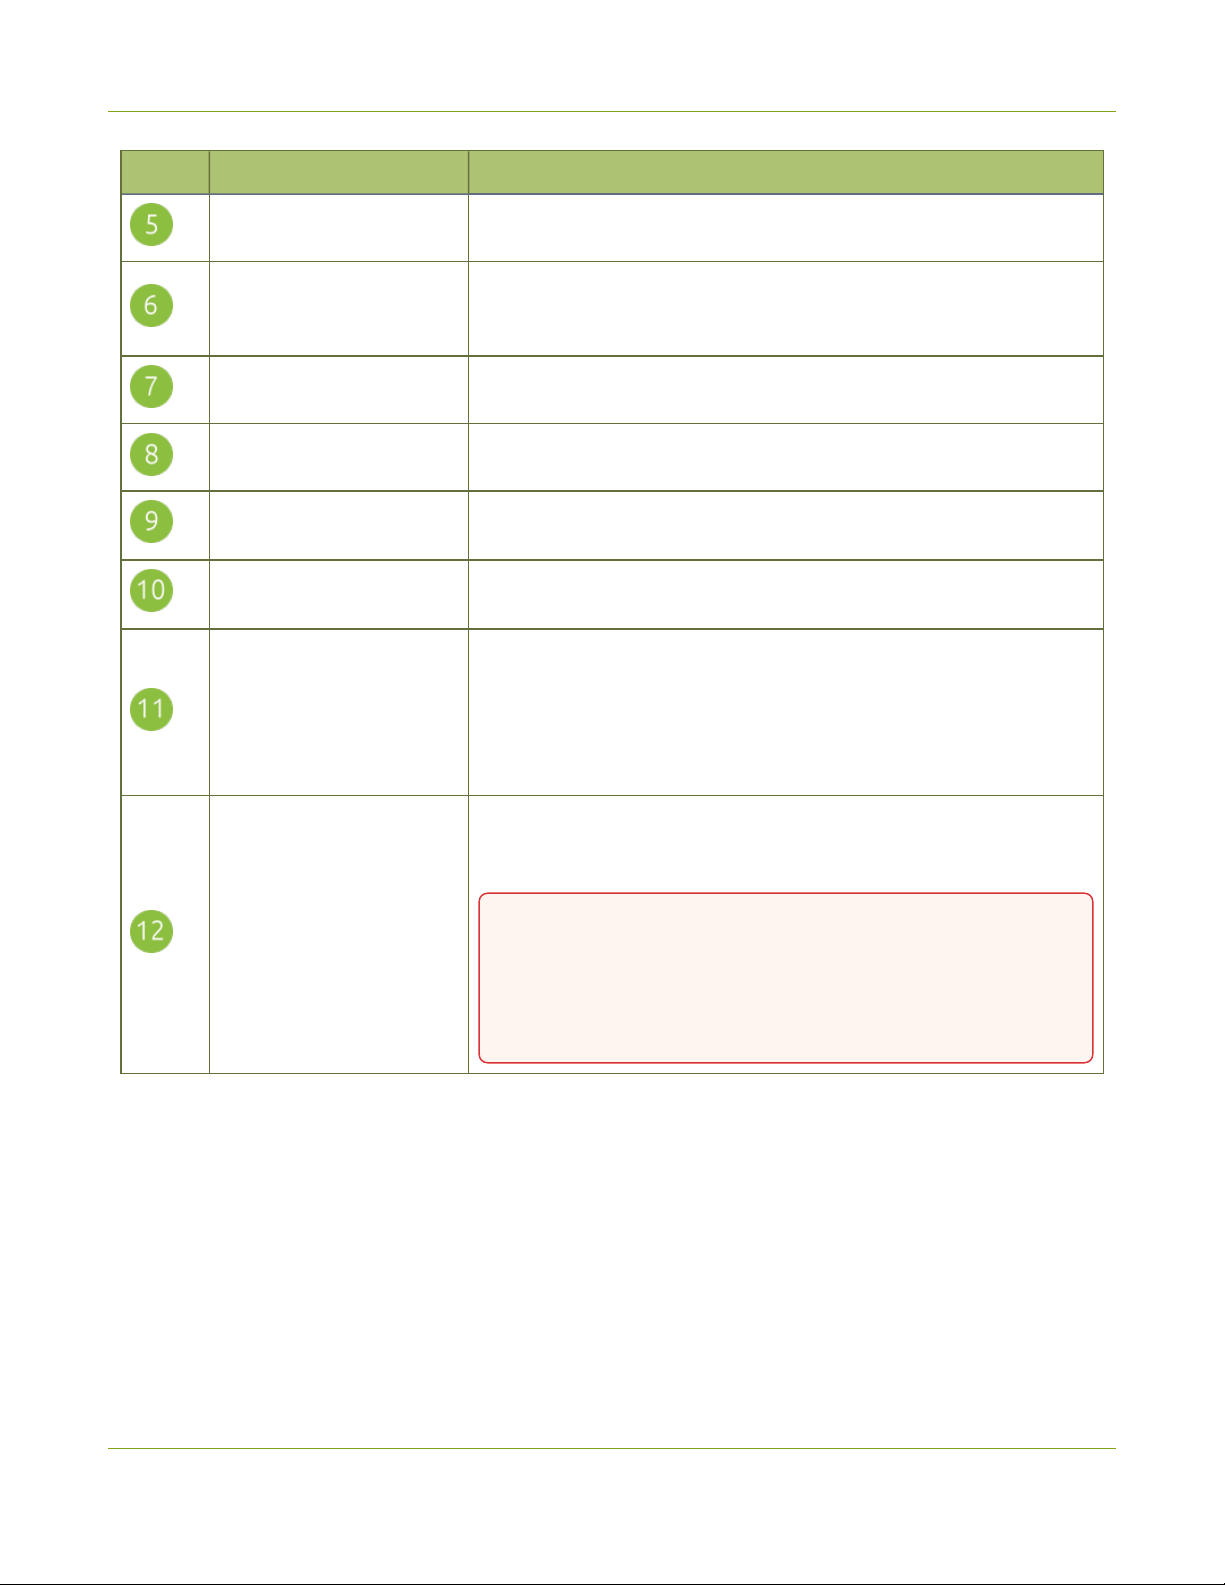
Pearl Mini User Guide Monitoring audio
Label Name Description
HDMI output port See Video output ports for details.
Auto-sensing gigabit Ethernet 10/100/1000 Base-T network port with
RJ-45 Ethernet
SDI in Connect up to 3G SDI signals toPearl Mini.
HDMIin Connects HDMI and DVIsignals (using an adapter) to Pearl Mini.
support for RTSP, SRT, and NDI|HX networked video inputs. See
Configure network settings for setup instructions.
RCAaudio in
3.5 mm audio in
XLR/TRScombo jacks
Phantom power light
RCA consumer line-level stereo pair (left/right) audio inputs. See Pearl
Mini AV inputs.
Stereo mic-level input to connect a passive or active stereo electret
microphone.
Two XLR /TRS combo jacks that can function as a stereo pair
(left/right) or as two mono inputs. See Pearl Mini AV inputs.
l
Two XLR mic-level (balanced)
l
Two TRS ¼" professional line-level, +4 dBu
(balanced/unbalanced)
Glows when 48 V phantom power is enabled. Phantom power is
applied to both XLR audio input ports when enabled. See Enable or
disable phantom power onPearl Mini.
WARNING: Connecting devices that are not designed for
phantom power when phantom power is enabled for the two
XLR ports can seriously damage those devices. Always check
the phantom power LED before connecting devices to the XLR
ports.
Monitoring audio
The front panel includes a 3.5 mm headphones audio jack for monitoring audio. To monitor the audio for a
channel, just select the channel using the device screen. The audio you hear depends on the audio source
configured in the live channel layout.On Pearl Mini and Pearl-2, different layouts can have different audio
sources configured.
BETA DRAFT - 12
Page 24
Pearl Mini User Guide Monitoring audio
Increasing the volume to 100% may cause you to hear distortion that is not actually present in the
audio signal being recorded and streamed.
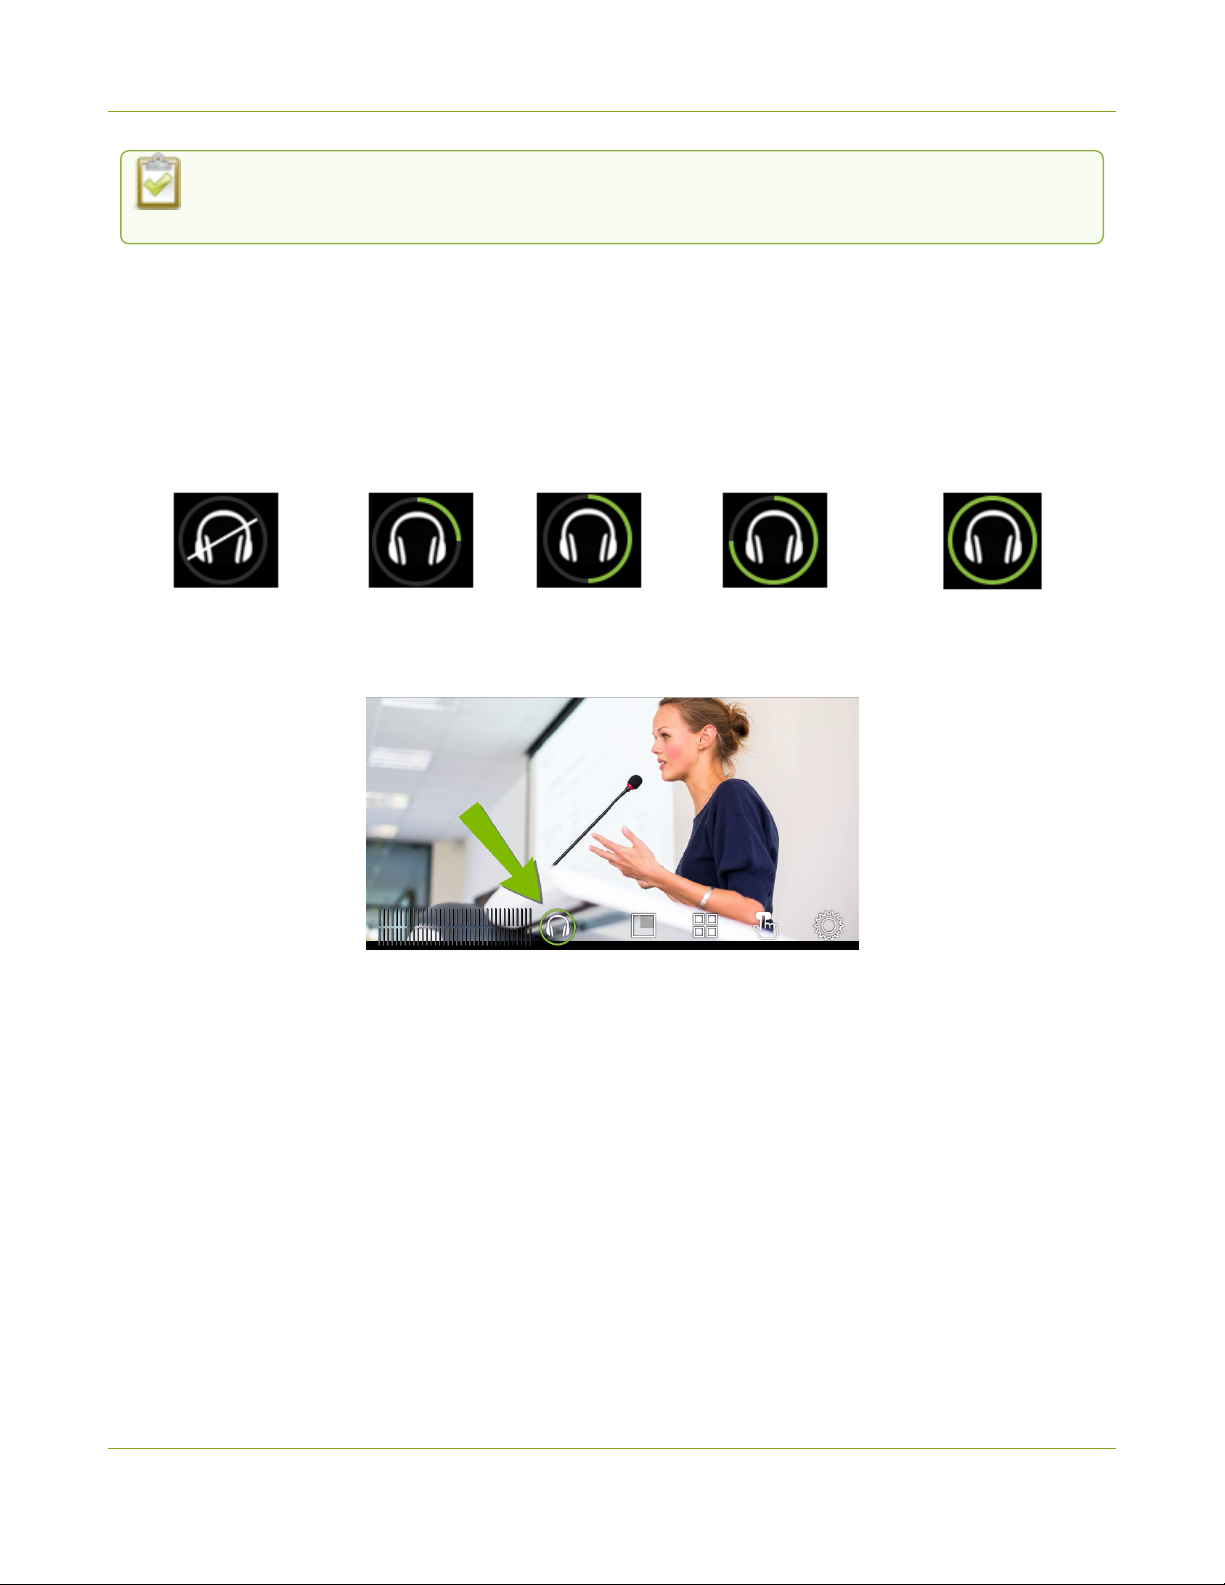
Adjust the volume on Pearl-2 or Pearl Mini
Tap the headphones icon on the touch screen to adjust the volume. Each tap increases the volume by 25% to a
maximum volume of 100%. Tapping the headphones icon when the volume is at 100% mutes the volume. You
can also long press the headphones icon to mute and unmute the volume.
At 75% volume, what you hear corresponds to the nominal audio level in the VU meter at approximately where
the green bars change to yellow.
Volume is muted.
25%
volume.
50%
volume.
75%
volume.
100%
volume.
Audio VUmeter
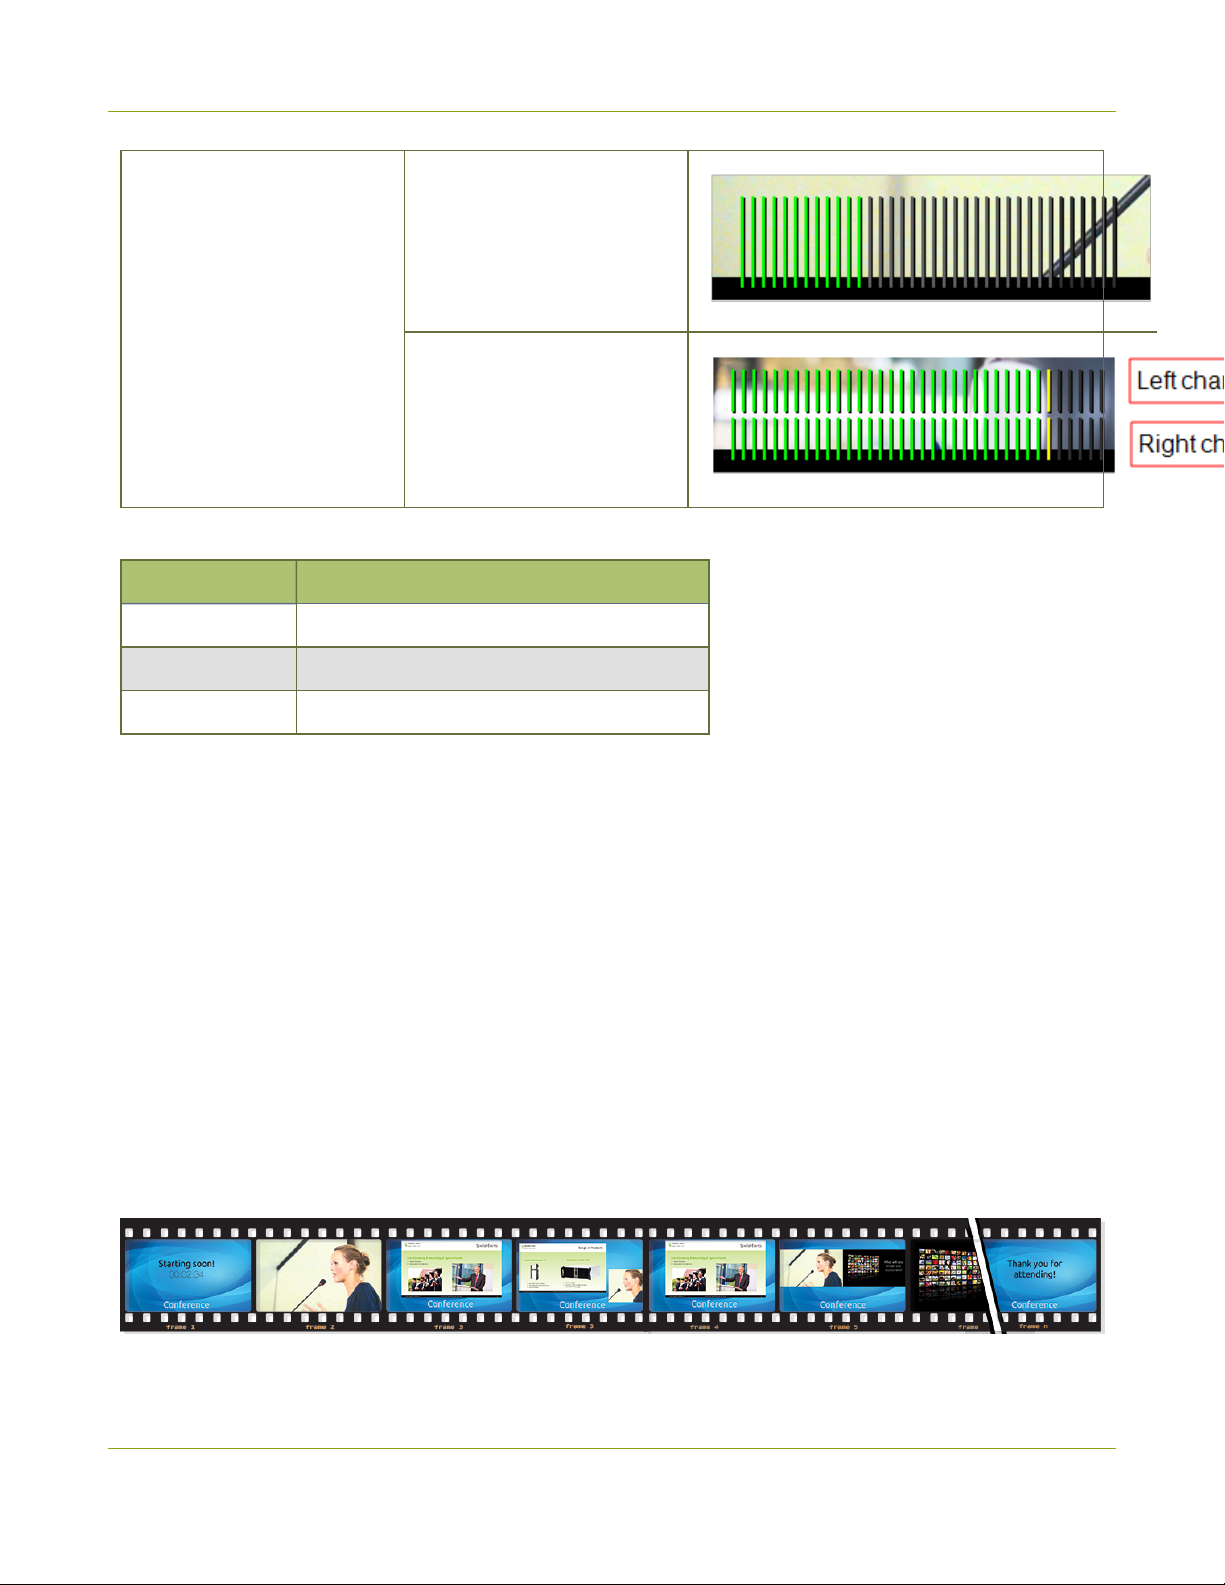
A VU meter on the device screen shows the audio levels for the channel you are monitoring.The value is
displayed in dBFS(decibels relative to full scale). Colored bars represent the audio level.
Channels that have stereo audio display two bars. The top bar is the left audio channel and the bottom bar is the
right audio channel.
BETA DRAFT - 13
Page 25
Pearl Mini User Guide Live video mixing / switching
VUmeter (mono)
Pearl Mini and Pearl-2
VUmeter (stereo)
Table 3 Audio VUmeter levels
Color Decibel range
Red 0 to -9 dBFS
Yellow -9 to -18 dBFS
Green -18 dBFS and lower
The VU meter appears in several different places so you can visually check audio levels:
l
Touch screen: On the individual channel view and the grid view. If the audio meter isn't showing, tap
anywhere on the touch screen to turn on the control icons.
l
Admin Panel: On the audio input source's configuration page when you select the input source from the
Inputs menu. You can also add the VU meter to appear on the video output ports, see Disable or enable
audio and output port volume.
l
Epiphan Live: See Monitor video and audio input sources using Epiphan Live
Live video mixing / switching
Create dynamic content for your viewers to watch while you record and stream your program. Using the custom
layout editor, you can create different layouts, like picture in picture or side-by-side views of a camera and slides,
then easily switch between layouts with either a tap on the touch screen, using Epiphan Live on a mobile device,
or from the Admin panel.
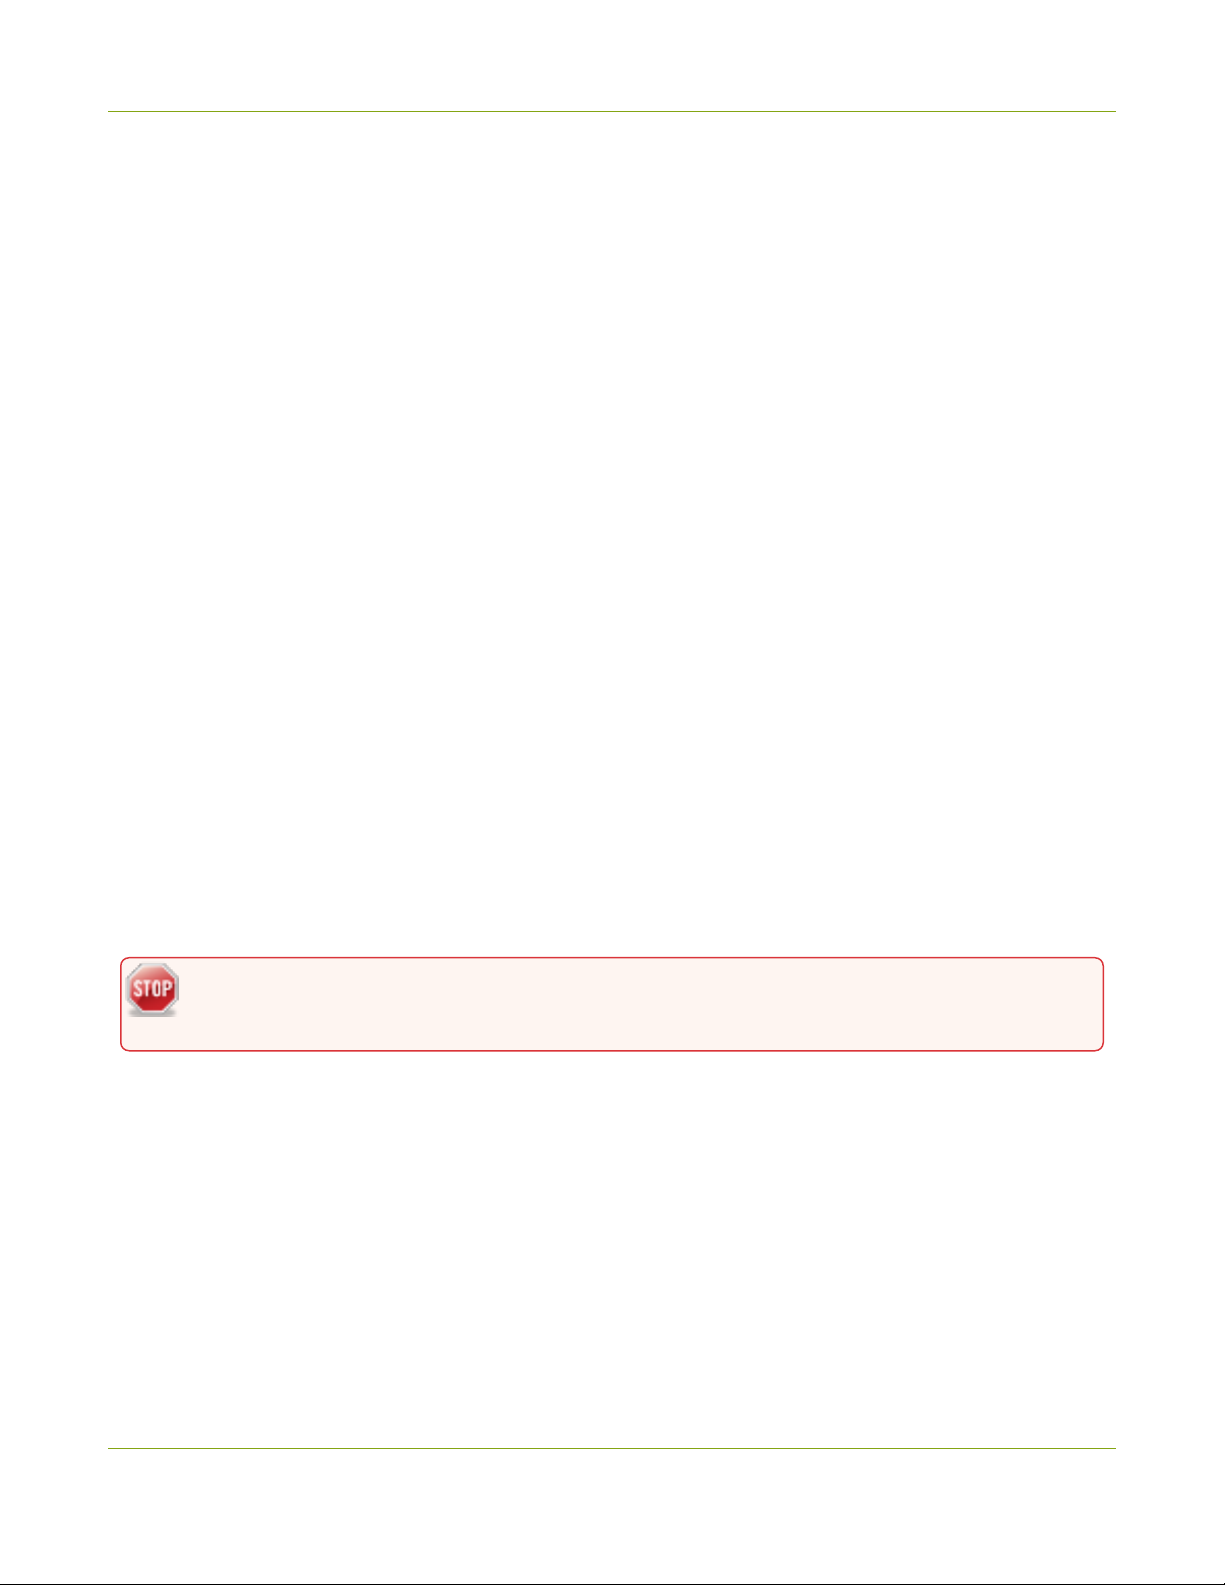
Your program stream with switched layouts could look like this:
BETA DRAFT - 14
Page 26
Pearl Mini User Guide SD card installation and file management
To create a program channel with custom layouts using the custom layout editor that you can switch, see What is
a channel?
For instructions on how to live switch, see:
l
Switching and mixing using the touch screen
l
Switching / mixing using Epiphan Live
l
Switching / mixing using the Admin panel
SD card installation and file management
Pearl Mini comes with a standard SD card slot on the front panel. An SD card is needed when recording video. If
you're only switching video or live streaming, then you don't need to install an SD card.
We recommend using a minimum class 10 (C10) SD card that's at least 64 GB capacity but does not exceed 512
GB; however, most SD cards that are at minimum a C10, a UHS class 1 (U1), or a video speed class 10 (V10)
should work. We've tested various SD cards with Pearl Mini, including:
l
Kingston 16 GB U1 / C10
l
Sony 32 GB U3 / C10
l
SanDisk 64 GB U1 / C10
l
PNY 256 GB U3 / C10
l
AData 128 GB U3 / V90
If you're using Pearl Mini with a Content Management System (CMS), we recommend using large capacity SD
cards such as 256 GB or more, see CMS recording and webcasting control.
When the SD card is full, new recordings overwrite the oldest recordings. Do not eject the SD card while
recording is in progress as that may corrupt the SD card.
The SD card must be EXT4 formatted for the Ubuntu operating system. You can format the SD card from the
touch screen or using the Admin panel, see Format the SD card.
The Ubuntu formatted SD card cannot be used to transfer files to iOS or Windows systems. Any
content that's contained on the SD card is lost when the SD card is formatted.
For important considerations when setting the maximum file size limit and recording to the SD card, see About
recording.
Quick start
After you've unpacked your Pearl device, you're ready to get started. This quick start uses the default settings
where possible so you can quickly start using your Pearl device.
BETA DRAFT - 15
Page 27
Pearl Mini User Guide Quick start
Before you begin, make sure you have:
l
A video source such as a camera or computer and cables to connect them to Pearl device. For HDMI, the
video source must not be HDCP protected.
l
An audio source coming from either your SDI orHDMI video source (must not be encrypted). Optionally,
audio from a different source such as an audio mixer that you connect to the audio input ports can be
used.
l
The Pearl Mini and Pearl 2 can use USB for video input.
l
The Pearl Nano can use the USB input for audio input.
l
Local area network that uses Dynamic Host Configuration Protocol (DHCP) is preferable.
l
Computer with a web browser connected to the same network. We'll call it the “admin” computer.
l
Ethernet cables to connect Pearl device and the admin computer to the network.
l
To record video using Pearl Nano or Pearl Mini, you need to install a storage medium. Pearl Nano and
Pearl Mini have a standard SD card slot on the front panel that you can use.
l
We recommend an SD card that is at least a class 10 with up to 512 GB of capacity.
l
Pearl Nano also has a SATAM.2 2280 SSD storage expansion slot that's accessible from the
underside.
Your Pearl device comes shipped with an AC/DC power adapter and a registration card that contains brief
instructions to connect the Pearl device to the network, login to the Admin panel, and format an SDcard. The
instructions in this quick start provide more details.
Start up the Pearl device for the first time
1. Turn on your camera or video source and connect the output to the back panel of Pearl device.
2. Connect the Ethernet cable to the Pearl device and to your network. Pearl Nano can power up using the
power from the Ethernet cable if your network supports PoE+ power. If you are using PoE+ power with a
Pearl Nano, you can skip the next step.
3. Attach the power cable and plug it into a power source.
4. Turn on the system:
l
Pearl Mini - power button is on the back of the unit. Wait for the power-up cycle to complete. The
Grid view showing both channels appears on the touch screen. The video source you connected to
the HDMI-A port appears in channel HDMI-A, and the video source connected to the HDMI-B port
appears in channel HDMI-B.
BETA DRAFT - 16
Page 28

Pearl Mini User Guide Selecting an audio source for Pearl Mini
5. (Required for recording on Pearl Mini and Pearl Nano) Install and format a storage solution. For more
information, see Install and format an SD card for the Pearl Mini and Pearl Nano .
6. (Optional) Plug headphones into the 3.5 mm headphone jack at the front ofthe Pearl device to monitor the
video signal's embedded audio. For more about monitoring audio, see Monitoring audio.
7. (Optional) Start recording:
a. Pearl Mini or Pearl-2 - tap the red dot that appears in the top right corner of the screen to start and
stop recording the channel. The dot flashes while recording.
Recordings are saved to the SD card on Pearl Mini and Pearl Nano by default. When the SD card is full,
new recordings overwrite the oldest recordings. Do not eject the SD card while recording is in progress as
that may corrupt the SD card.
Selecting an audio source for Pearl Mini
The audio that's coming from the connected HDMI video sources (HDMI-A and HDMI-B) is automatically used as
the default audio source for the HDMI-A and HDMI-B channels on Pearl Mini. You can choose different audio
sources for a channel using the Admin panel and do things like adjust the input gain, see Adjust audio gain and
delay.
Select your audio sources from connected video sources (SDI, HDMI, USB video UVC, SRT, and RTSP), as well
as from the dedicated analog audio input ports. The USB (UVC/UAC) ports on the rear panel of Pearl Mini will
accept a USB microphone (UAC).
Dedicated analog audio inputs ports are:
l
Two XLR/TRS combo jacks.
l
XLR mic-level input (balanced), supports 48 V phantom power
l
TRS ¼" professional line-level input, + 4.0 dBu up to 12.3 V RMS, (+24 dBu)
(balanced/unbalanced)
l
One 3.5 mm stereo mic level input for electret microphones (unbalanced)
l
One stereo pair RCA consumer line-level input (-10 dBV)
The XLR and TRS combo jacks are configured as a left/right stereo pair by default, see Configure audio ports for
stereo or mono. The 3.5 mm audio ports and the RCA audio ports are linked. You can configure Pearl Mini to use
both or just one of the audio sources using the Admin panel, see Assign audio sources to an input.
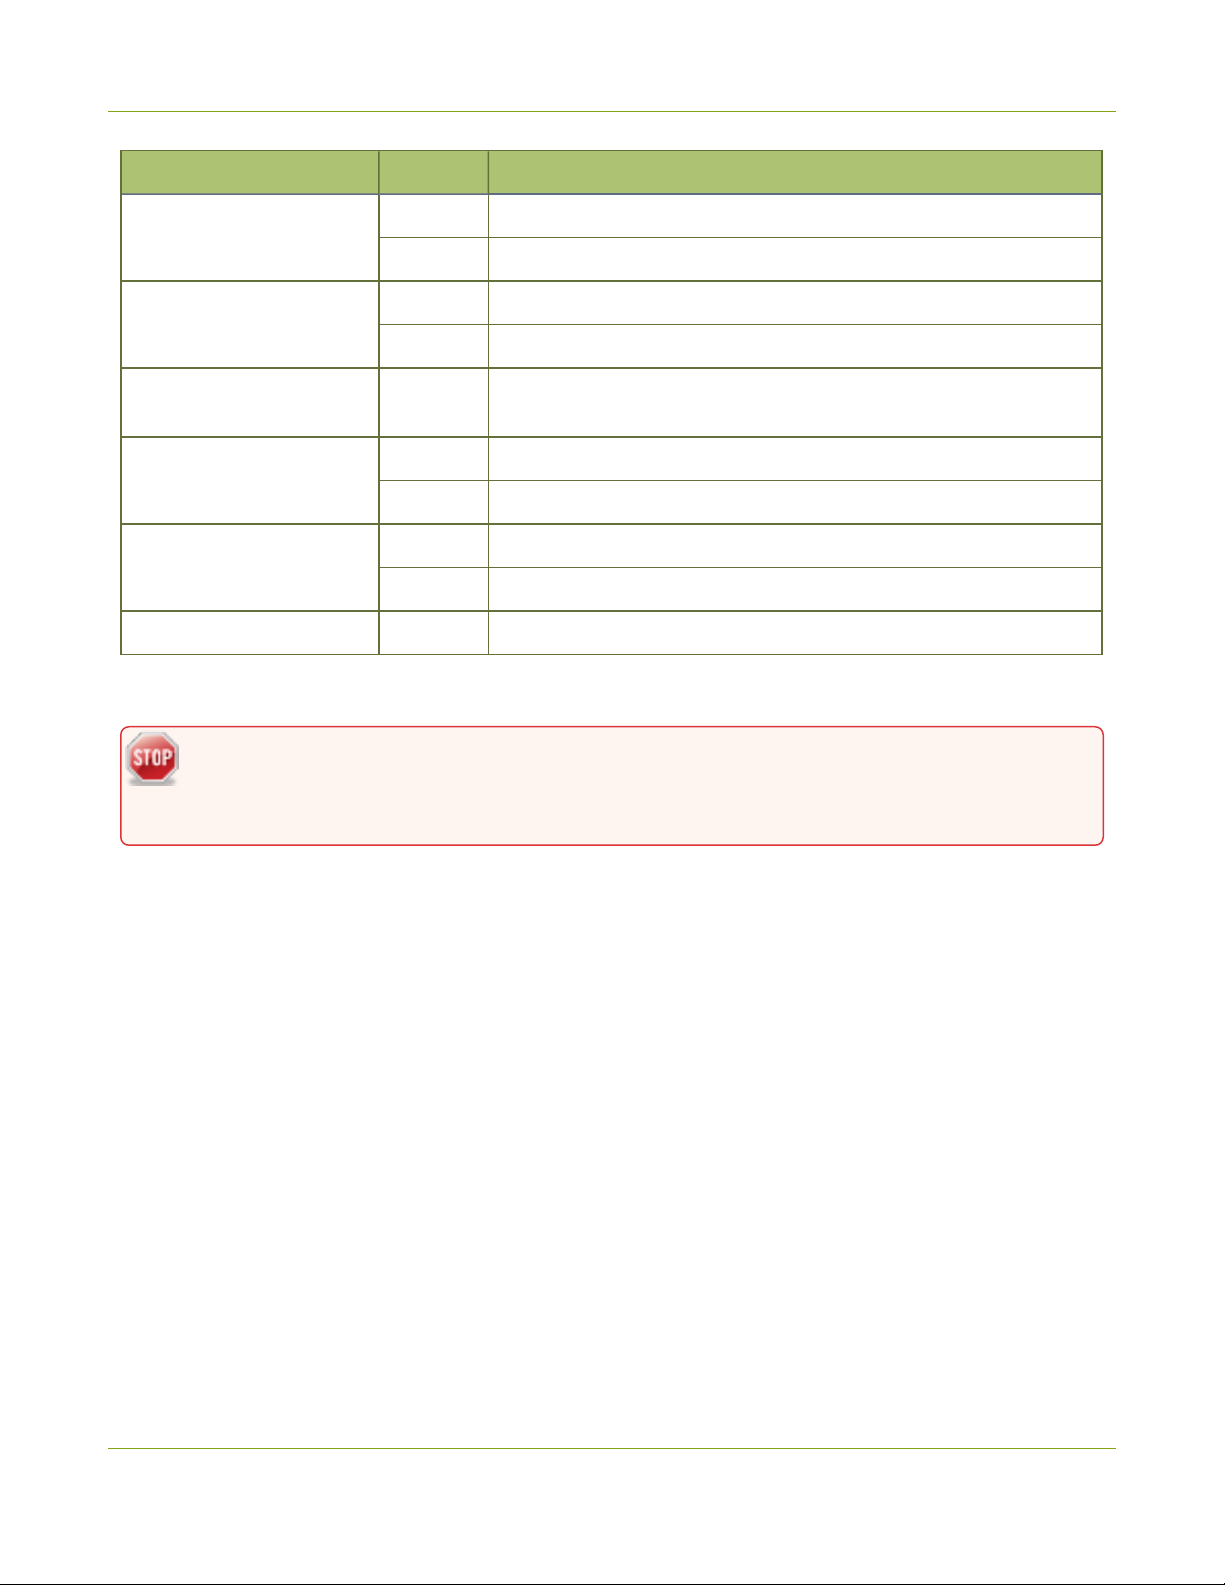
This table offers some guidelines for adjusting the gain of the audio input ports for common types of audio
devices. You should add the suggested gain to the audio input to get an average signal to register at a nominal
level in the VU meter (i.e. where the green bars change to yellow). The actual amount of gain needed depends
on the strength of the original audio signal.
Table 4 Audio gain guidelines for different audio devices
Audio source Input port Gain
Dynamic microphone XLR Add +50 to +60 dB gain to the audio input port.
BETA DRAFT - 17
Page 29
Pearl Mini User Guide Selecting an audio source for Pearl Mini
Audio source Input port Gain
XLR Add +18 to +40 dB gain to the audio input port.
Electret microphone
3.5 mm Add +6 to +12 dB gain to the audio input port.
Wireless microphone
receiver
Condenser microphone
with phantom power
Mobile phone or other
consumer line level device
Professional mixer
USB microphone USB Nominal
1
To avoid unwanted signal noise on the RCA ports, we recommend adding no more than 12dB of gain to the
RCA port or when XLR B/RCA is used
Connecting devices that are not designed for phantom power when phantom power is enabled for
the two XLR ports can seriously damage those devices. Always check the phantom power LED
before connecting devices to the XLR ports.
XLR Add +18 to +40 dB gain to the audio input port.
3.5 mm Add +6 to +12 dB gain to the audio input port.
XLR Add +40 to +60 dB gain to the audio input port.
TRS Add +6 to +12 dB gain to the audio input port.
1
RCA
TRS Nominal
RCA
Nominal
1
Not recommended.
To choose a different audio device for the channel:
1. Using a web browser on the admin computer, go to the IPaddress of your Pearl Mini and log in, see
Connect to the Admin panel.
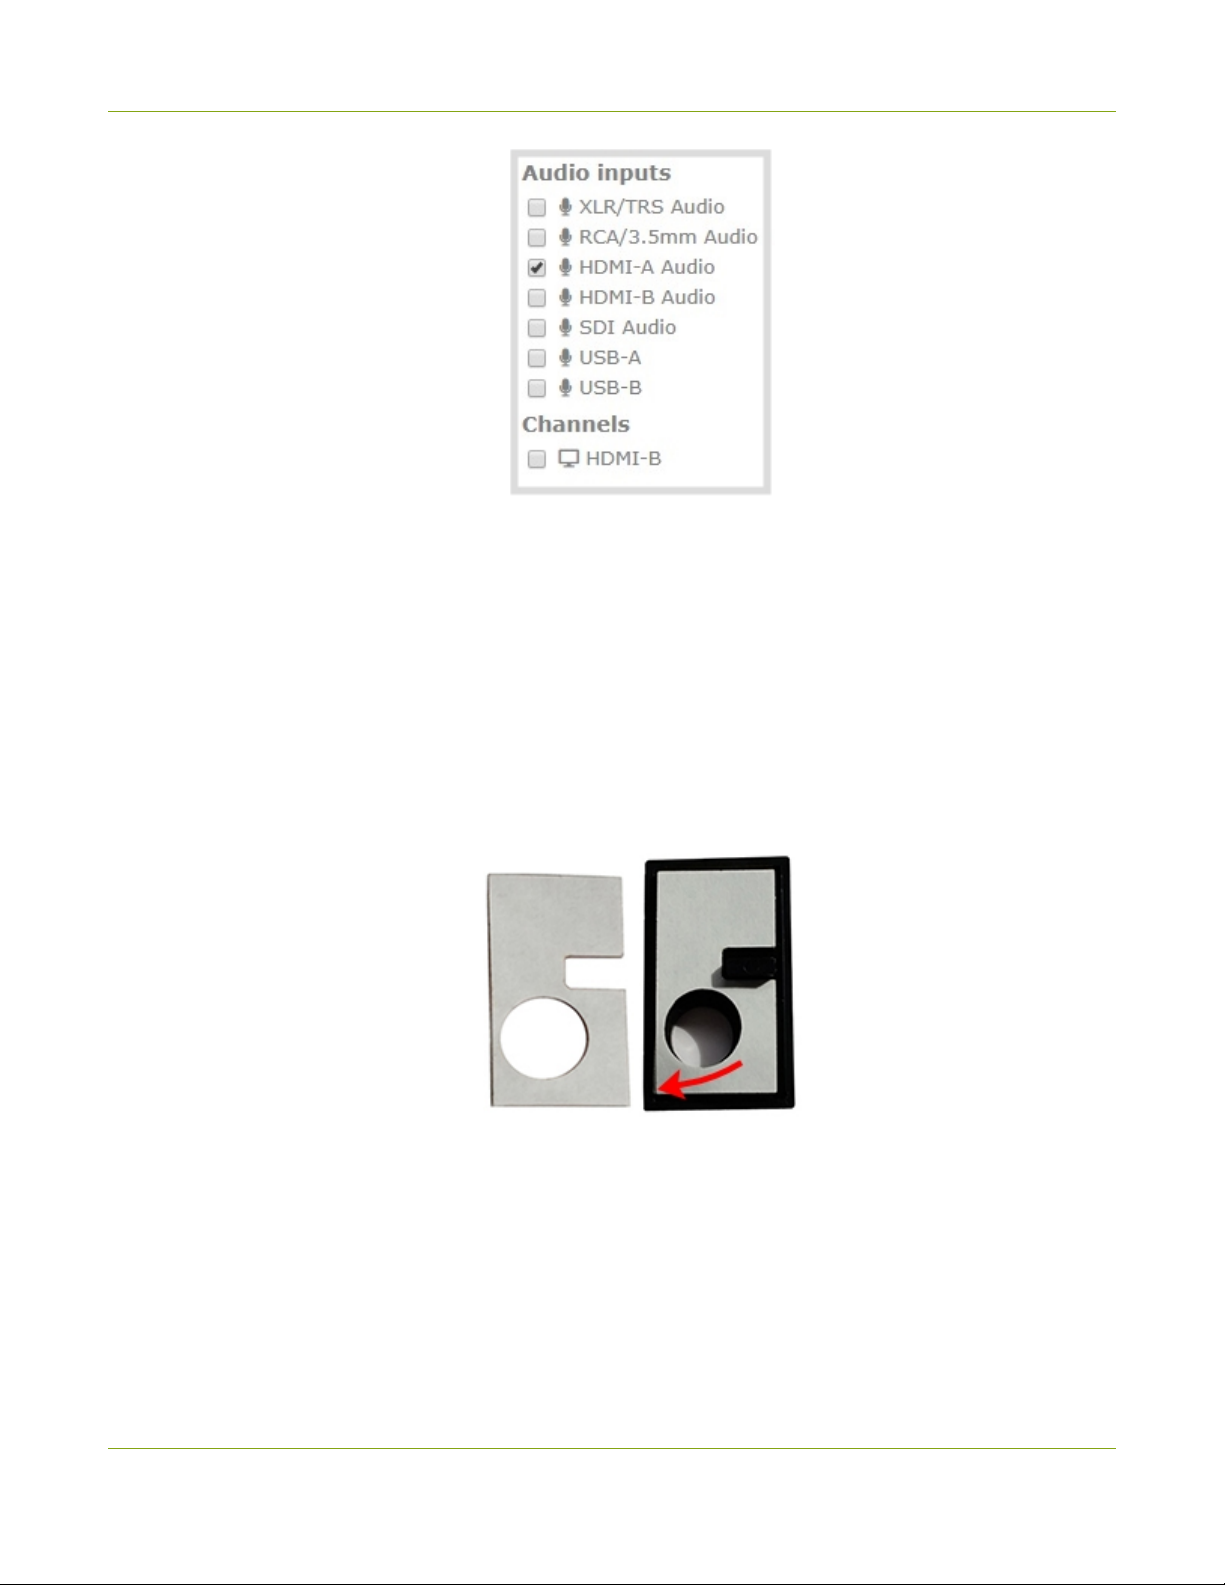
2. From the Channels menu, select your channel (i.e. HDMI-A or HDMI-B) and click Layouts. The custom
channel layout editor page opens.
3. Check the audio source that you want to use for the layout and click Save.
BETA DRAFT - 18
Page 30
Pearl Mini User Guide Install the power button shield
4. (Optional) Adjust the gain for an audio input source, select the input port from the Inputs menu and adjust
the amount of gain on the configuration page for the audio input port. Click Save when you're done. For
more details, see Adjust audio gain and delay.
Install the power button shield
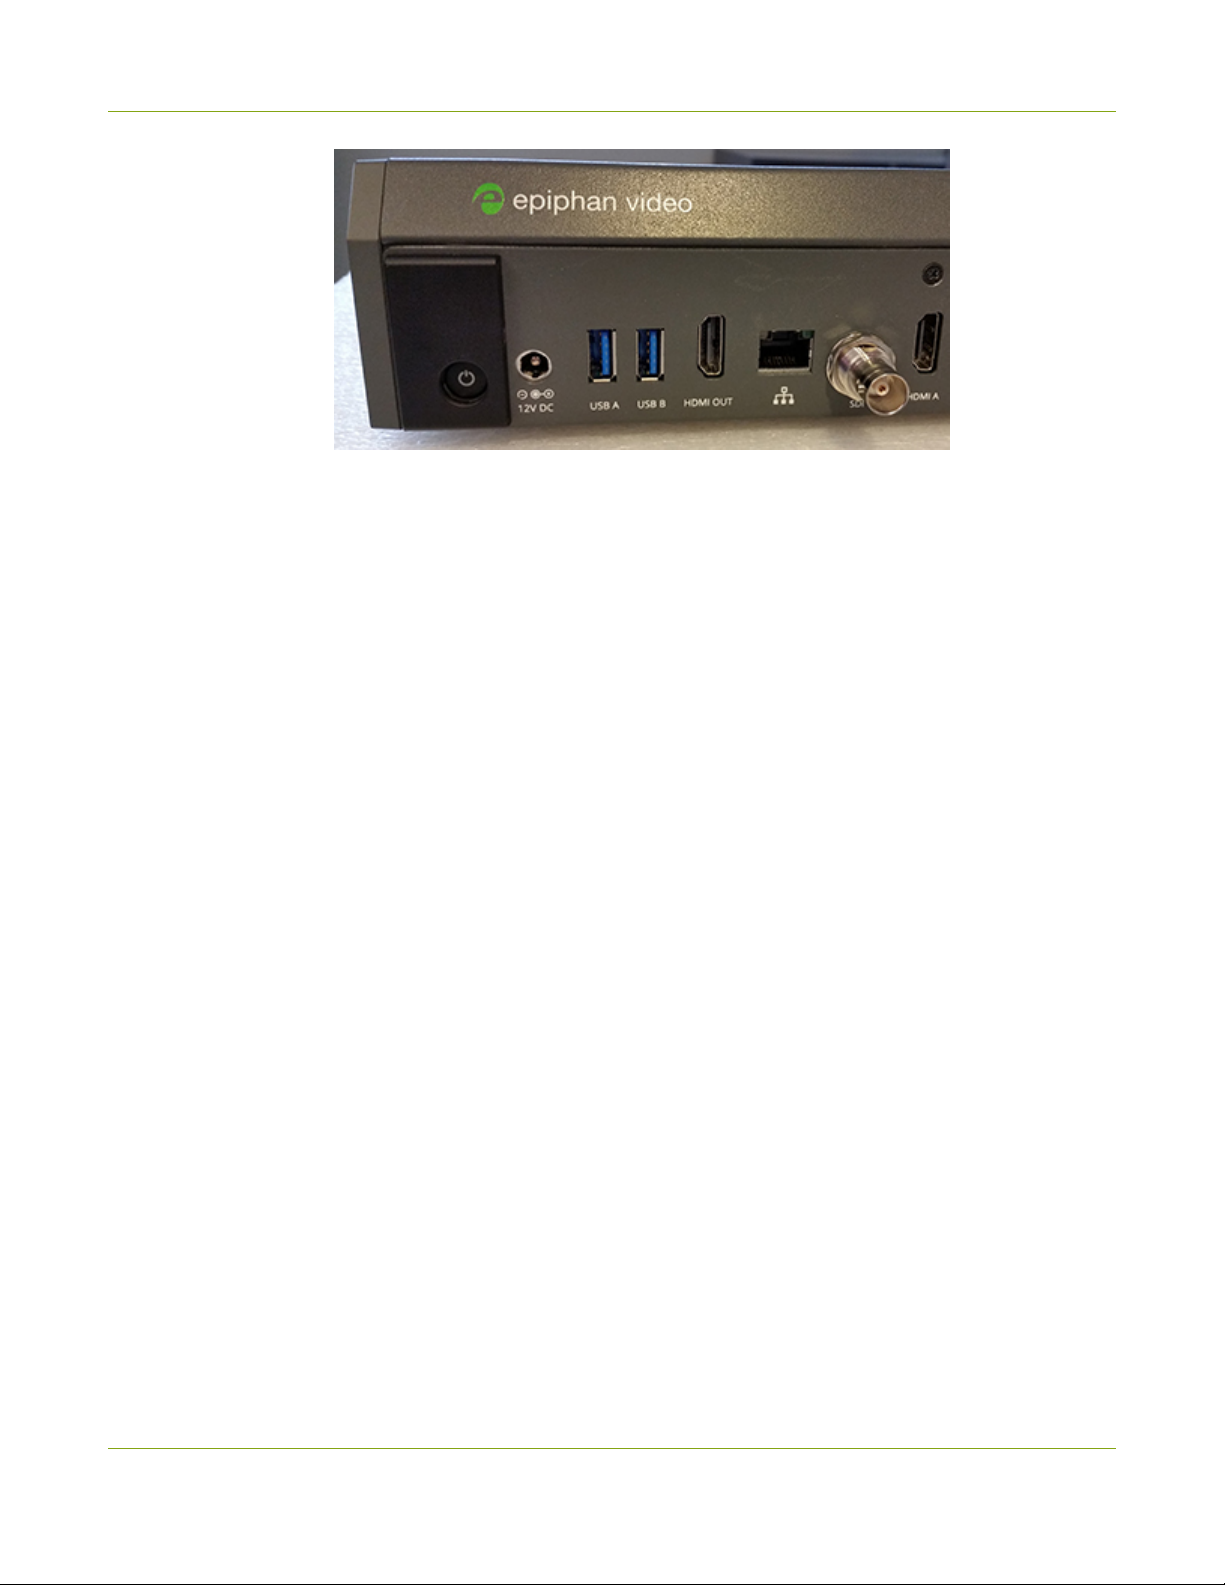
Install the power button shield over the power button to prevent accidentally turning the unit off. Once applied,
you cannot reposition the power button shield without damaging the adhesive.
Before you begin, clean the area around the power button to remove any dirt or grease.
1. To attach the adhesive to the back of the power button shield, remove the red adhesive backing and
carefully align the lower left corners before pressing firmly.
2. Remove the white adhesive backing and align the tab with the laptop lock key hole to position the power
button shield. Make sure the power button is clearly visible through the round hole before pressing firmly.
BETA DRAFT - 19
Page 31
Pearl Mini User Guide Specifications
3. Press the power button to ensure it functions properly.
Specifications
Topics include:
Pearl Mini
l
Pearl Mini AV inputs
l
Pearl Mini tech specs
l
Pearl Mini power adapter specifications
l
Optimum System Load
l
Vesa mounting the device
l
International character support
Pearl Mini AV inputs
For best performance, we recommend using two video sources in up to two full HD channels simultaneously.
However, you can connect up to three video sources to the Pearl Mini in the following scenarios:
1. One 1920×1080@30 fps channel configured with three layouts, one for each full HD video source without
any scaling and make the video image fill the whole frame.
2. Two 1920×1080@30 fps channels: one channel for a picture in picture switched program for HD recording
at 1080@30 fps at 8 Mbps, and a second channel with duplicate content at a lower resolution of 720@30
fps at 2 Mbps for streaming that uses the first channel as the video source, see Add video sources or a
channel as a source. The switched program can have up to three layouts: two that are picture in picture
that includes your main camera and one other video source such as a document camera or a laptop with
slides, and a third layout of your main camera.
One of the video sources you connect can be either a USB, SRT, or an RTSP source; however, you cannot
connect more than one of these sources at the same time. Pearl Mini supports connection of common signal
converters and input adapters.
BETA DRAFT - 20
Page 32

Pearl Mini User Guide Pearl Mini AV inputs
Table 5 Pearl Mini Input Ports
Input port Qty Details
1
SDI
1 Linear PCM audio/video input. Supports up to 3G-SDI signals.
HDMI™ 2
USB 3.0 2
2
RJ-45
4
RCA
3.5 mm
¼" TRS
4
4
Linear PCM audio/video input, non-HDCP protected. DVI-I (using
an adapter) is single link.
Linear PCM audio/video inputs on the rear panel accept non-HDCP
protected content. Use to connect a single UAC or UVC device,
such as a USB microphone or a web camera. Can also connect to
external hard drives, flash drives, and control interfaces.
One SRT source over Ethernet at 1920×1080@30 fps3.
1
One RTSP source over Ethernet at 1920×1080@30 fps.
One NDI|HX source over Ethernet at 1920×1080@30 fps.
RCA consumer line-level audio inputs function as a stereo pair (-10
dBV).
2
1
l
White = left
l
Red = right
Mic-level input to connect a passive or active stereo electret
microphone (unbalanced)
Combo XLR/TRS audio inputs operate as a stereo pair (left/right) by
default.
l
XLR/TRS 1 = left
l
XLR/TRS 2 = right
2
You can configure the two ports to operate as independent mono
inputs using the Admin panel, see Configure audio ports for stereo
or mono.
XLR
The ¼" TRS inputs accept balanced and unbalanced, pro line level
signals (+4.0 dBu) up to to 12.3 V
RMS
, +24 dBu.
Combo XLR/TRS audio inputs operate as a stereo pair (left/right) by
default.
l
XLR/TRS 1 = left
l
5
2
XLR/TRS 2 = right
You can configure the ports to operate as independent mono inputs
using the Admin panel, see Configure audio ports for stereo or
mono.
XLR inputs accept balanced and unbalanced, mic level and
BETA DRAFT - 21
Page 33
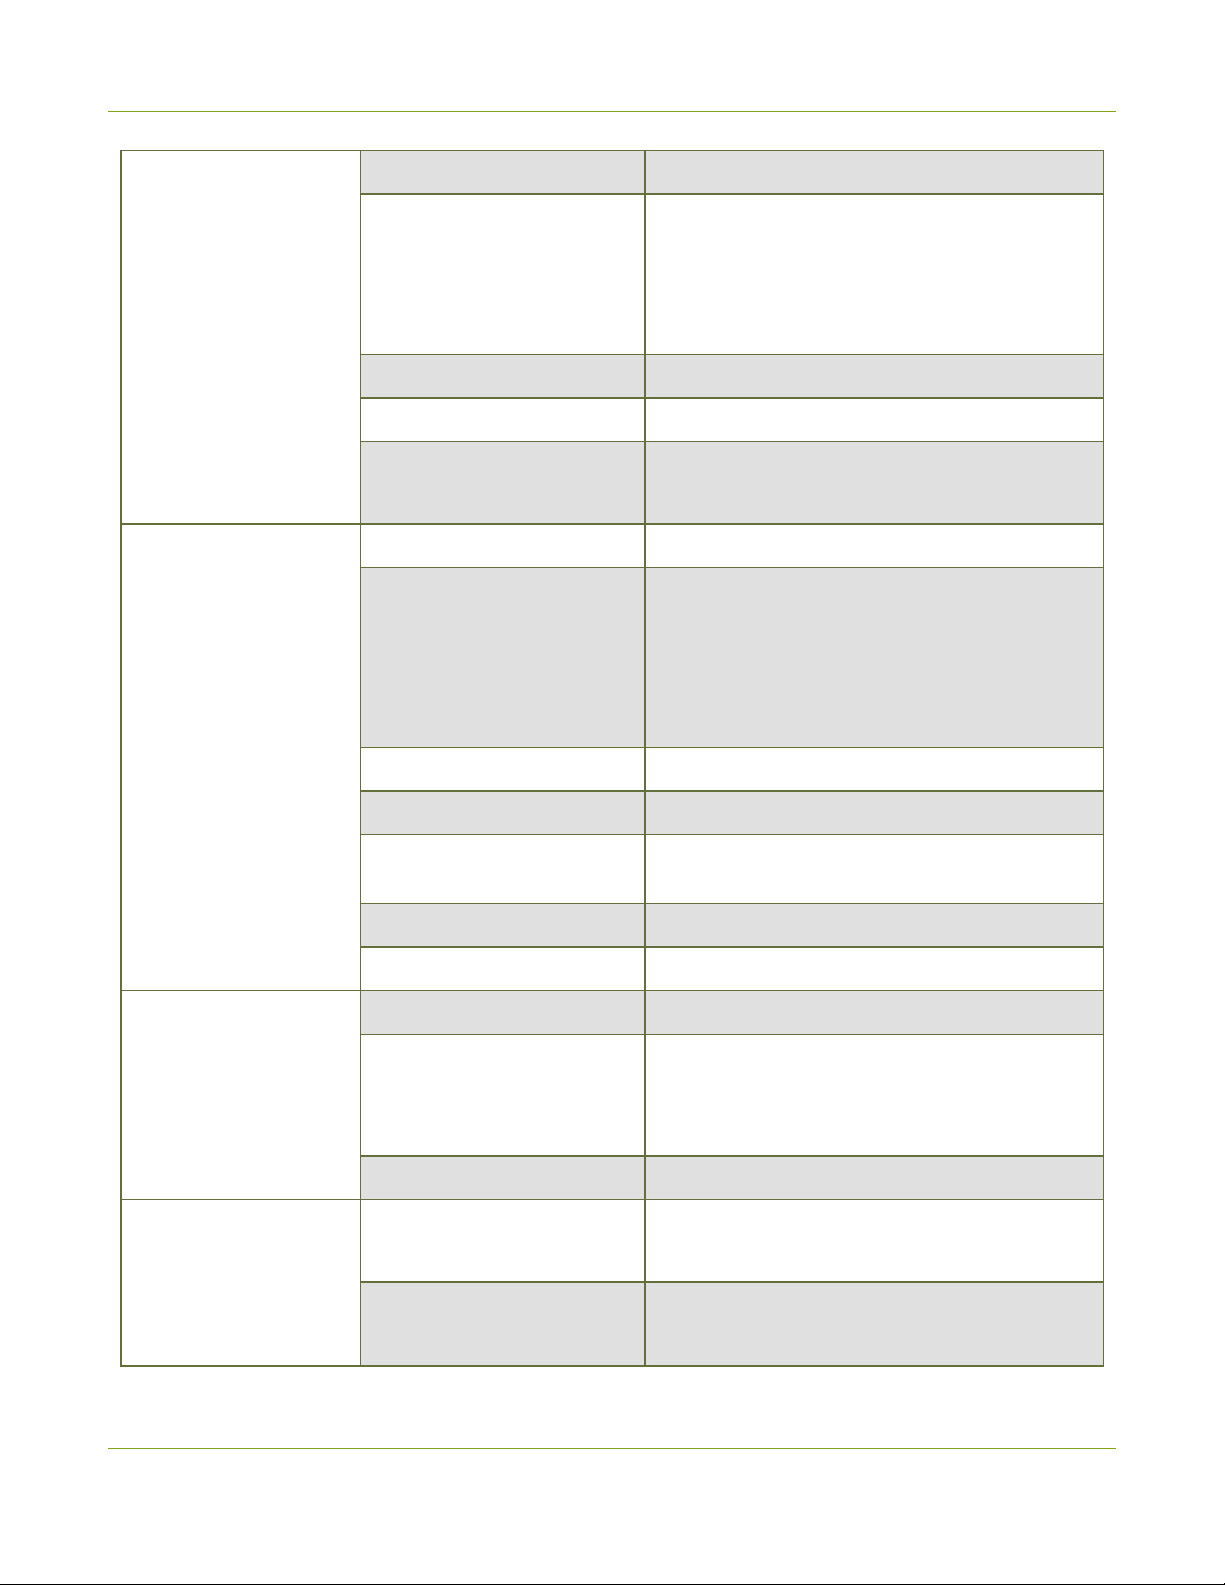
Pearl Mini User Guide Pearl Mini tech specs
Input port Qty Details
professional line level signals with a maximum of up to 12.3 V
RMS
,
+24 dBu.
Mic-level (balanced) inputs supply optional 48 V phantom power
across both XLR ports. see Enable or disable phantom power
onPearl Mini.
Connecting devices that are not designed for phantom power when phantom power is enabled on
the XLR ports can seriously damage those devices. Always check the phantom power LED before
connecting devices to the XLR ports. A direct box can be used to provide the correct mic-level
signal to the XLR port and offers some isolation protection in case of accidental exposure to 48 V
phantom power.
1
SD-SDI audio is not supported.
2
A mix of video over Ethernet sources are supported. Just ensure that total system loading is within acceptable
levels, see Optimum System Load.
3
You can have up to three SRT inputs in a channel with each SRT input in a separate layout with no scaling, or
put each SRT input in a separate channel with no scaling.
4
In the Admin panel, RCA/3.5 mm includes audio signals from the RCA audio pair and the 3.5 mm stereo audio
inputs by default. You can disable one or the other using the Admin panel, see Assign audio sources to an input.
5
You cannot use both XLR audio inputs and the ¼" TRS audio inputs at the same time.
Only content that is not HDCP-protected is captured from HDMI and SDI sources.
If you are using DVI2PCIe cards with your Pearl device, DVI2PCIe cards do not support audio over
HDMI.
Pearl Mini tech specs
The input and output connectors are listed for Pearl Mini.
For the most up-to-date product specifications and information, go to www.epiphan.com/pearl-mini.
Table 6 Specifications for Pearl Mini
(1) 3G-SDI
2
Video inputs
Local video inputs
1
Video over Ethernet
(2) HDMI™ 1.4a
(2) USB 3.0 (UVC)3- rear panel
(1) RTSP
3
(1) SRT (push)
(1) NDI|HX
BETA DRAFT - 22
Page 34

Pearl Mini User Guide Pearl Mini tech specs
(2) HDMI type A (female)
Connectors
(1) BNC (female)
(2) USB-A (female) - rear panel
(1) RJ-45 (female)
Aspect ratios 3:2, 4:3, 16:9, 16:10, and custom aspect ratios
Standard resolutions PAL, PAL wide, NTSC, NTSC wide
Resolution range 640×480 to 1920×1200
Frame rate Up to 60 fps
Input color spaces
HDMI: RGB 4:4:4, YCRCB4:2:2, YCRCB4:4:4
SDI: RGB 4:4:4, YCRCB4:2:2
Interlacing Yes
Maximum cable length for 3G
SDI
Maximum cable length for
USB 3.0
300 ft
6 ft
(2) XLR mic level/pro line level (+4.0 dBu) up to
12.3 V
, +24 dBu (balanced/unbalanced,
RMS
mono or L/R stereo pair) - Phantom optional
Audio inputs
Analog audio inputs
Connectors
Digital audio inputs
(2) 1/4" TRS pro line level (+4.0 dBu) up to to 12.3
V
, +24 dBu (balanced/unbalanced, mono or
RMS
two L/R stereo pairs)
(1) RCA consumer line level - 10 dBV (L/R stereo
pair)
(1) 3.5 mm stereo input for electret microphones
(unbalanced)
(2) XLR/TRS combo jacks (female)
(2) RCA (female)
(1) 3.5 mm (female) - rear panel
(1) SDI
5
(2) HDMI
4
(2) USB (rear panel)
(1) RTSP (embedded over Ethernet)
(1) SRT (embedded over Ethernet)
BETA DRAFT - 23
Page 35
Pearl Mini User Guide Pearl Mini tech specs
(1) NDI|HX (embedded over Ethernet)
(2) HDMI type A (female)
Video processing
Connectors
(1) BNC (female)
(2) USB-A (female) - rear panel
(1) RJ-45 (female)
Gain control 0 dB to +30 dB
Mute Yes
-300 ms to +300 ms
Configurable audio delay
Video output color space 4:2:0, 8 bits per color
H.264/AVC (ITU H.264, ISO/IEC 14496-10) 4:2:0,
8 bit color
l
Video codec
Encoding profile: High, Main, Baseline
l
Profile levels: 3.0, 3.1,3.2,4.0,4.1
Motion JPEG
Bitrate 1 to 50 Mbps (selectable)
Bitrate control Constant
Audio processing
Video output
Hardware accelerated video
encoding
Optional
Video scaling Software
Key frames 1/2 s, and 1 s up to 5 s in 1 second intervals
Compression MP3, AAC, and PCM
MP3: 22 kHz, 44 kHz, 48 kHz
Sampling rate
AAC: 16 kHz, 22 kHz, 44 kHz, 48 kHz
PCM: 22 kHz, 44 kHz, 48 kHz
Bitrate 64 to 320 kbps (MP3 and AAC)
(1) HDMI 1.4a
Signal types
(3) H.264/AVC digital video over Ethernet
(1) HDMI
Connectors
(1) RJ-45 (female)
BETA DRAFT - 24
Page 36
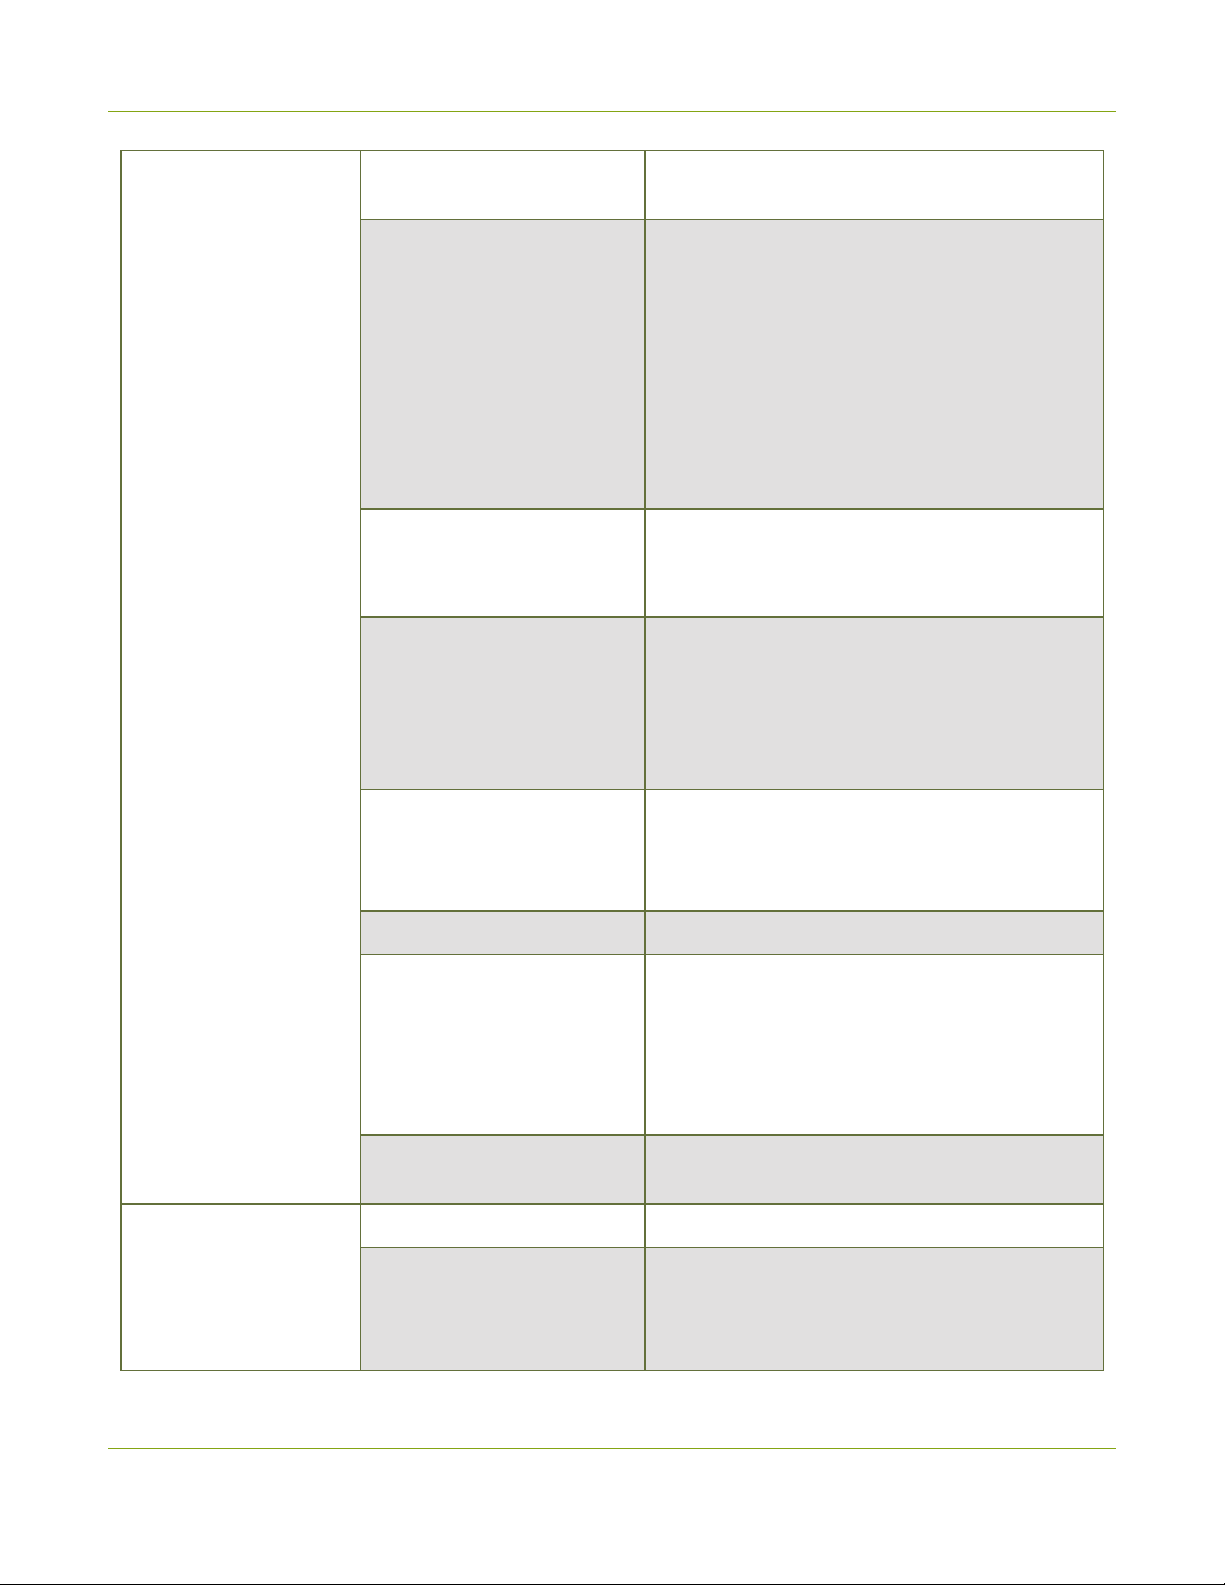
Pearl Mini User Guide Pearl Mini tech specs
Encoded channels
Streaming protocols
Multicast streams
Stream encryption and
authentication
Up to three 1080p channels at 30 fps with one full
HD video source per channel (recommended)
MPEG-TS, and FLV
RTSP over TCP/UDP
SRT (push) over UDP
HLS (push) over HTTP/HTTPS
Multi-Publish to Streaming Server / CDN (SRT,
RTSP, RTMP, RTMPS)
HLS (pull) - Native Apple HTTP/HTTPS stream for
iPad, iPhone and iPod Touch
RTP/UDP, MPEG-TS & RTP, and MPEG-TS over
UDP
SAP
SRT: 128 bits, 192 bits, or 256 bits AES
encryption (negotiated) and configurable
passphrase
HLS (push): MD5, SHA-256, and SHA-512
Audio output
RTMPS: encryption plus CA certificate negotiation
Recorded: 480p to 1920×1200p
Resolution ranges
Confidence monitoring: 480p to 1920×1200p
Streamed: 480p to 1920×1200p
Frame rate Up to 60 fps
H.264/AVC (ITU H.264, ISO/IEC 14496-10) 4:2:0,
8 bit color
l
Formats
Encoding profile: High, Main, Baseline
l
Profile levels: 3.0, 3.1,3.2,4.0,4.1
Motion JPEG
Network traffic shaping
(multicast streams)
4 Mbps to 95 Mbps (configurable)
Analog audio output (1) 3.5 mm stereo headphone jack - front panel
RTSP and SRT audio over Ethernet
Digital audio outputs
HLS audio over HTTP/HTTPS
HDMI audio (embedded)
BETA DRAFT - 25
Page 37
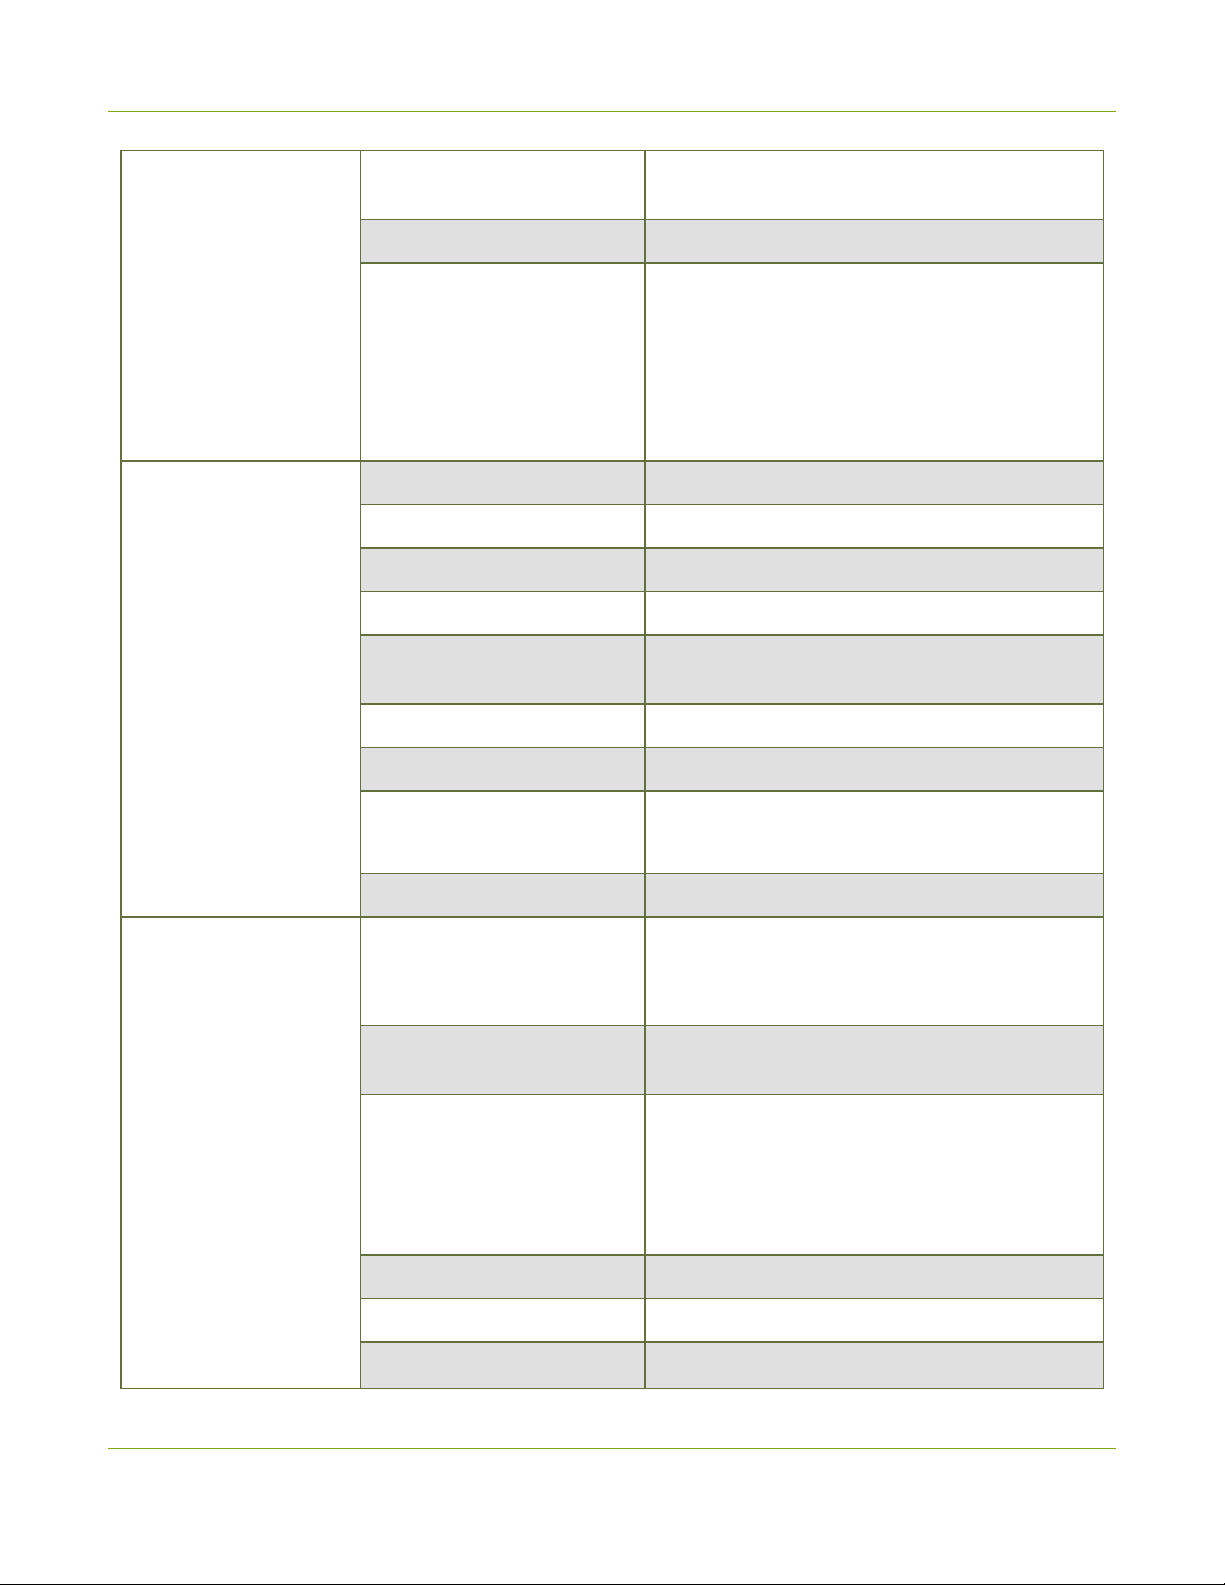
Pearl Mini User Guide Pearl Mini tech specs
Monitor and control
Recording and storage
Touch screen
USB keyboard Connect a standard USB keyboard (optional)
USB status light
Record formats AVI, MOV, MP4, and MPEG-TS
File upload formats JPEG, PNG
SD card Up to 512 GB
File system for SD card EXT4
File transfer protocols
Network file share protocols CIFS/SMB2+
7 inch touch screen monitor (built in) resolution:
800x480
Connect a single USB status light (optional),
supported models:
-Kuando BusyLight models: UC Alpha and UC
Omega
-Delcom Products USB HID single color and multicolor signal indicators
6
FTP, SFTP, SCP, AWS S3 client, and WebDAV
client RSync
Communication
File system for USB storage FAT16, FAT32, XFS, EXT2, EXT3, EXT4, NTFS
External USB ports
Bitrate Up to 50 Mbps
USB standards
Serial port
Serial protocols
Serial port baud rate 19200 bps
Ethernet host port (1) RJ-45 (female)
(1) USB 3.0 0.9A - front panel
(2) USB 3.0 0.9A (UAV/UAC) - rear panel
USB 1.1, USB 2.0, and USB 3.0
HDCP compliant. Only content that is not HDCPprotected is captured
(1) Bidirectional RS-232 (via a USB to serial
adapter)
Data bits: 7 or 8 (default)
Stop bits: 1
Parity: None
Flow control: None, Hardware or Software
Ethernet data rate
10/100/1000 Base-T, half/full duplex with
BETA DRAFT - 26
Page 38
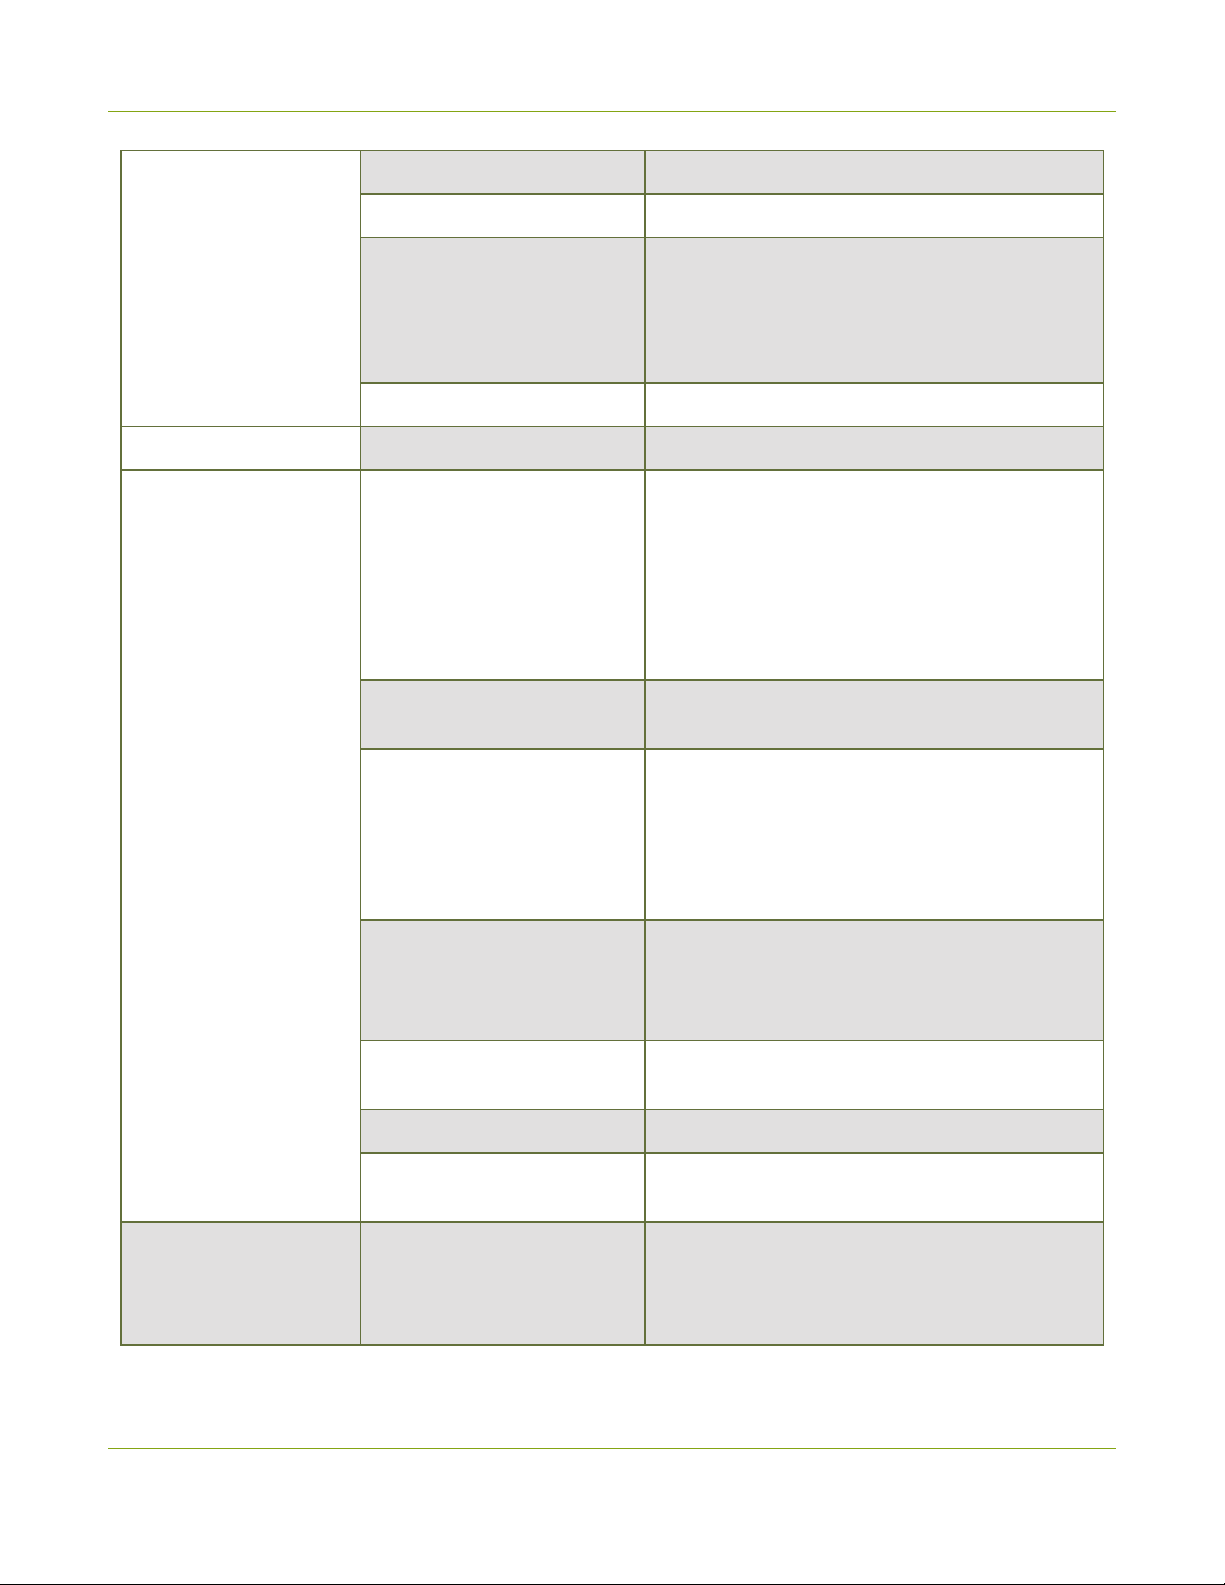
Pearl Mini User Guide Pearl Mini tech specs
autodetect
Maximum Transmission Unit 68 to 1500 MTU (configurable)
DHCP Option 81, TLS 1.2, LDAP, mDNS, DDNS,
SAP, RTP, MPEG-TS & RTP and MPEG-
Protocols
Network discovery/Announce SAP
Network security 802.1x EAP methods PEAP, EAP-TLS, EAP-TTLS
Admin panel
TS/UDP, 802.1x, EAPOL, EAP-TTLS, EAP-TLS,
PEAP, HTTP, HTTPS, NTP, PTP, FTP, SFTP,
SCP AWS S3
Local web UI for full administration. On-screen
display and mobile UI for confidence monitoring,
administration, and control.
Local Admin panel access using a USB mouse,
keyboard, and monitor connected directly to Pearl
Mini with built-in virtual keyboard and touchscreen monitor support.
Administration and
control
Integrations
Epiphan Live
Epiphan Edge
Secure access
Remote access
API Yes (HTTP/HTTPS or RS-232)
Crestron driver
Content Management
Systems
Local web-based UI to easily control streaming,
recording, and switching.
Cloud-based platform to remotely manage and
control Pearl Mini devices. Start and stop
recording/streaming, monitor channels and alert
dashboard, remotely login to Admin panel for
rescue troubleshooting, update firmware and
more from the Internet.
Multiple user accounts and passwords. HTTPS for
secure Admin panel and Epiphan Live access, as
well as local network access to the live channel
broadcast.
Remote login7to cloud versions of the Admin
panel and Epiphan Live.
Yes See
https://applicationmarket.crestron.com/epiphan/
Kaltura
Panopto
YuJa
BETA DRAFT - 27
Page 39
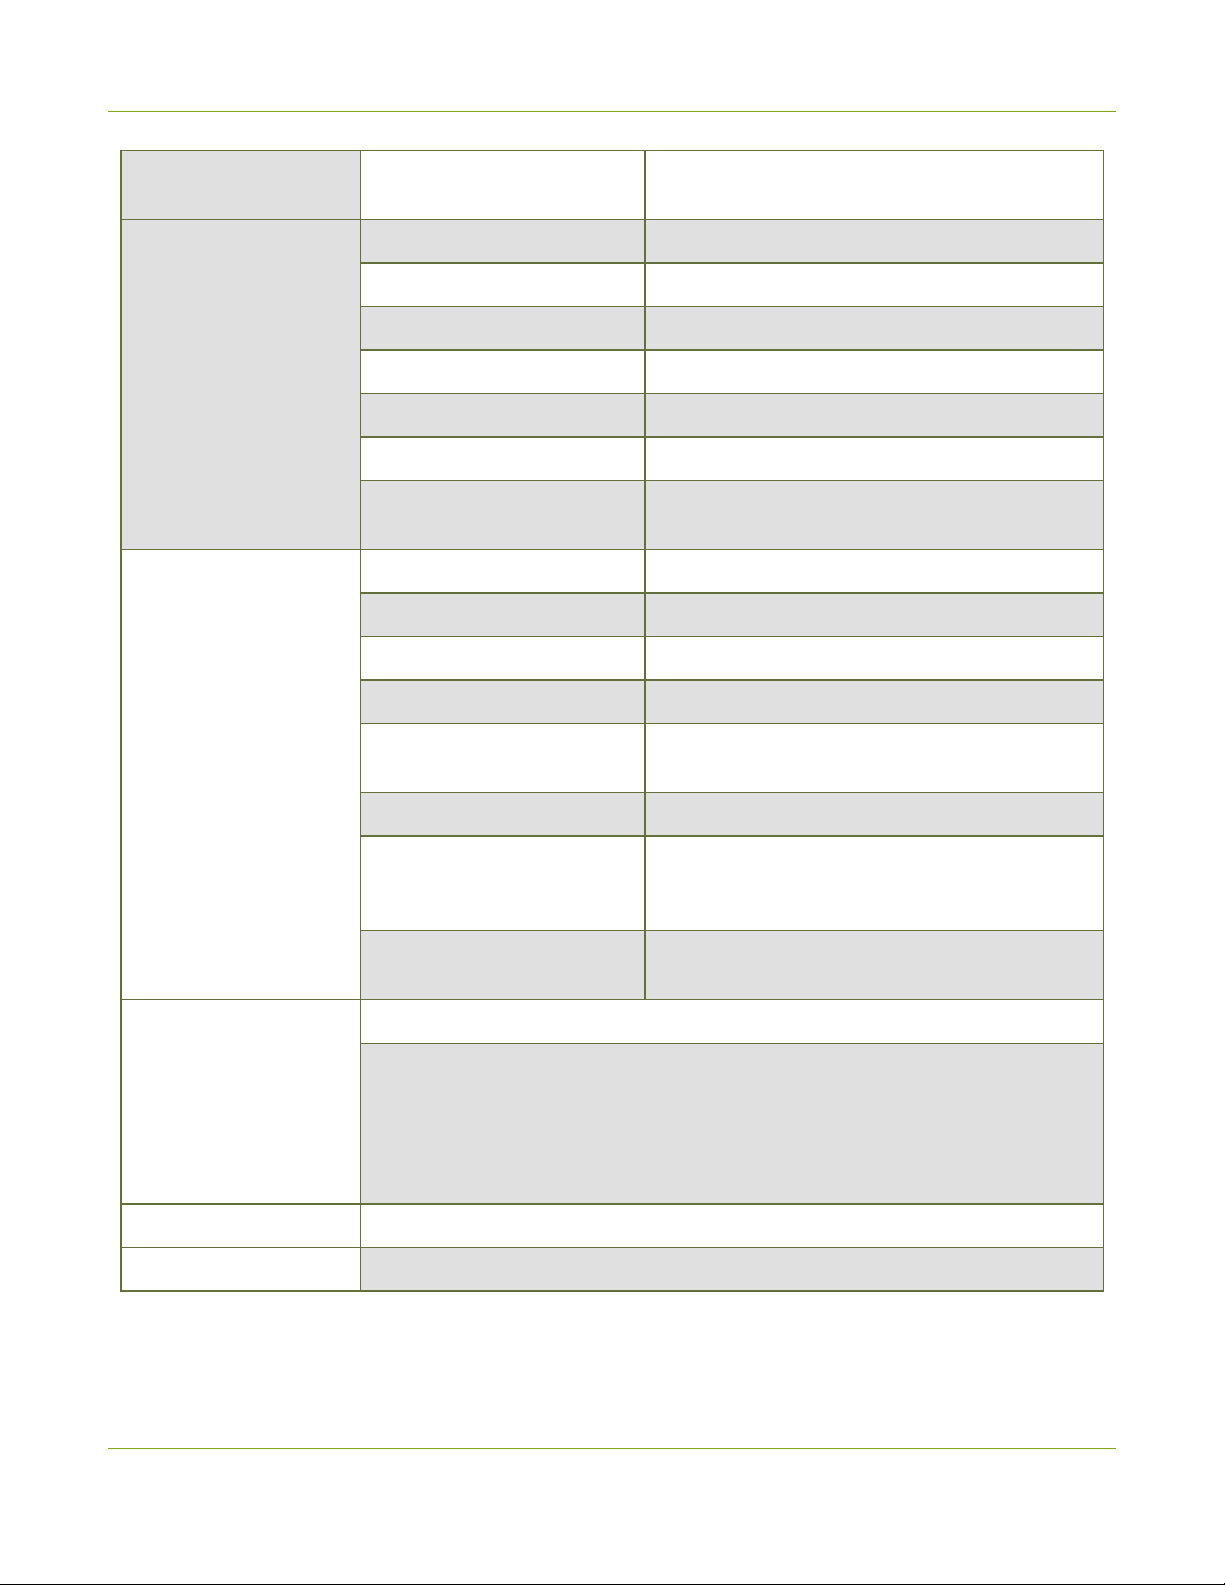
Pearl Mini User Guide Pearl Mini tech specs
AC/DC power adapter
General
Cloud access and
management
Model ADP 60KD BA
Input power rating 90 to 240 VAC, 47 to 63 Hz
Output power rating 12 VDC, 5.0 A, 60 W
Active efficiency (average) 88%
Efficiency (10% load) 95%
No load consumption 0.21 W
Power adapter manufacturer
Operating temperature: 32° to 104° F (0° to 40° Celsius)
Cooling: Fan air flow: Left to right
Enclosure: Metal
Form factor: Portable desktop model. VESA mountable
Dimensions (W × D × H)
Epiphan Edge
Delta Electronics Inc., 3 Tungyuan Road, Chungli
Industrial Zone, Taouyan City 32063, Taiwan
10 1/4" × 6 3/4" × 2 3/8" (261 mm × 172 mm × 60
mm)
Weight 3.8 lbs (1.7 kg)
External AC/DC power adapter:1.5 A, 100-240
Power supply
Input power rating
FCC compliance: Part 15
CE compliance:
Regulatory compliance
Time synchronization NTP, TIME (RFC 868), PTP v1 (IEEE-1588-2002 V1)
Country of origin Made in Taiwan
1
Pearl Mini supports up to three HD video sources in a single channel with two picture in picture layouts under
certain conditions, see Pearl Mini AV inputs.
2
HDCP compliant. Only content that is not HDCP-protected is captured from HDMI
Directive 2014/30/EU - Electromagnetic Compatibility
Directive 2014/35/EU - Low Voltage Directive
Directive 2011/65/EU - RoHS
VAC/12 VDC, 50 to 60 Hz (60W); 1.3 A, 100-240
VAC/12 VDC, 50 to 60 Hz (84W)
12 VDC, 5.0 A (maximum / 60W PSU); 12 VDC,
7.0 A (maximum / 84W PSU)
BETA DRAFT - 28
Page 40
Pearl Mini User Guide Pearl Mini power adapter specifications
3
You can connect a USB, RTSP, SRT, or NDI|HX source to Pearl Mini; however, using multiple digital sources
can affect performance depending on your setup. If you experience performance issues, check CPU usage and
take remedial actions like: remove some configured layouts, reduce the channel's frame rate, or remove a video
input.
4
Digital audio is de-embedded from the digital source.
5
SD-SDI audio is not supported.
6
SD card is reserved for system use and cannot be used to transfer files to other devices like a laptop. Use a
USB memory device to manually transfer files instead.
7
Remote login requires an Epiphan Edge Pro account.
Pearl Mini power adapter specifications
An AC to DC power adapter model FSP060-DHAN3 comes with your Pearl Mini.
Table 7 AC to DC power adapter FSP060-DHAN3 specifications
Parameter Value
Input voltage 90-240 VAC
Input AC frequency 47 to 63 Hz
Output voltage 12 VDC
Output current 5 A
Output power 60 W
Active efficiency (average) 88 %
Efficiency (10 % load) 95 %
No-load consumption 0.075 W
Manufacturer FSP Group Inc./No. 22, Jianguo E. Road, Taoyuan city, Taiwan
Optimum System Load
While Pearl Mini is powerful, there is a limit to the number of concurrent tasks the onboard CPU can perform
efficiently.
The number of concurrent tasks depends on many factors, such as:
l
the number of video sources
l
what frame rate and bitrate is used for a channel
l
if the video output ports are used
l
if a live monitor is connected to the HDMI output port (about the equivalent of an encoded 1920×1080@30
fps channel)
BETA DRAFT - 29
Page 41
Pearl Mini User Guide International character support
Other limiting factors
l
how many channels you have
l
how many layouts you have per channel
l
how often you switch layouts
l
if the system is resizing (scaling) video sources
For best results, we recommend keeping System load usage under 70%.
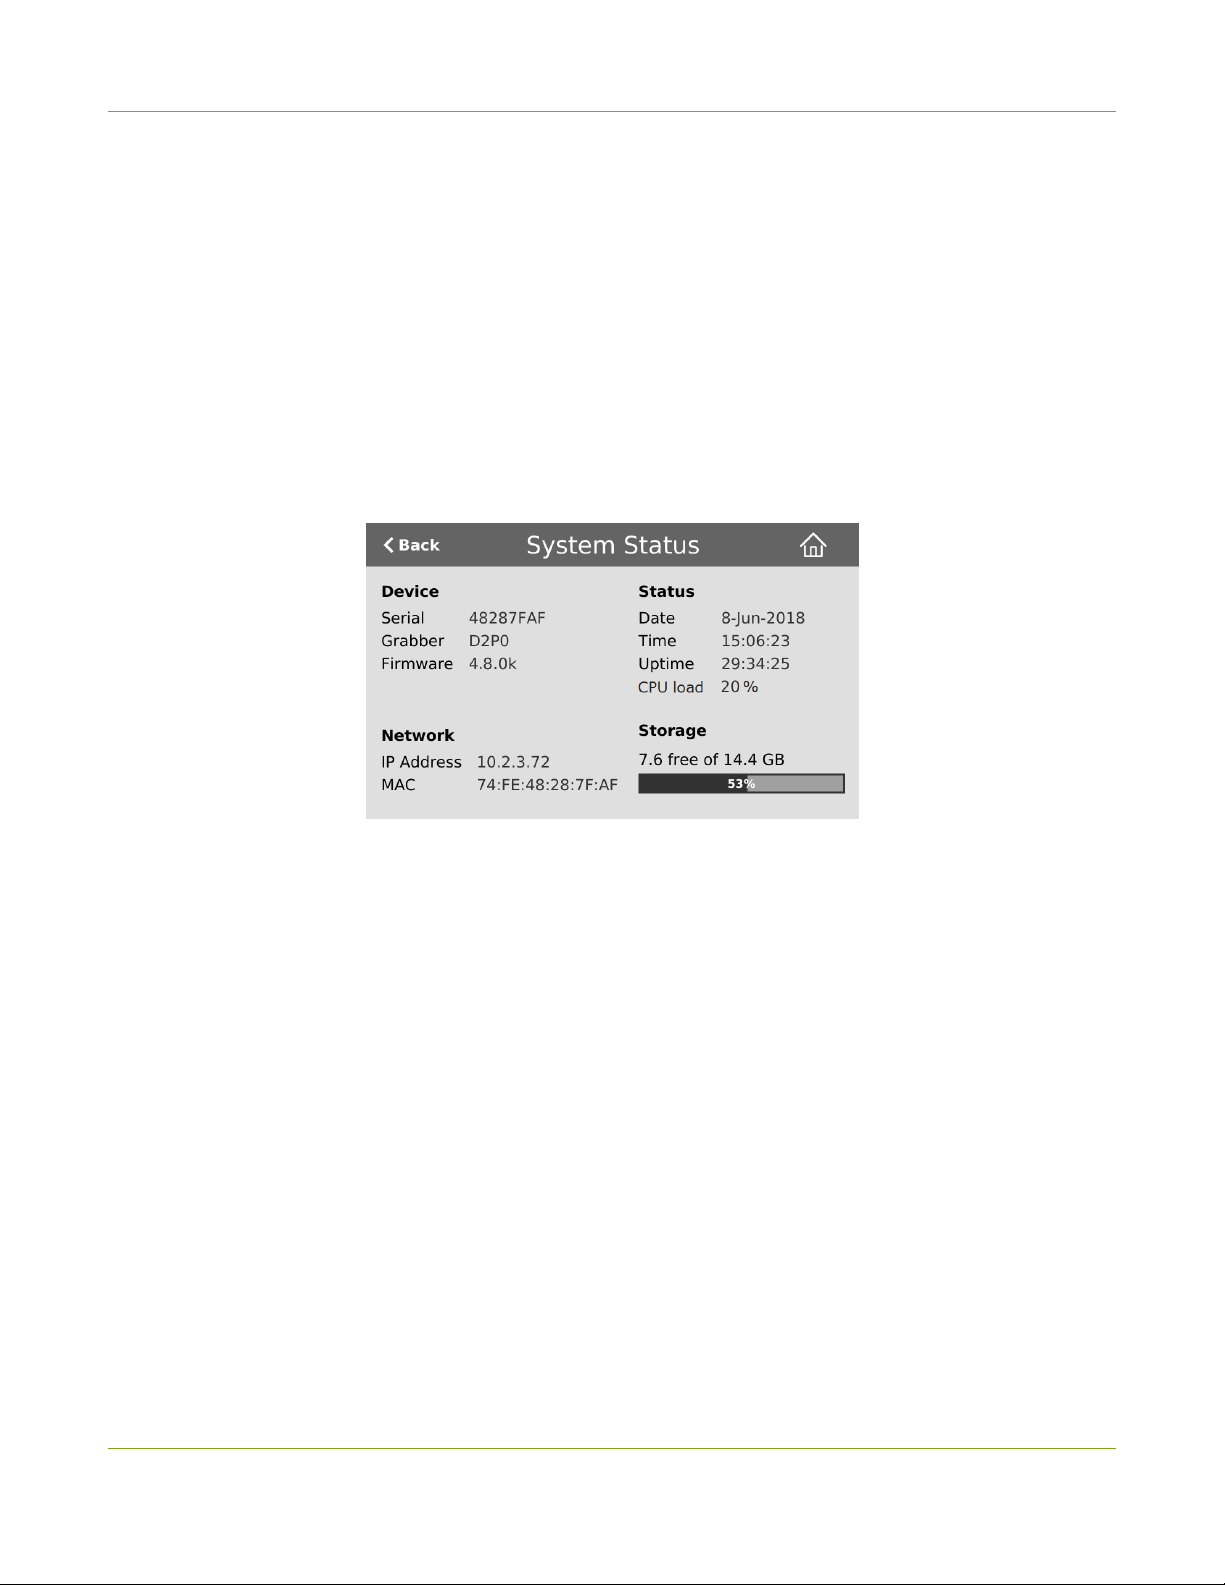
Check CPU usage on the touch screen of Pearl Mini and Pearl-2
To check the CPU usage from the touch screen, tap the gear icon and select System Status.
Recommendations
If the system load is higher than recommended, you can:
l
Disable the video output port (if unused).
l
Remove unused channels or layouts.
l
Reduce the number of channels created.
l
Stop channel(s) that are streaming or recording.
l
Ensure video sources come in at the right resolution so that Pearl Mini doesn't have to up scale or down
scale the video source.
International character support
You can include certain international characters in the channel name, layout name, video and audio input
names, text overlays, and in the name of recorded files. Common character sets for the following languages are
approved:
BETA DRAFT - 30
Page 42
Pearl Mini User Guide Vesa mounting the device
l
Western European/Nordic languages: Danish, Dutch, English, French, German, Icelandic, Italian,
Norwegian, Portuguese, Spanish, and Swedish.
l
Central/Eastern European languages: Bosnian, Croatian, Czech, Hungarian, Polish, Romanian, Slovak,
and Russian.
Important considerations
l
Use only alphanumeric and diacritic characters in metadata descriptions. The whole metadata string is
refused if any special currency or mathematical symbol appears in the description. You must remove the
offending characters before Pearl Mini will accept the description, see Add or remove channel metadata.
l
Do not include any special currency, mathematical symbols, and other special characters such as slashes
or spaces in the channel name. Pearl Mini replaces special characters with an underscore.
Vesa mounting the device
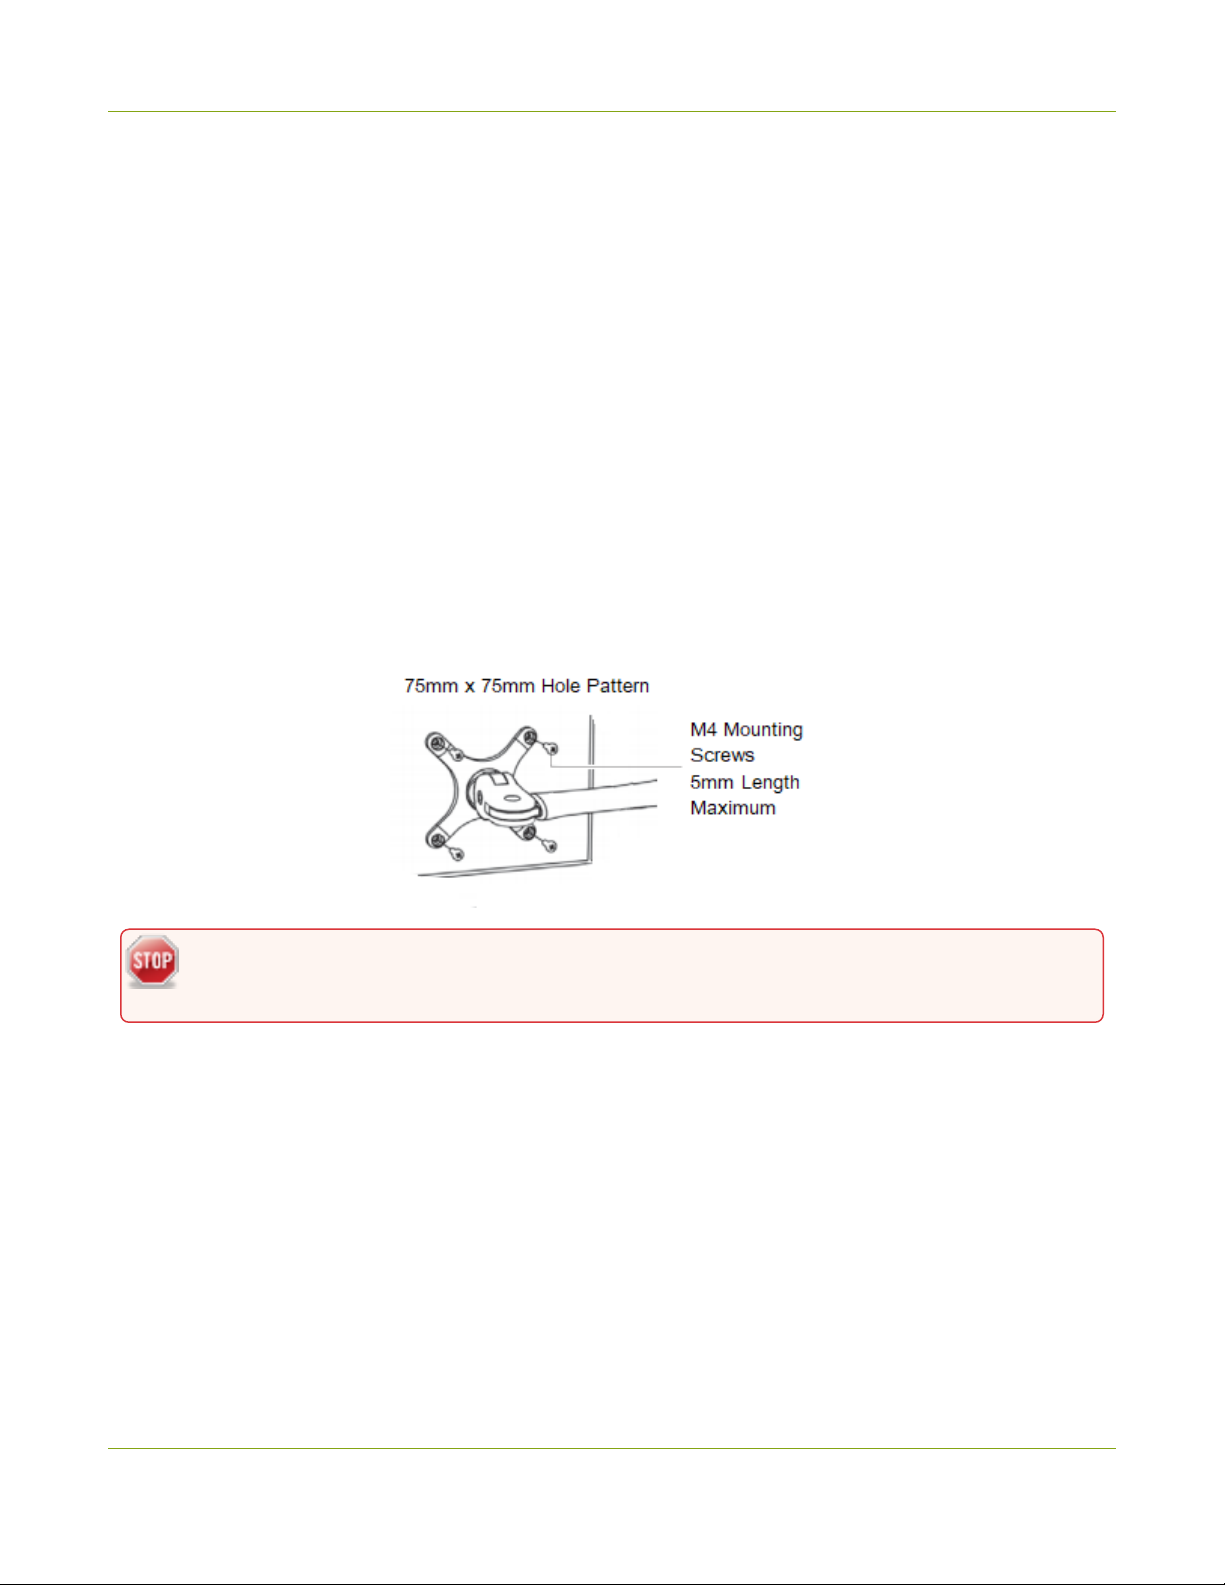
The rear panel of the Pearl Mini and Pearl Nano has vesa mounting holes to fit a standard, 75mm × 75mm vesa
mount. Use four M4 screws with a maximum length of 5mm to mount the plate to the rear panel of the Pearl
device.
Do not insert screws longer than the recommended 5mm. Using longer screws can damage the
device.
BETA DRAFT - 31
Page 43

Pearl Mini User Guide User interfaces and remote access
User interfaces and remote access
Pearl devices have several user interfaces:
l
Touch screen: Easily accessible on the front panel of Pearl, Pearl-2, and Pearl Mini, the touch screen is
primarily used for confidence monitoring, live switching, and Single Touch streaming and recording
control, see About the touch screen. For instructions to use the touch screen to start/stop scheduled
events or to authenticate with a Content Management System (CMS) and create unscheduled ad hoc
recordings and webcasts, see CMS event controls using the touch screen.
l
Admin Panel: A web-based user interface that's primarily used to perform system set up and
administrative tasks for your Pearl device. You can access the Admin Panel using an internet browser on
a computer or tablet that's connected to the same local Ethernet network as your Pearl device, or locally
using a USB mouse, keyboard, and monitor connected directly to the Pearl device. See About the Admin
panel.
l
Epiphan Live: A web-based user interface that's primarily used for confidence monitoring, statistics, live
switching, and recording control, see EpiphanLive.
Start and stop recording/streaming, monitor video sources, view status and alerts, remote rescue
troubleshooting and more over the Internet using Epiphan Edge, see Cloud-based device management. For
remote login access to your Pearl device, see Remote login to the Admin panel and Epiphan Live.
The touch screen - Pearl-2 and Pearl Mini
Use the touch screen to switch layouts, start and stop recording and streaming, configure network settings, load
configuration presets, and to view configured channels, audio meters, and system information.
Topics include:
l
About the touch screen
l
Record a channel using the touch screen
l
Stream a channel using the touch screen
l
Switching and mixing using the touch screen
l
Single Touch streaming and recording control
l
CMS event controls using the touch screen
l
Configure the touch screen
To view system information using the touch screen, see View system information using the touch screen
To select the video source for the output port using the touch screen when local console is enabled, see Select
the video output source using the device screen.
BETA DRAFT - 32
Page 44
Pearl Mini User Guide About the touch screen
About the touch screen
The touch screen has many uses, including confidence monitoring, basic configuration and diagnostics, onetouch streaming and recording control, easy start/stop of scheduled events, and authentication with a Content
Management System (CMS) to create unscheduled ad hoc recordings and webcasts.
The touch screen is capacitive. Use your finger or a specially designed soft-tipped capacitive stylus
with firm but gentle pressure. Pressing too hard or using something other than a fingertip or
capacitive stylus can result in damage to the screen.
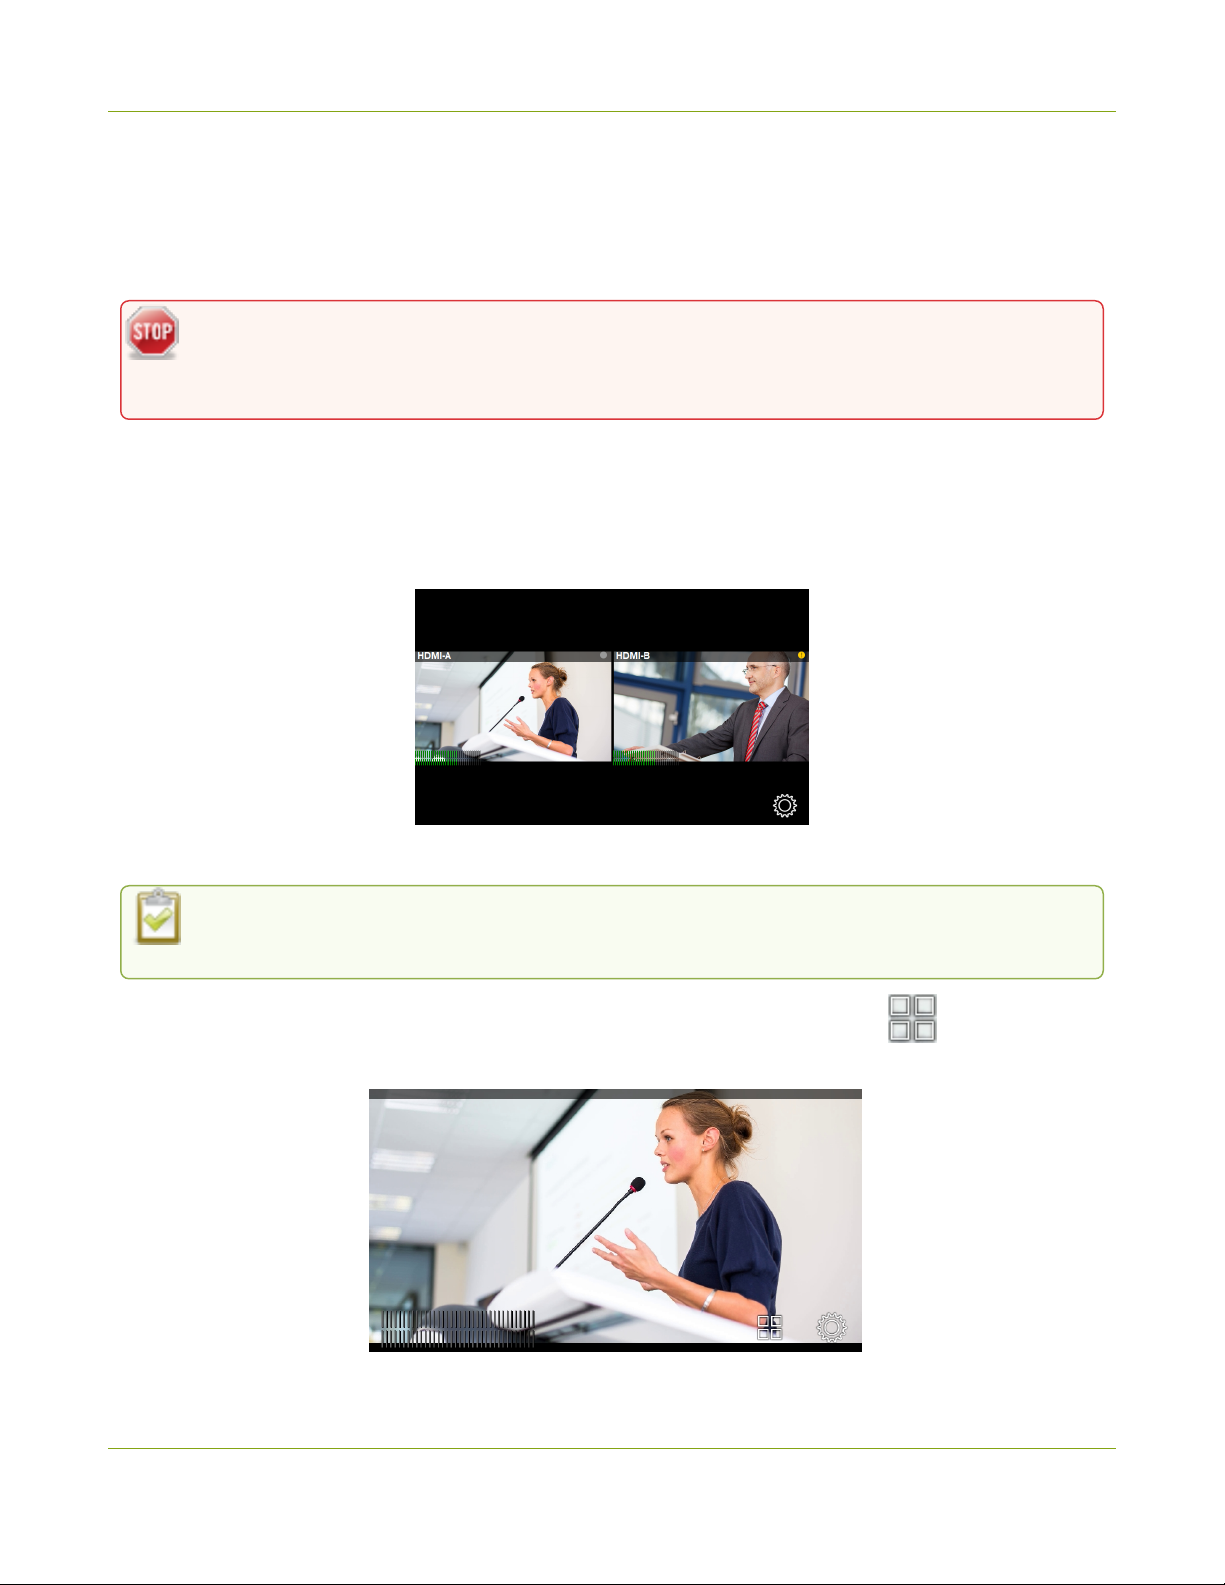
When you power on the Pearl device, a grid view appears. The grid view displays all channels that are
configured for your system. If you haven't created any channels yet, the grid view shows the two HDMI input
ports by default (Auto-A and Auto-B on Pearl-2).
In this example, the grid view shows two video sources, which are plugged into HDMI video input ports A and B
on the Pearl device.
If no video sources are connected, or your sources aren't sending a signal, the grid view shows no
signal images.
Tap a channel on the grid view to select it and go to that channel's view. You can tap the Grid icon to return
to the grid view. Tap the gear icon at any time to go to system settings.
BETA DRAFT - 33
Page 45
Pearl Mini User Guide The touchscreen channel view
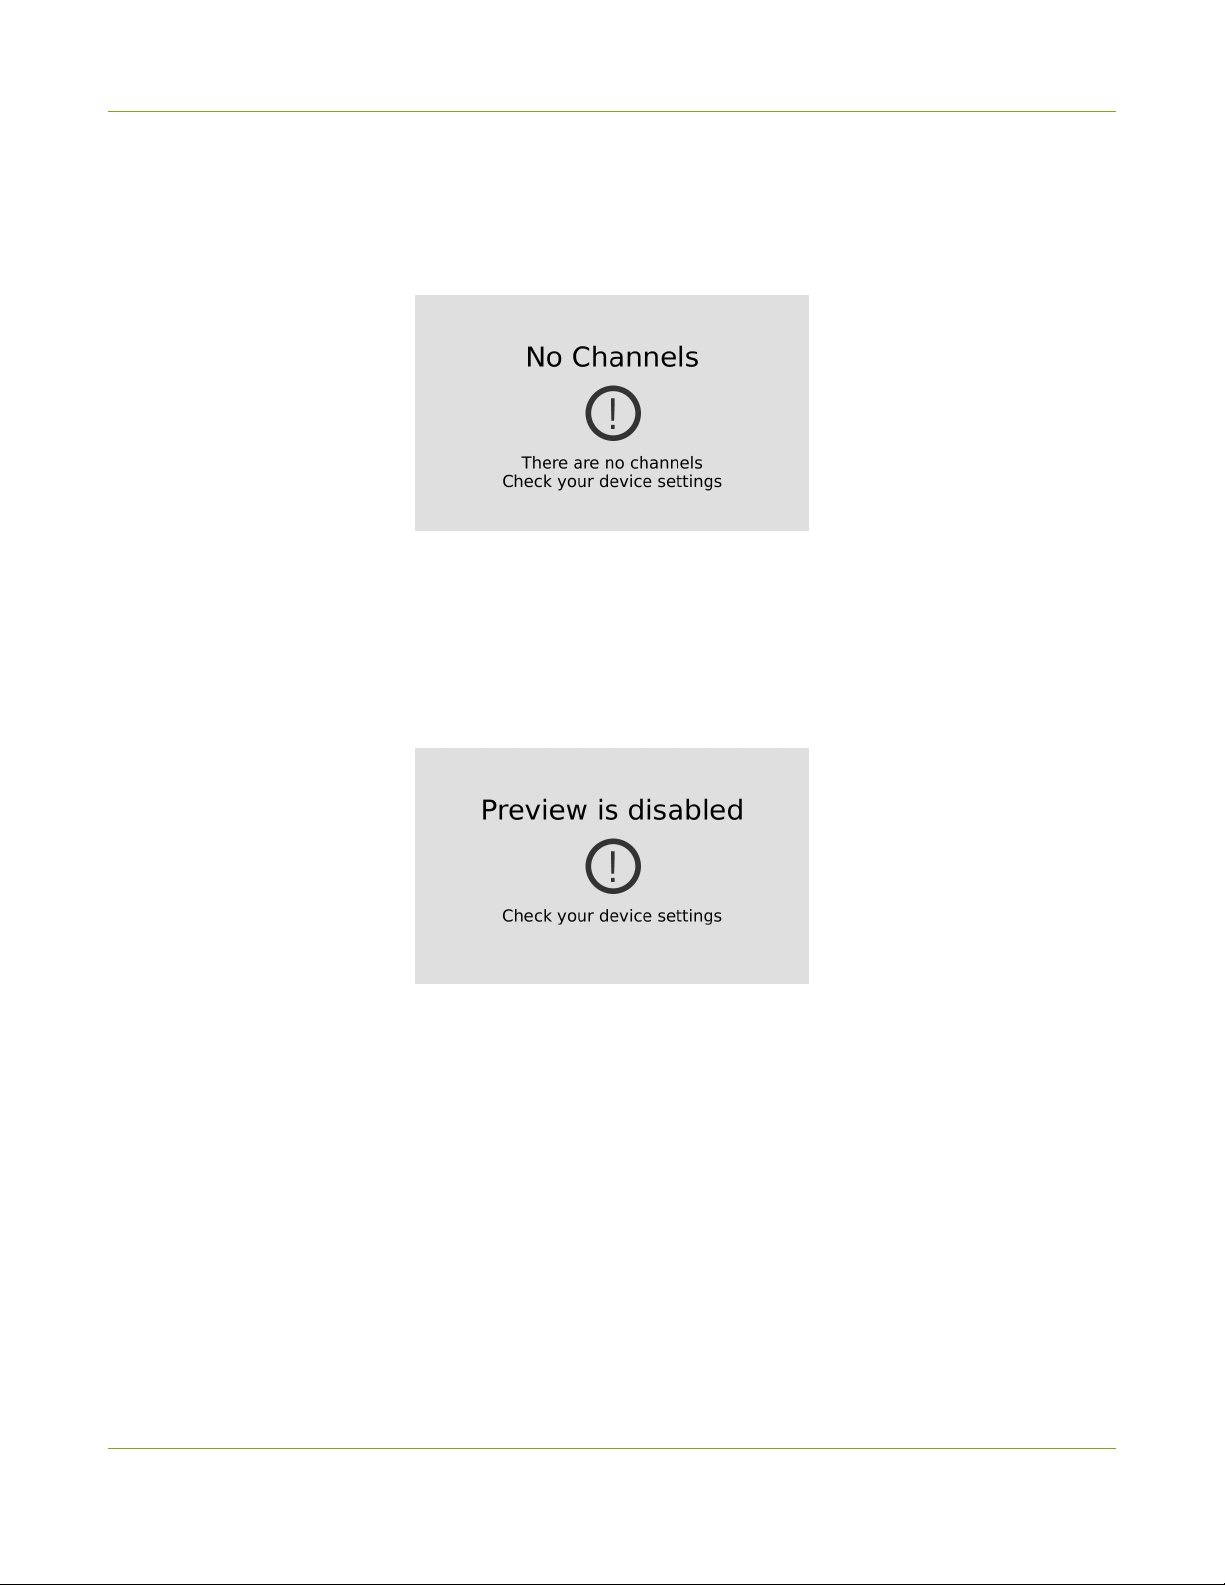
The No Channels screen
The No Channels screen appears if there are no channels configured on your Pearl Mini and the automatic
channels Auto A and Auto B have been deleted. Tap anywhere on this screen to go to the system settings
screen.
Enabling and disabling touch screen features
By default, the touch screen and all features except viewing the CMS Events screen are enabled. You can
disable the touch screen and define which features are enabled on the touch screen. If the touch screen is
configured to not show channel previews, tap anywhere on the screen to go to the system settings screen. See
Configure the touch screen for details. For information about the CMS Events screen and icon, see CMS event
controls using the touch screen.
When setting some features, a pop-up virtual keyboard appears. To enable using an external keyboard that you
connect to one of the Pearl device's USB ports instead, see Connect an external keyboard.
The touchscreen channel view
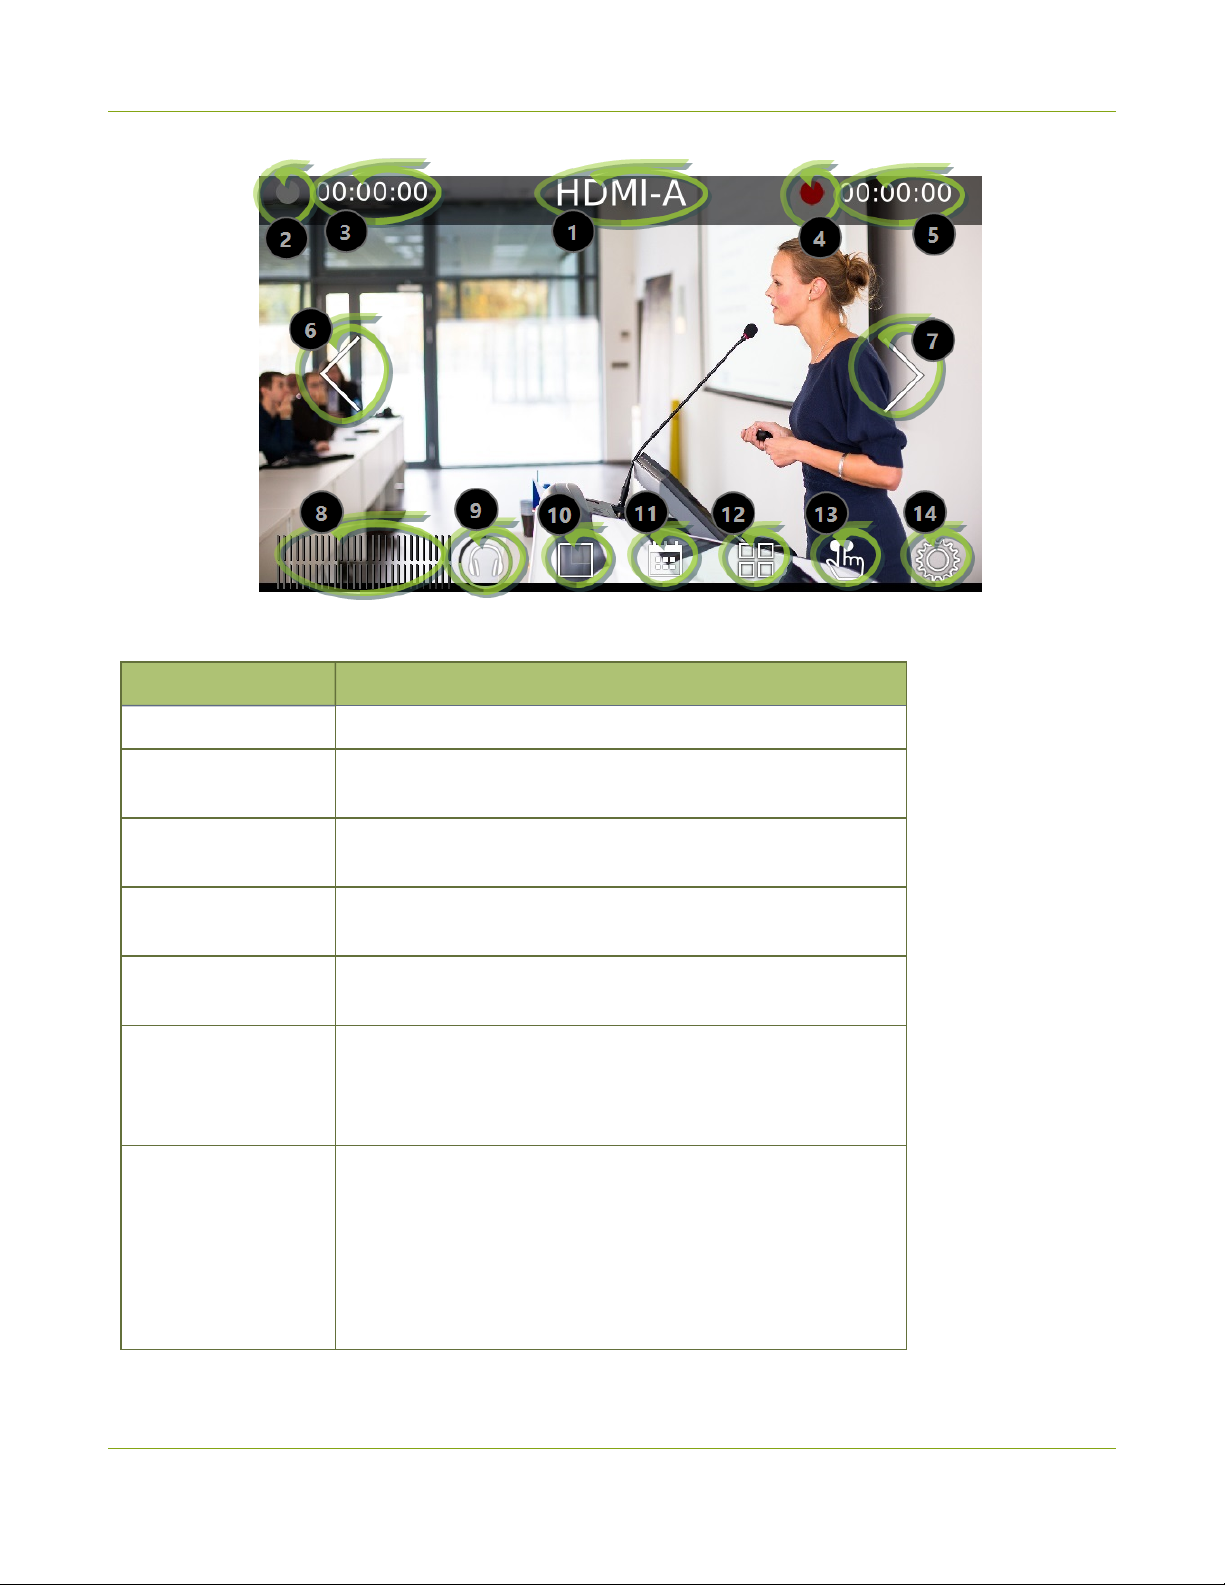
Each channel you configure on Pearl device can be monitored and controlled using the touch screen. After you
power on the Pearl device and the grid view opens, you can select a channel and open the channel view. Just tap
the channel you want in the grid view and the channel view opens.
BETA DRAFT - 34
Page 46
Pearl Mini User Guide The touchscreen channel view
Table 8 Parts of the touch screen for the individual channel view
Item Description
1 Channel name.
2
3
4
5
Streaming status. Gray means streaming is stopped, flashing
blue means streaming is in progress.
The streaming timershows the length of time that streaming
has been in progress.
Recording status. Bright red and flashing means recording is in
progress.
The recording timer shows the length of time that recording has
been in progress.
Controls to switch between channels. Tap the arrow to view the
6 and 7
next (or previous) channel. The arrow icons fade when the
touch screen is idle (i.e. untouched) for several seconds. Tap
the touch screen and the icons reappear.
Audio VU meter uses quasi-peak ballistics with samples
averaged every 10 ms. The maximum average audio level in
each 100 ms period is displayed using colored bars.
8
l
RED = 0 to -9 dBFS
l
Yellow = -9 to -18 dBFS
l
Green = -18 dBFS and lower
BETA DRAFT - 35
Page 47
Pearl Mini User Guide Record a channel using the touch screen
Item Description
9
10
11
12
13
14
Audio monitoring volume control icon. Tap to change volume
level. See Monitoring audio for more information.
Live Switcher view icon. Tap to view the live switcher, which
lets you live switch between different custom layouts that are
configured for the channel.
CMS Events screen icon. Tap to view the status of scheduled
Kaltura or Panopto CMS events or to authenticate with your
CMS and create an unscheduled ad hoc event, see Create ad
hoc events using the Admin panel.
Grid view icon. Tap to view all the configured channels in a
grid.
Single touch streaming and recording control icon. See Single
Touch streaming and recording control
System settings icon. See View system information using the
touch screen.
Record a channel using the touch screen
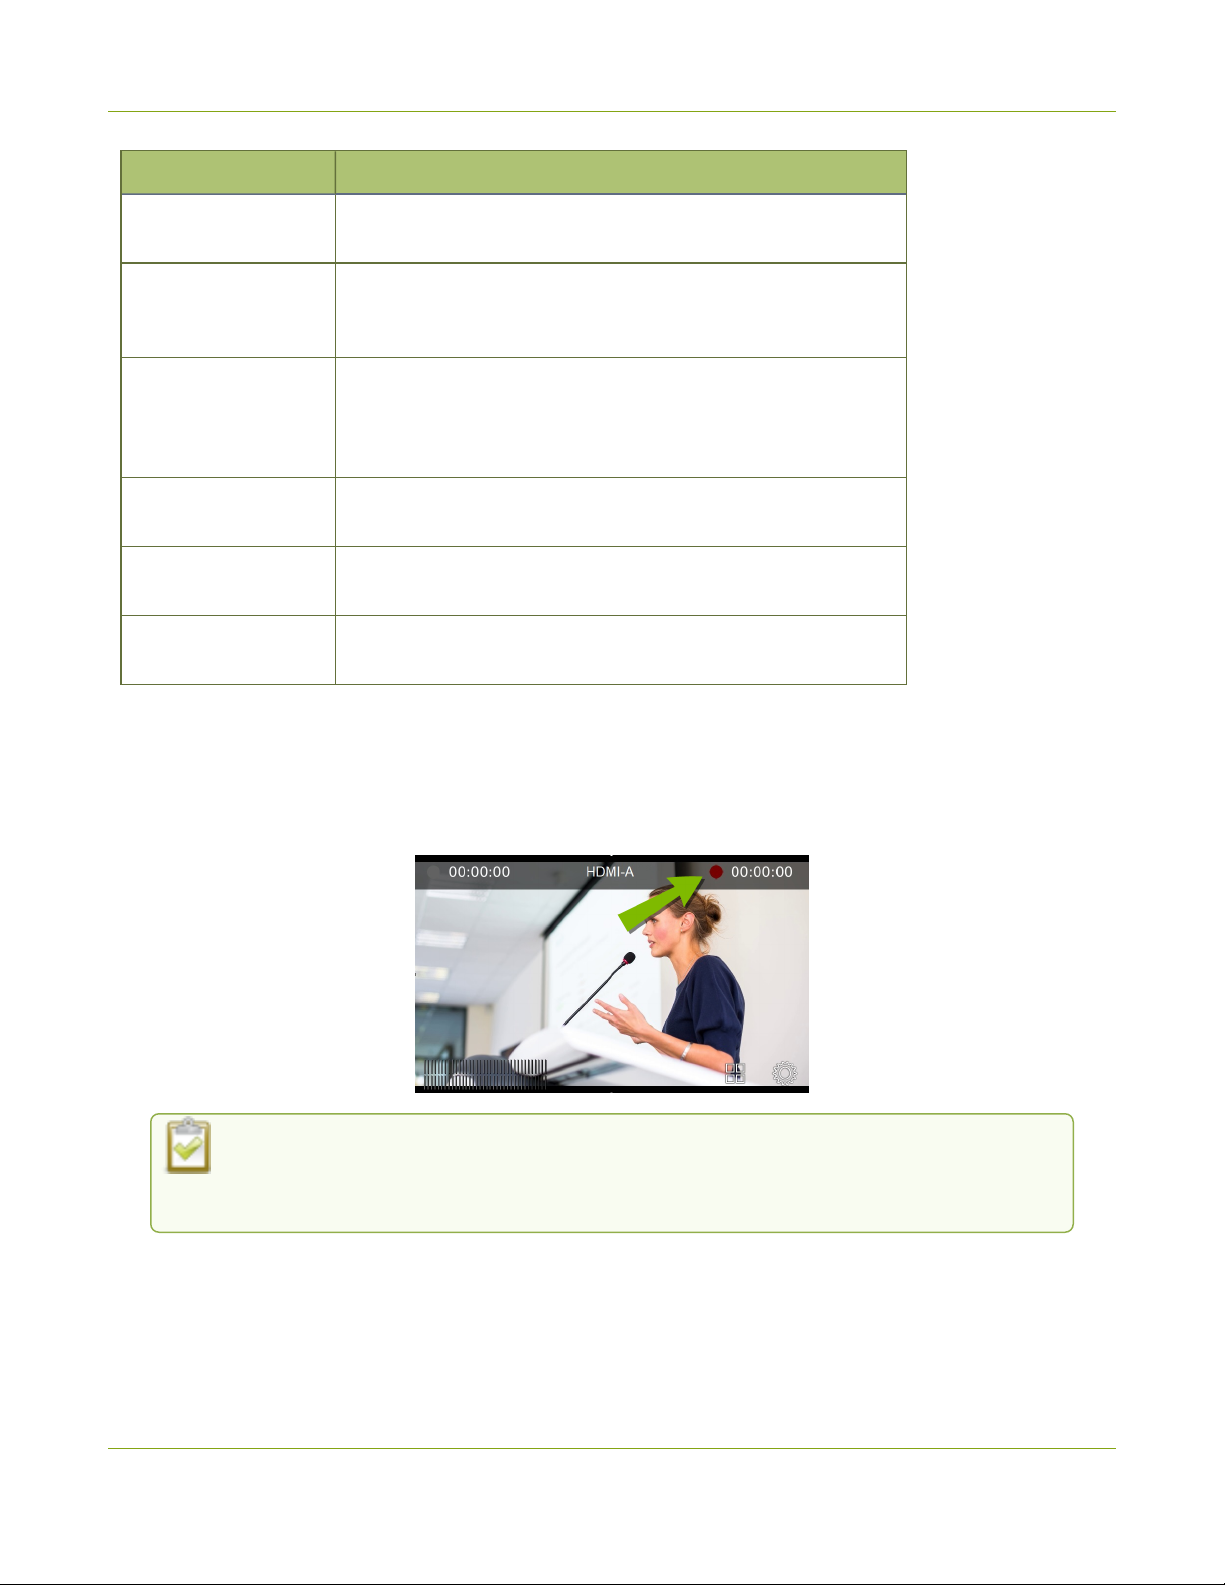
Use the touch screen to easily start and stop recording of a channel. Simply tap the recording control button that
appears in the channel view.
If the red Record icon doesn't appear in the top right corner of the screen, recording is
disabled. See Disable or enable recording, streaming, and switching from the touch
screen to enable recording.
Start and stop recording a channel using the touch screen
1. From the grid view, select the channel you want to record. The channel view opens. If necessary, tap the
screen once to display the controls.
BETA DRAFT - 36
Page 48
Pearl Mini User Guide Stream a channel using the touch screen
2. Tap the red Record icon at the top right of the screen to start recording. The red dot flashes and the record
timer increments when recording is in progress.
3. Tap the red Record icon again to stop recording. The dot stops flashing and the record timer resets to
00:00:00.
Pearl devices also feature One Touch, which lets you control recording and streaming of multiple channels and
recorders at the same time with the touch of a button. See Single Touch streaming and recording control for
more information.
Stream a channel using the touch screen
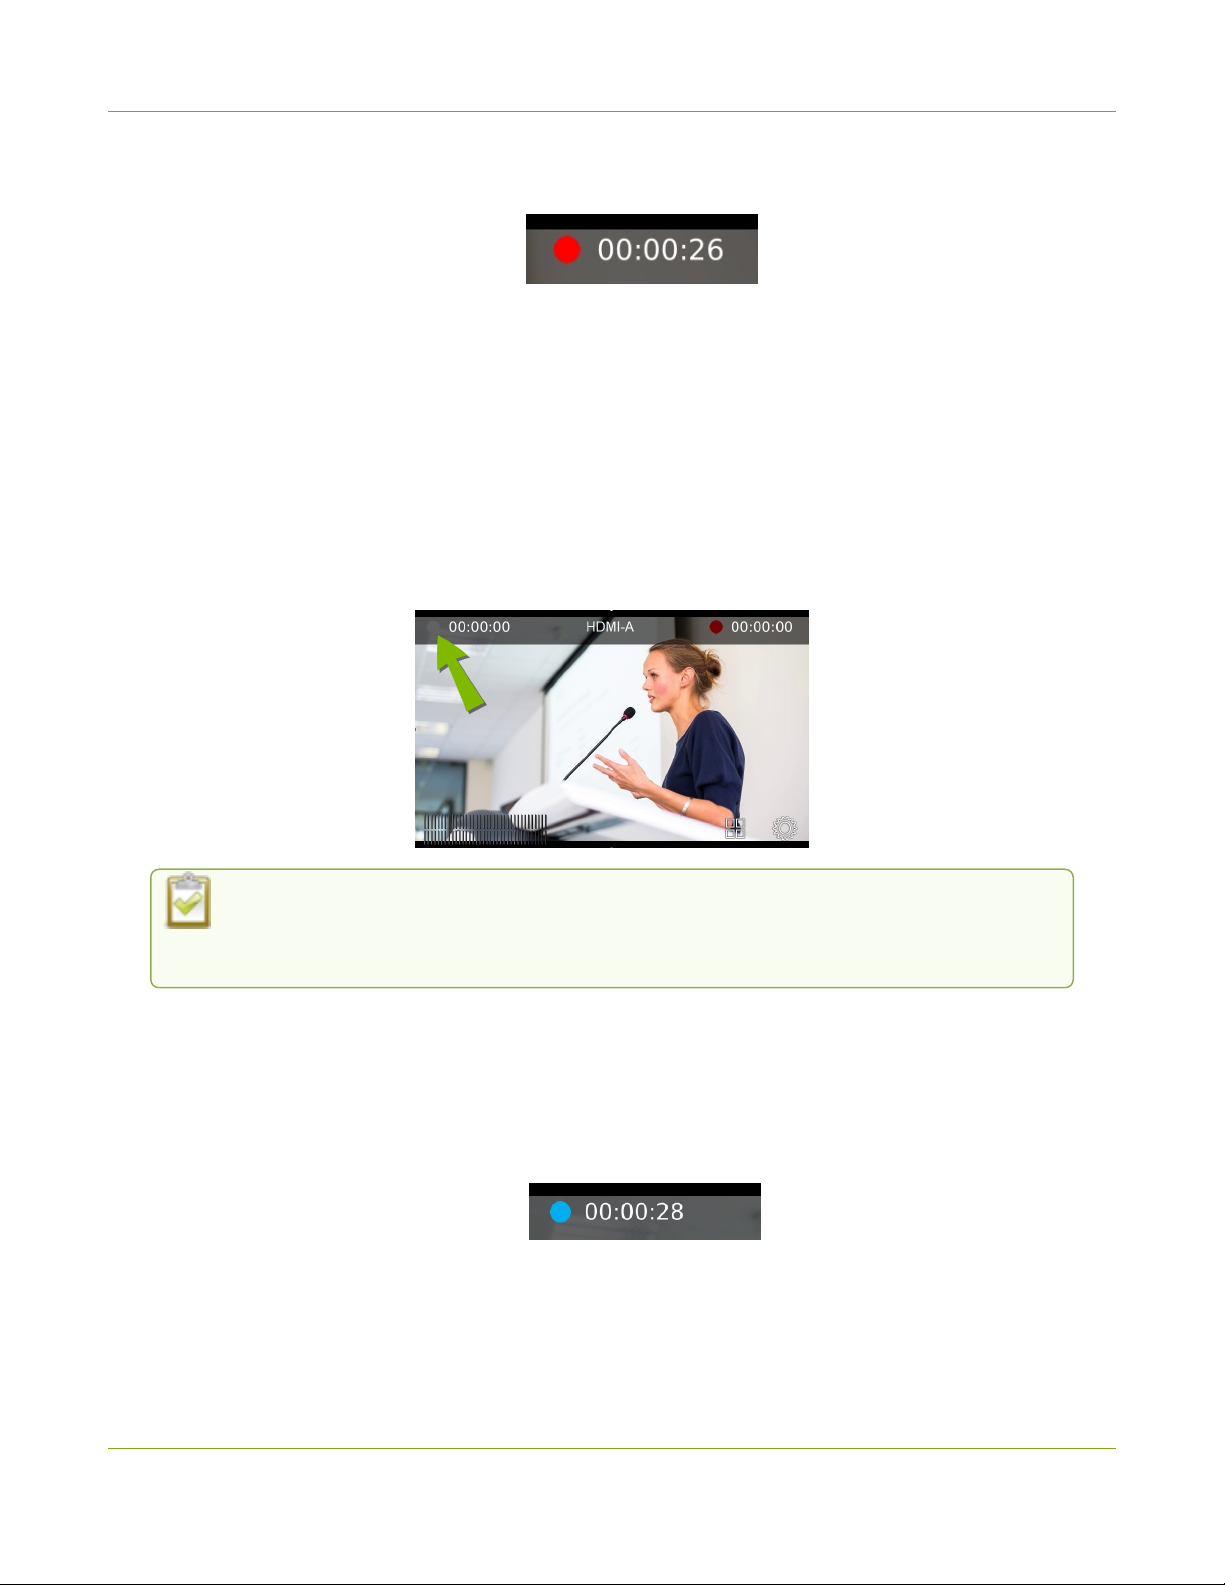
Use the touch screen to easily start and stop streaming a channel. Simply tap the streaming control button that
appears in the channel view.
If the gray (or blue) Stream icon doesn't appear in the top left corner of the screen, streaming
is disabled. See Disable or enable recording, streaming, and switching from the touch
screen to enable streaming.
Start and stop streaming a channel using the touch screen
1. From the grid view, select the channel you want to record. The channel view opens. If necessary, tap the
screen once to display the controls.
2. Tap the gray Stream icon at the top left of the screen to start streaming. The Stream icon turns blue and
the timer increments when streaming is in progress.
3. Tap the Stream icon again to stop streaming. The dot turns gray and the timer resets to 00:00:00.
BETA DRAFT - 37
Page 49
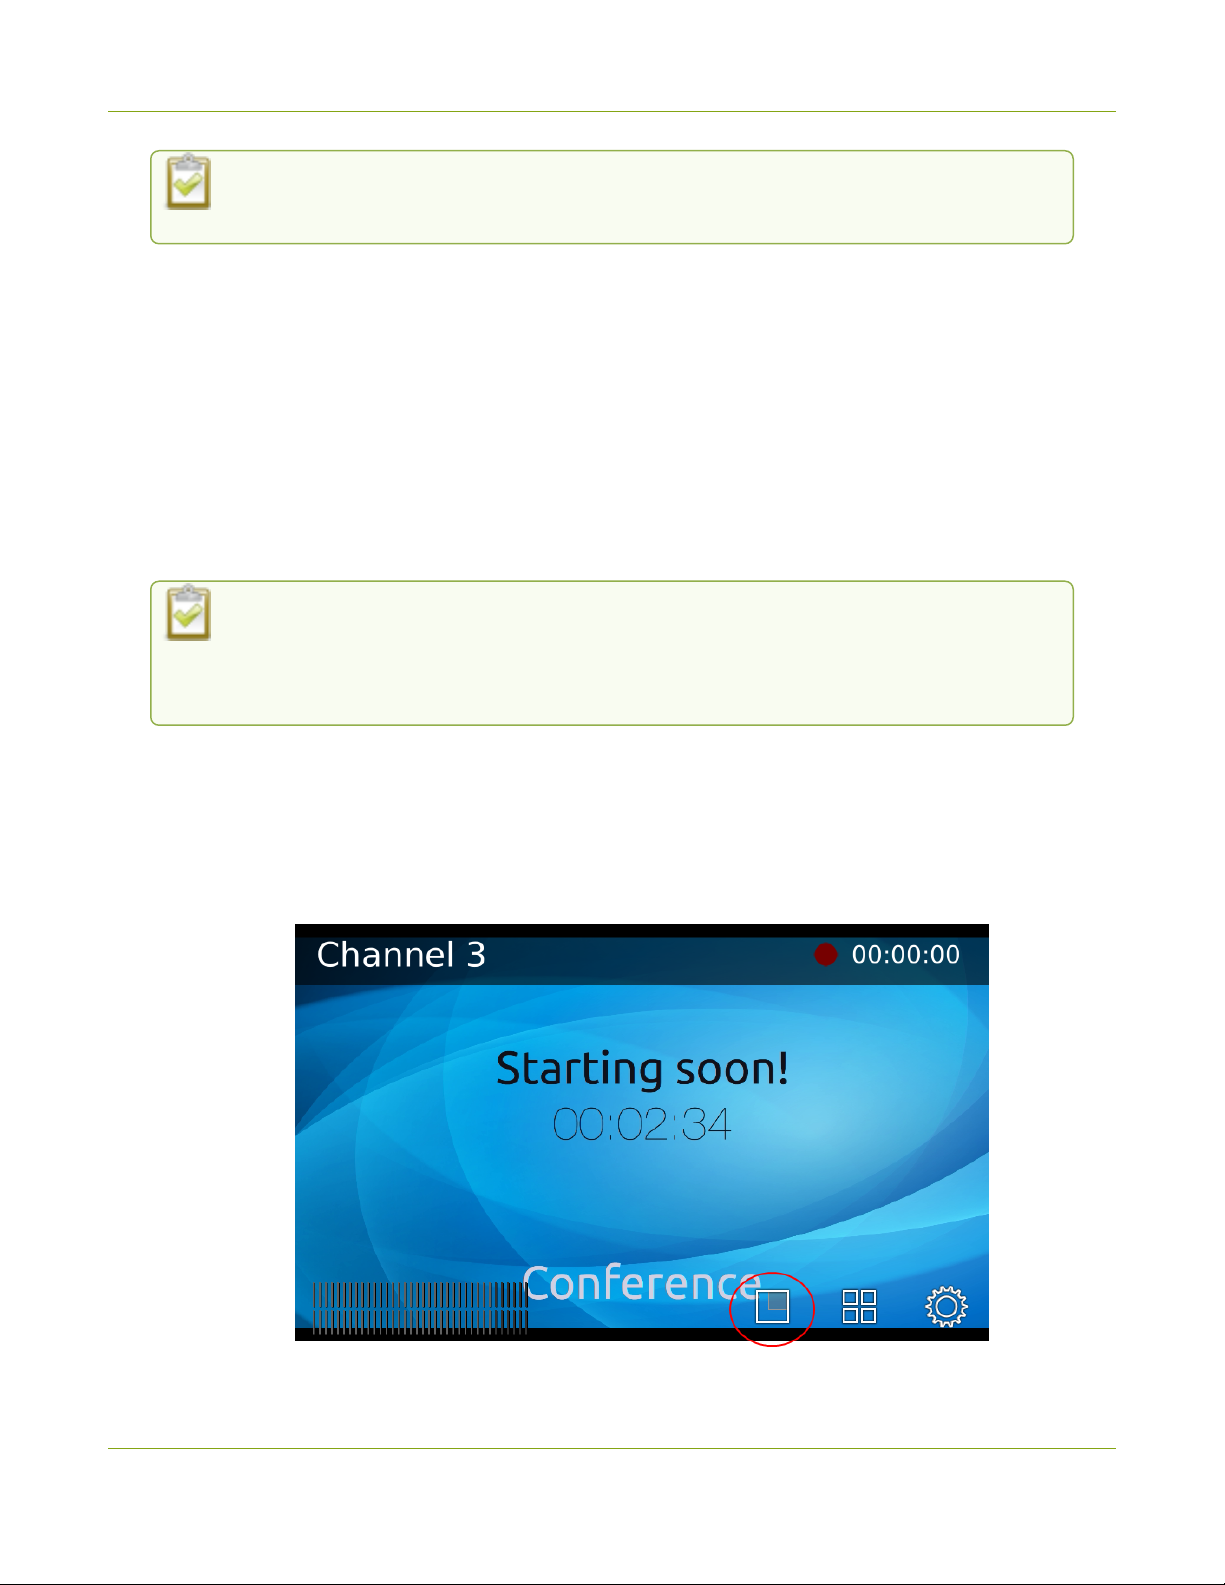
Pearl Mini User Guide Switching and mixing using the touch screen
If an error occurs when you start streaming, a yellow circle with an exclamation mark appears
in the left top corner of the touch screen. Check your networking and streaming settings.
Pearl devices also feature One Touch, which lets you control recording and streaming of multiple channels and
recorders at the same time with the touch of a button. See Single Touch streaming and recording control for
more information.
Switching and mixing using the touch screen
Switching live video inputs, or video mixing, is simple and intuitive using the Pearl device's touch screen.
After you select the channel you want to live switch, tap the Live Switcher icon along the bottom of the touch
screen to open the live switcher. All custom layouts that are configured for the channel display in the carousel.
Simply tap a layout to load it in to the standby panel and you're ready to start live switching.
Performing live switching using one interface, like the touch screen, does not dynamically
update the visuals in the other interfaces (e.g. the Admin panel and Epiphan Live). The other
interfaces must be manually refreshed to accurately reflect the current live switching layout
information.
If the live switching controls don't appear on the touch screen, they may have been disabled. see Disable or
enable recording, streaming, and switching from the touch screen.
Switch custom layouts for a channel using the touch screen
1. Tap the Live Switcher icon to open the live switcher view for the channel. If the control icons aren't
showing, tap anywhere on the touch screen.
BETA DRAFT - 38
Page 50
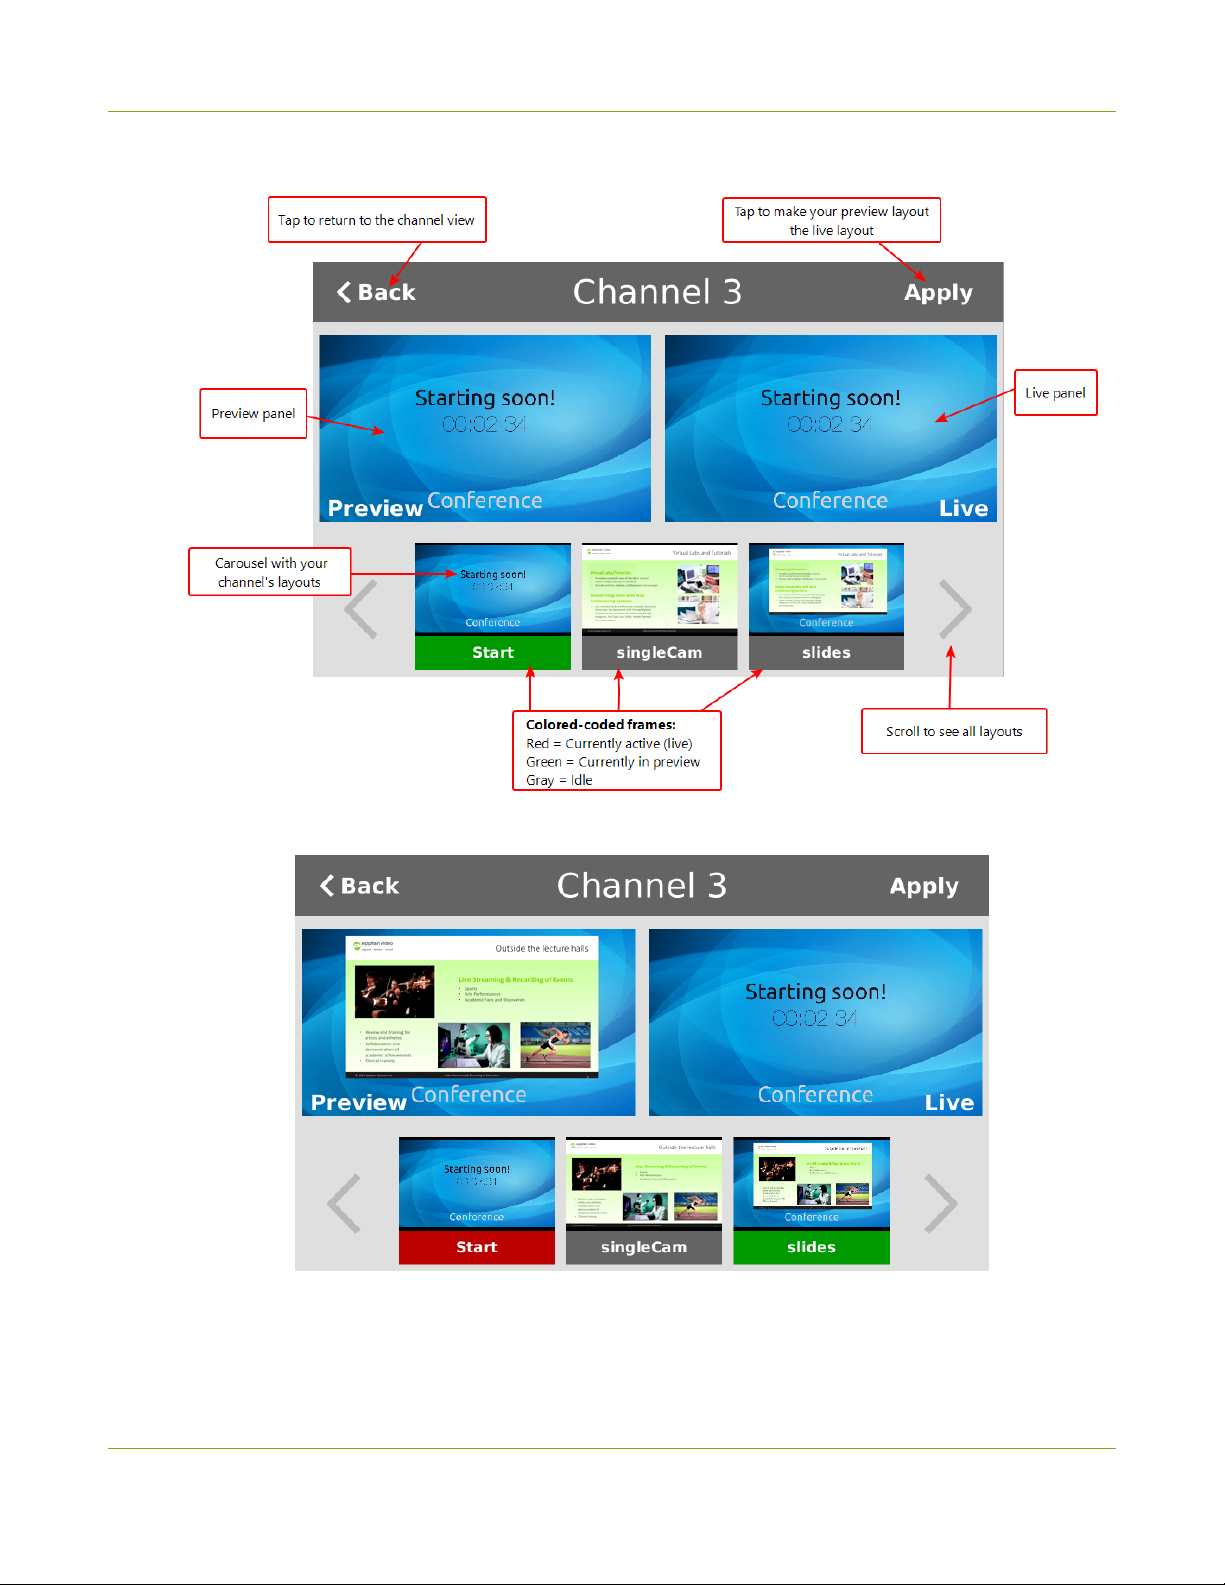
Pearl Mini User Guide Switching and mixing using the touch screen
2. The Live Switcher view opens.
3. Tap any layout that appears in the carousel to load it in to the Preview panel.
4. Tap Apply or double tap inside the Preview panel to switch that layout to the Live panel. The layout that
was in the Live panel moves to the Preview panel so that it's ready for the next time you switch.
5. To load a different layout into the Preview panel, tap another layout in the carousel.
BETA DRAFT - 39
Page 51
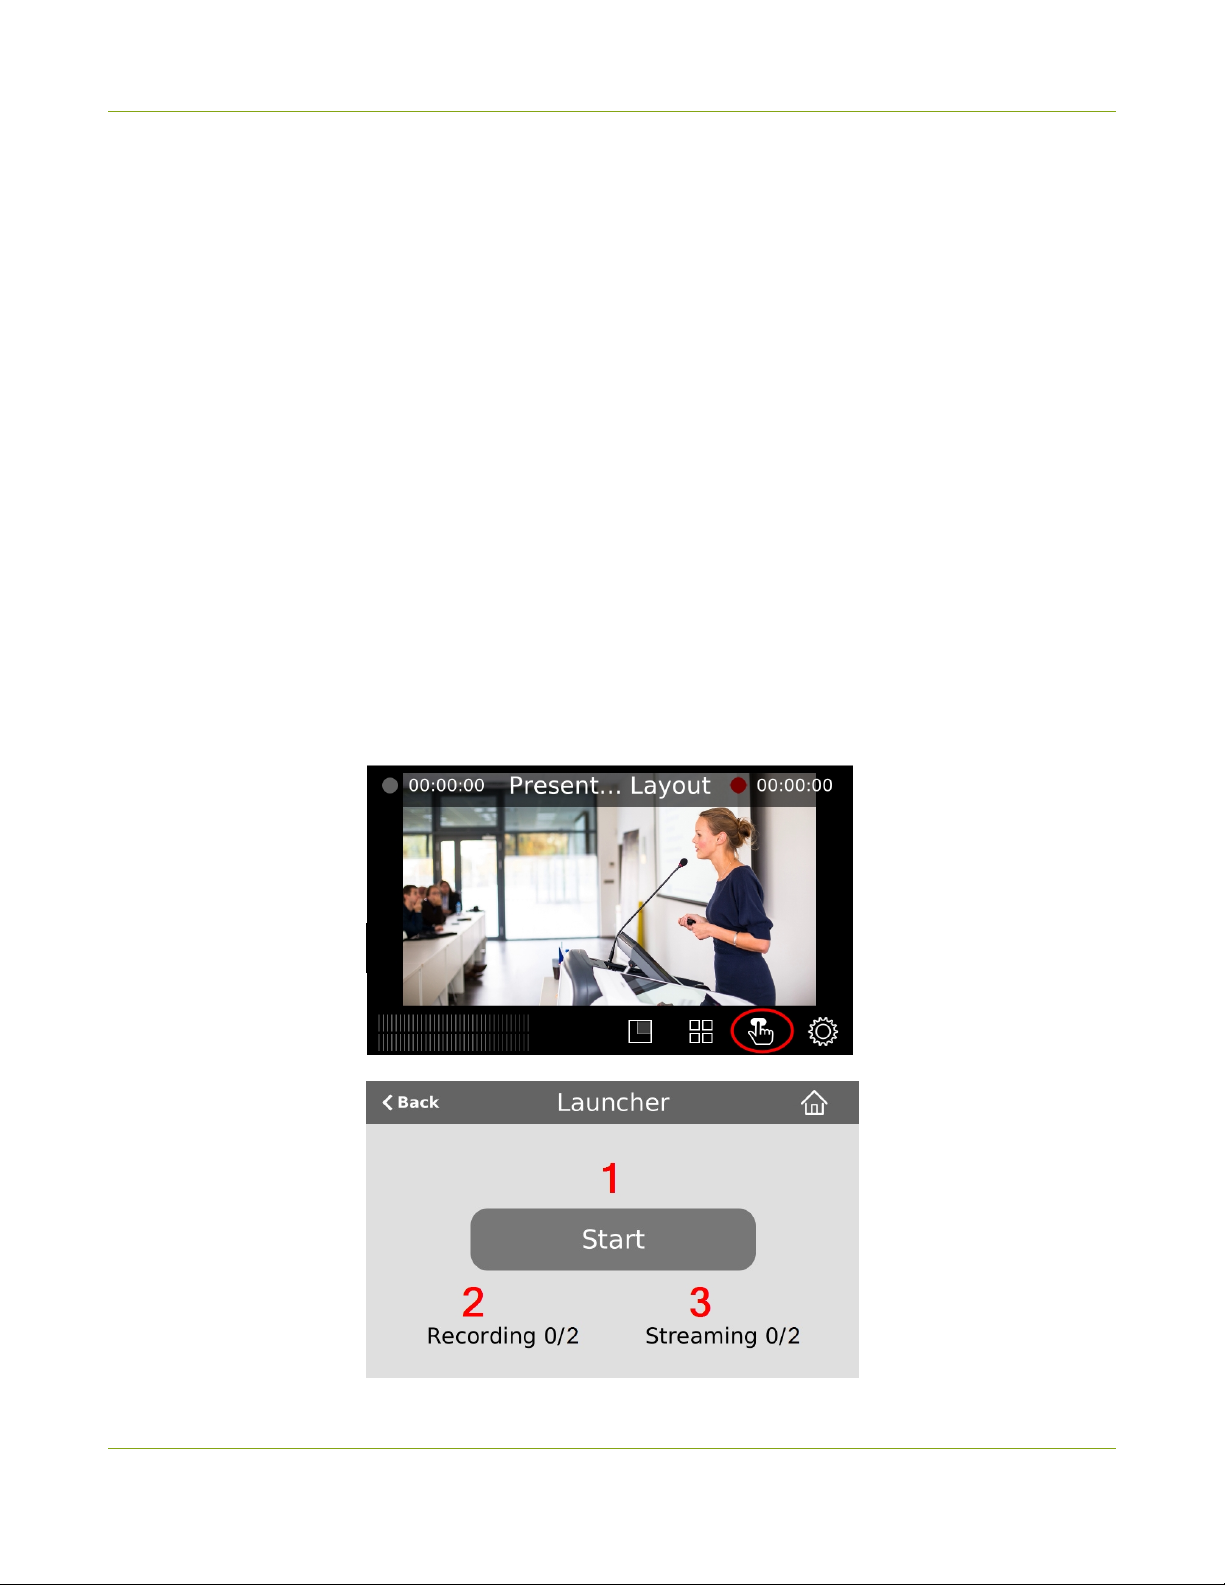
Pearl Mini User Guide Single Touch streaming and recording control
6. Tap Back to exit the Live Switcher view.
Single Touch streaming and recording control
You can easily control streaming and recording from the touch screen on Pearl-2 and Pearl Mini with just one
touch of a button.
Topics include:
l
About Single Touch streaming and recording
l
Specify channels and recorders for Single Touch recording
l
Specify channels for Single Touch streaming
l
Customize the Single Touch control display
About Single Touch streaming and recording
The Single Touch feature lets you control the recording and streaming of multiple channels and recorders with
one touch of a button on the touch screen. Specify which channels and recorders to include for Single Touch
control using the Admin panel.
To open the Single Touch control screen from the touch screen on the Pearl-2 or Pearl Mini, tap the Single
Touch control icon.
BETA DRAFT - 40
Page 52
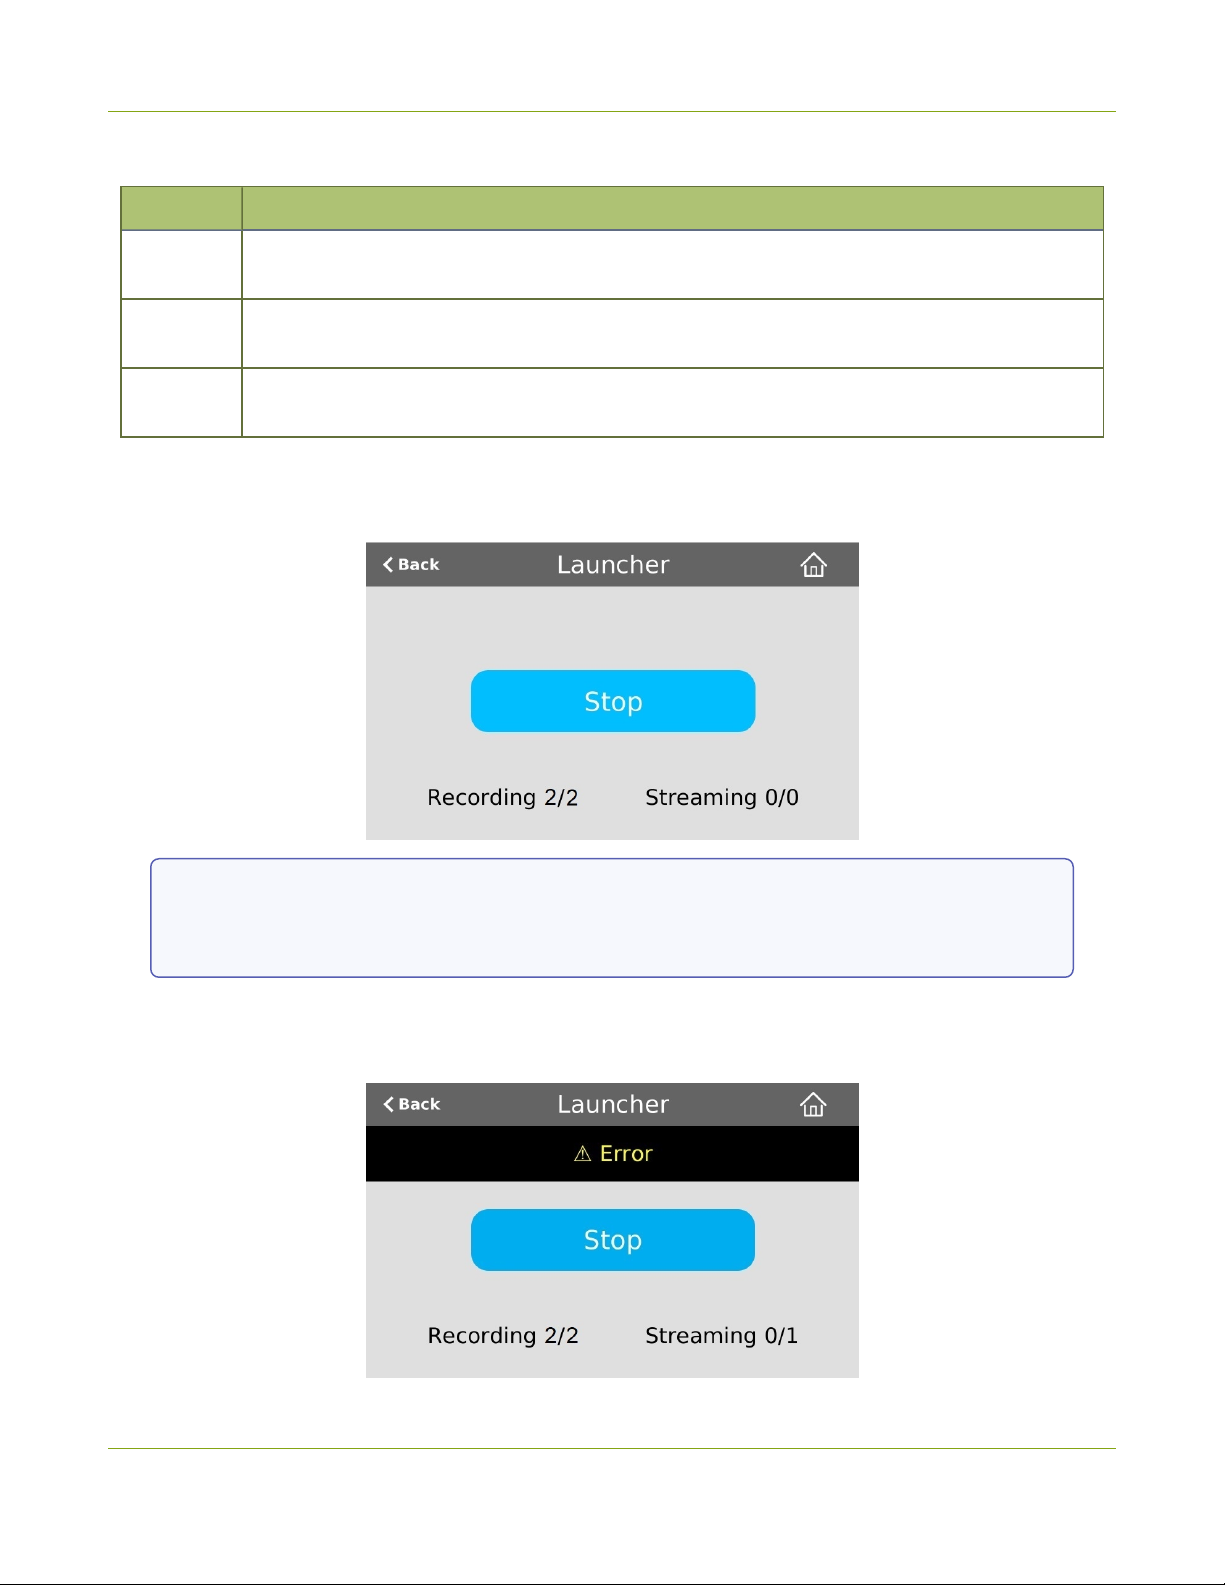
Pearl Mini User Guide About Single Touch streaming and recording
Table 9 One Touch control screen components
Label Description
1
2
3
When you press the start button to activate Single Touch recording and streaming, a blue Stop button appears,
the Recording values update to show the number of channels and recorders that are actively recording, and the
Streaming values update to show the number of channels that are actively streaming.
Start/stop button: Press the Single Touch control button to start or stop streaming and recording
for all specified channels and recorders.
The number of recorders and/or channels that are actively recording (the first number) over the
total number of channels that are configured for one touch recording (the second number).
The number of channels that are actively streaming (the first number) over the total number of
channels that are configured for one touch streaming (the second number).
In the example above, Single Touch control has been activated and both channels out of the two
total channels and/or recorders are recording successfully. There is no streaming activity because
there are no channels configured for Single Touch streaming.
An error icon displays if there's a problem with the streaming and/or recording settings for one or more of the
channels and recorders. All other channels and recorders that are working correctly continue to stream and
record normally.
BETA DRAFT - 41
Page 53
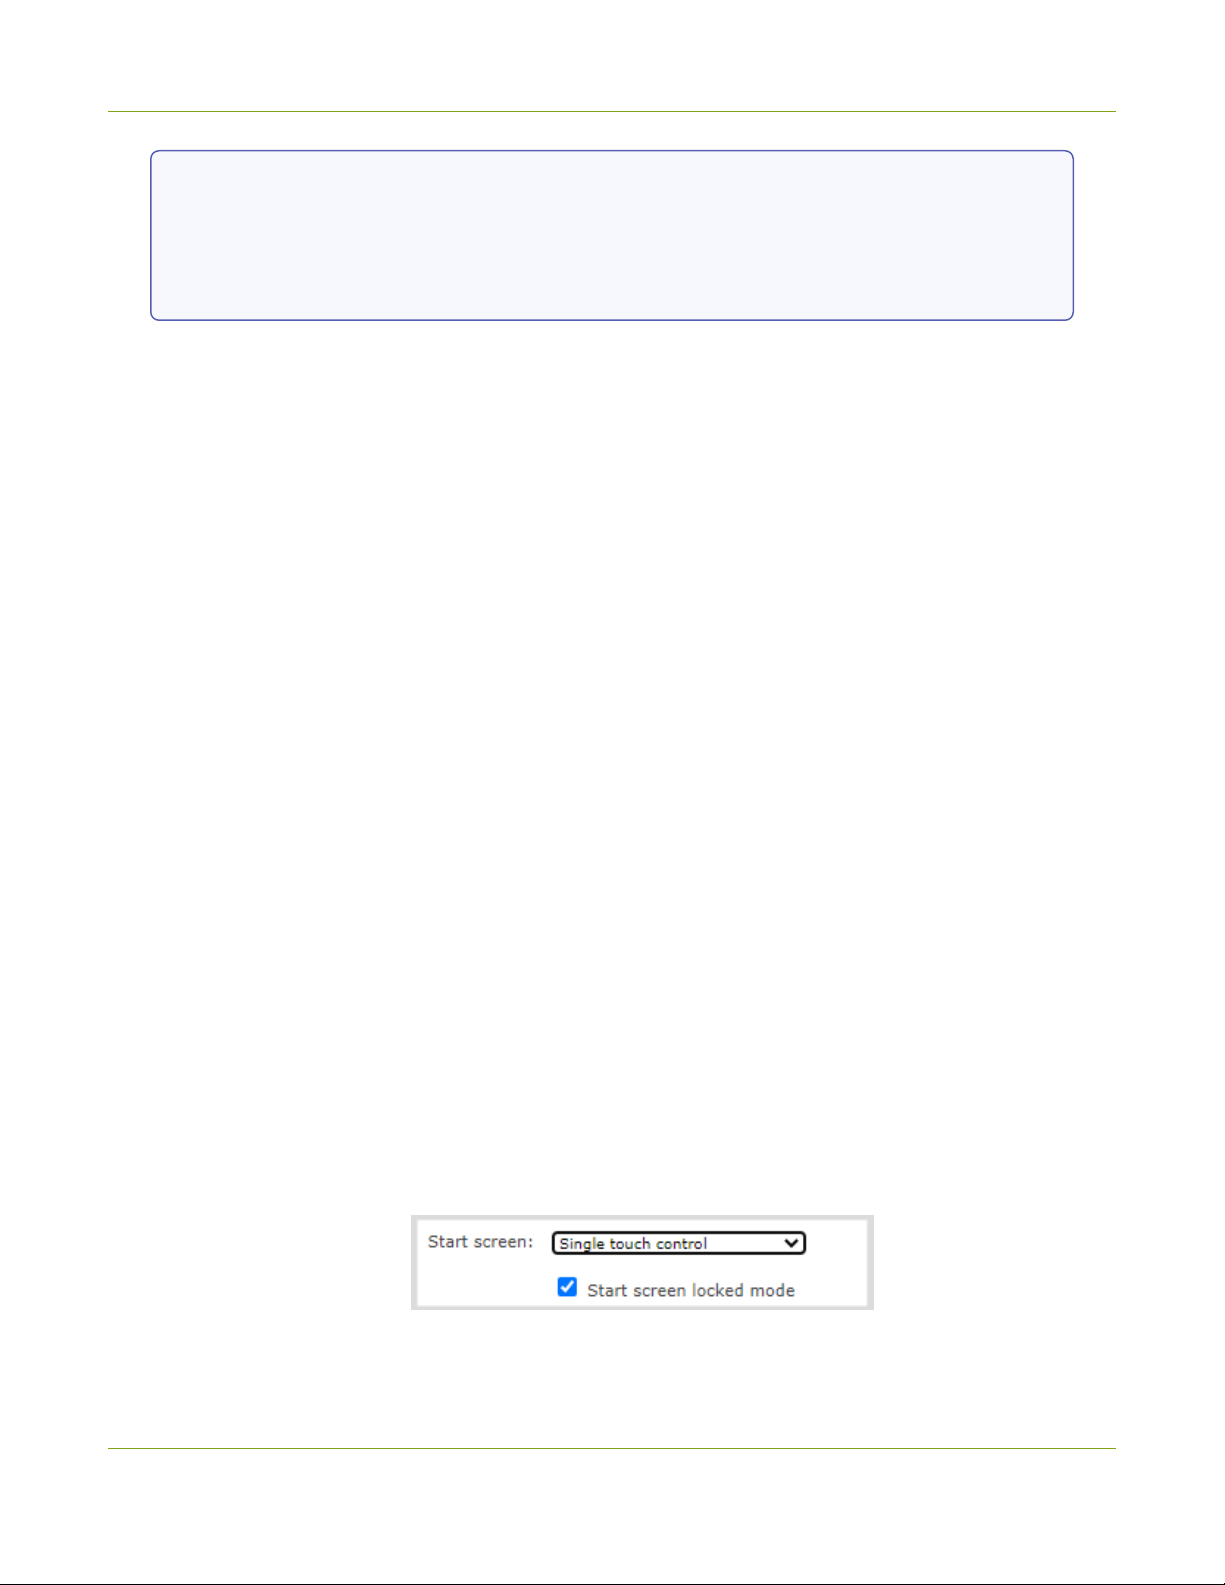
Pearl Mini User Guide Customize the Single Touch control display
In this example, after pressing Start, both recorders/channels are recording properly but the one
channel configured for streaming is not streaming correctly.
To troubleshoot, investigate each channel's streaming configuration page using the Admin panel
and identify which channel isn't streaming. Then correct any streaming configuration errors.
See Specify channels for Single Touch streaming and Specify channels and recorders for Single Touch
recording for more information about configuring channels and recorders for Single Touch control.
Customize the Single Touch control display
You can use the Admin panel to customize how Single Touch control is displayed on the touch screen. The start
screen options for Single Touch control are:
l
Default: The Single Touch control screen is accessed by tapping the One Touch control icon at the
bottom of the touch screen.
l
Single touch control: The Single Touch control start screen displays automatically on the touch screen
when you power on the Pearl device. Operators can still navigate to other screens from the Single Touch
control screen by tapping the Home icon in the top right corner of the screen.
l
Start screen locked mode: The Single Touch control start screen is the only screen that displays on the
touch screen. Operators cannot navigate to other screens from the Single Touch control screen.
If no 4-digit PIN set when the start screen is in locked mode, you can access the Single Touch control start
screen right away to start/stop streaming and recording. However, you cannot access any other screens using
the touch screen.
If you set a 4-digit PIN when the start screen is in locked mode, a lock appears in the top right of the start screen.
You must enter the PIN to unlock the Single Touch control start screen and access the other screens using the
touch screen. When you return to the Single Touch control start screen, the Pearl device automatically locks
itself and you must re-enter the 4-digit PIN to unlock the touch screen.
Configure how the Single Touch control screen displays on the touch screen using the
Admin panel
1. Login to the Admin panel as admin, see Connect to the Admin panel.
2. From the Configuration menu, select Touch Screen. The Touch screen configuration page opens.
3. From the Start screen drop-down menu, select Single Touch control.
4. (Optional) Check Start screen locked mode and set a 4-digit PIN. For more information about setting a
PIN, see Set a PIN security code.
5. Click Apply.
BETA DRAFT - 42
Page 54
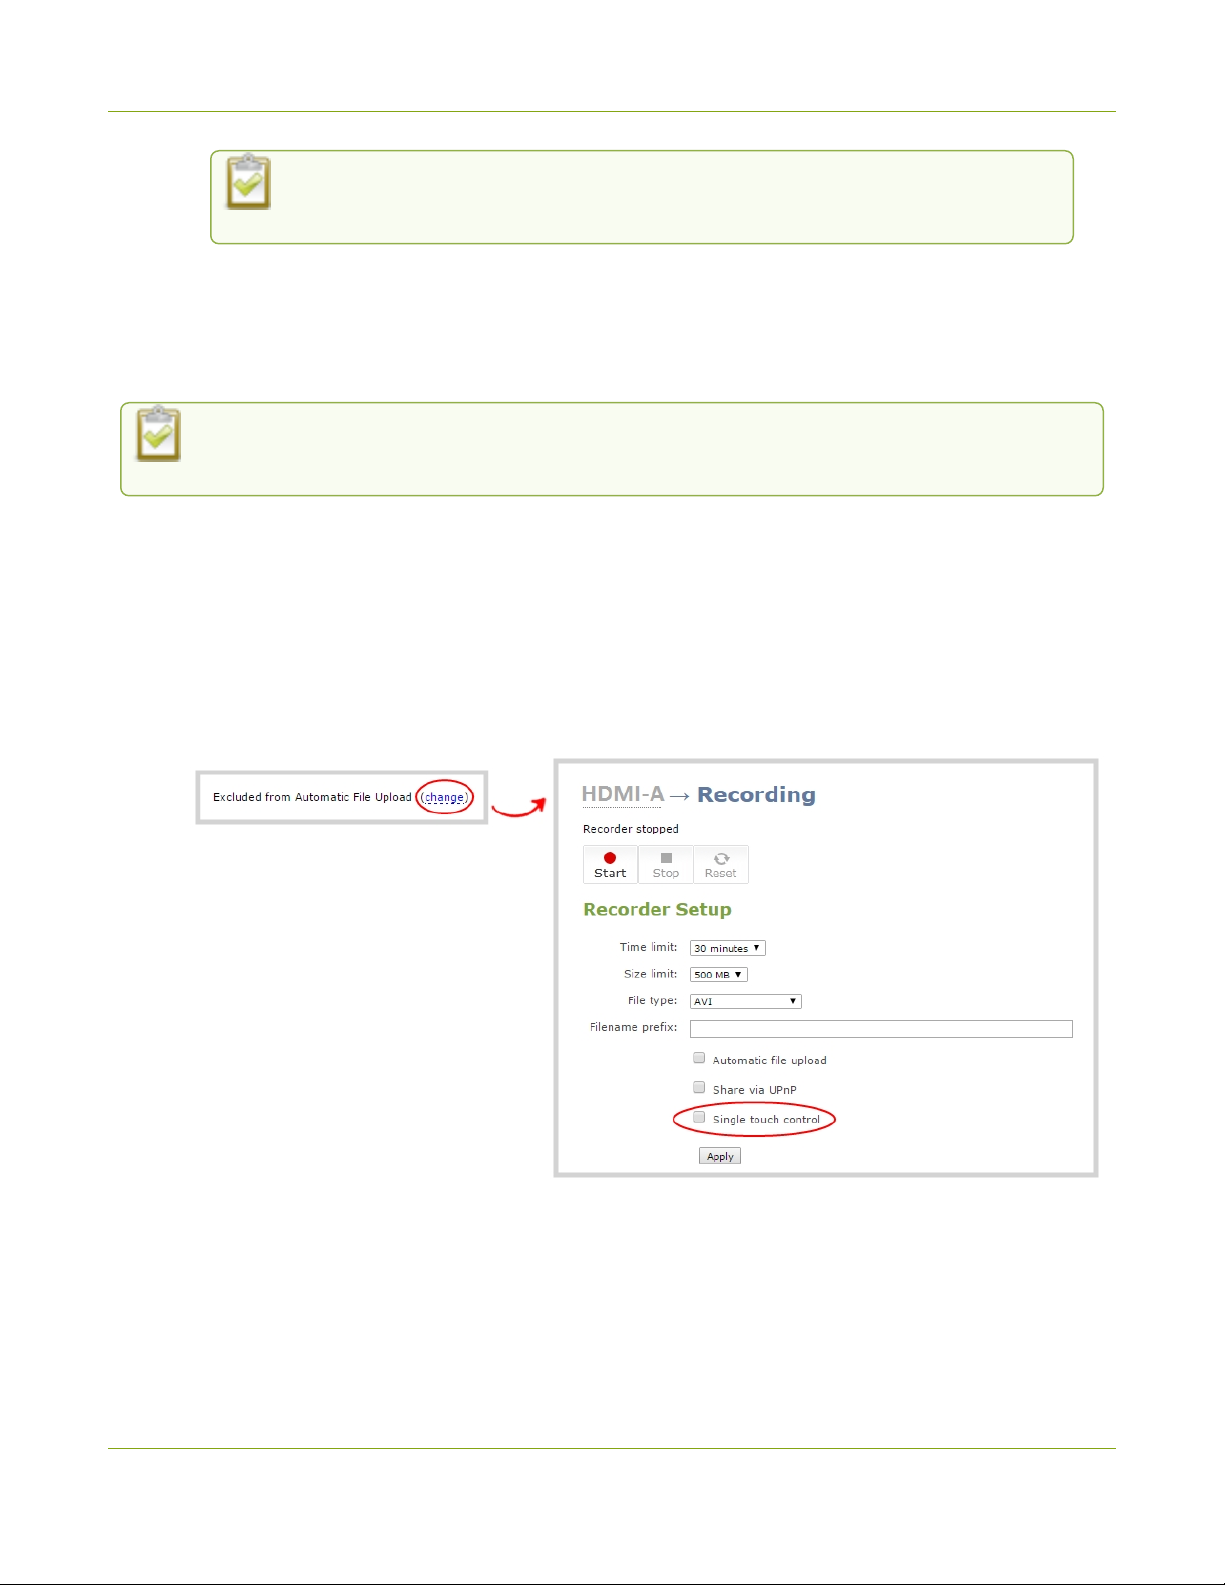
Pearl Mini User Guide
If you chose Single Touch control, the touch screen automatically refreshes to display
the Single Touch control screen.
Specify channels and recorders for Single Touch
Specify channels and recorders for Single Touch recording
All channels and recorders are enabled for Single Touch recording control by default. You can enable and
disable one touch recording for individual channels and recorders using the Admin panel.
To learn how to configure your channels for recording, see Record . To learn how to configure
recorders, see Recorders
Enable or disable Single Touch control for a channel
1. Login to the Admin panel as admin, see Connect to the Admin panel.
2. From the Channels menu, select the channel you want and click Recording. The Recording page opens.
recording
3. Select change, and then check Single touch control on the options page to enable the channel for One
Touch control. Uncheck the check box if you don't want to include that channel for One Touch control.
Then click Apply when you're done.
Enable Single Touch control for a recorder using the Admin panel
1. Log in to the Admin panel as admin, see Connect to the Admin panel.
2. To enable or disable Single touch control for a recorder.
3. From the Recorders menu, select the recorder you want. The Recorder Setup page opens.
BETA DRAFT - 43
Page 55
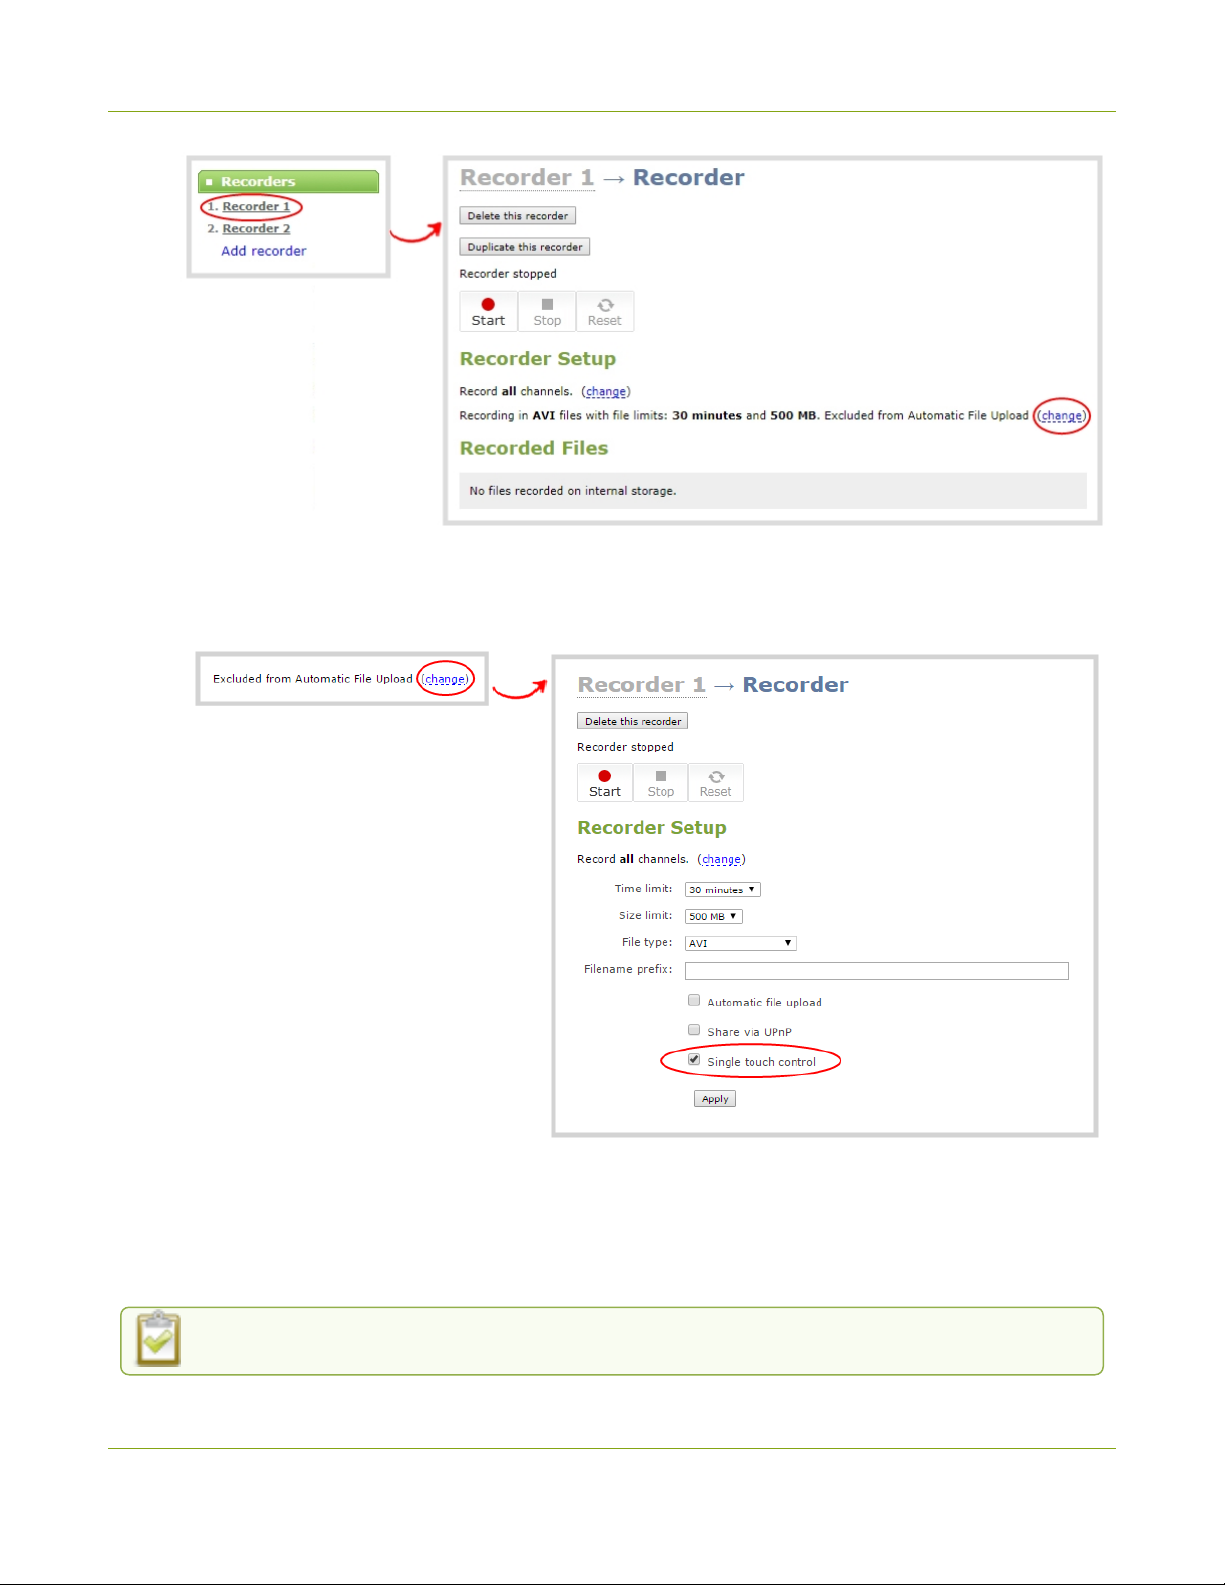
Pearl Mini User Guide Specify channels for Single Touch streaming
4. Select change, and then check Single touch control on the options page to enable the recorder for Single
Touch control. Uncheck Single touch control if you don't want to include that recorder for Single Touch
control. Then click Apply when you're done.
Specify channels for Single Touch streaming
Channels are not enabled for Single Touch streaming by default. You can enable and disable one touch
streaming control for individual channels using the Admin panel.
To learn how to configure your channels for streaming, see Stream.
BETA DRAFT - 44
Page 56
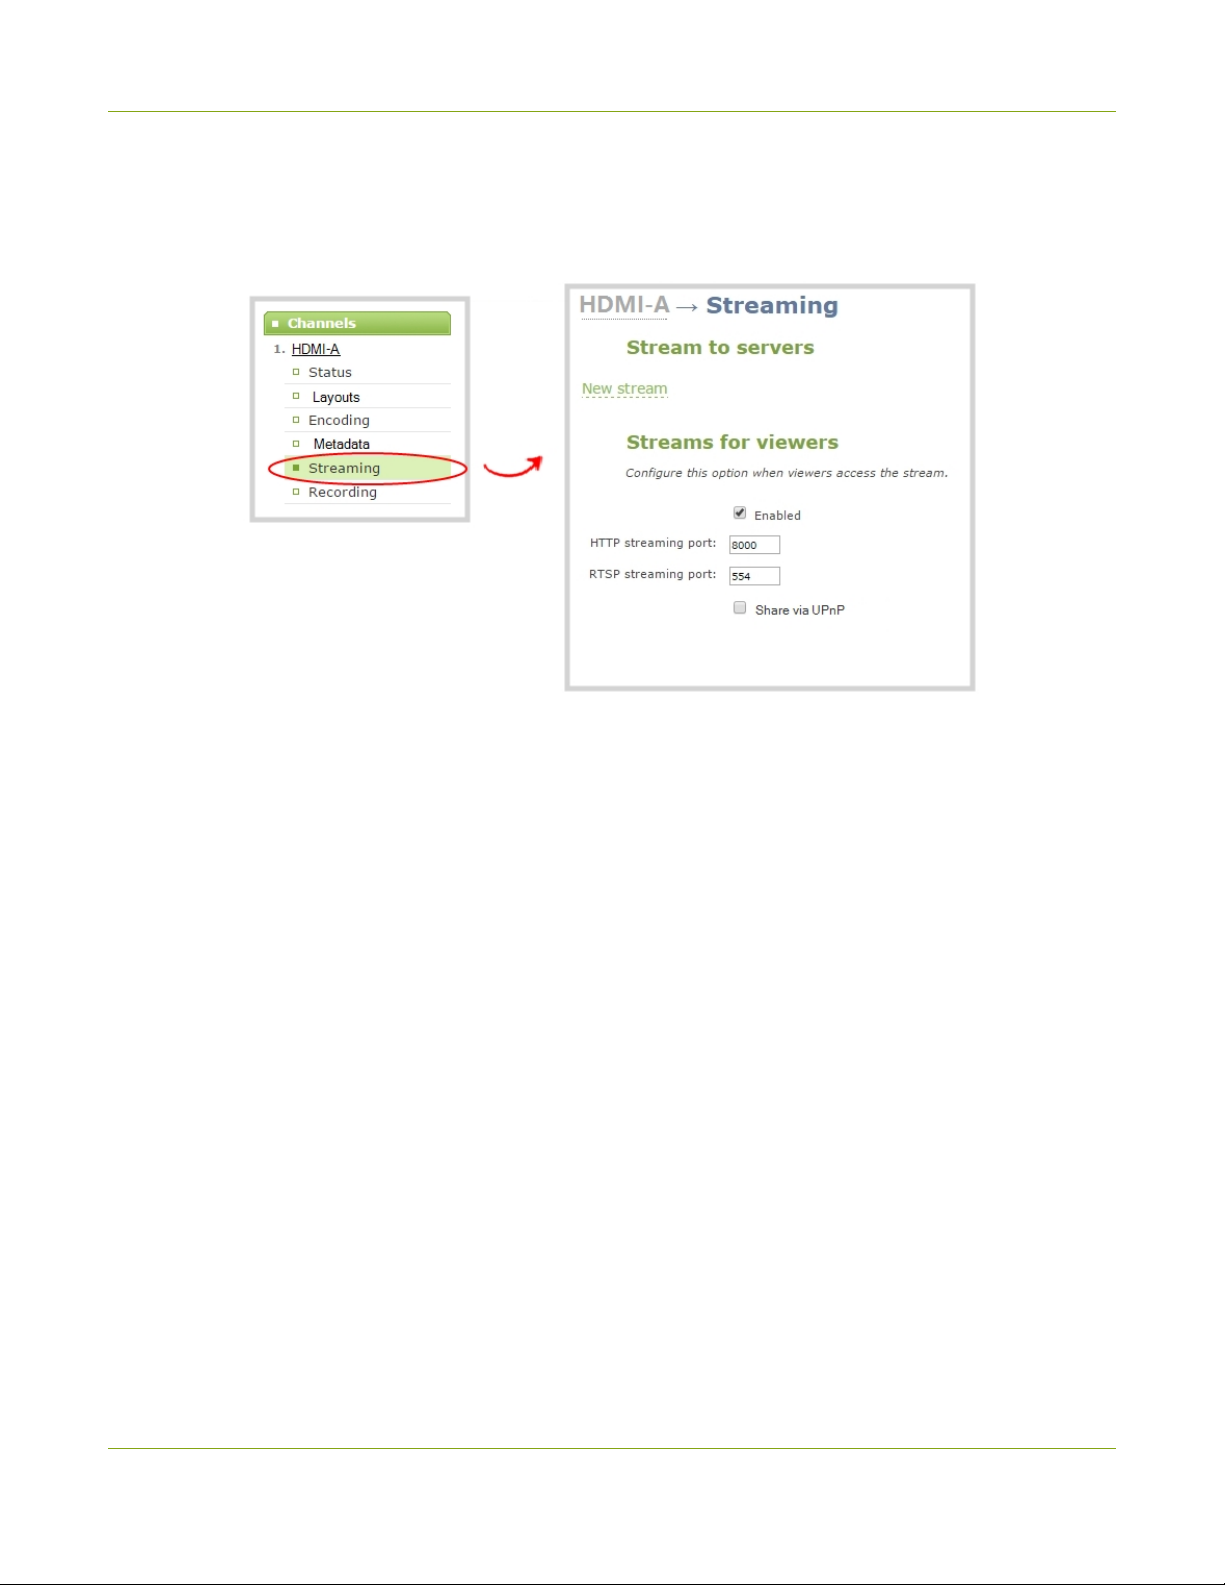
Pearl Mini User Guide CMS event controls using the touch screen
Specify channels for Single Touch streaming using the Admin panel
1. Login to the Admin panel as admin, see Connect to the Admin panel.
2. From the Channels menu, select a channel and click Streaming. The Streaming page opens.
3. Click New stream and select a publishing method, for example, RTMP push.
4. Check Single touch control to enable this channel's stream for Single Touch control. Uncheck Single
touch control if you don't want to include this channel's stream for Single Touch control. Then click Apply.
CMS event controls using the touch screen
Pearl devices start recording scheduled events automatically; however, you can use the touch screen to start
and stop scheduled events sooner. The touch screen can also be used to authenticate with your Content
Management System (CMS) to create unscheduled ad hoc recordings and webcasts. For detailed instructions,
see:
l
Stop/start scheduled CMS events using the touch screen
l
Extend or pause CMS recordings and webcasts
l
Create ad hoc events using the touch screen
l
Set up a CMS start screen
For important considerations before recording or webcasting to a CMS, see Integration.
BETA DRAFT - 45
Page 57
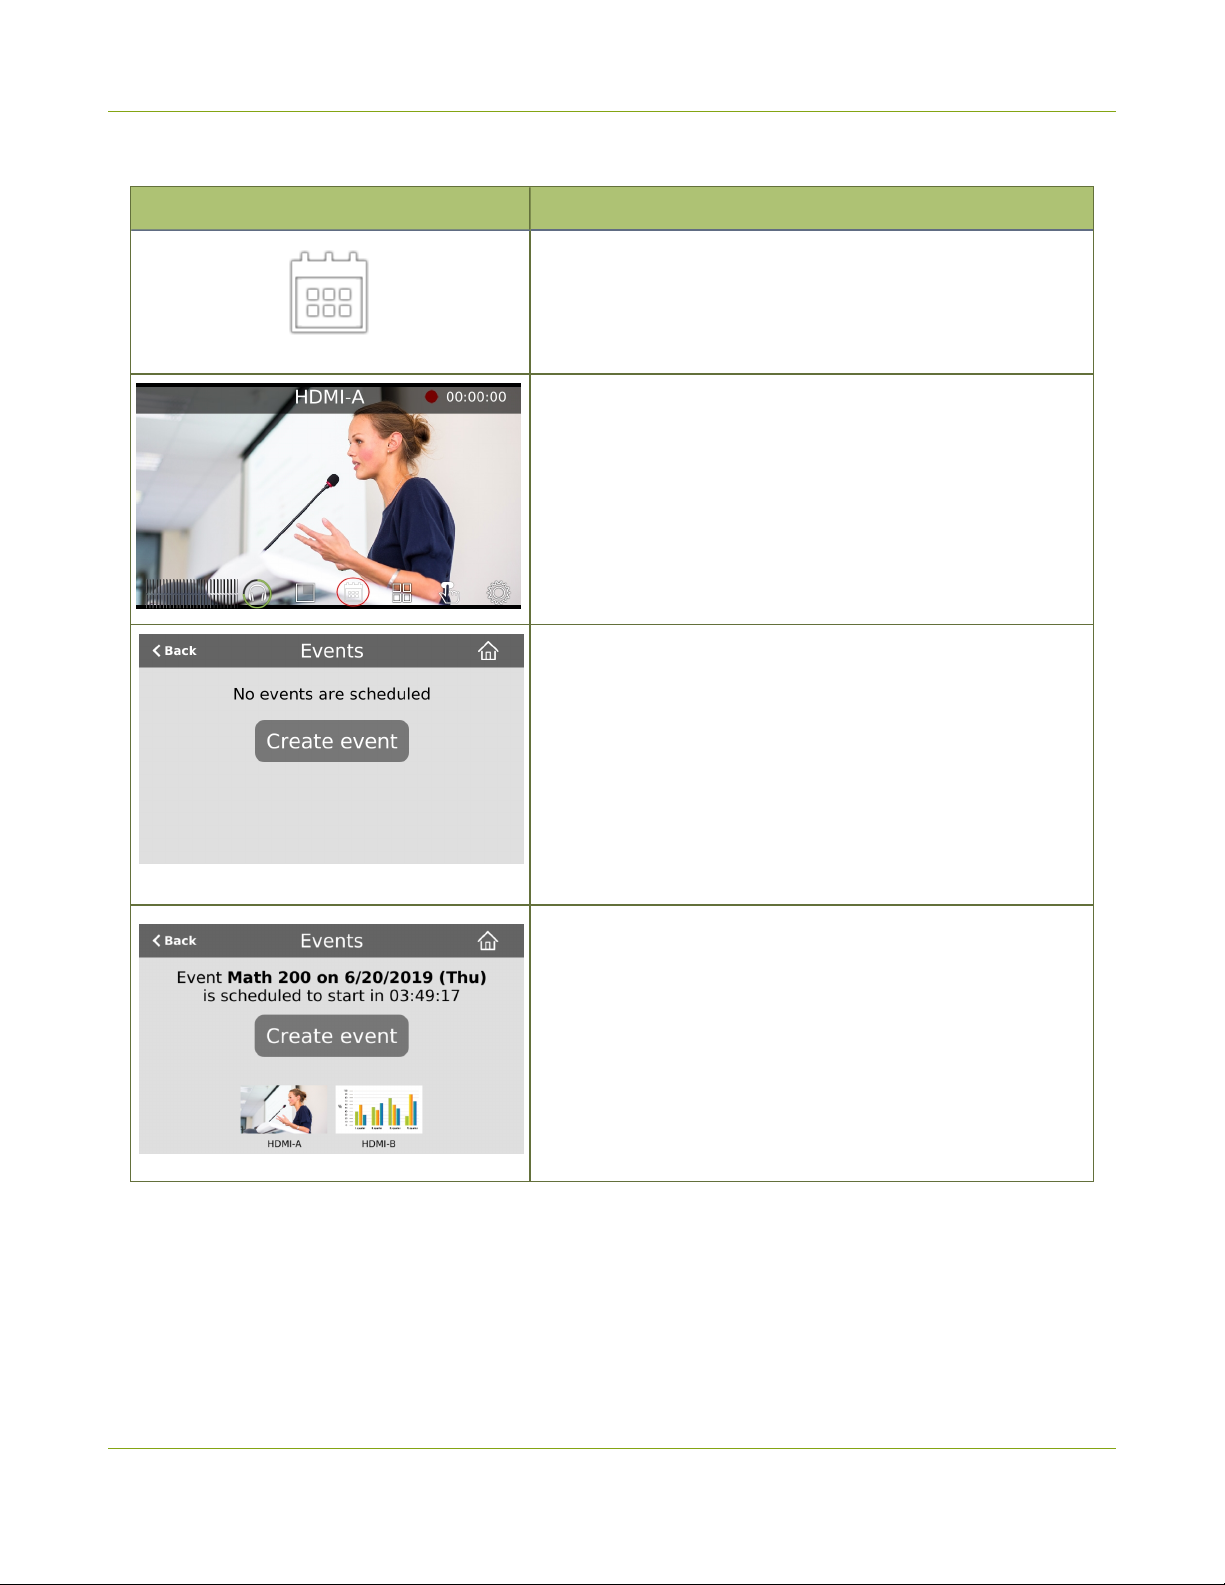
Pearl Mini User Guide CMS event controls using the touch screen
Table 10 Events screens for scheduled Kaltura, Panopto, and YuJa events
Events screens Description
The Calendar icon appears on the touch screen when CMS is
setup using the Admin panel.
Tap the calendar icon to display the Events screen.
For example: From the Channel view, the calendar icon
appears along the bottom of the screen.
This Events screen displays when no scheduled events are
configured.
To create an ad hoc recording or webcast, tap Create event
and authenticate using your CMS credentials.
Note: Pearl devices must be registered with the CMS to
create ad hoc events.
This Events screen displays when a scheduled event is
configured and it's 30 minutes or more before the event start
time. Notice that this is a recurring event with the date
appended to the event name.
To create an ad hoc recording or webcast, tap Create event
and authenticate using your CMS credentials.
Tap the channel thumbnail to go to the Channel view and see
a live preview of that channel with an audio VU meter for
confidence monitoring.
BETA DRAFT - 46
Page 58
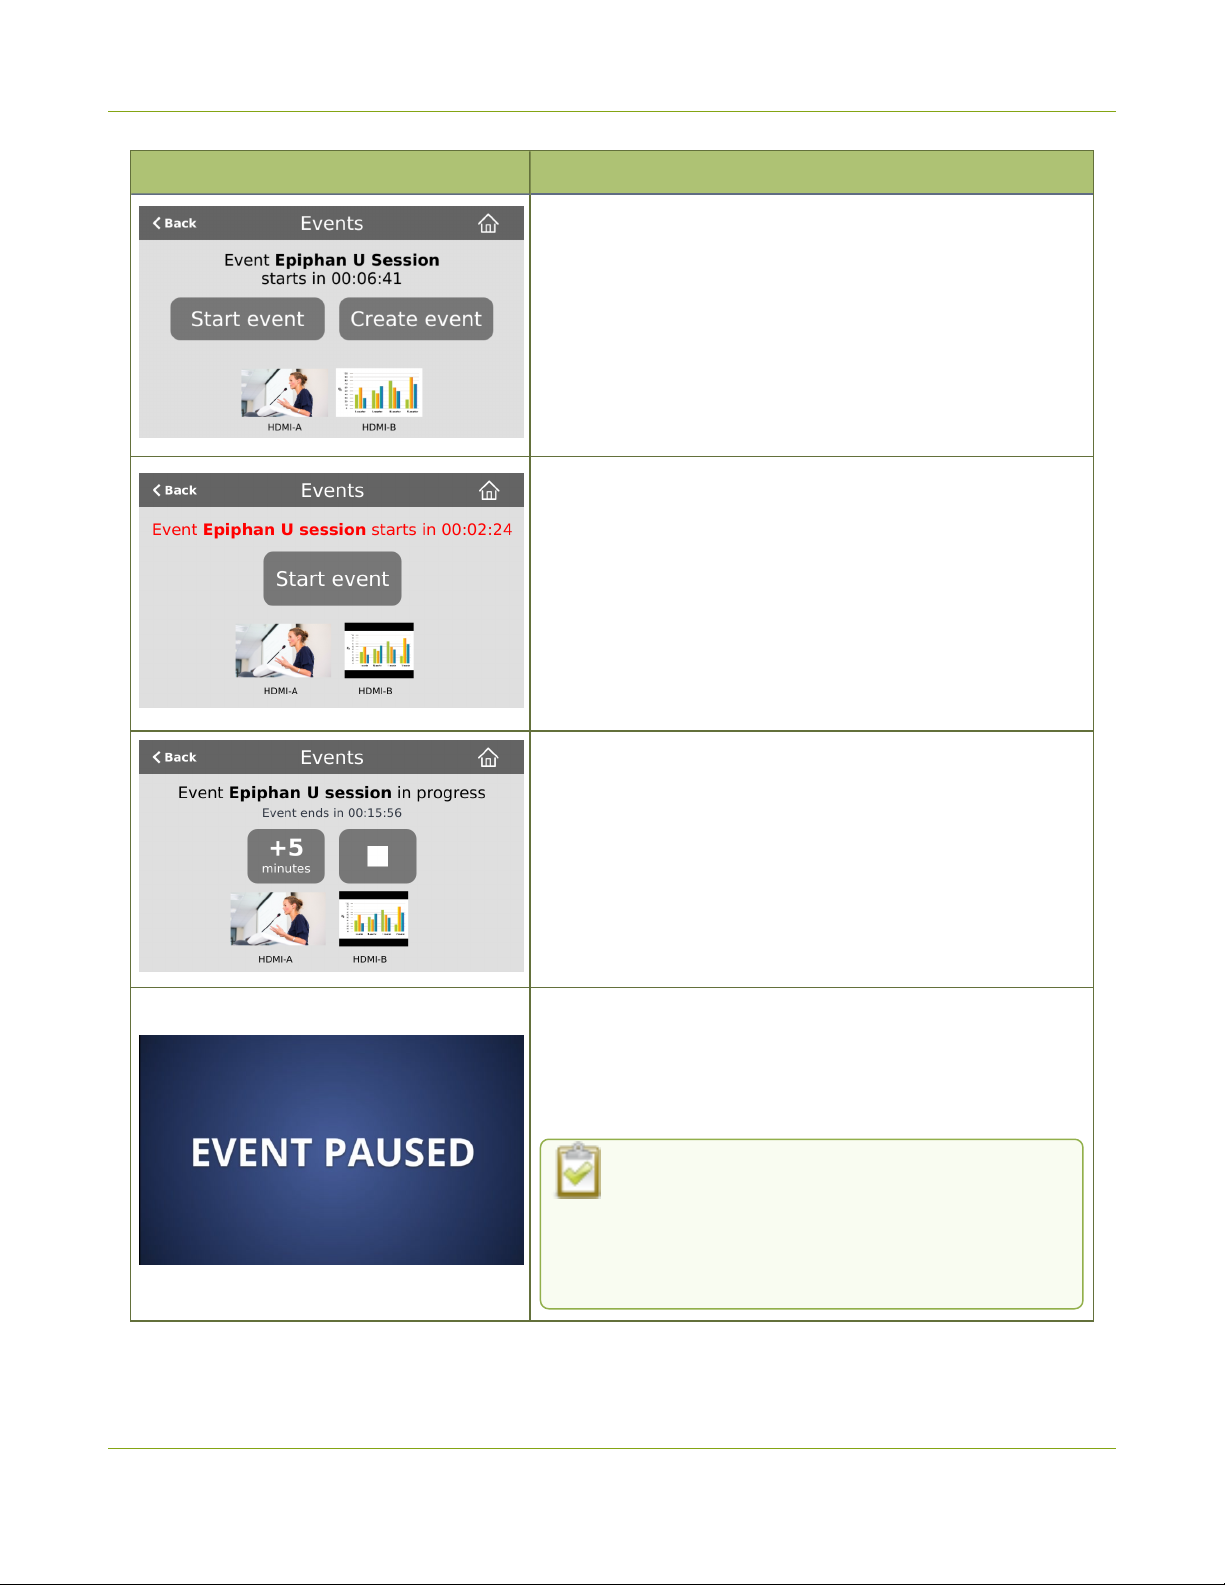
Pearl Mini User Guide CMS event controls using the touch screen
Events screens Description
This Events screen displays when a scheduled event is set to
start within 30 minutes.
To start the scheduled event early, tap Start event.
To create an ad hoc recording or webcast, tap Create event
and authenticate using your CMS credentials.
Note: Scheduled events override ad hoc events. The Pearl
device stops the ad hoc event and starts the scheduled event
when it's time for the scheduled event to start.
This Events screen displays when a scheduled event is set to
start in five minutes or less.
To start the scheduled event early, tap Start event.
Note: For Panopto, the video quality you select for the session
overrides the channel encoding settings in the Pearl device.
Notice the lower resolution of HDMI-B for the slides with the
inserted black bars. Video quality encoding settings applied to
the channel by Panopto persist for that channel after the
scheduled event ends.
This Events screen displays while a scheduled or an ad hoc
session is in progress. For Panopto, and YuJa, events an
additional pause button lets you pause and resume active
recordings and webcasts.
To stop the event early, tap the square stop button.
To extend the event, tap +5 minutes. The extend event button
can be setup to add 5, 10, or 15 minutes each time it is
selected. See your Pearl device administrator.
If configured, the Pearl device mutes the audio and displays
an event paused image when a Panopto CMS recording or
webcasting event is paused. For more information about
pausing Panopto events, see Extend or pause CMS
recordings and webcasts.
If mute on pause and the on-screen pause
illustration are not enabled on the Pearl device,
your viewers watching the stream can see and
hear the live webcast while the event is paused,
as well as in the recording in Panopto.
Authenticating using the touch screen lets you create unscheduled ad hoc recordings and webcasts.
BETA DRAFT - 47
Page 59
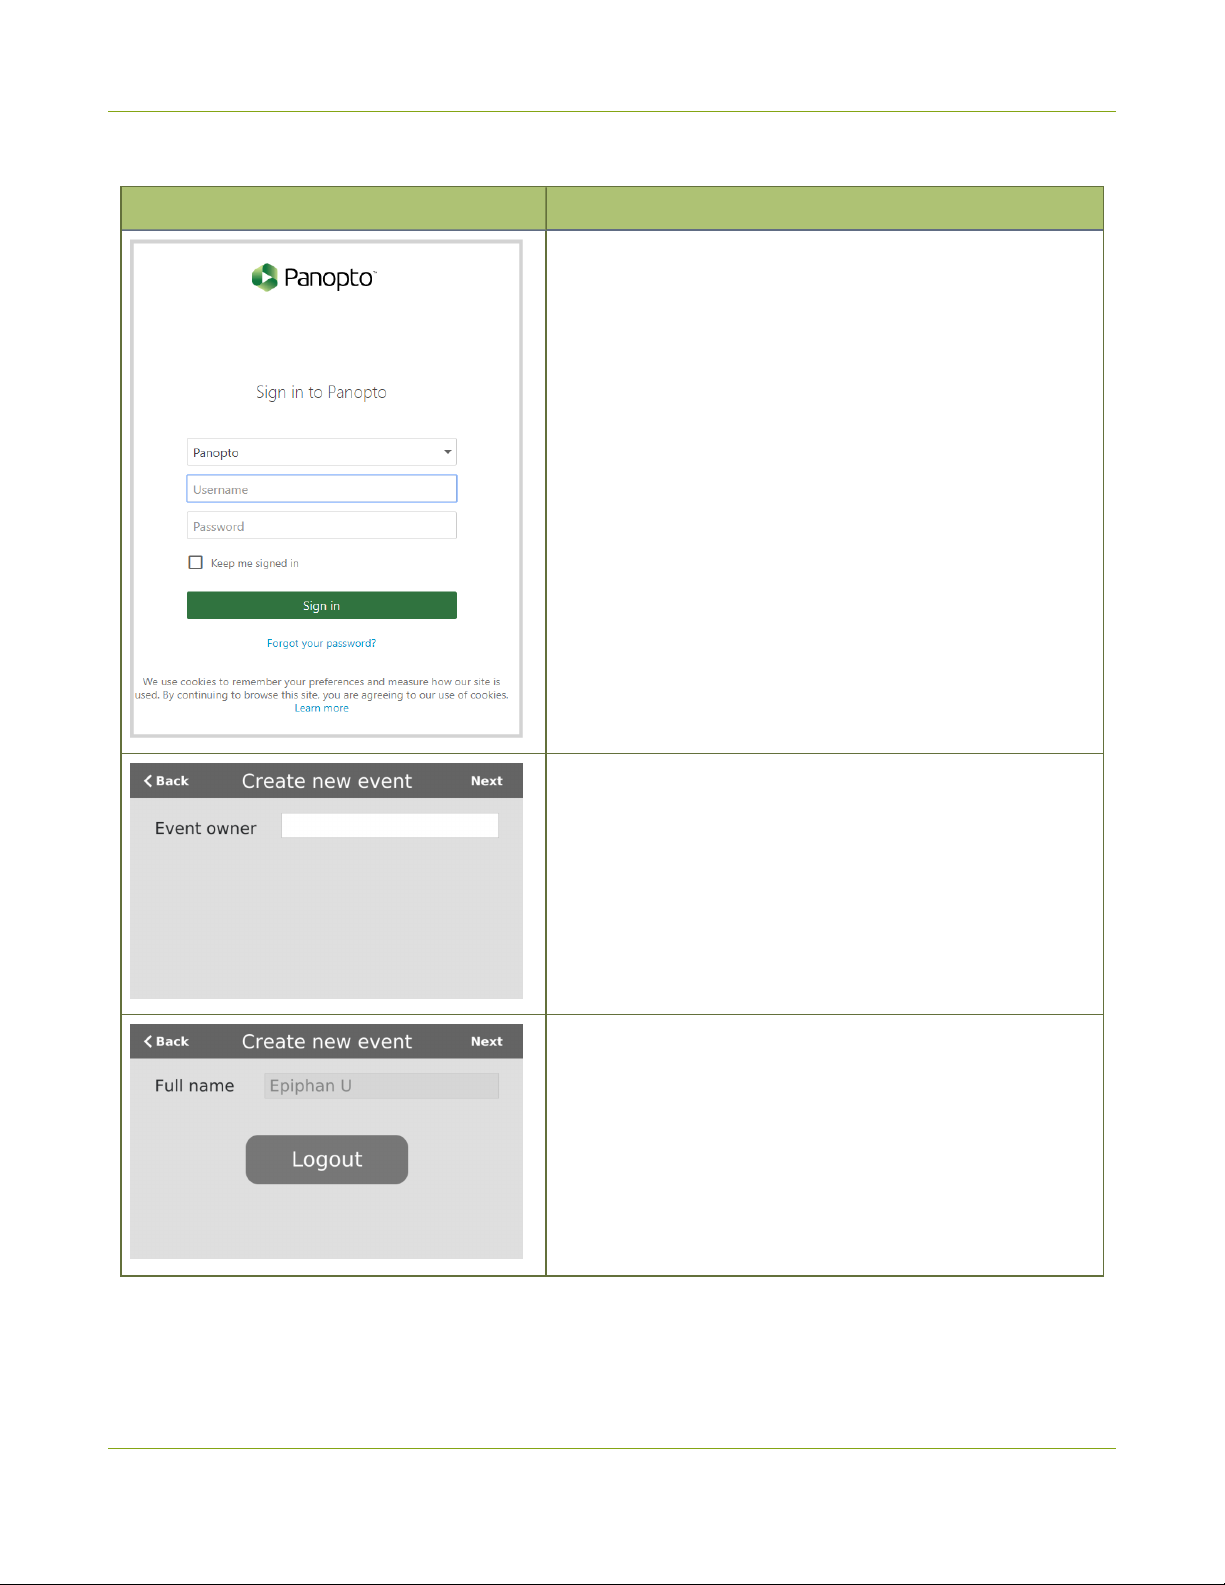
Pearl Mini User Guide CMS event controls using the touch screen
Table 11 Unscheduled ad hoc event screens
Unscheduled ad hoc event screens Description
Panopto login screen:
When Pearl Mini is registered with Panopto, this
authentication screen appears when you tap Create event
from the Events screen.
Tap in a field and enter your credentials, then tap Sign in.
TIP: To check the Keep me signed in check box using the
built-in keyboard or an externally connected keyboard, press
the space bar.
Kaltura login screen:
When Pearl Mini is registered with Kaltura, this authentication
screen appears when you tap Create event from the Events
screen.
Tap in the Event owner field and enter your Kaltura user ID or
a valid Kaltura email address as your login credentials, then
tap Next.
This screen displays after a successful authentication.
To create an ad hoc event, tap Next to go to the next screen
and set the event title and details.
Tapping Logout logs you out of your CMS session and you
return to the Events screen.
BETA DRAFT - 48
Page 60
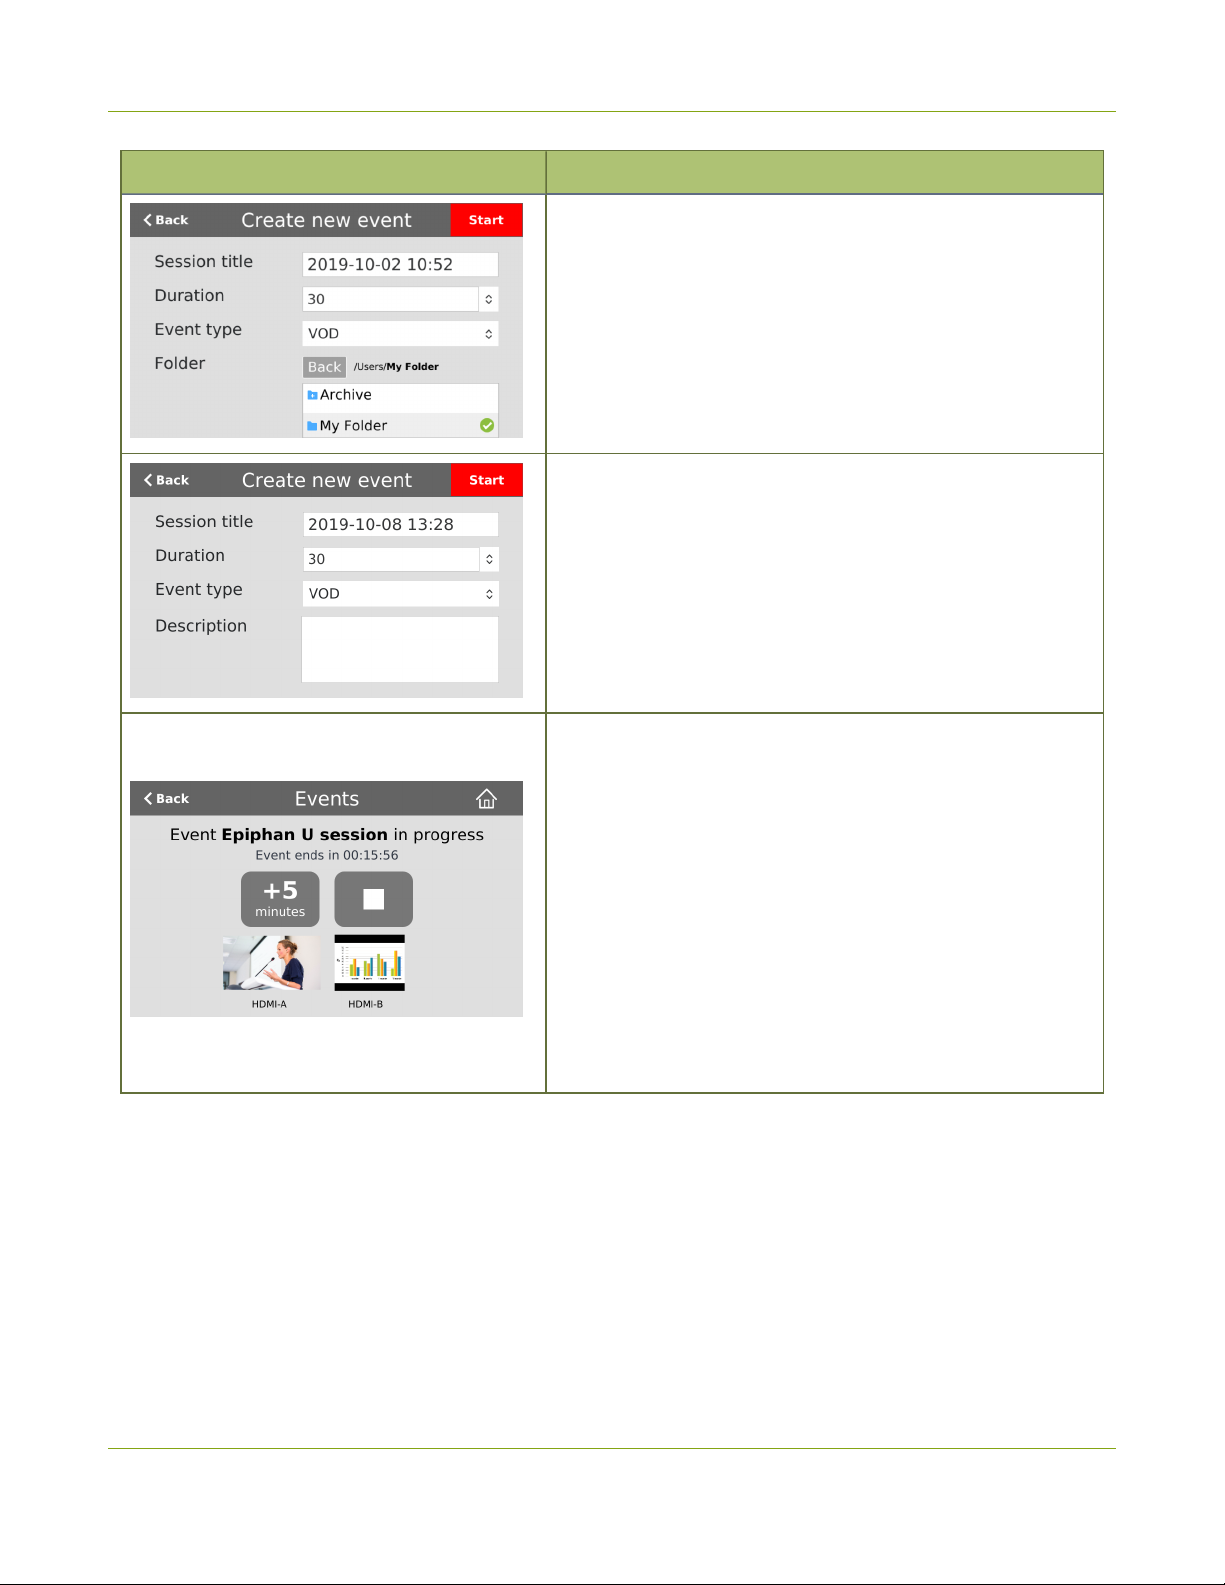
Pearl Mini User Guide Configure the touch screen
Unscheduled ad hoc event screens Description
Now enter your event details.
For Panopto, you can change the ad hoc session title,
duration, choose the type of event (VOD or Live Stream), and
select the folder in Panopto to upload the file. My Folder is
the default. Swipe to scroll down the list. Double tap and use
the Back button to navigate nested folders. Tap Start when
you're ready to start the ad hoc event.
For Kaltura, you can change the ad hoc session title,
duration, choose the type of event (VOD, Live Stream, or
VOD + Live Stream), and add a description. Swipe to scroll
down to add Kaltura categories and tags. Tap Start when
you're ready to start the ad hoc event.
This Events screen displays after you have started the ad hoc
event.
To stop the ad hoc event, tap the square stop button.
To extend the event, tap +5 minutes. The extend event
button can be setup to add 5, 10, or 15 minutes each time it is
selected. Events cannot be extended beyond the start of the
next scheduled event.
For Panopto events, an additional pause button lets you
pause and resume active recordings and webcasts.
Note: To log out after stopping an ad hoc event, tap Create
event from the Events screen and re-enter your User ID to
return to this logout screen.
Configure the touch screen
The touch screen on Pearl-2 and Pearl Mini is enabled by default and all its features are available. You can
disable the entire screen or some of its features using the Admin panel. For information about how to connect to
and use the Admin panel, see The Admin panel.
l
Enable display - Enable or disable the Pearl device from displaying anything on the touch screen.
l
Show preview - Hide or show the channel previews on the touch screen.
BETA DRAFT - 49
Page 61

Pearl Mini User Guide Configure the touch screen
l
Show system status - Disable or enable the system status screen. If disabled, system information like
device IP address will not be available from the touch screen.
l
Allow control for network settings, configuration presets, Epiphan Edge, output port and SD card Enable or disable the ability to:
l
modify network settings
l
modify configuration presets
l
Enable/disable Epiphan Edge access
l
format output port and SDcard.
l
If this check box is cleared and Show SystemStatus is selected, users see aniicon instead of the
configuration gears icon in the lower right corner of the touch screen.
l
Allow control for recording, streaming, and layout switching - Enable or disable control for recording,
streaming and layout switching. Show preview must be enabled for the touch screen for recording,
streaming and live switching control to work.
l
Single touch control - Select from the following:
l
Default - The Single Touch control screen is accessed by tapping the One Touch control icon at
the bottom of the touch screen.
l
Start screen - The Single Touch control start screen displays automatically on the touch screen
when you power on the Pearl device. Operators can still navigate to other screens from the Single
Touch control screen by tapping the Home icon in the top right corner of the screen.
l
Locked - The Single Touch control start screen is the only screen that displays on the touch screen
of the Pearl device. Operators cannot navigate to other screens from the Single Touch control
screen.
l
Orientation - Rotate the image displayed on the touch screen of the Pearl Mini 180 degrees. Text will
appear upside down and backwards on the touch screen unless you physically rotate the Pearl Mini
device. This display orientation setting does not affect the video sent to the video output port, or the video
being streamed or recorded.
l
Timeout - Set the touch screen to shut off after a given amount of time. To re-enable the touch screen
after it times out and shuts off, simply tap anywhere on the screen.
l
PIN - Enable a 4-digit pin to lock the screen of the Pearl device.
Topics include:
l
Disable or enablethe touch screen
l
Hide or show channel previews on the touch screen
l
Disable or enable the system status screen
l
Disable or enable configuration using the touch screen
l
Disable or enable recording, streaming, and switching from the touch screen
l
Rotate the Pearl Mini's touch screen orientation
l
Set the Pearl device screen timeout
l
Set a PIN security code
BETA DRAFT - 50
Page 62
Pearl Mini User Guide Disable or enablethe touch screen
Disable or enablethe touch screen
You can enable or disable Pearl devices from displaying anything on the touch screen. The touch screen
remains touch-sensitive even when the display is disabled.
Disable or enable the touch screen display using the Admin panel
1. Login to the Admin panel as admin, see Connect to the Admin panel.
2. From the Configuration menu, click Touch Screen. The touch screen configuration page opens.
3. Uncheck Enable display to disable the touch screen display. Check Enable display if you want the touch
screen display enabled.
4. Click Apply.
Hide or show channel previews on the touch screen
Previews of your configured channels display on the touch screen by default. You can disable channel previews
using the Admin panel.
A message displays on the touch screen when channel previews are disabled. If you have configured system
status or settings and configuration preset changes to be allowed, then tapping anywhere on the touch screen
opens the settings page.
Hide or show the channel previews on the touch screen using the Admin panel
1. Login to the Admin panel as admin, see Connect to the Admin panel.
2. From the Configuration menu, click Touch Screen. The touch screen configuration page opens.
3. Uncheck Show preview to disable channel previews from displaying on the touch screen. Check Show
preview if you want to enable channel previews on the touch screen.
4. Click Apply.
Disable or enable the system status screen
The system status screen displays network and system related information, such as the IP address needed to
access the Pearl device. You may not want this information visible on the touch screen after you've configured
BETA DRAFT - 51
Page 63
Pearl Mini User Guide Disable or enable configuration using the touch screen
the Pearl device. You can use the Admin panel to disable the system status screen from displaying on the touch
screen.
Disable or enable the system status screen from displaying on the touch screen
1. Login to the Admin panel as admin, see Connect to the Admin panel.
2. From the Configuration menu, click Touch Screen. The touch screen configuration page opens.
3. Uncheck Show system status to prevent the system status screen from opening on the touch screen.
Check Show system status if you want to enable the system status screen to open on the touch screen.
4. Click Apply.
Disable or enable configuration using the touch screen
You can apply configuration presets and configure network settings using the touch screen by default. You can
disable this ability using the Admin panel.
If configuration is blocked and system status is permitted, touch screen users see aniicon instead of the
configuration gears icon in the lower right corner of the touch screen.
Disable or enable configuration using the touch screen
1. Login to the Admin panel as admin, see Connect to the Admin panel.
2. Select the Touch Screen link in the Configuration menu. The touch screen configuration page opens.
3. Uncheck Allow settings and configuration preset changes to disable configuration from the touch
screen. Check the check box if you want to enable configuration from the touch screen.
4. Click Apply.
Disable or enable recording, streaming, and switching from the touch screen
Recording, streaming, and live switching control using the touch screen is enabled by default. You can disable
this function using the Admin panel to stop users from switching layouts and from starting or stopping live
streams and recordings.
Channel preview must be enabled for the touch screen for recording, streaming, and live switching
control to work. See Hide or show channel previews on the touch screen
Disable or enable recording, streaming, and switching control using the touch screen
1. Login to the Admin panel as admin, see Connect to the Admin panel.
2. From the Configuration menu, click Touch Screen. The touch screen configuration page opens.
3. Uncheck Allow start/stop recording and streaming to disable recording, streaming, and live switching
control from the touch screen. Check the check box to enable recording, streaming, and live switching
BETA DRAFT - 52
Page 64

Pearl Mini User Guide Rotate the Pearl Mini's touch screen orientation
control.
4. Click Apply.
Rotate the Pearl Mini's touch screen orientation
Using the Admin panel, you can rotate the image displayed on the touch screen of Pearl Mini 180 degrees. Text
will appear upside down and backwards on the touch screen unless you physically rotate the Pearl Mini device.
This display orientation setting does not affect the video sent to the video output port, or the video being
streamed or recorded. To flip the video at the output port, see Mirror the video output port display.
Rotate the touch screen 180° using the Admin panel
1. Login to the Admin panel as admin, see Connect to the Admin panel.
2. From the Configuration menu, select Touch Screen. The Touch screen configuration page opens.
3. From the Orientation drop-down menu, select 180° and then click Apply.
Set the Pearl device screen timeout
Initially, the Pearl device screen is always on for easy monitoring. However, you can set the screen to shut off
after a given amount of time. To re-enable the screen after it times out and shuts off:
l
Tap anywhere on the screen for Pearl-2 or Pearl Mini.
l
If the start screen is not set to locked mode and a screen timeout occurs, tapping the touch screen
returns you to the last screen you were on before the timeout occurred.
l
If you set a 4-digit PIN when the start screen is in locked mode, a lock appears in the top right of the
start screen after a timeout. You must enter the PIN to unlock the start screen for access to the
touch screen.
l
.
Set the screen timeout using the Admin panel
1. Log in to the Admin panel as admin, see Connect to the Admin panel.
2. From the Configuration menu, select Touch Screen (Front Screen for Pearl Nano). The Touch
screen/Front screen configuration page opens.
BETA DRAFT - 53
Page 65
Pearl Mini User Guide Set a PIN security code
3. Enter the number of seconds before the screen automatically shuts off in the Timeout field. A value of 0
keeps the screen on at all times when the system is on.
4. Click Apply.
Set a PIN security code
You can set a PIN code to protect the Pearl device screen from unauthorized access. By default, the PIN is not
set.
If a PIN is configured, users are prompted to enter the PIN code whenever:
l
You power on or restart the Pearl device.
l
The Pearl device recovers from timeout mode, see Set the Pearl device screen timeout.
If you set a PIN when the start screen is in locked mode, a lock appears in the top right of the start screen. You
must enter the PIN to unlock the start screen, access other screens, and use the Record and Stream Control
keys to start and/or stop recording or streaming. When you return to the Single Touch control or CMS start
screen, the Pearl device automatically locks itself and you must re-enter the PIN to unlock the screen.
If no PIN is set when the start screen is in locked mode, you can access the configured start screen right away.
Anyone can quickly start/stop streaming and recording if the Single Touch control start screen is configured, or
start/stop an event if the start screen is configured for Content Management System (CMS). However, no other
screens are accessible using the Pearl device screen.
Set a device screen PIN security code using the Admin panel
1. Log in to the Admin panel as admin, see Connect to the Admin panel.
2. From the Configuration menu, select Touch Screen (Front screen for Pearl Nano) . The Touch
screen/Front screen configuration page opens.
3. Enter a 4 to 12-digit PIN code in the PIN field, then click Apply. The Pearl Nano can only accept 4 digits.
Record the PIN code in a safe location for future reference. You need this PIN to access the
Pearl device screen.
The Admin panel
The Admin panel is used primarily to set up Pearl Mini and perform administrative tasks. Most tasks in this user
guide are performed using the Admin panel. This section contains what you need to get started using the Admin
panel.
Topics include:
l
About the Admin panel
l
Connect to the Admin panel
l
Enable local console access to the Admin panel
l
Connect using a DNS-based service discovery
BETA DRAFT - 54
Page 66

Pearl Mini User Guide About the Admin panel
l
Connect using persistent static IP address
l
Switching / mixing using the Admin panel
For information about remote access to the cloud version of the Admin panel, see Remote login to the Admin
panel and Epiphan Live.
For information about integrating Pearl Mini with Content Management Systems (CMSs) and related
administrator tasks, see Integration.
About the Admin panel
The Admin panel is a web-based user interface that's used primarily to set up your Pearl device and perform
administrative tasks.
BETA DRAFT - 55
Page 67
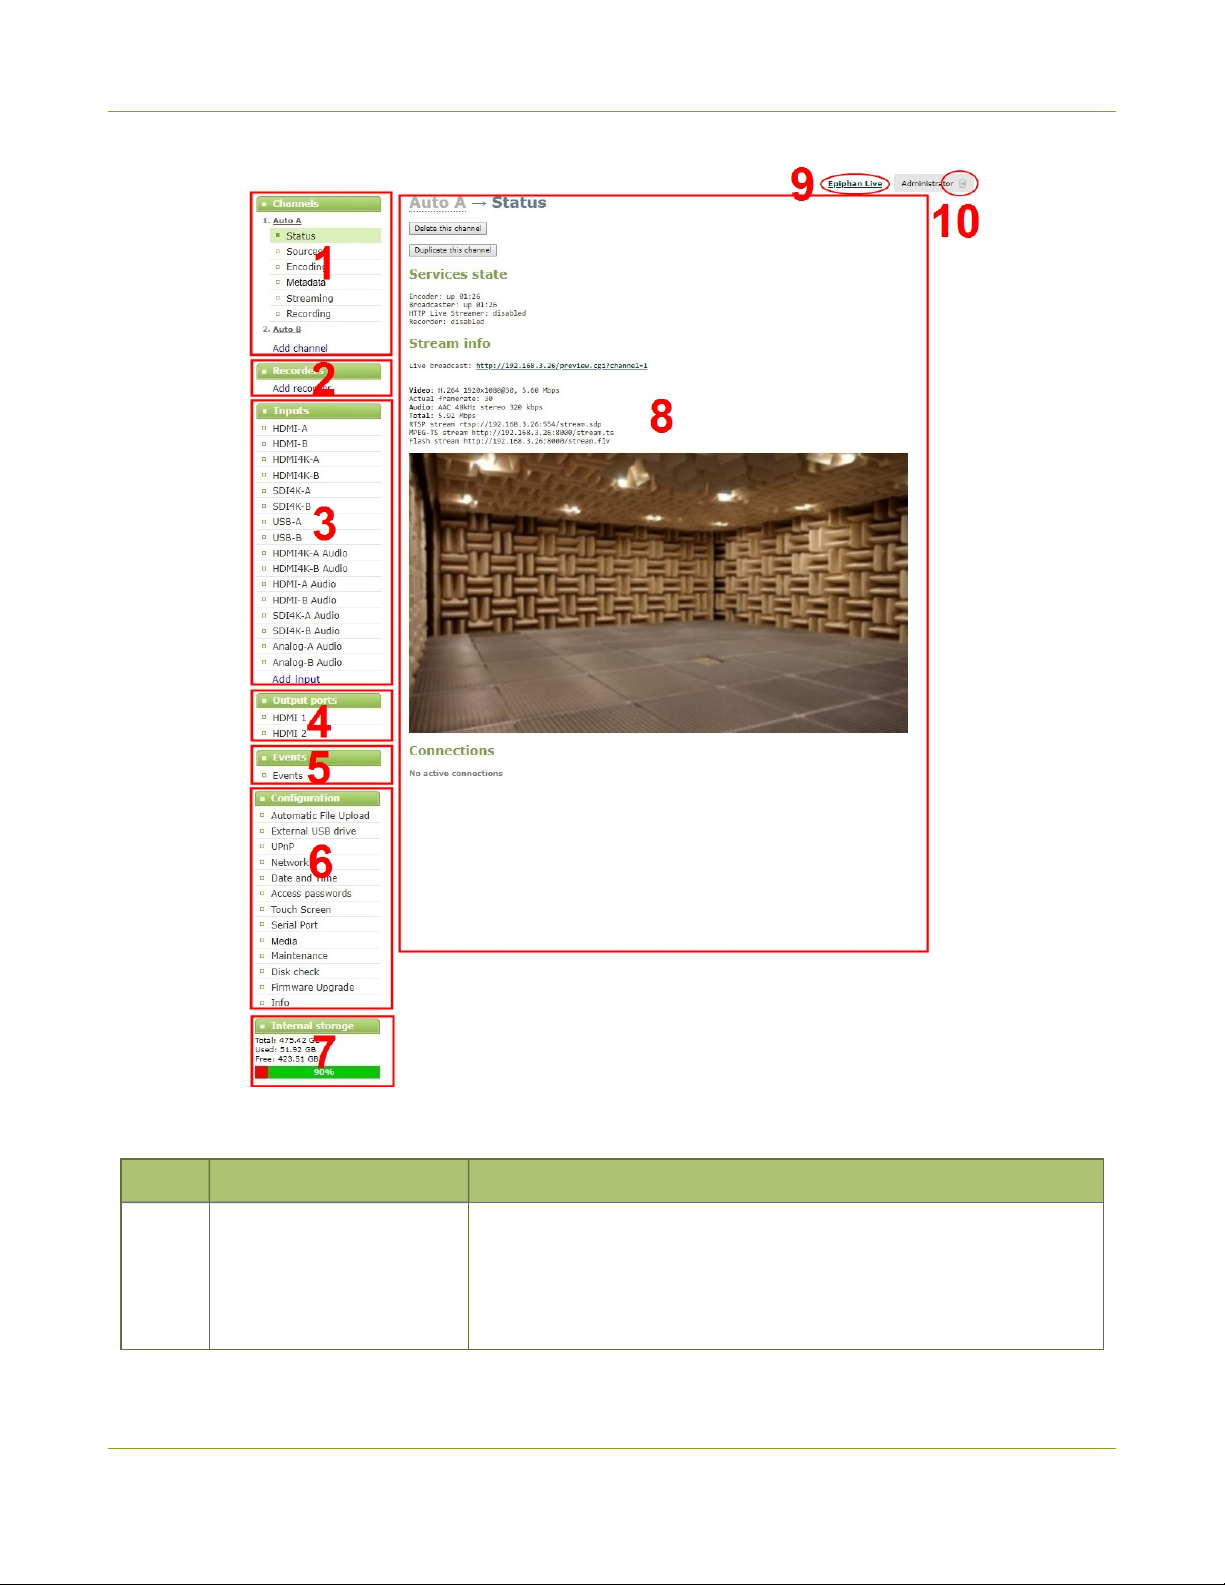
Pearl Mini User Guide About the Admin panel
Table 12 The Admin panel
Label Name Description
Channels menu
1
(Channel menu on Pearl
Nano)
The channels that are available for the current configuration of your
Pearl device are listed. Select a channel to access the drop down list
of options that are available to configure channel encoding, add video
and audio sources, create layouts, perform confidence monitoring,
record the channel, and more.
BETA DRAFT - 56
Page 68
Pearl Mini User Guide About the Admin panel
Label Name Description
The Pearl Nano has a single channel.
Recorders you add to your Pearl device are listed. Select a recorder to
Recorders menu(Pearl
2
Mini and Pearl-2 only)
open the status page and list of related recordings for that recorder.
You can start and stop recording, as well as configure the recorder
settings from this page.
The available video and audio input ports on your Pearl device are
3 Inputs menu
listed. Select a port to open the configuration and status page for that
port.
4 Output ports menu
The output ports available on your Pearl device are listed. Select a
port to open the configuration and status page for that port.
Access the Content Management System (CMS) events list containing
5 Events menu
up to three months of scheduled CMS events, in progress events, and
completed ah hoc and scheduled events.
6 Configuration menu A list of all the available configuration options.
Internal storage and
7
system information menu
8 Main panel
System details are displayed in this area, such as the total amount of
internal storage, how much space is currently used, and how much
free space is available.
The main panel is where the selected menu information displays.
What's displayed depends on which menu item you select.
Link to Epiphan Live
9
(Pearl-2 and Pearl Mini
Click to open Epiphan Live in a new tab.
only)
Click to log out of the Pearl admin panel. Click icon again to display the
10 Log out
log in window. The role of the currently logged in user displays beside
the icon.
You can access the Admin panel using these methods:
l
Any web browser, see Connect to the Admin panel.
l
Using a connected USB mouse, keyboard, and monitor, see Enable local console access to the Admin
panel.
l
Remotely using Epiphan Edge, see Remote login to the Admin panel and Epiphan Live.
BETA DRAFT - 57
Page 69
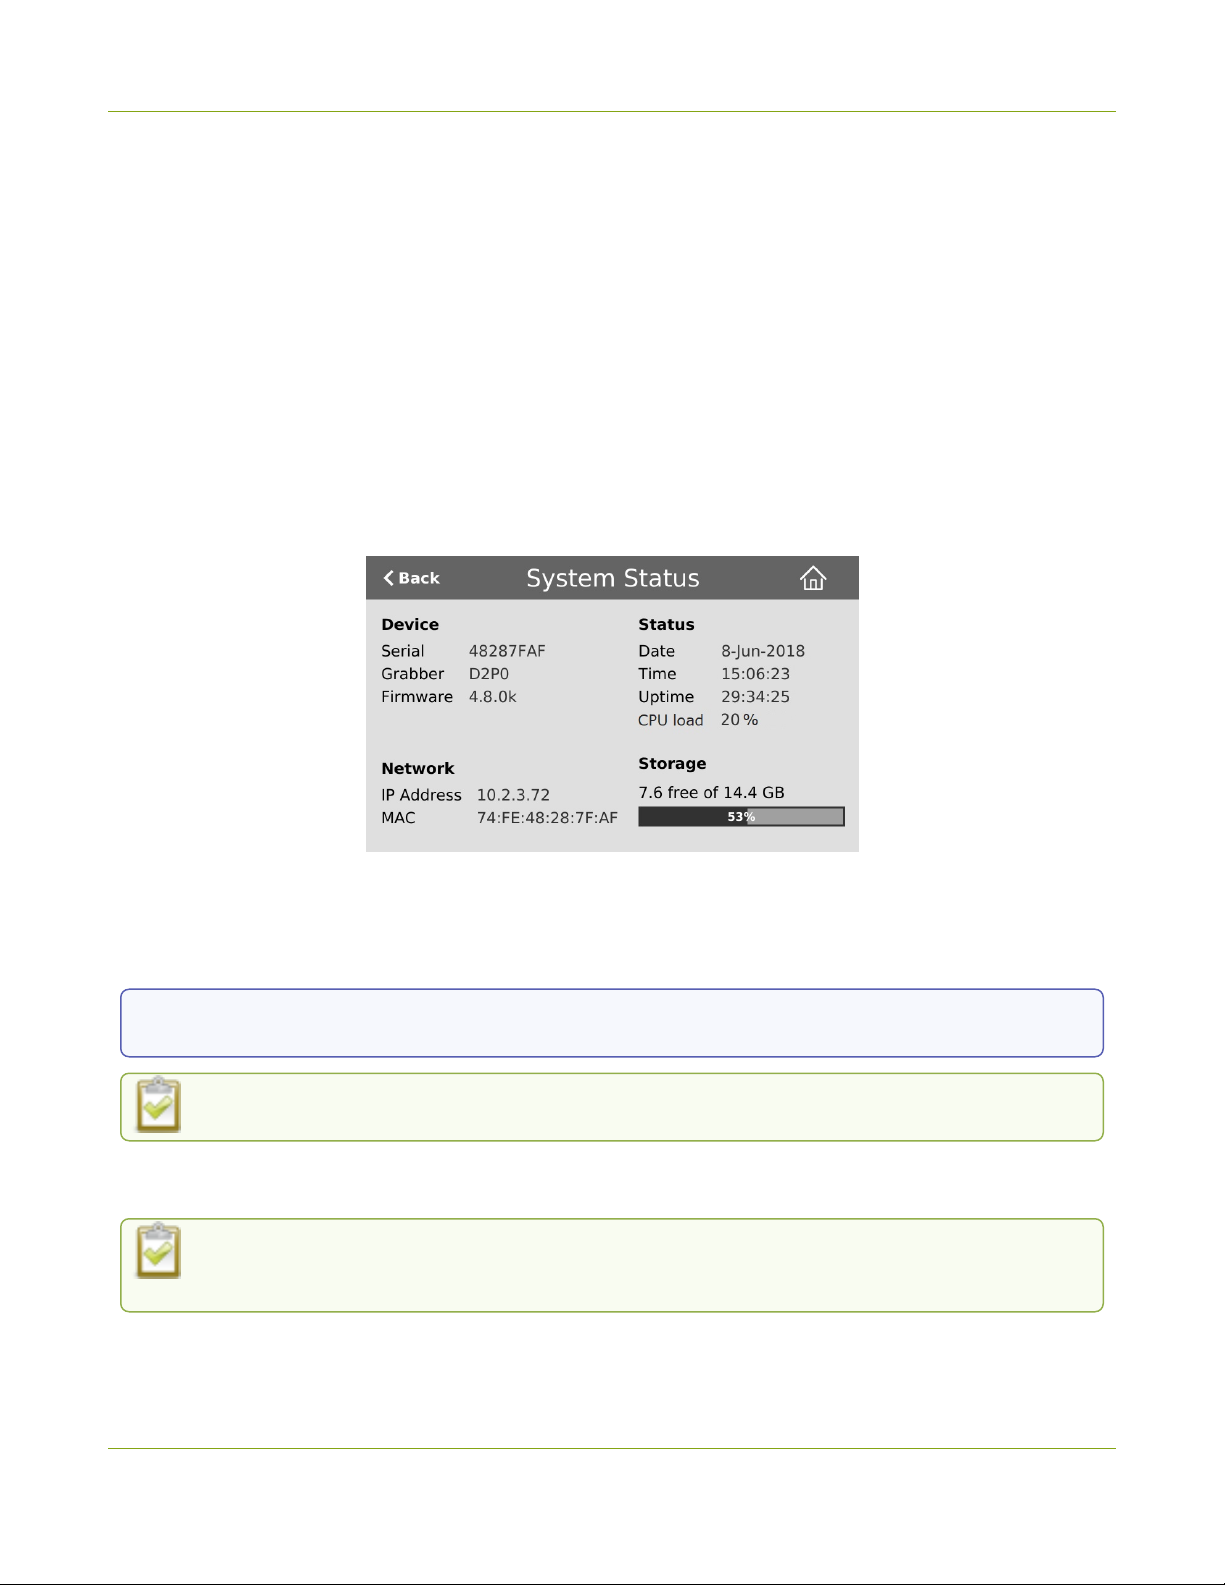
Pearl Mini User Guide Connect to the Admin panel
Connect to the Admin panel
You can access the Admin panel several ways. The most common way is using an internet browser on a
computer or tablet that's connected to the same local Ethernet network as Pearl device. All you need is the IP
address of the device, which you can get from the settings using the Pearl device's front screen.
Another way to access the Admin panel is to remotely login over the Internet. An Epiphan Edge Pro plan is
required for remote login, see Remote login to the Admin panel and Epiphan Live.
Get the IP address of Pearl Mini or Pearl 2
To get the IP address of Pearl Mini or Pearl 2, do one of the following:
l
From a single channel view or grid view, tap the system settings (gears) icon, then tap System Status, or
l
If your system doesn't have any channels showing, tap the touch screen anywhere to go to the system
settings screen, then tap System Status.
Access the Pearl Admin panel
1. When you have the IP address of the Pearl device, enter the URL for your Pearl device into a web browser
and include /admin to access the Admin panel.
http://<
2. When prompted, log in using the default user name admin and the administrator account password, then
Optionally, you can connect to your Pearl device using the following methods:
IP Address of Pearl device
If HTTPS is enabled on the Pearl device, replace
click OK. If you don't know the password, contact your Pearl system administrator.
For a first-time log in as an administrator-level user, you're prompted to assign passwords to the
admin, operator, and viewer accounts. Record the passwords for future reference.
>/admin
http
with
https
in the URL.
BETA DRAFT - 58
Page 70

Pearl Mini User Guide Enable local console access to the Admin panel
l
For networks with DHCP, you can Connect using a DNS-based service discovery
l
For networks without DHCP, you can Connect using persistent static IP address
Enable local console access to the Admin panel
Operators and administrators can access the Admin panel locally to reconfigure the Pearl device without
needing a laptop. With the local console feature, you can connect a USB mouse, keyboard, and a monitor
directly to Pearl device. Or you can connect a touch screen monitor. The Pearl device also supports connection
of a USB wireless RF receiver for local console. Pearl Nano also supports the connection of a USB hub.
A built-in virtual keyboard is readily available, but you can also connect an external USB keyboard. When you
enable local console, you must also enable the External keyboard option.
Use the Admin panel or the Pearl device screen to enable local console and the external USB keyboard. Once
enabled, simply connect your USB mouse, USB keyboard, and an HDMI monitor to the HDMI OUT port that has
local console enabled. You cannot use the HDMI pass-through port for local console.
Optionally, you can disable whether or not users must login to the Admin panel when they access the local
console. Login is enabled by default.
You can also change the layout of the built-in and external keyboards to any of the supported languages. If you
select multiple languages, you can toggle between languages using Ctrl+Shift (or Ctrl+Alt).
l
American English
l
Dutch
l
French
l
German
l
Italian
l
Netherlands
l
Portuguese (European)
l
Spanish (Spain)
l
Swiss
l
Norwegian (Bokmal)
l
Russian
Important considerations
l
Epiphan Live is not accessible from the local console.
l
The live preview link is not accessible from the Channel Status page using the local console.
BETA DRAFT - 59
Page 71
Pearl Mini User Guide Enable local console access to the Admin panel
l
You cannot upload/download the following types of media using the local console:
l
Images
l
Channel recordings
l
EDID files
l
Configuration files
l
Firmware update files
Use the web-based Admin panel from your administration computer for full access to all Admin
panel functions.
Enable local console and the external keyboard option using the Admin panel
1. Login to the Admin panel as admin, see Enable local console access to the Admin panel.
2. From the Configuration menu, select External keyboard. The External keyboard configuration page
opens.
3. Select Local console as the Keyboard application and click Apply.
4. (Optional) Check a different keyboard language layout or multiple language layouts. The default layout is
American English.
5. (Optional) Choose the keyboard key combination to toggle between keyboard layouts if multiple
languages are selected: Ctrl+Shift or Alt+Shift.
6. From the Output ports menu, select the output port (HDMI). The video output port configuration page
opens.
7. Under Settings, select Local console in the Source drop-down menu and click Apply.
If you skipped the steps to configure the external keyboard for local console, an error message appears.
Click the link to fix it.
8. (Optional) Check Disable authentication if you don't want users to have to use their credentials to log in
before using the local console to access the Admin panel on the Pearl device.
9. Under Settings, select Local console in the Source drop-down menu.
10. Click Apply.
Enable local console using the touch screen
1. Tap the gear icon to open the System settings screen. If the control icons aren't showing, tap anywhere on
the touch screen.
2. Tap the arrow icon in the lower-right corner of the screen to go to the second Settings page.
BETA DRAFT - 60
Page 72
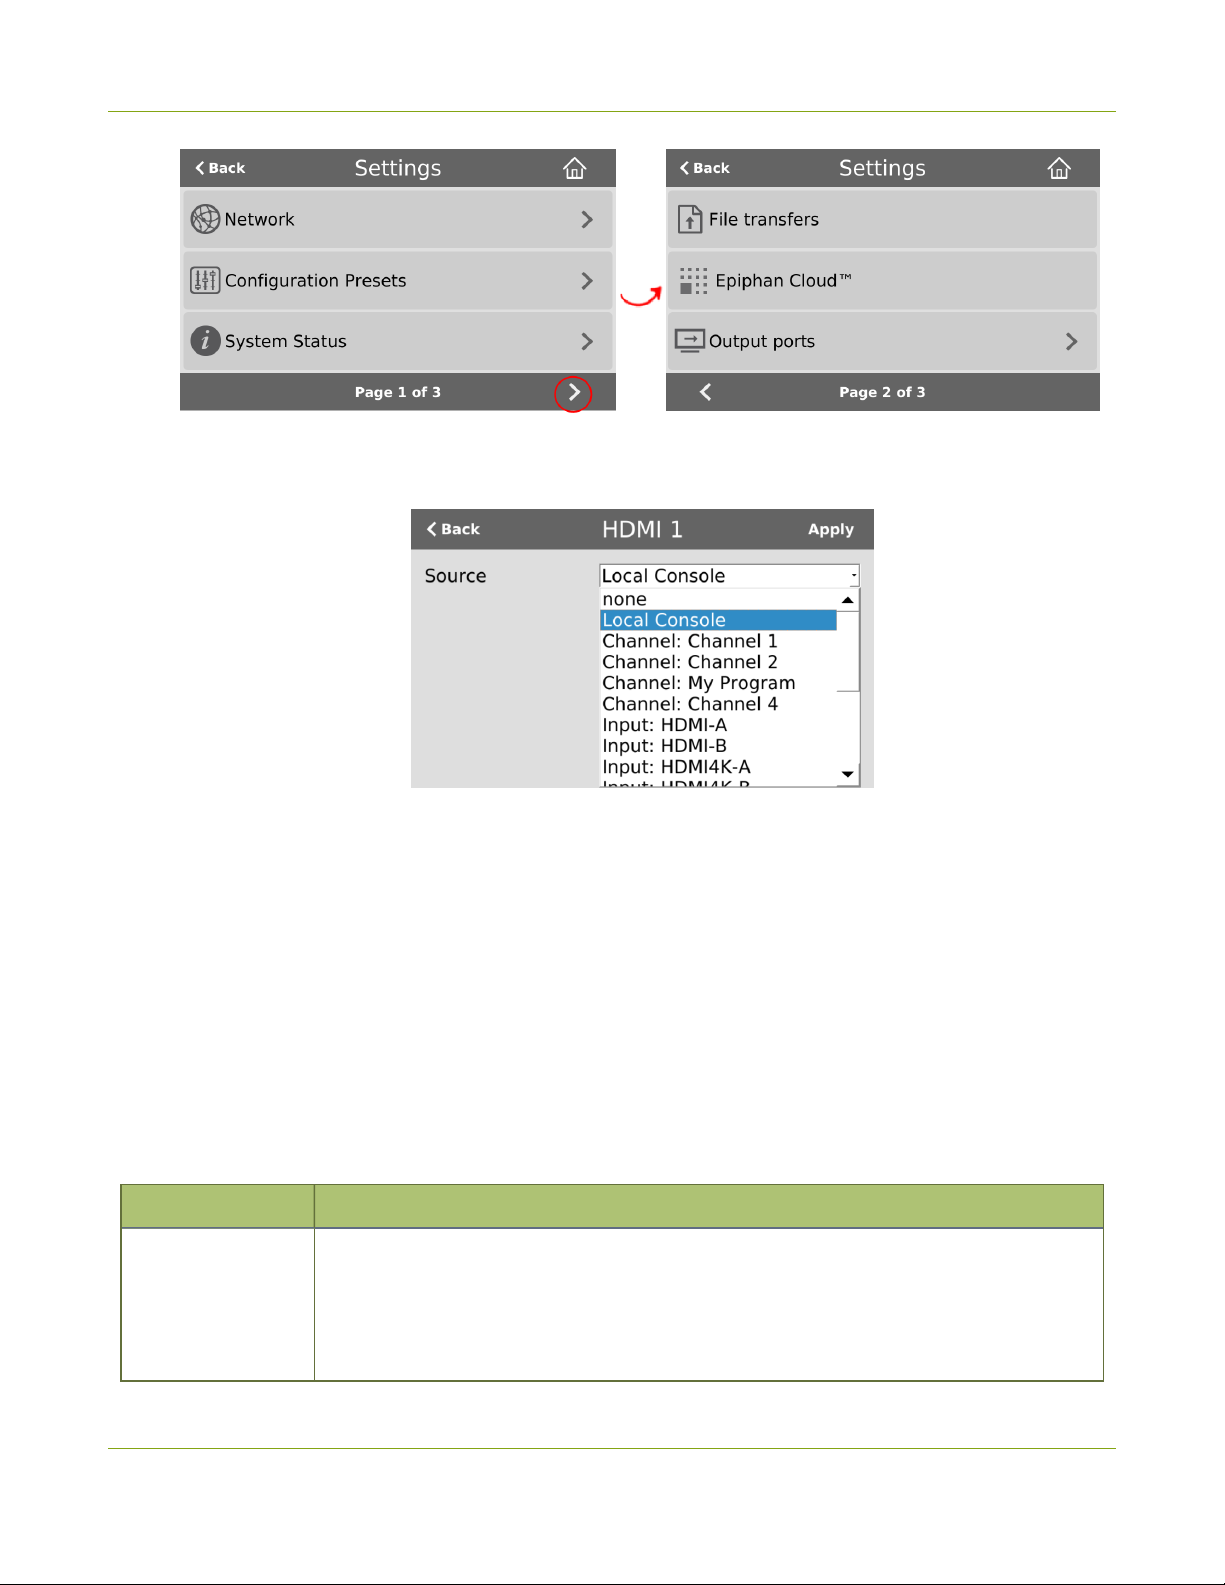
Pearl Mini User Guide Connect using a DNS-based service discovery
3. Tap Output port(s) and select an output port.
4. From the Output port's screen, select Local console as the Source and tap Apply.
What's next?
Connect your USB mouse, keyboard, and connect an HDMI monitor to the output port that has local console
enabled to access the local console directly from the Pearl device.
Connect using a DNS-based service discovery
Pearl devices use DNS-based messages to advertise details about itself, including its host name. With a
compatible utility installed on your computer, you can access the system simply by typing its serial number and
the suffix ".local" into the address bar of your browser.
The following table lists the compatible systems and Bonjour Print Services software needed.
Table 13 Install Bonjour Print Services
System Action Needed
You must install Bonjour Print Services:
Microsoft Windows
1. Use the following URL http://support.apple.com/kb/DL999
2. Click Download.
3. Follow the system prompts to download and install the application.
BETA DRAFT - 61
Page 73
Pearl Mini User Guide Connect using persistent static IP address
System Action Needed
MacOSX
Linux
The Bonjour software used for service discovery is built into the Mac OS. No special
actions are needed.
The Avahi implementation used for DNS-based discovery is shipped with most Linux
distributions. If necessary, check with your administrator to ensure you have the Avahi
package installed.
Access the Admin panel of the Pearl device using DNS discovery
1. Find the system’s serial number that's printed on a label attached to the device. To find the system serial
number using the device screen, do the following:
l
Pearl-2 and Pearl Mini: Tap the system information gear icon to display the System information
screen. If needed, tap the screen once to display the control icons.
2. Enter the following string into the address bar of your web browser on your admin computer, where
<serial>
http://
For example: http://95dd40d5.local/admin
is the serial number of your Pearl device:
<serial>
If HTTPS is enabled on the Pearl device, replace
.local/admin
http
with
https
in the URL.
3. Log in as an administrator using the default user name admin and the administrator account password,
then click OK to open the Admin panel. If you don't know the password, contact your Pearl system
administrator.
For a first-time log in as an administrator-level user, you're prompted to assign passwords to
the admin, operator, and viewer accounts. Record the passwords for future reference.
4. (Optional) From the Configuration menu, click Network and note the IP address of the system from the
network configuration page.
Connect using persistent static IP address
Your Pearl device has a default persistent static IP address, also known as the recoveryIPaddress. To set up a
Pearl device on a network that does not support DHCP, or to recover from a previous static IP address setting,
use this procedure to connect directly to the device for configuration.
A workstation computer with access rights to modify your network settings is required.
Pearl device static IP address defaults are:
BETA DRAFT - 62
Page 74
Pearl Mini User Guide Switching / mixing using the Admin panel
l
IP Address: 192.168.255.250
l
Netmask: 255.255.255.252
l
Username: admin
l
Password: your admin password (by default there is no password assigned)
Access the Admin panel using the persistent static IP address
1. Establish an Ethernet connection between Pearl device and the workstation using one of the following
methods:
a. Connect the Pearl device to a local Ethernet network shared with the workstation.
b. Connect the Pearl device directly to the workstation’s Ethernet port using either a regular or a
crossover Ethernet cable.
2. Record the network settings of the workstation that are used to connect to the Pearl device so that they
can be restored later.
3. Temporarily change the network configuration on the workstation to the following:
l
Use Static IP assignment
l
IP address: 192.168.255.249
l
Subnet mask: 255.255.255.252
4. Start a web browser on the workstation and go to: http://192.168.255.250/admin/
If HTTPS is enabled on the Pearl device, replace
http
with
https
in the URL.
5. Log in as an administrator using the default user name admin and the administrator account password,
then click OK to open the Admin panel. If you don't know the password, contact your Pearl system
administrator.
For a first-time log in as an administrator-level user, you're prompted to assign passwords to
the admin, operator, and viewer accounts. Record the passwords for future reference.
6. From the Configuration menu, click Networking.
7. Click use a static address and enter a static IP address and network settings you want for the Pearl
device. For more information, see Configure network settings.
8. Restore the previously saved network configurations on the workstation.
Switching / mixing using the Admin panel
Switching live video inputs, or video mixing, is fast and easy using the Admin panel. For best results, you may
wish to be in a location where you can see the live action, and have a solid understanding idea of what is in each
of your layouts. Good layout names can help with this. See Rename a layout.
BETA DRAFT - 63
Page 75
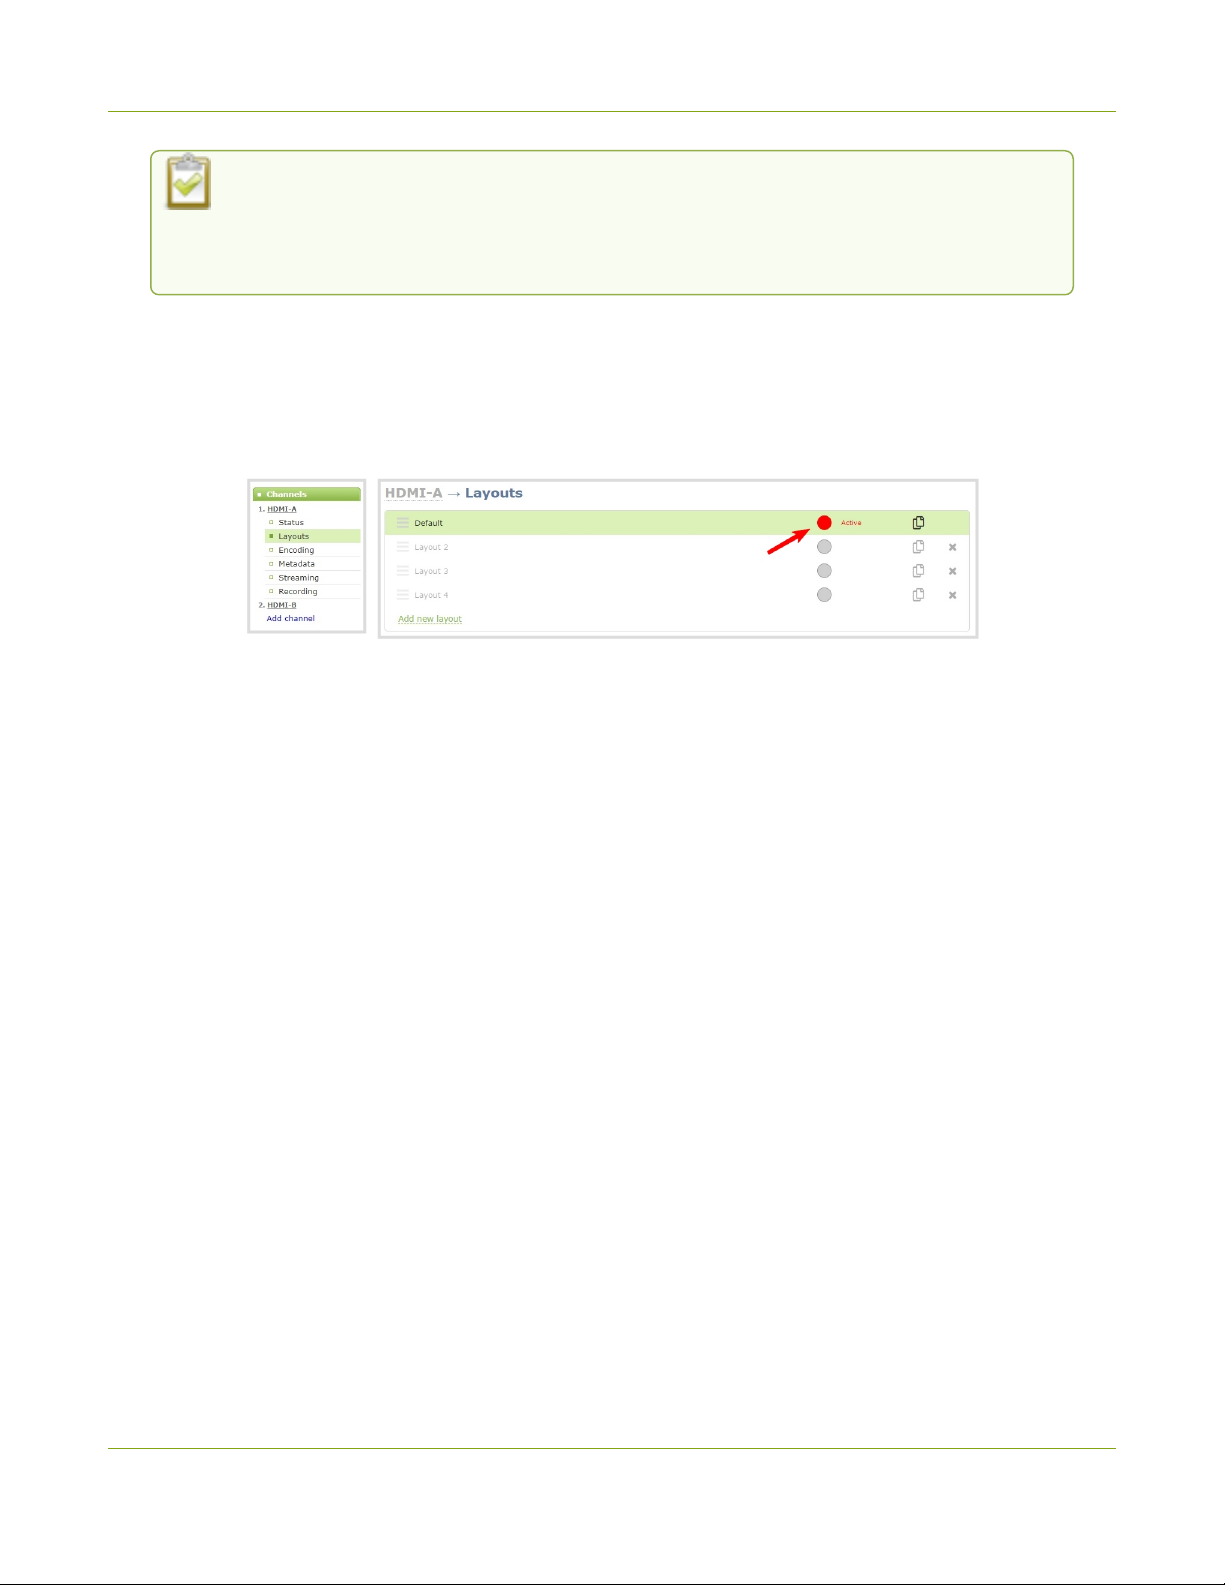
Pearl Mini User Guide EpiphanLive
Performing live switching using one interface, like the Admin panel, does not dynamically
update the visuals in the other interfaces (e.g. the touch screen and Epiphan Live). The other
interfaces must be manually refreshed to accurately reflect the current live switching layout
information.
Perform live video mixing
1. Login to the Admin panel as admin, see Connect to the Admin panel.
2. From the Channels menu, select a channel and click Layouts. The layout editor page opens.
3. In the layouts list, the layout with the big red circle beside it is the currently chosen "live" layout.
4. To switch to a different layout as the active "live" layout, click the gray circle beside the layout you want to
make go live. The circle turns red to indicate that it's now the active "live" layout.
EpiphanLive
EpiphanLive is a friendly and easy to use web and tablet interface designed for confidence monitoring of
channels and sources, switching between layouts while recording and streaming, and to easily stop or start
streaming and recording.
Topics include:
l
About Epiphan Live
l
The Dashboard interface
l
Access EpiphanLive using a web browser or mobile device
l
Access EpiphanLive from the Admin panel
l
Stream, record, and monitor using the Dashboard interface
l
Switching / mixing using Epiphan Live
l
Your recordings
For information about remote access to the cloud version of Epiphan Live, see Remote login to the Admin panel
and Epiphan Live.
BETA DRAFT - 64
Page 76
Pearl Mini User Guide About Epiphan Live
About Epiphan Live
The Epiphan Live interface lets you easily operate Pearl Mini using a computer or mobile device such as a tablet.
You can:
l
Control streaming and recording of channels and recorders.
l
Do live switching between sources and layouts while streaming and recording.
l
Perform video, audio and system confidence monitoring.
You need administrator or operator-level privileges to use Epiphan Live. See User administration for more
information about user privileges.
Epiphan Live is supported on the following operating systems on mobile devices and web browsers:
Operating system or
mobile device
Windows
Mac
Linux
Android phone or tablet
iPhone or iPad
Supported web browser(s)
l
Google Chrome
l
Microsoft Edge
l
Google Chrome
l
Safari
l
Google Chrome
l
Google Chrome
l
Google Chrome
l
Safari
Most instructions assume that a touch screen device is used; however, you can tap or click, depending on your
device.
Text scaling using Google Chrome for Android is not supported.
BETA DRAFT - 65
Page 77
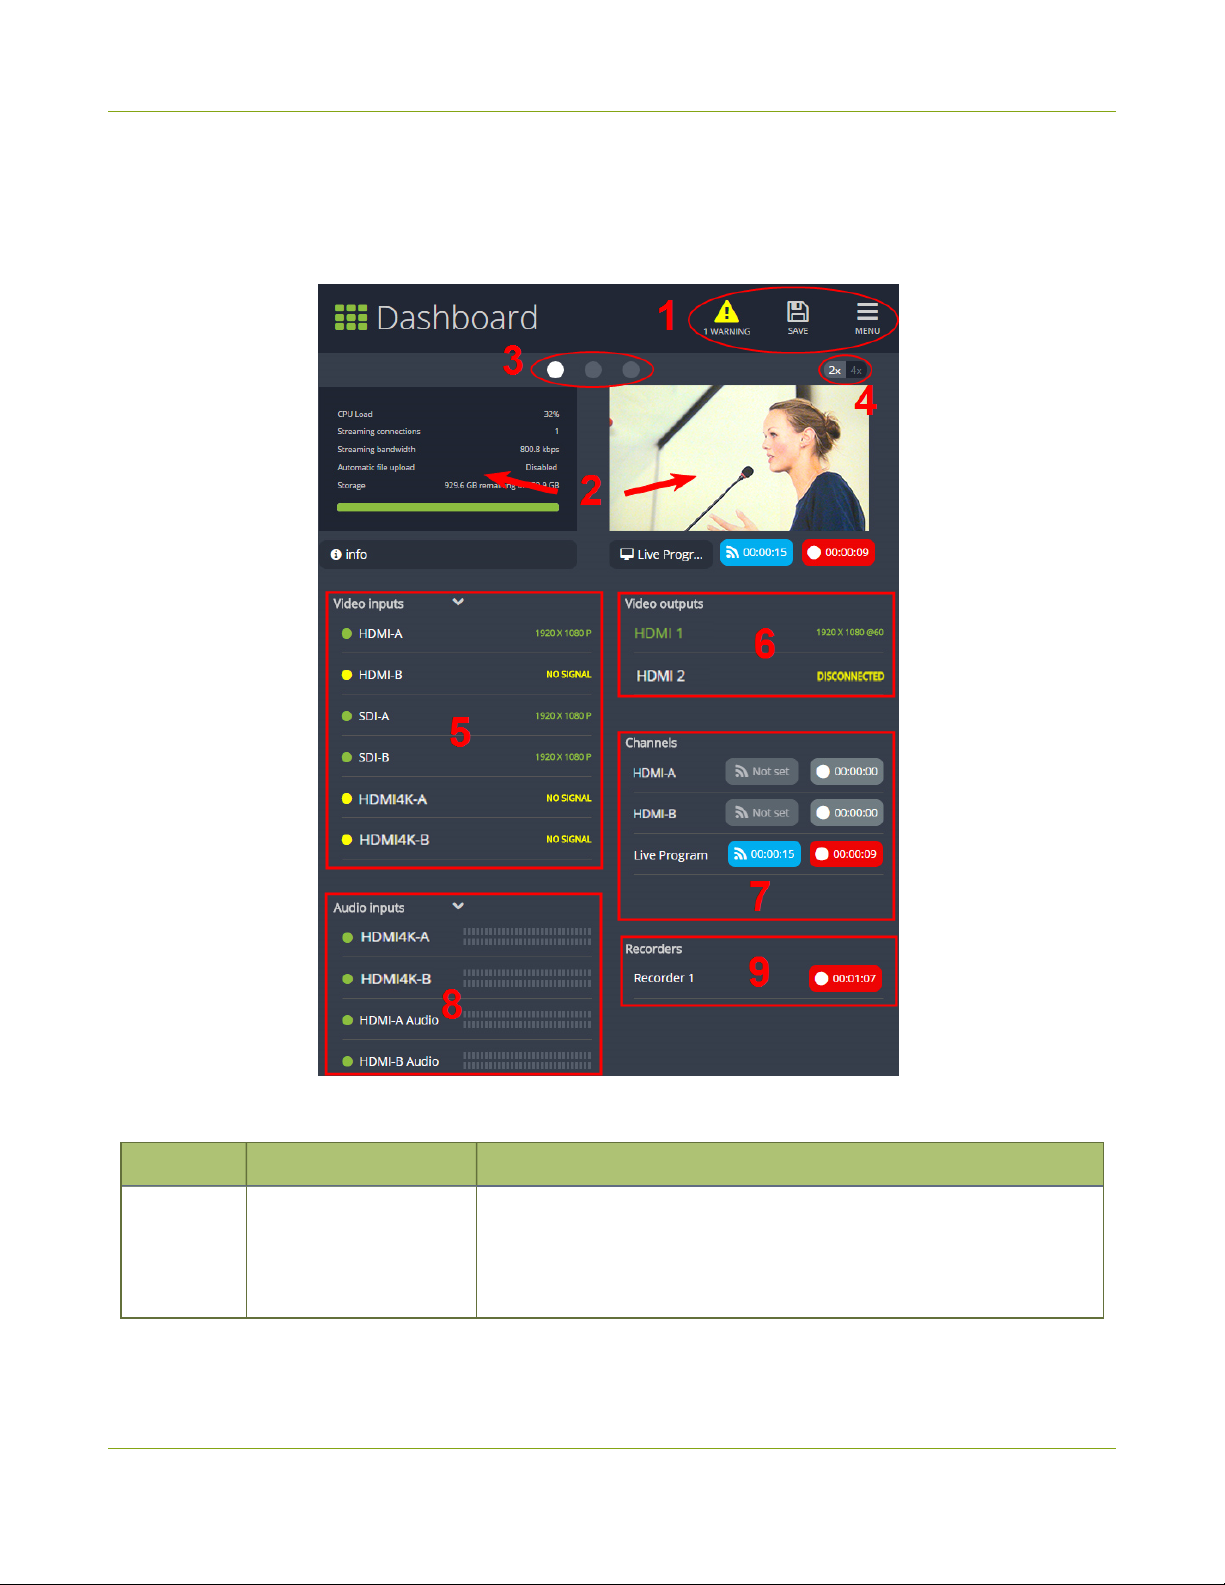
Pearl Mini User Guide The Dashboard interface
The Dashboard interface
The Dashboard interface is the first page you see when you open Epiphan Live. You'll find helpful tools for
confidence monitoring, as well as streaming and recording control.
Table 14 Elements in the Dashboard interface
Number Title Description
l
Warning – This icon displays only if there are any configuration
1
Dashboard header
icons
errors in your channels, sources, streams or recordings.
Clicking the icon displays more detail about the errors.
l
Save – Save the current Dashboard layout.
BETA DRAFT - 66
Page 78
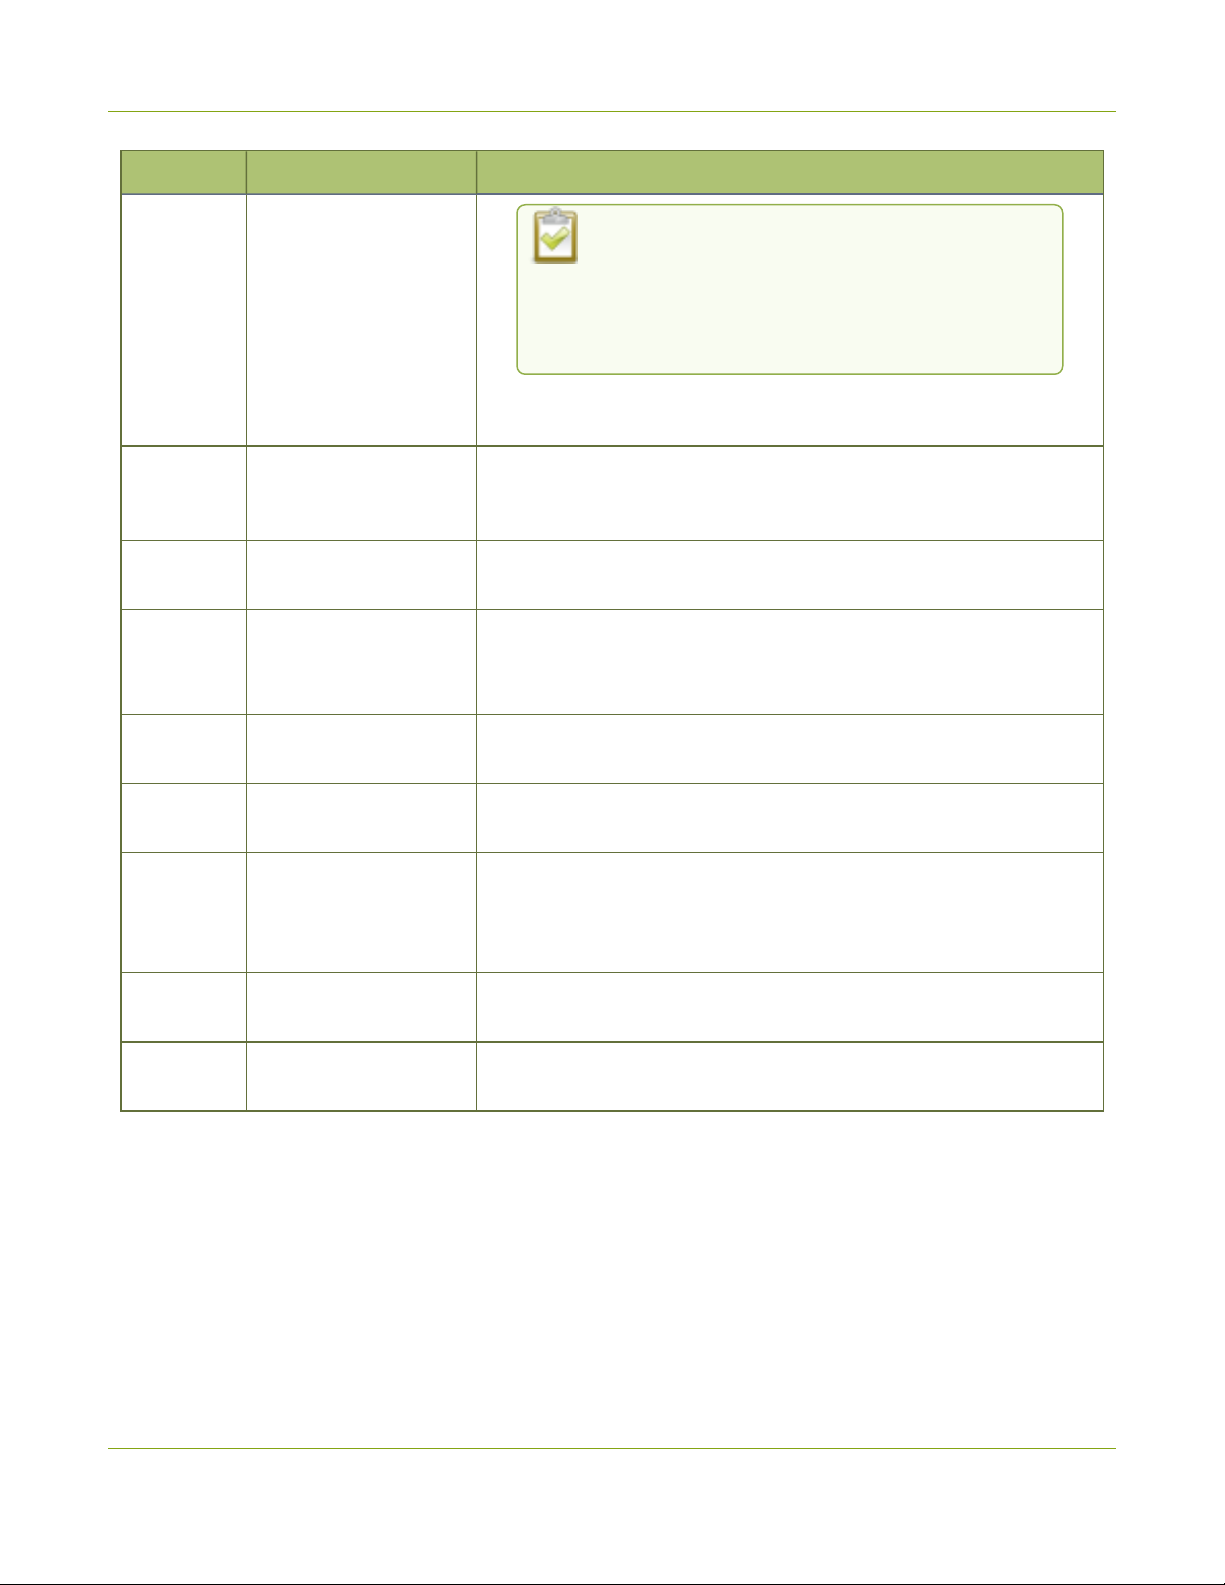
Pearl Mini User Guide
Number Title Description
l
Access EpiphanLive using a web browser or mobile
device
Tap Save to preserve the current layout. Logged
in operators and administrators will see the latest
Dashboard layout when they refresh their Epiphan
Live page. The latest saved layout displays the
next time you log in.
Menu – Access links to the Switcher view, Recordings, and
Admin panel.
2
3
4
Dashboard monitoring
panels
Dashboard panel
navigation icons
Dashboard panel set
quantity icons
5 Video inputs
6 Video outputs
7 Channels
8 Audio inputs
Configurable panels for confidence monitoring. You can set each
panel to display a source, channel, output, or basic system
information. Panels are empty by default.
Each dot represents a set of panels. Select a dot to navigate between
the three different sets of Dashboard monitoring panels.
l
2x – Changes the quantity of Dashboard panels per set to 2 (as
in the screen shot above).
l
4x – Changes the quantity of Dashboard panels per set to 4.
Displays a list of your video inputs configured in the Admin panel and
includes basic status information for each input.
Displays a list of your video outputs configured in the Admin panel
and includes basic status information for each output.
Displays a list of your channels configured in the Admin panel and
includes streaming and recording control buttons for each channel,
as well as individual control buttons for each stream when you set up
multiple streams in a channel.
Displays a list of your audio inputs configured in the Admin panel.
Includes basic status information and a VU meter for each input.
9 Recorders
Displays a list of your recorders configured in the Admin panel and
includes a recording control button for each recorder.
Access EpiphanLive using a web browser or mobile device
You can open EpiphanLive using a web browser on your Windows, Mac, or Linux computer. You can also use
EpiphanLive on an Android phone or tablet, an iPhone, or an iPad.
You need the IP address of Pearl Mini to connect to Epiphan Live, see Connect to the Admin panel.
BETA DRAFT - 67
Page 79
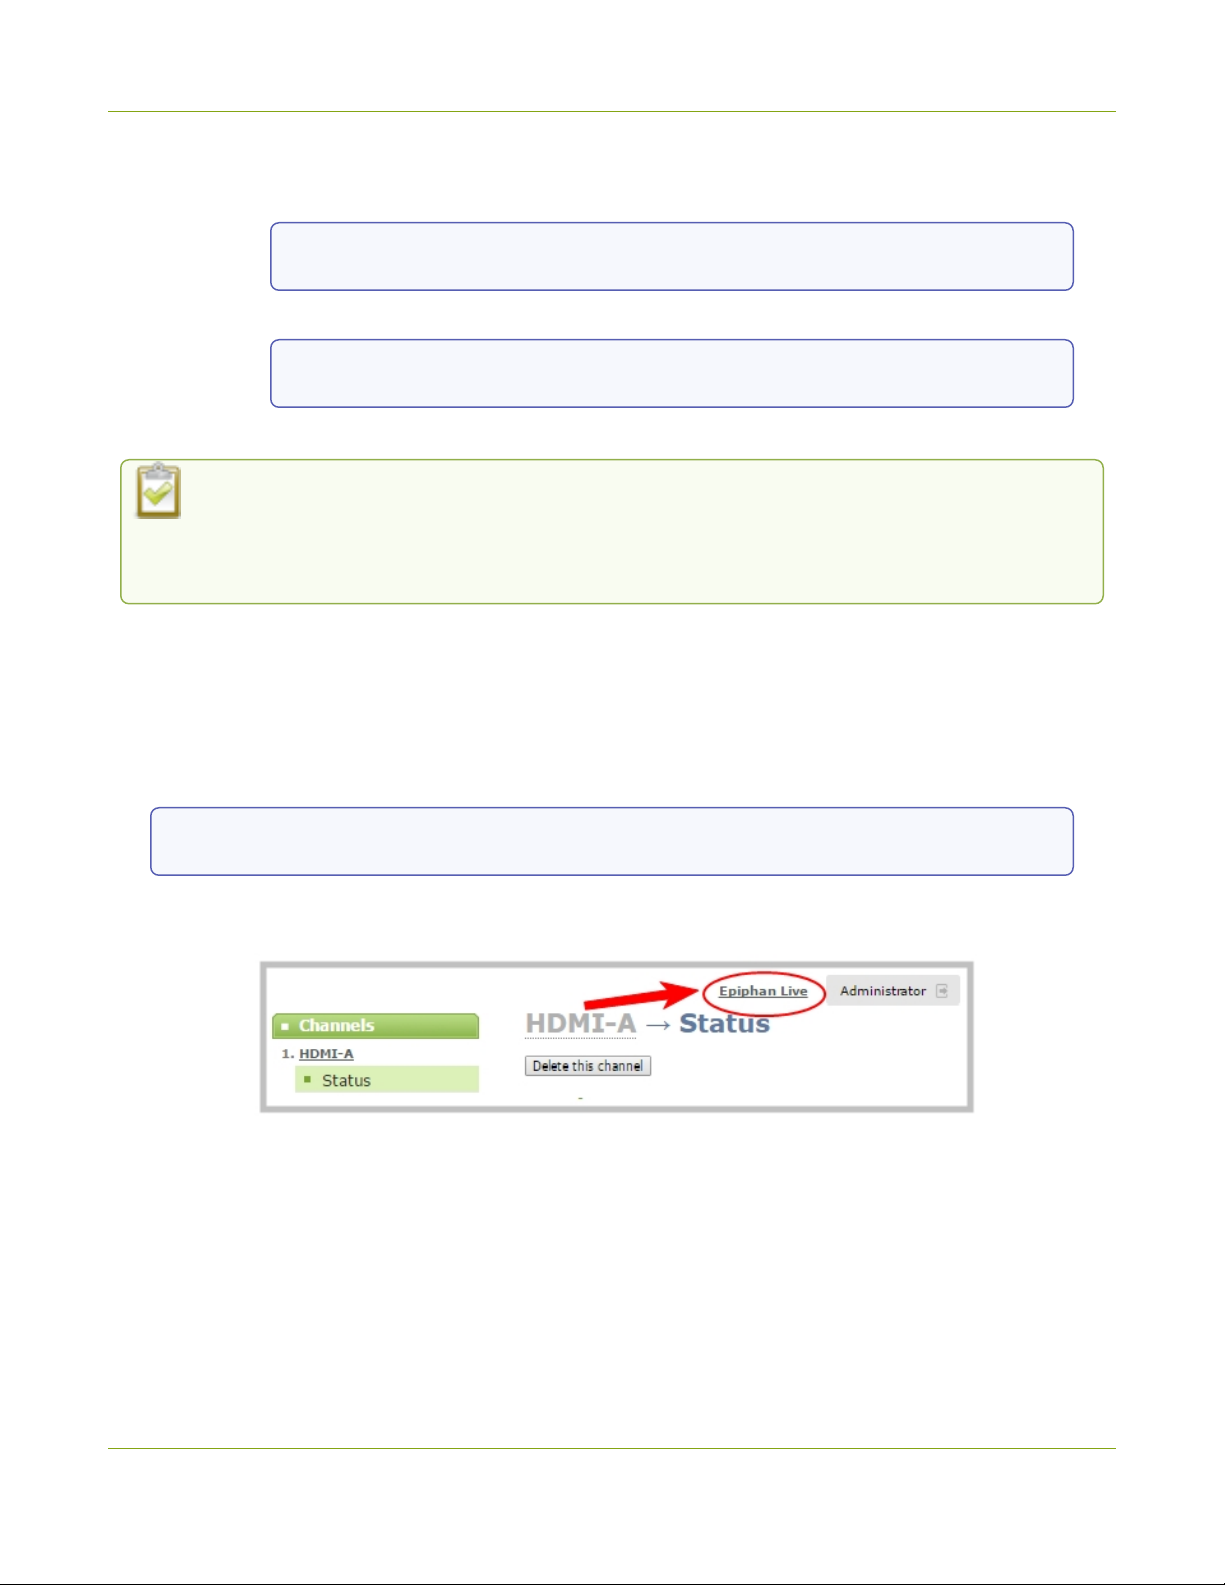
Pearl Mini User Guide Access EpiphanLive from the Admin panel
1. Enter the following into the address bar of your web browser.
a. For a web browser on a computer, enter:
http://<IP address of your Pearl device>/admin/m
b. For a web browser on a mobile device, enter:
http://<IP address of your Pearl device>
2. Enter your administrator or operator credentials when prompted.
Some versions of Chrome and Microsoft Edge don't display channel previews from the Dashboard if
you're on an HTTPs network and your website has an insecure or invalid security certificate, even
after you update the security certificate. Use a different web browser such as Firefox or update the
version of your web browser, then add the security certificate for the website to the exceptions list.
Access EpiphanLive from the Admin panel
You need the IP address of Pearl Mini to log in to the Admin panel for this procedure, see Connect to the Admin
panel.
1. Log in to the Admin panel using your credentials. In your web browser, enter:
http://<IP address of Pearl Mini>
2. Click Epiphan Live in the upper-right corner of the Status page for the channel. The Epiphan Live
dashboard opens in a new tab.
To open the Admin panel from Epiphan Live, click the Menu icon in the upper-right corner of the Dashboard or
Switcher interface, and then click Admin panel.
BETA DRAFT - 68
Page 80
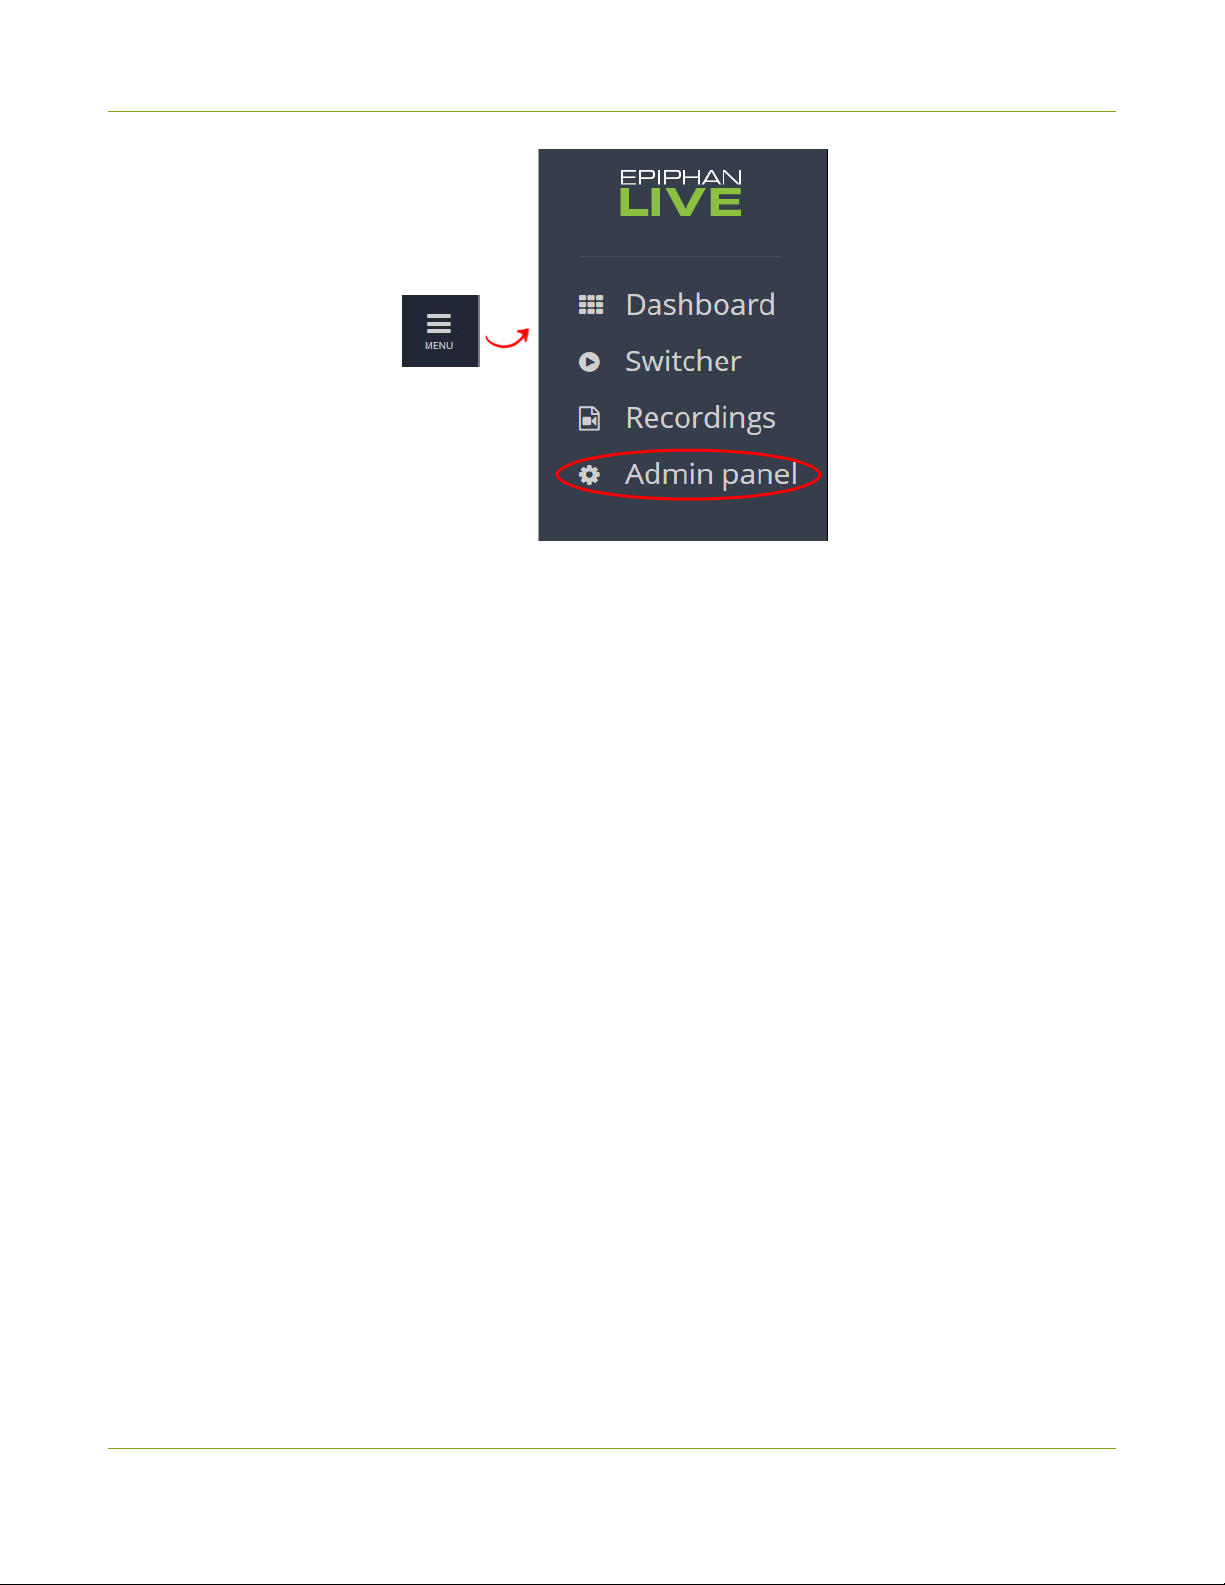
Pearl Mini User Guide
Stream, record, and monitor using the Dashboard
Stream, record, and monitor using the Dashboard interface
interface
The dashboard in Epiphan Live is where you can do confidence monitoring, as well as start and stop streaming
and recording for your channels.
Topics include:
l
Configure Dashboard panels
l
Monitor video and audio input sources using Epiphan Live
l
Monitor and select the video output source using Epiphan Live
l
Control streaming and recording using EpiphanLive
Configure Dashboard panels
You can customize each Dashboard panel to display a specific channel, input source, or video output for live
confidence monitoring. Panels can also be set up to display system information:
l
CPU load (%)
l
Quantity of streaming connections
l
The current streaming bandwidth (bitrate)
l
Automatic file upload status (enabled or disabled). see Automatic file transfers.
l
Storage available on Pearl Mini.
Other logged in operators and admins must refresh their web browsers to see the latest changes to the
Dashboard.
BETA DRAFT - 69
Page 81
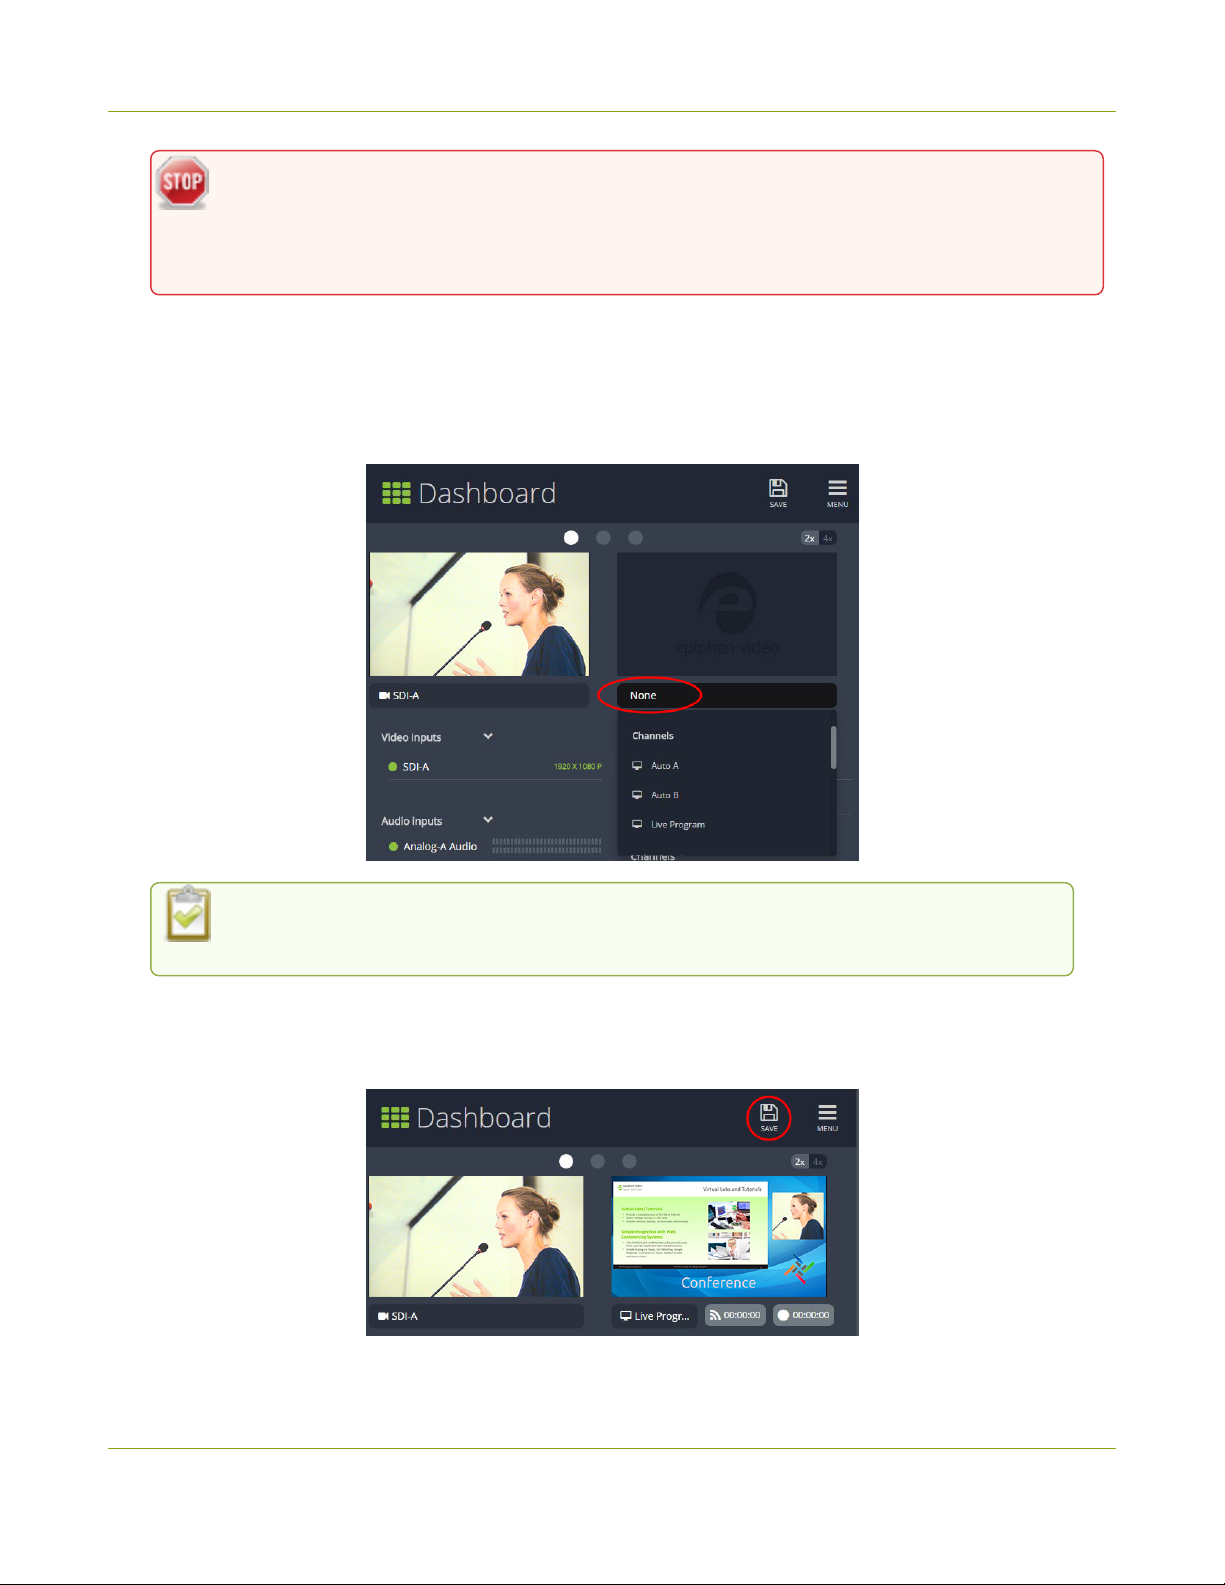
Pearl Mini User Guide Configure Dashboard panels
Up to 8 Epiphan Live preview panels can be open at the same time on Pearl devices. This limit
live preview panels applies across all open instances of Epiphan Live, including multiple users
accessing Epiphan Live simultaneously from different web browsers, or duplicate instances of
the same Epiphan Live interface open on multiple browser tabs at the same time.
Configure Dashboard panels
1. Log in to Epiphan Live (see Access EpiphanLive using a web browser or mobile device).
2. Tap the drop-down menu that appears below the panel and select the channel, source, or output to
display. The label says "None" if the panel is not yet configured.
When a channel is selected, streaming and recording control buttons appear below the panel.
You can control streaming and recording of that channel using those buttons.
3. (Optional) To choose between displaying 2 or 4 panels, tap the 2x|4x icon that appears in the upper-right
corner of the panels area.
4. Tap Save.
BETA DRAFT - 70
Page 82
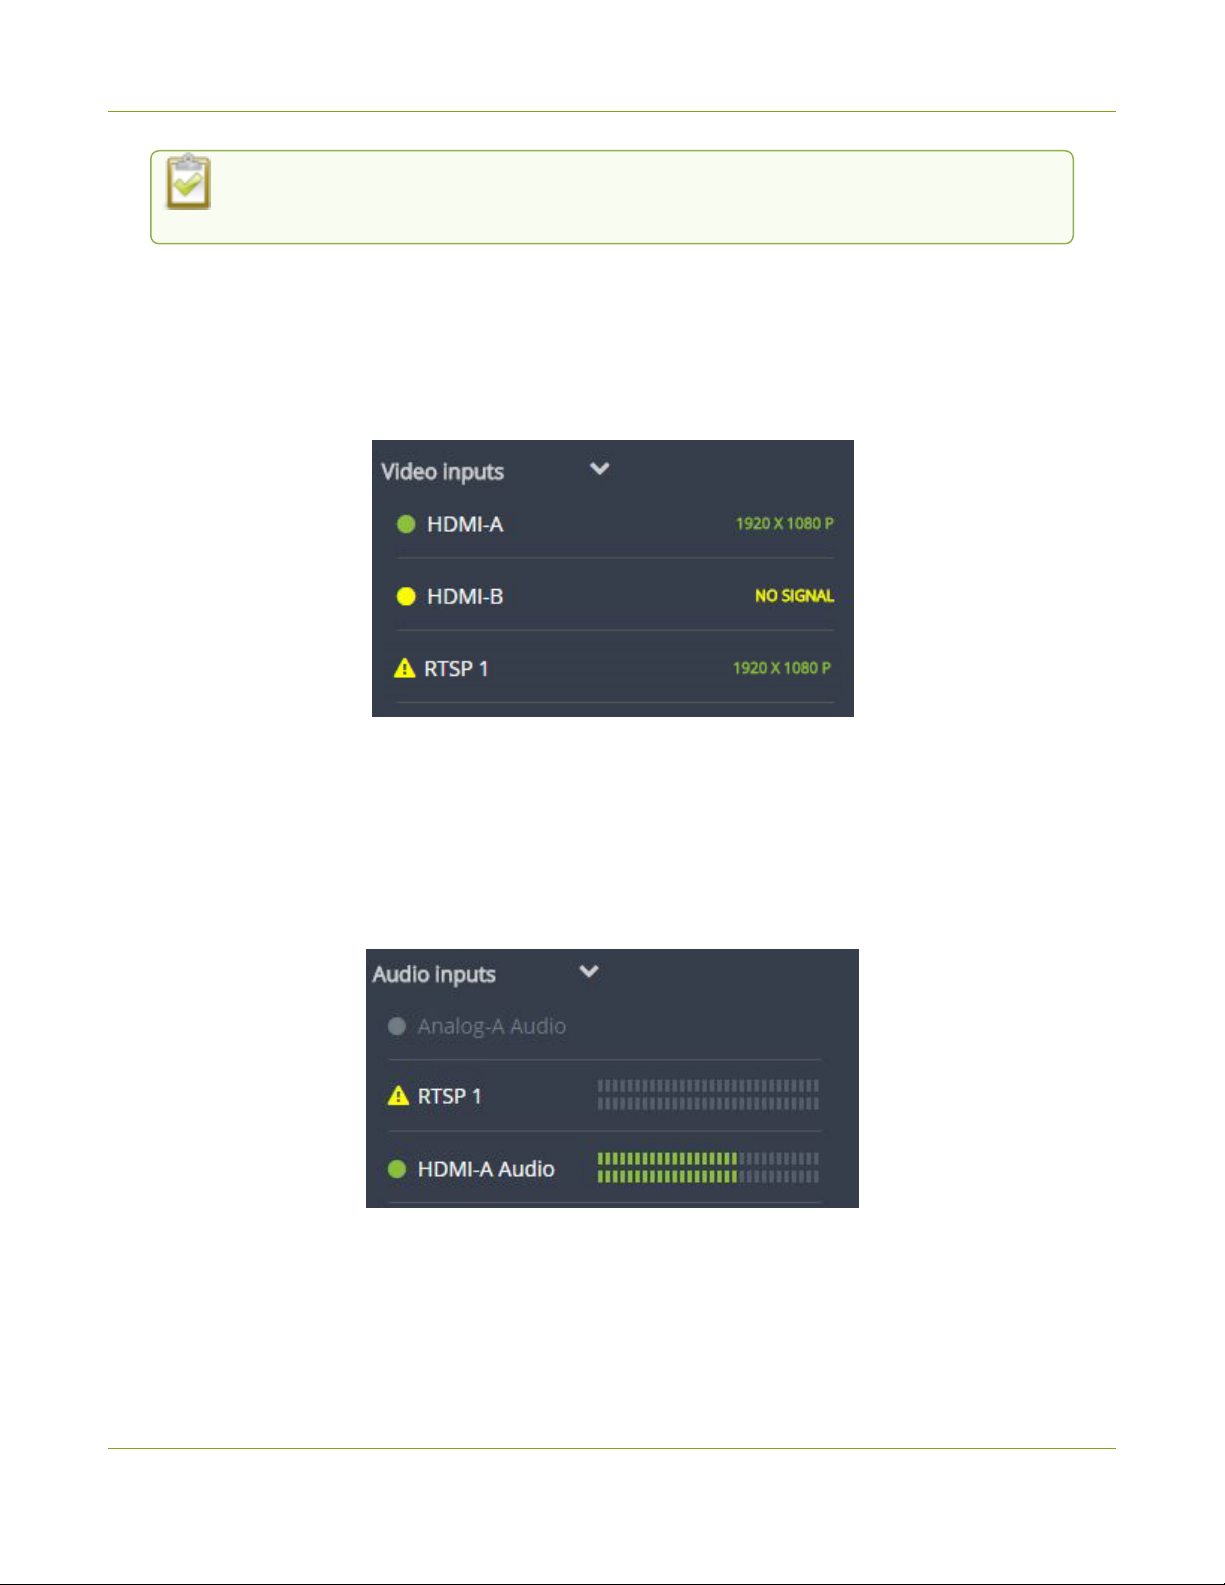
Pearl Mini User Guide
Monitor video and audio input sources using Epiphan
You can navigate between separate sets of Dashboard panels by selecting the circle icons
along the top of the first row of panels.
Monitor video and audio input sources using Epiphan Live
Use the Dashboard to monitor your video and audio inputs. The video inputs section of the Dashboard lists all
inputs and displays the video resolution.
Live
l
A green dot means that the video source is connected and a signal is received.
l
A yellow dot means that a signal is not being receiving from the source.
l
A triangular warning icon means there is a source configuration issue that needs attention.
Tap the name of a video input to open the source details in a thumbnail view, including warning information if
applicable.
The configured audio inputs appear in the Audio inputs section of the Dashboard.
l
A grayed-out audio source means that the audio source is not used in any channels.
l
A triangular warning icon means there is a source configuration issue that needs attention. Click the
audio source name to display the warning message.
l
A green dot means the source is connected and the accompanying VU meter shows the audio level.
BETA DRAFT - 71
Page 83
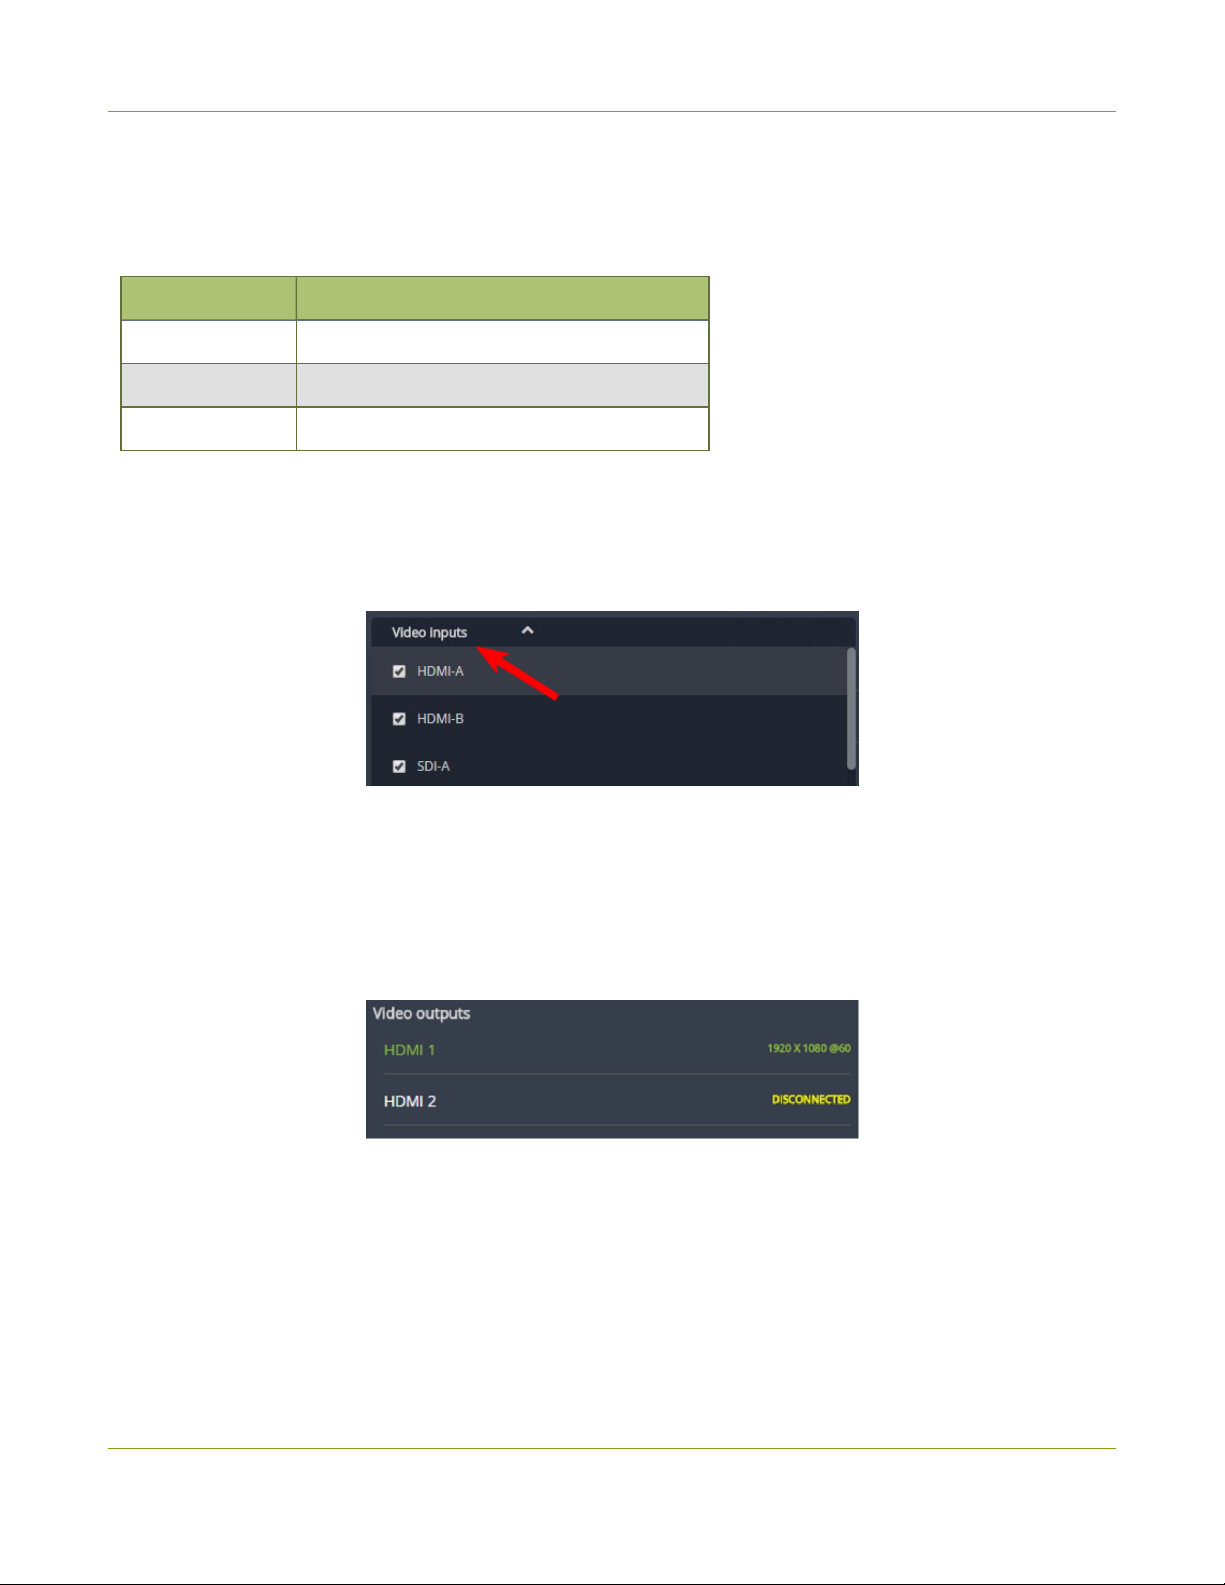
Pearl Mini User Guide
Monitor and select the video output source using
Epiphan Live
The audio VUmeter uses quasi-peak ballistics with samples averaged every 10 ms. The maximum average in
each 100 ms period is displayed as a series of colored bars. The following table describes the levels at which the
meter changes from green to yellow and red.
Table 15 Audio VUmeter levels
Color Decibel range
Red 0 to -9 dBFS
Yellow -9 to -18 dBFS
Green -18 dBFS and lower
Show or hide inputs in the list
You can pick which video inputs display in the Dashboard view. Just tap the Video inputs or Audio inputs header
and then check the checkbox next to the name of each source you want showing in the Dashboard view. Tap
Save when you're done. The Dashboard input list updates automatically.
Monitor and select the video output source using Epiphan Live
The Dashboard lists the output ports along with the resolution and frame rate. You can select a channel or a
video source to display on the video output port using Epiphan Live. You can also enable or disable audio for the
output port. To configure the video output port using the Admin panel, see Set up the video output port using the
Admin panel.
l
Green text means your output is connected and transmitting to your external display.
l
Grayed-out text means the output port is disabled.
l
White text means the output port is enabled but is not connected to an external display.
Click the name of a video output to open the port's details in a thumbnail view.
BETA DRAFT - 72
Page 84
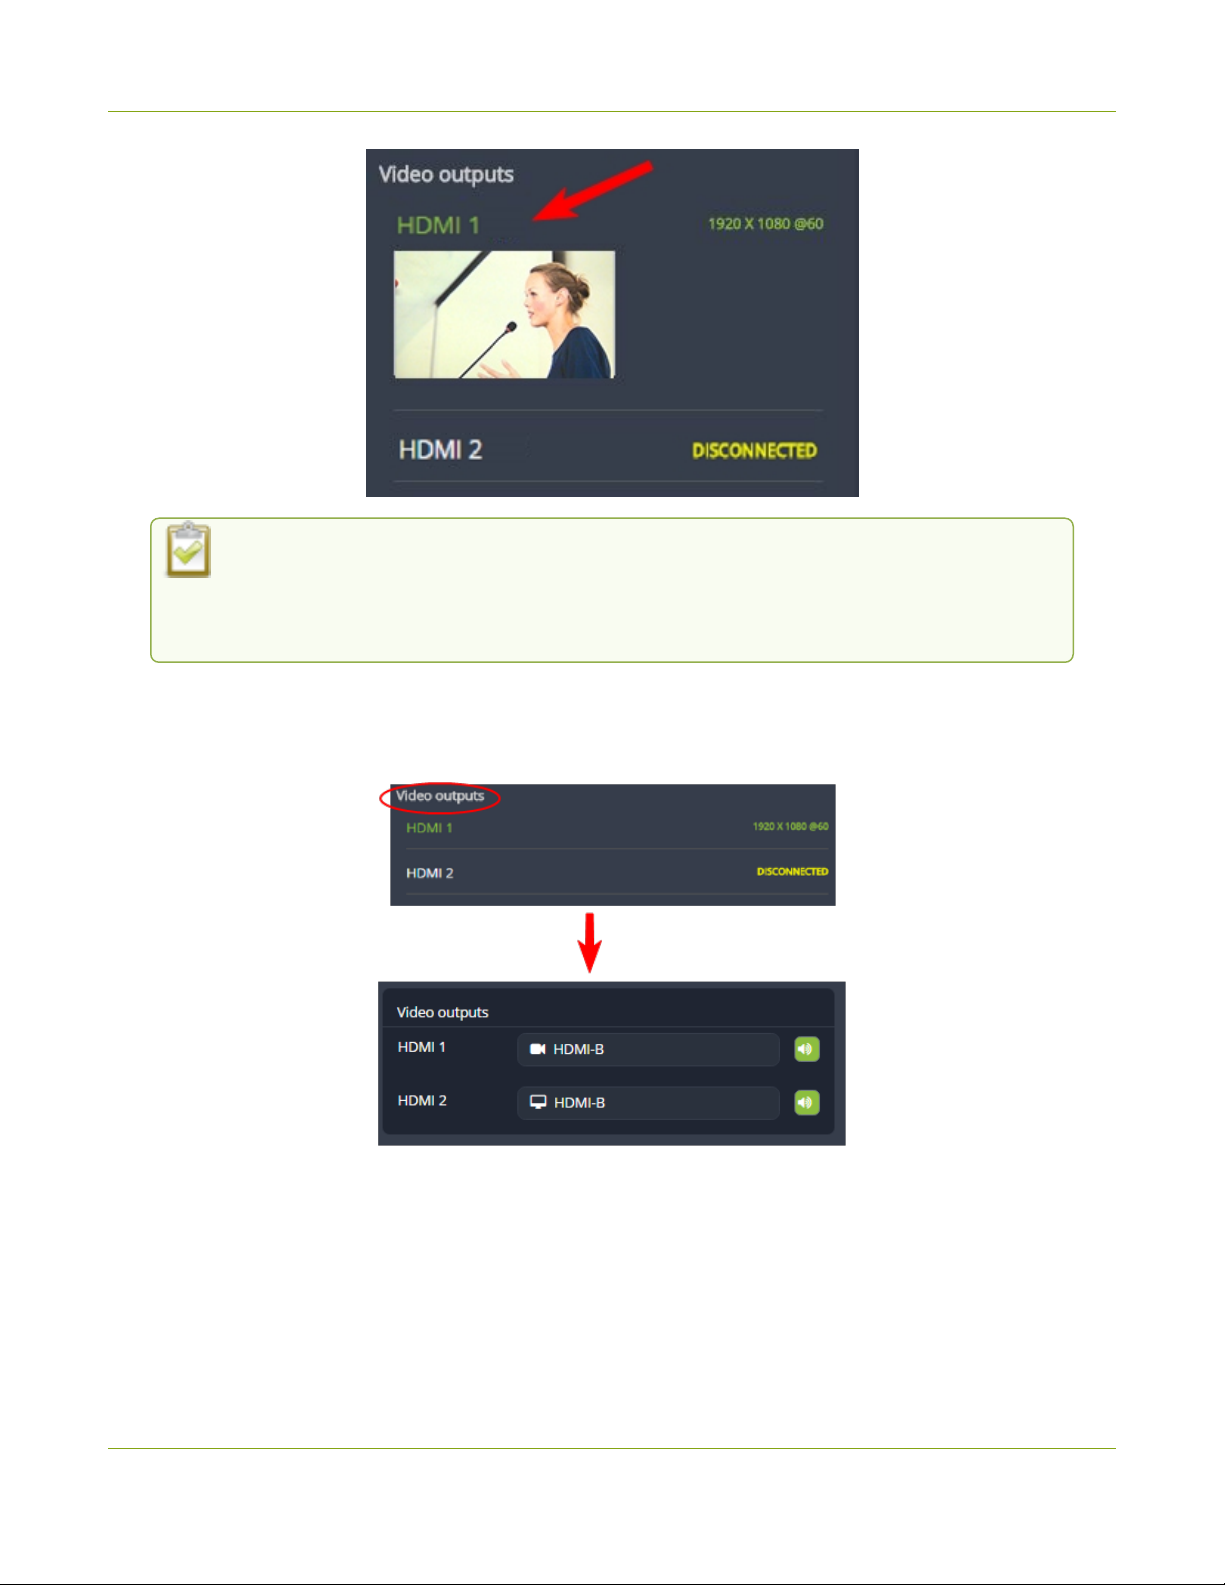
Pearl Mini User Guide
By default, video output ports are configured to maintain aspect ratio, use the display's default
resolution, include audio at 100% and they don't include the audio VU meter. You can change
these defaults in the Admin panel. See Video output ports to learn more about advancedlevel video output configuration using the Admin panel.
Monitor and select the video output source using
Epiphan Live
Select a video source for the output port and enable or disable audio
1. Tap Video outputs to display the video output configuration menu.
2. Tap the text field beside the output port and select a channel or source from the list.
BETA DRAFT - 73
Page 85
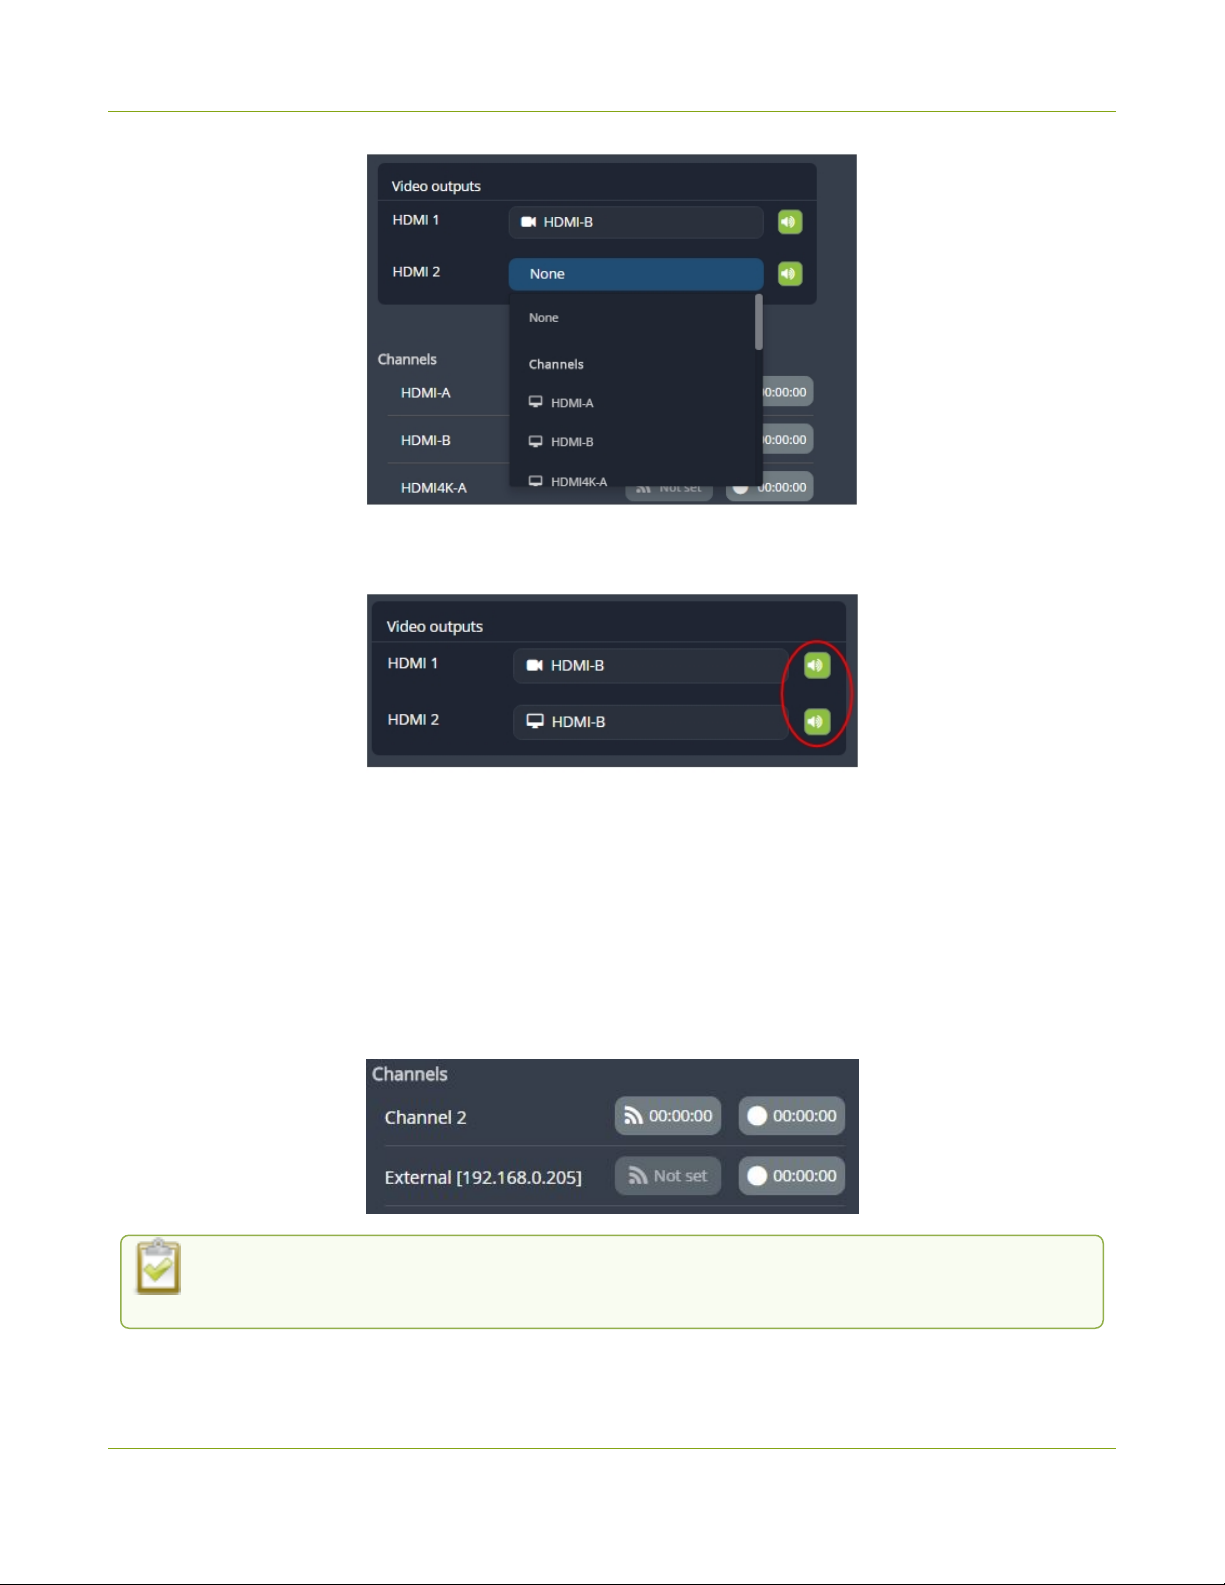
Pearl Mini User Guide Control streaming and recording using EpiphanLive
3. To enable or disable audio for the output port, tap the speaker icon to toggle audio On and Off for the port.
A green icon means audio is enabled. A gray icon means audio is disabled.
Control streaming and recording using EpiphanLive
From the EpiphanLive Dashboard, you can control streaming and recording for channels using the buttons in the
Channels section. When a channel is not currently streaming or recording, the buttons are gray and their
respective timers are set to 00:00:00. If streaming isn't configured for a channel, the streaming button displays as
Not set.
l
The left-most button with the "signal" icon starts and stops streaming for the channel.
l
The right-most button with the circle icon starts and stops recording for the channel.
If multiple streams are configured for a channel, a pair of control buttons is displayed for each
stream.
Click the channel name to open a preview thumbnail view.
BETA DRAFT - 74
Page 86
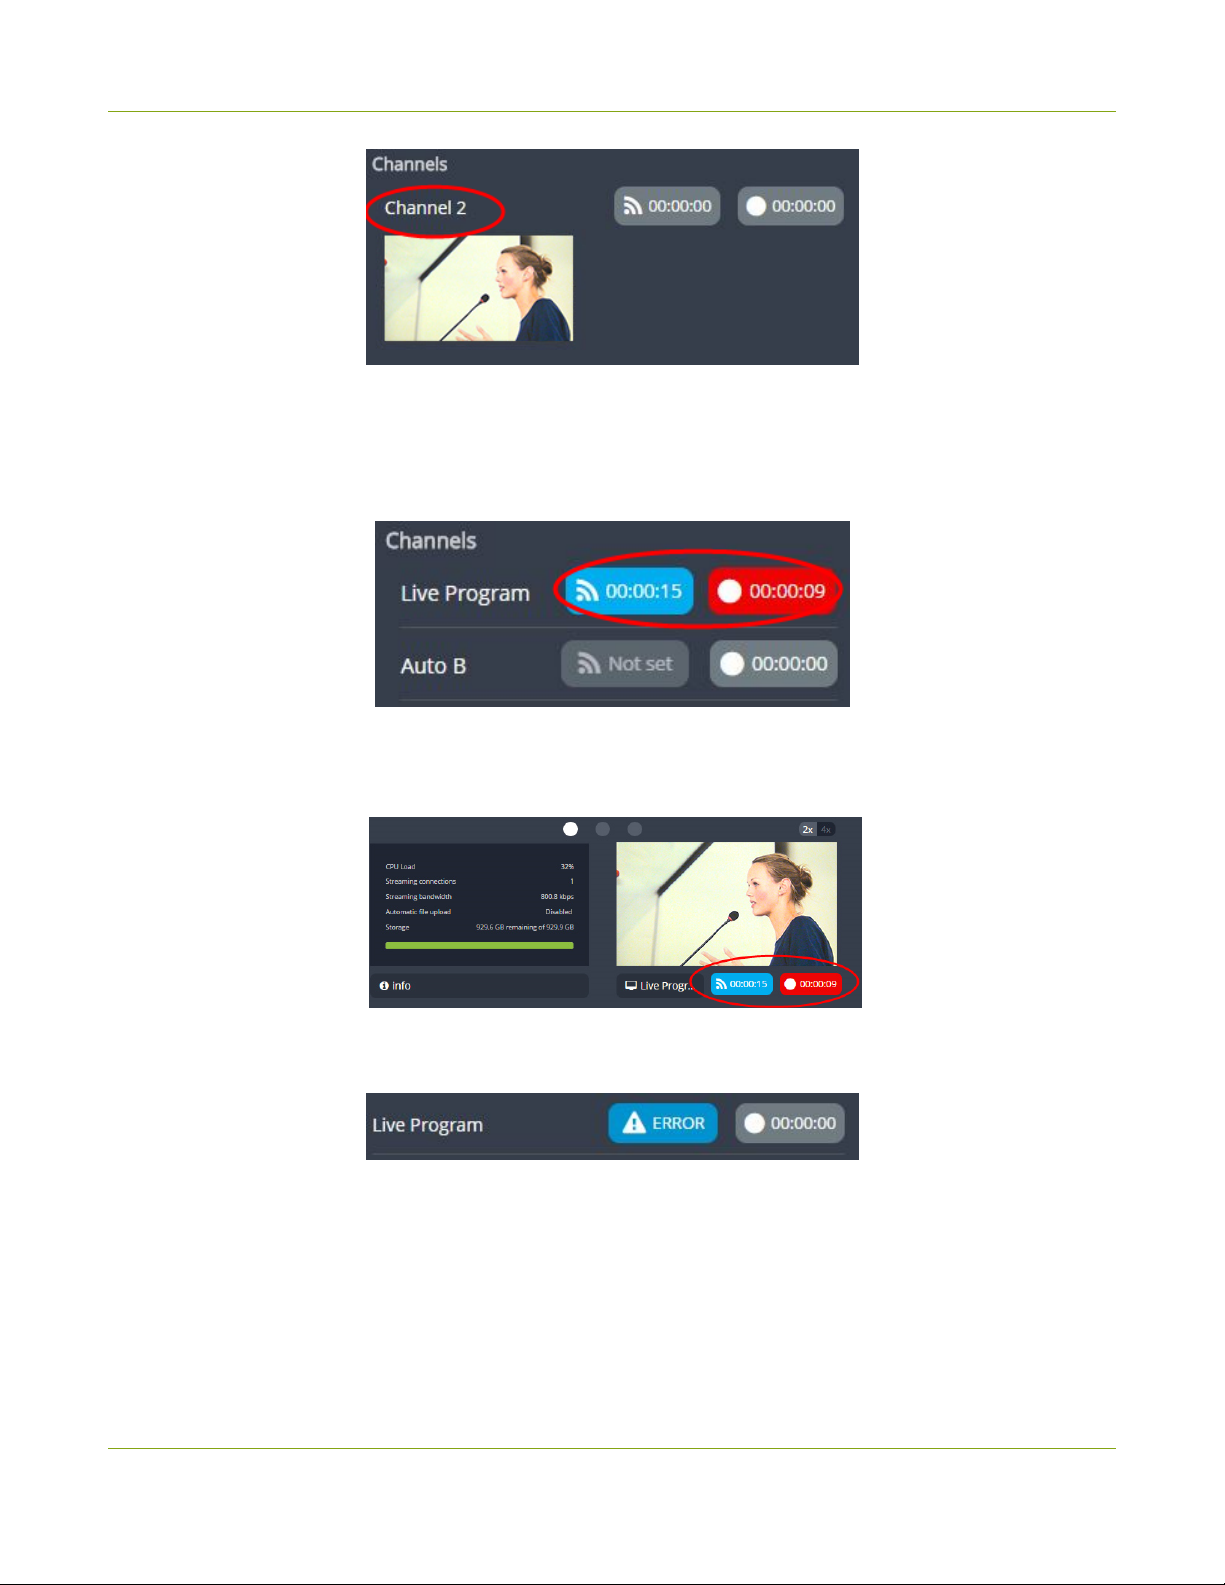
Pearl Mini User Guide Control streaming and recording using EpiphanLive
When you're ready to start streaming and recording the channel, tap the streaming and recording control buttons.
Tap the buttons a second time to stop streaming and recording.
l
The streaming button turns blue when the channel is streaming and the timer's clock increments.
l
The recording button turns red when the channel is recording and the timer's clock increments.
Streaming and recording control buttons also appear below the Dashboard monitoring panels when they're
configure to display a channel. You can use those control buttons to start and stop streaming or recording for a
channel too.
If the stream fails to publish, the streaming button flashes blue and displays ERROR. Check the streaming
settings for your channel using the Admin panel.
Recording using multi-track recorders
From the Admin panel, you can create multi-trackRecorders to capture multiple channels and audio sources in a
single recording. You can then select which combination of video and audio sources to extract from the
recording. This feature is useful when you're capturing a video source and multiple languages from different
audio sources. Multi-track recorders appear on the Dashboard if they are configured on Pearl Mini.
BETA DRAFT - 75
Page 87
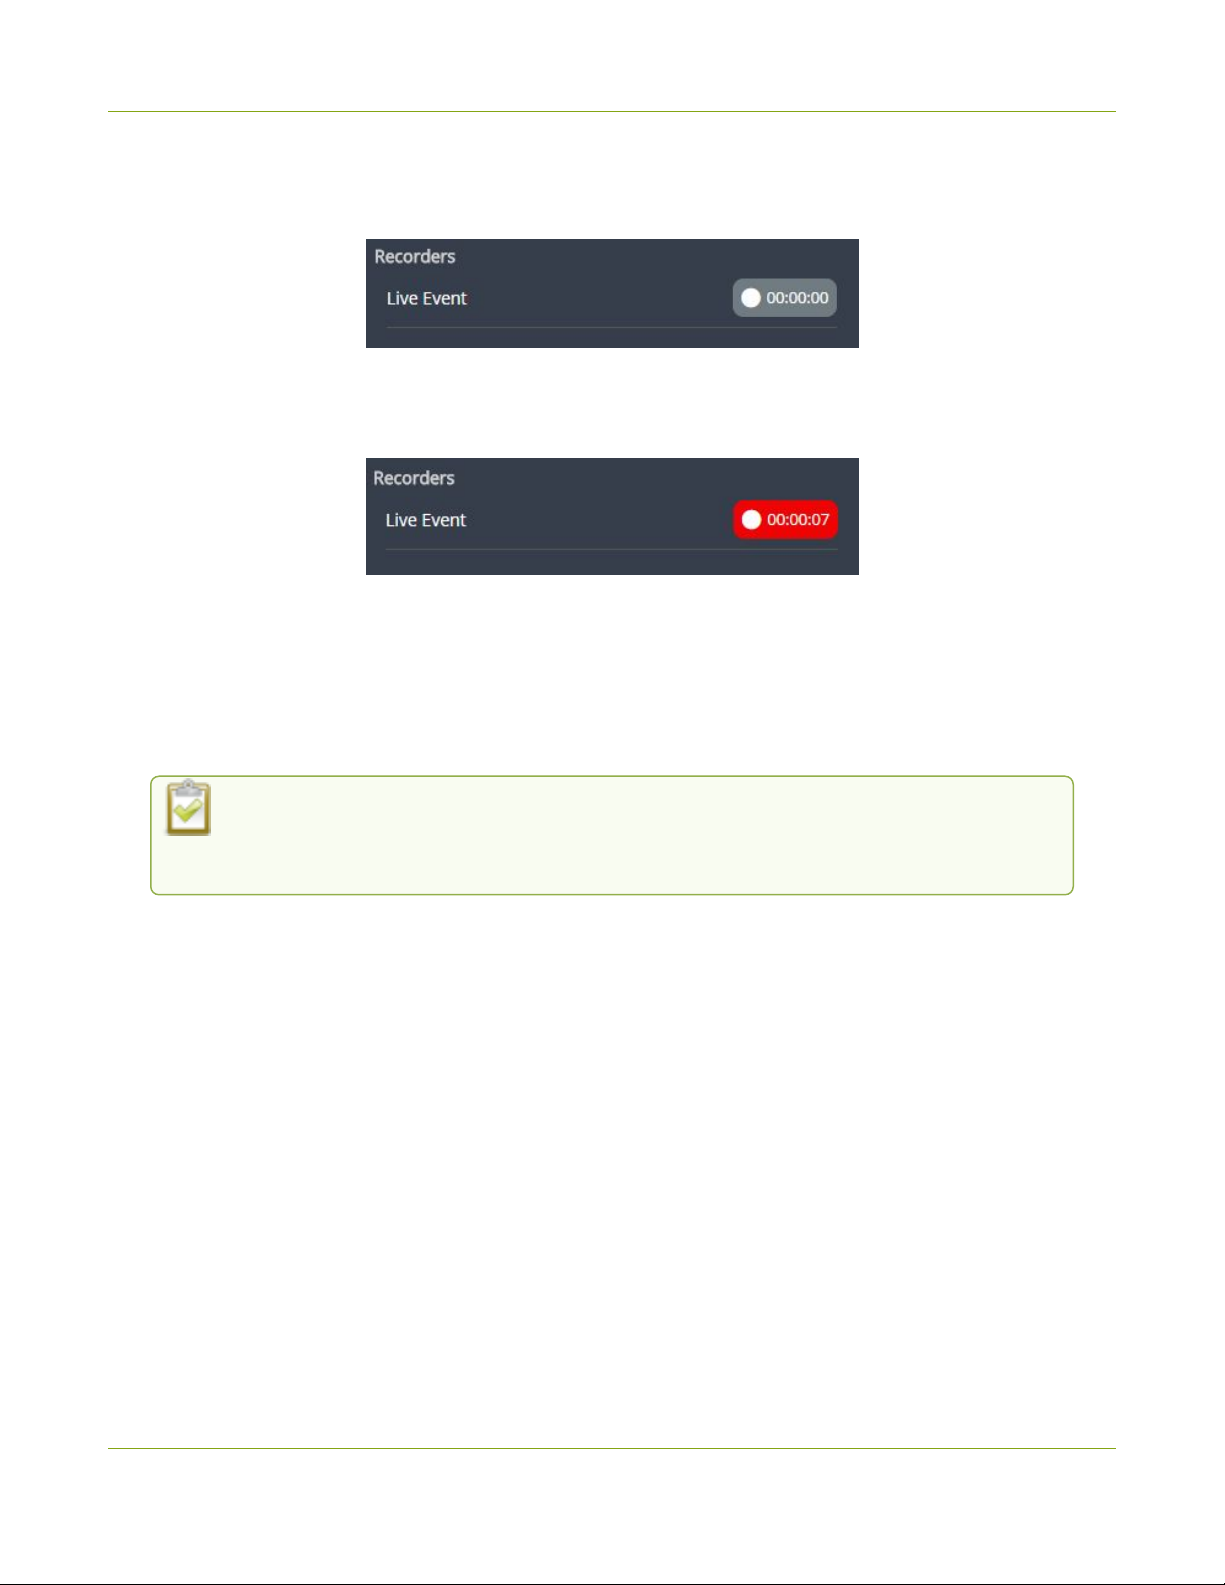
Pearl Mini User Guide Switching / mixing using Epiphan Live
Each multi-track recorder has a recording control button to start and stop recording. When a Recorder is not
recording, the button is gray and the timer is set to 00:00:00. See Add a recorder to learn more about configuring
multi-track recorders using the Admin panel.
To start recording, simply tap the recording control button for that multi-track recorder. The button turns red when
the multi-track recorder is recording and the timer's counter increments. Tap the button a second time to stop
recording.
Switching / mixing using Epiphan Live
The Live Switcher view in Epiphan Live is a simple interface that lets you live switch between layouts while
streaming and recording. To learn how to create different layouts for a channel using the Admin panel, see
Configure a custom layout for a channel.
Switching between layouts using one of the switcher interfaces does not dynamically update
what you see in the other switching interfaces (i.e. Epiphan Live and the Admin Panel). You
must manually refresh the other interfaces separately to reflect the current state.
Topics include:
l
About the Switcher interface
l
Switching while live streaming and recording using Epiphan Live
About the Switcher interface
Access the Switcher interface from the Menu button in the top right corner of the Dashboard interface. SeThe
Dashboard interface.
BETA DRAFT - 76
Page 88
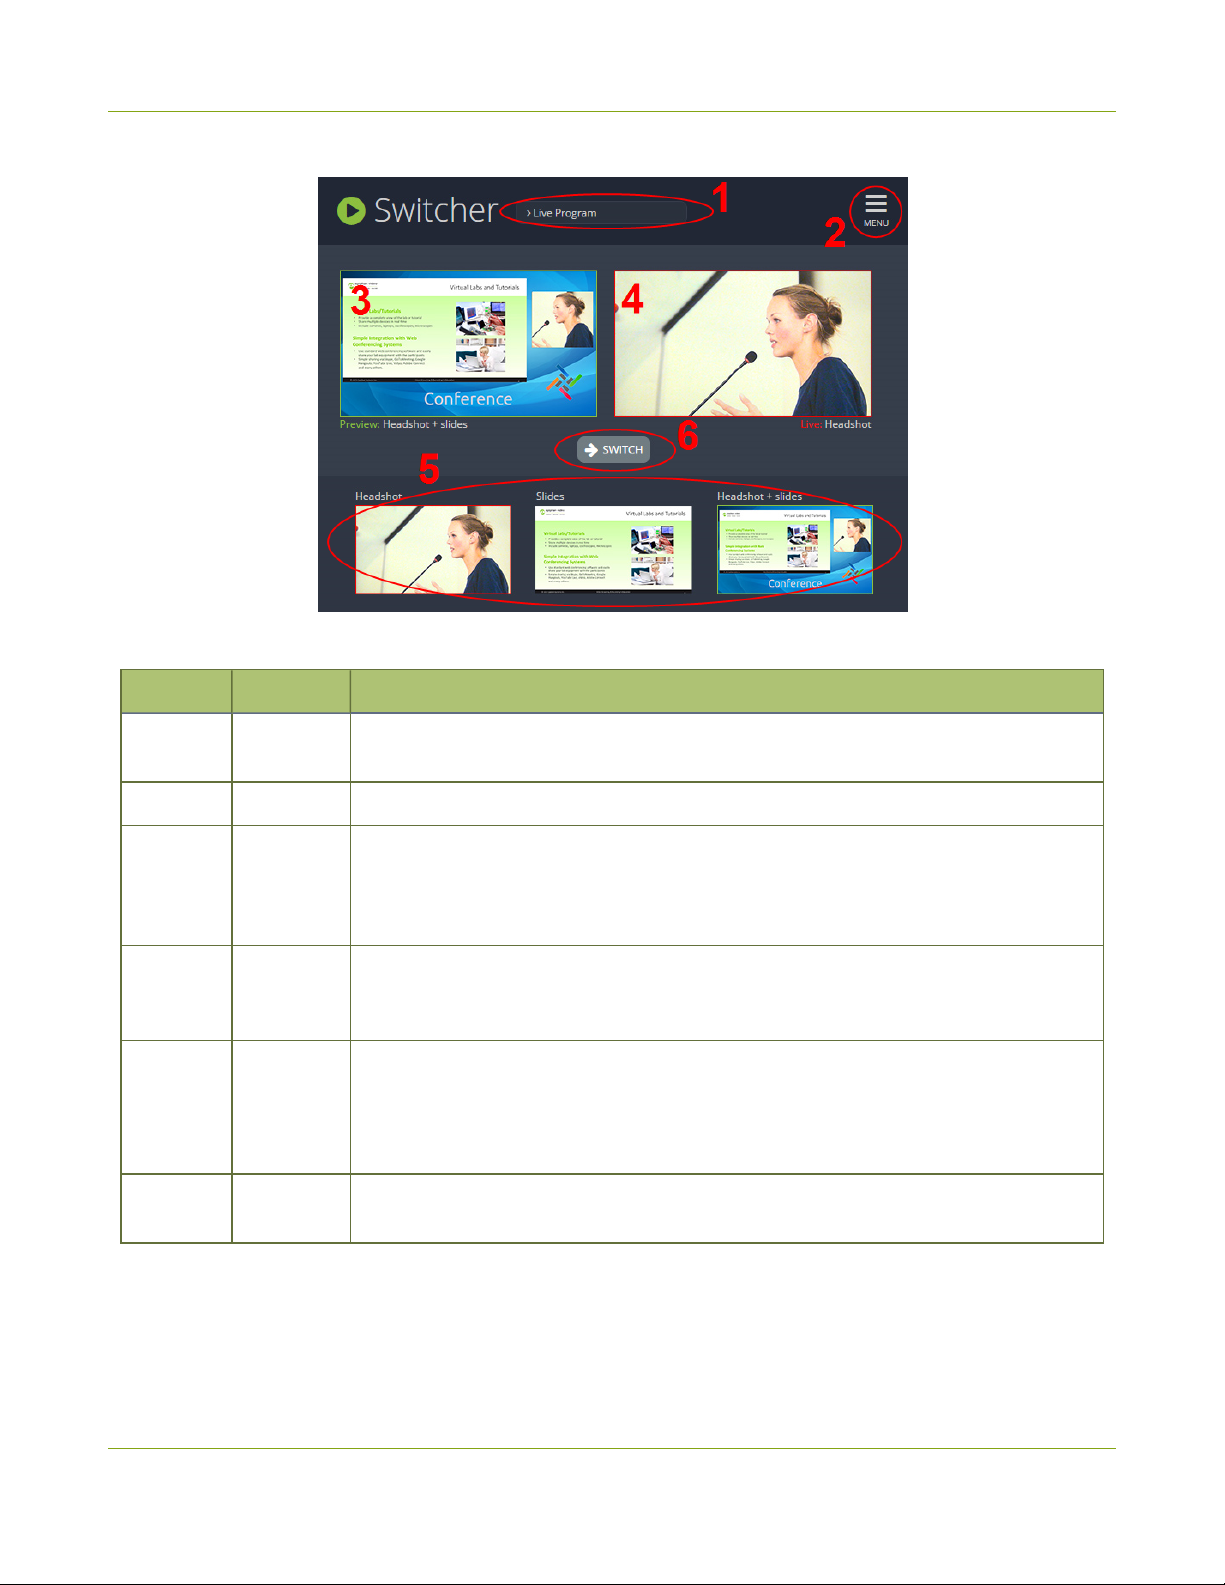
Pearl Mini User Guide
Table 16 Elements in the Switcher view
Switching while live streaming and recording using
Epiphan Live
Number Title Description
1
2 Menu icon Displays links to the Dashboard view and the Admin panel when clicked.
3
4
5
6
Channel
selector
Preview
panel
Live view
panel
Layout
carousel
Switch
button
The list of channels configured on Pearl Mini. Select a channel and switch between
the different layouts that are configured for that channel.
Displays a preview of a selected layout, which is outlined with a green border. When
you click the Switch button, this preview layout becomes the live layout. See
Switching while live streaming and recording using Epiphan Live for more
information.
Displays the active "live" layout that is currently being streamed or recorded. The
live layout is outlined with a red border. When you select the Switch button, this live
layout is replaced with the layout that's loaded in to the Preview panel.
Displays small previews for all layouts contained within your selected channel.
Select a layout from the carousel to add it to the Preview panel.
Note that the layout selected for the Preview panel has a green border and the
layout in the Live panel has a red border.
When selected, the layout in the Preview panel replaces the layout in the Live
panel and is immediately reflected in your active stream and recordings.
Switching while live streaming and recording using Epiphan Live
The Switcher interface lets you easily live switch between custom layouts with a simple click.
BETA DRAFT - 77
Page 89
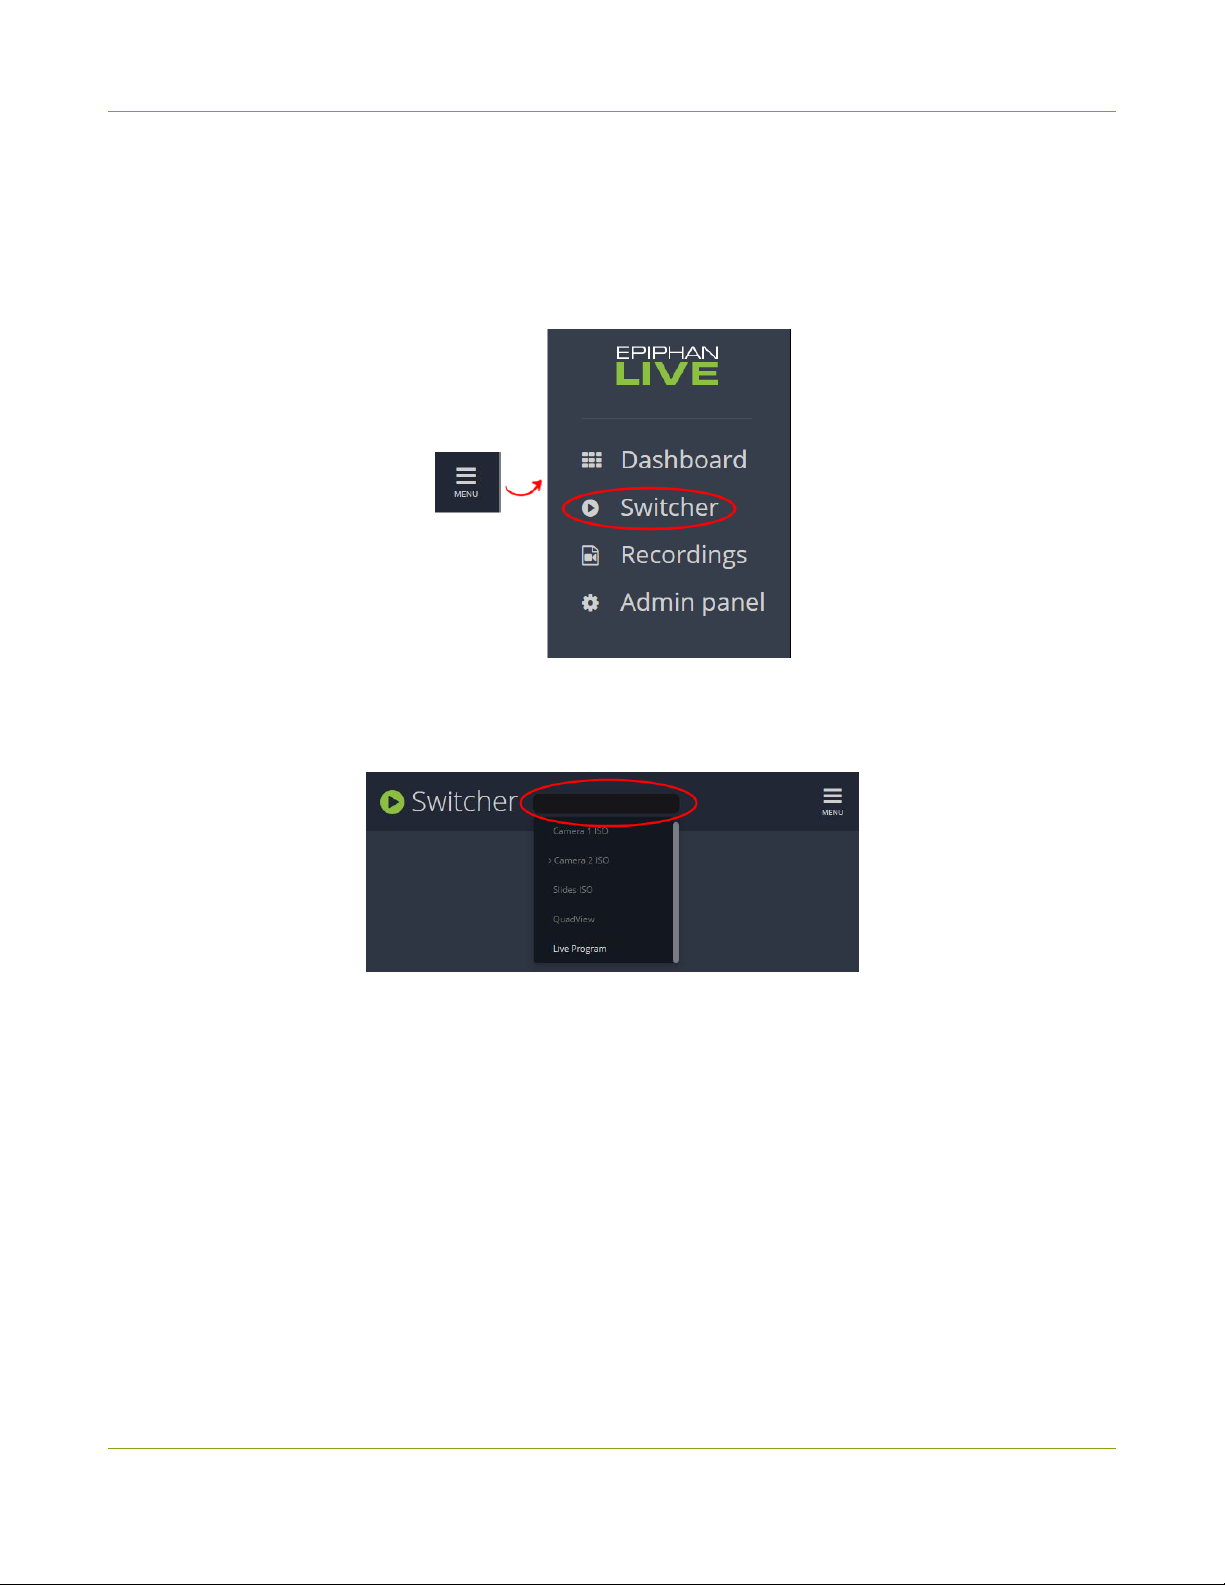
Pearl Mini User Guide
Switching while live streaming and recording using
Switch layouts while live streaming and recording
1. Log in to Epiphan Live. The Dashboard view opens by default. See Access EpiphanLive using a web
browser or mobile device.
2. Tap the Menu icon in the upper-right corner of the Dashboard screen and tap Switcher to open the
Switcher interface.
Epiphan Live
3. Tap the field beside the "Switcher" header and select a channel. The field is blank if this is your first time
configuring the Switcher. Channels with only one layout are grayed-out and cannot be selected for
switching.
All the layouts for the selected channel are displayed in a carousel along the bottom of the screen. The
layout that is live is displayed in the Live panel on the right side of the interface, see About the Switcher
interface.
BETA DRAFT - 78
Page 90
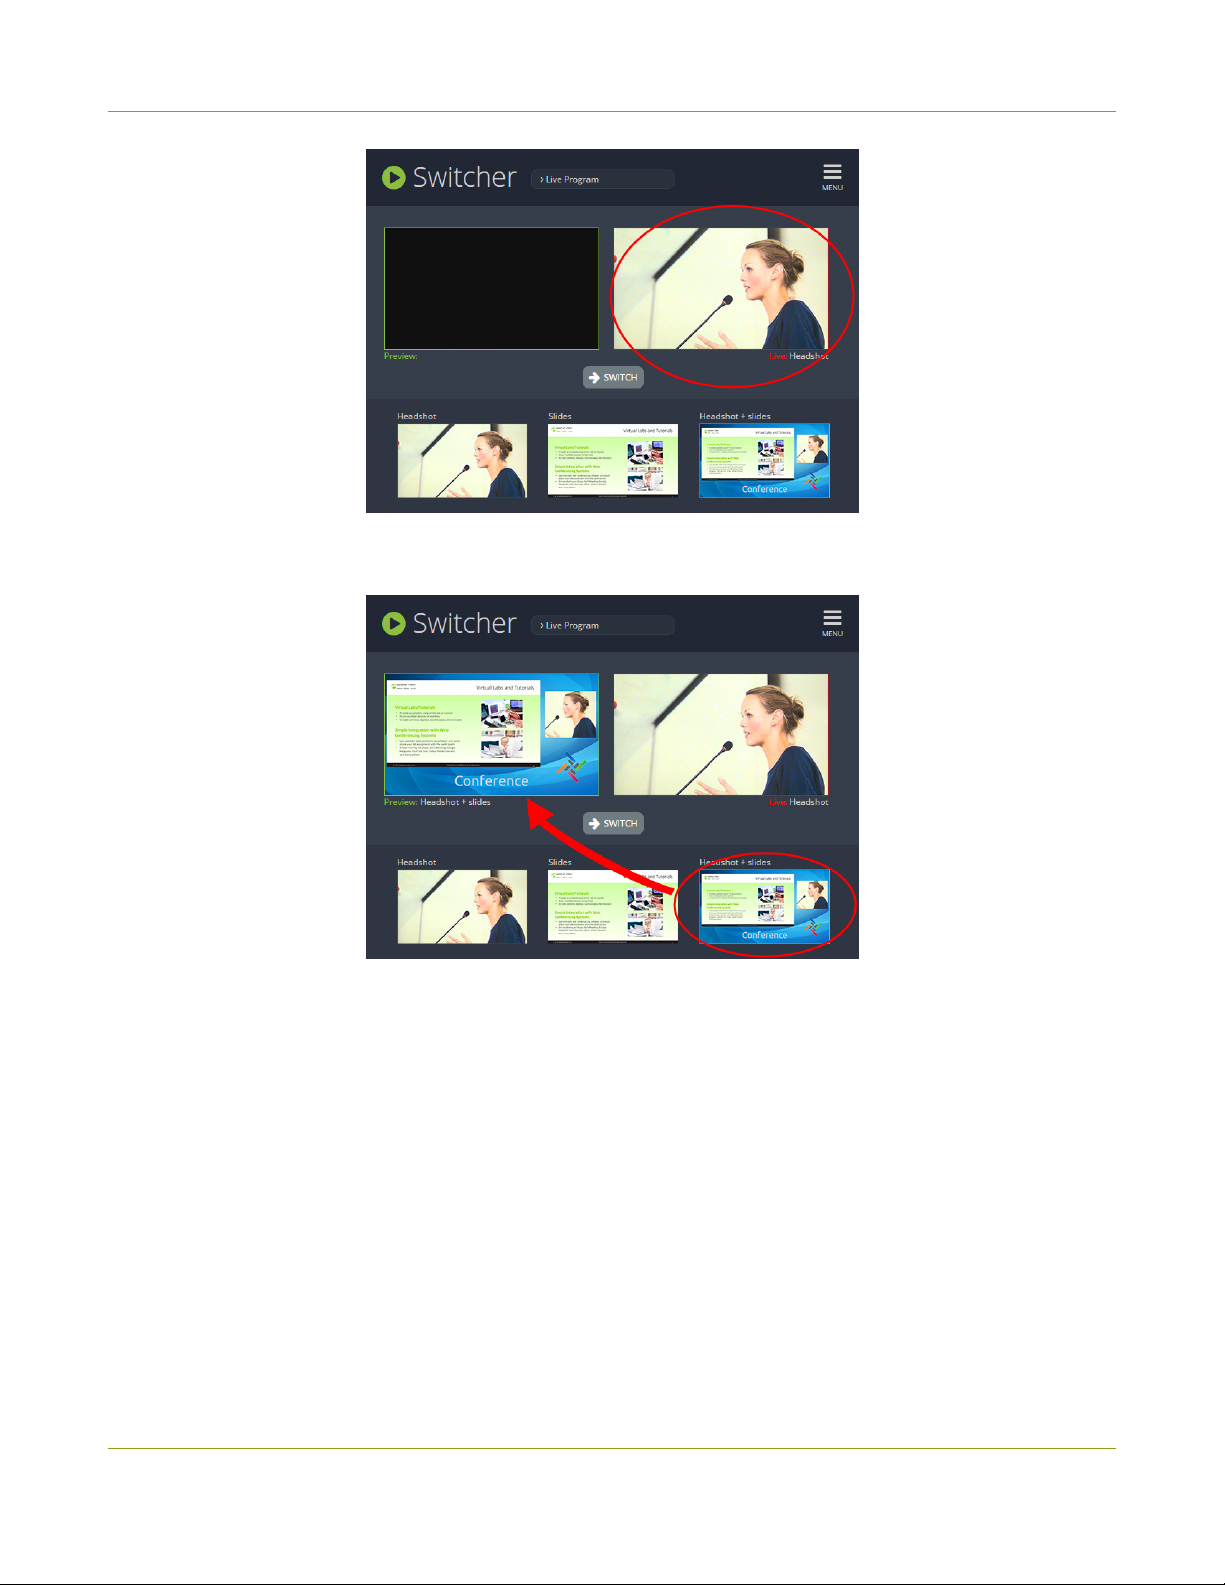
Pearl Mini User Guide
4. In the carousel, tap the layout that you want to switch to next. That layout is loaded into the Preview
panel.
Switching while live streaming and recording using
Epiphan Live
5. Tap the Switch button to switch the layout that is currently in the Preview panel to the Live panel. The
layout that was in the Live panel moves to the Preview panel so that it's ready for the next time you switch.
BETA DRAFT - 79
Page 91
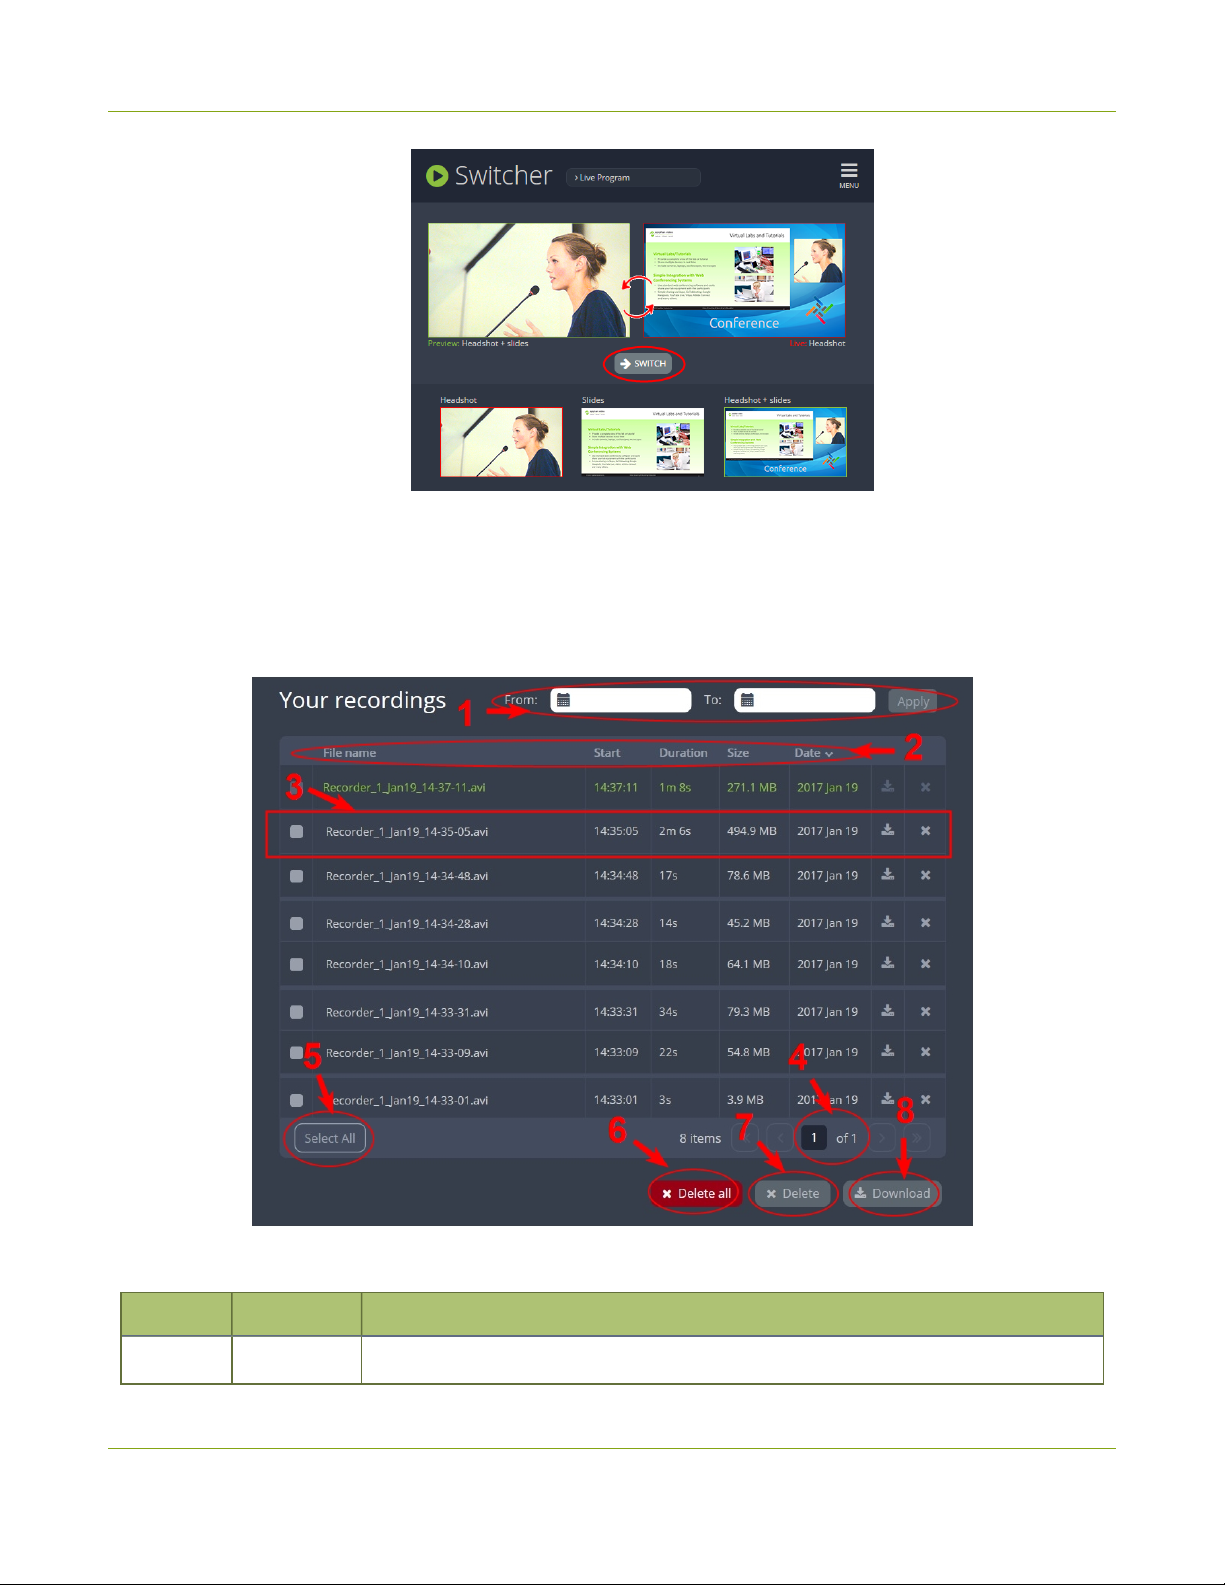
Pearl Mini User Guide Your recordings
6. To load a different layout into the Preview panel, tap another layout in the carousel.
Your recordings
All recordings made using Epiphan Live are saved to the Your recordings panel.
After recoding a file, you can manage it and any other files using the following tools on the page:
Number Title Description
1
Date
Select a From and a To date from the pop-up calendar to create a date range.
BETA DRAFT - 80
Page 92
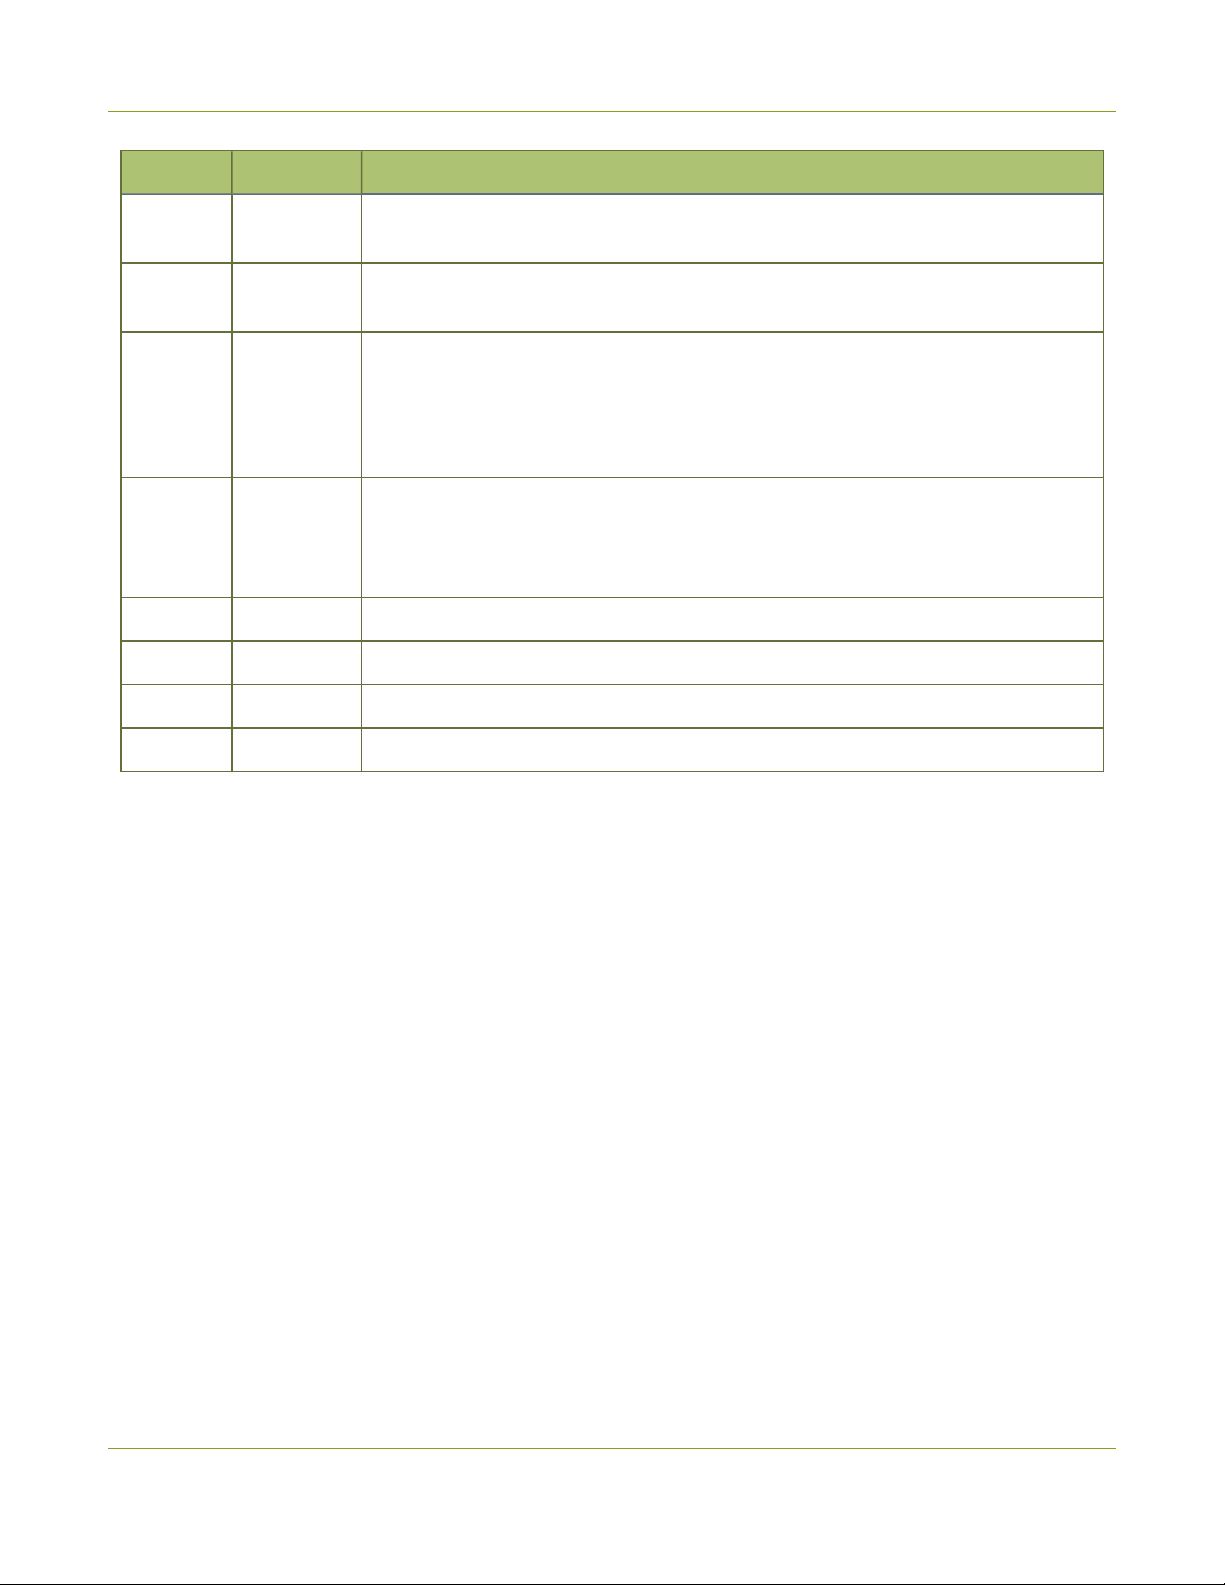
Pearl Mini User Guide Cloud-based device management
Number Title Description
selector
2 File details
3 Files
4
5 Select all Tap to select all files on the page.
6 Delete all Tap to delete all files on the list. Warning: Deleted files can not be recovered.
7 Delete Tap to delete all selected files. Warning: Deleted files can not be recovered.
8 Download Click this button to download all selected files to your local hard drive.
Page
indicators
Then tap Apply. Only recordings that were recorded within that time frame appear
in the list below.
Each heading in the list gives information about that category. Selecting Date
organizes the list chronologically by the date the recording began.
Each recorded file that falls within the search parameters appears in this list,
including important metadata about the file. Tap or click on the file selects it so that
it can be managed through the other tools on the page. You may also download or
delete an individual file by using the action items at the end of the file line. Tap the
file name to rename the file.
The page number indicates which page of results you are currently viewing, and
how many pages of results are there. The buttons allow you to move between
pages one at a time, or straight to the beginning or end of the list. You can also
change which page you are on by typing a valid page number into the text box.
Cloud-based device management
Epiphan Edge is where remote teams can conveniently manage and control all Pearl devices together in one
place. An Internet connection and a free Epiphan Cloud account is all you need to get started.
When Pearl Mini is paired with your Epiphan Cloud account, you can start/stop video recording and streaming,
monitor the health of Pearl Mini with status alerts and a diagnostics dashboard, monitor video feeds, update
firmware remotely, and even remotely configure channel encoding.
Topics include:
l
About Epiphan Edge
l
Enable or disable Epiphan Edge access
l
Pair and unpair from Epiphan Edge
l
Remote login to the Admin panel and Epiphan Live
For more information about Epiphan Edge, see the Epiphan Edge User Guide.
About Epiphan Edge
Epiphan Edge is your remote management and control center for all your Pearl devices. All you need is a free
Epiphan Cloud account.
BETA DRAFT - 81
Page 93

Pearl Mini User Guide Enable or disable Epiphan Edge access
After you pair you Pearl devices with your Epiphan Cloud account, you can access Pearl devices from anywhere
there's an Internet connection. You can even invite others to join your team for easy remote access.
Using Epiphan Edge you can:
l
Preview video sources and audio.
l
Start/stop channel recording and streaming remotely.
l
Remotely configure channel encoding.
l
Create live streams.
l
Monitor performance statistics and system alerts 24/7.
l
Set up custom email alerts.
l
Set up remote teams and assign team members access and control levels.
l
Perform updates and batch operations for efficient fleet management.
l
Remotely log in to cloud versions of the Admin panel for remote rescue troubleshooting, full administration
access, and to control recording and streaming using the Admin panel. You can also control switching
with Pearl-2 and Pearl Mini.
For more information about Epiphan Edge features and functions, see the online Epiphan EdgeUser Guide.
Important considerations
l
The following actions cause a Pearl device's entry in Epiphan Edge to permanently go offline. You must
pair Pearl devices again to remotely control, monitor, or configure Pearl devices using Epiphan Edge.
l
Unpairing Pearl devices in Epiphan Edge.
l
Using the Admin panel to disable the Epiphan Edge feature on a Pearl device while the device is
paired to Epiphan Edge.
l
If you pair a Pearl device again after you have successfully unpaired from Epiphan Edge, a new device
instance is created in Epiphan Edge. The previous instance for the Pearl device remains permanently
offline.
l
Some features like batch operations and remote login require the Epiphan Edge Premium plan.
Enable or disable Epiphan Edge access
Epiphan Edge is where you go to remotely manage and control all your Pearl devices. Access is enabled on
Pearl devices by default. All you need to do is pair the Pearl device to your free Epiphan Edge account for access
to your device over the Internet. You can disable Epiphan Edge access on Pearl device from the device screen or
using the Admin panel and enable it again later. Access is enabled by default.
Important considerations
l
Unpair the Pearl device from Epiphan Edge before disabling Epiphan Cloud access on the Pearl device
using the Admin panel.
BETA DRAFT - 82
Page 94
Pearl Mini User Guide Pair and unpair from Epiphan Edge
l
If you disable Epiphan Edge access while the Pearl device is paired, the device instance in Epiphan Edge
goes permanently offline. For more information, see Pair and unpair from Epiphan Edge.
Enable or disable Epiphan Edge access using the Admin panel
1. Log in as admin, see Connect to the Admin panel.
2. From the Configuration menu, click Maintenance. The Maintenance page opens.
3. Uncheck Enable Epiphan Edge to disable the feature or leave it checked to allow the Pearl device to
access Epiphan Edge. Click Apply to save your changes.
Enable or disable Epiphan Edge access using the touch screen on Pearl-2 or Pearl Mini
1. Tap the gear icon on the touch screen to open the system Settings screen. If the control icons aren't
showing, tap anywhere on the touch screen.
2. Tap the arrow icon in the lower-right corner of the screen to go to the second Settings page.
3. Tap Epiphan Edge. The Epiphan Edge settings page shows the status as enabled and displays a pairing
code by default.
4. Uncheck Enable Epiphan Edge to disable the feature or leave it checked to allow the Pearl device to
access Epiphan Edge.
Pair and unpair from Epiphan Edge
To manage your Pearl devices from the cloud or access the Admin login feature, the Pearl devices must be
paired to your Epiphan Cloud account.
Easily pair the Pearl devices directly from the Admin panel or add a Pearl device as a new device in Epiphan
Edge using the Pearl device's device ID paring code. To manually pair a Pearl device in Epiphan Edge using the
device's pairing code, see the Epiphan Edge online user guide.
You can see if the Pearl device is currently paired using the touch screen when you tap the Settings
gear icon and select Epiphan Edge from the second page of options. A pairing code displays if
Epiphan Edge access is enabled and the device is not paired. To enable Epiphan Edge access, see
Enable or disable Epiphan Edge access.
You can unpair from Epiphan Edge using the Admin panel or directly within Epiphan Edge. Each time you unpair
the Pearl device, the device ID pairing code changes value. When you pair the Pearl device again, a new
instance of the Pearl device with a different device ID is created in Epiphan Edge.
If you unpair from Epiphan Edge using the Admin panel, the Pearl device's status in Epiphan Edge
only changes to the offline state. To completely unpair the Pearl device from Epiphan Edge, you
must use Epiphan Edge to unpair your Pearl device.
BETA DRAFT - 83
Page 95
Pearl Mini User Guide Remote login to the Admin panel and Epiphan Live
Important considerations
l
The Pearl device's entry in Epiphan Edge permanently goes offline when you unpair. You must pair the
Pearl device again to use Epiphan Edge to remotely manage or log in to the Pearl device.
l
If you pair the Pearl device again after you have successfully unpaired from Epiphan Edge, a new device
instance is created in Epiphan Edge. The previous instance for the Pearl device remains permanently
offline, which you can delete at any time.
You can still access information about permanently offline device instances in Epiphan Edge.
Pair and unpair Pearl devices using the Admin panel
1. Log in to the Admin panel as admin, see Connect to the Admin panel.
2. From the Configuration menu, select Epiphan Edge. The Epiphan Edge status page opens. The pairing
code device ID for the Pearl device is shown, as well as a link to pair the device.
3. Select Click to pair. The Epiphan Cloud login page opens in a new tab (https://go.epiphan.cloud)
4. Log in to your existing Epiphan Cloud account or sign up for a free account.
5. After you've logged in to Epiphan Cloud, your Pearl device automatically pairs to your default Epiphan
Cloud team and the Device Details page opens in Epiphan Edge. If you have multiple teams associated
with your account, you're prompted to select a team.
6. In the Admin panel, the status of the Pearl device updates to paired on the Epiphan Edge status page.
7. To unpair a Pearl device using the Admin panel, select Unpair on the Epiphan Edge status page.
Get the pairing code for Pearl-2 or Pearl Mini using the touch screen
1. Tap the gear icon to open the System settings screen. If the control icons aren't showing, tap anywhere on
the touch screen.
2. Tap the arrow icon in the lower-right corner of the screen to go to the second Settings screen.
3. Tap Epiphan Edge to open the Epiphan Edge screen.
a. If a Pearl device is not currently paired to Epiphan Edge, the pairing code displays on screen.
b. If the Pearl device is paired to Epiphan Edge, the screen changes and displays the option to Unpair
instead of the pairing code.
Remote login to the Admin panel and Epiphan Live
You can remotely log in to the Pearl device for full administration access to configure and operate the Pearl
device over the Internet using a cloud version of the Admin panel and Epiphan Live. You just need to pair the
Pearl device to an Epiphan Cloud account that has a Premium plan.
BETA DRAFT - 84
Page 96
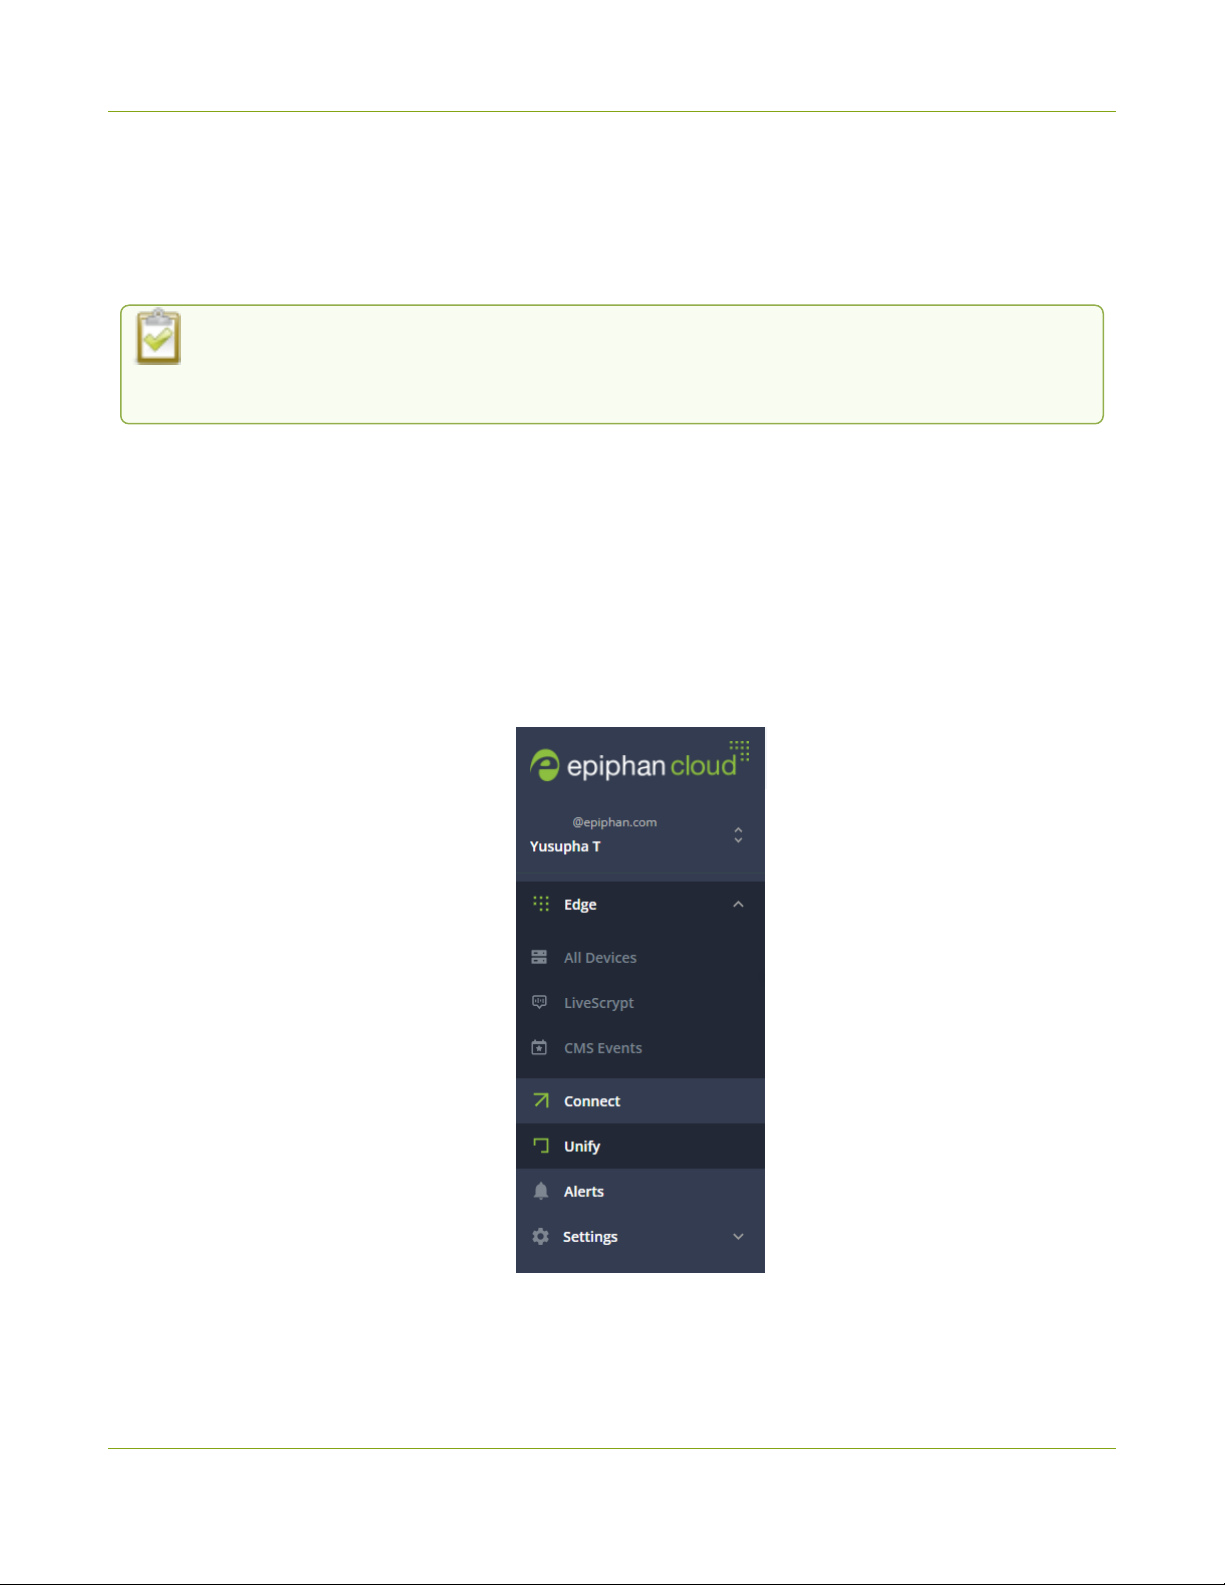
Pearl Mini User Guide Remote login to the Admin panel and Epiphan Live
With an Epiphan Edge Premium plan, full administrative access to your Pearl device for setup and rescue
troubleshooting is fast and convenient. The cloud version of the Admin panel uses the same login credentials as
the locally accessed web version.
Anyone on your team can remotely control live switching and recording using the cloud version of Epiphan Live.
Epiphan Live also uses the same login credentials as the locally accessed web version of the Admin panel
The URLof the local web version of the Admin panel and Epiphan Live are not the same as the
URLof the cloud version. An Epiphan Edge Premium plan is only required to access the cloud
version.
Before you begin
l
Make sure the Pearl device is paired to your Epiphan Edge account, see Pair and unpair from Epiphan
Edge.
l
Upgrade to an Epiphan Edge Premium plan.
Access the cloud version of the Admin panel and Epiphan Live
1. Log in to your Epiphan Edge account at https://go.epiphan.cloud
2. In the left navigation pane, click Edge > All Devices to open the All Devices page.
3. Click the device name in the list to open the details page for that device.
4. From the Device Details page, click Admin login in the header bar. A new tab with the cloud Admin panel
login opens in your browser.
BETA DRAFT - 85
Page 97
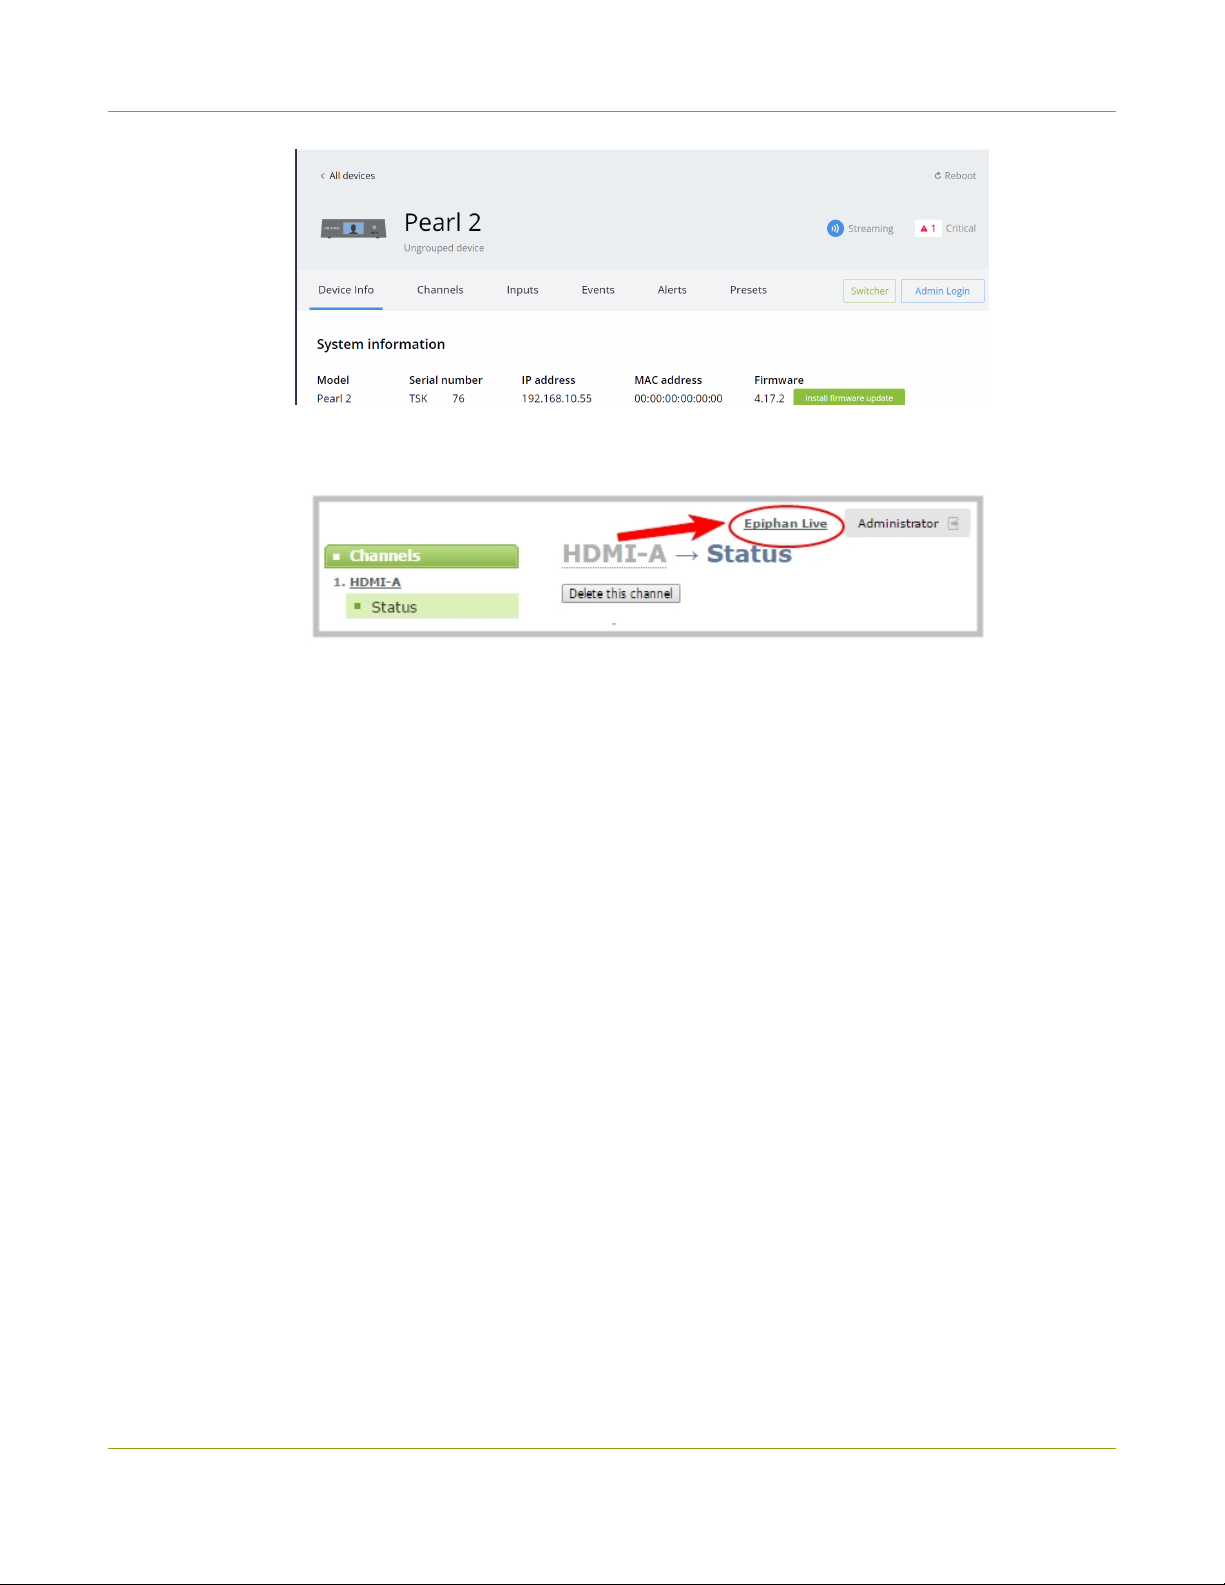
Pearl Mini User Guide Remote login to the Admin panel and Epiphan Live
5. Enter your Admin panel login credentials to log in to the cloud version of the Admin panel for that device.
The default administrator user name is admin.
See The Admin panel andEpiphanLive for instructions to use the interface or to access the local web version.
BETA DRAFT - 86
Page 98

Pearl Mini User Guide Setup
Setup
This section contains tasks that are needed to get Pearl Mini configured.
Topics include:
l
User interfaces and remote access
l
Configure network settings
l
Configure network security
l
Configure date and time
l
Configure device info, name, description, and location
l
Format the SD card
l
Audio input ports
l
Video output ports
l
Connect an external keyboard
l
Connect a USB status light
l
Configuration presets
l
User administration
l
Status and monitoring
For information about integrating with Content Management Systems (CMSs) like Panopto and related
administrator tasks, see Integration.
87
Page 99
Pearl Mini User Guide Configure network settings
Configure network settings
Pearl devices use DHCP to obtain an IP Address over an Ethernet-based network by default; however, you can
easily change the network settings.
Topics include:
l
Network ports used by Pearl Mini
l
Verify IP address and MAC address
l
Configure a static IP address
l
Configure DHCP
l
Configure DHCP Option 81
l
Configure Dynamic DNS
l
Change the HTTP/HTTPS port values
l
Perform network diagnostics
To monitor network status information, see View network status
To set up traffic shaping for multicast streams, see Set up traffic shaping.
Network ports used by Pearl Mini
The following table lists the default incoming and outgoing network ports.
Do not block traffic over these ports. If you want Pearl devices to operate properly, make sure that your firewall is
configured to open these ports. Blocking a port will cause the service that uses that port to fail. It is possible to
use the Admin panel to change the default ports that are used for some services.
Table 17 Default incoming network ports for Pearl devices
Port (or range) Protocol Description
22 TCP SSH for remote support. See Support.
HTTP/HTTPS for web-based access to the Admin panel and Epiphan
Live, HTTP/HTTPS API, REST API, HLS streaming (if enabled) and the
80 TCP
123 TCP/UDP NTP server, if enabled. See Configure a time server.
live channel preview.
You can change the default HTTP port value using the Admin panel, see
Configure HTTPS.
319 and 320 UDP PTP server, if enabled. See Configure a time server.
HTTPS for the Admin panel and HLS streaming if enabled. Port is open
443 TCP
only when HTTPS is enabled. You can change the default HTTPS port
value using the Admin panel, see Configure HTTPS.
88
Page 100
Pearl Mini User Guide Verify IP address and MAC address
Port (or range) Protocol Description
For RTSP/TCP and RTSP/HTTP streaming on your network (where x is
the number of channels configured). The number of ports used depends
Pearl Mini and
Pearl-2:554 to
554+(x-1)
Pearl Nano: 554
TCP
on how many channels you have with RTSPstreaming enabled. See
Share a live broadcast stream (HTTP, HTTPS, or RTSP). Note that client
video players choose whether they are using RTSP/TCP, RTSP/HTTP
orRTSP/UDP.
Port 554 (and port 555 for Pearl Mini and Pearl-2) is also used for internal
communications. If streaming is disabled, these ports remain open but
refuse all external connection requests.
If the client video player chooses RTSP/UDP, it will negotiate 4 random
Random in range
32768 - 61000
UDP
UDP ports (two for audio and two for video). The port range is dependent
on theOS of the client video player and can change with updates to that
OS.
5353 UDP
For multicast DNS discovery. See Connect using a DNS-based service
discovery.
For Flash (FLV) live stream and MPEG-TS streaming on your network
(where x is the number of channels configured). The number of ports
Pearl Mini and
Pearl-2: 8000 to
8000+(x-1)
Pearl Nano: 8000
TCP
used depends on how many channels you have with streaming enabled.
See Share a live broadcast stream (HTTP, HTTPS, or RTSP).
Port 8000 (and port 8001 for Pearl Mini and Pearl-2) is also used for
internal communications. If streaming is disabled for the channel from
Channel > Streaming using the Admin panel, these ports remain open but
refuse all external connection requests.
In addition to the incoming ports, Pearl devices use some outgoing connections as follows:
l
Port 80 - used for firmware update checks and downloads.
l
Publishing/streaming port - the actual ports used for streaming to a server depends on the server and
protocol used. See Streaming to servers, CDNs, and other devices
l
AFU file recording transfer port - the actual ports used for AFU depends on your configuration. See
Automatic file transfers.
Verify IP address and MAC address
To view the current IPaddress and MAC address of the Pearl device:
l
From the Network configuration page using the Admin panel.
l
For Pearl-2 or Pearl Mini, open the Settings menu using the touch screen.
89
 Loading...