

Page 1
LiveScrypt
User Guide
Release 1.0
December 14, 2020
UG123-03
© and ™ 2020, Epiphan Systems, Inc
Page 2

Terms and conditions
This document, the Epiphan web site, and the information contained therein, including but not limited to the text, videos and
images as well as Epiphan System Inc.’s trademarks, trade names and logos are the property of Epiphan Systems Inc. and
its affiliates and licensors, and are protected from unauthorized copying and dissemination by Canadian copyright law, United
States copyright law, trademark law, international conventions and other intellectual property laws.
Epiphan, Epiphan Video, Epiphan Systems, Epiphan Systems Inc., and Epiphan logos are trademarks or registered
trademarks of Epiphan Systems Inc., in certain countries. All Epiphan product names and logos are trademarks or registered
trademarks of Epiphan. All other company and product names and logos may be trademarks or registered trademarks of their
respective owners in certain countries.
Copyright © 2020 Epiphan Systems Inc. All Rights Reserved.
THE SOFTWARE LICENSE AND LIMITED WARRANTY FOR THE ACCOMPANYING PRODUCT ARE SET FORTH IN THE
INFORMATION PACKET OR PRODUCT INSTALLATION SOFTWARE PACKAGE THAT SHIPPED WITH THE PRODUCT
AND ARE INCORPORATED HEREIN BY REFERENCE. IF YOU ARE UNABLE TO LOCATE THE SOFTWARE LICENSES
OR LIMITED WARRANTY, CONTACT YOUR EPIPHAN REPRESENTATIVE FOR A COPY.
PRODUCT DESCRIPTIONS AND SPECIFICATIONS REGARDING THE PRODUCTS IN THIS MANUAL ARE SUBJECT
TO CHANGE WITHOUT NOTICE. EPIPHAN PERIODICALLY ADDS OR UPDATES THE INFORMATION AND
DOCUMENTS ON ITS WEB SITE WITHOUT NOTICE. ALL STATEMENTS, INFORMATION AND RECOMMENDATIONS
ARE BELIEVED TO BE ACCURATE AT TIME OF WRITING BUT ARE PRESENTED WITHOUT WARRANTY OF ANY
KIND, EXPRESS OR IMPLIED. USERS MUST TAKE FULL RESPONSIBILITY FOR THEIR APPLICATION OF ANY
PRODUCTS.
LIMITATION OF LIABILITY
UNDER NO CIRCUMSTANCES SHALL EPIPHAN BE LIABLE FOR ANY INCIDENTAL, SPECIAL, CONSEQUENTIAL,
EXEMPLARY OR OTHER INDIRECT DAMAGES THAT RESULT FROM THE USE OF, OR THE INABILITY TO USE, THIS
PRODUCT OR THE INFORMATION CONTAINED IN THIS DOCUMENT OR PROVIDED ON EPIPHAN’S WEB SITE, EVEN
IF EPIPHAN HAS BEEN ADVISED OF THE POSSIBILITY OF SUCH DAMAGES. IN NO EVENT SHALL EPIPHAN’S TOTAL
LIABILITY TO YOU FOR ALL DAMAGES, LOSSES, AND CAUSES OF ACTION RESULTING FROM YOUR USE OF THIS
PRODUCT, WHETHER IN CONTRACT, TORT (INCLUDING, BUT NOT LIMITED TO, NEGLIGENCE) OR OTHERWISE,
EXCEED THE AMOUNTS YOU PAID TO EPIPHAN DURING THE MOST RECENT THREE-MONTH PERIOD IN
CONNECTION WITH AMOUNTS WHICH YOU PAID FOR USING THIS PRODUCT.
INFORMATION AND DOCUMENTS, INCLUDING PRODUCT SPECIFICATIONS, PROVIDED IN THIS DOCUMENT OR
THE EPIPHAN WEB SITE ARE PROVIDED “AS IS”. SPECIFICALLY, BUT NOT WITHOUT LIMITATION, EPIPHAN DOES
NOT WARRANT THAT: (i) THE INFORMATION IS CORRECT, ACCURATE, RELIABLE OR COMPLETE; (ii) THE
FUNCTIONS CONTAINED ON THE EPIPHAN WEB SITE WILL BE UNINTERRUPTED OR ERROR-FREE; (iii) DEFECTS
WILL BE CORRECTED, OR (iv) THIS WEB SITE OR THE SERVER(S) THAT MAKES IT AVAILABLE ARE FREE OF
VIRUSES OR OTHER HARMFUL COMPONENTS. EPIPHAN SPECIFICALLY DISCLAIMS ALL REPRESENTATIONS,
WARRANTIES, AND CONDITIONS, EITHER EXPRESS, IMPLIED, STATUTORY, BY USAGE OF TRADE OR
OTHERWISE INCLUDING BUT NOT LIMITED TO ANY IMPLIED WARRANTIES OF MERCHANTABILITY, NONINFRINGEMENT, TITLE, SATISFACTORY QUALITY OR FITNESS FOR A PARTICULAR PURPOSE.
For additional terms and conditions, please refer to additional sections in this document.
ii
Page 3

Thank you for choosing Epiphan!
Building reliable solutions that perform above expectations is our mission at Epiphan Video and we value
customer feedback. Suggestions for improvement and comments can be sent to: [email protected]
Warranty
Epiphan Video products come with a 100% return to depot warranty for one year from the date of purchase.
Technical support
Epiphan’s products are backed by our professional support team. You can reach our team several ways:
l
Email [email protected]
l
Live chat from our support site https://www.epiphan.com/support/
l
Phone toll free at 1-877-599-6581 or call +1-613-599-6581
Gather as much information about your problem as you can before you contact us so we can help you better,
including:
l
A description of the problem
l
Details about your audio source (i.e. type and connection)
l
Product serial number
l
Product firmware version
l
Product LED lights
iii
Page 4

Table of contents
Table of contents iv
Get started 1
What is LiveScrypt? 3
User interfaces 4
Using the touch screen 4
Using the web interface 6
Using Epiphan Cloud 7
About your LiveScrypt device 9
Install the power button shield 11
Create an account and enable transcription services 12
Connect the network and power on 13
Connect audio sources and check levels 14
Optimize audio performance 16
Connect an external display 16
Pair the LiveScrypt device 18
Start, stop, and pause transcription using the touch screen 20
Start, stop, and pause transcription using Epiphan Cloud 21
Monitor audio 22
Output display options 24
Choose the display view 24
Display QR code 26
Copy the QR code and session URL 28
Change the display output port resolution 29
Change display color scheme and font size 31
Change touch screen font size 32
Change the direction of transcription 34
Transcription options 36
Change the language 36
Enable punctuation and profanity filter 37
Enter an NAICS code 39
Clear transcription from the display 40
Download and delete .SRT and.TXT files 42
Audio options 44
Adjust audio gain 44
Enable or disable phantom power 47
Mute audio 48
Assign audio sources to an input 50
iv
Page 5

System network options 52
Network ports used by LiveScrypt 52
Access system information 53
Rename the LiveScrypt device 55
Turn DHCP on or off 57
Set up a static IP address 58
Set the date, time, and zone 60
Setup local NTP or another synchronization server 61
Security options 62
Set touch screen PIN and lock 62
Set the web interface password 64
Billing and storage 65
Managing your account and changing your plan 65
Storage and managing your footage 66
Troubleshooting and support 67
Troubleshooting Quick Reference 68
View network diagnostics 69
Power down and system restart 69
Specifications 71
Audio inputs 71
Vesa mounting the device 72
Tech specs 72
Software license 76
v
Page 6

LiveScrypt User Guide Get started
Get started
Welcome and thank you for buying Epiphan LiveScrypt™. You'll find all the information you need to set up and
use your new live transcription solution in this guide.
The Get started covers What is LiveScrypt? and gives an overview About your LiveScrypt device, as well as the
User interfaces. You'll also find the basic step-by-step procedures you need to get started transcribing right
away.
The rest of the guide covers custom options that are available from the LiveScrypt device settings - like changing
the transcription language, displaying a QR code so people can watch using their favorite smart device,
changing the font size and the look of the output display, and more.
The guide is divided into these main sections:
l
Get started
l
Display options
l
Transcription options
l
Network and system options
l
Security options
l
Troubleshooting and support
l
Billing and storage
Before you begin
To get started, you need your LiveScrypt transcription device, a LiveScrypt account, a network connection, and
at least one audio source - like a microphone. You can connect one or more audio sources to the LiveScrypt
device. LiveScrypt even accepts embedded audio from SDI, HDMI, and USB (UVC) video sources.
The better your audio source, the better LiveScrypt works. To get the best performance out of your LiveScrypt
device, see Optimize audio performance.
Quick steps to start transcribing using your LiveScrypt device.
Step 1: Set up an Epiphan Cloud account and enable LiveScrypt transcription service. Valid credit card
information is required, see Create an account and enable transcription services.
Step 2: After your account is setup, you should connect the LiveScrypt device to the network and power up the
device, see Connect the network and power on.
Step 3: Next, connect your audio sources and check your levels, see Connect audio sources and check levels.
Step 4: And connect an output display device, see Connect an external display.
1
Page 7

LiveScrypt User Guide Get started
Step 5: Pair your LiveScrypt device to your Epiphan Cloud account, see Pair the LiveScrypt device.
Step 6: Now you're ready to start transcribing. Its just a simple tap to start, stop, and pause transcription using
the touch screen and web interface, see Start, stop, and pause transcription using the touch screen. Or use
Epiphan Cloud, see Start, stop, and pause transcription using Epiphan Cloud.
Step 7: When you're done, you can download an .SRT or .TXT file of the transcription, see Download and delete
.SRT and.TXT files.
2
Page 8
LiveScrypt User Guide What is LiveScrypt?
What is LiveScrypt?
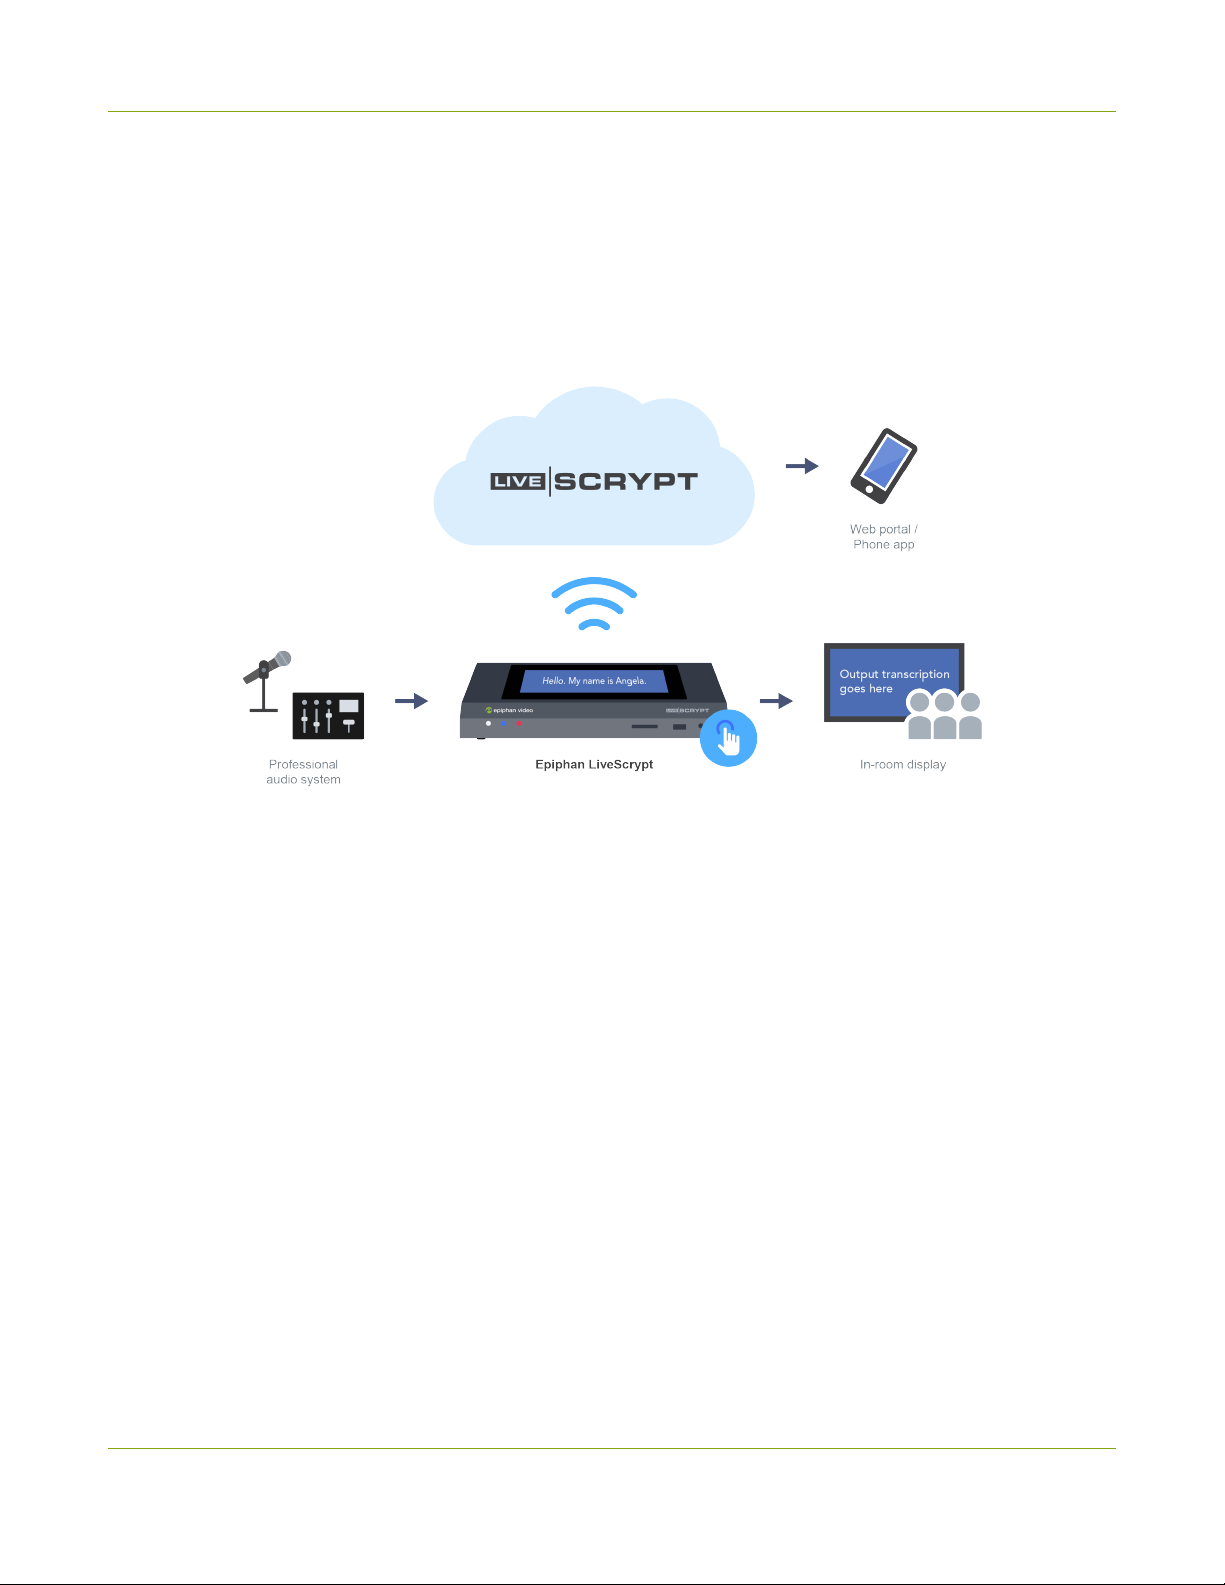
LiveScrypt is an automated, AI-based live transcription solution for real-time speech-to-text transcription that's
perfect for conferences, corporate town halls, medical training, lecture capture, and any live event where greater
accessibility is needed.
The LiveScrypt transcription solution has two main components: a hardware device and an automated cloudbased transcription service.
Highly accurate and affordable, LiveScrypt supports many languages - making it incredibly versatile.
Watch live transcriptions on in-room displays or from anywhere there's Internet connectivity using your mobile
device and favorite web browser. You can even feed the HDMI output to your video production software and
chroma key out the background for a transparent lower-third effect.
The convenient 7 inch built-in touch screen lets operators monitor the live transcription, as well as set up options
like the profanity filter and automatic punctuation. LiveScrypt also offers easy-access remote setup options using
a web-based UI or Epiphan Cloud.
When your event's done, the transcription is saved to your account in the cloud. You can download the .SRT or
.TXT transcription file at any time.
3
Page 9
LiveScrypt User Guide User interfaces
User interfaces
LiveScrypt has three interfaces you can use to monitor and control live transcription, as well as configure
LiveScrypt options.
l
Using the touch screen
l
Using the web interface
l
Using Epiphan Cloud
Using the touch screen
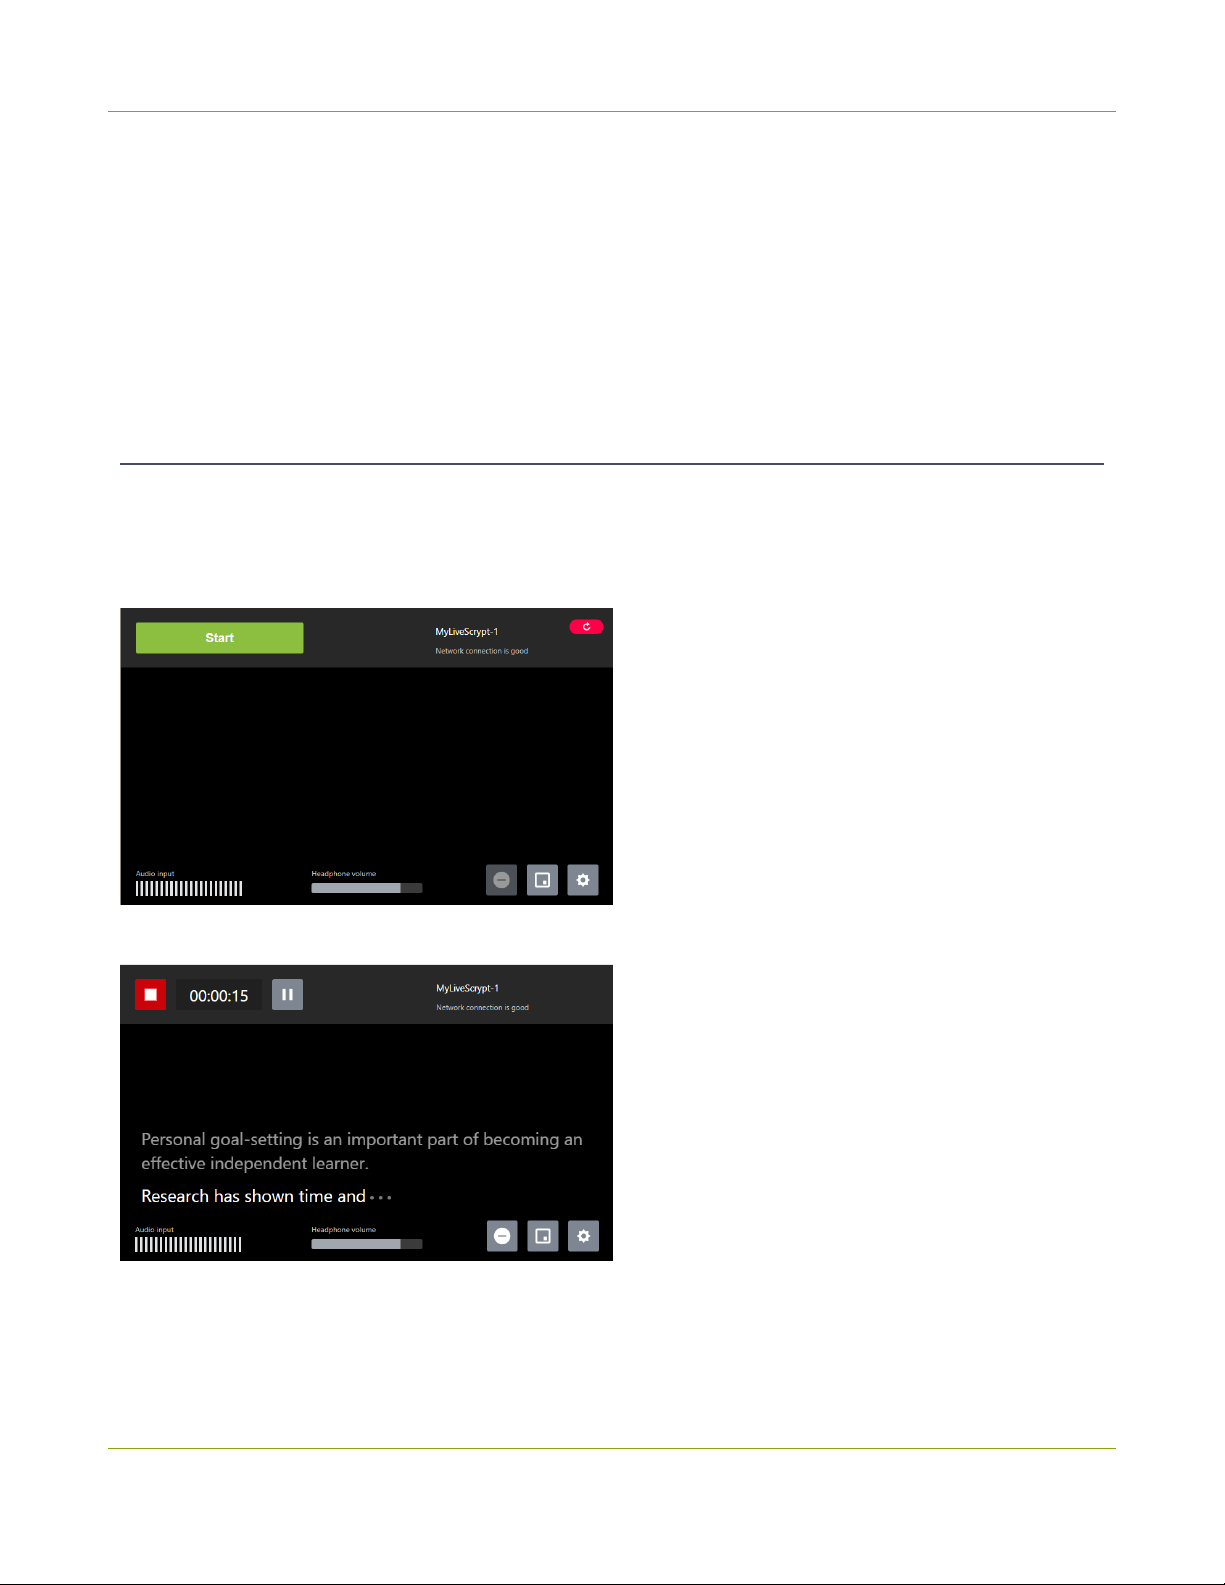
The LiveScrypt device's front panel includes a 7 inch touch screen for confidence monitoring, configuration, and
operation. Simply tap and swipe to select buttons and navigate menus.
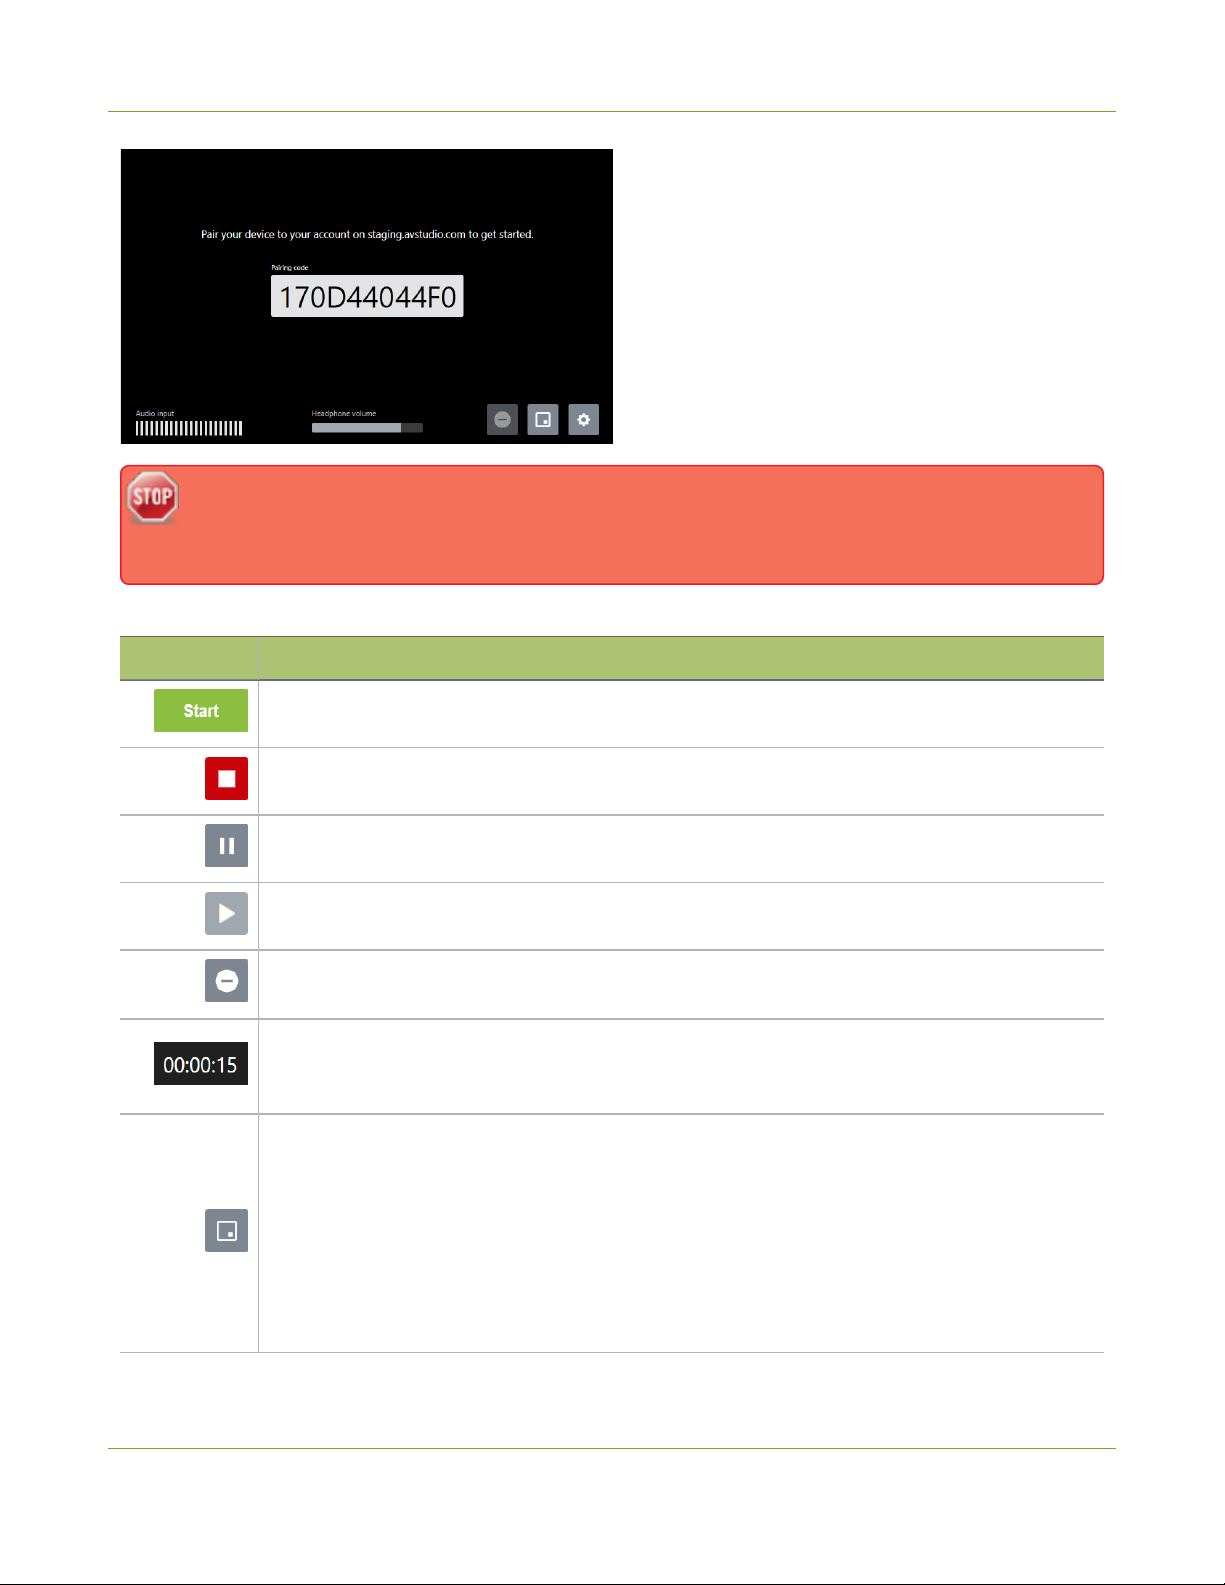
Control icons and a VU meter appear along the bottom of the touch screen, and a header bar with additional
buttons and information like the name of the device appears along the top.
Transcriptions scroll upwards from the bottom of the screen by default. The active phrase is highlighted.
The display area can show the pairing code, transcriptions, menus, the QR code, and messages.
4
Page 10
LiveScrypt User Guide Using the touch screen
The touch screen is capacitive. Use only your finger or a specially designed soft-tipped capacitive
stylus. Pressing too hard or using something other than your fingertip or capacitive stylus can
damage the screen.
Table 1 Description of controls and icons
Icon Description
Start transcription.
Stop transcription.
Pause transcription.
Restart a paused transcription.
Clears the transcription from the beginning of the current session. The icon is grayed out when
transcription isn't started.
The transcription timer increments while transcription is in progress and displays time in
hh:mm:ss. The time flashes while transcription is paused and reverts to 00:00:00 when
transcription is stopped.
Select the display view that people see. Options are:
l
None: A plain black screen with the LiveScrypt logo displays.
l
Text: The live transcription displays full screen when you start transcription. The
transcription appears only as speech is detected.
l
Text + QR: The live transcription displays along with the QR code when you start
transcription. The transcription appears only as speech is detected.
l
QR code: A full screen QR code displays when you start transcription.
5
Page 11
LiveScrypt User Guide Using the web interface
Icon Description
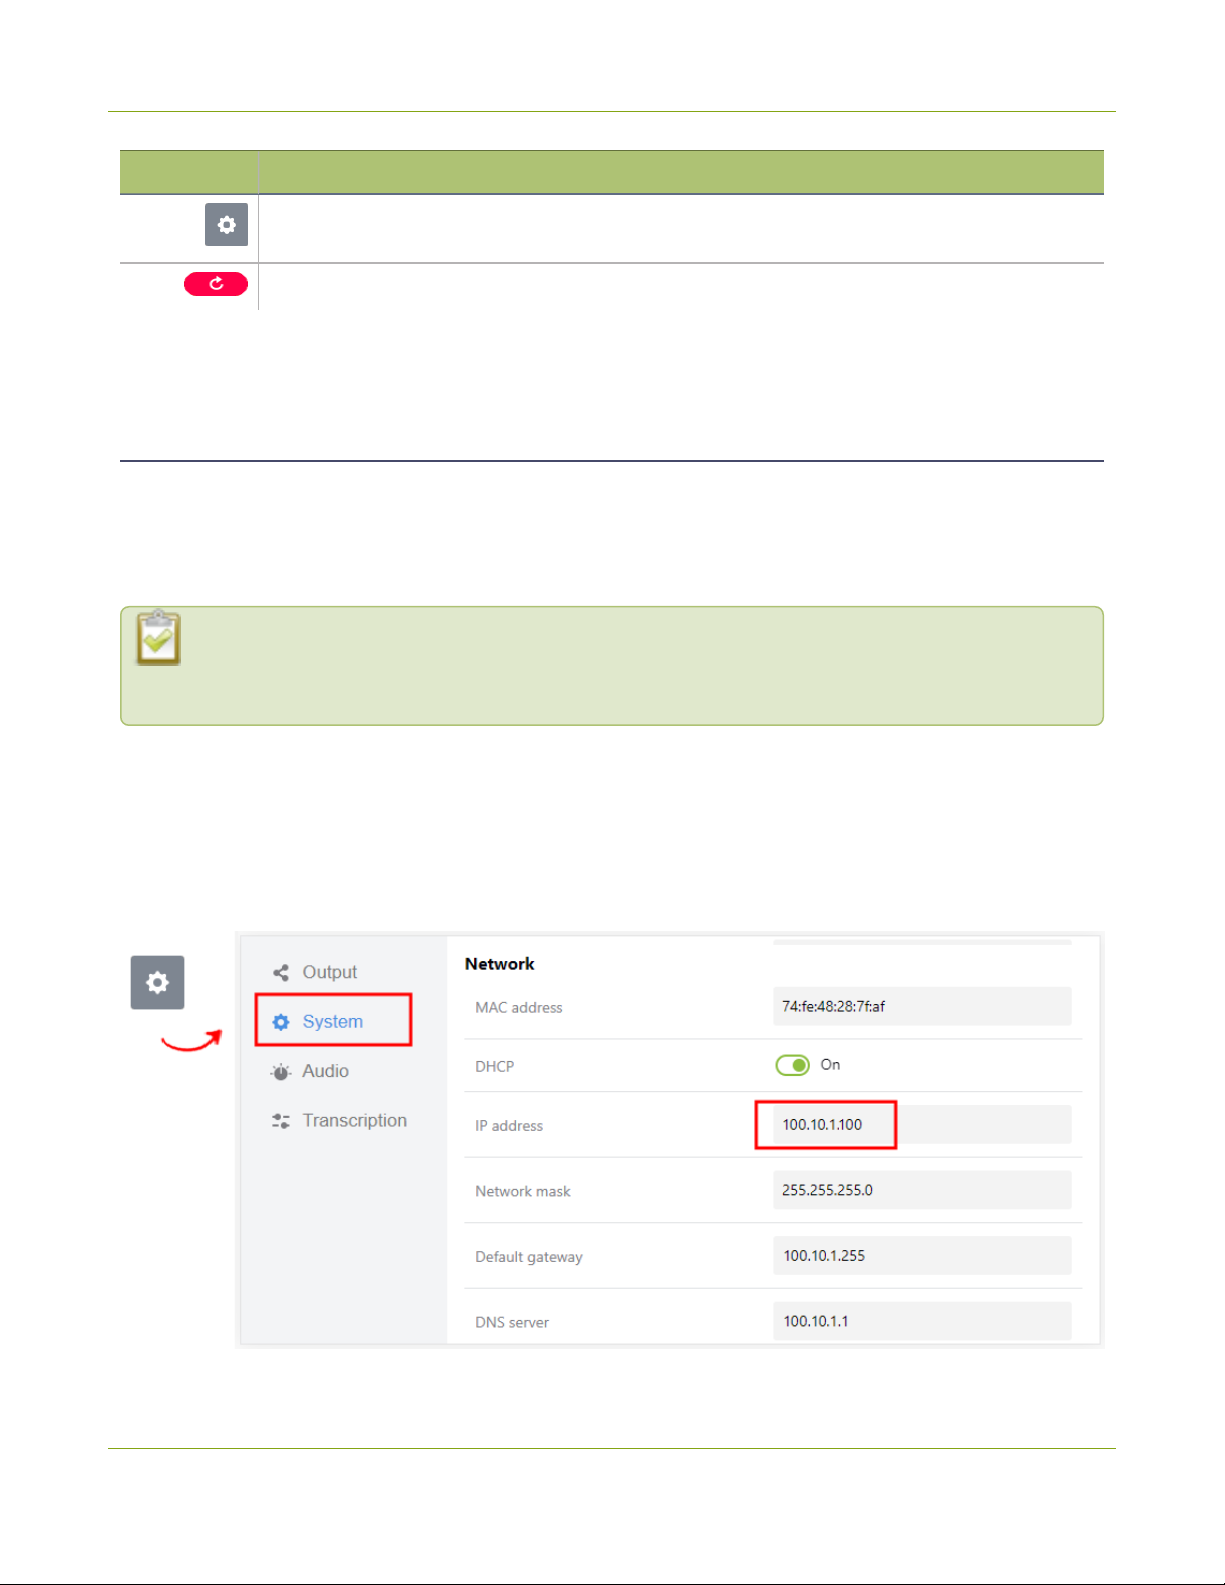
Access the Settings to configure the HDMI output options, audio sources, transcription options,
system and network options, and security features.
Reboot the device. Displays when a software update is available.
A headphone volume slider and VU meter appear along the bottom of the touch screen. For more information,
see Monitor audio.
Using the web interface
The web interface is a convenient way for you to remotely monitor, configure, and control your LiveScrypt device.
All screens and controls are exactly the same as the touch screen. Simply click and drag to scroll through lists
and select menus using a computer and mouse. Using a smart device or a touch-sensitive screen, you can tap
and swipe.
Throughout this user guide, follow the instructions to use the touch screen unless the instructions
specifically indicate there are alternate steps for the web interface. For an overview of icons and
controls on the screen, see Using the touch screen.
The IP address of your LiveScrypt device is needed to use the web interface. As well, the device must be
connected to a LAN with access to the Internet. To connect the device to the network, see Connect the network
and power on.
To use the web interface with your LiveScrypt device:
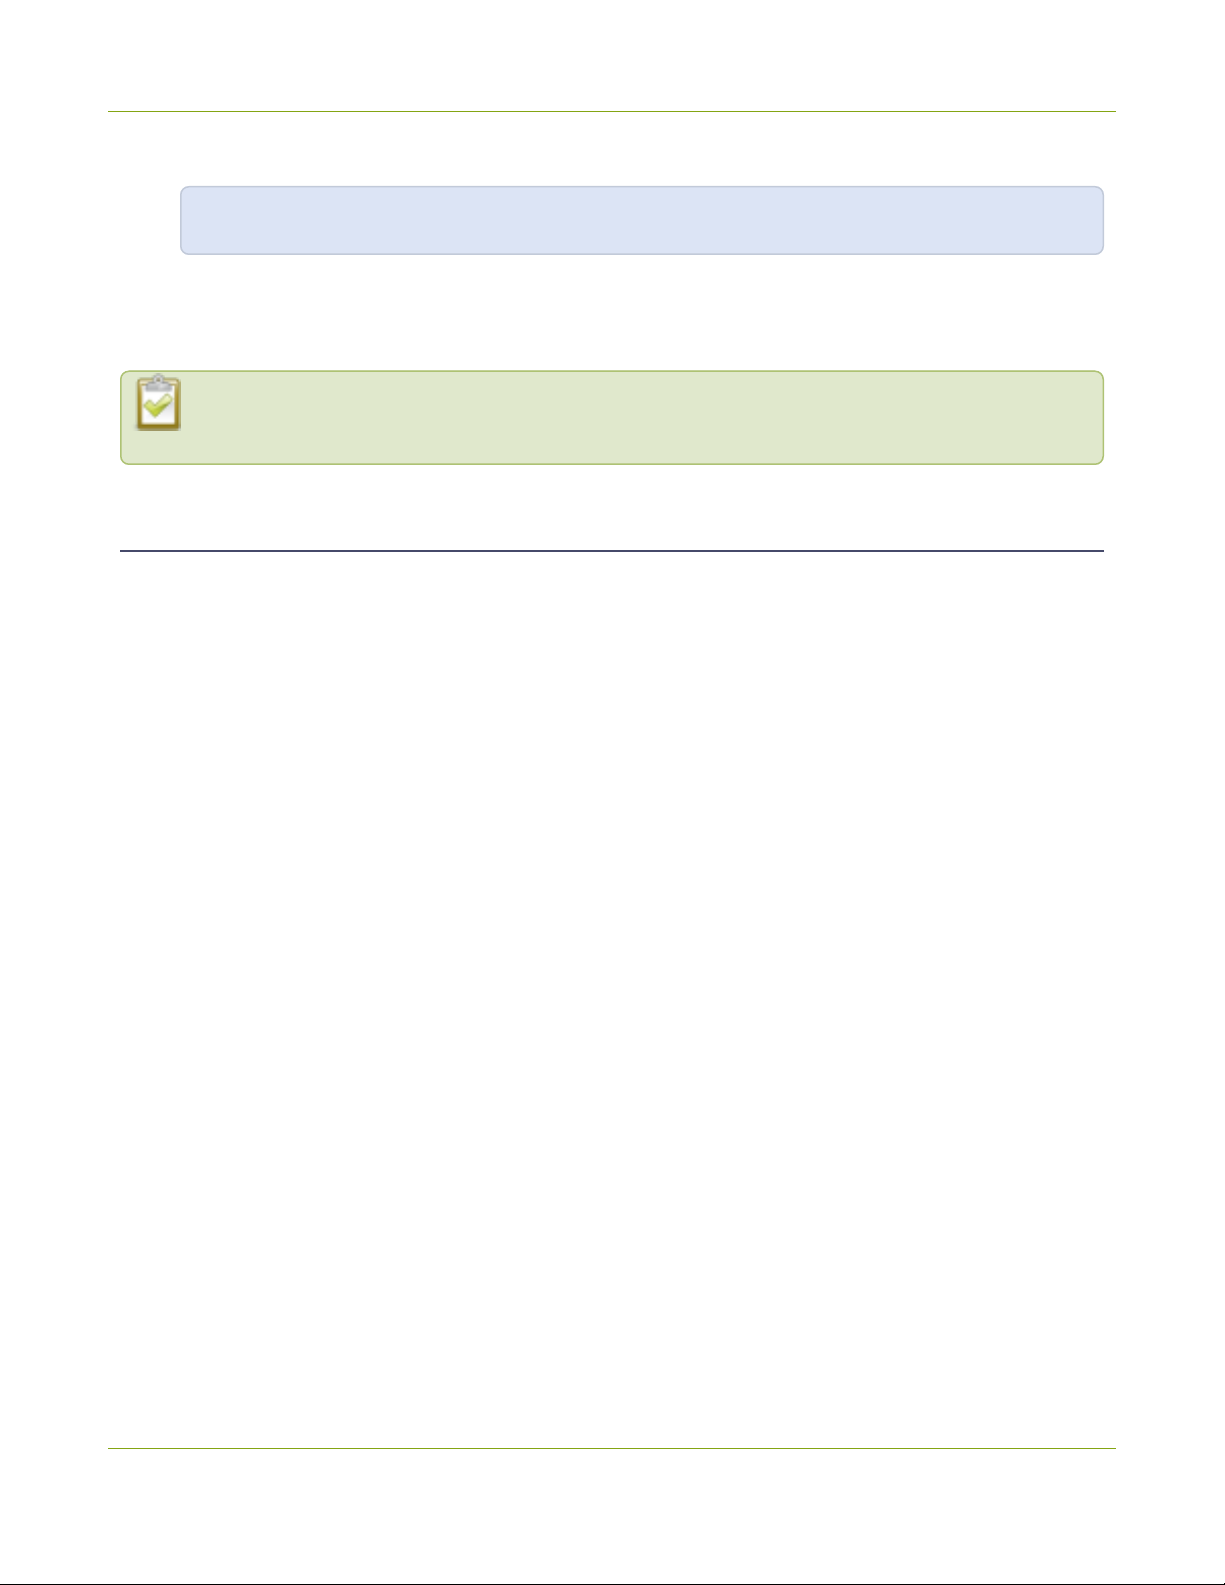
1. Get the IP address of the device. From the touch screen, tap the Settings (gear) icon and select System.
Then scroll to the Network section.
6
Page 12
LiveScrypt User Guide Using Epiphan Cloud
2. Enter the IP address of your device into the address bar of your web browser as follows:
http://<IP Address>/admin
3. Select Log In and that's it. You're in!
Alternatively, you can access the web interface from the System menu in Epiphan when you select Remote Web
Admin, see Using Epiphan Cloud .
If login credentials are configured for your LiveScrypt device, ask your administrator for the user
name and password. See Set the web interface password.
Using Epiphan Cloud
Epiphan Cloud is a cloud-based device management platform that enables remote teams to control, manage,
and perform rescue troubleshooting for LiveScrypt devices, as well as Epiphan Pearl systems. You can set up
transcription services, start/stop transcription, and configure your LiveScrypt device using Epiphan Cloud.
With a free Epiphan Cloud account, you can:
l
Setup LiveScrypt transcription services, billing, and monitor monthly usage, see Create an account and
enable transcription services.
l
Control transcription for a paired LiveScrypt device, see Start, stop, and pause transcription using
Epiphan Cloud.
l
Preview live transcriptions for individual LiveScrypt devices and monitor the audio VU meter.
l
Configure the LiveScrypt device settings, including: output options, system and network options, audio
options, and transcription options.
l
Manage archived transcription sessions and download .SRT and .TXT files after the transcription session
ends, see Download and delete .SRT and.TXT files.
l
Reboot the LiveScrypt device.
l
Access the web interface, see Access system information.
l
View health statistics on the Devices Dashboard.
l
Pair and unpair devices, as well as delete devices from your team, see Pair the LiveScrypt device.
l
The LiveScrypt device's entry in Epiphan Cloud permanently goes offline when you unpair. You
must pair the device again to start a new transcription session.
l
If you pair LiveScrypt again after you have successfully unpaired from Epiphan Cloud, it shows up
as a new device in Epiphan Cloud with a new device ID. The previous instance of the device
remains permanently offline; however, you can still access transcription .SRT and .TXT files for an
offline device instance.
7
Page 13
LiveScrypt User Guide Using Epiphan Cloud
Deleting an offline LiveScrypt device in Epiphan Cloud removes all transcription files
associated with that encoder instance.
For more information about Epiphan Cloud, see the Epiphan Cloud online user guide.
8
Page 14
LiveScrypt User Guide About your LiveScrypt device
About your LiveScrypt device
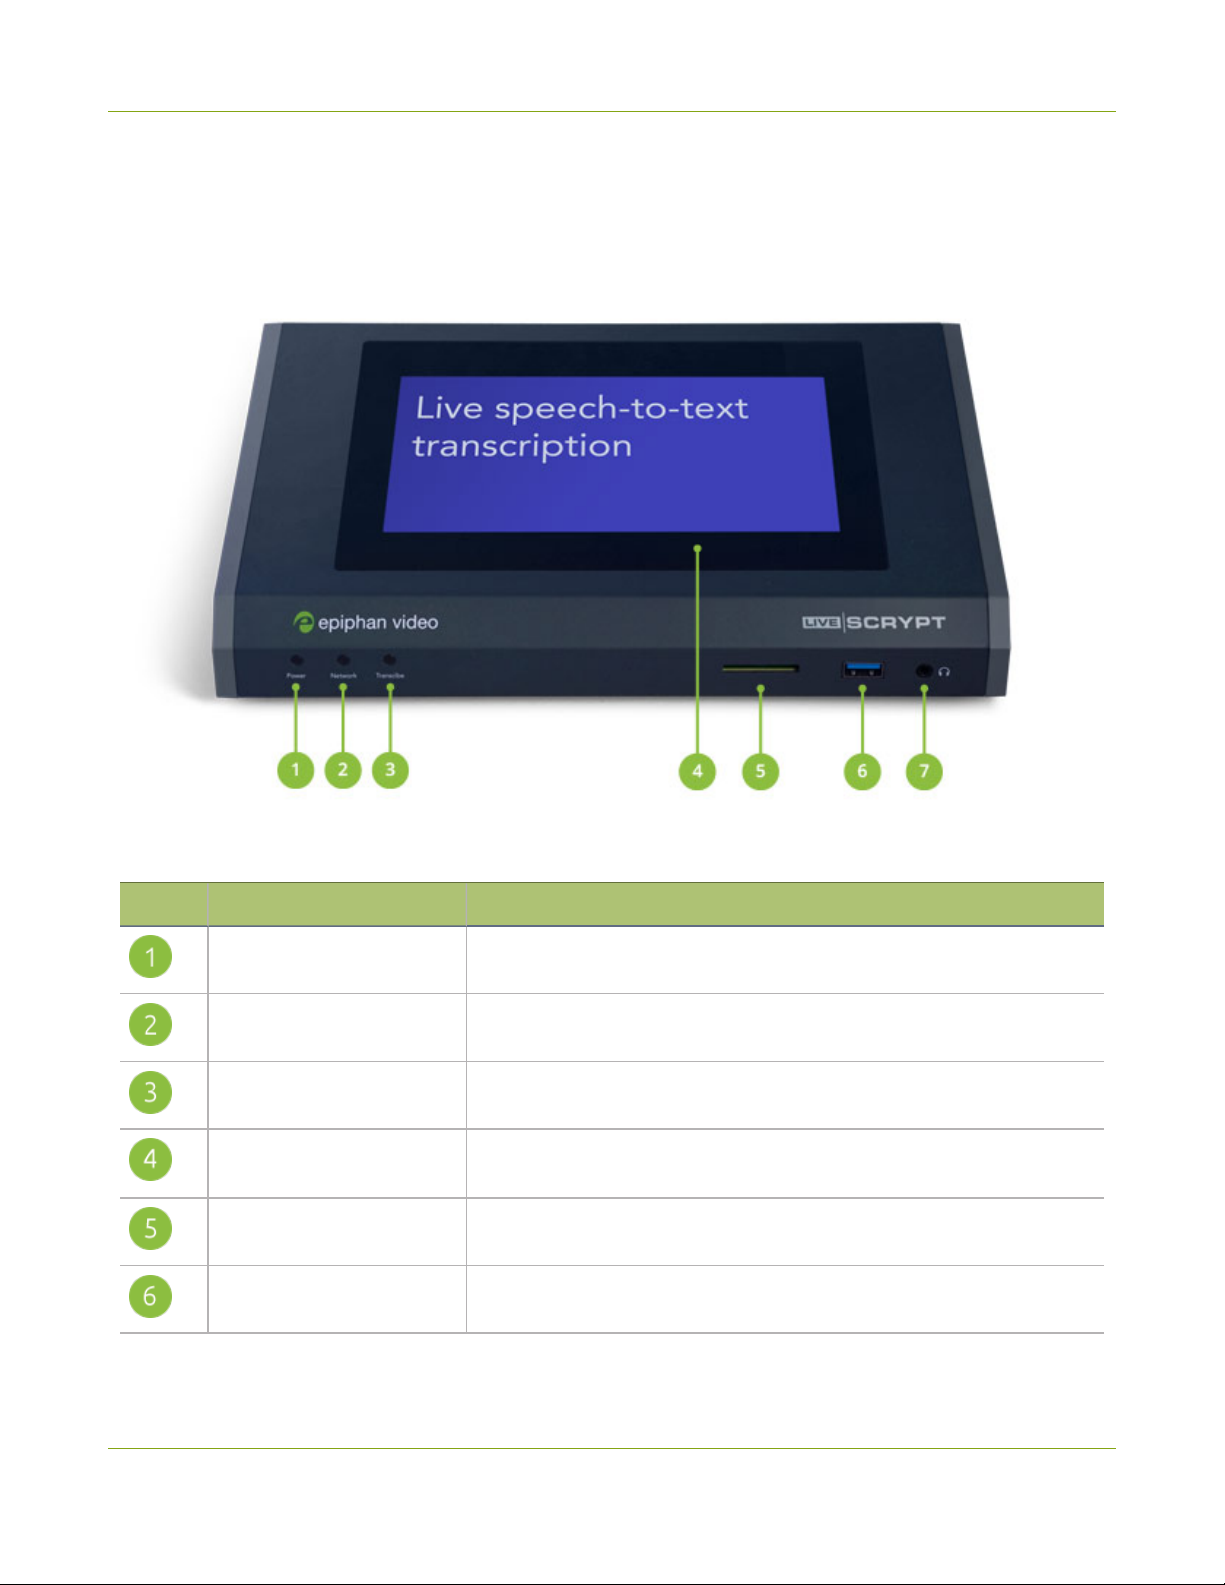
This section will help you get oriented with your LiveScrypt device. For the full product specifications, see
Specifications
Table 2 LiveScrypt front panel descriptions
Label Name Description
Power light Glows when the LiveScrypt is powered on.
Network light Glows when the LiveScrypt has network connectivity.
Transcribe light Glows when LiveScrypt is transcribing.
Touch screen front panel
display
SD card slot Unused
USB 3.0 port Unused. Do not connect a web camera or USB microphone to this port.
Used for confidence monitoring, configuration, and for authentication
using a 4-digit PIN (if enabled).
9
Page 15
LiveScrypt User Guide About your LiveScrypt device
Label Name Description
3.5 mm audio output jack Audio headphone jack.
Do not insert objects in to the two, pin-sized holes that are located beside the LEDs.
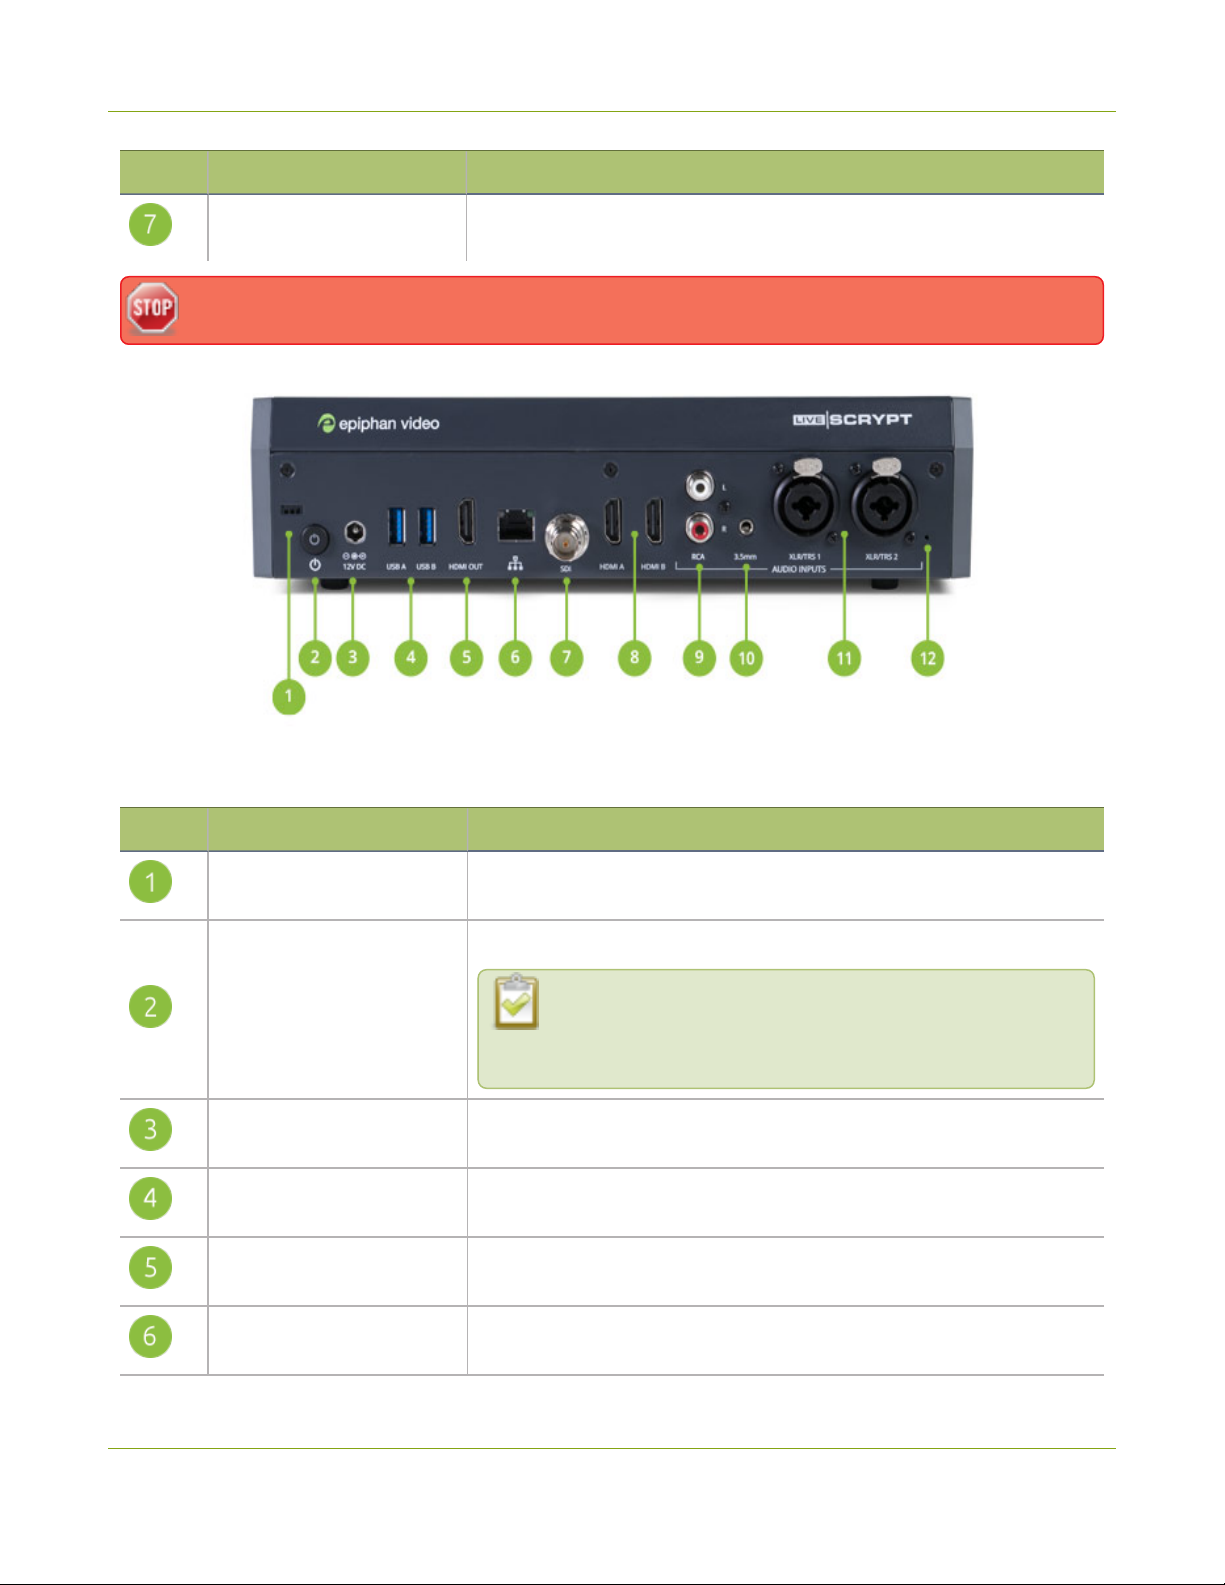
Table 3 LiveScrypt back panel descriptions
Label Name Description
Lock
Power button
Power jack
USB 3.0 ports
HDMI output port
RJ-45 Ethernet
Allows LiveScrypt to be locked to a desk or surface using a laptop lock
cable.
Press to toggle LiveScrypt on and off.
If a software shutdown is performed when the toggle
switch is in the on position, double press the power button
to turn on LiveScrypt.
Plug the power supply in here. The port requires a 12 V DC power
source (center-positive). Always use the provided power supply.
Connect a USB web camera (UVC) with embedded audio or a USB
(UAC) audio source.
Connect an HDMI monitor or display device, see Connect an external
display for details.
Auto-sensing gigabit Ethernet 10/100/1000 Base-T network port, see
Connect the network and power on.
10
Page 16
LiveScrypt User Guide Install the power button shield
Label Name Description
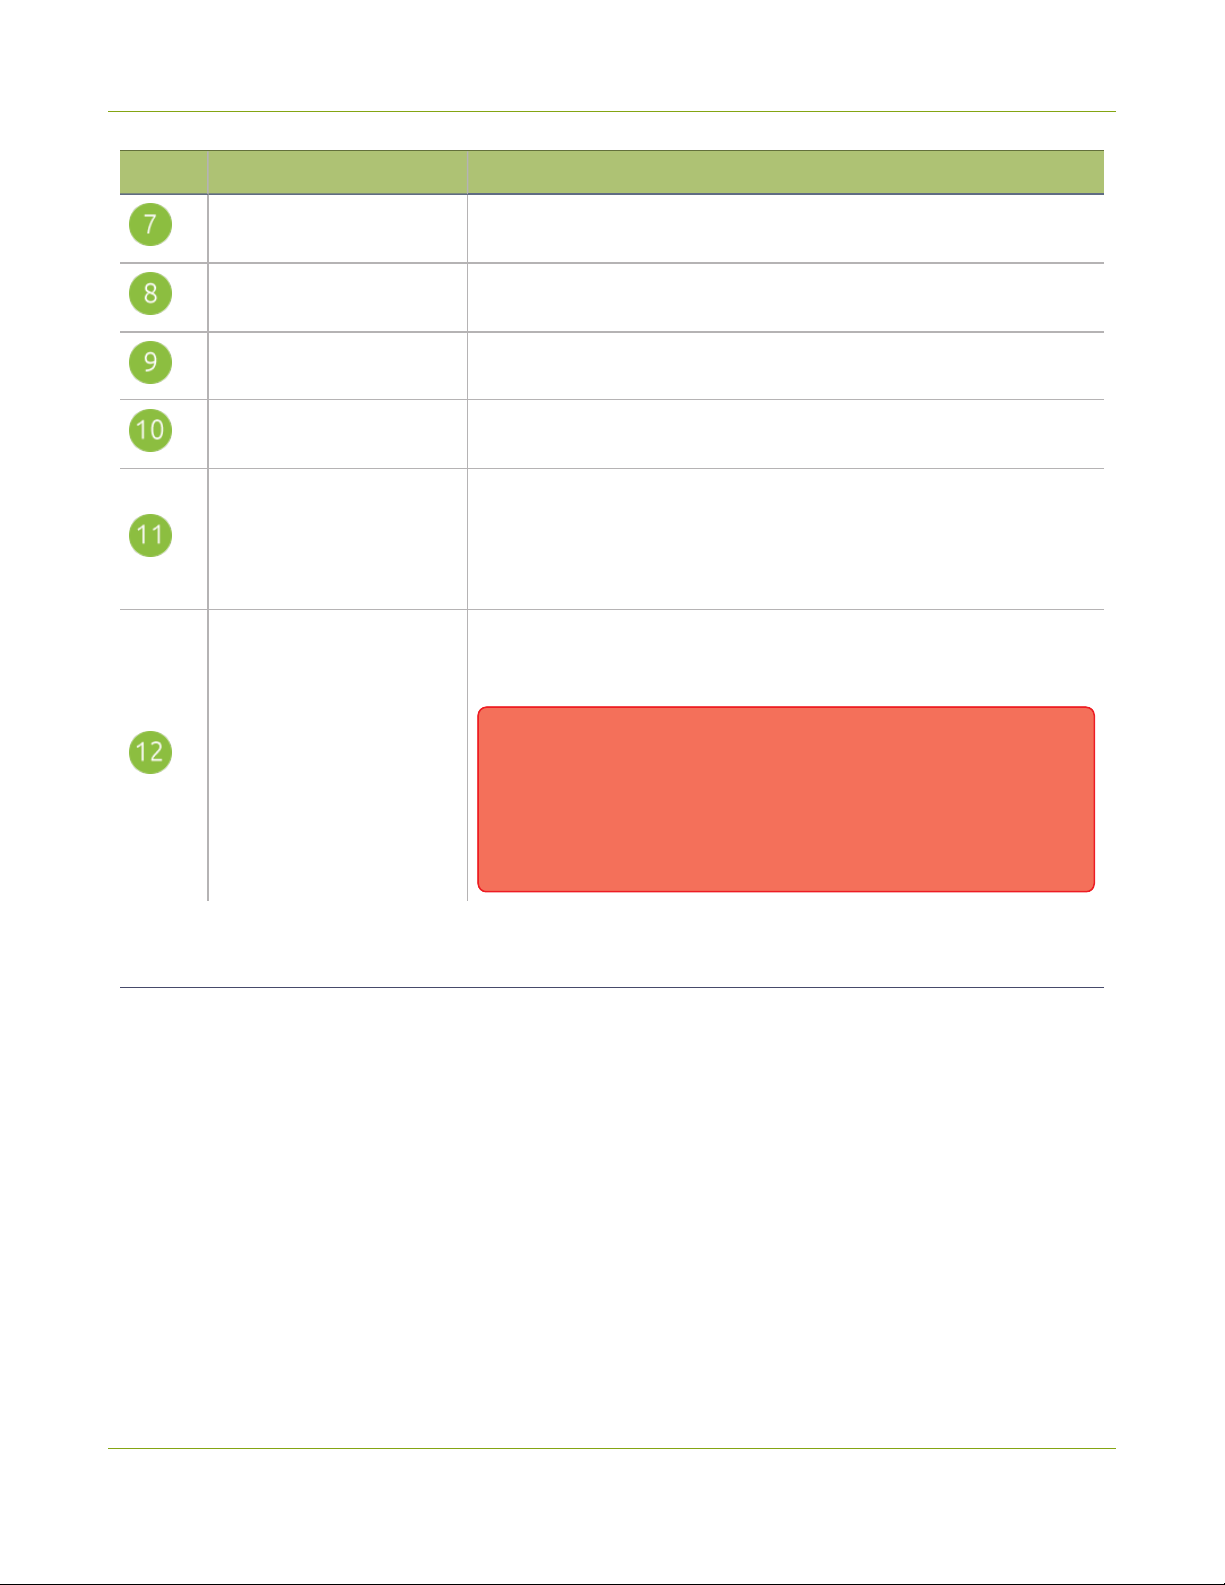
SDI in
HDMI in
RCA audio in RCA consumer line-level mono audio pair, see Audio inputs.
3.5 mm audio in
XLR/TRS combo jacks
Phantom power light
Connect up to 3G SDI signals for LiveScrypt to use the embedded
audio.
Connect HDMI and DVI signals (using an adapter) for LiveScrypt to
use the embedded audio.
Stereo plug for mic-level passive or active stereo electret
microphones.
Two mono XLR /TRS combo jacks.
l
Two XLR mic-level (balanced)
l
Two TRS ¼" professional line-level, +4 dBu
(balanced/unbalanced)
Glows when 48 V phantom power is enabled. Phantom power is
applied to both XLR audio input ports when enabled, see Enable or
disable phantom power.
WARNING: CoNNeCtING devICes thAt ARe Not desIGNed
foR phANtom poWeR WheN phANtom poWeR Is eNAbled
foR the tWo XlR poRts CAN seRIously dAmAGe those
devICes. AlWAys CheCk the phANtom poWeR led
befoRe CoNNeCtING devICes to the XlR poRts.
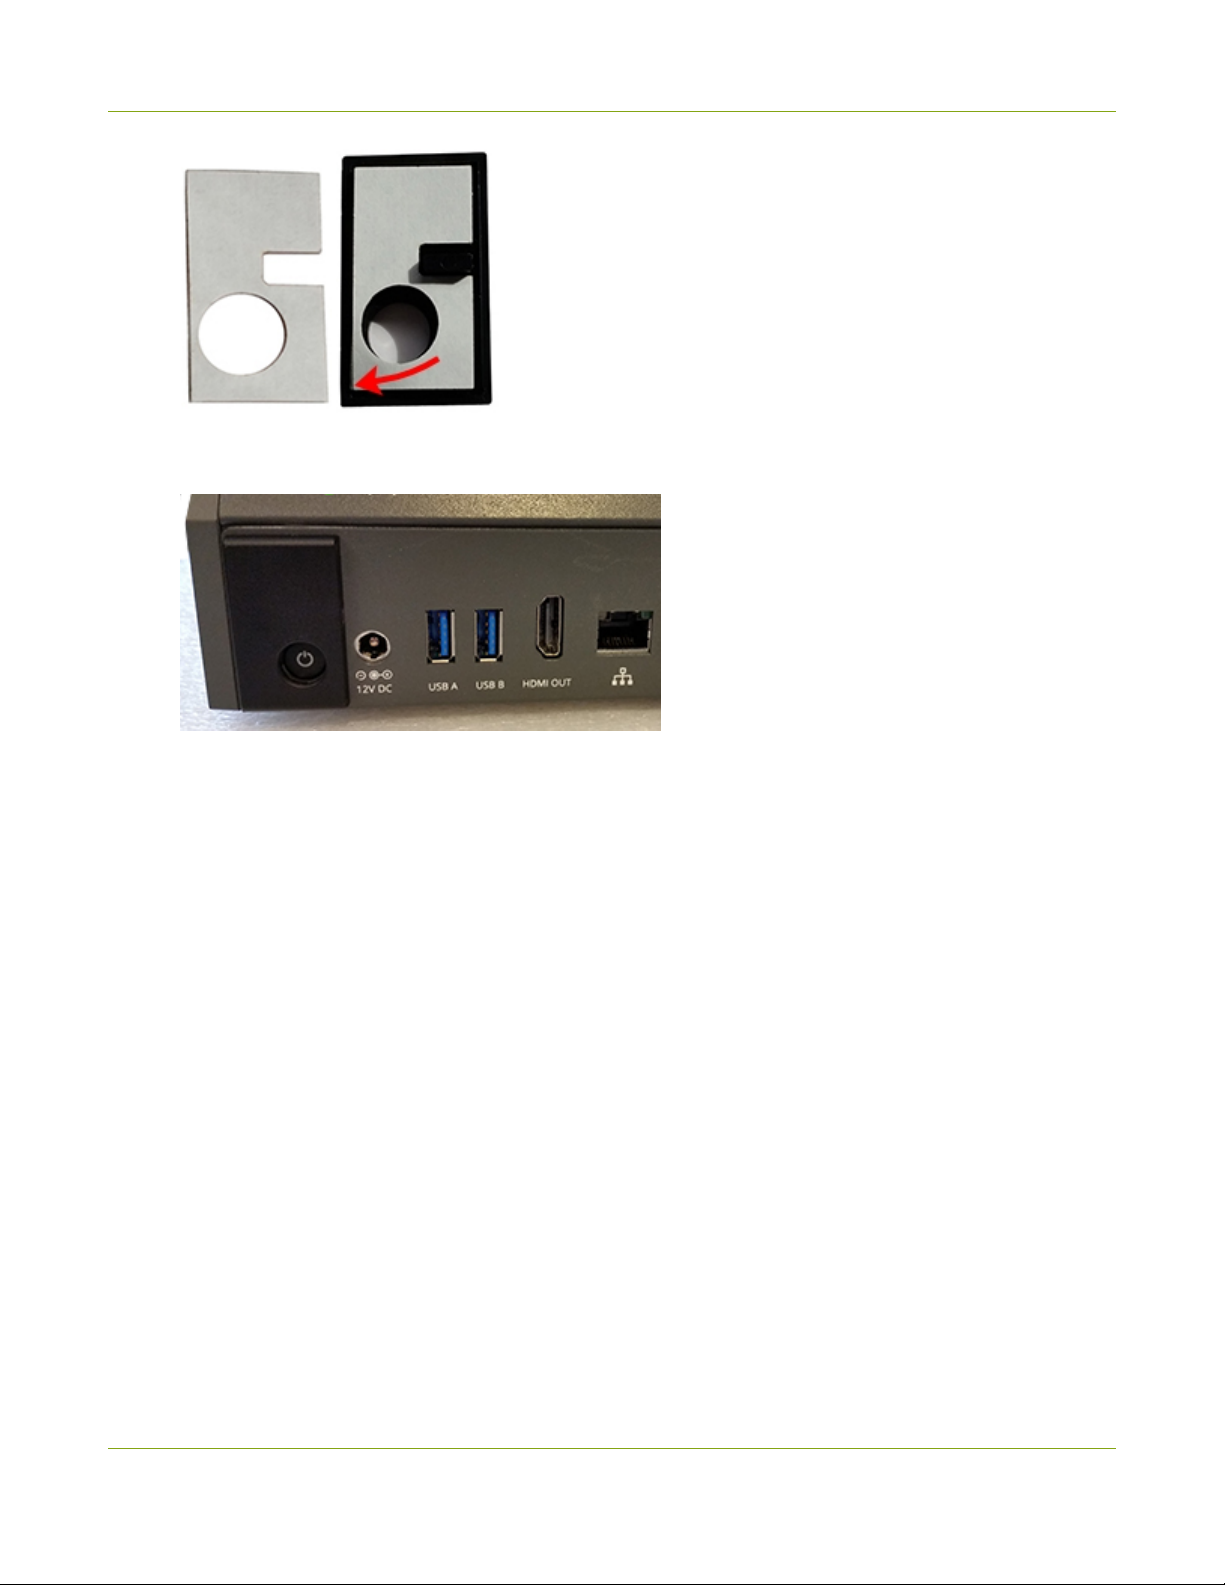
Install the power button shield
Optionally, you can install the supplied power button shield over the power button to prevent accidentally turning
the device off. Once applied, you cannot reposition the power button shield without damaging the adhesive.
Before you begin, clean the area around the power button to remove any dirt or grease.
To install the power button shield:
1. Attach the adhesive to the back of the power button shield. Remove the red adhesive backing and
carefully align the lower left corners before pressing firmly.
11
Page 17
LiveScrypt User Guide Create an account and enable transcription services
2. Remove the white adhesive backing and align the tab with the laptop lock keyhole to position the power
button shield. Make sure the power button is clearly visible through the round hole before pressing firmly.
3. Press the power button to ensure it functions properly.
Create an account and enable transcription services
To use your LiveScrypt transcription solution, you need an Epiphan Cloud account and a transcription service
plan. A valid credit card is required.
Only the Epiphan Cloud account owner can add or modify billing information, plans, and change ownership of the
account. A LiveScrypt plan can be setup for individual teams by the owner of that team.
After your LiveScrypt transcription service plan is setup, you can pair your LiveScrypt device to your account and
start transcribing, see Pair the LiveScrypt device.
For the current terms and cost for the LiveScrypt live transcription service, go to:
www.epiphan.com/products/livescrypt/
At the time of publishing this guide:
l
The cost is $9.95 USD per transcription hour with a one hour minimum.
l
The first five minutes of a transcription session is free. After five minutes, you’re billed a minimum of one
hour.
l
For sessions longer than one hour, additional charges at the rate of $9.95 USD per transcription hour
applies. For example, a session that is 61 minutes long is billed for two transcription hours.
12
Page 18
LiveScrypt User Guide Connect the network and power on
l
Your credit card is charged once at the end of the 30-day billing cycle. The billing cycle begins the date
credit card information was added to your account to enable the LiveScrypt transcription service for a
team.
To create an account and enable transcription services:
1. Using your web browser, login to Epiphan Cloud at: https://go.epiphan.cloud
The first time you login to Epiphan Cloud at go.epiphan.cloud, you can choose to authenticate
using either a Facebook account, a Google account, or using an email and password. Your
Epiphan Cloud account is associated with your login method, so make sure you login using
the same method each time. A new Epiphan Cloud account gets created if you authenticate
using a different login method.
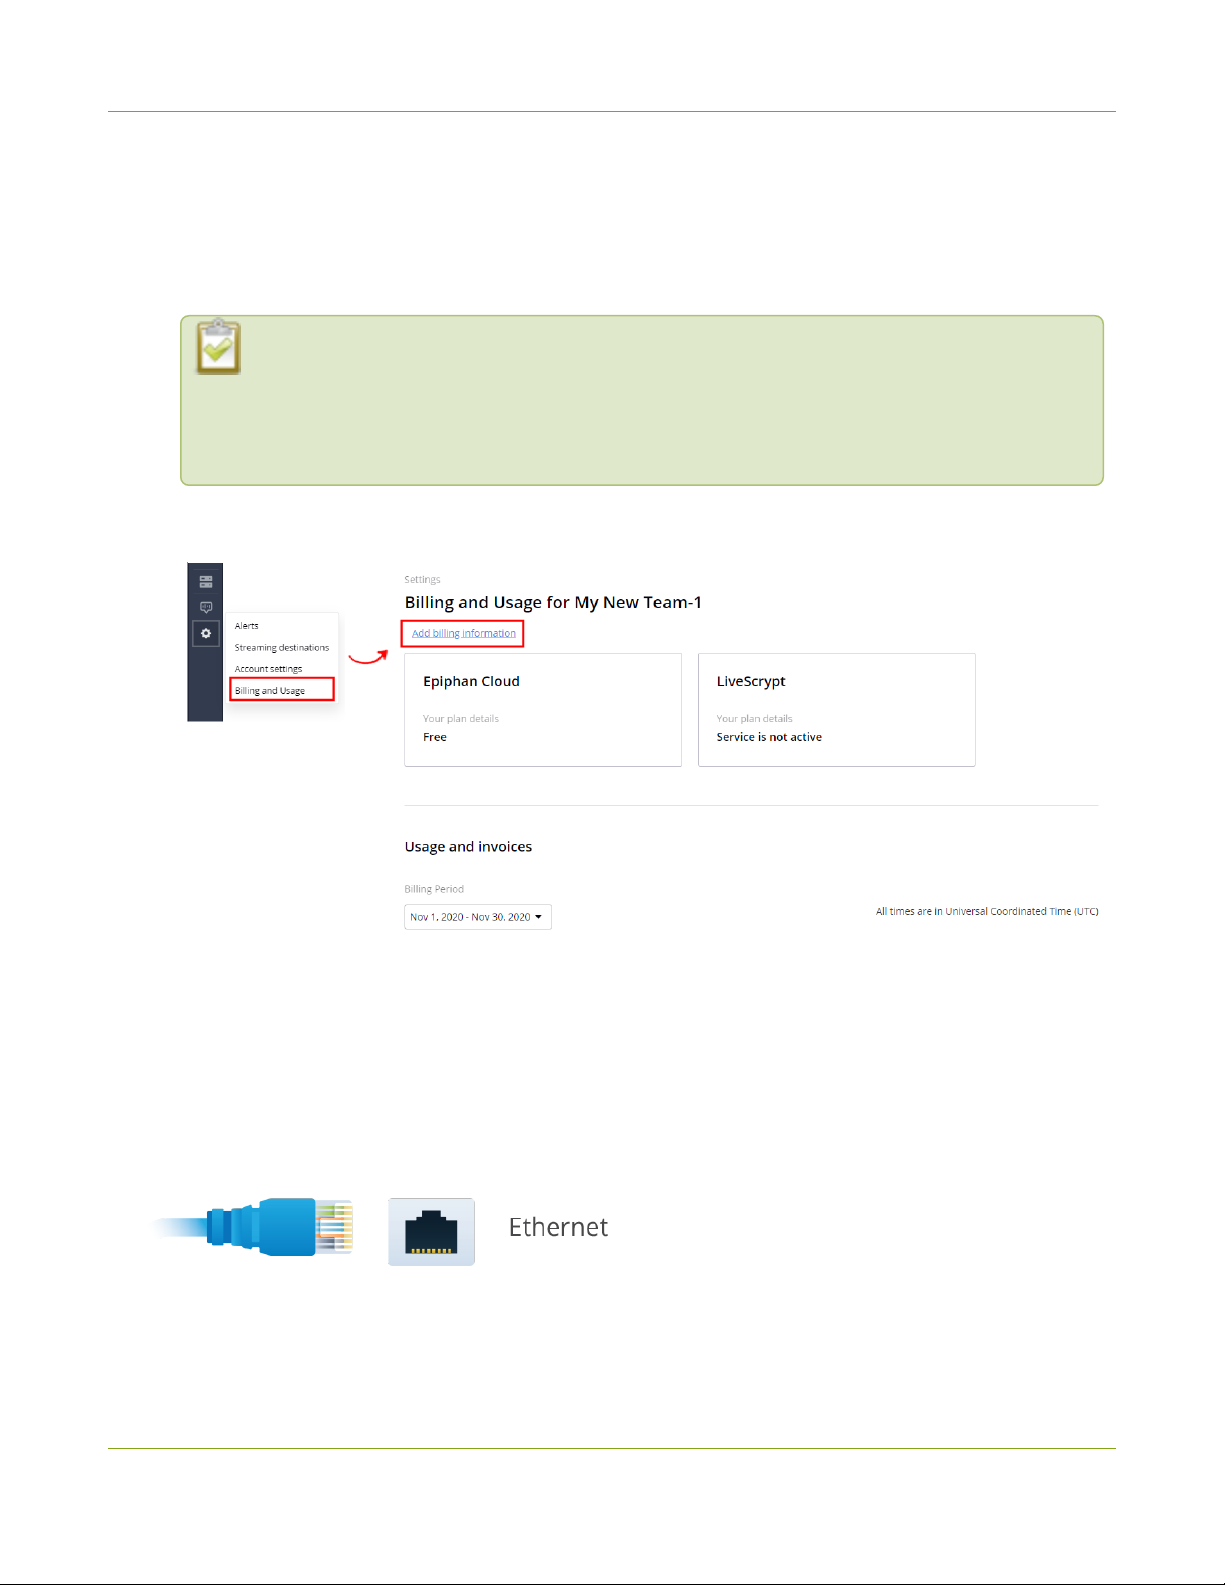
2. Click Settings > Billing and Usage in the side navigation panel, then select Add billing information on the
Billing and Usage page.
3. Enter your billing and credit card information in the pop up window. When you're done, select Confirm
billing.
Connect the network and power on
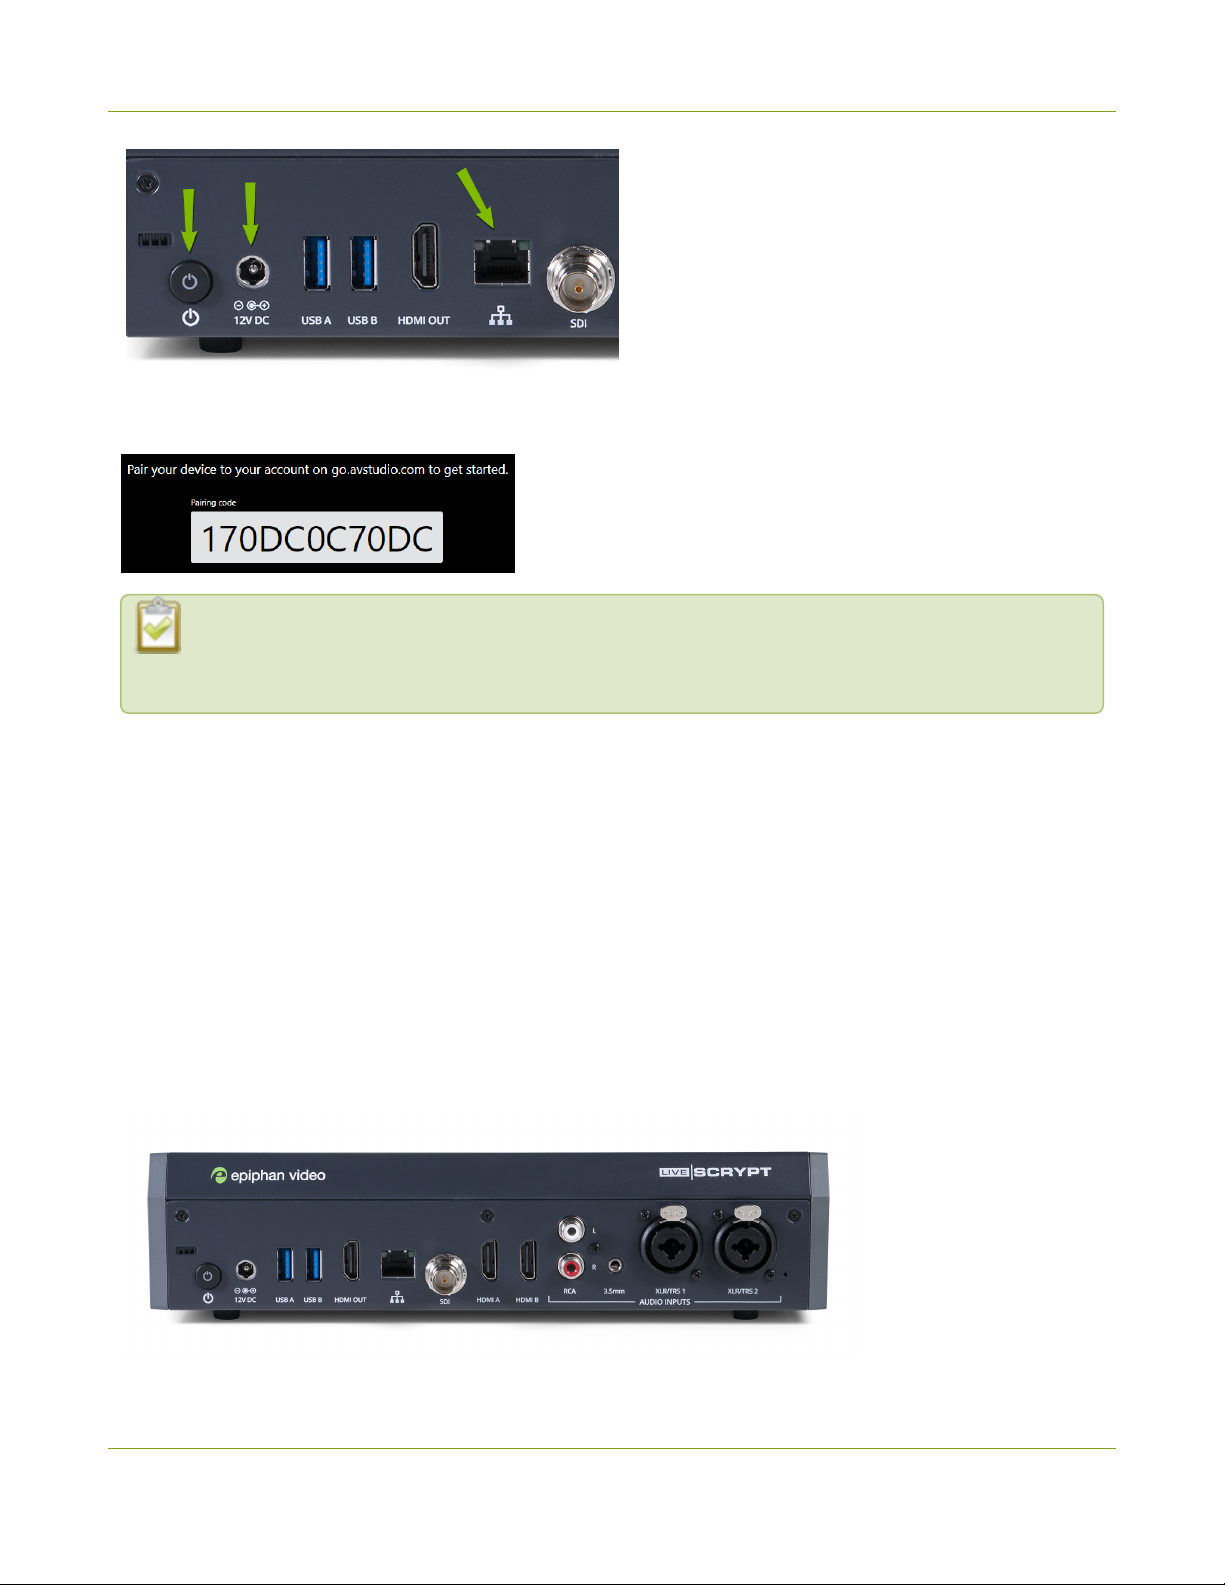
If your network uses DHCP, then all you need to do is connect the LiveScrypt device to your
network using a standard RJ-45 Ethernet cable. An IP address is automatically assigned to
the device.
13
Page 19
LiveScrypt User Guide Connect audio sources and check levels
Now you can connect the AC power adapter and power on. The LiveScrypt device should automatically connect
to the network. You will see a device pairing code on the touch screen.
Your network must have access to the Internet for LiveScrypt transcription to work, plus the required
network ports must be open with read/write privileges. Contact your IT administrator if you're not
sure.
The following network ports must be open with read/write privileges for LiveScrypt to function properly:
l
Port 22 - SSH used for remote support (TCP).
l
Port 80 - used by the local web admin page (HTTP).
l
Port 123 - used for NTP time synchronization (TCP/UDP).
l
Port 443 - used to communicate with the LiveScrypt cloud transcription service (HTTPS).
For more information about network settings or assigning a static IP address, see System network options.
Connect audio sources and check levels
The LiveScrypt device accepts multiple audio sources from cameras, digital mixers, and microphones.
Embedded audio from SDI, HDMI, and USB (UVC) video sources are extracted. A single, combined mono signal
is sent to the cloud for transcription.
14
Page 20
LiveScrypt User Guide Connect audio sources and check levels
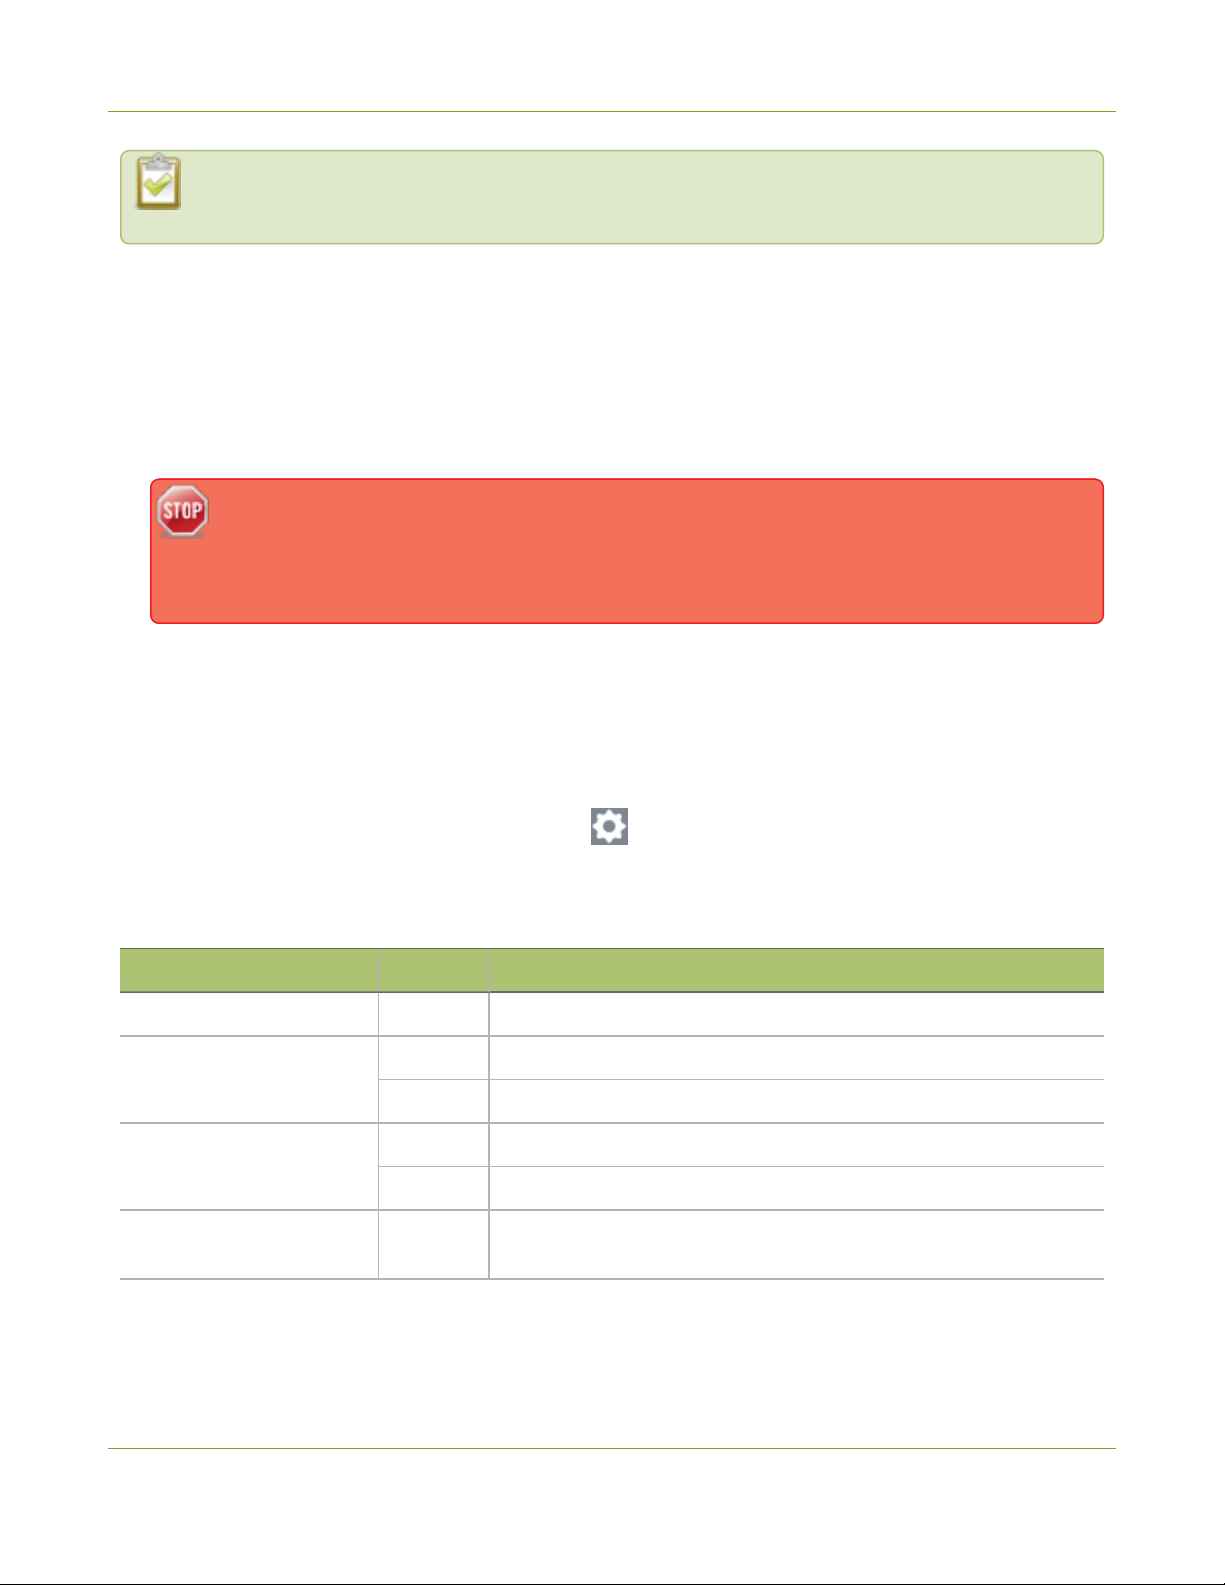
When connecting USB web cameras and microphones, make sure to use the USB ports on the rear
panel of the LiveScrypt device. USB devices must be UVC/UAC compliant
Analog audio inputs:
l
Two mono XLR/TRS combo jacks, + 4.0 dBu up to 12.3 V RMS (+24 dBu):
l
XLR mic-level input (balanced), supports +48 V phantom power
l
¼" TRS professional line-level input (balanced/unbalanced)
l
One 3.5 mm stereo mic-level input (unbalanced)
l
Two mono RCA (pair) consumer line-level inputs (-10 dBV)
Phantom power is applied to both XLR ports. Connecting devices that are not designed for
phantom power when phantom power is enabled can seriously damage those devices. Always
check the phantom power LED before connecting devices to the XLR ports. To enable phantom
power, see Enable or disable phantom power.
To connect audio sources and check audio levels:
1. Connect your audio sources to the ports on the rear panel of the LiveScrypt device.
2. Power on the LiveScrypt device, see Connect the network and power on.
3. Test your audio levels (for example, speak into connected microphones). You can monitor the volume in
the headphones and using the VU meter on the touch screen, see Monitor audio.
4.
(Optional) From the touch screen, tap Settings and then tap Audio to open the Audio options where
you can add gain to the XLR, ¼" TRS, and RCA ports as required. For details about adjusting the audio
gain, see Adjust audio gain.
Table 4 Audio gain guidelines
Audio source Input port Gain
Dynamic microphone XLR Add +50 to +60 dB gain to the audio input port.
XLR Add +18 to +40 dB gain to the audio input port.
Electret microphone
3.5 mm Add +6 to +12 dB gain to the audio input port.
Wireless microphone
receiver
Condenser microphone
with phantom power
XLR Add +18 to +40 dB gain to the audio input port.
3.5 mm Add +6 to +12 dB gain to the audio input port.
XLR Add +40 to +60 dB gain to the audio input port.
15
Page 21
LiveScrypt User Guide Optimize audio performance
Audio source Input port Gain
TRS Add +6 to +12 dB gain to the audio input port.
Mobile phone or other
consumer line level device
XLR Add +6 to +12 dB gain to the audio input port.
1
RCA
TRS Nominal
Nominal
Professional mixer
For technical details about the audio inputs, see Audio inputs.
For tips on how to optimize your audio signal for the best transcription performance, see Optimize audio
performance.
XLR Nominal
RCA Not recommended.
Optimize audio performance
The better your audio source, the better LiveScrypt works. Here are some tips to get the best out of your
LiveScrypt device:
l
Avoid multiple people speaking at the same time or in quick succession one after the other. It takes a
moment for LiveScrypt to adjust to each person's voice.
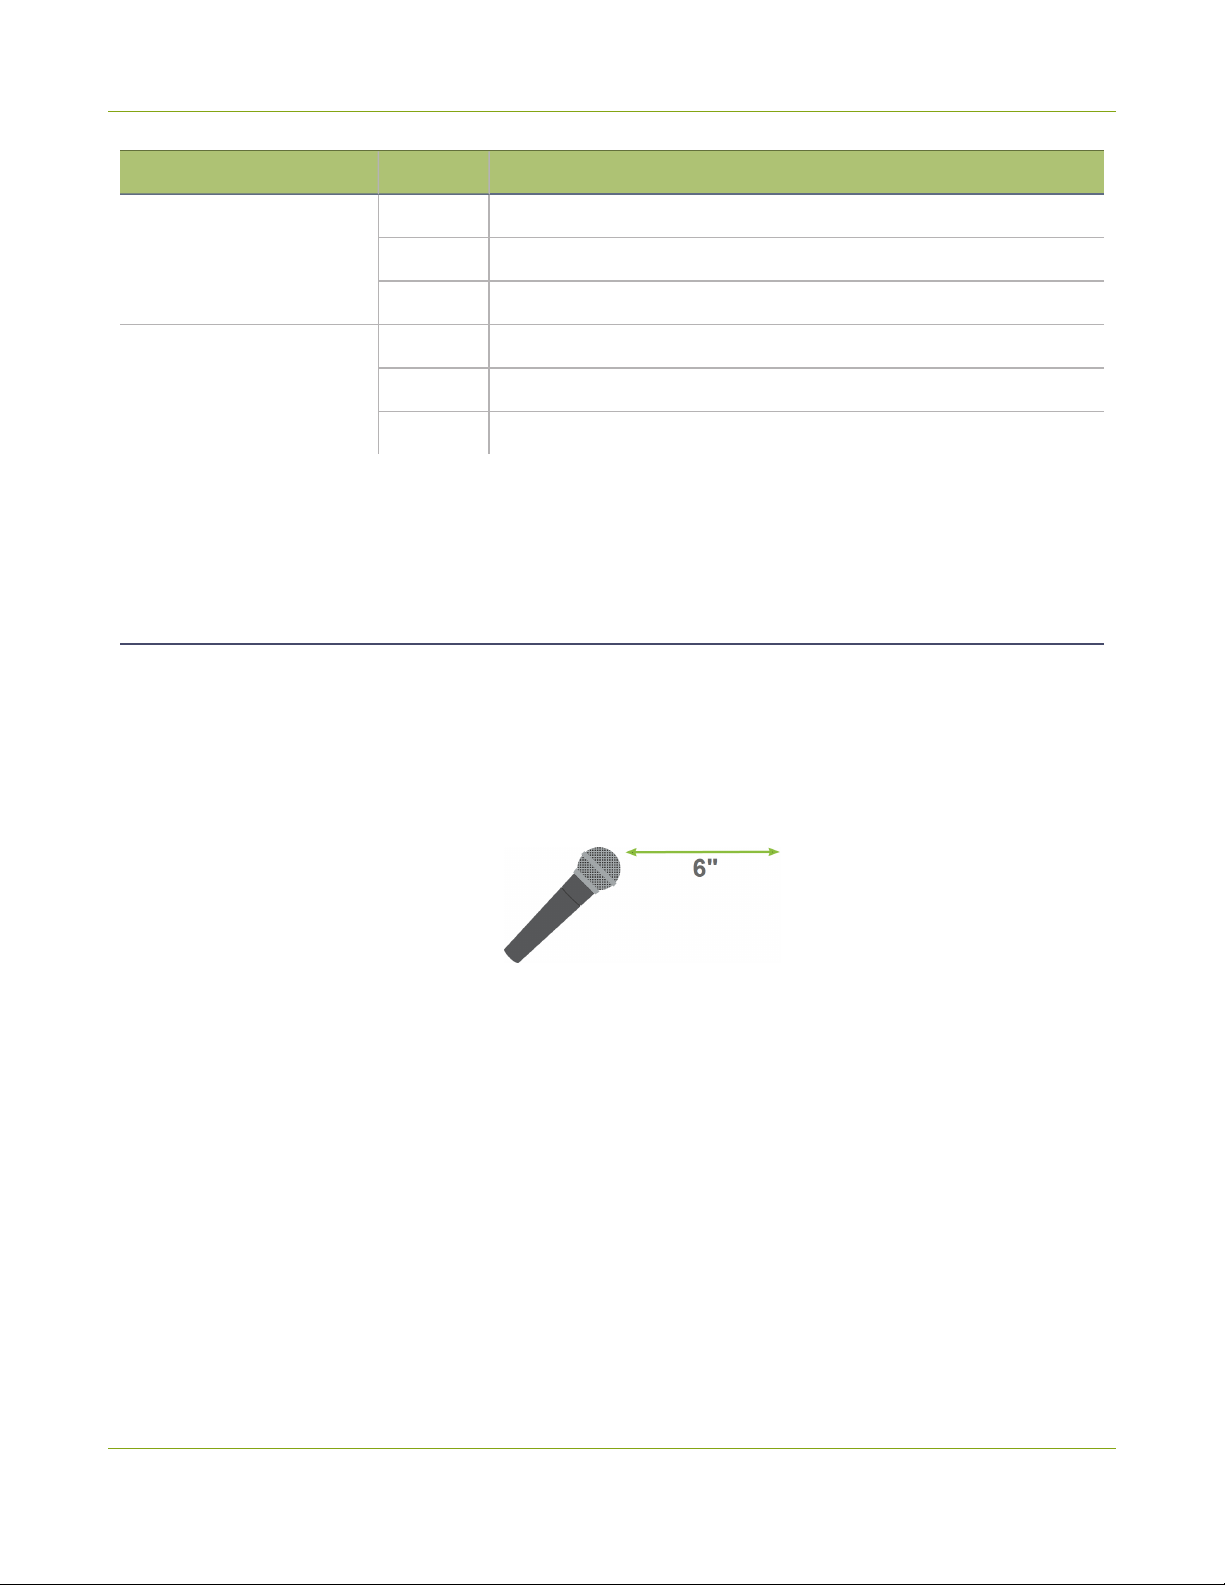
l
Choose a quality microphone and speak directly into it at a distance of about 6 inches for a good audio
signal.
l
Only connect mixers and microphones to the input ports on the LiveScrypt device that are rated for the
compatible audio-level. Avoid adapters to connect mismatched audio signals. For more information, see
Audio inputs.
l
Some types of microphones are more sensitive and produce a stronger audio signal. Others need a lot of
gain. For general guidelines on how much gain to add to an audio signal, see Adjust audio gain.
l
Avoid placing microphones near sources of noise, like loud fans and air vents. If the environment is
unavoidably noisy, consider using a lavalier microphone with a cardioid pickup pattern for better noise
rejection.
l
Check that your audio cables aren't damaged.
Connect an external display
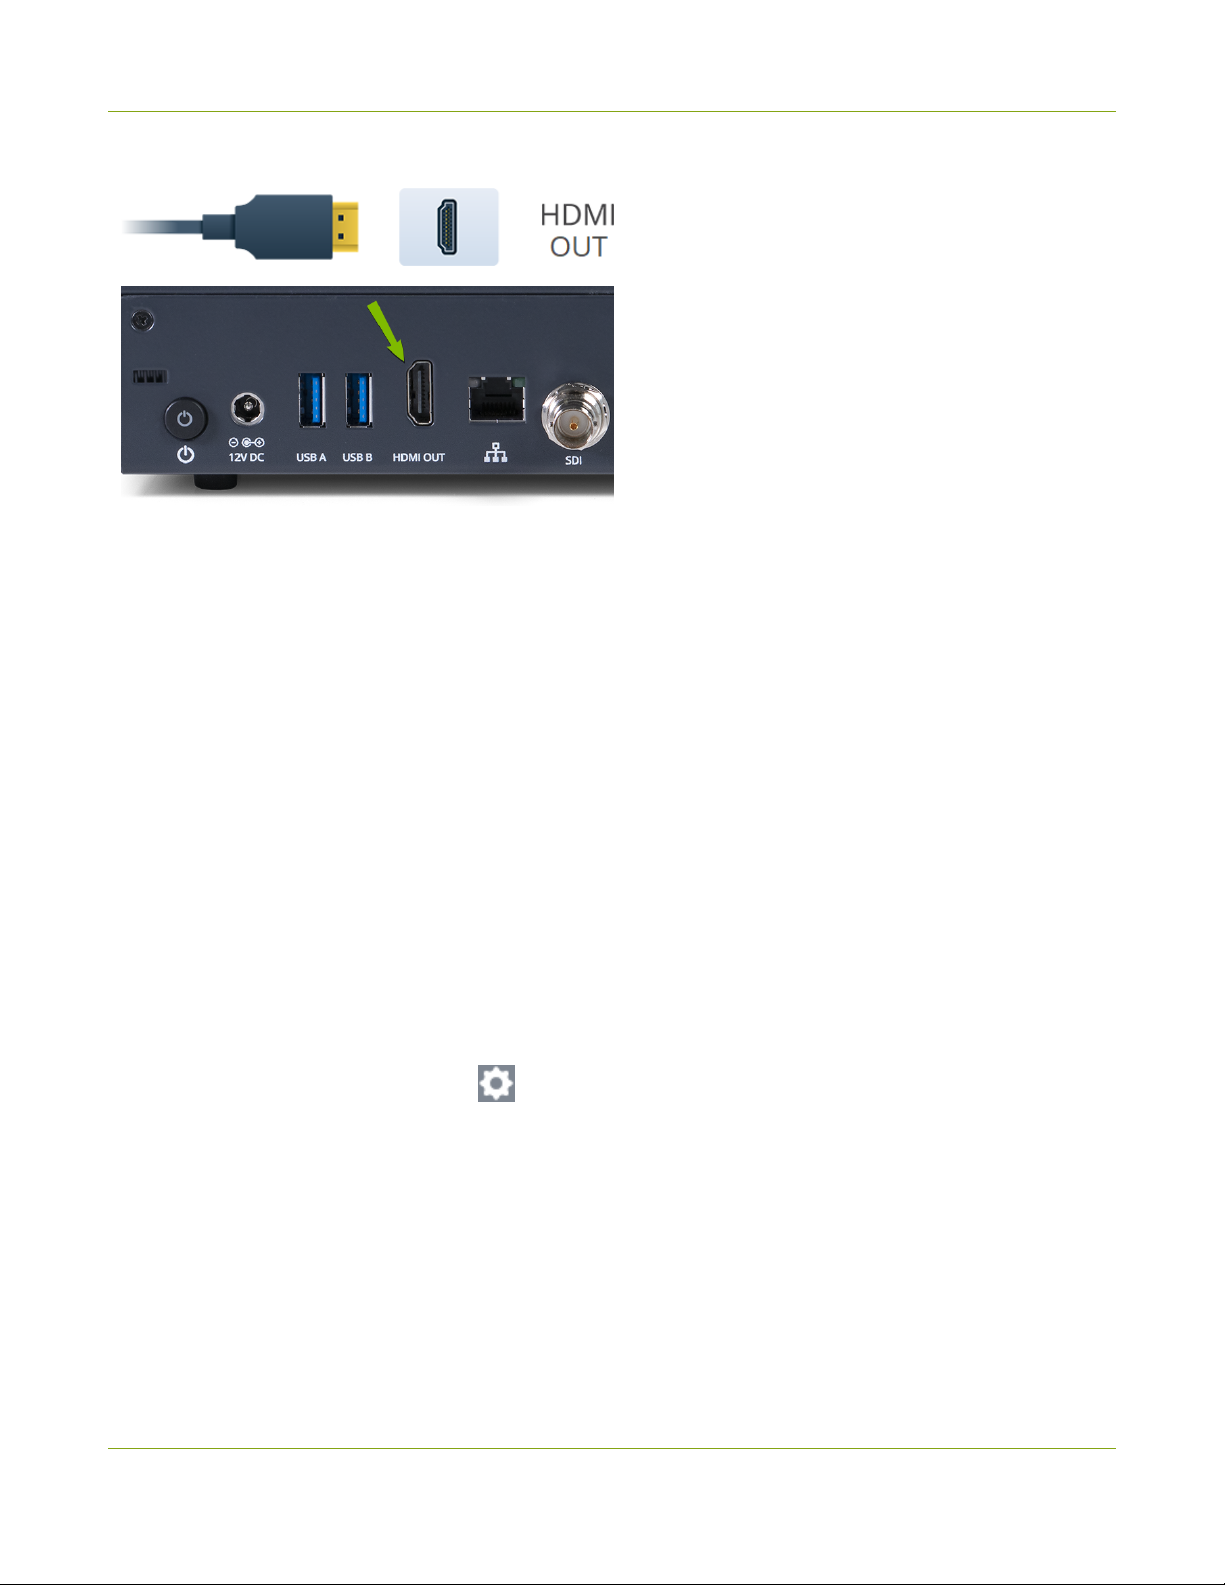
You can connect the HDMI output from the LiveScrypt device to in-room monitors, projectors, and any video
processing device that accepts an HDMI signal using a standard HDMI cable. No audio is included in the HDMI
16
Page 22
LiveScrypt User Guide Connect an external display
output. Only the live transcription displays.
The default output is set to display medium-size white text on a black background. You can change the size of
the text, as well as change the background color scheme from the Settings using the touch screen.
Display color schemes:
l
Dark: White text on black background.
l
Light: Black text on white background.
l
Green screen (white text): White text on chroma green background.
l
Green screen (black text): Black text on chroma green background.
Font size options:
l
Huge
l
Extra large
l
Large
l
Medium (default)
l
Small
To connect to the HDMI output port and change the default settings:
1. Connect your display device to the HDMI OUT port on the rear panel of the LiveScrypt device.
2.
On the touch screen, tap Settings and then tap Output to open the Output options.
3. Modify the output port options and color schemes.
4. Tap Apply when you're done.
For more details about setting Output port options, see Output display options
To test your settings, an audio device must be connected. The LiveScrypt device must also be connected to the
network and be paired to your Epiphan Cloud account with LiveScrypt transcription services setup.
17
Page 23
LiveScrypt User Guide Pair the LiveScrypt device
Pair the LiveScrypt device
You must pair the LiveScrypt device to your Epiphan Cloud team that has transcription services setup before you
can use the device for live transcription. You can create a new Epiphan Cloud account the first time you pair your
LiveScrypt device or you can set it up in advance, see Create an account and enable transcription services.
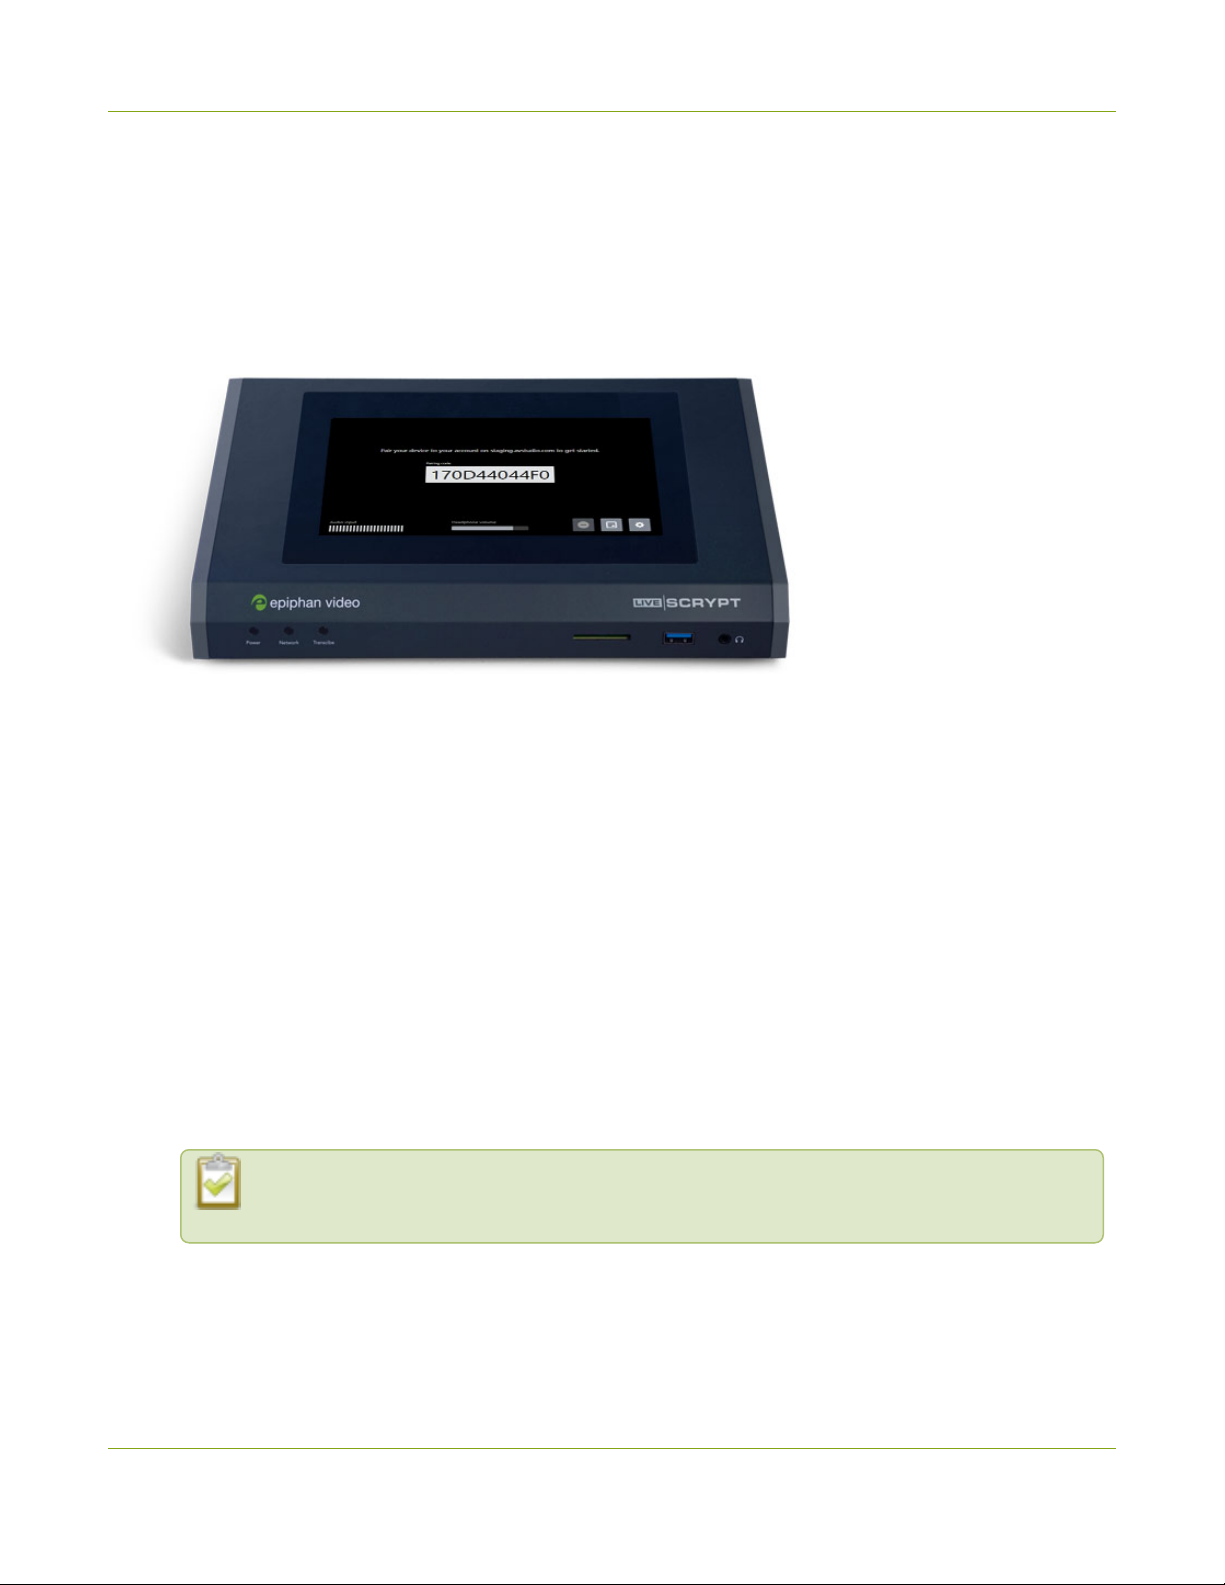
The device ID pairing code appears on the touch screen when the device isn't paired.
You can unpair the device using Epiphan Cloud. When you do, the device ID pairing code changes value. The
next time you pair the device with Epiphan Cloud, it shows up as a new device in Epiphan Cloud with the new
device ID.
Important considerations
l
The LiveScrypt device's entry in Epiphan Cloud permanently goes offline when you unpair. You must pair
the device again to start a new transcription session.
l
If you pair LiveScrypt again after you have successfully unpaired from Epiphan Cloud, it shows up as a
new LiveScrypt device in Epiphan Cloud. The previous instance of the device remains permanently
offline.
l
If you don't see the pairing code on the touch screen and the device isn't currently paired with Epiphan
Cloud, you can find the pairing code in the Settings. Tap the gear icon at the bottom right corner of the
touch screen and select System. Under the Your device section, use the Device ID as the pairing code.
To pair and unpair the LiveScrypt device:
1. Login to your Epiphan Cloud account at: go.epiphan.cloud
Your default Epiphan Cloud team is automatically selected. Your device is paired to the
selected team.
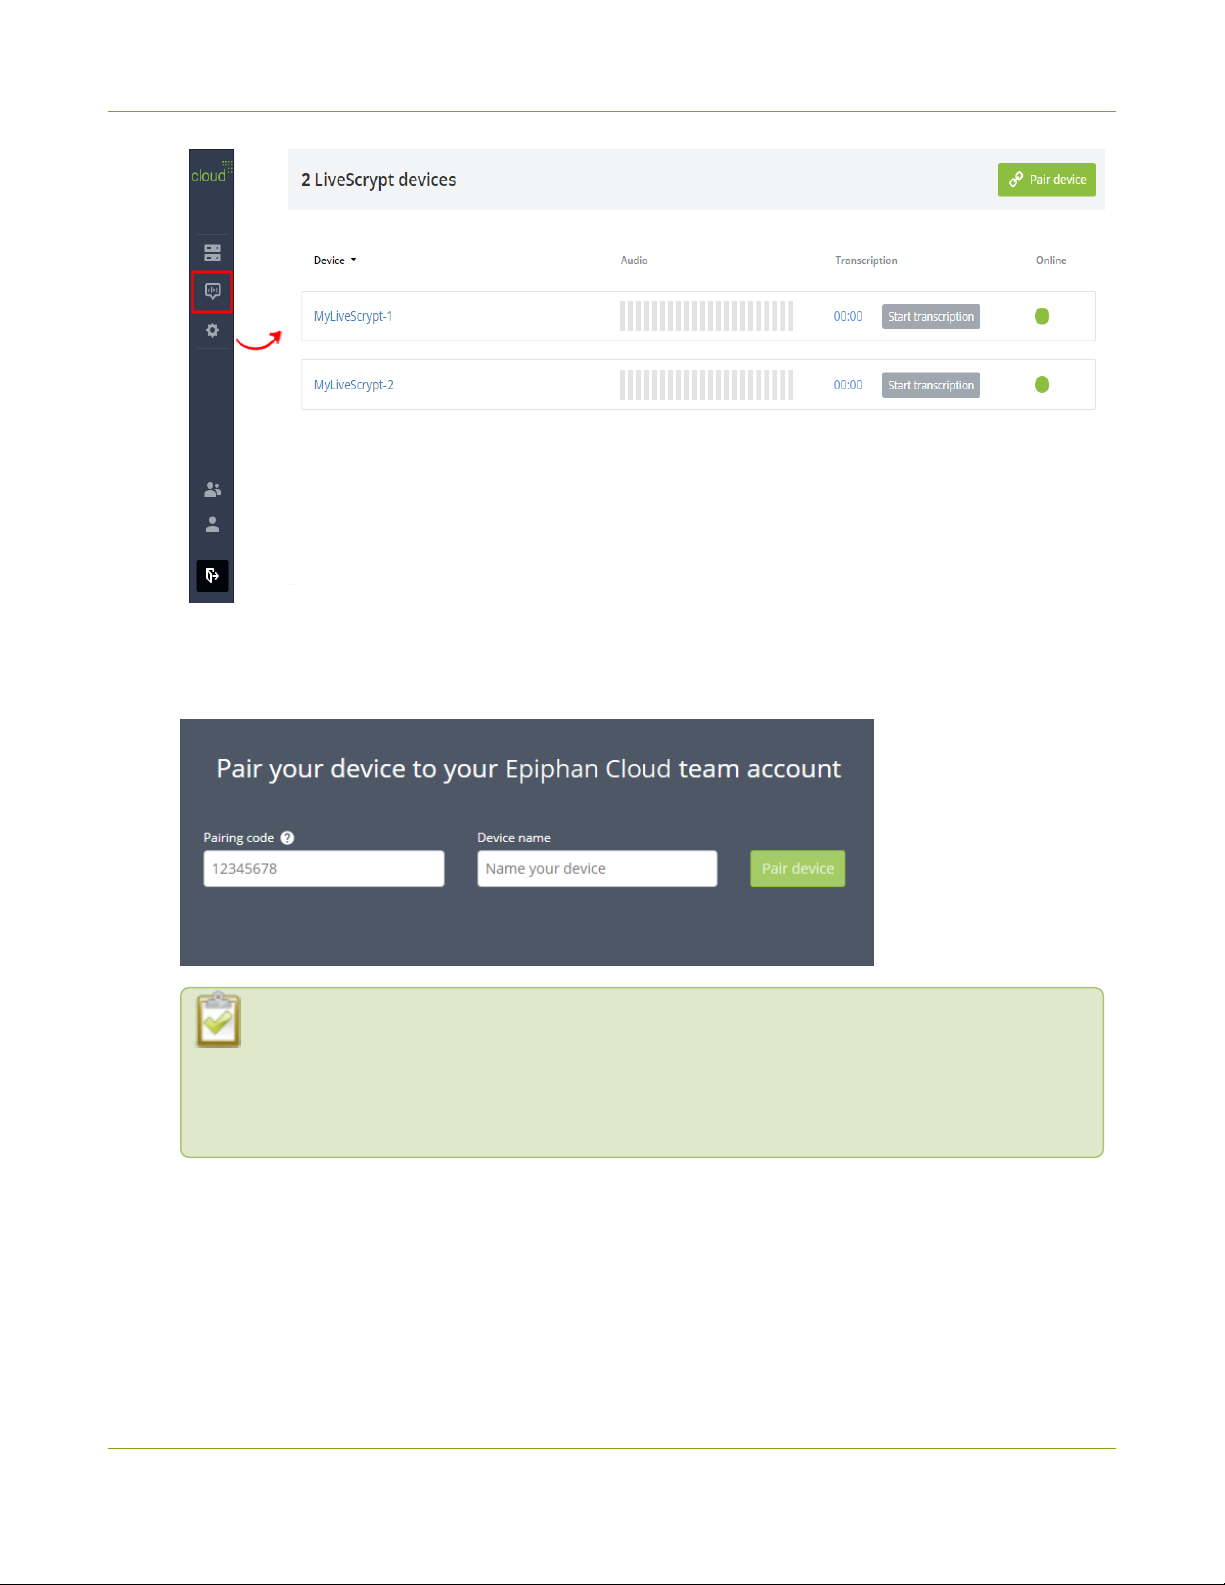
2. Select the LiveScrypt devices icon in the side navigation panel to open the LiveScrypt devices page, and
then select Pair device.
18
Page 24
LiveScrypt User Guide Pair the LiveScrypt device
3. On the device pairing page, enter your Device ID pairing code and give your device a name, then select
Pair device. Your device appears on the LiveScrypt devices page in Epiphan Cloud when the device is
paired.
You can use alphanumerical characters and spaces in the device name; however, we
recommend using underscores to separate words instead of spaces. Common character sets
for Western and Central European languages, Nordic languages, and Russian should display
correctly for the device name in the user interface on the LiveScrypt device. The device name
should not include the following special characters: ^ < > / \ ? * : " |
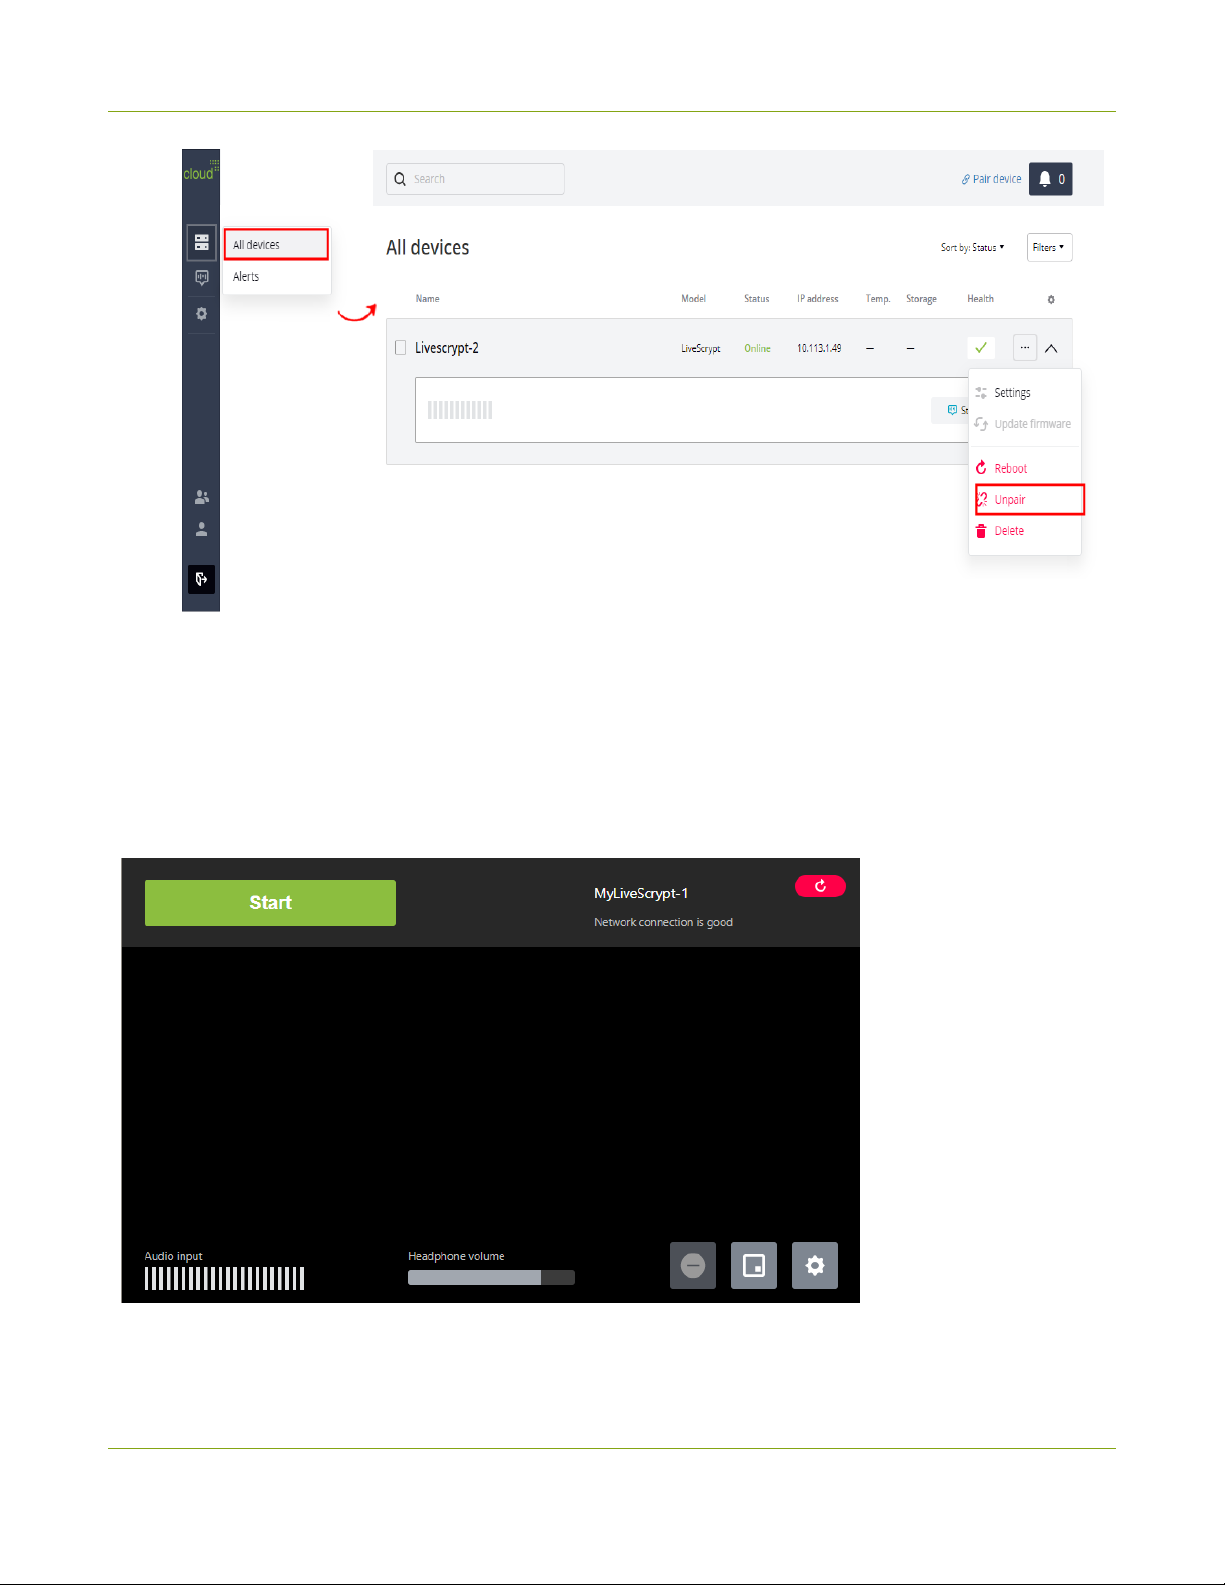
4. To unpair your LiveScrypt device using Epiphan Cloud, select Devices > All devices in the side
navigation panel to open the Devices Dashboard and select the three dots in the row for the device you
want to unpair.
19
Page 25
LiveScrypt User Guide
5. Select Unpair and confirm your selection when prompted.
Start, stop, and pause transcription using the touch
screen
Start, stop, and pause transcription using the touch screen
Easily start, stop, and pause a transcription session with a simple tap on the LiveScrypt device's touch screen.
The time a transcription session is paused is not counted as billable time for the session.
20
Page 26
LiveScrypt User Guide Start, stop, and pause transcription using Epiphan Cloud
The LiveScrypt device must be paired to your Epiphan Cloud team to start a transcription session,
see Pair the LiveScrypt device.
To start, stop, and pause transcription from the touch screen:
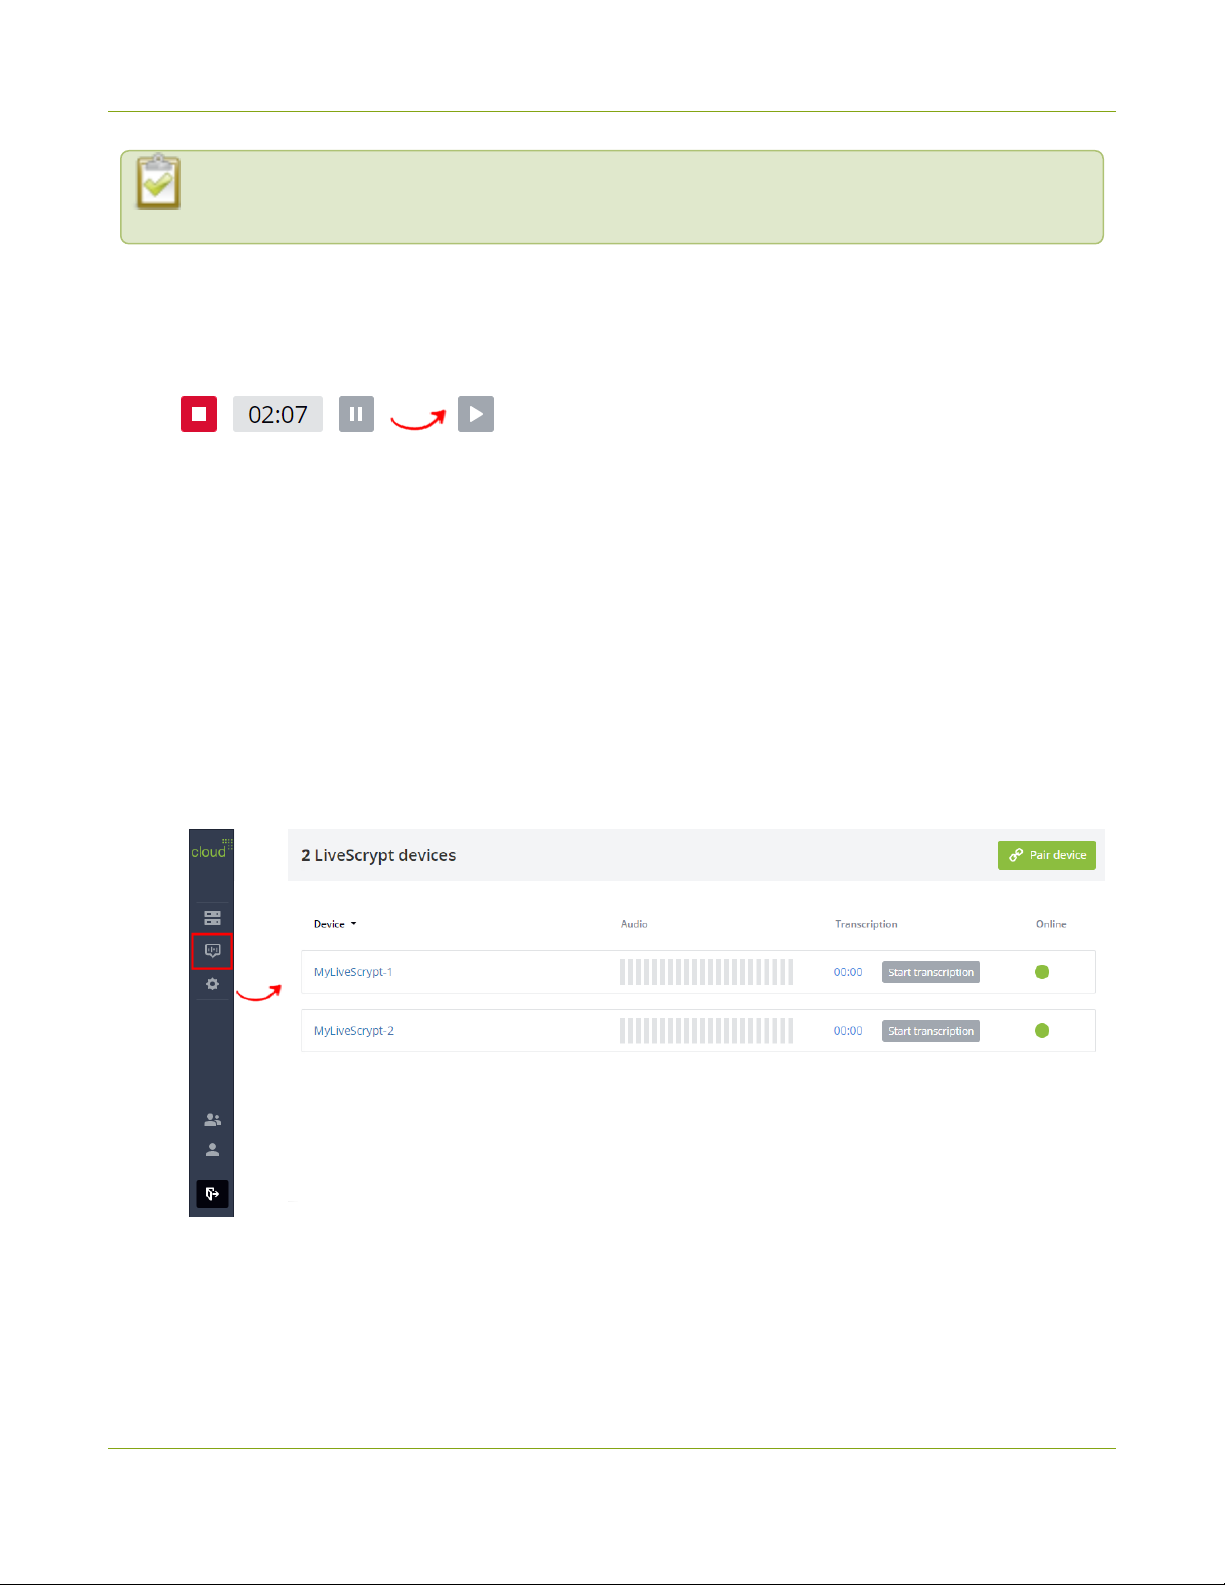
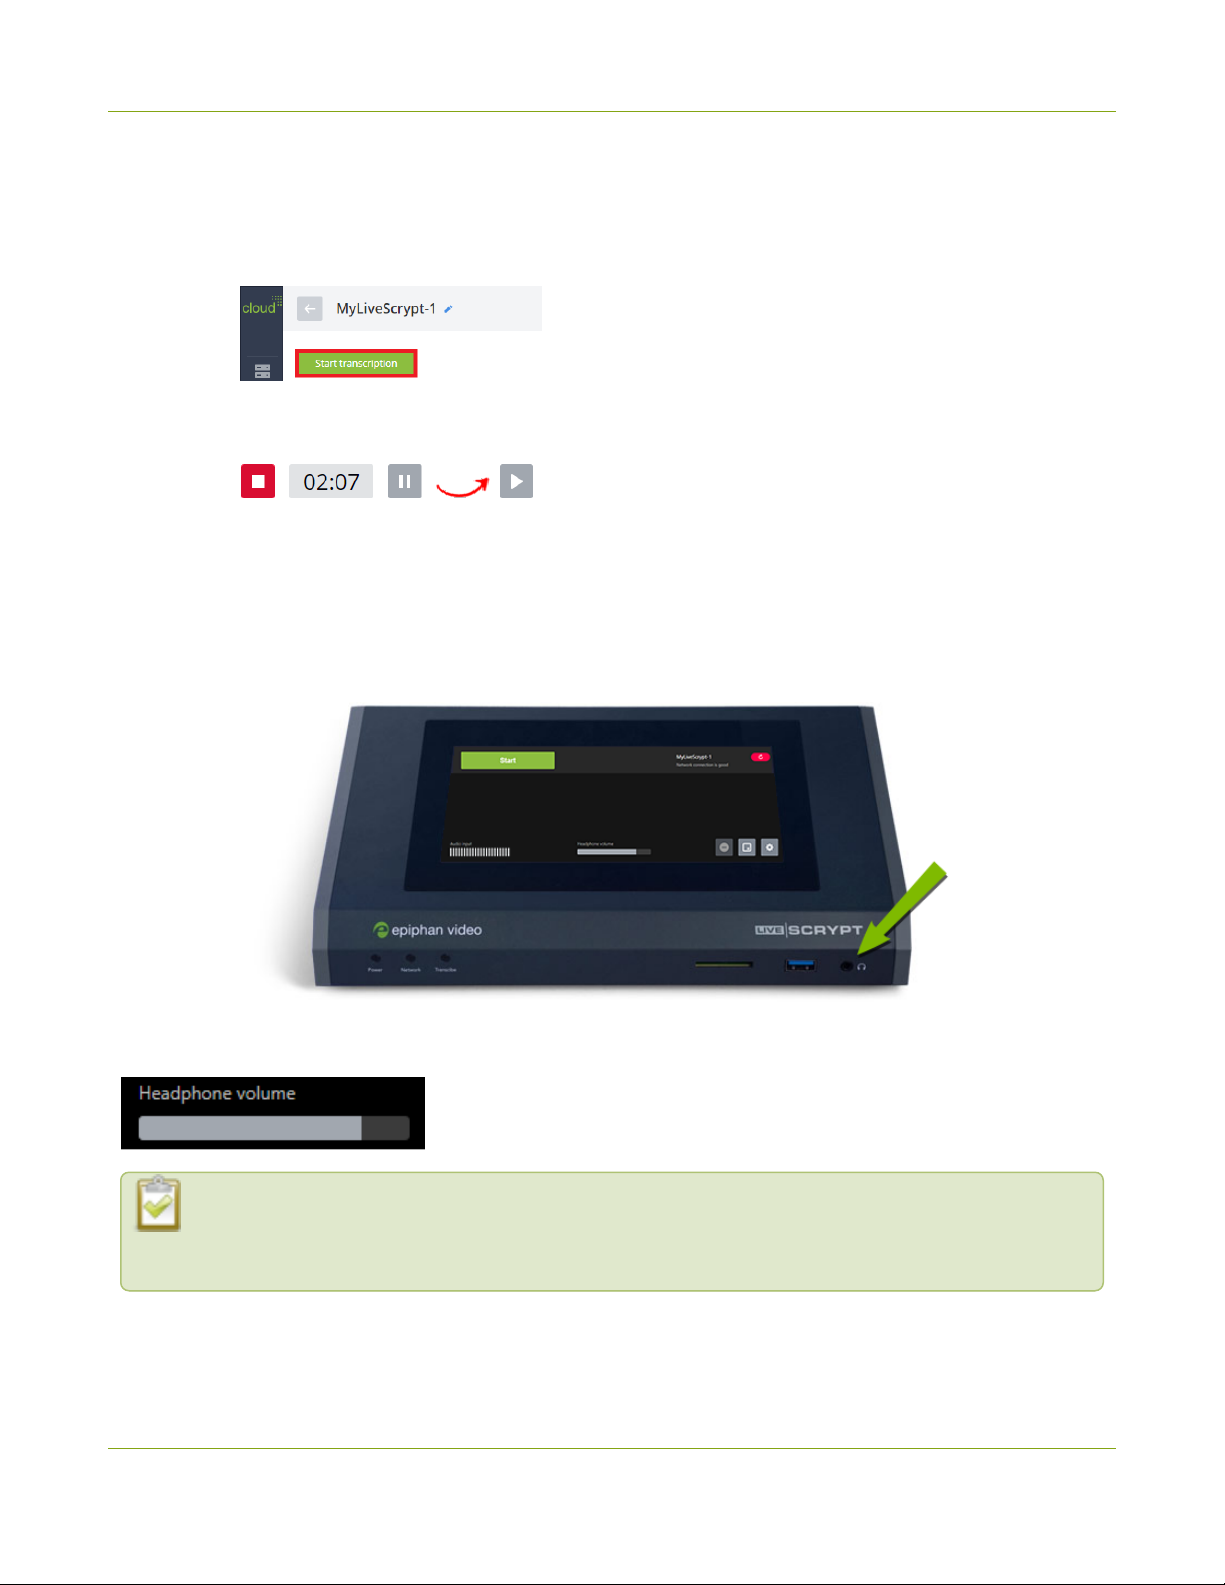
1. Tap Start to start transcription. The buttons on the header bar change.
2. When you're done, tap the red Stop button in the leftmost corner of the header bar. Or tap the Pause
button and then restart the transcription when you're ready.
Start, stop, and pause transcription using Epiphan Cloud
You can remotely start and stop a transcription session directly in Epiphan Cloud from several different places,
including the Devices Dashboard, the LiveScrypt devices page, and from a specific device's Settings page. You
can pause a session from the device's Settings page in Epiphan Cloud. The time a transcription session is
paused is not counted as billable time for the session.
To start, stop, and pause transcription using Epiphan Cloud:
1. Login to your Epiphan Cloud account at: https://go.epiphan.cloud
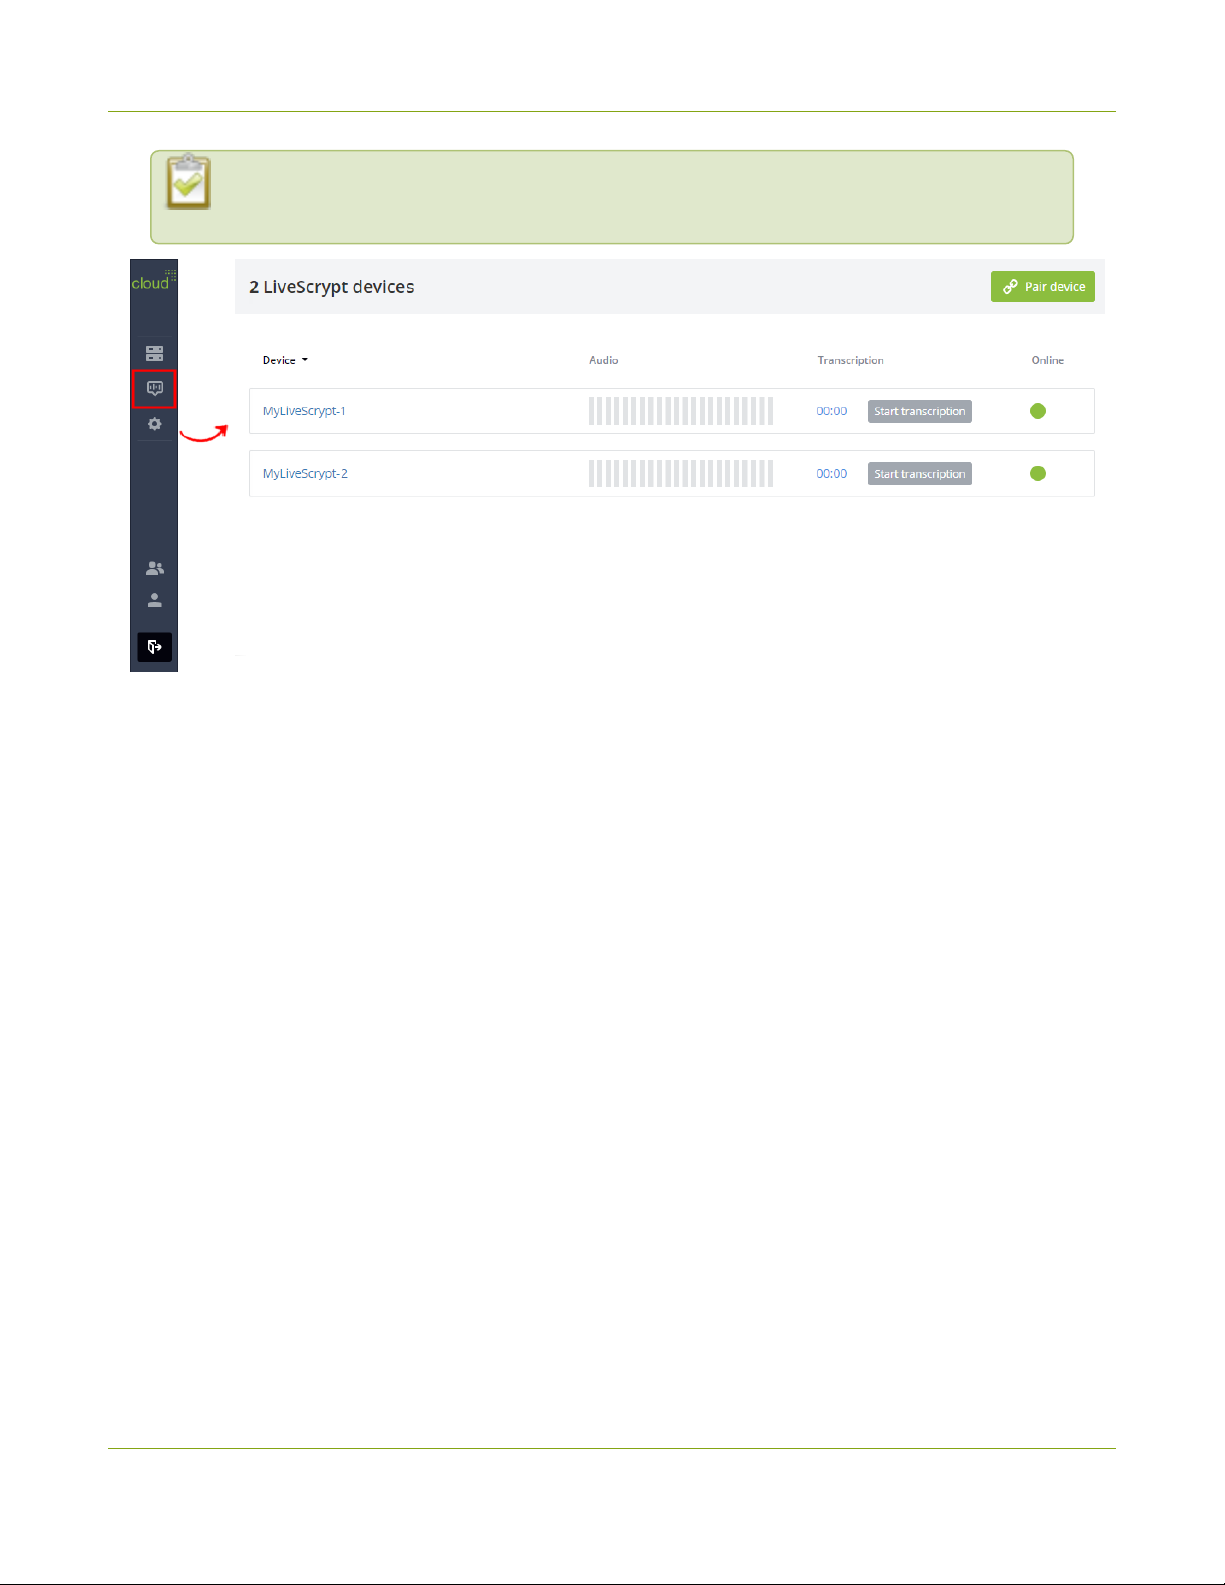
2. Using Epiphan Cloud, select the LiveScrypt devices icon in the side navigation panel. The LiveScrypt
devices page opens.
3. In the row for the LiveScrypt device, select Start transcription.
4. Select Stop transcription when you're done.
21
Page 27
LiveScrypt User Guide Monitor audio
5. (Alternative method) To start, stop, and pause transcription from the device Settings in Epiphan Cloud:
a. From the LiveScrypt devices page, select a device name in the list to open the Settings for that
device.
b. Select Start transcription.
c. When you're done, select the red stop icon in the leftmost corner of the header bar. Or select the
pause icon and then restart the transcription when you're ready.
Monitor audio
Audio from all connected sources are combined into a mono signal. There's a 3.5 mm audio jack for monitoring
audio on the front panel of the LiveScrypt device. You can plug external speakers or headphones into the 3.5 mm
audio jack. The same mono signal is heard in the left and right headphone speakers.
Tap or swipe the headphone volume control on the bottom of the touch screen to adjust your volume.
Increasing the headphone volume to 100% may cause you to hear distortion that is not actually
present in the audio signal being sent for transcription. At approximately 75% volume, you hear the
nominal audio level in the VU meter at approximately where the green bars change to yellow.
22
Page 28

LiveScrypt User Guide Monitor audio
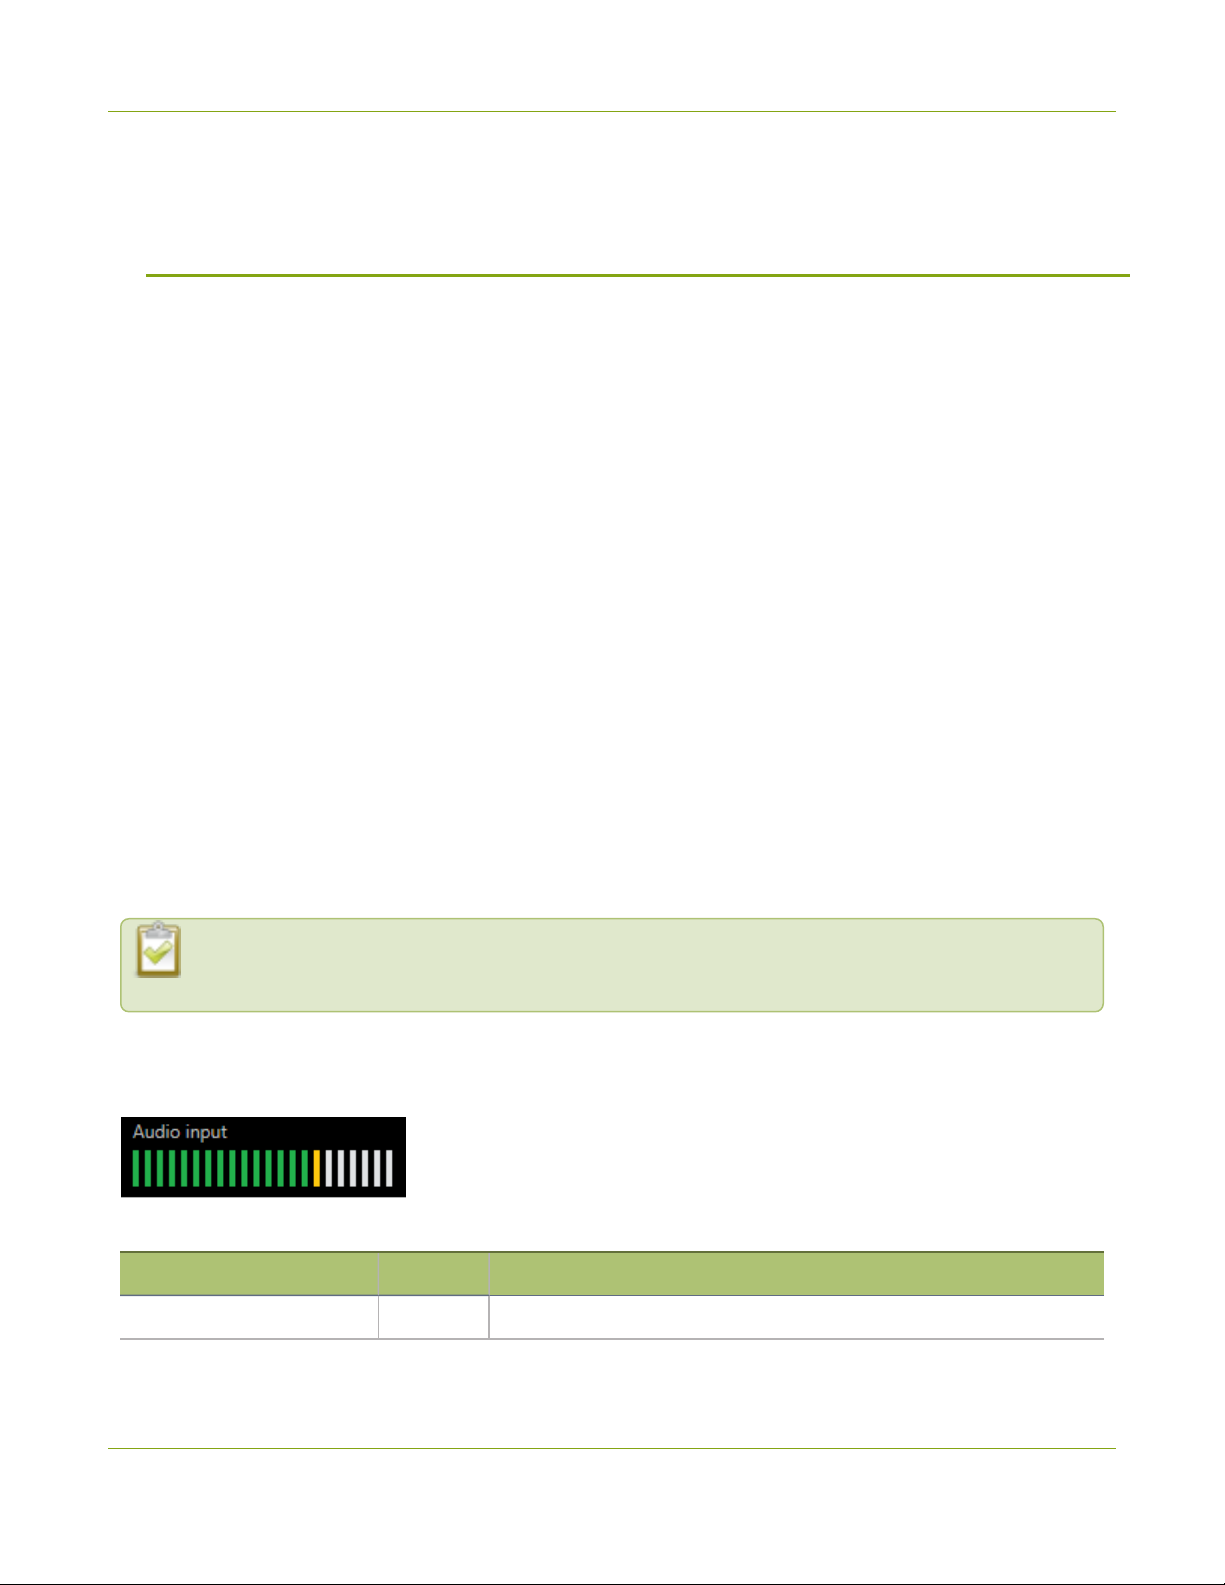
A mono VU meter on the touch screen shows the audio level of the combined audio signal. The value is
displayed in dBFS (decibels relative to full scale). Colored bars represent the audio level. Similar audio VU
meters appear in other places, like where you configure the audio gain in the Settings.
To optimize transcription performance and accuracy, the average signal level should register where the green
bars change to yellow. Red indicates the audio signal is too loud and excessive peaks are clipped, which
introduces distortion. To adjust the gain, see Adjust audio gain.
23
Page 29

LiveScrypt User Guide Output display options
Output display options
You can easily change the look of the output display directly from the touch screen. You can also configure the
HDMI output display port settings and the size of the text that appears on the touch screen of your LiveScrypt
device using the touch screen, the web interface, or Epiphan Cloud when your LiveScrypt device is paired with
your Epiphan Cloud team.
Topics:
l
Choose the display view
l
Display QR code
l
Copy the QR code and session URL
l
Change the display output port resolution
l
Change display color scheme and font size
l
Change the direction of transcription
l
Change touch screen font size
Choose the display view
You can quickly change what people see on the output display using the touch screen, web interface, or Epiphan
Cloud. For instructions on how to access the web interface and Epiphan Cloud, see User interfaces.
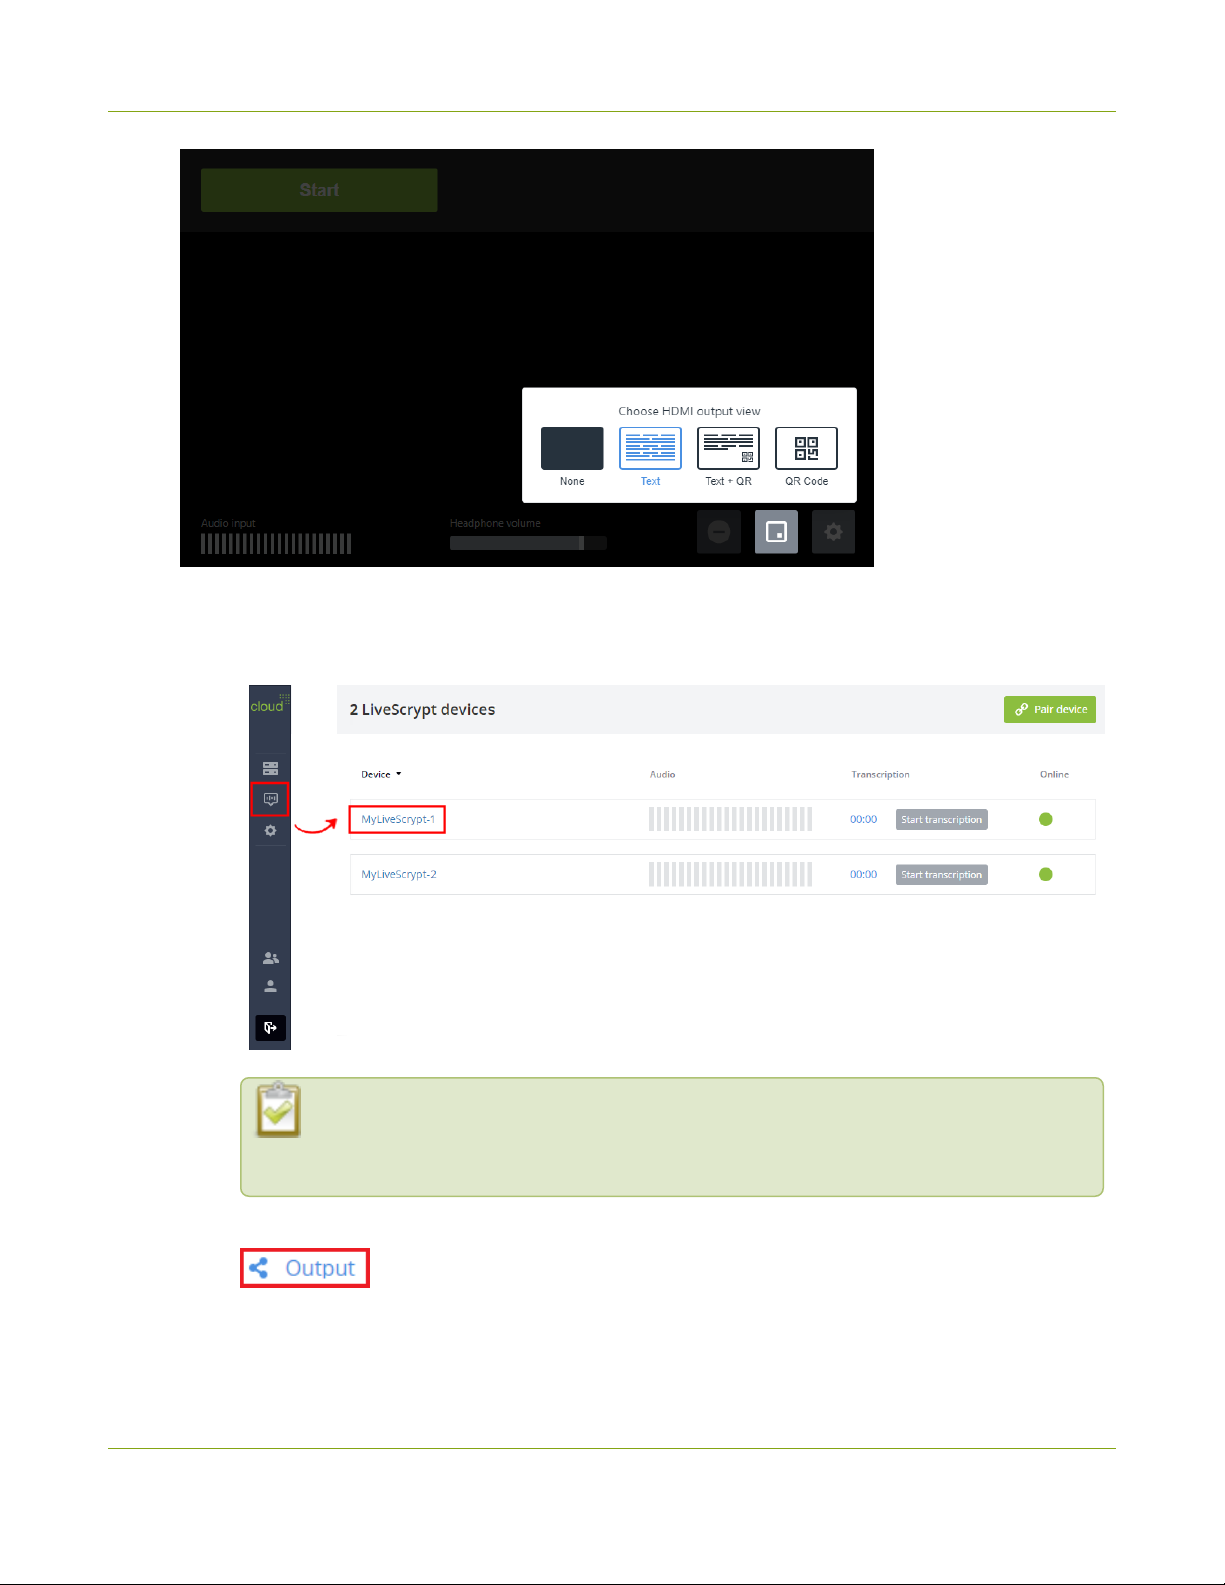
The display options are:
l
None: A plain black screen with the LiveScrypt logo displays.
l
Text: The live transcription displays full screen when you start transcription. The transcription appears
only as speech is detected.
l
Text + QR: The live transcription displays along with the QR code when you start transcription. The
transcription appears only as speech is detected.
l
QR Code: A full screen QR code displays when you start transcription.
To make other visual changes, like changing the color of the background or the font size, see Transcription
options.
To choose the display view:
1. Using the touch screen or web interface, tap the Display view icon and choose the view you want to
display. The selected view is highlighted in blue.
24
Page 30
LiveScrypt User Guide Choose the display view
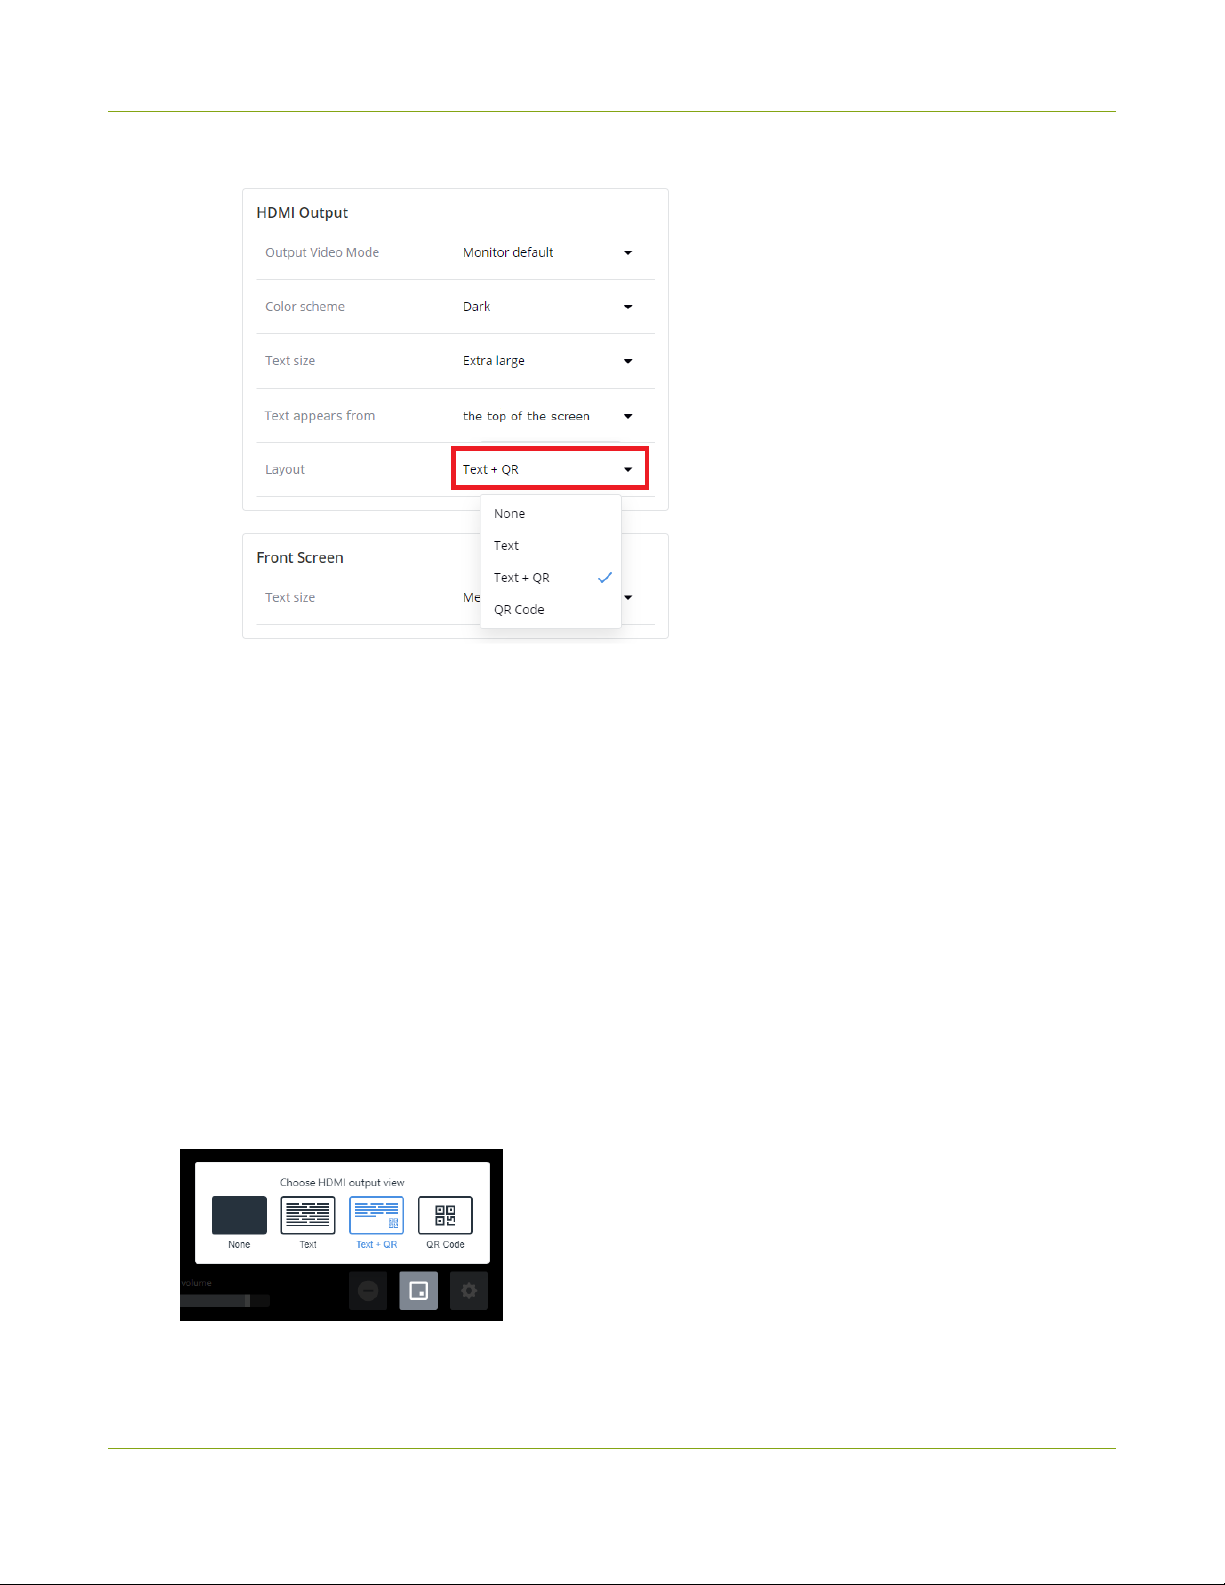
2. Using Epiphan Cloud, do the following:
a. Select the LiveScrypt devices icon in the side navigation panel, and then select a LiveScrypt
device to open the device Settings.
You can also open the LiveScrypt device settings page from the Devices Dashboard
when you click the LiveScrypt device name or click the three dots in the row for the
LiveScrypt device and select Settings.
b. From the Settings, select Output. The Output menu opens.
25
Page 31
LiveScrypt User Guide Display QR code
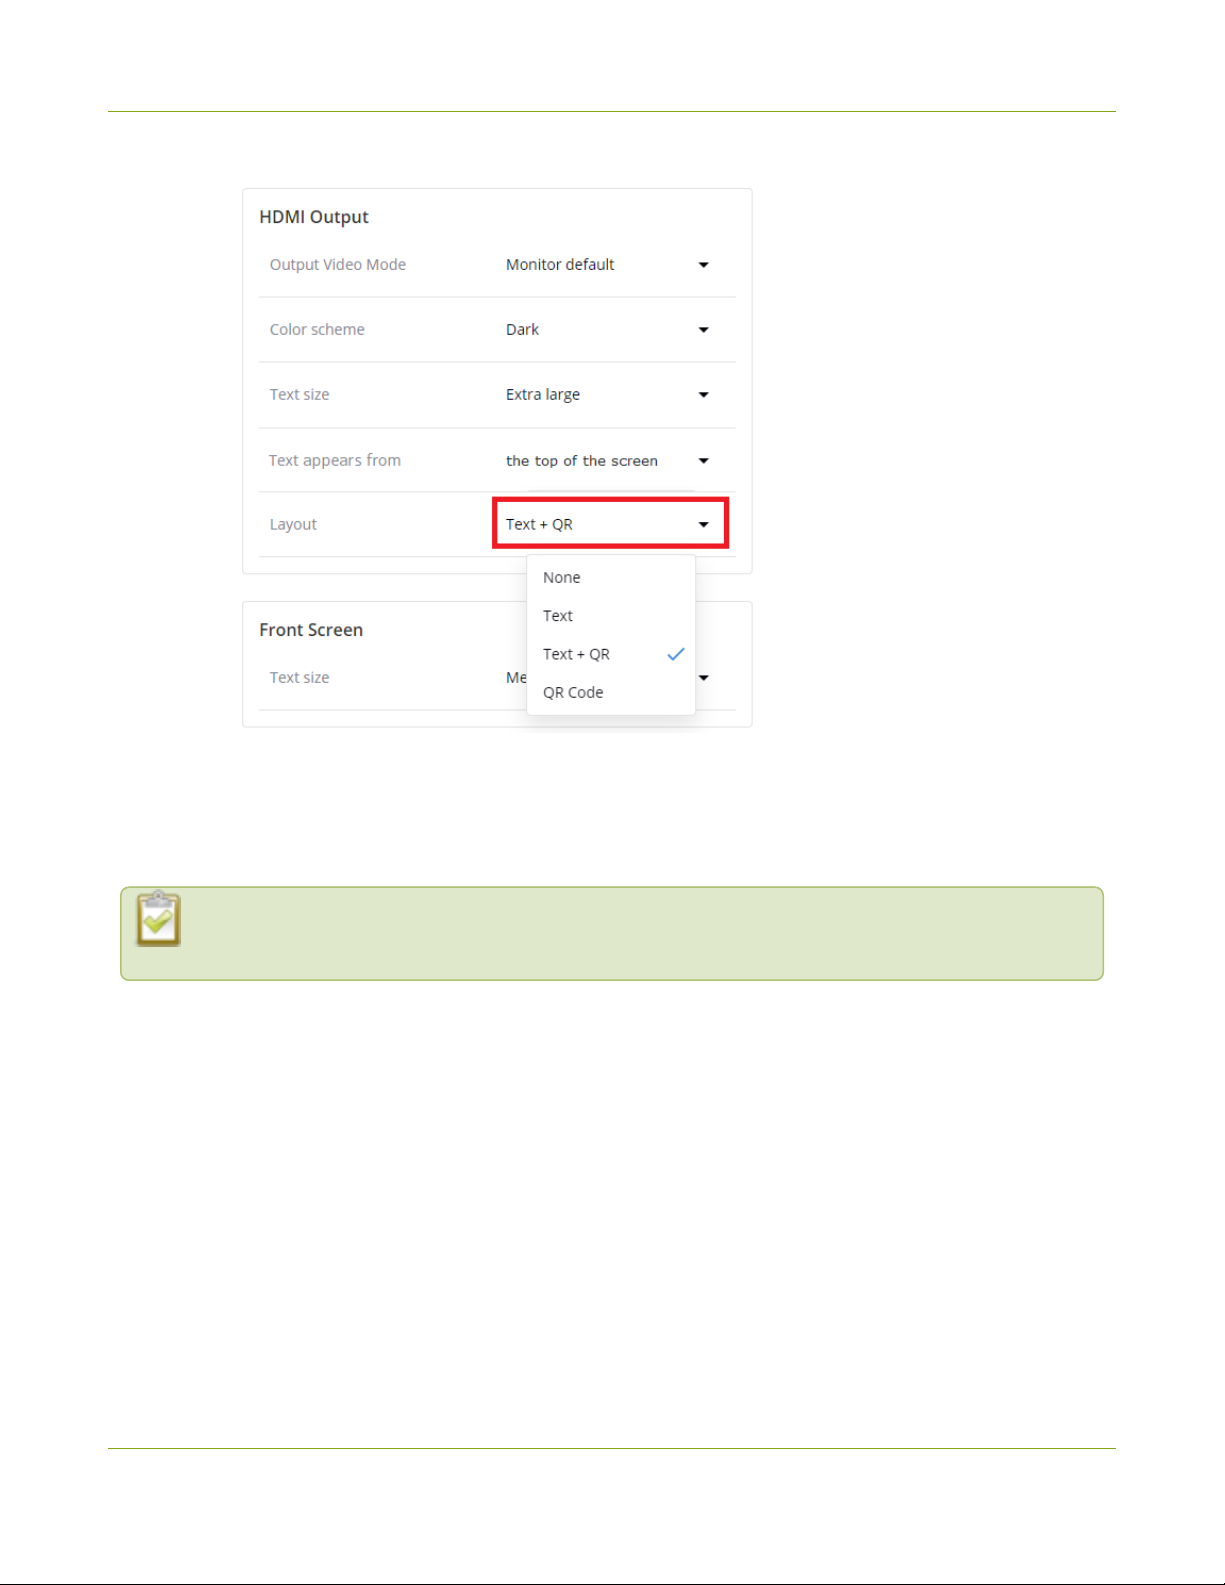
c. In the Layout field, select a layout from the drop-down menu.
Display QR code
It's easy to show a QR code on the HDMI output display port so that people can connect to the live transcription
using their favorite browser on their smart device. You can display the QR code using the touch screen, the web
interface, or Epiphan Cloud when the device is paired with your Epiphan Cloud team. For instructions on how to
access the web interface and Epiphan Cloud, see User interfaces.
The QR code display options are:
l
Text + QR: The live transcription displays along with the QR code when you start transcription. The
transcription appears only as speech is detected.
l
QR Code: A full screen QR code displays when you start transcription.
To copy the QR code and transcription session URL to provide them to audiences so they can watch the live
transcription from a smart device or computer, see Transcription options.
To display the QR code:
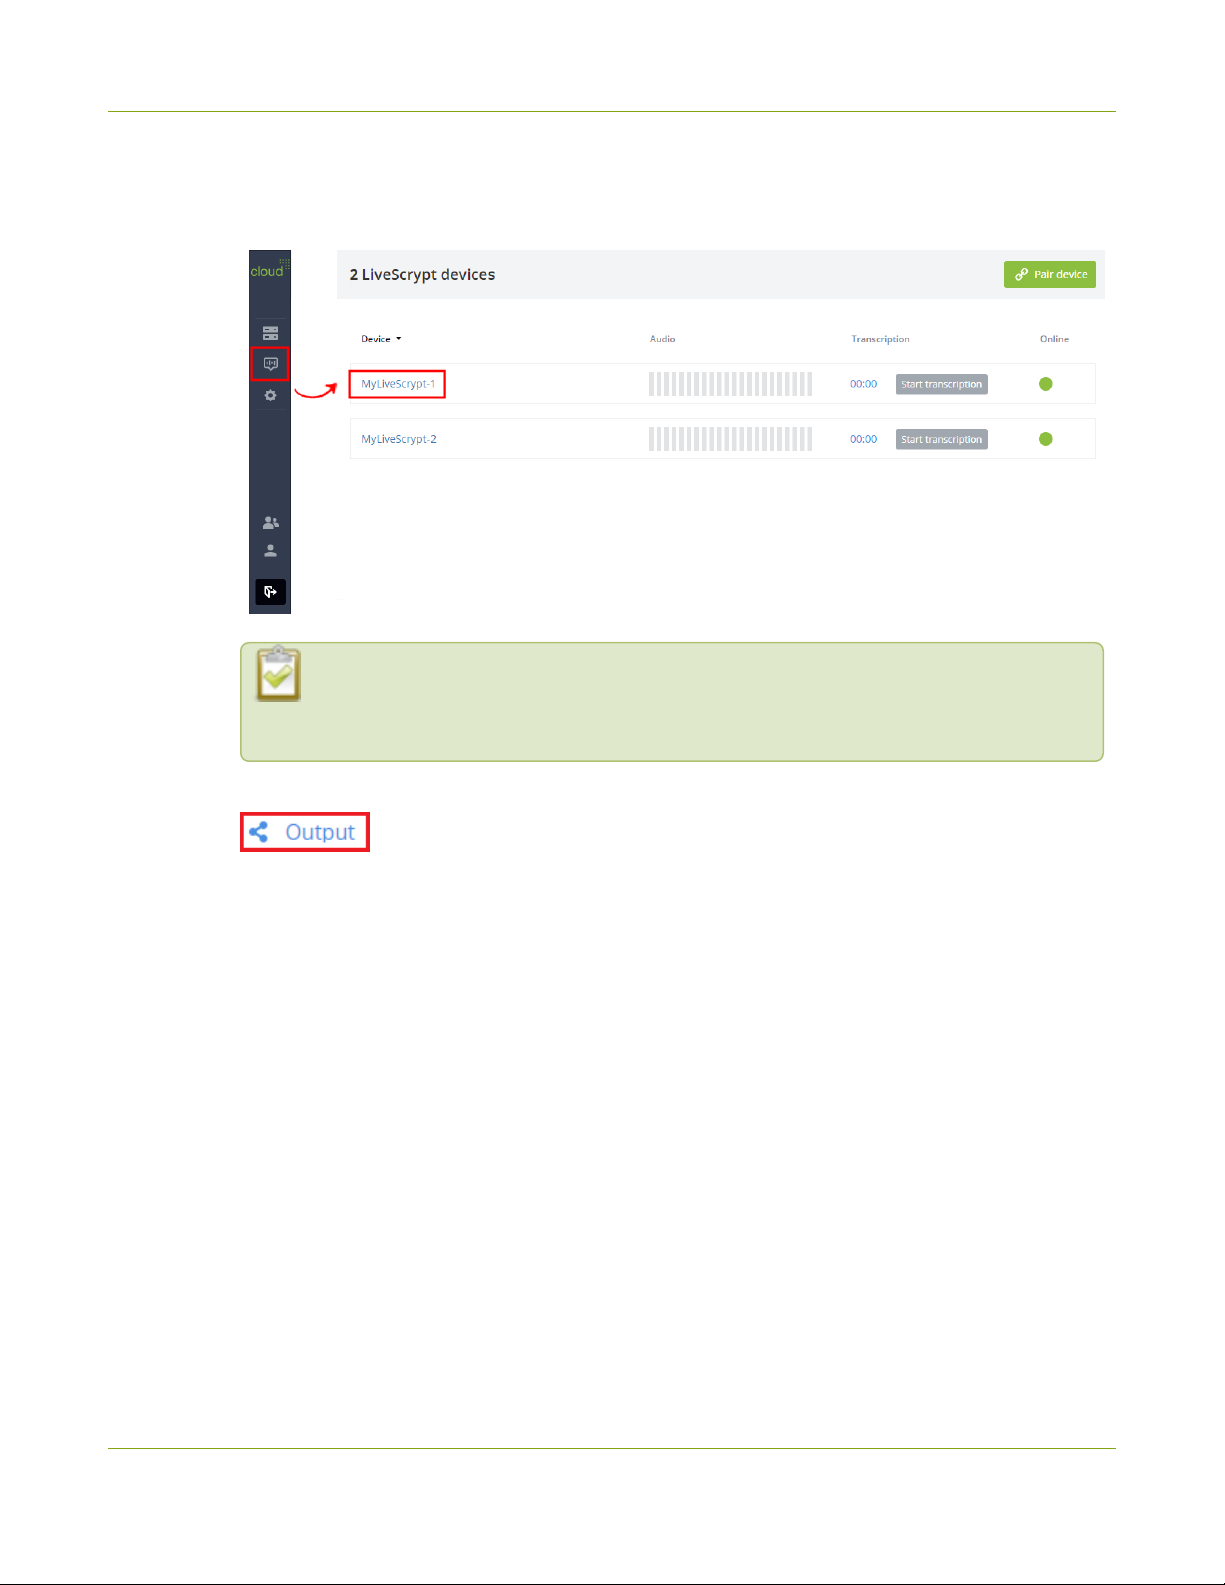
1. Using the touch screen or web interface, tap the Display view icon and choose the view you want to
display. The selected view is highlighted in blue.
26
Page 32
LiveScrypt User Guide Display QR code
2. Using Epiphan Cloud, do the following:
a. Select the LiveScrypt devices icon in the side navigation panel, and then select a LiveScrypt
device to open the device Settings.
You can also open the LiveScrypt device settings page from the Devices Dashboard
when you click the LiveScrypt device name or click the three dots in the row for the
LiveScrypt device and select Settings.
b. From the Settings, select Output. The Output menu opens.
27
Page 33
LiveScrypt User Guide Copy the QR code and session URL
c. In the Layout field, select a layout from the drop-down menu.
Copy the QR code and session URL
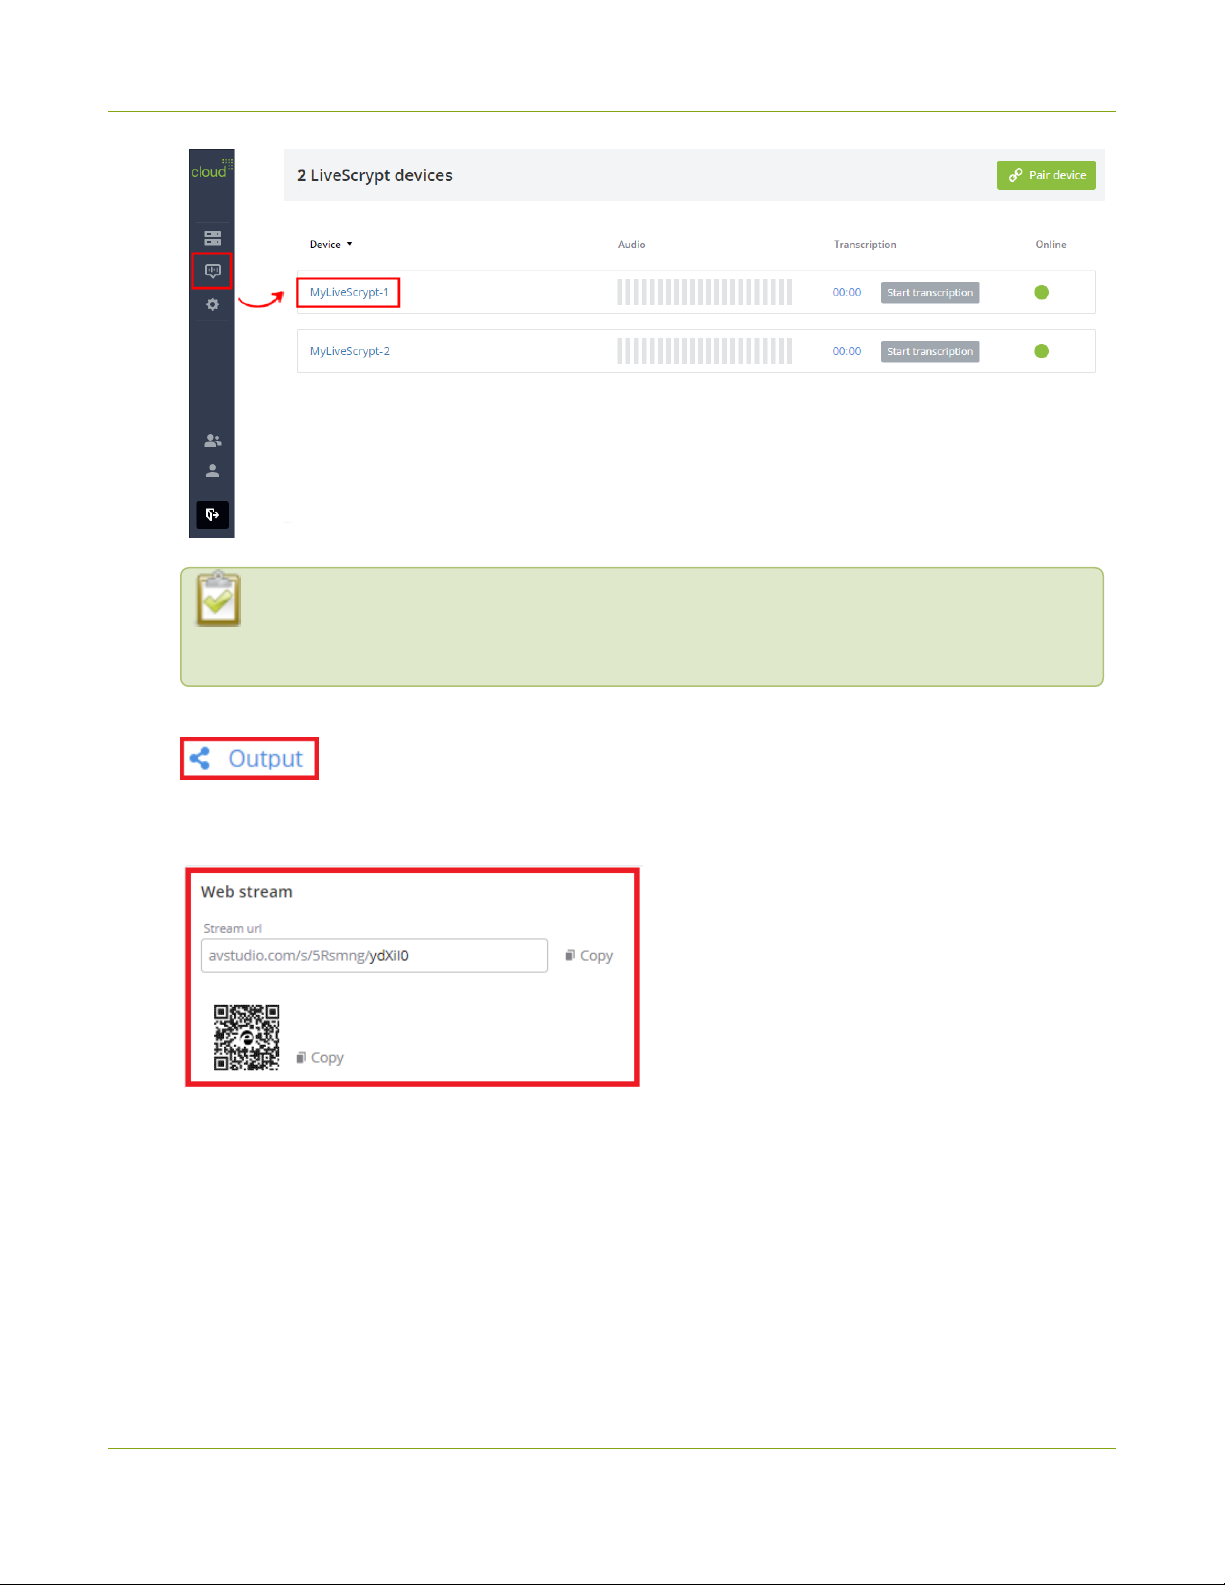
Using Epiphan Cloud, you can copy the QR code and transcription session URL to provide them to audiences so
they can watch the live transcription from a smart device or computer.
If the LiveScrypt device is unpaired and permanently offline, it won't appear in the list of LiveScrypt
devices.
To copy the QR code and session URL using Epiphan Cloud:
1. Login to your Epiphan Cloud account at: https://go.epiphan.cloud
2. Select the LiveScrypt devices icon in the side navigation panel, and then select a LiveScrypt device to
open the device Settings.
28
Page 34
LiveScrypt User Guide Change the display output port resolution
You can also open the LiveScrypt device settings page from the Devices Dashboard when
you click the LiveScrypt device name or click the three dots in the row for the LiveScrypt
device and select Settings.
3. From the Settings, select Output. The Output menu opens.
4. In the Web stream section, select Copy beside the Stream URL or QR code to copy it to your clipboard.
Then paste it into your document or email.
Change the display output port resolution
The default resolution of the HDMI display output port should work for most situations; however, you can
manually select a resolution using the touch screen, the web interface, or Epiphan Cloud when the LiveScrypt
device is paired with your Epiphan Cloud team. For instructions on how to access the web interface or Epiphan
Cloud, see User interfaces.
To change the display output port resolution:
29
Page 35
LiveScrypt User Guide Change the display output port resolution
1. Open the device Settings, do one of the following:
a.
Using the touch screen or web interface, select Settings .
b. Using Epiphan Cloud, select the LiveScrypt devices icon in the side navigation panel, and then
select a LiveScrypt device to open the device Settings.
You can also open the LiveScrypt device settings page from the Devices Dashboard
when you click the LiveScrypt device name or click the three dots in the row for the
LiveScrypt device and select Settings.
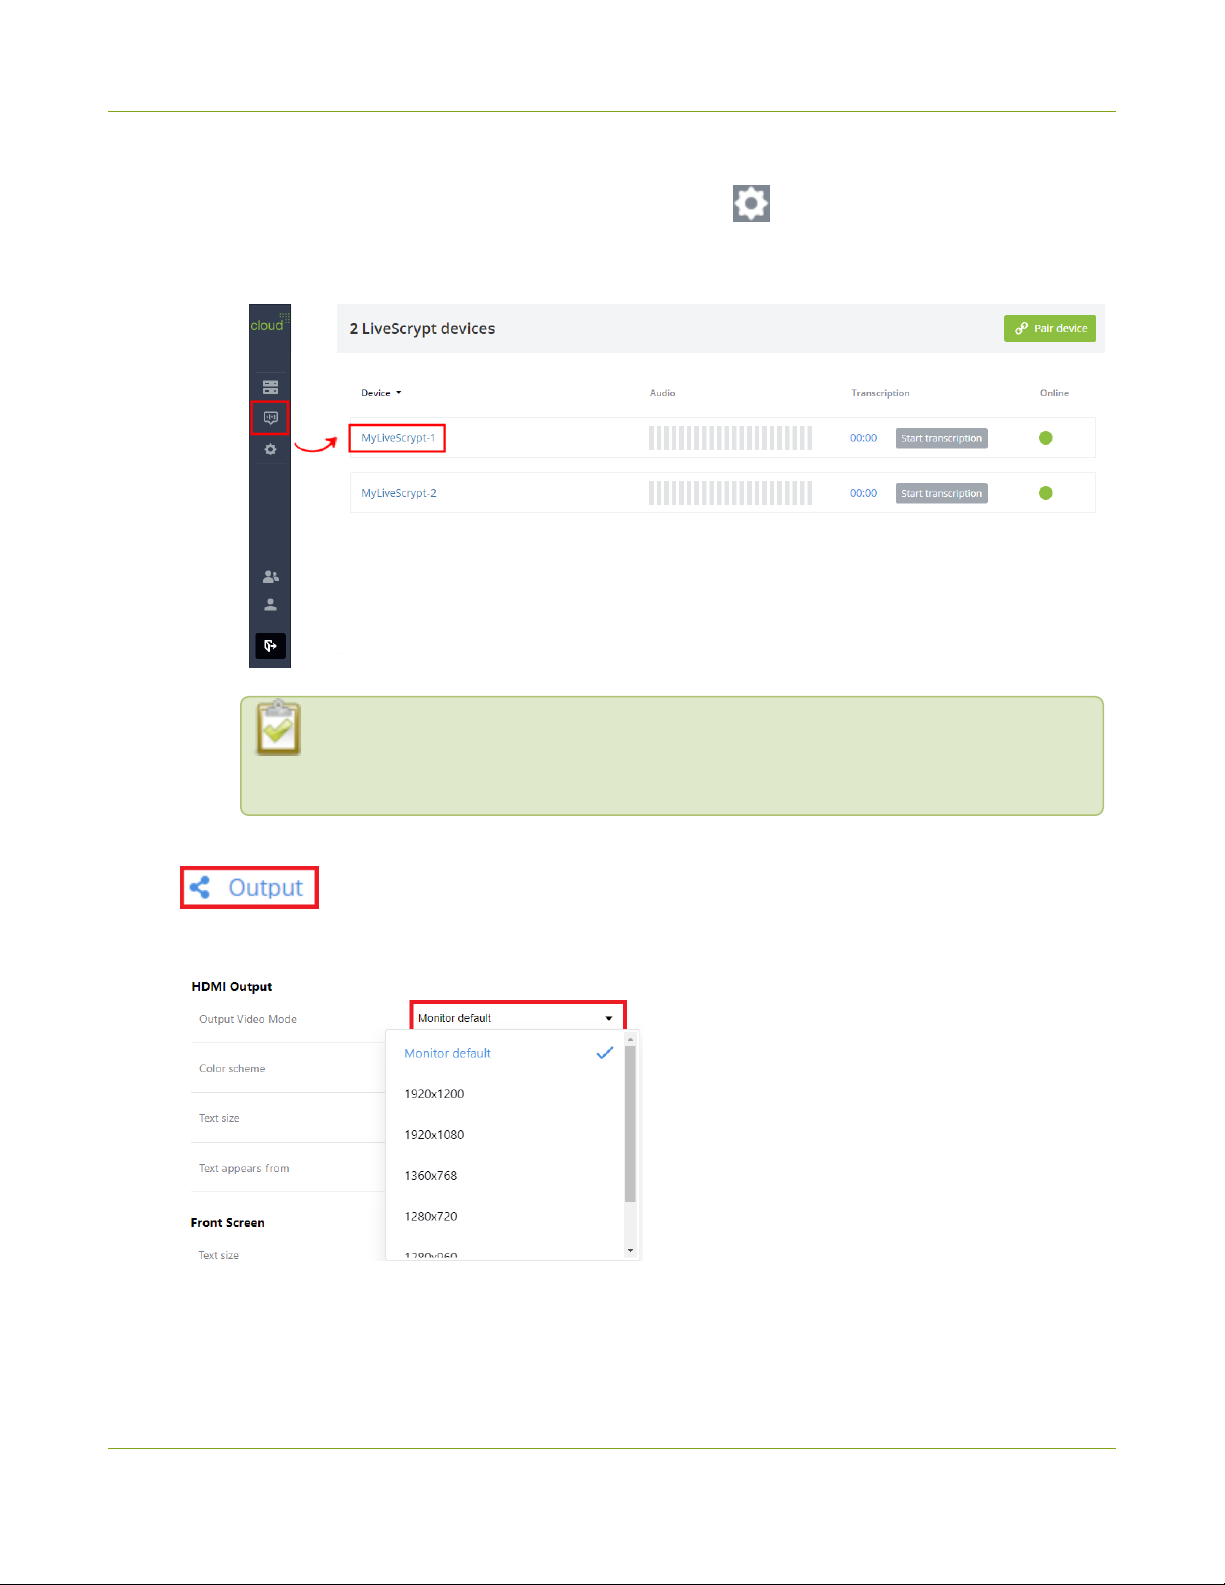
2. From the Settings, select Output. The Output menu opens.
3. In the Output Video Mode field, select a resolution from the drop-down menu.
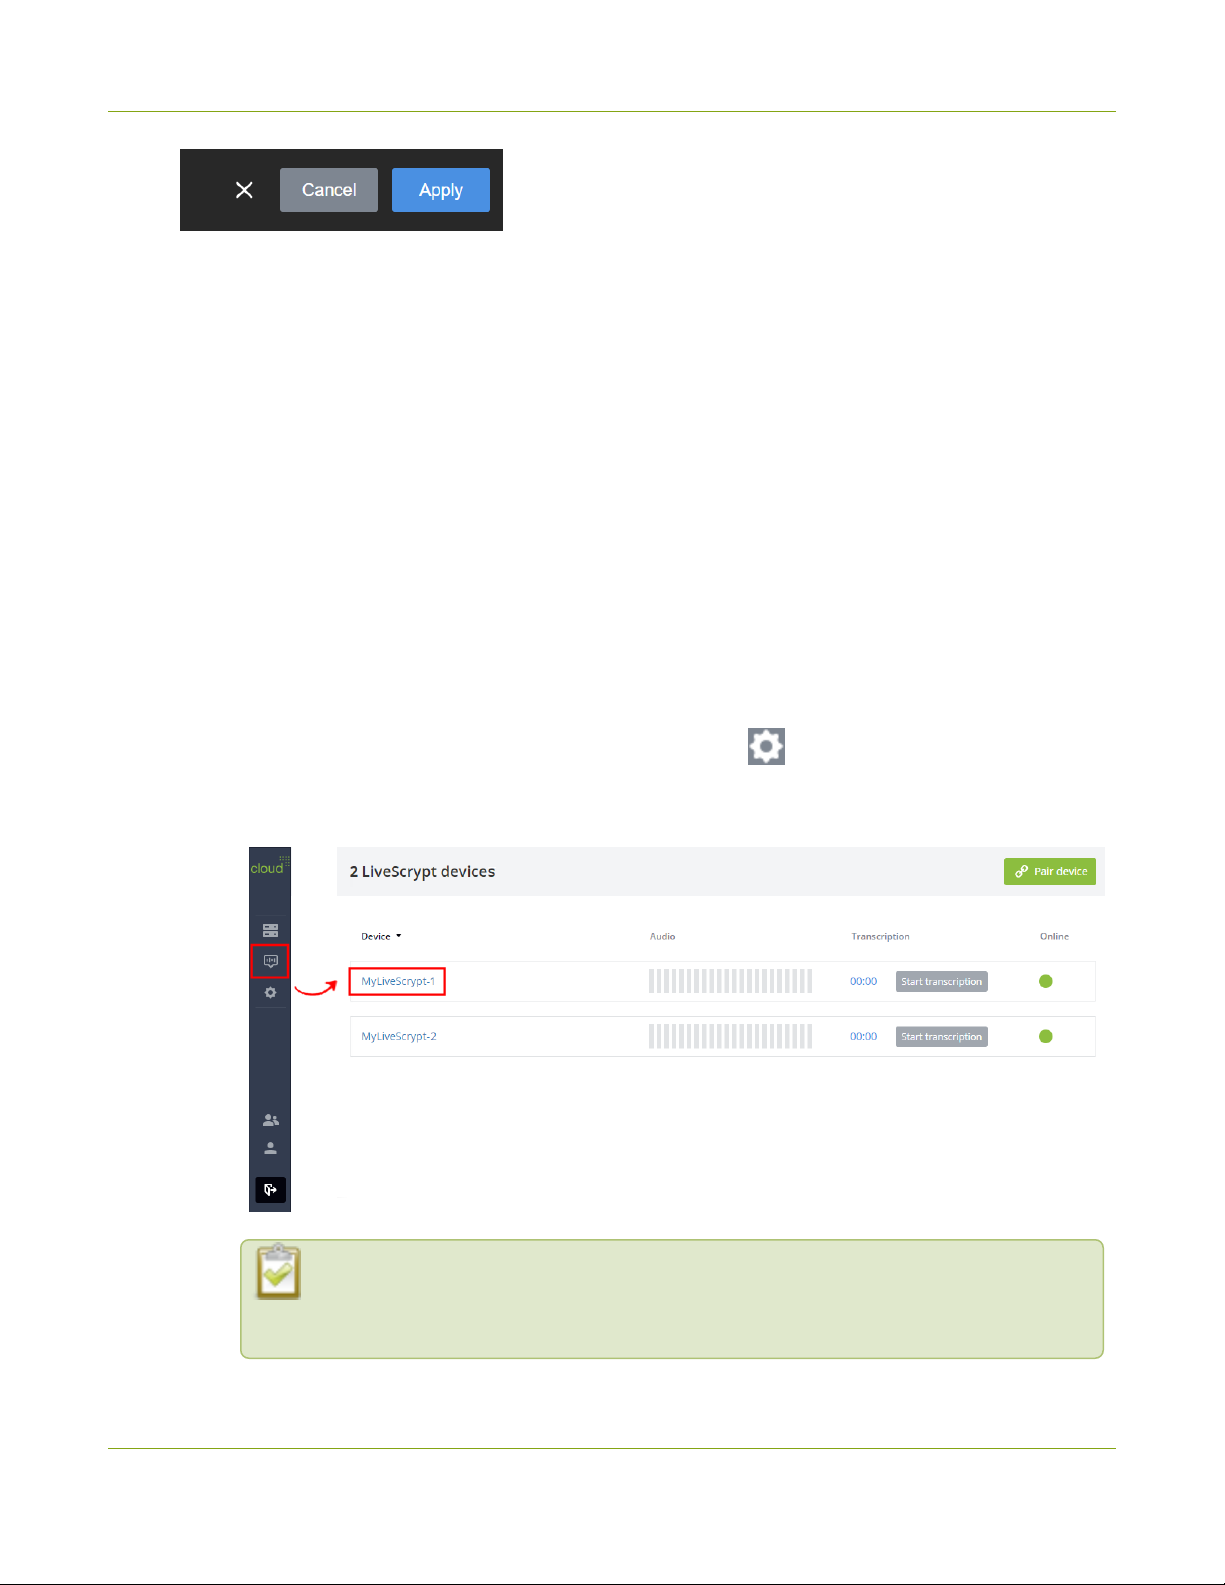
4. Select Apply if you're using the touch screen or web interface.
30
Page 36
LiveScrypt User Guide Change display color scheme and font size
Change display color scheme and font size
You can change the color scheme of the HDMI display output and the transcription font size using the touch
screen, the web interface, or Epiphan Cloud when the LiveScrypt device is paired with your Epiphan Cloud team.
For instructions on how to access the web interface or Epiphan Cloud, see User interfaces.
The default output is set to display medium-size white text on a black background. You can change the size of
the text, as well as the background color scheme from the Settings.
Display color schemes:
l
Dark: White text on black background.
l
Light: Black text on white background.
l
Green screen (white text): White text on chroma green background.
l
Green screen (black text): Black text on chroma green background.
To change the color scheme of the display output and the font size:
1. Open the device Settings, do one of the following:
a.
Using the touch screen and web interface, select Settings .
b. Using Epiphan Cloud, select the LiveScrypt devices icon in the side navigation panel, and then
select a LiveScrypt device to open the device Settings.
You can also open the LiveScrypt device settings page from the Devices Dashboard
when you click the LiveScrypt device name or click the three dots in the row for the
LiveScrypt device and select Settings.
31
Page 37
LiveScrypt User Guide Change touch screen font size
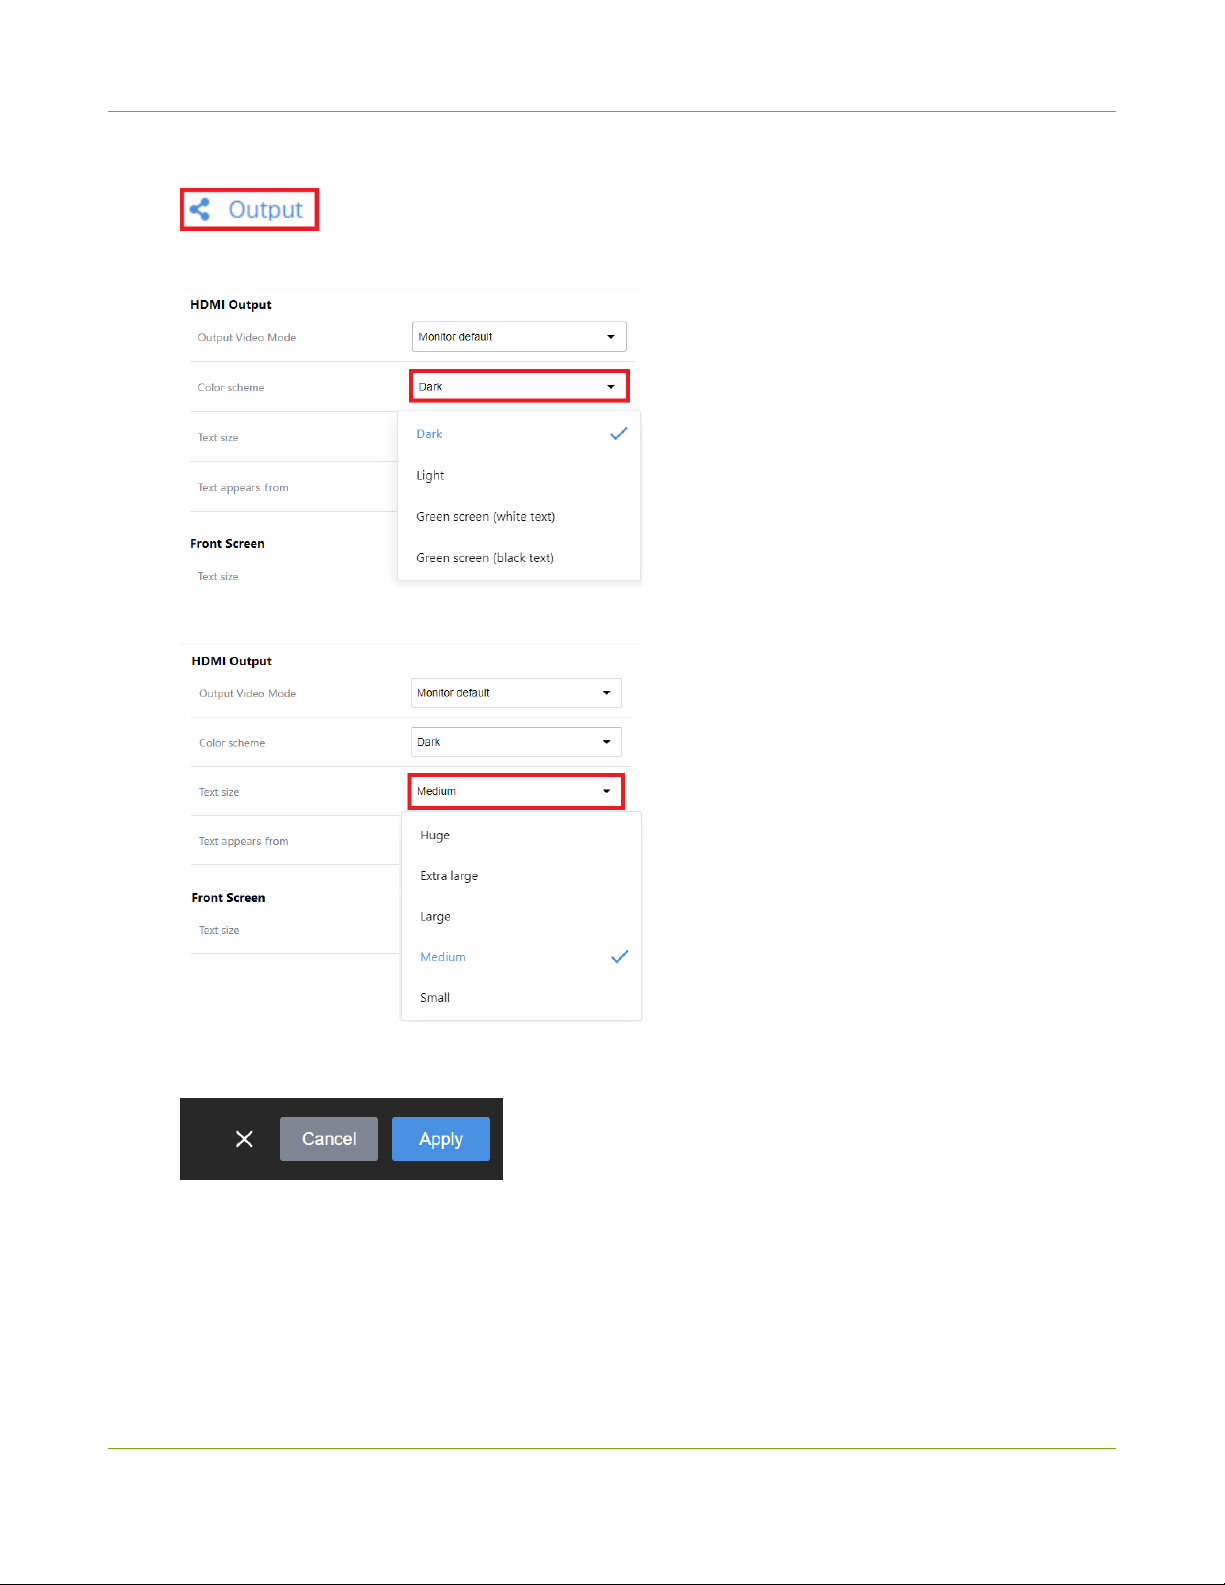
2. From the Settings, select Output. The Output menu opens.
3. To change the color scheme, select a scheme from the Color scheme drop-down menu.
4. To change the font size, select a size from the Text size drop-down menu.
5. Select Apply if you're using the touch screen or web interface.
Change touch screen font size
You can change the font size of the transcription displayed on the LiveScrypt device's touch screen using the
touch screen, the web interface, or Epiphan Cloud when the LiveScrypt device is paired with your Epiphan Cloud
team. The default output is set to display medium size white text on a black background.
For instructions on how to access the web interface or Epiphan Cloud, see User interfaces.
32
Page 38
LiveScrypt User Guide Change touch screen font size
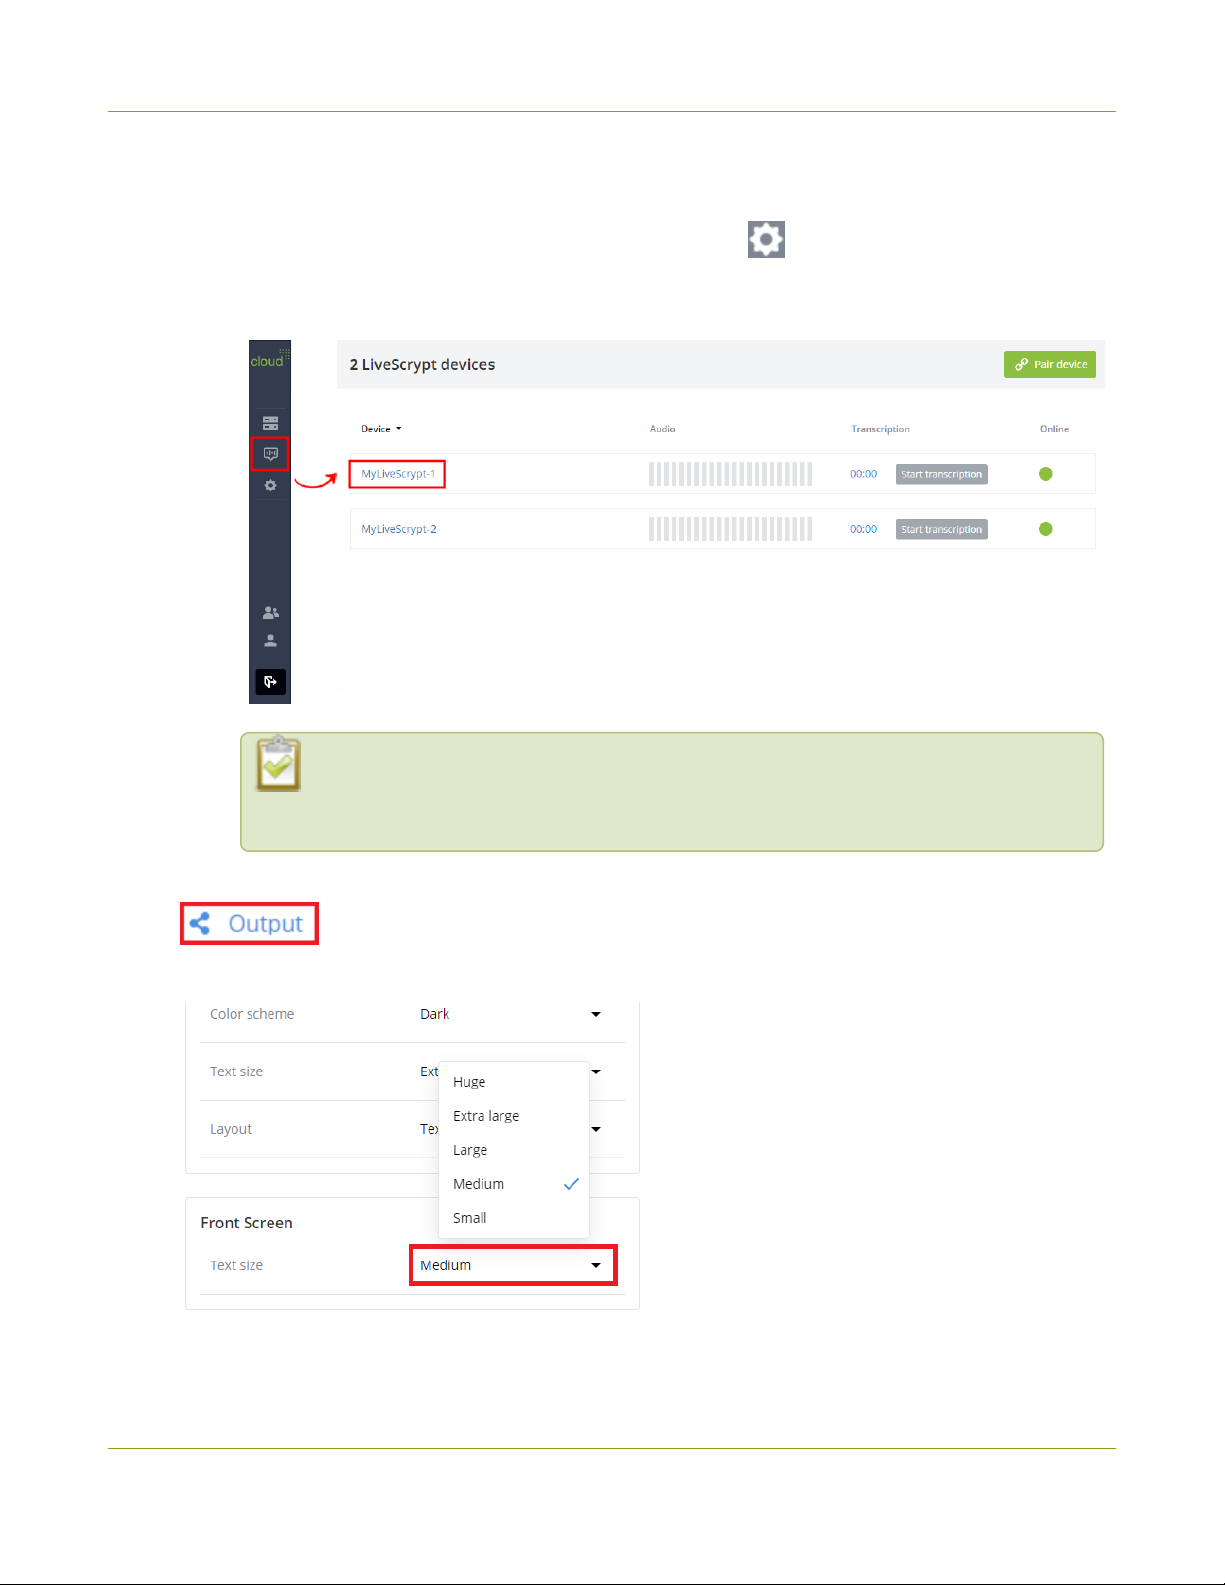
To change the font size of the transcription displayed on the touch screen:
1. Open the device Settings, do one of the following:
a.
Using the touch screen and web interface, select Settings .
b. Using Epiphan Cloud, select the LiveScrypt devices icon in the side navigation panel, and then
select a LiveScrypt device to open the device Settings.
You can also open the LiveScrypt device settings page from the Devices Dashboard
when you click the LiveScrypt device name or click the three dots in the row for the
LiveScrypt device and select Settings.
2. From the Settings, select Output. The Output menu opens.
3. In the Front Screen section, select a size in the Text size drop-down menu.
33
Page 39
LiveScrypt User Guide Change the direction of transcription
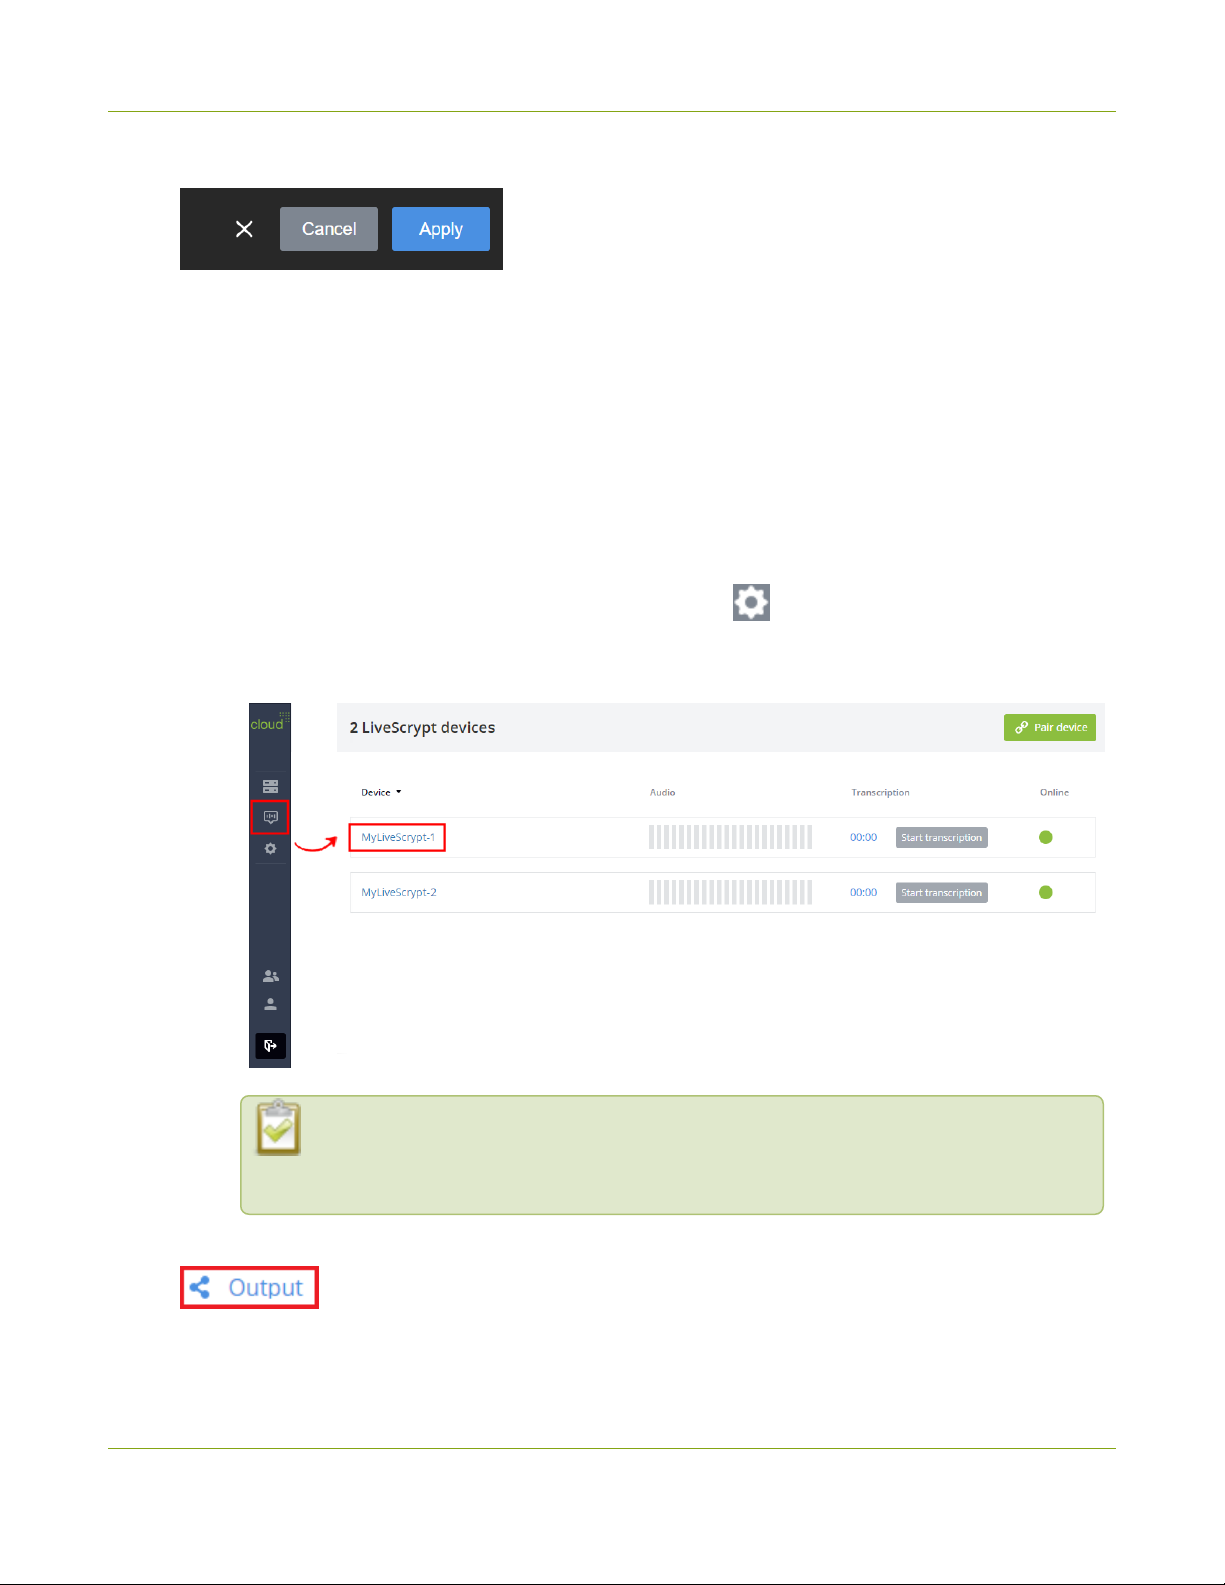
4. Select Apply if you're using the touch screen or web interface.
Change the direction of transcription
By default, new lines of transcription start at the top of the screen and move down as new text fills the screen.
You can change the direction so that the transcription fills the screen from the bottom and moves upwards using
the touch screen, the web interface, or Epiphan Cloud when the LiveScrypt device is paired with your Epiphan
Cloud team. For instructions on how to access the web interface or Epiphan Cloud, see User interfaces.
Words are written from left to right by default and cannot be changed.
To change the direction the transcription fills the screen:
1. Open the device Settings, do one of the following:
a.
Using the touch screen or web interface, select Settings .
b. Using Epiphan Cloud, select the LiveScrypt devices icon in the side navigation panel, and then
select a LiveScrypt device to open the device Settings.
You can also open the LiveScrypt device settings page from the Devices Dashboard
when you click the LiveScrypt device name or click the three dots in the row for the
LiveScrypt device and select Settings.
2. From the Settings, select Output. The Output menu opens.
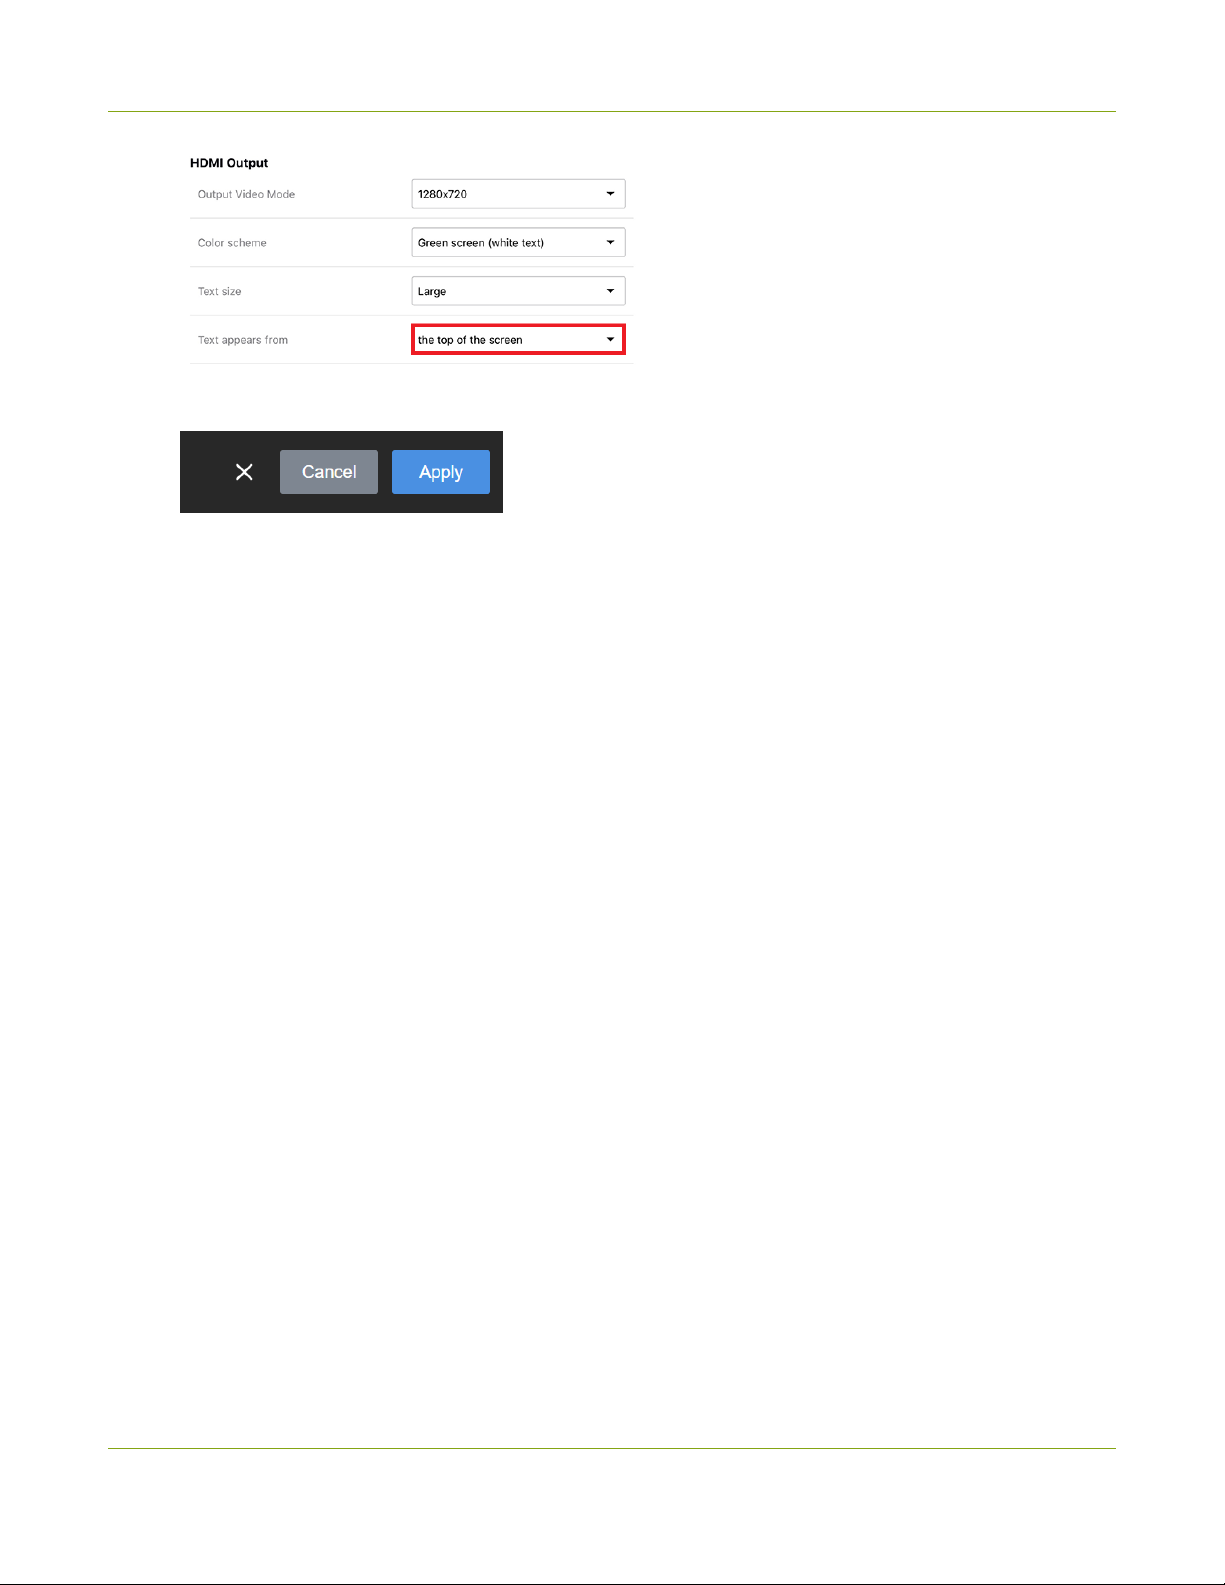
3. In the Text appears from field, select an option from the drop-down menu.
34
Page 40
LiveScrypt User Guide Change the direction of transcription
4. Select Apply if you're using the touch screen or web interface.
35
Page 41
LiveScrypt User Guide Transcription options
Transcription options
You can setup transcription options using the touch screen, the web interface, and in Epiphan Cloud when your
LiveScrypt device is paired.
Topics:
l
Change the language
l
Enable punctuation and profanity filter
l
Enter an NAICS code
l
Clear transcription from the display
l
Download and delete .SRT and.TXT files
To start, stop, and pause transcription, see Start, stop, and pause transcription using the touch screen or Start,
stop, and pause transcription using Epiphan Cloud.
Change the language
English (US) is set as the default language for transcription. This means that English speech is recognized and
transcribed. You can change the transcription language using the touch screen, the web interface, or Epiphan
Cloud when the LiveScrypt device is paired with your Epiphan Cloud team. For instructions on how to access the
web interface or Epiphan Cloud, see User interfaces.
LiveScrypt supports Google Cloud's language set for the basic ASR speech recognition model. For a
comprehensive list, see https://cloud.google.com/speech-to-text/docs/languages.
Changes do not take effect while transcription is in progress. You must stop or pause transcription,
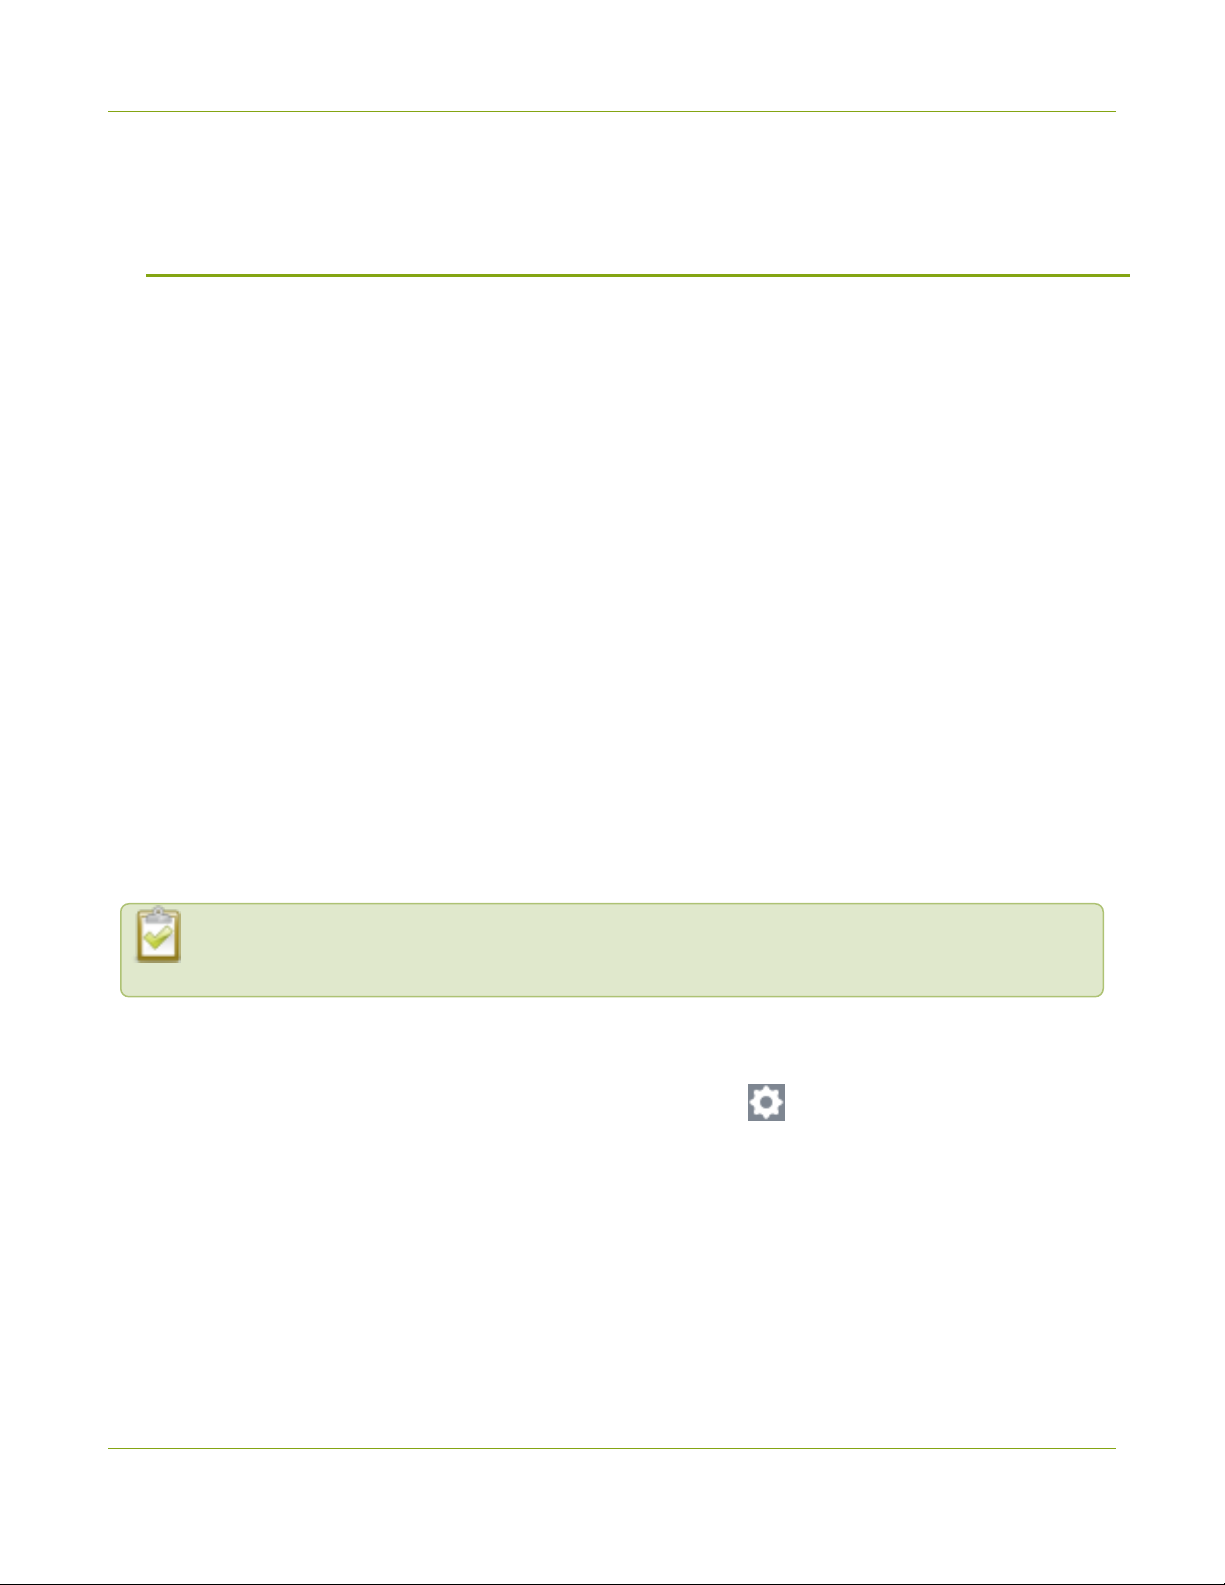
and then restart transcription to see the changes.
To change the language:
1. Open the device Settings:
a.
Using the touch screen and web interface, select Settings .
b. Using Epiphan Cloud, select the LiveScrypt devices icon in the side navigation panel, and then
select a LiveScrypt device to open the device Settings.
36
Page 42
LiveScrypt User Guide Enable punctuation and profanity filter
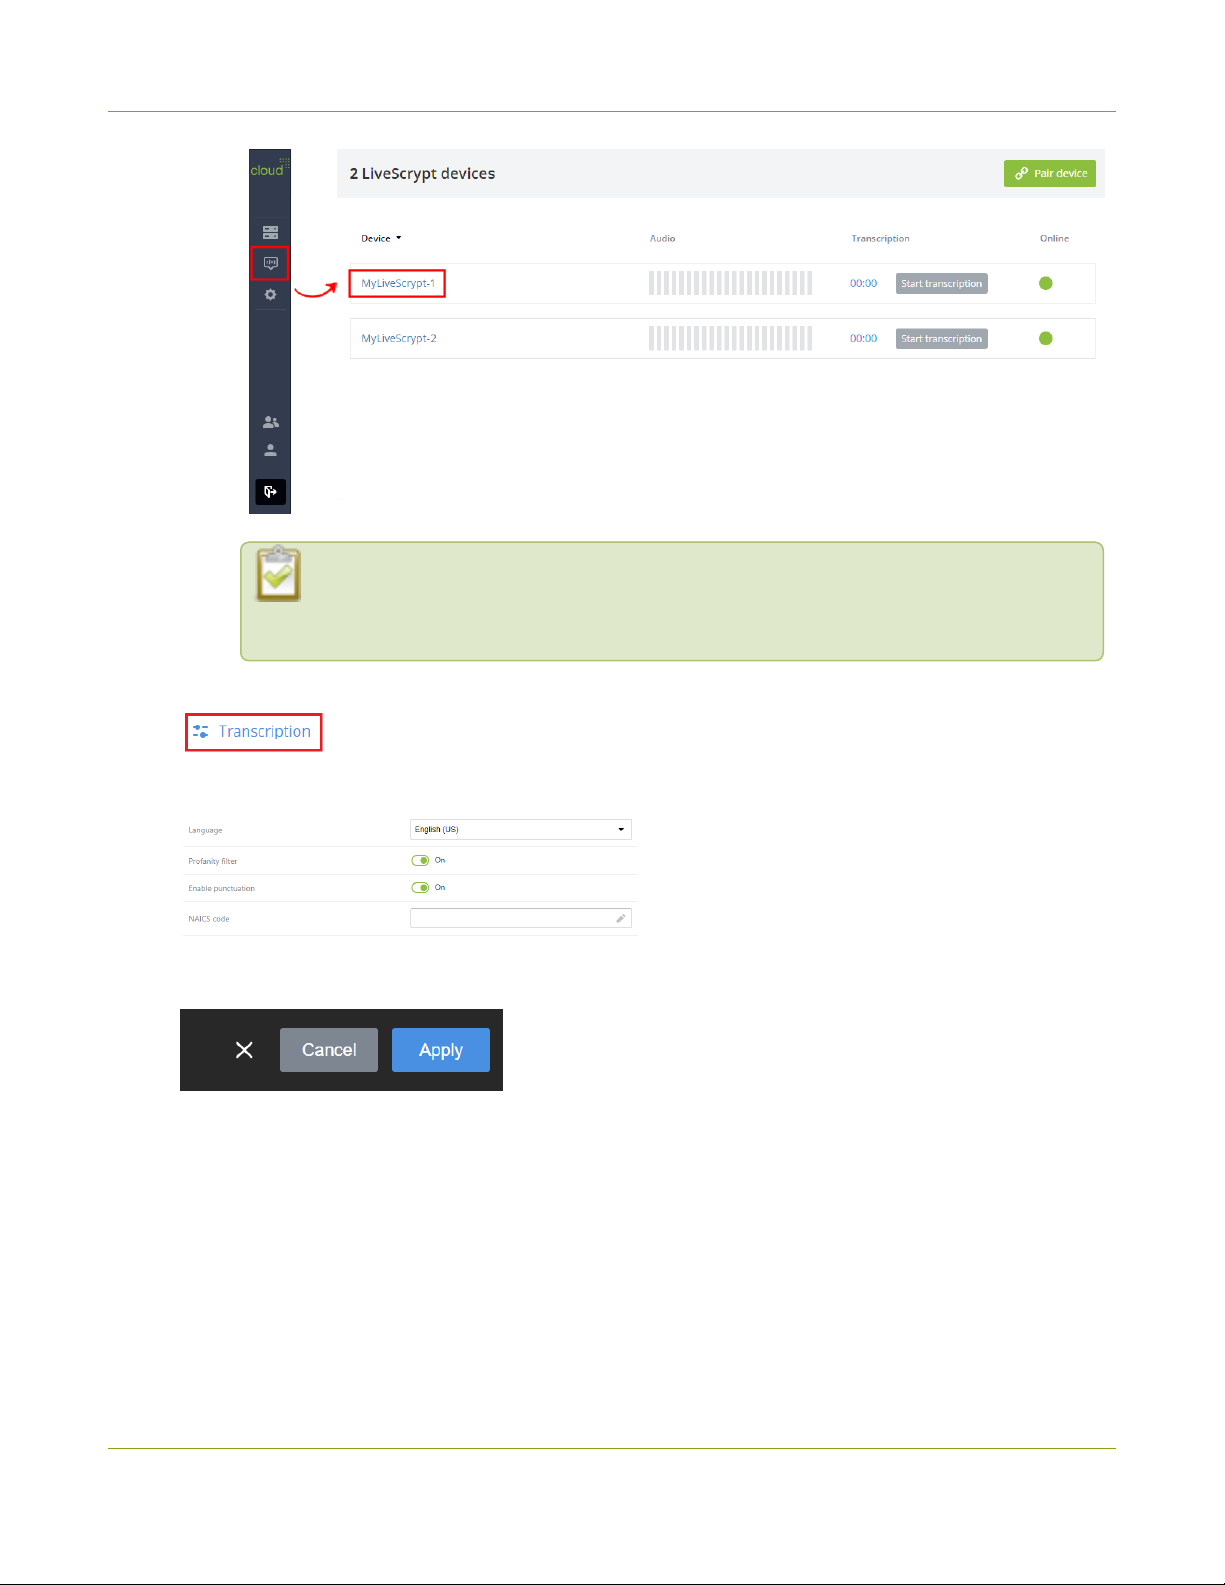
You can also open the LiveScrypt device settings page from the Devices Dashboard
when you click the LiveScrypt device name or click the three dots in the row for the
LiveScrypt device and select Settings.
2. From the Settings, select Transcription. The Transcription menu opens.
3. In the Language field, select your language from the drop-down menu.
4. Select Apply if you're using the touch screen or web interface.
Enable punctuation and profanity filter
Automatic punctuation and the profanity filter are enabled by default. You can turn the punctuation and profanity
filter options on and off from the touch screen, the web interface, or using Epiphan Cloud when the LiveScrypt
device is paired with your Epiphan Cloud team. For instructions on how to access the web interface or Epiphan
Cloud, see User interfaces.
The profanity filter replaces profane words with asterisks, for example: b***
37
Page 43
LiveScrypt User Guide Enable punctuation and profanity filter
Changes do not take effect while transcription is in progress. You must stop or pause transcription,
and then restart transcription to see the changes.
To turn punctuation and the profanity filter on or off:
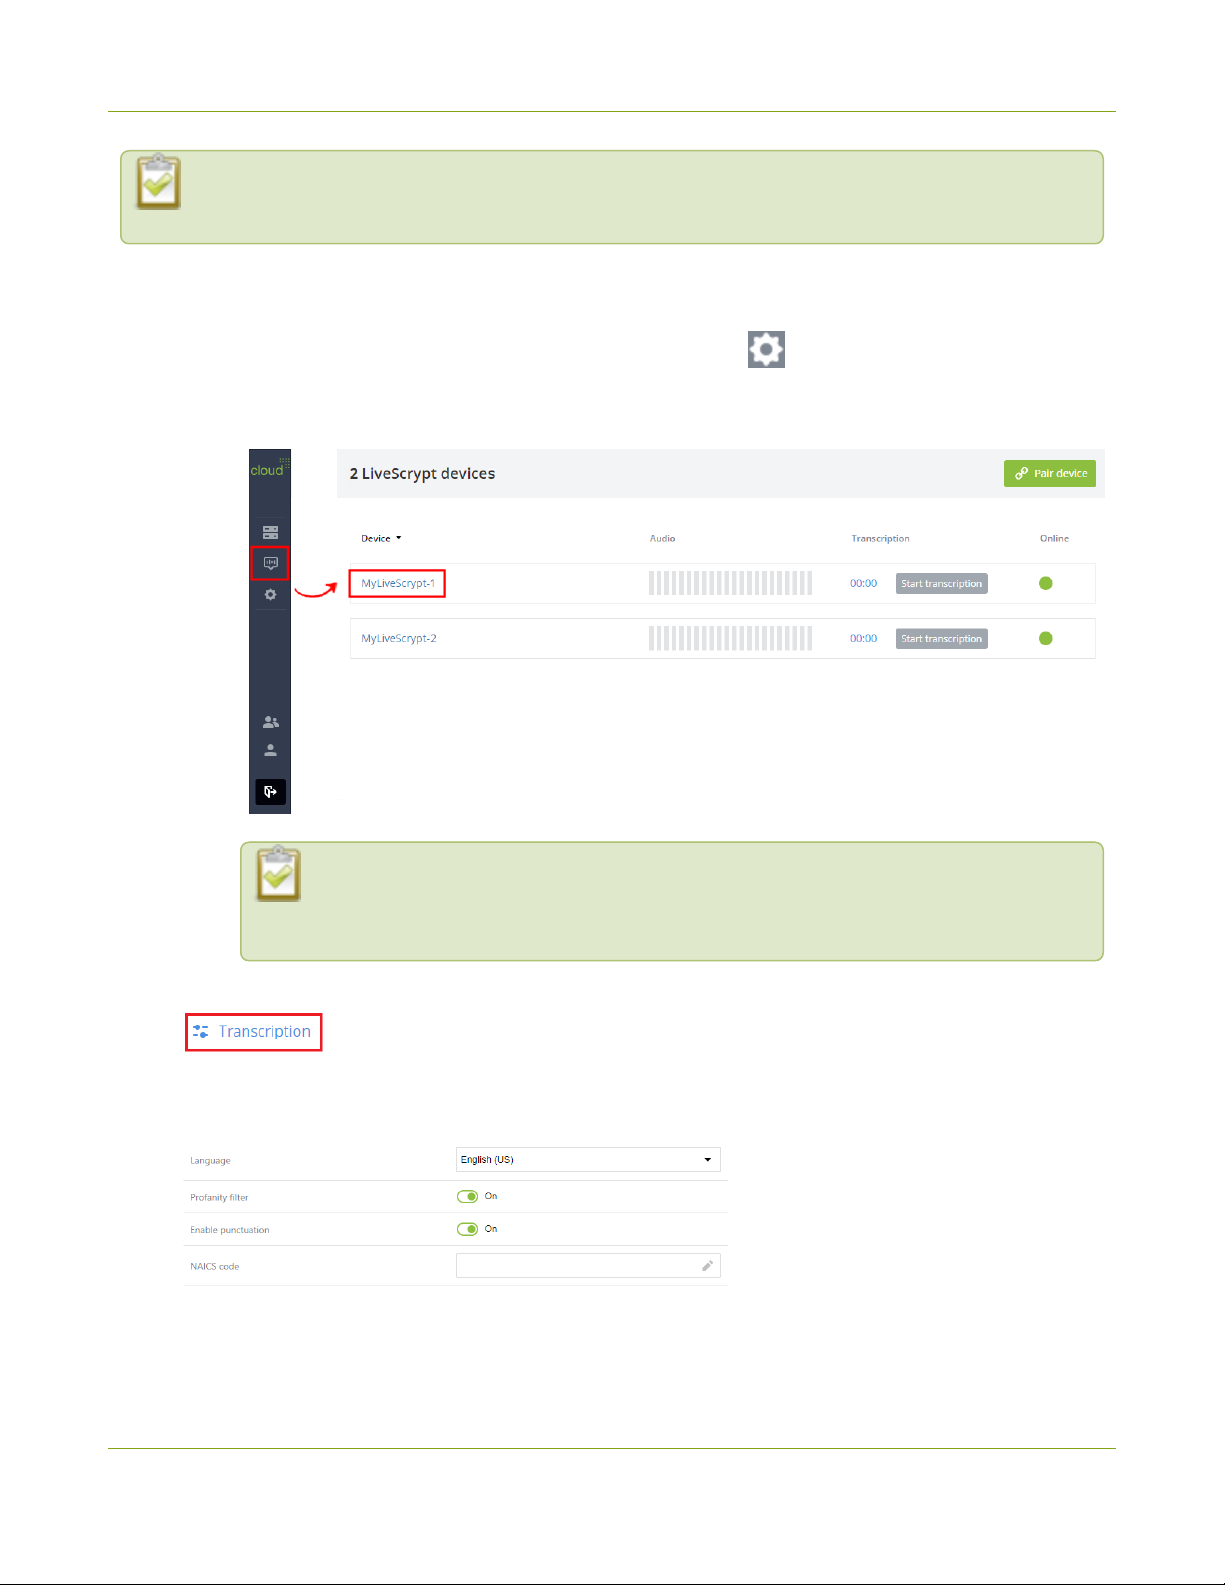
1. Open the device Settings:
a.
Using the touch screen and web interface, select Settings .
b. Using Epiphan Cloud, select the LiveScrypt devices icon in the side navigation panel, and then
select a LiveScrypt device to open the device Settings.
You can also open the LiveScrypt device settings page from the Devices Dashboard
when you click the LiveScrypt device name or click the three dots in the row for the
LiveScrypt device and select Settings.
2. From the Settings, select Transcription. The Transcription menu opens.
3. Toggle the Punctuation and Profanity filter switches On or Off. In Epiphan Cloud, check the appropriate
check boxes.
38
Page 44
LiveScrypt User Guide Enter an NAICS code
4. Select Apply if you're using the touch screen or web interface.
Enter an NAICS code
North American Industry Classification System (NAICS) codes are industry-specific language libraries, for
example: aerospace (33641) or agriculture (115). LiveScrypt supports NAICS codes to augment transcription.
You can enter an NAICS code using the touch screen, the web interface, or Epiphan Cloud when the LiveScrypt
device is paired with your Epiphan Cloud team. For instructions on how to access the web interface or Epiphan
Cloud, see User interfaces.
To enter an NAICS code:
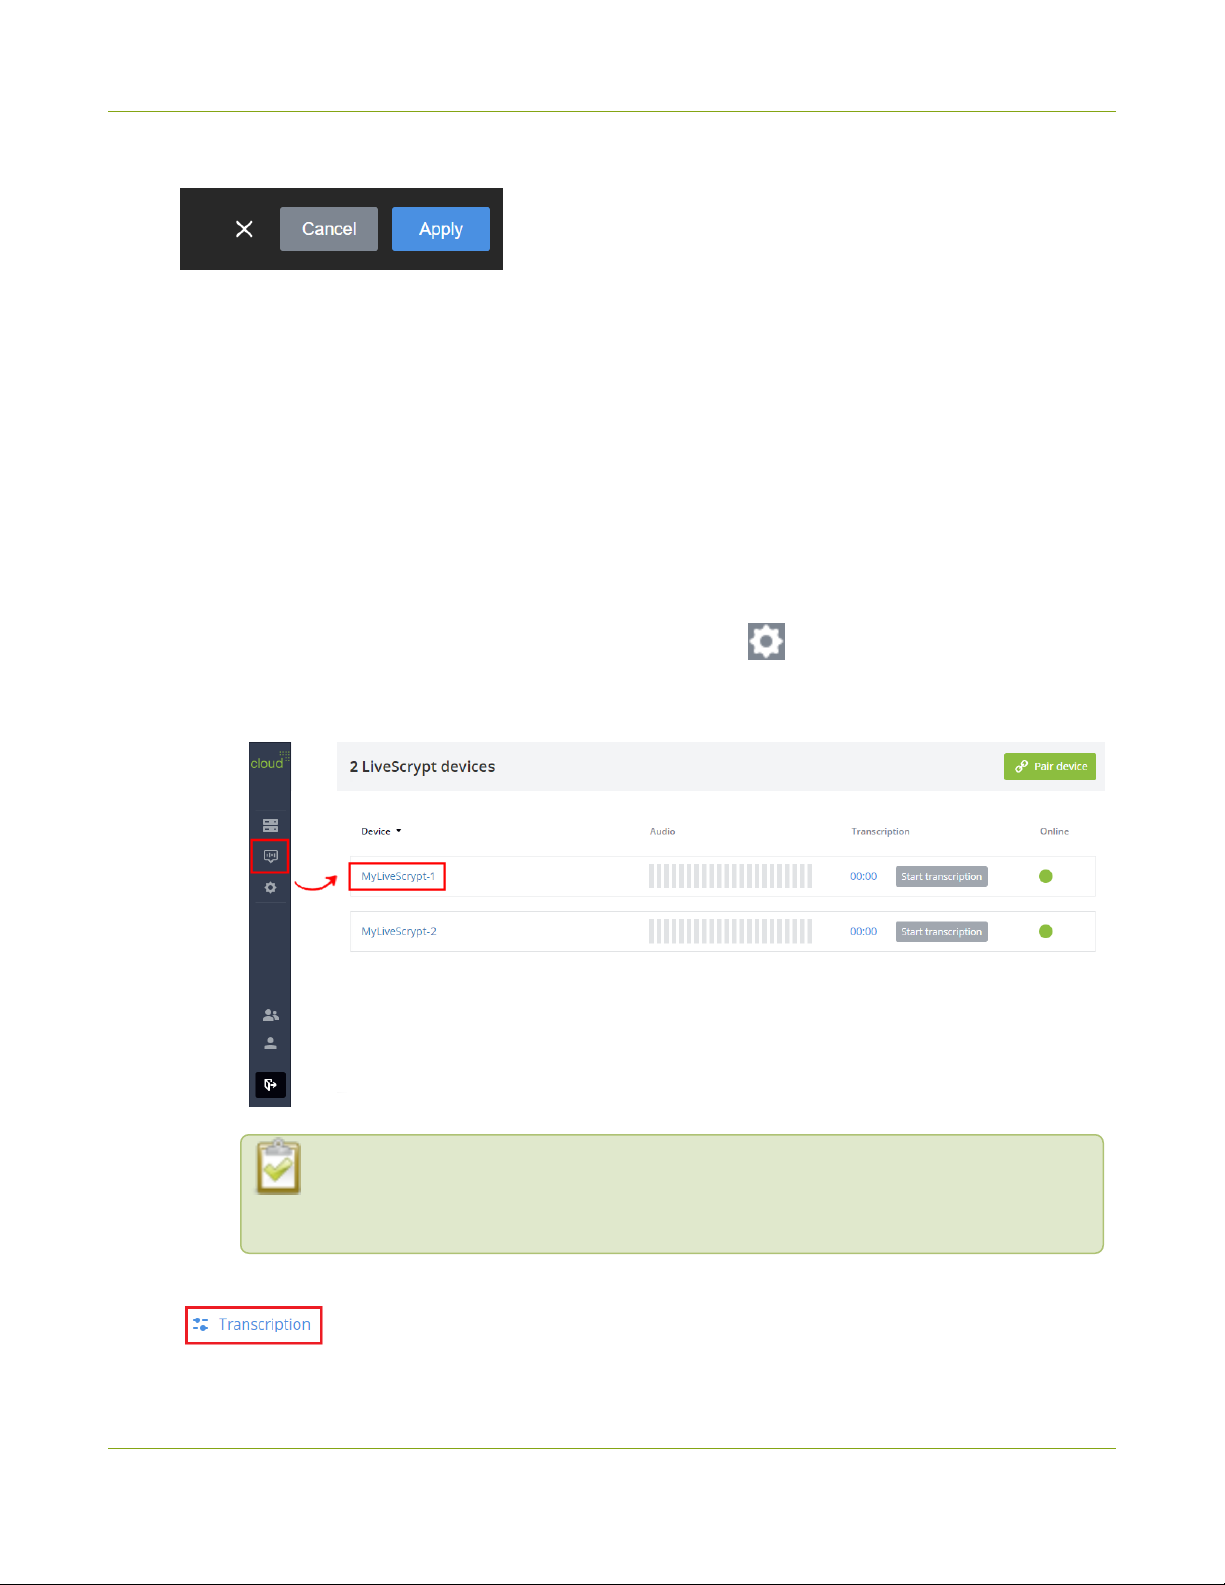
1. Open the device Settings:
a.
Using the touch screen and web interface, select Settings .
b. Using Epiphan Cloud, select the LiveScrypt devices icon in the side navigation panel, and then
select a LiveScrypt device to open the device Settings.
You can also open the LiveScrypt device settings page from the Devices Dashboard
when you click the LiveScrypt device name or click the three dots in the row for the
LiveScrypt device and select Settings.
2. From the Settings, select Transcription. The Transcription menu opens.
39
Page 45
LiveScrypt User Guide Clear transcription from the display
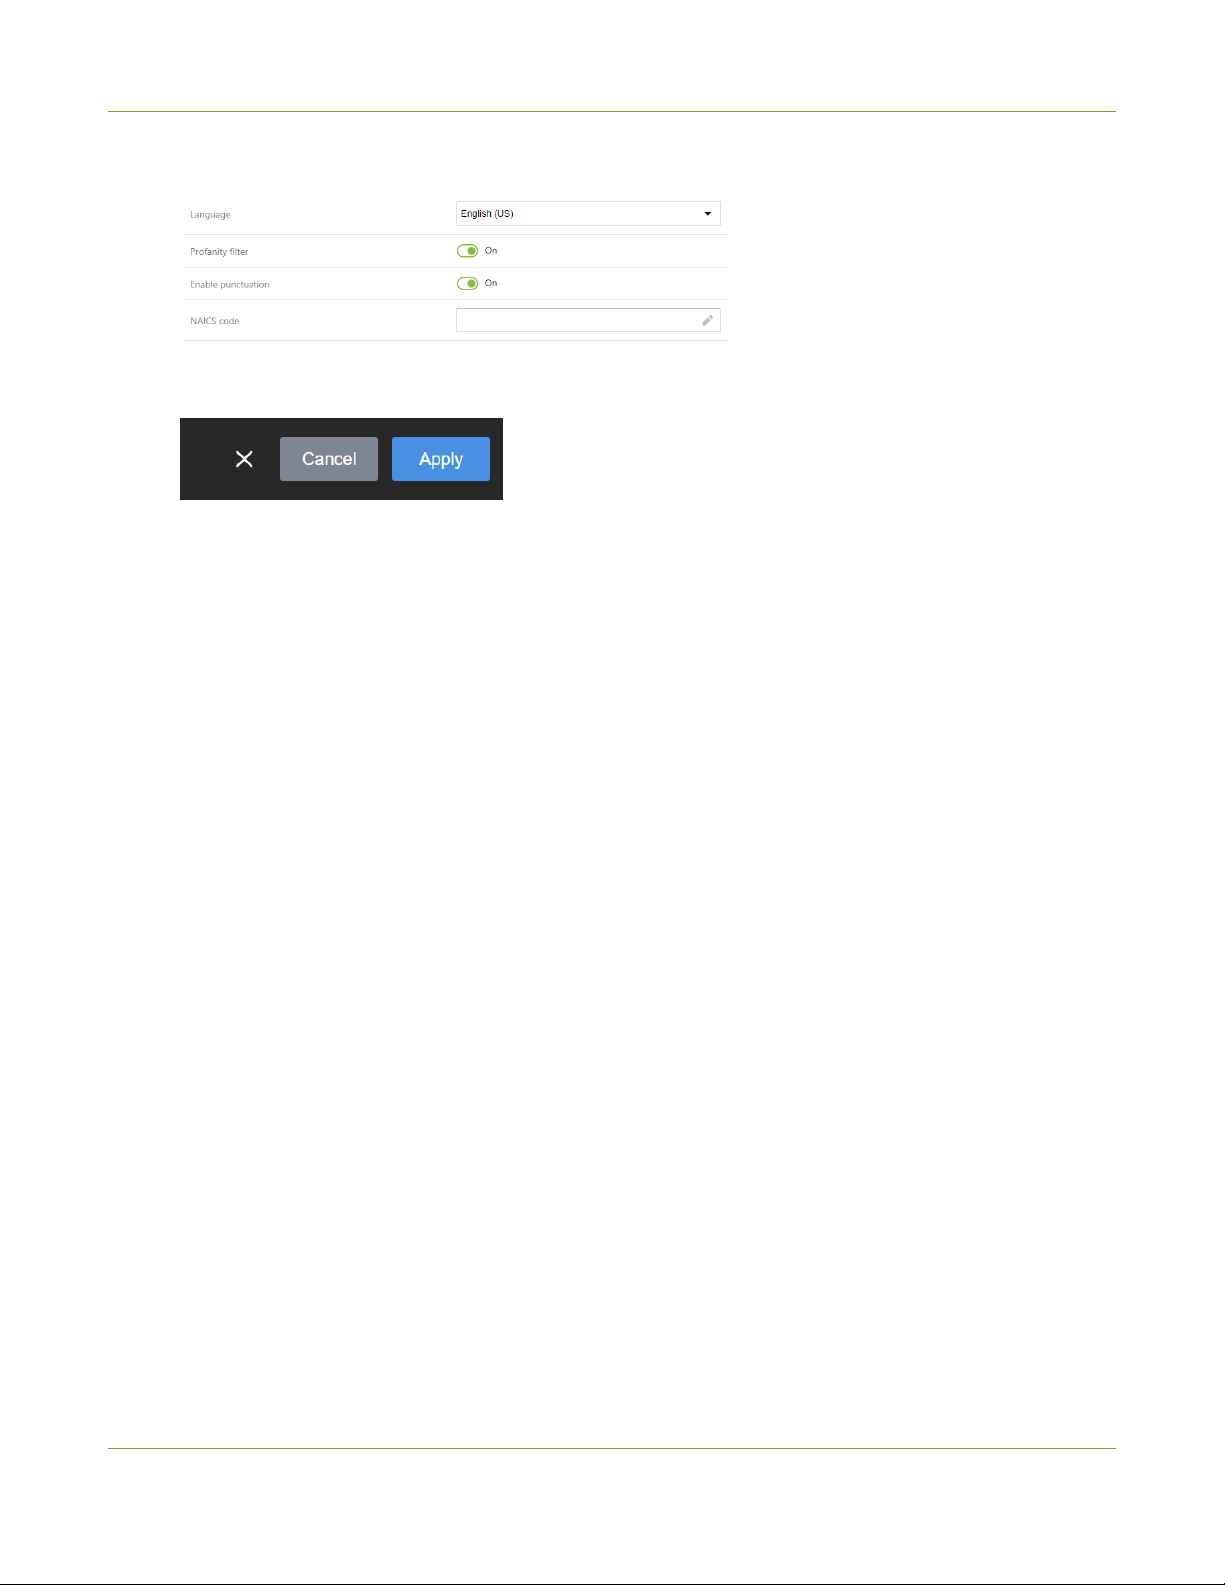
3. In the NAICS code field, enter the code using a keyboard.
4. Select Apply if you're using the touch screen or web interface.
Clear transcription from the display
You can clear the content of the current transcription session from the display without stopping or pausing the
session. All previously transcribed text is cleared from the touch screen and the HDMI output display port. You
can only clear the transcription for a session that's currently active.
Clearing the session does not delete the transcribed content from the .SRT or the .TXT file for that session.
Those files retain the full transcription of the whole session.
You can clear the transcription for a session using the touch screen, the web interface, or Epiphan Cloud when
the LiveScrypt device is paired with your Epiphan Cloud team. For instructions on how to access the web
interface or Epiphan Cloud, see User interfaces.
To clear the transcription from the display for an active session:
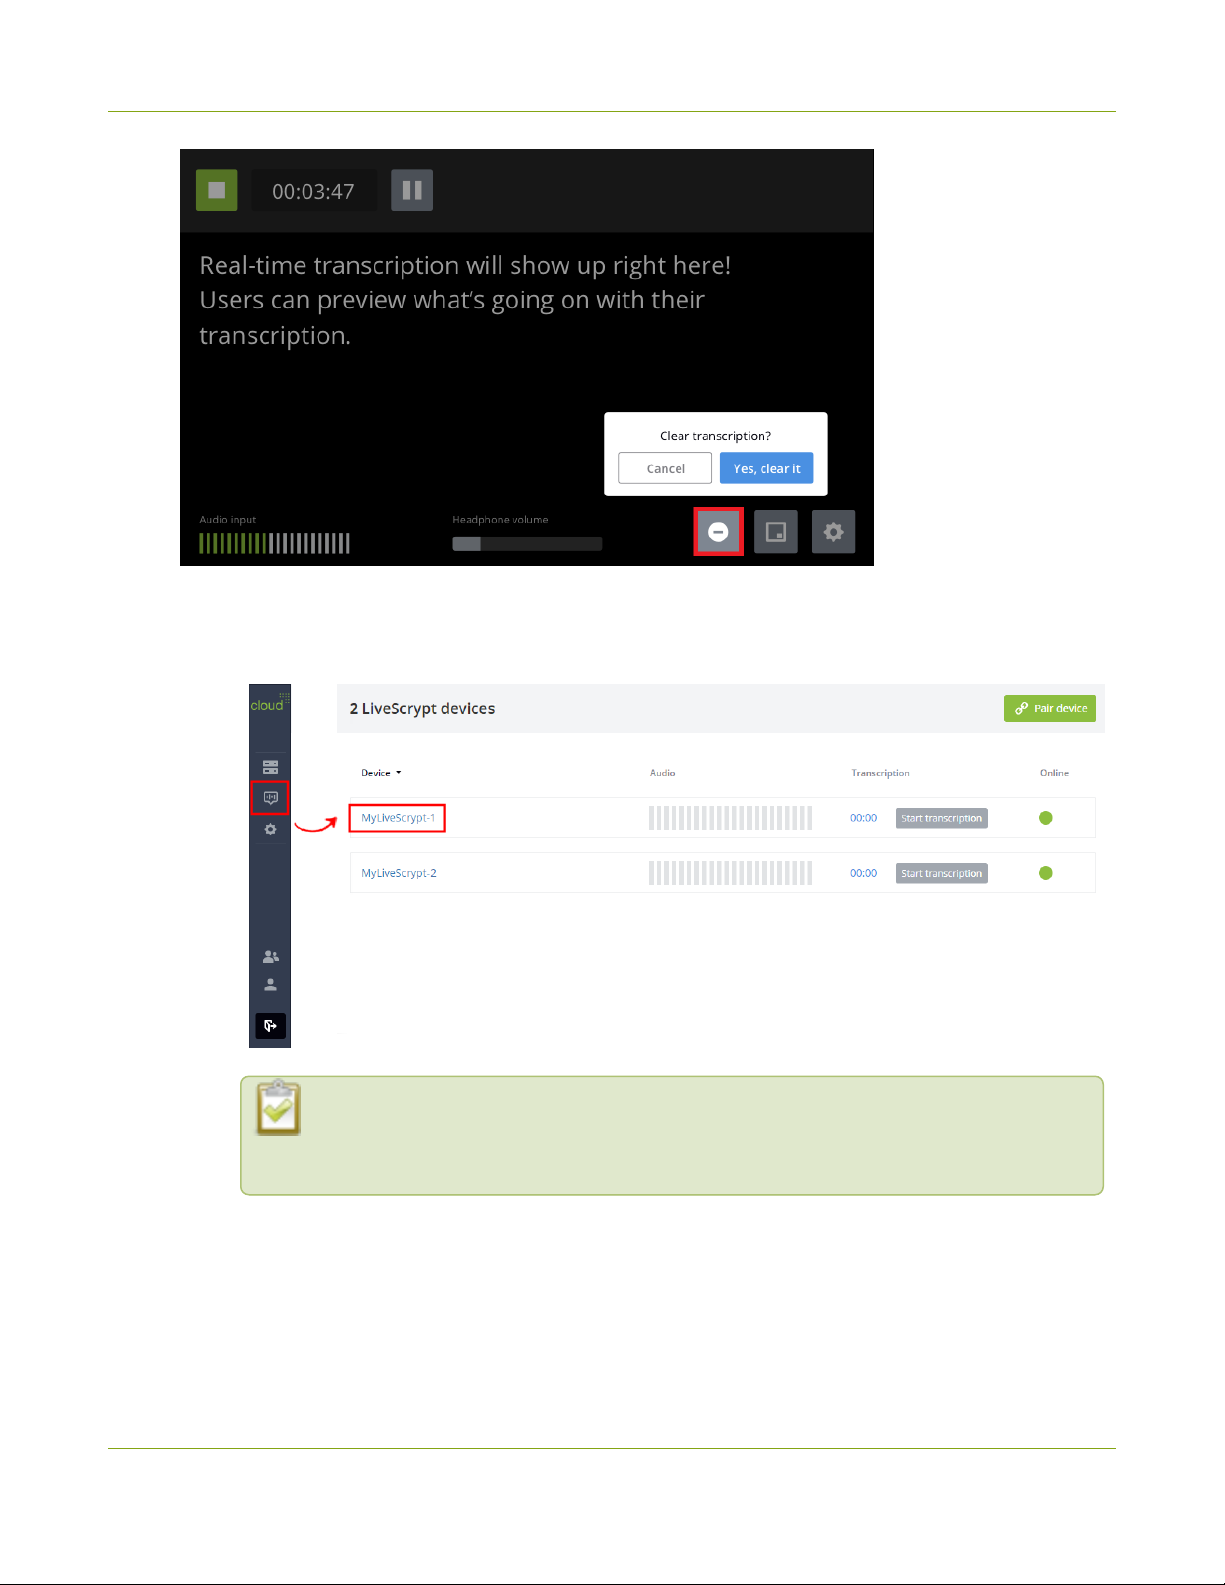
1. Using the touch screen and web interface, tap the Clear icon that appears along the bottom of the touch
screen and select Yes, clear it.
40
Page 46
LiveScrypt User Guide Clear transcription from the display
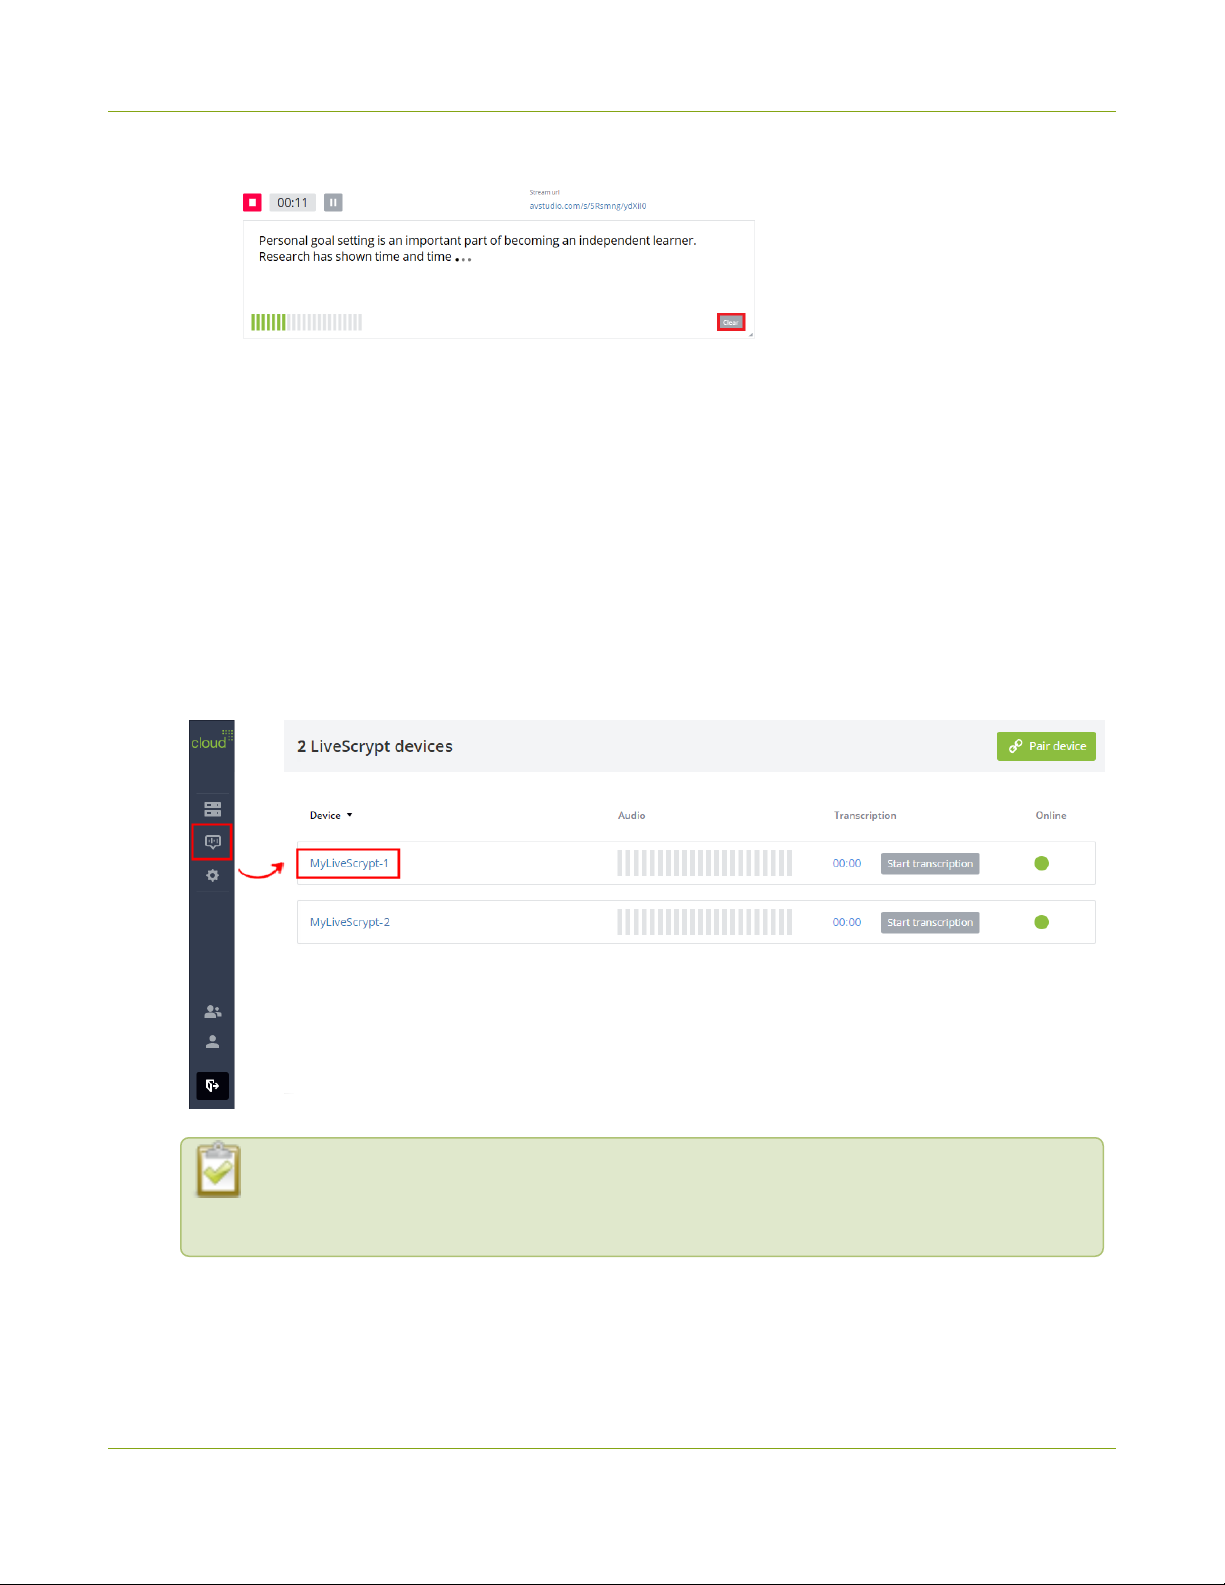
2. Using Epiphan Cloud, do the following:
a. Select the LiveScrypt devices icon in the side navigation panel, and then select a LiveScrypt
device to open the device Settings.
You can also open the LiveScrypt device settings page from the Devices Dashboard
when you click the LiveScrypt device name or click the three dots in the row for the
LiveScrypt device and select Settings.
41
Page 47
LiveScrypt User Guide Download and delete .SRT and.TXT files
b. From the Settings, select Clear in the bottom right corner of the display area.
Download and delete .SRT and.TXT files
You can access .SRT and .TXT transcription files for the sessions associated with a device as often as you like
using Epiphan Cloud. Download transcription files or delete them from the Sessions tab on the Settings page for
a paired LiveScrypt device.
If the LiveScrypt device is unpaired and permanently offline, it won't appear in the list of LiveScrypt devices. You
can no longer access the .SRT or .TXT transcription files associated with that device.
To download or delete .SRT and .TXT files in Epiphan Cloud:
1. Login to your Epiphan Cloud account at: https://go.epiphan.cloud
2. Select the LiveScrypt devices icon in the side navigation panel, and then select a LiveScrypt device to
open the device Settings.
You can also open the LiveScrypt device settings page from the Devices Dashboard when
you click the LiveScrypt device name or click the three dots in the row for the LiveScrypt
device and select Settings.
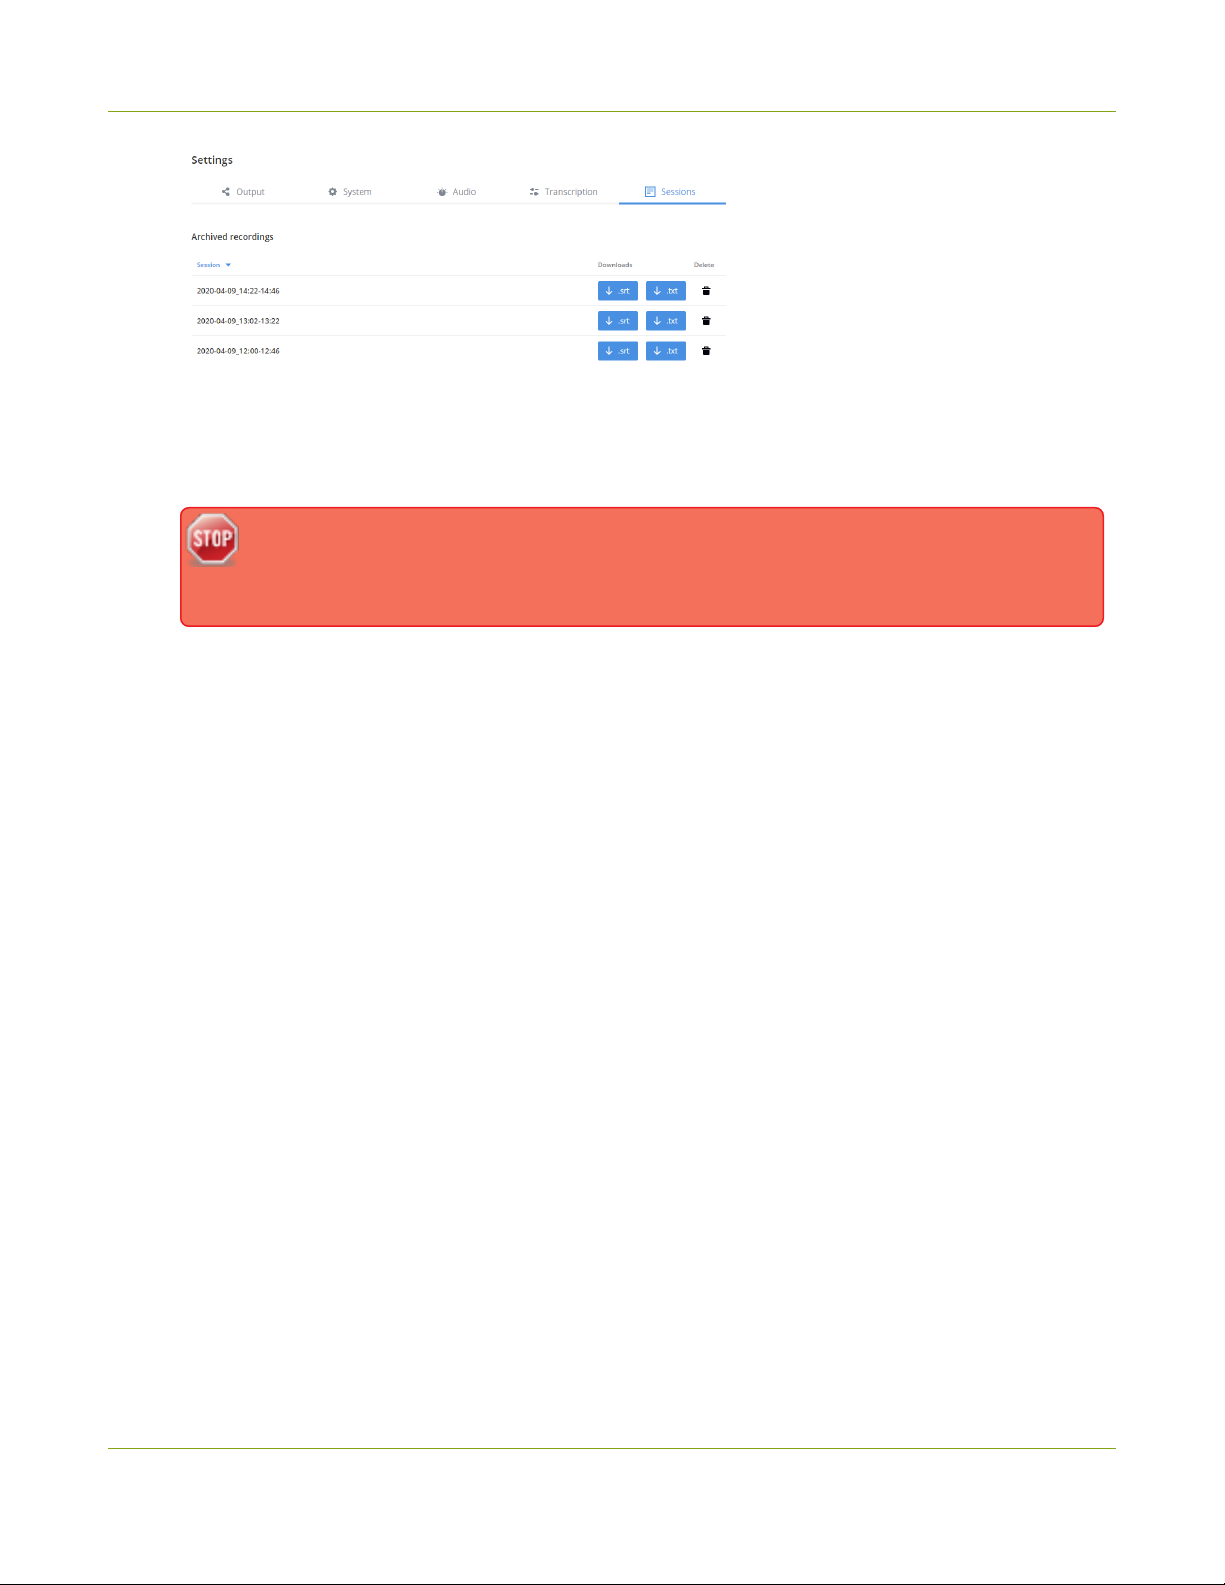
3. From the Settings, select the Sessions menu to see a list of the transcription sessions for that device.
42
Page 48
LiveScrypt User Guide Download and delete .SRT and.TXT files
4. To download a transcription file, select the blue download button for the file you want to download and
follow the prompts.
5. To delete a transcription file, select the trash can icon at the far right of that row and confirm when
prompted.
6.
Transcription files are permanently removed if you delete a session in Epiphan Cloud or
delete a paired instance of your LiveScrypt device from Epiphan Cloud. To learn more about
Epiphan Cloud, see the Epiphan Cloud online user guide.
43
Page 49
LiveScrypt User Guide Audio options
Audio options
If you went through the Get started section, you already have a basic setup with some audio sources connected
to the LiveScrypt device. This section contains additional information and audio options you can setup using the
touch screen, the web interface, and Epiphan Cloud when your LiveScrypt device is paired with your Epiphan
Cloud team.
Topics:
l
Enable or disable phantom power
l
Adjust audio gain
l
Mute audio
l
Assign audio sources to an input
For information about monitoring audio, see Monitor audio.
Adjust audio gain
Having the right amount of gain applied to your microphone or other type of audio source optimizes the
performance of the transcription. You can adjust the gain for XLR, ¼" TRS, RCA, and 3.5 mm inputs using the
touch screen, web interface, and Epiphan Cloud when your LiveScrypt device is paired with your Epiphan Cloud
team.
The amount of gain you need to add depends on the strength of the original audio signal. Adjusting the Input
Gain affects the volume of the audio that's sent to the cloud for transcription and what you hear in the headphone
jack.
Be aware that excessive amounts of gain increases the noise that may already be present in the
audio signal, which can affect the accuracy of transcription.
The following table offers some guidelines for adjusting the gain at the various audio input ports on the
LiveScrypt device for common types of audio input devices. Add the suggested gain to the audio input to get an
average signal to register at a nominal level in the VU meter (i.e. where the green bars change to yellow).
Table 5 Audio input port gain guidelines
Audio source Input port Gain
Dynamic microphone XLR Add +50 to +60 dB gain to the audio input port.
44
Page 50

LiveScrypt User Guide Adjust audio gain
Audio source Input port Gain
XLR Add +18 to +40 dB gain to the audio input port.
Electret microphone
3.5 mm Add +6 to +12 dB gain to the audio input port.
Wireless microphone
receiver
Condenser microphone
with phantom power
XLR Add +18 to +40 dB gain to the audio input port.
3.5 mm Add +6 to +12 dB gain to the audio input port.
XLR Add +40 to +60 dB gain to the audio input port.
TRS Add +6 to +12 dB gain to the audio input port.
Mobile phone or other
consumer line level device
XLR Add +6 to +12 dB gain to the audio input port.
1
RCA
Nominal
TRS Nominal
Professional mixer
XLR Nominal
RCA Not recommended.
1
To avoid unwanted signal noise on the RCA ports, we recommend adding no more than 12dB of gain to the RCA ports or when
RCA/3.5 mm is used.
Ensure the audio input source is connected to an analog audio input port on the LiveScrypt device before
proceeding. Gain is added to both the RCA and 3.5 mm inputs if the audio mode is set to RCA + 3.5 mm. For
information about setting the audio input mode, see Assign audio sources to an input.
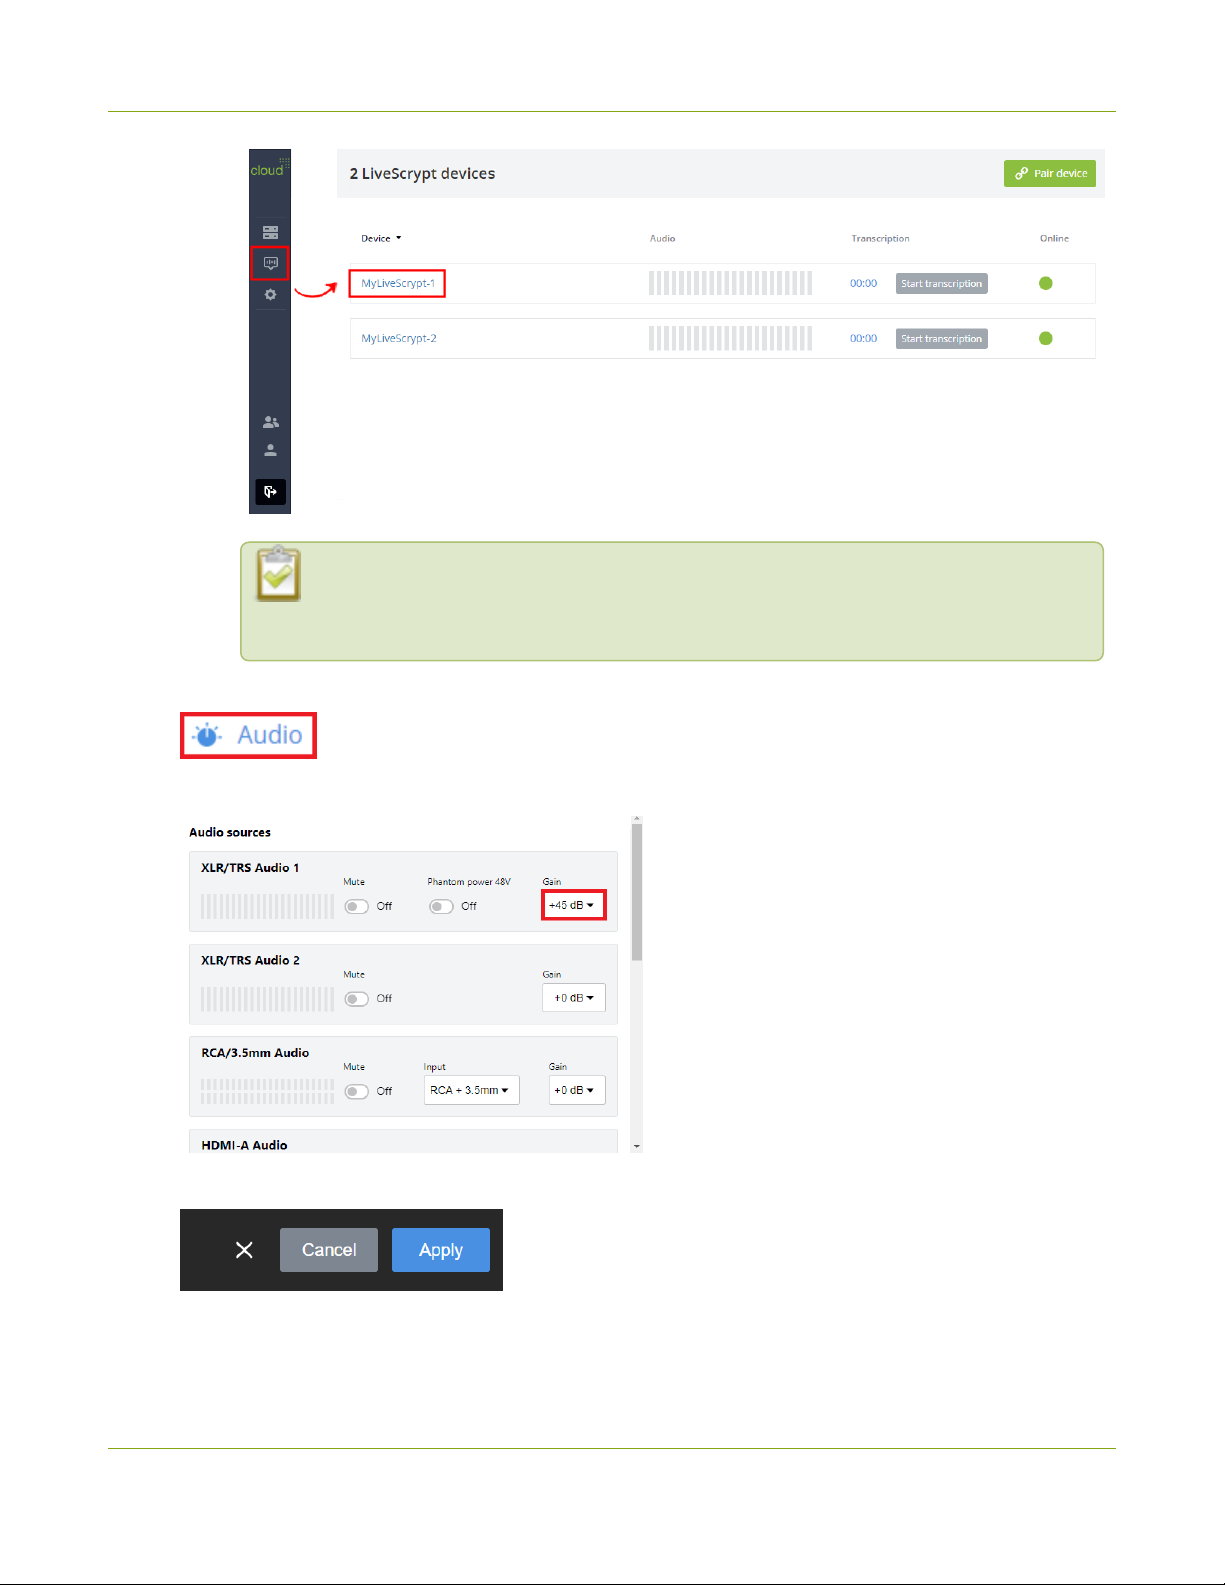
To adjust the gain for an audio source:
1. Open the device Settings:
a.
Using the touch screen and web interface, select Settings .
b. Using Epiphan Cloud, select the LiveScrypt devices icon in the side navigation panel, and then
select a LiveScrypt device to open the device Settings.
45
Page 51
LiveScrypt User Guide Adjust audio gain
You can also open the LiveScrypt device settings page from the Devices Dashboard
when you click the LiveScrypt device name or click the three dots in the row for the
LiveScrypt device and select Settings.
2. From the Settings, select Audio. The Audio menu opens.
3. Select a value from the Gain drop-down menu for the audio source.
4. Select Apply if you're using the touch screen or web interface.
46
Page 52
LiveScrypt User Guide Enable or disable phantom power
Enable or disable phantom power
Phantom power is not enabled on the XLR audio input ports by default on LiveScrypt. You can enable 48 V
Phantom power for the two XLR ports using the touch screen, the web interface, and Epiphan Cloud when the
LiveScrypt device is paired with your Epiphan Cloud team.
When phantom power is enabled:
l
48 V phantom power is applied to both XLR port 1 and XLR port 2.
l
The phantom power LED beside the XLR/TRS combo jacks on the rear panel of LiveScrypt is solid on.
l
Phantom power is not applied to the ¼" TRS inputs of the combo jacks.
Connecting devices that are not designed for phantom power when phantom power is enabled for
the two XLR ports can seriously damage those devices. Always check the phantom power LED
before connecting devices to the XLR ports. A direct box can be used to provide the correct mic-level
signal to the XLR port and offers some isolation protection in case of accidental exposure to 48 V
phantom power.
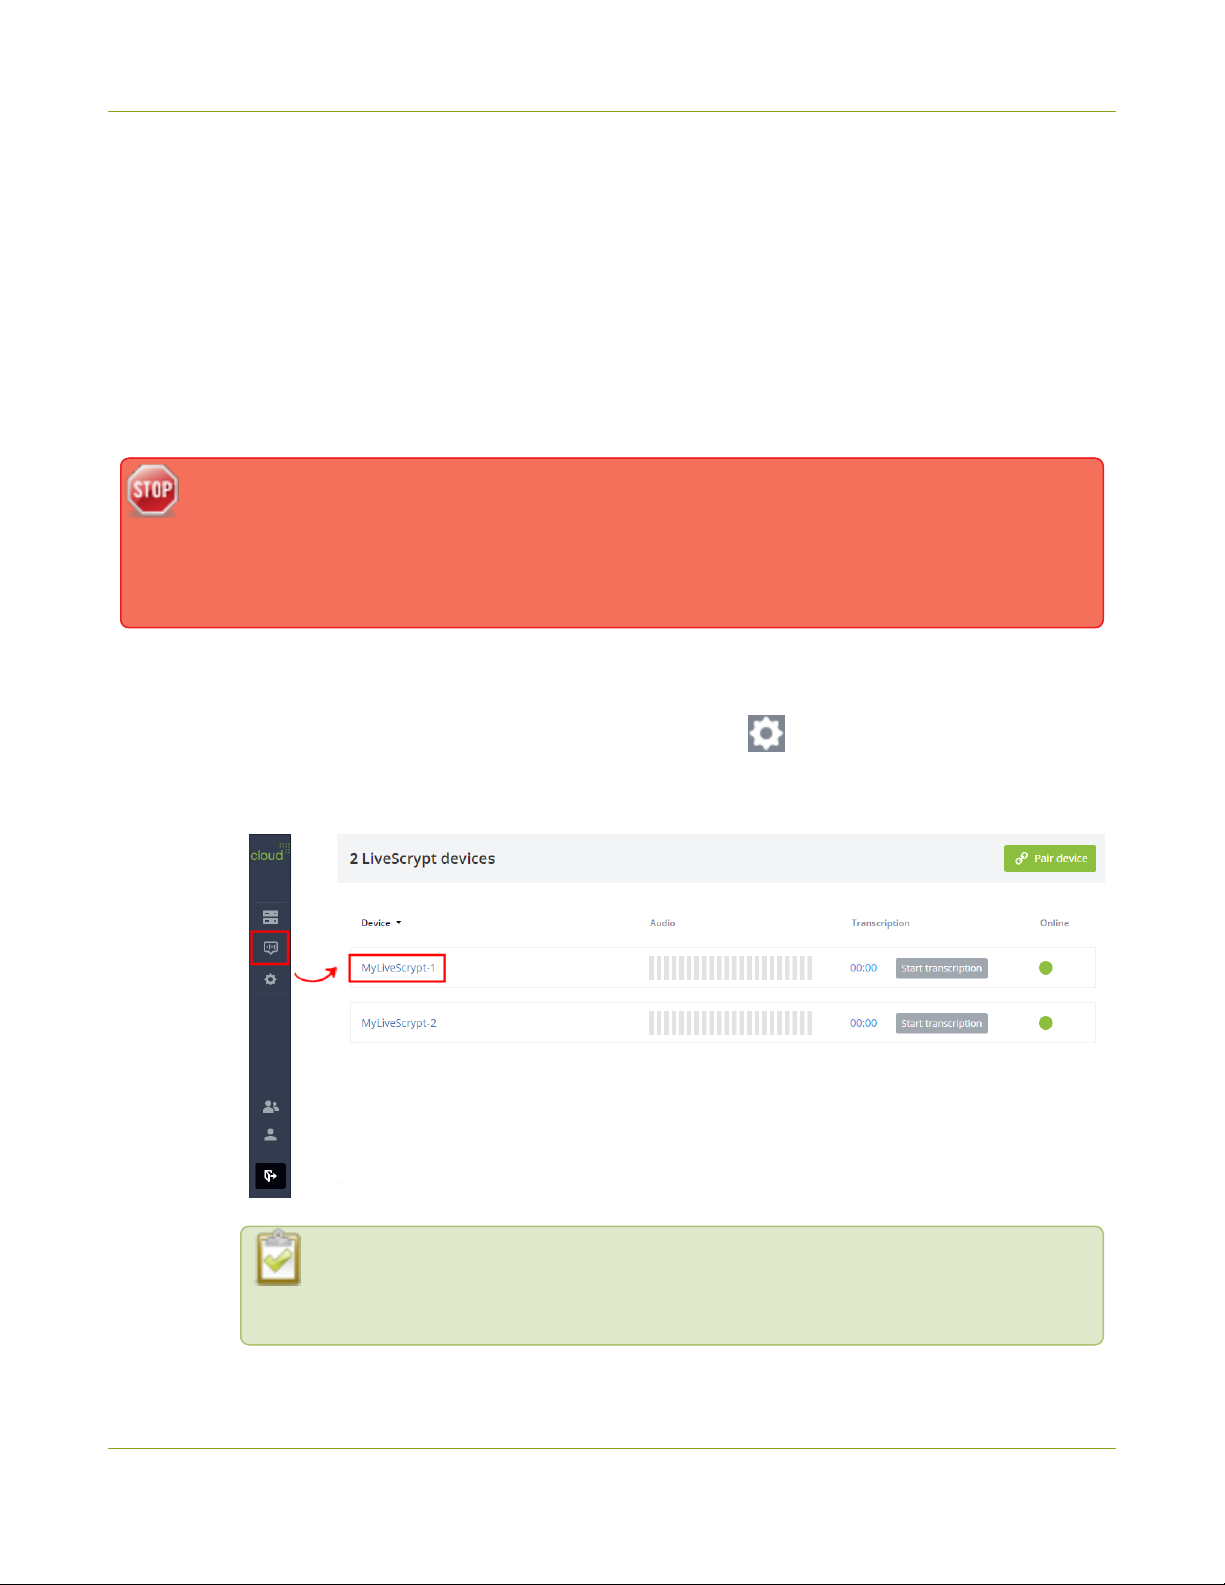
To enable or disable phantom power:
1. Open the device Settings:
a.
Using the touch screen and web interface, select Settings .
b. Using Epiphan Cloud, select the LiveScrypt devices icon in the side navigation panel, and then
select a LiveScrypt device to open the device Settings.
You can also open the LiveScrypt device settings page from the Devices Dashboard
when you click the LiveScrypt device name or click the three dots in the row for the
LiveScrypt device and select Settings.
47
Page 53
LiveScrypt User Guide Mute audio
2. From the Settings, select Audio. The Audio menu opens.
3. Toggle the Phantom power 48V switch On or Off for the audio source.
4. Select Apply if you're using the touch screen or web interface.
Mute audio
You can mute any audio input source using the touch screen, the web interface, and Epiphan Cloud when
LiveScrypt is paired with your Epiphan Cloud team.
The RCA and 3.5 mm audio input ports share internal audio processing resources. Muting an audio input that
shares internal resources mutes all the associated audio sources. To associate audio sources to RCA/3.5 mm
Audio, see Assign audio sources to an input.
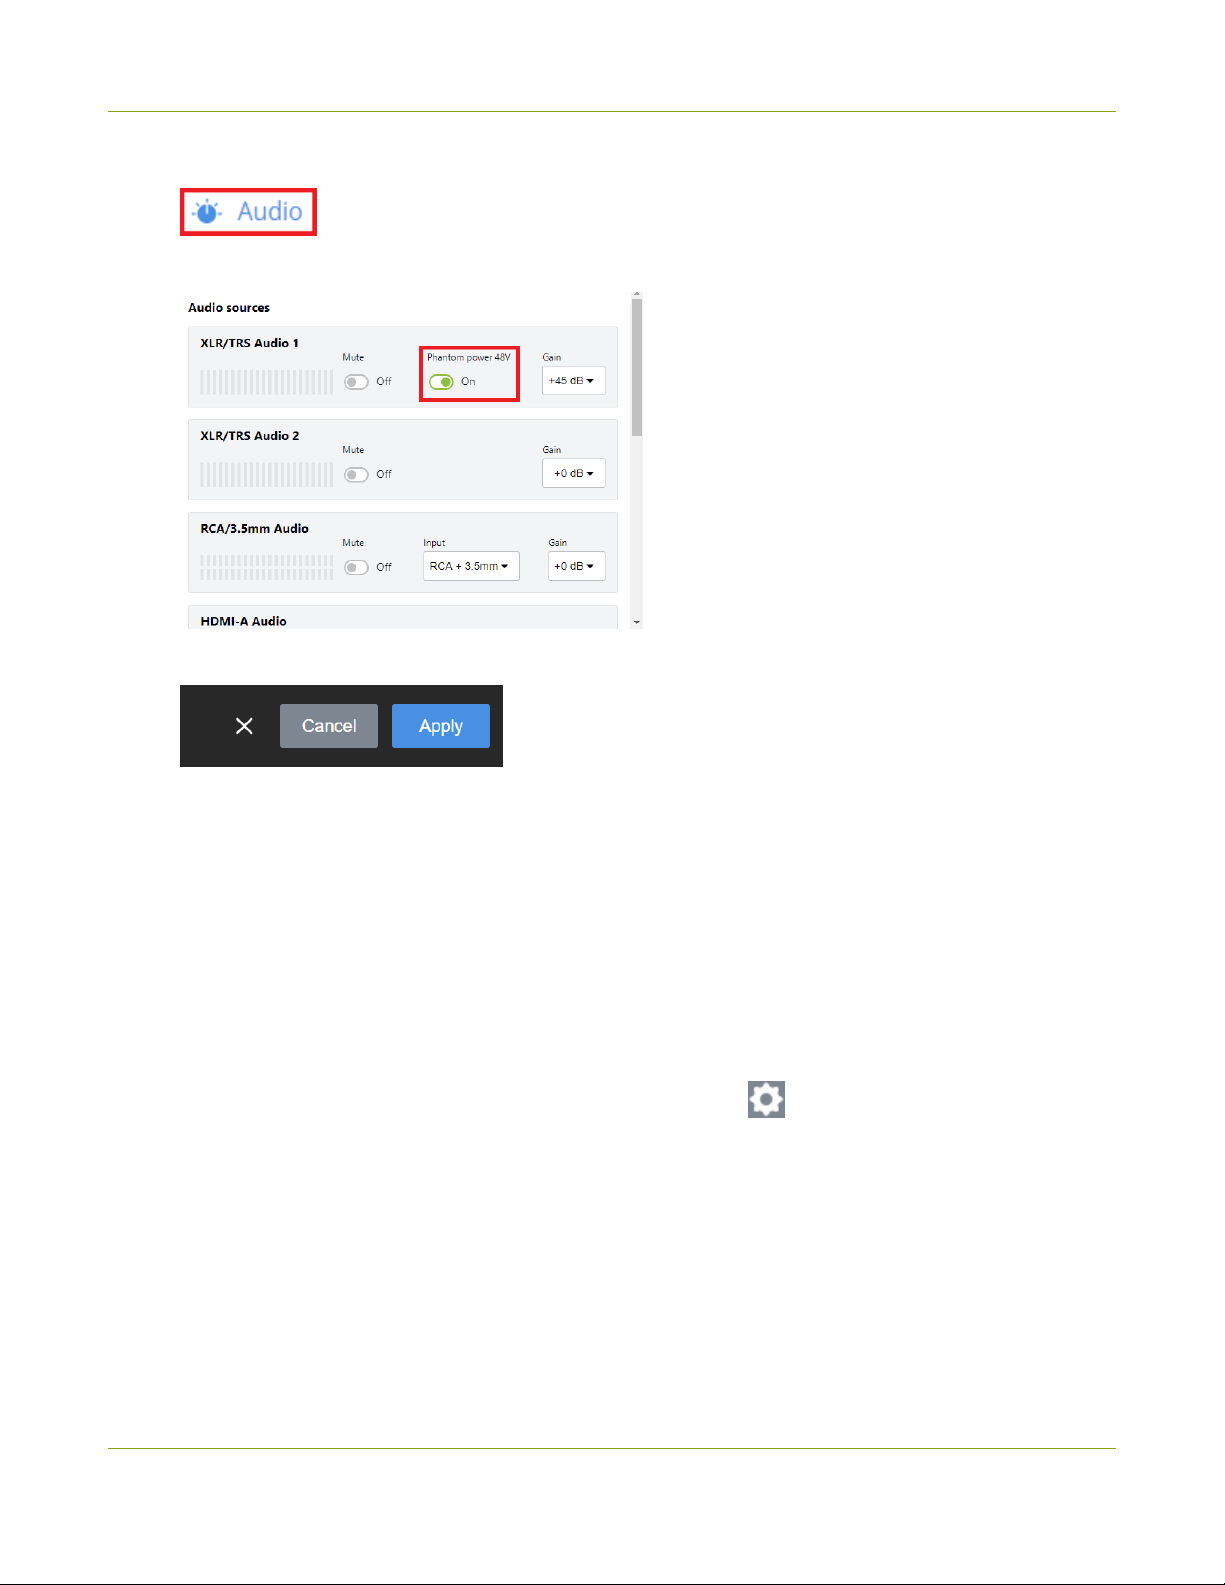
To mute an audio source:
1. Open the device Settings:
a.
Using the touch screen and web interface, select Settings .
b. Using Epiphan Cloud, select the LiveScrypt devices icon in the side navigation panel, and then
select a LiveScrypt device to open the device Settings.
48
Page 54
LiveScrypt User Guide Mute audio
You can also open the LiveScrypt device settings page from the Devices Dashboard
when you click the LiveScrypt device name or click the three dots in the row for the
LiveScrypt device and select Settings.
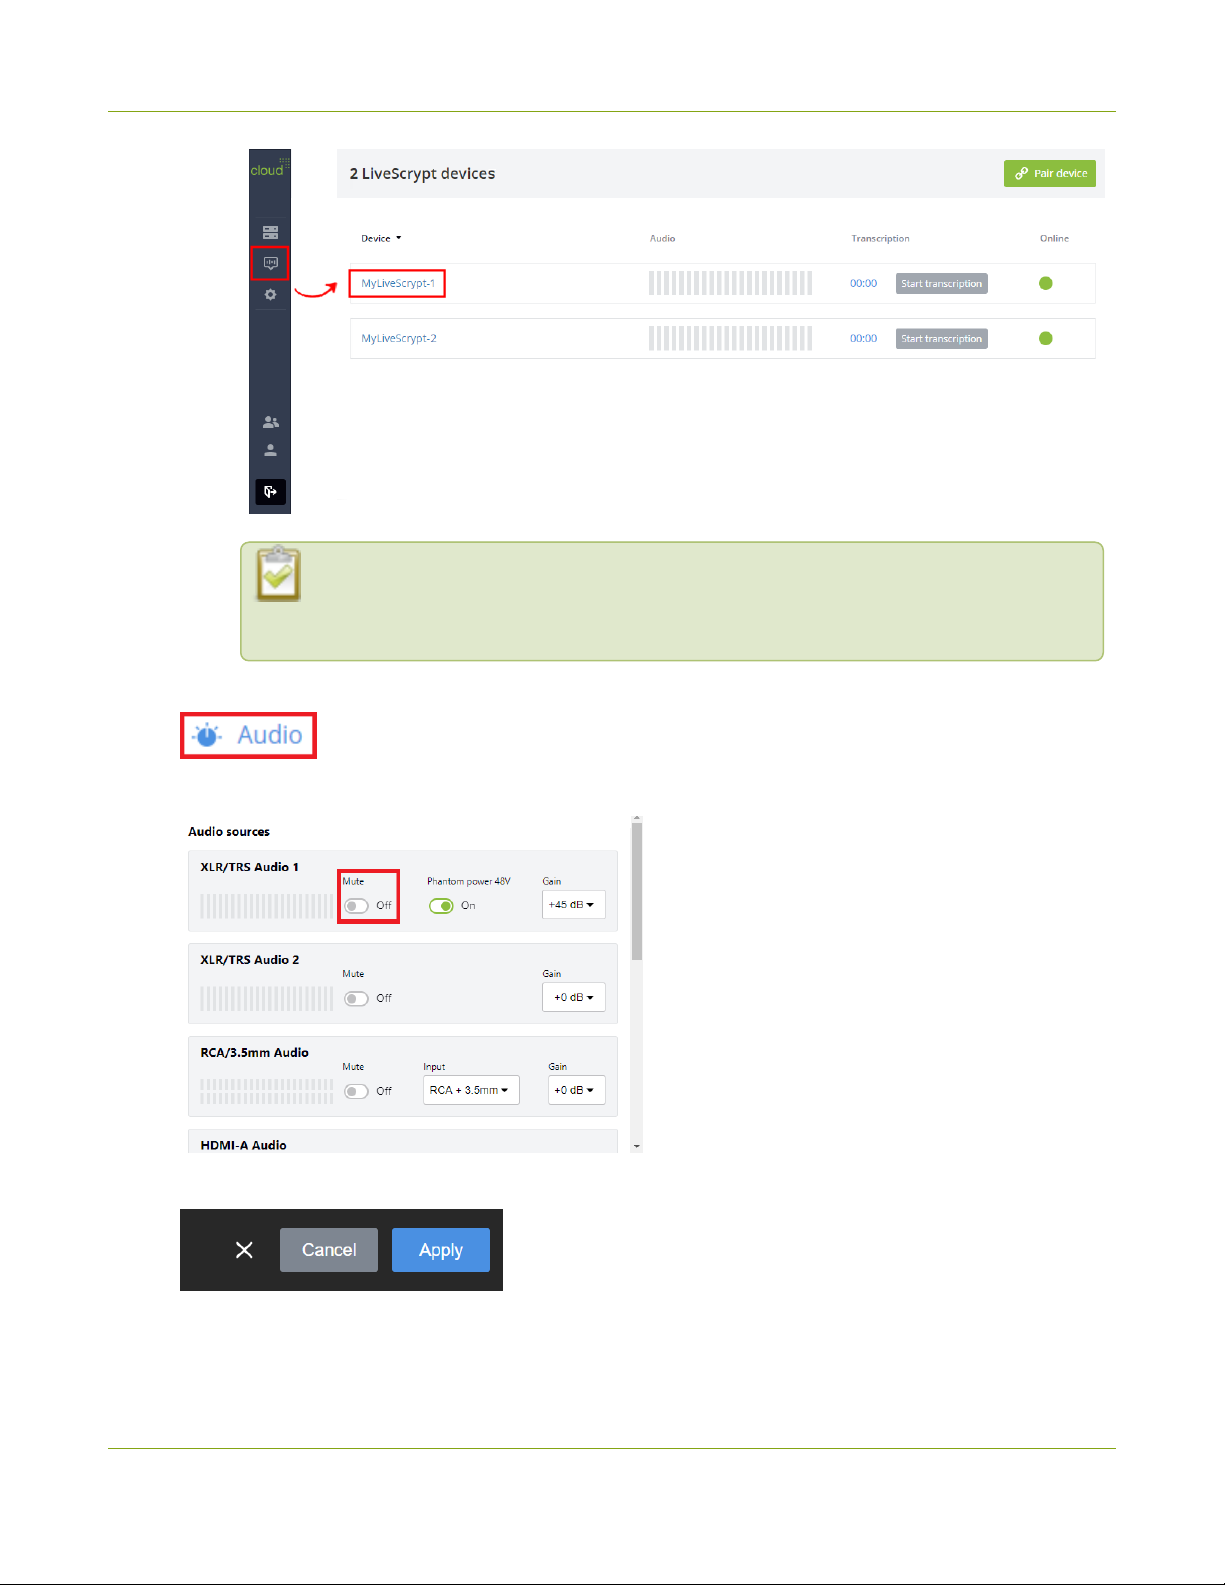
2. From the Settings, select Audio. The Audio menu opens.
3. Toggle the Mute switch On or Off for the audio source.
4. Select Apply if you're using the touch screen or web interface.
49
Page 55
LiveScrypt User Guide Assign audio sources to an input
Assign audio sources to an input
Some audio input ports on your LiveScrypt device share internal audio processing resources and are listed
together in the user interface.
The audio sources that share resources are:
l
RCA (left and right ports)
l
3.5 mm (stereo port)
In the user interface, both the RCA and 3.5 mm audio sources appear under the label RCA/3.5 mm Audio and
both sources are enabled at their input ports by default. You can change that using the touch screen, the web
interface, and Epiphan Cloud when your LiveScrypt device is paired with your Epiphan Cloud team.
Choosing one audio source for the shared input disables the other audio source. This means that when you add
gain to RCA/3.5 mm Audio, only the audio source you assign to RCA/3.5 mm Audio has gain applied and is
activated at the input port. The other port is disabled.
To avoid unwanted signal noise on the RCA ports, we recommend adding no more than 12dB of
gain when RCA or XLR+3.5mm is selected.
To assign the audio source to an input:
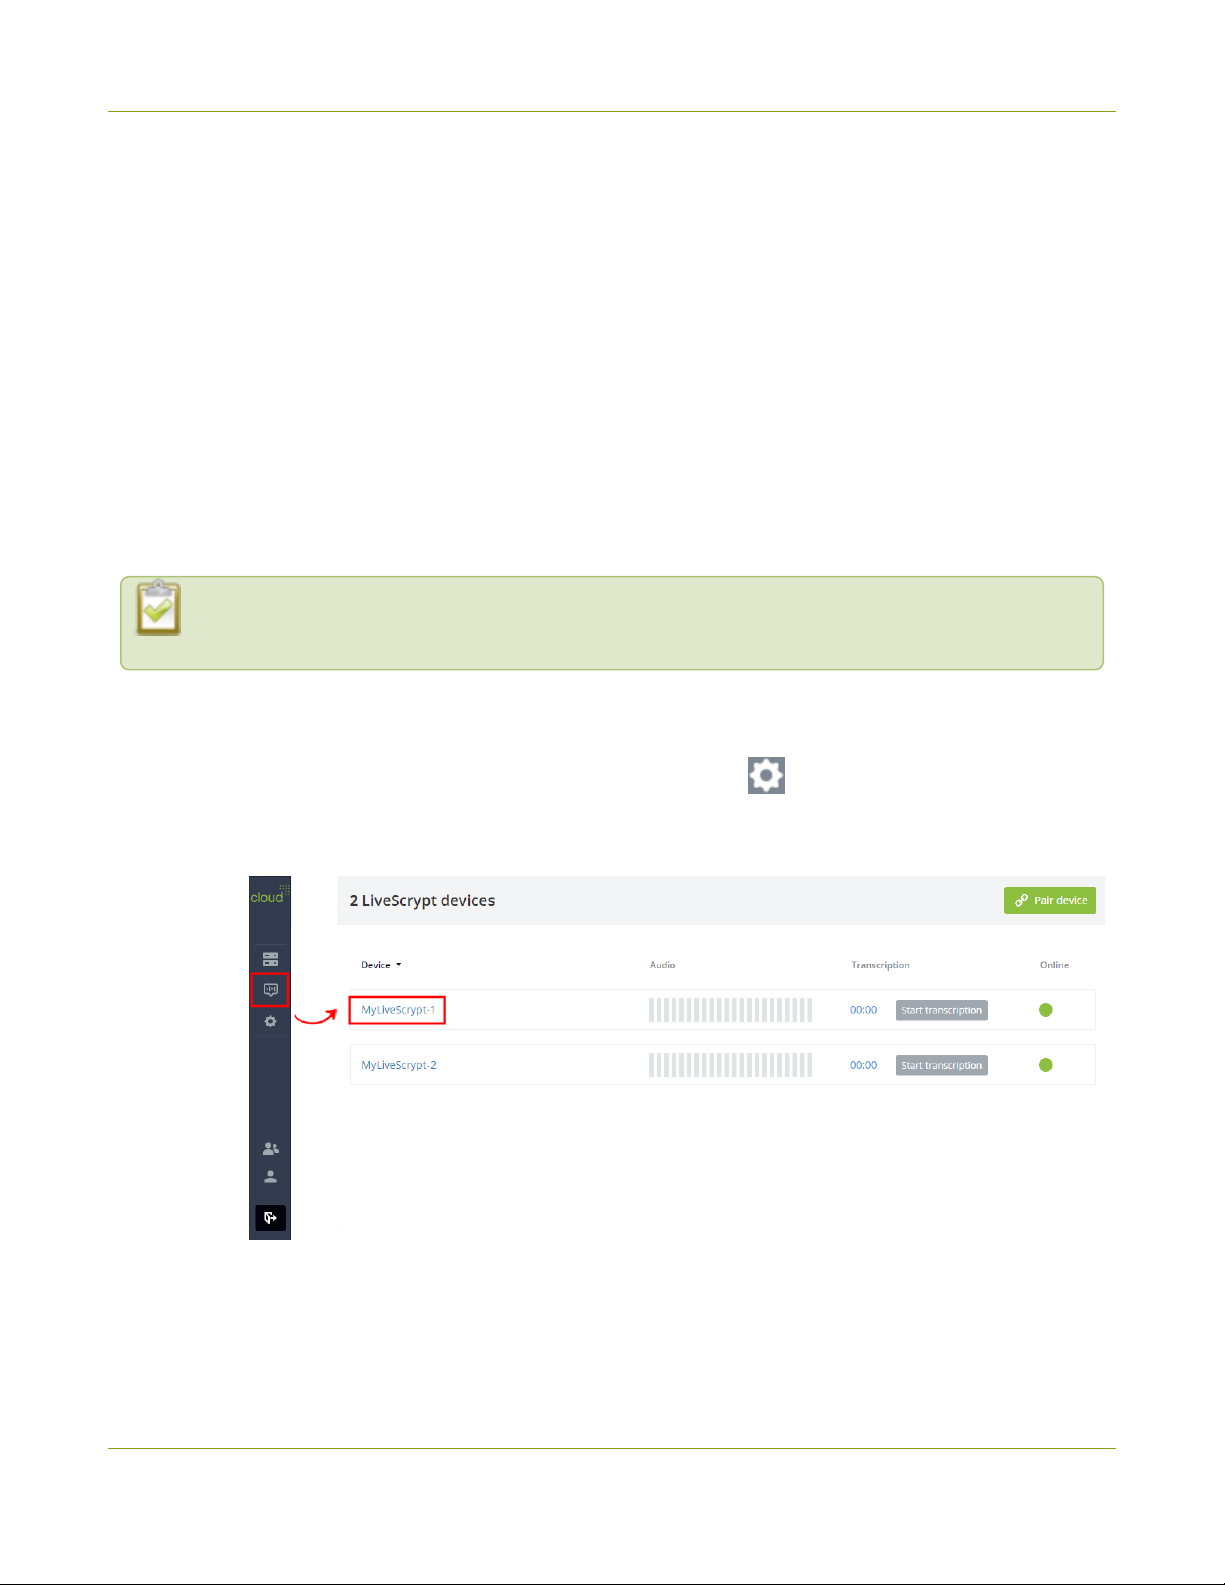
1. Open the device Settings:
a.
Using the touch screen and web interface, select Settings .
b. Using Epiphan Cloud, select the LiveScrypt devices icon in the side navigation panel, and then
select a LiveScrypt device to open the device Settings.
50
Page 56
LiveScrypt User Guide Assign audio sources to an input
You can also open the LiveScrypt device settings page from the Devices Dashboard
when you click the LiveScrypt device name or click the three dots in the row for the
LiveScrypt device and select Settings.
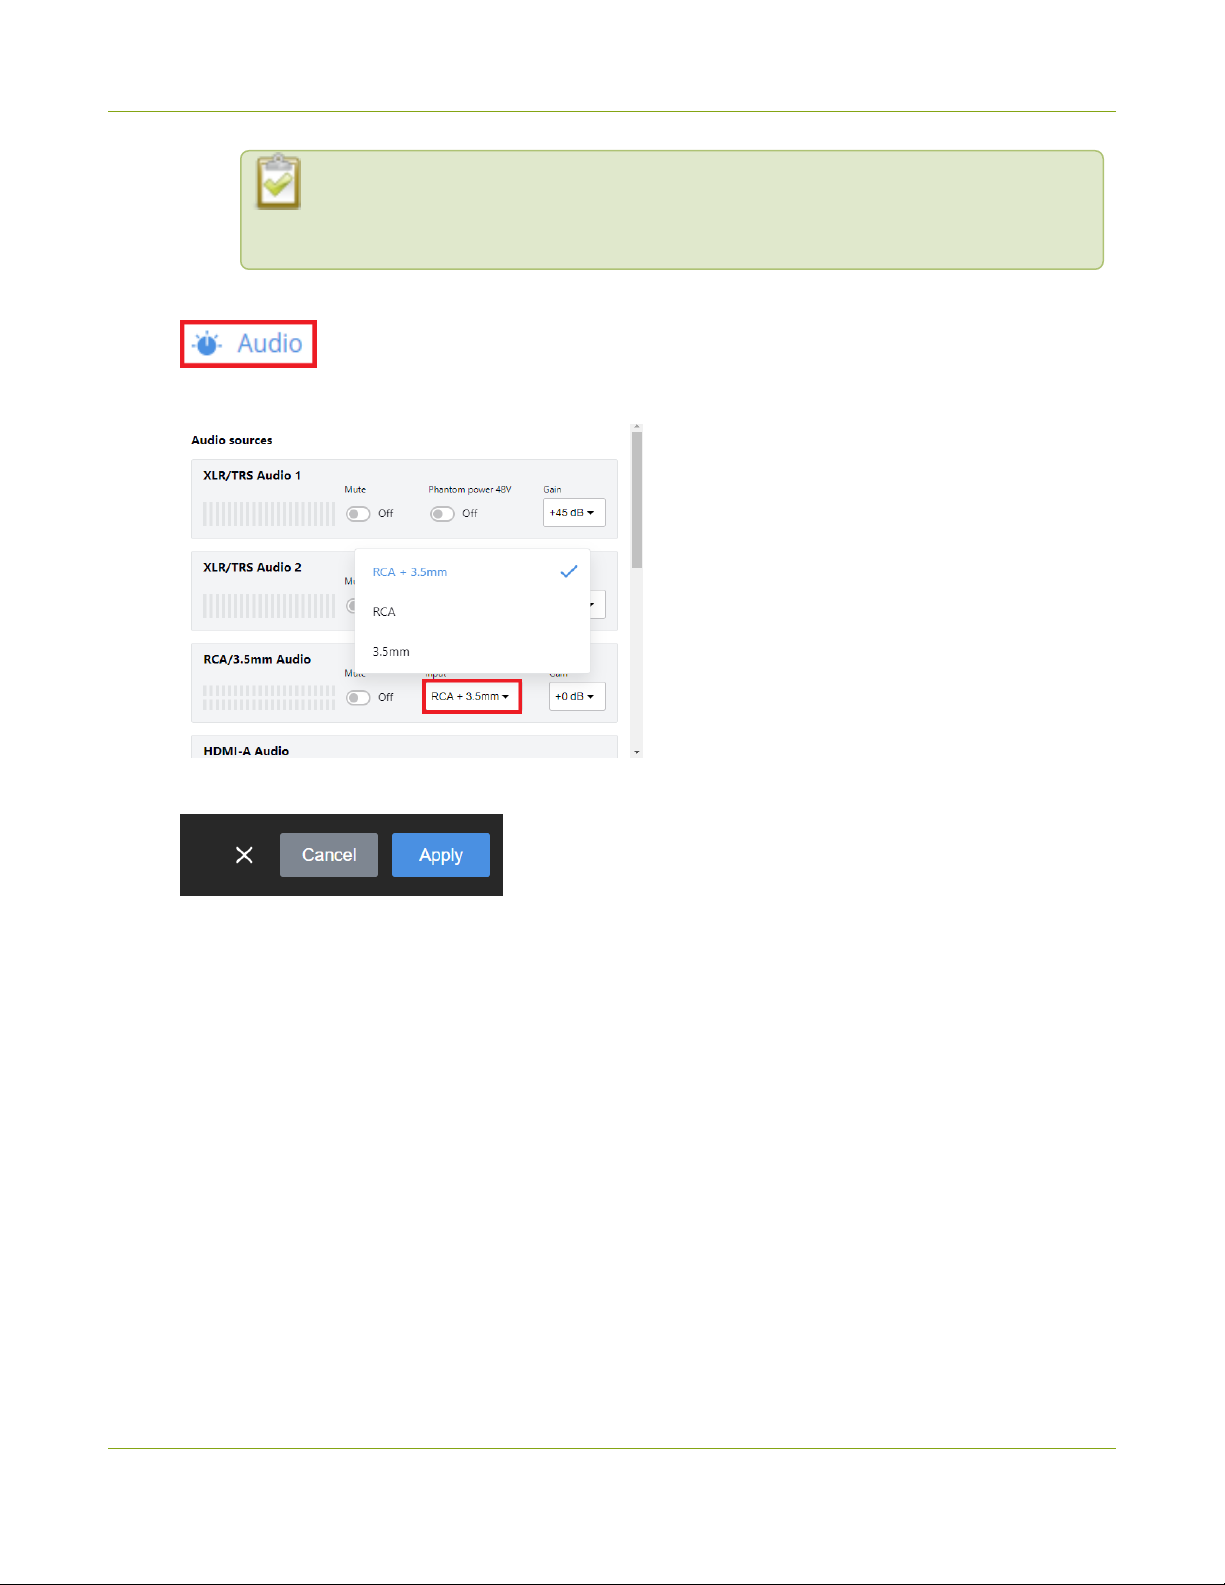
2. From the Settings, select Audio. The Audio menu opens.
3. For the RCA/3.5 mm Audio source, select the audio source option from the Input drop-down menu.
4. Select Apply if you're using the touch screen or web interface.
51
Page 57

LiveScrypt User Guide System network options
System network options
If you went through the Get started section, you should already be connected to the network. This section
describes the network and system options available from the touch screen, the web interface, and Epiphan
Cloud when your LiveScrypt device is paired.
Topics:
l
Network ports used by LiveScrypt
l
Access system information
l
Rename the LiveScrypt device
l
Turn DHCP on or off
l
Set up a static IP address
l
Set the date, time, and zone
l
Setup local NTP or another synchronization server
Network ports used by LiveScrypt
Do not block IP traffic over the default outgoing and incoming network ports that the LiveScrypt device uses. For
LiveScrypt to operate properly, make sure your firewall is configured to open the following ports for read/write
privileges. Blocking a port will cause the service that uses that port to fail.
Outbound ports:
l
HTTP Port 80 - used by the local web admin page.
l
HTTPS port 443 - used to communicate with the LiveScrypt cloud transcription service.
Incoming ports:
l
TCP port 22 - SSH used for remote support.
l
TCP/UDP port 123 - used for NTP time synchronization.
52
Page 58
LiveScrypt User Guide Access system information
Access system information
In the LiveScrypt device settings, you can access system information from the touch screen, the web interface, or
using Epiphan Cloud when the device is paired with your Epiphan Cloud team.
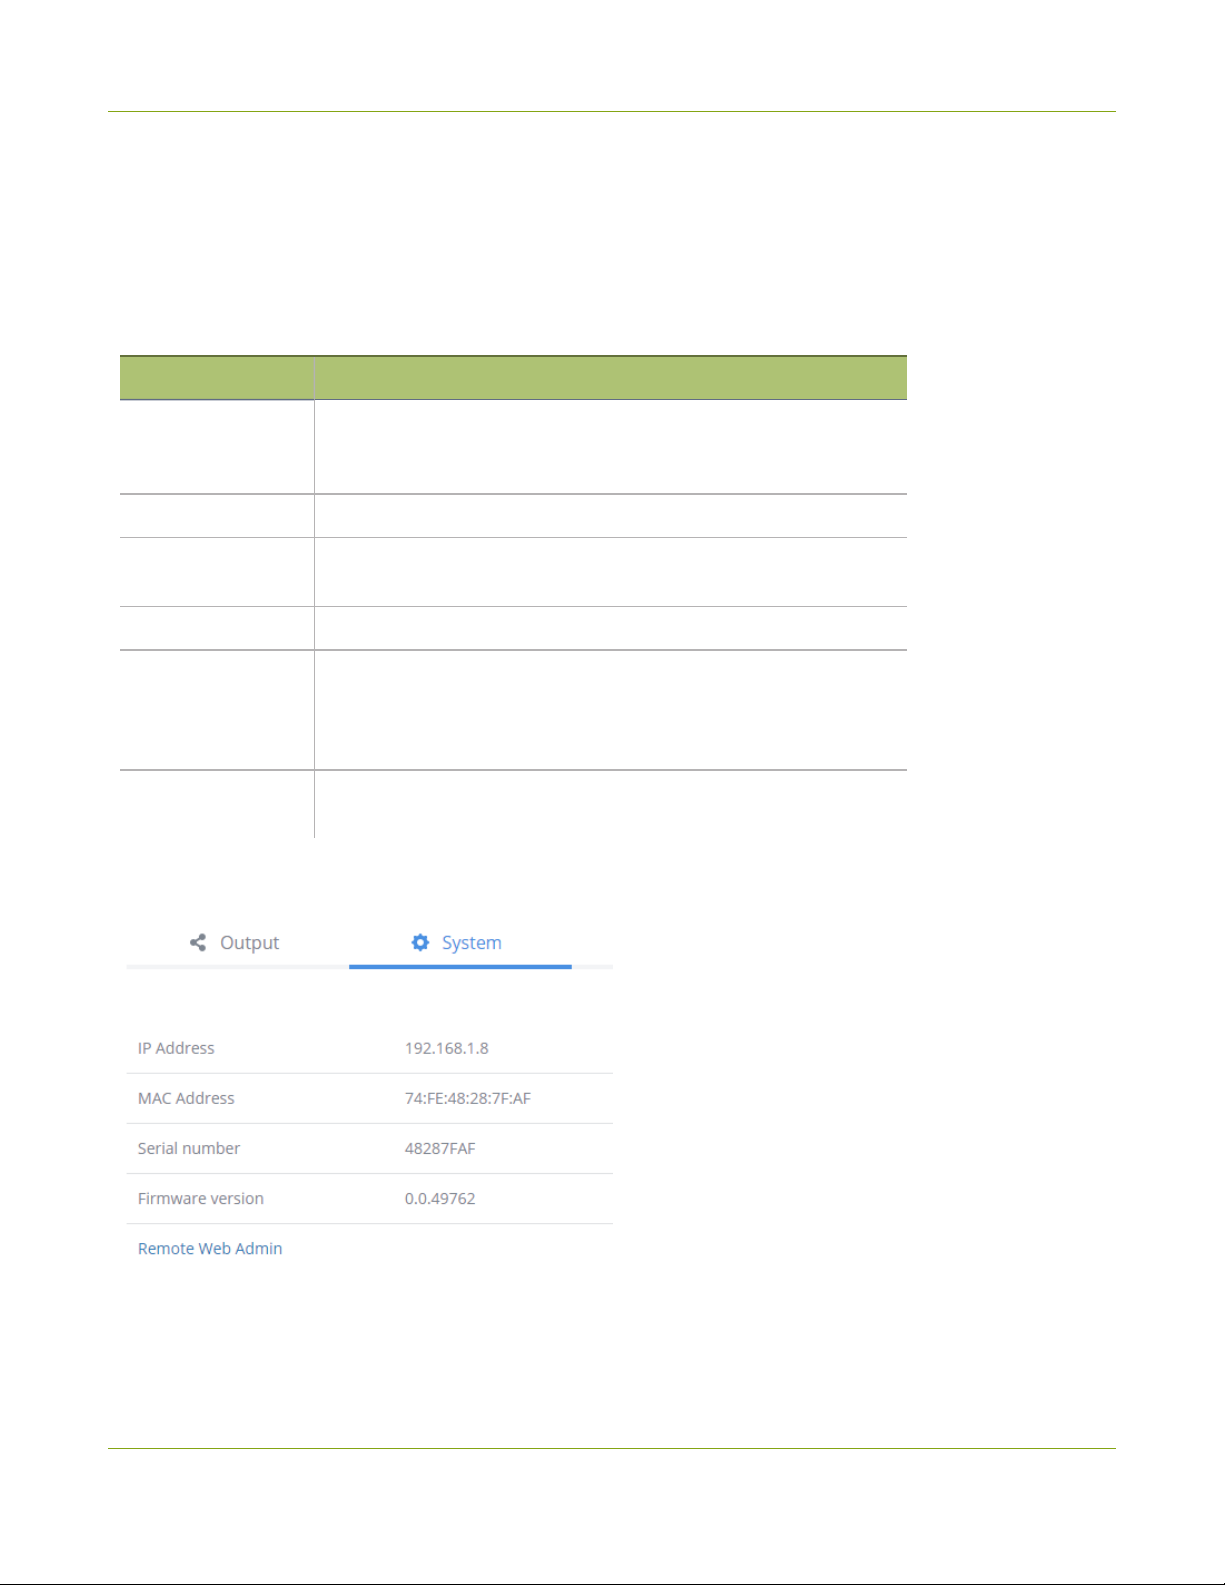
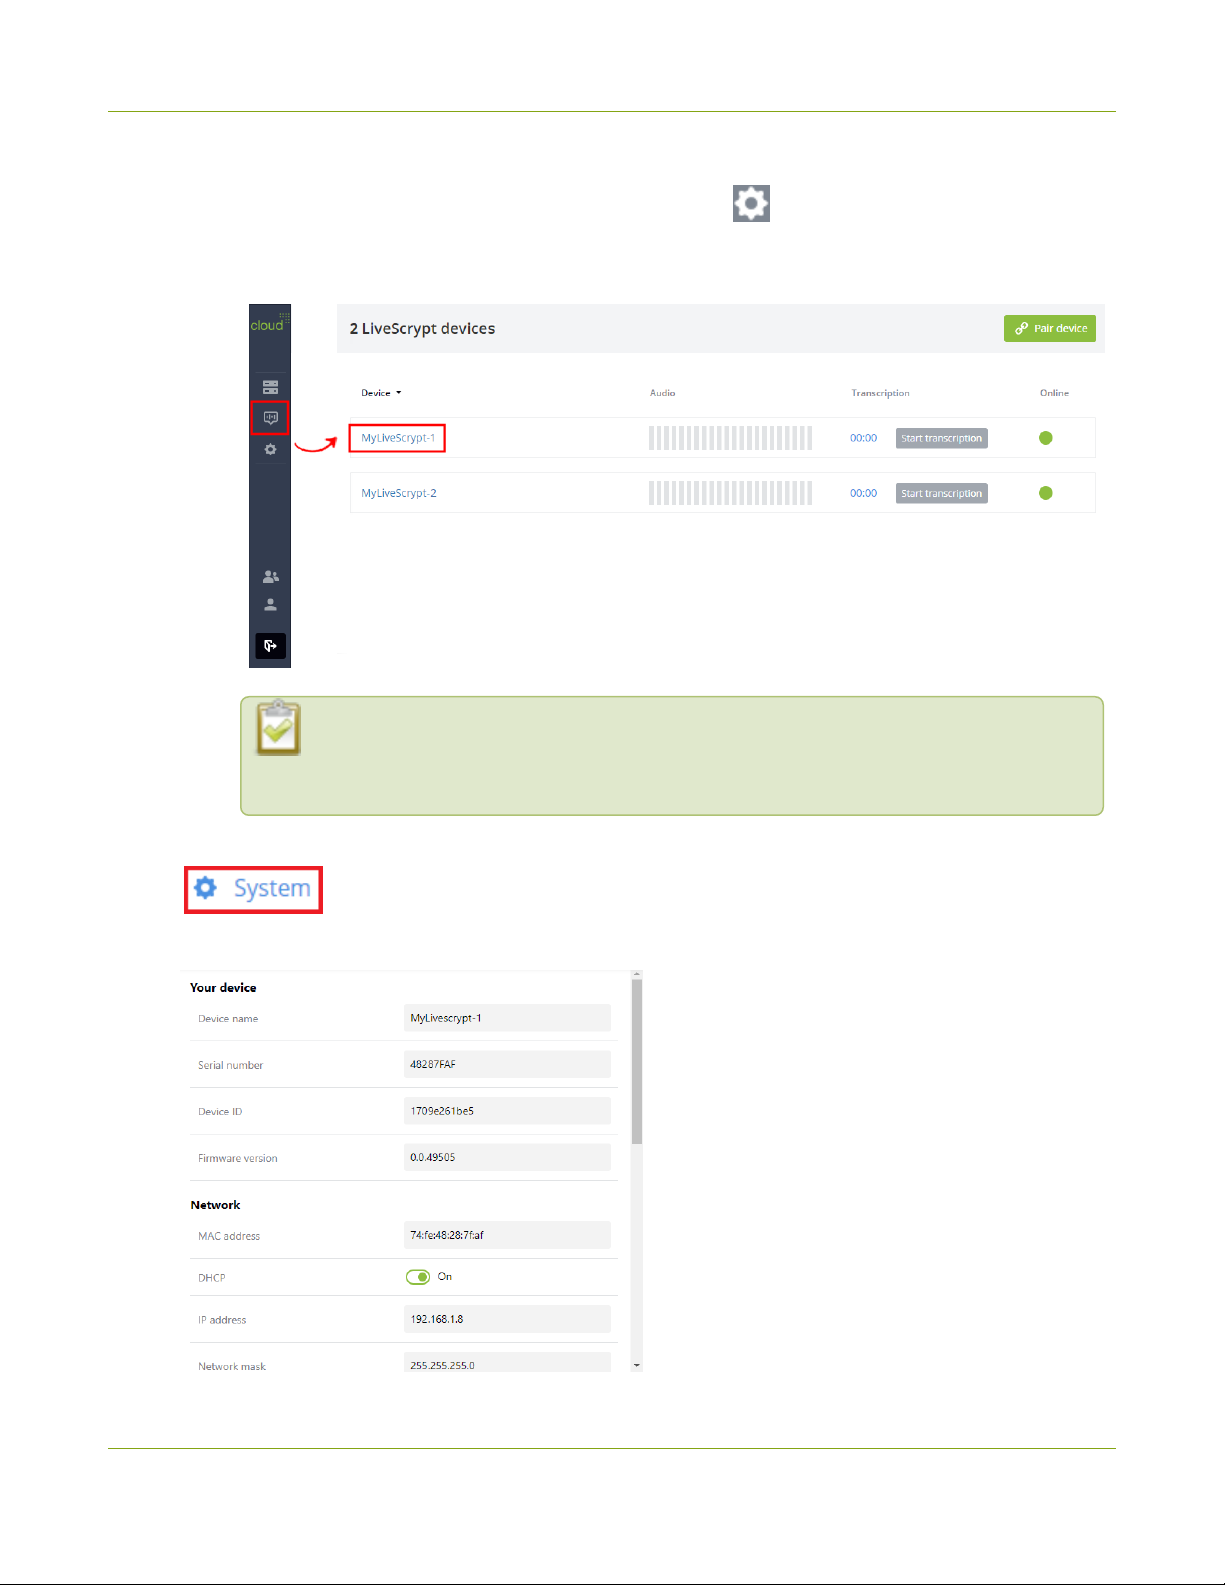
The following table lists and describes the system information you can access.
Table 6 System information accessed from the touch screen and web interface
Item Description
A name for this LiveScrypt device is displayed. You assign the
Device name
Serial number The manufacturer's serial number is displayed.
device a name when you pair the device with your Epiphan Cloud
team.
Device ID
Firmware version The firmware version of the LiveScrypt device is displayed.
Network settings
Date and time
For Epiphan Cloud, only a subset of system parameters are displayed. You can also select Remote Web Admin
to access the web interface from Epiphan Cloud.
This is the device ID that is also the pairing code that is used to
pair this LiveScrypt device with your Epiphan Cloud team.
This section displays the MAC address, IP address, network
mask, default gateway, and includes settings to enable DHCP or
set a static IP address for the LiveScrypt device. See Turn DHCP
on or off.
This section contains settings for the time zone, date and time,
NTP server, and other time synchronization protocol settings.
This procedure applies to all three interfaces. For instructions on how to access the web interface or Epiphan
Cloud, see User interfaces.
To access system information:
53
Page 59
LiveScrypt User Guide Access system information
1. Open the device Settings, do one of the following:
a.
Using the touch screen or web interface, select Settings .
b. Using Epiphan Cloud, select the LiveScrypt devices icon in the side navigation panel, and then
select a LiveScrypt device to open the device Settings.
You can also open the LiveScrypt device settings page from the Devices Dashboard
when you click the LiveScrypt device name or click the three dots in the row for the
LiveScrypt device and select Settings.
2. From the Settings, select System to open the System menu.
3. Use the scroll bar to navigate the menu.
54
Page 60
LiveScrypt User Guide Rename the LiveScrypt device
Rename the LiveScrypt device
In the LiveScrypt device settings, you can access system information and view the device name using the touch
screen, the web interface, or Epiphan Cloud when the device is paired with your Epiphan Cloud team.
When you pair the device to your Epiphan Cloud account, you can assign the device a unique name using
alphanumerical characters and spaces. You can change the name of your LiveScrypt device at any time from the
device's settings page in Epiphan Cloud. For instructions on how to access Epiphan Cloud, see User interfaces.
You can use alphanumerical characters and spaces in the device name; however, we
recommend using underscores to separate words instead of spaces. Common character sets
for Western and Central European languages, Nordic languages, and Russian should display
correctly for the device name in the user interface on the LiveScrypt device. The device name
should not include the following special characters: ^ < > / \ ? * : " |
To change the LiveScrypt device name using Epiphan Cloud:
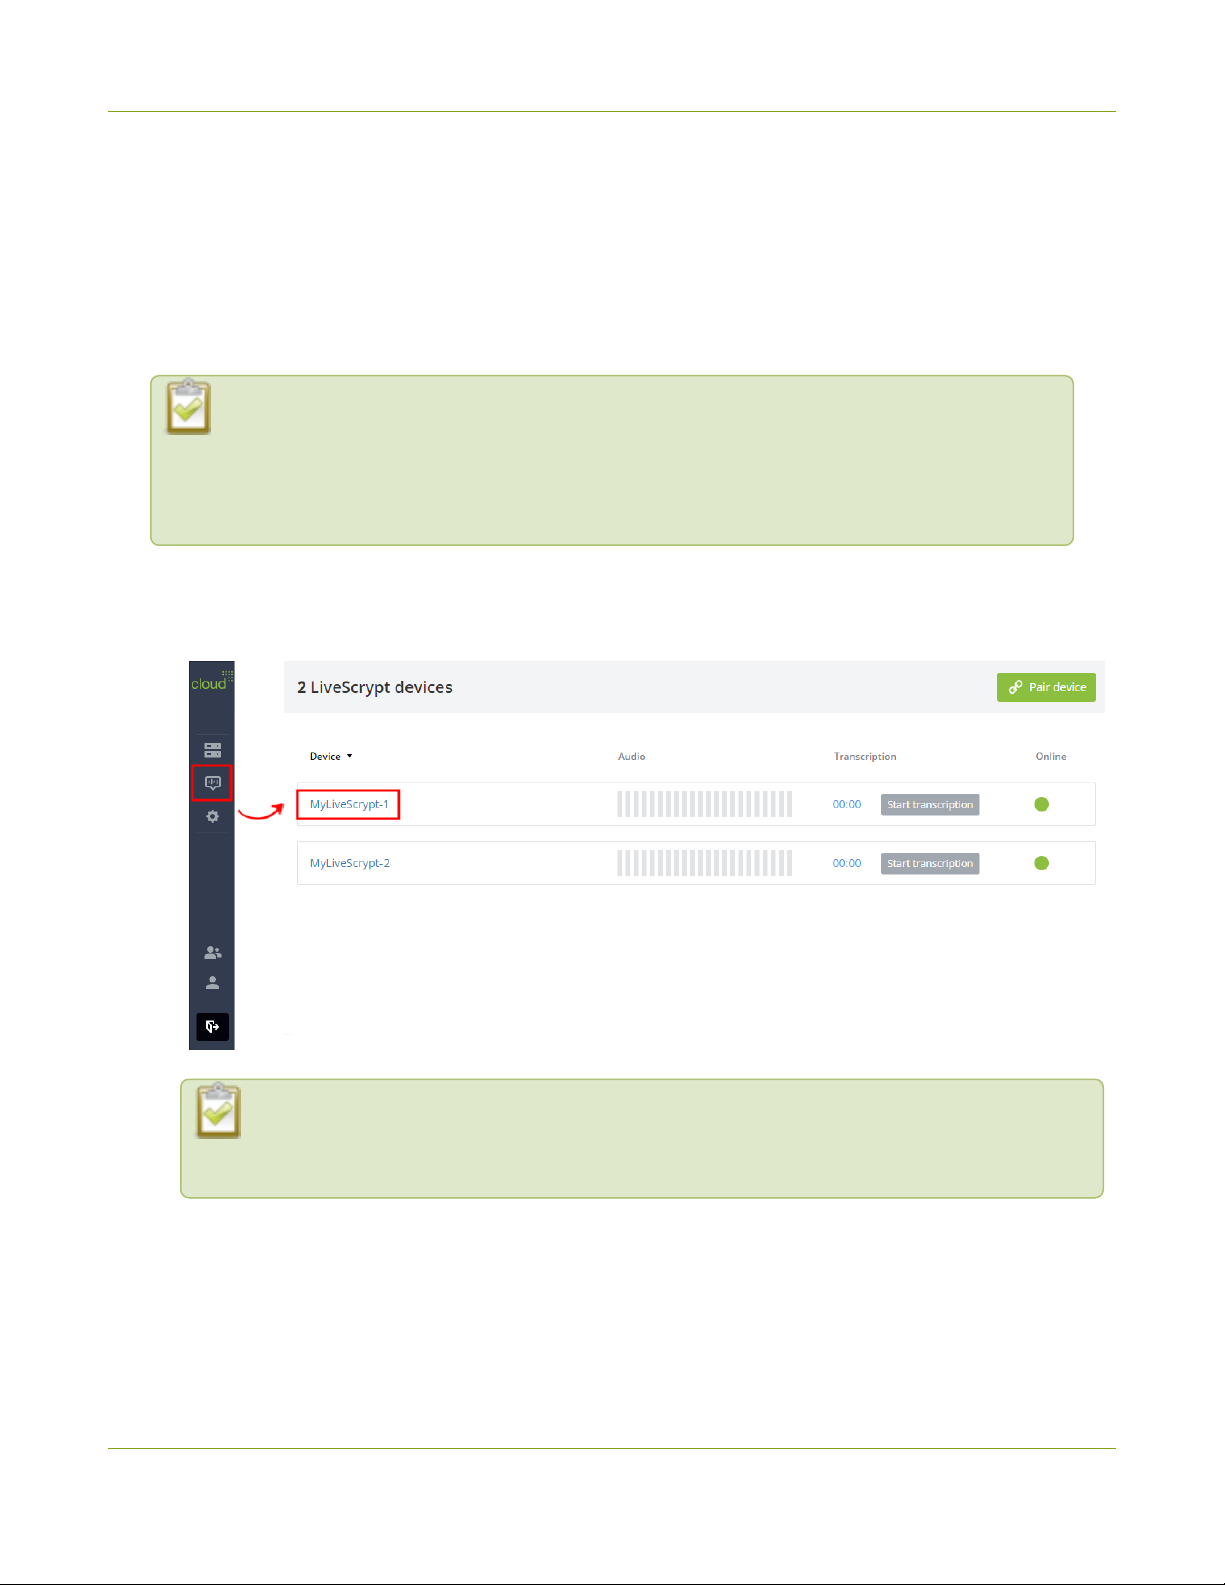
1. Select the LiveScrypt devices icon in the side navigation panel, and then select a LiveScrypt device to
open the device Settings.
You can also open the LiveScrypt device settings page from the Devices Dashboard when
you click the LiveScrypt device name or click the three dots in the row for the LiveScrypt
device and select Settings.
2. At the top of the page, select the device name that appears in the header bar and enter a new name.
55
Page 61

LiveScrypt User Guide Rename the LiveScrypt device
3. Click outside the device name field to save the changes.
56
Page 62
LiveScrypt User Guide Turn DHCP on or off
Turn DHCP on or off
In the LiveScrypt device settings, you can turn DHCP on or off. If your network uses a DHCP server to identify
devices that are connected to the network, then the LiveScrypt device dynamically obtains an IP address when
you power on the device. The network mask and default gateway are also obtained automatically from the
network client. DHCP is enabled by default.
This procedure applies to the touch screen and web interface. For instructions on how to access the web
interface, see Using the web interface.
To turn DHCP on or off:
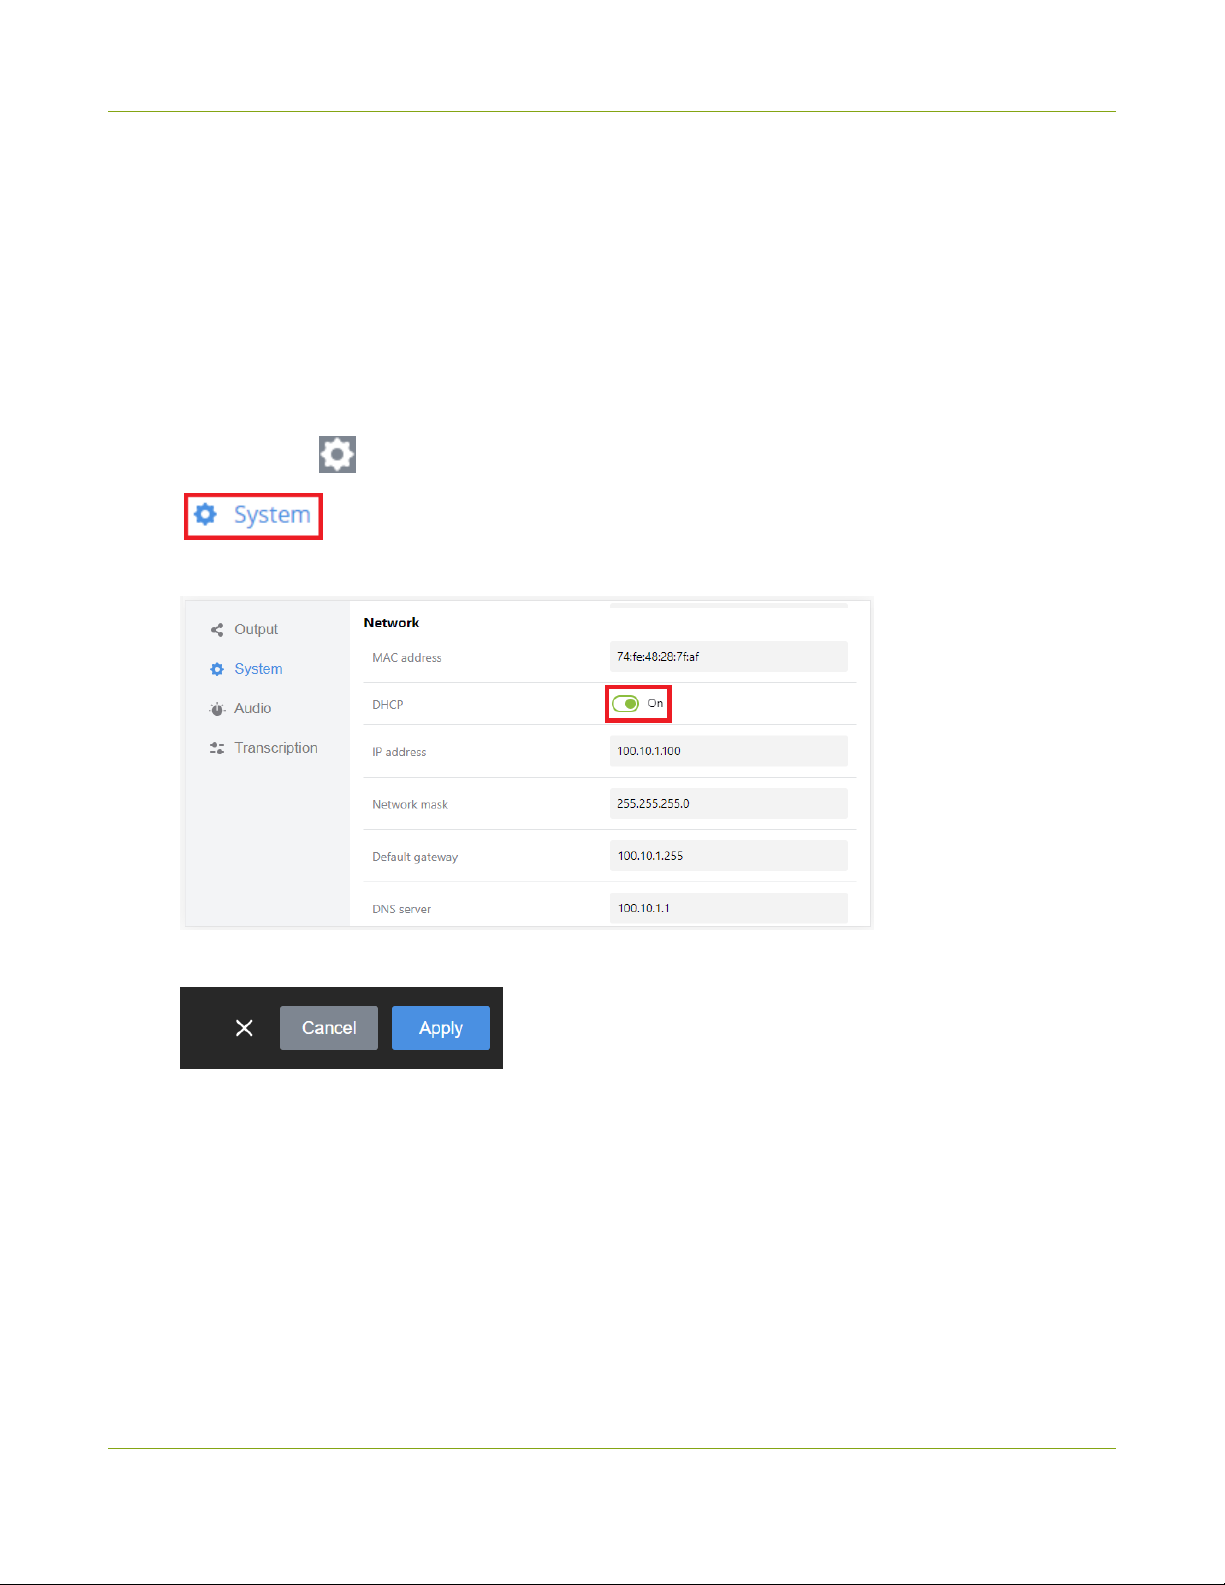
1.
Select Settings , and then select System to open the System menu.
2. In the Network section, toggle the DHCP switch on or off.
3. Select Apply.
57
Page 63
LiveScrypt User Guide Set up a static IP address
Set up a static IP address
If your network doesn't use a DHCP server to dynamically identify devices connected to the network, you can
manually assign the LiveScrypt device a static IP address and set the network mask, default gateway, and DNS
server values using the touch screen or web interface. Only IPv4 addresses are supported. LiveScrypt does not
support IPv6.
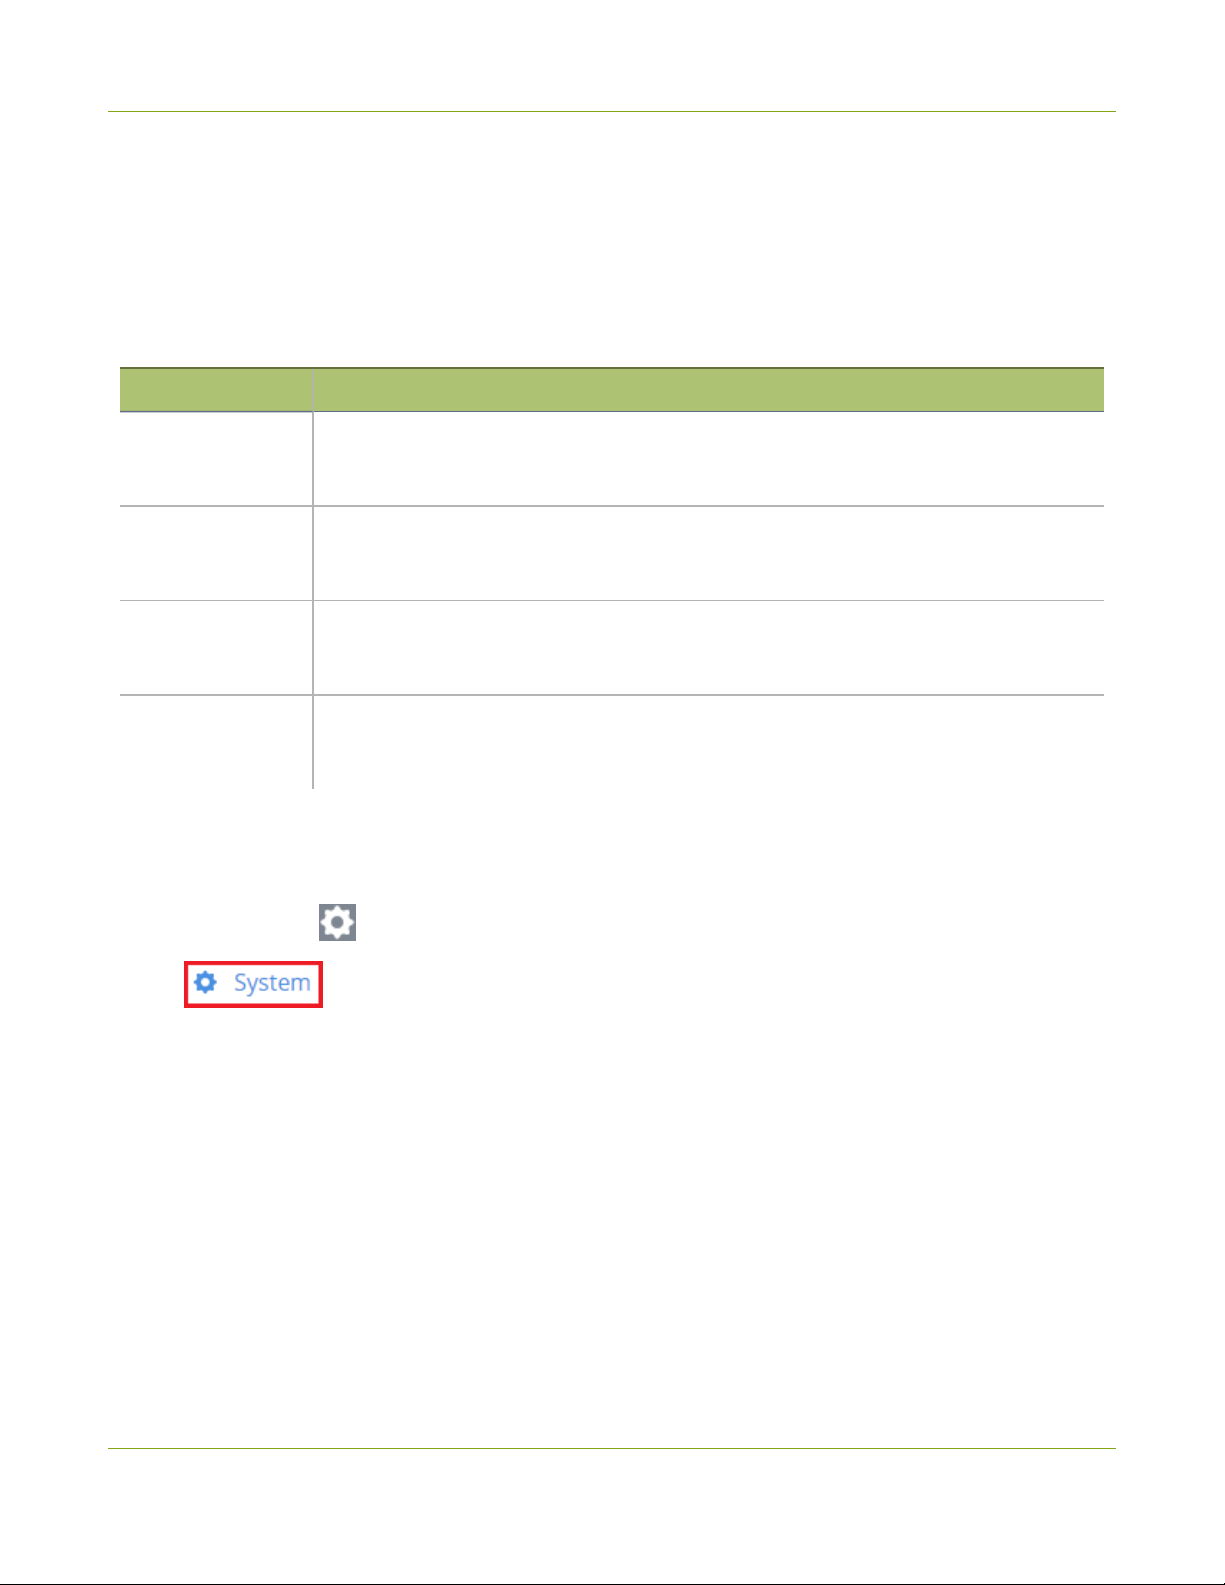
Table 7 Static IP Address Fields
Label Description
Obtain a static IP address to assign the LiveScrypt device from your network
IP Address
Network Mask
Default gateway
administrator. Only IPv4 addresses are supported. LiveScrypt does not support IPv6
addresses.
Also called the subnet mask, this value denotes a range of IP addresses. Obtain this
from your network administrator, from another computer on the same subnet, or
calculate the value using an online subnet calculator.
The network node that serves as an access point to the rest of the network. This value
cannot be blank unless you are using DCHP. Specify the system’s IP address if you
don’t have a default gateway on your network.
The domain name system server (DNS server) translates human-readable hostnames
DNS Server
This procedure applies to the touch screen and web interface. For instructions on how to access the web
interface, see Using the web interface.
To set up a static IP address:
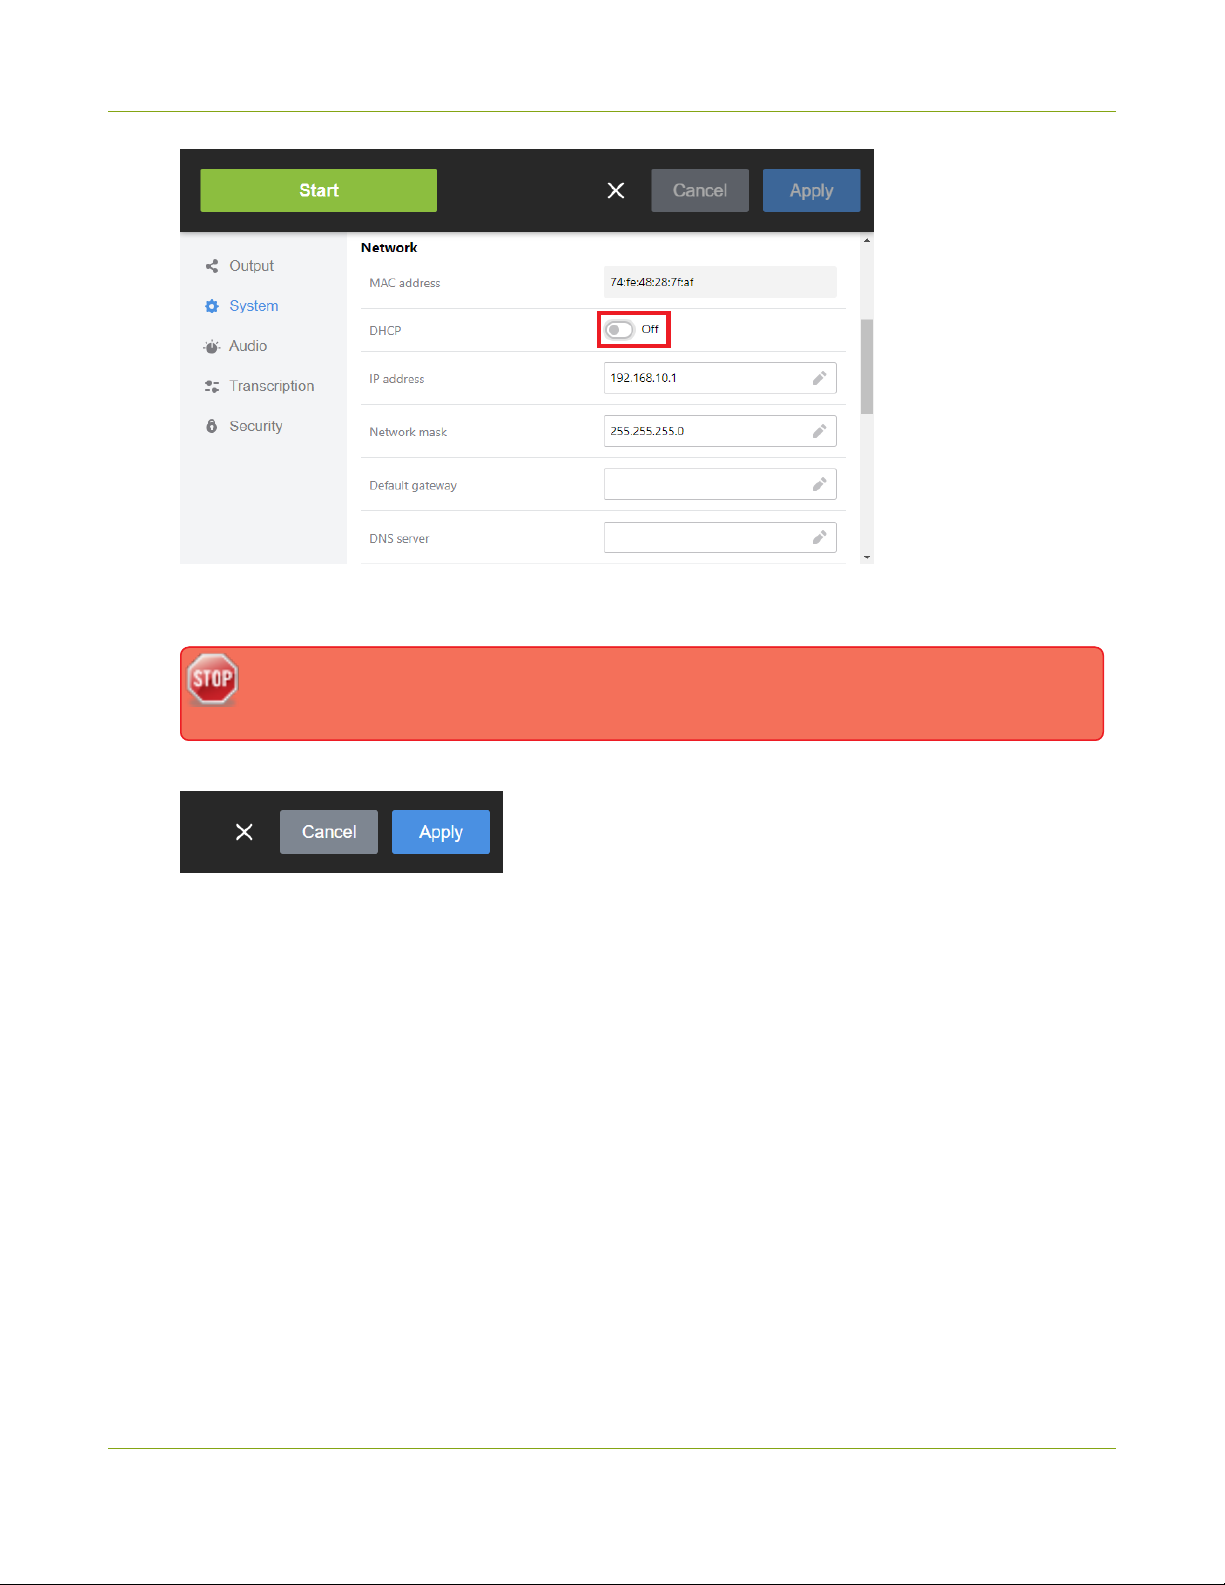
1.
Select Settings and then select System to open the System menu.
2. In the Network section, toggle the DHCP switch off.
into corresponding IP addresses. Specify the system’s IP address if you don’t have a
DNS server on your network. This value cannot be blank unless you are using DHCP.
58
Page 64
LiveScrypt User Guide Set up a static IP address
3. Enter a static IPv4 address in the IP address field. You can also add or modify the Network mask, Default
gateway, and DNS server values.
The default gateway and DNS Server fields cannot be left blank. If you do not have a default
gateway or a DNS server for your network, enter the static IP address in those fields.
4. Select Apply and reboot if prompted.
59
Page 65
LiveScrypt User Guide Set the date, time, and zone
Set the date, time, and zone
The LiveScrypt device's date and time are used for the transcription files when they're archived. You can set the
date, time, and time zone for your device using the touch screen and the web interface. For instructions on how
to access the web interface, see Using the web interface.
To set the date, time, and zone for the LiveScrypt device:
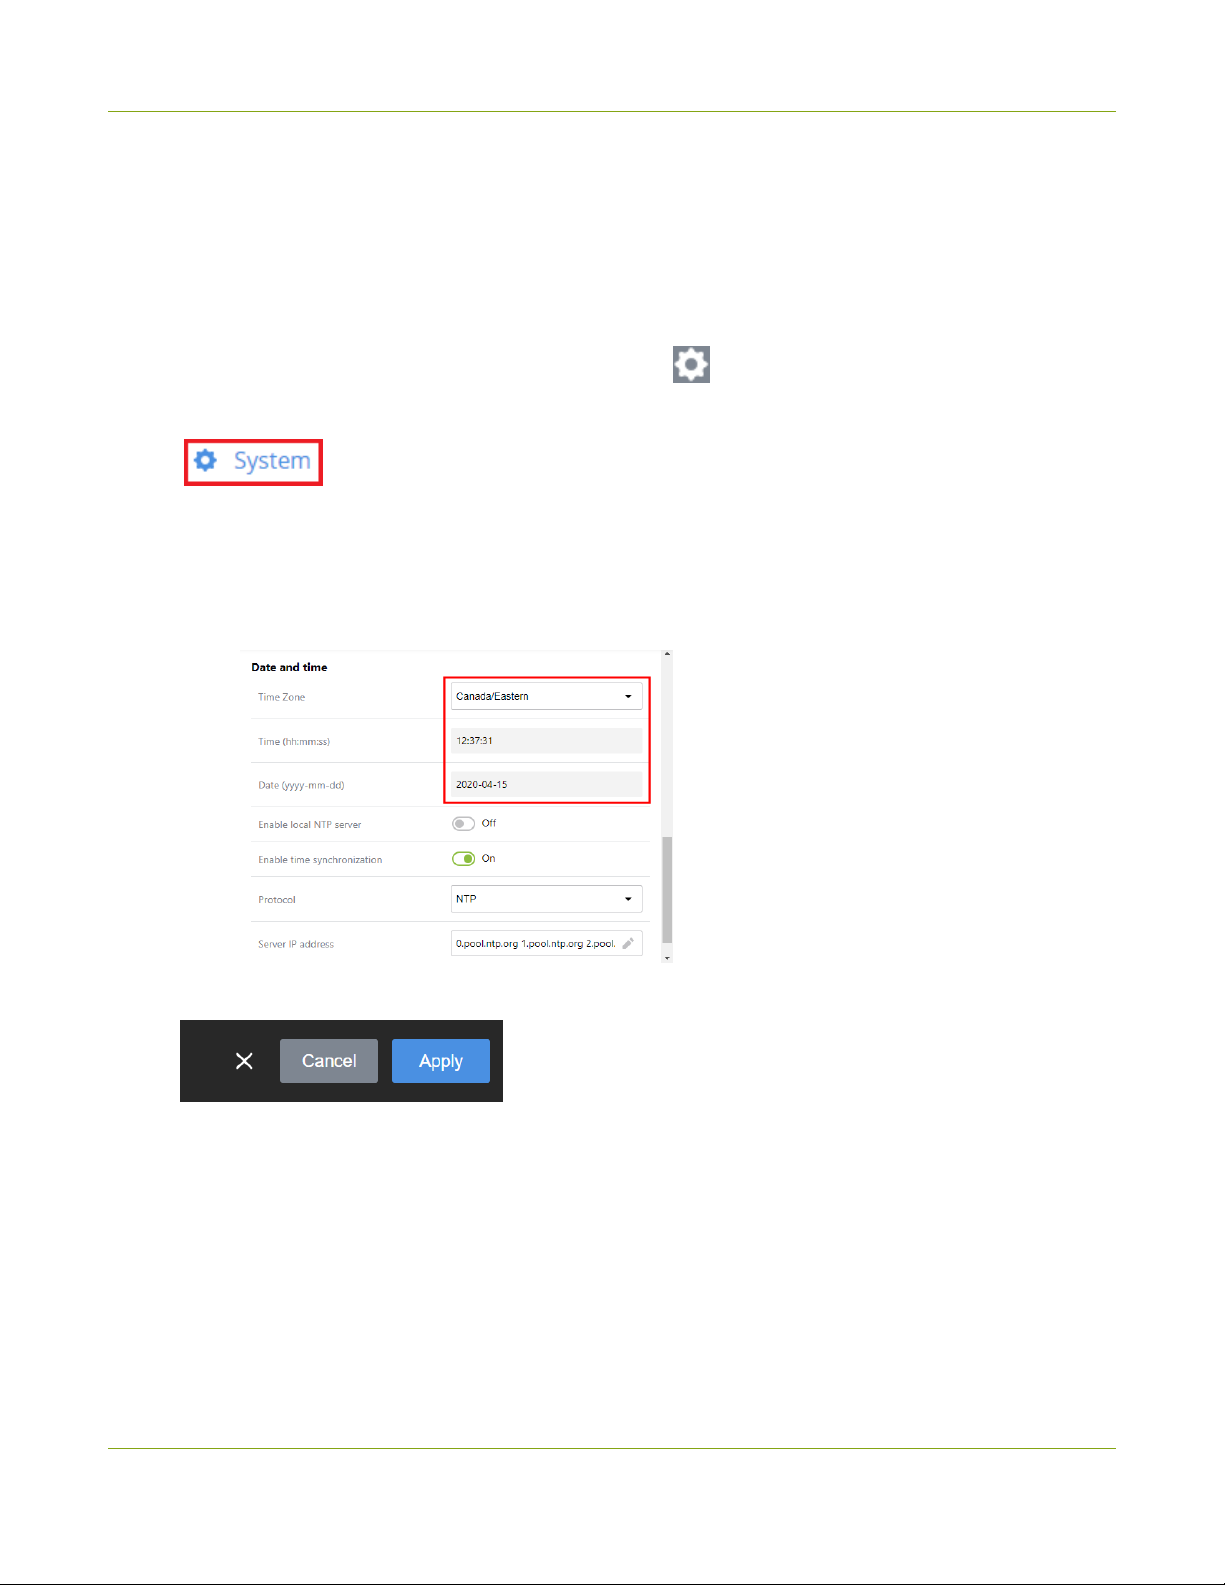
1.
Using the touch screen or web interface, select Settings .
2. From the Settings menu, select System to open the System menu.
3. Scroll to the Date and time section and do the following:
a. In the Time Zone field, select a time zone from the drop-down menu.
b. In the Time field, enter the time using the format hh:mm:ss.
c. In the Date field, enter the date using the format yyyy-mm-dd.
4. Select Apply.
60
Page 66
LiveScrypt User Guide Setup local NTP or another synchronization server
Setup local NTP or another synchronization server
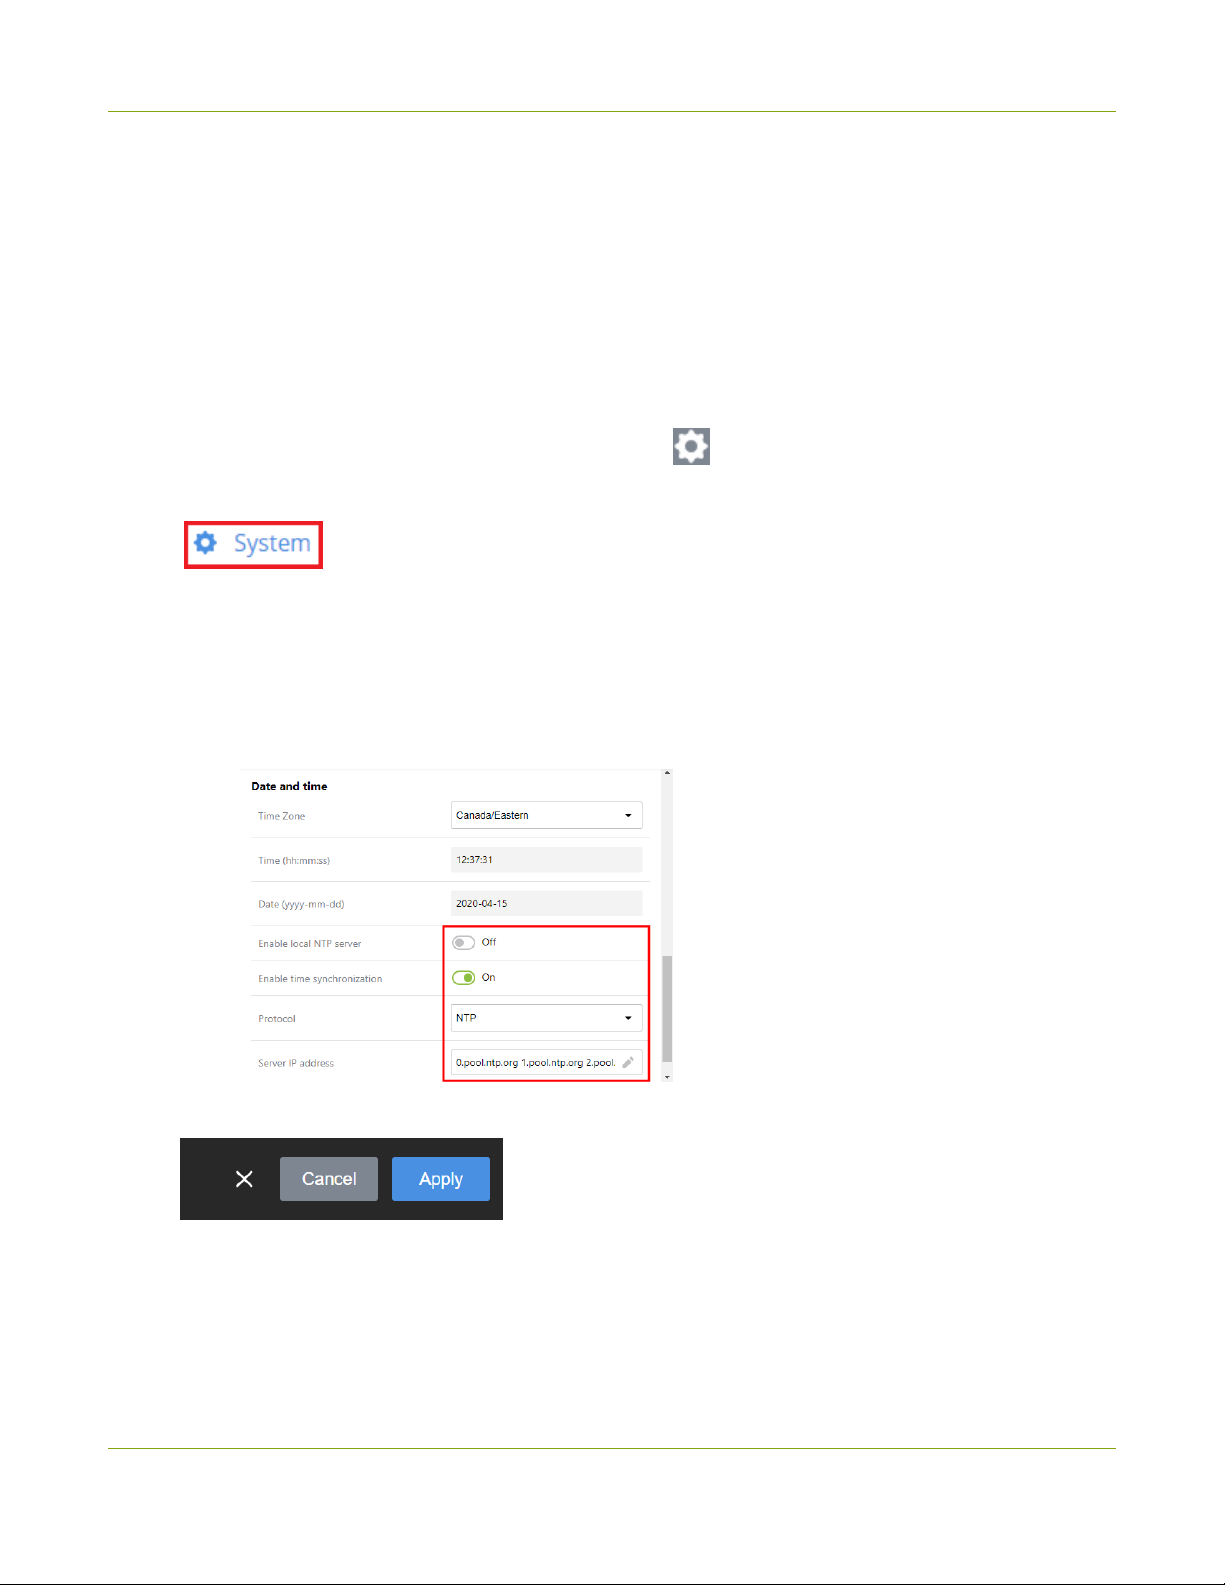
The LiveScrypt device is setup to use a web NTP server for time synchronization by default. You can select a
different synchronization protocol, enter a different server URL, or setup the LiveScrypt device to get it's time
synchronization from a local NTP server using the touch screen and the web interface. The device supports NTP,
PTPV1, and RDATE protocols. For instructions on how to access the web interface, see Using the web interface.
To setup the synchronization server for the LiveScrypt device:
1.
Using the touch screen or web interface, select Settings .
2. From the Settings, select System to open the System menu.
3. Scroll to the Date and time section and do any of the following:
a. To enable using the local NTP server, toggle the Enable local NTP server switch On.
b. To disable time synchronization, toggle the Enable time synchronization switch Off.
c. To change the time server protocol, select a different one in the Protocol field.
d. To change the time server URL, enter a new one in the Server IP address field.
4. Select Apply.
61
Page 67
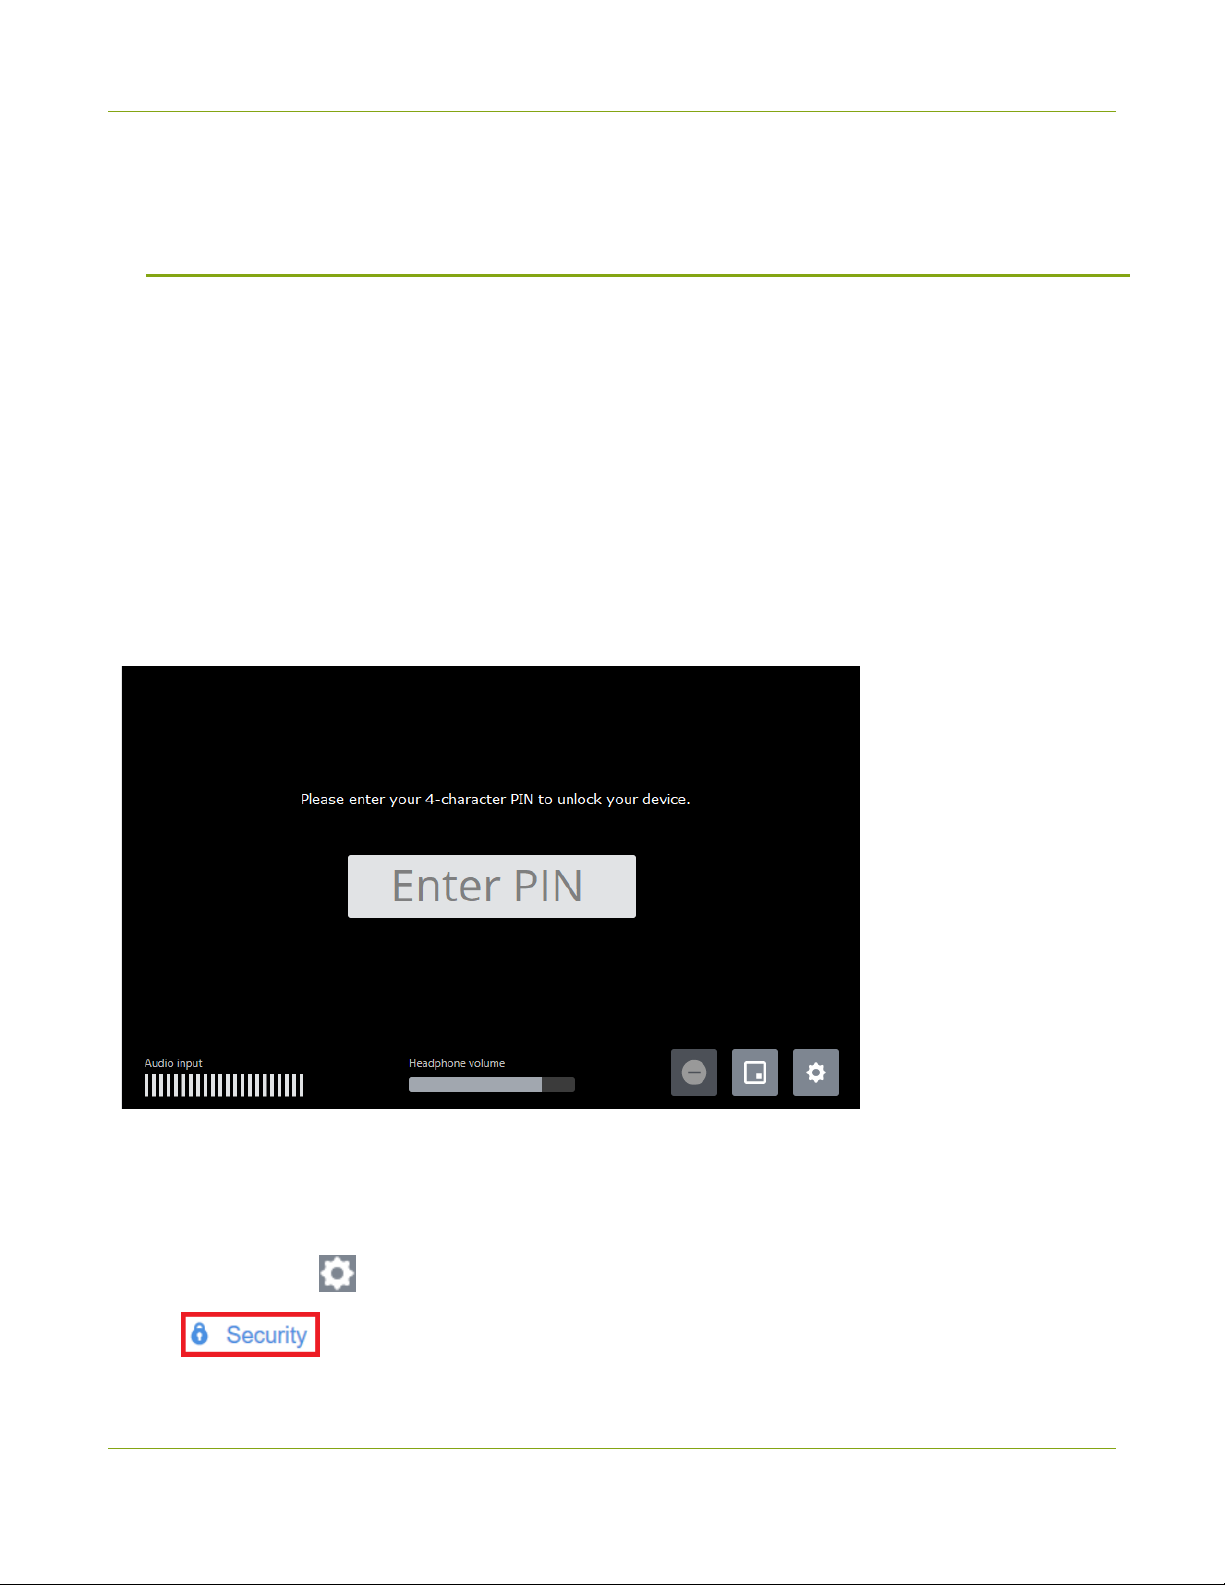
LiveScrypt User Guide Security options
Security options
LiveScrypt offers some security features to keep your device safe. Be sure to record passwords in a safe
location.
l
Set touch screen PIN and lock
l
Set the web interface password
Set touch screen PIN and lock
To protect your LiveScrypt device from unauthorized access, you can set a 4-character PIN security code and
lock the touch screen using the touch screen and web interface. By default, a PIN is not set.
When locked, users must enter the four-digit PIN to unlock the touch screen to access the LiveScrypt device.
Once unlocked, the touch screen remains unlocked and the password is reset to none. Simply repeat the
procedure the next time you want to lock the touch screen.
You can use the web interface and Epiphan Cloud to configure and control the LiveScrypt device while the touch
screen is locked. Using the web interface, you can even change the PIN while the touch screen is locked - just in
case the PIN is forgotten.
To configure a 4-character PIN and lock the touch screen using the touch screen and web interface:
1.
Select Settings to open the device Settings and then select Security. The Security menu opens.
62
Page 68

LiveScrypt User Guide Set touch screen PIN and lock
2. Enter up to four characters in the PIN code field. Alphanumeric characters, spaces, and special
characters are supported.
3. Do one of the following:
a. Select Apply to save the password.
b. Select Lock touch screen and confirm Yes, lock it to immediately apply the 4-character PIN and
lock the touch screen.
63
Page 69
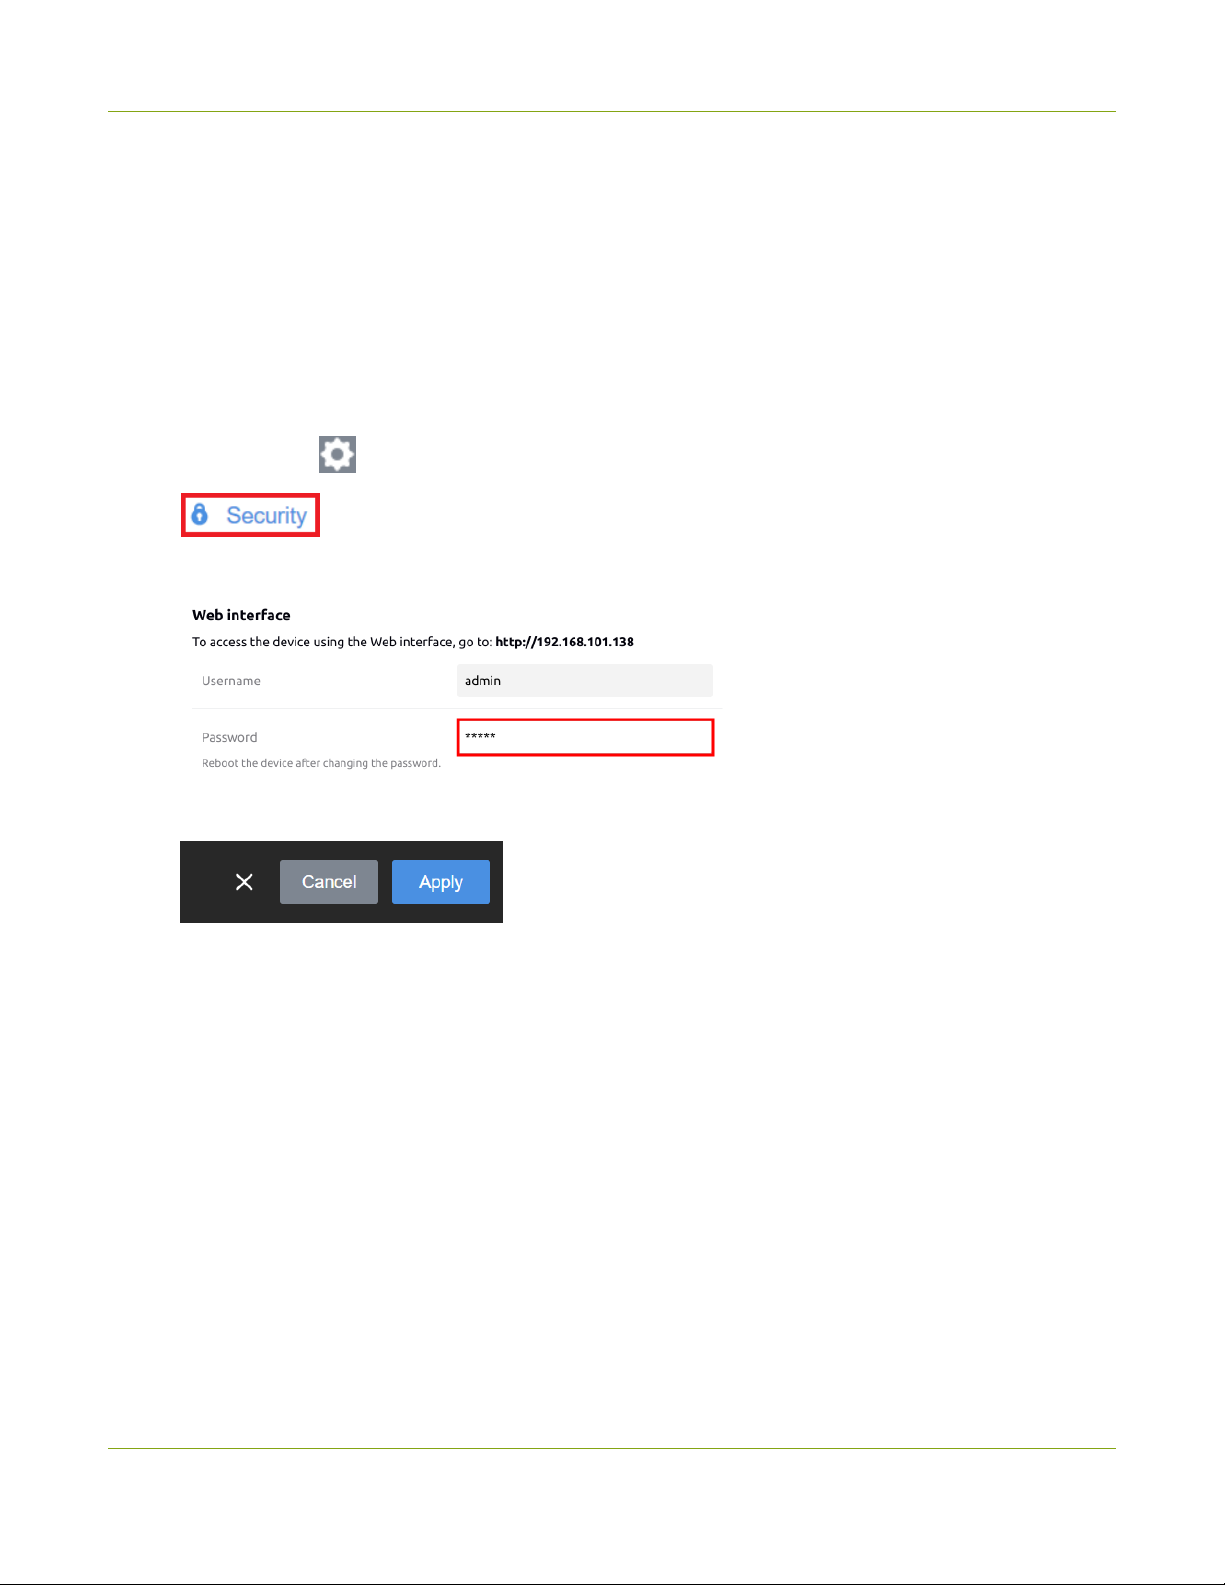
LiveScrypt User Guide Set the web interface password
Set the web interface password
When you login to the web interface for the first time, the default user name is admin and no password is
assigned. Just enter admin and leave the password field blank. For higher security, we recommend that you
assign a password using the touch screen or web interface as soon as possible.
Passwords are case sensitive and can use all alphanumeric keys in the ASCII range. Passwords can be up to
255 characters long, but should not include any spaces. Contact your system administrator for your
organization’s specific password requirements.
To set or change the password:
1.
Select Settings to open the device Settings and then select Security. The Security menu opens.
2. Enter a password in the Password field using alpha-numeric characters.
3. Select Apply.
64
Page 70
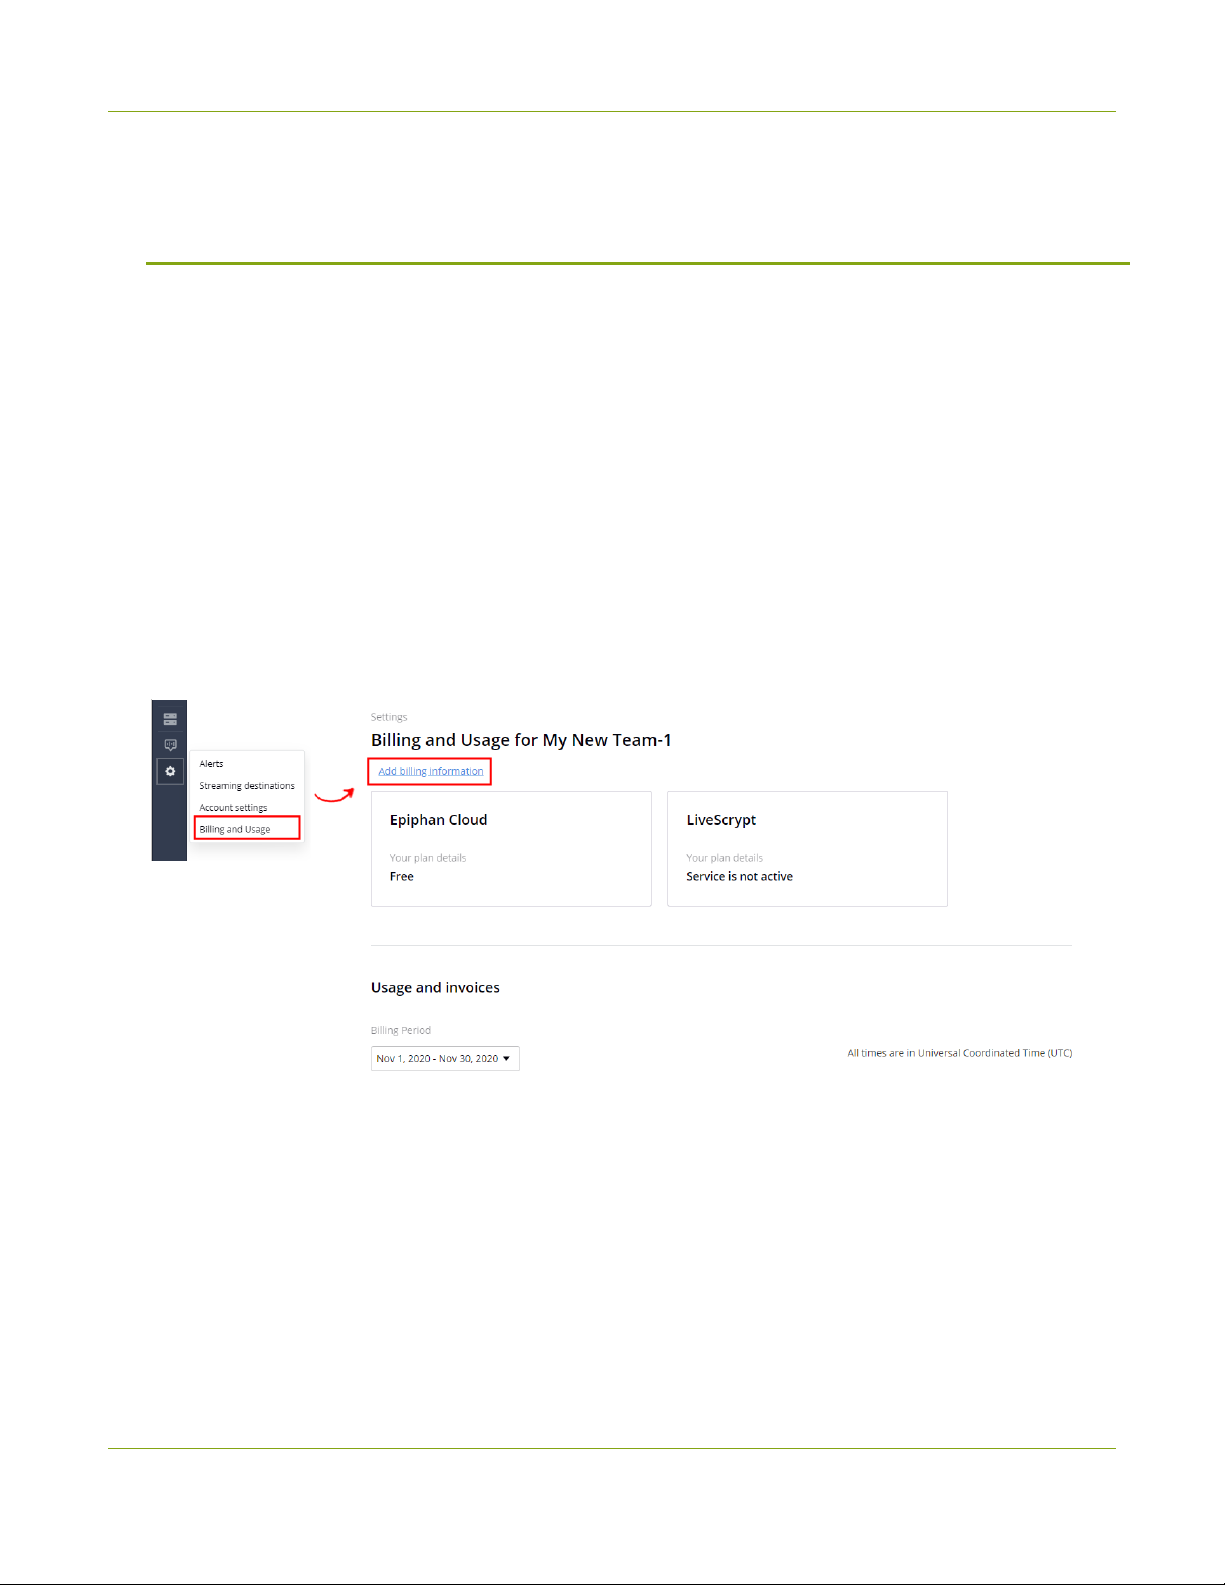
LiveScrypt User Guide Billing and storage
Billing and storage
You can modify your billing information, view usage, and content storage options using Epiphan Cloud.
Topics:
l
Managing your account and changing your plan
l
Display QR code
Managing your account and changing your
plan
When you first sign up for an Epiphan Cloud account, you're automatically assigned a default team. To use
LiveScrypt transcription services, you need to sign up for the LiveScrypt transcription service. For instructions to
access your account and set up services, see Create an account and enable transcription services.
In Epiphan Cloud, you can see the plan that's associated with your team on your team's Billing page.
Only the Epiphan Cloud account owner can add or modify billing information, plans, and change ownership of the
account. A LiveScrypt plan can be setup for individual teams by the owner of that team.
At the time of publishing this guide:
l
The cost is $9.95 USD per transcription hour with a one hour minimum.
l
The first five minutes of a transcription session is free. After five minutes, you’re billed a minimum of one
hour.
l
For sessions longer than one hour, additional charges at the rate of $9.95 USD per transcription hour
applies. For example, a session that is 61 minutes long is billed for two transcription hours.
65
Page 71

LiveScrypt User Guide Storage and managing your footage
l
Your credit card is charged once at the end of the 30-day billing cycle. The billing cycle begins the date
credit card information was added to your account to enable the LiveScrypt transcription service for a
team.
For the current terms and cost for the LiveScrypt live transcription service, go to:
https://www.epiphan.com/products/livescrypt/
You can create multiple teams and assign them different services. Each team is billed separately. Transcription
services are tracked per team and charged monthly to the credit card information that was provided when you
assigned the service to the team. It can take up to 24 hours for a charge to be processed and appear in your
team's usage and billing.
Only the owner of a team can change the team's services and billing information, or transfer ownership of the
team to another team member. When you transfer ownership of a team to another team member, you have the
option to transfer the billing information as well. However, the current billing information will continue to be used
until such time as the new owner accepts the transfer of the team and billing information. To change plans or
transfer a team, see the Epiphan Cloud user guide.
Deleting a team cancels the service assigned to that team. When a team is deleted, a final charge is made to the
credit card specified in the billing information for that team if there happens to be any outstanding charges.
Storage and managing your footage
LiveScrypt transcription services performs transcription in the cloud. You can access the transcription files at any
time to ensure you don't lose important content.
We recommend regularly downloading your transcription files or renaming them for easier retrieval. For details
on how to download .SRT and .TXT files, see Download and delete .SRT and.TXT files.
Transcription files remain a part of a team's assets until you decide to delete them.
66
Page 72

LiveScrypt User Guide Troubleshooting and support
Troubleshooting and support
Your LiveScrypt device comes with a one-year complimentary support plan starting one year from the original
product shipment date. You can purchase a 2-year extended support plan from Epiphan Video for a total of three
years of product support from the original product shipment date:
l
SupportPlan offers a 2-year support extension
l
SupportPlan+ offers a 2-year support extension plus remote troubleshooting support
For more information about service plans, see www.epiphan.com/supportplan.
Before you contact Epiphan support, check the troubleshooting topic:
l
Troubleshooting Quick Reference
l
Power down and system restart
To contact Epiphan support:
l
Email: [email protected]
l
Online chat: www.epiphan.com/support (Monday to Friday between 9am and 5pm Eastern)
l
Call: 1-877-599-6581 / 613-599-6581
Remote troubleshooting support allows the Epiphan support team access to your LiveScrypt device
to do things like reset lost admin passwords. No private information is sent to Epiphan maintenance
servers during a remote session.
67
Page 73

LiveScrypt User Guide Troubleshooting Quick Reference
Troubleshooting Quick Reference
Use the follow quick reference table for help if you are experiencing problems or unexpected behavior from
LiveScrypt.
Table 8 Troubleshooting Quick Reference
Problem Action(s) to Resolve
Verify that you are using the correct audio input , see Audio
inputs.
OR
Check if there are any bars registering audio in the audio meter,
No sound is coming from an audio source.
see Monitor audio.
OR
Check the touch screen interface for audio monitoring or use the
3.5 mm audio jack on the front of the LiveScrypt device to verify
audio, see Monitor audio.
There's no audio from my SD SDI source.
I can't hear the audio in my headphones.
The attached monitor is not recognized.
There's noticeable delay in the
headphones.
LiveScrypt doesn't boot up when powered
on.
System is not starting up correctly.
Embedded audio from sd-SDI sources are not supported.
Change your SDI source to use a different resolution up to 3G.
This might be a gain issue due to the type of audio source you're
using. See Adjust audio gain for recommended gain to add for
various types of audio sources.
Legacy Ubuntu systems have poor support for HDMI 2.0 and
don't recognize a monitor being plugged into the LiveScrypt
device. Try plugging the monitor into the device before you turn
the LiveScrypt device on.
It's normal for there to be a slight delay due to the audio signal
being processed by the LiveScrypt device.
Confirm that the power cable is connected to a working power
source. If LiveScrypt is still not powering up, remove any HDMI
cables connected to the output ports and try again. If you're still
unable to power up, contact Epiphan support.
Ensure there are no USB sticks inserted into the USB ports
during power up. They may be conflicting with the internal hard
drive, causing an unexpected behavior.
68
Page 74
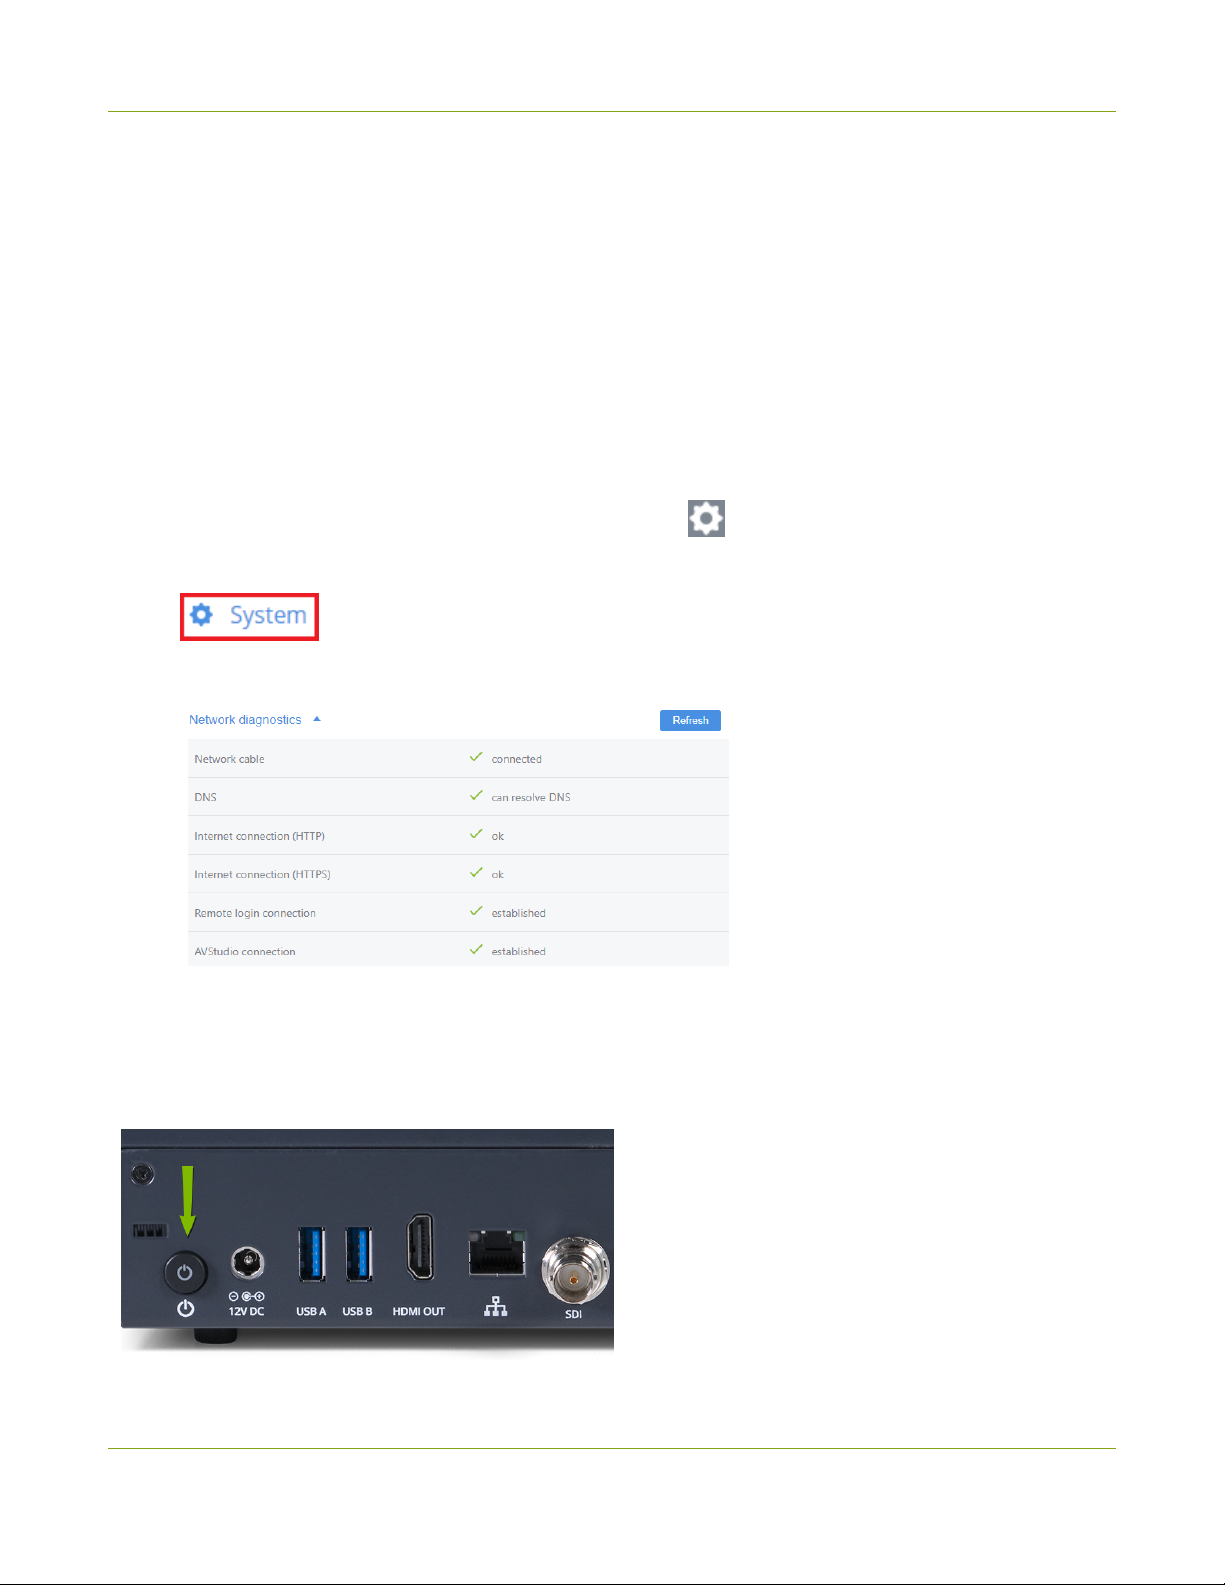
LiveScrypt User Guide View network diagnostics
View network diagnostics
From the System menu using the touch screen and web interface, you can view network diagnostics for your
LiveScrypt device to help you troubleshoot connection issues. Diagnostics include:
l
If the network cable is connected.
l
Can the DNS be resolved.
l
Internet connection (HTTP/HTTPS) status.
l
Remote login connection status.
l
Epiphan Cloud connection status.
To view the network diagnostics:
1.
Using the touch screen and web interface, select Settings .
2. From the Settings, select System. The System menu opens.
3. In the Network section, select network diagnostics.
4. (Optional) Select Refresh to refresh the diagnostics.
Power down and system restart
You can power down and restart the LiveScrypt device using the power button located on the rear panel.
69
Page 75

LiveScrypt User Guide Power down and system restart
Alternatively, you can reboot the LiveScrypt device from the LiveScrypt device Settings page in Epiphan Cloud.
70
Page 76
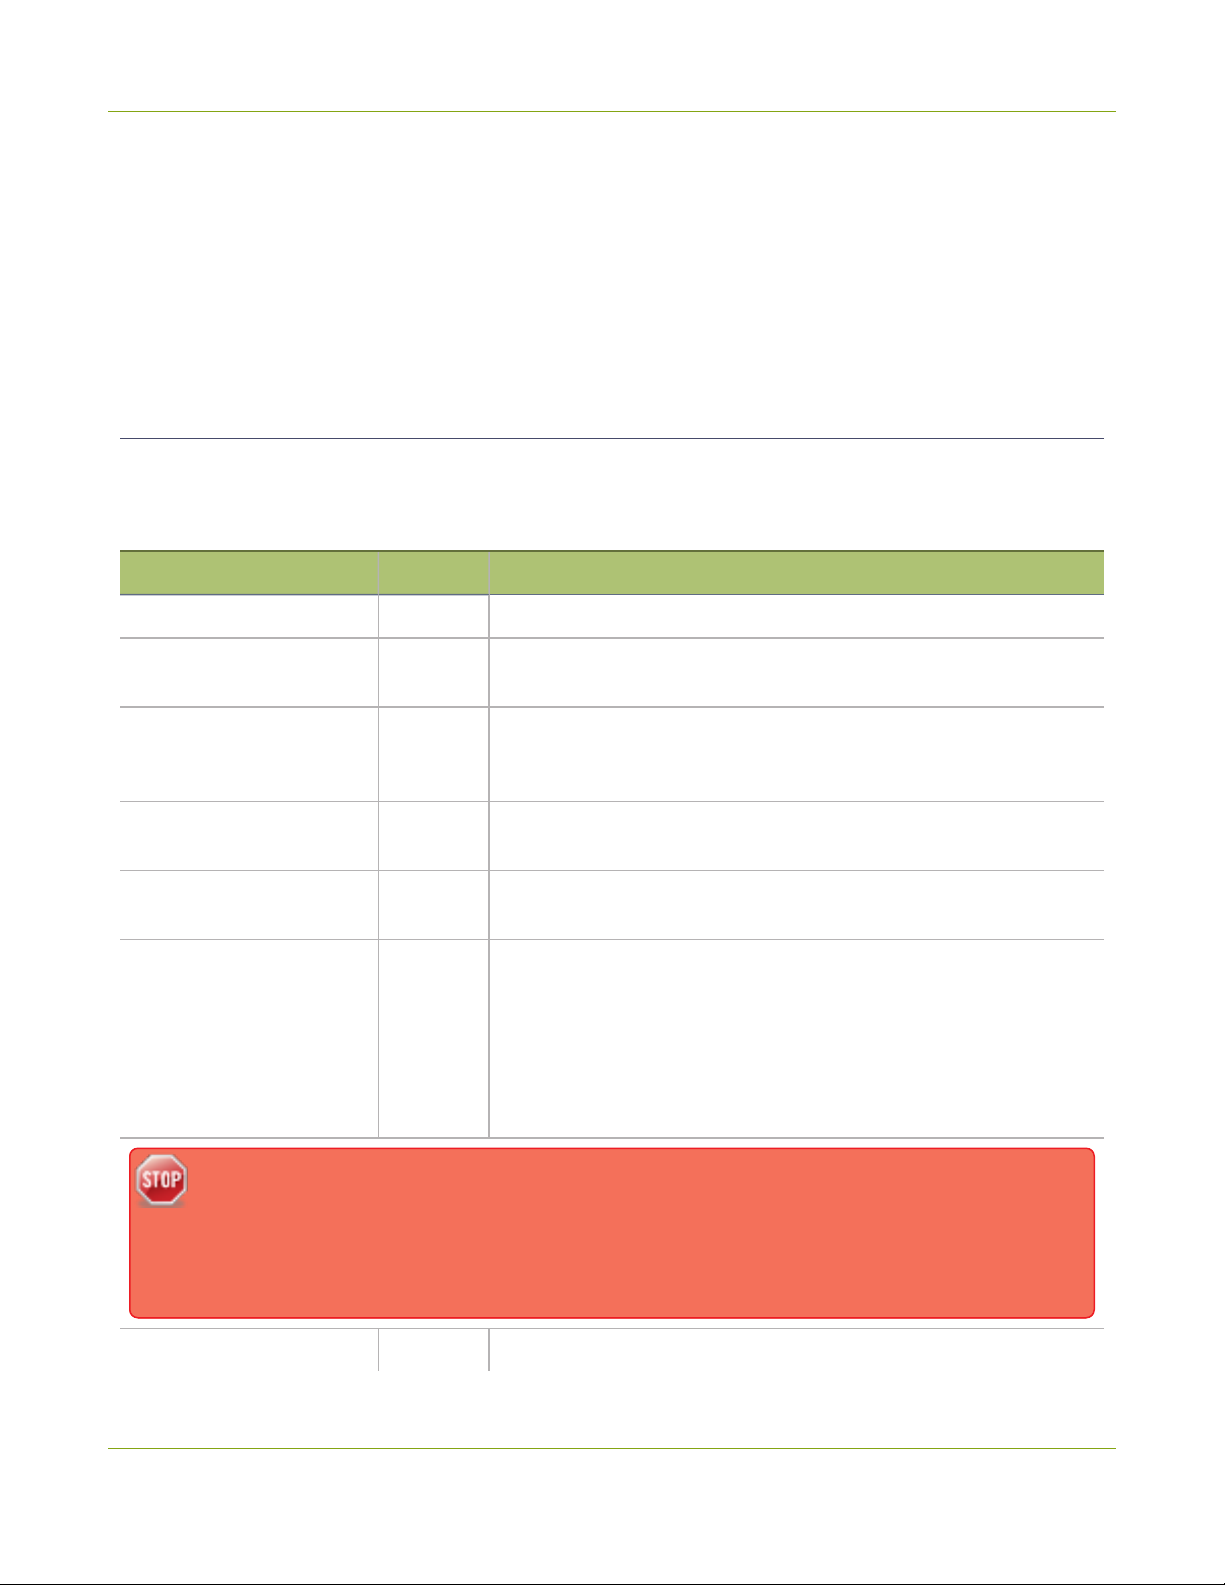
LiveScrypt User Guide Specifications
Specifications
Topics include:
l
Audio inputs
l
Vesa mounting the device
l
Tech specs
Audio inputs
Audio from all inputs are combined into a single mono signal that's sent to the LiveScrypt transcription service in
the cloud. The following table lists the sources of audio you can connect to the LiveScrypt device:
Table 9 LiveScrypt Audio Input Sources
Input port Qty Details
1
SDI
1 Linear PCM audio/video input. Supports up to 3G-SDI signals.
HDMI™ 2
USB 3.0 2
2
RCA
3.5 mm
XLR
2
3
Connecting devices that are not designed for phantom power when phantom power is enabled on
the XLR ports can seriously damage those devices. Always check the phantom power LED before
connecting devices to the XLR ports. A direct box can be used to provide the correct mic-level
signal to the XLR port and offers some isolation protection in case of accidental exposure to 48 V
phantom power.
Linear PCM audio/video input, non-HDCP protected. DVI-I (using an
adapter) is single link.
Linear PCM audio/video inputs on the rear panel accept non-HDCP
protected content. Use to connect a single UAC or UVC device,
such as a USB microphone or a web camera.
2
1
2
RCA consumer line-level audio inputs function as a mono pair (-10
dBV).
Mic-level input to connect a passive or active stereo electret
microphone (unbalanced)
Combo XLR/TRS audio inputs operate as individual mono inputs.
XLR inputs accept balanced and unbalanced, mic level and
professional line level signals with a maximum of up to 12.3 V
+24 dBu.
Mic-level (balanced) inputs supply optional 48 V phantom power
across both XLR ports. See Enable or disable phantom power.
RMS
,
¼" TRS
3
2 Combo XLR/TRS audio inputs operate as individual mono inputs.
71
Page 77
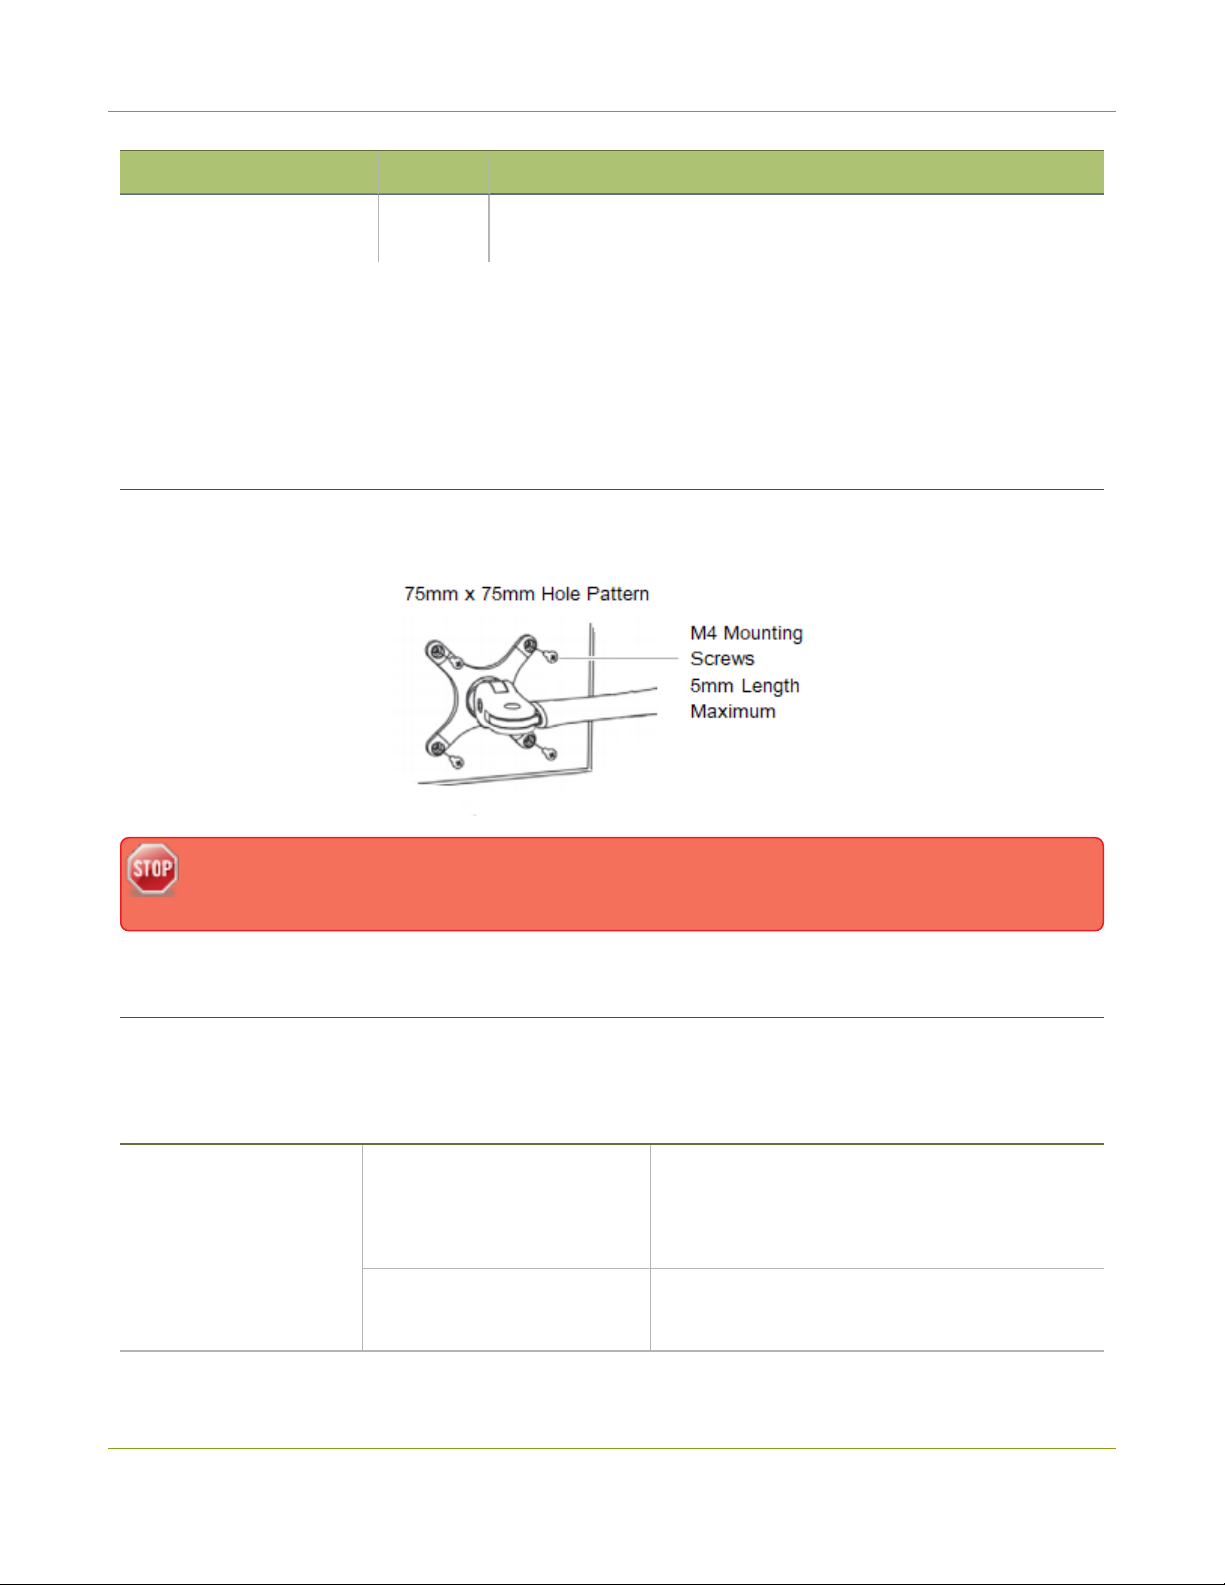
LiveScrypt User Guide Vesa mounting the device
Input port Qty Details
The ¼" TRS inputs accept balanced and unbalanced, pro line level
signals (+4.0 dBu) up to to 12.3 V
1
SD-SDI audio is not supported
2
RCA/3.5 mm includes audio signals from the RCA audio pair and the 3.5 mm stereo audio inputs by default.
You can disable one or the other using the touch screen, the web interface, or Epiphan Cloud when your
LiveScrypt device is paired to your Epiphan team, see Assign audio sources to an input.
3
You cannot use both XLR audio inputs and the ¼" TRS audio inputs at the same time.
RMS
, +24 dBu.
Vesa mounting the device
The rear panel of LiveScrypt has vesa mounting holes to fit a standard, 75mm × 75mm vesa mount. Use four M4
screws with a maximum length of 5mm to mount the plate to the rear panel of LiveScrypt.
Do not insert screws longer than the recommended 5mm. Using longer screws can damage the
device.
Tech specs
The input and output connectors are listed for LiveScrypt.
For the most up-to-date product specifications and information, go to www.epiphan.com/LiveScrypt.
Table 10 Specifications for LiveScrypt
(1) 3G-SDI
1
Video inputs
Local video inputs
2
Connectors
(2) HDMI™ 1.4a
(1) USB 3.0 (UVC) - rear panel
(2) HDMI type A (female)
(1) BNC (female)
72
Page 78

LiveScrypt User Guide Tech specs
(2) USB-A (female) - rear panel
(1) RJ-45 (female)
Standard resolutions PAL, PAL wide, NTSC, NTSC wide
Resolution range 640×480 to 1920×1200
Frame rate Up to 60 fps
Audio inputs
Maximum cable length for 3G
SDI
Maximum cable length for
USB 3.0
Analog audio inputs
Connectors
Digital audio inputs
300 ft
6 ft
(2) XLR mic level/pro line level (+4.0 dBu) up to
RMS
12.3 V
mono) - Phantom optional
(2) 1/4" TRS pro line level (+4.0 dBu) up to to 12.3
VRMS, +24 dBu (balanced/unbalanced, mono)
(1) RCA consumer line level (-10 dBV) mono pair
(1) 3.5 mm stereo input for electret microphones
(unbalanced) converted to mono
(2) XLR/TRS combo jacks (female)
(2) RCA (female)
(1) 3.5 mm (female) - rear panel
(1) SDI
(2) HDMI
, +24 dBu (balanced/unbalanced,
3
(2) USB (rear panel)
(2) HDMI type A (female)
Connectors
Gain control 0 dB to +60 dB (dependent on audio port type)
Mute Yes
(1) BNC (female)
(2) USB-A (female) - rear panel
73
Page 79

LiveScrypt User Guide Tech specs
Signal types (1) HDMI 1.4a
Connectors (1) HDMI
Video output
Resolution ranges Confidence monitoring: 480p to 1920×1200p
Frame rate Up to 60 fps
Audio output Analog audio output (1) 3.5 mm stereo headphone jack - front panel
Google's supported basic ASR speech
Languages
recognition languages:
https://cloud.google.com/speech-totext/docs/languages
Transcription
Communication
Confidence monitor,
administration, and
control interface
Transcription file formats SRT, TXT
Profanity filter Yes (optional)
Punctuation Yes (optional)
NAICS codes Yes (optional)
USB standards
Ethernet host port (1) RJ-45 (female)
Ethernet data rate
Protocols DHCP, HTTP, HTTPS
Touch screen
Web interface
USB 1.1, USB 2.0, and USB 3.0
HDCP compliant
10/100/1000 Base-T, half/full duplex with
autodetect
7 inch touch screen monitor (built in) resolution:
800x480.
Built-in touch screen for confidence monitoring,
configuration, and control.
Remote web-based user interface to access the
same configuration and controls as the touch
screen.
Security
Cloud-based device management and control
Epiphan Cloud
4-digit PIN PIN protected touch screen access (optional)
Password protected web
access
portal that lets users manage and operate their
LiveScrypt devices, as well as other Epiphan
devices.
Password protected web interface and secure
Epiphan Cloud remote access.
74
Page 80

LiveScrypt User Guide Tech specs
General
Regulatory compliance
Power supply
Input power rating
Operating temperature 32° to 104° F (0° to 40° Celsius)
Cooling Fan air flow: Left to right
Enclosure Metal
Form factor Portable desktop model. VESA mountable
Dimensions (W × D × H)
Weight 3.8 lbs (1.7 kg)
FCC compliance: Part 15
CE compliance:
Directive 2014/30/EU - Electromagnetic Compatibility
Directive 2014/35/EU - Low Voltage Directive
External: 1.5 A, 100-240 VAC, 50 to 60 Hz (60W);
1.3 A, 100-240 VAC, 50 to 60 Hz (84W)
12 VDC, 5.0 A (maximum / 60W PSU); 12 VDC,
7.0 A (maximum / 84W PSU)
10 1/4" × 6 3/4" × 2 3/8" (261 mm × 172 mm × 60
mm)
Directive 2011/65/EU - RoHS
Time synchronization NTP, PTPV1, RDATE
Country of origin Made in Taiwan
¹HDCP compliant.
2
For extracting embedded audio.
3
SD-SDI audio is not supported.
75
Page 81

Software license
ATTENTION: THE SOFTWARE AND DOCUMENTATION PROVIDED UNDER THIS AGREEMENT ARE BEING LICENSED TO YOU BY
EPIPHAN SYSTEMS INC. ("LICENSOR") AND ARE NOT BEING SOLD. THIS AGREEMENT CONTAINS LIMITATIONS ON
REPRESENTATIONS, WARRANTIES, CONDITIONS, REMEDIES, AND LIABILITIES THAT ARE APPLICABLE TO THE SOFTWARE AND
DOCUMENTATION.
Epiphan Systems Inc.
Software License
IMPORTANT: BEFORE DOWNLOADING, INSTALLING, OR USING THE SOFTWARE AND DOCUMENTATION, PLEASE
CAREFULLY READ THIS AGREEMENT WHICH CONTAINS THE TERMS AND CONDITIONS UNDER WHICH YOU ARE ACQUIRING
A LICENSE TO USE THE SOFTWARE AND DOCUMENTATION. IF YOU DO NOT ACCEPT THE TERMS AND CONDITIONS OF THIS
AGREEMENT PLEASE DO NOT DOWNLOAD, INSTALL, OR USE THE SOFTWARE AND DOCUMENTATION AND PROMPTLY
RETURN OR DESTROY THE SOFTWARE AND DOCUMENTATION. IF YOU DOWNLOAD, INSTALL, OR USE THE SOFTWARE
AND/OR DOCUMENTATION, YOU WILL HAVE ACCEPTED AND AGREED TO THESE TERMS AND CONDITIONS. THE SOFTWARE,
HARDWARE AND DOCUMENTATION ARE ALSO PROTECTED BY COPYRIGHT LAWS AND INTERNATIONAL COPYRIGHT
TREATIES, AS WELL AS OTHER INTELLECTUAL PROPERTY LAWS. IF YOU ARE AN AGENT OR EMPLOYEE OF AN ENTITY, YOU
REPRESENT AND WARRANT THAT (I) THE INDIVIDUAL ACCEPTING THIS AGREEMENT IS DULY AUTHORIZED TO ACCEPT
THIS AGREEMENT ON SUCH ENTITY'S BEHALF AND TO BIND SUCH ENTITY, AND (II) SUCH ENTITY HAS FULL POWER,
CORPORATE OR OTHERWISE, TO ENTER INTO THIS AGREEMENT AND PERFORM ITS OBLIGATIONS UNDER THIS
AGREEMENT.
1. Definitions: In this Agreement:
"Agreement" means this Epiphan Systems Inc. Software License;
"API" means an application programming interface;
"Documentation" means the technical publications delivered to You with the Software relating to the installation and operation of the Software
and/or Hardware, such as reference, user, installation and technical guides and release notes;
"Epiphan" means Epiphan Systems Inc;
"Epiphan Hardware Product" means an Epiphan hardware product (including enclosure and mechanical parts, circuitry and electrical and
electronic components contained therein) purchased by You, which is intended to be used in conjunction with the licensed Software and
Documentation;
"License Key" means a series of computer-generated characters used for the purpose of controlling the operation of Epiphan Hardware
Products and/or related Software;
"Software" means the Licensor binary and/or bytecode software and/or firmware programs that are (i) specified in Your Order or that are
included with or in the Epiphan Hardware Products specified in Your Order, (ii) are made available to You for download after acceptance of this
Agreement, (iii) are packaged with this Agreement, (iv) pre-installed on Epiphan Hardware Products, (v) embed this Agreement in their
installer(s) and which are installed after acceptance of this Agreement, or (vi) embed this Agreement in their product documentation. Software
also includes the related Documentation;
"You" or "Your" means the individual acquiring the Software license or any entity on whose behalf such individual is acting. In the case of an
entity, "You" includes any entity that by majority voting interest controls, is controlled by, or is under common control with You; and
"Your Order" means (i) the web forms provided by Epiphan or its applicable reseller or distributor for ordering Epiphan Hardware Products and
related Software licenses, or (ii) written documents executed by Epiphan, or one of its resellers or distributors, and You in respect to Your
purchases of Epiphan Hardware Products and/or related Software licenses.
2. Grant of Software License: Subject to the terms and conditions of this Agreement, including payment of any applicable fees specified in
Your Order, Licensor grants You a non-exclusive, non-transferable, non-sublicensable, internal license to use the number of copies of the
Page 82

Software specified in Your Order and to use the Software functions specified in Your Order solely for operation on the Epiphan Hardware
Products for which such Software has been designed as specified in the Documentation for such Software. If the number of copies of Software
is not specified in Your Order, then the number of copies shall be a reasonable number of copies. You acknowledge and agree that the ability
to use certain Software functions is controlled by a Licensing Key and that You will not be able to use such functions unless You have paid the
applicable fees charged by Epiphan for the right to use such functions and to receive a Licensing Key to enable such functions. For functions
that are controlled by a Licensing String You shall only use that Licensing String with the copy of the Software for which it was issued and You
shall not use that copy of the Licensing String with any other copies of the Software that You may have or make. All copies of the Software
made by You shall include all trademarks, copyright notices, restricted rights legends, proprietary markings and the like exactly as they appear
on the copy of the Software originally provided to You. No other rights in the Software or Documentation are granted to You.
3. Open Source Software: Binary, bytecode and source code versions of certain open source software packages may be embedded in or
distributed with the Software ("Open Source Software"). If a separate license agreement for an item of open source software is: delivered to
You with the Software; included in the download package for the Software; referenced in any material (including the Documentation) that is
included in the download or distribution package for the Software; or listed at www.epiphan.com/opensource, then such open source software
shall be Open Source Software and such separate license agreement shall govern Your use of that item or version of such open source
software. The Open Source Software may include free software (i.e. software licensed under the GNU Lesser General Public License or other
free software licenses) for which the applicable free software license may also require that the source code for such free software be made
available to those receiving only executable versions of such free software. If the source code for any free software distributed with the
Software is not provided with the Software, then upon request, within a three (3) year period from the original receipt of the binary or bytecode
version of such Open Source Software from Licensor, for a fee that shall not exceed Licensor's costs associated with the shipping of the
source code for such free software, Licensor will provide a copy of the source code for such free software to You.
4. Restrictions: The terms set forth in this Section 4 are additional conditions to the licenses granted in Section 2. Your right to use the
Software is conditioned upon Your timely payment of the full amount of fees due for: (i) the Epiphan Hardware Product(s) on which You want to
use the Software; (ii) all support agreements You have entered into with Licensor or any of its distributors and/or resellers; (iii) licensed
Software and Documentation.
You shall not reverse engineer, disassemble, reverse translate, decompile or in any other manner decode any Epiphan Hardware Product or
Software except to the extent the Software is distributed with any Open Source Software that prohibits the imposition of such a restriction or to
the extent the foregoing restriction is expressly prohibited by applicable law notwithstanding a contractual obligation to the contrary. You
acknowledge and agree that no rights in respect to the source code of the Software are granted to You. You acknowledge and agree that the
rights in respect to use of the Software and Documentation are granted only for use in conjunction with Epiphan Hardware Products. You shall
not distribute, lease, rent, grant a security interest in, assign, or otherwise transfer the Software except as expressly provided in this
Agreement. You shall not modify or create any derivatives works of the Software or merge all or any part of the Software with another program.
Notwithstanding the foregoing, You may call public APIs made available by Epiphan in the Software from applications developed by or on Your
behalf provided that such applications do not embed any of the Software other than the minimum linkage materials required to call separately
running instances of the Software. You shall not use the Software or make the Software available to any third parties as part of any service
bureau, time sharing service, application service provider offering, software-as-a-service offering or any other managed service offering. You
shall not disclose any performance, benchmarking, or feature-related information about the Software. You further agree not to disclose,
transfer or otherwise provide to any third party any portion of the Software, except as expressly permitted herein.
Some Epiphan Hardware Products and Software embed third-party APIs that integrate with third-party party services (“Third-Party Services”)
to allow users of such Epiphan Hardware Products and Software to interact with such Third-Party Services for various capabilities offered by
such Third-Party Services, such as, and without limitation, authentication, uploading and downloading of video content and other features
made available by such Third-Party Services. If You access or use any Third-Party Service and/or related APIs using an Epiphan Hardware
Product and/or the Software then You shall comply with all of the terms and conditions for such Third-Party Service and/or related APIs.
5. Disclaimer of Warranties: EXCEPT FOR ANY WARRANTIES THAT MAY BE PROVIDED IN ANY COMMERCIAL AGREEMENT
EXECUTED BETWEEN YOU AND LICENSOR (OR BETWEEN YOU AND ONE OF LICENSOR’S RESELLERS OR DISTRIBUTORS),
THE EPIPHAN HARDWARE PRODUCTS, SOFTWARE AND/OR DOCUMENTATION ARE PROVIDED “AS IS”, WITHOUT ANY
REPRESENTATIONS, CONDITIONS, AND/OR WARRANTIES OF ANY KIND. WITHOUT LIMITATION, LICENSOR AND ITS
AFFILIATES AND ITS AND THEIR LICENSORS, SUPPLIERS, SUBCONTRACTORS, RESELLERS AND DISTRIBUTORS DISCLAIM
ANY AND ALL IMPLIED REPRESENTATIONS, CONDITIONS AND/OR WARRANTIES OF MERCHANTABILITY, MERCHANTABLE
QUALITY, NON-INFRINGEMENT, DURABILITY, COMPATIBILITY, TITLE, SATISFACTORY QUALITY AND/OR FITNESS FOR A
PARTICULAR PURPOSE WHETHER ARISING BY STATUTE, COURSE OF DEALING, USAGE OF TRADE OR OTHERWISE.
EXCEPT AS OTHERWISE EXPRESSLY PROVIDED IN ANY COMMERCIAL AGREEMENT EXECUTED BETWEEN YOU AND
Page 83

LICENSOR (OR BETWEEN YOU AND ONE OF LICENSOR’S RESELLERS OR DISTRIBUTORS), THE ENTIRE RISK OF THE USE OF
THE EPIPHAN HARDWARE PRODUCTS, SOFTWARE AND/OR DOCUMENTATION SHALL BE BORNE BY YOU. EXCEPT AS
OTHERWISE EXPRESSLY PROVIDED IN ANY COMMERCIAL AGREEMENT EXECUTED BETWEEN YOU AND LICENSOR (OR
BETWEEN YOU AND ONE OF LICENSOR’S RESELLERS OR DISTRIBUTORS), NEITHER LICENSOR NOR ANY OF ITS AFFILIATES
NOR ANY OF ITS OR THEIR LICENSORS, SUPPLIERS, SUBCONTRACTORS, RESELLERS AND/OR DISTRIBUTORS MAKE ANY
REPRESENTATIONS OR PROVIDE ANY CONDITIONS AND/OR WARRANTIES ABOUT THE SUITABILITY OF THE EPIPHAN
HARDWARE PRODUCTS, SOFTWARE, SERVICES AND/OR DOCUMENTATION. NEITHER LICENSOR NOR ANY OF ITS
AFFILIATES NOR ANY ITS OR THEIR LICENSORS, SUPPLIERS, SUBCONTRACTORS, RESELLERS AND/OR DISTRIBUTORS
MAKE ANY REPRESENTATIONS OR PROVIDE ANY CONDITIONS AND/OR WARRANTIES WHATSOEVER ABOUT ANY
INFORMATION AND/OR DATA THAT MAY BE PROCESSED BY OR MADE AVAILABLE USING ANY EPIPHAN HARDWARE
PRODUCT AND/OR SOFTWARE OR ABOUT ANY THIRD-PARTY SERVICE THAT MAY BE ACCESSIBLE USING ANY EPIPHAN
HARDWARE PRODUCT AND/OR SOFTWARE.
6. LIMITATION OF LIABILITY: NEITHER LICENSOR NOR ANY OF ITS AFFILIATES NOR ANY OF ITS OR THEIR LICENSORS,
SUPPLIERS, SUBCONTRACTORS, RESELLERS AND/OR DISTRIBUTORS SHALL HAVE ANY LIABILITY TO YOU OR ANY OTHER
PERSON OR ENTITY FOR ANY DAMAGES ARISING FROM THIS AGREEMENT, RELATING TO THE HARDWARE, SOFTWARE OR
DOCUMENTATION, OR RELATING TO ANY SERVICES PROVIDED TO YOU BY LICENSOR (INCLUDING ITS AFFILIATES AND ITS
AND THEIR LICENSORS, SUPPLIERS, SUBCONTRACTORS, RESELLERS AND/OR DISTRIBUTORS) IN RELATION TO THE
EPIPHAN HARDWARE PRODUCTS, SERVICES, SOFTWARE AND/OR DOCUMENTATION FOR ANY INDIRECT, RELIANCE,
INCIDENTAL, SPECIAL, PUNITIVE, EXEMPLARY OR CONSEQUENTIAL DAMAGES, INCLUDING, BUT NOT LIMITED TO, LOSS OF
REVENUE OR PROFIT, LOSS OF OR DAMAGE TO DATA, BUSINESS INTERRUPTION, LOSS OF DATA, REPLACEMENT OR
RECOVERY COSTS, OR OTHER COMMERCIAL OR ECONOMIC LOSS, WHETHER ARISING FROM CONTRACT, EQUITY, TORT
(INCLUDING NEGLIGENCE OR STRICT LIABILITY) OR ANY OTHER THEORY OF LIABILITY, EVEN IF LICENSOR (INCLUDING ITS
AFFILIATES AND ITS AND THEIR LICENSORS, SUPPLIERS, SUBCONTRACTORS, RESELLERS AND/OR DISTRIBUTORS) HAVE
BEEN ADVISED OF THE POSSIBILITY OF SUCH DAMAGES, OR THEY ARE FORESEEABLE. THE LIMITATIONS IN THIS SECTION
SHALL APPLY WHETHER OR NOT THE ALLEGED BREACH OR DEFAULT IS A BREACH OF A FUNDAMENTAL CONDITION OR
TERM OR FUNDAMENTAL BREACH. SOME JURISDICTIONS DO NOT ALLOW THE EXCLUSION OR LIMITATION OF LIABILITY
FOR CONSEQUENTIAL OR INCIDENTAL DAMAGES, SO THESE LIMITATIONS MAY NOT APPLY TO YOU. IN NO EVENT SHALL
THE TOTAL CUMULATIVE LIABILITY OF LICENSOR (INCLUDING ITS AFFILIATES AND ITS AND THEIR LICENSORS, SUPPLIERS,
SUBCONTRACTORS, RESELLERS AND DISTRIBUTORS) TO YOU OR ANY OTHER PERSON OR ENTITY FOR ANY DAMAGES
ARISING FROM THIS AGREEMENT, RELATING TO THE EPIPHAN HARDWARE PRODUCTS, SOFTWARE, DOCUMENTATION
AND/OR RELATING TO ANY SERVICES PROVIDED TO YOU BY LICENSOR (INCLUDING ITS AFFILIATES AND ITS AND THEIR
LICENSORS, SUPPLIERS, SUBCONTRACTORS, RESELLERS AND DISTRIBUTORS) IN RELATION TO THE EPIPHAN HARDWARE
PRODUCTS, SOFTWARE AND/OR DOCUMENTATION, EXCEED THE LICENSE FEES PAID BY YOU FOR THE SOFTWARE.
NOTWITHSTANDING ANY OTHER PROVISION IN THIS AGREEMENT, NEITHER LICENSOR NOR ANY OF ITS AFFILIATES OR ITS
OR THEIR LICENSORS, SUPPLIERS, SUBCONTRACTORS, RESELLERS AND/OR DISTRIBUTORS SHALL HAVE ANY LIABILITY
TO YOU OR ANY OTHER PERSON OR ENTITY WHATSOEVER IN RESPECT TO ANY DIRECT, INDIRECT, RELIANCE,
INCIDENTAL, SPECIAL, PUNITIVE, EXEMPLARY OR CONSEQUENTIAL DAMAGES, INCLUDING, BUT NOT LIMITED TO, LOSS OF
REVENUE OR PROFIT, LOSS OF OR DAMAGE TO DATA, BUSINESS INTERRUPTION, LOSS OF DATA, REPLACEMENT OR
RECOVERY COSTS, OR OTHER COMMERCIAL OR ECONOMIC LOSS, ARISING FROM OR RELATING TO ANY INFORMATION
AND/OR DATA THAT MAY BE PROCESSED BY OR MADE AVAILABLE USING ANY EPIPHAN HARDWARE PRODUCT AND/OR
SOFTWARE OR ARISING FROM OR RELATING TO ANY THIRD-PARTY SERVICE THAT MAY BE ACCESSIBLE USING ANY
EPIPHAN HARDWARE PRODUCT AND/OR SOFTWARE.
THE DISCLAIMER OF REPRESENTATIONS, WARRANTIES AND CONDITIONS AND LIMITATION OF LIABILITY CONSTITUTE AN
ESSENTIAL PART OF THIS AGREEMENT. YOU ACKNOWLEDGE THAT BUT FOR THE DISCLAIMER OF REPRESENTATIONS,
WARRANTIES AND CONDITIONS AND LIMITATION OF LIABILITY, NEITHER LICENSOR NOR ANY OF ITS AFFILIATES OR ITS OR
THEIR LICENSORS, SUPPLIERS, RESELLERS OR DISTRIBUTORS WOULD GRANT THE RIGHTS GRANTED IN THIS
AGREEMENT.
7. Term and Termination: This Agreement shall continue for as long as You use the Software, however, it may be terminated sooner as
provided in this Section 7. You may terminate this Agreement by destroying all copies of the Software and Documentation under Your control
and providing certification of such destruction to Licensor or by returning the Software to Licensor. Licensor may terminate this Agreement
immediately by providing You with written notice if: (a) You are in material breach of any provision of this Agreement, which breach, if capable
of being cured, is not cured within thirty (30) days after Licensor gives You written notice thereof; or (b) You have committed a non-curable
Page 84

material breach of this Agreement. Upon termination You shall destroy all copies of the Software and Documentation. In addition to this
Section, the Sections entitled Definitions, Disclaimer of Warranties, Limitation of Liability, Title, Indemnities, High-Risk Activities, Intellectual
Property, and General shall continue in force even after any termination of this Agreement. No termination of this Agreement will entitle You to
a refund of any amounts paid by You to Licensor or any reseller or distributor or affect any obligations You may have to pay any outstanding
amounts owing to Licensor or any reseller or distributor. Upon any termination of this Agreement, Your license to the Software and
Documentation will terminate and You shall destroy all copies of the Software and Documentation under Your control and certify such
destruction to Licensor.
8. Support and Updates: This Agreement does not grant You the right to any updates or enhancements of the Software or the right to receive
any technical support for the Software. Such updates and other technical support services, if available, may be purchased separately from
Licensor or one of Licensor’s resellers or distributors. Use of any updates or enhancements to the Software provided pursuant to any technical
support You may procure from Licensor or one of Licensor’s resellers or distributors shall be governed by the terms and conditions of this
Agreement. Licensor reserves the right at any time not to release or to discontinue the release of any Software and to alter prices, features,
specifications, capabilities, functions, licensing terms, release dates, general availability or other characteristics of the Software.
9. Title: All right, title, and interest (including all intellectual property rights) in, to, and under the Software (including all copies thereof) shall
remain with Licensor and its licensors.
10. Indemnities: You shall indemnify, defend and hold Licensor, its affiliates, its and their licensors, suppliers, subcontractors, resellers and/or
distributors and all of the directors, officers, employees of all of the foregoing (collectively the “Indemnified Parties”) harmless from and against
any damages, losses, liabilities, expenses, costs, claims, demands, actions, suits and/or proceedings incurred by the Indemnified Parties as a
result of (i) Your use of the Epiphan Hardware Products, Software and/or Documentation, (ii) any use of the Epiphan Hardware Products,
Software and/or Documentation on Your behalf, (iii) the use of the Epiphan Hardware Products, Software and/or Documentation by anyone to
whom You give the Epiphan Hardware Products, Software and/or Documentation, and/or (iv) the use of the Epiphan Hardware Products,
Software and/or Documentation on behalf of anyone to whom You give the Epiphan Hardware Products, Software and/or Documentation,
including, without limitation, in all of the foregoing cases, any damages, losses, liabilities, expenses, costs, claims, demands, actions, suits
and/or proceedings arising from or relating to any information and/or data that may be processed by or made available using any Epiphan
Hardware Product and/or Software or arising from or relating to any Third-Party Service that may be accessible using any Epiphan Hardware
Product and/or Software (collectively, each matter falling within any of the foregoing, a “Claim”), including, without limitation, indemnifying,
defending and holding the Indemnified Parties harmless from and against any settlements agreed by You in connection with any Claims and/or
any damages, costs or other amounts (including reasonable attorneys' fees) awarded to a third party against any of the Indemnified Parties by
a court or tribunal of competent jurisdiction in respect to any Claim. If You do not timely defend against or resist a Claim after notice from
Licensor, Licensor shall be entitled to investigate, defend, compromise, settle, or otherwise dispose of the Claim, and incur costs in connection
therewith, at Your expense, in such manner as Licensor deems in its best interests until a reasonable time after You comply with its obligations
under this Section 10. You shall not enter into a settlement of any Claim without the Licensor’s written consent unless such settlement is solely
for monetary payment by You and contains an express, complete, unconditional release of all of the Indemnified Parties and which does not
impose any obligations or restrictions on any of the Indemnified Parties.
11. High-Risk Activities: The Software and Epiphan Hardware Products are not fault-tolerant and are not designed, manufactured or intended
for use in or in conjunction with on-line control equipment in hazardous environments requiring fail-safe performance, such as in the operation
of nuclear facilities, aircraft navigation systems, air traffic control, or direct life support machines. Licensor, its licensors, suppliers,
subcontractors, resellers and distributors specifically disclaim any express or implied representations, warranties and/or conditions for such
uses.
12. U.S. Government End-Users: The Software and Documentation are each a "commercial item" as that term is defined at FAR 2.101,
consisting of "commercial computer software" and "commercial computer software documentation" as such terms are defined in FAR 12.212,
and are provided to the U.S. Government only as commercial end items. Government end users acquire the rights set out in this Agreement for
the Software, Epiphan Hardware Products and Documentation consistent with: (i) for acquisition by or on behalf of civilian agencies, the terms
set forth in FAR12.212; or (ii) for acquisition by or on behalf of units of the Department of Defense, the terms set forth in DFARS 227.7202. Use
of the Epiphan Hardware Products, Software and Documentation is further restricted by the terms and conditions of this Agreement and the
applicable commercial purchase agreement for the Epiphan Hardware Products. For the purposes of any applicable government use, the
Epiphan Hardware Products, Software and Documentation were developed exclusively at private expense, and are trade secrets of Epiphan
Systems Inc. for the purpose of any Freedom of Information legislation or any other disclosure statute, regulation or provision.
13. Export Restrictions: The Epiphan Hardware Products, Software, Documentation and related information are subject to export and import
restrictions. By downloading, installing, or using the Software, Epiphan Hardware Products, Documentation and/or related information, You
are representing and warranting that You are not located in, are not under the control of, and are not a national or resident of any country to
Page 85

which the export of the Epiphan Hardware Products, Software, Documentation and/or related information would be prohibited by the laws
and/or regulations of Canada or the United States. You are also representing and warranting that You are not an individual to whom the export
of the Epiphan Hardware Products, Software, Documentation or related information would be prohibited by the laws and/or regulations of
Canada or the United States. You shall comply with the export laws and regulations of Canada and the United States that are applicable to the
Epiphan Hardware Products, Software, Documentation and related information and You shall also comply with any local laws and/or
regulations in Your jurisdiction that may impact Your right to export, import, or use the Epiphan Hardware Products, Software, Documentation
or related information, and You represent and warrant that You have complied with any such applicable laws and/or regulations. The Epiphan
Hardware Products, Software, Documentation and related information shall not be used for any purposes prohibited by export laws and/or
regulations, including, without limitation, nuclear, chemical, or biological weapons proliferation. You shall be responsible for procuring all
required permissions for any subsequent export, import, or use of the Epiphan Hardware Products, Software, Documentation or related
information.
14. Intellectual Property: Epiphan, Epiphan Systems and Epiphan Video are tradenames, trademarks or registered trademarks of Epiphan
Systems Inc. in certain countries. All Licensor product names and logos are trademarks or registered trademarks of Epiphan Systems Inc. in
certain countries. All other company and product names and logos are trademarks or registered trademarks of their respective owners in
certain countries. You shall not disclose, transfer or otherwise provide to any third party any portion of the Software, except as expressly
permitted in this Agreement.
15. General: This Agreement is the entire agreement between You and Licensor in respect to the Software, superseding any other
agreements or discussions, oral or written. The terms and conditions of this Agreement shall prevail over any pre-printed terms on any quotes,
orders, purchase orders, or purchase order acknowledgements, and shall prevail over any other communications between the parties in
relation to the Software. You may not assign this Agreement whether voluntarily, by operation of law, or otherwise without Licensor's prior
written consent. Licensor may assign this Agreement at any time without notice. The failure of a party to claim a breach of any term of this
Agreement shall not constitute a waiver of such breach or the right of such party to enforce any subsequent breach of such term. If any
provision of this Agreement is held to be unenforceable or illegal, such decision shall not affect the validity or enforceability of such provisions
under other circumstances or the remaining provisions of this Agreement and such remaining provisions shall be reformed only to the extent
necessary to make them enforceable under such circumstances. This Agreement shall be governed by the laws of the Province of Ontario and
the laws of Canada applicable therein. No choice or conflict of laws rules of any jurisdiction shall apply to this Agreement. You shall only be
entitled to bring any action or proceeding arising out of or relating to this Agreement, the Epiphan Hardware Products, Software,
Documentation or any services provided in respect to the Epiphan Hardware Products, Software and/or Documentation in a court in Ottawa,
Ontario, Canada, and You consent to the jurisdiction of such courts for any such action or proceeding. You waive all rights that You may have
or that may hereafter arise to contest the jurisdiction of such courts for any action or proceeding brought by You. You hereby waive any right
You may have to request a jury trial with respect to any action brought by You in connection with this Agreement, the Epiphan Hardware
Products or Software or any services provided in respect to the Epiphan Hardware Products or Software. The application of the United Nations
Convention on Contracts for the International Sale of Goods to this Agreement is expressly excluded.
April 22, 2019
© 2006-2020. Epiphan Systems Inc. All Rights Reserved.
Environmental Information
The equipment that you bought has required the extraction and use of natural resources for its production. It may contain hazardous
substances that could impact health and the environment. In order to avoid the dissemination of those substances in our environment and to
diminish the pressure on the natural resources, we encourage you to use the appropriate take-back systems. Those systems will reuse or
recycle most of the materials of your end life equipment in a sound way. The crossed-out wheeled bin symbol invites you to use those systems.
If you need more information about collection, reuse and recycling systems, please contact your local or regional waste administration. You
can also contact us for more information on the environmental performance of our products.
Important Safety Warnings
Model numbers covered by this document: ESP1500 and ESP1556
WARNING: This product has no user-serviceable parts and the battery used in this device is not replaceable. Do not attempt to disassemble.
Return the device for service.
CAUTION, RISK OF ELECTRIC SHOCK: This device may have multiple AC power cords installed. All power sources shall be disconnected
before servicing to avoid shock hazard.
Page 86

ATTENTION: Cet appareil ne contient aucun composant pouvant être entretenu ou réparé par l'utilisateur. En cas de panne, retourner
l'appareil pour réparation.
ATTENTION, RISQUE DE CHOC ÉLECTRIQUE: Cet appareil peut être équipé de multiples cordons d'alimentation en courant alternatif. Pour
placer cet appareil hors tension, débrancher tous les cordons d'alimentation sans exception.
FCC Compliance Statement
47 CFR Section 2.1077 Compliance Information
Unique identifier: LiveScrypt
This device complies with Part 15 of the FCC Rules. Operation is subject to the following two conditions:
1. This device may not cause harmful interference
2. This device must accept any interference received, including interference that may cause undesired operation.
Responsible party (US contact):
Epiphan Video
459 Hamilton Avenue, Suite 301
Palo Alto, CA
94301, USA
www.Epiphan.com
FCC CAUTION
Changes or modifications not expressly approved by the party responsible for compliance could void the user’s authority to operate the
equipment.
Note: This equipment has been tested and found to comply with the limits for a Class A digital device, pursuant to part 15 of the FCC Rules.
These limits are designed to provide reasonable protection against harmful interference when the equipment is operated in a commercial
environment. This equipment generates, uses, and can radiate radio frequency energy and, if not installed and used in accordance with the
instruction manual, may cause harmful interference to radio communications. Operation of this equipment in a residential area is likely to
cause harmful interference in which case the user will be required to correct the interference at his own expense.
Innovation, Science and Economic Development Canada:
This device complies with ICES-003 of the ISED rules. Operation is subject to the following two conditions:
(1) This device may not cause harmful interference, and
(2) this device must accept any interference received, including interference that may cause undesired operation.
Cet appareil est conforme à la norme ISED NBM-003 pour les appareils radio agréés. Son fonctionnement est sujet aux deux conditions
suivantes:
(1) Le dispositif ne doit pas produire de brouillage préjudiciable, et
(2) ce dispositif doit accepter tout brouillage reçu, y compris un brouillage susceptible de provoquer un fonctionnement indésirable.
CE Compliance Statement
Marking by the symbol indicates compliance of this device with the applicable directives of the European Community and meets or
exceeds the following technical standards.
Directive 2014/30/EU - Electromagnetic Compatibility
Directive 2014/35/EU - Low Voltage Directive
Directive 2011/65/EU - RoHS, restriction of the use of certain hazardous substances in electrical and electronic equipment
Warning: Operation of this equipment is not intended for a residential environment and could cause radio interference.
Page 87

Other Jurisdictional Issues
Epiphan makes no representation that its products or information in this document or its web site is appropriate or available for use in your
jurisdiction. Those who choose to access the Epiphan web site or use Epiphan products do so on their own initiative and are responsible for
compliance with local laws, if and to the extent local laws are applicable
Submissions to Epiphan and Affiliated Servers
Any information, including but not limited to remarks, suggestions, ideas, graphics, or other submissions, communicated to Epiphan through
their Epiphan web site is the exclusive property of Epiphan. Epiphan is entitled to use any information submitted for any purpose, without
restriction (except as stated in Epiphan's Privacy Statement) or compensation to the person sending the submission. The user acknowledges
the originality of any submission communicated to Epiphan and accepts responsibility for its accuracy, appropriateness, and legality.
Third Parties and Links to Third-Party Web Sites
Mention of non-Epiphan Systems Inc. products or services on their website, or this document site is for informational purposes and does not
constitute an endorsement or recommendation.
This document may contain links to non-Epiphan web sites. These links are provided to you as a convenience, and Epiphan is not responsible
for the content of any linked web site. Any outside web site accessed from the Epiphan web site is independent from Epiphan, and Epiphan
has no control over the content of that web site. In addition, a link to any non-Epiphan web site does not imply that Epiphan endorses or
accepts any responsibility for the content or use of such a web site.
In no event shall any reference to any third party or third party product or service be construed as an approval or endorsement by Epiphan of
that third party or of any product or service provided by a third party.
Miscellaneous
It is the user's responsibility to ascertain whether any information downloaded from the Epiphan web site or other websites is free of viruses,
worms, trojan horses, or other items of a potentially destructive nature.
Enforcement of Terms and Conditions
These Terms and Conditions for use of this document and the associated Epiphan Product are governed and interpreted pursuant to the laws
of the province of Ontario, Canada, notwithstanding any principles of conflicts of law.
All disputes arising out of or relating to these Terms and Conditions shall be finally resolved by arbitration conducted in the English language in
Ottawa, Ontario, Canada under the commercial arbitration rules of the Canada. The parties shall appoint as sole arbitrator a retired judge who
presided in the province of Ontario. The parties shall bear equally the cost of the arbitration (except that the prevailing party shall be entitled to
an award of reasonable attorneys' fees incurred in connection with the arbitration in such an amount as may be determined by the arbitrator).
All decisions of the arbitrator shall be final and binding on both parties and enforceable in any court of competent jurisdiction. Notwithstanding
this, application may be made to any court for a judicial acceptance of the award or order of enforcement. Notwithstanding the foregoing,
Epiphan shall be entitled to seek injunctive relief, security, or other equitable remedies from any court of competent jurisdiction.
If any part of these terms is unlawful, void, or unenforceable, that part will be deemed severable and will not affect the validity and
enforceability of the remaining provisions. Epiphan may, at its sole discretion and without notice, revise these terms at any time by updating
this posting.
Copyright © 2020 Epiphan Systems Inc.
All Rights Reserved.
Page 88

© and ™ 2020, Epiphan Systems, Inc
 Loading...