

Page 1
Epiphan VGA Printer User Guide
www.epiphan.com
8 April 2010 Firmware Version 3.5.11
Page 2

Thank you for choosing Epiphan!
At Epiphan, product function and quality are our top priority. We make every
effort to make sure that our products exceed our customers expectations. We
regularly contact our customers to ensure product performance and reliability.
We strive to continually enhance our products to accommodate your needs.
Specifications
You can go to the VGA Printer page of the Epiphan website to get information
about the VGA Printer.
Warranty
All Epiphan Systems products are provided with a 100% replacement warranty
for one year from the date of purchase. We welcome your feedback and
suggestions for product improvements. You can email your comments to
info@epiphan.com.
Technical Support
Epiphan is staffed by a professional support team. If, after checking the FAQs
for your product on the Epiphan website and re-installing the Epiphan driver
software, you continue to have outstanding issues, email a problem report to
support@epiphan.com. To help us solve the problem efficiently, include the
following info:
• Your VGA Printer serial number.
• The behavior of your VGA Printer LED indicators.
• Technical description of the VGA or DVI-A signal source including
resolution, refresh rate, synchronization, type of hardware.
• Complete description of the problem you’re experiencing.
Environmental Information
The equipment that you bought has required the extraction and use of natural
resources for its production. It may contain hazardous substances that could
impact health and the environment.
In order to avoid the dissemination of those substances in our environment and
to diminish the pressure on the natural resources, we encourage you to use the
appropriate take-back systems. Those systems will reuse or recycle most of the
materials of your end life equipment in a sound way.
The crossed-out wheeled bin symbol invites you to use those systems.
If you need more information about collection, reuse and recycling systems,
please contact your local or regional waste administration.
You can also contact us for more information on the environmental
performance of our products.
Copyright © 2010 Epiphan Systems Inc.
The names of actual companies and products mentioned herein may be the trademarks
of their respective owners.
Page 3

Table of Contents
Table of Contents
1. Introduction 5
Adding Printers 6
Printing Captured Images 7
About This Document 8
2. Installation and Getting Started 9
VGA Printer Hardware Features 10
VGA Printer Basics 12
Connecting the VGA Printer Device 14
Using the Network Discovery Utility to Find the IP Address
of the VGA Printer Device 16
Logging Into the VGA Printer Web admin interface 18
Troubleshooting 19
If the Network Doesn’t Have a DHCP Server 20
RS-232 Integration 25
3. Printing Basics 27
Adding Printers 27
Printing a Captured Image 33
4. VGA Printer Web admin interface 35
Adding or Changing the Administrator’s Password 36
Configuring the VGA Printer device 37
Configuring the Ethernet Bridge For Use if You Have Only
One Ethernet Connection 40
Using the VGA Printer device as a DHCP Server 45
Changing VGA Printer Sound Volume 46
Configuring VGA2USB Adjustments 46
Rebooting or Restarting the VGA Printer device 50
Maintenance Configuration 50
Web Page Configuration 54
Date and Time Configuration 54
User Guide Page 3
Page 4

Table of Contents
Firmware Upgrade 55
System Information 56
5. Advanced Printer Configuration 57
Adding a Printer That the VGA Printer Device Cannot Find
Automatically 57
Deleting a Printer 67
Selecting the Default Printer 68
Controlling Print Jobs 70
Network Protocols Supported By the VGA Printer
device 75
Index 79
Page 4 Epiphan VGA Printer
Page 5

1. Introduction
1. Introduction
You can use the VGA Printer device to print any VGA or DVI-A
display to any compatible printer with the push of a button or the
click of a link on a web interface. The VGA Printer device can
easily and cost-effectively capture images displayed on computer
screens, or generated by medical equipment, microscopes and
other specialized imaging products that have VGA or DVI-A
output. While these devices may support printing, none is easier
to set up or more effective than the VGA Printer device.
No special hardware is required just the VGA (or DVI-A) source
and a printer that supports USB 1.1 or 2.0. You can also print to
most network printers. Capturing and printing VGA or DVI-A
images requires the following components:
• A VGA or DVI-A video source to capture images from.
• An Epiphan VGA Printer device that captures images from the
video source and sends them to a printer.
• One or more printers to print captured images.
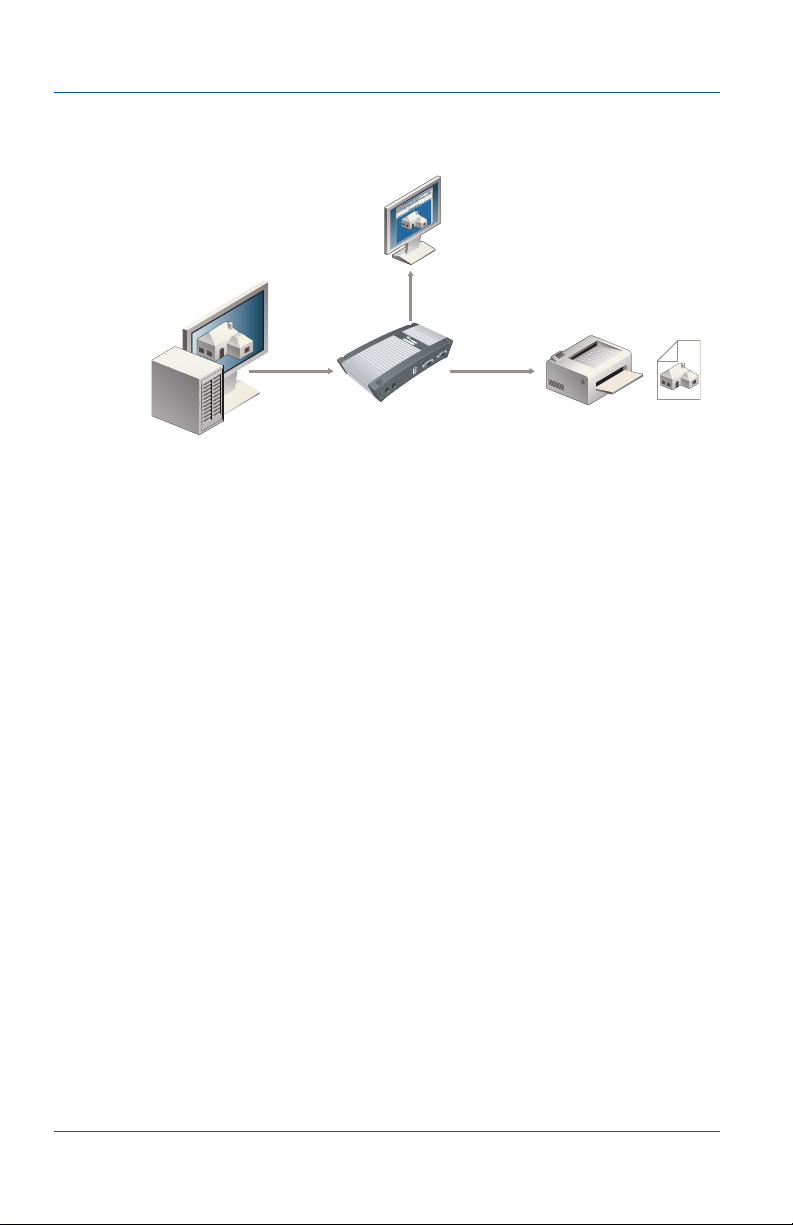
The VGA Printer device combines an Epiphan Frame Grabber
and a computer in a small appliance. The Frame Grabber captures
images. The computer records images captured by the Frame
Grabber and can send captured images to one or more configured
printers. The printers can be connected directly to the VGA
Printer device with a USB cable or they can be network printers
connected to the same network as the VGA printer.
Note: The VGA Printer Frame Grabber is equivalent to a
VGA2USB or VGA2USB Pro that has been optimized for the VGA
Printer device.
The computer also provides the VGA Printer network setup and
printer configuration settings, and the VGA Printer .Web admin
interface. You use the VGA Printer Web admin interface to
configure the VGA Printer device and to view and print captured
images.
User Guide Page 5
Page 6
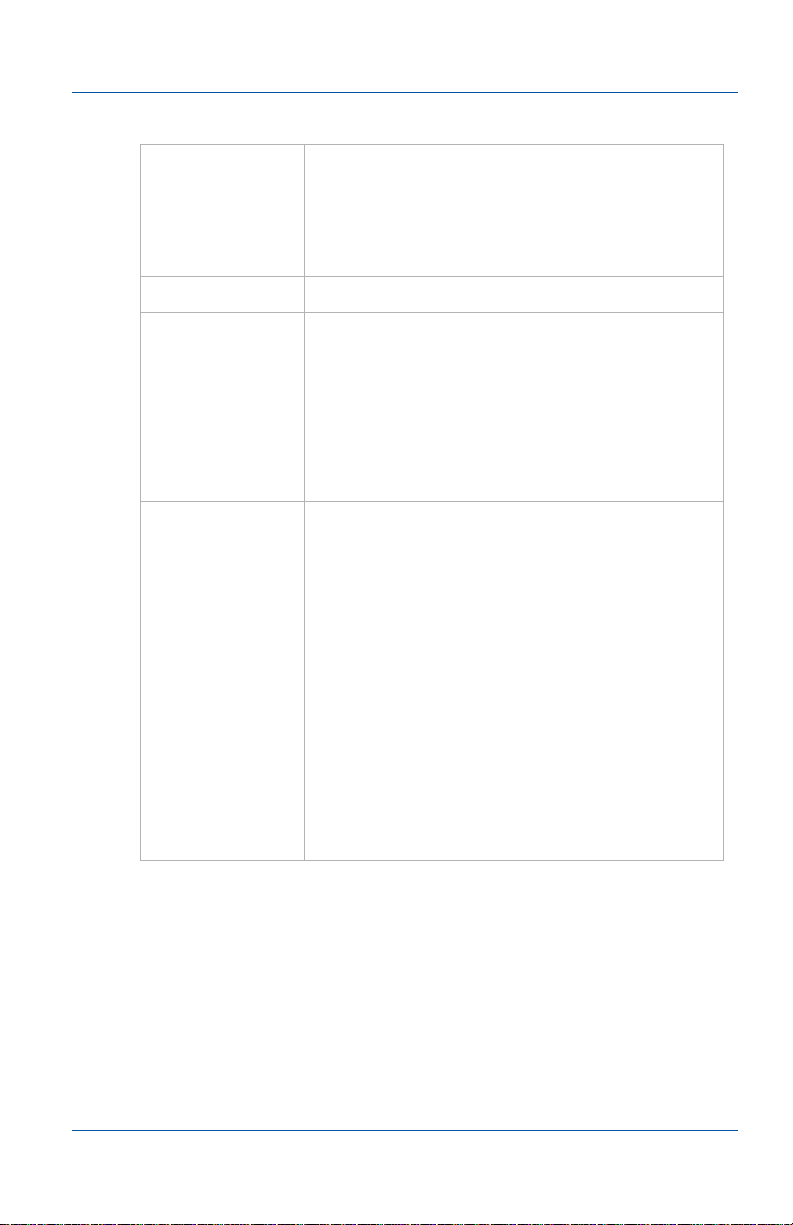
1. Introduction Adding Printers
Printer
(Print Captured
Images)
Video Source
(Equipment with VGA or
DVI-A Output)
Epiphan
VGA Printer
VGA or
DVI-A
Cable
Connection to printer
(USB or network)
VGA Printer
Admin Interface
Figure 1: VGA Printer components
Configuring and operating the VGA Printer device from the Web
admin interface is simple. You can connect to the Web admin
interface with any web browser and configure settings such as the
VGA Printer network configuration, printer settings, and image
capture optimization.
The VGA Printer device can also get network settings from a
DHCP server if there is a DHCP server on the network.
Adding Printers
In most cases, adding a printer to the VGA Printer device is quick
and easy, especially if the VGA Printer device can automatically
find your printer.
A wide range of printer options, print job settings, and other
functions are available if you require them. But in most cases once
you have used the VGA Printer device to automatically find and
configure a printer you do not have to spend much time working
with the printer configuration.
While there are a lot of settings and options, in most cases you do
not need to use them. However, they are available for advanced
users or if you have special requirements.
Page 6 Epiphan VGA Printer
Page 7
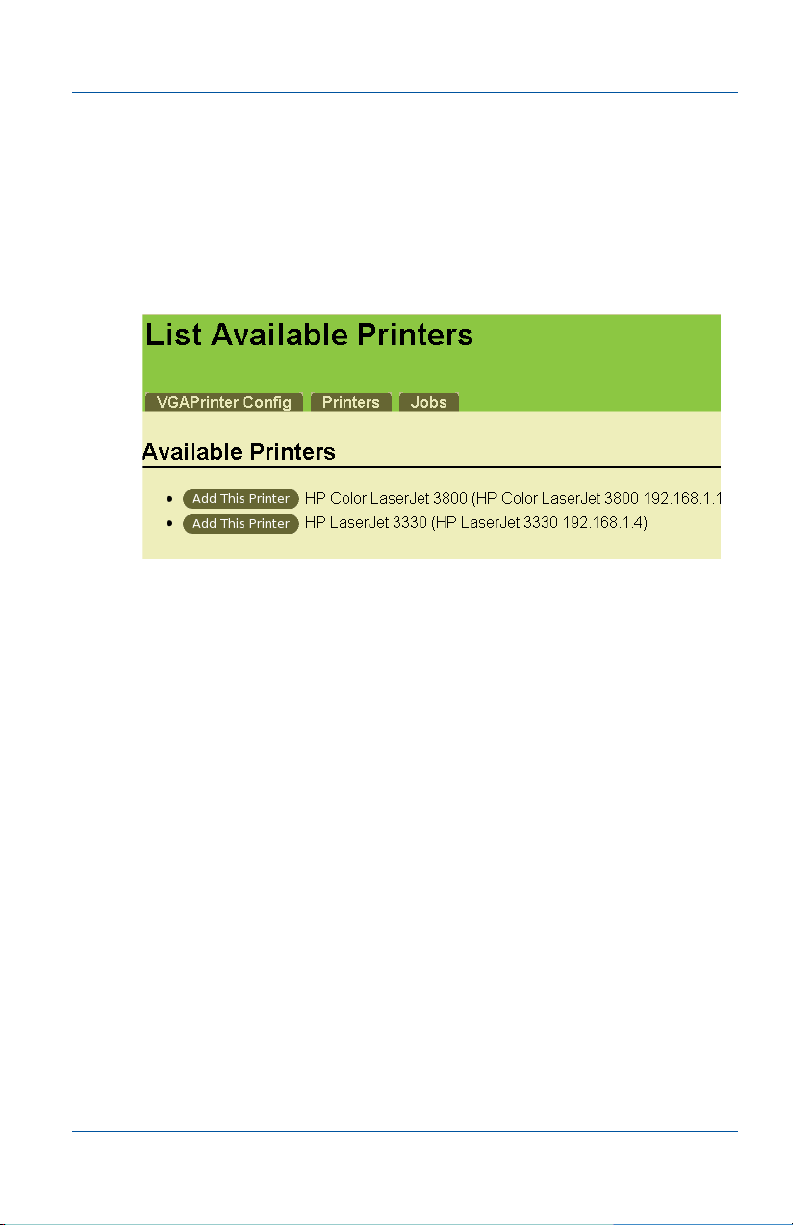
1. Introduction Printing Captured Images
The VGA Printer device is compatible with most printers. If you
connect a printer to a VGA Printer USB port or if a network
printer is connected to the same network, the VGA Printer device
can usually find the printer and after a few simple steps you can
be printing captured images to it.
Figure 2: Finding available printers
You can easily add more than one printer to the VGA Printer
device and then select one of them to use. The VGA Printer device
remembers all of the printers that you have configured. This
makes it easy to move the VGA Printer device to different
locations and either add a new printer or print to a previously
added printer.
As well, if you have special printer needs or want to print to a
printer that the VGA Printer device cannot find or does not
automatically support, the VGA Printer device supports
uploading PPD files or creating custom printer configurations.
Printing Captured Images
You can print captured images by pressing the Print button on
the VGA Printer device. You can also print from the Web admin
interface. Finally you can automate print requests using an
RS-232 interface or by using a custom VGA Printer URL.
User Guide Page 7
Page 8

1. Introduction About This Document
The VGA Printer device displays the current captured image on
the Web admin interface so that you can preview the image
before you print it. You can also use the VGA Printer Web admin
interface to add annotations to printed images and to adjust
image capture settings and printer settings to optimize the
printed image quality.
The VGA Printer device queues print jobs which means you can
continue to print captured images without having to wait for the
previous print job to finish.
About This Document
This Epiphan VGA Printer User Guide describes how to install the
VGA Printer device and how to use the VGA Printer device to
print captured images. This document also describes VGA Printer
Web admin interface settings, and basic and advanced printer
options.
This Epiphan VGA Printer User Guide describes Firmware Version
3.5.11 of the Epiphan VGA Printer firmware.
This document contains the following chapters:
• Chapter 2. “Installation and Getting Started” on page 9,
describes how to connect the VGA Printer device to a printer,
to a video source, and to a network. It also describes how to
log into the VGA Printer Web admin interface.
• Chapter 3. “Printing Basics” on page 27 describes how to add
a printer, and print a captured image. For many users the
information in chapters 2 and 3 should be all the information
needed.
• Chapter 4. “VGA Printer Web admin interface” on page 35,
describes the Web admin interface options.
• Chapter 5. “Advanced Printer Configuration” on page 57,
describes advanced printing functions such as manually
adding printers, selecting the default printer and working
with print job queues.
• This document concludes with an alphabetical Index.
Page 8 Epiphan VGA Printer
Page 9

2. Installation and Getting Started
2. Installation and Getting Started
This chapter describes how to connect and install the VGA Printer
device, add a printer, and print captured images. This chapter
contains the following sections:
• VGA Printer Hardware Features
• VGA Printer Software Features
• Connect and Power on the VGA Printer Device
• VGA Printer Basics
• Connecting the VGA Printer Device
• Using the Network Discovery Utility to Find the IP Address of
the VGA Printer Device
• Logging Into the VGA Printer Web admin interface
• Troubleshooting
• If the Network Doesn’t Have a DHCP Server
• RS-232 Integration
User Guide Page 9
Page 10
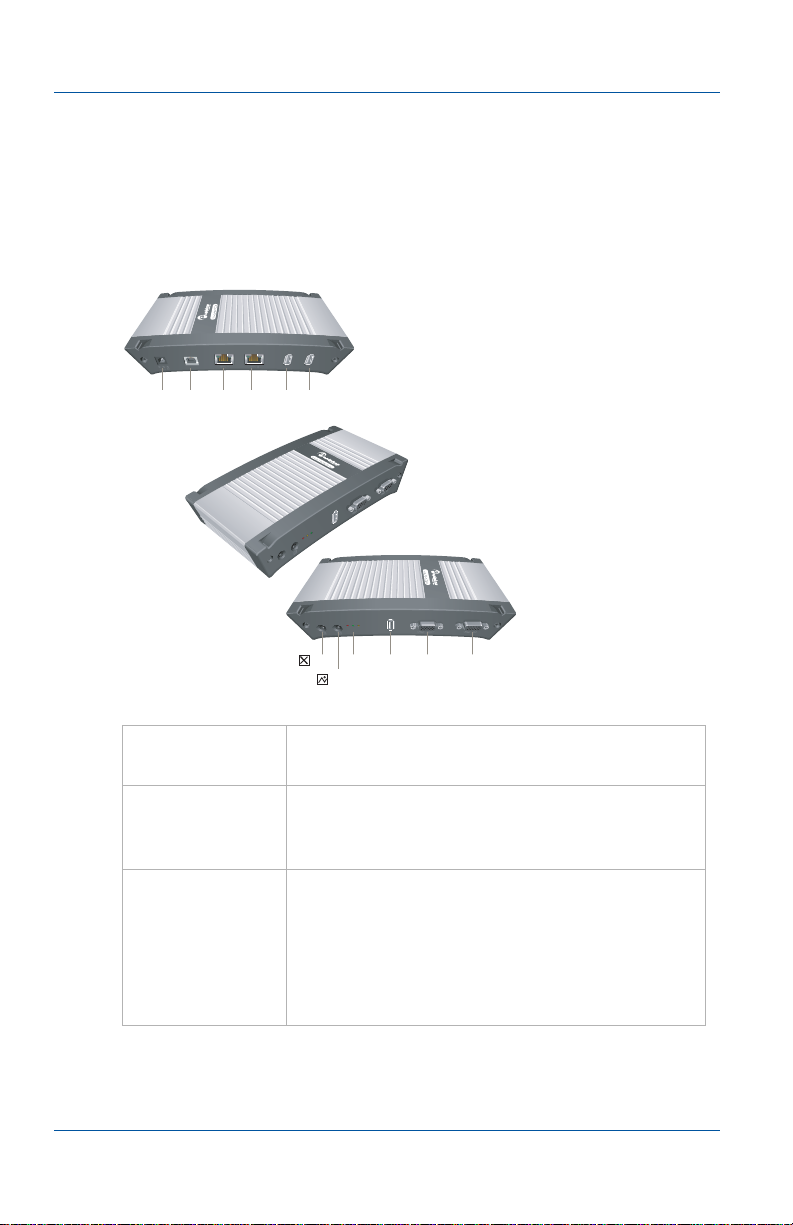
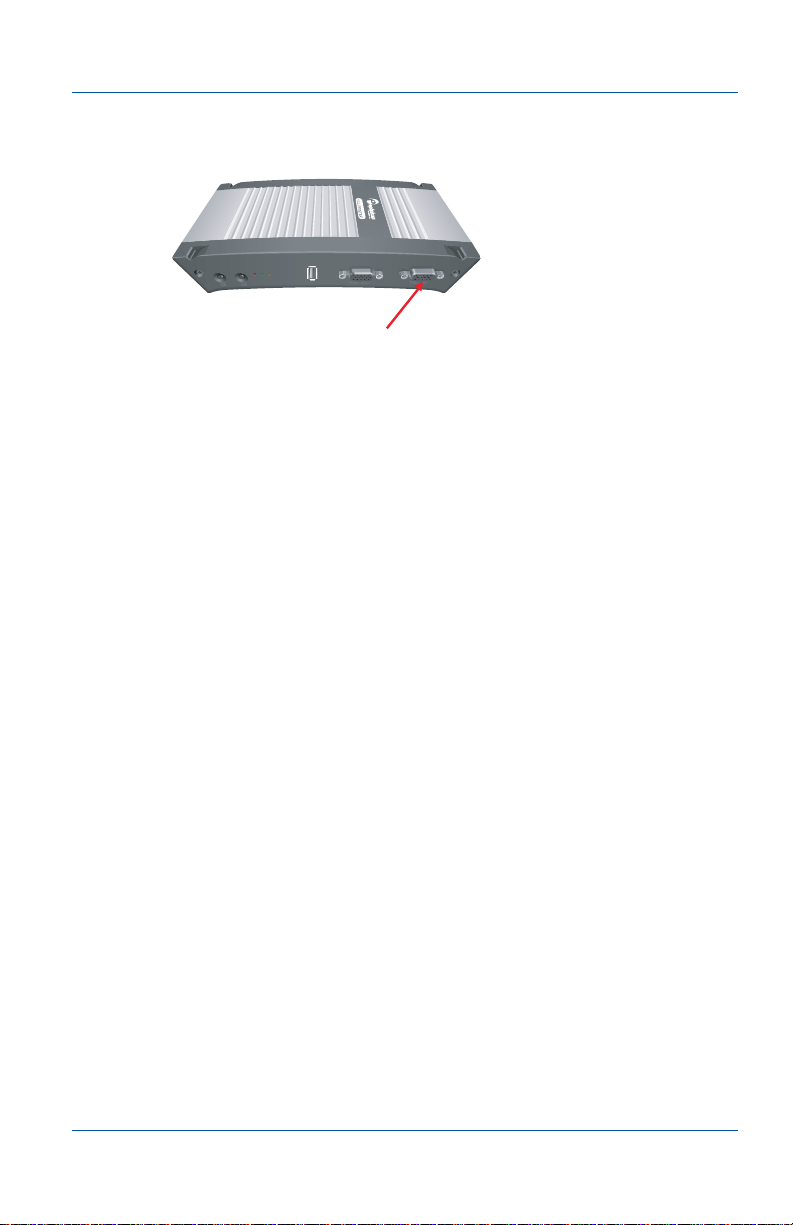
2. Installation and Getting Started VGA Printer Hardware Features
Right Side
LEDs
USB VGA
OUT
VGA
IN
USB USBEth 2Eth 1
not
supported
Power
Left Side
Reset
Button
Not
Used
VGA Printer Hardware Features
The VGA Printer device includes the following hardware
features.
Figure 3: VGA Printer connectors, buttons, and LEDs
Power Connect the AC adapter to the VGA Printer
power connector and to a power outlet.
ETH 1 Primary 10/100/1000 Base-T RJ-45 auto-
sensing Ethernet network port to connect the
device to an Ethernet network.
ETH 2 Secondary 10/100/1000 Base-T RJ-45 auto-
sensing Ethernet network port. This port is
useful for some configurations. See
“Configuring the Ethernet Bridge For Use if
You Have Only One Ethernet Connection” on
page 40 for more information.
Page 10 Epiphan VGA Printer
Page 11
2. Installation and Getting Started VGA Printer Hardware Features
VGA IN To connect a VESA-compatible VGA source to
the VGA Printer device. S
technical specifications
ee the
VGA Printer
on the Epiphan web
site for information about the video input
supported by the
VGA Printer
VGA OUT Not used.
USB ports All VGA Printer devices have multiple USB
2.0 connectors (that also support USB 1.1).
You can send commands to VGA Printer
device by connecting a USB port to an RS-232
control system (using a USB to RS-232
connector). See “RS-232 Integration” on
page 25 for more information.
Reset Button Reset the VGA Printer device to factory
default settings. To use this button, disconnect
power to the device, press and hold the Reset
button as you reconnect the power. The blue
LED lights up. Keep pressing the Reset button
until the blue LED turns off and the Green
LED lights up. Release the Reset button. The
device starts normally but with all settings
returned to factory defaults.
Note: You may have to re-configure the
device’s network settings to reconnect the
device to the network. See “Changing the
VGA Printer IP Address” on page 22 for more
information.
User Guide Page 11
Page 12
2. Installation and Getting Started VGA Printer Basics
VGA Printer LEDs
LED Activity Description
Red Normal operation, the Frame Grabber is
Power
(PWR)
Off Power is disconnected from the Frame
receiving power.
Grabber.
Capture
(CAP)
Status
(STAT)
Flashing
Amber
On The Frame Grabber is not receiving a
Off The Frame Grabber is not recognized by
Flashing
Green
The video capture application is running
and has found the Frame Grabber. The
Frame Grabber is capturing images.
VGA/DVI-A signal, or cannot adjust
video capture parameters.
the operating system.
Normal operation, the Frame Grabber is
initialized and ready to capture.
VGA Printer Basics
To get started, a quick reference of VGA Printer system
requirements and some useful information:
Video source Any VESA-compatible VGA or DVI-A source.
Printer
Interface
USB connection and network printers that use
the http, ipp, lpd, or socket protocol. The
VGA Printer device does not support printing
to Windows shared network printers.
Page 12 Epiphan VGA Printer
Page 13

2. Installation and Getting Started VGA Printer Basics
Recommended
and Supported
Printers
Web admin
interface
Default Web
admin
interface IP
address and
network mask
See the VGA Printer compatible printers page
of the Epiphan Web Site for the up-to-date list
of recommended and supported printers.
PostScript printers are recommended for
fastest printing. You can use the VGA Printer
Web admin interface to easily find and
quickly configure printers.
Note: You can automatically find printers
connected to the VGA Printer device or on the
same network. You must add a printer before
you can print captured images. See
3. “Printing Basics” on page 27.
Use the Web admin interface to add printers,
configure the VGA Printer device and print
captured images. To log in, open a web
browser to and browse to:
http://<VGA_Printer_IP_Address>
User Name: admin (no password)
IP: 192.168.255.250
Netmask: 255.255.255.252
The VGA Printer device can get an IP address
from a DHCP server on your network if
available. After you connect the VGA Printer
device to your network, check your DHCP
server logs to find the IP address assigned to
the VGA Printer device. If your network does
not have a DHCP server, see “If the Network
Doesn’t Have a DHCP Server” on page 20.
User Guide Page 13
Page 14
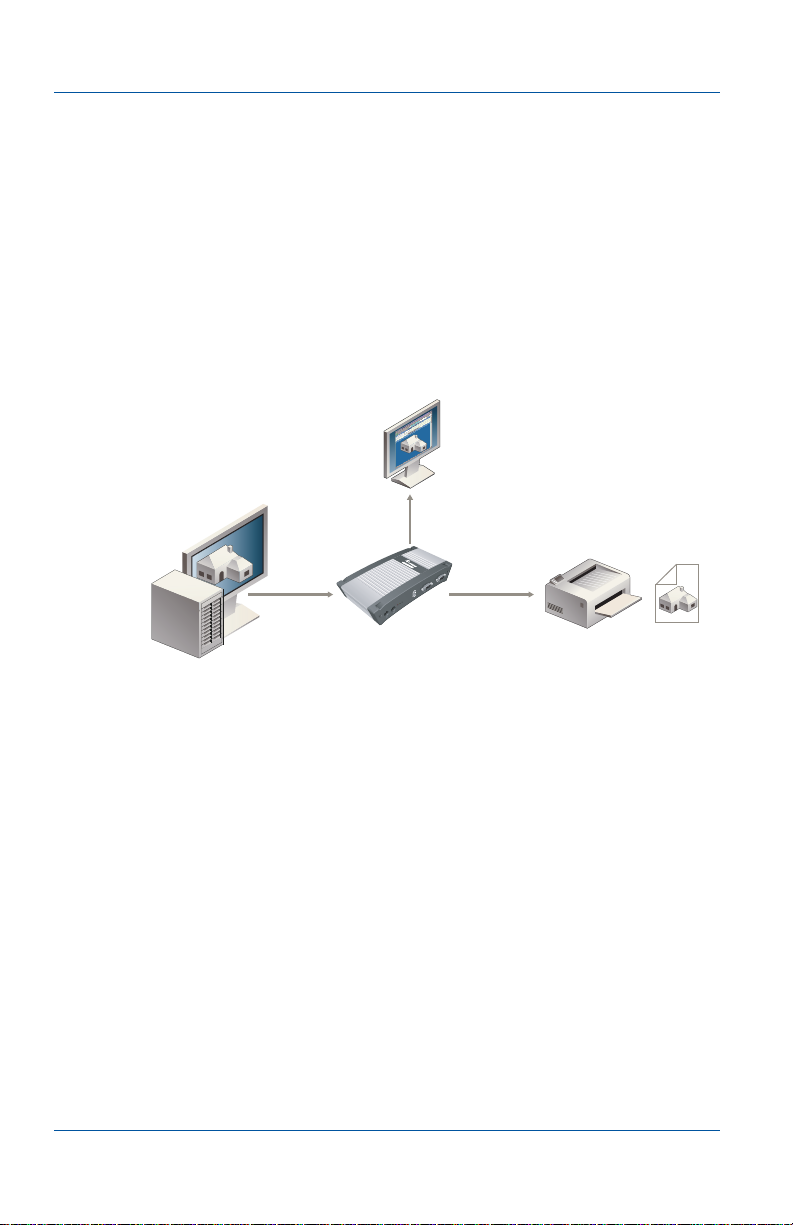
2. Installation and Getting Started Connecting the VGA Printer Device
Printer
(Print Captured
Images)
Video Source
(Equipment with VGA or
DVI-A Output)
Epiphan
VGA Printer
VGA or
DVI-A
Cable
Connection to printer
(USB or network)
VGA Printer
Admin Interface
Connecting the VGA Printer Device
This section describes how to connect the VGA Printer device to a
VGA or DVI-A video source, a printer, and to your network. Use
the network connection to connect to the VGA Printer Web admin
interface. The VGA Printer device also uses the network
connection to communicate with network printers.
Figure 4 shows VGA Printer connectors, buttons, and LEDs.
Figure 4: Connecting the VGA Printer device
To connect the VGA Printer device you need:
• A VGA or DVI-A video source.
• An IP-based Ethernet network.
• One or more printers the can connect to the network or to a
VGA Printer USB port.
To connect and turn on the VGA Printer device
1 Use a VGA cable to connect the VGA signal output source to
the VGA IN port.
You can connect the VGA Printer device to any VGA source.
If you are connecting to a DVI-A video signal, use a VGA to
DVI-A adapter.
Page 14 Epiphan VGA Printer
Page 15
2. Installation and Getting Started Connecting the VGA Printer Device
VGA IN
Figure 5: Connecting a the VGA Printer device to a VGA source
You can use an active VGA splitter to split the VGA signal
between a monitor and the VGA Printer device. Splitting the
VGA signal may reduce the image quality.
2 Use a USB cable to connect a printer directly to any VGA
Printer USB port.
Follow the connection instructions supplied by your printer
manufacturer for connecting your printer (except that you do
not have to install printer drivers on the VGA Printer device.)
3 Use a standard 10/100 Base-T RJ-45 Ethernet cable to connect
the network to the VGA Printer ETH 1 port.
The network must be running the TCP/IP protocol. Ideally
you should be able to connect to the Internet from the VGA
Printer device.
4 Connect the power adapter to the VGA Printer power
connector.
The VGA Printer device powers on and starts up.
5 Power on any printers connected to the VGA Printer device.
6 Start up the VGA source.
User Guide Page 15
Page 16

2. Installation and Getting StartedUsing the Network Discovery Utility to Find the IP Address of
7 Confirm that the VGA Printer device is receiving images from
the VGA source by logging into the VGA Printer Web admin
interface (see “Logging Into the VGA Printer Web admin
interface” on page 18) and confirming that a captured image
appears.
If a captured image does not appear, check the VGA source to
make sure it is transmitting a VGA image. Also check the cable
between the VGA Printer device and the VGA source to make
sure it is connected correctly.
Using the Network Discovery Utility to Find the IP Address of the VGA Printer Device
You can use the
find the VGA Printer device and its IP address on the network.
You can also use the Network Discovery Utility to connect to the
Web admin interface.
The
VGA Printer device
network to be able to find and print to network printers. It can get
an IP address from a DHCP server if there is one on the network.
If the network does not have a DHCP server, see “If the Network
Doesn’t Have a DHCP Server” on page 20.
This section assumes that the network has a DHCP server and
that the DHCP server gives the
on the network.
To install the Network Discovery Utility
1 Find the latest
download page. For example:
http://www.epiphan.com/products/broadcasting/
vga-broadcaster-lite/download/
2 Select Download Network Discovery Utility.
Make sure you note the download destination folder.
Network Discovery Utility on a Windows PC to
must be assigned an IP address on the
VGA Printer device
Network Discovery Utility on an
an IP address
Epiphan
Page 16 Epiphan VGA Printer
Page 17

2. Installation and Getting StartedUsing the Network Discovery Utility to Find the IP Address of
3 Run NetworkDiscovery.exe.
4 Select Search to find the Epiphan devices connected to the
network.
Note: The Network Discovery Utility can only find the Epiphan
devices on the same network as the Windows PC.
If the
VGA Printer device
is operating, has received an IP address
from a DHCP server, and is connected to the network, the
Network Discovery Utility should find it and it should appear on
the Network Discovery Utility display. The Network Discovery
Utility also displays the
VGA Printer
IP address.
You can use this IP address to connect to the Web admin
interface. You can also select Web config to connect to the Web
admin interface.
If the
VGA Printer device
is capturing images, its status should be
Device OK shown with a green indicator.
Note: When you restart the Network Discovery Utility and if it
has already found an Epiphan device, it will show the status as
Detecting and the indicator will be amber. The DHCP server may
have assigned a new IP address; therefore, always select Search
after starting the Network Discovery Utility.
If the Network Discovery Utility cannot find the
device
, make sure the device is turned on and check the network
VGA Printer
connections. If you find and correct the problem, select Search to
refresh the list of devices.
If you still cannot see the
VGA Printer device
, it may not have
gotten an IP address from the DHCP server. Use the information
in “Changing the VGA Printer IP Address” on page 22 to log into
the Web admin interface and manually change the VGA Printer
IP address.
User Guide Page 17
Page 18

2. Installation and Getting Started Logging Into the VGA Printer Web admin interface
Logging Into the VGA Printer Web admin interface
You use the VGA Printer Web admin interface to configure the
VGA Printer device. Log into the VGA Printer Web admin
interface from any web browser. Before you log into the Web
admin interface you need to determine the IP address of the VGA
Printer device.
Note: You can always log into the VGA Printer Web admin
interface by browsing to the default VGA Printer IP address,
which is http://192.168.255.250. To log into the VGA Printer
device using this IP address you must change your PC to use the
static IP address 192.168.255.249 and netmask 255.255.255.252.
Then open a Web browser and browse to http://192.168.255.250.
If the Network has a DHCP Server
The VGA Printer device can get network settings automatically if
the network has a DHCP server. After connecting the VGA
Printer device to the ethernet network, you can use the Network
Discovery Utility or check the DHCP server logs to determine the
IP address given to the VGA Printer device.
To log into the VGA Printer Web admin interface
1 Start a web browser on a PC connected to the same network as
the VGA Printer device.
2 Browse to:
http://<VGA_Printer_IP_address>
3 Enter the following:
User Name: admin
Password: (no password required)
Page 18 Epiphan VGA Printer
Page 19
2. Installation and Getting Started Troubleshooting
4 Press Enter.
The VGA Printer Web admin interface appears. Figure 6
shows a sample VGA Printer Web admin interface with an
example captured image. If the VGA Printer device is
connected to an active VGA source, the Web admin interface
shows the current captured image.
Figure 6: VGA Printer Web admin interface (example image)
Troubleshooting
If the VGA Printer device can’t print but the printer is connected
and functioning properly you may need to select a default printer
or add a new printer. Log into the VGA Printer Web admin
interface and if Configure VGA Printer displays the message
Error: printer is not configured! the VGA Printer device cannot
find a printer.
User Guide Page 19
Page 20

2. Installation and Getting Started If the Network Doesn’t Have a DHCP Server
• To add a new printer, see “Adding Printers” on page 27.
• To set a printer to be the default printer, see “Selecting the
Default Printer” on page 68.
If a printer is turned off or disconnected, VGA Printer may store
print jobs in that printer’s print queue. When the printer is
connected or turned on again, the stored print jobs will be
printed. After the printer is restarted you may have to go to the
print queue and restart print jobs for them to print. See
“Controlling Print Jobs” on page 70 for information about
viewing and starting print jobs.
If the Network Doesn’t Have a DHCP Server
If the network doesn't have a DHCP server, to log into the VGA
Printer Web admin interface you need to temporarily change the
network configuration of your PC.
You must also establish an ethernet connection between the VGA
Printer device and your PC. You can do this one of the following
ways:
• Connect the VGA Printer ETH 1 port to the same Ethernet
network as your PC.
• Connect the VGA Printer ETH 1 port to an Ethernet network
switch and connect your PC’s Ethernet port to the same
switch.
• Connect the VGA Printer ETH 1 port directly to your PC’s
Ethernet port using a cross-over cable.
Page 20 Epiphan VGA Printer
Page 21
2. Installation and Getting Started If the Network Doesn’t Have a DHCP Server
To log into the VGA Printer Web admin interface
1 Change the IP address of a PC connected to the same network
as the VGA Printer device to:
IP Address: 192.168.255.249
Subnet Mask: 255.255.255.252
Follow the instructions for your operating system. If your
operating system supports adding more than one IP address,
then you can add this IP address as a second IP address
instead of changing the current address.
Figure 7: VGA Printer Web admin interface (with an example
captured image)
2 Start a web browser on the PC and browse to:
http://192.168.255.250
User Guide Page 21
Page 22

2. Installation and Getting Started If the Network Doesn’t Have a DHCP Server
3 Enter the following:
User Name: admin
Password: (no password required)
4 Press Enter.
The VGA Printer Web admin interface appears. Figure 7
shows a sample VGA Printer Web admin interface. If the VGA
source is active, the display shows a captured image.
Otherwise it will be blank.
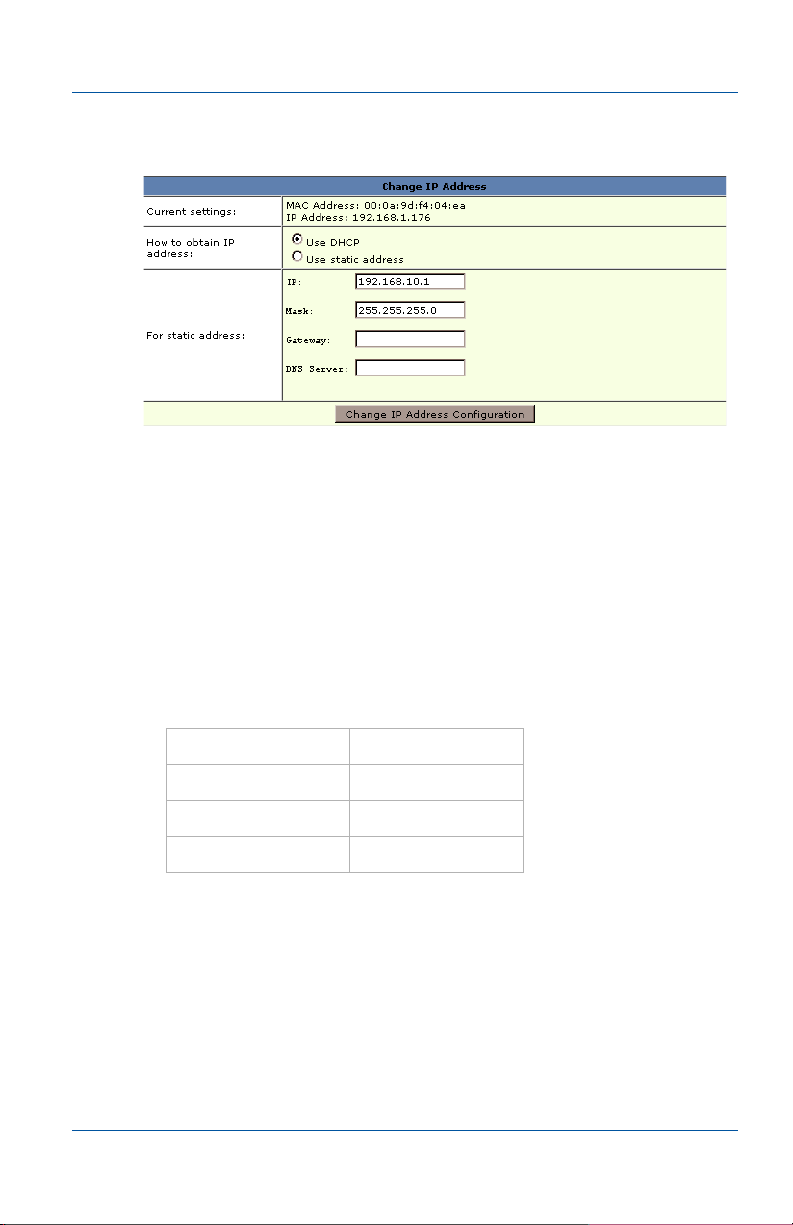
Changing the VGA Printer IP Address
You can change the VGA Printer IP address at any time. You may
need to change the IP address so that PCs on the network can
connect to the VGA Printer Web admin interface and so that the
VGA Printer device can connect to network printers.
• If the network does not have a DHCP server you will most
likely need to change the VGA Printer IP address.
• If the network does have a DHCP server you might also want
to change the VGA Printer IP address if you would rather the
the VGA Printer device have a static IP address instead of a
dynamic address assigned by the DHCP server.
• You can also change the VGA Printer IP address even if the
DHCP server has assigned an IP address. If for some reason
the DHCP server goes down, you can switch the VGA Printer
to connect using the static IP address.
To change the VGA Printer IP address
This procedure describes how to disable DHCP and give the VGA
Printer device a static IP address.
1 Log into the VGA Printer Web admin interface.
2 Scroll down to Change IP Address.
You can also use your web browser find feature to find
Change IP Address.
Page 22 Epiphan VGA Printer
Page 23
2. Installation and Getting Started If the Network Doesn’t Have a DHCP Server
Figure 8: Change the VGA Printer IP address
3 Set How to obtain IP address to Use static address.
You must disable DHCP for the VGA Printer device to use a
static IP address.
4 Enter an IP address, Mask, Gateway, and DNS server that are
valid for the network.
Contact your network administrator if you are not sure what
information to use. The IP address, netmask, gateway, and
DNS server that you assign to the VGA Printer device must be
compatible with the IP addresses and netmask of the other
devices on the network. For example:
IP: 192.168.1.20
Mask: 255.255.255.0
Gateway: 192.168.1.2
DNS server: 192.168.1.99
5 Select Change IP Address Configuration to save these
changes.
The VGA Printer device displays the changed IP address
configuration.
User Guide Page 23
Page 24

2. Installation and Getting Started If the Network Doesn’t Have a DHCP Server
Figure 9: Example VGA Printer IP address configuration change
6 Confirm that the settings are correct and select Continue.
7 Scroll down the Web admin interface to the Reboot the
system section and select Reboot. Then select Continue.
It takes a few minutes for the VGA Printer device to reboot.
8 After a few minutes try logging into the VGA Printer Web
admin interface by browsing to the new IP address. For
example, browse to:
http://192.168.1.20
9 Enter the Web admin interface user name and password to
login.
To reset network settings to use DHCP
By default, if you connect the VGA Printer device to a network
with a DHCP server, the DHCP server will automatically
configure the VGA Printer network settings. If required you can
disable DHCP settings to use a static IP address. This procedure
describes how to re-enable DHCP settings that have been
disabled.
1 Log into the VGA Printer Web admin interface.
2 Scroll down to Change IP Address.
You can also use your web browser find feature to find
Change IP Address.
3 Change How to obtain IP address to Use DHCP.
4 Select Continue.
5 Scroll down the Web admin interface to the Reboot the
system section and select Reboot. Then select Continue.
It takes a few minutes for the VGA Printer device to reboot.
Page 24 Epiphan VGA Printer
Page 25

2. Installation and Getting Started RS-232 Integration
6 After a few minutes check the Network Discovery Utility or
your DHCP server logs to determine the VGA Printer IP
address.
7 Try logging into the VGA Printer Web admin interface by
browsing to the new IP address. For example, if the VGA
Printer IP address has changed to 192.168.1.200, browse to:
http://192.168.1.200
RS-232 Integration
You can integrate the VGA Printer device with control equipment
that uses an RS-232 interface. You can use this RS-232 interface to
trigger the VGA Printer device to print the current captured
image by sending a PRINT command over the RS-232 connection.
The PRINT command must be terminated with an LF (ASCII code
10).
Connect your control equipment to the VGA Printer using a
standard RS-232 null-modem cable. (such as Belkin Serial File
Transfer cable part number F3X171-10). You must use an RS-232
serial adapter to connect the RS-232 null-modem cable to one of
the VGA Printer USB ports.
The VGA Printer package does not include an RS-232 serial
adapter but you can purchase one from Epiphan as an optional
accessory.
Use the following serial port configuration for the RS-232
connection:
Speed 19200 bps
Data bits 8
Parity None
Stop bits 1
Flow control Hardware
User Guide Page 25
Page 26

2. Installation and Getting Started RS-232 Integration
Page 26 Epiphan VGA Printer
Page 27

3. Printing Basics Adding Printers
3. Printing Basics
This chapter describes how to add a printer, and print captured
images. This chapter contains the following sections:
• Adding Printers
• Printing a Captured Image
Adding Printers
You can add a printer to the VGA Printer device if the printer is
connected directly to a VGA Printer USB port or if the printer is
connected to the same network as the VGA Printer device.
You can add almost any printer, but Epiphan recommends that
you add a compatible printer listed on the VGA Printer
compatible printers page of the Epiphan Web Site. This page
contains the up-to-date list of recommended and supported
printers. PostScript printers are recommended for fastest
printing.
Note: To add a printer that is not supported by the VGA Printer
device, see the information provided in Chapter 5. “Advanced
Printer Configuration” on page 57.
The VGA Printer device uses the Common UNIX Printing System
(CUPS) to communicate with locally connected and network
connected printers. This section describes some basic procedures
for using the VGA Printer CUPS implementation. For detailed
information about CUPS, see http://www.cups.org.
Note: Chapter 5. “Advanced Printer Configuration” on page 57
contains additional detailed CUPS-related procedures for the
VGA Printer device.
The procedures for adding a local or a network printer are
similar. This procedure describes how to add either type of
printer. Before starting this procedure:
User Guide Page 27
Page 28

3. Printing Basics Adding Printers
• If you want to print to a printer connected directly to the VGA
Printer device, connect the printer to a VGA Printer USB port
and turn on the printer.
• If you want to print to a network printer, make sure the
network printer is on the same network and subnet as the
VGA Printer device and make sure the printer is turned on.
Also make sure the VGA Printer device can connect to the
network.
To add a printer (local or network)
1 Log into the Web admin interface.
2 Scroll down to Configure VGA Printer.
Figure 10:Configure VGA Printer
3 Select Printers configuration and jobs control.
You may have to enter the admin username and password
again before the Printers page appears.
Page 28 Epiphan VGA Printer
Page 29

3. Printing Basics Adding Printers
Figure 11:Printers page
4 Select Find New Printers.
The VGA Printer device searches for locally connected
printers and network printers. All printers that the VGA
Printer device finds appear on the Available Printers list.
Figure 12:Example Available Printers list
If this list doesn’t find the printer that you want to add, you
can add the printer manually. See “Adding a Printer That the
VGA Printer Device Cannot Find Automatically” on page 57.
5 Select Add This Printer beside the printer that you would like
to add to the VGA Printer device.
User Guide Page 29
Page 30

3. Printing Basics Adding Printers
Figure 13:Adding a printer
6 Optionally change any information about the Name, Location,
and Description of the printer.
The printer Name cannot include spaces.
7 Select Continue.
The list of printer drivers appears.
Page 30 Epiphan VGA Printer
Page 31

3. Printing Basics Adding Printers
Figure 14:List of printer drivers
8 Select the best printer driver for the printer that you are
adding.
The VGA Printer device usually selects the correct printer
driver but if not, find the printer in the list.
If the printer does not appear in the list, see “Adding a Printer
That the VGA Printer Device Cannot Find Automatically” on
page 57.
9 Select Add Printer.
The VGA Printer device adds the selected printer. This may
take a short while. After the printer is added, a message is
displayed letting you know that the printer was added
successfully. Then, Set Printer Options appears.
User Guide Page 31
Page 32

3. Printing Basics Adding Printers
Figure 15:Set Printer Options
You can now select options for the printer. In most cases you
don’t have to change the default options. You can also go back
and change them later.
If you do change printer options, make sure to make all
required changes before selecting Set Printer Options.
Note: The VGA Printer device only prints in landscape mode.
You can’t change to portrait mode.
10 Select Set Printer Options.
The VGA Printer device saves the printer configuration. This
may take a short while. Information about the printer that you
added appears.
Page 32 Epiphan VGA Printer
Page 33

3. Printing Basics Printing a Captured Image
Figure 16:Printer Added
You can now start printing captured images on this printer.
You can also add additional printers by selecting Find New
Printers and repeating this procedure.
Note: See Chapter 5. “Advanced Printer Configuration” on
page 57 for more printer-related procedures.
Printing a Captured Image
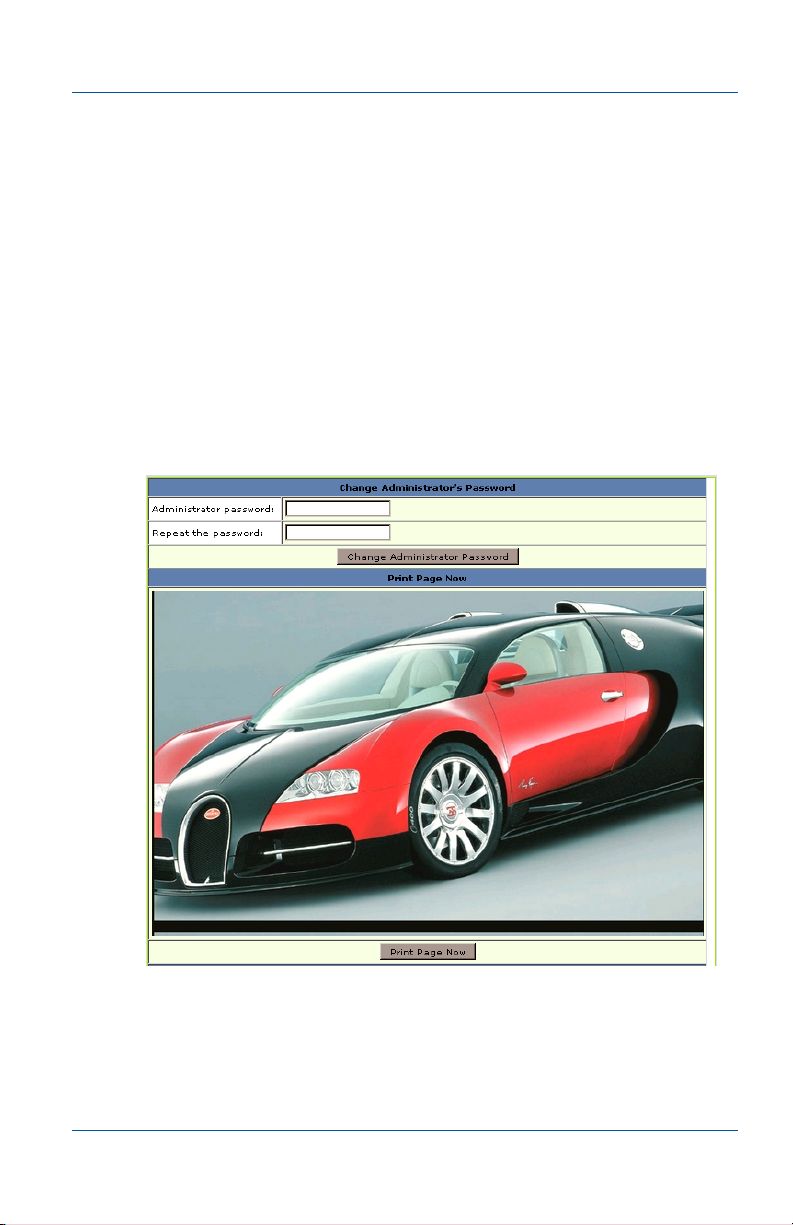
There are 3 ways to print a captured image:
• Press the Print Image button on the right side of the VGA
Printer device.
• Log into the VGA Printer Web admin interface and select the
Print Page Now button located below the captured image.
• Using an RS-232 port connection. See “RS-232 Integration” on
page 25.
If you have added only one printer, the captured image is printed
on this printer. If you have added more than one printer, the
captured image is sent to the printer at the top of the list.
If you have made one of the printers the default printer the
captured image is printed on the default printer. To set or change
the default printer, see “Selecting the Default Printer” on page 68.
User Guide Page 33
Page 34

3. Printing Basics Printing a Captured Image
Figure 17:Print Page Now button on the Web admin interface
Triggering Printing From a Third-Party Application
You can integrate the VGA Printer device with a third-party
application or a script that “touches” the Print Page Now URL to
trigger the VGA Printer device to print the currently captured
image. If the VGA Printer IP address is 1.1.1.1 a print URL could
be: http://1.1.1.1/admin/submit.cgi?cmd=prnow.
You must also include the admin user name and password. To do
this, you can combine the URL with authentication using a tool
such as Wget. For example, if you use Wget and the VGA Printer
Web admin interface password is vga_print the syntax could be:
wget --http-user=admin --http-passwd="vga_print"
“http://1.1.1.1/admin/submit.cgi?cmd=prnow”
See http://en.wikipedia.org/wiki/Wget for information about
Wget.
Page 34 Epiphan VGA Printer
Page 35

4. VGA Printer Web admin interface
4. VGA Printer Web admin
interface
This chapter describes configuring the VGA Printer Web admin
interface options. The following parts of the Web admin interface
are described in Chapter 2. “Installation and Getting Started” on
page 9.
• Printing the captured image. See “Printing a Captured Image”
on page 33.
• Changing the VGA Printer IP address. See “Changing the
VGA Printer IP Address” on page 22.
This chapter describes:
• Adding or Changing the Administrator’s Password
• Configuring the VGA Printer device
• Configuring the Ethernet Bridge For Use if You Have Only
One Ethernet Connection
• Using the VGA Printer device as a DHCP Server
• Changing VGA Printer Sound Volume
• Configuring VGA2USB Adjustments
• Rebooting or Restarting the VGA Printer device
• Maintenance Configuration
• Web Page Configuration
• Date and Time Configuration
• Firmware Upgrade
• System Information
User Guide Page 35
Page 36

4. VGA Printer Web admin interface Adding or Changing the Administrator’s Password
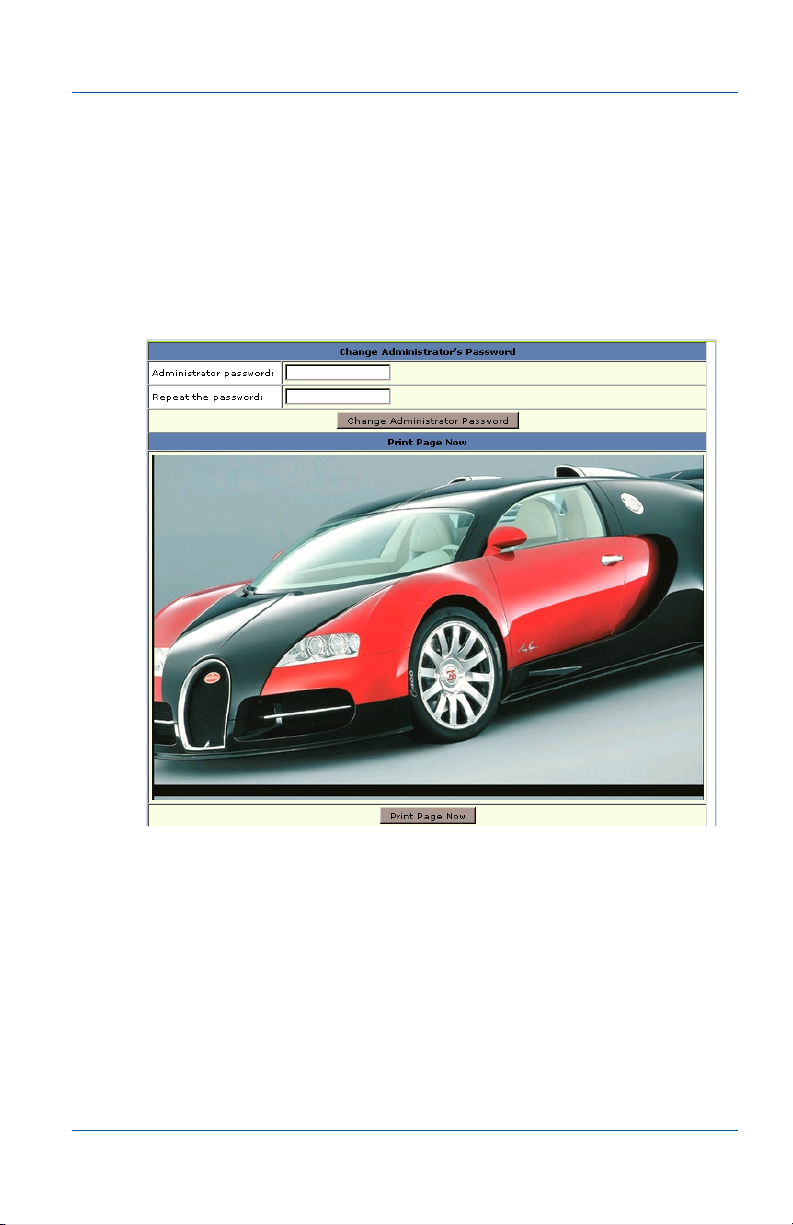
Adding or Changing the Administrator’s Password
Add a password for the Web admin interface to control access to
the interface. You can add a password or change the password at
any time.
Note: If you lose or forget the admin password you can contact
Epiphan Technical Support for help to reset it.
To add a password to the Web admin interface
1 Log into the Web admin interface.
The Change Administrator's Password section appears at the
top of the Web admin interface.
Figure 18:Change Administrator's Password
2 Enter and repeat the new password.
The password is case sensitive and can include up to 255
ASCII characters.
3 Select Change Administrator Password and select Continue.
The password changes and you must log into the Web admin
interface again.
4 Log into the Web admin interface with the admin user name
and the new password.
To delete the Web admin interface password
You can delete the Web admin interface password if you don’t
want to require administrators to enter a password to log into the
Web admin interface.
Page 36 Epiphan VGA Printer
Page 37

4. VGA Printer Web admin interface Configuring the VGA Printer device
Note: Removing the Web admin interface password makes it
easier for unauthorized users to change the
configuration.
1 Log into the Web admin interface.
The Change Administrator's Password section appears at the
top of the page.
2 Delete the characters from the Administrator’s password and
the Repeat the password fields.
3 Select Change Administrator’s Password.
The password is deleted and you must log into the Web admin
interface again.
4 Log into the Web admin interface with the admin user name
and no password.
VGA Printer
Configuring the VGA Printer device
You can use the Configure VGA Printer section of the Web admin
interface to configure color transformations, page fit, and to add
annotations and the date and time to the pages printed by the
VGA Printer device.
When you are done configuring the printer, select Change Printer
Settings to apply the changes.
Figure 19:Configuring the VGA Printer device
User Guide Page 37
Page 38

4. VGA Printer Web admin interface Configuring the VGA Printer device
Configured
Printer
Color
Transformation
Shows the current default printer. This is the
printer you are configuring the VGA Printer
device for.
In some cases, you may want to transform
some of the colors in the print of the captured
image. For example, if you are capturing
images with a dark background and white
text you might want to select Invert all colors
so that in the printed image the background
is light and the text is dark.
You can also select Invert black only, if you
want to keep the colors the same in the
printed image but convert black in the
captured image to white in the printed image.
You might want to select this option if the
captured image has a lot of black in it.
If you select Invert all colors or Invert black
only you can also enter a % invert threshold
value to control the brightness of the printed
inverted image. The higher the %invert
threshold the brighter the image.
Note: Color transformations affect the
printed image only and not the captured
image displayed on the VGA Printer Web
admin interface.
Page 38 Epiphan VGA Printer
Page 39

4. VGA Printer Web admin interface Configuring the VGA Printer device
Page Fit The VGA Printer device prints one image per
page and scales captured images up or down
to fit on the page size configured for the
printer.Fit image keeping original aspect
ratio is the default setting. This setting scales
the image to fit on the printed page without
distorting the image. This setting may result
in white space on the printed page if the
image doesn’t match the shape of the page.
You would usually select this page fit option
to avoid distortion of the image if the shape
of the captured image is very different from
the shape of the printer page.
Select Fit image to fill the whole page to
scale the image to fill as much of the printed
page as possible. Usually you would only
select this option if the captured image
closely matched the shape of the printed
page. If the captured image was a much
different shape than the page this page fit
option could distort the image an
unacceptable amount.
Annotation You can select Add annotation to the printed
page to add text to each captured image
printed by the VGA Printer device. The text
appears at the bottom of the page. Add the
text for the annotation to the Annotation text
field.
You can also select Include timestamp to the
annotation to add the current date and time
to the right of the annotation in the printed
image. The date and time format is
yyyy-mm-dd hh:mm:ss.
User Guide Page 39
Page 40

4. VGA Printer Web admin interface Configuring the Ethernet Bridge For Use if You Have Only
Configuring the Ethernet Bridge For Use if You Have Only One Ethernet Connection
You can use the ethernet bridge setting to connect devices or
networks to the VGA Printer ETH 1 and ETH 2 ports. This section
describes:
• Connecting a PC and an Ethernet Network to the VGA Printer
Device
• Connecting a Network Printer Directly to the VGA Printer
ETH 2 Port
Connecting a PC and an Ethernet Network to the VGA Printer Device
In some cases you may only have one network connection
available for a PC and for the VGA Printer device. To connect
both the PC and the VGA Printer device to the network you can
do the following.
To connect a PC and an Ethernet network to the VGA
Printer device
In this configuration the VGA Printer ETH 1 and ETH 2 interfaces
act like a 2-port hub allowing the PC to connect to the network.
For best performance you should connect the PC to ETH 1 and the
Ethernet network to ETH 2. Also, the overhead required to
forward packets between ETH 1 and ETH 2 can affect the
performance of the device. You can temporarily improve
performance by disconnecting ETH 2 from the network.
1 Log into the Web admin interface.
2 In the Ethernet Bridge section, select Enable.
3 Select Change Ethernet Bridge Configuration.
4 Select Continue.
Page 40 Epiphan VGA Printer
Page 41

4. VGA Printer Web admin interface Configuring the Ethernet Bridge For Use if You Have Only
VGA
Cable
ETH 1
ETH 2
PC
VGA source
Ethernet
Network
5 Scroll down the Web admin interface to the Reboot the
system section and select Reboot. Then select Continue.
It takes a few minutes for the device to reboot.
6 Connect ETH 1 directly to the PC using a cross-over or regular
Ethernet cable.
7 Connect ETH 2 to the network.
Figure 20:Connecting a network and a PC to the VGA Printer
device
Connecting a Network Printer Directly to the VGA Printer ETH 2 Port
You can use the following procedure to connect a supported
network printer directly to a VGA Printer Ethernet port. Usually
you would connect the printer to the ETH 2 port and keep the
ETH 1 port available for connecting a PC or for connecting the
VGA Printer device to a network.
User Guide Page 41
Page 42

4. VGA Printer Web admin interface Configuring the Ethernet Bridge For Use if You Have Only
This procedure is useful if you do not have access to a local
Ethernet network and you want to connect a network printer.
This procedure can also be useful if you have only one Ethernet
connection and you want to connect both the VGA Printer and a
network printer to the network.
To connect a network printer directly to the VGA Printer
ETH 2 port
In this configuration the ETH 1 and ETH 2 interfaces act like a
2-port hub allowing both the network printer and the PC to
connect to the VGA Printer device.
For best performance you should connect the PC to ETH 1 and the
printer to ETH 2. Also, the overhead required to forward packets
between ETH 1 and ETH 2 can affect the video capture
performance of the device. To improve performance do not print
from the PC and the VGA Printer device at the same time.
Note: This procedure uses example IP addresses for the network
printer, the PC, and the VGA Printer device. You can use any
three addresses as long as they are on the same subnet.
1 Manually configure the network printer with an IP address
netmask, and gateway. For example:
IP address: 192.168.10.102
Netmask: 255.255.255.0
Gateway: 192.168.10.200
2 Connect the VGA Printer ETH 1 port directly to the PC’s
Ethernet port using a cross-over cable.
Page 42 Epiphan VGA Printer
Page 43

4. VGA Printer Web admin interface Configuring the Ethernet Bridge For Use if You Have Only
3 Log into the Web admin interface.
If you have been able to assign the VGA Printer an IP address
log in using that IP address. Otherwise, use the following
steps:
• Change the IP address of the PC connected to ETH 1 to:
IP Address: 192.168.255.249
Subnet Mask: 255.255.255.252
Follow the instructions for your operating system. If your
operating system supports adding more than one IP
address, then you can add this IP address as a second IP
address instead of changing the current address.
• Start a web browser on the PC and browse to:
http://192.168.255.250
• Enter the following:
User Name: admin
Password: (no password required)
• Press Enter to log into the Web admin interface.
4 In the Ethernet Bridge section, select Enable.
5 Select Change Ethernet Bridge Configuration.
6 Select Continue.
7 Scroll down the Web admin interface to the Reboot the
system section and select Reboot. Then select Continue.
It takes a few minutes for the device to reboot.
8 Scroll down to Change IP Address.
9 Set How to obtain IP address to Use static address.
10 Enter the following network settings:
IP: 192.168.10.101
Mask: 255.255.255.0
Gateway: 192.168.10.200
DNS server: (leave blank)
User Guide Page 43
Page 44

4. VGA Printer Web admin interface Configuring the Ethernet Bridge For Use if You Have Only
VGA
Cable
ETH 1
ETH 2
PC
VGA source
Printer
(Print Captured
Images)
11 Change the IP address of the PC connected ETH 1 to:
IP Address: 192.168.10.103
Subnet Mask: 255.255.255.252
12 Connect ETH 2 directly to the printer Ethernet port using a
cross-over or regular Ethernet cable.
13 Log into the Web admin interface by browsing to the
following IP address:
http://192.168.10.101
14 Follow the instructions in “Adding Printers” on page 27 to
add the network printer to the VGA Printer configuration.
Figure 21:Connecting a network printer directly to the VGA
Printer ETH 2 port
Page 44 Epiphan VGA Printer
Page 45

4. VGA Printer Web admin interface Using the VGA Printer device as a DHCP Server
Using the VGA Printer device as a DHCP Server
You can configure the VGA Printer device to act as a DHCP
server on the network. To configure the VGA Printer device to act
as a DHCP server, enable the DHCP server on the device and
enter the range of IP addresses that the DHCP server can provide.
You might want to configure the VGA Printer DHCP server if the
network you are connecting your the VGA Printer device to does
not have a DHCP server and you want to automatically set the IP
addresses of the some of the devices on your network using
DHCP.
To enable the VGA Printer DHCP server
1 Log into the Web admin interface.
2 Scroll down to the DHCP Server section.
Figure 22:DHCP server
3 Select Run DHCP Server.
4 Enter the Start and End addresses of the IP address range that
the DHCP server can assign to devices on the network.
5 Select Change DHCP Server Configuration.
6 Scroll down to Reboot the system.
7 Scroll down the Web admin interface to the Reboot the
system section and select Reboot. Then select Continue.
It takes a few minutes for the device to reboot and resume
operation with the new DHCP server configuration.
User Guide Page 45
Page 46

4. VGA Printer Web admin interface Changing VGA Printer Sound Volume
Changing VGA Printer Sound Volume
You can configure the VGA Printer device to produce a sound
each time a print request is received. You can also set the sound
volume level. Set sound volume to 0 to turn sound off.
You can set the sound volume to 10, 25, 50, 75, or 100. Try
different sound levels until you find the one that works for you.
Configuring VGA2USB Adjustments
The VGA Printer device automatically adjusts image capture
settings every time it starts up. This automatic adjustment is
repeated every 60 seconds during operation. You can change the
interval between automatic adjustments if you want them to
occur more or less often.
Normally you would not have to make manual image
adjustments. However, you may have special requirements or for
other reasons have image quality problems that can only be fixed
by making manual adjustments.
The Web admin interface contains most of the information that
you need to make image adjustments including a brief
description of the affect of each adjustment and the adjustment
range.
Because image adjustments are made automatically there are no
default image adjustment settings. Also, changing image
adjustments means making relative adjustments from the settings
auto configured by the system.
To configure image adjustments from the Web admin
interface
1 Log into the Web admin interface.
2 Scroll down to the VGA2USB Adjustments section.
Page 46 Epiphan VGA Printer
Page 47

4. VGA Printer Web admin interfaceConfiguring VGA2USB Adjustments
Figure 23:Image adjustment options
3 Enter values for the image capture settings that you want to
adjust.
For information about each setting, see “Image Adjustment
Settings” on page 48.
4 Select Save and Apply VGA2USB Adjustments.
5 Select Continue.
If image adjustments are required, you may need to make
them in small increments to avoid loss of image
synchronization. If image synchronization is lost, the device
will stop responding and stop capturing images. You may
have to wait a few minutes before the device will start
responding again. You can disconnect the video cable for 10
seconds to reset image synchronization. You can also reset
image synchronization by restarting the device. See
“Rebooting or Restarting the VGA Printer device” on page 50.
To reset image adjustments from the Web admin
interface
1 Log into the Web admin interface.
User Guide Page 47
Page 48

4. VGA Printer Web admin interfaceConfiguring VGA2USB Adjustments
2 Scroll down to the VGA2USB Adjustments section.
3 Delete the values from the fields for each image adjustment
that you want to reset.
4 Select Save and Apply VGA2USB Adjustments.
5 Select Continue.
Image Adjustment Settings
Interval Change the interval between automatic
adjustments if you want them to occur more or
less often.
Vertical
shift
Configure vertical shift to offset the captured
image position. For example, a captured image
shifted slightly downward (vertically), can be
corrected with minor adjustments to the vertical
shift settings.
Increasing or decreasing the value entered in the
Vertical Shift field shifts the image up or down.
Horizontal
Shift
Configure horizontal shift to offset the captured
image position. For example, a captured image
shifted slightly to the right (horizontally) can be
corrected with minor adjustments to the
horizontal shift settings.
Increasing or decreasing the value entered in the
Horizontal Shift field shifts the image to the left
or right.
Phase Configure Phase (also called sampling phase) to
adjust the horizontal resolution of the image.
Improperly adjusted phase will result in a fuzzy
image. You can adjust the sampling phase in
small steps until a sharper image is displayed.
Page 48 Epiphan VGA Printer
Page 49

4. VGA Printer Web admin interfaceConfiguring VGA2USB Adjustments
PLL
adjustment
Offset and
Gain
Aspect
Ratio
Configure PLL to adjust the vertical
synchronization properties of the image. The
PLL adjustment may need to be changed when
there is a repetitive distortion or blurriness on
the horizontal axis of the image. You can adjust
the PLL setting in small steps until a sharper
image is displayed.
Use the offset and gain controls together to
optimize image quality. Increasing gain
amplifies weak signals but also increases noise.
Increasing offset reduces background noise but
also reduces the overall signal.
Balance offset and gain to achieve the best
quality image. You should adjust these settings
by the smallest values possible to achieve the
best results. You can compensate for a large
change to one by making a large change to the
other, but setting both offset and gain to high
values can result in poorer video quality.
Set the aspect ratio of the captured image. The
default aspect ratio is 4:3. You can change the
aspect ratio to wide mode so that the device can
accurately capture wide aspect ratio VGA
modes.
It's not always possible for the Epiphan device
driver to distinguish between video modes when
they have the same number of rows, for
example, 1024x768 and 1280x768. You can
change the aspect ratio to Wide Mode if you
want the driver to choose wide video mode in
these situations.
User Guide Page 49
Page 50

4. VGA Printer Web admin interface Rebooting or Restarting the VGA Printer device
Rebooting or Restarting the VGA Printer device
Some configuration changes, require you to reboot the VGA
Printer device. For an example, see “Changing the VGA Printer IP
Address” on page 22. You may also want to reboot the VGA
Printer device for other reasons.
To reboot or restart the device
1 Log into the Web admin interface.
2 Scroll down to Reboot the system.
3 Select Reboot.
The VGA Printer device takes a short time to reboot and
resume operation.
Maintenance Configuration
The VGA Printer device uses the maintenance configuration
settings that you set on the Web admin interface to communicate
with the Epiphan maintenance server. This allows Epiphan to
review the VGA Printer configuration, firmware version, and
other basic operating parameters. If you are having problems
with the VGA Printer device and you contact Epiphan Support,
the support team can use this maintenance information to help
remotely troubleshoot the problems.
Note: The VGA Printer device does not send private information
to the Epiphan maintenance server, just basic operation and
configuration information. The amount of traffic sent to the
Epiphan maintenance server is small. The traffic should not affect
network or Internet connection throughput.
Page 50 Epiphan VGA Printer
Page 51

4. VGA Printer Web admin interface Maintenance Configuration
By default, the maintenance configuration uses TCP port 30 to
communicate with the Epiphan maintenance server. The default
address of the Epiphan maintenance server is
epiphany.epiphan.com. The VGA Printer device must be able to
find a DNS server to resolve the epiphany.epiphan.com address
and then must be able to connect to this address on the Internet
using TCP port 30.
If there is a firewall or other device protecting the network, the
configuration of this device may have to be changed for the VGA
Printer device to connect to the Epiphan maintenance server.
Contact your network administrator for assistance.
Figure 24:Maintenance Configuration
You can change the following maintenance configuration
settings.
Enable
Remote
Support
Enable
Connection
to
Maintenance
server
Allow Epiphan Support to log into the VGA
Printer device with special access privileges to
troubleshoot problems.
The VGA Printer device establishes an outgoing
TCP connection to the Epiphan maintenance
server using TCP port 30. Using this connection,
the device sends information to the Epiphan
maintenance server and Epiphan Support can
use this maintenance connection to remotely log
into your VGA Printer device.
User Guide Page 51
Page 52

4. VGA Printer Web admin interface Maintenance Configuration
Maintenance
Server
The address of the Epiphan maintenance server.
This address is usually epiphany.epiphan.com.
However, you can change this address if
required, (but usually only as recommended by
Epiphan Support). For example, you may have to
change this address to a numeric IP address if the
VGA Printer device cannot connect to a DNS
server.
Maintenance
Port
The TCP port that the VGA Printer device uses to
connect to the Epiphan maintenance server. This
is usually port 30. However, you can change this
address if required or as recommended by
Epiphan Support.
You can enable and disable remote support and the connection to
the maintenance server independently. The following table
describes the results of different configurations.
Enable
Enable
Remote
Support
Connection to
Maintenance
Server Result
Yes Yes The VGA Printer device connects to
the Epiphan maintenance server. If
required, Epiphan Support can
remotely connect to the device with
special access privileges.
No Yes The VGA Printer device connects to
the Epiphan maintenance server.
Epiphan Support can remotely
connect to the Web admin interface
with the same access privileges as an
administrator.
Page 52 Epiphan VGA Printer
Page 53

4. VGA Printer Web admin interface Maintenance Configuration
Enable
Enable
Remote
Support
Connection to
Maintenance
Server Result
Yes No The VGA Printer device does not
connect to the Epiphan maintenance
server. If required, Epiphan Support
can remotely connect to the device
with special access privileges if you
provide remote access to the network
in some other way (for example,
using port forwarding). Contact
Epiphan Support for assistance.
No No The VGA Printer device does not
connect to the Epiphan maintenance
server. If required, Epiphan Support
can remotely connect to the Web
admin interface with the same access
privileges as an administrator if you
provide remote access to the network
in some other way (for example,
using port forwarding). Contact
Epiphan Support for assistance.
To change maintenance configuration settings
1 Log into the Web admin interface.
2 Scroll down to Maintenance Configuration.
3 Change settings as required and select Save and Apply
Settings.
The changes take effect right away.
User Guide Page 53
Page 54

4. VGA Printer Web admin interface Web Page Configuration
Web Page Configuration
You can use the Web admin interface web page configuration
setting to change how often the captured image is refreshed.
Change the Autorefresh time as required and select Save and
Apply Settings.
Date and Time Configuration
You can set date and time manually or you can Enable Time
synchronization. It is important that the VGA Printer device has
the correct time if you include the date and time annotation on
printed pages.
Enable time synchronization, to update the date and time using a
time server. You can select NTP to get date and time updates
from a public network time protocol (NTP) server by connecting
to the server over the Internet. NTP users UDP port 123. The
default NTP server is time.nrc.ca. You should change this to an
NTP server recommended for your location.
For complete information about NTP, including a list of
recommended NTP servers, see The NTP Public Services Project.
To make sure you get the correct time from an NTP server, you
should select the correct Time Zone for the location of the VGA
Printer device.
If the device cannot connect to the Internet and if you have an
RDATE server on your network, you can set time synchronization
to use RDATE (defined by RFC 868). Contact your network
administrator for the address of the RDATE server and enter the
RDATE server IP address into the Server IP Address field.
In both cases, you can control how often the date and time are
updated. The Time Update interval can be every 1, 6, 12, or 24
hours. You can also set Time Update to check for the correct date
and time just before printing an image.
Page 54 Epiphan VGA Printer
Page 55

4. VGA Printer Web admin interface Firmware Upgrade
Firmware Upgrade
You can obtain new firmware versions from Epiphan Support.
New firmware is released to fix known problems or to add new
features.
To install new firmware
Installing new firmware can take several minutes. Once you start
a firmware upgrade, you cannot print captured images until the
firmware upgrade is complete.
1 Get the new firmware file from Epiphan Support.
2 Place a copy of the firmware file on the PC you use to connect
to the Web admin interface.
3 Log into the Web admin interface.
4 Scroll down to Firmware Upgrade.
5 Select Browse and then select the firmware file.
6 Select Save and Upgrade Firmware.
The firmware uploads. The VGA Printer device unpacks the
firmware update file, verifies the contents and then upgrades
the firmware.
Messages similar to the following appear on the Web admin
interface.
Local update detected: /tmp/rfc1867_NHWCk7
Unpacking update...
linux
initrd.img
rootfs.img
syslinux.cfg
default.cf.default
boot.img
md5sum
Verifying update...
linux: OK
initrd.img: OK
rootfs.img: OK
syslinux.cfg: OK
default.cf.default: OK
boot.img: OK
Substituting files. Do NOT interrupt...
Update completed successfully. You can reboot the
system.
User Guide Page 55
Page 56

4. VGA Printer Web admin interface System Information
7 Select Continue.
To complete the firmware upgrade you must reboot the VGA
Printer device.
8 Scroll to the Reboot the system section of the Web admin
interface, select Reboot and select Continue.
The device reboots and starts up running the new firmware.
This may take a few minutes.
9 Log into the Web admin interface.
10 Scroll down to System Information and select View System
Information.
11 Confirm that the VGA Printer device is running the new
firmware version.
System Information
Scroll down to System Information and select View System
Information to display the following:
• The current firmware version including details of the
firmware build
• Information about the Frame Grabber installed in your VGA
Printer
• Information about the VGA Printer device CPU
•VGA mode information.
Figure 25:System Information
Page 56 Epiphan VGA Printer
Page 57

5. Advanced Printer ConfigurationAdding a Printer That the VGA Printer Device Cannot Find Au-
5. Advanced Printer Configuration
This chapter describes some advanced printer configuration
procedures for the VGA Printer device. In most cases, you would
only need the information in this chapter if the VGA Printer
device cannot find and configure a printer automatically.
The VGA Printer device uses the Common UNIX Printing System
(CUPS) to communicate with locally connected and network
printers. This chapter describes some basic procedures for using
the VGA Printer CUPS implementation. For more information
about CUPS, see http://www.cups.org.
This chapter contains the following sections:
• Adding a Printer That the VGA Printer Device Cannot Find
Automatically
• Deleting a Printer
• Selecting the Default Printer
• Controlling Print Jobs
• Network Protocols Supported By the VGA Printer device
Adding a Printer That the VGA Printer Device Cannot Find Automatically
The VGA Printer device can usually automatically find any
printer that is turned on and either directly connected to the VGA
Printer device or connected to the same network as the VGA
Printer device. However, if the VGA Printer device can’t find a
printer that you want to add, you can use the procedures in this
section to add and configure the printer manually.
You can also use these procedures if you want to add a printer
that is not currently connected to the to the VGA Printer device or
the network. For example, if you are moving the VGA Printer
device to a new location or network, you can add a printer that is
at the new location before you move the device.
User Guide Page 57
Page 58

5. Advanced Printer ConfigurationAdding a Printer That the VGA Printer Device Cannot Find Au-
This section contains two procedures. You can use the first one,
“Adding a Printer Manually” on page 58, if the VGA Printer
device can’t find a printer that you want to add. You can use the
second procedure, “Adding a Printer Using a PPD File” on
page 64, if the VGA Printer device can’t find a printer that you
want to add and you have a PPD file for that printer or if you
would like to attempt to get a PPD file for that printer.
Adding a Printer Manually
Use the following procedure to manually add a printer. Before
you start this procedure you should know the following:
• The name and manufacturer of the printer.
• If the printer is connected to a network, the network protocol
used by the printer (see “Network Protocols Supported By the
VGA Printer device” on page 75).
To add a printer manually
1 Log into the Web admin interface.
2 Scroll down to the Configure VGA Printer section.
3 Select Printers configuration and jobs control.
You may have to enter the admin username and password.
The Printers page appears.
Figure 26:Printers page (no printers added)
Page 58 Epiphan VGA Printer
Page 59

5. Advanced Printer ConfigurationAdding a Printer That the VGA Printer Device Cannot Find Au-
4 Select Add Printer.
The Add New Printer page appears.
Figure 27:Adding a new printer
5 Enter descriptive information about the printer.
You must enter a name and the name cannot include spaces or
the / and # characters. If you add more than one printer, the
VGA Printer device lists the printers in alphabetical order by
name. You cannot change the Name after you add the printer.
Entering the location and description is optional, but it can be
useful to enter this information to make it easier to identify the
printer. You can add or change the location and description
information later.
6 Select Continue.
The Device page appears.
User Guide Page 59
Page 60

5. Advanced Printer ConfigurationAdding a Printer That the VGA Printer Device Cannot Find Au-
Figure 28:Select the printer device
7 Select how the VGA Printer device communicates with the
printer.
• If the printer is a network printer select the correct network
protocol (See “Network Protocols Supported By the VGA
Printer device” on page 75).
• If the printer is, or will be connected directly to a VGA
Printer USB port, select USB Serial Port #1.
8 Select Continue.
The page that is displayed next depends on whether you are
adding a network printer or a printer that is connected to a
USB port.
9 Configure how the VGA Printer device connects to the printer:
• If the printer is a network printer, enter the Device URI for
the printer. (See “Network Protocols Supported By the
VGA Printer device” on page 75)
Page 60 Epiphan VGA Printer
Page 61

5. Advanced Printer ConfigurationAdding a Printer That the VGA Printer Device Cannot Find Au-
Figure 29:Device URI for a network printer
• If the printer is connected directly to the VGA Printer
device select Continue. You do not have to change serial
port settings.
Figure 30:Serial port settings for a USB-connected printer
The Make/Manufacturer page appears.
User Guide Page 61
Page 62

5. Advanced Printer ConfigurationAdding a Printer That the VGA Printer Device Cannot Find Au-
Figure 31:Select the printer Make/Manufacturer
10 At this point you can optionally upload a PPD file for the
printer. If you have a PPD file, see the procedure “To use a
PPD file to add a printer” on page 64.
11 Select the name of the manufacturer of the printer.
12 Select Continue.
13 Select the printer model name.
14 Select Add Printer.
The printer is added and you can optionally change printer
controls such as page size, and print resolution. The printer
controls that are available depend on the printer.
Page 62 Epiphan VGA Printer
Page 63

5. Advanced Printer ConfigurationAdding a Printer That the VGA Printer Device Cannot Find Au-
15 You can either change printer controls or select Set Printer
Options to add the printer and complete this procedure.
If the VGA Printer device can add the printer, a message
appears indicating that the printer has been successfully
added.
Figure 32:Printer added
16 Select the Printers tab to display all added printers. The
printers are displayed in alphabetical order by name.
17 Select VGA Printer Config to return to the Web admin
interface.
18 Scroll down to the Configure VGA Printer section and make
sure that the VGA Printer device will print to the correct
printer. If the VGA Printer device will not print to the correct
printer you can set the correct printer to be the default printer.
See “Selecting the Default Printer” on page 68.
User Guide Page 63
Page 64

5. Advanced Printer ConfigurationAdding a Printer That the VGA Printer Device Cannot Find Au-
Figure 33:The printer that the VGA Printer device will print to is
displayed in the Configure VGA Printer section of the
Web admin interface
Adding a Printer Using a PPD File
A PPD file is a text file that describes a printer. You can add a PPD
file to the VGA Printer device to add the configuration settings for
a printer.
Usually, you can get a PPD file from the printer manufacturer.
PPD files are also available for many printers from this CUPS web
page: http://www.cups.org/ppd.php. You can also test PPD
files, to confirm that they are compatible with CUPS and may
work with the VGA Printer device, at
http://www.cups.org/testppd.php.
To use a PPD file to add a printer
1 Follow steps 1 to 9 of the procedure “To add a printer
manually” on page 58.
Page 64 Epiphan VGA Printer
Page 65

5. Advanced Printer ConfigurationAdding a Printer That the VGA Printer Device Cannot Find Au-
Figure 34:Uploading a PPD file
2 Select Browse, select the PPD file and then select open.
3 Select Add Printer to upload the PPD file to the VGA Printer
device.
The printer is added to the VGA Printer device and you can
optionally change printer controls such as page size, and print
resolution. The printer controls that are available depend on
the PPD file.
4 You can either change printer controls or select Set Printer
Options to add the printer and complete this procedure.
A message appears indicating that the printer has been
successfully added.
User Guide Page 65
Page 66

5. Advanced Printer ConfigurationAdding a Printer That the VGA Printer Device Cannot Find Au-
Figure 35:Printer added
5 Select the Printers tab to display all added printers. The
printers are displayed in alphabetical order by name.
6 Select VGA Printer Config to return to the Web admin
interface.
7 Scroll down to the Configure VGA Printer section and make
sure that the VGA Printer device will print to the correct
printer. If the VGA Printer device will not print to the correct
printer you can set the correct printer to be the default printer.
See “Selecting the Default Printer” on page 68.
Page 66 Epiphan VGA Printer
Page 67

5. Advanced Printer Configuration Deleting a Printer
Figure 36:The printer that the VGA Printer device will print to is
displayed in the Configure VGA Printer section of the
Web admin interface
Deleting a Printer
You can delete any printer added to the VGA Printer device.
Deleting a printer removes the printer’s configuration settings.
If you delete the default printer or the printer that the VGA
Printer device was printing to, you may have to select another
printer to be the default printer. See “Selecting the Default
Printer” on page 68.
To delete a printer
1 Log into the Web admin interface.
2 Scroll down to the Configure VGA Printer section.
3 Select Printers configuration and jobs control.
You may have to enter the admin username and password.
The Printers page appears.
4 Scroll down the list of printers to find the printer to delete.
5 Select Delete Printer, for the printer to delete.
6 Confirm that you want to delete the printer.
A message appears indicating that the printer has been
successfully deleted.
User Guide Page 67
Page 68

5. Advanced Printer Configuration Selecting the Default Printer
7 Select VGA Printer Config to display the Web admin
interface.
8 Check the Configure VGA Printer section. If the message
Error: printer is not configured! appears, you must add a new
printer or set one of the already added printers to be the
default printer.
• To add a new printer, see “Adding Printers” on page 27 or
“Adding a Printer That the VGA Printer Device Cannot
Find Automatically” on page 57.
• To set a printer to be the default printer, see “Selecting the
Default Printer”.
Selecting the Default Printer
If you have added more than one printer, you may need to
change the printer that the VGA Printer device prints to. You
change the printer by making the printer that you want the VGA
Printer device to print to the default printer.
Also, if you delete the printer that the VGA Printer device was
printing to, you may need to select a default printer.
Note: You don’t always have to select a default printer. Setting
the default printer is available if you want to change the printer
that the VGA Printer device prints to, or if Configure VGA
Printer displays the message Error: printer is not configured!.
Only one printer can be the default printer. If the default printer is
turned off or disconnected, print jobs are stored in that printer’s
print queue. You can either move those print jobs to another
printer, or the stored print jobs will be printed when the printer is
connected or turned on again. You may have to start the print
jobs manually, see “Controlling Print Jobs” on page 70).
To change the default printer
1 Log into the Web admin interface.
2 Scroll down to the Configure VGA Printer section.
Page 68 Epiphan VGA Printer
Page 69

5. Advanced Printer Configuration Selecting the Default Printer
3 Select Printers configuration and jobs control.
The Printers page appears.
Figure 37:Printers page
4 Find the printer to set as the default printer and select the Set
As Default button.
The VGA Printer device sets the printer as the default printer
and displays the status of the printer.
User Guide Page 69
Page 70

5. Advanced Printer Configuration Controlling Print Jobs
Figure 38:The default printer
Controlling Print Jobs
When you select to print a captured image, the VGA Printer
device creates a print job. The print job is added to the current or
default printer’s job queue and then sent to the printer.
If you send captured images faster than the printer can print
them, multiple print jobs are added to the printer’s job queue. The
VGA Printer device then sends the print jobs to the printer one at
a time in the order in which you selected to print them.
All print jobs in the print queue have a unique ID which consists
of the printer name followed by a consecutive number. For a
given printer, the VGA Printer device prints jobs in ID order. If a
print job with a lower ID is stopped, print jobs with higher IDs
will not print. You must restart, cancel, or move a stopped print
job to print the jobs below it in the print queue.
Page 70 Epiphan VGA Printer
Page 71

5. Advanced Printer Configuration Controlling Print Jobs
Figure 39:Example print queue
You do not normally have to work with VGA Printer print jobs or
print job queues, but working with print jobs can be useful for
checking the status of print jobs and for solving some printing
problems. Also, if a printer is turned off or disconnected and you
send print jobs to it, the print jobs are stored in that printer’s print
queue. You can either move those print jobs to another printer or
when the printer is connected or turned on again, the VGA
Printer device sends the stored print jobs to the printer. After the
printer is restarted, you may have to go to the print queue and
restart print jobs for them to print.
To view an individual printer’s print jobs
1 Log into the Web admin interface.
2 Scroll down to the Configure VGA Printer section.
3 Select Printers configuration and jobs control.
The Printers page appears.
4 To see the print job queue, select the printer icon for the
printer.
The print jobs for the selected printer are displayed.
A number of options are available from the print jobs queue
including:
• Reject Jobs to prevent the VGA Printer device from
queueing jobs for this printer.
• Move All Jobs to move all print jobs to another printer’s
print queue.
• Cancel All Jobs to cancel all jobs in this printer’s queue.
User Guide Page 71
Page 72

5. Advanced Printer Configuration Controlling Print Jobs
Figure 40:Example print job queue for a printer showing two
print jobs
Page 72 Epiphan VGA Printer
Page 73

5. Advanced Printer Configuration Controlling Print Jobs
You can use the Search function to only display some jobs.
You can display all jobs completed by this printer since the
VGA Printer device was powered on.
For each print job you can:
• Reprint job to start a print job that has been stopped.
• Hold job to temporarily stop the VGA Printer device from
printing this job. The VGA Printer device will print the
next job in the queue.
• Release job to release a held job for printing.
• Cancel job to cancel a print job and remove it from the
queue.
• Move job to move a print job to another printer.
To view all print jobs
1 Log into the Web admin interface.
2 Scroll down to the Configure VGA Printer section.
3 Select Printers configuration and jobs control.
The Printers page appears.
4 Select the Jobs tab to view all print jobs for all printers.
Similar to viewing the print jobs for an individual printer you
can reject, move, cancel, reprint, and hold jobs.
To restart stopped print jobs
Use the following procedure to restart print jobs that have been
stopped. The print jobs could have been stopped because they
were added to the queue of a printer that was not connected or
turned on, moved to a printer’s print queue from another print
queue, or for other reasons. In most cases, the following steps will
restart a stopped print job.
1 Log into the Web admin interface.
2 Scroll down to the Configure VGA Printer section.
3 Select Printers configuration and jobs control.
The Printers page appears.
User Guide Page 73
Page 74

5. Advanced Printer Configuration Controlling Print Jobs
4 To restart print jobs, select the printer icon for the printer.
The print jobs for the selected printer are displayed.
5 To print all of the stopped print jobs, select Reprint job for
each stopped print job.
To move jobs from one printer to another
You can easily move jobs from one printer’s queue to another
printer’s queue even if the printers are completely different. After
you move a print job, you can start it printing on the printer that
you moved it to.
1 Log into the Web admin interface.
2 Scroll down to the Configure VGA Printer section.
3 Select Printers configuration and jobs control.
The Printers page appears.
4 To display the print jobs to move, select the Jobs tab to display
all print jobs or select a printer to view the jobs for that printer.
5 Select Move Job.
6 Select the name of the printer to move the job to.
The print job is added to the selected printer’s print queue.
Usually the job state is set to stopped.
7 Select the printer that you moved the print job to.
8 For the job that you moved, select Reprint Job to print the
moved job.
Page 74 Epiphan VGA Printer
Page 75

5. Advanced Printer Configuration Network Protocols Supported By the VGA Printer device
Network Protocols Supported By the VGA Printer device
The VGA Printer device supports most network printers that use
the following protocols:
•AppSocket/HP JetDirect
• Internet printing protocol (ipp or http)
• line printer daemon (LPD or LPR)
Printer discovery is currently accomplished using the SNMP
protocol; however, future versions of CUPS will also include
support for multicast DNS service discovery as well.
See the CUPS document Using Network Printers for more
information about network printing including a table of common
device URIs.
Note: The VGA Printer device does not support printing to
Windows network shared printers.
AppSocket/HP JetDirect
The AppSocket protocol (sometimes also called the JetDirect
protocol, because of its origins with the HP JetDirect network
interfaces) is the simplest, fastest, and generally the most reliable
network protocol used for printers. AppSocket printing normally
happens over port 9100 and uses socket URIs:
socket://ip-address-or-hostname
socket://ip-address-or-hostname?waiteof=false
socket://ip-address-or-hostname:port-number
socket://ip-address-or-hostname:port-number?waiteof=false
Examples:
socket://192.168.20.34
socket://MyPrinter?waiteof=false
socket://192.168.34.56:9100
socket://10.10.10.23:9100?waiteof=false
User Guide Page 75
Page 76

5. Advanced Printer Configuration Network Protocols Supported By the VGA Printer device
The “waiteof” option controls whether the socket backend waits
for the printer to complete the printing of the job. The default is to
wait.
Internet Printing Protocol (ipp or http)
IPP is supported by some network printers and print servers. IPP
support may be inconsistent so you should only use IPP when the
vendor actually documents official support for it. IPP printing
normally happens over port 631 and uses the http or ipp URIs:
http://ip-address-or-hostname:port-number/resource
http://ip-address-or-hostname:port-
number/resource?option=value
http://ip-address-or-hostname:port-
number/resource?option=value&option=value
ipp://ip-address-or-hostname/resource
ipp://ip-address-or-hostname/resource?option=value
ipp://ip-address-or-
hostname/resource?option=value&option=value
ipp://ip-address-or-hostname:port-number/resource
ipp://ip-address-or-hostname:port-
number/resource?option=value
ipp://ip-address-or-hostname:port-
number/resource?option=value&option=value
Examples:
http://192.168.20.1:631/ipp/
http://MyPrinter/ipp/port1
http://10.10.10.23:631/ipp?compression=gzip
ipp://192.168.22.34/ipp
ipp://OurPrinter/ipp/port3
Page 76 Epiphan VGA Printer
Page 77

5. Advanced Printer Configuration Network Protocols Supported By the VGA Printer device
Line Printer Daemon (LPD or LPR) Protocol
LPD is supported by many network printers. LPD printing
normally uses port 515 and lpd URIs:
lpd://ip-address-or-hostname/queue
lpd://ip-address-or-hostname/queue?option=value
lpd://ip-address-or-hostname
/queue?option=value&option=value
Examples:
lpd://192.168.45.123/queue
lpd://MyPrinter/queue?banner=on
User Guide Page 77
Page 78

5. Advanced Printer Configuration Network Protocols Supported By the VGA Printer device
Page 78 Epiphan VGA Printer
Page 79

Index
Symbols
% invert threshold 38
Numerics
2-port hub 40, 42
A
add
annotation to the printed
page 39
printer 59
printers 27
add password
admin 36
address
maintenance server 51
adjustments
image 46
admin interface 5
adding a password 36
default IP address and
netmask 13
log in 18, 20
web page configuration 54
admin password
add 36
advanced
printer configuration 57
annotation 39
adding to printed pages 37
text 39
AppSocket 75
aspect ratio
image adjustments 49
autorefresh 54
B
basics 12
bridge
Ethernet 40, 43
button
print image 33
reset 11
buttons and controls 10
C
cancelling print jobs 70, 71
captured image
adjustments 46
does not appear 16
printing 7, 33
change
DHCP server configuration
45
Ethernet bridge
configuration 40, 43
IP address 22, 43
IP address configuration 23
color transformation 38
printed pages 37
common UNIX printing system
(CUPS) 57
compatible printers 27
configured printer 38
connect to VGA printer
no DHCP server 20
connecting
printer to VGA printer 15
VGA Printer 14
connection to maintenance server
maintenance configuration
51
connector
USB 11
connectors 10
connectors and buttons 10
User Guide Page 79
Page 80

control interface
RS-232 25
controlling print jobs 70
CUPS 57
D
dark background 38
date and time
adding to printed pages 37
configuration 54
synchronization 54
default 68
printer 63, 68
VGA Printer IP address 18
delete
printer 67
the web admin interface
password 36
description
printer 59
device
printer 59
device URI
printer 60
DHCP
configuring VGA Printer as a
DHCP server 45
enabling 24
server 6, 18, 20, 45
turning on 24
DNS server 23, 51
download
network discovery utility 16
ETH 2 40, 41, 42
connector 10
Eth 2 42, 44
Ethernet
connection to VGA printer 15
network 10
Ethernet bridge 40, 43
configuring 40
F
firewall 51
firmware
upgrade 55
fit image
keeping original aspect ratio
39
to fill the whole page 39
G
gain
image adjustments 49
gateway 23
getting started 9
H
holding print jobs 73
horizontal resolution
image adjustments 48
horizontal shift
image adjustments 48
HP JetDirect 75
http 75, 76
hub 40, 42
E
Error
printer is not configured! 19,
68
ETH 1 40, 41, 42
connector 10
Eth 1 42
Page 80 Epiphan VGA Printer
I
ID
print job 70
image
confirm that VGA printer is
receiving 16
scaling 39
Page 81

image adjustments 46
aspect ratio 49
gain 49
horizontal resolution 48
horizontal shift 48
interval 48
offset 49
phase 48
PLL adjustment 49
reset 47
sampling phase 48
settings 48
vertical shift 48
vertical synchronization 49
wide mode 49
image capture
settings 46
image synchronization
recovering 47
include timestamp to the
annotation 39
information
system 56
install
network discovery utility 16
installation 9
internet printing protocol 75, 76
interval
image adjustment 46, 48
invert
all colors 38
black only 38
IP address
changing 22
default 18
DHCP server 18
VGA Printer default 13
ipp 75, 76
J
job
print 70
job queue 70
cancel jobs 70, 71
hold jobs 73
ID 70
moving jobs to another
printer 68, 70, 71, 74
reject jobs 71
release jobs 73
reprint jobs 73, 74
restart jobs 70, 71
restart stopped jobs 73
search jobs 73
status 71
view jobs 73
viewing print jobs 71
L
landscape 32
LEDs 10
VGA2USB 12
line printer daemon 75, 77
location
printer 59
log in
admin interface 18, 20
LPD 75, 77
LPR 75, 77
M
maintenance
changing the maintenance
configuration 53
configuration 50
default maintenance server
IP address 51
enable connection to
maintenance server 51
enable remote support 51
maintenance server 52
port 52
server 50
server configuration 52
User Guide Page 81
Page 82

maintenance server
TCP port 51
make
printer manufacturer 61
mask 23
model name
printer 62
move
VGA printer 57
N
name
printer 59
netmask 23
network discovery utility 16
download 16
install 16
network printer 28
network settings 6
DHCP server 6
network time protocol 54
NTP
date and time server 54
NTP Public Services Project 54
null-modem cable 25
O
offset
image adjustments 49
one Ethernet connection 40
P
page fit 39
printed pages 37
page size 62
password
add admin password 36
adding 36
deleting 36
if you loose or forget 36
PC
changing the network
configuration 20
phase
image adjustments 48
PLL adjustment
image adjustments 49
port
maintenance 52
portrait 32
power
connecting 15
connector 10
power on 14
PPD 58, 62, 64
getting a PPD file for your
printer 64
testing PPD files 64
uploading 65
uploading PPD files 7
PRINT
RS-232 interface command
25
print
from an application 34
queue 71
touching a URL 34
print image
button 33
print resolution 62
Page 82 Epiphan VGA Printer
Page 83

printer 68
add 27
adding 6, 28
adding a disconnected
printer 57
adding manually 57
adding using a PPD file 58,
62, 64
adding when you can’t
connect 57
advanced configuration 57
cancelling print jobs 70, 71
configuration 57
connected to a USB port 28
connecting to VGA printer 15
controlling print jobs 70
default 63, 68
deleting 67
description 59
device 59
holding print jobs 73
interface 12
job queue 70
job queue ID 70
location 59
make and manufacturer 61
model name 62
moving print jobs to another
printer 68, 70, 71, 74
name 59
network 28
not connected 57
print job status 71
recommended and
supported 13
rejecting print jobs 71
releasing print jobs 73
remote 57
reprinting print jobs 73, 74
restarting print jobs 70, 71
restarting stopped print jobs
73
searching print jobs 73
setting the default printer 68
VGA Printer cannot find 57
viewing print jobs 71, 73
printers configuration and jobs
control 28, 58
printing
captured images 7, 33
script 34
using a third-party
application 34
protocol 77
provide a PPD file 65
Q
queue
cancelling print jobs 70, 71
holding print jobs 73
moving print jobs to another
printer 68, 70, 71, 74
print job 70
print job ID 70
print job status 71
rejecting print jobs 71
releasing print jobs 73
reprinting print jobs 73, 74
restarting print jobs 70, 71
restarting stopped print jobs
73
searching print jobs 73
viewing print jobs 71, 73
R
RDATE
date and time server 54
reboot 56
VGA Printer 24, 50
recommended
printers 13
rejecting print jobs 71
releasing print jobs 73
User Guide Page 83
Page 84

remote support
maintenance configuration
51
reprinting print jobs 73, 74
reset
button 11
image adjustments 47
restart 50
restarting print jobs 70, 71
restarting stopped print jobs 73
RS-232
integration 25
printing 25
Run DHCP Server 45
S
sampling phase
image adjustments 48
scale
image 39
script
printing 34
searching print jobs 73
serial port settings 61
set as default 69
set printer options 63
settings
image adjustments 48
sound
volume 46
static IP address 22
stopped jobs
restarting 73
supported
printers 13
synchronization
date and time 54
system information 56
T
TCP port 30
default maintenance port 51
third-party application
printing 34
time
configuration 54
synchronization 54
time zone 54
update 54
time.nrc.ca 54
troubleshooting 19, 50
turn on power 14
U
UDP port 123 54
update
time 54
upgrade
firmware 55
URI 75
printer device 60
USB
USB Serial Port #1 60
USB connectors 11
use DHCP 24
use static address 23, 43
V
vertical shift
image adjustments 48
vertical synchronization
image adjustments 49
VGA IN
connector 11
VGA mode information 56
VGA OUT
connector 11
VGA Printer 50
VGA signal output
connecting 14
VGA source
connecting 14
Page 84 Epiphan VGA Printer
Page 85

VGA2USB
adjustments 46
LEDs 12
video source 12
view system information 56
viewing print jobs 71, 73
volume
sound 46
W
web admin interface 5, 13
deleting the password 36
options 35
web page configuration 54
Wget 34
white text 38
wide mode
image adjustments 49
Windows network shared printers
75
Z
zone
time zone 54
User Guide Page 85
Page 86

Page 86 Epiphan VGA Printer
 Loading...