


User Guide
Epiphan Pearl Mini
Release 4.7.1
February 20, 2019
UG122-05
© and ™ 2019, Epiphan Systems, Inc

Terms and conditions
This document, the Epiphan web site, and the information contained therein, including but not limited to the text, videos and images as well as Epiphan System Inc.’s trademarks, trade names and logos are the property of Epiphan Systems Inc. and its affiliates and licensors, and are protected from unauthorized copying and dissemination by Canadian copyright law, United States copyright law, trademark law, international conventions and other intellectual property laws.
Epiphan, Epiphan Video, Epiphan Systems, Epiphan Systems Inc., and Epiphan logos are trademarks or registered trademarks of Epiphan Systems Inc., in certain countries. All Epiphan product names and logos are trademarks or registered trademarks of Epiphan. All other company and product names and logos may be trademarks or registered trademarks of their respective owners in certain countries.
Copyright © 2019 Epiphan Systems Inc. All Rights Reserved.
THE SOFTWARE LICENSE AND LIMITED WARRANTY FOR THE ACCOMPANYING PRODUCT ARE SET FORTH IN THE INFORMATION PACKET OR PRODUCT INSTALLATION SOFTWARE PACKAGE THAT SHIPPED WITH THE PRODUCT AND ARE INCORPORATED HEREIN BY REFERENCE. IF YOU ARE UNABLE TO LOCATE THE SOFTWARE LICENSES OR LIMITED WARRANTY, CONTACT YOUR EPIPHAN REPRESENTATIVE FOR A COPY.
PRODUCT DESCRIPTIONS AND SPECIFICATIONS REGARDING THE PRODUCTS IN THIS MANUAL ARE SUBJECT TO CHANGE WITHOUT NOTICE. EPIPHAN PERIODICALLY ADDS OR UPDATES THE INFORMATION AND DOCUMENTS ON ITS WEB SITE WITHOUT NOTICE. ALL STATEMENTS, INFORMATION AND RECOMMENDATIONS ARE BELIEVED TO BE ACCURATE AT TIME OF WRITING BUT ARE PRESENTED WITHOUT WARRANTY OF ANY KIND, EXPRESS OR IMPLIED. USERS MUST TAKE FULL RESPONSIBILITY FOR THEIR APPLICATION OF ANY PRODUCTS.
LIMITATION OF LIABILITY
UNDER NO CIRCUMSTANCES SHALL EPIPHAN BE LIABLE FOR ANY INCIDENTAL, SPECIAL, CONSEQUENTIAL, EXEMPLARY OR OTHER INDIRECT DAMAGES THAT RESULT FROM THE USE OF, OR THE INABILITY TO USE, THIS PRODUCT OR THE INFORMATION CONTAINED IN THIS DOCUMENT OR PROVIDED ON EPIPHAN’S WEB SITE, EVEN IF EPIPHAN HAS BEEN ADVISED OF THE POSSIBILITY OF SUCH DAMAGES. IN NO EVENT SHALL EPIPHAN’S TOTAL LIABILITY TO YOU FOR ALL DAMAGES, LOSSES, AND CAUSES OF ACTION RESULTING FROM YOUR USE OF THIS PRODUCT, WHETHER IN CONTRACT, TORT (INCLUDING, BUT NOT LIMITED TO, NEGLIGENCE) OR OTHERWISE, EXCEED THE AMOUNTS YOU PAID TO EPIPHAN DURING THE MOST RECENT THREE-MONTH PERIOD IN CONNECTION WITH AMOUNTS WHICH YOU PAID FOR USING THIS PRODUCT.
INFORMATION AND DOCUMENTS, INCLUDING PRODUCT SPECIFICATIONS, PROVIDED IN THIS DOCUMENT OR THE EPIPHAN WEB SITE ARE PROVIDED “AS IS”. SPECIFICALLY, BUT NOT WITHOUT LIMITATION, EPIPHAN DOES NOT WARRANT THAT: (i) THE INFORMATION IS CORRECT, ACCURATE, RELIABLE OR COMPLETE; (ii) THE FUNCTIONS CONTAINED ON THE EPIPHAN WEB SITE WILL BE UNINTERRUPTED OR ERROR-FREE; (iii) DEFECTS WILL BE CORRECTED, OR (iv) THIS WEB SITE OR THE SERVER(S) THAT MAKES IT AVAILABLE ARE FREE OF VIRUSES OR OTHER HARMFUL COMPONENTS. EPIPHAN SPECIFICALLY DISCLAIMS ALL REPRESENTATIONS, WARRANTIES, AND CONDITIONS, EITHER EXPRESS, IMPLIED, STATUTORY, BY USAGE OF TRADE OR OTHERWISE INCLUDING BUT NOT LIMITED TO ANY IMPLIED WARRANTIES OF MERCHANTABILITY, NON-INFRINGEMENT, TITLE, SATISFACTORY QUALITY OR FITNESS FOR A PARTICULAR PURPOSE.
For additional terms and conditions, please refer to additional sections in this document.
ii

Thank you for choosing Epiphan!
At Epiphan Video (“Epiphan”),buildingreliablevideo systemswith pro featuresthat performaboveyour expectationsisourmission.
Wevalueyourfeedback! Emailusyoursuggestionsand let usknowhowyou think we'redoingand where you'd liketo seeourproductsimprove: info@epiphan.com
Warranty
AllEpiphan Systemsproductsareprovided with a100% return to depot warranty foroneyearfromthedate of purchase.
Technical support
Epiphan’sproductsarebacked by ourprofessionalsupport team. You can reach ourteamseveralways:
•Emailsupport@epiphan.com
•Livechat fromoursupport sitehttps://www.epiphan.com/support/
•Phonetollfreeat 1-877-599-6581 orcall+1-613-599-6581
Gatherasmuch information about yourproblemasyou can beforeyou contact usso wecan help you better, including:
•Adescription of theproblem
•Detailsabout yourvideo oraudio source(type,connection,resolution,refresh rate,etc.)
•Product serialnumber
•Product firmwareversion (usingtheadmin interface)
•Product LED lights
iii

What's new in release 4.7.1?
Firmware4.7.1 isamaintenancereleasethat includesan important stability fix forAFU foryourPearlMini.
What's fixed
AFU to SFTP server stability improvement
Thestability of automaticfileuploads(AFUs) to SFTP servershasbeen improved.
iv

Table of contents
What's new in release 4.7.1? |
iv |
Table of contents |
v |
Start here |
1 |
About this Guide |
1 |
What is Pearl Mini? |
2 |
Front and back view Pearl Mini |
4 |
SD card installation and file management |
6 |
Quick start |
8 |
Live video mixing / switching |
13 |
Monitoring audio |
14 |
Selecting an audio source |
16 |
Remote login access |
19 |
About remote login and control using AV Studio |
19 |
Enable or disable AV Studio remote login |
21 |
Pair a channel with AV Studio |
22 |
Control recording using AV Studio |
23 |
Configure channel encoding using AV Studio |
24 |
Access cloud versions of the Admin panel and Epiphan Live |
26 |
Specifications |
28 |
AV inputs |
28 |
Tech specs |
30 |
Optimum CPU performance |
33 |
Vesa mounting the device |
34 |
User interfaces |
35 |
The touch screen |
36 |
About the touch screen |
36 |
The Channel view |
38 |
Record a channel using the touch screen |
40 |
Stream a channel using the touch screen |
40 |
Switching / mixing using the touch screen |
41 |
One Touch streaming and recording control |
44 |
Configure the touch screen |
51 |
The Admin panel |
59 |
About the Admin panel |
59 |
Connect to the Admin panel |
61 |
v

Connect using the Epiphan discovery utility |
62 |
Connect using a DNS-based service discovery |
64 |
Connect using persistent static IP address |
65 |
Switching / mixing using the Admin panel |
66 |
Epiphan Live |
68 |
About Epiphan Live |
68 |
The Dashboard interface |
69 |
Access Epiphan Live using a web browser or mobile device |
71 |
Access Epiphan Live from the Admin panel |
72 |
Stream, record, and monitor using the Dashboard interface |
73 |
Switching / mixing using Epiphan Live |
81 |
Your recordings |
84 |
PART 1: Setup |
87 |
Configure network settings |
88 |
Network ports used by Pearl Mini |
88 |
Verify IP address and MAC address of Pearl Mini |
90 |
Configure a static IP address |
91 |
Configure DHCP |
94 |
Change the HTTP/HTTPS port values |
96 |
Perform network diagnostics |
97 |
Disable the network discovery utility |
98 |
Configure network security |
100 |
Configure 802.1x network security and manage user certificates |
100 |
Manage CA and self-signed certificates |
102 |
Configure HTTPS |
103 |
Tether to a mobile network |
104 |
Configure date and time |
107 |
Format the SD card |
110 |
Audio input ports |
112 |
Enable or disable phantom power |
112 |
Configure audio ports for stereo or mono |
113 |
Assign audio sources to an input |
114 |
Adjust audio gain and delay |
115 |
Mute audio |
117 |
Video output ports |
120 |
About video output ports |
120 |
Video output port resolution |
121 |
Show a channel or video source on the output port |
122 |
vi

Preview the video output port |
124 |
Disable the video output port |
125 |
Disable or enable audio and output port volume |
126 |
Display and reposition the audio VU meter |
127 |
Rename a video output port |
128 |
Mirror the video output port display |
128 |
Set up Kaltura CMS integration |
130 |
Enable CMS and register with Kaltura |
130 |
Disable or deregister the device from Kaltura |
132 |
Change the resource name used for Kaltura |
133 |
Reassign a registered resource |
134 |
User administration |
137 |
User types and privileges |
137 |
Set or change user passwords |
141 |
Remove user passwords |
142 |
Overcome lost passwords |
143 |
Configure LDAP user authentication |
144 |
Change the logged-in user |
146 |
Restrict viewers by IP address |
146 |
IP restriction examples |
148 |
Configuration presets |
151 |
About configuration presets |
151 |
Configuration preset considerations |
153 |
Configuration groups |
158 |
The Factory default configuration preset |
159 |
Create a configuration preset |
160 |
Apply a configuration preset using the Admin panel |
161 |
Apply a configuration preset using the touch screen |
162 |
Export and import configuration presets |
164 |
Update a configuration preset |
166 |
Delete a configuration preset |
167 |
Status and monitoring |
168 |
PART 2: Capture |
181 |
What is a channel? |
182 |
Channel layout examples |
183 |
Channel configuration |
187 |
Create a channel |
187 |
vii

Add video sources or a channel as a source |
191 |
Add an audio source to a layout |
195 |
Duplicate a channel |
196 |
Rename a channel |
197 |
Delete a channel |
198 |
Preview channel |
199 |
Add or remove channel metadata |
202 |
Configure encoding |
203 |
Codecs and file format compatibility |
203 |
Configure video encoding |
205 |
Configure audio encoding |
210 |
Multi-encoding and channel as a source |
211 |
Custom layout configuration |
213 |
About the custom layout editor |
213 |
Resize and position items using percents or pixels |
217 |
Open the custom layout editor for a channel |
223 |
Add or edit a custom layout |
224 |
Rename a layout |
226 |
Delete, move, or duplicate a layout |
227 |
Set the background color |
229 |
Add an image to a layout |
230 |
Upload or remove an image using the Media page |
232 |
Add a text overlay |
234 |
Custom system variables for text overlays |
237 |
Crop a video source |
237 |
Video and audio input sources |
240 |
About connecting video and audio sources |
240 |
Preview a video source using the Admin Panel |
241 |
Rename an input port |
242 |
Configure a video input source |
243 |
DVI and HDMI signals |
243 |
SDI signals |
244 |
Add a custom No Signal image |
245 |
PART 3: Stream |
247 |
What is streaming? |
248 |
Stream settings for video and slides |
249 |
View supported streaming formats |
250 |
viii

Streaming a channel directly to viewers |
251 |
Stream content using HTTP, HTTPS or RTSP |
252 |
Directly share stream URLs with viewers |
253 |
View the live broadcast URL using a web browser |
254 |
View the streaming URL using a media player |
256 |
Restrict viewer access to channel streams |
258 |
Restrict viewers by IP address |
259 |
IP restriction examples |
261 |
Change HTTP and RTSP streaming port values |
263 |
Disable and enable direct channel streaming |
265 |
Streaming to a server |
266 |
Stream to a CDN |
267 |
Start and stop streaming to a CDN |
268 |
Set up a stream using RTMP or RTMPS push |
270 |
Set up a stream using RTSP announce |
271 |
Stream to a CDN using an XML profile |
272 |
Stream to Wowza Streaming Cloud |
274 |
Stream to Original Livestream |
277 |
Stream using multicast |
279 |
MPEG-TS streams using RTP/UDP push |
279 |
MPEG-TS streams using UDP push |
281 |
Multicast streaming using RTP/UDP |
283 |
Viewing with Session Announcement Protocol (SAP) |
284 |
Stream to Kaltura CMS |
285 |
Set up a channel for a scheduled webcasting event |
285 |
Use RTMPS for a Kaltura webcasting event |
287 |
Stream to a media player or smart TV |
289 |
Stream using UPnP |
289 |
Enable UPnP |
290 |
Disable UPnP |
293 |
Viewing with UPnP |
294 |
Play directly to a media player |
296 |
Auto-restart playback to a UPnP device |
296 |
Change UPnP device name |
297 |
PART 4: Record |
298 |
About recording |
299 |
Record a channel |
301 |
ix

Record using One Touch control |
302 |
Configure recording settings, file size and type |
303 |
Restart recording |
306 |
Recorders |
308 |
Add a recorder |
308 |
Select channels to record |
309 |
Start and stop a recorder |
310 |
Rename a recorder |
311 |
Duplicate a recorder |
312 |
Delete a recorder |
313 |
Record to Kaltura CMS |
314 |
About recording to Kaltura CMS |
314 |
Select channels for VOD event views |
317 |
Manually start/stop scheduled VOD events |
318 |
Manually start/stop an ad hoc event |
320 |
Manage recorded files |
323 |
View list of recorded files |
323 |
Download recorded files manually |
324 |
Join recorded files together |
325 |
Extract tracks from a recording |
326 |
Rename recorded files |
328 |
Delete recorded files |
328 |
FTP and automatic file transfers |
330 |
About Automatic File Upload (AFU) |
330 |
Choose files to include in AFU |
331 |
Enable AFU and set parameters |
333 |
Configure AFU to FTP server parameters |
336 |
Configure AFU to RSync server parameters |
337 |
Configure AFU to CIFS server parameters |
339 |
Configure AFU to SCP client parameters |
340 |
Configure AFU to SFTP server parameters |
342 |
Configure AFU to AWS S3 parameters |
345 |
Configure AFU to WebDav server parameters |
346 |
AFU or copy to USB |
348 |
AFU to a USB storage device |
348 |
Do a one-time copy/move all recordings to USB storage device |
349 |
Manually copy recordings to USB storage device |
351 |
View available USB storage space |
353 |
Safely eject USB storage device |
353 |
x
View the AFU log |
354 |
Manage the AFU queue |
355 |
Local FTP server |
357 |
PART 5: Maintenance |
361 |
Power down and system restart |
362 |
Backup your Pearl Mini setup |
364 |
Perform a factory reset |
365 |
Firmware upgrade |
366 |
Support |
371 |
Storage space maintenance |
375 |
Third party integration |
378 |
Controlling Pearl Mini using RS-232 / serial port |
379 |
Controlling Pearl Mini using HTTP/HTTPS commands |
385 |
Configuration keys for third party APIs |
391 |
Troubleshooting |
404 |
Limitations and known issues |
415 |
Software license |
418 |
xi

PearlMiniUserGuide |
Start here |
Start here
Welcome,and thank you forbuyingEpiphan PearlMini™. You'llfind alltheinformation you need to set up and start usingyoursystemin thisuserguide. Foraproduct description,seeWhat isPearlMini?.
SeetheQuick start forbasicstepsto get asinglevideo source(and optionalaudio) set up so you can stream and record someoutput right away. Therest of theguideshowsyou howto tweak thesystemexactly how you want it so you can takeadvantageof themany advanced features.
About this Guide
Aftertheintroductory section and quick start,thenext chapterdescribesthemain userinterfacesthat are used to operateand configurePearlMini. You'llfind everythingthat you need to successfully accessand use theseinterfaces:
•Touch screen
•Admin Panel
•Epiphan Live
Therest of theuserguidecoverssettingup and operatingyoursystemforasuccessfulvideo switching, recording,and livestreamingexperience. Thechaptersareorganized in to thesefivecategories: Setup, Capture,Stream,Record and Maintenance.
1

PearlMiniUserGuide |
What isPearlMini? |
What is Pearl Mini?
PearlMiniisaversatilelivevideo production devicethat'savideo encoder,video streamer,liveswitcher,and video recorderallin one. PearlMiniisgreat forlecturecaptureapplications.
With PearlMini,you can capture,record and streamcomputermonitors,radardisplays,oranythingthat outputsto SDI,HDMI™,orDVI-I (singlelink). Captureaudio viaXLR,¼TRS,RCA,3.5 mm,SDI orHDMI.
Simultaneously captureup to *threeaudio visualsourcesand choosehowyou want to record and stream them. HaveseparateISOsorcreatecustomlayoutswith multiplevideo sourcesforliveswitching. You can do allthat usingPearlMini.
Easily watch livestreamsusingyourfavoriteweb browserormediaplayeron mobiledevicesand computers connected to thesameprivatenetwork asPearlMiniorusingContent Distribution Networks(CDNs). Recorded filescan bedownloaded viaFTP orset to automatically upload overFTP,RSYNC,orCIFSand can be integrated into yourContent Management System(CMS). PearlMiniisalso fully integrated with KalturaCMS and can beregistered asavideo encoderresourceforeasy lecturecapture.
Network security compliancewith 802.1x protocols,passwords,and certificateauthentication meansan easiersetup forITfriendly livestreamingoverenterprisenetworks. HTTPSenabled forsecureadministration and controlovertheLAN,and RTMPSsupport forsecure,encrypted livestreaming.
PearlMinidoesnot capturefromHDCP encrypted sources.
2

PearlMiniUserGuide |
What isPearlMini? |
*PearlMinisupportsup to threevideo inputswith certain conditions,seeAV inputs.
3

PearlMiniUserGuide |
Front andbackviewPearlMini |
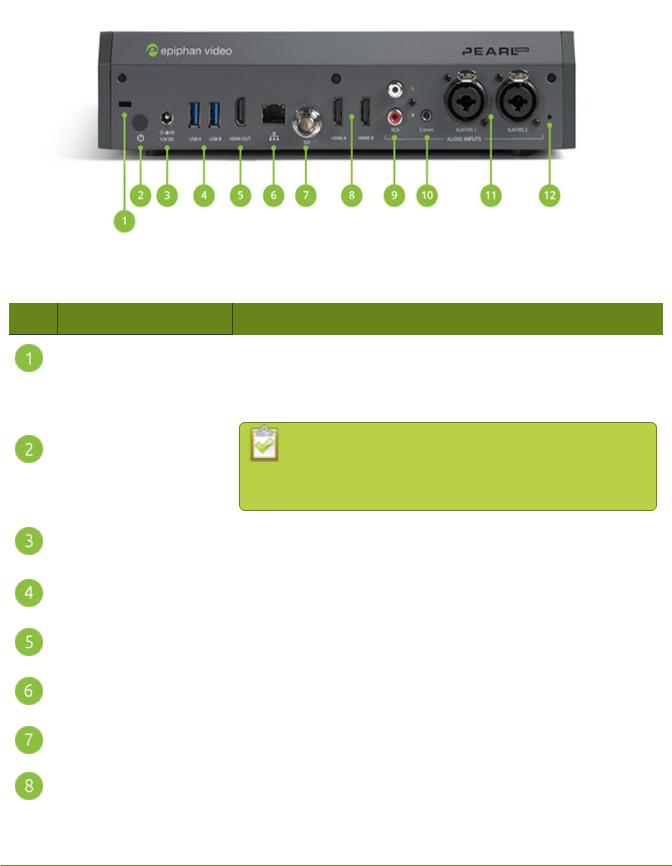
Front and back view Pearl Mini
Table 1 Pearl Mini front panel descriptions
Label Name |
Description |
|
|
|
|
|
Powerlight |
Glowswhen thesystemispowered on. |
|
|
|
|
Streaminglight |
Glowswhen thesystemisstreaming. Flashingmeansthat useraction |
|
isrequired and streaminghaseitherstopped orwon't start. |
|
|
|
|
|
|
|
|
Recordinglight |
Glowswhen thesystemisrecording. Flashingmeansthat useraction |
|
isrequired and recordinghaseitherstopped orwon't start. |
|
|
|
|
|
|
|
|
Touch screen front panel |
Used forconfidencemonitoringand simpleconfiguration,obtaining |
|
display |
systeminformation,and starting/stoppingrecordingsand streams. |
|
|
|
|
SD card slot |
Used to storeup to 512 GB of recordingsand useruploaded media |
|
files. Forrecommendations,seeTech specs. |
|
|
|
|
|
|
|
|
USB 3.0 port |
Forconnection of externalhard drivesorflash drivesforcopyingdata |
|
to aUSB drive,seeAFU orcopy to USB |
|
|
|
|
|
|
|
|
3.5 mmaudio output jack |
Foraudio confidencemonitoring. Playstheaudio forthecurrently |
|
visiblechannel. |
|
|
|
|
Do not insert objectsin to thetwo,pin-sized holesthat arelocated besidetheLEDs.
4
PearlMiniUserGuide |
Front andbackviewPearlMini |
Table 2 Pearl Mini back panel descriptions
Label Name |
Description |
|
|
|
|
|
Lock |
AllowsPearlMinito belocked to adesk orsurfaceusingalaptop lock |
|
cable. |
|
|
|
|
|
|
|
|
|
Pressto togglePearlMinion and off. |
|
Powerbutton |
If asoftwareshutdown isperformed when thetoggle |
|
switch isin theon position,doublepressthepower |
|
|
|
|
|
|
button to turn on PearlMini. |
|
|
|
|
Powerjack |
Plugthepowersupply in here. Theport requiresa12 V DCpower |
|
source(center-positive). Alwaysusetheprovided powersupply. |
|
|
|
|
|
|
|
|
USB 3.0 ports |
Forconnection of externalhard drivesorflash drives. Forcopying |
|
datato aUSB drive,seeAFU orcopy to USB. |
|
|
|
|
|
|
|
|
HDMI output port |
SeeVideo output portsfordetails. |
|
|
|
|
RJ-45 Ethernet |
Auto-sensinggigabit Ethernet 10/100/1000 Base-Tnetwork port. See |
|
Configurenetwork settingsforsetup instructions. |
|
|
|
|
|
|
|
|
SDI in |
Connect up to 3G SDI signalsto PearlMini. |
|
|
|
|
HDMI in |
ConnectsHDMI and DVI signals(usingan adapter) to PearlMini. |
|
|
|
5

PearlMiniUserGuide |
SD cardinstallationandfilemanagement |
|||
|
|
|
||
|
Label Name |
Description |
|
|
|
|
|
|
|
|
|
RCAaudio in |
RCAconsumerline-levelstereo pair(left/right) audio inputs. SeeAV |
|
|
|
inputs. |
|
|
|
|
|
|
|
|
|
|
|
|
|
|
3.5 mmaudio in |
Stereo mic-levelinput to connect apassiveoractivestereo electret |
|
|
|
microphone. |
|
|
|
|
|
|
|
|
|
|
|
|
|
|
|
Two XLR/TRScombo jacksthat can function asastereo pair |
|
|
|
|
(left/right) orastwo mono inputs. SeeAV inputs. |
|
|
|
XLR/TRScombo jacks |
• Two XLRmic-level(balanced) |
|
|
|
|
• Two TRS¼"professionalline-level,+4 dBu |
|
|
|
|
(balanced/unbalanced) |
|
|
|
|
|
|
|
|
|
Glowswhen 48 V phantompowerisenabled. Phantompoweris |
|
|
|
|
applied to both XLRaudio input portswhen enabled. SeeEnableor |
|
|
|
|
disablephantompower. |
|
|
|
Phantompowerlight |
WARNING: Connecting devices that are not designed for |
|
|
|
|
|
|
|
|
|
phantom power when phantom power is enabled for the two XLR |
|
|
|
|
ports can seriously damage those devices. Always check the |
|
|
|
|
phantom power LED before connecting devices to the XLR ports. |
|
|
|
|
|
|
SD card installation and file management
PearlMinicomeswith astandard SD card slot on thefront panel. An SD card isneeded when recordingvideo. If you'reonly switchingvideo orlivestreaming,then you don't need to installan SD card.
Werecommend usingaminimumclass10 (C10) SD card that'sat least 64 GB capacity but doesnot exceed 512 GB; however,most SD cardsthat areat minimumaC10,aUHSclass1 (U1),oravideo speed class10 (V10) should work. We'vetested variousSD cardswith PearlMini,including:
•Kingston 16 GB U1 / C10
•Sony 32 GB U3 / C10
•SanDisk 64 GB U1 / C10
•PNY256 GB U3 / C10
•AData128 GB U3 / V90
When theSD card isfull,newrecordingsoverwritetheoldest recordings. Do not eject theSD card while recordingisin progressasthat may corrupt theSD card.
6

PearlMiniUserGuide |
SD cardinstallationandfilemanagement |
TheSD card must beEXT4 formatted fortheUbuntu operatingsystem. You can format theSD card usingthe Admin panel,seeFormat theSD card.
TheUbuntu formatted SD card cannot beused to transferfilesto iOSorWindowssystems. Any content that'scontained on theSD card islost when theSD card isformatted.
Forimportant considerationswhen settingthemaximumfilesizelimit and recordingto theSD card,see About recording.
7

PearlMiniUserGuide |
Quickstart |
Quick start
PearlMinicomesshipped with apowersupply and cable,aquick start guide,and aregistration card. After you'veunpacked yourPearlMini,you'reready to get started. Thisquick start usesthedefault settingswhere possibleso you can quickly start usingyourPearlMini.
Beforeyou begin,makesureyou have:
•avideo sourcesuch asacameraorcomputerand cablesto connect themto PearlMini. ForHDMI,the video sourcemust not beHDCP protected.
•an audio sourcecomingfromeitheryourSDI orHDMI video source(must not beencrypted). Optionally,audio fromadifferent source,such asan audio mixerormicrophonethat you connect to theaudio input portscan beused.
•Localareanetwork that usesDynamicHost Configuration Protocol(DHCP) ispreferable.
•Computerwith aweb browserconnected to thesamenetwork. We'llcallit the“admin” computer.
•(Optional) Aformatted SD card if you plan to record video usingPearlMini. Werecommend an SD card that isat least aclass10 with up to 512 GB of capacity. TheSD card must beEXT4 formatted,seeSD card installation and filemanagement.
Starting up!
PearlMiniispre-configured with two channels: HDMI-Aand HDMI-B. TheHDMI-Avideo input port on Pearl Miniisassigned to theHDMI-Achanneland theHDMI-B video input sourceisassigned to theHDMI-B channel by default.
When you first start yourPearlMini,thevideo sourcesyou'veconnected to theHDMI-Aand HDMI-B input portsappearautomatically in theirassigned channels,alongwith theassociated HDMI audio. If no video sourceisconnected,astandard No Signalscreen displays.
Thechannel'sframesizeisset to match thevideo sourceby default and thebest bit rateforthe default framerateof 30 fpsisapplied to thechannelautomatically. Audio forthechannelcomes fromthevideo sourcethat isconnected to theHDMI port by default.
1.Turn on yourcameraorvideo sourceand connect theoutput to theHDMI-Ainput port on theback panelof PearlMini.
2.(Optional) Connect asecond video sourceto theHDMI-B port.
3.Connect theEthernet cableto PearlMiniand to yournetwork.
4.Attach thepowercableand plugit into apowersource.
8

PearlMiniUserGuide |
Quickstart |
5.Pressthepowerbutton on theback of PearlMinito turn on thesystem. Wait forthepower-up cycleto complete.
TheGrid viewshowingboth channelsappearson thetouch screen. Thevideo sourceyou connected to theHDMI-Aport appearsin channelHDMI-A,and thevideo sourceconnected to theHDMI-B port appearsin channelHDMI-B.
6.Usethetouch screen on PearlMiniforconfidencemonitoring. To display thesingleChannelview, simply tap on oneof thechannelsthat you seein theGrid view. FromtheChannelview,you can do thingslikestop and start recordingforthechannel.
7.(Optional) Plugspeakersorheadphonesinto the3.5 mmheadphonejack at thefront of PearlMini. For moreabout monitoringaudio,seeMonitoringaudio.
My network IP address and channel monitoring
You can get thenetwork IP addressof yourPearlMinifromthetouch screen so that you can do thingslike viewthechannelsusingaweb browseroraccesstheconfiguration Admin panel. Just makesurethat your admin computerisconnected to thesamenetwork asPearlMini.
1.To find theIP addressusingthetouch screen,tap thegear icon in thebottomright cornerof the screen and select System Status. If thecontroliconsaren't displayed,tap anywhereon thetouch screen.
9
PearlMiniUserGuide |
Quickstart |
2. Usingabrowseron theadmin computer,go to oneof thefollowingURLsto previewthechannel.
For HDMI A: http://<IP Address forPearlMini>/preview.cgi?channel=1
For HDMI B: http://<IP Address forPearlMini>/preview.cgi?channel=2
For example:http://192.1.10.100/preview.cgi?channel=2
3. (Optional) Open anewtab in yourbrowserand entertheURL to login to theAdmin panel.
http://<IP Address forPearlMini>/admin
For example:http://192.1.10.100/admin
Thedefault usernameadmin hasno password set by default. If apassword hasbeen set,consult with your systemadministratorforthelogin credentials,seeUsertypesand privileges. ForAdmin panellogin details,see Connect to theAdmin panel.
Install a formatted SD card to record a channel
An SD card must beinstalled and formatted beforeyou can record video usingPearlMini. You'llneed to login to theAdmin panelusingtheIP addressof yourPearlMinito format theSD card,seeFormat theSD card.
AftertheSD card isinstalled and formatted,it'seasy to start recordingyourchannelfromtheChannelview usingthetouch screen. Just tap thered dot that appearsin thetop right cornerof thescreen to start and stop recordingthechannel. Thedot flasheswhilerecording.
10

PearlMiniUserGuide |
Quickstart |
Recordingsaresaved to theSD card by default. You can not manually transferrecordingsoff theSD card to iOSorWindowssystems. Download recordingsusingtheAdmin panel. Forotheroptions,likedownloadingto aUSB memory deviceorusingAutomaticFileUploads,seeFTP and automaticfiletransfers.
EjectingtheSD card whiletherecordingisin progressmay corrupt theSD card and causelossof data. Stop allrecordingsbeforepoweringdown thesystem.
You can also controlrecordingusingtheAdmin panelorEpiphan Live. Formoreinformation about using Epiphan Live,seeAbout Epiphan Live.
To format an SD card and controlrecordingusingtheAdmin panel:
1.Insert theSD card into theSD card slot on PearlMini.
2.Usingaweb browseron theadmin computer,go to theIP addressof yourPearlMiniand login,see Connect to theAdmin panel.
3.FromtheConfiguration menu,click SD Card. TheSD Card configuration pageopens.
4.Select eitherquick disk format orthefulldisk format,then click Format. Do not eject theSD card while it isbeingformatted.
5.FromtheChannels menu,select yourchannel(eitherHDMI-AorHDMI-B) and click Recording. The Recordingpageforthechannelopens.
11

PearlMiniUserGuide |
Quickstart |
6. Click Start to start recordingthechanneland click Stopto stop recording.
7.Refresh thepageto seethenewly recorded fileappearin thelist.
8.Click thefileto download therecordingto youradmin computer.
What’s Next?
Nowthat you haveasourcesetup and areready to stream,you can fine-tunethesystemto yourexact requirements. Takealook at topicssuch as:
•Livevideo mixing/ switching
•Selectingan audio source
•Video output ports
•FTP and automaticfiletransfers
•Customlayout configuration
•What isstreaming?
Forhighersecurity,werecommend settingadmin,operatorand viewer-levelpasswordson Pearl Mini,seeSet or change user passwords.
When you'redonesettingup yourPearlMini,makesureto back up thesystemconfiguration usingthe proceduredescribed in:
• Createaconfiguration preset
12
PearlMiniUserGuide |
Livevideomixing/switching |
Live video mixing / switching
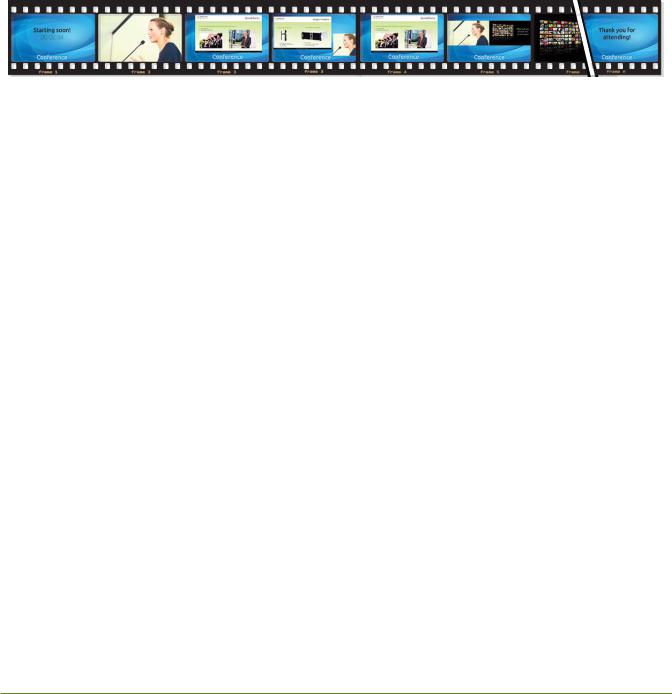
Createdynamiccontent foryourviewersto watch whileyou record and streamyourprogramusingPearl Mini. Usingthecustomlayout editor,you can createdifferent layouts,likepicturein pictureorside-by-side viewsof acameraand slides,then easily switch between layoutswith eitheratap on thetouch screen,using Epiphan Liveon amobiledevice,orfromtheAdmin panel.
Yourprogramstreamwith switched layoutscould look likethis:
To createaprogramchannelwith customlayoutsusingthecustomlayout editorthat you can switch,see What isachannel?
Forinstructionson howto liveswitch,see:
•Switching/ mixingusingthetouch screen
•Switching/ mixingusingEpiphan Live
•Switching/ mixingusingtheAdmin panel
13

PearlMiniUserGuide |
Monitoringaudio |
Monitoring audio
PearlMini'sfront panelincludesa3.5 mmaudio jack formonitoringaudio. You can plugexternalspeakersor headphonesinto the3.5 mmaudio jack. To monitortheaudio forachannel,just select thechannelusingthe touch screen. Theaudio you heardependson which layout iscurrently livebecausedifferent layoutscan have different audio sourcesconfigured.
Adjust the volume
Tap theheadphonesicon on thetouch screen to adjust thevolume. Each tap increasesthevolumeby 25% to
amaximumvolumeof 100%. Tappingtheheadphonesicon when thevolumeisat 100% mutesthevolume.
You can also longpresstheheadphonesicon to muteand unmutethevolume.
25% |
50% |
75% |
100% |
Volume is muted. |
volume. |
volume. |
volume. |
volume. |
At 75% volume,what you hearcorrespondsto thenominalaudio levelin theVU meterat approximately wherethegreen barschangeto yellow. Increasingthevolumeto 100% may causeyou to heardistortion that isnot actually present in theaudio signalbeingrecorded and streamed.
14

PearlMiniUserGuide |
Monitoringaudio |
Audio VU meter
AVU meteron thetouch screen showstheaudio levelsfortheselected channel. Thevalueisdisplayed in dBFS(decibelsrelativeto fullscale). Colored barsrepresent theaudio level.
Channelsthat havestereo audio display two bars. Thetop baristheleft audio channeland thebottombaris theright audio channel.
VU meter(mono)
VU meter(stereo)
Table 3 Audio VU meter levels
Color |
Decibel range |
|
|
Red |
0 to -9 dBFS |
|
|
Yellow |
-9 to -18 dBFS |
|
|
Green |
-18 dBFSand lower |
|
|
TheVU meterappearsin severaldifferent placesso you can visually check audio levels:
•Touch screen: On theindividualchannelviewand thegrid view. If theaudio meterisn't showing,tap anywhereon thetouch screen to turn on thecontrolicons.
15

PearlMiniUserGuide |
Selectinganaudiosource |
•Admin Panel: On theaudio input source'sconfiguration pagewhen you select theinput sourcefrom theInputsmenu. You can also add theVU meterto appearon thevideo output ports,seeDisableor enableaudio and output port volume.
•Epiphan Live: SeeMonitorvideo and audio input sources
Selecting an audio source
Theaudio that'scomingfromtheconnected HDMI video sources(HDMI-Aand HDMI-B) isautomatically used asthedefault audio sourcefortheHDMI-Aand HDMI-B channelson PearlMini. You can choosedifferent audio sourcesforachannelusingtheAdmin paneland do thingslikeadjust theinput gain,see Adjust audio gain and delay.
Thereare:
• Two XLR/TRScombo jacks.
•XLRmic-levelinput (balanced),supports48 V phantompower
•TRS¼"professionalline-levelinput,+ 4.0 dBu up to 12.3 V RMS,(+24 dBu) (balanced/unbalanced)
•One3.5 mmstereo miclevelinput forelectret microphones(unbalanced)
•Onestereo pairRCAconsumerline-levelinput (-10 dBV)
TheXLRand TRScombo jacksareconfigured asaleft/right stereo pairby default,seeConfigureaudio ports forstereo ormono. The3.5 mmaudio portsand theRCAaudio portsarelinked. You can configurePearlMini to useboth orjust oneof theaudio sourcesusingtheAdmin panel,see Assign audio sourcesto an input.
Thistableofferssomeguidelinesforadjustingthegain of theaudio input portsforcommon typesof audio devices. You should add thesuggested gain to theaudio input to get an averagesignalto registerat anominal levelin theVU meter(i.e. wherethegreen barschangeto yellow). Theactualamount of gain needed depends on thestrength of theoriginalaudio signal.
Table 4 Audio gain guidelines for different audio devices
Audio source |
Input |
Gain |
|
port |
|||
|
|
||
|
|
|
|
Dynamicmicrophone |
XLR |
Add +50 to +60 dB gain to theaudio input port. |
|
|
|
|
|
Electret microphone |
XLR |
Add +18 to +40 dB gain to theaudio input port. |
|
|
|
||
3.5 mm |
Add +6 to +12 dB gain to theaudio input port. |
||
|
|||
|
|
|
16

PearlMiniUserGuide |
|
Selectinganaudiosource |
||
|
|
|
|
|
|
Audio source |
Input |
Gain |
|
|
port |
|
||
|
|
|
|
|
|
|
|
|
|
|
Wirelessmicrophone |
XLR |
Add +18 to +40 dB gain to theaudio input port. |
|
|
|
|
|
|
|
receiver |
3.5 mm |
Add +6 to +12 dB gain to theaudio input port. |
|
|
|
|
||
|
|
|
|
|
|
Condensermicrophone |
XLR |
Add +40 to +60 dB gain to theaudio input port. |
|
|
with phantompower |
|
||
|
|
|
|
|
|
|
|
|
|
|
Mobilephoneorother |
TRS |
Add +6 to +12 dB gain to theaudio input port. |
|
|
|
|
|
|
|
consumerlineleveldevice |
RCA |
Nominal |
|
|
|
|
||
|
|
|
|
|
|
Professionalmixer |
TRS |
Nominal |
|
|
|
|
|
|
|
RCA |
Not recommended. |
|
|
|
|
|
||
|
|
|
|
|
Connectingdevicesthat arenot designed forphantompowerwhen phantompowerisenabled forthetwo XLRportscan seriously damagethosedevices. Alwayscheck thephantompowerLED beforeconnectingdevicesto theXLRports.
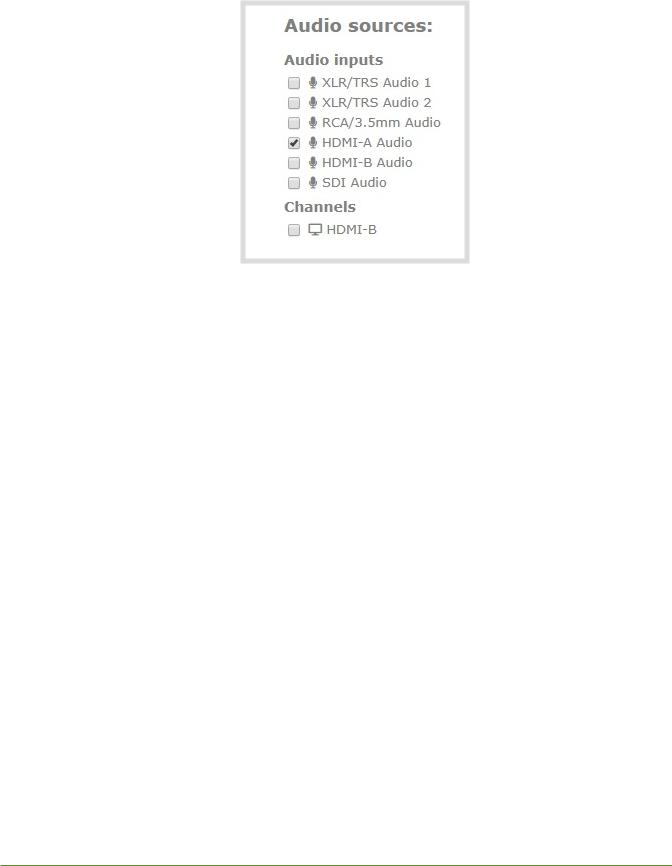
To chooseadifferent audio deviceforthechannel:
1.Usingaweb browseron theadmin computer,go to theIP addressof yourPearlMiniand login,see Connect to theAdmin panel.
2.FromtheChannelsmenu,select yourchannel(i.e. HDMI-AorHDMI-B) and click Layouts. Thecustom channellayout editorpageopens.
3.Check theaudio sourcethat you want to useforthelayout and click Save.
17
PearlMiniUserGuide |
Selectinganaudiosource |
4.(Optional) Adjust thegain foran audio input source,select theinput port fromtheInputsmenu and adjust theamount of gain on theconfiguration pagefortheaudio input port. Click Save when you're done. Formoredetails,see Adjust audio gain and delay.
18

PearlMiniUserGuide |
Remoteloginaccess |
Remote login access
Securely login to thecloud versionsof theAdmin paneland Epiphan Liveremotely fromanywhereyou have Internet access. Performoff-siterescuetroubleshooting,channelconfiguration,controlstreamingand recording,and moreusingyourfavoriteweb browseroverasecureconnection to theInternet. You don't need to beon thesame,localnetwork asPearlMini. Thissection containswhat you need to remotely access PearlMini.
Topicsinclude:
•About remotelogin and controlusingAV Studio
•EnableordisableAV Studio remotelogin
•Pairachannelwith AV Studio
•ControlrecordingusingAV Studio
•ConfigurechannelencodingusingAV Studio
•Accesscloud versionsof theAdmin paneland Epiphan Live
SeeTheAdmin paneland Epiphan Livefordetailsabout howto usetheseinterfacesand howto accessthe localweb versions.
About remote login and control using AV Studio
Performsecureremoterescuetroubleshooting,channelconfiguration,and morewhen you pairyourPearl
Minichannelswith yourfreeAV Studio account.
AV Studio isacloud-based platformthat allowsteamsto remotely controlvideo recordingencoderslikePearl Mini. UseAV Studio to performquick,lowtouch editingforfast turn around and cloud delivery of conferences,break out roomsessions,seminars,and more.
Accessthecloud version of theAdmin panelorEpiphan Livesecurely fromAV Studio. Controlrecordingand do thingslikecheck thechannelstatuson PearlMiniand even makesomechannelencodingsettingsfromAV Studio.
19
 Loading...