

Page 1
VGA2USB
Epiphan Frame Grabber User Guide
VGA2USB LR
VGA2USB HR
VGA2USB Pro
KVM2USB
DVI2USB
DVI2USB Solo
DVI2USB Duo
www.epiphan.com
1 February 2009 Version 3.20.2 (Windows) 3.16.14 (Mac OS X)
Page 2

Thank you for choosing Epiphan!
At Epiphan, product function and quality are our top priority. We make every
effort to make sure that our products exceed our customers expectations. We
regularly contact our customers to ensure product performance and reliability.
We strive to continually enhance our products to accommodate your needs.
Specifications
Epiphan manufactures a wide range of VGA and DVI Frame Grabbers. You can
go to the Frame Grabbers page of the Epiphan website and use the information
in the comparison table to select the optimal Frame Grabber for your
requirements.
Warranty
All Epiphan Systems products are provided with a 100% replacement warranty
for one year from the date of purchase. We welcome your feedback and
suggestions for product improvements. You can email your comments to
info@epiphan.com.
Technical Support
Epiphan is staffed by a professional support team. If, after checking the FAQs
for your product on the Epiphan website and re-installing the Epiphan driver
software, you continue to have outstanding issues, email a problem report to
support@epiphan.com. To help us solve the problem efficiently, include the
following info:
• Your hardware platform and operating system.
• Your product serial number
• The version of the Video capture application and the USB driver that you
are using.
• The behavior of your Frame Grabber product LED indicators.
• Technical description of the VGA or DVI signal source including resolution,
refresh rate, synchronization, type of hardware.
• Complete description of the problem you’re experiencing. If possible please
provide screen captures that show the problem.
Environmental Information
The equipment that you bought has required the extraction and use of natural
resources for its production. It may contain hazardous substances that could
impact health and the environment.
In order to avoid the dissemination of those substances in our environment and
to diminish the pressure on the natural resources, we encourage you to use the
appropriate take-back systems. Those systems will reuse or recycle most of the
materials of your end life equipment in a sound way.
The crossed-out wheeled bin symbol invites you to use those systems.
If you need more information about collection, reuse and recycling systems,
please contact your local or regional waste administration.
You can also contact us for more information on the environmental
performance of our products.
Copyright © 2009 Epiphan Systems Inc.
The names of actual companies and products mentioned herein may be the trademarks
of their respective owners.
Page 3

Table of Contents
Table of Contents
1. Introduction 7
Comparing Epiphan Frame Grabbers 7
About this Document 9
2. System Requirements 11
3. Installing the Windows VGA2USB/DVI2USB
drivers and application 12
4. Installing the Mac OS X VGA2USB/DVI2USB
drivers and application 14
5. Connecting a VGA2USB Device 16
6. Connecting a DVI2USB Device 18
7. Connecting a DVI2USB Solo Device 20
8. Connecting a DVI2USB Duo Device 22
9. Connecting a KVM2USB Device 24
10. Troubleshooting 26
11. About Epiphan frame grabbing technology 29
The VGA or DVI video source 30
The Frame Grabber 30
The video capture workstation 33
Glossary of Terms 45
User Guide Page 3
Page 4

Table of Contents
12. Windows video capture application 51
Upgrading to the latest software version 53
Starting the video capture application 54
Common procedures 56
Menus 61
Toolbar 67
Status bar 68
Shortcut keys 69
Recording, display, KVM and sharing options 69
Windows Epiphan USB device driver 76
13. Mac OS X video capture application 79
Upgrading to the latest Mac OS X software version 80
Starting the Mac OS X video capture application 81
Copying, saving, and printing images 83
Menus 84
Toolbar 89
Changing system preferences 90
14. Recording image files 91
Configuring image file recording options 91
Setting display options to change how image files are
recorded 95
Recording image files 95
Viewing saved image files 96
15. Recording videos 97
Recording videos for Windows 2000, XP, or Vista 97
Using a DirectShow application to record video files 107
Recording videos for Mac OS X 110
Recording videos for Linux 114
Page 4 Epiphan Frame Grabber
Page 5

Table of Contents
16. Web Broadcasting 121
Setting the Display format for web broadcasting 122
Starting a web broadcasting session 123
Viewing a web broadcasting session 124
Changing web broadcasting compression and
performance 125
17. Using the KVM2USB Frame Grabber 129
18. Advanced topics 133
About EDID 133
Configuring image adjustments 136
Configuring DirectShow options 143
Configuring VGA modes 145
Windows command line options 149
About the frame rate 151
Troubleshooting 153
Index 155
User Guide Page 5
Page 6

Table of Contents
Page 6 Epiphan Frame Grabber
Page 7

1. Introduction Comparing Epiphan Frame Grabbers
1. Introduction
Epiphan Frame Grabbers are compact external devices that you
can use to capture video images from virtually any VGA or DVI
source. Some example VGA or DVI sources include personal
computers running any version of Windows, Mac OS X, or Linux,
embedded imaging systems, medical imaging systems, scientific
equipment, and more.
Using the Epiphan video capture application installed on a video
capture workstation, you can display, record, and print captured
images and broadcast captured images on the Internet.
Epiphan Frame Grabbers can be used in a wide range of
applications such as:
• Capturing data from a computer screen for educational,
training and diagnostic purposes.
• Capturing and recording data from security cameras
especially high resolution cameras equipped with VGA signal
output.
• Monitoring remote equipment.
• Recording and analyzing data from research and diagnostic
equipment.
• Recording and transmitting data from medical equipment for
remote diagnoses and emergency help services when medical
personnel cannot travel to the patient.
• Quality control and testing.
• Collaborative work.
Comparing Epiphan Frame Grabbers
Epiphan Systems manufactures a wide range of VGA frame
grabbers. If you need to capture images from a VGA stream you
can use Figure 1 to help select the optimal VGA Frame Grabber
for your task.
User Guide Page 7
Page 8

1. Introduction Comparing Epiphan Frame Grabbers
Figure 1: Comparing Epiphan VGA Frame Grabbers
The VGA Frame Grabber comparison table on the Epiphan VGA
Frame Grabbers web page provides more detailed comparisons of
all Epiphan Frame Grabbers.
If you need to capture images from a DVI stream you can use
Figure 2 to help select the optimal DVI Frame Grabber for your
task.
Figure 2: Comparing Epiphan DVI Frame Grabbers
The DVI Frame Grabber comparison table on the Epiphan DVI
Frame Grabbers web page provides more detailed comparisons of
all Epiphan Frame Grabbers.
Page 8 Epiphan Frame Grabber
Page 9

1. Introduction About this Document
About this Document
This Epiphan Frame Grabber User Guide describes the basics of how
to install Epiphan Frame Grabbers and how to use the Epiphan
video capture application to capture, record, and broadcast
images captured by any Epiphan Frame Grabber.
This Epiphan Frame Grabber User Guide describes version 3.30.2 of
the Epiphan video capture application. Most of the information in
this document describes the Windows 2000, XP, and Vista
version; however, this document does contain sections and
chapters about the Mac OS X version and most of the information
can be applied to the Linux version.
This document contains the following chapters:
• Chapter 2. “System Requirements” on page 11, describes
hardware and software requirements required to support
Epiphan Frame Grabbers.
• Chapter 3. “Installing the Windows VGA2USB/DVI2USB
drivers and application” on page 12, describes how to install
the Windows VGA2USB/DVI2USB Epiphan device driver
and video capture application.
• Chapter 4. “Installing the Mac OS X VGA2USB/DVI2USB
drivers and application” on page 14, describes how to the
install the Mac OS X VGA2USB/DVI2USB Epiphan drivers
and video capture application.
• Chapter 5. “Connecting a VGA2USB Device” on page 16,
describes how to connect a VGA2USB, VGA2USB LR,
VGA2USB HR, or VGA2USB Pro Frame Grabber to a VGA
source and to a video capture workstation.
• Chapter 6. “Connecting a DVI2USB Device” on page 18,
describes how to connect a DVI 2USB Frame Grabber to a DVI
source and to a video capture workstation.
• Chapter 7. “Connecting a DVI2USB Solo Device” on page 20,
describes how to connect a DVI 2USB Solo Frame Grabber to a
DVI source and to a video capture workstation.
User Guide Page 9
Page 10

1. Introduction About this Document
• Chapter 8. “Connecting a DVI2USB Duo Device” on page 22,
describes how to connect a DVI 2USB Duo Frame Grabber to a
DVI source and to a video capture workstation.
• Chapter 9. “Connecting a KVM2USB Device” on page 24,
describes how to connect a KVM2USB Frame Grabber to a
headless server and to a video capture workstation.
• Chapter 10. “Troubleshooting” on page 26, describes
troubleshooting a Frame Grabber installation.
• Chapter 11. “About Epiphan frame grabbing technology” on
page 29, describes how the components required for
capturing, displaying, recording, and broadcasting images
from a VGA or DVI source with an Epiphan Frame Grabber
work together.
• Chapter 12. “Windows video capture application” on page 51,
describes the most commonly used functions and features of
the Epiphan Windows video capture application.
• Chapter 13. “Mac OS X video capture application” on page 79,
describes the most commonly used functions and features of
the Epiphan Mac OS X video capture application.
• Chapter 14. “Recording image files” on page 91, describes
how to record the frames captured by your Frame Grabber as
individual image files.
• Chapter 15. “Recording videos” on page 97, describes how to
record the frames captured by your Frame Grabber as an AVI
video file.
• Chapter 16. “Web Broadcasting” on page 121, describes how
to share or broadcast the images captured by your Epiphan
Frame Grabber over the Internet.
• Chapter 17. “Using the KVM2USB Frame Grabber” on
page 129, describes using the KVM2USB Frame Grabber to
connect to and operate a server that normally operates
without a keyboard, monitor, and mouse.
• Chapter 18. “Advanced topics” on page 133, describes special
topics such as upgrading to a new version of the video capture
application, EDID, and configuring image adjustments.
Page 10 Epiphan Frame Grabber
Page 11

2. System Requirements
2. System Requirements
To get started, make sure your system meets the following
hardware and software requirements:
Hardware Requirements
Video source Any VESA-compatible VGA or DVI source.
Video capture workstation
Processor speed VGA/DVI/KVM2USB: 700 MHz.
VGA2USB LR/HR/Pro, DVI2USB
Solo/Duo: 2.66 GHz.
USB port One USB 2.0 (also supports USB 1.1)
RAM memory VGA/DVI/KVM2USB: 256 MB
VGA2USB LR/HR/Pro, DVI2USB
Solo/Duo: 256 MB DDR2
Hard disk space 5 MB
Software Requirements
Video
capture
workstation
operating
system
VGA2USB/
DVI2USB/
drivers and
application
User Guide Page 11
Windows 2000 SP4, XP SP2, or 32-bit and 64-bit
Vista. See “Installing the Windows
VGA2USB/DVI2USB drivers and application”
on page 12.
Mac OS X 10.3 “Panther” or more recent, see
“Installing the Mac OS X VGA2USB/DVI2USB
drivers and application” on page 14.
Linux 2.6.x (i686 and x86_64).
To download the latest version, browse to
http://www.epiphan.com/products/ and
locate the Downloads page for your product.
(Also includes Linux install instructions.)
Page 12

3. Installing the Windows VGA2USB/DVI2U SB drivers and application
3. Installing the Windows
VGA2USB/DVI2USB drivers and
application
You must install the VGA2USB/DVI2USB drivers and
application on your Windows video capture workstation before
connecting the Frame Grabber to the workstation USB port. This
single download includes the video capture application and
VGA2USB/DVI2USB USB device drivers.
To install the VGA2USB/DVI2USB drivers and application
1 Download the latest software release to your video capture
workstation. Browse to http://www.epiphan.com/products/
and go to the Download page for your Frame Grabber.
2 Download the latest version of the VGA2USB drivers and
application from the Windows section of the Download page.
Tip: Make sure you note the download destination folder.
3 Unzip the downloaded file. Tip: Right-click on the .zip file and
choose Extract All.
Page 12 Epiphan Frame Grabber
Page 13

3. Installing the Windows VGA2USB/DVI2U SB drivers and application
4 Run the Setup Utility (setup.exe) and follow the prompts.
5 Connect your Frame Grabber, refer to the appropriate section:
• 5. “Connecting a VGA2USB Device” on page 16
• 6. “Connecting a DVI2USB Device” on page 18
• 7. “Connecting a DVI2USB Solo Device” on page 20
• 8. “Connecting a DVI2USB Duo Device” on page 22
• 9. “Connecting a KVM2USB Device” on page 24
Tip: If, after connecting your Frame Grabber, Windows
displays the Found New Hardware Wizard, respond to the
prompts before continuing with Step 6.
6 Open the Windows Device Manager and confirm that
Windows has detected your product. Tip: Refer to
10. “Troubleshooting” on page 26 if you encounter problems.
User Guide Page 13
Page 14

4. Installing the Mac OS X VGA2USB/DVI2USB drivers and application
4. Installing the Mac OS X
VGA2USB/DVI2USB drivers and
application
You must install the VGA2USB/DVI2USB software on your Mac
OS X video capture workstation before connecting the Frame
Grabber to the workstation USB port. This single download
includes the video capture application (v2u), the QuickTime
digitizer (vdig), and the VGA2USB/DVI2USB USB device driver.
To install the VGA2USB/DVI2USB drivers and application
1 Download the latest software release to your Mac OS X video
capture workstation. Browse to
http://www.epiphan.com/products/ to locate the Download
page for your Frame Grabber and scroll down to the
Macintosh section.
2 Download the latest version of the drivers and application that
will run on your system. Tip: Make sure you note the
download destination folder.
3 Untar the downloaded file. Tip: Double-click on the .tar file to
unpack it.
4 Double-click on the .pkg file and follow the prompts.
Page 14 Epiphan Frame Grabber
Page 15

4. Installing the Mac OS X VGA2USB/DVI2USB drivers and application
5 Connect your Frame Grabber, refer to the appropriate section:
• 5. “Connecting a VGA2USB Device” on page 16
• 6. “Connecting a DVI2USB Device” on page 18
• 7. “Connecting a DVI2USB Solo Device” on page 20
• 8. “Connecting a DVI2USB Duo Device” on page 22
• 9. “Connecting a KVM2USB Device” on page 24
6 Open System Profiler and expand the USB Device Tree to
confirm that the device is recognized. Tip: Refer to
10. “Troubleshooting” on page 26 if you have problems.
User Guide Page 15
Page 16
5. Connecting a VGA2USB Device
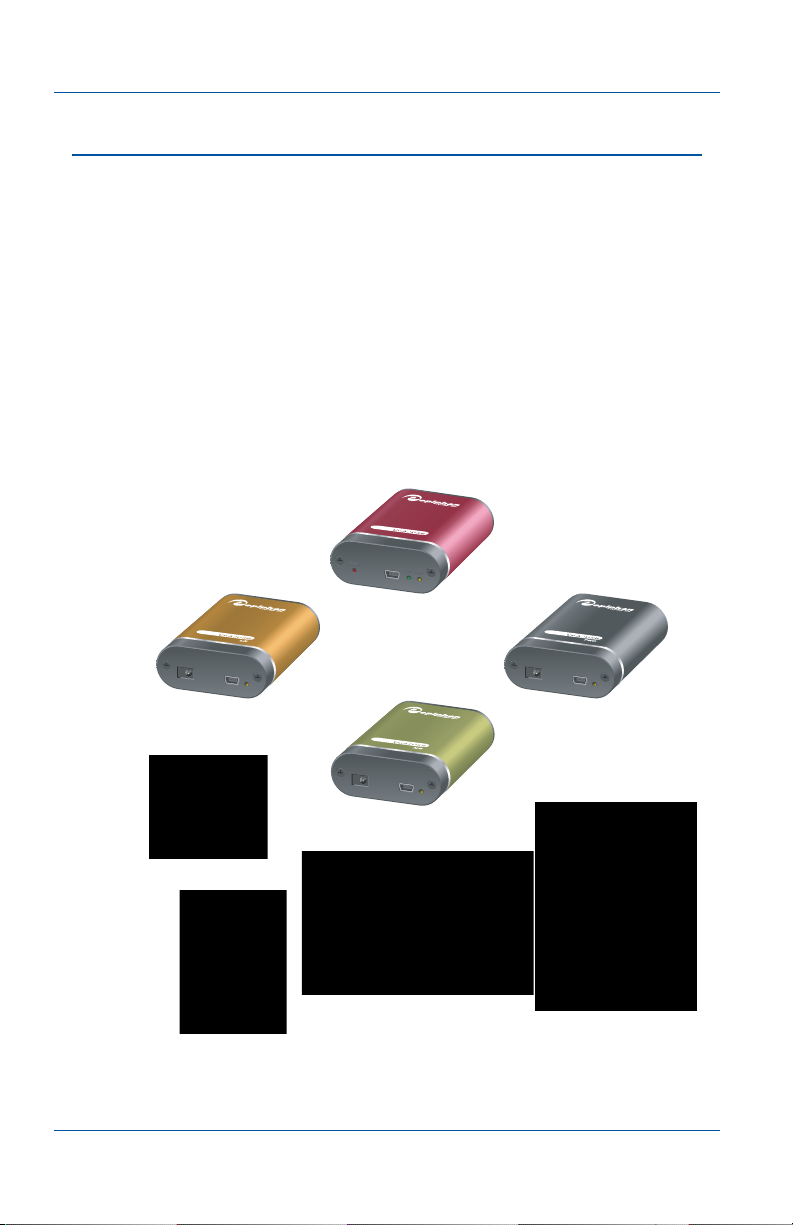
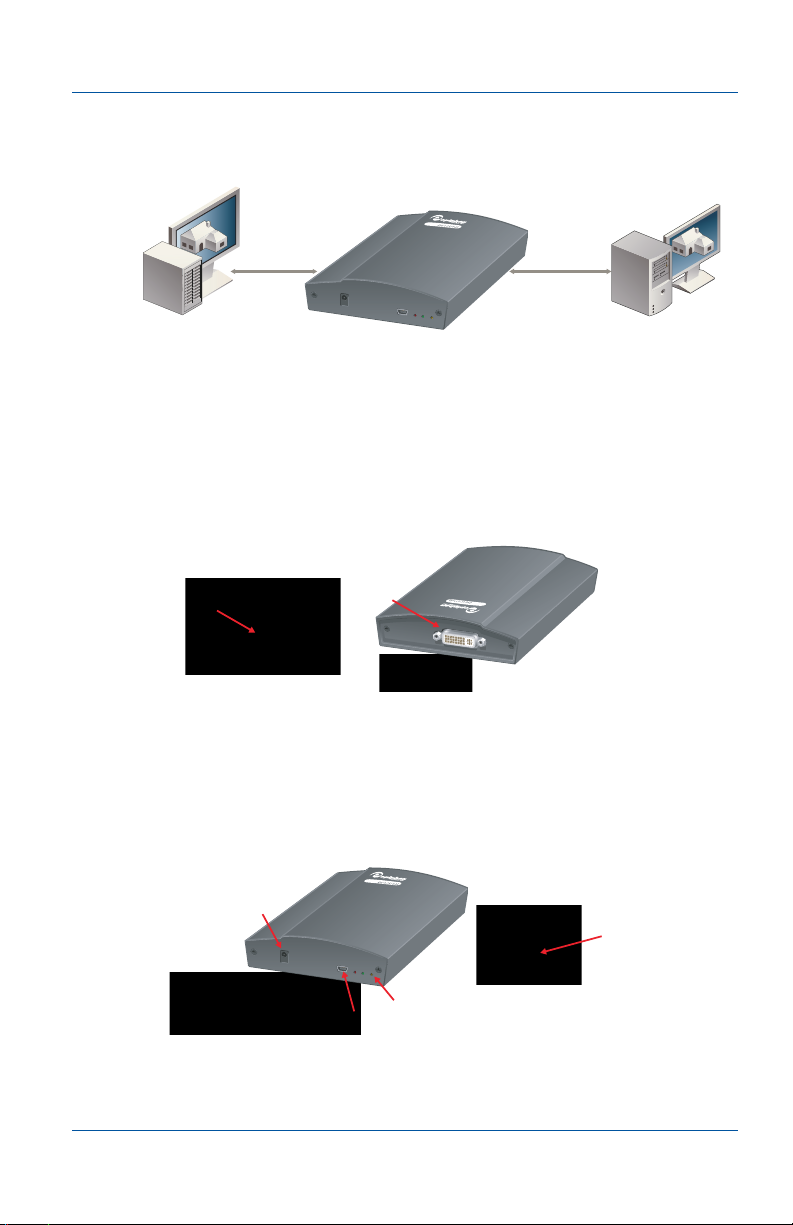
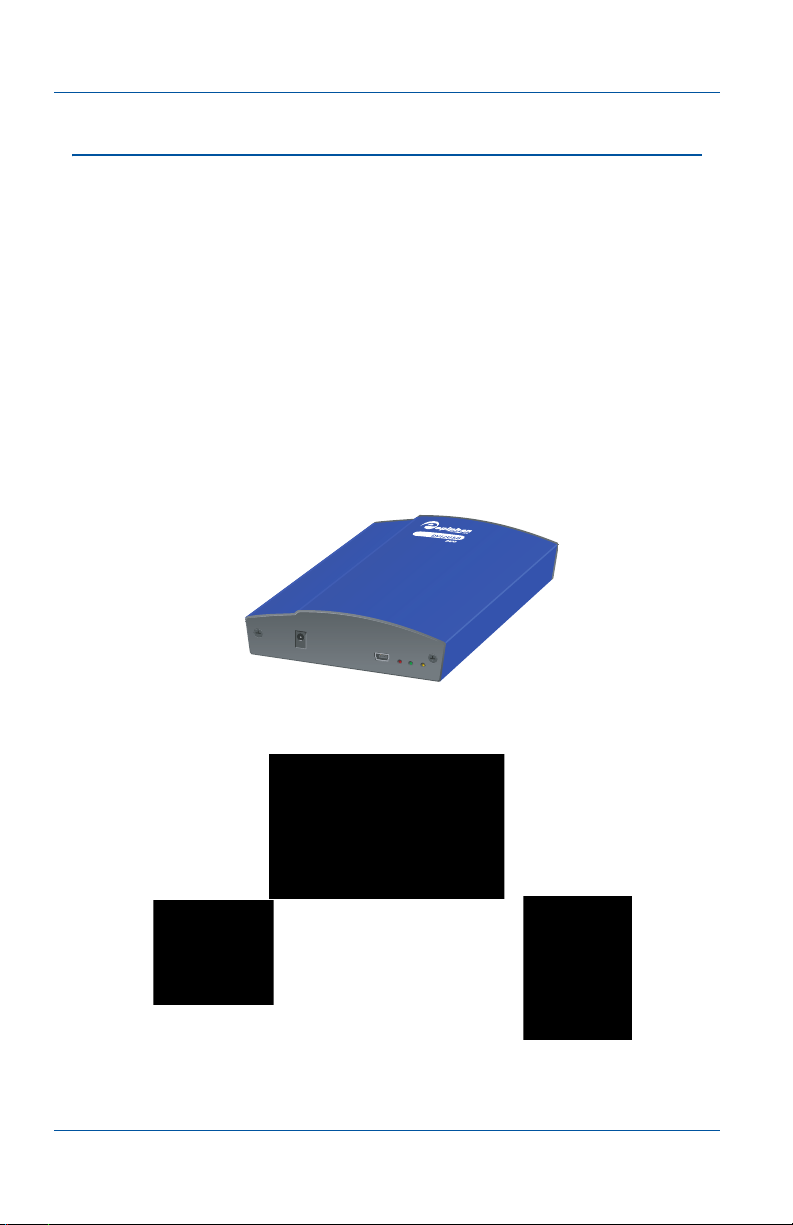
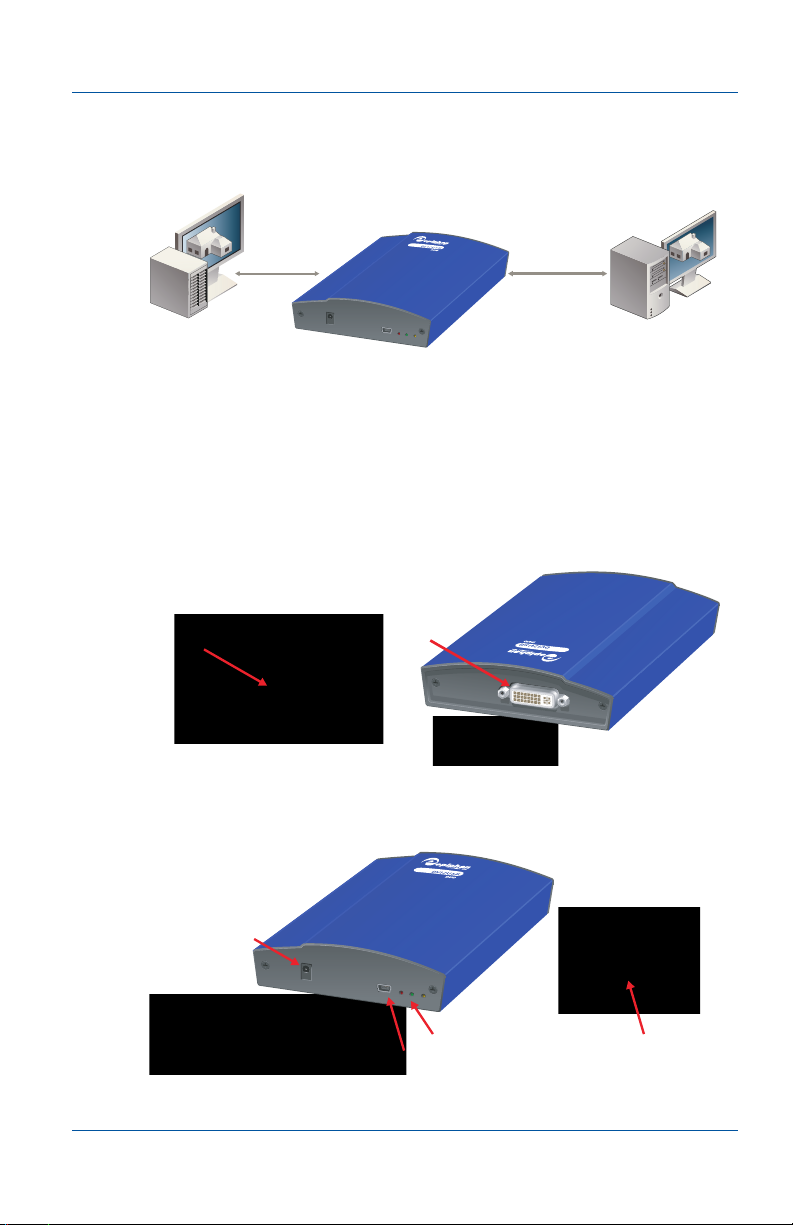
5. Connecting a VGA2USB Device
VGA2USB Frame Grabbers (including LR, HR, and Pro) capture
images from most VESA-compatible VGA sources. Using the
Epiphan video capture application installed on a video capture
workstation you can view and record the captured images. This
section shows VGA2USB (including LR, HR, and Pro) package
contents and describes and how to connect a VGA2USB Frame
Grabber to your VGA source and to a video capture workstation.
VGA2USB (including LR, HR, and Pro) package contents
VGA2USB
VGA2USB LR
USB
Cable
Power
Adapter
(LR/HR/Pro)
Page 16 Epiphan Frame Grabber
VGA2USB HR
VGA Cable
VGA2USB Pro
VGA Adapter
VGA Splitter
Page 17
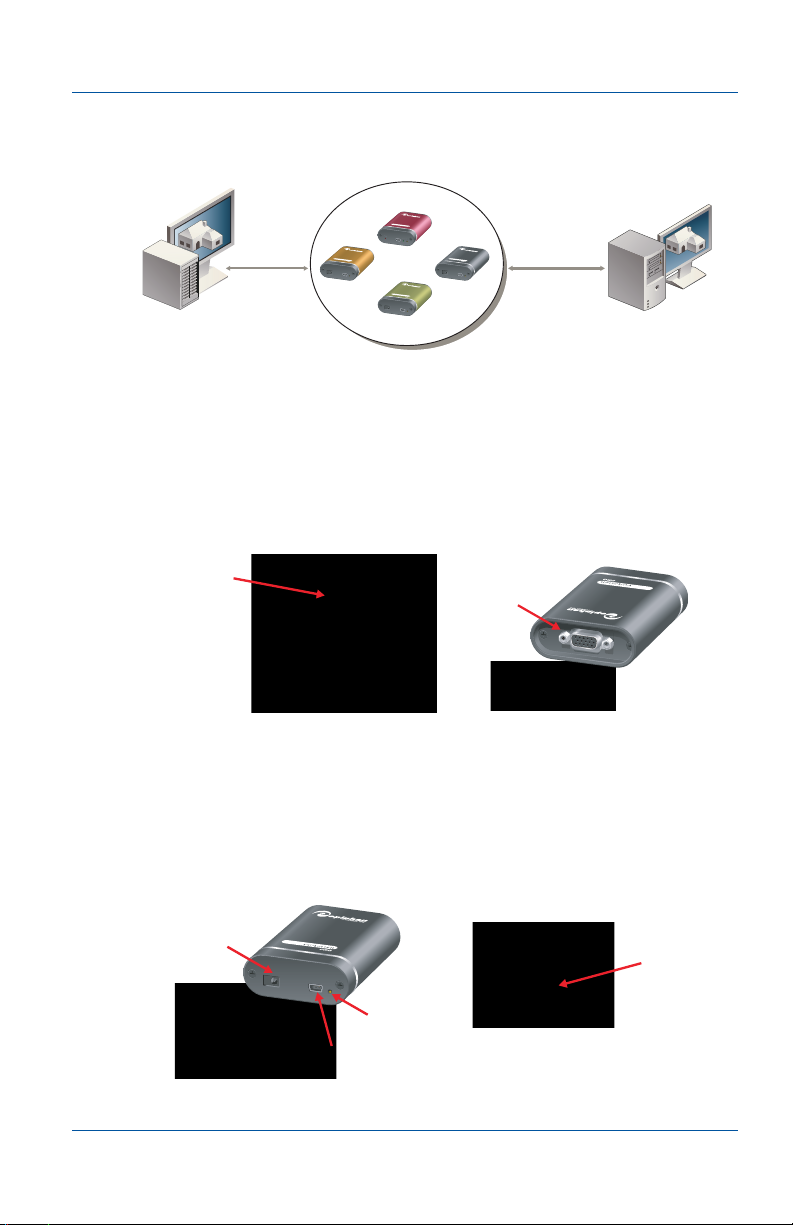
5. Connecting a VGA2USB Device
To connect a VGA2USB (including LR, HR, and Pro)
USB
Cable
Video Capture
Workstation
Equipment with
VGA Signal Output
VGA
Cable
Make sure that the video capture application is installed on the
video capture workstation before connecting the Frame Grabber.
1 If you are connecting a VGA2USB LR, HR, or Pro Frame
Grabber, connect the power adapter to the Frame Grabber.
2 Use the VGA cable to connect the VGA signal output source to
the Frame Grabber VGA port.
VGA Signal
Output
VGA Input
You can use a VGA splitter to split the VGA signal between an
external monitor and the Frame Grabber, (not recommended).
You can also use the VGA adaptor if your VGA signal output
source has a male connector.
3 Use the USB cable to connect the Frame Grabber to a USB 2.0
port on the video capture workstation.
Power Input
(LR/HR/Pro)
Power/Status/
Capture LEDs
USB Output
User Guide Page 17
USB Input
Page 18
6. Connecting a DVI2USB Device
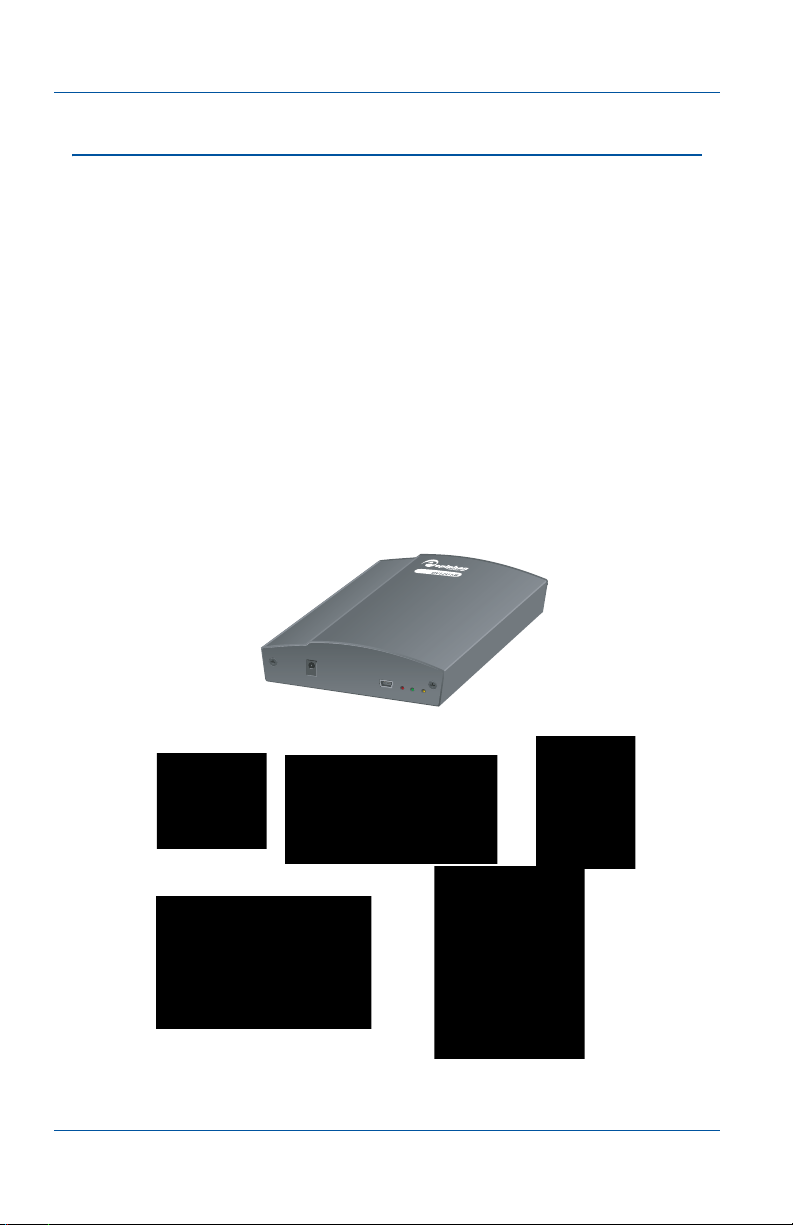
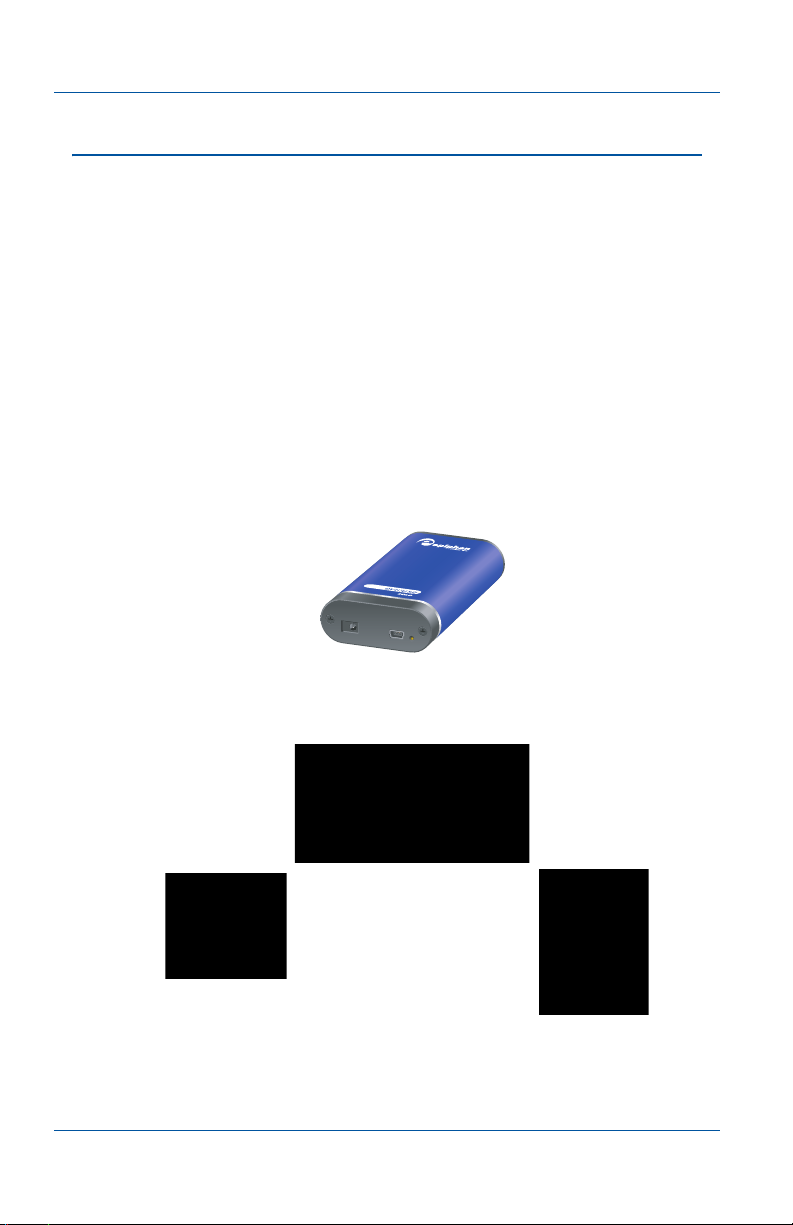
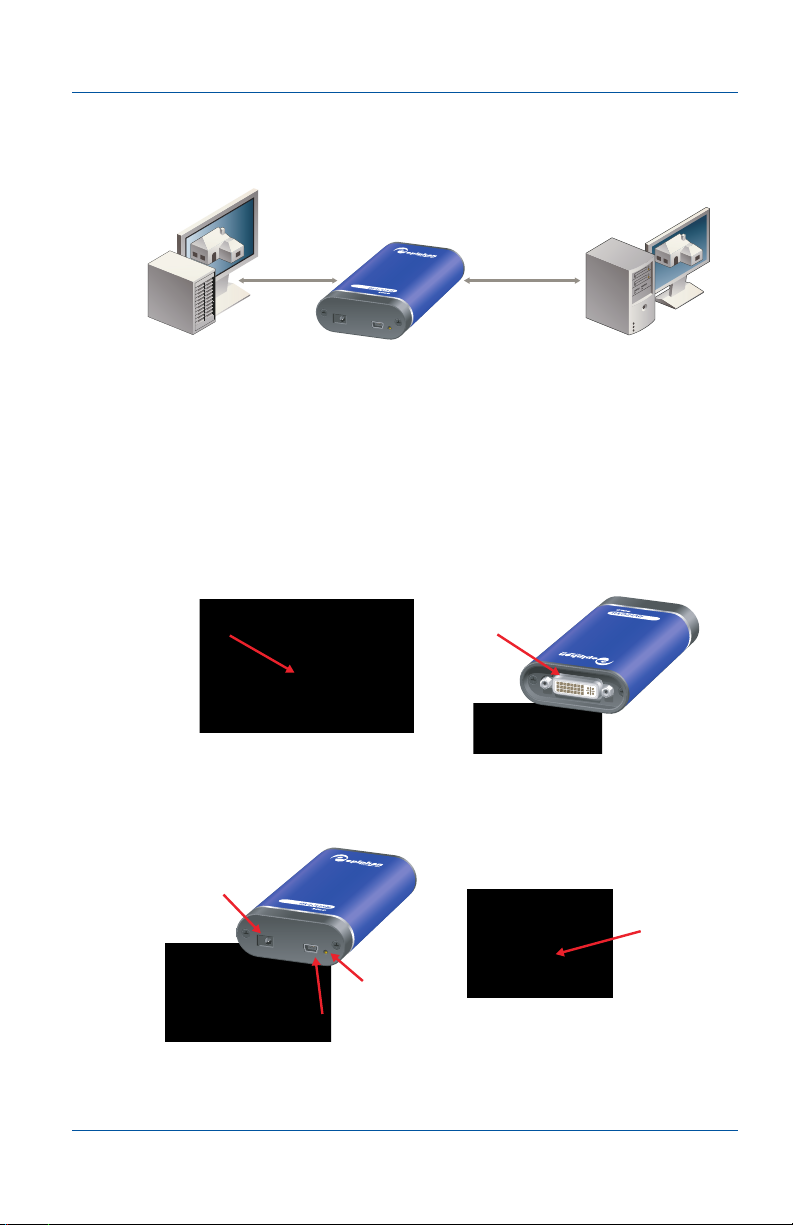
6. Connecting a DVI2USB Device
The DVI2USB Frame Grabber
captures images from most
VESA-compatible DVI sources. You can also use the DVI2USB
Frame Grabber to capture VGA images from most
VESA-compatible VGA sources
using a VGA to DVI cable.
Using the Epiphan video capture application installed on a video
capture workstation, you can view and record the captured
images.
This section shows DVI2USB package contents and describes how
to connect a DVI2USB
Frame Grabber
to a DVI or VGA source
and to a video capture workstation.
DVI2USB package contents
DVI2USB
USB
Cable
DVI Cable
Power
Adapter
DVI to
VGA Cable
Page 18 Epiphan Frame Grabber
VGA Adapter
VGA Splitter
Page 19
6. Connecting a DVI2USB Device
g
To connect a DVI2USB
Equipment with
nal Output
DVI Si
DVI
Cable
USB
Cable
Video Capture
Workstation
Make sure that the video capture application is installed on the
video capture workstation before connecting the DVI2USB Frame
Grabber.
1 Connect the power adapter to the DVI2USB Frame Grabber.
2 Use the DVI cable to connect the DVI signal output source to
the DVI2USB DVI port.
DVI Signal
Output
DVI Input
If you are connecting the VGA2USB Frame Grabber to a VGA
source, use the DVI to VGA cable to connect the VGA signal
output source to the DVI2USB DVI port.
3 Use the USB cable to connect the DVI2USB to a USB 2.0 port on
the video capture workstation.
Power Input
USB Input
Power/Status/
USB Output
Capture LEDs
User Guide Page 19
Page 20
7. Connecting a DVI2USB Solo Device
7. Connecting a DVI2USB Solo
Device
THe DVI2USB Solo Frame Grabber
VESA-compatible DVI sources.
application installed on a video capture workstation, you can
view and record the captured images.
This section shows DVI2USB Solo package contents and describes
how to connect a DVI2USB Solo to a DVI source and to a video
capture workstation.
DVI2USB Solo package contents
DVI2USB Solo
DVI Cable
captures images from most
Using the Epiphan video capture
USB
Cable
Page 20 Epiphan Frame Grabber
Power
Adapter
Page 21
7. Connecting a DVI2USB Solo Device
To connect a DVI2USB Solo
DVI Cable USB
Cable
Equipment with
DVI Signal Output
Video Capture
Workstation
Make sure that the video capture application is installed on the
video capture workstation before connecting the DVI2USB Solo
Frame Grabber.
1 Connect the power adapter to the DVI2USB Solo Frame
Grabber.
2 Use the DVI cable to connect the DVI signal output source to
the DVI2USB Solo DVI port.
DVI
DVI Signal
Output
Input
3 Use the USB cable to connect the DVI2USB Solo to a USB 2.0
port on the video capture workstation.
Power Input
USB Input
Power/Status/
Capture LED
USB Output
User Guide Page 21
Page 22
8. Connecting a DVI2USB Duo Device
8. Connecting a DVI2USB Duo
Device
The DVI2USB Duo Frame Grabber
VESA-compatible dual-link DVI sources.
video capture application installed on a video capture
workstation you can view and record the captured images.
This section shows DVI2USB Duo package contents and describes
how to connect a DVI2USB Duo to a dual-link DVI source and to
a video capture workstation.
DVI2USB Duo package contents
DVI2USB Duo
Dual-Link
DVI Cable
captures images from most
Using the Epiphan
USB
Cable
Page 22 Epiphan Frame Grabber
Power
Adapter
Page 23
8. Connecting a DVI2USB Duo Device
To connect a DVI2USB Duo
Dual-link
DVI Cable
Equipment with Dual-link
DVI Signal Output
USB
Cable
Video Capture
Workstation
Make sure that the video capture application is installed on the
video capture workstation before connecting the DVI2USB Duo
Frame Grabber.
1 Connect the power adapter to the DVI2USB Duo Frame
Grabber.
2 Use the dual-link DVI cable to connect the dual-link DVI signal
output source to the DVI2USB Duo dual-link DVI port.
Dual-link
DVI Signal
Output
Dual-link
DVI Input
3 Use the USB cable to connect the DVI2USB Duo to a USB 2.0
port on the video capture workstation.
Power Input
Power/Status/
USB Output
Capture LEDs
USB Input
User Guide Page 23
Page 24

9. Connecting a KVM2USB Device
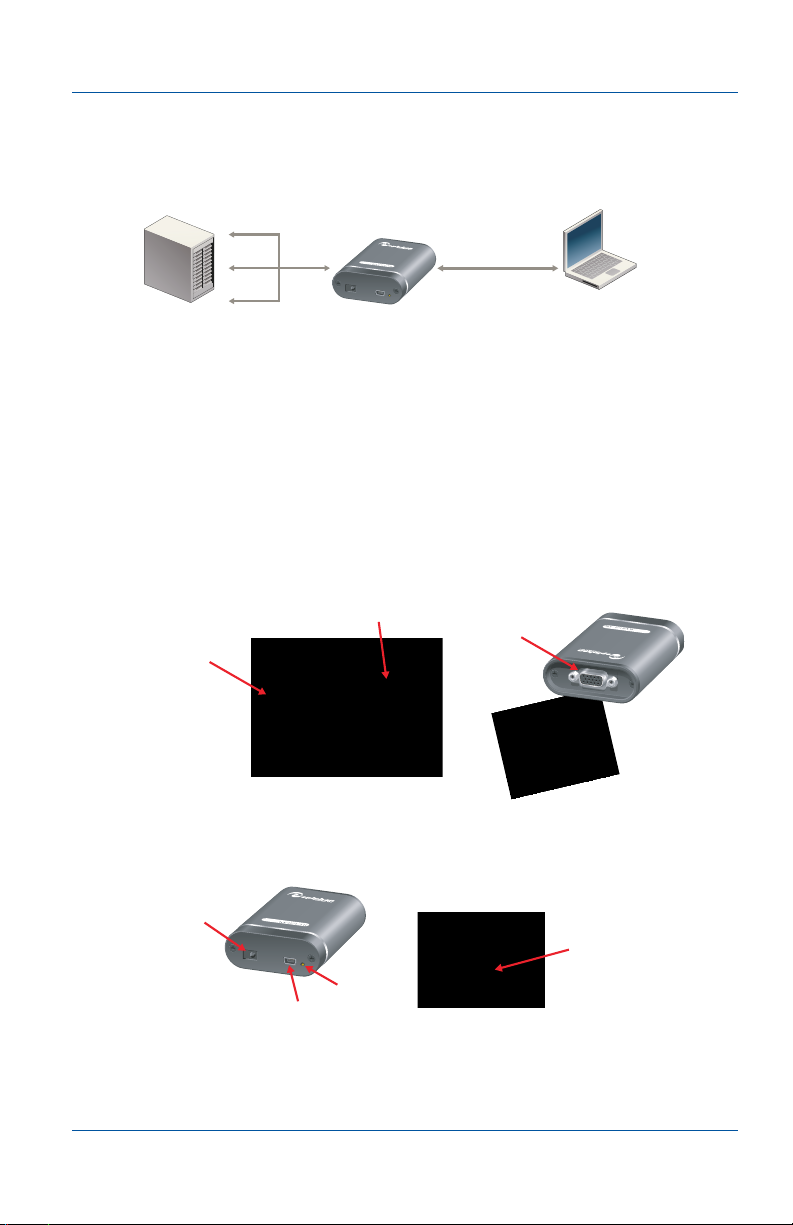
9. Connecting a KVM2USB Device
The KVM2USB Frame Grabber provides full Keyboard-VideoMouse (KVM) capabilities so that you can use the KVM2USB to
manage a headless server from an administrator’s PC. The
headless server can be a PC running Windows, Linux, or
Mac OS X. The administrator’s PC can be running Windows or
Mac OS X.
• If the headless server has a VGA port and PS2 mouse and
keyboard ports you can connect the KVM2USB directly.
• The KVM2USB also comes with PS/2 to USB adapters that
you can use if the headless server only has USB ports for
mouse and keyboard connections.
• The KVM2USB video connector is a VGA connector.
However, the KVM2USB is compatible with most DVI to VGA
adapters if the headless server has a DVI port.
This section shows KVM2USB package contents and describes
how to connect a KVM2USB to a headless server and to the
administrator’s PC.
KVM2USB package contents
KVM2USB
USB
Cable
Page 24 Epiphan Frame Grabber
KVM Cable
Page 25
9. Connecting a KVM2USB Device
To connect a KVM2USB
Keyboard
Video
Mouse (KVM)
USB Cable
Headless
Server
Administrator’s
PC or laptop
Make sure that the video capture application is installed on the
video capture workstation before connecting the KVM2USB
Frame Grabber.
1 Connect the multi-connector end of the KVM cable to the
Headless server keyboard, video, and mouse ports. Use PS/2
to USB and DVI to VGA adapters if required.
2 Connect the single-connector end of the KVM cable to the
KVM2USB KVM input port.
VGA Signal
Keyboard
and Mouse
Connections
Output
KVM Input
3 Use the USB cable to connect the KVM2USB to a USB 2.0 port
on the administrator’s PC.
Power Input
USB Input
Status/
USB Output
Capture LED
4 Start the video capture application and use the options on the
KVM menu to start and stop KVM operation.
User Guide Page 25
Page 26
10. Troubleshooting
10.Troubleshooting
If you experience any difficulty installing your Frame Grabber,
review the following items prior to contacting technical support:
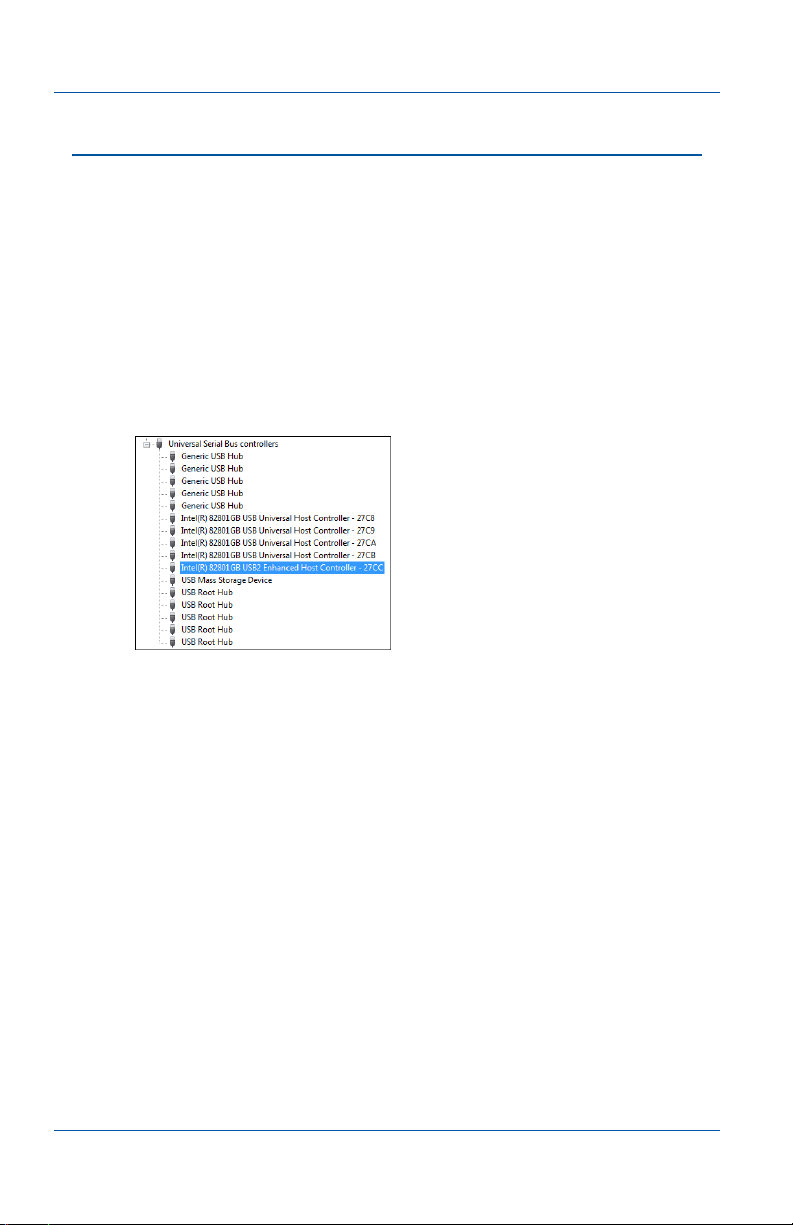
• Confirm that the Frame Grabber is connected to a USB 2.0
port. As shown below, Windows Device Manager reports a
USB 2.0 port as an Enhanced Host Controller and Macintosh
System Profiler reports a USB 2.0 port as a High-Speed Bus.
USB 2.0 ports on Windows and Mac OS X
Mac OS X System Profiler
Windows Device Manager
For additional assistance with USB driver troubleshooting,
browse to http://www.epiphan.com/products/ and locate
the Download page for your Frame Grabber.
• If included in the Frame Grabber package, always use the
power adapter to ensure your Frame Grabber is receiving
sufficient power. Also, plug in the power before connecting
the Frame Grabber to your equipment.
• Observe the behavior of your Frame Grabber LED indicators
before requesting support. See “VGA2USB, DVI2USB, and
KVM2USB LEDs” on page 27 for LED information.
• Whenever possible, when splitting VGA connections, use an
active VGA splitter rather than a VGA Y-adapter to help
maintain a cleaner video signal.
Page 26 Epiphan Frame Grabber
Page 27

10. Troubleshooting
• If, after following the installation steps, you are still having
problems, close all applications and restart the video capture
workstation. When the workstation comes back online, open
the Windows Device Manager or Mac OS X System Profiler to
confirm that the Frame Grabber is detected.
VGA2USB, DVI2USB, and KVM2USB LEDs
LED Activity Description
Power
(PWR)
Red Normal operation, the Frame Grabber is
receiving power.
Off Power is disconnected from the Frame
Grabber.
Capture
(CAP)
Status
(STAT)
Flashing
Amber
The video capture application is running
and has found the Frame Grabber. The
Frame Grabber is capturing images.
On The Frame Grabber is not receiving a
VGA/DVI signal, or cannot adjust video
capture parameters.
Off The Frame Grabber is not recognized by
the operating system.
Flashing
Green
Normal operation, the Frame Grabber is
initialized and ready to capture.
User Guide Page 27
Page 28

10. Troubleshooting
Page 28 Epiphan Frame Grabber
Page 29

11. About Epiphan frame grabbing technology
11.About Epiphan frame grabbing
technology
This chapter describes how the components required for
capturing, displaying, recording, and broadcasting images from a
VGA or DVI source with an Epiphan Frame Grabber work
together. This chapter also contains a glossary of the terms used
in this document.
This chapter contains the following sections:
• The VGA or DVI video source
• The Frame Grabber
• The video capture workstation
• Glossary of Terms
Capturing, displaying, recording, and broadcasting VGA or DVI
images requires the following components:
• A VGA or DVI video source to capture images from.
• An Epiphan Frame Grabber that captures images from the
video source.
• A video capture workstation that displays, records, and
broadcasts the images captured by the Frame Grabber.
Figure 3: Capturing, displaying, and recording images
VGA, DVI or
Dual-DVI
Cable
Video Source
(Equipment with VGA, DVI, or
Dual-DVI Output)
User Guide Page 29
Epiphan
Frame Grabber
USB Cable
Video Capture
Workstation
(Display, Record, and Broadcast
Captured images)
Page 30
11. About Epiphan frame grabbing technology The VGA or DVI video source
The VGA or DVI video source
Image capture begins with a VESA-compatible VGA, DVI, or
dual-DVI video source. Virtually all personal computers as well
as almost any device that displays images includes a VESAcompatible VGA or DVI video connection that you can connect an
Epiphan Frame Grabber to. To capture the video images from a
VGA or DVI source you connect the video source directly to a
suitable Epiphan Frame Grabber using a suitable cable.
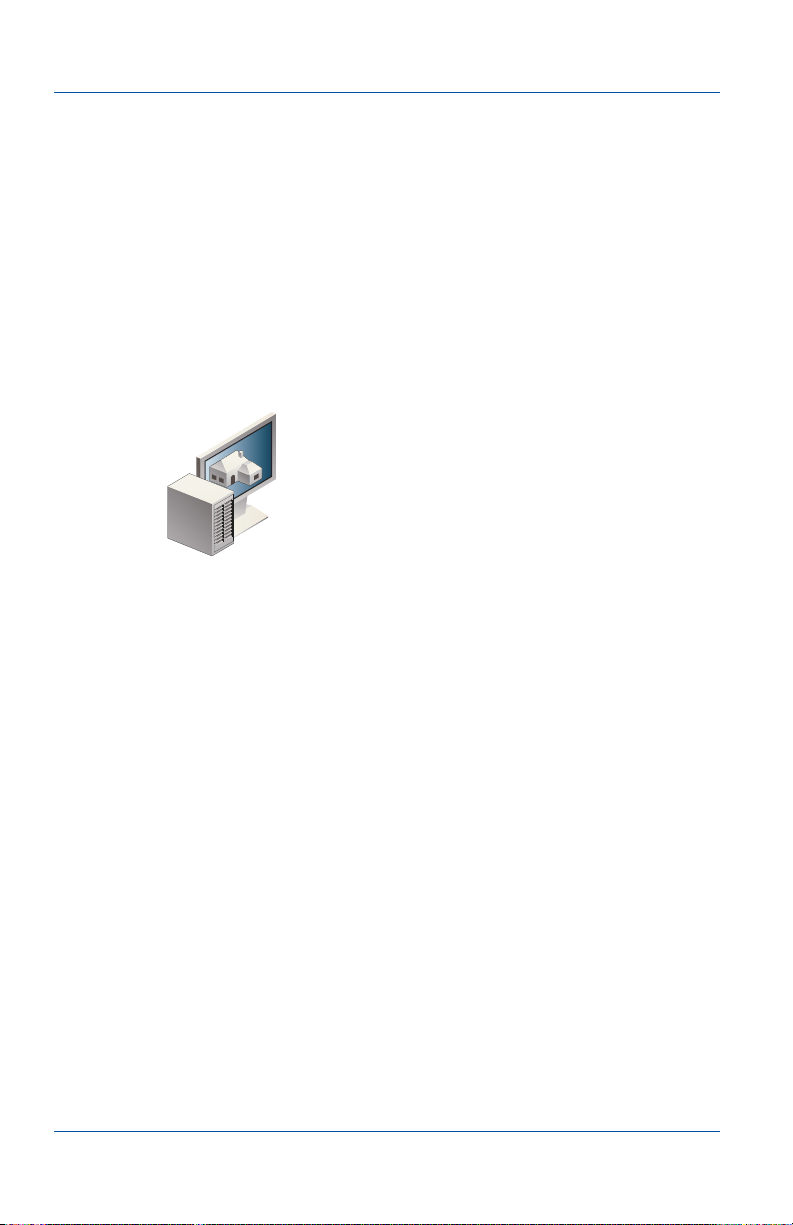
Figure 4: Video source (VGA, DVI, or dual-DVI output)
Video Source
(Equipment with VGA, DVI, or
Dual-DVI output)
Epiphan Frame Grabbers can capture video in a wide range of
video formats including analog and digital video formats,
resolutions from 640 x 480 to 2048 x 2048, frame rates up to 12 fps
at 2048 x 2048 resolution and up to 60 fps at 1024 x 768. For
information about all of the video source features that Epiphan
Frame Grabbers support, see the Frame Grabbers Comparison
Table on the Epiphan Web Site.
The Frame Grabber
The Frame Grabber that you select depends on the video format
produced by the video source. You can connect the basic
VGA2USB Frame Grabber to most VGA video sources and
successfully capture images.
For high resolution images or high frame rates, you should
upgrade to the VGA2USB LR, HR, or Pro, depending on your
detailed video format, frame rate, and resolution requirements
and budget. See the Frame Grabbers Comparison Table on the
Page 30 Epiphan Frame Grabber
Page 31

11. About Epiphan frame grabbing technology The Frame Grabber
Epiphan Web Site for specifications of the all of the VGA2USB
Frame Grabbers. You should select the Frame Grabber that
matches or exceeds the output of your video source.
For most DVI video sources, you can connect the DVI2USB Frame
Grabber. You can also use the DVI2USB Frame Grabber to
capture VGA images. For higher resolution DVI sources you can
upgrade to the DVI2USB Solo Frame Grabber. For dual-DVI
sources you can use the DVI2USB Duo Frame Grabber. See the
DVI2USB Frame Grabbers Comparison Table on the Epiphan
Web Site for specifications of the different DVI2USB Frame
Grabbers. You should select the DIV2USB Frame Grabber that
matches or exceeds the output of your video source.
Figure 5: Video source and Frame Grabber
VGA, DVI or
Dual-DVI
Cable
Epiphan
Video Source
(Equipment with VGA, DVI, or
Dual-DVI Output)
Frame Grabber
To get the signal from the video source to the Frame Grabber you
connect the two devices with the appropriate cable. In most cases
the cable you need comes in the package with your Frame
Grabber.
For example, if your video source is VESA-compatible VGA
source and if you want to capture images with a resolution of up
to 1600 x 1200 at a frame rate of 30 frames a second then you
could choose a VGA2USB HR or VGA2USB Pro. Both of these
Frame Grabbers ship with the VGA video cable and adapters that
you need to connect the video source directly to your Frame
Grabber.
User Guide Page 31
Page 32

11. About Epiphan frame grabbing technology The Frame Grabber
How Epiphan Frame Grabbers operate
The Frame Grabber is a hardware device that captures images
(also called frames) from analog VGA signals or digital DVI
streams. Capturing images means reading data from the VGA or
DVI signal and converting this data into a digital image.
The Frame Grabber synchronizes itself with the video source to
capture images at the resolution and color depth output by the
video source or at the maximum color depth and resolution
supported by the Frame Grabber. The Frame Grabber captures
images at its own frame rate up to the maximum frame rate
capacity of the Frame Grabber.
Epiphan Frame Grabbers perform the following functions to
optimize and compress captured image data. The aim is to reduce
the amount of data required for each captured image and
optimize data transmission to the video capture workstation.
These functions include:
• Pre-compression using technology developed by Epiphan to
clean up and optimize the image. Pre-compression reduces the
amount of data required for each image and improves the
performance of the standard compression algorithms also
built into most Epiphan Frame Grabbers. See Pre-compression
of computer-generated images on the Epiphan Web Site for a
description of pre-compression.
• Lossless image compression using industry standard image
compression algorithms.
• Optional on-board cropping of the image.
• Color space conversion.
• USB transfer acceleration.
The result is the Frame Grabber captures a large amount of image
data, converts the image data to RGB format at the maximum
color depth that the Frame Grabber supports at the operating
resolution, compresses and optimizes the data and then transmits
the data to the video capture workstation.
All Epiphan Frame Grabbers use USB 1.1 and USB 2.0 to transfer
captured images to the video capture workstation. USB 2.0 is
Page 32 Epiphan Frame Grabber
Page 33

11. About Epiphan frame grabbing technology The video capture workstation
recommended especially for high resolution and high frame rate
applications because USB 2.0 supports much higher data transfer
rates than USB 1.1. The USB version used depends on the video
capture workstation.
The video capture workstation
The video capture workstation is a personal computer running a
supported operating system such as Windows (2000, XP or Vista),
Mac OS X Panther, or supported versions of Linux. For video
capture workstation system requirements see Chapter 2. “System
Requirements” on page 11.
Figure 6: Video source, Frame Grabber and video capture
workstation
VGA, DVI or
Dual-DVI
Cable
USB Cable
Video Source
(Equipment with VGA, DVI, or
Dual-DVI Output)
Epiphan
Frame Grabber
Video Capture
Workstation
(Display, Record, and Broadcast
Captured images)
To be a video capture workstation the PC must include a USB
device driver that can receive images from Epiphan Frame
Grabbers. The video capture workstation must also include video
capture application software for processing captured images
according to your requirements. For example, you may want the
video capture application software to display captured images or
you may also want to record and print captured images, or you
may want to share captured images by broadcasting them across
the Internet to a remote location.
An Epiphan Frame Grabber is compatible with Windows, Mac
OS X Panther or Linux PC platforms. The video capture
workstation components are similar on each of these platforms. A
User Guide Page 33
Page 34

11. About Epiphan frame grabbing technology The video capture workstation
notable difference is that each platform includes different image
processing application programming interfaces (APIs):
• On Windows 2000, XP, and Vista the Epiphan USB device
driver and video capture application is compatible with the
Microsoft DirectShow API.
• On Mac OS X the Epiphan USB device driver and video
capture application is compatible with the Apple QuickTime
API.
• On Linux the Epiphan USB device driver and video capture
application is compatible with the Video4Linux V4L API.
The following sections describe the video capture workstation
software components and APIs on each supported video capture
application platform.
• “Windows video capture application software” on page 35
• “Mac OS X video capture workstation software” on page 40
• “Linux video capture workstation software” on page 42
About kernel mode and user mode
Some video capture workstation software components operate in
kernel mode and some in user mode. Kernel mode programs are
usually always running in the background and are usually not
started and stopped by users. Kernel mode programs are usually
configured from a central location such as the Windows control
panel. Most software that communicates directly with hardware
components operate in kernel mode. On all operating systems the
Epiphan USB device driver is a kernel mode application.
User mode programs are programs that users run to perform a
task such as word processing, drawing graphics, or recording
captured images. Users start, stop, use and configure user mode
programs. User mode programs do not usually communicate
directly with hardware components. They communicate with
kernel mode programs and it is the kernel mode programs that
communicate with the hardware components. The Epiphan video
capture application is a user mode program.
Page 34 Epiphan Frame Grabber
Page 35

11. About Epiphan frame grabbing technology The video capture workstation
Windows video capture application software
The following software components operate on a video capture
workstation running Windows 2000, XP, or Vista:
• The Epiphan USB device driver
• DirectShow
• The Epiphan capture API
• The Epiphan video capture application
• Video codecs
The Epiphan USB device driver
The Windows 2000, XP and Vista Epiphan USB device driver
receives images from an Epiphan Frame Grabber and delivers the
images to the Epiphan capture API and to DirectShow. Before
delivering the images the Epiphan USB device driver also
performs image adjustment to improve the quality of the image.
Image adjustments include setting the sampling phase, PLL
adjustments, and Horizontal shift. See “Configuring image
adjustments” on page 136 for more information about image
adjustments.
The USB device driver can also change the color depth of the
captured image before sending the image to the video API. For
example, if the Frame Grabber is capturing the frames at a color
depth that is different than that required by the video capture
application, the USB device driver converts the images to the
required color depth.
User Guide Page 35
Page 36

11. About Epiphan frame grabbing technology The video capture workstation
Figure 7: Windows video capture workstation software
Video Capture
Workstation
Print
Internet
Display
Epiphan
USB Device Driver
Epiphan
Capture API
Epiphan Video
Capture Application
Web
Broadcast
Record
Images
DirectShow
Kernel mode
User mode
Video
Codec
Record
Video
Using the Epiphan software development kit (SDK) you can also
create custom USB device drivers that incorporate the functions
that you need.
On Windows video capture workstations the Epiphan USB device
driver installs a control panel application (Figure 8).
From this control panel application you can view the status of the
Frame Grabbers connected to the video capture workstation. You
can also configure image adjustments for each Frame Grabber
and configure how the Epiphan USB device driver communicates
with DirectShow. See “Configuring DirectShow options” on
page 143.
If you have successfully installed the Epiphan USB device driver,
when you connect a Frame Grabber, the name of the Frame
Grabber appears in the Windows Device Driver under Imaging
Devices. For example, if you installed a DVI2USB Solo Frame
Grabber the name of the imaging device would be “DVI2USB
Solo by Epiphan Systems Inc”.
Page 36 Epiphan Frame Grabber
Page 37

11. About Epiphan frame grabbing technology The video capture workstation
Figure 8: Epiphan USB device driver
You can also find the Frame Grabber from the Windows Control
Panel by opening the Scanners and Cameras control panel
application.
DirectShow
DirectShow is the standard Microsoft DirectShow multimedia
API. The Epiphan USB device driver can send captured images
directly to DirectShow. This means that any DirectShowcompatible application can receive captured images. For example,
you can use applications such as VirtualDUB to record avi files,
Microsoft Media Encoder to record wmv files, and RealProducer
to record rm files all consisting of a series of captured images sent
to DirectShow by the Epiphan USB device driver. See “Using a
DirectShow application to record video files” on page 107.
You can also create your own custom DirectShow-compatible
video capture application to record captured images from
DirectShow.
The Epiphan capture API
The Epiphan capture API also receives captured images from the
Epiphan USB device driver. The Epiphan capture API is
optimized for processing Epiphan Frame Grabber captured
images. The Epiphan capture API analyzes individual images,
User Guide Page 37
Page 38

11. About Epiphan frame grabbing technology The video capture workstation
performs on-device cropping, handles video mode changes and
also supports KVM functions if you are using a KVM2USB frame
grabber.
The Epiphan capture API is an alternative to using DirectShow to
capture images. The Epiphan capture API delivers captured
images to the Epiphan video capture application. You can use the
Epiphan software development kit (SDK) to create your own
custom video capture application to record captured images from
the Epiphan capture API.
The Epiphan video capture application
The Epiphan video capture application receives and processes
captured images from the Epiphan capture API. Using the
Epiphan video capture application you can:
• Display, print, and copy captured images to the Windows
clipboard to be pasted into another application.
• Record captured images as bmp, jpeg, or png image files.
• Record captured images by sending them to a video codec so
that they can be saved as Windows AVI video files.
• Share captured images by broadcasting them over the Internet
in real time.
Using the Epiphan SDK you can create your own custom video
capture application for processing and recording captured
images received from DirectShow or from the Epiphan capture
API. By developing your own custom software application you
can include the features that you need according to your
requirements.
Video codecs
Many different video codecs are available for recording captured
images as video files. The Epiphan video capture application is
compatible with most Windows AVI video codecs. To use a video
codec you must obtain and install the video codec software.
Page 38 Epiphan Frame Grabber
Page 39

11. About Epiphan frame grabbing technology The video capture workstation
Figure 9: Selecting a video codec using the Epiphan video
capture application
After you install the video codec on the video capture
workstation you configure the Epiphan video capture application
or your custom video capture application to send captured
images to the video codec. From the Epiphan video capture
application you can also configure settings for the video codec
that you select. See Chapter 15. “Recording videos” on page 97.
The video codec and codec settings to choose depend on your
requirements. You may need to try several different codecs and
change configuration settings to see which codec best fits your
requirements. Epiphan recommends the ffvfw video codec for
most Windows video capture applications. See “Installing the
ffvfw video codec pack” on page 100.
User Guide Page 39
Page 40

11. About Epiphan frame grabbing technology The video capture workstation
Mac OS X video capture workstation software
The following software components operate on a video capture
workstation running Mac OS X Panther:
• The Epiphan USB device driver
• The Epiphan capture API
• Apple QuickTime and the Epiphan QuickTime component
• The Epiphan video capture application
Figure 10:Mac OS X video capture workstation software
Video Capture
Workstation
Epiphan
USB Driver
Kernel mode
Epiphan
QuickTime
Component
QuickTime
Compatible
Application
Record
Video
User mode
Print
Display
Epiphan
Capture API
Epiphan Video
Capture Application
Images
Save
The Epiphan USB device driver
The Mac OS X Epiphan USB device driver receives images from
an Epiphan Frame Grabber and delivers the images to the
Epiphan capture API. Before delivering the images, the Epiphan
USB device driver also performs image adjustment to improve
Page 40 Epiphan Frame Grabber
Page 41

11. About Epiphan frame grabbing technology The video capture workstation
the quality of the image. Image adjustments include setting the
sampling phase, PLL adjustments, and Horizontal shift. See
“Configuring image adjustments” on page 136 for more
information about image adjustments.
The USB device driver can also change the color depth of the
captured image before sending the image to the video capture
API. For example, if the Frame Grabber is capturing the frames at
a color depth that is different than that required by the video
capture application, the USB device driver converts the images to
the required color depth.
Using the Epiphan software development kit (SDK) you can also
create custom USB device drivers that incorporate the functions
that you need.
The Epiphan capture API
The Epiphan capture API receives captured images from the
Epiphan USB device driver. The Epiphan capture API is
optimized for processing Epiphan Frame Grabber captured
images. The Epiphan capture API analyzes individual images,
performs on-device cropping, handles video mode changes and
also supports KVM functions if you are using a KVM2USB frame
grabber.
The Epiphan capture API sends captured images to the Epiphan
QuickTime component and to the Epiphan video capture
application. You can use the Epiphan software development kit
(SDK) to create your own custom video capture application to
record captured images from the Epiphan capture API.
Apple QuickTime and the Epiphan QuickTime component
Apple QuickTime is the standard Mac OS X QuickTime
multimedia API. The Epiphan capture API sends captured
images to the Epiphan QuickTime component. The Epiphan
QuickTime component sends the captured images to QuickTime
where they can be recorded or otherwise processed by any
QuickTime-compatible video recording application. For example,
you can use applications such as QuickTime Pro or HackTV
Carbon to record QuickTime video files consisting of a series of
User Guide Page 41
Page 42

11. About Epiphan frame grabbing technology The video capture workstation
captured images sent to the QuickTime API by the Epiphan USB
device driver.You can also create your own custom QuickTimecompatible video capture application to record captured images
from QuickTime. See “Recording videos for Mac OS X” on
page 110.
The Epiphan video capture application
The Epiphan video capture application receives and processes
captured images from the Epiphan capture API. Using the
Epiphan video capture application you can:
• Display, print, and copy captured images to the MAc OS X
clipboard to be pasted into another application.
• Save captured images as bmp, jpeg, png, or tiff image files.
For more information about the Mac OS X Epiphan video capture
application, see Chapter 13. “Mac OS X video capture
application” on page 79.
Using the Epiphan SDK you can create your own custom video
capture application for processing and recording captured
images received from QuickTime or from the Epiphan capture
API. By developing your own custom software application you
can include the features that you need according to your
requirements.
Linux video capture workstation software
Epiphan provides the Epiphan USB device driver and the
Epiphan capture API for Linux. Epiphan does not provide a video
capture application for Linux. However, the USB device driver is
compatible with Video4Linux so you can use Video4Linuxcompatible applications to receive and process captured images.
You can also use the Epiphan Linux SDK to write your own
custom video capture application that receives captured images
from the Epiphan capture API. The following software
components operate on a video capture workstation running
Linux:
• The Epiphan USB device driver
• Video4Linux
Page 42 Epiphan Frame Grabber
Page 43

11. About Epiphan frame grabbing technology The video capture workstation
• The Epiphan capture API
• V4L custom video capture applications
Figure 11:Linux video capture workstation software
Video Capture
Workstation
Print
Display
Epiphan
USB Driver
Epiphan
Capture API
V4L-Compatible or Custom Video
Capture Application
Record
Images
Video4Linux
Kernel mode
User mode
Record
Video
The Epiphan USB device driver
The Linux Epiphan USB device driver receives images from an
Epiphan Frame Grabber and delivers the images to the Epiphan
capture API and to Video4Linux. Before delivering the images the
Epiphan USB device driver also performs image adjustment to
improve the quality of the image. Image adjustments include
setting the sampling phase, PLL adjustments, and Horizontal
shift. See “Configuring image adjustments” on page 136 for more
information about image adjustments.
The USB device driver can also change the color depth of the
captured image before sending the image to the video API. For
example, if the Frame Grabber is capturing the frames at a color
depth that is different than that required by the video capture
application, the USB device driver converts the images to the
required color depth.
User Guide Page 43
Page 44

11. About Epiphan frame grabbing technology The video capture workstation
The Epiphan USB device driver may not be available for your
version of Linux. Epiphan does not provide source code for the
Epiphan USB device driver. But you can contact Epiphan if you
need an Epiphan USB device driver compiled for a specific Linux
kernel version or kernel setting.
Using the Epiphan software development kit (SDK) you can also
create custom USB device drivers that incorporate the functions
that you need.
Video4Linux
Video4Linux (V4L) is a Linux video capture API. The Epiphan
USB device driver can send captured images directly to
Video4Linux. This means that any Video4Linux-compatible
application can receive captured images. You can use a
Video4Linux-compatible application to record a series of
captured images as a video in the video format supported by the
Video4Linux application. You can also create your own custom
Video4Linux-compatible video capture application to record
captured images from Video4Linux.
The Epiphan capture API
The Epiphan capture API also receives captured images from the
Epiphan USB device driver. The Epiphan capture API is
optimized for processing Epiphan Frame Grabber captured
images. The Epiphan capture API analyzes individual images,
performs on-device cropping, handles video mode changes and
also supports KVM functions if you are using a KVM2USB Frame
Grabber.
The Epiphan capture API is an alternative to using Video4Linux
to capture images on Linux video capture workstations. You can
use the Epiphan software development kit (SDK) to create your
own custom video capture application to record captured images
from the Epiphan capture API.
Page 44 Epiphan Frame Grabber
Page 45

11. About Epiphan frame grabbing technology Glossary of Terms
V4L custom video capture applications
Epiphan does not provide a video capture application for Linux.
However, you can use Video4Linux-compatible applications to
perform many video capture operations such as recording images
or video, copying, printing and saving images, or broadcasting
images across the Internet. You can also use the Epiphan Linux
SDK to create your own custom video capture application. The
SDK along with some example applications is available from the
downloads page of the Epiphan Web Site. To download the latest
version, browse to http://www.epiphan.com/products/ and
locate the downloads page for your product.
Glossary of Terms
This glossary describes many of the terms used in this Epiphan
Frame Grabber User Guide.
Color depth, bits per pixel (bpp)
Color depth or bits per pixel (bpp) (also known as color
resolution) is a computer graphics term describing the number of
bits used to represent the color of a pixel in a bitmapped image or
video frame. Epiphan Frame Grabbers support a number of color
depths:
• RGB 24 bits per pixel, RGB 8:8:8 format: also known as true
color and millions of colors, 24-bit color is the highest color
depth normally used. 24bpp can display over 16.7 million
colors. Most video codecs require a color depth of 24 bpp.
• RGB 16 bits per pixel, RGB 5:6:5 format: also known as high
color and thousands of colors. 16 bpp may look as good as 24
bpp in many applications while using less data. However
more complex images may not look as good with a 16 bpp
color depth. 16 bpp can display over 65,536 colors.
• RGB 8 bits per pixel, RGB 3:3:2, 3:2:3, 2:3:3: uses much less data
than 16 bpp but can only display 256 colors. 8 bpp is usually
only useful for video streams with very low color depth.
User Guide Page 45
Page 46

11. About Epiphan frame grabbing technology Glossary of Terms
• 8 bits per pixel, grayscale 256 levels: uses a similar amount of
data as RGB 8 bpp but images are black, white, and shades of
gray. Usually you would only use 8 bpp grayscale if your
video source or codec used this color depth or to reduce file
size.
• 5 bits per pixel, grayscale 32 levels: a grayscale format that has
fewer levels of gray and uses less data than grayscale 256
levels. Usually you would only use 5 bpp grayscale if your
video source or codec used this color depth or to reduce file
size.
• Black and white: a very low quality and low data format that
uses only black and white. Usually you would only use black
and white if your video source is producing a black and white
video signal.
• 16 bits per pixel, YUY2(422), UYVY: a color format used by
many video sources. Similar to RGB 16 bpp but uses
compression and other techniques to improve the video
signal. Epiphan Frame Grabbers and the video capture
application convert YUY2(422), UYVY video images to RGB,
grayscale or black and white images.
All color depths are not supported by all video codecs or image
file formats. Most video codecs and image file formats support
RGB 24 bpp. It may be difficult to find a video codec that supports
other color depths. Some image file formats do not support all
color depths. Epiphan Frame Grabber web broadcasting operates
at RGB 24 bpp.
Epiphan Frame Grabbers capture images at the color resolution of
the video source up to the maximum resolution supported by the
Frame Grabber. The maximum resolution supported by the
VGA2USB Frame Grabber is 16 bits per pixel (bpp). The
maximum supported by all other Epiphan Frame Grabbers is 24
bpp.
Capture, image capture, frame grabbing
Epiphan products can capture VGA, DVI, or dual DVI images.
Capturing VGA data involves using a Frame Grabber to digitize
analog VGA signals and transmit the digitized images as frames
over a USB connection to the Epiphan video capture application.
Page 46 Epiphan Frame Grabber
Page 47

11. About Epiphan frame grabbing technology Glossary of Terms
Capturing DVI or dual DVI data involves using a Frame Grabber
to convert DVI or dual DVI data into frames that can be
transmitted over a USB connection to the Epiphan video capture
application.
Capturing can also compress images before they are transmitted.
Frames must be captured before they are displayed, printed, or
recorded by the Epiphan video capture application.
Color resolution
See “Color depth, bits per pixel (bpp)” on page 45.
DVI
Digital Visual Interface (DVI) is a digital standard for
transmitting visual data from a graphics source (such as a PC
video card) to a display device (such as a computer monitor).
Many devices that output digital visual images use the DVI
standard for transmitting visual data. All Epiphan DVI2USB
Frame Grabbers capture digital DVI frames and convert them to
digital signals that are transmitted to the Epiphan video capture
application using a USB connection. This USB data is then
interpreted and displayed using the Epiphan video capture
application.
Frame Grabber
A hardware device that captures frames from analog VGA signals
or digital DVI streams. Epiphan Frame Grabbers may modify
captured frames and compress them before sending them to a
video capture workstation over a USB connection.
Frame
A frame is one of the many still images which can be combined to
create a moving picture such as a video image. The term frame
comes from the film industry. Film images are recorded on a strip
of photographic film and each image looks like a framed picture.
User Guide Page 47
Page 48

11. About Epiphan frame grabbing technology Glossary of Terms
Record
The process of saving (or recording) captured frames as video
files or as sets of image files. Recording requires that frames are
first captured before being recorded.
VGA
Video Graphics Array (VGA) is an analog standard for
transmitting visual data from a graphics source (such as a PC
video card) to a display device (such as a computer monitor).
VGA originated in 1988. Most PCs and many other devices that
output analog visual images use the VGA standard or extensions
to the VGA standard for transmitting visual data. All Epiphan
VGA2USB Frame Grabbers capture analog VGA frames and
convert them to digital signals that are transmitted to the Epiphan
video capture application using a USB connection. This USB data
is then interpreted and displayed using the Epiphan video
capture application.
VGA modes
A VGA mode describes the timing of the VGA signals sent by a
VGA source to a VGA display device (or Frame Grabber). The
VGA source and receiver (for example a monitor) must agree on
the VGA mode so that the VGA display device can decode the
timing of the VGA signal and display images.
A VGA signal consists of a series of frames. Each frame is a single
image displayed by a VGA display device or captured by a Frame
Grabber. A VGA frame is made up of horizontal lines. Each line is
made up of pixels. The pixels in each line are transmitted from
left to right. The lines in each frame are transmitted from top to
bottom. If the VGA signal is interlaced each frame consists of
every other line of the frame. An interlaced signal contains less
data and so displays faster but also results in a lower quality
image.
The timings in a VGA mode start with the refresh rate; which
defines how often a new frame is sent. A VGA mode also
indicates if the signal is interlaced.
Page 48 Epiphan Frame Grabber
Page 49

11. About Epiphan frame grabbing technology Glossary of Terms
Next a VGA mode describes the timing of the horizontal signals.
These horizontal timings define how the data that makes up each
line is transmitted. The line begins with the active area, which
contains the RGB values for each pixel in the line. The active area
is followed by a blanking region that contains black pixels. Inside
the blanking interval, a horizontal sync pulse is transmitted to
keep the signals synchronized. The blanking interval before the
sync pulse is called the front porch, and the blanking interval after
the sync pulse is called the back porch. The time between
horizontal sync pulses is called the sync time. The sync polarity
designates whether the sync pulse is positive or negative.
The vertical timings work the same way to define how the data
that makes up each frame is transmitted. A frame begins with the
active video area that contains all of the lines in the frame. The
vertical signal also includes a vertical synch pulse that is timed
according to the vertical sync time. The vertical blanking intervals
are also called the front porch and back porch. Finally the vertical
synch polarity designates whether the vertical sync pulse is
positive or negative.
Video capture application
The Epiphan software that intercepts the frames (images) sent by
the Frame Grabber over the USB connection. Using the video
capture application you can display, print and record captured
frames. You can also use the video capture application to transmit
captured frames over the Internet.
Video capture workstation
A computer running Windows, Mac OS X or Linux that you can
use to record captured frames. You connect your Frame Grabber
to the video capture workstation with a USB connection. You
must also install the Epiphan video capture application on the
video capture workstation. If the video capture workstation can
connect to the Internet you can use the video capture application
to broadcast captured images over the Internet.
User Guide Page 49
Page 50

11. About Epiphan frame grabbing technology Glossary of Terms
Page 50 Epiphan Frame Grabber
Page 51

12. Windows video capture applicat io n
12.Windows video capture
application
This chapter describes common functions and features of the
Epiphan video capture application. Most of the information in
this chapter describes the Windows 2000, XP, and Vista version of
the Epiphan video capture application. However the information
in this chapter also applies to the Linux version of the Epiphan
video capture application software.
Note: For information about the Mac OS X version of the Epiphan
video capture application, see Chapter 13. “Mac OS X video
capture application” on page 79.
• For details about how to record images or video, see
Chapter 14. “Recording image files” on page 91 and
Chapter 15. “Recording videos” on page 97.
• For details about how to broadcast captured images over the
Internet, see Chapter 16. “Web Broadcasting” on page 121.
• For details about how to set up KVM, see Chapter 17. “Using
the KVM2USB Frame Grabber” on page 129.
• For special advanced topics, see Chapter 18. “Advanced
topics” on page 133.
• For many useful How To procedures see the How To page of
the Epiphan Web Site.
This chapter assumes that you have followed the instructions in
the Frame Grabber Installation Guide shipped with your Frame
Grabber and also available as chapters 2 to 10 of this User Guide.
To start using this chapter you should have:
• Selected a video capture workstation that meets the system
requirements described in your install guide and in
Chapter 2. “System Requirements” on page 11.
• Successfully installed the Epiphan USB device drivers, and
video capture application on the video capture workstation as
described in Chapter 3. “Installing the Windows
VGA2USB/DVI2USB drivers and application” on page 12.
User Guide Page 51
Page 52

12. Windows video capture applicat io n
• Connected your Frame Grabber to a VGA, DVI or dual-DVI
source.
• Connected your Frame Grabber to a USB port on your video
capture workstation.
• If required you should have also connected power to the
Frame Grabber.
Figure 12:Connecting Epiphan Frame Grabbers
VGA, DVI or
Dual-DVI
Cable
USB Cable
Video Source
(Equipment with VGA, DVI, or
Dual-DVI Output)
Epiphan
Frame Grabber
(Display, Record, and Broadcast
This chapter describes:
• Upgrading to the latest software version
• Starting the video capture application
• Common procedures
• Menus
• Toolbar
• Status bar
• Shortcut keys
• Recording, display, KVM and sharing options
• Windows Epiphan USB device driver
Video Capture
Workstation
Captured images)
Page 52 Epiphan Frame Grabber
Page 53

12. Windows video capture application Upgrading to the latest software version
Upgrading to the latest software version
From time to time Epiphan makes new versions of all Epiphan
Frame Grabber software available from the Epiphan web site. To
confirm that you have the latest video capture application version
select Check for Updates from the Help menu.
Note: Check for Updates will only recommend an update if
Epiphan recommends that you install a new version. This will
happen if the latest version contains significant bug fixes or
enhancements. If a new video capture application version only
contains minor changes, Check for Updates may not recommend
that you install a new version.
In most cases you can upgrade the Epiphan software on your
Windows or Linux video capture workstation by using normal
procedures for your operating system to download the latest
version and install it without uninstalling the previous version.
If you have problems upgrading Windows software, see the
detailed driver update instructions and install/uninstall
instructions available from the Windows section of
http://www.epiphan.com/downloads.
Finding software updates
To find the latest versions of all Epiphan software for Windows
and Linux go to http://www.epiphan.com/downloads. You can
also browse to the download page for your Frame Grabber
product. For example, if you own an Epiphan VGA2USB Frame
Grabber, you can browse to http://www.epiphan.com and select
Products > VGA Frame Grabbers > VGA2USB > Download.
On these download pages you will find the most recent versions
of:
•This Epiphan Frame Grabber User Guide.
• For Windows: the Epiphan USB device driver and video
capture application for Windows 2000, Windows XP, and
Windows Vista.
User Guide Page 53
Page 54

12. Windows video capture application Starting the video capture application
• For Linux (i386 and x86_64): pre-compiled drivers for many
Linux distributions.
• For Macintosh: the latest release of the Epiphan device driver,
QuickTime component and VGA2USB application compatible
with MacOS X 10.4 and 10.5 (Intel and PowerPC) and 10.3.
Starting the video capture application
Before starting the video capture application the Frame Grabber
must be connected to the video capture workstation USB port. If
required the Frame Grabber should also be connected to power.
Start the video capture application as you would any other
application installed on the video capture workstation.
Figure 13:Epiphan video capture application window (Windows
XP, VGA2USB Frame Grabber)
Title Bar
Menu
Toolbar
Captured
Image
Status Bar
Page 54 Epiphan Frame Grabber
Page 55

12. Windows video capture application Starting the video capture application
As the application starts the following messages may appear on
the video capture application window:
• Detecting Video Mode as the video capture application starts
up and attempts to connect with the Frame Grabber.
• Tuning Capture Parameters if the video capture application
finds the Frame Grabber and begins synchronizing and tuning
capture settings and image adjustments (see “Configuring
image adjustments” on page 136 for more information).
• No Signal Detected if the video capture application cannot
connect with the Frame Grabber or if the Frame Grabber is not
connected to an active video source.
If the video capture application successfully connects to and
synchronizes with the Frame Grabber, the video capture
application window begins displaying captured images.
Figure 13 shows the parts of the video capture application
window.
Note: You use command line options to control some settings
when the video capture application starts. For example, you can
start the video capture application without any window borders
and so that it always appear on top of all application windows.
See “Windows command line options” on page 149.
Title Bar Displays the product name and serial number of the
Frame Grabber that the video capture application is
receiving captured images from. The title bar also
displays the screen resolution and refresh rate of the
video source. (The serial number is used for Web
Broadcasting, see Chapter 16. “Web Broadcasting”
on page 121.)
Menu Select commands from video capture application
menus. See “Menus” on page 61.
Toolbar Save, print, and copy a snapshot of the current
captured image. Start, stop, pause and resume
recording images. Start and stop a web
broadcasting session. See “Toolbar” on page 67.
User Guide Page 55
Page 56

12. Windows video capture application Common procedures
Captured
Image
Status Bar The status bar displays information about the
The image currently being captured by the Frame
Grabber. The captured image is the same as the
image that you can save, print, copy, and record.
current operation of the video capture application.
The information displayed includes the file name of
the video or image file last saved if the video
capture application is recording video or image
files. Other information includes whether sharing
(web broadcasting) is on or off, the current frame
rate, the number of frames captured, and the screen
resolution and refresh rate of the video source. See
“Status bar” on page 68.
Common procedures
This section describes many of the most common video capture
workstation procedures.
• Pausing, copying, saving, and printing images
• Recording captured images
• Starting web broadcasting
Pausing, copying, saving, and printing images
Once the video capture application is displaying images captured
by the Frame Grabber, you can pause, copy, save, and print the
current image.
To pause and resume the captured image
1 Select Pause from the Capture menu or from the toolbar select
.
While the captured image is paused the video capture
application stops receiving new images from the Frame
Grabber. Pause also pauses video recording, image recording
and web broadcasting. While paused you can save, print, and
copy the captured image.
Page 56 Epiphan Frame Grabber
Page 57

12. Windows video capture application Common procedures
2 To resume capturing images select Pause from the Capture
menu or from the toolbar select .
To copy a snapshot of the current image
You can use the following procedure to copy the image currently
displayed by the video capture application to the video capture
workstation clipboard. You can optionally pause image capture
before copying an image.
1 Select Copy from the Edit menu or from the toolbar select .
The current image is copied to the clipboard.
2 Paste the image into a document or other application as a
bitmap image.
The image is pasted as a device independent bitmap image.
To save a snapshot of the current image as an image file
You can use the following procedure to save the current image as
a bmp, png, or jpg file on the video capture workstation. You can
optionally pause image capture before saving an image.
1 Select Save from the File menu or from the toolbar select .
The status bar shows the location and name of the saved file.
The first time you save an image the Save As dialog appears
and you can specify the file name, file type, and location of the
saved image file.
When you select Save again, the video capture application
saves the new image with the same file name and location,
overwriting the previously saved file. You can select Save As
to save the image with a different file name, file type, and
location.
You can open the saved image file with most bitmap image
editing applications.
User Guide Page 57
Page 58

12. Windows video capture application Common procedures
To print a snapshot of the current image
You can use the following procedure to print the current image
on any printer that is connected to the video capture workstation.
You can optionally pause image capture before printing an
image.
1 Select Print from the File menu or from the toolbar select .
The current image is sent to the default printer. You can select
Print Setup from the file menu to select a different printer and
set printer options.
Note: You can also configure the video capture application to
invert colors for printing. From the Tools menu select Options
then select the Display tab and select Invert colors for printing.
Recording captured images
You can record captured images as a video file or as a series of
saved image files. In both cases the recording steps are the same.
To record captured images as a series of image files
Before recording captured images as a series of image files, you
must configure recording options by selecting Options from the
Tools menu, selecting the Recording tab, and selecting Record as
Images. You should also select the image file format and other
image file settings. See Chapter 14. “Recording image files” on
page 91 for the details.
1 Select Start Recording from the Capture menu or from the
toolbar select .
As images are captured by the Frame Grabber they are
recorded as a series of image files according to the image file
settings on the Recording tab of the Options dialog. The Status
bar shows the name and location of the last saved file.
You can pause recording by selecting Pause from the Capture
menu or from the toolbar.
Page 58 Epiphan Frame Grabber
Page 59

12. Windows video capture application Common procedures
You can stop recording by selecting Stop Recording from the
Capture menu or from the toolbar.
When you stop recording images, the status bar displays the
number of image files saved. For example, the message Wrote
31 files. indicates the video capture application saved 31
image files.
To record captured images as a video file
Before recording captured images as a video file you must
configure recording options by selecting Options from the Tools
menu, selecting the Recording tab, and selecting Record as Video.
See Chapter 15. “Recording videos” on page 97 for all the details.
1 Select Start Recording from the Capture menu or from the
toolbar select .
2 Enter the file name, select the location for saving the video file,
and select Save.
As images are captured by the Frame Grabber they are
recorded to the video file. The status bar shows the name and
location of the video file. The status bar also displays the
amount of time that the video has been recording and the
number of frames (or images) recorded.
When the size of the video file reaches the AVI file size limit
(see “AVI file size limit” on page 103) the video capture
application does one of the following:
•stops recording
• starts a new video file and continues recording
(“Configuring video file recording options” on page 102
describes how to specify the file name)
• overwrites the original video file and continues recording.
You can pause recording by selecting Pause from the Capture
menu or from the toolbar.
User Guide Page 59
Page 60

12. Windows video capture application Common procedures
You can stop recording by selecting Stop Recording from the
Capture menu or from the toolbar.
When you stop recording, the Status bar shows the name and
location of the saved video file, the amount of time that the
video file was recording, and the number of frames (or images)
recorded. For example: Wrote c:\temp\example.avi (85 sec,
464 frames).
Starting web broadcasting
Before broadcasting captured images over the Internet you need
to set the display format to 24 bits per pixel. See Chapter 16. “Web
Broadcasting” on page 121 for more information about setting up
web broadcasting.
To broadcast captured images over the Internet
1 Select Web Broadcasting from the Tools menu or from the
toolbar select .
The Start web broadcasting dialog appears.
2 Record the Internet address from which users can view the
web broadcast.
The address is always http://www.vga2usb/ followed by the
serial number of the Frame Grabber capturing the broadcasted
images. In the example above the Internet address is
http://www.vga2usb.com/V2U15100.
Page 60 Epiphan Frame Grabber
Page 61

12. Windows video capture application Menus
3 Select Start Web Broadcasting.
As images are captured by the Frame Grabber they are
broadcast over the Internet. The Status bar displays
SHARING ON.
Users can use any web browser to connect to the Internet
address to view the broadcast. See Chapter 16. “Web
Broadcasting” on page 121 for more information about the
system requirements for viewing web broadcasts.
You can pause web broadcasting new images by selecting
Pause from the Capture menu or from the toolbar.
You can stop web broadcasting by selecting Stop Web
Broadcasting from the Tools menu or from the toolbar.
When you stop web broadcasting the status bar displays
SHARING OFF.
Menus
This section describes the commands available from the following
Windows video capture application menus:
• File menu
• Edit menu
• View menu
• Capture menu
• Tools menu
• KVM menu
• Help menu
File menu
Use the File menu commands to save and print the current image
displayed by the video capture application and to exit the video
capture application.
User Guide Page 61
Page 62

12. Windows video capture application Menus
Save Save a snapshot of the current image to a file on the
video capture workstation. Select a location for the file
and select a file format. You can save the snapshot as a
bitmap (*.bmp), portable network graphics (*.png), or
JPEG (*.jpg) file.
The first time you select Save after starting the video
capture application you are prompted for a file name
and you can change the file location and format. After
saving the first file, every time you select Save the
video capture software saves a snapshot using the
same file name in the same location, replacing the
previously saved file. When you select Save the status
bar shows the location and name of the saved file.
Save As Save a snapshot of the current image to a file on the
video capture workstation. Using Save As you can
enter a file name and select a file location and format.
Save As resets the file name, location, and file format
used by the Save command and the Save snapshot
toolbar button. When you select Save As the status bar
shows the location and name of the saved file.
Print
Setup
Configure printer settings used when you select the
Print command or the Print snapshot toolbar button.
You can also configure the video capture application
to invert colors for printing. From the Tools menu
select Options then select the Display tab and select
Invert colors for printing. See “Configuring display
options” on page 71.
Print Print a snapshot of the current image to the configured
printer.
Exit Close and exit the video capture application.
Page 62 Epiphan Frame Grabber
Page 63

12. Windows video capture application Menus
Edit menu
From the edit menu you can copy a snapshot of the current
image.
Copy Copy a snapshot of the current image to the video
capture workstation clipboard. You can paste this image
into a document or other application as a bitmap image.
View menu
Use the commands on the view menu to control the parts of the
video capture application window that are displayed.
Toolbar Change the size of the toolbar icons or hide the
toolbar. You can select small, large, or huge icons.
If the toolbar is hidden, select an icon size to
display the toolbar.
Status Bar Enable or disable displaying the status bar.
Image Only
(Esc to exit)
Change the video capture application to operate
in image only mode. In image only mode the
video capture application displays the captured
image only. The window borders, toolbar, status
bar and menu bar are not displayed. Scroll bars
are displayed if required.
Image only mode can be useful for applications
such as integrating the video capture application
into a custom system. You can still use all of the
video capture application shortcut keys to save
and print images, start and stop recordings, and
to exit from image only mode. See “Shortcut
keys” on page 69. You can always press Alt+F4 to
exit from the video capture application.
You can also use the --borderless command line
option to start the video capture application in
image only mode. See “Windows command line
options” on page 149 for information about this
and other command line options.
User Guide Page 63
Page 64

12. Windows video capture application Menus
Capture menu
Use the commands on the capture menu to start, stop or pause
capturing and recording images. From the capture menu you can
also select the Frame Grabber that the video capture application
receives captured images from if you have more than one
Epiphan Frame Grabber connected to the video capture
workstation. You can also override image adjustments,
DirectShow settings, and the VGA mode settings for the selected
Frame Grabber.
The record functions on the capture menu record the current
image as a video or as a series of consecutive image files. Select
Options from the Tools menu and use the settings on the
Recording tab to configure what the video capture application
records. See “Recording, display, KVM and sharing options” on
page 69.
Start
Recording
Stop
Start recording the current image to a video file or
a series of image files.
Stop recording the current image.
Recording
Pause Pause or resume image capturing. If you select
pause the video capture application stops
displaying new captured images and the image
captured when you selected Pause is displayed.
Pause also pauses recording a video, pauses
saving image files, and pauses web broadcasting.
Select pause again to resume displaying captured
images and resume recording or web
broadcasting.
Select
Device
If you have more than one Frame Grabber
connected to the video capture workstation you
can select Select Device to choose the Frame
Grabber that the video capture application
receives captured images from. You can also use
this command to select the Frame Grabber to
configure with the Configure Device command.
Page 64 Epiphan Frame Grabber
Page 65

12. Windows video capture application Menus
Configure
Device
Override image adjustments, DirectShow options,
and select VGA modes for the current Frame
Grabber. See the following sections for more
information:
• “Configuring image adjustments” on page 136
• “Configuring DirectShow options” on page 143
• “Configuring VGA modes” on page 145
Tools menu
Use the Tools menu to customize basic video capture application
operating settings. The Tools menu also contains commands for
special functions such as broadcasting captured images over the
Internet.
Web
Broadcasting
Upload EDID Use this command to upload an extended
Measure
VGA Mode
Options Configure recording, display, KVM, and sharing
Broadcast the images being captured by the
video capture application over the Internet. See
Chapter 16. “Web Broadcasting” on page 121.
display identification data (EDID) file to your
DVI2USB Frame Grabber. See “About EDID” on
page 133.
When requested by Epiphan technical support,
you can use this command to display low-level
information about the VGA mode that you are
capturing with your Frame Grabber. You can
copy this information into an email to send it to
Epiphan technical support.
(Internet Broadcasting) settings. See “Recording,
display, KVM and sharing options” on page 69.
KVM menu
Use the KVM menu if you are using the Epiphan KVM2USB
Frame Grabber. See “Using the KVM2USB Frame Grabber” on
page 129 for more information.
User Guide Page 65
Page 66

12. Windows video capture application Menus
Enter KVM
Mode
Reconnect
Start operating the video capture application in
KVM mode.
Re-connect KVM mode if KVM stops functioning.
KVM
Send Ctrl-
Alt-Del
Simulate pressing Ctrl-Alt-Del on the Windows
PC being managed by KVM.
Help menu
Use the Help menu to Check for Updates and to display
information about the version of the video capture application
that you are running.
Note: Check for Updates will only recommend an update if
Epiphan recommends that you install a new version. This will
happen if the latest version contains significant bug fixes or
enhancements. If a new video capture application version only
contains minor changes, Check for Updates may not recommend
that you install a new version.
Figure 14:Displaying the video capture application version
Page 66 Epiphan Frame Grabber
Page 67

12. Windows video capture application Toolbar
Toolbar
Use the toolbar to save, print, or copy the current captured image,
to start, pause, and stop recording the current captured image,
and to start and stop web broadcasting. You can use the Toolbar
command on the View menu to change the size of the toolbar
icons or hide the toolbar. You can select small, large, or huge
icons. If the toolbar is hidden, you can select an icon size to
display the toolbar.
Save a snapshot of the current image captured by the
video capture application to a file on the video capture
workstation. Select a location for the file and select a file
format. You can save the snapshot as a Windows bitmap
(*.bmp), portable network graphics (*.png), or JPEG
(*.jpg) file.
Print a snapshot of the current image to the configured
printer.
Copy a snapshot of the current image to the video capture
workstation clipboard. You can paste this image into a
document or other application as a bitmap image.
Start or stop recording the images being captured by the
video capture application as a series of image files or a
video file. When you start recording the status bar
displays RECORDING and also displays information
about the image files or video file being recorded. When
you stop recording the status bar displays information
about the saved image files or video file.
Pause or resume image capturing. If you select pause, the
video capture application stops displaying new captured
images and the image captured when you selected Pause
is displayed. Pause also pauses recording a video, pauses
saving image files, and pauses web broadcasting. Select
pause again to resume displaying captured images and
resume recording or web broadcasting.
Start or stop broadcasting or sharing captured images
over the Internet. See Chapter 16. “Web Broadcasting” on
page 121.
User Guide Page 67
Page 68

12. Windows video capture applicat io n Status bar
Status bar
The status bar displays information about the current status of the
video capture application. The status bar contains the following
number of sections:
• Four if the video capture application is just capturing images.
• Five if you are recording images.
• Six if you are recording images and you have selected Options
from the Tools menu, selected the Display tab and selected
Show frame count on the status bar. See “Configuring display
options” on page 71.
These sections display the following information:
• The location and file name of image and video files saved
while recording images.
• The web broadcasting status. SHARING OFF means web
broadcasting is turned off. SHARING ON indicates that web
broadcasting is turned on.
• Recording status. RECORDING means that the video capture
application is recording captured images.
• The frame rate that the Frame Grabber is operating at in
frames per second (fps). For information about how the frame
rate is determined, see “About the frame rate” on page 151.
• The number of frames that the Frame Grabber has captured
since the video capture application was last started. The
number of frames is only visible if you select Show frame
count on the status bar from the Display tab of the Options
dialog. See “Configuring display options” on page 71. The
number of frames stops incrementing and starts flashing if
you have paused the video capture application.
• The color depth and refresh rate of the captured images.
Page 68 Epiphan Frame Grabber
Page 69

12. Windows video capture application Shortcut keys
Shortcut keys
You can use the following shortcut keys from the video capture
application window.
Ctrl+S Save a snapshot of the current image to the
video capture workstation.
Ctrl+Shift+S Save As.
Ctrl+P Print a snapshot of the current image to the
configured printer.
Ctrl+Shift+P Print Setup.
Ctrl+C Copy a snapshot of the current image to the
clipboard.
Ctrl+R Start or stop recording images or video.
Ctrl+U Pause or resume image capturing.
Ctrl+W Start or stop web broadcasting.
Esc Exit Image Only mode.
Recording, display, KVM and sharing options
This section introduces the options available from the Tools menu
when you select the Options command. These options control
how the Frame Grabber and video capture application records
images, displays images, triggers KVM, and shares or broadcasts
images over the Internet.
Recording Configure how the video capture application
saves captured frames when you start
recording. You can record captured images as a
series of image files or as an AVI video file. See
“Configuring recording options” on page 70.
Display Configure the display format used by the video
capture application for displaying and saving
captured images. See “Configuring display
options” on page 71.
User Guide Page 69
Page 70

12. Windows video capture application Recording, display, KVM and sharing options
KVM Configure the combination of keyboard and
mouse events that switch KVM mode on and
off. See “To set the KVM triggering event” on
page 130.
Sharing Override default compression settings for web
broadcasts. See “Changing web broadcasting
compression and performance” on page 125.
Configuring recording options
Select Options from the Tools menu and then select the Recording
tab to control how the video capture application records captured
images. You can record captured images as a series of
consecutively saved graphic files or as a video file. How the video
capture application records frames when you start recording
from the Toolbar or the capture menu depends on how you set
the recording options. You can select the following options.
Record as
Images
Record as
Video
Automatically
turn
recording off
Set the video capture application to record
captured images as a series of image files saved
on the video capture workstation. For
information about how to record images and
image recording settings, see
Chapter 14. “Recording image files” on page 91.
Set the video capture application to record
images as an AVI video file saved on the video
capture workstation. For information about
how to record videos and video recording
settings, see Chapter 15. “Recording videos” on
page 97.
Select automatically turn recording off to
configure the video capture application to
automatically stop recording captured images
as image files or as a video file.
• You can stop recording after a specified
number of images (frames) have been
recorded. Set the number of frames in the
range of 1 to 30,000.
• You can stop recording after a specified time
has elapsed. Set the time in seconds,
minutes, or hours.
Page 70 Epiphan Frame Grabber
Page 71

12. Windows video capture application Recording, display, KVM and sharing options
Figure 15:Record as images options
Configuring display options
Select Options from the Tools menu and select the Display tab to
select the display format that the video capture application uses
to display and record captured images. As well you can use the
display options to limit the frame rate that the video capture
application uses. You can also enable or disable options that
control how the video capture application displays and prints
images.
User Guide Page 71
Page 72

12. Windows video capture application Recording, display, KVM and sharing options
Figure 16:Display options
Display
Format
Select the color depth that the video capture
application uses to display, record, and print
captured images. You can set display format to:
• RGB 24 bits per pixel
• RGB 16 bits per pixel
• RGB 8 bits per pixel
• Grayscale 256 levels
• Grayscale 32 levels
•Black and white
In most cases you should set the display format to
RGB 24 bits per pixel. This setting is required for
most video codecs, is supported by all image
formats, and is required for web broadcasting.
For descriptions of display formats and color
depths, see “Color depth, bits per pixel (bpp)” on
page 45. For more information about setting the
display format, see “About setting the display
format” on page 74.
Page 72 Epiphan Frame Grabber
Page 73

12. Windows video capture application Recording, display, KVM and sharing options
Limit
frame
rate to
Resize
window
on
resolution
change
Fit image
to
window
Invert
colors for
printing
Select Limit frame rate to set a frame rate that is
lower than the frame rate at which your Frame
Grabber can capture images. You can reduce the
frame rate to reduce the number of images captured
by the Frame Grabber. You may want to reduce the
frame rate to reduce the load on the video capture
workstation, to reduce the size of recorded video
files, or the number of saved image files.
For example, a VGA2USB LR or PRO can capture up
to 60 frames a second (fps). This frame rate may
approach 100% CPU usage, even on a dual CPU
video capture workstation. To reduce load on the
video capture workstation you can reduce the frame
rate to 30 fps without losing very much useful data.
The valid frame rate range is from 0.01 to 60 fps. The
default frame rate is 30 fps.
Select this option so that the video capture
application resizes the application window when
the resolution of the VGA or DVI source changes.
This option does not affect recorded, printed, or
saved images.
Scale the displayed captured image up or down to
fit in the video capture application window. This
option does not change the size of recorded, printed,
or saved images.
This option is useful if you are printing images that
contain light colored images, white text on a black
background, or if for some other reason the printed
image will be more useful if the colors are inverted.
This option changes printed images only. It does not
change the display and does not affect recorded or
saved images.
User Guide Page 73
Page 74

12. Windows video capture application Recording, display, KVM and sharing options
Flip
image
vertically
Select this option to turn the captured image
displayed on the video capture application upside
down. If you select this option, the image in
recorded videos, the image that is copied when you
select Copy from the Edit menu, printed images,
and broadcasted images are also upside down.
Images saved by selecting Save from the File menu
and recorded image files are not affected by this
option.
Show
frame
count on
Select this option to display on the status bar the
total number of frames (or images) captured since
the video capture application was last started.
the status
bar
About setting the display format
For best results you would usually set the display format color
depth to match the video source color depth. If the display format
and video source color depth do not match, the device driver or
video capture application converts the color resolution of images
as they are captured. This conversion can put extra demands on
the video capture workstation CPU.
Note: For a definition of color depth, see “Color depth, bits per
pixel (bpp)” on page 45.
In some cases; however, you may want to set the display format
to a different color depth than the video source. There are a
number of possible reasons for doing this. For example:
• You are recording captured images to video and your video
codec is not compatible with the color depth of the video
source. In this case you could set the display format to match
the requirements of your video codec.
• You want to save disk space. Setting display format to a lower
color depth reduces the size of recorded image files or videos.
Using a lower display format color depth means that the video
and image files saved by the video capture application are
smaller and use less disk space.
Page 74 Epiphan Frame Grabber
Page 75

12. Windows video capture application Recording, display, KVM and sharing options
• You have special requirements for a color depth that is
different from the color depth produced by the video source.
Set the display format to the color depth that you require.
Epiphan Frame Grabbers capture images at the color depth of the
video source up to the maximum color depth supported by the
Frame Grabber. The maximum color depth supported by the
VGA2USB Frame Grabber is 16 bits per pixel (bpp). The
maximum color depth supported by all other Epiphan Frame
Grabbers is 24 bpp.
Increasing the color depth of captured images
The VGA2USB Frame Grabber captures images at 16 bpp. If
16 bpp is supported by the codec or image file format that you are
using, you should also set the display format to RGB 16 bits per
pixel. Setting the display format to RGB 24 bits per pixel requires
the Frame Grabber device driver to convert the image format
from RGB 16 to RGB 24. This results in extra CPU and memory
usage and larger image or video files but the image quality (or
amount of information) is still the same as in the original RGB 16
images that came from the Frame Grabber.
However, in most cases even with a VGA2USB Frame Grabber
you would usually operate at 24 bpp because this color depth is
required by most video codecs and also for web broadcasting.
In most cases image capture and recording performance should
be acceptable if the video capture workstation meets or exceeds
the hardware requirements described in “Hardware
Requirements” on page 11 and if there are not a lot of concurrent
demands on this PC.
Reducing the color depth of captured images
All DVI2USB Frame Grabbers and the VGA2USB LR/HR/PRO
Frame Grabbers can capture images at RGB 24 bpp. If your video
source is operating at RGB 24 bpp and you set the display format
lower than RGB 24 bpp, you are reducing the quality of the
captured image. You are also causing the Epiphan USB device
driver to consume extra CPU and memory resources to convert
the images to the reduced color depth.
User Guide Page 75
Page 76

12. Windows video capture application Windows Epiphan USB device driver
However, in some cases you may choose to reduce the quality of
the captured image for a number of reasons such as reducing file
size, or a custom application that uses a different color depth.
In most cases image capture and recording performance should
be acceptable if the video capture workstation meets or exceeds
the hardware requirements described in “Hardware
Requirements” on page 11 and if there are not a lot of concurrent
demands on this PC.
Converting color images to grayscale or black and white
If the Frame Grabber is capturing color RGB images and you set
the display format to a grayscale or black and white format, the
video capture application converts the color images to the
requested grayscale or black and white format. Conversion from
color to grayscale or black and white causes the greatest demand
on the video capture workstation CPU because the conversion is
performed by the video capture application. If you are capturing
color images, you should only set the display format to grayscale
or black and white if you have a specific need for this color depth.
If you have concerns about performance, you can make some trial
recordings to ensure the video capture workstation has sufficient
CPU and memory resources.
Windows Epiphan USB device driver
On Windows video capture workstations the Epiphan USB device
driver installs a VGA2USB control panel application (Figure 17).
You can use this control panel application to view the status of
the Frame Grabber or Frame Grabbers connected to the video
capture workstation. You can also select Configure Device to
configure the following settings for each Frame Grabber that you
have connected to the video capture workstation:
• Image adjustments, see “Configuring image adjustments” on
page 136
• How the Epiphan USB device driver communicates with
DirectShow, see “Configuring DirectShow options” on
page 143
Page 76 Epiphan Frame Grabber
Page 77

12. Windows video capture application Windows Epiphan USB device driver
• Customize or limit the VGA modes that the Frame Grabber
can use, see “Configuring VGA modes” on page 145.
Figure 17:Epiphan USB device driver
Note: Changing these settings from this control panel has the
same effect as selecting Configure Device from the Capture menu
and changing the settings there.
Note: You can change and save configuration settings for any
Frame Grabber that you have connected to the video capture
workstation even if the Frame Grabber is not operating or
connected at the time. If you change the configuration of a Frame
Grabber that is not connected, the configuration is stored on the
video capture workstation and applied to the Frame Grabber
when the Frame Grabber is connected and operating.
You can also select Default Configuration to reset a Frame
Grabber to its default configuration. Editing image adjustments
and DirectShow options from the control panel application or
from the video capture application has the same results.
User Guide Page 77
Page 78

12. Windows video capture application Windows Epiphan USB device driver
Page 78 Epiphan Frame Grabber
Page 79

13. Mac OS X video capture application
13.Mac OS X video capture
application
This chapter describes common functions and features of the
Epiphan video capture application for Mac OS X. You can use the
Mac OS X version of the Epiphan video capture application to
configure the Frame Grabber attached to your computer and to
view, save, copy, and print the images captured by the Frame
Grabber.
Note: For information about the Windows version of the Epiphan
video capture application, see Chapter 12. “Windows video
capture application” on page 51.
• For details about how to record video using the Mac OS X
application HackTV Carbon, see “Recording videos for Mac
OS X” on page 110.
• For details about how to set up KVM, see Chapter 17. “Using
the KVM2USB Frame Grabber” on page 129.
• For many useful How To procedures see the How To page of
the Epiphan Web Site.
This chapter assumes that you have followed the instructions in
the Frame Grabber Installation Guide shipped with your Frame
Grabber and also available as chapters 2 to 9 of this User Guide. To
start using this chapter you should have:
• Selected a video capture workstation running Mac OS X that
meets the system requirements described in your install guide
and in Chapter 2. “System Requirements” on page 11.
• Successfully installed the Epiphan USB device drivers, and
video capture application on the video capture workstation as
described in Chapter 4. “Installing the Mac OS X
VGA2USB/DVI2USB drivers and application” on page 14.
• Connected your Frame Grabber to a VGA, DVI or dual-DVI
source.
• Connected your Frame Grabber to a USB port on your video
capture workstation.
User Guide Page 79
Page 80

13. Mac OS X video capture application Upgrading to the latest Mac OS X software version
g
• If required you should have also connected power to the
Frame Grabber.
Figure 18:Connecting Epiphan Frame Grabbers
VGA, DVI or
Dual-DVI
Cable
USB Cable
Video Source
(Equipment with VGA, DVI, or
Dual-DVI Output)
Epiphan
Frame Grabber
Mac OS Video Capture
Workstation running
(Display, and Record
Captured ima
This chapter describes:
• Upgrading to the latest Mac OS X software version
• Starting the Mac OS X video capture application
• Copying, saving, and printing images
• Menus
• Toolbar
• Changing system preferences
Upgrading to the latest Mac OS X software version
From time to time Epiphan makes new versions of all Epiphan
Frame Grabber software available from the Epiphan web site. In
most cases you can upgrade the Epiphan software on your Mac
OS X video capture workstation by using normal procedures to
download the latest version and install it without uninstalling the
previous version.
es)
Page 80 Epiphan Frame Grabber
Page 81

13. Mac OS X video capture application Starting the Mac OS X video capture application
Note: Some versions of the Mac OS X Epiphan video capture
application do not install a shortcut on the desktop. You can drag
the Epiphan icon from the Applications folder to your desktop or
add it to the Dock after installing a new version of the video
capture application. You may also need to delete older versions of
the Epiphan icon.
Finding software updates
To find the latest versions of all Epiphan software for Mac OS X,
go to http://www.epiphan.com/downloads. You can also
browse to the download page for your Frame Grabber product.
For example, if you own an Epiphan VGA2USB Frame Grabber,
you can browse to http://www.epiphan.com and select Products
> VGA Frame Grabbers > VGA2USB > Download.
On these download pages you will find the most recent version of
this Epiphan Frame Grabber User Guide and the most recent release
of the Epiphan device driver, QuickTime component and
VGA2USB application compatible with MacOS X 10.4 and 10.5
(Intel and PowerPC) and 10.3.
Starting the Mac OS X video capture application
Before starting the video capture application the Frame Grabber
must be connected to the video capture workstation USB port. If
required the Frame Grabber should also be connected to power.
Start the video capture application as you would any other
application installed on the video capture workstation.
As the application starts the following messages may appear on
the video capture application window:
• Detecting Video Mode as the video capture application starts
up and attempts to connect with the Frame Grabber.
• Tuning Capture Parameters if the video capture application
finds the Frame Grabber and begins synchronizing and tuning
capture settings and image adjustments (see “Configuring
image adjustments” on page 136 for more information).
User Guide Page 81
Page 82

13. Mac OS X video capture application Starting the Mac OS X video capture application
• No Signal Detected if the video capture application cannot
connect with the Frame Grabber or if the Frame Grabber is not
connected to an active video source.
Figure 19:Epiphan video capture application window (Mac OS X,
VGA2USB Frame Grabber)
Title Bar
Toolbar
Captured
Image
If the video capture application successfully connects to and
synchronizes with the Frame Grabber, the video capture
application window begins displaying captured images.
Figure 19 shows the parts of the video capture application
window.
Title Bar Displays the product name of the Frame Grabber
that the video capture application is receiving
captured images from. The title bar also displays
the screen resolution and refresh rate of the video
source.
Page 82 Epiphan Frame Grabber
Page 83

13. Mac OS X video capture application Copying, saving, and printing images
Toolbar Save, copy, and print a snapshot of the current
captured image. Switch to full screen mode,
override image adjustments, and display
information about the Frame Grabber. See
“Toolbar” on page 89.
Captured
Image
The image currently being captured by the Frame
Grabber. The captured image is the same as the
image that you can save, print, copy, and record.
Copying, saving, and printing images
Once the video capture application is displaying images captured
by the Frame Grabber, you can copy, save, and print the current
image.
To copy a snapshot of the current image
You can use the following procedure to copy the image currently
displayed by the video capture application to the video capture
workstation clipboard.
1 Select Copy from the Edit menu or from the toolbar select .
The current image is copied to the clipboard.
2 Paste the image into a document or other application as a
bitmap image.
To save a snapshot of the current image as an image file
You can use the following procedure to save the current image as
a bmp, png, jpg, or tiff file on the video capture workstation.
1 Select Save from the File menu or from the toolbar select .
You can open the saved image file with most bitmap image
editing applications.
User Guide Page 83
Page 84

13. Mac OS X video capture application Menus
To print a snapshot of the current image
You can use the following procedure to print the current image
on any printer that is connected to the video capture workstation.
1 Select Print from the File menu or from the toolbar select
.
The current image is sent to the default printer. You can select
Print Setup from the file menu to select a different printer and
to set printer options.
Menus
This section describes the commands available from the following
Mac OS X video capture application menus:
• VGA2USB menu
• File menu
• Edit menu
• View menu
• Tools menu
VGA2USB menu
Use the commands on the VGA2USB menu to view the current
version of the video capture application, configure preferences
for the video capture application, configure KVM preferences,
and exit the video capture application.
About
VGA2USB
Preferences Configure general preferences and KVM
Quit
VGA2USB
Page 84 Epiphan Frame Grabber
Display the information about the version of the
video capture application that you are running.
See Figure 20.
preferences for the video capture application.
Exit the video capture application.
Page 85

13. Mac OS X video capture application Menus
Figure 20:Displaying the video capture application version
Video capture application general preferences
Configure video capture application preferences to set the video
capture application to wide video mode or to limit the frame
capture rate. To set preferences, select Preferences from the
VGA2USB menu.
Figure 21:General preferences
Wide
video
mode
This checkbox, when selected, allows Wide Aspect
Ratio VGA modes to be displayed by the video capture
application window. The Epiphan USB device driver
may not be able to determine whether the video source
is sending a wide video mode signal. You can select
this option if your video source uses a wide video
mode to make sure that the Epiphan USB device driver
selects a wide video mode. You can also set this option
using Mac OS X System Preferences. See “Setting
QuickTime options for recording videos (Mac OS X)”
on page 111.
User Guide Page 85
Page 86

13. Mac OS X video capture application Menus
Limit
capture
frame
rate
Limit the capture frame rate to use the video capture
application to control the capture frame rate. Specify a
maximum number of frames per second. Usually you
would only limit the frame rate in this way if the video
capture workstation is having performance problems.
If you limit the capture frame rate, the video capture
application records videos at the same rate as the
limited frame rate. If the limited frame rate is higher
than the frame rate of the Frame Grabber, the video
capture application records videos at the frame rate of
the Frame Grabber.
KVM preferences
Configure KVM preferences to enable KVM support and specify
the event that starts KVM operation.
To set KVM preferences, select Preferences from the VGA2USB
menu and the select KVM from the Preferences toolbar.
Figure 22:KVM Preferences
Page 86 Epiphan Frame Grabber
Page 87

13. Mac OS X video capture application Menus
Enable KVM
Support
KVM Trigger
Event
Enable or disable KVM support. This option
only takes effect when a KVM2USB Frame
Grabber is connected to the video capture
application. When KVM support is enabled the
video capture application sends PS/2 events and
with a KVM2USB Frame Grabber can be used to
control a headless machine.
Select the key and mouse button combination
that triggers switching between KVM mode and
non-KVM mode.
File menu
Use the File menu commands to save and print the current image
displayed by the video capture application.
Save
Image
Page
Setup
Print Print a snapshot of the current image to the
Save a snapshot of the current image to a file on the
video capture workstation. Select a location for the
file and select a file format. You can save the snapshot
as a bitmap (*.bmp), portable network graphics
(*.png), JPEG (*.jpg) file, or tiff (*.tiff) file.
Configure the printer settings used when you select
the Print command or the Print toolbar button.
configured printer.
Edit menu
From the edit menu you can copy a snapshot of the current
image.
Copy Copy a snapshot of the current image to the video
capture workstation clipboard. You can paste this image
into a document or other application as a bitmap image.
User Guide Page 87
Page 88

13. Mac OS X video capture application Menus
View menu
Use the commands on the view menu to control the parts of the
video capture application window that are displayed.
Show Device
Information
Show
adjustment
Controls
Enter Full
Screen
Hide/Show
Toolbar
Enable or disable displaying information about
the current Frame Grabber at the top of the
video capture application window.
Override image adjustments. When the video
capture application first starts, the application
and the Frame Grabber adjust the captured
image for optimal appearance. However, you
may need to override these image adjustment
settings to improve the image quality. See
“Configuring image adjustments” on page 136.
Scale the video capture application window to
fill the screen.
Enable or disable displaying the toolbar at the
top of the video capture application.
Tools menu
Use the Tools menu to select Show VGA Information to display
low level information about the VGA mode that you are
capturing with your Frame Grabber. When requested by Epiphan
Support you can use this command and copy this information
into an email to send it to Epiphan Support.
Figure 23:Viewing VGA information
Page 88 Epiphan Frame Grabber
Page 89

13. Mac OS X video capture application Toolbar
Toolbar
Use the toolbar to save, copy or print the current captured image
and to start, pause, or stop recording and to pause image
capturing. You can use the Hide/Show Toolbar command on the
View menu to show or hide the toolbar.
Save a snapshot of the current image captured by the
video capture application to a file on the video capture
workstation. Select a location for the file and select a file
format. You can save the snapshot as a bitmap (*.bmp),
portable network graphics (*.png), JPEG (*.jpg) file, or tiff
(*.tiff) file.
Copy a snapshot of the current image to the video capture
workstation clipboard. You can paste this image into a
document or other application as a bitmap image.
Print a snapshot of the current image to the configured
printer.
Full Screen mode. Scale the video capture application
window to fill the screen.
Override Image Adjustments. When the video capture
application first starts, the application and the Frame
Grabber adjust the captured image for optimal
appearance. However, you may need to override these
image adjustment settings to improve the image quality.
See “Configuring image adjustments” on page 136.
Device Info. Enable or disable displaying information
about the current Frame Grabber at the top of the video
capture application window.
User Guide Page 89
Page 90

13. Mac OS X video capture application Changing system preferences
Changing system preferences
Before starting to record videos or to save or print images, you
should configure Epiphan QuickTime integration options by
opening System Preferences and selecting VGA2USB under Other
and configuring QuickTime settings. See “Setting QuickTime
options for recording videos (Mac OS X)” on page 111.
You can also select About to view information about the current
software and driver versions.
Figure 24:System preferences about
Page 90 Epiphan Frame Grabber
Page 91

14. Recording image files Configuring image file recording options
14.Recording image files
You can use the information in this chapter if you are planning on
using your Epiphan Frame Grabber and Epiphan video capture
application to record the images captured by your Frame Grabber
as a series of individual image files.
This chapter describes:
• Configuring image file recording options
• Setting display options to change how image files are recorded
• Recording image files
• Viewing saved image files
Configuring image file recording options
You should review and modify image file recording options
before recording captured images as image files. Using image file
recording options you can control the format of the image files,
control the file naming system used for saving the image files,
and determine whether to save all captured images or to be
selective in the images that you capture.
To configure image file recording options
1 Start the video capture application.
2 On the Tools menu select Options.
3 On the Recording tab select Record Images.
4 Configure the following options and select OK or Apply to
save your changes.
User Guide Page 91
Page 92

14. Recording image files Configuring image file recording options
Figure 25:Image file recording options
Format Select the file format for saving image files. You
can choose BMP (Windows bitmap *.bmp),
PNG (portable network graphics (*.png), or
JPEG (*.jpg).
Filename
generation
Use the filename generation options to control
the names of the saved image files and the
location on the video capture workstation to
which to save the files.
Folder Type in the path to the folder or select the
folder button to select the folder into which to
save image files. All of the image files will be
saved into this folder.
Prefix Enter a prefix to be added to the start of each
saved image file name. All saved files will have
the same prefix.
Page 92 Epiphan Frame Grabber
Page 93

14. Recording image files Configuring image file recording options
Suffix Select a suffix for the end of each saved image
file name. Use the suffix to automatically
change the name of each saved file. You can
select a number of different suffixes. Each one
changes how the automatic file naming works.
Each suffix starts with a % and can include the
following characters:
• 02, 04, 06, or 08 indicates the number of
digits to use in numbering the suffix. You
can specify 2, 4, 6, or 8 digits.
• d means use decimal numbers in the suffix.
• X means use hexadecimal numbers in the
suffix.
The suffix %02d means the saved file names
would end with two-digit decimal numbers,
for example: 01, 02, 03, ... 10, 11 and so on. The
suffix %04X means the saved file names would
end with 4-digit hexadecimal numbers, for
example: 0001, 0002, 0003, ... 000A, 000B...
Start Enter the starting number used in the file name
suffixes in decimal format. If the suffixes
include hexadecimal numbering this decimal
number is automatically converted to
hexadecimal.
Example Displays an example file name constructed by
the prefix and suffix that you have configured.
Overwrite
existing files
If you select overwrite existing files, the video
capture application saves files according to the
image file recording options, overwriting
existing files if any are present.
If you do not select overwrite existing files,
every time the video capture application
encounters a file with the same name as it
would have used to save the file it selects the
next file name in the sequence until it can save
a file without overwriting an already saved file.
User Guide Page 93
Page 94

14. Recording image files Configuring image file recording options
Save All
Frames
Save all captured images during a recording
session.
Skip Reduce the number of image files saved during
a recording session. Save the first captured
image at the start of a recording session but
skip the specified number of captured images
before saving the next image. Continue
skipping the specified number of captured
images between saving images. You can skip
between 1 and 10,000 images.
Wait Save the first captured image at the start of a
recording session but wait until the specified
number of seconds, minutes, or hours has
passed before saving the next image. Continue
waiting the specified time period between
saving captured images. Use this option to
reduce the number of images saved during a
recording session. You can set wait for up to
10,000 hours.
Automatically
turn recording
off
Automatically stop recording images after a
number of images have been recorded or a set
amount of time has elapsed. You can turn
recording off after between 1 and 30000 frames
(or images) have been recorded. You can also
turn recording off after a period of time that
you set in seconds, minutes, or hours.
Page 94 Epiphan Frame Grabber
Page 95

14. Recording image files Setting display options to change how image files are recorded
Setting display options to change how image files are recorded
To change display options from the Tools menu, select Options
and then select the Display tab. The following display options
change how image files are recorded.
Display
Format
Limit
frame
rate to
For more information about display options, see “Configuring
display options” on page 71.
The video capture application saves image files with
the same color depth as the display format.
If you limit the frame rate, the video capture
application saves image files at the same rate as the
limited frame rate. If the limited frame rate is higher
than the frame rate of the Frame Grabber, the video
capture application saves image files at the frame
rate of the Frame Grabber.
Recording image files
Before recording captured images as a series of image files, you
should configure image recording options (see “Configuring
image file recording options” on page 91) and optionally
configure display format settings (see “Setting display options to
change how image files are recorded” on page 95).
To record image files
1 Start capturing the images to be recorded.
2 Select Start Recording from the Capture menu or from the
toolbar select .
As images are captured by the Frame Grabber, they are
recorded as a series of image files according to the image file
settings on the Recording tab of the Options dialog. The Status
bar shows the names and location of image files as the video
capture application saves them.
User Guide Page 95
Page 96

14. Recording image files Viewing saved image files
You can pause recording by selecting Pause from the Capture
menu or from the toolbar.
You can stop recording by selecting Stop Recording from the
Capture menu or from the toolbar. When you stop
recording images the status bar displays the number of image
files saved. For example, the message Wrote 31 files. indicates
the video capture application saved 31 image files.
Viewing saved image files
The video capture application saves image files in the popular file
formats that you can view using most bitmap graphics viewer or
editor software programs. Figure 26 shows a saved image file
named 640x480.png displayed using the GIMP bitmap graphics
editor. You cannot use the Epiphan video capture application to
view saved image files.
Figure 26:Viewing a saved image file using GIMP
Page 96 Epiphan Frame Grabber
Page 97

15. Recording videos Recording videos for Windows 2000, XP, or Vista
15.Recording videos
You can use the information in this chapter if you are planning on
using your Epiphan Frame Grabber and Epiphan video capture
application to record the frames captured by your Frame Grabber
as video files.
This chapter describes:
• Recording videos for Windows 2000, XP, or Vista
• Using a DirectShow application to record video files
• Recording videos for Mac OS X
• Recording videos for Linux
Recording videos for Windows 2000, XP, or Vista
This section describes how to use the Epiphan video capture
application to record video files on a video capture workstation
running Windows 2000, XP or Vista.
Under Windows 2000, XP, or Vista, the Epiphan video capture
application records videos as windows *.avi files. The *.avi files
are created and saved by an external codec that must be installed
on the video capture workstation. The Epiphan video capture
application passes captured images to the video codec and the
codec does the recording. Setting up video recording involves
installing an external third-party video codec and adding that
codec to your video capture application configuration. This
section describes:
• Setting display options for recording videos
• Selecting a Windows video codec
• Installing the ffvfw video codec pack
• Configuring video file recording options
• Recording a video
• Playing back a video file
• Using a DirectShow application to record video files
User Guide Page 97
Page 98

15. Recording videos Recording videos for Windows 2000, XP, or Vista
Setting display options for recording videos
Before starting to record videos, you should configure Epiphan
video capture application display settings.
Note: Most video codecs require setting the display format to
RGB 24 bits per pixel.
The following display options change how the video capture
application records video files.
Display
Format
Limit
frame
rate to
Flip
image
vertically
For more information about display options, see “Configuring
display options” on page 71.
The video capture application records video files
with the same color depth as the display format.
Usually you need to set the display format to RGB
24 bits per pixel before recording videos.
If you limit the frame rate, the video capture
application records videos at the same rate as the
limited frame rate. If the limited frame rate is higher
than the frame rate of the Frame Grabber, the video
capture application records videos at the frame rate
of the Frame Grabber.
Select this option to turn the captured image
displayed on the video capture application upside
down. If you select this option, the image in
recorded videos is also upside down.
Selecting a Windows video codec
The video capture application automatically finds all of the video
codecs installed on the video capture workstation. Unless you
have already installed a high-speed codec, most of the codecs that
the video capture application finds may be too slow or have poor
compression. If a codec is too slow, the video recording frame rate
may be too low to produce a good quality video without
compromising the performance of the video capture workstation.
If a video codec has poor compression, the recorded *.avi files
could become very large.
Page 98 Epiphan Frame Grabber
Page 99

15. Recording videos Recording videos for Windows 2000, XP, or Vista
To view the codecs installed on the video capture
workstation
1 Start the Epiphan video capture application.
2 Select Options from the Tools menu.
3 Select the Recording tab.
4 Set Record as to Video.
5 Select the Select Codec button.
6 Select the Compressor list to view the list of video codecs
available on the video capture workstation.
Figure 27:Example list of installed Windows video codecs
Although a number of codecs may be available, Epiphan
recommends that you select a third-party codec to purchase or
download that will meet your requirements. Select a video codec
that can record videos at a high frame rate and that also supports
high quality compression.
User Guide Page 99
Page 100

15. Recording videos Recording videos for Windows 2000, XP, or Vista
Epiphan recommends the MS MPEG 4 V2 video codec for most
applications. You can use this codec to produce *.avi files that are
compatible with most *.avi players. This codec operates at high
refresh rates without reducing the performance of the video
capture workstation and also includes high quality compression.
Installing the ffvfw video codec pack
The MS MPEG 4 V2 video codec is available from the free ffvfw
codecs pack. You can download the ffvfw codecs pack from
http://www.free-codecs.com/download/ffvfw.htm.
To download and install the ffvfw video codec pack
1 Make sure the Display Format is set to RGB 24 bits per pixel.
Check by selecting Options from the Tools menu and selecting
Display. See “Setting display options for recording videos” on
page 98.
2 Select the following link to download the ffvfw codec pack:
http://www.free-codecs.com/Video_Codecs.htm
This link starts a download of the file ffvfw-20031028.exe,
which is the installer for the ffvfw codec pack. Download this
file and then run the executable (for example, double-click on
the file) to install the ffvfw codec pack.
3 From the video capture application, select Options from the
Tools menu.
4 Select the Recording tab.
5 Select Record as Video.
6 Select the Select Codec button.
7 In the Compressor list select ffvfw MPEG-4 Codec.
8 Select Configure.
9 Select the following settings for the ffvfw codec pack:
Page 100 Epiphan Frame Grabber
 Loading...