

Page 1
UserGuide
Epiphan Pearl-2
Pearl-2 Rackmount
Pearl-2 Rackmount Twin
© and ™ 2019, Epiphan Systems, Inc
Release 4.7.1
February 20, 2019
UG115-13
Page 2

Terms and conditions
This document, the Epiphan web site, and the information contained therein, including but not limited to the text,
videos and images as well as Epiphan System Inc.’s trademarks, trade names and logos are the property of Epiphan
Systems Inc. and its affiliates and licensors, and are protected from unauthorized copying and dissemination by
Canadian copyright law, United States copyright law, trademark law, international conventions and other intellectual
property laws.
Epiphan, Epiphan Video, Epiphan Systems, Epiphan Systems Inc., and Epiphan logos are trademarks or registered
trademarks of Epiphan Systems Inc., in certain countries. All Epiphan product names and logos are trademarks or
registered trademarks of Epiphan. All other company and product names and logos may be trademarks or registered
trademarks of their respective owners in certain countries.
Copyright © 2019 Epiphan Systems Inc. All Rights Reserved.
THE SOFTWARE LICENSE AND LIMITED WARRANTY FOR THE ACCOMPANYING PRODUCT ARE SET FORTH IN THE
INFORMATION PACKET OR PRODUCT INSTALLATION SOFTWARE PACKAGE THAT SHIPPED WITH THE PRODUCT AND
ARE INCORPORATED HEREIN BY REFERENCE. IF YOU ARE UNABLE TO LOCATE THE SOFTWARE LICENSES OR LIMITED
WARRANTY, CONTACT YOUR EPIPHAN REPRESENTATIVE FOR A COPY.
PRODUCT DESCRIPTIONS AND SPECIFICATIONS REGARDING THE PRODUCTS IN THIS MANUAL ARE SUBJECT TO
CHANGE WITHOUT NOTICE. EPIPHAN PERIODICALLY ADDS OR UPDATES THE INFORMATION AND DOCUMENTS ON
ITS WEB SITE WITHOUT NOTICE. ALL STATEMENTS, INFORMATION AND RECOMMENDATIONS ARE BELIEVED TO BE
ACCURATE AT TIME OF WRITING BUT ARE PRESENTED WITHOUT WARRANTY OF ANY KIND, EXPRESS OR IMPLIED.
USERS MUST TAKE FULL RESPONSIBILITY FOR THEIR APPLICATION OF ANY PRODUCTS.
LIMITATION OF LIABILITY
UNDER NO CIRCUMSTANCES SHALL EPIPHAN BE LIABLE FOR ANY INCIDENTAL, SPECIAL, CONSEQUENTIAL,
EXEMPLARY OR OTHER INDIRECT DAMAGES THAT RESULT FROM THE USE OF, OR THE INABILITY TO USE, THIS
PRODUCT OR THE INFORMATION CONTAINED IN THIS DOCUMENT OR PROVIDED ON EPIPHAN’S WEB SITE, EVEN IF
EPIPHAN HAS BEEN ADVISED OF THE POSSIBILITY OF SUCH DAMAGES. IN NO EVENT SHALL EPIPHAN’S TOTAL
LIABILITY TO YOU FOR ALL DAMAGES, LOSSES, AND CAUSES OF ACTION RESULTING FROM YOUR USE OF THIS
PRODUCT, WHETHER IN CONTRACT, TORT (INCLUDING, BUT NOT LIMITED TO, NEGLIGENCE) OR OTHERWISE,
EXCEED THE AMOUNTS YOU PAID TO EPIPHAN DURING THE MOST RECENT THREE-MONTH PERIOD IN CONNECTION
WITH AMOUNTS WHICH YOU PAID FOR USING THIS PRODUCT.
INFORMATION AND DOCUMENTS, INCLUDING PRODUCT SPECIFICATIONS, PROVIDED IN THIS DOCUMENT OR THE
EPIPHAN WEB SITE ARE PROVIDED “AS IS”. SPECIFICALLY, BUT NOT WITHOUT LIMITATION, EPIPHAN DOES NOT
WARRANT THAT: (i) THE INFORMATION IS CORRECT, ACCURATE, RELIABLE OR COMPLETE; (ii) THE FUNCTIONS
CONTAINED ON THE EPIPHAN WEB SITE WILL BE UNINTERRUPTED OR ERROR-FREE; (iii) DEFECTS WILL BE
CORRECTED, OR (iv) THIS WEB SITE OR THE SERVER(S) THAT MAKES IT AVAILABLE ARE FREE OF VIRUSES OR OTHER
HARMFUL COMPONENTS. EPIPHAN SPECIFICALLY DISCLAIMS ALL REPRESENTATIONS, WARRANTIES, AND
CONDITIONS, EITHER EXPRESS, IMPLIED, STATUTORY, BY USAGE OF TRADE OR OTHERWISE INCLUDING BUT NOT
LIMITED TO ANY IMPLIED WARRANTIES OF MERCHANTABILITY, NON-INFRINGEMENT, TITLE, SATISFACTORY QUALITY
OR FITNESS FOR A PARTICULAR PURPOSE.
For additional terms and conditions, please refer to additional sections in this document.
ii
Page 3

Thank you for choosing Epiphan!
At Epiphan Video (“Epiphan”), building reliable video systems with pro features that perform above your
expectations is our mission.
We value your feedback! Email us your suggestions and let us know how you think we're doing and where
you'd like to see our products improve: info@epiphan.com
Warranty
All Epiphan Systems products are provided with a 100% return to depot warranty for one year from the date
of purchase.
Technical support
Epiphan’s products are backed by our professional support team. You can reach our team several ways:
l Email support@epiphan.com
l Live chat from our support site https://www.epiphan.com/support/
l Phone toll free at 1-877-599-6581 or call +1-613-599-6581
Gather as much information about your problem as you can before you contact us so we can help you better,
including:
l A description of the problem
l Details about your video or audio source (type, connection, resolution, refresh rate, etc.)
l Product serial number
l Product firmware version (using the admin interface)
l Product LED lights
iii
Page 4

What's new in release 4.7.1?
Firmware 4.7.1 is a maintenance release that includes an important stability fix for AFU for your Pearl-2 and
an important BIOS update.
What's fixed
AFU to SFTP server stability improvement
The stability of automatic file uploads (AFUs) to SFTP servers has been improved.
BIOS update to resume status after a power cycle
This BIOS update corrects the power cycle behavior of Pearl-2's purchased after August 2018 and older units
that were updated with the last BIOS update. With this BIOS update, Pearl-2 returns to same status that it was
in before an unexpected power loss. So if there's an unexpected power lose while Pearl-2 is recording (or
streaming), when power is restored, Pearl-2 resumes recording (or streaming).
iv
Page 5

Table of contents
What's new in release 4.7.1? iv
Table of contents v
Start here 1
About this Guide 1
What is Pearl-2? 2
Feature add-ons 3
Front and back view Pearl-2 4
What's in the Box? 10
Quick start 12
Live video mixing / switching 17
Monitoring audio 18
Selecting an audio source 20
Connecting microphones to the XLR line level inputs 22
Remote login access 23
About remote login and control using AV Studio 23
Enable or disable AV Studio remote login 25
Pair a channel with AV Studio 26
Control recording using AV Studio 27
Configure channel encoding using AV Studio 28
Access cloud versions of the Admin panel and Epiphan Live 30
Specifications 32
AV inputs 32
Tech specs 33
Optimum CPU performance 36
User interfaces 38
The touch screen 39
About the touch screen 39
The Channel view 41
Record a channel using the touch screen 43
Stream a channel using the touch screen 44
Switching / mixing using the touch screen 45
One Touch streaming and recording control 47
Configure the touch screen 54
The Admin panel 62
About the Admin panel 62
v
Page 6

Connect to the Admin panel 64
Connect using the Epiphan discovery utility 66
Connect using a DNS-based service discovery 67
Connect using persistent static IP address 68
Switching / mixing using the Admin panel 69
Epiphan Live 71
About Epiphan Live 71
The Dashboard interface 72
Access Epiphan Live using a web browser or mobile device 74
Access Epiphan Live from the Admin panel 75
Stream, record, and monitor using the Dashboard interface 76
Switching / mixing using Epiphan Live 84
Your recordings 88
PART 1: Setup 90
Rackmount installation 91
Configure network settings 92
Network ports used by Pearl-2 92
Verify IP address and MAC address of Pearl-2 94
Configure a static IP address 95
Configure DHCP 98
Change the HTTP/HTTPS port values 100
Perform network diagnostics 100
Disable the network discovery utility 102
Configure network security 103
Configure 802.1x network security and manage user certificates 103
Manage CA and self-signed certificates 105
Configure HTTPS 106
Tether to a mobile network 107
Configure date and time 110
Audio input ports 114
Configure audio ports for stereo or mono 114
Assign audio sources to an input 115
Adjust audio gain and delay 116
Mute audio 118
Video output ports 121
About video output ports 121
Video output port resolution 122
Show a channel or video source on the output port 123
vi
Page 7

Preview the video output port 125
Disable the video output port 126
Disable or enable audio and output port volume 127
Display and reposition the audio VU meter 128
Rename a video output port 129
Mirror the video output port display 130
Feature add-ons 132
4K feature add-on 135
Set up Kaltura CMS integration 137
Enable CMS and register with Kaltura 137
Disable or deregister the device from Kaltura 139
Change the resource name used for Kaltura 140
Reassign a registered resource 141
Configuration presets 144
About configuration presets 144
Configuration preset considerations 146
Configuration groups 151
The Factory default configuration preset 152
Create a configuration preset 153
Apply a configuration preset using the Admin panel 154
Apply a configuration preset using the touch screen 155
Export and import configuration presets 157
Update a configuration preset 159
Delete a configuration preset 160
User administration 161
User types and privileges 161
Set or change user passwords 165
Remove user passwords 166
Overcome lost passwords 167
Configure LDAP user authentication 168
Change the logged-in user 170
Restrict viewers by IP address 170
IP restriction examples 172
Status and monitoring 175
PART 2: Capture 188
What is a channel? 189
Channel layout examples 190
vii
Page 8

About automatic channels Auto A and Auto B 193
Channel configuration 196
Configure auto channels 197
Create a channel 197
Add video sources or a channel as a source 201
Add an audio source to a layout 205
Duplicate a channel 206
Rename a channel 207
Delete a channel 208
Preview channel 209
Add or remove channel metadata 212
Configure encoding 213
Codecs and file format compatibility 213
Configure video encoding 215
Configure audio encoding 220
Multi-encoding and channel as a source 221
Custom layout configuration 223
About the custom layout editor 223
Resize and position items using percents or pixels 227
Open the custom layout editor for a channel 234
Add or edit a custom layout 235
Rename a layout 237
Delete, move, or duplicate a layout 238
Set the background color 240
Add an image to a layout 241
Upload or remove an image using the Media page 243
Add a text overlay 245
Custom system variables for text overlays 248
Crop a video source 248
Configure chroma keying 251
Performance considerations 252
What is upstream chroma keying? 252
What is downstream chroma keying? 253
Set up chroma key for a green screen video source 254
Add chroma key titler effects using Microsoft Powerpoint slides 260
Add external titler software effects to Pearl-2 265
Video and audio input sources 272
About connecting video and audio sources 272
viii
Page 9

Tested RTSP-based IP cameras 274
Supported web cameras 276
Connect an RTSP source 276
Connect an AV.io video grabber 278
Preview a video source using the Admin Panel 279
Rename an input port 280
Configure a video input source 281
DVI and HDMI signals 282
USB signals 284
RTSP sources 287
Add a custom No Signal image 287
PART 3: Stream 289
What is streaming? 290
Secure streaming using RTMPS 290
Stream settings for video and slides 291
View supported streaming formats 292
Streaming a channel directly to viewers 293
Stream content using HTTP, HTTPS or RTSP 294
Stream content using HLS (HTTP/HTTPS) 295
Directly share stream URLs with viewers 296
View the live broadcast URL using a web browser 297
View the streaming URL using a media player 300
Restrict viewer access to channel streams 301
Restrict viewers by IP address 302
IP restriction examples 304
Change HTTP and RTSP streaming port values 306
Disable and enable direct channel streaming 308
Streaming to a server 309
Stream to a CDN 310
Start and stop streaming to a CDN 311
Set up a stream using RTMP or RTMPS push 313
Set up a stream using RTSP announce 315
Stream to a CDN using an XML profile 316
Stream to Wowza Streaming Cloud 318
Stream to Original Livestream 321
Stream using multicast 323
MPEG-TS streams using RTP/UDP push 323
ix
Page 10

MPEG-TS streams using UDP push 325
Multicast streaming using RTP/UDP 327
Viewing with Session Announcement Protocol (SAP) 328
Stream to Kaltura CMS 329
Set up a channel for a scheduled webcasting event 329
Use RTMPS for a Kaltura webcasting event 331
Stream to a media player or smart TV 333
Stream using UPnP 333
Enable UPnP 334
Disable UPnP 337
Viewing with UPnP 338
Play directly to a media player 340
Auto-restart playback to a UPnP device 340
Change UPnP device name 341
PART 4: Record 342
About recording 343
Record a channel 344
Record using One Touch control 346
Configure recording settings, file size and type 347
Restart recording 350
Recorders 352
Add a recorder 352
Select channels to record 353
Start and stop a recorder 354
Rename a recorder 355
Duplicate a recorder 356
Delete a recorder 356
Record to Kaltura CMS 358
About recording to Kaltura CMS 358
Select channels for VOD event views 361
Manually start/stop scheduled VOD events 362
Manually start/stop an ad hoc event 364
Manage recorded files 367
View list of recorded files 367
Download recorded files manually 368
Join recorded files together 369
Extract tracks from a recording 370
Rename recorded files 372
x
Page 11

Delete recorded files 372
FTP and automatic file transfers 374
About Automatic File Upload (AFU) 374
Choose files to include in AFU 375
Enable AFU and set parameters 377
Configure AFU to FTP server parameters 380
Configure AFU to RSync server parameters 381
Configure AFU to CIFS server parameters 383
Configure AFU to SCP client parameters 384
Configure AFU to SFTP server parameters 386
Configure AFU to AWS S3 parameters 389
Configure AFU to WebDav server parameters 390
AFU or copy to USB 392
AFU to a USB storage device 392
Do a one-time copy/move all recordings to USB storage device 393
Manually copy recordings to USB storage device 395
View available USB storage space 397
Safely eject USB storage device 397
View the AFU log 397
Manage the AFU queue 398
Local FTP server 401
PART 5: Maintenance 405
Power down and system restart 406
Backup your Pearl-2 setup 408
Perform a factory reset 409
Firmware upgrade 410
Support 415
Storage space maintenance 419
Third party integration 422
Controlling Pearl-2 using RS-232 / serial port 423
Controlling Pearl-2 using HTTP/HTTPS commands 429
Configuration keys for third party APIs 435
xi
Page 12

Troubleshooting 448
Limitations and known issues 460
Previous releases and features 464
Software license 466
xii
Page 13
Pearl-2 User Guide Start here
Start here
Welcome, and thank you for buying Epiphan Pearl-2™, Pearl-2 Rackmount™ or Pearl-2 Rackmount Twin™.
You'll find information on how to set up and use all three models in this user guide. Whenyou see the name
Pearl-2 used in this guide, it means that the content applies to all three models. Differences are explicitly called
out. For a product description, see What is Pearl-2?.
See the Quick start for basic steps to get a single video source (and optional audio) set up so you can stream
and record some output right away. The rest of the guide shows you how to tweak the system exactly how
you want it so you can take advantage of the many advanced features.
About this Guide
After the introductory section and quick start, the next chapter describes the main user interfaces that are
used to operate and configure Pearl-2. You'll find everything that you need to successfully access and use
these interfaces:
l Touch screen
l Admin Panel
l Epiphan Live
The rest of the user guide covers setting up and operating your system for a successful video switching,
recording, and live streaming experience. The chapters are organized in to these five categories: Setup,
Capture, Stream, Record and Maintenance.
1
Page 14
Pearl-2 User Guide What is Pearl-2?
This guide assumes that all feature add-ons for Pearl-2 are activated. If a documented feature or task is only
available when a specific feature add-on is activated, it is indicated by a link to the activation page for that
feature add-on. For the 4K add-on, the link is 4K .
What is Pearl-2?
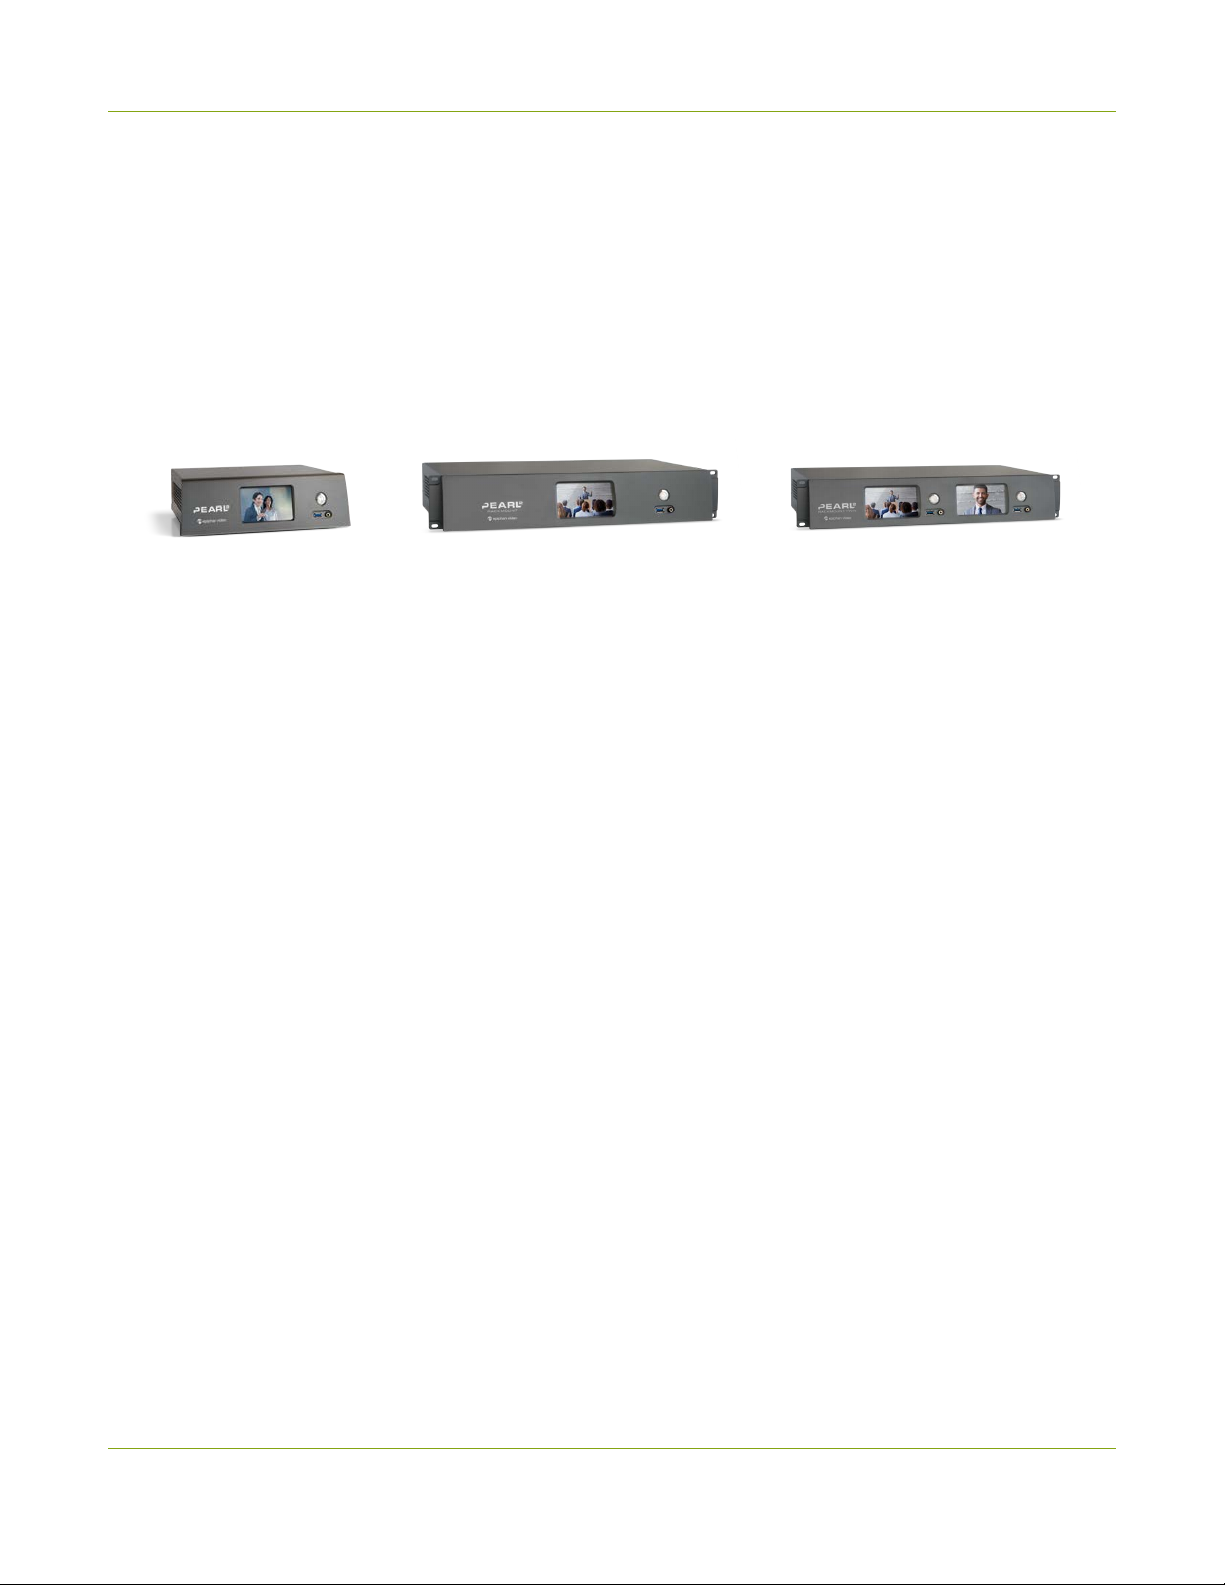
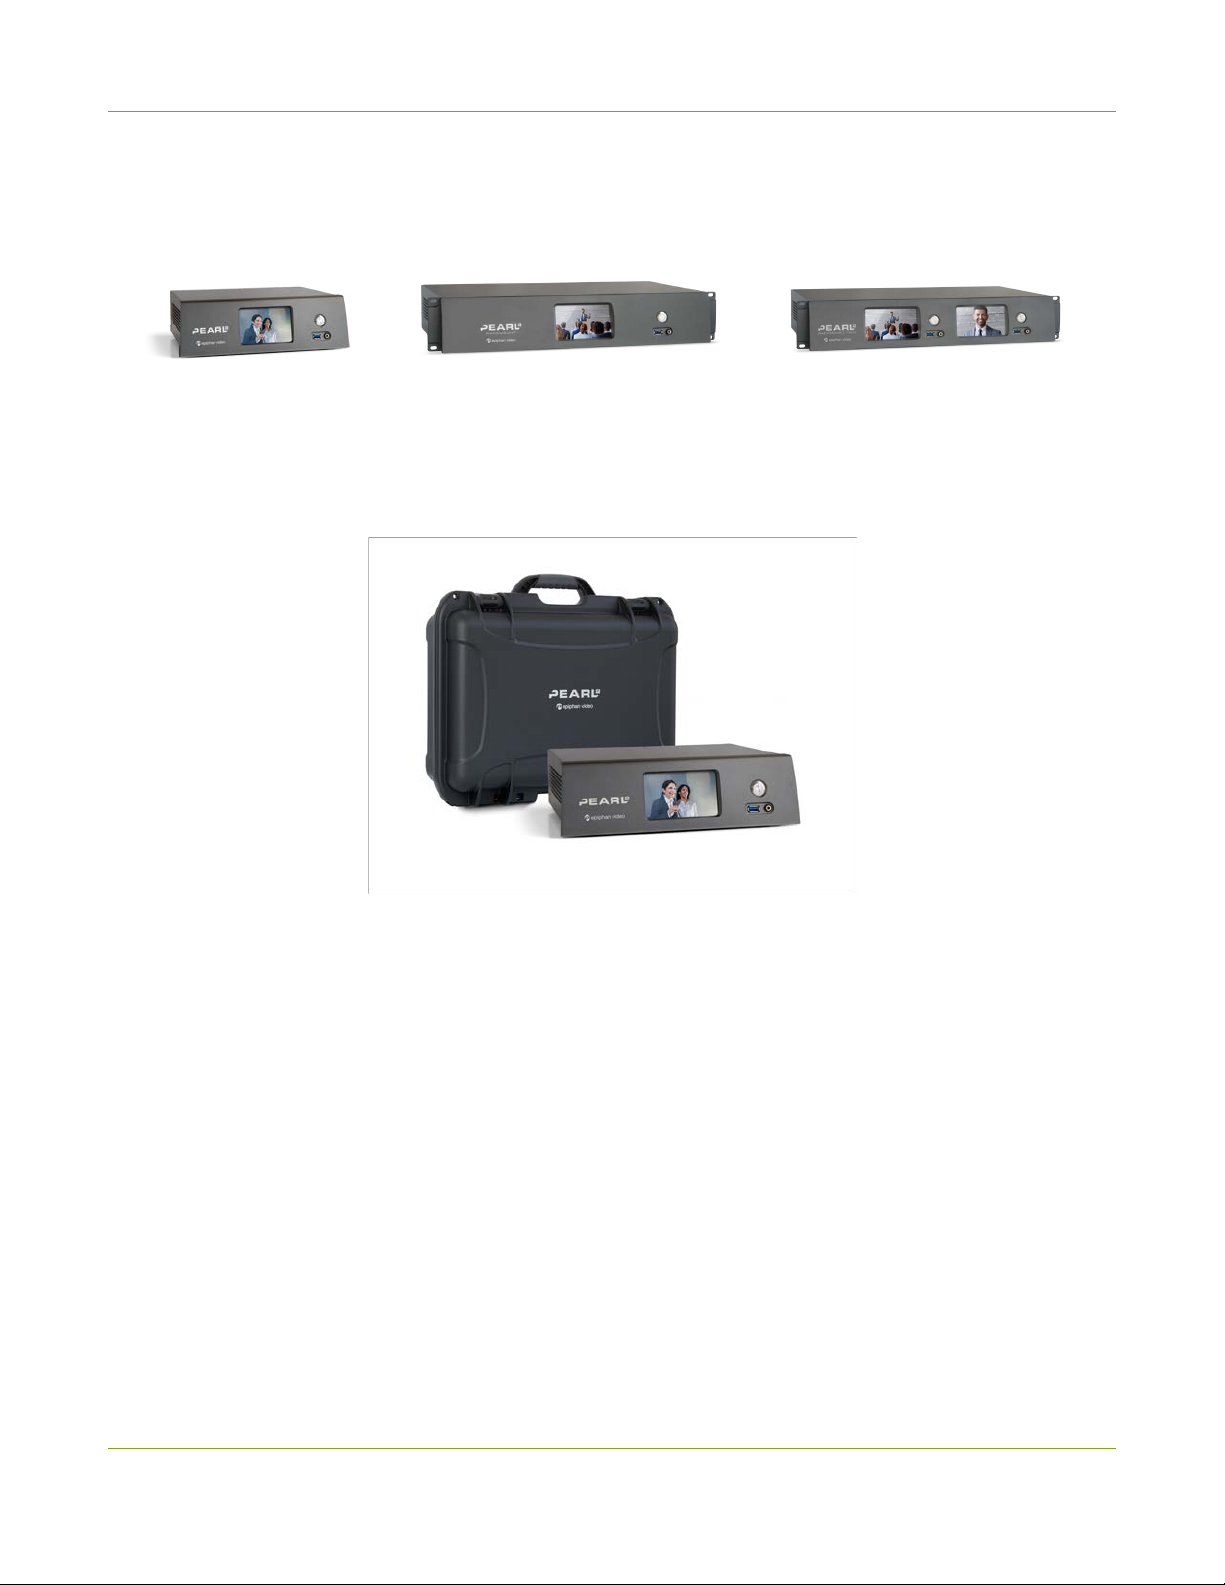
Pearl-2 is a versatile live video production device that's a video encoder, video streamer, live switcher, and
video recorder all in one. Pearl-2 comes in three models.
Pearl-2
A small, silent, portable
system that comes with a
hard-shell carry case.
With Pearl-2, you can capture, record, and stream from computer monitors, radar displays, or almost anything
that outputs to SDI, HDMI™, USB, HDMI 4K4K or DVI-I(single link). Capture audio from XLR, RCA,, USB, SDI
or HDMI sources.
Simultaneously capture up to six full HD video sources or up to four 4K sources if you have the 4K feature
add on installed. You can create up to five simultaneous channels for live switching, or a single 4K channel.
Have separate ISOs or create custom layouts with multiple video sources and picture in picture. You can do all
that with Pearl-2.
Easily watch live streams using your favorite web browser or media player on mobile devices and computers
connected to the same private network as Pearl-2 or using Content Distribution Networks (CDNs). Recorded
files can be downloaded via FTPor set to automatically upload via FTP, RSYNC, or CIFS and can be integrated
into your Content Management System (CMS). Pearl-2 is also fully integrated with Kaltura CMS and can be
registered as a video encoder resource for easy lecture capture.
A 2U rackmount system with all the
Pearl-2, but designed for installation
Pearl-2 Rackmount
same functionality as the portable
and operation in a rack.
Pearl-2 Rackmount Twin
A high density 2U rack mount
variation that contains two complete
(and independent) Pearl-2 systems.
Network security compliance with 802.1x protocols, passwords, and certificate authentication means an
easier setup for IT friendly live streaming over enterprise networks. HTTPS enabled for secure administration
and control over the LAN, and RTMPS support for secure, encrypted live streaming.
2
Page 15

Pearl-2 User Guide Feature add-ons
Pearl-2 does not capture from HDCP encrypted sources.
Feature add-ons
Pearl-2 offers add-on features so you can do even more with your system. Start from the base model of Pearl2 and add feature add-ons for extra functionality.
See Add-ons overview for details about the availability of add-ons for your system, as well as instructions to
purchase and install add-ons.
Where you see this symbol 4K in the guide, that means the feature or function applies only if you
have activated the 4K feature add-on.
3
Page 16
Pearl-2 User Guide Front and back view Pearl-2
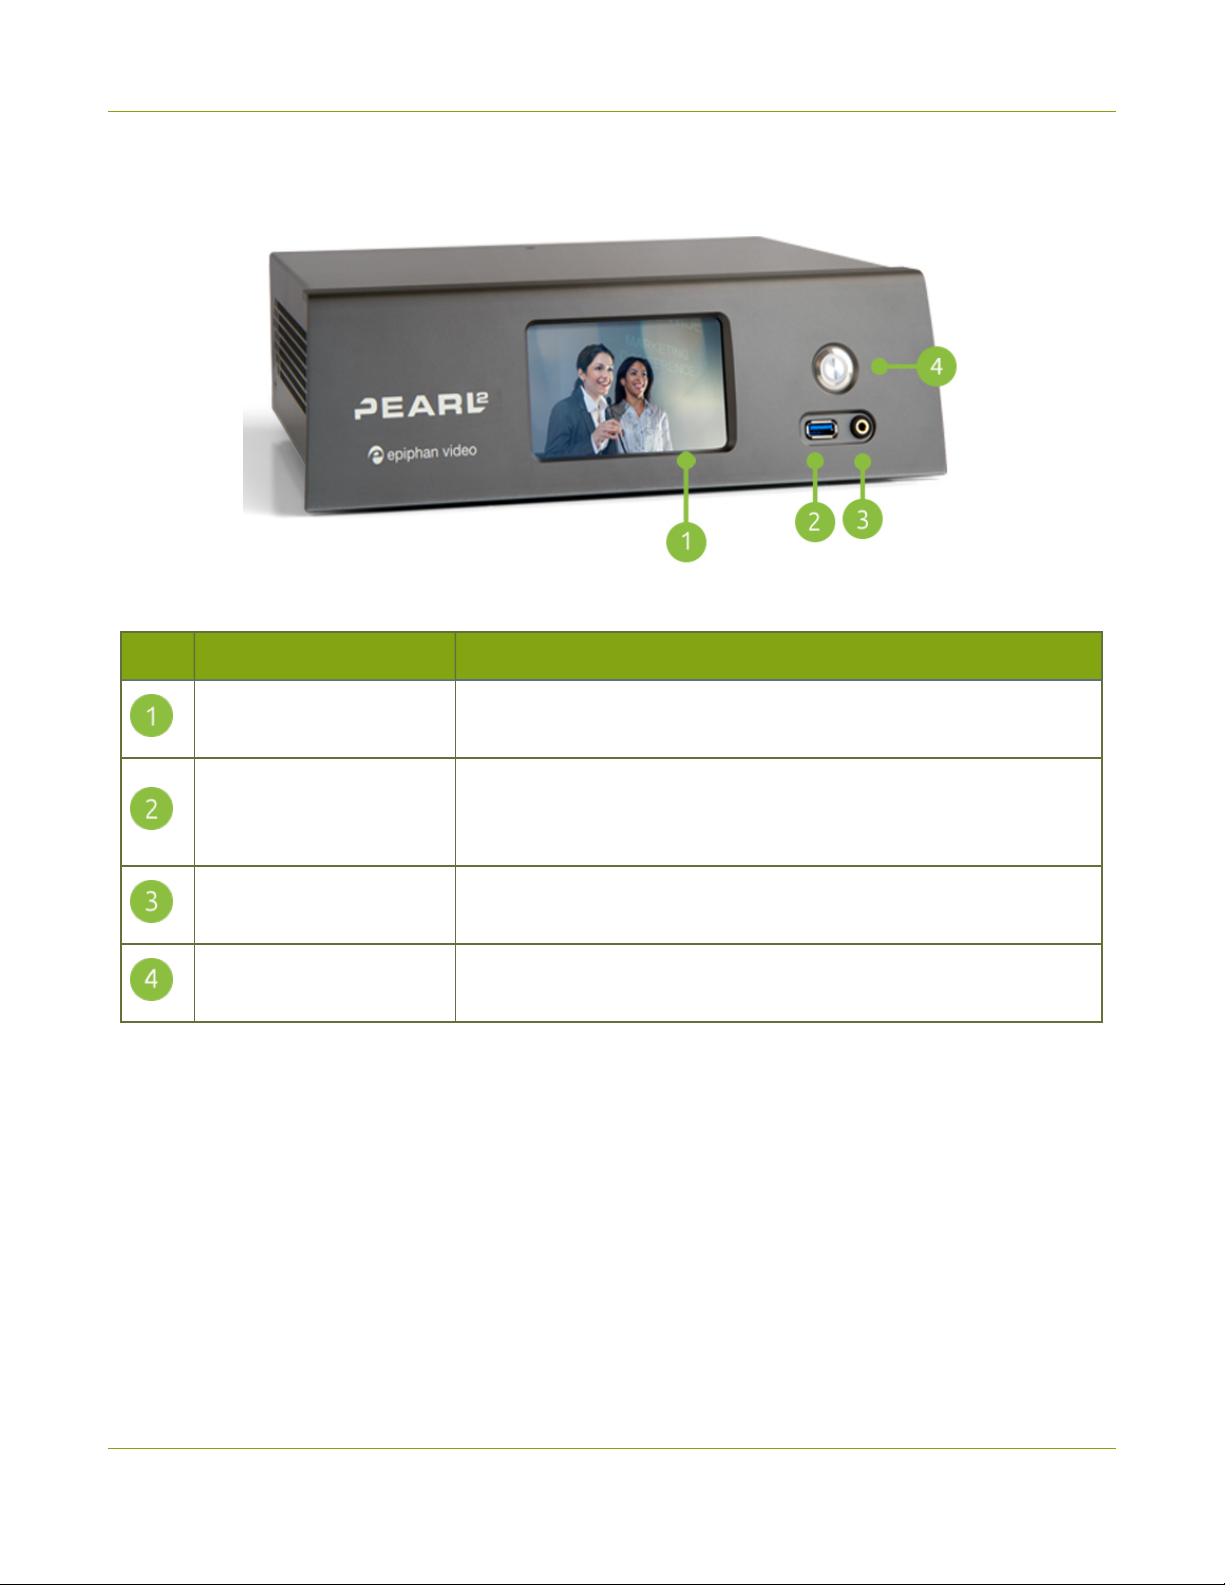
Front and back view Pearl-2
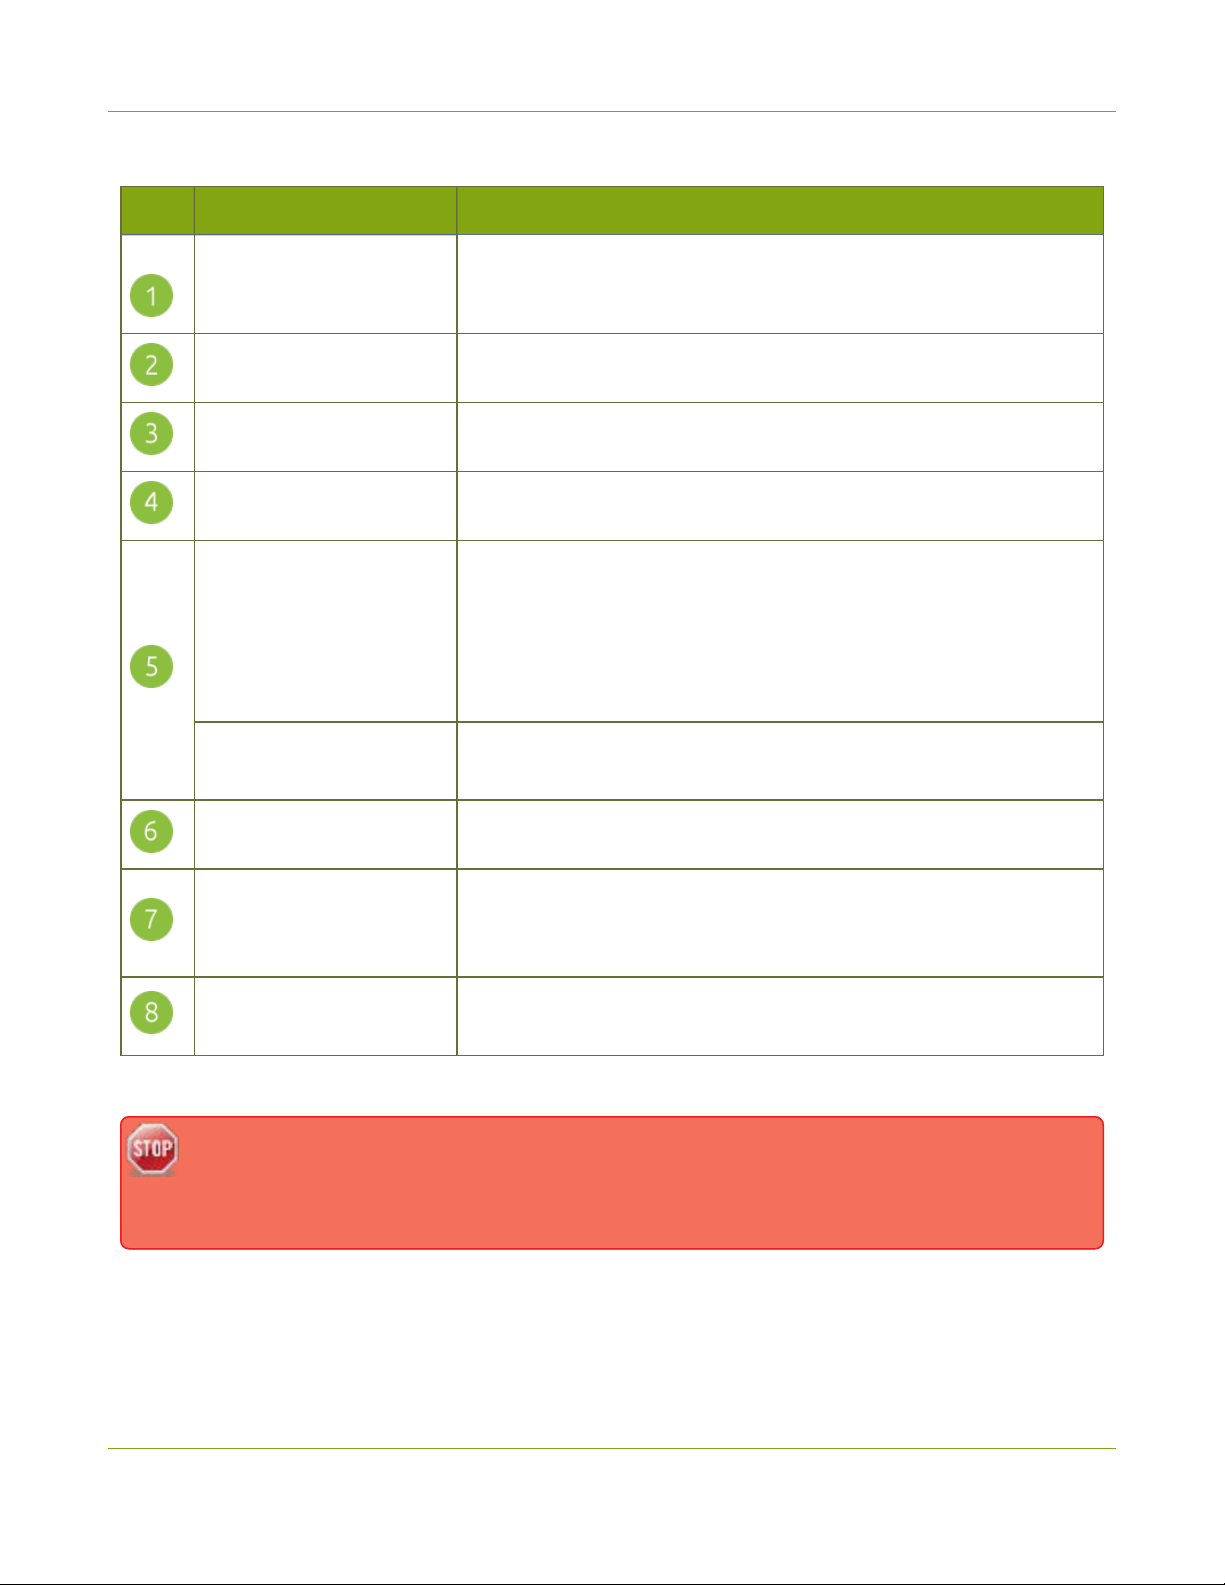
Table 1 Pearl-2 front panel descriptions
Label Name Description
Touch screen front panel
display
USB 3.0 port
3.5 mm audio jack
Power button
Used for confidence monitoring and simple configuration, obtaining
system information, and starting/stopping recordings and streams.
For connection of external hard drives, flash drives or control
interfaces, see AFU or copy to USB. Web cameras cannot be
connected to this port, only the ports on the rear.
For audio confidence monitoring. Plays the audio for the currently
visible channel.
Press once to power on. Double-press to initiate a graceful system
shutdown.
4
Page 17
Pearl-2 User Guide Front and back view Pearl-2
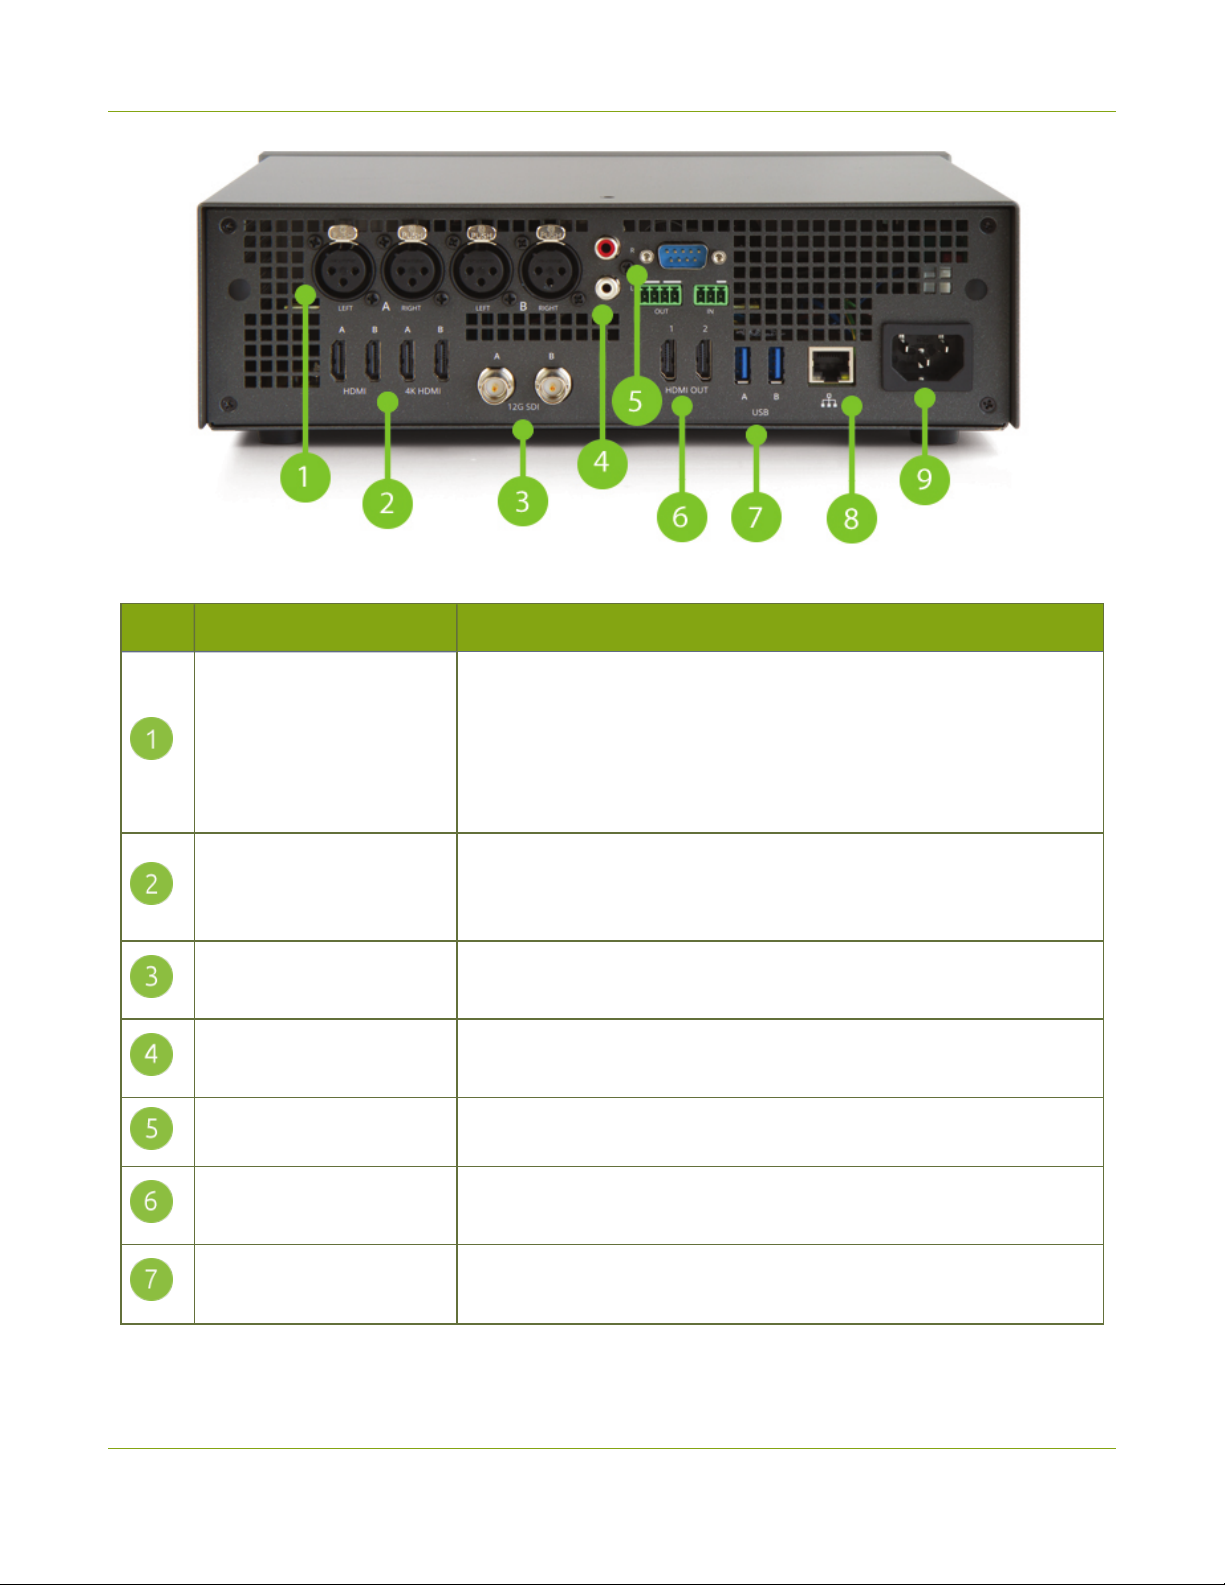
Table 2 Pearl-2 back panel descriptions
Label Name Description
The four XLR ports can function as two, professional line level
left/right stereo pairs (XLR A pair and XLR B pair) or as four mono
XLR audio in
HDMIin
12G SDI in
RCA audio in
RS-232 port For connection to a control computer terminal.
HDMIoutput ports
inputs, see AV inputs.
The XLR ports are professional line-level inputs and are calibrated for
+ 4.0 dBu signals.
Four HDMI 1.4 ports that connect HDMI and DVIsignals to Pearl-2.
The first two ports allow for any signal up to full HD, and the second
two inputs allow for any input resolution up to 4K4K .
Connects SDIsignals toPearl-2, including 3G-SDI; 6G-SDI; 12G-SDI;
4K-SDI; HD-SDI; SD-SDI
The RCA ports are consumer line level, left/right stereo pair and are
calibrated for - 10 dBV signals.
HDMIoutput for connection to a display or projector (up to 4K1). Port
1 is HDMI 2.0, and Port 2 is HDMI 1.4, see Video output ports.
USB3.0 ports
For connection of external hard drives, flash drives, USB webcameras,
USB microphones or control interfaces, see AFU or copy to USB.
5
Page 18
Pearl-2 User Guide Front and back view Pearl-2
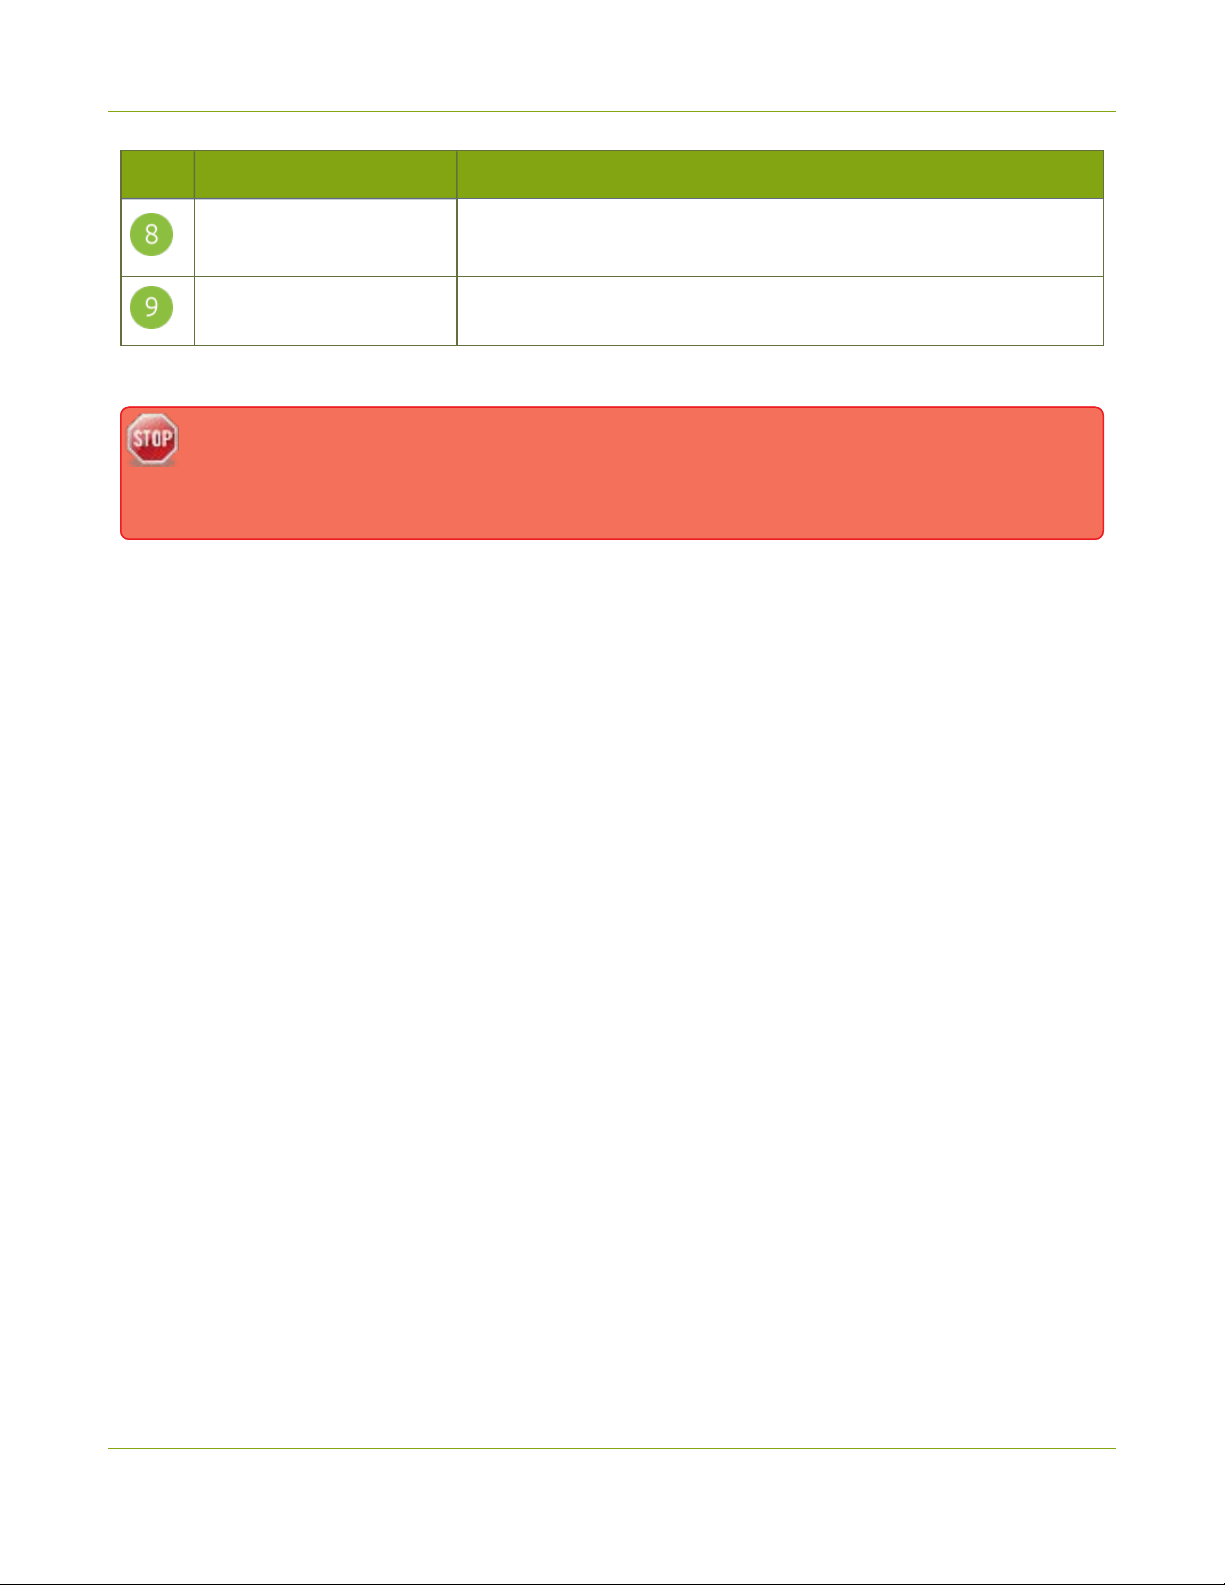
Label Name Description
RJ-45 Ethernet
Power jack Plug the supplied 120/240 V AC power cable in here.
1
Requires 4K feature add on
The SDI ports on the back of Pearl-2 can be delicate. Be careful to avoid sharp impacts or pressure
such as balancing the system on its back with the SDI ports against a hard surface. Rough
treatment of the SDI ports could result in loss of functionality for that port.
Auto-sensing gigabit Ethernet 10/100/1000 Base-T network port. See
Configure network settings for setup instructions.
6
Page 19
Pearl-2 User Guide Front and back view Pearl-2
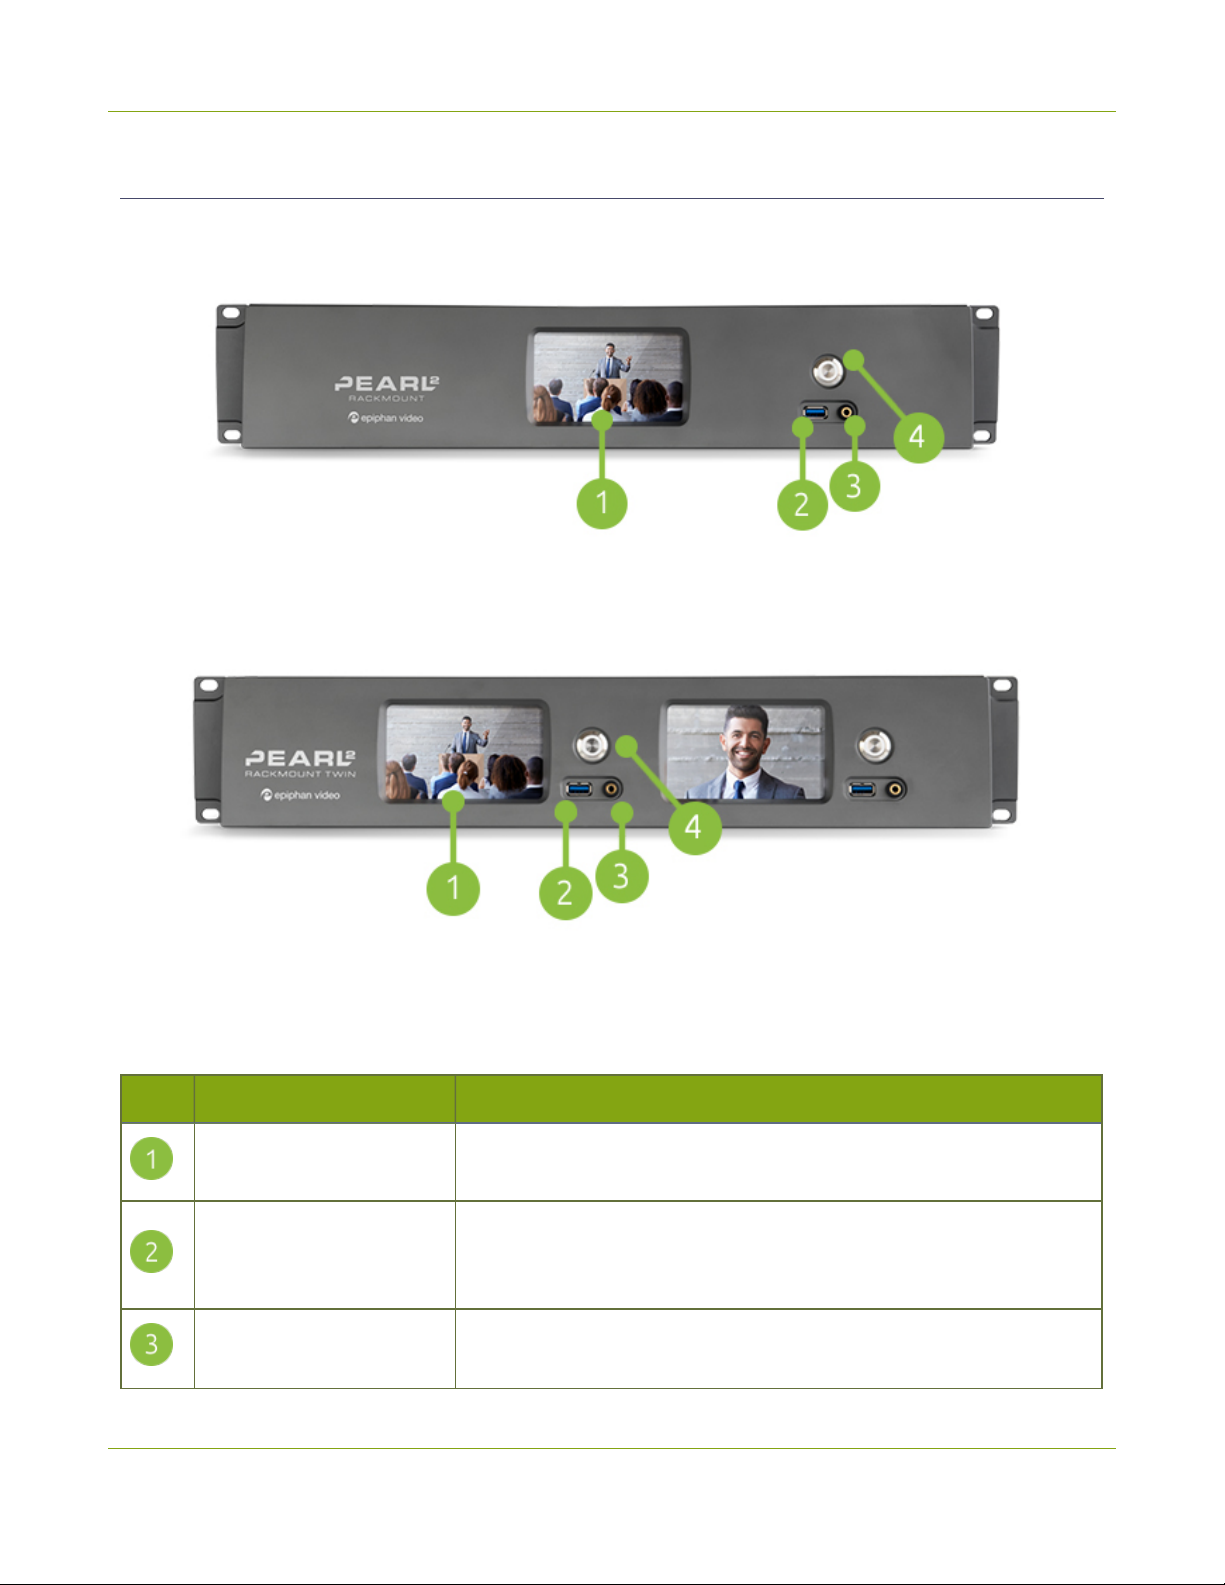
Pearl-2 Rackmount and Pearl-2 Rackmount Twin
Pearl-2 Rackmount Twin consists of two completely independent Pearl-2 systems, each with identical sets of
controls and ports.
Table 3 Pearl-2 Rackmount front panel descriptions
Label Name Description
Touch screen front panel
display
USB3.0 port
3.5 mm audio jack
Used for confidence monitoring and simple configuration, obtaining
system information, and starting/stopping recordings and streams.
Two other USB ports are located on the back. See Record for
information about recording to USBdrives. Web cameras cannot be
connected to this port, only the ports on the rear.
For audio confidence monitoring. Plays the audio for the currently
visible channel.
7
Page 20
Pearl-2 User Guide Front and back view Pearl-2
Label Name Description
Power button and LED
Press once to power on. Double-press to initiate a graceful system
shutdown.
Pearl-2 Rackmount Twin consists of two completely independent Pearl-2 systems, each with identical sets of
controls and ports.
8
Page 21
Pearl-2 User Guide Front and back view Pearl-2
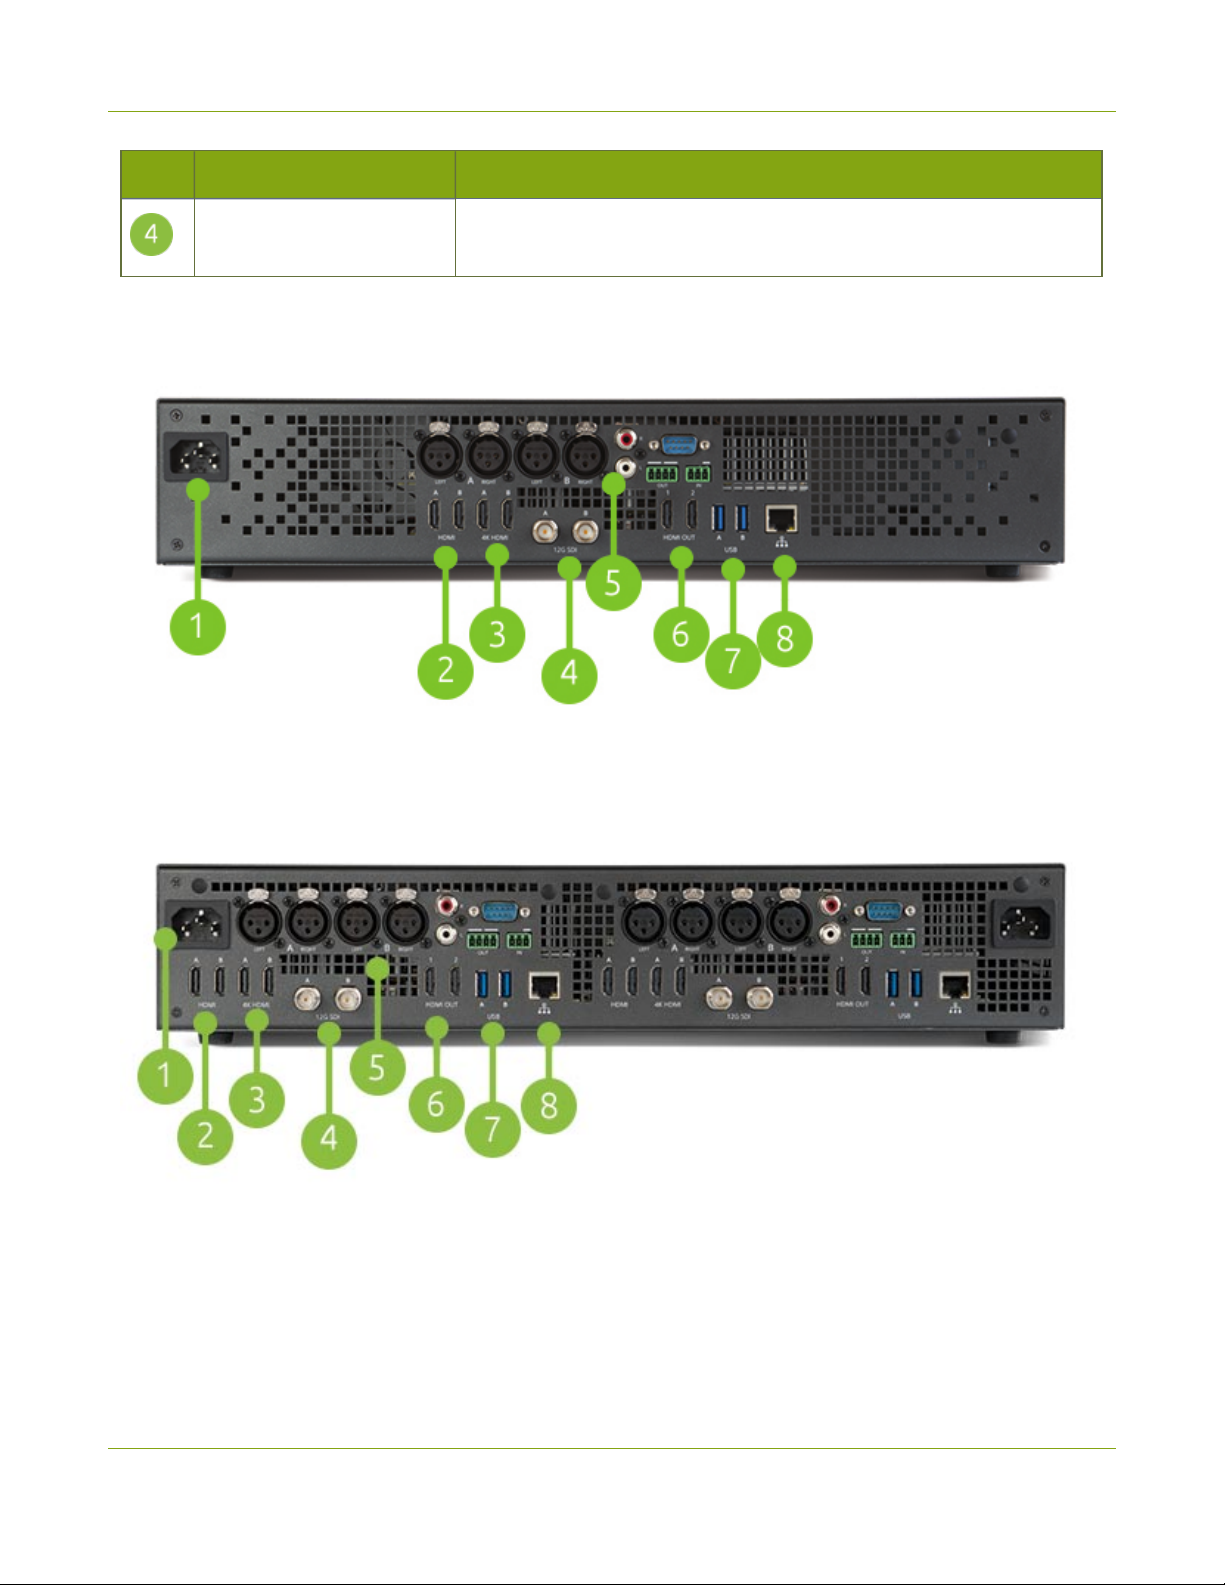
Table 4 Pearl-2 Rackmount and Pearl-2 Rackmount Twin back panel descriptions
Label Name Description
Power jack Plug the power supply in here. Always use the provided power supply.
HDMIin Connect HDMI and DVIsignals.
4KHDMIin Connect up to 4K1 HDMI signals.
SDI in Connect SDIsignals.
The four XLR ports can function as two, professional line level
left/right stereo pairs (XLR A pair and XLR B pair) or as four mono
XLRaudio in
inputs, see AV inputs.
The XLR ports are professional line-level inputs and are calibrated for
+ 4.0 dBu signals.
RCA audio in
HDMIOut For displaying a source or channel on an external display (up to 4K1).
USB3.0 ports
RJ-45 Ethernet
1
Requires 4K feature add on
The SDI ports on the back of Pearl-2 can be delicate. Be careful to avoid sharp impacts or pressure
such as balancing the system on its back with the SDI ports against a hard surface. Rough
treatment of the SDI ports could result in loss of functionality for that port.
The RCA ports are consumer line level, left/right stereo pair and are
calibrated for - 10 dBV signals.
For connection of external hard drives, flash drives, USB webcameras,
USB microphones or control interfaces. See Record for recording to a
USBdrive.
Auto-sensing gigabit Ethernet 10/100/1000 Base-T network port. See
Configure network settings for setup instructions.
9
Page 22
Pearl-2 User Guide What's in the Box?
What's in the Box?
Pearl-2
The standalone Pearl-2 model is shipped in a hard shell case that you can re-use for storing or moving the
system between jobs.Cable storage is located under the custom foam tray that holds Pearl-2 in the case.
Pearl-2 Rackmount
Pearl-2 Rackmount Twin
Inside the box with yourPearl-2 system, you'll find the power cable and the following items. Pearl-2
Rackmount Twin comes with two sets of cables:
1. One SDIcable (3 feet / 1 meter in length)
2. One HDMI cable (3 feet / 1 meter in length)
3. One HDMI to DVI adapter
4. One Ethernet cable
5. One region-specific power supply cable (6 feet / 1.8 meters in length)
10
Page 23
Pearl-2 User Guide What's in the Box?
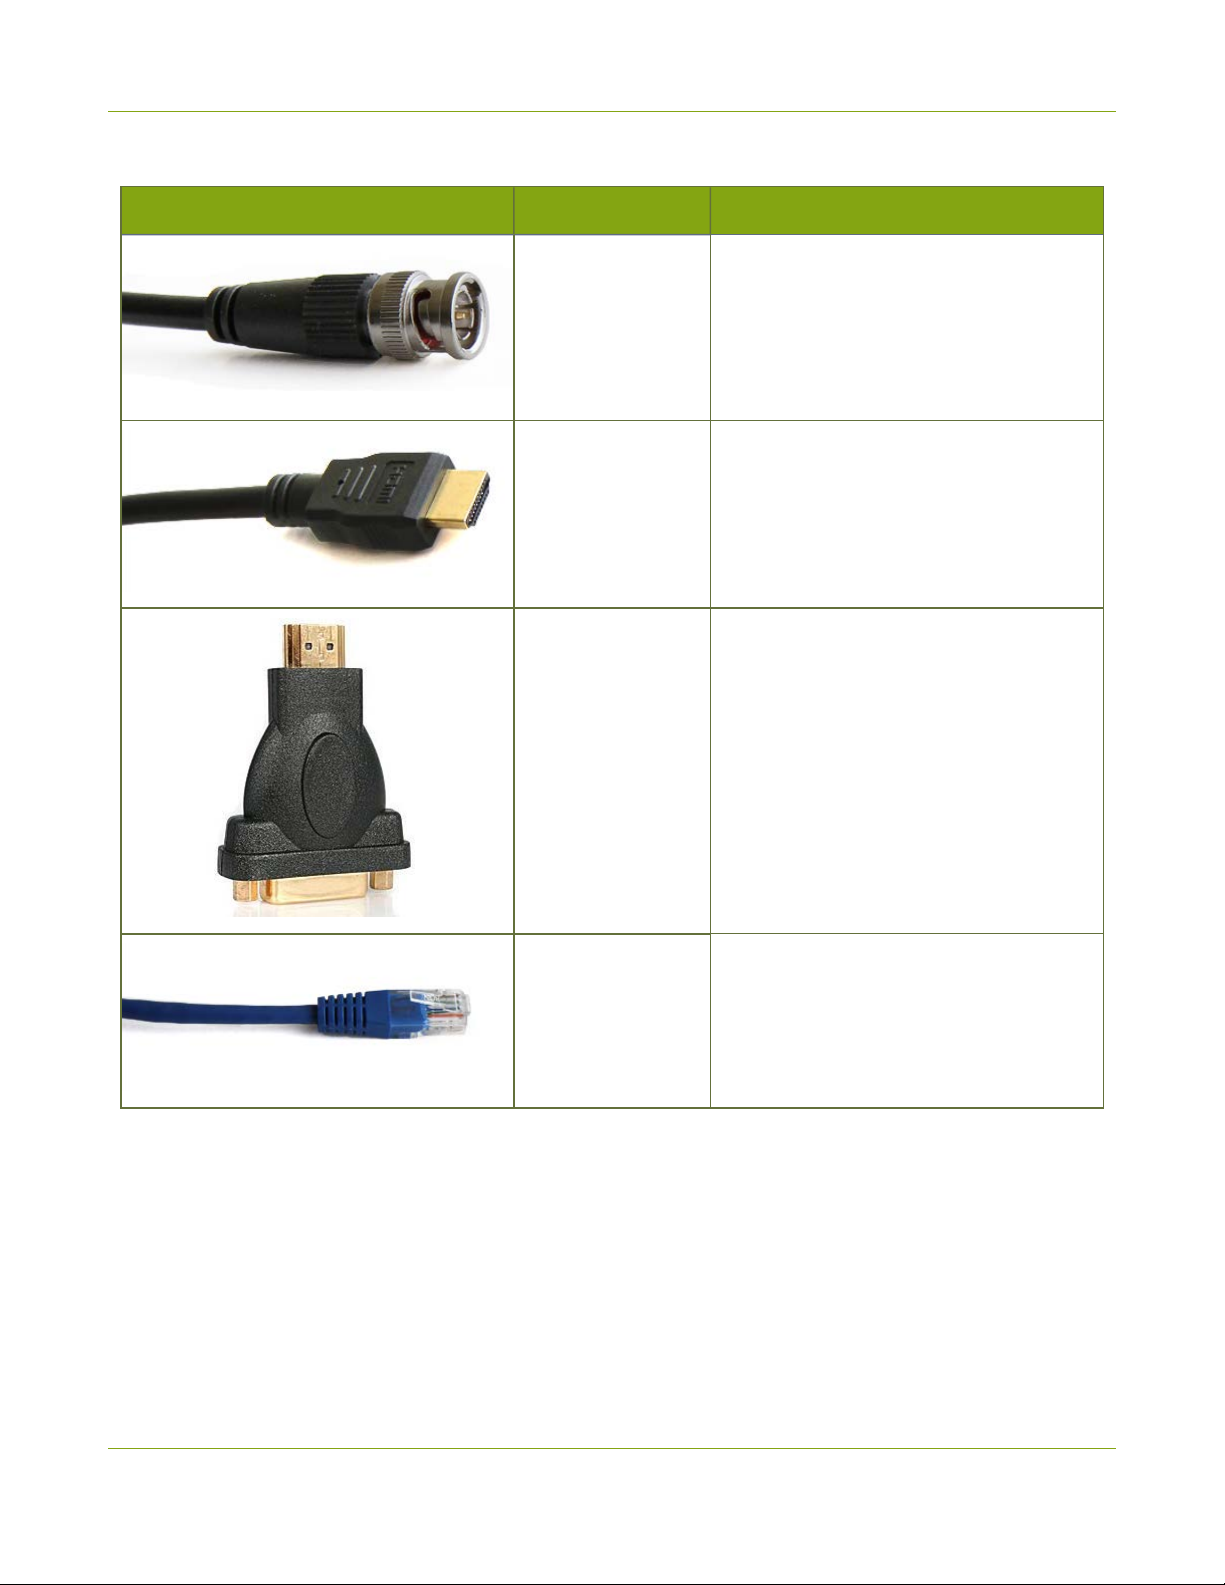
Table 5 Cables (power cable not shown)
Image Name Description
SDIcable
HDMI cable
DVI (female) to
HDMI(male)
adapter
Connect SDI sources to the SDI ports
(12G-SDI capable).
Connect HDMI or DVI(using adapter)
sources to the HDMI ports.
Connect DVI sources to the HDMI port.
RJ-45 Ethernet
cable
Connect Pearl-2 to your network.
11
Page 24
Pearl-2 User Guide Quick start
Quick start
This quick start uses the default settings where possible so you can quickly start using your Pearl-2. The
instructions apply to all Pearl-2 models; however, rackmount installation is not included here, see Rackmount
installation.
For the Pearl-2 Rackmount Twin , you cannot plug a source into one system and use it from the
other.
Before you start, make sure you have:
l A video source such as a camera or a computer and cables to connect them to Pearl-2. For HDMI, the
source must not be HDCPprotected.
l An audio source coming from either your SDI , USB videoorHDMI video source (must not be
encrypted). Optionally, audio from a different source, such as an audio mixer that you connect to the
audio input ports can be used.
l Local area network that uses Dynamic Host Configuration Protocol (DHCP) is preferable.
l Computer with a web browser connected to the same network. We'll call it the “admin” computer.
Starting up!
Pearl-2 is pre-configured with two plug and play channels: Auto A and Auto B. Auto channels are used for this
quick start. They have automatic video sensing, which detects the video signal you connect to the video input
ports on Pearl-2.
The first video source you connect while Pearl-2 is powered on is automatically assigned to the Auto channel
(either Auto A or Auto B, depending in which row you connect the video source). For example, when you first
start Pearl-2, the video sources you connect to the HDMI-A and HDMI-B input ports appear automatically in
Auto A and Auto B channels (respectively). If no video source is connected, a standard No Signal screen
displays.
With auto channels, audio from the connected SDI,HDMI, or USB video source is automatically applied to the
channel without needing any additional configuration. For SDIorHDMI audio, just make sure it's
unencrypted.
The Auto channel's frame size is set to match the video source by default and the best bit rate for the default
frame rate of 30 fps is applied automatically.
For details about Auto channel defaults, behavior, and audio source priorities, see About automatic channels
Auto A and Auto B.
To get started quickly with auto channels:
12
Page 25

Pearl-2 User Guide Quick start
1. Turn on your camera or video source and connect the output to one of the video input ports labeled
"A" on the back panel of Pearl-2.
2. (Optional) Connect a second video source to one of the video input ports labeled "B".
3. (Optional) Connect audio to the XLR left/right stereo pair audio input ports on the back of Pearl-2 or to
the RCA stereo pair audio input ports.
4. Connect the Ethernet cable to Pearl-2 and to your network.
5. Connect the power cable and plug it into a power source.
6. Press the power button on the front panel to turn on the system. Wait for the power-up cycle to
complete.
The Grid view showing both channels appears on the touch screen. The video source you connected to
the "A" row appears in the Auto A channel, and the video source connected to the "B" row appears in
the Auto B channel.
7. Use the touch screen on Pearl-2 for confidence monitoring. To display the single Channel view, simply
tap on one of the channels that you see in the Grid view. From the Channel view, you can do things like
stop and start recording for the
8. (Optional) Plug headphones or speakers into the 3.5 mm stereo audio jack on the front ofPearl-2 to
monitor the audio.
My network IP address and channel monitoring
You can get the network IP address of your Pearl-2 from the touch screen so that you can do things like view
the channels using a web browser or access the configuration Admin panel. Just make sure that your admin
computer is connected to the same network as Pearl-2.
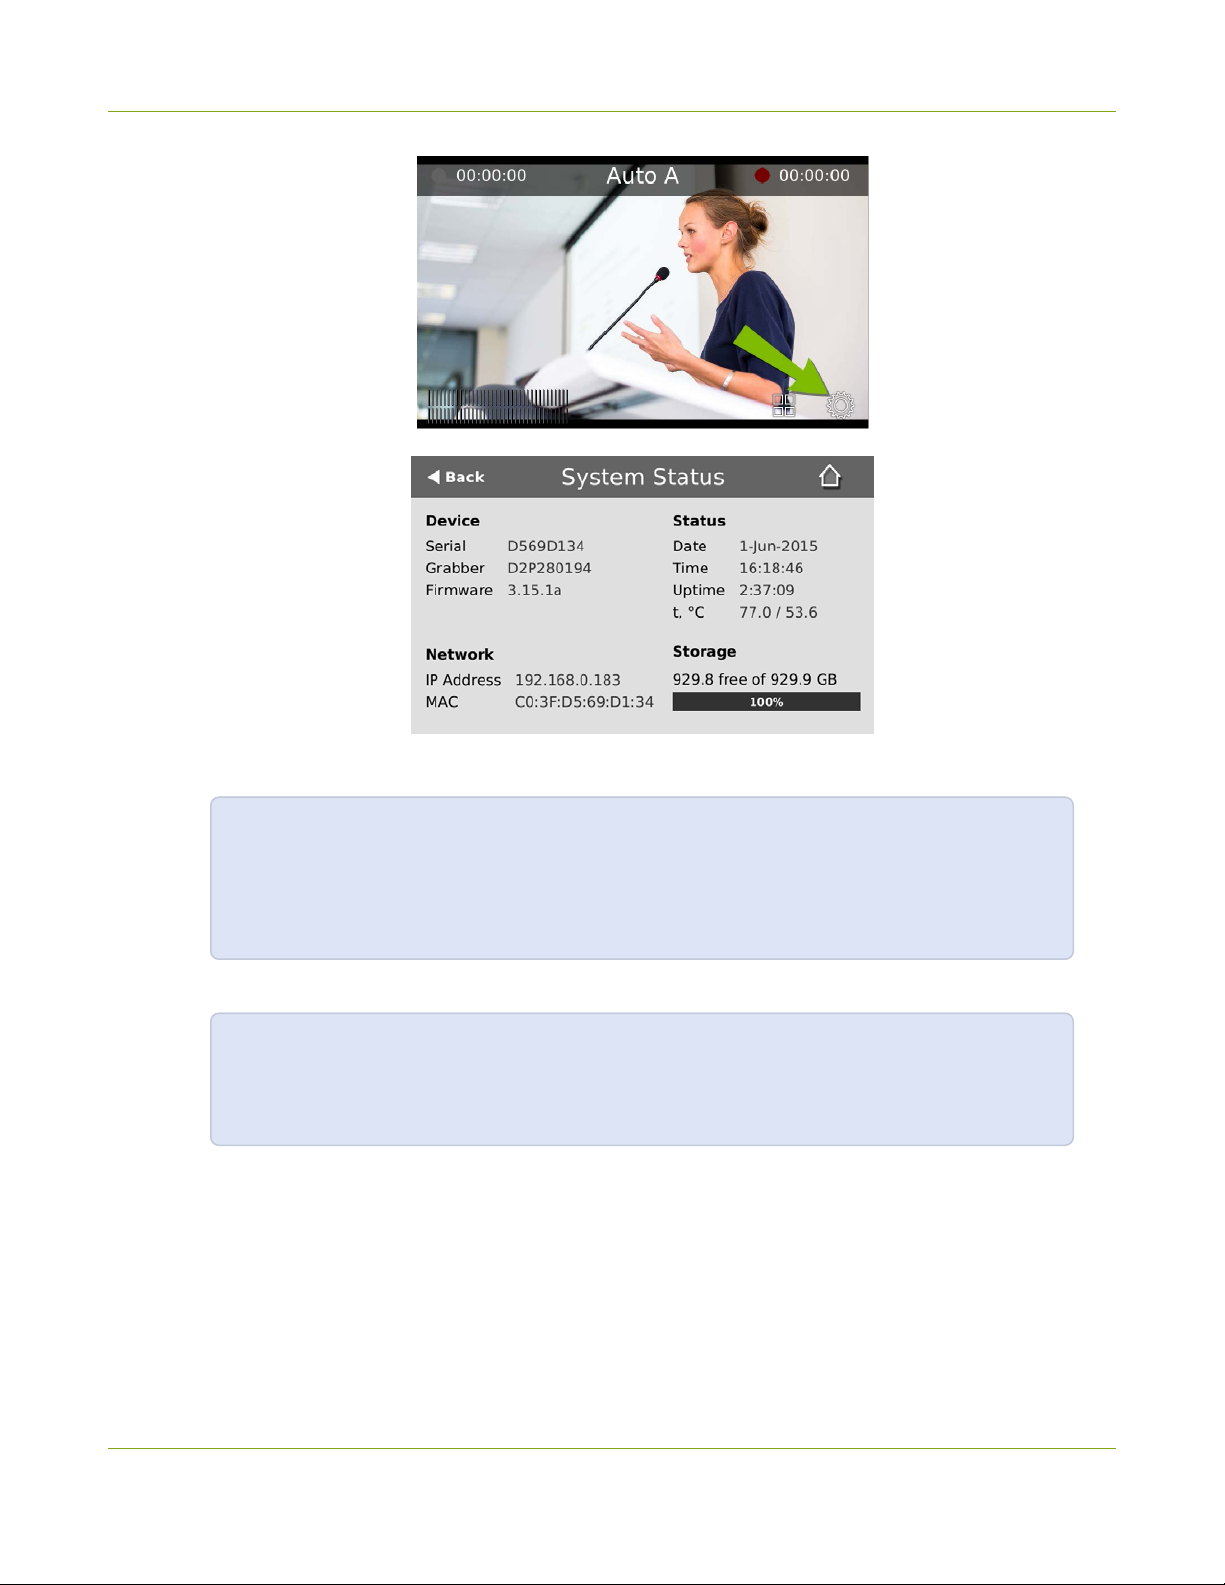
1. To find the system’s IP address using the touch screentap the gear icon in the bottom right corner of
the screen and select System Status.
13
Page 26
Pearl-2 User Guide Quick start
2. Using a browser on the admin computer, go to one of the following URLs to preview the channel.
For Auto A:http://<IP Address for Pearl-2>/preview.cgi?channel=1
For Auto B: http://<IP Address for Pearl-2>/preview.cgi?channel=2
For example:http://192.1.10.100/preview.cgi?channel=2
3. (Optional) Open a new tab in your browser and enter the URL to login to the Admin panel.
http://<IP Address for Pearl-2>/admin
For example:http://192.1.10.100/admin
The default user name admin has no password set by default. If a password has been set, consult with your
system administrator for the login credentials, see What is streaming?
14
Page 27

Pearl-2 User Guide Quick start
Record the channel
The channel is set up and streaming. This may be all you need, but if you like, you can also record the stream.
You can choose to initiate and control channel recording from either the touch screen or the Admin panel.
To control recording from the touch screen:
1. From the Grid view, tap the channel you want to record. The Channel view appears.
2. Tap the red dot to start recording. The record timer starts and continues for as long as the system is
recording. Tap the red dot again to stop recording. If the control icons aren't visible, tap the screen
once.
To control recording using the Admin panel:
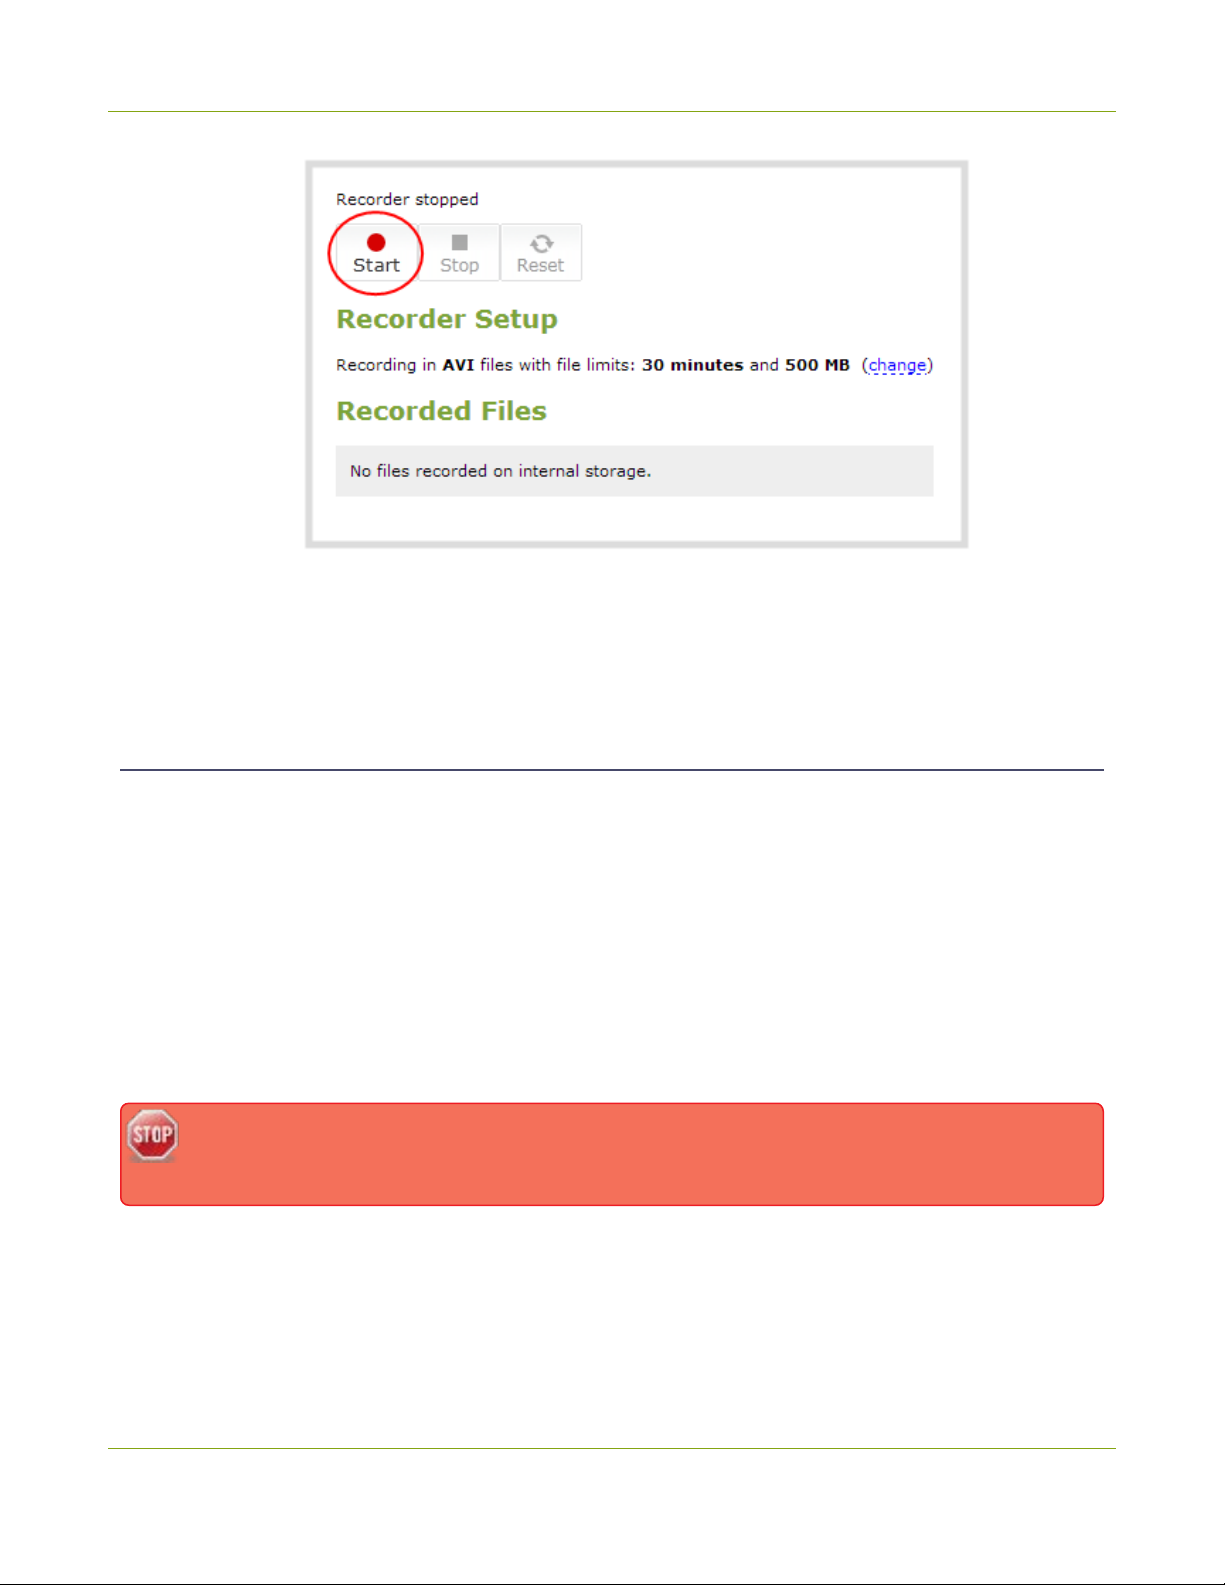
1. From the Channels menu in the Admin panel, click Recording for your channel. The Recording page
opens.
2. Click Start to start recording the channel and click Stop to stop recording.
15
Page 28
Pearl-2 User Guide Quick start
3. Refresh the page. Click Recording again in the Channels menu or reload the browser page. The page
reloads and a file list appears that shows your newly recorded content.
4. Click the file name to download and view your recording.
What’s Next?
Now that you have a source setup and are ready to stream, you can fine-tune the system to your exact
requirements. Take a look at topics such as:
l Live video mixing / switching
l Selecting an audio source
l Video output ports
l FTP and automatic file transfers
l Custom layout configuration
l What is streaming?
For higher security, we recommend setting admin, operator and viewer-level passwords on Pearl2, see Set or change user passwords.
When you're done setting up your Pearl-2, make sure to back up the system configuration using the
procedure described in:Create a configuration preset
l Create a configuration preset
16
Page 29

Pearl-2 User Guide Live video mixing / switching
Live video mixing / switching
Create dynamic content for your viewers to watch while you record and stream your program using Pearl-2.
Using the custom layout editor, you can create different layouts, like picture in picture or side-by-side views of
a camera and slides, then easily switch between layouts with either a tap on the touch screen, using Epiphan
Live on a mobile device, or from the Admin panel.
Your program stream with switched layouts could look like this:
To create a program channel with custom layouts using the custom layout editor that you can switch, see
What is a channel?
For instructions on how to live switch, see:
l Switching / mixing using the touch screen
l Switching / mixing using Epiphan Live
l Switching / mixing using the Admin panel
17
Page 30
Pearl-2 User Guide Monitoring audio
Monitoring audio
Pearl-2's front panel includes a 3.5 mm audio jack for monitoring audio. You can plug external speakers or
headphones into the 3.5 mm audio jack. To monitor the audio for a channel, just select the channel using the
touch screen. The audio you hear depends on which layout is currently live because different layouts can have
different audio sources configured.
Adjust the volume
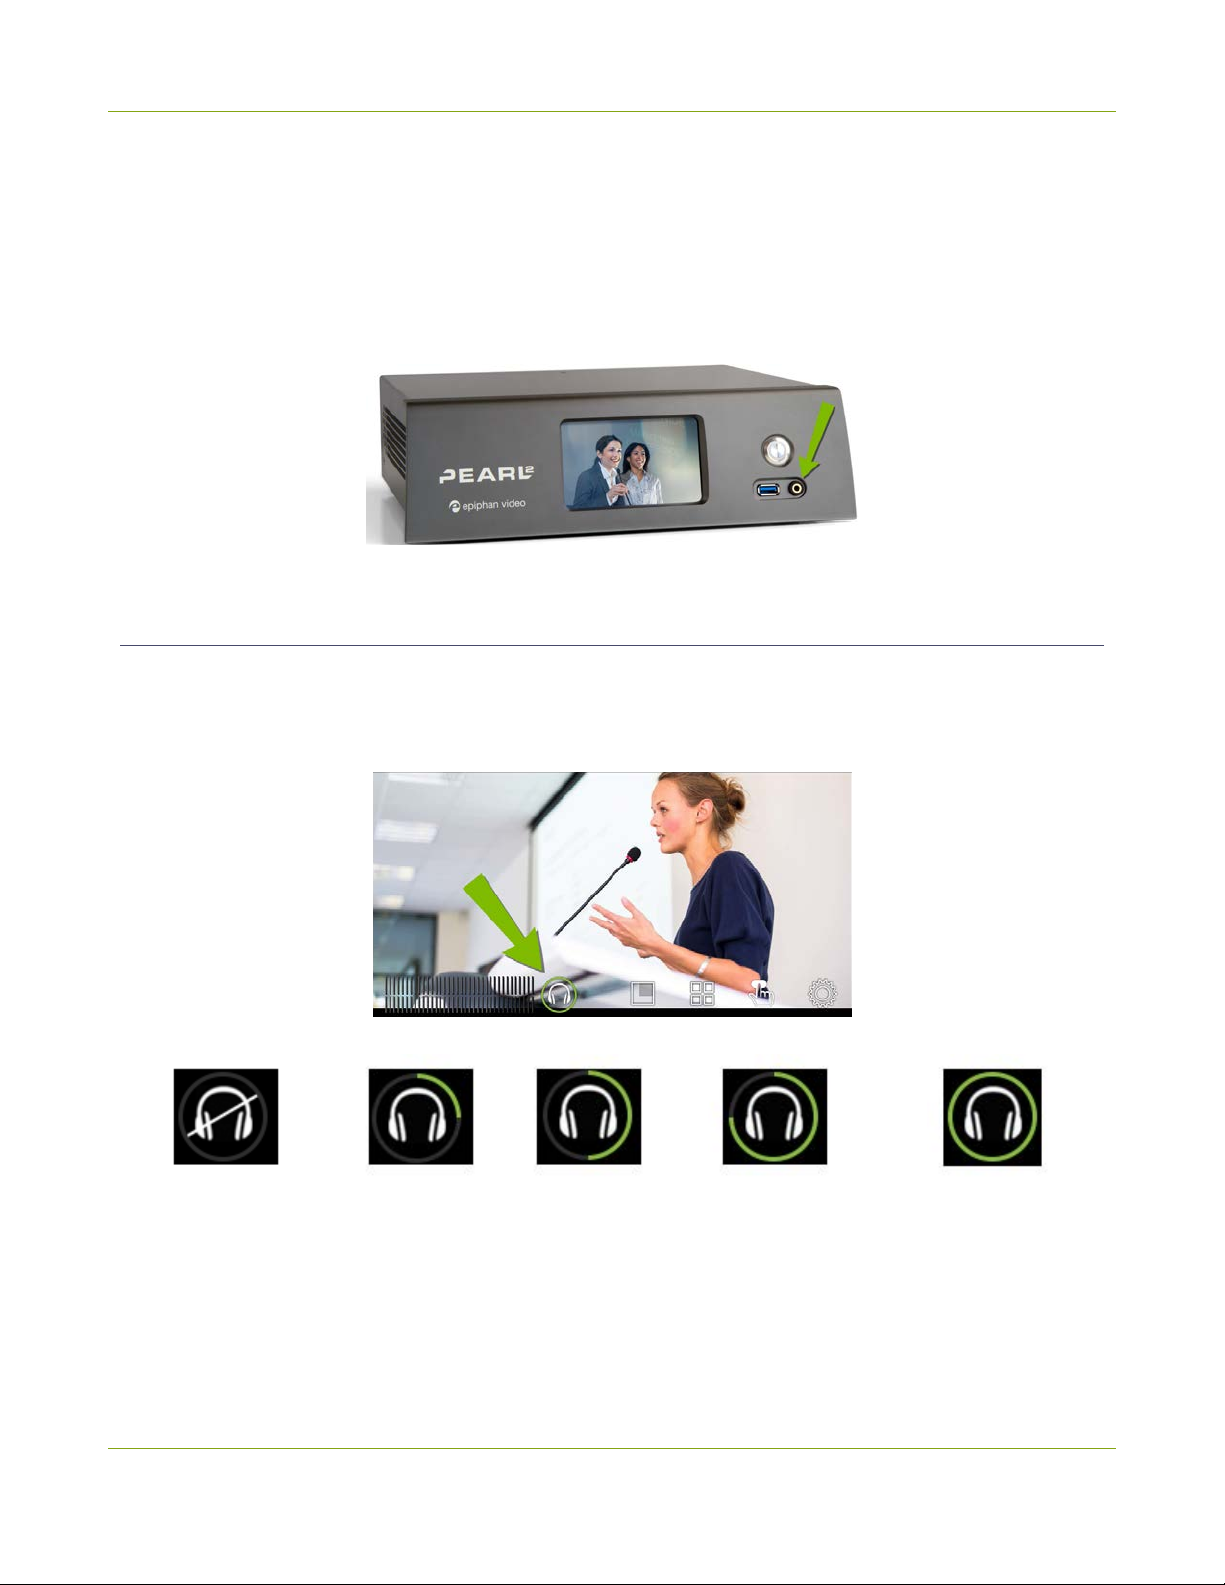
Tap the headphones icon on the touch screen to adjust the volume. Each tap increases the volume by 25% to
a maximum volume of 100%. Tapping the headphones icon when the volume is at 100% mutes the volume.
You can also long press the headphones icon to mute and unmute the volume.
Volume is muted.
25%
volume.
50%
volume.
75%
volume.
100%
volume.
At 75% volume, what you hear corresponds to the nominal audio level in the VU meter at approximately
where the green bars change to yellow. Increasing the volume to 100% may cause you to hear distortion that
is not actually present in the audio signal being recorded and streamed.
18
Page 31

Pearl-2 User Guide Monitoring audio
Audio VUmeter
A VU meter on the touch screen shows the audio levels for the selected channel.The value is displayed in
dBFS(decibels relative to full scale). Colored bars represent the audio level.
Channels that have stereo audio display two bars. The top bar is the left audio channel and the bottom bar is
the right audio channel.
VUmeter (mono)
VUmeter (stereo)
Table 6 Audio VUmeter levels
Color Decibel range
Red 0 to -9 dBFS
Yellow -9 to -18 dBFS
Green -18 dBFS and lower
The VU meter appears in several different places so you can visually check audio levels:
l Touch screen: On the individual channel view and the grid view. If the audio meter isn't showing, tap
anywhere on the touch screen to turn on the control icons.
19
Page 32

Pearl-2 User Guide Selecting an audio source
l Admin Panel: On the audio input source's configuration page when you select the input source from
the Inputs menu. You can also add the VU meter to appear on the video output ports, see Disable or
enable audio and output port volume.
l Epiphan Live: See Monitor video and audio input sources
Selecting an audio source
You can choose the audio source for a channel using the Admin panel and can have a mix of several different
audio sources. Select your audio sources from connected video sources (SDI, HDMI, USB video/audio), as well
as the XLR and RCA analog audio input ports.
There are:
l Four XLR professional line-level inputs + 4.0 dBu up to 12.3 V RMS, (+24 dBu) that support balanced
and unbalanced signals.
l One stereo pair RCA consumer line-level input (-10 dBV)
l Two USB video/audio ports
l Four HDMI ports
l Two SDI ports
The four XLR audio inputs are configured as two stereo pairs by default: XLR A (left/right) and XLR B
(left/right), see Configure audio ports for stereo or mono. The XLR B audio ports and the RCA audio ports are
linked. You can configure Pearl-2 to use both or just one of the audio sources using the Admin panel, see
Assign audio sources to an input.
Audio for Auto channels are selected automatically.
This table offers some guidelines for adjusting the gain of the XLR and RCA analog audio input ports, as well as
the USB ports. Add the suggested gain to the audio input to get an average signal to register at a nominal level
in the VU meter (i.e. where the green bars change to yellow). The actual amount of gain needed depends on
the strength of the original audio signal. See Adjust audio gain and delay for details.
Table 7 Audio input port gain guidelines
Audio source
Mobile phone or other
consumer line level device
Input
port
XLR Add +6 to +12 dB gain to the audio input port.
RCA Nominal
Gain
20
Page 33

Pearl-2 User Guide Selecting an audio source
Audio source
Professional mixer
USB microphone USB Nominal
Dynamic, condenser, or
electret microphones
To choose a different audio device for the channel:
1. Using a web browser on the admin computer, go to the IPaddress of your Pearl-2 and log in, see
Connect to the Admin panel.
2. From the Channels menu, select your channel (i.e. Auto A or Auto B) and click Layouts. The custom
channel layout editor page opens.
Input
port
XLR Nominal
RCA Not recommended.
Not recommended.
To connect microphones to the pro line level XLR inputs, you must
XLR
use an external preamp to boost the microphone signal enough to
provide the proper line level signal at the XLR input port, see
Connecting microphones to the XLR line level inputs.
Gain
Audio for Auto channels are selected automatically.
3. Check the audio source that you want to use for the layout and click Save.
21
Page 34

Pearl-2 User Guide Connecting microphones to the XLR line level inputs
4. (Optional) Adjust the gain for an audio input source, select the input port from the Inputs menu and
adjust the amount of gain on the configuration page for the audio input port. Click Save when you're
done. For more details, see Adjust audio gain and delay.
Connecting microphones to the XLR line level inputs
The four XLR analog audio input ports on Pearl-2 are professional line level inputs rated at + 4.0 dBu up to
12.3 V RMS, (+24 dBu). You can't connect microphones directly to the XLR ports because the microphone
signal is too low. If you want to connect microphones to the line-level XLR ports on Pearl-2, you must use an
external preamp and boost the mic level signal to the appropriate line level before connecting it to the XLR
port.
22
Page 35

Pearl-2 User Guide Remote login access
Remote login access
Securely login to the cloud versions of the Admin panel and Epiphan Live remotely from anywhere you have
Internet access. Perform off-site rescue troubleshooting, channel configuration, control streaming and
recording, and more using your favorite web browser over a secure connection to the Internet. You don't
need to be on the same, local network as Pearl-2. This section contains what you need to remotely access
Pearl-2.
Topics include:
l About remote login and control using AV Studio
l Enable or disable AV Studio remote login
l Pair a channel with AV Studio
l Control recording using AV Studio
l Configure channel encoding using AV Studio
l Access cloud versions of the Admin panel and Epiphan Live
See The Admin panel and Epiphan Live for details about how to use these interfaces and how to access the
local web versions.
About remote login and control using AV Studio
Perform secure remote rescue troubleshooting, channel configuration, and more when you pair your Pearl-2
channels with your free AV Studio account.
AV Studio is a cloud-based platform that allows teams to remotely control video recording encoders like Pearl-
2. Use AV Studio to perform quick, low touch editing for fast turn around and cloud delivery of conferences,
break out room sessions, seminars, and more.
Access the cloud version of the Admin panel or Epiphan Live securely from AV Studio. Control recording and
do things like check the channel status on Pearl-2 and even make some channel encoding settings from AV
Studio.
23
Page 36

Pearl-2 User Guide About remote login and control using AV Studio
Remote login access to your Pearl-2 is available as soon as you create a free AV Studio account and pair a
channel (or channels). When you've paired a channel to your AV Studio account, you can do things like:
l Start and stop channel recording directly in AV Studio.
l Preview the channel status.
l Set the channel bitrate, frame rate, frame size, and resolution directly in AV Studio.
l Access the cloud version of the Admin panel to perform remote administration tasks on your Pearl-2
and do remote rescue troubleshooting.
l Access the cloud version of Epiphan Live to remotely control live switching, recording, and streaming.
You can see which channels are already paired to your AV Studio account from the Configuration menu in the
Admin panel when you select AV studio. Channels that are paired have a clickable link to your AV Studio
account. The channel index number is used to identify channels.
Important considerations
24
Page 37

Pearl-2 User Guide Enable or disableAV Studio remote login
l A secure propriety tunnel over port 443 is used to access the Internet.
l You can pair any channel you want to your AV Studio account and you don't have to pair all your
channels. Channels stay paired until you manually unpair the channel.
l The file recording type for the channel you are controlling and recording using AV Studio must be set to
MP4 and the maximum file size supported is 500 MB. To set the recording type and maximum file size
for a channel, see Configure recording settings, file size and type.
l Do not configure AFU for a channel that is paired with AV Studio.
l Do not create a configuration preset when a channel is paired with AV Studio. Unpair the channel
before you create the configuration preset.
l Recordings do not automatically upload to AV Studio. You must manually upload recordings from
within AV Studio if you want to do any post-production on them using AV Studio. Some costs are
incurred when uploading recordings to a pay-as-you-go AV Studio account.
l Deleting recordings using the Admin panel that have already been uploaded to AV Studio does not
remove the recordings from AV Studio.
l The following actions cause the channel's encoder entry to permanently go offline in AV Studio. You will
need to pair the channel again to remotely control recording for that channel.
l Unpairing the channel in AV Studio.
l Using the Admin panel to delete a channel that it is paired to AV Studio.
l Using the Admin panel to disable the AV Studio feature on Pearl when a channel is paired to AV
Studio.
You can still access any recordings that you previously uploaded and any scenes that were
previously created for a channel that is permanently offline in AV Studio until you delete
the offline encoder in AV Studio.
Enable or disable AV Studio remote login
Pairing Pearl-2 channels to your AV Studio account for remote login and control is enabled by default. You can
disable the AV Studio remote login feature using the Admin panel and enable it again at a later time.
Important considerations
l Unpair all channels that are currently paired with your AV Studio account before disabling AV Studio
using the Admin panel.
l If you disable AV Studio remote login while a channel is paired, the encoder appears offline in AV
Studio.
25
Page 38

Pearl-2 User Guide Pair a channel with AV Studio
To enable or disable AV Studio remote login for a channel:
1. Login to the Admin panel as admin, see Connect to the Admin panel.
2. From the Configuration menu, click Maintenance. The Maintenance page opens.
3. Uncheck Enable AVStudio to disable AV Studio remote login or leave it checked to use this feature
with Pearl-2, then click Save.
Pair a channel with AV Studio
You can pair one or all your channels to your AV Studio account. You must create an AV Studio account to pair
a channel and use the remote login feature, see About remote login and control using AV Studio.
To pair a channel with AV Studio:
1. Login to the Admin panel as admin, see Connect to the Admin panel.
2. From the Configuration menu, click AV Studio. The AV Studio status page opens.
26
Page 39

Pearl-2 User Guide Controlrecording using AV Studio
3. Copy the Device ID for the channel you want to pair.
4. On another tab in your browser, login to your AV Studio account at https://go.avstudio.com
5. In the top header bar, click the plus sign beside Encoders. The encoder pairing page opens.
6. Paste the Device ID in to the ID field and give your channel a name, then click Verify.
Your channel is now paired with your AV Studio account. It appears on the Encoders page in AV Studio
and the channel's pairing status updates to paired on the AV Studio status page in the Admin panel.
Control recording using AV Studio
You can start and stop recording the channels on Pearl-2 remotely from AV Studio.
Important considerations
l The file recording type for the channel you are controlling and recording using AV Studio must be set to
MP4 and the maximum file size supported is 500 MB. To set the recording type and maximum file size
for a channel, see Configure recording settings, file size and type.
l Do not configure AFU for a channel that is paired with AV Studio.
l Recordings do not automatically upload to AV Studio. You must manually upload recordings from
within AV Studio if you want to do any post-production on them using AV Studio. Some costs are
incurred when uploading recordings to a pay-as-you-go AV Studio account.
l Deleting recordings using the Admin panel that have already been uploaded to AV Studio does not
remove the recordings from AV Studio.
l Deleting a channel using the Admin panel that it is paired to AV Studio causes the encoder to
permanently go offline in AV Studio. Recordings that were previously uploaded are still available in AV
Studio until you delete the encoder in AV Studio.
To start and stop recording using AV Studio:
27
Page 40

Pearl-2 User Guide Configure channel encodingusing AV Studio
1. Login to your AV Studio account at https://go.avstudio.com
2. In the top header bar, click Encoders. The list of encoders opens.
3. Select the row for the channel you've paired to your AV Studio account and click Details in the
thumbnail or click the three dots and choose Details. The Encoder Details page opens.
4. Click Start recording to remotely start recording the channel on Pearl-2. The button changes to Stop
recording. When you're ready to stop recording the channel, click Stop recording.
Configure channel encoding using AV Studio
You can remotely configure certain video encoding settings for a channel that is paired with AV Studio,
including:
l Use current signal resolution as frame size: Select this to allow Pearl-2 to automatically use the
frame size of the video input. If you plan to switch layouts during a live stream, a fixed frame rate is
recommended. This avoids the stream from stopping and restarting due to frame size changes when
switching between single-source layouts that use different frame sizes.
28
Page 41

Pearl-2 User Guide Configure channel encodingusing AV Studio
l Bitrate: If using the H.264 video codec, you can increase or decrease image quality by increasing or
decreasing the channel's Bitrate value. Video with a high level of motion and high resolution, such as
sporting events, requires a higher bitrate.
l Limit frame rate: You can choose a specific frame rate for your channel.
l Resolution: Manually select a fixed resolution for the channel to use when streaming, recording, and
for output to a confidence monitor.
To configure channel encoding using AV Studio:
1. Login to your AV Studio account at https://go.avstudio.com
2. In the top header bar, click Encoders. The list of encoders opens.
3. Select the row for the channel you've paired to your AV Studio account and click Details in the
thumbnail or click the three dots and choose Details. The Encoder Details page opens.
4. Select the Settings tab to configure the encoder settings for the channel. The channel settings on
Pearl-2 change automatically after you select the new values here.
The amount of time it takes for the selected option to update on the Settings tab
depends on the speed of your Internet connection and how often your connection
refreshes. Allow some time for the selected option to update.
29
Page 42

Pearl-2 User Guide
Accesscloud versions of theAdmin panel and Epiphan
Access cloud versions of the Admin panel and Epiphan Live
Perform remote configuration and rescue troubleshooting using the web version of the Admin panel. You can
access the cloud Admin panel from any location with access to the Internet after you've paired a channel to
your AV Studio account, see Pair a channel with AV Studio. Use the same login credentials for both versions of
the Admin panel.
After you've logged in to the cloud Admin panel, you can open the cloud version of Epiphan Live and perform
live switching, recording, and streaming control.
The URLsof the local web versions of the Admin panel and Epiphan Live are not the same as the
URLsof the cloud versions.
To access the cloud versions of the Admin panel and Epiphan Live:
1. Login to your AV Studio account at https://go.avstudio.com
2. In the top header bar, click Encoders. The list of encoders opens.
Live
3. Select the row for the channel you've paired to your AV Studio account and click Details in the
thumbnail or click the three dots and choose Details. The Encoder Details page opens.
4. Select the Settings tab and click Remote Web Admin. A new tab with the cloud Admin panel login
opens in your browser.
5. Enter your Admin panel login credentials to log in to the cloud version Admin panel . The default
administrator username is admin.
6. Click Epiphan Live in the upper-right corner of the Status page for a channel. The Epiphan Live
dashboard opens in a new tab.
30
Page 43

Pearl-2 User Guide
See The Admin panel and Epiphan Live for details about how to use these interfaces and how to access the
local web versions.
Accesscloud versions of theAdmin panel and Epiphan
Live
31
Page 44

Pearl-2 User Guide Specifications
Specifications
Topics include:
l AV inputs
l Tech specs
l Optimum CPU performance
AV inputs
When using Pearl-2, we recommend a maximum of six 1080p sources in up to 6 full HD channels or having up
to four 4K sources4K in a single channel for best performance. Only content that is not HDCP-protected is
captured from HDMIand USB video sources.
Pearl-2 supports the following AVinputs. However, Pearl-2 does support the use of many common signal
converters and input adapters.
Pearl-2 Rackmount Twin has two complete sets of these inputs.
Table 8 Inputs for Pearl-2
Input port Qty Details
1
SDI
HDMI™ 2
4K HDMI
USB 3.0 2
RCA
2
3
2 Linear PCM audio/video input. Supports up to 12G-SDI signals.
Linear PMC audio/video input, non-HDCP protected. DVI-I (using
an adapter) is single link.
2
2
Linear PMC audio/video input, non-HDCP protected. DVI-I (using
an adapter) is single link.
Linear PCM audio/video input accepts non-HDCP protected
content. Use to connect UAC or UVC devices, such as USB
microphones and web cameras. Can also connect to external hard
drives, flash drives, and control interfaces.
RCA consumer line-level audio inputs function as a stereo pair (-10
dBV).
l White = left
l Red = right
32
Page 45

Pearl-2 User Guide Tech specs
Input port Qty Details
The XLR inputs accept balanced and unbalanced, pro line level
signals (+4.0 dBu) up to to 12.3 VRMS, +24 dBu.
XLR
3
4
By default, the four XLR ports operate as two stereo left/right
audio pairs (XLR A pair and XLR B pair). You can configure the
ports to operate as independent mono inputs using the Admin
panel, see Configure audio ports for stereo or mono.
1
SD-SDI audio is not supported
2
Requires 4K feature add on
3
In the Admin panel, Analog audio B includes audio signals from the XLR B audio pair and the RCA audio pair
by default. You can disable one or the other using the Admin panel, see Assign audio sources to an input.
If you are using DVI2PCIe cards with your Pearl-2, DVI2PCIe cards do not support audio over
HDMI.
Tech specs
The input and output connectors are listed for Pearl-2 and Pearl-2 Rackmount. Pearl-2 Rackmount Twin is
made up of two completely independent Pearl-2 systems, therefore it has double the number of inputs and
outputs that are listed in this table.
For the most up-to-date product specifications and information, go to www.epiphan.com/pearl-2.
Table 9 Specifications for Pearl-2
(2) 12G SDI
(2) HDMI™ / DVI¹
Connectors
(2) 4K HDMI2 / DVI¹
(2) USB video
Video Inputs
Resolutions
Most common and custom HDMI/DVI/SDI/USB modes
up to 4096×2160
3G-SDI; 6G-SDI; 12G-SDI; 4K-SDI; HD-SDI; SD-SDI
Video Format
Options
DVI single link (through an adapter), USB video through
USB Webcamera or UVC AV.io video grabber;
HDMI, 4K HDMI
2
33
Page 46

Pearl-2 User Guide Tech specs
(4) XLR Pro line level + 4.0 dBu (or 2 stereo pairs
left/right) accept balanced and unbalanced analog signals.
No phantom power.
Audio Input
Connectors
(balanced or
unbalanced signals)
(1) Stereo RCA (Consumer line level, - 10 dBV)
(2) SDI audio
(4) HDMI audio
(2) USB audio
3
Analog audio
sensitivity
Connectors
Video Output
Built-In Display
Audio Output 3.5 mm audio Front-mounted jack for confidence monitoring
Video Codecs H.264, Motion JPEG
Video Bit Rates 1 - 50 Mb/s
Video Encoding
Key Frame Intervals Programmable
Color Resolution 4:2:0
Output Frame Size Configurable up to 4096×2160
XLR Max signal: 12.3 V RMS, (+24 dBu)
RCA signal level: - 10 dBV
(2) HDMI out with audio for local video display or larger
confidence monitoring
Front touch screen display used for system information,
confidence monitoring, simple configuration and
recording control
Encoder Bitrate Sample Frequencies
Audio Encoding Audio Codecs
MP3 64-320 kbps 22 kHz, 44 kHz, 48 kHz
PCM - 22 kHz, 44 kHz, 48 kHz
AAC 64-320 kbps 16 kHz, 22 kHz, 44 kHz, 48 kHz
34
Page 47

Pearl-2 User Guide Tech specs
Connector (1) 10/100/1000 Ethernet RJ45
MPEG-TS, and FLV
RTSP over TCP/UDP
IPNetwork Interfaces
Video / Audio Recording
and File Management
Streams
Multicast Streams RTP, MPEG-TS &RTP and MPEG-TS over UDP
Network Discovery /
Announce
Network security 802.1x EAP methods: PEAP, EAP-TLS, EAP-TTLS
Internal Storage
Local Storage
Multi-Publish to Streaming Server / CDN(RTSP, RTMP,
RTMPS)
HLS - Native Apple HTTP/HTTPS stream for iPad, iPhone
and iPod Touch
UPnP, SAP
512 GB SSD
Automatically removes oldest recordings from internal
4
storage as space is required.
File maintenance through admin interface (Web UI)
Automatic or manual copy to local USB drives via the (3)
USB 3.0 ports
Administration
Network Storage
Playback and
Recorded Formats
Web UI for full administration. On-screen display and mobile UI for confidence
monitoring and simple administration and control.
Multiple user accounts/passwords.
HTTPS for secure Admin panel and Epiphan Live access, as well as local network
access to the live channel broadcast.
Included API for integration into existing environments (executed via
HTTP/HTTPS or RS-232).
FTP server and FTP client capabilities (automatic and
manual)
Download recorded videos (AVI, MOV, MP4 or MPEG-TS)
using the Web UI and playback through any compatible
player.
35
Page 48

Pearl-2 User Guide OptimumCPU performance
Time Synchronization NTP, TIME (RFC 868), PTP v1 (IEEE-1588-2002 V1)
Power use 0.8 A, 100-240 V ac
Operating temperature 32° to 122° F (0° to 50° Celsius)
Pearl-2: 11.81" × 9.45" × 3.54" (300mm x 240mm x 90mm)
Product Dimensions
Product Weight
Country of Origin Made in Taiwan
¹Using HDMI port, with adapter
2
Requires 4K feature add on
3
SD-SDI audio is not supported.
4
A portion of the hard drive space (approximately 100 MB) is reserved for system use. Recording space can be
virtually unlimited with offload to networked storage.
Pearl-2 Rackmount: Pearl-2 Rackmount Twin
Pearl-2 Rackmount Twin: 19 ⅛” x 3½” x 10 ⅞” (498 mm x 89 mm x 276 mm)
Pearl-2: 8.38 lbs (3.8 kg)
Pearl-2 Rackmount: 12.1 lbs (5.5 kg)
Pearl-2 Rackmount Twin: 14.6 lbs (6.6 kg)
Optimum CPU performance
Pearl-2, Pearl-2 Rackmount and Pearl-2 Rackmount Twin are powerful live video production systems;
however, there's a limit to the number of concurrent tasks the onboard CPU can perform efficiently.
The number of concurrent tasks depends on many factors, like: how many channels you have, how many
layouts you have per channel, how often you switch layouts, is the system resizing (scaling) video sources,
what frame rate and bit rate is used per channel, are the video output ports used, etc.
For best results, we recommend keeping Pearl-2's CPU usage under 70%. You can check the Overall system
load from the Info page using the Admin panel.
36
Page 49

Pearl-2 User Guide OptimumCPU performance
If the system load is higher than recommended, you can:
l Disable the video output port (if unused).
l Remove unused channels or layouts.
l Reduce the number of channels created.
l Ensure video sources come in at the right resolution so that Pearl-2 doesn't have to up scale or down
scale the video source.
37
Page 50

Pearl-2 User Guide User interfaces
User interfaces
Pearl-2 has three user interfaces:
l Touch screen: Easily accessible on the front panel of Pearl-2, the touch screen is primarily used for
confidence monitoring, live switching, and one-touch recording and streaming control, see About the
touch screen.
l Admin Panel: A web-based user interface that's primarily used to perform system set up and
administrative tasks for your Pearl-2. You can access the Admin Panel using an internet browser on a
computer or tablet that's connected to the same local Ethernet network as your Pearl-2, see About the
Admin panel.
l Epiphan Live: A web-based user interface that's primarily used for confidence monitoring, statistics,
live switching, and recording control, see Epiphan Live.
For details about how to access the cloud versions of the Admin panel and Epiphan Live for remote login, see
Access cloud versions of the Admin panel and Epiphan Live.
38
Page 51

Pearl-2 User Guide The touch screen
The touch screen
Use the touch screen to switch layouts, start and stop recording and streaming, configure network settings,
load configuration presets, and to view configured channels, audio meters, and system information.
Topics include:
l About the touch screen
l The Channel view
l Record a channel using the touch screen
l Stream a channel using the touch screen
l Switching / mixing using the touch screen
l Configure the touch screen
l Disable or enablethe touch screen
l Hide or show channel previews on the touch screen
l Disable or enable the system status screen
l Disable or enable configuration using the touch screen
l Disable or enable recording, streaming and switching from the touch screen
l Set the touch screen timeout
l Set a 4-digit PIN security code
To view system information using the touch screen, see View system information using the touch screen
About the touch screen
Pearl-2's front panel includes a touch screen display that's used for confidence monitoring, basic
configuration, and one-touch streaming and recording control.
The touch screen is capacitive. Use your finger or a specially designed soft-tipped capacitive stylus
with firm but gentle pressure. Pressing too hard or using something other than a fingertip or
capacitive stylus can result in damage to the screen.
When you power on Pearl-2, a grid view appears. The grid view displays all channels that are configured for
your system. If you haven't created any channels yet, the grid view shows only the two default auto channels:
Auto-A and Auto-B.
39
Page 52

Pearl-2 User Guide About the touch screen
In this example, the grid view shows two video sources, which are plugged into video input ports A and B on
Pearl-2 and are displayed in auto channels Auto-A and Auto-B, respectively.
If no video sources are connected, or your sources aren't sending a signal, the grid view shows no
signal images. See About automatic channels Auto A and Auto B for more details about auto
channels.
Tap a channel on the grid view to select it and go to that channel's view. You can tap the grid icon to return to
the grid view. Tap the gear icon at any time to go to system settings.
Grid icon
A No Channels screen appears if there are no channels configured on your Pearl-2 and the automatic channels
Auto A and Auto B have been deleted. Tap anywhere on this screen to go to the system settings screen.
40
Page 53

Pearl-2 User Guide The Channelview
By default, the touch screen and all features except viewing the CMS Events screen are enabled. You can
disable the touch screen and define which features are enabled on the touch screen. If the touch screen is
configured to not show channel previews, tap anywhere on the screen to go to the system settings screen.
See Configure the touch screen for details. To see the CMS Events screen and icon, see Enable CMS and
register with Kaltura.
The Channel view
Each channel you configure on Pearl-2 can be monitored and controlled using the touch screen. After you
power on Pearl-2 and the grid view opens, you can select a channel and open the channel view. Just tap the
channel you want in the grid view and the channel view opens.
41
Page 54

Pearl-2 User Guide The Channelview
Table 10 Parts of the touch screen for the individual channel view
Item Description
1 Channel name.
2
3
4
5
6 and 7
8
Streaming status. Gray means streaming is stopped, flashing
blue means streaming is in progress.
The streaming timershows the length of time that streaming
has been in progress.
Recording status. Bright red and flashing means recording is
in progress.
The recording timer shows the length of time that recording
has been in progress.
Controls to switch between channels. Tap the arrow to view
the next (or previous) channel. The arrow icons fade when
the touch screen is idle (i.e. untouched) for several seconds.
Tap the touch screen and the icons reappear.
Audio VU meter uses quasi-peak ballistics with samples
averaged every 10 ms. The maximum average audio level in
each 100 ms period is displayed using colored bars.
l RED = 0 to -9 dBFS
9
10
11
12
l Yellow = -9 to -18 dBFS
l Green = -18 dBFS and lower
Audio monitoring volume control icon. Tap to change volume
level. See Monitoring audio for more information.
Live Switcher view icon. Tap to view the live switcher, which
lets you live switch between different custom layouts that are
configured for the channel.
CMS Events screen icon. Tap to view the status of scheduled
Kaltura CMS events, as well as view the manual start/stop
button for ad hoc events, see Manually start/stop an ad hoc
event.
Grid view icon. Tap to view all the configured channels in a
grid.
42
Page 55

Pearl-2 User Guide Record a channel usingthe touch screen
Item Description
13
14
Single touch streaming and recording control icon. See One
Touch streaming and recording control
System settings icon. See View system information using the
touch screen.
Record a channel using the touch screen
Use Pearl-2's touch screen to easily start and stop recording of a channel. Simply tap the recording control
button that appears in the channel view.
If the red Record icon doesn't appear in the top right corner of the screen, recording is
disabled. See Disable or enable recording, streaming and switching from the
touch screen to enable recording.
To start and stop recording a channel using the touch screen:
1. From the grid view, select the channel you want to record. The channel view opens. If necessary, tap
the screen once to display the controls.
2. Tap the red Record icon at the top right of the screen to start recording. The red dot flashes and the
record timer increments when recording is in progress.
3. Tap the red Record icon again to stop recording. The dot stops flashing and the record timer resets to
00:00:00.
43
Page 56

Pearl-2 User Guide Stream a channel using the touch screen
Pearl-2 also features One Touch, which lets you control recording and streaming of multiple channels and
recorders at the same time with the touch of a button. See One Touch streaming and recording control
for more information.
Stream a channel using the touch screen
Use Pearl-2's touch screen to easily start and stop streaming a channel. Simply tap the streaming control
button that appears in the channel view.
If the gray (or blue) Stream icon doesn't appear in the top left corner of the screen,
streaming is disabled. See Disable or enable recording, streaming and switching
from the touch screen to enable streaming.
To start and stop streaming a channel using the touch screen:
1. From the grid view, select the channel you want to record. The channel view opens. If necessary, tap
the screen once to display the controls.
2. Tap the gray Stream icon at the top left of the screen to start streaming. The Stream icon turns blue
and the timer increments when streaming is in progress.
3. Tap the Stream icon again to stop streaming. The dot turns gray and the timer resets to 00:00:00.
If an error occurs when you start streaming, a yellow circle with an exclamation mark
appears in the left top corner of the touch screen. Check your networking and streaming
settings.
Pearl-2 also features One Touch, which lets you control recording and streaming of multiple channels and
recorders at the same time with the touch of a button. See One Touch streaming and recording control
for more information.
44
Page 57

Pearl-2 User Guide Switching / mixing using the touch screen
Switching / mixing using the touch screen
Switching live video inputs, or video mixing, is simple and intuitive using Pearl-2's touch screen. After you
select the channel you want to live switch, just tap the layout switching icon to open the convenient switcher
on the touch screen. All custom layouts that are configured for the channel display in the carousel. Just tap a
layout to load it in to the standby panel and you're ready to start switching.
Performing live switching using one interface, like the touch screen, does not dynamically
update the visuals in the other interfaces (e.g. the Admin panel and Epiphan Live). The
other interfaces must be manually refreshed to accurately reflect the current live switching
layout information.
If the live switching controls don't appear on the touch screen, they may have been disabled, see Disable or
enable recording, streaming and switching from the touch screen.
To switch custom layouts for a channel using the touch screen:
1. Tap the Live Switcher icon to open the live switcher view for the channel. If the control icons aren't
showing, tap anywhere on the touch screen.
2. The Live Switcher view opens.
45
Page 58

Pearl-2 User Guide Switching / mixing using the touch screen
3. Tap any layout that appears in the carousel to load it in to the Preview panel.
4. Tap Apply or double tap inside the Preview panel to switch that layout to the Live panel.
5. Tap another layout in the carousel to load it in the Preview panel so that it's ready for the next time you
switch layouts.
46
Page 59

Pearl-2 User Guide One Touch streaming and recording control
6. Tap Back to exit the Live Switcher view.
One Touch streaming and recording control
You can easily control streaming and recording from the touch screen on Pearl-2 with the press of a single
button.
Topics include:
l About One Touch streaming and recording
l Specify channels and recorders for One Touch recording
l Specify channels for One Touch streaming
l Customize the One Touch control display
About One Touch streaming and recording
The One Touch feature lets you control the recording and streaming of multiple channels and recorders with
the touch of a single button on the touch screen of Pearl-2. You simply specify which channels and recorders
to include for One Touch control using the Admin panel.
To open the One Touch control screen from the touch screen on Pearl-2, simply tap the One Touch control
icon.
47
Page 60

Pearl-2 User Guide One Touch streaming and recording control
Table 11 One Touch control screen components
Label Description
Start/stop button: Press the One Touch control button to start
1
or stop streaming and recording for all specified channels and
recorders.
The number of recorders and/or channels that are actively
recording (the first number) over the total number of channels
2
that are configured for One Touch recording (the second
number).
The number of channels that are actively streaming (the first
3
number) over the total number of channels that are configured
for One Touch streaming (the second number).
When you press the start button to activate One Touch recording and streaming, a blue Stop button appears,
the Recording values update to show the number of channels and recorders that are actively recording, and
the Streaming values update to show the number of channels that are actively streaming.
48
Page 61

Pearl-2 User Guide One Touch streaming and recording control
In the example above, One Touch control has been activated and all six out of the six total
channels and/or recorders are recording successfully. There is no streaming activity because
there are no channels configured for One Touch streaming.
An error icon displays if there's a problem with the streaming and/or recording settings for one or more of the
channels and recorders. All other channels and recorders that are working correctly continue to stream and
record normally.
In this example, after pressing Start, both recorders/channels are recording properly but the
one channel configured for streaming is not streaming correctly.
To troubleshoot, investigate each channel's streaming configuration page using the Admin panel
and identify which channel isn't streaming. Then correct any streaming configuration errors.
See Specify channels for One Touch streaming and Specify channels and recorders for One Touch recording
for more information about configuring channels and recorders for One Touch control.
Customize the One Touch control display
You can use the Admin panel to customize how One Touch Control is displayed on the touch screen of Pearl-2:
l Default: The One Touch control screen is accessed by tapping the One Touch control icon at the
bottom of the touch screen.
l Start Screen: The One Touch control screen displays automatically on the touch screen when you
power on Pearl-2. Operators can still navigate to other screens from the One Touch control screen.
l Locked: The One Touch control screen is the only screen that displays on the touch screen of Pearl-2.
Operators cannot navigate to other screens from the One Touch control screen.
To configure how the One Touch control screen displays on the touch screen:
49
Page 62

Pearl-2 User Guide One Touch streaming and recording control
1. Login to the Admin panel as admin, see Connect to the Admin panel.
2. From the Configuration menu, click Touch Screen. The Touch screen configuration page opens.
3. Click Single touch control and select either Default, Start Screen or Locked.
4. Click Apply.
If you chose Start Screen or Locked, the touch screen automatically refreshes to
display the One Touch control screen.
Specify channels and recorders for One Touch recording
All channels and recorders are enabled for One Touch recording by default. You can enable and disable One
Touch recording control for individual channels and recorders using the Admin panel.
1. Login to the Admin panel as admin, see Connect to the Admin panel.
2. To enable or disable Single touch control for a channel.
a. From the Channels menu, select the channel you want and click Recording. The Recording page
opens.
50
Page 63

Pearl-2 User Guide One Touch streaming and recording control
b. Click change, and then check Single touch control on the options page to enable the channel
for One Touch control. Uncheck the check box if you don't want to include that channel for One
Touch control.
c. Click Apply.
3. To enable or disable Single touch control for a recorder.
51
Page 64

Pearl-2 User Guide One Touch streaming and recording control
a. From the Recorders menu, select the recorder you want. The Recorder Setup page opens.
b. Click change, and then check Single touch control on the options page to enable the recorder
for One Touch control. Uncheck Single touch control if you don't want to include that
recorder for One Touch control.
c. Click Apply.
To learn how to configure your channels for recording, see Record. To learn how to configure
recorders, see Recorders
52
Page 65

Pearl-2 User Guide One Touch streaming and recording control
Specify channels for One Touch streaming
Channels are not enabled for One Touch streaming by default. You can enable and disable One Touch
streaming control for individual channels using the Admin panel.
To specify channels for One Touch streaming:
1. Login to the Admin panel as admin, see Connect to the Admin panel.
2. From the Channels menu, select the channel you want and click Streaming. The Streaming page
opens.
3. Click New stream and select a publishing method, for example, RTMP push.
4. Check Single touch control to enable this channel's stream for One Touch control. Uncheck Single
touch control if you don't want to include this channel's stream for One Touch control.
53
Page 66

Pearl-2 User Guide Configure the touch screen
5. Click Apply.
To learn how to configure your channels for streaming, see Stream.
Configure the touch screen
The touch screen on Pearl-2 is enabled by default and all its features are available. You can disable the entire
screen or some of its features using the Admin panel. For information about how to connect to and use the
Admin panel, see The Admin panel.
Topics include:
l Disable or enablethe touch screen
l Hide or show channel previews on the touch screen
l Disable or enable the system status screen
l Disable or enable configuration using the touch screen
l Disable or enable recording, streaming and switching from the touch screen
l Set the touch screen timeout
l Set a 4-digit PIN security code
54
Page 67

Pearl-2 User Guide Configure the touch screen
Disable or enablethe touch screen
You can enable or disable Pearl-2 from displaying anything on the touch screen. The touch screen remains
touch-sensitive even when the display is disabled.
To disable or enable the touch screen display:
1. Login to the Admin panel as admin, see Connect to the Admin panel.
2. From the Configuration menu, click Touch Screen. The touch screen configuration page opens.
3. Uncheck Enable display to disable the touch screen display. Check Enable display if you want the
touch screen display enabled.
4. Click Apply.
Hide or show channel previews on the touch screen
Previews of your configured channels display on the touch screen of Pearl-2 by default. You can disable
channel previews using the Admin panel.
A message displays on the touch screen when channel previews are disabled. If you have configured system
status or settings and configuration preset changes to be allowed, then tapping anywhere on the touch
screen opens the settings page.
55
Page 68

Pearl-2 User Guide Configure the touch screen
To hide or show the channel previews on the touch screen:
1. Login to the Admin panel as admin, see Connect to the Admin panel.
2. From the Configuration menu, click Touch Screen. The touch screen configuration page opens.
3. Uncheck Show preview to disable channel previews from displaying on the touch screen. Check Show
preview if you want to enable channel previews on the touch screen.
4. Click Apply.
Disable or enable the system status screen
The system status screen displays network and system related information, such as the IP address needed to
access Pearl-2. You may not want this information visible on the touch screen after you've configured Pearl-2.
You can use the Admin panel to disable the system status screen from displaying on the touch screen.
To disable or enable the system status screen from displaying on the touch screen:
1. Login to the Admin panel as admin, see Connect to the Admin panel.
56
Page 69

Pearl-2 User Guide Configure the touch screen
2. From the Configuration menu, click Touch Screen. The touch screen configuration page opens.
3. Uncheck Show system status to prevent the system status screen from opening on the touch
screen. Check Show system status if you want to enable the system status screen to open on the
touch screen.
4. Click Apply.
Disable or enable configuration using the touch screen
You can apply configuration presets and configure network settings using the touch screen on Pearl-2 by
default. You can disable this ability using the Admin panel.
If configuration is blocked and system status is permitted, touch screen users see an i icon instead of the
configuration gears icon in the lower right corner of the touch screen.
To disable or enable configuration using the touch screen:
1. Login to the Admin panel as admin, see Connect to the Admin panel.
2. Select the Touch Screen link in the Configuration menu. The touch screen configuration page opens.
57
Page 70

Pearl-2 User Guide Configure the touch screen
3. Uncheck Allow settings and configuration preset changes to disable configuration from the
touch screen. Check the check box if you want to enable configuration from the touch screen.
4. Click Apply.
Disable or enable recording, streaming and switching from the
touch screen
Recording, streaming, and live switching control using the touch screen on Pearl-2 is enabled by default. You
can disable this function using the Admin panel to stop users from switching layouts and from starting or
stopping live streams and recordings.
Channel preview must be enabled for the touch screen for recording, streaming, and live switching
control to work. See Hide or show channel previews on the touch screen
To disable or enable recording, streaming, and switching control using the touch screen:
1. Login to the Admin panel as admin, see Connect to the Admin panel.
2. From the Configuration menu, click Touch Screen. The touch screen configuration page opens.
58
Page 71

Pearl-2 User Guide Configure the touch screen
3. Uncheck Allow start/stop recording and streaming to disable recording, streaming, and live
switching control from the touch screen. Check the check box to enable recording, streaming, and live
switching control.
4. Click Apply.
Set the touch screen timeout
Initially, the touch screen is always on for easy monitoring. However, you can set the touch screen to shut off
after a given amount of time. To re-enable the touch screen after it times out and shuts off, simply tap
anywhere on the screen.
To set a timeout for the touch screen:
1. Login to the Admin panel as admin, see Connect to the Admin panel.
2. From the Configuration menu, click Touch Screen. The touch screen configuration page opens.
59
Page 72

Pearl-2 User Guide Configure the touch screen
3. Enter the number of seconds before the touch screen automatically shuts off in the Timeout field. A
value of 0 keeps the touch screen on at all times when the system is on.
4. Click Apply.
Set a 4-digit PIN security code
You can set a 4-digit PIN code to protect the touch screen of Pearl-2 from unauthorized access. By default, the
PIN is not set.
If a PIN is configured, users are prompted to enter the PIN code whenever:
l When you power on or restart Pearl-2.
l When Pearl-2 recovers from timeout mode, see Set the touch screen timeout.
To configure a 4-digit PIN code:
1. Login to the Admin panel as admin, see Connect to the Admin panel.
60
Page 73

Pearl-2 User Guide Configure the touch screen
2. From the Configuration menu, click Touch Screen. The touch screen configuration page opens.
3. Enter a 4-digit PIN code in the PIN field.
4. Click Apply.
Record the PIN code in a safe location for future reference. You need this PIN to
access the touch screen of your Pearl-2.
61
Page 74

Pearl-2 User Guide The Admin panel
The Admin panel
The Admin panel is used primarily to set up your Pearl-2 and perform administrative tasks. Most tasks in this
user guide are performed using the Admin panel.This section contains what you need to get started using the
Admin panel.
Topics include:
l About the Admin panel
l Connect to the Admin panel
l Connect using a DNS-based service discovery
l Connect using the Epiphan discovery utility
l Connect using persistent static IP address
For information about remote access to the cloud version of the Admin panel, see Access cloud versions of
the Admin panel and Epiphan Live.
About the Admin panel
The Admin panel is a web-based user interface that's used primarily to set up your Pearl-2 and perform
administrative tasks.
62
Page 75

Pearl-2 User Guide About the Admin panel
Table 12 The Admin panel
Label Name Description
The channels that are available for the current configuration of your
Pearl-2 are listed. Select a channel to access the drop down list of
1 Channels menu
options that are available to configure channel encoding, add video
and audio source, create layouts, perform confidence monitoring,
record the channel, and more.
63
Page 76

Pearl-2 User Guide Connect to theAdmin panel
Label Name Description
Recorders you add to your Pearl-2 are listed. Select a recorder to open
2 Recorders menu
the status page and list of related recordings for that recorder. You
can start and stop recording, as well as configure the recorder settings
from this page.
3 Inputs menu
4 Output ports menu
5 Events menu
6 Configuration menu A list of all the available configuration options.
Internal storage and
7
system information
menu
8 Main panel
9 Link to Epiphan Live Click to open Epiphan Live in a new tab.
10 Log out
The available video and audio input ports on your Pearl-2 are listed.
Select a port to open the configuration and status page for that port.
The output ports available on your Pearl-2 are listed. Select a port to
open the configuration and status page for that port.
Access the Content Management System (CMS) events list containing
up to three months of scheduled Kaltura events, in progress events,
and completed ah hoc and scheduled events.
System details are displayed in this area, such as the total amount of
internal storage, how much space is currently used, and how much
free space is available.
The main panel is where the all the related information displays. What
gets displayed in the main panel depends on which menu item you
select.
Click to log out of Pearl-2. Click icon again to display the log in
window. The role of the currently logged in user displays beside the
icon.
Connect to the Admin panel
You can access the Admin panel using an internet browser on a computer or tablet that's connected to the
same local Ethernet network as your Pearl-2. You need the IP address of the system, which you can get from
the settings using the front touch screen of your Pearl-2. Using the touch screen is the easiest way to find the
IP address of your system.
There are two ways to get the IP address using the touch screen to log in to the Admin panel:
64
Page 77

Pearl-2 User Guide Connect to theAdmin panel
1. Get the IP address of Pearl-2. Do one of the following:
a. From a single channel view or grid view, tap the system settings (gears) icon, then tap System
Status, or
b. If your system doesn't have any channels showing, tap the touch screen anywhere to go to the
system settings screen, then tap System Status.
3. When you have the IP address of your Pearl-2, enter the following into the address bar of your web
browser to launch the Admin panel.
http://<IP Address of Pearl-2>/admin
If HTTPS is enabled on Pearl-2, replace http with https in the URL.
4. Enter your user name and password when prompted. The administrative user name is admin. Initially
no password is set so you can leave that blank and click OK.
We recommend setting an admin password for higher security, see User
administration.
If you don't know the IPaddress, you can do one of the following:
For networks with DHCP, you can:
l Connect using a DNS-based service discovery
l Connect using the Epiphan discovery utility
For networks without DHCP, you can:
l Connect using persistent static IP address
65
Page 78

Pearl-2 User Guide Connect using the Epiphan discovery utility
Connect using the Epiphan discovery utility
Epiphan provides a utility for discovering Epiphan systems on your network. The Epiphan network discovery
utility is a 32-bit Windows executable that works on most 32-bit and 64-bit Windows operating systems.
Download and install the utility via this link: https://www.epiphan.com/downloads/NetworkDiscovery.exe.
To access the Admin panel using the Epiphan discovery utility:
1. Launch the discovery utility.
2. Click Search to find all the Epiphan systems on the network. A list similar to the following appears.
If more than one Pearl-2 appears, select the one you want using the serial number
that's listed.
3. (Optional) Record the IP Address shown in the stream properties for future reference.
4. Click Web config. Your browser opens and points to the Admin panel page, for example: http://<IP
Address of Pearl-2>/admin
5. Enter your user name and password when prompted, then click OK. The administrative user name is
admin. Initially no password is set. To set a password, see User administration.
66
Page 79

Pearl-2 User Guide Connect using a DNS-based service discovery
Connect using a DNS-based service discovery
Pearl-2 uses DNS-based messages to advertise details about itself, including its host name. With a compatible
utility installed on your computer, you can access the system simply by typing its serial number and the suffix
".local" into the address bar of your browser.
The following table lists the compatible systems and Bonjour Print Services software needed.
Table 13 Install Bonjour Print Services
System Action Needed
You must install Bonjour Print Services:
1. Use the following URL http://support.apple.com/kb/DL999
Microsoft Windows
2. Click Download.
3. Follow the system prompts to download and install the application.
MacOSX
Linux
To access the Admin panel of Pearl-2 using DNS discovery:
1. Find the system’s serial number that's printed on a label attached to the device.
TIP: The serial number also appears on the System information screen from the touch screen of Pearl-
2. Tap the system information gear icon to display the System information screen. If needed, tap the
screen once to display the control icons.
The Bonjour software used for service discovery is built into the Mac OS. No special
actions are needed.
The Avahi implementation used for DNS-based discovery is shipped with most Linux
distributions. If necessary, check with your administrator to ensure you have the
Avahi package installed.
2. Enter the following string into the address bar of your web browser on your admin computer, where
<serial> is the serial number of your Pearl-2:
67
Page 80

Pearl-2 User Guide Connect using persistent static IP address
http://<serial>.local/admin
For example: http://95dd40d5.local/admin
If HTTPS is enabled on Pearl-2, replace http with https in the URL.
3. Enter your user name and password when prompted, then click OK. The administrative user name is
admin. Initially no password is set. To set a password, see User administration.
4. (Optional) From the Configuration menu, click Network and note the IP address of the system from
the network configuration page.
Connect using persistent static IP address
Pearl-2 has a default persistent static IP address, also known as the recoveryIPaddress. If ever you need to
set up Pearl-2 on a network that does not support DHCP, or you need to recover from a previous static IP
address setting, you can use this procedure to connect directly to the system for configuration.
A workstation computer with access rights to modify your network settings is required.
Pearl-2 static IP address defaults are:
l IP Address: 192.168.255.250
l Netmask: 255.255.255.252
l Username: admin
l Password: your admin password (by default set to no password)
To access the Admin panel using the persistent static IP address:
68
Page 81

Pearl-2 User Guide Switching / mixing using the Admin panel
1. Establish an Ethernet connection between Pearl-2 and the workstation using one of the following
methods:
a. Connect Pearl-2 to a local Ethernet network shared with the workstation.
b. Connect Pearl-2 directly to the workstation’s Ethernet port using either a regular or a crossover
Ethernet cable.
2. Record the network settings of the workstation that are used to connect to Pearl-2 so that they can be
restored later.
3. Temporarily change the network configuration on the workstation to the following:
a. Use Static IP assignment
b. IP address: 192.168.255.249
c. Subnet mask: 255.255.255.252
4. Start a web browser on the workstation and go to: http://192.168.255.250/admin/
If HTTPS is enabled on Pearl-2, replace http with https in the URL.
5. Log in as the administrator user with the user name admin and enter the admin password (by default
there is no password assigned). The Admin panel opens.
6. From the Configuration menu, click Networking.
7. Click use a static address and enter a static IP address and network settings you want for Pearl-2.
For more information, see Configure network settings.
8. Restore the previously saved network configurations on the workstation.
Switching / mixing using the Admin panel
Switching live video inputs, or video mixing, is fast and easy using the Admin panel. For best results, you may
wish to be in a location where you can see the live action, and have a solid understanding idea of what is in
each of your layouts. Good layout names can help with this. See Rename a layout.
Performing live switching using one interface, like the Admin panel, does not dynamically
update the visuals in the other interfaces (e.g. the touch screen and Epiphan Live). The
other interfaces must be manually refreshed to accurately reflect the current live switching
layout information.
To do live video mixing:
1. Login to the Admin panel as admin, see Connect to the Admin panel.
69
Page 82

Pearl-2 User Guide Switching / mixing using the Admin panel
2. From the Channels menu, select a channel and click Layouts. The layout editor page opens.
3. In the layouts list, the layout with the big red circle beside it is the currently chosen "live" layout.
4. To switch to a different layout as the active "live" layout, click the gray circle beside the layout you want
to make go live. The circle turns red to indicate that it's now the active "live" layout.
70
Page 83

Pearl-2 User Guide Epiphan Live
Epiphan Live
Epiphan Live is a friendly and easy to use web and tablet interface designed for confidence monitoring of
channels and sources, switching between layouts while recording and streaming, and to easily stop or start
streaming and recording.
Topics include:
l About Epiphan Live
l The Dashboard interface
l Access Epiphan Live using a web browser or mobile device
l Access Epiphan Live from the Admin panel
l Stream, record, and monitor using the Dashboard interface
l Switching / mixing using Epiphan Live
l Your recordings
For information about remote access to the cloud version of Epiphan Live, see Access cloud versions of the
Admin panel and Epiphan Live.
About Epiphan Live
The Epiphan Live interface lets you easily operate your Pearl-2 using a computer or mobile device such as a
tablet. You can:
l Control streaming and recording of channels and recorders.
l Do live switching between sources and layouts while streaming and recording.
l Perform video, audio and system confidence monitoring.
You need administrator or operator-level privileges to use Epiphan Live. See User administration for more
information about user privileges.
Epiphan Live is supported on the following operating systems on mobile devices and web browsers:
71
Page 84

Pearl-2 User Guide The Dashboard interface
Operating system
or mobile device
Windows
Mac
Linux l Google Chrome
Android phone or
tablet
iPhone or iPad
Most instructions assume that a touch screen device is used; however, you can tap or click, depending on your
device.
Text scaling using Google Chrome for Android is not supported.
Supported web browser(s)
l Google Chrome
l Microsoft Edge
l Google Chrome
l Safari
l Google Chrome
l Google Chrome
l Safari
The Dashboard interface
The Dashboard interface is the first page you see when you open Epiphan Live. You'll find helpful tools for
confidence monitoring, as well as streaming and recording control.
72
Page 85

Pearl-2 User Guide The Dashboard interface
Table 14 Elements in the Dashboard interface
Number Title Description
l Warning – This icon displays only if there are any
configuration errors in your channels, sources, streams or
recordings. Clicking the icon displays more detail about the
1
Dashboard header
icons
errors.
l Save – Save the current Dashboard layout.
Tap Save to preserve the current layout. Logged
in operators and administrators will see the
73
Page 86

Pearl-2 User Guide
Number Title Description
l Menu – Access links to the Switcher view, Recordings, and
Admin panel.
AccessEpiphan Live using aweb browser or mobile
device
latest Dashboard layout when they refresh their
Epiphan Live page. The latest saved layout
displays the next time you log in.
2
3
4
5 Video inputs
6 Channels
7 Audio inputs
Dashboard
monitoring panels
Dashboard panel
navigation icons
Dashboard panel set
quantity icons
Configurable panels for confidence monitoring. You can set each
panel to display a source, channel, output, or basic system
information. Panels are empty by default.
Each dot represents a set of panels. Select a dot to navigate
between the three different sets of Dashboard monitoring panels.
l 2x – Changes the quantity of Dashboard panels per set to 2
(as in the screen shot above).
l 4x – Changes the quantity of Dashboard panels per set to 4.
Displays a list of your video inputs configured in the Admin panel
and includes basic status information for each input.
Displays a list of your channels configured in the Admin panel and
includes streaming and recording control buttons for each channel,
as well as individual control buttons for each stream when you set
up multiple streams in a channel.
Displays a list of your audio inputs configured in the Admin panel.
Includes basic status information and a VU meter for each input.
8 Recorders
Displays a list of your recorders configured in the Admin panel and
includes a recording control button for each recorder.
Access Epiphan Live using a web browser or mobile device
You can open Epiphan Live using a web browser on your Windows, Mac, or Linux computer. You can also use
Epiphan Live on an Android phone or tablet, an iPhone, or an iPad.
You need the IP address of your Pearl-2 to connect to Epiphan Live, see Connect to the Admin panel.
74
Page 87

Pearl-2 User Guide AccessEpiphan Live from the Admin panel
1. Enter the following into the address bar of your web browser.
a. For a web browser on a computer, enter:
http://<IP address of your Pearl-2>/admin/m
b. For a web browser on a mobile device, enter:
http://<IP address of your Pearl-2>
2. Enter your administrator or operator credentials when prompted.
Some versions of Chrome and Microsoft Edge don't display channel previews from the
Dashboard if you're on an HTTPs network and your website has an insecure or invalid security
certificate, even after you update the security certificate. Use a different web browser such as
Firefox or update the version of your web browser, then add the security certificate for the
website to the exceptions list.
Access Epiphan Live from the Admin panel
You need the IP address of your Pearl-2 to log in to the Admin panel for this procedure, see Connect to the
Admin panel.
1. Log in to the Admin panel using your credentials. In your web browser, enter:
http://<IP address of your Pearl-2>
2. Click Epiphan Live in the upper-right corner of the Status page for the channel. The Epiphan Live
dashboard opens in a new tab.
To open the Admin panel from Epiphan Live, click the Menu icon in the upper-right corner of the Dashboard
or Switcher interface, and then click Admin panel.
75
Page 88

Pearl-2 User Guide
Stream, record,and monitor using the Dashboard
Stream, record, and monitor using the Dashboard interface
interface
The Dashboard interface in Epiphan Live is where you can do confidence monitoring, as well as start and stop
streaming and recording for your channels.
Topics include:
l Configure Dashboard panels
l Monitor video and audio input sources
l Monitor and setup the output port source and audio
l Control streaming and recording
Configure Dashboard panels
You can customize each Dashboard panel to display a specific channel, input source, or video output for live
confidence monitoring. Panels can also be set up to display system information:
l CPU load (%)
l Quantity of streaming connections
l The current streaming bandwidth (bitrate)
l Automatic file upload status (enabled or disabled). See FTP and automatic file transfers.
l Storage available on your Pearl-2.
Other logged in operators and admins must refresh their web browsers to see the latest changes to the
Dashboard.
76
Page 89

Pearl-2 User Guide
Up to 8 Epiphan Live preview panels can be open at the same time. The limit of 8 live preview
panels applies across all open instances of Epiphan Live, including multiple users
accessing Epiphan Live simultaneously from different web browsers, or duplicate instances of
the same Epiphan Live interface open on multiple browser tabs at the same time.
To configure Dashboard panels:
1. Log in to Epiphan Live (see Access Epiphan Live using a web browser or mobile device).
2. Tap the drop down menu that appears below the panel and select the channel, source, or output to
display. The label says "None" if the panel is not yet configured.
Stream, record,and monitor using the Dashboard
interface
When a channel is selected, streaming and recording control buttons appear below the
panel. You can control streaming and recording of that channel using those buttons.
3. (Optional) To choose between displaying 2 or 4 panels, tap the 2x|4x icon that appears in the upper-
right corner of the panels area.
4. Tap Save.
77
Page 90

Pearl-2 User Guide
You can navigate between 3 separate sets of Dashboard panels by selecting the circle
icons along the top of the first row of panels.
Stream, record,and monitor using the Dashboard
interface
Monitor video and audio input sources
Use the Dashboard to monitor your video and audio inputs. The video inputs section of the Dashboard lists
all inputs configured on your Pearl-2 and displays the video resolution.
l A green dot means that the video source is connected and a signal is received.
l A yellow dot means that a signal is not being receiving from the source.
l A triangular warning icon means there is a source configuration issue that needs attention.
Tap the name of a video input to open the source details in a thumbnail view, including warning
information if applicable.
The audio inputs configured on your Pearl-2 appear in the Audio inputs section of the Dashboard.
78
Page 91

Pearl-2 User Guide
l A grayed-out audio source means that the audio source is not used in any channels.
l A triangular warning icon means there is a source configuration issue that needs attention. Click the
audio source name to display the warning message.
l A green dot means the source is connected and the accompanying VU meter shows the audio level.
The audio VUmeter uses quasi-peak ballistics with samples averaged every 10 ms. The maximum average in
each 100 ms period is displayed as a series of colored bars. The following table describes the levels at which
the meter changes from green to yellow and red.
Stream, record,and monitor using the Dashboard
interface
Table 15 Audio VUmeter levels
Color Decibel range
Red 0 to -9 dBFS
Yellow -9 to -18 dBFS
Green -18 dBFS and lower
Show or hide video inputs in the list
You can pick which video inputs display in the Dashboard view. Just tap the Video inputs header and then
check the checkbox next to the name of each source you want showing in the Dashboard view. Tap Save
when you're done. The Dashboard video input list updates automatically.
79
Page 92

Pearl-2 User Guide
Stream, record,and monitor using the Dashboard
interface
Show or hide audio inputs
You can pick which audio inputs display in the Dashboard view. Just tap the Audio inputs header and then
check the checkbox next to the name of each source you want showing in the Dashboard view. Tap Save
when you're done. The Dashboard audio input list updates automatically.
Monitor and setup the output port source and audio
The Dashboard lists the output ports along with the resolution and frame rate. You can enable and disable a
video output port, as well as choose if you want to display a channel or a video source. You can also enable or
disable the audio volume for the output port. However, you cannot hide video output ports from displaying
on the Dashboard.
To configure the output port audio using the Admin panel, see Disable or enable audio and output port
volume.
l Green text means your output is connected and transmitting to your external display.
l Grayed-out text means the output port is disabled.
l White text means the output port is enabled but is not connected to an external display.
Click the name of a video output to open the port's details in a thumbnail view.
80
Page 93

Pearl-2 User Guide
By default, video output ports are configured to maintain aspect ratio, use the display's
default resolution, include audio at 100% and they don't include the audio VU meter. You
can change these defaults in the Admin panel. See Video output ports to learn more
about advanced-level video output configuration using the Admin panel.
Stream, record,and monitor using the Dashboard
interface
To configure a video output port and enable or disable the audio:
1. Tap Video outputs to display the video output configuration menu.
2. Tap the text field beside the output port and select a channel or source from the list.
81
Page 94

Pearl-2 User Guide
3. To enable or disable audio for the output port, tap the speaker icon to toggle audio On and Off for
the port. A green icon means audio is enabled. A gray icon means audio is disabled.
Stream, record,and monitor using the Dashboard
interface
Control streaming and recording
From the Epiphan Live Dashboard, you can control streaming and recording for channels using the buttons in
the Channels section. When a channel is not currently streaming or recording, the buttons are gray and their
respective timers are set to 00:00:00. If streaming isn't configured for a channel, the streaming button
displays as "Not set". See Streaming a channel directly to viewers to learn how to configure streaming for a
channel using the Admin panel.
l The left-most button with the "signal" icon starts and stops streaming for the channel.
l The right-most button with the circle icon starts and stops recording for the channel.
82
Page 95

Pearl-2 User Guide
If multiple streams are configured for a channel, a pair of control buttons is displayed for each
stream.
Click the channel name to open a preview thumbnail view.
When you're ready to start streaming and recording the channel, tap the streaming and recording control
buttons. Tap the buttons a second time to stop streaming and recording.
l The streaming button turns blue when the channel is streaming and the timer's clock increments.
Stream, record,and monitor using the Dashboard
interface
l The recording button turns red when the channel is recording and the timer's clock increments.
Streaming and recording control buttons also appear below the Dashboard monitoring panels when they're
configure to display a channel. You can use those control buttons to start and stop streaming or recording for
a channel too.
If the stream fails to publish, the streaming button flashes blue and displays "ERROR". Check the streaming
settings for your channel using the Admin panel, see Streaming a channel directly to viewers.
83
Page 96

Pearl-2 User Guide Switching / mixing using Epiphan Live
Recording using multi-track recorders
From the Admin panel, you can create multi-track Recorders to capture multiple channels and audio sources in
a single recording. You can then select which combination of video and audio sources to extract from the
recording. This feature is useful when you're capturing a video source and multiple languages from different
audio sources. Multi-track recorders appear on the Dashboard if they are configured on your Pearl-2.
Each multi-track recorder has a recording control button to start and stop recording. When a Recorder is not
recording, the button is gray and the timer is set to 00:00:00. See Add a recorder to learn more about
configuring multi-track recorders using the Admin panel.
To start recording, simply tap the recording control button for that multi-track recorder. The button turns red
when the multi-track recorder is recording and the timer's counter increments. Tap the button a second time
to stop recording.
Switching / mixing using Epiphan Live
The Live Switcher view in Epiphan Live is a simple interface that lets you live switch between layouts while
streaming and recording. To learn how to create different layouts for a channel using the Admin panel, see
Add or edit a custom layout.
Switching between layouts using one of the switcher interfaces, such as the touch screen,
does not dynamically update what you see in the other switching interfaces (i.e. Epiphan
Live and the Admin Panel). You must manually refresh the other interfaces separately to
reflect the current state.
Topics include:
l About the Switcher interface
l Switching / mixing using Epiphan Live
l Switching / mixing using the touch screen
l Switching / mixing using the Admin panel
84
Page 97

Pearl-2 User Guide Switching / mixing using Epiphan Live
About the Switcher interface
The Switcher interface is accessed from the Menu button in the top right corner of the Dashboard interface.
See The Dashboard interface.
Table 16 Elements in the Switcher view
Number Title Description
A list of channels configured on your Pearl-2. When a channel is selected,
1 Channel selector
2 Menu icon Displays links to the Dashboard view and the Admin panel when clicked.
3 Preview panel
4 Live view panel
5 Layout carousel
you can switch between the different layouts that are configured for
that channel.
Displays a preview of a selected layout, which is outlined with a green
border. When you click the Switch button, this preview layout becomes
the live layout. See Switching while live streaming and recording using
Epiphan Live for more information.
Displays the active "live" layout that is currently being streamed or
recorded. The live layout is outlined with a red border. When you select
the Switch button, this live layout is replaced with the layout that's
loaded in to the Preview panel.
Displays small previews for all layouts contained within your selected
channel. Select a layout from the carousel to add it to the Preview
85
Page 98

Pearl-2 User Guide Switching / mixing using Epiphan Live
Number Title Description
panel.
Note that the layout selected for the Preview panel has a green border
and the layout in the Live panel has a red border.
When selected, the layout in the Preview panel replaces the layout in
6
Switch button
the Live panel and is immediately reflected in your active stream and
recordings.
Switching while live streaming and recording using Epiphan Live
The Switcher interface lets you easily live switch between custom layouts with the simple press of a button.
To switch layouts while live streaming and recording:
1. Log in to Epiphan Live. The Dashboard view opens by default. See Access Epiphan Live using a web
browser or mobile device.
2. Tap the Menu icon in the upper-right corner of the Dashboard screen and tap Switcher to open the
Switcher interface.
3. Tap the field beside the "Switcher" header and select a channel. The field is blank if this is your first time
configuring the Switcher. Channels with only one layout are grayed-out and cannot be selected for
switching.
86
Page 99

Pearl-2 User Guide Switching / mixing using Epiphan Live
All the layouts for the selected channel are displayed in a carousel along the bottom of the screen. The
layout that is live is displayed in the Live panel on the right side of the interface, see About the
Switcher interface.
4. In the carousel, tap the layout that you want to switch to next. That layout displays in the Preview
panel.
87
Page 100

Pearl-2 User Guide Your recordings
5. Tap the Switch button to move the layout that is currently in the Preview panel to the Live panel.
Load another layout into the Preview panel so that it's ready to go live the next time you tap Switch.
Your recordings
All recordings made using Epiphan Live are saved to the Your recordings panel.
After recoding a file, you can manage it and any other files using the following tools on the page:
88
 Loading...