

Page 1
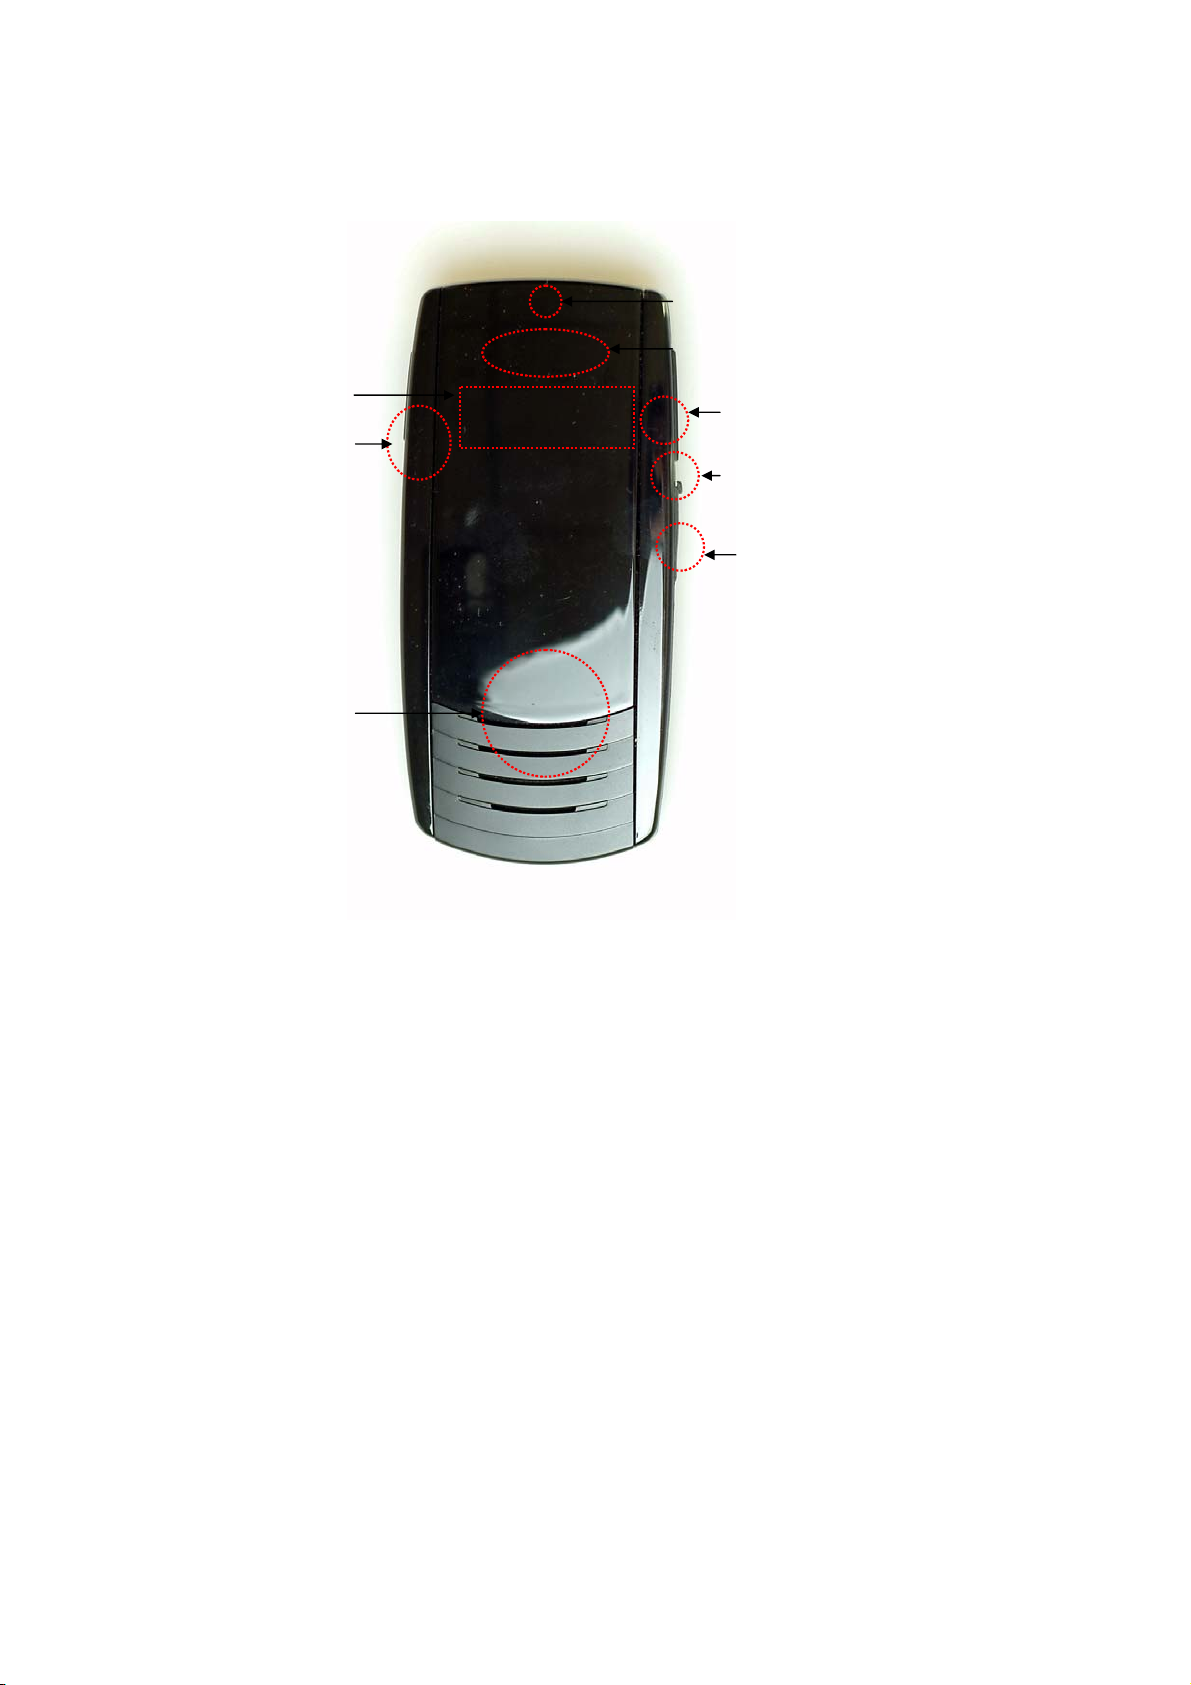
1. Product Overview
2
3
1
4
8
1) Connection, Battery, FM Status
2) Microphone
3) Multi-function button
4) FM/TTS button
5) Volume Up button
6) Volume Down Button
7) Charging Port
8) Speaker
5
6
7
Page 2

2. Charging hands-free car kit
Be sure to use the vehicle charger and USB charger cable provided.
The product uses an advanced lithium polymer rechargeable battery. When used for the first time,
it is important to charge the product for 2 hours, to ensure the battery is fully charged, ready for
use in the best conditions.
a) How to charge
Use the USB charger cable to connect the car kit to the vehicle charger.
Connect the product car kit through using the USB charger cable to the vehicle charger. Then
plug the vehicle charger into your car’s power outlet. The light on the USB charger cable
will light up red while it is charging. When the light on the USB charger cable turns green, the
product is fully charged.
Note: When the car kit battery is low, the Battery Icon on the product blinks, indicating that it
needs to be recharged.
3. Pairing
Before you use the product you must first pair it with your mobile phone.
Note: You can only pair devices that are Bluetooth enabled. To see if you mobile phone is
Bluetooth enabled, check your mobile phone’s user guide.
1) If the car kit is powered on, turn it off.
2) Press the Multi-function button for 7 seconds.Release the button when Bluetooth
Status Icon begins to flash quickly with beep sound (or TTS Message: Pairing Mode.
3) Use the mobile phone’s device search function and then select the device BHF-700.
4) Enter the password “0000” on your mobile phone.
5) The devices have been successfully paired when you see the Bluetooth Status Icon
changes or hear the message “Connected”.
Note: If the pairing is not successful within 2 minutes, the car kit status changes to
Page 3

Standby Mode. Repeat steps 1 to 4 to initiate pairing mode again.
4. Usage
1) Turn On/Off
Power On: Push the multi-function button of the product for 2 seconds to turn it on.
Power Off: Push the multi-function button of the product for 4 seconds to turn it off.
2) Connection
a. Once paired, press shortly on the Multi-function button to connect the car kit to the
mobile phone.
b. If not paired, see 3) pairing.
Note: if it was connected following the a. procedure, press and hold down the volume up or
volume down to enter the Stereo Mode (A2DP).
3) Call Functions
*Answer a call: Press shortly on the Multi-function button. .
*End a call:. Press shortly on the Multi-function button. .
*Voice Dialing: To place a call using voice dialing, press and hold down the multi-function
button for 1 second. You will hear a beep. Then say the name of the person you wish to
call using the voice tag that you previously recorded for that number.
Note: The voice dialing function is handset dependant. Consult your mobile phone’s user
guide to see if it supports voice dialing.
*Transferring calls between the product and mobile phone:
To transfer a call from the car kit to the mobile phone during a call, quickly press twice
on the Multi-Function button. To transfer a call from your mobile phone back to the car
kit repeat the same step.
6) Reject a call: To reject an incoming call when the product is ringing, press for 1 second on
the Multi-function button. A busy tone will be sent to the caller.
Note: The reject a call function is handset dependant. Consult your mobile phone’s user guide
to see if it supports reject a call function.
Page 4

7) Last numbers redial
To redial the last number you called, press twice the Multi-function button.
8) Volume Up / Down
Use the Volume Up / Down button to adjust the volume.
9) Mute / Un-mute
Press and hold down the Volume Down button for 1 second during the call. In this case, you
are able to hear the other person but she/he won’t be able to hear you. To un-mute the call,
quickly press once the Volume Up or Volume Down button.
10) Remove a registered mobile phone entry from the lists.
The car kit registers a list of recently connected mobile phones.
To remove the list, press and hold down the Multi-function button, Volume Up button and
FM/TTS button at the same time for 7 seconds. A beep indicates the list was
removed from the car kit memory.
Note: After removing the list the car kit remains in pairing mode.
11) Blind Mode
To turn off the status icon while using the product, hold down the Volume Up button and
FM/TTS button for 1 second at the same time. The light on the status icon will be
switched off but the product will continue to function.
Note: To switch off the Blind Mode, follow the above mentioned steps.
12) FM Transmission
a. Check the pairing status. This function can be activated after pairing.
b. To use the car audio system, press once shortly on the FM/TTS button then the FM
Status icon will be on.
c. Through the FM status icon and voice announcement, check the fixed frequency.
d. Tune the car kit and the car audio system into the same frequency channel. [See the
13)]
Note: 1. To switch off the FM transmitter function, press once shortly on the FM/TTS button.
2. The FM transmitter function will automatically switch off after 1 minute if you don’t try to
Page 5

make a call or transfer music via car audio system.
13) FM Frequency Selection Mode
The product has 7 pre-programmed frequencies. You can select one of them following these
steps:
a. Check if the car kit is in the Pairing Mode.
b. When FM transmission mode is not active, press and hold down the FM/TTS button
for 2 seconds. Release the FM/TTS button when you hear a beep.
c. FM status icon blinks every 1 second indicating that FM Frequency Selection Mode
is on, and the current frequency is announced. Select the desired frequency by
pressing the Volume Up and Volume Down button.
d. To exit Selection mode, press and hold down the FM/TTS button for 2 seconds.
e. You can check the frequency fixed by voice announcing.
f. If you cannot find the desired frequency, see 14) Scanning an FM Frequency
Note: To end the FM Frequency Selection Mode, repeat the above steps.
14) Scanning an FM Frequency
When pre-programmed frequency is crossed or the frequency is pre-used by the others, you
can scan the available frequencies following these steps:.
a. Check if the car kit is in the Pairing Mode
b. When FM transmission mode is not active, press and hold down the FM/TTS button
for 4 seconds. Release the FM/TTS button when you hear the message “Searching”.
c. Check if the Connection LED and Call Status LED are lit on.
d. When the scanning is finished, the selected frequency is announced.
e. If you don’t want to use the selected frequency, see 13) FM Frequency Selection
Mode.
Note: You do not need to scan again if you use the frequency in the same area.
15) Caller ID
When there is an incoming call, the caller’s ID number is displayed on the car audio
system LCD.
Note: Caller ID function is car audio system dependant. (RDS feature should be available
in order to use this function.)
Page 6

16) TTS (Talk-to-Speech) Setting
There are 9 languages supported in the following order:
1 UK English
2 US English
3 French
4 Italian
5 German
6 Spanish
7
8 Brazilian Portuguese
9 Chinese
The default language is British English. To change the TTS language (settings) follow these
steps:
1) Enter the register mode.
2) Press on the FM/TTS button for 1 second until you hear the current language and enter
the Language Selection mode. The Status LED and Connection LED are blinking.
3) Select the language by pressing the Volume Up and Volume Down button.
4) To exit selection mode, press and hold down the TTS/FM button for 1 sec.
5) After selecting the language, the language selected is announced and the devices enters
into the register mode again.
6) To change the selected language, repeat steps 1) to 5)
Hands free status LED indication
Mexican Portuguese
Portuguese
1. Hands-free Status indication
메모 [^1]: Wasn’t it
Mexican Spanish here?
Standby/Idle Connection LED blinks every 2 seconds
Connected Connection LED on
Incoming call Call Status LED blinks every 1 second.
Active call Call Status LED on
Page 7

2. FM Transmitter indication.
FM transmit state LED indication
No transmit FM LED off
Transmit FM LED off
Channel set FM LED blinks every 1 second.
3. TTS Status indication.
FM transmit state LED indication
Language selection Call Status LED and Connection LED blink alternatively.
4. TTS Sentence
Hands-free state Phrase (UK English)
Power off Power off
Pairing Pairing mode
Connected Connected
Disconnected Disconnected
Incoming call Call from XXX XXX XXX
FM channel set? XXX.XX MHz
Select End of FM channel set Set FM Frequency to XXX.XX MHz
Hang up call Call ended
Language selection XXXXXX(announcing the selected language)
End of Language selection Select language XXXXX
FM frequency scan Searching
Page 8

- Additional Page -
Cautions
Modifications not expressly approved by the party responsible for compliance could void
the user’s authority to operate the equipment.
FCC compliance Information
This device complies with part 15 of FCC Rules.
Operation is subject to the following two conditions: 1. This device may not cause
harmful interference, and 2. This device must accept any interference received.
Including interference that may cause undesired operation.
Information to User
This equipment has been tested and found to comply with the limits for a Class B
digital device, Pursuant to part 15 of the FCC Rules. These limits are designed to
provide reasonable protection against harmful interference in a residential installation.
This equipment generates, uses and can radiate radio Frequency energy and, if not
installed and used in accordance with the instructions, may cause harmful interference
to radio communications.
However, there is no guarantee that interference will not occur in a particular installation.
If this equipment does cause harmful interference to radio or television reception, which
can be determined by turning the equipment off and on, the user is encouraged to try
to correct the interference by one or more of the following measures:
- Reorient or relocate the receiving antenna.
- Increase the separation between the equipment and receiver
- Connect the equipment into an outlet on a circuit different from that to which the
receiver is connected.
- Consult the dealer or an experienced radio/TV technician for help.
FCC RF Radiation Exposure Statement
This equipment complies with FCC RF radiation exposure limits set forth for an
uncontrolled environment. This equipment should be installed and operated with a
minimum distance of 20 centimeters between the radiator and your body.
 Loading...