

Page 1
S-PLAY (70092)
Visit the ENTTEC website for the latest version.
USER MANUAL
1 |
ID: 4686708
Document Updated: April 2021
S-PLAY – User Manual
Record, Edit and Playback up to 32 Universes using Art-Net/sACN or 2 Universes using the two built in
DMX ports with an all-in-one show recorder.
ENTTEC’s S-PLAY is a highly accurate, 32 universes
lighting record and playback controller.
Capture or create static scenes or record dynamic
cues from up to 32 universes of Art-Net, sACN or 2
universes of DMX. The built-in pixel effects
generator provides an intuitive tool to create the
desired look to be output to your pixel controller.
Using either RS232, Art-Net, DMX, Digital Inputs,
Relays, sACN, UDP or OSC; send commands to
external devices or receive triggers the device allows
external devices to fully integrate the S-PLAY into
the installation.
Using the intuitive drag and drop timelines system,
build playlists using cues, events and triggers as
building blocks. Control the number of play counts,
priority, fade times and master intensities to fine
tune your playlists.
Build schedules of playlists to play at certain times
of the day or utilize external triggers to allow
multiple playlists to ruin over the top of each other
at the same time with different groups and
priorities.
Features
In-built controls to record and play cues
Internal memory supporting over 10 hours of 32
universe recording at 44FPS (plug in an external
SD card to increase this recording size.
Variable Art-Net/sACN refresh rate (60FPS max.).
The ability to increase storage using an SD card.
Four digital inputs to trigger device from
external sources.
Two relay outputs to control devices.
Monitor the DMX values for recording cues.
Create playlists from dynamic, static and
internal effect cues.
Add events and triggers to playlists.
Two universe Physical DMX input or output.
Up to 32 Universes of Art-Net and sACN
recording & playback.
Schedule playlists.
Remote trigger options: RS232, Art-Net, DMX,
Digital Inputs, sACN, UDP, OSC.
Page 2

S-PLAY (70092)
Visit the ENTTEC website for the latest version.
USER MANUAL
2 |
ID: 4686708
Document Updated: April 2021
Content
Safety ....................................................................................................................................................................................................................................................... 5
Electrical safety ............................................................................................................................................................................................................................. 5
System Planning and Specification ................................................................................................................................................................................... 5
Protection from Injury During Installation ..................................................................................................................................................................... 6
Installation Safety Guidelines ............................................................................................................................................................................................... 6
Physical Dimensions ........................................................................................................................................................................................................................ 7
Mounting Options.............................................................................................................................................................................................................................. 7
Wiring Diagrams ................................................................................................................................................................................................................................. 8
S-PLAY to distributed DMX Output ..................................................................................................................................................................................... 8
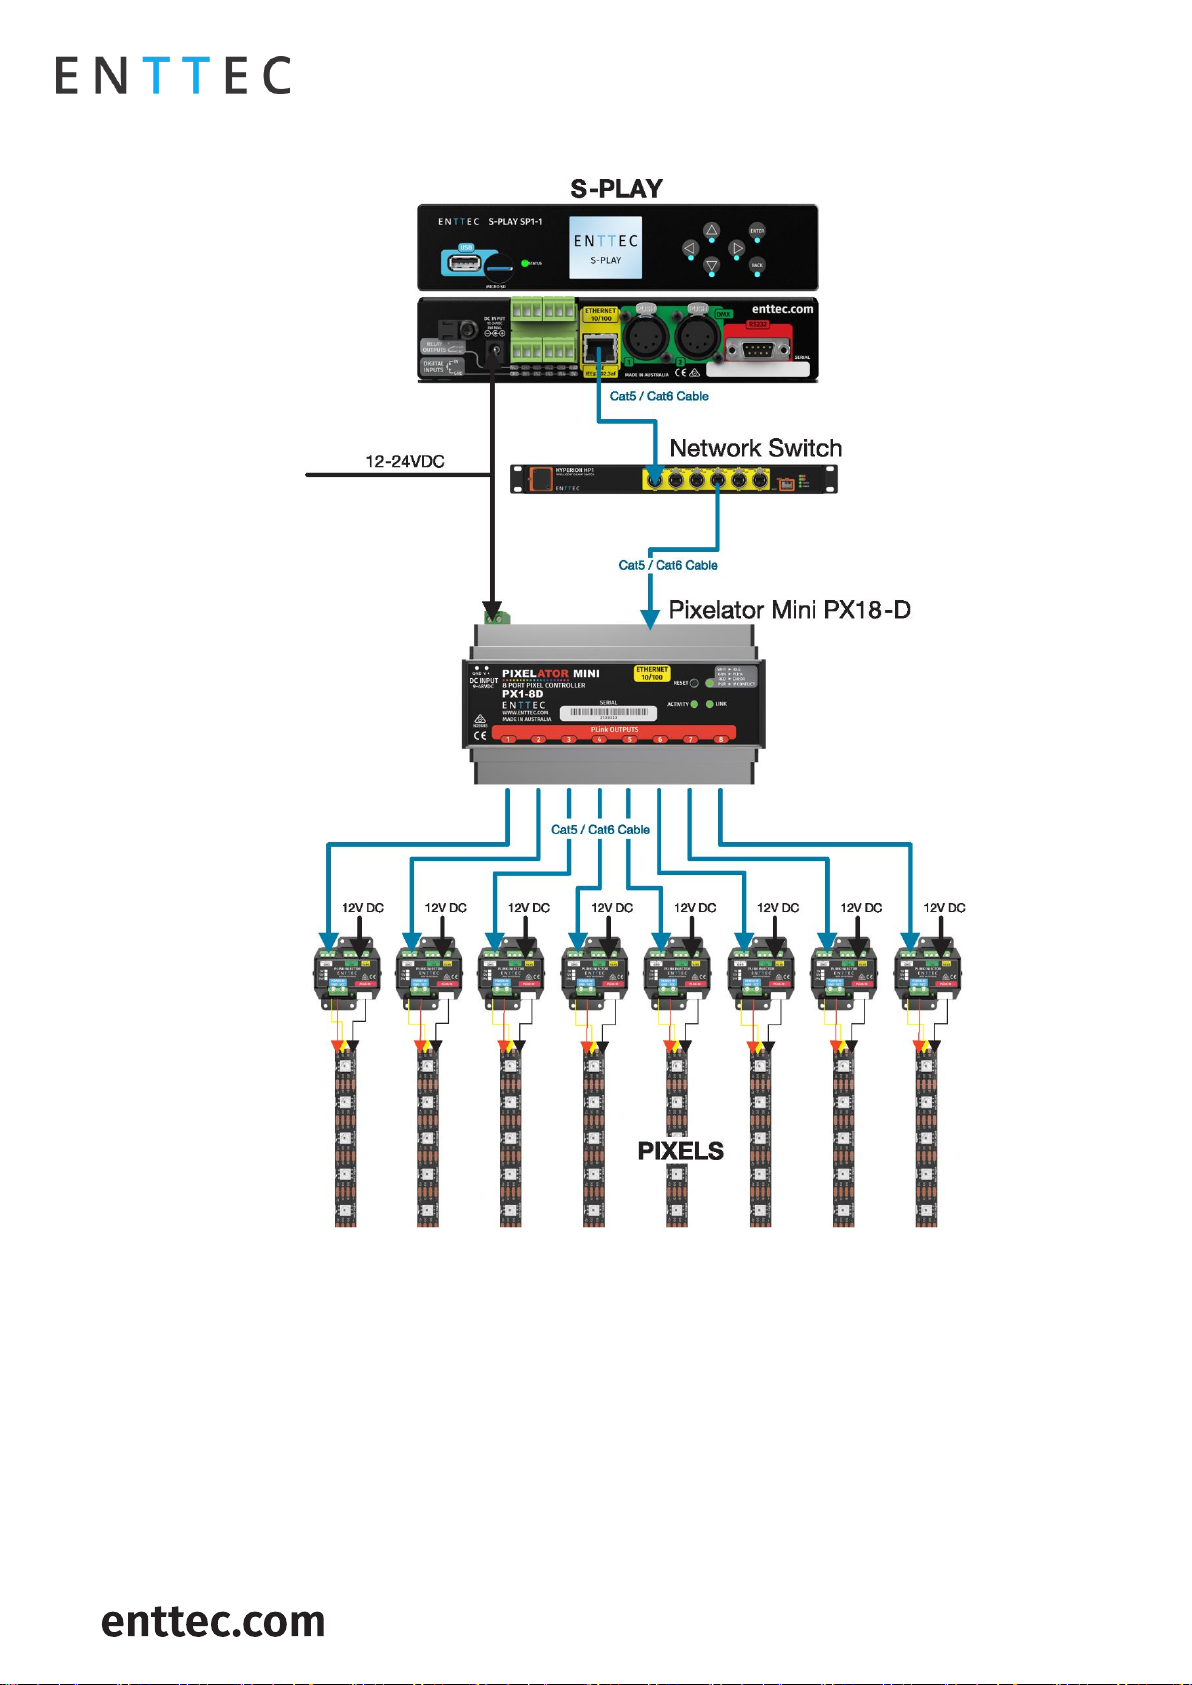
S-PLAY to Playback to Pixel Systems ................................................................................................................................................................................. 9
S-PLAY Application Diagram................................................................................................................................................................................................. 10
Connection to Relays ............................................................................................................................................................................................................... 10
Connection to Digital Inputs ................................................................................................................................................................................................ 11
Using Motion Sensors with the S-PLAY .......................................................................................................................................................................... 11
Functional features ........................................................................................................................................................................................................................ 13
Overview ......................................................................................................................................................................................................................................... 13
Hardware features .......................................................................................................................................................................................................................... 14
Overview ......................................................................................................................................................................................................................................... 14
S-PLAY Connectivity .................................................................................................................................................................................................................. 15
LCD Menu Screen ............................................................................................................................................................................................................................. 15
Controls ........................................................................................................................................................................................................................................... 15
Home Screen ................................................................................................................................................................................................................................ 15
Playlist Menu ................................................................................................................................................................................................................................ 16
Network Menu ............................................................................................................................................................................................................................. 16
Utilities Menu .............................................................................................................................................................................................................................. 16
Information Menu ..................................................................................................................................................................................................................... 17
Out of the Box ................................................................................................................................................................................................................................... 17
Network Discovery .......................................................................................................................................................................................................................... 17
View the S-PLAYs LCD ............................................................................................................................................................................................................... 17
Finding an S-PLAY’s IP Address from NMU ................................................................................................................................................................... 18
Changing the Network Settings .......................................................................................................................................................................................... 18
Changing the Network Settings Using LCD Interface ......................................................................................................................................... 18
Change IP Using the Web Interface ............................................................................................................................................................................ 18
Web interface ................................................................................................................................................................................................................................... 20
Home ............................................................................................................................................................................................................................................... 20
Cue Library ................................................................................................................................................................................................................................... 20
Static Scenes .......................................................................................................................................................................................................................... 21
DMX Snapshot ................................................................................................................................................................................................................... 22
Cue Creation....................................................................................................................................................................................................................... 22
Dynamic Recordings ........................................................................................................................................................................................................... 23
To create a new Dynamic Cue .................................................................................................................................................................................. 23
Page 3

S-PLAY (70092)
Visit the ENTTEC website for the latest version.
USER MANUAL
3 |
ID: 4686708
Document Updated: April 2021
Dynamic Recording Control ....................................................................................................................................................................................... 23
Effects ........................................................................................................................................................................................................................................24
Preview Cue .............................................................................................................................................................................................................................24
Editing a Cue, Effect or Dynamic Recording ...........................................................................................................................................................24
Events ...............................................................................................................................................................................................................................................25
RS232 ..........................................................................................................................................................................................................................................25
UDP ..............................................................................................................................................................................................................................................25
OSC ............................................................................................................................................................................................................................................. 26
Relay .......................................................................................................................................................................................................................................... 26
Art-Net ...................................................................................................................................................................................................................................... 26
sACN ............................................................................................................................................................................................................................................ 27
DMX.............................................................................................................................................................................................................................................. 27
Triggers ........................................................................................................................................................................................................................................... 28
RS232 ......................................................................................................................................................................................................................................... 28
UDP ............................................................................................................................................................................................................................................. 29
OSC ............................................................................................................................................................................................................................................. 29
Digital Input ........................................................................................................................................................................................................................... 29
Art-Net ...................................................................................................................................................................................................................................... 30
sACN ........................................................................................................................................................................................................................................... 30
DMX............................................................................................................................................................................................................................................. 30
Playlists ........................................................................................................................................................................................................................................... 31
Playlists Page Layout .......................................................................................................................................................................................................... 32
Created Playlists ................................................................................................................................................................................................................... 32
Global Playlist Control .......................................................................................................................................................................................................33
Search and Filter Bar .........................................................................................................................................................................................................33
Available Cues and Controls ..........................................................................................................................................................................................33
Playlist Attributes ................................................................................................................................................................................................................33
Playlist Settings ....................................................................................................................................................................................................................35
Playlist Timeline and Media Tracks ............................................................................................................................................................................35
Event and Trigger Tracks ................................................................................................................................................................................................. 36
Scheduler ....................................................................................................................................................................................................................................... 37
Created Schedules.............................................................................................................................................................................................................. 38
List of Schedules ................................................................................................................................................................................................................. 38
Schedule Name .................................................................................................................................................................................................................... 39
Selected Playlist .................................................................................................................................................................................................................. 39
Start Condition ..................................................................................................................................................................................................................... 39
End Condition ....................................................................................................................................................................................................................... 39
Frequency Type .................................................................................................................................................................................................................... 40
Settings ...........................................................................................................................................................................................................................................42
S-PLAY Output ...................................................................................................................................................................................................................... 44
Art-Net Output Configuration ....................................................................................................................................................................................... 44
sACN output configuration............................................................................................................................................................................................. 45
Change Date/Time and Location ................................................................................................................................................................................ 45
Page 4

S-PLAY (70092)
Visit the ENTTEC website for the latest version.
USER MANUAL
4 |
ID: 4686708
Document Updated: April 2021
Configure Remote Access Using SSH Tunnelling - (Advanced Feature) ................................................................................................. 45
Select Storage ....................................................................................................................................................................................................................... 46
Factory Reset ......................................................................................................................................................................................................................... 46
Factory Reset Via LCD .................................................................................................................................................................................................... 47
Factory Reset Via Web Interface ............................................................................................................................................................................. 47
Status ............................................................................................................................................................................................................................................... 47
Network Information ......................................................................................................................................................................................................... 48
Output Information ........................................................................................................................................................................................................... 48
System Information ........................................................................................................................................................................................................... 49
Software Information ........................................................................................................................................................................................................ 49
Backup ............................................................................................................................................................................................................................................ 49
Backup ...................................................................................................................................................................................................................................... 50
Restore ..................................................................................................................................................................................................................................... 50
Export Playback Data ......................................................................................................................................................................................................... 51
Storage .................................................................................................................................................................................................................................................. 51
Show Storage ............................................................................................................................................................................................................................... 51
Static Cue ................................................................................................................................................................................................................................. 51
Dynamic Cue ........................................................................................................................................................................................................................... 51
Triggers & Events.................................................................................................................................................................................................................. 51
Locking the S-PLAY and User Management ......................................................................................................................................................................52
Lock Feature ................................................................................................................................................................................................................................. 52
Default Login and Passwords ..............................................................................................................................................................................................53
Ports ...................................................................................................................................................................................................................................................... 54
XLR5 Female (DMX-512) .......................................................................................................................................................................................................... 54
DB9 Male (RS232) ....................................................................................................................................................................................................................... 54
GPIO ..................................................................................................................................................................................................................................................55
Relay .................................................................................................................................................................................................................................................55
Servicing, Inspection & Maintenance .................................................................................................................................................................................. 56
Cleaning ......................................................................................................................................................................................................................................... 56
Package Contents ............................................................................................................................................................................................................................ 57
Ordering Information .................................................................................................................................................................................................................... 57
Page 5
S-PLAY (70092)
Visit the ENTTEC website for the latest version.
USER MANUAL
5 |
ID: 4686708
Document Updated: April 2021
Safety
Ensure you are familiarized with all key information within this guide and other relevant ENTTEC
documentation before specifying, installing, or operating an ENTTEC device. If you are in any doubt about
system safety, or you plan to install ENTTEC device in a configuration that is not covered within this guide,
contact ENTTEC or your ENTTEC supplier for assistance.
ENTTEC’s return to base warranty for this product does not cover damage caused by inappropriate use,
application, or modification to the product.
Electrical safety
This product must be installed in accordance with applicable national and local electrical and
construction codes by a person familiar with the construction and operation of the product and the
hazards involved. Failure to comply with the following installation instructions may result in death or
serious injury.
Do not exceed the ratings and limitations defined in the product datasheet or this document. Exceeding
can cause damage to the device, risk of fire and electrical faults.
Ensure that no part of the installation is or can be connected to power until all connections and work
is complete.
Before applying power to your installation, ensure your installation follows the guidance within this
document. Including checking that all power distribution equipment and cables are in perfect condition
and rated for the current requirements of all connected devices and factor in overhead and verify that
it is appropriately fused and voltage is compatible.
Remove power from your installation immediately if accessories power cables or connectors is in any
way damaged, defective, shows signs of overheating or are wet.
Provide a means of locking out power to your installation for system servicing, cleaning and
maintenance. Remove power from this product when it is not in use.
Ensure your installation is protected from short circuits and overcurrent. Loose wires around this device
whilst in operation, this could result in short circuiting.
Do not over stretch cabling to the device’s connectors and ensure that cabling does not exert force on
the PCB.
Do not ‘hot swap’ or ‘hot plug’ power to the device or its accessories.
Do not connect any of this devices V- (GND) connectors to earth.
Do not connect this device to a dimmer pack or mains electricity.
System Planning and Specification
To contribute to an optimal operating temperature, where possible keep this device out of direct
sunlight.
Any twisted pair, 120ohm, shielded EIA-485 cable is suitable to transmit DMX512 data to or from the DIN
ETHERGATE. The DMX cable should be suitable for EIA-485 (RS-485) with one or more low capacitance
twisted pairs, with overall braid and foil shielding. Conductors should be 24 AWG (7/0.2) or larger for
mechanical strength and to minimize volt drop on long lines.
A maximum of 32 devices should be used on a DMX line before re-generating the signal using a DMX
buffer/ repeater / splitter.
Always terminate DMX chains using a 120Ohm resistor to stop signal degradation or data bounce-back.
The maximum recommended DMX cable run is 300m (984ft). ENTTEC advises against running data
cabling close to sources of electromagnetic interference (EMF) i.e., mains power cabling / air
conditioning units.
Page 6
S-PLAY (70092)
Visit the ENTTEC website for the latest version.
USER MANUAL
6 |
ID: 4686708
Document Updated: April 2021
This device has an IP20 rating and is not designed to be exposed to moisture or condensing humidity.
Ensure this device is operated within the specified ranges within its product datasheet.
Protection from Injury During Installation
Installation of this product must be performed by qualified personnel. If ever unsure always consult a
professional.
Always work with a plan of the installation that respects all system limitations as defined within this
guide and product datasheet.
Keep the S-PLAY and its accessories in its protective packaging until final installation.
Note the serial number of each S-PLAY and add it to your layout plan for future reference when servicing.
All network cabling should be terminated with an RJ45 connector in accordance with the T-568B
standard.
Always use suitable personal protective equipment when installing ENTTEC products.
Once installation is completed, check that all hardware and components are securely in place and
fastened to supporting structures if applicable.
Installation Safety Guidelines
The device is convection cooled, ensure it receives sufficient airflow so heat can be dissipated.
Do not cover the device with insulating material of any kind.
Do not operate the device if the ambient temperature exceeds that stated in the device specifications.
Do not cover or enclose the device without a suitable and proven method of dissipating heat.
Do not install the device in damp or wet environments.
Do not modify the device hardware in any way.
Do not use the device if you see any signs of damage.
Do not handle the device in an energized state.
Do not crush or clamp the device during installation.
Do not sign off a system without ensuring all cabling to the device and accessories has been
appropriately restrained, secured and is not under tension.
Page 7

S-PLAY (70092)
Visit the ENTTEC website for the latest version.
USER MANUAL
7 |
ID: 4686708
Document Updated: April 2021
Physical Dimensions
Note: All dimensions are in millimetres (mm).
Mounting Options
The S-PLAY is provided with ENTTEC’s, 1RU mount kit (pn: 79105). To provide 9.5” rack and various surface/
wall mounting solutions.
Note: The S-PLAY mounting solution is not intended to be suspended above head height or audiences.
Ensure all relevant legal safety guidelines are followed when installing this device.
Page 8
S-PLAY (70092)
Visit the ENTTEC website for the latest version.
USER MANUAL
8 |
ID: 4686708
Document Updated: April 2021
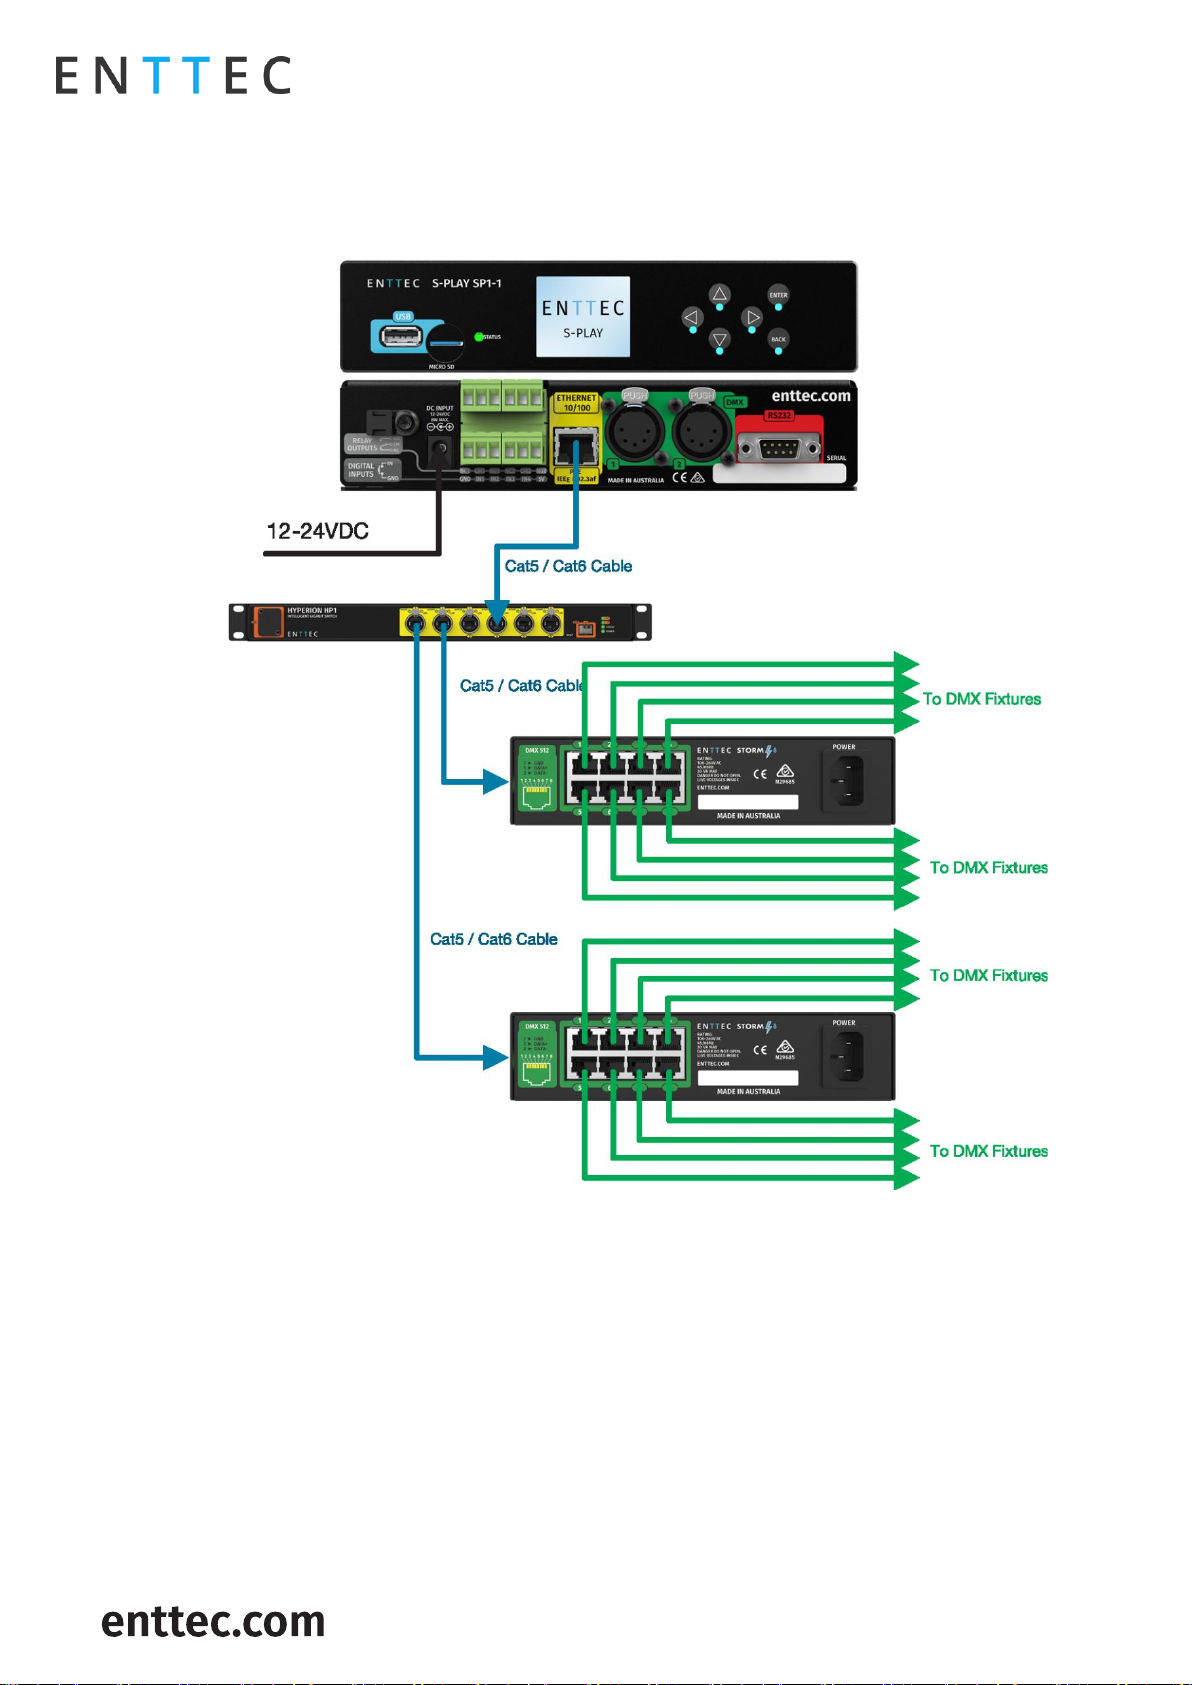
Wiring Diagrams
S-PLAY to distributed DMX Output
Page 9
S-PLAY (70092)
Visit the ENTTEC website for the latest version.
USER MANUAL
9 |
ID: 4686708
Document Updated: April 2021
S-PLAY to Playback to Pixel Systems
Page 10

S-PLAY (70092)
Visit the ENTTEC website for the latest version.
USER MANUAL
10 |
ID: 4686708
Document Updated: April 2021
S-PLAY Application Diagram
Connection to Relays
The S-PLAY features relays designed for use with low power devices and to provide switching logic for
higher power contactors.
To ensure a safe installation it is imperative that the power connected to the S-PLAY relays is within their
operating limits:
The S-PLAY’s relay specifications are as follows:
To calculate to total power your circuit will pass through the relay, multiply the circuit voltage by the current
you intend to pass through it. This value must be lower than 60w.
If your application requires mains power switching or high current applications, ENTTEC recommends the
use of a DMX switch pack controlled by the S-PLAY’s DMX output, or wire the S-PLAYs relay outputs to
connect to the primary coil of a DIN mount high powered relay or contactor.
Maximum Current Rating
2A
Maximum Voltage Rating
50V DC
Total switchable power of each S-PLAY relay
60W
Example 1
Example 2
Example 3
Current
1.2A
2A
2A
Voltage
50V
30V
50V
Maximum Power
60W
60W
100W
Page 11
S-PLAY (70092)
Visit the ENTTEC website for the latest version.
USER MANUAL
11 |
ID: 4686708
Document Updated: April 2021
Connection to Digital Inputs
The S-PLAY’s digital inputs detect circuit completion to the S-PLAYs ‘GND’ (V- terminal) to send triggers.
The maximum resistance of a cable that can be used to connect to a Digital Input to the S-PLAYs GND is
20 Ohms.
ENTTEC recommends a total maximum wire length of 100m. (50m total distance from the S-PLAY in a
loop).
The longer the cable, the higher it’s capacitance and likelihood of interference from EMF (Electro
Magnetic Interference).
To ensure a reliable trigger when creating a system, contact should be made for 3 seconds when
triggering a digital input.
Note: Always run digital input cabling away from mains power or high sources of EMI (i.e. air conditioning
units) to reduce interference.
If you require a remote input trigger further away from the S-PLAY than 50m, ENTTEC recommend the use
of a 3rd party GPIO interface that can communicate with the S-PLAYs other triggering methods over a
network.
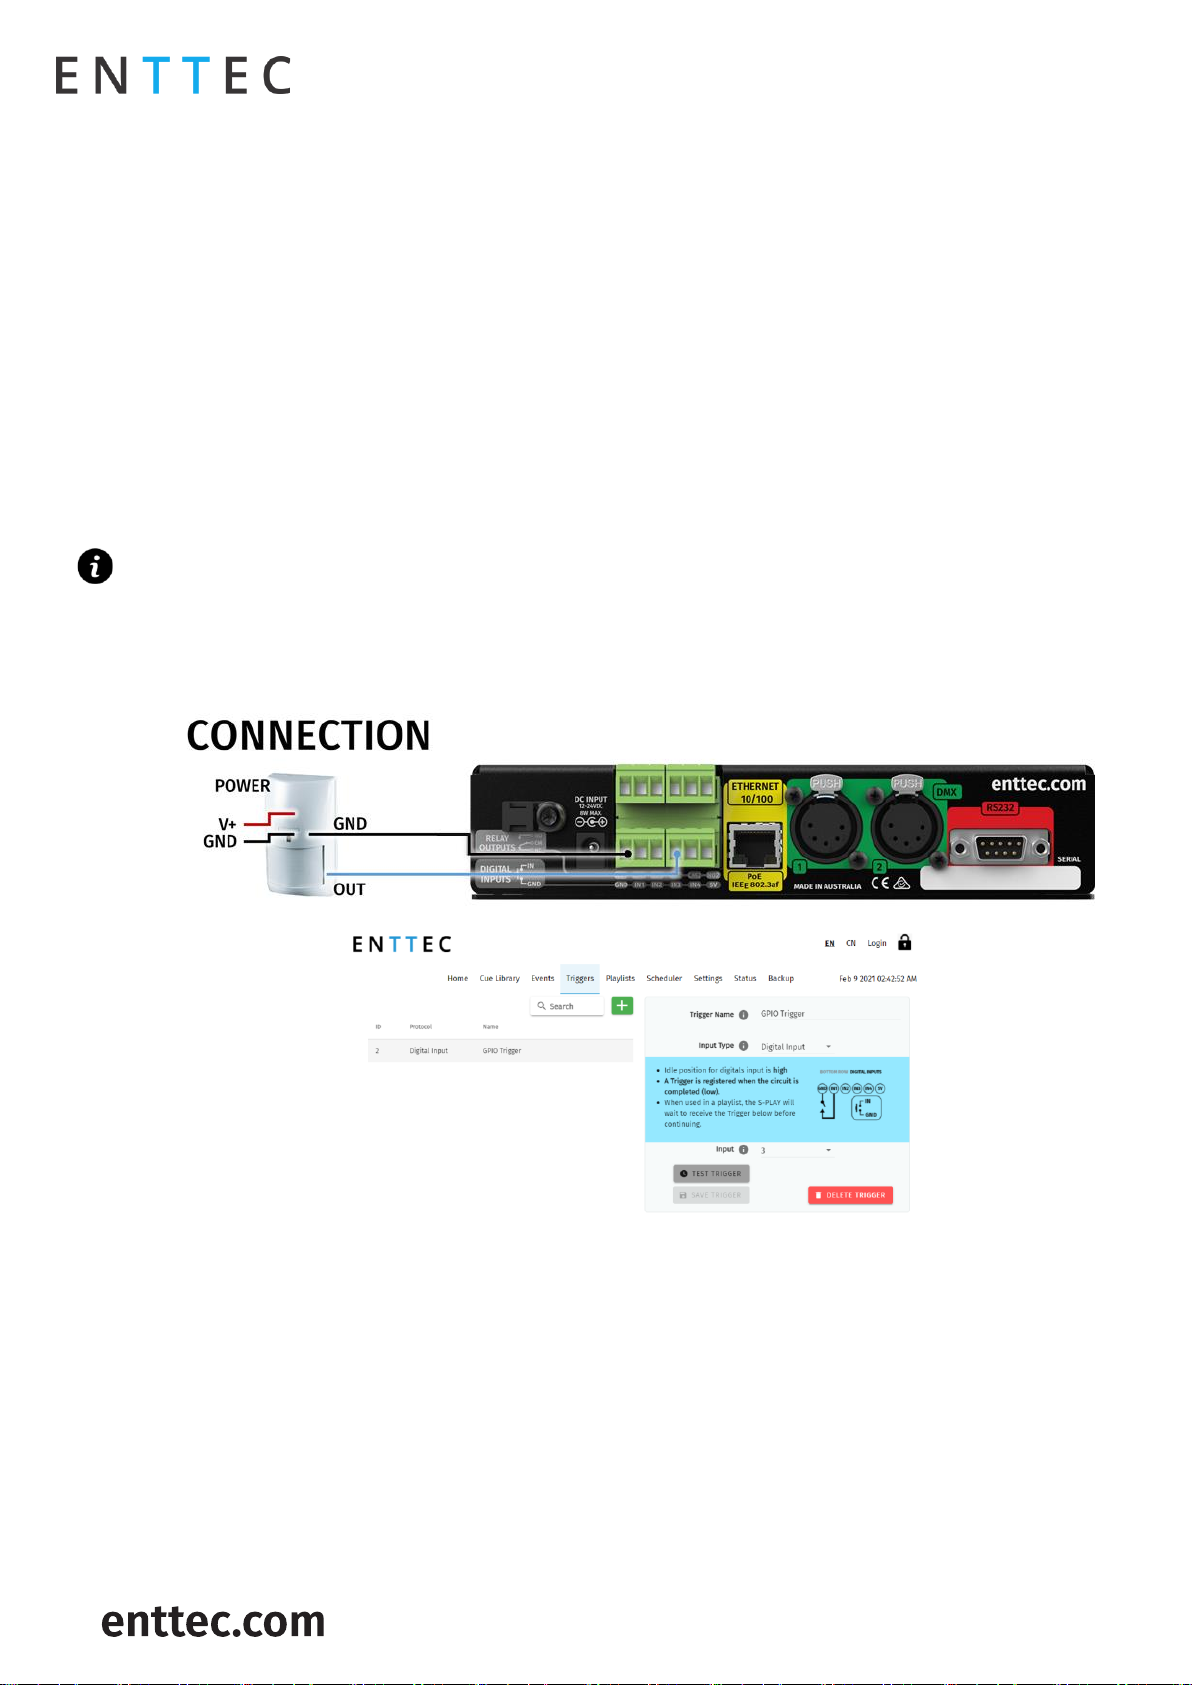
Using Motion Sensors with the S-PLAY
1. Connect a dry input from sensor to Port3 (or any other port), in the GPIO trigger connector in S-PLAY.
2. Connect 0V (GND) from the S-PLAY GPI through the connector in the S-PLAY.
3. Go to web interface:
Go to Triggers.
Create a new entry.
Select Digital Input from Type
Change to Port 3 in “Ports” (or to the corresponding port the OUT cable was connected to).
You can use the Test Trigger option to ensure functionality.
Click on Save Trigger for it to be saved ready for use on the Playlists page.
Page 12
S-PLAY (70092)
Visit the ENTTEC website for the latest version.
USER MANUAL
12 |
ID: 4686708
Document Updated: April 2021
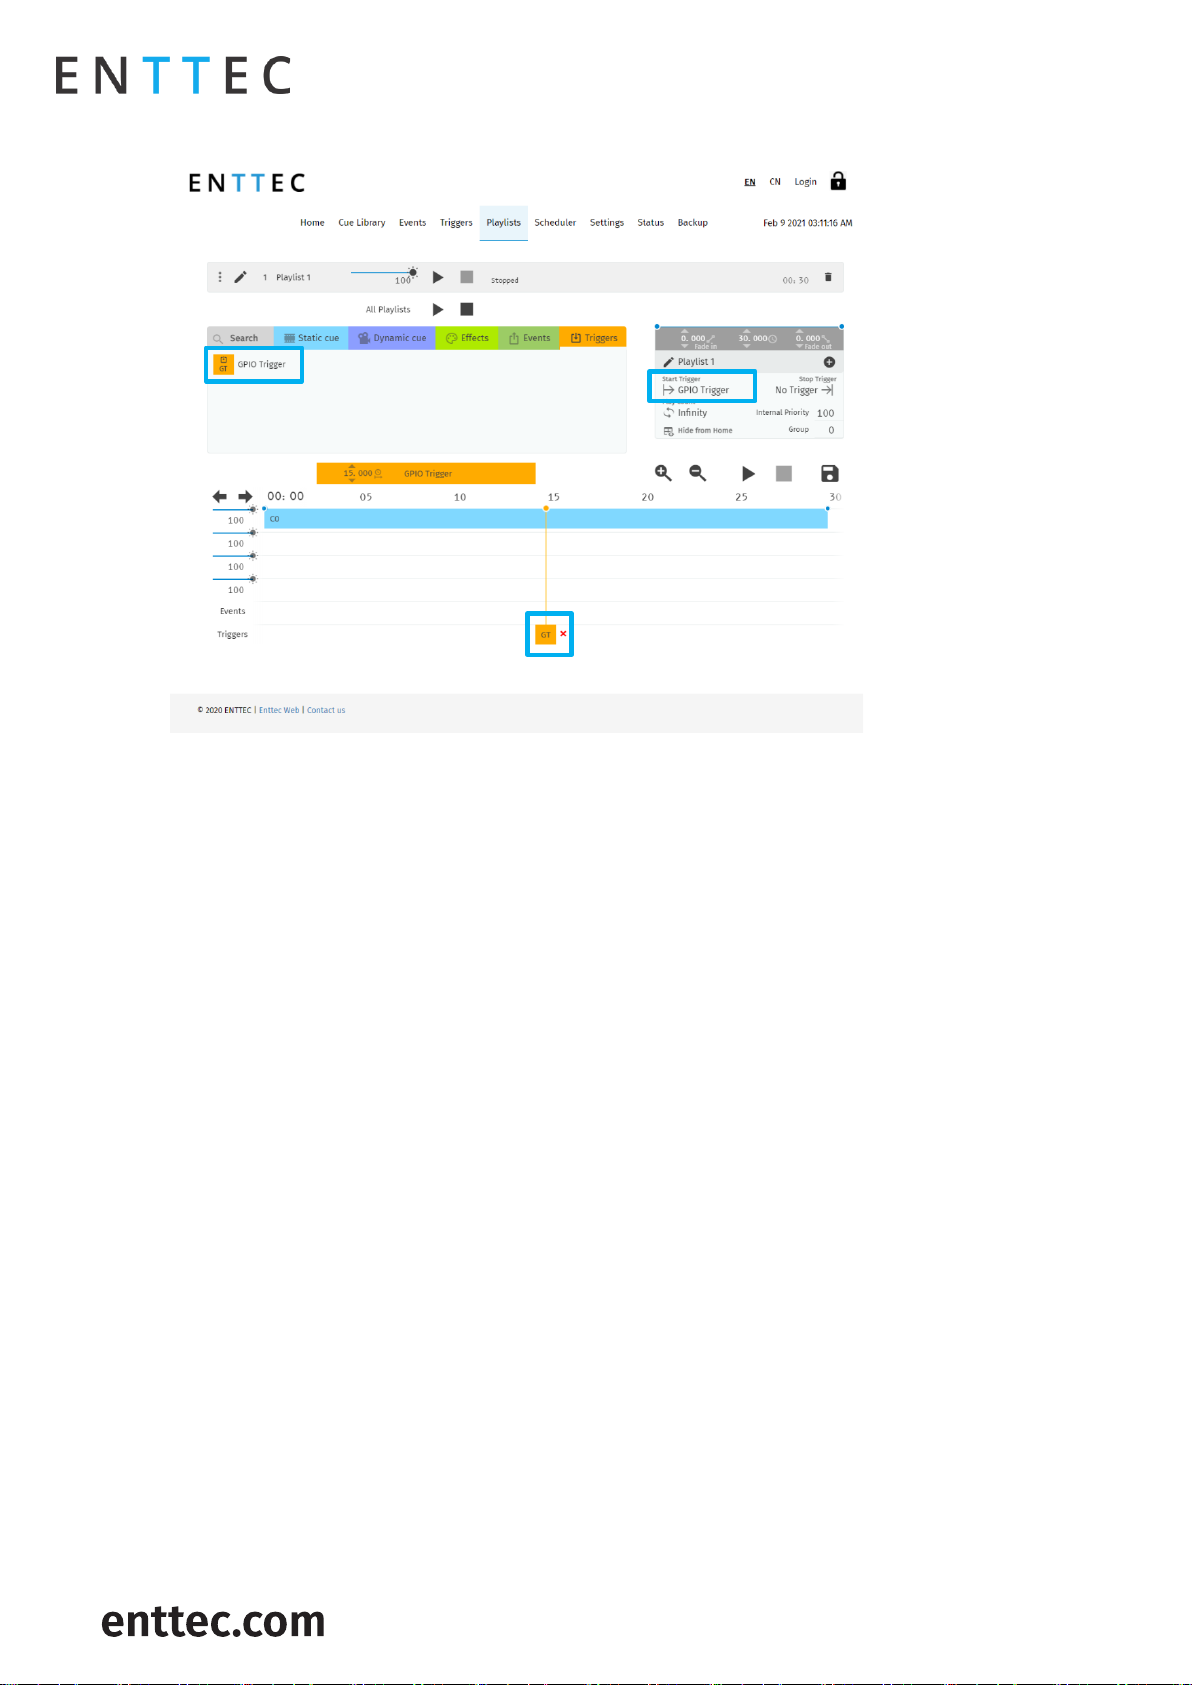
4. Navigate to the Playlists Page.
5. The Trigger can be selected as a ‘Start Trigger’ to commence playback of a certain playlist and/or dragged
onto the timeline to act as a condition that must be met for playback to continue.
Page 13

S-PLAY (70092)
Visit the ENTTEC website for the latest version.
USER MANUAL
13 |
ID: 4686708
Document Updated: April 2021
Functional features
Overview
Supports Physical DMX and eDMX over Network:
□ Art-Net
□ sACN
□ DMX512-A
2 Universe DMX output or input.
Up to 32 Universe Art-Net and sACN input or output.
Create / edit DMX Scenes (static cue).
Create / edit DMX Presets (dynamic cue).
Preview cues being created.
Monitor the DMX values of cues being made.
Configurable output refresh rate. (Max 60FPS eDMX, 44Hz Physical).
Make playlists from DMX Presets (dynamic cue).
Make live recordings using DMX/Art-Net/sACN.
Schedule playlists.
Map different streams and protocols to different ports.
HTP merge between cues and playlists.
Fade out on Stop command.
Hold last value on pause.
Remote trigger options: RS232, UDP, OSC, Digital Input (GPI), Art-Net, sACN and DMX.
HTTP and OSC Device API.
Lock out edit functionality using a password.
Page 14
S-PLAY (70092)
Visit the ENTTEC website for the latest version.
USER MANUAL
14 |
ID: 4686708
Document Updated: April 2021
Hardware features
Overview
1U height – Half width
Two bi-directional 5 Pin female DMX Ports
Colour TFT LCD screen (160x128)
Navigation LCD menu buttons
1 x USB Type A port
12 to 24v DC Input (8w max power draw) – Power supplies over 5A should not be connected to the S-
PLAY.
MicroSD card storage (Class 10 40/10 Mb/s Read/write performance)
100 Mbps Ethernet link featuring 802.3AF PoE
4 Digital Inputs (GPIO)
2 Relay outputs (NC, NO, COM)
Solid-state design
Page 15
S-PLAY (70092)
Visit the ENTTEC website for the latest version.
USER MANUAL
15 |
ID: 4686708
Document Updated: April 2021
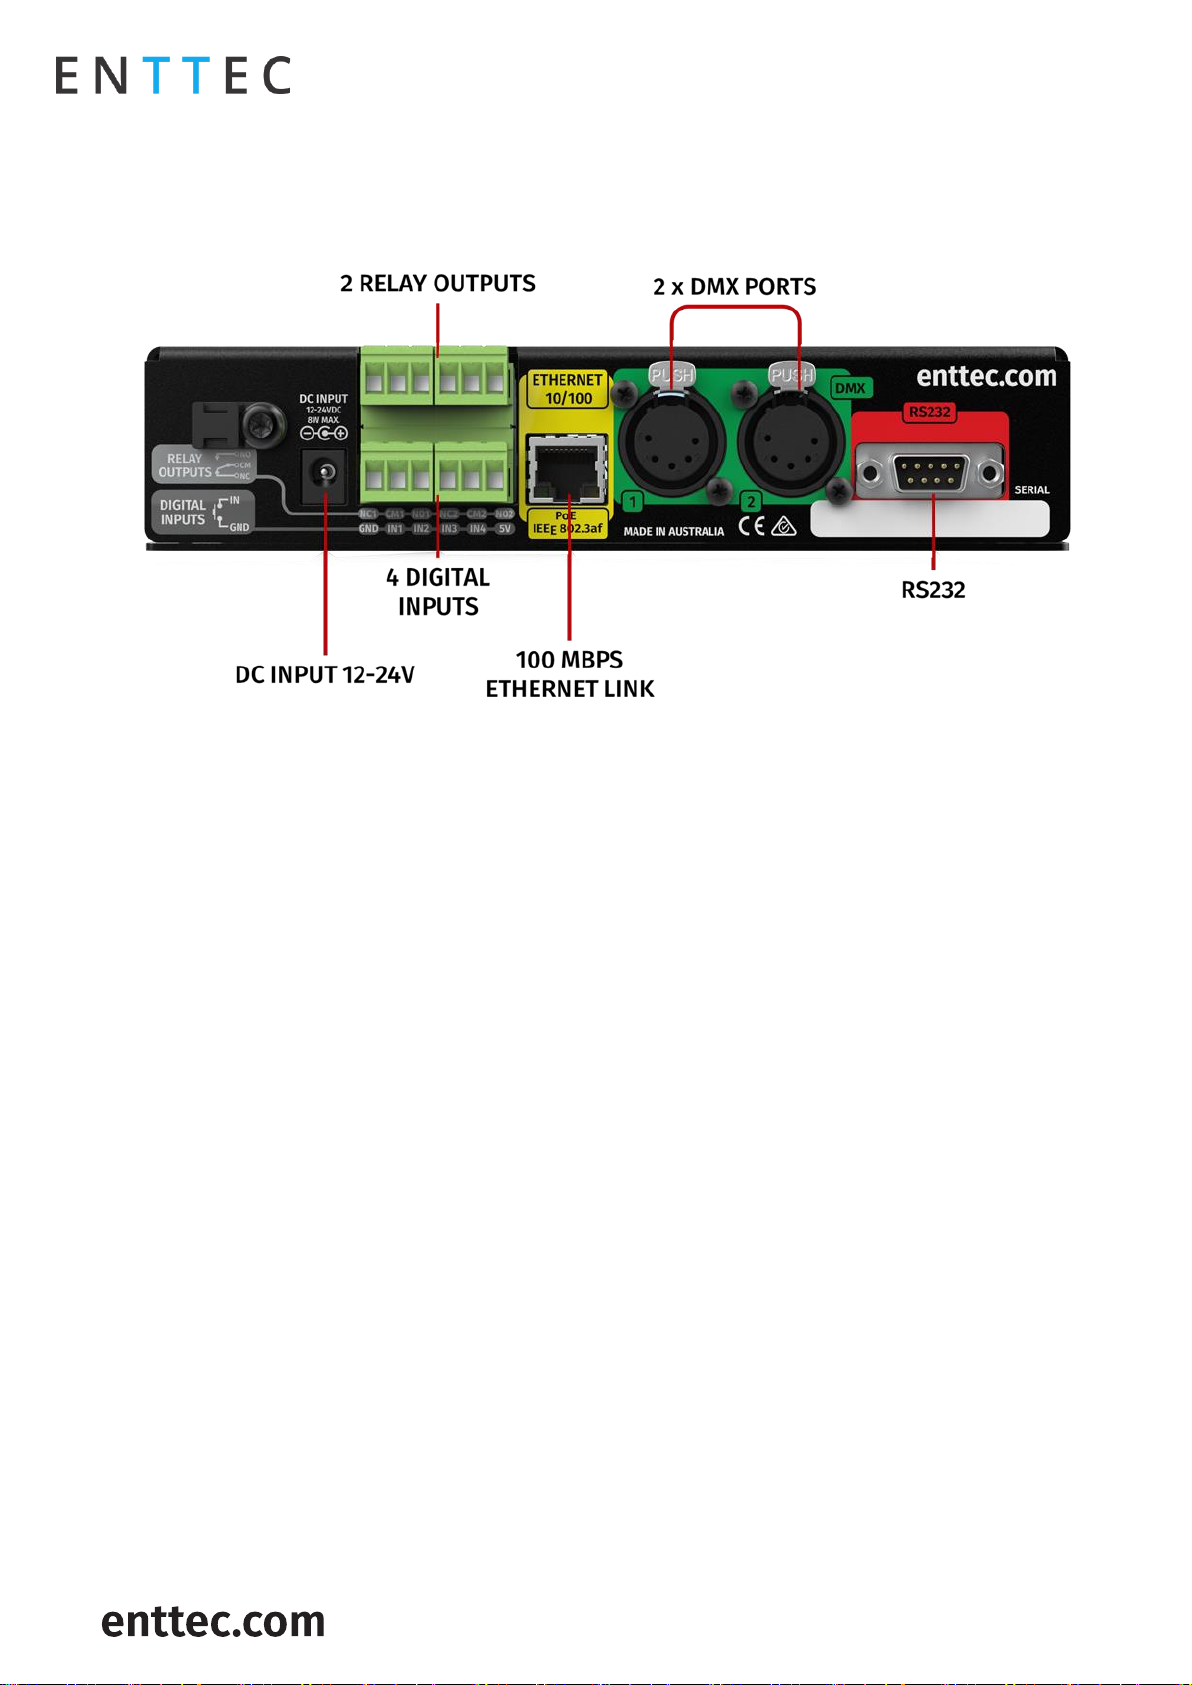
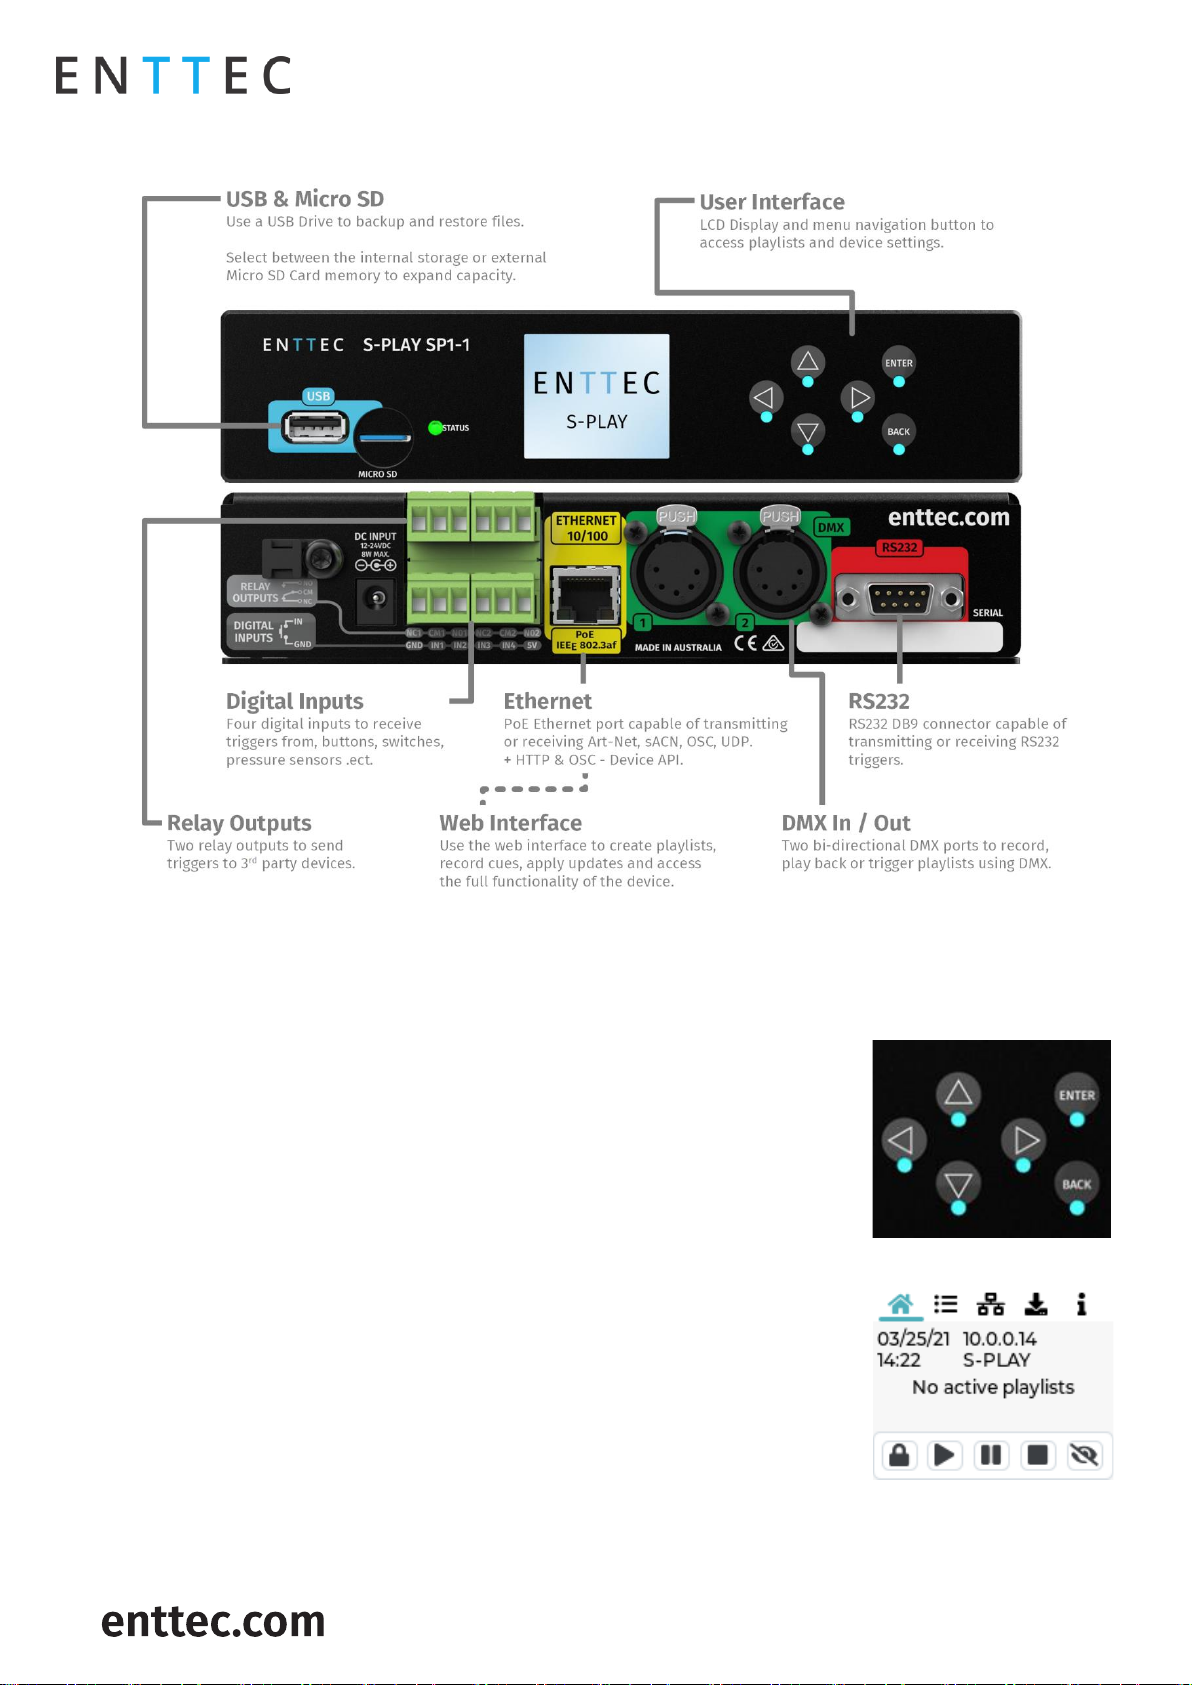
S-PLAY Connectivity
LCD Menu Screen
Controls
Direction arrows: Use to navigate around menu tabs and increase or
decrease the value in each field when selected. (i.e. IP address).
Back: Use to return to the main menu from a sub-menu.
Enter: Use to select and confirm actions within a menu or sub menu.
Home Screen
The Home Screen displays the following:
Current date and time
Device IP Address & Connection Status
Device Name
Playback state
Lock Screen
Play/Pause/Stop ALL
Enable/Disable LCD backlight
Page 16
S-PLAY (70092)
Visit the ENTTEC website for the latest version.
USER MANUAL
16 |
ID: 4686708
Document Updated: April 2021
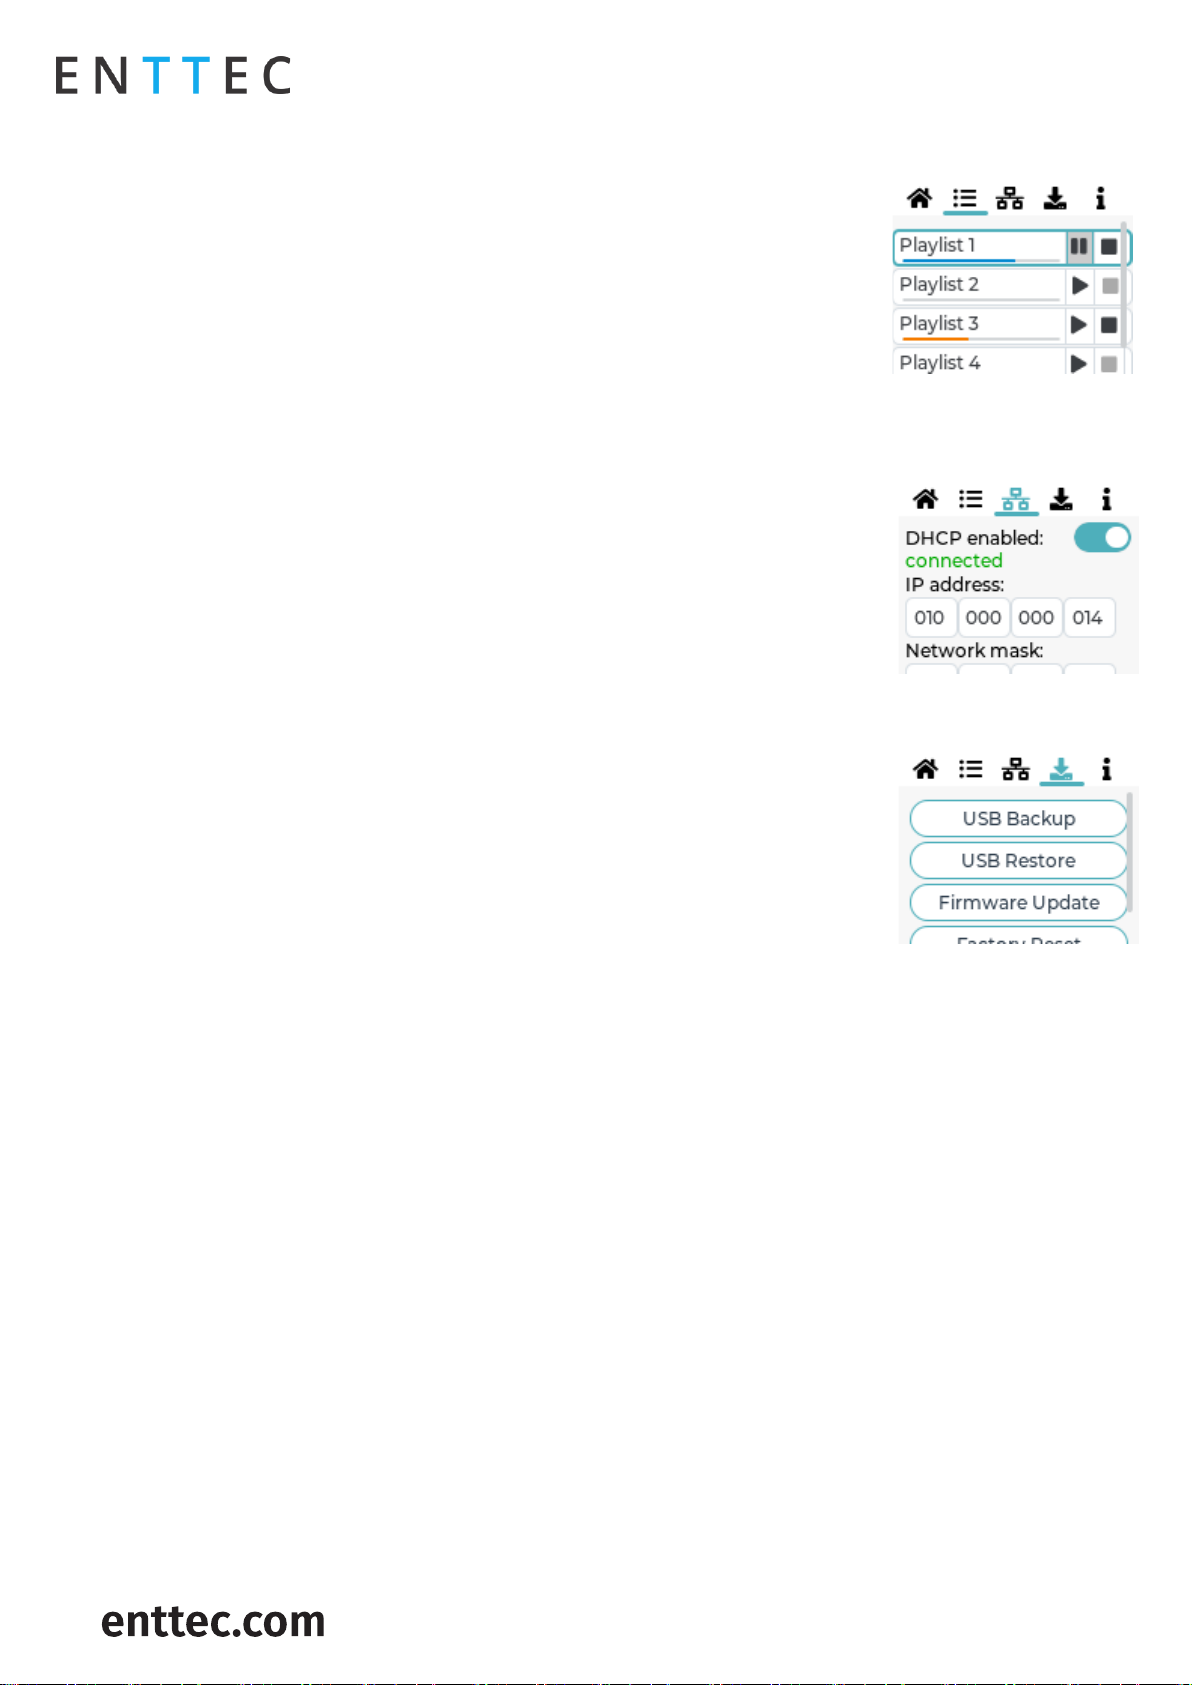
Playlist Menu
The Playlist Menu contains the following:
View all playlists on the S-PLAY.
Monitor playback status of all playlists.
Play, Pause and Stop each playlist.
Navigate up and down the page using the arrow keys. Press ‘enter’ to select a
playlist and once more to execute play / pause / stop commands.
Network Menu
The Network Menu allows:
DHCP to be Enabled / Disabled.
Network connection status to be monitored.
IP Address to be set.
Network Mask to be set.
Default Gateway to be set.
Utilities Menu
The Utilities menu allows:
USB Backups to be performed.
USB Backups to be restored.
USB Firmware update.
Reset to factory defaults (see section within this manual).
To create or restore a backup you must insert a USB thumb drive or SD card of 8GB capacity or more into
the S-PLAY and ensure it is named ‘backup.bak’.
The S-PLAY applies compression to all backup files. – If your S-PLAY contains large playlists and recordings
(up to 8GB in size) this process may take up to 20 minutes to complete.
When updating S-PLAY firmware using a USB thumb drive, copy the latest firmware file from the ENTTEC
website, onto the USB thumb drive and rename it to ‘firmware.bin’. Insert it into the S-PLAY and select
‘Firmware update’. Once the progress counter passes 70% the file has been copied across and validated.
Once the backup/restore process has been started, it’s possible to navigate away from the process whilst
it’s still active by pressing "enter". After this process is completed, a popup will appear showing a completion
message.
DO NOT remove the USB thumb drive whilst creating or restoring a backup.
Page 17

S-PLAY (70092)
Visit the ENTTEC website for the latest version.
USER MANUAL
17 |
ID: 4686708
Document Updated: April 2021
Information Menu
The Information menu allows:
The IP Address to be viewed.
Firmware Version information to be viewed.
CPU temperature.
Up time (how long the S-PLAY has been powered on for) to be monitored.
Device serial number to be viewed.
Out of the Box
Right out of the box, the S-PLAY is factory configured to:
DHCP – Allowing you to plug it directly into your existing router and it will receive a network address.
Output to DMX ports.
Update its internal clock based on the NTP server to update the date and time based on the selected
time zone.
To begin your installation please follow these steps:
Unpack the unit from the box. Inspect the S-PLAY for any damage that might have occurred in shipping
and verify that it looks to be in good condition before plugging it into power.
S-PLAY occupies a half width 1RU space, you will need to attach the mounting bracket kit included in
the box to use the S-PLAY within a half width rack.
Using a Cat5, Cat5e or Cat6 cable, connect the S-PLAY to an ethernet network.
If the unit is connected to a compatible PoE (IEEE 802.3aF) router or switch skip this step. Otherwise, use
the provided AC->DC power adapter to power up the unit by plugging it into your mains outlet and the
rear of the S-PLAY.
Once the unit is powered on, you will be able to see its IP address on the LCD display. The IP address
will be automatically assigned by the network, if connected to a DHCP network. If you are connected to
a static network, navigate to the devices settings to define a static IP address to allow you connect with
the unit's web interface.
Network Discovery
To configure your S-PLAY you will be required to use its web interface, to find your S-PLAYs IP Address you
can either:
View the S-PLAYs LCD
1. Ensure your S-PLAY is physically hooked up to your network (or WiFi router) using an ethernet cable –
DHCP is recommended for first time use.
2. Power up the device.
3. Monitor the LCD menu. The LCD will display the IP address in the LCD home page. If your S-PLAY’s LCD
shows ‘NO DHCP’ change it to have a static IP under the network tab S-PLAY is set to the correct IP
setting in the settings menu (either Static or DHCP) and power cycle the device.
4. Using a browser on a device within the same network range, type in the IP address shown on the LCD in
order to access the web interface to load the S-PLAY web interface. All configuration can be undertaken
using the devices web page.
Page 18
S-PLAY (70092)
Visit the ENTTEC website for the latest version.
USER MANUAL
18 |
ID: 4686708
Document Updated: April 2021
Finding an S-PLAY’s IP Address from NMU
ENTTEC provides free software (available for Windows and OSX) called Node Management Utility (NMU) that
find the S-PLAY and display its IP address.
Note: The S-PLAY is only supported in NMU v1.93 and above, using an older version will .
Please follow these steps:
1. Download NMU from www.enttec.com.
2. S-PLAY should be connected physically by an ethernet cable to the same physical network (or router) as
the computer on which you will run NMU.
3. Open NMU. If prompted to, select your computers network interface that your S-PLAY is connected to.
4. Press the Discovery button and wait until NMU finds all supported ENTTEC devices.
5. Once found, select ‘S-PLAY’ and press ‘Configure’ to be directed to your S-PLAYs Web interface.
Note: When the S-PLAY is set to a static IP, the default gateway MUST be the same for both the S-PLAY and
your computer for NMU to discover the S-PLAY.
Changing the Network Settings
Changing the Network Settings Using LCD Interface
1. Use the up or down navigation buttons located next to the screen to move to the Network tab.
2. Toggle between DHCP and Static by pressing enter to change options.
3. Press the Enter button to select each field and confirm each field of the IP address.
4. Use the arrows to assign a value for each byte in IP; press on the right-left arrow to move in increments
of 10, or use the up-down arrow to move in increments of one.
5. Once the desired IP is set, press enter button to move to Netmask settings.
6. Use the arrows to navigate to the SET button and press Enter.
7. All network settings assigned will get saved once the OK button is selected.
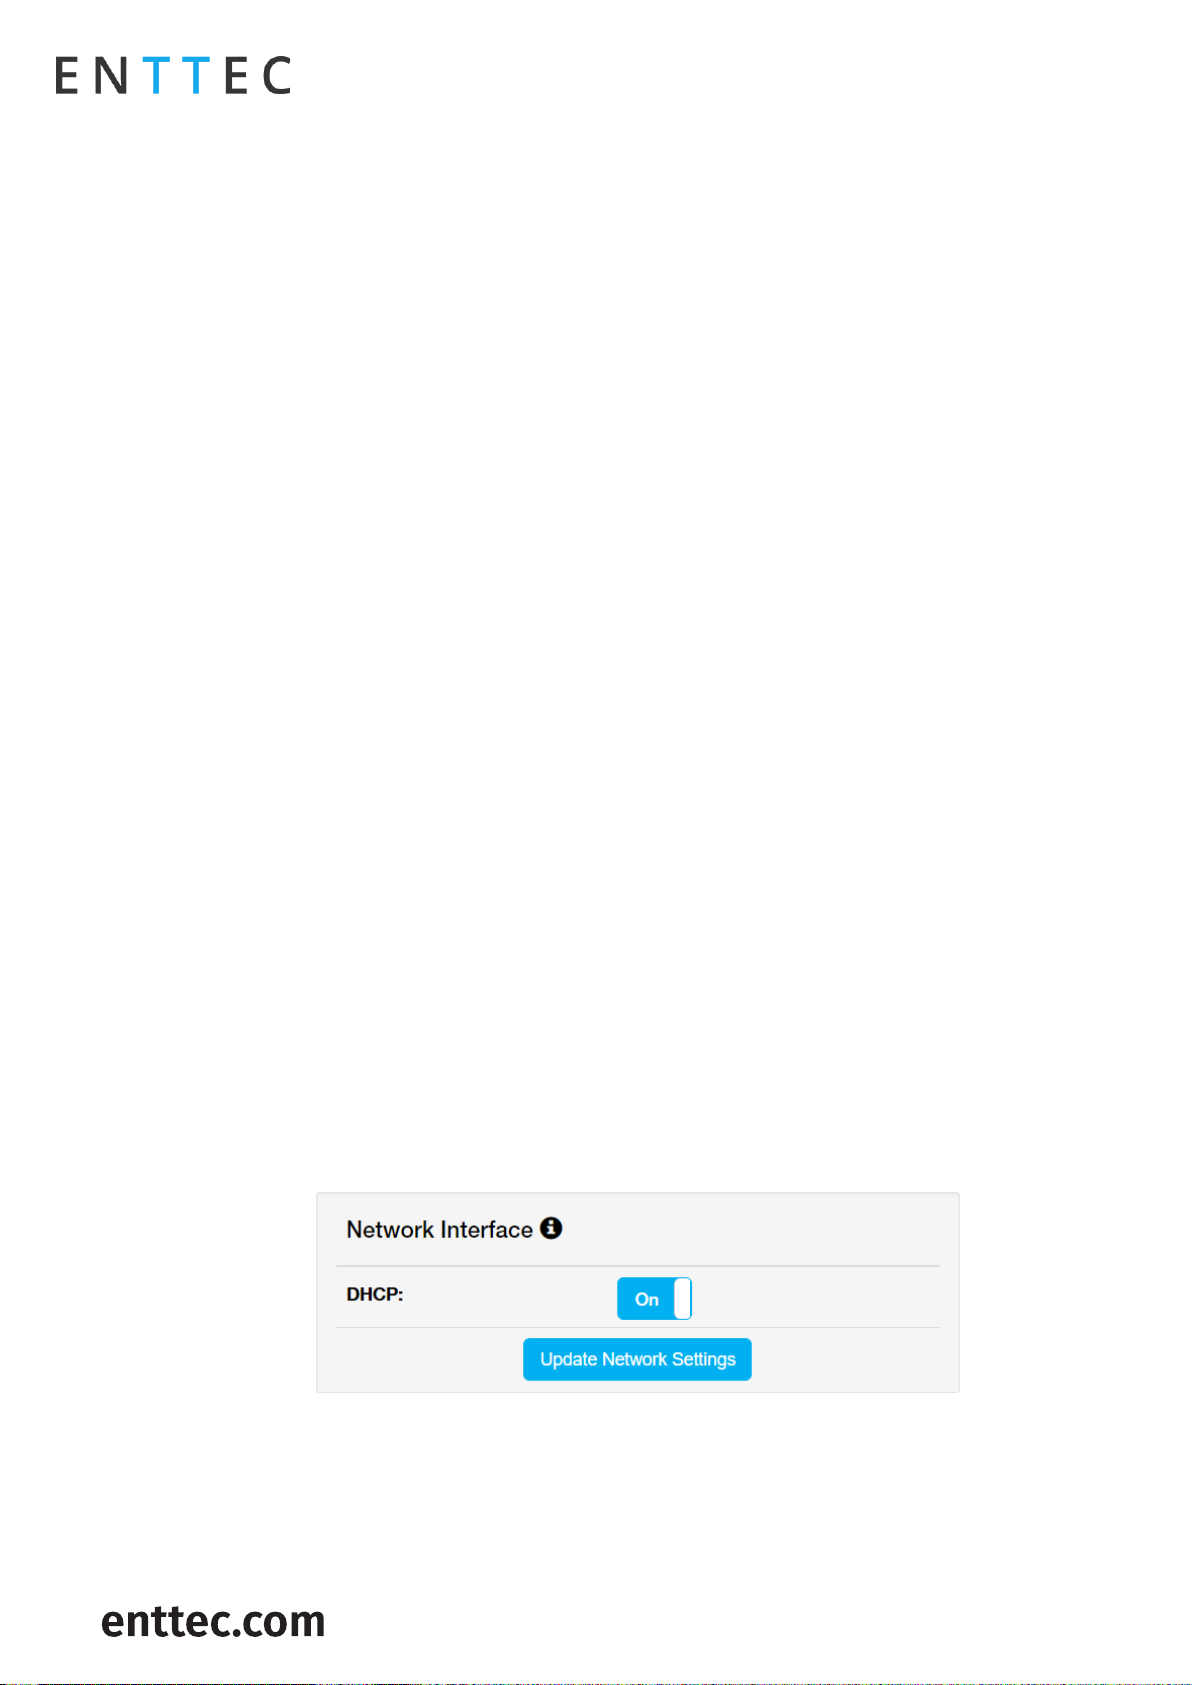
Change IP Using the Web Interface
Change the Network settings between DHCP and Static IP, Netmask and Gateway.
After modifying an IP address, it is good practice to power cycle the S-PLAY device.
Page 19

S-PLAY (70092)
Visit the ENTTEC website for the latest version.
USER MANUAL
19 |
ID: 4686708
Document Updated: April 2021
Page 20

S-PLAY (70092)
Visit the ENTTEC website for the latest version.
USER MANUAL
20 |
ID: 4686708
Document Updated: April 2021
Web interface
The S-PLAY can be configured and controlled through a web browser on a computer, located on the same
Local Area Network (LAN) as the device. Either click on the ‘configure button within in NMU or type the IP
address (as detected by NMU e.g. 10.10.3.156) into your web browser to access the web interface.
The S-PLAYs web interface consists of the following pages:
Home
The home page presents playlists and schedules to give an overview of all playback on the S-PLAY. This
page is the default landing page of the S-PLAY,
When used in combination with the lock function, the homepage can be used to present end users of the
system a page to view all playlists and schedules:
Playlists:
Play, Pause, Stop, Intensity, Progress.
Schedules:
Activate and Pause schedules
Note: Specific playlists can be hidden from the home page by selecting the ‘Hide from
Home’ option when editing each playlist on the playlist page.
Cue Library
The Cue Library page allows:
Cues to be created, configured, edited and recorded before building into a playlist.
Cues to be previewed.
The S-PLAY’s cue library is based around three key types of cue that can be created by using the green
icon:
Page 21

S-PLAY (70092)
Visit the ENTTEC website for the latest version.
USER MANUAL
21 |
ID: 4686708
Document Updated: April 2021
Static Scene is a single frame of between 1 -> 32 universes that can contain user defined DMX values or
a snapshot of an incoming DMX frame (or mix of the two) that can be built into a playlist captured at a
given time instance.
Dynamic Recording is a recording of up to 32 universes of lighting control data. The S-PLAY provides
various methods to allow a perfect loop to be achieved when recording over a user defined time period.
An Effect cue is a cue type capable of creating internal effects from within the S-PLAY without requiring
a DMX source (i.e. rainbow).
Once a cue is selected to be edited, the S-PLAY will internally trigger the Stop All command internally to
stop all playback on the S-PLAY to stop overlapping.
Static Scenes
When creating a Static Scene, press the green icon and select Static Scene as the cue type:
1. Provide a cue name to aid identification.
2. Set the cue type to ‘Static Scene’.
3. Press the ‘Edit Scene’ button to open the editor window.
This window will allow values to be manually set or a snapshot to be taken of a live Art-Net / sACN /
physical DMX input. Once this is taken the S-PLAY will populate the grid with DMX values that can be edited
with the inbuilt tools. Alternatively, use the inbuilt tools to create a look from the S-Play natively.
Page 22

S-PLAY (70092)
Visit the ENTTEC website for the latest version.
USER MANUAL
22 |
ID: 4686708
Document Updated: April 2021
DMX Snapshot
To capture a DMX Snapshot, define the protocol and external universes you want to take the snapshot from
(set all external universes to be identical if you want to mirror the same external Art-Net / sACN snapshot
to all internal universes). By selecting one from the coloured menu of universes.
It’s possible to record the following number of channels for each protocol:
DMX (up to 2 Universes / 1024 Channels).
Art-Net (up to 32 Universes / 16,384 Channels).
sACN (up to 32 Universes / 16,384 Channels).
Once the option for capturing is selected (either manually defined or a live snapshot), press on the ‘DMX
Snapshot’ button to take a snapshot of your input.
Cue Creation
Values can be modified and previewed with or without a DMX snapshot.
Use the S-PLAY’s inbuilt editor to create looks and define DMX values manually using per channel values,
the colour picker relevant to the fixture type by pressing ‘SET DMX’.
Note: Values are applied to all selected S-Play universes when ‘SET DMX’ is pressed.
Toggle All Inputs: Selects / Deselects all input universes.
Preview: Observe the contents of the Cue. This will stop all other S-Play playbacks.
Stop Preview: Stop output of captured data through DMX ports.
Save Scene: Used to save the cue.
Close: Close edit window without saving.
Page 23

S-PLAY (70092)
Visit the ENTTEC website for the latest version.
USER MANUAL
23 |
ID: 4686708
Document Updated: April 2021
Dynamic Recordings
Dynamic Recordings allow DMX/ Art-Net/ sACN streams to be recorded and integrated into a show. To create
a new Dynamic Cue
To create a new Dynamic Cue
Cues, select any cue in the library as shown in the image below.
When creating a Static Scene, press the green icon and select Static
Scene as the cue type:
1. Provide a cue name to aid identification.
2. Set the cue type to ‘Dynamic Cue’.
3. Define a Recording Control to stop and start the recording.
4. Press the ‘Edit Scene’ button to open the editor window.
Recording Pointers:
During Art-Net or sACN recording if using the ‘live preview’ function, ensure that no other active Art-
Net/sACN device is outputting on the same universes as being recorded to (including the S-PLAY). This will
eliminate the chance of interference loopback that can lead to jumpy or incorrect recordings. – To modify
your S-PLAYs output settings navigate to the Settings page.
When recording using the physical DMX ports, ensure the DMX ports are not already configured to be
outputs on the Settings page. – If a DMX port is configured to be an output it will be unable to receive data.
Dynamic Recording Control
1. Enter a cue name to aid identification.
2. Select Dynamic Cue as the cue type.
3. Select ‘Manually’ or choose a triggering option to start and stop the ‘Rec. Control’ dropdown.
4. Press the Edit Record button.
5. Select one of the following options for data capture:
a. DMX (up to 2 Universes / 1024 Channels)
b. Art-Net (up to 32 Universes / 16,384 Channels)
c. sACN (up to 32 Universes / 16,384 Channels)
6. Specify the universes and channel range for capturing data by toggling the checkboxes and modifying
the input universe fields.
7. To send data being recorded to your fixtures to your outputs defined on the
Settings page, toggle ‘Live Preview’ on.
8. If recording looped content toggle ’Perfect Loop’ on for the S-Play to stop
recording when it detects a loop.
9. Once the option for capturing is selected, press on the start rec button to start the recording or prime
the S-Play ready to receive the start trigger if one was defined.
- The timer in the top right of the window will start running as soon as data begins to be
captured.
The DMX values captured will be shown for their corresponding universes.
Page 24

S-PLAY (70092)
Visit the ENTTEC website for the latest version.
USER MANUAL
24 |
ID: 4686708
Document Updated: April 2021
Effects
1. A slot from the Cue Library.
2. Provide cue name to aid identification.
3. Select Effect from the Cue Type dropdown.
4. Press the Edit Effect button.
5. Configure your desired effects using the onboard parameters. – The S-PLAYs colour effects have been
primarily designed around LED and RGBW fixtures.
6. Effects are applied on a per universe basis and do not cascade across multiple. – Select each S-PLAY
universe that you wish to apply the effect to.
7. After the parameters have been set, the S-PLAY allows effects to be previewed using the Preview button.
8. Once happy with the effect created this can be saved to the S-PLAYs memory.
Preview Cue
Select a Cue within the Cue Library and enter edit mode.
Click Preview Cue.
The Cue is previewed on the selected output ports as defined within the S-PLAY’s Settings page.
When previewing a cue, be sure to stop the preview when done.
Editing a Cue, Effect or Dynamic Recording
After a cue has been created, the option to edit it is available when selecting the cue in the Cue Library,
please note this directly overwrites the full universe values received and extends the length of the cue if
necessary.
If you wish to subtract elements from a static scene, effect or dynamic recording (i.e. remove universes or
individual channels from the recording, shorten the length of a dynamic cue), this cannot be done using
the edit function. Clear the scene and start again with a new cue.
Page 25

S-PLAY (70092)
Visit the ENTTEC website for the latest version.
USER MANUAL
25 |
ID: 4686708
Document Updated: April 2021
Events
The Events page allows:
Create custom Relay, UDP, OSC, RS232, DMX, Art-Net and sACN Events, ready to be embedded in playlists.
Editing, testing and deletion of Events.
Use events to allow integration between S-PLAY and other devices. The S-PLAY can send commands over
multiple protocols and interact with Relays.
RS232
An RS232 Event will send the user defined RS232 command, when activated.
RS232 strings ending in \r – the \r will be replaced by a
carriage return.
RS232 strings ending in \n – the \n will be replaced by a
line feed.
Make sure the receiver has the correct communication setup:
Baud rate: 9600
Data: 8bit
Parity: None
Stop: 1bit
Flow Control: none
Note: ASCII Command text limited to 1024 Characters.
UDP
A UDP Event will send the command defined below when
activated.
Commands are limited to 1024 characters.
UDP strings ending in \r – the \r will be replaced by a
carriage return.
UDP strings ending in \n – the \n will be replaced by a line
feed.
Page 26

S-PLAY (70092)
Visit the ENTTEC website for the latest version.
USER MANUAL
26 |
ID: 4686708
Document Updated: April 2021
OSC
When activated, this Event will send the OSC data defined in the settings.
OSC Strings, Floats and Integers can be defined.
All OSC address must start with a leading ‘/’ sign.
Relay
Control the relay action.
NO: Normally Open
NC: Normally Closed
When activated in a playlist the Relay will perform the selected
action.
Note: On system power-up, the Relays position is set to be
normally open.
Art-Net
When activated, this Event will send the Art-Net channel
defined in the settings defined.
For best practice, do not overlap Events with universes used
for playback of recordings.
Page 27

S-PLAY (70092)
Visit the ENTTEC website for the latest version.
USER MANUAL
27 |
ID: 4686708
Document Updated: April 2021
sACN
When activated, this Event will send the sACN channel defined
in the settings.
For best practice, do not overlap Events with universes used
for playback of recordings.
DMX
When activated, this Event will send the DMX channel defined in
the settings.
For best practice, do not overlap Events with universes used
for playback of recordings.
Page 28

S-PLAY (70092)
Visit the ENTTEC website for the latest version.
USER MANUAL
28 |
ID: 4686708
Document Updated: April 2021
Triggers
The Triggers page allows:
Create custom Digital input, UDP, OSC, RS232, DMX, Art-Net and sACN Triggers, ready to be embedded in
or trigger playlists.
Editing, testing and deletion of Triggers.
Use triggers to take control of the timeline of the playlist. When using a trigger, the timeline will pause until
the selected trigger is active.
Triggers can be used to start a playlist or at any point within the timeline.
When a playlist is waiting for a trigger, it will play by either activating the trigger or by pressing play. This
way there is full control of the playback even when the triggers are not available.
When creating new triggers, the ‘Test Trigger’ option can be used to send the trigger being created.
RS232
RS232 communication settings:
Baud Rate: 9600
Data: 8bits
Parity: none
Stop: 1bit
Flow Control: None
Note: Each command string is limited to 1024 Characters.
Page 29

S-PLAY (70092)
Visit the ENTTEC website for the latest version.
USER MANUAL
29 |
ID: 4686708
Document Updated: April 2021
UDP
UDP communication settings:
A Trigger will be activated when an incoming UDP command
matches the one defined below.
When used in a playlist, the S-PLAY will wait to receive the
Trigger below before continuing.
To define a UDP input port navigate to your S-PLAY’s
Settings page.
UDP strings ending in: \r – the \r will be replaced by a
carriage return. \n – the \n will be replaced by a line feed.
OSC
The S-PLAY can receive OSC through two key methods:
1. Triggers that can be created to start and resume playlists.
A Trigger will be activated when an incoming command
matches the user defined Trigger string.
The command must be received upon the port defined
within the settings page (default 8000).
All OSC commands must start with a leading '/' sign.
When used in a playlist, the S-PLAY will wait to receive
the Trigger below before continuing.
2. Integration with the S-PLAYs OSC API to enable control of:
Master intensity
Play, pause and stop all playlists
Play, pause and stop individual playlists
Per-PLAYlist intensity control
Visit www.enttec.com to download a copy of the OSC API.
Digital Input
S-PLAY has 4 Digital input ports to activate triggers.
Idle position for digitals input is high.
A Trigger is registered when the circuit is completed (low).
When used in a playlist, the S-PLAY will wait to receive the
Trigger below before continuing.
If the input remains on low position while the timeline goes
over the trigger, the playlist won't pause.
Use Digital inputs with sensors, pressure pads, wall switches,
etc.
Page 30

S-PLAY (70092)
Visit the ENTTEC website for the latest version.
USER MANUAL
30 |
ID: 4686708
Document Updated: April 2021
Art-Net
An Art-Net trigger can be unicast or broadcast to the S-PLAY.
The Trigger will be activated, when the incoming value is
equal or greater than the Art-Net channel parameters
defined.
To avoid clashes do not use a universe assigned for
Recording/Playback.
When used in a playlist, the S-PLAY will wait to receive the
Trigger below before continuing.
sACN
The Trigger will be activated, when the incoming value is
matched to the sACN channel parameters defined.
To avoid clashes do not use a universe assigned for
Recording/Playback.
When used in a playlist, the S-PLAY will wait to receive the
Trigger below before continuing.
DMX
The Trigger will be activated, when the incoming value is
matched to the DMX settings defined.
To avoid clashes do not use a universe assigned for
Recording/Playback.
When used in a playlist, the S-PLAY will wait to receive the
Trigger below before continuing.
Note: If DMX is selected as output protocol in the setting page,
the DMX triggers will be disabled in the playlist.
Page 31

S-PLAY (70092)
Visit the ENTTEC website for the latest version.
USER MANUAL
31 |
ID: 4686708
Document Updated: April 2021
Playlists
The Playlists page is where playlists can be created by combining Cues, Events and Triggers onto the
timeline. Using the tools made available it is possible to:
Create, Edit, Rename and Delete Playlists.
Access to all Playlists.
Play, Pause and Stop Playlists.
Re-order Playlists.
Hide certain playlists from the home page.
Define loops.
Define fade time.
Define start and stop triggers or to start from start up.
The playlist page allows the user to add multiple cues (static or dynamic), events and triggers in a sequence
to be stored and played back at any given point.
Page 32

S-PLAY (70092)
Visit the ENTTEC website for the latest version.
USER MANUAL
32 |
ID: 4686708
Document Updated: April 2021
Playlists Page Layout
The playlists page is comprised of 9 key elements:
A. Created Playlists (all playlists are shown here)
B. Global Playlist Control
C. Search and Filter Bar
D. Attribute Library
E. E. Playlist Attributes
F. Timeline Navigation
G. Media Track Timelines
H. Event Track
I. Trigger Track
Created Playlists
This section lists all the playlist created. The section displays basic information like the playlist name and
duration and gives basic control over a playlist.
F
E
G
H
I
D C B
A
Page 33

S-PLAY (70092)
Visit the ENTTEC website for the latest version.
USER MANUAL
33 |
ID: 4686708
Document Updated: April 2021
Reorder: Drag and drop the playlist from the three dots rearranging your playlist (this will be reflected on
the Home Page).
Edit: Loads the playlist in the timeline and media tracks for editing
Name: Displays the ID (set internally) and name of the playlist set in the Playlist Attribute section.
Intensity: real-time control of the master intensity of the playlist. By default, it is set to 100% and it can be
changed when the playlist is playing.
Control - Play: Play the selected playlist, also the Playlist is loaded into the timeline and media track
section.
Control - Pause: Pause the selected playlist. By pausing a playlist, S-PLAY holds the las DMX value.
Control - Stop: Stops the selected playlist. By stopping a playlist, S-PLAY stops outputting any data (set
DMX value t 0).
Status: Shows the status of the playlist. It can be: Playing, Paused, Stopped, Waiting for Trigger.
Timeline and Duration: Shows the playback state of each playlist. Once the playlist has completed playing,
it stops outputting data. Opacity of this bar matches the playlist intensity.
Delete: Deletes the playlist and schedules where the playlist is used in
Global Playlist Control
Gives control over all playlists. When pressing play on the global control, all the playlists start playing. If
there are conflicts in channels, the values are merged on a Highest Takes Precedence (HTP) basis.
Search and Filter Bar
This box contains all Cues Events and Triggers Stored on the S-PLAY. To create a new Playlist, select "Create
New Playlist" from the list. This entry will always be the first entry of the menu.
Available Cues and Controls
Lists all the media that can be used in the playlist. It is categorized by Static Cues, Dynamic Cues, Effects,
Events and Triggers.
To use any media, drag and drop the desired cue into any of the media tracks. Please note that triggers and
events have dedicated tracks.
Playlist Attributes
EDIT
RE-ORDER
INTENSITY
NAME
CONTROL
DURATION
STATUS
TIMELINE
DELETE
Page 34

S-PLAY (70092)
Visit the ENTTEC website for the latest version.
USER MANUAL
34 |
ID: 4686708
Document Updated: April 2021
Name: Set the name of the playlist.
Internal Priority: When playing multiple playlists, for any conflict between channels, the playlist with higher
priority will drive the output. If the playlist has the same priority the channels will merge following HTP
(Highest takes precedence) method.
Loop: Determine the number of times that the playlist will play until it stops
Group: Define a group of playlists to override the output. Groups with the highest hierarchy drive the S-
PLAY’s output when the groups of the same number have universe conflicts the S-PLAY references Internal
Priority.
Start Trigger: A list of triggers set in Triggers page, except "On Power Up" which triggers playlist right after
Splay is powered on. These triggers are used to start the playlist. To use this feature, select a Trigger from
the dropdown menu; the Playlist will play by either pressing play or activating the trigger.
Stop Trigger: A list of Triggers set in Triggers page. These triggers are used to stop the playlist. To use this
feature, select a Trigger from the dropdown menu; the Playlist will stop when the trigger conditions are
met.
Fade: Set the fade in and fade out time for a cue. It will go from 0 to max intensity in the set period.
FADE IN TIME
FADE OUT TIME
FADE HANDLE
DURATION
FADE HANDLE
Page 35

S-PLAY (70092)
Visit the ENTTEC website for the latest version.
USER MANUAL
35 |
ID: 4686708
Document Updated: April 2021
Playlist Settings
Cue Options: Options for any cue added into the cue track. The cue options are also active when a cue in
the cue track is selected.
Zoom: Zoom In and Out using the magnifying glass with the plus and minus symbol. Note that when you
zoom in/out, the values in the timeline change and the size of the cue boxes change.
Control: Gives navigation and playback over the playlist loaded in the Playlist Editor.
Save: Saves any change on the Playlist. S-PLAY will ask to save any change before playing a Playlist.
Timeline navigation: Navigate back and forward between timelines using this option. Drag the timeline to
navigate back and forward.
Playlist Timeline and Media Tracks
S-PLAY has 4 different cue tracks where any cue from the playlist media section can be dragged on.
Intensity: Each track has its own intensity and it affects all the media on the same level.
Cue tracks: Drag and drop media to this section. To remove a cue from the tracks, select the cue and click
on the red x next to the right edge of the box.
When playing multiple media at the same time. i.e. 2 cues on 2 different tracks, S-PLAY will use HTP (Highest
value Takes Priority) merging.
TIMELINE
NAVIGATION
ZOOM
SAVE
CONTROL
CUE OPTIONS
CUE
TRACK
Page 36

S-PLAY (70092)
Visit the ENTTEC website for the latest version.
USER MANUAL
36 |
ID: 4686708
Document Updated: April 2021
Event and Trigger Tracks
These tracks are reserved for events and triggers respectively. The vertical line shows the exact moment
playlist will pause to wait for the trigger to be active, or the playlist executes the event. When using triggers,
the playlist pauses and holds the last value on the output. To continue, activate the selected trigger or
press play again.
Example Playlist
This example is showing a playlist named "Playlist 1" that will start on power up and will loop until manually
stopped (Play Count: Infinity).
The effect cue "Cue 001" will play while sending an RS232 Event. By second 5 the playlist will pause and wait
for the Digital input trigger to be sent before the effect will continue playing will continue playing. The
playlist will then continue sending Events and waiting for triggers. At second 30 it will loop back sending
the first RS232 Event out.
Page 37

S-PLAY (70092)
Visit the ENTTEC website for the latest version.
USER MANUAL
37 |
ID: 4686708
Document Updated: April 2021
Scheduler
The scheduler page allows the user to:
Access all schedules
Play and pause schedules
Monitor status of the schedule
Create and edit schedules
To set up a schedule you need to create a playlist first. The scheduler will play the playlist at a set time
until the end condition is met. i.e. PlaylistA can be played every day on sunset from the 1st of February until
the last Friday of October.
The playlists played by the scheduler will play after the current playlist is met. For example, in the previous
example, if the S-Play is playing PlaylistB right before sunset, S-PLAY will wait for PlaylistB to complete
before playing PlaylistA set in the scheduler.
Always ensure your S-Play system time and location is set correctly when using schedulers.
Page 38

S-PLAY (70092)
Visit the ENTTEC website for the latest version.
USER MANUAL
38 |
ID: 4686708
Document Updated: April 2021
The page has 7 different sections:
A. Created Schedules.
B. List of Schedules.
C. Schedule name.
D. Selected playlist.
E. Start condition.
F. End condition.
G. Frequency type.
Created Schedules
The created schedulers list gives information at a glance of the parameters set on each scheduler.
Pause/Play: Gives control of the scheduler. If a scheduler is paused, the status light will become yellow.
Load: Load scheduler into the Scheduler Editor to update or change any parameter.
Status: Displays the status of the scheduler.
Green: Active Scheduler. An active scheduler still has instances to play.
Red: Expired Scheduler. An expired scheduler does not have any instances left to play.
Yellow: Paused Scheduler. The scheduler will not play until it's active and the end condition is not met.
Scheduler name: Name set in the scheduler editor.
Playlist name: Playlist selected in the scheduler editor.
Play Count: Play Count is set in the scheduler editor, by default this is the same value configured in the
playlist attributes.
Scheduler frequency: frequency set in the scheduler editor.
Start time: Time set in the scheduler editor.
Start date: Start date set in the scheduler editor.
End condition: End condition set in the scheduler editor. To set an infinitely looping schedule, set the end
time to be identical to the beginning.
Delete: Delete selected scheduler.
List of Schedules
Lists all the schedules saved and shown in the created scheduler section. When an option is selected, its
Page 39

S-PLAY (70092)
Visit the ENTTEC website for the latest version.
USER MANUAL
39 |
ID: 4686708
Document Updated: April 2021
parameters are loaded into the scheduler editor.
To create a new scheduler, select "Create New Scheduler" option.
Schedule Name
Name to aid Schedule identification.
Selected Playlist
List of available Playlist to be scheduled.
Start Condition
Set a schedule to start at a specific time, at sunrise or sunset. The sun phase is calculated based on the
location set in the settings page. It takes into consideration:
GMT Offset.
Latitude.
Longitude.
To set the start of the scheduler to a specific time do the following:
Select “Time” from the dropdown menu.
Click the first two digits on the second dropdown menu and set the hour using the dial. Note that the
inner circle shows hours past noon (>12) and the outer circle show hours before noon (1AM to 12).
To set the minutes, click on the last two digits and use the dial to select the desired time.
End Condition
The scheduler will be expired once the end condition is met. It can be on a specific date or after a desired
number of repetitions.
Page 40

S-PLAY (70092)
Visit the ENTTEC website for the latest version.
USER MANUAL
40 |
ID: 4686708
Document Updated: April 2021
Frequency Type
Set the frequency when the playlist set will play.
Per Second: Start the selected playlist after the specified seconds.
Per Minute: Start the selected playlist after the specified minutes.
Hourly: Start the selected playlist after the specified hours.
Daily: Start the selected playlist either every day or every number of days specified.
Weekly: The selected playlist will play on the selected days every week or as specified in the text box. In
the example, the playlist will play every week on Wednesdays and Tuesdays.
Page 41

S-PLAY (70092)
Visit the ENTTEC website for the latest version.
USER MANUAL
41 |
ID: 4686708
Document Updated: April 2021
Monthly: The selected playlist will play a specific day of every month as specified. In the example above,
the playlist will play the 1st Day of every month.
Yearly: The selected playlist will play a specific day of the year. In the example above, the playlist will play
every year on the 1st of January.
Astronomical: The selected playlist will play depending on the phase of the moon. In the example above,
the playlist will play every new moon.
Page 42

S-PLAY (70092)
Visit the ENTTEC website for the latest version.
USER MANUAL
42 |
ID: 4686708
Document Updated: April 2021
Settings
The settings page allows the user to:
Configure Art-Net and sACN output universes and destination IP’s
Configure output protocol refresh rate
Configure DMX output ports
Define the OSC and UDP input port
Set the date, time and location
Change the S-PLAY’s network configuration
Configure remote access using SSH Tunnelling (Advanced Feature).
Reset to factory defaults
Update firmware
Note: Do not downgrade firmware version without consulting the ENTTEC support team first. Downgrading,
firmware version may result in playlists, schedules to operate as intended.
Page 43

S-PLAY (70092)
Visit the ENTTEC website for the latest version.
USER MANUAL
43 |
ID: 4686708
Document Updated: April 2021
Page 44

S-PLAY (70092)
Visit the ENTTEC website for the latest version.
USER MANUAL
44 |
ID: 4686708
Document Updated: April 2021
S-PLAY Output
Change outputs independently between Art-Net, sACN and DMX.
Use the Default configurations option in the top part of the section to Select between Art-Net, sACN, DMX
or No Output.
Art-Net Output Configuration
Configure output refresh rate for all Art-Net
output stream.
Set output Art-Net each of the 32 universes
□ Universe
□ Unicast IP address
□ Broadcast
Save after any change by pressing "Update Art-
Net".
Note: Max refresh rate = 60FPS.
Page 45

S-PLAY (70092)
Visit the ENTTEC website for the latest version.
USER MANUAL
45 |
ID: 4686708
Document Updated: April 2021
sACN output configuration
Configure output refresh rate for all sACN output stream
Set output sACN each of the 32 universes
□ Universe
□ Unicast IP address
□ multicast
Save after any change by pressing "Update sACN"
Generate sACN ID
Set S-PLAY sACN priority
Note: Max refresh rate=60FPS
Change Date/Time and Location
Set time, date and location. This information is critical when setting
schedules.
When the Set Date Manually is off and the S-PLAY is connected to an NTP server, the S-PLAY will
automatically update the system time information upon power-up.
If the S-PLAY’s system time is set manually the S-PLAY will stay locked to a set time. The user must manually
update the time to reflect daylight saving time twice a year.
Configure Remote Access Using SSH Tunnelling - (Advanced Feature)
The S-PLAY allows the option for remote access through an SSH tunnel. This is a cost-effective method to
access your device over the Internet.
Security Note – Internet Connection
Before connecting your S-PLAY to the Internet ensure your local network firewall provides security all
devices have been adequately secured.
If ever unsure consult a qualified professional.
Ensure you have sufficient extra bandwidth to deal with influxes of traffic caused by an internet
connection.
Ensure your SSH Tunnel is configured in such a way to ensure only trusted users can access the tunnel
to remotely configure the S-PLAY.
This advanced feature requires a cloud server to be configured that will allow users to connect to it from
anywhere in the world over the internet by navigating to a static URL via a browser and can be configured
on the S-PLAYs Settings page.
Visit the ENTTEC Website to view the application note showing step by step configuration with an AWS Web
Server.
Page 46

S-PLAY (70092)
Visit the ENTTEC website for the latest version.
USER MANUAL
46 |
ID: 4686708
Document Updated: April 2021
Select Storage
S-PLAY contains internal memory of 8GB+. However, if the storage is getting full, the user can switch memory
to an external Class 10 SD Memory card designed for high load video recording is used. (i.e. Samsung Pro
Endurance series).
S-PLAY can only operate from a single memory source so make sure to move all the files from the internal
memory to the external SD card. To do so, please refer to the next section in the user manual “Export
Playback Data”.
When a SD card is inserted into the S-PLAY it will be wiped and re-formatted to support the Linux EXT3
file format before shows are saved onto it. Ensure all files are removed from your SD card before inserting
it into the S-PLAY.
Factory Reset
A factory reset can be undertaken using either the web interface or LCD providing the user account is logged
in. Performing a factory reset will result in:
The Network settings returning to DHCP
All cues, playlists and schedulers stored internally will be deleted
The output universes will return to Art-Net
Art-Net output will be set to broadcast
sACN output will be set to multicast
Always take a backup before undertaking a factory reset.
Note: Once a factory reset has been started the process will not stop until completion.
Page 47

S-PLAY (70092)
Visit the ENTTEC website for the latest version.
USER MANUAL
47 |
ID: 4686708
Document Updated: April 2021
Note: Do not remove power from the S-PLAY whilst a factory reset is in progress.
Following a successful factory reset and the S-PLAY re-booting, ENTTEC recommends removing power for
10 seconds, then re-plugging your device. Once it boots navigate to a 404 page on the device by modifying
the URL to a page that doesn’t exist on the S-PLAY (i.e. http://10.0.0.100/en/404/). This will automatically
clear its web cache.
Factory Reset Via LCD
Navigate to settings
Locate Reset to Defaults
Select “RESET”
Factory Reset Via Web Interface
Go to settings page, scroll down to the end of the page and click “Reset to factory Defaults”.
Status
The status page displays:
Network information of the device
Current output protocols
System information including:
□ System status
□ Playlist activity
□ CPU status
□ Storage status
□ Device name
□ System uptime
□ Hardware ID
Software version information
□ Firmware version
Page 48

S-PLAY (70092)
Visit the ENTTEC website for the latest version.
USER MANUAL
48 |
ID: 4686708
Document Updated: April 2021
The Status page displays the following information:
Network Information
IP Address
Subnet Mask
Broadcast Address
MAC Address
Engine Address
Output Information
Protocol
Universe
Output IP Address, (if applicable)
Page 49

S-PLAY (70092)
Visit the ENTTEC website for the latest version.
USER MANUAL
49 |
ID: 4686708
Document Updated: April 2021
System Information
Status
Activity
CPU Status
Disk Space (internal and external)
System Uptime
Hardware ID
Software Information
Software Information
DMX Driver Version
Backup
The backup page allows the user to achieve the following:
Settings backup
Restore
Page 50

S-PLAY (70092)
Visit the ENTTEC website for the latest version.
USER MANUAL
50 |
ID: 4686708
Document Updated: April 2021
Backup
S-PLAY produces a package that includes:
Cues
Playlist
Schedules
Settings
The backup can be done via LCD and web interface.
Go to Backup page, click “Backup”. The process produces a .bak package that can be downloaded and saved
to any location in your computer.
Restore
Use the created .bak file to restore cues, playlists,
schedules and output settings.
Go to the Backup menu in the web interface
Select the desired memory location (internal
or external)
Click browse and look for the .bak file
Insert and click on restore
Once the restore is complete, a confirmation
message will appear on the top of the page.
Page 51

S-PLAY (70092)
Visit the ENTTEC website for the latest version.
USER MANUAL
51 |
ID: 4686708
Document Updated: April 2021
Export Playback Data
The Export Playback Data function moves:
Cues
Playlists
Schedules
from the internal memory to an external SD card inserted
in the front slot of the unit or vice versa.
When moving files across make sure the desired storage is
selected in “Select Storage” section on the web interface.
The files are copied from one location to another. Which
means that they are not deleted from the original location.
The status of both memory devices can be tracked down in
the “Status” page.
Storage
Show Storage
Static Cue
Snapshots are comprised of a single DMX frame. The maximum file size of a frame of one universe with
associated metadata is 518 bytes. To calculate the file size of a Static Cue.
To calculate the theoretical file size of a static cue, multiply 518bytes by the quantity of universes you intend
to capture as part of the static cue. This calculation will give a file size in bytes.
Dynamic Cue
A dynamic cue can be thought of as a stream of Static Cues. To calculate the theoretical file size of a
Dynamic Cue the size of a single 1 universe DMX frame (518 bytes) should be multiplied by the quantity of
universes being captured, the quantity of frames being recorded per second and duration of recording (in
seconds).
Triggers & Events
Triggers and Events each have a maximum file size of 1Kb (1000bytes). To calculate the theoretical storage
size all Triggers and Events your configuration will occupy, multiply the total quantity of Triggers and Events
you will use by 1Kb.
((518 bytes) * (Quantity of Universes to be captured)) = Static Cue Size (bytes)
((518 bytes) * (Quantity of Universes) * (Frames per Second [produced by the DMX
source]) * (Intended Recording Length [seconds])) = Dynamic Cue Size (bytes)
((1000 bytes) * (Quantity of Triggers and Events)) = Total Trigger and Event Size (bytes)
Page 52

S-PLAY (70092)
Visit the ENTTEC website for the latest version.
USER MANUAL
52 |
ID: 4686708
Document Updated: April 2021
Locking the S-PLAY and User Management
S-PLAY includes a locking system to prevent settings, playlists, cues and schedulers from being modified.
Lock Feature
Out of the box, S-PLAY is unlocked which means when connected to a network any computer within the
network can change settings, create cues, create playlists, trigger playlists, etc.
If the lock on the top right corner of the screen is open, as shown below, the unit is unlocked and accessible
within the network.
To lock the unit, simply click on the padlock in the top right-hand corner of the user interface and the unit
will automatically disable all the tabs but home.
When the S-PLAY is locked, users can:
Play and Stop any playlist.
Play and Stop all playlists.
Pause and Resume Schedules
Navigate the LCD to preview cues, activate playlists and display settings.
To enable full functionality the user account must be logged in.
When a user is logged in, the unit can remain locked for the rest of the users accessing from other
Page 53

S-PLAY (70092)
Visit the ENTTEC website for the latest version.
USER MANUAL
53 |
ID: 4686708
Document Updated: April 2021
locations/browsers. Within the network. However, the unit will ensure that only one browser is open at the
same time when accessing "Home", "Cue Library" and/or "Playlist Page". This is to avoid having conflicting
commands that can jeopardize any part of the recording process.
To unlock the S-PLAY, simply click on the padlock icon on the top right corner of the web interface.
Default Login and Passwords
Before setting a password take a full backup of your show data and settings. If the password is forgotten
or lost, contact the ENTTEC support team for assistance to use the Admin log-in functionality. A full factory
reset of the device is the only method to return the password to default.
User
Default Password
User
123456
Page 54

S-PLAY (70092)
Visit the ENTTEC website for the latest version.
USER MANUAL
54 |
ID: 4686708
Document Updated: April 2021
Ports
XLR5 Female (DMX-512)
DB9 Male (RS232)
PIN
CONNECTION
1
GND
2
DATA -
3
DATA +
4
NC 5 NC
PIN
CONNECTION
1
NC 2 RX 3 TX 4 NC 5 GND
6
NC
7
NC 8 NC 9 NC
Page 55

S-PLAY (70092)
Visit the ENTTEC website for the latest version.
USER MANUAL
55 |
ID: 4686708
Document Updated: April 2021
GPIO
Relay
Page 56

S-PLAY (70092)
Visit the ENTTEC website for the latest version.
USER MANUAL
56 |
ID: 4686708
Document Updated: April 2021
Servicing, Inspection & Maintenance
The device has no user serviceable parts. If your installation has become damaged, parts should be
replaced.
Power down the device and ensure a method is in place to stop the system from becoming energized
during servicing, inspection & maintenance.
Key areas to examine during inspection:
Ensure all connectors are mated securely and show no sign of damage or corrosion.
Ensure all cabling has not obtained physical damage or been crushed.
Check for dust or dirt build up on the device and schedule cleaning if necessary.
Dirt or dust buildup can limit the ability for a device to dissipate heat and can lead to damage.
The replacement device should be installed in accordance with all steps within the installation guide.
To order replacement devices or accessories contact your reseller or message ENTTEC directly.
Cleaning
Dust and dirt build up can limit the ability for the device to dissipate heat resulting in damage. It’s important
that the device is cleaned in a schedule fit for the environment it is installed within to ensure maximum
product longevity.
Cleaning schedules will vary greatly depending on the operating environment. Generally, the more extreme
the environment, the shorter the interval between cleaning.
Before cleaning, power down your system and ensure a method is in place to stop the system from
becoming energized until cleaning is complete.
Do not use abrasive, corrosive, or solvent-based cleaning products on an device.
Do not spray device or accessories. The device is an IP20 product.
To clean an ENTTEC device, use low-pressure compressed air to remove dust, dirt and loose particles. If
deemed necessary, wipe the device with a damp microfiber cloth.
A selection of environmental factors that may increase the need for frequent cleaning include:
Use of stage fog, smoke or atmospheric devices.
High airflow rates (i.e., in close proximity to air conditioning vents).
High pollution levels or cigarette smoke.
Airborne dust (from building work, the natural environment or pyrotechnic effects).
If any of these factors are present, inspect all elements of the system soon after installation to see whether
cleaning is necessary, then check again at frequent intervals. This procedure will allow you to determine a
reliable cleaning schedule for your installation.
Page 57

S-PLAY (70092)
Visit the ENTTEC website for the latest version.
USER MANUAL
57 |
ID: 4686708
Document Updated: April 2021
Package Contents
S-PLAY (70092)
2m cat5 cable (79102)
1RU mount kit (79105)
1 X 12V PSU adaptor with international plugs
ReadMe Card
Ordering Information
For further support and to browse ENTTEC’s range of products visit the ENTTEC website.
Item
Part No.
S-PLAY
70092
Due to constant innovation, information within this document is subject to change.
 Loading...