

Page 1

User Manual
PMINI-MANUAL (50881)
For latest version visit:
www.enttec.com
1
ID: 1585589
PIXELATOR MINI
(PN 7 0066)
Box Contents
• Pixelator Mini (pn: 70066)
• Straight connect Ethernet lead (pn:79102)
• 1RU Mounting kit (pn: 79105)
• Country specific IEC Power lead.
• This user manual
Physical Dimensions
Note:
All dimensions are in millimetres unless specified otherwise
LED Protocols Supported
• 9PDOT-8bit and 9PDOT-16bit
• WS2811, WS2812, WS2813, WS2812B
• APA-104 LEDs
• SK6812 – use WS2812B
• TM1804 – use WS2812B
• TM1812 – use WS2812B
• TLC5973-8bit and TLC5973-16bit
Notes:
▪ We cannot claim to support other led protocols similar to the ones
supported by Pixelator Mini. If you happen to find one that works, and
is not listed, please let us know, so we can update our documentation
Features
• 8 Pixel Link (RJ-45) data output ports
• 16 Universe Ethernet to Plink
• Easy to setup & update through any web browser
• Supports following DMX over Ethernet protocols:
o Art-Net 1/2/3
o Streaming ACN (sACN)
o Kling-net
o ESP
• 1 RJ45 Ethercon connector (10/100 Mbps)
• Static or Dynamic (DHCP) IP configuration (DHCP by
default)
• Compatible with ENTTEC Plink Injectors
• Pixel Grouping is configurable for each Pixel Link
port. (1 to 340) for RGB and (1 to 256) for RGBW
• Each Pixel Link output can be assigned up to 2
Ethernet Universes.
• Pixel Ordering is configurable for each Pixel Link
port. RGB modes allow 3 slot mapping, and RGBW
modes allows 4 slot mapping.
Page 2
User Manual
PMINI-MANUAL (50881)
For latest version visit:
www.enttec.com
2
ID: 1585589
Safety
• Do not expose the unit to rain or moisture, doing
this will void the warranty
• Do not remove the cover, there are no
serviceable parts inside
• This unit is intended for indoor use only
Basic Setup
Right out of the box, the Pixelator Mini is factory configured to be a standard Art-Net node, listening to the first
16 Art-Net Universes (0 to 15). It is also set as a DHCP
node, so you can plug it into your existing router, and it's
good to go.
To make any changes to the configuration, you will need
the IP address of the unit. ENTTEC provides a free App
(available for Windows and Mac) called NMU, which will
find the Pixelator Mini on your network and display its IP
address.
Using the IP address one can access the built-in web-interface inside the Pixelator Mini via any modern webbrowser. The web-interface allows the settings of the
unit to be changed.
Pixel Tape/Dots are to be connected to the Pixel Link
port using a PLink Injector (sold separately). The injector
takes external DC power and has appropriate terminals
to connect the tape.
Once setup, any Art-Net/sACN/ Kling-net/ESP enabled
software/app or a lighting control desk can be used to
drive the Pixel Link outputs on the Pixelator Mini. For a
list of recommended apps, please check the website
www.enttec.com/mini
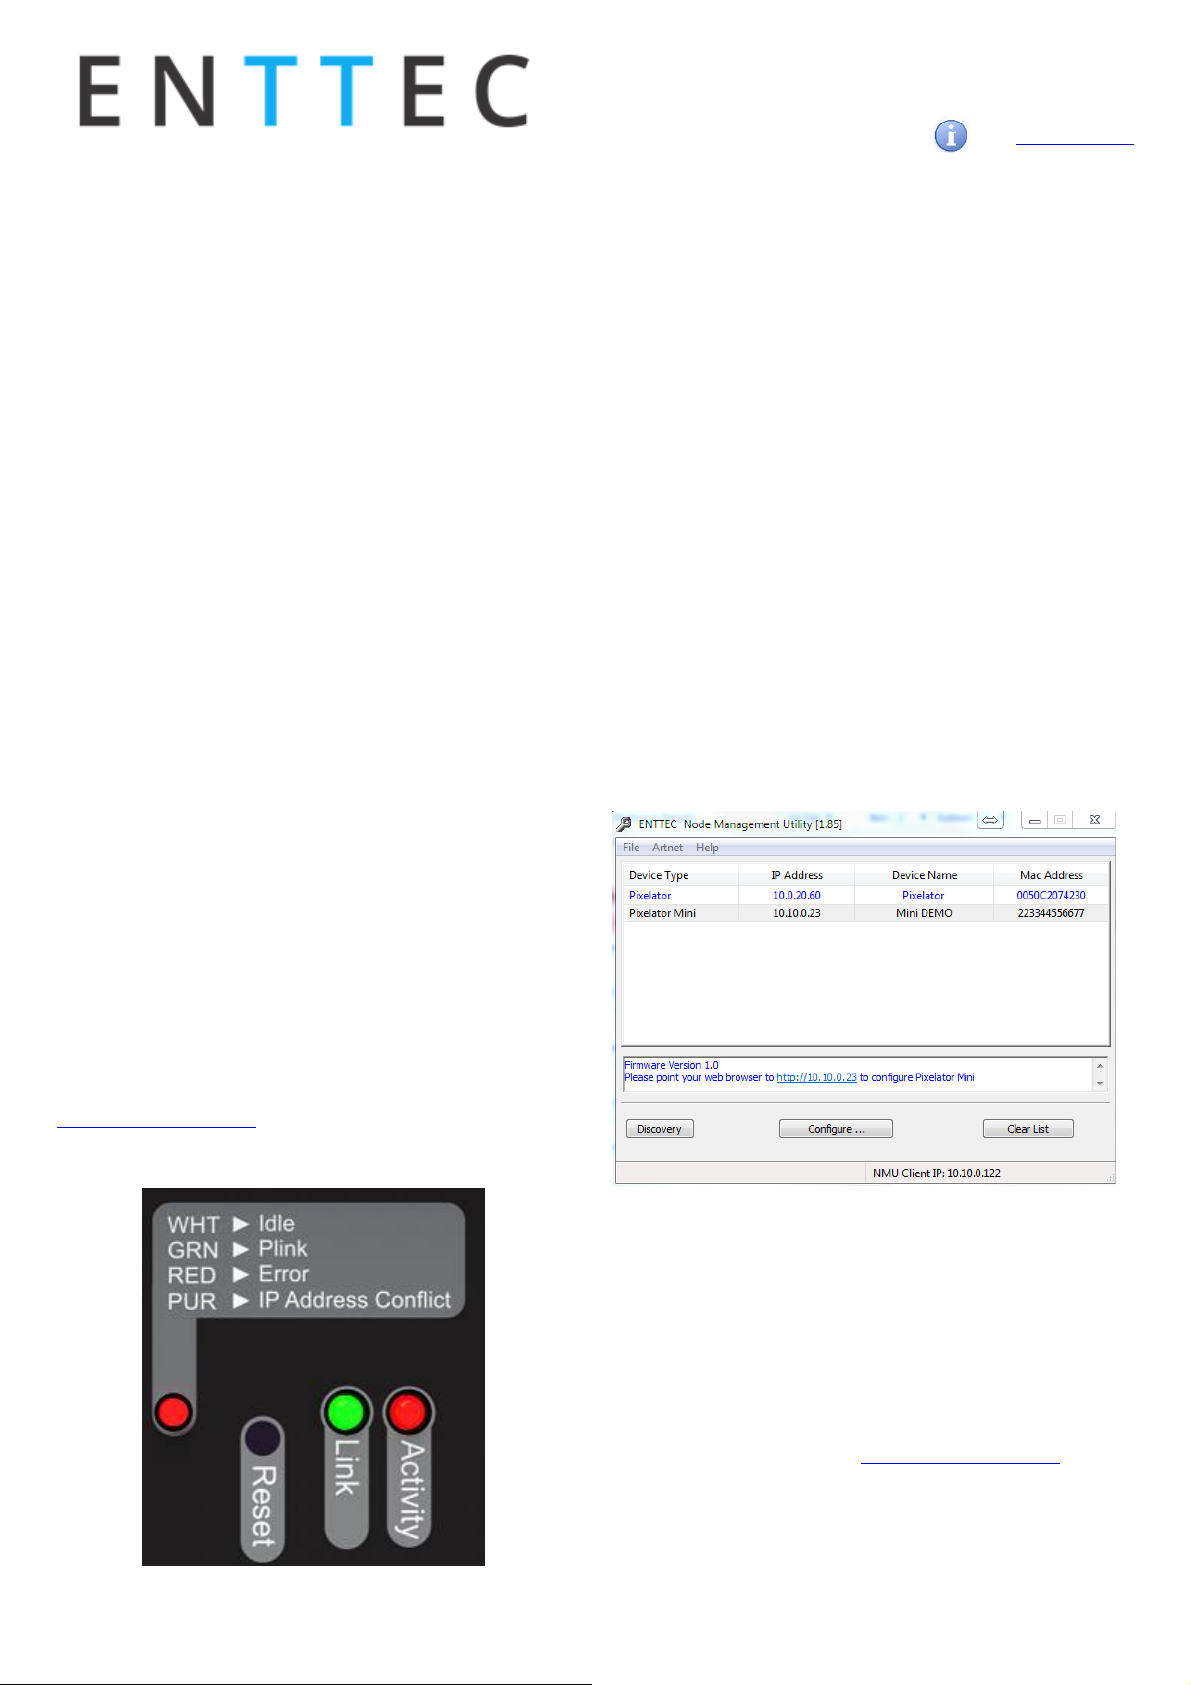
LED Status
The Pixelator Mini comes with one RGB status LED and two
green network LED indicators located on the right side of
the front panel
RGB Status LED:
• WHITE: idle, signifies that Pixelator Mini is
operating normally.
• GREEN: Pixel Link Data is being output. The led will
fade from white to green.
• RED: (Blinking) Error State. Requires a firmware
update or needs to be rebooted. A reset might be
required, if it stays in error-mode on reboot.
• PURPLE: (Blinking) IP Address Conflict. Please
change the IP address manually or enable DHCP.
Ethernet Link Speed: is ON when there is an active
Ethernet Link @ 100 mbps. It will stay OFF @ 10 mbps.
Ethernet Activity: This LED blinks when there is activity on
the Ethernet network.
NMU
NMU (Node Management Utility) is a free Windows and Mac
application that is used to manage compatible ENTTEC DMX
over Ethernet nodes.
NMU will help you find your unit's IP address and then open
a browser window to access the web-interface.
Please follow these steps:
1. Download NMU from www.enttec.com/nmu
2. Ensure that Pixelator Mini is hooked up physically
by an Ethernet cable.
Page 3
User Manual
PMINI-MANUAL (50881)
For latest version visit:
www.enttec.com
3
ID: 1585589
3. And connected to the same physical network (or
router) as the computer on which you will run
NMU.
4. Open NMU. If prompted with multiple networks,
select the correct network. (identified by the IP
address of your computer on that network)
5. Press the Discovery button, and wait till NMU
finds all supported ENTTEC devices on your network.
6. Once found, select Pixelator Mini and use the IP
address to access the web-interface via your
web browser.
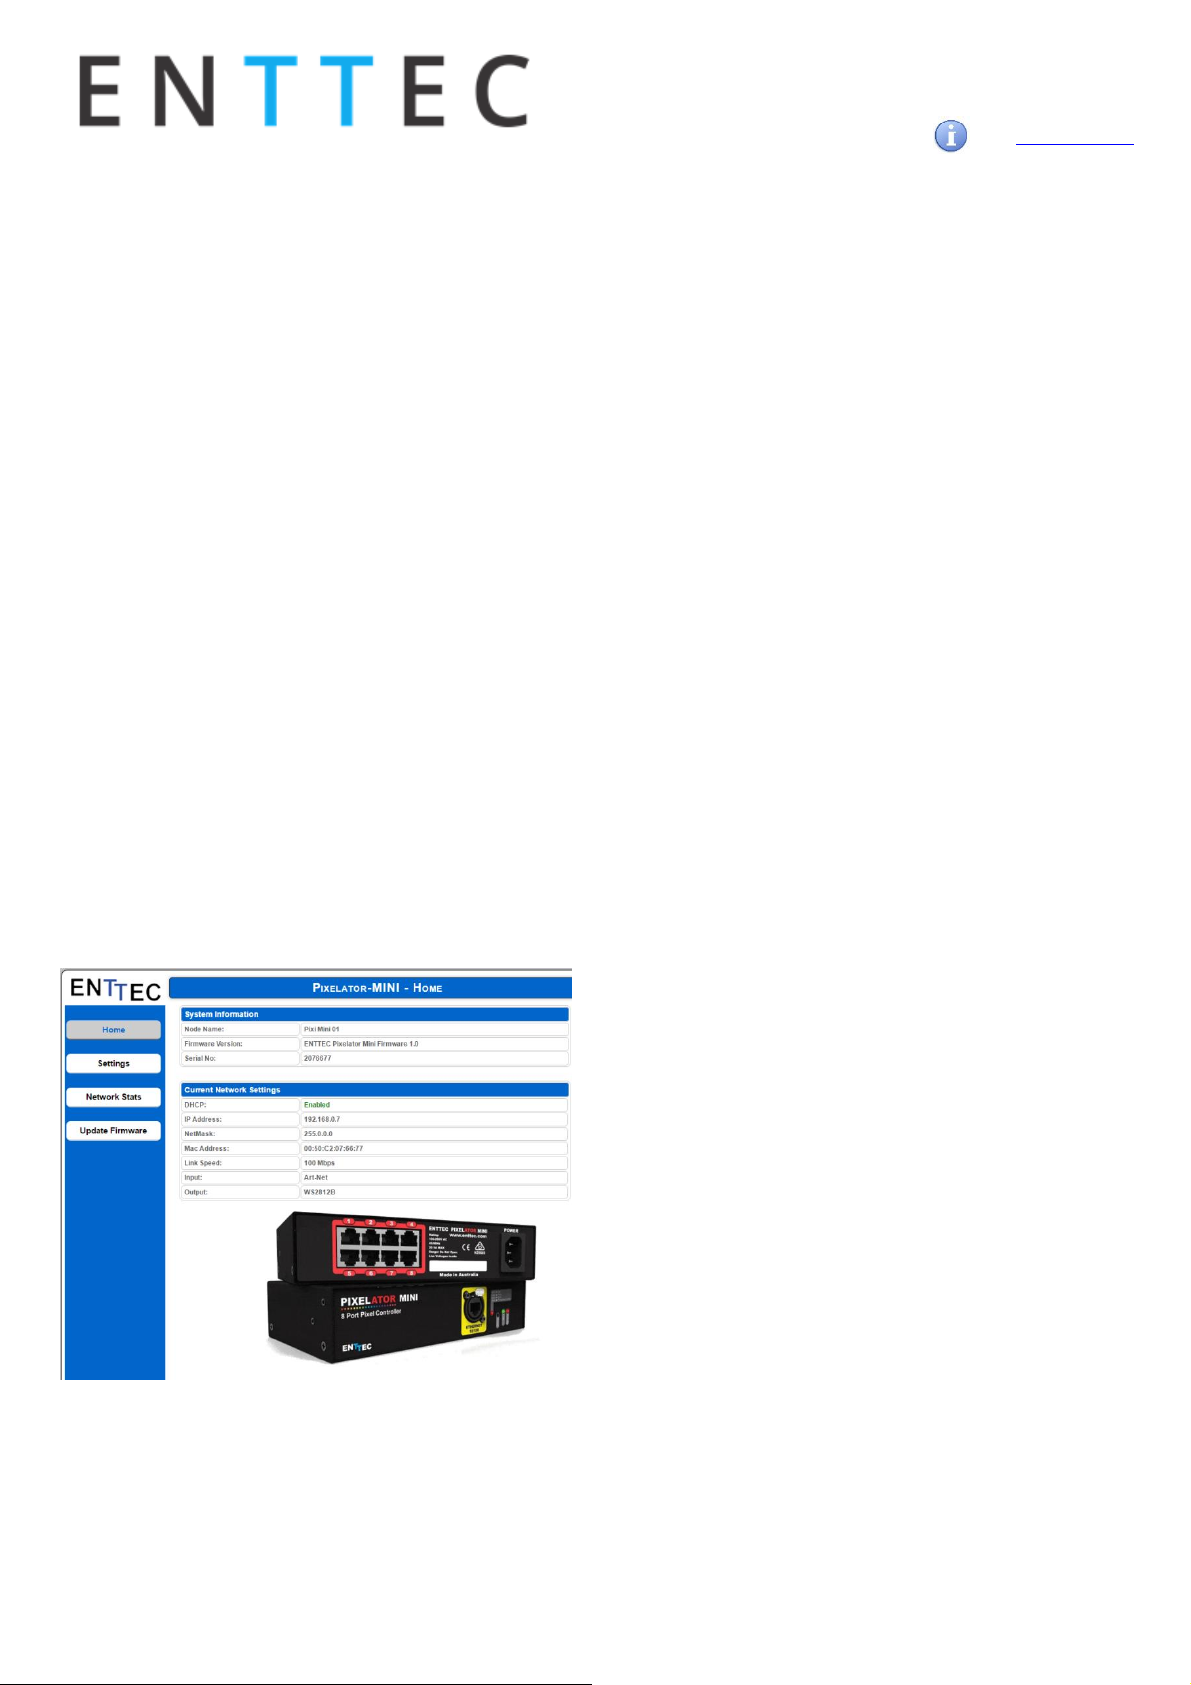
Web Configuration
The Pixelator Mini can be configured and controlled
through a web browser, running on a computer system,
located on the same Local Area Network. Any modern
web browser, such as Chrome, Firefox, Internet Explorer,
Safari or Opera, running under any operating system, including Windows XP/7/8/10, Mac OS X or Linux can be
used.
Either click on the underlined URL displayed in NMU, or
type the IP address (as detected by NMU) into your web
browser to access the Web Interface. The left side menu
allows all the Pixelator Mini web pages to be accessed.
Home page provides the following information:
System Information: Name, Firmware Version and Se-
rial No. of the unit. The Serial No. is unique to this unit
and can be used to identify this unit.
Current Network Settings: Configured IP address and
Link speed for the unit.
To change any of the displayed settings, you must use the
Settings page.
Settings
Node name is used to identify the unit on the network. Any
meaningful name can be used.
DHCP is enabled by default. When enabled, the router on
your network is expected to automatically provide the IP
address to the unit. If no DHCP router/server is present on
the network, the manual IP address will be used.
If for some reason, your unit does not get an IP address via
DHCP, please restart the unit with the Ethernet cable connected. It will listen for DHCP on start-up and wait for a few
seconds, before giving up.
IP Address and Netmask are only used if DHCP is disabled
or is unavailable on your network. Pixelator Mini web-page
will warn you, if non-standard IP address or netmask is
used.
If ever you manage to use an IP Address that can't be connected to later, please perform the reset procedure (as described later). The reset will re-enable DHCP on Pixelator
Mini.
DMX Protocol: allows you to pick the input DMX over Ether-
net protocol that the Pixelator Mini will act on. Available options are Art-Net, sACN, Kling-net and ESP.
Art-Net Address: Net and Subnet can be selected here,
and comply with Art-Net 3 protocol. Universe can be selected from the PLink Port Settings.
LED Protocol: allows you to pick the Plink Output protocol
that the pixel tape conforms to. Available options are
9PDOT-8bit, 9PDOT-16bit, WS2812B (option applies to
WS2811, WS2812, and WS2812b) APA-104, TLC5973-8bit and
TLC5973-16bit.
Page 4

User Manual
PMINI-MANUAL (50881)
For latest version visit:
www.enttec.com
4
ID: 1585589
Plink Settings
The Plink Outputs table allows all settings to be individually changed for each Plink Port. The options available
for each Port are as follows:
Universe / Output
Select the number of universe to drive the outputs. Available options are:
• None: No output.
• 1: Maps to One universe, and drives first 170 pix-
els in RGB modes, or First 128 Pixels in RGBW
modes.
• 2: Maps the output to two universes, and drives
first 340 pixels in RGB modes, or First 256 Pixels
in RGBW modes.
First Universe
Allows selections of the First universe that the output will
be mapped to. Drives the first 170 Pixels in RGB modes,
or the first 128 Pixels in RGBW modes.
For Art-net universe, please change Net/Subnet to increase combined universe beyond 15. (Combined universe is shown under the selection).
Second Universe
Allows selections of the Second universe that the output
will be mapped to. Drives pixels 171-340 in RGB modes, or
the pixels 129-256 in RGBW modes.
For Art-net universe, please change Net/Subnet to increase
combined universe beyond 15. Combined universe is shown
under the selection.
Pixel Order
Ordering controls, how the DMX slots are mapped to the LED
pixel color on each LED pixel. The ordering selected here
should match the ordering on the Pixel Tape or Dots being
used. The Pixel ordering selected, will also determine the
number of Pixels being driven on the output.
RGB options: uses 3 DMX channels per pixel.
RGBW options: uses 4 DMX channels per pixel.
Pixel Group
Pixel Grouping allows one DMX pixel to drive multiple physical LED pixels. This option is only available when One Universe/Output is selected. Defaults to 1.
The max. Group will depend on the Pixel order selected.
DMX Start Add
Selects DMX slot number for the first pixel to output. This
option is only available when One Universe/Output is selected. Defaults to 0.
Page 5

User Manual
PMINI-MANUAL (50881)
For latest version visit:
www.enttec.com
5
ID: 1585589
Update Firmware
From this page you can update Pixelator Mini to the latest firmware. Latest firmware file is available at
enttec.com/mini.
Choose or browse the firmware file (as per your browser)
and click on Update firmware to start the process. The
update progress is shown in real-time, and will take a few
seconds for the update to complete
When the update is complete, the page will refresh and
you will be taken to the home page – where you can verify
the firmware version. If the update fails for any reason,
please try the same process again.
Pixelator Mini will reboot after a firmware update, please
allow a few seconds for it to be refreshed in the browser.
Please wait until the update process is complete.
Reset button
The reset button restores the configuration of the
Pixelator Mini to factory defaults:
• DHCP is set to enabled
• Static IP address is mapped to the Serial number
of the unit (used if DHCP is unavailable).
• Netmask is set to 255.0.0.0
• DMX Protocol is set to Art-Net (0-15)
• Each Plink output is set to 2 Universe with RGB
ordering.
To successfully reset to factory defaults the Pixelator Mini,
the following procedure must be performed:
• Power off the unit
• Press and hold the Reset button.
• While holding the Reset button, power up the unit,
and keep holding the button for 3 seconds.
• Release the Reset button once the status led starts
blinking red.
• Wait 3 seconds and cycle power
Connector pin out
Pixel Link pinout (RJ-45):
• Pin 1: Data +
• Pin 2: Data -
• Pin 7: Ground
Art-Net Send Test
NMU can also be used to troubleshoot the Plink output on
the Pixelator Mini. Art-Net Test can be accessed from the
top menu: Art-net → Art-net Test
When first opened, the Art-Net is set to Disabled, please set
it to Enabled, and then you can use either the DMX faders to
test one or more DMX channels, or use the test-patterns
from the options available.
Please set the Pixelator Mini to be Art-Net output and on
the same universe as being used to send Art-Net from NMU.
Page 6

User Manual
PMINI-MANUAL (50881)
For latest version visit:
www.enttec.com
6
ID: 1585589
PLink system
• Each PLink port can drive up to 340 RGB
individual pixels (2 DMX universes) - PLink 2U
module must be used in Pixelator Profile
• PLink Injector sold separately (73546 / 73544)
• 1 PLink Injector needs to be used per PLink port
on the Pixelator Mini
• External DC power supply
• Maximum distance between Plink Injector and
Tape/dots should not exceed 3m
• Data extensions can be up to 300m over Cat6
cable
• Small, light and easy to hide design
• High power screw terminal connectors
• Easy wiring using straight Cat5/Cat6 standard
connections
Notes:
▪ Plink system only works with CAT5/6 straight-through cables, do not
use crossover cables.
Pixelator Mini Specifications
Item
Value
PSU Input Voltage
90 – 260V AC
PSU Input Frequency
50/60 Hz
Weight
1.65 lbs. / 0.8 Kg
Shipped weight
3.19 lbs. / 1.153 Kg
Length
7.52” / 191mm
Width
4.19” / 106.5mm
Height
1.75” / 44.5mm
Output Protocol
9PDOT-8bit
9PDOT-16bit
WS2812B
APA-104
TLC5973-8bit
TLC5973-16bit
Input Protocol
Art-Net, sACN, Kling-net
or ESP
Op Environment
0°-50°C
Connectors
8x RJ45 Plink output
1x IEC power connector
1x RJ45 Ethercon connector
Due to continuous improvements and innovations of all
ENTTEC products, specifications and features are subject to
change without notice.
Ordering Information
The ENTTEC Pixelator Mini and compatible products can be
ordered from our website or through your ENTTEC dealer.
PN
Description
70066
Pixelator Mini
73546
Plink Injector 5V
73544
Plink Injector 12V - 24V
Page 7

User Manual
PMINI-MANUAL (50881)
For latest version visit:
www.enttec.com
7
ID: 1585589
Accessories and Recommended Products
Part Number
Description
70581-ARC
ENTTEC LED Mapper Software (ELM)
Architectural (512 Universes)
70581-PRO
ENTTEC LED Mapper Software (ELM)
Professional (96 Universes)
70581-STU
ENTTEC LED Mapper Software (ELM)
Standard (16 Universes)
9PDOT (1-8)
HI-RES SMART RGB PIXEL DOTS
8PL60-F-12
RGB PIXEL TAPE 60 LEDS/METER 12V
- 5M Roll
8PL30-F
RGB PIXEL TAPE 30 LEDS/METER 5V
- 5M Roll
8PL60-F
RGB PIXEL TAPE 60 LEDS/METER 5V
- 5M Roll
8PL144-2
RGB PIXEL TAPE 144 LEDS/METER 5V
- 2M Roll
8PX60-4
RGBW PIXEL TAPE 60 LEDS/METER 5V
- 4M Roll
8PXW60-4-B
RGBW PIXEL TAPE 60 LEDS/METER 5V
- 4M Roll Black No Coating
8PX30-F
RGBW PIXEL TAPE 30 LEDS/METER 5V
- 5M Roll
8PW60-F
WWA (CTA+AMBER) PIXEL TAPE 60
LEDS/METER 5V - 5M Roll
8PW30-F
WWA (CTA+AMBER) PIXEL TAPE 30
LEDS/METER 5V - 5M Roll
8P60-5-B
Pixel tape 60 LEDS/METER 5V - 5M
Roll Black No Coating
Page 8

User Manual
PMINI-MANUAL (50881)
For latest version visit:
www.enttec.com
8
ID: 1585589
 Loading...