

Page 1
E-Streamer Quick User Manual
For latest version visit:
www.enttec.com
20 December 2018 mfile ID: 4838403 Page|1
E-Streamer Mk2
Box Contents
• E-Streamer Mk2 (pn: 70710 or 70711)
• Straight connect Ethernet lead (pn:79102)
• IEC power cord (country dependent plug)
Safety
• This unit is intended for indoor use only.
• Do not expose this device to rain and moisture
• Do not use this device near water.
• Do not block any ventilation apertures on this
device.
• Ensure proper earth connections
• Always be sure to mount this unit in an area that
will allow proper ventilation. Allow about 6” (20
cm) between this device and a wall.
• Do not install this device near heat sources such
as heaters, stoves, monitors, amplifiers, dimmers, luminaries or any other equipment that
produces heat.
• Power-supply cords should be routed so that
they are not likely to be walked on or pinched
by protective cabinets, enclosures or cases.
• Use only attachments, accessories or fixings
specified by ENTTEC.
• Unplug this device from the mains supply and ex-
ternal data links during electrical storms or when
the device is not used for a long time.
• Do not remove the cover, there are no user service-
able components inside.
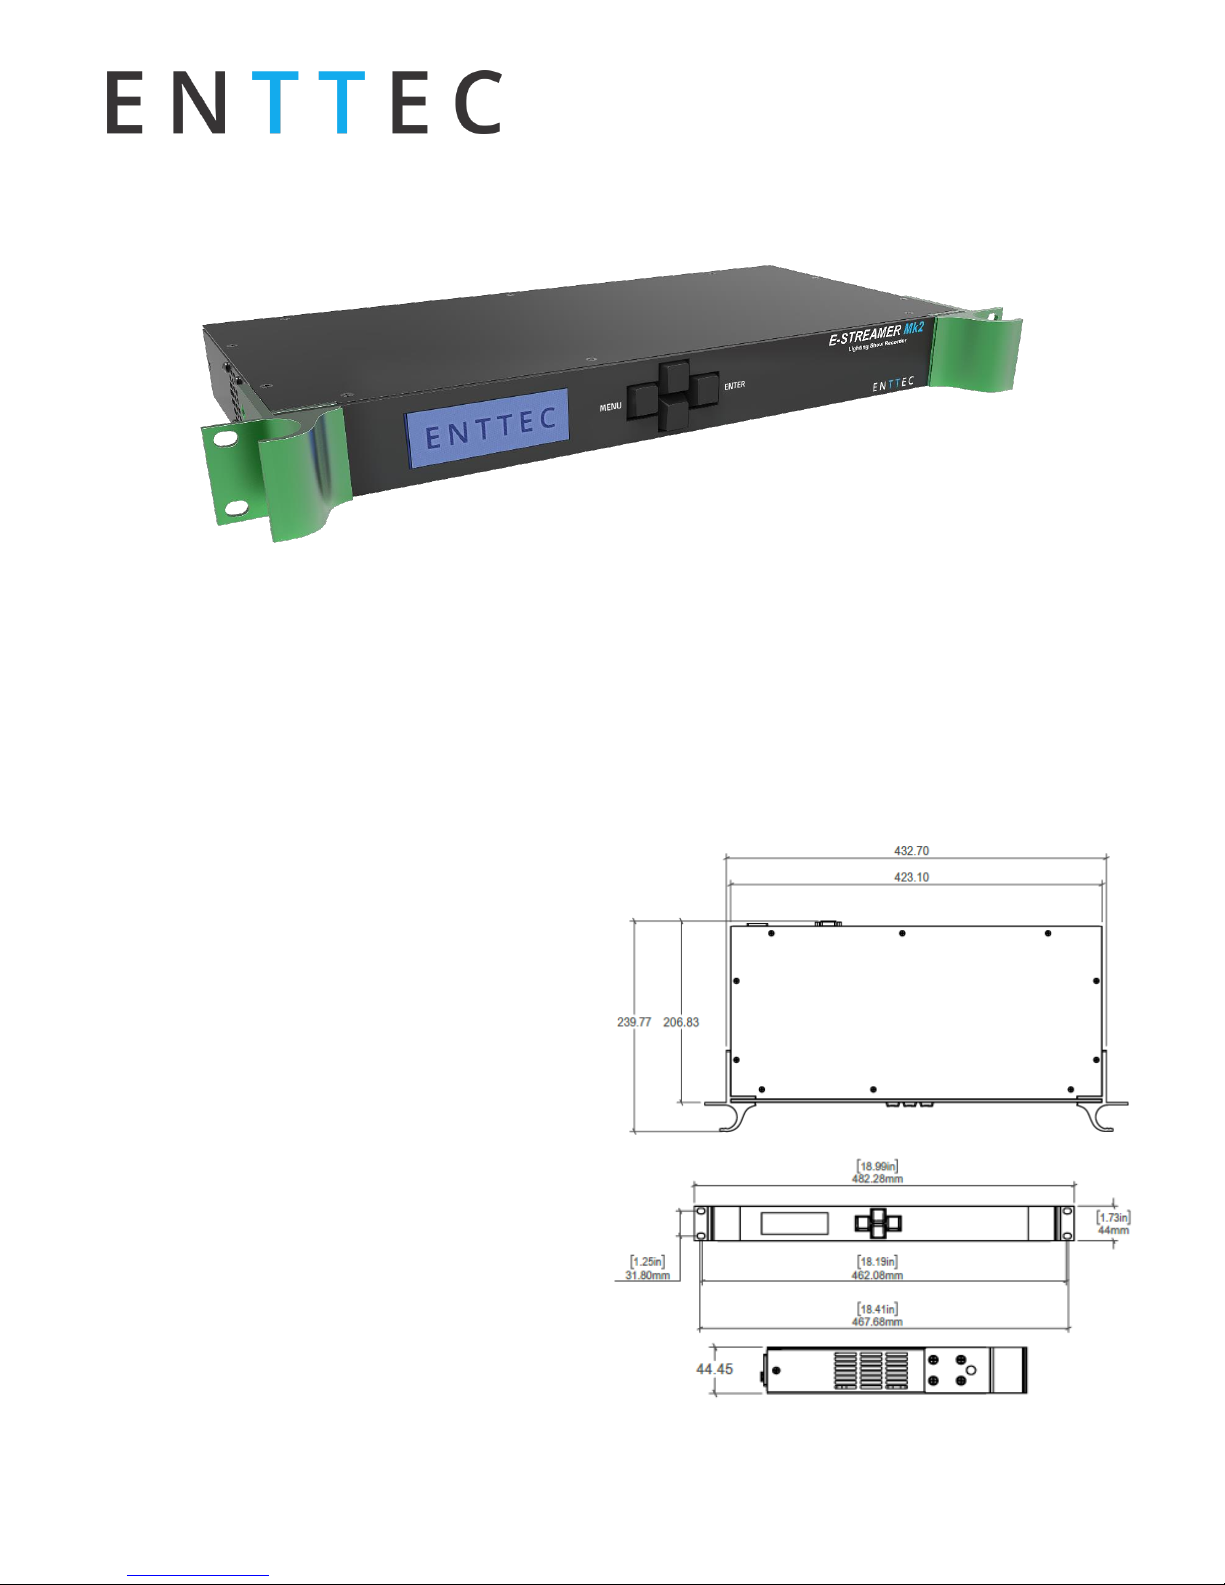
Physical Dimensions
Page 2

E-Streamer Quick User Manual
For latest version visit:
www.enttec.com
20 December 2018 mfile ID: 4838403 Page|2
Physical Features
• 4x DMX OUT 5Pin Ports (70711 Only)
• 4x DMX IN 5Pin Ports (70711 Only)
• Gigabit Ethernet Connection
• RS232 port to trigger shows
• LCD display provides system information and al-
lows show control
Software Features
• DMX Recording and playback over Ethernet
• Art-Net and ESP support for Ethernet streams
• Up to 64 Universes per show
• Simultaneous show playback (merging between
shows)
• SD Card based recording
• DMX input/output through DMX Ports (70711
Only)
• Control and configuration using inbuilt web in-
terface
• Show replay can be triggered on:
o Power up
o Art-Net & ESP control (slave from other
lighting control)
o Day, date, month and time of day
o Remote serial command (RS232)
• Easy firmware updates
• System and shows backup over USB
• 8 Universe License included with 70710
• 4 Universe License included with 70711
• Ability to add more universes (up to 64)
Basic Setup
E-Streamer Mk2 unit can record numerous universes
of DMX per show. A basic setup includes:
• Creating a show with required number of Ethernet
or DMX Streams using Show Editor page
• Configuring the show with control and playback
options using Show Editor page
• Recording the Show (Show Control / LCD Menu)
• Playback the Show (Show Control / LCD Menu)
• Schedule the Show to run at configured intervals
(Events)
• Remotely Control all Shows (RS232 or Web)
Getting Started
To begin your installation please follow these steps.
1. Unpack the unit from the box. Inspect the E-
Streamer Mk2 for any damage that might have occurred in shipping and verify that it looks to be in
good condition before plugging it in to power.
2. The E-Streamer Mk2 occupies a single unit (1U) in a
19-inch rack. You may attach it to the rack either at
this time or later after configuring it, if desired.
3. Attach a power cord with mains voltage to the IEC
input on the back.
4. Using an Ethernet Cat5, Cat5E or Cat6 cable, con-
nect the E-Streamer Mk2 to an Ethernet Network.
When the unit turns on, you will be able to see its initial IP address on the LCD panel which looks like
w.x.y.z, where each letter is a number between 0 and
255. Note that IP address down for later use.
1. The LCD always displays the IP address of the unit
(except when it's booting), but if it is not possible
to check the LCD, NMU App (available for Windows
& Mac) can be used to detect the E-Streamer Mk2
Page 3

E-Streamer Quick User Manual
For latest version visit:
www.enttec.com
20 December 2018 mfile ID: 4838403 Page|3
on your network. NMU can be downloaded from
our website (www.enttec.com)
2. E-Streamer Mk2 can now be configured using a
web browser and the IP address displayed on
the LCD Menu. More details on different web
pages will be covered later.
LCD Menu
The LCD Menu is navigated through the four panel
buttons on the front of the unit.
• The Menu button acts as the “Back” button,
which takes you to the previous Menu/screen.
• The Enter button goes into the selected option
on the screen and activates the option.
• The Top & Bottom button are used to navi-
gate/scroll through the options on any screen.
The currently selected option is highlighted with
a white background on the screen.
Main Menu
ES_Mk2 ACTIVE: 0
IP: 192.168.10.200
10:10:25 3.65 GB
press a key to enter
Line1: displays the E-Streamer Mk2 System Name
and Number of Active Shows
Line2: displays either the current IP address / DHCP
Failed /disconnected, highlighting the status of the
network interface. The IP address is where the web
interface can be accessed.
Line3: displays the current time of the system, and
the free disk space on the SD Card. And if the SD
Card cannot be accessed, “SD ERROR” will be dis-
played.
Pressing any of the panel buttons/keys will activate
the next screen on the LCD Menu.
Selection Menu
1-Show Select
2-Setup
3-Status
4-Restart
1-Show Select
Lists all available shows on the E-Streamer Mk2, list
can be scrolled using up & down keys. Scrolling indicator is visible when the list allows scrolling.
Show 11 Λ
Black Room Show
Show 9
New Year Show Ⅴ
When a show is selected by pressing the Enter button,
the Show Control Screen is shown, this is where one
can start, stop, pause or record the show. Depending
on what status the show is in, only 2 options are available. Pressing Enter will activate the selected action,
and status will be updated.
BLACK ROOM: STOPPED
PLAY
RECORD
next show >>
Show Control screen allows cycling through the Show
List, by using the “Next Show >>” option. Activating
record on an existing recording will prompt for “Overwrite Prompt”.
All the other actions (play, pause, stop) happen instantly, and show status is visible on the top right of
the Show Control screen.
Pressing Menu button will take you back to Show Select screen and pressing it one more will take you back
to the Selection Menu.
Page 4

E-Streamer Quick User Manual
For latest version visit:
www.enttec.com
20 December 2018 mfile ID: 4838403 Page|4
2-Setup
1-Change IP
2-Factory Reset
3-USB Backup/Restore
Setup screen allows changing the IP address of the
unit via “Change IP” or doing Factory Reset.
Change IP
This screen further gives two options DHCP or Static
IP. When Static IP is selected, the screen allows you
to change the IP address using the top and bottom
button to scroll through the digits and the menu &
enter buttons to select the segment.
Once you are on the last segment of the IP address,
pressing the Enter button, will activate the IP address. It will take a few seconds for the change to go
through, please wait 30 seconds, before attempting
to try again.
Change IP address
192.168.001.003
Factory Reset
Activating Factory Reset, leads to a simple prompt
confirming your action. Once confirmed, the Factory
Reset will take a minute to run. It will end up deleting all your shows & events, as well as any saved
settings. Please use this only when needed.
F-Reset in progress
please wait …
USB Backup/Restore
This screen further gives two options USB Backup or
USB Restore. For both Backup & Restore to succeed,
you must have a USB Mass storage device (FAT or FAT32
only) connected to the top USB port in the rear of the
unit.
3-Status
Status screen allows the following two options:
1-System
2-Network
Both the Status screens are read-only and provide information about the system and Networking.
These require no user-input and serve as a way of
checking the performance of the unit.
4-Restart
Restart screen, when activated, prompts for the user
to confirm the selection.
1-YES
2-NO
Once confirmed, E-Streamer Mk2 will stop all DMX output and restart the system. While rebooting the LCD
screen will change between a couple of screens, and
the LCD Main Menu will only be visible, once the system is fully ready. (usually takes a minute)
System Restarting
Please wait …
Page 5

E-Streamer Quick User Manual
For latest version visit:
www.enttec.com
20 December 2018 mfile ID: 4838403 Page|5
Web Interface
The E-Streamer Mk2 is configured, controlled and
programmed through a web browser interface running on a computer system located on the same Local Area Network. A web browser, such as Chrome or
Firefox running under an operating system such as
Windows 7 can be used. It is recommended that a
recent version of web browser be used to ensure
full compatibility to display the web interface.
Throughout the Web Interface, helpful hints are displayed when a user hovers the mouse over the
question mark icon as shown in the image
Show Editor
The Show Editor page provides the facility to define
a Show, then configure or modify the DMX data
streams used to control the Show.
Creating a New Show
Enter the show name in the text box which accepts
standard text up to 20 characters. Please note, only
English characters, underscore and numbers are supported for the show name. Space character is not sup-
ported
The Save button will save the Show with selected options, and streams.
Show Options
Play on power up
Selecting this option will automatically play the Show
when the Streamer Engine has completed its powerup sequence (takes approximately a minute).
Frame Rate
The Frame Rate setting [1 - 44 frames per second] adjusts the frequency at which updates are made to the
DMX data streams for this Show.
While the maximum refresh rate for the DMX512-A protocol is 44 frames per second, it may not be necessary
to record a show at high frame rates for accurate replay. Many widely-used lighting consoles generate
DMX512 at 25 frames per second, which is the default
rate for the E-Streamer Mk2.
Page 6

E-Streamer Quick User Manual
For latest version visit:
www.enttec.com
20 December 2018 mfile ID: 4838403 Page|6
Art-Net Control Channel
A single Art-Net DMX channel can be used to control
the replay for a Show.
The values (levels) for the channel override the Play,
Pause and Stop functions for that Show on a Latest
Takes Precedence basis.
DMX
Values
Percentage
(approx)
Command
Executed
0 - 85
0% - 33%
Stop
86 - 170
34% - 67%
Pause
171 - 255
68% - 100%
Play
Art-Net is Artistic Licence's DMX over Ethernet protocol. This protocol is used by products from Artistic
Licence, Enttec and other members of the Art-Net
Alliance throughout the world.
The Art-Net protocol can transport up to 256 universes or streams of DMX512 data over an Ethernet
network. These are divided into 16 Subnets [0 - F
(hexadecimal)] each containing 16 Universes [0 - F
(hexadecimal)].
Recording Control Channel
A single DMX channel can be used as an override
control for the recording of a Show.
Any channel, in any of the Show's DMX streams, can
be assigned as the Recording Control Channel for
that Show. As this includes channels that may lie
outside the range of channels being recorded for a
stream, it is possible to use a channel for recording
control that will not be recorded into the Show.
Recording begins only when a record button has
been pressed and the assigned control channel
reaches the set threshold value. Recording will continue until the level of the control channel falls be-
low the threshold value. This function cannot be activated until the DMX data streams have been allocated
for the Show.
Copying a Show
The Copy button copies the streams and configuration
of the selected show into another show, as named by
the user. It can be useful to copy all streams into another show and make changes as desired, without
changing the existing show.
Data Streams
Although the E-Streamer Mk2 is an Ethernet based system, the DMX data streams recorded by E-Streamer
Mk2 can be the output of virtually any lighting control
system. The streams may originate as standard
DMX512 or be generated directly onto the Ethernet
network from Art-Net or ESP compatible controllers.
Direct DMX input and output is possible via up to four
of DMX Output Ports 4 (only on PN 70711)
An E-Streamer Mk2 show may have up to 64 data
streams (maximum streams determined by universe license on the unit), each of which can contain a continuous range of channels from a DMX universe. EStreamer Mk2 streams can be different ranges from
the same DMX universe. Eg. Stream Fx1 can be channels 1 to 96 from universe 1 on the console, while
stream Fx2 can be channels 385 to 512 from that same
universe.
Page 7

E-Streamer Quick User Manual
For latest version visit:
www.enttec.com
20 December 2018 mfile ID: 4838403 Page|7
Add Stream
The Add Stream button creates a new data stream
with a specified name and opens the Stream Editor
panel.
The Create New Stream button saves all configuration information for the current stream.
The Delete Stream button deletes all configuration
data for the current stream.
Show Control
This page gives basic push-button control of the recording and playback of the Shows that have been
configured from the ‘Show Configuration Page’ All
status information is updated every 3 seconds.
The Show name displayed is allocated during Show
configuration. Clicking on the Show Name will open
the Show in the Stream Monitor.
The Show control buttons are similar in function to the
record and replay functions found on audio and video
recorders. Each row of buttons controls a single Show.
The Show Master acts as proportional master fader
over all data in all Streams in the Show.
This function is useful for a temporary reduction in
show levels, but it also proportionally reduces data
values to other devices including effects equipment
and robotic luminaries.
Show ID
The Show's ID number is used in place of its name for
Show data storage and remote Show control commands via RS-232 and TCP/IP. Clicking on the ID will
open the show in the Show Configuration editor.
Event
Defining Events are crucial to scheduling shows using
the E-Streamer MK2. Events allow the user to define
various conditions, specify start & stop times and provide the ability to create complex events that can be
scheduled and controlled as needed.
Event Structure
Each event consists of:
• a list of shows to be played
• the number of times to repeat the shows
• conditions to start the show
• conditions to stop the show (optional)
Page 8

E-Streamer Quick User Manual
For latest version visit:
www.enttec.com
20 December 2018 mfile ID: 4838403 Page|8
Examples of E-Streamer Mk2's scheduling possibilities include:
• Starting a show at midnight every night and hav-
ing it repeat continuously until 45 minutes before dawn.
• Starting a show whenever the lighting system is
powered up.
• Starting a show each time a new customer en-
ters a showroom, even if the previous show has
not yet completed.
• Starting a show at 18:15:32 on July 4th and re-
peating it four times.
• Starting a show on the hour, at 20 past the hour,
and 45 minutes past the hour on Tuesdays between sunset and 23:00 - only during the months
of August and November.
• Starting a show whenever the newsroom cam-
eras are switched on, then changing shows when
the weather graphics are put to air.
• Starting alternate shows on the half hour and
quarter hour, until 23:30, on weekend nights,
from January to March.
• Starting a show and repeating it continuously,
whenever the building management computer
system draws the blinds.
• Starting a show every time a jackpot is scored
on Thursday evenings during the winter.
• Starting a show at sunrise every Tuesday and re-
peating it continuously until an hour and five
minutes after sunset.
Backup / Restore
The Settings Backup includes all the user settings,
show configurations and events for this E-Streamer
Mk2. It is always a good idea to create a backup, once
the unit has been configured and setup as required.
Clicking the button produces a zip file that includes all
the system data.
The Settings backup does not include any recorded
shows, these can be backed up separately using the
USB port or export show option.
The Settings Restore allows the E-Streamer Mk2 to be
restored to the saved settings. Upload the backup file
that was generated for an E-Streamer Mk2 and restore
using the “Restore Settings” button.
Restore might take a while to be executed, and it will
also refresh the Network interface as setup in the
backup. This might change the IP address on the EStreamer Mk2, which is why the backup file name has
the I.P address it should restore to. However, in the
case of DHCP, if the unit gets a new address from the
DHCP Server, please get the new I.P address from the
front LCD screen of the unit.
Page 9

E-Streamer Quick User Manual
For latest version visit:
www.enttec.com
20 December 2018 mfile ID: 4838403 Page|9
Export & Import Shows
E-Streamer Mk2 includes a feature to individually
export and import shows. This feature can be found
under the Backup + Restore page. The feature enables the export and import of recorded shows, using
the web interface.
The show files are exported with an. eshw extension. Only shows with this extension can be imported into the E-streamer.
Note:
• Please ensure that your E-Streamer is on the latest
firmware version prior to using this feature
• This feature was added in August 2018
An imported show, which has artnet triggers will
only respond to these triggers once the show is
loaded to the engine. To load manually play to load
the show to the engine.
The current channel number is visible through a
tool-tip, activated by a mouse hover action on any
cell.
Settings
The Settings page allows:
• Firmware updates
• License updates
• Date, time and geolocation changes
• Network settings changes
• Configuration of DMX parameters
• Specify DMX recording settings
• Configure a NTP server
• System customization
• Configure communication settings
Firmware Update
The Firmware Update function provides a facility to
update the firmware that runs the E-Streamer Mk2. To
obtain the latest revision of the firmware, visit the EStreamer Mk2 page at www.enttec.com.
The update process will terminate all Recording and
Playback activities.
Selecting the Update Firmware button transfers the
new firmware to the E-Streamer Mk2 and initiates the
installation process. When the upload is complete, the
unit will process the firmware update and displays a
progress bar until the update is complete.
Please do not attempt to refresh or change the web
page, while the unit is updating the firmware.
After a successful update, E-Streamer Mk2 will automatically restart and the following reboot screen will
be displayed on the browser
DMX Port Parameters
This option is only available if your E-Streamer was
configured to include DMX Input/Output. (PN 70711)
Users can change the DMX Port Parameters to suit
their needs. Default values are recommended for nor-
mal usage. All DMX Ports share the same parameters.
Page 10

E-Streamer Quick User Manual
For latest version visit:
www.enttec.com
20 December 2018 mfile ID: 4838403 Page|10
Stream Monitor
The Stream Monitor shows the current DMX recorded or playing data on all the 512 channels for the
selected Show and Stream. The data is refreshed
every 3 seconds to give an idea of the data currently
being processed by the selected Stream. This
screen can be used to determine whether the show
is recording or playing back what is intended.
Ordering Information
E-Streamer Mk2 and related products can be
ordered from our website or through your ENTTEC
dealer using the following part numbers.
Part No.
Description
70710
E-Streamer MK2 (inc. 8 universe license)
70711
E-Streamer MK2 + DMX Ports (inc. 4 universe
license)
70721
1 Universe license for E-Streamer MK2
70724
4 Universes license for E-Streamer MK2
70728
8 Universes license for E-Streamer MK2
Specifications
Item
Product Name
70710
70711
Input Voltage
85 - 264V AC
Input Frequency
47 - 63Hz
Supported
Protocols
Artnet 1/2/3
Artnet 1/2/3
ESP
ESP DMX512
Output Protocols
Artnet 1/2/3
Artnet 1/2/3
DMX512
Heat dissipation
65BTU/ Hour
Ambient Operating
Temperature
0 to 50 oC in non-condensing
environment (5% - 95% humidity)
Connectors
1 x RJ-45 Ethernet Connector
1 x RS232 Connector
2 x USB Ports (Top one for backup)
4* 5pin female XLR
4* 5pin male XLR
IP Rating
IP 20
Weight
Unit
1.8 kg / 3.96 lb
Shipped
2.6 kg / 5.78 lb
Length
With rack
ears
483 mm/19.1 inches
Without
rack ears
424 mm/16.7 inches
Width
With rack
ears
240 mm /9.5 inches
Without
rack ears
207 mm /8.2 inches
Height
32 mm/1.26 inches
Certification
CE, FCC certified
Due to continuous improvements and innovations of all
ENTTEC products, specifications and features are subject to
change without notice.
Page 11

E-Streamer Quick User Manual
For latest version visit:
www.enttec.com
20 December 2018 mfile ID: 4838403 Page|11
Tips and Guidelines
E-Streamer Mk2 start-up procedure
Please connect a Cat5 cable to the network interface and turn on the unit.
The LCD will display ENTTEC Logo, until the unit is
ready to be used (typically takes a minute for the
unit to startup)
Once the unit is started and ready, the LCD Menu is
displayed, and the current IP address is shown on
the LCD Menu. Please use that IP in your browser to
access the web interface of the E-Streamer Mk2.
Can't connect to the E-Streamer Mk2 or web
page shows blank page or Networking issue
By default, the E-Streamer Mk2 is shipped configured for DHCP, so if your network is not setup for
auto-addressing, please use the LCD Menu to
change the IP address to static.
If the LCD Menu shows an IP address, it means the
E-Streamer Mk2 is connected on the network.
However, if the LCD shows “disconnected” or “DHCP
Failed”, there might be a problem with your network
setup. Try to isolate the unit to a simple network if
possible.
If you still can't connect to the E-Streamer Mk2,
please restart the unit, and try again.
If the screen does not show the LCD Menu, or is
blank, the E-Streamer Mk2 needs to be reset by an
ENTTEC support technician, please contact support
for help.
Can't record any new shows
Please check the home page to see if the Free Disk
Space is not too low (shown in red if it is), and that
the System Status is Active.
If the disk space is low, please delete any recorded
shows to free up enough space. The recorded show
size is shown on the Show Control page.
If you are unable to record with enough disk space,
please re-create the show or restart the device engine
using the Stop Engine button in the Home Page
.
Can't create new shows or save any content
Please restart the unit and try again. failing which,
please follow the steps to do a System Restore.
Scheduled Event and shows did not start at set
time
Please confirm via the Scheduler page, that the Event
in question has correct shows assigned to it, and that
the shows do playback individually (recording exists
for the selected shows). Make sure that the start date
is not set to a past date, or if a cycle is set, it is correctly defined.
Sunrise and Sunset times do not work as
expected
Out of the box, E-Streamer has default geolocation set,
you will need to customize these to your local city.
Please get the required coordinates and GMT offset,
from http://www.timeanddate.com/ . Find your city on
that website, and retrieve the GMT offset and coordinates, and save that on the Settings page under Geolocation.
Web page goes blank during Firmware update
Since the unit restarts after a successful firmware update, on a few occasions, the browser reacts too
slowly, and a blank page is shown. Simply refresh the
page once E-Streamer Mk2 restarts (when LCD Menu is
running) and verify the firmware version on the Home
page.
Page 12

E-Streamer Quick User Manual
For latest version visit:
www.enttec.com
20 December 2018 mfile ID: 4838403 Page|12
Web page says License is invalid
You will need to upload a correct license file for
your E-Streamer Mk2, please contact support with
the Serial No. (SN) displayed on the page to receive
a license for your unit
Shows recording and playback: data not
correct
Please check the size and duration of your show recording via the Show Control page.
You can check the streams data, through the Stream
Monitor page to audit the DMX data that comes in
during recording and goes out during playback.
If you know the data that you intend to record, you
can verify that the same show is being played back
through Stream Monitor.
Alternatively use an Artnet Viewer (for Artnet
streams) to see what data is being sent out on the
universe selected for the show, and compare with
what is recorded.
Doesn't output DMX (License)
Your E-Streamer Mk2 must be equipped with DMX
Ports (License) to output DMX streams
Please ensure that the show(s) being played have
DMX streams correctly configured.
E-Streamer Mk2 will output on the respective Port
that is set up in the Stream Configuration, only if
there is recorded data. You can confirm with Stream
Monitor.
Restart the device Engine using the Stop Engine
button in the Home page (shown in the image), and
play the show again, to see if that makes any difference.
 Loading...